JBoss AOP comes with an Eclipse plugin that helps you define interceptors to an eclipse project via a GUI, and to run the appication from within Eclipse. This is a new project, and expect the feature set to grow quickly!
You install the JBoss AOP IDE in the same way as any other Eclipse plugin.
- Make sure you have Eclipse 3.0.x installed, and start it up.
- Select Help > Software Updates > Find and Install in the Eclipse workbench.
- In the wizard that opens, click on the "Search for new features to install" radio button, and click Next.
- On the next page you will need to add a new update site for JBossIDE. Click the "New Remote Site.." button.
- Type in "JBossIDE" for the name, and "http://jboss.sourceforge.net/jbosside/updates" for the URL, and click OK.
- You should see a new site in the list now called JBossIDE. click the "+" sign next to it to show the platforms available.
-
Now, depending if you just want to install the AOP IDE (if you don't know what JBoss-IDE is,
go for this set of options):
- Check the "JBoss-IDE AOP Standalone" checkbox.
- In the feature list you should check the "JBoss-IDE AOP Standalone 1.0" checkbox.
If you have JBoss-IDE installed, or want to use all the other (non-AOP) features of JBoss-IDE:
- If you don't have JBossIDE installed, check the "JBoss-IDE 1.4/Eclipse 3.0" checkbox.
- Check the "JBoss-IDE AOP Extension" checkbox.
- In the feature list you should check the "JBoss-IDE AOP Extension 1.0" checkbox, and the JBoss-IDE (1.4.0) checkbox if you don't have JBossIDE installed.
- At this point you should only need to accept the license agreement(s) and wait for the install process to finish.
- From eclipse's main menu, you can click on the File Menu, and under it, New > Project...
- Double click on JBoss AOP Project under the JBossAOP folder
- In the Project Name text box, let's enter HelloAOP.
- Use Default should be fine for the project location. (If you want to use an external location, make sure there are no spaces in the path.)
- Click Finish
At this point, your eclipse workbench should look something like this:

Next step is to create a normal Java class.
- Right click on the "src" directory in the Package Explorer and in the menu, click New > Class.
- The only thing you should need to change is the Name of the class. Enter HelloAOP without quotes into the Name textbox, and click Finish
Modify the code for your class so it loks like
public class HelloAOP {

	public void callMe ()
	{
		System.out.println("AOP!");
	}

	public static void main (String args[])
	{
		new HelloAOP().callMe();
	}
}
Next we want to create an interceptor to the class.
-
Right click on the "src" directory in the Package Explorer and in the menu, click
New > Class. In the resulting dialog:
- Name the class HelloAOPInterceptor
- Add org.jboss.aop.advice.Interceptor to the list of interceptors.
Then modify the class so it looks like:
   import org.jboss.aop.advice.Interceptor;
   import org.jboss.aop.joinpoint.Invocation;

   public class HelloAOPInterceptor implements Interceptor {

   	public String getName() {
   		return "HelloAOPInterceptor";
   	}

      //We renamed the arg0 parameter to invocation
   	public Object invoke(Invocation invocation) throws Throwable {
   		System.out.print("Hello, ");
         //Here we invoke the next in the chain
   		return invocation.invokeNext();
   	}
   }
In order to apply your Interceptor to the callMe() method, we'll first need to switch back to the HelloAOP.java editor. Once the editor is active, you should be able to see the callMe() method in the Outline view (If you cannot see the outline view, go to Window > Show View > Outline).
Right click on this method, and click JBoss AOP > Apply Interceptor(s)... A dialog should open, with a list of available Interceptors. Click on HelloAOPInterceptor, and click Finish.
You should see in your Package Explorer that the file "jboss-aop.xml" now exists under your project root.
Now all that's left is running the application! Similar to running a normal Java Application from Eclipse, you must create a Run Configuration for your project.
- From the Run menu of eclipse, and choose "Run..."
- In the dialog that opens, you should see a few choices in a list on the left. Double click on "JBoss AOP Application".
- Once it is finished loading, you should have a new Run Configuration under JBoss AOP Application called "Hello AOP".
- Click the "Run" button
The Eclipse console should now say: Hello, AOP!, where the Hello, bit has been added by the interceptor.

In the real world, when developing AOP application across a development team, you can expect it will be hard to understand when and where aspects are applied in your codebase. JBoss-IDE/AOP has a few different strategies for notifying developers when an aspect is applied to a certain part of code.
A marker in eclipse is a small icon that appears on the left side of the editor. Most developers are familiar with the Java Error and Bookmark markers. The AOP IDE provides markers for methods and fields which are intercepted. To further facilitate this marking, anytime the developer presses Ctrl + 1 (the default key combination for the Eclipse Quick Fix functionality)), a list of interceptors and advice will be given for that method or field. This makes navigation between methods and their interceptors extremeley easy!

The Advised Members view gives the developer an overview of every single method and field in the current class that is advised by an Aspect or Interceptor. Let's have a look.
- From the Eclipse main menu, click on Window > Show View > Other...
- In the window that opens, you should see a folder called "JBoss AOP". Press the "+" to expand it.
- Double click on "Advised Members"
Once you've done this, you should now make sure you are currently editing the HelloAOP class we created in the last tutorial. Once you have that class open in an editor, you should see something similar to this in the Advised Members view:

Here we see that the method "callMe()" is intercepted by the interceptor HelloInterceptor. Double clicking on HelloInterceptor will take you straight to it. This view is similar to the Outline view, except it only shows members in your class which are intercepted.
The Aspect Manager View is a graphical representation of the AOP descriptor file (jboss-aop.xml). It allows you to remove an Interceptor or advice from a pointcut, as well as apply new Interceptors and Advice to existing pointcuts.
- From the Eclipse main menu, click on Window > Show View > Other...
- In the window that opens, you should see a folder called "JBoss AOP". Press the "+" to expand it.
- Double click on "Aspect Manager"
Under Bindings, you'll notice that a pointcut is already defined that matches our "callMe()" method, and our HelloInterceptor is directly under it. Right Click on HelloInterceptor will provide you with this menu:
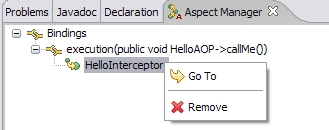
You can remove the interceptor, or jump to it directly in code. If you right click on the binding (pointcut) itself, you'll be able to apply more interceptors and advice just like when right clicking on a field or method in the outline view. You can also remove the entire binding altogether (which subsequently removes all child interceptors and advice, be warned)
