- 1. The Rule Engine
- 2. Quick Start
- 3. Advanced Concepts and Theory
- 4. User Guide
- 5. The Rule Language
- 6. Authoring
- 7. The Java Rule Engine API
- 8. The Rule IDE (Eclipse)
- 9. Examples
- Index

Artificial Intelligence (A.I.) is a very broad research area that focuses on "Making computers think like people" and includes disciplines such as Neural Networks, Genetic Algorithms, Decision Trees, Frame Systems and Expert Systems. Knowledge representation is the area of A.I. concerned with how knowledge is represented and manipulated. Expert Systems use Knowledge representation to facilitate the codification of knowledge into a knowledge base which can be used for reasoning, i.e., we can process data with this knowledge base to infer conclusions. Expert Systems are also known as Knowledge-based Systems and Knowledge-based Expert Systems and are considered to be "applied artificial intelligence". The process of developing with an Expert System is Knowledge Engineering. EMYCIN was one of the first "shells" for an Expert System, which was created from the MYCIN medical diagnosis Expert System. Whereas early Expert Systems had their logic hard-coded, "shells" separated the logic from the system, providing an easy to use environment for user input. Drools is a Rule Engine that uses the rule-based approach to implement an Expert System and is more correctly classified as a Production Rule System.
The term "Production Rule" originates from formal grammars where it is described as "an abstract structure that describes a formal language precisely, i.e., a set of rules that mathematically delineates a (usually infinite) set of finite-length strings over a (usually finite) alphabet" (Wikipedia).
Business Rule Management Systems build additional value on top of a general purpose Rule Engine by providing business user focused systems for rule creation, management, deployment, collaboration, analysis and end user tools. Further adding to this value is the fast evolving and popular methodology "Business Rules Approach", which is a helping to formalize the role of Rule Engines in the enterprise.
The term Rule Engine is quite ambiguous in that it can be any system that uses rules, in any form, that can be applied to data to produce outcomes. This includes simple systems like form validation and dynamic expression engines. The book "How to Build a Business Rules Engine (2004)" by Malcolm Chisholm exemplifies this ambiguity. The book is actually about how to build and alter a database schema to hold validation rules. The book then shows how to generate VB code from those validation rules to validate data entry. This, while a very valid and useful topic for some, caused quite a surprise to this author, unaware at the time in the subtleties of Rules Engines' differences, who was hoping to find some hidden secrets to help improve the Drools engine. JBoss jBPM uses expressions and delegates in its Decision nodes which control the transitions in a Workflow. At each node it evaluates ther is a rule set that dictates the transition to undertake, and so this is also a Rule Engine. While a Production Rule System is a kind of Rule Engine and also an Expert System, the validation and expression evaluation Rule Engines mentioned previously are not Expert Systems.
A Production Rule System is Turing complete, with a focus on knowledge representation to express propositional and first order logic in a concise, non-ambiguous and declarative manner. The brain of a Production Rules System is an Inference Engine that is able to scale to a large number of rules and facts. The Inference Engine matches facts and data against Production Rules - also called Productions or just Rules - to infer conclusions which result in actions. A Production Rule is a two-part structure using First Order Logic for reasoning over knowledge representation.
when

    <conditions>

then

    <actions>;
The process of matching the new or existing facts against Production Rules is called Pattern Matching, which is performed by the Inference Engine. There are a number of algorithms used for Pattern Matching by Inference Engines including:
Linear
Rete
Treat
Leaps
Drools implements and extends the Rete algorithm; Leaps used to be provided but was retired as it became unmaintained. The Drools Rete implementation is called ReteOO, signifying that Drools has an enhanced and optimized implementation of the Rete algorithm for object oriented systems. Other Rete based engines also have marketing terms for their proprietary enhancements to Rete, like RetePlus and Rete III. The most common enhancements are covered in "Production Matching for Large Learning Systems (Rete/UL)" (1995) by Robert B. Doorenbos.
The Rules are stored in the Production Memory and the facts that the Inference Engine matches against are kept in the Working Memory. Facts are asserted into the Working Memory where they may then be modified or retracted. A system with a large number of rules and facts may result in many rules being true for the same fact assertion; these rules are said to be in conflict. The Agenda manages the execution order of these conflicting rules using a Conflict Resolution strategy.

There are two methods of execution for a rule system: Forward Chaining and Backward Chaining; systems that implement both are called Hybrid Chaining Systems. As of Drools 5.2 Drools provides seamless hybrid chaining, both forward and backwards. Understanding these two modes of operation is the key to understanding why a Production Rule System is different and how to get the best from it. Forward chaining is "data-driven" and thus reactionary, with facts being asserted into working memory, which results in one or more rules being concurrently true and scheduled for execution by the Agenda. In short, we start with a fact, it propagates and we end in a conclusion.

Backward chaining is "goal-driven", meaning that we start with a conclusion which the engine tries to satisfy. If it can't it then searches for conclusions that it can satisfy; these are known as subgoals, that will help satisfy some unknown part of the current goal. It continues this process until either the initial conclusion is proven or there are no more subgoals. Prolog is an example of a Backward Chaining engine. Drools can also do backward chaining, which we refer to as derivation queries.

Some frequently asked questions:
We will attempt to address these questions below.
Declarative Programming
Rule engines allow you to say "What to do", not "How to do it".
The key advantage of this point is that using rules can make it easy to express solutions to difficult problems and consequently have those solutions verified. Rules are much easier to read than code.
Rule systems are capable of solving very, very hard problems, providing an explanation of how the solution was arrived at and why each "decision" along the way was made (not so easy with other of AI systems like neural networks or the human brain - I have no idea why I scratched the side of the car).
Logic and Data Separation
Your data is in your domain objects, the logic is in the rules. This is fundamentally breaking the OO coupling of data and logic, which can be an advantage or a disadvantage depending on your point of view. The upshot is that the logic can be much easier to maintain as there are changes in the future, as the logic is all laid out in rules. This can be especially true if the logic is cross-domain or multi-domain logic. Instead of the logic being spread across many domain objects or controllers, it can all be organized in one or more very distinct rules files.
Speed and Scalability
The Rete algorithm,the Leaps algorithm, and their descendants such as Drools' ReteOO, provide very efficient ways of matching rule patterns to your domain object data. These are especially efficient when you have datasets that change in small portions as the rule engine can remember past matches. These algorithms are battle proven.
Centralization of Knowledge
By using rules, you create a repository of knowledge (a knowledge base) which is executable. This means it's a single point of truth, for business policy, for instance. Ideally rules are so readable that they can also serve as documentation.
Tool Integration
Tools such as Eclipse (and in future, Web based user interfaces) provide ways to edit and manage rules and get immediate feedback, validation and content assistance. Auditing and debugging tools are also available.
Explanation Facility
Rule systems effectively provide an "explanation facility" by being able to log the decisions made by the rule engine along with why the decisions were made.
Understandable Rules
By creating object models and, optionally, Domain Specific Languages that model your problem domain you can set yourself up to write rules that are very close to natural language. They lend themselves to logic that is understandable to, possibly nontechnical, domain experts as they are expressed in their language, with all the program plumbing, the technical know-how being hidden away in the usual code.
The shortest answer to this is "when there is no satisfactory traditional programming approach to solve the problem.". Given that short answer, some more explanation is required. The reason why there is no "traditional" approach is possibly one of the following:
The problem is just too fiddle for traditional code.
The problem may not be complex, but you can't see a non-fragile way of building a solution for it.
The problem is beyond any obvious algorithmic solution.
It is a complex problem to solve, there are no obvious traditional solutions, or basically the problem isn't fully understood.
The logic changes often
The logic itself may even be simple but the rules change quite often. In many organizations software releases are few and far between and pluggable rules can help provide the "agility" that is needed and expected in a reasonably safe way.
Domain experts (or business analysts) are readily available, but are nontechnical.
Domain experts often possess a wealth of knowledge about business rules and processes. They typically are nontechnical, but can be very logical. Rules can allow them to express the logic in their own terms. Of course, they still have to think critically and be capable of logical thinking. Many people in nontechnical positions do not have training in formal logic, so be careful and work with them, as by codifying business knowledge in rules, you will often expose holes in the way the business rules and processes are currently understood.
If rules are a new technology for your project teams, the overhead in getting going must be factored in. It is not a trivial technology, but this document tries to make it easier to understand.
Typically in a modern OO application you would use a rule engine to contain key parts of your business logic, especially the really messy parts. This is an inversion of the OO concept of encapsulating all the logic inside your objects. This is not to say that you throw out OO practices, on the contrary in any real world application, business logic is just one part of the application. If you ever notice lots of conditional statements such as "if" and "switch", an overabundance of strategy patterns and other messy logic in your code that just doesn't feel right: that would be a place for rules. If there is some such logic and you keep coming back to fix it, either because you got it wrong, or the logic or your understanding changes: think about using rules. If you are faced with tough problems for which there are no algorithms or patterns: consider using rules.
Rules could be used embedded in your application or perhaps as a service. Often a rule engine works best as "stateful" component, being an integral part of an application. However, there have been successful cases of creating reusable rule services which are stateless.
For your organization it is important to decide about the process you will use for updating rules in systems that are in production. The options are many, but different organizations have different requirements. Frequently, rules maintenance is out of the control of the application vendors or project developers.
To quote a Drools mailing list regular:
It seems to me that in the excitement of working with rules engines, that people forget that a rules engine is only one piece of a complex application or solution. Rules engines are not really intended to handle workflow or process executions nor are workflow engines or process management tools designed to do rules. Use the right tool for the job. Sure, a pair of pliers can be used as a hammering tool in a pinch, but that's not what it's designed for. | ||
| --Dave Hamu | ||
As rule engines are dynamic (dynamic in the sense that the rules can be stored and managed and updated as data), they are often looked at as a solution to the problem of deploying software. (Most IT departments seem to exist for the purpose of preventing software being rolled out.) If this is the reason you wish to use a rule engine, be aware that rule engines work best when you are able to write declarative rules. As an alternative, you can consider data-driven designs (lookup tables), or script processing engines where the scripts are managed in a database and are able to be updated on the fly.
Hopefully the preceding sections have explained when you may want to use a rule engine.
Alternatives are script-based engines that provide the drive for "changes on the fly", and there are many such solutions.
Alternatively Process Engines (also capable of workflow) such as jBPM allow you to graphically (or programmatically) describe steps in a process. Those steps can also involve decision points which are in themselves a simple rule. Process engines and rules often can work nicely together, so they are not mutually exclusive.
One key point to note with rule engines is that some rule engines are really scripting engines. The downside of scripting engines is that you are tightly coupling your application to the scripts. If they are rules, you are effectively calling rules directly and this may cause more difficulty in future maintenance, as they tend to grow in complexity over time. The upside of scripting engines is that they can be easier to implement initially, producing results quickly, and are conceptually simpler for imperative programmers.
Many people have also implemented data-driven systems successfully in the past (where there are control tables that store meta-data that changes your applications behavior) - these can work well when the control can remain very limited. However, they can quickly grow out of control if extended too much (such that only the original creators can change the applications behavior) or they cause the application to stagnate as they are too inflexible.
No doubt you have heard terms like "tight coupling" and "loose coupling" in systems design. Generally people assert that "loose" or "weak" coupling is preferable in design terms, due to the added flexibility it affords. Similarly, you can have "strongly coupled" and "weakly coupled" rules. Strongly coupled in this sense means that one rule "firing" will clearly result in another rule firing, and so on; in other words, there is a clear (probably obvious) chain of logic. If your rules are all strongly coupled, the chances are that the will turn out to be inflexible, and, more significantly, that a rule engine is an overkill. A clear chain can be hard coded, or implemented using a Decision Tree. This is not to say that strong coupling is inherently bad, but it is a point to keep in mind when considering a rule engine and the way you capture the rules. "Loosely" coupled rules should result in a system that allows rules to be changed, removed and added without requiring changes to other, unrelated rules.
So where do we get started, there are so many use cases and so much functionality in a rule engine such as Drools that it becomes beguiling. Have no fear my intrepid adventurer, the complexity is layered and you can ease yourself into with simple use cases.
Stateless session, not utilising inference, forms the simplest use case. A stateless session can be called like a function passing it some data and then receiving some results back. Some common use cases for stateless sessions are, but not limited to:
Validation
Is this person eligible for a mortgage?
Calculation
Compute a mortgage premium.
Routing and Filtering
Filter incoming messages, such as emails, into folders.
Send incoming messages to a destination.
So let's start with a very simple example using a driving license application.
public class Applicant {

    private String name;

    private int age;

    private boolean valid;

    // getter and setter methods here

}
Now that we have our data model we can write our first rule. We assume that the application uses rules to refute invalid applications. As this is a simple validation use case we will add a single rule to disqualify any applicant younger than 18.
package com.company.license

rule "Is of valid age"
when
    $a : Applicant( age < 18 )
then
    $a.setValid( false );
end
To make the engine aware of data, so it can be processed against the
rules, we have to insert the data, much like with a
database. When the Applicant instance is inserted into the engine it is
evaluated against the constraints of the rules, in this case just two
constraints for one rule. We say two because the type
Applicant is the first object type constraint, and age <
18 is the second field constraint. An object type constraint plus
its zero or more field constraints is referred to as a pattern. When an
inserted instance satisfies both the object type constraint and all the
field constraints, it is said to be matched. The $a is a
binding variable which permits us to reference the matched object in the
consequence. There its properties can be updated. The dollar character
('$') is optional, but it helps to differentiate variable names from field
names. The process of matching patterns against the inserted data is, not
surprisingly, often referred to as pattern
matching.
Let's assume that the rules are in the same folder as the classes,
so we can use the classpath resource loader to build our first
KnowledgeBase. A Knowledge Base is what we call our
collection of compiled definitions, such as rules and processes, which are
compiled using the KnowledgeBuilder. Both the
KnowledgeBuilder and KnowledgeBase can be created from the factories
KnowledeBuilderFactory and KnowledgeBaseFactory.
KnowledgeBuilder kbuilder = KnowledgeBuilderFactory.newKnowledgeBuilder();

kbuilder.add( ResourceFactory.newClassPathResource( "licenseApplication.drl", getClass() ),

              ResourceType.DRL );

if ( kbuilder.hasErrors() ) {

    System.err.println( kbuilder.getErrors().toString() );

}

KnowledgeBase kbase = KnowledgeBaseFactory.newKnowledgeBase();

kbase.addKnowledgePackages( kbuilder.getKnowledgePackages() );
The above code snippet looks on the classpath for the
licenseApplication.drl file, using the method
newClassPathResource(). The resource type is DRL, short for
"Drools Rule Language". Once the DRL file has been added we can check the
Knowledge Builder object for any errors. If there are no errors, we can
add the resulting packages to our Knowledge Base. Now we are ready to
build our session and execute against some data:
StatelessKnowledgeSession ksession = kbase.newStatelessKnowledgeSession();

Applicant applicant = new Applicant( "Mr John Smith", 16 );

assertTrue( applicant.isValid() );

ksession.execute( applicant );

assertFalse( applicant.isValid() );
The preceding code executes the data against the rules. Since the applicant is under the age of 18, the application is marked as invalid.
So far we've only used a single instance, but what if we want to use
more than one? We can execute against any object implementing Iterable,
such as a collection. Let's add another class called
Application, which has the date of the application, and we'll
also move the boolean valid field to the Application
class.
public class Applicant {

    private String name;

    private int age;

    // getter and setter methods here

}


public class Application {

    private Date dateApplied;

    private boolean valid;

    // getter and setter methods here

}
We can also add another rule to validate that the application was made within a period of time.
package com.company.license

rule "Is of valid age"
when
    Applicant( age < 18 )
    $a : Application()
then
    $a.setValid( false );
end

rule "Application was made this year"
when
    $a : Application( dateApplied > "01-jan-2009" )
then
    $a.setValid( false );
end
Unfortunately a Java array does not implement the
Iterable interface, so we have to use the JDK converter
method Arrays.asList(...). The code shown below executes
against an iterable list, where all collection elements are inserted
before any matched rules are fired.
StatelessKnowledgeSession ksession = kbase.newStatelessKnowledgeSession();

Applicant applicant = new Applicant( "Mr John Smith", 16 );

Application application = new Application();

assertTrue( application() );

ksession.execute( Arrays.asList( new Object[] { application, applicant } ) );

assertFalse( application() );
The two execute methods execute(Object object) and
execute(Iterable objects) are actually convenience methods
for the interface BatchExecutor's method
execute(Command command).
A CommandFactory is used to create commands, so that
the following is equivalent to execute(Iterable it):
ksession.execute( CommandFactory.newInsertIterable( new Object[] { application, applicant } ) );
Batch Executor and Command Factory are particularly useful when working with multiple Commands and with output identifiers for obtaining results.
List<Command> cmds = new ArrayList<Command>();

cmds.add( CommandFactory.newInsert( new Person( "Mr John Smith" ), "mrSmith" );

cmds.add( CommandFactory.newInsert( new Person( "Mr John Doe" ), "mrDoe" );

BatchExecutionResults results = ksession.execute( CommandFactory.newBatchExecution( cmds ) );

assertEquals( new Person( "Mr John Smith" ), results.getValue( "mrSmith" ) );
CommandFactory supports many other Commands that can be
used in the BatchExecutor like StartProcess,
Query, and SetGlobal.
Stateful Sessions are longer lived and allow iterative changes over time. Some common use cases for Stateful Sessions are, but not limited to:
Monitoring
Stock market monitoring and analysis for semi-automatic buying.
Diagnostics
Fault finding, medical diagnostics
Logistics
Parcel tracking and delivery provisioning
Compliance
Validation of legality for market trades.
In contrast to a Stateless Session, the dispose()
method must be called afterwards to ensure there are no memory leaks, as
the Knowledge Base contains references to Stateful Knowledge Sessions when
they are created. StatefulKnowledgeSession also supports the
BatchExecutor interface, like
StatelessKnowledgeSession, the only difference being that the
FireAllRules command is not automatically called at the end
for a Stateful Session.
We illustrate the monitoring use case with an example for raising a
fire alarm. Using just four classes, we represent rooms in a house, each
of which has one sprinkler. If a fire starts in a room, we represent that
with a single Fire instance.
public class Room {

    private String name

    // getter and setter methods here

}

public classs Sprinkler {

    private Room room;

    private boolean on;

    // getter and setter methods here

}

public class Fire {

    private Room room;

    // getter and setter methods here

}

public class Alarm {

}
In the previous section on Stateless Sessions the concepts of inserting and matching against data was introduced. That example assumed that only a single instance of each object type was ever inserted and thus only used literal constraints. However, a house has many rooms, so rules must express relationships between objects, such as a sprinkler being in a certain room. This is best done by using a binding variable as a constraint in a pattern. This "join" process results in what is called cross products, which are covered in the next section.
When a fire occurs an instance of the Fire class is
created, for that room, and inserted into the session. The rule uses a
binding on the room field of the Fire object to
constrain matching to the sprinkler for that room, which is currently off.
When this rule fires and the consequence is executed the sprinkler is
turned on.
rule "When there is a fire turn on the sprinkler"
when
    Fire($room : room)
    $sprinkler : Sprinkler( room == $room, on == false )
then
    modify( $sprinkler ) { setOn( true ) };
    System.out.println( "Turn on the sprinkler for room " + $room.getName() );
end
Whereas the Stateless Session uses standard Java syntax to modify a
field, in the above rule we use the modify statement,
which acts as a sort of "with" statement. It may contain a series of comma
separated Java expressions, i.e., calls to setters of the object selected
by the modify statement's control expression. This
modifies the data, and makes the engine aware of those changes so it can
reason over them once more. This process is called inference, and it's
essential for the working of a Stateful Session. Stateless Sessions
typically do not use inference, so the engine does not need to be aware of
changes to data. Inference can also be turned off explicitly by using the
sequential mode.
So far we have rules that tell us when matching data exists, but
what about when it does not exist? How do we
determine that a fire has been extinguished, i.e., that there isn't a
Fire object any more? Previously the constraints have been
sentences according to Propositional Logic, where the engine is
constraining against individual intances. Drools also has support for
First Order Logic that allows you to look at sets of data. A pattern under
the keyword not matches when something does not exist.
The rule given below turns the sprinkler off as soon as the fire in that
room has disappeared.
rule "When the fire is gone turn off the sprinkler"
when
    $room : Room( )
    $sprinkler : Sprinkler( room == $room, on == true )
    not Fire( room == $room )
then
    modify( $sprinkler ) { setOn( false ) };
    System.out.println( "Turn off the sprinkler for room " + $room.getName() );
end
While there is one sprinkler per room, there is just a single alarm
for the building. An Alarm object is created when a fire
occurs, but only one Alarm is needed for the entire building,
no matter how many fires occur. Previously not was
introduced to match the absence of a fact; now we use its complement
exists which matches for one or more instances of some
category.
rule "Raise the alarm when we have one or more fires"
when
    exists Fire()
then
    insert( new Alarm() );
    System.out.println( "Raise the alarm" );
end
Likewise, when there are no fires we want to remove the alarm, so
the not keyword can be used again.
rule "Cancel the alarm when all the fires have gone"
when
    not Fire()
    $alarm : Alarm()
then
    retract( $alarm );
    System.out.println( "Cancel the alarm" );
end
Finally there is a general health status message that is printed when the application first starts and after the alarm is removed and all sprinklers have been turned off.
rule "Status output when things are ok"
when
    not Alarm()
    not Sprinkler( on == true )
then
    System.out.println( "Everything is ok" );
end
The above rules should be placed in a single DRL file and saved to
some directory on the classpath and using the file name
fireAlarm.drl, as in the Stateless Session example.
We can then build a Knowledge Base, as before, just using the new name
fireAlarm.drl. The difference is that this time we
create a Stateful Session from the Knowledge Base, whereas before we
created a Stateless Session.
KnowledgeBuilder kbuilder = KnowledgeBuilderFactory.newKnowledgeBuilder();

kbuilder.add( ResourceFactory.newClassPathResource( "fireAlarm.drl", getClass() ),

              ResourceType.DRL );

if ( kbuilder.hasErrors() ) {

    System.err.println( builder.getErrors().toString() );

}

kbase.addKnowledgePackages( kbuilder.getKnowledgePackages() );

StatefulKnowledgeSession ksession = kbase.newStatefulKnowledgeSession();
With the session created it is now possible to iteratvely work with
it over time. Four Room objects are created and inserted, as
well as one Sprinkler object for each room. At this point the
engine has done all of its matching, but no rules have fired yet. Calling
ksession.fireAllRules() allows the matched rules to fire, but
without a fire that will just produce the health message.
String[] names = new String[]{"kitchen", "bedroom", "office", "livingroom"};

Map<String,Room> name2room = new HashMap<String,Room>();

for( String name: names ){

    Room room = new Room( name );

    name2room.put( name, room );

    ksession.insert( room );

    Sprinkler sprinkler = new Sprinkler( room );

    ksession.insert( sprinkler );

}


ksession.fireAllRules()
> Everything is ok
We now create two fires and insert them; this time a reference is
kept for the returned FactHandle. A Fact Handle is an
internal engine reference to the inserted instance and allows instances to
be retracted or modified at a later point in time. With the fires now in
the engine, once fireAllRules() is called, the alarm is
raised and the respective sprinklers are turned on.
Fire kitchenFire = new Fire( name2room.get( "kitchen" ) );

Fire officeFire = new Fire( name2room.get( "office" ) );


FactHandle kitchenFireHandle = ksession.insert( kitchenFire );

FactHandle officeFireHandle = ksession.insert( officeFire );


ksession.fireAllRules();
> Raise the alarm
> Turn on the sprinkler for room kitchen
> Turn on the sprinkler for room office
After a while the fires will be put out and the Fire
instances are retracted. This results in the sprinklers being turned off,
the alarm being cancelled, and eventually the health message is printed
again.
ksession.retract( kitchenFireHandle );

ksession.retract( officeFireHandle );


ksession.fireAllRules();
> Turn on the sprinkler for room office
> Turn on the sprinkler for room kitchen
> Cancel the alarm
> Everything is ok
Everyone still with me? That wasn't so hard and already I'm hoping you can start to see the value and power of a declarative rule system.
People often confuse methods and rules, and new rule users regular ask, "How do I call a rule?" After the last section, you are now feeling like a rule expert and the answer to that is obvious, but let's summarize the differences nonetheless.
public void helloWorld(Person person) {

    if ( person.getName().equals( "Chuck" ) ) {

        System.out.println( "Hello Chuck" );

    }

}
Methods are called directly.
Specific instances are passed.
One call results in a single execution.
rule "Hello World"
    when
        Person( name == "Chuck" )
    then
        System.out.println( "Hello Chuck" );
        end
Rules execute by matching against any data as long it is inserted into the engine.
Rules can never be called directly.
Specific instances cannot be passed to a rule.
Depending on the matches, a rule may fire once or several times, or not at all.
Earlier the term "cross product" was mentioned, which is the result of a join. Imagine for a moment that the data from the fire alarm example were used in combination with the following rule where there ar no field constraints:
rule
when
    $room : Room()
    $sprinkler : Sprinkler()
then
    System.out.println( "room:" + $room.getName() +
                        " sprinkler:" + $sprinkler.getRoom().getName() );
end
In SQL terms this would be like doing select * from Room,
Sprinkler and every row in the Room table would be joined with
every row in the Sprinkler table resulting in the following output:
room:office sprinker:office room:office sprinkler:kitchen room:office sprinkler:livingroom room:office sprinkler:bedroom room:kitchen sprinkler:office room:kitchen sprinkler:kitchen room:kitchen sprinkler:livingroom room:kitchen sprinkler:bedroom room:livingroom sprinkler:office room:livingroom sprinkler:kitchen room:livingroom sprinkler:livingroom room:livingroom sprinkler:bedroom room:bedroom sprinkler:office room:bedroom sprinkler:kitchen room:bedroom sprinkler:livingroom room:bedroom sprinkler:bedroom
These cross products can obviously become huge, and they may very well contain spurious data. The size of cross products is often the source of performance problems for new rule authors. From this it can be seen that it's always desirable to constrain the cross products, which is done with the variable constraint.
rule
when
$room : Room()
$sprinkler : Sprinkler( room == $room )
then
System.out.println( "room:" + $room.getName() +
" sprinkler:" + $sprinkler.getRoom().getName() );
endThis results in just four rows of data, with the correct Sprinkler
for each Room. In SQL (actually HQL) the corresponding query would be
select * from Room, Sprinkler where Room ==
Sprinkler.room.
room:office sprinkler:office
room:kitchen sprinkler:kitchen
room:livingroom sprinkler:livingroom
room:bedroom sprinkler:bedroom
So far the data and the matching process has been simple and small. To mix things up a bit a new example will be explored that handles cashflow calculations over date periods. The state of the engine will be illustratively shown at key stages to help get a better understanding of what is actually going on under the hood. Three classes will be used, as shown below.
public class CashFlow {

    private Date   date;

    private double amount;

    private int    type;

    long           accountNo;

    // getter and setter methods here

}


public class Account {

    private long   accountNo;

    private double balance;

    // getter and setter methods here

}


public AccountPeriod {

    private Date start;

    private Date end;

    // getter and setter methods here

}
By now you already know how to create Knowledge Bases and how to
instantiate facts to populate the StatefulKnowledgeSession,
so tables will be used to show the state of the inserted data, as it makes
things clearer for illustration purposes. The tables below show that a
single fact was inserted for the Account. Also inserted are a
series of debits and credits as CashFlow objects for that
account, extending over two quarters.

Two rules can be used to determine the debit and credit for that quarter and update the Account balance. The two rules below constrain the cashflows for an account for a given time period. Notice the "&&" which use short cut syntax to avoid repeating the field name twice.
rule "increase balance for credits"
when
  ap : AccountPeriod()
  acc : Account( $accountNo : accountNo )
  CashFlow( type == CREDIT,
            accountNo == $accountNo,
            date >= ap.start && <= ap.end,
            $amount : amount )
then
  acc.balance  += $amount;
end |
rule "decrease balance for debits"
when
  ap : AccountPeriod()
  acc : Account( $accountNo : accountNo )
  CashFlow( type == DEBIT,
            accountNo == $accountNo,
            date >= ap.start && <= ap.end,
            $amount : amount )
then
  acc.balance -= $amount;
end |
If the AccountPeriod is set to the first quarter we
constrain the rule "increase balance for credits" to fire on two rows of
data and "decrease balance for debits" to act on one row of data.

The two cashflow tables above represent the matched data for the two
rules. The data is matched during the insertion stage and, as you
discovered in the previous chapter, does not fire straight away, but only
after fireAllRules() is called. Meanwhile, the rule plus its
matched data is placed on the Agenda and referred to as an Activation. The
Agenda is a table of Activations that are able to fire and have their
consequences executed, as soon as fireAllRules() is called. Activations on
the Agenda are executed in turn. Notice that the order of execution so far
is considered arbitrary.

After all of the above activations are fired, the account has a balance of -25.

If the AccountPeriod is updated to the second quarter,
we have just a single matched row of data, and thus just a single
Activation on the Agenda.

The firing of that Activation results in a balance of 25.

What if you don't want the order of Activation execution to be arbitrary? When there is one or more Activations on the Agenda they are said to be in conflict, and a conflict resolver strategy is used to determine the order of execution. At the simplest level the default strategy uses salience to determine rule priority. Each rule has a default value of 0, the higher the value the higher the priority. To illustrate this we add a rule to print the account balance, where we want this rule to be executed after all the debits and credits have been applied for all accounts. We achieve this by assigning a negative salience to this rule so that it fires after all rules with the default salience 0.
rule "Print balance for AccountPeriod"
        salience -50
    when
        ap : AccountPeriod()
        acc : Account()
    then
        System.out.println( acc.accountNo + " : " + acc.balance );
end
|
The table below depicts the resulting Agenda. The three debit and credit rules are shown to be in arbitrary order, while the print rule is ranked last, to execute afterwards.

Earlier we showed how rules would equate to SQL, which can often help people with an SQL background to understand rules. The two rules above can be represented with two views and a trigger for each view, as below:
select * from Account acc,
              Cashflow cf,
              AccountPeriod ap
where acc.accountNo == cf.accountNo and
      cf.type == CREDIT and
      cf.date >= ap.start and
      cf.date <= ap.end
|
select * from Account acc,
              Cashflow cf,
              AccountPeriod ap
where acc.accountNo == cf.accountNo and
      cf.type == DEBIT and
      cf.date >= ap.start and
      cf.date <= ap.end
|
trigger : acc.balance += cf.amount |
trigger : acc.balance -= cf.amount |
Drools also features ruleflow-group attributes which allows workflow diagrams to declaratively specify when rules are allowed to fire. The screenshot below is taken from Eclipse using the Drools plugin. It has two ruleflow-group nodes which ensures that the calculation rules are executed before the reporting rules.

The use of the ruleflow-group attribute in a rule is shown below.
rule "increase balance for credits"
  ruleflow-group "calculation"
when
  ap : AccountPeriod()
  acc : Account( $accountNo : accountNo )
  CashFlow( type == CREDIT,
            accountNo == $accountNo,
            date >= ap.start && <= ap.end,
            $amount : amount )
then
  acc.balance  += $amount;
end
|
rule "Print balance for AccountPeriod"
  ruleflow-group "report"
when
  ap : AccountPeriod()
  acc : Account()
then
  System.out.println( acc.accountNo +
                      " : " + acc.balance );
end
|
Inference has a bad names these days, as something not relevant to business use cases and just too complicated to be useful. It is true that contrived and complicated examples occur with inference, but that should not detract from the fact that simple and useful ones exist too. But more than this, correct use of inference can crate more agile and less error prone businesses with easier to maintain software.
So what is inference? Something is inferred when we gain knowledge of something from using previous knowledge. For example given a Person fact with an age field and a rule that provides age policy control, we can infer whether a Person is an adult or a child and act on this.
rule "Infer Adult"
when
  $p : Person( age >= 18 )
then
  insert( new IsAdult( $p ) )
end
So in the above every Person who is 18 or over will have an instance of IsAdult inserted for them. This fact is special in that it is known as a relation. We can use this inferred relation in any rule:
$p : Person()
IsAdult( person == $p )
So now we know what inference is, and have a basic example, how does this facilitate good rule design and maintenance?
Let's take a government department that are responsible for issuing ID cards when children become adults, hence forth referred to as ID department. They might have a decision table that includes logic like this, which says when an adult living in london is 18 or over, issue the card:

However the ID department does not set the policy on who an adult is. That's done at a central government level. If the central government where to change that age to 21 there is a change management process. Someone has to liaise with the ID department and make sure their systems are updated, in time for the law going live.
This change management process and communication between departments is not ideal for an agile environment and change become costly and error prone. Also the card department is managing more information than it needs to be aware of with its "monolothic" approach to rules management which is "leaking" information better placed else where. By this I mean that it doesn't care what explicit "age >= 18" information determines whether someone is an adult, only that they are an adult.
Instead what if we were to split (de-couple) the authoring responsibility, so the central government maintains its rules and the ID department maintains its.
So its the central governments job to determine who is an adult and if they change the law they just update their central repository with the new rules, which others use:

The IsAdult fact, as discussed previously, is inferred from the policy rules. It encapsulates the seemingly arbitrary piece of logic "age >= 18" and provides semantic abstractions for it's meaning. Now if anyone uses the above rules, they no longer need to be aware of explicit information that determines whether someone is an adult or not. They can just use the inferred fact:

While the example is very minimal and trivial it illustrates some important points. We started with a monolithic and leaky approach to our knowledge engineering. We create a single decision table that had all possible information in it that leaks information from central government that the ID department did not care about and did not want to manage.
We first de-coupled the knowledge process so each department was responsible for only what it needed to know. We then encapsulated this leaky knowledge using an inferred fact IsAdult. The use of the term IsAdult also gave a semantic abstraction to the previously arbitrary logic "age >= 18".
So a general rule or thumb when doing your knowledge engineering is:
Bad
Monolithic
Leaky
Good
De-couple knowledge responsibilities
Encapsulate knowledge
Provide semantic abstractions for those encapsulations
The previous example was issuing ID cards to over 18s, in this example we now issue bus passes, either a child or adult pass.
rule "Issue Child Bus Pass" when
  $p : Person( age < 16 )
then
  insert(new ChildBusPass( $p ) );
end

rule "Issue Adult Bus Pass" when
  $p : Person( age >= 16 )
then
  insert(new AdultBusPass( $p ) );
end
As before the above example is considered monolithic, leaky and providing poor separation of concerns.
As before we can provide a more robust application with a separation of concerns using inference. Notice this time we don't just insert the inferred object, we use "logicalInsert":
rule "Infer Child" when
  $p : Person( age < 16 )
then
    logicalInsert( new IsChild( $p ) )
end
rule "Infer Adult" when
  $p : Person( age >= 16 )
then
    logicalInsert( new IsAdult( $p ) )
end
A "logicalInsert" is part of the Drools Truth Maintenance System (TMS). Here the fact is logically inserted, this fact is dependant on the truth of the "when" clause. It means that when the rule becomes false the fact is automatically retracted. This works particularly well as the two rules are mutually exclusive. So in the above rules if the person is under 16 it inserts an IsChild fact, once the person is 16 or over the IsChild fact is automatically retracted and the IsAdult fact inserted.
We can now bring back in the code to issue the passes, these two can also be logically inserted, as the TMS supports chaining of logical insertions for a cascading set of retracts.
rule "Issue Child Bus Pass" when
  $p : Person( )
       IsChild( person == $p )
then
  logicalInsert(new ChildBusPass( $p ) );
end

rule "Issue Adult Bus Pass" when
  $p : Person( age >= 16 )
       IsAdult( person =$p )
then
  logicalInsert(new AdultBusPass( $p ) );
end
Now when the person changes from being 15 to 16, not only is the IsChild fact automatically retracted, so is the person's ChildBusPass fact. For bonus points we can combine this with the 'not' conditional element to handle notifications, in this situation a request for the returning of the pass. So when the TMS automatically retracts the ChildBusPass object, this rule triggers and sends a request to the person:
rule "Return ChildBusPass Request "when
  $p : Person( )
       not( ChildBusPass( person == $p ) )
then
    requestChildBusPass( $p );
endSo far, the programmatic API has been used to build a Knowledge
Base. Quite often it's more desirable to do this via configuration. To
facilitate this, Drools supports the "Changeset" feature. The file
changeset.xml contains a list of resources, and it
may also point recursively to another changeset XML file. Currently there is
no XML schema for the changeset XML, but we hope to add one soon.
A few examples will be shown to give you the gist of things. A resource
approach is employed that uses a prefix to indicate the protocol. All the
protocols provided by java.net.URL, such as "file" and "http",
are supported, as well as an additional "classpath".
Currently the type attribute must always be specified for a resource, as
it is not inferred from the file name extension. Here is a simple example
that points to a http location for some rules.
<change-set xmlns='http://drools.org/drools-5.0/change-set'

             xmlns:xs='http://www.w3.org/2001/XMLSchema-instance'

             xs:schemaLocation='http://drools.org/drools-5.0/change-set http://anonsvn.jboss.org/repos/labs/labs/jbossrules/trunk/drools-api/src/main/resources/change-set-1.0.0.xsd' >

   <add>

       <resource source='http:org/domain/myrules.drl' type='DRL' />

   </add>

 </change-set>
To use the above XML, the code is almost identical as before, except
we change the resource type to CHANGE_SET.
KnowledgeBuilder kbuilder = KnowledgeBuilderFactory.newKnowledgeBuilder();

kbuilder.add( ResourceFactory.newClasspathResource( "myChangeSet.xml", getClass() ),

              ResourceType.CHANGE_SET );

if ( kbuilder.hasErrors() ) {

    System.err.println( builder.getErrors().toString() );

}
Changesets can include any number of resources, and they even support additional configuration information, which currently is only needed for decision tables. The example below is expanded to load the rules from a http URL location, and an Excel decision table from the classpath.
<change-set xmlns='http://drools.org/drools-5.0/change-set'

             xmlns:xs='http://www.w3.org/2001/XMLSchema-instance'

             xs:schemaLocation='http://drools.org/drools-5.0/change-set.xsd http://anonsvn.jboss.org/repos/labs/labs/jbossrules/trunk/drools-api/src/main/resources/change-set-1.0.0.xsd' >

   <add>

       <resource source='http:org/domain/myrules.drl' type='DRL' />

       <resource source='classpath:data/IntegrationExampleTest.xls' type="DTABLE">

           <decisiontable-conf input-type="XLS" worksheet-name="Tables_2" />

       </resource>

   </add>

 </change-set>
It is also possible to specify a directory, to add the contents of that directory. It is expected that all the files are of the specified type, since type is not yet inferred from the file name extensions.
<change-set xmlns='http://drools.org/drools-5.0/change-set'

             xmlns:xs='http://www.w3.org/2001/XMLSchema-instance'

             xs:schemaLocation='http://drools.org/drools-5.0/change-set.xsd http://anonsvn.jboss.org/repos/labs/labs/jbossrules/trunk/drools-api/src/main/resources/change-set-1.0.0.xsd' >

   <add>

       <resource source='file://myfolder/' type='DRL' />

   </add>

 </change-set>
The Knowlege Agent provides automatic loading, caching and re-loading of resources and is configured from a properties files. The Knowledge Agent can update or rebuild this Knowlege Base as the resources it uses are changed. The strategy for this is determined by the configuration given to the factory, but it is typically pull-based using regular polling. We hope to add push-based updates and rebuilds in future versions.
KnowledgeAgent kagent = KnowledgeAgentFactory.newKnowledgeAgent( "MyAgent" );

kagent.applyChangeSet( ResourceFactory.newUrlResource( url ) );

KnowledgeBase kbase = kagent.getKnowledgeBase();
A KnowledgeAgent object will continuously scan all the
added resources, using a default polling interval of 60 seconds and, when
some last modification date is updated, it will applied the changes into the
cached Knowledge Base using the new resources. Note that the previous
KnowledgeBase reference will still exist and you'll have to
call getKnowledgeBase() to access the newly built
KnowledgeBase. If a directory is specified as part of the
change set, the entire contents of that directory will be scanned for
changes. The way modifications are applied depends on
drools.agent.newInstance property present in the
KnowledgeAgentConfiguration object passed to the agent.
For polling to occur, the polling and notifier services must be started:
ResourceFactory.getResourceChangeNotifierService().start();

ResourceFactory.getResourceChangeScannerService().start();
Because Knowledge Agent could scan and process remote resources, it could ends up failing when compiling or executing rules, queries, functions, etc. that use classes outside the agent's classloader. If this is your case, you could take 2 approach: use a custom classloader for agent's kbuilder or force the agent to use the same classloader that its kbase has.
Knowledge Agent uses KnowledgeBuilder internally in order to compile managed resources. If you need to pass custom configuration to these compilers you could pass a KnowledgeBuilderConfiguration object to KnowledgeAgentFactory.newKnowledgeAgent(). This object will be used in every builder the agent creates. Using a KnowledgeBuilderConfiguration you can specify a custom classloader.
Most of the times, the classloader you wan't to use in the compilation process of remote resources is the same needed in the agent's kbase, so the rules could be executed. If you want to use this approach, you will need to setup the desired ClassLoader to the agen't kbase and use the "drools.agent.useKBaseClassLoaderForCompiling" property of KnowledgeAgentConfiguration object.
This approach lets you modify agent's kbuilder classloader in runtime by modifying the classloader the agent's kbase uses. This will serve also when not using incremental change set processing (see the section below). When the kbase is recreated its configuration is reused, so the classloader is maintained.
KnowledgeBaseConfiguration kbaseConfig =

    KnowledgeBaseFactory.newKnowledgeBaseConfiguration(null, customClassLoader);

KnowledgeBase kbase =

    KnowledgeBaseFactory.newKnowledgeBase(kbaseConfig); //kbase with custom classloader

KnowledgeAgentConfiguration aconf =

    KnowledgeAgentFactory.newKnowledgeAgentConfiguration();

aconf.setProperty("drools.agent.newInstance", "false"); //incremental change set processing enabled

aconf.setProperty("drools.agent.useKBaseClassLoaderForCompiling", "true");

KnowledgeAgent kagent = KnowledgeAgentFactory.newKnowledgeAgent(

                "test agent", kbase, aconf);
Knowledge Agent can process change sets in two different ways: recreating the knowledge base every time a new change set is processed or applying the change set in the cached knowledge base without destroying it. This behavior is controlled by the "newInstance" property of the KnowledgeAgentConfiguration object passed to the Agent's constructor.
When "newInstace" is set to true (the default value), the agent will destroy the cached Knowledge Base it contains and populate a new one containing the change set modifications. When "newInstance" is set to "false" change sets are applied directly to the cached Knowledge Base. The rule that were not modified in the change sets' resources are not replaced in the Knowledge Base, the modified or deleted rules are modified or deleted from the cached Knowledge Base. Functions, Queries and Definition Types are always replaced in the cached Knowledge Base whether they are modified or not.
The following code snippet creates a new Knowledge Agent with its "newInstace" property set to false
KnowledgeAgentConfiguration aconf = KnowledgeAgentFactory.newKnowledgeAgentConfiguration();

aconf.setProperty("drools.agent.newInstance", "false");

KnowledgeAgent kagent = KnowledgeAgentFactory.newKnowledgeAgent("test agent", null, aconf);
A note on remote HTTP Url Resources: if your knowledge agent is "pulling" resources from a http(s) URL, then you might rightly be concerned if that resource (remote web server) suddenly disappears. To survive a restart when a resource is no longer available remotely (eg the remote server is being restarted) then you can set a System Property: drools.resource.urlcache to a directory that has write permissions for the application: the Knowledge Agent will cache copies of the remote resources in that local directory.
For example, using the java command line: -Ddrools.resource.urlcache=/users/someone/KnowledgeCache - will keep local copies of the resources (rules, packages etc) in that directory, for the agent to use should it be restarted (when a remote resource becomes available, and is updated, it will automatically update the local cache copy).
After regular inserts you have to retract facts explicitly. With logical assertions, the fact that was asserted will be automatically retracted when the conditions that asserted it in the first place are no longer true. Actually, it's even cleverer then that, because it will be retracted only if there isn't any single condition that supports the logical assertion.
Normal insertions are said to be stated, i.e.,
just like the intuitive meaning of "stating a fact" implies. Using a
HashMap and a counter, we track how many times a particular
equality is stated; this means we count how many
different instances are equal.
When we logically insert an object during a RHS execution we are said to justify it, and it is considered to be justified by the firing rule. For each logical insertion there can only be one equal object, and each subsequent equal logical insertion increases the justification counter for this logical assertion. A justification is removed by the LHS of the creating rule becoming untrue, and the counter is decreased accordingly. As soon as we have no more justifications the logical object is automatically retracted.
If we try to logically insert an object when
there is an equal stated object, this will fail and
return null. If we state an object that has an
existing equal object that is justified we override
the Fact; how this override works depends on the configuration setting
WM_BEHAVIOR_PRESERVE. When the property is set to discard we
use the existing handle and replace the existing instance with the new
Object, which is the default behavior; otherwise we override it to
stated but we create an new
FactHandle.
This can be confusing on a first read, so hopefully the flow charts
below help. When it says that it returns a new FactHandle,
this also indicates the Object was propagated through the
network.


An example may make things clearer. Imagine a credit card processing application, processing transactions for a given account and we have a working memory accumulating knowledge about a single account transaction. The rule engine is doing its best to decide whether transactions are possibly fraudulent or not. Imagine that this rule base basically has rules that kick in when there is "reason to be suspicious" and when "everything is normal".
Of course there are many rules that operate no matter what, performing standard calculations, etc. Now there are possibly many reasons as to what could trigger a "reason to be suspicious": someone notifying the bank, a sequence of large transactions, transactions for geographically disparate locations, or even reports of credit card theft. Rather then smattering all the little conditions in lots of rules, imagine there is a fact class called "SuspiciousAccount".
Then there can be a series of rules whose job is to look for things that may raise suspicion, and if they fire, they logically insert a new SuspiciousAccount() instance. All the other rules just have conditions like "not SuspiciousAccount()" or "SuspiciousAccount()" depending on their needs. Note that this has the advantage of allowing there to be many rules around raising suspicion, without touching the other rules. After all the facts causing the SuspiciousAccount() insertion are removed, the account handling reverts to a normal mode of operation where, for instance, a rule with "not SuspiciousAccount()" may kick in, which flushes through any blocked transactions.
If you have followed this far, you will note that truth maintenance, like logical assertions, allows rules to behave a little like a human would, and can certainly make the rules more manageable.
You no longer need to enable or disable truth maintenance, via the kbase configuration. It is now handled automatically and turned on only when needed. This was done along with the code changes so that all entry points use the same code, previous to this the default entry point and named entry points used different code, to avoid TMS overhead for event processing.
It is important to note that for Truth Maintenance (and logical assertions) to work at all, your Fact objects (which may be JavaBeans) must override equals and hashCode methods (from java.lang.Object) correctly. As the truth maintenance system needs to know when two different physical objects are equal in value, both equals and hashCode must be overridden correctly, as per the Java standard.
Two objects are equal if and only if their equals methods return true for each other and if their hashCode methods return the same values. See the Java API for more details (but do keep in mind you MUST override both equals and hashCode).
The Rete algorithm was invented by Dr. Charles Forgy and documented in his PhD thesis in 1978-79. A simplified version of the paper was published in 1982 (http://citeseer.ist.psu.edu/context/505087/0). The latin word "rete" means "net" or "network". The Rete algorithm can be broken into 2 parts: rule compilation and runtime execution.
The compilation algorithm describes how the Rules in the Production Memory are processed to generate an efficient discrimination network. In non-technical terms, a discrimination network is used to filter data as it propagates through the network. The nodes at the top of the network would have many matches, and as we go down the network, there would be fewer matches. At the very bottom of the network are the terminal nodes. In Dr. Forgy's 1982 paper, he described 4 basic nodes: root, 1-input, 2-input and terminal.

The root node is where all objects enter the network. From there, it
immediately goes to the ObjectTypeNode. The purpose of the ObjectTypeNode
is to make sure the engine doesn't do more work than it needs to. For
example, say we have 2 objects: Account and Order. If the rule engine
tried to evaluate every single node against every object, it would waste a
lot of cycles. To make things efficient, the engine should only pass the
object to the nodes that match the object type. The easiest way to do this
is to create an ObjectTypeNode and have all 1-input and 2-input nodes
descend from it. This way, if an application asserts a new Account, it
won't propagate to the nodes for the Order object. In Drools when an
object is asserted it retrieves a list of valid ObjectTypesNodes via a
lookup in a HashMap from the object's Class; if this list doesn't exist it
scans all the ObjectTypeNodes finding valid matches which it caches in the
list. This enables Drools to match against any Class type that matches
with an instanceof check.
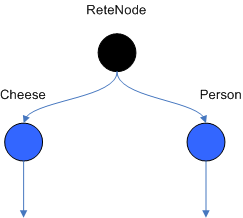
ObjectTypeNodes can propagate to AlphaNodes, LeftInputAdapterNodes
and BetaNodes. AlphaNodes are used to evaluate literal conditions.
Although the 1982 paper only covers equality conditions, many RETE
implementations support other operations. For example, Account.name
== "Mr Trout" is a literal condition. When a rule has multiple
literal conditions for a single object type, they are linked together.
This means that if an application asserts an Account object, it must first
satisfy the first literal condition before it can proceed to the next
AlphaNode. In Dr. Forgy's paper, he refers to these as IntraElement
conditions. The following diagram shows the AlphaNode combinations for
Cheese( name == "cheddar", strength == "strong" ):
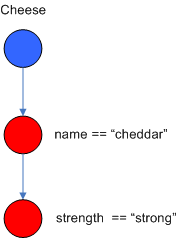
Drools extends Rete by optimizing the propagation from ObjectTypeNode to AlphaNode using hashing. Each time an AlphaNode is added to an ObjectTypeNode it adds the literal value as a key to the HashMap with the AlphaNode as the value. When a new instance enters the ObjectType node, rather than propagating to each AlphaNode, it can instead retrieve the correct AlphaNode from the HashMap,thereby avoiding unnecessary literal checks.
There are two two-input nodes, JoinNode and NotNode, and both are types of BetaNodes. BetaNodes are used to compare 2 objects, and their fields, to each other. The objects may be the same or different types. By convention we refer to the two inputs as left and right. The left input for a BetaNode is generally a list of objects; in Drools this is a Tuple. The right input is a single object. Two Nodes can be used to implement 'exists' checks. BetaNodes also have memory. The left input is called the Beta Memory and remembers all incoming tuples. The right input is called the Alpha Memory and remembers all incoming objects. Drools extends Rete by performing indexing on the BetaNodes. For instance, if we know that a BetaNode is performing a check on a String field, as each object enters we can do a hash lookup on that String value. This means when facts enter from the opposite side, instead of iterating over all the facts to find valid joins, we do a lookup returning potentially valid candidates. At any point a valid join is found the Tuple is joined with the Object; which is referred to as a partial match; and then propagated to the next node.

To enable the first Object, in the above case Cheese, to enter the network we use a LeftInputNodeAdapter - this takes an Object as an input and propagates a single Object Tuple.
Terminal nodes are used to indicate a single rule having matched all its conditions; at this point we say the rule has a full match. A rule with an 'or' conditional disjunctive connective results in subrule generation for each possible logically branch; thus one rule can have multiple terminal nodes.
Drools also performs node sharing. Many rules repeat the same patterns, and node sharing allows us to collapse those patterns so that they don't have to be re-evaluated for every single instance. The following two rules share the first pattern, but not the last:
    rule
    when
        Cheese( $chedddar : name == "cheddar" )
        $person : Person( favouriteCheese == $cheddar )
    then
        System.out.println( $person.getName() + " likes cheddar" );
    end
    rule
    when
        Cheese( $chedddar : name == "cheddar" )
        $person : Person( favouriteCheese != $cheddar )
    then
        System.out.println( $person.getName() + " does not like cheddar" );
    end
As you can see below, the compiled Rete network shows that the alpha node is shared, but the beta nodes are not. Each beta node has its own TerminalNode. Had the second pattern been the same it would have also been shared.


The KnowledgeBuilder is responsible for taking source files, such as
a DRL file or an Excel file, and turning them into a Knowledge Package of
rule and process definitions which a Knowledge Base can consume. An object
of the class ResourceType indicates the type of resource it is being
asked to build.
The ResourceFactory provides capabilities to load resources from a
number of sources, such as Reader, ClassPath, URL, File, or ByteArray.
Binaries, such as decision tables (Excel .xls files), should not use a Reader based
resource handler, which is only suitable for text based resources.

The KnowlegeBuilder is created using the KnowledgeBuilderFactory.

A KnowledgeBuilder can be created using the default configuration.
Example 4.1. Creating a new KnowledgeBuilder
KnowledgeBuilder kbuilder = KnowledgeBuilderFactory.newKnowledgeBuilder();
A configuration can be created using the KnowledgeBuilderFactory.
This allows the behavior of the Knowledge Builder to be modified. The most
common usage is to provide a custom class loader so that the KnowledgeBuilder
object can resolve classes that are not in the default classpath. The first parameter
is for properties and is optional, i.e., it may be left null, in which case the
default options will be used. The options parameter can be used for things
like changing the dialect or registering new accumulator functions.
Example 4.2. Creating a new KnowledgeBuilder with a custom ClassLoader
KnowledgeBuilderConfiguration kbuilderConf = KnowledgeBuilderFactory.newKnowledgeBuilderConfiguration(null, classLoader );

KnowledgeBuilder kbuilder = KnowledgeBuilderFactory.newKnowledgeBuilder(kbuilderConf);
Resources of any type can be added iteratively. Below, a DRL file is added. Unlike Drools 4.0 Package Builder, the Knowledge Builder can now handle multiple namespaces, so you can just keep adding resources regardless of namespace.
Example 4.3. Adding DRL Resources
kbuilder.add( ResourceFactory.newFileResource( "/project/myrules.drl" ),

              ResourceType.DRL);
It is best practice to always check the hasErrors() method after an
addition. You should not add more resources or retrieve the Knowledge Packages
if there are errors. getKnowledgePackages() returns an empty list if
there are errors.
Example 4.4. Validating
if( kbuilder.hasErrors() ) {

    System.out.println( kbuilder.getErrors() );

    return;

}
When all the resources have been added and there are no errors the collection of Knowledge Packages can be retrieved. It is a Collection because there is one Knowledge Package per package namespace. These Knowledge Packages are serializable and often used as a unit of deployment.
Example 4.5. Getting the KnowledgePackages
Collection<KnowledgePackage> kpkgs = kbuilder.getKnowledgePackages();
The final example puts it all together.
Example 4.6. Putting it all together
KnowledgeBuilder kbuilder = KnowledgeBuilderFactory.newKnowledgeBuilder();

if( kbuilder.hasErrors() ) {

    System.out.println( kbuilder.getErrors() );

    return;

}


KnowledgeBuilder kbuilder = KnowledgeBuilderFactory.newKnowledgeBuilder();

kbuilder.add( ResourceFactory.newFileResource( "/project/myrules1.drl" ),

              ResourceType.DRL);

kbuilder.add( ResourceFactory.newFileResource( "/project/myrules2.drl" ),

              ResourceType.DRL);


if( kbuilder.hasErrors() ) {

    System.out.println( kbuilder.getErrors() );

    return;

}


Collection<KnowledgePackage> kpkgs = kbuilder.getKnowledgePackages();
Instead of adding the resources to create definitions programmatically it is also possible to do it by configuration, via the ChangeSet XML. The simple XML file supports three elements: add, remove, and modify, each of which has a sequence of <resource> subelements defining a configuration entity. The following XML schema is not normative and intended for illustration only.
Example 4.7. XML Schema for ChangeSet XML (not normative)
<xs:schema xmlns:xs="http://www.w3.org/2001/XMLSchema"

           xmlns="http://drools.org/drools-5.0/change-set"

           targetNamespace="http://drools.org/drools-5.0/change-set">


  <xs:element name="change-set" type="ChangeSet"/>


  <xs:complexType name="ChangeSet">

    <xs:choice maxOccurs="unbounded">

      <xs:element name="add"    type="Operation"/>

      <xs:element name="remove" type="Operation"/>

      <xs:element name="modify" type="Operation"/>

    </xs:choice>

  </xs:complexType>


  <xs:complexType name="Operation">

    <xs:sequence>

      <xs:element name="resource" type="Resource"

                  maxOccurs="unbounded"/>

    </xs:sequence>

  </xs:complexType>


  <xs:complexType name="Resource">

    <xs:sequence>


      <xs:element name="decisiontable-conf" type="DecTabConf"

                  minOccurs="0"/>

    </xs:sequence>


    <xs:attribute name="source" type="xs:string"/>

    <xs:attribute name="type"   type="ResourceType"/>

  </xs:complexType>


  <xs:complexType name="DecTabConf">

    <xs:attribute name="input-type"     type="DecTabInpType"/>

    <xs:attribute name="worksheet-name" type="xs:string"

                  use="optional"/>

  </xs:complexType>


  <xs:simpleType name="ResourceType">

    <xs:restriction base="xs:string">

      <xs:enumeration value="DRL"/>

      <xs:enumeration value="XDRL"/>

      <xs:enumeration value="DSL"/>

      <xs:enumeration value="DSLR"/>

      <xs:enumeration value="DRF"/>

      <xs:enumeration value="DTABLE"/>

      <xs:enumeration value="PKG"/>

      <xs:enumeration value="BRL"/>

      <xs:enumeration value="CHANGE_SET"/>

    </xs:restriction>

  </xs:simpleType>


  <xs:simpleType name="DecTabInpType">

    <xs:restriction base="xs:string">

      <xs:enumeration value="XLS"/>

      <xs:enumeration value="CSV"/>

    </xs:restriction>

  </xs:simpleType>


</xs:schema>
Currently only the add element is supported, but the others will be implemented to support iterative changes. The following example loads a single DRL file.
Example 4.8. Simple ChangeSet XML
<change-set xmlns='http://drools.org/drools-5.0/change-set'

             xmlns:xs='http://www.w3.org/2001/XMLSchema-instance'

             xs:schemaLocation='http://drools.org/drools-5.0/change-set.xsd http://anonsvn.jboss.org/repos/labs/labs/jbossrules/trunk/drools-api/src/main/resources/change-set-1.0.0.xsd' >

   <add>

      <resource source='file:/project/myrules.drl' type='DRL' />

   </add>

</change-set>
Notice the file: prefix, which signifies the protocol for the
resource. The Change Set supports all the protocols provided by
java.net.URL, such as "file" and "http", as well as an additional
"classpath". Currently the type attribute must always be specified for a
resource, as it is not inferred from the file name extension. Using the
ClassPath resource loader in Java allows you to specify the Class Loader to
be used to locate the resource but this is not possible from XML. Instead,
the Class Loader will default to the one used by the Knowledge Builder
unless the ChangeSet XML is itself loaded by the ClassPath resource, in
which case it will use the Class Loader specified for that resource.
Currently you still need to use the API to load that ChangeSet, but we will add support for containers such as Spring in the future, so that the process of creating a Knowledge Base can be done completely by XML configuration. Loading resources using an XML file couldn't be simpler, as it's just another resource type.
Example 4.9. Loading the ChangeSet XML
kbuilder.add( ResourceFactory.newUrlResource( url ), ResourceType.CHANGE_SET );
ChangeSets can include any number of resources, and they even support additional configuration information, which currently is only needed for decision tables. Below, the example is expanded to load rules from a http URL location, and an Excel decision table from the classpath.
Example 4.10. ChangeSet XML with resource configuration
<change-set xmlns='http://drools.org/drools-5.0/change-set'

             xmlns:xs='http://www.w3.org/2001/XMLSchema-instance'

             xs:schemaLocation='http://drools.org/drools-5.0/change-set.xsd http://anonsvn.jboss.org/repos/labs/labs/jbossrules/trunk/drools-api/src/main/resources/change-set-1.0.0.xsd' >

  <add>

       <resource source='http:org/domain/myrules.drl' type='DRL' />

       <resource source='classpath:data/IntegrationExampleTest.xls' type="DTABLE">

           <decisiontable-conf input-type="XLS" worksheet-name="Tables_2" />

       </resource>

   </add>

 </change-set>
The ChangeSet is especially useful when working with a Knowledge Agent, as it allows for change notification and automatic rebuilding of the Knowledge Base, which is covered in more detail in the section on the Knowledge Agent, under Deploying.
Directories can also be specified, to add all resources in that folder. Currently it is expected that all resources in that folder are of the same type. If you use the Knowledge Agent it will provide a continous scanning for added, modified or removed resources and rebuild the cached Knowledge Base. The KnowledgeAgent provides more information on this.
Example 4.11. ChangeSet XML which adds a directory's contents
<change-set xmlns='http://drools.org/drools-5.0/change-set'

            xmlns:xs='http://www.w3.org/2001/XMLSchema-instance'

            xs:schemaLocation='http://drools.org/drools-5.0/change-set.xsd http://anonsvn.jboss.org/repos/labs/labs/jbossrules/trunk/drools-api/src/main/resources/change-set-1.0.0.xsd' >

   <add>

      <resource source='file:/projects/myproject/myrules' type='DRL' />

   </add>

</change-set>
A Knowledge Package is a collection of Knowledge Definitions, such as rules and processes. It is created by the Knowledge Builder, as described in the chapter "Building". Knowledge Packages are self-contained and serializable, and they currently form the basic deployment unit.

Knowledge Packages are added to the Knowledge Base. However, a Knowledge Package instance cannot be reused once it's added to the Knowledge Base. If you need to add it to another Knowledge Base, try serializing it first and using the "cloned" result. We hope to fix this limitation in future versions of Drools.
The Knowlege Base is a repository of all the application's knowledge definitions. It may contain rules, processes, functions, and type models. The Knowledge Base itself does not contain instance data, known as facts; instead, sessions are created from the Knowledge Base into which data can be inserted and where process instances may be started. Creating the Knowlege Base can be heavy, whereas session creation is very light, so it is recommended that Knowledge Bases be cached where possible to allow for repeated session creation.

A KnowledgeBase object is also serializable, and some people
may prefer to build and then store a KnowledgeBase, treating it also
as a unit of deployment, instead of the Knowledge Packages.
The KnowlegeBase is created using the KnowledgeBaseFactory.

A KnowledgeBase can be created using the default configuration.
Example 4.12. Creating a new KnowledgeBase
KnowledgeBase kbase = KnowledgeBaseFactory.newKnowledgeBase();
If a custom class loader was used with the KnowledgeBuilder to
resolve types not in the default class loader, then that must also be set
on the KnowledgeBase. The technique for this is the same as with the
KnowledgeBuilder.
Example 4.13. Creating a new KnowledgeBase with a custom ClassLoader
KnowledgeBaseConfiguration kbaseConf =

    KnowledgeBaseFactory.createKnowledgeBaseConfiguration( null, cl );

KnowledgeBase kbase = KnowledgeBaseFactory.newKnowledgeBase( kbaseConf );
This is the simplest form of deployment. It compiles the knowledge definitions and adds them to the Knowledge Base in the same JVM. This approach requires drools-core.jar and drools-compiler.jar to be on the classpath.
Example 4.14. Add KnowledgePackages to a KnowledgeBase
Collection<KnowledgePackage> kpkgs = kbuilder.getKnowledgePackages();


KnowledgeBase kbase = KnowledgeBaseFactory.newKnowledgeBase();

kbase.addKnowledgePackages( kpkgs );
Note that the addKnowledgePackages(kpkgs) method can be called
iteratively to add additional knowledge.
Both the KnowledgeBase and the KnowledgePackage
are units of
deployment and serializable. This means you can have one machine do any
necessary building, requiring drools-compiler.jar, and
have another machine deploy and execute everything, needing only
drools-core.jar.
Although serialization is standard Java, we present an example of how one machine might write out the deployment unit and how another machine might read in and use that deployment unit.
Example 4.15. Writing the KnowledgePackage to an OutputStream
ObjectOutputStream out = new ObjectOutputStream( new FileOutputStream( fileName ) );

out.writeObject( kpkgs );

out.close();
Example 4.16. Reading the KnowledgePackage from an InputStream
ObjectInputStream in = new ObjectInputStream( new FileInputStream( fileName ) );

// The input stream might contain an individual

// package or a collection.

@SuppressWarnings( "unchecked" )

Collection<KnowledgePackage> kpkgs =

    ()in.readObject( Collection<KnowledgePackage> );

in.close();


KnowledgeBase kbase = KnowledgeBaseFactory.newKnowledgeBase();

kbase.addKnowledgePackages( kpkgs );
The KnowledgeBase is also serializable and some people may prefer
to build and then store the KnowledgeBase itself, instead of the
Knowledge Packages.
Drools Guvnor, our server side management system, uses this deployment approach. After Guvnor has compiled and published serialized Knowledge Packages on a URL, Drools can use the URL resource type to load them.
Stateful Knowledge Sessions will be discussed in more detail in
section "Running". The KnowledgeBase creates and returns
StatefulKnowledgeSession objects, and it may optionally
keep references to those.
When KnowledgeBase modifications occur those modifications are applied
against the data in the sessions. This reference is a weak reference and it
is also optional, which is controlled by a boolean flag.
The KnowlegeAgent provides automatic loading, caching and
re-loading of resources and is configured from a properties files. The
Knowledge Agent can update or rebuild this Knowlege Base as the
resources it uses are changed. The strategy for this is determined by the configuration
given to the factory, but it is typically pull-based using regular
polling. We hope to add push-based updates and rebuilds in future
versions. The Knowledge Agent will continuously scan all the added
resources, using a default polling interval of 60 seconds. If their
date of the last modification is updated it will rebuild the cached
Knowledge Base using the new resources.

The KnowlegeBuilder is created using a
KnowledgeBuilderFactory object.
The agent must specify a name, which is used in the log files to associate
a log entry with the corresponding agent.
Example 4.17. Creating the KnowledgeAgent
KnowledgeAgent kagent = KnowledgeAgentFactory.newKnowledgeAgent( "MyAgent" );

The following example constructs an agent that will build a new KnowledgeBase from the specified ChangeSet. (See section "Building" for more details on the ChangeSet format.) Note that the method can be called iteratively to add new resources over time. The Knowledge Agent polls the resources added from the ChangeSet every 60 seconds, the default interval, to see if they are updated. Whenever changes are found it will construct a new Knowledge Base or apply the modifications to the existing Knowledge Base according to its configuration. If the change set specifies a resource that is a directory its contents will be scanned for changes, too.
Example 4.18. Writing the KnowledgePackage to an OutputStream
KnowledgeAgent kagent = KnowledgeAgentFactory.newKnowledgeAgent( "MyAgent" );

kagent.applyChangeSet( ResourceFactory.newUrlResource( url ) );

KnowledgeBase kbase = kagent.getKnowledgeBase();
Resource scanning is not on by default, it's a service and must be started, and the same is true for notification. Both can be done via the ResourceFactory.
Example 4.19. Starting the Scanning and Notification Services
ResourceFactory.getResourceChangeNotifierService().start();

ResourceFactory.getResourceChangeScannerService().start();
The default resource scanning period may be changed via the
ResourceChangeScannerService. A suitably updated
ResourceChangeScannerConfiguration object is passed to the service's
configure() method, which allows for the service to be reconfigured on
demand.
Example 4.20. Changing the Scanning Intervals
ResourceChangeScannerConfiguration sconf =

    ResourceFactory.getResourceChangeScannerService().newResourceChangeScannerConfiguration();

// Set the disk scanning interval to 30s, default is 60s.

sconf.setProperty( "drools.resource.scanner.interval", "30" );

ResourceFactory.getResourceChangeScannerService().configure( sconf );
Knowledge Agents can take an empty Knowledge Base or a populated one.
If a populated Knowledge Base is provided, the Knowledge Agent will
run an iterator from Knowledge Base and subscribe to the resources that
it finds. While it is
possible for the Knowledge Builder to build all resources found in a
directory, that information is lost by the Knowledge Builder so that those
directories will not be continuously scanned. Only directories specified
as part of the applyChangeSet(Resource) method are monitored.
One of the advantages of providing KnowledgeBase as the starting
point is that you can provide it with a KnowledgeBaseConfiguration. When
resource changes are detected and a new KnowledgeBase object is
instantiated, it will use the KnowledgeBaseConfiguration of the previous
KnowledgeBase object.
Example 4.21. Using an existing KnowledgeBase
KnowledgeBaseConfiguration kbaseConf =

    KnowledgeBaseFactory.createKnowledgeBaseConfiguration( null, cl );

KnowledgeBase kbase KnowledgeBaseFactory.newKnowledgeBase( kbaseConf );

// Populate kbase with resources here.


KnowledgeAgent kagent =

    KnowledgeAgentFactory.newKnowledgeAgent( "MyAgent", kbase );

KnowledgeBase kbase = kagent.getKnowledgeBase();
In the above example getKnowledgeBase() will return the same
provided kbase instance until resource changes are detected and a new
Knowledge Base is built. When the new Knowledge Base is built, it will be
done with the KnowledgeBaseConfiguration that was provided to
the previous KnowledgeBase.
As mentioned previously, a ChangeSet XML can specify a directory and
all of its contents will be added. If this ChangeSet XML is used with the
applyChangeSet() method it will also add any directories to the scanning
process. When the directory scan detects an additional file, it will be
added to the Knowledge Base; any removed file is removed from the
Knowledge Base, and modified files will be removed from the Knowledge Base.
Example 4.22. ChangeSet XML which adds a directories contents
<change-set xmlns='http://drools.org/drools-5.0/change-set'

            xmlns:xs='http://www.w3.org/2001/XMLSchema-instance'

            xs:schemaLocation='http://drools.org/drools-5.0/change-set.xsd' >

   <add>

      <resource source='file:/projects/myproject/myrules' type='PKG' />

   </add>

</change-set>
Note that for the resource type PKG the drools-compiler dependency is not needed as the Knowledge Agent is able to handle those with just drools-core.
The KnowledgeAgentConfiguration can be used to modify a
Knowledge Agent's default behavior. You could use this to load
the resources from a directory, while inhibiting the continuous scan
for changes of that directory.
Example 4.23. Change the Scanning Behavior
KnowledgeBase kbase = KnowledgeBaseFactory.newKnowledgeBase();


KnowledgeAgentConfiguration kaconf =

    KnowledgeAgentFactory.newKnowledgeAgentConfiguation();

// Do not scan directories, just files.

kaconf.setProperty( "drools.agent.scanDirectories", "false" );

KnowledgeAgent kagent =

    KnowledgeAgentFactory.newKnowledgeAgent( "test agent", kaconf );
Previously we mentioned Drools Guvnor and how it can build and publish serialized Knowledge Packages on a URL, and that the ChangeSet XML can handle URLs and Packages. Taken together, this forms an importanty deployment scenario for the Knowledge Agent.
The KnowlegeBase is a repository of all the
application's knowledge definitions. It will contain rules, processes,
functions, and type models. The Knowledge Base itself does not contain
data; instead, sessions are created from the KnowledgeBase
into which data can be inserted and from which process instances may be
started. Creating the KnowlegeBase can be heavy, whereas
session creation is very light, so it is recommended that Knowle Bases be
cached where possible to allow for repeated session creation.
Example 4.24. Creating a new KnowledgeBase
KnowledgeBase kbase = KnowledgeBaseFactory.newKnowledgeBase();
The StatefulKnowledgeSession stores and executes on the
runtime data. It is created from the KnowledgeBase.

Example 4.25. Create a StatefulKnowledgeSession from a KnowledgeBase
StatefulKnowledgeSession ksession = kbase.newStatefulKnowledgeSession();
The WorkingMemoryEntryPoint provides the methods
around inserting, updating and retrieving facts. The term "entry point"
is related to the fact that we have multiple partitions in a Working
Memory and you can choose which one you are inserting into, although
this use case is aimed at event processing and covered in more detail in
the Fusion manual. Most rule based applications will work with the
default entry point alone.
The KnowledgeRuntime interface provides the main
interaction with the engine. It is available in rule consequences and
process actions. In this manual the focus is on the methods and
interfaces related to rules, and the methods pertaining to processes
will be ignored for now. But you'll notice that the
KnowledgeRuntime inherits methods from both the
WorkingMemory and the ProcessRuntime, thereby
providing a unified API to work with processes and rules. When working
with rules, three interfaces form the KnowledgeRuntime:
WorkingMemoryEntryPoint, WorkingMemory and the
KnowledgeRuntime itself.

Insertion is the act of telling the WorkingMemory
about a fact, which you do by
ksession.insert(yourObject), for example. When you insert
a fact, it is examined for matches against the rules. This means
all of the work for deciding about firing or not
firing a rule is done during insertion; no rule, however, is executed
until you call fireAllRules(), which you call after you
have finished inserting your facts. It is a common misunderstanding
for people to think the condition evaluation happens when you call
fireAllRules(). Expert systems typically use the term
assert or assertion to refer
to facts made available to the system. However, due to "assert" being
a keyword in most languages, we have decided to use the
insert keyword; so expect to hear the two used
interchangeably.
When an Object is inserted it returns a FactHandle.
This FactHandle is the token used to represent your
inserted object within the WorkingMemory. It is also used
for interactions with the WorkingMemory when you wish to
retract or modify an object.
Cheese stilton = new Cheese("stilton");

FactHandle stiltonHandle = ksession.insert( stilton );
As mentioned in the Knowledge Base section, a Working Memory may operate in two assertion modes, i.e., equality or identity, with identity being the default.
Identity means that the Working Memory uses
an IdentityHashMap to store all asserted objects. New
instance assertions always result in the return of a new
FactHandle, but if an instance is asserted again then it
returns the original fact handle, i.e., it ignores repeated insertions
for the same fact.
Equality means that the Working Memory uses
a HashMap to store all asserted Objects. New instance
assertions will only return a new FactHandle if no equal
objects have been asserted.
Retraction is the removal of a fact from Working Memory, which
means that it will no longer track and match that fact, and any rules
that are activated and dependent on that fact will be cancelled. Note
that it is possible to have rules that depend on the nonexistence of a
fact, in which case retracting a fact may cause a rule to activate.
(See the not and exist keywords.) Retraction
is done using the FactHandle that was returned by the
insert call.
Cheese stilton = new Cheese("stilton");

FactHandle stiltonHandle = ksession.insert( stilton );

....

ksession.retract( stiltonHandle );
The Rule Engine must be notified of modified facts, so that they
can be reprocessed. Internally, modification is actually a retract
followed by an insert; the Rule Engine removes the fact from the
WorkingMemory and inserts it again. You must use the
update() method to notify the WorkingMemory
of changed objects for those objects that are not able to notify the
WorkingMemory themselves. Notice that
update() always takes the modified object as a second
parameter, which allows you to specify new instances for immutable
objects. The update() method can only be used with
objects that have shadow proxies turned on. The update method is only
available within Java code. On the right hand side of a rule, also the
modify statement is supported, providing simplified
calls to the object's setters.
Cheese stilton = new Cheese("stilton");

FactHandle stiltonHandle = workingMemory.insert( stilton );

...

stilton.setPrice( 100 );

workingMemory.update( stiltonHandle, stilton );
The WorkingMemory provides access to the Agenda, permits query executions, and lets you access named Enty Points.

Queries are used to retrieve fact sets based on patterns, as they are used in rules. Patterns may make use of optional parameters. Queries can be defined in the Knowlege Base, from where they are called up to return the matching results. While iterating over the result collection, any bound identifier in the query can be accessed using the get(String identifier) method and any FactHandle for that identifier can be retrieved using getFactHandle(String identifier).


Example 4.26. Simple Query Example
QueryResults results =

    ksession.getQueryResults( "my query", new Object[] { "string" } );

for ( QueryResultsRow row : results ) {

    System.out.println( row.get( "varName" ) );

}
Drools has always had query support, but the result was returned as an iterable set; this makes it hard to monitor changes over time.
We have now complimented this with Live Querries, which has a listener attached instead of returning an iterable result set. These live querries stay open creating a view and publish change events for the contents of this view. So now you can execute your query, with parameters and listen to changes in the resulting view.
Example 4.27. Implementing ViewChangedEventListener
final List updated = new ArrayList();

final List removed = new ArrayList();

final List added = new ArrayList();


ViewChangedEventListener listener = new ViewChangedEventListener() {

 public void rowUpdated(Row row) {

  updated.add( row.get( "$price" ) );

 }


 public void rowRemoved(Row row) {

  removed.add( row.get( "$price" ) );

 }


 public void rowAdded(Row row) {

  added.add( row.get( "$price" ) );

 }

};


// Open the LiveQuery

LiveQuery query = ksession.openLiveQuery( "cheeses",

                                          new Object[] { "cheddar", "stilton" },

                                          listener );

...

...

query.dispose() // make sure you call dispose when you want the query to close
A Drools blog article contains an example of Glazed Lists integration for live queries,
http://blog.athico.com/2010/07/glazed-lists-examples-for-drools-live.html
The KnowledgeRuntime provides further methods that
are applicable to both rules and processes, such as setting globals and
registering Channels (previously exit points, some
references may remain in docs for a while).

Globals are named objects that can be passed to the rule engine, without needing to insert them. Most often these are used for static information, or for services that are used in the RHS of a rule, or perhaps as a means to return objects from the rule engine. If you use a global on the LHS of a rule, make sure it is immutable. A global must first be declared in a rules file before it can be set on the session.
global java.util.List list
With the Knowledge Base now aware of the global identifier and
its type, it is now possible to call ksession.setGlobal()
for any session. Failure to declare the global type and identifier
first will result in an exception being thrown. To set the global on
the session use ksession.setGlobal(identifier,
value):
List list = new ArrayList();

ksession.setGlobal("list", list);
If a rule evaluates on a global before you set it you will get a
NullPointerException.
The StatefulRuleSession is inherited by the
StatefulKnowledgeSession and provides the rule related
methods that are relevant from outside of the engine.


AgendaFilter objects are optional implementations
of the filter interface which are used to allow or deny the firing of
an activation. What you filter on is entirely up to the
implementation. Drools 4.0 used to supply some out of the box filters,
which have not be exposed in drools 5.0 knowledge-api, but they are
simple to implement and the Drools 4.0 code base can be referred
to.
To use a filter specify it while calling
fireAllRules(). The following example permits only rules
ending in the string "Test". All others will be filtered
out.
ksession.fireAllRules( new RuleNameEndsWithAgendaFilter( "Test" ) );
The Agenda is a Rete feature. During actions on
the WorkingMemory, rules may become fully matched and
eligible for execution; a single Working Memory Action can result in
multiple eligible rules. When a rule is fully matched an Activation is
created, referencing the rule and the matched facts, and placed onto the
Agenda. The Agenda controls the execution order of these Activations using
a Conflict Resolution strategy.
The engine cycles repeatedly through two phases:
Working Memory Actions. This is where most of the work takes place, either in the Consequence (the RHS itself) or the main Java application process. Once the Consequence has finished or the main Java application process calls
fireAllRules()the engine switches to the Agenda Evaluation phase.Agenda Evaluation. This attempts to select a rule to fire. If no rule is found it exits, otherwise it fires the found rule, switching the phase back to Working Memory Actions.

The process repeats until the agenda is clear, in which case control returns to the calling application. When Working Memory Actions are taking place, no rules are being fired.

Conflict resolution is required when there are multiple rules on the agenda. (The basics to this are covered in chapter "Quick Start".) As firing a rule may have side effects on the working memory, the rule engine needs to know in what order the rules should fire (for instance, firing ruleA may cause ruleB to be removed from the agenda).
The default conflict resolution strategies employed by Drools are: Salience and LIFO (last in, first out).
The most visible one is salience (or priority), in which case a user can specify that a certain rule has a higher priority (by giving it a higher number) than other rules. In that case, the rule with higher salience will be preferred. LIFO priorities are based on the assigned Working Memory Action counter value, with all rules created during the same action receiving the same value. The execution order of a set of firings with the same priority value is arbitrary.
As a general rule, it is a good idea not to count on rules firing in any particular order, and to author the rules without worrying about a "flow". However when a flow is needed a number of possibilities exist, including but not limited to: agenda groups, rule flow groups, activation groups, control/semaphore facts. These are discussed in later sections.
Drools 4.0 supported custom conflict resolution strategies; while this capability still exists in Drools it has not yet been exposed to the end user via knowledge-api in Drools 5.0.

Agenda groups are a way to partition rules (activations, actually) on the agenda. At any one time, only one group has "focus" which means that activations for rules in that group only will take effect. You can also have rules with "auto focus" which means that the focus is taken for its agenda group when that rule's conditions are true.
Agenda groups are known as "modules" in CLIPS terminology. While it best to design rules that do not need control flow, this is not always possible. Agenda groups provide a handy way to create a "flow" between grouped rules. You can switch the group which has focus either from within the rule engine, or via the API. If your rules have a clear need for multiple "phases" or "sequences" of processing, consider using agenda-groups for this purpose.
Each time setFocus() is called it pushes that Agenda
Group onto a stack. When the focus group is empty it is popped from the
stack and the focus group that is now on top evaluates. An Agenda Group
can appear in multiple locations on the stack. The default Agenda Group
is "MAIN", with all rules which do not specify an Agenda Group being in
this group. It is also always the first group on the stack, given focus
initially, by default.
ksession.getAgenda().getAgendaGroup( "Group A" ).setFocus();

An activation group is a set of rules bound together by the same
"activation-group" rule attribute. In this group only one rule can fire,
and after that rule has fired all the other rules are cancelled from the
agenda. The clear() method can be called at any time, which
cancels all of the activations before one has had a chance to
fire.
ksession.getAgenda().getActivationGroup( "Group B" ).clear();

A rule flow group is a group of rules associated by the
"ruleflow-group" rule attribute. These rules can only fire when the
group is activate. The group itself can only become active when the
elaboration of the ruleflow diagram reaches the node representing the
group. Here too, the clear() method can be called at any
time to cancels all activations still remaining on the Agenda.
ksession.getAgenda().getRuleFlowGroup( "Group C" ).clear();
The event package provides means to be notified of rule engine events, including rules firing, objects being asserted, etc. This allows you, for instance, to separate logging and auditing activities from the main part of your application (and the rules).
The KnowlegeRuntimeEventManager interface is
implemented by the KnowledgeRuntime which provides two
interfaces, WorkingMemoryEventManager and
ProcessEventManager. We will only cover the
WorkingMemoryEventManager here.

The WorkingMemoryEventManager allows for listeners to
be added and removed, so that events for the working memory and the agenda
can be listened to.

The following code snippet shows how a simple agenda listener is declared and attached to a session. It will print activations after they have fired.
Example 4.28. Adding an AgendaEventListener
ksession.addEventListener( new DefaultAgendaEventListener() {

   public void afterActivationFired(AfterActivationFiredEvent event) {

       super.afterActivationFired( event );

       System.out.println( event );

   }

});
Drools also provides DebugWorkingMemoryEventListener
and DebugAgendaEventListener which implement each method with
a debug print statement. To print all Working Memory events, you add a
listener like this:
Example 4.29. Creating a new KnowledgeBuilder
ksession.addEventListener( new DebugWorkingMemoryEventListener() );
All emitted events implement the KnowlegeRuntimeEvent
interface which can be used to retrieve the actual
KnowlegeRuntime the event originated from.

The events currently supported are:
ActivationCreatedEvent
ActivationCancelledEvent
BeforeActivationFiredEvent
AfterActivationFiredEvent
AgendaGroupPushedEvent
AgendaGroupPoppedEvent
ObjectInsertEvent
ObjectRetractedEvent
ObjectUpdatedEvent
ProcessCompletedEvent
ProcessNodeLeftEvent
ProcessNodeTriggeredEvent
ProcessStartEvent
The KnowledgeRuntimeLogger uses the comprehensive event system in Drools to create an audit log that can be used to log the execution of an application for later inspection, using tools such as the Eclipse audit viewer.

Example 4.30. FileLogger
KnowledgeRuntimeLogger logger =

  KnowledgeRuntimeLoggerFactory.newFileLogger(ksession, "logdir/mylogfile");

...

logger.close();
The StatelessKnowledgeSession wraps the
StatefulKnowledgeSession, instead of extending it. Its main
focus is on decision service type scenarios. It avoids the need to call
dispose(). Stateless sessions do not support iterative
insertions and the method call fireAllRules() from Java code;
the act of calling execute() is a single-shot method that
will internally instantiate a StatefulKnowledgeSession, add
all the user data and execute user commands, call
fireAllRules(), and then call dispose(). While
the main way to work with this class is via the
BatchExecution (a subinterface of Command) as
supported by the CommandExecutor interface, two convenience
methods are provided for when simple object insertion is all that's
required. The CommandExecutor and BatchExecution
are talked about in detail in their own section.

Our simple example shows a stateless session executing a given collection of Java objects using the convenience API. It will iterate the collection, inserting each element in turn.
Example 4.31. Simple StatelessKnowledgeSession execution with a Collection
KnowledgeBuilder kbuilder = KnowledgeBuilderFactory.newKnowledgeBuilder();

kbuilder.add( ResourceFactory.newFileSystemResource( fileName ), ResourceType.DRL );

if (kbuilder.hasErrors() ) {

    System.out.println( kbuilder.getErrors() );

} else {

    KnowledgeBase kbase = KnowledgeBaseFactory.newKnowledgeBase();

    kbase.addKnowledgePackages( kbuilder.getKnowledgePackages() );

    StatelessKnowledgeSession ksession = kbase.newStatelessKnowledgeSession();

    ksession.execute( collection );

}
If this was done as a single Command it would be as follows:
Example 4.32. Simple StatelessKnowledgeSession execution with InsertElements Command
ksession.execute( CommandFactory.newInsertElements( collection ) );
If you wanted to insert the collection itself, and the collection's
individual elements, then
CommandFactory.newInsert(collection) would do the job.
Methods of the CommandFactory create the supported
commands, all of which can be marshalled using XStream and the
BatchExecutionHelper. BatchExecutionHelper
provides details on the XML format as well as how to use Drools Pipeline
to automate the marshalling of BatchExecution and
ExecutionResults.
StatelessKnowledgeSession supports globals, scoped in a
number of ways. I'll cover the non-command way first, as commands are
scoped to a specific execution call. Globals can be resolved in three
ways.
The Stateless Knowledge Session method
getGlobals()returns a Globals instance which provides access to the session's globals. These are shared for all execution calls. Exercise caution regarding mutable globals because execution calls can be executing simultaneously in different threads.Example 4.33. Session scoped global
StatelessKnowledgeSession ksession = kbase.newStatelessKnowledgeSession();

// Set a global hbnSession, that can be used for DB interactions in the rules.

ksession.setGlobal( "hbnSession", hibernateSession );

// Execute while being able to resolve the "hbnSession" identifier.

ksession.execute( collection );
Using a delegate is another way of global resolution. Assigning a value to a global (with
setGlobal(String, Object)) results in the value being stored in an internal collection mapping identifiers to values. Identifiers in this internal collection will have priority over any supplied delegate. Only if an identifier cannot be found in this internal collection, the delegate global (if any) will be used.The third way of resolving globals is to have execution scoped globals. Here, a
Commandto set a global is passed to theCommandExecutor.
The CommandExecutor interface also offers the ability
to export data via "out" parameters. Inserted facts, globals and query
results can all be returned.
Example 4.34. Out identifiers
// Set up a list of commands

List cmds = new ArrayList();

cmds.add( CommandFactory.newSetGlobal( "list1", new ArrayList(), true ) );

cmds.add( CommandFactory.newInsert( new Person( "jon", 102 ), "person" ) );

cmds.add( CommandFactory.newQuery( "Get People" "getPeople" );


// Execute the list

ExecutionResults results =

  ksession.execute( CommandFactory.newBatchExecution( cmds ) );


// Retrieve the ArrayList

results.getValue( "list1" );

// Retrieve the inserted Person fact

results.getValue( "person" );

// Retrieve the query as a QueryResults instance.

results.getValue( "Get People" );
With Rete you have a stateful session where objects can be asserted and modified over time, and where rules can also be added and removed. Now what happens if we assume a stateless session, where after the initial data set no more data can be asserted or modified and rules cannot be added or removed? Certainly it won't be necessary to re-evaluate rules, and the engine will be able to operate in a simplified way.
Order the Rules by salience and position in the ruleset (by setting a sequence attribute on the rule terminal node).
Create an array, one element for each possible rule activation; element position indicates firing order.
Turn off all node memories, except the right-input Object memory.
Disconnect the Left Input Adapter Node propagation, and let the Object plus the Node be referenced in a Command object, which is added to a list on the Working Memory for later execution.
Assert all objects, and, when all assertions are finished and thus right-input node memories are populated, check the Command list and execute each in turn.
All resulting Activations should be placed in the array, based upon the determined sequence number of the Rule. Record the first and last populated elements, to reduce the iteration range.
Iterate the array of Activations, executing populated element in turn.
If we have a maximum number of allowed rule executions, we can exit our network evaluations early to fire all the rules in the array.
The LeftInputAdapterNode no longer creates a Tuple,
adding the Object, and then propagate the Tuple – instead a Command
object is created and added to a list in the Working Memory. This
Command object holds a reference to the
LeftInputAdapterNode and the propagated object. This stops
any left-input propagations at insertion time, so that we know that a
right-input propagation will never need to attempt a join with the
left-inputs (removing the need for left-input memory). All nodes have
their memory turned off, including the left-input Tuple memory but
excluding the right-input object memory, which means that the only node
remembering an insertion propagation is the right-input object memory.
Once all the assertions are finished and all right-input memories
populated, we can then iterate the list of
LeftInputAdatperNode Command objects calling each in turn.
They will propagate down the network attempting to join with the
right-input objects, but they won't be remembered in the left input as
we know there will be no further object assertions and thus propagations
into the right-input memory.
There is no longer an Agenda, with a priority queue to schedule
the Tuples; instead, there is simply an array for the number of rules.
The sequence number of the RuleTerminalNode indicates the
element within the array where to place the Activation. Once all Command
objects have finished we can iterate our array, checking each element in
turn, and firing the Activations if they exist. To improve performance,
we remember the first and the last populated cell in the array. The
network is constructed, with each RuleTerminalNode being
given a sequence number based on a salience number and its order of
being added to the network.
Typically the right-input node memories are Hash Maps, for fast object retraction; here, as we know there will be no object retractions, we can use a list when the values of the object are not indexed. For larger numbers of objects indexed Hash Maps provide a performance increase; if we know an object type has only a few instances, indexing is probably not advantageous, and a list can be used.
Sequential mode can only be used with a Stateless Session and is
off by default. To turn it on, either call
RuleBaseConfiguration.setSequential(true), or set the
rulebase configuration property drools.sequential to true.
Sequential mode can fall back to a dynamic agenda by calling
setSequentialAgenda with
SequentialAgenda.DYNAMIC. You may also set the
"drools.sequential.agenda" property to "sequential" or "dynamic".
Drools has the concept of stateful or stateless sessions. We've already covered stateful sessions, which use the standard working memory that can be worked with iteratively over time. Stateless is a one-off execution of a working memory with a provided data set. It may return some results, with the session being disposed at the end, prohibiting further iterative interactions. You can think of stateless as treating a rule engine like a function call with optional return results.
In Drools 4 we supported these two paradigms but the way the user
interacted with them was different. StatelessSession used an execute(...)
method which would insert a collection of objects as facts.
StatefulSession didn't have this method, and insert used the more
traditional insert(...) method. The other issue was that the
StatelessSession did not return any results, so that users themselves had
to map globals to get results, and it wasn't possible to do anything
besides inserting objects; users could not start processes or execute
queries.
Drools 5.0 addresses all of these issues and more. The foundation
for this is the CommandExecutor interface, which both the
stateful and stateless interfaces extend, creating consistency and
ExecutionResults:


The CommandFactory allows for commands to be executed
on those sessions, the only difference being that the Stateless Knowledge
Session executes fireAllRules() at the end before disposing
the session. The currently supported commands are:
FireAllRules
GetGlobal
SetGlobal
InsertObject
InsertElements
Query
StartProcess
BatchExecution
InsertObject will insert a single object, with an
optional "out" identifier. InsertElements will iterate an
Iterable, inserting each of the elements. What this means is that a
Stateless Knowledge Session is no longer limited to just inserting
objects, it can now start processes or execute queries, and do this in any
order.
Example 4.35. Insert Command
StatelessKnowledgeSession ksession = kbase.newStatelessKnowledgeSession();

ExecutionResults bresults =

  ksession.execute( CommandFactory.newInsert( new Cheese( "stilton" ), "stilton_id" ) );

Stilton stilton = bresults.getValue( "stilton_id" );
The execute method always returns an ExecutionResults
instance, which allows access to any command results if they specify an
out identifier such as the "stilton_id" above.
Example 4.36. InsertElements Command
StatelessKnowledgeSession ksession = kbase.newStatelessKnowledgeSession();

Command cmd = CommandFactory.newInsertElements( Arrays.asList( Object[] {

                  new Cheese( "stilton" ),

                  new Cheese( "brie" ),

                  new Cheese( "cheddar" ),

              });

ExecutionResults bresults = ksession.execute( cmd );
The execute method only allows for a single command. That's where
BatchExecution comes in, which represents a composite
command, created from a list of commands. Now, execute will iterate over
the list and execute each command in turn. This means you can insert some
objects, start a process, call fireAllRules and execute a query, all in a
single execute(...) call, which is quite powerful.
As mentioned previosly, the Stateless Knowledge Session will execute
fireAllRules() automatically at the end. However the
keen-eyed reader probably has already noticed the
FireAllRules command and wondered how that works with a
StatelessKnowledgeSession. The FireAllRules command is
allowed, and using it will disable the automatic execution at the end;
think of using it as a sort of manual override function.
Commands support out identifiers. Any command that has an out identifier set on it will add its results to the returned ExecutionResults instance. Let's look at a simple example to see how this works.
Example 4.37. BatchExecution Command
StatelessKnowledgeSession ksession = kbase.newStatelessKnowledgeSession();


List cmds = new ArrayList();

cmds.add( CommandFactory.newInsertObject( new Cheese( "stilton", 1), "stilton") );

cmds.add( CommandFactory.newStartProcess( "process cheeses" ) );

cmds.add( CommandFactory.newQuery( "cheeses" ) );

ExecutionResults bresults = ksession.execute( CommandFactory.newBatchExecution( cmds ) );

Cheese stilton = ( Cheese ) bresults.getValue( "stilton" );

QueryResults qresults = ( QueryResults ) bresults.getValue( "cheeses" );
In the above example multiple commands are executed, two of which
populate the ExecutionResults. The query command defaults to
use the same identifier as the query name, but it can also be mapped to a
different identifier.
A custom XStream marshaller can be used with the Drools Pipeline to
achieve XML scripting, which is perfect for services. Here are two simple
XML samples, one for the BatchExecution and one for the
ExecutionResults.
Example 4.38. Simple BatchExecution XML
<batch-execution>

   <insert out-identifier='outStilton'>

      <org.drools.Cheese>

         <type>stilton</type>

         <price>25</price>

         <oldPrice>0</oldPrice>

      </org.drools.Cheese>

   </insert>

</batch-execution>
Example 4.39. Simple ExecutionResults XML
<execution-results>

   <result identifier='outStilton'>

      <org.drools.Cheese>

         <type>stilton</type>

         <oldPrice>25</oldPrice>

         <price>30</price>

      </org.drools.Cheese>

   </result>

</execution-results>
Spring and Camel, covered in the integrations book, facilitate declarative services.
Example 4.40. BatchExecution Marshalled to XML
<batch-execution>

  <insert out-identifier="stilton">

    <org.drools.Cheese>

      <type>stilton</type>

      <price>1</price>

      <oldPrice>0</oldPrice>

    </org.drools.Cheese>

  </insert>

  <query out-identifier='cheeses2' name='cheesesWithParams'>

    <string>stilton</string>

    <string>cheddar</string>

  </query>

</batch-execution>
The CommandExecutor returns an
ExecutionResults, and this is handled by the pipeline code
snippet as well. A similar output for the <batch-execution> XML
sample above would be:
Example 4.41. ExecutionResults Marshalled to XML
<execution-results>

  <result identifier="stilton">

    <org.drools.Cheese>

      <type>stilton</type>

      <price>2</price>

    </org.drools.Cheese>

  </result>

  <result identifier='cheeses2'>

    <query-results>

      <identifiers>

        <identifier>cheese</identifier>

      </identifiers>

      <row>

        <org.drools.Cheese>

          <type>cheddar</type>

          <price>2</price>

          <oldPrice>0</oldPrice>

        </org.drools.Cheese>

      </row>

      <row>

        <org.drools.Cheese>

          <type>cheddar</type>

          <price>1</price>

          <oldPrice>0</oldPrice>

        </org.drools.Cheese>

      </row>

    </query-results>

  </result>

</execution-results>
The BatchExecutionHelper provides a configured XStream
instance to support the marshalling of Batch Executions, where the
resulting XML can be used as a message format, as shown above. Configured
converters only exist for the commands supported via the Command Factory.
The user may add other converters for their user objects. This is very
useful for scripting stateless or stateful knowledge sessions, especially
when services are involved.
There is currently no XML schema to support schema validation. The
basic format is outlined here, and the drools-pipeline module has an
illustrative unit test in the XStreamBatchExecutionTest unit
test. The root element is <batch-execution> and it can contain zero
or more commands elements.
This contains a list of elements that represent commands, the supported commands is limited to those Commands provided by the Command Factory. The most basic of these is the <insert> element, which inserts objects. The contents of the insert element is the user object, as dictated by XStream.
Example 4.43. Insert
<batch-execution>

   <insert>

      ...<!-- any user object -->

   </insert>

</batch-execution>
The insert element features an "out-identifier" attribute, demanding that the inserted object will also be returned as part of the result payload.
Example 4.44. Insert with Out Identifier Command
<batch-execution>

   <insert out-identifier='userVar'>

      ...

   </insert>

</batch-execution>
It's also possible to insert a collection of objects using the
<insert-elements> element. This command does not support an
out-identifier. The org.domain.UserClass is just an
illustrative user object that XStream would serialize.
Example 4.45. Insert Elements command
<batch-execution>

   <insert-elements>

      <org.domain.UserClass>

         ...

      </org.domain.UserClass>

      <org.domain.UserClass>

         ...

      </org.domain.UserClass>

      <org.domain.UserClass>

         ...

      </org.domain.UserClass>

   </insert-elements>

</batch-execution>
Next, there is the <set-global> element, which
sets a global for the session.
Example 4.46. Insert Elements command
<batch-execution>

   <set-global identifier='userVar'>

      <org.domain.UserClass>

         ...

      </org.domain.UserClass>

   </set-global>

</batch-execution>
<set-global> also supports two other optional
attributes, out and out-identifier.
A true value for the boolean out will add the global to
the <batch-execution-results> payload, using the name
from the identifier attribute.
out-identifier works like out but
additionally allows you to override the identifier used in the
<batch-execution-results> payload.
Example 4.47. Set Global Command
<batch-execution>

   <set-global identifier='userVar1' out='true'>

      <org.domain.UserClass>

         ...

      </org.domain.UserClass>

   </set-global>

   <set-global identifier='userVar2' out-identifier='alternativeUserVar2'>

      <org.domain.UserClass>

         ...

      </org.domain.UserClass>

   </set-global>

</batch-execution>
There is also a <get-global> element, without
contents, with just an out-identifier attribute. (There
is no need for an out attribute because retrieving the
value is the sole purpose of a <get-global>
element.
Example 4.48. Get Global Command
<batch-execution>

   <get-global identifier='userVar1' />

   <get-global identifier='userVar2' out-identifier='alternativeUserVar2'/>

</batch-execution>
While the out attribute is useful in returning
specific instances as a result payload, we often wish to run actual
queries. Both parameter and parameterless queries are supported. The
name attribute is the name of the query to be called,
and the out-identifier is the identifier to be used for
the query results in the <execution-results>
payload.
Example 4.49. Query Command
<batch-execution>

   <query out-identifier='cheeses' name='cheeses'/>

   <query out-identifier='cheeses2' name='cheesesWithParams'>

      <string>stilton</string>

      <string>cheddar</string>

   </query>

</batch-execution>
The <start-process> command accepts optional
parameters. Other process related methods will be added later, like
interacting with work items.
Example 4.50. Start Process Command
<batch-execution>

   <startProcess processId='org.drools.actions'>

      <parameter identifier='person'>

         <org.drools.TestVariable>

            <name>John Doe</name>

         </org.drools.TestVariable>

      </parameter>

   </startProcess>

</batch-execution
Example 4.51. Signal Event Command
<signal-event process-instance-id='1' event-type='MyEvent'>

   <string>MyValue</string>

</signal-event>
Example 4.52. Complete Work Item Command
<complete-work-item id='" + workItem.getId() + "' >

   <result identifier='Result'>

      <string>SomeOtherString</string>

   </result>

</complete-work-item>
Support for more commands will be added over time.
The MarshallerFactory is used to marshal and unmarshal
Stateful Knowledge Sessions.

At the simplest the MarshallerFactory can be used as
follows:
Example 4.54. Simple Marshaller Example
// ksession is the StatefulKnowledgeSession

// kbase is the KnowledgeBase

ByteArrayOutputStream baos = new ByteArrayOutputStream();

Marshaller marshaller = MarshallerFactory.newMarshaller( kbase );

marshaller.marshall( baos, ksession );

baos.close();
However, with marshalling you need more flexibility when dealing
with referenced user data. To achieve this we have the
ObjectMarshallingStrategy interface. Two implementations are
provided, but users can implement their own. The two supplied strategies
are IdentityMarshallingStrategy and
SerializeMarshallingStrategy.
SerializeMarshallingStrategy is the default, as used in the
example above, and it just calls the Serializable or
Externalizable methods on a user instance.
IdentityMarshallingStrategy instead creates an integer id for
each user object and stores them in a Map, while the id is written to the
stream. When unmarshalling it accesses the
IdentityMarshallingStrategy map to retrieve the instance.
This means that if you use the IdentityMarshallingStrategy,
it is stateful for the life of the Marshaller instance and will create ids
and keep references to all objects that it attempts to marshal. Below is
he code to use an Identity Marshalling Strategy.
Example 4.55. IdentityMarshallingStrategy
ByteArrayOutputStream baos = new ByteArrayOutputStream();

ObjectMarshallingStrategy oms = MarshallerFactory.newIdentityMarshallingStrategy()

Marshaller marshaller =

  MarshallerFactory.newMarshaller( kbase, new ObjectMarshallingStrategy[]{ oms } );

marshaller.marshall( baos, ksession );

baos.close();
For added flexability we can't assume that a single strategy is
suitable. Therefore we have added the
ObjectMarshallingStrategyAcceptor interface that each Object
Marshalling Strategy contains. The Marshaller has a chain of strategies,
and when it attempts to read or write a user object it iterates the
strategies asking if they accept responsability for marshalling the user
object. One of the provided implementations is
ClassFilterAcceptor. This allows strings and wild cards to be
used to match class names. The default is "*.*", so in the above example
the Identity Marshalling Strategy is used which has a default "*.*"
acceptor.
Assuming that we want to serialize all classes except for one given package, where we will use identity lookup, we could do the following:
Example 4.56. IdentityMarshallingStrategy with Acceptor
ByteArrayOutputStream baos = new ByteArrayOutputStream();

ObjectMarshallingStrategyAcceptor identityAcceptor =

  MarshallerFactory.newClassFilterAcceptor( new String[] { "org.domain.pkg1.*" } );

ObjectMarshallingStrategy identityStrategy =

  MarshallerFactory.newIdentityMarshallingStrategy( identityAcceptor );

ObjectMarshallingStrategy sms = MarshallerFactory.newSerializeMarshallingStrategy();

Marshaller marshaller =

  MarshallerFactory.newMarshaller( kbase,

                                   new ObjectMarshallingStrategy[]{ identityStrategy, sms } );

marshaller.marshall( baos, ksession );

baos.close();
Note that the acceptance checking order is in the natural order of the supplied array.
Longterm out of the box persistence with Java Persistence API (JPA) is possible with Drools. You will need to have some implementation of the Java Transaction API (JTA) installed. For development purposes we recommend the Bitronix Transaction Manager, as it's simple to set up and works embedded, but for production use JBoss Transactions is recommended.
Example 4.57. Simple example using transactions
Environment env = KnowledgeBaseFactory.newEnvironment();

env.set( EnvironmentName.ENTITY_MANAGER_FACTORY,

         Persistence.createEntityManagerFactory( "emf-name" ) );

env.set( EnvironmentName.TRANSACTION_MANAGER,

         TransactionManagerServices.getTransactionManager() );


// KnowledgeSessionConfiguration may be null, and a default will be used

StatefulKnowledgeSession ksession =

  JPAKnowledgeService.newStatefulKnowledgeSession( kbase, null, env );

int sessionId = ksession.getId();


UserTransaction ut =

  (UserTransaction) new InitialContext().lookup( "java:comp/UserTransaction" );

ut.begin();

ksession.insert( data1 );

ksession.insert( data2 );

ksession.startProcess( "process1" );

ut.commit();
To use a JPA, the Environment must be set with both the
EntityManagerFactory and the TransactionManager.
If rollback occurs the ksession state is also rolled back, so you can
continue to use it after a rollback. To load a previously persisted
Stateful Knowledge Session you'll need the id, as shown below:
Example 4.58. Loading a StatefulKnowledgeSession
StatefulKnowledgeSession ksession =

  JPAKnowledgeService.loadStatefulKnowledgeSession( sessionId, kbase, null, env );
To enable persistence several classes must be added to your persistence.xml, as in the example below:
Example 4.59. Configuring JPA
<persistence-unit name="org.drools.persistence.jpa" transaction-type="JTA">

   <provider>org.hibernate.ejb.HibernatePersistence</provider>

   <jta-data-source>jdbc/BitronixJTADataSource</jta-data-source>

   <class>org.drools.persistence.session.SessionInfo</class>

   <class>org.drools.persistence.processinstance.ProcessInstanceInfo</class>

   <class>org.drools.persistence.processinstance.ProcessInstanceEventInfo</class>

   <class>org.drools.persistence.processinstance.WorkItemInfo</class>

   <properties>

         <property name="hibernate.dialect" value="org.hibernate.dialect.H2Dialect"/>

         <property name="hibernate.max_fetch_depth" value="3"/>

         <property name="hibernate.hbm2ddl.auto" value="update" />

         <property name="hibernate.show_sql" value="true" />

         <property name="hibernate.transaction.manager_lookup_class"

                      value="org.hibernate.transaction.BTMTransactionManagerLookup" />

   </properties>

</persistence-unit>
The jdbc JTA data source would have to be configured first. Bitronix provides a number of ways of doing this, and its documentation should be contsulted for details. For a quick start, here is the programmatic approach:
Example 4.60. Configuring JTA DataSource
PoolingDataSource ds = new PoolingDataSource();

ds.setUniqueName( "jdbc/BitronixJTADataSource" );

ds.setClassName( "org.h2.jdbcx.JdbcDataSource" );

ds.setMaxPoolSize( 3 );

ds.setAllowLocalTransactions( true );

ds.getDriverProperties().put( "user", "sa" );

ds.getDriverProperties().put( "password", "sasa" );

ds.getDriverProperties().put( "URL", "jdbc:h2:mem:mydb" );

ds.init();
Bitronix also provides a simple embedded JNDI service, ideal for testing. To use it add a jndi.properties file to your META-INF and add the following line to it:
Example 4.61. JNDI properties
java.naming.factory.initial=bitronix.tm.jndi.BitronixInitialContextFactory
Drools Clips is an alpha level research project to provide a Clips like front end ot Drools. As of Drools 5.2 this module as stopped working, we will try and fix for 5.3.
Deftemplates are working, the knowledge base handles multiple name spaces and you can attach the knoweldge base to the session for interative building, to provide a more "shell" like environment suitable for Clips.
deftemplate
defrule
deffunction
and/or/not/exists/test conditional elements
Literal, Variable, Return Value and Predicate field constarints

This project is very early stages and in need of love. If you want to help, open up eclipse import api, core, compiler and clips and you should be good to go. The unit tests should be self explanatory.
Drools has a "native" rule language.
This format is very light in terms of punctuation, and supports
natural and domain specific languages via "expanders" that allow the
language to morph to your problem domain. This chapter is mostly concerted
with this native rule format. The diagrams used to present the syntax are
known as "railroad" diagrams, and they are basically flow charts for the
language terms. The
technically very keen may also refer to DRL.g which is
the Antlr3
grammar for the rule language. If you use the Rule Workbench, a lot of the
rule structure is done for you with content assistance, for example, type
"ru" and press ctrl+space, and it will build the rule structure for
you.
A rule file is typically a file with a .drl extension. In a DRL file you can have multiple rules, queries and functions, as well as some resource declarations like imports, globals and attributes that are assigned and used by your rules and queries. However, you are also able to spread your rules across multiple rule files (in that case, the extension .rule is suggested, but not required) - spreading rules across files can help with managing large numbers of rules. A DRL file is simply a text file.
The overall structure of a rule file is:
The order in which the elements are declared is not important, except for the package name that, if declared, must be the first element in the rules file. All elements are optional, so you will use only those you need. We will discuss each of them in the following sections.
For the inpatients, just as an early view, a rule has the following rough structure:
rule"name"attributeswhenLHSthenRHSend
It's really that simple. Mostly punctuation is not needed, even the double quotes for "name" are optional, as are newlines. Attributes are simple (always optional) hints to how the rule should behave. LHS is the conditional parts of the rule, which follows a certain syntax which is covered below. RHS is basically a block that allows dialect specific semantic code to be executed.
It is important to note that white space is not important, except in the case of domain specific languages, where lines are processed one by one and spaces may be significant to the domain language.
Drools 5 introduces the concept of hard and soft keywords.
Hard keywords are reserved, you cannot use any hard keyword when naming your domain objects, properties, methods, functions and other elements that are used in the rule text.
Here is the list of hard keywords that must be avoided as identifiers when writing rules:
truefalsenull
Soft keywords are just recognized in their context, enabling you to use these words in any other place if you wish, although, it is still recommended to avoid them, to avoid confusions, if possible. Here is a list of the soft keywords:
lock-on-activedate-effectivedate-expiresno-loopauto-focusactivation-groupagenda-groupruleflow-groupentry-pointdurationpackageimportdialectsalienceenabledattributesruleextendwhen
then
templatequerydeclarefunctionglobalevalnotinorandexistsforallaccumulate
collect
from
actionreverseresultendover
init
Of course, you can have these (hard and soft) words as part of a method name in camel case, like notSomething() or accumulateSomething() - there are no issues with that scenario.
Although the 3 hard keywords above are unlikely to be used in your existing domain models, if you absolutely need to use them as identifiers instead of keywords, the DRL language provides the ability to escape hard keywords on rule text. To escape a word, simply enclose it in grave accents, like this:
Holiday( `true` == "yes" ) // please note that Drools will resolve that reference to the method Holiday.isTrue()
Comments are sections of text that are ignored by the rule engine. They are stripped out when they are encountered, except inside semantic code blocks, like the RHS of a rule.

To create single line comments, you can use either '#' or '//'. The parser will ignore anything in the line after the comment symbol. Example:
rule "Testing Comments"
when
    # this is a single line comment
    // this is also a single line comment
    eval( true ) # this is a comment in the same line of a pattern
then
    // this is a comment inside a semantic code block
    # this is another comment in a semantic code block
end

Multi-line comments are used to comment blocks of text, both in and outside semantic code blocks. Example:
rule "Test Multi-line Comments"
when
    /* this is a multi-line comment
       in the left hand side of a rule */
    eval( true )
then
    /* and this is a multi-line comment
       in the right hand side of a rule */
end Drools 5 introduces standardized error messages. This standardization aims to help users to find and resolve problems in a easier and faster way. In this section you will learn how to identify and interpret those error messages, and you will also receive some tips on how to solve the problems associated with them.
The standardization includes the error message format and to better explain this format, let's use the following example:

1st Block: This area identifies the error code.
2nd Block: Line and column information.
3rd Block: Some text describing the problem.
4th Block: This is the first context. Usually indicates the rule, function, template or query where the error occurred. This block is not mandatory.
5th Block: Identifies the pattern where the error occurred. This block is not mandatory.
Indicates the most common errors, where the parser came to a decision point but couldn't identify an alternative. Here are some examples:
The above example generates this message:
[ERR 101] Line 4:4 no viable alternative at input 'exits' in rule one
At first glance this seems to be valid syntax, but it is not (exits != exists). Let's take a look at next example:
Example 5.3.
1: package org.drools;
2: rule
3:   when
4:     Object()
5:   then
6:     System.out.println("A RHS");
7: end
Now the above code generates this message:
[ERR 101] Line 3:2 no viable alternative at input 'WHEN'
This message means that the parser encountered the token WHEN, actually a hard keyword, but it's in the wrong place since the the rule name is missing.
The error "no viable alternative" also occurs when you make a simple lexical mistake. Here is a sample of a lexical problem:
The above code misses to close the quotes and because of this the parser generates this error message:
[ERR 101] Line 0:-1 no viable alternative at input '<eof>' in rule simple_rule in pattern Student
Note
Usually the Line and Column information are accurate, but in some cases (like unclosed quotes), the parser generates a 0:-1 position. In this case you should check whether you didn't forget to close quotes, apostrophes or parentheses.
This error indicates that the parser was looking for a particular symbol that it didn’t find at the current input position. Here are some samples:
The above example generates this message:
[ERR 102] Line 0:-1 mismatched input '<eof>' expecting ')' in rule simple_rule in pattern Bar
To fix this problem, it is necessary to complete the rule statement.
Note
Usually when you get a 0:-1 position, it means that parser reached the end of source.
The following code generates more than one error message:
Example 5.6.
1: package org.drools;
2:
3: rule "Avoid NPE on wrong syntax"
4:   when
5:     not( Cheese( ( type == "stilton", price == 10 ) || ( type == "brie", price == 15 ) ) from $cheeseList )
6:   then
7:     System.out.println("OK");
8: end
These are the errors associated with this source:
[ERR 102] Line 5:36 mismatched input ',' expecting ')' in rule "Avoid NPE on wrong syntax" in pattern Cheese
[ERR 101] Line 5:57 no viable alternative at input 'type' in rule "Avoid NPE on wrong syntax"
[ERR 102] Line 5:106 mismatched input ')' expecting 'then' in rule "Avoid NPE on wrong syntax"
Note that the second problem is related to the first. To fix it, just replace the commas (',') by AND operator ('&&').
Note
In some situations you can get more than one error message. Try to fix one by one, starting at the first one. Some error messages are generated merely as consequences of other errors.
A validating semantic predicate evaluated to false. Usually these semantic predicates are used to identify soft keywords. This sample shows exactly this situation:
Example 5.7.
 1: package nesting;
 2: dialect "mvel"
 3:
 4: import org.drools.Person
 5: import org.drools.Address
 6:
 7: fdsfdsfds
 8:
 9: rule "test something"
10:   when
11:     p: Person( name=="Michael" )
12:   then
13:     p.name = "other";
14:     System.out.println(p.name);
15: end
With this sample, we get this error message:
[ERR 103] Line 7:0 rule 'rule_key' failed predicate: {(validateIdentifierKey(DroolsSoftKeywords.RULE))}? in rule
The fdsfdsfds text is invalid and
the parser couldn’t identify it as the soft keyword
rule.
Note
This error is very similar to 102: Mismatched input, but usually involves soft keywords.
This error is associated with the eval clause,
where its expression may not be terminated with a semicolon. Check this
example:
Due to the trailing semicolon within eval, we get this error message:
[ERR 104] Line 3:4 trailing semi-colon not allowed in rule simple_rule
This problem is simple to fix: just remove the semi-colon.
The recognizer came to a subrule in the grammar that must match an alternative at least once, but the subrule did not match anything. Simply put: the parser has entered a branch from where there is no way out. This example illustrates it:
This is the message associated to the above sample:
[ERR 105] Line 2:2 required (...)+ loop did not match anything at input 'aa' in template test_error
To fix this problem it is necessary to remove the numeric value as it is neither a valid data type which might begin a new template slot nor a possible start for any other rule file construct.
A package is a collection of rules and other related constructs, such as imports and globals. The package members are typically related to each other - perhaps HR rules, for instance. A package represents a namespace, which ideally is kept unique for a given grouping of rules. The package name itself is the namespace, and is not related to files or folders in any way.
It is possible to assemble rules from multiple rule sources, and have one top level package configuration that all the rules are kept under (when the rules are assembled). Although, it is not possible to merge into the same package resources declared under different names. A single Rulebase may, however, contain multiple packages built on it. A common structure is to have all the rules for a package in the same file as the package declaration (so that is it entirely self-contained).
The following railroad diagram shows all the components that may make
up a package. Note that a package must have a namespace and be declared
using standard Java conventions for package names; i.e., no spaces, unlike
rule names which allow spaces. In terms of the order of elements, they can
appear in any order in the rule file, with the exception of the package
statement, which must be at the top of the file. In all cases, the semicolons are
optional.

Notice that any rule atttribute (as described the section Rule Attributes) may also be written at package level, superseding the attribute's default value. The modified default may still be replaced by an attribute setting within a rule.

Import statements work like import statements in Java. You need to
specify the fully qualified paths and type names for any objects you want
to use in the rules. Drools automatically imports classes from the
Java package of the same name, and also from the package
java.lang.

With global you define global variables. They are used to make
application objects available to the rules. Typically, they are used
to provide data or services that the rules use, especially application
services used in rule consequences, and to return data from the rules,
like logs or values added in rule consequences, or for the rules to
interact with the application, doing callbacks. Globals are not
inserted into the Working Memory, and therefore a global should never be
used to establish conditions in rules except when it has a
constant immutable value. The engine cannot be notified about value
changes of globals and does not track their changes. Incorrect use
of globals in constraints may yield surprising results - surprising
in a bad way.
If multiple packages declare globals with the same identifier they must be of the same type and all of them will reference the same global value.
In order to use globals you must:
Declare your global variable in your rules file and use it in rules. Example:
global java.util.List myGlobalList;

rule "Using a global"
when
    eval( true )
then
    myGlobalList.add( "Hello World" );
end
Set the global value on your working memory. It is a best practice to set all global values before asserting any fact to the working memory. Example:
List list = new ArrayList();

WorkingMemory wm = rulebase.newStatefulSession();

wm.setGlobal( "myGlobalList", list );
Note that these are just named instances of objects that you pass in
from your application to the working memory. This means you can pass in
any object you want: you could pass in a service locator, or perhaps a
service itself. With the new from element it is now common to pass a
Hibernate session as a global, to allow from to pull data from a named
Hibernate query.
One example may be an instance of a Email service. In your integration code that is calling the rule engine, you obtain your emailService object, and then set it in the working memory. In the DRL, you declare that you have a global of type EmailService, and give it the name "email". Then in your rule consequences, you can use things like email.sendSMS(number, message).
Globals are not designed to share data between rules and they should never be used for that purpose. Rules always reason and react to the working memory state, so if you want to pass data from rule to rule, assert the data as facts into the working memory.
It is strongly discouraged to set or change a global value from inside your rules. We recommend to you always set the value from your application using the working memory interface.

Functions are a way to put semantic code in your rule source file, as
opposed to in normal Java classes. They can't do anything more than what you
can do with helper classes. (In fact, the compiler generates the helper class
for you behind the scenes.) The main advantage of using functions in a rule
is that you can keep the logic all in one place, and you can change the
functions as needed (which can be a good or a bad thing). Functions are most
useful for invoking actions on the consequence (then) part of a rule,
especially if that particular action is used over and over again, perhaps
with only differing parameters for each rule.
A typical function declaration looks like:
function String hello(String name) {
    return "Hello "+name+"!";
}
Note that the function keyword is used, even though its not really
part of Java. Parameters to the function are defined as for a method, and
you don't have to have parameters if they are not needed. The return type
is defined just like in a regular method.
Alternatively, you could use a static method in a helper class,
e.g., Foo.hello(). Drools supports the use of
function imports, so all you would need to do is:
import function my.package.Foo.hello
Irrespective of the way the function is defined or imported, you use a function by calling it by its name, in the consequence or inside a semantic code block. Example:
rule "using a static function"
when
    eval( true )
then
    System.out.println( hello( "Bob" ) );
end


Type declarations have two main goals in the rules engine: to allow the declaration of new types, and to allow the declaration of metadata for types.
Declaring new types: Drools works out of the box with plain Java objects as facts. Sometimes, however, users may want to define the model directly to the rules engine, without worrying about creating models in a lower level language like Java. At other times, there is a domain model already built, but eventually the user wants or needs to complement this model with additional entities that are used mainly during the reasoning process.
Declaring metadata: facts may have meta information associated to them. Examples of meta information include any kind of data that is not represented by the fact attributes and is consistent among all instances of that fact type. This meta information may be queried at runtime by the engine and used in the reasoning process.
To declare a new type, all you need to do is use the keyword
declare, followed by the list of fields, and the
keyword end.
Example 5.10. Declaring a new fact type: Address
declare Address
   number : int
   streetName : String
   city : String
end
The previous example declares a new fact type called
Address. This fact type will have three attributes:
number, streetName and city. Each
attribute has a type that can be any valid Java type, including any other
class created by the user or even other fact types previously
declared.
For instance, we may want to declare another fact type
Person:
Example 5.11. declaring a new fact type: Person
declare Person
    name : String
    dateOfBirth : java.util.Date
    address : Address
end
As we can see on the previous example, dateOfBirth is
of type java.util.Date, from the Java API, while
address is of the previously defined fact type
Address.
You may avoid having to write the fully qualified name of a class
every time you write it by using the import clause, as
previously discussed.
Example 5.12. Avoiding the need to use fully qualified class names by using import
import java.util.Date

declare Person
    name : String
    dateOfBirth : Date
    address : Address
end
When you declare a new fact type, Drools will, at compile time, generate bytecode that implements a Java class representing the fact type. The generated Java class will be a one-to-one Java Bean mapping of the type definition. So, for the previous example, the generated Java class would be:
Example 5.13. generated Java class for the previous Person fact type declaration
public class Person implements Serializable {

    private String name;

    private java.util.Date dateOfBirth;

    private Address address;


    // empty constructor

    public Person() {...}


    // constructor with all fields

    public Person( String name, Date dateOfBirth, Address address ) {...}


    // if keys are defined, constructor with keys

    public Person( ...keys... ) {...}


    // getters and setters

    // equals/hashCode

    // toString

}
Since the generated class is a simple Java class, it can be used transparently in the rules, like any other fact.
Example 5.14. Using the declared types in rules
rule "Using a declared Type"
when
    $p : Person( name == "Bob" )
then
    // Insert Mark, who is Bob's mate.
    Person mark = new Person();
    mark.setName("Mark");
    insert( mark );
end
Metadata may be assigned to several different constructions in Drools: fact types, fact attributes and rules. Drools uses the at sign ('@') to introduce metadata, and it always uses the form:
@metadata_key( metadata_value )
The parenthesized metadata_value is optional.
For instance, if you want to declare a metadata attribute like
author, whose value is Bob, you could
simply write:
Drools allows the declaration of any arbitrary metadata attribute, but some will have special meaning to the engine, while others are simply available for querying at runtime. Drools allows the declaration of metadata both for fact types and for fact attributes. Any metadata that is declared before the attributes of a fact type are assigned to the fact type, while metadata declared after an attribute are assigned to that particular attribute.
Example 5.16. Declaring metadata attributes for fact types and attributes
import java.util.Date

declare Person
    @author( Bob )
    @dateOfCreation( 01-Feb-2009 )

    name : String @key @maxLength( 30 )
    dateOfBirth : Date
    address : Address
end
In the previous example, there are two metadata items declared for
the fact type (@author and @dateOfCreation) and
two more defined for the name attribute (@key and
@maxLength). Please note that the @key metadata
has no required value, and so the parentheses and the value were
omitted.:
@position can be used to declare the position of a field, overriding the default declared order. This is used for positional constraints in patterns.
declare Cheese
    name : String @position(1)
    shop : String @position(2)
    price : int @position(0)
end
Some annotations have predefined semantics that are interpreted by the engine. The following is a list of some of these predefined annotations and their meaning.
By default all type declarations are compiled with type safety enabled; @typesafe( false ) provides a means to override this behaviour by permitting a fall-back, to type unsafe evaluation where all constraints are generated as MVEL constraints and executed dynamically. This can be important when dealing with collections that do not have any generics or mixed type collections.
Facts that implement support for property changes as defined in the Javabean(tm) spec, now can be annotated so that the engine register itself to listen for changes on fact properties. The boolean parameter that was used in the insert() method in the Drools 4 API is deprecated and does not exist in the drools-api module.
As noted before, Drools also supports annotations in type attributes. Here is a list of predefined attribute annotations.
Declaring an attribute as a key attribute has 2 major effects on generated types:
The attribute will be used as a key identifier for the type, and as so, the generated class will implement the equals() and hashCode() methods taking the attribute into account when comparing instances of this type.
Drools will generate a constructor using all the key attributes as parameters.
For instance:
Example 5.18. example of @key declarations for a type
declare Person
    firstName : String @key
    lastName : String @key
    age : int
end
For the previous example, Drools will generate equals() and hashCode() methods that will check the firstName and lastName attributes to determine if two instances of Person are equal to each other, but will not check the age attribute. It will also generate a constructutor taking firstName and lastName as parameters, allowing one to create instances with a code like this:
Example 5.19. creating an instance using the key constructor
Person person = new Person( "John", "Doe" );
Patterns support positional arguments on type declarations.
Positional arguments are ones where you don't need to specify the field name, as the position maps to a known named field. i.e. Person( name == "mark" ) can be rewritten as Person( "mark"; ). The semicolon ';' is important so that the engine knows that everything before it is a positional argument. Otherwise we might assume it was a boolean expression, which is how it could be interpretted after the semicolon. You can mix positional and named arguments on a pattern by using the semicolon ';' to separate them. Any variables used in a positional that have not yet been bound will be bound to the field that maps to that position.
declare Cheese
    name : String
    shop : String
    price : int
end
The default order is the declared order, but this can be overiden using @position
declare Cheese
    name : String @position(1)
    shop : String @position(2)
    price : int @position(0)
end
The @Position annotation, in the org.drools.definition.type package, can be used to annotate original pojos on the classpath. Currently only fields on classes can be annotated. Inheritence of classes is supported, but not interfaces of methods yet.
Example patterns, with two constraints and a binding. Remember semicolon ';' is used to differentiate the positional section from the named argument section. Variables and literals and expressions using just literals are supported in posional arguments, but not variables.
Cheese( "stilton", "Cheese Shop", p; )
Cheese( "stilton", "Cheese Shop"; p : price )
Cheese( "stilton"; shop == "Cheese Shop", p : price )
Cheese( name == "stilton"; shop == "Cheese Shop", p : price )
Drools allows the declaration of metadata attributes for existing types in the same way as when declaring metadata attributes for new fact types. The only difference is that there are no fields in that declaration.
For instance, if there is a class org.drools.examples.Person, and one wants to declare metadata for it, it's possible to write the following code:
Example 5.20. Declaring metadata for an existing type
import org.drools.examples.Person

declare Person
    @author( Bob )
    @dateOfCreation( 01-Feb-2009 )
end
Instead of using the import, it is also possible to reference the class by its fully qualified name, but since the class will also be referenced in the rules, it is usually shorter to add the import and use the short class name everywhere.
Example 5.21. Declaring metadata using the fully qualified class name
declare org.drools.examples.Person
    @author( Bob )
    @dateOfCreation( 01-Feb-2009 )
end
Generate constructors with parameters for declared types.
Example: for a declared type like the following:
declare Person
    firstName : String @key
    lastName : String @key
    age : int
end
The compiler will implicitly generate 3 constructors: one without parameters, one with the @key fields, and one with all fields.
Person() // parameterless constructor
Person( String firstName, String lastName )
Person( String firstName, String lastName, int age )
@typesafe( <boolean>) has been added to type declarations. By default all type declarations are compiled with type safety enabled; @typesafe( false ) provides a means to override this behaviour by permitting a fall-back, to type unsafe evaluation where all constraints are generated as MVEL constraints and executed dynamically. This can be important when dealing with collections that do not have any generics or mixed type collections.
Declared types are usually used inside rules files, while Java models are used when sharing the model between rules and applications. Although, sometimes, the application may need to access and handle facts from the declared types, especially when the application is wrapping the rules engine and providing higher level, domain specific user interfaces for rules management.
In such cases, the generated classes can be handled as usual with the Java Reflection API, but, as we know, that usually requires a lot of work for small results. Therefore, Drools provides a simplified API for the most common fact handling the application may want to do.
The first important thing to realize is that a declared fact will
belong to the package where it was declared. So, for instance, in the
example below, Person will belong to the
org.drools.examples package, and so the fully qualified name
of the generated class will be
org.drools.examples.Person.
Example 5.22. Declaring a type in the org.drools.examples package
package org.drools.examples

import java.util.Date

declare Person
    name : String
    dateOfBirth : Date
    address : Address
end
Declared types, as discussed previously, are generated at knowledge base compilation time, i.e., the application will only have access to them at application run time. Therefore, these classes are not available for direct reference from the application.
Drools then provides an interface through which users can handle
declared types from the application code:
org.drools.definition.type.FactType. Through this interface,
the user can instantiate, read and write fields in the declared fact
types.
Example 5.23. Handling declared fact types through the API
// get a reference to a knowledge base with a declared type:
KnowledgeBase kbase = ...

// get the declared FactType
FactType personType = kbase.getFactType( "org.drools.examples",
                                         "Person" );

// handle the type as necessary:
// create instances:
Object bob = personType.newInstance();

// set attributes values
personType.set( bob,
                "name",
                "Bob" );
personType.set( bob,
                "age",
                42 );

// insert fact into a session
StatefulKnowledgeSession ksession = ...
ksession.insert( bob );
ksession.fireAllRules();

// read attributes
String name = personType.get( bob, "name" );
int age = personType.get( bob, "age" );
The API also includes other helpful methods, like setting all the attributes at once, reading values from a Map, or reading all attributes at once, into a Map.
Although the API is similar to Java reflection (yet much simpler to use), it does not use reflection underneath, relying on much more performant accessors implemented with generated bytecode.
Type declarations now support 'extends' keyword for inheritance
In order to extend a type declared in Java by a DRL declared subtype, repeat the supertype in a declare statement without any fields.
import org.people.Person

declare Person
end

declare Student extends Person
    school : String
end

declare LongTermStudent extends Student
    years : int
    course : String
end
A rule specifies that when a particular set of conditions occur, specified in the Left Hand Side (LHS), then do what queryis specified as a list of actions in the Right Hand Side (RHS). A common question from users is "Why use when instead of if?" "When" was chosen over "if" because "if" is normally part of a procedural execution flow, where, at a specific point in time, a condition is to be checked. In contrast, "when" indicates that the condition evaluation is not tied to a specific evaluation sequence or point in time, but that it happens continually, at any time during the life time of the engine; whenever the condition is met, the actions are executed.
A rule must have a name, unique within its rule package. If you define a rule twice in the same DRL it produces an error while loading. If you add a DRL that includes a rule name already in the package, it replaces the previous rule. If a rule name is to have spaces, then it will need to be enclosed in double quotes (it is best to always use double quotes).
Attributes - described below - are optional. They are best written one per line.
The LHS of the rule follows the when keyword
(ideally on a new line), similarly the RHS follows the
then keyword (again, ideally on a newline). The rule is
terminated by the keyword end. Rules cannot be
nested.
Example 5.24. Rule Syntax Overview
rule "<name>"
    <attribute>*
when
    <conditional element>*
then
    <action>*
end
Example 5.25. A simple rule
rule "Approve if not rejected"
  salience -100
  agenda-group "approval"
    when
        not Rejection()
        p : Policy(approved == false, policyState:status)
        exists Driver(age > 25)
        Process(status == policyState)
    then
        log("APPROVED: due to no objections.");
        p.setApproved(true);
endRule attributes provide a declarative way to influence the behavior of the rule. Some are quite simple, while others are part of complex subsystems such as ruleflow. To get the most from Drools you should make sure you have a proper understanding of each attribute.

no-loopdefault value:
falsetype: Boolean
When a rule's consequence modifies a fact it may cause the rule to activate again, causing an infinite loop. Setting no-loop to true will skip the creation of another Activation for the rule with the current set of facts.
ruleflow-groupdefault value: N/A
type: String
Ruleflow is a Drools feature that lets you exercise control over the firing of rules. Rules that are assembled by the same ruleflow-group identifier fire only when their group is active.
lock-on-activedefault value:
falsetype: Boolean
Whenever a ruleflow-group becomes active or an agenda-group receives the focus, any rule within that group that has lock-on-active set to true will not be activated any more; irrespective of the origin of the update, the activation of a matching rule is discarded. This is a stronger version of no-loop, because the change could now be caused not only by the rule itself. It's ideal for calculation rules where you have a number of rules that modify a fact and you don't want any rule re-matching and firing again. Only when the ruleflow-group is no longer active or the agenda-group loses the focus those rules with lock-on-active set to true become eligible again for their activations to be placed onto the agenda.
saliencedefault value:
0type: integer
Each rule has an integer salience attribute which defaults to zero and can be negative or positive. Salience is a form of priority where rules with higher salience values are given higher priority when ordered in the Activation queue.
Drools also supports dynamic salience where you can use an expression involving bound variables.
Example 5.26. Dynamic Salience
rule "Fire in rank order 1,2,.." salience( -$rank ) when Element( $rank : rank,... ) then ... endagenda-groupdefault value: MAIN
type: String
Agenda groups allow the user to partition the Agenda providing more execution control. Only rules in the agenda group that has acquired the focus are allowed to fire.
auto-focusdefault value:
falsetype: Boolean
When a rule is activated where the
auto-focusvalue is true and the rule's agenda group does not have focus yet, then it is given focus, allowing the rule to potentially fire.activation-groupdefault value: N/A
type: String
Rules that belong to the same activation-group, identified by this attribute's string value, will only fire exclusively. In other words, the first rule in an activation-group to fire will cancel the other rules' activations, i.e., stop them from firing.
Note: This used to be called Xor group, but technically it's not quite an Xor. You may still hear people mention Xor group; just swap that term in your mind with activation-group.
dialectdefault value: as specified by the package
type: String
possible values: "java" or "mvel"
The dialect species the language to be used for any code expressions in the LHS or the RHS code block. Currently two dialects are available, Java and MVEL. While the dialect can be specified at the package level, this attribute allows the package definition to be overridden for a rule.
date-effectivedefault value: N/A
type: String, containing a date and time definition
A rule can only activate if the current date and time is after date-effective attribute.
date-expiresdefault value: N/A
type: String, containing a date and time definition
A rule cannot activate if the current date and time is after the date-expires attribute.
durationdefault value: no default value
type: long
The duration dictates that the rule will fire after a specified duration, if it is still true.
Rules now suport both interval and cron based timers, which replace the now deprecated duration attribute.
Example 5.28. Sample timer attribute uses
timer ( int: <initial delay> <repeat interval>? )

timer ( int: 30s )

timer ( int: 30s 5m )


timer ( cron: <cron expression> )

timer ( cron:* 0/15 * * * ? )
Interval (indicated by "int:") timers follow the semantics of java.util.Timer objects, with an initial delay and an optional repeat interval. Cron (indicated by "cron:") timers follow standard Unix cron expressions:
Example 5.29. A Cron Example
rule "Send SMS every 15 minutes"

    timer (cron:* 0/15 * * * ?)

when

    $a : Alarm( on == true )

then

    channels[ "sms" ].insert( new Sms( $a.mobileNumber, "The alarm is still on" );

end
Calendars are used to control when rules can fire. The Calendar API is modelled on Quartz:
Example 5.30. Adapting a Quartz Calendar
Calendar weekDayCal = QuartzHelper.quartzCalendarAdapter(org.quartz.Calendar quartzCal)
Calendars are registered with the StatefulKnowledgeSession:
They can be used in conjunction with normal rules and rules including timers. The rule attribute "calendars" may contain one or more comma-separated calendar names written as string literals.
Example 5.32. Using Calendars and Timers together
rule "weekdays are high priority"

   calendars "weekday"

   timer (int:0 1h)

when

    Alarm()

then

    send( "priority high - we have an alarm );

end


rule "weekend are low priority"

   calendars "weekend"

   timer (int:0 4h)

when

    Alarm()

then

    send( "priority low - we have an alarm );

end
The Left Hand Side (LHS) is a common name for the conditional part of the rule. It consists of zero or more Conditional Elements. If the LHS is empty, it will be considered as a condition element that is always true and it will be activated once, when a new WorkingMemory session is created.

Example 5.33. Rule without a Conditional Element
rule "no CEs"
when
    // empty
then
    ... // actions (executed once)
end

# The above rule is internally rewritten as:

rule "eval(true)"
when
    eval( true )
then
    ... // actions (executed once)
end
Conditional elements work on one or more
patterns (which are described below). The most
common conditional element is "and". Therefore it is
implicit when you have multiple patterns in the LHS of a rule that are
not connected in any way:
Example 5.34. Implicit and
rule "2 unconnected patterns"
when
    Pattern1()
    Pattern2()
then
    ... // actions
end

# The above rule is internally rewritten as:

rule "2 and connected patterns"
when
    Pattern1()
    and Pattern2()
then
    ... // actions
end
Note
An "and" cannot have a leading declaration
binding (unlike for example or). This is obvious,
since a declaration can only reference a single fact at a time, and
when the "and" is satisfied it matches both facts -
so which fact would the declaration bind to?
// Compile error
$person : (Person( name == "Romeo" ) and Person( name == "Juliet"))
A pattern element is the most important Conditional Element. It can potentially match on each fact that is inserted in the working memory.
A pattern contains of zero or more constraints and has an optional pattern binding. The railroad diagram below shows the syntax for this.

In its simplest form, with no constraints, a pattern matches
against a fact of the given type. In the following case the type is
Cheese, which means that the pattern will match against
all Person objects in the Working Memory:
Person()
The type need not be the actual class of some fact object. Patterns may refer to superclasses or even interfaces, thereby potentially matching facts from many different classes.
Object() // matches all objects in the working memory
Inside of the pattern parenthesis is where all the action happens: it defines the constraints for that pattern. For example, with a age related constraint:
Person( age == 100 )
Note
For backwards compatibility reasons it's allowed to suffix
patterns with the ; character. But it is not
recommended to do that.
For referring to the matched object, use a pattern binding
variable such as $p.
Example 5.35. Pattern with a binding variable
rule ...
when
    $p : Person()
then
    System.out.println( "Person " + $p );
end
The prefixed dollar symbol ($) is just a
convention; it can be useful in complex rules where it helps to easily
differentiate between variables and fields, but it is not
mandatory.
A constraint is an expression that returns
true or false. This example has
a constraint that states 5 is smaller than
6:
Person( 5 < 6 ) // just an example, as constraints like this would be useless in a real pattern
In essence, it's a Java expression with some enhancements (such
as property access) and a few differences (such as
equals() semantics for ==).
Let's take a deeper look.
Any bean property can be used directly. A bean property is
exposed using a standard Java bean getter: a method
getMyProperty() (or
isMyProperty() for a primitive boolean) which takes
no arguments and return something. For example: the age property is
written as age in DRL instead of the getter
getAge():
Person( age == 50 )

// this is the same as:
Person( getAge() == 50 )
Drools uses the standard JDK Introspector
class to do this mapping, so it follows the standard Java bean
specification.
Note
We recommend using property access (age)
over using getters explicitly (getAge()) because
of performance enhancements through field indexing.
Warning
Property accessors must not change the state of the object in a way that may effect the rules. Remember that the rule engine effectively caches the results of its matching in between invocations to make it faster.
public int getAge() {
    age++; // Do NOT do this
    return age;
}
public int getAge() {
Date now = DateUtil.now(); // Do NOT do this
return DateUtil.differenceInYears(now, birthday);
}To solve this latter case, insert a fact that wraps the
current date into working memory and update that fact between
fireAllRules as needed.
Note
The following fallback applies: if the getter of a property cannot be found, the compiler will resort to using the property name as a method name and without arguments:
Person( age == 50 )

// If Person.getAge() does not exists, this falls back to:
Person( age() == 50 )
Nested property access is also supported:
Person( address.houseNumber == 50 )

// this is the same as:
Person( getAddress().getHouseNumber() == 50 )
Nested properties are also indexed.
Warning
In a stateful session, care should be taken when using nested
accessors as the Working Memory is not aware of any of the nested
values, and does not know when they change. Either consider them
immutable while any of their parent references are inserted into the
Working Memory. Or, instead, if you wish to modify a nested value
you should mark all of the outer facts as updated. In the above
example, when the houseNumber changes, any
Person with that Address must
be marked as updated.
You can use any Java expression that returns a
boolean as a constraint inside the parentheses of a
pattern. Java expressions can be mixed with other expression
enhancements, such as property access:
Person( age == 50 )
It is possible to change the evaluation priority by using parentheses, as in any logic or mathematical expression:
Person( age > 100 && ( age % 10 == 0 ) )
It is possible to reuse Java methods:
Person( Math.round( weight / ( height * height ) ) < 25.0 )
Warning
As for property accessors, methods must not change the state of the object in a way that may affect the rules. Any method executed on a fact in the LHS should be a read only method.
Person( incrementAndGetAge() == 10 ) // Do NOT do this
Warning
The state of a fact should not change between rule invocations (unless those facts are marked as updated to the working memory on every change):
Person( System.currentTimeMillis() % 1000 == 0 ) // Do NOT do this
Normal Java operator precedence applies, see the operator precedence list below.
Important
All operators have normal Java semantics except for
== and !=.
The == operator has null-safe
equals() semantics:
// Similar to: java.util.Objects.equals(person.getFirstName(), "John")
// so (because "John" is not null) similar to:
// "John".equals(person.getFirstName())
Person( firstName == "John" )
The != operator has null-safe
!equals() semantics:
// Similar to: !java.util.Objects.equals(person.getFirstName(), "John")
Person( firstName != "John" )
Type coercion is always attempted if the field and the value are of different types; exceptions will be thrown if a bad coercion is attempted. For instance, if "ten" is provided as a string in a numeric evaluator, an exception is thrown, whereas "10" would coerce to a numeric 10. Coercion is always in favor of the field type and not the value type:
Person( age == "10" ) // "10" is coerced to 10
The comma character (',') is used to separate
constraint groups. It has implicit AND connective
semantics.
// Person is at least 50 and weighs at least 80 kg
Person( age > 50, weight > 80 )
// Person is at least 50, weighs at least 80 kg and is taller than 2 meter.
Person( age > 50, weight > 80, height > 2 )
Note
Although the && and
, operators have the same semantics, they are
resolved with different priorities: The
&& operator precedes the
|| operator. Both the
&& and || operator
precede the , operator. See the operator
precedence list below.
The comma operator should be preferred at the top level constraint, as it makes constraints easier to read and the engine will often be able to optimize them better.
The comma (,) operator cannot be embedded in
a composite constraint expression, such as parentheses:
Person( ( age > 50, weight > 80 ) || height > 2 ) // Do NOT do this: compile error

// Use this instead
Person( ( age > 50 && weight > 80 ) || height > 2 )
A property can be bound to a variable:
// 2 persons of the same age
Person( $firstAge : age ) // binding
Person( age == $firstAge ) // constraint expression
The prefixed dollar symbol ($) is just a
convention; it can be useful in complex rules where it helps to easily
differentiate between variables and fields.
Note
For backwards compatibility reasons, It's allowed (but not recommended) to mix a constraint binding and constraint expressions as such:
// Not recommended
Person( $age : age * 2 < 100 )
// Recommended (seperates bindings and constraint expressions)
Person( age * 2 < 100, $age : age )
Bound variable restrictions using the operator
== provide for very fast execution as it use hash
indexing to improve performance.
Drools does not allow bindings to the same declaration. However this is an important aspect to derivation query unification. While positional arguments are always processed with unification a special unification symbol, ':=', was introduced for named arguments named arguments. The following "unifies" the age argument across two people.
Person( $age := age )
Person( $age := age)
In essence unification will declare a binding for the first occurance, and constrain to the same value of the bound field for sequence occurances.
Besides normal Java literals (including Java 5 enums), this literal is also supported:
The date format dd-mmm-yyyy is supported by
default. You can customize this by providing an alternative date
format mask as the System property named
drools.dateformat. If more control is required, use a
restriction.
It's possible to directly access a List value
by index:
// Same as childList(0).getAge() == 18
Person( childList[0].age == 18 )
It's also possible to directly access a Map
value by key:
// Same as credentialMap.get("jsmith").isValid()
Person( credentialMap["jsmith"].valid )This allows you to place more than one restriction on a field
using the restriction connectives && or
||. Grouping via parentheses is permitted,
resulting in a recursive syntax pattern.


// Simple abbreviated combined relation condition using a single &&
Person( age > 30 && < 40 )
// Complex abbreviated combined relation using groupings
Person( age ( (> 30 && < 40) ||
              (> 20 && < 25) ) )
// Mixing abbreviated combined relation with constraint connectives Person( age > 30 && < 40 || location == "london" )

Coercion to the correct value for the evaluator and the field will be attempted.
These operators can be used on properties with natural
ordering. For example, for Date fields, <
means before, for String
fields, it means alphabetically lower.
Person( firstName < $otherFirstName )
Person( birthDate < $otherBirthDate )
Only applies on Comperable
properties.
Matches a field against any valid Java Regular Expression. Typically that regexp is a string literal, but variables that resolve to a valid regexp are also allowed.
Note
Like in Java, regular expressions written as string literals
need to escape '\'.
Only applies on String properties.
The operator returns true if the String does not match the
regular expression. The same rules apply as for the
matches operator. Example:
Only applies on String properties.
The operator contains is used to check
whether a field that is a Collection or array contains the specified
value.
Example 5.39. Contains with Collections
CheeseCounter( cheeses contains "stilton" ) // contains with a String literal
CheeseCounter( cheeses contains $var ) // contains with a variable
Only applies on Collection
properties.
The operator not contains is used to check
whether a field that is a Collection or array does not
contain the specified value.
Example 5.40. Literal Constraint with Collections
CheeseCounter( cheeses not contains "cheddar" ) // not contains with a String literal
CheeseCounter( cheeses not contains $var ) // not contains with a variable
Only applies on Collection
properties.
Note
For backward compatibility, the
excludesoperator is supported as a synonym fornot contains.
The operator memberOf is used to check
whether a field is a member of a collection or array; that
collection must be a variable.
The operator not memberOf is used to check
whether a field is not a member of a collection or array; that
collection must be a variable.
Example 5.42. Literal Constraint with Collections
CheeseCounter( cheese not memberOf $matureCheeses )
This operator is similar to matches, but it
checks whether a word has almost the same sound (using English
pronunciation) as the given value. This is based on the Soundex
algorithm (see
http://en.wikipedia.org/wiki/Soundex).
Example 5.43. Test with soundslike
// match cheese "fubar" or "foobar"
Cheese( name soundslike 'foobar' )
This operator str is used to check whether
a field that is a String starts with or ends with
a certain value. It can also be used to check the length of the
String.
Message( routingValue str[startsWith] "R1" )
Message( routingValue str[endsWith] "R2" )
Message( routingValue str[length] 17 )
The compound value restriction is used where there is more
than one possible value to match. Currently only the
in and not in evaluators
support this. The second operand of this operator must be a
comma-separated list of values, enclosed in parentheses. Values may
be given as variables, literals, return values or qualified
identifiers. Both evaluators are actually syntactic
sugar, internally rewritten as a list of multiple
restrictions using the operators != and
==.

Example 5.44. Compound Restriction using "in"
Person( $cheese : favouriteCheese )
Cheese( type in ( "stilton", "cheddar", $cheese ) )

An inline eval constraint can use any valid dialect expression as long as it results to a primitive boolean. The expression must be constant over time. Any previously bound variable, from the current or previous pattern, can be used; autovivification is also used to auto-create field binding variables. When an identifier is found that is not a current variable, the builder looks to see if the identifier is a field on the current object type, if it is, the field binding is auto-created as a variable of the same name. This is called autovivification of field variables inside of inline eval's.
This example will find all male-female pairs where the male is 2
years older than the female; the variable age is
auto-created in the second pattern by the autovivification
process.
Example 5.45. Return Value operator
Person( girlAge : age, sex = "F" )
Person( eval( age == girlAge + 2 ), sex = 'M' ) // eval() is actually obselete in this example
Note
Inline eval's are effectively obsolete as their inner syntax is now directly supported. It's recommended not to use them. Simply write the expression without wrapping eval() around it.
The operators are evaluated in this precedence:
Table 5.1. Operator precedence
| Operator type | Operators | Notes |
|---|---|---|
| (nested) property access | . | Not normal Java semantics |
| List/Map access | [ ] | Not normal Java semantics |
| constraint binding | : | Not normal Java semantics |
| multiplicative | * /
% | |
| additive | + - | |
| shift | << >>
>>> | |
| relational | < >
<= >=
instanceof | |
| equality | == != | Does not use normal Java (not) same semantics: uses (not) equals semantics instead. |
| non-short circuiting AND | & | |
| non-short circuiting exclusive OR | ^ | |
| non-short circuiting inclusive OR | | | |
| logical AND | && | |
| logical OR | || | |
| ternary | ? : | |
| Comma separated AND | , | Not normal Java semantics |
Patterns now support positional arguments on type declarations.
Positional arguments are ones where you don't need to specify the field name, as the position maps to a known named field. i.e. Person( name == "mark" ) can be rewritten as Person( "mark"; ). The semicolon ';' is important so that the engine knows that everything before it is a positional argument. Otherwise we might assume it was a boolean expression, which is how it could be interpretted after the semicolon. You can mix positional and named arguments on a pattern by using the semicolon ';' to separate them. Any variables used in a positional that have not yet been bound will be bound to the field that maps to that position.
declare Cheese
    name : String
    shop : String
    price : int
end
Example patterns, with two constraints and a binding. Remember semicolon ';' is used to differentiate the positional section from the named argument section. Variables and literals and expressions using just literals are supported in posional arguments, but not variables. Positional arguments are always resolved using unification.
Cheese( "stilton", "Cheese Shop", p; )
Cheese( "stilton", "Cheese Shop"; p : price )
Cheese( "stilton"; shop == "Cheese Shop", p : price )
Cheese( name == "stilton"; shop == "Cheese Shop", p : price )
Positional arguments that are given a previously declared binding will consrain against that using unification; these are referred to as input arguments. If the binding does not yet exist, it will create the declaration binding it to the field represented by the position argument; these are referred to as output arguments.
The Conditional Element "and" is used to
group other Conditional Elements into a logical conjunction. Drools
supports both prefix and and infix
and.

Traditional infix and is supported:
//infixAnd
Cheese( cheeseType : type ) and Person( favouriteCheese == cheeseType )
Explicit grouping with parentheses is also supported:
//infixAnd with grouping
( Cheese( cheeseType : type ) and
  ( Person( favouriteCheese == cheeseType ) or
    Person( favouriteCheese == cheeseType ) )
Note
The symbol && (as an alternative to
and) is deprecated. But it is still supported in
the syntax for backwards compatibility.

Prefix and is also supported:
(and Cheese( cheeseType : type )
     Person( favouriteCheese == cheeseType ) )
The root element of the LHS is an implicit prefix
and and doesn't need to be specified:
Example 5.46. implicit root prefixAnd
when
    Cheese( cheeseType : type )
    Person( favouriteCheese == cheeseType )
then
...The Conditional Element or is used to group
other Conditional Elements into a logical disjunction. Drools supports
both prefix or and infix
or.

Traditional infix or is supported:
//infixOr
Cheese( cheeseType : type ) or Person( favouriteCheese == cheeseType )
Explicit grouping with parentheses is also supported:
//infixOr with grouping
( Cheese( cheeseType : type ) or
  ( Person( favouriteCheese == cheeseType ) and
    Person( favouriteCheese == cheeseType ) )
Note
The symbol || (as an alternative to
or) is deprecated. But it is still supported in
the syntax for backwards compatibility.

Prefix or is also supported:
(or Person( sex == "f", age > 60 )
    Person( sex == "m", age > 65 )
Note
The behavior of the Conditional Element or
is different from the connective || for
constraints and restrictions in field constraints. The engine
actually has no understanding of the Conditional Element
or. Instead, via a number of different logic
transformations, a rule with or is rewritten as a
number of subrules. This process ultimately results in a rule that
has a single or as the root node and one subrule
for each of its CEs. Each subrule can activate and fire like any
normal rule; there is no special behavior or interaction between
these subrules. - This can be most confusing to new rule
authors.
The Conditional Element or also allows for
optional pattern binding. This means that each resulting subrule will
bind its pattern to the pattern binding. Each pattern must be bound
separately, using eponymous variables:
pensioner : ( Person( sex == "f", age > 60 ) or Person( sex == "m", age > 65 ) )
(or pensioner : Person( sex == "f", age > 60 )
    pensioner : Person( sex == "m", age > 65 ) )
Since the conditional element or results in
multiple subrule generation, one for each possible logically outcome,
the example above would result in the internal generation of two
rules. These two rules work independently within the Working Memory,
which means both can match, activate and fire - there is no
shortcutting.
The best way to think of the conditional element
or is as a shortcut for generating two or more
similar rules. When you think of it that way, it's clear that for a
single rule there could be multiple activations if two or more terms
of the disjunction are true.

The CE not is first order logic's
non-existential quantifier and checks for the non-existence of
something in the Working Memory. Think of "not" as meaning "there must
be none of...".
The keyword not may be followed by
parentheses around the CEs that it applies to. In the simplest case of
a single pattern (like below) you may optionally omit the
parentheses.
Example 5.48. No red Busses
// Brackets are optional:
not Bus(color == "red")
// Brackets are optional:
not ( Bus(color == "red", number == 42) )
// "not" with nested infix and - two patterns,
// brackets are requires:
not ( Bus(color == "red") and
      Bus(color == "blue") )
The CE exists is first order logic's
existential quantifier and checks for the existence of something in
the Working Memory. Think of "exists" as meaning "there is at least
one..". It is different from just having the pattern on its own, which
is more like saying "for each one of...". If you use
exists with a pattern, the rule will only activate
at most once, regardless of how much data there is in working memory
that matches the condition inside of the exists
pattern. Since only the existence matters, no bindings will be
established.
The keyword exists must be followed by
parentheses around the CEs that it applies to. In the simplest case of
a single pattern (like below) you may omit the parentheses.
Example 5.50. At least one red Bus
exists Bus(color == "red")
// brackets are optional:
exists ( Bus(color == "red", number == 42) )
// "exists" with nested infix and,
// brackets are required:
exists ( Bus(color == "red") and
         Bus(color == "blue") )
The Conditional Element forall completes the
First Order Logic support in Drools. The Conditional Element
forall evaluates to true when all facts that match
the first pattern match all the remaining patterns. Example:
rule "All English buses are red"
when
    forall( $bus : Bus( type == 'english')
                   Bus( this == $bus, color = 'red' ) )
then
    # all english buses are red
end
In the above rule, we "select" all Bus objects whose type is "english". Then, for each fact that matches this pattern we evaluate the following patterns and if they match, the forall CE will evaluate to true.
To state that all facts of a given type in the working memory
must match a set of constraints, forall can be
written with a single pattern for simplicity. Example:
Example 5.51. Single Pattern Forall
rule "All Buses are Red"
when
    forall( Bus( color == 'red' ) )
then
    # all asserted Bus facts are red
end
Another example shows multiple patterns inside the
forall:
Example 5.52. Multi-Pattern Forall
rule "all employees have health and dental care programs"
when
    forall( $emp : Employee()
            HealthCare( employee == $emp )
            DentalCare( employee == $emp )
          )
then
    # all employees have health and dental care
end
Forall can be nested inside other CEs. For instance,
forall can be used inside a not
CE. Note that only single patterns have optional parentheses, so that
with a nested forall parentheses must be
used:
Example 5.53. Combining Forall with Not CE
rule "not all employees have health and dental care"
when
    not ( forall( $emp : Employee()
                  HealthCare( employee == $emp )
                  DentalCare( employee == $emp ) )
        )
then
    # not all employees have health and dental care
end
As a side note, forall( p1 p2 p3...) is equivalent
to writing:
not(p1 and not(and p2 p3...))
Also, it is important to note that forall is
a scope delimiter. Therefore, it can use any
previously bound variable, but no variable bound inside it will be
available for use outside of it.

The Conditional Element from enables users to
specify an arbitrary source for data to be matched by LHS patterns.
This allows the engine to reason over data not in the Working Memory.
The data source could be a sub-field on a bound variable or the
results of a method call. It is a powerful construction that allows
out of the box integration with other application components and
frameworks. One common example is the integration with data retrieved
on-demand from databases using hibernate named queries.
The expression used to define the object source is any expression that follows regular MVEL syntax. Therefore, it allows you to easily use object property navigation, execute method calls and access maps and collections elements.
Here is a simple example of reasoning and binding on another pattern sub-field:
rule "validate zipcode"
when
    Person( $personAddress : address )
    Address( zipcode == "23920W") from $personAddress
then
    # zip code is ok
end
With all the flexibility from the new expressiveness in the Drools engine you can slice and dice this problem many ways. This is the same but shows how you can use a graph notation with the 'from':
rule "validate zipcode"
when
    $p : Person( )
    $a : Address( zipcode == "23920W") from $p.address
then
    # zip code is ok
end
Previous examples were evaluations using a single pattern. The
CE from also support object sources that return a
collection of objects. In that case, from will
iterate over all objects in the collection and try to match each of
them individually. For instance, if we want a rule that applies 10%
discount to each item in an order, we could do:
rule "apply 10% discount to all items over US$ 100,00 in an order"
when
    $order : Order()
    $item  : OrderItem( value > 100 ) from $order.items
then
    # apply discount to $item
end
The above example will cause the rule to fire once for each item whose value is greater than 100 for each given order.
You must take caution, however, when using
from, especially in conjunction with the
lock-on-active rule attribute as it may produce
unexpected results. Consider the example provided earlier, but now
slightly modified as follows:
rule "Assign people in North Carolina (NC) to sales region 1"
ruleflow-group "test"
lock-on-active true
when
$p : Person( )
$a : Address( state == "NC") from $p.address
then
modify ($p) {} #Assign person to sales region 1 in a modify block
end
rule "Apply a discount to people in the city of Raleigh"
ruleflow-group "test"
lock-on-active true
when
$p : Person( )
$a : Address( city == "Raleigh") from $p.address
then
modify ($p) {} #Apply discount to person in a modify block
endIn the above example, persons in Raleigh, NC should be assigned to sales region 1 and receive a discount; i.e., you would expect both rules to activate and fire. Instead you will find that only the second rule fires.
If you were to turn on the audit log, you would also see that
when the second rule fires, it deactivates the first rule. Since the
rule attribute lock-on-active prevents a rule from
creating new activations when a set of facts change, the first rule
fails to reactivate. Though the set of facts have not changed, the use
of from returns a new fact for all intents and
purposes each time it is evaluated.
First, it's important to review why you would use the above
pattern. You may have many rules across different rule-flow groups.
When rules modify working memory and other rules downstream of your
RuleFlow (in different rule-flow groups) need to be reevaluated, the
use of modify is critical. You don't, however, want
other rules in the same rule-flow group to place activations on one
another recursively. In this case, the no-loop
attribute is ineffective, as it would only prevent a rule from
activating itself recursively. Hence, you resort to
lock-on-active.
There are several ways to address this issue:
Avoid the use of
fromwhen you can assert all facts into working memory or use nested object references in your constraint expressions (shown below).Place the variable assigned used in the modify block as the last sentence in your condition (LHS).
Avoid the use of
lock-on-activewhen you can explicitly manage how rules within the same rule-flow group place activations on one another (explained below).
The preferred solution is to minimize use of
from when you can assert all your facts into
working memory directly. In the example above, both the Person and
Address instance can be asserted into working memory. In this case,
because the graph is fairly simple, an even easier solution is to
modify your rules as follows:
rule "Assign people in North Carolina (NC) to sales region 1"
ruleflow-group "test"
lock-on-active true
when
$p : Person(address.state == "NC" )
then
modify ($p) {} #Assign person to sales region 1 in a modify block
end
rule "Apply a discount to people in the city of Raleigh"
ruleflow-group "test"
lock-on-active true
when
$p : Person(address.city == "Raleigh" )
then
modify ($p) {} #Apply discount to person in a modify block
endNow, you will find that both rules fire as expected. However, it
is not always possible to access nested facts as above. Consider an
example where a Person holds one or more Addresses and you wish to use
an existential quantifier to match people with at least one address
that meets certain conditions. In this case, you would have to resort
to the use of from to reason over the
collection.
There are several ways to use from to achieve
this and not all of them exhibit an issue with the use of
lock-on-active. For example, the following use of
from causes both rules to fire as expected:
rule "Assign people in North Carolina (NC) to sales region 1"
ruleflow-group "test"
lock-on-active true
when
$p : Person($addresses : addresses)
exists (Address(state == "NC") from $addresses)
then
modify ($p) {} #Assign person to sales region 1 in a modify block
end
rule "Apply a discount to people in the city of Raleigh"
ruleflow-group "test"
lock-on-active true
when
$p : Person($addresses : addresses)
exists (Address(city == "Raleigh") from $addresses)
then
modify ($p) {} #Apply discount to person in a modify block
endHowever, the following slightly different approach does exhibit the problem:
rule "Assign people in North Carolina (NC) to sales region 1"
ruleflow-group "test"
lock-on-active true
when
$assessment : Assessment()
$p : Person()
$addresses : List() from $p.addresses
exists (Address( state == "NC") from $addresses)
then
modify ($assessment) {} #Modify assessment in a modify block
end
rule "Apply a discount to people in the city of Raleigh"
ruleflow-group "test"
lock-on-active true
when
$assessment : Assessment()
$p : Person()
$addresses : List() from $p.addresses
exists (Address( city == "Raleigh") from $addresses)
then
modify ($assessment) {} #Modify assessment in a modify block
endIn the above example, the $addresses variable is returned from
the use of from. The example also introduces a new
object, assessment, to highlight one possible solution in this case.
If the $assessment variable assigned in the condition (LHS) is moved
to the last condition in each rule, both rules fire as
expected.
Though the above examples demonstrate how to combine the use of
from with lock-on-active where
no loss of rule activations occurs, they carry the drawback of placing
a dependency on the order of conditions on the LHS. In addition, the
solutions present greater complexity for the rule author in terms of
keeping track of which conditions may create issues.
A better alternative is to assert more facts into working
memory. In this case, a person's addresses may be asserted into
working memory and the use of from would not be
necessary.
There are cases, however, where asserting all data into working
memory is not practical and we need to find other solutions. Another
option is to reevaluate the need for
lock-on-active. An alternative to
lock-on-active is to directly manage how rules
within the same rule-flow group activate one another by including
conditions in each rule that prevent rules from activating each other
recursively when working memory is modified. For example, in the case
above where a discount is applied to citizens of Raleigh, a condition
may be added to the rule that checks whether the discount has already
been applied. If so, the rule does not activate.

The Conditional Element collect allows rules
to reason over a collection of objects obtained from the given source
or from the working memory. In First Oder Logic terms this is the
cardinality quantifier. A simple example:
import java.util.ArrayList
rule "Raise priority if system has more than 3 pending alarms"
when
$system : System()
$alarms : ArrayList( size >= 3 )
from collect( Alarm( system == $system, status == 'pending' ) )
then
# Raise priority, because system $system has
# 3 or more alarms pending. The pending alarms
# are $alarms.
endIn the above example, the rule will look for all pending alarms in the working memory for each given system and group them in ArrayLists. If 3 or more alarms are found for a given system, the rule will fire.
The result pattern of collect can be any
concrete class that implements the java.util.Collection
interface and provides a default no-arg public constructor. This means
that you can use Java collections like ArrayList, LinkedList, HashSet,
etc., or your own class, as long as it implements the
java.util.Collection interface and provide a default
no-arg public constructor.
Both source and result patterns can be constrained as any other pattern.
Variables bound before the collect CE are in
the scope of both source and result patterns and therefore you can use
them to constrain both your source and result patterns. But note that
collect is a scope delimiter for bindings, so that
any binding made inside of it is not available for use outside of
it.
Collect accepts nested from CEs. The
following example is a valid use of "collect":
import java.util.LinkedList;
rule "Send a message to all mothers"
when
$town : Town( name == 'Paris' )
$mothers : LinkedList()
from collect( Person( gender == 'F', children > 0 )
from $town.getPeople()
)
then
# send a message to all mothers
end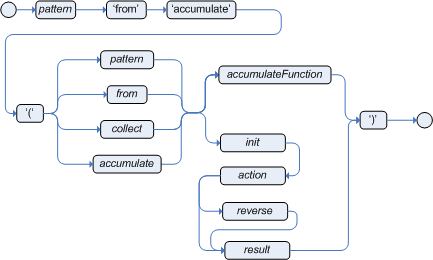
The Conditional Element accumulate is a more
flexible and powerful form of collect, in the sense
that it can be used to do what collect does and
also achieve results that the CE collect is not
capable of doing. Basically, what it does is that it allows a rule to
iterate over a collection of objects, executing custom actions for
each of the elements, and at the end it returns a result
object.
Accumulate supports both the use of pre-defined accumulate functions, or the use of inline custom code. Inline custom code should be avoided though, as it is extremely hard to maintain, and frequently leads to code duplication. Accumulate functions are easier to test and reuse.
The accumulate CE is a very powerful CE, but it gets real declarative and easy to use when using predefined functions that are known as Accumulate Functions. They work exactly like accumulate, but instead of explicitly writing custom code in every accumulate CE, the user can use predefined code for common operations.
For instance, a rule to apply a 10% discount on orders over $100 could be written in the following way, using Accumulate Functions:
rule "Apply 10% discount to orders over US$ 100,00"
when
$order : Order()
$total : Number( doubleValue > 100 )
from accumulate( OrderItem( order == $order, $value : value ),
sum( $value ) )
then
# apply discount to $order
endIn the above example, sum is an Accumulate Function and will sum the $value of all OrderItems and return the result.
Drools ships with the following built-in accumulate functions:
average
min
max
count
sum
collectList
collectSet
These common functions accept any expression as input. For instance, if someone wants to calculate the average profit on all items of an order, a rule could be written using the average function:
rule "Average profit"
when
$order : Order()
$profit : Number()
from accumulate( OrderItem( order == $order, $cost : cost, $price : price )
average( 1 - $cost / $price ) )
then
# average profit for $order is $profit
endAccumulate Functions are all pluggable. That means that if
needed, custom, domain specific functions can easily be added to the
engine and rules can start to use them without any restrictions. To
implement a new Accumulate Functions all one needs to do is to
create a Java class that implements the
org.drools.runtime.rule.TypedAccumulateFunction
interface and add a line to the configuration file or set a system
property to let the engine know about the new function. As an
example of an Accumulate Function implementation, the following is
the implementation of the average
function:
/**
* An implementation of an accumulator capable of calculating average values
*/
public class AverageAccumulateFunction implements AccumulateFunction {
public void readExternal(ObjectInput in) throws IOException, ClassNotFoundException {
}
public void writeExternal(ObjectOutput out) throws IOException {
}
public static class AverageData implements Externalizable {
public int count = 0;
public double total = 0;
public AverageData() {}
public void readExternal(ObjectInput in) throws IOException, ClassNotFoundException {
count = in.readInt();
total = in.readDouble();
}
public void writeExternal(ObjectOutput out) throws IOException {
out.writeInt(count);
out.writeDouble(total);
}
}
/* (non-Javadoc)
* @see org.drools.base.accumulators.AccumulateFunction#createContext()
*/
public Serializable createContext() {
return new AverageData();
}
/* (non-Javadoc)
* @see org.drools.base.accumulators.AccumulateFunction#init(java.lang.Object)
*/
public void init(Serializable context) throws Exception {
AverageData data = (AverageData) context;
data.count = 0;
data.total = 0;
}
/* (non-Javadoc)
* @see org.drools.base.accumulators.AccumulateFunction#accumulate(java.lang.Object, java.lang.Object)
*/
public void accumulate(Serializable context,
Object value) {
AverageData data = (AverageData) context;
data.count++;
data.total += ((Number) value).doubleValue();
}
/* (non-Javadoc)
* @see org.drools.base.accumulators.AccumulateFunction#reverse(java.lang.Object, java.lang.Object)
*/
public void reverse(Serializable context,
Object value) throws Exception {
AverageData data = (AverageData) context;
data.count--;
data.total -= ((Number) value).doubleValue();
}
/* (non-Javadoc)
* @see org.drools.base.accumulators.AccumulateFunction#getResult(java.lang.Object)
*/
public Object getResult(Serializable context) throws Exception {
AverageData data = (AverageData) context;
return new Double( data.count == 0 ? 0 : data.total / data.count );
}
/* (non-Javadoc)
* @see org.drools.base.accumulators.AccumulateFunction#supportsReverse()
*/
public boolean supportsReverse() {
return true;
}
/**
* {@inheritDoc}
*/
public Class< ? > getResultType() {
return Number.class;
}
}
The code for the function is very simple, as we could expect, as all the "dirty" integration work is done by the engine. Finally, to plug the function into the engine, we added it to the configuration file:
drools.accumulate.function.average = org.drools.base.accumulators.AverageAccumulateFunction
Here, "drools.accumulate.function." is a prefix that must always be used, "average" is how the function will be used in the rule file, and "org.drools.base.accumulators.AverageAccumulateFunction" is the fully qualified name of the class that implements the function behavior.
Warning
The use of accumulate with inline custom code is not a good practice for several reasons, including dificulties on maintaining and testing rules that use them, as well as the inability of reusing that code. Implementing your own accumulate functions is very simple and straightforward, they are easy to unit test and to use. This form of accumulate is supported for backward compatibility only.
The general syntax of the accumulate CE
with inline custom code is:
<result pattern>from accumulate(<source pattern>,init(<init code>),action(<action code>),reverse(<reverse code>),result(<result expression>) )
The meaning of each of the elements is the following:
<source pattern>: the source pattern is a regular pattern that the engine will try to match against each of the source objects.
<init code>: this is a semantic block of code in the selected dialect that will be executed once for each tuple, before iterating over the source objects.
<action code>: this is a semantic block of code in the selected dialect that will be executed for each of the source objects.
<reverse code>: this is an optional semantic block of code in the selected dialect that if present will be executed for each source object that no longer matches the source pattern. The objective of this code block is to undo any calculation done in the <action code> block, so that the engine can do decremental calculation when a source object is modified or retracted, hugely improving performance of these operations.
<result expression>: this is a semantic expression in the selected dialect that is executed after all source objects are iterated.
<result pattern>: this is a regular pattern that the engine tries to match against the object returned from the <result expression>. If it matches, the
accumulateconditional element evaluates to true and the engine proceeds with the evaluation of the next CE in the rule. If it does not matches, theaccumulateCE evaluates to false and the engine stops evaluating CEs for that rule.
It is easier to understand if we look at an example:
rule "Apply 10% discount to orders over US$ 100,00"
when
$order : Order()
$total : Number( doubleValue > 100 )
from accumulate( OrderItem( order == $order, $value : value ),
init( double total = 0; ),
action( total += $value; ),
reverse( total -= $value; ),
result( total ) )
then
# apply discount to $order
endIn the above example, for each Order in the
Working Memory, the engine will execute the init
code initializing the total variable to zero. Then it
will iterate over all OrderItem objects for that order,
executing the action for each one (in the
example, it will sum the value of all items into the total
variable). After iterating over all OrderItem objects,
it will return the value corresponding to the result
expression (in the above example, the value of variable
total). Finally, the engine will try to match the
result with the Number pattern, and if the double value
is greater than 100, the rule will fire.
The example used Java as the semantic dialect, and as such, note that the usage of the semicolon as statement delimiter is mandatory in the init, action and reverse code blocks. The result is an expression and, as such, it does not admit ';'. If the user uses any other dialect, he must comply to that dialect's specific syntax.
As mentioned before, the reverse code is optional, but it is strongly recommended that the user writes it in order to benefit from the improved performance on update and retract.
The accumulate CE can be used to execute
any action on source objects. The following example instantiates and
populates a custom object:
rule "Accumulate using custom objects"
when
$person : Person( $likes : likes )
$cheesery : Cheesery( totalAmount > 100 )
from accumulate( $cheese : Cheese( type == $likes ),
init( Cheesery cheesery = new Cheesery(); ),
action( cheesery.addCheese( $cheese ); ),
reverse( cheesery.removeCheese( $cheese ); ),
result( cheesery ) );
then
// do something
endThe accumulate CE now supports multiple functions. For instance, if one needs to find the minimum, maximum and average value for the same set of data, instead of having to repeat the accumulate statement 3 times, a single accumulate can be used.
rule "Max, min and average"
when
accumulate( Cheese( $price : price ),
$max : max( $price ),
$min : min( $price ),
$avg : average( $price ) )
then
// do something
end 
The conditional element eval is essentially a
catch-all which allows any semantic code (that returns a primitive
boolean) to be executed. This code can refer to variables that were
bound in the LHS of the rule, and functions in the rule package. Overuse
of eval reduces the declarativeness of your rules and can result in a
poorly performing engine. While eval can be used
anywhere in the patterns, the best practice is to add it as the last
conditional element in the LHS of a rule.
Evals cannot be indexed and thus are not as efficient as Field Constraints. However this makes them ideal for being used when functions return values that change over time, which is not allowed within Field Constraints.
For folks who are familiar with Drools 2.x lineage, the old Drools parameter and condition tags are equivalent to binding a variable to an appropriate type, and then using it in an eval node.
p1 : Parameter() p2 : Parameter() eval( p1.getList().containsKey( p2.getItem() ) )
p1 : Parameter() p2 : Parameter() // call function isValid in the LHS eval( isValid( p1, p2 ) )


The Right Hand Side (RHS) is a common name for the consequence or action part of the rule; this part should contain a list of actions to be executed. It is bad practice to use imperative or conditional code in the RHS of a rule; as a rule should be atomic in nature - "when this, then do this", not "when this, maybe do this". The RHS part of a rule should also be kept small, thus keeping it declarative and readable. If you find you need imperative and/or conditional code in the RHS, then maybe you should be breaking that rule down into multiple rules. The main purpose of the RHS is to insert, retractor modify working memory data. To assist with that there are a few convenience methods you can use to modify working memory; without having to first reference a working memory instance.
update(object,
handle); will tell the engine that an
object has changed (one that has been bound to something on the LHS) and
rules may need to be reconsidered.
update(object);
can also be used; here the Knowledge Helper will look up the facthandle
for you, via an identity check, for the passed object. (Note that if you
provide Property Change Listeners to your Java beans that you are
inserting into the engine, you can avoid the need to call
update() when the object changes.)
insert(new
Something()); will place a new
object of your creation into the Working Memory.
insertLogical(new
Something()); is similar to
insert, but the object will be automatically retracted when there are no
more facts to support the truth of the currently firing rule.
retract(handle);
removes an object from Working Memory.
These convenience methods are basically macros that provide short
cuts to the KnowledgeHelper instance that lets you access
your Working Memory from rules files. The predefined variable
drools of type KnowledgeHelper lets you call
several other useful methods. (Refer to the KnowledgeHelper
interface documentation for more advanced operations).
The call
drools.halt()terminates rule execution immediately. This is required for returning control to the point whence the current session was put to work withfireUntilHalt().Methods
insert(Object o),update(Object o)andretract(Object o)can be called ondroolsas well, but due to their frequent use they can be called without the object reference.drools.getWorkingMemory()returns theWorkingMemoryobject.drools.setFocus( String s)sets the focus to the specified agenda group.drools.getRule().getName(), called from a rule's RHS, returns the name of the rule.drools.getTuple()returns the Tuple that matches the currently executing rule, anddrools.getActivation()delivers the corresponding Activation. (These calls are useful for logging and debugging purposes.)
The full Knowledge Runtime API is exposed through another
predefined variable, kcontext, of type
KnowledgeContext. Its method
getKnowledgeRuntime() delivers an object of type
KnowledgeRuntime, which, in turn, provides access to a
wealth of methods, many of which are quite useful for coding RHS
logic.
The call
kcontext.getKnowledgeRuntime().halt()terminates rule execution immediately.The accessor
getAgenda()returns a reference to this session'sAgenda, which in turn provides access to the various rule groups: activation groups, agenda groups, and rule flow groups. A fairly common paradigm is the activation of some agenda group, which could be done with the lengthy call:// give focus to the agenda group CleanUp
kcontext.getKnowledgeRuntime().getAgenda().getAgendaGroup( "CleanUp" ).setFocus();(You can achieve the same using
drools.setFocus( "CleanUp" ).)To run a query, you call
getQueryResults(String query), whereupon you may process the results, as explained in section “Query”.A set of methods dealing with event management lets you, among other things, add and remove event listeners for the Working Memory and the Agenda.
Method
getKnowledgeBase()returns theKnowledgeBaseobject, the backbone of all the Knowledge in your system, and the originator of the current session.You can manage globals with
setGlobal(...),getGlobal(...)andgetGlobals().Method
getEnvironment()returns the runtime'sEnvironmentwhich works much like what you know as your operating system's environment.
This language extension provides a structured approach to fact
updates. It combines the update operation with a number of setter calls
to change the object's fields. This is the syntax schema for the
modify statement:
modify (<fact-expression>) {<expression>[,<expression>]*}
The parenthesized <fact-expression> must yield a fact object reference. The expression list in the block should consist of setter calls for the given object, to be written without the usual object reference, which is automatically prepended by the compiler.
The example illustrates a simple fact modification.
Example 5.54. A modify statement
rule "modify stilton"
when
$stilton : Cheese(type == "stilton")
then
modify( $stilton ){
setPrice( 20 ),
setAge( "overripe" )
}
endDrools attempts to preserve numbers in their primitive or object wrapper form, so a variable bound to an int primitive when used in a code block or expression will no longer need manual unboxing; unlike Drools 3.0 where all primitives were autoboxed, requiring manual unboxing. A variable bound to an object wrapper will remain as an object; the existing JDK 1.5 and JDK 5 rules to handle auto-boxing and unboxing apply in this case. When evaluating field constraints, the system attempts to coerce one of the values into a comparable format; so a primitive is comparable to an object wrapper.

A query is a simple way to search the working memory for facts that match the stated conditions. Therefore, it contains only the structure of the LHS of a rule, so that you specify neither "when" nor "then". A query has an optional set of parameters, each of which can be optionally typed. If the type is not given, the type Object is assumed. The engine will attempt to coerce the values as needed. Query names are global to the KnowledgeBase; so do not add queries of the same name to different packages for the same RuleBase.
To return the results use
ksession.getQueryResults("name"), where "name" is the query's
name. This returns a list of query results, which allow you to retrieve the
objects that matched the query.
The first example presents a simple query for all the people over the age of 30. The second one, using parameters, combines the age limit with a location.
Example 5.55. Query People over the age of 30
query "people over the age of 30"
person : Person( age > 30 )
endExample 5.56. Query People over the age of x, and who live in y
query "people over the age of x" (int x, String y)
person : Person( age > x, location == y )
endWe iterate over the returned QueryResults using a standard "for" loop. Each element is a QueryResultsRow which we can use to access each of the columns in the tuple. These columns can be accessed by bound declaration name or index position.
Example 5.57. Query People over the age of 30
QueryResults results = ksession.getQueryResults( "people over the age of 30" );
System.out.println( "we have " + results.size() + " people over the age of 30" );
System.out.println( "These people are are over 30:" );
for ( QueryResultsRow row : results ) {
Person person = ( Person ) row.get( "person" );
System.out.println( person.getName() + "\n" );
}Support for positional syntax has been added for more compact code. By default the the declared type order in the type declaration matches the argument position. But it possible to override these using the @position annotation.
declare Cheese
name : String @position(1)
shop : String @position(2)
price : int @position(0)
end
The @Position annotation, in the org.drools.definition.type package, can be used to annotate original pojos on the classpath. Currently only fields on classes can be annotated. Inheritence of classes is supported, but not interfaces of methods yet.
Queries can now call other queries, this combined with optional query arguments provides deriviation query style backward chaining. Positional and mixed positional/named type is supported. Literal expressions can passed as query arguments, but at this stage you cannot mix expressions with variables. Here s an example of a query that calls another query. Note that 'z' here will always be an 'out' variable. The '?' symbol means the query is pull only, once the results are returned you will not received further results as the underlying data changes.
declare Location
thing : String
location : String
end
query isContainedIn( String x, String y )
Location(x, y;)
or
( Location(z, y;) and ?isContainedIn(x, z;) )
endAs previously mentioned you can use live "open" queries to reactively receive changes over time from the query results, as the underlying data it queries against changes. Notice the "look" rule calls the query without using '?'.
query isContainedIn( String x, String y )
Location(x, y;)
or
( Location(z, y;) and isContainedIn(x, z;) )
end
rule look when
Person( $l : likes )
isContainedIn( $l, 'office'; )
then
insertLogical( $l 'is in the office' );
end
Drools supports unification for derivation queries, in short this means that arguments are optional. It is possible to call queries from java leaving arguments unspecified using the static field org.drools.runtime.rule.Variable.v - note you must use 'v' and not an alternative instanceof Variable. These are referred to as 'out' arguments. Note that the query itself does not declare at compile time whether an argument is in or an out, this can be defined purely at runtime on each use. The following example will return all objects contained in the office.
results = ksession.getQueryResults( "isContainedIn", new Object[] { Variable.v, "office" } );
l = new ArrayList<List<String>>();
for ( QueryResultsRow r : results ) {
l.add( Arrays.asList( new String[] { (String) r.get( "x" ), (String) r.get( "y" ) } ) );
}
The algorithm uses stacks to handle recursion, so the method stack will not blow up.
The following is not yet suported:
List and Map unification
Variables for the fields of facts
Expression unification - pred( X, X + 1, X * Y / 7 )
Domain Specific Languages (or DSLs) are a way of creating a rule language that is dedicated to your problem domain. A set of DSL definitions consists of transformations from DSL "sentences" to DRL constructs, which lets you use of all the underlying rule language and engine features. Given a DSL, you write rules in DSL rule (or DSLR) files, which will be translated into DRL files.
DSL and DSLR files are plain text files, and you can use any text editor to create and modify them. But there are also DSL and DSLR editors, both in the IDE as well as in the web based BRMS, and you can use those as well, although they may not provide you with the full DSL functionality.
DSLs can serve as a layer of separation between rule authoring (and rule authors) and the technical intricacies resulting from the modelling of domain object and the rule engine's native language and methods. If your rules need to be read and validated by domain experts (such as business analysts, for instance) who are not programmers, you should consider using a DSL; it hides implementation details and focuses on the rule logic proper. DSL sentences can also act as "templates" for conditional elements and consequence actions that are used repeatedly in your rules, possibly with minor variations. You may define DSL sentences as being mapped to these repeated phrases, with parameters providing a means for accomodating those variations.
DSLs have no impact on the rule engine at runtime, they are just a compile time feature, requiring a special parser and transformer.
The Drools DSL mechanism allows you to customise conditional expressions and consequence actions. A global substitution mechanism ("keyword") is also available.
In the preceding example, [when] indicates the scope of
the expression, i.e., whether it is valid for the LHS or the RHS of a rule. The
part after the bracketed keyword is the expression that you use in the rule;
typically a natural language expression, but it doesn't have to be. The
part to the right of the equal sign ("=") is the mapping of the expression into
the rule language. The form of this string depends on its destination, RHS or
LHS. If it is for the LHS, then it ought to be a term according to the regular
LHS syntax; if it is for the RHS then it might be a Java statement.
Whenever the DSL parser matches a line from the rule file written in the
DSL with an expression in the DSL definition, it performs three steps of
string manipulation. First, it extracts the string values appearing where the
expression contains variable names in braces (here: {colour}). Then,
the values obtained from these captures are then interpolated wherever that name,
again enclosed in braces, occurs on the right hand side of the mapping. Finally, the
interpolated string replaces whatever was matched by the entire expression
in the line of the DSL rule file.
Note that the expressions (i.e., the strings on the left hand side of the equal sign) are used as regular expressions in a pattern matching operation against a line of the DSL rule file, matching all or part of a line. This means you can use (for instance) a '?' to indicate that the preceding character is optional. One good reason to use this is to overcome variations in natural language phrases of your DSL. But, given that these expressions are regular expression patterns, this also means that all "magic" characters of Java's pattern syntax have to be escaped with a preceding backslash ('\').
It is important to note that the compiler transforms DSL rule files line by line. In the above example, all the text after "Something is " to the end of the line is captured as the replacement value for "{colour}", and this is used for interpolating the target string. This may not be exactly what you want. For instance, when you intend to merge different DSL expressions to generate a composite DRL pattern, you need to transform a DSLR line in several independent operations. The best way to achieve this is to ensure that the captures are surrounded by characteristic text - words or even single characters. As a result, the matching operation done by the parser plucks out a substring from somewhere within the line. In the example below, quotes are used as distinctive characters. Note that the characters that surround the capture are not included during interpolation, just the contents between them.
As a rule of thumb, use quotes for textual data that a rule editor
may want to enter. You can also enclose the capture with words to ensure
that the text is correctly matched. Both is illustrated by the following
example. Note that a single line such as Something is "green" and
another solid thing is now correctly expanded.
Example 5.59. Example with quotes
[when]something is "{colour}"=Something(colour=="{colour}")
[when]another {state} thing=OtherThing(state=="{state}"It is a good idea to avoid punctuation (other than quotes or apostrophes) in your DSL expressions as much as possible. The main reason is that punctuation is easy to forget for rule authors using your DSL. Another reason is that parentheses, the period and the question mark are magic characters, requiring escaping in the DSL definition.
In a DSL mapping, the braces "{" and "}" should only be used to enclose a variable definition or reference, resulting in a capture. If they should occur literally, either in the expression or within the replacement text on the right hand side, they must be escaped with a preceding backslash ("\"):
[then]do something= if (foo) \{ doSomething(); \}
Note
If braces "{" and "}" should appear in the replacement string of a DSL definition, escape them with a backslash ('\').
Example 5.60. Examples of DSL mapping entries
# This is a comment to be ignored.
[when]There is a person with name of "{name}"=Person(name=="{name}")
[when]Person is at least {age} years old and lives in "{location}"=
Person(age >= {age}, location=="{location}")
[then]Log "{message}"=System.out.println("{message}");
[when]And = andGiven the above DSL examples, the following examples show the expansion of various DSLR snippets:
Example 5.61. Examples of DSL expansions
There is a person with name of "Kitty"
==> Person(name="Kitty")
Person is at least 42 years old and lives in "Atlanta"
==> Person(age >= 42, location="Atlanta")
Log "boo"
==> System.out.println("boo");
There is a person with name of "Bob" and Person is at least 30 years old and lives in "Utah"
==> Person(name="Bob") and Person(age >= 30, location="Utah")Note
Don't forget that if you are capturing plain text from a DSL rule line and want to use it as a string literal in the expansion, you must provide the quotes on the right hand side of the mapping.
You can chain DSL expressions together on one line, as long as it is clear to the parser where one ends and the next one begins and where the text representing a parameter ends. (Otherwise you risk getting all the text until the end of the line as a parameter value.) The DSL expressions are tried, one after the other, according to their order in the DSL definition file. After any match, all remaining DSL expressions are investigated, too.
The resulting DRL text may consist of more than one line. Line ends
are in the replacement text are written as \n.
A common requirement when writing rule conditions is to be able to add an arbitrary combination of constraints to a pattern. Given that a fact type may have many fields, having to provide an individual DSL statement for each combination would be plain folly.
The DSL facility allows you to add constraints to a pattern by a simple convention: if your DSL expression starts with a hyphen (minus character, "-") it is assumed to be a field constraint and, consequently, is is added to the last pattern line preceding it.
For an example, lets take look at class Cheese,
with the following fields: type, price, age and country. We can
express some LHS condition in normal DRL like the following
Cheese(age < 5, price == 20, type=="stilton", country=="ch")
The DSL definitions given below result in three DSL phrases which may be used to create any combination of constraint involving these fields.
[when]There is a Cheese with=Cheese()
[when]- age is less than {age}=age<{age}
[when]- type is '{type}'=type=='{type}'
[when]- country equal to '{country}'=country=='{country}'You can then write rules with conditions like the following:
There is a Cheese with
- age is less than 42
- type is 'stilton'The parser will pick up a line beginning with "-" and add it as a constraint to the preceding pattern, inserting a comma when it is required. For the preceding example, the resulting DRL is:
Cheese(age<42, type=='stilton')
Combining all all numeric fields with all relational operators (according to the DSL expression "age is less than..." in the preceding example) produces an unwieldy amount of DSL entries. But you can define DSL phrases for the various operators and even a generic expression that handles any field constraint, as shown below. (Notice that the expression definition contains a regular expression in addition to the variable name.)
[when][]is less than or equal to=<= [when][]is less than=< [when][]is greater than or equal to=>= [when][]is greater than=> [when][]is equal to=== [when][]equals=== [when][]There is a Cheese with=Cheese()[when][]- {field:\w*} {operator} {value:\d*}={field} {operator} {value}
Given these DSL definitions, you can write rules with conditions such as:
There is a Cheese with - age is less than 42 - rating is greater than 50 - type equals 'stilton'
In this specific case, a phrase such as "is less than" is replaced by
<, and then the line matches the last DSL entry. This
removes the hyphen, but the final result is still added as a constraint
to the preceding pattern. After processing all of the lines, the resulting
DRL text is:
Cheese(age<42, rating > 50, type=='stilton')
Note
The order of the entries in the DSL is important if separate DSL expressions are intended to match the same line, one after the other.
A good way to get started is to write representative samples of the rules your application requires, and to test them as you develop. This will provide you with a stable framework of conditional elements and their constraints. Rules, both in DRL and in DSLR, refer to entities according to the data model representing the application data that should be subject to the reasoning process defined in rules. Notice that writing rules is generally easier if most of the data model's types are facts.
Given an initial set of rules, it should be possible to identify recurring or similar code snippets and to mark variable parts as parameters. This provides reliable leads as to what might be a handy DSL entry. Also, make sure you have a full grasp of the jargon the domain experts are using, and base your DSL phrases on this vocabulary.
You may postpone implementation decisions concerning conditions and actions during this first design phase by leaving certain conditional elements and actions in their DRL form by prefixing a line with a greater sign (">"). (This is also handy for inserting debugging statements.)
During the next development phase, you should find that the DSL configuration stabilizes pretty quickly. New rules can be written by reusing the existing DSL definitions, or by adding a parameter to an existing condition or consequence entry.
Try to keep the number of DSL entries small. Using parameters lets you apply the same DSL sentence for similar rule patterns or constraints. But do not exaggerate: authors using the DSL should still be able to identify DSL phrases by some fixed text.
A DSL file is a text file in a line-oriented format. Its entries are used for transforming a DSLR file into a file according to DRL syntax.
A line starting with "#" or "//" (with or without preceding white space) is treated as a comment. A comment line starting with "#/" is scanned for words requesting a debug option, see below.
Any line starting with an opening bracket ("[") is assumed to be the first line of a DSL entry definition.
Any other line is appended to the preceding DSL entry definition, with the line end replaced by a space.
A DSL entry consists of the following four parts:
A scope definition, written as one of the keywords "when" or "condition", "then" or "consequence", "*" and "keyword", enclosed in brackets ("[" and "]"). This indicates whether the DSL entry is valid for the condition or the consequence of a rule, or both. A scope indication of "keyword" means that the entry has global significance, i.e., it is recognized anywhere in a DSLR file.
A type definition, written as a Java class name, enclosed in brackets. This part is optional unless the the next part begins with an opening bracket. An empty pair of brackets is valid, too.
A DSL expression consists of a (Java) regular expression, with any number of embedded variable definitions, terminated by an equal sign ("="). A variable definition is enclosed in braces ("{" and "}"). It consists of a variable name and two optional attachements, separated by colons (":"). If there is one attachment, it is a regular expression for matching text that is to be assigned to the variable; if there are two attachments, the first one is a hint for the GUI editor and the second one the regular expression.
Note that all characters that are "magic" in regular expressions must be escaped with a preceding backslash ("\") if they should occur literally within the expression.
The remaining part of the line after the delimiting equal sign is the replacement text for any DSLR text matching the regular expression. It may contain variable references, i.e., a variable name enclosed in braces. Optionally, the variable name may be followed by an exclamation mark ("!") and a transformation function, see below.
Note that braces ("{" and "}") must be escaped with a preceding backslash ("\") if they should occur literally within the replacement string.
Debugging of DSL expansion can be turned on, selectively, by using a comment line starting with "#/" which may contain one or more words from the table presented below. The resulting output is written to standard output.
Table 5.2. Debug options for DSL expansion
| Word | Description |
|---|---|
| result | Prints the resulting DRL text, with line numbers. |
| steps | Prints each expansion step of condition and consequence lines. |
| keyword | Dumps the internal representation of all DSL entries with scope "keyword". |
| when | Dumps the internal representation of all DSL entries with scope "when" or "*". |
| then | Dumps the internal representation of all DSL entries with scope "then" or "*". |
| usage | Displays a usage statistic of all DSL entries. |
Below are some sample DSL definitions, with comments describing the language features they illustrate.
# Comment: DSL examples
#/ debug: display result and usage
# keyword definition: replaces "regula" by "rule"
[keyword][]regula=rule
# conditional element: "T" or "t", "a" or "an", convert matched word
[when][][Tt]here is an? {entity:\w+}=
${entity!lc}: {entity!ucfirst} ()
# consequence statement: convert matched word, literal braces
[then][]update {entity:\w+}=modify( ${entity!lc} )\{ \}
The transformation of a DSLR file proceeds as follows:
The text is read into memory.
Each of the "keyword" entries is applied to the entire text. First, the regular expression from the keyword definition is modified by replacing white space sequences with a pattern matching any number of white space characters, and by replacing variable definitions with a capture made from the regular expression provided with the definition, or with the default (".*?"). Then, the DSLR text is searched exhaustively for occurrences of strings matching the modified regular expression. Substrings of a matching string corresponding to variable captures are extracted and replace variable references in the corresponding replacement text, and this text replaces the matching string in the DSLR text.
Sections of the DSLR text between "when" and "then", and "then" and "end", respectively, are located and processed in a uniform manner, line by line, as described below.
For a line, each DSL entry pertaining to the line's section is taken in turn, in the order it appears in the DSL file. Its regular expression part is modified: white space is replaced by a pattern matching any number of white space characters; variable definitions with a regular expression are replaced by a capture with this regular expression, its default being ".*?". If the resulting regular expression matches all or part of the line, the matched part is replaced by the suitably modified replacement text.
Modification of the replacement text is done by replacing variable references with the text corresponding to the regular expression capture. This text may be modified according to the string transformation function given in the variable reference; see below for details.
If there is a variable reference naming a variable that is not defined in the same entry, the expander substitutes a value bound to a variable of that name, provided it was defined in one of the preceding lines of the current rule.
If a DSLR line in a condition is written with a leading hyphen, the expanded result is inserted into the last line, which should contain a pattern CE, i.e., a type name followed by a pair of parentheses. if this pair is empty, the expanded line (which should contain a valid constraint) is simply inserted, otherwise a comma (",") is inserted beforehand.
If a DSLR line in a consequence is written with a leading hyphen, the expanded result is inserted into the last line, which should contain a "modify" statement, ending in a pair of braces ("{" and "}"). If this pair is empty, the expanded line (which should contain a valid method call) is simply inserted, otherwise a comma (",") is inserted beforehand.
Note
It is currently not possible to use a line with a leading hyphen to insert text into other conditional element forms (e.g., "accumulate") or it may only work for the first insertion (e.g., "eval").
All string transformation functions are described in the following table.
Table 5.3. String transformation functions
| Name | Description |
|---|---|
| uc | Converts all letters to upper case. |
| lc | Converts all letters to lower case. |
| ucfirst | Converts the first letter to upper case, and all other letters to lower case. |
| num | Extracts all digits and "-" from the string. If the last two digits in the original string are preceded by "." or ",", a decimal period is inserted in the corresponding position. |
| a?b/c | Compares the string with string a, and if they are equal, replaces it with b, otherwise with c. But c can be another triplet a, b, c, so that the entire structure is, in fact, a translation table. |
The following DSL examples show how to use string transformation functions.
# definitions for conditions
[when][]There is an? {entity}=${entity!lc}: {entity!ucfirst}()
[when][]- with an? {attr} greater than {amount}={attr} <= {amount!num}
[when][]- with a {what} {attr}={attr} {what!positive?>0/negative?%lt;0/zero?==0/ERROR}A file containing a DSL definition is customarily given the extension
.dsl. It is passed to the Knowledge Builder with
ResourceType.DSL. For a file using DSL definition, the extension
.dslr should be used. The Knowledge Builder expects
ResourceType.DSLR. The IDE, however, relies on file extensions
to correctly recognize and work with your rules file.
The DSL must be passed to the Knowledge Builder ahead of any rules file using the DSL.
KnowledgeBuilder kBuilder = new KnowledgeBuilder(); Resource dsl = ResourceFactory.newClassPathResource( dslPath, getClass() ); kBuilder.add( dsl, ResourceType.DSL ); Resource dslr = ResourceFactory.newClassPathResource( dslrPath, getClass() ); kBuilder.add( dslr, ResourceType.DSLR );
For parsing and expanding a DSLR file the DSL configuration is read and supplied to the parser. Thus, the parser can "recognize" the DSL expressions and transform them into native rule language expressions.
As an option, Drools also supports a "native" rule language as an alternative to DRL. This allows you to capture and manage your rules as XML data. Just like the non-XML DRL format, the XML format is parsed into the internal "AST" representation - as fast as possible (using a SAX parser). There is no external transformation step required. All the features are available with XML that are available to DRL.
There are several scenarios that XML is desirable. However, we recommend that it is not a default choice, as XML is not readily human readable (unless you like headaches) and can create visually bloated rules.
If you do want to edit XML by hand, use a good schema aware editor that provides nice hierarchical views of the XML, ideally visually (commercial tools like XMLSpy, Oxygen etc are good, but cost money, but then so do headache tablets).
Other scenarios where you may want to use the XML format are if you have a tool that generates rules from some input (programmatically generated rules), or perhaps interchange from another rule language, or from another tool that emits XML (using XSLT you can easily transform between XML formats). Note you can always generate normal DRL as well.
Alternatively you may be embedding Drools in a product that already uses XML for configuration, so you would like the rules to be in an XML format. You may be creating your own rule language on XML - note that you can always use the AST objects directly to create your own rule language as well (the options are many, due to the open architecture).
A full W3C standards (XMLSchema) compliant XSD is provided that describes the XML language, which will not be repeated here verbatim. A summary of the language follows.
<?xml version="1.0" encoding="UTF-8"?>
<package name="com.sample"
xmlns="http://drools.org/drools-4.0"
xmlns:xs="http://www.w3.org/2001/XMLSchema-instance"
xs:schemaLocation="http://drools.org/drools-4.0 drools-4.0.xsd">
<import name="java.util.HashMap" />
<import name="org.drools.*" />
<global identifier="x" type="com.sample.X" />
<global identifier="yada" type="com.sample.Yada" />
<function return-type="void" name="myFunc">
<parameter identifier="foo" type="Bar" />
<parameter identifier="bada" type="Bing" />
<body>
System.out.println("hello world");
</body>
</function>
<rule name="simple_rule">
<rule-attribute name="salience" value="10" />
<rule-attribute name="no-loop" value="true" />
<rule-attribute name="agenda-group" value="agenda-group" />
<rule-attribute name="activation-group" value="activation-group" />
<lhs>
<pattern identifier="foo2" object-type="Bar" >
<or-constraint-connective>
<and-constraint-connective>
<field-constraint field-name="a">
<or-restriction-connective>
<and-restriction-connective>
<literal-restriction evaluator=">" value="60" />
<literal-restriction evaluator="<" value="70" />
</and-restriction-connective>
<and-restriction-connective>
<literal-restriction evaluator="<" value="50" />
<literal-restriction evaluator=">" value="55" />
</and-restriction-connective>
</or-restriction-connective>
</field-constraint>
<field-constraint field-name="a3">
<literal-restriction evaluator="==" value="black" />
</field-constraint>
</and-constraint-connective>
<and-constraint-connective>
<field-constraint field-name="a">
<literal-restriction evaluator="==" value="40" />
</field-constraint>
<field-constraint field-name="a3">
<literal-restriction evaluator="==" value="pink" />
</field-constraint>
</and-constraint-connective>
<and-constraint-connective>
<field-constraint field-name="a">
<literal-restriction evaluator="==" value="12"/>
</field-constraint>
<field-constraint field-name="a3">
<or-restriction-connective>
<literal-restriction evaluator="==" value="yellow"/>
<literal-restriction evaluator="==" value="blue" />
</or-restriction-connective>
</field-constraint>
</and-constraint-connective>
</or-constraint-connective>
</pattern>
<not>
<pattern object-type="Person">
<field-constraint field-name="likes">
<variable-restriction evaluator="==" identifier="type"/>
</field-constraint>
</pattern>
<exists>
<pattern object-type="Person">
<field-constraint field-name="likes">
<variable-restriction evaluator="==" identifier="type"/>
</field-constraint>
</pattern>
</exists>
</not>
<or-conditional-element>
<pattern identifier="foo3" object-type="Bar" >
<field-constraint field-name="a">
<or-restriction-connective>
<literal-restriction evaluator="==" value="3" />
<literal-restriction evaluator="==" value="4" />
</or-restriction-connective>
</field-constraint>
<field-constraint field-name="a3">
<literal-restriction evaluator="==" value="hello" />
</field-constraint>
<field-constraint field-name="a4">
<literal-restriction evaluator="==" value="null" />
</field-constraint>
</pattern>
<pattern identifier="foo4" object-type="Bar" >
<field-binding field-name="a" identifier="a4" />
<field-constraint field-name="a">
<literal-restriction evaluator="!=" value="4" />
<literal-restriction evaluator="!=" value="5" />
</field-constraint>
</pattern>
</or-conditional-element>
<pattern identifier="foo5" object-type="Bar" >
<field-constraint field-name="b">
<or-restriction-connective>
<return-value-restriction evaluator="==" >a4 + 1</return-value-restriction>
<variable-restriction evaluator=">" identifier="a4" />
<qualified-identifier-restriction evaluator="==">
org.drools.Bar.BAR_ENUM_VALUE
</qualified-identifier-restriction>
</or-restriction-connective>
</field-constraint>
</pattern>
<pattern identifier="foo6" object-type="Bar" >
<field-binding field-name="a" identifier="a4" />
<field-constraint field-name="b">
<literal-restriction evaluator="==" value="6" />
</field-constraint>
</pattern>
</lhs>
<rhs>
if ( a == b ) {
assert( foo3 );
} else {
retract( foo4 );
}
System.out.println( a4 );
</rhs>
</rule>
</package>
In the preceding XML text you will see the typical XML element, the package declaration, imports, globals, functions, and the rule itself. Most of the elements are self explanatory if you have some understanding of the Drools features.
The import elements import the types you wish to
use in the rule.
The global elements define global objects that can
be referred to in the rules.
The function contains a function declaration, for
a function to be used in the rules. You have to specify a return type,
a unique name and parameters, in the body goes a snippet of code.
The rule is discussed below.
Example 5.63. Detail of rule element
<rule name="simple_rule">
<rule-attribute name="salience" value="10" />
<rule-attribute name="no-loop" value="true" />
<rule-attribute name="agenda-group" value="agenda-group" />
<rule-attribute name="activation-group" value="activation-group" />
<lhs>
<pattern identifier="cheese" object-type="Cheese">
<from>
<accumulate>
<pattern object-type="Person"></pattern>
<init>
int total = 0;
</init>
<action>
total += $cheese.getPrice();
</action>
<result>
new Integer( total ) );
</result>
</accumulate>
</from>
</pattern>
<pattern identifier="max" object-type="Number">
<from>
<accumulate>
<pattern identifier="cheese" object-type="Cheese"></pattern>
<external-function evaluator="max" expression="$price"/>
</accumulate>
</from>
</pattern>
</lhs>
<rhs>
list1.add( $cheese );
</rhs>
</rule>
In the above detail of the rule we see that the rule has LHS and RHS (conditions and consequence) sections. The RHS is simple, it is just a block of semantic code that will be executed when the rule is activated. The LHS is slightly more complicated as it contains nested elements for conditional elements, constraints and restrictions.
A key element of the LHS is the Pattern element. This allows you to specify a type (class) and perhaps bind a variable to an instance of that class. Nested under the pattern object are constraints and restrictions that have to be met. The Predicate and Return Value constraints allow Java expressions to be embedded.
That leaves the conditional elements, not, exists, and, or etc. They work like their DRL counterparts. Elements that are nested under and an "and" element are logically "anded" together. Likewise with "or" (and you can nest things further). "Exists" and "Not" work around patterns, to check for the existence or nonexistence of a fact meeting the pattern's constraints.
The Eval element allows the execution of a valid snippet of Java code - as long as it evaluates to a boolean (do not end it with a semi-colon, as it is just a fragment) - this can include calling a function. The Eval is less efficient than the columns, as the rule engine has to evaluate it each time, but it is a "catch all" feature for when you can express what you need to do with Column constraints.
The Drools 2.x legacy XML format is no longer supported by Drools XML parser
Drools comes with some utility classes to transform between formats. This works by parsing the rules from the source format into the AST, and then "dumping" out to the appropriate target format. This allows you, for example, to write rules in DRL, and when needed, export to XML if necessary at some point in the future.
The classes to look at if you need to do this are:
XmlDumper - for exporting XML. DrlDumper - for exporting DRL. DrlParser - reading DRL. XmlPackageReader - reading XML.
Using combinations of the above, you can convert between any format (including round trip). Note that DSLs will not be preserved (from DRLs that are using a DSL) - but they will be able to be converted.
Feel free to make use of XSLT to provide all sorts of possibilities for XML, XSLT and its ilk are what make XML powerful.
Decision tables are a "precise yet compact" (ref. Wikipedia) way of representing conditional logic, and are well suited to business level rules.
Drools supports managing rules in a spreadsheet format. Supported formats are Excel (XLS), and CSV, which means that a variety of spreadsheet programs (such as Microsoft Excel, OpenOffice.org Calc amongst others) can be utilized. It is expected that web based decision table editors will be included in a near future release.
Decision tables are an old concept (in software terms) but have proven useful over the years. Very briefly speaking, in Drools decision tables are a way to generate rules driven from the data entered into a spreadsheet. All the usual features of a spreadsheet for data capture and manipulation can be taken advantage of.
Consider decision tables as a course of action if rules exist that can be expressed as rule templates and data: each row of a decision table provides data that is combined with a template to generate a rule.
Many businesses already use spreadsheets for managing data, calculations, etc. If you are happy to continue
this way, you can also manage your business rules this way. This also assumes you are happy to manage packages of
rules in .xls or .csv files. Decision tables are not recommended for rules
that do not follow a set of templates, or where there are a small number of rules (or if there is a dislike towards
software like Excel or OpenOffice.org). They are ideal in the sense that there can be control over what
parameters of rules can be edited, without exposing the rules directly.
Decision tables also provide a degree of insulation from the underlying object model.
Here are some examples of real world decision tables (slightly edited to protect the innocent).


In the above examples, the technical aspects of the decision table have been collapsed away (using a standard spreadsheet feature).
The rules start from row 17, with each row resulting in a rule. The conditions are in columns C, D, E, etc., the actions being off-screen. The values in the cells are quite simple, and their meaning is indicated by the headers in Row 16. Column B is just a description. It is customary to use color to make it obvious what the different areas of the table mean.
Note
Note that although the decision tables look like they process top down, this is not necessarily the case. Ideally, rules are authored without regard for the order of rows, simply because this makes maintenance easier, as rows will not need to be shifted around all the time.
As each row is a rule, the same principles apply. As the rule engine processes the facts, any rules that match may fire. (Some people are confused by this. It is possible to clear the agenda when a rule fires and simulate a very simple decision table where only the first match effects an action.) Also note that you can have multiple tables on one spreadsheet. This way, rules can be grouped where they share common templates, yet at the end of the day they are all combined into one rule package. Decision tables are essentially a tool to generate DRL rules automatically.

The key point to keep in mind is that in a decision table each row is a rule, and each column in that row is either a condition or action for that rule.

The spreadsheet looks for the RuleTable keyword to indicate the start of a rule table (both the starting row and column). Other keywords are also used to define other package level attributes (covered later). It is important to keep the keywords in one column. By convention the second column ("B") is used for this, but it can be any column (convention is to leave a margin on the left for notes). In the following diagram, C is actually the column where it starts. Everything to the left of this is ignored.
If we expand the hidden sections, it starts to make more sense how it works; note the keywords in column C.

Now the hidden magic which makes it work can be seen. The RuleSet keyword indicates the name to be used in the rule package that will encompass all the rules. This name is optional, using a default, but it must have the RuleSet keyword in the cell immediately to the right.
The other keywords visible in Column C are Import and Sequential which will be covered later. The RuleTable keyword is important as it indicates that a chunk of rules will follow, based on some rule templates. After the RuleTable keyword there is a name, used to prefix the names of the generated rules. The row numbers are appended to guarantee unique rule names. The column of RuleTable indicates the column in which the rules start; columns to the left are ignored.
Note
In general the keywords make up name-value pairs.
Referring to row 14 (the row immediately after RuleTable), the keywords CONDITION and ACTION indicate that the data in the columns below are for either the LHS or the RHS parts of a rule. There are other attributes on the rule which can also be optionally set this way.
Row 15 contains declarations of ObjectTypes. The content in this row is optional, but
if this option is not in use, the row must be left blank; however this option is usually found to be quite useful.
When using this row, the values in the cells below (row 16) become constraints on that object type. In the above
case, it generates Person(age=="42") and Cheese(type=="stilton"), where 42 and
"stilton" come from row 18. In the above example, the "==" is implicit; if just a field name is given the
translator assumes that it is to generate an exact match.
Note
An ObjectType declaration can span columns (via merged cells), meaning that all columns below the merged range are to be combined into one set of constraints within a single pattern matching a single fact at a time, as opposed to non-merged cells containing the same ObjectType, but resulting in different patterns, potentially matching different or identical facts.
Row 16 contains the rule templates themselves. They can use the "$param" placeholder to indicate where data from the cells below should be interpolated. (For multiple insertions, use "$1", "$2", etc., indicating parameters from a comma-separated list in a cell below.) Row 17 is ignored; it may contain textual descriptions of the column's purpose.
Rows 18 and 19 show data, which will be combined (interpolated) with the templates in row 15, to generate rules. If a cell contains no data, then its template is ignored. (This would mean that some condition or action does not apply for that rule row.) Rule rows are read until there is a blank row. Multiple RuleTables can exsist in a sheet. Row 20 contains another keyword, and a value. The row positions of keywords like this do not matter (most people put them at the top) but their column should be the same one where the RuleTable or RuleSet keywords should appear. In our case column C has been chosen to be significant, but any other column could be used instead.
In the above example, rules would be rendered like the following (as it uses the "ObjectType" row):
//row 18
rule "Cheese_fans_18"
when
Person(age=="42")
Cheese(type=="stilton")
then
list.add("Old man stilton");
end
Note
The constraints age=="42" and type=="stilton" are interpreted as single
constraints, to be added to the respective ObjectType in the cell above. If the cells above were spanned, then
there could be multiple constraints on one "column".
There are two types of rectangular areas defining data that is used for generating a DRL file.
One, marked by a cell labelled RuleSet, defines all DRL items except rules. The
other one may occur repeatedly and is to the right and below a cell whose contents begin with
RuleTable. These areas represent the actual decision tables, each area resulting
in a set of rules of similar structure.
A Rule Set area may contain cell pairs, one below the RuleSet cell and containing
a keyword designating the kind of value contained in the other one that follows in the same row.
The columns of a Rule Table area define patterns and constraints for the left hand sides of
the rules derived from it, actions for the consequences of the rules, and the values of
individual rule attributes. Thus, a Rule Table area should contain one or more columns, both for
conditions and actions, and an arbitrary selection of columns for rule attributes, at most one
column for each of these. The first four rows following the row with the cell marked with
RuleTable are earmarked as header area, mostly used for the definition of code to
construct the rules. It is any additional row below these four header rows that spawns another
rule, with its data providing for variations in the code defined in the Rule Table header.
All keywords are case insensitive.
Only the first worksheet is examined for decision tables.
Entries in a Rule Set area may define DRL constructs (except rules), and specify rule attributes. While entries for constructs may be used repeatedly, each rule attribute may be given at most once, and it applies to all rules unless it is overruled by the same attribute being defined within the Rule Table area.
Entries must be given in a vertically stacked sequence of cell pairs. The first one
contains a keyword and the one to its right the value, as shown in the table below.
This sequence of cell pairs may be interrupted by blank rows or even a Rule Table, as long
as the column marked by RuleSet is upheld as the one containing the keyword.
Table 6.1. Entries in the Rule Set area
| Keyword | Value | Usage |
|---|---|---|
| RuleSet | The package name for the generated DRL file.
Optional, the default is rule_table. | Must be First entry. |
| Sequential | "true" or "false". If "true", then salience is used to ensure that rules fire from the top down. | Optional, at most once. If omitted, no firing order is imposed. |
| Import | A comma-separated list of Java classes to import. | Optional, may be used repeatedly. |
| Variables | Declarations of DRL globals, i.e., a type followed by a variable name. Multiple global definitions must be separated with a comma. | Optional, may be used repeatedly. |
| Functions | One or more function definitions, according to DRL syntax. | Optional, may be used repeatedly. |
| Queries | One or more query definitions, according to DRL syntax. | Optional, may be used repeatedly. |
For defining rule attributes that apply to all rules in the generated DRL file you can use any of the entries in the following table. Notice, however, that the proper keyword must be used. Also, each of these attributes may be used only once.
Table 6.2. Rule attribute entries in the Rule Set area
| Keyword | Initial | Value |
|---|---|---|
| PRIORITY | P | An integer defining the "salience" value for the rule. Overriden by the "Sequential" flag. |
| DURATION | D | A long integer value defining the "duration" value for the rule. |
| NO-LOOP | U | A Boolean value. "true" inhibits looping of rules due to changes made by its consequence. |
| LOCK-ON-ACTIVE | L | A Boolean value. "true" inhibits additional activations of all rules with this flag set within the same ruleflow or agenda group. |
| AUTO-FOCUS | F | A Boolean value. "true" for a rule within an agenda group causes activations of the rule to automatically give the focus to the group. |
| ACTIVATION-GROUP | X | A string identifying an activation (or XOR) group. Only one rule within an activation group will fire, i.e., the first one to fire cancels any existing activations of other rules within the same group. |
| AGENDA-GROUP | G | A string identifying an agenda group, which has to be activated by giving it the "focus", which is one way of controlling the flow between groups of rules. |
| RULEFLOW-GROUP | R | A string identifying a rule-flow group. |
All Rule Tables begin with a cell containing "RuleTable", optionally followed by a string within the same cell. The string is used as the initial part of the name for all rules derived from this Rule Table, with the row number appended for distinction. (This automatic naming can be overridden by using a NAME column.) All other cells defining rules of this Rule Table are below and to the right of this cell.
The next row defines the column type, with each column resulting in a part of the condition or the consequence, or providing some rule attribute, the rule name or a comment. The table below shows which column headers are available; additional columns may be used according to the table showing rule attribute entries given in the preceding section. Note that each attribute column may be used at most once. For a column header, either use the keyword or any other word beginning with the letter given in the "Initial" column of these tables.
Table 6.3. Column Headers in the Rule Table
| Keyword | Initial | Value | Usage |
|---|---|---|---|
| NAME | N | Provides the name for the rule generated from that row. The default is constructed from the text following the RuleTable tag and the row number. | At most one column |
| DESCRIPTION | I | A text, resulting in a comment within the generated rule. | At most one column |
| CONDITION | C | Code snippet and interpolated values for constructing a constraint within a pattern in a condition. | At least one per rule table |
| ACTION | A | Code snippet and interpolated values for constructing an action for the consequence of the rule. | At least one per rule table |
| METADATA | @ | Code snippet and interpolated values for constructing a metadata entry for the rule. | Optional, any number of columns |
Given a column headed CONDITION, the cells in successive lines result in a conditional element.
Text in the first cell below CONDITION develops into a pattern for the rule condition, with the snippet in the next line becoming a constraint. If the cell is merged with one or more neighbours, a single pattern with multiple constraints is formed: all constraints are combined into a parenthesized list and appended to the text in this cell. The cell may be left blank, which means that the code snippet in the next row must result in a valid conditional element on its own.
To include a pattern without constraints, you can write the pattern in front of the text for another pattern.
The pattern may be written with or without an empty pair of parentheses. A "from" clause may be appended to the pattern.
If the pattern ends with "eval", code snippets are supposed to produce boolean expressions for inclusion into a pair of parentheses after "eval".
Text in the second cell below CONDITION is processed in two steps.
The code snippet in this cell is modified by interpolating values from cells farther down in the column. If you want to create a constraint consisting of a comparison using "==" with the value from the cells below, the field selector alone is sufficient. Any other comparison operator must be specified as the last item within the snippet, and the value from the cells below is appended. For all other constraint forms, you must mark the position for including the contents of a cell with the symbol
$param. Multiple insertions are possible by using the symbols$1,$2, etc., and a comma-separated list of values in the cells below.A text according to the pattern
forall(delimiter){snippet}is expanded by repeating the snippet once for each of the values of the comma-separated list of values in each of the cells below, inserting the value in place of the symbol$and by joining these expansions by the given delimiter. Note that the forall construct may be surrounded by other text.If the cell in the preceding row is not empty, the completed code snippet is added to the conditional element from that cell. A pair of parentheses is provided automatically, as well as a separating comma if multiple constraints are added to a pattern in a merged cell.
If the cell above is empty, the interpolated result is used as is.
Text in the third cell below CONDITION is for documentation only. It should be used to indicate the column's purpose to a human reader.
From the fourth row on, non-blank entries provide data for interpolation as described above. A blank cell results in the omission of the conditional element or constaint for this rule.
Given a column headed ACTION, the cells in successive lines result in an action statement.
Text in the first cell below ACTION is optional. If present, it is interpreted as an object reference.
Text in the second cell below ACTION is processed in two steps.
The code snippet in this cell is modified by interpolating values from cells farther down in the column. For a singular insertion, mark the position for including the contents of a cell with the symbol
$param. Multiple insertions are possible by using the symbols$1,$2, etc., and a comma-separated list of values in the cells below.A method call without interpolation can be achieved by a text without any marker symbols. In this case, use any non-blank entry in a row below to include the statement.
The forall construct is available here, too.
If the first cell is not empty, its text, followed by a period, the text in the second cell and a terminating semicolon are stringed together, resulting in a method call which is added as an action statement for the consequence.
If the cell above is empty, the interpolated result is used as is.
Text in the third cell below ACTION is for documentation only. It should be used to indicate the column's purpose to a human reader.
From the fourth row on, non-blank entries provide data for interpolation as described above. A blank cell results in the omission of the action statement for this rule.
Note
Using $1 instead of $param works in most cases, but it will fail
if the replacement text contains a comma: then, only the part preceding the first comma is inserted.
Use this "abbreviation" judiciously.
Given a column headed METADATA, the cells in successive lines result in a metadata annotation for the generated rules.
Text in the first cell below METADATA is ignored.
Text in the second cell below METADATA is subject to interpolation, as described above, using values from the cells in the rule rows. The metadata marker character
@is prefixed automatically, and thus it should not be included in the text for this cell.Text in the third cell below METADATA is for documentation only. It should be used to indicate the column's purpose to a human reader.
From the fourth row on, non-blank entries provide data for interpolation as described above. A blank cell results in the omission of the metadata annotation for this rule.
The various interpolations are illustrated in the following example.
Example 6.1. Interpolating cell data
If the template is Foo(bar == $param) and the cell is 42, then the result is
Foo(bar == 42).
If the template is Foo(bar < $1, baz == $2) and the cell contains 42,43,
the result will be Foo(bar < 42, baz ==43).
The template forall(&&){bar != $} with a cell containing 42,43
results in bar != 42 && bar != 43.
The next example demonstrates the joint effect of a cell defining the pattern type and the code snippet below it.

This spreadsheet section shows how the Person type declaration spans 2 columns, and thus
both constraints will appear as Person(age == ..., type == ...). Since only
the field names are present in the snippet, they imply an equality test.
In the following example the marker symbol $param is used.

The result of this column is the pattern Person(age == "42")). You may have
noticed that the marker and the operator "==" are redundant.
The next example illustrates that a trailing insertion marker can be omitted.

Here, appending the value from the cell is implied, resulting in Person(age < "42")).
You can provide the definition of a binding variable, as in the example below. .

Here, the result is c: Cheese(type == "stilton"). Note that the quotes are provided
automatically. Actually, anything can be placed in the object type row. Apart from the definition
of a binding variable, it could alse be an additional pattern that is to be inserted literally.
A simple construction of an action statement with the insertion of a single value is shown below.

The cell below the ACTION header is left blank. Using this style, anything can be placed in the consequence, not just a sinle method call. (The same technique is applicable within a CONDITION column as well.)
Below is a comprehensive example, showing the use of various column headers. It is not an error to have no value below a column header (as in the NO-LOOP column): here, the attribute will not be applied in any of the rules.

And, finally, here is an example of Import, Variables and Functions.

Multiple package names within the same cell must be separated by a comma. Also, the pairs of type and variable names must be comma-separated. Functions, however, must be written as they appear in a DRL file. This should appear in the same column as the "RuleSet" keyword; it could be above, between or below all the rule rows.
Note
It may be more convenient to use Import, Variables, Functions and Queries repeatedly rather than packing several definitions into a single cell.
The API to use spreadsheet based decision tables is in the drools-decisiontables module. There is really only
one class to look at: SpreadsheetCompiler. This class will take spreadsheets in various formats,
and generate rules in DRL (which you can then use in the normal way). The SpreadsheetCompiler can
just be used to generate partial rule files if it is wished, and assemble it into a complete rule package after the
fact (this allows the separation of technical and non-technical aspects of the rules if needed).
To get started, a sample spreadsheet can be used as a base. Alternatively, if the plug-in is being used (Rule Workbench IDE), the wizard can generate a spreadsheet from a template (to edit it an xls compatible spreadsheet editor will need to be used).

Spreadsheets are well established business tools (in use for over 25 years). Decision tables lend themselves to close collaboration between IT and domain experts, while making the business rules clear to business analysts, it is an ideal separation of concerns.
Typically, the whole process of authoring rules (coming up with a new decision table) would be something like:
Business analyst takes a template decision table (from a repository, or from IT)
Decision table business language descriptions are entered in the table(s)
Decision table rules (rows) are entered (roughly)
Decision table is handed to a technical resource, who maps the business language (descriptions) to scripts (this may involve software development of course, if it is a new application or data model)
Technical person hands back and reviews the modifications with the business analyst.
The business analyst can continue editing the rule rows as needed (moving columns around is also fine etc).
In parallel, the technical person can develop test cases for the rules (liaising with business analysts) as these test cases can be used to verify rules and rule changes once the system is running.
Features of applications like Excel can be used to provide assistance in entering data into spreadsheets, such as validating fields. Lists that are stored in other worksheets can be used to provide valid lists of values for cells, like in the following diagram.

Some applications provide a limited ability to keep a history of changes, but it is recommended to use an alternative means of revision control. When changes are being made to rules over time, older versions are archived (many open source solutions exist for this, such as Subversion or Git).
Related to decision tables (but not necessarily requiring a spreadsheet) are "Rule Templates" (in the drools-templates module). These use any tabular data source as a source of rule data - populating a template to generate many rules. This can allow both for more flexible spreadsheets, but also rules in existing databases for instance (at the cost of developing the template up front to generate the rules).
With Rule Templates the data is separated from the rule and there are no restrictions on which part of the rule is data-driven. So whilst you can do everything you could do in decision tables you can also do the following:
store your data in a database (or any other format)
conditionally generate rules based on the values in the data
use data for any part of your rules (e.g. condition operator, class name, property name)
run different templates over the same data
As an example, a more classic decision table is shown, but without any hidden rows for the rule meta data (so the spreadsheet only contains the raw data to generate the rules).

See the ExampleCheese.xls in the examples download for the above spreadsheet.
If this was a regular decision table there would be hidden rows before row 1 and between rows 1 and 2 containing rule metadata. With rule templates the data is completely separate from the rules. This has two handy consequences - you can apply multiple rule templates to the same data and your data is not tied to your rules at all. So what does the template look like?
1 template header
2 age
3 type
4 log
5
6 package org.drools.examples.templates;
7
8 global java.util.List list;
9
10 template "cheesefans"
11
12 rule "Cheese fans_@{row.rowNumber}"
13 when
14 Person(age == @{age})
15 Cheese(type == "@{type}")
16 then
17 list.add("@{log}");
18 end
19
20 end template
Annotations to the preceding program listing:
Line 1: All rule templates start with
template header.Lines 2-4: Following the header is the list of columns in the order they appear in the data. In this case we are calling the first column
age, the secondtypeand the thirdlog.Line 5: An empty line signifies the end of the column definitions.
Lines 6-9: Standard rule header text. This is standard rule DRL and will appear at the top of the generated DRL. Put the package statement and any imports and global and function definitions into this section.
Line 10: The keyword
templatesignals the start of a rule template. There can be more than one template in a template file, but each template should have a unique name.Lines 11-18: The rule template - see below for details.
Line 20: The keywords
end templatesignify the end of the template.
The rule templates rely on MVEL to do substitution using the syntax @{token_name}. There is currently one built-in expression, @{row.rowNumber} which gives a unique number for each row of data and enables you to generate unique rule names. For each row of data a rule will be generated with the values in the data substituted for the tokens in the template. With the example data above the following rule file would be generated:
package org.drools.examples.templates;
global java.util.List list;
rule "Cheese fans_1"
when
Person(age == 42)
Cheese(type == "stilton")
then
list.add("Old man stilton");
end
rule "Cheese fans_2"
when
Person(age == 21)
Cheese(type == "cheddar")
then
list.add("Young man cheddar");
end
The code to run this is simple:
DecisionTableConfiguration dtableconfiguration =
KnowledgeBuilderFactory.newDecisionTableConfiguration();
dtableconfiguration.setInputType( DecisionTableInputType.XLS );
KnowledgeBuilder kbuilder = KnowledgeBuilderFactory.newKnowledgeBuilder();
kbuilder.add( ResourceFactory.newClassPathResource( getSpreadsheetName(),
getClass() ),
ResourceType.DTABLE,
dtableconfiguration );
If you discover that you have a group of rules following the same arrangement of patterns, constraints and actions on the RHS, differing only in constants or names for objects or fields, you might think of employing Drool's rule template feature for generating the actual rules. You would write a rule template file, containing the textual skeleton of your rule and use the Drools template compiler in combination with a collection of objects providing the actual values for the "flesh" of the rules for their instantiation.
The mechanism is very similar to what a macro processor does. The major advantage proffered by template expansion is that it's nicely integrated in the overall handling of Knowledge Resources.
Caution
This is an experimental feature. In particular, the API is subject to change.
A rule template file begins with a header defining the
placeholders, or formal template parameters
for the strings that are to be inserted during instantiation.
After the first line, which invariably contains template header,
you should write a number of lines, each of which contains a single
parameter name.
Example 6.2. Rule template file: template header
template header parameter-name-1 ... parameter-name-n ...
The template header is followed by the text that is to
be replicated and interpolated with the actual parameters. It
may begin with a package statement, followed by some
additional lines. These
may be sectioned into one or more templates, each of them
between a pair of matching template and
end template statements. The template takes
an argument, which puts a name to the template. The name
can be a simple unquoted name or an arbitrary string enclosed
in double quotes. The template text between these lines may
contain one or more rules, constituting the "raw material"
for the expansion.
Example 6.3. Rule template file: templates
template header parameter-name-1 ... parameter-name-n package ... # optional header text # optional template template-name ... // template text ... end template ...
The resulting text will begin with the package line and the header text following it, if present. Then, each template text will be expanded individually, yielding one set of rules for each of the actual parameter sets. Therefore, the structure of the template sections affect the order of the generated rules, since the generator iterates over the sections and then over the set of actual parameters.
Any interpolation takes place between a pair of template
and end template statements, when this template is
expanded. The template text is scanned for occurrences of
parameter expansions written according to:
@{parameter-name}The name between '@{' and '}' should be one of the parameter names defined in the template header. The substitution is effected anywhere, even within string literals.
An important parameter is available without having to be
included in the data source providing the actual values. The
parameter substitution
@{row.rowNumber}
expands to the integers 0, 1, 2, etc., providing a unique distinction
for the instantiation derived from a parameter set. You would use this
as part of each rule name, because, without this precaution, there
would be duplicate rule names. (You are, of course, free to use your
own identification included as an extra parameter.)
To expand a template, you must prepare a data source. This can
be a spreadsheet, as explained in the previous section. Here, we'll
concentrate on expansion driven by Java objects. There are two
straightforward ways of supplying values for a fixed set of names:
Java objects, in the JavaBeans style, and Maps. Both of them can
be arranged in a Collection, whose elements will be
processed during the expansion, resulting in an instantiation
for each element.
You may use a Java object that provides getter methods corresponding to all of the parameter names of your template file. If, for instance, you have defined a header
template header type limit word
the following Java class could be used:
public class ParamSet {
//...
public ParamSet( String t, int l, boolean w ) {
//...
}
public String getType(){...}
public int getLimit(){...}
public boolean isWord(){...}
}
Although interpolation is pure text manipulation, the actual values
supplied may be of any type, just as long as this type provides a
reasonable toString() method. (For simple types, the
eponymous static method of the related class from java.lang
is used.)
Assuming that we have created a Collection<ParamSet>
for a template file template.drl, we can now proceed to
request its expansion.
The resulting string contains the expanded rules text. You could write it to a file and proceed as usual, but it's also possible to feed this to a
Collection<ParamSet> paramSets = new ArrayList<ParamSet>();
// populate paramSets
paramSets.add( new ParamSet( "Foo", 42, true ) );
paramSets.add( new ParamSet( "Bar", 13, false ) );
ObjectDataCompiler converter = new ObjectDataCompiler();
InputStream templateStream =
this.getClass().getResourceAsStream( "template.drl" );
String drl = converter.compile( objs, templateStream );
KnowledgeBuilder and continue with the
resulting Knowledge Packages.
KnowledgeBase kBase = KnowledgeBaseFactory.newKnowledgeBase();
KnowledgeBuilder kBuilder = KnowledgeBuilderFactory.newKnowledgeBuilder();
Reader rdr = new StringReader( drl );
kBuilder.add( ResourceFactory.newReaderResource( rdr ), ResourceType.DRL );
if( kBuilder.hasErrors() ){
// ...
throw new IllegalStateException( "DRL errors" );
}
kBase.addKnowledgePackages( kBuilder.getKnowledgePackages() );
A Map that provides the values for substituting
template parameters should have a (string) key set matching all of
the parameter names. Again, values could be from any class, as long
as they provide a good toString() method. The expansion
would use the same approach, just differing in the way the
map collection is composed.
Collection<Map<String,Object>> paramMaps = new ArrayList<Map<String,Object>>();
// populate paramMaps
ObjectDataCompiler converter = new ObjectDataCompiler();
InputStream templateStream =
this.getClass().getResourceAsStream( "template.drl" );
String drl = converter.compile( objs, templateStream );
The following example illustrates template expansion. It is based on simple
objects of class Item containing a couple of integer fields and an
enum field of type ItemCode.
public class Item {
// ...
public Item( String n, int p, int w, ItemCode c ){...}
public String getName() {...}
public int getWeight() {...}
public int getPrice() {...}
public ItemCode getCode() {...}
}
public enum ItemCode {
LOCK,
STOCK,
BARREL;
}
The rule template contains a single rule. Notice that the field name for the range test is a parameter, which enables us to instantiate the template for different fields.
template header
field
lower
upper
codes
package range;
template "inRange"
rule "is in range @{row.rowNumber}"
when
Item( $name : name, $v : @{field} >= @{lower} && <= @{upper}, $code : code @{codes} )
then
System.out.println( "Item " + $name + " @{field} in range: " + $v + " code: " + $code );
end
end templateThe next code snippet is from the application, where several
parameter sets have to be set up. First, there is class
ParamSet, for storing a set of actual parameters.
public class ParamSet {
//...
private EnumSet<ItemCode> codeSet;
public ParamSet( String f, int l, int u, EnumSet<ItemCode> cs ){...}
public String getField() { return field; }
public int getLower() { return lower; }
public int getUpper() { return upper; }
public String getCodes(){
StringBuilder sb = new StringBuilder();
String conn = "";
for( ItemCode ic: codeSet ){
sb.append( conn ).append( " == ItemCode." ).append( ic );
conn = " ||";
}
return sb.toString();
}
}
Note that the method getCodes() does returns the
EnumSet<ItemCode> field value as a String
value representing a multiple restriction, i.e., a test for one out
of a list of values.
The task of expanding a template, passing the resulting DRL text
to a Knowledge Builder and adding the resulting Knowledge Packages
to a Knowledge Base is generic. The utility class Expander
takes care of this, using a Knowledge Base, the InputStream
with the rule template and the collection of parameter sets.
public class Expander {
public void expand( KnowledgeBase kBase, InputStream is, Collection<?> act )
throws Exception {
ObjectDataCompiler converter = new ObjectDataCompiler();
String drl = converter.compile( act, is );
KnowledgeBuilder kBuilder = KnowledgeBuilderFactory.newKnowledgeBuilder();
Reader rdr = new StringReader( drl );
kBuilder.add( ResourceFactory.newReaderResource( rdr ), ResourceType.DRL );
if( kBuilder.hasErrors() ){
for( KnowledgeBuilderError err: kBuilder.getErrors() ){
System.err.println( err.toString() );
}
throw new IllegalStateException( "DRL errors" );
}
kBase.addKnowledgePackages( kBuilder.getKnowledgePackages() );
}
}
We are now all set to prepare the Knowledge Base with some
generated rules. First, we define several parameter sets,
constructed as ParamSet objects, and add them to a
List, which is passed to the expand
method shown above. Then we launch a stateful session, insert a
few Item, and watch what happens.
Collection<ParamSet> cfl = new ArrayList<ParamSet>();
cfl.add( new ParamSet( "weight", 10, 99, EnumSet.of( ItemCode.LOCK, ItemCode.STOCK ) ) );
cfl.add( new ParamSet( "price", 10, 50, EnumSet.of( ItemCode.BARREL ) ) );
KnowledgeBase kBase = KnowledgeBaseFactory.newKnowledgeBase();
Expander ex = new Expander();
InputStream dis = new FileInputStream( new File( "rangeTemp.drl" ) );
ex.expand( kBase, dis, cfl );
StatefulKnowledgeSession session = kBase.newStatefulKnowledgeSession();
session.insert( new Item( "A", 130, 42, ItemCode.LOCK ) );
session.insert( new Item( "B", 44, 100, ItemCode.STOCK ) );
session.insert( new Item( "C", 123, 180, ItemCode.BARREL ) );
session.insert( new Item( "D", 85, 9, ItemCode.LOCK ) );
session.fireAllRules();
Notice that the two resulting rules deal with different fields, one with an item's weight, the other one with its price. - Below is the output.
Item E price in range: 25 code: BARREL Item A weight in range: 42 code: LOCK
Drools provides an implementation of the Java Rule Engine API (known as JSR94), which allows for support of multiple rule engines from a single API. JSR94 does not deal in any way with the rule language itself. W3C is working on the Rule Interchange Format (RIF) and the OMG has started to work on a standard based on RuleML. Recently Haley Systems has also proposed a rule language standard called RML.
It should be remembered that the JSR94 standard represents the "least common denominator" in features across rule engines. This means that there is less functionality in the JSR94 API than in the standard Knowledge (Drools and jBPM) API. So, by using JSR94, you forfeit the advantage of using the full capabilities of the Drools Rule Engine. It is necessary to expose further functionality, like globals and support for DRL, DSL and XML, via property maps due to the very basic feature set of JSR94; this introduces non-portable functionality. Furthermore, as JSR94 does not provide a rule language, you are only solving a small fraction of the complexity of switching rule engines with very little gain. So, while we support JSR94, for those that insist on using it, we strongly recommend you program against the Knowledge (Drools and jBPM) API.
There are two parts to working with JSR94. The first part is the administrative API that deals with building and registering RuleExecutionSet objects, the second part is runtime session execution of these RuleExecutionSets.
The RuleServiceProviderManager manages the registration and retrieval of RuleServiceProviders. The Drools RuleServiceProvider implementation is automatically registered via a static block when the class is loaded using Class.forNamem, in much the same way as JDBC drivers.
Example 7.1. Automatic RuleServiceProvider Registration
// RuleServiceProviderImpl is registered to "http://drools.org/"
// via a static initialization block
Class.forName("org.drools.jsr94.rules.RuleServiceProviderImpl");
// Get the rule service provider from the provider manager.
RuleServiceProvider ruleServiceProvider =
RuleServiceProviderManager.getRuleServiceProvider("http://drools.org/");
The RuleServiceProvider provides access to the RuleRuntime and RuleAdministrator APIs. The RuleAdministrator provides an administration API for the management of RuleExecutionSet objects, making it possible to register a RuleExecutionSet that can then be retrieved via the RuleRuntime.
First, you need to create a RuleExecutionSet before it can be registered; RuleAdministrator provides factory methods to return an empty LocalRuleExecutionSetProvider or RuleExecutionSetProvider. The LocalRuleExecutionSetProvider should be used to load a RuleExecutionSets from local sources that are not serializable, like Streams. The RuleExecutionSetProvider can be used to load RuleExecutionSets from serializable sources, like DOM Elements or Packages. Both the "ruleAdministrator.getLocalRuleExecutionSetProvider( null );" and the "ruleAdministrator.getRuleExecutionSetProvider( null );" take null as a parameter, as the properties map for these methods is not currently used.
Example 7.2. Registering a LocalRuleExecutionSet with the RuleAdministrator API
// Get the RuleAdministration
RuleAdministrator ruleAdministrator = ruleServiceProvider.getRuleAdministrator();
LocalRuleExecutionSetProvider ruleExecutionSetProvider =
ruleAdministrator.getLocalRuleExecutionSetProvider( null );
// Create a Reader for the drl
URL drlUrl = new URL("http://mydomain.org/sources/myrules.drl");
Reader drlReader = new InputStreamReader( drlUrl.openStream() );
// Create the RuleExecutionSet for the drl
RuleExecutionSet ruleExecutionSet =
ruleExecutionSetProvider.createRuleExecutionSet( drlReader, null );
"ruleExecutionSetProvider.createRuleExecutionSet( reader, null )" in the above example takes a null parameter for the properties map; however it can actually be used to provide configuration for the incoming source. When null is passed the default is used to load the input as a drl. Allowed keys for a map are "source" and "dsl". The key "source" takes "drl" or "xml" as its value; you set "source" to "drl" to load a DRL, or to "xml" to load an XML source; "xml" will ignore any "dsl" key/value settings. The "dsl" key can take a Reader or a String (the contents of the dsl) as a value.
Example 7.3. Specifying a DSL when registering a LocalRuleExecutionSet
// Get the RuleAdministration
RuleAdministration ruleAdministrator = ruleServiceProvider.getRuleAdministrator();
LocalRuleExecutionSetProvider ruleExecutionSetProvider =
ruleAdministrator.getLocalRuleExecutionSetProvider( null );
// Create a Reader for the drl
URL drlUrl = new URL("http://mydomain.org/sources/myrules.drl");
Reader drlReader = new InputStreamReader( drlUrl.openStream() );
// Create a Reader for the dsl and a put in the properties map
URL dslUrl = new URL("http://mydomain.org/sources/myrules.dsl");
Reader dslReader = new InputStreamReader( dslUrl.openStream() );
Map properties = new HashMap();
properties.put( "source", "drl" );
properties.put( "dsl", dslReader );
// Create the RuleExecutionSet for the drl and dsl
RuleExecutionSet ruleExecutionSet =
ruleExecutionSetProvider.createRuleExecutionSet( reader, properties );
When registering a RuleExecutionSet you must specify the name to be used for its retrieval. There is also a field to pass properties, which is currently unused - so just pass null.
Example 7.4. Register the RuleExecutionSet
// Register the RuleExecutionSet with the RuleAdministrator
String uri = ruleExecutionSet.getName();
ruleAdministrator.registerRuleExecutionSet(uri, ruleExecutionSet, null);
The Runtime, obtained from the RuleServiceProvider, is used to create stateful and stateless rule engine sessions.
To create a rule session you must use one of the two RuleRuntime public constants. These are "RuleRuntime.STATEFUL_SESSION_TYPE" and "RuleRuntime.STATELESS_SESSION_TYPE", accompanying the URI to the RuleExecutionSet you wish to instantiate a RuleSession for. The properties map can be null, or it can be used to specify globals, as shown in the next section. The createRuleSession(...) method returns a RuleSession instance which must then be cast to StatefulRuleSession or StatelessRuleSession.
Example 7.6. Stateful Rule
(StatefulRuleSession) session =
ruleRuntime.createRuleSession( uri,
null,
RuleRuntime.STATEFUL_SESSION_TYPE );
session.addObject( new PurchaseOrder( "lots of cheese" ) );
session.executeRules();
The StatelessRuleSession has a very simple API; you can only call executeRules(List list) passing a list of objects, and an optional filter, the resulting objects are then returned.
Example 7.7. Stateless
(StatelessRuleSession) session =
ruleRuntime.createRuleSession( uri,
null,
RuleRuntime.STATELESS_SESSION_TYPE );
List list = new ArrayList();
list.add( new PurchaseOrder( "even more cheese" ) );
List results = new ArrayList();
results = session.executeRules( list );
It is possible to support globals with JSR94, in a manner that is not portable, by using the properties map passed to the RuleSession factory method. Globals must be defined in the DRL or XML file first, otherwise an exception will be thrown. The key represents the identifier declared in the DRL or XML, and the value is the instance you wish to be used in the execution. In the following example the results are collected in a java.util.List which is used as global:
java.util.List globalList = new java.util.ArrayList( );
java.util.Map map = new java.util.HashMap( );
map.put( "list", globalList );
//Open a stateless Session
StatelessRuleSession srs =
(StatelessRuleSession) runtime.createRuleSession( "SistersRules",
map,
RuleRuntime.STATELESS_SESSION_TYPE );
...
// Persons added to List
// call executeRules( ) giving a List of Objects as parameter
// There are rules which will put Objects in the List
// fetch the list from the map
List list = (java.util.List) map.get("list");
Do not forget to declare the global "list" in your DRL:
package SistersRules;
import org.drools.jsr94.rules.Person;
global java.util.List list
rule FindSisters
when
$person1 : Person ( $name1:name )
$person2 : Person ( $name2:name )
eval( $person1.hasSister($person2) )
then
list.add($person1.getName() + " and " + $person2.getName() +" are sisters");
assert( $person1.getName() + " and " + $person2.getName() +" are sisters");
endIf you need more information on JSR 94, please refer to the following references
Official JCP Specification for Java Rule Engine API (JSR 94)
The Java Rule Engine API documentation
The Logic From The Bottom Line: An Introduction to The Drools Project. By N. Alex Rupp, published on TheServiceSide.com in 2004
Getting Started With the Java Rule Engine API (JSR 94): Toward Rule-Based Applications. By Dr. Qusay H. Mahmoud, published on Sun Developer Network in 2005
Jess and the javax.rules API. By Ernest Friedman-Hill, published on TheServerSide.com in 2003
The Eclipse based IDE provides developers (and very technical users) with an environment to edit and test rules in various formats, and integrate it deeply with their applications. In cases where you prefer business rules and web tooling, you will want to look at the BRMS (but using the BRMS and the IDE together is not uncommon).
The Drools IDE is delivered as an Eclipse plug-in, which allows you to author and manage rules from within Eclipse, as well as integrate rules with your application. This is an optional tool, and not all components are required to be used, you can use what components are relevant to you. The Drools IDE is also a part of the Red Hat Developer Studio (formerly known as JBoss IDE).
This guide will cover some of the features of JBoss Drools, in as far as the IDE touches on them (it is assumed that the reader has some familiarity with rule engines, and Drools in particular. It is important to note that none of the underlying features of the rule engine are dependent on Eclipse, and integrators are free to use their tools of choice, as always ! Plenty of people use IntelliJ with rules, for instance.
Note
You can get the plug-in either as a zip to download, or from an update site. Refer to the chapter on installation.

The rules IDE has the following features
Textual/graphical rule editor
An editor that is aware of DRL syntax, and provides content assistance (including an outline view)
An editor that is aware of DSL (domain specific langauge) extensions, and provides content assistance.
RuleFlow graphical editor
You can edit visual graphs which represent a process (a rule flow). The RuleFlow can then be applied to your rule package to have imperative control.
Wizards for fast creation of
a "rules" project
a rule resource, either as a DRL file or a "guided rule editor" file (.brl)
a Domain Specific language
a decision table
a ruleflow
A domain specific language editor
Create and manage mappings from your user's language to the rule language
Rule validation
As rules are entered, the rule is "built" in the background and errors reported via the problem view where possible
The above features make use of Eclipse infrastructure and features, with all of the power of Eclipse being available.
A Drools runtime is a collection of jar files that represent one specific release of the Drools project jars. To create a runtime, you must point the IDE to the release of your choice. If you want to create a new runtime based on the latest Drools project jars included in the plugin itself, you can also easily do that. You are required to specify a default Drools runtime for your Eclipse workspace, but each individual project can override the default and select the appropriate runtime for that project specifically.
To define one or more Drools runtimes using the Eclipse preferences view you open up your Preferences, by selecting the "Preferences" menu item in the menu "Window". A "Preferences" dialog should show all your settings. On the left side of this dialog, under the Drools category, select "Installed Drools runtimes". The panel on the right should then show the currently defined Drools runtimes. If you have not yet defined any runtimes, it should look like the figure below.

To define a new Drools runtime, click on the add button. A dialog such as the one shown below should pop up, asking for the name of your runtime and the location on your file system where it can be found.

In general, you have two options:
If you simply want to use the default jar files as included in the Drools Eclipse plugin, you can create a new Drools runtime automatically by clicking the "Create a new Drools 5 runtime ..." button. A file browser will show up, asking you to select the folder on your file system where you want this runtime to be created. The plugin will then automatically copy all required dependencies to the specified folder. After selecting this folder, the dialog should look like the figure shown below.
If you want to use one specific release of the Drools project, you should create a folder on your file system that contains all the necessary Drools libraries and dependencies. Instead of creating a new Drools runtime as explained above, give your runtime a name and select the location of this folder containing all the required jars.

After clicking the OK button, the runtime should show up in your table of installed Drools runtimes, as shown below. Click on checkbox in front of the newly created runtime to make it the default Drools runtime. The default Drools runtime will be used as the runtime of all your Drools project that have not selected a project-specific runtime.

You can add as many Drools runtimes as you need. For example, the screenshot below shows a configuration where two runtimes have been defined: a Drools 5.1.1 runtime and a Drools 5.2.0.M2 runtime. The Drools 5.1.1 runtime is selected as the default one.

Note that you will need to restart Eclipse if you changed the default runtime and you want to make sure that all the projects that are using the default runtime update their classpath accordingly.
Whenever you create a Drools project (using the New Drools Project wizard or by converting an existing Java project to a Drools project using the action "Convert to Drools Project" that is shown when you are in the Drools perspective and you right-click an existing Java project), the plugin will automatically add all the required jars to the classpath of your project.
When creating a new Drools project, the plugin will automatically use the default Drools runtime for that project, unless you specify a project-specific one. You can do this in the final step of the New Drools Project wizard, as shown below, by deselecting the "Use default Drools runtime" checkbox and selecting the appropriate runtime in the drop-down box. If you click the "Configure workspace settings ..." link, the workspace preferences showing the currently installed Drools runtimes will be opened, so you can add new runtimes there.

You can change the runtime of a Drools project at any time by opening the project properties and selecting the Drools category, as shown below. Mark the "Enable project specific settings" checkbox and select the appropriate runtime from the drop-down box. If you click the "Configure workspace settings ..." link, the workspace preferences showing the currently installed Drools runtimes will be opened, so you can add new runtimes there. If you deselect the "Enable project specific settings" checkbox, it will use the default runtime as defined in your global preferences.

The aim of the new project wizard is to set up an executable scaffold project to start using rules immediately. This will set up a basic structure, the classpath, sample rules and a test case to get you started.

When you choose to create a new "rule project" you will get a choice to add some default artifacts to it, like rules, decision tables, ruleflows, etc. These can serve as a starting point, and will give you something executable almost immediately, which you can then modify and mould to your needs. The simplest case (a hello world rule) is shown below. Feel free to experiment with the plug-in at this point.

The newly created project contains an example rule file (Sample.drl) in the src/rules directory and an example Java file (DroolsTest.java) that can be used to execute the rules in a Drools engine. You'll find this in the folder src/java, in the com.sample package. All the other jars that are necessary during execution are also added to the classpath in a custom classpath container called Drools Library. Rules do not have to be kept in "Java" projects at all, this is just a convenience for people who are already using Eclipse as their Java IDE.
Important note: The Drools plug-in adds a "Drools Builder" capability to your Eclipse instance. This means you can enable a builder on any project that will build and validate your rules when resources change. This happens automatically with the Rule Project Wizard, but you can also enable it manually on any project. One downside of this is that if you have rule files with a large number of rules (more than 500 rules per file), it means that the background builder may be doing a lot of work to build the rules on each change. An option here is to turn off the builder, or put the large rules into .rule files, where you can still use the rule editor, but it won't build them in the background. To fully validate the rules you will need to run them in a unit test of course.
You can create a rule simple as an empty text ".drl" file, or use the wizard to do so. The wizard menu can be invoked with Control+N, or by choosing it from the toolbar, where there is a menu with the JBoss Drools icon.

The wizard will ask for some basic options for generating a rule resource. These are just hints - you can change your mind later. For storing rule files you would typically create a directory src/rules and create suitably named subdirectories. The package name is mandatory, and is similar to a package name in Java; i.e., it establishes a namespace for grouping related rules.

The result of this wizard is a rule skeleton, for you to expand. As with all wizards, they are an optional help - you don't have to use them if you don't want to.
The rule editor is where rule managers and developers will be spending most of their time. The rule editor follows the pattern of a normal text editor in Eclipse, with all the customary features of a text editor. On top of this, the rule editor provides pop-up content assistance. You invoke pop-up content assistance the "normal" way by pressing Control+Space.

The rule editor works on files that have a .drl (or .rule) extension. Usually these contain related rules, but it would also be possible to have rules in individual files, grouped by being in the same package "namespace", if you so prefer. These DRL files are plain text files.
You can see from the example above that the rule group is using a domain specific language. Note the expander keyword, which tells the rule compiler to look for a dsl file of that name, to resolve the rule language. Even with the domain specific language (DSL) the rules are still stored as plain text as you see it onscreen, which allows simpler management of rules and versions, e.g., comparing versions of rules.
The editor has an outline view that is kept in sync with the structure of the rules; it is updated on save. This provides a quick way of navigating around rules by name, even in a file which may have hundreds of rules. The items are sorted alphabetically by default.

When debugging an application using a Drools engine, these views can be used to check the state of the Drools engine itself: the Working Memory View, the Agenda View, and the Global Data View. To be able to use these views, create breakpoints in your code invoking the working memory. For example, the line where you call workingMemory.fireAllRules() is a good candidate. If the debugger halts at that joinpoint, you should select the working memory variable in the debug variables view. The available views can then be used to show the details of the selected working memory:
The Working Memory View shows all elements of the Drools working memory.
The Agenda View shows all elements on the agenda. For each rule on the agenda, the rule name and bound variables are shown.
The Global Data View shows all global data currently defined in the Drools working memory.
The Audit view can be used to display audit logs containing events that were logged during the execution of a rules engine, in tree form.

The Working Memory View shows all elements in the working memory of the Drools engine.
An action is added to the right of the view, to customize what is shown:
The Show Logical Structure toggles showing the logical structure of the elements in the working memory, or all their details. Logical structures allow for visualizing sets of elements in a more obvious way.

The Agenda View shows all elements on the agenda. For each rule on the agenda, the rule name and bound variables are shown.
An action is added to the right of the view, to customize what is shown:
The Show Logical Structure toggles showing the logical structure of the agenda item, or all their details. Logical structures allow for example visualizing sets of elements in a more obvious way. The logical structure of AgendaItems shows the rule that is represented by the AgendaItem, and the values of all the parameters used in the rule.

The Global Data View shows all global data currently defined in the Drools engine.
An action is added to the right of the view, to customize what is shown:
The Show Logical Structure toggles showing the logical structure of the elements in the working memory, or all their details. Logical structures allow for example visualizing sets of elements in a more obvious way.

The audit view visualizes an audit log, that is optionally created when executing the rules engine. To create an audit log, use the following code:
WorkingMemory workingMemory = ruleBase.newWorkingMemory();
// Create a new Working Memory Logger, that logs to file.
WorkingMemoryFileLogger logger = new WorkingMemoryFileLogger(workingMemory);
// An event.log file is created in the subdirectory log (which must exist)
// of the working directory.
logger.setFileName( "log/event" );
workingMemory.assertObject(...);
workingMemory.fireAllRules();
// stop logging
logger.writeToDisk();
Open the log by clicking the Open Log action, the first icon in the Audit View, and select the file. The Audit View now shows all events that where logged during the executing of the rules. There are different types of events, each with a different icon:
Object inserted, a green square:

Object updated, a yellow square:

Object removed, a red square:

Activation created, a right arrow:

Activation cancelled, a left arrow:

Activation executed, a blue diamond:

Ruleflow start or end, the "process" icon:

Ruleflow-group activation or deactivation, the "activity" icon:

Rule package addition or removal, the Drools icon:

Rule addition or removal, the Drools icon:
All these events show extra information concerning the event, like the id and toString representation of the object in case of working memory events (insert, modify and retract), the name of the rule and all the variables bound in the activation in case of an activation event (created, cancelled or executed). If an event occurs when executing an activation, it is shown as a child of the activation's execution event. For some events, you can retrieve the "cause":
The cause of an object modified or retracted event is the last object event for that object. This is either the object asserted event, or the last object modified event for that object.
The cause of an activation cancelled or executed event is the corresponding activation created event.
When selecting an event, the cause of that event is shown in green in the audit view (if visible of course). You can also right click the action and select the "Show Cause" menu item. This will scroll you to the cause of the selected event.
Domain Specific Languages (DSL) enable you to create a language that allows your rules to look like - rules! Most often the domain specific language reads like natural language. Typically you would look at how a business analyst would describe the rule, in their own words, and then map this to your object model, via rule constructs. A side benefit of this is that it can provide an insulation layer between your domain objects and the rules themselves (as we know you like to refactor). A domain specific language will grow as the rules grow, and works best when there are common terms used over an over, with different parameters.
To aid with this, the rule workbench provides an editor for Domain Specific Languages. They are stored in a plain text format, so you can use any editor of your choice; this format is simply a slightly enhanced version of the "Properties" file format. The editor will be invoked on any files with a .dsl extension. There is also a wizard to create a sample DSL.

The DSL editor provides a tabular view of the mapping of Language to Rule Expressions. The Language Expression is what is used in the rules. This also feeds the content assistance for the rule editor, so that it can suggest Language Expressions from the DSL configuration. (The rule editor loads the DSL configuration when the rule resource is loaded for editing.) The Rule language mapping defines the "code" for the rules into which the language expression will be compiled by the rule engine compiler. The form of this Rule language expression depends on it being intended for the condition or the action part of a rule. (For the RHS it may be a snippet of Java, for instance). The "scope" item indicates where the expression belongs, "when" indicating the LHS, "then" the RHS, and "*" meaning anywhere. It's also possible to create aliases for keywords.
By selecting a mapping item (a row in the table) you can see the expression and mapping in the text fields below the table. Double clicking or pressing the edit button will open the edit dialog. Other buttons let you remove and add mappings. Don't remove mappings while they are still in use.

Here is a short description of the DSL translation process. The parser reads the rule text in a DSL, line by line, and tries to match some "Language Expression", depending on the scope. After a match, the values that correspond to a placeholder between curly braces (e.g., {age}) are extracted from the rule source. The placeholders in the corresponding "Rule Expression" are replaced by their corresponding value. In the example above, the natural language expression maps to two constraints on a fact of type Person, based on the fields age and location, and the {age} and {location} values are extracted from the original rule text.
If you do not wish to use a language mapping for a particular rule in a drl, prefix the expression with > and the compiler will not try to translate it according to the language definition. Also note that Domain Specific Languages are optional. When the rule is compiled, the .dsl file will also need to be available.
The Rete Tree View shows you the current Rete Network for your DRL file. You display it by clicking on the tab "Rete Tree" at the bottom of the DRL Editor window. With the Rete Network visualization being open, you can use drag-and-drop on individual nodes to arrange optimal network overview. You may also select multiple nodes by dragging a rectangle over them; then the entire group can be moved around. The Eclips toolbar icons for zooming in and out can be used in the customary manner.
In the current release there is no export function to creates a gif or jpeg file. Meanwhile, please use ctrl + alt + print to create a copy of your current Eclipse window, and cut it off.

The Rete View is an advanced feature which takes full advantage of the Eclipse Graphical Editing Framework (GEF).
The Rete view works only in Drools Rule Projects, where the Drools Builder is set in the project´s properties.
If you are using Drools in another type of project where you are not having a Drools Rule Project with the appropriate Drools Builder, you can use a workaround: Set up a little Drools Rule Project next to it, putting needed libraries into it, and the DRLs you want to inspect with the Rete View. Just click on the right tab below in the DRL Editor, followed by a click on "Generate Rete View".
Depending on the JDK you use, it may be necessary to increase the permanent generation max size. Both the SUN and the IBM JDK have a permanent generation, whereas BEA JRockit does not.
To increase the permanent generation, start Eclipse with -XX:MaxPermSize=###m
Example: c:\Eclipse\Eclipse.exe -XX:MaxPermSize=128m
Rulesets of 4,000 rules or greater should set the permanent generation to at least 128Mb.
Note
This may also apply to compiling large numbers of rules in general, as there is generally one or more classes per rule.
As an alternative to the above, you may put rules in a file with the ".rule" extension, and the background builder will not try to compile them with each change, which may provide performance improvements if your IDE becomes sluggish with very large numbers of rules.

You can debug rules during the execution of your Drools application. You can add breakpoints in the consequences of your rules, and whenever such a breakpoint is encountered during the execution of the rules, execution is halted. You can then inspect the variables known at that point and use any of the default debugging actions to decide what should happen next: step over, continue, etc. You can also use the debug views to inspect the content of the working memory and the Agenda.
You can add and remove rule breakpoints in DRL files in two ways, similar to adding breakpoints to Java files:
Double-click the ruler of the DRL editor at the line where you want to add a breakpoint. Note that rule breakpoints can only be created in the consequence of a rule. Double-clicking on a line where no breakpoint is allowed will do nothing. A breakpoint can be removed by double-clicking the ruler once more.
If you right-click the ruler, a popup menu will show up, containing the "Toggle breakpoint" action. Note that rule breakpoints can only be created in the consequence of a rule. The action is automatically disabled if no rule breakpoint is allowed at that line. Clicking the action will add a breakpoint at the selected line, or remove it if there was one already.
The Debug Perspective contains a Breakpoints view which can be used to see all defined breakpoints, get their properties, enable/disable or remove them, etc.
Drools breakpoints are only enabled if you debug your application as a Drools Application. You can do this like this:

Select the main class of your application. Right click it and select the "Debug As >" sub-menu and select Drools Application. Alternatively, you can also select the "Debug ..." menu item to open a new dialog for creating, managing and running debug configurations (see the screenshot below).
Select the "Drools Application" item in the left tree and click the "New launch configuration" button (leftmost icon in the toolbar above the tree). This will create a new configuration with some of the properties (like project and main class)already filled in, based on the main class you selected in the beginning. All properties shown here are the same as for any standard Java program.
Change the name of your debug configuration to something meaningful. You can just accept the defaults for all other properties. For more information about these properties, please check the Eclipse JDT documentation.
Click the "Debug" button on the bottom to start debugging your application. You only have to define your debug configuration once. The next time you run your Drools application, you don't have to create a new one but select the previously defined one in the tree on the left, as a sub-element of the "Drools Application" tree node, and then click the Debug button. The Eclipse toolbar also contains shortcut buttons to quickly re-execute one of your previous configurations (at least when one of the Java, Java Debug, or Drools perspectives has been selected).

After clicking the "Debug" button, the application starts executing and will halt if any breakpoint is encountered. This can be a Drools rule breakpoint, or any other standard Java breakpoint. Whenever a Drools rule breakpoint is encountered, the corresponding DRL file is opened and the active line is highlighted. The Variables view also contains all rule parameters and their value. You can then use the default Java debug actions to decide what to do next: resume, terminate, step over, etc. The debug view can also be used to inspect the contents of the Working Memory and the Agenda at that time as well. You don't have to select a Working Memory now, as the current executing working memory is automatically shown.

Make sure the Drools Eclipse plugin is installed, which needs the Graphical Editing Framework (GEF) dependency installed first. Then download and extract the drools-examples zip file, which includes an already created Eclipse project. Import that project into a new Eclipse workspace. The rules all have example classes that execute the rules. If you want to try the examples in another project (or another IDE) then you will need to set up the dependencies by hand, of course. Many, but not all of the examples are documented below, enjoy!
Some examples require Java 1.6 to run.
Name: Hello World Main class: org.drools.examples.helloworld.HelloWorldExample Module: drools-examples Type: Java application Rules file: HelloWorld.drl Objective: demonstrate basic rules in use
The "Hello World" example shows a simple example of rules usage, and both the MVEL and Java dialects.
This example demonstrates how to build Knowledge Bases and Sessions.
Also, audit logging and debug outputs are shown, which is ommitted
from other examples as it's all very similar. A KnowledgeBuilder
is used to turn a DRL source file into Package objects which
the Knowledge Base can consume. The add method takes a Resource
interface and a Resource Type as parameters. The Resource can be
used to retrieve a DRL source file from various locations; in this case the
DRL file is being retrieved from the classpath using a
ResourceFactory, but it could come from a disk file or a URL.
Here, we only add a single DRL source file, but multiple DRL files can be
added. Also, DRL files with different namespaces can be added, where
the Knowledge Builder creates a package for each namespace. Multiple
packages of different namespaces can be added to the same Knowledge Base.
When all the DRL files have been added, we should check the builder for
errors. While the Knowledge Base will validate the package, it will only
have access to the error information as a String, so if you wish to debug
the error information you should do it on the KnowledgeBuilder
instance. Once you know the builder is error free, get the
Package collection, instantiate a KnowledgeBase
from the KnowledgeBaseFactory and add the package
collection.
Example 9.1. HelloWorld: Creating the KnowledgeBase and Session
final KnowledgeBuilder kbuilder = KnowledgeBuilderFactory.newKnowledgeBuilder();
// this will parse and compile in one step
kbuilder.add(ResourceFactory.newClassPathResource("HelloWorld.drl",
HelloWorldExample.class), ResourceType.DRL);
// Check the builder for errors
if (kbuilder.hasErrors()) {
System.out.println(kbuilder.getErrors().toString());
throw new RuntimeException("Unable to compile \"HelloWorld.drl\".");
}
// get the compiled packages (which are serializable)
final Collection<KnowledgePackage> pkgs = kbuilder.getKnowledgePackages();
// add the packages to a knowledgebase (deploy the knowledge packages).
final KnowledgeBase kbase = KnowledgeBaseFactory.newKnowledgeBase();
kbase.addKnowledgePackages(pkgs);
final StatefulKnowledgeSession ksession = kbase.newStatefulKnowledgeSession();
Drools has an event model that exposes much of what's happening
internally. Two default debug listeners are supplied,
DebugAgendaEventListener and
DebugWorkingMemoryEventListener which print out
debug event information to the System.err stream displayed
in the Console window. Adding listeners to a
Session is trivial, as shown below. The KnowledgeRuntimeLogger
provides execution auditing, the result of which can be viewed in a
graphical viewer. The logger is actually a specialised implementation
built on the Agenda and Working Memory listeners. When the engine has
finished executing, logger.close() must be called.
Most of the examples use the Audit logging features of Drools to record execution flow for later inspection.
Example 9.2. HelloWorld: Event logging and Auditing
// setup the debug listeners
ksession.addEventListener( new DebugAgendaEventListener() );
ksession.addEventListener( new DebugWorkingMemoryEventListener() );
// setup the audit logging
KnowledgeRuntimeLogger logger =
KnowledgeRuntimeLoggerFactory.newFileLogger(ksession, "log/helloworld");
The single class used in this example is very simple. It has two
fields: the message, which is a String and the status which can be one
of the two integers HELLO or GOODBYE.
Example 9.3. HelloWorld example: Message Class
public static class Message {
public static final int HELLO = 0;
public static final int GOODBYE = 1;
private String message;
private int status;
...
}
A single Message object is created with the
message text "Hello World" and the status HELLO and then
inserted into the engine, at which point fireAllRules()
is executed. Remember that all the network evaluation is done
during the insert time, so that by the time the program execution reaches the
fireAllRules() method call the engine already knows which rules
are fully matches and able to fire.
Example 9.4. HelloWorld: Execution
final Message message = new Message();
message.setMessage("Hello World");
message.setStatus(Message.HELLO);
ksession.insert(message);
ksession.fireAllRules();
logger.close();
ksession.dispose();
To execute the example as a Java application:
Open the class org.drools.examples.helloworld.HelloWorldExample in your Eclipse IDE
Right-click the class and select "Run as..." and then "Java application"
If we put a breakpoint on the fireAllRules() method
and select the ksession variable, we can see that the
"Hello World" rule is already activated and on the Agenda, confirming
that all the pattern matching work was already done during the insert.

The may application print outs go to to System.out while the debug listener print outs go to System.err.
Example 9.6. HelloWorld: System.err in the Console window
==>[ActivationCreated(0): rule=Hello World;
tuple=[fid:1:1:org.drools.examples.helloworld.HelloWorldExample$Message@17cec96]]
[ObjectInserted: handle=[fid:1:1:org.drools.examples.helloworld.HelloWorldExample$Message@17cec96];
object=org.drools.examples.helloworld.HelloWorldExample$Message@17cec96]
[BeforeActivationFired: rule=Hello World;
tuple=[fid:1:1:org.drools.examples.helloworld.HelloWorldExample$Message@17cec96]]
==>[ActivationCreated(4): rule=Good Bye;
tuple=[fid:1:2:org.drools.examples.helloworld.HelloWorldExample$Message@17cec96]]
[ObjectUpdated: handle=[fid:1:2:org.drools.examples.helloworld.HelloWorldExample$Message@17cec96];
old_object=org.drools.examples.helloworld.HelloWorldExample$Message@17cec96;
new_object=org.drools.examples.helloworld.HelloWorldExample$Message@17cec96]
[AfterActivationFired(0): rule=Hello World]
[BeforeActivationFired: rule=Good Bye;
tuple=[fid:1:2:org.drools.examples.helloworld.HelloWorldExample$Message@17cec96]]
[AfterActivationFired(4): rule=Good Bye] The LHS (after when) section of the rule states that it will be
activated for each Message object inserted into the Working
Memory whose status is Message.HELLO. Besides that, two
variable bindings are created: the variable message is bound
to the message attribute and the variable m
is bound to the matched Message object itself.
The RHS (after then) or consequence part of the rule is
written using the MVEL expression language, as declared by
the rule's attribute dialect. After printing the content of
the bound variable message to System.out,
the rule changes the values of the message and
status attributes of the Message object
bound to m. This is done MVEL's modify statement,
which allows you to apply a block of assignments in one statement, with the
engine being automatically notified of the changes at the end of the
block.
Example 9.7. HelloWorld: rule "Hello World"
rule "Hello World"
dialect "mvel"
when
m : Message( status == Message.HELLO, message : message )
then
System.out.println( message );
modify ( m ) { message = "Goodbyte cruel world",
status = Message.GOODBYE };
endWe can set a breakpoint into the DRL, on the modify
call, and inspect the Agenda view again during the execution of the
rule's consequence. This time we start the execution via "Debug As"
and "Drools application" and not by running a "Java application":
Open the class
org.drools.examples.HelloWorldin your Eclipse IDE.Right-click the class and select "Debug as..." and then "Drools application".
Now we can see that the other rule "Good Bye", which
uses the Java dialect, is activated and placed on the Agenda.

The "Good Bye" rule, which specifies the "java" dialect, is similar
to the "Hello World" rule except that it matches Message
objects whose status is Message.GOODBYE.
Example 9.8. HelloWorld: rule "Good Bye"
rule "Good Bye"
dialect "java"
when
Message( status == Message.GOODBYE, message : message )
then
System.out.println( message );
endRemember the Java code where we used the
KnowledgeRuntimeLoggerFactory method newFileLogger
to create a KnowledgeRuntimeLogger and called
logger.close() at the end. This created an audit log file that
can be shown in the Audit view. We use the Audit view in many of the
examples to demostrate the example execution flow. In the view screen shot
below we can see that the object is inserted, which creates an activation
for the "Hello World" rule; the activation is then executed which updates
the Message object causing the "Good Bye" rule to
activate; finally the "Good Bye" rule also executes. Selecting an event in
the Audit view highlights the origin event in green; therefore the
"Activation created" event is highlighted in green as the origin of the
"Activation executed" event.

This example is implemented in three different versions to demonstrate different ways of implementing the same basic behavior: forward chaining, i.e., the ability the engine has to evaluate, activate and fire rules in sequence, based on changes on the facts in the Working Memory.
Name: State Example Main class: org.drools.examples.state.StateExampleUsingSalience Module: drools-examples Type: Java application Rules file: StateExampleUsingSalience.drl Objective: Demonstrates basic rule use and Conflict Resolution for rule firing priority.
Each State class has fields for its name and its
current state (see the class org.drools.examples.state.State).
The two possible states for each objects are:
NOTRUNFINISHED
Example 9.9. State Class
public class State {
public static final int NOTRUN = 0;
public static final int FINISHED = 1;
private final PropertyChangeSupport changes =
new PropertyChangeSupport( this );
private String name;
private int state;
... setters and getters go here...
}
Ignoring the PropertyChangeSupport, which will
be explained later, we see the creation of four State
objects named A, B, C and D. Initially their states are set to
NOTRUN, which is default for the used constructor.
Each instance is asserted in turn into the Session and then
fireAllRules() is called.
Example 9.10. Salience State: Execution
State a = new State( "A" );
State b = new State( "B" );
State c = new State( "C" );
final State d = new State( "D" );
// By setting dynamic to TRUE, Drools will use JavaBean
// PropertyChangeListeners so you don't have to call modify or update().
boolean dynamic = true;
session.insert( a, dynamic );
session.insert( b, dynamic );
session.insert( c, dynamic );
session.insert( d, dynamic );
session.fireAllRules();
session.dispose(); // Stateful rule session must always be disposed when finished
To execute the application:
Open the class
org.drools.examples.state.StateExampleUsingSaliencein your Eclipse IDE.Right-click the class and select "Run as..." and then "Java application"
You will see the following output in the Eclipse console window:
There are four rules in total. First, the Bootstrap
rule fires, setting A to state FINISHED, which then
causes B to change its state to FINISHED. C and D are
both dependent on B, causing a conflict which is resolved by the
salience values. Let's look at the way this was executed.
The best way to understand what is happening is to use the Audit Logging feature to graphically see the results of each operation. To view the Audit log generated by a run of this example:
If the Audit View is not visible, click on "Window" and then select "Show View", then "Other..." and "Drools" and finally "Audit View".
In the "Audit View" click the "Open Log" button and select the file "<drools-examples-dir>/log/state.log".
After that, the "Audit view" will look like the following screenshot:

Reading the log in the "Audit View", top to bottom, we see every
action and the corresponding changes in the Working Memory. This way
we observe that the assertion of the State object A in the state
NOTRUN activates the Bootstrap rule, while
the assertions of the other State objects have no
immediate effect.
Example 9.12. Salience State: Rule "Bootstrap"
rule Bootstrap
when
a : State(name == "A", state == State.NOTRUN )
then
System.out.println(a.getName() + " finished" );
a.setState( State.FINISHED );
endThe execution of rule Bootstrap changes the state of A to
FINISHED, which, in turn, activates rule "A to B".
Example 9.13. Salience State: Rule "A to B"
rule "A to B"
when
State(name == "A", state == State.FINISHED )
b : State(name == "B", state == State.NOTRUN )
then
System.out.println(b.getName() + " finished" );
b.setState( State.FINISHED );
end
The execution of rule "A to B" changes the state of B to
FINISHED, which activates both, rules "B to C" and
"B to D", placing their Activations onto the Agenda. From this moment
on, both rules may fire and, therefore, they are said to be
"in conflict". The conflict resolution strategy allows the engine's
Agenda to decide which rule to fire. As rule "B to C" has the
higher salience value (10 versus
the default salience value of 0), it fires first, modifying object C
to state FINISHED. The Audit view shown above reflects
the modification of the State object in the rule "A to B",
which results in two activations being in conflict. The Agenda view
can also be used to investigate the state of the Agenda, with debug
points being placed in the rules themselves and the Agenda view opened.
The screen shot below shows the breakpoint in the rule "A to B" and
the state of the Agenda with the two conflicting rules.

Example 9.14. Salience State: Rule "B to C"
rule "B to C"
salience 10
when
State(name == "B", state == State.FINISHED )
c : State(name == "C", state == State.NOTRUN )
then
System.out.println(c.getName() + " finished" );
c.setState( State.FINISHED );
end
Rule "B to D" fires last, modifying object D to state
FINISHED.
Example 9.15. Salience State: Rule "B to D"
rule "B to D"
when
State(name == "B", state == State.FINISHED )
d : State(name == "D", state == State.NOTRUN )
then
System.out.println(d.getName() + " finished" );
d.setState( State.FINISHED );
endThere are no more rules to execute and so the engine stops.
Another notable concept in this example is the use of
dynamic facts, based on
PropertyChangeListener objects. As described in the
documentation, in order for the engine to see and react to changes of
fact properties, the application must tell the engine that changes
occurred. This can be done explicitly in the rules by using the
modify statement, or implicitly by letting the engine know
that the facts implement PropertyChangeSupport as defined
by the JavaBeans specification. This example
demonstrates how to use PropertyChangeSupport to avoid
the need for explicit modify statements in the rules. To
make use of this feature, ensure that your facts implement
PropertyChangeSupport, the same way the class
org.drools.example.State does, and use the following
code to insert the facts into the Working Memory:
Example 9.16. Inserting a Dynamic Fact
// By setting dynamic to TRUE, Drools will use JavaBean
// PropertyChangeListeners so you don't have to call modify or update().
final boolean dynamic = true;
session.insert( fact, dynamic );
When using PropertyChangeListener objects, each
setter must implement a little extra code for the notification. Here
is the setter for state in the class
org.drools.examples:
Example 9.17. Setter Example with PropertyChangeSupport
public void setState(final int newState) {
int oldState = this.state;
this.state = newState;
this.changes.firePropertyChange( "state",
oldState,
newState );
}
There are two other classes in this example:
StateExampleUsingAgendGroup and
StateExampleWithDynamicRules. Both execute from A to B
to C to D, as just shown. The StateExampleUsingAgendGroup
uses agenda-groups to control the rule conflict and which one fires
first. StateExampleWithDynamicRules shows how an
additional rule can be added to an already running Working Memory
with all the existing data applying to it at runtime.
Agenda groups are a way to partition the Agenda into groups
and to control which groups can execute. By default, all rules are
in the agenda group "MAIN". The "agenda-group" attribute lets
you specify a different agenda group for the rule. Initially,
a Working Memory has its focus on the Agenda group "MAIN". A group's
rules will only fire when the group receives the focus. This can be
achieved either ny using the method by setFocus() or the
rule attribute auto-focus. "auto-focus" means that the rule
automatically sets the focus to its agenda group when the rule is
matched and activated. It is this "auto-focus" that enables rule
"B to C" to fire before "B to D".
Example 9.18. Agenda Group State Example: Rule "B to C"
rule "B to C"
agenda-group "B to C"
auto-focus true
when
State(name == "B", state == State.FINISHED )
c : State(name == "C", state == State.NOTRUN )
then
System.out.println(c.getName() + " finished" );
c.setState( State.FINISHED );
kcontext.getKnowledgeRuntime().getAgenda().getAgendaGroup( "B to D" ).setFocus();
endThe rule "B to C" calls setFocus() on the
agenda group "B to D", allowing its active rules
to fire, which allows the rule "B to D" to fire.
Example 9.19. Agenda Group State Example: Rule "B to D"
rule "B to D"
agenda-group "B to D"
when
State(name == "B", state == State.FINISHED )
d : State(name == "D", state == State.NOTRUN )
then
System.out.println(d.getName() + " finished" );
d.setState( State.FINISHED );
endThe example StateExampleWithDynamicRules adds
another rule to the Rule Base after fireAllRules().
The added rule is just another state transition.
Example 9.20. Dynamic State Example: Rule "D to E"
rule "D to E"
when
State(name == "D", state == State.FINISHED )
e : State(name == "E", state == State.NOTRUN )
then
System.out.println(e.getName() + " finished" );
e.setState( State.FINISHED );
endThis produces the following expected output:
Name: Fibonacci
Main class: org.drools.examples.fibonacci.FibonacciExample
Module: drools-examples
Type: Java application
Rules file: Fibonacci.drl
Objective: Demonstrates Recursion,
the CE not and cross product matchingThe Fibonacci Numbers (see http://en.wikipedia.org/wiki/Fibonacci_number) discovered by Leonardo of Pisa (see http://en.wikipedia.org/wiki/Fibonacci) is a sequence that starts with 0 and 1. The next Fibonacci number is obtained by adding the two preceding Fibonacci numbers. The Fibonacci sequence begins with 0, 1, 1, 2, 3, 5, 8, 13, 21, 34, 55, 89, 144, 233, 377, 610, 987, 1597, 2584, 4181, 6765, 10946,... The Fibonacci Example demonstrates recursion and conflict resolution with salience values.
The single fact class Fibonacci is used in this
example. It has two fields, sequence and value. The sequence field
is used to indicate the position of the object in the Fibonacci
number sequence. The value field shows the value of that
Fibonacci object for that sequence position, using -1 to indicate
a value that still needs to be computed.
Example 9.22. Fibonacci Class
public static class Fibonacci {
private int sequence;
private long value;
public Fibonacci( final int sequence ) {
this.sequence = sequence;
this.value = -1;
}
... setters and getters go here...
}
Execute the example:
Open the class
org.drools.examples.fibonacci.FibonacciExamplein your Eclipse IDE.Right-click the class and select "Run as..." and then "Java application"
Eclipse shows the following output in its console window (with "...snip..." indicating lines that were removed to save space):
Example 9.23. Fibonacci Example: Console Output
recurse for 50 recurse for 49 recurse for 48 recurse for 47 ...snip... recurse for 5 recurse for 4 recurse for 3 recurse for 2 1 == 1 2 == 1 3 == 2 4 == 3 5 == 5 6 == 8 ...snip... 47 == 2971215073 48 == 4807526976 49 == 7778742049 50 == 12586269025
To kick this off from Java we only insert a single Fibonacci
object, with a sequence field of 50. A recursive rule is then used
to insert the other 49 Fibonacci objects. This example
doesn't use
PropertyChangeSupport. It uses the MVEL dialect, which
means we can use the modify keyword, which allows a block
setter action which also notifies the engine of changes.
Example 9.24. Fibonacci Example: Execution
ksession.insert( new Fibonacci( 50 ) );
ksession.fireAllRules();
The rule Recurse is very simple. It matches each asserted
Fibonacci object with a value of -1, creating and
asserting a new Fibonacci object with a sequence of
one less than the currently matched object. Each time a Fibonacci
object is added while the one with a sequence field equal to 1
does not exist, the rule re-matches and fires again. The
not conditional element is used to stop the rule's matching
once we have all 50 Fibonacci objects in memory. The rule also has a
salience value, because we need to have all 50 Fibonacci
objects asserted before we execute the Bootstrap rule.
Example 9.25. Fibonacci Example: Rule "Recurse"
rule Recurse
salience 10
when
f : Fibonacci ( value == -1 )
not ( Fibonacci ( sequence == 1 ) )
then
insert( new Fibonacci( f.sequence - 1 ) );
System.out.println( "recurse for " + f.sequence );
endThe Audit view shows the original assertion of the
Fibonacci object with a sequence field of 50, done from
Java code. From there on, the Audit view shows the continual
recursion of the rule, where each asserted Fibonacci
object causes the Recurse rule to become activated and to fire again.

When a Fibonacci object with a sequence field of 2 is
asserted the "Bootstrap" rule is matched and activated along with the
"Recurse" rule. Note the multi-restriction on field
sequence, testing for equality with 1 or 2.
Example 9.26. Fibonacci Example: Rule "Bootstrap"
rule Bootstrap
when
f : Fibonacci( sequence == 1 || == 2, value == -1 ) // multi-restriction
then
modify ( f ){ value = 1 };
System.out.println( f.sequence + " == " + f.value );
endAt this point the Agenda looks as shown below. However, the "Bootstrap" rule does not fire because the "Recurse" rule has a higher salience.

When a Fibonacci object with a sequence of 1 is
asserted the Bootstrap rule is matched again, causing two activations
for this rule. Note that the "Recurse" rule does not match and activate
because the not conditional element stops the rule's matching
as soon as a Fibonacci object with a sequence of 1
exists.

Once we have two Fibonacci objects with values
not equal to -1 the "Calculate" rule is able to match. It was
the "Bootstrap" rule that set the objects with sequence 1 and 2 to
values of 1. At this point we have 50 Fibonacci objects in the Working
Memory. Now we need to select a suitable triple to calculate each
of their values in turn. Using three Fibonacci patterns in a rule without
field constraints to confine the possible cross products would result
in 50x49x48 possible combinations, leading to about 125,000 possible rule
firings, most of them incorrect. The "Calculate" rule uses field
constraints to correctly constraint the thee Fibonacci patterns in the
correct order; this
technique is called cross product matching. The
first pattern finds any Fibonacci with a value != -1 and binds both
the pattern and the field. The second Fibonacci does this, too, but
it adds an additional field constraint to ensure that its sequence is
greater by one than the Fibonacci bound to f1. When this
rule fires for the first time, we know that only sequences 1 and 2
have values of 1, and the two constraints ensure that f1
references sequence 1 and f2 references sequence 2. The
final pattern finds the Fibonacci with a value equal to -1 and with a
sequence one greater than f2. At this point, we have
three Fibonacci objects correctly selected from the
available cross products, and we can calculate the value for the
third Fibonacci object that's bound to f3.
Example 9.27. Fibonacci Example: Rule "Calculate"
rule Calculate
when
// Bind f1 and s1
f1 : Fibonacci( s1 : sequence, value != -1 )
// Bind f2 and v2; refer to bound variable s1
f2 : Fibonacci( sequence == (s1 + 1), v2 : value != -1 )
// Bind f3 and s3; alternative reference of f2.sequence
f3 : Fibonacci( s3 : sequence == (f2.sequence + 1 ), value == -1 )
then
// Note the various referencing rechniques.
modify ( f3 ) { value = f1.value + v2 };
System.out.println( s3 + " == " + f3.value );
end
The modify statement updated the value of the
Fibonacci object bound to f3. This means
we now have another new Fibonacci object with a value not equal to -1,
which allows the "Calculate" rule to rematch and calculate the next
Fibonacci number. The Audit view below shows how the firing of the
last "Bootstrap" modifies the Fibonacci object,
enabling the "Calculate" rule to match, which then modifies
another Fibonacci object allowing the "Calculate" rule to match again.
This continues till the value is set for all Fibonacci
objects.

Name: BankingTutorial Main class: org.drools.tutorials.banking.BankingExamplesApp.java Module: drools-examples Type: Java application Rules file: org.drools.tutorials.banking.*.drl Objective: Demonstrate pattern matching, basic sorting and calculation rules.
This tutorial demonstrates the process of developing a complete personal banking application to handle credits and debits on multiple accounts. It uses a set of design patterns that have been created for the process.
The class RuleRunner is a simple harness to execute
one or more DRL files against a set of data. It compiles the Packages
and creates the Knowledge Base for each execution, allowing us to
easily execute each scenario and inspect the outputs. In reality this
is not a good solution for a production system, where the Knowledge Base
should be built just once and cached, but for the purposes of this
tutorial it shall suffice.
Example 9.28. Banking Tutorial: RuleRunner
public class RuleRunner {
public RuleRunner() {
}
public void runRules(String[] rules,
Object[] facts) throws Exception {
KnowledgeBase kbase = KnowledgeBaseFactory.newKnowledgeBase();
KnowledgeBuilder kbuilder = KnowledgeBuilderFactory.newKnowledgeBuilder();
for ( int i = 0; i < rules.length; i++ ) {
String ruleFile = rules[i];
System.out.println( "Loading file: " + ruleFile );
kbuilder.add( ResourceFactory.newClassPathResource( ruleFile,
RuleRunner.class ),
ResourceType.DRL );
}
Collection<KnowledgePackage> pkgs = kbuilder.getKnowledgePackages();
kbase.addKnowledgePackages( pkgs );
StatefulKnowledgeSession ksession = kbase.newStatefulKnowledgeSession();
for ( int i = 0; i < facts.length; i++ ) {
Object fact = facts[i];
System.out.println( "Inserting fact: " + fact );
ksession.insert( fact );
}
ksession.fireAllRules();
}
}
The first of our sample Java classes loads and executes a single
DRL file, Example.drl, but without inserting any
data.
Example 9.29. Banking Tutorial : Java Example1
public class Example1 {
public static void main(String[] args) throws Exception {
new RuleRunner().runRules( new String[] { "Example1.drl" },
new Object[0] );
}
}
The first simple rule to execute has a single eval
condition that will alway be true, so that this rule will match and
fire, once, after the start.
Example 9.30. Banking Tutorial: Rule in Example1.drl
rule "Rule 01"
when
eval( 1==1 )
then
System.out.println( "Rule 01 Works" );
endhThe output for the rule is below, showing that the rule matches and executes the single print statement.
The next step is to assert some simple facts and print them out.
Example 9.32. Banking Tutorial: Java Example2
public class Example2 {
public static void main(String[] args) throws Exception {
Number[] numbers = new Number[] {wrap(3), wrap(1), wrap(4), wrap(1), wrap(5)};
new RuleRunner().runRules( new String[] { "Example2.drl" },
numbers );
}
private static Integer wrap( int i ) {
return new Integer(i);
}
}
This doesn’t use any specific facts but instead asserts a set
of java.lang.Integer objects. This is not considered
"best practice" as a number is not a useful fact, but we use it here
to demonstrate basic techniques before more complexity is added.
Now we will create a simple rule to print out these numbers.
Example 9.33. Banking Tutorial: Rule in Example2.drl
rule "Rule 02"
when
Number( $intValue : intValue )
then
System.out.println( "Number found with value: " + $intValue );
endOnce again, this rule does nothing special. It identifies any
facts that are Number objects and prints out the values.
Notice the use of the abstract class Number: we inserted
Integer objects but we now look for any kind of number.
The pattern matching engine is able to match interfaces and
superclasses of asserted objects.
The output shows the DRL being loaded, the facts inserted and then the matched and fired rules. We can see that each inserted number is matched and fired and thus printed.
Example 9.34. Banking Tutorial: Output of Example2.java
Loading file: Example2.drl Inserting fact: 3 Inserting fact: 1 Inserting fact: 4 Inserting fact: 1 Inserting fact: 5 Number found with value: 5 Number found with value: 1 Number found with value: 4 Number found with value: 1 Number found with value: 3
There are certainly many better ways to sort numbers than using rules, but since we will need to apply some cashflows in date order when we start looking at banking rules we'll develop simple rule based sorting technique.
Example 9.35. Banking Tutorial: Example3.java
public class Example3 {
public static void main(String[] args) throws Exception {
Number[] numbers = new Number[] {wrap(3), wrap(1), wrap(4), wrap(1), wrap(5)};
new RuleRunner().runRules( new String[] { "Example3.drl" },
numbers );
}
private static Integer wrap(int i) {
return new Integer(i);
}
}
Again we insert our Integer objects, but this time the
rule is slightly different:
Example 9.36. Banking Tutorial: Rule in Example3.drl
rule "Rule 03"
when
$number : Number( )
not Number( intValue < $number.intValue )
then
System.out.println("Number found with value: " + $number.intValue() );
retract( $number );
endThe first line of the rule identifies a Number and
extracts the value. The second line ensures that there does not exist
a smaller number than the one found by the first pattern. We might
expect to match only one number - the smallest in the set. However,
the retraction of the number after it has been printed means that the
smallest number has been removed, revealing the next smallest number,
and so on.
The resulting output shows that the numbers are now sorted numerically.
Example 9.37. Banking Tutorial: Output of Example3.java
Loading file: Example3.drl Inserting fact: 3 Inserting fact: 1 Inserting fact: 4 Inserting fact: 1 Inserting fact: 5 Number found with value: 1 Number found with value: 1 Number found with value: 3 Number found with value: 4 Number found with value: 5
We are ready to start moving towards our personal accounting
rules. The first step is to create a Cashflow object.
Example 9.38. Banking Tutorial: Class Cashflow
public class Cashflow {
private Date date;
private double amount;
public Cashflow() {
}
public Cashflow(Date date, double amount) {
this.date = date;
this.amount = amount;
}
public Date getDate() {
return date;
}
public void setDate(Date date) {
this.date = date;
}
public double getAmount() {
return amount;
}
public void setAmount(double amount) {
this.amount = amount;
}
public String toString() {
return "Cashflow[date=" + date + ",amount=" + amount + "]";
}
}
Class Cashflow has two simple attributes, a date
and an amount. (Note that using the type double for
monetary units is generally not a good idea
because floating point numbers cannot represent most numbers accurately.)
There is also an overloaded constructor to set the values, and a
method toString to print a cashflow. The Java code of
Example4.java inserts five Cashflow objects,
with varying dates and amounts.
Example 9.39. Banking Tutorial: Example4.java
public class Example4 {
public static void main(String[] args) throws Exception {
Object[] cashflows = {
new Cashflow(new SimpleDate("01/01/2007"), 300.00),
new Cashflow(new SimpleDate("05/01/2007"), 100.00),
new Cashflow(new SimpleDate("11/01/2007"), 500.00),
new Cashflow(new SimpleDate("07/01/2007"), 800.00),
new Cashflow(new SimpleDate("02/01/2007"), 400.00),
};
new RuleRunner().runRules( new String[] { "Example4.drl" },
cashflows );
}
}
The convenience class SimpleDate extends
java.util.Date, providing a constructor taking
a String as input and defining a date format. The code is
listed below
Example 9.40. Banking Tutorial: Class SimpleDate
public class SimpleDate extends Date {
private static final SimpleDateFormat format = new SimpleDateFormat("dd/MM/yyyy");
public SimpleDate(String datestr) throws Exception {
setTime(format.parse(datestr).getTime());
}
}
Now, let’s look at Example4.drl to see how
we print the sorted Cashflow objects:
Example 9.41. Banking Tutorial: Rule in Example4.drl
rule "Rule 04"
when
$cashflow : Cashflow( $date : date, $amount : amount )
not Cashflow( date < $date)
then
System.out.println("Cashflow: "+$date+" :: "+$amount);
retract($cashflow);
endHere, we identify a Cashflow and extract the date
and the amount. In the second line of the rule we ensure that there
is no Cashflow with an earlier date than the one found. In the
consequence, we print the Cashflow that satisfies the
rule and then retract it, making way for the next earliest
Cashflow. So, the output we generate is:
Example 9.42. Banking Tutorial: Output of Example4.java
Loading file: Example4.drl Inserting fact: Cashflow[date=Mon Jan 01 00:00:00 GMT 2007,amount=300.0] Inserting fact: Cashflow[date=Fri Jan 05 00:00:00 GMT 2007,amount=100.0] Inserting fact: Cashflow[date=Thu Jan 11 00:00:00 GMT 2007,amount=500.0] Inserting fact: Cashflow[date=Sun Jan 07 00:00:00 GMT 2007,amount=800.0] Inserting fact: Cashflow[date=Tue Jan 02 00:00:00 GMT 2007,amount=400.0] Cashflow: Mon Jan 01 00:00:00 GMT 2007 :: 300.0 Cashflow: Tue Jan 02 00:00:00 GMT 2007 :: 400.0 Cashflow: Fri Jan 05 00:00:00 GMT 2007 :: 100.0 Cashflow: Sun Jan 07 00:00:00 GMT 2007 :: 800.0 Cashflow: Thu Jan 11 00:00:00 GMT 2007 :: 500.0
Next, we extend our Cashflow, resulting in a
TypedCashflow which can be a credit or a debit operation.
(Normally, we would just add this to the Cashflow type, but
we use extension to keep the previous version of the class intact.)
Example 9.43. Banking Tutorial: Class TypedCashflow
public class TypedCashflow extends Cashflow {
public static final int CREDIT = 0;
public static final int DEBIT = 1;
private int type;
public TypedCashflow() {
}
public TypedCashflow(Date date, int type, double amount) {
super( date, amount );
this.type = type;
}
public int getType() {
return type;
}
public void setType(int type) {
this.type = type;
}
public String toString() {
return "TypedCashflow[date=" + getDate() +
",type=" + (type == CREDIT ? "Credit" : "Debit") +
",amount=" + getAmount() + "]";
}
}
There are lots of ways to improve this code, but for the sake of the example this will do.
Now let's create Example5, a class for running our code.
Example 9.44. Banking Tutorial: Example5.java
public class Example5 {
public static void main(String[] args) throws Exception {
Object[] cashflows = {
new TypedCashflow(new SimpleDate("01/01/2007"),
TypedCashflow.CREDIT, 300.00),
new TypedCashflow(new SimpleDate("05/01/2007"),
TypedCashflow.CREDIT, 100.00),
new TypedCashflow(new SimpleDate("11/01/2007"),
TypedCashflow.CREDIT, 500.00),
new TypedCashflow(new SimpleDate("07/01/2007"),
TypedCashflow.DEBIT, 800.00),
new TypedCashflow(new SimpleDate("02/01/2007"),
TypedCashflow.DEBIT, 400.00),
};
new RuleRunner().runRules( new String[] { "Example5.drl" },
cashflows );
}
}
Here, we simply create a set of Cashflow objects
which are either credit or debit operations. We supply them and
Example5.drl to the RuleEngine.
Now, let’s look at a rule printing the sorted
Cashflow objects.
Example 9.45. Banking Tutorial: Rule in Example5.drl
rule "Rule 05"
when
$cashflow : TypedCashflow( $date : date,
$amount : amount,
type == TypedCashflow.CREDIT )
not TypedCashflow( date < $date,
type == TypedCashflow.CREDIT )
then
System.out.println("Credit: "+$date+" :: "+$amount);
retract($cashflow);
endHere, we identify a Cashflow fact with a type
of CREDIT and extract the date and the amount. In the
second line of the rule we ensure that there is no Cashflow
of the same type with an earlier date than the one found. In the
consequence, we print the cashflow satisfying the patterns and then
retract it, making way for the next earliest cashflow of type
CREDIT.
So, the output we generate is
Example 9.46. Banking Tutorial: Output of Example5.java
Loading file: Example5.drl Inserting fact: TypedCashflow[date=Mon Jan 01 00:00:00 GMT 2007,type=Credit,amount=300.0] Inserting fact: TypedCashflow[date=Fri Jan 05 00:00:00 GMT 2007,type=Credit,amount=100.0] Inserting fact: TypedCashflow[date=Thu Jan 11 00:00:00 GMT 2007,type=Credit,amount=500.0] Inserting fact: TypedCashflow[date=Sun Jan 07 00:00:00 GMT 2007,type=Debit,amount=800.0] Inserting fact: TypedCashflow[date=Tue Jan 02 00:00:00 GMT 2007,type=Debit,amount=400.0] Credit: Mon Jan 01 00:00:00 GMT 2007 :: 300.0 Credit: Fri Jan 05 00:00:00 GMT 2007 :: 100.0 Credit: Thu Jan 11 00:00:00 GMT 2007 :: 500.0
Continuing our banking exercise, we are now going to process both
credits and debits on two bank accounts, calculating the account balance.
In order to do this, we create two separate Account objects
and inject them into the Cashflows objects before passing
them to the Rule Engine. The reason for this is to provide easy access
to the correct account without having to resort to helper classes. Let’s
take a look at the Account class first. This is a simple
Java object with an account number and balance:
Example 9.47. Banking Tutorial: Class Account
public class Account {
private long accountNo;
private double balance = 0;
public Account() {
}
public Account(long accountNo) {
this.accountNo = accountNo;
}
public long getAccountNo() {
return accountNo;
}
public void setAccountNo(long accountNo) {
this.accountNo = accountNo;
}
public double getBalance() {
return balance;
}
public void setBalance(double balance) {
this.balance = balance;
}
public String toString() {
return "Account[" + "accountNo=" + accountNo + ",balance=" + balance + "]";
}
}
Now let’s extend our TypedCashflow, resulting in
AllocatedCashflow, to include an Account
reference.
Example 9.48. Banking Tutorial: Class AllocatedCashflow
public class AllocatedCashflow extends TypedCashflow {
private Account account;
public AllocatedCashflow() {
}
public AllocatedCashflow(Account account, Date date, int type, double amount) {
super( date, type, amount );
this.account = account;
}
public Account getAccount() {
return account;
}
public void setAccount(Account account) {
this.account = account;
}
public String toString() {
return "AllocatedCashflow[" +
"account=" + account +
",date=" + getDate() +
",type=" + (getType() == CREDIT ? "Credit" : "Debit") +
",amount=" + getAmount() + "]";
}
}
The Java code of Example5.java creates
two Account objects and passes one of them into each
cashflow, in the constructor call.
Example 9.49. Banking Tutorial: Example5.java
public class Example6 {
public static void main(String[] args) throws Exception {
Account acc1 = new Account(1);
Account acc2 = new Account(2);
Object[] cashflows = {
new AllocatedCashflow(acc1,new SimpleDate("01/01/2007"),
TypedCashflow.CREDIT, 300.00),
new AllocatedCashflow(acc1,new SimpleDate("05/02/2007"),
TypedCashflow.CREDIT, 100.00),
new AllocatedCashflow(acc2,new SimpleDate("11/03/2007"),
TypedCashflow.CREDIT, 500.00),
new AllocatedCashflow(acc1,new SimpleDate("07/02/2007"),
TypedCashflow.DEBIT, 800.00),
new AllocatedCashflow(acc2,new SimpleDate("02/03/2007"),
TypedCashflow.DEBIT, 400.00),
new AllocatedCashflow(acc1,new SimpleDate("01/04/2007"),
TypedCashflow.CREDIT, 200.00),
new AllocatedCashflow(acc1,new SimpleDate("05/04/2007"),
TypedCashflow.CREDIT, 300.00),
new AllocatedCashflow(acc2,new SimpleDate("11/05/2007"),
TypedCashflow.CREDIT, 700.00),
new AllocatedCashflow(acc1,new SimpleDate("07/05/2007"),
TypedCashflow.DEBIT, 900.00),
new AllocatedCashflow(acc2,new SimpleDate("02/05/2007"),
TypedCashflow.DEBIT, 100.00)
};
new RuleRunner().runRules( new String[] { "Example6.drl" },
cashflows );
}
}
Now, let’s look at the rule in Example6.drl
to see how we apply each cashflow in date order and calculate and print
the balance.
Example 9.50. Banking Tutorial: Rule in Example6.drl
rule "Rule 06 - Credit"
when
$cashflow : AllocatedCashflow( $account : account,
$date : date,
$amount : amount,
type == TypedCashflow.CREDIT )
not AllocatedCashflow( account == $account, date < $date)
then
System.out.println("Credit: " + $date + " :: " + $amount);
$account.setBalance($account.getBalance()+$amount);
System.out.println("Account: " + $account.getAccountNo() +
" - new balance: " + $account.getBalance());
retract($cashflow);
end
rule "Rule 06 - Debit"
when
$cashflow : AllocatedCashflow( $account : account,
$date : date,
$amount : amount,
type == TypedCashflow.DEBIT )
not AllocatedCashflow( account == $account, date < $date)
then
System.out.println("Debit: " + $date + " :: " + $amount);
$account.setBalance($account.getBalance() - $amount);
System.out.println("Account: " + $account.getAccountNo() +
" - new balance: " + $account.getBalance());
retract($cashflow);
endAlthough we have separate rules for credits and debits, but we do not specify a type when checking for earlier cashflows. This is so that all cashflows are applied in date order, regardless of the cashflow type. In the conditions we identify the account to work with, and in the consequences we update it with the cashflow amount.
Example 9.51. Banking Tutorial: Output of Example6.java
Loading file: Example6.drl Inserting fact: AllocatedCashflow[account=Account[accountNo=1,balance=0.0],date=Mon Jan 01 00:00:00 GMT 2007,type=Credit,amount=300.0] Inserting fact: AllocatedCashflow[account=Account[accountNo=1,balance=0.0],date=Mon Feb 05 00:00:00 GMT 2007,type=Credit,amount=100.0] Inserting fact: AllocatedCashflow[account=Account[accountNo=2,balance=0.0],date=Sun Mar 11 00:00:00 GMT 2007,type=Credit,amount=500.0] Inserting fact: AllocatedCashflow[account=Account[accountNo=1,balance=0.0],date=Wed Feb 07 00:00:00 GMT 2007,type=Debit,amount=800.0] Inserting fact: AllocatedCashflow[account=Account[accountNo=2,balance=0.0],date=Fri Mar 02 00:00:00 GMT 2007,type=Debit,amount=400.0] Inserting fact: AllocatedCashflow[account=Account[accountNo=1,balance=0.0],date=Sun Apr 01 00:00:00 BST 2007,type=Credit,amount=200.0] Inserting fact: AllocatedCashflow[account=Account[accountNo=1,balance=0.0],date=Thu Apr 05 00:00:00 BST 2007,type=Credit,amount=300.0] Inserting fact: AllocatedCashflow[account=Account[accountNo=2,balance=0.0],date=Fri May 11 00:00:00 BST 2007,type=Credit,amount=700.0] Inserting fact: AllocatedCashflow[account=Account[accountNo=1,balance=0.0],date=Mon May 07 00:00:00 BST 2007,type=Debit,amount=900.0] Inserting fact: AllocatedCashflow[account=Account[accountNo=2,balance=0.0],date=Wed May 02 00:00:00 BST 2007,type=Debit,amount=100.0] Debit: Fri Mar 02 00:00:00 GMT 2007 :: 400.0 Account: 2 - new balance: -400.0 Credit: Sun Mar 11 00:00:00 GMT 2007 :: 500.0 Account: 2 - new balance: 100.0 Debit: Wed May 02 00:00:00 BST 2007 :: 100.0 Account: 2 - new balance: 0.0 Credit: Fri May 11 00:00:00 BST 2007 :: 700.0 Account: 2 - new balance: 700.0 Credit: Mon Jan 01 00:00:00 GMT 2007 :: 300.0 Account: 1 - new balance: 300.0 Credit: Mon Feb 05 00:00:00 GMT 2007 :: 100.0 Account: 1 - new balance: 400.0 Debit: Wed Feb 07 00:00:00 GMT 2007 :: 800.0 Account: 1 - new balance: -400.0 Credit: Sun Apr 01 00:00:00 BST 2007 :: 200.0 Account: 1 - new balance: -200.0 Credit: Thu Apr 05 00:00:00 BST 2007 :: 300.0 Account: 1 - new balance: 100.0 Debit: Mon May 07 00:00:00 BST 2007 :: 900.0 Account: 1 - new balance: -800.0
The Pricing Rule decision table demonstrates the use of a decision table in a spreadsheet, in Excel's XLS format, in calculating the retail cost of an insurance policy. The purpose of the provide set of rules is to calculate a base price and a discount for a car driver applying for a specific policy. The driver's age, history and the policy type all contribute to what the basic premium is, and an additional chunk of rules deals with refining this with a discount percentage.
Name: Example Policy Pricing Main class: org.drools.examples.decisiontable.PricingRuleDTExample Module: drools-examples Type: Java application Rules file: ExamplePolicyPricing.xls Objective: demonstrate spreadsheet-based decision tables.
Open the file PricingRuleDTExample.java and
execute it as a Java application. It should produce the following
output in the Console window:
Cheapest possible BASE PRICE IS: 120 DISCOUNT IS: 20
The code to execute the example follows the usual pattern. The rules are loaded, the facts inserted and a Stateless Session is created. What is different is how the rules are added.
DecisionTableConfiguration dtableconfiguration =
KnowledgeBuilderFactory.newDecisionTableConfiguration();
dtableconfiguration.setInputType( DecisionTableInputType.XLS );
KnowledgeBuilder kbuilder = KnowledgeBuilderFactory.newKnowledgeBuilder();
Resource xlsRes = ResourceFactory.newClassPathResource( "ExamplePolicyPricing.xls",
getClass() );
kbuilder.add( xlsRes,
ResourceType.DTABLE,
dtableconfiguration );
Note the use of the DecisionTableConfiguration object.
Its input type is set to DecisionTableInputType.XLS.
If you use the BRMS, all this is of course taken care of for you.
There are two fact types used in this example, Driver
and Policy. Both are used with their default values. The
Driver is 30 years old, has had no prior claims and
currently has a risk profile of LOW. The Policy
being applied for is COMPREHENSIVE, and it has not yet been
approved.
In this decision table, each row is a rule, and each column is a condition or an action.

Referring to the spreadsheet show above, we have the
RuleSet declaration, which provides the package name.
There are also other optional items you can have here, such as
Variables for global variables, and Imports
for importing classes. In this case, the namespace of the rules is
the same as the fact classes we are using, so we can omit it.
Moving further down, we can see the RuleTable
declaration. The name after this (Pricing bracket) is used as the
prefix for all the generated rules. Below that, we have
"CONDITION or ACTION", indicating the purpose of the column, i.e.,
whether it forms part of the condition or the consequence of the rule
that will be generated.
You can see that there is a driver, his data spanned across three
cells, which means that the template expressions below it apply to that
fact. We observe the driver's age range (which uses $1 and
$2 with comma-separated values),
locationRiskProfile, and priorClaims in the
respective columns. In the action columns, we are set the policy
base price and log a message.

In the preceding spreadsheet section, there are broad category brackets, indicated by the comment in the leftmost column. As we know the details of our drivers and their policies, we can tell (with a bit of thought) that they should match row number 18, as they have no prior accidents, and are 30 years old. This gives us a base price of 120.

The above section contains the conditions for the discount we
might grant our driver. The discount results from the Age
bracket, the number of prior claims, and the policy type. In our case,
the driver is 30, with no prior claims, and is applying for a
COMPREHENSIVE policy, which means we can give a discount
of 20%. Note that this is actually a separate table, but in the same
worksheet, so that different templates apply.
It is important to note that decision tables generate rules. This means they aren't simply top-down logic, but more a means to capture data resulting in rules. This is a subtle difference that confuses some people. The evaluation of the rules is not necessarily in the given order, since all the normal mechanics of the rule engine still apply.
Name: Pet Store Main class: org.drools.examples.petstore.PetStoreExample Module: drools-examples Type: Java application Rules file: PetStore.drl Objective: Demonstrate use of Agenda Groups, Global Variables and integration with a GUI, including callbacks from within the rules
The Pet Store example shows how to integrate Rules with a GUI, in this case a Swing based desktop application. Within the rules file, it demonstrates how to use Agenda groups and auto-focus to control which of a set of rules is allowed to fire at any given time. It also illustrates the mixing of the Java and MVEL dialects within the rules, the use of accumulate functions and the way of calling Java functions from within the ruleset.
All of the Java code is contained in one file,
PetStore.java, defining the following principal
classes (in addition to several classes to handle Swing Events):
Petstorecontains themain()method that we will look at shortly.PetStoreUIis responsible for creating and displaying the Swing based GUI. It contains several smaller classes, mainly for responding to various GUI events such as mouse button clicks.TableModelholds the table data. Think of it as a JavaBean that extends the Swing classAbstractTableModel.CheckoutCallbackallows the GUI to interact with the Rules.Ordershowkeeps the items that we wish to buy.Purchasestores details of the order and the products we are buying.Productis a JavaBean holding details of the product available for purchase, and its price.
Much of the Java code is either plain JavaBeans or Swing-based.
Only a few Swing-related points will be discussed in this section,
but a good tutorial about Swing components can be found at Sun's
Swing website, in
http://java.sun.com/docs/books/tutorial/uiswing/
.
The pieces of Java code in Petstore.java
that relate to rules and facts are shown below.
Example 9.52. Creating the PetStore RuleBase in PetStore.main
KnowledgeBuilder kbuilder = KnowledgeBuilderFactory.newKnowledgeBuilder();
kbuilder.add( ResourceFactory.newClassPathResource( "PetStore.drl",
PetStore.class ),
ResourceType.DRL );
KnowledgeBase kbase = KnowledgeBaseFactory.newKnowledgeBase();
kbase.addKnowledgePackages( kbuilder.getKnowledgePackages() );
// Create the stock.
Vector<Product> stock = new Vector<Product>();
stock.add( new Product( "Gold Fish", 5 ) );
stock.add( new Product( "Fish Tank", 25 ) );
stock.add( new Product( "Fish Food", 2 ) );
// A callback is responsible for populating the
// Working Memory and for firing all rules.
PetStoreUI ui = new PetStoreUI( stock,
new CheckoutCallback( kbase ) );
ui.createAndShowGUI();
The code shown above loads the rules from a DRL file on the
classpath. Unlike other examples where the facts are asserted and
fired straight away, this example defers this step to later. The
way it does this is via the second last line where a
PetStoreUI object is created using a constructor
accepting the Vector object stock
collecting our products, and an instance of
the CheckoutCallback class containing the Rule Base
that we have just loaded.
The Java code that fires the rules is within the
CheckoutCallBack.checkout() method. This is triggered
(eventually) when the Checkout button is pressed by the user.
Example 9.53. Firing the Rules - extract from CheckoutCallBack.checkout()
public String checkout(JFrame frame, List<Product> items) {
Order order = new Order();
// Iterate through list and add to cart
for ( Product p: items ) {
order.addItem( new Purchase( order, p ) );
}
// Add the JFrame to the ApplicationData to allow for user interaction
StatefulKnowledgeSession ksession = kbase.newStatefulKnowledgeSession();
ksession.setGlobal( "frame", frame );
ksession.setGlobal( "textArea", this.output );
ksession.insert( new Product( "Gold Fish", 5 ) );
ksession.insert( new Product( "Fish Tank", 25 ) );
ksession.insert( new Product( "Fish Food", 2 ) );
ksession.insert( new Product( "Fish Food Sample", 0 ) );
ksession.insert( order );
ksession.fireAllRules();
// Return the state of the cart
return order.toString();
}
Two items get passed into this method. One is the handle to the
JFrame Swing component surrounding the output text
frame, at the bottom of the GUI. The second is a list of order items;
this comes from the TableModel storing the information
from the "Table" area at the top right section of the GUI.
The for loop transforms the list of order items coming from the
GUI into the Order JavaBean, also contained in the
file PetStore.java. Note that it would be
possible to refer to the Swing dataset directly within the rules,
but it is better coding practice to do it this way, using simple
Java objects. It means that we are not tied to Swing if we wanted
to transform the sample into a Web application.
It is important to note that all state in this
example is stored in the Swing components, and that the rules are
effectively stateless. Each time the "Checkout" button is
pressed, this code copies the contents of the Swing
TableModel into the Session's Working Memory.
Within this code, there are nine calls to the Working Memory.
The first of these creates a new Working Memory, as a Stateful
Knowledge Session from the Knowledge Base. Remember that we passed
in this Knowledge Base when we created the CheckoutCallBack
class in the main() method. The next two calls pass in
two objects that we will hold as global variables in the rules: the
Swing text area and the Swing frame used for writing messages.
More inserts put information on products into the Working Memory,
as well as the order list. The final call is the standard
fireAllRules(). Next, we look at what this method causes
to happen within the rules file.
Example 9.54. Package, Imports, Globals and Dialect: extract from PetStore.drl
package org.drools.examples
import org.drools.WorkingMemory
import org.drools.examples.petstore.PetStoreExample.Order
import org.drools.examples.petstore.PetStoreExample.Purchase
import org.drools.examples.petstore.PetStoreExample.Product
import java.util.ArrayList
import javax.swing.JOptionPane;
import javax.swing.JFrame
global JFrame frame
global javax.swing.JTextArea textArea
The first part of file PetStore.drl
contains the standard package and import statements to make various
Java classes available to the rules. New to us are the two globals
frame and textArea. They hold references
to the Swing components JFrame and JTextArea
components that were previously passed on by the Java code calling
the setGlobal() method. Unlike variables in rules,
which expire as soon as the rule has fired, global variables retain
their value for the lifetime of the Session.
The next extract from the file PetStore.drl
contains two functions that are referenced by the rules that we will
look at shortly.
Example 9.55. Java Functions in the Rules: extract from PetStore.drl
function void doCheckout(JFrame frame, WorkingMemory workingMemory) {
Object[] options = {"Yes",
"No"};
int n = JOptionPane.showOptionDialog(frame,
"Would you like to checkout?",
"",
JOptionPane.YES_NO_OPTION,
JOptionPane.QUESTION_MESSAGE,
null,
options,
options[0]);
if (n == 0) {
workingMemory.setFocus( "checkout" );
}
}
function boolean requireTank(JFrame frame, WorkingMemory workingMemory, Order order, Product fishTank, int total) {
Object[] options = {"Yes",
"No"};
int n = JOptionPane.showOptionDialog(frame,
"Would you like to buy a tank for your " + total + " fish?",
"Purchase Suggestion",
JOptionPane.YES_NO_OPTION,
JOptionPane.QUESTION_MESSAGE,
null,
options,
options[0]);
System.out.print( "SUGGESTION: Would you like to buy a tank for your "
+ total + " fish? - " );
if (n == 0) {
Purchase purchase = new Purchase( order, fishTank );
workingMemory.insert( purchase );
order.addItem( purchase );
System.out.println( "Yes" );
} else {
System.out.println( "No" );
}
return true;
}
Having these functions in the rules file just makes the Pet Store
example more compact. In real life you probably have the functions
in a file of their own, within the same rules package, or as a
static method on a standard Java class, and import them, using
import function my.package.Foo.hello.
The purpose of these two functions is:
doCheckout()displays a dialog asking users whether they wish to checkout. If they do, focus is set to thecheckOutagenda-group, allowing rules in that group to (potentially) fire.requireTank()displays a dialog asking users whether they wish to buy a tank. If so, a new fish tankProductis added to the order list in Working Memory.
We'll see the rules that call these functions later on. The
next set of examples are from the Pet Store rules themselves. The
first extract is the one that happens to fire first, partly because
it has the auto-focus attribute set to true.
Example 9.56. Putting items into working memory: extract from PetStore.drl
// Insert each item in the shopping cart into the Working Memory
// Insert each item in the shopping cart into the Working Memory
rule "Explode Cart"
agenda-group "init"
auto-focus true
salience 10
dialect "java"
when
$order : Order( grossTotal == -1 )
$item : Purchase() from $order.items
then
insert( $item );
kcontext.getKnowledgeRuntime().getAgenda().getAgendaGroup( "show items" ).setFocus();
kcontext.getKnowledgeRuntime().getAgenda().getAgendaGroup( "evaluate" ).setFocus();
endThis rule matches against all orders that do not yet have their
grossTotal calculated . It loops for each purchase item
in that order. Some parts of the "Explode Cart" rule should be familiar:
the rule name, the salience (suggesting the order for the rules being
fired) and the dialect set to "java". There are three
new features:
agenda-group"init"defines the name of the agenda group. In this case, there is only one rule in the group. However, neither the Java code nor a rule consequence sets the focus to this group, and therefore it relies on the next attribute for its chance to fire.auto-focustrueensures that this rule, while being the only rule in the agenda group, gets a chance to fire whenfireAllRules()is called from the Java code.kcontext....setFocus()sets the focus to the"show items"and"evaluate"agenda groups in turn, permitting their rules to fire. In practice, we loop through all items on the order, inserting them into memory, then firing the other rules after each insert.
The next two listings show the rules within the
"show items" and evaluate agenda groups.
We look at them in the order that they are called.
Example 9.57. Show Items in the GUI - extract from PetStore.drl
rule "Show Items"
agenda-group "show items"
dialect "mvel"
when
$order : Order( )
$p : Purchase( order == $order )
then
textArea.append( $p.product + "\n");
end
The "show items" agenda-group has only one rule,
called "Show Items" (note the difference in case). For each purchase
on the order currently in the Working Memory (or Session), it logs
details to the text area at the bottom of the GUI. The
textArea variable used to do this is one of the global
variables we looked at earlier.
The evaluate Agenda group also gains focus from
the "Explode Cart" rule listed previously. This
Agenda group has two rules, "Free Fish Food Sample" and
"Suggest Tank", shown below.
Example 9.58. Evaluate Agenda Group: extract from PetStore.drl
// Free Fish Food sample when we buy a Gold Fish if we haven't already bought
// Fish Food and don't already have a Fish Food Sample
rule "Free Fish Food Sample"
agenda-group "evaluate"
dialect "mvel"
when
$order : Order()
not ( $p : Product( name == "Fish Food") && Purchase( product == $p ) )
not ( $p : Product( name == "Fish Food Sample") && Purchase( product == $p ) )
exists ( $p : Product( name == "Gold Fish") && Purchase( product == $p ) )
$fishFoodSample : Product( name == "Fish Food Sample" );
then
System.out.println( "Adding free Fish Food Sample to cart" );
purchase = new Purchase($order, $fishFoodSample);
insert( purchase );
$order.addItem( purchase );
end
// Suggest a tank if we have bought more than 5 gold fish and don't already have one
rule "Suggest Tank"
agenda-group "evaluate"
dialect "java"
when
$order : Order()
not ( $p : Product( name == "Fish Tank") && Purchase( product == $p ) )
ArrayList( $total : size > 5 ) from collect( Purchase( product.name == "Gold Fish" ) )
$fishTank : Product( name == "Fish Tank" )
then
requireTank(frame, drools.getWorkingMemory(), $order, $fishTank, $total);
end
The rule "Free Fish Food Sample" will only fire if
we don't already have any fish food, and
we don't already have a free fish food sample, and
we do have a Gold Fish in our order.
If the rule does fire, it creates a new product (Fish Food Sample), and adds it to the order in Working Memory.
The rule "Suggest Tank" will only fire if
we don't already have a Fish Tank in our order, and
we do have more than 5 Gold Fish Products in our order.
If the rule does fire, it calls the requireTank() function
that we looked at earlier (showing a Dialog to the user, and adding a Tank to
the order / working memory if confirmed). When calling the
requireTank() function the rule passes
the global frame variable so that the
function has a handle to the Swing GUI.
The next rule we look at is "do checkout".
Example 9.59. Doing the Checkout - extract (6) from PetStore.drl
rule "do checkout"
dialect "java"
when
then
doCheckout(frame, drools.getWorkingMemory());
endThe rule "do checkout" has no
agenda group set and no auto-focus attribute. As such, is is
deemed part of the default (MAIN) agenda group. This group gets focus by
default when all the rules in agenda-groups that explicity had focus set
to them have run their course.
There is no LHS to the rule, so the RHS will always call the
doCheckout() function. When calling the
doCheckout() function, the rule passes the global
frame variable to give the function a handle to the Swing GUI.
As we saw earlier, the doCheckout() function shows a
confirmation dialog to the user. If confirmed, the function sets the focus
to the checkout agenda-group, allowing
the next lot of rules to fire.
Example 9.60. Checkout Rules: extract from PetStore.drl
rule "Gross Total"
agenda-group "checkout"
dialect "mvel"
when
$order : Order( grossTotal == -1)
Number( total : doubleValue )
from accumulate( Purchase( $price : product.price ), sum( $price ) )
then
modify( $order ) { grossTotal = total };
textArea.append( "\ngross total=" + total + "\n" );
end
rule "Apply 5% Discount"
agenda-group "checkout"
dialect "mvel"
when
$order : Order( grossTotal >= 10 && < 20 )
then
$order.discountedTotal = $order.grossTotal * 0.95;
textArea.append( "discountedTotal total=" + $order.discountedTotal + "\n" );
end
rule "Apply 10% Discount"
agenda-group "checkout"
dialect "mvel"
when
$order : Order( grossTotal >= 20 )
then
$order.discountedTotal = $order.grossTotal * 0.90;
textArea.append( "discountedTotal total=" + $order.discountedTotal + "\n" );
end
There are three rules in the checkout agenda-group:
If we haven't already calculated the gross total,
Gross Totalaccumulates the product prices into a total, puts this total into Working Memory, and displays it via the SwingJTextArea, using thetextAreaglobal variable yet again.If our gross total is between 10 and 20,
"Apply 5% Discount"calculates the discounted total and adds it to the Working Memory and displays it in the text area.If our gross total is not less than 20,
"Apply 10% Discount"calculates the discounted total and adds it to the Working Memory and displays it in the text area.
Now that we've run through what happens in the code, let's have a
look at what happens when we actually run the code. The file
PetStore.java contains a main() method,
so that it can be run as a standard Java application, either from the
command line or via the IDE. This assumes you have your classpath set
correctly. (See the start of the examples section for more information.)
The first screen that we see is the Pet Store Demo. It has a list of available products (top left), an empty list of selected products (top right), checkout and reset buttons (middle) and an empty system messages area (bottom).

To get to this point, the following things have happened:
The
main()method has run and loaded the Rule Base but not yet fired the rules. So far, this is the only code in connection with rules that has been run.A new
PetStoreUIobject has been created and given a handle to the Rule Base, for later use.Various Swing components do their stuff, and the above screen is shown and waits for user input.
Clicking on various products from the list might give you a screen similar to the one below.

Note that no rules code has been fired here. This
is only Swing code, listening for mouse click events, and adding some
selected product to the TableModel object for display in the
top right hand section. (As an aside, note that this is a classic use of
the Model View Controller design pattern).
It is only when we press the "Checkout" button that we fire our business rules, in roughly the same order that we walked through the code earlier.
Method
CheckOutCallBack.checkout()is called (eventually) by the Swing class waiting for the click on the "Checkout" button. This inserts the data from theTableModelobject (top right hand side of the GUI), and inserts it into the Session's Working Memory. It then fires the rules.The
"Explode Cart"rule is the first to fire, given that it hasauto-focusset to true. It loops through all the products in the cart, ensures that the products are in the Working Memory, and then gives the"Show Items"andEvaluationagenda groups a chance to fire. The rules in these groups add the contents of the cart to the text area (at the bottom of the window), decide whether or not to give us free fish food, and to ask us whether we want to buy a fish tank. This is shown in the figure below.

The Do Checkout rule is the next to fire as it (a) No other agenda group currently has focus and (b) it is part of the default (MAIN) agenda group. It always calls the doCheckout() function which displays a 'Would you like to Checkout?' Dialog Box.
The
doCheckout()function sets the focus to thecheckoutagenda-group, giving the rules in that group the option to fire.The rules in the the
checkoutagenda-group display the contents of the cart and apply the appropriate discount.Swing then waits for user input to either checkout more products (and to cause the rules to fire again), or to close the GUI - see the figure below.

We could add more System.out calls to demonstrate this flow of events. The output, as it currently appears in the Console window, is given in the listing below.
Example 9.61. Console (System.out) from running the PetStore GUI
Adding free Fish Food Sample to cart SUGGESTION: Would you like to buy a tank for your 6 fish? - Yes
Name: Honest Politician Main class: org.drools.examples.honestpolitician.HonestPoliticianExample Module: drools-examples Type: Java application Rules file: HonestPoliticianExample.drl Objective: Illustrate the concept of "truth maintenance" based on the logical insertion of facts
The Honest Politician example demonstrates truth maintenance with
logical assertions. The basic premise is that an object can only exist
while a statement is true. A rule's consequence can logically insert an
object with the insertLogical() method. This means the object
will only remain in the Working Memory as long as the rule that logically
inserted it remains true. When the rule is no longer true the object is
automatically retracted.
In this example there is the class Politician, with a
name and a boolean value for being honest. Four politicians with honest
state set to true are inserted.
Example 9.62. Class Politician
public class Politician {
private String name;
private boolean honest;
...
}
Example 9.63. Honest Politician: Execution
Politician blair = new Politician("blair", true);
Politician bush = new Politician("bush", true);
Politician chirac = new Politician("chirac", true);
Politician schroder = new Politician("schroder", true);
ksession.insert( blair );
ksession.insert( bush );
ksession.insert( chirac );
ksession.insert( schroder );
ksession.fireAllRules();
The Console window output shows that, while there is at least one honest politician, democracy lives. However, as each politician is in turn corrupted by an evil corporation, so that all politicians become dishonest, democracy is dead.
Example 9.64. Honest Politician: Console Output
Hurrah!!! Democracy Lives I'm an evil corporation and I have corrupted schroder I'm an evil corporation and I have corrupted chirac I'm an evil corporation and I have corrupted bush I'm an evil corporation and I have corrupted blair We are all Doomed!!! Democracy is Dead
As soon as there is at least one honest politician in the
Working Memory a new Hope object is logically asserted.
This object will only exist while there is at least one honest
politician. As soon as all politicians are dishonest, the
Hope object will be automatically retracted. This rule
is given a salience of 10 to ensure that it fires before any other
rule, as at this stage the "Hope is Dead" rule is actually true.
Example 9.65. Honest Politician: Rule "We have an honest politician"
rule "We have an honest Politician"
salience 10
when
exists( Politician( honest == true ) )
then
insertLogical( new Hope() );
endAs soon as a Hope object exists the "Hope Lives" rule
matches and fires. It has a salience of 10 so that it takes priority
over "Corrupt the Honest".
Example 9.66. Honest Politician: Rule "Hope Lives"
rule "Hope Lives"
salience 10
when
exists( Hope() )
then
System.out.println("Hurrah!!! Democracy Lives");
endNow that there is hope and we have, at the start, four honest
politicians, we have four activations for this rule, all in conflict.
They will fire in turn, corrupting each politician so that they are
no longer honest. When all four politicians have been corrupted we
have no politicians with the property honest == true.
Thus, the rule "We have an honest Politician" is no longer true and
the object it logical inserted (due to the last execution of
new Hope()) is automatically retracted.
Example 9.67. Honest Politician: Rule "Corrupt the Honest"
rule "Corrupt the Honest"
when
politician : Politician( honest == true )
exists( Hope() )
then
System.out.println( "I'm an evil corporation and I have corrupted " + politician.getName() );
modify ( politician ) { honest = false };
endWith the Hope object being automatically retracted,
via the truth maintenance system, the conditional element not
applied to Hope is no longer true so that the following
rule will match and fire.
Example 9.68. Honest Politician: Rule "Hope is Dead"
rule "Hope is Dead"
when
not( Hope() )
then
System.out.println( "We are all Doomed!!! Democracy is Dead" );
endLet's take a look at the Audit trail for this application:

The moment we insert the first politician we have two activations.
The rule "We have an honest Politician" is activated only once for the first
inserted politician because it uses an exists conditional
element, which matches once for any number. The rule "Hope is Dead" is
also activated at this stage, because we have not yet inserted the
Hope object. Rule "We have an honest Politician" fires first,
as it has a higher salience than "Hope is Dead", which inserts the
Hope object. (That action is highlighted green.) The
insertion of the Hope object activates "Hope Lives" and
de-activates "Hope is Dead"; it also activates "Corrupt the Honest"
for each inserted honest politician. Rule "Hope Lives" executes,
printing "Hurrah!!! Democracy Lives". Then, for each politician, rule
"Corrupt the Honest" fires, printing "I'm an evil corporation and I
have corrupted X", where X is the name of the politician, and modifies
the politician's honest value to false. When the last honest politician
is corrupted, Hope is automatically retracted, by the truth
maintenance system, as shown by the blue highlighted area. The green
highlighted area shows the origin of the currently selected blue
highlighted area. Once the Hope fact is retracted, "Hope is
dead" activates and fires printing "We are all Doomed!!! Democracy is
Dead".
Name: Sudoku Main class: org.drools.examples.sudoku.SudokuExample Type: Java application Rules file: sudoku.drl, validate.drl Objective: Demonstrates the solving of logic problems, and complex pattern matching.
This example demonstrates how Drools can be used to find a solution in a large potential solution space based on a number of constraints. We use the popular puzzle of Sudoku. This example also shows how Drools can be integrated into a graphical interface and how callbacks can be used to interact with a running Drools rules engine in order to update the graphical interface based on changes in the Working Memory at runtime.
Sudoku is a logic-based number placement puzzle. The objective is to fill a 9x9 grid so that each column, each row, and each of the nine 3x3 zones contains the digits from 1 to 9, once, and only once.
The puzzle setter provides a partially completed grid and the puzzle solver's task is to complete the grid with these constraints.
The general strategy to solve the problem is to ensure that when you insert a new number it should be unique in its particular 3x3 zone, row and column.
See Wikipedia for a more detailed description.
Download and install drools-examples as described above and then
execute java org.drools.examples.DroolsExamplesApp and
click on "SudokuExample".
The window contains an empty grid, but the program comes with a number of grids stored internally which can be loaded and solved. Click on "File", then "Samples" and select "Simple" to load one of the examples. Note that all buttons are disabled until a grid is loaded.

Loading the "Simple" example fills the grid according to the puzzle's initial state.

Click on the "Solve" button and the Drools-based engine will fill out the remaining values, and the buttons are inactive once more.

Alternatively, you may click on the "Step" button to see the next digit found by the rule set. The Console window will display detailed information about the rules which are executing to solve the step in a human readable form. Some examples of these messages are presented below.
single 8 at [0,1] column elimination due to [1,2]: remove 9 from [4,2] hidden single 9 at [1,2] row elimination due to [2,8]: remove 7 from [2,4] remove 6 from [3,8] due to naked pair at [3,2] and [3,7] hidden pair in row at [4,6] and [4,4]
Click on the "Dump" button to see the state of the grid, with cells showing either the established value or the remaining possibilitiescandidates.
Col: 0 Col: 1 Col: 2 Col: 3 Col: 4 Col: 5 Col: 6 Col: 7 Col: 8
Row 0: 2 4 7 9 2 456 4567 9 23 56 9 --- 5 --- --- 1 --- 3 67 9 --- 8 --- 4 67
Row 1: 12 7 9 --- 8 --- 1 67 9 23 6 9 --- 4 --- 23 67 1 3 67 9 3 67 9 --- 5 ---
Row 2: 1 4 7 9 1 456 --- 3 --- 56 89 5 78 5678 --- 2 --- 4 67 9 1 4 67
Row 3: 1234 12345 1 45 12 5 8 --- 6 --- 2 5 78 5 78 45 7 --- 9 ---
Row 4: --- 6 --- --- 7 --- 5 --- 4 --- 2 5 8 --- 9 --- 5 8 --- 1 --- --- 3 ---
Row 5: --- 8 --- 12 45 1 45 9 12 5 --- 3 --- 2 5 7 567 4567 2 4 67
Row 6: 1 3 7 1 3 6 --- 2 --- 3 56 8 5 8 3 56 8 --- 4 --- 3 567 9 1 678
Row 7: --- 5 --- 1 34 6 1 4 678 3 6 8 --- 9 --- 34 6 8 1 3 678 --- 2 --- 1 678
Row 8: 34 --- 9 --- 4 6 8 --- 7 --- --- 1 --- 23456 8 3 56 8 3 56 6 8
Now, let us load a Sudoku grid that is deliberately invalid. Click on "File", "Samples" and "!DELIBERATELY BROKEN!". Note that this grid starts with some issues, for example the value 5 appears twice in the first row.

A few simple rules perform a sanity check, right after loading a grid. In this case, the following messages are printed on standard output:
cell [0,8]: 5 has a duplicate in row 0 cell [0,0]: 5 has a duplicate in row 0 cell [6,0]: 8 has a duplicate in col 0 cell [4,0]: 8 has a duplicate in col 0 Validation complete.
Nevertheless, click on the "Solve" button to apply the solving rules to this invalid grid. This will not complete; some cells remain empty.

The solving functionality has been achieved by the use of rules that implement standard solving techniques. They are based on the sets of values that are still candidates for a cell. If, for instance, such a set contains a single value, then this is the value for the cell. A little less obvious is the single occurrence of a value in one of the groups of nine cells. The rules detecting these situations insert a fact of type Setting with the solution value for some specific cell. This fact causes the elimination of this value from all other cells in any of the groups the cell belongs to. Finally, it is retracted.
Other rules merely reduce the permissible values for some cells. Rules "naked pair", "hidden pair in row", "hidden pair in column" and "hidden pair in square" merely eliminate possibilities but do not establish solutions. More sophisticated eliminations are done by "X-wings in rows", "X-wings in columns", "intersection removal row" and "intersection removal column".
The Java source code can be found in the /src/main/java/org/drools/examples/sudoku directory, with the two DRL files defining the rules located in the /src/main/rules/org/drools/examples/sudoku directory.
The package org.drools.examples.sudoku.swing
contains a set of classes which implement a framework for Sudoku
puzzles. Note that this package does not have any dependencies on
the Drools libraries. SudokuGridModel defines an
interface which can be implemented to store a Sudoku puzzle as a 9x9
grid of Cell objects. SudokuGridView is
a Swing component which can visualize any implementation of
SudokuGridModel. SudokuGridEvent and
SudokuGridListener are used to
communicate state changes between the model and the view: events are
fired when a cell's value is resolved or changed. If you are familiar
with the model-view-controller patterns in other Swing components such
as JTable then this pattern should be familiar.
SudokuGridSamples provides a number of partially filled
Sudoku puzzles for demonstration purposes.
Package org.drools.examples.sudoku.rules contains a
utility class with a method for compiling DRL files.
The package org.drools.examples.sudoku contains a
set of classes implementing the elementary Cell object
and its various aggregations: the CellFile subtypes
CellRow and CellCol as well as
CellSqr, all of which are subtypes of
CellGroup. It's interesting to note that Cell
and CellGroup are subclasses of SetOfNine,
which provides a property free with the
type Set<Integer>. For a Cell it
represents the individual candidate set; for a CellGroup
the set is the union of all candidate sets of its cells, or, simply,
the set of digits that still need to be allocated.
With 81 Cell and 27 CellGroup objects and
the linkage provided by the Cell properties
cellRow, cellCol and cellSqr
and the CellGroup property cells, a list of
Cell objects, it is possible to write rules that
detect the specific sitations that permit the allocation of a
value to a cell or the elimination of a value from some candidate
set.
An object of class Setting is used for triggering
the operations that accompany the allocation of a value: its removal
from the candidata sets of sibling cells and associated cell groups.
Moreover, the presence of a Setting fact is used in
all rules that should detect a new situation; this is to avoid
reactions to inconsistent intermediary states.
An object of class Stepping is used in a
low priority rule to execute an emergency halt when a "Step"
does not terminate regularly. This indicates that the puzzle
cannot be solved by the program.
The class org.drools.examples.sudoku.SudokuExample
implements a Java application combining the components desribed.
Validation rules detect duplicate numbers in cell groups. They are combined in an agenda group which enables us to activate them, explicitly, after loading a puzzle.
The three rules "duplicate in cell..." are very similar. The first pattern locates a cell with an allocated value. The second pattern pulls in any of the three cell groups the cell belongs to. The final pattern would find a cell (other than the first one) with the same value as the first cell and in the same row, column or square, respectively.
Rule "terminate group" fires last. It prints a message and calls halt.
There are three types of rules in this file: one group handles the allocation of a number to a cell, another group detects feasible allocations, and the third group eliminates values from candidate sets.
Rules "set a value", "eliminate a value from Cell" and
"retract setting" depend on the presence of a Setting
object. The first rule handles the assignment to the cell and the
operations for removing the value from the "free" sets of the
cell's three groups. Also, it decrements a counter that, when
zero, returns control to the Java application that has called
fireUntilHalt(). The purpose of rule
"eliminate a value from Cell" is to reduce the candidate lists
of all cells that are related to the newly assigned cell. Finally,
when all eliminations have been made, rule "retract setting"
retracts the triggering Setting fact.
There are just two rules that detect a situation where an
allocation of a number to a cell is possible. Rule "single" fires
for a Cell with a candidate set containing a single
number. Rule "hidden single" fires when there is no cell with a
single candidate but when there is a cell containing a candidate but
this candidate is absent from all other cells in one of the three
groups the cell belongs to. Both rules create and insert a
Setting fact.
Rules from the largest group of rules implement, singly or in groups of two or three, various solving techniques, as they are employed when solving Sudoku puzzles manually.
Rule "naked pair" detects identical candidate sets of size 2 in two cells of a group; these two values may be removed from all other candidate sets of that group.
A similar idea motivates the three rules "hidden pair in..."; here, the rules look for a subset of two numbers in exactly two cells of a group, with neither value occurring in any of the other cells of this group. This, then, means that all other candidates can be eliminated from the two cells harbouring the hidden pair.
A pair of rules deals with "X-wings" in rows and columns. When there are only two possible cells for a value in each of two different rows (or columns) and these candidates lie also in the same columns (or rows), then all other candidates for this value in the columns (or rows) can be eliminated. If you follow the pattern sequence in one of these rules, you will see how the conditions that are conveniently expressed by words such as "same" or "only" result in patterns with suitable constraints or prefixed with "not".
The rule pair "intersection removal..." is based on the restricted occurrence of some number within one square, either in a single row or in a single column. This means that this number must be in one of those two or three cells of the row or column; hence it can be removed from the candidate sets of all other cells of the group. The pattern establishes the restricted occurrence and then fires for each cell outside the square and within the same cell file.
These rules are sufficient for many but certainly not for all Sudoku puzzles. To solve very difficult grids, the rule set would need to be extended with more complex rules. (Ultimately, there are puzzles that cannot be solved except by trial and error.)
Name: Number Guess Main class: org.drools.examples.numberguess.NumberGuessExample Module: droolsjbpm-integration-examples (Note: this is in a different download, the droolsjbpm-integration download.) Type: Java application Rules file: NumberGuess.drl Objective: Demonstrate use of Rule Flow to organise Rules
The "Number Guess" example shows the use of Rule Flow, a way of controlling the order in which rules are fired. It uses widely understood workflow diagrams for defining the order in which groups of rules will be executed.
Example 9.69. Creating the Number Guess RuleBase: NumberGuessExample.main() - part 1
final KnowledgeBuilder kbuilder = KnowledgeBuilderFactory.newKnowledgeBuilder();
kbuilder.add( ResourceFactory.newClassPathResource( "NumberGuess.drl",
ShoppingExample.class ),
ResourceType.DRL );
kbuilder.add( ResourceFactory.newClassPathResource( "NumberGuess.rf",
ShoppingExample.class ),
ResourceType.DRF );
final KnowledgeBase kbase = KnowledgeBaseFactory.newKnowledgeBase();
kbase.addKnowledgePackages( kbuilder.getKnowledgePackages() );
The creation of the package and the loading of the rules (using the add() method) is the same as
the previous examples. There is an additional line to add the Rule Flow (NumberGuess.rf), which
provides the option of specifying different rule flows for the same Knowledge Base. Otherwise, the Knowledge Base is
created in the same manner as before.
Example 9.70. Starting the RuleFlow: NumberGuessExample.main() - part 2
final StatefulKnowledgeSession ksession = kbase.newStatefulKnowledgeSession();
KnowledgeRuntimeLogger logger =
KnowledgeRuntimeLoggerFactory.newFileLogger(ksession, "log/numberguess");
ksession.insert( new GameRules( 100, 5 ) );
ksession.insert( new RandomNumber() );
ksession.insert( new Game() );
ksession.startProcess( "Number Guess" );
ksession.fireAllRules();
logger.close();
ksession.dispose();
Once we have a Knowledge Base, we can use it to obtain a Stateful Session. Into our session we insert our facts,
i.e., standard Java objects. (For simplicity, in this sample, these classes are all contained within our
NumberGuessExample.java file. Class GameRules provides the maximum range and the
number of guesses allowed. Class RandomNumber automatically generates a number between 0 and 100 and
makes it available to our rules, by insertion via the getValue() method. Class Game keeps
track of the guesses we have made before, and their number.
Note that before we call the standard fireAllRules() method, we also start the process that we
loaded earlier, via the startProcess() method. We'll learn where to obtain the parameter we pass ("Number
Guess", i.e., the identifier of the rule flow) when we talk about the rule flow file and the graphical Rule Flow
Editor below.
Before we finish the discussion of our Java code, we note that in some real-life application we would examine
the final state of the objects. (Here, we could retrieve the number of guesses, to add it to a high score table.) For
this example we are content to ensure that the Working Memory session is cleared by calling the dispose()
method.

If you open the NumberGuess.rf file in the Drools IDE (provided you have the JBoss Rules
extensions installed correctly in Eclipse) you should see the above diagram, similar to a standard flowchart. Its
icons are similar (but not exactly the same) as in the JBoss jBPM workflow product. Should you wish to edit the
diagram, a menu of available components should be available to the left of the diagram in the IDE, which is called the
palette. This diagram is saved in XML, an (almost) human readable format, using XStream.
If it is not already open, ensure that the Properties View is visible in the IDE. It can be opened by clicking "Window", then "Show View" and "Other", where you can select the "Properties" view. If you do this before you select any item on the rule flow (or click on the blank space in the rule flow) you should be presented with the following set of properties.

Keep an eye on the Properties View as we progress through the example's rule flow, as it presents valuable
information. In this case, it provides us with the identification of the Rule Flow Process that we used in our earlier
code snippet, when we called session.startProcess().
In the "Number Guess" Rule Flow we encounter several node types, many of them identified by an icon.
The Start node (white arrow in a green circle) and the End node (red box) mark beginning and end of the rule flow.
A Rule Flow Group box (yellow, without an icon) represents a Rule Flow Groups defined in our rules (DRL) file that we will look at later. For example, when the flow reaches the Rule Flow Group "Too High", only those rules marked with an attribute of
ruleflow-group"Too High"can potentially fire.Action nodes (yellow, cog-shaped icon) perform standard Java method calls. Most action nodes in this example call
System.out.println(), indicating the program's progress to the user.Split and Join Nodes (blue ovals, no icon) such as "Guess Correct?" and "More guesses Join" mark places where the flow of control can split, according to various conditions, and rejoin, respectively
Arrows indicate the flow between the various nodes.
The various nodes in combination with the rules make the Number Guess game work. For example, the "Guess" Rule
Flow Group allows only the rule "Get user Guess" to fire, because only that rule has a matching attribute of
ruleflow-group "Guess".
Example 9.71. A Rule firing only at a specific point in the Rule Flow: NumberGuess.drl
rule "Get user Guess"
ruleflow-group "Guess"
no-loop
when
$r : RandomNumber()
rules : GameRules( allowed : allowedGuesses )
game : Game( guessCount < allowed )
not ( Guess() )
then
System.out.println( "You have " + ( rules.allowedGuesses - game.guessCount )
+ " out of " + rules.allowedGuesses
+ " guesses left.\nPlease enter your guess from 0 to "
+ rules.maxRange );
br = new BufferedReader( new InputStreamReader( System.in ) );
i = br.readLine();
modify ( game ) { guessCount = game.guessCount + 1 }
insert( new Guess( i ) );
endThe rest of this rule is fairly standard. The LHS section (after when) of the rule states
that it will be activated for each RandomNumber object inserted into the Working Memory where
guessCount is less than allowedGuesses from the GameRules object and where the
user has not guessed the correct number.
The RHS section (or consequence, after then) prints a message to the user and then awaits
user input from System.in. After obtaining this input (the readLine() method call blocks
until the return key is pressed) it modifies the guess count and inserts the new guess, making both available to the
Working Memory.
The rest of the rules file is fairly standard: the package declares the dialect as MVEL, and various Java classes are imported. In total, there are five rules in this file:
Get User Guess, the Rule we examined above.
A Rule to record the highest guess.
A Rule to record the lowest guess.
A Rule to inspect the guess and retract it from memory if incorrect.
A Rule that notifies the user that all guesses have been used up.
One point of integration between the standard Rules and the RuleFlow is via the
ruleflow-group attribute on the rules, as dicussed above. A second point of integration
between the rules (.drl) file and the Rules Flow .rf files is that the Split Nodes (the blue ovals) can use
values in the Working Memory (as updated by the rules) to decide which flow of action to take. To see how this works,
click on the "Guess Correct Node"; then within the Properties View, open the Constraints Editor by clicking the button
at the right that appears once you click on the "Constraints" property line. You should see something similar to the
diagram below.

Click on the "Edit" button beside "To node Too High" and you'll see a dialog like the one below. The values in the "Textual Editor" window follow the standard rule format for the LHS and can refer to objects in Working Memory. The consequence (RHS) is that the flow of control follows this node (i.e., "To node Too High") if the LHS expression evaluates to true.

Since the file NumberGuess.java contains a main() method, it can be run as a
standard Java application, either from the command line or via the IDE. A typical game might result in the interaction
below. The numbers in bold are typed in by the user.
Example 9.72. Example Console output where the Number Guess Example beat the human!
You have 5 out of 5 guesses left. Please enter your guess from 0 to 100 50 Your guess was too high You have 4 out of 5 guesses left. Please enter your guess from 0 to 100 25 Your guess was too low You have 3 out of 5 guesses left. Please enter your guess from 0 to 100 37 Your guess was too low You have 2 out of 5 guesses left. Please enter your guess from 0 to 100 44 Your guess was too low You have 1 out of 5 guesses left. Please enter your guess from 0 to 100 47 Your guess was too low You have no more guesses The correct guess was 48
A summary of what is happening in this sample is:
The
main()method ofNumberGuessExample.javaloads a Rule Base, creates a Stateful Session and insertsGame,GameRulesandRandomNumber(containing the target number) objects into it. The method also sets the process flow we are going to use, and fires all rules. Control passes to the Rule Flow.File
NumberGuess.rf, the Rule Flow, begins at the "Start" node.Control passes (via the "More guesses" join node) to the Guess node.
At the Guess node, the appropriate Rule Flow Group ("Get user Guess") is enabled. In this case the Rule "Guess" (in the
NumberGuess.drlfile) is triggered. This rule displays a message to the user, takes the response, and puts it into Working Memory. Flow passes to the next Rule Flow Node.At the next node, "Guess Correct", constraints inspect the current session and decide which path to take.
If the guess in step 4 was too high or too low, flow proceeds along a path which has an action node with normal Java code printing a suitable message and a Rule Flow Group causing a highest guess or lowest guess rule to be triggered. Flow passes from these nodes to step 6.
If the guess in step 4 was right, we proceed along the path towards the end of the Rule Flow. Before we get there, an action node with normal Java code prints a statement "you guessed correctly". There is a join node here (just before the Rule Flow end) so that our no-more-guesses path (step 7) can also terminate the Rule Flow.
Control passes as per the Rule Flow via a join node, a guess incorrect Rule Flow Group (triggering a rule to retract a guess from Working Memory) onto the "More guesses" decision node.
The "More guesses" decision node (on the right hand side of the rule flow) uses constraints, again looking at values that the rules have put into the working memory, to decide if we have more guesses and if so, goto step 3. If not, we proceed to the end of the rule flow, via a Rule Flow Group that triggers a rule stating "you have no more guesses".
The loop over steps 3 to 7 continues until the number is guessed correctly, or we run out of guesses.
Name: Miss Manners Main class: org.drools.benchmark.manners.MannersBenchmark Module: drools-examples Type: Java application Rules file: manners.drl Objective: Advanced walkthrough on the Manners benchmark, covers Depth conflict resolution in depth.
Miss Manners is throwing a party and, being a good host, she wants to arrange good seating. Her initial design arranges everyone in male-female pairs, but then she worries about people have things to talk about. What is a good host to do? She decides to note the hobby of each guest so she can then arrange guests not only pairing them according to alternating sex but also ensuring that a guest has someone with a common hobby, at least on one side.

Five benchmarks were established in the 1991 paper "Effects of Database Size on Rule System Performance: Five Case Studies" by David Brant, Timothy Grose, Bernie Lofaso and Daniel P. Miranker:
Manners uses a depth-first search approach to determine the seating arrangements alternating women and men and ensuring one common hobby for neighbors.
Waltz establishes a three-dimensional interpretation of a line drawing by line labeling by constraint propagation.
WaltzDB is a more general version of Waltz, supporting junctions of more than three lines and using a database.
ARP is a route planner for a robotic air vehicle using the A* search algorithm to achieve minimal cost.
Weaver VLSI router for channels and boxes using a black-board technique.
Manners has become the de facto rule engine benchmark. Its behavior, however, is now well known and many engines optimize for this, thus negating its usefulness as a benchmark which is why Waltz is becoming more favorable. These five benchmarks are also published at the University of Texas http://www.cs.utexas.edu/ftp/pub/ops5-benchmark-suite/.
After the first seating arrangement has been assigned, a
depth-first recursion occurs which repeatedly assigns correct
seating arrangements until the last seat is assigned. Manners
uses a Context instance to control execution flow.
The activity diagram is partitioned to show the relation of the
rule execution to the current Context state.

Before going deeper into the rules, let's first take a look at the asserted data and the resulting seating arrangement. The data is a simple set of five guests who should be arranged so that sexes alternate and neighbors have a common hobby.
The Data
The data is given in OPS5 syntax, with a parenthesized list of name and value pairs for each attribute. Each person has only one hobby.
(guest (name n1) (sex m) (hobby h1) )
(guest (name n2) (sex f) (hobby h1) )
(guest (name n2) (sex f) (hobby h3) )
(guest (name n3) (sex m) (hobby h3) )
(guest (name n4) (sex m) (hobby h1) )
(guest (name n4) (sex f) (hobby h2) )
(guest (name n4) (sex f) (hobby h3) )
(guest (name n5) (sex f) (hobby h2) )
(guest (name n5) (sex f) (hobby h1) )
(last_seat (seat 5) )
The Results
Each line of the results list is printed per execution of the
"Assign Seat" rule. They key bit to notice is that each line has
a "pid" value one greater than the last. (The significance of this
will be explained in the discussion of the rule "Assign Seating".)
The "ls", "rs", "ln" and "rn" refer to the left and right
seat and neighbor's name, respectively. The actual implementation
uses longer attribute names (e.g., leftGuestName,
but here we'll stick to the notation from the original
implementation.
[Seating id=1, pid=0, done=true, ls=1, ln=n5, rs=1, rn=n5]
[Seating id=2, pid=1, done=false, ls=1, ln=n5, rs=2, rn=n4]
[Seating id=3, pid=2, done=false, ls=2, ln=n4, rs=3, rn=n3]
[Seating id=4, pid=3, done=false, ls=3, rn=n3, rs=4, rn=n2]
[Seating id=5, pid=4, done=false, ls=4, ln=n2, rs=5, rn=n1]
Manners has been designed to exercise cross product joins and Agenda activities. Many people not understanding this tweak the example to achieve better performance, making their port of the Manners benchmark pointless. Known cheats or porting errors for Miss Manners are:
Using arrays for a guests hobbies, instead of asserting each one as a single fact massively reduces the cross products.
Altering the sequence of data can also reduce the amount of matching, increasing execution speed.
It's possible to change the
notConditional Element so that the test algorithm only uses the "first-best-match", which is, basically, transforming the test algorithm to backward chaining. The results are only comparable to other backward chaining rule engines or ports of Manners.Removing the context so the rule engine matches the guests and seats prematurely. A proper port will prevent facts from matching using the context start.
It's possible to prevent the rule engine from performing combinatorial pattern matching.
If no facts are retracted in the reasoning cycle, as a result of the
notCE, the port is incorrect.
The Manners benchmark was written for OPS5 which has two conflict resolution strategies, LEX and MEA. LEX is a chain of several strategies including salience, recency and complexity. The recency part of the strategy drives the depth first (LIFO) firing order. The CLIPS manual documents the Recency strategy as follows:
Every fact and instance is marked internally with a "time tag" to indicate its relative recency with respect to every other fact and instance in the system. The pattern entities associated with each rule activation are sorted in descending order for determining placement. An activation with a more recent pattern entity is placed before activations with less recent pattern entities. To determine the placement order of two activations, compare the sorted time tags of the two activations one by one starting with the largest time tags. The comparison should continue until one activation’s time tag is greater than the other activation’s corresponding time tag. The activation with the greater time tag is placed before the other activation on the agenda. If one activation has more pattern entities than the other activation and the compared time tags are all identical, then the activation with more time tags is placed before the other activation on the agenda. | ||
| --CLIPS Reference Manual | ||
However Jess and CLIPS both use the Depth strategy, which is simpler and lighter, which Drools also adopted. The CLIPS manual documents the Depth strategy as:
Newly activated rules are placed above all rules of the same salience. For example, given that fact-a activates rule-1 and rule-2 and fact-b activates rule-3 and rule-4, then if fact-a is asserted before fact-b, rule-3 and rule-4 will be above rule-1 and rule-2 on the agenda. However, the position of rule-1 relative to rule-2 and rule-3 relative to rule-4 will be arbitrary. | ||
| --CLIPS Reference Manual | ||
The initial Drools implementation for the Depth strategy would not work for Manners without the use of salience on the "make_path" rule. The CLIPS support team had this to say:
The default conflict resolution strategy for CLIPS, Depth, is different than the default conflict resolution strategy used by OPS5. Therefore if you directly translate an OPS5 program to CLIPS, but use the default depth conflict resolution strategy, you're only likely to get the correct behavior by coincidence. The LEX and MEA conflict resolution strategies are provided in CLIPS to allow you to quickly convert and correctly run an OPS5 program in CLIPS. | ||
| --Clips Support Forum | ||
Investigation into the CLIPS code reveals there is undocumented functionality in the Depth strategy. There is an accumulated time tag used in this strategy; it's not an extensively fact by fact comparison as in the recency strategy, it simply adds the total of all the time tags for each activation and compares.
Once the context is changed to START_UP,
activations are created for all asserted guest. Because all
activations are created as the result of a single Working Memory
action, they all have the same Activation time tag. The last
asserted Guest object would have a higher fact
time tag, and its Activation would fire because it has the highest
accumulated fact time tag. The execution order in this rule has little
importance, but has a big impact in the rule "Assign Seat". The
activation fires and asserts the first Seating
arrangement and a Path, and then sets the
Context attribute state to create
an activation for rule findSeating.
rule assignFirstSeat
when
context : Context( state == Context.START_UP )
guest : Guest()
count : Count()
then
String guestName = guest.getName();
Seating seating =
new Seating( count.getValue(), 1, true, 1, guestName, 1, guestName);
insert( seating );
Path path = new Path( count.getValue(), 1, guestName );
insert( path );
modify( count ) { setValue ( count.getValue() + 1 ) }
System.out.println( "assign first seat : " + seating + " : " + path );
modify( context ) {
setState( Context.ASSIGN_SEATS )
}
endThis rule determines each of the Seating
arrangements. The rule creates cross product solutions for
all asserted Seating arrangements
against all the asserted guests except
against itself or any already assigned chosen solutions.
rule findSeating
when
context : Context( state == Context.ASSIGN_SEATS )
$s : Seating( pathDone == true )
$g1 : Guest( name == $s.rightGuestName )
$g2 : Guest( sex != $g1.sex, hobby == $g1.hobby )
count : Count()
not ( Path( id == $s.id, guestName == $g2.name) )
not ( Chosen( id == $s.id, guestName == $g2.name, hobby == $g1.hobby) )
then
int rightSeat = $s.getRightSeat();
int seatId = $s.getId();
int countValue = count.getValue();
Seating seating =
new Seating( countValue, seatId, false, rightSeat,
$s.getRightGuestName(), rightSeat + 1, $g2.getName() );
insert( seating );
Path path = new Path( countValue, rightSeat + 1, $g2.getName() );
insert( path );
Chosen chosen = new Chosen( seatId, $g2.getName(), $g1.getHobby() );
insert( chosen );
System.err.println( "find seating : " + seating + " : " + path +
" : " + chosen);
modify( count ) {setValue( countValue + 1 )}
modify( context ) {setState( Context.MAKE_PATH )}
endHowever, as can be seen from the printed results shown earlier,
it is essential that only the Seating with the highest
pid cross product be chosen. How can this be possible
if we have activations, of the same time tag, for nearly all
existing Seating and Guest objects? For
example, on the third iteration of findDeating the
produced activations will be as shown below. Remember, this is from
a very small data set, and with larger data sets there would be many
more possible activated Seating solutions, with multiple
solutions per pid:
=>[ActivationCreated(35): rule=findSeating
[fid:19:33]:[Seating id=3, pid=2, done=true, ls=2, ln=n4, rs=3, rn=n3]
[fid:4:4]:[Guest name=n3, sex=m, hobbies=h3]
[fid:3:3]:[Guest name=n2, sex=f, hobbies=h3]
=>[ActivationCreated(35): rule=findSeating
[fid:15:23]:[Seating id=2, pid=1, done=true, ls=1, ln=n5, rs=2, rn=n4]
[fid:5:5]:[Guest name=n4, sex=m, hobbies=h1]
[fid:2:2]:[Guest name=n2, sex=f, hobbies=h1]
=>[ActivationCreated(35): rule=findSeating
[fid:13:13]:[Seating id=1, pid=0, done=true, ls=1, ln=n5, rs=1, rn=n5]
[fid:9:9]:[Guest name=n5, sex=f, hobbies=h1]
[fid:1:1]:[Guest name=n1, sex=m, hobbies=h1]
The creation of all these redundant activations might seem
pointless, but it must be remembered that Manners is not about good
rule design; it's purposefully designed as a bad ruleset to fully
stress-test the cross product matching process and the Agenda, which
this clearly does. Notice that each activation has the same time tag
of 35, as they were all activated by the change in the
Context object to ASSIGN_SEATS. With OPS5
and LEX it would correctly fire the activation with the
Seating asserted last. With Depth, the accumulated fact
time tag ensures that the activation with the last asserted
Seating fires.
Rule makePath must always fire before
pathDone. A Path object is asserted for
each Seating arrangement, up to the last asserted
Seating. Notice that the conditions in
pathDone are a subset of those in
makePath - so how do we ensure that makePath
fires first?
rule makePath
when
Context( state == Context.MAKE_PATH )
Seating( seatingId:id, seatingPid:pid, pathDone == false )
Path( id == seatingPid, pathGuestName:guestName, pathSeat:seat )
not Path( id == seatingId, guestName == pathGuestName )
then
insert( new Path( seatingId, pathSeat, pathGuestName ) );
endrule pathDone
when
context : Context( state == Context.MAKE_PATH )
seating : Seating( pathDone == false )
then
modify( seating ) {setPathDone( true )}
modify( context ) {setState( Context.CHECK_DONE)}
end
Both rules end up on the Agenda in conflict and with identical activation time tags. However, the accumulate fact time tag is greater for "Make Path" so it gets priority.
Rule areWeDone only activates when the last seat
is assigned, at which point both rules will be activated. For the
same reason that makePath always wins over
path Done, areWeDone will take
priority over rule continue.
rule areWeDone
when
context : Context( state == Context.CHECK_DONE )
LastSeat( lastSeat: seat )
Seating( rightSeat == lastSeat )
then
modify( context ) {setState(Context.PRINT_RESULTS )}
end
rule continue
when
context : Context( state == Context.CHECK_DONE )
then
modify( context ) {setState( Context.ASSIGN_SEATS )}
end
Assign First seat
=>[fid:13:13]:[Seating id=1, pid=0, done=true, ls=1, ln=n5, rs=1, rn=n5]
=>[fid:14:14]:[Path id=1, seat=1, guest=n5]
==>[ActivationCreated(16): rule=findSeating
[fid:13:13]:[Seating id=1, pid=0, done=true, ls=1, ln=n5, rs=1, rn=n5]
[fid:9:9]:[Guest name=n5, sex=f, hobbies=h1]
[fid:1:1]:[Guest name=n1, sex=m, hobbies=h1]
==>[ActivationCreated(16): rule=findSeating
[fid:13:13]:[Seating id=1 , pid=0, done=true, ls=1, ln=n5, rs=1, rn=n5]
[fid:9:9]:[Guest name=n5, sex=f, hobbies=h1]
[fid:5:5]:[Guest name=n4, sex=m, hobbies=h1]*
Assign Seating
=>[fid:15:17] :[Seating id=2 , pid=1 , done=false, ls=1, lg=n5, rs=2, rn=n4]
=>[fid:16:18]:[Path id=2, seat=2, guest=n4]
=>[fid:17:19]:[Chosen id=1, name=n4, hobbies=h1]
=>[ActivationCreated(21): rule=makePath
[fid:15:17] : [Seating id=2, pid=1, done=false, ls=1, ln=n5, rs=2, rn=n4]
[fid:14:14] : [Path id=1, seat=1, guest=n5]*
==>[ActivationCreated(21): rule=pathDone
[Seating id=2, pid=1, done=false, ls=1, ln=n5, rs=2, rn=n4]*
Make Path
=>[fid:18:22:[Path id=2, seat=1, guest=n5]]
Path Done
Continue Process
=>[ActivationCreated(25): rule=findSeating
[fid:15:23]:[Seating id=2, pid=1, done=true, ls=1, ln=n5, rs=2, rn=n4]
[fid:7:7]:[Guest name=n4, sex=f, hobbies=h3]
[fid:4:4] : [Guest name=n3, sex=m, hobbies=h3]*
=>[ActivationCreated(25): rule=findSeating
[fid:15:23]:[Seating id=2, pid=1, done=true, ls=1, ln=n5, rs=2, rn=n4]
[fid:5:5]:[Guest name=n4, sex=m, hobbies=h1]
[fid:2:2]:[Guest name=n2, sex=f, hobbies=h1], [fid:12:20] : [Count value=3]
=>[ActivationCreated(25): rule=findSeating
[fid:13:13]:[Seating id=1, pid=0, done=true, ls=1, ln=n5, rs=1, rn=n5]
[fid:9:9]:[Guest name=n5, sex=f, hobbies=h1]
[fid:1:1]:[Guest name=n1, sex=m, hobbies=h1]
Assign Seating
=>[fid:19:26]:[Seating id=3, pid=2, done=false, ls=2, lnn4, rs=3, rn=n3]]
=>[fid:20:27]:[Path id=3, seat=3, guest=n3]]
=>[fid:21:28]:[Chosen id=2, name=n3, hobbies=h3}]
=>[ActivationCreated(30): rule=makePath
[fid:19:26]:[Seating id=3, pid=2, done=false, ls=2, ln=n4, rs=3, rn=n3]
[fid:18:22]:[Path id=2, seat=1, guest=n5]*
=>[ActivationCreated(30): rule=makePath
[fid:19:26]:[Seating id=3, pid=2, done=false, ls=2, ln=n4, rs=3, rn=n3]
[fid:16:18]:[Path id=2, seat=2, guest=n4]*
=>[ActivationCreated(30): rule=done
[fid:19:26]:[Seating id=3, pid=2, done=false, ls=2, ln=n4, rs=3, rn=n3]*
Make Path
=>[fid:22:31]:[Path id=3, seat=1, guest=n5]
Make Path
=>[fid:23:32] [Path id=3, seat=2, guest=n4]
Path Done
Continue Processing
=>[ActivationCreated(35): rule=findSeating
[fid:19:33]:[Seating id=3, pid=2, done=true, ls=2, ln=n4, rs=3, rn=n3]
[fid:4:4]:[Guest name=n3, sex=m, hobbies=h3]
[fid:3:3]:[Guest name=n2, sex=f, hobbies=h3], [fid:12:29]*
=>[ActivationCreated(35): rule=findSeating
[fid:15:23]:[Seating id=2, pid=1, done=true, ls=1, ln=n5, rs=2, rn=n4]
[fid:5:5]:[Guest name=n4, sex=m, hobbies=h1]
[fid:2:2]:[Guest name=n2, sex=f, hobbies=h1]
=>[ActivationCreated(35): rule=findSeating
[fid:13:13]:[Seating id=1, pid=0, done=true, ls=1, ln=n5, rs=1, rn=n5]
[fid:9:9]:[Guest name=n5, sex=f, hobbies=h1], [fid:1:1] : [Guest name=n1, sex=m, hobbies=h1]
Assign Seating
=>[fid:24:36]:[Seating id=4, pid=3, done=false, ls=3, ln=n3, rs=4, rn=n2]]
=>[fid:25:37]:[Path id=4, seat=4, guest=n2]]
=>[fid:26:38]:[Chosen id=3, name=n2, hobbies=h3]
==>[ActivationCreated(40): rule=makePath
[fid:24:36]:[Seating id=4, pid=3, done=false, ls=3, ln=n3, rs=4, rn=n2]
[fid:23:32]:[Path id=3, seat=2, guest=n4]*
==>[ActivationCreated(40): rule=makePath
[fid:24:36]:[Seating id=4, pid=3, done=false, ls=3, ln=n3, rs=4, rn=n2]
[fid:20:27]:[Path id=3, seat=3, guest=n3]*
=>[ActivationCreated(40): rule=makePath
[fid:24:36]:[Seating id=4, pid=3, done=false, ls=3, ln=n3, rs=4, rn=n2]
[fid:22:31]:[Path id=3, seat=1, guest=n5]*
=>[ActivationCreated(40): rule=done
[fid:24:36]:[Seating id=4, pid=3, done=false, ls=3, ln=n3, rs=4, rn=n2]*
Make Path
=>fid:27:41:[Path id=4, seat=2, guest=n4]
Make Path
=>fid:28:42]:[Path id=4, seat=1, guest=n5]]
Make Path
=>fid:29:43]:[Path id=4, seat=3, guest=n3]]
Path Done
Continue Processing
=>[ActivationCreated(46): rule=findSeating
[fid:15:23]:[Seating id=2, pid=1, done=true, ls=1, ln=n5, rs=2, rn=n4]
[fid:5:5]:[Guest name=n4, sex=m, hobbies=h1], [fid:2:2]
[Guest name=n2, sex=f, hobbies=h1]
=>[ActivationCreated(46): rule=findSeating
[fid:24:44]:[Seating id=4, pid=3, done=true, ls=3, ln=n3, rs=4, rn=n2]
[fid:2:2]:[Guest name=n2, sex=f, hobbies=h1]
[fid:1:1]:[Guest name=n1, sex=m, hobbies=h1]*
=>[ActivationCreated(46): rule=findSeating
[fid:13:13]:[Seating id=1, pid=0, done=true, ls=1, ln=n5, rs=1, rn=n5]
[fid:9:9]:[Guest name=n5, sex=f, hobbies=h1]
[fid:1:1]:[Guest name=n1, sex=m, hobbies=h1]
Assign Seating
=>[fid:30:47]:[Seating id=5, pid=4, done=false, ls=4, ln=n2, rs=5, rn=n1]
=>[fid:31:48]:[Path id=5, seat=5, guest=n1]
=>[fid:32:49]:[Chosen id=4, name=n1, hobbies=h1]
Name: Conway's Game Of Life Main class: org.drools.examples.conway.ConwayAgendaGroupRun org.drools.examples.conway.ConwayRuleFlowGroupRun Module: droolsjbpm-integration-examples (Note: this is in a different download, the droolsjbpm-integration download.) Type: Java application Rules file: conway-ruleflow.drl conway-agendagroup.drl Objective: Demonstrates 'accumulate', 'collect' and 'from'
Conway's Game Of Life, described in http://en.wikipedia.org/wiki/Conway's_Game_of_Life and in http://www.math.com/students/wonders/life/life.html, is a famous cellular automaton conceived in the early 1970's by the mathematician John Conway. While the system is well known as "Conway's Game Of Life", it really isn't a game at all. Conway's system is more like a simulation of a form of life. Don't be intimidated. The system is terribly simple and terribly interesting. Math and Computer Science students alike have marvelled over Conway's system for more than 30 years now. The application presented here is a Swing-based implementation of Conway's Game of Life. The rules that govern the system are implemented as business rules using Drools. This document will explain the rules that drive the simulation and discuss the Drools parts of the implementation.
We'll first introduce the grid view, shown below, designed for the visualisation of the game, showing the "arena" where the life simuation takes place. Initially the grid is empty, meaning that there are no live cells in the system. Each cell is either alive or dead, with live cells showing a green ball. Preselected patterns of live cells can be chosen from the "Pattern" drop-down list. Alternatively, individual cells can be doubled-clicked to toggle them between live and dead. It's important to understand that each cell is related to its neighboring cells, which is fundamental for the game's rules. Neighbors include not only cells to the left, right, top and bottom but also cells that are connected diagonally, so that each cell has a total of 8 neighbors. Exceptions are the four corner cells which have only three neighbors, and the cells along the four border, with five neighbors each.

So what are the basic rules that govern this game? Its goal is to show the development of a population, generation by generation. Each generation results from the preceding one, based on the simultaneous evaluation of all cells. This is the simple set of rules that govern what the next generation will look like:
If a live cell has fewer than 2 live neighbors, it dies of loneliness.
If a live cell has more than 3 live neighbors, it dies from overcrowding.
If a dead cell has exactly 3 live neighbors, it comes to life.
That is all there is to it. Any cell that doesn't meet any of those criteria is left as is for the next generation. With those simple rules in mind, go back and play with the system a little bit more and step through some generations, one at a time, and notice these rules taking their effect.
The screenshot below shows an example generation, with a number of live cells. Don't worry about matching the exact patterns represented in the screen shot. Just get some groups of cells added to the grid. Once you have groups of live cells in the grid, or select a pre-designed pattern, click the "Next Generation" button and notice what happens. Some of the live cells are killed (the green ball disappears) and some dead cells come to life (a green ball appears). Step through several generations and see if you notice any patterns. If you click on the "Start" button, the system will evolve itself so you don't need to click the "Next Generation" button over and over. Play with the system a little and then come back here for more details of how the application works.

Now lets delve into the code. As this is an advanced example we'll
assume that by now you know your way around the Drools framework and are
able to connect the presented highlight, so that we'll just focus at a
high level overview. The example has two ways to execute, one way
uses Agenda Groups to manage execution flow, and the other one uses
Rule Flow Groups to manage execution flow. These two versions are
implemented in ConwayAgendaGroupRun and
ConwayRuleFlowGroupRun, respectively. Here,
we'll discuss the Rule Flow version, as it's what most people will
use.
All the Cell objects are inserted into the Session
and the rules in the ruleflow-group "register neighbor" are
allowed to execute by the Rule Flow process. This group of four rules
creates Neighbor relations between some cell and its
northeastern, northern, northwestern and western neighbors. This
relation is bidirectional, which takes care of the other four directions.
Border cells don't need any special treatment - they simply won't be
paired with neighboring cells where there isn't any. By
the time all activations have fired for these rules, all cells are related
to all their neighboring cells.
Example 9.73. Conway's Game of Life: Register Cell Neighbour relations
rule "register north east"
ruleflow-group "register neighbor"
when
$cell: Cell( $row : row, $col : col )
$northEast : Cell( row == ($row - 1), col == ( $col + 1 ) )
then
insert( new Neighbor( $cell, $northEast ) );
insert( new Neighbor( $northEast, $cell ) );
end
rule "register north"
ruleflow-group "register neighbor"
when
$cell: Cell( $row : row, $col : col )
$north : Cell( row == ($row - 1), col == $col )
then
insert( new Neighbor( $cell, $north ) );
insert( new Neighbor( $north, $cell ) );
end
rule "register north west"
ruleflow-group "register neighbor"
when
$cell: Cell( $row : row, $col : col )
$northWest : Cell( row == ($row - 1), col == ( $col - 1 ) )
then
insert( new Neighbor( $cell, $northWest ) );
insert( new Neighbor( $northWest, $cell ) );
end
rule "register west"
ruleflow-group "register neighbor"
when
$cell: Cell( $row : row, $col : col )
$west : Cell( row == $row, col == ( $col - 1 ) )
then
insert( new Neighbor( $cell, $west ) );
insert( new Neighbor( $west, $cell ) );
endOnce all the cells are inserted, some Java code applies the pattern to the grid, setting certain cells to Live. Then, when the user clicks "Start" or "Next Generation", it executes the "Generation" ruleflow. This ruleflow is responsible for the management of all changes of cells in each generation cycle.

The rule flow process first enters the "evaluate" group, which means
that any active rule in the group can fire. The rules in this group apply
the Game-of-Life rules discussed in the beginning of the example,
determining the cells to be killed and the ones to be given life. We use
the "phase" attribute to drive the reasoning of the Cell by specific
groups of rules; typically the phase is tied to a Rule Flow Group in the
Rule Flow process definition. Notice that it doesn't actually change the
state of any Cell objectss at this point; this is because
it's evaluating the grid in turn and it must complete the full evaluation
until those changes can be applied. To achieve this, it sets the cell to
a "phase" which is either Phase.KILL or
Phase.BIRTH, used later to control actions applied
to the Cell object.
Example 9.74. Conway's Game of Life: Evaluate Cells with state changes
rule "Kill The Lonely"
ruleflow-group "evaluate"
no-loop
when
# A live cell has fewer than 2 live neighbors
theCell: Cell( liveNeighbors < 2, cellState == CellState.LIVE,
phase == Phase.EVALUATE )
then
modify( theCell ){
setPhase( Phase.KILL );
}
end
rule "Kill The Overcrowded"
ruleflow-group "evaluate"
no-loop
when
# A live cell has more than 3 live neighbors
theCell: Cell( liveNeighbors > 3, cellState == CellState.LIVE,
phase == Phase.EVALUATE )
then
modify( theCell ){
setPhase( Phase.KILL );
}
end
rule "Give Birth"
ruleflow-group "evaluate"
no-loop
when
# A dead cell has 3 live neighbors
theCell: Cell( liveNeighbors == 3, cellState == CellState.DEAD,
phase == Phase.EVALUATE )
then
modify( theCell ){
theCell.setPhase( Phase.BIRTH );
}
end
Once all Cell objects in the grid have been evaluated,
we first clear any calculation activations that occured from any previous
data changes. This is done via the "reset calculate" rule, which clears
any activations in the "calculate" group. We then enter a split in the
rule flow which allows any activations in both the "kill" and the "birth"
group to fire. These rules are responsible for applying the state
change.
Example 9.75. Conway's Game of Life: Apply the state changes
rule "reset calculate"
ruleflow-group "reset calculate"
when
then
WorkingMemory wm = drools.getWorkingMemory();
wm.clearRuleFlowGroup( "calculate" );
end
rule "kill"
ruleflow-group "kill"
no-loop
when
theCell: Cell( phase == Phase.KILL )
then
modify( theCell ){
setCellState( CellState.DEAD ),
setPhase( Phase.DONE );
}
end
rule "birth"
ruleflow-group "birth"
no-loop
when
theCell: Cell( phase == Phase.BIRTH )
then
modify( theCell ){
setCellState( CellState.LIVE ),
setPhase( Phase.DONE );
}
end At this stage, a number of Cell objects have been
modified with the state changed to either LIVE or
DEAD. Now we get to see the power of the
Neighbor facts defining the cell relations. When a cell
becomes live or dead, we use the Neighbor relation to
iterate over all surrounding cells, increasing or decreasing the
liveNeighbor count. Any cell that has its count changed
is also set to to the EVALUATE phase, to make sure
it is included in the reasoning during the evaluation stage of the
Rule Flow Process. Notice that we don't have to do any iteration
ourselves; simply by applying the relations in the rules we make
the rule engine do all the hard work for us, with a minimal amount of
code. Once the live count has been determined and set for all cells,
the Rule Flow Process comes to and end. If the user has initially
clicked the "Start" button, the engine will restart the rule flow;
otherwise the user may request another generation.
Example 9.76. Conway's Game of Life: Evaluate cells with state changes
rule "Calculate Live"
ruleflow-group "calculate"
lock-on-active
when
theCell: Cell( cellState == CellState.LIVE )
Neighbor( cell == theCell, $neighbor : neighbor )
then
modify( $neighbor ){
setLiveNeighbors( $neighbor.getLiveNeighbors() + 1 ),
setPhase( Phase.EVALUATE );
}
end
rule "Calculate Dead"
ruleflow-group "calculate"
lock-on-active
when
theCell: Cell( cellState == CellState.DEAD )
Neighbor( cell == theCell, $neighbor : neighbor )
then
modify( $neighbor ){
setLiveNeighbors( $neighbor.getLiveNeighbors() - 1 ),
setPhase( Phase.EVALUATE );
}
end B
- BeanShell, Why use a Rule Engine?
C
- Collection, The operator contains, The operator not contains
D
- Domain Specific Languages, Domain Specific Languages
- DSL, DSL Basics
I
- Inference Engine, Introduction and Background
L
- Leaps, Introduction and Background
- Logical Object, Truth Maintenance with Logical Objects
P
- Pattern Matching, Introduction and Background
- Predicate, Inline eval operator (deprecated)
- Production Memory, Introduction and Background
R
- regular expression, The operator matches
- Rete, Introduction and Background
W
- WorkingMemory, Introduction and Background
X
- XML, XML Rule Language
- XML Rule, The XML format