

PicketLink
Legal Notice
http://creativecommons.org/licenses/by-sa/3.0/. In accordance with CC-BY-SA, if you distribute this document or an adaptation of it, you must provide the URL for the original version.
Abstract
- Preface
- 1. Overview
- 2. Authentication
- 3. Identity Management - Overview
- 4. Identity Management - Credential Validation and Management
- 5. Identity Management - Basic Identity Model
- 6. Identity Management - Attribute Management
- 7. Identity Management - Configuration
- 7.1. Configuration
- 7.1.1. Architectural Overview
- 7.1.2. Default Configuration
- 7.1.3. Providing a Custom Configuration
- 7.1.4. Initializing the
PartitionManager - 7.1.5. Programmatic Configuration Overview
- 7.1.6. Providing Multiple Configurations
- 7.1.7. Providing Multiple Stores for a Configuration
- 7.1.8. Configuring Credential Handlers
- 7.1.9. Identity Context Configuration
- 7.1.10. IDM configuration from XML file
- 8. Identity Management - Working with JPA
- 8.1. JPAIdentityStoreConfiguration
- 8.1.1. Default Database Schema
- 8.1.2. Configuring an EntityManager
- 8.1.3. Mapping
IdentityTypeTypes - 8.1.4. Mapping
PartitionTypes - 8.1.5. Mapping
RelationshipTypes - 8.1.6. Mapping Attributes for
AttributedTypeTypes - 8.1.7. Mapping a
CredentialStoragetype - 8.1.8. Configuring the Mapped Entities
- 8.1.9. Providing a
EntityManager
- 9. Identity Management - Working with LDAP
- 10. Identity Management - Permissions API and Permission Management
- 11. Authorization
- 11.1. Overview
- 11.2. Configuration
- 11.3. Role-Based Access Control
- 11.4. Group-Based Access Control
- 11.5. Partition-Based Access Control
- 11.6. Security Level-Based Access Control
- 11.7. Restricting Access Based on the Authenticated User
- 11.8. Checking for Permissions
- 11.9. Using EL-Based Expresions
- 11.10. Providing Your Own Security Annotations
- 12. Http Security
- 13. PicketLink Subsystem
- 14. Federation
- 14.1. Overview
- 14.2. SAML SSO
- 14.3. SAML Web Browser Profile
- 14.4. PicketLink SAML Specification Support
- 14.5. SAML v2.0
- 14.5.1. Which Profiles are supported ?
- 14.5.2. Which Bindings are supported ?
- 14.5.3. PicketLink Identity Provider (PIDP)
- 14.5.4. PicketLink Service Provider (PSP)
- 14.5.5. SAML Authenticators (Tomcat,JBossAS)
- 14.5.6. Digital Signatures in SAML Assertions
- 14.5.7. SAML2 Handlers
- 14.5.8. Single Logout
- 14.5.9. SAML2 Configuration Providers
- 14.5.10. Metadata Support
- 14.5.11. Token Registry
- 14.5.12. Standalone vs JBossAS Distribution
- 14.5.13. Standalone Web Applications(All Servlet Containers)
- 14.6. SAML v1.1
- 14.7. Trust
- 14.8. Extensions
- 14.9. PicketLink API
- 14.10. 3rd party integration
- 15. PicketLink Quickstarts
- 16. Logging
- 17. Compiler Output
- A. Revision History
1. Document Conventions
1.1. Typographic Conventions
Mono-spaced Bold
To see the contents of the filemy_next_bestselling_novelin your current working directory, enter thecat my_next_bestselling_novelcommand at the shell prompt and press Enter to execute the command.
Press Enter to execute the command.Press Ctrl+Alt+F2 to switch to a virtual terminal.
mono-spaced bold. For example:
File-related classes includefilesystemfor file systems,filefor files, anddirfor directories. Each class has its own associated set of permissions.
Choose → → from the main menu bar to launch Mouse Preferences. In the Buttons tab, click the Left-handed mouse check box and click to switch the primary mouse button from the left to the right (making the mouse suitable for use in the left hand).To insert a special character into a gedit file, choose → → from the main menu bar. Next, choose → from the Character Map menu bar, type the name of the character in the Search field and click . The character you sought will be highlighted in the Character Table. Double-click this highlighted character to place it in the Text to copy field and then click the button. Now switch back to your document and choose → from the gedit menu bar.
Mono-spaced Bold Italic or Proportional Bold Italic
To connect to a remote machine using ssh, typessh username@domain.nameat a shell prompt. If the remote machine isexample.comand your username on that machine is john, typessh john@example.com.Themount -o remount file-systemcommand remounts the named file system. For example, to remount the/homefile system, the command ismount -o remount /home.To see the version of a currently installed package, use therpm -q packagecommand. It will return a result as follows:package-version-release.
Publican is a DocBook publishing system.
1.2. Pull-quote Conventions
mono-spaced roman and presented thus:
books        Desktop   documentation  drafts  mss    photos   stuff  svn
books_tests  Desktop1  downloads      images  notes  scripts  svgs
mono-spaced roman but add syntax highlighting as follows:
static int kvm_vm_ioctl_deassign_device(struct kvm *kvm,
struct kvm_assigned_pci_dev *assigned_dev)
{
int r = 0;
struct kvm_assigned_dev_kernel *match;
mutex_lock(&kvm->lock);
match = kvm_find_assigned_dev(&kvm->arch.assigned_dev_head,
assigned_dev->assigned_dev_id);
if (!match) {
printk(KERN_INFO "%s: device hasn't been assigned before, "
"so cannot be deassigned\n", __func__);
r = -EINVAL;
goto out;
}
kvm_deassign_device(kvm, match);
kvm_free_assigned_device(kvm, match);
out:
mutex_unlock(&kvm->lock);
return r;
}
1.3. Notes and Warnings
Note
Important
Warning
2. Getting Help and Giving Feedback
2.1. Do You Need Help?
https://issues.jboss.org/browse/PLINK.
https://community.jboss.org/en/picketlink.
Chapter 1. Overview
1.1. The Top Java Application Security Problems Solved by PicketLink
-
What's the best way to add security to the application?PicketLink provides an easy way to enable security to an application. With a minimal configuration you are able to authenticate(Section 2.1, “Overview”), authorize(Section 11.1, “Overview”) and perform identity management(Section 3.1, “Introduction”) operations using a database or a LDAP identity store. -
How do I authenticate and authorize users?If you're already faimilar with JBoss Seam 2, you'll find PicketLink very familiar. PicketLink provides aIdentitybean(Section 2.2, “Authentication API - The Identity Bean”) to represent your users with useful methods for authentication, logout and authorization. PicketLink also provides a bunch of authorization annotations(Section 11.1, “Overview”) that you can use to easily protect your beans and their methods. -
How do I add Identity and Access Management(IAM) to my application ?Identity Management is one of the core features provided by PicketLink. With a minimal setup you are able to manage users, roles, groups and relationships between them. It supports identity partitioning, useful for multi-tenancy architectures. You can even store your identity data using different repositories such as databases or LDAP servers. -
How can I create a secure multi-tenancy architecture for my SaaS (Software as a Service) application ?PicketLink supports identity partitioning. This means that you can logically separate your identity data into partitions. You can use a single repository or even use a different repository for each partition. For instance, using different database servers for each partition. -
How can I enable Single Sign-On for my applications?PicketLink provides an easy way to configure Single Sign-On based on the SAML specification. Enable your application as an Identity Provider or Service Provider requires only a few configuration. -
How do I add authentication and authorization to my REST layer and API ?PicketLink provides several features to secure REST-based applications. Regarding authentication, it supports both stateful and stateless authentication models, depending on your requirements. When using a steteless model user is re-authenticated on every single request, ideal when you have a huge load of requests. It also provides a simple API to manage JSON Web Token(JWT) and Javascript Object Signing and Encryption(JOSE), which you can use to create your own tokens or consume tokens following the format defined by these specifications. Authorization can also be done by using the different annotations provided by PicketLink. You can even define your own authorization annotations. -
How do I protect my application HTTP resources and pages ?PicketLink provides an easy, simple and powerful API for Http Security fully integrated with the Java Servlet API. It allows you to configure your aplication resources or paths to enable authentication and authorization. With a minimal setup you can enforce security policies such as authentication and authorization based on roles, groups, realms or even use EL expressions. -
How can my application authenticate users using their Facebook, Twitter, or Google accounts ?PicketLink provides support for Social Authentication using the most common providers such as Facebook, Twitter and Google. Please, take a look at the quickstarts(Section 1.3.1, “QuickStarts”) for some examples.
1.2. What is PicketLink?

1.3. Where do I get started?
Warning
-
Download JBoss EAP or WildFlyPicketLink can be used on both servers. Use the Section 1.7, “PicketLink Installer” to configure them with the latest version of the PicketLink modules and libraries. This is specially important if you want to enable SAML-based SSO across your applications. However, if you are just looking for JEE Security and Identity Management features provided by PicketLink, you can just configure your project with Section 1.6, “Maven Dependencies” and have them shipped inside your deployment archive. -
Get the Quickstarts Up and RunningThis is a very good way to learn from examples. Use your favorite IDE to import the Section 1.3.1, “QuickStarts” and look at their sources. All quickstarts can be deployed on both JBoss EAP and WildFly. -
Spend Some Time Reading the Available GuidesEach one cover an important PicketLink aspect. They explain some core concepts and make easier to understand the quickstarts. All guides are available at PicketLink Oficial Site at www.picketlink.org/. -
Read the Reference DocumentationYou're already doing this, right ? -
PicketLink JavaDoc ReferenceFor more detailed information on JavaDoc for API of PicketLink. See http://docs.jboss.org/picketlink/2/latest/api/ -
Use the User ForumAnd post your questions and feedbacks. See https://community.jboss.org/en/picketlink/content?filterID=contentstatus[published]~objecttype~objecttype[thread]
1.3.1. QuickStarts
1.3.2. API Documentation
1.4. Modules
1.4.1. Base module
-
picketlink-api- API for PicketLink's base module. -
picketlink-impl- Internal implementation classes for the base API.
1.4.2. Identity Management
-
picketlink-idm-api- PicketLink's Identity Management (IDM) API. This library defines the Identity Model central to all of PicketLink, and all of the identity management-related interfaces. -
picketlink-idm-impl- Internal implementation classes for the IDM API.
1.4.3. Authorization Module
-
Roles
-
Groups
-
Partitions
-
Authenticated User
-
EL-based expressions
-
Permissions
-
Security Levels
-
picketlink-deltaspike
1.4.4. JSON
-
JWT, JSON Web Token -
JWS, JSON Web Signature -
JWK, JSON Web Key -
JWE, JSON Web Encryption
-
picketlink-json.jar
Note
1.4.5. Federation
1.5. License
1.6. Maven Dependencies
Note
<properties> <!-- PicketLink dependency versions --> <version.picketlink.javaee.bom>2.7.0.Final</version.picketlink.javaee.bom> </properties> <dependencyManagement> <dependencies> <!-- Dependency Management for PicketLink and Java EE 6.0. --> <dependency> <groupId>org.picketlink</groupId> <artifactId>picketlink-javaee-6.0</artifactId> <version>${version.picketlink.javaee.bom}</version> <scope>import</scope> <type>pom</type> </dependency> </dependencies> </dependencyManagement>
artifactId to picketlink-javaee-7.0 as follows:
<dependencyManagement> <dependencies> <!-- Dependency Management for PicketLink and Java EE 7.0. --> <dependency> <groupId>org.picketlink</groupId> <artifactId>picketlink-javaee-7.0</artifactId> <version>${version.picketlink.javaee.bom}</version> <scope>import</scope> <type>pom</type> </dependency> </dependencies> </dependencyManagement>
<dependencies> <!-- PicketLink Uber Dependency. It provides all PicketLink dependencies from a single JAR. You still can define each module separately, if you want to. --> <dependency> <groupId>org.picketlink</groupId> <artifactId>picketlink</artifactId> </dependency> </dependencies>
-
picketlink-api -
picketlink-impl -
picketlink-idm-api -
picketlink-idm-impl -
picketlink-deltaspike
Note
<dependencies> <!-- Import the PicketLink API, we deploy this as library with the application, and can compile against it --> <dependency> <groupId>org.picketlink</groupId> <artifactId>picketlink-api</artifactId> </dependency> <!-- Import the PicketLink Implementation, we deploy this as library with the application, but can't compile against it --> <dependency> <groupId>org.picketlink</groupId> <artifactId>picketlink-impl</artifactId> <scope>runtime</scope> </dependency> </dependencies>
<dependencies> <dependency> <groupId>org.picketlink</groupId> <artifactId>picketlink-deltaspike</artifactId> </dependency> </dependencies>
Note
<dependencies> <dependency> <groupId>org.picketlink</groupId> <artifactId>picketlink-idm-api</artifactId> <scope>compile</scope> </dependency> <dependency> <groupId>org.picketlink</groupId> <artifactId>picketlink-idm-impl</artifactId> <scope>runtime</scope> </dependency>
Note
1.7. PicketLink Installer
-
Updates the PicketLink module with the latest libraries.
Important
ant
prepare: [echo] [echo] #################################################################################### [echo] Welcome to the PicketLink Installer [echo] [echo] This installer will update your JBoss Enterprise Application Platform installation with the [echo] following libraries and their dependencies: [echo] [echo] - PicketLink Core 2.7.0.Final [echo] - PicketLink Identity Management 2.7.0.Final [echo] - PicketLink Federation 2.7.0.Final [echo] [echo] New modules will be added to your installation. [echo] #################################################################################### [echo] [input] Which JBoss Application Server are you using ? ([eap], wildfly) eap [input] Please enter the path to your JBoss Application Server installation:
Note
1.8. Referencing PicketLink from JBoss Modules
META-INF/jboss-deployment-structure.xml file inside the root directory of your deployment to configure the dependencies as follows:
<jboss-deployment-structure> <deployment> <dependencies> <!-- This will enable PicketLink Federation to your deployment. --> <module name="org.picketlink" /> </dependencies> </deployment> </jboss-deployment-structure>
<jboss-deployment-structure> <deployment> <dependencies> <!-- This will enable PicketLink Authentication/Authorization and IDM dependencies to your deployment. --> <module name="org.picketlink.core" meta-inf="import" annotations="true"/> <module name="org.picketlink.core.api" meta-inf="import" annotations="true"/> <module name="org.picketlink.idm" meta-inf="import" annotations="true"/> <module name="org.picketlink.idm.api" meta-inf="import" annotations="true"/> </dependencies> </deployment> </jboss-deployment-structure>
<jboss-deployment-structure> <deployment> <dependencies> <!-- This will enable only the IDM dependencies to your deployment. --> <module name="org.picketlink.idm" /> </dependencies> </deployment> </jboss-deployment-structure>
provided:
<dependency> <groupId>org.picketlink</groupId> <artifactId>picketlink-api</artifactId> <scope>provided</scope> </dependency> <dependency> <groupId>org.picketlink</groupId> <artifactId>picketlink-idm-api</artifactId> <scope>provided</scope> </dependency>
1.9. Help us improve the docs!
Chapter 2. Authentication
2.1. Overview
2.2. Authentication API - The Identity Bean
Identity bean (which can be found in the org.picketlink package) is central to PicketLink's security API. This bean represents the authenticated user for the current session, and provides many useful methods for controlling the authentication process and querying the user's assigned privileges. In terms of authentication, the Identity bean provides the following methods:
AuthenticationResult login(); void logout(); boolean isLoggedIn(); Account getAccount();
login() method is the primary point of entry for the authentication process. Invoking this method will cause PicketLink to attempt to authenticate the user based on the credentials that they have provided. The AuthenticationResult type returned by the login() method is a simple enum that defines the following two values:
public enum AuthenticationResult { SUCCESS, FAILED }
login() method returns a result of SUCCESS, otherwise it returns a result of FAILED. The default implementation of the Identity bean is a @SessionScoped CDI bean, which means that once a user is authenticated they will stay authenticated for the duration of the session.
Note
@Named annotation on the Identity bean, which means that its methods may be invoked directly from the view layer (if the view layer, such as JSF, supports it) via an EL expression.
public @RequestScoped @Named class LoginAction { @Inject Identity identity; public void login() { AuthenticationResult result = identity.login(); if (AuthenticationResult.FAILED.equals(result)) { FacesContext.getCurrentInstance().addMessage(null, new FacesMessage( "Authentication was unsuccessful. Please check your username and password " + "before trying again.")); } } }
Identity bean is injected into the action bean via the CDI @Inject annotation. The login() method is essentially a wrapper method that delegates to Identity.login() and stores the authentication result in a variable. If authentication was unsuccessful, a FacesMessage is created to let the user know that their login failed. Also, since the bean is @Named it can be invoked directly from a JSF control like so:
<h:commandButton value="LOGIN" action="#{loginAction.login}"/>
Identity.isLoggedIn() method may be used to determine whether there is a user logged in for the current session. It is typically used as an authorization check to control either an aspect of the user interface (for example, not displaying a menu item if the user isn't logged in), or to restrict certain business logic. While logged in, the getAccount() method can be used to retrieve the currently authenticated account (i.e. the user). If the current session is not authenticated, then getAccount() will return null. The following example shows both the isLoggedIn() and getAccount() methods being used inside a JSF page:
<ui:fragment rendered="#{identity.loggedIn}">Welcome, #{identity.account.loginName}
Note
Account is, it is simply a representation of the external entity that is interacting and authenticating with your application. The Account interface is actually the superclass of the User and Agent - see Chapter 5, Identity Management - Basic Identity Model for more details.
logout() method allows the user to log out, thereby clearing the authentication state for their session. Also, if the user's session expires (for example due to inactivity) their authentication state will also be lost requiring the user to authenticate again.
<ui:fragment rendered="#{identity.loggedIn}"> <h:form> <h:commandButton value="Log out" action="#{identity.logout}"/> </h:form> </ui:fragment>
Identity bean that controls the overall authentication process, the actual authentication "business logic" is defined by the Authenticator interface:
public interface Authenticator { public enum AuthenticationStatus { SUCCESS, FAILURE, DEFERRED } void authenticate(); void postAuthenticate(); AuthenticationStatus getStatus(); Account getAccount(); }
Identity bean will invoke the methods of the active Authenticator (more on this in a moment) to perform user authentication. The authenticate() method is the most important of these, as it defines the actual authentication logic. After authenticate() has been invoked by the Identity bean, the getStatus() method will reflect the authentication status (either SUCCESS, FAILURE or DEFERRED). If the authentication process was a success, the getAccount() method will return the authenticated Account object and the postAuthenticate() method will be invoked also. If the authentication was not a success, getAccount() will return null.
Note
Identity bean uses a Authenticator fully integrated with the Identity Management API. You don't need to provide your own authenticator to start using PicketLink and authenticate your users! Check Section 3.1, “Introduction” for more details about how to manage users and credentials.
2.2.1. Stateful or Stateless Authentication
Identity bean is stateful by default, using the session scope to share user's authentication state between different requests and interactions. Once the user is authenticated, the Identity bean will hold user's data until the session is invalidated.
Identity bean as follows:
@Inject private Identity identity;
Identity bean.
Identity bean as a service, with a high load of authentication requests. A good example is a RESTful endpoint that issues a token to represent user's information after a successful authentication, using that token in subsequent invocations to other services to check if the user was previously authenticated, check the token validity or even provide some authorization. Pretty common scenario for mobile and HTML5 applications.
Identity bean as stateless you need to provide the following configuration:
public class SecurityConfiguration { public void init(@Observes SecurityConfigurationEvent event) { SecurityConfigurationBuilder securityConfigurationBuilder = event.getBuilder(); securityConfigurationBuilder .identity() .stateless(); // enable stateless authentication } }
org.picketlink.event.SecurityConfigurationEvent is an event that lets you configure PicketLink. It provides access to a org.picketlink.config.SecurityConfigurationBuilder instance from where you can provide all configuration for PicketLink.
2.2.2. Defining a Custom Scope
Identity bean can be also configured to use a specific scope, depending on your requirements. For example, Apache DeltaSpike features a WindowScoped, a normal passivating scope. It makes sense to want to have a window scoped identity to enable a user-per-window application (like Google does).
Identity bean scope you just need a configuration as follows:
public class SecurityConfiguration { public void init(@Observes SecurityConfigurationEvent event) { SecurityConfigurationBuilder securityConfigurationBuilder = event.getBuilder(); securityConfigurationBuilder .identity() .scope(WindowScoped.class); } }
Note
NormalScope and not a pseudo-scope.
2.3. The Authentication Process

-
1 - The user invokes the
login()method of theIdentitybean. -
1.1 - The
Identitybean (after performing a couple of validations) invokes its ownauthenticate()method. -
1.1.1 - Next the
Identitybean invokes theAuthenticatorbean'sauthenticate()method (which has a return value ofvoid). -
1.1.2 - To determine whether authentication was successful, the
Identitybean invokes theAuthenticator'sgetStatus()method, which returns aSUCCESS. -
1.1.3 - Upon a successful authentication, the
Identitybean then invokes theAuthenticator'spostAuthenticate()method to perform any post-authentication logic. -
1.1.4 - The
Identitybean then invokes theAuthenticator'sgetAccount()method, which returns anAccountobject representing the authenticated agent, which is then stored as a private field in theIdentitybean.
Identity.authenticate() method returns a value of true to the login() method, which in turn returns an authentication result of SUCCESS to the invoking user.
2.3.1. A Basic Authenticator
Authenticator. The following code demonstrates an Authenticator implementation that simply tests the username and password credentials that the user has provided against hard coded values of jsmith for the username, and abc123 for the password, and if they match then authentication is deemed to be a success:
@PicketLink public class SimpleAuthenticator extends BaseAuthenticator { @Inject DefaultLoginCredentials credentials; @Override public void authenticate() { if ("jsmith".equals(credentials.getUserId()) && "abc123".equals(credentials.getPassword())) { setStatus(AuthenticationStatus.SUCCESS); setAccount(new User("jsmith")); } else { setStatus(AuthenticationStatus.FAILURE); FacesContext.getCurrentInstance().addMessage(null, new FacesMessage( "Authentication Failure - The username or password you provided were invalid.")); } } }
@PicketLink annotation. This annotation indicates that this bean should be used for the authentication process. The next thing is that the authenticator class extends something called BaseAuthenticator. This abstract base class provided by PicketLink implements the Authenticator interface and provides implementations of the getStatus() and getAccount() methods (while also providing matching setStatus() and setAccount() methods), and also provides an empty implementation of the postAuthenticate() method. By extending BaseAuthenticator, our Authenticator implementation simply needs to implement the authenticate() method itself.
setStatus() method is used to set the authentication status to SUCCESS, and the setAccount() method is used to set the user (in this case by creating a new instance of User). For an unsuccessful authentication, the setStatus() method is used to set the authentication status to FAILURE, and a new FacesMessage is created to indicate to the user that authentication has failed. While this code is obviously meant for a JSF application, it's possible to execute whichever suitable business logic is required for the view layer technology being used.
@Inject DefaultLoginCredentials credentials;
@Inject annotation, so that our Authenticator implementation can query the credential values to determine whether they're valid or not. We'll take a look at credentials in more detail in the next section.
Note
Authenticator bean in your application. If this is the case, PicketLink will automatically authenticate via the identity management API, using a sensible default configuration. See the Identity Management chapter for more information.
2.3.2. Multiple Authenticator Support
Authenticator implementations and decide which one should be used depending on some decision logic. For that, use a producer method annotated with @PicketLink to produce the desired Authenticator:
@RequestScoped @Named public class AuthenticatorSelector { @Inject Instance<CustomAuthenticator> customAuthenticator; @Inject Instance<IdmAuthenticator> idmAuthenticator; private String authenticator; public String getAuthenticator() { return authenticator; } public void setAuthenticator(String authenticator) { this.authenticator = authenticator; } @Produces @PicketLink public Authenticator selectAuthenticator() { if ("custom".equals(authenticator)) { return customAuthenticator.get(); } else { return idmAuthenticator.get(); } } }
@Named bean exposes an authenticationSelector.authenticator property that can be set by a user interface control in the view layer. If its value is set to "custom" then CustomAuthenticator will be used, otherwise IdmAuthenticator (the Authenticator used to authenticate using the Identity Management API) will be used instead. Another good example is when you need to choose the Authenticator based on a request header or parameter value.
2.3.3. Credentials
DefaultLoginCredentials (an implementation of the Credentials interface that supports a user ID and a credential value) was injected into the SimpleAuthenticator bean. The most important thing to know about the Credentials interface in relation to writing your own custom Authenticator implementation is that you're not forced to use it. However, while the Credentials interface is mainly designed for use with the Identity Management API (which is documented in a separate chapter) and its methods would rarely be used in a custom Authenticator, PicketLink provides some implementations which are suitably convenient to use as such, DefaultLoginCredentials being one of them.
Authenticator such as this:
public class SimpleAuthenticator extends BaseAuthenticator { @Inject DefaultLoginCredentials credentials; // code snipped }
UsernamePassword with simple getters and setters like so:
public @RequestScoped class UsernamePassword { private String username; private String password; public String getUsername() { return username; } public String getPassword() { return password; } public void setUsername(String username) { this.username = username; } public void setPassword(String password) { this.password = password; } }
Authenticator bean instead:
public class SimpleAuthenticator extends BaseAuthenticator { @Inject UsernamePassword usernamePassword; // code snipped }
2.3.4. DefaultLoginCredentials
DefaultLoginCredentials bean is provided by PicketLink as a convenience, and is intended to serve as a general purpose Credentials implementation suitable for a variety of use cases. It supports the setting of a userId and credential property, and provides convenience methods for working with text-based passwords. It is a request-scoped bean and is also annotated with @Named so as to make it accessible directly from the view layer.

DefaultLoginCredentials bean directly via its bean name, loginCredentials. The following code snippet shows some JSF markup that binds the controls of a login form to DefaultLoginCredentials:
<div class="loginRow"> <h:outputLabel for="name" value="Username" styleClass="loginLabel"/> <h:inputText id="name" value="#{loginCredentials.userId}"/> </div> <div class="loginRow"> <h:outputLabel for="password" value="Password" styleClass="loginLabel"/> <h:inputSecret id="password" value="#{loginCredentials.password}" redisplay="true"/> </div>
2.4. Events
Table 2.1. Authentication Events
| Event Type | Description |
|---|---|
org.picketlink.authentication.event.PreAuthenticateEvent | This event is raised just before authentication. |
org.picketlink.authentication.event.LoggedInEvent | This event is raised when user successfully logs in. |
org.picketlink.authentication.event.PostAuthenticateEvent | This event is raised just after authentication. |
org.picketlink.authentication.event.AlreadyLoggedInEvent | This event is fired when an already authenticated user attempts to authenticate again. |
org.picketlink.authentication.event.LoginFailedEvent | This event is fired when an authentication attempt fails. |
org.picketlink.authentication.event.LockedAccountEvent | This event is fired during the authentication process if the Account is disabled. |
org.picketlink.authentication.event.PreLoggedOutEvent | This event is raised just before the user un-authenticates. |
org.picketlink.authentication.event.PostLoggedOutEvent | This event is raised just after the user un-authenticates. |
@Observer method to any bean, as follows:
public class AuthenticationAuditor { public void onSuccessFulLogin(@Observes LoggedInEvent event) { // handle user authenticated } public void onLoginFailed(@Observes LoginFailedEvent event) { // login failed } }
2.5. Multi-Level Authentication
-
Contextual-based
-
Credential-based
-
Authenticator-based
1. Even if the user is not authenticated, he can be assigned with a specific level. Current security level is stored in the Identity bean and can be obtained as follows:
@Inject private Identity identity; public void accessConfidentialInfo() { Level level = this.identity.getLevel(); if (level.compareTo(getConfidentialLevel()) >= 0)) { // user is allowed to access confidential stuff } }
this.identity.getLevel(). This method returns an instance of Level that represents the level itself. By default, PicketLink create level instances from the DefaultLevel type. However, PicketLink also allows you to provide your own security level types and factory, as we will see later along this book.
Level using the @DefaultSecurityLevel annotation qualifier:
@PicketLink @DefaultSecurityLevel @Produces public Level getDefaultSecurityLevel() { return MyDefaultLevel(10); }
-
When
identity.getLevel()is called and security level is not resolved yet (for example for unauthenticated user).Whenidentity.login()is called. In this case the level will be resolved based on the credential, authenticator or any other contextual level resolver.
Note
Identity.login is invoked.
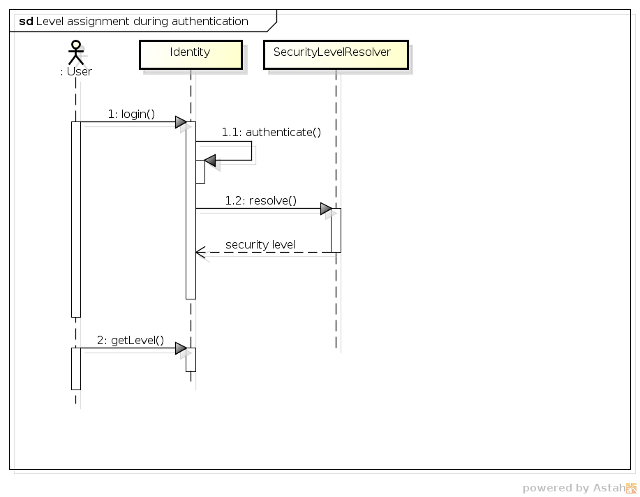
-
1 - The user invokes the
login()method of theIdentitybean. If the user is logged in, PicketLink will always check if the user is really trying to raise his level. If that is not the case, theIdentitybean will throw aUserAlreadyLoggedInException. -
1.1 - The
Identitybean authenticates the user. At this momment, PicketLink will also check if the user is already authenticated. If so, it will check if the user performing the authentication is the same that was previously authenticated. If that is not the case, theIdentity beanwill throw aDifferentUserLoggedInExcpetion. -
1.2 - If user authentication is successful, the
Identitybean try to resolve the security level by invoking theresolvemethod on eachSecurityLevelResolverregistered by the application. At this moment, the highest security level resolved from the resolvers is assigned to the user. -
2 - The user retrieve the security level from the
Identitybean.
2.5.1. Security Level Resolver
SecurityLevelResolver interface registered by your application. The highest level of all implementation is then determined as the current level for the user. That is the rule.
SecurityLevelResolver implementations are just regular CDI beans as follows:
@RequestScoped public class CustomSecurityLevelResolver implements SecurityLevelResolver { @Inject private DefaultLoginCredentials defaultLoginCredentials; @Override public Level resolve() { Object currentCredential = this.defaultLoginCredentials.getCredential(); if (TOTPCredentials.class.isInstance(currentCredential)) { return new DefaultLevel(2); } return null; } }
resolve method where all the logic to determine the proper security level resides. In the example above, your application will determine a level 2 when the user is being authenticated using a TOTP credential. In other words, if he proved his identity using two-factor authentication his level will be raised to 2.
HttpServletRequest (if you are in a web application), time-based decisions and so forth. Just remember that only the highest level will be assigned to the user.
@SecurityLevel annotation to specify a security level for both authenticators or credentials.
-
Authenticator Security Level Resolver
-
Credential Security Level Resolver
Authenticator Security Level Resolver automatically resolves security levels from the Authenticator (see Section 2.3.1, “A Basic Authenticator”) used to authenticate an user. That said, if you have created your own authenticators you can just define a security level for them as follows:
@SecurityLevel("3") @PicketLink class MyAuthenticator extends BaseAuthenticator { ... }
Credential Security Level Resolver. However, in this case, PicketLink will resolve the security level from the credential used to authenticate an user.
@SecurityLevel("4") public class MyCredential { ... }
DefaultLoginCredentials.setCredential during user authentication, PicketLink will try to resolve the security level from the @SecurityLevel annotation defined on the type of a credential instance.
2.5.2. User-defined Security Level
Level implementation provided by the DefaultLevel type. However, you may want to represent your levels in a different way and using your own type.
Level interface and then an implementation of a factory. For example:
public class CustomLevel implements Level { private int level; public CustomLevel(int level) { this.level = level; } @Override public int compareTo(Level level) { // logic to compare levels } } @PicketLink public class CustomLevelFactory implements LevelFactory{ @Override public Level createLevel(String level) { return new CustomLevel(Integer.parseInt(level)); } }
Chapter 3. Identity Management - Overview
3.1. Introduction
-
PartitionManageris used to manage identity partitions, which are essentially a container for a set of identity objects. ThePartitionManagerinterface provides a set of CRUD methods for creating, reading, updating and deleting partitions, as well as methods for creating anIdentityManagerorRelationshipManager(more on these next). A typical Java EE application with simple security requirements will likely not be required to access thePartitionManagerAPI directly. -
IdentityManageris used to manage identity objects within the scope of a partition. Some examples of identity objects are users, groups and roles, although PicketLink is not limited to just these. Besides providing the standard set of CRUD methods for managing and locating identity objects, theIdentityManagerinterface also defines methods for managing credentials and for creating identity queries which may be used to locate identities by their properties and attributes. -
RelationshipManageris used to manage relationships - a relationship is a typed association between two or more identities, with each identity having a definitive meaning within the relationship. Some examples of relationships that may already be familiar are group memberships (where a user is a member of a particular group) or granted roles (where a user is assigned to a role to afford them a certain set of privileges). TheRelationshipManagerprovides CRUD methods for managing relationships, and also for creating a relationship query which may be used to locate relationships between identities based on the relationship type and participating identity object/s. -
PermissionManageris used to manage permissions. For more details take a look at Chapter 10, Identity Management - Permissions API and Permission Management.
Note
RelationshipManager interface is required for managing relationships between identites, it is because PicketLink supports relationships between identities belonging to separate partitions; therefore the scope of a RelationshipManager instance is not constrained to a single partition in the same way as the IdentityManager.
IdentityStores. PicketLink provides a few built-in IdentityStore implementations for storing identity state in a database, file system or LDAP directory server, and it is possible to provide your own custom implementation to support storing your application's identity data in other backends, or extend the built-in implementations to override their default behaviour.

3.1.1. Injecting the Identity Management Objects
Table 3.1. Identity Management Objects
| Class Name | Scope |
|---|---|
org.picketlink.idm.PartitionManager | @ApplicationScoped |
org.picketlink.idm.IdentityManager | @RequestScoped |
org.picketlink.idm.RelationshipManager | @RequestScoped |
org.picketlink.idm.PermissionManager | @RequestScoped |
3.1.2. Interacting with PicketLink IDM During Application Startup
IdentityManager and RelationshipManager beans are request scoped beans (as per the above table) it is not possible to inject them directly into a @Startup bean as there is no request scope available at application startup time. Instead, if you wish to use the IDM API within a @Startup bean in your Java EE application you may inject the PartitionManager (which is application-scoped) from which you can then get references to the IdentityManager and RelationshipManager:
@Singleton @Startup public class InitializeSecurity { @Inject private PartitionManager partitionManager; @PostConstruct public void create() { // Create an IdentityManager IdentityManager identityManager = partitionManager.createIdentityManager(); User user = new User("shane"); identityManager.add(user); Password password = new Password("password"); identityManager.updateCredential(user, password); // Create a RelationshipManager RelationshipManager relationshipManager = partitionManager.createRelationshipManager(); // Create some relationships } }
3.1.3. Configuring the Default Partition
IdentityManager.
IdentityManager for the default Realm (i.e. the org.picketlink.idm.model.basic.Realm partition with a name of default). If your application has basic security requirements then this might well be adequate, however if you wish to override this default behaviour then simply provide a producer method annotated with the @PicketLink qualifier that returns the default partition for your application:
@ApplicationScoped public class DefaultPartitionProducer { @Inject PartitionManager partitionManager; @Produces @PicketLink public Partition getDefaultPartition() { return partitionManager.getPartition(Realm.class, "warehouse.dispatch"); } }
Warning
Partition to produce based on a condition. For instance, you can create conditions based on the user`s name (eg.: if they use an email to login, you can choose the partition on a per-domain basis), an input from a page or whatever other information available from the bean producing partitions.
3.2. Getting Started - The 5 Minute Guide
PartitionManager, IdentityManager or RelationshipManager beans into your own application and start using them immediately:
@Inject PartitionManager partitionManager; @Inject IdentityManager identityManager; @Inject RelationshipManager relationshipManager;
IdentityManager you can begin creating users, groups and roles for your application:
Note
User user = new User("jdoe"); user.setFirstName("Jane"); user.setLastName("Doe"); identityManager.add(user); Group group = new Group("employees"); identityManager.add(group); Role admin = new Role("admin"); identityManager.add(admin);
RelationshipManager to create relationships, such as role assignments and group memberships:
// Grant the admin role to the user relationshipManager.add(new Grant(user, admin)); // Add the user to the employees group relationshipManager.add(new GroupMembership(user, group));
org.picketlink.idm.model.basic.BasicModel class are based on the basic identity model and may be used to lookup various identity objects, or test whether certain relationships exist. These methods accept either an IdentityManager or RelationshipManager object as a parameter.
// Lookup the user by their username User user = BasicModel.getUser(identityManager, "jdoe"); // Test if the user has the admin role boolean isAdmin = BasicModel.hasRole(relationshipManager, user, admin); // Test if the user is a member of the employee group boolean isEmployee = BasicModel.isMember(relationshipManager, user, group);
BasicModel are just wrappers to simplify some very common use cases.
// Lookup the user by their username IdentityQueryBuilder queryBuilder = identityManager.getQueryBuilder(); List<User> users = queryBuilder .createIdentityQuery(User.class) .where( queryBuilder.equal(User.LOGIN_NAME, loginName) ) .getResultList(); User user = agents.get(0); // Test if the user has the admin role RelationshipQuery<Grant> relationshipQuery = relationshipManager.createRelationshipQuery(Grant.class); relationshipQuery.setParameter(Grant.ASSIGNEE, user); relationshipQuery.setParameter(Grant.ROLE, admin); boolean hasRole = !relationshipQuery.getResultList().isEmpty();
3.3. Identity Model
org.picketlink.idm.model package define the base types upon which the identity model is built upon:

-
AttributedTypeis the base interface for the identity model. It declares a number of methods for managing a set of attribute values, plusgetId()andsetId()methods for setting a unique identifier value. -
Attributeis used to represent an attribute value. An attribute has a name and a (generically typed) value, and may be marked as read-only. Attribute values that are expensive to load (such as large binary data) may be lazy-loaded; theisLoaded()method may be used to determine whether the Attribute has been loaded or not. -
Partitionis the base interface for partitions. Since each partition must have a name it declares agetName()method. -
Relationshipis the base interface for relationships. Besides the base methods defined by theAttributedTypeinterface, relationship implementations have no further contractual requirements, however they will define methods that return the identities and attribute values in accordance with the relationship type. -
IdentityTypeis the base interface for Identity objects. It declares properties that indicate whether the identity object is enabled or not, optional created and expiry dates, plus methods to read and set the owningPartition. -
Accountis the base interface for identities that are capable of authenticating. Since the authentication process may not depend on one particular type of attribute (not all authentication is performed with a username and password) there are no hard-coded property accessors defined by this interface. It is up to each application to define theAccountimplementations required according to the application's requirements. -
AbstractAttributedTypeis an abstract base class for creatingAttributedTypeimplementations. -
AbstractPartitionis an abstract base class that implements the base methods of thePartitioninterface, to simplify the development of partition implementations. -
AbstractIdentityTypeis an abstract base class that implements the base methods of theIdentityTypeinterface, to simplify the development of identity objects.
3.3.1. Which Identity Model Should My Application Use?
3.4. Stereotypes
-
Users -
Roles -
Groups -
Users and Roles Relationship -
Users and Groups Membership
IdentityType or Relationship type is.
Note
-
Identity Stereotypes -
Relationship Stereotypes
Important
3.4.1. Identity Stereotypes
IdentityType type. Let's take for an example the User type provided by the Basic Model:
@IdentityStereotype(USER) public class User extends Agent { }
User type represents users we need to annotate the class with the @IdentityStereotype(USER) annotation.
-
USER- Should be used by identity types that represent an user. -
ROLE- Should be used by identity types that represent a role. -
GROUP- Should be used by identity types that represent a group.
name property from where we can get its name.
StereotypeProperty annotation. It provides a set of values defining the properties for a specific stereotype.
@IdentityStereotype(ROLE) public class Role extends AbstractIdentityType { @AttributeProperty @StereotypeProperty(IDENTITY_ROLE_NAME) @Unique public String getName() { return this.name; } }
name property of the Role type is related with the name of a role stereotype.
3.4.2. Relationship Stereotypes
Relationship type. Let's take for an example the Grant relationship type provided by the Basic Model:
@RelationshipStereotype(GRANT) public class Grant extends AbstractAttributedType implements Relationship { }
Grant type represents the relationship between others identity types (eg.: users and groups) and roles, we need to annotate the class with the @RelationshipStereotype(GRANT) annotation.
-
GRANT- Should be used by relationship types that represent an association between any identity type and a role type. -
GROUP_MEMBERSHIP- Should be used by relationship types that represent an association between an identity type and a group type. Usually, the associated identity type is an user that is member of a group.
assignee and a role property.
StereotypeProperty annotation. It provides a set of values defining the properties for a specific stereotype.
@RelationshipStereotype(GRANT) public class Grant extends AbstractAttributedType implements Relationship { @InheritsPrivileges("role") @StereotypeProperty(RELATIONSHIP_GRANT_ASSIGNEE) public IdentityType getAssignee() { return this.assignee; } @StereotypeProperty(RELATIONSHIP_GRANT_ROLE) public Role getRole() { return this.role; } }
assignee property of the Role type is related with the assignee of a grant relationship stereotype. The same with the role property, which is related with the role assigned to an assignee.
3.5. Creating a Custom Identity Model
Agent and User objects:
@IdentityStereotype(USER) public class Agent extends AbstractIdentityType implements Account { private String loginName; public Agent() { } public Agent(String loginName) { this.loginName = loginName; } @AttributeProperty @StereotypeProperty(IDENTITY_USER_NAME) @Unique public String getLoginName() { return loginName; } public void setLoginName(String loginName) { this.loginName = loginName; } }
@IdentityStereotype(USER) public class User extends Agent { private String firstName; private String lastName; private String email; public User() { } public User(String loginName) { super(loginName); } @AttributeProperty public String getFirstName() { return firstName; } public void setFirstName(String firstName) { this.firstName = firstName; } @AttributeProperty public String getLastName() { return lastName; } public void setLastName(String lastName) { this.lastName = lastName; } @AttributeProperty public String getEmail() { return this.email; } public void setEmail(String email) { this.email = email; } }
Agent class is intended to represent a third party entity that may authenticate against an application, whether human (a user) or non-human (an external or remote process). Because Agent implements the Account marker interface, it is making a declaration that this identity object is capable of authenticating. To support the typical username/password authentication method, the Agent class defines a loginName property, however since the Account interface enforces no particular method of authentication (instead of a using username for authentication your application may require a certificate or fingerprint) this property is arbitrary.
User class represents a human user and extends Agent to add the human-specific properties firstName, lastName and email. Since human users are also capable of authenticating it will also inherit the loginName property from the Agent.
3.5.1. The @AttributeProperty Annotation
@AttributeProperty. This annotation (from the org.picketlink.idm.model.annotation package) is used to indicate that the property of the identity object should be persisted by the configured identity store when creating or updating the identity object. If this annotation was missing, then the property value would be null when loading the identity object from the identity store.
AttributeProperty annotation as follows:
@AttributeProperty(managed=true) private int failedLoginAttempts;
3.5.2. The @Unique Annotation
Agent class, we can also see that there is a @Unique annotation on the getLoginName() getter method (in addition to the @AttributeProperty annotation). This special annotation (also from the org.picketlink.idm.model.annotation package) is used to indicate to PicketLink that a unique constraint must be enforced on the property value - i.e. no two Agent objects (or their subclasses) may return the same value for getLoginName().
3.5.3. The @InheritsPrivileges Annotation
IdentityType property of an IdentityType class, or to an IdentityType property of a Relationship.
IdentityType property, it means instances inherit all privileges of the instance stored in the property annotated with @InheritsPrivileges. In the example below, childs groups inherit all privileges from their parents.
@IdentityStereotype(IdentityStereotype.Stereotype.GROUP) public class Group extends AbstractIdentityType { @InheritsPrivileges @AttributeProperty public Group getParentGroup() { return this.parentGroup; } }
IdentityType.
@RelationshipStereotype(GRANT) public class Grant extends AbstractAttributedType implements Relationship { @InheritsPrivileges("role") @StereotypeProperty(RELATIONSHIP_GRANT_ASSIGNEE) public IdentityType getAssignee() { return this.assignee; } }
Group instance, all childs of this group inherit the roles granted to it.
3.6. Creating Custom Relationships
Note
IdentityStore implementations - see the Identity Store section for more information.
Relationship interface. To save time, we also extend the AbstractAttributedType abstract class which takes care of the identifier and attribute management methods for us:
public class Authorization extends AbstractAttributedType implements Relationship { }
org.picketlink.idm.model.annotation.RelationshipIdentity annotation. This is done by creating a property for each identity type.
private User user; private Application application; @RelationshipIdentity public User getUser() { return user; } public void setUser(User user) { this.user = user; } @RelationshipIdentity public Application getApplication() { return application; } public void setApplication(Application application) { this.application = application; }
@RelationshipAttribute annotation:
private String accessToken; @RelationshipAttribute public String getAccessToken() { return accessToken; } public void setAccessToken(String accessToken) { this.accessToken = accessToken; }
3.7. Partition Management
PartitionManager interface provides the following methods for managing partitions:
public interface PartitionManager extends Serializable { <T extends Partition> T getPartition(Class<T> partitionClass, String name); <T extends Partition> List<T> getPartitions(Class<T> partitionClass); <T extends Partition> T lookupById(final Class<T> partitionClass, String id); void add(Partition partition); void add(Partition partition, String configurationName); void update(Partition partition); void remove(Partition partition); }
Partition object you may use either of the add() methods. If a configurationName parameter value isn't provided (see Chapter 7, Identity Management - Configuration for more information), then the newly created Partition will use the default configuration.
// Create a new Realm partition called "acme" partitionManager.add(new Realm("acme"));
// Create a new Tier partition called "sales" using the named configuration "companyAD" partitionManager.add(new Tier("sales"), "companyAD");
Partition object created will be automatically assigned a unique identifier value, which can be accessed via its getId() method:
Realm realm = new Realm("acme"); partitionManager.add(realm); String partitionId = realm.getId();
Realm realm = partitionManager.getPartition(Realm.class, "acme"); Tier tier = partitionManager.lookupById(Tier.class, tierId);
List<Realm> realms = partitionManager.getPartitions(Realm.class); List<Partition> allPartitions = partitionManager.getPartitions(Partition.class);
Partition objects all implement the AttributedType interface, it is also possible to set arbitrary attribute values:
realm.setAttribute(new Attribute<Date>("created", new Date()));
Partition object, the update() method may be used to persist those changes:
partitionManager.update(realm);
Partition object may also be removed with the remove() method:
Warning
Partition object is permanent, and will also remove all identity objects that exist within that partition!
partitionManager.remove(realm);
3.7.1. Creating Custom Partitions
AbstractPartition (see above) which makes creating a custom partition class a trivial exercise - simply extend the AbstractPartition class and then add any additional property getter/setter methods that you might require. Let's take a look at the built-in Realm class to see how little code it requires to create a custom partition:
@IdentityPartition(supportedTypes = {IdentityType.class}) public class Realm extends AbstractPartition { public Realm() { super(null); } public Realm(String name) { super(name); } }
@IdentityPartition annotation must be present on the partition class - the supportedTypes member is used to configure which identity types may be stored in this partition. Any identity object (or subclass) specified by supportedTypes is valid. There is also a unsupportedTypes member which may be used to specify identity types which may not be stored in the partition. This value can be used to trim unsupported classes (and their subclasses) off the supportedTypes.
Chapter 4. Identity Management - Credential Validation and Management
4.1. Authentication
Note
IdentityManager interface provides a single method for performing credential validation, as follows:
void validateCredentials(Credentials credentials);
validateCredentials() method accepts a single Credentials parameter, which should contain all of the state required to determine who is attempting to authenticate, and the credential (such as a password, certificate, etc) that they are authenticating with. Let's take a look at the Credentials interface:
public interface Credentials { public enum Status { UNVALIDATED, IN_PROGRESS, INVALID, VALID, EXPIRED }; Account getValidatedAccount(); Status getStatus(); void invalidate(); }
-
The
Statusenum defines the following values, which reflect the various credential states:-
UNVALIDATED- The credential is yet to be validated. -
IN_PROGRESS- The credential is in the process of being validated. -
INVALID- The credential has been validated unsuccessfully -
VALID- The credential has been validated successfully -
EXPIRED- The credential has expired
-
-
getValidatedAccount()- If the credential was successfully validated, this method returns theAccountobject representing the validated user. -
getStatus()- Returns the current status of the credential, i.e. one of the above enum values. -
invalidate()- Invalidate the credential. Implementations ofCredentialshould use this method to clean up internal credential state.
UsernamePasswordCredentials is a Credentials implementation that supports traditional username/password-based authentication:
public class UsernamePasswordCredentials extends AbstractBaseCredentials { private String username; private Password password; public UsernamePasswordCredentials() { } public UsernamePasswordCredentials(String userName, Password password) { this.username = userName; this.password = password; } public String getUsername() { return username; } public UsernamePasswordCredentials setUsername(String username) { this.username = username; return this; } public Password getPassword() { return password; } public UsernamePasswordCredentials setPassword(Password password) { this.password = password; return this; } @Override public void invalidate() { setStatus(Status.INVALID); password.clear(); } }
UsernamePasswordCredentials class extends AbstractBaseCredentials. This abstract base class implements the basic functionality required by the Credentials interface. Next, we can see that two fields are defined; username and password. These fields are used to hold the username and password state, and can be set either via the constructor, or by their associated setter methods. Finally, we can also see that the invalidate() method sets the status to INVALID, and also clears the password value.
Credentials creds = new UsernamePasswordCredentials("john", new Password("abcde")); identityManager.validate(creds); if (Status.VALID.equals(creds.getStatus())) { // authentication was successful }
Credentials creds = new UsernamePasswordCredentials("john", new Password("abcde")); identityManager.validate(creds); if (Status.EXPIRED.equals(creds.getStatus())) { // password has expired, redirect the user to a password change screen }
4.2. Managing Credentials
IdentityManager interface provides the following two methods for updating credentials:
void updateCredential(Account account, Object credential); void updateCredential(Account account, Object credential, Date effectiveDate, Date expiryDate);
Account. The second overloaded method however also accepts effectiveDate and expiryDate parameters, which allow some temporal control over when the credential will be valid. Use cases for this feature include implementing a strict password expiry policy (by providing an expiry date), or creating a new account that might not become active until a date in the future (by providing an effective date). Invoking the first overloaded method will store the credential with an effective date of the current date and time, and no expiry date.
Note
credential parameter is of type java.lang.Object. Since credentials can come in all shapes and sizes (and may even be defined by third party libraries), there is no common base interface for credential implementations to extend. To support this type of flexibility in an extensible way, PicketLink provides an SPI that allows custom credential handlers to be configured that override or extend the default credential handling logic. Please see the next section for more information on how this SPI may be used.
User user = BasicModel.getUser(identityManager, "jsmith"); identityManager.updateCredential(user, new Password("abcd1234"));
User user = BasicModel.getUser(identityManager, "jdoe"); Digest digest = new Digest(); digest.setRealm("default"); digest.setUsername(user.getLoginName()); digest.setPassword("abcd1234"); identityManager.updateCredential(user, digest);
4.3. Credential Handlers
IdentityStore implementations that support multiple credential types, PicketLink provides an optional SPI to allow the default credential handling logic to be easily customized and extended. To get a better picture of the overall workings of the Credential Handler SPI, let's take a look at the sequence of events during the credential validation process when validating a username and password against JPAIdentityStore:
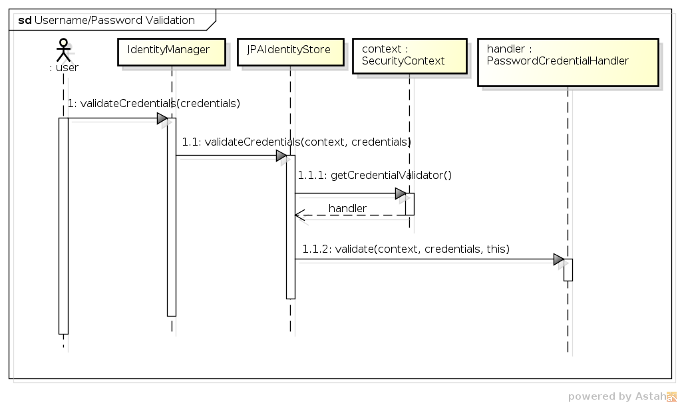
-
1 - The user (or some other code) first invokes the
validateCredentials()method onIdentityManager, passing in theCredentialsinstance to validate. -
1.1 - After looking up the correct
IdentityStore(i.e. the one that has been configured to validate credentials) theIdentityManagerinvokes the store'svalidateCredentials()method, passing in theIdentityContextand the credentials to validate. -
1.1.1 - In
JPAIdentityStore's implementation of thevalidateCredentials()method, theIdentityContextis used to look up theCredentialHandlerimplementation that has been configured to process validation requests for usernames and passwords, which is then stored in a local variable calledhandler. -
1.1.2 - The
validate()method is invoked on theCredentialHandler, passing in the security context, the credentials value and a reference back to the identity store. The reference to the identity store is important as the credential handler may require it to invoke certain methods upon the store to validate the credentials.
CredentialHandler interface declares three methods, as follows:
public interface CredentialHandler { void setup(IdentityStore<?> identityStore); void validate(IdentityContext context, Credentials credentials, IdentityStore<?> identityStore); void update(IdentityContext context, Account account, Object credential, IdentityStore<?> identityStore, Date effectiveDate, Date expiryDate); }
setup() method is called once, when the CredentialHandler instance is first created. Credential handler instantiation is controlled by the CredentialHandlerFactory, which creates a single instance of each CredentialHandler implementation to service all credential requests for that handler. Each CredentialHandler implementation must declare the types of credentials that it is capable of supporting, which is done by annotating the implementation class with the @SupportsCredentials annotation like so:
@SupportsCredentials( credentialClass = { UsernamePasswordCredentials.class, Password.class }, credentialStorage = EncodedPasswordStorage.class ) public class PasswordCredentialHandler implements CredentialHandler {
validate() and update() methods receive different parameter types (validate() takes a Credentials parameter value while update() takes an Object that represents a single credential value), the @SupportsCredentials annotation must contain a complete list of all types supported by that handler.
IdentityStore implementation makes use of the credential handler SPI then it also must declare which credential handlers support that identity store. This is done using the @CredentialHandlers annotation; for example, the following code shows how JPAIdentityStore is configured to be capable of handling credential requests for usernames and passwords, X509 certificates and digest-based authentication:
@CredentialHandlers({ PasswordCredentialHandler.class, X509CertificateCredentialHandler.class, DigestCredentialHandler.class }) public class JPAIdentityStore implements IdentityStore<JPAIdentityStoreConfiguration>, CredentialStore {
4.3.1. The CredentialStore interface
IdentityStore implementations that support multiple credential types (such as JPAIdentityStore and FileBasedIdentityStore), the implementation may choose to also implement the CredentialStore interface to simplify the interaction between the CredentialHandler and the IdentityStore. The CredentialStore interface declares methods for storing and retrieving credential values within an identity store, as follows:
public interface CredentialStore { /** * Stores the specified credential state. * * @param context The contextual invocation context. * @param account The account which credentials should be removed. * @param storage The credential storage instance to be stored. */ void storeCredential(IdentityContext context, Account account, CredentialStorage storage); /** * Returns the currently active credential state of the specified {@link T}, for the specified {@link org.picketlink.idm.model.Account}. * * @param context The contextual invocation context. * @param account The account which credentials should be removed. * @param storageClass The credential storage type specifying which credential types should be removed. * * @return */ <T extends CredentialStorage> T retrieveCurrentCredential(IdentityContext context, Account account, Class<T> storageClass); /** * Returns a list of all credential state of the specified {@link T}, for the specified {@link org.picketlink.idm.model.Account}. * * @param context The contextual invocation context. * @param account The account which credentials should be removed. * @param storageClass The credential storage type specifying which credential types should be removed. * * @return */ <T extends CredentialStorage> List<T> retrieveCredentials(IdentityContext context, Account account, Class<T> storageClass); /** * <p>Removes all credentials stored by a certain {@link org.picketlink.idm.credential.storage.CredentialStorage} associated * with the given {@link org.picketlink.idm.model.Account}.</p> * * @param context The contextual invocation context. * @param account The account which credentials should be removed. * @param storageClass The credential storage type specifying which credential types should be removed. */ void removeCredential(IdentityContext context, Account account, Class<? extends CredentialStorage> storageClass); }
4.3.2. The CredentialStorage interface
CredentialStorage interface is essentially used to represent the state required to validate an account's credentials, and is persisted within the identity store. The base interface is quite simple and only declares two methods - getEffectiveDate() and getExpiryDate():
public interface CredentialStorage { @Stored Date getEffectiveDate(); @Stored Date getExpiryDate(); }
@Stored annotation. This annotation is used to mark the properties of the CredentialStorage implementation that should be persisted. The only requirement for any property values that are marked as @Stored is that they are serializable (i.e. they implement the java.io.Serializable interface). The @Stored annotation may be placed on either the getter method or the field variable itself. An implementation of CredentialStorage will typically declare a number of properties (in addition to the effectiveDate and expiryDate properties) annotated with @Stored. Here's an example of one of a CredentialStorage implementation that is built into PicketLink - EncodedPasswordStorage is used to store a password hash and salt value:
public class EncodedPasswordStorage implements CredentialStorage { private Date effectiveDate; private Date expiryDate; private String encodedHash; private String salt; @Override @Stored public Date getEffectiveDate() { return effectiveDate; } public void setEffectiveDate(Date effectiveDate) { this.effectiveDate = effectiveDate; } @Override @Stored public Date getExpiryDate() { return expiryDate; } public void setExpiryDate(Date expiryDate) { this.expiryDate = expiryDate; } @Stored public String getEncodedHash() { return encodedHash; } public void setEncodedHash(String encodedHash) { this.encodedHash = encodedHash; } @Stored public String getSalt() { return this.salt; } public void setSalt(String salt) { this.salt = salt; } }
4.4. Built-in Credential Handlers
Warning
IdentityStore implementations support all credential types. For example, since the LDAPIdentityStore is backed by an LDAP directory server, only password credentials are supported. The following table lists the built-in IdentityStore implementations that support each credential type.
Table 4.1. Built-in credential types
| Credential type | Description | Supported by |
|---|---|---|
org.picketlink.idm.credential.UsernamePasswordCredentials | A standard username and text-based password | JPAIdentityStore FileBasedIdentityStore LDAPIdentityStore |
org.picketlink.idm.credential.DigestCredentials | Used for digest-based authentication | JPAIdentityStore FileBasedIdentityStore |
org.picketlink.idm.credential.X509CertificateCredentials | Used for X509 certificate based authentication | JPAIdentityStore FileBasedIdentityStore |
org.picketlink.idm.credential.TOTPCredentials | Used for Time-based One-time Password authentication | JPAIdentityStore FileBasedIdentityStore |
org.picketlink.idm.credential.TokenCredential | Used for Token-based authentication | JPAIdentityStore FileBasedIdentityStore |
4.4.1. Username/Password-based Credential Handler
User user = BasicModel.getUser(identityManager, "jsmith"); identityManager.updateCredential(user, new Password("abcd1234"));
UsernamePasswordCredentials credential = new UsernamePasswordCredentials(); Password password = new Password("abcd1234"); credential.setUsername("jsmith"); credential.setPassword(password); identityManager.validateCredentials(credential); if (Status.VALID.equals(credential.getStatus()) { // successful validation } else { // invalid credential }
4.4.1.1. Configuration Parameters
Table 4.2. Configuration Parameters
| Parameter | Description |
|---|---|
PasswordCredentialHandler. PASSWORD_ENCODER | It must be a org.picketlink.idm.credential.encoder.PasswordEncoder sub-type. It defines how passwords are encoded. Defaults to SHA-512. |
PasswordCredentialHandler. SECURE_RANDOM_PROVIDER | It must be a org.picketlink.common.random.SecureRandomProvider sub-type. It defines how SecureRandom are created in order to be used to generate random numbers to salt passwords. Defaults to SHA1PRNG with a default seed. |
PasswordCredentialHandler. RENEW_RANDOM_NUMBER_GENERATOR_INTERVAL | To increase the security of generated salted passwords, SecureRandom instances can be renewed from time to time. This option defines the time in milliseconds. Defaults to disabled, what means that a single instance is used during the life-time of the application. |
PasswordCredentialHandler. ALGORITHM_RANDOM_NUMBER | Defines the algorithm to be used by the default SecureRandomProvider. Defaults to SHA1PRNG. |
PasswordCredentialHandler. KEY_LENGTH_RANDOM_NUMBER | Defines the key length of seeds when using the default SecureRandomProvider. Defaults to 0, which means it is disabled. |
PasswordCredentialHandler. LOGIN_NAME_PROPERTY | This option defines the name of the property used to lookup the Account object using the provided login name. It has a default value of loginName and can be overridden if the credential handler is to be used to authenticate an Account type that uses a different property name. |
PasswordCredentialHandler. SUPPORTED_ACCOUNT_TYPES | This option defines any additional Account types that are supported by the credential handler. If no value is specified and/or no identity instances of the specified types are found then the credential handler's fall back behaviour is to attempt to lookup either an Agent or User (from the org.picketlink.idm.model.basic package) identity. The property value is expected to be an array of Class<? extends Account> objects. |
4.4.2. DIGEST-based Credential Handler
User user = BasicModel.getUser(identityManager, "jsmith"); Digest digest = new Digest(); digest.setRealm("PicketLink Realm"); digest.setUsername(user.getLoginName()); digest.setPassword("abcd1234"); identityManager.updateCredential(user, digest);
User user = BasicModel.getUser(identityManager, "jsmith"); Digest digest = new Digest(); digest.setRealm("PicketLink Realm"); digest.setUsername(user.getLoginName()); digest.setPassword("abcd1234"); digest.setDigest(DigestUtil.calculateA1(user.getLoginName(), digest.getRealm(), digest.getPassword().toCharArray())); DigestCredentials credential = new DigestCredentials(digest); identityManager.validateCredentials(credential); if (Status.VALID.equals(credential.getStatus()) { // successful validation } else { // invalid credential }
4.4.3. X509-based Credential Handler
User user = BasicModel.getUser(identityManager, "jsmith"); java.security.cert.X509Certificate clientCert = // get user certificate identityManager.updateCredential(user, clientCert);
User user = BasicModel.getUser(identityManager, "jsmith"); java.security.cert.X509Certificate clientCert = // get user certificate X509CertificateCredentials credential = new X509CertificateCredentials(clientCert); identityManager.validateCredentials(credential); if (Status.VALID.equals(credential.getStatus()) { // successful validation } else { // invalid credential }
User user = BasicModel.getUser(identityManager, "jsmith"); java.security.cert.X509Certificate clientCert = // get user certificate X509CertificateCredentials credential = new X509CertificateCredentials(clientCert); // trust the certificate and only check the principal existence credential.setTrusted(true); identityManager.validateCredentials(credential); if (Status.VALID.equals(credential.getStatus()) { // successful validation } else { // invalid credential }
4.4.4. Time-based One Time Password Credential Handler
User user = BasicModel.getUser(identityManager, "jsmith"); TOTPCredential credential = new TOTPCredential("abcd1234", "my_totp_secret"); identityManager.updateCredential(user, credential);
User user = BasicModel.getUser(identityManager, "jsmith"); TOTPCredential credential = new TOTPCredential("abcd1234", "my_totp_secret"); credential.setDevice("My Cool Android Phone"); identityManager.updateCredential(user, credential);
User user = BasicModel.getUser(identityManager, "jsmith"); TOTPCredentials credential = new TOTPCredentials(); credential.setUsername(user.getLoginName()); credential.setPassword(new Password("abcd1234")); TimeBasedOTP totp = new TimeBasedOTP(); // let's manually generate a token based on the user secret String token = totp.generate("my_totp_secret"); credential.setToken(token); // if you want to validate the token for a specific device // credential.setDevice("My Cool Android Phone"); identityManager.validateCredentials(credential); if (Status.VALID.equals(credential.getStatus()) { // successful validation } else { // invalid credential }
4.4.4.1. Configuration Parameters
Table 4.3. Configuration Parameters
| Parameter | Description |
|---|---|
TOTPCredentialHandler.ALGORITHM | The encryption algorithm. Defaults to HmacSHA1. |
TOTPCredentialHandler.INTERVAL_SECONDS | The number of seconds a token is valid. Defaults to 30 seconds. |
TOTPCredentialHandler.NUMBER_DIGITS | The number of digits for a token. Defaults to 6 digits. |
TOTPCredentialHandler.DELAY_WINDOW | the number of previous intervals that should be used to validate tokens. Defaults to 1 interval of 30 seconds. |
4.4.5. Token-based Credential Handler
User user = BasicModel.getUser(identityManager, "jsmith"); StringBuilder tokenBuilder = new StringBuilder(); tokenBuilder .append("id=").append(UUID.randomUUID().toString()) .append(";") .append("subject=").append(user.getId()) .append(";") .append("partition=").append(user.getPartition().getName()) .append(";") .append("userName=").append(user.getLoginName()) .append(";") .append("expiration=").append(1000) .append(";"); MyToken token = new MyToken(tokenBuilder.toString()); identityManager.updateCredential(user, token);
User user = BasicModel.getUser(identityManager, "jsmith"); MyToken token = new MyToken(tokenBuilder.toString()); TokenCredential credential = new TokenCredential(token); identityManager.validateCredentials(credential); if (Status.VALID.equals(credential.getStatus()) { // successful validation } else { // invalid credential }
org.picketlink.idm.credential.Token. You can also extend org.picketlink.idm.credential.AbstractToken, which is basically an adapter for the Token interface.
public class MyToken extends AbstractToken { public TokenC(String token) { super(token); } @Override public String getSubject() { return extractSubjectFromToken(); } private String extractSubjectFromToken() { // the code that knows how to extract the subject from the token string } }
MyToken type above) is responsible to extract all the necessary information from the string value representing a token instance. Being the subject the most important piece of information. The subject helps PicketLink to properly validate tokens by linking it with the corresponding account. By default, PicketLink will try to resolve the account associated with a token using the subject as both an identifier or user name.
org.picketlink.idm.credential.Token.Consumer type and implement the validate method.
public class MyTokenConsumer implements Token.Consumer<MyToken> { @Override public boolean validate(MyToken token) { // eg.: check signatures, expiration, issuer and so forth return false; } @Override public <I extends IdentityType> I extractIdentity(MyToken token, Class<I> identityType, StereotypeProperty.Property stereotypeProperty, Object identifier) { return null; } @Override public Class<MyToken> getTokenType() { return MyToken.class; } }
extractIdentity method that will be used by PicketLink to ask for some very common identity information such as the account associated with a token, roles, groups and so forth.
IdentityConfigurationBuilder serviceProviderConfigBuilder = new IdentityConfigurationBuilder(); serviceProviderConfigBuilder .named("sp.config") .stores() .token() .tokenConsumer(new MyTokenConsumer()) .supportAllFeatures();
Token.Consumer#extractIdentity method all the time your code tries to lookup user, role or group information. The token identity store is very useful to support all authentication and authorization features provided by PicketLink even if you don't manage the identities consumed by your application. In this case, the only source of identity data you have is a token.
org.picketlink.idm.credential.Token.Provider. Token providers are responsible to issue, renew and invalidate tokens for a given account.
public class MyTokenProvider implements Token.Provider<MyToken> { @Override public MyToken issue(Account account) { User user = (User) account; StringBuilder tokenBuilder = new StringBuilder(); tokenBuilder .append("id=").append(UUID.randomUUID().toString()) .append(";") .append("subject=").append(user.getId()) .append(";") .append("partition=").append(user.getPartition().getName()) .append(";") .append("userName=").append(user.getLoginName()) .append(";") .append("expiration=").append(1000) .append(";"); return new MyToken(tokenBuilder.toString()); } @Override public MyToken renew(Account account, MyToken renewToken) { // you may also check if the renew token is valid return issue(account); } @Override public void invalidate(Account account) { // invalidate the token } @Override public Class<MyToken> getTokenType() { return MyToken.class; } }
4.4.5.1. Configuration Parameters
Table 4.4. Configuration Parameters
| Parameter | Description |
|---|---|
TokenCredentialHandler.TOKEN_CONSUMER | Stores stateless and thread-safe instances of {@link org.picketlink.idm.credential.Token.Consumer}. The value can be a single instance, a list or an array. |
4.5. Implementing a Custom CredentialHandler
PasswordCredentialHandler to learn how to create a custom credential handler. The AbstractCredentialHandler abstract class is provided to simplify the process of creating a new credential handler, and is also used by PasswordCredentialHandler as a base class:

PasswordCredentialHandler:
@SupportsCredentials( credentialClass = {UsernamePasswordCredentials.class, Password.class}, credentialStorage = EncodedPasswordStorage.class) public class PasswordCredentialHandler<S extends CredentialStore<?>, V extends UsernamePasswordCredentials, U extends Password> extends AbstractCredentialHandler<S, V, U> {
@SupportsCredentials annotation is used to declare exactly which credential classes are supported by the credential handler (as indicated by the credentialClass annotation member). The supported credential classes include both credentials used to authenticate via the validate() method (i.e. a class that implements the org.picketlink.idm.credential.Credentials interface, in this example UsernamePasswordCredentials) and the actual encapsulated credential value (e.g. org.picketlink.idm.credential.Password). These supported credential classes are also reflected in the generic type declaration of the class itself - the V and U types in the code above. The credentialStorage annotation member declares the storage class used to persist the necessary state for the credential. The storage class must implement the org.picketlink.idm.credential.storage.CredentialStorage interface.
setup() method is executed only once and is used to perform any required initialization for the credential handler. In the case of PasswordCredentialHandler, the setup() method reads the configuration properties (made available from store.getConfig().getCredentialHandlerProperties()) and uses those property values to initialize the state required for encoding password values.
@Override public void setup(S store) { super.setup(store); Map<String, Object> options = store.getConfig().getCredentialHandlerProperties(); if (options != null) { Object providedEncoder = options.get(PASSWORD_ENCODER); if (providedEncoder != null) { if (PasswordEncoder.class.isInstance(providedEncoder)) { this.passwordEncoder = (PasswordEncoder) providedEncoder; } else { throw new SecurityConfigurationException("The password encoder [" + providedEncoder + "] must be an instance of " + PasswordEncoder.class.getName()); } } Object renewRandomNumberGeneratorInterval = options.get( RENEW_RANDOM_NUMBER_GENERATOR_INTERVAL); if (renewRandomNumberGeneratorInterval != null) { this.renewRandomNumberGeneratorInterval = Integer.valueOf( renewRandomNumberGeneratorInterval.toString()); } Object secureRandomProvider = options.get(SECURE_RANDOM_PROVIDER); if (secureRandomProvider != null) { this.secureRandomProvider = (SecureRandomProvider) secureRandomProvider; } else { Object saltAlgorithm = options.get(ALGORITHM_RANDOM_NUMBER); if (saltAlgorithm == null) { saltAlgorithm = DEFAULT_SALT_ALGORITHM; } Object keyLengthRandomNumber = options.get(KEY_LENGTH_RANDOM_NUMBER); if (keyLengthRandomNumber == null) { keyLengthRandomNumber = Integer.valueOf(0); } this.secureRandomProvider = new DefaultSecureRandomProvider( saltAlgorithm.toString(), Integer.valueOf(keyLengthRandomNumber.toString())); } } this.secureRandom = createSecureRandom(); }
validateCredential() method. This method (which the parent AbstractCredentialHandler class declares as an abstract method) checks the validity of the credential value passed in and either returns true if the credential is valid or false if it is not. The validateCredential() method is a convenience method which delegates much of the boilerplate code required for credential validation to AbstractCredentialHandler, allowing the subclass to simply define the bare minimum code required to validate the credential. If you were to implement a CredentialHandler without using AbstractCredentialHandler as a base class, you would instead need to implement the validate() method which in general requires a fair bit more code.
@Override protected boolean validateCredential(final CredentialStorage storage, final V credentials) { EncodedPasswordStorage hash = (EncodedPasswordStorage) storage; if (hash != null) { String rawPassword = new String(credentials.getPassword().getValue()); return this.passwordEncoder.verify(saltPassword(rawPassword, hash.getSalt()), hash.getEncodedHash()); } return false; }
update() method (in contrast to validateCredential) is defined by the CredentialHandler interface itself, and is used to persist a credential value to the backend identity store. In PasswordCredentialHandler this method creates a new instance of EncodedPasswordStorage, a CredentialStorage implementation that represents a password's hash and salt values. The salt value in this implementation is randomly generated using the configured property values, and then used to encode the password hash. This value is then stored by calling the store.storeCredential() method.
@Override public void update(IdentityContext context, Account account, U password, S store, Date effectiveDate, Date expiryDate) { EncodedPasswordStorage hash = new EncodedPasswordStorage(); if (password.getValue() == null || isNullOrEmpty(password.getValue().toString())) { throw MESSAGES.credentialInvalidPassword(); } String rawPassword = new String(password.getValue()); String passwordSalt = generateSalt(); hash.setSalt(passwordSalt); hash.setEncodedHash(this.passwordEncoder.encode(saltPassword(rawPassword, passwordSalt))); if (effectiveDate != null) { hash.setEffectiveDate(effectiveDate); } hash.setExpiryDate(expiryDate); store.storeCredential(context, account, hash); }
4.6. Validating Credentials for Custom Account Types
Account types provided by the Basic Model when validating or updating credentials. That said, only the following types can be used with the built-in credential types, by default:
-
org.picketlink.idm.model.basic.Agent -
org.picketlink.idm.model.basic.User
Account types provided by the Basic Model.
Account types and use your own to better represent your users.
Account type called MyUser. Which may look like this:
@IdentityStereotype(USER) public class MyUser extends AbstractIdentityType implements Account { @AttributeProperty @Unique @StereotypeProperty(IDENTITY_USER_NAME) private String loginName; // getters and setters }
Account types you must provide them during the configuration as follows:
IdentityConfigurationBuilder builder = event.getConfig(); builder .named("default.config") .stores() .jpa() .supportType(MyUser.class)
MyUser is annotated with @IdentityStereotype(USER) and also defines a loginName property annotated with @StereotypeProperty(IDENTITY_USER_NAME) to represent the user name. Those annotations are important to tell PicketLink that your type represents an user and the loginName property is used to store his name. The latter is going to be used to retrieve the account from the underlying stores when updating or validating credentials.
Chapter 5. Identity Management - Basic Identity Model
5.1. Basic Identity Model
org.picketlink.idm.model.basic package:
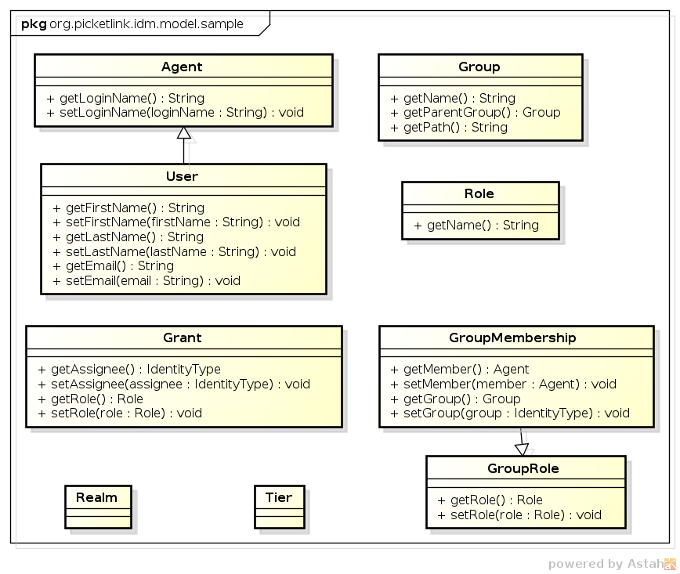
-
Agentrepresents a unique entity that may access the services secured by PicketLink. In contrast to a user which represents a human,Agentis intended to represent a third party non-human (i.e. machine to machine) process that may authenticate and interact with your application or services. It declares methods for reading and setting theAgent's login name. -
Userrepresents a human user that accesses your application and services. In addition to the login name property defined by its parent interfaceAgent, theUserinterface declares a number of other methods for managing the user's first name, last name and e-mail address. -
Groupis used to manage collections of identity types. EachGrouphas a name and an optional parent group. -
Roleis used in various relationship types to designate authority to another identity type to perform various operations within an application. For example, a forum application may define a role called moderator which may be assigned to one or moreUsers orGroups to indicate that they are authorized to perform moderator functions. -
Grantrelationship represents the assignment of aRoleto an identity. -
GroupMembershiprelationship represents aUser(orAgent) membership within aGroup. -
GroupRolerelationship represents the the assignment of a specificRolewithin aGroupto aUserorAgent. The reason this relationship extends theGroupMembershiprelationship is simply so it inherits thegetMember()andgetGroup()methods - being assigned to aGroupRoledoes not mean that theUser(orAgent) that was assigned the group role also becomes a member of the group. -
Realmis a partition type, and may be used to store anyIdentityTypeobjects (includingAgents,Users,Groups orRoles. -
Tieris a specialized partition type, and may be only used to storeGrouporRoleobjects specific to an application.
5.1.1. Utility Class for the Basic Identity Model
org.picketlink.idm.model.basic.BasicModel. If you're using the basic identity model, this helper class can save you a lot of code and make your application even more simple.
-
Retrieve
UserandAgentinstances by login name. -
Retrieve
RoleandGroupinstances by name. -
Add users as group members, grant roles to users. As well check if an user is member of a group or has a specific role.
BasicModel helper class is only suitable if you're using the types provided by the basic identity model, only. If you are using custom types, even if those are sub-types of any of the types provided by the basic identity model, you should handle those custom types directly using the PicketLink IDM API.
Agent type.
SalesAgent salesAgent = BasicModel.getUser(identityManager, "someSalesAgent");
SalesAgent instance. The correct way of doing that is using the Query API directly as follows:
public SaleAgent findSalesAgent(String loginName) { IdentityQueryBuilder queryBuilder = identityManager.getQueryBuilder(); List<SaleAgent> result = queryBuilder .createIdentityQuery(SaleAgent.class) .where(queryBuilder.equal(SaleAgent.LOGIN_NAME, loginName)) .getResultList(); return result.isEmpty() ? null : result.get(0); }
Warning
BasicModel helper class is only suitable for use cases where only the types provided by the basic identity model are used. If your application have also custom types, they need to be handled directly using the PicketLink IDM API.
5.2. Managing Users, Groups and Roles
org.picketlink.idm.model.basic package. The following sections provide examples that show these implementations in action.
5.2.1. Managing Users
-
Login name - jsmith
-
First name - John
-
Last name - Smith
-
E-mail - jsmith@acme.com
User user = new User("jsmith"); user.setFirstName("John"); user.setLastName("Smith"); user.setEmail("jsmith@acme.com"); identityManager.add(user);
User is created, it's possible to look it up using its login name:
User user = BasicModel.getUser(identityManager, "jsmith");
User user = BasicModel.getUser(identityManager, "jsmith"); user.setEmail("john@smith.com"); identityManager.update(user);
User user = BasicModel.getUser(identityManager, "jsmith"); identityManager.remove("jsmith");
5.2.2. Managing Groups
Group employees = new Group("employees");
Group managers = new Group("managers", employees);
Group, the getGroup() method may be used. If the group name is unique, it can be passed as a single parameter:
Group employees = BasicModel.getGroup(identityManager, "employees");
Group managers = BasicModel.getGroup(identityManager, "managers", employees);
Group's name and other properties (besides its parent) after it has been created. The following example demonstrates how to disable the "employees" group we created above:
Group employees = BasicModel.getGroup(identityManager, "employees"); employees.setEnabled(false); identityManager.update(employees);
remove() method:
Group employees = BasicModel.getGroup(identityManager, "employees"); identityManager.remove(employees);
5.3. Managing Relationships
org.picketlink.idm.model.Relationship:
RelationshipManager interface provides three standard methods for managing relationships:
void add(Relationship relationship); void update(Relationship relationship); void remove(Relationship relationship);
-
The
add()method is used to create a new relationship. -
The
update()method is used to update an existing relationship.Note
Please note that the identities that participate in a relationship cannot be updated themselves, however the attribute values of the relationship can be updated. If you absolutely need to modify the identities of a relationship, then delete the relationship and create it again. -
The
remove()method is used to remove an existing relationship. -
The
createRelationshipQuery()method is used to perform relationship queries. -
The
inheritsPrivileges()method is used to check whether an identity inherits privileges from another.
Note
5.3.1. Built In Relationship Types
AbstractAttributedType abstract class, which provides the basic methods for setting a unique identifier value and managing a set of attribute values:

5.3.1.1. Application Roles
Grant relationship, which is used to assign application-wide privileges to a User or Agent.

RelationshipManager interface provides methods for directly granting a role. Here's a simple example:
User bob = BasicModel.getUser(identityManager, "bob"); Role superuser = BasicModel.getRole(identityManager, "superuser"); BasicModel.grantRole(relationshipManager, bob, superuser);
User bob = BasicModel.getUser(identityManager, "bob"); Role superuser = BasicModel.getRole(identityManager, "superuser"); Grant grant = new Grant(bob, superuser); identityManager.add(grant);
revokeRole() method:
User bob = BasicModel.getUser(identityManager, "bob"); Role superuser = BasicModel.getRole(identityManager, "superuser"); BasicModel.revokeRole(relationshipManager, bob, superuser);
hasRole() method:
User bob = BasicModel.getUser(identityManager, "bob"); Role superuser = BasicModel.getRole(identityManager, "superuser"); boolean isBobASuperUser = BasicModel.hasRole(relationshipManager, bob, superuser);
5.3.1.2. Groups and Group Roles
GroupMembership and GroupRole relationships are used to represent a user's membership within a Group, and a user's role for a group, respectively.

Note
GroupRole relationship type extends GroupMembership, it does not mean that a member of a GroupRole automatically receives GroupMembership membership also - these are two distinct relationship types with different semantics.
Group is typically used to form logical collections of users. Within an organisation, groups are often used to mirror the organisation's structure. For example, a corporate structure might consist of a sales department, administration, management, etc. This structure can be modelled in PicketLink by creating corresponding groups such as sales, administration, and so forth. Users (who would represent the employees in a corporate structure) may then be assigned group memberships corresponding to their place within the company's organisational structure. For example, an employee who works in the sales department may be assigned to the sales group. Specific application privileges can then be blanket assigned to the sales group, and anyone who is a member of the group is free to access the application's features that require those privileges.
GroupRole relationship type should be used when it is intended for an identity to perform a specific role for a group, but not be an actual member of the group itself. For example, an administrator of a group of doctors may not be a doctor themselves, but have an administrative role to perform for that group. If the intent is for an individual identity to both be a member of a group and have an assigned role in that group also, then the identity should have both GroupRole and GroupMembership relationships for that group.

Group sales = new Group("Sales"); identityManager.add(sales);
identityManager.add(new Group("North America", sales); identityManager.add(new Group("EMEA", sales); identityManager.add(new Group("Asia", sales); // and so forth
Group() constructor is used to specify the group's parent group. This allows us to create a hierarchical group structure, which can be used to mirror either a simple or complex personnel structure of an organisation. Let's now take a look at how we assign users to these groups.
Role admin = BasicModel.getRole(identityManager, "administrator"); User user = BasicModel.getUser(identityManager, "jsmith"); Group group = BasicModel.getGroup(identityManager, "Northeast"); BasicModel.grantGroupRole(relationshipManager, user, admin, group);
revokeGroupRole() method:
BasicModel.revokeGroupRole(relationshipManager, user, admin, group);
hasGroupRole() method:
boolean isUserAGroupAdmin = BasicModel.hasGroupRole(relationshipManager, user, admin, group);
User user = BasicModel.getUser(identityManager, "rbrown"); Group group = BasicModel.getGroup(identityManager, "Northeast"); BasicModel.addToGroup(relationshipManager, user, group);
User may also be a member of more than one Group; there are no built-in limitations on the number of groups that a User may be a member of.
removeFromGroup() method to remove the same user from the group:
BasicModel.removeFromGroup(relationshipManager, user, group);
isMember() method:
boolean isUserAMember = BasicModel.isMember(relationshipManager, user, group);
add() method. The following code is equivalent to assigning a group role via the grantGroupRole() method shown above:
Role admin = BasicModel.getRole(identityManager, "administrator"); User user = BasicModel.getUser(identityManager, "jsmith"); Group group = BasicModel.getGroup(identityManager, "Northeast"); GroupRole groupRole = new GroupRole(user, group, admin); identityManager.add(groupRole);
5.4. Realms and Tiers

Realm and Tier classes implement the Partition interface, as shown in the following class diagram:

Chapter 6. Identity Management - Attribute Management
6.1. Overview
6.2. Formal attributes
@AttributeProperty Annotation”
User type as an example, you'll see that all its properties are defined as follows:
public class User extends Agent { @AttributeProperty private String firstName; @AttributeProperty private String lastName; @AttributeProperty private String email; }
QueryParameter constant as follows:
public class User extends Agent { /** * A query parameter used to set the firstName value. */ public static final QueryParameter FIRST_NAME = QUERY_ATTRIBUTE.byName("firstName"); /** * A query parameter used to set the lastName value. */ public static final QueryParameter LAST_NAME = QUERY_ATTRIBUTE.byName("lastName"); /** * A query parameter used to set the email value. */ public static final QueryParameter EMAIL = QUERY_ATTRIBUTE.byName("email"); @AttributeProperty private String firstName; @AttributeProperty private String lastName; @AttributeProperty private String email; }
IdentityQueryBuilder queryBuilder = identityManager.getQueryBuilder(); IdentityQuery<User> query = queryBuilder.createIdentityQuery(User.class); query.where(queryBuilder.like(User.FIRST_NAME, "John%")); // find only by the first name List<User> result = query.getResultList(); for (User user : result) { // do something }
6.3. Ad-hoc attributes
User user = new User("john"); user.setAttribute(new Attribute<Integer>("QuestionTotal", 2); // attribute for question #1 user.setAttribute(new Attribute<String>("Question1", "What is favorite toy?")); user.setAttribute(new Attribute<String>("Question1Answer", "Gum")); // attribute for question #2 user.setAttribute(new Attribute<String>("Question2", "What is favorite word?")); user.setAttribute(new Attribute<String>("Question2Answer", "Hi")); identityManager.add(user);
Note
IdentityType, Relationship and Partition support ad-hoc attributes. The reason is that all those types are a subtypes of AttributedType. But in practice, even if a type support ad-hoc attributes the underlying store may not. Which means you can not use those attributes. The LDAP Identity Store, for example, does not support ad-hoc attributes at all if used alone. Take a look at Chapter 9, Identity Management - Working with LDAP for more details about how to support ad-hoc attributes when using the LDAP store.
IdentityQueryBuilder queryBuilder = identityManager.getQueryBuilder(); IdentityQuery<User> query = identityManager.<User> createIdentityQuery(User.class); query.where(queryBuilder.equal(IdentityType.QUERY_ATTRIBUTE.byName("SomeAttribute"), "SomeAttributeValue")); List<User> result = query.getResultList(); for (User user : result) { // do something }
6.4. Managed attributes
AttributedType (eg.: identity types, partitions and relationships). They are stored in the same way as ad-hoc attributes. However, instead of having to handle these attributes using the getAttribute , setAttribute and removeAttribute methods, you just use the getter an setter of a property, in a more type-safe manner.
public class Application extends AbstractIdentityType { @AttributeProperty(managed = true) private String name; }
name property. Now, if you want to add another property to this type you need to store it somewhere. In this case, you can map the property in the corresponding entity or use managed attributes to store it as an ad-hoc attribute and still access it in a type-safe manner.
public class Application extends AbstractIdentityType { @AttributeProperty(managed = true) private String name; @AttributeProperty(managed = true) private String url; }
url property as follows:
Application application = // obtain from IdentityManager application.setUrl("http://mydomain.com/app") identityManager.update(application);
Application application = // obtain from IdentityManager Attribute<String> url application.getAttribute("url");
Chapter 7. Identity Management - Configuration
- 7.1. Configuration
- 7.1.1. Architectural Overview
- 7.1.2. Default Configuration
- 7.1.3. Providing a Custom Configuration
- 7.1.4. Initializing the
PartitionManager - 7.1.5. Programmatic Configuration Overview
- 7.1.6. Providing Multiple Configurations
- 7.1.7. Providing Multiple Stores for a Configuration
- 7.1.8. Configuring Credential Handlers
- 7.1.9. Identity Context Configuration
- 7.1.10. IDM configuration from XML file
7.1. Configuration
7.1.1. Architectural Overview
IdentityConfiguration object must first be created to hold the PicketLink configuration options. Once all configuration options have been set, you just create a PartitionManager instance passing the previously created configuration. The PartitionManager can then be used to create Partition and IdentityManager instances.

IdentityConfiguration is usually created using a Configuration Builder API, which provides a rich and fluent API for every single aspect of PicketLink configuration.
7.1.2. Default Configuration
PartitionManager, IdentityManager or RelationshipManager beans into your own application and start using them immediately:
@Inject PartitionManager partitionManager; @Inject IdentityManager identityManager; @Inject RelationshipManager relationshipManager;
Note
7.1.3. Providing a Custom Configuration
IdentityConfigurationEvent:
public class IdentityManagementConfiguration { public void observeIdentityConfigurationEvent(@Observes IdentityConfigurationEvent event) { IdentityConfigurationBuilder builder = event.getConfig(); // use the builder to provide your own configuration } }
IdentityConfiguration instances using a @Producer annotated method:
public class IdentityManagementConfiguration { @Produces public IdentityConfiguration produceJPAConfiguration() { IdentityConfigurationBuilder builder = new IdentityConfigurationBuilder(); builder .named("jpa.config") .stores() .jpa() .supportAllFeatures() return builder.build(); } @Produces public IdentityConfiguration produceLDAPConfiguration() { IdentityConfigurationBuilder builder = new IdentityConfigurationBuilder(); builder .named("ldap.config") .stores() .ldap() // configure the LDAP store return builder.build(); } }
Warning
IdentityConfiguration instances the produced bean must be dependent and not normal-scoped.
PartitionManager instance if you want more control.
@ApplicationScoped public static class PicketLinkConfiguration { @PicketLink @Produces public PartitionManager producePartitionManager() { IdentityConfigurationBuilder builder = new IdentityConfigurationBuilder(); builder .named("produced.partition.manager.config") .stores() .jpa() .supportAllFeatures(); PartitionManager partitionManager = new DefaultPartitionManager(builder.build()); // in this case you must initialize the identity store with a default partition Partition defaultPartition = new Realm(Realm.DEFAULT_REALM); partitionManager.add(defaultPartition); // creates the default partition return partitionManager; } }
PartitionManager instance. Note that the producer method is annotated with the PicketLink annotation.
Important
PartitionManager is that you must manually create the partitions before start producing IdentityManager instances (eg.: the default partition)
SecurityConfigurationEvent as follows:
public class IdentityManagementConfiguration { public void configureIdentityManagement(@Observes SecurityConfigurationEvent event) { SecurityConfigurationBuilder builder = event.getBuilder(); builder .idmConfig() .named("default.config") .stores() .jpa() .supportAllFeatures(); } }
SecurityConfigurationEvent. The reason is because from this event you have access to not only the IDM config but for others features provided by PicketLink.
PartitionManager instance, instead of relying on PicketLink to create one for you. In this case you can produce a PartitionManager by your own. Or if you want different methods for each IDM config you may want to produce IdentityConfiguration instances instead.
7.1.4. Initializing the PartitionManager
PartitionManager with some data before your application starts to produce partition manager instances. PicketLink provides a specific event called PartitionManagerCreateEvent, which can be used to provide any initialization logic right after a PartitionManager instance is created and before it is consumed by any injection point in your application.
public class MyPartitionManagerInitializer { public void init(@Observes PartitionManagerCreateEvent event) { // retrieve the recently created partition manager instance PartitionManager partitionManager = event.getPartitionManager(); // retrieve all the configuration used to build the instance Collection configurations = partitionManager.getConfigurations(); } }
PartitionManagerCreateEvent is that if any partition is created during the initialization, PicketLink won't try to create the default partition.
Note
PartitionManagerCreateEvent in order to initialize the partition manager properly. Specially if using the JPA store and if no active transaction exists when the PartitionManager is being created.
7.1.5. Programmatic Configuration Overview
IdentityConfiguration is created using the IdentityConfigurationBuilder helper object, from where we choose which identity store we want to use (in this case a file-based store) and any other configuration option, if necessary. Finally, we use the configuration to create a PartitionManager, from where we can create Partition and IdentityManager instances:
IdentityConfigurationBuilder builder = new IdentityConfigurationBuilder(); builder .named("default") .stores() .file() .supportAllFeatures(); DefaultPartitionManager partitionManager = new DefaultPartitionManager(builder.buildAll()); Realm defaultRealm = new Realm(Realm.DEFAULT_REALM); // let's add the partition using the default configuration. partitionManager.add(defaultRealm); // if no partition is specified to createIdentityManager, defaults to the default Realm. IdentityManager identityManager = partitionManager.createIdentityManager(); User john = new User("john"); // let's add john to the default partition identityManager.add(user);
7.1.6. Providing Multiple Configurations
PartitionManager can be built considering multiple configurations. This is a very powerful feature given that you can manage your identity data between different partitions each one using a specific configuration.
Partition.
IdentityConfigurationBuilder builder = new IdentityConfigurationBuilder(); builder .named("ldap.config") .stores() .ldap() // specific configuration options for the LDAP store .supportAllFeatures(); .named("jpa.config") .stores() .jpa() // specific configuration options for the JPA store .supportAllFeatures(); DefaultPartitionManager partitionManager = new DefaultPartitionManager(builder.buildAll()); Realm internalPartition = new Realm("internal"); // the 'internal' partition will use the 'ldap.config' configuration partitionManager.add(internalPartition, "ldap.config"); // we create an IdentityManager for the LDAP managed partition IdentityManager internalIdentityManager = partitionManager.createIdentityManager(internalPartition); User john = new User("john"); // john will be added to the LDAP internalIdentityManager.add(john); Realm externalPartition = new Realm("external"); // the 'external' partition will use the 'jpa.config' configuration partitionManager.add(externalPartition, "jpa.config"); User mary = new User("mary"); // we create an IdentityManager for the JPA managed partition IdentityManager externalIdentityManager = partitionManager.createIdentityManager(externalPartition); // mary will be added to the database externalIdentityManager.add(mary);
IdentityManager for one of those partitions, all identity management operations will be done considering the configuration associated with the current partition. In other words, considering the example above, the user 'john' will be stored in the LDAP and 'mary' in a Database.
7.1.7. Providing Multiple Stores for a Configuration
IdentityStore configurations in a single named configuration. This can be very useful when your identity data is distributed in different stores or even if a specific store have any kind of limitation that can be provided by another one.
IdentityConfigurationBuilder builder = new IdentityConfigurationBuilder(); builder .named("default") .stores() .jpa() // configuration options for the jpa store .supportGlobalRelationship(Relationship.class) .supportAttributes(true) .ldap() // configuration options for the ldap store .supportType(IdentityType.class)
IdentityType types should be supported. In other words, we're only storing users, roles and groups. For the JPA store configuration we define that only Relationship types should be supported. In other words, we're only storing relationships such as Grant, GroupMembership, etc.
7.1.8. Configuring Credential Handlers
IdentityStore may support a different set of credential handlers. This documentations describes the built-in credential handlers provided by PicketLink, but sometimes you may want to provide your own implementations.
IdentityConfigurationBuilder builder = new IdentityConfigurationBuilder(); builder .named("default") .stores() .jpa() // other JPA configuration .addCredentialHandler(UserPasswordCredentialHandler.class) .supportAllFeatures();
addCredentialHandler method.
7.1.8.1. Passing parameters to Credential Handlers
IdentityConfigurationBuilder builder = new IdentityConfigurationBuilder(); builder .named("default") .stores() .jpa() // other JPA configuration .setCredentialHandlerProperty(PasswordCredentialHandler.PASSWORD_ENCODER, new BCryptPasswordEncoder(4)) .supportAllFeatures();
PasswordCredentialHandler using the setCredentialHandlerProperty method.
7.1.9. Identity Context Configuration
IdentityContext plays an important role in the PicketLink IDM achitecture. It is strongly used during the execution of operations. It carries very sensitive and contextual information for a specific operation and provides access for some of the IDM underlying services such as caching, event handling, id generator for AttributedType instances, among others.
IdentityStore in order to persist or store identity data using a specific repository (eg.: LDAP, databases, filesystem, etc). When executing a operation the identity store must be able to:
-
Access the current
Partition. Eg.:RealmorTier. -
Access the Event Handling API in order to fire events such as when an user is created, updated, etc.
-
Access the Caching API in order to cache identity data and increase performance.
-
Access to external resources, provided before the operation is executed and initialized by a
ContextInitializer.
7.1.9.1. Initializing the IdentityContext
JPAIdentityStore which EntityManager instance should be used. When executing an operation, the JPAIdentityStore must be able to access the current EntityManager to persist or retrieve data from the database. You need someway to populate the IdentityContext with such information. When you're configuring an identity store, there is a configuration option that allows you to provide a ContextInitializer implementation.
public interface ContextInitializer { void initContextForStore(IdentityContext context, IdentityStore<?> store); }
initContextForStore will be invoked for every single operation and before its execution by the identity store. It can be implemented to provide all the necessary logic to initialize and populate the IdentityContext for a specific IdentityStore.
IdentityConfigurationBuilder builder = new IdentityConfigurationBuilder(); builder .named("default") .stores() .file() .supportAllFeatures(); .addContextInitializer(new MyContextInitializer());
Note
7.1.10. IDM configuration from XML file
7.1.10.1. Unified XML configuration
<PicketLink xmlns="urn:picketlink:identity-federation:config:2.1"> <PicketLinkIDP xmlns="urn:picketlink:identity-federation:config:1.0" ServerEnvironment="tomcat" BindingType="POST" SupportsSignatures="true"> <!-- SAML2 IDP configuration is here --> </PicketLinkIDP> <Handlers xmlns="urn:picketlink:identity-federation:handler:config:2.1"> <!-- Configuration of SAML2 handlers is here --> </Handlers> <PicketLinkSTS xmlns="urn:picketlink:identity-federation:config:1.0" STSName="Test STS" TokenTimeout="7200" EncryptToken="true"> <!-- Configuration of Picketlink STS is here --> </PicketlinkSTS> <PicketLinkIDM> <!-- IDM configuration is here --> </PicketLinkIDM> </PicketLink>
7.1.10.2. XML configuration format
FileIdentityStore and your programmatic configuration looks like this:
IdentityConfigurationBuilder builder = new IdentityConfigurationBuilder(); builder .named(SIMPLE_FILE_STORE_CONFIG) .stores() .file() .preserveState(false) .supportGlobalRelationship(Relationship.class) .supportAllFeatures();
FileIdentityStore will look like this:
<PicketLink xmlns="urn:picketlink:identity-federation:config:2.1"> <PicketLinkIDM> <named value="SIMPLE_FILE_STORE_CONFIG"> <stores> <file> <preserveState value="false" /> <supportGlobalRelationship value="org.picketlink.idm.model.Relationship" /> <supportAllFeatures /> </file> </stores> </named> </PicketLinkIDM> </PicketLink>
7.1.10.3. Bootstrap IDM from XML file
// Replace with your own configuration file String configFilePath = "config/embedded-file-config.xml"; ClassLoader tcl = Thread.currentThread().getContextClassLoader(); InputStream configStream = tcl.getResourceAsStream(configFilePath); XMLConfigurationProvider xmlConfigurationProvider = new XMLConfigurationProvider(); IdentityConfigurationBuilder idmConfigBuilder = xmlConfigurationProvider.readIDMConfiguration(configStream);
idmConfigBuilder in same way, like it's done in Section 7.1.5, “Programmatic Configuration Overview” . Note that you can initialize builder from XML file and then you can do some additional programmatic configuration. For example, you may need to programmatically add JPAContextInitializer in case that you are using JPA, because you will need access to JPA EntityManager.
Chapter 8. Identity Management - Working with JPA
- 8.1. JPAIdentityStoreConfiguration
- 8.1.1. Default Database Schema
- 8.1.2. Configuring an EntityManager
- 8.1.3. Mapping
IdentityTypeTypes - 8.1.4. Mapping
PartitionTypes - 8.1.5. Mapping
RelationshipTypes - 8.1.6. Mapping Attributes for
AttributedTypeTypes - 8.1.7. Mapping a
CredentialStoragetype - 8.1.8. Configuring the Mapped Entities
- 8.1.9. Providing a
EntityManager
8.1. JPAIdentityStoreConfiguration
org.picketlink.jpa.annotations package. All identity configuration annotations listed in the tables below are from this package.
8.1.1. Default Database Schema
picketlink-idm-simple-schema module. This module contains a collection of entity beans suitable for use with JPAIdentityStore. To use this module, add the following dependency to your Maven project's pom.xml file:
<dependency> <groupId>org.picketlink</groupId> <artifactId>picketlink-idm-simple-schema</artifactId> <version>${picketlink.version}</version> </dependency>
persistence.xml file. Add the following entries within the persistence-unit section:
<class>org.picketlink.idm.jpa.model.sample.simple.PartitionTypeEntity</class> <class>org.picketlink.idm.jpa.model.sample.simple.AccountTypeEntity</class> <class>org.picketlink.idm.jpa.model.sample.simple.RelationshipTypeEntity</class> <class>org.picketlink.idm.jpa.model.sample.simple.AttributedTypeEntity</class> <class>org.picketlink.idm.jpa.model.sample.simple.AttributeTypeEntity</class> <class>org.picketlink.idm.jpa.model.sample.simple.AbstractCredentialTypeEntity</class> <class>org.picketlink.idm.jpa.model.sample.simple.X509CredentialTypeEntity</class> <class>org.picketlink.idm.jpa.model.sample.simple.GroupTypeEntity</class> <class>org.picketlink.idm.jpa.model.sample.simple.OTPCredentialTypeEntity</class> <class>org.picketlink.idm.jpa.model.sample.simple.TokenCredentialTypeEntity</class> <class>org.picketlink.idm.jpa.model.sample.simple.RoleTypeEntity</class> <class>org.picketlink.idm.jpa.model.sample.simple.PasswordCredentialTypeEntity</class> <class>org.picketlink.idm.jpa.model.sample.simple.RelationshipIdentityTypeEntity</class> <class>org.picketlink.idm.jpa.model.sample.simple.IdentityTypeEntity</class> <class>org.picketlink.idm.jpa.model.sample.simple.DigestCredentialTypeEntity</class> <class>org.picketlink.idm.jpa.model.sample.simple.PermissionTypeEntity</class>
IdentityType, Partition or Relationship type without any change to the schema or the JPA entities provided by PicketLink.
8.1.2. Configuring an EntityManager
EntityManager so that it can connect to a database. In Java EE this can be done by providing a producer method within your application as follows:
@Produces @PersistenceContext private EntityManager picketLinkEntityManager;
EntityManager should be used by PicketLink by specifying the @org.picketlink.annotations.PicketLink qualifier, for example like so:
@Produces @PicketLink @PersistenceContext private EntityManager picketLinkEntityManager(unitName = "picketlink");
EntityManager with the @PicketLink qualifier will always be preferred over any other EntityManager produced by your application.
EntityManager is how you define the entity classes in your /META-INF/persistence.xml. By default, PicketLink will read all entities from your persistence unit to automatically discover those annotated with the PicketLink IDM JPA Annotations.
<persistence-unit name="picketlink-forge-app-persistence-unit" transaction-type="JTA"> <description>PicketLink IDM Persistence Unit Using the Basic Identity Model</description> // connection properties <class>org.picketlink.idm.jpa.model.sample.simple.PartitionTypeEntity</class> <class>org.picketlink.idm.jpa.model.sample.simple.AccountTypeEntity</class> <class>org.picketlink.idm.jpa.model.sample.simple.RelationshipTypeEntity</class> <class>org.picketlink.idm.jpa.model.sample.simple.AttributedTypeEntity</class> <class>org.picketlink.idm.jpa.model.sample.simple.AttributeTypeEntity</class> <class>org.picketlink.idm.jpa.model.sample.simple.AbstractCredentialTypeEntity</class> <class>org.picketlink.idm.jpa.model.sample.simple.X509CredentialTypeEntity</class> <class>org.picketlink.idm.jpa.model.sample.simple.GroupTypeEntity</class> <class>org.picketlink.idm.jpa.model.sample.simple.OTPCredentialTypeEntity</class> <class>org.picketlink.idm.jpa.model.sample.simple.TokenCredentialTypeEntity</class> <class>org.picketlink.idm.jpa.model.sample.simple.RoleTypeEntity</class> <class>org.picketlink.idm.jpa.model.sample.simple.PasswordCredentialTypeEntity</class> <class>org.picketlink.idm.jpa.model.sample.simple.RelationshipIdentityTypeEntity</class> <class>org.picketlink.idm.jpa.model.sample.simple.IdentityTypeEntity</class> <class>org.picketlink.idm.jpa.model.sample.simple.DigestCredentialTypeEntity</class> </persistence-unit>
8.1.3. Mapping IdentityType Types
IdentityType types:
Table 8.1. IdentityType Annotations
| Annotation | Description | Property Type | Required |
|---|---|---|---|
@IdentityManaged | This annotation is a type-level annotation and must be used to specify the IdentityType types that should be mapped by the annotated entity. | - | True |
@AttributeValue | This annotation can be used to map a entity property to a IdentityType property. The name property of this annotation can be used in case the property names are different. | Any Type | False |
@Identifier | The unique identifier value for the identity. | String | True |
@IdentityClass | The type for the identity. When a IdentityType is stored the FQN of its type is stored in a property annotated with this annotation. | String | True |
@OwnerReference | The reference to a Partition mapped entity. This annotation is used to identify the property that holds a reference to the partition where a IdentityType belongs. Usually this annotation is used in conjunction with a @ManyToOne property referencing the entity used to store partitions. | The same type used to map a Partition | True |
User types:
Example 8.1. Example
@IdentityManaged (User.class) @Entity public class IdentityTypeEntity implements Serializable { @Id @Identifier private String id; @IdentityClass private String typeName; @AttributeValue private String loginName; @AttributeValue private Date createdDate; @AttributeValue private Date expirationDate; @AttributeValue private boolean enabled; @OwnerReference @ManyToOne private PartitionTypeEntity partition; // getters and setters }
8.1.4. Mapping Partition Types
IdentityType types:
Table 8.2. Partition Annotations
| Annotation | Description | Property Type | Required |
|---|---|---|---|
@IdentityManaged | This annotation is a type-level annotation and must be used to specify the Partition types that should be mapped by the annotated entity. | - | True |
@AttributeValue | This annotation can be used to map a entity property to a Partition property. The name property of this annotation can be used in case the property names are different. | Any Type | False |
@Identifier | The unique identifier value for the partition. | String | True |
@PartitionClass | The type for the partition. When a Partition is stored the FQN of its type is stored in a property annotated with this annotation. | String | True |
@ConfigurationName | This annotation must be used to indicate the field to store the configuration name for a partition. | String | True |
Realm types:
Example 8.2. Example
@IdentityManaged (Realm.class) @Entity public class PartitionTypeEntity implements Serializable { @Id @Identifier private String id; @AttributeValue private String name; @PartitionClass private String typeName; @ConfigurationName private String configurationName; // getters and setters }
8.1.5. Mapping Relationship Types
Relationship types:
Table 8.3. Relationship Annotations
| Annotation | Description | Property Type | Required |
|---|---|---|---|
@IdentityManaged | This annotation is a type-level annotation and must be used to specify the Relationship types that should be mapped by the annotated entity. | - | True |
@AttributeValue | This annotation can be used to map a entity property to a Relationship property. The name property of this annotation can be used in case the property names are different. | Any Type | False |
@Identifier | The unique identifier value for the relationship. | String | True |
@RelationshipClass | The type for the relationship. When a Relationship is stored the FQN of its type is stored in a property annotated with this annotation. | String | True |
@RelationshipDescriptor | This annotation must be used to indicate the field to store the name of the relationship role of a member. | String | True |
@RelationshipMember | The reference to a IdentityType mapped entity. This annotation is used to identify the property that holds a reference to the identity type that belongs to this relationship with a specific descriptor. Usually this annotation is used in conjunction with a @ManyToOne property referencing the entity used to store identity types. | The same type used to map a IdentityType | True |
@OwnerReference | The reference to a Relationship mapped entity. This annotation is used to identify the property that holds a reference to the root entity for relationships, usually the entity annotated with the @RelationshipClass annotation. | The same type used to map an entity with the @RelationshipClass annotation. | True |
Relationship types:
Example 8.3. Example
@IdentityManaged (Relationship.class) @Entity public class RelationshipTypeEntity implements Serializable { @Id @Identifier private String id; @RelationshipClass private String typeName; // getters and setters }
Example 8.4. Example
@Entity public class RelationshipIdentityTypeEntity implements Serializable { @Id @GeneratedValue private Long id; @RelationshipDescriptor private String descriptor; @RelationshipMember @ManyToOne private IdentityTypeEntity identityType; @OwnerReference @ManyToOne private RelationshipTypeEntity owner; // getters and setters }
8.1.6. Mapping Attributes for AttributedType Types
AttributedType types:
Table 8.4. Partition Annotations
| Annotation | Description | Property Type | Required |
|---|---|---|---|
@AttributeName | The name of the attribute. A property with this annotation is used to store the name of the attribute. | String | True |
@AttributeValue | The value of the attribute. A property with this annotation is used to store the value of the attribute. Values are Base64 encoded. | String | True |
@AttributeClass | The type for the attribute. When a attribute is stored the FQN of its type is stored in a property annotated with this annotation. | String | True |
@OwnerReference | The reference to a IdentityType, or a Partition or a Relationship mapped entity. This annotation is used to identify the property that holds a reference to the owner of the attributes. | The same type used to map IdentityType, or a Partition or a Relationship type. | True |
IdentityType types:
Example 8.5. Example
@Entity public class IdentityTypeAttributeEntity implements Serializable { @OwnerReference @ManyToOne private IdentityTypeEntity owner; @AttributeClass private String typeName; @AttributeName private String name; @AttributeValue private String value; // getters and setters }
8.1.7. Mapping a CredentialStorage type
AttributedType types:
Table 8.5. Partition Annotations
| Annotation | Description | Property Type | Required |
|---|---|---|---|
@CredentialClass | The type for the credential. When a credential is stored the FQN of its corresponding CredentialStorage type is stored in a property annotated with this annotation. | String | True |
@CredentialProperty | This annotation can be used to map a entity property to a CredentialStorage property. The name property of this annotation can be used in case the property names are different. | String | True |
@EffectiveDate | The effective date for a credential. A property annotated with this annotation will be mapped to the effectiveDate of a CredentialStorage type. | String | True |
@ExpiryDate | The expiry date for a credential. A property annotated with this annotation will be mapped to the expiryDate of a CredentialStorage type. | String | True |
@OwnerReference | The reference to a IdentityType mapped entity. This annotation is used to identify the property that holds a reference to the owner of the credential. | The same type used to map a IdentityType type. | True |
IdentityType types:
Example 8.6. Example
@ManagedCredential (EncodedPasswordStorage.class) @Entity public class PasswordCredentialTypeEntity implements Serializable { @Id @GeneratedValue private Long id; @OwnerReference @ManyToOne private IdentityTypeEntity owner; @CredentialClass private String typeName; @EffectiveDate private Date effectiveDate; @ExpiryDate private Date expiryDate; @CredentialProperty (name = "encodedHash") private String passwordEncodedHash; @CredentialProperty (name = "salt") private String passwordSalt; // getters and setters }
8.1.8. Configuring the Mapped Entities
IdentityConfigurationBuilder builder = new IdentityConfigurationBuilder(); builder .stores() .jpa() .mappedEntity(IdentityTypeEntity.class, PartitionTypeEntity.class, ...);
8.1.9. Providing a EntityManager
EntityManager is provided to the JPAIdentityStore, like when your application is using CDI and you must run the operations in the scope of the current transaction by using a injected EntityManager instance.
IdentityContext by providing a ContextInitializer implementation, as discussed in Section 7.1.9, “Identity Context Configuration” . You can always provide your own implementation for this interface to obtain the EntityManager from your application's environment.
IdentityConfigurationBuilder builder = new IdentityConfigurationBuilder(); builder .stores() .jpa() .addContextInitializer(new ContextInitializer() { @Override public void initContextForStore(IdentityContext context, IdentityStore<?> store) { if (store instanceof JPAIdentityStore) { EntityManager entityManager = // get the EntityManager context.setParameter(JPAIdentityStore.INVOCATION_CTX_ENTITY_MANAGER, entityManager); } } });
ContextInitializer.
Chapter 9. Identity Management - Working with LDAP
9.1. Overview
IdentityType, Relationship and so forth), plus some additional configuration options that give you more control how the store should integrate with your server.
-
Mapping
IdentityTypetypes to their corresponding LDAP entries and attributes. -
Mapping
Relationshiptypes to their corresponding LDAP entries and attributes. -
Mapping of parent/child relationships between the LDAP entries mapped to the same type.
-
Authentication of users based on username/password credentials.
-
Use of LDAP UUID attributes as the identifier for identity types. For each identity type in PicketLink we need to provide a single/unique identifier. The LDAP store uses the
entryUUIDandobjectGUID(depending on your server implementation, of course) to identify each type. You can also specify a different attribute name if your LDAP server does not support any of these none attributes.
-
Complex relationship mappings such as
GroupRole. -
Relationships can not be updated directly using the
IdentityManager. -
Limited support for credential types. Only username/password is available.
-
Partition Management.
-
Permission Management.
9.2. Configuration
IdentityConfigurationBuilder builder = new IdentityConfigurationBuilder(); builder .named("ldap.config") .stores() .ldap() // connection configuration .baseDN("dc=jboss,dc=org") .bindDN("uid=admin,ou=system") .bindCredential("passwd") .url("ldap://localhost:389") // mapping configuration .mapping(Agent.class) .baseDN("ou=Agent,dc=jboss,dc=org") .objectClasses("account") .attribute("loginName", "uid", true) .readOnlyAttribute("createdDate", "createTimeStamp") .mapping(User.class) .baseDN("ou=User,dc=jboss,dc=org") .objectClasses("inetOrgPerson", "organizationalPerson") .attribute("loginName", "uid", true) .attribute("firstName", "cn") .attribute("lastName", "sn") .attribute("email", EMAIL) .readOnlyAttribute("createdDate", "createTimeStamp") .mapping(Role.class) .baseDN("ou=Roles,dc=jboss,dc=org") .objectClasses("role") .attribute("name", "cn", true) .readOnlyAttribute("createdDate", "createTimeStamp") .mapping(Group.class) .hierarchySearchDepth(4) .objectClasses("group") .attribute("name", "cn", true) .readOnlyAttribute("createdDate", "createTimeStamp") .parentMembershipAttributeName("member") .mapping(Grant.class) .forMapping(Role.class) .attribute("assignee", "member") .mapping(GroupMembership.class) .forMapping(Group.class) .attribute("member", "member");
9.2.1. Connecting to the LDAP Server
.ldap() .baseDN("dc=jboss,dc=org") .bindDN("uid=admin,ou=system") .bindCredential("passwd") .url("ldap://localhost:389")
Properties that will be used when creating the LdapContext.
.ldap() .connectionProperties(myProperties)
Table 9.1. LDAP Connection Configuration Options
| Option | Description |
|---|---|
baseDN | Sets the base DN for a specific mapped type or all types. |
bindDN | Sets the the DN used to bind against the ldap server. If you want to perform write operations the DN must have permissions on the agent,user,role and group contexts. |
bindCredential | Sets the password for the bindDN. |
url | Sets the url that should be used to connect to the server. Eg.: ldap://<<server>>:389 . |
connectionProperties | Set a Properties instance from where additional connection properties will be retrieved from when creating the LdapContext. |
9.2.1.1. Connection Pooling
Properties properties = new Properties(); // set this property to enable connection pooling properties.put("com.sun.jndi.ldap.connect.pool", "true"); // provide other pooling properties to configure the pool System.setProperty("com.sun.jndi.ldap.connect.pool.authentication", "simple"); System.setProperty("com.sun.jndi.ldap.connect.pool.maxsize", "10"); System.setProperty("com.sun.jndi.ldap.connect.pool.prefsize", "5"); System.setProperty("com.sun.jndi.ldap.connect.pool.timeout", "300000"); System.setProperty("com.sun.jndi.ldap.connect.pool.debug", "all"); IdentityConfigurationBuilder builder = new IdentityConfigurationBuilder(); builder .named(SIMPLE_LDAP_STORE_CONFIG) .stores() .ldap() .connectionProperties(properties) // set the connection properties to the LDAP configuration .baseDN(embeddedServer.getBaseDn()) .bindDN(embeddedServer.getBindDn()) .bindCredential(embeddedServer.getBindCredential()) .url(embeddedServer.getConnectionUrl())
Note
9.2.2. Mapping Identity Types
IdentityConfigurationBuilder builder = new IdentityConfigurationBuilder(); builder .named("ldap.config") .stores() .ldap() .mapping(User.class) .baseDN("ou=User,dc=jboss,dc=org") .objectClasses("inetOrgPerson", "organizationalPerson") .attribute("loginName", "uid", true) .attribute("firstName", "cn") .attribute("lastName", "sn") .attribute("email", "mail") .readOnlyAttribute("createdDate", "createTimeStamp")
User type) plus all information required to store the type and populate its properties from their corresponding LDAP attributes.
User entries are located at the baseDN "ou=User,dc=jboss,dc=org". The baseDN is a very important information, specially if you want to store information from a type instance. Beside that, the baseDN can have a huge impact on performance when querying your LDAP entries for a specific type, as the search will be more restrictive and consider only those entries located at the baseDN and sub entries.
.mapping(User.class) .attribute("loginName", "uid", true)
9.2.3. Mapping Relationship Types
Grant and GroupMembership
.ldap() .mapping(Grant.class) .forMapping(Role.class) .attribute("assignee", "member"))
Grant relationship, the LDAP attribute used to map the association between a role and other types is the member attribute. This attribute belongs to role entries on the LDAP server, what makes the Role type the owner of this relationship. For last, we need to tell which property on the Grant type is related with the associated entries. In the case of the Grant relationship, we're configuring the assignee property to store the associated type instances.
9.2.4. Mapping a Type Hierarchies
.ldap() .mapping(Group.class) .parentMembershipAttributeName("member")
.ldap() .mapping(Group.class) .hierarchySearchDepth(1)
9.2.5. Mapping Groups to different contexts
mapping(Group.class) .baseDN(embeddedServer.getGroupDnSuffix()) .objectClasses(GROUP_OF_NAMES) .attribute("name", CN, true) .readOnlyAttribute("createdDate", CREATE_TIMESTAMP) .parentMembershipAttributeName("member") .parentMapping("QA Group", "ou=QA,ou=Groups,dc=jboss,dc=org")
IdentityManager identityManager = getIdentityManager(); Group managers = new SimpleGroup("managers"); identityManager.add(managers); // group's path is /manager Group qaGroup = identityManager.getGroup("QA Group"); Group managersQA = new SimpleGroup("managers", qaGroup); // the QA Group is mapped to a different DN. Group qaManagerGroup = identityManager.add(managersQA); // group's path is /QA Group/managers
Chapter 10. Identity Management - Permissions API and Permission Management
10.1. Overview
PermissionManager. It also explains how the PermissionResolver SPI can be used to in conjunction with a custom PermissionVoter implementation, allowing you to plugin your own custom authorization logic.
Permission interface is used in a number of places throughout the Permissions API, and defines the following methods:
public interface Permission { Object getResource(); Class<?> getResourceClass(); Serializable getResourceIdentifier(); IdentityType getAssignee(); String getOperation(); }
-
The assignee, which is the identity to which the permission is assigned.
-
The operation, which is a string value that represents the exact action that the assigned identity is allowed to perform.
-
Either a direct reference to the resource (if known), or a combination of a resource class and resource identifier. This value represents the resource to which the permission applies.
-
John is allowed to read FileA.txt
-
John is allowed to load/read entity Confidential with identifier 123.
-
John is allowed to view the /myapp/page page.
-
John is allowed to access Mary's profile
-
John is allowed to view button 'Delete' on page /myapp/page.
string or type-based. In the latter case, if you are using JPA entities, you can also manage permissions for a specific entity given its identifier.
IdentityType you want. For example, let's say that we have a role wich gives read access to a file. If you grant this role to users they are going to inherit all privileges/permissions from the role they were granted. You can even grant this role to a entire group, where all members of the group are also going to inherit the privileges.
10.2. Checking permissions for the current user
Identity bean, which provides the following two methods for checking permissions for the currently authenticated user:
boolean hasPermission(Object resource, String operation); boolean hasPermission(Class<?> resourceClass, Serializable identifier, String operation);
@Inject Identity identity; public void deleteAccount(Account account) { // Check the current user has permission to delete the account if (identity.hasPermission(account, "DELETE")) { // Logic to delete Account object goes here } else { throw new SecurityException("Insufficient privileges!"); } }
@Inject Identity identity; public void deleteCustomer(Long customerId) { // Check the current user has permission to delete the customer if (identity.hasPermission(Customer.class, customerId, "DELETE")) { // Logic to delete Customer object goes here } else { throw new SecurityException("Insufficient privileges!"); } }
10.3. ACL Permissions
PersistentPermissionResolver, which reads the ACL entries for each resource via the PermissionStore, which is typically a wrapper around some form of persistent storage such as database table.
10.3.1. The PermissionManager Bean
PermissionManager. Actually, this bean is used by the Identity when you invoke its hasPermission methods. An instance of this bean can be obtained by injecting the PermissionManager as follows:
@Inject PermissionManager permissionManager;
Note
PermissionManager bean is injected based on the current partition defined by the application. If no partition was specified, the bean is injected based on the default partition.
PermissionManager from a PartitionManager via the createPermissionManager() method:
@Inject PartitionManager partitionManager; public void managePermissions() { PermissionManager permissionManager = partitionManager.createPermissionManager(); }
PermissionManager is being created based on the default partition. But you may also specify a partition when creating it:
@Inject PartitionManager partitionManager; public void managePermissions() { Realm partition = partitionManager.getPartition(Realm.class, "MyPartition"); PermissionManager permissionManager = partitionManager.createPermissionManager(partition); }
PermissionManager, you can use it to grant permissions:
public void allowRead(User user, Customer customer) { permissionManager.grantPermission(user, customer, "READ"); }
grantPermission() method accepts three parameters:
void grantPermission(IdentityType assignee, Object resource, String operation);
Object so long as there exists a unique, serializable value that can be determined or in some way calculated from the resource object, which uniquely identifies that resource from other resources of the same type. This unique value is called the identifier, an example of which might be the primary key value of an entity bean. The PermissionHandler SPI (see section below) is responsible for generating identifier values for resource objects.
revokePermission() method is used to remove permissions. Like grantPermission(), it also accepts three parameters:
void revokePermission(IdentityType assignee, Object resource, String operation);
clearPermissions() method. This is useful for example if you wish to delete the resource and don't wish to leave orphaned permissions:
void clearPermissions(Object resource);
List<Permission> listPermissions(Object resource); List<Permission> listPermissions(Class<?> resourceClass, Serializable identifier); List<Permission> listPermissions(Object resource, String operation); List<Permission> listPermissions(Class<?> resourceClass, Serializable identifier, String operation);
// List all permissions for a known Product Product p = lookupProduct("grapes"); List<Permission> permissions = permissionManager.listPermissions(p); // List all permissions for a Product where we know the resource class // and the identifier List<Permission> permissions = permissionManager.listPermissions( Product.class, "bananas"); // List all "DELETE" permissions that have been granted for a Product Product p = lookupProduct("apples"); List<Permissions> permissions = permissionManager.listPermissions(p, "DELETE"); // List all "UPDATE" permissions for a Product where we know the // resource class and the identifier List<Permissions> permissions = permissionManager.listPermissions( Product.class, "oranges", "UPDATE");
10.3.2. Configuring resources for ACL usage
PermissionHandler. This interface is primarily responsible for the generation of resource identifier values, plus a couple of other utility methods (please refer to the API documentation for more details):
public interface PermissionHandler { boolean canHandle(Class<?> resourceClass); Serializable getIdentifier(Object resource); Class<?> unwrapResourceClass(Object resource); Set<String> listClassOperations(Class<?> resourceClass); Set<String> listInstanceOperations(Class<?> resourceClass); }
PermissionHandler - the first way is by providing a @PermissionsHandledBy annotation on the resource class itself:
import org.picketlink.idm.permission.annotations.PermissionsHandledBy; @PermissionsHandledBy(CustomPermissionHandler.class) public class MyResourceClass { }
PermissionHandler instance for which the canHandle() method returns true for the resource class:
public boolean canHandle(Class<?> resourceClass) { return MyResourceClass.class.equals(resourceClass); }
PermissionHandler is very easy - simply include it in your application deployment as an @ApplicationScoped bean, and it will be registered automatically. Here's a complete example of a PermissionHandler that allows permissions to be assigned to arbitrary string values (this handler is actually provided by PicketLink):
@ApplicationScoped public class StringPermissionHandler implements PermissionHandler { @Override public boolean canHandle(Class<?> resourceClass) { return String.class.equals(resourceClass); } @Override public Serializable getIdentifier(Object resource) { checkResourceValid(resource); return (String) resource; } @Override public Class<?> unwrapResourceClass(Object resource) { checkResourceValid(resource); return String.class; } private void checkResourceValid(Object resource) { if (!(resource instanceof String)) { throw new IllegalArgumentException("Resource [" + resource + "] must be instance of String"); } } @Override public Set<String> listAvailableOperations(Class<?> resourceClass) { return Collections.emptySet(); } }
10.3.3. Restricting resource operations
Country bean is likely to only require the bare minimum in terms of data management and so you might like to restrict the available operations for it to the typical CREATE, READ, UPDATE, DELETE operations. To do this we use the @AllowedOperations annotation - this annotation allows us to provide a child array of @AllowedOperation values that specify exactly which operation values that permissions can be assigned for:
import org.picketlink.idm.permission.annotations.AllowedOperation; import org.picketlink.idm.permission.annotations.AllowedOperations; @Entity @AllowedOperations({ @AllowedOperation(value = "CREATE", mask = 1, classOperation = true), @AllowedOperation(value = "READ", mask = 2), @AllowedOperation(value = "UPDATE", mask = 4), @AllowedOperation(value = "DELETE", mask = 8) }) public class Country implements Serializable {
mask value can be used to specify a bitmask value to allow for more efficient storage of permission values. If the mask values are set, the operation values for that object's permissions will be stored as a numerical value with the corresponding bit values turned on. For example, if a single user was assigned permission for both the READ and UPDATE operations for one of our Country beans, then this operation value would be stored as 6 (READ (2) + UPDATE (4)).
classOperation can be set to true if the permission applies to the class itself, and not an instance of a class. For example, you might wish to check that the current user has permission to actually create a new Country bean. In this case, the permission check would look something like this:
@Inject Identity identity; public void createCountry() { if (!identity.hasPermission(Country.class, "CREATE")) { throw new SecurityException( "Current user has insufficient privileges for this operation."); } // snip }
ClassPermissionHandler permission handler.
Chapter 11. Authorization
- 11.1. Overview
- 11.2. Configuration
- 11.3. Role-Based Access Control
- 11.4. Group-Based Access Control
- 11.5. Partition-Based Access Control
- 11.6. Security Level-Based Access Control
- 11.7. Restricting Access Based on the Authenticated User
- 11.8. Checking for Permissions
- 11.9. Using EL-Based Expresions
- 11.10. Providing Your Own Security Annotations
11.1. Overview
11.2. Configuration
WEB-INF/beans.xml or META-INF/beans.xml:
<interceptors> <class>org.apache.deltaspike.security.impl.extension.SecurityInterceptor</class> </interceptors>
11.3. Role-Based Access Control
@RolesAllowed("Administrator") public void shutdown() { // only users granted with this role can access this method }
@RolesAllowed annotation can also be used on types. In this case, all bean methods are protected:
@RolesAllowed("Administrator") public class MyBean() { }
@RolesAllowed({"Sales", "Financial"})
11.4. Group-Based Access Control
@GroupsAllowed("Managers") public void approveTimesheet() { // only users form group "Project Manager" are allowed to access this method }
@GroupsAllowed annotation can also be used on types. In this case, all bean methods are protected:
@GroupsAllowed("Managers") public class Timesheet() { }
@GroupsAllowed({"Marketing", "Human Resources"})
11.5. Partition-Based Access Control
@PartitionsAllowed annotation allows you to restrict access for beans based on the partition an user belongs. You only need to specify the partition name.
@PartitionsAllowed("Acme Realm") public void someMethod() { // only users from "Acme Realm" partition are allowed to access this method }
@PartitionsAllowed annotation can also be used on types. In this case, all bean methods are protected:
@PartitionsAllowed("Acme Realm") public class ACMEServices() { }
@PartitionsAllowed({"ACME Realm", "Foo Realm"})
org.picketlink.idm.model.basic.Realm type to represent them. Considering that PicketLink allows you to provide your own types, the @PartitionsAllowed can also be used to restrict which partition types are allowed to perform an operation:
@PartitionsAllowed(type = {Acme.class, Foo.class})
Acme and Foo are partition types, implementing the org.picketlink.idm.model.Partition interface.
11.6. Security Level-Based Access Control
Note
11.7. Restricting Access Based on the Authenticated User
@LoggedIn annotation allows you to protect a bean and allow access only from previously authenticated users.
@LoggedIn public void logout() { // only authenticated users can logout }
@LoggedIn annotation can also be used on types. In this case, all bean methods are protected:
@LoggedIn public class MyRESTAPI() { }
org.picketlink.idm.model.basic.User type to represent them. Considering that PicketLink allows you to provide your own types, the @LoggedIn can also be used to restrict which account types are allowed to perform an operation:
@LoggedIn(requiresAccount = {Employee.class, Customer.class})
Employee and Customer are account types, implementing the org.picketlink.idm.model.Account interface.
11.8. Checking for Permissions
@RequiresPermission annotation. You can easily restrict access to your beans and methods based on the permissions granted for an user given a specific resource and operation.
@RequiresPermission(resource = "user_profile", operation = "read") public javax.ws.rs.core.Response getUserProfile() { }
11.9. Using EL-Based Expresions
@Restrict("#{identity.loggedIn}") public void protectedFromUnauthenticatedUsers() { } @Restrict("#{isLoggedIn()}") public void protectedFromUnauthenticatedUsersFunction() { } @Restrict("#{hasPermission('user_profile','read')}") public void protectedWithResourcePermission() { } @Restrict("#{hasPermission('profile','write')}") public void protectedWithResourceWithoutPermission() { } @Restrict("#{hasRole('Tester')}") public void protectedWithRequiredRole() { } @Restrict("#{hasRole('Invalid Role')}") public void protectedWithRequiredInvalidRole() { } @Restrict("#{isMember('QA')}") public void protectedWithRequiredGroup() { } @Restrict("#{isMember('Invalid Group')}") public void protectedWithRequiredInvalidGroup() { } @Restrict("#{isMember('QA') and hasRole('Tester')}") public void protectedWithRequiredMemberAndRole() { } @Restrict("#{isMember('QA') and hasRole('Invalid Role')}") public void protectedWithRequiredMemberAndInvalidRole() { } @Restrict("#{hasPartition('default')}") public void protectedWithRequiredPartitionName() { } @Restrict("#{hasPartition('invalid partition')}") public void protectedWithInvalidPartitionName() { } @Restrict("#{hasAttribute('someAttribute')}") public void protectedWithAttribute() { } @Restrict("#{hasAttribute('invalidAttribute')}") public void protectedWithInvalidAttribute() { } @Restrict("#{identity.account != null}") public void protectedWithValidAccountExpression() { } @Restrict("#{identity.account.partition.name == 'default'}") public void protectedWithValidPartitionExpression() { } @Restrict("#{identity.account.partition.name != 'default'}") public void protectedWithInvalidPartitionExpression() { } @Restrict("#{identity.account.attributes['someAttribute'] != null}") public void protectedWithValidAccountAttributeExpression() { } @Restrict("#{identity.account.attributes['someAttribute'] == 'someValue'}") public void protectedWithValidAccountAttributeValueExpression() { } @Restrict("#{identity.account.attributes['someAttribute'] == 'invalidValue'}") public void protectedWithInvalidAccountAttributeValueExpression() { }
-
#{identity}- The currentIdentitybean instance representing the authenticated user. From there you can invoke all public methods defined by this interface.#{hasAttributes('someAttribute')}- A handy function that checks if the authenticated user is set with a specific ad-hoc attribute.
11.10. Providing Your Own Security Annotations
Chapter 12. Http Security
12.1. Overview
-
CORS, Cross Origin Resource Sharing (In Development)
-
CSRF, Cross-Site Request Forgery (In Development)
public class HttpSecurityConfiguration { public void configureHttpSecurity(@Observes SecurityConfigurationEvent event) { SecurityConfigurationBuilder builder = event.getBuilder(); builder .http() .allPaths() .authenticateWith() .form() .loginPage("/login.html") .errorPage("/loginFailed.html"); } }
12.2. Configuration
-
/protected/*, defines all resources starting with /protected. eg.: /protected/admin
-
/protected, defines a single resource /protected
-
/*.jsf, defines all resources with a suffix .jsf
-
/home.jsf, defines a single resource /home.jsf
public class HttpSecurityConfiguration { public void configureHttpSecurity(@Observes SecurityConfigurationEvent event) { SecurityConfigurationBuilder builder = event.getBuilder(); builder .http() .forPath("/*.jsf") .authenticateWith() .form() .loginPage("/login.jsf") .errorPage("/loginFailed.jsf") .forPath("/admin/*") .authorizeWith() .role("Administrator"); } }
org.picketlink.config.http.HttpSecurityBuilder, retrieved when you invoke the http() method of org.picketlink.config.SecurityConfigurationBuilder. And also, that you must observe for the SecurityConfigurationEvent in order to obtain a reference to the HttpSecurityBuilder and start providing your security policies.
12.2.1. Protecting Paths
HttpSecurityBuilder provides you a few methods to start protecting the paths of your application.
httpBuilder.forPath("/*.jsf")
httpBuilder .forPath("/user/profile") .authenticateWith() .form() .forPath("/user/profile") .withHeaders() .header("X-Requested-With", "XMLHttpRequest") .authenticateWith() basic()
should not be protected, for that you just need to:
httpBuilder .forPath("/unprotected/resource") .unprotected()
HttpSecurityBuilder also provides some additional methods to configure your paths, some of them we'll cover in more details on the next sections.
12.2.2. Grouping Paths
HttpSecurityBuilder provides the following method to define a group:
httpBuilder .forGroup("REST Services") .authenticateWith() .basic() .forGroup("Web Pages") .authenticateWith() .form() .forPath("/rest/*", "REST Services") .forPath("/*.jsf", "Web Pages")
REST Services and Web Pages. The first is enforcing BASIC authentication and the latter FORM authentication. For that we used the forGroup method provided by the HttpSecurityBuilder.
httpBuilder .forPath("/rest/*", "REST Services") .forPath("/*.jsf", "Web Pages")
forPath(String, String) method from the HttpSecurityBuilder where the first argument is the path and the second the name of the group.
httpBuilder .forPath("/rest/admin/*", "REST Services") .authorizeWith() .role("Administrator")
12.2.3. Path Rewriting
httpBuilder .forPath("/user/profile/{identity.account.id}")
/user/profile/1
httpBuilder .forPath("/company/{identity.account.patition.name}/home.jsf")
/company/acme/home.jsf
12.2.4. Path Redirection
httpBuilder .forPath("/logout") .logout() .redirectTo("/goodbye.html");
httpBuilder .forPath("/admin/*") .authorizeWith() .role("Administrator") .redirectTo("/accessDenied.html").whenForbidden();
httpBuilder .forPath("/admin/*") .authorizeWith() .role("Administrator") .redirectTo("/error.html").whenError();
12.2.5. Permissive vs Restrictive
permissive behavior. It helps to get a more simple configuration and avoids you to specify every single path you want to protect or not.
restrictive.
restrictive behavior you just need to provide the following configuration:
httpBuilder .restrictive()
12.3. Authentication
-
HTTP BASIC -
HTTP DIGEST -
HTTP X.509 or CLIENT-CERT -
FORM -
Token-Based -
Write Your Own Method
authenticateWith() method provided by the HttpSecurityBuilder.
httpBuilder .forPath("/rest/*") .authenticateWith() .basic()
12.3.1. Form Authentication
httpBuilder .forPath("/faces/*.xhtml") .authenticateWith() .form() .loginPage("/faces/login.xhtml") .errorPage("/faces/loginFailed.xhtml");
<form method="POST" action="j_security_check"> <input type="text" name="j_username"/> <input type="password" name="j_password"/> <input type="submit" name="login" value="Login"/> </form>
httpBuilder .forPath("/faces/*.xhtml") .authenticateWith() .form() .loginPage("/faces/login.xhtml") .errorPage("/faces/loginFailed.xhtml") .restoreOriginalRequest();
restoreOriginalRequest() to enable this behavior.
<h:form method="POST" prependId="false"> <h:inputText id="j_username" /> <h:inputSecret id="j_password"/> <h:commandButton id="login" value="Login" action="#{identity.login()}"/> </h:form>
Note
j_username and j_password as request parameters. For that, change the id attribute of both fields accordingly and make sure your form is set with prependId="false"
Identity bean login() method:
<h:commandButton id="login" value="Login" action="#{identity.login()}"/>
httpBuilder .forPath("/faces/*.xhtml") .authenticateWith() .form() .authenticationUri("/faces/login.xhtml") .loginPage("/faces/login.xhtml") .errorPage("/faces/loginFailed.xhtml") .restoreOriginalRequest();
12.3.2. Basic Authentication
httpBuilder .forPath("/faces/*.xhtml") .authenticateWith() .basic() .realmName("My Application Realm");
realmName, PicketLink will use a default value, which is "PicketLink Default Realm".
12.3.3. Digest Authentication
httpBuilder .forPath("/faces/*.xhtml") .authenticateWith() .digest() .realmName("My Application Realm");
realmName, PicketLink will use a default value, which is "PicketLink Default Realm".
12.3.4. X.509 Authentication
httpBuilder .forPath("/faces/*.xhtml") .authenticateWith() .x509() .subjectRegex("CN=(.*?), ");
subjectRegex to provide a regular expression that will be used to extract the subject's name from the certificate. If not provided, PicketLink will try to extract the name from the subject DN considering only the CN value.
12.3.5. Token Authentication
Token Provider, responsible for issuing tokens.
Note
Identity Bean as stateless. Take a look at Section 2.2.1, “Stateful or Stateless Authentication” for more details.
Token Provider to issue a new token and write it to the response using a JSON format.
httpBuilder .forPath("/authenticate") .authenticateWith() .token();
public class MyToken extends AbstractToken { private String token; public MyToken(String token) { super(token); } @Override public String getSubject() { return this.token; } }
@Stateless public class MyTokenProvider implements Token.Provider<MyToken> { @Inject private PartitionManager partitionManager; @Override public MyToken issue(Account account) { MyToken token = new MyToken(account.getId()); IdentityManager identityManager = getIdentityManager(account); identityManager.updateCredential(account, token); return token; } @Override public MyToken renew(Account account, MyToken renewToken) { IdentityManager identityManager = getIdentityManager(account); TokenCredentialStorage tokenStorage = getCurrentToken(account, identityManager); if (tokenStorage.getToken().equals(renewToken.getToken())) { invalidate(account); return issue(account); } return null; } @Override public void invalidate(Account account) { IdentityManager identityManager = getIdentityManager(account); identityManager.removeCredential(account, TokenCredentialStorage.class); } @Override public Class<MyToken> getTokenType() { return MyToken.class; } private TokenCredentialStorage getCurrentToken(Account account, IdentityManager identityManager) { return identityManager.retrieveCurrentCredential(account, TokenCredentialStorage.class); } private IdentityManager getIdentityManager(Account account) { return this.partitionManager.createIdentityManager(account.getPartition()); } }
Token.Provider. Token providers are responsible for issuing, invalidating and renewing tokens. In this case, we're issuing a token where its value is the id of a specific Account. In real world use cases, you'll prefer a better format such as JWT.
Note
@Stateless annotation. The reason for that is that if you are using the JPA Identity Store you must initiate or join a transaction before persisting data to the database. When using an EJB all transaction management is done by the container. Considering this is just an exmaple about how to use a specific functionality, we are trying to keep the code simple without managing transaction manually.
POST /picketlink-forge-app/authenticate HTTP/1.1 Host: localhost:8080 Content-Type: application/json X-Requested-With: XMLHttpRequest Cache-Control: no-cache
401 HTTP Status Code, teeling that authentication is required. The response also contains a specific header to indicate which type of authentication is required.
Content-Length →1062 Content-Type →text/html;charset=utf-8 Date →Thu, 21 Aug 2014 12:58:51 GMT Server →Apache-Coyote/1.1 WWW-Authenticate →Token
Token by setting the WWW-Authenticate header.
POST /picketlink-forge-app/authenticate HTTP/1.1 Host: localhost:8080 Authorization: Basic cGlja2V0bGluazpwaWNrZXRsaW5r Cache-Control: no-cache
{"authctoken":"4761e6f7-847d-4a7a-afc1-1a899c3d5d61"}
X-Requested-With header in the request. Most AJAX libraries such as JQuery and AngularJS do use this header when sending AJAX requests. In this case, PicketLink will not respond with a 401, but with a 403 status code.
12.3.6. Write Your Own Authentication Scheme
httpBuilder .forPath("/authenticate") .authenticateWith() .scheme(MyCustomAuthenticationScheme.class);
org.picketlink.http.authentication.HttpAuthenticationScheme interface.
public class MyCustomAuthenticationScheme implements HttpAuthenticationScheme { @Override public void initialize(AuthenticationSchemeConfiguration config) { } @Override public void extractCredential(HttpServletRequest request, DefaultLoginCredentials creds) { // use this method to extract credentials from request and set them into DefaultLoginCredentials } @Override public void challengeClient(HttpServletRequest request, HttpServletResponse response) { // use this method to challenge client for credentials } @Override public void onPostAuthentication(HttpServletRequest request, HttpServletResponse response) { // use this method to perform any logic after an authentication attempt } }
12.4. Authorization
-
RBAC, Role-Based Access Control -
GBAC, Group-Based Access Control -
Realm-Based Access Control -
Expression Language -
Write Your Authorization Method
authorizeWith() method provided by the HttpSecurityBuilder.
httpBuilder .forPath("/admin/*") .authorizeWith() .role("Administrator")
12.4.1. Role-Based Authorization
httpBuilder .forPath("/admin/*") .authorizeWith() .role("Administrator");
role method expects one or more role names.
12.4.2. Group-Based Authorization
httpBuilder .forPath("/admin/*") .authorizeWith() .group("Administrators");
group method expects one or more group names. When checking if an user is member of a Group, PicketLink will consider the parent-child relationship of each group defined in the configuration.
12.4.3. Realm-Based Authorization
Partition.
httpBuilder .forPath("/acme/*") .authorizeWith() .realm("Acme");
realm method expects one or more realm names. In this case, only users from a Partition with name Acme are allowed to access a given path.
Partition type instead. For example:
httpBuilder .forPath("/acme/*") .authorizeWith() .realm(Acme.class.getName());
Acme is a Partition type.
12.4.4. Expression-Based Authorization
httpBuilder .forPath("/acme/*") .authorizeWith() .expression("#{identity.account.partition.name == 'Acme'}");
expression method expects one or more expressions. In this case, we're using the Identity Bean to retrieve the authenticated account and check if it belongs to the Acme partition. Pretty much the same rule we provided when using the Realm-Based Authorization method.
httpBuilder .forPath("/company/{identity.account.partition.name}/{identity.account.id}/*") .authorizeWith() .expression("#{identity.account.partition.name}", "#{identity.account.id}");
/company/default_partition/1/*
12.4.5. Write Your Own Path Authorizer
httpBuilder .forPath("/custom/protected/*") .authorizeWith() .authorizer(MyCustomPathAuthorizer.class);
org.picketlink.http.authorization.PathAuthorizer interface.
public static class CustomPathAuthorizer implements PathAuthorizer { @Override public boolean authorize(PathConfiguration pathConfiguration, HttpServletRequest request, HttpServletResponse response) { // perform authorization } }
org.picketlink.http.authorization.PathAuthorizer types are just regular CDI beans.
12.5. Logout
httpBuilder .forPath("/logout") .logout()
logout method will mark the given path as a point of logout. In this case, when a request arrives to this path PicketLink will logout the user.
httpBuilder .forPath("/logout") .logout() .redirectTo("/goodbye.html");
12.6. Servlet API Integration
HttpServletRequest.
HttpServletRequest request = // get request request.login("john", "password");
Principal principal = request.getUserPrincipal();
request.logout();
request.isUserInRole("Administrator);
12.7. CORS Support
SecurityConfigurationBuilder builder = event.getBuilder(); builder.http().forPath("/corsAuthorization") .cors() .allowOrigins("http://www.example.org:9000", "http://www.example.com:8008") .allowMethods("GET", "PUT", "POST", "DELETE", "OPTIONS") .allowHeaders("Origin", "X-Requested-With", "Content-Type", "Accept", "Authorization") .exposedHeaders("Origin", "Accept") .allowCredentials(true) .maxAge(3600);
SecurityConfigurationBuilder builder = event.getBuilder(); builder.http() .forPath("/cors/protected") .cors() .allowAll()
Chapter 13. PicketLink Subsystem
13.1. Overview
-
A rich domain model supporting the configuration of PicketLink Federation (specially SAML-based applications) deployments and Identity Management services.
-
Minimal configuration for deployments. Part of the configuration is done automatically with some hooks for customizations.
-
Minimal dependencies for deployments. All PicketLink dependencies are automatically set from modules.
-
Configuration management using JBoss Application Server Management API. It can be managed in different ways: HTTP/JSON, CLI, Native DMR, etc.
-
Identity Management Services are exposed in JNDI and are fully integrated with CDI.
-
Applications don't need to change when moving between different environments such as development, testing, staging or production. All the configuration is defined outside the application.
-
Users should learn a single and consolidated schema.
Important
13.2. Installation and Configuration
standalone.xml or domain.xml, inside your JBoss AS installation, with the following extension and subsystem:
<extensions> ... <!-- Add the PicketLink extension --> <extension module="org.wildfly.extension.picketlink"/> </extensions> <profile> <!-- Add the PicketLink Identity Management Subsystem --> <subsystem xmlns="urn:jboss:domain:picketlink-identity-management:1.0"/> <!-- Add the PicketLink Federation Subsystem --> <subsystem xmlns="urn:jboss:domain:picketlink-federation:1.1/> </profile>
13.3. Configuring the PicketLink Dependencies for your Deployment
13.4. Domain Model
standalone.xml or domain.xml inside your JBoss AS installation. The domain model is very easy to understand if you are already familiar with the PicketLink configuration.
<!-- An example of the PicketLink Federation configuration --> <subsystem xmlns="urn:jboss:domain:picketlink-federation:1.1"> <federation name="federation-with-signatures"> <saml token-timeout="4000" clock-skew="0"/> <key-store url="/jbid_test_keystore.jks" passwd="changeit" sign-key-alias="localhost" sign-key-passwd="changeit"> <keys> <key name="servercert" host="${jboss.bind.address:localhost},127.0.0.1"/> </keys> </key-store> <identity-provider url="http://localhost:8080/idp-sig/" name="idp-sig.war" security-domain="idp" support-signatures="true"> <trust> <trust-domain name="localhost" cert-alias="localhost"/> <trust-domain name="127.0.0.1" cert-alias="localhost"/> </trust> </identity-provider> <service-providers> <service-provider name="sales-post-sig.war" security-domain="sp" url="http://localhost:8080/sales-post-sig/"/> <service-provider name="sales-redirect-sig.war" security-domain="sp" url="http://localhost:8080/sales-redirect-sig/" support-signatures="true" /> </service-providers> </federation> </subsystem> <!-- A configuration using a JPA-based identity store. The store is configured using a existing datasource. --> <subsystem xmlns="urn:jboss:domain:picketlink-identity-management:1.0"> <partition-manager jndi-name="picketlink/JPADSBasedPartitionManager" name="jpa.ds.based.partition.manager"> <identity-configuration name="jpa.config"> <jpa-store data-source="jboss/datasources/ExampleDS"> <supported-types supports-all="true"/> </jpa-store> </identity-configuration> </partition-manager> </subsystem>
$JBOSS_HOME/docs/schema directory.
13.5. Identity Management
standalone.xml or domain.xml. Basically, what the subsystem does is parse the configuration, automatically build a PartitionManager and expose it via JNDI for further access.
-
Externalize and centralize the IDM configuration for deployments.
-
Define multiple configuration for identity management services.
-
Expose the
PartitionManagervia JNDI for further access. -
If using CDI, inject the
PartitionManagerinstances using theResourceannotation. -
If using CDI, use the PicketLink IDM alone without requiring the base module dependencies.
<subsystem xmlns="urn:jboss:domain:picketlink-identity-management:1.0"> <!-- A complete configuration using a file-based identity store. --> <partition-manager jndi-name="picketlink/FileCompletePartitionManager" name="file.complete.partition.manager"> <identity-configuration name="file.config"> <file-store relative-to="jboss.server.data.dir" working-dir="pl-idm-complete" always-create-files="true" async-write="true" async-write-thread-pool="10"> <supported-types supports-all="true"/> </file-store> </identity-configuration> </partition-manager> <!-- A configuration using a JPA-based identity store. The store is configured using a existing datasource. --> <partition-manager jndi-name="picketlink/JPADSBasedPartitionManager" name="jpa.ds.based.partition.manager"> <identity-configuration name="jpa.config"> <jpa-store data-source="jboss/datasources/ExampleDS"> <supported-types supports-all="true"/> </jpa-store> </identity-configuration> </partition-manager> </subsystem>
Note
JBOSS_HOME/docs/examples/configs/standalone-picketlink.xml.
-
jndi-url, that defines where the
PartitionManagershould be published in the JNDI tree for further access. -
name, the name of the configuration to allow other subsystems to inject the Identity Management Services using the MSC injection infrastructure.
13.5.1. <code xmlns="http://docbook.org/ns/docbook">JPAIdentityStore</code>
JPAIdentityStore configuration provides some additional configuration to let you configure how the EntityManagerFactory is built or used by the JPAIdentityStore.
13.5.1.1. Using a DataSource JNDI Url
EntityManagerFactory using a default configuration. This is the fastest way to get a JPA Identity Store up and running, specially if you just want to use the Section 5.1, “Basic Identity Model” provided by PicketLink.
<subsystem xmlns="urn:jboss:domain:picketlink-identity-management:1.0"> <!-- A configuration using a JPA-based identity store. The store is configured using a existing datasource. --> <partition-manager jndi-name="picketlink/JPADSBasedPartitionManager" name="jpa.ds.based.partition.manager"> <identity-configuration name="jpa.config"> <jpa-store data-source="jboss/datasources/ExampleDS"> <supported-types supports-all="true"/> </jpa-store> </identity-configuration> </partition-manager> </subsystem>
13.5.1.2. Using a EntityManagerFactory JNDI Url
EntityManagerFactory is located.
<subsystem xmlns="urn:jboss:domain:picketlink-identity-management:1.0"> <!-- A configuration using a JPA-based identity store. The store is configured using a existing JPA EntityManagerFactory, obtained via JNDI. --> <partition-manager jndi-name="picketlink/JPAEMFBasedPartitionManager" name="jpa.emf.based.partition.manager"> <identity-configuration name="jpa.config"> <jpa-store entity-manager-factory="jboss/MyEntityManagerFactory"> <supported-types> <supported-type code="Partition"/> <supported-type code="IdentityType"/> <supported-type code="Relationship"/> </supported-types> </jpa-store> </identity-configuration> </partition-manager> </subsystem>
13.5.1.3. Using a JBoss Module
-
entity-module, the module name where the JPA Persistence Unit and all mapped entities are located.
-
entity-module-unit-name, the name of the JPA Persistence Unit name. If you don't provide a name the subsystem will use identity.
<subsystem xmlns="urn:jboss:domain:picketlink-identity-management:1.0"> <!-- A configuration using a JPA-based identity store. The store is configured using a existing JPA Persistence Unit from a static module. --> <partition-manager jndi-name="picketlink/JPAEMFModulePartitionManager" name="jpa.emf.modules.partition.manager"> <identity-configuration name="jpa.config"> <jpa-store entity-module="my.module" entity-module-unit-name="my-persistence-unit-name"> <supported-types supports-all="true"/> </jpa-store> </identity-configuration> </partition-manager> </subsystem>
13.5.2. Usage Examples
META-INF/jboss-deployment-structure.xml file to your deployment as follows:
<jboss-deployment-structure> <deployment> <dependencies> <module name="org.picketlink.core.api" meta-inf="import"/> <module name="org.picketlink.core" meta-inf="import"/> <module name="org.picketlink.idm.api" /> <!-- if you're using a JPA Identity Store and the Basic Model, you must provide this dependency. --> <module name="org.picketlink.idm.schema" /> </dependencies> </deployment> </jboss-deployment-structure>
Note
META-INF/jboss-deployment-structure.xml file you don't need to ship the libraries inside your deployment. All the necessary dependencies are automatically resolved and configured.
13.5.2.1. Injecting a PartitionManager using Resource annotation
@Resource(mappedName="picketlink/JPADSBasedPartitionManager") private PartitionManager jpaDSBasedPartitionManager;
13.5.2.2. Producing a PartitionManager
PartitionManager instance built by the subsystem. For that, you just need to:
public static class SecurityConfiguration { @Resource(mappedName = "picketlink/JPADSBasedPartitionManager") @Produces private PartitionManager jpaDSBasedPartitionManager; }
13.6. Federation
-
The configuration in
picketlink.xmlis automatically created. No need to have this file inside your deployment. -
The PicketLink Authenticators for Identity Providers and Service Providers are automatically registered. No need to have a
jboss-web.xmlfile inside your deployment. -
The PicketLink dependencies are automatically configured. No need to have a
META-INF/jboss-deployment-structure.xmlinside your deployment defining theorg.picketlinkmodule as a dependency. -
The Security Domain is automatically configured using the configurations defined in the domain model. No need to have a
WEB-INF/jboss-web.xmlfile inside your deployment.
|
Configuration
|
Old Configuration
|
Subsystem Configuration
|
|---|---|---|
|
WEB-INF/picketlink.xml
|
Required
|
Not required. If present, the configuration from the domain model is going to be used instead.
|
|
WEB-INF/jboss-web.xml
|
Required
|
Not required. The PicketLink Authenticators and the Security Domain is read from the domain model.
|
|
META-INF/jboss-deployment-structure.xml
|
Required
|
Not required. When the PicketLink Extension/Subsystem is enabled, the dependency to the org.picketlink module is automatically configured.
|
13.6.1. The Federation concept (Circle of Trust)
13.6.2. Federation Domain Model
<subsystem xmlns="urn:jboss:domain:picketlink:1.0"> <federation name="federation-without-signatures"> <saml token-timeout="4000" clock-skew="0" /> <identity-provider name="idp.war" security-domain="idp" support-signatures="false" url="http://localhost:8080/idp/"> <trust> <trust-domain name="localhost" /> <trust-domain name="mycompany.com2" /> <trust-domain name="mycompany.com3" /> <trust-domain name="mycompany.com4" /> </trust> <handlers> <handler class-name="com.mycompany.CustomHandler"> <handler-parameter name="param1" value="paramValue1"/> <handler-parameter name="param2" value="paramValue2"/> <handler-parameter name="param3" value="paramValue3"/> </handler> </handlers> </identity-provider> <service-providers> <service-provider name="sales.war" post-binding="true" security-domain="sp" url="http://localhost:8080/sales/" support-signatures="false"> <handlers> <handler class-name="com.mycompany.CustomHandler"> <handler-parameter name="param1" value="paramValue1"/> <handler-parameter name="param2" value="paramValue2"/> <handler-parameter name="param3" value="paramValue3"/> </handler> </handlers> </service-provider> <service-provider name="employee.war" post-binding="true" security-domain="sp" url="http://localhost:8080/employee/" support-signatures="false" /> </service-providers> </federation> </subsystem>
Note
JBOSS_HOME/docs/examples/configs/standalone-picketlink.xml.
13.6.3. Usage Examples
-
WEB-INF/picketlink.xml
-
META-INF/jboss-deployment-structure.xml
-
WEB-INF/jboss-web.xml
Important
<subsystem xmlns="urn:jboss:domain:picketlink-federation:1.0"> <federation name="example-federation"> <!-- Identity Provider configuration --> <identity-provider name="picketlink-federation-saml-idp-basic.war" security-domain="idp" url="http://localhost:8080/idp/"> <trust> <trust-domain name="localhost" /> </trust> </identity-provider> <!-- Service Provider configuration --> <service-providers> <service-provider name="picketlink-federation-saml-sp-post-basic.war" security-domain="sp" url="http://localhost:8080/sales-post/" /> </service-providers> </federation> </subsystem>
13.6.4. Metrics and Statistics
-
How many SAML assertions were issued by your identity provider ?
-
How many times your identity provider respond to service providers ?
-
How many SAML assertions were expired ?
-
How many authentications are done by your identity provider ?
-
How many errors happened ? Trusted Domain errors, signing errors, etc.
[standalone@localhost:9999 federation=example-federation] ./identity-provider=idp.war:read-resource(include-runtime=true) { "outcome" => "success", "result" => { "name" => "idp.war", "created-assertions-count" => "1", "error-response-to-sp-count" => "0", "error-sign-validation-count" => "0", "error-trusted-domain-count" => "0", "expired-assertions-count" => "0", "external" => false, "handler" => undefined, "login-complete-count" => "0", "login-init-count" => "0", "response-to-sp-count" => "3", "security-domain" => "idp", "strict-post-binding" => false, "supports-signatures" => false, "url" => "http://localhost:8080/idp", "trust-domain" =>{"localhost" => undefined} } }
Chapter 14. Federation
- 14.1. Overview
- 14.2. SAML SSO
- 14.3. SAML Web Browser Profile
- 14.4. PicketLink SAML Specification Support
- 14.5. SAML v2.0
- 14.5.1. Which Profiles are supported ?
- 14.5.2. Which Bindings are supported ?
- 14.5.3. PicketLink Identity Provider (PIDP)
- 14.5.4. PicketLink Service Provider (PSP)
- 14.5.5. SAML Authenticators (Tomcat,JBossAS)
- 14.5.6. Digital Signatures in SAML Assertions
- 14.5.7. SAML2 Handlers
- 14.5.8. Single Logout
- 14.5.9. SAML2 Configuration Providers
- 14.5.10. Metadata Support
- 14.5.11. Token Registry
- 14.5.12. Standalone vs JBossAS Distribution
- 14.5.13. Standalone Web Applications(All Servlet Containers)
- 14.6. SAML v1.1
- 14.7. Trust
- 14.8. Extensions
- 14.9. PicketLink API
- 14.10. 3rd party integration
14.1. Overview
single sign on (SSO) and trust features. We describe SAML SSO in detail.
Warning
14.2. SAML SSO
OASIS Standards Consortium standard for single sign on. PicketLink suppors SAML v2.0 and SAML v1.1.
-
SAML Web Browser SSO Profile.
-
SAML Global Logout Profile.
14.3. SAML Web Browser Profile
-
SAML HTTP Redirect Binding
-
SAML HTTP POST Binding
14.4. PicketLink SAML Specification Support
14.5. SAML v2.0
14.5.1. Which Profiles are supported ?
-
SAML2 Web Browser Profile
-
SAML2 Metadata Profile
-
SAML2 Logout Profile
14.5.2. Which Bindings are supported ?
-
SAML HTTP Redirect Binding
-
SAML HTTP POST Binding
14.5.3. PicketLink Identity Provider (PIDP)
14.5.3.1. Introduction
Tip
14.5.3.2. How to create your own PicketLink Identity Provider
14.5.3.3. Identity Provider Authenticators
14.5.3.3.1. Introduction
Error
14.5.3.3.2. Configuring an Authenthicator for a Identity Provider
14.5.3.3.2.1. JBoss Application Server v7
<?xml version="1.0" encoding="UTF-8"?> <jboss-web> <security-domain>idp</security-domain> <context-root>idp</context-root> <valve> <class-name>org.picketlink.identity.federation.bindings.tomcat.idp.IDPWebBrowserSSOValve</class-name> </valve> </jboss-web>
14.5.3.3.2.2. JBoss Application Server v5 or v6
<?xml version="1.0" encoding="UTF-8"?> <Context> <Valve className="org.picketlink.identity.federation.bindings.tomcat.idp.IDPWebBrowserSSOValve" /> </Context>
14.5.3.3.2.3. Apache Tomcat 6
<?xml version="1.0" encoding="UTF-8"?> <Context> <Valve className="org.picketlink.identity.federation.bindings.tomcat.idp.IDPWebBrowserSSOValve" /> </Context>
14.5.3.3.3. Built-in Authenticators
|
Name
|
Description
|
|---|---|
|
Default implementation for an Identity Provider Authenticator.
|
14.5.3.3.4. IDPWebBrowserSSOValve
14.5.3.3.4.1. Configuration
14.5.3.3.4.2. Attributes
|
#
|
Name
|
Type
|
Objective
|
Since version
|
|---|---|---|---|---|
|
1
|
attributeList
|
String
|
a comma separated list of attribute keys IDP interested in
|
2.0
|
|
2
|
configProvider
|
String
|
an optional implementation of the SAMLConfigurationProvider interface. Provide the fully qualified name.
|
2.0
|
|
3
|
ignoreIncomingSignatures
|
boolean
|
if the IDP should ignore the signatures on the incoming messages Default: false
|
2.0 Deprecated since 2.1.2.
|
|
4
|
ignoreAttributesGeneration
|
boolean
|
if the IDP should not generate attribute statements in response to Service Providers
|
2.0
|
|
5
|
signOutgoingMessages
|
boolean
|
Should the IDP sign the outgoing messages? Default: true
|
2.0 Deprecated since 2.1.2.
|
|
6
|
roleGenerator
|
String
|
optional fqn of a role generator Default: org.picketlink.identity. federation.bindings. tomcat.TomcatRoleGenerator
|
2.0 Deprecated since 2.1.2.
|
|
7
|
samlHandlerChainClass
|
String
|
fqn of a custom SAMLHandlerChain implementation
|
2.0 Deprecated since 2.1.2.
|
|
8
|
identityParticipantStack
|
String
|
fqn of a custom IdentityParticipantStack
|
2.0 Deprecated since 2.1.2.
|
| | | | | |
14.5.3.4. Identity Provider Configuration
14.5.3.4.1. Configuring a Identity Provider
-
Configure the web.xml.
-
Configure an Section 14.5.4.4, “Service Provider Authenticators” .
-
Configure a Section 14.5.4.5, “Service Provider Security Domain” for your application.
-
Configure PicketLink JBoss Module as a dependency.
-
Create and configure a file named WEB-INF/picketlink.xml .
14.5.3.4.2. Configuring the web.xml
<security-constraint>
<web-resource-collection>
<web-resource-name>Manager command</web-resource-name>
<url-pattern>/*</url-pattern>
</web-resource-collection>
<auth-constraint>
<role-name>manager</role-name>
</auth-constraint>
</security-constraint>
<security-role>
<description>
The role that is required to log in to IDP Application
</description>
<role-name>manager</role-name>
</security-role>
<login-config>
<auth-method>FORM</auth-method>
<realm-name>PicketLink IDP Application</realm-name>
<form-login-config>
<form-login-page>/jsp/login.jsp</form-login-page>
<form-error-page>/jsp/login-error.jsp</form-error-page>
</form-login-config>
</login-config>
Important
14.5.3.4.3. The picketlink.xml configuration file
<PicketLink xmlns="urn:picketlink:identity-federation:config:2.1">
<PicketLinkIDP xmlns="urn:picketlink:identity-federation:config:2.1">
<IdentityURL>http://localhost:8080/idp/ </IdentityURL>
<Trust>
<Domains>locahost,mycompany.com</Domains>
</Trust>
<KeyProvider ClassName="org.picketlink.identity.federation.core.impl.KeyStoreKeyManager">
<Auth Key="KeyStoreURL" Value="/jbid_test_keystore.jks" />
<Auth Key="KeyStorePass" Value="store123" />
<Auth Key="SigningKeyPass" Value="test123" />
<Auth Key="SigningKeyAlias" Value="servercert" />
<ValidatingAlias Key="localhost" Value="servercert" />
<ValidatingAlias Key="127.0.0.1" Value="servercert" />
</KeyProvider>
</PicketLinkIDP>
<PicketLinkSTS xmlns="urn:picketlink:identity-federation:config:1.0" TokenTimeout="1000" ClockSkew="1000">
<TokenProviders>
<TokenProvider ProviderClass="org.picketlink.identity.federation.core.saml.v2.providers.SAML20AssertionTokenProvider"
TokenType="urn:oasis:names:tc:SAML:2.0:assertion" TokenElement="Assertion"
TokenElementNS="urn:oasis:names:tc:SAML:2.0:assertion" />
</TokenProviders>
</PicketLinkSTS>
<Handlers xmlns="urn:picketlink:identity-federation:handler:config:2.1">
<Handler class="org.picketlink.identity.federation.web.handlers.saml2.SAML2IssuerTrustHandler" />
<Handler class="org.picketlink.identity.federation.web.handlers.saml2.SAML2LogOutHandler" />
<Handler class="org.picketlink.identity.federation.web.handlers.saml2.SAML2AuthenticationHandler" />
<Handler class="org.picketlink.identity.federation.web.handlers.saml2.RolesGenerationHandler" />
</Handlers>
</PicketLink>
Important
14.5.3.4.3.1. PicketLinkIDP Element
|
Name
|
Description
|
Value
|
|---|---|---|
|
AssertionValidity
|
Defines the timeout for the SAML assertion validity, in miliseconds.
|
Defaults to 300000 . Deprecated. Use the PicketLinkSTS element, instead.
|
|
RoleGenerator
|
Defines the name of the org.picketlink. identity.federation. core.interfaces. RoleGenerator subclass to be used to obtain user roles.
|
Defaults to org.picketlink.identity. federation.core. impl.EmptyRoleGenerator .
|
|
AttributeManager
|
Defines the name of the org.picketlink. identity.federation. core.interfaces. AttributeManager subclass to be used to obtain the SAML assertion attributes.
|
Defautls to org.picketlink. identity.federation. core.impl. EmptyAttributeManager .
|
|
StrictPostBinding
|
SAML Web Browser SSO Profile has a requirement that the IDP does not respond back in Redirect Binding. Set this to false if you want to force the IDP to respond to SPs using the Redirect Binding.
|
Values: true|false . Defaults to true, the IDP always respond via POST Binding.
|
|
SupportsSignatures
|
Indicates if digital signature/verification of SAML assertions are enabled. If this attribute is marked to true the Service Providers must support signatures too, otherwise the SAML messages will be considered as invalid.
|
Values: true|false. Defaults to false.
|
|
Encrypt
|
Indicates if SAML Assertions should be encrypted. If this attribute is marked to true the Service Providers must support signatures too, otherwise the SAML messages will be considered as invalid.
|
Values: true|false. Defaults to false
|
|
IdentityParticipantStack
|
Defines the name of the org.picketlink. identity.federation. web.core. IdentityParticipantStack subclass to be used to register and deregister participants in the identity federation.
|
Defaults to org.picketlink. identity.federation. web.core. IdentityServer.STACK.
|
14.5.3.4.3.1.1. IdentityURL Element
14.5.3.4.3.1.2. Trust/Domains Elements
14.5.3.4.3.1.3. SAML Digital Signature Configuration (KeyProvider Element)
-
Set the SupportsSignature attribute to true;
-
Add the Section 14.5.7.11, “SAML2SignatureGenerationHandler” and the Section 14.5.7.12, “SAML2SignatureValidationHandler” in the handlers chain (Handler Element).
-
Configure a Section 14.5.6, “Digital Signatures in SAML Assertions” * *element.
14.5.3.4.3.1.4. SAML Encryption Configuration
-
Set the Encrypt attribute to true;
-
Add the Section 14.5.7.8, “SAML2EncryptionHandler” and the Section 14.5.7.12, “SAML2SignatureValidationHandler” in the handlers chain (Handler Element).
-
Configure a Section 14.5.6, “Digital Signatures in SAML Assertions” * *element.
14.5.3.4.3.2. SAML Handlers Configuration (Handlers Element)
14.5.3.4.3.3. SecurityToken Service Configuration (PicketLinkSTS Element)
Important
14.5.3.5. Identity Stores
14.5.3.5.1. Introduction
14.5.3.5.2. Configuring a Security Domain for a Identity Store
<?xml version="1.0" encoding="UTF-8"?>
<jboss-web>
<security-domain>idp</security-domain>
<valve>
<class-name>org.picketlink.identity.federation.bindings.tomcat.idp.IDPWebBrowserSSOValve</class-name>
</valve>
</jboss-web>
<subsystem xmlns="urn:jboss:domain:security:1.1">
<security-domains>
<security-domain name="idp" cache-type="default">
<authentication>
<login-module code="UsersRoles" flag="required">
<module-option name="usersProperties" value="users.properties"/>
<module-option name="rolesProperties" value="roles.properties"/>
</login-module>
</authentication>
</security-domain>
...
</subsystem>
14.5.3.6. Security Token Service Configuration
14.5.3.6.1. SecurityToken Service Configuration (PicketLinkSTS Element)
|
Name
|
Description
|
Value
|
|---|---|---|
|
STSName
|
Name for this STS configuration.
|
Name for this Security Token Service.
|
|
TokenTimeout
|
Defines the token timeout in miliseconds.
|
Defaults to 3600 miliseconds.
|
|
ClockSkew
|
Defines the clock skew, or timing skew, for the token timeout.
|
Defaults to 2000 miliseconds.
|
|
SignToken
|
Indicates if the tokens should be signed.
|
Values: true|false . Defaults to false .
|
|
EncryptToken
|
Indicates if the tokens should be encrypted.
|
Values: true|false . Defaults to false .
|
|
CanonicalizationMethod
|
Sets the canonicalization method.
|
14.5.3.6.1.1. Security Token Providers (TokenProviders/TokenProvider elements)
-
SAML v2.0 : org.picketlink.identity.federation.core.saml.v2.providers.SAML20AssertionTokenProvider
-
WS-Trust _ : org.picketlink.identity.federation.core.wstrust.plugins.saml.SAML20TokenProvider_
14.5.4. PicketLink Service Provider (PSP)
14.5.4.1. Introduction
Tip
14.5.4.2. How to create your own PicketLink Service Provider
14.5.4.3. Service Provider Configuration
14.5.4.3.1. Configuring a Service Provider
-
Configuring the web.xml.
-
Configure an Section 14.5.4.4, “Service Provider Authenticators” .
-
Configure a Section 14.5.4.5, “Service Provider Security Domain” for your application.
-
Configure PicketLink JBoss Module as a dependency.
-
Create and configure a file named WEB-INF/picketlink.xml .
14.5.4.3.2. Configuring the web.xml
<security-constraint>
<web-resource-collection>
<web-resource-name>Manager command</web-resource-name>
<url-pattern>/*</url-pattern>
</web-resource-collection>
<auth-constraint>
<role-name>manager</role-name>
</auth-constraint>
</security-constraint>
<security-role>
<description>
The role that is required to log in to the Manager Application
</description>
<role-name>manager</role-name>
</security-role>
Important
14.5.4.3.3. The picketlink.xml configuration file
<PicketLink xmlns="urn:picketlink:identity-federation:config:2.1">
<PicketLinkSP xmlns="urn:picketlink:identity-federation:config:2.1"
BindingType="REDIRECT"
RelayState="someURL"
ErrorPage="/someerror.jsp"
LogOutPage="/customLogout.jsp"
IDPUsesPostBinding="true"
SupportsSignatures="true">
<IdentityURL>http://localhost:8080/idp/ </IdentityURL>
<ServiceURL>http://localhost:8080/employee/ </ServiceURL>
<KeyProvider ClassName="org.picketlink.identity.federation.core.impl.KeyStoreKeyManager">
<Auth Key="KeyStoreURL" Value="/jbid_test_keystore.jks" />
<Auth Key="KeyStorePass" Value="store123" />
<Auth Key="SigningKeyPass" Value="test123" />
<Auth Key="SigningKeyAlias" Value="servercert" />
<ValidatingAlias Key="localhost" Value="servercert" />
<ValidatingAlias Key="127.0.0.1" Value="servercert" />
</KeyProvider>
</PicketLinkSP>
<Handlers xmlns="urn:picketlink:identity-federation:handler:config:2.1">
<Handler class="org.picketlink.identity.federation.web.handlers.saml2.SAML2IssuerTrustHandler" />
<Handler class="org.picketlink.identity.federation.web.handlers.saml2.SAML2LogOutHandler" />
<Handler class="org.picketlink.identity.federation.web.handlers.saml2.SAML2AuthenticationHandler" />
<Handler class="org.picketlink.identity.federation.web.handlers.saml2.RolesGenerationHandler" />
</Handlers>
</PicketLink>
Important
14.5.4.3.3.1. PicketLinkSP Element
|
Name
|
Description
|
Value
|
|---|---|---|
|
BindingType
|
Defines which SAML binding should be used: SAML HTTP POST or Redirect bindings.
|
POST|REDIRECT. Defaults to POST if no specified.
|
|
ErrorPage
|
Defines a custom error page to be displayed when some error occurs during the request processing.
|
Defaults to /error.jsp.
|
|
LogOutPage
|
Defines a custom logout page to be displayed after the logout.
|
Defaults to /logout.jsp.
|
|
IDPUsesPostBinding
|
Indicates if the Identity Provider configured for this Service Provider is always using POST for SAML responses.
|
true|false. Defaults to true if no specified.
|
|
SupportsSignatures
|
Indicates if digital signature/verification of SAML assertions are enabled. If this attribute is marked to true the Identity Provider configured for this Service Provider must support signatures too, otherwise the SAML messages will be considered as invalid.
|
true|false. Defaults to false if no specified.
|
14.5.4.3.3.1.1. IdentityURL Element
14.5.4.3.3.1.2. ServiceURL Element
14.5.4.3.3.2. SAML Digital Signature Configuration (KeyProvider Element)
-
Set the SupportsSignature attribute to true;
-
Add the Section 14.5.7.11, “SAML2SignatureGenerationHandler” and the Section 14.5.7.12, “SAML2SignatureValidationHandler” in the handlers chain (Handler Element).
-
Configure a Section 14.5.6, “Digital Signatures in SAML Assertions” * *element.
14.5.4.3.3.3. SAML Handlers Configuration (Handlers Element)
14.5.4.4. Service Provider Authenticators
14.5.4.4.1. Introduction
Error
14.5.4.4.2. Configuring an Authenthicator for a Service Provider
14.5.4.4.2.1. JBoss Application Server v7
<?xml version="1.0" encoding="UTF-8"?> <jboss-web> <security-domain>sp</security-domain> <context-root>employee</context-root> <valve> <class-name>org.picketlink.identity.federation.bindings.tomcat.sp.ServiceProviderAuthenticator</class-name> </valve> </jboss-web>
14.5.4.4.2.2. JBoss Application Server v5 or v6
<?xml version="1.0" encoding="UTF-8"?>
<Context>
<Valve className="org.picketlink.identity.federation.bindings.tomcat.sp.ServiceProviderAuthenticator" />
</Context>
14.5.4.4.2.3. Apache Tomcat 6
<?xml version="1.0" encoding="UTF-8"?>
<Context>
<Valve className="org.picketlink.identity.federation.bindings.tomcat.sp.ServiceProviderAuthenticator" />
</Context>
14.5.4.4.3. Built-in Authenticators
|
Name
|
Description
|
|---|---|
|
Preferred service provider authenticator. Supports both SAML HTTP Redirect and POST bindings.
| |
|
Deprecated . Supports only HTTP POST Binding without signature of SAML assertions.
| |
|
Deprecated . Supports only HTTP POST Binding with signature of SAML assertions.
| |
|
Deprecated . Supports only HTTP Redirect Binding without signature of SAML assertions.
| |
|
Deprecated . Supports only HTTP Redirect Binding with signature of SAML assertions.
|
Warning
14.5.4.4.4. ServiceProviderAuthenticator
14.5.4.4.4.1. Configuration
14.5.4.4.5. SPRedirectSignatureFormAuthenticator
Warning
14.5.4.4.5.2. Configuration
14.5.4.4.5.2.3. Example:
Example 14.2. context.xml
<Context> <Valve className="org.picketlink.identity.federation.bindings.tomcat.sp.SPRedirectSignatureFormAuthenticator" /> </Context>
14.5.4.4.5.2.4. Attributes
|
#
|
Name
|
Type
|
Objective
|
Since
|
|---|---|---|---|---|
|
1
|
configFile
|
String
|
optional - fully qualified location of the config file Default: /WEB-INF/picketlink-idfed.xml
|
2.0
|
|
2
|
samlHandlerChainClass
|
String
|
optional - fqn of a custom SAMLHandlerChain implementation
|
2.0
|
|
3
|
serviceURL
|
String
|
optional - the service provider URL
|
2.0
|
|
4
|
saveRestoreRequest
|
boolean
|
should the authenticator save the original request and restore it after authentication Default: true
|
2.0
|
|
5
|
configProvider
|
String
|
optional - a fqn of the SAMLConfigurationProvider implementation
|
2.0
|
|
6
|
issuerID
|
String
|
optional - customize the issuer id
|
2.0
|
|
7
|
idpAddress
|
String
|
optional - If the request.getRemoteAddr is not exactly the IDP address that you have keyed in your deployment descriptor for keystore alias, you can configure it explicitly
|
2.0
|
14.5.4.4.6. SPRedirectFormAuthenticator
Warning
14.5.4.4.6.2. Configuration
14.5.4.4.6.2.3. Example:
Example 14.3. context.xml
<Context> <Valve className="org.picketlink.identity.federation.bindings.tomcat.sp.SPRedirectFormAuthenticator" /> </Context>
14.5.4.4.6.2.4. Attributes
|
#
|
Name
|
Type
|
Objective
|
Since
|
|---|---|---|---|---|
|
1
|
configFile
|
String
|
optional - fully qualified location of the config file Default: /WEB-INF/picketlink-idfed.xml
|
2.0
|
|
2
|
samlHandlerChainClass
|
String
|
optional - fqn of a custom SAMLHandlerChain implementation
|
2.0
|
|
3
|
serviceURL
|
String
|
optional - the service provider URL
|
2.0
|
|
4
|
saveRestoreRequest
|
boolean
|
should the authenticator save the original request and restore it after authentication Default: true
|
2.0
|
|
5
|
configProvider
|
String
|
optional - a fqn of the SAMLConfigurationProvider implementation
|
2.0
|
|
6
|
issuerID
|
String
|
optional - customize the issuer id
|
2.0
|
| | | | | |
14.5.4.4.7. SPPostSignatureFormAuthenticator
Warning
14.5.4.4.7.2. Configuration
14.5.4.4.7.2.3. Example:
Example 14.4. context.xml
<Context> <Valve className="org.picketlink.identity.federation.bindings.tomcat.sp.SPPostSignatureFormAuthenticator" /> </Context>
14.5.4.4.7.2.4. Attributes
|
#
|
Name
|
Type
|
Objective
|
Since
|
|---|---|---|---|---|
|
1
|
configFile
|
String
|
optional - fully qualified location of the config file Default: /WEB-INF/picketlink-idfed.xml
|
2.0
|
|
2
|
samlHandlerChainClass
|
String
|
optional - fqn of a custom SAMLHandlerChain implementation
|
2.0
|
|
3
|
serviceURL
|
String
|
optional - the service provider URL
|
2.0
|
|
4
|
saveRestoreRequest
|
boolean
|
should the authenticator save the original request and restore it after authentication Default: true
|
2.0
|
|
5
|
configProvider
|
String
|
optional - a fqn of the SAMLConfigurationProvider implementation
|
2.0
|
|
6
|
issuerID
|
String
|
optional - customize the issuer id
|
2.0
|
|
7
|
idpAddress
|
String
|
optional - If the request.getRemoteAddr is not exactly the IDP address that you have keyed in your deployment descriptor for keystore alias, you can configure it explicitly
|
2.0
|
14.5.4.4.8. SPPostFormAuthenticator
Warning
14.5.4.4.8.2. Configuration
14.5.4.4.8.2.3. Example:
Example 14.5. context.xml
<Context> <Valve className="org.picketlink.identity.federation.bindings.tomcat.sp.SPPostFormAuthenticator" /> </Context>
14.5.4.4.8.2.4. Attributes
|
#
|
Name
|
Type
|
Objective
|
Since
|
|---|---|---|---|---|
|
1
|
configFile
|
String
|
optional - fully qualified location of the config file Default: /WEB-INF/picketlink-idfed.xml
|
2.0
|
|
2
|
samlHandlerChainClass
|
String
|
optional - fqn of a custom SAMLHandlerChain implementation
|
2.0
|
|
3
|
serviceURL
|
String
|
optional - the service provider URL
|
2.0
|
|
4
|
saveRestoreRequest
|
boolean
|
should the authenticator save the original request and restore it after authentication Default: true
|
2.0
|
|
5
|
configProvider
|
String
|
optional - a fqn of the SAMLConfigurationProvider implementation
|
2.0
|
|
6
|
issuerID
|
String
|
optional - customize the issuer id
|
2.0
|
| | | | | |
14.5.4.5. Service Provider Security Domain
14.5.4.5.1. Configuring a security domain
<?xml version="1.0" encoding="UTF-8"?>
<jboss-web>
<security-domain>sp</security-domain>
<valve>
<class-name>org.picketlink.identity.federation.bindings.tomcat.sp.ServiceProviderAuthenticator</class-name>
</valve>
</jboss-web>
<subsystem xmlns="urn:jboss:domain:security:1.1">
<security-domains>
<security-domain name="sp" cache-type="default">
<authentication>
<login-module code="org.picketlink.identity.federation.bindings.jboss.auth.SAML2LoginModule" flag="required"/>
</authentication>
</security-domain>
...
</subsystem>
14.5.5. SAML Authenticators (Tomcat,JBossAS)
14.5.5.1. Introduction
Error
14.5.5.2. Tomcat Authenticators for use in Apache Tomcat and JBoss Application Server
14.5.5.2.1. Authenticators/Valves for Identity Provider (IDP)
14.5.5.2.2. Authenticators/Valves for Service Provider (SP)
14.5.6. Digital Signatures in SAML Assertions
14.5.6.1. Configuring the KeyProvider
Important
<KeyProvider ClassName="org.picketlink.identity.federation.core.impl.KeyStoreKeyManager">
<Auth Key="KeyStoreURL" Value="/jbid_test_keystore.jks" />
<Auth Key="KeyStorePass" Value="store123" />
<Auth Key="SigningKeyPass" Value="test123" />
<Auth Key="SigningKeyAlias" Value="servercert" />
<ValidatingAlias Key="idp.example.com" Value="servercert" />
<ValidatingAlias Key="localhost" Value="servercert" />
</KeyProvider>
|
Auth Key
|
Description
|
|---|---|
|
KeyStoreURL
|
Where the value of the Value attribute points to the location of a Java KeyStore with the properly installed certificates.
|
|
KeyStorePass
|
Where the value of the Value attribute refers to the password of the referenced Java KeyStore.
|
|
SigningKeyAlias
|
Where the value of the Value attribute refers to the password of the installed certificate to be used to sign the SAML assertions.
|
|
SigningKeyPass
|
Where the value of the Value attribute refers to the alias of the certificate to be used to sign the SAML assertions.
|
<ValidatingAlias Key="idp.example.com" Value="servercert" />
Tip
14.5.6.2. SImple Example Scenario
14.5.6.2.1. How SAML assertions are signed ?
14.5.6.2.2. How signatures are validated ?
<saml2:Assertion xmlns:saml2="urn:oasis:names:tc:SAML:2.0:assertion"
ID="ID_ab0392ef-b557-4453-95a8-a7e168da8ac5" IssueInstant="2010-09-30T19:13:37.869Z"
Version="2.0">
<saml2:Issuer>http://idp.example.com </saml2:Issuer>
<saml2:Subject>
<saml2:NameID NameQualifier="urn:picketlink:identity-federation">jduke</saml2:NameID>
<saml2:SubjectConfirmation Method="urn:oasis:names:tc:SAML:2.0:cm:bearer" />
</saml2:Subject>
<saml2:Conditions NotBefore="2010-09-30T19:13:37.869Z"
NotOnOrAfter="2010-09-30T21:13:37.869Z" />
<ds:Signature xmlns:ds="http://www.w3.org/2000/09/xmldsig#">
<ds:SignedInfo>
<ds:CanonicalizationMethod Algorithm="http://www.w3.org/2001/10/xml-exc-c14n#WithComments" />
<ds:SignatureMethod Algorithm="http://www.w3.org/2000/09/xmlds#rsa-sha1" />
<ds:Reference URI="#ID_ab0392ef-b557-4453-95a8-a7e168da8ac5">
<ds:Transforms>
<ds:Transform Algorithm="http://www.w3.org/2000/09/xmlds#enveloped-signature" />
<ds:Transform Algorithm="http://www.w3.org/2001/10/xml-exc-c14n#" />
</ds:Transforms>
<ds:DigestMethod Algorithm="http://www.w3.org/2000/09/xmlds#sha1" />
<ds:DigestValue>0Y9QM5c5qCShz5UWmbFzBmbuTus=</ds:DigestValue>
</ds:Reference>
</ds:SignedInfo>
<ds:SignatureValue>
se/flQ2htUQ0IUYieVkXNn9cfjnfgv6H99nFarsTNTpRI9xuSlw5OTai/2PYdZI2Va9+QzzBf99m
VFyigfFdfrqug6aKFhF0lsujzlFfPfmXBbDRiTFX+4SkBeV71uuy7rOUI/jRiitEA0QrKqs0e/pV
\+C8PoaariisK96Mtt7A=
</ds:SignatureValue>
<ds:KeyInfo>
<ds:KeyValue>
<ds:RSAKeyValue>
<ds:Modulus>
suGIyhVTbFvDwZdx8Av62zmP+aGOlsBN8WUE3eEEcDtOIZgO78SImMQGwB2C0eIVMhiLRzVPqoW1
dCPAveTm653zHOmubaps1fY0lLJDSZbTbhjeYhoQmmaBro/tDpVw5lKJwspqVnMuRK19ju2dxpKw
lYGGtrP5VQv00dfNPbs=
</ds:Modulus>
<ds:Exponent>AQAB</ds:Exponent>
</ds:RSAKeyValue>
</ds:KeyValue>
</ds:KeyInfo>
</ds:Signature>
</saml2:Assertion>
14.5.7. SAML2 Handlers
14.5.7.1. Introduction
14.5.7.2. Configuring Handlers
<Handlers xmlns="urn:picketlink:identity-federation:handler:config:2.1">
<Handler class="org.picketlink.identity.federation.web.handlers.saml2.SAML2IssuerTrustHandler" />
<Handler class="org.picketlink.identity.federation.web.handlers.saml2.SAML2LogOutHandler" />
<Handler class="org.picketlink.identity.federation.web.handlers.saml2.SAML2AuthenticationHandler" />
<Handler class="org.picketlink.identity.federation.web.handlers.saml2.RolesGenerationHandler" />
</Handlers>
14.5.7.2.1. Handlers Element
|
Name
|
Description
|
Value
|
|---|---|---|
|
ChainClass
|
Defines the name of a class that implements the org.picketlink. identity.federation. core.saml. v2.interfaces. SAML2HandlerChain interface.
|
Defaults to org.picketlink. identity.federation. core.saml. v2.impl. DefaultSAML2HandlerChain.
|
14.5.7.2.2. Handler Element
|
Name
|
Description
|
|---|---|
|
class
|
Defines the name of a class that implements the org.picketlink. identity.federation. core.saml. v2.interfaces. SAML2Handler interface.
|
14.5.7.3. Custom Handlers
14.5.7.4. Built-in Handlers
14.5.7.5. RolesGenerationHandler
14.5.7.5.2. Fully Qualified Name
14.5.7.5.3. Configuration
14.5.7.5.3.1. Example:
Example 14.6. WEB-INF/picketlink-handlers.xml
<Handlers xmlns="urn:picketlink:identity-federation:handler:config:1.0"> <Handler class="org.picketlink.identity.federation.web.handlers.saml2.SAML2IssuerTrustHandler"/> <Handler class="org.picketlink.identity.federation.web.handlers.saml2.SAML2LogOutHandler"/> <Handler class="org.picketlink.identity.federation.web.handlers.saml2.SAML2AuthenticationHandler"/> <Handler class="org.picketlink.identity.federation.web.handlers.saml2.RolesGenerationHandler"/> </Handlers>
14.5.7.5.3.2. Configuration Parameters
|
#
|
Name
|
Type
|
Objective
|
Default Value
|
SP/IDP
|
Since Version
|
|---|---|---|---|---|---|---|
|
1
|
ATTRIBUTE_ MANAGER
|
string
|
fqn of attribute manager class
|
org.picketlink. identity.federation. core.impl. EmptyAttributeManager
|
IDP
|
2.0
|
14.5.7.6. SAML2AttributeHandler
14.5.7.6.1. Objective
14.5.7.6.2. Fully Qualified Name
14.5.7.6.3. Configuration
14.5.7.6.3.1. Example:
Example 14.8. WEB-INF/picketlink-handlers.xml
<Handlers xmlns="urn:picketlink:identity-federation:handler:config:1.0"> <Handler class="org.picketlink.identity.federation.web.handlers.saml2.SAML2IssuerTrustHandler"/> <Handler class="org.picketlink.identity.federation.web.handlers.saml2.SAML2LogOutHandler"/> <Handler class="org.picketlink.identity.federation.web.handlers.saml2.SAML2AuthenticationHandler"/> <Handler class="org.picketlink.identity.federation.web.handlers.saml2.RolesGenerationHandler"/> </Handlers>
14.5.7.6.4. Configuration Parameters
|
#
|
Name
|
Type
|
Objective
|
Default Value
|
SP/IDP
|
Since Version
|
|---|---|---|---|---|---|---|
|
1
|
ATTRIBUTE_ MANAGER
|
string
|
fqn of attribute manager class
|
org.picketlink. identity.federation. core.impl. EmptyAttributeManager
|
IDP
|
2.0
|
|
2
|
ATTRIBUTE_ KEYS
|
String
|
a comma separated list of string values representing attributes to be sent
| |
IDP
|
2.0
|
|
3
|
ATTRIBUTE_ CHOOSE_ FRIENDLY_ NAME
|
boolean
|
set to true if you require attributes to be keyed by friendly name rather than default name.
| |
SP
|
2.0
|
14.5.7.6.4.1. Example:
Example 14.9. WEB-INF/picketlink-handlers.xml
<Handler class="org.picketlink.
identity.federation.
web.handlers.
saml2.SAML2AttributeHandler">
<Option Key="ATTRIBUTE_CHOOSE_FRIENDLY_NAME" Value="true"/>
</Handler>
14.5.7.6.4.2. Example:
Error
14.5.7.7. SAML2AuthenticationHandler
14.5.7.7.1. Objective
14.5.7.7.2. Fully Qualified Name
14.5.7.7.3. Configuration
14.5.7.7.3.1. Example:
Example 14.10. WEB-INF/picketlink-handlers.xml
<Handlers xmlns="urn:picketlink:identity-federation:handler:config:1.0"> <Handler class="org.picketlink.identity.federation.web.handlers.saml2.SAML2IssuerTrustHandler"/> <Handler class="org.picketlink.identity.federation.web.handlers.saml2.SAML2LogOutHandler"/> <Handler class="org.picketlink.identity.federation.web.handlers.saml2.SAML2AuthenticationHandler"/> <Handler class="org.picketlink.identity.federation.web.handlers.saml2.RolesGenerationHandler"/> </Handlers>
14.5.7.7.4. Configuration Parameters
|
#
|
Name
|
Type
|
Objective
|
SP/IDP
|
Since Version
|
|---|---|---|---|---|---|
|
1
|
CLOCK_ SKEW_ MILIS
|
string
|
a long value in miliseconds to add a clock skew to assertion expiration validation at the Service provider
|
SP
|
2.0
|
|
2
|
DISABLE_ AUTHN_ STATEMENT
|
boolean
|
Setting a value will disable the generation of an AuthnStatement
|
IDP
|
2.0
|
|
3
|
DISABLE_ SENDING_ ROLES
|
boolean
|
Setting any value will disable the generation and return of roles to SP
|
IDP
|
2.0
|
|
4
|
DISABLE_ ROLE_ PICKING
|
boolean
|
Setting to true will disable picking IDP attribute statements
|
SP
|
2.0
|
|
5
|
ROLE_ KEY
|
String
|
a csv list of strings that represent the roles coming from IDP
|
SP
|
2.0
|
|
6
|
ASSERTION_ CONSUMER_ URL
|
String
|
the url to be used for assertionConsumerURL
|
SP
|
2.0
|
|
7
|
NAMEID_ FORMAT
|
String
|
Setting to a value will provide the nameid format to be sent to IDP
|
SP
|
2.0
|
|
8
|
ASSERTION_ SESSION_ ATTRIBUTE_ NAME
|
String
|
Specifies the name of the session attribute where the assertion will be stored. The assertion is stored as a DOM Document. This option is useful when you need to obtain the user's assertion to propagate or validate it against the STS.
|
SP
|
2.1.7
|
|
9
|
AUTHN_CONTEXT_CLASSES
|
String
|
Specifies a single or a comma separated list of SAML Authentication Classes to be used when creating an AuthnRequest. The value can be a full qualified name (FQN) or an alias. For each standard class name there is an alias, as defined by the
org.picketlink.common.constants.SAMLAuthenticationContextClass.
|
SP
|
2.5.0
|
|
9
|
REQUESTED_AUTHN_CONTEXT_COMPARISON
|
String
|
Specifies the Comparison attribute of the RequestedAuthnContext. This option should be used in conjunction with the AUTHN_CONTEXT_CLASSES option. Only the values defined by the specification are supported.
|
SP
|
2.5.0
|
14.5.7.7.4.1. Example:
Example 14.11. WEB-INF/picketlink-handlers.xml
<Handler class="org.picketlink.identity.
federation.web.
handlers.saml2.SAML2AuthenticationHandler">
<Option Key="DISABLE_ROLE_PICKING" Value="true"/>
</Handler>
14.5.7.7.4.2. NAMEID_FORMAT:
14.5.7.8. SAML2EncryptionHandler
14.5.7.8.1. Objective
14.5.7.8.2. Fully Qualified Name
14.5.7.8.3. Restrictions
-
This handler should be used only when configuring Identity Providers.
-
For Service Providers, the decryption of SAML Assertion is already done by the authenticators.
-
When using this handler, make sure that your service providers are also configured with the Section 14.5.7.11, “SAML2SignatureGenerationHandler” and the Section 14.5.7.12, “SAML2SignatureValidationHandler” handlers.
-
Do not use this handler with the __ Section 14.5.7.11, “SAML2SignatureGenerationHandler” _ configured in the same chain. Otherwise SAML messages will be signed several times._
14.5.7.8.4. Configuration
14.5.7.8.4.1. Example:
Error
14.5.7.8.4.2. Configuration Parameters
|
#
|
Name
|
Type
|
Objective
|
Default Value
|
SP/IDP
|
Since Version
|
14.5.7.9. SAML2IssuerTrustHandler
14.5.7.9.1. Objective
14.5.7.9.2. Fully Qualified Name
14.5.7.9.3. Configuration
14.5.7.9.3.1. Example:
Example 14.12. WEB-INF/picketlink-handlers.xml
<Handlers xmlns="urn:picketlink:identity-federation:handler:config:1.0"> <Handler class="org.picketlink.identity.federation.web.handlers.saml2.SAML2IssuerTrustHandler"/> <Handler class="org.picketlink.identity.federation.web.handlers.saml2.SAML2LogOutHandler"/> <Handler class="org.picketlink.identity.federation.web.handlers.saml2.SAML2AuthenticationHandler"/> <Handler class="org.picketlink.identity.federation.web.handlers.saml2.RolesGenerationHandler"/> </Handlers>
14.5.7.9.3.2. Configuration Parameters
|
#
|
Name
|
Type
|
Objective
|
Default Value
|
SP/IDP
|
Since Version
|
14.5.7.10. SAML2LogOutHandler.java
14.5.7.10.2. Fully Qualified Name
14.5.7.10.3. Configuration
14.5.7.10.3.1. Example:
Example 14.13. WEB-INF/picketlink-handlers.xml
<Handlers xmlns="urn:picketlink:identity-federation:handler:config:1.0"> <Handler class="org.picketlink.identity.federation.web.handlers.saml2.SAML2IssuerTrustHandler"/> <Handler class="org.picketlink.identity.federation.web.handlers.saml2.SAML2LogOutHandler"/> <Handler class="org.picketlink.identity.federation.web.handlers.saml2.SAML2AuthenticationHandler"/> <Handler class="org.picketlink.identity.federation.web.handlers.saml2.RolesGenerationHandler"/> </Handlers>
14.5.7.10.3.2. Configuration Parameters
|
#
|
Name
|
Type
|
Objective
|
Default Value
|
SP/IDP
|
Since Version
|
14.5.7.11. SAML2SignatureGenerationHandler
14.5.7.11.1. Objective
14.5.7.11.2. Fully Qualified Name
14.5.7.11.3. Configuration
14.5.7.11.3.1. Example:
Error
14.5.7.11.3.2. Configuration Parameters
|
#
|
Name
|
Type
|
Objective
|
Default Value
|
SP/IDP
|
Since Version
|
14.5.7.12. SAML2SignatureValidationHandler
14.5.7.12.1. Objective
14.5.7.12.2. Fully Qualified Name
14.5.7.12.3. Configuration
14.5.7.12.3.1. Example:
Error
14.5.7.12.3.2. Configuration Parameters
|
#
|
Name
|
Type
|
Objective
|
Default Value
|
SP/IDP
|
Since Version
|
14.5.8. Single Logout
14.5.8.1. Configuring the GLO
14.5.8.2. Configuring the LLO
Important
14.5.9. SAML2 Configuration Providers
14.5.9.1. Configuration providers at the IDP
14.5.9.1.1. IDPMetadataConfigurationProvider
14.5.9.2. Configuration Providers at the SP
14.5.9.2.1. SPPostMetadataConfigurationProvider
14.5.9.2.1.1. How does it work?
14.5.9.2.2. SPRedirectMetadataConfigurationProvider
14.5.9.2.2.1. How does it work?
14.5.9.2.3. What about Key Information and other configuration that comes via picketlink-idfed.xml?
14.5.10. Metadata Support
14.5.10.1. Introduction
|
Name
|
Description
|
Provider Type
|
|---|---|---|
|
org.picketlink. identity.federation. web.config. IDPMetadataConfigurationProvider
|
For Identity Providers
|
IDP
|
|
org.picketlink. identity.federation. web.config. SPPostMetadataConfigurationProvider
|
For Service Providers using HTTP-POST Binding
|
SP
|
|
org.picketlink.identity. federation.web. config.SPRedirectMetadataConfigurationProvider
|
For Service Providers using HTTP-REDIRECT Binding
|
SP
|
14.5.10.2. Configuration
-
Define the PicketLink Authenticator (SP or IDP valves) and provide the configuration provider class name as an attribute
-
Depending if you're configuring an IDP or SP, provide a metadata file and put it on the classpath:
-
For Identity Providers : WEB-INF/classes/idp-metadata.xml
-
For Service Providers : WEB-INF/classes/sp-metadata.xml
14.5.10.2.1. Configuring the PicketLink Authenticator
<jboss-web>
<security-domain>idp</security-domain>
<context-root>idp-metadata</context-root>
<valve>
<class-name>org.picketlink.identity.federation.bindings.tomcat.idp.IDPWebBrowserSSOValve</class-name>
<param>
<param-name>configProvider</param-name>
<param-value>org.picketlink.identity.federation.web.config.IDPMetadataConfigurationProvider</param-value>
</param>
</valve>
</jboss-web>
<?xml version="1.0" encoding="UTF-8"?>
<jboss-web>
<security-domain>sp</security-domain>
<context-root>sales-metadata</context-root>
<valve>
<class-name>org.picketlink.identity.federation.bindings.tomcat.sp.ServiceProviderAuthenticator</class-name>
<param>
<param-name>configProvider</param-name>
<param-value>org.picketlink.identity.federation.web.config.SPPostMetadataConfigurationProvider</param-value>
</param>
</valve>
</jboss-web>
14.5.10.2.2. What about Key Information and other configuration that comes via picketlink-idfed.xml?
14.5.10.3. Examples
14.5.11. Token Registry
14.5.11.1. Introduction
Tip
14.5.11.2. of-box Token Registries
|
Name
|
Description
|
Version
|
|---|---|---|
|
org.picketlink. identity.federation. core.sts. registry.DefaultTokenRegistry
|
In-memory based registry. Used by default if no configuration is provided
|
2.x.x
|
|
org.picketlink. identity.federation. core.sts. registry.FileBasedTokenRegistry
|
Filesystem based registry
|
2.x.x
|
|
org.picketlink. identity.federation. core.sts. registry.JPABasedTokenRegistry
|
Database/JPA based registry
|
2.1.3
|
14.5.11.3. Configuration
Tip
<PicketLinkSTS xmlns="urn:picketlink:identity-federation:config:1.0" TokenTimeout="5000" ClockSkew="0">
<TokenProviders>
<TokenProvider
ProviderClass="org.picketlink.identity.federation.core.saml.v2.providers.SAML20AssertionTokenProvider"
TokenType="urn:oasis:names:tc:SAML:2.0:assertion"
TokenElement="Assertion" TokenElementNS="urn:oasis:names:tc:SAML:2.0:assertion">
<Property Key="TokenRegistry" Value="org.picketlink.identity.federation.core.sts.registry.JPABasedTokenRegistry" />
</TokenProvider>
</TokenProviders>
</PicketLinkSTS>
14.5.11.3.1. org.picketlink.identity.federation.core.sts.registry.FileBasedTokenRegistry
<TokenProvider
ProviderClass="org.picketlink.identity.federation.core.saml.v2.providers.SAML20AssertionTokenProvider"
TokenType="urn:oasis:names:tc:SAML:2.0:assertion"
TokenElement="Assertion" TokenElementNS="urn:oasis:names:tc:SAML:2.0:assertion">
<Property Key="TokenRegistry" Value="FILE" />
<Property Key="TokenRegistryFile" Value="/some/dir/token.registry" />
</TokenProvider>
14.5.11.3.2. org.picketlink.identity.federation.core.sts.registry.JPABasedTokenRegistry
<TokenProvider
ProviderClass="org.picketlink.identity.federation.core.saml.v2.providers.SAML20AssertionTokenProvider"
TokenType="urn:oasis:names:tc:SAML:2.0:assertion"
TokenElement="Assertion" TokenElementNS="urn:oasis:names:tc:SAML:2.0:assertion">
<Property Key="TokenRegistry" Value="org.picketlink.identity.federation.core.sts.registry.JPABasedTokenRegistry" />
</TokenProvider>
14.5.11.4. Custom Token Registry
Tip
public class CustomSecurityTokenRegistry implements SecurityTokenRegistry {
@Override
public void addToken(String tokenID, Object token) throws IOException {
// TODO: logic to add a token to the registry
}
@Override
public void removeToken(String tokenID) throws IOException {
// TODO: logic to remove a token to the registry
}
@Override
public Object getToken(String tokenID) {
// TODO: logic to get a token from the registry
return null;
}
}
14.5.12. Standalone vs JBossAS Distribution
14.5.13. Standalone Web Applications(All Servlet Containers)
14.5.13.1. Service Provider Configuration
Example 14.14. web.xml
<?xml version="1.0" encoding="UTF-8"?>
<web-app xmlns="http://java.sun.com/xml/ns/javaee"
xmlns:xsi="http://www.w3.org/2001/XMLSchema-instance"
xsi:schemaLocation="http://java.sun.com/xml/ns/javaee http://java.sun.com/xml/ns/javaee/web-app_2_5.xsd"
version="2.5">
<description>Sales Standalone Application</description>
<filter>
<description>
The SP Filter intersects all requests at the SP and sees if there is a need to contact the IDP.
</description>
<filter-name>SPFilter</filter-name>
<filter-class>org.picketlink.identity.federation.web.filters.SPFilter</filter-class>
<init-param>
<param-name>ROLES</param-name>
<param-value>sales,manager</param-value>
</init-param>
</filter>
<filter-mapping>
<filter-name>SPFilter</filter-name>
<url-pattern>/*</url-pattern>
</filter-mapping>
</web-app>
14.5.13.2. IDP Configuration
Example 14.15. web.xml
<?xml version="1.0" encoding="ISO-8859-1"?>
<web-app xmlns="http://java.sun.com/xml/ns/javaee"
xmlns:xsi="http://www.w3.org/2001/XMLSchema-instance"
xsi:schemaLocation="http://java.sun.com/xml/ns/javaee http://java.sun.com/xml/ns/javaee/web-app_2_5.xsd"
version="2.5">
<display-name>Standalone IDP</display-name>
<description>
IDP Standalone Application
</description>
<!-- Listeners -->
<listener>
<listener-class>org.picketlink.identity.federation.web.core.IdentityServer</listener-class>
</listener>
<!-- Create the servlet -->
<servlet>
<servlet-name>IDPLoginServlet</servlet-name>
<servlet-class>org.picketlink.identity.federation.web.servlets.IDPLoginServlet</servlet-class>
</servlet>
<servlet>
<servlet-name>IDPServlet</servlet-name>
<servlet-class>org.picketlink.identity.federation.web.servlets.IDPServlet</servlet-class>
</servlet>
<servlet-mapping>
<servlet-name>IDPLoginServlet</servlet-name>
<url-pattern>/</url-pattern>
</servlet-mapping>
<servlet-mapping>
<servlet-name>IDPServlet</servlet-name>
<url-pattern>/IDPServlet</url-pattern>
</servlet-mapping>
</web-app>
Example 14.16. jsp/login.jsp
<html><head><title>Login Page</title></head> <body> <font size='5' color='blue'>Please Login</font><hr> <form action='<%=application.getContextPath()%>/' method='post'> <table> <tr><td>Name:</td> <td><input type='text' name='JBID_USERNAME'></td></tr> <tr><td>Password:</td> <td><input type='password' name='JBID_PASSWORD' size='8'></td> </tr> </table> <br> <input type='submit' value='login'> </form></body> </html>
Example 14.17. jsp/error.jsp
<html> <head> <title>Error!</title></head>
<body>
<font size='4' color='red'>
The username and password you supplied are not valid.
</p>
Click <a href='<%= response.encodeURL("login.jsp") %>'>here</a>
to retry login
</body>
</form>
</html>
14.5.13.3. Other References
14.5.13.4. IDPLoginServlet
14.5.13.4.1. Initialization Parameters
|
#
|
Name
|
Type
|
Objective
|
Default
|
Since
|
|---|---|---|---|---|---|
|
1
|
loginClass
|
String
|
fqn of an implementation of the ILoginHandler interface. Provides the authentication/authorization.
|
org.picketlink. identity.federation. web.handlers. DefaultLoginHandler
|
2.0
|
| | | | | | |
| | | | | | |
14.5.13.4.2. Configuration
14.5.13.5. IDPServlet
14.5.13.5.1. Initialization Parameters
|
#
|
Name
|
Type
|
Objective
|
Default
|
Since
|
|---|---|---|---|---|---|
|
1
|
CONFIG_ PROVIDER
|
String
|
optional - fqn of an implementation of the SAMLConfigurationProvider interface.
| |
2.0
|
|
2
|
SIGN_ OUTGOING_ MESSAGES
|
boolean
|
optional - whether the IDP should sign outgoing messages
|
true
|
2.0
|
|
3
|
ROLE_ GENERATOR
|
String
|
optional - fqn of a RoleGenerator
|
org.picketlink. identity.federation. web.roles. DefaultRoleGenerator
|
2.0
|
|
4
|
ATTRIBUTE_ KEYS
|
String
|
optional - comma separated list of keys for attributes that need to be sent
| |
2.0
|
|
5
|
IDENTITY_ PARTICIPANT_ STACK
|
String
|
optional - fqn of a custom IdentityParticipantStack implementation
| |
2.0
|
| | | | | | |
14.5.13.5.2. Configuration
14.5.13.6. SPFilter
14.5.13.6.1. Initialization Parameters
|
#
|
Name
|
Type
|
Objective
|
Default
|
Since
|
|---|---|---|---|---|---|
|
1
|
IGNORE_ SIGNATURES
|
boolean
|
optional - should the SP ignore signatures
|
false
|
2.0
|
|
2
|
SAML_ HANDLER_ CHAIN_ CLASS
|
String
|
optional - fqn of custom SAMLHandlerChain interface
| |
2.0
|
|
3
|
ROLE_ VALIDATOR
|
String
|
optional - fqn of a IRoleValidator interface
|
org.picketlink. identity.federation. web.roles. DefaultRoleValidator
|
2.0
|
|
4
|
ROLES
|
String
|
optional - comma separated list of roles that the sp will take
| |
2.0
|
|
5
|
LOGOUT_ PAGE
|
String
|
optional - a logout page
|
/logout.jsp
|
2.0
|
| | | | | | |
14.6. SAML v1.1
14.6.2. PicketLink SAML v1.1 Support
14.7. Trust
14.7.1. Security Token Server (STS)
14.7.1.1. Introduction
Tip
14.7.1.3. PicketLink JBoss Web Services Handlers
-
SAML2Handler
-
BinaryTokenHandler
-
WSAuthenticationHandler
-
WSAuthorizationHandler
14.7.1.3.1. BinaryTokenHandler
14.7.1.3.1.1. Fully Qualified Name
14.7.1.3.1.2. Objective
14.7.1.3.1.4. Settings
-
binary.http.header: http header name
-
binary.http.cookie: http cookie name
-
binary.http.encodingType: attribute value of the EncodingType attribute
-
binary.http.valueType: attribute value of the ValueType attribute
-
binary.http.valueType.namespace: namespace for the ValueType attribute
-
binary.http.valueType.prefix: namespace for the ValueType attribute
-
binary.http.cleanToken: true or false dependending on whether the binary token has to be cleaned
14.7.1.3.2. SAML2Handler
14.7.1.3.2.3. Objective:
14.7.1.3.2.3.1. Outbound:
Example 14.18. STSWSClientTestCase.java
package org.picketlink.test.trust.tests;
import java.net.URL;
import java.util.List;
import javax.xml.namespace.QName;
import javax.xml.ws.BindingProvider;
import javax.xml.ws.Service;
import javax.xml.ws.handler.Handler;
import org.junit.Test;
import org.picketlink.identity.federation.api.wstrust.WSTrustClient;
import org.picketlink.identity.federation.api.wstrust.WSTrustClient.SecurityInfo;
import org.picketlink.identity.federation.core.wstrust.WSTrustException;
import org.picketlink.identity.federation.core.wstrust.plugins.saml.SAMLUtil;
import org.picketlink.test.trust.ws.WSTest;
import org.picketlink.trust.jbossws.SAML2Constants;
import org.picketlink.trust.jbossws.handler.SAML2Handler;
import org.w3c.dom.Element;
/**
* A Simple WS Test for the SAML Profile of WSS
* @author Marcus Moyses
* @author Anil Saldhana
*/
public class STSWSClientTestCase
{
private static String username = "UserA";
private static String password = "PassA";
@SuppressWarnings("rawtypes")
@Test
public void testWSInteraction() throws Exception {
WSTrustClient client = new WSTrustClient("PicketLinkSTS", "PicketLinkSTSPort",
"http://localhost:8080/picketlink-sts/PicketLinkSTS",
new SecurityInfo(username, password));
Element assertion = null;
try {
System.out.println("Invoking token service to get SAML assertion for " + username);
assertion = client.issueToken(SAMLUtil.SAML2_TOKEN_TYPE);
System.out.println("SAML assertion for " + username + " successfully obtained!");
} catch (WSTrustException wse) {
System.out.println("Unable to issue assertion: " + wse.getMessage());
wse.printStackTrace();
System.exit(1);
}
URL wsdl = new URL("http://localhost:8080/picketlink-wstest-tests/WSTestBean?wsdl");
QName serviceName = new QName("http://ws.trust.test.picketlink.org/", "WSTestBeanService");
Service service = Service.create(wsdl, serviceName);
WSTest port = service.getPort(new QName("http://ws.trust.test.picketlink.org/", "WSTestBeanPort"), WSTest.class);
BindingProvider bp = (BindingProvider)port;
bp.getRequestContext().put(SAML2Constants.SAML2_ASSERTION_PROPERTY, assertion);
List<Handler> handlers = bp.getBinding().getHandlerChain();
handlers.add(new SAML2Handler());
bp.getBinding().setHandlerChain(handlers);
port.echo("Test");
}
}
-
The Client can push the SAML2 Assertion into the SOAP MessageContext under the key " org.picketlink.trust.saml.assertion ". In the example code above, look in the call bindingProvider.getRequestContext().put(xxxxx)
-
The SAML2 Assertion is available as part of the JAAS subject on the security context. This can happen if there has been a JAAS interaction with the usage of PicketLink STS login modules.
14.7.1.3.2.3.2. Inbound:
Example 14.19. handlers.xml
<?xml version="1.0" encoding="UTF-8"?>
<handler-chains xmlns="http://java.sun.com/xml/ns/javaee"
xmlns:xsi="http://www.w3.org/2001/XMLSchema-instance"
xmlns:ns1="http://org.jboss.ws/jaxws/samples/logicalhandler"
xsi:schemaLocation="http://java.sun.com/xml/ns/javaee javaee_web_services_1_2.xsd">
<handler-chain>
<handler>
<handler-name>SAML2Handler</handler-name>
<handler-class>org.picketlink.trust.jbossws.handler.SAML2Handler</handler-class>
</handler>
</handler-chain>
</handler-chains>
14.7.1.3.2.4. References
14.7.1.3.3. WSAuthenticationHandler
14.7.1.3.3.3. Example Usage:
package org.picketlink.test.trust.ws;
import javax.jws.HandlerChain;
import javax.jws.WebMethod;
import javax.jws.WebService;
import javax.jws.soap.SOAPBinding;
/**
* POJO that is exposed as WS
* @author Anil Saldhana
*/
@WebService
@SOAPBinding(style = SOAPBinding.Style.RPC)
@HandlerChain(file="authorize-handlers.xml")
public class POJOBean
{
@WebMethod
public void echo(String echo)
{
System.out.println(echo);
}
@WebMethod
public void echoUnchecked(String echo)
{
System.out.println(echo);
}
}
<?xml version="1.0" encoding="UTF-8"?>
<handler-chains xmlns="http://java.sun.com/xml/ns/javaee"
xmlns:xsi="http://www.w3.org/2001/XMLSchema-instance"
xsi:schemaLocation="http://java.sun.com/xml/ns/javaee javaee_web_services_1_2.xsd">
<handler-chain>
<handler>
<handler-name>WSAuthorizationHandler</handler-name>
<handler-class>org.picketlink.trust.jbossws.handler.WSAuthorizationHandler</handler-class>
</handler>
<handler>
<handler-name>WSAuthenticationHandler</handler-name>
<handler-class>org.picketlink.trust.jbossws.handler.WSAuthenticationHandler</handler-class>
</handler>
<handler>
<handler-name>SAML2Handler</handler-name>
<handler-class>org.picketlink.trust.jbossws.handler.SAML2Handler</handler-class>
</handler>
</handler-chain>
</handler-chains>
Warning
<web-app xmlns="http://java.sun.com/xml/ns/javaee" xmlns:xsi="http://www.w3.org/2001/XMLSchema-instance" xsi:schemaLocation="http://java.sun.com/xml/ns/javaee http://java.sun.com/xml/ns/javaee/web-app_2_5.xsd" version="2.5"> <servlet> <display-name>POJO Web Service</display-name> <servlet-name>POJOBeanService</servlet-name> <servlet-class>org.picketlink.test.trust.ws.POJOBean</servlet-class> <load-on-startup>1</load-on-startup> </servlet> <servlet-mapping> <servlet-name>POJOBeanService</servlet-name> <url-pattern>/POJOBeanService</url-pattern> </servlet-mapping> </web-app>
Warning
<jboss-web> <security-domain>sts</security-domain> </jboss-web>
<jboss-ws-security xmlns="http://www.jboss.com/ws-security/config"
xmlns:xsi="http://www.w3.org/2001/XMLSchema-instance"
xsi:schemaLocation="http://www.jboss.com/ws-security/config
http://www.jboss.com/ws-security/schema/jboss-ws-security_1_0.xsd">
<port name="POJOBeanPort">
<operation name="{http://ws.trust.test.picketlink.org/}echoUnchecked">
<config>
<authorize>
<unchecked/>
</authorize>
</config>
</operation>
<operation name="{http://ws.trust.test.picketlink.org/}echo">
<config>
<authorize>
<role>JBossAdmin</role>
</authorize>
</config>
</operation>
</port>
</jboss-ws-security>
anil@localhost:~/picketlink/picketlink/integration-tests/trunk/picketlink-trust-tests$ jar tvf target/pojo-test.war
0 Mon Apr 11 19:48:32 CDT 2011 META-INF/
123 Mon Apr 11 19:48:30 CDT 2011 META-INF/MANIFEST.MF
0 Mon Apr 11 19:48:30 CDT 2011 WEB-INF/
0 Mon Apr 11 19:48:30 CDT 2011 WEB-INF/classes/
0 Mon Apr 11 19:48:30 CDT 2011 WEB-INF/classes/org/
0 Mon Apr 11 19:48:30 CDT 2011 WEB-INF/classes/org/picketlink/
0 Mon Apr 11 19:48:30 CDT 2011 WEB-INF/classes/org/picketlink/test/
0 Mon Apr 11 19:48:30 CDT 2011 WEB-INF/classes/org/picketlink/test/trust/
0 Mon Apr 11 19:48:30 CDT 2011 WEB-INF/classes/org/picketlink/test/trust/ws/
0 Mon Apr 11 19:48:30 CDT 2011 WEB-INF/lib/
858 Mon Apr 11 19:48:26 CDT 2011 WEB-INF/classes/authorize-handlers.xml
1021 Mon Apr 11 19:48:28 CDT 2011 WEB-INF/classes/org/picketlink/test/trust/ws/POJOBean.class
65 Mon Apr 11 12:00:32 CDT 2011 WEB-INF/jboss-web.xml
770 Mon Apr 11 17:44:16 CDT 2011 WEB-INF/jboss-wsse.xml
598 Mon Apr 11 16:25:46 CDT 2011 WEB-INF/web.xml
0 Mon Apr 11 19:48:32 CDT 2011 META-INF/maven/
0 Mon Apr 11 19:48:32 CDT 2011 META-INF/maven/org.picketlink/
0 Mon Apr 11 19:48:32 CDT 2011 META-INF/maven/org.picketlink/picketlink-integration-trust-tests/
7918 Mon Apr 11 18:56:16 CDT 2011 META-INF/maven/org.picketlink/picketlink-integration-trust-tests/pom.xml
142 Mon Apr 11 19:48:30 CDT 2011 META-INF/maven/org.picketlink/picketlink-integration-trust-tests/pom.properties
anil@localhost:~/picketlink/picketlink/integration-tests/trunk/picketlink-trust-tests
package org.picketlink.test.trust.tests;
import java.net.URL;
import java.util.List;
import javax.xml.namespace.QName;
import javax.xml.ws.BindingProvider;
import javax.xml.ws.Service;
import javax.xml.ws.handler.Handler;
import org.junit.Test;
import org.picketlink.identity.federation.api.wstrust.WSTrustClient;
import org.picketlink.identity.federation.api.wstrust.WSTrustClient.SecurityInfo;
import org.picketlink.identity.federation.core.wstrust.WSTrustException;
import org.picketlink.identity.federation.core.wstrust.plugins.saml.SAMLUtil;
import org.picketlink.test.trust.ws.WSTest;
import org.picketlink.trust.jbossws.SAML2Constants;
import org.picketlink.trust.jbossws.handler.SAML2Handler;
import org.w3c.dom.Element;
/**
* A Simple WS Test for POJO WS Authorization using PicketLink
* @author Anil Saldhana
* @since Oct 3, 2010
*/
public class POJOWSAuthorizationTestCase
{
private static String username = "UserA";
private static String password = "PassA";
@SuppressWarnings("rawtypes")
@Test
public void testWSInteraction() throws Exception
{
// Step 1: Get a SAML2 Assertion Token from the STS
WSTrustClient client = new WSTrustClient("PicketLinkSTS", "PicketLinkSTSPort",
"http://localhost:8080/picketlink-sts/PicketLinkSTS",
new SecurityInfo(username, password));
Element assertion = null;
try {
System.out.println("Invoking token service to get SAML assertion for " + username);
assertion = client.issueToken(SAMLUtil.SAML2_TOKEN_TYPE);
System.out.println("SAML assertion for " + username + " successfully obtained!");
} catch (WSTrustException wse) {
System.out.println("Unable to issue assertion: " + wse.getMessage());
wse.printStackTrace();
System.exit(1);
}
// Step 2: Stuff the Assertion on the SOAP message context and add the SAML2Handler to client side handlers
URL wsdl = new URL("http://localhost:8080/pojo-test/POJOBeanService?wsdl");
QName serviceName = new QName("http://ws.trust.test.picketlink.org/", "POJOBeanService");
Service service = Service.create(wsdl, serviceName);
WSTest port = service.getPort(new QName("http://ws.trust.test.picketlink.org/", "POJOBeanPort"), WSTest.class);
BindingProvider bp = (BindingProvider)port;
bp.getRequestContext().put(SAML2Constants.SAML2_ASSERTION_PROPERTY, assertion);
List<Handler> handlers = bp.getBinding().getHandlerChain();
handlers.add(new SAML2Handler());
bp.getBinding().setHandlerChain(handlers);
//Step 3: Access the WS. Exceptions will be thrown anyway.
port.echo("Test");
}
}
14.7.1.3.4. WSAuthorizationHandler
14.7.1.3.4.2. Objective:
14.7.1.3.4.3. Example Usage:
Important
14.7.1.4. Protecting EJB Endpoints
14.7.1.4.1. Introduction
-
Leverage your Single Sign-On infrastructure to your service layer (EJBs, Web Services, etc)
-
Integrate your SAML Service Providers with your services by trusting the assertion previously issued by the Identity Provider
-
Any situation that requires the propagation of authorization/authentication information from one domain to another
14.7.1.4.1.1. Process Overview

14.7.1.4.2. Configuration
-
Remote EJB Client using JNDI
-
EJB Client is deployed at the same instance than your EJB endpoints
14.7.1.4.2.1. Remote EJB Client using JNDI
Important
-
Add a new Security Realm to your standalone.xml
-
Create a Security Domain using the Section 14.7.1.5.3, “SAML2STSLoginModule”
-
Change the Remoting Connector to use the new Security Realm
14.7.1.4.2.1.1. Add a new Security Realm
Important
<security-realm name="SAMLRealm">
<authentication>
<jaas name="ejb-remoting-sts"/>
</authentication>
</security-realm>
Tip
14.7.1.4.2.1.2. Create a Security Domain using the SAML2STSLoginModule
<security-domain name="ejb-remoting-sts" cache-type="default">
<authentication>
<login-module code="org.picketlink.identity.federation.bindings.jboss.auth.SAML2STSLoginModule" flag="required" module="org.picketlink">
<module-option name="configFile" value="${jboss.server.config.dir}/sts-config.properties"/>
<module-option name="password-stacking" value="useFirstPass"/>
</login-module>
</authentication>
</security-domain>
serviceName=PicketLinkSTS portName=PicketLinkSTSPort endpointAddress=http://localhost:8080/picketlink-sts/PicketLinkSTS username=admin #password=admin password=MASK-0BbleBL2LZk= salt=18273645 iterationCount=56 #java -cp picketlink-fed-core.jar org.picketlink.identity.federation.core.util.PBEUtils 18273645 56 admin #Encoded password: MASK-0BbleBL2LZk=
14.7.1.4.2.1.3. Change the Remoting Connector Security Realm
<subsystem xmlns="urn:jboss:domain:remoting:1.1">
<connector name="remoting-connector" socket-binding="remoting" security-realm="SAMLRealm"/>
</subsystem>
14.7.1.4.2.1.4. EJB Remote Client
// add the JDK SASL Provider that allows to use the PLAIN SASL Client
Security.addProvider(new Provider());
Element assertion = getAssertionFromSTS("UserA", "PassA");
// JNDI environment configuration properties
Hashtable<String, Object> env = new Hashtable<String, Object>();
env.put(Context.URL_PKG_PREFIXES, "org.jboss.ejb.client.naming");
env.put("java.naming.factory.initial", "org.jboss.naming.remote.client.InitialContextFactory");
env.put("java.naming.provider.url", "remote://localhost:4447");
env.put("jboss.naming.client.ejb.context", "true");
env.put("jboss.naming.client.connect.options.org.xnio.Options.SASL_POLICY_NOPLAINTEXT", "false");
env.put("javax.security.sasl.policy.noplaintext", "false");
// provide the user principal and credential. The credential is the previously issued SAML assertion
env.put(Context.SECURITY_PRINCIPAL, "admin");
env.put(Context.SECURITY_CREDENTIALS, DocumentUtil.getNodeAsString(assertion));
// create the JNDI Context and perform the authentication using the SAML2STSLoginModule
Context context = new InitialContext(env);
// lookup the EJB
EchoService object = (EchoService) context.lookup("ejb-test/EchoServiceImpl!org.picketlink.test.trust.ejb.EchoService");
// If everything is ok the Principal name will be added to the message
Assert.assertEquals("Hi UserA", object.echo("Hi "));
14.7.1.4.3. References
14.7.1.5. STS Login Modules
14.7.1.5.2. JBWSTokenIssuingLoginModule
14.7.1.5.2.1. Fully Qualified Name
14.7.1.5.2.2. Objective
-
Inject BinaryTokenHandler or SAML2Handler or both as client side handlers to the STS WS call.
-
Inject the JaasSecurityDomainServerSocketFactory DomainSocketFactory as a request property to the BindingProvider set to the key "org.jboss.ws.socketFactory". This is useful for mutually authenticated SSL with the STS where in we use a trust store defined by a JaasSecurityDomain instance.
14.7.1.5.2.3. Configuration
-
configFile : a properties file that gives details on the STS to the login module. This can be optional if you want to specify values directly.
-
handlerChain : Comma separated list of handlers you need to set for handling outgoing message to STS. Values: binary (to inject BinaryTokenHandler), saml2 (to inject SAML2Handler), map (to inject MapBasedTokenHandler) or class name of your own handler with default constructor.
-
cache.invalidation : set it to "true" if you want the JBoss auth cache to invalidate caches based on saml token expiry. By default, this value is false.
-
inject.callerprincipa l: set it to "true" if the login module should add a group principal called "CallerPrincipal" to the subject. This is useful in JBoss AS for programmatic security in web/ejb components.
-
groupPrincipalName : by default, JBoss AS security uses "Roles" as the group principal name in the subject. You can give a different value.
-
endpointAddress : endpoint url of STS
-
serviceName : service Name of STS
-
portName : port name of STS
-
username : username of account on STS.
-
password : password of account on STS
-
wsaIssuer : if you need to customize the WS-Addressing Issuer address in the WS-Trust call to the STS.
-
wspAppliesTo : if you need to customize the WS-Policy AppliesTo in the WS-Trust call to the STS.
-
securityDomainForFactory : if you have a JaasSecurityDomain mbean service in JBoss AS that provides the truststore.
-
map.token.key : key to find binary token in JAAS sharedState map. Defaults to "ClientID".
-
soapBinding : allow to change SOAP binding for SAML reuest.
-
requestType : allows to override SAML request type when sending request to STS. Default: "http://docs.oasis-open.org/ws-sx/ws-trust/200512/Issue" Other possible value: "http://docs.oasis-open.org/ws-sx/ws-trust/200512/Validate".
-
the password can be masked according to http://community.jboss.org/wiki/PicketLinkConfigurationMaskpassword which would give us something like, password=MASK-dsfdsfdslkfh
-
wsaIssuer can be optionally added if you want a value for the WS-Addressing issuer in the WS-Trust call to the STS.
-
wspAppliesTo can be optionally added if you want a value for WS-Policy AppliesTo in the WS-Trust call to the STS.
-
serviceName, portName, endpointAddress are mandatory .
-
username and password keys are not needed if you are using mutual authenticated ssl (MASSL) with the STS.
14.7.1.5.2.3.1. SSL DomainSocketFactory in use by the client side
14.7.1.5.2.4. Example configurations
14.7.1.5.2.4.1. Configuration specified directly
<application-policy name="saml-issue-token">
<authentication>
<login-module code="org.picketlink.identity.federation.core.wstrust.auth.JBWSTokenIssuingLoginModule" flag="required">
<module-option name="password-stacking">useFirstPass</module-option>
<module-option name="endpointAddress">http://somests</module-option>
<module-option name="serviceName">PicketLinkSTS</module-option>
<module-option name="portName">PicketLinkPort</module-option>
<module-option name="username">admin</module-option>
<module-option name="password">admin</module-option>
<module-option name="inject.callerprincipal">true</module-option>
<module-option name="groupPrincipalName">Membership</module-option>
</login-module>
</authentication>
</application-policy>
14.7.1.5.2.4.2. Configuration with configFileOption
<application-policy name="saml-issue-token">
<authentication>
<login-module code="org.picketlink.identity.federation.core.wstrust.auth.JBWSTokenIssuingLoginModule" flag="required">
<module-option name="configFile">/sts-client.properties</module-option>
<module-option name="password-stacking">useFirstPass</module-option>
<module-option name="cache.invalidation">true</module-option>
<module-option name="inject.callerprincipal">true</module-option>
<module-option name="groupPrincipalName">Membership</module-option>
</login-module>
</authentication>
</application-policy>
14.7.1.5.2.4.3. Dealing with Roles
<application-policy name="saml">
<authentication>
<login-module code="org.picketlink.trust.jbossws.jaas.JBWSTokenIssuingLoginModule" flag="required">
<module-option name="endpointAddress">SOME_URL</module-option>
<module-option name="serviceName">SecurityTokenService</module-option>
<module-option name="portName">RequestSecurityToken</module-option>
<module-option name="inject.callerprincipal">true</module-option>
<module-option name="handlerChain">binary</module-option>
</login-module>
<login-module code="org.picketlink.trust.jbossws.jaas.SAMLRoleLoginModule" flag="required"/>
</authentication>
</application-policy>
<application-policy xmlns="urn:jboss:security-beans:1.0" name="binary">
<authentication>
<login-module code="org.picketlink.trust.jbossws.jaas.JBWSTokenIssuingLoginModule" flag="required">
<module-option name="endpointAddress">http://localhost:8080/picketlink-sts/PicketLinkSTS</module-option>
<module-option name="serviceName">PicketLinkSTS</module-option>
<module-option name="portName">PicketLinkSTSPort</module-option>
<module-option name="inject.callerprincipal">true</module-option>
<module-option name="handlerChain">binary</module-option>
<module-option name="username">admin</module-option>
<module-option name="password">MASK-0BbleBL2LZk=</module-option>
<module-option name="salt">18273645</module-option>
<module-option name="iterationCount">56</module-option>
<module-option name="useOptionsCredentials">true</module-option>
<module-option name="overrideDispatch">true</module-option>
<module-option name="wspAppliesTo">http://services.testcorp.org/provider1</module-option>
<module-option name="wsaIssuer">http://something</module-option>
<module-option name="password-stacking">useFirstPass</module-option>
</login-module>
<login-module code="org.jboss.security.auth.spi.UsersRolesLoginModule" flag="required">
<module-option name="usersProperties">sts-users.properties</module-option>
<module-option name="rolesProperties">sts-roles.properties</module-option>
<module-option name="password-stacking">useFirstPass</module-option>
</login-module>
</authentication>
</application-policy>
14.7.1.5.3. SAML2STSLoginModule
14.7.1.5.3.1. FQN
14.7.1.5.3.3. Objective
14.7.1.5.3.4. Module Options
-
configFile - this property identifies the properties file that will be used to establish communication with the external security token service.
-
cache.invalidation : set it to true if you require invalidation of JBoss Auth Cache at SAML Principal expiration.
-
jboss.security.security_domain -security domain at which Principal will expire if cache.invalidation is used.
-
roleKey : key of the attribute name that we need to use for Roles from the SAML assertion. This can be a comma-separated string values such as (Role,Membership)
-
localValidation : if you want to validate the assertion locally for signature and expiry
-
localValidationSecurityDomain : the security domain for the trust store information (via the JaasSecurityDomain)
-
tokenEncodingType : encoding type of SAML token delivered via http request's header. Possible values are:
-
base64 - content encoded as base64. In case of encoding will vary between base64 and gzip use base64 and LoginModule will detect gzipped data.
-
gzip - gzipped content encoded as base64
-
none - content not encoded in any way
-
-
samlTokenHttpHeader - name of http request header to fetch SAML token from. For example: "Authorize"
-
samlTokenHttpHeaderRegEx - Java regular expression to be used to get SAML token from "samlTokenHttpHeader". Example: use: . "(. )".* to parse SAML token from header content like this: SAML_assertion="HHDHS=", at the same time set samlTokenHttpHeaderRegExGroup to 1.
-
samlTokenHttpHeaderRegExGroup - Group value to be used when parsing out value of http request header specified by "samlTokenHttpHeader" using "samlTokenHttpHeaderRegEx".
pattern = Pattern.compile(samlTokenHttpHeaderRegEx, Pattern.DOTALL); Matcher m = pattern.matcher(content); m.matches(); m.group(samlTokenHttpHeaderRegExGroup)
serviceName=PicketLinkSTS portName=PicketLinkSTSPort endpointAddress=[http://localhost:8080/picketlink-sts/PicketLinkSTS] username=JBoss password=JBoss
14.7.1.5.3.5. Examples
<application-policy xmlns="urn:jboss:security-beans:1.0" name="cache-test">
<authentication>
<login-module code="org.picketlink.identity.federation.bindings.jboss.auth.SAML2STSLoginModule" flag="required">
<module-option name="password-stacking">useFirstPass</module-option>
<module-option name="configFile">sts-config.properties</module-option>
<module-option name="cache.invalidation">true</module-option>
<module-option name="localValidation">true</module-option>
<module-option name="localValidationSecurityDomain">MASSL</module-option>
</login-module>
</authentication>
</application-policy>
<application-policy xmlns="urn:jboss:security-beans:1.0" name="service">
<authentication>
<login-module code="org.picketlink.identity.federation.bindings.jboss.auth.SAML2STSLoginModule" flag="required">
<module-option name="password-stacking">useFirstPass</module-option>
<module-option name="cache.invalidation">true</module-option>
<module-option name="localValidation">true</module-option>
<module-option name="localValidationSecurityDomain">java:jaas/localValidationDomain</module-option>
<module-option name="tokenEncodingType">gzip</module-option>
<module-option name="samlTokenHttpHeader">Auth</module-option>
<module-option name="samlTokenHttpHeaderRegEx">.*"(.*)".*</module-option>
<module-option name="samlTokenHttpHeaderRegExGroup">1</module-option>
</login-module>
<login-module code="org.picketlink.trust.jbossws.jaas.SAMLRoleLoginModule" flag="required"/>
</authentication>
</application-policy>
<?xml version="1.0" encoding="UTF-8"?>
<deployment xmlns="urn:jboss:bean-deployer:2.0">
<!-- localValidationDomain bean -->
<bean name="LocalValidationBean" class="org.jboss.security.plugins.JaasSecurityDomain">
<constructor>
<parameter>localValidationDomain</parameter>
</constructor>
<property name="keyStoreURL">file://${jboss.server.home.dir}/conf/stspub.jks</property>
<property name="keyStorePass">keypass</property>
<property name="keyStoreAlias">sts</property>
<property name="securityManagement"><inject bean="JNDIBasedSecurityManagement"/></property>
</bean>
</deployment>
<security-domain name="localValidationDomain">
<jsse
keystore-password="keypass"
keystore-type="JKS"
keystore-url="file:///${jboss.server.config.dir}/stspub.jks"
server-alias="sts"/>
</security-domain>
14.7.1.5.4. SAMLTokenCertValidatingLoginModule
14.7.1.5.4.2. Objective
-
CertPath against specified truststore. It has to have common valid public certificate in the trusted entries.
-
X509 certificate stored in SAML token didn't expire
-
if signature itself is valid
-
SAML token expiration
14.7.1.5.4.3. Module Options
-
roleKey : key of the attribute name that we need to use for Roles from the SAML assertion. This can be a comma-separated string values such as (Role,Membership)
-
localValidationSecurityDomain : the security domain for the trust store information (via the JaasSecurityDomain)
-
cache.invalidation - set it to true if you require invalidation of JBoss Auth Cache at SAML Principal expiration.
-
jboss.security.security_domain -security domain at which Principal will expire if cache.invalidation is used.
-
tokenEncodingType : encoding type of SAML token delivered via http request's header. Possible values are:
-
base64 - content encoded as base64. In case of encoding will vary between base64 and gzip use base64 and LoginModule will detect gzipped data.
-
gzip - gzipped content encoded as base64
-
none - content not encoded in any way
-
-
samlTokenHttpHeader - name of http request header to fetch SAML token from. For example: "Authorize"
-
samlTokenHttpHeaderRegEx - Java regular expression to be used to get SAML token from "samlTokenHttpHeader". Example: use: . "(. )".* to parse SAML token from header content like this: SAML_assertion="HHDHS=", at the same time set samlTokenHttpHeaderRegExGroup to 1.
-
samlTokenHttpHeaderRegExGroup - Group value to be used when parsing out value of http request header specified by "samlTokenHttpHeader" using "samlTokenHttpHeaderRegEx".
pattern = Pattern.compile(samlTokenHttpHeaderRegEx, Pattern.DOTALL); Matcher m = pattern.matcher(content); m.matches(); m.group(samlTokenHttpHeaderRegExGroup)
14.7.1.5.4.4. Examples
<application-policy xmlns="urn:jboss:security-beans:1.0" name="certpath"> <authentication> <login-module code="org.picketlink.identity.federation.bindings.jboss.auth.SAMLTokenCertValidatingLoginModule" flag="required"> <module-option name="password-stacking">useFirstPass</module-option> <module-option name="cache.invalidation">true</module-option> <module-option name="localValidationSecurityDomain">java:jaas/localValidationDomain</module-option> </login-module> </authentication> </application-policy>
<application-policy xmlns="urn:jboss:security-beans:1.0" name="service">
<authentication>
<login-module code="org.picketlink.identity.federation.bindings.jboss.auth.SAML2STSLoginModule" flag="required">
<module-option name="password-stacking">useFirstPass</module-option>
<module-option name="cache.invalidation">true</module-option>
<module-option name="localValidationSecurityDomain">java:jaas/localValidationDomain</module-option>
<module-option name="tokenEncodingType">gzip</module-option>
<module-option name="samlTokenHttpHeader">Auth</module-option>
<module-option name="samlTokenHttpHeaderRegEx">.*"(.*)".*</module-option>
<module-option name="samlTokenHttpHeaderRegExGroup">1</module-option>
</login-module>
</authentication>
</application-policy>
<?xml version="1.0" encoding="UTF-8"?>
<deployment xmlns="urn:jboss:bean-deployer:2.0">
<!-- localValidationDomain bean -->
<bean name="LocalValidationBean" class="org.jboss.security.plugins.JaasSecurityDomain">
<constructor>
<parameter>localValidationDomain</parameter>
</constructor>
<property name="keyStoreURL">file://${jboss.server.home.dir}/conf/stspub.jks</property>
<property name="keyStorePass">keypass</property>
<property name="keyStoreAlias">sts</property>
<property name="securityManagement"><inject bean="JNDIBasedSecurityManagement"/></property>
</bean>
</deployment>
14.7.1.5.5. STSValidatingLoginModule
14.7.1.5.5.1. FQN:
14.7.1.5.5.3. Objective/Features:
-
Calls the configured STS and validates an available security token.
-
A call to STS typically requires authentication. This LoginModule uses credentials from one of the following sources:
-
Its properties file, if the useOptionsCredentials module-option is set to true
-
Previous login module credentials if the password-stacking module-option is set to useFirstPass
-
From the configured CallbackHandler by supplying a Name and Password Callback
-
-
Upon successful authentication, the SamlCredential is inserted in the Subject's public credentials if one with the same Assertion is not found to be already present there.
-
New features included since 1.0.4 based on PLFED-87 :
-
If a Principal MappingProvider is configured, retrieves and inserts the Principal into the Subject
-
If a RoleGroup MappingProvider is configured, retrieves and inserts the user roles into the Subject
-
Roles can only be returned if they are included in the Security Token. Configure your STS to return roles through an AttributeProvider
-
14.8. Extensions
14.8.1. Extensions
14.8.2. PicketLinkAuthenticator
14.8.2.1. PicketLinkAuthenticator
14.8.2.1.1. FQN
14.8.2.1.2. Objective
14.8.2.1.3. JBoss Application Server 7.x Configuration
<security-constraint>
<web-resource-collection>
<web-resource-name>Restricted Access - Get Only</web-resource-name>
<url-pattern>/*</url-pattern>
<http-method>GET</http-method>
</web-resource-collection>
<auth-constraint>
<role-name>STSClient</role-name>
</auth-constraint>
<user-data-constraint>
<transport-guarantee>NONE</transport-guarantee>
</user-data-constraint>
</security-constraint>
<security-role>
<role-name>STSClient</role-name>
</security-role>
<login-config>
<auth-method>SECURITY_DOMAIN</auth-method>
<realm-name>SECURITY_DOMAIN</realm-name>
<form-login-config>
<form-login-page>/login.html</form-login-page>
<form-error-page>/error.html</form-error-page>
</form-login-config>
</login-config>
Important
<jboss-web> <security-domain>authenticator</security-domain> <context-root>authenticator</context-root> <valve> <class-name>org.picketlink.identity.federation.bindings.tomcat.PicketLinkAuthenticator </class-name> </valve> </jboss-web>
<security-domain name="authenticator" cache-type="default">
<authentication>
<login-module code="org.picketlink.test.trust.loginmodules.TestRequestUserLoginModule" flag="required">
<module-option name="usersProperties" value="users.properties"/>
<module-option name="rolesProperties" value="roles.properties"/>
</login-module>
</authentication>
</security-domain>
Tip
14.8.2.1.4. JBoss Application Server 5.x Configuration
<Context> <Valve className="org.picketlink.identity.federation.bindings.tomcat.PicketLinkAuthenticator" /> </Context>
<?xml version="1.0" encoding="UTF-8"?>
<web-app version="2.4"
xmlns="http://java.sun.com/xml/ns/j2ee"
xmlns:xsi="http://www.w3.org/2001/XMLSchema-instance"
xsi:schemaLocation="http://java.sun.com/xml/ns/j2ee
http://java.sun.com/xml/ns/j2ee/web-app_2_4.xsd">
<description>Sales Application</description>
<security-constraint>
<display-name>Restricted</display-name>
<web-resource-collection>
<web-resource-name>Restricted Access</web-resource-name>
<url-pattern>/*</url-pattern>
</web-resource-collection>
<auth-constraint>
<role-name>Sales</role-name>
</auth-constraint>
<user-data-constraint>
<transport-guarantee>NONE</transport-guarantee>
</user-data-constraint>
</security-constraint>
<security-role>
<role-name>Sales</role-name>
</security-role>
<login-config>
<auth-method>SECURITY-DOMAIN</auth-method>
</login-config>
</web-app>
Warning
14.8.2.1.4.1. Default Configuration at Global Level
<property name="authenticators">
<map class="java.util.Properties" keyClass="java.lang.String" valueClass="java.lang.String">
<entry>
<key>BASIC</key>
<value>org.apache.catalina.authenticator.BasicAuthenticator</value>
</entry>
<entry>
<key>CLIENT-CERT</key>
<value>org.apache.catalina.authenticator.SSLAuthenticator</value>
</entry>
<entry>
<key>DIGEST</key>
<value>org.apache.catalina.authenticator.DigestAuthenticator</value>
</entry>
<entry>
<key>FORM</key>
<value>org.apache.catalina.authenticator.FormAuthenticator</value>
</entry>
<entry>
<key>NONE</key>
<value>org.apache.catalina.authenticator.NonLoginAuthenticator</value>
</entry>
<key>SECURITY-DOMAIN</key>
<value>org.picketlink.identity.federation.bindings.tomcat.PicketLinkAuthenticator</value>
</entry>
</map>
</property>
14.8.2.1.4.2. Testing
-
Go to the deploy directory.
-
cp -R jmx-console.war test.war
-
In deploy/test.war/WEB-INF/web.xml, change the auth-method element to SECURITY-DOMAIN.
-
<login-config> <auth-method>SECURITY-DOMAIN</auth-method> <realm-name>JBoss JMX Console</realm-name> </login-config> -
Also uncomment the security constraints in web.xml. It should look as follows.
-
<!-- A security constraint that restricts access to the HTML JMX console to users with the role JBossAdmin. Edit the roles to what you want and uncomment the WEB-INF/jboss-web.xml/security-domain element to enable secured access to the HTML JMX console. --> <security-constraint> <web-resource-collection> <web-resource-name>HtmlAdaptor</web-resource-name> <description>An example security config that only allows users with the role JBossAdmin to access the HTML JMX console web application </description> <url-pattern>/*</url-pattern> <http-method>GET</http-method> <http-method>POST</http-method> </web-resource-collection> <auth-constraint> <role-name>JBossAdmin</role-name> </auth-constraint> </security-constraint> -
In the /server/default/conf/jboss-log4j.xml , add trace category for org.jboss.security.
-
Start JBoss AS.
-
Go to the following url: http://localhost:8080/test/
-
You should see a HTTP 403 message.
-
If you look inside the log, log/server.log, you will see the following exception trace:
-
2011-04-20 11:02:01,714 TRACE [org.jboss.security.plugins.auth.JaasSecurityManagerBase.jmx-console] (http-127.0.0.1-8080-1) Login failure javax.security.auth.login.FailedLoginException: Password Incorrect/Password Required at org.jboss.security.auth.spi.UsernamePasswordLoginModule.login(UsernamePasswordLoginModule.java:252) at org.jboss.security.auth.spi.UsersRolesLoginModule.login(UsersRolesLoginModule.java:152) at sun.reflect.NativeMethodAccessorImpl.invoke0(Native Method) at sun.reflect.NativeMethodAccessorImpl.invoke(NativeMethodAccessorImpl.java:39) at sun.reflect.DelegatingMethodAccessorImpl.invoke(DelegatingMethodAccessorImpl.java:25) at java.lang.reflect.Method.invoke(Method.java:597) at javax.security.auth.login.LoginContext.invoke(LoginContext.java:769) at javax.security.auth.login.LoginContext.access$000(LoginContext.java:186) at javax.security.auth.login.LoginContext$4.run(LoginContext.java:683) at java.security.AccessController.doPrivileged(Native Method) at javax.security.auth.login.LoginContext.invokePriv(LoginContext.java:680) at javax.security.auth.login.LoginContext.login(LoginContext.java:579) at org.jboss.security.plugins.auth.JaasSecurityManagerBase.defaultLogin(JaasSecurityManagerBase.java:552) at org.jboss.security.plugins.auth.JaasSecurityManagerBase.authenticate(JaasSecurityManagerBase.java:486) at org.jboss.security.plugins.auth.JaasSecurityManagerBase.isValid(JaasSecurityManagerBase.java:365) at org.jboss.security.plugins.JaasSecurityManager.isValid(JaasSecurityManager.java:160) at org.jboss.web.tomcat.security.JBossWebRealm.authenticate(JBossWebRealm.java:384) at org.picketlink.identity.federation.bindings.tomcat.PicketLinkAuthenticator.authenticate(PicketLinkAuthenticator.java:104) at org.apache.catalina.authenticator.AuthenticatorBase.invoke(AuthenticatorBase.java:491) at org.jboss.web.tomcat.security.JaccContextValve.invoke(JaccContextValve.java:92) at org.jboss.web.tomcat.security.SecurityContextEstablishmentValve.process(SecurityContextEstablishmentValve.java:126) at org.jboss.web.tomcat.security.SecurityContextEstablishmentValve.invoke(SecurityContextEstablishmentValve.java:70) at org.apache.catalina.core.StandardHostValve.invoke(StandardHostValve.java:127) at org.apache.catalina.valves.ErrorReportValve.invoke(ErrorReportValve.java:102) at org.jboss.web.tomcat.service.jca.CachedConnectionValve.invoke(CachedConnectionValve.java:158) at org.apache.catalina.core.StandardEngineValve.invoke(StandardEngineValve.java:109) at org.apache.catalina.connector.CoyoteAdapter.service(CoyoteAdapter.java:330) at org.apache.coyote.http11.Http11Processor.process(Http11Processor.java:829) at org.apache.coyote.http11.Http11Protocol$Http11ConnectionHandler.process(Http11Protocol.java:598) at org.apache.tomcat.util.net.JIoEndpoint$Worker.run(JIoEndpoint.java:447) at java.lang.Thread.run(Thread.java:662)As you can see from the stack trace, PicketLinkAuthenticator method has been kicked in.
14.9. PicketLink API
14.9.1. Working with SAML Assertions
14.9.1.1. Introduction
-
How to parse a XML to a PicketLink AssertionType
-
How to sign SAML Assertions
-
How to validate SAML Assertions
-
org.picketlink.identity.federation.saml.v2.assertion.AssertionType
-
org.picketlink.identity.federation.core.saml.v2.util.AssertionUtil
-
org.picketlink.identity.federation.core.parsers.saml.SAMLParser
-
org.picketlink.identity.federation.core.saml.v2.writers.SAMLAssertionWriter
-
org.picketlink.identity.federation.api.saml.v2.sig.SAML2Signature
-
org.picketlink.identity.federation.core.impl.KeyStoreKeyManager
Important
14.9.1.2. Parsing SAML Assertions
<saml:Assertion xmlns:saml="urn:oasis:names:tc:SAML:2.0:assertion" ID="ID_75291c31-93f7-4f7f-8422-aacdb07466ee" IssueInstant="2012-05-25T10:40:58.912-03:00" Version="2.0">
<saml:Issuer>http: //192.168.1.1:8080/idp-sig/</saml:Issuer>
<saml:Subject>
<saml:NameID Format="urn:oasis:names:tc:SAML:2.0:nameid-format:persistent">user</saml:NameID>
<saml:SubjectConfirmation Method="urn:oasis:names:tc:SAML:2.0:cm:bearer">
<saml:SubjectConfirmationData InResponseTo="ID_326a389f-6a8a-4712-b71d-77aa9c36795c" NotBefore="2012-05-25T10:40:58.894-03:00" NotOnOrAfter="2012-05-25T10:41:00.912-03:00" Recipient="http://192.168.1.4:8080/fake-sp" />
</saml:SubjectConfirmation>
</saml:Subject>
<saml:Conditions NotBefore="2012-05-25T10:40:57.912-03:00" NotOnOrAfter="2012-05-25T10:41:00.912-03:00" />
<saml:AuthnStatement AuthnInstant="2012-05-25T10:40:58.981-03:00">
<saml:AuthnContext>
<saml:AuthnContextClassRef>urn:oasis:names:tc:SAML:2.0:ac:classes:Password</saml:AuthnContextClassRef>
</saml:AuthnContext>
</saml:AuthnStatement>
<saml:AttributeStatement>
<saml:Attribute Name="Role">
<saml:AttributeValue xmlns:xs="http://www.w3.org/2001/XMLSchema" xmlns:xsi="http://www.w3.org/2001/XMLSchema-instance" xsi:type="xs:string">test-role1</saml:AttributeValue>
</saml:Attribute>
<saml:Attribute Name="Role">
<saml:AttributeValue xmlns:xs="http://www.w3.org/2001/XMLSchema" xmlns:xsi="http://www.w3.org/2001/XMLSchema-instance" xsi:type="xs:string">test-role2</saml:AttributeValue>
</saml:Attribute>
<saml:Attribute Name="Role">
<saml:AttributeValue xmlns:xs="http://www.w3.org/2001/XMLSchema" xmlns:xsi="http://www.w3.org/2001/XMLSchema-instance" xsi:type="xs:string">test-role3</saml:AttributeValue>
</saml:Attribute>
</saml:AttributeStatement>
</saml:Assertion>
/**
* <p>
* Parses a SAML Assertion XML representation and convert it to a {@link AssertionType} instance.
* </p>
*
* @throws Exception
*/
@Test
public void testParseAssertion() throws Exception {
// get a InputStream from the source XML file
InputStream samlAssertionInputStream = getSAMLAssertion();
SAMLParser samlParser = new SAMLParser();
Object parsedObject = samlParser.parse(samlAssertionInputStream);
Assert.assertNotNull(parsedObject);
Assert.assertTrue(parsedObject.getClass().equals(AssertionType.class));
// cast the parsed object to the expected type, in this case AssertionType
AssertionType assertionType = (AssertionType) parsedObject;
// checks if the Assertion has expired.
Assert.assertTrue(AssertionUtil.hasExpired(assertionType));
// let's write the parsed assertion to the sysout
ByteArrayOutputStream baos = new ByteArrayOutputStream();
SAMLAssertionWriter writer = new SAMLAssertionWriter(StaxUtil.getXMLStreamWriter(baos));
writer.write(assertionType);
System.out.println(new String(baos.toByteArray()));
}
14.9.1.3. Signing a SAML Assertion
/**
* <p>
* Signs a SAML Assertion.
* </p>
*
* @throws Exception
*/
@Test
public void testSignAssertion() throws Exception {
InputStream samlAssertionInputStream = getSAMLAssertion();
// convert the InputStream to a DOM Document
Document document = DocumentUtil.getDocument(samlAssertionInputStream);
SAML2Signature samlSignature = new SAML2Signature();
// get the key store manager instance.
KeyStoreKeyManager keyStoreKeyManager = getKeyStoreManager();
samlSignature.signSAMLDocument(document, keyStoreKeyManager.getSigningKeyPair());
// let's print the signed assertion to the sysout
System.out.println(DocumentUtil.asString(document));
}
/**
* <p>
* Creates a {@link KeyStoreKeyManager} instance.
* </p>
*
* @throws Exception
*/
private KeyStoreKeyManager getKeyStoreManager()
throws TrustKeyConfigurationException, TrustKeyProcessingException {
KeyStoreKeyManager keyStoreKeyManager = new KeyStoreKeyManager();
ArrayList<AuthPropertyType> authProperties = new ArrayList<AuthPropertyType>();
authProperties.add(createAuthProperty(KeyStoreKeyManager.KEYSTORE_URL, Thread.currentThread().getContextClassLoader().getResource("./keystore/jbid_test_keystore.jks").getFile()));
authProperties.add(createAuthProperty(KeyStoreKeyManager.KEYSTORE_PASS, "store123"));
authProperties.add(createAuthProperty(KeyStoreKeyManager.SIGNING_KEY_ALIAS, "servercert"));
authProperties.add(createAuthProperty(KeyStoreKeyManager.SIGNING_KEY_PASS, "test123"));
keyStoreKeyManager.setAuthProperties(authProperties);
return keyStoreKeyManager;
}
public AuthPropertyType createAuthProperty(String key, String value) {
AuthPropertyType authProperty = new AuthPropertyType();
authProperty.setKey(key);
authProperty.setValue(value);
return authProperty;
}
14.9.1.4. Validating a Signed SAML Assertion
/**
* <p>
* Validates a SAML Assertion.
* </p>
*
* @throws Exception
*/
@Test
public void testValidateSignatureAssertion() throws Exception {
InputStream samlAssertionInputStream = getSAMLSignedAssertion();
KeyStoreKeyManager keyStoreKeyManager = getKeyStoreManager();
Document signedDocument = DocumentUtil.getDocument(samlAssertionInputStream);
boolean isValidSignature = AssertionUtil.isSignatureValid(signedDocument.getDocumentElement(), keyStoreKeyManager.getSigningKeyPair().getPublic());
Assert.assertTrue(isValidSignature);
}
14.10. 3rd party integration
14.10.1. Picketlink as IDP, Salesforce as SP
14.10.1.1. Salesforce setup
Error
14.10.1.2. Picketlink IDP setup
-
Download and import Salesforce certificate - SAMLRequest messages sent from Salesforce are signed with Salesforce certificate. In order to validate them, you need to download Salesforce client certificate from http://wiki.developerforce.com/page/Client_Certificate . Then you need to import the certificate into your keystore:
unzip -q /tmp/downloads/certificates/New_proxy.salesforce.com_certificate_chain.zip keytool -import -keystore jbid_test_keystore.jks -file proxy-salesforce-com.123 -alias salesforce-cert
-
ValidatingAlias update - You need to update ValidatingAlias section, so the SAMLRequest from Salesforce will be validated with Salesforce certificate. You need to add the line into file idp-sig.war/WEB-INF/picketlink.xml :
<ValidatingAlias Key="saml.salesforce.com" Value="salesforce-cert" />
-
Trusted domain - update list of trusted domains and add domain "salesforce.com" to the list:
<Trust> <Domains>localhost,jboss.com,jboss.org,redhat.com,amazonaws.com,salesforce.com</Domains> </Trust>
14.10.1.2.1. Single logout
Error
14.10.1.3. Test the setup
-
Start the server with Picketlink IDP
-
Visit URL of your salesforce domain. It should be likely something like: https://yourdomain.my.salesforce.com/ . Now Salesforce will send SAMLRequest to your IDP and so you should be redirected to login screen on your IDP on http://localhost:8080/idp-sig/
-
Login into Picketlink IDP as user tomcat . After successful login, SAMLRequest signature is validated by the certificate salesforce-cert and IDP produces SAMLResponse for IDP and performs redirection.
-
Now Salesforce parse SAMLResponse, validates it signature with imported Picketlink certificate and then you should be redirected to salesforce and logged as user tomcat in your Salesforce domain.
14.10.1.4. Troubleshooting
14.10.2. Picketlink as SP, Salesforce as IDP
14.10.2.1. Salesforce setup
Error
14.10.2.2. Picketlink Setup
-
Import salesforce IDP certificate - In sales-post-sig.war/WEB-INF/classes you need to import downloaded certificate from salesforce into your keystore. You can use command like:
keytool -import -file salesforce_idp_cert.cer -keystore jbid_test_keystore.jks -alias salesforce-idp
-
Identity URL configuration - In sales-post-sig.war/WEB-INF/picketlink.xml you need to change identity URL to something like:
<IdentityURL>${idp-sig.url::https://yourdomain.my.salesforce.com/idp/endpoint/HttpPost}
-
ValidatingAlias configuration - In same file, you can add new validating alias for the salesforce host of your domain:
<ValidatingAlias Key="yourdomain.my.salesforce.com" Value="salesforce-idp" />
-
Roles mapping - Last very important step is mapping of roles for users, which are logged through Salesforce IDP. Normally when you have Picketlink as both IDP and SP, then SAMLResponse from IDP usually contains AttributeStatement as part of SAML assertion and this statement contains list of roles in attribute Role . Picketlink SP is then able to parse list of roles from statement and then it leverages SAML2LoginModule to assign these roles to JAAS Subject of logged principal. Thing is that SAML Response from Salesforce IDP does not contain any attribute statement with roles, so you need to handle roles assignment by yourself. Easiest way could be to chain SAML2LoginModule with another login module (like UsersRolesLoginModule for instance), which will ensure that assigning of JAAS roles is delegated from SAML2LoginModule to the second Login Module in chain. Needed steps:
-
In sales-post-sig.war/WEB-INF/jboss-web.xml you can change security-domain from value sp to something different like sp-salesforce
-
<security-domain>sp-salesforce</security-domain>
-
Create new application policy for this security domain. It differs in each application server, for example in JBoss 7 you need to edit JBOSS_HOME/standalone/configuration/standalone.xml and add this policy to particular section:
<security-domain name="sp-salesforce" cache-type="default"> <authentication> <login-module code="org.picketlink.identity.federation.bindings.jboss.auth.SAML2LoginModule" flag="required"> <module-option name="password-stacking" value="useFirstPass"/> </login-module> <login-module code="org.jboss.security.auth.spi.UsersRolesLoginModule" flag="required"> <module-option name="password-stacking" value="useFirstPass"/> <module-option name="usersProperties" value="users.properties"/> <module-option name="rolesProperties" value="roles.properties"/> </login-module> </authentication> </security-domain>
-
In sales-post-sig.war/WEB-INF/classes you need to create empty file users.properties and non-empty file roles.properties where you need to map roles. For example you can add line like:
tomcat=manager,employee,sales
14.10.2.3. Test the integration
14.10.3. Picketlink as IDP, Google Apps as SP
14.10.3.1. Google Apps setup
Error
14.10.3.2. Picketlink IDP configuration
-
Trusted domains configuration - update domains in idp-sig.war/WEB-INF/picketlink.xml
<Trust> <Domains>localhost,jboss.com,jboss.org,redhat.com,amazonaws.com,salesforce.com,google.com</Domains> </Trust>
-
Metadata configuration - We don't want SAMLRequest from Google Apps to be validated, because it's not signed. So let's add another metadata for Google Apps, which will specify that SAMLRequest from Google Apps Service Provider won't be signed. So let's add another EntityMetadataDescriptor entry for your domain google.com/a/yourdomain.com into sp-metadata.xml file created in previous tutorial (you may need to create new metadata file from scratch if not followed previous tutorial). Important attribute is especially AuthnRequestsSigned , which specifies that SAMLRequest from Google Apps are not signed.
<md:EntitiesDescriptor xmlns="urn:oasis:names:tc:SAML:2.0:metadata"
xmlns:ds="http://www.w3.org/2000/09/xmldsig#"
xmlns:md="urn:oasis:names:tc:SAML:2.0:metadata">
<md:EntityDescriptor xmlns:md="urn:oasis:names:tc:SAML:2.0:metadata" entityID="https://saml.salesforce.com" validUntil="2022-06-18T14:08:08.052Z">
......
</md:EntityDescriptor>
<md:EntityDescriptor xmlns:md="urn:oasis:names:tc:SAML:2.0:metadata" entityID="google.com/a/yourdomain.com" validUntil="2022-06-13T21:46:02.496Z">
<md:SPSSODescriptor AuthnRequestsSigned="false" WantAssertionsSigned="true" protocolSupportEnumeration="urn:oasis:names:tc:SAML:2.0:protocol" />
</md:EntityDescriptor>
</md:EntitiesDescriptor>
14.10.3.3. Test it
Chapter 15. PicketLink Quickstarts
15.1. Overview
Note
15.2. Available Quickstarts
15.3. PicketLink Federation Quickstarts
Note
15.4. Contributing
Chapter 16. Logging
16.1. Overview
Table 16.1. Logging Categories
| Category | Scope | Description |
|---|---|---|
org.picketlink | GLOBAL | Root category, used to enable logging for all PicketLink modules in use by your application. |
org.picketlink.idm | IDM | PicketLink Identity Management root category. |
org.picketlink.idm.credential | IDM | This category enables logging only for the Credential Management functionality provided by PicketLink Identity Management. |
org.picketlink.idm.identity.store | IDM | This category enables logging only for the Identity Store in use by your application. |
org.picketlink.idm.identity.store.file | IDM | This category enables logging only for the File Identity Store, if in use by your application. |
org.picketlink.idm.identity.store.jpa | IDM | This category enables logging only for the JPA Identity Store, if in use by your application. |
org.picketlink.idm.identity.store.ldap | IDM | This category enables logging only for the LDA[ Identity Store, if in use by your application. |
org.picketlink.authentication | BASE | This category enables logging only for the Authentication functionality provided by the Base Module. |
org.picketlink.http | HTTP | This category enables logging only for the Http Security functionality provided by the Base Module. |
16.2. Configuration
<!-- A file handler for PicketLink logging messages --> <periodic-rotating-file-handler name="PICKETLINK"> <file relative-to="jboss.server.log.dir" path="picketlink.log"/> <suffix value=".yyyy-MM-dd"/> <append value="true"/> </periodic-rotating-file-handler> <!-- This should enable logging for all PicketLink modules in use by your application --> <logger category="org.picketlink"> <level name="DEBUG"/> <handlers> <handler name="PICKETLINK"/> </handlers> </logger>
<?xml version="1.0" encoding="UTF-8"?> <!DOCTYPE log4j:configuration SYSTEM "log4j.dtd"> <log4j:configuration xmlns:log4j="http://jakarta.apache.org/log4j/" debug="false"> <!-- ============================== --> <!-- Append messages to the file --> <!-- ============================== --> <appender name="FILE" class="org.apache.log4j.DailyRollingFileAppender"> <param name="File" value="${basedir}/target/test.log"/> <param name="Append" value="true"/> <param name="DatePattern" value="'.'yyyy-MM-dd"/> <layout class="org.apache.log4j.PatternLayout"> <param name="ConversionPattern" value="%d{ABSOLUTE} %-5p [%c] %m%n"/> </layout> </appender> <!-- ============================== --> <!-- Append messages to the console --> <!-- ============================== --> <appender name="CONSOLE" class="org.apache.log4j.ConsoleAppender"> <param name="Target" value="System.out"/> <layout class="org.apache.log4j.PatternLayout"> <param name="ConversionPattern" value="%d{ABSOLUTE} %-5p [%c] %m%n"/> </layout> </appender> <!-- ================ --> <!-- Limit categories --> <!-- ================ --> <!-- PicketLink Root category. --> <category name="org.picketlink"> <priority value="DEBUG"/> </category> <!-- ======================= --> <!-- Setup the Root category --> <!-- ======================= --> <root> <appender-ref ref="CONSOLE"/> <appender-ref ref="FILE"/> </root> </log4j:configuration>
<dependency> <groupId>org.slf4j</groupId> <artifactId>slf4j-log4j12</artifactId> <version>1.6.0</version> </dependency>
Chapter 17. Compiler Output
Topic ID 42191
-
INFO: Security Level-Based Access Control
-
INFO: Topic Types: Concept Assigned Writer: pedroigor
-
INFO: Topic URL
-
WARNING: This topic has no XML data
Topic ID 30033
-
INFO: Salesforce setup
-
INFO: Topic URL
-
ERROR: This topic has invalid DocBook XML. The error is element "mediaobject" not allowed yet; expected element "info", "title" or "titleabbrev". The processed XML is
<section remap="TID_30033" version="5.0" xml:id="Salesforce_setup" xmlns="http://docbook.org/ns/docbook" xmlns:xlink="http://www.w3.org/1999/xlink"> <title>Salesforce setup</title> <itemizedlist> <listitem> <para> <emphasis role="strong">Disable Single Sign on</emphasis> in SSO settings if you enabled it previously. As in this step, we don't want to login into Salesforce through SSO but we want Salesforce to provide SSO for us and act as Identity Provider. </para> </listitem> </itemizedlist> <itemizedlist> <listitem> <para> <emphasis role="strong">Identity provider setup</emphasis> - In link <emphasis role="strong">Setup</emphasis> -> <emphasis role="strong">Security controls</emphasis> -> <emphasis role="strong">Identity provider</emphasis> you need to setup Salesforce as IDP. </para> </listitem> </itemizedlist> <itemizedlist> <listitem> <para> <emphasis role="strong">Generate certificate</emphasis> - first generate certificate on first screen. This certificate will be used to sign SAMLResponse messages sent from Salesforce IDP. </para> <figure> <mediaobject> <imageobject> <imagedata fileref="images/5880.png" /> </imageobject> </mediaobject> </figure> <para> After certificate will be generated in Salesforce, you can download it to your computer. </para> </listitem> <listitem> <para> <emphasis role="strong">Configure generated certificate for Identity Provider</emphasis> - In Identity Provider setup, you need to select the certificate, which you just generated </para> </listitem> </itemizedlist> <itemizedlist> <listitem> <para> <emphasis role="strong">Add service provider</emphasis> - In section <emphasis role="strong">Setup</emphasis> -> <emphasis role="strong">Security Controls</emphasis> -> <emphasis role="strong">Identity Provider</emphasis> -> <emphasis role="strong">Service providers</emphasis> you can add your Picketlink application as Service Provider. We will use application <emphasis role="strong">sales-post-sig</emphasis> from <link xlink:href="https://docs.jboss.org/author/display/PLINK/PicketLink+Quickstarts#PicketLinkQuickstarts-AbouttheQuickstarts">Picketlink quickstarts</link> . So in first screen of configuration of your Service provider, you need to add <emphasis role="strong">ACS URL</emphasis> and <emphasis role="strong">Entity ID</emphasis> like <emphasis role="italics"> <link xlink:href="http://localhost:8080/sales-post-sig/" /> </emphasis> <emphasis role="italics">. Subject type</emphasis> needs to be <emphasis role="italics">Federation ID</emphasis> and you also need to upload certificate corresponding to signing key of sales-post-sig application. You first need to export this certificate from your keystore file. See <link xlink:href="https://docs.jboss.org/author/display/PLINK/Picketlink+as+IDP%2C+Salesforce+as+SP">previous tutorial</link> for how to do it. In next screen, you can select profile for users, who will be able to login to this Service Provider. By checking first checkbox, you will automatically select all profiles. After confirm this screen, you will have your service provider created. Let's see how your final configuration can looks like after confirming: </para> <figure> <mediaobject> <imageobject> <imagedata fileref="images/5881.png" /> </imageobject> </mediaobject> </figure> </listitem> </itemizedlist> <sidebar> <para> <emphasis role="strong">WARNING:</emphasis> As mentioned in previous tutorial, you should create your own keystore file for Picketlink and not use example keystore <emphasis role="italics">jbid_test_keystore.jks</emphasis> and certificates from it in production environment. In this tutorial, we will use it only for simplicity and demonstration purposes. </para> </sidebar> </section>
Topic ID 30037
-
INFO: Google Apps setup
-
INFO: Topic URL
-
ERROR: This topic has invalid DocBook XML. The error is element "mediaobject" not allowed yet; expected element "info", "title" or "titleabbrev". The processed XML is
<section remap="TID_30037" version="5.0" xml:id="Google_Apps_setup" xmlns="http://docbook.org/ns/docbook" xmlns:xlink="http://www.w3.org/1999/xlink"> <title>Google Apps setup</title> <itemizedlist> <listitem> <para> <emphasis role="strong">Creating Google Apps domain</emphasis> - you need to create Google Apps domain on <link xlink:href="http://www.google.com/apps" /> . Follow the instructions on google page on how to do it. </para> </listitem> <listitem> <para> <emphasis role="strong">Add some users</emphasis> - let's add some users, which will be available to login into your domain. So let's add user <emphasis role="italics">tomcat</emphasis> first. In Google & Apps control panel, you need to click <emphasis role="strong">Organization & Users</emphasis> -> <emphasis role="strong">Create new user</emphasis> and add him email <emphasis role="strong">tomcat@yourdomain.com</emphasis> . This will ensure that nick of new user will be <emphasis role="italics">tomcat</emphasis> . See screenshot: </para> <figure> <mediaobject> <imageobject> <imagedata fileref="images/5870.png" /> </imageobject> </mediaobject> </figure> </listitem> <listitem> <para> <emphasis role="strong">Configure SAML SSO</emphasis> - In menu <emphasis role="strong">Advanced tools</emphasis> -> <emphasis role="strong">Set up single sign-on (SSO)</emphasis> you can setup SSO settings. For our testing purposes, you can set it like done on screenshot . Especially it's important to set Sign-in page to <emphasis role="italics"> <link xlink:href="http://localhost:8080/idp-sig/" /> </emphasis> <emphasis role="italics">. Sign-out page can be also set but Google Apps don't support SAML Single Logout profile, so this is only page where will be users redirected after logout. Let's click checkbox _Use a domain specific issuer</emphasis> to true. </para> </listitem> </itemizedlist> <itemizedlist> <listitem> <para> <emphasis role="strong">Certificate upload</emphasis> - you also need to upload certificate exported from your picketlink keystore in similar way, like done for Salesforce in <link xlink:href="https://docs.jboss.org/author/display/PLINK/Picketlink+as+IDP%2C+Salesforce+as+SP">previous tutorials</link> . So let's upload <emphasis role="italics">test-certificate.crt</emphasis> into Google Apps. </para> </listitem> </itemizedlist> <sidebar> <para> WARNING: Once again, you shouldn't use picketlink test keystore file jbid_test_keystore.jks in production environment. We use it here only for simplicity and for demonstration purposes. </para> </sidebar> <para> <figure> <mediaobject> <imageobject> <imagedata fileref="images/5869.png" /> </imageobject> </mediaobject> </figure> </para> </section>
Topic ID 30026
-
INFO: Salesforce setup
-
INFO: Topic URL
-
ERROR: This topic has invalid DocBook XML. The error is element "mediaobject" not allowed yet; expected element "info", "title" or "titleabbrev". The processed XML is
<section remap="TID_30026" version="5.0" xml:id="Salesforce_setup1" xmlns="http://docbook.org/ns/docbook" xmlns:xlink="http://www.w3.org/1999/xlink"> <title>Salesforce setup</title> <para> First you need to perform some actions on Salesforce side. Brief description is here. For more details, you can see Salesforce documentation. </para> <itemizedlist> <listitem> <para> <emphasis role="strong">Register Salesforce account</emphasis> - You will need to register in Salesforce with free developer account. You can do it <link xlink:href="http://developer.force.com/">here</link> . </para> </listitem> <listitem> <para> <emphasis role="strong">Register your salesforce domain</emphasis> - Salesforce supports SP-initiated SAML login workflow or IDP-initiated SAML login workflow. For picketlink integration, we will use SP-initiated login workflow, where user needs to access Salesforce and Salesforce will send SAMLRequest to Picketlink IDP. For achieving this, you need to create Salesforce domain. When registered and logged in <link xlink:href="http://www.salesforce.com">www.salesforce.com</link> , you will need to click on Your name in right top corner -> Link <emphasis role="strong">Setup</emphasis> -> Link <emphasis role="strong">Company Profile</emphasis> -> Link <emphasis role="strong">My Domain</emphasis> . Here you can create your Salesforce domain and make it available for testing. </para> </listitem> <listitem> <para> <emphasis role="strong">SAML SSO configuration</emphasis> - Now you need again to click on Your name in right top corner -> Link <emphasis role="strong">Setup</emphasis> -> Link <emphasis role="strong">Security controls</emphasis> -> Link <emphasis role="strong">Single Sign-On Settings</emphasis> Then configure it as follows: </para> <itemizedlist> <listitem> <para> <emphasis role="strong">SAML Enabled</emphasis> checkbox needs to be checked </para> </listitem> <listitem> <para> <emphasis role="strong">SAML Version</emphasis> needs to be 2.0 </para> </listitem> <listitem> <para> <emphasis role="strong">Issuer</emphasis> needs to be <emphasis role="italics"> <link xlink:href="http://localhost:8080/idp-sig/_">http://localhost:8080/idp-sig/</link> </emphasis> <emphasis role="italics">-</emphasis> This identifies issuer, which will be used as IDP for salesforce. NOTE: Be sure that URL really ends with "/" character. </para> </listitem> <listitem> <para> <emphasis role="strong">Identity Provider Login URL</emphasis> also needs to be <link xlink:href="http://localhost:8080/idp-sig/_">http://localhost:8080/idp-sig/</link> - This identifies URL where Salesforce SP will send it's SAMLRequest for login. </para> </listitem> <listitem> <para> <emphasis role="strong">Identity Provider Logout URL</emphasis> points to URL where Salesforce redirects user after logout. You may also use your IDP address or something different according to your needs. </para> </listitem> <listitem> <para> <emphasis role="strong">Subject mapping</emphasis> - You need to configure how to map Subject from SAMLResponse, which will be send by Picketlink IDP, to Salesforce user account. In the example, we will use that SAMLResponse will contain information about Subject in "NameIdentifier" element of SAMLResponse and ID of subject will be mapped to Salesforce Federation ID of particular user. So in: <emphasis role="strong">SAML User ID Type</emphasis> , you need to check option <emphasis role="italics">Assertion contains the Federation ID from the User object</emphasis> and for <emphasis role="strong">SAML User ID Location</emphasis> , you need to check <emphasis role="italics">User ID is in the NameIdentifier element of the Subject statement</emphasis> . </para> </listitem> <listitem> <para> <emphasis role="strong">Entity ID</emphasis> - Here we will use <link xlink:href="https://saml.salesforce.com_">https://saml.salesforce.com</link> . Whole configuration can look as follows: </para> <figure> <mediaobject> <imageobject> <imagedata fileref="images/5882.png" /> </imageobject> </mediaobject> </figure> </listitem> </itemizedlist> </listitem> </itemizedlist> <itemizedlist> <listitem> <para> <emphasis role="strong">Certificate</emphasis> - Last very important thing is upload of your certificate to Salesforce, because Salesforce needs to verify signature on SAMLResponse sent from your Picketlink Identity Provider. So first you need to export certificate from your keystore file and then import this certificate into Salesforce. So in <emphasis role="strong">idp-sig.war/WEB-INF/classes</emphasis> you can run command like: </para> </listitem> </itemizedlist> <informalexample> <programlisting> keytool -export -keystore jbid_test_keystore.jks -alias servercert -file test-certificate.crt </programlisting> </informalexample> <para> after typing keystore password <emphasis role="italics">store123</emphasis> you should see exported certificate in file <emphasis role="italics">test-certificate.crt .</emphasis> </para> <sidebar> <para> <emphasis role="strong">WARNING:</emphasis> For production environment in salesforce, you should generate your own keystore file and use certificate from your own file instead of the default picketlink <emphasis role="italics">jbid_test_keystore.jks</emphasis> </para> </sidebar> <para> Then you can import this certificate <emphasis role="italics">test-certificate.crt</emphasis> into SalesForce via menu with SSO configuration. </para> <itemizedlist> <listitem> <para> <emphasis role="strong">Adding users</emphasis> - Last action you need to do in Salesforce is to add some users. You can do it in: Link <emphasis role="strong">Setup</emphasis> -> Link <emphasis role="strong">Manage Users</emphasis> -> Link <emphasis role="strong">Users</emphasis> . Now you can create user and fill some values as you want. Please note that username must be in form of email address. Note that <emphasis role="italics">Federation ID</emphasis> is the value, which is used for mapping the user with the NameIdentifier subject from SAML assertion, which will be sent from Picketlink IDP. So let's use Federation ID with value <emphasis role="italics">tomcat</emphasis> for our first user. </para> </listitem> </itemizedlist> <para> <figure> <mediaobject> <imageobject> <imagedata fileref="images/5884.png" /> </imageobject> </mediaobject> </figure> </para> </section>
Topic ID 30029
-
INFO: Single logout
-
INFO: Topic URL
-
ERROR: This topic has invalid DocBook XML. The error is element "mediaobject" not allowed yet; expected element "info", "title" or "titleabbrev". The processed XML is
<section remap="TID_30029" version="5.0" xml:id="Single_logout" xmlns="http://docbook.org/ns/docbook" xmlns:xlink="http://www.w3.org/1999/xlink"> <title>Single logout</title> <para> Now you have basic setup done but in order to support single logout, you need to do some additional actions. Especially Salesforce is not using same URL for login and single logout, which means that we need to configure SP metadata on Picketlink side to provide mapping between SP and their URL for logout. Needed actions are: </para> <itemizedlist> <listitem> <para> <emphasis role="strong">Download SAML metadata</emphasis> from Salesforce SSO settings. Save downloaded XML file as <emphasis role="strong">idp-sig.war/WEB-INF/sp-metadata.xml</emphasis> </para> </listitem> </itemizedlist> <itemizedlist> <listitem> <para> <emphasis role="strong">Add SingleLogoutService element</emphasis> - unfortunately another element needs to be manually added into metadata as Salesforce doesn't use single logout configuration in their metadata. So let's add following element into metadata file after <emphasis role="italics">md:AssertionConsumerService</emphasis> element: </para> </listitem> </itemizedlist> <informalexample> <programlisting> <md:SingleLogoutService Binding="urn:oasis:names:tc:SAML:2.0:bindings:HTTP-POST" Location="https://login.salesforce.com/saml/logout-request.jsp?saml=MgoTx78aEPkEM4eGV5ZzptlliwIVkRkOWYKlqXQq2StV_sLo0EiRqKYtIc" index="0" isDefault="true"/> </programlisting> </informalexample> <para> Note that value of Location attribute will be different for your domain. You can see which value to use in Salesforce SSO settings page from element <emphasis role="italics">Salesforce.com Single Logout URL</emphasis> : </para> <para> <figure> <mediaobject> <imageobject> <imagedata fileref="images/5883.png" /> </imageobject> </mediaobject> </figure> </para> <itemizedlist> <listitem> <para> <emphasis role="strong">Add md:EntitiesDescriptor element</emphasis> - Finally you need to add enclosing element <emphasis role="italics">md:EntitiesDescriptor</emphasis> and encapsulate whole current content into it. This is needed as we may want to use more EntityDescriptor elements in this single metadata file (like another element for Google Apps etc): </para> </listitem> </itemizedlist> <informalexample> <programlisting> <?xml version="1.0" encoding="UTF-8"?> <md:EntitiesDescriptor xmlns="urn:oasis:names:tc:SAML:2.0:metadata" xmlns:ds="http://www.w3.org/2000/09/xmldsig#" xmlns:md="urn:oasis:names:tc:SAML:2.0:metadata"> <md:EntityDescriptor xmlns:md="urn:oasis:names:tc:SAML:2.0:metadata" entityID="https://saml.salesforce.com" .... ... </md:EntityDescriptor> </md:EntitiesDescriptor> </programlisting> </informalexample> <itemizedlist> <listitem> <para> <emphasis role="strong">Configure metadata location</emphasis> - Let's add new MetaDataProvider into file <emphasis role="strong">idp-sig.war/WEB-INF/picketlink.xml</emphasis> after section with KeyProvider: </para> </listitem> </itemizedlist> <informalexample> <programlisting> ... </KeyProvider> <MetaDataProvider ClassName="org.picketlink.identity.federation.core.saml.md.providers.FileBasedEntitiesMetadataProvider"> <Option Key="FileName" Value="/WEB-INF/sp-metadata.xml"/> </MetaDataProvider> </PicketLinkIDP> ..... </programlisting> </informalexample> </section>
Topic ID 29879
-
INFO: Example:
-
INFO: Topic URL
-
ERROR: This topic has invalid DocBook XML. The error is element "section" incomplete; expected element "address", "anchor", "annotation", "bibliolist", "blockquote", "bridgehead", "calloutlist", "caution", "classsynopsis", "cmdsynopsis", "constraintdef", "constructorsynopsis", "destructorsynopsis", "epigraph", "equation", "example", "fieldsynopsis", "figure", "formalpara", "funcsynopsis", "glosslist", "important", "indexterm", "info", "informalequation", "informalexample", "informalfigure", "informaltable", "itemizedlist", "literallayout", "mediaobject", "methodsynopsis", "msgset", "note", "orderedlist", "para", "procedure", "productionset", "programlisting", "programlistingco", "qandaset", "refentry", "remark", "revhistory", "screen", "screenco", "screenshot", "section", "segmentedlist", "sidebar", "simpara", "simplelist", "simplesect", "subtitle", "synopsis", "table", "task", "tip", "titleabbrev", "variablelist" or "warning". The processed XML is
<section remap="TID_29879" version="5.0" xml:id="Example10" xmlns="http://docbook.org/ns/docbook" xmlns:xlink="http://www.w3.org/1999/xlink"> <title>Example:</title> </section>
Topic ID 29851
-
INFO: Introduction
-
INFO: Topic URL
-
ERROR: This topic has invalid DocBook XML. The error is element "mediaobject" not allowed yet; expected element "info", "title" or "titleabbrev". The processed XML is
<section remap="TID_29851" version="5.0" xml:id="Introduction" xmlns="http://docbook.org/ns/docbook" xmlns:xlink="http://www.w3.org/1999/xlink"> <title>Introduction</title> <para> The PicketLink Identity Provider Authenticator is a component responsible for the authentication of users and for issue and validate SAML assertions. </para> <para> Basically, there two different different authenticator implementations type: </para> <itemizedlist> <listitem> <para> Identity Provider Authenticators </para> </listitem> <listitem> <para> Service Provider Authenticators </para> </listitem> </itemizedlist> <para> <figure> <mediaobject> <imageobject> <imagedata fileref="images/5885.png" /> </imageobject> </mediaobject> </figure> </para> </section>
Topic ID 29920
-
INFO: Example:
-
INFO: Topic URL
-
ERROR: This topic has invalid DocBook XML. The error is element "section" incomplete; expected element "address", "anchor", "annotation", "bibliolist", "blockquote", "bridgehead", "calloutlist", "caution", "classsynopsis", "cmdsynopsis", "constraintdef", "constructorsynopsis", "destructorsynopsis", "epigraph", "equation", "example", "fieldsynopsis", "figure", "formalpara", "funcsynopsis", "glosslist", "important", "indexterm", "info", "informalequation", "informalexample", "informalfigure", "informaltable", "itemizedlist", "literallayout", "mediaobject", "methodsynopsis", "msgset", "note", "orderedlist", "para", "procedure", "productionset", "programlisting", "programlistingco", "qandaset", "refentry", "remark", "revhistory", "screen", "screenco", "screenshot", "section", "segmentedlist", "sidebar", "simpara", "simplelist", "simplesect", "subtitle", "synopsis", "table", "task", "tip", "titleabbrev", "variablelist" or "warning". The processed XML is
<section remap="TID_29920" version="5.0" xml:id="Example11" xmlns="http://docbook.org/ns/docbook" xmlns:xlink="http://www.w3.org/1999/xlink"> <title>Example:</title> </section>
Topic ID 29894
-
INFO: Example:
-
INFO: Topic URL
-
ERROR: This topic has invalid DocBook XML. The error is element "section" incomplete; expected element "address", "anchor", "annotation", "bibliolist", "blockquote", "bridgehead", "calloutlist", "caution", "classsynopsis", "cmdsynopsis", "constraintdef", "constructorsynopsis", "destructorsynopsis", "epigraph", "equation", "example", "fieldsynopsis", "figure", "formalpara", "funcsynopsis", "glosslist", "important", "indexterm", "info", "informalequation", "informalexample", "informalfigure", "informaltable", "itemizedlist", "literallayout", "mediaobject", "methodsynopsis", "msgset", "note", "orderedlist", "para", "procedure", "productionset", "programlisting", "programlistingco", "qandaset", "refentry", "remark", "revhistory", "screen", "screenco", "screenshot", "section", "segmentedlist", "sidebar", "simpara", "simplelist", "simplesect", "subtitle", "synopsis", "table", "task", "tip", "titleabbrev", "variablelist" or "warning". The processed XML is
<section remap="TID_29894" version="5.0" xml:id="Example16" xmlns="http://docbook.org/ns/docbook" xmlns:xlink="http://www.w3.org/1999/xlink"> <title>Example:</title> </section>
Topic ID 29913
-
INFO: Example:
-
INFO: Topic URL
-
ERROR: This topic has invalid DocBook XML. The error is element "section" incomplete; expected element "address", "anchor", "annotation", "bibliolist", "blockquote", "bridgehead", "calloutlist", "caution", "classsynopsis", "cmdsynopsis", "constraintdef", "constructorsynopsis", "destructorsynopsis", "epigraph", "equation", "example", "fieldsynopsis", "figure", "formalpara", "funcsynopsis", "glosslist", "important", "indexterm", "info", "informalequation", "informalexample", "informalfigure", "informaltable", "itemizedlist", "literallayout", "mediaobject", "methodsynopsis", "msgset", "note", "orderedlist", "para", "procedure", "productionset", "programlisting", "programlistingco", "qandaset", "refentry", "remark", "revhistory", "screen", "screenco", "screenshot", "section", "segmentedlist", "sidebar", "simpara", "simplelist", "simplesect", "subtitle", "synopsis", "table", "task", "tip", "titleabbrev", "variablelist" or "warning". The processed XML is
<section remap="TID_29913" version="5.0" xml:id="Example2" xmlns="http://docbook.org/ns/docbook" xmlns:xlink="http://www.w3.org/1999/xlink"> <title>Example:</title> </section>
Topic ID 29813
-
INFO: Introduction
-
INFO: Topic URL
-
ERROR: This topic has invalid DocBook XML. The error is element "mediaobject" not allowed yet; expected element "info", "title" or "titleabbrev". The processed XML is
<section remap="TID_29813" version="5.0" xml:id="Introduction4" xmlns="http://docbook.org/ns/docbook" xmlns:xlink="http://www.w3.org/1999/xlink"> <title>Introduction</title> <para> PicketLink Service Providers Authenticators are important components responsible for the authentication of users using the SAML Assertion previously issued by an Identity Provider. </para> <para> They are responsible for intercepting each request made to an application, checking if a SAML assertion is present in the request, validating its signature and executing SAML specific validations and creating a security context for the user in the requested application. </para> <para> <figure> <mediaobject> <imageobject> <imagedata fileref="images/5885.png" /> </imageobject> </mediaobject> </figure> </para> </section>
Topic ID 29775
-
INFO: Introduction
-
INFO: Topic URL
-
ERROR: This topic has invalid DocBook XML. The error is element "mediaobject" not allowed yet; expected element "info", "title" or "titleabbrev". The processed XML is
<section remap="TID_29775" version="5.0" xml:id="Introduction8" xmlns="http://docbook.org/ns/docbook" xmlns:xlink="http://www.w3.org/1999/xlink"> <title>Introduction</title> <para> The PicketLink Identity Provider Authenticator is a component responsible for the authentication of users and for issue and validate SAML assertions. </para> <para> <figure> <mediaobject> <imageobject> <imagedata fileref="images/5885.png" /> </imageobject> </mediaobject> </figure> </para> </section>
Topic ID 29982
-
INFO: Process Overview
-
INFO: Topic URL
-
ERROR: No image filename specified. Must be in the format [ImageFileID].extension e.g. 123.png, or images/321.jpg
Compiler Glossary
- "... is possibly an invalid custom Injection Point."
-
The XML comment mentioned has been identified as a possible custom Injection Point, that is incorrectly referenced.
-
To fix this error please ensure that the type is valid, a colon is used to separate the IDs from the type and only topic IDs are used in the ID list.
-
- "This topic contains an invalid element that can't be converted into a DOM Element."
-
The topic XML contains invalid elements that cannot be successfully converted in DOM elements.
-
To fix this error please remove or correct any invalid XML elements or entities.
-
- "This topic doesn't have well-formed xml."
-
The topic XML is not well-formed XML and maybe missing opening or closing element statements.
-
To fix this error please ensure that all XML elements having an opening and closing statement and all XML reserved characters are represented as XML entities.
-
- "This topic has invalid DocBook XML."
-
The topic XML is not valid against the DocBook specification.
-
To fix this error please ensure that all XML elements are valid DocBook elements . Also check to ensure all XML sub elements are valid for the root XML element.
-
- "This topic has invalid Injection Points."
-
The topic XML contains Injection Points that cannot be resolved into links.
-
To fix this error please ensure that all the topics referred to by Injection Points are included in the build and/or have adequate relationships.
-
- "This topic has no XML data"
-
The topic doesn't have any XML Content to display.
-
To fix this warning, open the topic URL and add some content.
-