This chapter describes the JBoss CVS administration policies for managing the CVS repository. Comments or questions regarding these policies should be directed to the JBoss Development forum.
The CVS branching and release management procedures are outlined in this section. All development of new features occurs on the main trunk. Releases are done on branches off of the main trunk.
Releases are tracked using CVS tags that have the following forms:
- Final Binary Releases: JBoss_(major).(even_minor).(patch)
- Beta Binary Releases: Rel__(major).(even_minor).(patch).(build)
- Development Binary Releases(optional): JBoss_(major).(odd_minor).(patch)
- Alpha Development Builds(optional): Rel_(major).(odd_minor).(patch).(build)
- A final binary release is a tested and approved release of the JBoss server. The major and minor version numbers are fixed for a given branch. The minor version number is always even on a release branch. Example final release tags are: JBoss_2_2_0, JBoss_2_2_1, JBoss_2_4_13, JBoss_3_0_0.
- A beta binary release is a candidate final release that is being made available for testing. The major and minor version numbers are fixed for a given branch. The patch number is one greater than the current final binary. The build number indicates the number of patches that have been incorporated into the candidate release. For example, if the latest final release is JBoss_2_2_0, then next beta binary release patch number will be 1 and build numbers will start at 1. A build number of 0 is used to tag the previous final release code. So, if JBoss_2_2_0 were the latest final release, and three fixes were incorported into the 2.2 branch, there would be beta binary release tags of Rel_2_2_1_0, Rel_2_2_1_1 Rel_2_2_1_2, Rel_2_2_1_3. The idea is that beta binary releases are building to the next final binary release, in this case JBoss_2_2_1.
- A development binary release is an alpha release of the JBoss server. It is a snapshot of the functionallity in the main trunk at some point in time. The major version number is greater than or equal to the latest final binary release. The minor version number is 1 greater than the latest final binary release minor version number. This means that minor versions of development binaries will always be odd. Example development binary releases are: JBoss_2_3_0, JBoss_2_3_1, JBoss_2_5_13, JBoss_3_1_0.
- An alpha development build is a patch beyond a development binary release. The patch number is one greater than the current development binary. The build number indicates the number of patches that have been incorporated into the candidate build. For example, if the latest development build is JBoss_2_3_0, then next alpha build patch number will be 1 and build numbers will start at 1. A build number of 0 is used to tag the previous devlopment build code. So, if JBoss_2_3_0 were the latest development build, and three fixes were incorported into the main trunk, there would be alpha release tags of Rel_2_3_1_0, Rel_2_3_1_1 Rel_2_3_1_2, Rel_2_3_1_3. The idea is that alpha builds are leading to the next development build, in this case JBoss_2_3_1.
Consider events 1-13 in blue on the following figure:
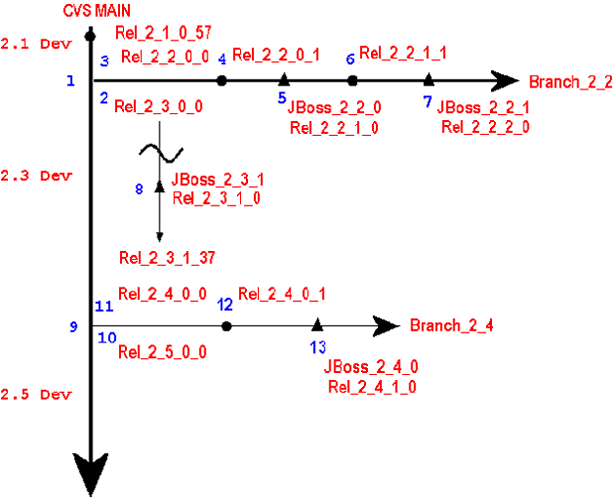
Prior to event 1, the latest alpha development build is Rel_2_1_0_57. At this point it is decided to create a new binary release.
- This is the creation of a 2.2 branch. It is labeled with a branch tag of Branch_2_2. This fixes the major version to 2 and the minor version to 2 for all tags on this branch.
- This is the creation of a Rel_2_3_0_0 alpha release tag on the main trunk. It it is also an alias to the state of the main branch at the time of the 2.2 branch creation.
- This is the creation of a Rel_2_2_0_0 beta release tag in the branch. It serves as an alias to the state of the main branch at the time the 2.2 branch was created.
- This is the integration of the first patch/change into the 2.2 branch. After the code is commited the Rel_2_2_0_1 tag is applied.
- This is the release of the initial 2.2 branch binary. The release is tagged as JBoss_2_2_0 as well as Rel_2_2_1_0 to start the next beta series.
- This is the integration of the first patch/change after the 2.2.0 binary release. After the code is commited the Rel_2_2_1_1 tag is applied.
- This is the release of the second 2.2 branch binary. The release is tagged as JBoss_2_2_1 as well as Rel_2_2_2_0 to start the next beta series.
- This is the release of a development binary. The release is tagged as JBoss_2_3_1 as well as Rel_2_3_1_0 to start the next alpha series. Prior to this there had also been a JBoss_2_3_0 development binary not shown in the diagram.
- This is the creation of a new binary release branch. After some period of development on the 2.3 portion of the trunk(Rel_2_3_0_0 to Rel_2_3_1_37), it is decided to release a final binary incorporating the main trunk functionality. The new 2.4 branch is labeled with a branch tag of Branch_2_4. This fixes the major version to 2 and the minor version to 4 for all tags on this branch.
- This is the creation of a Rel_2_5_0_0 alpha release tag on the main trunk. It it is also an alias to the state of the main branch at the time of the 2.4 branch creation.
- This is the creation of a Rel_2_4_0_0 beta release tag in the branch. It serves as an alias to the state of the main branch at the time the 2.4 branch was created.
- This is the integration of the first patch/change into the 2.4 branch. After the code is commited the Rel_2_4_0_1 tag is applied.
- This is the release of the initial 2.4 branch binary. The release is tagged as JBoss_2_4_0 as well as Rel_2_4_1_0 to start the next beta series.
-
Perform a clean check out of the jboss main
branch without any tags to select the latest
code:
cvs co jboss-head
-
Label the main branch with the next initial
alpha development build tag:
Rel_(major)_(odd_minor)_0_0. For the case of a
2.2 release case this would mean that main
development would be for a 2.3 cycle and so main
should be tagged with Rel_2_3_0_0 as follows
from within the working directory created in
step 1:
cvs tag Rel_2_3_0_0
-
Create the new branch giving it a branch tag of
Branch_(major)_(even_minor). For example, to
create a 2.2 branch, perform the following
within the working directory created by the
previous check out:
cvs tag -b Branch_2_2
-
Create a working directory for the new branch by
checking it out using the Branch_2_2 tag:
cvs co -r Branch_2_2 jboss
-
Label the branch working directory with the
initial beta release tag of
Rel_(major)_(even_minor)_0_0. For the Branch_2_2
case this would be done by executing the
following in the working directory created by
the previous check out:
cvs tag Rel_2_2_0_0
- Branch all non-jboss modules that contribute jars to the jboss module. Create a branch for each cvs module for which there is one or more jars included in the jboss module. This allows patches to be made to these modules and to be tagged with the JBoss_X_Y_Z final release tag so that all source can be obtained for the final release.
New features and bug fixes on unreleased code should go into the main trunk which is the latest development branch. The steps for doing this are:
-
Checkout the target module in which the changes are to be made. For
example to commit changes to the
jboss module do:
cvs co jboss-head
- Make your chages to the source in the jboss working directory created by the previous check out.
-
Commit your changes. Do this by executing the following
command in the directory you made the changes in, or any
common parent directory:
cvs commit -m "commit-comment"
You don't have to specify the commit msg on the commit command line. If you don't you will be prompted for the commit msg. Note that this will apply the same commit msg to all files you have changed. If you want specific commit msgs for each file then you can perform a seperate commit on each file. - Optional Tag the code with the next alpha build tag.
For example, to tag the jboss source tree with a
Rel_2_3_1_3 tag, do:
cvs tag Rel_2_3_1_3
from within the jboss working directory.
When you have changes that need to go into the codebase of a release branch, you need to check out that branch and make the changes. So for example, if you need to add a patch the the 2.2 branch of the example CVS structure above, you need to first check out the 2.2 branch using the Branch_2_2 tag.
-
Checkout the module using the branch tag you want to
work on. To checkout the 2.2 branch of the jboss module
do:
cvs co -r Branch_2_2 jboss
This will create a jboss working directory with a sticky tag that associates the source code with the 2.2 branch. If you look at the jboss/src/main/org/jboss/Main.java file in the jboss working directory that results from the previous command using the cvs status command you will see something like:bash-2.04$ cd jboss/src/main/org/jboss/ bash-2.04$ cvs status Main.java =================================================================== File: no file Main.java Status: Needs Checkout Working revision: 1.30.2.6 Repository revision: 1.30.2.6 /cvsroot/jboss/jboss/src/main/org/jboss/Main.java,v Sticky Tag: Branch_2_2 (branch: 1.30.2) Sticky Date: (none) Sticky Options: (none)
This shows that the "Sticky Tag:" is set to the Branch_2_2 tag as we requested. - Make your chages to the source in the jboss working directory created by the previous check out.
- Required Run the jbosstest unit test suite. If there are any errors do NOT commit your change. Repeated failures to validate a change made to a branch will result in loss of CVS write priviledges.
-
Commit your changes. Do this by executing the following
command in the directory you made the changes in, or any
common parent directory:
cvs commit -m "commit-comment"
As already noted, you don't have to specify the commit msg on the commit command line. If you don't you will be prompted for the commit msg. Note that this will apply the same commit msg to all files you have changed. If you want specific commit msgs for each file then you can perform a seperate commit on each file. - Required
Tag the branch with the next beta binary release tag by
incrementing the build number of the latest tag. To
determine what build number to use, look at all of the
tags for a file using the cvs status command with the -v
option. For example, looking at
jboss/src/main/org/jboss/Main.java again:
bash-2.04$ cvs status -v Main.java
===================================================================
File: no file Main.java         Status: Needs Checkout

   Working revision:    1.30.2.6
   Repository revision: 1.30.2.6        /cvsroot/jboss/jboss/src/main/org/jboss/Main.java,v
   Sticky Tag:          Branch_2_2 (branch: 1.30.2)
   Sticky Date:         (none)
   Sticky Options:      (none)

   Existing Tags:
        Rel_2_3_1_0                      (revision: 1.34)
        Rel_2_2_2_0                      (revision: 1.30.2.6)
        JBoss_2_2_2                      (revision: 1.30.2.6)
        JBoss_2_2_1                      (revision: 1.30.2.3)
        Rel_2_2_1_0                      (revision: 1.30.2.3)
The Rel_2_2_2_0 tag is the latest tag on the 2.2 branch and indicates that no patches have been made since the JBoss_2_2_2 release. So to tag the changes you have made you need to use Rel_2_2_2_1. Do this using:cvs tag Rel_2_2_2_1
from the top of the jboss working directory. - Required Merge the changes to the main trunk if they are missing. You need to validate that the changes you have made to the release branch are not already in the main trunk and merge the changes if they are.
- Required, if merge was done Check out the latest trunk
code:
cvs co jboss
- Required, if merge was done
Tag the main trunk with the next alpha build tag.
Assuming the this is Rel_2_3_1_5, you would do:
cvs tag Rel_2_3_1_5
from within the jboss working directory you just checked out.
When you have changes that need to go into one of the modules other than the jboss cvs module for integration as a jar in a jboss release branch, perform the following steps. The example below describes how to make a change in the jbosscx module for incorporation into the jboss 2.4 release branch.
-
Checkout the module using the branch tag you want to
work on (if the branch has not been created do so). To
checkout the 2.4 branch of the jbosscx module do:
cvs co -r Branch_2_4 jbosscx
- Make your chages to the source in the jbosscx working directory created by the previous check out.
-
Commit your changes. Do this by executing the following
command in the directory you made the changes in, or any
common parent directory:
cvs commit -m "commit-comment"
- Required
Tag the branch with the next beta binary
release tag on the jboss module release branch, not the
jbosscx. The non-jboss modules are not labeled
independent of the jboss module. This allows one to see
what changes from the modules were merged into jboss.
So, if the latest beta binary release tag in the jboss
module is Rel_2_4_0_0, the jbosscx module would be
tagged with Rel_2_4_0_1. Do this from within the root
jbosscx working directory:
cvs tag Rel_2_4_0_1
The Rel_2_2_2_0 tag is the latest tag on the 2.2 branch and indicates that no patches have been made since the JBoss_2_2_2 release. So to tag the changes you have made you need to use Rel_2_2_2_1.cvs tag Rel_2_2_2_1
- Perform the build of the module jars that are to be incorporated into the jboss module.
- Copy the module jars into the approriate jboss/src subdirectory locations.
- Required Run the jbosstest unit test suite. If there are any errors do NOT commit your change. Repeated failures to validate a change made to a branch will result in loss of CVS write priviledges.
-
Commit the jar changes in the jboss module by running
the following from within the jboss/src directory:
cvs commit -m "commit-comment"
- Required Tag the jboss module with the same tag used
in step 4. From within the jboss root working directory
tag the release:
cvs tag Rel_2_4_0_1