JBoss.orgCommunity Documentation
Developing applications using RichFaces 4 (draft)
Copyright ©
Abstract
Read this book for a comprehensive guide to getting started and working with RichFaces 4. It includes details of the architecture, the framework's use in different applications, and skinning implementations.
- 1. Introduction
- 2. Getting started with RichFaces
- 3. RichFaces overview
- 4. Basic concepts
- 5. Advanced features
- 6. Skinning and theming
The RichFaces framework is a rich component library for JavaServer Faces (JSF). It allows integration of Ajax capabilities into enterprise web application development without needing to use JavaScript.
RichFaces leverages several parts of the JSF2 framework including lifecycle, validation, conversion facilities, and management of static and dynamic resources. The RichFaces framework includes components with built-in Ajax support and a customizable look-and-feel that can be incorporated into JSF applications.
RichFaces provides a number of advantages for enterprise web application development:
Build on the benefits of JavaServer Faces with support for Ajax. RichFaces is fully integrated into the JSF lifecycle: it uses the action and value change listeners, and invokes server-side validators and converters during the Ajax request-response cycle.
Extend Ajax capability in existing JSF applications. The core Ajax library (
a4j) adds extra Ajax functionality into existing pages, such that additional JavaScript code is unnecessary and existing components do not need to be replaced with Ajax ones. RichFaces enables page-wide Ajax support instead of the traditional component-wide support, and events can be defined on the page for invoking an Ajax requests and JSF Component Tree synchronization.Create complex application views using out-of-the-box components. The RichFaces user interface (UI) library (
rich) contains components for adding rich interactive features to JSF applications. It extends the RichFaces framework to include a large set of Ajax-enabled components that come with extensive skinning support. Additionally, the RichFaces framework is designed to be used seamlessly with other 3d-party libraries on the same page, so you have more options for developing applications.Write your own customized rich components with built-in Ajax support. The Component Development Kit (CDK), used for the RichFaces UI library creation, includes a code-generation facility and a templating facility using XHTML (extended hyper-text markup language) syntax.
Package dynamic resources with application Java classes. Ajax functionality in RichFaces extends support for the management of different resources, such as pictures, JavaScript code, and CSS stylesheets. The resource framework makes it possible to pack dynamic resources along with the code for any custom components.
Generate binary resources on the fly. The resource framework can generate images, sounds, Microsoft Excel spreadsheets, and more during run-time.
Create a modern rich user-interface with skinning technology. RichFaces provides a skinning feature that allows you to define and manage different color schemes and other parameters of the look and feel. It is possible to access the skin parameters from JSP code and Java code during run-time. RichFaces comes packaged with a number of skins to get you started, but you can also easily create your own customized skins too.
Follow the instructions in this chapter to configure the RichFaces framework and get started with application development. RichFaces applications can be developed using JBoss Tools, as described in Section 2.3, “Creating a project with JBoss Tools”; or using Maven, as described in Section 2.4, “Creating a project with Maven”.
If you have existing projects that use a previous version of RichFaces, refer to the RichFaces Migration Guide.
The minimum technical requirements needed to get started with RichFaces are outlined below.
Java Development Kit (JDK) 1.5 or higher
JBoss Tools 3.1
A JavaServer Faces 2 (JSF 2) implementation
An application server, such as JBoss Application Server 6 or Apache Tomcat 6.
A web browser, such as Firefox 3.5 or Internet Explorer 7
RichFaces supports additional products not listed here. Refer to Section 3.1, “Full technical requirements” for a full list of technical requirements and supported envrionments, browsers, and tools.
Follow the instructions in this section to set up the RichFaces framework and begin building applications.
Download RichFaces archive
Download RichFaces from the JBoss RichFaces Downloads area at http://www.jboss.org/richfaces/download.html. The binary files (available in
.bin.zipor.bin.tar.gzarchives) contain a compiled, ready-to-use version of RichFaces with a set of basic skins.Compiling from source
Instead of downloading the pre-compiled binaries, you can download the source files and compile them yourself. Refer to Section 3.6, “Compiling from source code” for further instructions.
Unzip archive
Create a new directory named
RichFaces, then unzip the archive containing the binaries there.
Follow the procedure in this section to create a new RichFaces application with JBoss Tools.
Create a new project
Create a new project based on the JSF 2 environment. In JBoss Tools, select + → from the menu. Name the project, select JSF 2 from the JSF Environment drop-down box, and click the button to create the project.
Add the RichFaces libraries to the project
Add
core-ui.jar,richfaces-api.jar, andrichfaces-impl.jarinto your project by copying them from the location where you unzipped the RichFaces archive to theWebContent/WEB-INF/lib/directory of your project in JBoss Tools.Reference the tag libraries
The RichFaces tag libraries need to be referenced on each XHTML page in your project:
<ui:composition xmlns="http://www.w3.org/1999/xhtml"

                xmlns:ui="http://java.sun.com/jsf/facelets"

                xmlns:a4j="http://richfaces.org/a4j"

                xmlns:rich="http://richfaces.org/rich">

    ...

</ui:composition>
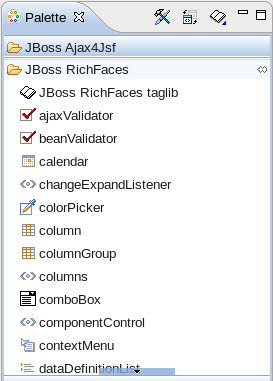
You are now ready to begin constructing your RichFaces applications. RichFaces components can be dragged and dropped into your application's XHTML pages from the RichFaces palette in JBoss Tools, shown in Figure 2.1, “RichFaces palette in JBoss Tools”
Apache Maven is a build automation and project management tool for Java projects. Follow the instructions in this section to create a Maven project for RichFaces.
Maven can be downloaded and installed from Apache's website at http://maven.apache.org/download.html. Version 2.2.1 is recommended.
Once Maven has been installed, no further configuration is required to begin building Maven projects.
A Maven archetype is a template for creating projects. Maven uses an archetype to generate a directory structure and files for a particular project, as well as creating pom.xml files that contain build instructions.
The RichFaces Component Development Kit includes a Maven archetype named richfaces-archetype-simpleapp for generating the basic structure and requirements for a RichFaces application project. Maven can obtain the archetype from the JBoss repository at https://repository.jboss.org/nexus/content/groups/public/. The archetype is also included with the RichFaces source code. Follow the procedure in this section to generate a new Maven-based RichFaces project using the archetype.
Add required repository
The details for the JBoss repository need to be added to Maven so it can access the archetype. Add a profile in the
maven_installation_folder/conf/settings.xml<profiles>element:<profiles>
...
<profile>
<id>jboss-public-repository</id>
<repositories>
<repository>
<id>jboss-public-repository-group</id>
<name>JBoss Public Maven Repository Group</name>
<url>https://repository.jboss.org/nexus/content/groups/public/</url>
<layout>default</layout>
<releases>
<enabled>true</enabled>
<updatePolicy>never</updatePolicy>
</releases>
<snapshots>
<enabled>true</enabled>
<updatePolicy>never</updatePolicy>
</snapshots>
</repository>
</repositories>
<pluginRepositories>
<pluginRepository>
<id>jboss-public-repository-group</id>
<name>JBoss Public Maven Repository Group</name>
<url>https://repository.jboss.org/nexus/content/groups/public/</url>
<layout>default</layout>
<releases>
<enabled>true</enabled>
<updatePolicy>never</updatePolicy>
</releases>
<snapshots>
<enabled>true</enabled>
<updatePolicy>never</updatePolicy>
</snapshots>
</pluginRepository>
</pluginRepositories>
</profile>
</profiles>
The profile then needs to be activated in the
<activeProfiles>element:<activeProfiles>
<activeProfile>jboss-public-repository</activeProfile>
</activeProfiles>
Generate the project from the archetype
The project can now be generated with the
richfaces-archetype-simpleapparchetype. Create a new directory for your project, then run the following Maven command in the directory:mvn archetype:generate -DarchetypeGroupId=org.richfaces.archetypes -DarchetypeArtifactId=richfaces-archetype-simpleapp -DarchetypeVersion=4.0.0-SNAPSHOT -DgroupId=
org.docs.richfaces-DartifactId=new_projectThe following parameters can be used to customize your project:
-DgroupIdDefines the package for the Managed Beans
-DartifactIdDefines the name of the project
The command generates a new RichFaces project with the following structure:
new_project├──pom.xml└──src└──main├──java│ └──org│ └──docs│ └──richfaces│ └──RichBean.java└──webapp├──index.xhtml├──templates│ └──template.xhtml└──WEB-INF├──faces-config.xml└──web.xmlAdd test dependencies (optional)
Your root directory of your project contains a project descriptor file,
pom.xml. If you wish to include modules for test-driven JSF development, add any dependencies for the tests to thepom.xmlfile. For full details on how to use the jsf-test project, refer to http://community.jboss.org/wiki/TestDrivenJSFDevelopment.Build the project
Build the project from the command line by entering the
mvn installcommand.The
BUILD SUCCESSFULmessage indicates the project has been assembled and is ready to import into an IDE (integrated development environment), such as JBoss Tools.Import the project into an IDE
Import the Maven project into your IDE. For Eclipse and JBoss Tools, you can import the project using the M2Eclipse plug-in.
To install the plug-in, choose → from the menu. Type
Mavento locate the Maven Integration for Eclipse Update Site entry, then typeMavenin the filter to show the available plug-ins. Follow the prompts to install the Maven Integration for Eclipse plug-in.With the plug-in installed, open the importing wizard by choosing → from the menu. Select → as the import source and choose the
pom.xmlfile for your project.
Your project is now ready to use. Once components and functionality have been added, you can run the application on a server and access it through a web browser at the address http://localhost:8080/.
jsf-app/
RichFaces can be added to existing JSF2 projects by adding references to the new RichFaces libraries. Refer to Step 2 and Step 3 in Section 2.3, “Creating a project with JBoss Tools” for details.
Documentation in development
Some concepts covered in this chapter may refer to the previous version of Richfaces, version 3.3.3. This chapter is scheduled for review to ensure all information is up to date.
The RichFaces framework is a component library which enhances JSF Ajax capabilities, such that you don't need to write any extra JavaScript code or replace any existing components with new Ajax widgets. RichFaces also enables page-wide Ajax support instead of the traditional component-wide support. Events can be defined on pages that invoke Ajax requests. After an Ajax request, the areas of a page that are synchronized with the JSF Component Tree can themselves change data on the server according to events fired on the client.
Figure 3.1, “Request processing flow” illustrates how requests are processed in the RichFaces framework.
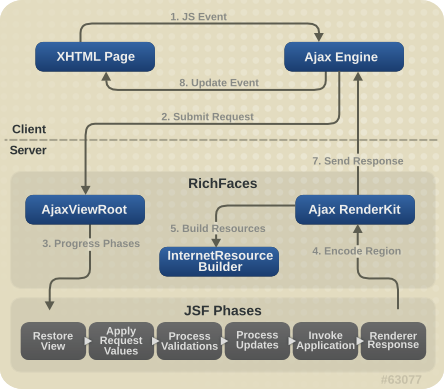
Using JSF tags, RichFaces allows different parts of a JSF page to be updated with an Ajax request. JSF pages using RichFaces do not change from "regular" JSF pages, and additional JavaScript code is not required.
RichFaces has been developed with an open architecture to be compatible with a wide variety of environments.
A Java application server or servlet container is required for running RichFaces applications. RichFaces supports the following servers:
Apache Tomcat 6.0 and higher
BEA WebLogic 9.1 – 10.0
JBoss 4.2 and higher
Geronimo 2.0 and higher
Glassfish (J2EE 5 and JEE 6)
Resin 3.1
Sun Application Server 9 (J2EE 1.5)
Websphere 7.0 and higher
Clients accessing RichFaces applications require a web browser. Richfaces supports the following web browsers:
Developing applications with the RichFaces framework requires the Java Development Kit (JDK), an implementation of JavaServer Faces (JSF), and a development environment.
- Java Development Kit (JDK)
RichFaces supports the following JDK versions:
JDK 1.5 and higher
- JavaServer Faces (JSF)
RichFaces supports the following JSF implementations and frameworks:
MyFaces 2 and higher
Seam 2 and higher
Sun JSF-RI 2 and higher
- Development environment
RichFaces can be developed using most Java development environments. The following are recommended, and used for examples in this guide:
JBoss Tools 3.1 and higher
Maven 2.1.0 and higher (2.2.1 recommended)
The important elements of the RichFaces framework are as follows:
Ajax Action Components
Ajax Containers
Skins and Theming
RichFaces JavaScript Engine
Read this section for details on each element.
The RichFaces framework includes several Ajax Action Components: <a4j:commandButton>, <a4j:commandLink>, <a4j:poll>, <a4j:support>, and more. Use Ajax Action Components to send Ajax requests from the client side.
AjaxContainer (name possibly changed in release) is an interface that describes an area on a JSF page that is decoded during an Ajax request. AjaxViewRoot and AjaxRegion are implementations of this interface.
RichFaces includes extensive support for application skinning. Skinning is a high-level extension to traditional CSS (Cascading Style Sheets) which allows the color scheme and appearance of an application to be easily managed. The skins simplify look-and-feel design by allowing multiple elements of the interface to be handled as manageable features, which have associated color palettes and styling. Application skins can additionally be changed on the fly during run-time, allowing user experiences to be personalized and customized.
For full details on skinning and how to create skins for the components in your application, refer to Chapter 6, Skinning and theming.
RichFaces originated from the Ajax4jsf project, an open-source web application framework that added Ajax capabilities to the JavaServer Faces (JSF) framework. The RichFaces components were split into a separate commercial component library, then later both the Ajax4jsf and RichFaces libraries were re-combined under the RichFaces name.
RichFaces 4.0 features full JSF2 integration and uses standard web application technologies such as JavaScript, XML (Extensible Markup Language), and XHTML (Extensible Hypertext Markup Language).
JavaServer Faces (JSF) declares render and execute processes on the client side, while RichFaces declares server-side definitions of lists.
RichFaces components uses their own renderers. In the Render Response Phase, the RichFaces framework makes a traversal of the component tree, calls its own renderer, and passes the result to the Faces Response.
The following restrictions apply to applications implementing the RichFaces framework:
Any Ajax framework should not append or delete elements on a page, but should instead replace them. For successful updates, an element with the same identifier as in the response must exist on the page. If it is necessary to append code to a page, include a placeholder for it (an empty element).
<f:verbatim>should not be used for self-rendered containers, since it is transient and not saved in the tree.The RichFaces
ViewHandlerputs itself in front of the FaceletsViewHandlerschain.
The source code for the RichFaces framework can be downloaded and compiled manually rather than using the pre-compiled binaries.
Download source code
JBoss RichFaces Downloads area
Download the source files (also available in
.bin.zipor.bin.tar.gzarchives) from the JBoss RichFaces Downloads area at http://www.jboss.org/richfaces/download.html.Anonymous SVN repository
Alternatively, the source files can be downloaded from the anonymous SVN repository at http://anonsvn.jboss.org/repos/richfaces/root/ using the following command:
svn co http://anonsvn.jboss.org/repos/richfaces/root/
Unzip archive
Create a new directory named
RichFaces, then unzip the archive containing the source code there.Configure Maven with JBoss developer settings
To compile the RichFaces source code, Maven requires access to JBoss development repositories. Edit the
maven_installation_folder/conf/settings.xml- Server definitions
<servers>

    <server>

        <id>jboss-developer-repository-group</id>

        <username>username</username>

        <password>password</password>

    </server>

    <server>

        <id>jboss-screenshots-repository</id>

        <username>username</username>

        <password>password</password>

    </server>

    <server>

        <id>jboss-releases-repository</id>

        <username>username</username>

        <password>password</password>

    </server>

    ...

</servers>
Change the
usernamepassword- Mirror definitions
<mirrors>

    <mirror>

        <id>jboss-developer-repository-group</id>

        <mirrorOf>*,!jboss-deprecated</mirrorOf>

        <name>JBoss.org Developer Repository Group</name>

        <url>https://repository.jboss.org/nexus/content/groups/developer/</url>

    </mirror>

    ...

</mirrors>
- Profile definitions
<profiles>

    <!-- Redefine the Maven central repository to enable snapshots.  The url will be replaced by the mirror -->

    <profile>

        <id>jboss-nexus</id>

        <repositories>

            <repository>

                <id>central</id>

                <name>Central repository proxy</name>

                <url>replaced by mirror settings</url>

                <layout>default</layout>

                <releases>

                    <enabled>true</enabled>

                </releases>

                <snapshots>

                    <enabled>true</enabled>

                    <updatePolicy>never</updatePolicy>

                </snapshots>

            </repository>

        </repositories>

        <pluginRepositories>

            <pluginRepository>

                <id>central</id>

                <url>replaced by mirror settings</url>

                <releases>

                    <enabled>true</enabled>

                </releases>

                <snapshots>

                    <enabled>true</enabled>

                </snapshots>

            </pluginRepository>

        </pluginRepositories>

    </profile>

    ...

</profiles>
- Activate profile
<activeProfiles>

    <activeProfile>jboss-nexus</activeProfile>

    ...

</activeProfiles>
Compile using Maven
In the root directory of the unzipped source code, enter the following command to compile and build the RichFaces framework:
mvn clean install
Add any of the following options after the command to customize the build:
-P release,docsMaven additionally builds the documentation and release artifacts.
-D skipTests=trueMaven skips the unit and functional tests, which completes the build faster.
-D checkstyle.skip=trueMaven skips the scans for checking style, which completes the build faster.
-D skip-sourceMaven does not produce any source
jarfiles from the build.-D skip-enforceMaven does not check for the correct JDK version, Maven version, and
SNAPSHOTplug-in, and forces the build.-D jsf-profile=implementationMaven tests builds and tests against the specified JSF implementation. The
implementationvalue can be any of the following:jsf_ri: The latest release of JSF RI (Mojarra). This is the default implemenation.jsf_ri_javax: The latest release of javax.faces.jsf_ri_snapshot: The latest snapshot version of JSF RI (Mojarra).myfaces: The latest release of MyFaces.myfaces: The latest snapshot version of MyFaces.
Access compiled binaries
The compiled libraries are located in the following sub-directories of the root RichFaces directory:
ui/assembly/target/dist/richfaces-ui-version-SNAPSHOT.jarframework/api/target/richfaces-api-version-SNAPSHOT.jarframework/impl/target/richfaces-impl-version-SNAPSHOT.jar
If Maven built the framework using the
-P releaseoption, the distribution package containing all three compiled libraries and reference documentation is located atui/assembly/target/dist/richfaces-ui-.version-SNAPSHOT-bin.zip
You can now add the compiled libraries to your project as described in Step 2 of Section 2.3, “Creating a project with JBoss Tools”.
Documentation in development
Some concepts covered in this chapter may refer to the previous version of Richfaces, version 3.3.3. This chapter is scheduled for review to ensure all information is up to date.
Read this chapter for the basic concepts of using RichFaces in conjunction with Ajax and JavaServer Faces.
Many of the tags in the a4j and rich tag libraries are capable of sending Ajax requests from a JavaServer Faces (JSF) page. RichFaces tags hide the usual JavaScript activities that are required for an XMHTTPRequest object building and an Ajax request sending. Additionally the tags can determine which components of a JSF page are to be re-rendered as a result of the Ajax response; refer to Section 4.2.1, “Partial page updates” for details.
The
<a4j:commandButton>and<a4j:commandLink>tags are used to send an Ajax request on theclickJavaScript event.The
<a4j:poll>tag is used to send an Ajax request periodically using a timer.The
<a4j:ajax>tag allows you to add Ajax functionality to standard JSF components and send Ajax request on a chosen JavaScript event, such askeyupormouseover, for example.Most components in the
richtag library have built-in Ajax support. Refer to the RichFaces Component Reference for details on the use of each component.
Updates are made only to those regions specified using the execute. If no specific regions are declared, the whole page is updated when an Ajax response is received.
Specific regions of a page can be defined through the use of container components such as <a4j:region>. These regions can then be specified with their id identifiers in the render attribute of a component so that when the component sends an Ajax request, only the specified regions are updated. In this way you can control which part of the JSF View is decoded on the server side when the Ajax request is sent. Multiple regions can be defined and sent, and regions can be nested inside other regions. Controls and components from third-party libraries contained in these regions are also updated.
Additionally, regions can be wrapped with the <a4j:outputPanel ajaxRendered="true"> tag. This causes all contents of the region to be updated on every Ajax response, even if not explicitly listed in the requesting component's render attribute.
Setting the limitRender attribute to true will cause only those regions listed in the requesting component's render attribute to be updated. This overrides any regions with the <a4j:outputPanel ajaxRendered="true"> tag.
Refer to the RichFaces Component Reference for further details on the common Ajax attributes used for partial page updates.
The RichFaces framework is made up of two tag libraries: the a4j library and the rich library. The a4j tag library represents Ajax4jsf, which provides page-level Ajax support with core Ajax components. This allows developers to make use of custom Ajax behavior with existing components. The rich tag library provides Ajax support at the component level instead, and includes ready-made, self-contained components. These components don't require additional configuration in order to send requests or update.
For details on the use of the various components, refer to RichFaces Component Reference.
Documentation in development
Some concepts covered in this chapter may refer to the previous version of Richfaces, version 3.3.3. This chapter is scheduled for review to ensure all information is up to date.
Read this chapter for details on some of the advanced features and configuration possibilities for the RichFaces framework.
JavaServer Faces (JSF) is the Java-based web application framework upon which the RichFaces framework has been built. RichFaces is now integrated with JSF2, which features several improvements to the framework.
The standard display technology used by JSF1 was JavaServer Pages (JSP). With JSP2, the standard display technology has been changed to Facelets, which is a more powerful and more efficient View Declaration Language (VLD) than JSP.
The RichFaces framework includes several components designed to improve application performance. Script and style management can be optimized with resource-loading components such as <a4j:loadBundle>, <a4j:loadScript>, and <a4j:loadStyle>.
For further details on optimizing the performance of RichFaces applications, refer to the Resources and Processing management chapters in the Component Reference Guide.
The RichFaces framework allows for queues to manage traffic from Ajax requests, events, and page updates. Controlling the message processing with a queue can make applications more efficient and avoid problems with data corruption. Basic queuing is available with all RichFaces components, and the <a4j:queue> component adds advanced queuing to standard JSF components.
For further details on RichFaces queue management, refer to the queuing details in the Common Ajax attributes chapter and the Processing management chapter in the Component Reference Guide.
The RichFaces framework features several validation components. These components can validate Ajax actions, or validate data against model-based constraints defined using Hibernate Validator.
For further details on RichFaces validation components, refer to the Validation chapter of the Component Reference Guide.
Scripts and styles are normally loaded into a RichFaces application on demand. The default loading strategy can be altered to suit certain applications by specifying the strategy in the web.xml file.
The script-loading strategy is specified as follows:
<context-param>

    <param-name>org.richfaces.LoadScriptStrategy</param-name>

    <param-value>ALL</param-value>

</context-param>
The <param-value> element can be set to one of three values:
ALLAll scripts are loaded when the application starts.
JavaScript file compression
When
org.richfaces.LoadScriptStrategyis set toALL, JavaScript file compression is turned off.DEFAULTScripts are loaded as required. If not otherwise specified, this is the normal script-loading behavior.
NONENo scripts are loaded. This can be useful for including scripts manually.
The style-loading strategy is specified as follows:
<context-param>

    <param-name>org.richfaces.LoadStyleStrategy</param-name>

    <param-value>ALL</param-value>

</context-param>
The <param-value> element can be set to one of three values:
ALLAll styles from a single integrated style sheet are loaded when the application starts.
DEFAULTStyles are loaded as required. If not otherwise specified, this is the normal style-loading behavior.
NONENo styles are loaded. The default plain skin resets all color and font parameters to
null. Any pre-defined styles for RichFaces are not used.
RichFaces allows standard handlers to be defined for processing different application exceptions. Custom JavaScript can be executed when these exceptions occur.
To define handlers for application exceptions, add the following code to your web.xml file:
<context-param>

    <param-name>org.ajax4jsf.handleViewExpiredOnClient</param-name>

    <param-value>true</param-value>

</context-param>
MyFaces compatibility
Custom error handlers for the onError and onExpire events do not work under MyFaces. MyFaces handles exceptions through its internal debug page. Use the following code in the web.xml file to prevent this behavior in MyFaces:
<context-param>

    <param-name>org.apache.myfaces.ERROR_HANDLING</param-name>

    <param-value>false</param-value>

</context-param>
To execute custom JavaScript code on the client when an error occurs during an Ajax request, redefine the standard A4J.AJAX.onError method, as shown in Example 5.1, “Example request error”.
Example 5.1. Example request error
A4J.AJAX.onError = function(req, status, message){

    window.alert("Custom onError handler "+message);

}
The function accepts three parameters:
reqA string of parameters from the request that caused the error.
statusThe error number returned by the server.
messageA default message for the error.
Redefine the A4J.AJAX.onExpired method to handle the expiration of a user's session, as shown in Example 5.2, “Example session expiration error”.
Example 5.2. Example session expiration error
A4J.AJAX.onExpired = function(loc, expiredMsg){

    if(window.confirm("Custom onExpired handler "+expiredMsg+" for a location: "+loc)){

        return loc;

    } else {

        return false;

    }

}
The function accepts two parameters:
locThe URL of the current page, which can be updated on demand.
expiredMsgA default message for the session expiration error.
JavaServer Faces (JSF) has an advanced navigation mechanism that allows you to define navigation from one view to another. Navigation typically happens in a web application when a user moves from one page to another, but there is no switch mechanism between certain logical states in the same view. The RichFaces State API allows sets of states to be defined for the views, as well as any properties associated with these states.
Actually States is a map where the entry key is a name of the State and the value is a State map. Particular State map has entries with some names as keys and any objects as values that are used after the state activation. Thus, in the State map you could define any values, method bindings, or just some simple state variables (constants) which have different values for every State.
To check whether the logged-in user belongs to a certain user role, use the rich:isUserInRole(Object) function in RichFaces. The example demonstrates the function's use to render controls only for users with administrator privileges.
Example 5.3. User role example
Certain controls only need to be rendered for administrators.
Create
adminroleCreate the
adminrole in theweb.xmlfile:<security-role>
<role-name>admin</role-name>
</security-role>
Implement authorization for users
Assign the
adminrole to users when they log in to the application as administrators.Use the
rich:isUserInRole(Object)functionThe
rich:isUserInRole(Object)function can be used with therenderedattribute of any component:<rich:editor value="#{bean.text}" rendered="#{rich:isUserInRole('admin')}" />
Documentation in development
Some concepts covered in this chapter may refer to the previous version of Richfaces, version 3.3.3. This chapter is scheduled for review to ensure all information is up to date.
Read this chapter for a guide to skinning and theming RichFaces applications, including how to implement themes, and details on customizing and extending skins.
Application skins are used with the RichFaces framework to change the appearance of an application through setting the colors and decoration of controls and components. Typically the appearance of web applications is handled through the CSS (Cascading Style Sheet) files associated with the application, but skinning allows the settings in a CSS file to be abstracted and easily edited. Using skins avoids repetitive coding and duplication in CSS files through the use of style variables and generalization. CSS files are not completely replaced: skins work as a high-level extension to standard CSS.
Each skin has a set of skin-parameters, which are used to define the theme palette and other elements of the user interface. These parameters work together with regular CSS declarations, and can be referred to from within CSS using JavaServer Faces Expression Language (EL).
The skinning feature of RichFaces also allows themes to be changed at runtime, so users can personalize an application's appearance.
RichFaces includes a number of predefined skins. These skins can be used in RichFaces web applications by specifying the skin name in the org.richfaces.SKIN context parameter in the web.xml settings file. The predefined skins are as follows:
DEFAULTplain, which contains no skin parameters and is intended for embedding RichFaces components into existing projects with their own styles.emeraldTownblueSkywinejapanCherryrubyclassicdeepMarinelagunadarkXglassX
To add one of these skins to your application, add the org.richfaces.SKIN context parameter to the web.xml configuration file:
<context-param>
    <param-name>org.richfaces.SKIN</param-name>
    <param-value>skin_name</param-value>
</context-param>RichFaces skins are designed to use a combination of styling elements. Themes for components can be applied using any of the following style classes:
- A default style class inserted into the framework
Style classes contain skin parameters linked to constant theme styles in the skin. Each component has a class style defining a default representation level. Application interfaces can be modified by altering the values of skin parameters in the skin itself.
- A style class extending the skin
A custom style class can be added to the skin, working in conjunction with CSS classes of the same name. All components referencing the class are extended in the same way.
- User style class
Components can use the
styleClassattribute to redefine specific component elements. As such, the appearance of an individual component can be customized according to a CSS style parameter specified in the class.
Example 6.1. Simple skinning example
Using any component, such as a panel, without specifying a styleClass will use the default skin parameters for that component.
<rich:panel>...</rich:panel>
When rendered for display, the panel consists of two HTML elements: a wrapper <div> element and a <div> element for the body of the panel. The wrapper element for a panel without a specified styleClass is rendered as follows:
<div class="dr-pnl rich-panel">

    ...

</div>
dr-pnl refers to a CSS class specified in the framework. The CSS class uses skin parameters for generic theme styles:
The
background-colorCSS class attribute is defined by thegeneralBackgroundColorskin parameter.The
border-colorCSS class attribute is defined by thepanelBorderColorskin parameter.
Changing the definitions for generalBackgroundColor or panelBorderColor in the skin will cause all panels in the application to change.
If a styleClass attribute is used, the specified style class is applied to the component, which could extend or override the default styles.
<rich:panel styleClass="customClass">...</rich:panel>
The customClass style is added to the CSS, and is applied to the component when it is rendered for display:
<div class="dr-pnl rich-panel customClass">

    ...

</div>
Table 6.1, “Parameter settings for the blueSky skin” lists the default values for the parameter settings in the blueSky skin. These values can be customized and extended for a unique application theme as described in Section 6.3, “Customizing skins”.
Table 6.1. Parameter settings for the blueSky skin
| Parameter name | Default value |
|---|---|
headerBackgroundColor
|
#BED6F8
|
headerGradientColor
|
#F2F7FF
|
headTextColor
|
#000000
|
headerWeightFont
|
bold
|
generalBackgroundColor
|
#FFFFFF
|
generalTextColor
|
#000000
|
generalSizeFont
|
11px
|
generalFamilyFont
|
Arial, Verdana, sans-serif
|
controlTextColor
|
#000000
|
controlBackgroundColor
|
#ffffff
|
additionalBackgroundColor
|
#ECF4FE
|
shadowBackgroundColor
|
#000000
|
shadowOpacity
|
1
|
panelBorderColor
|
#BED6F8
|
subBorderColor
|
#ffffff
|
tabBackgroundColor
|
#C6DEFF
|
tabDisabledTextColor
|
#8DB7F3
|
trimColor
|
#D6E6FB
|
tipBackgroundColor
|
#FAE6B0
|
tipBorderColor
|
#E5973E
|
selectControlColor
|
#E79A00
|
generalLinkColor
|
#0078D0
|
hoverLinkColor
|
#0090FF
|
visitedLinkColor
|
#0090FF
|
headerSizeFont
|
11px
|
headerFamilyFont
|
Arial, Verdana, sans-serif
|
tabSizeFont
|
11px
|
tabFamilyFont
|
Arial, Verdana, sans-serif
|
buttonSizeFont
|
11px
|
buttonFamilyFont
|
Arial, Verdana, sans-serif
|
tableBackgroundColor
|
#FFFFFF
|
tableFooterBackgroundColor
|
#cccccc
|
tableSubfooterBackgroundColor
|
#f1f1f1
|
tableBorderColor
|
#C0C0C0
|
The user can change skins at runtime if a managed bean is used to access the skin.
Create the skin bean
The skin bean is a simple interface to manage the skin:
public class SkinBean {


    private String skin;


    public String getSkin() {

        return skin;

    }

    public void setSkin(String skin) {

        this.skin = skin;

    }

}
Reference the skin bean
Use EL (Expression Language) to reference the skin bean from the
web.xmlsettings file.<context-param>
<param-name>org.richfaces.SKIN</param-name>
<param-value>#{skinBean.skin}</param-value>
</context-param>
Set initial skin
The application needs an initial skin to display before the user chooses an alternative skin. The initial skin is specified in the
web.xmlconfiguration file.<managed-bean>
<managed-bean-name>skinBean</managed-bean-name>
<managed-bean-class>SkinBean</managed-bean-class>
<managed-bean-scope>session</managed-bean-scope>
<managed-property>
<property-name>skin</property-name>
<value>classic</value>
</managed-property>
</managed-bean>
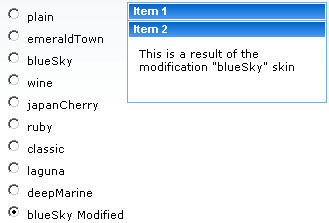
Example 6.2. Skin changing example
This example renders a list of radio buttons from which the user can choose their desired skin. The chosen skin is then applied to the panel bar items.
<h:form>

    <div style="display: block; float: left">

        <h:selectOneRadio value="#{skinBean.skin}" border="0" layout="pageDirection" title="Changing skin" style="font-size: 8; font-family: comic" onchange="submit()">

            <f:selectItem itemLabel="plain" itemValue="plain" />

            <f:selectItem itemLabel="emeraldTown" itemValue="emeraldTown" />

            <f:selectItem itemLabel="blueSky" itemValue="blueSky" />

            <f:selectItem itemLabel="wine" itemValue="wine" />

            <f:selectItem itemLabel="japanCherry" itemValue="japanCherry" />

            <f:selectItem itemLabel="ruby" itemValue="ruby" />

            <f:selectItem itemLabel="classic" itemValue="classic" />

            <f:selectItem itemLabel="laguna" itemValue="laguna" />

            <f:selectItem itemLabel="deepMarine" itemValue="deepMarine" />

            <f:selectItem itemLabel="blueSky Modified" itemValue="blueSkyModify" />

        </h:selectOneRadio>

    </div>

    <div style="display: block; float: left">

        <rich:panelBar height="100" width="200">

            <rich:panelBarItem label="Item 1" style="font-family: monospace; font-size: 12;">

                Changing skin in runtime

            </rich:panelBarItem>


            <rich:panelBarItem label="Item 2" style="font-family: monospace; font-size: 12;">

                This is a result of the modification "blueSky" skin

            </rich:panelBarItem>

        </rich:panelBar>

    </div>

</h:form>
Create the skin file
The name of the skin file should follow the format
new_skin_name.skin.propertiesMETA-INF/skins/directory or the classpath directory of your project.Define skin constants
Add skin parameter constants and values to the file. Example 6.3, “blueSky.skin.properties file” shows how the skin parameters listed in Table 6.1, “Parameter settings for the blueSky skin” are included in the skin file.
Example 6.3.
blueSky.skin.propertiesfileThe
blueSky.skin.propertiesfile lists all the skin parameter constants for the skin. It can be extracted from the/META-INF/skinsdirectory in the richfaces-impl-version.jar package.#Colors headerBackgroundColor=#BED6F8 headerGradientColor=#F2F7FF headerTextColor=#000000 headerWeightFont=bold generalBackgroundColor=#FFFFFF generalTextColor=#000000 generalSizeFont=11px generalFamilyFont=Arial, Verdana, sans-serif controlTextColor=#000000 controlBackgroundColor=#ffffff additionalBackgroundColor=#ECF4FE shadowBackgroundColor=#000000 shadowOpacity=1 panelBorderColor=#BED6F8 subBorderColor=#ffffff tabBackgroundColor=#C6DEFF tabDisabledTextColor=#8DB7F3 trimColor=#D6E6FB tipBackgroundColor=#FAE6B0 tipBorderColor=#E5973E selectControlColor=#E79A00 generalLinkColor=#0078D0 hoverLinkColor=#0090FF visitedLinkColor=#0090FF # Fonts headerSizeFont=11px headerFamilyFont=Arial, Verdana, sans-serif tabSizeFont=11 tabFamilyFont=Arial, Verdana, sans-serif buttonSizeFont=11 buttonFamilyFont=Arial, Verdana, sans-serif tableBackgroundColor=#FFFFFF tableFooterBackgroundColor=#cccccc tableSubfooterBackgroundColor=#f1f1f1 tableBorderColor=#C0C0C0 tableBorderWidth=1px #Calendar colors calendarWeekBackgroundColor=#F5F5F5 calendarHolidaysBackgroundColor=#FFEBDA calendarHolidaysTextColor=#FF7800 calendarCurrentBackgroundColor=#FF7800 calendarCurrentTextColor=#FFEBDA calendarSpecBackgroundColor=#E4F5E2 calendarSpecTextColor=#000000 warningColor=#FFE6E6 warningBackgroundColor=#FF0000 editorBackgroundColor=#F1F1F1 editBackgroundColor=#FEFFDA #Gradients gradientType=plain
Alternatively, instead of redefining an entire new skin, your skin can use an existing skin as a base on which to build new parameters. Specify a base skin by using the
baseSkinparameter in the skin file, as shown in Example 6.4, “Using a base skin”.Example 6.4. Using a base skin
This example takes the
blueSkyskin as a base and only changes thegeneralSizeFontparameter.baseSkin=blueSky generalSizeFont=12pt
Reference skin definition
Add a skin definition
<context-param>to theweb.xmlsettings file of your application:<context-param> <param-name>org.richfaces.SKIN</param-name> <param-value>new_skin_name</param-value> </context-param>
The RichFaces framework can also use skinning to theme JSF (JavaServer Faces) components in addition to RichFaces components. Follow these additional steps to skin JSF components.
Register a custom render kit
The custom render kit is created by registering it in the
faces-config.xmlconfiguration file:<render-kit> <render-kit-id>new_skin_name</render-kit-id> <render-kit-class>org.ajax4jsf.framework.renderer.ChameleonRenderKitImpl</render-kit-class> </render-kit>Register custom renderers for the JSF component
Add custom renderers in the
faces-config.xmlconfiguration file for each JSF component you want to skin:<renderer> <component-family>javax.faces.Command</component-family> <renderer-type>javax.faces.Link</renderer-type> <renderer-class>new_skin_name.HtmlCommandLinkRenderer</renderer-class> </renderer>Reference the render kit in the skin file
Add the following to the top of the skin parameters file:
render.kit=new_skin_name
Standard HTML controls and components used alongside RichFaces and JSF components can also be themed to create a cohesive user interface. The following HTML elements accept skinning:
<a>(includinga:hover,a:visitedand other elements)<fieldset><hr><input><isindex><keygen><legend><select><textarea>
Skinning for standard HTML controls can be included in one of two ways:
- Automatic skinning
The skinning style properties are automatically applied to controls based on their element names and attribute types. Specify the
org.richfaces.CONTROL_SKINNINGcontext parameter in theweb.xmlconfiguration file:<context-param>
<param-name>org.richfaces.CONTROL_SKINNING</param-name>
<param-value>enable</param-value>
</context-param>
- Skinning with CSS classes
The skinning style properties are determined through CSS. This method is available by default, but can be disabled through the
org.richfaces.CONTROL_SKINNING_CLASSEScontext parameter in theweb.xmlconfiguration file:<context-param>
<param-name>org.richfaces.CONTROL_SKINNING_CLASSES</param-name>
<param-value>disable</param-value>
</context-param>
When enabled, the parameter offers a predefined CSS class named
rich-container. Reference the class from any container-like component, and the standard HTML controls in the container will be skinned. Standard HTML controls can also be specifically defined in the CSS; refer to theorg/richfaces/renderkit/html/css/basic_classes.xcssfile in the richfaces-ui.jar package for examples of specially-defined CSS classes with skin parameters for HTML controls.
There are two levels of skinning for HTML controls, depending on whether the browser viewing the application includes rich visual styling capabilities, and whether the browser supports features of CSS2 and CSS3.
Browser lists may need to be updated.
Basic skinning
Apple Safari
Microsoft Internet Explorer 6
Microsoft Internet Explorer 7 in
BackCompatmode (refer to “compatModeProperty” at http://msdn.microsoft.com/en-us/library/ms533687(VS.85).aspxOpera
Extended skinning
Microsoft Internet Explorer 7 in standards-compliant mode
Mozilla Firefox
If the browser type cannot be identified, the extended level is used. Set the level explicitly by adding the following context parameter to the web.xml configuration file, and specifying the <param-value> element as either basic or extended:
<context-param>

    <param-name>org.richfaces.CONTROL_SKINNING_LEVEL</param-name>

    <param-value>basic</param-value>

</context-param>
RichFaces uses XCSS (XML-formatted CSS) files to add extra functionality to the skinning process. XCSS files can contain all the styling information for each RichFaces component in the library.
XCSS files contain mappings between CSS properties and skin parameters. The name attribute of the <u:selector> element is the name of the CSS selector. Each <u:style> element defines a CSS property with the name attribute as its name. Using the skin attribute specifies a skin parameter from the current skin file, while using the value attribute enters the literal value in the CSS file. An example of this is shown in Example 6.5, “XCSS style mappings”.
Example 6.5. XCSS style mappings
The XCSS code for the CSS selector named .rich-component-name is as follows:
<u:selector name=".rich-component-name">

    <u:style name="background-color" skin="additionalBackgroundColor" />

    <u:style name="border-color" skin="tableBorderColor" />

    <u:style name="border-width" skin="tableBorderWidth" />

    <u:style name="border-style" value="solid" />

</u:selector>
This renders the following CSS code to be read by a standard browser:
.rich-component-name {

    background-color: additionalBackgroundColor; /*the value of the constant defined by your skin*/

    border-color: tableBorderColor; /*the value of the constant defined by your skin*/

    border-width: tableBorderWidth; /*the value of the constant defined by your skin*/

    border-style: solid;

}
CSS selectors with identical skinning properties can be listed in a single name attribute of a <u:selector> element, separated by commas.
<u:selector name=".rich-ordering-control-disabled, .rich-ordering-control-top, .rich-ordering-control-bottom, .rich-ordering-control-up, .rich-ordering-control-down">

    <u:style name="border-color" skin="tableBorderColor" />

</u:selector>
Style properties can be modified using XML-based XCSS code, or using embedded standard CSS code, as shown in Example 6.6, “Using XCSS code or standard CSS code”
Example 6.6. Using XCSS code or standard CSS code
Using XCSS code
XCSS code follows an XML structure, using <u:selector> elements to define style classes and <u:style> elements for each style parameter.
...

<u:selector name=".rich-calendar-cell">

    <u:style name="border-bottom-color" skin="panelBorderColor"/>

    <u:style name="border-right-color" skin="panelBorderColor"/>

    <u:style name="background-color" skin="tableBackgroundColor"/>

    <u:style name="font-size" skin="generalSizeFont"/>

    <u:style name="font-family" skin="generalFamilyFont"/>

</u:selector>

...
Using standard CSS code
CSS code can be included in an XCSS file through the use of a <f:verbatim> element with a character data (CDATA) section.
<f:verbatim><![CDATA[

    ...

    .rich-calendar-cell {

        background: #537df8;

    }

    ...

]]></f:verbatim>
Plug-n-skin is an alternate method to create, customize, and add a skin. The skin can be based on an existing RichFaces skin, and can include support for skinning standard HTML controls.
Create a template
Use the Maven build and deployment tool to create the skin template by using the following command:
mvn archetype:create -DarchetypeGroupId=org.richfaces.cdk -DarchetypeArtifactId=maven-archetype-plug-n-skin -DarchetypeVersion=
RF-VERSION-DartifactId=ARTIFACT-ID-DgroupId=GROUP-ID-Dversion=VERSIONUse the following parameters for the command:
archetypeVersionThe version of RichFaces, for example,
4.0.0.GA.artifactIdThe artifact identifier or name of the project. The Maven template will be created in a directory using this name.
groupIdThe group identifier of the project.
versionThe version of your project, for example,
1.0.
Add the skin to the CDK
Change to the newly-created directory. Ensure it contains the
pom.xmlproject file, then enter the following command to create a new skin and add it to the CDK (Component Development Kit):mvn cdk:add-skin -Dname=
SKIN-NAME-Dpackage=SKIN-PACKAGEUse the following parameters for the command:
nameThe name of your new skin.
packageThe base package of the skin. By default, the group identifier is used.
Use the following optional keys for advanced features:
baseSkinThe skin to use as a base for the new skin.
createExtUse
createExt=trueto add extended CSS classes for skinning standard HTML controls.
The command creates the following files:
src/main/java/SKIN-PACKAGE/SKIN-NAME/images/BaseImage.javaThe base class to store images.
src/test/java/SKIN-PACKAGE/SKIN-NAME/images/BaseImage.javaA test version of the base class to store images.
src/main/resources/SKIN-PACKAGE/SKIN-NAME/css/The directory that holds the XCSS files that define the themes for RichFaces components affected by the new skin.
If the
createExt=trueparameter was used with the command, the following XCSS files are included for defining styles for standard HTML controls:extended_classes.xcssextended.xcss
src/main/resources/SKIN-PACKAGE/SKIN-NAME/css/SKIN-NAME.propertiesThe file that contains the skin properties.
src/main/resources/META-INF/skins/SKIN-NAME.xcssA global XCSS file that imports the component-specific XCSS files.
If the
createExt=trueparameter was used with the command, the followingskin-name-ext.xcsssrc/main/config/resources/SKIN-NAME-resources.xmlThe file that contains the description of all the files listed above.
Edit XCSS files
Edit the XCSS files contained in the
src/main/resources/META-INF/skins/directory. Refer to Section 6.8, “Defining skins for individual components” for instructions on how to edit XCSS files.Build the skin
After editing the XCSS files, build the skin by running the following command in the root directory of your skin project (the directory that contains the
pom.xmlfile).mvn clean install
Add the skin to the project configuration
Add the following context parameter to your project's
web.xmlconfiguration file to use the new skin in your application:<context-param> <param-name>org.ajax4jsf.SKIN</param-name> <param-value>SKIN-NAME</param-value> </context-param>