This is the Getting Started Guide for Testable Architecture, and the supporting tools provided by project SAVARA. This guide starts with the installation instructions for the SAVARA tools.
The remainder of the document is organised to reflect phases within the Testable Architecture Methodology, and how the current tools can be used in support of that methodology. The tools are still in development, and therefore not all phases will have tools, and the tools in some phases will not necessarily be complete.
As an overview, the tools currently include capabilities for:
Definition of business requirements as scenarios
Creation of a choreography (global model) to represent the architecture for a system that delivers the requirements
Generation of documentation based on the choreography
Generation of service designs (e.g. BPMN2, etc)
Generation of service contracts (e.g. WSDL, etc)
Generation of service implementation (e.g. WS-BPEL, SCA Java, etc)
Simulation of scenarios against the choreography and service designs/implementations
This section describes the installation procedure for the SAVARA tools.
The installation instructions for the SAVARA Eclipse tools are:
Eclipse
Download the latest version of Eclipse JEE, from http://www.eclipse.org , and install in your environment.
Savara Eclipse Tools
Start up your Eclipse environment, and go to the Help->Install New Software.. menu item. Select the appropriate update site URL from the SAVARA Downloads page. Once the contents of the update site is available, then select the Savara and Savara Dependencies categories and follow the instructions to install them within your Eclipse environment.
For the purpose of the Getting Started Guide, we will be using the Purchasing example located here: http://downloads.jboss.org/savara/examples/savara2-example-purchasing.zip
Once the SAVARA Eclipse Tool distribution has been correctly installed, and the example zip downloaded, then use the following steps to import the project:
Select the 'Import...' menu item, associated with the popup menu on the background of the left panel (Navigator or Package depending on perspective being viewed).
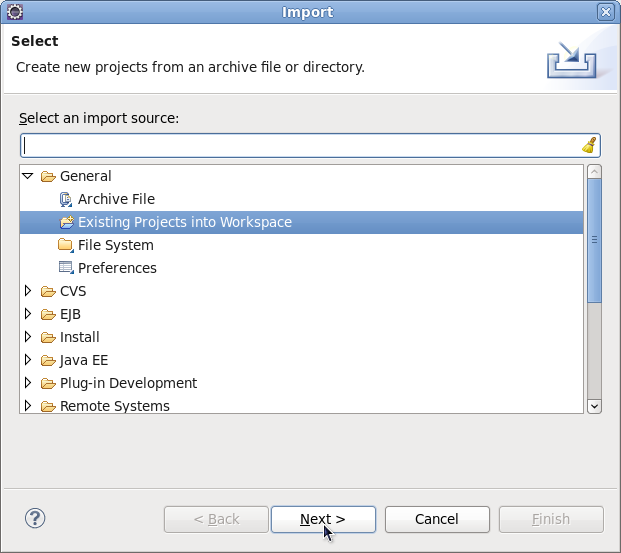
When the import dialog appears, select the "General->Existing Projects from Workspace " option and press the 'Next' button.
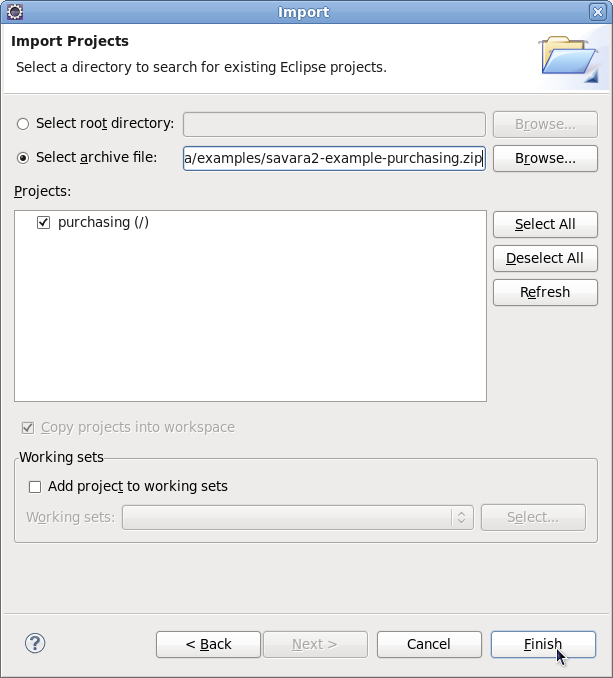
Ensuring that the 'Select archive file' radio button is selected, press the 'Browse' button and locate the downloaded example zip, and then press 'Ok'. Press the 'Finish' button to import the project.
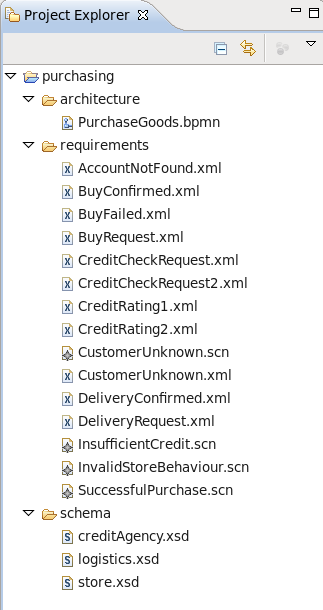
Once imported, the Eclipse navigator will list the sample project:
The first step is to create the example messages, to be used by the scenarios that will document the business requirements.
Some previously defined examples can be found in the
purchasing
Eclipse project. For example, the Buy request is defined as:
<tns:BuyRequest xmlns:tns="http://www.jboss.org/examples/store"
            id="1" product="Laptop" />
Although a schema may not have been defined at this stage, unless one previously existed that is being reused, it is a good idea to define a namespace for the message type. This is because it will be used within the scenarios and architectural models defined in the following stage. If the namespace was not specified at this stage, then the example messages, scenarios and architectural models would need to be updated at a later stage.
Although this phase has been defined before the definition of the scenarios, in practice these phases are iterative. So scenarios and example messages would be defined concurrently, as the requirements evolve through discussions between the business analyst and users.
When designing a system, it is necessary to capture requirements. Various approaches can be used for this, but currently there are no mechanisms that enable the requirements to be documented in such a way to enable an implementation to be validated back against the requirements.
The SAVARA tools provide a means of describing requirements, representing specific use cases for the interactions between a set of cooperating services, using scenarios - which can be considered similar to UML sequence diagrams that have been enhanced to include example messages. In the
purchasing
Eclipse project, the
SuccessfulPurchase.scn
scenario looks like this:
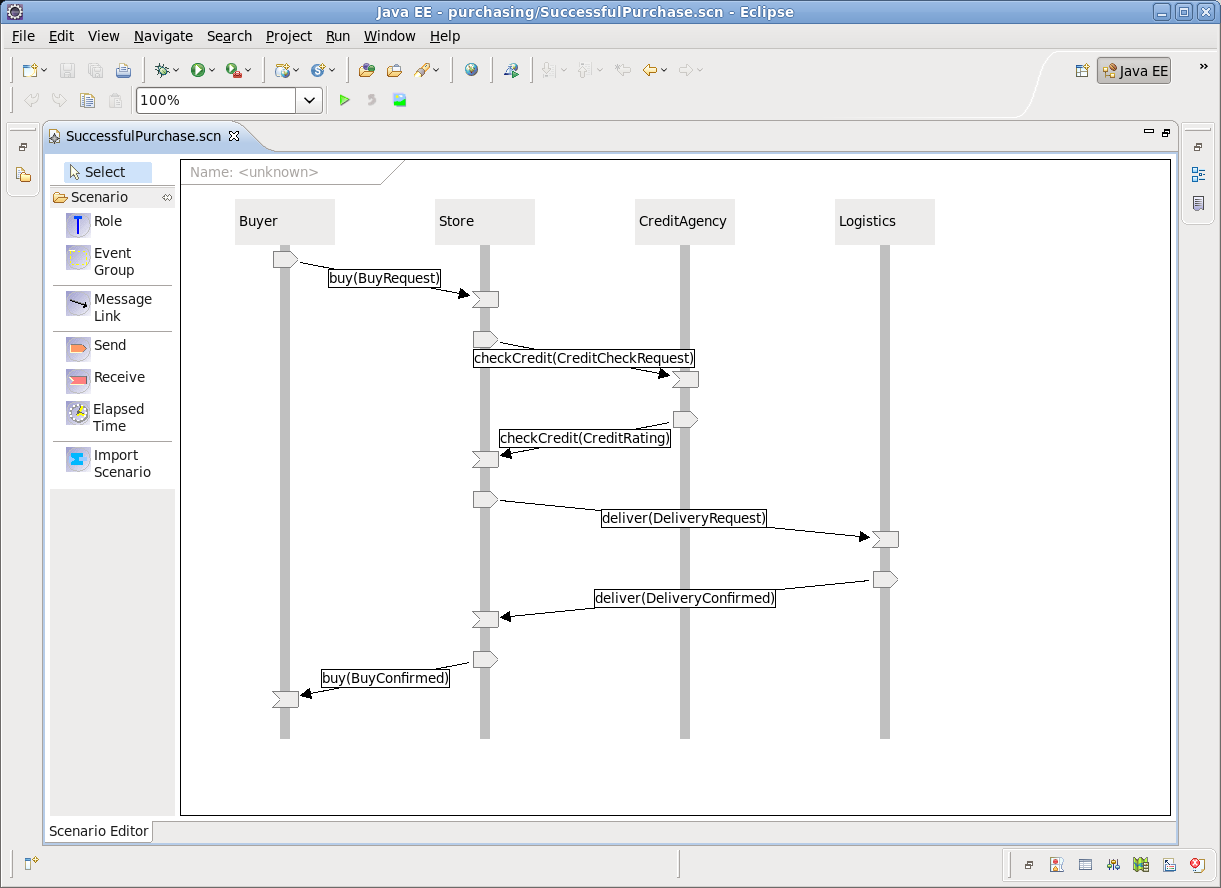
The business requirements can therefore be defined as a set of scenarios, each demonstrating a specific use-case, or path through the business process being enacted.
It is also possible to define scenarios that represent invalid use cases, that should not be implemented by the system. In these cases, the invalid message events (i.e. the sending or receiving icons) will be flagged as "Error Expected", to indicate that they should not occur.
One of the stages within the architecture phase is to define the information model for the message types associated with the messages exchanges between the interacting participants.
This involves defining message schema for each example message. The schema could already exist and be reused, it could be based on existing schema and just need to be upgraded to support new requirements, or it may need to be defined from scratch.
An example of a schema associated with the purchasing model is the
store.xsd
shown here:
<?xml version="1.0" encoding="UTF-8"?>
<schema xmlns="http://www.w3.org/2001/XMLSchema" targetNamespace="http://www.jboss.org/examples/store" xmlns:tns="http://www.jboss.org/examples/store" elementFormDefault="qualified">

    <element name="BuyRequest" type="tns:BuyRequestType"></element>
    <element name="BuyConfirmed" type="tns:BuyConfirmedType"></element>
    <element name="AccountNotFound" type="tns:AccountNotFoundType"></element>
    <element name="BuyFailed" type="tns:BuyFailedType"></element>

    <complexType name="BuyRequestType">
        <attribute name="id" type="string"></attribute>
        <attribute name="product" type="string"></attribute>
        <attribute name="customer" type="string"></attribute>
    </complexType>

    <complexType name="BuyConfirmedType">
        <attribute name="id" type="string"></attribute>
        <attribute name="amount" type="integer"></attribute>
        <attribute name="deliveryDate" type="date"></attribute>
    </complexType>

    <complexType name="AccountNotFoundType">
        <attribute name="id" type="string"></attribute>
        <attribute name="reason" type="string"></attribute>
    </complexType>

    <complexType name="BuyFailedType">
        <attribute name="id" type="string"></attribute>
        <attribute name="reason" type="string"></attribute>
    </complexType>
</schema>
Once the schema has been defined, then the example messages need to be updated to reference the schema, as shown in the following
BuyRequest.xml
example message:
<tns:BuyRequest xmlns:xsi="http://www.w3.org/2001/XMLSchema-instance"
            xmlns:tns="http://www.jboss.org/examples/store"
            xsi:schemaLocation="http://www.jboss.org/examples/store ../schema/store.xsd "
            id="1" product="Laptop" customer="Joe" />
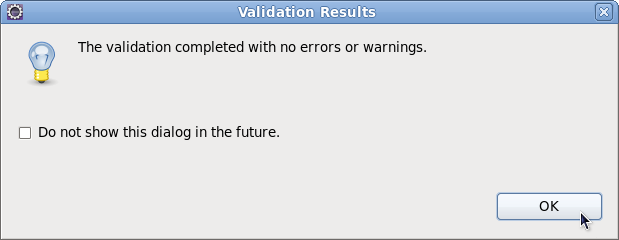
Once the association between example messages and the schema has been established, it is possible to validate the messages against the schema. Select the context menu associated with the XML file (e.g.
BuyRequest.xml
), and choose the
Validate
menu item. You should see the following message displayed, and no errors or warnings appear in the Problems or Markers view:
However, if we now introduce an error into this example message, for example change the attribute name 'customer' to 'customerX', and then perform the validation again, you will see an error has been reported:

Note
Don't forget to change the attribute name back to 'customer', and re-validate the XML file, before proceeding - as we will need the message be valid for the next section of the document.
For further information on how to use the validation capabilities within Eclipse, please read the Eclipse XML Validation Tutorial .
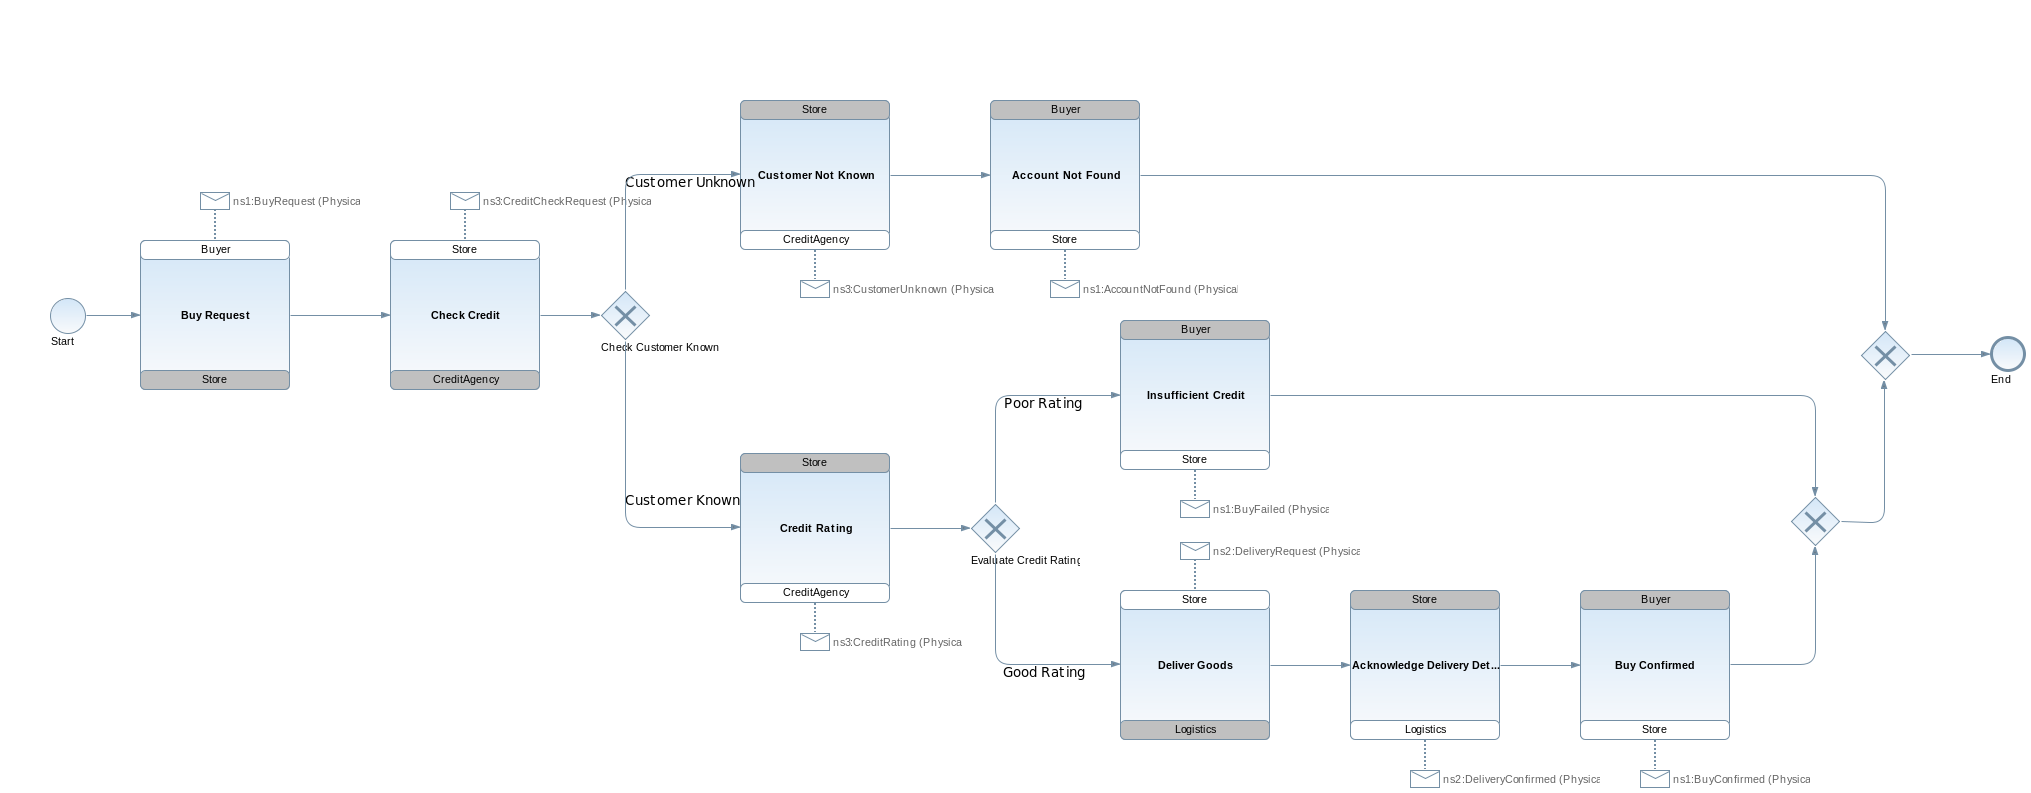
The next step in the development process is to specify a Choreography Model to implement the requirements described within the set of scenarios. Information on how to build a choreography can be found in the User Guide.
The choreography description for the Purchasing example can be found in
purchasing/architecture/PurchaseGoods.bpmn
, and looks like this:
The SAVARA tools can be used to validate the scenarios against the choreography description, to ensure that the choreography correctly implements the requirements. To test the
requirements/SuccessfulPurchase.scn
scenario against the choreography, launch the scenario editor by double-clicking on the scenario file, and then pressing the green
play
button in the toolbar. This will display a dlalog window used to configure what models and simulators are used for each role in the scenario:
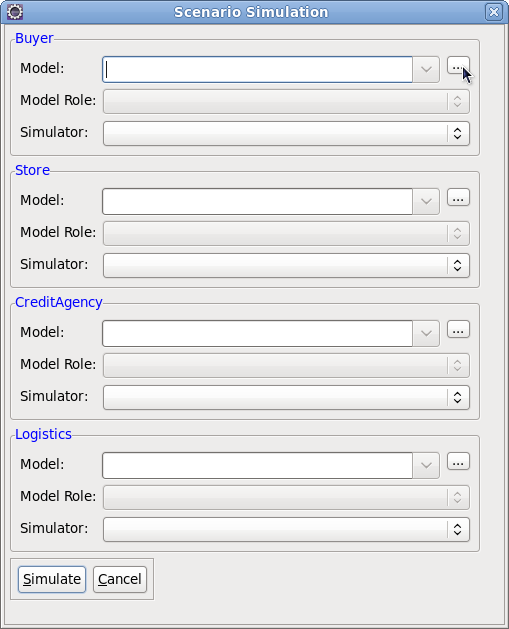
When simulating all roles against a single model (i.e. a choreography), then simply browser for the model (using the ... button) - which in this case is the PurchaseGoods.bpmn file in the same Eclipse project (architecture folder), and then when asked "Should model be set for all roles", press the "Yes" button. This will setup the simulation configuration for all roles:
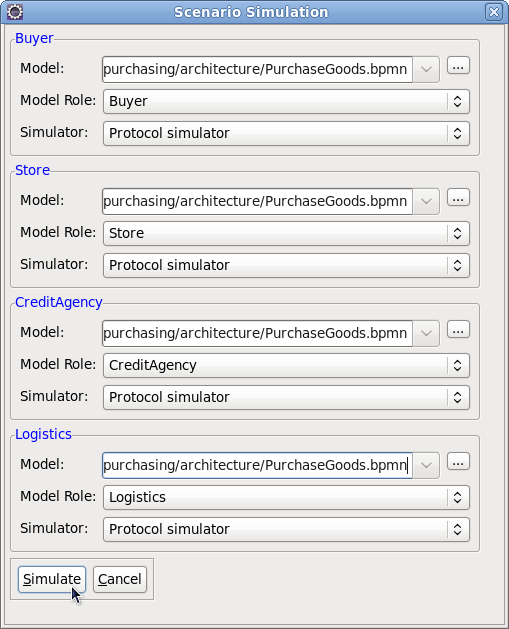
The simulators are all automatically initialised to "Protocol simulator", as this is the only simulator that supports the ".bpmn" type of model, and the model roles are initialised on a best guess basis. If the roles in the scenario are completely different names to the ones in the model (i.e. choreography), then the user will need to select the appropriate model roles to map from the scenario roles.
When the "Simulate" button has been pressed, and the simulation is complete, the scenario should look like the following image, indicating that the scenario completed successfully.
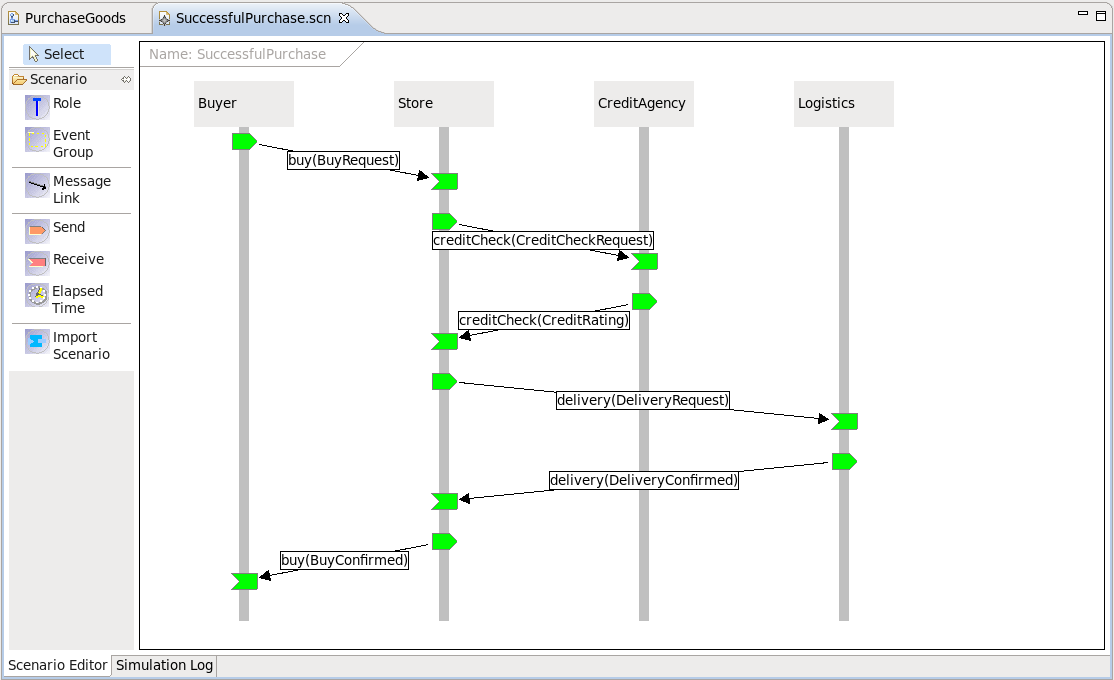
Figure 4.6. Simulation results showing the successful validation of a scenario against the choreography
To view a scenario that demonstrates a test failure, open the
requirements/InvalidStoreBehaviour.scn
scenario by double-clicking on the file, and then initiate the test using the green
play
button in the toolbar. When complete, the scenario should look like the following image.
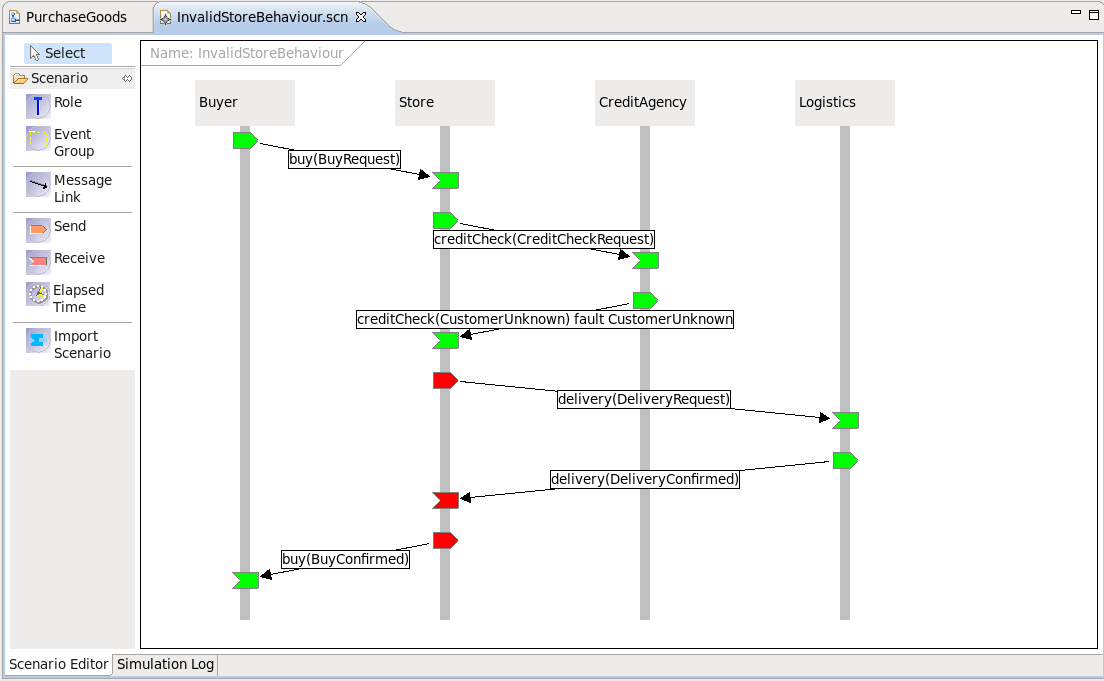
You will notice that the Store participant has a red 'send' node, indicating that this action was not expected behaviour when compared with the choreography description. The reason this is considered an error, is that the Store participant should only send an AccountNotFound message following a customer unknown response from the credit agency.
When an error is detected in a scenario, the architect can then determine whether the scenario is wrong (i.e. it does not correctly describe a business requirement), or whether the choreography is wrong and needs to be updated to accommodate the scenario.
At this point in the lifecycle, various activities would occur related to reviewing services (i.e. in a SOA Repository) and understanding whether existing services meet requirements, need to be modified, or whether new services need to be developed from scratch.
In the current SAVARA tooling, the main functionality in the Service Oriented Design phase is the generation of BPMN2 diagrams. These diagrams can be used as guidance for the development teams that are implementing the individual services (i.e. as design documents) or as the basis for the development (i.e. by using the BPMN2 models as executable processes).
It is also possible to extend the generated BPMN2 diagrams to include service logic. However it should be noted that changes to the choreography or BPMN2 diagrams will not be synchronized/merged. In future versions of SAVARA it will be possible to formally check BPMN2 process models for conformance against a choreography model, and potentially synchronize differences in externally observable behaviour between them.
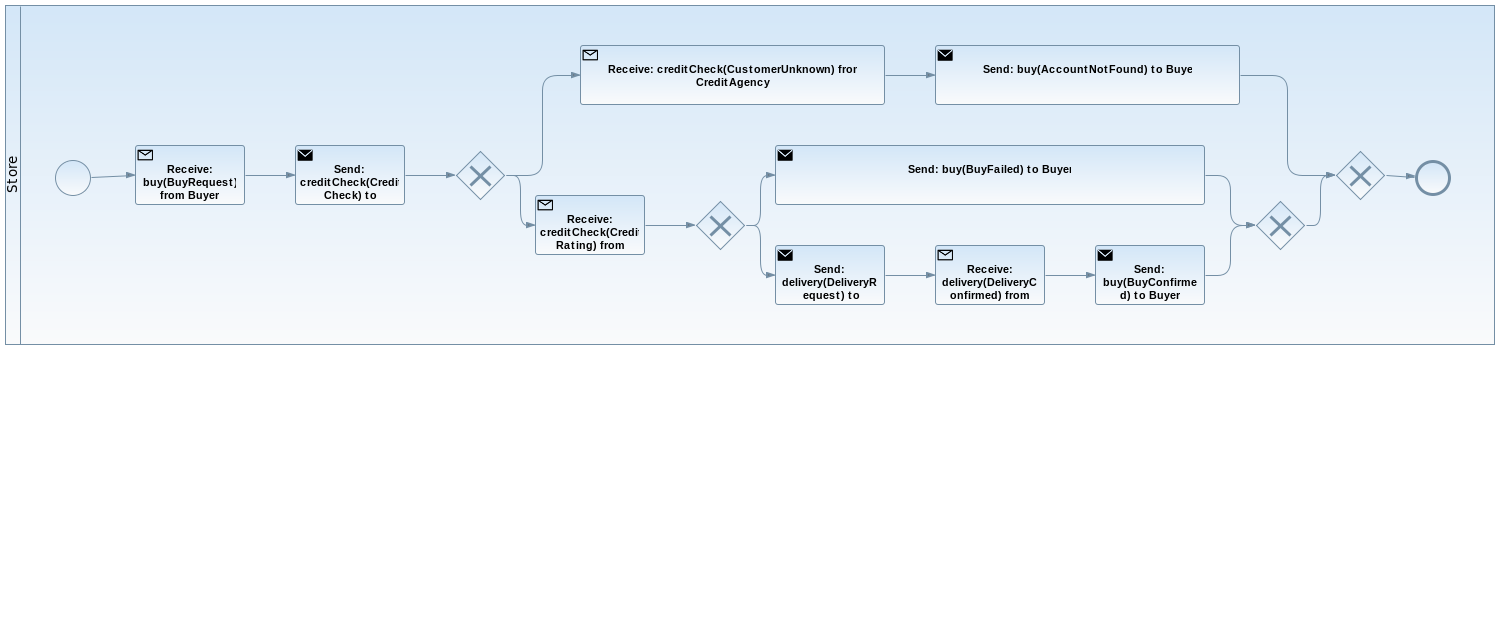
To generate the BPMN2 processes for a choreography, select the Savara->Generate->Service menu item from the context menu associated with the choreography, and then for each relevant participant choose the BPMN2 Process service type:

Once the "Ok" button has been pressed, separate projects will be created for each participant, containing the appropriate BPMN2 process for that participant. For example, the Store participant will have:
Services can be developed by generating initial development artifacts, based on artifacts created in preceding phases (e.g. architectural model or service contracts/designs).
To ensure that the services continue to conform to the artifacts defined in the previous phases, the tools will (eventaully) perform conformance checking between the service implementation and the existing architecture/design artifacts. This is not possible with all implementation languages - they must provide the means to extract the communication structure for comparison.
The following sections explain how the generation can be achieved for the WS-BPEL and SCA Java implementations.
The tools include a capability to generate a service implementation, for a participant in a choreography, using WS-BPEL.
When a choreography description has been created, it is possible to generate a BPEL Process (and associated WSDL files and deployment descriptor) for each of the participants defined within the choreography. To try this out, select the
Savara->Generate->Service
menu item from the popup menu associated with the
architecture/PurchaseGoods.bpmn
.
This will display a dialog listing the possible services that can be generated from this choreography, with a proposed Eclipse project name, and the option to select a service type.
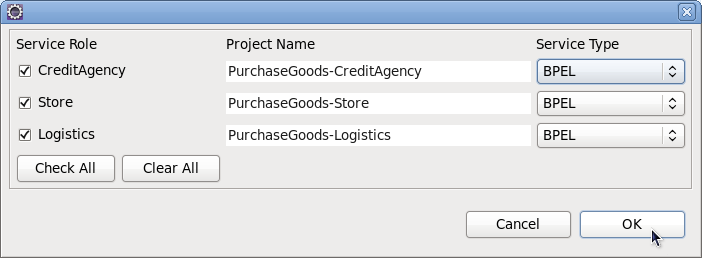
Press the 'Ok' button and this will create a single a BPEL project for the Store , Logistics and CreditAgency participants.
Each project will contain a single
bpelContent
folder containing the WS-BPEL process definition for the participant, a list of relevant WSDL files and a deployment descriptor file for use with any Apache ODE based engine (e.g. RiftSaw). However the WS-BPEL and WSDL files are standard, so can be deployed to any WS-BPEL 2.0 compliant engine.
The SAVARA tools include the ability to statically verify the external observable behaviour of a BPEL process definition against other artifacts (e.g. a scenario).
To verify a scenario against one or more BPEL process definitions, open the scenario in the editor and select the green play button. When the dialog is displayed, select the BPEL process associated with the role being simulated. For example, the
Store
role should be associated with the generated
PurchaseGoods_Store.bpel
, the
CreditAgency
role associated with the
PurchaseGoods_CreditAgency.bpel
, etc. When the OK button is pressed, the simulation will be performed against the selected BPEL process definitions.
'Static' verification refers to the fact that a protocol description is derived from the BPEL process, describing the communications behaviour of the process. It is this protocol description that is validated against other artifacts - in this case a scenario.
In contract, a dynamic verification would involve actually executing an instance of the BPEL process, to determine whether it correctly behaves when presented with a series of sample (simulated) use cases. We hope to be able to support this functionality in the near future.
This section shows how to generate SCA Java based services from a choreography, add implementation details to the service and then verify it against scenarios.
When a choreography description has been created, it is possible to generate a SCA Java implementation (and associated WSDL files and SCA composite descriptor) for one or more of the participants defined within the choreography. To try this out, select the
Savara->Generate->Service
menu item from the popup menu associated with the
architecture/PurchaseGoods.bpmn
.
This will display a dialog listing the possible services that can be generated from this choreography, with a proposed Eclipse project name, and the option to select a service type (in this case SCA Java ).
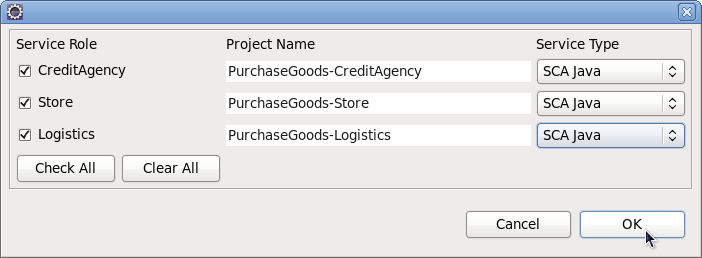
Press the 'Ok' button and this will create a Java project for the Store , Logistics and CreditAgency participants.
Each project will be generated as a Java project, containing the relevant Java interfaces and classes for the service implementation, the WSDL and XSD files for the public service interface, and the SCA composite descriptor.
In a previous section of the document, it showed how to use the Scenario (that represents a particular use case or requirement) to verify an architectural model (or choreography). The same scenarios can be used to test the service implementations generated from those architectural models or designs.
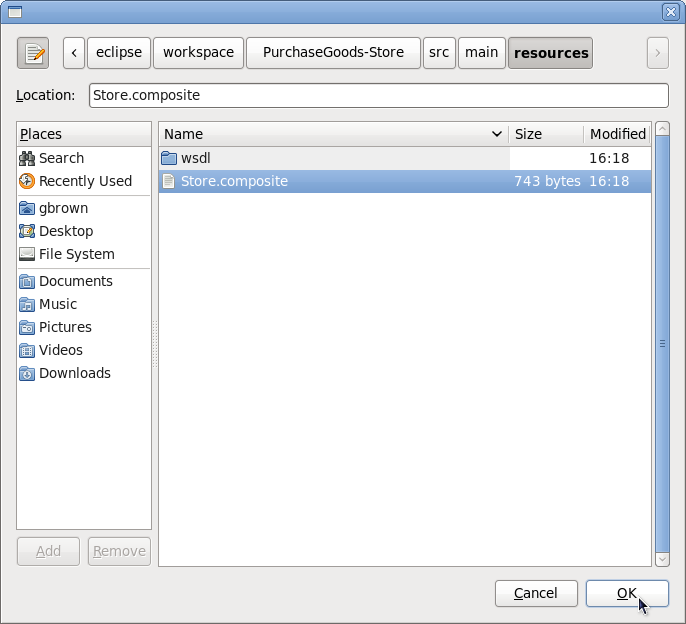
For example, to test the SCA Java implementation for the
Store
participants, you open the
requirements/SuccessfulPurchase.scn
scenario and press the green "play" button in the toolbar. This will show the 'scenario simulation' dialog. Then for the
Store
role, select the relevant composite file, so for the
Store
role locate the
Store.composite
file in the
PurchaseGoods-Store/src/main/resources
folder:
When the SCA composite has been selected, then it will automatically set the simulator to be "SCA simulator" and clear the model role - this is because the model role is not relevant as the service implementation represents a single role, rather than a collection of roles as in the case of a choreography being used for the model.
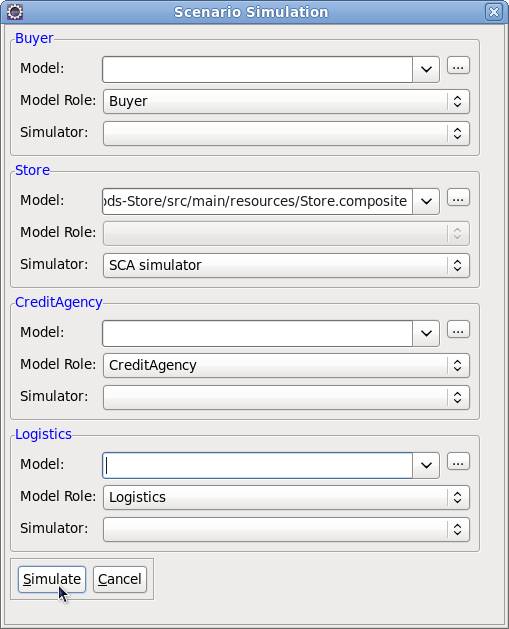
Figure 6.4. Scenario simulation configured for validating the SCA Java implementation for the Store role
Next press the "Simulate" button. Unlike the verification against a choreography model, which is pure simulation, when the SCA simulator is used and configured with a particular SCA composite file, then the simulation is performed by executing the service implementation. The simulation output is the same though:
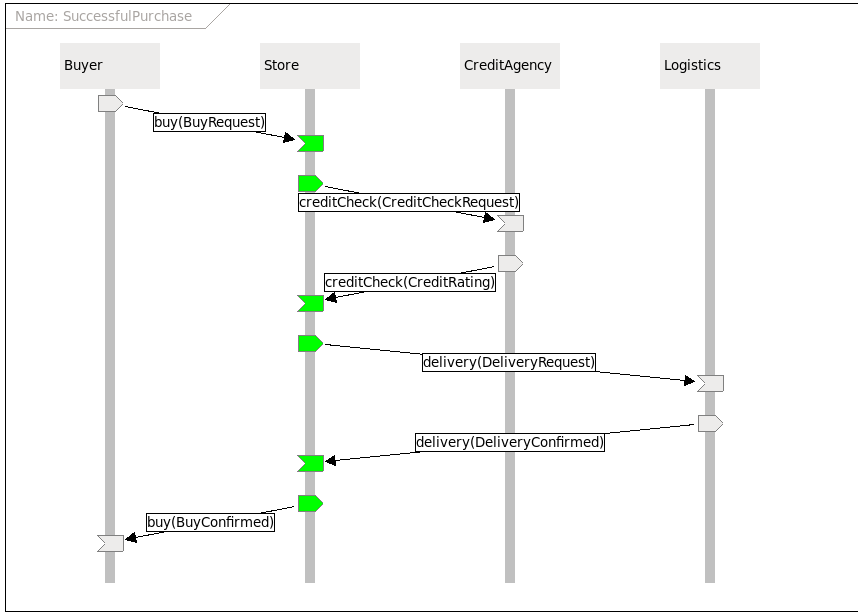
Figure 6.5. Result of simulating the Store role, within the Successful Purchase scenario, against the SCA Java implementation
Note however, before being able to verify the SCA Store implementation through simulation, you will need to implement the service logic. Initially it will be created as a skeleton. The following is a completed version of the
org.savara.examples.store.StoreImpl
class:
package org.savara.examples.store;

import java.math.BigInteger;
import java.util.logging.Logger;
import javax.jws.WebMethod;
import javax.jws.WebParam;
import javax.jws.WebResult;
import javax.jws.WebService;
import javax.jws.soap.SOAPBinding;
import javax.xml.bind.annotation.XmlSeeAlso;

import org.savara.examples.creditagency.CreditAgency;
import org.savara.examples.logistics.Logistics;
import org.jboss.examples.store.AccountNotFoundType;
import org.oasisopen.sca.annotation.Reference;

/**
 * This class was generated by Apache CXF 2.4.0
 * 2012-02-08T10:25:28.453Z
 * Generated source version: 2.4.0
 *
 */

@javax.jws.WebService(
                      serviceName = "StoreService",
                      portName = "StorePort",
                      targetNamespace = "http://www.savara.org/examples/Store",
                      wsdlLocation = "wsdl/PurchaseGoods_Store.wsdl",
                      endpointInterface = "org.savara.examples.store.Store")

public class StoreImpl implements Store {

    private static final Logger LOG = Logger.getLogger(StoreImpl.class.getName());

    @Reference
    public CreditAgency  creditAgency;

    @Reference
    public Logistics  logistics;

    /* (non-Javadoc)
     * @see org.savara.examples.store.Store#buy(org.jboss.examples.store.BuyRequestType  content )*
     */
    public org.jboss.examples.store.BuyConfirmedType buy(org.jboss.examples.store.BuyRequestType content) throws InsufficientCreditFault , AccountNotFoundFault    {
        LOG.info("Executing operation buy");
        System.out.println(content);
        try {
        	org.jboss.examples.creditagency.CreditCheckType check=
        			new org.jboss.examples.creditagency.CreditCheckType();
        	check.setId(content.getId());
        	check.setCustomer("C104536");

        	org.jboss.examples.creditagency.CreditRatingType rating=
        			creditAgency.creditCheck(check);

        	System.out.println("RATING="+rating);

        	if (rating.getRating().intValue() > 5) {
	        	org.jboss.examples.logistics.DeliveryRequestType deliveryRequest=
	    			new org.jboss.examples.logistics.DeliveryRequestType();
	        	deliveryRequest.setId(content.getId());
	        	deliveryRequest.setAddress("1001 Acme Street");

	        	org.jboss.examples.logistics.DeliveryConfirmedType delivery=
	        			logistics.delivery(deliveryRequest);

	            org.jboss.examples.store.BuyConfirmedType _return =
	            		new org.jboss.examples.store.BuyConfirmedType();
	            _return.setId("1");
	            _return.setAmount(BigInteger.valueOf(500));
	            return _return;
        	} else {
	            org.jboss.examples.store.BuyFailedType buyFailed =
	            		new org.jboss.examples.store.BuyFailedType();
	            buyFailed.setId("1");

	            throw new org.savara.examples.store.InsufficientCreditFault("Buy failed", buyFailed);
        	}
        } catch(org.savara.examples.creditagency.CustomerUnknownFault cuf) {
        	AccountNotFoundType anft=new AccountNotFoundType();
        	anft.setId(content.getId());
        	anft.setReason("Don't know you");
        	throw new AccountNotFoundFault("Account not found", anft);
        }
    }

}