JBoss.orgCommunity Documentation
Information about using the plug-ins comprising JBoss Tools
Abstract
This document details how to use and customize the individual plug-ins comprising JBoss Tools.
- Preface
- 1. Introduction to Red Hat JBoss Developer Studio
- I. Tools for Every Project
- 2. JBoss Central and the JBoss Perspective
- 3. JBoss Server Tools
- 3.1. Overview of JBoss Server Tools
- 3.2. Features of JBoss Server Tools
- 3.2.1. Features Overview
- 3.2.2. Download a JBoss Community Application Server
- 3.2.3. Define a Local Server with Runtime Detection
- 3.2.4. Create an Additional Server Runtime Environment
- 3.2.5. Define an Additional Local Server
- 3.2.6. Define a Remote Server
- 3.2.7. Manage Server Settings
- 3.2.8. Manage Server Settings in Overview Mode
- 3.2.9. Manage Server Settings in Deployment Mode
- 3.3. Customizing JBoss Server Tools
- 4. Forge Tools
- II. Tools for Creating Web Interfaces
- III. Tools for Creating Mobile Applications
- 6. Mobile Web Tools
- 6.1. Overview of Mobile Web Tools
- 6.2. Features of Mobile Web Tools
- 6.2.1. Features Overview
- 6.2.2. Create a Mobile Web Project
- 6.2.3. Use a HTML5 jQuery Mobile File Template
- 6.2.4. Access the jQuery Mobile Palette
- 6.2.5. Insert a jQuery Mobile Palette Widget into a HTML5 File
- 6.2.6. Get Assistance with jQuery Mobile Programming
- 6.2.7. View jQuery Mobile Pages in a Browser
- 6.3. Customizing Mobile Web Tools
- 7. BrowserSim
- 7.1. Overview of BrowserSim
- 7.2. Features of BrowserSim
- 7.2.1. Features Overview
- 7.2.2. View a Web Application on BrowserSim
- 7.2.3. Manage Web Applications on BrowserSim
- 7.2.4. Change the Appearance of a Simulated Device
- 7.2.5. View a Web Page in Different Browsers and Simulated Devices
- 7.2.6. Generate a Screen Capture of a Simulated Device
- 7.2.7. Activate LiveReload for BrowserSim
- 7.2.8. View the Source of a Web Page
- 7.3. Customizing BrowserSim
- 7.3.1. Customizing Overview
- 7.3.2. Make BrowserSim the Default Browser
- 7.3.3. Add BrowserSim to the Global Toolbar
- 7.3.4. Set a Shortcut for the Run BrowserSim Action
- 7.3.5. Add or Modify Devices in BrowserSim
- 7.3.6. Change the Default Behavior when a Device does not Fit the Display
- 7.3.7. Change the Default LiveReload Port
- 7.3.8. Change the Default Location for Saved Screen Captures
- 7.3.9. Change the Default Settings for Weinre
- IV. Tools for Deployment and Maintenance
- 8. OpenShift Tools
- 8.1. Overview of OpenShift Tools
- 8.2. Features of OpenShift Tools
- 8.2.1. Features Overview
- 8.2.2. Create an OpenShift User Account
- 8.2.3. Connect to OpenShift
- 8.2.4. Manage a Connection
- 8.2.5. Generate and Upload SSH keys to OpenShift
- 8.2.6. Manage SSH Keys
- 8.2.7. Create a Domain
- 8.2.8. Manage a Domain
- 8.2.9. Create and Deploy an Application on OpenShift
- 8.2.10. Deploy an Existing Application on OpenShift
- 8.2.11. Import a Deployed OpenShift Application into the IDE
- 8.2.12. Generate a server adapter for an application
- 8.2.13. View a Deployed Application and Associated Information
- 8.2.14. Manage a Deployed Application
- A. Revision History
This manual uses several conventions to highlight certain words and phrases and draw attention to specific pieces of information.
In PDF and paper editions, this manual uses typefaces drawn from the Liberation Fonts set. The Liberation Fonts set is also used in HTML editions if the set is installed on your system. If not, alternative but equivalent typefaces are displayed. Note: Red Hat Enterprise Linux 5 and later include the Liberation Fonts set by default.
Four typographic conventions are used to call attention to specific words and phrases. These conventions, and the circumstances they apply to, are as follows.
Mono-spaced Bold
Used to highlight system input, including shell commands, file names and paths. Also used to highlight keys and key combinations. For example:
To see the contents of the file
my_next_bestselling_novelin your current working directory, enter thecat my_next_bestselling_novelcommand at the shell prompt and press Enter to execute the command.
The above includes a file name, a shell command and a key, all presented in mono-spaced bold and all distinguishable thanks to context.
Key combinations can be distinguished from an individual key by the plus sign that connects each part of a key combination. For example:
Press Enter to execute the command.
Press Ctrl+Alt+F2 to switch to a virtual terminal.
The first example highlights a particular key to press. The second example highlights a key combination: a set of three keys pressed simultaneously.
If source code is discussed, class names, methods, functions, variable names and returned values mentioned within a paragraph will be presented as above, in mono-spaced bold. For example:
File-related classes include
filesystemfor file systems,filefor files, anddirfor directories. Each class has its own associated set of permissions.
Proportional Bold
This denotes words or phrases encountered on a system, including application names; dialog box text; labeled buttons; check-box and radio button labels; menu titles and sub-menu titles. For example:
Choose → → from the main menu bar to launch Mouse Preferences. In the Buttons tab, select the Left-handed mouse check box and click to switch the primary mouse button from the left to the right (making the mouse suitable for use in the left hand).
To insert a special character into a gedit file, choose → → from the main menu bar. Next, choose → from the Character Map menu bar, type the name of the character in the Search field and click . The character you sought will be highlighted in the Character Table. Double-click this highlighted character to place it in the Text to copy field and then click the button. Now switch back to your document and choose → from the gedit menu bar.
The above text includes application names; system-wide menu names and items; application-specific menu names; and buttons and text found within a GUI interface, all presented in proportional bold and all distinguishable by context.
Mono-spaced Bold ItalicProportional Bold Italic
Whether mono-spaced bold or proportional bold, the addition of italics indicates replaceable or variable text. Italics denotes text you do not input literally or displayed text that changes depending on circumstance. For example:
To connect to a remote machine using ssh, type
sshat a shell prompt. If the remote machine isusername@domain.nameexample.comand your username on that machine is john, typessh john@example.com.The
mount -o remountcommand remounts the named file system. For example, to remount thefile-system/homefile system, the command ismount -o remount /home.To see the version of a currently installed package, use the
rpm -qcommand. It will return a result as follows:package.package-version-release
Note the words in bold italics above — username, domain.name, file-system, package, version and release. Each word is a placeholder, either for text you enter when issuing a command or for text displayed by the system.
Aside from standard usage for presenting the title of a work, italics denotes the first use of a new and important term. For example:
Publican is a DocBook publishing system.
Terminal output and source code listings are set off visually from the surrounding text.
Output sent to a terminal is set in mono-spaced roman and presented thus:
books        Desktop   documentation  drafts  mss    photos   stuff  svn
books_tests  Desktop1  downloads      images  notes  scripts  svgs
Source-code listings are also set in mono-spaced roman but add syntax highlighting as follows:
package org.jboss.book.jca.ex1;


import javax.naming.InitialContext;


public class ExClient

{

   public static void main(String args[])

       throws Exception

   {

      InitialContext iniCtx = new InitialContext();

      Object         ref    = iniCtx.lookup("EchoBean");

      EchoHome       home   = (EchoHome) ref;

      Echo           echo   = home.create();


      System.out.println("Created Echo");


      System.out.println("Echo.echo('Hello') = " + echo.echo("Hello"));

   }

}
Finally, we use three visual styles to draw attention to information that might otherwise be overlooked.
Note
Notes are tips, shortcuts or alternative approaches to the task at hand. Ignoring a note should have no negative consequences, but you might miss out on a trick that makes your life easier.
Important
Important boxes detail things that are easily missed: configuration changes that only apply to the current session, or services that need restarting before an update will apply. Ignoring a box labeled 'Important' will not cause data loss but may cause irritation and frustration.
Warning
Warnings should not be ignored. Ignoring warnings will most likely cause data loss.
Do You Need Help?
If you experience difficulty with a procedure described in this documentation, visit the JBoss Tools website at http://www.jboss.org/tools. Through the JBoss Tools website, you can:
search or browse through a knowledgebase of technical support articles in the wiki.
view video tutorials on how to use the tools.
participate in discussions in the user forum.
keep up to date with changes via the blog, mailing list and News and Noteworthy web page.
Give us Feedback
If you find a typographical error or have a suggestion for improving this documentation, we would love to hear from you. Submit a report in JIRA at https://issues.jboss.org against the project Documentation for JBoss Tools and Developer Studio (TOOLSDOC).
Fill out the template below in JIRA's Description field. Be as specific as possible when describing the issue; this will help ensure that we can fix it quickly.
Document URL:

Section Number and Name:

Describe the issue:

Suggestions for improvement:

Additional information:
Be sure to give us your name so that you can receive full credit for reporting the issue.
Red Hat JBoss Developer Studio is a set of Eclipse-based development tools. It contains plug-ins that integrate with Eclipse to extend the existing functionality of the integrated development environment (IDE).
JBoss Developer Studio is designed to increase your productivity when developing applications. You can focus on building, testing and deploying your applications because JBoss application development tools are integrated in one IDE. Furthermore, JBoss Developer Studio has many unique features to assist your application development:
Develop new applications using the wizards and project examples of JBoss Central.
Add powerful functionality to applications with minimal effort using Forge Tools.
Build web interfaces with ease using the visual editing and drag-and-drop utilities of Visual Web Tools and Mobile Web Tools.
Experience browsers automatically refreshing in response to modified application resources with LiveReload Tools.
Incorporate JSF, Seam, JAX-RS, Hibernate, CDI and other popular APIs into applications with simplicity using the tool-driven interface.
Preview and test mobile web applications on a variety of simulation mobile devices using BrowserSim.
Deploy applications to JBoss runtime servers and the cloud using JBoss Server Tools and OpenShift Tools.
JBoss Developer Studio comes built around Eclipse and packaged with all of the necessary dependencies and third-party plug-ins for simplified installing. For developers already running Eclipse, JBoss Developer Studio can also be installed through Eclipse Marketplace. For distinction, this latter JBoss Developer Studio installation is called JBoss Developer Studio BYOE (Bring Your Own Eclipse).
JBoss Developer Studio assists JEE developers by integrating JBoss technology and APIs in a single development environment. Here are a few ways that JBoss Developer Studio makes the work of a developer easier:
- Web applications
JBoss Central provides wizards that generate skeleton and sample projects, enabling you to focus on developing the functionality of your applications. The wizards create web applications based on different APIs and technologies, showing the usage and advantages of each. JBoss Developer Studio also offers project file templates in a range of popular programming languages, including HTML, XHTML, and JSF.
Palettes in JBoss Developer Studio give access to the core elements of the JSF, Richfaces and Seam APIs, for use in developing the user interfaces of your applications. Elements of these APIs can be dragged and dropped directly into your project so that you can create richer user interfaces quickly. Visual Web Tools offers graphical and source viewing of files and defaults to dedicated editors for different file types. JBoss Developer Studio supports the Java EE 6 specification and provides tools for JAX-RS, Hibernate, and CDI APIs so you can develop the server-side components of your application effortlessly.
LiveReload Tools automatically refreshes browsers of local or deployed applications as you modify project resources to save you from needing to manually refresh. You can even experience automatic refreshing when viewing applications in browsers on external and mobile devices, with application web addresses easy to navigate to with QR codes.
- Web applications optimized for mobile devices
Mobile Web Tools provides support for HTML5 and jQuery Mobile to enable you to create web applications optimized across desktop and mobile clients. The HTML5 Project wizard in JBoss Central generates a sample application using HTML5 and jQuery Mobile technologies and, together with HTML5 and jQuery Mobile project file templates, helps you to get up and running with these APIs and technologies quickly. HTML5 and jQuery Mobile widgets can be dragged from the Mobile Web palette into your project files and, in conjunction with the widget wizards, enable you to effortlessly develop customized user interfaces for your mobile web applications.
BrowserSim allows you to view your web applications on a variety of simulated mobile devices so that you can ensure they will be correctly formatted. LiveReload also extends to BrowserSim allowing you to experience automatic browser refreshing as you develop your mobile web applications. The integration of Firebug Lite and Weinre capabilities with BrowserSim assists you to inspect the page source of web pages with familiar tools.
- Applications for cloud deployment
OpenShift Tools deploys your applications directly to the cloud on the Red Hat OpenShift platform. You can create and manage your OpenShift account and manage the deployment of applications in your OpenShift domain from within the IDE. In addition to using the OpenShift Application wizard to create new applications for deployment to OpenShift, OpenShift Tools can import applications already deployed on OpenShift so that you can further develop them and manage their deployment from the comfort of the IDE.
Table of Contents
- 2. JBoss Central and the JBoss Perspective
- 3. JBoss Server Tools
- 3.1. Overview of JBoss Server Tools
- 3.2. Features of JBoss Server Tools
- 3.2.1. Features Overview
- 3.2.2. Download a JBoss Community Application Server
- 3.2.3. Define a Local Server with Runtime Detection
- 3.2.4. Create an Additional Server Runtime Environment
- 3.2.5. Define an Additional Local Server
- 3.2.6. Define a Remote Server
- 3.2.7. Manage Server Settings
- 3.2.8. Manage Server Settings in Overview Mode
- 3.2.9. Manage Server Settings in Deployment Mode
- 3.3. Customizing JBoss Server Tools
- 4. Forge Tools
JBoss Central is a core IDE tab, providing access to JBoss information and assistance in one centralized location. It offers features for first time users of JBoss Tools, as well as those with more experience.
The JBoss Central tab comprises resources and actions for creating new projects, learning about the tools and installing software updates:
Project wizards create new projects based on sample applications and different technologies.
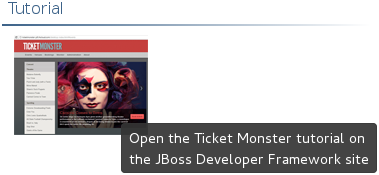
The TicketMonster tutorial, part of JBoss Java Developer Framework, demonstrates how to use the IDE to best advantage in developing a complex web application that utilizes JBoss technologies.
Links to JBoss blog posts give timely insight into JBoss developments and the links to JBoss resources, such as documentation and forums, provide easy access to key information sources.
Software installation and update information assist in the easy management of IDE plug-ins.
JBoss is a key IDE perspective, giving easy access to useful tabs and actions when developing applications with JBoss technologies. The perspective consists of a default set of tabs, menus and toolbars.
- Tabs
The default tabs of the JBoss perspective are OpenShift Explorer, Outline, Package Explorer, Palette, Problems, Project Explorer, Properties, and Servers. These tabs are vital when developing with JBoss technologies.
- Menus
The default menus of the JBoss perspective are File, Edit, Navigate, Search, Project, Run, Window, Help. These are shared with other perspectives but contain unique menu items for actions such as starting project wizards, converting line delimiters, showing items in JBoss perspective tabs, generating Javadoc, building packages, accessing JBoss Central and cheat sheets, and reporting problems with tools.
- Toolbars
The default toolbars that compose the global toolbar of the JBoss perspective are BrowserSim, Debug, File, Help, Java EE, Java Element Creation, JBoss Tools WTP Server Actions, JPA Element Creation, Launch, Navigate, Search, Select Maven Profiles, and Web Browser. The global toolbar provides access to frequently used actions.
The aim of this section is to guide you in using JBoss Central and the JBoss perspective:
View JBoss Central to access project wizards and information resources
Install and update software with JBoss Central
Open the JBoss perspective for easy access to key tabs, menus and toolbars
Access cheat sheets that assist in project development
The JBoss Central tab provides resources for getting started and updating software.
To open the JBoss Central tab, click the icon
 . Alternatively, click →.
To maximize the JBoss Central tab, double-click the name of the tab. The JBoss Central tab fills the whole IDE window. Double-click the name of the tab to reduce the size of the tab again. These actions work for all IDE tabs.
JBoss Central provides access to wizards for generating projects. There are two types of project wizards available in JBoss Central:
The Start from scratch wizards create the same project using different underlying technology, as started in the project name. To view a project summary, hover the cursor over a project wizard. If you do not have the necessary plug-in installed to use a wizard, you will be prompted to install it when you select the wizard.
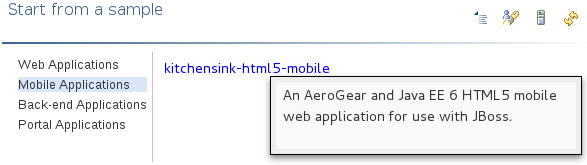
The Start from a sample wizards create sample web, mobile, back-end and portal applications. To view a project summary, hover the cursor over a project wizard.

To create a project from one of the wizards, in the JBoss Central tab select the Getting Started page. Click on one of the links below Start from scratch or Start from a sample. Alternatively, click → and select a project from the list. A wizard opens to guide you through the process of creating the project.
Additionally, access is provided to the comprehensive TicketMonster tutorial, part of JBoss Developer Framework, that guides you through developing a complex web application utilizing JBoss technologies from within the IDE. To view the tutorial, in the JBoss Central tab select the Getting Started page and click the button. The JBoss Developer Framework website will open in the default browser of the IDE.
JBoss Central provides easy access to JBoss and developer information. Each of the information sources listed below are web-based and, depending on the web browser preferences you have set for the IDE, clicking on links results in an internal or external browser window opening.
- View JBoss Tools website
In the JBoss Central tab, click the icon
 .
.
- View the latest JBoss developments
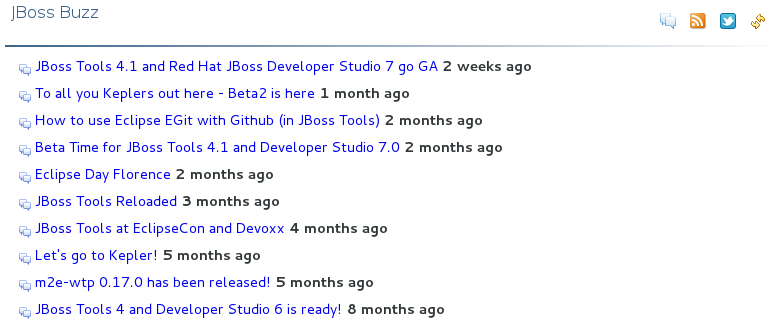
In the JBoss Central tab, select the Getting Started page and click the links under JBoss Buzz. To see previews of the blog posts, hover the cursor over these links. To view a complete list of JBoss blog posts, click the button. JBoss blog posts are available to follow as RSS feeds or with Twitter. To review these options, click the or icons.
- View JBoss developer information sources
In the JBoss Central tab, select the Getting Started page and click the links under Other resources. These links provide access to videos, documentation and forums.
- Search JBoss Community website
In the JBoss Central tab, click the arrow next to the search box and select Search JBoss Community. In the search field, enter the search terms.

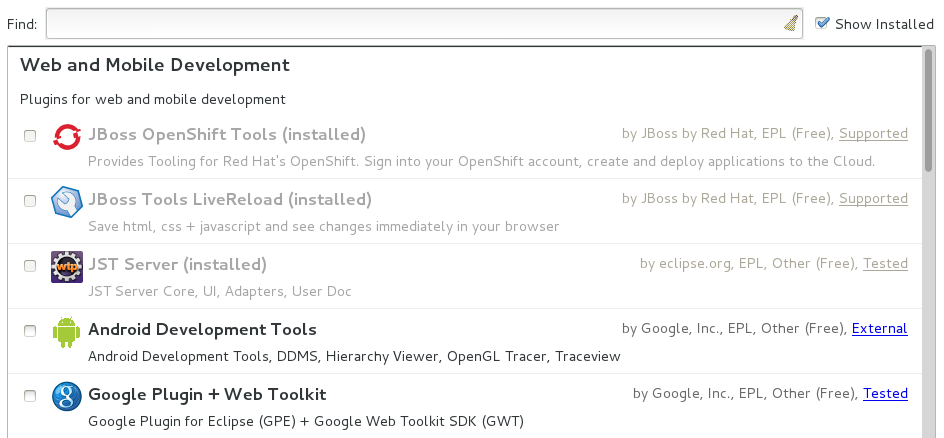
JBoss Central enables you to install and update a range of IDE plug-ins. The available plug-ins comprise JBoss and third party plug-ins that have been specifically tested for use with the IDE. These plug-ins include ones for web and mobile development, source control management, testing and Maven.
For all actions listed below, open the JBoss Central tab and select the Software/Update page.
- View available software
The available software is listed in the table. To refresh the list of available plug-ins, click the icon
 .
.
- View installed plug-ins
Select the Show Installed check box. The installed plug-ins are listed in the table as disabled.
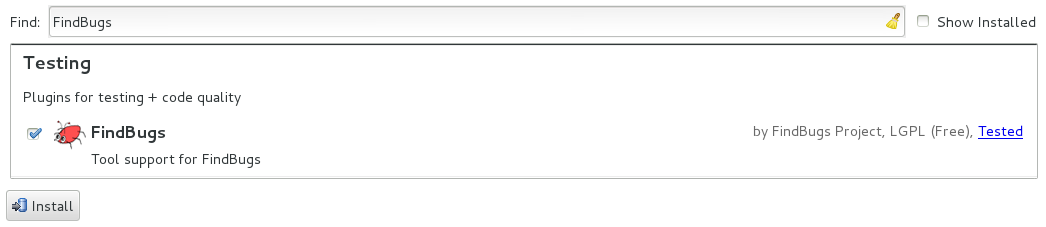
- Install available software
In the Find field, type the name of the software or scroll through the list to locate it. Select the check box corresponding to the software you want to install and click or click the icon
 .
.
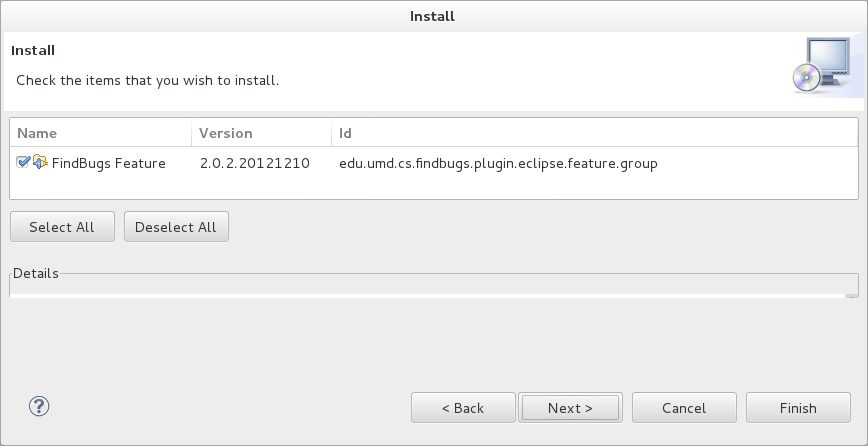
In the Install wizard, ensure the check boxes are selected for the software you want to install and click .
Review the details of the items listed for install and click . After reading and agreeing to the license(s), click I accept the terms of the license agreement(s) and click . The Installing Software window opens and reports the progress of the installation.
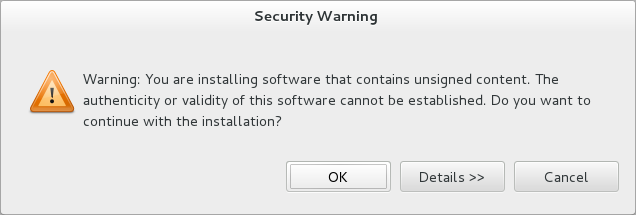
During the installation process you may receive warnings about installing unsigned content. If this is the case, check the details of the content and if satisfied click to continue with the installation.
Once installing is complete, you are prompted to restart the IDE. Click to restart now and if you need to save any unsaved changes to open projects. Note that changes do not take effect until the IDE is restarted.
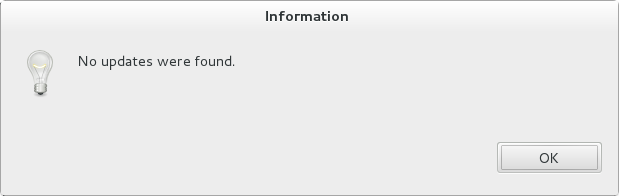
- Check for software updates
Click the icon
 . The Contacting Software Sites window opens and reports the progress of checking. Once checking is complete, a prompt informs you of any new software found. Click to close the prompt.
The JBoss perspective provides a default set of tabs, menus and toolbars to assist with common tasks associated with developing applications that use JBoss technologies.
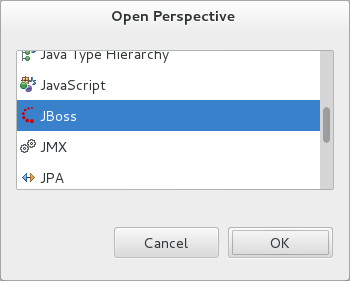
To open the JBoss perspective, click →→. From the list of available perspectives, select JBoss and click . The tabs associated with the JBoss perspective open and menus and toolbars change as appropriate.
There are a number of actions provided by the IDE for managing perspectives, including the JBoss perspective.
- Reset the JBoss perspective
You may want to reset the JBoss perspective to its default settings after opening and closing tabs. Click →. At the prompt asking if you want to reset the current JBoss perspective to its default settings, click .
- Switch to the JBoss perspective
You can have multiple perspectives open at one time. To switch to the JBoss perspective, click the icon
 . Alternatively, click →→ or press Ctrl+F8 and repeat until the JBoss perspective is the current perspective.
- Close the JBoss perspective
Click →.
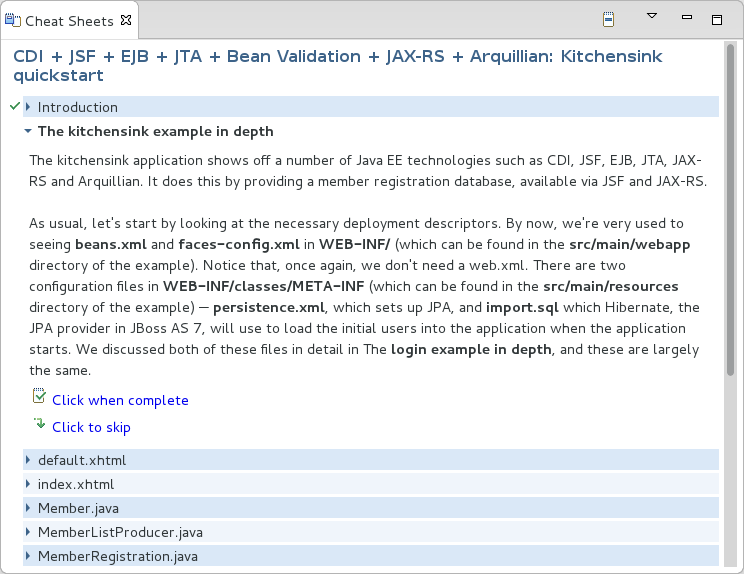
Typically, cheat sheets contain detailed information about projects, with step by step guidance and explanations for how to create and deploy applications. JBoss Central and the JBoss perspective provide actions to make the cheat sheets that accompany projects easier to access and view.
A cheat sheet contained in a project is automatically opened in the Cheat Sheets tab when the project is imported into the workspace with →.
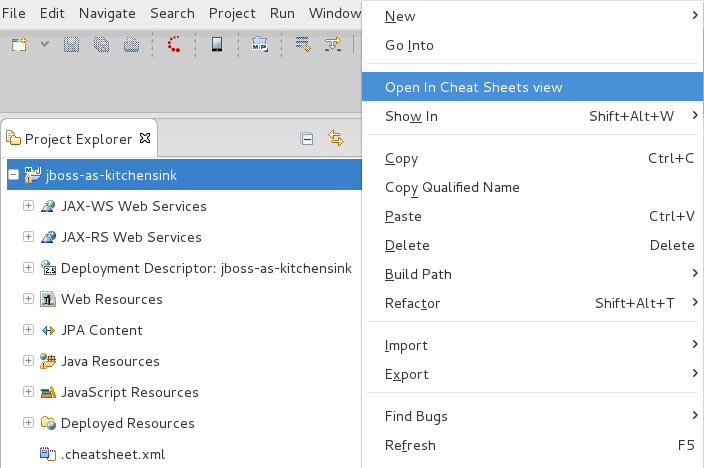
To open a cheat sheet manually, in the Project Explorer tab right-click the project name or a cheat sheet file and click .
Alternatively, click →, click Select a cheat sheet from a file and type the location of the file in the field or click to navigate to the file. Click to close the window. The cheat sheet opens in the Cheat Sheets tab.
Note
If the cheat sheet file name begins with dot, it may not be automatically visible in the Project Explorer tab. To change the viewing preferences of the Project Explorer tab, click the icon and click . In the Filters tab, clear the .* resources check box and click .
The aim of this section is to guide you in customizing JBoss Central and the JBoss perspective:
Make JBoss Central visible when the IDE starts
Customize the menu and toolbar items of the JBoss perspective
Enable project examples for use when you are offline
Specify the default IDE behavior for cheat sheets
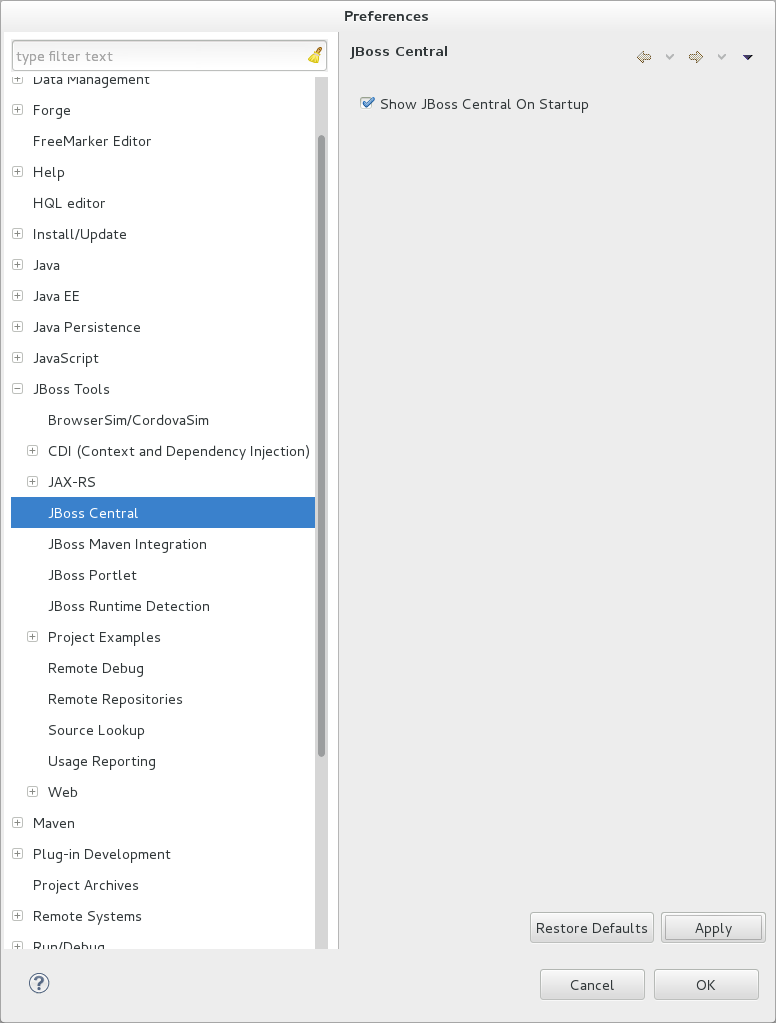
JBoss Central is set by default to show when the IDE starts but you can customize this behavior.
To change the behavior, in the JBoss Central tab select or clear the Show on Startup check box as appropriate.

Alternatively, in the JBoss Central tab click the icon
 or click →. In both cases, expand JBoss Tools and select JBoss Central. Select or clear the Show JBoss Central on Startup check box as appropriate. Click and click to close the Preferences window.
You can customize the menus and toolbars displayed by the JBoss perspective, as with any perspective.
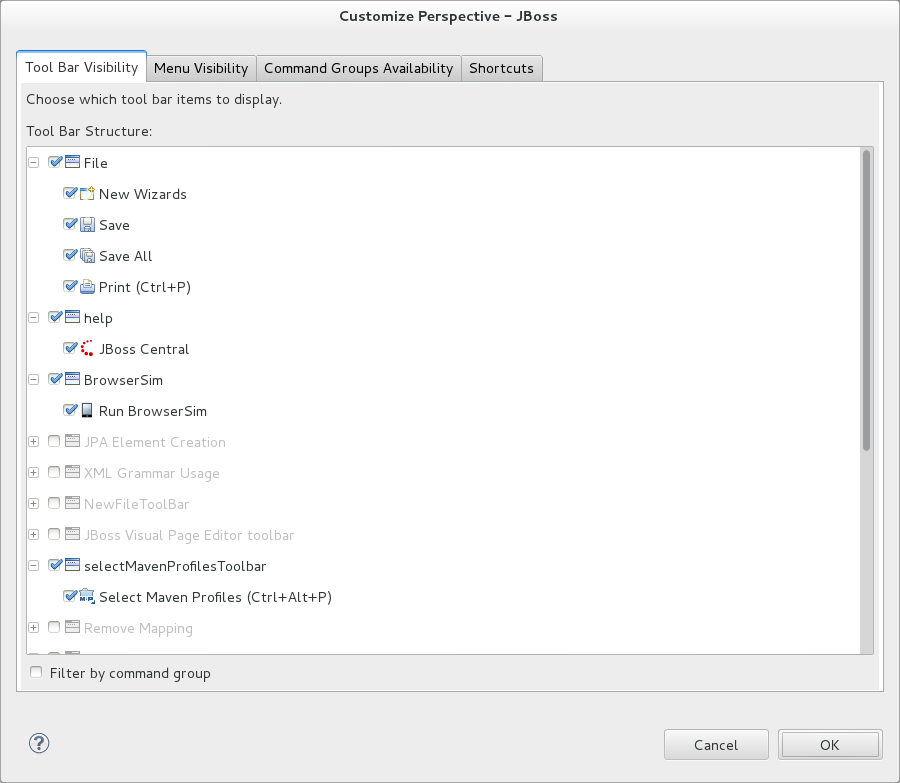
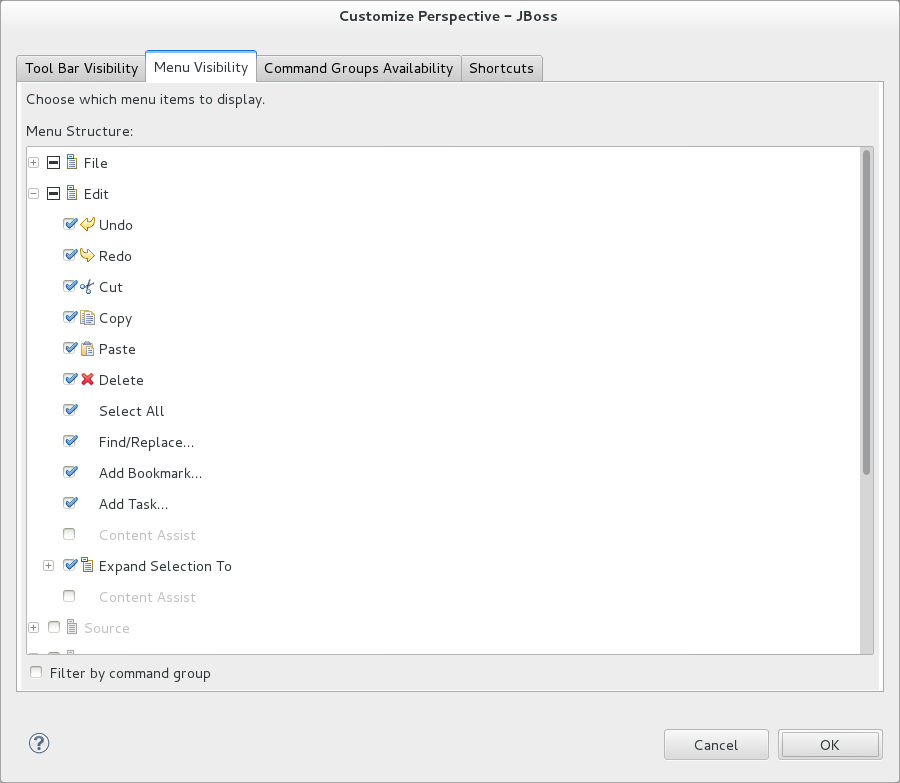
To customize the JBoss perspective, ensure it is the current perspective and click →. In the Tool Bar Visibility tab, select or clear the check boxes corresponding to the individual toolbars and icons visible in the global toolbar of the JBoss perspective as appropriate. In the Menu Visibility tab, select or clear the check boxes corresponding to the menus and menu items visible in the JBoss perspective as appropriate. Disabled items in the Tool Bar Visibility or Menu Visibility tab can be activated in the Command Groups Availability tab. Click to close the window.
You can reorder the individual toolbars comprising the global toolbar in the JBoss perspective. To reorder, click the vertical line indicating the beginning of a toolbar and drag the toolbar to its new location in the global toolbar.

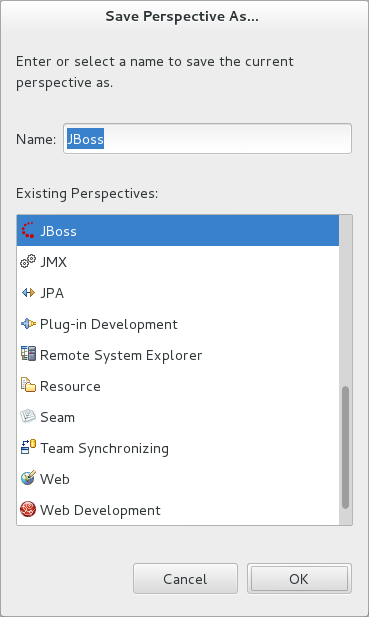
Additionally, you can customize which tabs are part of the JBoss perspective. To customize the tabs, ensure the JBoss perspective is the current perspective. Open or close tabs as desired and click →. From the Existing Perspectives list, select JBoss and click . At the prompt asking if you want to overwrite the existing JBoss perspective, click .
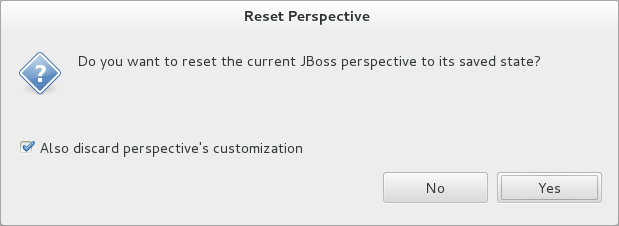
To revert all customization of the JBoss perspective, ensure it is the current perspective and click →. At the prompt asking if you want to reset the JBoss perspective to its saved state, select the Also discard perspective's customization check box and click .
When a project wizard in JBoss Central is used, the IDE searches online respositories for the most recent versions of project dependencies. JBoss Central provides a feature that enables you to create a cache of the necessary project dependencies when you are online so that you can still use the project wizards offline. As detailed below, this is achieved by first creating the cache and then informing the IDE to use that cache.
Important
Groovy must be installed and configured as stated in the Groovy documentation. For more information, see http://groovy.codehaus.org/Installing+Groovy at the Groovy website.
Important
Maven must be correctly configured for all of the project wizards before the cache script is run. Red Hat JBoss Enterprise Application Platform and Red Hat JBoss Web Framework Kit Maven repositories must be specified in settings.xml.
To create the cache, click →. Expand JBoss Tools→Project Examples and select Offline Support. To run the cache generating script, click and paste the selected text on a command line outside the IDE. The script will download and build all of the project examples in a new directory offline. The script may take some time to complete.
Once the cache is generated, copy offline/.jbosstools/cache to the directory where you want to keep the project examples. Copy the contents of offline/.m2/repository to your local maven repository.
To inform the IDE to use the cache for the project example wizards, click →. Expand JBoss Tools→Project Examples and select Offline Support. Select the Enable offline mode for project examples check box. Ensure the correct cache location is specified in the Offline directory field. Click and click to close the Preferences window.
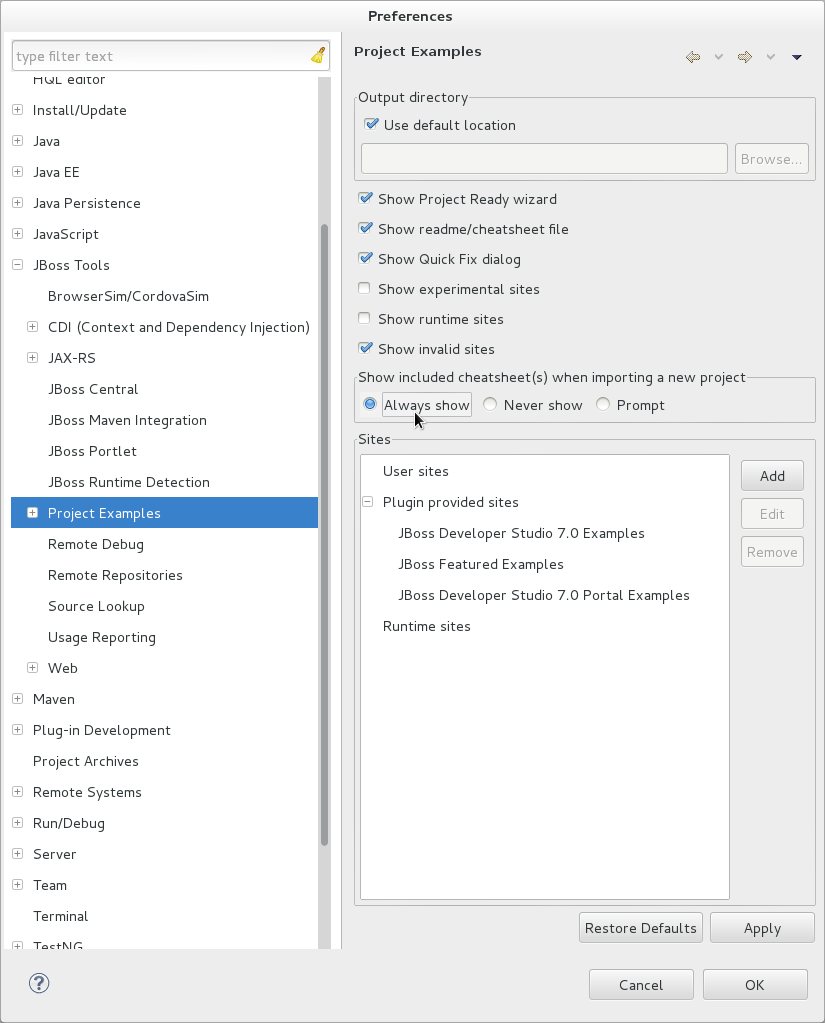
You can specify the default action the IDE should take when finding cheat sheets in projects that it is importing. The available options include always or never showing cheat sheets or the IDE prompting for which action to take for each import.
To customize the action, click →. Expand JBoss Tools and select Project Examples. From the Show included cheat sheet(s) when importing a project list, click one of the options. Click and click to close the window.
- 3.1. Overview of JBoss Server Tools
- 3.2. Features of JBoss Server Tools
- 3.2.1. Features Overview
- 3.2.2. Download a JBoss Community Application Server
- 3.2.3. Define a Local Server with Runtime Detection
- 3.2.4. Create an Additional Server Runtime Environment
- 3.2.5. Define an Additional Local Server
- 3.2.6. Define a Remote Server
- 3.2.7. Manage Server Settings
- 3.2.8. Manage Server Settings in Overview Mode
- 3.2.9. Manage Server Settings in Deployment Mode
- 3.3. Customizing JBoss Server Tools
JBoss Server Tools is tooling for working with application servers in the IDE. It extends and enhances the existing server functionality of the IDE.
JBoss Server Tools consists of wizards, editors and actions that enable you to define, configure and manage application servers.
For assisting in defining servers for IDE use, JBoss Server Tools provides runtime detection. This feature locates installed application servers and integrates them into the IDE ready for use. Additionally, you can define remote servers for JBoss community application servers in the enhanced New Server wizard, which integrates with the IDE Remote System Explorer (RSE) tool.JBoss Server Tools also allows you to download JBoss community application servers from within the IDE.
Extensions to the standard IDE New Server wizard and server editor allow you to specify and customize more management and behavior settings for servers. Settings include IDE interaction with servers such as launching, communicating and publishing. The JBoss Server Editor supports you in managing applications for the server as a whole and individual modules.
JBoss Server Tools actions enable you to customize based on application server type, such as default filesets added to new servers and classpath filesets. You can also customize the default server used for IDE actions such as 'Run on Server'.
The aim of this section is to guide you in using JBoss Server Tools:
Download JBoss community application servers from with the IDE
Use runtime detection to locate installed application servers and generate complete server definitions, making them ready for IDE use
Define custom configured servers, both local and remote, by creating additional runtime environments and server adapters
Manage server configuration and specify IDE-server interaction with the JBoss Server Editor, including settings such as launch options, publishing frequency and communication ports
Application servers must be installed on your system in order to deploy applications to local and remote instances of them. Many application servers must be downloaded from outside the IDE. But JBoss Server Tools can assist you to download JBoss community application servers from within the IDE, as detailed in the procedure below.
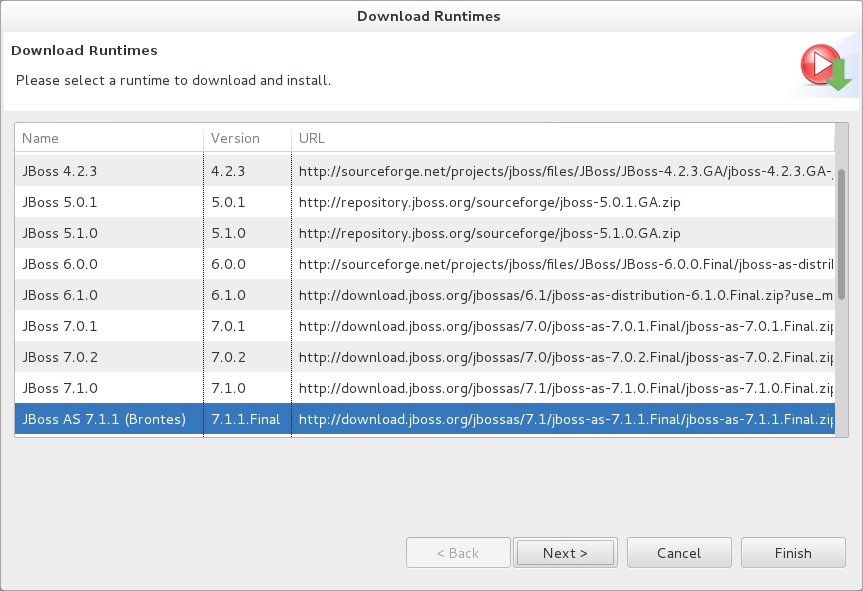
Procedure 3.1. Download a JBoss Community Application Server
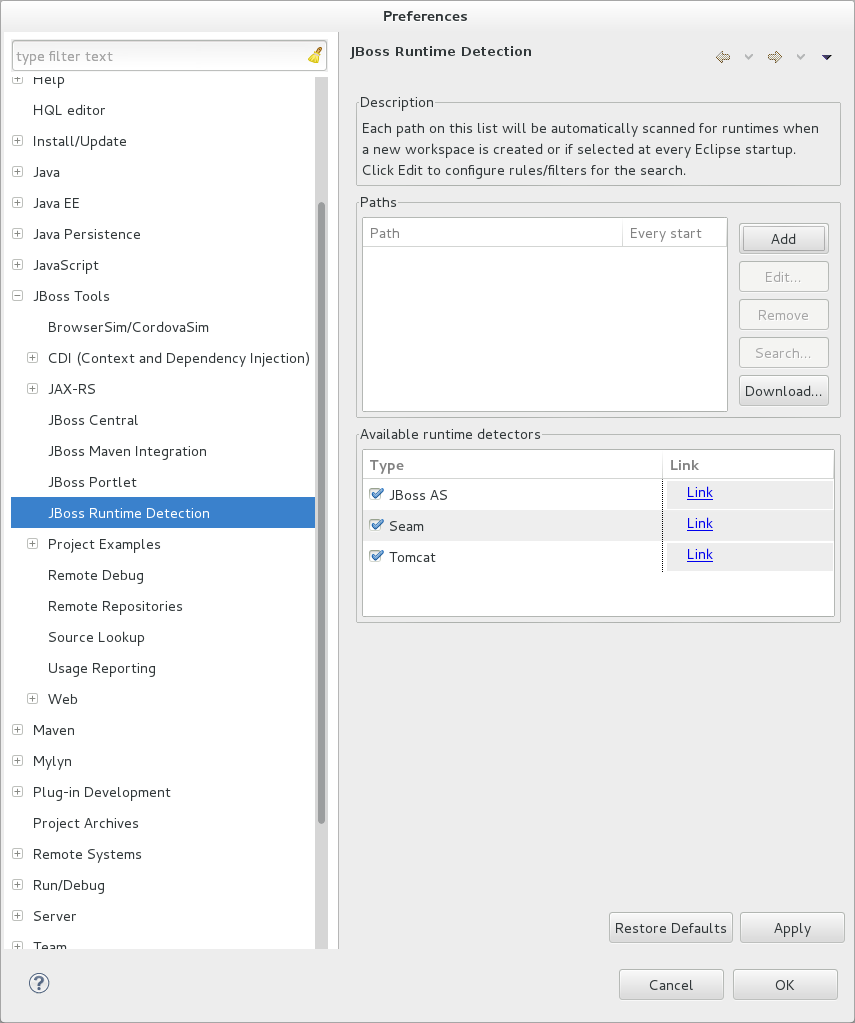
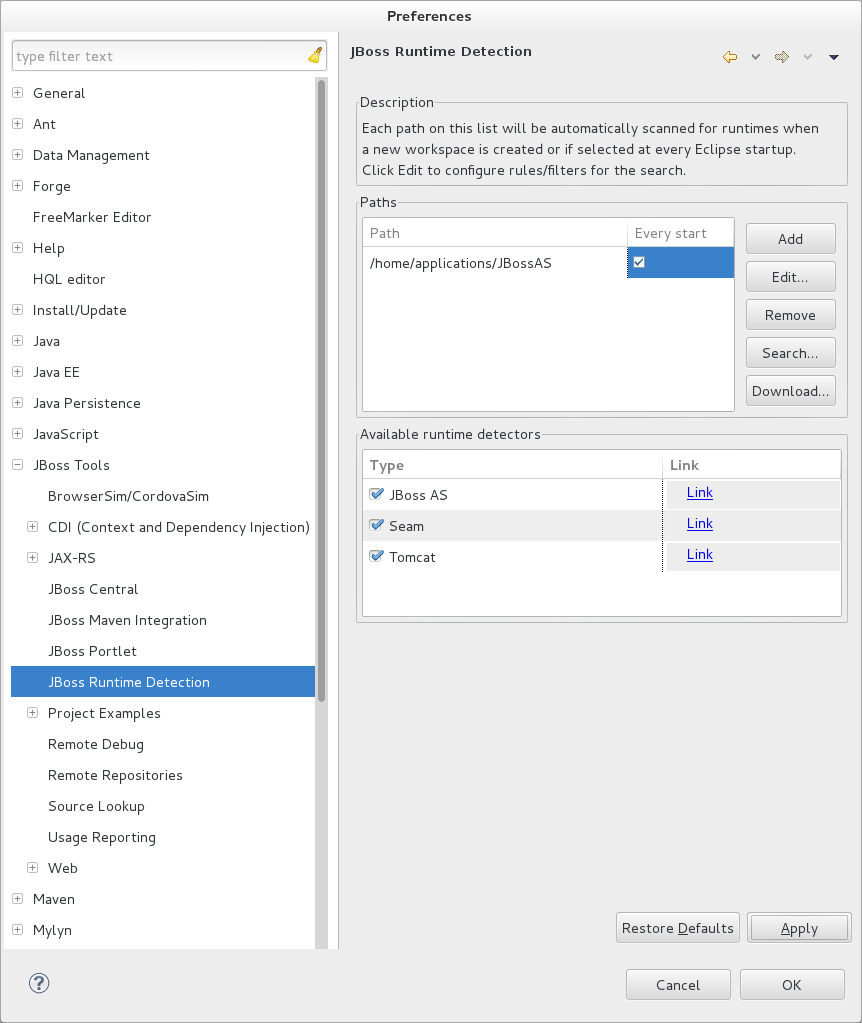
Click →, expand JBoss Tools and select JBoss Runtime Detection.
Click .
From the table, select an application server and click .
After reading and agreeing to the terms of the license, click I accept the terms of this license agreement and click .
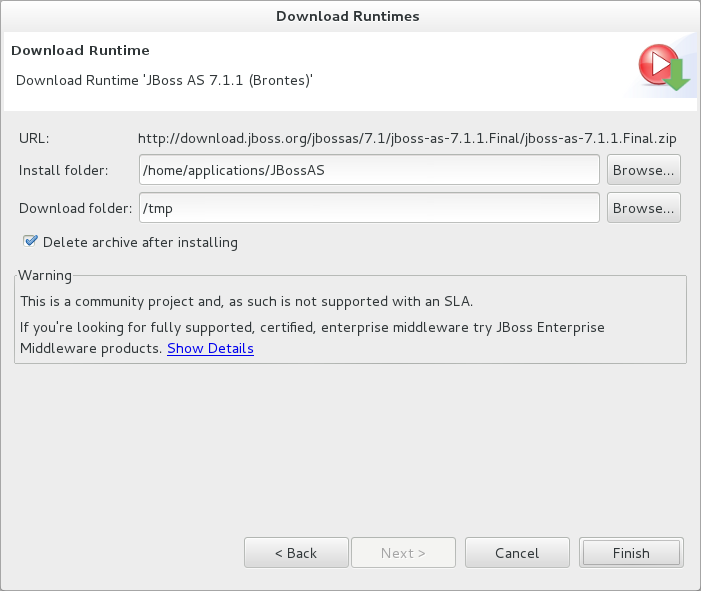
In the Install folder field, type the path in which the downloaded application server should be installed or click to navigate to the location.
In the Download folder field, type the path to which the application server should be downloaded or click to navigate to the location.
To automatically remove the downloaded archive after installing, select the Delete archive after installing check box.
Click to commence downloading and installing. The IDE progress bar and Download window show the progress of the download process. You can click to close the download window and continue the download process.
Click to close the Preferences window.

Once downloading is complete, the application server archive is extracted and several automated actions occur:
The path of the application server is added to the runtime detection Paths table.
A default server runtime environment is generated for the application server.
A default server adapter is created for the server runtime environment.
Note
Alternatively, you can download and install JBoss community application servers when adding server runtime environments within under Server→Runtime Environments, with the wizard for creating new servers, or with the Start from scratch and Start from a sample wizards in JBoss Central.
You must define a server in the IDE before you can use it. A complete server definition is composed of two elements:
A server runtime environment informs the IDE about available local application servers. Each server runtime environment defines a specific application server configuration in terms of the application server itself, a configuration file and a Java developer kit. By varying the configuration details, one application server can be associated with several server runtime environments.
A server adapter, or simply server, informs the IDE about management settings for server runtime environments. Each server adapter completes the definition for a specific server by detailing settings such as access parameters, launch arguments, and publishing options. By varying the configuration details, one server runtime environment can have several server adapters associated with it.
JBoss Server Tools provides runtime detection that automatically generates a complete default server definition for any installed application servers found in a given local system search path, as detailed in the procedure below. Complete server definitions are automatically generated for JBoss community servers downloaded with JBoss Server Tools.
Procedure 3.2. Define a Local Server with Runtime Detection
Click →, expand JBoss Tools and select JBoss Runtime Detection.
Click .
Select a path from which recursive scanning for application servers should commence. To detect a specific application server, select the install directory for that application server. To detect multiple application servers, select a directory higher up the directory tree.
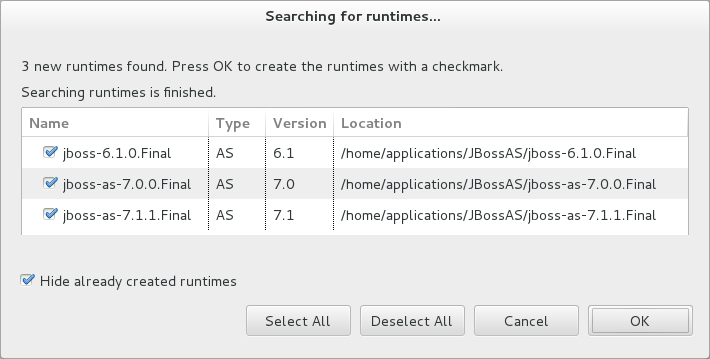
Depending on the outcome of the scan, follow the appropriate step:
If no new application servers are found or you do not wish to create any server runtime environments for them, click .
If new application servers are found, you can generate server runtime environments for them. Select the check boxes of the application servers for which you want to generate server runtime environments and click .
In all cases, the path is added to the Paths table.
Click and click to close the Preferences window.
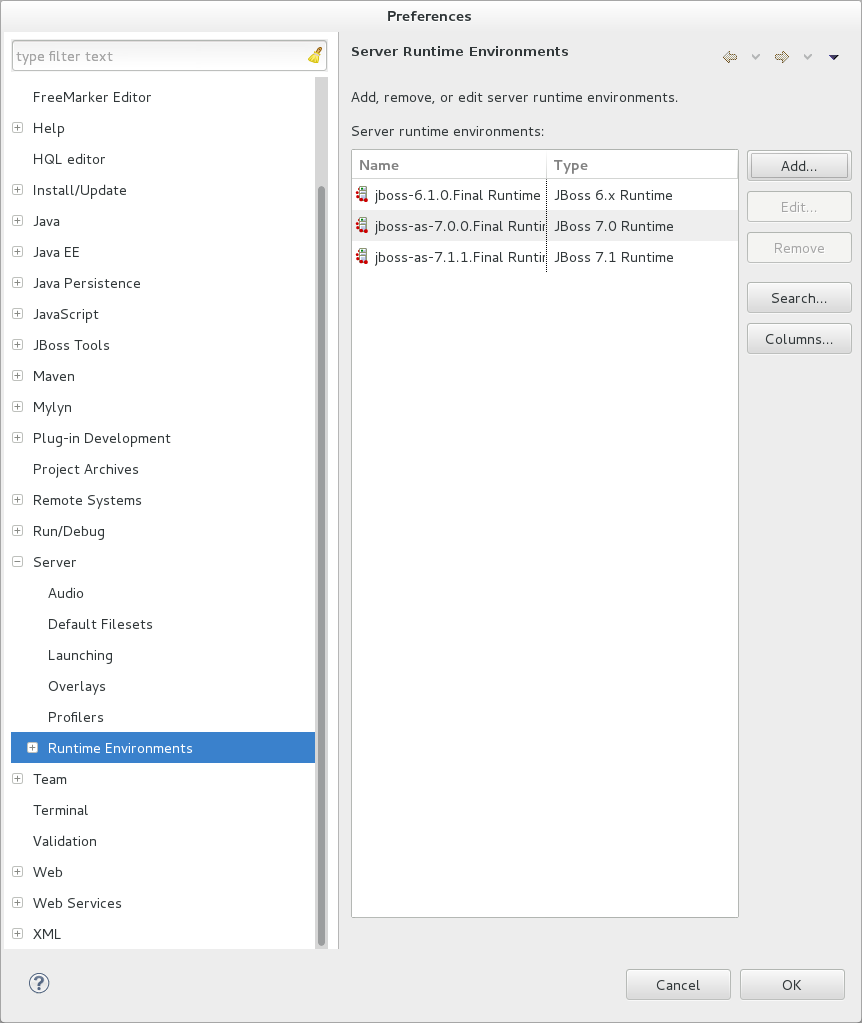
Generated server runtime environments are listed in under Server→Runtime Environments. A default server adapter is automatically created for each generated server runtime environment to complete the server definition. Server adapters are listed in the Servers tab.

Note
Alternatively, you can manually define servers by using the IDE server functions to create a server runtime environment and then to create a server adapter.
Runtime detection defines a local server for each application server it discovers in given search paths on your system. But you may want to create additional server runtime environments with different configurations for an installed application server. The procedure below details the process for creating new server runtime environments. For older versions of application servers, you can also create a new runtime server by cloning an existing one.
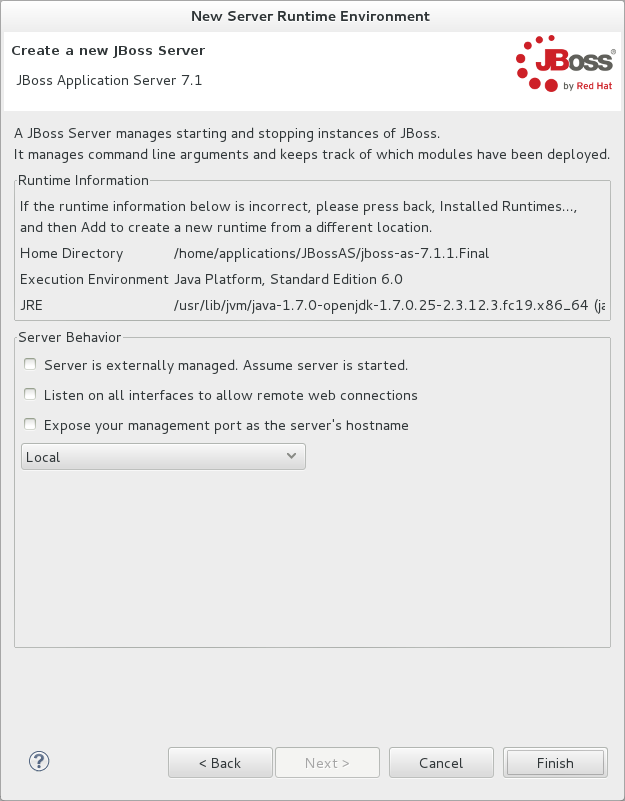
Procedure 3.3. Create a Server Runtime Environment
Click →, expand Server and select Runtime Environments.
Click .
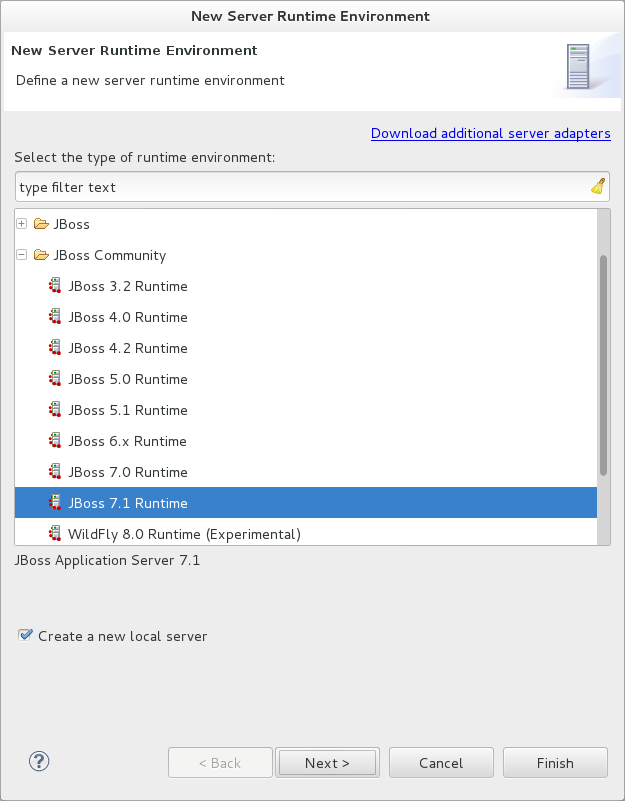
From the Select the type of runtime environment list, select a JBoss community application server.
To create a complete local server definition, select the Create a new local server check box.
Click .
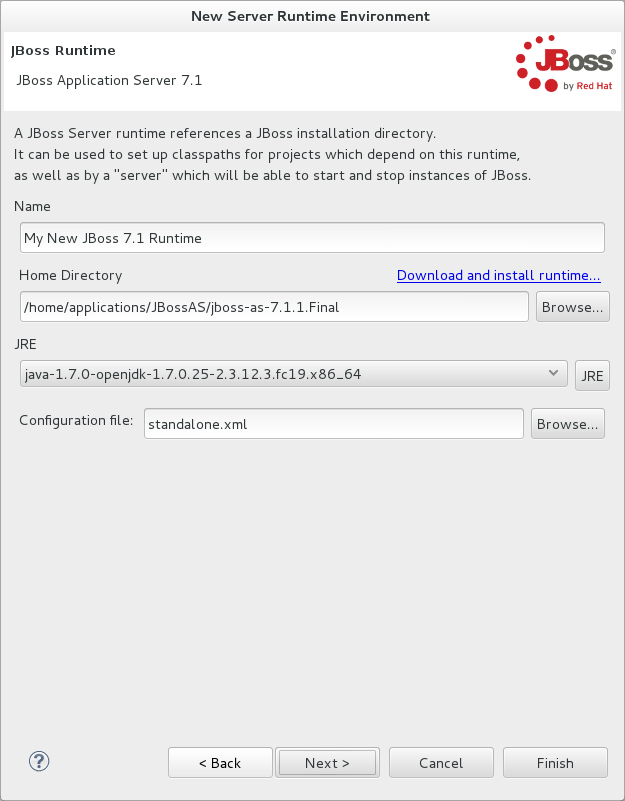
In the Name field, type a name by which to identify the server runtime environment within the IDE.
In the Home Directory field, type the path of the installed application server or click to navigate to the location.Alternatively, to use a JBoss community application server that is not already installed on the system, click Download and install runtime and follow the instructions.
From the JRE list, select the JRE to use with the application server.
In the Configuration file field, type the path of the application server configuration file or click to navigate to the location. Note that the path of the application server configuration file is relative to
Home Directory/standalone/configuration/, whereHome Directoryis specified in the Home Directory field.Note
For older application servers, the Configuration file field is replaced with the Directory field. In this field, type the path where the application server configurations are installed and then select a listed configuration. To clone from an existing server runtime environment, after selecting a listed configuration click . Complete the name for the new configuration and the location where the configuration should be stored and click .
Click if the button is enabled, otherwise click . The button is only enabled if you selected the Create a new local server check box earlier. On the presented page, complete the appropriate information and click .
Note
Alternatively, you can create server runtime environments with the wizard for creating new servers in the Servers tab or with the Start from scratch and Start from a sample wizards in the JBoss Central tab.
Runtime detection defines a local server for each application server it discovers in given search paths on your system. But you may want to create additional server adapters with different configurations to define multiple servers. To create a new server adapter to define a local server, you must use the new server wizard as detailed in the procedure below.
Procedure 3.4. Define a Local Server
Click the Servers tab. If the Servers tab is not visible, click →→.
Depending on the number of existing servers, follow the appropriate step:
If there are no existing servers, click Click this link to create a new server.
If there are one or more existing servers, right-click an existing server and click →.
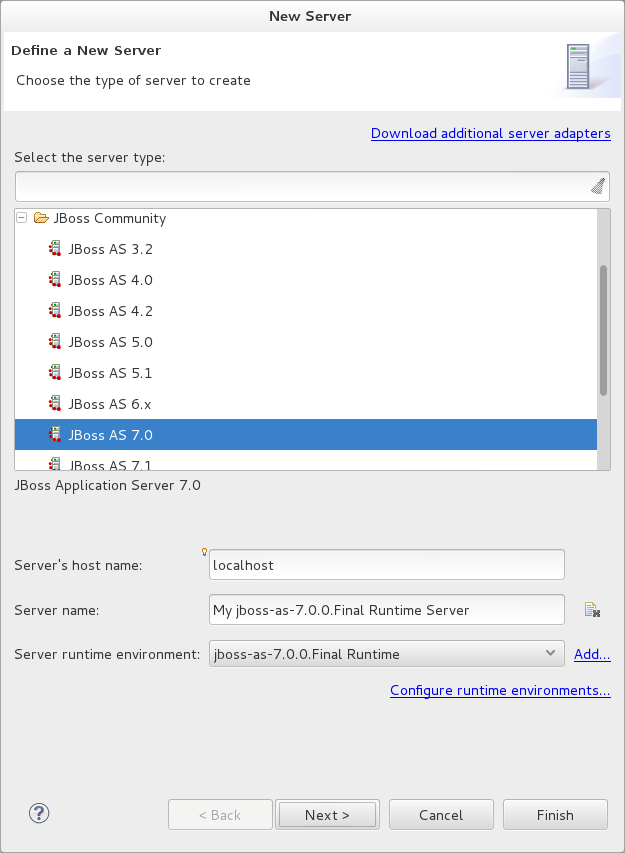
From the Select the server type list, select a JBoss community application server.
The Server's host name and Server name fields are completed by default. In the Server name field, type a name by which to identify the server definition.
From the Server runtime environment list, select the specific server runtime environment for the application server type to use. Alternatively, to create a new runtime environment click and complete the fields as appropriate.
Note
If the Server runtime environment field is not shown, no server runtime environments exist for the selected application server type. A server runtime environment must be selected before you can successfully create a server adapter and complete the server definition. To create a new server runtime environment without canceling the wizard, click and complete the fields as appropriate.
Click .
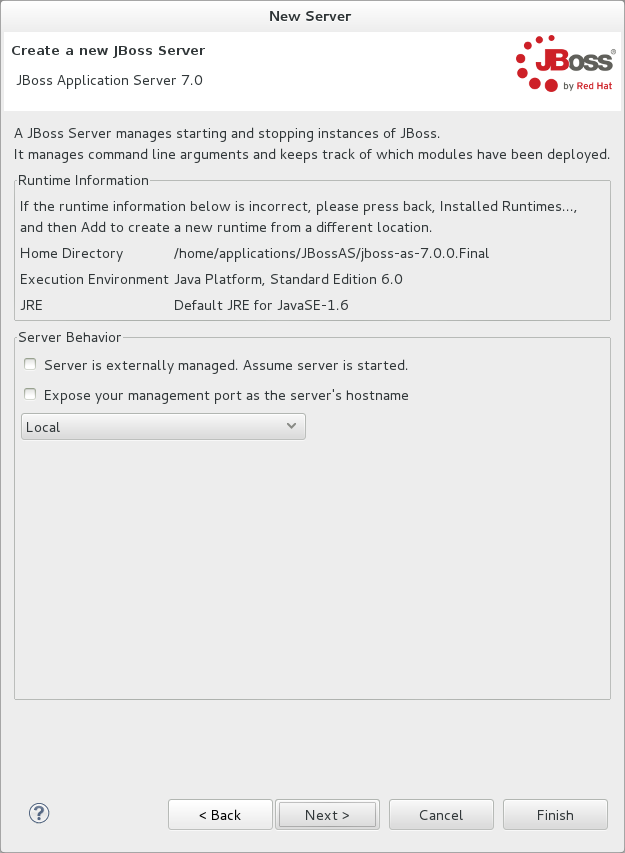
The server behavior options displayed vary depending on the selected application server type.
Complete the options as appropriate:
To specify that the server life cycle will be managed from outside the IDE, select the Server is externally managed check box.
To specify that the server should be launched to respond to requests on all hostnames, select the Listen on all interfaces to allow remote web connections check box. This option adds the
-b 0.0.0.0argument to the server launch command.To enable management commands sent by the IDE to be successfully received by the server, select the Expose your management port as the server's hostname check box. This option is useful for remote servers but bypassed for local servers.
Note
To make use of this facility, a management user must exist for the remote server and you must provide the management user credentials to the IDE.
From the location list, select Local.
Click .
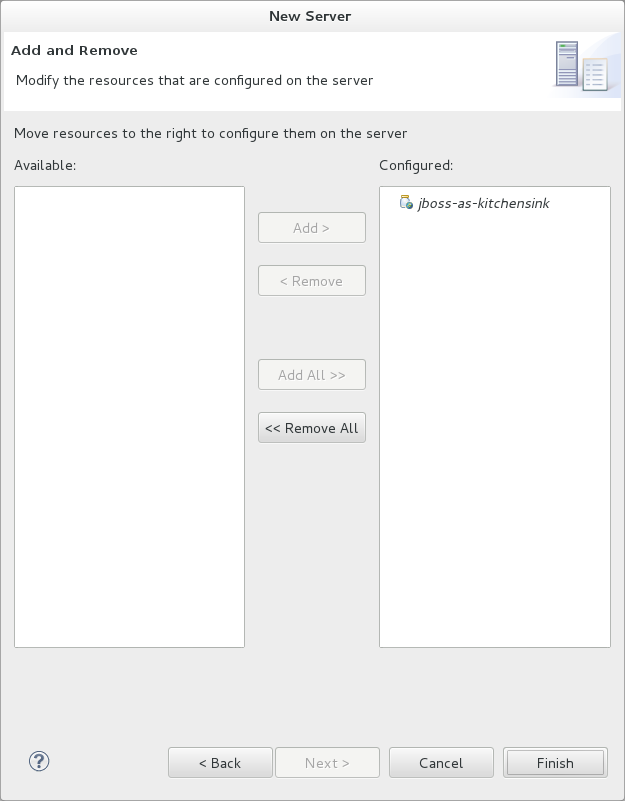
To select applications to deploy with this server, from the Available list select the applications and click . Applications to be deployed are detailed in the Configured list.
Click to create the server. The server is listed in the Servers tab, with the information in brackets detailing the server status.
Important
You can create multiple servers that use the same application server. But a warning is displayed if you try to simultaneously run more than one server on the same host. This is because multiple running servers on the same host can result in port conflicts.
You can define remote servers for JBoss community application servers. To complete a server definition, you must create a server adapter, or server, that informs the IDE how to communicate and manage the remote server, as detailed in the procedure below.
Important
A complete server definition requires a server runtime environment and a server adapter. Ideally the server runtime environment would be created by specifying the remote application server and remote Java developer kit but server runtime environments can only be created using local components. To work around this issue, you must have a version of the remote application server and remote Java developer kit installed locally and create a server runtime environment based on these.
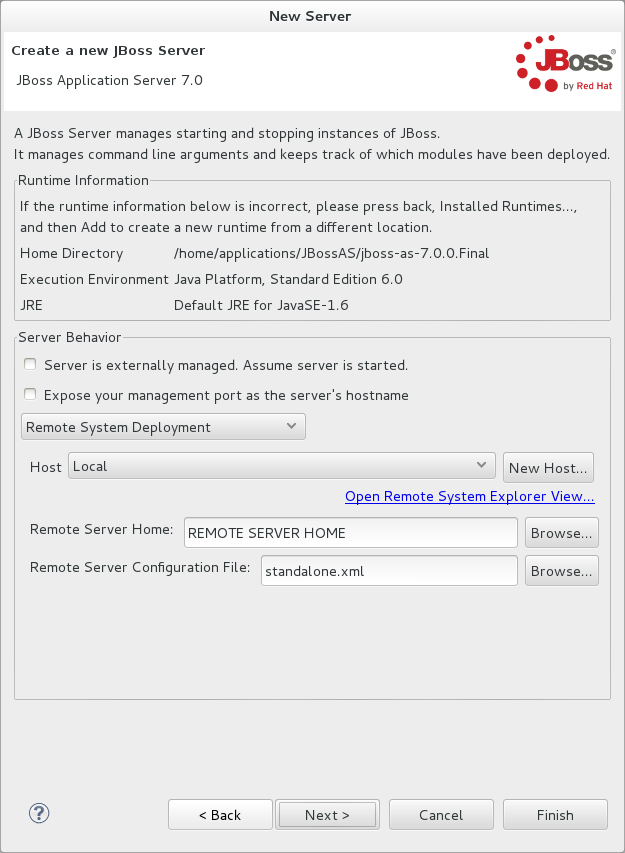
Procedure 3.5. Define a Remote Server
Click the Servers tab. If the Servers tab is not visible, click →→.
Depending on the number of existing servers, follow the appropriate step:
If there are no existing servers, click Click this link to create a new server.
If there are one or more existing servers, right-click an existing server and click →.
From the Select the server type list, select a JBoss community application server.
The Server's host name and Server name fields are completed by default. In the Server name field, type a name by which to identify the server definition.
From the Server runtime environment list, select the specific server runtime environment for the application server type to use. Alternatively, to create a new runtime environment click and complete the fields as appropriate.
Note
If the Server runtime environment field is not shown, no server runtime environments exist for the selected application server type. A server runtime environment must be selected before you can successfully create a server adapter and complete the server definition. To create a new server runtime environment without canceling the wizard, click and complete the fields as appropriate.
Click .
The server behavior options displayed vary depending on the selected application server type. Complete the options as appropriate:
To specify that the server life cycle will be managed from outside the IDE, select the Server is externally managed check box.
To specify that the server should be launched to respond to requests on all hostnames, select the Listen on all interfaces to allow remote web connections check box. This option adds the
-b 0.0.0.0argument to the server launch command.To enable management commands sent by the IDE to be successfully received by the server, select the Expose your management port as the server's hostname check box. This option is useful for remote servers.
Note
To make use of this facility, a management user must exist for the remote server and you must provide the management user credentials to the IDE.
From the location list, select Remote System Deployment.
From the Host list, select the host. Alternatively, to specify a new host, click and follow the instructions.
In the Remote Server Home field, type the path of the application server or click to navigate to the location.
In the Remote Server Configuration File field, type the path of the configuration file or click to navigate to the location.
Click .
To select applications to deploy with this server, from the Available list select the applications and click . Applications to be deployed are detailed in the Configured list.
Click to create the server. The server is listed in the Servers tab, with the information in brackets detailing the server status.
JBoss Server Tools provides the JBoss Server Editor for managing the settings of servers. This editor has two modes: Overview and Deployment. As described below, each mode enables you to configure fundamental server settings.
The Overview mode details the settings for the server. Within this mode you can provide management information, specify application publishing and reload behavior, and customize port settings.
The Deployment mode lists applications deployed to the server. Within this mode you can specify the general publishing behavior for applications and provide deployment settings for individual applications.
To open the JBoss Server Editor for a specific server, in the Servers tab double-click the server. All changes to the settings of a server must be saved before the results will take effect. To save, press Ctrl+S. You may be required to enter the server management password when making changes to certain settings.
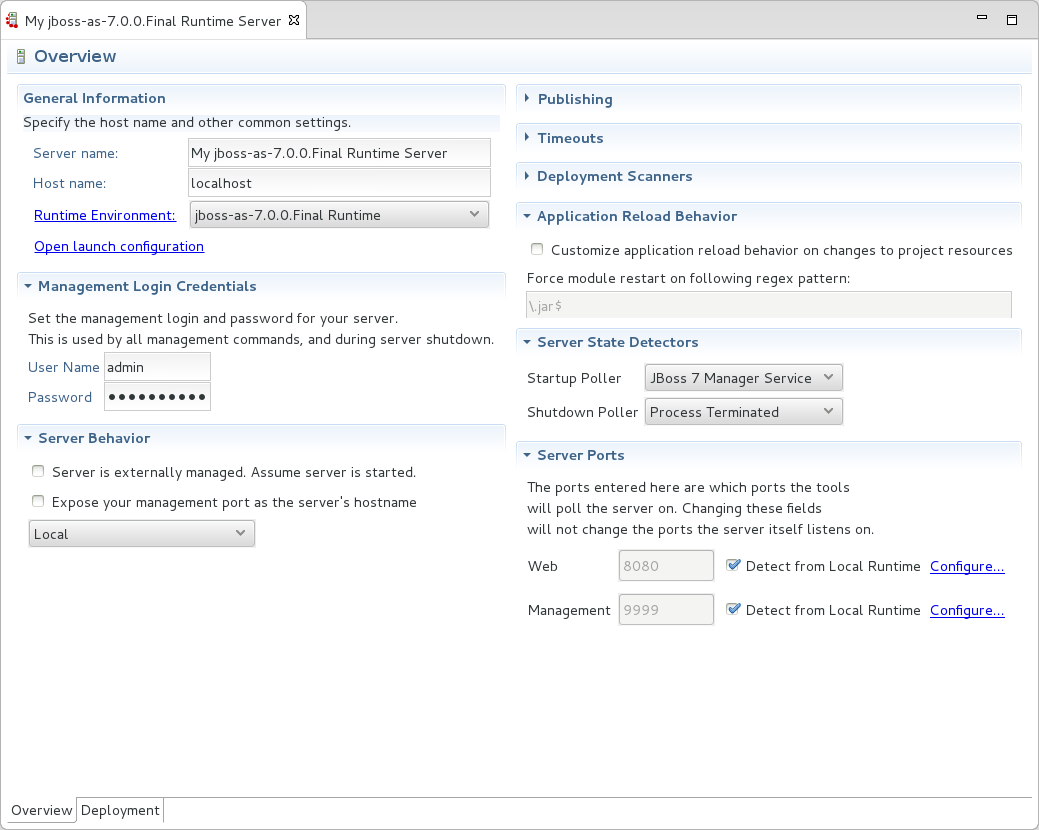
The Overview mode of the JBoss Server Editor enables you to vary the management and behavior settings of an individual server. Each section of the Overview mode is outlined below. All changes to server settings must be saved before the results will take effect. To save, press Ctrl+S.
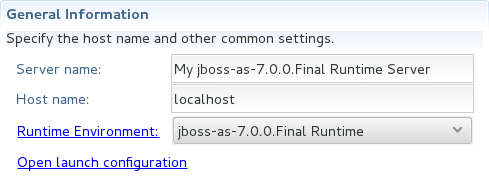
- General information
This section details essential information comprising the server definition: the name by which the server is identified in the IDE, the hostname of the server and the server runtime environment.
To change the server runtime environment, from the Runtime Environment list select a server runtime environment. Alternatively, to create and assign a new server runtime environment click Runtime Environment and follow the instructions.
To view or edit the server launch configuration, click .
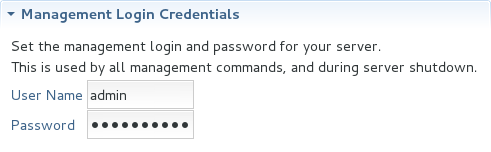
- Management login credentials
This section holds credentials, specifically username and password, necessary for the IDE to successfully communicate management commands with the server. The password is obscured and stored in Eclipse Secure Storage for security. Incorrect management credentials can cause the IDE to not detect when a server is started.
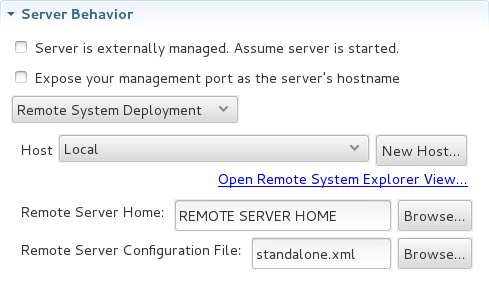
- Server behavior
This section enables you to customize server behavior that encompasses how the IDE communicates with the server.
To specify that the server life cycle will be managed from outside the IDE, select the Server is externally managed check box.
To specify that the server should be launched to respond to requests on all hostnames, select the Listen on all interfaces to allow remote web connections check box. This option is most useful for remote servers and adds the
-b 0.0.0.0argument to the server launch command.To enable management commands sent by the IDE to be successfully received by the server, select the Expose your management port as the server's hostname check box. This option is useful for remote servers and unnecessary for local servers.
Warning
The Expose your management port as the server's hostname feature should be used carefully for servers on production as it leaves the server open for anyone to access.
To specify the location of the server, from the list select Local or Remote System Deployment. For remote systems, there are further details that must be specified: the host, the path of the remote application server, and the remote application server configuration file.
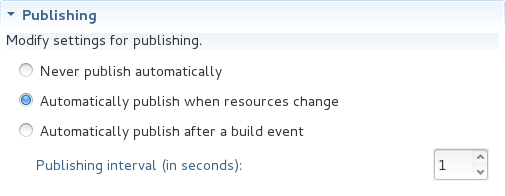
- Publishing
This section details the publishing action the IDE should take in response to modifications to local resources of deployed applications. Publishing involves replacing changed project resources in the dedicated deployment location of a server and the IDE action options are Never publish automatically, Automatically publish when resources change, and Automatically publish after a build event. Additionally, you can specify a minimum time interval that must occur between consecutive automated publish actions by the IDE to control the frequency of publishing.
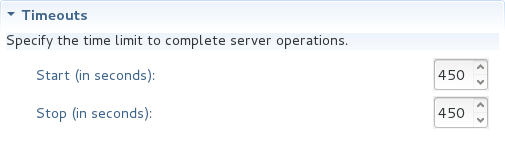
- Timeouts
This section specifies the maximum length of time, in seconds, the IDE should wait for server actions to complete before aborting. The server actions are specifically starting and stopping.
- Deployment scanner
This section enables you to customize the behavior of deployment scanners, which detect the applications deployed to a server. You can manage deployment scanners or allow the IDE to do it for you. The management options available are Add missing deployment scanners after server startup and Remove added deployment scanners before shutdown.
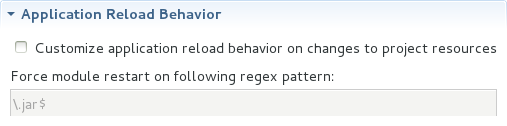
- Application reload behavior
This section details the application reload action the IDE should take in response to changed published resources of deployed applications. Application reload involves undeploying and redeploying an application and this action is necessary when you make changes to project resources that will not be detected by the server. By default, the application reload behavior is set to invoke application redeployment when
.jarfiles are changed.To customize which changes invoke application redeployment, select the Customize application reload behavior on changes to project resources check box. In the Force module restart on following regex pattern field, type a regex pattern indicating the changed resources that you want to trigger redeployment.
To disable application reload, select the Customize application reload behavior on changes to project resources check box and ensure the Force module restart on following regex pattern field is empty.
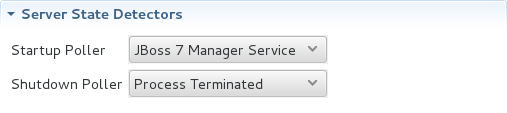
- Server state detectors
This section specifies which method the IDE should use to verify the started and stopped status of the server.
There are four methods from which to choose:
Web Port, which pings the web port on the host to see if the server responds
Timeout, which waits for a specified time duration and then declares the start or stop operation a success without any actual verification
Process Terminated (available for Shutdown Poller of local servers only), which checks if a server process is still alive and sets the server status to stopped when it is terminated
JMX, which polls JMX, the JBoss Management service
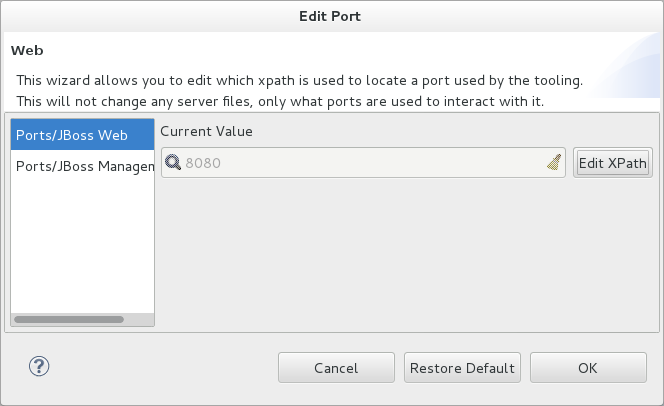
- Server ports
This section details the ports and port offset that the IDE should use for communication with the server.
Port offset is typically offered by newer application servers and it enables multiple servers to run on the same system without port conflicts. JBoss Server Tools uses information in the server configuration file, typically XPath values, to automatically detect the correct ports and port offset for communicating with the server but you can perform further customization.
To view the configuration file information used by JBoss Server Tools for automatic port detection, click corresponding to the appropriate tool. The information used is displayed in the Current Value field. To change this value, click . Click to close the window.
To manually specify the server ports or port offset, clear the Detect from Local Runtime check box corresponding to the appropriate tool and edit the value.


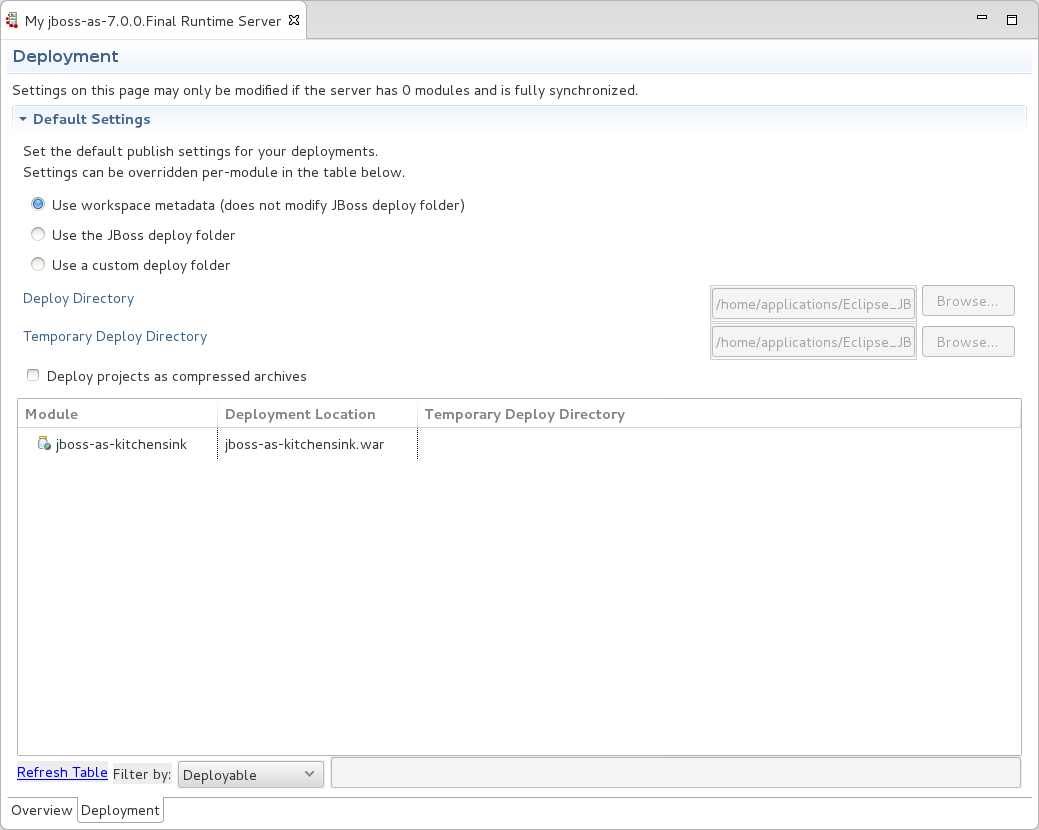
The Deployment mode of the JBoss Server Editor enables you to vary the deployment settings of an individual server. Each section of the Deployment mode is outlined below. All changes to server settings must be saved before the results will take effect. To save, press Ctrl+S.
Important
Changing deployment settings when modules are already deployed can adversely result in multiple deployed copies of an application. For this reason, many of the functions of the Deployment mode are only enabled when a server is fully synchronized and it has no modules deployed.
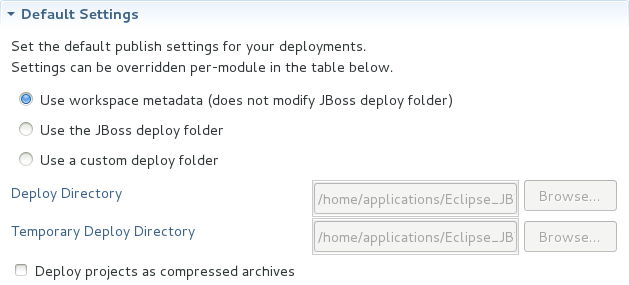
- Default settings for the server
This section specifies where deployments are kept and how they are packaged.
You can customize the deployment location and packaging type:
To select the workspace deployment folder for the server, click Use workspace metadata.
To select the deployment folder of the application server, click Use the JBoss deploy folder.
To select a folder of your choice, click Use a custom deploy folder. With this option, you should complete the Deploy directories and Temporary Deploy Directory fields. The temporary folder must be on the same file system as the final deploy location otherwise publishing often fails.
For all modules to be archived for deployment, select the Deploy projects as compressed archives check box. This avoids exploded deployments and reduces the amount of memory deployments occupy but may result in slower deployments.
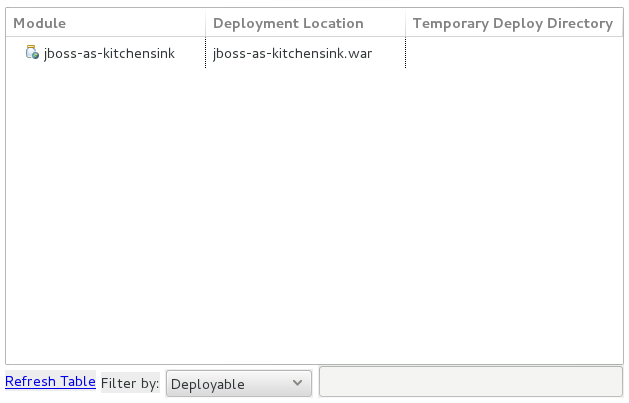
- Settings per module
This section shows deployment settings for all modules in the workspace regardless of whether they are deployed on the server under consideration.
To filter the module list in the case that you have lots of modules, from the Filter by list select the criteria for the filter. If you select By Module Name, in the text field enter the part or whole name of the module.
To change the Deployment Location and Temporary Deploy Directory on a per module basis, in the table click the value to be changed and enter an alternative value. Ensure the values for these variables are specified use absolute paths or paths relative to the default deploy directory.
The aim of this section is to guide you in customizing JBoss Server Tools:
Enable runtime detection to search paths for application servers on IDE start
Select a default server for IDE actions
Specify default filesets that are listed in the Servers tab for ease of access
Customize classpath entries for your projects based on application server type
You can customize runtime detection to automatically search paths for installed application servers when the IDE starts. If any application servers are found, you are prompted about creating corresponding complete server definitions.
To enable automated searching on IDE start, click →. Expand JBoss Tools and select JBoss Runtime Detection. In the Paths table, select the Every start check box for all of the paths that you want to be automatically searched on IDE start. Click and click to close the window.
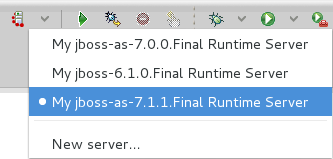
JBoss Server Tools enables you to select a default server on which to carry out actions such as . This is useful when you have multiple server instances but use one predominately.
To set a default server, in the global toolbar of the JBoss perspective click the icon
 . From the list of servers, click the server that you want to set as the default.
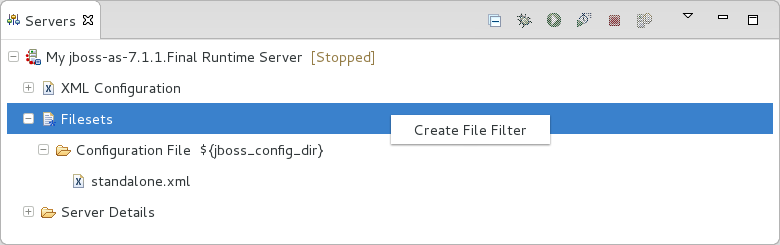
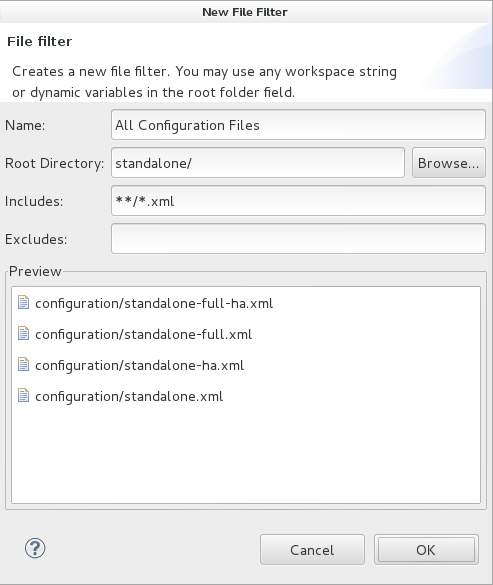
Filesets are collections of files that are listed under the server in the Servers tab for ease of access. You can open listed files for viewing and modifying in IDE editors by double-clicking them. JBoss Server Tools generates a default fileset for new JBoss community application servers that includes the server configuration file. But JBoss Server Tools also provides the ability for you to customize default filesets for individual servers and an application server type.
To customize the fileset for an individual server, in the Servers tab expand the server. Right-click Filesets and click . In the Name field, type a name for the filter. In the Root Directory field, type the path of the directory in which the filter should be applied or click to navigate to the location. In the Includes and Excludes fields, type the regex patterns for filtering. Click to create the filter. The new filter is listed under the server in the Servers tab and expanding it shows all of the files matching the filter.
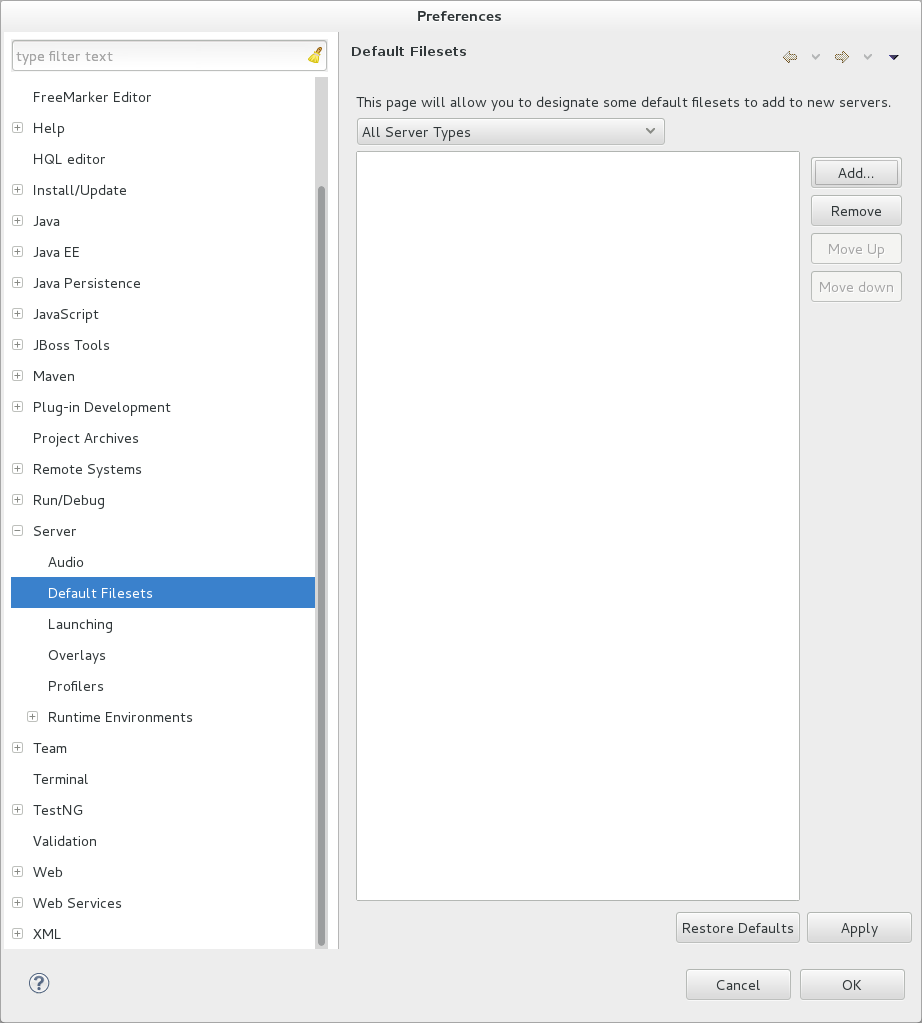
To customize the default fileset for an application server type, click →. Expand Server and select Default Filesets. From the list, select a JBoss community application server type. Click or click to customize the default filesets. Click and click to close the window.
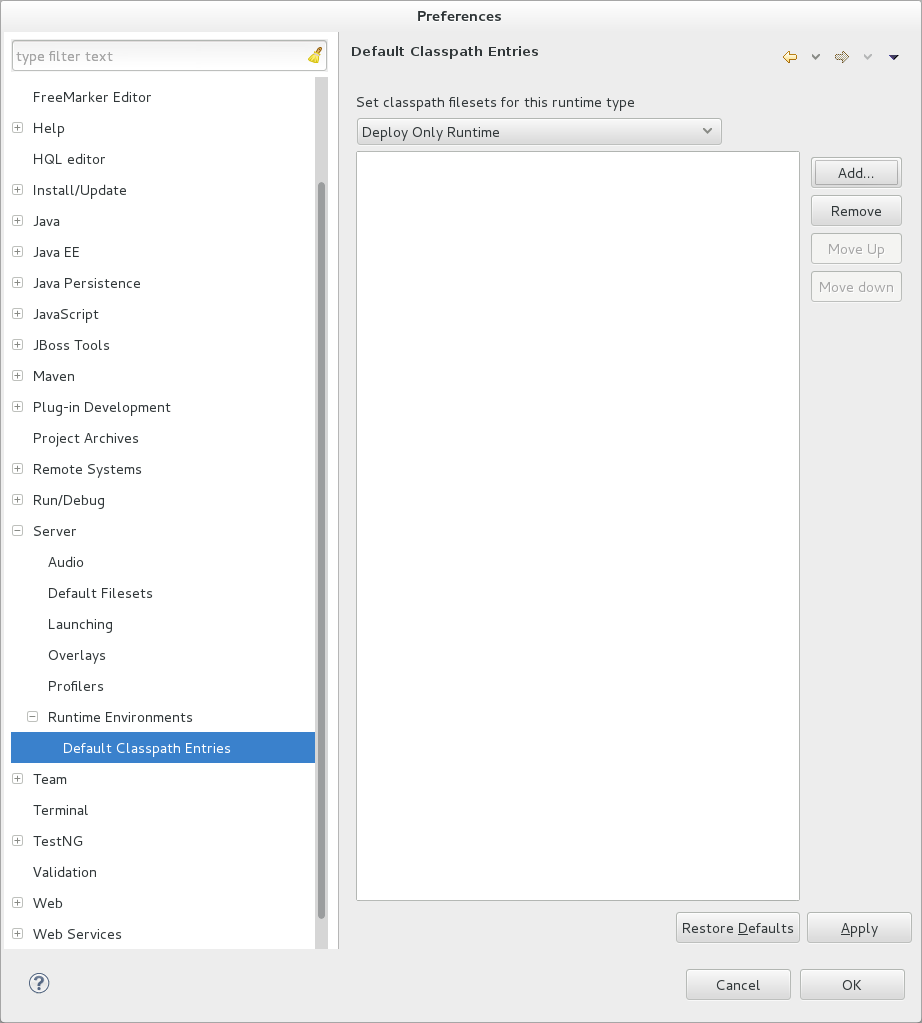
Classpath entries specify the availability of .jar files for your projects. JBoss Server Tools generates a default classpath fileset for new JBoss community application servers based on the .jar files that accompanying each. But JBoss Server Tools also provides the ability for you to customize classpaths for individual servers and an application server type.
To customize the classpath fileset for an application server type, click →. Expand Server→Runtime Environments and select Default Classpath Entries. From the Select classpath filesets for this runtime type list, select a JBoss community application server type. Click or click to customize the classpath filesets. Click and click to close the window.
Forge is an application for developing Java EE applications, promoting ease in getting started, working efficiently, and integrating technologies. It simplifies development workflow by providing automation at a command line level. Such automation is useful if you are working with new or complex technology or completing repetitive tasks.
Forge consists of a command line interface and sets of commands provided through plug-ins. The Forge command line accepts standard Unix commands such as cd for change directory, mkdir to create a new directory and touch to create a new file. But Forge's real power lies in its unique command set, which is extendable through plugins. For example, the scaffold command generates a user interface for an application and the persistence command adds persistence to a project. Furthermore, Forge comprehends a range of file types, with actions for working with their contents.
Forge Tools is tooling that integrates Forge into the IDE. It enhances your workflow by providing and integrating Forge functionality within the IDE.
Forge Tools consists of the Forge Console and background actions. The Forge Console provides a Forge command line on which to execute all of the Forge commands. The background actions result in the outcome of the Forge commands being immediately reflected in the IDE. For example, files are opened in editors and projects and directories expanded in explorer tabs as actions creating and modifying them are executed on the Forge command line.
The aim of this section is to guide you in using Forge Tools:
View and manage the Forge Console tab, from which the Forge command line is accessible
Start and stop the Forge runtime server in order to access the command line
Navigate to project resources in the Forge command line
Understand how Forge commands affect the IDE through background actions, such as expanding directories in explorer tabs and opening files in editors
Use wizards for accomplishing common Forge commands as an alternative to the Forge command line
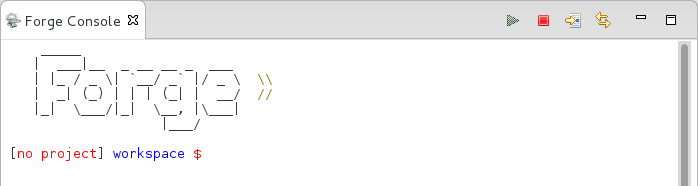
A key element for working with Forge is the Forge command line. In order to view this, you need to open the Forge Console tab.

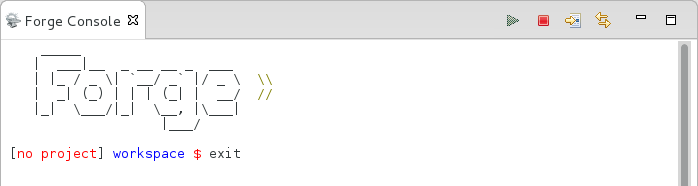
To open the Forge Console tab, click →→. Expand Forge, select Forge Console and click . Alternatively, press Ctrl+4, at which you are prompted whether you also want to start Forge. Irrespective of your response to starting Forge, the Forge Console tab opens.
You must start a Forge runtime server in order to access the Forge command line. Forge Tools provides actions for starting and managing the Forge runtime server.
- Start Forge
In the Forge Console tab, click the icon
 . Alternatively, press Ctrl+4 and at the prompt asking if you want to start Forge, click . A progress bar in the IDE window and text in the Forge Console tab indicate the starting status of the Forge runtime server.
- Run Forge in the background
With a running instance of Forge, in the Forge Console tab click the icon
 . Despite the Forge Console tab not being open, Forge will continue to run in the background. Reopen the Forge Console tab to access the same Forge command line, identifiable by the existing command line output.
- Stop Forge
In the Forge Console tab, click the icon
 . Alternatively, on the Forge command line, enter
 exit.
Forge Tools enables you to efficiently navigate to project resources, such as directories and files, on the Forge command line.
To navigate to a project resource on the Forge command line, in the Project Explorer tab right-click any project resource and click →. If the Forge runtime server is not started, you are prompted to start it. At the prompt, click .
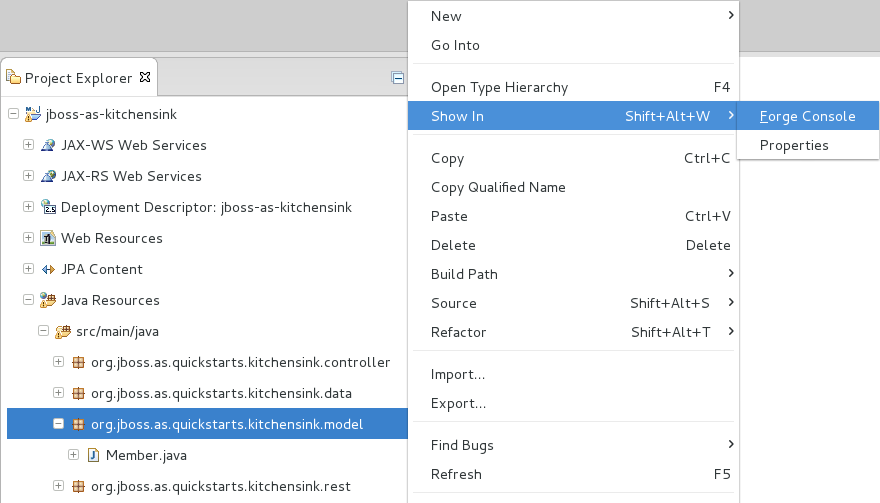
Alternatively, in the Project Explorer tab, select a project resource and click the icon
 in the Forge Console tab.
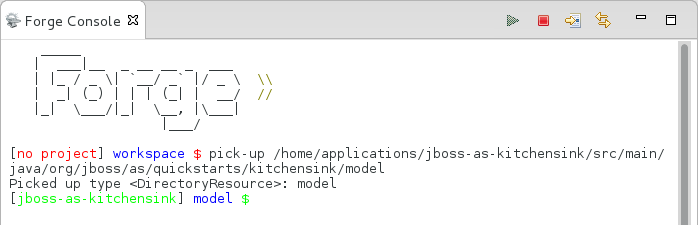
Both of these actions result in the Forge command line automatically executing the pick-up command for the project resource. Following this, the command line navigates to the project resource, the command prompt indicates the selected resource, and the resource opens in an editor if it is a file.
Forge Tools invokes background actions in the IDE in response to commands issued on the command line in the Forge Console. For example, if you create a project file or directory on the Forge command line, the Project Explorer tab is automatically refreshed to show the newly created project resource. A list of Forge commands that result in additional background actions is given below.
cdThe command navigates to the project directory and selects it in the Project Explorer and Package Explorer tabs.
pick-upThe command navigates to the project resource and in the case that the resource is a file it is opened in an editor within the IDE. The project resource is selected and expanded in the Project Explorer and Package Explorer tabs. If the resource resides outside the workspace, it is selected and expanded in the Remote Systems Explorer tab, providing this is installed.
openThe command opens a file in an editor within the IDE. The project resource is selected and expanded in the Project Explorer and Package Explorer tabs. If the resource resides outside the workspace, it is selected and expanded in the Remote Systems Explorer tab, providing this is installed.
new-projectThe command creates a new project. The project is automatically imported into the workspace and it is visible in the Project Explorer and Package Explorer tabs.
persistence setupThe command creates a
persistence.xmlfile. This file is selected in the Project Explorer and Package Explorer tabs and it is automatically opened in an editor within the IDE.entityThe command creates a new entity and associated Java file. This file is selected in the Project Explorer and Package Explorer tabs and it is automatically opened in the Java editor within the IDE.
fieldThe command creates a new field for an entity. The Java file associated with the entity is selected in the Project Explorer and Package Explorer tabs and it is automatically opened in an editor within the IDE and the field selected. The field is also selected in the Outline tab.
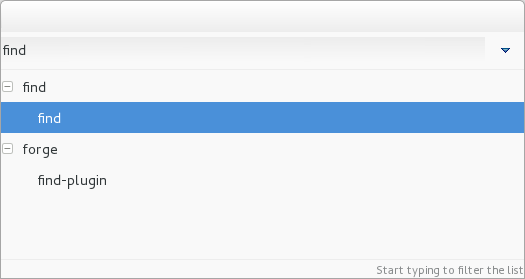
Forge Tools provides access to a readily available list of Forge commands. Additionally, the commands can be easily inserted in to the Forge command line, as detailed below.
To view the list of Forge commands, with a running instance of Forge, press Ctrl+4. To insert one of the commands in to the Forge command line, in the pop-up window expand the command groups and double-click a command.
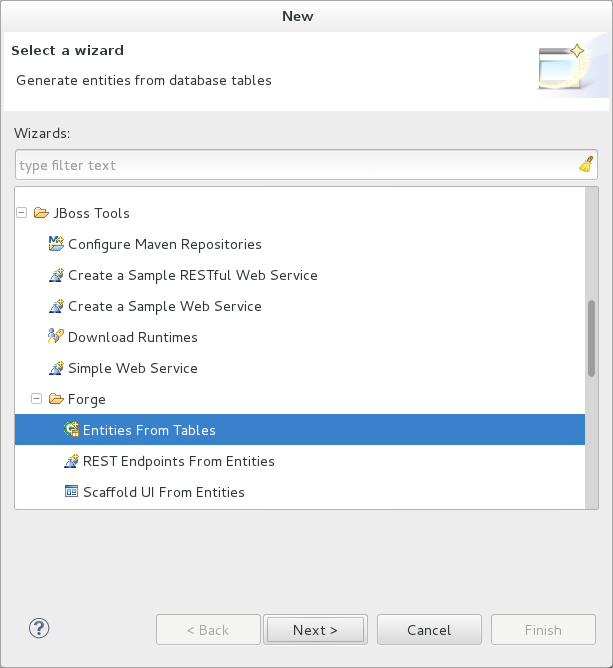
You may prefer to work with wizards rather than the command line. Forge Tools provides wizards for some of the most used Forge commands, in addition to supporting command line functionality. There are three wizards currently available relating to entities, as detailed below.
- Entities from Tables
This wizard generates entities from an existing database. There are options for creating a new project if one does not already exist and browsing for the driver.jar and driver classes.
- REST Endpoints from Entities
This wizard generates REST endpoint for entities.
- Scaffold UI from Entities
This wizard generates the necessary scaffolding for you to use JPA entities in your project. There are options for JavaServer Faces and AngularJS implementations, with the wizard creating the associated pages and Java backing beans.
To open a Forge Tools wizard, click →→ and expand JBoss Tools→Forge. Select one of the listed wizards, click and follow the instructions. If Forge is not already started, this automatically occurs.
The aim of this section is to guide you in customizing Forge Tools:
Customize when and how Forge starts
Manage available Forge runtime servers
Forge Tools provides a number of customization options for starting Forge.
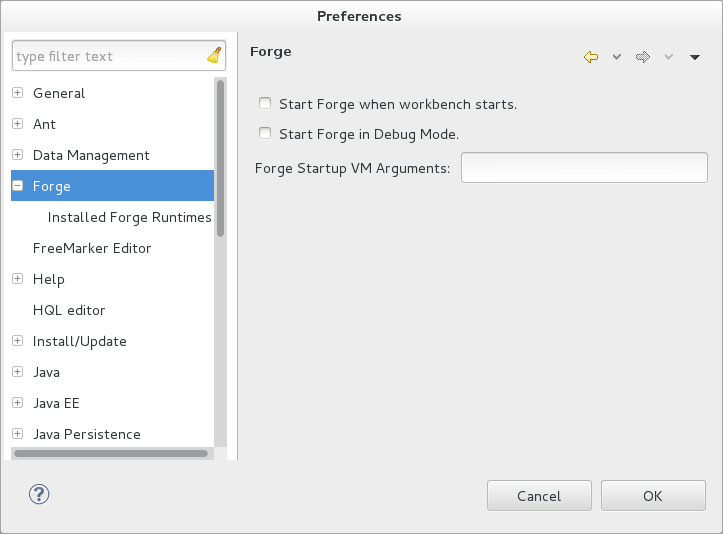
- Start Forge on IDE start
Click → and select Forge. Select the Start Forge when workbench starts check box. Click to close the Preferences window.
- Start Forge in debug mode
The debug mode enables you to view the progress of processes executed on the Forge command line in the Debug tab. Click → and select Forge. Select the Start Forge in Debug Mode check box. Click to close the Preferences window. This mode is most useful if you are developing plug-ins to extend the functionality of Forge.
- Specify arguments for Forge start
Click → and select Forge. In the Forge Startup VM Arguments field, type the arguments you want Forge to use when it starts. Click to close the Preferences window.
Note
The standard Java VM arguments can be used when starting Forge. Additionally, Forge specific commands include
--debugto start Forge in debug mode and-pluginDirto specify the directory where Forge should look for plug-ins to install rather than the default.forge/pluginsdirectory.
Forge Tools is distributed with a Forge runtime server but you may want to use different versions of Forge runtime servers. Forge Tools provides the ability to manage the Forge runtime servers that are available in the IDE, as detailed below.
To manage the available Forge runtime servers, click →, expand Forge and select Installed Forge Runtimes.
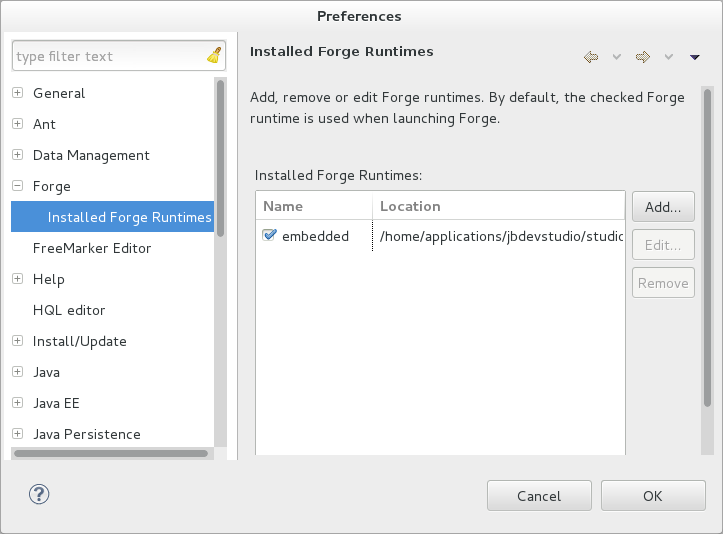
To add a Forge runtime server, click . In the Name field, type a name to distinguish the Forge runtime server in the IDE. In the Location field, type the location of the runtime server or click to navigate to the location. Click to close the window.
To change the name or the location of a Forge runtime server, from the Installed Forge Runtimes list select a runtime and click . Modify the Name and Location fields as appropriate. Click to close the window.
To delete a Forge runtime server, from the Installed Forge Runtimes list select the runtime and click .
To set a runtime server as the default, select the check box corresponding to the Forge runtime server. This runtime server will be used when Forge starts.
Click to close the Preferences window.
Important
It is not possible to edit or delete the Forge runtime server that is distributed with Forge Tools. Additionally, it is not possible to delete a Forge runtime server that is selected as the default. You must first select a different runtime server as the default.
Table of Contents
LiveReload is an open source tool that refreshes web pages open in browsers as their source is edited. Immediate and automatic web page refreshing, without the need to manually refresh, simplifies the workflow of web developers.
LiveReload consists of server-side and client-side components. The server-side application monitors the source and sends notifications as the source is changed. On the client-side, a JavaScript snippet receives the notifications and invokes the browser to refresh the web page. The server-side and client-side components communicate using the WebSocket protocol, which allows the server-side application to send notifications to the client-side JavaScript snippet.
The JavaScript snippet can be installed and activated using a LiveReload browser extension. Alternatively, it can be inserted manually in the HTML pages. Depending upon the changes to the source, the web page is either reloaded or the browser updated instantly without reloading.
The LiveReload application is available for OS X and Microsoft Window operating systems and through a third-party provider for Linux-based operating systems. LiveReload browser extensions are available for Safari, Chrome and Firefox.
LiveReload Tools is tooling that implements LiveReload in the IDE. It enables you to take advantage of LiveReload browser refreshing while editing files within the IDE. The capabilities of LiveReload Tools also removes the need to install the LiveReload standalone application or browser extensions.
LiveReload Tools is the implementation of the LiveReload server-side component, which listens to the IDE for resource changes and sends notifications for refreshes as appropriate. The server can also be configured to inject the livereload.js JavaScript snippet into the source code, which removes the need to install LiveReload browser extensions.
Unique features of LiveReload tools include LiveReload for both workspace and deployed resources due to the use of HTTP protocol for all resources and LiveReload on external devices with access and ease of use for remote connections to LiveReload servers. The LiveReload server can also be used in conjunction with BrowserSim, extending LiveReload to simulated devices.
The aim of this section is to guide you in using LiveReload Tools:
Create a LiveReload server to receive information from the IDE on resource changes
Configure LiveReload for use with system web browsers and external devices
View resources in LiveReload-enabled web browsers, including system and external device browsers and BrowserSim
The LiveReload server is integral to the LiveReload integration with the IDE. In its default configuration, the server receives information from the IDE when resources change and sends notifications for refresh actions to be taken. The server may also be further configured to inject the necessary JavaScript code snippets into HTML files or enable remote connections. The procedure below guides you through creating a default LiveReload server.
Procedure 5.1. Create a LiveReload Server
In the Servers tab, click create a new server or right-click an existing server and click →.
From the list of server types, expand Basic and select LiveReload Server.
The Server's host name and Server name fields are automatically populated. The
localhostvalue in the Server's host name field indicates that the server is to be run on the local system and the value in the Server name field is the name by which the LiveReload server is identified in the Servers tab. You can edit these values as appropriate by typing in the fields.Click to close the window. The LiveReload server is listed in the Servers tab.


Note
Alternatively, LiveReload servers can be automatically created when you select to view workspace and deployed resources in web browsers using the actions provided by LiveReload Tools.
A LiveReload client must be inserted into HTML files in order for it to receive the LiveReload server notifications about changed resources. LiveReload Tools provides additional configuration options so that the LiveReload server can inject the necessary <script> element into the HTML resources. Furthermore, the LiveReload server can be configured to allow access from external devices, enabling LiveReload to function in browsers of remote devices.
The details below outline how to set the configuration options using the Server Editor. To open the Server Editor for a LiveReload server, in the Servers tab double-click the LiveReload server. Alternatively, right-click the LiveReload server and click or press F3.
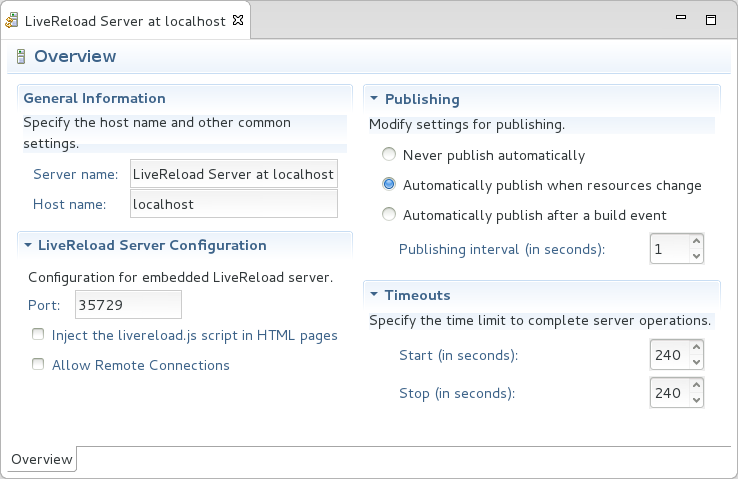
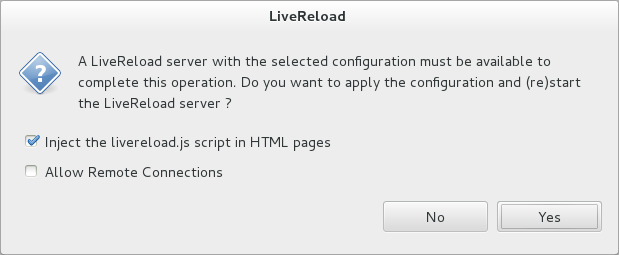
- Insert JavaScript code snippet to resources
In the Server Editor under LiveReload Server Configuration, select the Inject the livereload.js script in HTML pages check box.
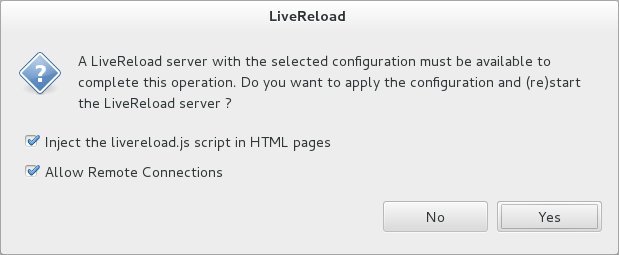
- Enable LiveReload in external device browsers
In the Server Editor under LiveReload Server Configuration, select the Allow Remote Connections check box. This option is disabled by default when a LiveReload server is created as it exposes your workspace files, which may not always be desirable.
All changes to the settings of a LiveReload server must be saved and the server restarted before the results will take effect. To save setting changes, press Ctrl+S or click → or click the icon. To restart the server, in the Servers tab right-click the LiveReload server and click .
You can use the actions of LiveReload Tools to open resources in browsers with LiveReload enabled, as detailed below. Note that if the requisite LiveReload server does not exist or is not correctly configured, you are prompted by LiveReload Tools, which can complete the necessary requirements for you.
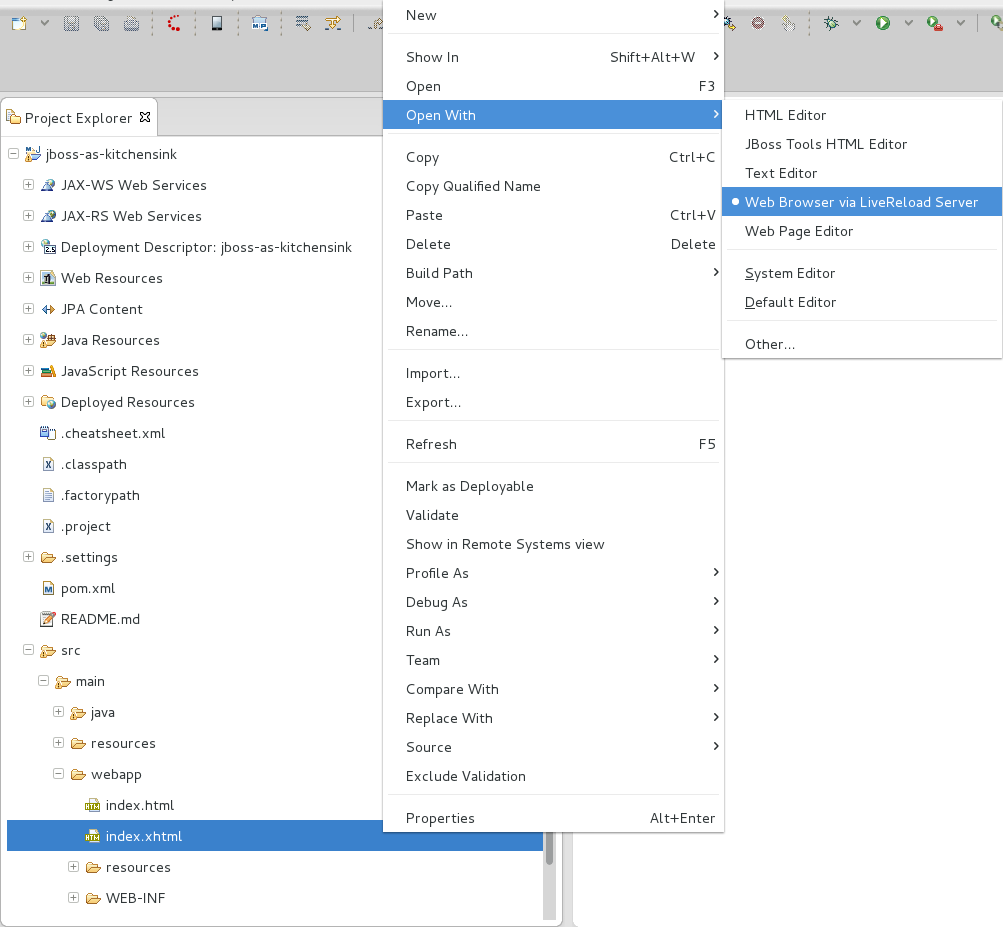
- View workspace resources on an external device
In the Project Explorer tab, right-click the HTML file and click →.
This requires the server to be configured to Inject the livereload.js script in HTML pages and, if the server is not correctly configured, you are prompted to enable this option.
The IDE-specified external web browser opens, with LiveReload activated, and displays the workspace resource.
- View deployed resources in a system browser
Ensure the server and application of the deployed resources are started. In the Servers tab, right-click the application and click →.
This requires the server to be configured to Inject the livereload.js script in HTML pages and, if the server is not correctly configured, you are prompted to enable this option.
The IDE-specified external web browser opens, with LiveReload activated, and displays the deployed resource.
Note
To change the IDE-specified external web browser, click → and expand General→Web Browser. From the External web browsers list, select the browser to use for actions involving external web browsers. Click and click to close the window.
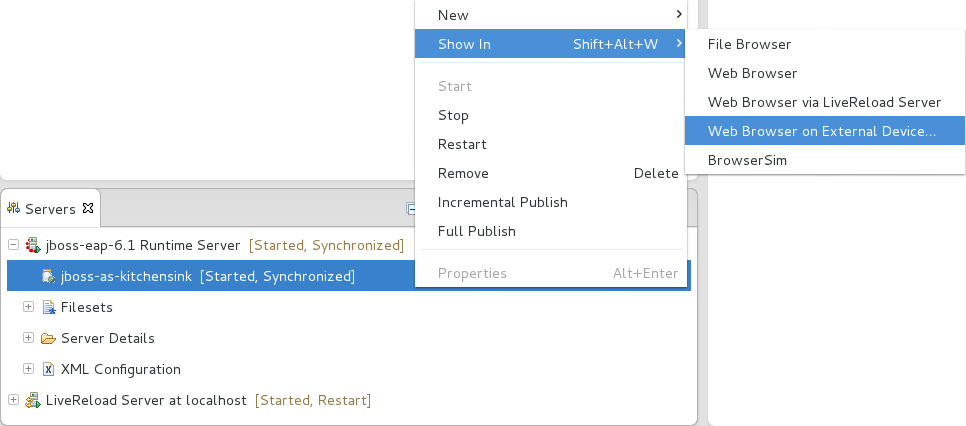
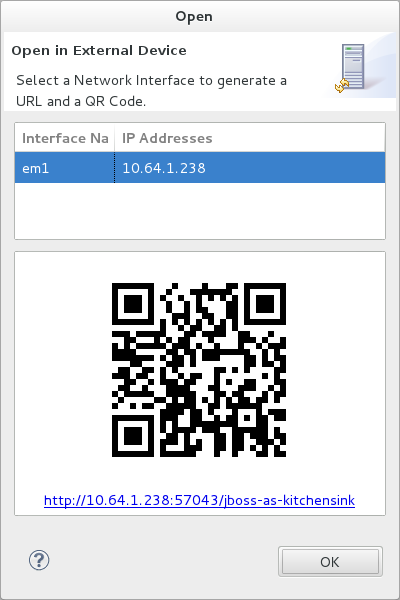
- View deployed resources on an external device
Ensure the server and application of the deployed resources are started. In the Servers tab, right-click the application and click →.
This requires the server to be configured to Inject the livereload.js script in HTML pages and Allow Remote Connections and, if the server is not correctly configured, you are prompted to enable these options.
A QR code and LiveReload server port URL corresponding to the deployed application are displayed and these can be input into external device browsers.

Note
The configuration of a LiveReload server can be viewed and manually set in the Server Editor tab.
The LiveReload server can be used in conjunction with BrowserSim. In this case, the server sends notifications about changed resources and BrowserSim inserts the JavaScript code, which invokes the simulated device browser window to refresh. The procedure below outlines how to enable LiveReload in BrowserSim for workspace and deployed resources.
Procedure 5.2. View Resources in LiveReload-enabled BrowserSim
Ensure the LiveReload server is started. If it is not started, in the Servers tab right-click the LiveReload server and click .
Complete the appropriate step depending on the location of your resources:
For workspace resources, in the Project Explorer tab right-click the
.htmlfile and click →BrowserSim.For deployed resources, in the Servers tab right-click the application and click →BrowserSim.
Important
Ensure the server and application of the deployed resources are started before attempting to view the resources in LiveReload-enabled BrowserSim. To start the server and the application, in the Servers tab right-click each and click .
Right-click the simulated device and ensure the Enable LiveReload check box is selected.
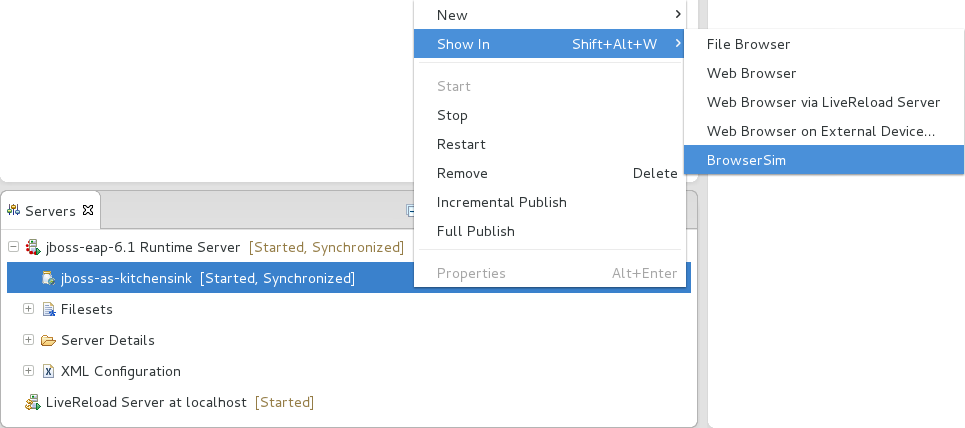
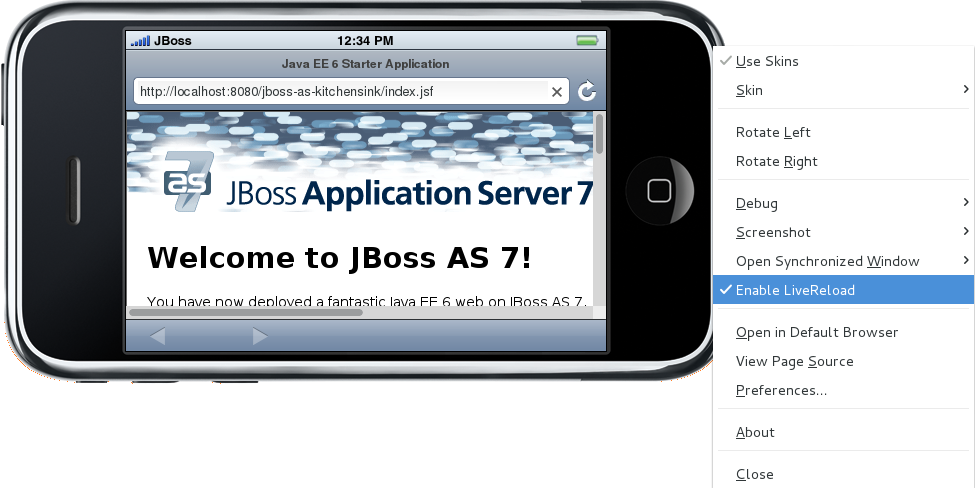
Important
The Enable LiveReload check box has no effect when the LiveReload server is set to insert the JavaScript code and the web resource is viewed in BrowserSim via the LiveReload server port URL. LiveReload is always enabled in this case.
Table of Contents
- 6. Mobile Web Tools
- 6.1. Overview of Mobile Web Tools
- 6.2. Features of Mobile Web Tools
- 6.2.1. Features Overview
- 6.2.2. Create a Mobile Web Project
- 6.2.3. Use a HTML5 jQuery Mobile File Template
- 6.2.4. Access the jQuery Mobile Palette
- 6.2.5. Insert a jQuery Mobile Palette Widget into a HTML5 File
- 6.2.6. Get Assistance with jQuery Mobile Programming
- 6.2.7. View jQuery Mobile Pages in a Browser
- 6.3. Customizing Mobile Web Tools
- 7. BrowserSim
- 7.1. Overview of BrowserSim
- 7.2. Features of BrowserSim
- 7.2.1. Features Overview
- 7.2.2. View a Web Application on BrowserSim
- 7.2.3. Manage Web Applications on BrowserSim
- 7.2.4. Change the Appearance of a Simulated Device
- 7.2.5. View a Web Page in Different Browsers and Simulated Devices
- 7.2.6. Generate a Screen Capture of a Simulated Device
- 7.2.7. Activate LiveReload for BrowserSim
- 7.2.8. View the Source of a Web Page
- 7.3. Customizing BrowserSim
- 7.3.1. Customizing Overview
- 7.3.2. Make BrowserSim the Default Browser
- 7.3.3. Add BrowserSim to the Global Toolbar
- 7.3.4. Set a Shortcut for the Run BrowserSim Action
- 7.3.5. Add or Modify Devices in BrowserSim
- 7.3.6. Change the Default Behavior when a Device does not Fit the Display
- 7.3.7. Change the Default LiveReload Port
- 7.3.8. Change the Default Location for Saved Screen Captures
- 7.3.9. Change the Default Settings for Weinre
- 6.1. Overview of Mobile Web Tools
- 6.2. Features of Mobile Web Tools
- 6.2.1. Features Overview
- 6.2.2. Create a Mobile Web Project
- 6.2.3. Use a HTML5 jQuery Mobile File Template
- 6.2.4. Access the jQuery Mobile Palette
- 6.2.5. Insert a jQuery Mobile Palette Widget into a HTML5 File
- 6.2.6. Get Assistance with jQuery Mobile Programming
- 6.2.7. View jQuery Mobile Pages in a Browser
- 6.3. Customizing Mobile Web Tools
Mobile Web Tools provides tooling for developing mobile web applications within the IDE. It simplifies the process of getting started with HTML5 and jQuery Mobile technologies that are used for these types of applications and provides efficient workflows for developing with them on a daily basis.
Mobile Web Tools consists of project wizards, file templates, the jQuery Mobile palette, and actions for developing with HTML5 and jQuery Mobile:
The HTML5 project wizards and HTML5 jQuery Mobile file template enable you to quickly generate the foundations of mobile web applications and to view mobile web application programming in action.
The jQuery Mobile palette offers a visual reference of the available HTML5 and jQuery Mobile user interface widgets, which can be effortlessly inserted into your project files with drag-and-drop functionality. In conjunction with the jQuery Mobile palette, widget wizards allow you to easily customize HTML5 and jQuery Mobile widgets when inserting them into your project.
Code assistance and one-click action for viewing jQuery Mobile pages in browsers enable you to work more efficiently when developing mobile web applications in the IDE.
The aim of this section is to guide you in using Mobile Web Tools:
Generate the foundations of web applications with the project wizards and file templates
Access the jQuery Mobile palette and add customized widgets to your mobile web application with the aid of the widget wizards
Use code completion to assist in programming
View pages of the application in various browsers
Project wizards are available to assist you in generating new mobile web applications. The project wizards are listed in the JBoss Central tab:
HTML5 Project, under Start from scratch
kitchensink-html5-mobile, under Start from a sample
Important
In order to deploy the applications created by these wizards, JBoss Application Server 7.1 must be defined for use in the IDE. You can define a server using runtime detection from within a project wizard. From the Requirements table on the first page of the project wizard, select server/runtime and click or and follow the instructions. Alternatively, before starting a wizard click →, expand JBoss Tools and select JBoss Runtime Detection. Click and follow the instructions.
Procedure 6.1. Create a HTML5 Project with the HTML5 Project Wizard
In the JBoss Central tab under Start from scratch, click HTML5 Project.
From the Target Runtime list, select an existing JBoss Application Server 7.1 server runtime environment or select <none>. When <none> is selected, a non-enterprise server runtime environment is assumed.
Click .
In the Project name field, type a name for the project.
In the Package field, type a package name for the project resources.
To create the project in a different location to the Workspace default, clear the Use default Workspace location and type the path in the field or click to navigate to the location.
Click .
Check the Maven details for the project to be created and click .
During project creation, the wizard imports project dependencies. When the HTML5 Project wizard displays 'HTML5 Project' Project is now ready, click to close the wizard. A
README.mdfile for the project automatically opens for viewing.

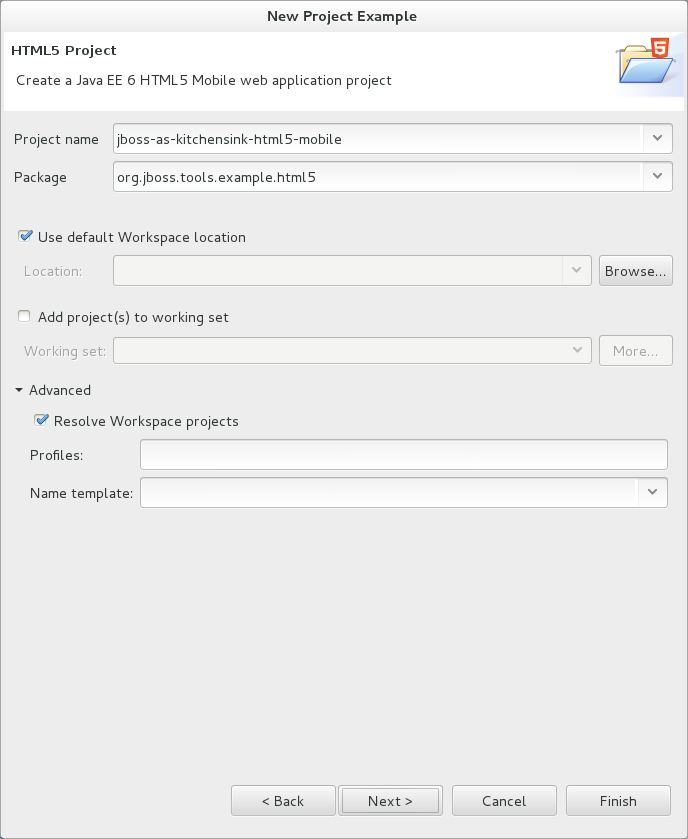
Procedure 6.2. Create a HTML5 Project with the kitchensink-html5-mobile Wizard
In the JBoss Central tab under Start from a sample, hover the mouse over Mobile Applications and click kitchensink-html5-mobile.
Click .
To create the project in a different location to the Workspace default, clear the Use default Workspace location and type the path in the field or click to navigate to the location.
Click .
During project creation, the wizard imports project dependencies. When the kitchensink-html5-mobile wizard displays 'kitchensink-html5-mobile' Project is now ready, click to close the wizard. A
README.mdfile for the project automatically opens for viewing.

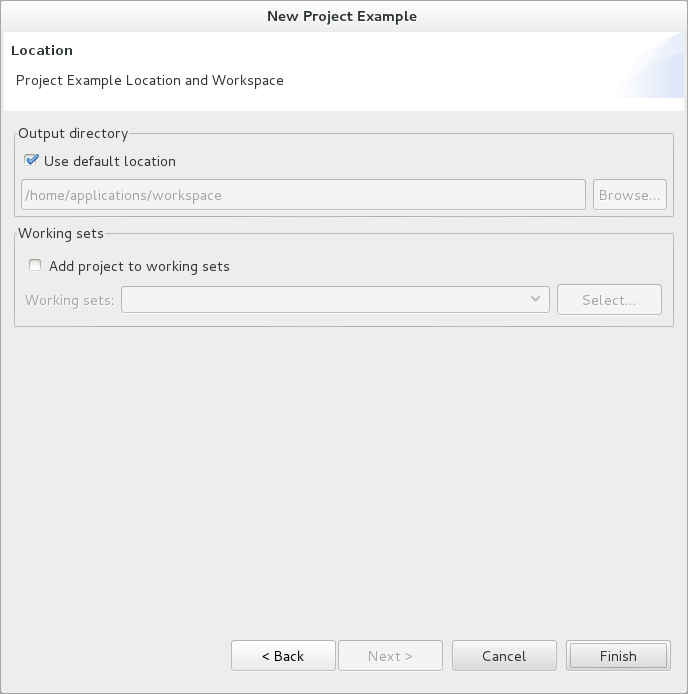
Mobile Web Tools provides a HTML5 jQuery Mobile file template to assist in creating mobile web applications. The template inserts the necessary JavaScript and CSS library references into the HTML header and includes skeleton jQuery Mobile page and listview widgets in the HTML body. The procedure below details how to insert the template into your project.
Procedure 6.3. Use a HTML5 jQuery Mobile File Template
In the Project Explorer tab, right-click a project and click →.
In the Enter or select the parent folder field, type a project path or expand the project folder tree and select the parent folder for the new file.
In the File name field, type the name for the new file. It is not essential to include the file extension in the name as this is automatically appended if it is found to be missing.
Click .
Ensure the Use HTML Template check box is selected.
From the Templates table, select HTML5 jQuery Mobile Page.
Click . The new HTML5 file is listed in the Project Explorer tab and automatically opened in the JBoss Tools HTML Editor.
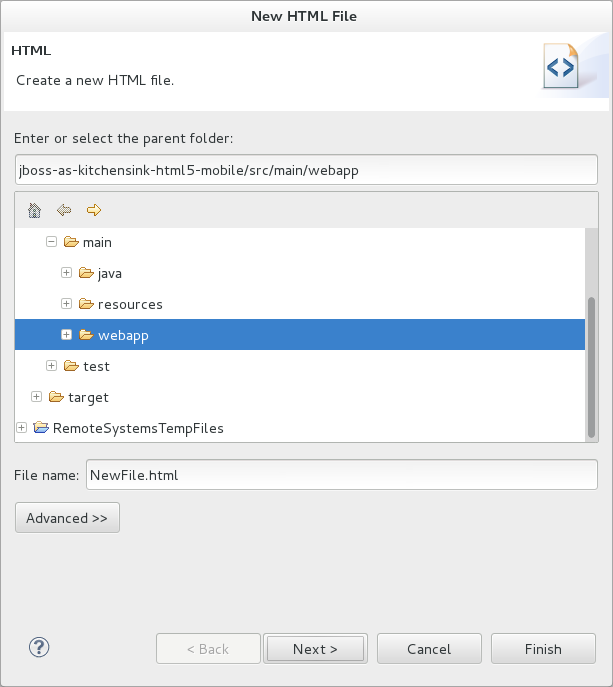
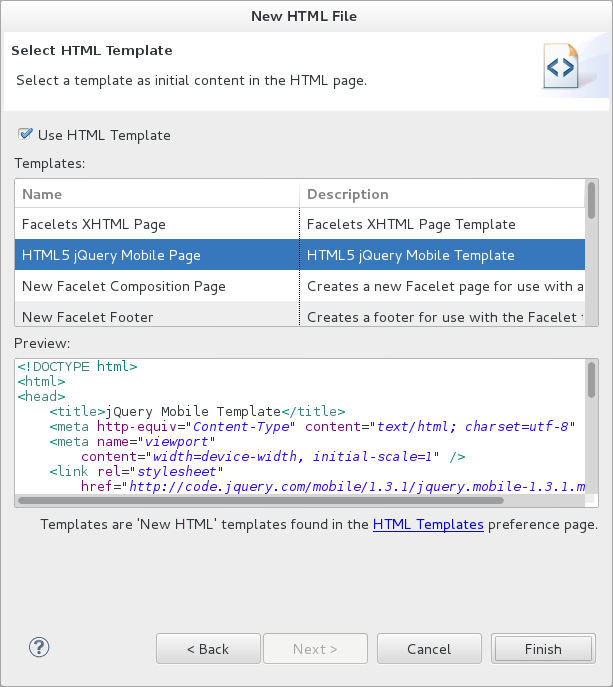
Mobile Web Tools offers a jQuery Mobile palette, with wizards for adding jQuery Mobile and HTML5 widgets to your project. It is available for use with HTML5 files in the JBoss Tools HTML Editor. The jQuery Mobile palette is available in the Palette tab, which is part of the JBoss perspective.
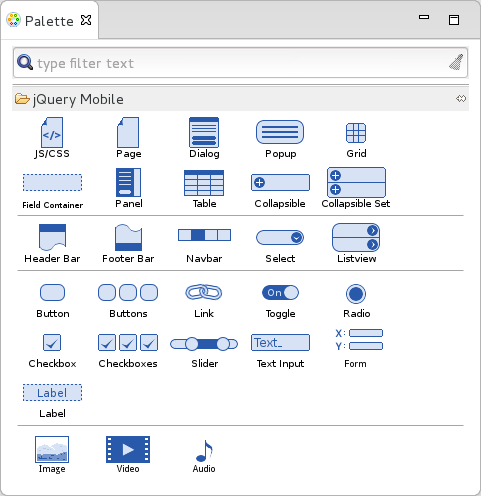
The jQuery Mobile palette is automatically displayed in the Palette tab when a HTML5 file is opened in the JBoss Tools HTML Editor. To open a file in this editor, in the Project Explorer tab right-click a HTML5 file and click →JBoss Tools HTML Editor. Alternatively, if JBoss Tools HTML Editor is the default option for Open With, double-click the HTML5 file to open it in the editor. The file opens in the editor and the Mobile Web palette is displayed in the Palette tab.
Note
The Palette tab must be visible in order to see the jQuery Mobile palette. To open the tab, click →→, expand General and select Palette.
To show or hide an individual palette in the Palette tab, click the name of the individual palette.
To search for a palette element within the jQuery Mobile palette, in the search field type a search term or phrase. The elements displayed in the jQuery Mobile palette are filtered as you type in the search field.
The jQuery Mobile palette contains wizards for the HTML5 and jQuery Mobile user interface widgets commonly used in mobile web applications. The widgets are grouped in the palette by functionality, with tooltips providing widget descriptions.
To insert a palette widget into a file open in the JBoss Tools HTML Editor, drag the widget icon to the appropriate place in the file. Alternatively, ensure the text cursor is located at the desired insertion point in the file and click the widget icon. For widgets with no attributes that can be customized, such as JS/CSS and Field Container, the code snippets are immediately inserted into the file. For widgets with attributes that can be customized, a widget wizard opens allowing you to input attribute information. Once complete, click and the code snippet is inserted into the file.
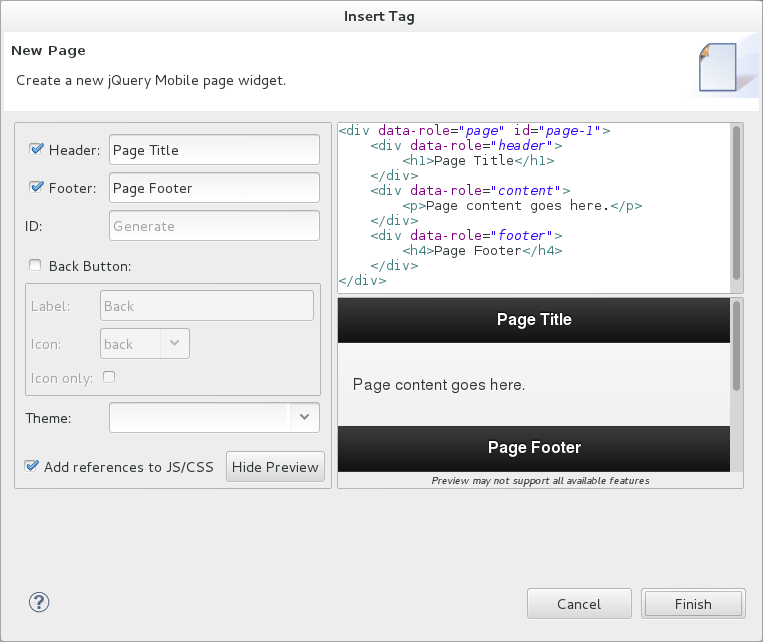
The widget wizards have three common aspects:
- Design fields
These fields are unique to each widget. They allow you to customize the attributes of the widget by providing names, actions, numbers of elements, and styling themes. All widget wizards assign automatically generated values to the ID attribute in the case that you do not specify a value. Content assist is available for the URL (href) field by placing the text cursor in the field and pressing Ctrl+Space.
- Add references to JS/CSS
This check box provides the ability to automatically add any missing library references to the HTML5 file that are required by the widget.
- Preview Panes
These panes show previews of the code snippet for the widget and of the rendered widget. The preview panes can be shown and hidden by clicking the and button, respectively.
Mobile Web Tools offers code assist to help you when working with jQuery Mobile. Code assist lists available options for attributes and attribute values. Code assist is available for use in files and in the URL (href) field of widget wizards.
To view code assist in a file, ensure the text cursor is located at the desired insertion point in the file and press Ctrl+Space. Repeatedly press Ctrl+Space to cycle through HTML and JSF EL completion options. To view more information about a listed item, select the item. To insert a listed item into the code, double-click the item.
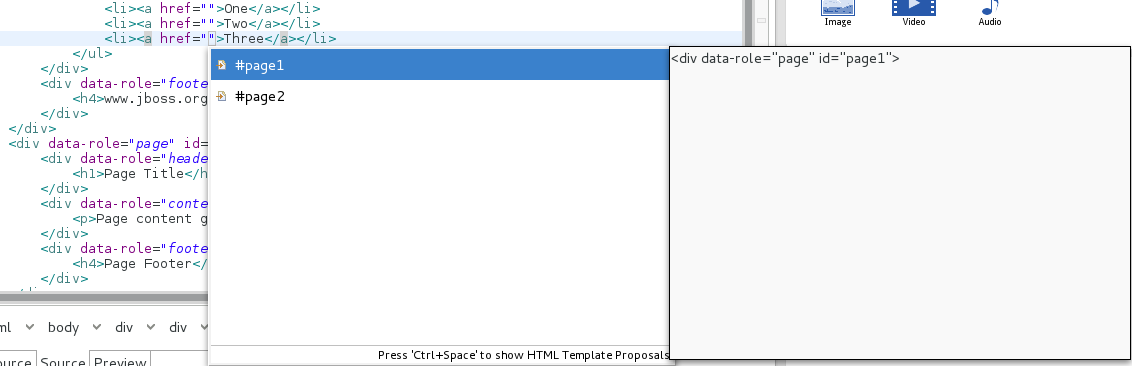
To view code assist in a widget wizard, ensure the text cursor is located in the URL (href) field and press Ctrl+Space. To view more information about a listed item, select the item. To insert a listed item into the code, double-click the item.

Mobile Web Tools provides an action to easily and quickly open jQuery Mobile pages in web browsers for viewing.
To open a jQuery Mobile page from a file open in the JBoss Tools HTML Editor, press Ctrl and move the mouse over the <div> tag corresponding to the page widget. Continue to press Ctrl and from the menu select one of the options:
, which shows the page in the default browser of the IDE
, which shows the page in BrowserSim
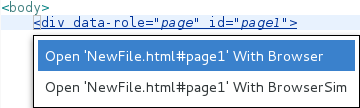
The aim of this section is to guide you in customizing Mobile Web Tools:
Customize the HTML5 jQuery Mobile templates available in the IDE
The HTML5 jQuery Mobile Page template for new HTML files is provided by Mobile Tools. You can customize this template and add more jQuery Mobile templates to the IDE.
To customize the jQuery Mobile templates available in the IDE, click →. Expand Web→HTML Files→Editor and select Templates.
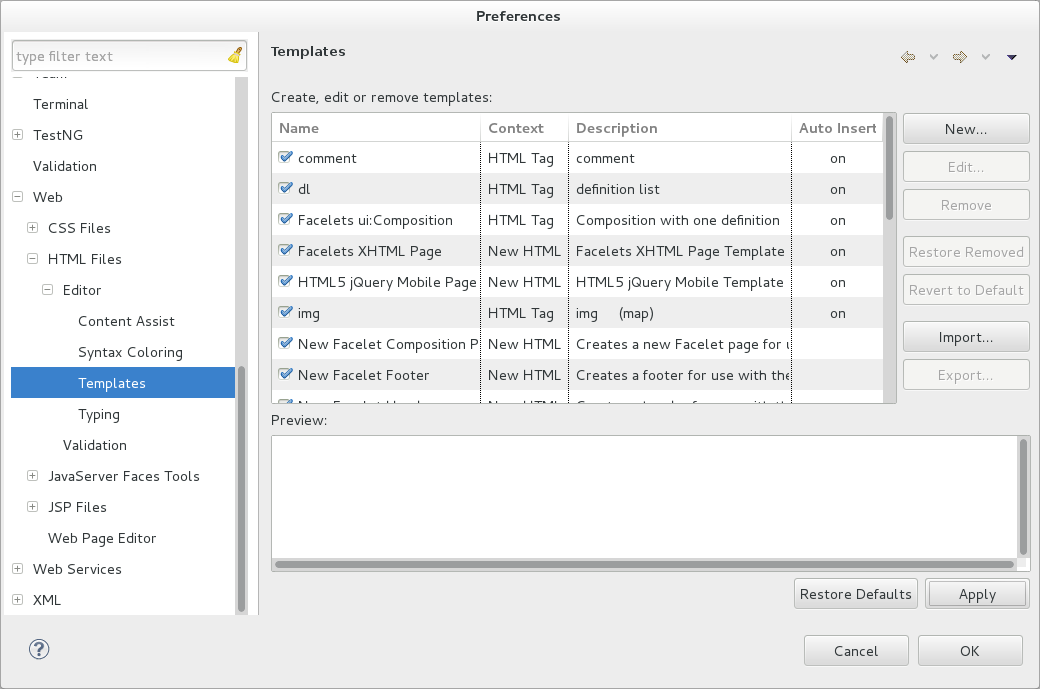
There are a number of available actions:
- Add a template
There are several options for adding templates:
To create a new template, click . In the Name and Description fields, type a name and description of the template, respectively. In the Pattern field, type the code for the template. From the Context list, select the instance in which the IDE should make the template available. Click to close the window.
To restore all templates that have been deleted, click .
To load an existing template into the IDE, click and select the file. The file must be an XML file, with appropriate file headers and the HTML5 and jQuery Mobile content written in XML syntax and contained between XML
templateandtemplatestags.
- Edit a template
From the table, select a template and click . You can modify the name, description, code content and context in which the IDE makes the template available. Click to close the window.
- Remove a template
From the table, select a template and click .
- 7.1. Overview of BrowserSim
- 7.2. Features of BrowserSim
- 7.2.1. Features Overview
- 7.2.2. View a Web Application on BrowserSim
- 7.2.3. Manage Web Applications on BrowserSim
- 7.2.4. Change the Appearance of a Simulated Device
- 7.2.5. View a Web Page in Different Browsers and Simulated Devices
- 7.2.6. Generate a Screen Capture of a Simulated Device
- 7.2.7. Activate LiveReload for BrowserSim
- 7.2.8. View the Source of a Web Page
- 7.3. Customizing BrowserSim
- 7.3.1. Customizing Overview
- 7.3.2. Make BrowserSim the Default Browser
- 7.3.3. Add BrowserSim to the Global Toolbar
- 7.3.4. Set a Shortcut for the Run BrowserSim Action
- 7.3.5. Add or Modify Devices in BrowserSim
- 7.3.6. Change the Default Behavior when a Device does not Fit the Display
- 7.3.7. Change the Default LiveReload Port
- 7.3.8. Change the Default Location for Saved Screen Captures
- 7.3.9. Change the Default Settings for Weinre
BrowserSim is a mobile web browser simulator. It enables you to view and interact with web pages as they would appear on mobile devices.
BrowserSim consists of an external web browser window. This browser window is different from standard browsers in that it can be transformed to simulate browsers on a variety of mobile devices. The browser window can also be rotated to demonstrate the changes that would occur to a web application as a result of rotating a mobile device. Additionally, BrowserSim provides access to tools for inspecting and editing the source of web pages.
The overall system requirements of JBoss Tools are applicable for BrowserSim and can be viewed at https://community.jboss.org/wiki/MatrixOfSupportedPlatformsRuntimesAndTechnologiesInJBossToolsJBDS on the JBoss Tools website. But, as reiterated below, there are additional system requirements and restrictions when using BrowserSim on Microsoft Windows operating systems.
BrowserSim depends on WebKit and, consequently, requires Apple Safari to be installed on Microsoft Windows operating systems. Only a 32-bit version of Apple Safari is available for Microsoft Windows operating systems. To work around this restriction for 64-bit Microsoft Windows operating systems, you must set BrowserSim to use a 32-bit JVM when running in 64-bit versions of Eclipse. Note that 32-bit JVM choice is limited to Oracle 32-bit JRE 1.6, JDK 1.6, or JDK 1.7 on Microsoft Windows operating systems because Oracle 32-bit JRE 1.7 is incompatible with Apple Safari.
To set BrowserSim to use a 32-bit JVM, click →. Expand JBoss Tools and select BrowserSim/CordovaSim. Under Select JRE to run BrowserSim, click Select and from the list select a 32-bit JRE or Java developer kit. Click and click to close the window.
The aim of this section is to guide you in using BrowserSim:
View local and remote web applications in BrowserSim
Change the appearance of simulated devices, by rotating them and changing or removing their skins
Check the look and functionality of web pages in different browsers, such as the default browser or additional synchronized simulated devices
Generate screen captures of simulated devices and their web pages
View the page source of web pages with editors, Firebug Lite and Weinre
You can use BrowserSim to view web applications on local file systems or deployed on runtime servers.
- To view web applications in local file systems
In the Project Explorer tab, select a
.htmlfile and click the icon . Alternatively, right-click a
 .htmlfile and click →.- To view deployed web applications
In the Servers tab, expand the server on which the application is deployed. Right-click the application and click →. Alternatively, select the application and click the icon. If BrowserSim is the IDE browser preferences, you can also right-click the application and click →.
BrowserSim employs intelligent loading when selecting which web page to open in the browser window. If a web page is already open in a standard browser window, this is the web page that is loaded in BrowserSim.
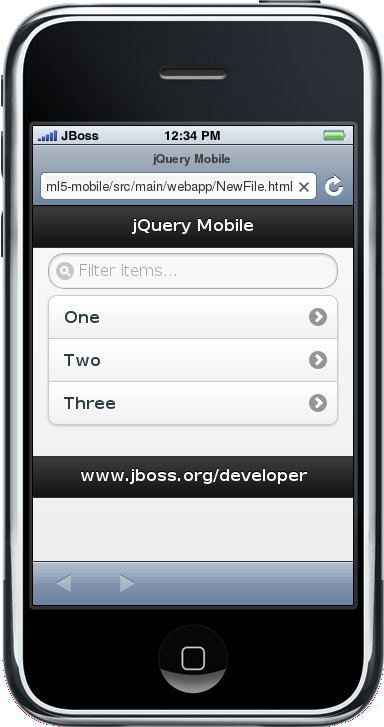
BrowserSim provides actions to assist with viewing web applications on its simulated devices.
- Open a web link
In the browser window, click the web link. The link opens in the browser windows of the simulated device.
- Show or hide the address bar
Click the notification bar, where the connectivity, time and battery are displayed, to show or hide the address bar.
- Reload a web page
Click the Reload icon
 at the end of the address bar.
- Stop loading a web page
Click the Stop icon
 at the end of the address bar.
- Close BrowserSim
Right-click the simulated device and click . Open BrowserSim windows automatically close when the IDE closes.
BrowserSim provides a number of ways to change the appearance of simulated devices. Changes made to the appearance of simulated devices are retained by BrowserSim and they are automatically applied when it starts in future.
- Rotate the view between portrait and landscape modes
Click any corner of the simulated device. Alternatively, right-click the simulated device and click or .
- Change the simulated device
Right-click the simulated device, click and select from the listed devices.
- Remove or use skins
To view a plain browser window without the mobile device skin, right-click the simulated device and clear the Use Skins check box. To reapply the skin, click and select the Use Skins check box.
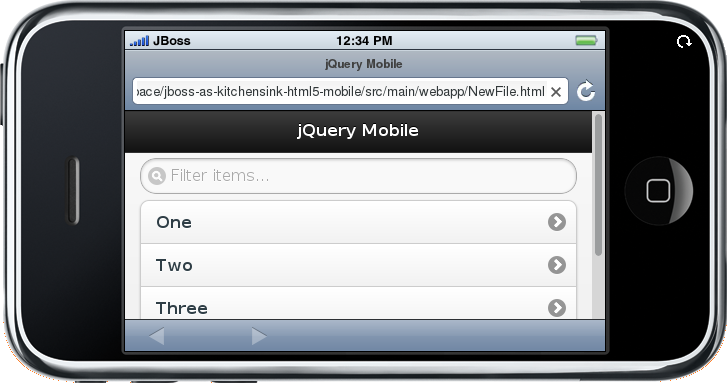
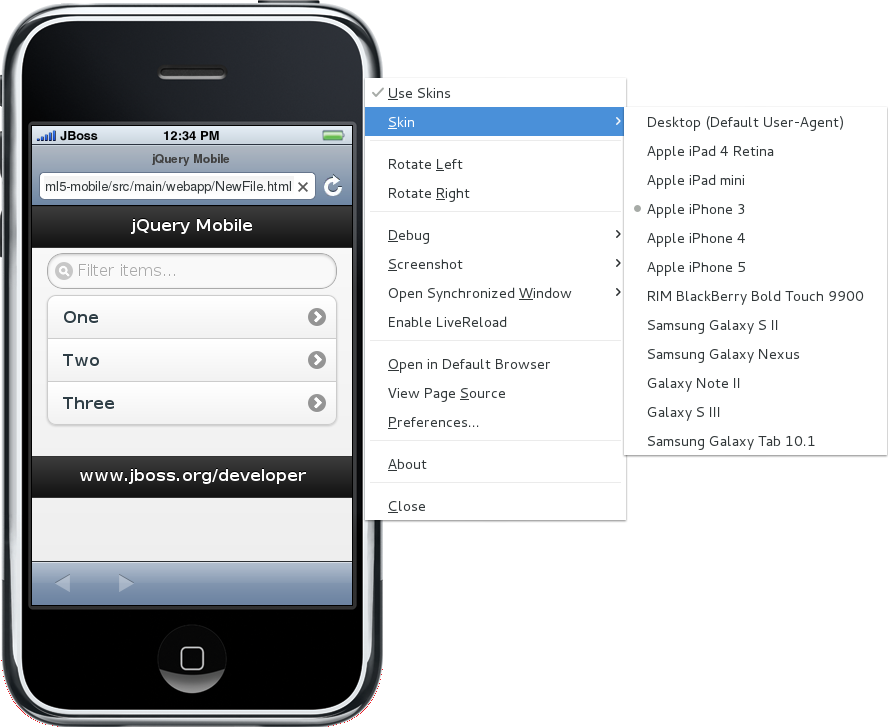
From within BrowserSim, web pages can be viewed in different browsers and simulated devices.
- View in the default browser of the system
Right-click the simulated device and click . An external browser window opens and displays the web page.
- View simultaneously on synchronized simulated devices
Right-click the simulated device and click . Select from the list of available skins for the additional simulated device. An additional simulated device opens and displays the same web page as that of the synchronized simulated device. Opening a web page in one synchronized simulated device results in the web page opening in all the synchronized simulated devices.
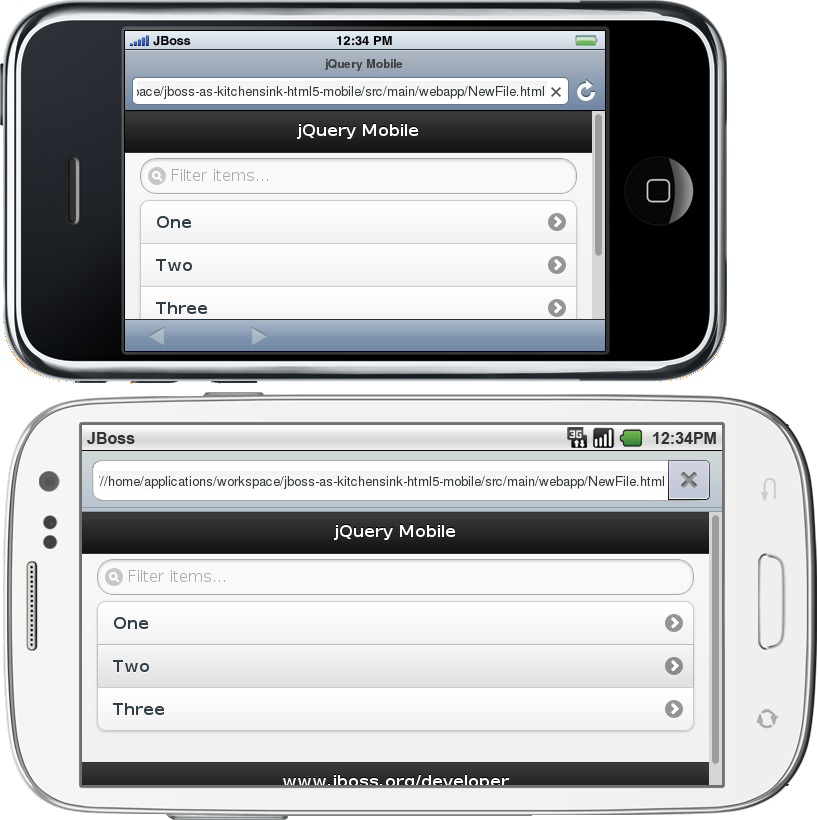
BrowserSim provides the ability to generate screen captures of a simulated device and the web pages it shows.
To generate a screen capture of a simulated device, right-click the simulated device and click .
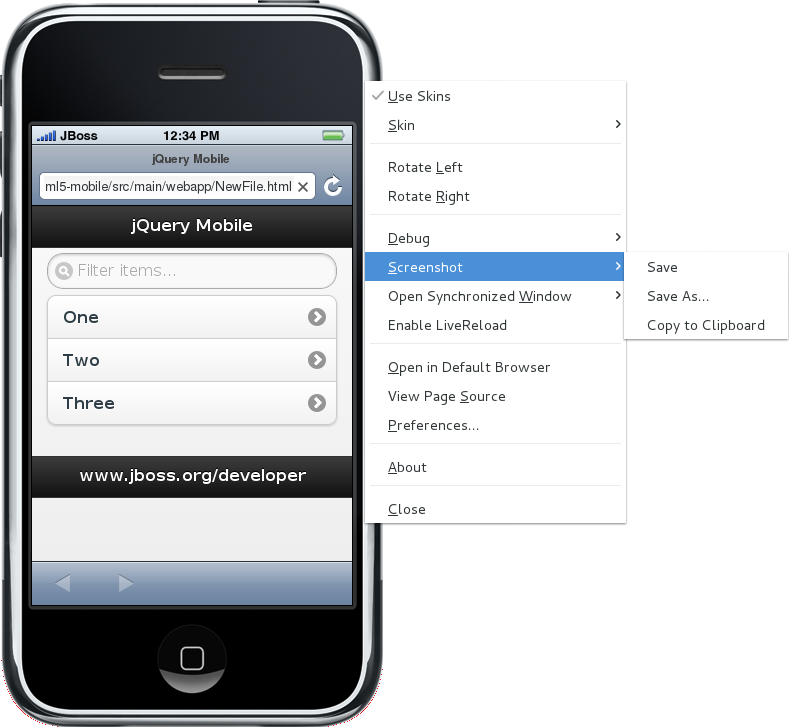
Select the output for the screen capture from the list of options:
to save as a
.pngfile in the default location. The default location is your home directory.to save as a
.pngfile in a location you specify.to copy the graphic for immediate use.
LiveReload for BrowserSim refreshes web pages open in simulated device browser windows as the source is edited. A LiveReload server sends notifications as resources are changed in the IDE and BrowserSim inserts the JavaScript code, which invokes the simulated device browser window to refresh. The procedures below outline how to create a LiveReload server and how to enable LiveReload in BrowserSim for workspace and deployed resources.
Procedure 7.1. Create a LiveReload Server
In the Servers tab, click create a new server or right-click an existing server and click →.
From the list of server types, expand Basic and select LiveReload Server.
The Server's host name and Server name fields are automatically populated. The
localhostvalue in the Server's host name field indicates that the server is to be run on the local system and the value in the Server name field is the name by which the LiveReload server is identified in the Servers tab. You can edit these values as appropriate by typing in the fields.Click to close the window. The LiveReload server is listed in the Servers tab.
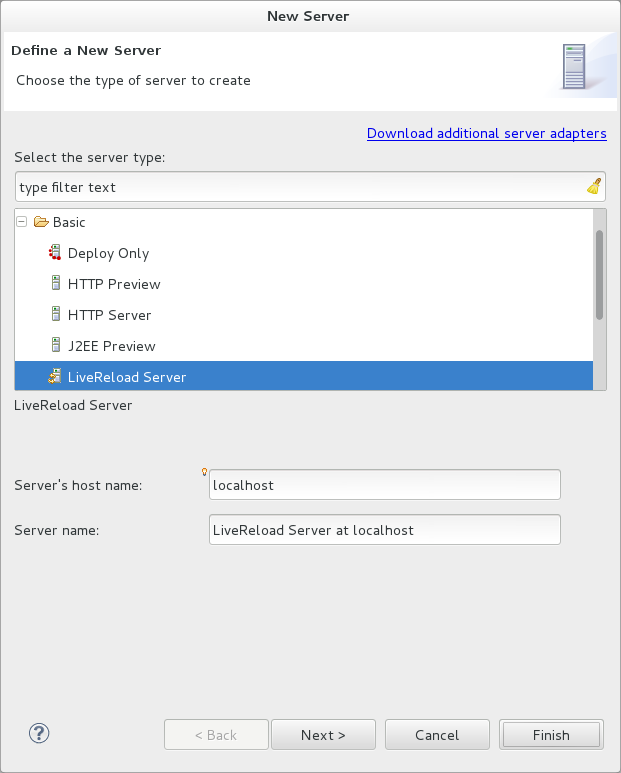

Procedure 7.2. Activate LiveReload for BrowserSim
Ensure the LiveReload server is started. If it is not started, in the Servers tab right-click the LiveReload server and click .
Complete the appropriate step depending on the location of your resources:
For workspace resources, in the Project Explorer tab right-click the
.htmlfile and click →BrowserSim.For deployed resources, in the Servers tab right-click the application and click →BrowserSim.
Important
Ensure the server and application of the deployed resources are started before attempting to view the resources in LiveReload-enabled BrowserSim. To start the server and the application, in the Servers tab right-click each and click .
Right-click the simulated device and ensure the Enable LiveReload check box is selected.
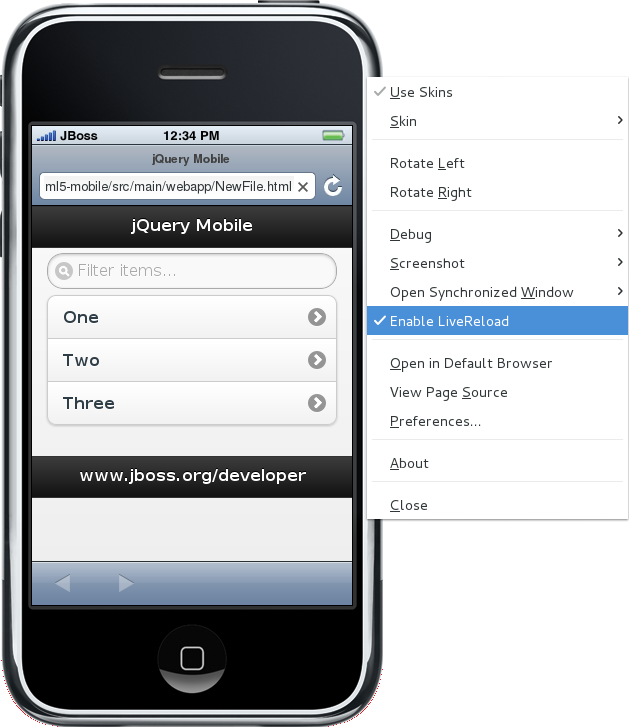
Important
The Enable LiveReload check box has no effect when the LiveReload server is set to insert the JavaScript code and the web resource is viewed in BrowserSim via the LiveReload server port URL. LiveReload is always enabled in this case.
From within BrowserSim, the source of web pages can be viewed with a variety of applications.
- Open the page source in an editor
Right-click the simulated device and click . The file containing the page source opens in an editor tab.
- Inspect the page source with Firebug Lite
Right-click the simulated device and click →. The Firebug Lite application is displayed in an external window.
- Inspect and edit the page source with Weinre
Right-click the simulated device and click →. The Weinre Inspector is displayed in an external window. Weinre supports remote debugging, enabling you to debug an application running on a mobile device from your desktop browser.
The aim of this section is to guide you in customizing BrowserSim:
Make BrowserSim more prominent to use by making it the default browser, by adding its icon to the global toolbar and creating a shortcut key for launching it
Extend the functionality of BrowserSim by adding or modify the simulated devices it provides
Customize the default settings of BrowserSim for large simulated devices, for LiveReload, for screen captures and for Weinre
You can set BrowserSim to be the default browser used in actions such as → and .
To set BrowserSim as the default browser, click → and click .
Alternatively, click →, expand General and select Web Browser. Select the BrowserSim check box. Click and click to close the Preferences window.
The BrowserSim icon is part of the BrowserSim toolbar and, by default, this toolbar is included in the global toolbar of the JBoss perspective. But the BrowserSim icon might not be visible in other perspectives because the icons in the global toolbar change depending on the perspective you are using. As detailed in the procedure below, you can add the BrowserSim toolbar to other perspectives.
Procedure 7.3. Add BrowserSim to the Global Toolbar in the Current Perspective
Ensure you are using the perspective in which you would like to add the BrowserSim toolbar. If you need to change the perspective, click →→ and search for the appropriate perspective.
Click →.
On the Command Groups Availability tab, select the BrowserSim check box to add this command group to the current perspective.
On the Tool Bar Visibility tab, ensure the BrowserSim check box is selected as this makes the BrowserSim toolbar visible.
Click to close the window. The icon
is now visible in the global toolbar of the perspective.
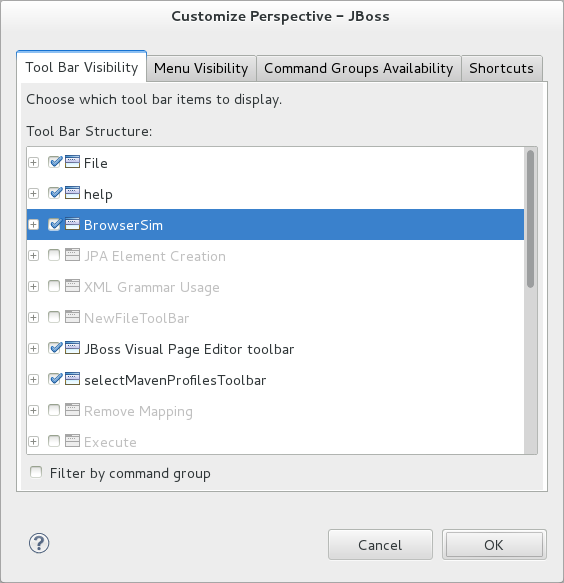
If you use BrowserSim frequently but do not want to set it as the default browser, you can set a shortcut for the action, as described in the procedure below.
Procedure 7.4. Set a Shortcut for BrowserSim
Click →, expand General and select Keys.
To find the Run BrowserSim action, in the type filter text field enter
BrowserSim.In the table, select Run BrowserSim.
In the Binding field, type the key combination you want to use as a shortcut. Check the Conflicts table to ensure the key binding you have chosen does not conflict with existing shortcuts.
Once a unique key binding is selected, click and click to close the Preferences window.
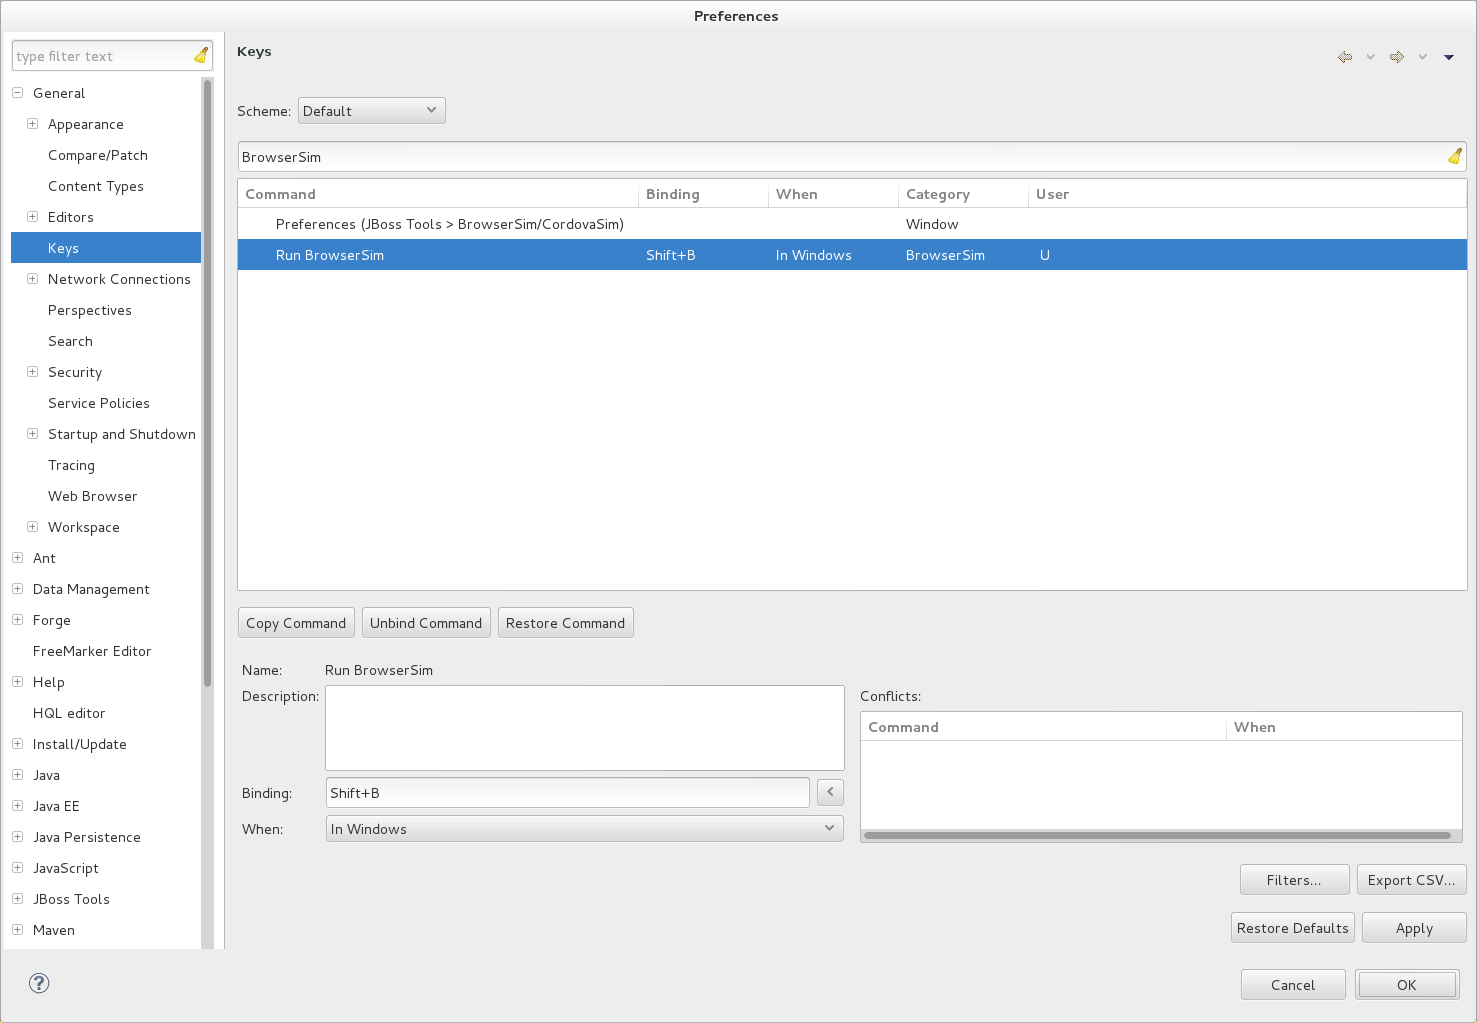
You may wish to preview a web application on a simulated mobile device that is not predefined in BrowserSim. You can add more devices to BrowserSim and modify the existing devices, as detailed below.
Procedure 7.5. Add Devices to BrowserSim
Right-click the simulated device and click .
In the Devices section of the Devices tab, click .
In the Name field, type the name you want to give the device.
In the Width and Height fields, type the dimensions of the device window in pixels.
In the Pixel Ratio field, type a value for the ratio of CSS pixels to device pixels.
In the User Agent field, type the User Agent string of your device. Clearing the User Agent check box results in the default User Agent for the BrowserSim browser being used.
Note
User Agent is a string denoting the device, operating system and browser combination. This string may be used by websites to provide content tailored for devices, operating systems and browsers. Information is widely available on the Internet to assist you in identifying the User Agent associated with a particular device.
From the Skin list, select the skin to be used or select None.
Click to add the new device and click to close the Devices window.
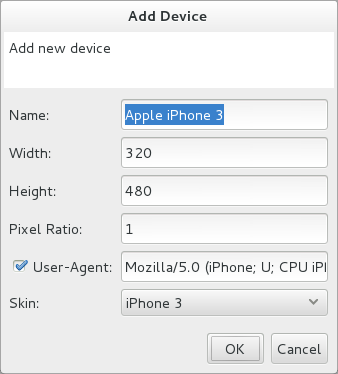
To modify existing devices in BrowserSim, right-click the simulated device and click . In the Devices table, select a device and click . Once you have finished editing the fields, click . Click to close the Devices window.
By default, when a device window is too large to fit the display of the system, you are prompted about which action should be taken. Rather than prompting, the default behavior can be set to always truncate or never truncate.
To change the default behavior, right-click the simulated device and click . In the Truncate the device window when it does not fit display section of the Devices tab, click Always truncate or Never truncate to change the behavior as appropriate and click to close the window.

The LiveReload server uses a port to communicate resource changes to BrowserSim. The default port can be changed.
To change the default LiveReload port, right-click the simulated device and click . In the LiveReload options section of the Settings tab, in the LiveReload Port field type the port number you want to use. Click to close the window.

Note
You must enable LiveReload for BrowserSim in order to specify the LiveReload port. To enable LiveReload, right-click the simulated device and ensure the Enable LiveReload check box is selected. Alternatively, right-click the simulated device and click . In the LiveReload options section of the Settings tab, select the Enable LiveReload check box and click to close the window.
The option for screen captures saves graphics files to a set location. The default location can be changed.
To change the default location, right-click the simulated device and click . In the Screenshots section of the Settings tab, in the Location field type the location where you want graphics files to be saved or click to navigate to the desired location. Click to close the window.

By default, the option for viewing the source of a web page uses the Weiner server provided by PhoneGap. If you have a different Weiner server available, the default Weinre settings can be changed.
To change the default settings for Weinre, right-click the simulated device and click . In the Weinre section of the Settings tab, in the Script URL field type the address of the .js file provided by the Weinre server and in the Client URL field type the address of the web page showing the Weinre Inspector interface. Click to close the window.

Table of Contents
- 8. OpenShift Tools
- 8.1. Overview of OpenShift Tools
- 8.2. Features of OpenShift Tools
- 8.2.1. Features Overview
- 8.2.2. Create an OpenShift User Account
- 8.2.3. Connect to OpenShift
- 8.2.4. Manage a Connection
- 8.2.5. Generate and Upload SSH keys to OpenShift
- 8.2.6. Manage SSH Keys
- 8.2.7. Create a Domain
- 8.2.8. Manage a Domain
- 8.2.9. Create and Deploy an Application on OpenShift
- 8.2.10. Deploy an Existing Application on OpenShift
- 8.2.11. Import a Deployed OpenShift Application into the IDE
- 8.2.12. Generate a server adapter for an application
- 8.2.13. View a Deployed Application and Associated Information
- 8.2.14. Manage a Deployed Application
OpenShift is Red Hat's Platform as a Service (PaaS) for applications. It consists of an application platform in the cloud, enabling you to build, test and run applications in a cloud architecture. OpenShift provides disk space, CPU resources, network connectivity, and a runtime environment.
OpenShift has a number of key features to assist you in developing and deploying applications:
Unique domain names, or namespaces, support the hosting of your applications. A user account provides you with access to the domain, the latter having the potential to be associated with multiple applications.
Numerous cartridges give you access to popular language, database and management frameworks. OpenShift can also be customized, allowing you to add APIs of your choice.
Gears provide RAM and disk space for your applications and cartridges. OpenShift currently provides two gear sizes:
Small - 512MB of RAM, 100MB of swap space, and 1GB of disk space
Medium - 1GB of RAM, 100MB of swap space, and 1GB of disk space
You can use up to three small gears as part of OpenShift Online with Free Plan, a free OpenShift user account, and extend to more gears and bigger gears with OpenShift Online with Silver Plan or OpenShift Enterprise. OpenShift offers flexibility by letting you choose the number of gears to assign to your application.
Built-in administrative and stack management frees you up to focus on code development. OpenShift manages the intricate details of deploying your application to the stack and interfacing with middleware technologies for you.
Automatic or manual scaling of the resources supporting your applications ensure that application performance does not suffer as usage increases. OpenShift can create additional instances of your application and enable clustering.
OpenShift can be accessed via the web interface at https://www.openshift.com/ on the OpenShift website or via the OpenShift command line interface.
OpenShift Tools is tooling available within the IDE for OpenShift. It provides an alternative way of accessing OpenShift and managing the development of applications deployed there.
OpenShift Tools consists of a set of wizards and actions, which together provide core functionality for developing OpenShift applications:
The tools prepare you for working with OpenShift, by assisting you to create OpenShift user accounts and domains.
OpenShift Tools assists you with the essential tasks of setting up your system and the IDE for OpenShift interaction, such as creating connections and generating and uploading SSH keys.
When creating and developing OpenShift applications, OpenShift Tools provides wizards for creating new and importing existing OpenShift applications.
A variety of actions are available for managing deployed applications, for tasks such as restarting applications, uploading changes to applications, viewing OpenShift server output, and deleting applications.
The aim of this section is to guide you in using OpenShift Tools:
Create OpenShift user accounts and connect to OpenShift
Generate SSH keys and upload them to an OpenShift user account
Create and manage domains
Create new OpenShift applications from within the IDE
Deploy existing applications in the IDE to OpenShift and import existing OpenShift applications into the IDE
Manage deployed OpenShift applications and view information about them
To begin using OpenShift, you need to create an OpenShift user account. OpenShift Tools provides the ability to create a user account from within the IDE.
To create a user account, click the OpenShift Explorer tab. If the OpenShift Explorer tab is not visible, click →→.

Click the icon
 and click the link to sign up for an account. This opens https://openshift.redhat.com/app/account/new in a browser tab. Follow the instructions on the OpenShift web page to create an account. Once created, you can close the browser tab.
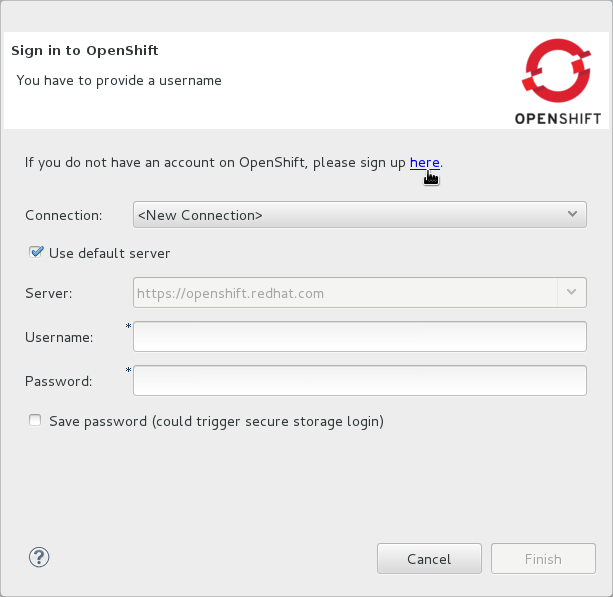
Management of your user account, such as changing or resetting your password, must be carried out through the OpenShift management console at https://openshift.redhat.com/app/login?redirectUrl=%2Fapp%2Fconsole.
Once you have an OpenShift user account, you can connect to OpenShift and then create a domain and applications. The procedure below guides you through setting up a connection to OpenShift using your user account information.
Procedure 8.1. Connect to OpenShift
Click the OpenShift Explorer tab and click the icon
.
From the Connection list, select New Connection.
If you want to use a server other than the default at https://openshift.redhat.com, clear the Use default server check box and in the Server field type the address of the server.
Note
There are a number of OpenShift servers from which you can choose:
OpenShift Online is the public cloud offering and it is hosted at https://openshift.redhat.com.
OpenShift Enterprise is a private cloud, obtained through a subscription and hosted in a private data center.
OpenShift Origin is a local cloud, available to download and install locally for development and testing purposes.
In the Username and Password fields, type your OpenShift user account authentication information.
If you want the Password field to automatically populate for this connection in future, select the Save password check box.
Note
The password is retained in secure storage provided by the IDE. To manage the settings for secure storage, click →, expand General→Security and select Secure Storage.
Click for OpenShift Tools to connect to OpenShift.
If your credentials are incorrect, the Sign in to OpenShift wizard remains open for you to change your authentication information.
If you selected for your password to be saved, you are prompted to enter your secure storage password or, if this is your first use of secure storage, you are prompted to set a secure storage password.
Once your credentials are verified as correct, the wizard closes and a live OpenShift connection is listed in the OpenShift Explorer tab.
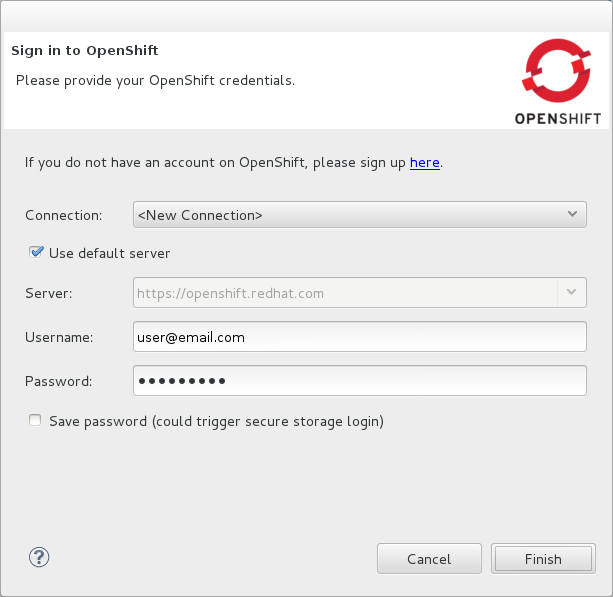

When you close the IDE, any live OpenShift connections will be disconnected but they can be easily reestablished. OpenShift Tools lists previous connections in the OpenShift Explorer tab until cleared by you. In the OpenShift Explorer tab, double-click or expand the appropriate connection to open an automatically completed connection wizard. Type your password or the master password, if using the saved password facility, and click .
Using OpenShift Tools, you can view and manage live OpenShift connections.
- View information about a connection
In the OpenShift Explorer tab, right-click the connection and click . The Properties tab opens and shows information about the associated domain, key and user account. The Key parameter is unique to the connection and it is used by the IDE for identification purposes.
- Refresh information about a connection
In the OpenShift Explorer tab, right-click the connection and click . Information is retrieved from OpenShift and the OpenShift Explorer tab updated as appropriate. This action is useful if you are simultaneously making changes to your domain and applications in the IDE and the OpenShift web interface or command line interface. Additionally, it may be used to recover from errors.
- Delete a connection
In the OpenShift Explorer tab, right-click the connection and click .
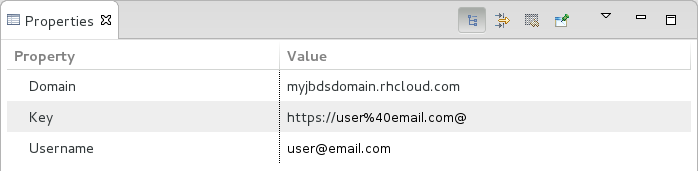
SSH keys are essential when working with OpenShift. They enable you to develop and access deployed applications. SSH keys are also used to control access of other contributors to your OpenShift applications. SSH keys must be uploaded to the OpenShift server and, as detailed in the procedure below, OpenShift Tools can assist with both the generation and uploading of SSH keys to OpenShift.
Procedure 8.2. Generate and Upload SSH Keys to OpenShift
In the OpenShift Explorer tab, right-click the connection and click .
To create a new SSH private-public key pair, click .
In the Name field, type a name for the key pair that will be used by OpenShift to distinguish the key pair from others associated with your account.
From the Key Type list, select SSH_RSA.
Ensure the SSH2 Home field contains the location where you want to create the files associated with the key pair. To change the location, clear the Default check box and type the location in the SSH2 Home field or click to navigate to the desired location.
Note
The default location for creating SSH key files is determined by the SSH information for the IDE. The default location can be altered by clicking →, expanding General→Network Connections, selecting SSH2 and changing the location in the SSH2 home field of the General tab.
In the Private Key File Name field, type a name for the private key file.
In the Private Key Passphrase field, type a passphrase for use in accessing the private key. This field is not mandatory and can be left empty if you want.
In the Public Key File Name field, type a name for the public key file. Typically the file name of the public key is that of the private key with
.pubappended.Click . The SSH key pair will be generated and the public key automatically uploaded to OpenShift.
Click to close the Manage SSH Keys window.
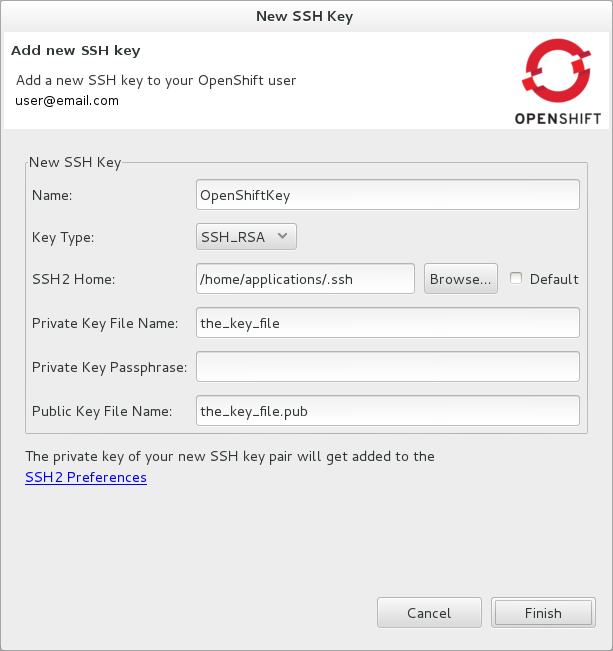
OpenShift Tools provides actions for managing the SSH keys of your OpenShift account.
- Upload an existing public SSH key to OpenShift
In the OpenShift Explorer tab, right-click the connection and click . Click . In the Name field, type a name for the key that will be used by OpenShift to distinguish the key from others associated with your account. Click to navigate to the public key file. Click and click to close the Manage SSH Keys window.
- Remove a public SSH key from OpenShift
In the OpenShift Explorer tab, right-click the connection and click . From the SSH Public Keys table select the key you want to remove from your OpenShift account and click . At the prompt asking if you are sure you want to remove the key, click . Click to close the Manage SSH Keys window.
Note
only disassociates keys with your OpenShift account. The files associated with a 'removed' SSH public-private key pair still exist in the local location where they were generated and can be uploaded again to OpenShift using the action.
- Refresh the SSH key information associated with OpenShift
In the OpenShift Explorer tab, right-click the connection and click . Click and click to close the Manage SSH Keys window. It may be necessary to use this action if you make changes to your OpenShift SSH key settings through the OpenShift web interface while the IDE is open with a live OpenShift connection.
Once you have an OpenShift user account, you need to create a domain in which to host your applications. Each user account can be associated with one domain only. The procedure below guides you through creating a new domain but you first need a live connection. If you already have a domain associated with your user account then domain information will be automatically passed to the IDE when a live connection is started.
Procedure 8.3. Create a Domain
In the OpenShift Explorer tab, right-click the connection and click .
In the Domain Name field, type the name of the domain you would like to use and click . The name you provide will be appended with
.rhcloud.com. Domain names must be unique so if the name you have chosen is already in use you will see a warning. In this case, choose another name and try again until you have a unique one.
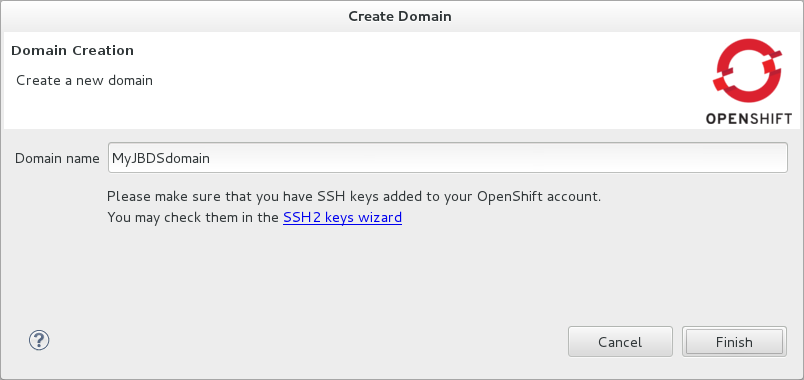
Note
There are restrictions on the name you can use for a domain. Names must consist only of letters and digits and can have a maximum length of 16 characters.
OpenShift Tools provides actions for managing the domain of your OpenShift account.
- View the name of the current domain
In the OpenShift Explorer tab, right-click the connection and click . The Properties tab will open, where the first row of the table contains the name of the domain.
- Rename a domain
In the OpenShift Explorer tab, right-click the connection and click . In the Domain Name field, type the new name of the domain and click . You cannot change the name of a domain which has associated applications.
Important
Renaming your domain changes the public URLs of applications you later create.
- Delete a domain
In the OpenShift Explorer tab, right-click the connection and click . You cannot delete a domain that has any applications associated with it unless, at the prompt, you check the Force applications deletion check box. Click to complete the deleting action.
Note
Forcing the deletion of applications results in the applications being deleted from the OpenShift server. The projects of applications will still be visible in the Project Explorer and Git Repositories tab as the local clone of the Git repository for projects is not deleted.
OpenShift Tools provides the OpenShift Application wizard to assist you in creating new applications and deploying them on OpenShift. OpenShift uses Git, a free and open source version control system. The wizard will also assist you in setting up linked remote and local Git repositories containing the original and clone of your project, respectively. To create an application, you must have a domain and, in the case that you do not have a domain already set up, the wizard will prompt and guide you in creating one first. The procedure below guides you through using the OpenShift Application wizard.
Important
You must have SSH keys set up first in order to successfully proceed with the OpenShift Application wizard.
Procedure 8.4. Create and Deploy an Application on OpenShift
In the OpenShift Explorer tab, right-click the connection and click . Alternatively, in JBoss Central click OpenShift Application, after which you are prompted to select an OpenShift connection and provide your user authentication information.
In the Name field, type a name for the new OpenShift application.
Note
There are restrictions on the name you can use for an application. Names must consist only of letters and digits.
From the Type list, select a runtime server. This will ensure the necessary core programming or technology cartridge is added to your application.
From the Gear profile list, select the gear size. This is RAM and disk space required by your applications and its cartridges. If you are using OpenShift Online with Free Plan, you have access to small gears only.
If you want OpenShift to automatically increase the instances of your application and enable clustering as usage increases, select the Enable scaling check box.
From the Embedded Cartridges list, select the functionality you want to enable in your application. This will add associated capabilities and support to your application.
To specify that the new application is to be based on source code from an existing Git repository, click and clear the Use default source code check box. In the Source code field, type the URL of the source code location. OpenShift clones the source code to the OpenShift git repository for your application, instead of using the default template.
Click .
Ensure the Create a new project and Create and set up a server for easy publishing check boxes are selected. The latter will automatically create an OpenShift server adapter for the application, enabling you to easily upload changes to the OpenShift server.
To disable Maven builds, check the Disable automatic Maven builds when pushing to OpenShift check box. This informs OpenShift not to launch the Maven build process when the Maven project is pushed to OpenShift but to put the deployment straight into the deployments folder. It is useful when you want to push applications already built for deployment rather than source code.
Click .
The Location field shows the location that will be used for the local Git repository. The location must already exist to be able to proceed with the wizard. To change the location, clear the Use default location check box and type the location in the Location field or click to navigate to the desired location.
Click . If you are prompted that the authenticity of the host cannot be established and asked whether you want to continue connecting, check that the host name matches that of your application and domain and click .
At the prompt asking if you want to publish committed changes to OpenShift, click . The progress of the application creation process is visible in the Console tab.
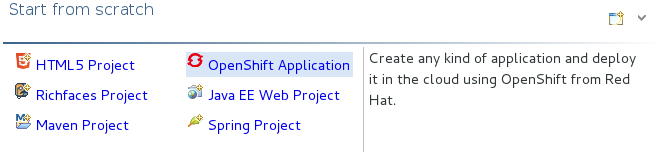
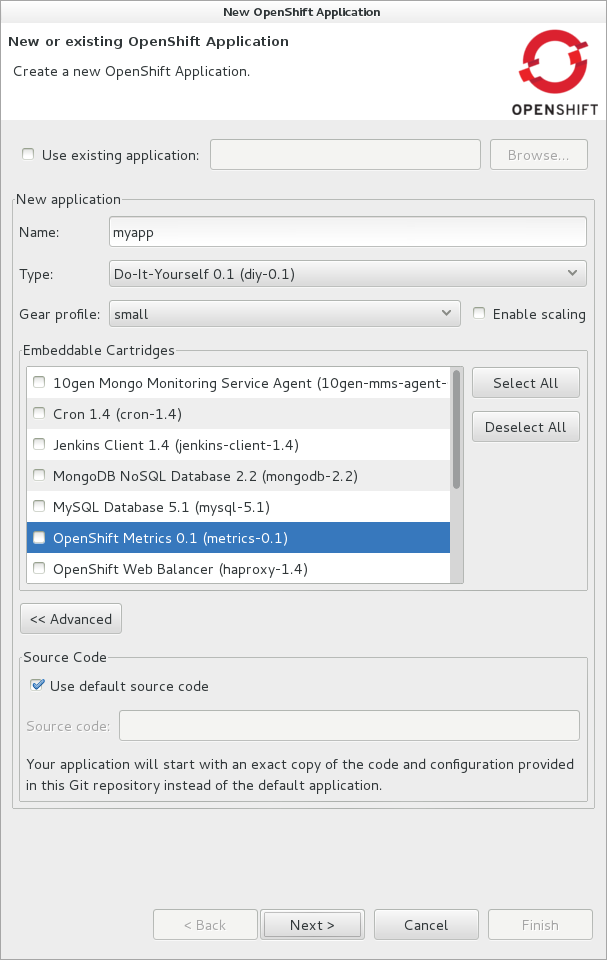
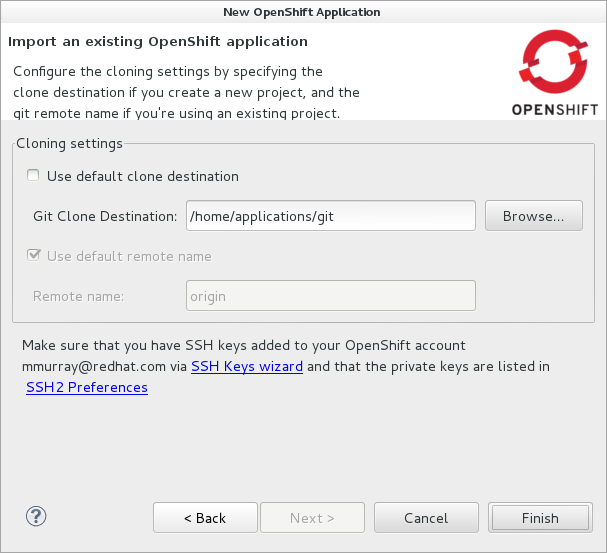
Once created, the application is listed under the connection in the OpenShift Explorer tab. The application type proceeds the application name. The project is also listed in the Project Explorer and Git Repositories tabs, where the details proceeding the application name indicate the current Git branch and status compared to the remote repository. Additionally, the server adapter for the application is visible in the Servers tab.
Note
To view the project in the Git Repositories tab, in the Project Explorer tab right-click the project name and click →. Alternatively, click →→, expand Git and select Git Repositories. Click to close the window.
OpenShift Tools can assist you to deploy existing workspace applications to OpenShift, as detailed in the procedure below. The procedure uses the OpenShift Application wizard, with the latter merging the existing project contents with the key metadata files from a new OpenShift application so that the application can be deployed on OpenShift. The wizard also enables git for the existing project, so that you can push project changes to OpenShift via git or allow the OpenShift Server Adapter do it for you.
Procedure 8.5. Deploy an Existing Application on OpenShift
In the OpenShift Explorer tab, right-click the connection and click . Alternatively, in JBoss Central click OpenShift Application, after which you are prompted to select an OpenShift connection and provide your user authentication information.
In the Name field, type a name for the new OpenShift application. For simplicity, you may choose this to be the same as the name of the workspace project.
Note
There are restrictions on the name you can use for an application. Names must consist only of letters and digits.
From the Type list, select a runtime server. This will ensure the necessary core programming or technology cartridge is added to your application.
From the Gear profile list, select the gear size. This is RAM and disk space required by your applications and its cartridges. If you are using OpenShift Online with Free Plan, you have access to small gears only.
If you want OpenShift to automatically increase the instances of your application and enable clustering as usage increases, select the Enable scaling check box.
From the Embedded Cartridges list, select the functionality you want to enable in your application. This will add associated capabilities and support to your application.
To specify that the new application is to be based on source code from an existing Git repository, click and clear the Use default source code check box. In the Source code field, type the URL of the source code location. OpenShift clones the source code to the OpenShift git repository for your application, instead of using the default template.
Click .
Clear the Create a new project check box and in the Use existing project field type the name of the project or click to locate the project.
Ensure the Create and set up a server for easy publishing check box is selected. This option automatically creates an OpenShift server adapter for the application, enabling you to easily upload changes to the OpenShift server.
To disable Maven builds, check the Disable automatic Maven builds when pushing to OpenShift check box. This informs OpenShift not to launch the Maven build process when the Maven project is pushed to OpenShift but to put the deployment straight into the deployments folder. It is useful when you want to push applications already built for deployment rather than source code.
Click .
The Location field shows the location that will be used for the local Git repository. The location must already exist to be able to proceed with the wizard. To change the location, clear the Use default location check box and type the location in the Location field or click to navigate to the desired location.
Click . If you are prompted that the authenticity of the host cannot be established and asked whether you want to continue connecting, check that the host name matches that of your application and domain and click .
At the prompt asking if you want to publish committed changes to OpenShift, click . The progress of the application creation process is visible in the Console tab.
All applications deployed on OpenShift are listed under live connections in the OpenShift Explorer tab. But only the project files of OpenShift applications created through the IDE will be immediately available in the Project Explorer and Git Repositories tabs. If you want to work on the project files associated with an application, you must first import the application. OpenShift Tools can assist you to import your deployed OpenShift applications into the IDE, as detailed in the procedure below.
Procedure 8.6. Import an OpenShift Application
Click →, expand OpenShift, select Existing OpenShift Application and click . Alternatively, in the OpenShift Explorer tab, right-click the application and click .
Ensure the Use existing application check box is selected and type the name of the application in the text field. This field has an auto-completion feature to assist you in typing the application name or click to see a list of all of your applications associated with the connection.
Important
Project names in the IDE workspace must be unique. If the name of the application you want to import is identical to an existing project in the workspace, the OpenShift Tools will not complete the import. To work around this constraint, you can import the OpenShift application to another workspace or change the name of one of the conflicting projects and applications.
Click .
Ensure the Create a new project and Create and set up a server for easy publishing check boxes are selected. The latter will automatically create an OpenShift server adapter for the application, enabling you to easily upload changes to the OpenShift server.
To disable Maven builds, check the Disable automatic Maven builds when pushing to OpenShift check box. This informs OpenShift not to launch the Maven build process when the Maven project is pushed to OpenShift but to put the deployment straight into the deployments folder. It is useful when you want to push applications already built for deployment rather than source code.
Click .
The Location field shows the location that will be used for the local Git repository. The location must already exist to be able to proceed with the wizard. To change the location, clear the Use default location check box and type the location in the Location field or click to navigate to the desired location.
Click . If you are prompted that the authenticity of the host cannot be established and asked whether you want to continue connecting, check that the host name matches that of your application and domain and click .
OpenShift Tools modified the .gitignore file on importing the application. At the prompt asking if you want to publish committed changes to OpenShift, click . The progress of the import process is visible in the Console tab.

Once imported, the project is listed in the Project Explorer and Git Repositories tabs, where the details proceeding the application name indicate the current Git branch and status compared to the remote repository. Additionally, the server adapter for the application is visible in the Servers tab.
In order to easily publish changes to a deployed OpenShift application, each application needs a server adapter. The OpenShift Application wizard can automatically generate server adapters for new or imported OpenShift applications if you select the Create and set up a server for easy publishing check box. But OpenShift also provides an action to assist you in generating server adapters for OpenShift application that already exist in the IDE, as detailed in the procedure below. You can use this action if you need to regenerate a deleted server adapter for an OpenShift application or if you create or import an OpenShift application and do not select the Create and set up a server for easy publishing check box.
Procedure 8.7. Generate a server adapter for an application
In the OpenShift Explorer tab, expand the connection.
Right-click the application name and click .
From the list of server types, expand OpenShift and select OpenShift Server.
The Server's host name and Server name field are automatically completed but you can change the contents of both as you need. The Server's host name field contains the host name of the server and the Server name field contains the name by which the server adapter is know in the Servers tab.
Once the fields are complete, click .
Ensure the Connection, Application Name and Deploy Project fields contain the correct information relating to the application for which you want to generate the server adapter.
In the Remote field, type the alias for the remote Git repository. For OpenShift applications created and imported by OpenShift Tools this is
origin.In the Output Directory field, type the location where archived projects for deployment should be stored or click to navigate to the desired location.
Click .
From the Available list, select the project for which the server adapter is being generated and click . The application is now listed under Configured.
Click for OpenShift Tools to generate the server adapter. Once generated, the server adapter is listed in the Servers tab.
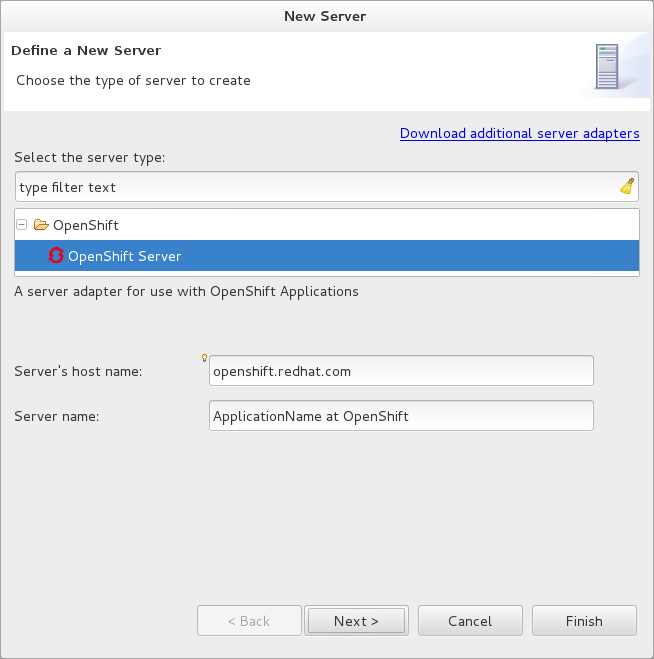
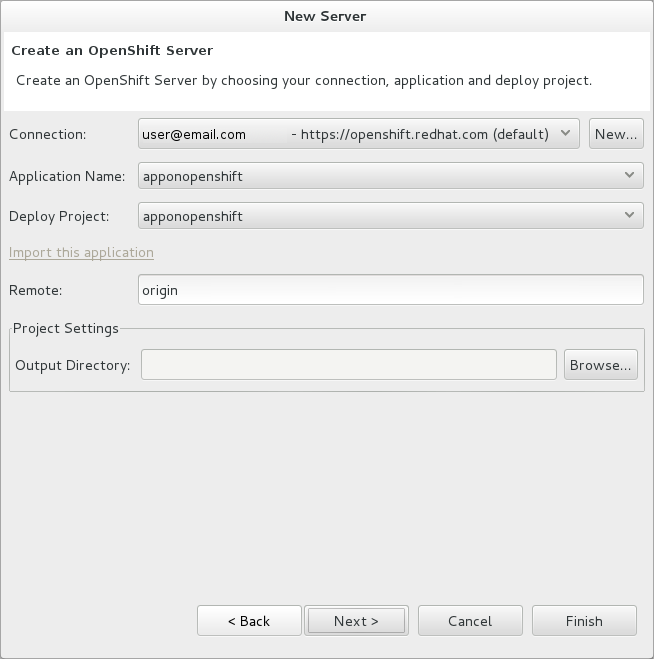

OpenShift Tools provides actions for viewing deployed OpenShift applications and information about them.
- View a deployed application
In the OpenShift Explorer tab, expand the connection. Right-click the application name and click . A browser tab will open displaying your deployed application. Alternatively, in the Servers tab, right-click the server adapter for the application and click →.
- View information about an application
In the OpenShift Explorer tab, expand the connection. Right-click the application name and click . The displayed information includes the public URL of the application, application type, and remote Git repository location. Click to close the Details window.
- View output from the OpenShift server
In the OpenShift Explorer tab, expand the connection. Right-click the application name and click . Alternatively, right-click the server adapter of the application in the Servers tab and click →. The Tail Log Files window opens, with the default retrieval syntax in the Tail options field. To change the retrieval command, in the Tail options field type the appropriate syntax. Click for OpenShift to retrieve the output, which is displayed in the Console tab.
- View values of variables associated with an application
In the OpenShift Explorer tab, expand the connection. Right-click the application name and click . Variable names and values are listed in the Console tab. Alternatively, in the Servers tab, right-click the server adapter of the application and click →.
- View information about the server of an application
In the Servers tab, double-click the server adapter for the application. A Server Editor tab opens, enabling viewing and editing of server details. To save any changes, press Ctrl+S or click → or click the icon.
- Refresh information about an application
In the OpenShift Explorer tab, right-click the connection and click . Information is retrieved from OpenShift and the OpenShift Explorer tab updated as appropriate. This action is useful if you are simultaneously making changes in the IDE and the OpenShift web interface or command line interface to your domain and applications. Additionally, it may be used to recover from errors.
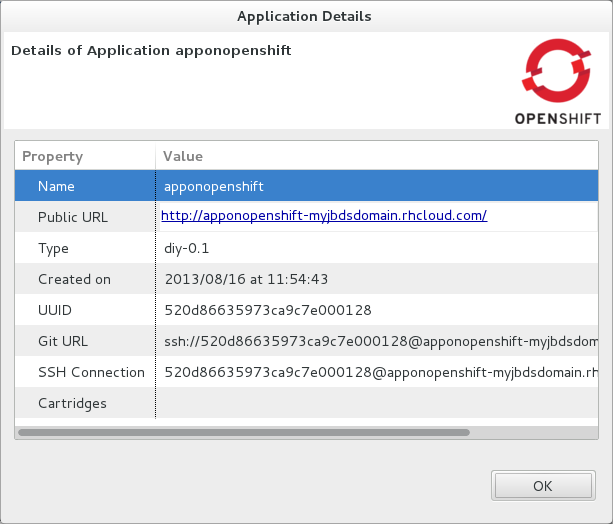
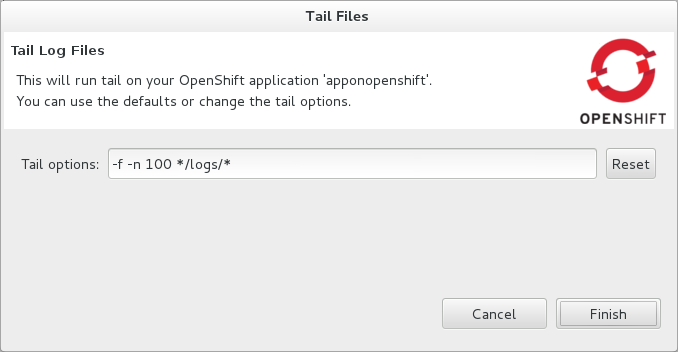
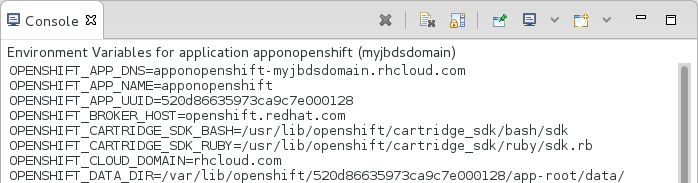
OpenShift Tools provides actions for developing and managing deployed OpenShift applications.
- Upload modifications to a deployed application
In the Severs tab, right-click the server adapter for the application and click . At the prompt asking if you want to publish to OpenShift by committing changes to Git, click . The commit message
Commit from JBoss Toolsis automatically generated and changes are pushed to the remote Git repository. Additionally, the application is automatically updated on the OpenShift server and the Console tab displays OpenShift server output.Note
To view a log of changes to the local git repository, in the Git Repositories tab, right-click a repository and click →. The History tab opens, showing a log of commits for the local Git repository.
- Add or remove markers associated with an application
In the Project Explorer tab, right-click the application and click →. Select or clear the check boxes of markers as desired. Information about markers is given in the Marker Description section of the Configure OpenShift Markers Window. Click for your marker choice to be applied to the application.
- Add or remove cartridges associated with an application
In the OpenShift Explorer tab, expand the connection. Right-click the application name and click . Select or clear the check boxes of cartridges as desired. Click for your cartridge choice to be applied to the application. You are prompted if the cartridges you have chosen to add or remove require further action, such as the addition of prerequisite cartridges or removal of conflicting cartridges. You can choose to ignore or apply the suggestions of the prompt.
- View properties of cartridges associated with an application
In the OpenShift Explorer tab, expand the connection and the application. Right-click the cartridge and click . The Properties tab opens and lists information about the cartridge.
- Restart an application
In the OpenShift Explorer tab, expand the connection. Right-click the application name and click . Alternatively, right-click the server adapter of the application in the Servers tab and click →.
- Forward remote ports
You can forward the remote ports of the OpenShift server to your workstation to enable access to various services, such as MySQL. Port forwarding is available for all OpenShift applications, including scalable ones.
Important
Your application must be running before attempting to configure port forwarding.
In the OpenShift Explorer tab, expand the connection. Right-click the application name and click . Alternatively, right-click the server adapter of the application in the Servers tab and click →.
After checking the authenticity of SSH keys, the Application port forward window opens. Before commencing port forwarding, there are a number of options you can set:
By default, the local address is 127.0.0.1. If this is unavailable, a random available address will be allocated. To set the local address to be the same as the remote address, clear the Use '127.0.0.1' as the local address for all Services check box.
By default, the local port numbers are the same as the remote port numbers. To set independent local port numbers, select the Find free ports for all Services check box.
To commence port forwarding, click . Click to close the Application port forward window.
- Delete a server adapter for an OpenShift application
In the Servers tab, right-click the server adapter for the application and click . At the prompt asking if you are sure you want to delete the server adapter, click . The progress of the deleting process is shown in the activity bar in the lower right of the IDE window. To open the Progress tab and view more detailed progress information or cancel the deleting process, double-click on the activity bar.
- Delete an application
In the OpenShift Explorer tab, expand the connection. Right-click the application name and click . At the prompt asking if you are sure you want to destroy the application, select .
Note
Deleting applications results in the applications being deleted from the OpenShift server. The projects of applications will still be visible in the Project Explorer and Git Repositories tab as the local Git repository copies of projects are not deleted. Additionally, any server adapters for deleted OpenShift applications are still listed in the Servers tab but they are invalid.