JBoss RESTful Web Services is a framework developed as a part of the JBoss Application Server. It implements the JAX-RS specifications. JAX-RS (Java API for RESTful Web Services) is a Java API that supports the creation of Representational State Transfer (REST) web services, using annotations.
JBoss RESTful Web Services integrates with most current JBoss Application Server releases as well as earlier ones, that did implement the J2EE 1.4 specifications.
RESTful Web Services tooling works with JBossWS Runtime and allows you to create, deploy and run RESTful Web Services
Also JBossWS Tool gives a way to test a web service running on a server.
JBoss Tools includes wizards for the creation of sample web services. These include:
Create a Sample RESTful Web Service for a JAX-RS web service.
These wizards are used within a Dynamic Web project. A dynamic web project can be created by following the steps in Creating a dynamic web project.
Procedure 2.1. Creating a dynamic web project
Access the New Project Dialog
Select → →
Result:
The New Project screen displays.
Define the Project Type
Click the Dynamic Web Project label by expanding the folder.
Click the button to proceed.
Result:
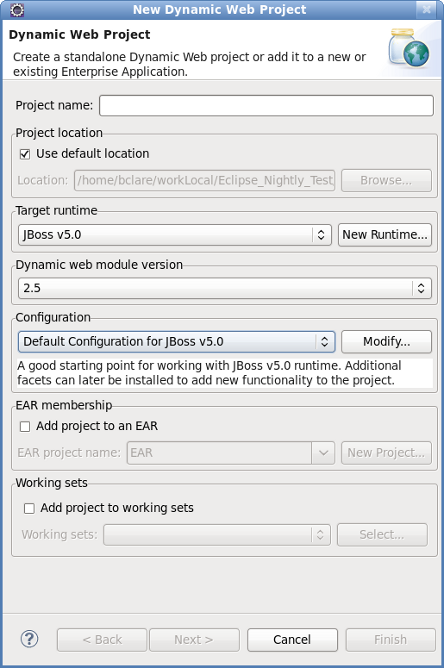
The New Dynamic Web Project screen displays.
Define the Project Attributes
Define the Dynamic Web Project attributes according to the options displayed in Table 2.1, “New Dynamic Web Project”
Table 2.1. New Dynamic Web Project
Field Mandatory Instruction Description Project name yes Enter the project name. The project name can be any name defined by the user. Project location yes Click the Use default location checkbox to define the project location as the Eclipse workspace or define a custom path in the Location field. The default location corresponds to the Eclipse workspace. Target runtime no Select a pre-configured runtime from the available options or configure a new runtime environment. The target runtime defines the server to which the application will be deployed.
Dynamic web module version yes Select the required web module version. This option adds support for the Java Servlet API with module versions corresponding to J2EE levels as listed in Table 2.2, “New Dynamic Project - Dynamic web module version”.
Configuration yes Select the project configuration from the available options. The project can be based on either a custom or a set of pre-defined configurations as described in Table 2.3, “New Dynamic Project - Configuration”.
EAR membership no Add the project to an existing EAR project. The project can be added to an existing EAR project by selecting the checkbox. Once checked, a new EAR project can be defined by clicking the button.
Working sets no Add the project to an existing working set. A working set provides the ability to group projects or project attributes in a customized way to improve access. A new working set can be defined once the button has been clicked.
Table 2.2. New Dynamic Project - Dynamic web module version
Option Description 2.2 This web module version corresponds to the J2EE 1.2 implementation. 2.3 This web module version corresponds to the J2EE 1.3 implementation. 2.4 This web module version corresponds to the J2EE 1.4 implementation. 2.5 This web module version corresponds to the JEE 5 implementation. Table 2.3. New Dynamic Project - Configuration
Option Description <custom> Choosing from one of the pre-defined configurations will minimise the effort required to set up the project. BIRT Charting Web Project A project with the BIRT Charting Runtime Component. BIRT Charting Web Project A project with the BIRT Reporting Runtime Component. CXF Web Services Project v2.5 Configures a project with CXF using Web Module v2.5 and Java v5.0. Default Configuration for JBoss 5.0 Runtime This option is a suitable starting point. Additional facets can be installed later to add new functionality. Dynamic Web Project with Seam 1.2 Configures a project to use Seam v1.2. Dynamic Web Project with Seam 2.0 Configures a project to use Seam v2.0. Dynamic Web Project with Seam 2.1 Configures a project to use Seam v2.1. Dynamic Web Project with Seam 2.2 Configures a project to use Seam v2.2. JBoss WS Web Service Project v3.0 Configures a project with JBossWS using Web Module v2.5 and Java v5.0. JavaServer Faces v1.2 Project Configures a project to use JSF v1.2. Minimal Configuration The minimum required facets are installed. Additional facets can be chosen later to add functionality to the project. Access the Java sub-dialog
Click Next to proceed.
Result:
The New Dynamic Web Project - Java dialog displays.
Define the source and output folders
Define the Dynamic Web Project source and output folders by adding or editing folders as required.
Access the Web Module sub-dialog
Click Next to proceed.
Result:
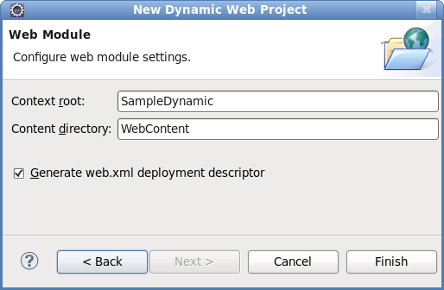
The New Dynamic Web Project - Web Module dialog displays.
Enter the web module settings
Define the settings as listed in Table 2.4, “New Dynamic Web Project - Web Module” including the root folder for path names in the web project context and the name of the web content directory.
Table 2.4. New Dynamic Web Project - Web Module
Field Mandatory Instruction Description Context root yes Enter the context root for the project. The context root identifies a web application to the server and which URLs to delegate to the application. Content directory yes Enter the directory name for the web content. Web resources such as html, jsp files and graphic files will be written to the specified content directory. Generate web.xml deployment descriptor no Check this box to generate a deployment descriptor for the project. URL to servlet mappings and servlet authentication details are written to the deployment descriptor enabling the web server to serve requests. Open the Java EE perspective.
Click the button to complete the project setup.
Result:
If not already set, a dialog will appear prompting the user to open the relevant perspective.
Click the button to display the Java EE perspective.
Result:
The project is configured and the Java EE perspective is displayed.
A sample RESTful web service can be generated by following the steps outlined in Generate a sample RESTful web service.
Procedure 2.2. Generate a sample RESTful web service
Target runtime must have RESTEasy installed
The sample RESTful web service will not work unless it is deployed to a server with RESTEasy installed, such as JBoss SOA-P.
Access the New - Select a wizard dialog
Right click on the project name in the Project Explorer view.
Select → .
Click the Create a Sample RESTful Web Service label by expanding the folder.
Result:
The New - Select a wizard dialog displays with the selected wizard type highlighted.
Access the Generate a Sample RESTful Web Service dialog
Click the button to proceed.
Result:
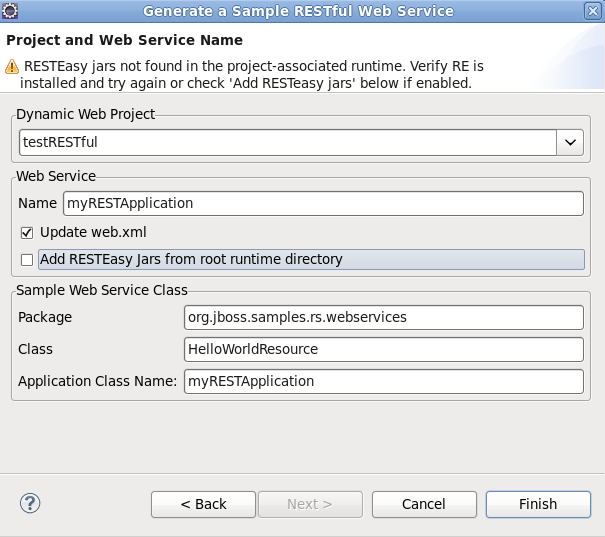
The Generate a Sample RESTful Web Service - Project and Web Service Name dialog displays.
Due to the nature in which JBoss Application Server 7 and JBoss Enterprise Application Server 5 handle JAX-RS support, the wizard can now be completed without the need for RESTEasy JARs in the project classpath or associated project runtime. The JARs are necessary for JBoss SOA-P servers.
Define the service attributes
Define the project, web service, package and class names according to the options displayed in Table 2.5, “Project and Web Service Name”
Table 2.5. Project and Web Service Name
Dialog group Field Mandatory Instruction Description Dynamic Web Project yes Enter the project name. The project name will default to the highlighted project in the Project Explorer. A different project can be selected from the list or entered directly in the editable drop-down list. Web Service Name yes Enter the name for the web service. The web service name will be the url for the service as mapped in the deployment descriptor ( web.xml).Update web.xml no Check this box to add the service to the deployment descriptor. This option is checked by default and may be unchecked when deploying to JBoss AS 6.0 or RESTEasy 2.0 servers. Service information is not required in the deployment descriptor for these servers. Add RESTEasy Jars from root runtime directory no Check this box to add RESTEasy JARs to the project. This option allows you to add RESTEasy JARs to the project if they appear in the root runtime directory but are not installed in the runtime. While this is not required, it will assist when working with JBoss Application Server 5 and JBoss Enterprse Application Platform 5 web service projects. Sample Web Service Class Package yes Enter the package for the web service class. The default package for the sample web service will be displayed. Class yes Enter the name of the web service class containing the JAX-RS annotated path. This class defines the path to the web service and is referenced in the Application Class Name. The Application Class Name is declared in the deployment descriptor providing indirect access to the annotated path. Application Class Name yes Enter the name of the Application Class Name. The Application Class Name constructor instantiates objects of the web service class containing the JAX-RS annotated path, GET and POST methods. It serves as a single point of access to the application for the web server. Generate the web service
Click the button to complete the web service setup.
Result:
The web service classes will be generated and the web.xml file updated with the deployment details.
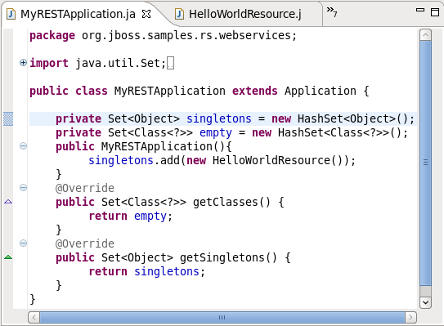
Browse the MyRESTApplication.java class
Double click the
MyRESTApplication.javaclass and note the constructor instantiating objects of type HelloWorldResource. The relevance of this will be discussed shortly.Browse the HelloWorldResource.java class
Double click the
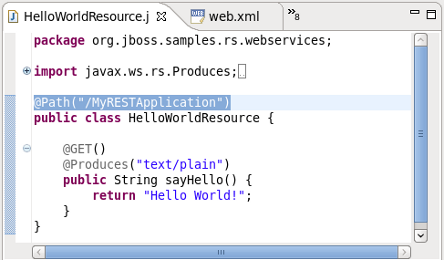
HelloWorldResource.javaclass and note the JAX-RS annotated path and the annotated GET method.Browse the web.xml deployment descriptor
Double click the
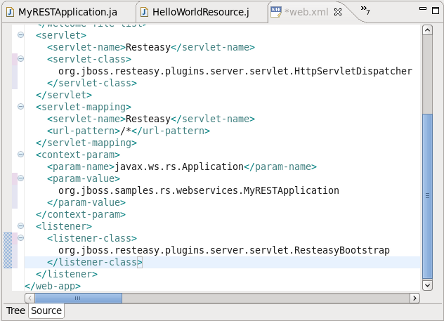
web.xmlfile and note thejax.ws.rs.Applicationparameter mapped to the Application class. Note also that:the main servlet for the application is
org.jboss.resteasy.plugins.server.servlet.HttpServletDispatcherwhich is given the custom name Resteasy; andthe main servlet is not mapped to a particular url as indicated by
/*.
The url for sending GET requests can be resolved as follows:
Identify the Application Class as defined in the deployment descriptor.
Note the object type instantiated in the Application class and added to the singleton set:
HelloWorldResource.Note the JAX-RS annotated path declared in the corresponding
HelloWorldResourceclass:@Path("/MyRESTApplication")[1].
The url for sending GET requests is therefore http://localhost:8080/ProjectName/[1] or, http://localhost:8080/RestfulSample/MyRESTApplication.
JBoss Tools includes many example projects which are available by selecting → . The following sections describe setting up the example RESTEasy project. This project serves as a good example for testing the numerous Web Service Test View functions.
Once the required plugins have been installed, the example project can be set up as described in JBoss Tools New Example Project
Procedure 3.1. JBoss Tools New Example Project
Access the New Example Project Dialog
Select →
Result:
The New Example Project dialog displays.
Define the Example Project Type
Click the RESTEasy Simple Example label by expanding the node.
Click the button to complete the project set up.
Result:
The simple project is configured and ready to build.
Project requirements
In the event that a message is displayed indicating some requirements could not be configured, click the button followed by the button to rectify the problem. The message will be displayed as a result of missing plugins or a requirement to select or configure a suitable runtime.
Build the project
Right click on the project name and select →
Result:
The
simple.warfile is written to the project's 'targetdirectory.Deploy the project
Copy the
simple.warfile to thedeploydirectory of the required server profile such as theallprofile.Result:
The
simple.warfile is written to thetargetdirectory.Determine the URL for the web service
Double click the
web.xmlfile and note thejax.ws.rs.Applicationparameter mapped to the Application class. Note also that:the main servlet for the application is
org.jboss.resteasy.plugins.server.servlet.HttpServletDispatcherwhich is given the custom name Resteasy; andthe main servlet is mapped to the url
/rest-services/*[1].
The url for sending GET requests can be resolved as follows:
Identify the Application class as defined in the deployment descriptor.
Note the object type (
CustomerResource) instantiated in the Application class (ShoppingApplication) and added to the singleton set (singletons.add(new CustomerResource())).Note the JAX-RS annotated path declared in the corresponding
CustomerResourceclass:@Path("/customers")[2].
The url for sending GET requests can be formed from http://localhost:8080/ProjectName/[1]/[2] or, http://localhost:8080/simple/rest-services/customers..
Procedure 3.2. Export the project as a Web Archive (WAR)
Access the Export dialog
Right click on the project name in the Project Explorer view.
Select → .
Result:
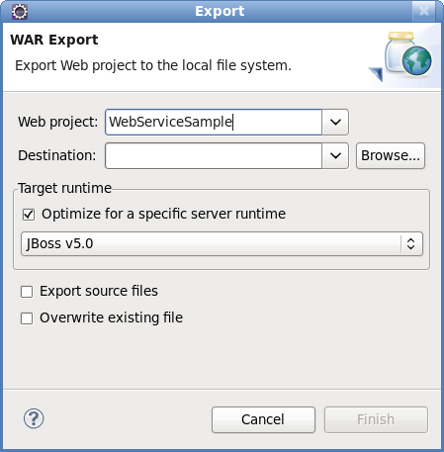
The Export- WAR Export dialog displays with the selected web project highlighted.
Complete the export dialog
Define the WAR file attributes as described in Table 3.1, “Export - War Export”
Table 3.1. Export - War Export
Field Mandatory Instruction Description Web project yes Enter the web project name. The project name will default to the highlighted project in the Project Explorer. A different project can be selected from the list or entered directly in the editable drop-down list. Destination yes Enter or browse to the destination. Set the destination as the buildfolder to store the WAR file within the project. Alternatively, deploy the project directly to thedeploydirectory of the target server profile.Optimize for a specific server runtime no Select this box to optimize the WARfile for deployment to the targeted runtime.The list of available runtimes will be those configured during the project set-up or by selecting → → . Deploy the application
Copy the file to the
deploydirectory of the required target server profile, such as theallprofile. Note that the WAR file destination may have already been set as the deploy directory in Step 2.
JBoss Tools provides a view to test web services. The Web Services Test View can be displayed by following the steps in Web Services Test View.
Procedure 4.1. Web Services Test View
Access the Show View dialog
Select → →
Result:
The Show View dialog displays.
Click on the Web Services Tester label by expanding the JBoss Tools Web Services node and click .
Result:
The Web Services test view displays.
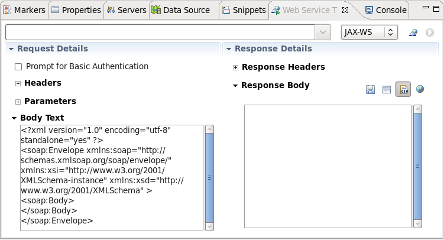
The main components of the Web Service Tester View are:
WSDL path/button bar (Table 4.1, “WSDL path/button bar”)
Request details panel (Table 4.2, “Request details panel”)
Response details panel (Table 4.3, “Response details panel”)
Table 4.1. WSDL path/button bar
Component Description Editable dropdown list Enter the location of the WSDL file or HTTP address of the service to be tested. The combo box requires the path to the WSDL in a URI format. Combo box Select the type of service to test. The options are JAX-WS or any other option to test a JAX-RS service using HTTP request methods ( PUT,GET,POST,DELETEorOPTIONS).Toolbar button - Get From WSDL Click this button to display the Select WSDL dialog. Enter the , location or Eclipse location of the WSDL file. Given a valid file, the dialog will allow selection of the Port and Operation to test. Once selected, the request details will be displayed in the Request Details panel. Toolbar button - Invoke Once the WSDL file has been selected, the service can be invoked by clicking this button. Response details will be displayed in the Response Details panel. Table 4.2. Request details panel
Component Description Prompt for Basic Authentication Select this check box to send a username and password with the request. Entering the user details for each subsequent request is not necessary as the details are stored in memory. Headers Enter () one or more name=valuepairs. These headers will be passed with the invocation request at the HTTP level where possible.Parameters As for header information, enter one or more name=valuepairs by clicking the button.Body Enter the JAX-WS SOAP request messages or input for JAX-RS service invocations in this text box. Table 4.3. Response details panel
Component Description Response headers The headers returned by the service invocation will be displayed in this panel. Response body The JAX-WS and JAX-RS response bodies will be displayed in this box. The raw text returned from the web service invocation can be displayed by clicking the button. The output will be embedded in a html browser by clicking the button. The output can alternatively be displayed in the Eclipse editor as xml or raw text (depending on the response content type) by clicking the button. Parameters As for header information, enter one or more name=valuepairs by clicking the button.Body Enter JAX-WS SOAP request messages and input for JAX-RS service invocations in this text box.
The following sections describe testing JAX-RS web services, including the necessary preliminary steps.
The following procedure describes the steps to perform before testing a web service.
Procedure 4.2. Testing a web service
Preliminary steps
Prior to testing a web service:
The Web Service Test View should be opened as described in Web Services Test View;
Result:
The Web Service Test View displays.
A web service has been deployed to the
deploydirectory of the chosen server profile.The server has been started with
run.sh -c <profile>
Testing a RESTful ( JAX-RS ) web service is achieved by following a similar procedure to testing a JAX-WS web service. Instead of selecting the JAX-WS option in the combobox, the JAX-RS service is invoked by sending HTTP method requests of the form OPTIONS, GET, POST, PUT and DELETE. As there is no WSDL file associated with a JAX-RS service, the available options can be determined by selecting OPTIONS in the combobox.
A JAX-RS web service can be tested by using the Web Service Tester View displayed in Figure 4.1, “Web Service Test View”. The JAX-RS test is specified by:
The test procedure is discussed in the following sections for both the RestfulSample and the RESTEasy sample projects developed earlier.
Procedure 4.3. RestfulSample test
Query the available options
Select OPTIONS from the available combobox options.
Enter the url of the web service in the editable drop-down list: http://localhost:8080/RestfulSample/MyRESTApplication.
Click the Invoke button
Result:
The Response Headers text area indicates that the allowed options are
[GET, OPTIONS, HEAD]as shown in Figure 4.3, “JAX-RS Response Header Text”.
Test the GET request
Having established that the GET request is valid, select GET from the available combobox options.
Click the Invoke button.
Result:
The Response Body text area displays the expected “Hello World” text as shown in Figure 4.4, “JAX-RS Response Body Text”.
Procedure 4.4. Testing a JAX-RS web service- POST and GET requests
Query the available options
Following the preliminary steps described in Testing a web service, select the OPTIONS method from the operations text area.
Enter the url of the web service in the editable drop-down list http://localhost:8080/simple/rest-services/customers.
Click the Invoke button
Result:
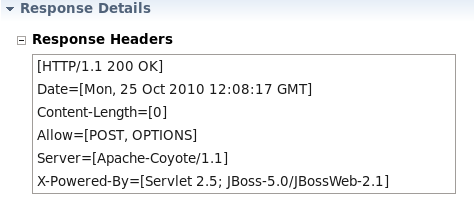
The Response Headers text area indicates that the allowed options are
[POST, OPTIONS]as shown in Figure 4.5, “JAX-RS RESTEasy project Body Text”.
Test the POST option
Select POST method in the the operations drop-down list.
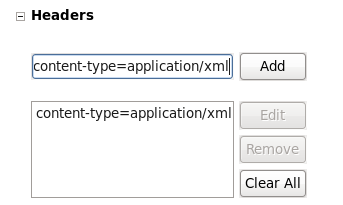
We will post xml data to this particular web service. Complete the header details by entering
content-type=application/xmlin the text area and click to add it to the Headers list.Result:
The content-type is added to the Headers list as shown in Figure 4.6, “content-type header”.
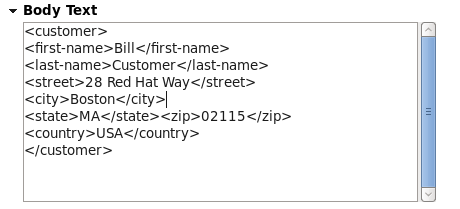
Enter customer details
Enter the customer details in the Body Text area as displayed in Figure 4.7, “Customer data”.
Click the button.
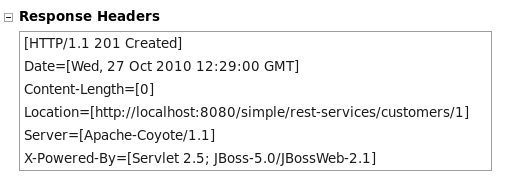
Result:
The Response Headers area indicated that a record was created and lists the location as http://localhost:8080/simple/rest-services/customers/1 as shown in Figure 4.8, “Customer added”.
The console also indicates the successful creation of the customer:
10:44:33,846 INFO [STDOUT] Created customer 1
Test the GET option
Select the GET method in the the operations drop-down list.
We will retrieve the record created in the previous step. Enter the url for the record returned in the previous step http://localhost:8080/simple/rest-services/customers/1
Click the button.
Result:
The Response Headers area indicates a
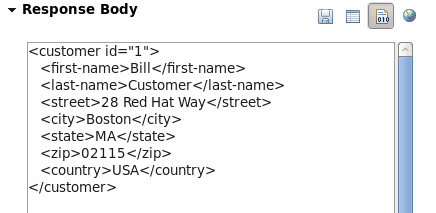
[HTTP/1.1 200 OK]response and the customer data is retrieved and displayed in the Response Body area as shown in Figure 4.9, “GET response”.
Test the PUT option
Editing a record is achieved by using the PUT method. Select the PUT method in the operations drop-down list.
Enter the url of the record to be edited http://localhost:8080/simple/rest-services/customers/1
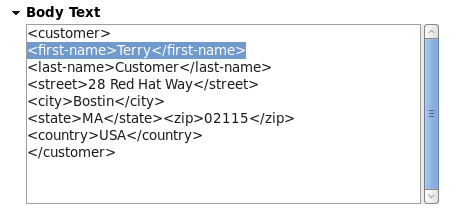
Enter the data in the Body Text area. Replace the first-name with a different entry as in Figure 4.10, “Updated customer data”
Ensure that the
content-type=application/xmlheader is in the Headers list.Click the button.
Result:
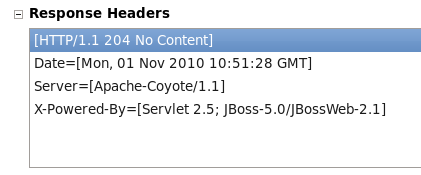
The Response Headers area indicates a No Response (
[HTTP/1.1 204 No Content]) Figure 4.11, “Response header following PUT”.In this instance, the console does not indicate an update was performed, however, the console may provide useful information following an operation.
Check the updated data with a GET
Perform a GET operation by following the steps in Step 3.
Result:
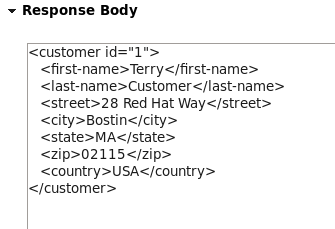
The Response Body area displays the updated data.
Test the DELETE option
Deleting a record is a similar process to posting. Select the DELETE method in the operations drop-down list.
Enter the url of the record to be deleted http://localhost:8080/simple/rest-services/customers/1
Click the button.
Result:
The Response Headers area indicates a No Response (
[HTTP/1.1 204 No Content]) as was the case for the PUT operation in Figure 4.11, “Response header following PUT”.Once again, the console does not indicate an update was performed, however, the console may provide useful information following an operation.
Check the DELETE operation with a GET
Perform a GET operation by following the steps in Step 3.
Result:
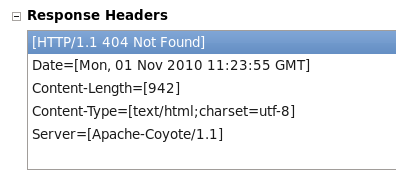
The Response Body area returns an error report indicating that
The requested resource () is not availableand the Response Headers area returns a[HTTP/1.1 404 Not Found].The response header and body messages indicate that the data was successfully deleted.
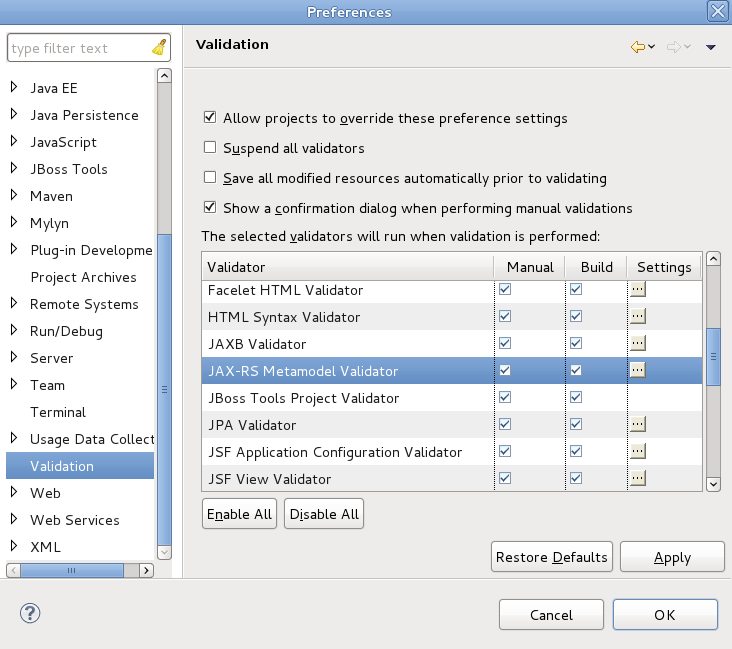
JAX-RS validation is enabled by default. Validation allows your project to be checked for errors. If an error is discovered a Problems tab will appear in the bottom section of your workbench, outlining the errors found.
If you wish to turn off JAX-RS Validation, you can do so by first navigating to → → . In the Validator section of the dialog, deselect the checkboxes for JAX-RS Metamodel Validator and click the button, followed by .
