<portal-config>
	<portal-name>classic</portal-name>
	<locale>en</locale>
	<access-permissions>Everyone</access-permissions>
	<edit-permission>*:/platform/administrators</edit-permission>
	<skin>MySkin</skin>
	...
GateIn Portal3.8 provides a robust skinning support for the entire portal User Interface (UI). This includes support for skinning all of the common portal elements as well as being able to provide custom skins and window decorations for individual portlets. It is designed for common graphic resource reuse and ease of development.
Skin Components
The complete skinning of a page can be decomposed into three main parts:
-
Portal Skin
The portal skin contains the CSS styles for the portal and its various UI components. This should include all the UI components, except for the window decorators and portlet specific styles.
-
Window Styles
The CSS styles are associated with the porlet window decorators. The window decorators contain the control buttons and borders surrounding each portlet. Individual portlets can have their own window decorator selected, or be rendered without one.
-
Portlet Skins
The portlet skins affects how portlets are rendered on the page via one of the following ways:
-
Portlet Specification CSS Classes
The portlet specification defines a set of CSS classes that should be available to portlets. GateIn Portal3.8 provides these classes as part of the portal skin. This allows each portal skin to define its own look and feel for these default values.
-
Portlet Skins
GateIn Portal3.8 provides a means for portlet CSS files to be loaded, based on the current portal skin. This allows a portlet to provide different CSS styles to better match the current portal look and feel. Portlet skins provide a much more customizable CSS experience than just using the portlet specification CSS classes.
The window decorators and the default portlet specification CSS classes should be considered as separate types of skinning components, but they need to be included as part of the overall portal skin. The portal skin must include these components´ CSS classes or they will not be displayed correctly.
A portlet skin does not need to be included as part of the portal skin and can be included within the portlet web application.
-
Skin Selection
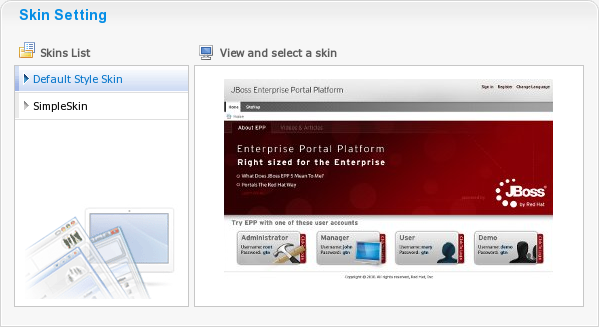
Skin Selection Through the User Interface
There are a few means for you to select the display skin. The easiest way to change the skin is to select it through the user interface. Administrators can change the default skin for the portal, or users who logged in can select their desired display skins.
Please see the User Guide for information on how to change the skin using the user interface.
Setting the Default Skin within the Configuration Files
The default skin can also be configured through the portal configuration files if you do not want to use the admin user interface. This will allow the portal to have the new default skin ready when GateIn Portal is initially started.
The default skin of the portal is called Default. To change this value, add a skin tag to the portal.war/WEB-INF/conf/portal/portal/classic/portal.xml configuration file.
To change the skin to MySkin, you would make the following changes:
Skins in Page Markups
A GateIn Portal skin contains CSS styles for the portal's components but also shares components that may be reused in portlets. When GateIn Portal3.8 generates a portal page markup, it inserts stylesheet links in the page's head tag.
There are two main types of CSS links that will appear in the head tag: a link to the portal skin CSS file and a link to the portlet skin CSS files.
-
Portal Skin
The portal skin will appear as a single link to a CSS file. This link contains content from all the portal skin classes merged into one file. This allows the portal skin to be transfered more quickly as a single file instead of multiple smaller files. All pages of the portal have the same skin defined in the CSS file.
-
Portlet Skin
Each portlet on a page may contribute its own style. The link to the portlet skin will only appear on the page if that portlet is loaded on the current page. A page may contain many portlet skin CSS links or none.
In the code fragment below, you can see the two types of links:
<head>
...
<!-- The portal skin -->
<link id="CoreSkin" rel="stylesheet" type="text/css" href="/eXoResources/skin/Stylesheet.css" />

<!-- The portlet skins -->
<link id="web_FooterPortlet" rel="stylesheet" type="text/css" href= "/web/skin/portal/webui/component/UIFooterPortlet/DefaultStylesheet.css" />
<link id="web_NavigationPortlet" rel="stylesheet" type="text/css" href= "/web/skin/portal/webui/component/UINavigationPortlet/DefaultStylesheet.css" />
<link id="web_HomePagePortlet" rel="stylesheet" type="text/css" href= "/portal/templates/skin/webui/component/UIHomePagePortlet/DefaultStylesheet.css" />
<link id="web_BannerPortlet" rel="stylesheet" type="text/css" href= "/web/skin/portal/webui/component/UIBannerPortlet/DefaultStylesheet.css" />
...
</head>
Both window styles and portlet specification CSS classes are included in the portal skin.
Skin Service
The skin service of GateIn Portal3.8 manages various types of skins. This service is responsible for discovering and deploying the skins into the portal.
Skin configuration
GateIn Portal3.8 automatically discovers web archives that contain a file descriptor for skins (WEB-INF/gatein-resources.xml). This file is reponsible for specifying the portal, portlet and window decorators to be deployed into the skin service.
The full schema can be found in the lib directory: exo.portal.component.portal.jar/gatein_resources_1_0.xsd.
Here is an example where a skin (MySkin) with its CSS location is defined, and a few window decorator skins are specified:
<gatein-resources>
  <portal-skin>
    <skin-name>MySkin</skin-name>
    <css-path>/skin/myskin.css</css-path>
    <overwrite>false</overwrite>
  </portal-skin>
</gatein-resources>

  <!-- window style -->
  <window-style>
    <style-name>MyThemeCategory</style-name>
    <style-theme>
      <theme-name>MyThemeBlue</theme-name>
    </style-theme>
    <style-theme>
      <theme-name>MyThemeRed</theme-name>
    </style-theme>
    ...
Default Skin
The default skin for GateIn Portal3.8 is located as part of the eXoResources.war. The main files associated with the skin are shown below:
WEB-INF/gatein-resources.xml
WEB-INF/web.xml
skin/Stylesheet.css
Define the skin setup to use.
Contain the resource filter and has the display-name set.
Contain the CSS class definitions for this skin.
-
gatein-resources.xml
For the default portal skin, this file contains definitions for the portal skin, the window decorations and defines some Javascript resources which are not related to the skin. The default portal skin does not directly define portlet skins which should be provided by the portlets themselves.
-
web.xml
For the default portal skin, web.xml of the eXoResources.war contains a lot of information which is mostly irrelevant to the portal skinning. The areas of interest in this file is ResourceRequestFilter and the fact that display-name is set.
-
Stylesheet.css
This file contains the main stylesheet of the portal skin. The file is the main entry point to the CSS class definitions for the skin. The content of this file is shown below:
@import url(DefaultSkin/portal/webui/component/UIPortalApplicationSkin.css);
@import url(DefaultSkin/webui/component/Stylesheet.css);
@import url(PortletThemes/Stylesheet.css);
@import url(Portlet/Stylesheet.css);
Skin for the main portal page.
Skins for various portal components.
Window decoration skins.
The portlet specificiation CSS classes.
Instead of defining all the CSS classes in this file, you can import other CSS stylesheet files, some of which may also import other CSS stylesheets. The CSS classes are split up between multiple files to make it easier for new skins to reuse parts of the default skin.
To reuse a CSS stylesheet from the default portal skin, you need to refer to the default skin from eXoResources. For example, to include the window decorators from the default skin within a new portal skin, you would need to use this import:@import url(/eXoResources/skin/Portlet/Stylesheet.css);
When the portal skin is added to the page, it merges all the CSS stylesheets into a single file.
Creating New Skins
Creating a New Portal Skin
A new portal skin needs to be added to the portal through the skin service. The web application which contains the skin will need to be properly configured for the skin service to discover them. This means properly configuring ResourceRequestFilter and gatein-resources.xml.
Portal Skin Configuration
The gatein-resources.xml file specifies the new portal skin, including its name and where to locate its CSS stylesheet file and whether to overwrite an existing portal theme with the same name.
<gatein-resources>
  <portal-skin>
    <skin-name>MySkin</skin-name>
    <css-path>/skin/myskin.css</css-path>
    <overwrite>false</overwrite>
  </portal-skin>
</gatein-resources>
The default portal skin and window styles are defined in eXoResources.war/WEB-INF/gatein-resources.xml.
The CSS for the portal skin needs to contain the CSS for all the window decorators and the portlet specification CSS classes.
Portal Skin Preview Icon
When selecting a skin, it is possible to preview it. The current skin needs to know about the skin icons for all the available skins; otherwise, it will not be able to show the previews. When creating a new portal, it is recommended to include the preview icons of the other skins and to update the other skins with your new portal skin preview.
The portal skin preview icon is specified through the CSS of the portal skin. In order for the current portal skin to be able to display the preview, it must specify a specific CSS class and set the icon as the background.
For a portal named MySkin, the CSS class must be defined as follows:
.UIChangeSkinForm .UIItemSelector .TemplateContainer .MySkinImage
In order for the default skin to know about the skin icon for a new portal skin, the preview screenshot needs to be placed in:
{{eXoResources.war:/skin/DefaultSkin/portal/webui/component/customization/UIChangeSkinForm/background}}The CSS stylesheet for the default portal needs to have the following updated with the preview icon CSS class. For a skin named MySkin then the following needs to be updated:
eXoResources.war:/skin/DefaultSkin/portal/webui/component/customization/UIChangeSkinForm/Stylesheet.css
.UIChangeSkinForm .UIItemSelector .TemplateContainer .MySkinImage {
  margin: auto;
  width: 329px; height:204px;
  background: url('background/MySkin.jpg') no-repeat top;
  cursor: pointer ;
}
Creating a New Window Style
Window styles are the CSS applied to the window decoration. When an administrator chooses a new application to add to a page, he can decide which style of decoration would go around the window if any.

Window Style Configuration
Window Styles are defined within the gatein-resources.xml file which is used by the skin service to deploy the window style into the portal. Window styles can belong in with a window style category, this category and the window styles need to be specified in resources file.
The following gatein-resource.xml fragment adds MyThemeBlue and MyThemeRed to the MyTheme category.
<window-style>
  <style-name>MyTheme</style-name>
  <style-theme>
    <theme-name>MyThemeBlue</theme-name>
  </style-theme>
  <style-theme>
    <theme-name>MyThemeRed</theme-name>
  </style-theme>
</window-style>
The windows style configuration for the default skin is configured in: eXoResources.war/WEB-INF/gatein-resources.xml.
When a window style is defined in the gatein-resources.xml file, it will be available to all portlets whether the current portal skin supports the window decorator or not. When a new window decorator is added, it is recommended you add it to all portal skins or that portal skins share a common stylesheet for window decorators.
Window Style CSS
To display the window decorators for the skin service, it must have the CSS classes with specific naming related to the window style name. The service will try and display the CSS based on this naming. The CSS class must be included as part of the current portal skin for displaying the window decorators.
The location of the window decorator CSS classes for the default portal theme is located at: eXoResources.war/skin/PortletThemes/Stylesheet.css.
Create the CSS file:
/*---- MyTheme ----*/
.MyTheme .WindowBarCenter .WindowPortletInfo {
	margin-right: 80px; /* orientation=lt */
	margin-left: 80px; /* orientation=rt */
}

.MyTheme .WindowBarCenter .ControlIcon {
	float: right; /* orientation=lt */
	float: left; /* orientation=rt */
	width: 24px;
	height: 17px;
	cursor: pointer;
	background-image: url('background/MyTheme.png');
}

.MyTheme .ArrowDownIcon {
	background-position: center 20px;
}

.MyTheme .OverArrowDownIcon {
	background-position: center 116px;
}

.MyTheme .MinimizedIcon {
	background-position: center 44px;
}

.MyTheme .OverMinimizedIcon {
	background-position: center 140px;
}

.MyTheme .MaximizedIcon {
	background-position: center 68px;
}

.MyTheme .OverMaximizedIcon {
	background-position: center 164px;
}

.MyTheme .RestoreIcon {
	background-position: center 92px;
}

.MyTheme .OverRestoreIcon {
	background-position: center 188px;
}

.MyTheme .NormalIcon {
	background-position: center 92px;
}

.MyTheme .OverNormalIcon {
	background-position: center 188px;
}

.MyTheme .Information {
	height: 18px; line-height: 18px;
	vertical-align: middle; font-size: 10px;
	padding-left: 5px; /* orientation=lt */
	padding-right: 5px; /* orientation=rt */
	margin-right: 18px; /* orientation=lt */
	margin-left: 18px; /* orientation=rt */
}

.MyTheme .WindowBarCenter .WindowPortletIcon {
	background-position: left top; /* orientation=lt */
	background-position: right top; /* orientation=rt */
	padding-left: 20px; /* orientation=lt */
	padding-right: 20px; /* orientation=rt */
	height: 16px;
	line-height: 16px;
}

.MyTheme .WindowBarCenter .PortletName {
	font-weight: bold;
	color: #333333;
	overflow: hidden;
	white-space: nowrap;
}

.MyTheme .WindowBarLeft {
	padding-left: 12px;
	background-image: url('background/MyTheme.png');
	background-repeat: no-repeat;
	background-position: left -148px;
}

.MyTheme .WindowBarRight {
	padding-right: 11px;
	background-image: url('background/MyTheme.png');
	background-repeat: no-repeat;
	background-position: right -119px;
}

.MyTheme .WindowBarCenter {
	background-image: url('background/MyTheme.png');
	background-repeat: repeat-x;
	background-position: left -90px;
	height: 21px;
	padding-top: 8px;
}

.MyTheme .MiddleDecoratorLeft {
	padding-left: 12px;
	background: url('background/MMyTheme.png') repeat-y left;
}

.MyTheme .MiddleDecoratorRight {
	padding-right: 11px;
	background: url('background/MMyTheme.png') repeat-y right;
}

.MyTheme .MiddleDecoratorCenter {
	background: #ffffff;
}

.MyTheme .BottomDecoratorLeft {
	padding-left: 12px;
	background-image: url('background/MyTheme.png');
	background-repeat: no-repeat;
	background-position: left -60px;
}

.MyTheme .BottomDecoratorRight {
	padding-right: 11px;
	background-image: url('background/MyTheme.png');
	background-repeat: no-repeat;
	background-position: right -30px;
}

.MyTheme .BottomDecoratorCenter {
	background-image: url('background/MyTheme.png');
	background-repeat: repeat-x;
	background-position: left top;
	height: 30px;
}
Set Default Window Style
To set the default window style for a portal, you need to specify the CSS classes for a theme called DefaultTheme.
You do not need to specify DefaultTheme in gatein-resources.xml.
Create New Portlet skins
Portlets often require additional styles that may not be defined by the portal skin. GateIn Portal3.8 allows portlets to define additional stylesheets for each portlet and will append the corresponding link tags to the head.
The link ID will be of the form: {portletAppName}{PortletName}. For example, ContentPortlet in content.war will give id="contentContentPortlet".
To define a new CSS file to include whenever a portlet is available on a portal page, the following fragment needs to be added to gatein-resources.xml as follows:
<portlet-skin>
  <application-name>portletAppName</application-name>
  <portlet-name>PortletName</portlet-name>
  <skin-name>Default</skin-name>
  <css-path>/skin/DefaultStylesheet.css</css-path>
</portlet-skin>

<portlet-skin>
  <application-name>portletAppName</application-name>
  <portlet-name>PortletName</portlet-name>
  <skin-name>OtherSkin</skin-name>
  <css-path>/skin/OtherSkinStylesheet.css</css-path>
</portlet-skin>
This will load DefaultStylesheet.css when the Default skin is used and the OtherSkinStylesheet.css when the OtherSkin is used.
If the current portal skin is not defined as part of the supported skins, then the portlet CSS class will not be loaded. It is recommended you update portlet skins whenever a new portal skin is created.
Change portlet icons
Each portlet can be represented by a unique icon that you can see in the portlet registry or page editor. This icon can be changed by adding an image to the directory of the portlet webapplication:
-
{{skin/DefaultSkin/portletIcons/}}icon_name.png
To use the icon correctly, it must be named after the portlet.
The icon for an account portlet named AccountPortlet would be located at: {{skin/DefaultSkin/portletIcons/}}AccountPortlet.png.
You must use skin/DefaultSkin/portletIcons/ for the directory to store the portlet icon regardless of what skin is going to be used.
Create New Portlet Specification CSS Classes
The portlet specification defines a set of default CSS classes that should be available for portlets. These classes are included as part of the portal skin. Please see the portlet specification for a list of the default classes that should be available.
For the default portal skin, the portlet specification CSS classes are defined in: eXoResources.war/skin/Portlet/Stylesheet.css.
Tips and Tricks
Easier CSS debugging
By default, all CSS files are processed during deployment of a portal application so that @import and url(...) statements are replaced by the actual content returned by the imported URLs. This results in a single flat CSS file that is stored in a cache directly used by SkinService. This reduces the number of HTTP requests sent from the browser to the server.
Although the optimization is useful for production environments, it may be easier to deactivate this optimization while debugging stylesheets. To do so, set the java system property exo.product.developing to true.
For example, the property can be passed as a JVM parameter with the -D option when running GateIn Portal.
sh $JBOSS_HOME/bin/standalone.sh -Dexo.product.developing=true
This option may cause display bugs with certain browsers, such as Internet Explorer.
Some CSS techniques
It is recommended you have some experiences with CSS before studying GateIn Portal CSS.
GateIn Portal3.8 relies heavily on CSS to create the layout and effects for the UI. Some common techniques for customizing GateIn Portal CSS are explained below.
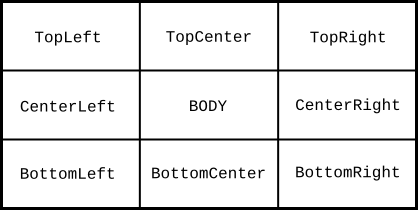
Decorator pattern
The decorator is a pattern to create a contour or a curve around an area. To achieve this effect, you need to create 9 cells. The BODY is the central area for you to decorate. The other 8 cells are distributed around the BODY cell. You can use the width, height and background image properties to achieve any desired decoration effects.
<div class="Parent">
  <div class="TopLeft">
    <div class="TopRight">
      <div class="TopCenter"><span></span></div>
    </div>
  </div>
  <div class="CenterLeft">
    <div class="CenterRight">
      <div class="CenterCenter">BODY</div>
    </div>
  </div>
  <div class="BottomLeft">
    <div class="BottomRight">
      <div class="BottomCenter"><span></span></div>
    </div>
  <div>
</div>
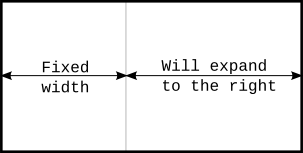
Left margin left pattern
Left margin left pattern is a technique to create 2 blocks side by side. The left block has a fixed size and the right block will take the rest of the available space. When the user resizes the browser, the added or removed space will be taken from the right block.
<div class="Parent">
	<div style="float: left; width: 100px">
	</div>
	<div style="margin-left: 105px;">
	<div>
	<div style="clear: left"><span></span></div>
</div>