keytool -export -keystore jbid_test_keystore.jks -alias servercert -file test-certificate.crt
In first scenario we will use Salesforce as SAML SP and we will use Picketlink application as SAML IDP. In this tutorial, we will reuse application idp-sig.war from Picketlink quickstarts .
NOTE: Integration is working from Picketlink version 2.1.2.Final and newer
Salesforce setup
First you need to perform some actions on Salesforce side. Brief description is here. For more details, you can see Salesforce documentation.
-
Register Salesforce account - You will need to register in Salesforce with free developer account. You can do it here .
-
Register your salesforce domain - Salesforce supports SP-initiated SAML login workflow or IDP-initiated SAML login workflow. For picketlink integration, we will use SP-initiated login workflow, where user needs to access Salesforce and Salesforce will send SAMLRequest to Picketlink IDP. For achieving this, you need to create Salesforce domain. When registered and logged in www.salesforce.com, you will need to click on Your name in right top corner -> Link Setup -> Link Company Profile -> Link My Domain. Here you can create your Salesforce domain and make it available for testing.
-
SAML SSO configuration - Now you need again to click on Your name in right top corner -> Link Setup -> Link Security controls -> Link Single Sign-On Settings
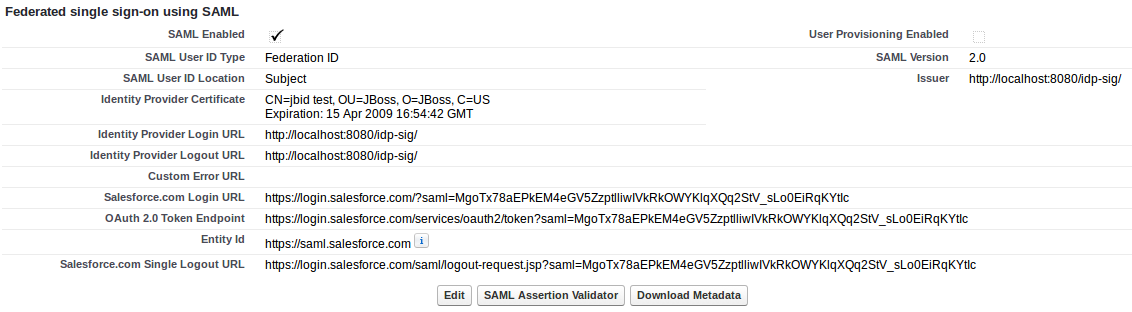
Then configure it as follows:-
SAML Enabled checkbox needs to be checked
-
SAML Version needs to be 2.0
-
Issuer needs to be http://localhost:8080/idp-sig/ - This identifies issuer, which will be used as IDP for salesforce. NOTE: Be sure that URL really ends with "/" character.
-
Identity Provider Login URL also needs to be http://localhost:8080/idp-sig/ - This identifies URL where Salesforce SP will send it's SAMLRequest for login.
-
Identity Provider Logout URL points to URL where Salesforce redirects user after logout. You may also use your IDP address or something different according to your needs.
-
Subject mapping - You need to configure how to map Subject from SAMLResponse, which will be send by Picketlink IDP, to Salesforce user account. In the example, we will use that SAMLResponse will contain information about Subject in "NameIdentifier" element of SAMLResponse and ID of subject will be mapped to Salesforce Federation ID of particular user. So in:
SAML User ID Type, you need to check option Assertion contains the Federation ID from the User object and for SAML User ID Location, you need to check User ID is in the NameIdentifier element of the Subject statement . -
Entity ID - Here we will use https://saml.salesforce.com . Whole configuration can look as follows:

-
-
Certificate - Last very important thing is upload of your certificate to Salesforce, because Salesforce needs to verify signature on SAMLResponse sent from your Picketlink Identity Provider. So first you need to export certificate from your keystore file and then import this certificate into Salesforce. So in idp-sig.war/WEB-INF/classes you can run command like:
after typing keystore password store123 you should see exported certificate in file test-certificate.crt .
WARNING: For production environment in salesforce, you should generate your own keystore file and use certificate from your own file instead of the default picketlink jbid_test_keystore.jks
Then you can import this certificate test-certificate.crt into SalesForce via menu with SSO configuration.
-
Adding users - Last action you need to do in Salesforce is to add some users. You can do it in: Link Setup -> Link Manage Users -> Link Users. Now you can create user and fill some values as you want. Please note that username must be in form of email address. Note that Federation ID is the value, which is used for mapping the user with the NameIdentifier subject from SAML assertion, which will be sent from Picketlink IDP. So let's use Federation ID with value tomcat for our first user.

Picketlink IDP setup
-
Download and import Salesforce certificate - SAMLRequest messages sent from Salesforce are signed with Salesforce certificate. In order to validate them, you need to download Salesforce client certificate from http://wiki.developerforce.com/page/Client_Certificate . Then you need to import the certificate into your keystore:
unzip -q /tmp/downloads/certificates/New_proxy.salesforce.com_certificate_chain.zip
keytool -import -keystore jbid_test_keystore.jks -file proxy-salesforce-com.123 -alias salesforce-cert
-
ValidatingAlias update - You need to update ValidatingAlias section, so the SAMLRequest from Salesforce will be validated with Salesforce certificate. You need to add the line into file idp-sig.war/WEB-INF/picketlink.xml :
<ValidatingAlias Key="saml.salesforce.com" Value="salesforce-cert" />
-
Trusted domain - update list of trusted domains and add domain "salesforce.com" to the list:
<Trust>
  <Domains>localhost,jboss.com,jboss.org,redhat.com,amazonaws.com,salesforce.com</Domains>
</Trust>
Single logout
Now you have basic setup done but in order to support single logout, you need to do some additional actions. Especially Salesforce is not using same URL for login and single logout, which means that we need to configure SP metadata on Picketlink side to provide mapping between SP and their URL for logout. Needed actions are:
-
Download SAML metadata from Salesforce SSO settings. Save downloaded XML file as idp-sig.war/WEB-INF/sp-metadata.xml
-
Add SingleLogoutService element - unfortunately another element needs to be manually added into metadata as Salesforce doesn't use single logout configuration in their metadata. So let's add following element into metadata file after md:AssertionConsumerService element:
         <md:SingleLogoutService Binding="urn:oasis:names:tc:SAML:2.0:bindings:HTTP-POST"
                                 Location="https://login.salesforce.com/saml/logout-request.jsp?saml=MgoTx78aEPkEM4eGV5ZzptlliwIVkRkOWYKlqXQq2StV_sLo0EiRqKYtIc" index="0" isDefault="true"/>
Note that value of Location attribute will be different for your domain. You can see which value to use in Salesforce SSO settings page from element Salesforce.com Single Logout URL:
-
Add md:EntitiesDescriptor element - Finally you need to add enclosing element md:EntitiesDescriptor and encapsulate whole current content into it. This is needed as we may want to use more EntityDescriptor elements in this single metadata file (like another element for Google Apps etc):
<?xml version="1.0" encoding="UTF-8"?>
<md:EntitiesDescriptor xmlns="urn:oasis:names:tc:SAML:2.0:metadata"
                    xmlns:ds="http://www.w3.org/2000/09/xmldsig#"
                    xmlns:md="urn:oasis:names:tc:SAML:2.0:metadata">
  <md:EntityDescriptor xmlns:md="urn:oasis:names:tc:SAML:2.0:metadata" entityID="https://saml.salesforce.com" ....
  ...
  </md:EntityDescriptor>
</md:EntitiesDescriptor>
-
Configure metadata location - Let's add new MetaDataProvider into file idp-sig.war/WEB-INF/picketlink.xml after section with KeyProvider:
...
         </KeyProvider>

         <MetaDataProvider ClassName="org.picketlink.identity.federation.core.saml.md.providers.FileBasedEntitiesMetadataProvider">
           <Option Key="FileName" Value="/WEB-INF/sp-metadata.xml"/>
         </MetaDataProvider>
      </PicketLinkIDP>
.....
Test the setup
-
Start the server with Picketlink IDP
-
Visit URL of your salesforce domain. It should be likely something like: https://yourdomain.my.salesforce.com/ . Now Salesforce will send SAMLRequest to your IDP and so you should be redirected to login screen on your IDP on http://localhost:8080/idp-sig/
-
Login into Picketlink IDP as user tomcat. After successful login, SAMLRequest signature is validated by the certificate salesforce-cert and IDP produces SAMLResponse for IDP and performs redirection.
-
Now Salesforce parse SAMLResponse, validates it signature with imported Picketlink certificate and then you should be redirected to salesforce and logged as user tomcat in your Salesforce domain.
Troubleshooting
Salesforce provides simple tool in SSO menu, where you can see the status of last SAMLResponse sent to Salesforce SP and you can check what's wrong with the response here.
Good tool for checking communication between SP and IDP is also Firefox plugin SAML Tracer