package com.example.switchyard.docs;

import org.switchyard.component.bean.Service;

@Service(Example.class)
public class ExampleBean implements Example {

}
This guide provides detailed, developer-focused information on how to create and configure applications in SwitchYard. If you are looking for a quick introduction or high-level overview, check out the Getting Started and the User Guide.
Service Implementations
Bean Services
Overview
The Bean Component is a pluggable container in SwitchYard which allows Java classes (or beans) to provide and consume services. This means that you can implement a service by simply annotating a Java class. It also means you can consume a service by injecting a reference to that service directly into your Java class. Rather than writing our own POJO container to provide this capability, we have implemented the bean component as a Weld extension. No need to learn a new programming model - bean services are standard CDI beans with a few extra annotations. This also opens up the possibilities of how SwitchYard is used; you can now expose existing CDI-based beans in your application as services to the outside world or consume services within your bean
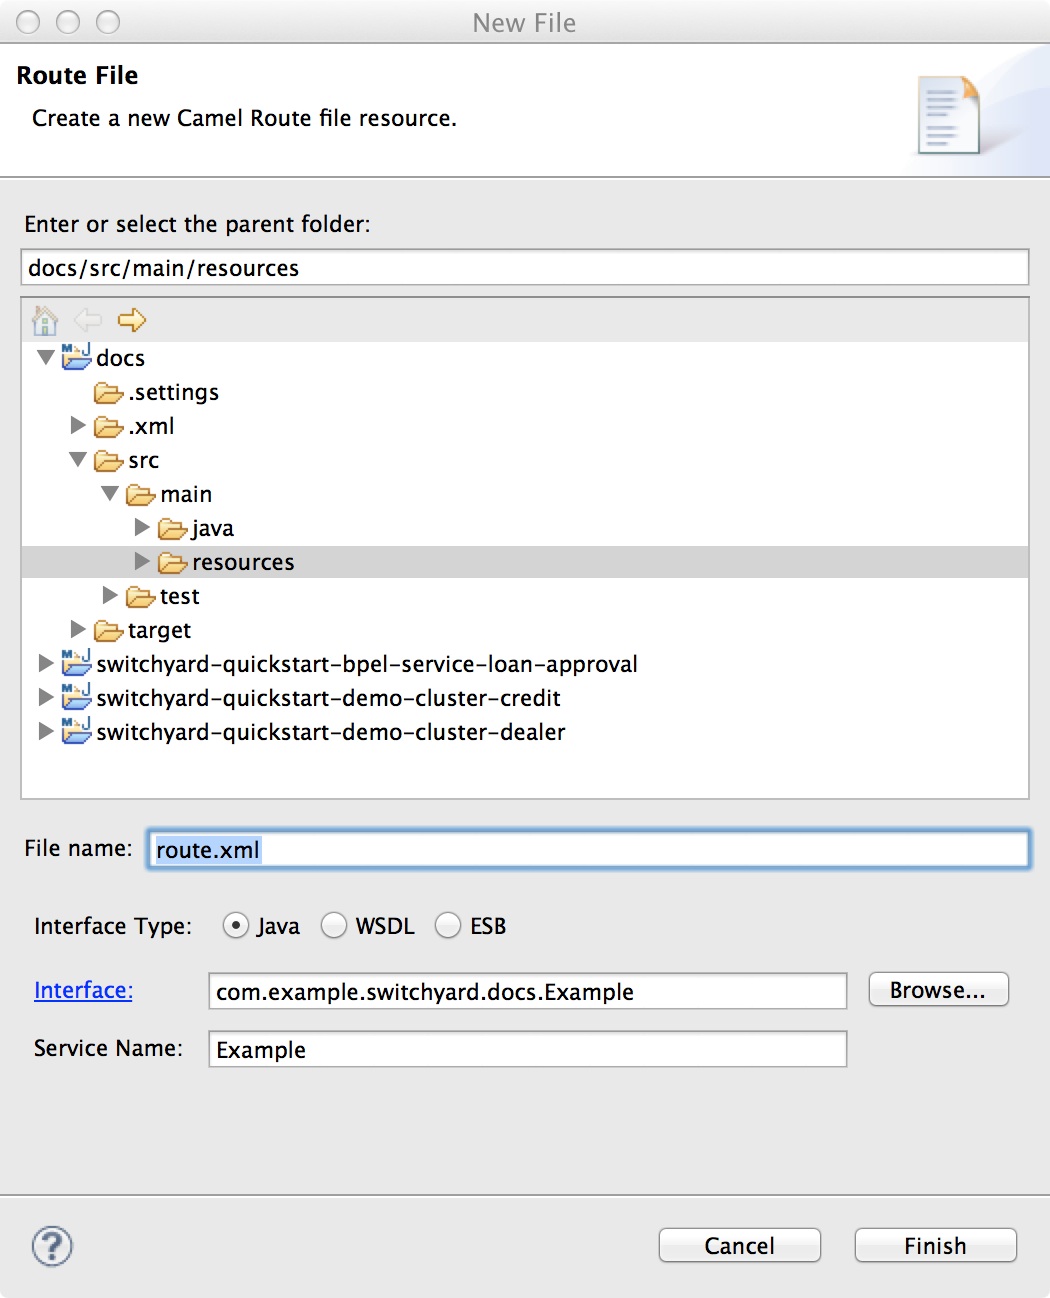
Creating a Bean Service
To create a new Bean service you only need a few pieces of information:
-
Name : the name of the Java class for your bean service.
-
Service Name : the name of the service your bean will provide.
-
Interface : the contract for the service being provided. Java is the only valid interface type for bean services.
Note that starting with the interface value will default the names for Name and Service Name, which can speed things up if you're in a hurry.
After clicking Finish, you will have a new class that looks something like this:
The @Service annotation allows the SwitchYard CDI Extension to discover your bean at runtime and register it as a service. The value of the annotation (Example.class in the above example) represents the service contract for the service. Every bean service must have an @Service annotation with a value identifying the service interface for the service.
To complete the definition of your service, add one or more operations to the service interface and provide a corresponding implementation in your bean:
package com.example.switchyard.docs;

import org.switchyard.component.bean.Service;

@Service(Example.class)
public class ExampleBean implements Example {

   public void greet(Person person) {
       // implement service logic here for greet operation
   }
}
Consuming a Service
In addition to providing a service in SwitchYard, beans can also consume other services. These services can be provided in the same application by other implementations, or they could be wired to gateway bindings to invoke services over JMS, SOAP, FTP, etc. The SwitchYard runtime handles the resolution of the service reference to a concrete service, allowing your service logic to remain blissfully ignorant. Invocations made through this reference are routed through the SwitchYard exchange mechanism.
Consuming a SwitchYard service from within a CDI bean is done via @Reference annotations.
@Service(ConsumerService.class)
public class ConsumerServiceBean implements ConsumerService {

   @Inject
   @Reference
   private SimpleService service;

   public void consumeSomeService(String consumerName) {
      service.sayHello("Hello " + consumerName);
   }
}
By default, SwitchYard expects a service reference to be declared with a name which matches the Java type used for the reference. In the above example, the SimpleService type would require a service reference in your SwitchYard configuration called "SimpleService". In the event where the service reference name is different from the type name of the contract, the @Reference annotation can accept a service name:
@Reference("urn:myservices:purchasing:OrderService")
private OrderService orders;
ReferenceInvoker
The default behavior of @Reference is to inject a reference using the Java interface of the reference contract (SimpleService in the above example). This is adequate for most cases, but it does not allow you to access SwitchYard API constructs like the Message and Context interfaces. If you need to access to an attachment or a context property when invoking a reference from a Bean service, then you will want to use a ReferenceInvoker. To use a ReferenceInvoker, all you need to do is replace the service contract interface type with a ReferenceInvoker type and SwitchYard will automatically inject the correct instance. Here's a revised example which uses a ReferenceInvoker instance to invoke "SimpleService":
@Inject
@Reference("SimpleService")
private ReferenceInvoker service;

public void consumeSomeService(String consumerName) {
   service.newInvocation("sayHello")
      .setProperty("myHeader", "myValue")
      .invoke(consumerName);
}
Note how the ReferenceInvoker instance is used to create a ReferenceInvocation using the newInvocation() method. A new instance of ReferenceInvocation should be created each time you want to invoke a service using ReferenceInvoker.
Invocation Properties
While it's a best practice to write your service logic to the data that's defined in the contract (the input and output message types), there can be situations where you need to access contextual information like message headers (e.g. received file name) in your implementation. To facilitate this, the Bean component allows you to access the SwitchYard Exchange Context instance associated with a given Bean Service Operation invocation. To get a reference to the Context, simply add a Context property to your bean and annotate it with the CDI @Inject annotation.
@Service(SimpleService.class)
public class SimpleServiceBean implements SimpleService {

@Inject
private Context context;

public String sayHello(String message) {
        System.out.println("*** Funky Context Property Value: " + context.getPropertyValue("funkyContextProperty"));
        return "Hi there!!";
    }
}
The Context interface allows your bean logic to get and set properties in the context. Note that you can only make calls on the Context instance within the scope of one of the Service Operation methods. Invoking it outside this scope will result in an UnsupportedOperationException being thrown.
Implementation Properties
In contrast to invocation properties, implementation properties represent environmental properties that you have defined in the SwitchYard application descriptor (switchyard.xml) for your bean implementation. To access these properties, simply add an @Property annotation to your bean class identifying the property you want to inject. The following example demonstrates injection of a "user.name" property:
@Service(SimpleService.class)
public class SimpleServiceBean implements SimpleService {

@Property(name="user.name")
private String name;

public String sayHello(String message) {
        return "Hello " + name + ", I got a message: " + message;
    }
}
See the Properties section of the User Guide for more information about SwitchYard property support.
Fault propagation on IN_ONLY
If the MEP of the service is IN_ONLY, Bean service just ignores the fault by default. If you want to propagate the fault back to service consumer, then you need to use IN_OUT MEP instead, or set "org.switchyard.propagateExceptionOnInOnly" property to true in your application domain. Domain properties are set via entries in the <domain> section of switchyard.xml.
<domain>
    <properties>
        <property name="org.switchyard.propagateExceptionOnInOnly" value="true"/>
    </properties>
</domain>
Camel Services
Overview
Camel services allow you to leverage the core routing engine inside of Apache Camel to route between services in SwitchYard. All of the EIP and core routing support in Camel is available to your service implementation. Each Camel route is exposed as a service within SwitchYard, which means it has a well-defined contract and can be injected into any other service in the runtime.
Creating a Camel Service
The first thing you need to decide when you create a Camel routing service is whether you want to use the Java DSL or XML dialect for the route. Functionally, they are more or less equivalent, so it's more a choice of how you want to express your routing logic. If you want create a Java DSL route, select the "Camel (Java)" implementation type. For XML, use the "Camel (XML)" type. Regardless of which language you choose, the following information is required:
-
Name : the name of the Java class or XML file for your bean service.
-
Service Name : the name of the service your bean will provide.
-
Interface : the contract for the service being provided. Camel supports Java, WSDL, and ESB contract types.
For details on each type of Camel route, see the Java DSL Routes and XML Routes sections below. You can have multiple routing services per application, each with it's own routing language (e.g. an application can have two Java DSL routes and one XML route). There are some general guidelines to keep in mind with both types of routes:
-
There is only one route per service.
-
The consumer or "from" endpoint in a route is always a "switchyard" endpoint and the endpoint name must equal the service name. This is default behavior in the tooling.
-
To consume other services from within your route, only use "switchyard" consumer (i.e. "to") endpoints. This keeps your routing logic independent of the binding details for consumed services.
Java DSL Routes
A newly created Java DSL route looks like this:
package com.example.switchyard.docs;

import org.apache.camel.builder.RouteBuilder;

public class CamelServiceRoute extends RouteBuilder {
    /**
     * The Camel route is configured via this method.  The from:
     * endpoint is required to be a SwitchYard service.
     */
    public void configure() {
        // TODO Auto-generated method stub
        from("switchyard://Example").log(
                "Received message for 'Example' : ${body}");
    }
}
There are no SwitchYard-specific classes or APIs used for Java DSL routes; the route class is identical in signature to what you would use with Apache Camel directly. Since there is one route per service, you will have one RouteBuilder class for each Camel routing service in your application. To add logic to your routing service, simply add additional logic to the configure() method. For background and details on what you can do with the Java DSL, please consult the Apache Camel documentation.
XML Routes
A newly created XML route looks like this:
<?xml version="1.0" encoding="ASCII"?>
<route xmlns="http://camel.apache.org/schema/spring">
   <from uri="switchyard://Example"/>
   <log message="Example - message received: ${body}"/>
</route>
Like Java DSL routes, the XML routing syntax is identical to what you would use with Apache Camel directly and conforms to the Camel schema for <route> definitions. There will be one file containing a route definition for each XML routing service in your application.
Consuming Services From Camel Routes
Invoking another service from within your Camel route can be done by using the SwitchYard producer endpoint (switchyard://) within your route. Endpoint configuration is very straightforward:
switchyard://[service-name]?operationName=[operation-name]
-
service-name : name of the SwitchYard service. This value needs to match the name of a service reference defined on the service component for the route.
-
operation-name : name of the service operation to be invoked. This is only used on references and is optional if the target service only has a single operation.
A modified version of the default XML route which invokes a SwitchYard service can be found below:
<?xml version="1.0" encoding="ASCII"?>
<route xmlns="http://camel.apache.org/schema/spring">
   <from uri="switchyard://Example"/>
   <log message="Example - message received: ${body}"/>
   <!-- Invoke hasItem operation on WarehouseService -->
   <to uri="switchyard://WarehouseService?operationName=hasItem"/>
</route>
Scripting languages
Camel supports dynamic languages inside route logic in both XML and Java form. As the support for dynamic languages is built in JDK any language which provides javax.script.ScriptEngineManager may be used. However, because of 3rd party dependencies by default SwitchYard supports only following languages:
-
BeanShell
-
JavaScript
-
Groovy
-
Ruby
-
Python
To use these script languages you have couple of options. They are available in expression-aware places like filter:
public class ScriptingBuilder extends RouteBuilder {

    public void configure() {
        from("switchyard://Inbound")
            .filter().javaScript("request.getHeader('myHeader') != null")
                .to("switchyard://Outbound");
    }
}
If you would like use dynamic language to implement your service you may use transform element:
public class ScriptingImplementationBuilder extends RouteBuilder {

    public void configure() {
        from("switchyard://Inbound")
            .transform().groovy("classpath:script.groovy"); // classpath resource

        from("switchyard://InboundBsh")
            .transform().language("beanshell", "file:script.bsh"); // file system resource
    }
}
Inside your script you will have access to predefined variables like request, response or exchange which will let you generate response.
CDI Integration
SwitchYard integrates the CDI Bean Manager with the Camel Bean Registry to allow you to reference CDI Beans in your Camel routes. Any Java class annotated with @Named in your application will be available through Camel's Bean registry.
Consider an example of where you have the following CDI bean:
@Named("StringSupport")
@ApplicationScoped
public class StringUtil {

    public String trim(String string) {
        return string.trim();
    }
}
This bean can be used inside your SwitchYard Camel Routes as follows:
public class ExampleBuilder extends RouteBuilder {

    public void configure() {
        from("switchyard://ExampleBuilder")
            .split(body(String.class).tokenize("\n"))
            .filter(body(String.class).startsWith("sally:"))
            .to("bean:StringSupport");
    }
}
See Camel's Bean Binding documentation for more details.
Implementation Property Injection
SwitchYard integrates with the Properties Component in Camel to make system and application properties available inside your route definitions. You can inject properties into your camel route using "{{propertyName}}" expression where "propertyName" is the name of the property. The following camel route expects the "user.name" property to be injected in the last <log> statement:
<route xmlns="http://camel.apache.org/schema/spring" id="CamelTestRoute">
   <log message="ItemId [${body}]"/>
   <to uri="switchyard://WarehouseService?operationName=hasItem"/>
   <log message="Title Name [${body}]"/>
   <log message="Properties [{{user.name}}]"/>
</route>
See the Properties section of the User Guide for more details of SwitchYard property support.
BPM Services
Overview
The BPM Component is a pluggable container in SwitchYard which allows a business process to be exposed as a service. One fronts their business process with a custom interface and, if desired, can easily annotate it's methods to define which should start a process, signal a process event, or abort a process.
Important
A BPM Service is a type of Knowledge Service (the other type being a Rules Service). Thus, it is strongly suggested you familiarize yourself with the shared configuration capabilities of Knowledge Services.
Creating a BPM Service
To create a new BPM service in SwitchYard, you'll need the following information:
-
File Name : the file name that will be used to create a new, empty BPMN 2 Process definition.
-
Interface Type : the contract for the service being provided. BPM supports Java, WSDL, and ESB contract types.
-
Service Name : the name of the service your process will provide.
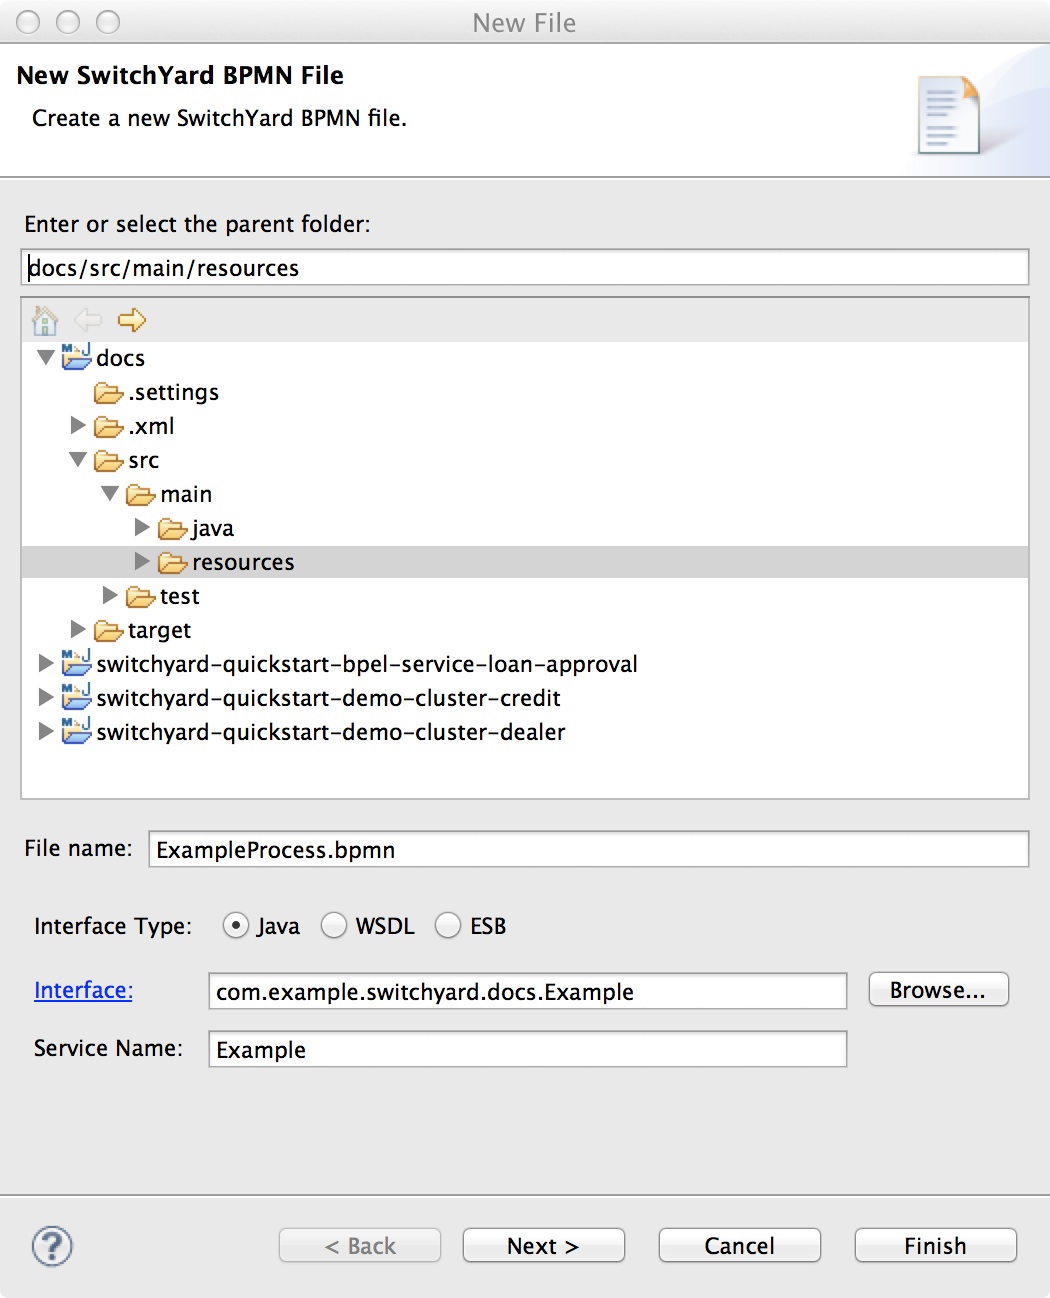
After clicking Finish, you will have a new service component definition for your process service and an empty BPMN process definition. The next phase in developing your BPM service is to author the BPMN 2 process definition (details outside the scope of this documentation) and then configure the BPM service component to interact with that process definition.
Process Interaction
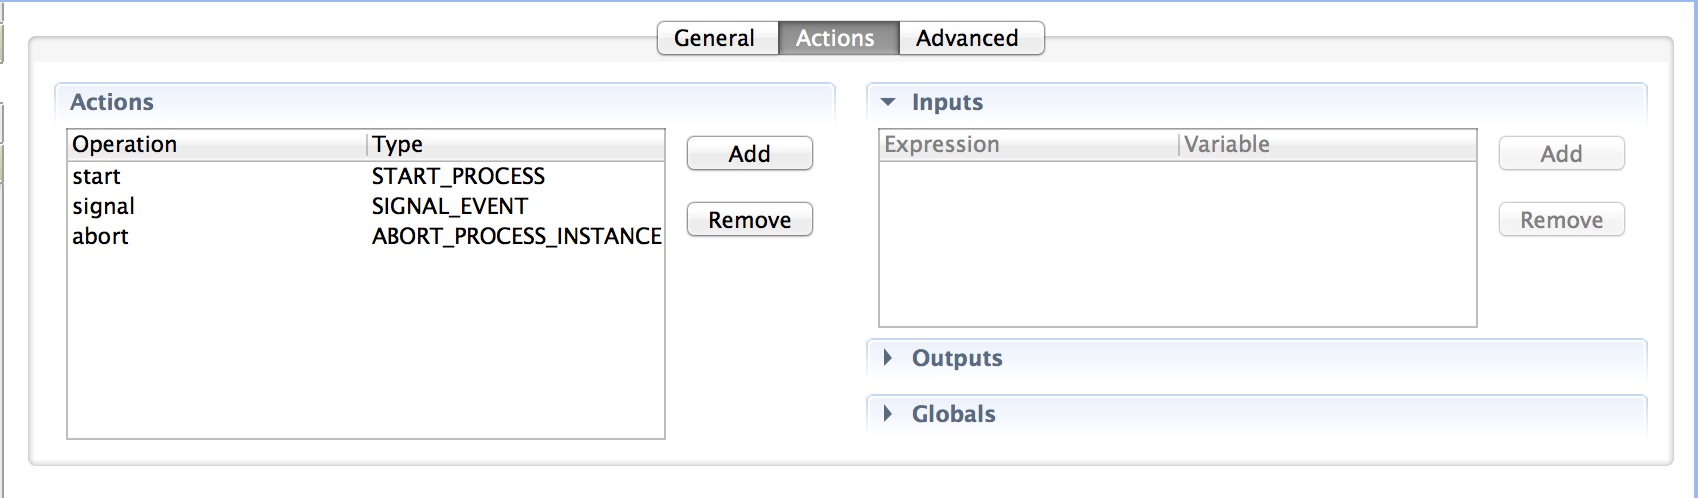
Interaction with a process is defined via actions on a BPM service component. Take the following service contract as an example:
package org.switchyard.userguide;
public interface MyService {
    public void start(String data);
    public void signal(String data);
    public void abort(String data);
}
Actions allow you to map an operation in the service contract to one of the following interactions with a business process:
-
START_PROCESS
-
SIGNAL_EVENT
-
SIGNAL_EVENT_ALL
-
ABORT_PROCESS_INSTANCE
Starting a Process Instance
Operations configured with the START_PROCESS action type will start new process instances.
When you start your process (actually, any interaction with a service whose implementation is bpm), the processInstanceId will be put into the Switchyard Context at Scope.MESSAGE, and will be fed back to your client in a binding-specific way. For soap, it will be in the form of a soap header in the soap response envelope:
<soap:Header>
    <bpm:processInstanceId xmlns:bpm="urn:switchyard-component-bpm:bpm:1.0">1</bpm:processInstanceId>
</soap:Header>
In future process interactions, you will need to send back that same processInstanceId, so that the correlation is done properly. For soap, that means including the same soap header that was returned in the response to be sent back with subsequent requests.
Note
If you are using persistence, the sessionId will also be available in the Context, and will need to be fed back as well. It would look the same way in the soap header as the processInstanceId does.
Correlation Keys
If you do not want to track the processInstanceId, however need to have multiple interactions with the same process instance, you can start the process with your own application-specific correlation key, and include that same correlation key for future interactions. Here is an example of including in a a soap request:
<soap:Header>
    <bpm:correlationKey xmlns:bpm="urn:switchyard-component-bpm:bpm:1.0">MY-APP-KEY-0123456789</bpm:correlationKey>
</soap:Header>
Signaling a Process Instance
Operations configured with the SIGNAL_EVENT operation type will have the associated process instance signaled. As above, the processInstanceId will need to have been available in the Context so the correct process instance is correlated.
There are two other pieces of information when signaling an event:
-
The "event id". In BPMN2 lexicon, this is known as the "signal id", but in jBPM can also be known as the "event type". This is set as the eventId in the configuration.
-
Note: In BPMN2, a signal looks like this: <signal id="foo" value="bar"/> In jBPM, it is the signal id that is respected, not the name. This might require you to tweak a tooling-generated id to whatever you want it called.
-
-
The "event object". This is the data representing the event itself, coming from the Message content object itself (your payload).
Operations configured with the SIGNAL_EVENT_ALL operation type will have all process instances signaled.
Aborting a Process Instance
Operations configured with the ABORT_PROCESS_INSTANCE operation type will cause associated process instances to be aborted. As above, the processInstanceId will need to have been available in the Context so the correct process instance is correlated.
Operation Mappings
SwitchYard provides a flexible way to map data in and out service operation invocations via MVEL expressions. First, please familiarize yourself with the general Knowledge Services documentation, specifically the sections related to what Globals, Faults, Inputs and Outputs are. Next, consider the following tooling screenshot:
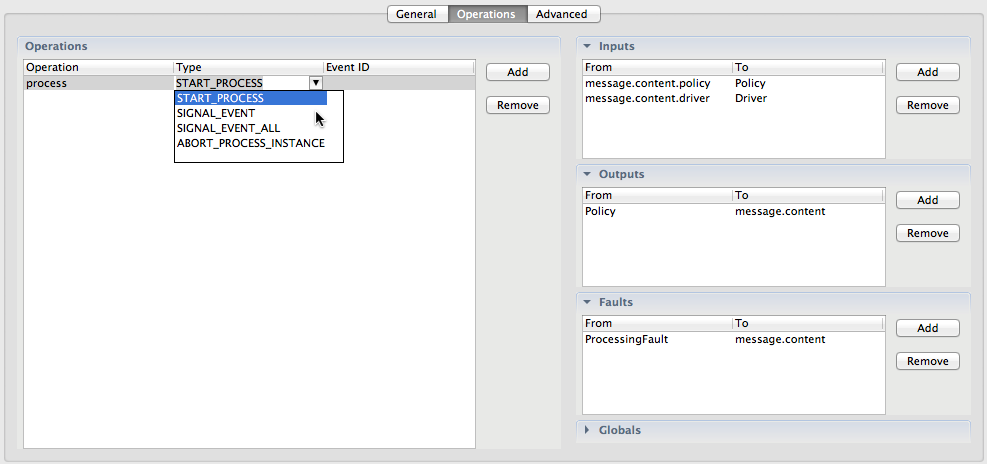
The above will create XML configuration like this:
<operation name="process" type="START_PROCESS">
  <inputs>
    <input from="message.content.policy" to="Policy"/>
    <input from="message.content.driver" to="Driver"/>
  </inputs>
  <outputs>
    <output from="Policy" to="message.content"/>
  </outputs>
  <faults>
    <fault from="ProcessingFault" to="message.content"/>
  </faults>
</operation>
Globals
If your process executes business rules, you can use global mappings to access data in your rules which do not trigger rule execution themselves.
Inputs
For the BPM component, inputs are used to set process instance variables that can later be referenced by nodes within your process.
Important
For you to be able to use variables inside your process, you have to declare your variable names at the process level, as well as in the Parameter Mapping (and possibly Result Mapping) of any process node that wants access to those variables. This can be done easily in the BPMN2 Eclipse tooling by using the Properties view when clicking on either the whitespace around the process, or on any of your process nodes.
Outputs
Outputs are used to extract process instance variables so that they can be set in the outgoing SwitchYard Message content.
Faults
Fault mapping is similar to Output mapping, however the data represents an Exception or data that will be wrapped in an Exception.
Consuming a Service
There are two ways of consuming Services with the SwitchYard BPM component:
-
Invoking the BPM implementation through a gateway binding. Since the BPM component exposes a java interface fronting the business process, you can use any of the bindings provided by SwitchYard. This could be a SOAP Binding or a Camel Binding, for example. (Please refer to those sections of this guide for more information.)
-
Invoking other SwitchYard Services from inside a BPM process itself. To do this, you can use the SwitchYardServiceTaskHandler, which is provided out-of-the-box, and auto-registered with the runtime. To make authoring BPMN2 processes easier, SwitchYard provides a new widget for the Eclipse BPMN2 Modeler visual editor palette. Here is a screenshot from the "Help Desk" demo quickstart:
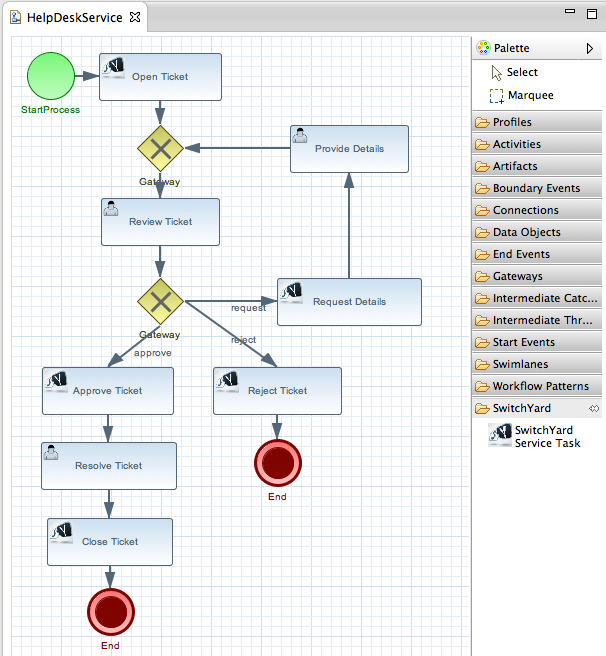
SwitchYard Service Task
On the bottom right hand side under "Custom Task", you can see the SwitchYard Service widget. On the left hand side, you can see the various points of the business process where SwitchYard Services are being invoked. Once you have dropped a SwitchYard Service task in the main window, you can customize it via the Eclipse Properties Editor:
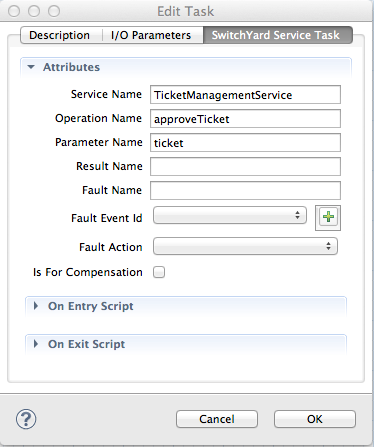
SwitchYard Service Task Properties
The following are properties you can use to configure the SwitchYard Service task (a.k.a. the "Dynamic" SwitchYard Service task):
Service Naming Properties
-
ServiceName: (required) The name of the SwitchYard service to invoke.
-
OperationName: (optional; default=use the single method name in the service interface, if there is just one) The name of the operation within the SwitchYard service to invoke.
Content I/O Properties
-
ParameterName: (optional; default=Parameter) The process variable which the message content will be placed in.
-
ResultName: (optional; default=Result) The process variable which the message content will be gotten from.
Fault-Handling Properties (see SwitchYard Service Fault Handling below)
-
FaultName: (optional; default=Fault) The name of the output parameter (result variable) the fault (Exception) will be stored under.
-
FaultEventId: (optional) The bpmn signal id ("event type" in jbpm lingo) that will be used to signal an event in the same process instance. The event object will be the fault (Exception). Please see Signaling a Process above.
-
FaultAction: (optional; default=throw) After a fault occurs, what should be done? If null or throw, an exception is thrown. If complete, the current work item (SwitchYard Service task) is completed. If abort, the current work item is aborted. If skip, nothing is done.
You can read a more detailed explanation of the Help Desk quickstart demo, as well as how to set up Eclipse to make use of new widget, on this wiki page.
SwitchYard Service Fault Handling
During your process execution, the SwitchYardServiceTaskHandler class is used to handle Switchyard Service tasks. It executes service references, per the properties specified in the panel above. Pay particular attention to the list of Fault-Handling Properties. These properties define the behavior of the SwitchYardServiceTaskHandler in the case were a fault is encountered when executing the service reference. There are 3scenarios that the fault-handling covers:
-
"In my process flow, after the SwitchYard Service task, I would like a split gateway where I can inspect a process variable (a "flag") that can tell me that a fault occurred, so that I can diverge one way or another."
-
To do this, specify the FaultName property. The SwitchYardServiceTaskHandler will make the fault itself available as an output parameter of the task, so that it can be associated with a process variable, and inspected for existence in your split gateway. You must also set the FaultAction property to complete, so that the process will continue on to your split gateway!
-
An example bpmn2 process can be found in our JUnit test suite here: BPMServiceTests-FaultResultProcess.bpmn
-
-
"In my process flow, I have multiple places where faults could occur, and I want to have one shared path of fault-handling."
-
To do this, specify the FaultEventId property. This must match a signal id you specify in your bpmn2 process definition. You can then add an event node in your process that is triggered with this signal id; the flow from that event node on is your fault-handling path. The SwitchYardServiceTaskHandler will then signal the proper event with the configured id.
-
An example bpmn2 process can be found in our JUnit test suite here: BPMServiceTests-FaultEventrocess.bpmn
-
-
"In my process flow, I want to bubble an Exception back out to the process, so it can be handled with a boundary event."
-
This is the default behavior, but to explicitly declare this, set the FaultAction property to throw, so that an exception will be thrown.
-
Whether which scenario above you choose, the question remains "What next?" If you don't specify a FaultAction property, it is the same as setting it to throw. If you set the property to skip, the work item is not completed, nor is it aborted. You can set the property to complete to complete the work item after a fault, or you can set the property to abort to abort the work item after a fault.
Using the standard BPMN2 Service Task
It is possible to invoke SwitchYard Services using the standard BPMN2 Service Task <serviceTask>. It is conceptually similar, however you will use the Service Task icon from the BPMN2 Editor palette, and configure it slightly differently:
-
The <serviceTask> knows to invoke SwitchYard when it has an implementation="##SwitchYard" attribute.
-
The ServiceName is derived from the BPMN2 interface or interfaceImplementationRef.
-
The OperationName is derived from the BPMN2 operation or operationImplementationRef.
-
The ParameterName is always called Parameter.
-
The ResultName is always called Result.
Resources
A Resource represents an artifact that is required by your BPM process. It could be anything you could think of, including a properties file, a Drools Rule Language file, or whatever. But it needs to be available to the BPM component's runtime for that process. The list of resources available to your process is a configurable aspect of the BPM service component.
WorkItem Handlers
A WorkItemHandler is a way for you to add your own code into the business process. Simply implement the org.kie.api.runtime.process.WorkItemHandler interface and add it to your BPM service component.
By default, the SwitchYardServiceTaskHandler is always added for you by the SwitchYard Maven plugin. That handler allows you to easily call out to other SwitchYard services by name within your business process. Please see the section "Consuming a BPM Service" below for more information.
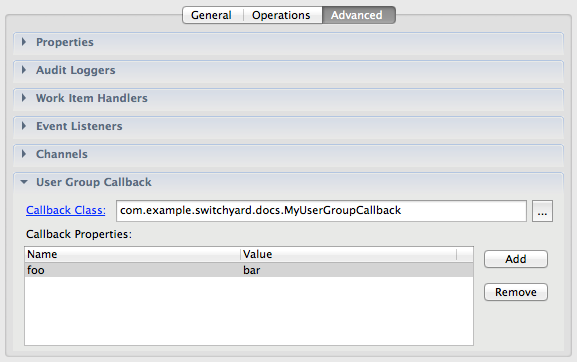
User/Group Callbacks
A UserGroupCallback is a way for you to specify how to access user and group information. jBPM provides several implementations out of the box, including ones for DB, JAAS, Properties, LDAP and MVEL. Simply implement the org.kie.internal.task.api.UserGroupCallback interface and add it to your BPM service component.
Auditing a Process
Please see the Listeners and Loggers sections found in the Knowledge Services documentation.
Rules Services
Overview
The Rules Component is a pluggable container in SwitchYard which allows business rules to be exposed as a service. One fronts their rules with a custom interface and, if desired, can easily annotate it's methods to define which should execute the rules. The Rules Component currently supports Drools as the rule engine. Even though it is quite simple to write rules in Drools, that project's developer tooling and business analyst tooling are very mature.
Important
A Rules Service is a type of Knowledge Service (the other type being a BPM Service). Thus, it is strongly suggested you familiarize yourself with the shared configuration capabilities of Knowledge Services.
Creating a Rules Service
To create a new Rules service in SwitchYard, you'll need the following information
-
File Name : the file name that will be used to create a new template rules definition.
-
Interface Type : the contract for the service being provided. Rules services support Java, WSDL, and ESB contract types.
-
Service Name : the name of the service your process will provide.
-
Package Name : package name used for the new Rules file.
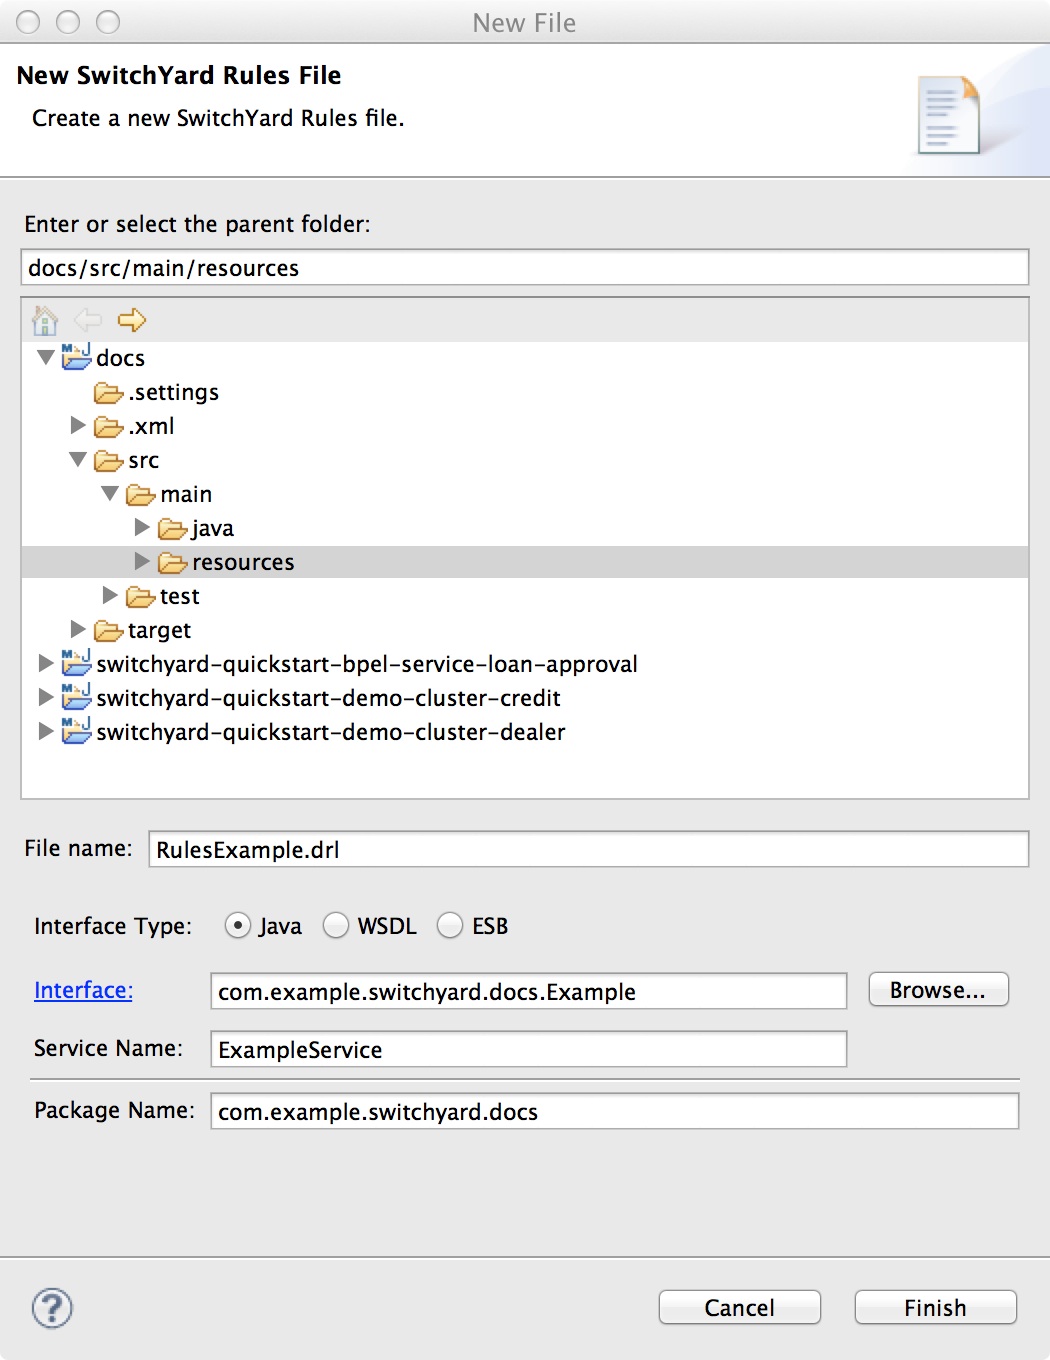
The MyService interface can be as simple as this, with no SwitchYard-specific imports:
package com.example.switchyard.docs;
public interface Example {
    public void process(MyData data);
}
The generated rule template will look like this:
package com.example.switchyard.docs
import org.switchyard.Message
global Message message

rule "RulesExample"
    when
        // insert conditional here
    then
        // insert consequence here
        System.out.println("service: ExampleService, payload: " + message.getContent());
end
Operation Mappings
SwitchYard provides a flexible way to map data in and out service operation invocations via MVEL expressions. First, please familiarize yourself with the general Knowledge Services documentation, specifically the sections related to what Globals, Faults, Inputs and Outputs are. Next, consider the following tooling screenshot:
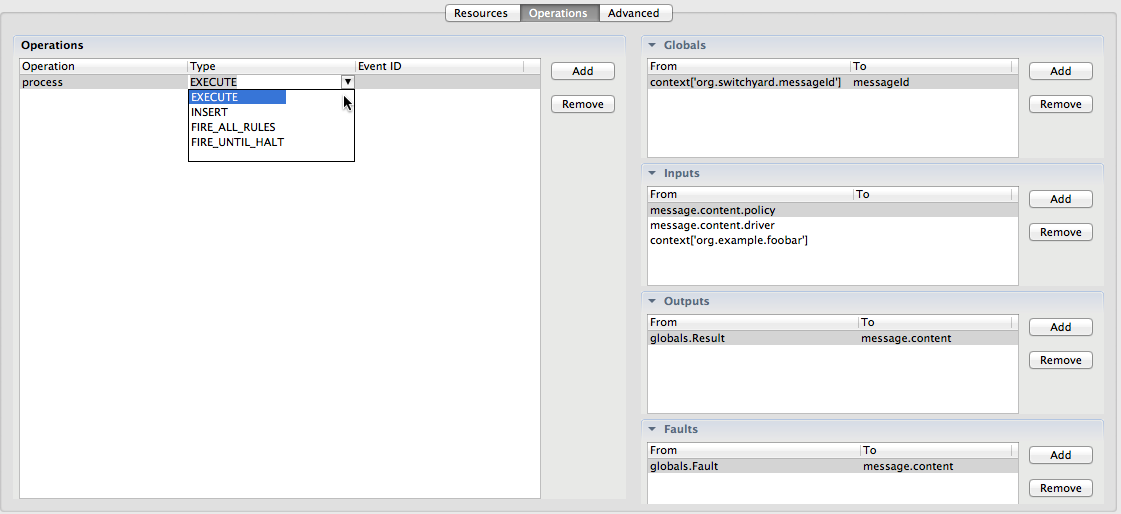
The above will create XML configuration like this:
<operation name="process" type="EXECUTE">
  <globals>
    <global from="context['org.switchyard.messageId']" to="messageId"/>
  </globals>
  <inputs>
    <input from="message.content.policy"/>
    <input from="message.content.driver"/>
    <input from="context['org.example.foobar']"/>
  </inputs>
  <outputs>
    <output from="globals.Result" to="message.content"/>
  </outputs>
  <faults>
    <fault from="globals.Fault" to="message.content"/>
  </faults>
</operation>
The associated DRL could look like this:
package org.switchyard.example.docs

global java.lang.String messageId
global java.util.Map globals

rule "Approval"
    when
        policy : Policy(threshold >= 600)
    then
        policy.setFlag(true);
        globals.put("Result", policy);
end

rule "Denial"
    when
        policy : Policy(threshold < 600)
    then
        policy.setFlag(false);
        globals.put("Result", policy);
end
Globals
Globals represent variable in your rules that do not trigger rule execution, but can be used in either the LHS or RHS of your rules for customization. They also provide a nice way to define in/out "buckets" so you can get data out of rule execution. In the example above, the messageId is a global variable, and a Map (called "globals") is as well. This way, we can set the outgoing SwitchYard Message content to the modified Policy.
Important
The global variable called globals (java.util.Map) is always available for in/out purposes. You don't have to configure it in your <globals> section for it to be available to your DRL. (See above.)
If you want to use your own application object as in in/out variable, you are free to do so.
You can even dynamically create your own Map using MVEL and name it what you want. For example, "holder" as shown below:
<operation name="process" type="EXECUTE">
  <globals>
    <!-- the from is an MVEL construct which creates a new Map -->
    <global from="['':'']" to="holder"/>
  </globals>
  <outputs>
    <!-- this assumes your DRL did a holder.put("out", someObject) at some point -->
    <output from="holder.out" to="message.content"/>
  </outputs>
</operation>
Inputs
For the Rules component, Inputs are the "facts" that are inserted into the Drools rules engine. In the example above, a Policy object, a Driver object, and a Context property. The rules engine will react to these inserted objects, building an agenda so that the appropriate RHS clauses will execute.
If you do not specify your own Inputs, the default will be the incoming Message content. If you do specify your own Inputs, the incoming Message content will not be inserted as a fact, and you will have to include "message.content" yourself, if desired.
Outputs
Using in/out variables (for example, the global Map called "globals"), we can extract data out of the rules execution and into the outgoing Message content.
If you do not specify your own Outputs, the default will be the result of the expression "globals.Result".
Warning
If you do not specify your own Outputs, or in your DRL, you do not populate the "Result" of the globals Map, then your Rules component execution will return null. For IN_OUT Exchange patterns, this could obviously be a problem, so in those cases make sure you configure (or populate the default) Output correctly!
Faults
Fault mapping is similar to Output mapping, however the data represents an Exception or data that will be wrapped in an Exception.
Stateless vs. Stateful Rules Execution
By default, service method invocation will create a new Drools knowledge session, execute it given the passed-in domain data, and then be cleanly disposed.
However, it is possible to configure SwitchYard so that a stateful knowledge session will be used. Specifically, it will "stick around" spanning multiple invocations. (Please visit the Drools documentation to learn more about stateless vs. stateful knowledge sessions.) To do this, you use the FIRE_ALL_RULES action type instead of EXECUTE.
There is also a new capability which allows you to insert facts into a stateful knowledge session without firing the rules (you might want to do that later). In this case, use the INSERT operation type.
Complex Event Processing
Complex Event Processing, or "CEP", is an advanced topic, and can best be explained in the Drools Fusion documentation. What will be shown here in the SwitchYard documentation is how it can be configured via XML. Obviously this can be set using the Eclipse tooling as well.
<implementation.rules ...>
    <operations>
        <operation eventId="FooStream" name="processFooMessage" type="FIRE_UNTIL_HALT"/>
        <operation eventId="BarStream" name="processBarMessage" type="FIRE_UNTIL_HALT"/>
    </operations>
    ...
    <properties>
        <property name="drools.clockType" value="realtime"/>
        <property name="drools.eventProcessingMode" value="stream"/>
        <property name="drools.maxThreads" value="1"/>
        <property name="drools.multithreadEvaluation" value="false"/>
    </properties>
</implementation.rules>
Note the type of "FIRE_UNTIL_HALT". This is required for CEP scenarios.
How do facts (data) get inputted for CEP?
Operations of type FIRE_UNTIL_HALT can specify <inputs> just like any other operation. If all of your inputs have "from" attributes but not "to" attributes, then:
-
If the "eventId" attribute on the operation element is set, then the eventId is your entry point that the data gets inserted into.
-
If the "eventId" attribute on the operation element is not set, then everything gets inserted into the stateful session, not into an entry point (as we can't guess that for you).
In other words, if you have input elements with "to" attributes, then the value of the "to" attribute will override - for just those input elements - what is set as "eventId" on the operation element. The point of this is that with just one operation invocation, you can have a list of different inputs, and whatever facts come from each input can be targeted to different entry points. Again, all with one operation invocation. Any inputs without to attributes in that operation will default to the operation's eventId, and if there is no eventId, again it defaults up again to be inserted into the stateful session itself.
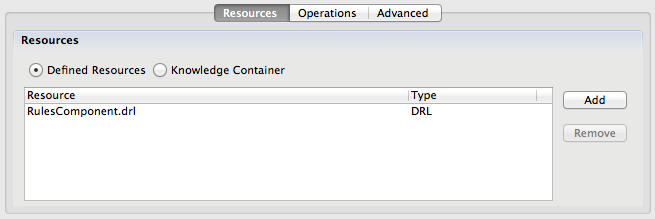
Resources
A Resource represents an artifact that is required by your Rules component. It could be anything you could think of, including a properties file, a Drools Rule Language file, or whatever. But it needs to be available to the Rules component's runtime for that process. The list of resources available to your process is a configurable aspect of the Rules service component.
Decision Tables
If your resource type is decision table (DTABLE), then you have the option of also specifying additional information for that resource using the resourceDetail sub-element:
-
If the decision table is an eXcel spreadsheet (XLS), or a Comma Separated Value (CSV) file, you can use the "inputType" attribute.
-
If it is a spreadsheet, to use a specifically named tab (or "sheet") in it, you can use the "worksheetName" attribute.For example:
<resource location="META-INF/Example.xls" type="DTABLE">
    <resourceDetail inputType="XLS" worksheetName="Sheet 2"/>
</resource>
Auditing a Service
Please see the Listeners and Loggers sections found in the Knowledge Services documentation.
Consuming a Service
Please see the Channels section found in the Knowledge Services documentation.
BPEL Services
The BPEL Component is a pluggable container in SwitchYard which allows a WS-BPEL business process to be exposed as a service through an interface defined using WSDL.
Providing a Service
To provide a service with the BPEL component, you will have to:
-
Define your process using WS-BPEL (e.g. using the Eclipse BPEL editor bundled with JBossTools).
-
Define a WSDL interface for the BPEL service.
-
Define a Deployment Descriptor (e.g. using the ODE Deployment Descriptor editor bundled with JBossTools).
-
Add the component containing the implementation and service interface to the SwitchYard configuration.
Here is an example of the component section of the SwitchYard configuration:
<sca:component name="SayHelloService">
    <bpel:implementation.bpel process="sh:SayHello" />
    <sca:service name="SayHelloService">
        <sca:interface.wsdl interface="SayHelloArtifacts.wsdl#wsdl.porttype(SayHello)"/>
    </sca:service>
</sca:component>
The BPEL component contains a single 'implementation.bpel' element that identifies the fully qualified name of the BPEL process.
The component may also contain one or more service elements defining the WSDL port types through which the BPEL process can be accessed.
In the packaged Switchyard application, the BPEL process associated with this fully qualified name, must be present within the root folder of the distribution, along with the deployment descriptor (deploy.xml). The service name specified must match the component service name declared in the switchyard.xml. The port field is not used. An example of the deployment descriptor for the BPEL process referenced above is:
<deploy xmlns="http://www.apache.org/ode/schemas/dd/2007/03"
    xmlns:examples="http://www.jboss.org/bpel/examples"
    xmlns:domain="urn:switchyard-quickstart:bpel-say-hello:0.1.0">
    <!-- say_hello example -->
    <process name="examples:SayHello">
        <active>true</active>
        <retired>false</retired>
        <process-events generate="all"/>
        <provide partnerLink="client">
            <service name="domain:SayHelloService" port="ignored"/>
        </provide>
    </process>
</deploy>
Consuming a Service
This section describes how a BPEL process can invoke other services.
The first step is to define the WSDL interface(s), representing the service(s) to be consumed, using an invoke element within the deployment descriptor. Once again, the service name must match the name of the component reference in the switchyard.xml, e.g.
<deploy xmlns="http://www.apache.org/ode/schemas/dd/2007/03"
    xmlns:ls="http://example.com/loan-approval/loanService/"
    xmlns:ra="http://example.com/loan-approval/riskAssessment/"
    xmlns:examples="http://www.jboss.org/bpel/examples"
    xmlns:domain="urn:switchyard-quickstart:bpel-loan-approval:0.1.0">

    <!-- loan_approval/loanService example -->
    <process name="ls:loanApprovalProcess">
    <active>true</active>
    <process-events generate="all"/>
        <provide partnerLink="customer">
            <service name="domain:loanService" port="ignored"/>
        </provide>
        <invoke partnerLink="assessor" usePeer2Peer="false">
            <service name="domain:riskAssessor" port="ignored"/>
        </invoke>
    </process>
    <!-- loan_approval/riskAssessment example -->
    <process name="ra:riskAssessmentProcess">
        <active>true</active>
        <process-events generate="all"/>
        <provide partnerLink="assessor">
            <service name="domain:riskAssessor" port="ignored"/>
        </provide>
    </process>
</deploy>
The 'usePeer2Peer' property informs the BPEL engine not to use internal communications for sending messages between BPEL processes that may be executing within the same engine, and instead pass messages through the SwitchYard infrastructure.
For each consumed service, we then need to create a reference element within the SwitchYard configuration, to locate the WSDL file and identify the port type associated with the required WSDL service/port.
<sca:component name="loanService">
             <bpel:implementation.bpel process="ls:loanApprovalProcess" />
             <sca:service name="loanService">
                 <sca:interface.wsdl interface="loanServicePT.wsdl#wsdl.porttype(loanServicePT)"/>
             </sca:service>
             <sca:reference name="riskAssessor" >
                 <sca:interface.wsdl interface="riskAssessmentPT.wsdl#wsdl.porttype(riskAssessmentPT)"/>
             </sca:reference>
         </sca:component>
Implementation Property Injection
You can inject properties into your BPEL process definition with using SwitchYardPropertyFunction.resolveProperty() XPath custom function. This bpel:copy section copies "Greeting" property value into the ReplySayHelloVar variable:
.....
<bpel:copy>
     <bpel:from xmlns:property="java:org.switchyard.component.bpel.riftsaw.SwitchYardPropertyFunction"
                expressionLanguage="urn:oasis:names:tc:wsbpel:2.0:sublang:xpath2.0">
         <![CDATA[concat(property:resolveProperty('Greeting'), $ReceiveSayHelloVar.parameters/tns:input)]]>
     </bpel:from>
     <bpel:to part="parameters" variable="ReplySayHelloVar">
         <bpel:query queryLanguage="urn:oasis:names:tc:wsbpel:2.0:sublang:xpath1.0"><![CDATA[tns:result]]></bpel:query>
     </bpel:to>
</bpel:copy>
See Properties section of the User Guide for more details of SwitchYard property support.
Maintain Multiple Versions of a BPEL Process
BPEL processes can be used to implement long lived stateful business processes. However the BPEL process may need to change, over the course of its lifetime, to accomodate new requirements.
This introduces the problem of how to deal with existing active instances of the BPEL process that may not complete for weeks, months or even years. In these situations we need to have a strategy for dealing with multiple version of a BPEL process, to enable new requirements to be introduced, while still preserving the original process definitions associated with existing active process instances.
This is achieved by simply associating a version number with the BPEL process by adding it as a suffix to the BPEL file name. For example, if our BPEL process would normally be located in the file 'HelloWorld.bpel', then we simply add a hyphen followed by the version number, e.g. 'HelloWorld-32.bpel' would indicate that this is the 32nd version of this BPEL process.
When a new version of the BPEL process has been defined, it is packaged in the SwitchYard application, along side the previous versions of the BPEL process. It is important that the older version of the BPEL process remain in the SwitchYard application until there are no longer any active process instances associated with that version.
![]() It is then important that the SwitchYard application is re-deployed, without undeploying the previous version. If the previous version of the SwitchYard application is undeployed, it will cause the BPEL engine to delete all outstanding active instances associated with the process definitions that have bene removed.
It is then important that the SwitchYard application is re-deployed, without undeploying the previous version. If the previous version of the SwitchYard application is undeployed, it will cause the BPEL engine to delete all outstanding active instances associated with the process definitions that have bene removed.
Although the BPEL process is versioned, the WSDL interfaces are not. It is important to ensure that any changes made to the WSDL interfaces are backward compatible, so that both the new and older versions of the BPEL (that still have active process instances) are not affected by the changes.
Structure of a SwitchYard BPEL Application
The following image shows the structure of the say_hello SwitchYard BPEL quickstart:
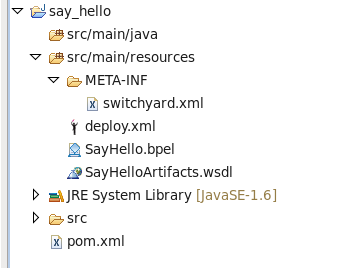
The important part is how the artifacts are structured within the src/main/resources folder.
The switchyard.xml configuration file is located in the META-INF folder as usual. However the BPEL deployment descriptor (deploy.xml), and the BPEL process definition are located in the root folder.
The WSDL interface definitions, and any accompanying XSD schemas, can be located in sub-folders. If they are, then the BPEL process and SwitchYard BPEL component configuration must define the correct relative path.
Knowledge Services
Knowledge Services are SwitchYard Services that leverage KIE, and thus, Drools and/or jBPM:
Given that Drools and jBPM are very tightly integrated under KIE, much of their runtime configuration can be shared by both SwitchYard's BPM component and its Rules component. Therefore, documentation on this page refers to elements that are either exactly, or structurally, identical to both the BPM and Rules components. That is to say, any configuration element you see here can be used in the same way for both BPM and Rules. Sometimes, however, the context of the element is significant, so cases like that will be identified where applicable.
Note
For some of the configuration elements below, you might wonder why it is a shared element between both the BPM and Rules components. For example, Channels are something only applicable to Rules, right? Yes, however what if your BPM process has a node which executes business rules, and those rules reference channels? In that case, you need a way to configure channels for the rules within your process. Thus, it is documented here.
Operations
Operations are how Knowledge Services know how to map service operation invocations to their appropriate runtime counterparts. For example, when method "myOperation" is called, what should happen? Execute some business rules? Start a business process?
Using the XML below as reference, when the SwitchyYard service’s "myOperation" operation is invoked, an operation of type "OPERATION_TYPE" will be taken. Note that "OPERATION_TYPE" is just a placeholder here. Actual OperationTypes are specific to the BPM and Rules components. Please refer to the specific documentation on those pages.
At this time, the eventId attribute is only applicable to the Rules component.
Please see the Mapping section below for an explanation of the globals, inputs, outputs and faults sections.
XML
<operations>
    <operation eventId="myEventId" name="myOperation" type="OPERATION_TYPE">
        <globals>
            <global from="" to=""/>
        </globals>
        <inputs>
            <input from="" to=""/>
        </inputs>
        <outputs>
            <output from="" to=""/>
        </outputs>
        <faults>
            <fault from="" to=""/>
        </faults>
    </action>
</operations>
Mappings
Mappings are the way to move data in or out of an operation. You can specify as many mappings as you like for an operation, and they get grouped as globals, inputs, outputs or faults:
-
Global mappings are used to provide data that is applicable to the entire action, and is often used in classic in/out param (or data-holder/provider) fashion. An example of a global mapping is a global variable specified within a Drools Rule Language (DRL) file.
-
Input mappings are used to provide data that represents parameters being fed into an action. An example of an input mapping for BPM could be a process variable used while starting a business process. For Rules, it could be a fact to insert into a rules engine session.
-
Output mappings are used to return data out of an action. An example of an output mapping would be a BPM process variable that you want to set as the outgoing (response) message’s content.
-
Fault mappings are used to return fault data out of an action. An example of a fault mapping would be a BPM process variable that you want to set as the outgoing (response) application Exception to be thrown.
All of the different mapping types support a from and to attribute. Those attributes get configured with MVEL expressions, which themselves support variables that can come from process or global variable names, implicit variable names (see below), or variables that get resolved from properties.
Implicit Variables
-
context - The current org.switchyard.Context.
-
message - The current org.switchyard.Message.
Some examples:
-
from="message.content" - This is the same as message.getContent().
-
from="context[‘foo’]" - This is the same as context.getProperty("foo", Scope.MESSAGE).getValue(), in a null-safe manner.
Specifying attributes is often optional, but this depends on the usage. For example, if you are specifying a global variable for a rule, or a process variable to put into (or get out of) a BPM process, then it is required. However, if the result of the expression is to be used as facts for rule session insertion, than specifying a "to" isn’t applicable.
Channels
Drools supports the notion of "Channels", which are basically "exit points" in your DRL. They can be used in both stateful and stateless sessions. Here is an example:
package com.example
rule "example rule"
    when
        $f : Foo ( bar > 10 )
    then
        channels["Bar"].send( $f.getBar() );
end
XML
<channels>
    <channel class="com.example.BarChannel" name="Bar"/>
</channels>
Warning
Channels must implement org.kie.api.runtime.Channel.
SwitchYard Service Channel
SwitchYard provides an out-of-the-box Channel which allows you to invoke (one-way) other SwitchYard services directly and easily from your DRL. Here is an example:
XML
<channel name="HelloWorld" reference="HelloWorld" operation="greet"/>
Attribute Reference:
-
class = The channel implementation class. (Default is SwitchYardServiceChannel.)
-
name = The channel name. (default = simple name of the implementation class)
-
reference = The service reference qualified name.
-
operation = The service reference operation name.
Listeners
Listeners are used to monitor specific types of events that occur during Knowledge execution. An example of this would be to audit a BPM process, and save the audit details into a database while the process progresses. Then at a later time, these details can be reported against. There are many out-of-the-box Listeners that Drools and jBPM provide, and you can write your own. The only restriction in writing your own Listener is that it must, at the minimum, implement java.util.EventListener. However, your Listener won’t actually be registered for anything unless it also implements one of the respected KIE/Drools/jBPM Listener interfaces. For example, org.drools.core.event.WorkingMemoryEventListener, org.kie.api.event.rule.AgendaEventListener, org.kie.api.event.process.ProcessEventListener, or similar.
Note
If the Listeners provide a Constructor taking a single KieRuntimeEventManager (or KnowledgeRuntimeEventManager) as a parameter, that is used and it is assumed it will do the work of registering itself with the passed-in event manager (OOTB {{WorkingMemoryLogger}}s do this). Otherwise, a no-arg constructor is assumed, and SwitchYard will do the work of registering the Listeners for each of the respected interfaces it implements.
XML
<listeners>
    <listener class="org.drools.core.event.DebugProcessEventListener"/>
    <listener class="org.kie.api.event.rule.DebugWorkingMemoryEventListener"/>
    <listener class="com.example.MyListener"/>
</listeners>
Loggers
Loggers are special types of Listeners, and are used to output the events that occur during Knowledge execution. Support for Loggers is done using a dedicated configuration element. Events can be logged to the CONSOLE or to a FILE (or THREADED_FILE). If they are directed to a file, that log can later be opened via the Drools Eclipse tooling.
XML
<loggers>
    <logger interval="2000" log="myLog" type="THREADED_FILE"/>
    <logger type="CONSOLE/>
</loggers>
Manifest
The only configuration element more important than Operations is the Manifest, which is where you specify where the "intelligence" of the component comes from. For the BPM component, this will be, at the minimum, the location of the BPMN 2 process definition file. For the Rules component, this will most likely be the location of DRL, DSL, DSLR or XLS files. There are two ways to to configure the Manifest:
-
With a KIE Container. This relies upon the existence of a META-INF/kmodule.xml configuration file.
-
With a manually defined list of Resources.
Warning
These two options are mutually exclusive: You have to choose one or the other!
The following examples assume there is a DRL file located at classpath: com/example/MyRules.drl
Option 1 (KIE Container):
META-INF/kmodule.xml
<kmodule xmlns="http://jboss.org/kie/6.0.0/kmodule">
    <kbase name="com.example">
        <ksession name="my-session"/>
    </kbase>
</kmodule>
XML
<manifest>
    <container sessionName="my-session"/>
</manifest>
In addition to the sessionName attribute, you can also specify baseName and releaseId, if desired.
Also, scanning for updates is supported only with the container option (not the resources option). To enable this, simply set scan="true" and, optionally, scanInterval=<# of milliseconds>.
Option 2 (Resources):
XML
<manifest>
    <resources>
        <resource location="com/example/MyProcess.bpmn" type="BPMN2"/>
        <resource location="com/example/MyRules.drl" type="DRL"/>
    </resources>
</manifest>
Properties
Properties are the way to provide "hints" to the underlying KIE/Drools/jBPM runtime on how certain options are configured. Rather than having to expose every single KIE/Drools/jBPM option as a configurable element or attribute within SwitchYard, they can be set as open-ended properties.
Properties are an advanced topic, so setting them should be done with care. All possible property names and values will not be listed here, but as a starting point, in your IDE open up a Type Heirarchy with a root of org.kie.api.conf.Option. That is your full list. Here are just a couple examples:
XML
<properties>
    <property name="drools.clockType" value="pseudo"/>
    <property name="drools.eventProcessingMode" value="stream"/>
</properties>
Gateways
Bindings
SOAP
The SOAP component in SwitchYard provides SOAP-based web service binding support for services and references in SwitchYard.
Binding Services with SOAP
Composite-level services can be exposed as a SOAP-based web service using the <binding.soap> binding definition. The following configuration options are available for binding.soap when binding services:
-
wsdl : location of the WSDL used to describe the web service endpoint. A relative path can be used if the WSDL is included in the deployed application. If the WSDL is located outside the application, then a file: or http: URL can be used.
-
socketAddr : the IP Socket Address to be used. The value can be in the form hostName/ipAddress:portNumber or hostName/ipAddress or :portNumber.
-
wsdlPort : port name in the WSDL to use. If unspecified, the first port definition in the WSDL is used for the service endpoint
-
contextPath : additional context path for the SOAP endpoint. Default is none.
In AS7 by default the JBossWS-CXF stack is enabled now and hence the socketAddr parameter will be ignored. However, this parameter can be used for standalone usage.
Here's an example of what a SOAP service binding looks like:
<sca:composite name="orders" targetNamespace="urn:switchyard-quickstart-demo:orders:0.1.0">
    <sca:service name="OrderService" promote="OrderService">
        <soap:binding.soap>
            <soap:wsdl>wsdl/OrderService.wsdl</soap:wsdl>
            <soap:socketAddr>:9000</soap:socketAddr>
         </soap:binding.soap>
    </sca:service>
</sca:composite>
Binding References with SOAP
Binding a reference with SOAP can be used to make SOAP-based web services available to SwitchYard services. The following configuration options are available for binding.soap when binding references:
-
wsdl : location of the WSDL used to describe the web service endpoint. A relative path can be used if the WSDL is included in the deployed application. If the WSDL is located outside the application, then a file: or http: URL can be used.
-
wsdlPort : port name in the WSDL to use. If unspecified, the first port definition in the WSDL is used for the service endpoint.
-
endpointAddress : the SOAP endpoint address to override from that specified in the WSDL. Optional property, if not specified will use the one specified in the WSDL.
-
timeout : The request's time-out value in milliseconds.
-
proxy : HTTP Proxy settings for the endpoint.
-
basic/ntlm : authentication configuration for the endpoint.
<sca:composite name="orders" targetNamespace="urn:switchyard-quickstart-demo:orders:0.1.0">
    <sca:reference name="WarehouseService" promote="OrderComponent/WarehouseService" multiplicity="1..1">
         <soap:binding.soap>
            <soap:wsdl>wsdl/OrderService.wsdl</soap:wsdl>
            <soap:endpointAddress>http://www.change.com/toanewendpointurl</soap:endpointAddress>
         </soap:binding.soap>
    </sca:reference>
</sca:composite>
Proxy Configuration
If the SOAP reference needs to pass through a proxy server then the proxy server configuration can be provided using the proxy element. The following configuration options are available:
-
type : The proxy type. Can be HTTP or SOCKS, default is HTTP
-
host : The proxy host.
-
port : The proxy port (optional).
-
user : The proxy user (optional).
-
password : The proxy password (optional).
<sca:composite name="orders" targetNamespace="urn:switchyard-quickstart-demo:orders:0.1.0">
    <sca:reference name="WarehouseService" promote="OrderComponent/WarehouseService" multiplicity="1..1">
        <soap:binding.soap>
            <soap:wsdl>wsdl/OrderService.wsdl</soap:wsdl>
            <soap:endpointAddress>[http://www.change.com/toanewendpointurl]</soap:endpointAddress>
            <soap:proxy>
                <soap:type>HTTP</soap:type>
                <soap:host>192.168.1.2</soap:host>
                <soap:port>9090</soap:port>
                <soap:user>user</soap:user>
                <soap:password>password</soap:password>
            </soap:proxy>
        </soap:binding.soap>
    </sca:reference>
</sca:composite>
Authentication Configuration
If the SOAP reference endpoint is secured using BASIC/NTLM, then the authentication configuration can be provided using the basic or ntlm elements. The following configuration options are available:
-
user : the user name.
-
password : password.
-
host : the authentication host (optional).
-
port : the authentication port (optional).
-
realm : the authentication realm (optional, applicable only for BASIC).
-
domain: the Windows domain for authentication (optional, applicable only for NTLM).
A sample NTLM authentication configuration:
<sca:composite name="orders" targetNamespace="urn:switchyard-quickstart-demo:orders:0.1.0">
    <sca:reference name="WarehouseService" promote="OrderComponent/WarehouseService" multiplicity="1..1">
        <soap:binding.soap>
            <soap:wsdl>wsdl/OrderService.wsdl</soap:wsdl>
            <soap:endpointAddress>[http://www.change.com/toanewendpointurl]</soap:endpointAddress>
            <soap:ntlm>
                <soap:user>user</soap:user>
                <soap:password>password</soap:password>
                <soap:domain>domain</soap:domain>
            </soap:ntlm>
        </soap:binding.soap>
    </sca:reference>
</sca:composite>
Security
Important
It is strongly suggested that you first read up on JBoss Web Services WS-Security.
UsernameToken Support
To enable WS-Security within your application, a few steps are required:
-
Define a Policy within your WSDL, and reference with with a PolicyReference inside your binding.
-
Configure your <soap.binding> with an <endpointConfig> so JBossWS-CXF is configured properly.
-
Configure your <soap.binding> with an <inInterceptors> section, including the appropriate JBossWS-CXF <interceptor> to handle incoming SOAP requests.
-
Include a WEB-INF/jboss-web.xml in your application with a <security-domain> specified, so JBossWS-CXF knows which modules to use for authentication and roles mapping.
SwitchYard provides a policy-security-wss-username Quickstart as an example. Here are the pertinent sections:
META-INF/WorkService.wsdl
  <binding name="WorkServiceBinding" type="tns:WorkService">
    <wsp:PolicyReference URI="#WorkServicePolicy"/>
    ...
  </binding>
  <wsp:Policy wsu:Id="WorkServicePolicy">
    <wsp:ExactlyOne>
      <wsp:All>
        <sp:SupportingTokens xmlns:sp="http://docs.oasis-open.org/ws-sx/ws-securitypolicy/200702">
          <wsp:Policy>
            <sp:UsernameToken sp:IncludeToken="http://docs.oasis-open.org/ws-sx/ws-securitypolicy/200702/IncludeToken/AlwaysToRecipient">
              <wsp:Policy>
                <sp:WssUsernameToken10/>
              </wsp:Policy>
            </sp:UsernameToken>
          </wsp:Policy>
        </sp:SupportingTokens>
      </wsp:All>
    </wsp:ExactlyOne>
  </wsp:Policy>
META-INF/switchyard.xml
  <binding.soap xmlns="urn:switchyard-component-soap:config:1.0">
    <wsdl>META-INF/WorkService.wsdl</wsdl>
    <contextPath>policy-security-wss-username</contextPath>
    <endpointConfig configFile="META-INF/jaxws-endpoint-config.xml" configName="SwitchYard-Endpoint-Config"/>
    <inInterceptors>
        <interceptor class="org.jboss.wsf.stack.cxf.security.authentication.SubjectCreatingPolicyInterceptor"/>
    </inInterceptors>
  </binding.soap>
WEB-INF/jaxws-endpoint-config.xml
<jaxws-config xmlns="urn:jboss:jbossws-jaxws-config:4.0" xmlns:javaee="http://java.sun.com/xml/ns/javaee" xmlns:xsi="http://www.w3.org/2001/XMLSchema-instance" xsi:schemaLocation="urn:jboss:jbossws-jaxws-config:4.0 schema/jbossws-jaxws-config_4_0.xsd">
    <endpoint-config>
        <config-name>SwitchYard-Endpoint-Config</config-name>
        <property>
            <property-name>ws-security.validate.token</property-name>
            <property-value>false</property-value>
        </property>
    </endpoint-config>
</jaxws-config>
WEB-INF/jboss-web.xml
<jboss-web>
    <security-domain>java:/jaas/other</security-domain>
</jboss-web>
With the above pieces in place, JBossWS-CXF will intercept incoming SOAP requests, extract the UsernameToken, attempt to authenticate it against the LoginModule(s) configured in the application server's "other" security domain, and provide any authorized roles. If successful, the request will be handed over to SwitchYard, who can do further processing, including enforcing our own policies. In the case of WS-Security, SwitchYard will not attempt a second clientAuthentication, but instead will respect the outcome from JBossWS-CXF. Note that if the original clientAuthentication fails, it is a "fail-fast" scenario, and the request will not be channeled into SwitchYard.
Signature and Encryption Support
Required steps:
-
The Policy in your WSDL needs to reflect the added requirements. An example of this can be found in the JBossWS documentation here: Signature and Encryption.
-
Configure your <soap.binding> with an <endpointConfig> so JBossWS-CXF is configured properly.
For example:
META-INF/switchyard.xml
  <binding.soap xmlns="urn:switchyard-component-soap:config:1.0">
    <wsdl>META-INF/WorkService.wsdl</wsdl>
    <contextPath>policy-security-wss-username</contextPath>
    <endpointConfig configFile="META-INF/jaxws-endpoint-config.xml" configName="SwitchYard-Endpoint-Config">
  </binding.soap>
WEB-INF/jaxws-endpoint-config.xml
<jaxws-config xmlns="urn:jboss:jbossws-jaxws-config:4.0" xmlns:javaee="http://java.sun.com/xml/ns/javaee" xmlns:xsi="http://www.w3.org/2001/XMLSchema-instance" xsi:schemaLocation="urn:jboss:jbossws-jaxws-config:4.0 schema/jbossws-jaxws-config_4_0.xsd">
    <endpoint-config>
        <config-name>SwitchYard-Endpoint-Config</config-name>
        <property>
            <property-name>ws-security.callback-handler</property-name>
            <property-value>org.switchyard.quickstarts.demo.policy.security.wss.signencrypt.WorkServiceCallbackHandler</property-value>
        </property>
        <property>
            <property-name>ws-security.encryption.properties</property-name>
            <property-value>META-INF/bob.properties</property-value>
        </property>
        <property>
            <property-name>ws-security.encryption.username</property-name>
            <property-value>alice</property-value>
        </property>
        <property>
            <property-name>ws-security.signature.properties</property-name>
            <property-value>META-INF/bob.properties</property-value>
        </property>
        <property>
            <property-name>ws-security.signature.username</property-name>
            <property-value>bob</property-value>
        </property>
    </endpoint-config>
</jaxws-config>
META-INF/bob.properties
org.apache.ws.security.crypto.provider=org.apache.ws.security.components.crypto.Merlin
org.apache.ws.security.crypto.merlin.keystore.type=jks
org.apache.ws.security.crypto.merlin.keystore.password=password
org.apache.ws.security.crypto.merlin.keystore.alias=bob
org.apache.ws.security.crypto.merlin.file=META-INF/bob.jks
Attachments
SOAP with Attachments (SwA)
By default any attachment sent with a SOAP Envelope is passed around in a SwitchYard Message as an attachment. The default SOAPMessageComposer handles this.
SOAP with MTOM/XOP
To support optimization mechanism, the underlying stack transports/receives the attachments as Mime-Multipart messages. One additional configuration in SwitchYard that allows to expand an xop:inline's SOAP Message is this:
-
mtom : attribute xopExpand when set to true will replace the xop:include element with the contents from the Mime attachment.
sample:
<soap:binding.soap xmlns:soap="urn:switchyard-component-soap:config:1.0">
    <soap:wsdl>Foo.wsdl</soap:wsdl>
    <soap:endpointAddress>http://modified.com/phantom</soap:endpointAddress>
    <soap:mtom enabled="true" xopExpand="true"/>
</soap:binding.soap>
MTOM can be enabled using WSDL policy as shown below or can be overridden as shown above using the SwitchYard config.
<definitions targetNamespace="urn:switchyard-component-soap:test-ws:1.0" name="ImageService"
    xmlns="http://schemas.xmlsoap.org/wsdl/"
    xmlns:wsdl="http://schemas.xmlsoap.org/wsdl/"
    xmlns:tns="urn:switchyard-component-soap:test-ws:1.0"
    xmlns:xsd="http://www.w3.org/2001/XMLSchema"
    xmlns:soap="http://schemas.xmlsoap.org/wsdl/soap12/"
    xmlns:wsam="http://www.w3.org/2007/05/addressing/metadata"
    xmlns:wsp="http://www.w3.org/ns/ws-policy"
    xmlns:wsaw="http://www.w3.org/2006/05/addressing/wsdl"
    xmlns:xmime="http://www.w3.org/2005/05/xmlmime"
    xmlns:wsoma="http://www.w3.org/2007/08/soap12-mtom-policy"
    xmlns:wsu="http://docs.oasis-open.org/wss/2004/01/oasis-200401-wss-wssecurity-utility-1.0.xsd">
...
    <wsp:Policy wsu:Id="ImageServicePortBinding_policy">
        <wsp:ExactlyOne>
            <wsp:All>
                <wsoma:MTOM/>
            </wsp:All>
        </wsp:ExactlyOne>
    </wsp:Policy>
...
  <binding name="ImageServicePortBinding" type="tns:ImageService">
    <wsp:PolicyReference URI="#ImageServicePortBinding_policy"/>
    <soap:binding transport="http://www.w3.org/2003/05/soap/bindings/HTTP/" style="document"/>
    <operation name="resize">
      <soap:operation soapAction=""/>
      <input>
        <soap:body use="literal"/>
      </input>
      <output>
        <soap:body use="literal"/>
      </output>
    </operation>
  </binding>
Addressing
SwitchYard runtime provides support for WS-A via the underlying SOAP stack. To enable WS-A you can either set a policy or use the UseAdrressing element in the WSDL as shown below:
<definitions targetNamespace="urn:switchyard-component-soap:test-ws:1.0" name="HelloAddressingService"
    xmlns="http://schemas.xmlsoap.org/wsdl/"
    xmlns:wsdl="http://schemas.xmlsoap.org/wsdl/"
    xmlns:tns="urn:switchyard-component-soap:test-ws:1.0"
    xmlns:xsd="http://www.w3.org/2001/XMLSchema"
    xmlns:soap="http://schemas.xmlsoap.org/wsdl/soap12/"
    xmlns:wsam="http://www.w3.org/2007/05/addressing/metadata"
    xmlns:wsp="http://www.w3.org/ns/ws-policy"
    xmlns:wsaw="http://www.w3.org/2006/05/addressing/wsdl"
    xmlns:wsu="http://docs.oasis-open.org/wss/2004/01/oasis-200401-wss-wssecurity-utility-1.0.xsd">
...
    <wsp:Policy wsu:Id="HelloSOAPAddressingServicePortBinding_policy">
        <wsp:ExactlyOne>
            <wsp:All>
                <wsam:Addressing wsdl:required="false">
                    <wsp:Policy/>
                </wsam:Addressing>
            </wsp:All>
        </wsp:ExactlyOne>
    </wsp:Policy>
...
  <binding name="HelloSOAPAddressingServicePortBinding" type="tns:HelloAddressingService">
    <wsp:PolicyReference URI="#HelloSOAPAddressingServicePortBinding_policy"/>
    <soap:binding transport="http://www.w3.org/2003/05/soap/bindings/HTTP/" style="document"/>
    <operation name="sayHello">
      <soap:operation soapAction=""/>
      <input>
        <soap:body use="literal"/>
      </input>
      <output>
        <soap:body use="literal"/>
      </output>
    </operation>
  </binding>
...
  <binding name="HelloSOAPAddressingServicePortBinding2" type="tns:HelloAddressingService2">
    <wsaw:UsingAddressing required="true" />
    <soap:binding transport="http://www.w3.org/2003/05/soap/bindings/HTTP/" style="document"/>
    <operation name="sayHello">
      <soap:operation soapAction=""/>
      <input>
        <soap:body use="literal"/>
      </input>
      <output>
        <soap:body use="literal"/>
      </output>
    </operation>
  </binding>
HTTP
The HTTP component in SwitchYard provides HTTP-based binding support for services and references in SwitchYard.
Binding Services with HTTP
Composite-level services can be exposed as a HTTP-based service using the <binding.http> binding definition. The following configuration options are available for binding.rest when binding services:
-
operationSelector : specification of the operation to use for the message exchange. See Operation Selector for more details.
-
contextPath : A context path for the HTTP endpoint.
Here's an example of what a HTTP service binding looks like:
<sca:service name="QuoteService" promote="StockService/QuoteService">
    <http:binding.http>
        <selector:operationSelector operationName="getPrice"/>
        <http:contextPath>http-binding/quote</http:contextPath>
    </http:binding.http>
</sca:service>
Binding References with HTTP
Binding a reference with HTTP can be used to make HTTP-based services available to SwitchYard services. The following configuration options are available for binding.http when binding references:
-
address : A URL that points to the HTTP endpoint. It is optional and if not specified will default to http://127.0.0.1:8080/.
-
method : The HTTP method used for invoking the endpoint. Default is GET.
-
timeout : The request's time-out value in milliseconds.
-
contentType : The HTTP Content-Type header that needs to be set on the request.
-
proxy : HTTP Proxy settings for the endpoint.
-
basic/ntlm : authentication configuration for the endpoint.
Here's an example of what a HTTP reference binding looks like:
<sca:reference name="Symbol" promote="StockService/SymbolService" multiplicity="1..1">
    <http:binding.http>
        <http:address>http://localhost:8080/http-binding/symbol</http:address>
        <http:method>POST</http:method>
        <http:contentType>text/plain</http:contentType>
    </http:binding.http>
</sca:reference>
Proxy Configuration
If the HTTP reference needs to pass through a proxy server then the proxy server configuration can be provided using the proxy element. The following configuration options are available:
-
host : The proxy host.
-
port : The proxy port (optional).
-
user : The proxy user (optional).
-
password : The proxy password (optional).
<sca:reference name="Symbol" promote="StockService/SymbolService" multiplicity="1..1">
    <http:binding.http>
        <http:address>http://localhost:8080/http-binding/symbol</http:address>
        <http:proxy>
            <http:host>host</http:host>
            <http:port>8090</http:port>
            <http:user>Beal</http:user>
            <http:password>conjecture</http:password>
        </http:proxy>
    </http:binding.http>
</sca:reference>
Authentication Configuration
If the HTTP reference endpoint is secured using BASIC/NTLM, then the authentication configuration can be provided using the basic or ntlm elements. The following configuration options are available:
-
user : The authentication user.
-
password : The authentication password.
-
realm/domain : The authentication realm or the Windows domain.
A sample BASIC authentication configuration:
<sca:reference name="Symbol" promote="StockService/SymbolService" multiplicity="1..1">
    <http:binding.http>
        <http:address>http://localhost:8080/http-binding/symbol</http:address>
        <http:basic>
            <http:user>Beal</http:user>
            <http:password>conjecture</http:password>
            <http:realm>Any</http:realm>
        </http:basic>
    </http:binding.http>
</sca:reference>
RESTEasy
The RESTEasy component in SwitchYard provides REST-based binding support for services and references in SwitchYard.
Binding Services with RESTEasy
Composite-level services can be exposed as a REST-based service using the <binding.rest> binding definition. The following configuration options are available for binding.rest when binding services:
-
interfaces : A comma seperated list of interfaces or abstract/empty classes with JAX-RS annotations.
-
contextPath : Additional context path for the REST endpoint. Default is none.
Here's an example of what a REST service binding looks like:
<sca:service name="OrderService" promote="OrderService/OrderService">
    <rest:binding.rest>
        <rest:interfaces>org.switchyard.quickstarts.rest.binding.OrderResource,org.switchyard.quickstarts.rest.binding.TestResource</rest:interfaces>
        <rest:contextPath>rest-binding</rest:contextPath>
    </rest:binding.rest>
</sca:service>
Binding References with RESTEasy
Binding a reference with REST can be used to make REST-based services available to SwitchYard services. The following configuration options are available for binding.rest when binding references:
-
interfaces : A comma seperated list of interfaces or abstract/empty classes with JAX-RS annotations.
-
address : A URL that points to the root path of resources. This is only applicable for Reference bindings. It is optional and if not specified will default to http://127.0.0.1:8080/.
-
timeout : The request's time-out value in milliseconds.
-
contextPath : Additional context path for the REST endpoint. Default is none.
-
proxy : HTTP Proxy settings for the endpoint.
-
basic/ntlm : authentication configuration for the endpoint.
Here's an example of what a REST reference binding looks like:
<sca:reference name="Warehouse" promote="OrderService/Warehouse" multiplicity="1..1">
    <rest:binding.rest>
        <rest:interfaces>org.switchyard.quickstarts.rest.binding.WarehouseResource</rest:interfaces>
        <rest:address>http://localhost:8080</rest:address>
        <rest:contextPath>rest-binding</rest:contextPath>
    </rest:binding.rest>
</sca:reference>
In this example above the resource URLs will start from http://localhost:8080/rest-binding.
Proxy Configuration
If the REST reference needs to pass through a proxy server then the proxy server configuration can be provided using the proxy element. The following configuration options are available:
-
host : The proxy host.
-
port : The proxy port (optional).
-
user : The proxy user (optional).
-
password : The proxy password (optional).
<sca:reference name="Warehouse" promote="OrderService/Warehouse" multiplicity="1..1">
    <rest:binding.rest>
        <rest:interfaces>org.switchyard.quickstarts.rest.binding.WarehouseResource</rest:interfaces>
        <rest:address>http://localhost:8080/rest-binding</rest:address>
        <rest:proxy>
            <rest:host>host</rest:host>
            <rest:port>8090</rest:port>
            <rest:user>Beal</rest:user>
            <rest:password>conjecture</rest:password>
        </rest:proxy>
    </rest:binding.rest>
</sca:reference>
Authentication Configuration
If the REST reference endpoint is secured using BASIC/NTLM, then the authentication configuration can be provided using the basic or ntlm elements. The following configuration options are available:
-
user : The authentication user.
-
password : The authentication password.
-
realm/domain : The authentication realm or the Windows domain.
A sample NTLM authentication configuration:
<sca:reference name="Warehouse" promote="OrderService/Warehouse" multiplicity="1..1">
    <rest:binding.rest>
        <rest:interfaces>org.switchyard.quickstarts.rest.binding.WarehouseResource</rest:interfaces>
        <rest:address>http://localhost:8080/rest-binding</rest:address>
        <rest:ntlm>
            <rest:user>user</rest:user>
            <rest:password>password</rest:password>
            <rest:domain>domain</rest:domain>
        </rest:ntlm>
    </rest:binding.rest>
</sca:reference>
SSL Configuration
If the REST reference endpoint is secured using SSL, the following optional configuration options are available:
-
verifier : Allowed options are ANY,STRICT or BROWSER. Please read Apache HTP component documentation for more info.
-
keystore : The SSL keystore.
-
keystorePass : The password for SSL keystore.
-
truststore : The SSL truststore.
-
truststorePass : The password for SSL truststore.
A sample configuration:
<sca:reference name="Warehouse" promote="OrderService/Warehouse" multiplicity="1..1">
    <rest:binding.rest>
        <rest:interfaces>org.switchyard.quickstarts.rest.binding.WarehouseResource</rest:interfaces>
        <rest:address>https://localhost:8443/rest-binding</rest:address>
        <rest:ssl>
            <rest:verifier>ANY</rest:verifier>
            <rest:keystore>https.jks</rest:keystore>
            <rest:keystorePass>changeit</rest:keystorePass>
            <rest:truststore>client.jks</rest:truststore>
            <rest:truststorePass>changeit</rest:truststorePass>
        </rest:ssl>
    </rest:binding.rest>
</sca:reference>
JCA
The JCA gateway allows you to send and receive messages to/from EIS via JCA ResourceAdapter.
Binding Services with JCA message inflow
Composite-level services can be bound to a EIS with JCA message inflow using the <binding.jca> binding definition. The following configuration options are required for binding.jca:
-
operationSelector : specification of the operation to use for the message exchange. See Operation Selector for more details.
-
inboundConnection
-
resourceAdapter
-
@name : Name of the ResourceAdapter archive. Please make sure the resource adapter has been deployed on JBoss application server before you deploy the SwitchYard application which has JCA binding.
-
-
activationSpec
-
property : Properties to be injected into ActivationSpec instance. Required properties are specific to the ResourceAdapter implementation.
-
-
-
inboundInteraction
-
listener : FQN of the listener interface. When you use JMSEndpoint, javax.jms.MessageListener should be specified. When you use CCIEndpoint, javax.resource.cci.MessageListener should be specified. Otherwise, you may need to specify EIS specific listener interface according to its ResourceAdapter. Note that the endpoint class should implement this listener interface.
-
endpoint
-
@type : FQN of the Endpoint implementation class. There are 2 built-in Endpoint, org.switchyard.component.jca.endpoint.JMSEndpoint and org.switchyard.component.jca.endpoint.CCIEndpoint. Note that these 2 have corresponding listener. If neither JMSEndpoint nor CCIEndpoint is applicable for the EIS you're supposed to bind to, then you need to implement its own Endpoint class according to the ResourceAdapter implementation. The Endpoint class should be a subclass of org.switchyard.component.jca.endpoint.AbstractInflowEndpoint.
-
property : Properties to be injected into Endpoint class. See "Endpoint Properties" for more detail.
-
-
transacted : The boolean value to indicate whether transaction is needed by endpoint or not. True by default.
-
batchCommit : Multiple incoming messages are processed in one transaction if you define this element. The transaction is committed when the number of processed messages reach to batchSize, or batchTimeout milliseconds pass since the transaction is started. Transaction reaper thread is watching inflight transaction, and once batch timeout occurs the transaction reaper thread commits it.
-
@batchSize : The number of messages to be processed in one transaction
-
@batchTimeout : The batch timeout in milliseconds
-
-
Endpoint Properties
The build-in endpoints JMSEndpoint and CCIEndpoint has following configurable properties.
-
JMSEndpoint : Note that all the properties for this endpoint is to perform IN_OUT MEP. JCA JMS message inflow is generally IN_ONLY, but if you set these properties, JMSEndpoint sends reply or fault message back in return for inflow message.
-
connectionFactoryJNDIName : JNDI name of JMS ConnectionFactory
-
jndiPropertiesFileName : Name of the JNDI properties file
-
destinationType : Destination type of replyTo/faultTo. Possible values are Queue, Topic and
JNDIdeprecated. We recommend to use Queue or Topic and specify physical name -
replyTo : Name of the replyTo destination
-
faultTo : Name of the faultTo destination
-
messageType : Type of the message. Possible values are Text, Object, Bytes, Map, Stream and Plain. Object message is used by default.
-
userName : User name
-
password : password
-
destinationJndiPropertiesFileName
-
-
CCIEndpoint
-
 connectionFactoryJNDIName : JNDI name of CCI ConnectionFactory
-
![]() required property
required property
Dynamic property configuration
Some of JMSEndpoint properties are configurable via context property. You can override those properties with specifying corresponding context property.
|
JMSEndpoint property name |
Context property name |
|
destinationType |
org.switchyard.component.jca.endpoint.destinationType |
|
replyTo |
org.switchyard.component.jca.endpoint.replyTo |
|
faultTo |
org.switchyard.component.jca.endpoint.faultTo |
|
messageType |
org.switchyard.component.jca.endpoint.messageType |
Here's an example of what a JCA service binding looks like. This example binds a service to the HornetQ JMS:
<sca:composite name="JCAInflowExample" targetNamespace="urn:userguide:jca-example-service:0.1.0">
    <sca:service name="JCAService" promote="SomeService">
        <jca:binding.jca>
            <selector:operationSelector operationName="onMessage"/>
            <jca:inboundConnection>
                <jca:resourceAdapter name="hornetq-ra.rar"/>
                <jca:activationSpec>
                    <jca:property name="destinationType" value="javax.jms.Queue"/>
                    <jca:property name="destination" value="ServiceQueue"/>
                </jca:activationSpec>
            </jca:inboundConnection>
            <jca:inboundInteraction>
                <jca:listener>javax.jms.MessageListener</jca:listener>
                <jca:endpoint type="org.switchyard.component.jca.endpoint.JMSEndpoint"/>
                <jca:transacted>true</jca:transacted>
                <jca:batchCommit batchSize="10" batchTimeout="5000"/>
            </jca:inboundInteraction>
        </jca:binding.jca>
    </service>
    <!-- sca:component definition omitted -->
</sca:composite>
Binding References with JCA outbound
Composite-level references can be bound to a EIS with JCA outbound using the <binding.jca> binding definition. The following configuration options are required for binding.jca:
-
outboundConnection
-
resourceAdapter
-
@name : Name of the ResourceAdapter archive. Please make sure the resource adapter has been deployed on JBoss application server before you deploy the SwitchYard application which has JCA binding.
-
-
connection
-
@jndiName : JNDI name which the ConnectionFactory is bound into.
-
-
-
outboundInteraction
-
connectionSpec : Configuration for javax.resource.cci.ConnectionSpec. Note that JMSProcessor doesn't use this option.
-
@type : FQN of the ConnectionSpec implementation class.
-
property : Properties to be injected into ConnectionSpec instance.
-
-
interactionSpec : Configuration for _javax.resource.cci.InteractionSpec. _Note that JMSProcessor doesn't use this option.
-
@type : FQN of the InteractionSpec implementation class.
-
property : Properties to be injected into InteractionSpec instance.
-
-
processor
-
@type : FQN of the class which processes outbound delivery. There are 2 build-in processor, org.switchyard.component.jca.processor.JMSProcessor and org.switchyard.component.jca.processor.CCIProcessor. JMSProcessor just sends a message to the JMS provider, so it only supports IN_ONLY MEP. CCIProcessor sends a input record and return a output record which is returned by the EIS. If neither JMSProcessor nor CCIProcessor is applicable for the EIS you're supposed to bind to, then you need to implement its own processor class according to the ResourceAdapter implementation. Note that this class should be a subclass of org.switchyard.component.jca.processor.AbstractOutboundProcessor.
-
property : Properties to be injected into processor instance. See "Processor Properties" for more detail.
If the ConnectionFactory and JMS destination need to be looked up from remote JNDI provider, you can add JNDI properties file into your SwitchYard application and specify its file name with jndiPropertiesFileName property. If the ConnectionFactory and JMS Destination should be looked up from different JNDI provider, you can specify both of jndiPropertiesFileName and destinationJndiPropertiesFileName to point distinct JNDI properties file.JNDI destination lookup is deprecated. We recommend to specify Queue or Topic for destinationType and specify physical name for destination name
You can specify the message type to be sent with messageType property. Available values are Stream for StreamMessage, Map for MapMessage, Text for TextMessage, Object for ObjectMessage, Bytes for BytesMessage and Plain for Message with no payload (headers and properties only). ObjectMessage is used by default.
-
-
Processor Properties
The build-in processors JMSProcessor and CCIProcessor has following configurable properties.
-
JMSProcessor
-
connectionFactoryJNDIName : JNDI name of JMS ConnectionFactory
-
jndiPropertiesFileName : Name of the JNDI properties file
-
destinationType : Destination type. Possible values are Queue, Topic and
JNDIdeprecated. We recommend to use Queue or Topic and specify physical name -
destination : Name of the destination
-
messageType : Type of the message. Possible values are Text, Object, Bytes, Map, Stream and Plain. Object message is used by default.
-
username : User name
-
password : password
-
destinationJndiPropertiesFileNamedeprecated -
acknowledgeModedeprecated -
transacteddeprecated
-
-
CCIProcessor
-
connectionFactoryJNDIName : JNDI name of CCI ConnectionFactory
-
recordClassName : Name of the record record type to be used to interact with EIS. If you use CCIProcessor with the record type other than MappedRecord IndexedRecord or StreamableRecord, you need to implement corresponding RecordHandler. Please refer to org.switchyard.component.jca.processor.cci.IndexedRecordHandler, org.switchyard.component.jca.processor.cci.MappedRecordHandler and org.switchyard.component.jca.processor.cci.StreamableRecordHandler.
-
![]() required property
required property
Dynamic property configuration
Some of JMSProcessor properties are configurable via context property. You can override those properties with specifying corresponding context property.
|
JMSProcessor property name |
Context property name |
|
destinationType |
org.switchyard.component.jca.processor.destinationType |
|
destination |
org.switchyard.component.jca.processor.destination |
|
messageType |
org.switchyard.component.jca.processor.messageType |
Here's an example of what a JCA reference binding looks like. This example binds a reference to the HornetQ JMS:
<sca:composite name="JCAReferenceExample" targetNamespace="urn:userguide:jca-example-reference:0.1.0">
    <sca:reference name="JCAReference" promote="SomeComponent/SomeReference" multiplicity="1..1">
        <jca:binding.jca>
            <jca:outboundConnection>
                <jca:resourceAdapter name="hornetq-ra.rar"/>
                <jca:connection jndiName="java:/JmsXA"/>
            </jca:outboundConnection>
            <jca:outboundInteraction>
                <jca:processor type="org.switchyard.component.jca.processor.JMSProcessor">
                    <jca:property name="destinationType" value="Queue"/>
                    <jca:property name="destination" value="ReferenceQueue"/>
                    <jca:property name="messageType" value="Text"/>
                </jca:processor>
            </jca:outboundInteraction>
        </jca:binding.jca>
    </sca:reference>
</sca:composite>
JMS
The JMS binding in SwitchYard provides support for asynchronous communication with messaging providers. It supports both sides - service and reference. The JMS binding is built on top of camel-jms and supports most of options for this endpoint. Please refer camel documentation for a detailed description of them.
Generic options
Following options can be apile to <binding.jms> definition:
-
queue or topic : destination name to consume from/produce to
-
connectionFactory : an instance of connection factory to use
-
username
-
password
-
clientId
-
durableSubscriptionName
-
concurrentConsumers
-
maxConcurrentConsumers
-
disableReplyTo
-
preserveMessageQos
-
deliveryPersistent
-
priority
-
explicitQosEnabled
-
replyTo
-
replyToType
-
requestTimeout
-
selector
-
timeToLive
-
transacted
-
transactionManager
-
acknowledgementModeName
-
acknowledgementMode
Binding Services with JMS
Here's an example of what a jms service binding looks like:
<sca:composite name="camel-binding" targetNamespace="urn:switchyard-quickstart:camel-binding:0.1.0">
    <sca:service name="GreetingService" promote="GreetingService">
        <camel:binding.jms>
            <camel:queue>INCOMING_GREETS</camel:queue>
            <camel:connectionFactory>#connectionFactory</camel:connectionFactory>
            <camel:username>esb</camel:username>
            <camel:password>rox</camel:password>
            <camel:selector>RECEIVER='ESB' AND SENDER='ERP'<camel:selector>
        </camel:binding.jms>
    </sca:service>
</sca:composite>
Binding References with JMS
<sca:composite name="camel-binding" targetNamespace="urn:switchyard-quickstart:camel-binding:0.1.0">
    <sca:reference name="GreetingService" promote="camel-binding/GreetingService" multiplicity="1..1">
        <camel:binding.jms>
            <camel:topic>GREETINGS_NOTIFICATION</camel:topic>
            <camel:connectionFactory>#connectionFactory</camel:connectionFactory>
            <camel:priority>8</camel:priority>
        <camel:binding.jms>
    </sca:reference>
</sca:composite>
File
The file binding in SwitchYard provides filesystem level support for services and references in SwitchYard.
The file binding is built on top of camel-file and supports most of options for this endpoint. Please refer camel documentation for detailed description of them.
Generic options
Following options can be apiled to <binding.file> definition:
-
directory : directory to consume/produce files to
-
autoCreate : automatically create directory if doesn't exist
-
bufferSize : write buffer size
-
fileName : file name filter for consumer or file name pattern for producer
-
flatten : skip path and just use file name
-
charset : charset used for reading/wrinting file
Binding Services with Files
Supported options are:
-
delete
-
recursive
-
noop
-
preMove
-
move
-
moveFailed
-
include
-
exclude
-
idempotent
-
idempotentRepository
-
inProgressRepository
-
filter
-
sorter
-
sortBy
-
readLock
-
readLockTimeout
-
readLockCheckInterval
-
exclusiveReadLockStrategy
-
processStrategy
-
startingDirectoryMustExist
-
directoryMustExist
-
doneFileName
Here's an example of what a file service binding looks like:
<sca:composite name="camel-binding" targetNamespace="urn:switchyard-quickstart:camel-binding:0.1.0">
    <sca:service name="GreetingService" promote="GreetingService">
        <camel:binding.file>
            <camel:directory>target/input</camel:directory>
            <camel:fileName>test.txt</camel:fileName>
            <camel:consume>
               <camel:initialDelay>50</camel:initialDelay>
               <camel:delete>true</camel:delete>
            </camel:consume>
        </camel:binding.file>
    </sca:service>
</sca:composite>
Binding References with File
Binding a reference with file can be used to store outcome of service on disk. The following configuration options are available for binding.file when binding references:
-
fileExist
-
tempPrefix
-
tempFileName
-
keepLastModified
-
eagerDeleteTargetFile
-
doneFileName
For detailed description of these parameters please refer camel-file documentation
<sca:composite name="camel-binding" targetNamespace="urn:switchyard-quickstart:camel-binding:0.1.0">
    <sca:reference name="GreetingService" promote="camel-binding/GreetingService" multiplicity="1..1">
        <camel:binding.file>
            <camel:directory>target/output</camel:directory>
            <camel:autoCreate>false</camel:autoCreate>
            <camel:produce>
                <camel:fileExist>Override</camel:fileExist>
            </camel:produce>
        <camel:binding.file>
    </sca:reference>
</sca:composite>
FTP FTPS SFTP
SwitchYard provides support for remote file systems on both sides service and reference.
The ftp binding is built on top of camel-ftp and supports most of options for this endpoint. Please refer camel documentation for detailed description of them.
Generic options
Following options can be apiled to <binding.ftp> <binding.ftps> and <binding.sftp> definition:
-
host
-
port
-
username
-
password
-
binary
-
connectTimeout
-
disconnect
-
maximumReconnectAttempts
-
reconnectDelay
-
separator
-
stepwise
-
throwExceptionOnConnectFailed
FTP specific options
-
passiveMode
-
timeout
-
soTimeout
-
siteCommand
FTPS specific options
-
securityProtocol
-
isImplicit
-
execPbsz
-
execProt
-
disableSecureDataChannelDefaults
SFTP specific options
-
knownHostsFile
-
privateKeyFile
-
privateKeyFilePassphrase
Binding Services with Files
Supported options are same as for File.
Here's an example of what a file service binding looks like:
<sca:composite name="camel-binding" targetNamespace="urn:switchyard-quickstart:camel-binding:0.1.0">
    <sca:service name="GreetingService" promote="GreetingService">
        <camel:binding.ftp>
            <camel:directory>target/input</camel:directory>
            <camel:host>localhost</camel:host>
            <camel:port>22</camel:port>
            <camel:username>camel</camel:username>
            <camel:password>secret</camel:password>
            <camel:consume>
               <camel:initialDelay>50</camel:initialDelay>
               <camel:delete>true</camel:delete>
            </camel:consume>
        </camel:binding.file>
    </sca:service>
</sca:composite>
Binding References with File
Binding a reference with file can be used to store outcome of service on remote server. All File referene properties are supported.
<sca:composite name="camel-binding" targetNamespace="urn:switchyard-quickstart:camel-binding:0.1.0">
    <sca:reference name="GreetingService" promote="camel-binding/GreetingService" multiplicity="1..1">
        <camel:binding.ftp>
            <camel:directory>target/output</camel:directory>
            <camel:autoCreate>false</camel:autoCreate>
            <camel:host>localhost</camel:host>
            <camel:port>22</camel:port>
            <camel:username>camel</camel:username>
            <camel:password>secret</camel:password>
            <camel:produce>
                <camel:fileExist>Override</camel:fileExist>
            </camel:produce>
        <camel:binding.ftp>
    </sca:reference>
</sca:composite>
TCP UDP
SwitchYard provides support for network level integration with TCP and UPD protocols.
The TCP and UDP binding is built on top of camel-netty and supports most of options for this endpoint. Please refer camel documentation for detailed description of them.
Generic options
Following options can be apiled to <binding.tcp> and <binding.udp definition:
-
host
-
port
-
receiveBufferSize
-
sendBufferSize
-
reuseAddress
-
encoders
-
decoders
-
allowDefaultCodec
-
workerCount
-
sync
-
disconnect
TCP specific options
-
textline
-
tcpNoDelay
-
keepAlive
UDP specific options
-
broadcast
SSL Options
This endpoint supports SSL. Following parameters may be used to configure it:
-
ssl - turn on SSL
-
sslHandler - custom SSL Handler to use
-
passphrase - bean reference to String instance used to open KeyStore
-
securityProvider - name of Java security provider
-
keyStoreFormat
-
keyStoreFile - reference to File instance which is used loaded into java KeyStore
-
trustStoreFile - reference to File instance
-
sslContextParametersRef - if this parameter is specified it must be an bean reference to an instance of org.apache.camel.util.jsse.SSLContextParameters where you may specify all necessary parameters at once.
Binding Services with tcp/udp
Here's an example of what a file service binding looks like:
<sca:composite name="camel-binding" targetNamespace="urn:switchyard-quickstart:camel-binding:0.1.0">
    <sca:service name="GreetingService" promote="GreetingService">
        <camel:binding.tcp>
            <camel:host>localhost</camel:host>
            <camel:port>3939</camel:port>
            <camel:allowDefaultCodec>false</camel:allowDefaultCodec>
            <camel:sync>false</camel:sync>
        </camel:binding.tcp>
        <camel:binding.udp>
            <camel:host>localhost</camel:host>
            <camel:port>3940</camel:port>
            <camel:allowDefaultCodec>false</camel:allowDefaultCodec>
            <camel:sync>false</camel:sync>
        </camel:binding.udp>
    </sca:service>
</sca:composite>
JPA
The jpa binding in SwitchYard provides support for consuming and storing JPA entities. It supports both sides - service binding for entity consumption and reference for entity storing.
The JPA binding is built on top of camel-jpa and supports most of options for this endpoint. Please reffer camel documentation for detailed description of them.
Generic options
Following options can be apiled to <binding.jpa> definition:
-
entityClassName
-
persistenceUnit
-
transactionManager
Binding Services with JPA
Supported options are:
-
consumeDelete
-
consumeLockEntity
-
maximumResults
-
consumer.query
-
consumer.namedQuery
-
consumer.nativeQuery
-
consumer.resultClass
-
consumer.transacted
The consumeLockEntity option causes problems with transaction management.
Here's an example of what a mail service binding looks like:
<sca:composite name="camel-binding" targetNamespace="urn:switchyard-quickstart:camel-binding:0.1.0">
    <sca:service name="GreetingService" promote="GreetingService">
        <camel:binding.jpa>
            <camel:entityClassName>org.switchyard.quickstarts.camel.jpa.binding.domain.Greet</camel:entityClassName>
            <camel:persistenceUnit>JpaEvents</camel:persistenceUnit>
            <camel:transactionManager>#jtaTransactionManager</camel:transactionManager>
            <camel:consume>
                <camel:consumeLockEntity>false</camel:consumeLockEntity>
                <camel:consumer.transacted>true</camel:consumer.transacted>
            </camel:consume>
        </camel:binding.jpa>
    </sca:service>
</sca:composite>
Binding References with JPA
Binding a reference with jpa can be used to store entity. The following configuration options are available for binding.jpa when binding references:
-
flushOnSend
-
usePersist
<sca:composite name="camel-binding" targetNamespace="urn:switchyard-quickstart:camel-binding:0.1.0">
    <sca:reference name="GreetingService" promote="camel-binding/GreetingService" multiplicity="1..1">
        <camel:binding.jpa>
            <camel:entityClassName>org.switchyard.quickstarts.camel.jpa.binding.domain.Greet</camel:entityClassName>
            <camel:persistenceUnit>JpaEvents</camel:persistenceUnit>
            <camel:produce>
                <camel:flushOnSend>false</camel:flushOnSend>
            </camel:produce>
        </camel:binding.jpa>
    </sca:reference>
</sca:composite>
SQL
The sql binding in SwitchYard provides database read/write support for references in SwitchYard.
The file binding is built on top of camel-sql.
SQL Binding options
Following options can be apiled to <binding.sql> definition:
-
query : SQL query to execute
-
dataSourceRef : data source name
-
batch : turn on JDBC batching
-
placeholder : a placeholder sign used to replace parameters in query
-
consume: define the consumer attributes. This is optional.
-
delay: number of milliseconds between query executions.
-
initialDelay: a delay before query is run first time.
-
For detailed description of these parameters please visit camel-sql site.
Binding Services with database
<sca:composite name="camel-binding" targetNamespace="urn:switchyard-quickstart:camel-binding:0.1.0">
    <sca:service name="GreetingService" promote="GreetingService">
        <camel:binding.sql>
            <camel:query>SELECT * FROM greetings</camel:query>
            <camel:dataSourceRef>java:jboss/datasources/GreetDS</camel:dataSourceRef>
            <!--This is optional. If not defined the default camel values will be used.-->
            <camel:consume>
               <camel:initialDelay>1000</camel:initialDelay>
               <camel:delay>500</camel:delay>
            </camel:consume>
        </camel:binding.sql>
    </sca:service>
</sca:composite>
For being compatible with previous versions (although not recommended), it is allowed to include in the camel:binding.sql tag the attributes.
-
period: number of milliseconds between query executions.
-
initialDelay: a delay before query is run first time.
Binding References with database
<sca:composite name="camel-binding" targetNamespace="urn:switchyard-quickstart:camel-binding:0.1.0">
    <sca:reference name="GreetingDatabaseStore" promote="camel-binding/GreetingDatabaseStore" multiplicity="1..1">
        <camel:binding.sql>
            <camel:query>INSERT INTO greetings (name) VALUES (#)</camel:query>
            <camel:dataSourceRef>java:jboss/datasources/GreetDS</camel:dataSourceRef>
        <camel:binding.sql>
    </sca:reference>
</sca:composite>
The mail binding in SwitchYard provides support for consuming and sending mail messages. It supports both sides - service binding for mail consumption and reference for message sending.
The Mail binding is built on top of camel-mail and supports most of options for this endpoint. Please reffer camel documentation for detailed description of them.
Generic options
Following options can be apiled to <binding.mail> definition:
-
host
-
port
-
username
-
password
-
connectionTimeout
Additional attribute secure may be used to identify usage of secured connection (pop3s/imaps/smtps) instead.
Binding Services with Mail
Supported options are:
-
folderName
-
fetchSize
-
unseen
-
delete
-
copyTo
-
disconnect
Additional attribute accountType may be specified to choose mail protocol. Possible values are pop3 or imap. Default is imap.
Here's an example of what a mail service binding looks like:
<sca:composite name="camel-binding" targetNamespace="urn:switchyard-quickstart:camel-binding:0.1.0">
    <sca:service name="GreetingService" promote="GreetingService">
        <camel:binding.mail>
            <camel:host>localhost</camel:host>
            <camel:username>camel</camel:username>
            <camel:consume accountType="pop3">
                <camel:copyTo>after-processing</camel:copyTo>
            </camel:consume>
        </camel:binding.mail>
    </sca:service>
</sca:composite>
Binding References with Mail
Binding a reference with mail can be used to send outgoing message. The following configuration options are available for binding.mail when binding references:
-
subject
-
from
-
to
-
CC
-
BCC
-
replyTo
<sca:composite name="camel-binding" targetNamespace="urn:switchyard-quickstart:camel-binding:0.1.0">
    <sca:reference name="GreetingService" promote="camel-binding/GreetingService" multiplicity="1..1">
        <camel:binding.mail>
            <camel:host>localhost</camel:host>
            <camel:username>camel</camel:username>
            <camel:produce>
                <camel:subject>Forwarded message</camel:subject>
                <camel:from>camel@localhost</camel:from>
                <camel:to>rider@camel</camel:to>
            </camel:produce>
        </camel:binding.mail>
    </sca:reference>
</sca:composite>
Quartz
The quartz binding in SwitchYard provides support for triggering services with given cron expression.
The quartz binding is built on top of camel-quartz.
Generic options
Following options can be applied to <binding.quartz> definition:
-
name : name of job
-
cron : execution expression
-
stateful : use a StatefulJob; defaults to false
-
trigger.startTime : sets the trigger start time; format is yyyy-MM-dd'T'HH:mm:ss
-
trigger.endTime : sets the trigger end time; format is yyyy-MM-dd'T'HH:mm:as
-
trigger.timeZone : set the trigger timezone; format is any string accepted by java.util.TimeZone
Binding Services with Quartz
Here's an example of what a quartz service binding looks like:
<sca:composite name="camel-binding" targetNamespace="urn:switchyard-quickstart:camel-binding:0.1.0">
    <sca:service name="GreetingService" promote="GreetingService">
        <camel:binding.quartz>
            <camel:name>GreetingJob</camel:name>
            <camel:cron>0 0/5 * * * ?</camel:cron>
        </camel:binding.quartz>
    </sca:service>
</sca:composite>
Timer
The timer binding in SwitchYard provides support for triggering services with fixed timer. It's lightweight alternative for Quartz.
The file binding is built on top of camel-timer. Please refer camel documentation for detailed description of options.
Generic options
Following options can be apiled to <binding.timer> definition:
-
name : name of timer
-
time
-
pattern
-
period
-
delay
-
fixedRate
-
daemon
Binding Services with Timer
Here's an example of what a timer service binding looks like:
<sca:composite name="camel-binding" targetNamespace="urn:switchyard-quickstart:camel-binding:0.1.0">
    <sca:service name="GreetingService" promote="GreetingService">
        <camel:binding.timer>
            <camel:name>GreetingTimer</camel:name>
            <camel:time>2012-01-01T12:00:00</camel:time>
            <camel:pattern>yyyy-MM-dd'T'HH:mm:ss</camel:pattern>
            <camel:delay>1000</camel:delay>
            <camel:fixedRate>true</camel:fixedRate>
        </camel:binding.timer>
    </sca:service>
</sca:composite>
SEDA
The SEDA binding in SwitchYard provides asynchronous service binding between camel route and SwitchYard service.
SEDA queue is not persistent.
This binding is built on top of camel-seda. Please refer camel documentation for detailed description of options.
Generic options
Following options can be apiled to <binding.seda> definition:
-
name : queue name
-
size : the maximum capacity of the SEDA queue (the number of messages it can hold)
-
concurrentConsumers
-
timeout
-
multipleConsumers
-
limitConcurrentConsumers
Binding References with SEDA
The following configuration options are available for binding.seda when binding references:
-
waitForTaskToComplete
Binding Services with SEDA
Here's an example of what a SEDA service binding looks like:
<sca:composite name="camel-binding" targetNamespace="urn:switchyard-quickstart:camel-binding:0.1.0">
    <sca:service name="GreetingService" promote="GreetingService">
        <camel:binding.seda>
            <camel:name>GreetingQueue</camel:name>
            <camel:size>6</camel:size>
            <camel:concurrentConsumers>2</camel:concurrentConsumers>
        </camel:binding.seda>
    </sca:service>
</sca:composite>
Camel URI
Camel binding support in SwitchYard allows Camel components to be used as gateway bindings for services and references within an application.
Binding Services with Camel
Every camel component binding supported by SwitchYard has it's own configuration namespace. However, there is a small exception. Bindings for direct, seda, timer and mock share same namespace urn:switchyard-component-camel-core:config:1.0.
Composite-level services can be bound to a Camel component using the <binding.uri> binding definition. The following configuration options are available for binding.uri:
-
configURI : contains the Camel endpoint URI used to configure a Camel component instance
-
operationSelector : specification of the operation to use for the message exchange. See Operation Selector for more details. This setting is not used for cxfrs configurations.
binding.uri is not linked with any specific component. It allows usage of 3rd party camel components which are not part of distribution.
Here's an example of what a service binding looks like using a Camel component.
<sca:composite name="SimpleCamelService" targetNamespace="urn:userguide:simple-camel-service:0.1.0">
<sca:service name="SimpleCamelService" promote="SimpleComponent/SimpleCamelService">
<camel:binding.uri configURI="file://target/input?fileName=test.txt&initialDelay=50&delete=true">
<selector:operationSelector operationName="print"/>
</camel:binding.uri>
</sca:service>
<!-- sca:component definition omitted -->
</sca:composite>
Binding References with Camel
Binding a reference with Camel is very similar to binding a service. The only significant difference is that specification of the operationSelector is not required on reference bindings. Logically reference elements points to outgoing communication eg. service called by Switchyard.
<sca:composite name="orders" targetNamespace="urn:switchyard-quickstart-demo:orders:0.1.0">
    <sca:reference name="WarehouseService" promote="OrderComponent/WarehouseService" multiplicity="1..1">
        <camel:binding.uri configURI="file://target/output"/>
    </sca:reference>
</sca:composite>
Message Composition
Message Composers
A MessageComposer can compose or decompose a native binding message to/from SwitchYard's canonical message. A MessageComposer does this in three steps:
-
Construct a new target message instance.
-
Copy the content ("body") of the message.
-
Delegate the header/property mapping to a ContextMapper.
We currently provide a SOAPMessageComposer, a CamelMessageComposer, and a HornetQMessageComposer. These default implementations are used by their associated bindings, but can be overridden by the user.
Custom Message Composers
To implement a custom MessageComposer, you need to implement the org.switchyard.component.common.composer.MessageComposer interface:
public interface MessageComposer<T> {
    ContextMapper<T> getContextMapper();
    MessageComposer<T> setContextMapper(ContextMapper<T> contextMapper);
    Message compose(T source, Exchange exchange, boolean create) throws Exception;
    public T decompose(Exchange exchange, T target) throws Exception;
}
-
The getContextMapper() and setContextMapper() methods are just bean properties. If you extend BaseMessageComposer, both of these are implemented for you.
-
Your compose() method needs to take the data from the passed in source native message and compose a SwitchYard Message based on the specified Exchange. The create parameter is whether or not we ask the Exchange to create a new Message, or just get the existing one.
-
Your decompose() method needs to take the data from the SwitchYard Message in the specified Exchange and decompose it into the target native message.
Then, specify your implementation in your switchyard.xml:
<binding.xyz ...>
    <messageComposer class="com.example.MyMessageComposer"/>
</binding.xyz>
Context Mappers
A ContextMapper moves native binding message headers and/or properties to/from SwitchYard's canonical context. We provide many ContextMapper implementations OOTB (see section below). These default implementations are used by their associated bindings, but can be overridden by the user.
Custom Context Mappers
To implement a custom ContextMapper, you need to implement the org.switchyard.component.common.composer.ContextMapper interface:
public interface ContextMapper<T> {
    void mapFrom(T source, Context context) throws Exception;
    void mapTo(Context context, T target) throws Exception;
}
-
Your mapFrom() method needs to map a source native message's properties to the SwitchYard Message's Context.
-
Your mapTo() method needs to map a SwitchYard Message's Context properties into the target native message.
-
If you extend BaseContextMapper, these methods are stubbed-out with no-op implementations so you only have to implement what you want to.
Then, specify your implementation in your switchyard.xml:
<binding.xyz ...>
    <contextMapper class="com.example.MyContextMapper"/>
</binding.xyz>
Alternatively, you can implement the org.switchyard.component.common.composer.RegexContextMapper. The purpose of this interface is to add regular expression support, where you can filter exactly which Context properties get mapped:
public interface RegexContextMapper<T> extends ContextMapper<T> {
    ContextMapper<T> setIncludes(String includes);
    ContextMapper<T> setExcludes(String excludes);
    ContextMapper<T> setIncludeNamespaces(String includeNamespaces);
    ContextMapper<T> setExcludeNamespaces(String excludeNamespaces);
    boolean matches(String name);
    boolean matches(QName qname);
}
-
The setIncludes(), setExcludes(), setIncludeNamespaces() and setExcludeNamespaces() methods are just bean properties. The matches() methods use those bean properties to determine if the specified name or qualified name passes the collective regular expressions.
-
If you extend BaseRegexContextMapper, all of these are implemented for you. Then, in your implementation's mapFrom / mapTo methods, you only need to first check if the property matches before you map it.
If your implementation extends RegexContextMapper, the following additional (regular expression valued) attributes of the <contextMapper/> element become meaningful/respected:
-
includes = Which context property names to include.
-
excludes = Which context property names to exclude.
-
includeNamespaces = Which context property namespaces to include (if the property name is a qualified name).
-
excludeNamespaces = Which context property namespaces to exclude (if the property name is a qualified name).
OOTB Implementation Notes
Note: All of the out-of-the-box implementations below extend BaseRegexContextMapper, thus all can be configured with the regular expression attributes described above.
-
The SOAPContextMapper, when processing an incoming SOAPMessage, takes the mime (in most cases, HTTP) headers from a soap envelope and maps them into the SwitchYard Context as Scope.MESSAGE properties with the SOAPComposition.SOAP_MESSAGE_MIME_HEADER label, and takes the soap header elements from the soap envelope and maps them into the SwitchYard Context as Scope.EXCHANGE properties with the SOAPComposition.SOAP_MESSAGE_HEADER label. When processing an outgoing SOAPMessage, it takes the SwitchYard Scope.MESSAGE Context properties and maps them into mime (in most cases, HTTP) headers, and takes the SwitchYard Scope.EXCHANGE Context properties and maps them into the soap envelope as soap header elements.
The SOAPContextMapper has an additional attribute that the other OOTB ContextMappers do not have: soapHeadersType:
<binding.soap>
    <contextMapper includes=".*" soapHeadersType="VALUE"/>
</binding.soap>
The value of soapHeadersType can be CONFIG, DOM, VALUE or XML (and correspond to the enum SOAPHeadersType.CONFIG, DOM, VALUE or XML). With CONFIG, each soap header element is mapped into an org.switchyard.config.Configuration object, with DOM, each soap header element is left as is (a DOM element), with VALUE, just the String value of each soap header element is stored, and with XML, each soap header element is transformed into an XML String.
-
The CamelContextMapper, when processing an incoming CamelMessage, takes the CamelMessage headers and maps them into the SwitchYard Context as Scope.MESSAGE properties with the CamelComposition.CAMEL_MESSAGE_HEADER label, and takes the Camel Exchange properties and maps them into the SwitchYardContext as Scope.EXCHANGE properties with the CamelComposition.CAMEL_EXCHANGE_PROPERTY label. When processing an outgoing CamelMessage, it takes the SwitchYard Scope.MESSAGE Context properties and maps them into the CamelMessage as headers, and takes the SwitchYard Scope.EXCHANGE Context properties and maps them into the Camel Exchange as properties.
-
The HornetQContextMapper, when processing an incoming ClientMessage, takes the ClientMessage properties and maps them into the SwitchYardContext as Scope.EXCHANGE properties with the HornetQCompsition.HORNETQ_MESSAGE_PROPERTY label. When procesing an outgoing ClientMessage, it takes the SwitchYard Scope.EXCHANGE Context properties and maps them into the ClientMessage as properties. There is no concept of "headers" in a HornetQ ClientMessage.
-
The HTTPContextMapper, when processing an incoming HTTP request, takes the incoming request headers and maps them into the SwitchYard Context as Scope.MESSAGE with the HttpComposition.HTTTP_HEADER label. When processing an outgoing HTTP response, it takes the SwitchYard Scope.MESSAGE Context properties and maps them into the response headers.
-
The RESTEasyContextMapper, when processing an incoming HTTP request, takes the incoming request headers and maps them into the SwitchYard Context as Scope.MESSAGE with the RESTEasyComposition.HTTP_HEADER label. When processing an outgoing HTTP response, it takes the SwitchYard Scope.MESSAGE Context properties and maps them into the response headers.
-
The JCA Component actually has 3 different ContextMappers:
-
The CCIIndexedRecordContextMapper, when processing an incoming IndexedRecord, takes the record name and record short description and maps them into the SwitchYardContext as Scope.EXCHANGE properties with the JCAComposition.JCA_MESSAGE_PROPERTY label. When processing an outgoing IndexedRecord, it looks for those properties specifically in the SwitchYard.EXCHANGE Context properties by key and sets them on the IndexedRecord.
-
The CCIMappedRecordContextMapper, when processing an incoming MappedRecord, takes the record name and record short description and maps them into the SwitchYardContext as Scope.EXCHANGE properties with the JCAComposition.JCA_MESSAGE_PROPERTY label. When processing an outgoing MappedRecord, it looks for those properties specifically in the SwitchYard.EXCHANGE Context properties by key and sets them on the MappedRecord.
-
The JMSContextMapper, when processing an incoming (JMS) Message, takes the Message properties and maps them into the SwitchYardContext as Scope.EXCHANGE properties with the JCAComposition.JCA_MESSAGE_PROPERTY label. When processing an outgoing (JMS) Message, it takes the SwitchYard.EXCHANGE Context properties and maps them into the Message as Object properties.
-
The reasoning of scoping headers as MESSAGE scope was modeled after the notion of http headers, where you will see some headers specifically useful for http requests, and other headers specifically useful for http responses. In both cases, they are most likely tied to the binding's notion of an incoming message or an outgoing message.
The reasoning of scoping properties as EXCHANGE scope came from the idea that this is most likely application or domain data, and possibly useful in the entire processing of the Exchange. An example of this would be a processInstanceId when using the BPM Component.
Operation Selectors
OperationSelector provides a capability to determine which service operation should be invoked for the message exchange. The following options are available. If the target service only has a single operation, this setting is optional.
Static Operation Selector
specify a operation name in the configuration.
<hornetq:binding.hornetq>
    <swyd:operationSelector operationName="greet" xmlns:swyd="urn:switchyard-config:switchyard:1.0"/>
(... snip ...)
</hornetq:binding.hornetq>
XPath Operation Selector
specify a XPath location which contains a operation name to be invoked in the message contents.
If the configuration looks like this:
<jca:binding.jca>
    <swyd:operationSelector.xpath expression="//person/language" xmlns:swyd="urn:switchyard-config:switchyard:1.0"/>
(... snip ...)
</jca:binding.jca>
And the message content is like this:
<person>
    <name>Fernando</name>
    <language>spanish</language>
</person>
Then operation spanish() would be invoked.
Regex Operation Selector
specify a Regular Expression to find a operation name to be invoked in the message contents.
If the configuration looks like this:
<http:binding.http>
    <swyd:operationSelector.regex expression="[a-zA-Z]*Operation" xmlns:swyd="urn:switchyard-config:switchyard:1.0"/>
(... snip ...)
</http:binding.http>
And the message content is like this:
xxx yyy zzz regexOperation aaa bbb ccc
Then operation regexOperation() would be invoked.
Java Operation Selector
specify a Java class which is able to determine the operation to be invoked.
configuration should look like this:
<jca:binding.jca>
    <swyd:operationSelector.java class="org.switchyard.example.MyOperationSelectorImpl" xmlns:swyd="urn:switchyard-config:switchyard:1.0"/>
(... snip ...)
</jca:binding.jca>
Note that the org.switchyard.example.MyOperationSelectorImpl needs to implement org.switchyard.selector.OperationSelector or other concrete OperationSelector classes for each service bindings. You can override the selectOperation() method as you like.
Default OperationSelector implementation for each service bindings are following:
-
Camel : org.switchyard.component.camel.selector.CamelOperationSelector
-
JCA/JMS : org.switchyard.component.jca.selector.JMSOperationSelector
-
JCA/CCI : org.switchyard.component.jca.selector.CCIOperationSelector
-
HTTP : org.switchyard.component.http.selector.HttpOperationSelector
Scope of Support
Support for operation selector is limited to Camel, JCA and HTTP service bindings. Support for other service bindings will be added in the future.
Transformation
Java Transformers
There are two methods available for creating a Java-based transformer in SwitchYard:
-
Implement the org.switchyard.transform.Transfomer interface and add a <transform.java> definition to your switchyard.xml.
-
Annotate one or more methods on your Java class with @Transformer.
When using the @Transformer annotation, the SwitchYard maven plugin will automatically generate the <transform.java> definition(s) for you and add them to the switchyard.xml packaged in your application. The following Java class would produce the <transform.java> definition provided above:
@Named("MyTransformerBean")
public class MyTransformer {
    @Transformer(from = "{urn:switchyard-quickstart-demo:orders:1.0}submitOrder")
    public Order transform(Element from) {
       // handle transformation here
    }
}
The optional from and to elements of the @Transformer annotation can be used to specify the qualified type name used during transformer registration. If not supplied, the full class name of the method parameter will be used as the from type and the full class name of the return type will be used as the to type.
The CDI bean name specified by @Named annotation is used to resolve transformer class. If you don't specify, then class name of the transformer is used instead like following:
<transforms>
   <transform.java class="org.switchyard.quickstarts.demos.orders.MyTransformer"
                   from="{urn:switchyard-quickstart-demo:orders:1.0}submitOrder"
                   to="java:org.switchyard.quickstarts.demos.orders.Order"/>
</transforms>
Note that both of above <transform.java> definition has a bean attribute or a class attribute. bean attribute and class attribute are mutually exclusive.
JAXB Transformers
The JAXB transformer allows you to perform Java to XML (and XML to Java) transformations using JAXB (XML marshalling and unmarshalling). It is exactly like the JSON Transformer in terms of how it is configured i.e. a to and from configuration with one Java type and one QNamed XML type.
JAXB Java Model Creation
JAXB Java models can be generated from an XML Schema using XJC, or from a WSDL using tools like wsconsume (.sh/.bat), which is shipped with both SwitchYard AS6 and AS7 distros (in the bin directory).
JAXB Transformer Configurations
Working out the available transformations is quite simple. Just look in the ObjectFactory class source file (ObjectFactory.java). In this source file you will see factory methods representing the available marshallings/unmarshallings e.g.
@XmlElementDecl(namespace = "http://com.acme/orders", name = "create")
public JAXBElement<CreateOrder> createOrder(CreateOrder value) {
    return new JAXBElement<Order>(_CreateOrder_QNAME, CreateOrder.class, null, value);
}
JAXB Transformer Requirements
JAXB transformation is for data objects that contain JAXB annotations or objects that include an ObjectFactory in a configured context path. A common error has been to use String as a payload type, but in this case the JAXB transformer will not work because String doesn't meet either of the two requirements outlined above. See this forum thread for more details.
JSON Transformers
The JSON transformer provides a basic mapping facility between POJOs and JSON (JSON marshalling and unmarshalling). Just like the JAXB Transformer, specification of the transformer requires a to and from specification with one Java type and one QNamed JSON type, depending on whether you're performing a Java to JSON or JSON to Java transformation.
The following configuration illustrates a JSON to Java transformation.
<trfm:transform.json
            from="{urn:switchyard-quickstart:transform-json:1.0}order"
            to="java:org.switchyard.quickstarts.transform.json.Order"/>
The following configuration illustrates a Java to JSON transformation of the same types as above.
<trfm:transform.json
            from="java:org.switchyard.quickstarts.transform.json.Order"
            to="{urn:switchyard-quickstart:transform-json:1.0}order"/>
Smooks Transformers
There are three distinct transformation models available with Smooks in SwitchYard:
-
XML to Java : Based on a standard Smooks Java Binding configuration.
-
Java to XML: Based on a standard Smooks Java Binding configuration.
-
Smooks : This is a "normal" Smooks transformation in which the developer must define which Smooks filtering Result is to be exported back to the SwitchYard Message as the transformation result.
Smooks transformations are declared by including a <transform.smooks> definition in switchyard.xml.
<transform.smooks config="/smooks/OrderAck_XML.xml"
                  from="java:org.switchyard.quickstarts.transform.smooks.OrderAck"
                  to="{urn:switchyard-quickstart:transform-smooks:1.0}submitOrderResponse"
                  type="JAVA2XML"/>
The config attribute points to a Smooks resource containing the mapping definition. The type attribute can be one of SMOOKS, XML2JAVA, or JAVA2XML.
XSLT Transformers
The XSLT transformer allows you to perform a transformation between 2 types, using an XSLT. It is configured simply by specifying the to and from QNames, as well as the path to the XSLT to be applied.
<transform.xslt from="{http://acme/}A" to="{http://acme/}B" xsltFile="com/acme/xslt/A2B.xslt"/>
Validation
Java Validator
There are two methods available for creating a Java-based validator in SwitchYard:
-
Implement the org.switchyard.validate.Validator interface and add a <validate.java> definition to your switchyard.xml.
-
Annotate one or more methods on your Java class with @Validator.
When using the @Validator annotation, the SwitchYard maven plugin will automatically generate the <validate.java> definition(s) for you and add them to the switchyard.xml packaged in your application.
@Named("MyValidatorBean")
public class MyValidator {
    @Validator(name = "{urn:switchyard-quickstart-demo:orders:1.0}submitOrder")
    public ValidationResult validate(Element from) {
       // handle validation here
    }
}
The above Java class would produce the <validate.java> definition as following:
<validate.java bean="MyValidatorBean"
               name="{urn:switchyard-quickstart-demo:orders:1.0}submitOrder"/>
The optional name element of the @Validator annotation can be used to specify the qualified type name used during validator registration. If not supplied, the full class name of the method parameter will be used as the type.
The CDI bean name specified by @Named annotation is used to resolve validator class. If you don't specify, then class name of the validator is used instead like following:
<validates>
   <validate.java class="org.switchyard.quickstarts.demos.orders.MyValidator"
                   name="{urn:switchyard-quickstart-demo:orders:1.0}submitOrder"/>
</transforms>
Note that both of above <validate.java> definition has a bean attribute or a class attribute. bean attribute and class attribute are mutually exclusive.
ValidationResult
ValidationResult is a simple interface which represents the result of validation. It has 2 methods, isValid() and getDetail(). isValid() returns whether the validation succeeded or not. _getDetail() returns error message if validation failed.
package org.switchyard.validate;
public interface ValidationResult {
    boolean isValid();
    String getDetail();
}
There are 3 convenience methods on org.switchyard.validate.BaseValidator, validResult(), invalidResult(), and invalidResult(String) which help you to generate ValidationResult object.
Validation Failure
If validation fails, message exchange processing stops immediately, and HandlerException is thrown with the failure detail which is returned by ValidationResult.getDetail(). We recommend to return a ValidationResult with failure detail message when you want to indicate a validation failure in your Java Validator, instead of throwing a RuntimeException.
XML Validator
The XML validator allows you to perform a validation against its schema definition. Supported schema types are DTD, XML_SCHEMA, and RELAX_NG. It is configured simply by specifying the schema Type, the name QName, and the path to the schema file.
<validate.xml schemaType="XML_SCHEMA" name="{urn:switchyard-quickstart:validate-xml:0.1.0}order" failOnWarning="true" namespaceAware="true">
   <schemaFiles>
      <entry file="/xsd/orders.xsd"/>
   </schemaFiles>
   <schemaCatalogs>
      <entry file="/xsd/catalog.xml"/>
   </schemaCatalogs>
</validate.xml>
If you specify failOnWarning attribute as true, then validation would fail if any warning is detected during validation. If the XML content to be validated has namespace prefix, then you need to specify namespaceAware as true.
XML Catalog
You can use XML catalog to decouple the schema file location from schema definition itself. This schema is orders.xsd which has a import element. It refers to logical name orders.base by the schemaLocation attribute:
<schema xmlns="http://www.w3.org/2001/XMLSchema"
        targetNamespace="urn:switchyard-quickstart:validate-xml:0.1.0"
        xmlns:base="urn:switchyard-quickstart:validate-xml-base:0.1.0"
        xmlns:orders="urn:switchyard-quickstart:validate-xml:0.1.0">
        <import namespace="urn:switchyard-quickstart:validate-xml-base:0.1.0" schemaLocation="orders.base"/>
...
And this is the catalog.xml which resolves actual schema location from logical name orders.base:
<catalog xmlns="urn:oasis:names:tc:entity:xmlns:xml:catalog">
    <system systemId="orders.base" uri="orders-base.xsd"/>
</catalog>
Validation Failure
If XML validation fails, message exchange processing stops immediately and HandlerException is thrown with validation failure detail message. XMLValidator collects a set of validation failures through the SAX ErrorHandler, and use the getMessage() of each received SAXParseException as a failure detail with extracting root cause if exists.
Testing
Testing your applications is dead simple with the comprehensive unit test support provided in SwitchYard. There are three primary elements to test support in SwitchYard:
-
SwitchYardRunner: JUnit test Runner class which takes care of bootstrapping an embedded SwitchYard runtime and deploying a SwitchYard application for the test instance. Its behavior is influenced heavily by the optional SwitchYardTestCaseConfig annotation. Its runtime state is represented by the SwitchYardTestKit.
-
SwitchYardTestKit: represents the runtime state of the deployed SwitchYard application instance deployed by SwitchYardRunner. Also provides access to a set of test utility methods for the test (e.g. assertion methods). The SwitchYardTestKit is reflectively injected into the test instance, if a property of type SwitchYardTestKit is declared in the test.
-
SwitchYardTestCaseConfig: optional annotation allows additional information to be specified for controlling the behavior of the SwitchYardRunner.
Enabling Test Support
Adding test support to your SwitchYard application is simply a matter of adding a dependency to the switchyard-test module in your application's pom.xml.
<dependency>
    <groupId>org.switchyard</groupId>
    <artifactId>switchyard-test</artifactId>
    <version>[release-version]</version> <!-- e.g. "0.7.0" -->
    <scope>test</scope>
</dependency>
In addition to a dependency on the core test framework, you might want to take advantage of MixIns in your test classes. Dependency information for each MixIn is listed under the Test MixIns section.
SwitchYardRunner and SwitchYardTestKit
To take advantage of the test support in SwitchYard, your unit test should be annotated with the SwitchYardRunner JUnit test Runner class. SwitchYardRunner takes care of creating and starting an embedded runtime for each test method. After the embedded runtime is started, the project containing the test is packaged as a SwitchYard application and deployed to it. The runtime state of the deployed SwitchYard test application is represented by an instance of the SwitchYardTestKit class, which is injected into the test when a property of type SwitchYardTestKit is declared in the test.
@RunWith(SwitchYardRunner.class)
public class MyServiceTest  {

    private SwitchYardTestKit testKit;

    @Test
    public void testOperation() {
        MyTestServiceHandler service = new MyTestServiceHandler();

        // register the service...
        testKit.registerInOutService("MyService", service);

        // invoke the service and capture the response...
        Message response = newInvoker("MyService")
        .sendInOut("<create>A1234</create>");

        // test the response content by doing an XML comparison with a
        // file resource on the classpath...
        testKit.compareXMLToResource(response.getContent(String.class), "/myservice/expected-create-response.xml");
    }

    private class MyTestServiceHandler implements ExchangeHandler {
        // implement methods....
    }
}
The SwitchYardTestKit provides a set of utility methods for performing all sorts of deployment configuration and test operations.
SwitchYardTestCaseConfig
The optional SwitchYardTestCaseConfig annotation can be used control the behavior of the SwitchYardRunner:
-
config: allows the specification of a SwitchYard XML configuration file (switchyard.xml) for the test. The SwitchYardRunner will attempt to load the specified configuration from the classpath. If if fails to locate the config on the classpath, it will then attempt to locate it on the file system (e.g. within the project structure).
-
mixins: composition-based method for adding specific testing tools to your test case. Each TestMixIn provides customized testing tools for things like service implementations, gateway bindings, and transformers. When a TestMixIn is annotated on a Test Class, the SwitchYardRunner handles all the initialization and cleanup (lifecycle) of the TestMixIn instance(s). It's also possible to manually create and manage TestMixIn instance(s) within your test class if (for example) you are not using the SwitchYardRunner.
-
scanners: add classpath scanning as part of the test lifecycle. This adds the same Scanner behavior as is available with the SwitchYard maven build plugin, but allows the scanning to take place as part of the test lifecycle. You will often find that you need to add Scanners if you want your test to run inside your IDE. This is because running your test inside your IDE bypasses the whole maven build process, which means the build plugin does not perform any scanning for you.
@RunWith(SwitchYardRunner.class)
@SwitchYardTestCaseConfig(config = "testconfigs/switchyard-01.xml", mixins = {CDIMixIn.class, BPMMixIn.class}, scanners = {BeanSwitchYardScanner.class, TransformSwitchYardScanner.class})
public class MyServiceTest  {

    @Test
    public void testOperation() {
        newInvoker("OrderService")
        .operation("createOrder")
        .sendInOnly("<order><product>AAA</product><quantity>2</quantity></order>");
    }
}
TestMixIns
The TestMixIn feature allows you to selectively enable additional test functionality based on the capabilities of your application. To include MixIn support in your application, you must include a Maven dependency in your application's pom.xml.
<dependency>
    <groupId>org.switchyard.components</groupId>
    <artifactId>switchyard-component-test-mixin-name</artifactId>
    <version>release-version</version> <!-- e.g. "0.7.0" -->
    <scope>test</scope>
</dependency>
-
CDIMixIn (switchyard-component-test-mixin-cdi) : boostraps a stand-alone CDI environment, automatically discovers CDI beans, registers bean services, and injects references to SwitchYard services.
-
HTTPMixIn (switchyard-component-test-mixin-http) : client methods for testing HTTP-based services.
-
SmooksMixIn (switchyard-component-test-mixin-smooks) : stand-alone testing of any Smoooks transformers in your application.
-
BPMMixIn (switchyard-component-test-mixin-bpm) : utility methods for working with jBPM 5 Human Tasks (like starting/stopping a TaskServer).
-
HornetQMixIn (switchyard-component-test-mixin-hornetq) : bootstraps a stand-alone HornetQ server and provides utility methods to interact with it for testing purpose. It can be also used to interact with remote HornetQ server.
-
JCAMixIn (switchyard-component-test-mixin-jca) : bootstraps a embedded IronJacamar JCA container and provides utility methods to interact with it for testing purpose. It has a MockResourceAdapter feature to simulate the SwitchYard application behavior without connecting to the real EIS systems.JCAMixIn has been deprecated. It will be removed from the distribution in the future. -
NamingMixIn (switchyard-component-test-mixin-naming) : provides access to naming and JNDI services within an application.
-
PropertyMixIn (switchyard-test) : provides ability to set test values to properties that are used within the configuration of the application.
Scanners
Scanners add classpath scanning as part of the test lifecycle. This adds the same Scanner behavior as is available with the SwitchYard maven build plugin, but allows the scanning to take place as part of the test lifecycle. The following Scanners are available:
-
BeanSwitchYardScanner: Scans for CDI Bean Service implementations.
-
TransformSwitchYardScanner: Scans for Transformers.
-
BpmSwitchYardScanner: Scans for @Process, @StartProcess, @SignalEvent and @AbortProcessInstance annotations.
-
RouteScanner: Scans for Camel Routes.
-
RulesSwitchYardScanner: Scans for @Rule annotations.
Metadata and Support Class Injections
As shown above, injecting the SwitchYardTestKit instance into the test at runtime is simply a case of declaring a property of that type in the test class.
@RunWith(SwitchYardRunner.class)
public class MyServiceTest  {

    private SwitchYardTestKit testKit;

    // implement test methods...
}
The SwitchYard test framework also injects other test support and metadata classes, which we outline in the following sections.
Deployment Injection
The Deployment instance can be injected by declaring a property of type Deployment.
@RunWith(SwitchYardRunner.class)
public class MyServiceTest  {

    private Deployment deployment;

    // implement test methods...
}
SwitchYardModel Injection
The SwitchYardModel instance can be injected by declaring a property of type SwitchYardModel.
@RunWith(SwitchYardRunner.class)
public class MyServiceTest  {

    private SwitchYardModel model;

    // implement test methods...
}
ServiceDomain Injection
The ServiceDomain instance can be injected by declaring a property of type ServiceDomain.
@RunWith(SwitchYardRunner.class)
public class MyServiceTest  {

    private ServiceDomain serviceDomain;

    // implement test methods...
}
TransformerRegistry Injection
The TransformerRegistry instance can be injected by declaring a property of type TransformerRegistry.
@RunWith(SwitchYardRunner.class)
public class MyServiceTest  {

    private TransformerRegistry transformRegistry;

    // implement test methods...
}
TestMixIn Injection
TestMixIn instance(s) can be injected by declaring properties of the specific type TestMixIn type.
@RunWith(SwitchYardRunner.class)
@SwitchYardTestCaseConfig(mixins = {CDIMixIn.class, HTTPMixIn.class})
public class MyServiceTest  {

    private CDIMixIn cdiMixIn;
    private HTTPMixIn httpIn;

    // implement test methods...
}
PropertyMixIn Injection
PropertyMixIn instance(s) are injected like any other TestMixIn type, however any properties you set on the mix in have to be done before deployment to be respected, thus the use of the @BeforeDeploy annotation:
@RunWith(SwitchYardRunner.class)
@SwitchYardTestCaseConfig(mixins = {CDIMixIn.class, PropertyMixIn.class, HTTPMixIn.class})
public class MyServiceTest  {

    private PropertyMixIn propMixIn;
    private HTTPMixIn httpMixIn;

    @BeforeDeploy
    public void setTestProperties() {
        propMixIn.set("soapPort", Integer.valueOf(18002));
    }

    // implement test methods...
}
Invoker Injection
Service Invoker instance(s) can be injected by declaring properties of type Invoker and annotating them with @ServiceOperation annotation.
@RunWith(SwitchYardRunner.class)
@SwitchYardTestCaseConfig(config = "testconfigs/switchyard-01.xml")
public class MyServiceTest  {

    @ServiceOperation("OrderService.createOrder")
    private Invoker createOrderInvoker;

    @Test
    public void test_createOrder() {
        createOrderInvoker.sendInOnly("<order><product>AAA</product><quantity>2</quantity></order>");
    }
}
Note the annotation value is a dot-delimited Service Operation name of the form "service-name.operation-name".
Selectively Enabling Activators for a Test
The test framework defaults to a mode where the entire application descriptor is processed during a test run. This means all gateway bindings and service implementations are activated during each test. There are times when this may not be appropriate, so we allow activators to be selectively enabled or disabled based on your test configuration.
The following example excludes SOAP bindings from all tests. This means that SOAP gateway bindings will not be activated when the test framework loads the application.
@RunWith(SwitchYardRunner.class)
@SwitchYardTestCaseConfig(config = "testconfigs/switchyard-01.xml" exclude="soap")
public class NoSOAPTest  {
   ...
}
This example includes only CDI bean services defined in the application descriptor.
@RunWith(SwitchYardRunner.class)
@SwitchYardTestCaseConfig(config = "testconfigs/switchyard-02.xml" include="bean")
public class BeanServicesOnlyTest  {
...
}
Preparing procedure for the Test
Sometimes we need to add some procedures before test is performed. JUnit @Before operation is invoked right after the application is deployed, however, it can't be used if you expect something before deploy. We have @BeforeDeploy annotation for this purpose. This is required to test the application which has JCA binding with using JCAMixIn since the ResourceAdapter must be deployed before the application is activated.
This is the example for deploying HornetQ ResourceAdapter to the embedded IronJacamar JCA Container using JCAMixIn. Although @BeforeDeploy is still available, JCAMixIn has been deprecated.
@BeforeDeploy
public void before() {
    ResourceAdapterConfig ra = new ResourceAdapterConfig(ResourceAdapterConfig.ResourceAdapterType.HORNETQ);
    _jcaMixIn.deployResourceAdapters(ra);
}
Arquillian: Running a Test on the real application server
If your application requires Java EE functionality like JCA or EJB, you will need to deploy your application onto real server to test if it actually works. Arquillian helps you to test your SwitchYard application with actually deploying onto the server.
Visit here for more information - http://arquillian.org/
There are a couple of tests using Arquillian AS7 remote in our quickstarts. Please see its README to know how it runs.
-
switchyard-quickstart-jca-inflow-activemq
-
switchyard-quickstart-jca-inflow-hornetq
-
switchyard-quickstart-jca-outbound-activemq
-
switchyard-quickstart-jca-outbound-hornetq
-
switchyard-quickstart-demo-policy-transaction
Debugging
What to do when your application is not behaving as expected? This section describes a number of mechanisms in SwitchYard that provide more visibility and control into the machinery underneath your application.
Message Tracing
Message tracing provides a view of the content and context of a message exchange on the SwitchYard bus by printing exchange information to the log. The trace is generated from an exchange interceptor which is triggered at the following points:
-
Immediately after the consumer sends the request message. For example, In the case of a service which is invoked from a service binding, this will be the point at which the gateway binding puts the message onto the bus.
-
Immediately before the service provider is invoked.
-
Immediately after the service provider is invoked.
-
At completion of the exchange before the message is returned to the consumer.
Trace Output
Trace output includes details on the metadata, context properties, payload, and attachments for a message exchange. Here is an example of a trace entry:
12:48:25,038 INFO  [org.switchyard.handlers.MessageTraceHandler]
------- Begin Message Trace -------
Consumer -> {urn:switchyard-quickstart:bean-service:0.1.0}OrderService
Provider -> [unassigned]
Operation -> submitOrder
MEP -> IN_OUT
Phase -> IN
State -> OK
Exchange Context ->
	org.switchyard.bus.camel.consumer : ServiceReference [name={urn:switchyard-quickstart:bean-service:0.1.0}OrderService, interface=BaseServiceInterface [type=wsdl, operations=[submitOrder : IN_OUT : [{urn:switchyard-quickstart:bean-service:1.0}submitOrder, {urn:switchyard-quickstart:bean-service:1.0}submitOrderResponse, null]]], domain=ServiceDomain [name=org.switchyard.domains.root]]
	org.switchyard.exchangeGatewayName : _OrderService_soap_1
	org.switchyard.bus.camel.securityContext : SecurityContext[credentials=[ConfidentialityCredential [confidential=false]], securityDomainsToSubjects={}]
	org.switchyard.exchangeInitiatedNS : 1375980505021790000
	CamelCreatedTimestamp : Thu Aug 08 12:48:25 EDT 2013
	org.switchyard.bus.camel.phase : IN
	org.switchyard.bus.camel.dispatcher : org.switchyard.bus.camel.ExchangeDispatcher@b4aa453
	org.switchyard.bus.camel.labels : {org.switchyard.exchangeGatewayName=[org.switchyard.label.behavior.transient]}
	CamelToEndpoint : direct://%7Burn:switchyard-quickstart:bean-service:0.1.0%7DOrderService
	org.switchyard.bus.camel.contract : org.switchyard.metadata.BaseExchangeContract@2176feaf
	org.switchyard.bus.camel.replyHandler : org.switchyard.component.common.SynchronousInOutHandler@516a4aef
	CamelFilterMatched : false
Message Context ->
	org.switchyard.bus.camel.labels : {org.switchyard.contentType=[org.switchyard.label.behavior.transient], org.switchyard.bus.camel.messageSent=[org.switchyard.label.behavior.transient]}
	org.switchyard.messageId : ID-kookaburra-local-49858-1375980502093-0-1
	org.switchyard.bus.camel.messageSent : true
	org.switchyard.soap.messageName : submitOrder
	org.switchyard.contentType : {urn:switchyard-quickstart:bean-service:1.0}submitOrder
	breadcrumbId : ID-kookaburra-local-49858-1375980502093-0-1
Message Content ->
<?xml version="1.0" encoding="UTF-8"?><orders:submitOrder xmlns:orders="urn:switchyard-quickstart:bean-service:1.0">
			<order>
				<orderId>PO-19838-XYZ</orderId>
				<itemId>BUTTER</itemId>
				<quantity>200</quantity>
			</order>
		</orders:submitOrder>
------ End Message Trace -------
Enabling Message Tracing
Message tracing is enabled by setting the value of the "org.switchyard.handlers.messageTrace.enabled" property to true in your application domain. Domain properties are set via entries in the <domain> section of switchyard.xml. An easy shortcut to enabling tracing is to view the Domain tab of the visual application model in Eclipse and select the "Enable Message Trace" checkbox.
<domain>
   <properties>
      <property name="org.switchyard.handlers.messageTrace.enabled" value="true"/>
   </properties>
</domain>
Exchange Interceptors
ExchangeInterceptors provide a mechanism for injecting logic into the message path of the SwitchYard exchange bus. You can use an interceptor to read or update message content and context properties, which makes interceptors useful for debugging and for applying logic outside a traditional service implementation in SwitchYard.
Implementing an ExchangeInterceptor
An ExchangeInterceptor is a Java class with the following properties:
-
Implements the org.switchyard.ExchangeInterceptor interface.
-
Is annotated with @Named so that it can be discovered as a CDI bean.
The ExchangeInterceptor interface looks like this:
public interface ExchangeInterceptor {
    String CONSUMER = "Consumer";
    String PROVIDER = "Provider";

    void before(String target, Exchange exchange) throws HandlerException;
    void after(String target, Exchange exchange) throws HandlerException;
    List<String> getTargets();
}
An interceptor is invoked for all message exchanges in an application, so if you only care about a specific service you will want to add a conditional to before() and after() to check for service name. You can restrict the interception points used through the getTargets() method. The CONSUMER and PROVIDER string constants are provided for use with getTargets() to restrict interception to the consumer, provider, or both. The CONSUMER target maps to an injection point just after the consumer sends a request and just before the reply is handed back. The PROVIDER target maps to an injection point just before the provider is called with a request and just after it produces a response.
Here is an example ExchangeInterceptor implementation from the bean-service quickstart:
package org.switchyard.quickstarts.bean.service;

import java.util.Arrays;
import java.util.List;

import javax.inject.Named;

import org.switchyard.Exchange;
import org.switchyard.ExchangeInterceptor;
import org.switchyard.ExchangeState;
import org.switchyard.HandlerException;

/**
 * This is an example of an exchange interceptor which can be used to inject code
 * around targets during a message exchange.  This example updates the content of
 * OrderAck after the provider has generated a response.
 */
@Named("UpdateStatus")
public class OrderInterceptor implements ExchangeInterceptor {

    @Override
    public void before(String target, Exchange exchange) throws HandlerException {
        // Not interested in doing anything before the provider is invoked
    }

    @Override
    public void after(String target, Exchange exchange) throws HandlerException {
        // We only want to intercept successful replies from OrderService
        if (exchange.getProvider().getName().getLocalPart().equals("OrderService")
                && ExchangeState.OK.equals(exchange.getState())) {
            OrderAck orderAck = exchange.getMessage().getContent(OrderAck.class);
            orderAck.setStatus(orderAck.getStatus() + " [intercepted]");
        }
    }

    @Override
    public List<String> getTargets() {
       return Arrays.asList(PROVIDER);
    }

}
Auditing Exchanges
SwitchYard provides a low-level auditing mechanism intended for application debugging. Using Auditors to implement application logic is generally discouraged as the set and order of processors which auditors bind to is subject to change at any time. Auditing support requires a CDI environment to run, so your application must include META-INF/beans.xml.
Mediation states
SwitchYard exchanges sent from a service consumer to a service provider go through a set of handlers:
-
Addressing - addressing handler determines which provider is wired to a consumer reference.
-
Transaction - when service requires transaction this handler starts it
-
Security - verifies contraints related to authentication and authorization
-
General policy - executes other checks different than security and transaction
-
Validation - executes custom validators
-
Transformation - prepare payload for calling providing service
-
Validation - validates transformed payload
-
Provider call - calls providing service
-
Transaction - commits or rollbacks transaction, if necessary
If service consumer is synchronous and exchange pattern is set to in-out then some from these handlers are called once again:
-
Validation - verifies output generated by provider
-
Transformation - converts payload to structure required by consumer
-
Validation - checks output after transformation
-
Consumer callback - returns exchange to service consumer
Writing custom auditors
As said before audit mechanism requires CDI runtime to work. Annotate your Auditor implementations with the @Named annotation in order to have Camel recognise them. Camel Exchange Bus (a default implementation used by SwitchYard) look up for bean definitions with @Audit annotation. Simplest auditor looks following:
@Audit
@Named("custom auditor")
public class SimpleAuditor implements Auditor {

    @Override
    public void beforeCall(Processors processor, Exchange exchange) {
        System.out.println("Before " + processor.name());
    }

    @Override
    public void afterCall(Processors processor, Exchange exchange) {
        System.out.println("After " + processor.name());
    }

}
You will see lots of statements printed in server console like 'Before DOMAIN_HANDLERS', 'Before ADDRESSING' and so on. Every step of mediation is surrounded by this SimpleAuditor class.
Be aware that afterCall method is not called if surrounded step thrown an exception. In this case call of afterCall is skipped.
Chosing exact places for audit
If you are not interested in all these states of SwitchYard mediation process you might provide argument to @Audit annotation. Accepted values must come from org.switchyard.bus.camel.processors.Processors enumeration. For example @Audit(Processors.VALIDATION) will handle only validation occurances.
Please remember that validation is executed twice for in-only exchanges and fourth times for in-out. Validation occurs before transformation of inbound message and after transformation. In case when outgoing message will be sent from SwitchYard service validation is executed before transformation of outbound message and after transformation.
Transformation is executed once for in-only exchanges and twice for in-out exchanges.
Transaction phase is always executed twice.
If you are interested in only one execution of your auditor use following combination @Audit(Processors.PROVIDER_CALLBACK). Auditor will be executed just before sending exchange to service implementation. It's also possible to stick one auditor instance with few mediation steps. For example bean with annotation @Audit({Processors.PROVIDER_CALLBACK, Processors.CONSUMER_CALLBACK}) will be executed twice. One pair of before/after call for provider service and second pair for outgoing response.
Important notes
Custom auditors should not preserve state inside any fields because dispatching order is not guaranteed and only one instance of auditor is created by default. If you would like store some values please use exchange properties or message headers. Example below shows how to count processing time using Exchange properties as temporary storage.
@Named("custom auditor")
public class SimpleAuditor implements Auditor {

    private Logger _logger = Logger.getLogger(SimpleAuditor.class);

    @Override
    public void beforeCall(Processors processor, Exchange exchange) {
        exchange.setProperty("time", System.currentTimeMillis());
    }

    @Override
    public void afterCall(Processors processor, Exchange exchange) {
        long time = System.currentTimeMillis() - exchange.getProperty("time", 0, Long.class);
        _logger.info("Step " + processor.name() + " took " + time + "ms");
    }

}
Remote Invoker
The RemoteInvoker serves as a remote invocation client for SwitchYard services. It allows non-SwitchYard applications to invoke any service in SwitchYard which uses a <binding.sca> binding. It is also used by the internal clustering channel to facilitate intra-cluster communication between instances.
Using the RemoteInvoker
RemoteInvoker and supporting classes can be included in your application via the following Maven dependency:
<dependency>
   <groupId>org.switchyard</groupId>
   <artifactId>switchyard-remote</artifactId>
   <version> <!-- SY version goes here (e.g. 0.8.0.Final) --> </version>
</dependency>
Each instance of SY includes a special context path called "switchyard-remote" which is bound to the default HTTP listener in AS 7. The initial version of RemoteInvoker supports communication with this endpoint directly. Here's an example of invoking an in-out service in SY using the HttpInvoker:
public class MyClient {
    public static void main(String[] args) throws Exception {
        RemoteInvoker invoker = new HttpInvoker("http://localhost:8080/switchyard-remote");
        Offer offer = new Offer();
        offer.setAmount(100);
        offer.setItem("honda");

        RemoteMessage msg = invoker.invoke(new RemoteMessage()
            .setContext(new DefaultContext())
            .setService(new QName("urn:com.example.switchyard:remote", "Dealer"))
            .setContent(offer));

        Deal deal = (Deal)msg.getContent();
        System.out.println("It's a deal? " + deal.isAccepted());
    }
}
The remote-invoker quickstart serves as a nice example of using RemoteInvoker with a SwitchYard application.
Serialization
Serialization becomes a concern within SwitchYard with regards to clustering and execution from a client invoker (introduced in 0.6.0.Beta2). In those cases, objects that represent the content of a SwitchYard Message or objects that are placed within a SwitchYard Exchange's Context become candidates for serialization/deserialization.
Application-Defined Objects
Custom (application-defined) objects that are stored as the content of the message or property of the exchange context are not required to implement java.io.Serializable. This is because SwitchYard does not use the JDK's default object serialization mechanism. Rather, it traverses the object graph, extracting the properties along the way, and stores the values in it's own graph representation, which by default is serialized to/from the JSON format. This is what ends up going over the wire. For this to work, custom objects must follow one of the following two rules:
-
Adhere to the JavaBeans specification. This means a public, no arg constructor, and public getter/setter pairs for every property you want serialized. If you go this (suggested) route, your custom objects will not require any compilation dependencies on SwitchYard.
-
Use SwitchYard annotations to define your serialization strategy (see below).
Annotations
The following annotations, enums, interface and class exist in the org.switchyard.serial.graph package:
-
@Strategy - Here you can define the serialization strategy, including access type, coverage type, and factory (all optional) for your class.
-
access=AccessType - BEAN (default) for getter/setter property access, FIELD for member variable access.
-
coverage=CoverageType - INCLUSIVE (default) for serializing all properties, EXCLUSIVE for ignoring all properties. (See @Include and @Exclude below for overrides.)
-
factory=Factory - Interface for how the class gets instantiated.
-
DefaultFactory - Creates an instance of the class using the default constructor.
-
-
-
@Include - Placed on individual getter methods or fields to override CoverageType.EXCLUSIVE.
-
@Exclude - Placed on individual getter methods or fields to override CoverageType.INCLUSIVE.
Level API Usage
As an application developer, you should not have to use SwitchYard's serialization API directly. However, documentation is still presented here.
Serialization is done using Serializers, obtained from the SerializerFactory. For example:
// See SerializerFactory for overloaded "create" methods.
Serializer ser = SerializerFactory.create(FormatType.JSON, CompressionType.GZIP, true);


// to and from a byte array
Foo fooBefore = new Foo();
byte[] bytes = ser.serialize(fooBefore, Foo.class);
Foo fooAfter = ser.deserialize(bytes, Foo.class);


// to and from output/input streams
Bar barBefore = new Bar();
OutputStream out = ...
ser.serialize(barBefore, Bar.class, out);
InputStream in = ...
Bar barAfter = ser.deserialize(in, Bar.class);
Out of the box, the available FormatTypes are SER_OBJECT, XML_BEAN and JSON, and the available CompressionTypes are GZIP, ZIP, or null (for no compression).
In the example Serializer.create invocation above, the 3rd (boolean) argument means that the object graph will be walked via reflection, as per the description in "Application-Defined Objects" above.
Extensions
Extensions allow users to augment the set of component modules included in the SwitchYard distribution. This feature can be used to:
-
Support additional binding types via Camel components not included in the distribution.
-
Add data formats and other Camel libraries for use within Camel routing services.
-
Implement custom gateway bindings as Camel components.
Creating an Extension Module
In order to create an extension for SwitchYard, you must package the relevant jars and resources used by the component as an AS module. SwitchYard modules can be found in the modules/system/layers/soa directory of your EAP installation. Let's look at adding an extension component for a custom camel component called "MyBinding".
First we need to grab the jar for mybinding and create a module:
modules/system/layers/soa/org/example/mybinding/
   main/
      module.xml
      my-binding.jar
The module definition for our extension component looks like this:
<module xmlns="urn:jboss:module:1.0" name="org.example.mybinding">
  <resources>
    <resource-root path="my-binding.jar"/>
  </resources>
  <dependencies>
    <module name="org.apache.camel.core"/>
  </dependencies>
</module>
Registering the Extension Module
In order to make SwitchYard aware of the extension module, you need to add the module name to the list of extensions defined in the SwitchYard subsystem in standalone.xml.
<subsystem xmlns="urn:jboss:domain:switchyard:1.0">
  <modules>
    <module identifier="org.switchyard.component.bean" implClass="org.switchyard.component.bean.deploy.BeanComponent"/>
    <module identifier="org.switchyard.component.soap" implClass="org.switchyard.component.soap.deploy.SOAPComponent">
    <!-- snip -->
  </modules>
  <extensions>
    <extension identifier="org.apache.camel.mvel"/>
    <extension identifier="org.apache.camel.ognl"/>
    <extension identifier="org.apache.camel.jaxb"/>
    <extension identifier="org.apache.camel.soap"/>
    <!-- adding mybinding -->
    <extension identifier="org.example.mybinding"/>
  </extensions>
</subsystem>
Add the extension definition will make the module visible to all SwitchYard deployments in the runtime.
Using Extensions
How you use an extension in your application depends on the type of extension.
Camel DataFormat
Once a data format is packaged as a module and added as an extension to the SwitchYard subsystem, no further configuration is required in your application. You can simply refer to the data format directly in your route as if it was packaged directly within your application.
Camel Gateway Components
If the extension is to be used as a gateway binding for services and/or references, then you will need to use the Camel URI binding in your application to configure the endpoint details.