<sca:composite name="example" targetNamespace="urn:example:switchyard:1.0">
</sca:composite>
Welcome to the SwitchYard User Guide. This document provides a conceptual overview and explanation of the moving parts in SwitchYard. If you are looking for a way to get up and running quickly, be sure to check out the Getting Started guide.
What is SwitchYard?
SwitchYard is a component-based development framework focused on building structured, maintainable services and applications using the concepts and best practices of SOA. It works with Apache Camel to provide a fast, simple, flexible integration runtime with comprehensive connectivity and transports. A uniform application model augments Apache Camel, joining Java EE, BPM, rules, orchestration, and routing into a cohesive development model and runtime. Common functionality and cross-cutting concerns - validation, transformation and policy - are isolated from business logic and handled declaratively. This ensures consistency and eliminates duplication, offering developers a clear view of the structure and relationships of services in an integration application.
Application Basics
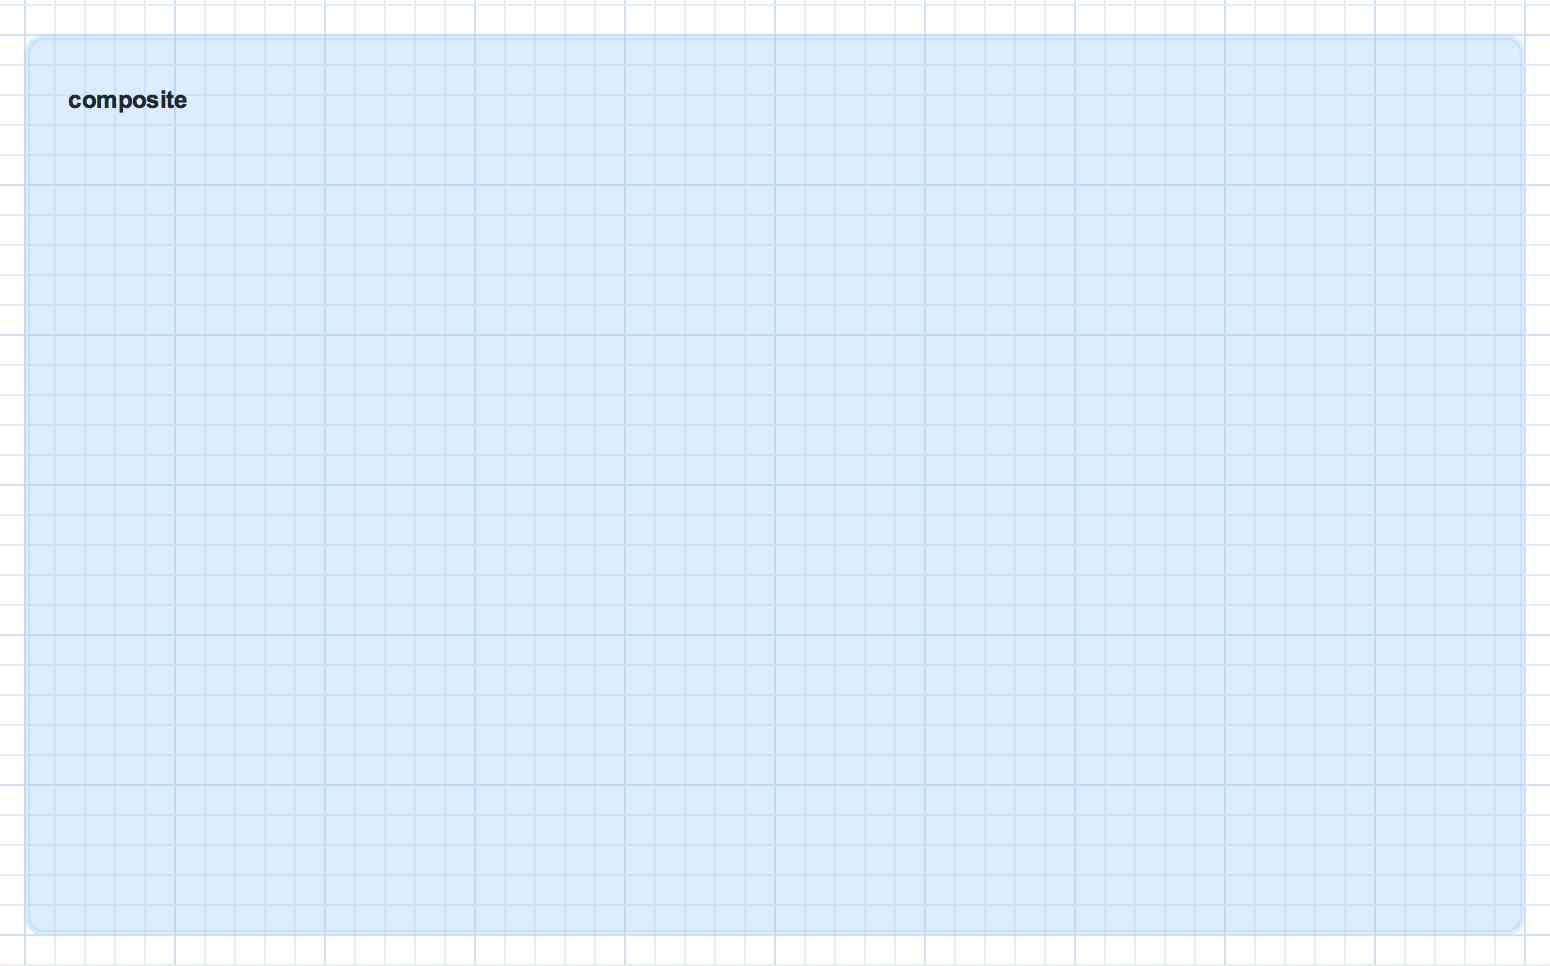
This section introduces the basic building blocks of a SwitchYard application starting from an empty application and building up to the complete application you see below:
Each topic includes a representation in the SwitchYard visual editor and the corresponding metadata from the SwitchYard application descriptor (switchyard.xml). The snippet of XML from the descriptor is provided for context only - you do not have to view or edit XML descriptors when creating SwitchYard applications.
Composite
A composite is displayed as a light blue rectangle and represents the boundary between what's inside your application and what's outside your application. A SwitchYard application consists of exactly one composite that has a name and a targetNamespace. The targetNamespace value is important as it allows names defined locally in the application (e.g. service names) to be qualified and unique within a SwitchYard runtime.
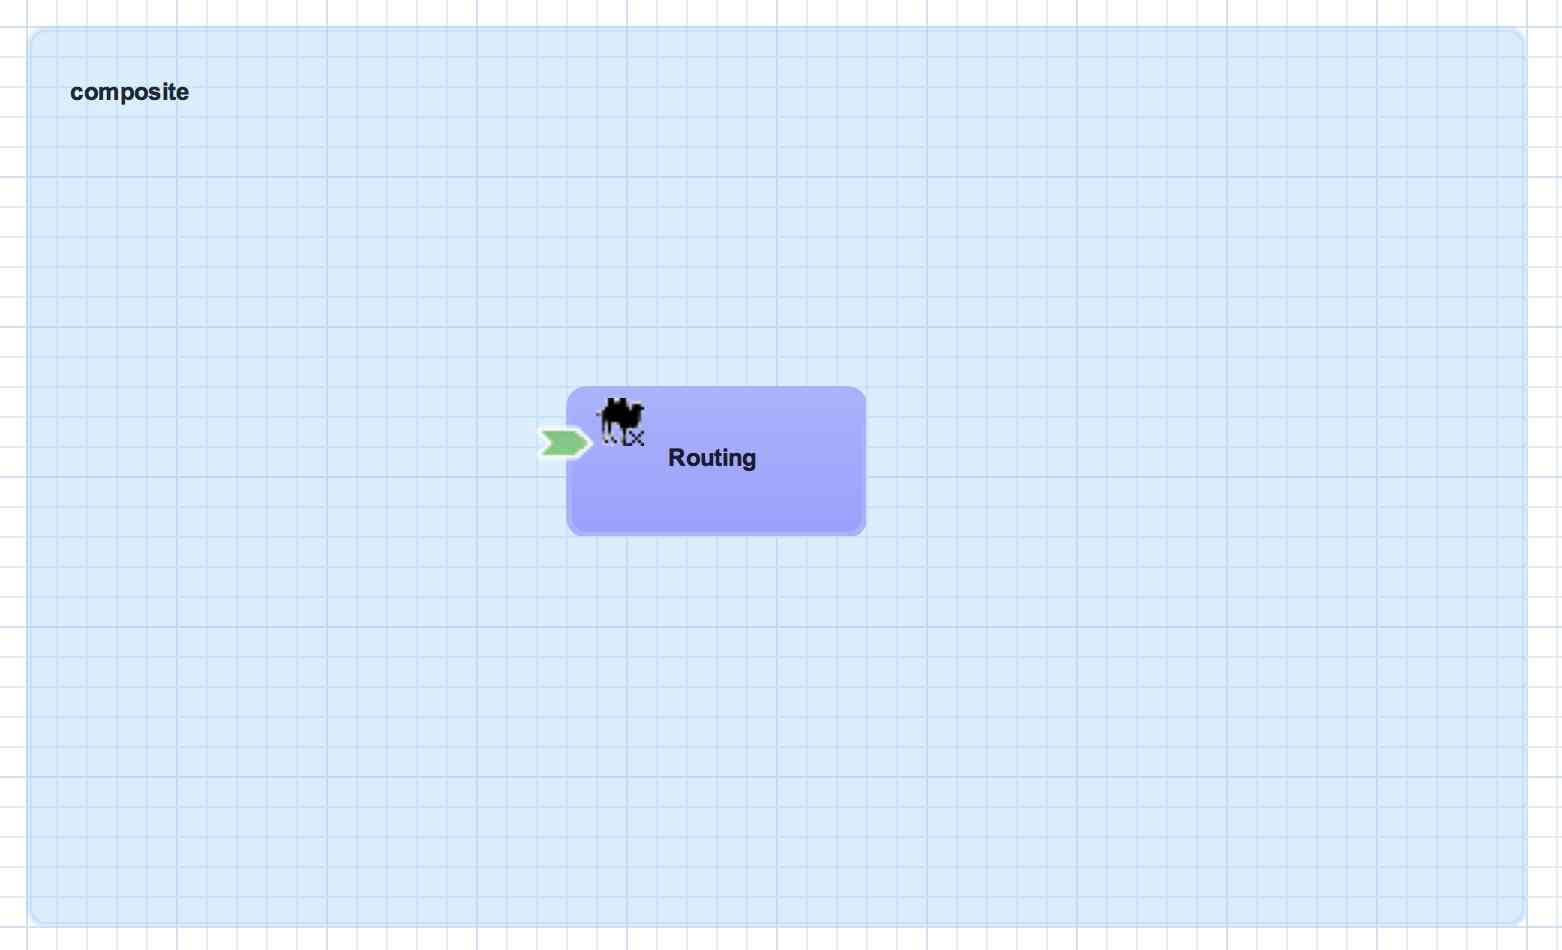
Component
A component is a modular container for application logic and consists of the following:
-
0 or 1 component service definitions
-
0 to many component reference definitions
-
1 implementation
Services and references allow a component to interact with other components, while the implementation provides the actual logic for providing and/or consuming services.
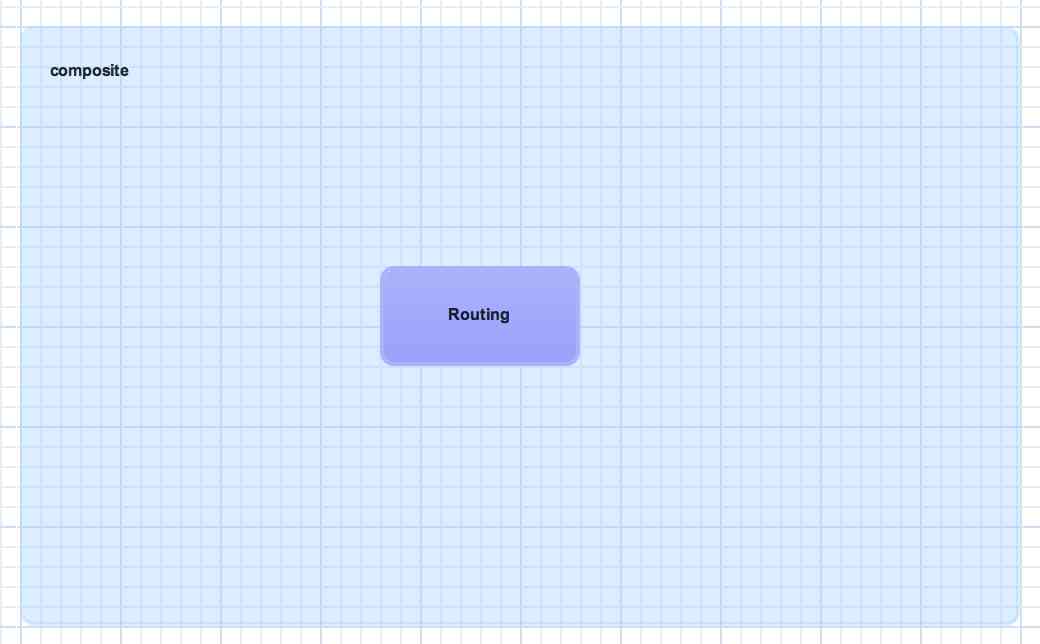
<sca:component name="Routing">
</sca:component>
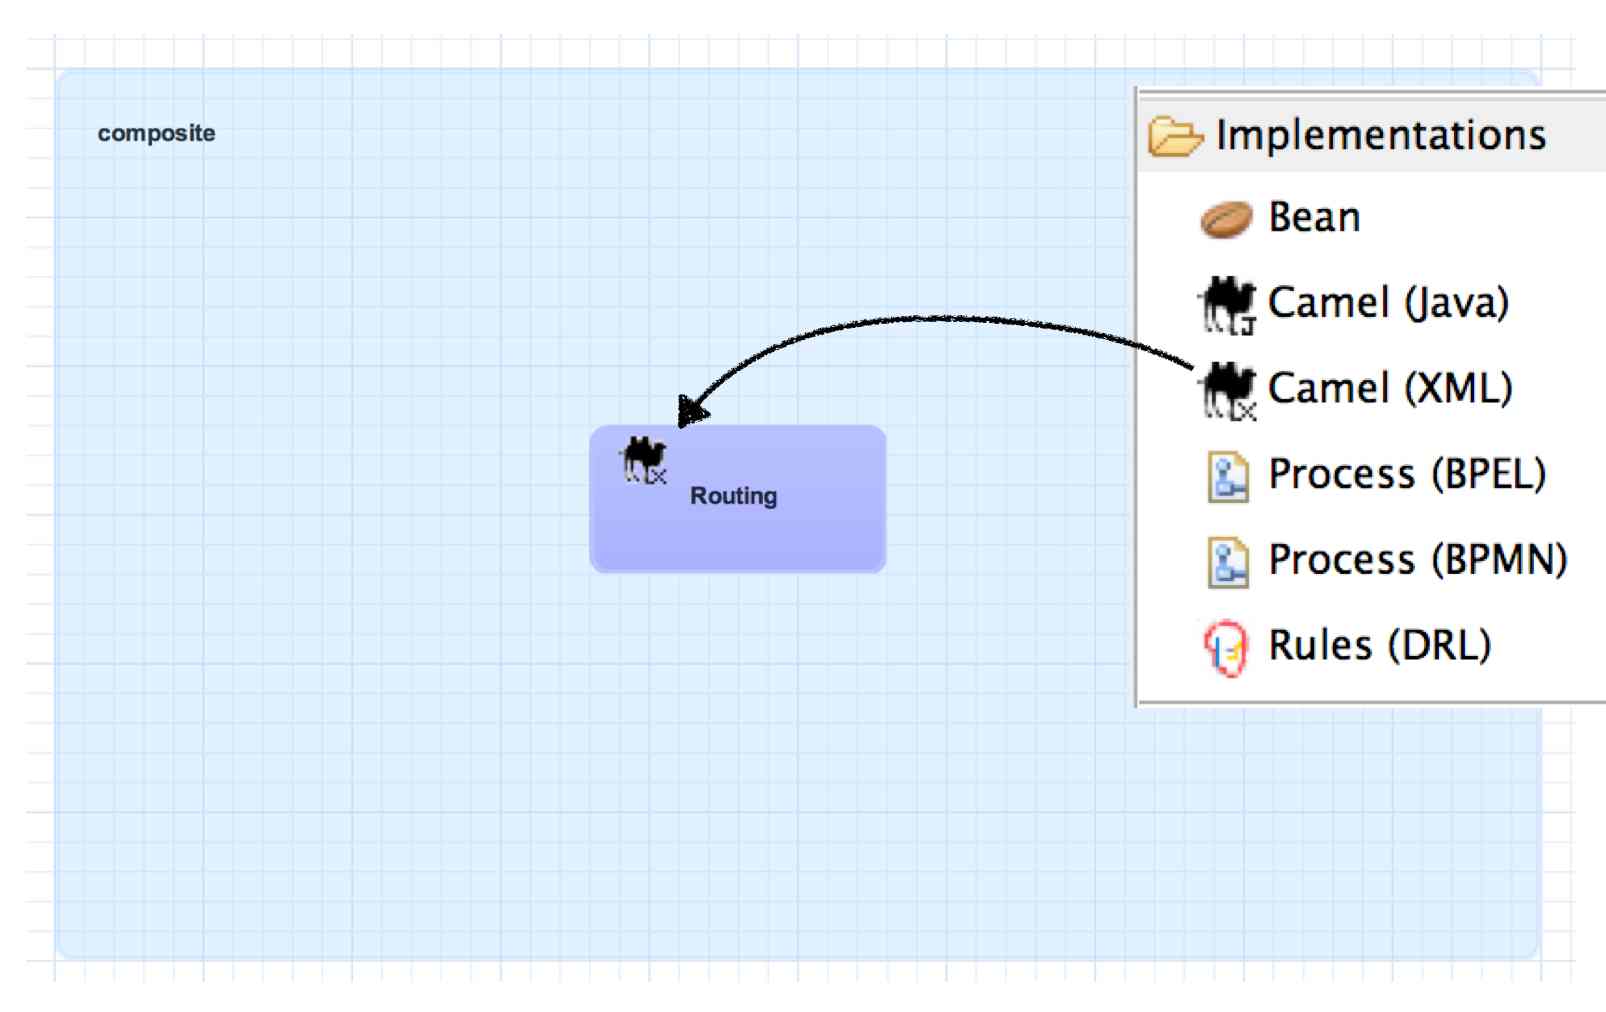
Implementation
An implementation acts as the 'brain' of a service component and it is how implement your application logic. The following implementation options are available:
-
Bean : allows a CDI Bean to consume or provide services using annotations.
-
Camel : EIP-style routing and service composition using the XML or Java DSL in Apache Camel.
-
BPMN 2 : service orchestration and human task integration expressed as BPMN 2 and executed using jBPM
-
BPEL Process : web service orchestration using the OASIS Business Process Execution Language
-
Rules : decision services based on Drools
Implementations are private to a component, which means external consumers and providers are not aware of the details of a component's implementation (implementation-hiding). All interactions with other components within an application and with external services are handled through component services and references.
<sca:component name="Routing">
   <camel:implementation.camel>
      <camel:xml path="RoutingService.xml"/>
   </camel:implementation.camel>
</sca:component>
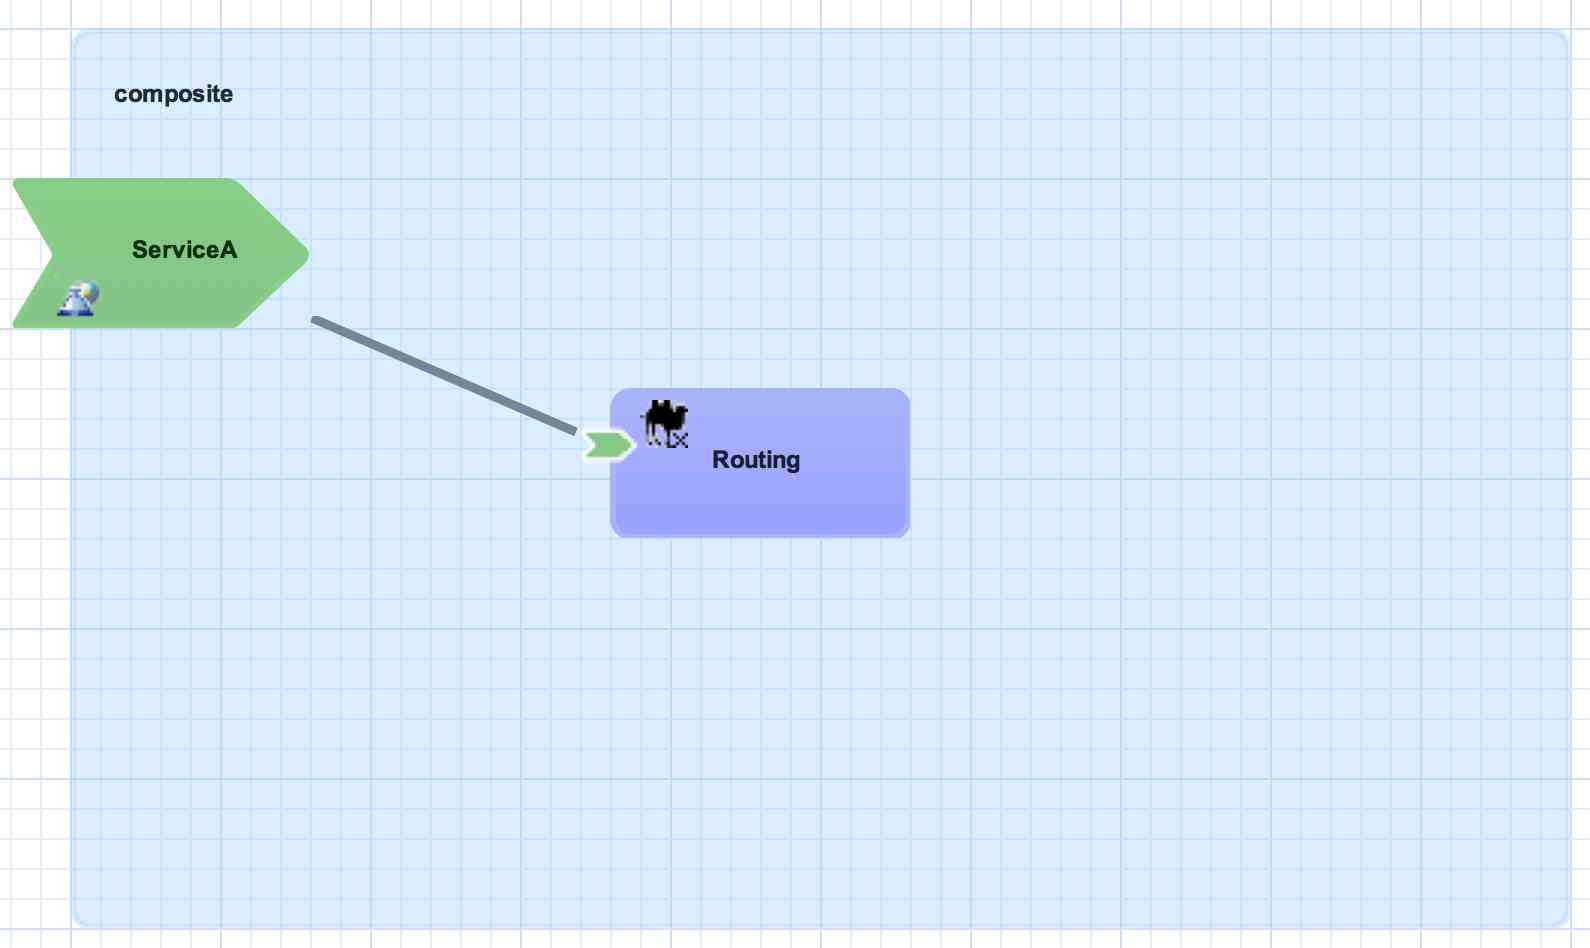
Component Service
A component service is used to expose the functionality of an implementation as a service. All component services have a contract, which can be a Java interface, WSDL portType definition, or a set of named data types (interface.esb). Component services are private to an application, which means a component service can only be invoked by other components in the same application. In order to expose a component service to consumers external to the application, a component service can be 'promoted' to a composite service. A component service can be promoted multiple times to create different composite services.
<sca:component name="Routing">
   <camel:implementation.camel>
      <camel:xml path="route.xml"/>
   </camel:implementation.camel>
   <sca:service name="ServiceA">
      <sca:interface.java interface="org.example.ServiceA"/>
   </sca:service>
</sca:component>
Composite Service
A composite service represents an application service which is visible to other applications. A composite service can only be realized by promoting a component service within the application. The name and the interface of the composite service can be different from the component service. If the interface, or contract, of the composite service is different from the component service, be aware that a transformation may be required to map between the types defined in each interface. In our example application, the component service has a Java interface while the composite service has a WSDL interface. This means we would need to declare a transformer which maps between XML and Java to resolve the data type mismatch. For more information on transformation, see the Transformers section of the Developer Guide.
<sca:composite name="example" targetNamespace="urn:example:switchyard:1.0">
   <sca:service name="ServiceA" promote="Routing/ServiceA">
      <sca:interface.wsdl interface="ServiceA.wsdl#wsdl.porttype(ServiceAPortType)"/>
   </sca:service>
</sca:composite>
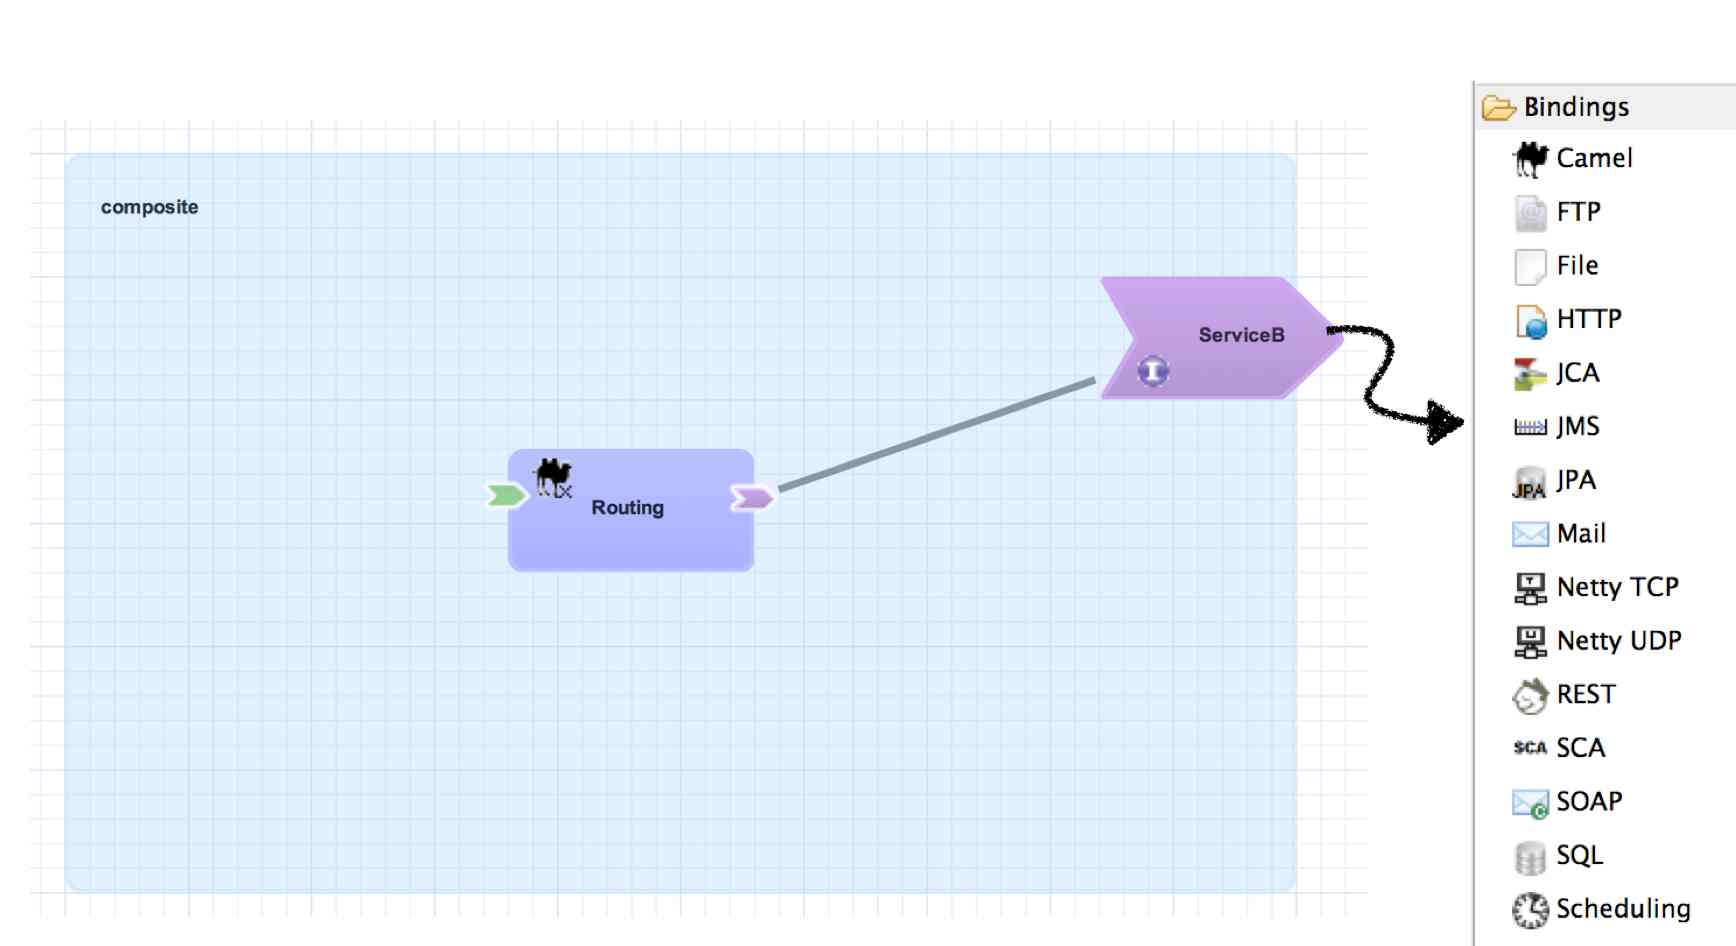
Service Binding
A service binding is used to define an access method for a composite service. Composite services can have multiple bindings, which allows a single service to be accessed in different ways. In most cases, a service binding represents a protocol/transport adapter (e.g. SOAP, JMS, REST). An important exception to this rule is the SCA binding, which allows services across applications in the same runtime to be wired together in memory. Regardless of the underlying binding details, a binding must always be used to facilitate inter-application communication in SwitchYard.

<sca:composite name="example" targetNamespace="urn:example:switchyard:1.0">
   <sca:service name="ServiceA" promote="Routing/ServiceA">
      <sca:interface.wsdl interface="ServiceA.wsdl#wsdl.porttype(ServiceAPortType)"/>
      <soap:binding.soap>
        <soap:wsdl>ServiceA.wsdl</soap:wsdl>
      </soap:binding.soap>
   </sca:service>
</sca:composite>
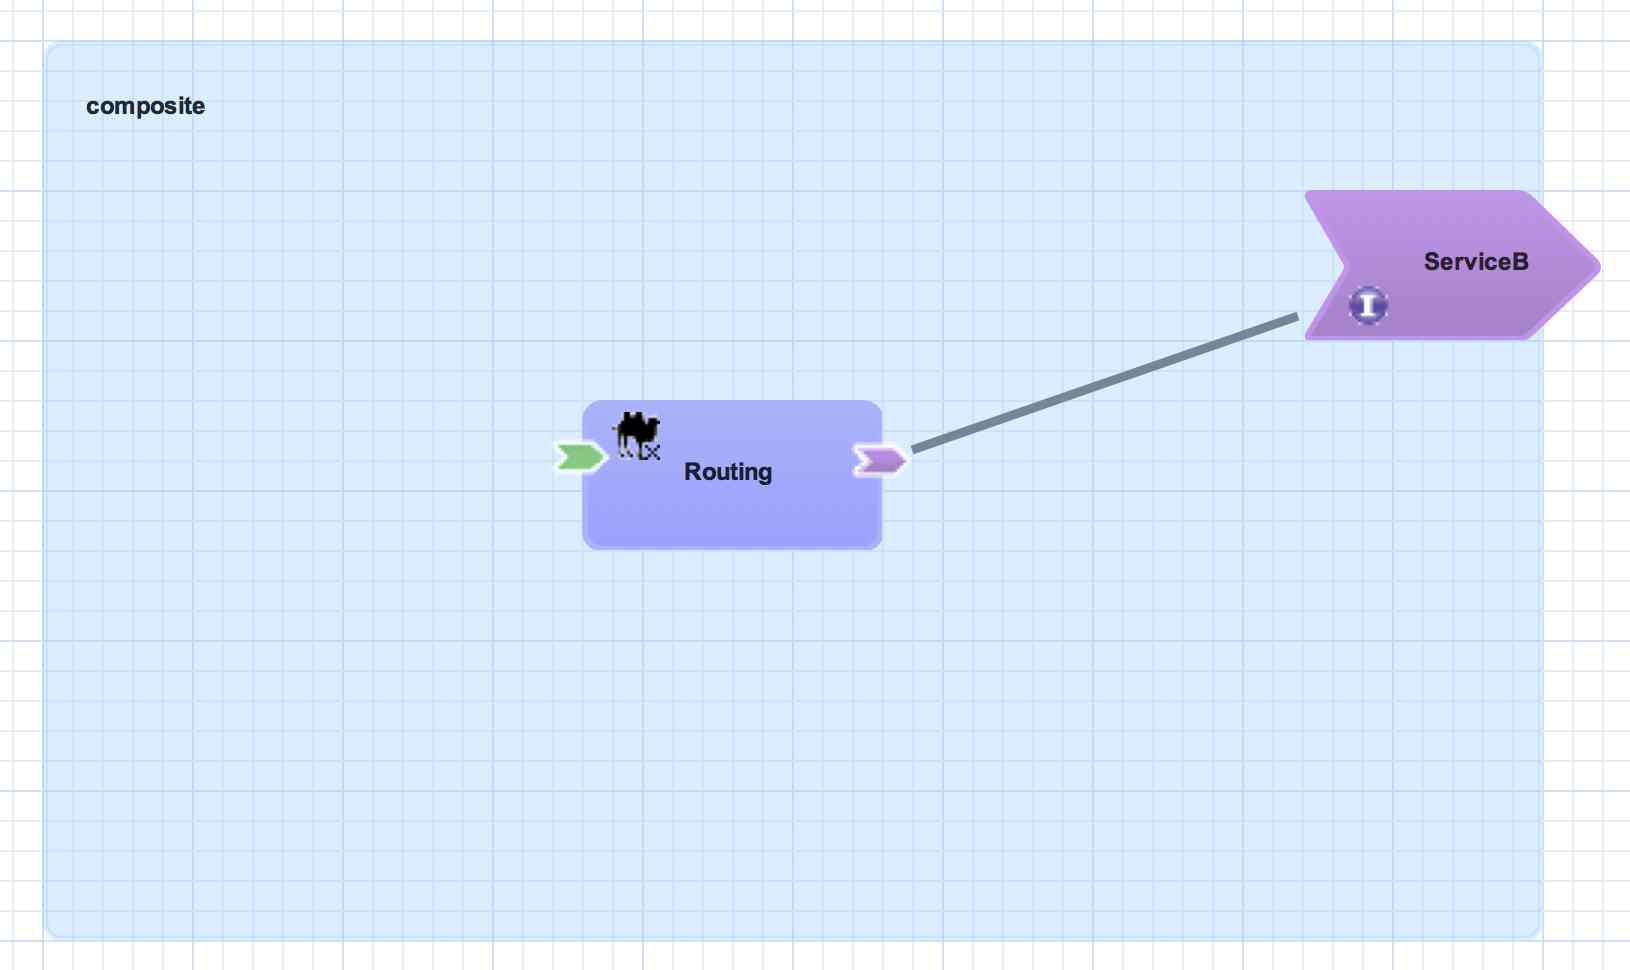
Component Reference
A component reference allows a component to consume other services. A component reference can be wired to a service offered by another component in the same application or it can be wired to services outside the application via a composite reference. Similar to component services, all component references have a contract with allows a component to invoke services without knowing implementation or binding details. The picture below shows an example of wiring a reference on the Routing component to a service offered by the Bean component.
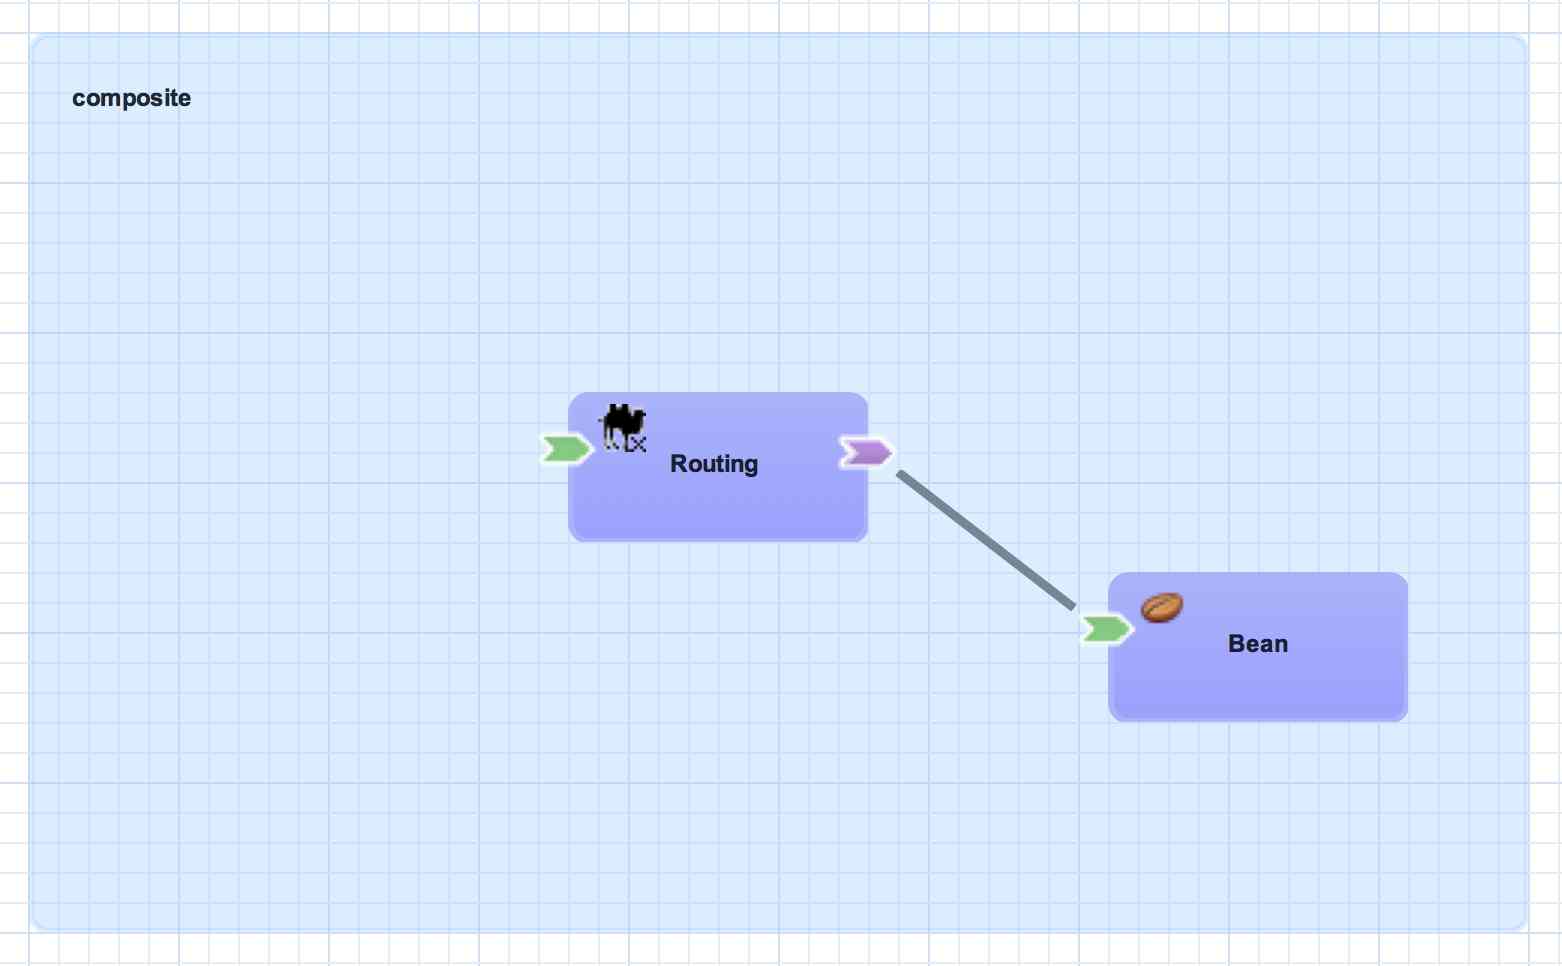
<sca:component name="Routing">
   <camel:implementation.camel>
      <camel:xml path="route.xml"/>
   </camel:implementation.camel>
   <sca:service name="ServiceA">
      <sca:interface.java interface="org.example.ServiceA"/>
   </sca:service>
   <sca:reference name="ServiceC">
      <sca:interface.java interface="org.example.ServiceC"/>
   </sca:reference>
</sca:component>
Composite Reference
A composite reference allows a component reference to be wired to a service outside the application. Similar to composite services, bindings are used with composite references to specify the communication method for invoking the external service.
<sca:composite name="example" targetNamespace="urn:example:switchyard:1.0">
   <sca:reference name="ReferenceB" multiplicity="0..1" promote="Routing/ServiceB">
      <sca:interface.java interface="org.example.ServiceB"/>
   </sca:reference>
</sca:composite>
Reference Bindings
A reference binding is used to define an access method for an external service via a composite reference. Unlike service bindings, there can only be one binding for each composite reference. The set of bindings available for references is identical to the set of bindings available for services, although the configuration values for a given binding may be different depending on whether it's used as a service binding or a reference binding.
<sca:composite name="example" targetNamespace="urn:example:switchyard:1.0">
   <sca:reference name="ReferenceB" multiplicity="0..1" promote="Routing/ServiceB">
      <sca:interface.java interface="org.example.ServiceB"/>
         <jms:binding.jms>
         <jms:queue>MyQueue</jms:queue>
         <jms:connectionFactory>#ConnectionFactory</jms:connectionFactory>
      </jms:binding.jms>
   </sca:reference>
</sca:composite>
Transformation
Transformation represents a change to the format and/or representation of a message's content. The representation of a message is simply the Java contract (e.g. java.lang.String, org.example.MyFancyObject) used to access the underlying content. The format of a message refers to the actual structure of the data itself. Examples of data formats include XML, JSON, CSV, and EDI.
Take the following message content:
<MyBook>
  <Chapter1>
  <Chapter2>
</MyBook>
The format of this content is XML. One representation of XML in Java is as a String. Of course, the representation could also be a org.w3c.dom.Document, java.io.InputStream, etc.
String content = "<MyBook>...";
Transformation plays an important role in connecting service consumers and providers, since the format and representation of message content can be quite different between the two. For example, a SOAP gateway binding will likely use a different representation and format for messages than a service offered by a Java Bean. In order to route services from the SOAP gateway to the Bean providing the service, the format and representation of the SOAP message will need to change. Implementing the transformation logic directly in the consumer or provider pollutes the service logic and can lead to tight coupling. SwitchYard allows for the transformation logic to declared outside the service logic and injected into the mediation layer at runtime.
Adding Transformation to Your Application
Transformation of message content is specified in the descriptor of your SwitchYard application (switchyard.xml). The qualified name of the type being transformed from as well as the type being transformed to are defined along with the transformer implementation. This allows transformation to be a declarative aspect of a SwitchYard application, as the runtime will automatically register and execute transfomers in the course of a message exchange.
<transforms>
   <transform.java bean="MyTransformerBean"
                   from="{urn:switchyard-quickstart-demo:orders:1.0}submitOrder"
                   to="java:org.switchyard.quickstarts.demos.orders.Order"/>
</transforms>
Content Type Names
Since transformations occur between named types (i.e. from type A, to type B), it's important to understand how the type names are derived. The type of the message is determined based on the service contract, which can be WSDL or Java.
For WSDL interfaces, the message name is determined based on the fully-qualified element name of a WSDL message. Take the following WSDL definition:
<definitions xmlns:tns="urn:switchyard-quickstart:bean-service:1.0">
  <message name="submitOrder">
    <part name="parameters" element="tns:submitOrder"/>
  </message>
  <portType name="OrderService">
    <operation name="submitOrder">
      <input message="tns:submitOrder"/>
    </operation>
  </portType>
</definitions>
This would yield the following message type name based on the message element name defined in the WSDL:
{urn:switchyard-quickstart:bean-service:1.0}submitOrder
When Java interfaces are used for the service contract, the message name consists of the full package name + the class name, prefixed with "java:".
package org.switchyard.example;
public interface OrderService {
    void submitOrder(Order order);
}
The message type name for the submitOrder method in this Java interface would be "java:org.switchyard.example.Order". Occasionally, it can be useful to override the default operation name generated for a Java interface. The @OperationTypes annotation provides this capability by allowing the user to specify the input, output, and/or fault type names used for a Java service interface. For example, if we wanted to accept XML input content without any need for transformation to a Java object model, the OrderService interface could be changed to look like this:
package org.switchyard.example;
public interface OrderService {
    @OperationTypes(in = "{urn:switchyard-quickstart:bean-service:1.0}submitOrder")
    void submitOrder(String orderXML);
}
Aside from short-circuiting the requirement for transformation, this annotation can be useful if you want to maintain tight control over the names used for message content.
Available Transformers
Switchyard supports several transformers that facilitate conversion from one data format to another. The list of available transformers is given below
Validation
Validation feature provides a functionality for message content validation.
Take the following message content:
<MyBook xmlns="example">
  <Chapter1/>
  <Chapter2/>
</MyBook>
And follwing XML Schema definition:
<?xml version="1.0" encoding="UTF-8"?>
<schema xmlns="http://www.w3.org/2001/XMLSchema"
        targetNamespace="example"
        xmlns:orders="example">
        <element name="MyBook" type="example:MyBook"/>
        <complexType name="MyBook">
            <sequence>
                <element name="Chapter1" type="string"/>
            </sequence>
        </complexType>
</schema>
The XML content is still Well-Formed, but it has a Chapter2 element that is not declared as the child of MyBook element in the XML Schema, So the content is not Valid against this XML Schema. We often need to perform this kind of validation before processing its data in service logic, but implementing the validation logic directly in the consumer or provider pollutes the service logic and can lead to tight coupling. SwitchYard allows for the validation logic to declared outside the service logic and injected into the mediation layer at runtime.
Adding Validation to Your Application
Validation of message content is specified in the descriptor of your SwitchYard application (switchyard.xml). The qualified name of the type being validated name is defined along with the validator implementation. This allows validation to be a declarative aspect of a SwitchYard application, as the runtime will automatically register and execute validators in the course of a message exchange.
<validates>
   <validate.xml schemaType="XML_SCHEMA"
                   name="{urn:example}MyBook">
      <schemaFiles><entry file="/xsd/orders.xsd"/></schemaFiles>
   </validate.xml>
</validates>
Content Type Names
Since validations occur with named type (i.e. type A) as well as transformations, it's important to understand how the type names are derived. Please refer to the Content Type Names section in the Transformation chapter if you have not ever seen it.
Available Validators
Switchyard currently offers support for the following validators
Properties
SwitchYard supports two types of properties, Environment Properties and Implementation Properties. These two types of properties support distinct use cases within SwitchYard, yet they are compatible. For example, an implementation property can be injected into application logic with a value from an environment property.
Note
While SCA supports complex type of properties, SwitchYard only supports simple String name/value type of properties for now. Complex property support will be added in the future.
Environment Properties
Environment properties allow you to replace any attribute or element value in switchyard.xml with a property from the runtime environment. The syntax for a replaced token is "${varName}" where "varname" is your property name. The configuration layer in SwitchYard is configured with instances of PropertyResolver, which are used to resolve the value of a property based on its name. Property values are resolved from the following locations:
-
System properties passed by -D option of Java VM like "-Dproperty.name=property.value"
-
System environment variables, referenced with an "env." prefix, for example: env.PATH
-
Unit test properties
-
JBoss AS7 properties, including access into the SecurityVault
-
Domain properties in switchyard.xml
-
SCA property definitions in the composite or component
Property Overriding
SwitchYard property resolver scans the property in following order.
-
System properties and System environment variables
-
Unit test properties
-
JBoss AS7 properties
-
Domain properties
-
SCA composite properties
-
SCA component properties
For example, if you define the property inventory.interface in both of composite and component like this:
<sca:composite name="orders" targetNamespace="urn:switchyard-quickstart-demo:orders:0.1.0">
    <sca:component name="InventoryService">
        <sca:service name="InventoryService">
            <sca:interface.java interface="${inventory.interface:org.switchyard.quickstarts.demos.orders.InventoryService}"/>
        </sca:service>
        <sca:property name="inventory.interface" value="org.switchyard.quickstarts.demos.orders.InventoryServiceEx"/>
    </sca:component>
    <sca:property name="inventory.interface" value="org.switchyard.quickstarts.demos.orders.InventoryServiceEx2"/>
</sca:composite>
In this case, the composite property "org.switchyard.quickstarts.demos.orders.InventoryServiceEx2" is used as the value of interface attribute. Note that the default value is specified as org.switchyard.quickstarts.demos.orders.InventoryService. You can specify the default property value with "${propertyName:defaultValue}" syntax where "propertyName" is the name of property. If you remove both of composite and component property from above, then the default value is used.
And if you pass a inventory.interface system property like this:
-Dinventory.interface=org.switchyard.quickstarts.demos.orders.InventoryServiceEx3
then the system property overrides all of other properties, so "org.switchyard.quickstarts.demos.orders.InventoryServiceEx3" is used as the value of interface attribute.
In order to set properties to test values, please refer to the "PropertyMixIn Injection" section of the Testing documentation.
Property Escaping
Sometimes, the desired value for a property needs to be in the same "dollar curly" syntax which triggers SwitchYard's property substitution. This can be problematic because in these cases, you want SwitchYard to leave the configured value alone. To accomplish this, use a "double dollar curly" syntax instead. Take the following example:
<foo value="${prop}"/>
<bar value="$${prop}"/>
Assuming the value "prop" is a resolvable property (say, equal to "test"), the value attribute of the foo element will be that value ("test"). However, the value attribute of the bar element will be "${prop}" (with one dollar sign).
Implementation Properties
Implementation properties allow you to inject one or more property values into a service implementation. This is based on the property support in the SCA assembly spec. Since the property is injected into service implementation logic, the injection mechanism itself is unique to each implementation type. The details for each implementation type follow:
-
Java : injected using @Property into a CDI bean
-
Camel : wired into Camel properties component and accessible in a Camel route using Camel's own varName property notation
-
BPEL : mapped into process variables via an <assign> with using resolveProperty() XPath custom function
-
BPMN 2 : inserted into process variables by data input associations
-
Drools : available in a global map
See each Service implementation section of the Developer Guide for more details.
Policy
Policy allows you to control the runtime behavior of a service in a declarative manner, independent of the service implementation and binding details. For example, you may require that a service always participates in a global transaction. One way to achieve this would be to add logic to your service implementation which checks the current transaction state, associates with an active global transaction, and handles error cases such as when a global transaction does not exist. Of course, this pollutes your application logic with runtime details and also makes the service implementation less flexible - any time you want to change the transactional behavior, you have to change the service implementation. Another way to satisfy the transaction policy would be to ensure that the gateway used to expose the service is transactional and that it propagates the transaction to the service implementation. The problem with this approach is that there is no explicit constraint defined for transactionality, so if the binding configuration changes between environments or the service is repackaged into another application, you could unintentionally violate your constraint that the service must participate in a global transaction. Policy support addresses this problem by allowing you to express these requirements in your application configuration outside of the service implementation and binding configuration. These policy definitions are picked up by the runtime during deployment and enforced on a per-message basis as services are invoked.
Configuring Policy
There are two aspects to a Policy definition:
-
What policy does the service provider require?
-
What policy support does the service consumer provide?
You define the policy that a service requires by annotating the service's configuration in the SwitchYard application descriptor. You also define how a service is consumed (e.g. through a gateway binding), which effectively determines how the policy requirements are satisfied (or provided). The runtime will take care of determining whether the consumer satisfies the policy requirements by evaluating the configuration of the application and the runtime state of the messages exchanged between the consumer and provider.
Take the following example configuration:
<composite name="policy-transaction">
<service name="WorkService" promote="WorkService">
<camel:binding.camel configURI="jms://policyQSTransacted?connectionFactory=%23JmsXA&transactionManager=%23jtaTransactionManager&transacted=true"/>
<camel:binding.camel configURI="jms://policyQSNonTransacted?connectionFactory=#ConnectionFactory"/>
</service>
<component name="WorkService">
<implementation.bean class="org.switchyard.quickstarts.demo.policy.transaction.WorkServiceBean" requires="managedTransaction.Global"/>
<service name="WorkService" requires="propagatesTransaction">
<interface.java interface="org.switchyard.quickstarts.demo.policy.transaction.WorkService"/>
</service>
<reference name="TaskAService" requires="propagatesTransaction">
<interface.java interface="org.switchyard.quickstarts.demo.policy.transaction.TaskAService"/>
</reference>
</component>
</composite>
The service has declared that it requires a global transaction by including the requires attribute with a value of "propagatesTransaction". This service is available at two distinct JMS endpoints - one is configured to provide a transaction (policyQSTransacted) and the other is not (policyQSNonTransacted). When messages are sent to the policyQSTransacted queue, the service is invoked in the context of a global transaction. When messages are sent to the policyQSNonTransacted queue, the SwitchYard runtime rejects the message because it violates the policy requirements of the service (there is no transaction).
The provided policy is actually set at runtime by the Camel component in this scenario. An alternate option that is not yet implemented would allow the provided policy to be directly set on the binding in the configuration. Each component would be responsible for interpreting this policy declaration and configuring itself accordingly. This allows for policy configuration errors to be caught at deployment time instead of runtime.
Interaction Policy and Implementation Policy
There are two parts to be marked by policies using requires attribute. Interaction Policy is allowed on component service and component reference. Implementation Policy is allowed on component implementation. Each policy belongs to one of these. Implementation Policy is NOT allowed to be marked on component service nor component reference, and Interaction Policy is NOT allowed to be marked on component implementation.
Transaction Policy
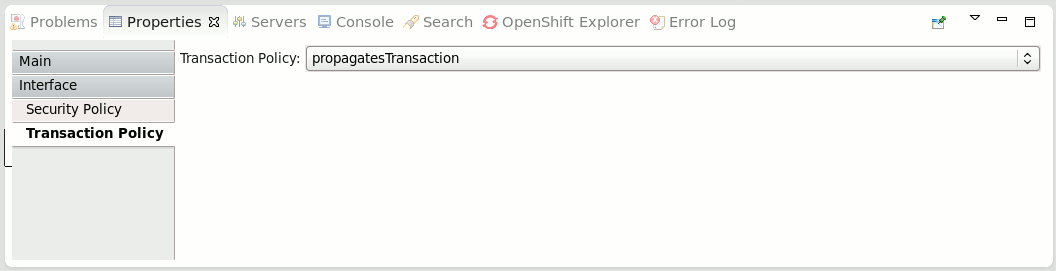
Transaction Interaction Policy
Transaction Interaction Policy is specified using the requires attribute of a component service or component reference definition.
<service name="WorkService" requires="propagatesTransaction">
Valid values for transaction interaction policy are:
-
propagatesTransaction - indicates that a global transaction is required when a service is invoked. If no transaction is present, the SwitchYard runtime will generate an error.
-
suspendsTransaction - if a transaction is present, the transaction is suspended before the service implementation is invoked and resumed after the invocation. This policy setting allows the transactional context of a gateway binding to be separated from the transactional context of the service implementation (e.g. a rollback in the service implementation will not impact the transaction used to receive a message from a JMS queue).
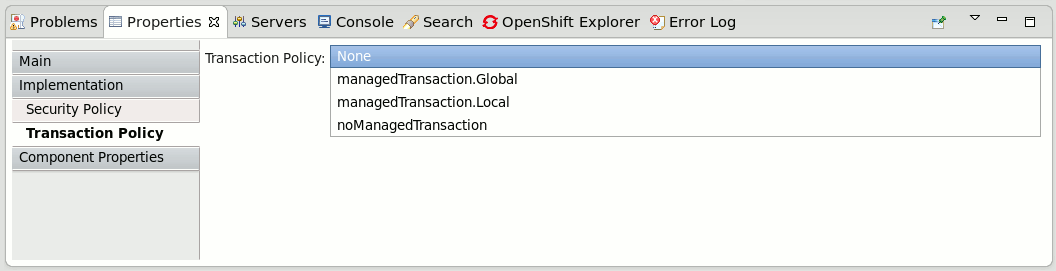
Transaction Implementation Policy
Transaction Implementation Policy is specified using the requires attribute of a component implementation definition.
<implementation.bean class="org.switchyard.quickstarts.demo.policy.transaction.WorkServiceBean" requires="managedTransaction.Global"/>
Valid values for transaction implementation policy are:
-
managedTransaction.Global - indicates that this service implementation runs under global transaction. If no transaction is present, the SwitchYard runtime will create a new JTA transaction before the execution. Created transaction will be committed by SwitchYard runtime at the end of service execution.
-
managedTransaction.Local - indicates that this service implementation runs under local transaction containment. If transaction exists, SwitchYard runtime suspends it. And SwitchYard always create a new JTA transaction before the execution. Created transaction will be committed and suspended transcation will be resumed by SwitchYard runtime after the invocation. Note that since the local transaction containment doesn't propagate its transaction through the reference, all of the component reference must be marked as suspendsTransaction. If not, SwitchYard will automatically add suspendsTransaction.
-
noManagedTransaction - indicates that this service implementation runs under no managed transaction. If transaction exists, SwitchYard runtime suspends it before the service implementation is invoked and resumed after the invocation.
Fault Handling
Even if exchange state is fault, SwitchYard runtime doesn't automatically rollback the transaction by default. If you want the transaction to be marked as rollback-only on fault exchange, then you need to set "org.switchyard.rollbackOnFault" context property as true. Note that transaction is rolledback if unchecked exception is thrown regardless of this context property.
Scope of Support
Currently, the following gateways are transaction aware. More gateways will be added in the future.
-
Camel JMS Gateway (binding.jms)
-
Camel JPA Gateway (binding.jpa)
-
Camel SQL Gateway (binding.sql)
-
JCA Gateway (binding.jca)
-
SCA Gateway (binding.sca)
BPM service and transaction
BPM service (implementation.bpm) always need a JTA transaction if the persistence is enabled. It synchronizes with incoming transaction if exists, otherwise it begins a new JTA Transaction and commit/rollback by itself.
Camel bindings and transaction
If your application has multiple camel-jms bindings which are bound to the same JMS provider, you need to define distinct connection factory for each binding to get Transaction Policy working. otherwise, transaction can't be suspended as expected. Similarly, distinct xa-datasource is needed to get Transaction Policy working on camel-jpa and camel-sql. (cf. https://issues.jboss.org/browse/SWITCHYARD-1285)
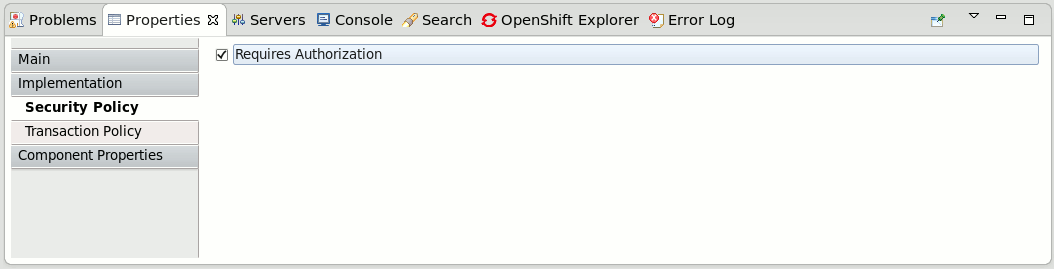
Security Policy
Security Interaction Policy
Security Interaction Policy is specified using the requires attribute of a component service definition.
<sca:component name="WorkService">
    <sy:implementation.bean class="org.switchyard.quickstarts.demo.policy.security.basic.WorkServiceBean" requires="authorization"/>
    <sca:service name="WorkService" requires="confidentiality clientAuthentication" sy:security="default">
        <sca:interface.java interface="org.switchyard.quickstarts.demo.policy.security.basic.WorkService"/>
    </sca:service>
</sca:component>
Valid values for security interaction policy are:
-
clientAuthentication - indicates that the client has been authenticated when a service is invoked. If the associated authenticated user Principal is not available, the SwitchYard runtime will generate an error. There are a number of reasons this policy may not be fulfilled, including incorrect username, incorrect password, or configuration issues.
-
confidentiality - indicates that the data in the request is not viewable by unintended parties. One example of this is when a request is made over SSL. Another example is if a SOAP message is encrypted according to WS-Security. If confidentiality cannot be verified, the SwitchYard runtime will generate an error.

Security Implementation Policy
Security Implementation Policy is specified using the requires attribute of a component implementation definition.
Valid values for security implementation policy are:
-
authorization - indicates that the the client is authorized to invoke the service. Please refer to the rolesAllowed and runAs attributes on the security configuration element in the Security section of the documentation for details. If the associated authenticated Subject does not have an allowed role, the SwitchYard runtime will generate an error.
Security Processing
When the container does not automatically provide certain security policies, SwitchYard can be configured to process security credentials extracted from the binding-specific data, then provide certain security policies itself (like clientAuthentication). See the Security section of the documentation for details.
Scope of Support
Support for security policy is limited to bean services (implementation.bean), SOAP endpoints via the SOAP gateway (binding.soap), and HTTP endpoints via the HTTP gateway (binding.http). Support for other implementation types and gateways will be added in the future.
Security
SwitchYard services can be secured by:
-
Specifying a list of security policies that are required for that service. See the Security Policy section of the documentation for details.
-
Configuring application-level security processing details for the services within a domain. See Application Security Configuration below for details.
-
Configuring system-level security processing details. See System Security Configuration below for details.
-
Storing sensitive information, such as passwords, in the JBoss AS password vault. See the Storing Passwords section for details.
Application Security Configuration
All services within a domain can share - or define their own - security configuration:
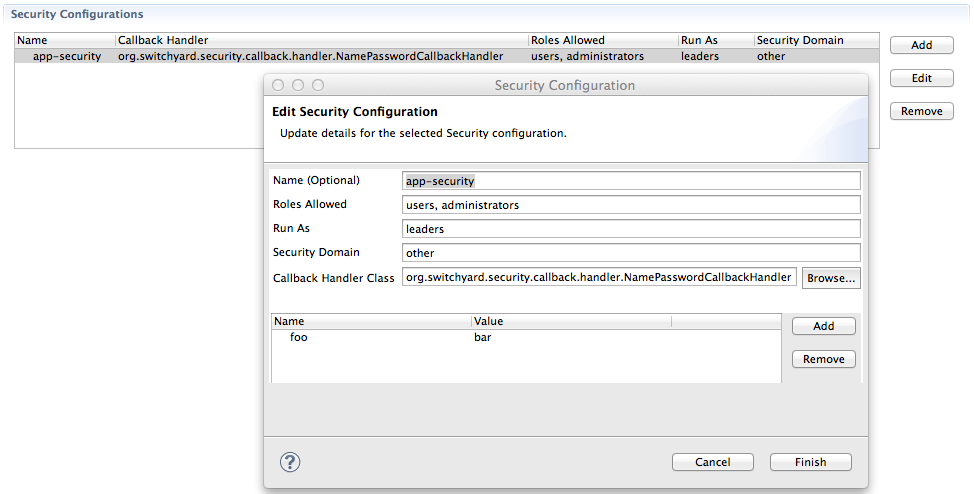
, which is specified in META-INF/switchyard.xml:
<sy:switchyard>
    <sca:composite ...>
        <component ...>
            ...
            <service ... sy:security="app-security">
            ...
            </service>
            <reference ... sy:security="default">
            ...
            </reference>
        </component>
    <sca:composite>
    <domain>
        <securities>
            <security callbackHandler="org.switchyard.security.callback.handler.NamePasswordCallbackHandler" name="app-security" rolesAllowed="users, administrators" runAs="leaders" securityDomain="other">
                <properties>
                    <property name="foo" value="bar"/>
                </properties>
            </security>
        </securities>
    </domain>
</sy:switchyard>
The <component><service> and <component><reference> security Attribute
Component Services and Component References can specify an optional sy:security attribute (namespace prefix required, as the SCA schema is being extended). This attribute points to a named <security> element in the domain section. If not defined, default will be inferred.
The <securities> Element
This is an optional element. Contains any number of <security> elements. If not defined, a default security configuration is still used. See the <security> element below.
The <security> Element
This is an optional element. If not specified, the callbackHandler, name, and securityDomain attributes described below will fallback to their default values.
The callbackHandler Attribute
This is an optional attribute. If not specified, a default value of org.switchyard.security.callback.NamePasswordCallbackHandler will be used. See the Callback Handlers section below for details on CallbackHandlers.
The name Attribute
This is an optional attribute. If not specified, a default value of default will be used. Component Services and Component References point to this name.
The rolesAllowed Attribute
This is an optional attribute. If specified, and if a Service has an authorization security policy requirement, the authenticated user must be in one of the roles listed. The value is a comma-separated list of roles (whitespace gets trimmed).
The runAs Attribute
This is an optional attribute. If specified, the value of this attribute will be added as a role to the authenticated user.
The securityDomain Attribute
This is an optional attribute. If not specified, a default value of other will be used. The value maps to a JAAS security domain name. See the Login Modules section below for details on LoginModules.
The <properties> and <property> Elements
A <security> element can optionally specify a <properties> element, which can optionally specify zero to many (0..*) <property> elements. Each <property> element has two required attributes: name and value.
The list of specified name/value properties are made available to the SwitchYard Security configuration, as well as the configured callbackHandler. Some CallbackHandlers require configuration information beyond what can be assumed in a no-argument constructor. See the individual CallbackHandler implementations for details.
Callback Handlers
The following is a list of available CallbackHandlers, all within the org.switchyard.security.callback java package:
NamePasswordCallbackHandler
Provides name and password credentials to a configured LoginModule stack. For example, the UsersRoles LoginModule that comes out-of-the-box in JBoss AS7.
STSTokenCallbackHandler
Provides assertion credentials to a configured LoginModule stack. For example, the PicketLink STSValidatingLoginModule that comes out-of-the-box in JBoss AS7.
STSIssueCallbackHandler
Wraps both the NamePasswordCallbackHandler and the STSTokenCallbackHandler, so as to provide name, password and assertion credentials to a configured LoginModule stack. For example the UsersRoles LoginModule and STSIssuingLoginModule that comes out-of-the-box in JBoss AS7.
CertificateCallbackHandler
Provides Certificate credentials to a configured LoginModule stack. SwitchYard 0.7+ provides a CertificateLoginModule for this purpose.
System Security Configuration
These are settings that apply to the entire running instance of SwitchYard (within the application server).
Login Modules
In JBoss AS7, JAAS LoginModules can be stacked underneath a single security domain, and other is available out-of-the-box. Here is an example that could be added to jboss-as7/standalone/configuration/standalone.xml:
<server>
    <profile>
        <subsystem xmlns="urn:jboss:domain:security:1.1">
            <security-domains>
                <security-domain name="jaas-domain-name" cache-type="default">
                    <authentication>
                        <login-module code="login-module-class-name-or-shorthand-name" flag="required">
                            <module-option name="option-name" value="option-value"/>
                        </login-module>
                    </authentication>
                </security-domain>
            </security-domains>
        </subsystem>
    </profile>
</server>
JBoss AS7 bundles various PicketBox (underlying security capability) LoginModules, as well as various PicketLink (federated trust security capability) LoginModules.
Please refer to the LoginModule documentation directly for complete configuration details, however a couple will be provided as example here.
Simple users/roles properties files on the classpath:
<login-module code="UsersRoles" flag="required">
    <module-option name="usersProperties" value="users.properties"/>
    <module-option name="rolesProperties" value="roles.properties"/>
</login-module>
Security Token Service validation:
<login-module code="org.picketlink.identity.federation.core.wstrust.auth.STSValidatingLoginModule" flag="required">
    <module-option name="configFile" value="../standalone/configuration/sts-client.properties"/>
    <module-option name="useOptionsCredentials" value="true"/>
</login-module>
Subsystem Configuration Elements
Security-specific configuration details for the SwitchYard JBoss Subsystem.
Security Context Timeout
A SecurityContext is a SwitchYard-internal construct that maintains information regarding a client's authenticated Subject for what security domains, as well as a list of built-up credentials (think name, password, certificate, etc). This security context, by default, does not expire, however is only valid within the current running instance of SwitchYard. That is to say, if an invocation crosses a process or network boundary, re-authentication and authorization checks will need to be re-done. That being said, you can configure the security context to expire after a specified number of milliseconds. To do that, within your AS standalone.xml file, add the appropriate security-config section, as shown below:
<subsystem xmlns="urn:jboss:domain:switchyard:1.0">
    <security-configs>
        <security-config identifier="org.switchyard.security.context.SecurityContext">
            <properties>
                <timeoutMillis>30000</timeoutMillis>
            </properties>
        </security-config>
    </security-configs>
</subsystem>
Encryption
Sensitive data within the JVM - including the SecurityContext mentioned above - can be encrypted as well, such that sneaky applications can't access sensitive user credentials. Configuring encryption is a security-system-wide endeavor, and can be done adding the appropriate security-config section, as shown below:
<subsystem xmlns="urn:jboss:domain:switchyard:1.0">
    <security-configs>
        <security-config identifier="org.switchyard.security.crypto.PrivateCrypto">
            <properties>
                <sealAlgorithm>TripleDES</sealAlgorithm>
                <sealKeySize>168</sealKeySize>
            </properties>
        </security-config>
    </security-configs>
</subsystem>
Note that acceptable values for sealAlgorithm and sealKeySize will depend upon the capabilities of your JVM.
Quickstarts
The SwitchYard distribution contains security examples in the form of quickstart demos:
-
policy-security-basic: This quickstart exposes a bean service through a soap binding. Confidentiality is provided via SSL, and client authentication via a HTTP Basic Authorization header. See the Readme.md file for details.
-
policy-security-basic-propagate: This quickstart is similar to policy-security-basic, however the bean service additionally invokes a different back end bean service which also has security policy requirements. The client's security context (authenticated subject and credentials) is propagated to this secondary service.
-
policy-security-cert: This quickstart exposes a bean service through a soap binding. Confidentiality is provided via SSL, and client authentication via an X509 Certificate. See the Readme.md file for details.
-
policy-security-saml: This quickstart exposes a bean service through a soap binding. Confidentiality is provided via SSL, and client authentication via a SAML assertion in the form of a token retrieved from PicketLink STS. See the Readme.md file for details.
-
policy-security-wss-signencrypt: This quickstart exposes a bean service through a soap binding. Proper Signature and Encryption are enforced by JBossWS-CXF. See the Readme.md file for details.
-
policy-security-wss-username: This quickstart exposes a bean service through a soap binding. Confidentiality is provided via SSL, and client authentication via a WS-Security UsernameToken which is handled by JBossWS-CXF. See the Readme.md file for details.
Storing Passwords
Instead of storing plain-text passwords in switchyard.xml, you can use a combination of the JBoss AS password vault and property substitution in SwitchYard to obscure the password value. There are two steps involved with this approach:
-
Configure the AS password vault and store your password information in the vault following the instructions documented on the JBoss AS7 Securing Passwords page. Please pay special attention to the warnings on the page which indicate the level of security protection provided by the default password vault implementation.
-
Wherever you would normally include a password value in your switchyard.xml, use the vault ID instead, e.g.
${VAULT::ds_ExampleDS::password::N2NhZDYzOTMtNWE0OS00ZGQ0LWE4MmEtMWNlMDMyNDdmNmI2TElORV9CUkVBS3ZhdWx0}
Clustering
Clustering Architecture
There are two fundamental building blocks to the clustering support in SwitchYard:
-
Shared Runtime Registry - a shared, distributed runtime registry which allows individual instances to publish and query service endpoint details.
-
Remote Communication Channels - an internal communication protocol used to allow a service client to invoke a service hosted in a remote instance.
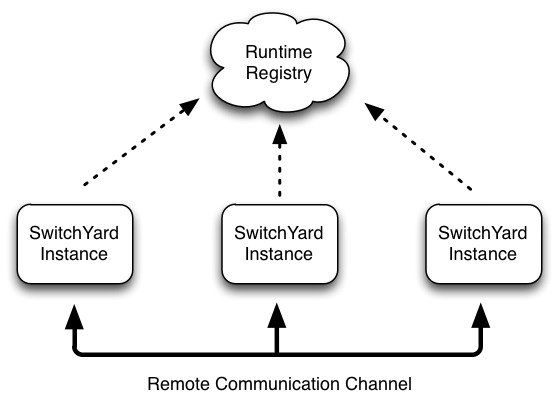
The runtime registry is backed by a replicated Infinispan cache. Each instance in a cluster points to the same replicated cache. When a node joins a cluster, it immediately has access to all remote service endpoints published in the registry. If a node leaves the cluster due to failure or shutdown, all service endpoint registrations are immediately removed for that node. The registry is not persisted, so manually clean-up and maintenance is not required. Note that the shared registry is a runtime registry and not a publication registry, which means the registry's lifecycle and state is tied to the current state of deployed services within a cluster. This is in contrast to a publication registry (e.g. UDDI), where published endpoints are independent from the runtime state of the ESB.
The communications channel is a private intra-cluster protocol used by instances to invoke a remote service. The channel is currently based on HTTP, but this may change in the future and should be considered a transparent detail of the clustering support in SwitchYard.
Configuring Clustering
Clustering support is light on configuration and should work out of the box. The only real requirements are using a shared Infinispan cache for the runtime registry and indicating which services are clustered in your application config (switchyard.xml). By default, SwitchYard uses the default cache in the "cluster" cache container which comes pre-defined in your standalone-ha.xml. Unless you have specific requirements to use a different cache or separate cache configuration, just stick with the default.
Applications take advantage of clustering by explicitly identifying which services should be clustered in the application's descriptor (switchyard.xml). You can control which services in your application will be published in the cluster's runtime registry and which references can be resolved by clustered services. To enable a service to be published in the cluster's runtime registry, promote the service in your application and add a <binding.sca> with clustering enabled to it.
<sca:service name="Goodbye" promote="GoodbyeBean/Goodbye">
   <sca:interface.java interface="com.example.Goodbye"/>
   <sca:binding.sca sy:clustered="true"/>
</sca:service>
Consuming services in a cluster follows the same configuration approach, but applies to references in your application. To invoke a service in a cluster, promote the reference and add an SCA binding with clustering enabled.
<sca:reference name="Goodbye" multiplicity="0..1" promote="GreetingBean/Goodbye">
   <sca:interface.java interface="com.example.Goodbye"/>
   <sca:binding.sca sy:clustered="true"
</sca:reference>
For more information on clustering using <binding.sca>, check out the SCA Binding documentation in the Developer's Guide.
Using Clustering
To create a cluster of SwitchYard instances, start two or more AS 7 instances with a shared Infinispan cache. Out-of-the-box configuration in standalone-ha.xml should be sufficient:
# start instance 1
node1> bin/standalone.sh -c standalone-ha.xml -Djboss.node.name=node1
# start instance 2
node2> bin/standalone.sh -c standalone-ha.xml -Djboss.node.name=node2 -Djboss.socket.binding.port-offset=1000
Once the instances are up, you can deploy applications independently to each instance. A homogeneous cluster would have identical applications deployed on each node. A heterogeneous cluster will have different applications and services deployed on each instance. For testing purposes, it's easiest to deploy a consumer application to one instance and a provider application to another. Thecluster demo quickstart is a great way to try kick the tires on this feature.
Tooling
Eclipse
Installation
Please refer to Installing Eclipse Tooling for details on installing the SwitchYard Eclipse tooling.
Features
The SwitchYard Eclipse tooling provides the following features:
-
Creation of SwitchYard projects.
-
Adding SwitchYard capabilities to existing Maven based Eclipse projects.
-
Configuration of SwitchYard capabilities (i.e. runtime component dependencies; e.g. SOAP, BPM, Camel, etc.).
-
A graphical editor for editing SwitchYard application configuration (i.e. switchyard.xml), which provides the following features:
-
Creation and configuration of components, services and references.
-
Component service/reference promotion and configuration of gateway bindings.
-
Creation of implementation skeletons for new service components (e.g. bean classes, BPMN2 files, DRL files, etc.).
-
Creation of unit test skeletons for services.
-
Configuration of message transformers, including creation of implementation skeletons for message transformers (e.g. XSL, Java, etc.).
-
Creation of Artifact references.
-
-
Java2WSDL
-
WSDL2Java
-
XML catalog entries for SwitchYard configuration schema.
-
m2eclipse integration supporting the SwitchYard Maven plugin (org.switchyard:switchyard-plugin).
-
Support for workspace deployment of SwitchYard projects.
Tutorial
A basic tutorial can be found on the Tutorial page.
SwitchYard Projects
A SwitchYard project is a Maven based project with the following characteristics:
-
a switchyard.xml file in the project's META-INF folder
-
one or more SwitchYard runtime dependencies declared in the pom.xml file
-
org.switchyard:switchyard-plugin mojo configured in the pom.xml file
A SwitchYard project may also contain a variety of other resources used to implement the application, for example: Java, BPMN2, DRL, BPEL, WSDL, XSD, and XML files.
The Eclipse tooling supports the creation of new SwitchYard projects. The tooling also allows users to add SwitchYard capabilities to existing Maven projects.
Creating a New SwitchYard Project
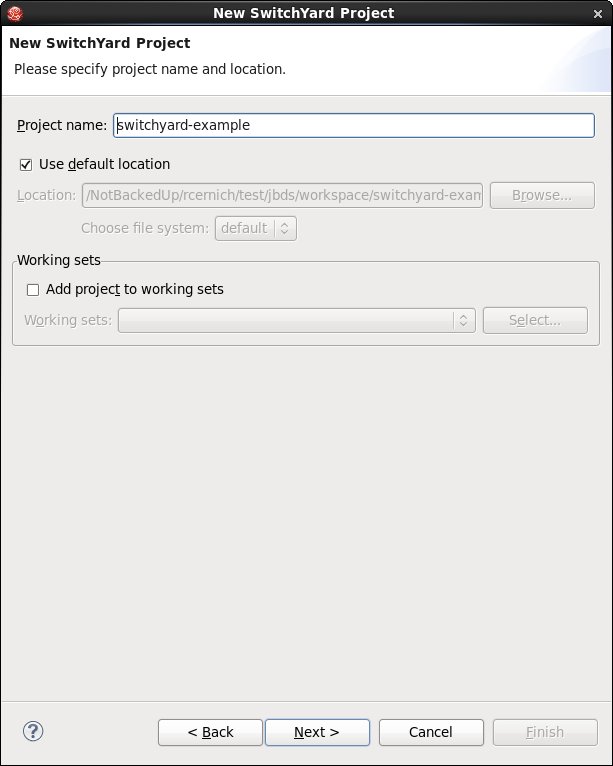
Use the New SwitchYard Project wizard to create new SwitchYard project in your workspace. The wizard produces a new project with the following structure:
-
a switchyard.xml file in src/main/resources/META-INF/
-
a pom.xml file declaring SwitchYard runtime dependencies and configuration for the switchyard-plugin mojo
-
a beans.xml file in src/main/resources/META-INF/
-
a beans.xml file src/test/resources/META-INF/
-
a folder hierarchy for the specified Java package
The newly created project's switchyard.xml file will be opened in the SwitchYard editor after the wizard finishes.
Initiate the wizard by selecting SwitchYard Project from the SwitchYard category in the File→New→Project... wizard.
The first page asks for the name and location for the new project:
The second page asks for basic project details, including:
-
the Maven groupId for the project
-
the targetNamespace for the SwitchYard application
-
the default Java package name for the project
-
the SwitchYard configuration version
-
the SwitchYard library version
-
the SwitchYard runtime components (e.g. BPM, Camel, SOAP, etc. support) required for the project
The library version can be specified directly using the Library Version field or indirectly by selecting a Target Runtime. Selecting a target runtime will set the library version to match the version provided by the target runtime.
It is not necessary to select any components when creating the project. The tooling will automatically configure components on the project as necessary.
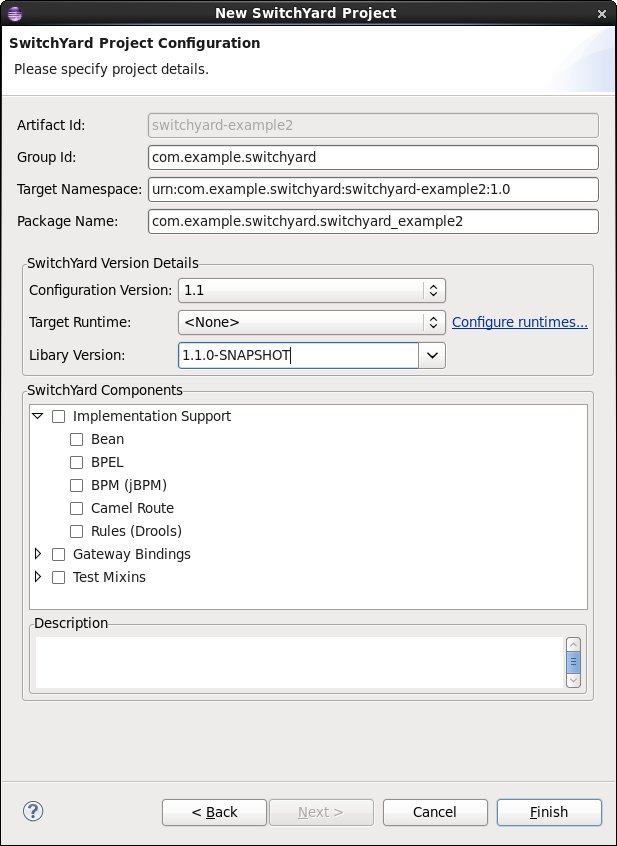
Press Finish to create the new project.
Adding SwitchYard Capabilities to Existing Projects
SwitchYard capabilities may be added to existing projects in the workspace. The following additions are made to the project:
-
a switchyard.xml file is added to src/main/resources/META-INF/
-
a beans.xml file is added to src/main/resources/META-INF/
-
a beans.xml file is added to src/test/resources/META-INF/
-
declarations for SwitchYard runtime dependencies are added to the pom.xml file
-
org.switchyard:switchyard-plugin mojo configuration is added the pom.xml file
SwitchYard capabilities can only be added to Maven projects.
If the project is not already a Faceted Project, a prompt asks if you wish to convert the project to a faceted project.
Changing the configuration version updates the SwitchYard namespace URIs declared in the switchyard.xml, e.g. from urn:switchyard-config:switchyard:1.0 to urn:switchyard-config:switchyard:1.1.
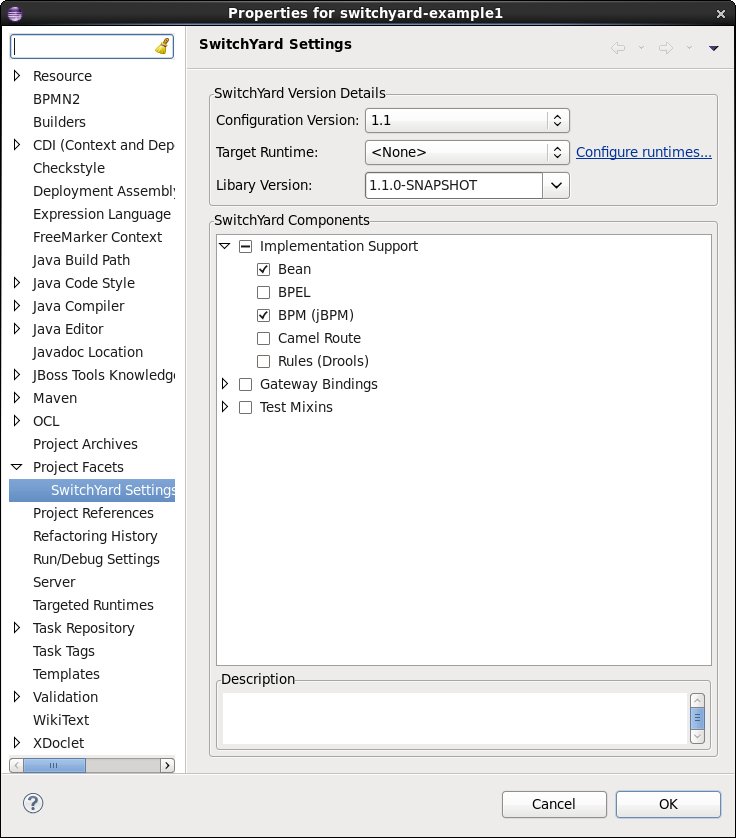
Right-click the project and select, Configure -> SwitchYard Capabilities... to add (or modify) SwitchYard capabilities. A property dialog is displayed allowing configuration of SwitchYard settings for project. Changes are reflected in the project's pom.xml and switchyard.xml files.
Unit Testing
The SwitchYard tooling provides support for stubbing out test classes for services.
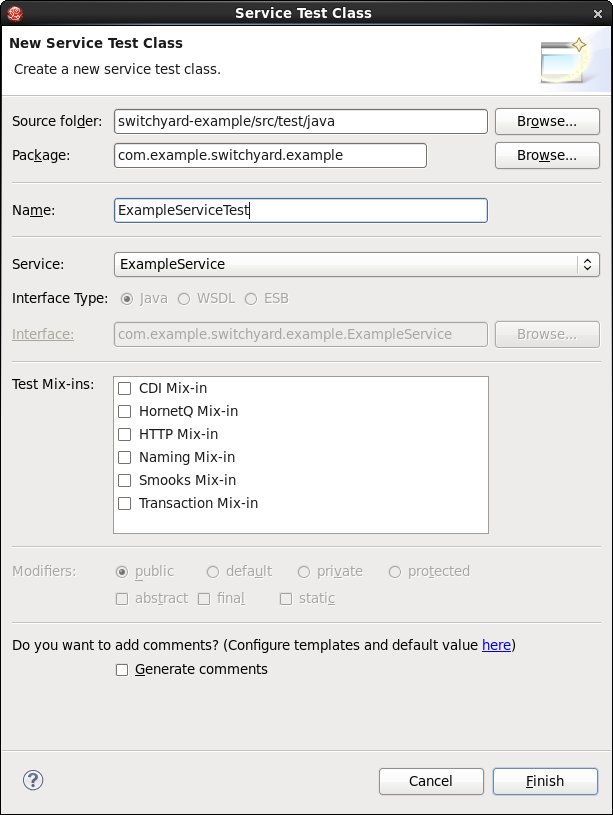
New Service Test Wizard
This wizard creates a new service test class. The class is created with references to any mix-ins specified and a method stub for each operation in the selected service interface. The method stubs include code for passing a message to the operation and processing the result. The user needs to initialize the message data and validate the results. The following illustrates the stubs that are created by the wizard:
SomeServiceTest
@RunWith(SwitchYardRunner.class)
@SwitchYardTestCaseConfig(mixins = CDIMixIn.class, config = SwitchYardTestCaseConfig.SWITCHYARD_XML)
public class SomeServiceTest {

    private SwitchYardTestKit testKit;
    private CDIMixIn cdiMixIn;
    @ServiceOperation("ExampleService")
    private Invoker service;

    @Test
    public void testSomeInOnlyOperation() throws Exception {
        // TODO Auto-generated method stub
        // initialize your test message
        Object message = null;
        service.operation("someInOnlyOperation").sendInOnly(message);

        // validate the results
        Assert.assertTrue("Implement me", false);
    }

    @Test
    public void testSomeInOutOperation() throws Exception {
        // TODO Auto-generated method stub
        // initialize your test message
        Object message = null;
        String result = service.operation("someInOutOperation")
                .sendInOut(message).getContent(String.class);

        // validate the results
        Assert.assertTrue("Implement me", false);
    }

}
Runtime Support
TBD: document SwitchYard runtime support
Workspace Deployment
All SwitchYard projects are configured as some type of JEE module by the tooling. This allows the user to deploy the project to any JEE server defined in the workspace.
SwitchYard projects packaged as JAR are configured as JEE Utility Modules.
SwitchYard capabilities may be added to any existing JEE project. See Adding SwitchYard Capabilities to Existing Projects for more details.
The user is responsible for ensuring the target server has a compatible SwitchYard runtime installed.
Forge
SwitchYard integrates with JBoss Forge to provide a set of rapid application development tools for service-oriented applications. Please consult the Getting Started guide for information on how to install Forge and the SwitchYard extensions to Forge.
Creating a Project
The first thing you'll want to do with Forge is create a new project. This can be done inside the Forge shell using the new-project command.
switchyard$ forge
    _____
   |  ___|__  _ __ __ _  ___
   | |_ / _ \| `__/ _` |/ _ \  \\
   |  _| (_) | | | (_| |  __/  //
   |_|  \___/|_|  \__, |\___|
                   |___/

[no project] switchyard $ new-project --named syApp --topLevelPackage org.switchyard.examples.forge
 ? Use [/private/tmp/switchyard/syApp] as project directory? [Y/n]
***SUCCESS*** Created project [syApp] in new working directory [/private/tmp/switchyard/syApp]
At this point, you have an empty application with a few Maven facets installed. What's a facet you ask? Read on ....
Facets
Facets add capabilities to an application and to the forge environment itself. This allows SwitchYard to add dependencies to your application's pom based on the functionality you will be using, instead of sticking every possible SwitchYard dependency in the application by default. Facets are also used to add commands specific to SwitchYard itself and components which you will be using in your application. The following facets are currently available:
-
switchyard - core set of commands and dependencies for the SwitchYard runtime
-
switchyard.bean - commands and dependencies for Bean component services
-
switchyard.bpm - commands and dependencies for BPM component services
-
switchyard.rules - commands and dependencies for Rules component services
-
switchyard.soap - commands and dependencies for SOAP gateway bindings
-
switchyard.camel - commands and dependencies for Camel services and gateway bindings
-
switchyard.rest - commands and dependencies for RESTEasy gateway bindings
-
switchyard.http - commands and dependencies for HTTP gateway bindings
Installing a facet can be done directly in the shell using the install-facet command.
[syapp] syapp $ project install-facet switchyard.soap
***SUCCESS*** Installed [switchyard.soap] successfully.
Wrote /tmp/syapp/pom.xml
Commands
The following SwitchYard commands are available in Forge (grouped by facet).
switchyard
-
switchyard show-config : displays the current state of your application's configuration, including services, references, and bindings.
-
switchyard promote-service : promotes an internal application-scoped service to be visible to other applications.
-
switchyard promote-reference : promotes an internal application-scoped reference so that it can be mapped to services provided in other applications.
-
switchyard create-service-test : create a new unit test for a service.
-
switchyard get-version : returns the version of SwitchYard used by the application.
-
switchyard trace-messages : enables message tracing at runtime - all messages will be logged.
-
switchyard import-artifacts : add a dependency on a service artifact module to the application's configuration
-
switchyard add-reference : adds a reference to a service implementation; particularly useful for service types which do not autogenerate references (Camel, BPM, BPEL).
switchyard.bean
-
bean-service create : creates a new CDI Bean service, consisting of a service interface and implementation class.
switchyard.bpm
-
bpm-service create : creates a new BPM service, consisting of a service interface and implementation class.
switchyard.rules
-
rules-service create : creates a new Rules service, consisting of a service interface and implementation class.
switchyard.camel
-
camel-service create : creates a new XML or Java DSL Camel route.
-
camel-binding bind-service : binds a service using a Camel endpoint URI.
-
camel-binding bind-reference : binds a reference using a Camel endpoint URI.
switchyard.soap
-
soap-binding bind-service : binds a service to a SOAP endpoint.
-
soap-binding bind-reference : binds a reference to a SOAP endpoint.
switchyard.rest
-
rest-binding bind-service : binds a service to a RESTEasy endpoint.
-
rest-binding bind-reference : binds a reference to a RESTEasy endpoint.
switchyard.http
-
http-binding bind-service : binds a service to a HTTP endpoint.
-
http-binding bind-reference : binds a reference to a HTTP endpoint.
Administration Console
Overview
The SwitchYard management console is integrated with the standard JBoss AS management console and provides the following:
-
A view of the applications and services deployed on the server.
-
A view of various execution metrics.
-
A view of the SwitchYard subsystem configuration.
SwitchYard contributes views to the standard JBoss AS management console's Runtime and Profile pages.
Metrics Views
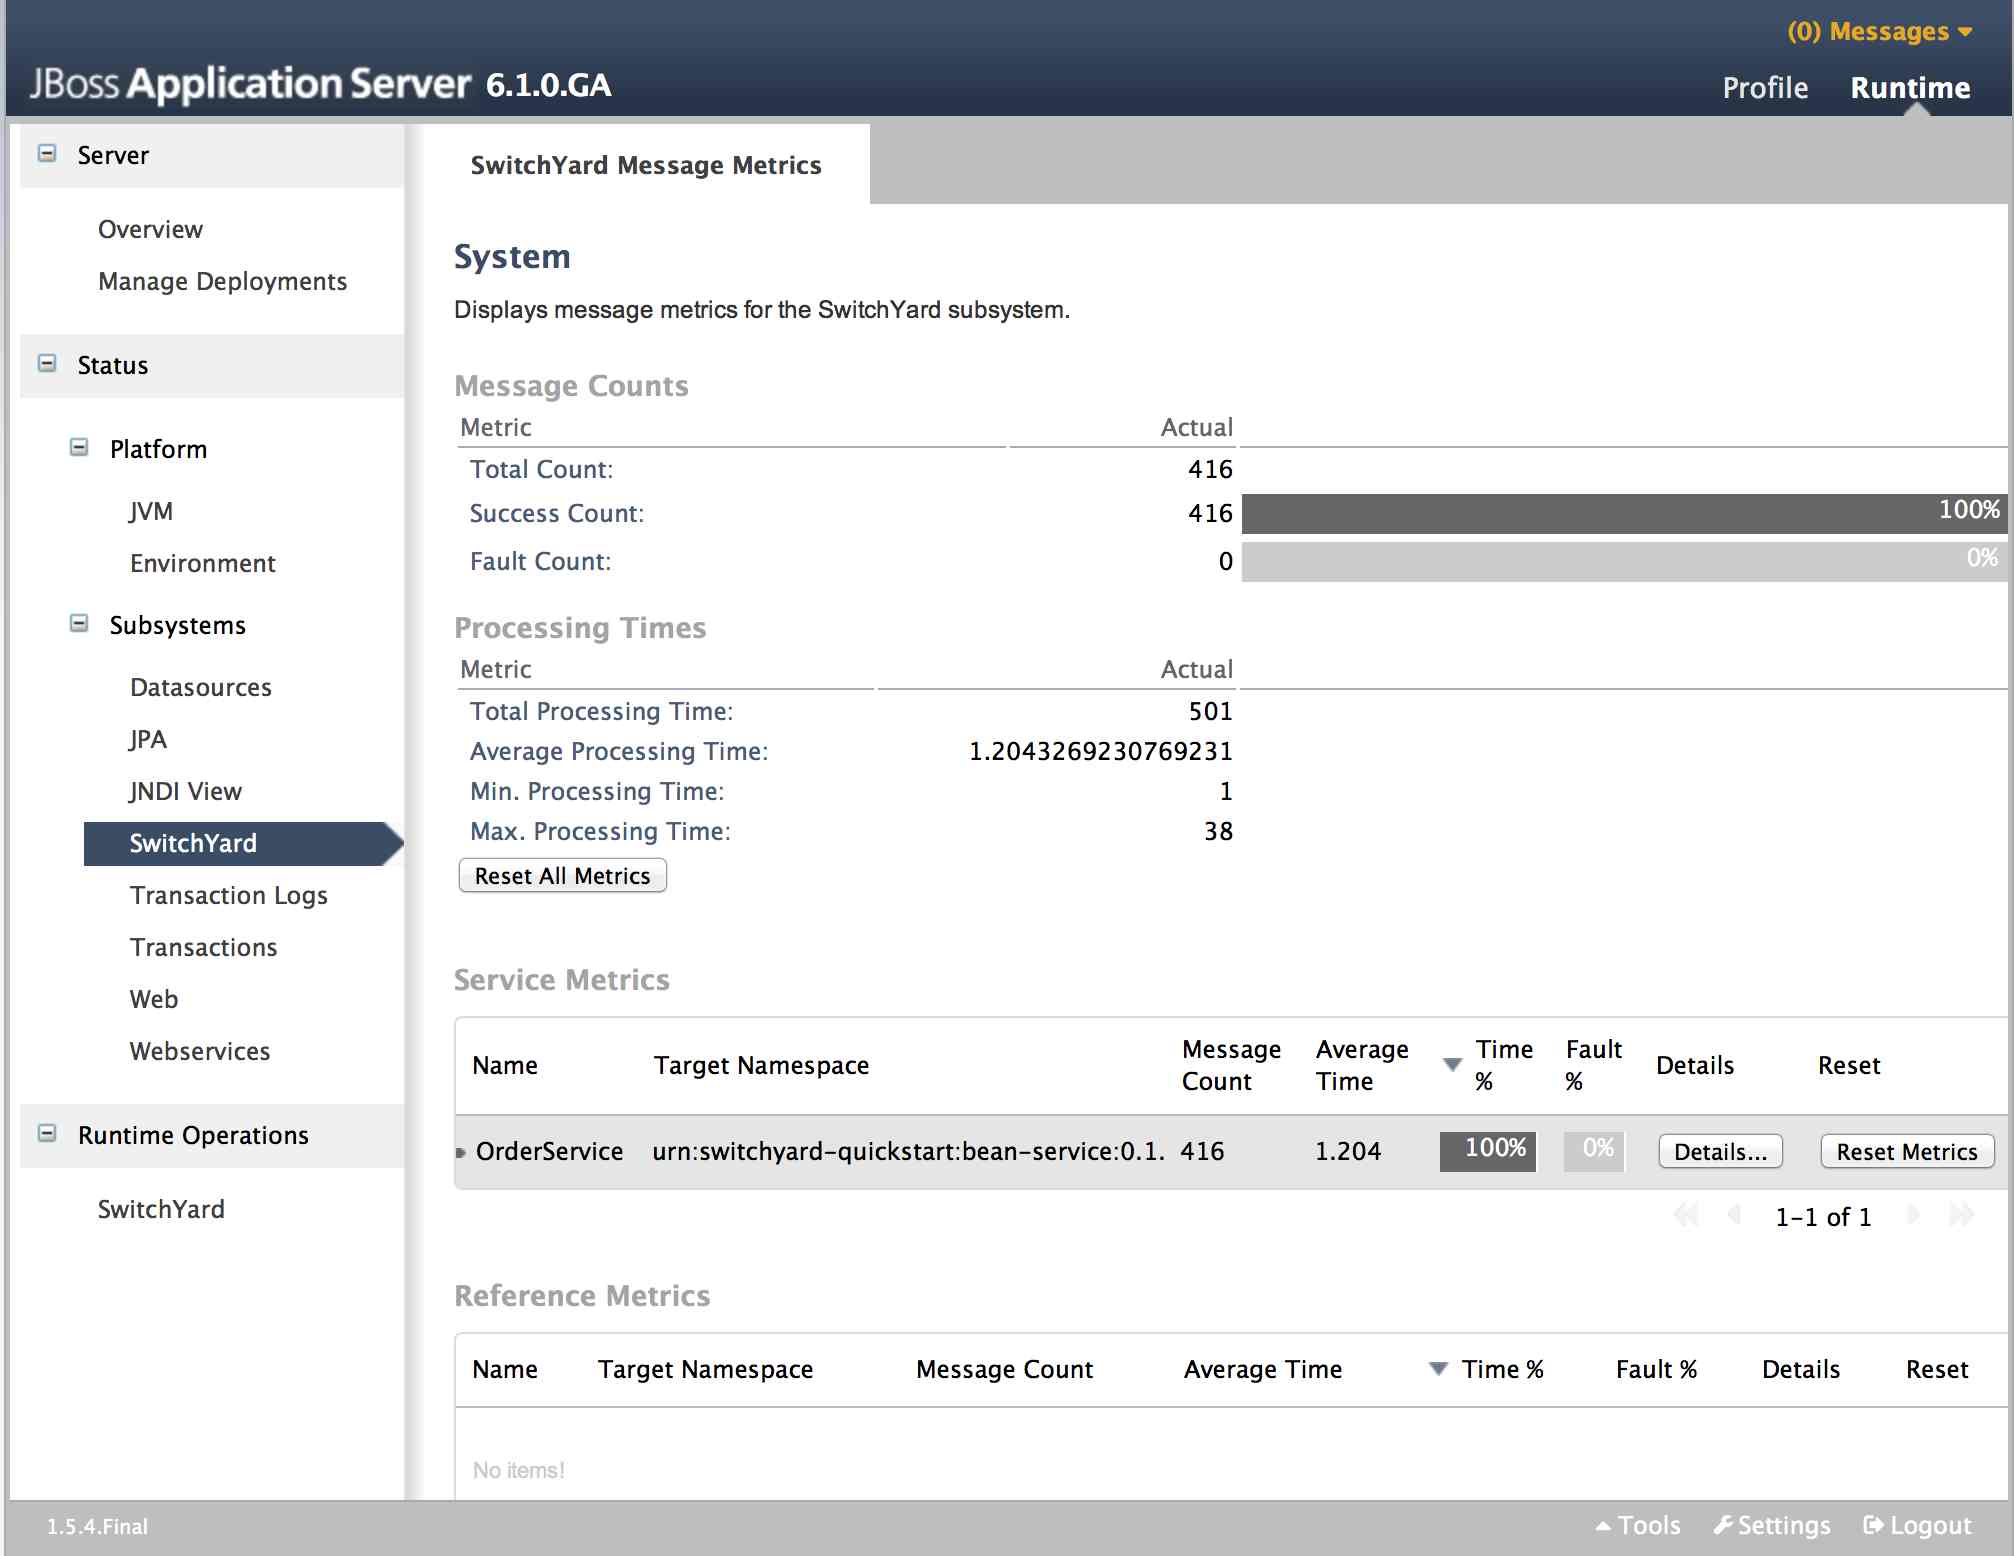
SwitchYard Message Metrics can be accessed on the Runtime page of the AS console under Status -> Subsystems -> SwitchYard. This page provides a view of a comprehensive set of metrics aggregated at various levels within the system.
The following types of metrics are available:
-
Message count: total, success, failed
-
Processing time: total, min., avg., max.
Collected metrics can be viewed at the following levels:
-
System : metrics for the entire SwitchYard runtime (all deployed applications)
-
Service : metrics for a composite service in an application. Additional metric details are provided for the following:
-
Gateway: metrics for each binding on the service (e.g. FTP metrics for service "ABC")
-
Operation: metrics for each operation on the service
-
Service Reference : metrics for references invoked by the service
-
-
Reference : metrics for a composite reference in an application. Additional metric details are provided for the following
-
Gateway : metrics for each binding on the reference (e.g. FTP metrics for reference "ABC")
-
Operation : metrics for each operation on the reference
-
This page also provides the user with the ability to reset metrics at various levels.
Application Views
SwitchYard contributes a page to the Runtime Operations section which provides views detailing various aspects of SwitchYard applications running on the system. These views may be accessed on the Runtime page of the AS console by selecting Runtime Operations -> SwitchYard. The following views are provided:
-
Applications: lists all SwitchYard applications deployed on the server
-
Services: lists all Services provided by the applications deployed on the server
-
References: lists all service References used by applications deployed on the server
-
Artifacts: lists all artifacts referenced by applications deployed on the server
Applications
The main Applications tab displays all the applications deployed on the server. Selecting a particular application in the list will populate the Application Details section below the list. The following details are provided:
-
Services: services provided by the application. Selecting a service will open the main Services tab, displaying details for the service.
-
References: services used by the application. Selecting a reference will open the main References tab, displaying details for the reference.
-
Properties: properties defined in the application. The properties may also be edited within this view.
-
Artifacts: artifacts referenced by the application. Selecting an artifact will open the main Artifacts tab, displaying details for the artifact.
-
Transformers: transformers configured in the application.
-
Validators: validators configured in the application.
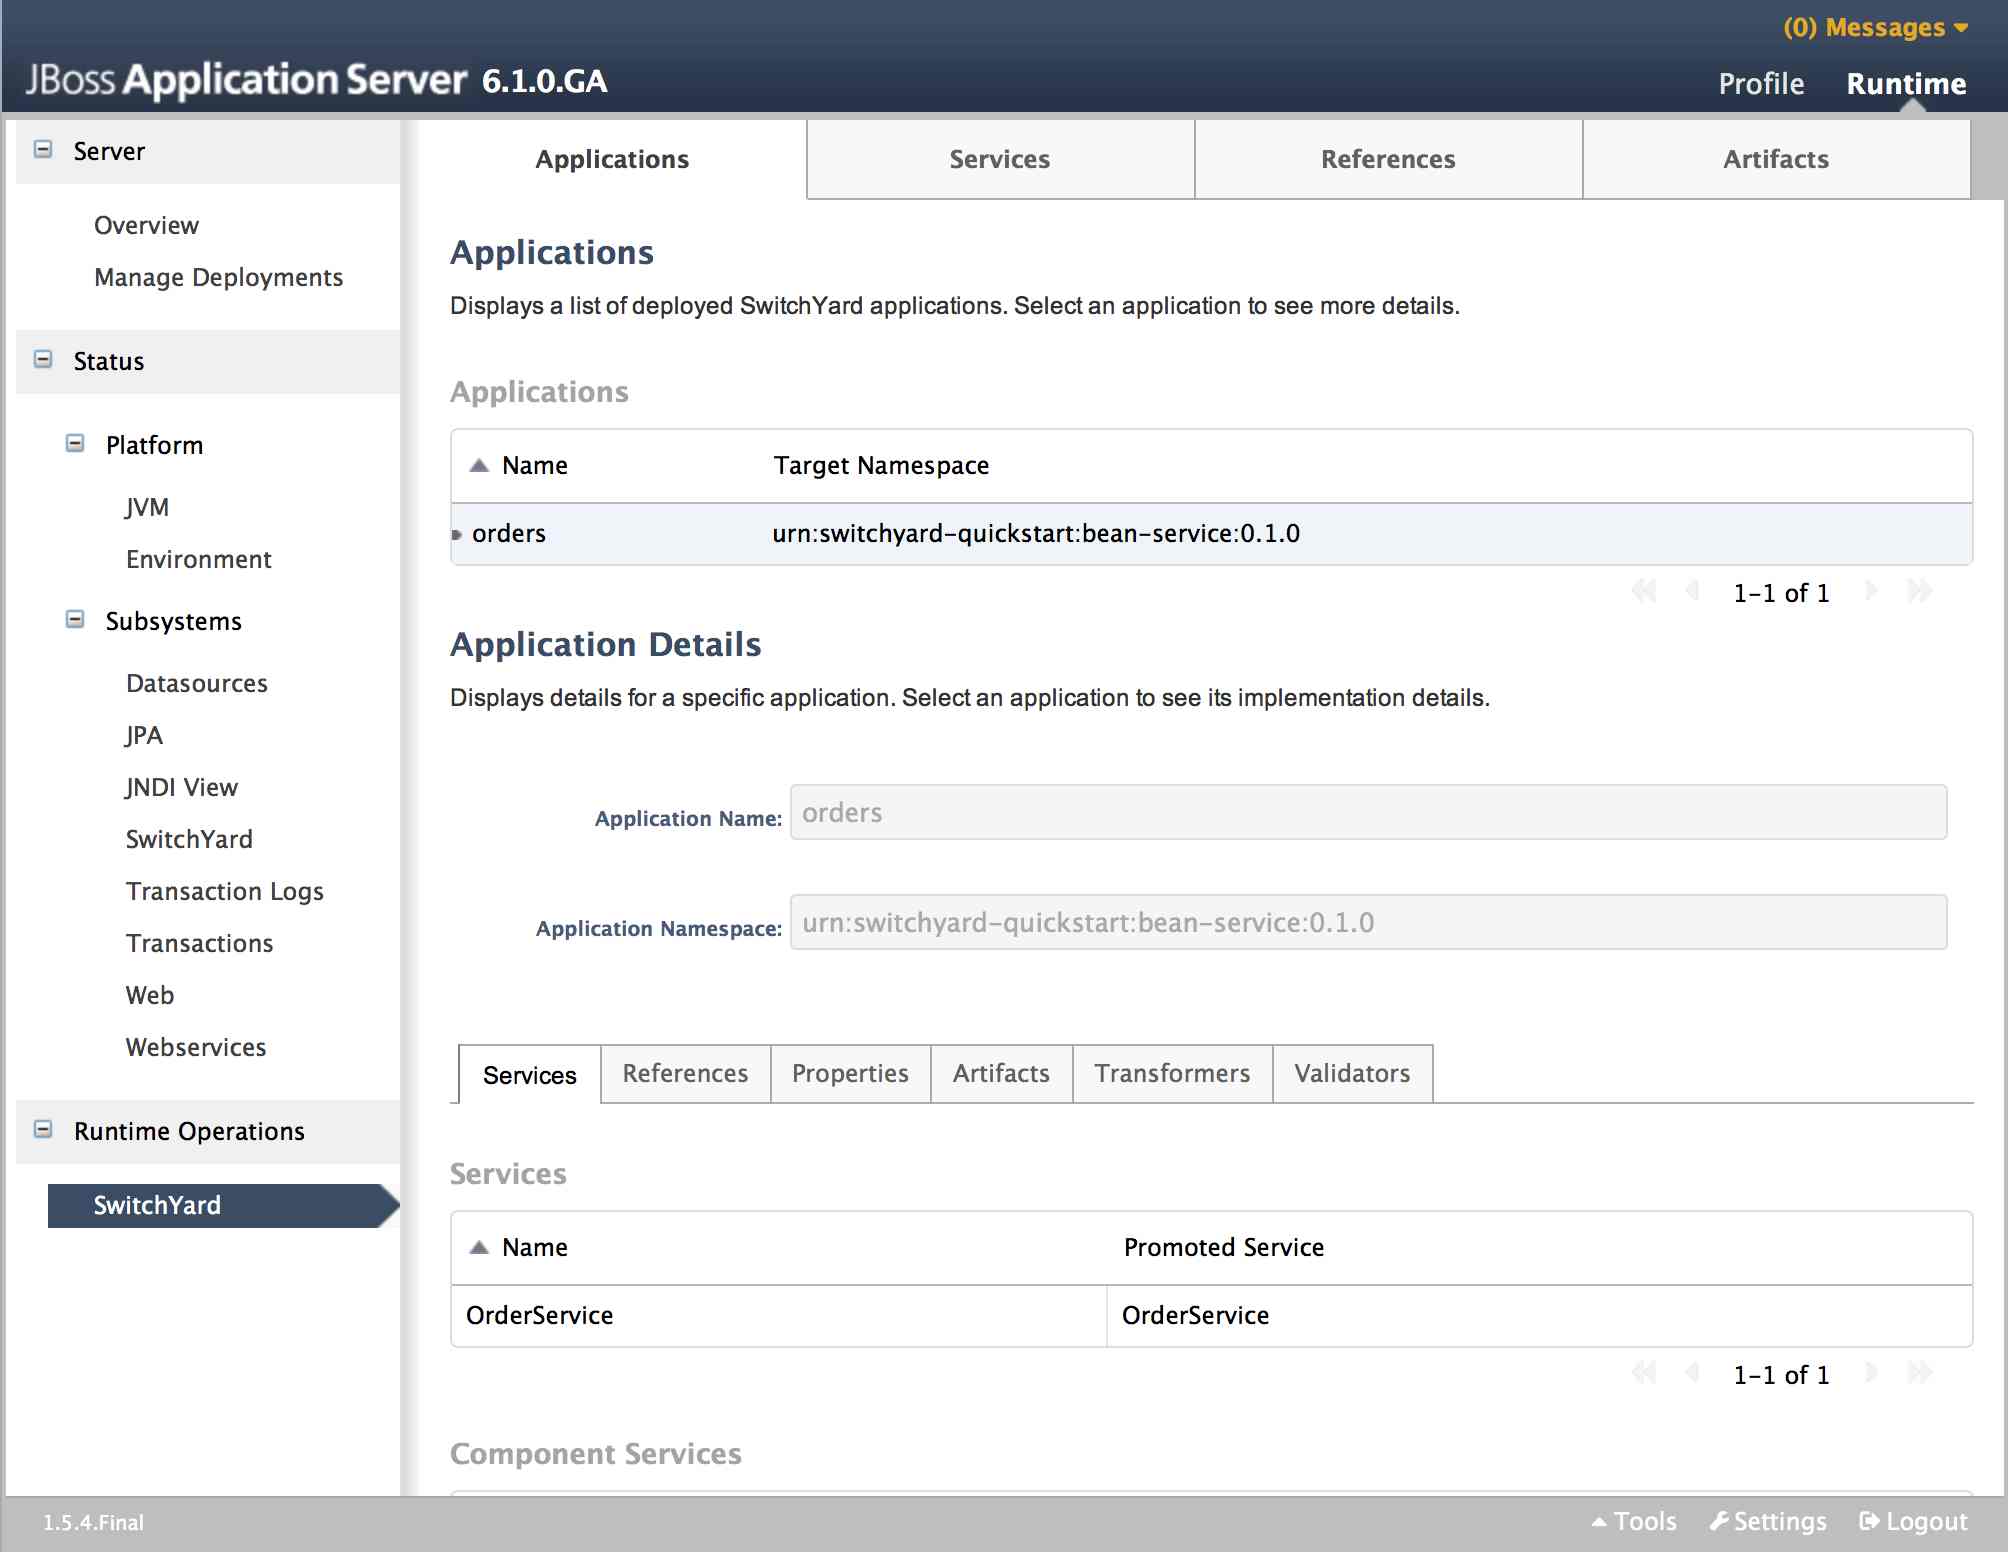
Services Tab
The Services tab displays information about the services provided by the application. This information includes the services provided by the application and the component services used to implement the services.
The Services table displays the services provided by the application. The table provides the following details:
-
Name: the name of the service.
-
Promoted Service: the name of the component service providing the implementation for the service.
Clicking on an item in the Name column will load the open the main Services page displaying details for that service. Clicking on an item in the Promoted Service column will highlight the corresponding item in the Component Services table below.
The Component Services table displays the component services defined in the application. This table provides the following details:
-
Name: the name of the component service
-
Interface: the interface implemented by the component
-
Implementation: provides a link for viewing the implementation details of the component
Clicking on an item in the Implementation column will open a dialog detailing the component's implementation.
The Implementation dialog provides the following information:
-
The technology used to implement the component (e.g. Camel).
-
A list of references required by the component.
-
The raw configuration for the implementation.

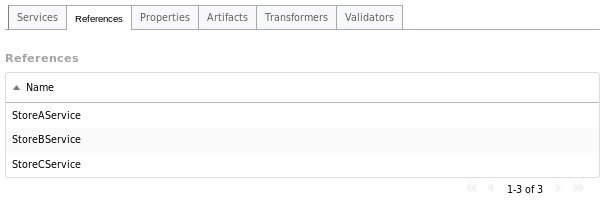
References Tab
The References tab lists all the composite references used by the application.
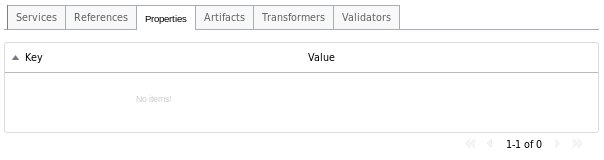
Properties Tab
The Properties tab provides a list of properties defined in the application. In addition to viewing the properties, this page may be used to update the values for individual properties.
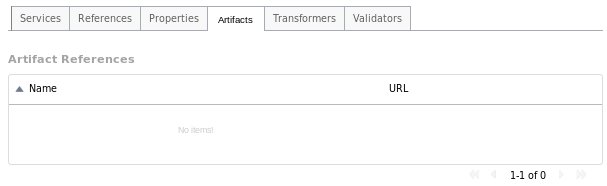
Artifacts Tab
The Artifacts tab provides information about the artifacts referenced by the application and is comprised of a table providing the following details:
-
Name: the name of the referenced artifact
-
URL: the location of the artifact
Clicking on an item in the table will navigate to the main Artifacts page.
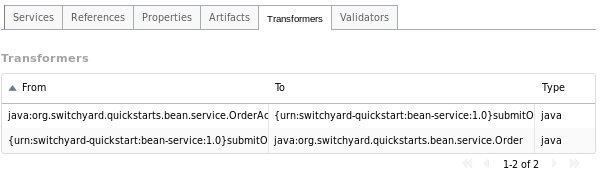
Transformers Tab
The Transformers tab provides details about the transformers deployed by the application, providing the following details:
-
From: the from type supported by the transformer.
-
To: the to type supported by the transformer.
-
Type: the implementation technology used by the transformer (e.g. Java, XSLT, etc.).
Validators Tab
The Validators tab provides details about the validators deployed by the application, providing the following details:
-
Name: the name of the validator.
-
Type: the type of the validator.

Services
The main Services tab displays all services provided by the deployed applications. Selecting a specific service will populate the Service Details section below the list. Details displayed include:
-
Name: the service name
-
Namespace: the namespace within which the service is defined
-
Application: the application providing the service (this links to the main Applications tab)
-
Interface: the interface provided by the service.
-
Promoted Service: the component service implementing the service.
-
Gateways: lists the gateways providing access to the service.
-
Throttling: throttling configuration for the service

Gateways Tab
The Gateways tab in the details section provides the following information for each of the gateways provided for the service:
-
Name: the name of the gateway
-
Type: the type of the gateway (e.g. SOAP, HornetQ, etc.)
-
Status: the status of the gateway (e.g. started, stopped)
-
Start/Stop: starts or stops the gateway
-
Configuration: opens a dialog displaying the raw configuration for the gateway

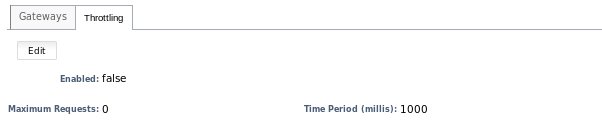
Throttling Tab
The Throttling tab in the details section allows the user to view throttling details for the service.
-
Edit: switch to edit mode, allowing the user to change the throttling configuration.
-
Enable: enable/disable throttling for the service
-
Maximum Requests: the maximum number of requests per period before throttling occurs
-
Time Period: the time period over which requests are counted (cannot be edited)
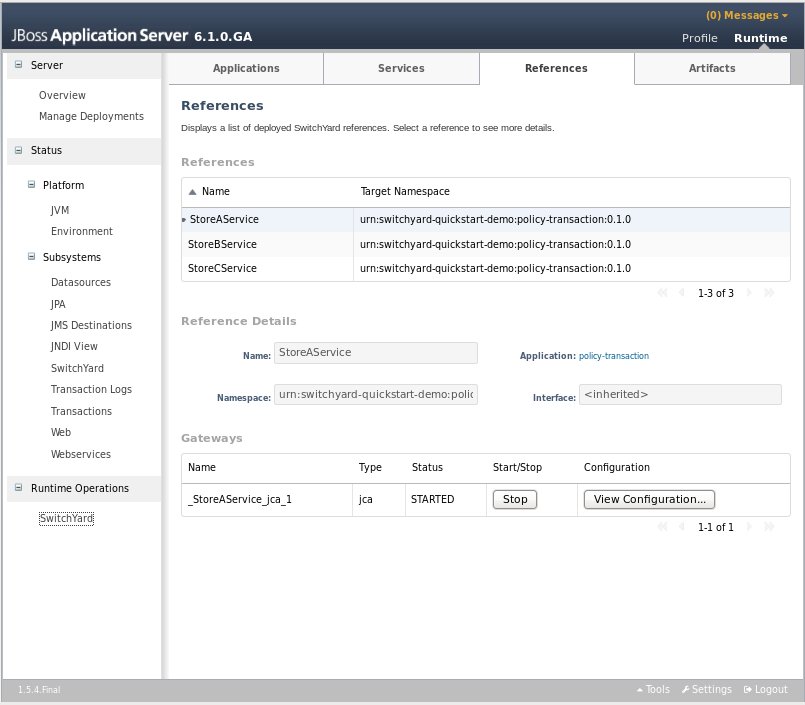
References
The main References tab displays all service references used by the deployed applications. Selecting a specific reference will populate the Reference Details section below the list. Details displayed include:
-
Name: the name of the reference
-
Namespace: the namespace within which the reference is defined
-
Application: the application containing the reference (this links to the main Applications tab)
-
Interface: the interface provided by the reference.
-
Gateways: lists the gateways through which the reference is accessed.
The Gateways section provides the following information for each of the gateways configured for the reference:
-
Name: the name of the gateway
-
Type: the type of the gateway (e.g. SOAP, HornetQ, etc.)
-
Status: the status of the gateway (e.g. started, stopped)
-
Start/Stop: starts or stops the gateway
-
Configuration: opens a dialog displaying the raw configuration for the gateway
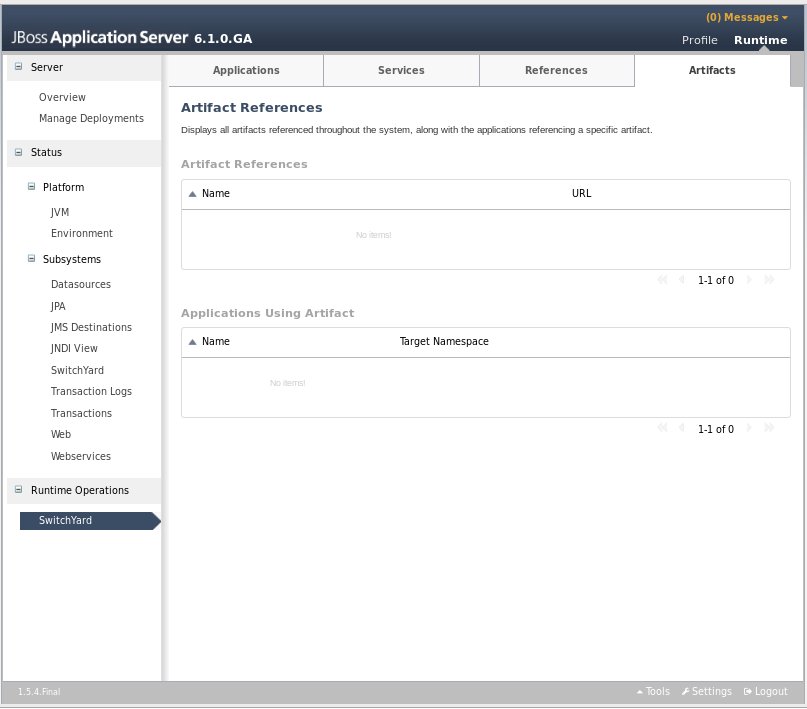
Artifacts
The main Artifacts tab displays all artifacts referenced by applications deployed to the system. Selecting a specific artifact reference will populate the Applications Using Artifact table below. Selecting an application in the applications table will navigate to the main Applications tab.
Subsystem Configuration View
SwitchYard contributes an additional view to the standard JBoss AS management console's Profile page, which can be accessed by selecting the Subsystems -> SwitchYard -> Runtime Details node. This page displays details about to the SwitchYard subsystem configured in the AS configuration profile.
This page displays the version of the SwitchYard runtime, along with a list of installed components. Selecting a component will populate the Component Details section below, which displays:
-
Name: the component name, e.g. SOAP, Camel.
-
Type: the component type, e.g. soap, camel. (The type is the suffix used within switchyard.xml identifying component specific elements, e.g. binding.soap, implementation.camel.)
-
A section providing component specific details. For most components, this section lists any configurable properties and their current settings.

BPEL Console
The BPEL console can be deployed to SwitchYard through its installer since SwitchYard-0.4 version.
Overview
This section provides an overview of the BPEL Console. The console provides the ability to view:
-
The process definitions deployed to the BPEL engine
-
The process instances executing in the BPEL engine
-
The execution history of a process
-
The history instances query
Installation
The easiest way to install the BPEL console is to download the SwitchYard installer and then run :
ant install-bpel-console
You will then be prompted for the location of your EAP installation, and the Installer will place the necessary WAR files in EAP.HOME/standalone/deployments.
Alternatively, you can just simply copy the switchyard-bpel-console.war folder and switchyard-bpel-console-server.war from the Tools distribution into the EAP_HOME/standalone/deployments folder. Remember that you will need to add a marker file named "switchyard-bpel-console.war.dodeploy" in the deployments folder as well to trigger the deployment.
Because of this issue (https://issues.jboss.org/browse/RIFTSAW-391), we used the exploded war of the switchyard-bpel-console as the workaround.
Logging in
The BPEL console can be located using the URL: http://localhost:8080/bpel-console.
It is recommended that you only open one bpel-console window within your browser, otherwise, you may see blank window once you logged in, or couldn't log in from your second window. For detail please see RIFTSAW-400.
The first screen that is presented is the login screen:
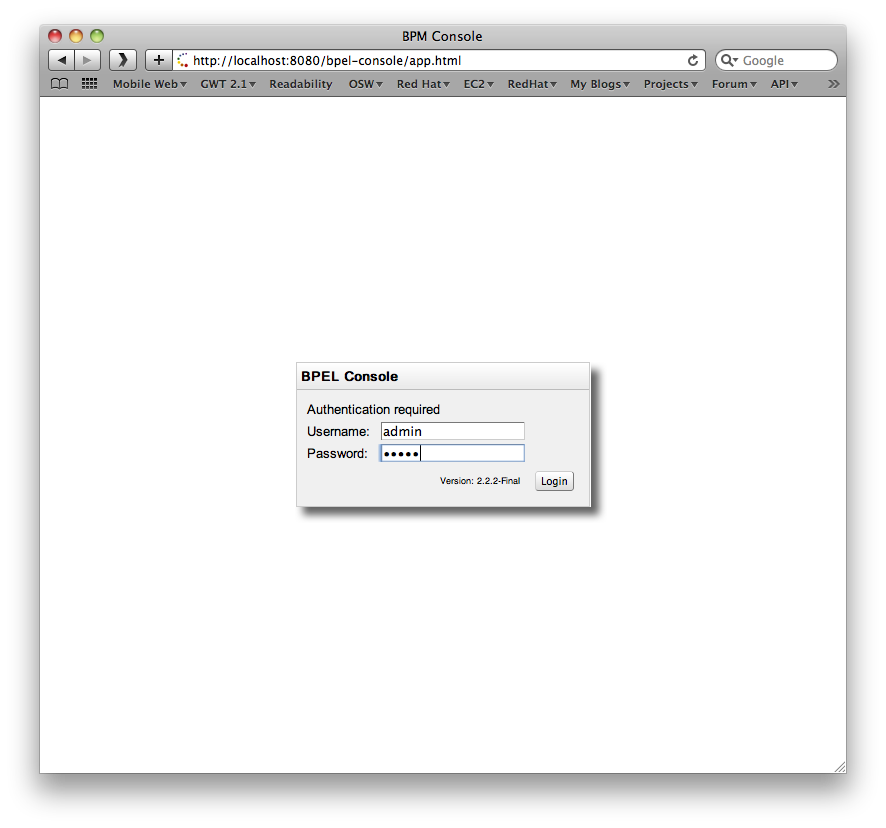
The default username is admin with password admin.
The Access Control mechanism used by the admin console is configured in the $deployFolder/bpel-console/bpel-identity.sar/META-INF/jboss-service.xml. The JAAS login module is initially set to use a property file based access mechanism, but can be replaced to use any appropriate alternative implementation.
The users for the default mechanism are configured in the property file $deployFolder/bpel-console/bpel-identity.sar/bpel-users.properties. The entries in this file represent username=password.
The user roles for the default mechanism are configured in the property file $deployFolder/bpel-console/bpel-identity.sar/bpel-roles.properties. The entries in this file represent username=role. The only role of interest currently is administrator.
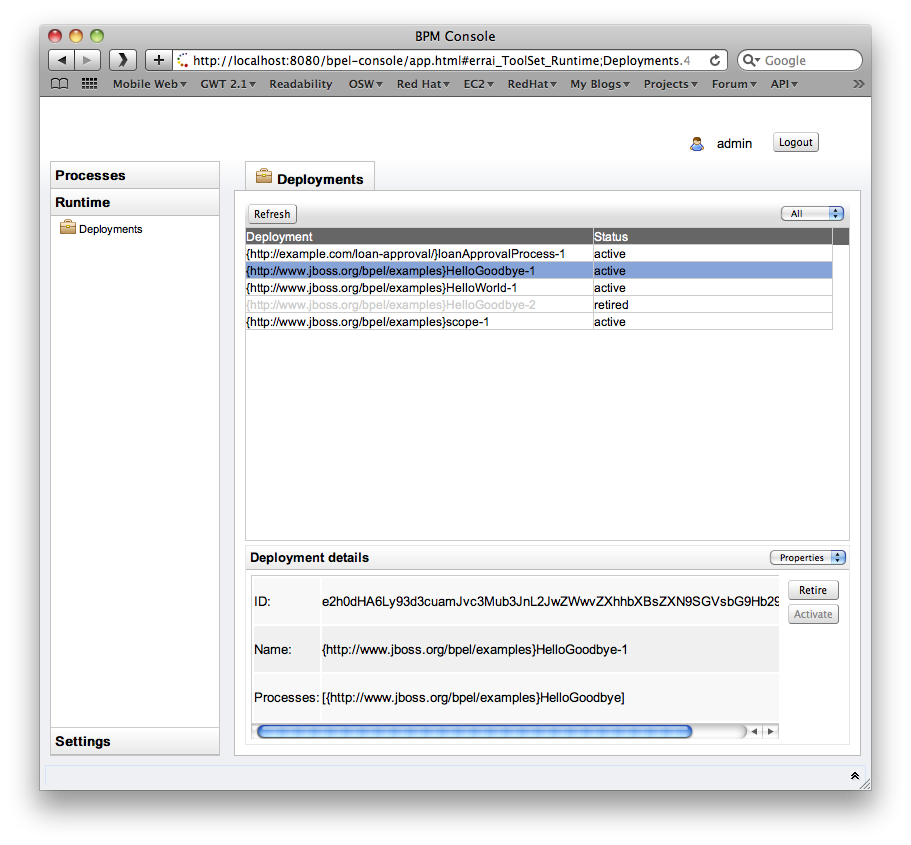
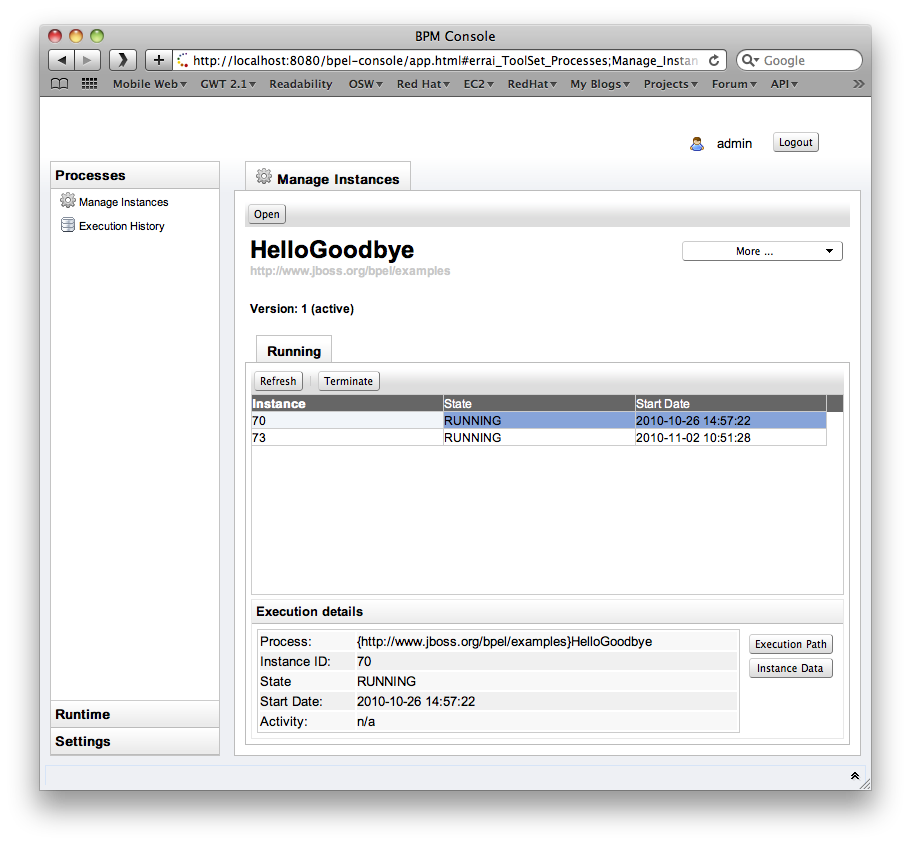
Deployed Process Definitions
Once logged in, the 'Manage Instances' tab shows the currently deployed BPEL processes and their versions.
Process Instances
When a process definition is selected (Open), the list of active process instances for that process definition (and version) will be displayed in the bottom panel.
Process Versions
There is only one active version at a time. If you open a process definition the active version will be chosen by default. Sometimes you need to manage instances of a retired version (i.e. to terminate running instances). In that case the button More - Change Version allows you to select a different version of that process.

Execution History
The Execution History allows you to inspect the BPAF history data associated with a process. You can specify a timespan and whether or not you'd like to see failed/terminated instances included in the chart.
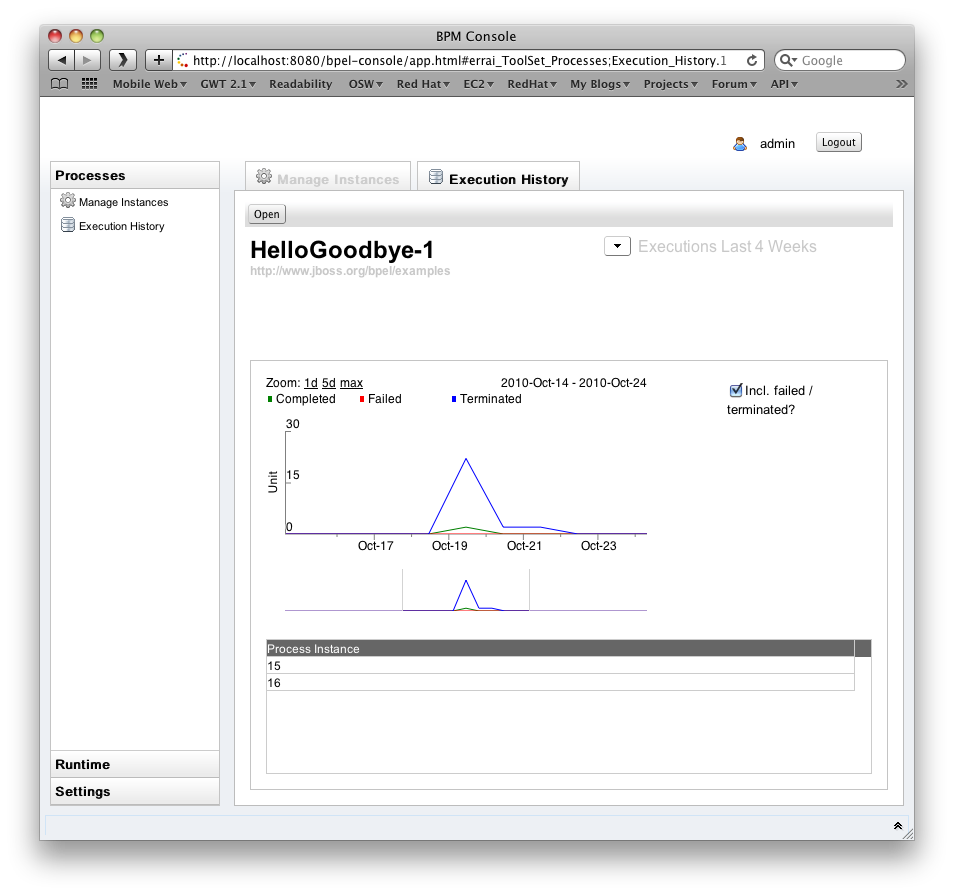
The chart has various keyboard bindings to browse through the displayed execution data:
|
Key |
Action |
|
Up Arrow |
Zoom In |
|
Down Arrow |
Zoom Out |
|
Left Arrow |
Half-Page Left |
|
Right Arrow |
Half-Page Right |
|
Page-Up |
Page Left |
|
Page-Down |
Page Right |
|
TAB |
Next Focus |
|
Shift-TAB |
Previous Focus |
|
HOME |
Max Zoom Out |
|
ENTER |
Max Zoom In to Focus |
|
Mouse Drag |
Scroll Chart |
|
Shift Mouse Drag |
Drag Select/Zoom |
|
Mouse Wheel Up/Z |
Zoom In |
|
Mouse Wheel Down/X |
Zoom Out |
|
Backspace/Back Button |
Back |
|
Right Mouse Button |
Context Menu |
|
Left Click |
Set Focus |
|
Double Click |
Max Zoom In to Focus |
Logging configuration options
You need to explicitly enable history logging for a particular process through the 'deploy.xml' file and for the BPEL engine in general through the 'bpel.properties' file. In order to record history data, set the 'process-events' option for a particular process and make sure the 'org.jboss.soa.bpel.console.bpaf.BPAFLogAdapter' is enabled.
Process configuration example (deploy.xml):
<deploy xmlns="http://www.apache.org/ode/schemas/dd/2007/03"
	xmlns:bpl="http://www.jboss.org/bpel/examples"
	xmlns:intf="http://www.jboss.org/bpel/examples/wsdl">

	<process name="bpl:HelloGoodbye">
		<active>true</active>
        <process-events generate="all"/>
		<provide partnerLink="helloGoodbyePartnerLink">
			<service name="intf:HelloGoodbyeService" port="HelloGoodbyePort"/>
		</provide>
	</process>
</deploy>
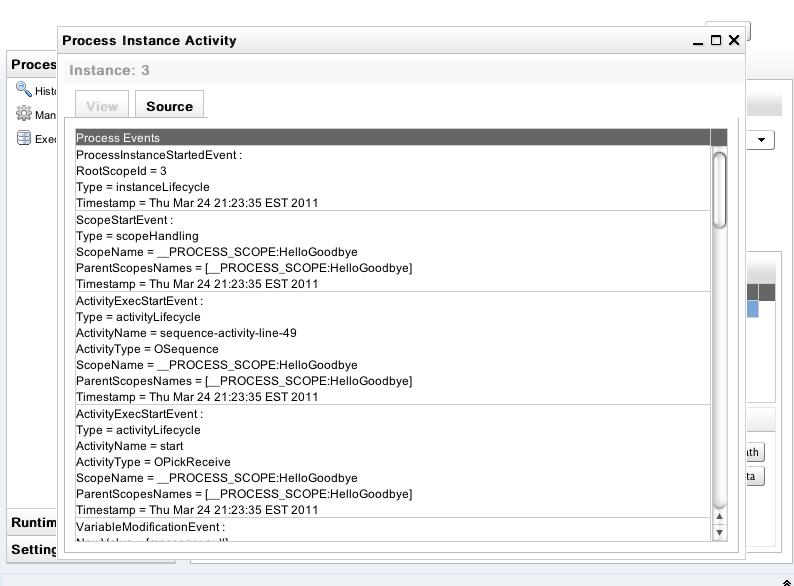
Instance Data and Execution Path
When a process instance is selected, its details will be displayed in the Execution Details panel. The Instance Data button will also become enabled, allowing further detail about the process to be displayed. Likewise the Execution Path button opens the related instance execution graph.

The View tab shows the instance execution graph, while the Source tab below shows all activity events
History Instance Query
Once a process instance is finished, could be 'COMPLETED', 'FAILD' or 'TERMINATED', you could search it through the History Query tab window as following:

You need to choose the Process Definition and the Process Status from the list box. You could also input the correlation key, start time and end time as criteria to search the history instances. Below is the search result.
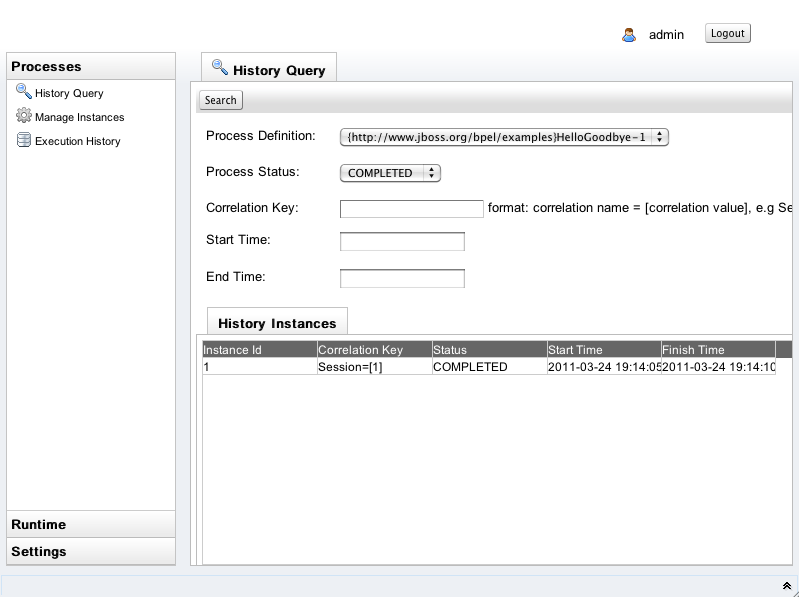
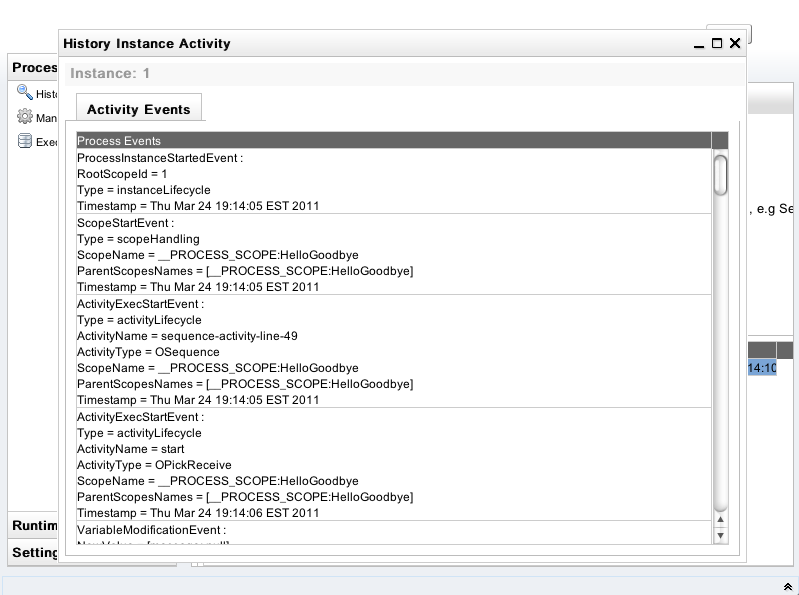
On the History Instances List, when you double click a specific row, it will pop up a window that shows all of execution events that happened during this process instance execution.
Please be noted that you have to explicitly enable the history logging in order to use the History Query functionality.
Retiring and Reactivating Process Definitions
When a process definition is initially deployed (i.e. the first version of the process), it automatically becomes the active process definition. If that BPEL process definition is subsequently change and redeployed, then the previous version is retired, and the new version becomes the active version.
The only difference between an active and retired process definition is that a retired process definition can no longer create new process instances. However if there are current process instances associated with the retired process definition version, then these will continue to execute.
On some occasions, the administrator may wish to change which version of a process definition is considered the <emphasis>active</emphasis> version. Or they may simply want to retire the currently active process definition, so that no more process instances can be created, only allowing the already running process instances to continue until completed.
To change the status of a process definition, the administrator should select the Runtime tab from the lefthand panel, and then select the Deployments option. This will show the process definitions, their versions and their current status (active or retired).