package com.example.switchyard.example;

public interface ExampleService {

	public String sayHello(String name);

}
Installation
Please refer to Installing Eclipse Tooling for details on installing the SwitchYard Eclipse tooling.
Features
The SwitchYard Eclipse tooling provides the following features:
-
Creation of SwitchYard projects.
-
Adding SwitchYard capabilities to existing Maven based Eclipse projects.
-
Configuration of SwitchYard capabilities (i.e. runtime component dependencies; e.g. SOAP, BPM, Camel, etc.).
-
A graphical editor for editing SwitchYard application configuration (i.e. switchyard.xml), which provides the following features:
-
Creation and configuration of components, services and references.
-
Component service/reference promotion and configuration of gateway bindings.
-
Creation of implementation skeletons for new service components (e.g. bean classes, BPMN2 files, DRL files, etc.).
-
Creation of unit test skeletons for services.
-
Configuration of message transformers, including creation of implementation skeletons for message transformers (e.g. XSL, Java, etc.).
-
Creation of Artifact references.
-
-
Java2WSDL
-
XML catalog entries for SwitchYard configuration schema.
-
m2eclipse integration supporting the SwitchYard Maven plugin (org.switchyard:switchyard-plugin).
-
Support for workspace deployment of SwitchYard projects.
Quick Start
Overview
This quickstart takes you through the steps required to create, implement, test and deploy a SwitchYard application using the Eclipse tooling. The application being created will provide a greeter service, implemented as a Java bean and accessible via a SOAP HTTP gateway. This quickstart will illustrate how to perform the following tasks:
-
Create a SwitchYard project
-
Create a Java service interface
-
Create a bean component implementation
-
Create and execute a unit test for the service
-
Create a WSDL service interface
-
Add a SOAP gateway for accessing the service
-
Create a transformer
-
Create and execute a unit test for the transformer
-
Create and execute a unit test for the SOAP gateway
-
Deploy the application to a server
-
Test the deployed application
Create a Project
The first step is to create a project for the application. From the new menu, select SwitchYard Project. (See SwitchYard Projects for more details.)
The first page in the wizard is used for specifying the project name and location.

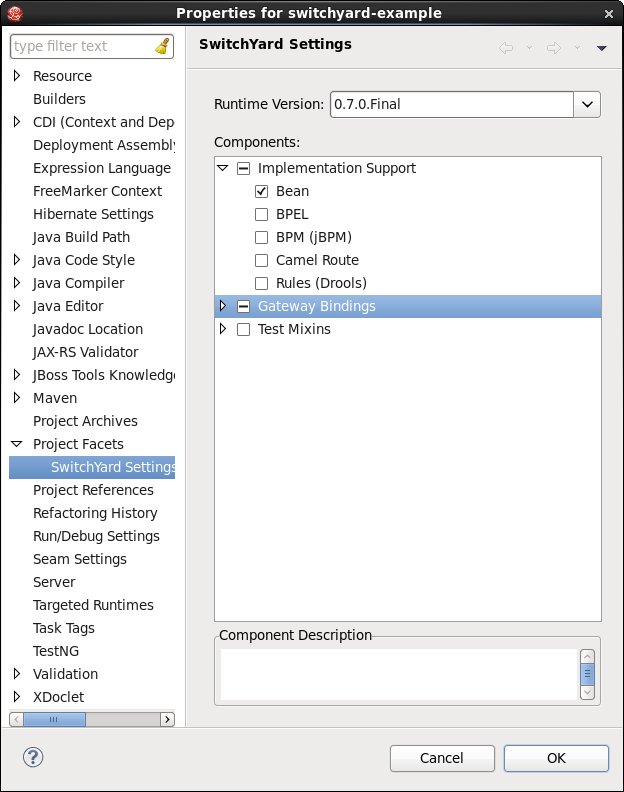
The next page is used for specifying various project details, including which SwitchYard components are required by the project. In this example, the default package has been modified and the Bean and SOAP components have been selected.

Upon completion, a new project will be created and the SwitchYard configuration will be open in the editor.

The Palette view may not be immediately visible. If it is missing from your workbench, it can be displayed using the Window→Show View→Other... menu
Create a Bean Component
The next step is to create a component that will implement the service logic. Every component must be associated with an interface describing the service. As part of this step, we will create the interface using the Interface link on the New Bean Service wizard. At the end of this step, we will have:
-
A new ExampleService.java file describing a Java interface that will be implemented by the component. This will provide the interface for the service.
-
A new ExampleServiceBean.java file describing a Java class that implements ExampleService. This will provide the implementation for the service.
-
A component and component service will be added to the SwitchYard configuration. This tells SwitchYard about the service and implementation.
In the SwitchYard editor, drag the Bean tool from the Components section of the palette onto the canvas. This will open a wizard prompting for details about the component.

First, specify the service interface. Create a new interface by clicking the Interface link. This will open the standard Java New Interface wizard. Specify a name for the interface (e.g. ExampleService), any other details and press Finish.
The name for the bean should be defaulted based on the service name (e.g. ExampleServiceBean). Look over the fields and press Finish.

A new component shape should be added to the canvas.
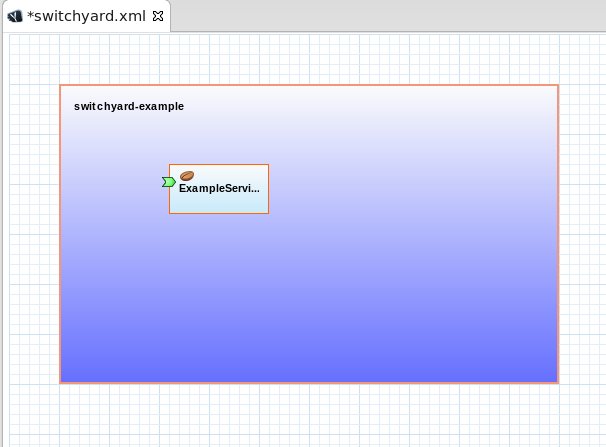
Save the changes to the switchyard.xml file.
If the project contains a number of XML validation errors, make sure Honour all XML schema locations is disabled in workbench preferences (under XML→XML Files→Validation).
Flesh Out the Service Interface
The next step is to flesh out the interface for the service. The Java interface created in the previous step contains no methods, so we will add them here. At the end of this step, we will have a complete interface which describes the service.
In the SwitchYard editor, double-click the service icon on the component (the green arrow on the left side of the component). This will open the file describing the interface (ExampleService.java).
Add a method to the interface, for example:
ExampleService.java
In the previous step, we created the interface while we were creating the component. We could have created the interface first, then used the Browse... button in the New Bean Service wizard to select it. The resulting bean class would have been created with stubs for each method on the interface.
Implement the Bean
The next step is to implement the service logic. After adding methods to the interface in the previous step, there are compiler errors in the bean class. We will resolve the errors by creating the missing methods. At the end of this step we will have a completed service implementation and will have a SwitchYard application that provides an ExampleService and the project should be error free.
In the SwitchYard editor, double-click the component (ExampleServiceBean) in the diagram. This will open the file used to implement the component (ExampleServiceBean.java).
The file should contain errors, since it does not implement required methods.
Add an implementation for the newly added method on the service interface. (Using quick-fix, click the error icon and select, Add unimplemented methods.)
Update the implementation of the sayHello() method so it matches the following:
ExampleServiceBean.java
package com.example.switchyard.example;

import org.switchyard.component.bean.Service;

@Service(ExampleService.class)
public class ExampleServiceBean implements ExampleService {

	@Override
	public String sayHello(String name) {
		return "Hello, " + name;
	}

}
Create a Unit Test for the Service
The next step is to verify that the service implemented in the previous steps is behaving appropriately. To do that, we will create a unit test to verify the behavior. At the end of this step we will have a unit test class which sends a message to the service and verifies its output. We will also execute the test using the native Eclipse JUnit support.
In the SwitchYard editor, right-click the service icon on the component (the green arrow on the left side of the component) and select New Service Test Class. This will open a wizard, which should be defaulted appropriately. Look the fields over and press Finish.

Modify the testSayHello() method to properly exercise the service. Initialize the message variable to "Bob" and update the Assert statement to verify the return value from the service is, "Hello, Bob"
ExampleServiceTest.java
package com.example.switchyard.example;

import org.junit.Assert;
import org.junit.Test;
import org.junit.runner.RunWith;
import org.switchyard.test.Invoker;
import org.switchyard.test.ServiceOperation;
import org.switchyard.test.SwitchYardRunner;
import org.switchyard.test.SwitchYardTestCaseConfig;
import org.switchyard.test.mixins.CDIMixIn;

@RunWith(SwitchYardRunner.class)
@SwitchYardTestCaseConfig(mixins = CDIMixIn.class, config = SwitchYardTestCaseConfig.SWITCHYARD_XML)
public class ExampleServiceTest {

	@ServiceOperation("ExampleService")
	private Invoker service;

	@Test
	public void testSayHello() throws Exception {
		// initialize your test message
		Object message = "Bob";
		String result = service.operation("sayHello").sendInOut(message)
				.getContent(String.class);

		// validate the results
		Assert.assertTrue("Unexpected result: " + result, result.equals("Hello, Bob"));
	}

}
Run the tests by selecting Run As => JUnit Test.
Promote the Service
The next step is to configure the service so it can be invoked by external applications. This is process is called promotion. We will promote our service through a WSDL interface which will require the creation of a WSDL file to describe the external version of the service, as well as the creation of a couple of transformers to convert the between the different types exposed by the internal and external interfaces (i.e. between the Java and WSDL types). The SwitchYard tooling allows us to create the WSDL and the required transformers during the promotion process.
In the SwitchYard editor, right-click the service icon on the component and select Promote Component Service. This will open a wizard, which allows us to specify the interface that will be exposed by the promoted service. By default, the interface specified matches the interface used to describe the component service.

In the Promote Component Service wizard, change the interface type from Java to WSDL. This will blank out the interface and name fields.

To create the WSDL, from the Java interface describing the source, press the Interface link. This will open the Java2WSDL wizard.
The first page of the Java2WSDL wizard is used for specifying the name and location for the WSDL file. The default values should be appropriate. Look them over and press Next.

The next page is used for specifying details about the generated WSDL. The default values should be appropriate, but you may want to modify the Endpoint URI field. Look the values over and press Finish.
WSDL Endpoint URI
While the Eclipse Web Services Tester allows one to specify service endpoints, for best results, modify the Endpoint URI to match the runtime port, e.g. http://localhost:8080/switchyard-example/ExampleService. This will allow the Web Services Tester to locate the running endpoint directly from the WSDL.

The WSDL file is created and we should be back on the Promote Component Service wizard, which should now be defaulted with details from the newly created WSDL file. Notice that the Create required transformers button is checked and press Next.

The next page is the New Transformers page which allows us to create the required transformers. Notice the two transformer type pairs checked in the table correspond to the input and output types declared on the two interfaces. Ensure both pairs are checked and Java Transformer is selected as the Transformer Type and press Next.
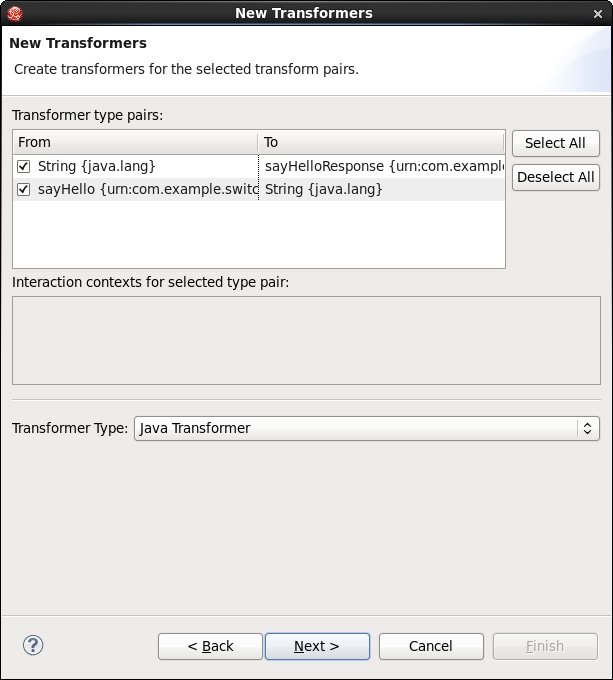
The next page collects information for a new Java class that will be used to implement the transformers. Specify ExampleServiceTransformers for the name and leave org.w3c.dom.Element selected as the Java type to be used to represent XML/ESB types in the transformer class. Press Finish.

A new composite service promoting the component service should have been added to the SwitchYard configuration. Save the editor.

In addition, there should be a new ExampleServiceTransformers.java file in the workspace.
Select the main shape in the SwitchYard editor and review the contents of the Transforms tab in the Properties view. The newly added transformers should be listed.
If no transformers are visible in the properties page, try updating the Maven project configuration by right-clicking the project and selecting Maven→Update Project...
There was a bug in earlier versions of the tooling where the project configuration was not setup correctly when creating a new SwitchYard project.
Add a Unit Test For the Tranformers
The next step is to add a unit test to verify the transformer logic. At the end of this step we will have a unit test that fails (we have configured the transformers, but haven't implemented them).
Open ExampleServiceTest.java and add the following method, which will test the transformers:
ExampleServiceTest.java
	@Test
	public void testSayHelloTransform() throws Exception {
		final QName inputType = QName
				.valueOf("{urn:com.example.switchyard:switchyard-example:1.0}sayHello");
		final QName outputType = QName
				.valueOf("{urn:com.example.switchyard:switchyard-example:1.0}sayHelloResponse");
		// initialize your test message
		Object message = "<sayHello xmlns=\"urn:com.example.switchyard:switchyard-example:1.0\"><string>Bob</string></sayHello>";
		String result = service.operation("sayHello").inputType(inputType)
				.expectedOutputType(outputType).sendInOut(message)
				.getContent(String.class);

		// validate the results
		String control = "<sayHelloResponse xmlns=\"urn:com.example.switchyard:switchyard-example:1.0\"><string>Hello, Bob</string></sayHelloResponse>";
		Assert.assertTrue("Unexpected result: " + result,
				XMLUnit.compareXML(control, result).identical());
	}
Run the test and verify that it fails.
Implement the Transformers
The next step is to implement transformer class created earlier. Once complete, we will run the unit tests to verify they now pass.
Open ExampleServiceTransformers.java and implement the transformStringToSayHelloResponse() as follows:
ExampleServiceTransformers.java
	@Transformer(to = "{urn:com.example.switchyard:switchyard-example:1.0}sayHelloResponse")
	public static String transformStringToSayHelloResponse(String from) {
		// TODO: properly escape the input string
		return "<sayHelloResponse xmlns=\"urn:com.example.switchyard:switchyard-example:1.0\"><string>"
				+ from + "</string></sayHelloResponse>";
	}
And implement transformSayHelloToString() as follows:
ExampleServiceTransformers.java
	@Transformer(from = "{urn:com.example.switchyard:switchyard-example:1.0}sayHello")
	public String transformSayHelloToString(Element from) {
		return from.getTextContent();
	}
Notice the return type of transformStringToSayHelloResponse() was changed from Element to String. The annotation specifies the to type as sayHelloResponse, but the data is returned as a String. SwitchYard provides low-level transformers for converting XML to/from a variety of Java accessible types (e.g. String, Element, Document, byte[]).
Run the unit tests to verify they now pass.
Add a SOAP Gateway Binding
The next step is to add a gateway binding to the composite service so it may be accessed via a SOAP HTTP. At this point, our service is only accessible to other SwitchYard applications running on the same server. We will now enable SOAP clients to access the service.
Add a SOAP endpoint to the service by dragging the SOAP tool under the Bindings section of the tool palette onto the new service. This will open the new binding wizard. The default values are acceptable, so review them and press Finish.

Save the changes made to the switchyard.xml file. Our application is now configured with a single service, implemented using a Java bean, which is exposed to clients as a SOAP HTTP service. We have unit tests for the service and transformation logic. The view of the final state of the project and configuration: 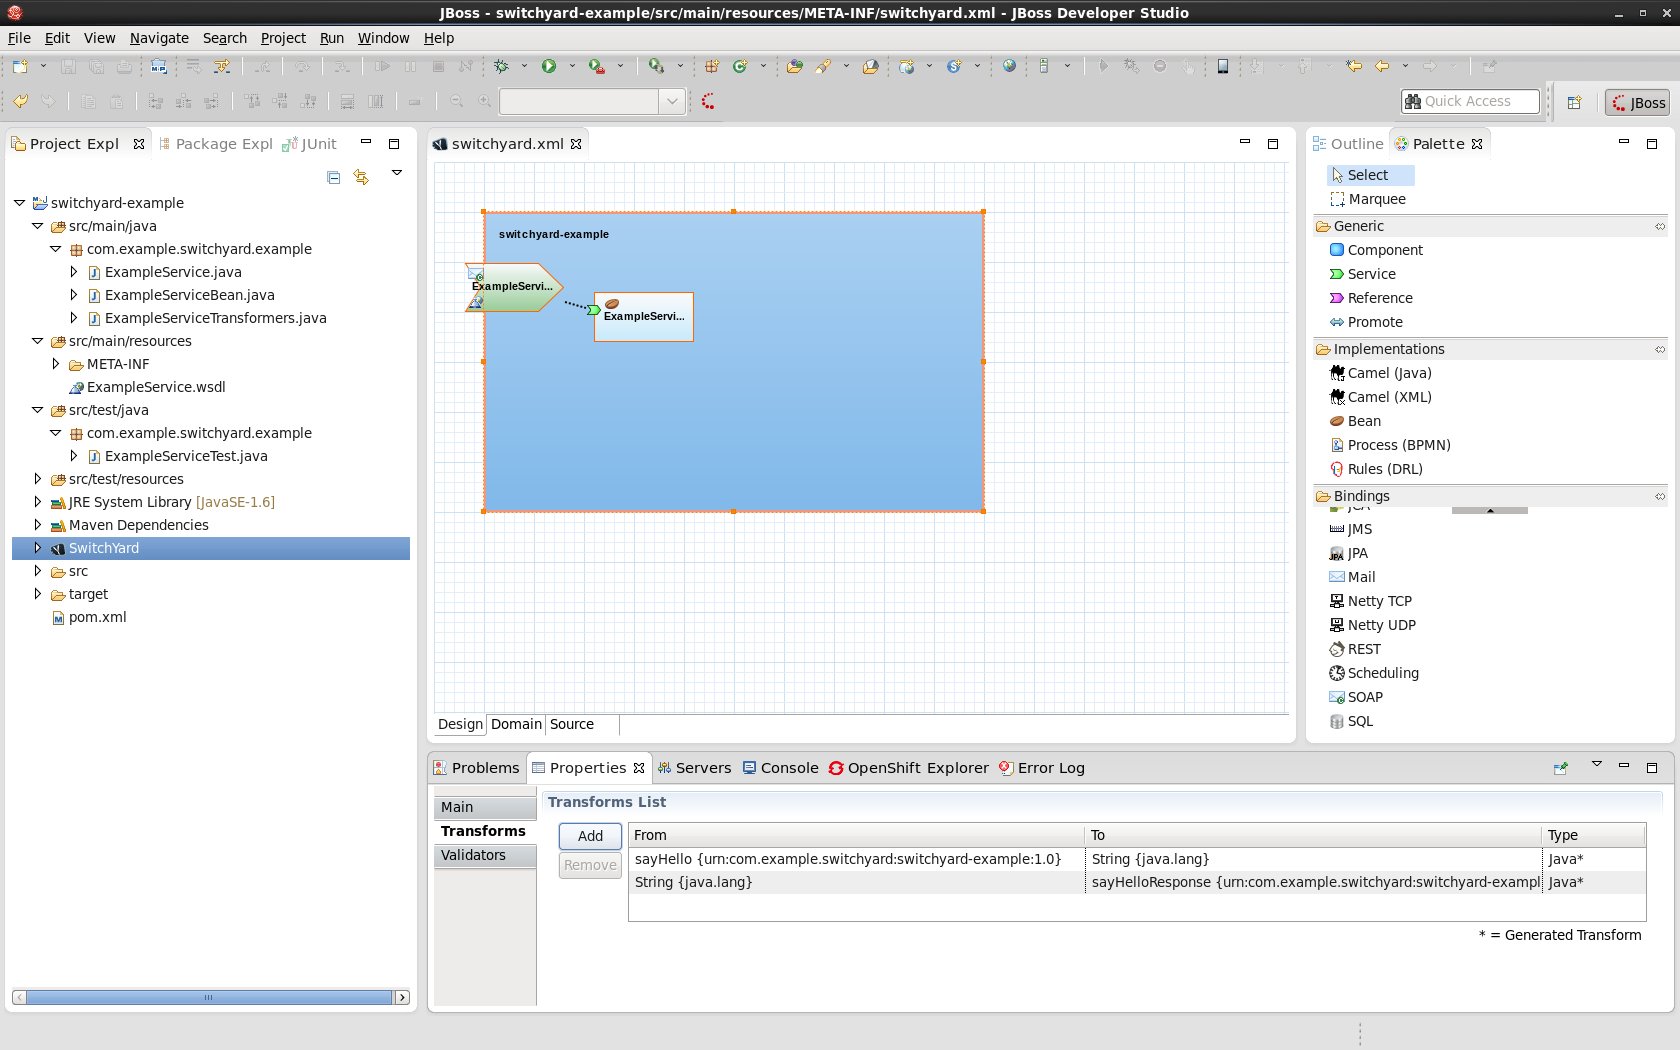
Deploy the Project
Now that we have a complete application, we are ready to deploy it into a server. We will deploy the project into a local runtime instance, which we will configure next.
Open the Servers View and create a new server.
Select JBoss AS 7.1 as the server type. Press Next.

Browse... to the directory containing your SwitchYard runtime installation. Press Finish.

Start the server.
Right-click the project, Run As→Run On Server. Select the server and press Finish.
Test the Deployed Service
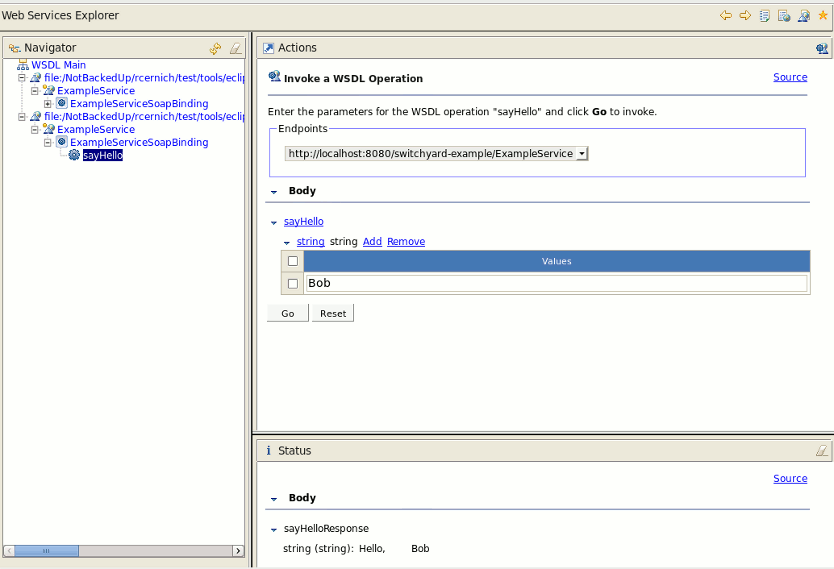
With our application deployed, our service is now available to SOAP HTTP clients. To verify, we will use the web services tester that ships with Eclipse, but you could use the web services test/debug tool you are most familiar with.
Right-click the WSDL file (ExampleService.wsdl) and select Web Services→Test with Web Services Explorer. Exercise the service using the tester
View Details in the Management Console
Right-click the server in the Servers view and select Show In→Web Management Console. Refer to the SwitchYard management console documentation for details.
SwitchYard Projects
A SwitchYard project is a Maven based project that contains a switchyard.xml file in the project's META-INF folder, declares one or more SwitchYard runtime dependencies and configures the org.switchyard:switchyard-plugin build plugin. A SwitchYard project may also contain a variety of resources used to implement the application including, but not limited to: Java, BPMN2, DRL, BPEL, WSDL, XSD, and XML files.
The Eclipse tooling supports the creation of new SwitchYard projects, as well as adding SwitchYard capabilities to existing Maven based projects in the workspace.
Creating a New SwitchYard Project
The tooling provides a new project wizard which creates a new Maven project in your workspace. The new project contains the following:
-
pom.xml file containing dependencies and build plugin configuration for the selected SwitchYard components.
-
src/main/resources/META-INF/switchyard.xml file, initialized using information from the wizard.
-
beans.xml file in src/main/resources/META-INF/ and src/test/resources/META-INF/ (required to support CDI)
-
folder hierarchy in src/main/java and src/test/java for the default Java package
Upon completion of the wizard, the project will be created and the project's switchyard.xml file will be opened in the SwitchYard editor.
To create a new SwitchYard project, select SwitchYard Project from the SwitchYard category the File→New→Project... wizard.
The first page is a basic new project screen, allowing the user to specify the name and location of the new project:

The second page allows the user to specify some basic project details, including:
-
The Maven groupId for the project.
-
The target namespace for the SwitchYard application.
-
The default Java package name for the project.
-
The SwitchYard runtime version.
-
The SwitchYard runtime components (e.g. BPM, Camel, SOAP, etc. support) required for the project.

Press Finish to create the new project.
Configuring SwitchYard Capabilities on Existing Projects
SwitchYard capabilities may be added to any existing Maven project in the workspace. To add/modify SwitchYard capabilities, simply right-click the project and select, Configure -> SwitchYard Capabilities... A prompt will be displayed asking for confirmation.
If the project is not already a Faceted Project the prompt will ask if you wish to convert the project to use project facets.
If the project does not contain a switchyard.xml file in the project's META-INF folder, one will be creating with the following defaults:
-
name - project's Maven artifactId
-
target namespace - URN URI based on project's Maven groupId and version
These can be modified in the SwitchYard editor.
A property dialog will be displayed, allowing configuration of the SwitchYard runtime required by the project.
Any changes made will be reflected in the project's pom.xml file (e.g. dependencies, build plugin configuration, SwitchYard version).Unit Testing
The SwitchYard tooling provides support for stubbing out test classes for services.
New Service Test Wizard
This wizard creates a new service test class. The class is created with a method stub for each operation in the selected service interface. The method stubs include code for passing a message to the operation and processing the result. The user needs to initialize the message data and validate the results. The following illustrates the stubs that are created by the wizard:
SomeServiceTest
@RunWith(SwitchYardRunner.class)
@SwitchYardTestCaseConfig(mixins = CDIMixIn.class, config = SwitchYardTestCaseConfig.SWITCHYARD_XML)
public class SomeServiceTest {

    @ServiceOperation("ExampleService")
    private Invoker service;

    @Test
    public void testSomeInOnlyOperation() throws Exception {
        // TODO Auto-generated method stub
        // initialize your test message
        Object message = null;
        service.operation("someInOnlyOperation").sendInOnly(message);

        // validate the results
        Assert.assertTrue("Implement me", false);
    }

    @Test
    public void testSomeInOutOperation() throws Exception {
        // TODO Auto-generated method stub
        // initialize your test message
        Object message = null;
        String result = service.operation("someInOutOperation")
                .sendInOut(message).getContent(String.class);

        // validate the results
        Assert.assertTrue("Implement me", false);
    }

}
 Workspace Deployment
Workspace Deployment
SwitchYard projects created through the new wizard are created as faceted projects, configured as Utility Modules. This allows the user to mark the project for deployment to a JEE server.
SwitchYard capabilities may be added to any existing JEE project type. In those instances, deployment will be facilitated by the specific JEE project type (e.g. EJB, Web, etc.).
It is up to the user to ensure the server has the SwitchYard runtime installed.