weli@power:~$ mvn -version
Apache Maven 3.0.3 (r1075438; 2011-03-01 01:31:09+0800)
Maven home: /usr/share/maven
Java version: 1.6.0_33, vendor: Apple Inc.
Java home: /System/Library/Java/JavaVirtualMachines/1.6.0.jdk/Contents/Home
Default locale: en_US, platform encoding: MacRoman
OS name: "mac os x", version: "10.8", arch: "x86_64", family: "mac"
JBoss AS7 is a very 'modern' application server that has very fast startup speed. So it's an excellent container to test your JSF project. In this article, I'd like to show you how to use AS7, maven and IntelliJ together to develop your JSF project.
In this article I'd like to introduce the following things:
-
Create a project using Maven
-
Add JSF into project
-
Writing Code
-
Add JBoss AS 7 deploy plugin into project
-
Deploy project to JBoss AS 7
-
Import project into IntelliJ
-
Add IntelliJ JSF support to project
-
Add JBoss AS7 to IntelliJ
-
Debugging project with IntelliJ and AS7
I won't explain many basic concepts about AS7, maven and IntelliJ in this article because there are already many good introductions on these topics. So before doing the real work, there some preparations should be done firstly:
Download JBoss AS7
It could be downloaded from here: http://www.jboss.org/jbossas/downloads/
Using the latest release would be fine. When I'm writing this article the latest version is 7.1.1.Final.
Install Maven
Please make sure you have maven installed on your machine. Here is my environment:
Get IntelliJ
In this article I'd like to use IntelliJ Ultimate Edition as the IDE for development, it's a commercial software and can be downloaded from: http://www.jetbrains.com/idea/
The version I'm using is IntelliJ IDEA Ultimate 11.1
After all of these prepared, we can dive into the real work:
Create a project using Maven
Use the following maven command to create a web project:
mvn archetype:create -DarchetypeGroupId=org.apache.maven.archetypes \
-DarchetypeArtifactId=maven-archetype-webapp \
-DarchetypeVersion=1.0 \
-DgroupId=net.bluedash \
-DartifactId=jsfdemo \
-Dversion=1.0-SNAPSHOT
If everything goes fine maven will generate the project for us:

The contents of the project is shown as above.
Add JSF into project
The JSF library is now included in maven repo, so we can let maven to manage the download for us. First is to add repository into our pom.xml:
<repository>
  <id>jvnet-nexus-releases</id>
  <name>jvnet-nexus-releases</name>
  <url>https://maven.java.net/content/repositories/releases/</url>
</repository>
Then we add JSF dependency into pom.xml:
<dependency>
    <groupId>javax.faces</groupId>
    <artifactId>jsf-api</artifactId>
    <version>2.1</version>
    <scope>provided</scope>
</dependency>
Please note the 'scope' is 'provided', because we don't want to bundle the jsf.jar into the war produced by our project later, as JBoss AS7 already have jsf bundled in.
Then we run 'mvn install' to update the project, and maven will download jsf-api for us automatically.
Writing Code
Writing JSF code in this article is trivial, so I've put written a project called 'jsfdemo' onto github:
https://github.com/liweinan/jsfdemo
Please clone this project into your local machine, and import it into IntelliJ following the steps described as above.
Add JBoss AS 7 deploy plugin into project
JBoss AS7 has provide a set of convenient maven plugins to perform daily tasks such as deploying project into AS7. In this step let's see how to use it in our project.
We should put AS7's repository into pom.xml:
<repository>
    <id>jboss-public-repository-group</id>
    <name>JBoss Public Repository Group</name>
    <url>http://repository.jboss.org/nexus/content/groups/public/</url>
    <layout>default</layout>
    <releases>
        <enabled>true</enabled>
        <updatePolicy>never</updatePolicy>
    </releases>
    <snapshots>
        <enabled>true</enabled>
        <updatePolicy>never</updatePolicy>
    </snapshots>
</repository>
And also the plugin repository:
<pluginRepository>
    <id>jboss-public-repository-group</id>
    <name>JBoss Public Repository Group</name>
    <url>http://repository.jboss.org/nexus/content/groups/public/</url>
    <releases>
        <enabled>true</enabled>
    </releases>
    <snapshots>
        <enabled>true</enabled>
    </snapshots>
</pluginRepository>
And put jboss deploy plugin into 'build' section:
<plugin>
    <groupId>org.jboss.as.plugins</groupId>
    <artifactId>jboss-as-maven-plugin</artifactId>
    <executions>
        <execution>
            <phase>package</phase>
            <goals>
                <goal>deploy</goal>
            </goals>
        </execution>
    </executions>
</plugin>
I've put the final version pom.xml here to check whether your modification is correct:
https://github.com/liweinan/jsfdemo/blob/master/pom.xml
Now we have finished the setup work for maven.
Deploy project to JBoss AS 7
To deploy the project to JBoss AS7, we should start AS7 firstly. In JBoss AS7 directory, run following command:
bin/standalone.sh
AS7 should start in a short time. Then let's go back to our project directory and run maven command:
mvn -q jboss-as:deploy
Maven will use some time to download necessary components for a while, so please wait patiently. After a while, we can see the result:

And if you check the console output of AS7, you can see the project is deployed:

Now we have learnt how to create a JSF project and deploy it to AS7 without any help from graphical tools. Next let's see how to use IntelliJ IDEA to go on developing/debugging our project.
Import project into IntelliJ
Now it's time to import the project into IntelliJ. Now let's open IntelliJ, and choose 'New Project...':

The we choose 'Import project from external model':

Next step is choosing 'Maven':

Then IntelliJ will ask you the position of the project you want to import. In 'Root directory' input your project's directory and leave other options as default:

For next step, just click 'Next':

Finally click 'Finish':

Hooray! We've imported the project into IntelliJ now ![]()
Adding IntelliJ JSF support to project
Let's see how to use IntelliJ and AS7 to debug the project. First we need to add 'JSF' facet into project. Open project setting:
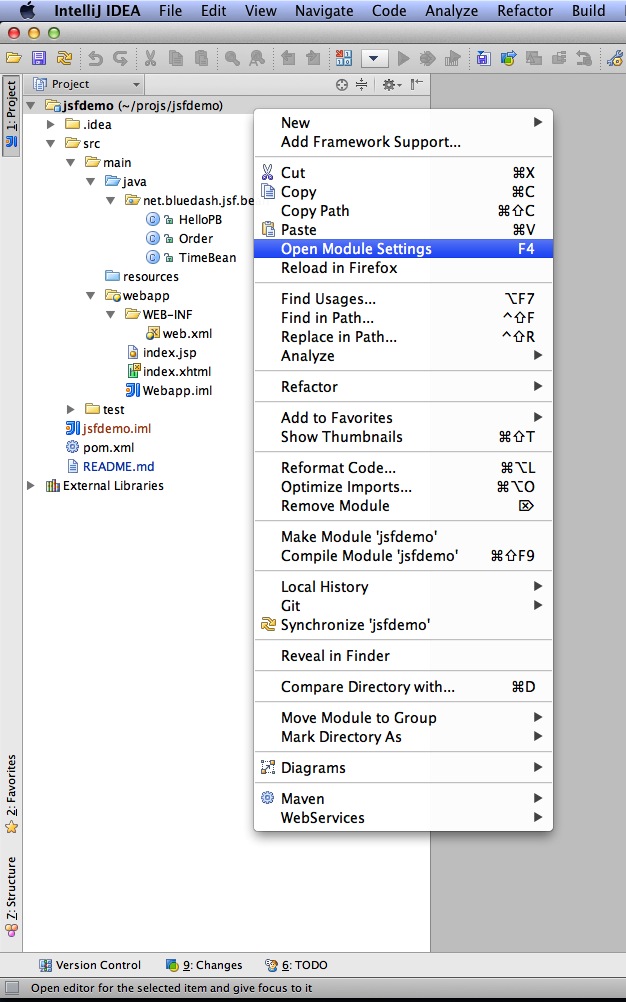
Click on 'Facets' section on left; Select 'Web' facet that we already have, and click the '+' on top, choose 'JSF':

Select 'Web' as parent facet:

Click 'Ok':

Now we have enabled IntelliJ's JSF support for project.
Add JBoss AS7 to IntelliJ
Let's add JBoss AS7 into IntelliJ and use it to debug our project. First please choose 'Edit Configuration' in menu tab:

Click '+' and choose 'JBoss Server' -> 'Local':

Click 'configure':

and choose your JBoss AS7:

Now we need to add our project into deployment. Click the 'Deployment' tab:
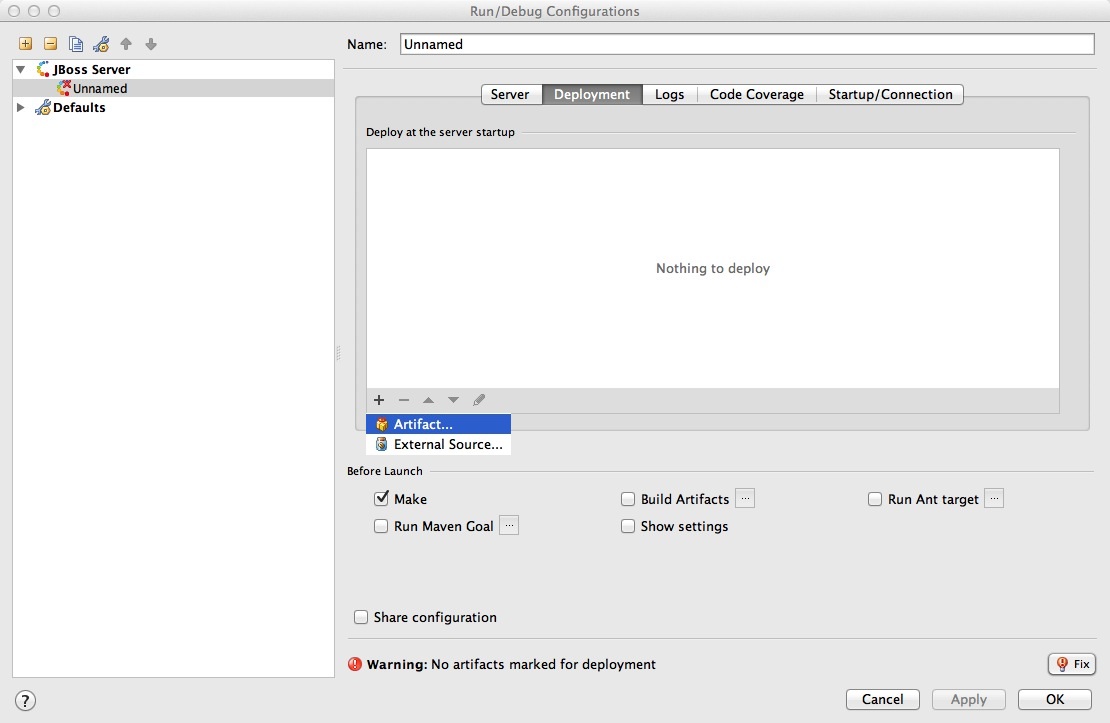
Choose 'Artifact', and add our project:

Leave everything as default and click 'Ok', now we've added JBoss AS7 into IntelliJ
Debugging project with IntelliJ and AS7
Now comes the fun part. To debug our project, we cannot directly use the 'debug' feature provided by IntelliJ right now(maybe in the future version this problem could be fixed). So now we should use the debugging config provided by AS7 itself to enable JPDA feature, and then use the remote debug function provided by IntelliJ to get things done. Let's dive into the details now:
First we need to enable JPDA config inside AS7, open 'bin/standalone.conf' and find following lines:
# Sample JPDA settings for remote socket debugging
#JAVA_OPTS="$JAVA_OPTS -Xrunjdwp:transport=dt_socket,address=8787,server=y,suspend=n"
Enable the above config by removing the leading hash sign:
# Sample JPDA settings for remote socket debugging
JAVA_OPTS="$JAVA_OPTS -Xrunjdwp:transport=dt_socket,address=8787,server=y,suspend=n"
With WildFly you can directly start the server in debug mode:
bin/standalone.sh --debug --server-config=standalone.xml
Now we start AS7 in IntelliJ:

Please note we should undeploy the existing 'jsfdemo' project in AS7 as we've added by maven jboss deploy plugin before. Or AS7 will tell us there is already existing project with same name so IntelliJ could not deploy the project anymore.
If the project start correctly we can see from the IntelliJ console window, and please check the debug option is enabled:

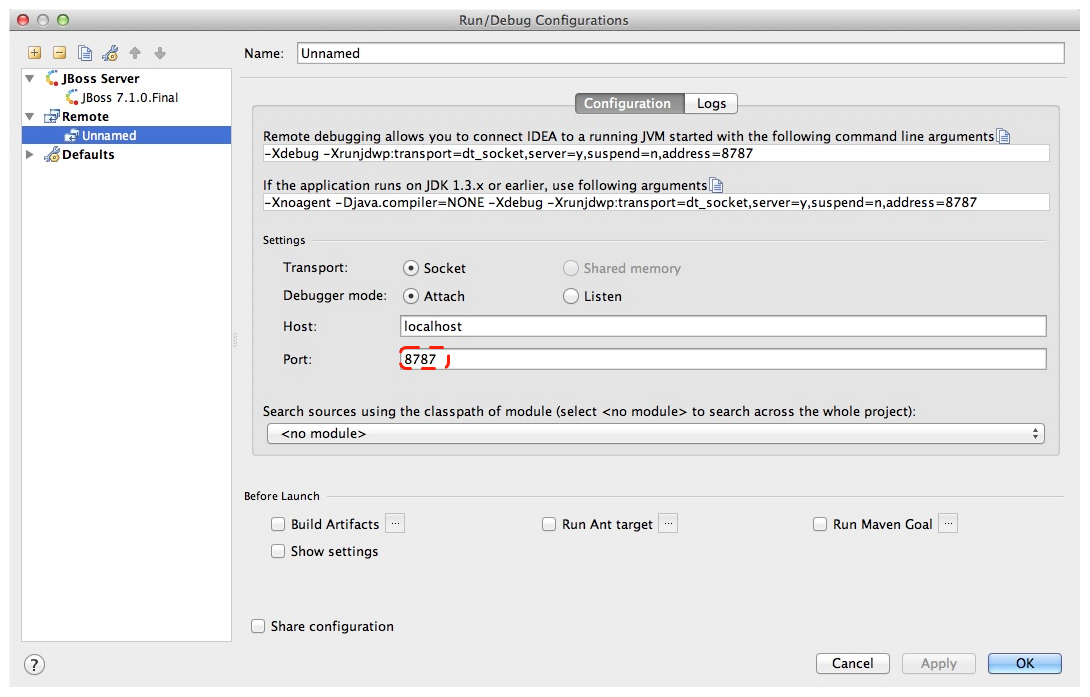
Now we will setup the debug configuration, click 'debug' option on menu:

Choose 'Edit Configurations':

Then we click 'Add' and choose Remote:

Set the 'port' to the one you used in AS7 config file 'standalone.conf':
Leave other configurations as default and click 'Ok'. Now we need to set breakpoints in project, let's choose TimeBean.java and set a breakpoint on 'getNow()' method by clicking the left side of that line of code:

Now we can use the profile to do debug:

If everything goes fine we can see the console output:

Now we go to web browser and see our project's main page, try to click on 'Get current time':

Then IntelliJ will popup and the code is pausing on break point:

And we could inspect our project now.
Conclusion
In this article I've shown to you how to use maven to create a project using JSF and deploy it in JBoss AS7, and I've also talked about the usage of IntelliJ during project development phase. Hope the contents are practical and helpful to you ![]()