- Preface
- 1. Introduction
- 2. Messaging
- 2.1. Messaging Overview
- 2.2. Messaging API Basics
- 2.3. Conversations
- 2.4. Handling Errors
- 2.5. Handling Transport Errors
- 2.6. Single-Response Conversations & Pseudo-Synchronous Messaging
- 2.7. Broadcasting
- 2.8. Client-to-Client Communication
- 2.9. Asynchronous Message Tasks
- 2.10. Repeating Tasks
- 2.11. Sender Inferred Subjects
- 2.12. Message Routing Information
- 2.13. Queue Sessions
- 2.14. Client Logging and Error Handling
- 2.15. Wire Protocol (J.REP)
- 2.16. WebSockets
- 3. Dependency Injection
- 4. Errai CDI
- 5. Marshalling
- 6. Remote Procedure Calls (RPC)
- 7. Errai JAX-RS
- 8. Errai JPA
- 8.1. Getting Started
- 8.1.1. Compile-time dependency
- 8.1.2. GWT Module Descriptor
- 8.1.3. INF/persistence.xml
- 8.1.4. Declaring an Entity Class
- 8.1.5. Entity Lifecycle States
- 8.1.6. Obtaining an instance of EntityManager
- 8.1.7. Named Queries
- 8.1.8. Entity Lifecycle Events
- 8.1.9. JPA Metamodel
- 8.1.10. JPA Features Not Implemented in Errai 2.1
- 8.1.11. Other Caveats for Errai 2.1 JPA
- 9. Data Binding
- 10. Errai UI
- 10.1. Get started
- 10.2. Use Errai UI Composite components
- 10.3. Create a @Templated Composite component
- 10.4. Create an HTML template
- 10.5. Use other Widgets in a composite component
- 10.6. How HTML templates are merged with Components
- 10.7. Event handlers
- 10.8. Data Binding
- 10.9. Nest Composite components
- 10.10. Extend Composite components
- 11. Errai UI Navigation
- 12. Configuration
- 13. Debugging Errai Applications
- 14. Troubleshooting & FAQ
- 15. Upgrade Guide
- 16. Downloads
- 17. Sources
- 18. Reporting problems
- 19. Errai License
- A. Revision History
Errai is a GWT-based framework for building rich web applications using next-generation web technologies. Built on-top of ErraiBus, the framework provides a unified federation and RPC infrastructure with true, uniform, asynchronous messaging across the client and server.
Errai requires a JDK version 6 or higher and depends on Apache Maven to build and run the examples, and for leveraging the quickstart utilities.
Apache Maven: http://maven.apache.org/download.html
Launching maven the first time
Please note, that when launching maven the first time on your machine, it will fetch all dependencies from a central repository. This may take a while, because it includes downloading large binaries like GWT SDK. However, subsequent builds are not required to go through this step and will be much faster.
- 2.1. Messaging Overview
- 2.2. Messaging API Basics
- 2.3. Conversations
- 2.4. Handling Errors
- 2.5. Handling Transport Errors
- 2.6. Single-Response Conversations & Pseudo-Synchronous Messaging
- 2.7. Broadcasting
- 2.8. Client-to-Client Communication
- 2.9. Asynchronous Message Tasks
- 2.10. Repeating Tasks
- 2.11. Sender Inferred Subjects
- 2.12. Message Routing Information
- 2.13. Queue Sessions
- 2.14. Client Logging and Error Handling
- 2.15. Wire Protocol (J.REP)
- 2.16. WebSockets
This section covers the core messaging concepts of the ErraiBus messaging framework.
ErraiBus forms the backbone of the Errai framework's approach to application design. Most importantly, it provides a straight-forward approach to a complex problem space. Providing common APIs across the client and server, developers will have no trouble working with complex messaging scenarios from building instant messaging clients, stock tickers, to monitoring instruments. There's no more messing with RPC APIs, or unweildy AJAX or COMET frameworks. We've built it all in to one, consice messaging framework. It's single-paradigm, and it's fun to work with.
It's important to understand the concept of how messaging works in ErraiBus. Service endpoints are given string-based names that are referenced by message senders. There is no difference between sending a message to a client-based service, or sending a message to a server-based service. In fact, a service of the same name may co-exist on both the client and the server and both will receive all messages bound for that service name, whether they are sent from the client or from the server.
Services are lightweight in ErraiBus, and can be declared liberally and extensively within your application to provide a message-based infrastructure for your web application. It can be tempting to think of ErraiBus simply as a client-server communication platform, but there is a plethora of possibilities for using ErraiBus purely with the GWT client context, such as a way to advertise and expose components dynamically, to get around the lack of reflection in GWT.
In fact, ErraiBus was originally designed to run completely within the client but quickly evolved into having the capabilities it now has today. So keep that in mind when you run up against problems in the client space that could benefit from runtime federation.
The MessageBuilder is the heart of the messaging API in ErraiBus. It provides a fluent / builder API, that is used for constructing messages. All three major message patterns can be constructed from the
MessageBuilder
.
Components that want to receive messages need to implement the
MessageCallback
interface.
But before we dive into the details, let look at some use cases first.
In order to send a message from a client you need to create a
Message
and send it through an instance of
MessageBus
. In this simple example we send it to the subject 'HelloWorldService'.
public class HelloWorld implements EntryPoint {


  // Get an instance of the RequestDispatcher

  private RequestDispatcher dispatcher = ErraiBus.getDispatcher();


  public void onModuleLoad() {

    Button button = new Button("Send message");


    button.addClickHandler(new ClickHandler() {

      public void onClick(ClickEvent event) {

        // Send a message to the 'HelloWorldService'.

        MessageBuilder.createMessage()

          .toSubject("HelloWorldService") // (1)

          .signalling() // (2)

          .noErrorHandling() // (3)

          .sendNowWith(dispatcher); // (4)

        });


        [...]

      }

   }

}
In the above example we build and send a message every time the button is clicked. Here's an explanation of what's going on as annotated above:
We specify the subject we wish to send a message to. In this case, "
HelloWorldService".We indicate that we wish to only signal the service, meaning, that we're not sending a qualifying command to the service. For information on this, read the section on Protocols .
We indicate that we do not want to provide an
ErrorCallbackto deal with errors for this message.We transmit the message by providing an instance to the
RequestDispatcher
Note
An astute observer will note that access to the
RequestDispatcher
differs within client code and server code. Because the client code does not run within a container, access to the
RequestDispatcher
and
MessageBus
is statically accessed using the
ErraiBus.get()
and
ErraiBus.getDispatcher()
methods. The server-side code, conversely, runs inside a dependency container for managing components. See the section on Errai IOC and Errai CDI for using ErraiBus from a client-side container.
Every message has a sender and at least one receiver. A receiver is as it sounds--it receives the message and does something with it. Implementing a receiver (also referred to as a service) is as simple as implementing our standard MessageCallback interface, which is used pervasively across, both client and server code. Let's begin with server side component that receives messages:
@Service

  public class HelloWorldService implements MessageCallback {

    public void callback(Message message) {

      System.out.println("Hello, World!");

    }

  }
He we declare an extremely simple service. The
@Service
annotation provides a convenient, meta-data based way of having the bus auto-discover and deploy the service.
In the following example we extend our server side component to reply with a message when the callback method is invoked. It will create a message and address it to the subject '
HelloWorldClient
':
@Service

public class HelloWorldService implements MessageCallback {


  private RequestDispatcher dispatcher;


  @Inject

  public HelloWorldService(RequestDispatcher dispatcher) {

    dispatcher = dispatcher;

  }


  public void callback(CommandMessage message) {

    // Send a message to the 'HelloWorldClient'.

    MessageBuilder.createMessage()

      .toSubject("HelloWorldClient") // (1)

      .signalling()                  // (2)

      .with("text", "Hi There")      // (3)

      .noErrorHandling()             // (4)

      .sendNowWith(dispatcher);      // (5)

    });

  }

}
The above example shows a service which sends a message in response to receiving a message. Here's what's going on:
We specify the subject we wish to send a message to. In this case, "
HelloWorldClient". We are sending this message to all clients which are listening in on this subject. For information on how to communicate with a single client, see Section 2.6.We indicate that we wish to only signal the service, meaning that we're not sending a qualifying command to the service. For information on this, read the section on Protocols.
We add a message part called "text" which contains the value "Hi there".
We indicate that we do not want to provide an
ErrorCallbackto deal with errors for this message.We transmit the message by providing an instance of the
RequestDispatcher.
Messages can be received asynchronously and arbitriraily by declaring callback services within the client bus. As ErraiBus maintains an open COMET channel at all times, these messages are delivered in real time to the client as they are sent. This provides built-in push messaging for all client services.
public class HelloWorld implements EntryPoint {


  private MessageBus bus = ErraiBus.get();


  public void onModuleLoad() {

     [...]


     /**

      * Declare a local service to receive messages on the subject

      * "BroadcastReceiver".

      */

     bus.subscribe("BroadcastReceiver", new MessageCallback() {

       public void callback(CommandMessage message) {

         /**

          * When a message arrives, extract the "text" field and

          * do something with it

          */

          String messageText = message.get(String.class, "text");

        }

     });


     [...]

  }

}
In the above example, we declare a new client service called
"BroadcastReceiver"
which can now accept both local messages and remote messages from the server bus. The service will be available in the client to receive messages as long the client bus is and the service is not explicitly de-registered.
Conversations are message exchanges which are between a single client and a service. They are a fundmentally important concept in ErraiBus, since by default, a message will be broadcast to all client services listening on a particular channel.
When you create a reply with an incoming message, you ensure that the message you are sending back is received by the same client which sent the incoming message. A simple example:
@Service

public class HelloWorldService implements MessageCallback {

  public void callback(CommandMessage message) {

    // Send a message to the 'HelloWorldClient' on the client that sent us the

    // the message.

    MessageBuilder.createConversation(message)

      .toSubject("HelloWorldClient")

      .signalling()

      .with("text", "Hi There! We're having a reply!")

      .noErrorHandling().reply();

    });

  }

}
Note that the only difference between the example in the previous section and this is the use of the
createConversation()
method with
MessageBuilder
.
Asynchronous messaging necessitates the need for asynchronous error handling. Luckily, support for handling errors is built directly into the
MessageBuilder
API, utilizing the
ErrorCallback
interface. In the examples shown in previous exceptions, error handing has been glossed over with aubiquitous usage of the
noErrorHandling()
method while building messaging. We chose to require the explicit use of such a method to remind developers of the fact that they are responsible for their own error handling, requiring you to explicitly make the decision to forego handling potential errors.
As a general rule, you should always handle your errors . It will lead to faster and quicker identification of problems with your applications if you have error handlers, and generally help you build more robust code.
MessageBuilder.createMessage()

    .toSubject("HelloWorldService")

    .signalling()

    .with("msg", "Hi there!")

    .errorsHandledBy(new ErrorCallback() {

      public boolean error(Message message, Throwable throwable) {

        throwable.printStackTrace();

          return true;

      }

    })

    .sendNowWith(dispatcher);
The addition of error handling at first may put off developers as it makes code more verbose and less-readable. This is nothing that some good practice can't fix. In fact, you may find cases where the same error handler can appropriately be shared between multiple different calls.
ErrorCallback error = new ErrorCallback() {

  public boolean error(Message message, Throwable throwable) {

    throwable.printStackTrace();

    return true;

  }

}


MessageBuilder.createMessage()

  .toSubject("HelloWorldService")

  .signalling()

  .with("msg", "Hi there!")

  .errorsHandledBy(error)

  .sendNowWith(dispatcher);
The error handler is required to return a
boolean
value. This is to indicate whether or not Errai should perform the default error handling actions it would normally take during a failure. You will almost always want to return
true
here, unless you are trying to explicitly surpress some undesirably activity by Errai, such as automatic subject-termination in conversations. But this is almost never the case.
Errai further provides a subject to subscribe to for handling global errors on the client (such as a disconnected server bus or an invalid response code) that occur outside a regular application message exchange. Subscribing to this subject is useful to detect errors early (e.g. due to failing heartbeat requests). A use case that comes to mind here is activating your application's offline mode.
bus.subscribe(DefaultErrorCallback.CLIENT_ERROR_SUBJECT, new MessageCallback() {

  @Override

  public void callback(Message message) {

    try {

      caught = message.get(Throwable.class, MessageParts.Throwable);

      throw caught;

    }

    catch(TransportIOException e) {

      // thrown in case the server can't be reached or an unexpected status code was returned

    }

    catch (Throwable throwable) {

      // handle system errors (e.g response marshalling errors) - that of course should never happen :)

    }

  }

});
You may need to detect problems which occur on the bus at runtime. The client bus API provides a facility for doing this in the
org.jboss.errai.bus.client.framework.ClientMessageBus
using the
addTransportErrorHandler()
method.
A
TransportErrorHandler
is an interface which you can use to define error handling behavior in the event of a transport problem.
For example:
messageBus.addTransportErrorHandler(new TransportErrorHandler() {

  public void onError(TransportError error) {

    // error handling code.

  }

});
The
TransportError
interface represents the details of an an error from the bus. It contains a set of methods which can be used for determining information on the initial request which triggered the error, if the error occurred over HTTP or WebSockets, status code information, etc. See the JavaDoc for more information.
It is possible to contruct a message and a default response handler as part of the
MessageBuilder
API. It should be noted, that multiple replies will not be possible and will result an exception if attempted. Using this aspect of the API is very useful for doing simple psuedo-synchronous conversive things.
You can do this by specifying a
MessageCallback
using the
repliesTo()
method in the
MessageBuilder
API after specifying the error handling of the message.
MessageBuilder.createMessage()

  .toSubject("ConversationalService").signalling()

  .with("SomeField", someValue)

  .noErrorHandling()

  .repliesTo(new MessageCallback() {

    public void callback(Message message) {

      System.out.println("I received a response");

    }

   })
See the next section on how to build conversational services that can respond to such messages.
Broadcasting messages to all clients listening on a specific subject is quite simple and involves nothing more than forgoing use of the reply API. For instance:
MessageBuilder.createMessage().

    .toSubject("MessageListener")

    .with("Text", "Hello, from your overlords in the cloud")

    .noErrorHandling().sendGlobalWith(dispatcher);
If sent from the server, all clients currently connected, who are listening to the subject
"MessageListener"
will receive the message. It's as simple as that.
Communication from one client to another client is not directly possible within the bus federation, by design. This isn't to say that it's not possible. But one client cannot see a service within the federation of another client. We institute this limitation as a matter of basic security. But many software engineers will likely find the prospects of such communication appealing, so this section will provide some basic pointers on how to go about accomplishing it.
The essential architectural thing you'll need to do is create a relay service that runs on the server. Since a service advertised on the server is visible to all clients and all clients are visible to the server, you might already see where we're going with this.
By creating a service on the server which accepts messages from clients, you can create a simple protocol on-top of the bus to enable quasi peer-to-peer communication. (We say quasi, because it still needs to be routed through the server)
While you can probably imagine simply creating a broadcast-like service which accepts a message from one client and broadcasts it to the rest of the world, it may be less clear how to go about routing from one particular client to another particular client, so we'll focus on that problem. This is covered in Section 2.12, “Message Routing Information”
In some applications, it may be necessary or desirable to delay transmission of, or continually stream data to a remote client or group of clients (or from a client to the server). In cases like this, you can utilize the
replyRepeating()
,
replyDelayed()
,
sendRepeating()
and
sendDelayed()
methods in the
MessageBuilder
.
Delayed TasksSending a task with a delay is straight forward. Simply utilize the appropriate method (either
replyDelayed()
or
sendDelayed()
).
  MessageBuilder.createConversation(msg)

    .toSubject("FunSubject")

    .signalling()

    .noErrorHandling()

    .replyDelayed(TimeUnit.SECONDS, 5); // sends the message after 5 seconds.
or
   MessageBuilder.createMessage()

     .toSubject("FunSubject")

     .signalling()

     .noErrorHandling()

     .sendDelayed(requestDispatcher, TimeUnit.SECONDS, 5); // sends the message after 5 seconds.
A repeating task is sent using one of the MessageBuilder's
repeatXXX()
methods. The task will repeat indefinitely until cancelled (see next section).
  MessageBuilder.createMessage()

    .toSubject("FunSubject")

    .signalling()

    .withProvided("time", new ResourceProvider<String>() {

       SimpleDateFormat fmt = new SimpleDateFormat("hh:mm:ss");


       public String get() {

         return fmt.format(new Date(System.currentTimeMillis());

       }

     }

     .noErrorHandling()

     .sendRepeatingWith(requestDispatcher, TimeUnit.SECONDS, 1); //sends a message every 1 second
The above example sends a message very 1 second with a message part called
"time"
, containing a formatted time string. Note the use of the
withProvided()
method; a provided message part is calculated at the time of transmission as opposed to when the message is constructed.
Cancelling an Asynchronous TaskA delayed or repeating task can be cancelled by calling the
cancel()
method of the
AsyncTask
instance which is returned when creating a task. Reference to the AsyncTask object can be retained and cancelled by any other thread.
AsyncTask task = MessageBuilder.createConversation(message)

  .toSubject("TimeChannel").signalling()

  .withProvided(TimeServerParts.TimeString, new ResourceProvider<String>() {

     public String get() {

       return String.valueOf(System.currentTimeMillis());

     }

   }).defaultErrorHandling().replyRepeating(TimeUnit.MILLISECONDS, 100);


    ...


  // cancel the task and interrupt it's thread if necessary.

  task.cancel(true);
It is possible for the sender to infer, to whatever conversational service it is calling, what subject it would like the reply to go to. This is accomplished by utilizing the standard
MessageParts.ReplyTo
message part. Using this methodology for building conversations is generally encouraged.
Consider the following client side code:
  MessageBuilder.createMessage()

    .toSubject("ObjectService").signalling()

    .with(MessageParts.ReplyTo, "ClientEndpoint")

    .noErrorHandling().sendNowWith(dispatcher);
And the conversational code on the server (for service ObjectService ):
  MessageBuilder.createConversation(message)

    .subjectProvided().signalling()

    .with("Records", records)

    .noErrorHandling().reply();
In the above examples, assuming that the latter example is inside a service called "
ObjectService
" and is referencing the incoming message that was sent in the former example, the message created will automatically reference the
ReplyTo
subject that was provided by the sender, and send the message back to the subject desired by the client on the client that sent the message.
Every message that is sent between a local and remote (or server and client) buses contain session routing information. This information is used by the bus to determine what outbound queues to use to deliver the message to, so they will reach their intended recipients. It is possible to manually specify this information to indicate to the bus, where you want a specific message to go.
You can obtain the
SessionID
directly from a
Message
by getting the
QueueSession
resource:
   QueueSession sess = message.getResource(QueueSession.class, Resources.Session.name());

   String sessionId = sess.getSessionId();
You can extract the
SessionID
from a message so that you may use it for routing by obtaining the
QueueSession
resource from the
Message
. For example:
...

  public void callback(Message message) {

   QueueSession sess = message.getResource(QueueSession.class, Resources.Session.name());

   String sessionId = sess.getSessionId();


    // Record this sessionId somewhere.

    ...

  }
The
SessionID
can then be stored in a medium, say a Map, to cross-reference specific users or whatever identifier you wish to allow one client to obtain a reference to the specific
SessionID
of another client. In which case, you can then provide the
SessionID
as a MessagePart to indicate to the bus where you want the message to go.
  MessageBuilder.createMessage()

    .toSubject("ClientMessageListener")

    .signalling()

    .with(MessageParts.SessionID, sessionId)

    .with("Message", "We're relaying a message!")

    .noErrorHandling().sendNowWith(dispatcher);
By providing the
SessionID
part in the message, the bus will see this and use it for routing the message to the relevant queue.
It may be tempting however, to try and include destination
SessionIDs
at the client level, assuming that this will make the infrastructure simpler. But this will not achieve the desired results, as the bus treats
SessionIDs
as transient. Meaning, the
SessionID
information is not ever transmitted from bus-to-bus, and therefore is only directly relevant to the proximate bus.
The ErraiBus maintains it's own seperate session management on-top of the regular HTTP session management. While the queue sessions are tied to, and dependant on HTTP sessions for the most part (meaning they die when HTTP sessions die), they provide extra layers of session tracking to make dealing with complex applications built on Errai easier.
The lifescyle of a session is bound by the underlying HTTP session. It is also bound by activity thresholds. Clients are required to send heartbeat messages every once in a while to maintain their sessions with the server. If a heartbeat message is not received after a certain period of time, the session is terminated and any resources are deallocated.
One of the things Errai offers is the concept of session and local scopes.
A session scope is scoped across all instances of the same session. When a session scope is used, any parameters stored will be accessible and visible by all browser instances and tabs.
The SessionContext helper class is used for accessing the session scope.
public class TestService implements MessageCallback {

  public void callback(final Message message) {

    // obtain a reference to the session context by referencing the incoming message.

    SessionContext injectionContext = SessionContext.get(message);


    // set an attribute.

    injectionContext.setAttribute("MyAttribute", "Foo");

  }

}
A local scope is scoped to a single browser instance. But not to a single session.
In a browser a local scope would be confined to a tab or a window within a browser. You can store parameters inside a local scope just like with a session by using the
LocalContext
helper class.
public class TestService implements MessageCallback {

  public void callback(final Message message) {

    // obtain a reference to the local context by referencing the incoming message.

    LocalContext injectionContext = LocalContext.get(message);


   // set an attribute.

    injectionContext.setAttribute("MyAttribute", "Foo");

  }

}
ErraiBus implements a JSON-based wire protocol which is used for the federated communication between different buses. The protocol specification encompasses a standard JSON payload structure, a set of verbs, and an object marshalling protocol. The protocol is named J.REP. Which stands for JSON Rich Event Protocol.
All wire messages sent across are assumed to be JSON arrays at the outermost element, contained in which, there are 0..n messages. An empty array is considered a no-operation, but should be counted as activity against any idle timeout limit between federated buses.
Example 2.1. Figure 1 - Example J.REP Payload
[

  {"ToSubject" : "SomeEndpoint", "Value" : "SomeValue" },

  {"ToSubject" : "SomeOtherEndpoint", "Value" : "SomeOtherValue"}

]
In
Figure 1
, we see an example of a J.REP payload containing two messages. One bound for an endpoint named
"SomeEndpoint"
and the other bound for the endpoint
"SomeOtherEndpoint"
. They both include a payload element
"Value"
which contain strings. Let's take a look at the anatomy of an individual message.
Example 2.2. Figure 2 - An J.REP Message
{

  "ToSubject" : "TopicSubscriber",

  "CommandType" : "Subscribe",

  "Value " : "happyTopic",

  "ReplyTo" : "MyTopicSubscriberReplyTo"

}
The message shown in Figure 2 shows a very vanilla J.REP message. The keys of the JSON Object represent individual message parts , with the values representing their corresponding values. The standard J.REP protocol encompasses a set of standard message parts and values, which for the purposes of this specification we'll collectively refer to as the protocol verbs.
The following table describes all of the message parts that a J.REP capable client is expected to understand:
|
Part |
Required |
JSON Type |
Description |
|---|---|---|---|
|
|
Yes |
String |
Specifies the subject within the bus, and its federation, which the message should be routed to. |
|
|
No |
String |
Specifies a command verb to be transmitted to the receiving subject. This is an optional part of a message contract, but is required for using management services |
|
|
No |
String |
Specifies to the receiver what subject it should reply to in response to this message. |
|
|
No |
Any |
A recommended but not required standard payload part for sending data to services |
|
|
No |
Number |
A processing order salience attribute. Messages which specify priority processing will be processed first if they are competing for resources with other messages in flight. Note: the current version of ErraiBus only supports two salience levels (0 and >1). Any non-zero salience in ErraiBus will be given the same priority relative to 0 salience messages |
|
|
No |
String |
An accompanying error message with any serialized exception |
|
|
No |
Object |
If applicable, an encoded object representing any remote exception that was thrown while dispatching the specified service |
The table contains a list of reserved subject names used for facilitating things like bus management and error handling. A bus should never allow clients to subscribe to these subjects directly.
|
Subject |
Description |
|---|---|
|
|
The self-hosted message bus endpoint on the client |
|
|
The self-hosted message bus endpoint on the server |
|
|
The standard error receiving service for clients |
As this table indicates, the bus management protocols in J.REP are accomplished using self-hosted services. See the section on Bus Management and Handshaking Protocols for details.
There is no real distinction in the J.REP protocol between communication with the server, versus communication with the client. In fact, it assumed from an architectural standpoint that there is no real distinction between a client and a server. Each bus participates in a flat-namespaced federation. Therefore, it is possible that a subject may be observed on both the server and the client.
One in-built assumption of a J.REP-compliant bus however, is that messages are routed within the auspices of session isolation. Consider the following diagram:
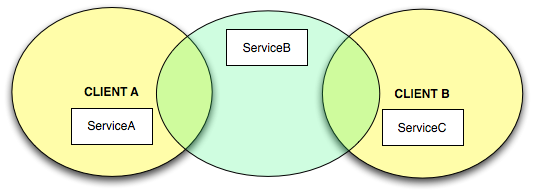
In Figure 3 , is is possible for Client A to send messages to the subjects ServiceA and ServiceB . But it is not possible to address messages to ServiceC . Conversely, Client B can address messages to ServiceC and ServiceB , but not ServiceA .
Federation between buses requires management traffic to negotiate connections and manage visibility of services between buses. This is accomplished through services named
ClientBus
and
ServerBus
which both implement the same protocol contracts which are defined in this section.
Both bus services share the same management protocols, by implementing verbs (or commands) that perform different actions. These are specified in the protocol with the
CommandType
message part. The following table describes these commands:
Table 2.1. Message Parts for Bus Commands:
|
Command / Verb |
Message Parts |
Description |
|---|---|---|
|
|
N/A |
The first message sent by a connecting client to begin the handshaking process. |
|
|
|
A message sent by one bus to another to notify it of its capabilities during handshake (for instance long polling or websockets) |
|
|
N/A |
A message sent from one bus to another to indicate that it has now provided all necessary information to the counter-party bus to establish the federation. When both buses have sent this message to each other, the federation is considered active. |
|
|
|
A message sent to the remote bus to notify it of a service or set of services which it is capable of routing to. |
|
|
|
A message sent to the remote bus to notify it that a service is no longer available. |
|
|
|
A message sent to a server bus from a client bus to indicate that it wishes to disconnect and defederate. Or, when sent from the client to server, indicates that the session has been terminated. |
|
|
N/A |
A message sent to a client bus to indicate that its messages are no longer being routed because it no longer has an active session |
|
|
N/A |
A message sent from one bus to another periodically to indicate it is still active. |
|
Part |
Required |
JSON Type |
Description |
|---|---|---|---|
|
|
Yes |
String |
A comma delimited string of capabilities the bus is capable of us |
|
|
Yes |
String |
The subject to subscribe or unsubscribe from |
|
|
Yes |
Array |
An array of strings representing a list of subjects to subscribe to |
ErraiBus has support for WebSocket-based communication. When WebSockets are enabled, capable web browsers will attempt to upgrade their COMET-based communication with the server-side bus to use a WebSocket channel.
There are two different ways the bus can enable WebSockets. The first uses a sideband server, which is a small, lightweight server which runs on a different port from the application server. The second is native JBoss AS 7-based integration.
Activating the sideband server is as simple as adding the following to the
ErraiService.properties
file:
errai.bus.enable_web_socket_server=true
The default port for the sideband server is
8085
. You can change this by specifying a port with the
errai.bus.web_socket_port
property in the
ErraiService.properties
file.
It is currently necessary use the native connector in JBoss AS for WebSockets to work. So the first step is to configure your JBoss AS instance to use the native connector by changing the
domain/configuration/domain.xml
file, and change the line:
<subsystem xmlns="urn:jboss:domain:web:1.1" default-virtual-server="default-host" native="false">
to:
<subsystem xmlns="urn:jboss:domain:web:1.1" default-virtual-server="default-host" native="true">
You will then need to configure the servlet in your application's
web.xml
which will provide WebSocket upgrade support within AS7.
Add the following to the
web.xml
:
<context-param>

  <param-name>websockets-enabled</param-name>

  <param-value>true</param-value>

</context-param>


<context-param>

  <param-name>websocket-path-element</param-name>

  <param-value>in.erraiBusWS</param-value>

</context-parm>
This will tell the bus to enable web sockets support. The
websocket-path-element
specified the path element within a URL which the client bus should request in order to negotiate a websocket connection. For instance, specifying
in.erraiBusWS
as we have in the snippit above, will result in attempted negotiation at
http://<your_server>:<your_port>/<context_path>/in.erraiBusWS
. For this to have any meaningful result, we must add a servlet mapping that will match this pattern:
<servlet>

  <servlet-name>ErraiWSServlet</servlet-name>

  <servlet-class>org.jboss.errai.bus.server.servlet.JBossAS7WebSocketServlet</servlet-class>

  <init-param>

    <param-name>service-locator</param-name>

    <param-value>org.jboss.errai.cdi.server.CDIServiceLocator</param-value>

  </init-param>

  <load-on-startup>1</load-on-startup>

</servlet>


<servlet-mapping>

  <servlet-name>ErraiWSServlet</servlet-name>

  <url-pattern>*.erraiBusWS</url-pattern>

</servlet-mapping>
Do not remove the regular ErraiBus servlet mappings!
When configuring ErraiBus to use WebSockets on JBoss AS, you do not remove the existing servlet mappings for the bus. The WebSocket servlet is in addition to your current bus servlet. This is because ErraiBus always negotiates WebSocket sessions over the COMET channel.
The core Errai IOC module implements the JSR-330 Dependency Injection specification for in-client component wiring.
Dependency injection (DI) allows for cleaner and more modular code, by permitting the implementation of decoupled and type-safe components. By using DI, components do not need to be aware of the implementation of provided services. Instead, they merely declare a contract with the container, which in turn provides instances of the services that component depends on.
Classpath Scanning and ErraiApp.properties
Errai only scans the contents of classpath locations (JARs and directories) that have
a file called
ErraiApp.properties
at their root. If dependency injection is not working for you, double-check that you have an
ErraiApp.properties
in every JAR and directory that contains classes Errai should know about.
A simple example:
public class MyLittleClass {

  private final TimeService timeService;


  @Inject

  public MyLittleClass(TimeService timeService) {

    this.timeService = timeService;

  }


  public void printTime() {

    System.out.println(this.timeService.getTime());

  }

}
In this example, we create a simple class which declares a dependency using
@Inject
for the interface
TimeService
. In this particular case, we use constructor injection to establish the contract between the container and the component. We can similarly use field injection to the same effect:
public class MyLittleClass {

  @Inject

  private TimeService timeService;


  public void printTime() {

    System.out.println(this.timeService.getTime());

  }

}
In order to inject
TimeService
, you must annotate it with
@ApplicationScoped
or the Errai DI container will not acknowledge the type as a bean.
@ApplicationScoped

public class TimeService {

}
Best Practices
Although field injection results in less code, a major disadvantage is that you cannot create immutable classes using the pattern, since the container must first call the default, no argument constructor, and then iterate through its injection tasks, which leaves the potential – albeit remote – that the object could be left in an partially or improperly initialized state. The advantage of constructor injection is that fields can be immutable (final), and invariance rules applied at construction time, leading to earlier failures, and the guarantee of consistent state.
In contrast to
Gin
, the Errai IOC container does not provide a programmatic way of creating and configuring injectors. Instead, container-level binding rules are defined by implementing a
Provider
, which is scanned for and auto-discovered by the container.
A
Provider
is essentially a factory which produces type instances within in the container, and defers instantiation responsibility for the provided type to the provider implementation. Top-level providers use the standard
javax.inject.Provider<T>
interface.
Types made available as top-level providers will be available for injection in any managed component within the container.
Out of the box, Errai IOC implements three default top-level providers:
org.jboss.errai.ioc.client.api.builtin.MessageBusProvider :Makes an instance ofMessageBusavailable for injection.org.jboss.errai.ioc.client.api.builtin.RequestDispatchProvider :Makes an instance of theRequestDispatcheravailable for injection.org.jboss.errai.ioc.client.api.builtin.ConsumerProvider :Makes eventConsumer<?>objects available for injection.
Implementing a
Provider
is relatively straight-forward. Consider the following two classes:
TimeService.java
public interface TimeService {

  public String getTime();

}
TimeServiceProvider.java
@IOCProvider

@Singleton

public class TimeServiceProvider implements Provider<TimeService> {

  @Override

  public TimeService get() {

    return new TimeService() {

      public String getTime() {

        return "It's midnight somewhere!";

      }

    };

  }

}
If you are familiar with Guice, this is semantically identical to configuring an injector like so:
Guice.createInjector(new AbstractModule() {

  public void configure() {

    bind(TimeService.class).toProvider(TimeServiceProvider.class);

  }

 }).getInstance(MyApp.class);
As shown in the above example code, the annotation
@IOCProvider
is used to denote top-level providers.
The classpath will be searched for all annotated providers at compile time.
Important
Top-level providers are treated as regular beans. And as such may inject dependencies – particularly from other top-level providers – as necessary.
By default, Errai uses Google Guice to wire server-side components. When deploying services on the server-side, it is currently possible to obtain references to the
MessageBus
,
RequestDispatcher
, the
ErraiServiceConfigurator
, and
ErraiService
by declaring them as injection dependencies in Service classes, extension components, and session providers.
Alternatively, supports CDI based wiring of server-side components. See the chapter on Errai CDI for more information.
Out of the box, the IOC container supports three bean scopes,
@Dependent
,
@Singleton
and
@EntryPoint
. The singleton and entry-point scopes are roughly the same semantics.
In Errai IOC, all client types are valid bean types if they are default constructable or can have construction dependencies satisfied. These unqualified beans belong to the dependent pseudo-scope. See: Dependent Psuedo-Scope from CDI Documentation
Additionally, beans may be qualified as
@ApplicationScoped
,
@Singleton
or
@EntryPoint
. Although
@ApplicationScoped
and
@Singleton
are supported for completeness and conformance, within the client they effectively result in behavior that is identical.
Example 3.1. Example dependent scoped bean
public void MyDependentScopedBean {

  private final Date createdDate;


  public MyDependentScopedBean {

    createdDate = new Date();

  }

}
Example 3.2. Example ApplicationScoped bean
@ApplicationScoped

public void MyClientBean {

  @Inject MyDependentScopedBean bean;


  // ... //

}
Availability of dependent beans in the client-side BeanManager
As is mentioned in the
bean manager documentation
, only beans that are
explicitly
scoped will be made available to the bean manager for lookup. So while it is not necessary for regular injection, you must annotate your dependent scoped beans with
@Dependent
if you wish to dynamically lookup these beans at runtime.
As Errai IOC provides a container-based approach to client development, support for Errai services are exposed to the container so they may be injected and used throughout your application where appropriate. This section covers those services.
The
org.jboss.errai.bus.server.annotations.Service
annotation is used for binding service endpoints to the bus. Within the Errai IOC container you can annotate services and have them published to the bus on the client (or on the server) in a very straight-forward manner:
Example 3.3. A simple message receiving service
@Service

public class MyService implements MessageCallback {

  public void callback(Message message) {

    // ... //

  }

}
Or like so ...
Example 3.4. Mapping a callback from a field of a bean
@Singleton

public class MyAppBean {

   @Service("MyService")

   private final MessageCallback myService = new MesageCallback() {

     public void callback(Message message) {

       // ... //

     }

   }

}
As with server-side use of the annotation, if a service name is not explicitly specified, the underlying class name or field name being annotated will be used as the service name.
The
org.jboss.errai.bus.server.api.Local
annotation is used in conjunction with the
@Service
annotation to advertise a service only for visibility on the local bus and thus, cannot receive messages across the wire for the service.
Example 3.5. A local only service
@Service @Local

public class MyLocalService implements MessageCallback {

  public void callback(Message message) {

    // ... //

  }

}
Services which are registered with ErraiBus via the bean manager through use of the
@Service
annotation, have de-registration hooks tied implicitly to the destruction of the bean. Thus,
destruction of the bean
implies that these associated services are to be dereferenced.
The IOC container, by default, provides a set of default injectable bean types. They range from basic services, to injectable proxies for RPC. This section covers the facilities available out-of-the-box.
The type
org.jboss.errai.bus.client.framework.MessageBus
is globally injectable into any bean. Injecting this type will provide the instance of the active message bus running in the client.
The type
org.jboss.errai.bus.client.framework.RequestDispatcher
is globally injectable into any bean. Injecting this type will provide a
RequestDispatcher
instance capable of delivering any messages provided to it, to the the
MessageBus
.
The type
org.jboss.errai.ioc.client.api.Caller<?>
is a globally injectable RPC proxy. RPC proxies may be provided by various components. For example, JAX-RS or Errai RPC. The proxy itself is agnostic to the underlying RPC mechanism and is qualified by it's type parameterization.
For example:
Example 3.8. An example Caller<?> proxy
public void MyClientBean {

  @Inject

  private Caller<MyRpcInterface> rpcCaller;


  // ... ///


  @UiHandler("button")

  public void onButtonClick(ClickHandler handler) {

    rpcCaller.call(new RemoteCallback<Void>() {

      public void callback(Void void) {

      }

    ).callSomeMethod();

  }

}
The above code shows the injection of a proxy for the RPC remote interface,
MyRpcInterface
. For more information on defining RPC proxies see
Chapter 6, Remote Procedure Calls (RPC)
and
Section 7.2, “Creating Requests”
in Errai JAX-RS.
A problem commonly associated with building large applications in the browser is ensuring that things happen in the proper order when code starts executing. Errai IOC provides you tools which permit you to ensure things happen before initialization, and forcing things to happen after initialization of all of the Errai services.
In order to prevent initialization of the the bus and it's services so that you can do necessary configuration, especially if you are writing extensions to the Errai framework itself, you can create an implicit startup dependency on your bean by injecting an
org.jboss.errai.ioc.client.api.InitBallot<?>
.
Example 3.9. Using an InitBallot to Control Startup
@Singleton

public class MyClientBean {

  @Inject InitBallot<MyClientBean> ballot;


  @PostConstruct

  public void doStuff() {

    // ... do some work ...


    ballot.voteForInit();

  }

}
Sending RPC calls to the server from inside constructors and
@PostConstruct
methods in Errai is not always reliable due to the fact that the bus and RPC proxies initialize asynchronously with the rest of the application. Therefore it is often desirable to have such things happen in a post-initialization task, which is exposed in the
ClientMessageBus
API. However, it is much cleaner to use the
@AfterInitialization
annotation on one of your bean methods.
Example 3.10. Using @AfterInitialization to do something after startup
@Singleton

public class MyClientBean {

  @AfterInitialization

  public void doStuffAfterInit() {

    // ... do some work ...

  }

}
It may be necessary at times to obtain instances of beans managed by Errai IOC from outside the container managed scope or creating a hard dependency from your bean. Errai IOC provides a simple client-side bean manager for handling these scenarios:
org.jboss.errai.ioc.client.container.IOCBeanManager
.
As you might expect, you can inject the bean manager into any of your managed beans.
Example 3.11. Injecting the client-side bean manager
public MyManagedBean {

  @Inject IOCBeanManager manager;


  // class body

}
If you need to access the bean manager outside a managed bean, such as in a unit test, you can access it by calling
org.jboss.errai.ioc.client.container.IOC.getBeanManager()
Looking up beans can be done through the use of the
lookupBean()
method in
IOCBeanManager
. Here's a basic example:
Example 3.12. Example lookup of a bean
public MyManagedBean {

  @Inject IOCBeanManager manager;


  public void lookupBean() {

    IOCBean<SimpleBean> bean = manager.lookupBean(SimpleBean.class);


    // check to see if the bean exists

    if (bean != null) {

      // get the instance of the bean

      SimpleBean inst = bean.getInstance();

    }

  }

}
In this example we lookup a bean class named
SimpleBean
. This example will succeed assuming that
SimpleBean
is unambiguous. If the bean is ambiguous and requires qualification, you can do a qualified lookup like so:
Example 3.13. Looking up beans with qualifiers
MyQualifier qual = new MyQualifier() {

  public annotationType() {

    return MyQualifier.class;

  }

}


MyOtherQualifier qual2 = new MyOtherQualifier() {

  public annotationType() {

    return MyOtherQualifier.class;

  }

}


// pass qualifiers to IOCBeanManager.lookupBean

IOCBean<SimpleInterface> bean = beanManager.lookupBean(SimpleBean.class, qual, qual2);
In this example we manually construct instances of qualifier annotations in order to pass it to the bean manager for lookup. This is a necessary step since there's currently no support for annotation literals in Errai client code.
It may be desirable to have multiple matching dependencies for a given injection point with the ability to specify which implementation to use at runtime. For instance, you may have different versions of your application which target different browsers or capabilities of the browser. Using alternatives allows you to share common interfaces among your beans, while still using dependency injection, by exporting consideration of what implementation to use to the container's configuration.
Consider the following example:
@Singleton @Alternative

public class MobileView implements View {

  // ... //

}
and
@Singleton @Alternative

public class DesktopView implements View {

  // ... //
In our controller logic we in turn inject the
View
interface:
@EntryPoint

public class MyApp {

  @Inject

  View view;


  // ... //

}
This code is unaware of the implementation of
View
, which maintains good separation of concerns. However, this of course creates an ambiguous dependency on the
View
interface as it has two matching subtypes in this case. Thus, we must configure the container to specify which alternative to use. Also note, that the beans in both cases have been annotated with
javax.enterprise.inject.Alternative
.
In your
ErraiApp.properties
for the module, you can simply specify which active alternative should be used:
errai.ioc.enabled.alternatives=org.foo.MobileView
You can specify multiple alternative classes by white space separating them:
errai.ioc.enabled.alternatives=org.foo.MobileView \
                               org.foo.HTML5Orientation \
                               org.foo.MobileStorage
You can only have one enabled alternative for a matching set of alternatives, otherwise you will get ambiguous resolution errors from the container.
Similar to alternatives, but specifically designed for testing scenarios, you can replace beans with mocks at runtime for the purposes of running unit tests. This is accomplished simply by annotating a bean with the
org.jboss.errai.ioc.client.api.TestMock
annotation. Doing so will prioritize consideration of the bean over any other matching beans while running unit tests.
Consider the following:
@ApplicationScoped

public class UserManagementImpl implements UserManagement {

  public List<User> listUsers() {

     // do user listy things!

  }

}
You can specify a mock implementation of this class by implementing its common parent type (
UserManagement
) and annotating that class with the
@TestMock
annotation inside your test package like so:
@TestMock @ApplicationScoped

public class MockUserManagementImpl implements UserManagement {

  public List<User> listUsers() {

     // return only a test user.

     return Collections.singletonList(TestUser.INSTANCE);

  }

}
In this case, the container will replace the
UserManagementImpl
with the
MockUserManagementImpl
automatically when running the unit tests.
The
@TestMock
annotation can also be used to specify alternative providers during test execution. For example, it can be used to mock a
Caller<T>
.
Callers
are used to invoke RPC or JAX-RS endpoints. During tests you might want to replace theses callers with mock implementations. For details on providers see
Section 3.1, “Container Wiring”
.
@TestMock @IOCProvider

public class MockedHappyServiceCallerProvider implements ContextualTypeProvider<Caller<HappyService>> {


  @Override

  public Caller<HappyService> provide(Class<?>[] typeargs, Annotation[] qualifiers) {

    return new Caller<HappyService>() {

      ...

    }

}
All beans managed by the Errai IOC container support the
@PostConstruct
and
@PreDestroy
annotations.
Beans which have methods annotated with
@PostConstruct
are guaranteed to have those methods called before the bean is put into service, and only after all dependencies within its graph has been satisfied.
Beans are also guaranteed to have their
@PreDestroy
annotated methods called before they are destroyed by the bean manager.
Important
This cannot be guaranteed when the browser DOM is destroyed prematurely due to: closing the browser window; closing a tab; refreshing the page, etc.
Beans under management of Errai IOC, of any scope, can be explicitly destroyed through the client bean manager. Destruction of a managed bean is accomplished by passing a reference to the
destroyBean()
method of the bean manager.
Example 3.14. Destruction of bean
public MyManagedBean {

  @Inject IOCBeanManager manager;


  public void createABeanThenDestroyIt() {

    // get a new bean.

    SimpleBean bean = manager.lookupBean(SimpleBean.class).getInstance();


    bean.sendMessage("Sorry, I need to dispose of you now");


    // destroy the bean!

    manager.destroyBean(bean);

  }

}
When the bean manager "destroys" the bean, any pre-destroy methods the bean declares are called, it is taken out of service and no longer tracked by the bean manager. If there are references on the bean by other objects, the bean will continue to be accessible to those objects.
Important
Container managed resources that are dependent on the bean such as bus service endpoints or CDI event observers will also be automatically destroyed when the bean is destroyed.
Another important consideration is the rule, "all beans created together are destroyed together." Consider the following example:
Example 3.15. SimpleBean.class
@Dependent

public class SimpleBean {

   @Inject @New AnotherBean anotherBean;


   public AnotherBean getAnotherBean() {

     return anotherBean;

   }


   @PreDestroy

   private void cleanUp() {

     // do some cleanup tasks

   }

}
Example 3.16. Destroying bean from subgraph
public MyManagedBean {

  @Inject IOCBeanManager manager;


  public void createABeanThenDestroyIt() {

    // get a new bean.

    SimpleBean bean = manager.lookupBean(SimpleBean.class).getInstance();


    // destroy the AnotherBean reference from inside the bean

    manager.destroyBean(bean.getAnotherBean());

  }

}
In this example we pass the instance of
AnotherBean,
created as a dependency of
SimpleBean,
to the bean manager for destruction. Because this bean was created at the same time as its parent, its destruction will also result in the destruction of
SimpleBean
; thus, this action will result in the
@PreDestroy
cleanUp()
method of
SimpleBean
being invoked.
Another way which beans can be destroyed is through the use of the injectable
org.jboss.errai.ioc.client.api.Disposer<T>
class. The class provides a straight forward way of disposing of bean type.
For instance:
Example 3.17. Destroying bean with disposer
public MyManagedBean {

  @Inject @New SimpleBean myNewSimpleBean;

  @Inject Disposer<SimpleBean> simpleBeanDisposer;


  public void destroyMyBean() {

    simpleBeanDisposer.dispose(myNewSimpleBean);

  }

}
CDI (Contexts and Dependency Injection) is the Jave EE standard (JSR-299) for handling dependency injection. In addition to dependency injection, the standard encompasses component lifecycle, application configuration, call-interception and a decoupled, type-safe eventing specification.
The Errai CDI extension implements a subset of the specification for use inside of client-side applications within Errai, as well as additional capabilities such as distributed eventing.
Errai CDI does not currently implement all life cycles specified in JSR-299 or interceptors. These deficiencies may be addressed in future versions.
Important
The Errai CDI extension itself is implemented on top of the Errai IOC Framework (see Chapter 3, Dependency Injection ), which itself implements the JSR-330 specification. Inclusion of the CDI module your GWT project will result in the extensions automatically being loaded and made available to your application.
Classpath Scanning and ErraiApp.properties
Errai CDI only scans the contents of classpath locations (JARs and directories) that have
a file called
ErraiApp.properties
at their root. If CDI features such as dependency injection, event observation, and
@PostConstruct
are not working for your classes, double-check that you have an
ErraiApp.properties
in every JAR and directory that contains classes Errai should know about.
Beans that are deployed to a CDI container will automatically be registered with Errai and exposed to your GWT client application. So, you can use Errai to communicate between your GWT client components and your CDI backend beans.
Errai CDI based applications use the same annotation-driven programming model as server-side CDI components, with some notable limitations. Many of these limitations will be addressed in future releases.
There is no support for CDI interceptors in the client. Although this is planned in a future release.
Passivating scopes are not supported.
The JSR-299 SPI is not supported for client side code. Although writing extensions for the client side container is possible via the Errai IOC Extensions API.
The
@Typedannotation is unsupported.The
@Interceptorannotation is unsupported.The
@Decoratorannotation is unsupported.
The CDI container in Errai is built around the Errai IOC module , and thus is a superset of the existing functionality in Errai IOC. Thus, all features and APIs documented in Errai IOC are accessible and usable with this Errai CDI programming model.
Any CDI managed component may produce and consume
events
. This allows beans to interact in a completely decoupled fashion. Beans consume events by registering for a particular event type and optional qualifiers. The Errai CDI extension simply extends this concept into the client tier. A GWT client application can simply register an
Observer
for a particular event type and thus receive events that are produced on the server-side. Likewise and using the same API, GWT clients can produce events that are consumed by a server-side observer.
Let's take a look at an example.
Example 4.1. FraudClient.java
public class FraudClient extends LayoutPanel {


  @Inject

  private Event<AccountActivity> event; (1)


  private HTML responsePanel;


  public FraudClient() {

    super(new BoxLayout(BoxLayout.Orientation.VERTICAL));

  }


  @PostConstruct

  public void buildUI() {

    Button button = new Button("Create activity", new ClickHandler() {

      public void onClick(ClickEvent clickEvent) {

        event.fire(new AccountActivity());

      }

    });

    responsePanel = new HTML();

    add(button);

    add(responsePanel);

  }


  public void processFraud(@Observes @Detected Fraud fraudEvent) { (2)

    responsePanel.setText("Fraud detected: " + fraudEvent.getTimestamp());

  }

}
Two things are noteworthy in this example:
Injection of an
Eventdispatcher proxyCreation of an
Observermethod for a particular event type
The event dispatcher is responsible for sending events created on the client-side to the server-side event subsystem (CDI container). This means any event that is fired through a dispatcher will eventually be consumed by a CDI managed bean, if there is an corresponding
Observer
registered for it on the server side.
In order to consume events that are created on the server-side you need to declare an client-side observer method for a particular event type. In case an event is fired on the server this method will be invoked with an event instance of type you declared.
To complete the example, let's look at the corresponding server-side CDI bean:
Example 4.2. AccountService.java
@ApplicationScoped

public class AccountService {


  @Inject @Detected

  private Event<Fraud> event;


  public void watchActivity(@Observes AccountActivity activity) {

    Fraud fraud = new Fraud(System.currentTimeMillis());

    event.fire(fraud);

 }

}
A server can address a single client in response to an event annotating event types as
@Conversational
. Consider a service that responds to a subscription event.
Example 4.3. SubscriptionService.java
@ApplicationScoped

public class SubscriptionService {


  @Inject

  private Event<Documents> welcomeEvent;


  public void onSubscription(@Observes Subscription subscription) {

    Document docs = createWelcomePackage(subscription);

    welcomeEvent.fire(docs);

 }

}
And the
Document
class would be annotated like so:
As such, when
Document
events are fired, they will be limited in scope to the initiating conversational contents – which are implicitly inferred by the caller. So only the client which fired the
Subscription
event will receive the fired
Document
event.
A key feature of the Errai CDI framework is the ability to federate the CDI eventing bus between the client and the server. This permits the observation of server produced events on the client, and vice-versa.
Example server code:
Example 4.5. MyServerBean.java
@ApplicationScoped

public class MyServerBean {

  @Inject

  Event<MyResponseEvent> myResponseEvent;


  public void myClientObserver(@Observes MyRequestEvent event) {

    MyResponseEvent response;


    if (event.isThankYou()) {

      // aww, that's nice!

      response = new MyResponseEvent("Well, you're welcome!");

    }

    else {

      // how rude!

      response = new MyResponseEvent("What? Nobody says 'thank you' anymore?");

    }


    myResponseEvent.fire(response);

  }

}
Domain-model:
Example 4.6. MyRequestEvent.java
@Portable

public class MyRequestEvent {

  private boolean thankYou;


  public MyRequestEvent(boolean thankYou) {

    setThankYou(thankYou);

  }


  public void setThankYou(boolean thankYou) {

    this.thankYou = thankYou;

  }


  public boolean isThankYou() {

    return thankYou;

  }

}
Example 4.7. MyResponseEvent.java
@Portable

public class MyResponseEvent {

  private String message;


  public MyRequestEvent(String message) {

    setMessage(message);

  }


  public void setMessage(String message) {

    this.message = message;

  }


  public String getMessage() {

    return message;

  }

}
Client application logic:
Example 4.8. MyClientBean.java
@EntryPoint

public class MyClientBean {

   @Inject

   Event<MyRequestEvent> requestEvent;


   public void myResponseObserver(@Observes MyResponseEvent event) {

     Window.alert("Server replied: " + event.getMessage());

   }


   @PostConstruct

   public void init() {

     Button thankYou = new Button("Say Thank You!");

     thankYou.addClickHandler(new ClickHandler() {

       public void onClick(ClickEvent event) {

         requestEvent.fire(new MyRequestEvent(true));

       }

     }


     Button nothing = new Button("Say nothing!");

     nothing.addClickHandler(new ClickHandler() {

       public void onClick(ClickEvent event) {

         requestEvent.fire(new MyRequestEvent(false));

       }

     }


     VerticalPanel vPanel = new VerticalPanel();

     vPanel.add(thankYou);

     vPanel.add(nothing);


     RootPanel.get().add(vPanel);

   }

}
Producer methods and fields act as sources of objects to be injected. They are useful when additional control over object creation is needed before injections can take place e.g. when you need to make a decision at runtime before an object can be created and injected.
Example 4.9. App.java
@EntryPoint

public class App {

  ...


  @Produces @Supported

  private MyBaseWidget createWidget() {

    return (Canvas.isSupported()) ? new MyHtml5Widget() : new MyDefaultWidget();

  }

}
Example 4.10. MyComposite.java
@ApplicationScoped

public class MyComposite extends Composite {


  @Inject @Supported

  private MyBaseWidget widget;


  ...

}
Producers can also be scoped themselves. By default, producer methods are dependent-scoped, meaning they get called every time an injection for their provided type is requested. If a producer method is scoped
@Singleton
for instance, the method will only be called once, and the bean manager will inject the instance from the first invokation of the producer into every matching injection point.
Example 4.11. Singleton producer
public class App {

  ...


  @Produces @Singleton

  private MyBean produceMyBean() {

    return new MyBean();

  }

}
For more information on CDI producers, see the CDI specification and the WELD reference documentation .
As an alternative to using the bean manager to dynamically create beans, this can be accomplished in a type-safe way by injecting a
javax.enterprise.inject.Instance<T>
.
For instance, assume you have a dependent-scoped bean
Bar
and consider the following:
public class Foo {

  @Inject Instance<Bar> barInstance;


  public void pingNewBar() {

    Bar bar = barInstance.get();

    bar.ping();

  }

}
In this example, calling
barInstance.get()
returns a new instance of the dependent-scoped bean
Bar
.
If you do not care about the deployment details for now and just want to get started take a look at the Quickstart Guide .
The CDI integration is a plugin to the Errai core framework and represents a CDI portable extension. Which means it is discovered automatically by both Errai and the CDI container. In order to use it, you first need to understand the different runtime models involved when working GWT, Errai and CDI.
Typically a GWT application lifecycle begins in Development Mode and finally a web application containing the GWT client code will be deployed to a target container (Servlet Engine, Application Server). This is no way different when working with CDI components to back your application.
What's different however is availability of the CDI container across the different runtimes. In GWT development mode and in a pure servlet environment you need to provide and bootstrap the CDI environment on your own. While any Java EE 6 Application Server already provides a preconfigured CDI container. To accomodate these differences, we need to do a little trickery when executing the GWT Development Mode and packaging our application for deployment.
In development mode we need to bootstrap the CDI environment on our own and make both Errai and CDI available through JNDI (common denominator across all runtimes). Since GWT uses Jetty, that only supports read only JNDI, we need to replace the default Jetty launcher with a custom one that will setup the JNDI bindings:
<plugin>

  <groupId>org.codehaus.mojo</groupId>

  <artifactId>gwt-maven plugin</artifactId>

  <version>${gwt.maven}</version>


  <configuration>

  ...

    <server>org.jboss.errai.cdi.server.gwt.JettyLauncher</server>

  </configuration>

  <executions>

  ...

  </executions>

</plugin>
Starting Development Mode from within your IDE
Consequently, when starting Development Mode from within your IDE the following program argument has to be provided: -server org.jboss.errai.cdi.server.gwt.JettyLauncher
Once this is set up correctly, we can bootstrap the CDI container through a servlet listener:
<web-app>

  ...

  <listener>

    <listener-class>org.jboss.errai.container.CDIServletStateListener</listener-class>

  </listener>


  <resource-env-ref>

    <description>Object factory for the CDI Bean Manager</description>

    <resource-env-ref-name>BeanManager</resource-env-ref-name>

    <resource-env-ref-type>javax.enterprise.inject.spi.BeanManager</resource-env-ref-type>

  </resource-env-ref>

  ...

</web-app>
Errai-CDI maven archetype
Sounds terribly complicated, no? Don't worry we provide a maven archetype that takes care of all these setup steps and configuration details.
Deployment to servlet engine has basically the same requirements as running in development mode. You need to include the servlet listener that bootstraps the CDI container and make sure both Errai and CDI are accessible through JNDI. For Jetty you can re-use the artefacts we ship with the archetype. In case you want to run on tomcat, please consult the Apache Tomcat Documentation .
We provide integration with the
JBoss Application Server
, but the requirements are basically the same for other vendors. When running a GWT client app that leverages CDI beans on a Java EE 6 application server, CDI is already part of the container and accessible through JNDI (
java:/BeanManager
).
Errai includes a comprehensive marshalling framework which permits the serialization of domain objects between the browser and the server. From the perspective of GWT, this is a complete replacement for the provided GWT serialization facilities and offers a great deal more flexibility. You are be able to map both application-specific domain model, as well as preexisting model, including model from third-party libraries using the custom definitions API.
All classes that you intend to be marshalled between the client and the server must be exposed to the marshalling framework. There are several ways you can do it and this section will take you through the different approaches you can take to fit your needs.
To make a Java class eligible for serialization with Errai Marshalling, mark it with the
org.jboss.errai.common.client.api.annotations.Portable
annotation. This tells the marshalling system to generate marshalling and demarshalling code for the annotated class and all of its nested classes.
The mapping strategy that will be used depends on how much information you provide about your model up-front. If you simply annotate a domain type with
@Portable
and do nothing else, the marshalling system will use and exhaustive strategy to determine how to construct and deconstruct instances of that type and its nested types.
The Errai marshalling system works by enumerating all of the Portable types it can find (by any of the three methods discussed in this section of the reference guide), eliminating all the non-portable types it can find (via
@NonPortable
annotations and entries in
ErraiApp.properties
), then enumerating the marshallable properties that make up each remaining portable entity type. The rules that Errai uses for enumerating the properties of a portable entity type are as follows:
If an entity type has a field called
foo, then that entity has a property calledfoounless the field is markedstaticortransient.
Note that the existence of methods called
getFoo()
,
setFoo()
, or both,
does not
mean that the entity has a property called
foo
. Errai Marshalling always works from fields when discovering properties.
When reading a field
foo
, Errai Marshalling will call the method
getFoo()
in preference to direct field access if the
getFoo()
method exists.
Similarly, when writing a field
foo
, Errai Marshalling will call the method
setFoo()
in preference to direct field access if the
setFoo()
method exists.
The above rules are sufficient for marshalling an existing entity to a JSON representation, but for de-marshalling, Errai must also know how to obtain an instance of a type. The rules that Errai uses for deciding how to create an instance of a
@Portable
type are as follows:
If the entity has a public constructor where every argument is annotated with
@MapsTo, and those parameters cover all properties of the entity type, then Errai uses this constructor to create the object, passing in all of the property values.Otherwise, if the entity has a public static method where every argument is annotated with
@MapsTo, and those parameters cover all properties of the entity type, then Errai uses this method to create the object. Note that when using this mechanism you are free to create and return a subtype of the marshalled type, or resolve one from a cache.If the entity has a public no-arguments constructor (or no explicit constructors at all), it will be created via that constructor, and the properties will be written to the new object one at a time. Each property will be written by its setter method, or by direct field access if a setter method is not available.
Now let's take a look at some common examples of how this works.
@Portable

public class Person {

  private String name;

  private int age;


  public Person() {

  }


  public Person(String name, int age) {

    this.name = name;

    this.age = age;

  }


  public String getName() {

    return name;

  }


  public int getAge() {

    return age;

  }

}
This is a pretty vanilla domain object. Note the default, public, no-argument constructor. In this case, it will be necessary to have one explicitly declared. But notice we have no setters. In this case, the marshaler will rely on private field access to write the values on each side of the marshalling transaction. For simple domain objects, this is both nice and convenient. But you may want to make the class immutable and have a constructor enforce invariance. See the next section for that.
Immutability is almost always a good practice, and the marshalling system provides you a straight forward way to tell it how to marshal and de-marshal objects which enforce an immutable contract. Let's modify our example from the previous section.
@Portable

public class Person {

  private final String name;

  private final int age;


  public Person(@MapsTo("name") String name, @MapsTo("age") int age) {

    this.name = name;

    this.age = age;

  }


  public String getName() {

    return name;

  }


  public int getAge() {

    return age;

  }

}
Here we have set both of the class fields final. By doing so, we had to remove our default constructor. But that's okay, because we have annotated the remaining constructor's parameters using the
org.jboss.errai.marshalling.client.api.annotations.MapsTo
annotation.
By doing this, we have told the marshaling system, for instance, that the first parameter of the constructor maps to the property
name
. Which in this case, defaults to the name of the corresponding field. This may not always be the case – as will be explored in the section on custom definitions. But for now that's a safe assumption.
Another good practice is to use a factory pattern to enforce invariance. Once again, let's modify our example.
@Portable

public class Person {

  private final String name;

  private final int age;


  private Person(String name, int age) {

    this.name = name;

    this.age = age;

  }


  public static Person createPerson(@MapsTo("name") String name, @MapsTo("age") int age) {

    return new Person(name, age);

  }


  public String getName() {

    return name;

  }


  public int getAge() {

    return age;

  }

}
Here we have made our only declared constructor private, and created a static factory method. Notice that we've simply used the same
@MapsTo
annotation in the same way we did on the constructor from our previous example. The marshaller will see this method and know that it should use it to construct the object.
For types with a large number of optional attributes, a builder is often the best approach.
@Portable

public class Person {

  private final String name;

  private final int age;


  private Person(@MapsTo("name") String name, @MapsTo("age") int age) {

    this.name = name;

    this.age = age;

  }


  public String getName() {

    return name;

  }


  public int getAge() {

    return age;

  }


  @NonPortable

  public static class Builder {

    private String name;

    private int age;


    public Builder name(String name) {

      this.name = name;

      return this;

    }


    public Builder age(int age) {

      this.age = age;

      return this;

    }


    public BuilderEntity build() {

      return new Person(name, age);

    }

  }

}
In this example, we have a nested
Builder
class that implements the Builder Pattern and calls the private
Person
constructor. Hand-written code will always use the builder to create
Person
instances, but the
@MapsTo
annotations on the private
Person
constructor tell Errai Marshalling to bypass the builder and construct instances of Person directly.
One final note: as a nested type of
Person
(which is marked
@Portable
), the builder itself would normally be portable. However, we do not intend to move instances of
Person.Builder
across the network, so we mark
Person.Builder
as
@NonPortable
.
Some classes may be out of your control, making it impossible to annotate them for auto-discovery by the marshalling framework. For cases such as this, there are two approaches which can be undertaken to include these classes in your application.
The first approach is the easiest, but is contingent on whether or not the class is directly exposed to the GWT compiler. That means, the classes must be part of a GWT module and within the GWT client packages. See the GWT documentation on Client-Side Code for information on this.
If you have client-exposed classes that cannot be annotated with the
@Portable
annotation, you may manually map these classes so that the marshaller framework will comprehend and produce marshallers for them and their nested types.
To do this, specify them in
ErraiApp.properties
, using the
errai.marshalling.serializableTypes
attribute with a whitespace separated list of classes to make portable.
Example 5.1. Example ErraiApp.properties defining portable classes.
errai.marshalling.serializableTypes=org.foo.client.UserEntity \
                                    org.foo.client.GroupEntity \
                                    org.abcinc.model.client.Profile
If any of the serializable types have nested classes that you wish to make non-portable, you can specify them like this:
Example 5.2. Example ErraiApp.properties defining nonportable classes.
errai.marshalling.nonserializableTypes=org.foo.client.UserEntity$Builder \
                                       org.foo.client.GroupEntity$Builder
The marshalling framework supports and promotes the concept of marshalling by interface contract, where possible. For instance, the framework ships with a marshaller which can marshall data to and from the
java.util.List
interface. Instead of having custom marshallers for classes such as
ArrayList
and
LinkedList
, by default, these implementations are merely aliased to the
java.util.List
marshaller.
There are two distinct ways to go about doing this. The most straightforward is to specify which marshaller to alias when declaring your class is
@Portable
.
package org.foo.client;


@Portable(aliasOf = java.util.List.class)

public MyListImpl extends ArrayList {

  // .. //

}
In the case of this example, the marshaller will not attempt to comprehend your class. Instead, it will merely rely on the
java.util.List
marshaller to dematerialize and serialize instances of this type onto the wire.
If for some reason it is not feasible to annotate the class, directly, you may specify the mapping in the
ErraiApp.properties
file using the
errai.marshalling.mappingAliases
attribute.
errai.marshalling.mappingAliases=org.foo.client.MyListImpl->java.util.List \
                                 org.foo.client.MyMapImpl->java.util.Map
The list of classes is whitespace-separated so that it may be split across lines.
The example above shows the equivalent mapping for the
MyListImpl
class from the previous example, as well as a mapping of a class to the
java.util.Map
marshaller.
The syntax of the mapping is as follows:
<class_to_map>
->
<contract_to_map_to>
.
Aliases do not inherit functionality!
When you alias a class to another marshalling contract, extended functionality of the aliased class will not be available upon deserialization. For this you must provide custom marshallers for those classes.
Although the default marshalling strategies in Errai Marshalling will suit the vast majority of use cases, there may be situations where it is necessary to manually map your classes into the marshalling framework to teach it how to construct and deconstruct your objects.
This is accomplished by specifying
MappingDefinition
classes which inform the framework exactly how to read and write state in the process of constructing and deconstructing objects.
All manual mappings should extend the
org.jboss.errai.marshalling.rebind.api.model.MappingDefinition
class. This is base metadata class which contains data on exactly how the marshaller can deconstruct and construct objects.
Consider the following class:
public class MySuperCustomEntity {

   private final String mySuperName;

   private String mySuperNickname;


   public MySuperCustomEntity(String mySuperName) {

     this.mySuperName = mySuperName;;

   }


   public String getMySuperName() {

     return this.mySuperName;

   }


   public void setMySuperNickname(String mySuperNickname) {

     this.mySuperNickname = mySuperNickname;

   }


   public String getMySuperNickname() {

     return this.mySuperNickname;

   }

}
Let us construct this object like so:
  MySuperCustomEntity entity = new MySuperCustomEntity("Coolio");

  entity.setSuperNickname("coo");
It is clear that we may rely on this object's two getter methods to extract the totality of its state. But due to the fact that the
mySuperName
field is final, the only way to properly construct this object is to call its only public constructor and pass in the desired value of
mySuperName
.
Let us consider how we could go about telling the marshalling framework to pull this off:
@CustomMapping

public MySuperCustomEntityMapping extends MappingDefinition {

  public MySuperCustomEntityMapping() {

    super(MySuperCustomEntity.class);                                                          // (1)


    SimpleConstructorMapping cnsMapping = new SimpleConstructorMapping();

    cnsMapping.mapParmToIndex("mySuperName", 0, String.class);                                 // (2)


    setInstantiationMapping(cnsMapping);


    addMemberMapping(new WriteMapping("mySuperNickname", String.class, "setMySuperNickname")); // (3)


    addMemberMapping(new ReadMapping("mySuperName", String.class, "getMySuperName"));          // (4)

    addMemberMapping(new ReadMapping("mySuperNickname", String.class, "getMySuperNickname"));  // (5)

  }

}
And that's it. This describes to the marshalling framework how it should go about constructing and deconstructing
MySuperCustomEntity
.
Paying attention to our annotating comments, let's describe what we've done here.
Call the constructor in
MappingDefinitionpassing our reference to the class we are mapping.Using the
SimpleConstructorMappingclass, we have indicated that a custom constructor will be needed to instantiate this class. We have called themapParmToIndexmethod with three parameters. The first,"mySupername"describes the class field that we are targeting. The second parameter, the integer0indicates the parameter index of the constructor arguments that we'll be providing the value for the aforementioned field – in this case the first and only, and the final parameterString.classtells the marshalling framework which marshalling contract to use in order to de-marshall the value.Using the
WriteMappingclass, we have indicated to the marshaller framework how to write the"mySuperNickname"field, using theString.classmarshaller, and using the setter methodsetMySuperNickname.Using the
ReadMappingclass, we have indicated to the marshaller framework how to read the"mySuperName"field, using theString.classmarshaller, and using the getter methodgetMySuperName.Using the
ReadMappingclass, we have indicated to the marshaller framework how to read the"mySuperNickname"field, using theString.classmarshaller, and using the getter methodgetMySuperNickname.
There is another approach to extending the marshalling functionality that doesn't involve mapping rules, and that is to implement your own
Marshaller
class. This gives you complete control over the parsing and emission of the JSON structure.
The implementation of marshallers is made relatively straight forward by the fact that both the server and the client share the same JSON parsing API.
Consider the included
java.util.Date
marshaller that comes built-in to the marshalling framework:
Example 5.3. DataMarshaller.java from the built-in marshallers
@ClientMarshaller @ServerMarshaller

public class DateMarshaller extends AbstractNullableMarshaller<Date> {

  @Override

  public Class<Date> getTypeHandled() {

    return Date.class;

  }


  @Override

  public Date demarshall(EJValue o, MarshallingSession ctx) {

    // check if the JSON element is null

    if (o.isNull() != null) {

      // if the JSON element is null, so is our object!

      return null;

    }


    // instantiate our Date!

    return new Date(Long.parseLong(o.isObject().get(SerializationParts.QUALIFIED_VALUE).isString().stringValue()));

  }


  @Override

  public String marshall(Date o, MarshallingSession ctx) {

    // if the object is null, we encode "null"

    if (o == null) { return "null"; }


    // return the JSON representation of the object

    return "{\"" + SerializationParts.ENCODED_TYPE + "\":\"" + Date.class.getName() + "\"," +

            "\"" + SerializationParts.OBJECT_ID + "\":\"" + o.hashCode() + "\"," +

            "\"" + SerializationParts.QUALIFIED_VALUE + "\":\"" + o.getTime() + "\"}";

  }

}
The class is annotated with both
@ClientMarshaller
and
@ServerMarshaller
indicating that this class should be used for both marshalling on the client and on the server.
The
demarshall()
method does what its name implies: it is responsible for demarshalling the object from JSON and turning it back into a Java object.
The
marshall()
method does the opposite, and encodes the object into JSON for transmission on the wire.
ErraiBus supports a high-level RPC layer to make typical client-server RPC communication easy on top of the bus. While it is possible to use ErraiBus without ever using this API, you may find it to be a more useful and concise approach to exposing services to the clients.
Please note that this API has changed since version 1.0. RPC services provide a way of creating type-safe mechanisms to make client-to-server calls. Currently, this mechanism only support client-to-server calls, and not vice-versa.
Creating a service is straight forward. It requires the definition of a remote interface, and a service class which implements it. See the following:
@Remote

public interface MyRemoteService {

  public boolean isEveryoneHappy();

}
The
@Remote
annotation tells Errai that we'd like to use this interface as a remote interface. The remote interface must be part of of the GWT client code. It cannot be part of the server-side code, since the interface will need to be referenced from both the client and server side code. That said, the implementation of a service is relatively simple to the point:
@Service

public class MyRemoteServiceImpl implements MyRemoteService {


  public boolean isEveryoneHappy() {

    // blatently lie and say everyone's happy.

    return true;

  }

}
That's all there is to it. You use the same
@Service
annotation as described in Section 2.4. The presence of the remote interface tips Errai off as to what you want to do with the class.
Calling a remote service involves use of the
MessageBuilder
API. Since all messages are asynchronous, the actual code for calling the remote service involves the use of a callback, which we use to receive the response from the remote method. Let's see how it works:
MessageBuilder.createCall(new RemoteCallback<Boolean>() {

  public void callback(Boolean isHappy) {

    if (isHappy) Window.alert("Everyone is happy!");

  }

 }, MyRemoteService.class).isEveryoneHappy();
In the above example, we declare a remote callback that receives a Boolean, to correspond to the return value of the method on the server. We also reference the remote interface we are calling, and directly call the method. However, don't be tempted to write code like this :
boolean bool = MessageBuilder.createCall(..., MyRemoteService.class).isEveryoneHappy();
The above code will never return a valid result. In fact, it will always return null, false, or 0 depending on the type. This is due to the fact that the method is dispatched asynchronously, as in, it does not wait for a server response before returning control. The reason we chose to do this, as opposed to emulate the native GWT-approach, which requires the implementation of remote and async interfaces, was purely a function of a tradeoff for simplicity.
An alternative to using the
MessageBuilder
API is to have a proxy of the service injected.
@Inject

private Caller<MyRemoteService> remoteService;
For calling the remote service, the callback objects need to be provided to the
call
method before the corresponding interface method is invoked.
remoteService.call(callback).isEveryoneHappy();
Handling remote exceptions can be done by providing an
ErrorCallback
on the client:
MessageBuilder.createCall(

  new RemoteCallback<Boolean>() {

    public void callback(Boolean isHappy) {

      if (isHappy) Window.alert("Everyone is happy!");

    }

  },

  new ErrorCallback() {

    public boolean error(Message message, Throwable caught) {

      try {

        throw caught;

      }

      catch (NobodyIsHappyException e) {

        Window.alert("OK, that's sad!");

      }

      catch (Throwable t) {

        GWT.log("An unexpected error has occurred", t);

      }

      return false;

    }

  },

  MyRemoteService.class).isEveryoneHappy();
As remote exceptions need to be serialized to be sent to the client, the
@Portable
annotation needs to be present on the corresponding exception class (see
Chapter 5, Marshalling
). Further the exception class needs to be part of the client-side code. For more details on
ErrorCallbacks
see
Section 2.4, “Handling Errors”
.
Client-side remote call interceptors provide the ability to manipulate or bypass the remote call before it's being sent. This is useful for implementing crosscutting concerns like caching e.g. when the remote call should be avoided if the data is already cached locally.
To have a remote call intercepted, either an interface method or the remote interface type has to be annotated with
@InterceptedCall
. If the type is annotated, all interface methods will be intercepted.
@Remote

public interface CustomerService {


  @InterceptedCall(MyCacheInterceptor.class)

  public Customer retrieveCustomerById(long id);

}
Note that an ordered list of interceptors can be used for specifying an interceptor chain e.g.
@InterceptedCall({MyCacheInterceptor.class, MySecurityInterceptor.class})

public Customer retrieveCustomerById(long id);
Implementing an interceptor is easy:
public class MyCacheInterceptor implements RpcInterceptor {


  @Override

  public void aroundInvoke(final RemoteCallContext context) {

    // e.g check if the result is cached and carry out the actual call only in case it's not.

    context.proceed() // executes the next interceptor in the chain or the actual remote call.

    // context.setResult() // sets the result directly without carrying out the remote call.

  }

}
The
RemoteCallContext
passed to the
aroundInvoke
method provides access to the intercepted method's name and read/write access to the parameter values provided at the call site.
Calling proceed executes the next interceptor in the chain or the actual remote call if all interceptors have been executed. If access to the result of the (asynchronous) remote call is needed in the interceptor, one of the overloaded versions of this method accepting a
RemoteCallback
has to be used.
The result of the remote call can be manipulated by calling
RemoteCallContext.setResult()
Not calling
proceed
in the interceptor bypasses the actual remote call, passing
RestCallContext.getResult()
to the
RemoteCallBack
provided at the call site.
Before invoking an endpoint method Errai sets up an
RpcContext
that provides access to message resources that are otherwise not visible to RPC endpoints.
@Service

public class MyRemoteServiceImpl implements MyRemoteService {


  public boolean isEveryoneHappy() {

    HttpSession session = RpcContext.getHttpSession();

    ServletRequest request = RpcContext.getServletRequest();

    ...

    return true;

  }

}
JAX-RS (Java API for RESTful Web Services) is a Java EE standard (JSR-311) for implementing REST-based Web services in Java. Errai JAX-RS brings this standard to the browser and simplifies the integration of REST-based services in GWT client applications. Errai can generate proxies based on JAX-RS interfaces which will handle all the underlying communication and serialization logic. All that's left to do is to invoke a Java method.
Errai's JAX-RS support consists of the following:
The
Caller<T>interface (the same interface used in Errai RPC)A client-side API to communicate with JAX-RS endpoints
A code generator that runs at your project's build time, providing proxy implementations for each JAX-RS resource class visible within the GWT module
Errai IoC and CDI providers that allow you to
@Injectinstances ofCaller<T>Integration with either Errai Marshalling or Jackson to translate request and response data between Java object and a string-based wire format
If you want to get started right away with a working Errai JAX-RS CRUD application, use our Maven archetype to get started. See the Quickstart Guide for details.
Errai's JAX-RS support consists mostly of features that make the client side easier and more reliable to maintain. You will need to use an existing third-party JAX-RS implementation on the server side. All Java EE 6 application servers include such a module out-of-the-box. If you are developing an application that you intend to deploy on a plain servlet container, you will have to choose a JAX-RS implementation (for example, RestEasy) and configure it properly in your web.xml.
Alternatively, you could keep your REST resource layer in a completely separate web application hosted on the same server (perhaps build an Errai JAX-RS client against an existing REST service you developed previously). In this case, you could factor out the shared JAX-RS interface into a shared library, leaving the implementation in the non-Errai application.
Finally, you can take advantage of the cross-origin resource sharing (CoRS) feature in modern browsers and use Errai JAX-RS to send requests to a third-party server. The third-party server would have to be configured to allow cross-domain requests. In this case, you would write a JAX-RS-Annotated interface describing the remote REST resources, but you would not create an implementation of that interface.
For Errai's JAX-RS support to work, an interface that bears the JAX-RS annotations must be contained within a GWT module in your project. You will also want these interfaces visible to server-side code so that your JAX-RS resource classes can implement them. This keeps the whole setup typesafe, and reduces duplication to the bare minimum. The natural solution, then is to put the JAX-RS interfaces under the client.shared package within your GWT module:
project
src
main
java
com.mycompany.myapp
MyApp.gwt.xml [the app's GWT module]
com.mycompany.myapp.client.local
MyAppClientStuff.java [code that @Injects Caller<MyAppRestResource>]
com.mycompany.myapp.client.shared
CustomerService.java [the JAX-RS interface]
com.mycompany.myapp.server
CustomerServiceImpl.java [the server-side JAX-RS resource implementation]
The contents of the server-side files would be as follows:
Example 7.1. CustomerService.java
@Path("customers")

public interface CustomerService {

  @GET

  @Produces("application/json")

  public List<Customer> listAllCustomers();


  @POST

  @Consumes("application/json")

  @Produces("text/plain")

  public long createCustomer(Customer customer);

}
The above interface is visible both to server-side code and to client-side code. It is used by client-side code to describe the available operations, their parameter types, and their return types. If you use your IDE's refactoring tools to modify this interface, both the server-side and client-side code will be updated automatically.
Example 7.2. CustomerServiceImpl.java
public class CustomerServiceImpl implements CustomerService {


  @Override

  public List<Customer> listAllCustomers() {

    // Use a database API to look up all customers in back-end data store

    // Return the resulting list

  }


  @Override

  public long createCustomer(Customer customer) {

    // Store new Customer instance in back-end data store

  }

}
The above class implements the shared interface. Since it performs database and/or filesystem operations to manipulate the persistent data store, it is not GWT translatable, and it's therefore kept in a package that is not part of the GWT module.
Save typing and reduce duplication
Note that all JAX-RS annotations (
@Path
,
@GET
,
@Consumes
, and so on) can be inherited from the interface. You do not need to repeat these annotations in your resource implementation classes.
This section assumes you have already set up the CustomerService JAX-RS endpoint as described in the previous section.
To create a request on the client, all that needs to be done is to invoke
RestClient.create()
, thereby providing the JAX-RS interface, a response callback and to invoke the corresponding interface method:
Example 7.3. App.java
...

Button create = new Button("Create", new ClickHandler() {

  public void onClick(ClickEvent clickEvent) {

    Customer customer = new Customer(firstName, lastName, postalCode);

    RestClient.create(CustomerService.class, callback).createCustomer(customer);

  }

});

...
For details on the callback mechanism see Section 7.3, “Handling Responses” .
Note
The JAX-RS interfaces need to be visible to the GWT compiler and must therefore reside within the client packages (e.g. client.shared).
Injectable proxies can be used as an alternative to calling
RestClient.create()
.
@Inject

private Caller<CustomerService> customerService;
To create a request, the callback objects need to be provided to the
call
method before the corresponding interface method is invoked.
customerService.call(callback).listAllCustomers();
An instance of Errai's
RemoteCallback<T>
has to be passed to the
RestClient.create()
call, which will provide access to the JAX-RS resource method's result.
T
is the return type of the JAX-RS resource method. In the example below it's just a
Long
representing a customer ID, but it can be any serializable type (see
Chapter 5, Marshalling
).
RemoteCallback<Long> callback = new RemoteCallback<Long>() {

  public void callback(Long id) {

    Window.alert("Customer created with ID: " + id);

  }

};
A special case of this
RemoteCallback
is the
ResponseCallback
which provides access to the
Response
object representing the underlying HTTP response. This is useful when more details of the HTTP response are needed, such as headers, the status code, etc. This
ResponseCallback
can be provided as an alternative to the
RemoteCallback
for the method result.
ResponseCallback callback = new ResponseCallback() {

  public void callback(Response response) {

    Window.alert("HTTP status code: " + response.getStatusCode());

    Window.alert("HTTP response body: " + response.getText());

  }

};
For handling errors, Errai's error callback mechanism can be reused and an instance of
ErrorCallback
can optionally be passed to the
RestClient.create()
call. In case of an HTTP error, the
ResponseException
provides access to the
Response
object. All other
Throwables
indicate a communication problem.
ErrorCallback errorCallback = new ErrorCallback() {

  public boolean error(Message message, Throwable throwable) {

    try {

      throw throwable;

    }

    catch (ResponseException e) {

      Response response = e.getResponse();

      // process unexpected response

      response.getStatusCode();

    }

    catch (Throwable t) {

      // process unexpected error (e.g. a network problem)

    }

    return false;

  }

};
Client-side remote call interceptors provide the ability to manipulate or bypass the request before it's being sent. This is useful for implementing crosscutting concerns like caching or security features e.g:
avoiding the request when the data is cached locally
adding special HTTP headers or parameters to the request
To have a JAX-RS remote call intercepted, either an interface method or the remote interface type has to be annotated with
@InterceptedCall
. If the type is annotated, all interface methods will be intercepted.
@Path("customers")

public interface CustomerService {


  @GET

  @Path("/{id}")

  @Produces("application/json")

  @InterceptedCall(MyCacheInterceptor.class)

  public Customer retrieveCustomerById(@PathParam("id") long id);

}
Note that an ordered list of interceptors can be used for specifying an interceptor chain e.g.
@InterceptedCall({MyCacheInterceptor.class, MySecurityInterceptor.class})

public Customer retrieveCustomerById(@PathParam("id") long id);
Implementing an interceptor is easy:
public class MyCacheInterceptor implements RestClientInterceptor {


  @Override

  public void aroundInvoke(final RestCallContext context) {

    RequestBuilder builder = context.getRequestBuilder();

    builder.setHeader("headerName", "value");

    context.proceed();

  }

}
The
RestCallContext
passed to the
aroundInvoke
method provides access to the context of the intercepted JAX-RS (REST) remote call. It allows to read and write the parameter values provided at the call site and provides read/write access to the
RequestBuilder
instance which has the URL, HTTP headers and parameters set.
Calling
proceed
executes the next interceptor in the chain or the actual remote call if all interceptors have been executed. If access to the result of the (asynchronous) remote call is needed in the interceptor, one of the overloaded versions of this method accepting a
RemoteCallback
has to be used.
The result of the remote call can be manipulated by calling
RestCallContext.setResult()
Not calling
proceed
in the interceptor bypasses the actual remote call, passing
RestCallContext.getResult()
to the
RemoteCallBack
provided at the call site.
Errai's JSON format will be used to serialize/deserialize your custom types. See Chapter 5, Marshalling for details.
Alternatively, a Jackson compatible JSON format can be used on the wire. See Section 7.6, “Errai JAX-RS Configuration” for details on how to enable Jackson marshalling.
All paths specified using the
@Path
annotation on JAX-RS interfaces are by definition relative paths. Therefore, by default, it is assumed that the JAX-RS endpoints can be found at the specified paths relative to the GWT client application's context path.
To configure a relative or absolute root path, the following JavaScript variable can be set in either
the host HTML page
<script type="text/javascript">

  erraiJaxRsApplicationRoot = "/MyJaxRsEndpointPath";

</script>
or by using a JSNI method:
private native void setMyJaxRsAppRoot(String path) /*-{

  $wnd.erraiJaxRsApplicationRoot = path;

}-*/;
or by simply invoking:
RestClient.setApplicationRoot("/MyJaxRsEndpointPath");
The root path will be prepended to all paths specified on the JAX-RS interfaces. It serves as the base URL for all requests sent from the client.
The following options are available for activating Jackson marshalling on the client. Note that this is a client-side configuration, the JAX-RS endpoint is assumed to already return a Jackson representation (Jackson is supported by all JAX-RS implementations). The
errai-jaxrs-provider.jar
does not have to be deployed on the server in this case!
<script type="text/javascript">

  erraiJaxRsJacksonMarshallingActive = true;

</script>
or by using a JSNI method:
private native void setJacksonMarshallingActive(boolean active) /*-{

  $wnd.erraiJaxRsJacksonMarshallingActive = active;

}-*/;
or by simply invoking:
RestClient.setJacksonMarshallingActive(true);
- 8.1. Getting Started
- 8.1.1. Compile-time dependency
- 8.1.2. GWT Module Descriptor
- 8.1.3. INF/persistence.xml
- 8.1.4. Declaring an Entity Class
- 8.1.5. Entity Lifecycle States
- 8.1.6. Obtaining an instance of EntityManager
- 8.1.7. Named Queries
- 8.1.8. Entity Lifecycle Events
- 8.1.9. JPA Metamodel
- 8.1.10. JPA Features Not Implemented in Errai 2.1
- 8.1.11. Other Caveats for Errai 2.1 JPA
Starting with Errai 2.1, Errai implements a subset of JPA 2.0. With Errai JPA, you can store and retrieve entity objects on the client side, in the browser's local storage. This allows the reuse of JPA-related code (both entity class definitions and procedural logic that uses the EntityManager) between client and server.
Errai JPA implements the following subset of JPA 2.0:
Annotation-based configuration
Entity Types with
Identifiers of any numeric type (int, long, short, etc.)
Generated identifiers
Regular attributes of any JPA Basic type (Java primitive types, boxed primitives, enums, BigInteger, BigDecimal, String, Date, Time, and Timestamp)
Singular and Plural (collection-valued) attributes of other entity types
All association types (one-to-one, one-to-many, many-to-one, many-to-many)
All association cascade rules (ALL, PERSIST, MERGE, REMOVE, REFRESH, DETACH)
Circular and self references work properly
Property access by field or get/set methods
Named, typed JPQL queries that select exactly one entity type
With cascading fetch of related entities
With or without
WHEREclauseAll boolean, arithmetic, and string operators supported
All String manipulation functions supported
With or without
ORDER BYclause
Lifecycle events and entity lifecycle listeners
Much of the Metamodel API (
Metamodel,EntityType,SingularAttribute,PluralAttribute, etc.)
It's all client-side
Errai JPA is a declarative, typesafe interface to the web browser's
localStorage
object. As such it is a
client-side implementation
of JPA. Objects are stored and fetched from the browser's local storage,
not
from the JPA provider on the server side.
To use Errai JPA, you must include it on the compile-time classpath. If you are using Maven for your build, add this dependency:
    <dependency>

      <groupId>org.jboss.errai</groupId>

      <artifactId>errai-jpa-client</artifactId>

      <version>${errai.version}</version>

    </dependency>
If you are not using Maven for dependency management, add
errai-jpa-client-version.jar
, Hibernate 4.1.1, and Google Guava for GWT 12.0 to your compile-time classpath.
Once you have Errai JPA on your classpath, ensure your application inherits the GWT module as well. Add this line to your application's
*.gwt.xml
file:
<inherits name="org.jboss.errai.jpa.JPA"/>
You need to have a META-INF/persistence.xml file on the classpath that defines a persistence unit. This persistence unit should declare every entity class you want to use with the client-side JPA provider.
Example:
<?xml version="1.0" encoding="UTF-8"?>

<persistence version="2.0"

   xmlns="http://java.sun.com/xml/ns/persistence"

   xmlns:xsi="http://www.w3.org/2001/XMLSchema-instance"

   xsi:schemaLocation="http://java.sun.com/xml/ns/persistence http://java.sun.com/xml/ns/persistence/persistence_2_0.xsd">


  <persistence-unit name="ErraiJpaDemo">

    <description>Entities used in the browser</description>

    <class>com.company.app.client.shared.Album</class>

    <class>com.company.app.client.shared.Artist</class>

    <class>com.company.app.client.shared.Genre</class>

  </persistence-unit>

</persistence>
Classes whose instances can be stored and retrieved by JPA are called
entities
. To declare a class as a JPA entity, annotate it with
@Entity
.
JPA requires that entity classes conform to a set of rules. These are:
The class must have an ID attribute
The class must have a public or protected constructor that takes no arguments
The class must be public and nonfinal
No methods or persistent fields of the class may be final
The class must be a top-level type (not a nested or inner class)
Here is an example of a valid entity class with an ID attribute (
id
) and a String-valued persistent attribute (
name
):
@Entity

public class Genre {


  @Id @GeneratedValue

  private int id;


  private String name;


  // This constructor is used by JPA

  public Genre() {}


  // This constructor is not used by JPA

  public Genre(String name) {

    this();

    this.name = name;

  }


  // These getter and Setter methods are optional:


  public int getId() { return id; }

  public void setId(int id) { this.id = id; }


  public String getName() { return name; }

  public void setName(String name) { this.name = name; }

}
The state of fields and JavaBeans properties of entities are generally persisted with the entity instance. These persistent things are called attributes .
JPA Attributes are subdivided into two main types:
singular
and
plural
. Singular attributes are scalar types like
Integer
or
String
. Plural attributes are collection values, such as
List<Integer>
or
Set<String>
.
The values of singular attributes (and the elements of plural attributes) can be of any application-defined entity type or a JPA Basic type. The JPA basic types are all of the Java primitive types, all boxed primitives, enums, BigInteger, BigDecimal, String, Date (
java.util.Date
or
java.sql.Date
), Time, and Timestamp.
You can direct JPA to read and write your entity's attributes by direct field access or via JavaBeans property access methods (that is, "getters and setters"). Direct field access is the default. To request property access, annotate the class with
@Access(AccessType.PROPERTY)
. If using direct field access, attribute-specific JPA annotations should be on the fields themselves; when using property access, the attribute-specific annotations should be on the getter method for that property.
Each entity class must have exactly one ID attribute. The value of this attribute together with the fully-qualified class name uniquely identifies an instance to the entity manager.
ID values can be assigned by the application, or they can be generated by the JPA entity manager. To declare a generated identifier, annotate the field with
@GeneratedValue
. To declare an application-assigned identifier, leave off the
@GeneratedValue
annotation.
Generated identifier fields must not be initialized or modified by application code. Application-assigned identifier fields must be initialized to a unique value before the entity is persisted by the entity manager, but must not be modified afterward.
By default, every field of a JPA basic type is a persistent attribute. If a basic type field should not be presistent, mark it with
transient
or annotate it with
@Transient
.
Single-valued attributes of entity types must be annotated with
@OneToOne
or
@ManyToOne
.
Single-valued types that are neither entity types nor JPA Basic types are not presently supported by Errai JPA. Such attributes must be marked transient.
Here is an example of an entity with single-valued basic attributes and a single-valued relation to another entity type:
@Entity

public class Album {


  @GeneratedValue

  @Id

  private Long id;


  private String name;


  @ManyToOne

  private Artist artist;


  private Date releaseDate;


  private Format format;


  public Long getId() { return id; }

  public void setId(Long id) { this.id = id; }


  public String getName() { return name; }

  public void setName(String name) { this.name = name; }


  public Artist getArtist() { return artist; }

  public void setArtist(Artist artist) { this.artist = artist; }


  public Date getReleaseDate() { return releaseDate; }

  public void setReleaseDate(Date releaseDate) { this.releaseDate = releaseDate; }


  public Format getFormat() { return format; }

  public void setFormat(Format format) { this.format = format; }

}
Collection-valued types
Collection<T>
,
Set<T>
, and
List<T>
are supported. JPA rules require that all access to the collections are done through the collection interface method; never by specific methods on an implementation.
The element type of a collection attribute can be a JPA basic type or an entity type. If it is an entity type, the attribute must be annotated with
@OneToMany
or
@ManyToMany
.
Here is an example of an entity with two plural attributes:
@Entity

public class Artist {


  @Id

  private Long id;


  private String name;


  // a two-way relationship (albums refer back to artists)

  @OneToMany(mappedBy="artist", cascade=CascadeType.ALL)

  private Set<Album> albums = new HashSet<Album>();


  // a one-way relationship (genres don't reference artists)

  @OneToMany(cascade={CascadeType.PERSIST, CascadeType.MERGE})

  private Set<Genre> genres = new HashSet<Genre>();


  public Long getId() { return id; }

  public void setId(Long id) { this.id = id; }


  public String getName() { return name; }

  public void setName(String name) { this.name = name; }


  public Set<Album> getAlbums() { return albums; }

  public void setAlbums(Set<Album> albums) { this.albums = albums; }


  public Set<Genre> getGenres() { return genres; }

  public void setGenres(Set<Genre> genres) { this.genres = genres; }

}
When an entity changes state (more on this later), that state change can be cascaded automatically to related entity instances. By default, no state changes are cascaded to related entities. To request cascading of entity state changes, use the
cascade
attribute on any of the relationship quantifiers
@OneToOne
,
@ManyToOne
,
@OneToMany
, and
@ManyToMany
.
|
CascadeType value |
Description |
|---|---|
|
|
Persist the related entity object(s) when this entity is persisted |
|
|
Merge the attributes of the related entity object(s) when this entity is merged |
|
|
Remove the related entity object(s) from persistent storage when this one is removed |
|
|
Not applicable in Errai JPA |
|
|
Detach the related entity object(s) from the entity manager when this object is detached |
|
|
Equivalent to specifying all of the above |
For an example of specifying cascade rules, refer to the
Artist
example above. In that example, the cascade type on
albums
is
ALL
. When a particular
Artist
is persisted or removed, detached, etc., all of that artist's albums will also be persisted or removed, or detached correspondingly. However, the cascade rules for
genres
are different: we only specify
PERSIST
and
MERGE
. Because a
Genre
instance is reusable and potentially shared between many artists, we do not want to remove or detach these when one artist that references them is removed or detached. However, we still want the convenience of automatic cascading persistence in case we persist an
Artist
which references a new, unmanaged
Genre
.
The entity manager provides the means for storing, retrieving, removing, and otherwise affecting the lifecycle state of entity instances.
To obtain an instance of EntityManager on the client side, use Errai IoC (or CDI) to inject it into any client-side bean:
@EntryPoint

public class Main {

  @Inject EntityManager em;

}
To store an entity object in persistent storage, pass that object to the
EntityManager.persist()
method. Once this is done, the entity instance transitions from the
new
state to the
managed
state.
If the entity references any related entities, these entities must be in the managed state already, or have cascade-on-persist enabled. If neither of these criteria are met, an
IllegalStateException
will be thrown.
See an example in the following section.
If you know the unique ID of an entity object, you can use the
EntityManager.find()
method to retrieve it from persistent storage. The object returned from the
find()
method will be in the managed state.
Example:
    // make it

    Album album = new Album();

    album.setArtist(null);

    album.setName("Abbey Road");

    album.setReleaseDate(new Date(-8366400000L));


    // store it

    EntityManager em = getEntityManager();

    em.persist(album);

    em.flush();

    em.detach(album);

    assertNotNull(album.getId());


    // fetch it

    Album fetchedAlbum = em.find(Album.class, album.getId());

    assertNotSame(album, fetchedAlbum);

    assertEquals(album.toString(), fetchedAlbum.toString());
To remove a persistent managed entity, pass it to the
EntityManager.remove()
method. As the cascade rules specify, related entities will also be removed recursively.
Once an entity has been removed and the entity manager's state has been flushed, the entity object is unmanaged and back in the new state.
Errai's EntityManager class provides a
removeAll()
method which removes everything from the browser's persistent store for the domain of the current webpage.
This method is not part of the JPA standard, so you must down-cast your client-side
EntityManager
instance to
ErraiEntityManager
. Example:
@EntryPoint

public class Main {


  @Inject EntityManager em;


  void resetJpaStorage() {

    ((ErraiEntityManager) em).removeAll();

  }

}
For every entity instance in the managed state, changes to the attribute values of that entity are persisted to local storage whenever the entity manager is flushed. To prevent this automatic updating from happening, you can detach an entity from the entity manager. When an instance is detached, it is not deleted. All information about it remains in persistent storage. The next time that entity is retrieved, the entity manager will create a new and separate managed instance for it.
To detach one particular object along with all related objects whose cascade rules say so, call
EntityManager.detach()
and pass in that object.
To detach all objects from the entity manager at once, call
EntityManager.detachAll()
.
To retrieve one or more entities that match a set of criteria, Errai JPA allows the use of JPA named queries . Named queries are declared in annotations on entity classes.
Queries in JPA are written in the JPQL language. As of Errai 2.1, Errai JPA does not support all JPQL features. Most importantly, implicit and explicit joins in queries are not yet supported. Queries of the following form generally work:
SELECT et FROM EntityType et WHERE [expression with constants, named parameters and attributes of et] ORDER BY et.attr1 [ASC|DESC], et.attr2 [ASC|DESC]
Here is how to declare a JPQL query on an entity:
@NamedQuery(name="selectAlbumByName", query="SELECT a FROM Album a WHERE a.name=:name")

@Entity

public class Album {

  ... same as before ...

}
To declare more than one query on the same entity, wrap the
@NamedQuery
annotations in
@NamedQueries
like this:
@NamedQueries({

  @NamedQuery(name="selectAlbumByName", query="SELECT a FROM Album a WHERE a.name = :name"),

  @NamedQuery(name="selectAlbumsAfter", query="SELECT a FROM Album a WHERE a.releaseDate >= :startDate")

})

@Entity

public class Album {

  ... same as before ...

}
To execute a named query, retrieve it by name and result type from the entity manager, set the values of its parameters (if any), and then call one of the execution methods
getSingleResult()
or
getResultList()
.
Example:
    TypedQuery<Album> q = em.createNamedQuery("selectAlbumByName", Album.class);

    q.setParameter("name", "Let It Be");

    List<Album> fetchedAlbums = q.getResultList();
To receive a notification when an entity instance transitions from one lifecycle state to another, use an entity lifecycle listener.
These annotations can be applied to methods in order to receive notifications at certain points in an entity's lifecycle. These events are delivered for direct operations initiated on the EntityManager as well as operations that happen due to cascade rules.
|
Annotation |
Meaning |
|---|---|
|
|
The entity is about to be persisted or merged into the entity manager. |
|
|
The entity has just been persisted or merged into the entity manager. |
|
|
The entity's state is about to be captured into the browser's localStorage. |
|
|
The entity's state has just been captured into the browser's localStorage. |
|
|
The entity is about to be removed from persistent storage. |
|
|
The entity has just been removed from persistent storage. |
|
|
The entity's state has just been retrieved from the browser's localStorage. |
JPA lifecycle event annotations can be placed on methods in the entity type itself, or on a method of any type with a public no-args constructor.
To receive lifecycle event notifications directly on the affected entity instance, create a no-args method on the entity class and annotate it with one or more of the lifecycle annotations in the above table.
For example, here is a variant of the Album class where instances receive notification right after they are loaded from persistent storage:
@Entity

public class Album {


  ... same as before ...


  @PostLoad

  public void postLoad() {

    System.out.println("Album " + getName() + " was just loaded into the entity manager");

  }

}
To receive lifecycle methods in a different class, declare a method that takes one parameter of the entity type and annotate it with the desired lifecycle annotations. Then name that class in the
@EntityListeners
annotation on the entity type.
The following example produces the same results as the previous example:
@Entity

@EntityListeners(StandaloneLifecycleListener.class)

public class Album {


  ... same as always ...


}


public class StandaloneLifecycleListener {


  @PostLoad

  public void albumLoaded(Album a) {

  public void postLoad() {

    System.out.println("Album " + a.getName() + " was just loaded into the entity manager");

  }

}
Errai captures structural information about entity types at compile time and makes them available in the GWT runtime environment. The JPA metamodel includes methods for enumerating all known entity types and enumerating the singular and plural attributes of those types. Errai extends the JPA 2.0 Metamodel by providing methods that can create new instances of entity classes, and read and write attribute values of existing entity instances.
As an example of what is possible, this functionality could be used to create a reusable UI widget that can present an editable table of any JPA entity type.
To access the JPA Metamodel, call the
EntityManager.getMetamodel()
method. For details on what can be done with the stock JPA metamodel, see the API's javadoc or consult the JPA specification.
Wherever you obtain an instance of
SingularAttribute
from the metamodel API, you can down-cast it to
ErraiSingularAttribute
. Likewise, you can down-cast any
PluralAttribute
to
ErraiPluralAttribute
.
In either case, you can read the value of an arbitrary attribute by calling
ErraiAttribute.get()
and passing in the entity instance. You can set any attribute's value by calling
ErraiAttribute.set()
, passing in the entity instance and the new value.
In addition to
get()
and
set()
,
ErraiPluralAttribute
also has the
createEmptyCollection()
method, which creates an empty collection of the correct interface type for the given attribute.
The following features are not yet implemented, but could conceivably be implemented in a future Errai JPA release:
Many
persistence.xmlsettings are not honoured; need to use annotations for theseFlush modes other than immediate
Transactions, including EntityManager.getTransaction()
More than one persistence context
In named queries:
Joins and nested attribute paths (
a.b.c) do not yet work, although single-step attribute paths (a.b) do.The
SELECTclause must specify exactly one entity type. Selection of individual attributes is not yet implemented.
Embedded collections
Compound identifiers (presently, only basic types are supported for entity IDs)
Polymorphic relations (eg. relationship to a collection of a base entity type)
EntityManager.merge()EntityManager.refresh()to pick up changes made in localStorage from a different browser window/tab.Criteria Queries
The generated static Metamodel
The
@PersistenceContextannotation currently has no effect in client-side code (use@Injectinstead)
The following may never be implemented due to limitations and restrictions in the GWT client-side environment:
EntityManager.createQuery(String, ...)(that is, unnamed queries) are impractical because JPQL queries are parsed at compile time, not in the browser.EntityManager.createNativeQuery(String, ...)don't make sense because the underlying database is just a hash table. It does not have a query language.Persistent attributes of type
java.util.Calendarbecause theCalendarclass is not in GWT's JRE emulation library.
We hope to remedy these shortcomings in a future release.
The
persistence.xmlfile is not optional. It must list all the entity types that Errai should know aboutIn Dev Mode, changes to entity classes are not discovered on page refresh. You need to restart Dev Mode.
The local data stored in the browser is not encrypted
Errai's data binding module provides the ability to bind model objects to UI fields/widgets. The bound properties of the model and the UI components will automatically be kept in sync for as long as they are bound. So, there is no need to write code for UI updates in response to model changes and no need to register listeners to update the model in response to UI changes.
The data binding module is directly integrated with Chapter 10, Errai UI and Chapter 8, Errai JPA but can also be used as a standalone project in any GWT client application by simply inheriting the Data Binding GWT module:
Objects that should participate in data bindings have to be marked as
@Bindable
and must follow Java bean conventions. All editable properties of these objects are then bindable to UI widgets.
Example 9.2. Customer.java
@Bindable

public class Customer {

  ...

  private String name;


  public String getName() {

    return name;

  }


  public void setName(String name) {

    this.name = name;

  }

  ...

}
An instance of
DataBinder
is required to create bindings. It can either be
injected into a client-side bean:
public class CustomerView {

  @Inject

  private DataBinder<Customer> dataBinder;

}
or created manually:
DataBinder<Customer> dataBinder = DataBinder.forType(Customer.class);
In both cases above, the
DataBinder
instance is associated with a new instance of the model (e.g. a new
Customer
object). A
DataBinder
can also be associated with an already existing object:
DataBinder<Customer> dataBinder = DataBinder.forModel(existingCustomerObject);
In case there is existing state in either the model object or the UI components before the they are bound, initial state synchronization can be carried out to align the model and the corresponding UI fields.
For using the model object's state to set the initial values in the UI:
DataBinder<Customer> dataBinder = DataBinder.forModel(existingCustomerObject, InitialState.FROM_MODEL);
For using the UI values to set the initial state in the model object:
DataBinder<Customer> dataBinder = DataBinder.forModel(existingCustomerObject, InitialState.FROM_UI);
Bindings can be created by calling the
bind
method on a
DataBinder
instance, thereby specifying which widgets should be bound to which properties of the model. Note that when using Errai UI these bindings are created automatically based on matching data-field and model property names.
public class CustomerView {

  @Inject

  private DataBinder<Customer> dataBinder;


  private Customer customer;

  private TextBox nameTextBox = new TextBox();

  // more UI widgets...


  @PostConstruct

  private void init() {

    customer = dataBinder

        .bind(nameTextBox, "name")

        .bind(idLabel, "id")

        .getModel();

  }

}
After the call to
dataBinder.bind()
in the example above, the customer object's name property and the
nameTextBox
are kept in sync until either the
dataBinder.unbind()
method is called or the
CustomerView
bean is destroyed.
That means that a call to
customer.setName()
will automatically update the value of the TextBox and any change to the TextBox's value in the browser will update the customer object's name property. So,
customer.getName()
will always reflect the currently displayed value of the
TextBox
.
Note
It's important to retrieve the model instance using dataBinder.getModel() before making changes to it as the data binder will provide a proxy to the model to ensure that changes will update the corresponding UI components.
Errai has built-in conversion support for all Number types as well as Boolean and Date to java.lang.String and vice versa. However, in some cases it will be necessary to provide custom converters (e.g. if a custom date format is desired). This can be done on two levels.
@DefaultConverter

public class MyCustomDateConverter implements Converter<Date, String> {


  private static final String DATE_FORMAT = "YY_DD_MM";


  @Override

  public Date toModelValue(String widgetValue) {

    return DateTimeFormat.getFormat(DATE_FORMAT).parse(widgetValue);

  }


  @Override

  public String toWidgetValue(Date modelValue) {

    return DateTimeFormat.getFormat(DATE_FORMAT).format((Date) modelValue);

  }

}
All converters annotated with
@DefaultConverter
will be registered as global defaults calling
Convert.registerDefaultConverter()
. Note that the
Converter
interface specifies two type parameters. The first one represents the type of the model field, the second one the type held by the widget (e.g.
String
for widgets implementing
HasValue<String>
). These default converters will be used for all bindings with matching model and widget types.
In some cases keeping the model and the UI in sync is not enough. Errai's
DataBinder
allows for the registration of
PropertyChangeHandlers
for both specific properties or all properties of a bound model. This provides a uniform notification mechanism for model and UI value changes.
PropertyChangeHandlers
can be used to carry out any additional logic that might be necessary after a model or UI value has changed.
dataBinder.addPropertyChangeHandler(new PropertyChangeHandler() {

  @Override

  public void onPropertyChange(PropertyChangeEvent event) {

    Window.alert(event.getPropertyName() + " changed to:" + event.getNewValue());

  }

});
dataBinder.addPropertyChangeHandler("name", new PropertyChangeHandler() {

  @Override

  public void onPropertyChange(PropertyChangeEvent event) {

    Window.alert("name changed to:" + event.getNewValue());

  }

});
- 10.1. Get started
- 10.2. Use Errai UI Composite components
- 10.3. Create a @Templated Composite component
- 10.4. Create an HTML template
- 10.5. Use other Widgets in a composite component
- 10.6. How HTML templates are merged with Components
- 10.7. Event handlers
- 10.8. Data Binding
- 10.9. Nest Composite components
- 10.10. Extend Composite components
|
One of the primary complaints of GWT to date has been that it is difficult to use "pure HTML" when building and skinning widgets. Inevitably one must turn to Java-based configuration in order to finish the job. Errai, however, strives to remove the need for Java styling. HTML template files are placed in the project source tree, and referenced from custom "Composite components" (Errai UI Widgets) in Java. Since Errai UI depends on Errai IOC and Errai CDI, dependency injection is supported in all custom components. Errai UI provides rapid prototyping and HTML5 templating for GWT. |

The Errai UI module is directly integrated with Chapter 9, Data Binding and Errai JPA but can also be used as a standalone project in any GWT client application by simply inheriting the Errai UI GWT module, and ensuring that you have properly using Errai CDI's @Inject to instantiate your widgets:
<inherits name="org.jboss.errai.ui.UI" />
If you work better by playing with a finished product, you can see a simple client-server project implemented using Errai UI here .
Before explaining how to create Errai UI components, it should be noted that these components behave no differently from any other GWT Widget once built. The primary difference is in A) their construction, and B) their instantiation. As with most other features of Errai, dependency injection with CDI is the programming model of choice, so when interacting with components defined using Errai UI, you should always
@Inject
references to your Composite components.
@EntryPoint

public class Application {

   @Inject

   private ColorComponent comp;


   @PostConstruct

   public void init() {

      comp.setColor("blue");

      RootPanel.get().add(comp);

   }

}
@EntryPoint

public class Application {

   private String[] colors = new String[]{"Blue", "Yellow", "Red"};


   @Inject

   private Instance<ColorComponent> instance;

�

   @PostConstruct

   public void init() {

      for(String color: colors) {

        ColorComponent comp = instance.get();

        comp.setColor(c);

        RootPanel.get().add();

      }

   }

}
Custom components in Errai UI are single classes extending from
com.google.gwt.user.client.ui.Composite
, and must be annotated with @Templated.
@Templated

public class LoginForm extends Composite {

   /* looks for LoginForm.html in LoginForm's package */

}
With default values, @Templated informs Errai UI to look in the current package for a parallel
".html"
template next to the Composite component Class; however, the template name may be overridden by passing a String into the @Templated annotation, like so:
@Templated("my-template.html")

public class LoginForm extends Composite {

   /* looks for my-template.html in LoginForm's package */

}
Fully qualified template paths are also supported, but must begin with a leading '/':
@Templated("/org/example/my-template.html")

public class LoginForm extends Composite {

   /* looks for my-template.html in package org.example */

}
Templates in Errai UI may be designed either as an HTML snippit, or as a full HTML document. You may even take an existing HTML page and use it as a template. With either approach, the
"data-field"
annotation is used to identify fragments (by name) in the template, which are used in the Composite component to add behavior, and use additional components to add functionality to the template. There is no limit to how many component classes may share a given HTML template.
We will begin by creating a simple HTML login form to accompany our
@Templated LoginForm
composite component.
<form>

  <legend>Log in to your account</legend>


  <label for="username">Username</label>

  <input id="username" type="text" placeholder="Username">


  <label for="password">Password</label>

  <input id="password" type="password" placeholder="Password">


  <button>Log in</button>

  <button>Cancel</button>

</form>
Or as a full HTML document which may be more easily previewed during design without running the application; however, in this case we must also specify the location of our root component DOM Element using a
"data-field"
matching the value of the @Templated annotation. There is no limit to how many component classes may share a given HTML template.
@Templated("my-template.html#login-form")

public class LoginForm extends Composite {

   /* Specifies that <... data-field="login-form"> be used as the root Element of this Widget  */

}
Notice the corresponding HTML data-field attribute in the form Element below, and also note that multiple components may use the same template provided that they specify a corresponding
data-field
attribute. Also note that two or more components may share the same template
data-field
DOM elements; there is no conflict since components each receive a unique copy of the template DOM from the designated
data-field
at runtime (or from the root element if a fragment is not specified.)
<!DOCTYPE html>

<html lang="en">

<head>

    <title>A full HTML snippit</title>

</head>

<body>

    <div>

        <form data-field="login-form">

          <legend>Log in to your account</legend>


          <label for="username">Username</label>

          <input id="username" type="text" placeholder="Username">

 ��� �

          <label for="username">Password</label>

          <input id="password" type="password" placeholder="Password">

�� ��� ��� ��� �

          <button>Log in</button>

          <button>Cancel</button>

        </form>

    </div>


    <hr>

    <footer data-field="theme-footer">

        <p>� Company 2012</p>

    </footer>

</body>

</html>
For example's sake, the component below could also use the same template. All it needs to do is reference the template name, and specify a fragment.
@Templated("my-template.html#theme-footer")

public class Footer extends Composite {

   /* Specifies that <... data-field="theme-footer"> be used as the root Element of this Widget  */

}
Now that we have created the @Templated Composite component and an HTML template, we can start wiring in functionality and behavior; this is done by annotating fields and methods to replace specific sub-elements of the template DOM with other Widgets. We can even replace portions of the template with other Errai UI Widgets!
In order to composite Widgets into the template DOM, you must annotate fields in your @Templated Composite component with @DataField, and mark the HTML template Element with a corresponding
data-field
attribute. This informs Errai UI that the contents of the field should replace the element marked by data-field in the template; thus, fields annotated with @DataField must either be @Inject or initialize valid Widget or Element instances.
@Templated

public class LoginForm extends Composite {

   // This element must be initialized manually because Element is not @Inject-able*/

   @DataField

   private Element form = DOM.createForm();


   // If not otherwise specified, the data-field name defaults to the name of the field; in this case, the data-field name would be "username"

   @Inject

   @DataField

   private TextBox username;


   // The data-field name may also be specified manually

   @Inject

   @DataField("pass")

   private PasswordTextBox password;


   // We can also choose to instantiate our own Widgets. Injection is not required.

   @DataField

   private Button submit = new Button();

}
Important
Note: Field, method, and constructor injection are all supported by @DataField.
We must also add data-field attributes to the corresponding locations in our template HTML file. This, combined with the @DataField annotation in our Composite component allow Errai UI to determine where and what should be composited when creating component instances.
<form data-field="form">

  <legend>Log in to your account</legend>


  <label for="username">Username</label>

  <input data-field="username" id="username" type="text" placeholder="Username">


  <label for="password">Password</label>

  <input data-field="pass" id="password" type="password" placeholder="Password">


  <button data-field="submit">Log in</button>

  <button>Cancel</button>

</form>
Now, when we run our application, we will be able to interact with these fields in our Widget.
Three things are merged or modified when Errai UI creates a new Composite component instance:
Element attributes are merged from the template to the component
DOM Elements are merged from the component to the template
Template element inner text and inner HTML are preserved when the given
@DataFieldWidgetimplementsHasTextorHasHTML
@Templated

public class StyledComponent extends Composite {

   @Inject

   @DataField("field-1")

   private Label div = new Label();


   public StyledComponent() {

      div.getElement().setAttribute("style", "position: fixed; top: 0; left: 0;");

      this.getElement().setId("outer-id");

   }

}
<form>

  <span data-field="field-1" style="display:inline;"> This element will become a div </span>

</form>


This text will be ignored.
<form id="outer-id">

   <div data-field="field-1" style="display:inline;"> This element will become a div </div>

</form>
But why does the output look the way it does? Some things happened that may be unsettling at first, but we find that once you understand why these things occur, you'll find the mechanisms extremely powerful.
When styling your templates, you should keep in mind that all attributes defined in the template file will take precedence over any preset attributes in your Widgets. This "attribute merge" occurs only when the components are instantiated; subsequent changes to any attributes after Widget construction will function normally. In the example we defined a Composite component that applied several styles to a child Widget in its constructor, but we can see from the output that the styles from the template have overridden them. If styles must be applied in Java, instead of the template,
@PostConstruct
or other methods should be favored over constructors to apply styles to fully-constructed Composite components.
Element composition, however, functions inversely from attribute merging, and the
<span>
defined in our template was actually be replaced by the
<div>
Label in our Composite component field. This does not, however, change the behavior of the attribute merge - the new
<div>
was still be rendered inline, because we have specified this style in our template, and the template always wins in competition with attributes set programatically before composition occurs. In short, whatever is in the
@DataField
in your class will replace the
data-field
in your template.
Additionally, because
Label
implements both
HasText
and
HasHTML
(only one is required,) the contents of this <span> "field-1" Element in the template were preserved; however, this would not have been the case if the
@DataField
specified for the element did not implement
HasText
or
HasHTML
. In short, if you wish to preserve text or HTML contents of an element in your template, you can do one of two things: do not composite that Element with a
@DataField
reference, or ensure that the Widget being composited implements
HasText
or
HasHTML
.
Dealing with User and DOM Events is a reality in rich web development, and Errai UI provides several approaches for dealing with all types of browser events using its "quick handler" functionality. It is possible to handle:
GWT events on Widgets
GWT events on DOM Elements
Native DOM events on Elements
Important
It is not possible to handle Native DOM events on Widgets because GWT overrides native event handlers when Widgets are added to the DOM. You must programatically configure such handlers after the Widget has been added to the DOM.
Each of the three supported approaches for event handling function on the same basic programming model. Event handler methods, annotated with
@EventHandler("my-data-field")
, are created and dynamically wired to the corresponding
@DataField("my-data-field")
in the same component.
Probably the simplest and most common use-case, this approach handles GWT Event classes for Widgets that explicitly handle the given event type. In the case that a Widget does not handle the Event type given in the
@EventHandler
method signature, the application will fail to compile and appropriate errors will be displayed.
@Templated

public class WidgetHandlerComponent extends Composite {


   @Inject

   @DataField("b1")

   private Button button;


   @EventHandler("b1")

   public void doSomethingC1(ClickEvent e) {

     // do something

   }

}
Errai UI also makes it possible to handle GWT events on native Elements which are specified as a
@DataField
in the component class. This is useful when a full GWT Widget is not available for a given Element, or for GWT events that might not normally be available on a given Element type. This could occur, for instance, when clicking on a
<div>
, which would normally not have the ability to receive the GWT
ClickEvent
, and would otherwise require creating a custom DIV Widget to handle such an event.
@Templated

public class ElementHandlerComponent extends Composite {


   @DataField("div-1")

   private DivElement button = DOM.createDiv();


   @EventHandler("div-1")

   public void doSomethingC1(ClickEvent e) {

     // do something�

   }

}
The last approach is handles the case where native DOM events must be handled, but no such GWT event handler exists for the given event type. Alternatively, it can also be used for situations where Elements in the template should receive events, but no handle to the Element the component class is necessary (aside from the event handling itself.) Native DOM events do not require a corresponding
@DataField
be configured in the class; only the HTML
data-field
template attribute is required.
<div>

   <a data-field="link" href="/page"

   <div data-field="div"> Some content </div>

</div>
The
@SinkNative
annotation is used to select native events (as a bit mask) of which the method should handle; this sink behaves the same as when using
DOM.sinkEvents(Element e, int bits)
. Note that a
@DataField
reference in the component class is optional.
Important
Only one @EventHandler may be specified for a given data-field when @SinkNative is used to handle native DOM events.
@Templated

public class QuickHandlerComponent extends Composite {


  @DataField

  private AnchorElement link = DOM.createAnchor().cast();


  @EventHandler("link")

  @SinkNative(Event.ONCLICK | Event.ONMOUSEOVER)

  public void doSomething(Event e) {

    // do something

  }


  @EventHandler("div")

  @SinkNative(Event.ONMOUSEOVER)

  public void doSomethingElse(Event e) {

    // do something else

  }

}
A recurring implementation task in rich web development is writing event handler code for updating model objects to reflect input field changes in the user interface. The requirement to update user interface fields in response to changed model values is just as common. These tasks cause a significant amount of boilerplate code which can be alleviated by Errai. Errai's data binding module provides the ability to bind model objects to user interface fields, so they will automatically be kept in sync. While the module can be used on its own, it can cut even more boilerplate when integrated with Errai UI.
In the following example, all
@DataFields
annotated with
@Bound
will automatically be bound to properties of the data model (a
User
object). The model object is provided by an injected
DataBinder
instance which has to be annotated with
@AutoBound
for the automatic bindings to be carried out. Both field and constructor injection can be used.
@Templated

public class LoginForm extends Composite {


   @Inject

   @Bound

   @DataField

   private TextBox username;


   @Inject

   @Bound

   @DataField

   private PasswordTextBox password;


   @DataField

   private Button submit = new Button();


   private User user;


   @Inject

   public LoginForm(@AutoBound DataBinder<User> userBinder) {

     this.user = userBinder.getModel();

   }

}
Now the user object and the username and password fields are automatically kept in sync. No event handling code needs to be written for updating the user object in response to input field changes and no code needs to be written for updating the user interface fields when the model object changes (when
setUsername
or
setPassword
is called).
By default, the bindings are carried out based on the
@DataField
names. So, in the example above, the
@DataField
username is automatically bound to the JavaBean property username of the model object. The
@Bound
annotation also allows for specifying the property to bind to. In the following example, the password field is bound the JavaBean property named pass, assuming such a property exists in the
User
class.
@Inject

@Bound(property="pass")

@DataField

private PasswordTextBox password;
The
@Bound
annotation further allows to specify a converter to use for the binding (see
Specifying Converters
for details). This is how a binding specific converter can be specified on a data field:
@Inject

@Bound(converter=MyDateConverter.class)

@DataField

private TextBox date;
Errai's
DataBinder
also allows to register
PropertyChangeHandlers
for the cases where keeping the model and UI in sync is not enough and additional logic needs to be executed (see
Property Change Handlers
for details).
Using Composite components to build up a hierarchy of widgets functions exactly the same as when building hierarchies of GWT widgets. The only distinction might be that with Errai UI,
@Inject
is preferred to manual instantiation.
@Templated

public class ComponentOne extends Composite {


   @Inject

   @DataField("other-comp")

   private ComponentTwo two;

}
Templating would not be complete without the ability to inherit from parent templates, and Errai UI also makes this possible using simple Java inheritance. The only additional requirement is that Composite components extending from a parent Composite component must also be annotated with @Templated, and the path to the template file must also be specified in the child component's annotation. Child components may specify
@DataField
references that were omitted in the parent class, and they may also override
@DataField
references (by using the same
data-field
name) that were already specified in the parent component.
Extension templating is particularly useful for creating reusable page layouts with some shared content (navigation menus, side-bars, footers, etc...,) where certain sections will be filled with unique content for each page that extends from the base template; this is commonly seen when combined with the MVP design pattern traditionally used in GWT applications.
<div class="container">

   <div data-field="header"> Default header </div>

   <div data-field="content"> Default content </div>   <div data-field="footer"> Default footer </div>

</div>
This component provides the common features of our page layout, including header and footer, but does not specify any content. The missing data-field will be supplied with unique content by the individual page components extending from this parent component.
@Templated

public class PageLayout extends Composite {


   @Inject

   @DataField

   private HeaderComponent header;


   @Inject

   @DataField

   private FooterComponent footer;


   @PostConstruct

   public final void init() {

      // do some setup

   }

}
We are free to fill in the missing "content"
data-field
with a Widget of our choosing. Note that it is not required to fill in all omitted data-field references.
@Templated("PageLayout.html")

public class LoginLayout extends PageLayout {


   @Inject

   @DataField

   private LoginForm content;


}
We could also have chosen to override one or more
@DataField
references defined in the parent component, simply by specifying a
@DataField
with the same name in the child component, as is done with the "footer"
data-field
below.
@Templated("PageLayout.html")

public class LoginLayout extends PageLayout {


   @Inject

   @DataField

   private LoginForm content;


   /* Override footer defined in PageLayout */

   @Inject

   @DataField

   private CustomFooter footer;


}
Starting in version 2.1, Errai offers a system for creating applications that have multiple bookmarkable pages. This navigation system has the following features:
Declarative, statically-analyzable configuration of pages and links
Compile time referential safety (i.e. “no broken links”)
Can generate storyboard of the application’s navigation flow at compile time
Decentralized configuration
Create a new page by creating a new annotated class. No need to edit a second file.
Make navigational changes in the natural place in the code.
Integrates cleanly with Errai UI templates, but also works well with other view technologies.
Builds on Errai CDI
To use Errai UI Navigation, you must include it on the compile-time classpath. If you are using Maven for your build, add this dependency:
    <dependency>

      <groupId>org.jboss.errai</groupId>

      <artifactId>errai-navigation</artifactId>

      <version>${errai.version}</version>

    </dependency>
If you are not using Maven for dependency management, add
errai-navigation-version.jar
to your classpath.
Errai Navigation has three main parts: the
@Page
annotation marks any widget as a page; the
TransitionTo<P>
interface is an injectable type that provides a link to another page; and the
Navigation
singleton offers control over the navigation system as a whole.
The Navigation singleton owns a GWT Panel, called the navigation panel . This panel always contains a widget corresponding to the the fragment ID (the part after the # symbol) in the browser's location bar. Whenever the fragment ID changes for any reason (for example, because the user pressed the back button, navigated to a bookmarked URL, or simply typed a fragment ID by hand), the widget in the navigation panel is replaced by the widget associated with that fragment ID. Likewise, when the application asks the navigation system to follow a link, the fragment ID in the browser's location bar is updated to reflect the new current page.
To declare a page, annotate any subclass of Widget with the
@Page
annotation:
@Page

public class ItemListPage extends Composite {

  // Anything goes...

}
By default, the name of a page is the simple name of the class that declares it. In the above example, the
ItemListPage
will fill the navigation panel whenever the browser's location bar ends with
#ItemListPage
. If you prefer a different page name, use the
@Page
annotation's
path
attribute:
@Page(path="items")

public class ItemListPage extends Composite {

  // Anything goes...

}
Each application must have exactly one starting page . This requirement is enforced at compile time. The starting page is displayed when there is no fragment ID present in the browser's location bar.
Use the
startingPage
attribute to declare the starting page, like this:
@Page(startingPage=true)

public class WelcomePage extends Composite {

  // Anything goes...

}
Pages are looked up as CDI beans, so you can inject other CDI beans into fields or a constructor. Pages can also have
@PostConstruct
and
@PreDestroy
CDI methods.
The lifecycle of a Page instance is governed by CDI scope: Dependent and implict-scoped beans are instantiated each time the user navigates to them, and Singleton and ApplicationScoped beans are created only once over the lifetime of the application. If a particular page is slow to appear because its UI takes a lot of effort to build, try marking it as a singleton.
Any widget can be a page. This includes Errai UI
@Templated
classes! Simply annotate any Errai UI templated class with
@Page
, and it will become a page that can be navigated to.
To declare a link from one page to another, inject an instance of
TransitionTo<P>
, where
P
is the class of the target page.
For example, this code declares a link from the welcome page to the item list page:
@Page(startingPage=true)

public class WelcomePage extends Composite {


  @Inject TransitionTo<ItemListPage> startButtonClicked;


}
You do not need to implement the
TransitionTo
interface yourself; the framework creates the appropriate instance for you.
You can inject any number of links into a page. The only restriction is that the target of the link must be a Widget type that is annotated with
@Page
.
To follow a link, simply call the
go()
method on an injected
TransitionTo
object. For example:
@Page(startingPage=true)

public class WelcomePage extends Composite {


  @Inject TransitionTo<ItemListPage> startButtonClicked;


  public void onStartButtonPressed(ClickEvent e) {

    startButtonClicked.go();

  }

}
Now that you've created several pages and injected some links between them, there is one last step to seeing the results in the user interface: you must add the navigation panel somewhere in the document. The best place to do this is during application startup, for example in the
@PostConstruct
method of your
@EntryPoint
class. You can allow Errai Navigation to control the full contents of the page, or you can opt to keep some parts of the page (headers, footers, and sidebars, for example) away from Errai Navigation.
This example code gives the Navigation system control of the full page contents:
@EntryPoint

public class Bootstrap {


  @Inject

  private Navigation navigation;


  @PostConstruct

  public void clientMain() {

    RootPanel.get().add(navigation.getContentPanel());

  }


}
The following example reserves space for header and footer content that is not affected by the navigation system:
@EntryPoint

public class Bootstrap {


  @Inject

  private Navigation navigation;


  @PostConstruct

  public void clientMain() {

    VerticalPanel vp = new VerticalPanel();

    vp.add(new HeaderWidget());

    vp.add(navigation.getContentPanel());

    vp.add(new FooterWidget());


    RootPanel.get().add(vp);

  }

}
This last example demonstrates a simple approach to defining the page structure with an Errai UI template. The final product is identical to the above example, but in this case the overall page structure is declared in an HTML template rather than being defined programmatically in procedural logic:
@Templated

@EntryPoint

public class OverallPageStrucutre extends Composite {


  @Inject

  private Navigation navigation;


  @Inject @DataField

  private HeaderWidget header;


  @Inject @DataField

  private SimplePanel content;


  @Inject @DataField

  private FooterWidget footer;


  @PostConstruct

  public void clientMain() {


    // give over the contents of this.content to the navigation panel

    content.add(navigation.getContentPanel());


    // add this whole templated widget to the root panel

    RootPanel.get().add(this);

  }


}
Because the pages and links in an Errai Navigation application are declared structurally, the framework gets a complete picture of the app's navigation structure at compile time. This knowledge is saved out during compilation (and at page reload when in Dev Mode) to the file
.errai/navgraph.gv
. You can view the navigation graph using any tool that understands the GraphViz (also known as DOT) file format.
One popular open source tool that can display GraphViz/DOT files is GraphViz . Free downloads are available for all major operating systems.
When rendered, a navigation graph looks like this:

In the rendered graph, the pages are nodes (text surrounded by an ellipse). The starting page is drawn with a heavier stroke. The links are drawn as arrows from one page to another. The labels on these arrows come from the Java field names the TransitionTo objects were injected into.
This section contains information on configuring Errai.
Depending on what application server you are deploying on, you must provide an appropriate servlet implementation if you wish to use true, asynchronous I/O. See Section 12.6, “Servlet Implementations” for information on the available servlet implementations.
Here's a sample web.xml file:
<web-app xmlns="http://java.sun.com/xml/ns/javaee"

  xmlns:xsi="http://www.w3.org/2001/XMLSchema-instance"

  xsi:schemaLocation="http://java.sun.com/xml/ns/javaee

  http://java.sun.com/xml/ns/javaee/web-app_2_5.xsd"

  version="2.5">


  <servlet>

    <servlet-name>ErraiServlet</servlet-name>

    <servlet-class>org.jboss.errai.bus.server.servlet.DefaultBlockingServlet</servlet-class>

    <load-on-startup>1</load-on-startup>

  </servlet>


  <servlet-mapping>

    <servlet-name>ErraiServlet</servlet-name>

    <url-pattern>*.erraiBus</url-pattern>

  </servlet-mapping>


  <context-param>

    <param-name>errai.properties</param-name>

    <param-value>/WEB-INF/errai.properties</param-value>

  </context-param>


  <context-param>

    <param-name>login.config</param-name>

    <param-value>/WEB-INF/login.config</param-value>

  </context-param>


  <context-param>

    <param-name>users.properties</param-name>

    <param-value>/WEB-INF/users.properties</param-value>

  </context-param>


</web-app>
In some cases it might be desirable to prevent the client bus from communicating with the server. One use case for this is when all communication with the server is handled using JAX-RS and the constant long polling requests for message exchange are not needed.
To turn off remote communication in the client bus the following JavaScript variable can be set in the HTML host page:
<script type="text/javascript">

  erraiBusRemoteCommunicationEnabled = false;

</script>
ErraiApp.properties acts both as a marker file for JARs that contain Errai-enabled GWT modules, and as a place to put configuration settings for those modules in the rare case that non-default configuration is necessary.
An
ErraiApp.properties
file must appear at the root of each classpath location that contains an Errai module.
The contents of JAR and directory classpath entries that do not contain an
ErraiApp.properties
are effectively invisible to Errai's classpath scanner.
ErraiApp.properties is usually left empty, but it can contain configuration settings for both the core of Errai and any of its extensions. Configuration properties defined and used by Errai components have keys that start with "
errai.
". Third party extensions should each choose their own prefix for keys in ErraiApp.properties.
In a non-trivial application, there will be several instances of ErraiApp.properties on the classpath (one per JAR file that contains Errai modules, beans, or portable classes).
Before using the configuration information from ErraiApp.properties, Errai reads the contents of every ErraiApp.properties on the classpath. The configuration information in all these files is merged together to form one set of key=value pairs.
If the same key appears in more than one ErraiApp.properties file, only one of the values will be associated with that key. The other values will be ignored. In future versions of Errai, this condition may be made into an error. It's best to avoid specifying the same configuration key in multiple ErraiApp.properties files.
Configuration properties related to marshalling are documented in the Errai Marshalling section on Manual Mapping .
errai.ioc.QualifyingMetaDataFactory specifies the fully-qualified class name of the QualifyingMetadataFactory implementation to use with Errai IoC.
errai.ioc.enabled.alternatives specifies a whitespace-separated list of fully-qualified class names for alternative beans . See Section 3.6, “Alternatives and Mocks” for details.
The ErraiService.properties file contains basic configuration for the bus itself. Unlike ErraiApp.properties, there should be at most one ErraiService.properties file on the classpath of a deployed application. If you do not need to set any properties to their non-default values, this file can be omitted from the deployment entirely.
errai.dispatcher.implementation specifies the dispatcher implementation to be used by the bus. There are two implementations which come with Errai out of the box: the
SimpleDispatcherand theAsyncDispatcher. See Section 12.5, “Dispatcher Implementations” for more information about the differences between the two.
errai.async_thread_pool_size specifies the total number of worker threads in the worker pool for handling and delivering messages. Adjusting this value does not have any effect if you are using the SimpleDispatcher.
errai.async.worker_timeout specifies the total amount of time (in seconds) that a service is given to finish processing an incoming message before the pool interrupts the thread and returns an error. Adjusting this value has no effect if you are using the SimpleDispatcher.
errai.bus.buffer_size The total size of the transmission buffer, in megabytes. If this attribute is specified along with
errai.bus.buffer_segment_count, then the segment count is inferred by the calculationbuffer_segment_count / buffer_size}. If {{errai.bus.buffer_segment_countis also defined, it will be ignored in the presence of this property. Default value: 32.
errai.bus.buffer_segment_size The transmission buffer segment size in bytes. This is the minimum amount of memory each message will consume while stored within the buffer. Defualt value: 8.
errai.bus.buffer_segment_count The number of segments in absolute terms. If this attribute is specified in the absence of
errai.bus.buffer_size, the buffer size is inferred by the calculationbuffer_segment_size / buffer_segment_count.
errai.bus.buffer_allocation_mode Buffer allocation mode. Allowed values are
directandheap. Direct allocation puts buffer memory outside of the JVM heap, while heap allocation uses buffer memory inside the Java heap. For most situations, heap allocation is preferable. However, if the application is data intensive and requires a substantially large buffer, it is preferable to use a direct buffer. From a throughput perspective, current JVM implementations pay about a 20% performance penalty for direct-allocated memory access. However, your application may show better scaling characteristics with direct buffers. Benchmarking under real load conditions is the only way to know the optimal setting for your use case and expected load. Default value:direct.
errai.authentication_adapter specifies the authentication modelAdapter the bus should use for determining whether calls should be serviced based on authentication and security principals.
errai.require_authentication_for_all indicates whether or not the bus should always require the use of authentication for all requests inbound for the bus. If this is turned on, an authentication model adapter must be defined, and any user must be authenticated before the bus will deliver any messages from the client to any service.
errai.auto_discover_services A boolean indicating whether or not the Errai bootstrapper should automatically scan for services. This property must be set to
trueif and only if Errai CDI is not on the classpath . The default value isfalse.
errai.auto_load_extensions A boolean indicating whether or not the Errai bootstrapper should automatically scan for extensions. The default value is
true.
##
## Request dispatcher implementation (default is SimpleDispatcher)
##
#errai.dispatcher_implementation=org.jboss.errai.bus.server.SimpleDispatcher
errai.dispatcher_implementation=org.jboss.errai.bus.server.AsyncDispatcher

#
## Worker pool size. This is the number of threads the asynchronous worker pool should provide for
processing
## incoming messages. This option is only valid when using the AsyncDispatcher implementation.
##
errai.async.thread_pool_size=5

##
## Worker timeout (in seconds). This defines the time that a single asychronous process may run,
before the worker pool
## terminates it and reclaims the thread. This option is only valid when using the AsyncDispatcher
implementation.
##
errai.async.worker.timeout=5

##
## Specify the Authentication/Authorization Adapter to use
##
#errai.authentication_adapter=org.jboss.errai.persistence.server.security.HibernateAuthenticationAdapter
#errai.authentication_adapter=org.jboss.errai.bus.server.security.auth.JAASAdapter

##
## This property indicates whether or not authentication is required for all communication with the
bus. Set this
## to 'true' if all access to your application should be secure.
##
#errai.require_authentication_for_all=true
Dispatchers encapsulate the strategy for taking messages that need to be delivered somewhere and seeing that they are delivered to where they need to go. There are two primary implementations that are provided with Errai, depending on your needs.
SimpleDispatcher is basic implementation that provides no asychronous delivery mechanism. Rather, when you configure the Errai to use this implementation, messages are delivered to their endpoints synchronously. The incoming HTTP thread will be held open until the messages are delivered.
While this sounds like it has almost no advantages, especially in terms of scalablity. Using the SimpleDispatcher can be far preferable when you're developing your application, as any errors and stack traces will be far more easily traced and some cloud services may not permit the use of threads in any case.
The AsyncDispatcher provides full asynchronous delivery of messages. When this dispatcher is used, HTTP threads will have control immediately returned upon dispatch of the message. This dispatcher provides far more efficient use of resources in high-load applications, and will significantly decrease memory and thread usage overall.
Errai has several different implementations for HTTP traffic to and from the bus. We provide a universally-compatible blocking implementation that provides fully synchronous communication to/from the server-side bus. Where this introduces scalability problems, we have implemented many webserver-specific implementations that take advantage of the various proprietary APIs to provide true asynchrony.
These included implementations are packaged at:
org.jboss.errai.bus.server.servlet
.
This is a universal, completely servlet spec (2.0) compliant, Servlet implementation. It provides purely synchronous request handling and should work in virtually any servlet container, unless there are restrictions on putting threads into sleep states.
The JBoss Comet support utilizes the JBoss Web AIO APIs (AS 5.0 and AS 6.0) to improve scalability and reduce thread usage. The HTTP, NIO, and AJP connectors are not supported. Use of this implementation requires use of the APR (Apache Portable Runtime).
The Jetty implementation leverages Jetty's continuations support, which allows for threadless pausing of port connections. This servlet implementation should work without any special configuration of Jetty.
Errai includes a bus monitoring application, which allows you to monitor all of the message exchange activity on the bus in order to help track down any potential problems It allows you to inspect individual messages to examine their state and structure.
To utilize the bus monitor, you'll need to include the _errai-tools _ package as part of your application's dependencies. When you run your application in development mode, you will simply need to add the following JVM options to your run configuration in order to launch the monitor:
-Derrai.tools.bus_monitor_attach=true
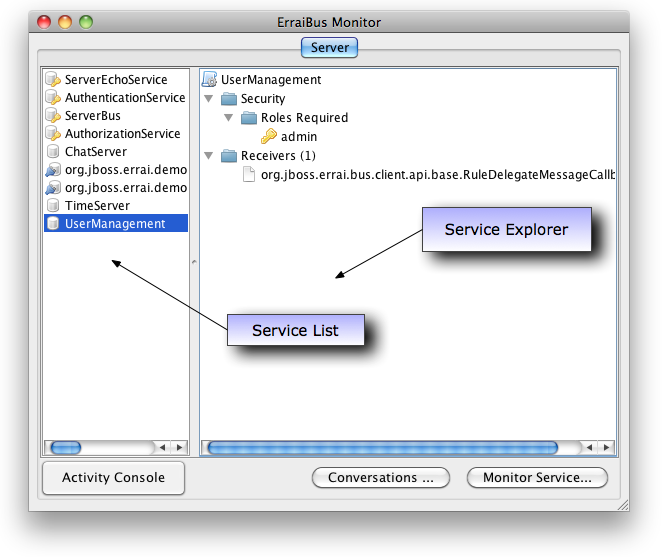
The monitor provides you a real-time perspective on what's going on inside the bus. The left side of the main screen lists the services that are currently available, and the right side is the service-explorer, which will show details about the service.
To see what's going on with a specific service, simply double-click on the service or highlight the service, then click "Monitor Service...". This will bring up the service activity monitor.
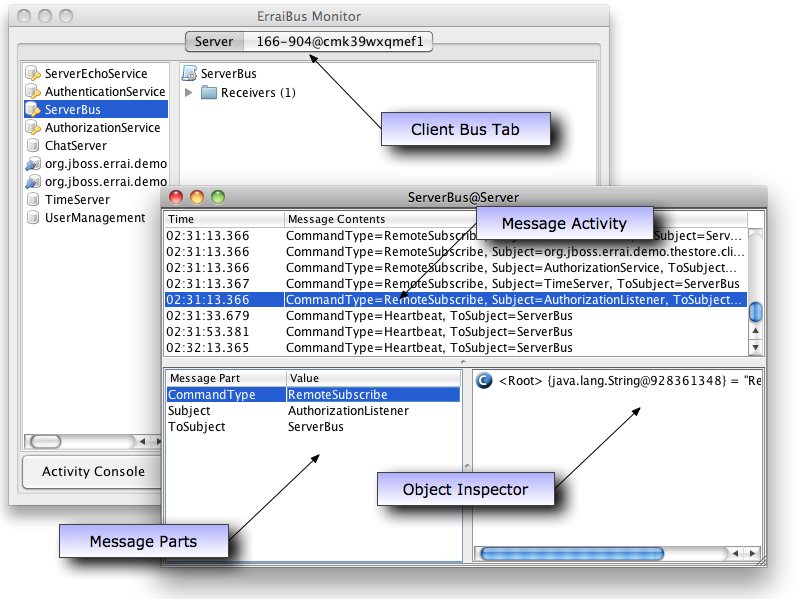
The service activity monitor will display a list of all the messages that were transmitted on the bus since the monitor became active. You do not need to actually have each specific monitor window open in order to actively monitor the bus activity. All activity on the bus is recorded.
The monitor allows you select individual messages, an view their individual parts. Clicking on a message part will bring up the object inspector, which will allow you to explore the state of any objects contained within the message, not unlike the object inspectors provided by debuggers in your favorite IDE. This can be a powerful tool for looking under the covers of your application.
This section explains the cause of and solution to some common problems that people encounter when building applications with Errai.
Of course, when lots of people trip over the same problem, it's probably because there is a deficiency in the framework! A FAQ list like this is just a band-aid solution. If you have suggestions for permanent fixes to these problems, please get in touch with us: file an issue in our issue tracker, chat with us on IRC, or post a suggestion on our forum.
But for now, on to the FAQ:
Possible symptoms:
uncaught exception: java.lang.RuntimeException: No proxy provider found for type: my.fully.qualified.ServiceName
Answer: Make sure the Section 12.3, “ErraiApp.properties” file is actually making it into your runtime classpath.
One common cause of this problem is a <resources> section in pom.xml that includes src/main/java (to expose .java sources to the GWT compiler) that does not also include src/main/resources as a resource path. You must include both explicitly:
<resources>

  <resource>

    <directory>src/main/java</directory>

  </resource>

  <resource>

    <directory>src/main/resources</directory>

  </resource>

</resources>
Answer: This error message means that your project has a (direct or indirect) subclass of JavaScriptObject that lacks a protected no-args constructor. All subtypes of JavaScriptObject (also known as overlay types ) must declare a protected no-args constructor, but the error message could be much clearer. There is an issue filed in the GWT project's bug tracker for improving the error message: GWT issue 3383 .
This chapter contains important information for migrating to newer versions of Errai. If you experience any problems, don't hesitate to get in touch with us. See Chapter 18, Reporting problems .
The first issues that will arise after replacing the jars or after changing the version numbers in the
pom.xml
are unresolved package imports. This is due to refactorings that became necessary when the project grew. Most of these import problems can be resolved automatically by modern IDEs (Organize Imports). So, this should replace
org.jboss.errai.bus.client.protocols.*
with
org.jboss.errai.common.client.protocols.*
for example.
The following is a list of manual steps that have to be carried out when upgrading:
@ExposedEntity became @Portable (
org.jboss.errai.common.client.api.annotations.Portable). See Chapter 5, Marshalling for details.
The @Conversational annotation must now target the event objects themselves, not the observer methods of the events. So an event type is either conversational or not; you no longer specify that listeners receive arbitrary events in a conversational context. See the Conversational Events section of the CDI chapter for details.
Errai CDI projects must now use the
SimpleDispatcherinstead of theAsynDispatcher. This has to be configured in Section 12.4, “ErraiService.properties” .
The bootstrap listener (configured in
WEB-INF/web.xml) for Errai CDI has changed (org.jboss.errai.container.DevModeCDIBootstrapis noworg.jboss.errai.container.CDIServletStateListener).
gwt 2.3.0 or newer must be used and replace older versions.
mvel2 2.1.Beta8 or newer must be used and replace older versions.
weld 1.1.5.Final or newer must be used and replace older versions.
slf4j 1.6.1 or newer must be used and replace older versions.
This step can be skipped if Maven is used to build the project. If the project is NOT built using Maven, the following jar files have to be added manually to project's build/class path: errai-common-2.x.jar, errai-marshalling-2.x.jar, errai-codegen-2.x.jar, netty-4.0.0.Alpha1.errai.r1.jar.
If the project was built using an early version of an Errai archetype the configuration of the maven-gwt-plugin has to be modified to contain the
<hostedWebapp>path-to-your-standard-webapp-folder</hostedWebapp>. This is usually eitherwarorsrc/main/webapp.
The following is a list of manual steps that have to be carried out when upgrading from a 2.0.Beta version to 2.0.CR1 or 2.0.Final:
Starting with 2.0.CR1 the default for automatic service discovery has been changed in favour of CDI based applications. That means it has to be explicitly turned on for plain bus applications (Errai applications that do not use Errai-CDI). Not doing so will result in
NoSubscribersToDeliverToexceptions. The snippet below shows how to activate automatic service discovery:Example 15.1. web.xml
<servlet>

  <servlet-name>ErraiServlet</servlet-name>

  <servlet-class>org.jboss.errai.bus.server.servlet.DefaultBlockingServlet</servlet-class>

  <init-param>

    <param-name>auto-discover-services</param-name>

    <param-value>true</param-value>

  </init-param>

  <load-on-startup>1</load-on-startup>

</servlet>
The
jboss7-supportmodule was deleted and is no longer needed as a dependency.
The distribution packages can be downloaded from jboss.org http://jboss.org/errai/Downloads.html
Errai is currently managed using Github. You can clone our repositories from http://github.com/errai .
If you run into trouble don't hesitate to get in touch with us:
JIRA Issue Tracking: https://jira.jboss.org/jira/browse/ERRAI
User Forum: http://community.jboss.org/en/errai?view=discussions
Mailing List: http://jboss.org/errai/MailingLists.html
Errai is distributed under the terms of the Apache License, Version 2.0. See the full Apache license text .