JBoss.orgCommunity Documentation
Java Content Repository and Extension services
Copyright © 2012 eXoPlatform SAS
- I. eXoJCR
- 1. Introduction in eXoJCR
- 2. Why use JCR?
- 3. eXo JCR Implementation
- 4. Advantages of eXo JCR
- 5. Compatibility Levels
- 6. Using JCR
- 7. JCR Extensions
- 8. eXo JCR Application Model
- 9. NodeType Registration
- 10. Registry Service
- 11. Namespace altering
- 12. Node Types and Namespaces
- 13. eXo JCR configuration
- 13.1. Related documents
- 13.2. Portal and Standalone configuration
- 13.3. JCR Configuration
- 13.4. Repository service configuration (JCR repositories configuration)
- 13.5. Repository configuration:
- 13.6. Workspace configuration:
- 13.7. Workspace data container configuration:
- 13.8. Value Storage plugin configuration (for data container):
- 13.9. Initializer configuration (optional):
- 13.10. Cache configuration:
- 13.11. Query Handler configuration:
- 13.12. Lock Manager configuration:
- 13.13. Help application to prohibit the use of closed sessions
- 13.14. Getting the effective configuration at Runtime of all the repositories
- 14. Multilanguage support in eXo JCR RDB backend
- 15. How to host several JCR instances on the same database instance?
- 16. Search Configuration
- 17. JCR Configuration persister
- 18. JDBC Data Container Config
- 19. External Value Storages
- 20. Workspace Data Container
- 21. REST Services on Groovy
- 22. Configuring JBoss AS with eXo JCR in cluster
- 23. JBoss Cache configuration
- 24. LockManager configuration
- 25. QueryHandler configuration
- 26. JBossTransactionsService
- 27. TransactionManagerLookup
- 28. Infinispan integration
- 29. RepositoryCreationService
- 30. JCR Query Usecases
- 30.1. Intro
- 30.2. Query Lifecycle
- 30.3. Query result settings
- 30.4. Type Constraints
- 30.5. Property Constraints
- 30.6. Path Constraint
- 30.7. Ordering specifing
- 30.8. Fulltext Search
- 30.9. Indexing rules and additional features
- 30.10. Query Examples
- 30.10.1. SetOffset and SetLimit
- 30.10.2. Finding All Nodes
- 30.10.3. Finding Nodes by Primary Type
- 30.10.4. Finding Nodes by Mixin Type
- 30.10.5. Property Comparison
- 30.10.6. LIKE Constraint
- 30.10.7. Escaping in LIKE Statements
- 30.10.8. NOT Constraint
- 30.10.9. AND Constraint
- 30.10.10. OR Constraint
- 30.10.11. Property Existence Constraint
- 30.10.12. Finding Nodes in a Case-Insensitive Way
- 30.10.13. Date Property Comparison
- 30.10.14. Node Name Constraint
- 30.10.15. Multivalue Property Comparison
- 30.10.16. Exact Path Constraint
- 30.10.17. Child Node Constraint
- 30.10.18. Finding All Descendant Nodes
- 30.10.19. Sorting Nodes by Property
- 30.10.20. Ordering by Descendant Nodes Property (XPath only)
- 30.10.21. Ordering by Score
- 30.10.22. Ordering by Path or Name
- 30.10.23. Fulltext Search by Property
- 30.10.24. Fulltext Search by All Properties in Node
- 30.10.25. Ignoring Accent Symbols. New Analyzer Setting.
- 30.10.26. Finding nt:file node by content of child jcr:content node
- 30.10.27. Changing Priority of Node
- 30.10.28. Removing Nodes Property From Indexing Scope
- 30.10.29. Regular Expression as Property Name in Indexing Rules
- 30.10.30. High-lighting Result of Fulltext Search
- 30.10.31. Searching By Synonim
- 30.10.32. Checking the spelling of Phrase
- 30.10.33. Finding Similar Nodes
- 30.11. Tips and tricks
- 31. Searching Repository Content
- 32. Fulltext Search And Affecting Settings
- 33. JCR API Extensions
- 34. WebDAV
- 35. FTP
- 36. eXo JCR Backup Service
- 37. HTTPBackupAgent and backup client
- 37.1. Introduction
- 37.2. HTTPBackupAgent
- 37.3. Backup Client
- 37.4. Backup Client Usage
- 37.4.1. Building application
- 37.4.2. Running application
- 37.4.3. Getting information about backup service
- 37.4.4. Starting full backup
- 37.4.5. Starting full and incremental backup on a single workspace
- 37.4.6. Getting information about the current backups (in progress)
- 37.4.7. Getting information about the current backup by 'backup_id'
- 37.4.8. Stopping backup by "backup_id"
- 37.4.9. Getting information about the completed (ready to restore) backups
- 37.4.10. Restoring to workspace
- 37.4.11. Getting information about the current restore
- 37.4.12. Restoring workspace and remove exists workspace
- 37.4.13. Restoring workspace from backup set
- 37.4.14. Restoring workspace from backup set and remove exists workspace
- 37.4.15. Restoring workspace with original configuation
- 37.4.16. Restoring workspace with original configuation and remove exists workspace
- 37.4.17. Restoring workspace from backup set with original configuation
- 37.4.18. Restoring workspace from backup set with original configuation and remove exists workspace
- 37.4.19. Restoring repository
- 37.4.20. Restoring repository and remove exists repository
- 37.4.21. Restoring repository from backup set
- 37.4.22. Restoring repository from backup set and remove exists repository
- 37.4.23. Restoring repository with original configuation
- 37.4.24. Restoring repository with original configuation and remove exists repository
- 37.4.25. Restoring repository from backup set with original configuation
- 37.4.26. Restoring repository from backup set with original configuation and remove exists repository
- 37.5. Full example about creating backup and restoring it for workspace 'backup'
- 37.6. Full example about creating backup and restoring it for repository 'repository'
- 38. Use external backup tool
- 39. eXo JCR statistics
- 40. Checking repository integrity and consistency
- 41. JTA
- 42. The JCA Resource Adapter
- 43. Access Control
- 44. Access Control Extension
- 45. Link Producer Service
- 46. Binary Values Processing
- 47. JCR Resources:
- 48. JCR Workspace Data Container (architecture contract)
- 49. How-to implement Workspace Data Container
- 50. DBCleanService
- 51. JCR Performance Tuning Guide
- II. eXoKernel
- 52. eXo Kernel
- 53. ExoContainer info
- 54. Service Configuration for Beginners
- 55. Service Configuration in Detail
- 56. Container Configuration
- 57. Inversion Of Control
- 58. Services Wiring
- 59. Component Plugin Priority
- 60. Understanding the ListenerService
- 61. Initial Context Binder
- 62. Job Scheduler Service
- 63. eXo Cache
- 64. TransactionService
- 64.1. Base information
- 64.2. Existing TransactionService implementations
- 64.2.1. JOTM in standalone mode
- 64.2.2. Generic TransactionService based on the TransactionManagerLookup of JBoss Cache
- 64.2.3. Specific GenericTransactionService for JBoss Cache and Arjuna
- 64.2.4. Generic TransactionService based on the TransactionManagerLookup of Infinispan
- 64.2.5. Specific GenericTransactionService for Infinispan and Arjuna
- 64.2.6. A very specific TransactionService for JBoss AS
- 64.2.7. TransactionsEssentials in standalone mode
- 65. The data source provider
- 66. JNDI naming
- 67. Logs configuration
- 68. Manageability
- 69. ListenerService
- 70. RPC Service
- III. eXoCore
- 71. eXo Core
- 72. Database Creator
- 73. Security Service
- 74. Spring Security Integration
- 75. Organization Service
- 76. Organization Service Initializer
- 77. Organization Listener
- 78. Update ConversationState when user's Membership changed
- 79. DB Schema creator service (JDBC implementation)
- 80. Database Configuration for Hibernate
- 81. LDAP Configuration
- 82. Organization Service TCK tests configuration
- 83. Tika Document Reader Service
- 84. Digest Authentication
- IV. eXoWS
- V. Frequently Asked Question
- VI. eXo JCR with GateIn
- 92. How to extend my GateIn instance?
- 92.1. Introduction
- 92.2. Prerequisites
- 92.2.1. Removing all the hard coded portal container name (i.e. "portal")
- 92.2.2. Removing all the hard coded rest context name (i.e. "rest")
- 92.2.3. Removing all the hard coded realm name (i.e. "exo-domain")
- 92.2.4. Making your Http Filters compatible
- 92.2.5. Making your HttpServlets compatible
- 92.2.6. Making your HttpSessionListeners compatible
- 92.2.7. Use init tasks if you need a PortalContainer to initialize an Http Filter or an HttpServlet
- 92.2.8. Making your LoginModules compatible
- 92.2.9. Avoiding static modifier on component dependency
- 92.2.10. Avoid component initialization based on component dependency in the constructor
- 92.3. FAQ
- 92.3.1. What has changed since the previous versions?
- 92.3.2. What is the main purpose of a portal extension?
- 92.3.3. What is the main purpose of the starter?
- 92.3.4. How a portal and a portal container are related?
- 92.3.5. How to define and register a PortalContainerDefinition?
- 92.3.6. How the platform interprets the dependency order defined into the PortalContainerDefinition?
- 92.3.7. How to change the ServletContext name, the realm name and/or the rest context name of my portal without using a PortalContainerDefinition?
- 92.3.8. How to add new configuration file to a given portal from a war file?
- 92.3.9. How to create/define a portal extension?
- 92.3.10. How to deploy a portal extension?
- 92.3.11. How to create/define a new portal?
- 92.3.12. How to deploy a new portal?
- 92.3.13. How to import properly a configuration file using the prefix "war:"?
- 92.3.14. How to avoid duplicating configuration files just to rename a simple value?
- 92.3.15. How to add or change a Repository and/or a Workspace?
- 92.3.16. How to add new ResourceBundles to my portal?
- 92.3.17. How to overwrite existing ResourceBundles in my portal?
- 92.3.18. How to replace a groovy template of my portal?
- 92.3.19. How to add new Portal Configurations, Navigations, Pages or Portlet Preferences to my portal?
- 92.3.20. How to add new Http Filters to my portal without modifying the portal binary?
- 92.3.21. How to add new HttpSessionListeners and/or ServletContextListeners to my portal without modifying the portal binary?
- 92.3.22. How to add new HttpServlet to my portal without modifying the portal binary?
- 92.3.23. How to override or add a Context Parameter to my portal without modifying the portal binary?
- 92.3.24. Where can I found an example of how to extend my portal?
- 92.3.25. How to deploy the sample extension?
- 92.3.26. Where can I find an example of how to create a new portal?
- 92.3.27. How to deploy the sample portal?
- 92.3.28. I get "java.lang.IllegalStateException: No pre init tasks can be added to the portal container 'portal', because it has already been initialized." what can I do to fix it?
- 92.4. Recommendations
- 93. How to use AS Managed DataSource under JBoss AS
Table of Contents
- 1. Introduction in eXoJCR
- 2. Why use JCR?
- 3. eXo JCR Implementation
- 4. Advantages of eXo JCR
- 5. Compatibility Levels
- 6. Using JCR
- 7. JCR Extensions
- 8. eXo JCR Application Model
- 9. NodeType Registration
- 10. Registry Service
- 11. Namespace altering
- 12. Node Types and Namespaces
- 13. eXo JCR configuration
- 13.1. Related documents
- 13.2. Portal and Standalone configuration
- 13.3. JCR Configuration
- 13.4. Repository service configuration (JCR repositories configuration)
- 13.5. Repository configuration:
- 13.6. Workspace configuration:
- 13.7. Workspace data container configuration:
- 13.8. Value Storage plugin configuration (for data container):
- 13.9. Initializer configuration (optional):
- 13.10. Cache configuration:
- 13.11. Query Handler configuration:
- 13.12. Lock Manager configuration:
- 13.13. Help application to prohibit the use of closed sessions
- 13.14. Getting the effective configuration at Runtime of all the repositories
- 14. Multilanguage support in eXo JCR RDB backend
- 15. How to host several JCR instances on the same database instance?
- 16. Search Configuration
- 17. JCR Configuration persister
- 18. JDBC Data Container Config
- 19. External Value Storages
- 20. Workspace Data Container
- 21. REST Services on Groovy
- 22. Configuring JBoss AS with eXo JCR in cluster
- 23. JBoss Cache configuration
- 24. LockManager configuration
- 25. QueryHandler configuration
- 26. JBossTransactionsService
- 27. TransactionManagerLookup
- 28. Infinispan integration
- 29. RepositoryCreationService
- 30. JCR Query Usecases
- 30.1. Intro
- 30.2. Query Lifecycle
- 30.3. Query result settings
- 30.4. Type Constraints
- 30.5. Property Constraints
- 30.6. Path Constraint
- 30.7. Ordering specifing
- 30.8. Fulltext Search
- 30.9. Indexing rules and additional features
- 30.10. Query Examples
- 30.10.1. SetOffset and SetLimit
- 30.10.2. Finding All Nodes
- 30.10.3. Finding Nodes by Primary Type
- 30.10.4. Finding Nodes by Mixin Type
- 30.10.5. Property Comparison
- 30.10.6. LIKE Constraint
- 30.10.7. Escaping in LIKE Statements
- 30.10.8. NOT Constraint
- 30.10.9. AND Constraint
- 30.10.10. OR Constraint
- 30.10.11. Property Existence Constraint
- 30.10.12. Finding Nodes in a Case-Insensitive Way
- 30.10.13. Date Property Comparison
- 30.10.14. Node Name Constraint
- 30.10.15. Multivalue Property Comparison
- 30.10.16. Exact Path Constraint
- 30.10.17. Child Node Constraint
- 30.10.18. Finding All Descendant Nodes
- 30.10.19. Sorting Nodes by Property
- 30.10.20. Ordering by Descendant Nodes Property (XPath only)
- 30.10.21. Ordering by Score
- 30.10.22. Ordering by Path or Name
- 30.10.23. Fulltext Search by Property
- 30.10.24. Fulltext Search by All Properties in Node
- 30.10.25. Ignoring Accent Symbols. New Analyzer Setting.
- 30.10.26. Finding nt:file node by content of child jcr:content node
- 30.10.27. Changing Priority of Node
- 30.10.28. Removing Nodes Property From Indexing Scope
- 30.10.29. Regular Expression as Property Name in Indexing Rules
- 30.10.30. High-lighting Result of Fulltext Search
- 30.10.31. Searching By Synonim
- 30.10.32. Checking the spelling of Phrase
- 30.10.33. Finding Similar Nodes
- 30.11. Tips and tricks
- 31. Searching Repository Content
- 32. Fulltext Search And Affecting Settings
- 33. JCR API Extensions
- 34. WebDAV
- 35. FTP
- 36. eXo JCR Backup Service
- 37. HTTPBackupAgent and backup client
- 37.1. Introduction
- 37.2. HTTPBackupAgent
- 37.3. Backup Client
- 37.4. Backup Client Usage
- 37.4.1. Building application
- 37.4.2. Running application
- 37.4.3. Getting information about backup service
- 37.4.4. Starting full backup
- 37.4.5. Starting full and incremental backup on a single workspace
- 37.4.6. Getting information about the current backups (in progress)
- 37.4.7. Getting information about the current backup by 'backup_id'
- 37.4.8. Stopping backup by "backup_id"
- 37.4.9. Getting information about the completed (ready to restore) backups
- 37.4.10. Restoring to workspace
- 37.4.11. Getting information about the current restore
- 37.4.12. Restoring workspace and remove exists workspace
- 37.4.13. Restoring workspace from backup set
- 37.4.14. Restoring workspace from backup set and remove exists workspace
- 37.4.15. Restoring workspace with original configuation
- 37.4.16. Restoring workspace with original configuation and remove exists workspace
- 37.4.17. Restoring workspace from backup set with original configuation
- 37.4.18. Restoring workspace from backup set with original configuation and remove exists workspace
- 37.4.19. Restoring repository
- 37.4.20. Restoring repository and remove exists repository
- 37.4.21. Restoring repository from backup set
- 37.4.22. Restoring repository from backup set and remove exists repository
- 37.4.23. Restoring repository with original configuation
- 37.4.24. Restoring repository with original configuation and remove exists repository
- 37.4.25. Restoring repository from backup set with original configuation
- 37.4.26. Restoring repository from backup set with original configuation and remove exists repository
- 37.5. Full example about creating backup and restoring it for workspace 'backup'
- 37.6. Full example about creating backup and restoring it for repository 'repository'
- 38. Use external backup tool
- 39. eXo JCR statistics
- 40. Checking repository integrity and consistency
- 41. JTA
- 42. The JCA Resource Adapter
- 43. Access Control
- 44. Access Control Extension
- 45. Link Producer Service
- 46. Binary Values Processing
- 47. JCR Resources:
- 48. JCR Workspace Data Container (architecture contract)
- 49. How-to implement Workspace Data Container
- 50. DBCleanService
- 51. JCR Performance Tuning Guide
Java Content Repository API as well as other Java language related standards is created within the Java Community Process http://jcp.org/ as a result of collaboration of an expert group and the Java community. It is known as JSR-170 (Java Specification Request).
The main purpose of content repository is to maintain the data. The heart of CR is the data model:
The main data storage abstraction of JCR's data model is a workspace
Each repository should have one or more workspaces
The content is stored in a workspace as a hierarchy of items
Each workspace has its own hierarchy of items
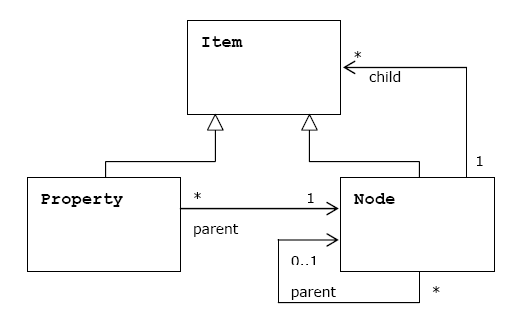
Node is intended to support the data hierarchy. It is of type using namespaced names which allows the content to be structured in accordance with standardized constraints. A node may be versioned through an associated version graph (optional feature)
Property stored data are values of predefined types (String, Binary, Long, Boolean, Double, Date, Reference, Path).
It is important to note that the data model for the interface (the repository model) is rarely the same as the data models used by the repository's underlying storage subsystems. The repository knows how to make the client's changes persistent because that is part of the repository configuration, rather than part of the application programming task.
JCR (Java Content Repository) is a java interface used to access contents that are not only web contents, but also other hierarchically stored data. The content is stored in a repository. The repository can be a file system, a relational database or an XML document. The internal structure of JCR data looks similar to an XML document, that means a document tree with nodes and data, but with a small difference, in JCR the data are stored in "property items".
Or better to cite the specification of JCR: "A content repository is a high-level information management system that is a superset of traditional data repositories."
How do you know the data of your website are stored? The images are probably in a file system, the meta data are in some dedicated files - maybe in XML - the text documents and pdfs are stored in different folders with the meta data in an other place (a database?) and in a proprietary structure. How do you manage to update these data and how do you manage the access rights? If your boss asks you to manage different versions of each document or not? The larger your website is, the more you need a Content Management Systems (CMS) which tackles all these issues.
These CMS solutions are sold by different vendors and each vendor provides its own API for interfacing the proprietary content repository. The developers have to deal with this and need to learn the vendor-specific API. If in the future you wish to switch to a different vendor, everything will be different and you will have a new implementation, a new interface, etc.
JCR provides a unique java interface for interacting with both text and binary data, for dealing with any kind and amount of meta data your documents might have. JCR supplies methods for storing, updating, deleting and retrieving your data, independent of the fact if this data is stored in a RDBMS, in a file system or as an XML document - you just don't need to care about. The JCR interface is also defined as classes and methods for searching, versioning, access control, locking, and observation.
Furthermore, an export and import functionality is specified so that a switch to a different vendor is always possible.
eXo fully complies a JCR standard JSR 170; therefore with eXo JCR you can use a vendor-independent API. It means that you could switch any time to a different vendor. Using the standard lowers your lifecycle cost and reduces your long term risk.
Of course eXo does not only offer JCR, but also the complete solution for ECM (Enterprise Content Management) and for WCM (Web Content Management).
In order to further understand the theory of JCR and the API, please refer to some external documents about this standard:
Roy T. Fielding, JSR 170 Overview: Standardizing the Content Repository Interface (March 13, 2005)
Benjamin Mestrallet, Tuan Nguyen, Gennady Azarenkov, Francois Moron and Brice Revenant eXo Platform v2, Portal, JCR, ECM, Groupware and Business Intelligence. (January 2006)
Access Control Configuration, Export Import Implementation, External Value Storages, JDBC Data Container config, Locking, Multilanguage support, Node types and Namespaces, Repository and Workspace management, Repository container life cycle, Workspace, Persistence Storage Workspace, SimpleDB storage
eXo Repository Service is a standard eXo service and is a registered IoC component, i.e. can be deployed in some eXo Containers (see Service configuration for details). The relationships between components are shown in the picture below:
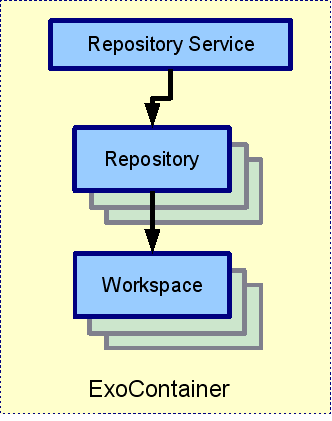
eXo Container: some subclasses of org.exoplatform.container.ExoContainer (usually org.exoplatform.container.StandaloneContainer or org.exoplatform.container.PortalContainer) that holds a reference to Repository Service.
Repository Service: contains information about repositories. eXo JCR is able to manage many Repositories.
Repository: Implementation of javax.jcr.Repository. It holds references to one or more Workspace(s).
Workspace: Container of a single rooted tree of Items. (Note that here it is not exactly the same as javax.jcr.Workspace as it is not a per Session object).
Usual JCR application use case includes two initial steps:
Obtaining Repository object by getting Repository Service from the current eXo Container (eXo "native" way) or via JNDI lookup if eXo repository is bound to the naming context using (see Service configuration for details).
Creating javax.jcr.Session object that calls Repository.login(..).
The following diagram explains which components of eXo JCR implementation are used in a data flow to perform operations specified in JCR API
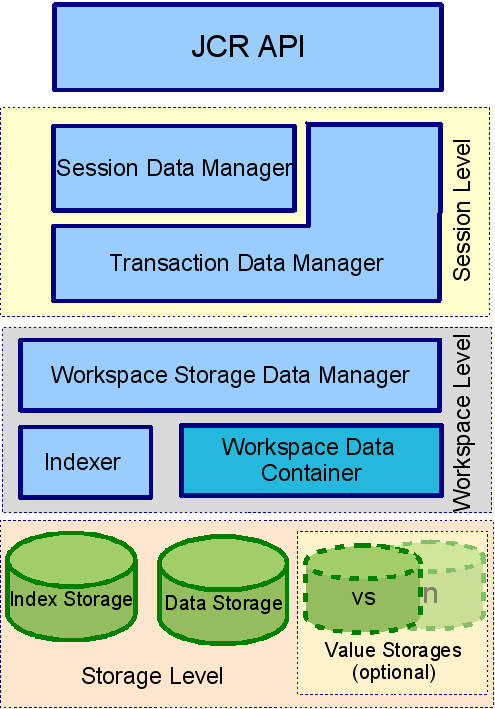
The Workspace Data Model can be split into 4 levels by data isolation and value from the JCR model point of view.
eXo JCR core implements JCR API interfaces, such as Item, Node, Property. It contains JCR "logical" view on stored data.
Session Level: isolates transient data viewable inside one JCR Session and interacts with API level using eXo JCR internal API.
Session Data Manager: maintains transient session data. With data access/ modification/ validation logic, it contains Modified Items Storage to hold the data changed between subsequent save() calling and Session Items Cache.
Transaction Data Manager: maintains session data between save() and transaction commit/ rollback if the current session is part of a transaction.
Workspace Level: operates for particular workspace shared data. It contains per-Workspace objects
Workspace Storage Data Manager: maintains workspace data, including final validation, events firing, caching.
Workspace Data Container: implements physical data storage. It allows different types of backend (like RDB, FS files, etc) to be used as a storage for JCR data. With the main Data Container, other storages for persisted Property Values can be configured and used.
Indexer: maintains workspace data indexing for further queries.
Storage Level: Persistent storages for:
JCR Data
Indexes (Apache Lucene)
Values (e.g., for BLOBs) if different from the main Data Container
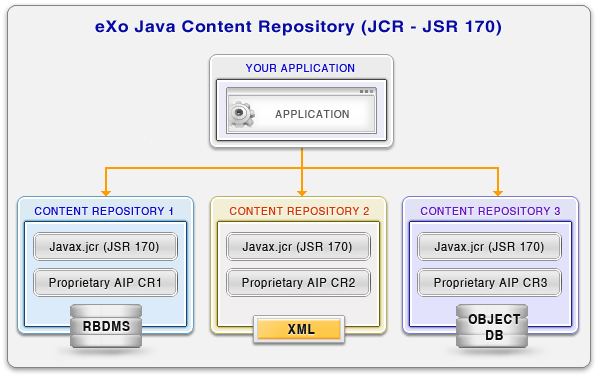
Data repository and application are isolated from each other so an application developer should not learn the details of particular data storage's interfaces, but can need to concentrate on business logic of a particular application built on the top of JCR.
Repositories can be simply exchanged between different applications without changing the applications themselves. This is the matter of the repository configuration.
Data storage types/ versions can be changed and also, different types of data storages can be combined in one repository data model (of course, the complexity and work of building interfaces between the repository and its data storage don't disappear but these changes are isolated in the repository and thus manageable from the point of view of the customer).
Using a standardized repository for content management reduces the risk of dependence on a particular software vendor and proprietary API.
Costs for maintaining and developing a content repository based custom application is significantly lower than developing and supporting your own interfaces and maintaining your own data repository applications (staff can be trained once, it is possible to take help from the community and the third party consulters).
Thanks to flexible layered JCR API (see below), it is possible to fit the legacy storage subsystem into new interfaces and decrease the costs and the risk of losing data.
An extension to the API exists as we can see in the following layer schema.
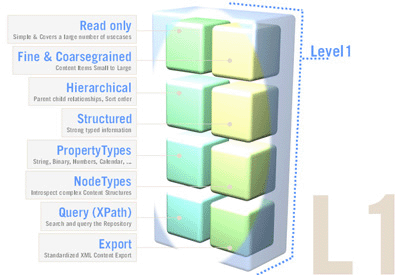
The Java Content Repository specification JSR-170 has been split into two compliance levels as well as a set of optional features. Level 1 defines a read-only repository, level 2 defines methods for writing content and bidirectional interaction with the repository.
eXo JCR supports JSR-170 level 1 and level 2 and all optional features. The recent JSR-283 is not yet supported.
Level 1 includes read-only functionality for very simple repositories. It is useful to port an existing data repository and convert it to a more advanced form step by step. JCR uses a well-known Session abstraction to access the repository data (similar to the sessions we have in OS, web, etc).
The features of level 1:
Initiating a session calling login method with the name of desired workspace and client credentials. It involves some security mechanisms (JAAS) to authenticate the client and in case the client is authorized to use the data from a particular workspace, he can retrieve the session with a workspace tied to it.
Using the obtained session, the client can retrieve data (items) by traversing the tree, directly accessing a particular item (requesting path or UUID) or traversing the query result. So an application developer can choose the "best" form depending on the content structure and desired operation.
Reading property values. All content of a repository is ultimately accessed through properties and stored in property values of predefined types (Boolean, Binary Data, Double, Long, String) and special types Name, Reference, and Path. It is possible to read property value without knowing its real name as a primary item.
Export to XML. Repository supports two XML/JCR data model mappings: system and doc view. The system view provides complete XML serialization without loss of information and is somewhat difficult for a human to read. In contrast, the document view is well readable but does not completely reflect the state of repository, it is used for Xpath queries.
Query facility with Xpath syntax. Xpath, originally developed for XML, suits the JCR data model as well because the JCR data model is very close to XML's one. It is applied to JCR as it would be applied to the document view of the serialized repository content, returning a table of property names and content matching the query.
Discovery of available node types. Every node should have only one primary node type that defines names, types and other characteristics of child nodes and properties. It also can have one or more mixin data types that defines additional characteristics. Level 1 provides methods for discovering available in repository node types and node types of a concrete node.
Transient namespace remapping. Item name can have prefix, delimited by a single ':' (colon) character that indicates the namespace of this name. It is patterned after XML namespaces, prefix is mapped to URI to minimize names collisions. In Level 1, a prefix can be temporary overridden by another prefix in the scope of a session.
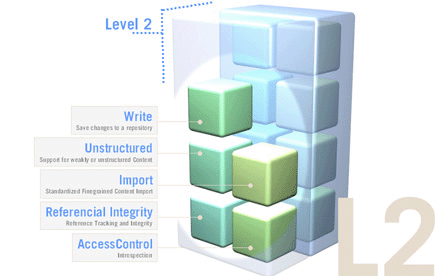
JCR level 2 includes reading/ writing content functionality, importing other sources and managing content definition and structuring using extensible node types.
In addition to the features of the Level 1, it also supports the following major features:
Adding, moving, copying and removing items inside workspace and moving, copying and cloning items between workspaces. The client can also compare the persisted state of an item with its unsaved states and either save the new state or discard it.
Modifying and writing value of properties. Property types are checked and can be converted to the defined format.
Importing XML document into the repository as a tree of nodes and properties. If the XML document is an export of JCR system view, the content of repository can be completely restored. If this is not the case, the document is interpreted as a document view and the import procedure builds a tree of JCR nodes and properties that matches the tree structure of the XML document.
Assigning node types to nodes. The primary node type is assigned when adding a node. This can be done automatically based on the parent node type definition and mixin node types.
Persistent namespaces changes. Adding, changing and removing namespaces stored in the namespace registry, excluding built-in namespaces required by JCR.
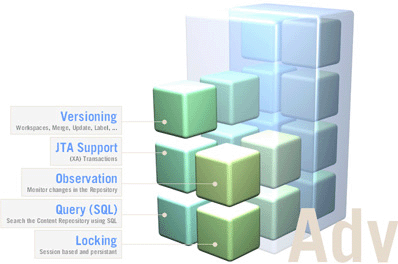
On the top of Level 1 or Level 2, a number of optional features are defined for a more advanced repository functionality. This includes functions such as Versioning, (JTA) Transactions, Query using SQL, Explicit Locking and Content Observation. eXo JCR supports all optional features.
A javax.jcr.Repository object can be obtained by:
Using the eXo Container "native" mechanism. All Repositories are kept with a single RepositoryService component. So it can be obtained from eXo Container, described as the following:
            RepositoryService repositoryService = (RepositoryService) container.getComponentInstanceOfType(RepositoryService.class);
  Repository repository = repositoryService.getRepository("repositoryName");
Using the eXo Container "native" mechanism with a thread local saved "current" repository (especially if you plan to use a single repository which covers more than 90% of use cases)
  // set current repository at initial time
  RepositoryService repositoryService = (RepositoryService) container.getComponentInstanceOfType(RepositoryService.class);
  repositoryService.setCurrentRepositoryName("repositoryName");
  ....
  // retrieve and use this repository
  Repository repository = repositoryService.getCurrentRepository();
Using JNDI as specified in JSR-170. This way you have to configure the reference (see eXo JNDI Naming configuration )
  Context ctx = new InitialContext();
Repository repository =(Repository) ctx.lookup("repositoryName");Remember that javax.jcr.Session is not a thread safe object. Never try to share it between threads.
Do not use System session from the user related code because a system session has unlimited rights. Call ManageableRepository.getSystemSession() from process related code only.
Call Session.logout() explicitly to release resources assigned to the session.
When designing your application, take care of the Session policy inside your application. Two strategies are possible: Stateless (Session per business request) and Stateful (Session per User) or some mix.
(one-shot logout for all opened sessions)
Use org.exoplatform.services.jcr.ext.common.SessionProvider which is responsible for caching/obtaining your JCR Sessions and closing all opened sessions at once.
public class SessionProvider {

  /**
   * Creates a SessionProvider for a certain identity
   * @param cred
   */
  public SessionProvider(Credentials cred)

  /**
   * Gets the session from internal cache or creates and caches a new one
   */
  public Session getSession(String workspaceName, ManageableRepository repository)
    throws LoginException, NoSuchWorkspaceException, RepositoryException

  /**
   * Calls a logout() method for all cached sessions
   */
  public void close()

  /**
   * a Helper for creating a System session provider
   * @return System session
   */
  public static SessionProvider createSystemProvider()

  /**
   * a Helper for creating an Anonimous session provider
   * @return System session
   */
  public static SessionProvider createAnonimProvider()

}
The SessionProvider is per-request or per-user object, depending on your policy. Create it with your application before performing JCR operations, use it to obtain the Sessions and close at the end of an application session(request). See the following example:
// (1) obtain current javax.jcr.Credentials, for example get it from AuthenticationService
Credentials cred = ....

// (2) create SessionProvider for current user
SessionProvider sessionProvider = new SessionProvider(ConversationState.getCurrent());

// NOTE: for creating an Anonymous or System Session use  the corresponding static SessionProvider.create...() method
// Get appropriate Repository as described in "Obtaining Repository object" section for example
ManageableRepository repository = (ManageableRepository) ctx.lookup("repositoryName");

// get an appropriate workspace's session
Session session = sessionProvider.getSession("workspaceName", repository);

 .........
// your JCR code
 .........

 // Close the session provider
sessionProvider.close(); As shown above, creating the SessionProvider involves multiple steps and you may not want to repeat them each time you need to get a JCR session. In order to avoid all this plumbing code, we provide the SessionProviderService whose goal is to help you to get a SessionProvider object.
The org.exoplatform.services.jcr.ext.app.SessionProviderService interface is defined as follows:
public interface SessionProviderService {
  void setSessionProvider(Object key, SessionProvider sessionProvider);
  SessionProvider getSessionProvider(Object key);
  void removeSessionProvider(Object key);
}
Using this service is pretty straightforward, the main contract of an implemented component is getting a SessionProvider by key. eXo provides two implementations :
Table 6.1. SessionProvider implementations
| Implementation | Description | Typical Use |
|---|---|---|
| org.exoplatform.services.jcr.ext.app.MapStoredSessionProviderService | per-user style : keeps objects in a Map | per-user. The usual practice uses a user's name or Credentials as a key. |
| org.exoplatform.services.jcr.ext.app.ThreadLocalSessionProviderService | per-request style : keeps a single SessionProvider in a static ThreadLocal variable | Always use null for the key. |
For any implementation, your code should follow the following sequence :
Call SessionProviderService.setSessionProvider(Object key, SessionProvider sessionProvider) at the beginning of a business request for Stateless application or application's session for Statefull policy.
Call SessionProviderService.getSessionProvider(Object key) for obtaining a SessionProvider object
Call SessionProviderService.removeSessionProvider(Object key) at the end of a business request for Stateless application or application's session for Statefull policy.
eXo JCR supports observation (JSR-170 8.3), which enables applications to register interest in events that describe changes to a workspace, and then monitor and respond to those events. The standard observation feature allows dispatching events when persistent change to the workspace is made.
eXo JCR also offers a proprietary Extension Action which dispatches and fires an event upon each transient session level change, performed by a client. In other words, the event is triggered when a client's program invokes some updating methods in a session or a workspace (such as: Session.addNode(), Session.setProperty(), Workspace.move() etc.
One important recommendation should be applied for an extension action implementation. Each action will add its own execution time to standard JCR methods (Session.addNode(), Session.setProperty(), Workspace.move() etc.) execution time. As a consequence, it's necessary to minimize Action.execute(Context) body execution time.
To make the rule, you can use the dedicated Thread in Action.execute(Context) body for a custom logic. But if your application logic requires the action to add items to a created/updated item and you save these changes immediately after the JCR API method call is returned, the suggestion with Thread is not applicable for you in this case.
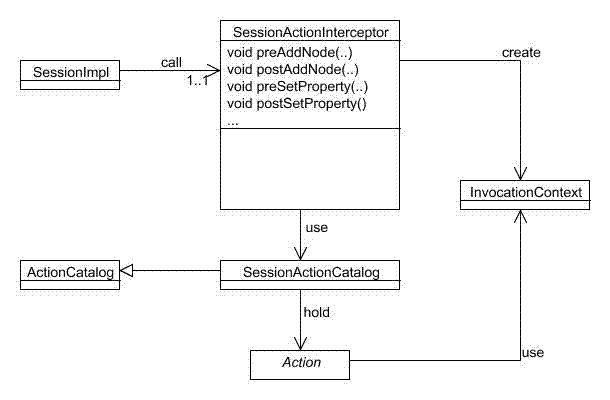
Add a SessionActionCatalog service and an appropriate AddActionsPlugin (see the example below) configuration to your eXo Container configuration. As usual, the plugin can be configured as in-component-place, which is the case for a Standalone Container or externally, which is a usual case for Root/Portal Container configuration).
Each Action entry is exposed as org.exoplatform.services.jcr.impl.ext.action. ActionConfiguration of actions collection of org.exoplatform.services.jcr.impl.ext.action.AddActionsPlugin$ActionsConfig (see an example below). The mandatory field named actionClassName is the fully qualified name of org.exoplatform.services.command.action.Action implementation - the command will be launched in case the current event matches the criteria. All other fields are criteria. The criteria are *AND*ed together. In other words, for a particular item to be listened to, it must meet ALL the criteria:
* workspace: the comma delimited (ORed) list of workspaces
* eventTypes: a comma delimited (ORed) list of event names (see below) to be listened to. This is the only mandatory field, others are optional and if they are missing they are interpreted as ANY.
* path - a comma delimited (ORed) list of item absolute paths (or within its subtree if isDeep is true, which is the default value)
* nodeTypes - a comma delimited (ORed) list of the current NodeType. Since version 1.6.1 JCR supports the functionalities of nodeType and parentNodeType. This parameter has different semantics, depending on the type of the current item and the operation performed. If the current item is a property it means the parent node type. If the current item is a node, the semantic depends on the event type: ** add node event: the node type of the newly added node. ** add mixin event: the newly added mixing node type of the current node. ** remove mixin event the removed mixin type of the current node. ** other events: the already assigned NodeType(s) of the current node (can be both primary and mixin).
NOTE: the list of fields can be extended.
NOTE2: no spaces between list elements.
NOTE3: isDeep=false means node, node properties and child nodes.
The list of supported Event names: addNode, addProperty, changeProperty, removeProperty, removeNode, addMixin, removeMixin, lock, unlock, checkin, checkout, read.
<component>
   <type>org.exoplatform.services.jcr.impl.ext.action.SessionActionCatalog</type>
   <component-plugins>
      <component-plugin>
         <name>addActions</name>
         <set-method>addPlugin</set-method>
         <type>org.exoplatform.services.jcr.impl.ext.action.AddActionsPlugin</type>
         <description>add actions plugin</description>
         <init-params>
            <object-param>
               <name>actions</name>
               <object type="org.exoplatform.services.jcr.impl.ext.action.AddActionsPlugin$ActionsConfig">
               <field  name="actions">
                  <collection type="java.util.ArrayList">
                     <value>
                        <object type="org.exoplatform.services.jcr.impl.ext.action.ActionConfiguration">
                          <field  name="eventTypes"><string>addNode,removeNode</string></field>
                          <field  name="path"><string>/test,/exo:test</string></field>
                          <field  name="isDeep"><boolean>true</boolean></field>
                          <field  name="nodeTypes"><string>nt:file,nt:folder,mix:lockable</string></field>
                          <!-- field  name="workspace"><string>backup</string></field -->
                          <field  name="actionClassName"><string>org.exoplatform.services.jcr.ext.DummyAction</string></field>
                        </object>
                     </value>
                  </collection>
               </field>
            </object>
          </object-param>
        </init-params>
      </component-plugin>
    </component-plugins>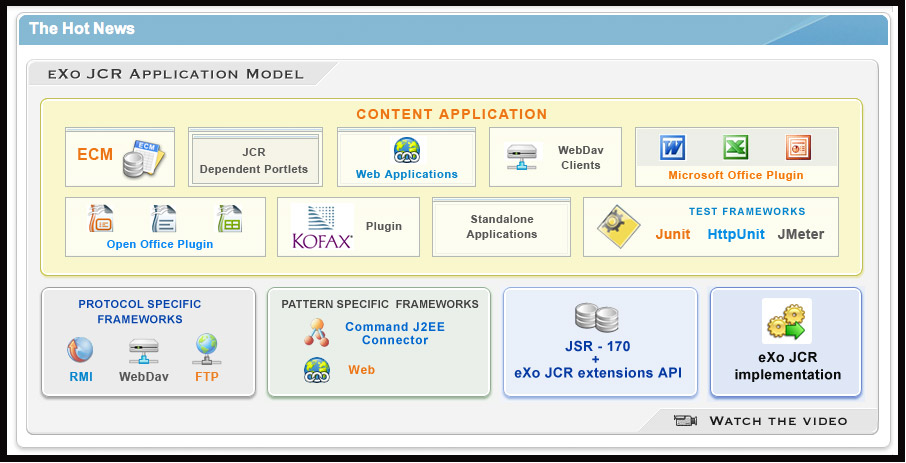
</component>The following is a picture about the interaction between Applications and JCR:
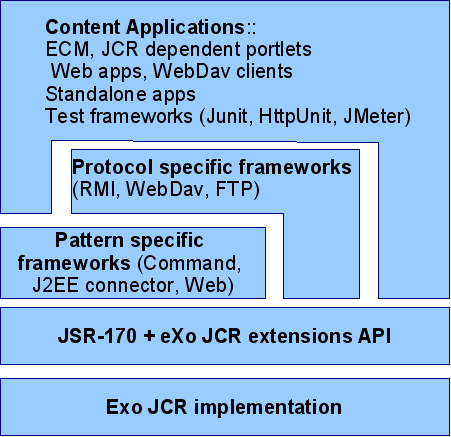
Every Content (JCR) dependent application interacts with eXo JCR via JSR-170 and eXo JCR API extension (mostly for administration) directly or using some intermediate Framework (Neither Application nor Framework should ever rely on Implementation directly!)
Content Application: all applications may use JCR as a data storage. Some of them are generic and completely decoupled from JCR API as interaction protocol hides Content storage nature (like WebDav client), some partially decoupled (like Command framework based), meaning that they do not use JCR API directly, and some (most part) use JSR-170 directly.
Frameworks is a special kind of JCR client that acts as an intermediate level between Content Repository and End Client Application. There are Protocol (WebDav, RMI or FTP servers for example) and Pattern (Command, Web(servlet), J2EE connector) specific Frameworks. It is possible to build a multi-layered (in framework sense) JCR application, for example Web application uses Web framework that uses Command framework underneath.
eXo JCR implementation supports two ways of Nodetypes registration:
From a NodeTypeValue POJO
From an XML document (stream)
The ExtendedNodeTypeManager (from JCR 1.11) interface provides the following methods related to registering node types:
public static final int IGNORE_IF_EXISTS  = 0;

public static final int FAIL_IF_EXISTS    = 2;

public static final int REPLACE_IF_EXISTS = 4;


/**
 * Registers node type using value object.
 */
void registerNodeType(NodeTypeValue nodeTypeValue, int alreadyExistsBehaviour) throws RepositoryException;

/**
 * Registers all node types using XML binding value objects from xml stream.
 */
void registerNodeTypes(InputStream xml, int alreadyExistsBehaviour) throws RepositoryException;

/**
 * Return <code>NodeTypeValue</code> for a given nodetype name. Used for
 * nodetype update. Value can be edited and registered via
 * <code>registerNodeType(NodeTypeValue nodeTypeValue, int alreadyExistsBehaviour)</code>
 */
NodeTypeValue getNodeTypeValue(String ntName) throws NoSuchNodeTypeException, RepositoryException;

/**
 * Registers or updates the specified <code>Collection</code> of
 * <code>NodeTypeValue</code> objects.
 */
public NodeTypeIterator registerNodeTypes(Collection<NodeTypeValue> values,
                                            int alreadyExistsBehaviour) throws UnsupportedRepositoryOperationException,
                                                                       RepositoryException;

/**
 * Unregisters the specified node type.
 */
public void unregisterNodeType(String name) throws UnsupportedRepositoryOperationException,
                                             NoSuchNodeTypeException,
                                             RepositoryException;

/**
 * Unregisters the specified set of node types.<p/> Used to unregister a set
 * of node types with mutual dependencies.
 */
public void unregisterNodeTypes(String[] names) throws UnsupportedRepositoryOperationException,
                                                 NoSuchNodeTypeException,
RepositoryException;The NodeTypeValue interface represents a simple container structure used to define node types which are then registered through the ExtendedNodeTypeManager.registerNodeType method. The implementation of this interface does not contain any validation logic.
/**
 * @return Returns the declaredSupertypeNames.
 */
public List<String> getDeclaredSupertypeNames();

/**
 * @param declaredSupertypeNames
 *The declaredSupertypeNames to set.
 */
public void setDeclaredSupertypeNames(List<String> declaredSupertypeNames);

/**
 * @return Returns the mixin.
 */
public boolean isMixin();

/**
 * @param mixin
 *The mixin to set.
 */
public void setMixin(boolean mixin);

/**
 * @return Returns the name.
 */
public String getName();

/**
 * @param name
 *The name to set.
 */
public void setName(String name);

/**
 * @return Returns the orderableChild.
 */
public boolean isOrderableChild();

/**
 * @param orderableChild
 *The orderableChild to set.
 */
public void setOrderableChild(boolean orderableChild);

/**
 * @return Returns the primaryItemName.
 */
public String getPrimaryItemName();

/**
 * @param primaryItemName
 *The primaryItemName to set.
 */
public void setPrimaryItemName(String primaryItemName);

/**
 * @return Returns the declaredChildNodeDefinitionNames.
 */
public List<NodeDefinitionValue> getDeclaredChildNodeDefinitionValues();

/**
 * @param declaredChildNodeDefinitionNames
 *The declaredChildNodeDefinitionNames to set.
 */
public void setDeclaredChildNodeDefinitionValues(List<NodeDefinitionValue> declaredChildNodeDefinitionValues);

/**
 * @return Returns the declaredPropertyDefinitionNames.
 */
public List<PropertyDefinitionValue> getDeclaredPropertyDefinitionValues();

/**
 * @param declaredPropertyDefinitionNames
 *The declaredPropertyDefinitionNames to set.
 */
public void setDeclaredPropertyDefinitionValues(List<PropertyDefinitionValue> declaredPropertyDefinitionValues);
The NodeDefinitionValue interface extends ItemDefinitionValue with the addition of writing methods, enabling the characteristics of a child node definition to be set, after that the NodeDefinitionValue is added to a NodeTypeValue.
/**
 * @return Returns the declaredSupertypeNames.
 */
public List<String> getDeclaredSupertypeNames();

/**
 * @param declaredSupertypeNames
 *The declaredSupertypeNames to set.
 */
public void setDeclaredSupertypeNames(List<String> declaredSupertypeNames);

/**
 * @return Returns the mixin.
 */
public boolean isMixin();

/**
 * @param mixin
 *The mixin to set.
 */
public void setMixin(boolean mixin);

/**
 * @return Returns the name.
 */
public String getName();

/**
 * @param name
 *The name to set.
 */
public void setName(String name);

/**
 * @return Returns the orderableChild.
 */
public boolean isOrderableChild();

/**
 * @param orderableChild
 *The orderableChild to set.
 */
public void setOrderableChild(boolean orderableChild);

/**
 * @return Returns the primaryItemName.
 */
public String getPrimaryItemName();

/**
 * @param primaryItemName
 *The primaryItemName to set.
 */
public void setPrimaryItemName(String primaryItemName);

/**
 * @return Returns the declaredChildNodeDefinitionNames.
 */
public List<NodeDefinitionValue> getDeclaredChildNodeDefinitionValues();

/**
 * @param declaredChildNodeDefinitionNames
 *The declaredChildNodeDefinitionNames to set.
 */
public void setDeclaredChildNodeDefinitionValues(List<NodeDefinitionValue> declaredChildNodeDefinitionValues);

/**
 * @return Returns the declaredPropertyDefinitionNames.
 */
public List<PropertyDefinitionValue> getDeclaredPropertyDefinitionValues();

/**
 * @param declaredPropertyDefinitionNames
 *The declaredPropertyDefinitionNames to set.
 */
public void setDeclaredPropertyDefinitionValues(List<PropertyDefinitionValue> declaredPropertyDefinitionValues);
The PropertyDefinitionValue interface extends ItemDefinitionValue with the addition of writing methods, enabling the characteristics of a child property definition to be set, after that the PropertyDefinitionValue is added to a NodeTypeValue.
/**
 * @return Returns the defaultValues.
 */
public List<String> getDefaultValueStrings();

/**
 * @param defaultValues The defaultValues to set.
 */
public void setDefaultValueStrings(List<String> defaultValues);

/**
 * @return Returns the multiple.
 */
public boolean isMultiple();

/**
 * @param multiple The multiple to set.
 */
public void setMultiple(boolean multiple);

/**
 * @return Returns the requiredType.
 */
public int getRequiredType();

/**
 * @param requiredType The requiredType to set.
 */
public void setRequiredType(int requiredType);

/**
 * @return Returns the valueConstraints.
 */
public List<String> getValueConstraints();

/**
 * @param valueConstraints The valueConstraints to set.
 */
public void setValueConstraints(List<String> valueConstraints);
 /**
 * @return Returns the autoCreate.
 */
public boolean isAutoCreate();

/**
 * @param autoCreate The autoCreate to set.
 */
public void setAutoCreate(boolean autoCreate);

/**
 * @return Returns the mandatory.
 */
public boolean isMandatory();

/**
 * @param mandatory The mandatory to set.
 */
public void setMandatory(boolean mandatory);

/**
 * @return Returns the name.
 */
public String getName();

/**
 * @param name The name to set.
 */
public void setName(String name);

/**
 * @return Returns the onVersion.
 */
public int getOnVersion();

/**
 * @param onVersion The onVersion to set.
 */
public void setOnVersion(int onVersion);

/**
 * @return Returns the readOnly.
 */
public boolean isReadOnly();

/**
 * @param readOnly The readOnly to set.
 */
public void setReadOnly(boolean readOnly);
eXo JCR implementation supports various methods of the node-type registration.
ExtendedNodeTypeManager nodeTypeManager = (ExtendedNodeTypeManager) session.getWorkspace()
                                                             .getNodeTypeManager();
InputStream is = MyClass.class.getResourceAsStream("mynodetypes.xml");
nodeTypeManager.registerNodeTypes(is,ExtendedNodeTypeManager.IGNORE_IF_EXISTS );ExtendedNodeTypeManager nodeTypeManager = (ExtendedNodeTypeManager) session.getWorkspace()
.getNodeTypeManager();
NodeTypeValue testNValue = new NodeTypeValue();
List<String> superType = new ArrayList<String>();
superType.add("nt:base");
testNValue.setName("exo:myNodeType");
testNValue.setPrimaryItemName("");
testNValue.setDeclaredSupertypeNames(superType);
List<PropertyDefinitionValue> props = new ArrayList<PropertyDefinitionValue>();
props.add(new PropertyDefinitionValue("*",
false,
false,
1,
false,
new ArrayList<String>(),
false,
0,
new ArrayList<String>()));
testNValue.setDeclaredPropertyDefinitionValues(props);
nodeTypeManager.registerNodeType(testNValue, ExtendedNodeTypeManager.FAIL_IF_EXISTS);If you want to replace existing node type definition, you should pass ExtendedNodeTypeManager.REPLACE_IF_EXISTS as a second parameter for the method ExtendedNodeTypeManager.registerNodeType.
ExtendedNodeTypeManager nodeTypeManager = (ExtendedNodeTypeManager) session.getWorkspace()
                                                                           .getNodeTypeManager();
InputStream is = MyClass.class.getResourceAsStream("mynodetypes.xml");
.....
nodeTypeManager.registerNodeTypes(is,ExtendedNodeTypeManager.REPLACE_IF_EXISTS );Note
Node type is only possibly removed when the repository does not contain this node type.
nodeTypeManager.unregisterNodeType("myNodeType");
NodeTypeValue myNodeTypeValue = nodeTypeManager.getNodeTypeValue(myNodeTypeName);
List<PropertyDefinitionValue> props = new ArrayList<PropertyDefinitionValue>();
props.add(new PropertyDefinitionValue("tt",
                                      true,
                                      true,
                                      1,
                                      false,
                                      new ArrayList<String>(),
                                      false,
                                      PropertyType.STRING,
                                      new ArrayList<String>()));
myNodeTypeValue.setDeclaredPropertyDefinitionValues(props);

nodeTypeManager.registerNodeType(myNodeTypeValue, ExtendedNodeTypeManager.REPLACE_IF_EXISTS);NodeTypeValue myNodeTypeValue = nodeTypeManager.getNodeTypeValue(myNodeTypeName);
List<NodeDefinitionValue> nodes = new ArrayList<NodeDefinitionValue>();
nodes.add(new NodeDefinitionValue("child",
false,
false,
1,
false,
"nt:base",
new ArrayList<String>(),
false));
testNValue.setDeclaredChildNodeDefinitionValues(nodes);
nodeTypeManager.registerNodeType(myNodeTypeValue, ExtendedNodeTypeManager.REPLACE_IF_EXISTS);Note that the existing data must be consistent before changing or removing a existing definition . JCR does not allow you to change the node type in the way in which the existing data would be incompatible with a new node type. But if these changes are needed, you can do it in several phases, consistently changing the node type and the existing data.
For example:
Add a new residual property definition with name "downloadCount" to the existing node type "myNodeType".
There are two limitations that do not allow us to make the task with a single call of registerNodeType method.
Existing nodes of the type "myNodeType", which does not contain properties "downloadCount" that conflicts with node type what we need.
Registered node type "myNodeType" will not allow us to add properties "downloadCount" because it has no such specific properties.
To complete the task, we need to make 3 steps:
Change the existing node type "myNodeType" by adding the mandatory property "downloadCount".
Add the node type "myNodeType" with the property "downloadCount" to all the existing node types.
Change the definition of the property "downloadCount" of the node type "myNodeType" to mandatory.
NodeTypeValue testNValue = nodeTypeManager.getNodeTypeValue("exo:myNodeType");

List<String> superType  = testNValue.getDeclaredSupertypeNames();
superType.add("mix:versionable");
testNValue.setDeclaredSupertypeNames(superType);

nodeTypeManager.registerNodeType(testNValue, ExtendedNodeTypeManager.REPLACE_IF_EXISTS);The Registry Service is one of the key parts of the infrastructure built around eXo JCR. Each JCR that is based on service, applications, etc may have its own configuration, settings data and other data that have to be stored persistently and used by the approptiate service or application. ( We call it "Consumer").
The service acts as a centralized collector (Registry) for such data. Naturally, a registry storage is JCR based i.e. stored in some JCR workspace (one per Repository) as an Item tree under /exo:registry node.
Despite the fact that the structure of the tree is well defined (see the scheme below), it is not recommended for other services to manipulate data using JCR API directly for better flexibility. So the Registry Service acts as a mediator between a Consumer and its settings.
The proposed structure of the Registry Service storage is divided into 3 logical groups: services, applications and users:
 exo:registry/          <-- registry "root" (exo:registry)
   exo:services/        <-- service data storage (exo:registryGroup)
     service1/
       Consumer data    (exo:registryEntry)
     ...
   exo:applications/    <-- application data storage (exo:registryGroup)
     app1/
       Consumer data    (exo:registryEntry)
     ...
   exo:users/           <-- user personal data storage (exo:registryGroup)
     user1/
       Consumer data    (exo:registryEntry)
     ...
Each upper level eXo Service may store its configuration in eXo Registry. At first, start from xml-config (in jar etc) and then from Registry. In configuration file, you can add force-xml-configuration parameter to component to ignore reading parameters initialization from RegistryService and to use file instead:
<value-param>
  <name>force-xml-configuration</name>
  <value>true</value>
</value-param>
The main functionality of the Registry Service is pretty simple and straightforward, it is described in the Registry abstract class as the following:
public abstract class Registry {

  /**
   * Returns the Registry object which wraps the Node of the "exo:registry" type
   */
  public abstract RegistryNode getRegistry(SessionProvider sessionProvider)
      throws RepositoryConfigurationException, RepositoryException;

  /**
   * Returns the existing RegistryEntry which wraps the Node of the "exo:registryEntry" type
   */
  public abstract RegistryEntry getEntry(SessionProvider sessionProvider, String groupName,
      String entryName) throws RepositoryException;

  /**
   * Creates a new RegistryEntry
   */
  public abstract void createEntry(SessionProvider sessionProvider,
      String groupName, RegistryEntry entry) throws RepositoryException;

  /**
   * Replaces a RegistryEntry
   */
  public abstract void recreateEntry(SessionProvider sessionProvider,
      String groupName, RegistryEntry entry) throws RepositoryException;

  /**
   * Removes a RegistryEntry
   */
  public abstract void removeEntry(SessionProvider sessionProvider,
      String groupName, String entryName) throws RepositoryException;
As you can see it looks like a simple CRUD interface for the RegistryEntry object which wraps registry data for some Consumer as a Registry Entry. The Registry Service itself knows nothing about the wrapping data, it is Consumer's responsibility to manage and use its data in its own way.
To create an Entity Consumer you should know how to serialize the data to some XML structure and then create a RegistryEntry from these data at once or populate them in a RegistryEntry object (using RegistryEntry(String entryName) constructor and then obtain and fill a DOM document).
Example of RegistryService using:
    RegistryService regService = (RegistryService) container
    .getComponentInstanceOfType(RegistryService.class);

    RegistryEntry registryEntry = regService.getEntry(sessionProvider,
            RegistryService.EXO_SERVICES, "my-service");

    Document doc = registryEntry.getDocument();

    String mySetting = getElementsByTagName("tagname").item(index).getTextContent();
.....RegistryService has two optional params: value parameter mixin-names and properties parameter locations. The mixin-names is used for adding additional mixins to nodes exo:registry, exo:applications, exo:services, exo:users and exo:groups of RegistryService. This allows the top level applications to manage these nodes in special way. Locations is used to mention where exo:registry is placed for each repository. The name of each property is interpreted as a repository name and its value as a workspace name (a system workspace by default).
<component>
   <type>org.exoplatform.services.jcr.ext.registry.RegistryService</type>
   <init-params>
      <values-param>
         <name>mixin-names</name>
         <value>exo:hideable</value>
      </values-param>
      <properties-param>
      <name>locations</name>
         <property name="db1" value="ws2"/>
      </properties-param>
   </init-params>
</component>Since version 1.11, eXo JCR implementation supports namespaces altering.
ExtendedNamespaceRegistry namespaceRegistry = (ExtendedNamespaceRegistry) workspace.getNamespaceRegistry();
namespaceRegistry.registerNamespace("newMapping", "http://dumb.uri/jcr");ExtendedNamespaceRegistry namespaceRegistry = (ExtendedNamespaceRegistry) workspace.getNamespaceRegistry();
namespaceRegistry.registerNamespace("newMapping", "http://dumb.uri/jcr");
namespaceRegistry.registerNamespace("newMapping2", "http://dumb.uri/jcr");Support of node types and namespaces is required by the JSR-170 specification. Beyond the methods required by the specification, eXo JCR has its own API extension for the Node type registration as well as the ability to declaratively define node types in the Repository at the start-up time.
Node type registration extension is declared in org.exoplatform.services.jcr.core.nodetype.ExtendedNodeTypeManager interface
Your custom service can register some neccessary predefined node types at the start-up time. The node definition should be placed in a special XML file (see DTD below) and declared in the service's configuration file thanks to eXo component plugin mechanism, described as follows:
<external-component-plugins>
  <target-component>org.exoplatform.services.jcr.RepositoryService</target-component>
      <component-plugin>
        <name>add.nodeType</name>
        <set-method>addPlugin</set-method>
        <type>org.exoplatform.services.jcr.impl.AddNodeTypePlugin</type>
        <init-params>
          <values-param>
            <name>autoCreatedInNewRepository</name>
            <description>Node types configuration file</description>
            <value>jar:/conf/test/nodetypes-tck.xml</value>
            <value>jar:/conf/test/nodetypes-impl.xml</value>
          </values-param>
    <values-param>
            <name>repo1</name>
            <description>Node types configuration file for repository with name repo1</description>
            <value>jar:/conf/test/nodetypes-test.xml</value>
          </values-param>
    <values-param>
            <name>repo2</name>
            <description>Node types configuration file for repository with name repo2</description>
            <value>jar:/conf/test/nodetypes-test2.xml</value>
          </values-param>
        </init-params>
      </component-plugin>
There are two types of registration. The first type is the registration of node types in all created repositories, it is configured in values-param with the name autoCreatedInNewRepository. The second type is registration of node types in specified repository and it is configured in values-param with the name of repository.
Node type definition file format:
  <?xml version="1.0" encoding="UTF-8"?>
  <!DOCTYPE nodeTypes [
   <!ELEMENT nodeTypes (nodeType)*>
      <!ELEMENT nodeType (supertypes?|propertyDefinitions?|childNodeDefinitions?)>

      <!ATTLIST nodeType
         name CDATA #REQUIRED
         isMixin (true|false) #REQUIRED
         hasOrderableChildNodes (true|false)
         primaryItemName CDATA
      >
      <!ELEMENT supertypes (supertype*)>
      <!ELEMENT supertype (CDATA)>

      <!ELEMENT propertyDefinitions (propertyDefinition*)>

      <!ELEMENT propertyDefinition (valueConstraints?|defaultValues?)>
      <!ATTLIST propertyDefinition
         name CDATA #REQUIRED
         requiredType (String|Date|Path|Name|Reference|Binary|Double|Long|Boolean|undefined) #REQUIRED
         autoCreated (true|false) #REQUIRED
         mandatory (true|false) #REQUIRED
         onParentVersion (COPY|VERSION|INITIALIZE|COMPUTE|IGNORE|ABORT) #REQUIRED
         protected (true|false) #REQUIRED
         multiple  (true|false) #REQUIRED
      >
    <!-- For example if you need to set ValueConstraints [],
      you have to add an empty element <valueConstraints/>.
      The same order is for other properties like defaultValues, requiredPrimaryTypes etc.
      -->
      <!ELEMENT valueConstraints (valueConstraint*)>
      <!ELEMENT valueConstraint (CDATA)>
      <!ELEMENT defaultValues (defaultValue*)>
      <!ELEMENT defaultValue (CDATA)>

      <!ELEMENT childNodeDefinitions (childNodeDefinition*)>

      <!ELEMENT childNodeDefinition (requiredPrimaryTypes)>
      <!ATTLIST childNodeDefinition
         name CDATA #REQUIRED
         defaultPrimaryType  CDATA #REQUIRED
         autoCreated (true|false) #REQUIRED
         mandatory (true|false) #REQUIRED
         onParentVersion (COPY|VERSION|INITIALIZE|COMPUTE|IGNORE|ABORT) #REQUIRED
         protected (true|false) #REQUIRED
         sameNameSiblings (true|false) #REQUIRED
      >
      <!ELEMENT requiredPrimaryTypes (requiredPrimaryType+)>
      <!ELEMENT requiredPrimaryType (CDATA)>
]>Default namespaces are registered by repository at the start-up time
Your custom service can extend a set of namespaces with some application specific ones, declaring it in service's configuration file thanks to eXo component plugin mechanism, described as follows:
      <component-plugin>
          <name>add.namespaces</name>
          <set-method>addPlugin</set-method>
          <type>org.exoplatform.services.jcr.impl.AddNamespacesPlugin</type>
          <init-params>
            <properties-param>
              <name>namespaces</name>
              <property name="test" value="http://www.test.org/test"/>
            </properties-param>
          </init-params>
</component-plugin>- 13.1. Related documents
- 13.2. Portal and Standalone configuration
- 13.3. JCR Configuration
- 13.4. Repository service configuration (JCR repositories configuration)
- 13.5. Repository configuration:
- 13.6. Workspace configuration:
- 13.7. Workspace data container configuration:
- 13.8. Value Storage plugin configuration (for data container):
- 13.9. Initializer configuration (optional):
- 13.10. Cache configuration:
- 13.11. Query Handler configuration:
- 13.12. Lock Manager configuration:
- 13.13. Help application to prohibit the use of closed sessions
- 13.14. Getting the effective configuration at Runtime of all the repositories
Like other eXo services, eXo JCR can be configured and used in the portal or embedded mode (as a service embedded in eXo Portal) and in standalone mode.
In Embedded mode, JCR services are registered in the Portal container and the second option is to use a Standalone container. The main difference between these container types is that the first one is intended to be used in a Portal (Web) environment, while the second one can be used standalone (see the comprehensive page Service Configuration for Beginners for more details).
The following setup procedure is used to obtain a Standalone configuration (see more in Container configuration):
Configuration that is set explicitly using StandaloneContainer.addConfigurationURL(String url) or StandaloneContainer.addConfigurationPath(String path) before getInstance()
Configuration from $base:directory/exo-configuration.xml or $base:directory/conf/exo-configuration.xml file. Where $base:directory is either AS's home directory in case of J2EE AS environment or just the current directory in case of a standalone application.
/conf/exo-configuration.xml in the current classloader (e.g. war, ear archive)
Configuration from $service_jar_file/conf/portal/configuration.xml. WARNING: Don't rely on some concrete jar's configuration if you have more than one jar containing conf/portal/configuration.xml file. In this case choosing a configuration is unpredictable.
JCR service configuration looks like:
<component>
  <key>org.exoplatform.services.jcr.RepositoryService</key>
  <type>org.exoplatform.services.jcr.impl.RepositoryServiceImpl</type>
</component>
<component>
  <key>org.exoplatform.services.jcr.config.RepositoryServiceConfiguration</key>
  <type>org.exoplatform.services.jcr.impl.config.RepositoryServiceConfigurationImpl</type>
  <init-params>
    <value-param>
      <name>conf-path</name>
      <description>JCR repositories configuration file</description>
      <value>jar:/conf/standalone/exo-jcr-config.xml</value>
    </value-param>
    <properties-param>
      <name>working-conf</name>
      <description>working-conf</description>
      <property name="source-name" value="jdbcjcr" />
      <property name="dialect" value="hsqldb" />
      <property name="persister-class-name" value="org.exoplatform.services.jcr.impl.config.JDBCConfigurationPersister" />
    </properties-param>
  </init-params>
</component>
conf-path : a path to a RepositoryService JCR Configuration.
working-conf : optional; JCR configuration persister configuration. If there isn't a working-conf, the persister will be disabled.
The Configuration is defined in an XML file (see DTD below).
JCR Service can use multiple Repositories and each repository can have multiple Workspaces.
From v.1.9 JCR, repositories configuration parameters support human-readable formats of values. They are all case-insensitive:
Numbers formats: K,KB - kilobytes, M,MB - megabytes, G,GB - gigabytes, T,TB - terabytes. Examples: 100.5 - digit 100.5, 200k - 200 Kbytes, 4m - 4 Mbytes, 1.4G - 1.4 Gbytes, 10T - 10 Tbytes
Time format endings: ms - milliseconds, m - minutes, h - hours, d - days, w - weeks, if no ending - seconds. Examples: 500ms - 500 milliseconds, 20 - 20 seconds, 30m - 30 minutes, 12h - 12 hours, 5d - 5 days, 4w - 4 weeks.
Service configuration may be placed in jar:/conf/standalone/exo-jcr-config.xml for standalone mode. For portal mode, it is located in the portal web application portal/WEB-INF/conf/jcr/repository-configuration.xml.
default-repository: The name of a default repository (one returned by RepositoryService.getRepository()).
repositories: The list of repositories.
name: The name of a repository.
default-workspace: The name of a workspace obtained using Session's login() or login(Credentials) methods (ones without an explicit workspace name).
system-workspace: The name of workspace where /jcr:system node is placed.
security-domain: The name of a security domain for JAAS authentication.
access-control: The name of an access control policy. There can be 3 types: optional - ACL is created on-demand(default), disable - no access control, mandatory - an ACL is created for each added node(not supported yet).
authentication-policy: The name of an authentication policy class.
workspaces: The list of workspaces.
session-max-age: The time after which an idle session will be removed (called logout). If session-max-age is not set up, idle session will never be removed.
lock-remover-max-threads: Number of threads that can serve LockRemover tasks. Default value is 1. Repository may have many workspaces, each workspace have own LockManager. JCR supports Locks with defined lifetime. Such a lock must be removed is it become expired. That is what LockRemovers does. But LockRemovers is not an independent timer-threads, its a task that executed each 30 seconds. Such a task is served by ThreadPoolExecutor which may use different number of threads.
name: The name of a workspace
auto-init-root-nodetype: DEPRECATED in JCR 1.9 (use initializer). The node type for root node initialization.
container: Workspace data container (physical storage) configuration.
initializer: Workspace initializer configuration.
cache: Workspace storage cache configuration.
query-handler: Query handler configuration.
auto-init-permissions: DEPRECATED in JCR 1.9 (use initializer). Default permissions of the root node. It is defined as a set of semicolon-delimited permissions containing a group of space-delimited identities (user, group, etc, see Organization service documentation for details) and the type of permission. For example, any read; :/admin read;:/admin add_node; :/admin set_property;:/admin remove means that users from group admin have all permissions and other users have only a 'read' permission.
class: A workspace data container class name.
properties: The list of properties (name-value pairs) for the concrete Workspace data container.
Table 13.1.
| trigger_events_for_descendents_on_rename | indicates if need to trigger events for descendents on rename or not. It allows to increase performance on rename operation but in same time Observation'll not notified, has default value true |
| lazy-node-iterator-page-size | the page size for lazy iterator. Indicates how many nodes can be retrieved from storage per request. The default value is 100 |
| acl-bloomfilter-false-positive-probability | ACL Bloom-filter desired false positive probability. Range [0..1]. Default value 0.1d. (See the note below) |
| acl-bloomfilter-elements-number | Expected number of ACL-elements in the Bloom-filter. Default value 1000000. (See the note below) |
Note
Bloom filters are not supported by all the cache implementations so far only the inplementation for infinispan supports it.
value-storages: The list of value storage plugins.
Note
The value-storage element is optional. If you don't include it, the values will be stored as BLOBs inside the database.
value-storage: Optional value Storage plugin definition.
class: A value storage plugin class name (attribute).
properties: The list of properties (name-value pairs) for a concrete Value Storage plugin.
filters: The list of filters defining conditions when this plugin is applicable.
class: Initializer implementation class.
properties: The list of properties (name-value pairs). Properties are supported.
root-nodetype: The node type for root node initialization.
root-permissions: Default permissions of the root node. It is defined as a set of semicolon-delimited permissions containing a group of space-delimited identities (user, group etc, see Organization service documentation for details) and the type of permission. For example any read; :/admin read;:/admin add_node; :/admin set_property;:/admin remove means that users from group admin have all permissions and other users have only a 'read' permission.
Configurable initializer adds a capability to override workspace initial startup procedure (used for Clustering). Also it replaces workspace element parameters auto-init-root-nodetype and auto-init-permissions with root-nodetype and root-permissions.
enabled: If workspace cache is enabled or not.
class: Cache implementation class, optional from 1.9. Default value is. org.exoplatform.services.jcr.impl.dataflow.persistent.LinkedWorkspaceStorageCacheImpl.
Cache can be configured to use concrete implementation of WorkspaceStorageCache interface. JCR core has two implementation to use:
LinkedWorkspaceStorageCacheImpl - default, with configurable read behavior and statistic.
WorkspaceStorageCacheImpl - pre 1.9, still can be used.
properties: The list of properties (name-value pairs) for Workspace cache.
max-size: Cache maximum size (maxSize prior to v.1.9).
live-time: Cached item live time (liveTime prior to v.1.9).
From 1.9 LinkedWorkspaceStorageCacheImpl supports additional optional parameters.
statistic-period: Period (time format) of cache statistic thread execution, 5 minutes by default.
statistic-log: If true cache statistic will be printed to default logger (log.info), false by default or not.
statistic-clean: If true cache statistic will be cleaned after was gathered, false by default or not.
cleaner-period: Period of the eldest items remover execution, 20 minutes by default.
blocking-users-count: Number of concurrent users allowed to read cache storage, 0 - unlimited by default.
class: A Query Handler class name.
properties: The list of properties (name-value pairs) for a Query Handler (indexDir).
Properties and advanced features described in Search Configuration.
time-out: Time after which the unused global lock will be removed.
persister: A class for storing lock information for future use. For example, remove lock after jcr restart.
path: A lock folder. Each workspace has its own one.
Note
Also see lock-remover-max-threads repository configuration parameter.
<!ELEMENT repository-service (repositories)>
<!ATTLIST repository-service default-repository NMTOKEN #REQUIRED>
<!ELEMENT repositories (repository)>
<!ELEMENT repository (security-domain,access-control,session-max-age,authentication-policy,workspaces)>
<!ATTLIST repository
  default-workspace NMTOKEN #REQUIRED
  name NMTOKEN #REQUIRED
  system-workspace NMTOKEN #REQUIRED
>
<!ELEMENT security-domain (#PCDATA)>
<!ELEMENT access-control (#PCDATA)>
<!ELEMENT session-max-age (#PCDATA)>
<!ELEMENT authentication-policy (#PCDATA)>
<!ELEMENT workspaces (workspace+)>
<!ELEMENT workspace (container,initializer,cache,query-handler)>
<!ATTLIST workspace name NMTOKEN #REQUIRED>
<!ELEMENT container (properties,value-storages)>
<!ATTLIST container class NMTOKEN #REQUIRED>
<!ELEMENT value-storages (value-storage+)>
<!ELEMENT value-storage (properties,filters)>
<!ATTLIST value-storage class NMTOKEN #REQUIRED>
<!ELEMENT filters (filter+)>
<!ELEMENT filter EMPTY>
<!ATTLIST filter property-type NMTOKEN #REQUIRED>
<!ELEMENT initializer (properties)>
<!ATTLIST initializer class NMTOKEN #REQUIRED>
<!ELEMENT cache (properties)>
<!ATTLIST cache
  enabled NMTOKEN #REQUIRED
  class NMTOKEN #REQUIRED
>
<!ELEMENT query-handler (properties)>
<!ATTLIST query-handler class NMTOKEN #REQUIRED>
<!ELEMENT access-manager (properties)>
<!ATTLIST access-manager class NMTOKEN #REQUIRED>
<!ELEMENT lock-manager (time-out,persister)>
<!ELEMENT time-out (#PCDATA)>
<!ELEMENT persister (properties)>
<!ELEMENT properties (property+)>
<!ELEMENT property EMPTY>
Products that use eXo JCR, sometimes missuse it since they continue to use a session that has been closed through a method call on a node, a property or even the session itself. To prevent bad practices we propose three modes which are the folllowing:
If the system property exo.jcr.prohibit.closed.session.usage has been set to true, then a RepositoryException will be thrown any time an application will try to access to a closed session. In the stack trace, you will be able to know the call stack that closes the session.
If the system property exo.jcr.prohibit.closed.session.usage has not been set and the system property exo.product.developing has been set to true, then a warning will be logged in the log file with the full stack trace in order to help identifying the root cause of the issue. In the stack trace, you will be able to know the call stack that closes the session.
If none of the previous system properties have been set, then we will ignore that the issue and let the application use the closed session as it was possible before without doing anything in order to allow applications to migrate step by step.
The effective configuration of all the repositories and their workspaces can be known thanks to the method getConfigurationXML() that is exposed through JMX at the RepositoryServiceConfiguration level in case of a PortalContainer the name of the related MBean will be of type exo:portal=${portal-container-name},service=RepositoryServiceConfiguration. This method will give you the effective configuration in XML format that has been really interpreted by the the JCR core. This could be helpful to understand how your repositories/workspaces are configured especially if you would like to overwrite the configuration for some reasons.
Whenever relational database is used to store multilingual text data of eXo Java Content Repository, we need to adapt configuration in order to support UTF-8 encoding. Here is a short HOWTO instruction for several supported RDBMS with examples.
The configuration file you have to modify: .../webapps/portal/WEB-INF/conf/jcr/repository-configuration.xml
Note
Datasource jdbcjcr used in examples can be
configured via InitialContextInitializer
component.
In order to run multilanguage JCR on an Oracle backend Unicode
encoding for characters set should be applied to the database. Other
Oracle globalization parameters don't make any impact. The only property
to modify is NLS_CHARACTERSET.
We have tested NLS_CHARACTERSET =
AL32UTF8 and it works well for many European and
Asian languages.
Example of database configuration (used for JCR testing):
NLS_LANGUAGE             AMERICAN
NLS_TERRITORY            AMERICA
NLS_CURRENCY             $
NLS_ISO_CURRENCY         AMERICA
NLS_NUMERIC_CHARACTERS   .,
NLS_CHARACTERSET         AL32UTF8
NLS_CALENDAR             GREGORIAN
NLS_DATE_FORMAT          DD-MON-RR
NLS_DATE_LANGUAGE        AMERICAN
NLS_SORT                 BINARY
NLS_TIME_FORMAT          HH.MI.SSXFF AM
NLS_TIMESTAMP_FORMAT     DD-MON-RR HH.MI.SSXFF AM
NLS_TIME_TZ_FORMAT       HH.MI.SSXFF AM TZR
NLS_TIMESTAMP_TZ_FORMAT  DD-MON-RR HH.MI.SSXFF AM TZR
NLS_DUAL_CURRENCY        $
NLS_COMP                 BINARY
NLS_LENGTH_SEMANTICS     BYTE
NLS_NCHAR_CONV_EXCP      FALSE
NLS_NCHAR_CHARACTERSET   AL16UTF16
Warning
JCR 1.12.x doesn't use NVARCHAR columns, so that the value of the parameter NLS_NCHAR_CHARACTERSET does not matter for JCR.
Create database with Unicode encoding and use Oracle dialect for the Workspace Container:
<workspace name="collaboration">
          <container class="org.exoplatform.services.jcr.impl.storage.jdbc.JDBCWorkspaceDataContainer">
            <properties>
              <property name="source-name" value="jdbcjcr" />
              <property name="dialect" value="oracle" />
              <property name="multi-db" value="false" />
              <property name="max-buffer-size" value="200k" />
              <property name="swap-directory" value="target/temp/swap/ws" />
            </properties>
.....DB2 Universal Database (DB2 UDB) supports UTF-8 and UTF-16/UCS-2. When a Unicode database is created, CHAR, VARCHAR, LONG VARCHAR data are stored in UTF-8 form. It's enough for JCR multi-lingual support.
Example of UTF-8 database creation:
DB2 CREATE DATABASE dbname USING CODESET UTF-8 TERRITORY US
Create database with UTF-8 encoding and use db2 dialect for Workspace Container on DB2 v.9 and higher:
<workspace name="collaboration">
          <container class="org.exoplatform.services.jcr.impl.storage.jdbc.JDBCWorkspaceDataContainer">
            <properties>
              <property name="source-name" value="jdbcjcr" />
              <property name="dialect" value="db2" />
              <property name="multi-db" value="false" />
              <property name="max-buffer-size" value="200k" />
              <property name="swap-directory" value="target/temp/swap/ws" />
            </properties>
          .....
Note
For DB2 v.8.x support change the property "dialect" to db2v8.
JCR MySQL-backend requires special dialect MySQL-UTF8 to be used for internationalization support. But the database default charset should be latin1 to use limited index space effectively (1000 bytes for MyISAM engine, 767 for InnoDB). If database default charset is multibyte, a JCR database initialization error is thrown concerning index creation failure. In other words, JCR can work on any singlebyte default charset of database, with UTF8 supported by MySQL server. But we have tested it only on latin1 database default charset.
Repository configuration, workspace container entry example:
<workspace name="collaboration">
          <container class="org.exoplatform.services.jcr.impl.storage.jdbc.JDBCWorkspaceDataContainer">
            <properties>
              <property name="source-name" value="jdbcjcr" />
              <property name="dialect" value="mysql-utf8" />
              <property name="multi-db" value="false" />
              <property name="max-buffer-size" value="200k" />
              <property name="swap-directory" value="target/temp/swap/ws" />
            </properties>
.....On PostgreSQL-backend, multilingual support can be enabled in different ways:
Using the locale features of the operating system to provide locale-specific collation order, number formatting, translated messages, and other aspects. UTF-8 is widely used on Linux distributions by default, so it can be useful in such case.
Providing a number of different character sets defined in the PostgreSQL server, including multiple-byte character sets, to support storing text of any languages, and providing character set translation between client and server. We recommend to use UTF-8 database charset, it will allow any-to-any conversations and make this issue transparent for the JCR.
Create database with UTF-8 encoding and use PgSQL dialect for Workspace Container:
<workspace name="collaboration">
          <container class="org.exoplatform.services.jcr.impl.storage.jdbc.JDBCWorkspaceDataContainer">
            <properties>
              <property name="source-name" value="jdbcjcr" />
              <property name="dialect" value="pgsql" />
              <property name="multi-db" value="false" />
              <property name="max-buffer-size" value="200k" />
              <property name="swap-directory" value="target/temp/swap/ws" />
            </properties>
.....Frequently a single database instance must be shared by several other applications. But some of our customers have also asked for a way to host several JCR instances in the same database instance. To fulfill this need, we had to review our queries and scope them to the current schema; it’s now possible to have one JCR instance per DB schema instead of per DB instance. To benefit of the work done for this feature you will need to apply the configuration changes described in the next sections.
To enable this feature you need to replace org.jboss.cache.loader.JDBCCacheLoader with org.exoplatform.services.jcr.impl.core.lock.jbosscache.JDBCCacheLoader in JBossCache configuration file.
Here is an example of this very part of the configuration:
<jbosscache xmlns:xsi="http://www.w3.org/2001/XMLSchema-instance" xmlns="urn:jboss:jbosscache-core:config:3.1">

   <locking useLockStriping="false" concurrencyLevel="500" lockParentForChildInsertRemove="false"
      lockAcquisitionTimeout="20000" />

   <clustering mode="replication" clusterName="${jbosscache-cluster-name}">
      <stateRetrieval timeout="20000" fetchInMemoryState="false" />
      <sync />
   </clustering>

   <loaders passivation="false" shared="true">
      <!-- All the data of the JCR locks needs to be loaded at startup -->
      <preload>
         <node fqn="/" />
      </preload>
      <!--
      For another cache-loader class you should use another template with
      cache-loader specific parameters
      -->
      <loader class="org.exoplatform.services.jcr.impl.core.lock.jbosscache.JDBCCacheLoader" async="false" fetchPersistentState="false"
         ignoreModifications="false" purgeOnStartup="false">
         <properties>
            cache.jdbc.table.name=${jbosscache-cl-cache.jdbc.table.name}
            cache.jdbc.table.create=${jbosscache-cl-cache.jdbc.table.create}
            cache.jdbc.table.drop=${jbosscache-cl-cache.jdbc.table.drop}
            cache.jdbc.table.primarykey=${jbosscache-cl-cache.jdbc.table.primarykey}
            cache.jdbc.fqn.column=${jbosscache-cl-cache.jdbc.fqn.column}
            cache.jdbc.fqn.type=${jbosscache-cl-cache.jdbc.fqn.type}
            cache.jdbc.node.column=${jbosscache-cl-cache.jdbc.node.column}
            cache.jdbc.node.type=${jbosscache-cl-cache.jdbc.node.type}
            cache.jdbc.parent.column=${jbosscache-cl-cache.jdbc.parent.column}
            cache.jdbc.datasource=${jbosscache-cl-cache.jdbc.datasource}
         </properties>
      </loader>
   </loaders>
</jbosscache>
You can also obtain file exmaple from svn.
If you use HibernateService for JDBC connections management you will need to specify explicitly the default schema by setting "hibernate.default_schema" property in the configuration of HibernateService.
Here is an example:
<component>
    <key>org.exoplatform.services.database.HibernateService</key>
    <jmx-name>database:type=HibernateService</jmx-name>
    <type>org.exoplatform.services.database.impl.HibernateServiceImpl</type>
    <init-params>
      <properties-param>
        <name>hibernate.properties</name>
        <description>Default Hibernate Service</description>
        ...........
        <property name="hibernate.default_schema" value="${gatein.idm.datasource.schema:}"/>
      </properties-param>
    </init-params>
</component>JCR index configuration. You can find this file here:
.../portal/WEB-INF/conf/jcr/repository-configuration.xml
<repository-service default-repository="db1">
  <repositories>
    <repository name="db1" system-workspace="ws" default-workspace="ws">
       ....
      <workspaces>
        <workspace name="ws">
       ....
          <query-handler class="org.exoplatform.services.jcr.impl.core.query.lucene.SearchIndex">
            <properties>
              <property name="index-dir" value="${java.io.tmpdir}/temp/index/db1/ws" />
              <property name="synonymprovider-class" value="org.exoplatform.services.jcr.impl.core.query.lucene.PropertiesSynonymProvider" />
              <property name="synonymprovider-config-path" value="/synonyms.properties" />
              <property name="indexing-config-path" value="/indexing-configuration.xml" />
              <property name="query-class" value="org.exoplatform.services.jcr.impl.core.query.QueryImpl" />
            </properties>
          </query-handler>
        ...
        </workspace>
     </workspaces>
    </repository>
  </repositories>
</repository-service>Table 16.1.
| Parameter | Default | Description | Since |
|---|---|---|---|
| index-dir | none | The location of the index directory. This parameter is mandatory. Up to 1.9, this parameter called "indexDir" | 1.0 |
| use-compoundfile | true | Advises lucene to use compound files for the index files. | 1.9 |
| min-merge-docs | 100 | Minimum number of nodes in an index until segments are merged. | 1.9 |
| volatile-idle-time | 3 | Idle time in seconds until the volatile index part is moved to a persistent index even though minMergeDocs is not reached. | 1.9 |
| max-merge-docs | Integer.MAX_VALUE | Maximum number of nodes in segments that will be merged. The default value changed in JCR 1.9 to Integer.MAX_VALUE. | 1.9 |
| merge-factor | 10 | Determines how often segment indices are merged. | 1.9 |
| max-field-length | 10000 | The number of words that are fulltext indexed at most per property. | 1.9 |
| cache-size | 1000 | Size of the document number cache. This cache maps uuids to lucene document numbers | 1.9 |
| force-consistencycheck | false | Runs a consistency check on every startup. If false, a consistency check is only performed when the search index detects a prior forced shutdown. | 1.9 |
| auto-repair | true | Errors detected by a consistency check are automatically repaired. If false, errors are only written to the log. | 1.9 |
| query-class | QueryImpl | Class name that implements the javax.jcr.query.Query interface.This class must also extend from the class: org.exoplatform.services.jcr.impl.core.query.AbstractQueryImpl. | 1.9 |
| document-order | true | If true and the query does not contain an 'order by' clause, result nodes will be in document order. For better performance when queries return a lot of nodes set to 'false'. | 1.9 |
| result-fetch-size | Integer.MAX_VALUE | The number of results when a query is executed. Default value: Integer.MAX_VALUE (-> all). | 1.9 |
| excerptprovider-class | DefaultXMLExcerpt | The name of the class that implements org.exoplatform.services.jcr.impl.core.query.lucene.ExcerptProvider and should be used for the rep:excerpt() function in a query. | 1.9 |
| support-highlighting | false | If set to true additional information is stored in the index to support highlighting using the rep:excerpt() function. | 1.9 |
| synonymprovider-class | none | The name of a class that implements org.exoplatform.services.jcr.impl.core.query.lucene.SynonymProvider. The default value is null (-> not set). | 1.9 |
| synonymprovider-config-path | none | The path to the synonym provider configuration file. This path interpreted is relative to the path parameter. If there is a path element inside the SearchIndex element, then this path is interpreted and relative to the root path of the path. Whether this parameter is mandatory or not, it depends on the synonym provider implementation. The default value is null (-> not set). | 1.9 |
| indexing-configuration-path | none | The path to the indexing configuration file. | 1.9 |
| indexing-configuration-class | IndexingConfigurationImpl | The name of the class that implements org.exoplatform.services.jcr.impl.core.query.lucene.IndexingConfiguration. | 1.9 |
| force-consistencycheck | false | If setting to true, a consistency check is performed, depending on the parameter forceConsistencyCheck. If setting to false, no consistency check is performed on startup, even if a redo log had been applied. | 1.9 |
| spellchecker-class | none | The name of a class that implements org.exoplatform.services.jcr.impl.core.query.lucene.SpellChecker. | 1.9 |
| spellchecker-more-popular | true | If setting true, spellchecker returns only the suggest words that are as frequent or more frequent than the checked word. If setting false, spellchecker returns null (if checked word exit in dictionary), or spellchecker will return most close suggest word. | 1.10 |
| spellchecker-min-distance | 0.55f | Minimal distance between checked word and proposed suggest word. | 1.10 |
| errorlog-size | 50(Kb) | The default size of error log file in Kb. | 1.9 |
| upgrade-index | false | Allows JCR to convert an existing index into the new format. Also, it is possible to set this property via system property, for example: -Dupgrade-index=true Indexes before JCR 1.12 will not run with JCR 1.12. Hence you have to run an automatic migration: Start JCR with -Dupgrade-index=true. The old index format is then converted in the new index format. After the conversion the new format is used. On the next start, you don't need this option anymore. The old index is replaced and a back conversion is not possible - therefore better take a backup of the index before. (Only for migrations from JCR 1.9 and later.) | 1.12 |
| analyzer | org.apache.lucene.analysis.standard.StandardAnalyzer | Class name of a lucene analyzer to use for fulltext indexing of text. | 1.12 |
The global search index is configured in the above-mentioned
configuration file
(portal/WEB-INF/conf/jcr/repository-configuration.xml)
in the tag "query-handler".
<query-handler class="org.exoplatform.services.jcr.impl.core.query.lucene.SearchIndex">
In fact, when using Lucene, you should always use the same analyzer for indexing and for querying, otherwise the results are unpredictable. You don't have to worry about this, eXo JCR does this for you automatically. If you don't like the StandardAnalyzer configured by default, just replace it by your own.
If you don't have a handy QueryHandler, you should learn how to create a customized Handler in 5 minutes.
By default Exo JCR uses the Lucene standard Analyzer to index contents. This analyzer uses some standard filters in the method that analyzes the content:
public TokenStream tokenStream(String fieldName, Reader reader) {
    StandardTokenizer tokenStream = new StandardTokenizer(reader, replaceInvalidAcronym);
    tokenStream.setMaxTokenLength(maxTokenLength);
    TokenStream result = new StandardFilter(tokenStream);
    result = new LowerCaseFilter(result);
    result = new StopFilter(result, stopSet);
    return result;
  }
The first one (StandardFilter) removes 's (as 's in "Peter's") from the end of words and removes dots from acronyms.
The second one (LowerCaseFilter) normalizes token text to lower case.
The last one (StopFilter) removes stop words from a token stream. The stop set is defined in the analyzer.
For specific cases, you may wish to use additional filters like ISOLatin1AccentFilter, which replaces accented characters in the ISO Latin 1 character set (ISO-8859-1) by their unaccented equivalents.
In order to use a different filter, you have to create a new analyzer, and a new search index to use the analyzer. You put it in a jar, which is deployed with your application.
The ISOLatin1AccentFilter is not present in the current Lucene version used by eXo. You can use the attached file. You can also create your own filter, the relevant method is
public final Token next(final Token reusableToken) throws java.io.IOException
which defines how chars are read and used by the filter.
The analyzer has to extends org.apache.lucene.analysis.standard.StandardAnalyzer, and overload the method
public TokenStream tokenStream(String fieldName, Reader reader)
to put your own filters. You can have a glance at the example analyzer attached to this article.
Now, we have the analyzer, we have to write the SearchIndex, which will use the analyzer. Your have to extends org.exoplatform.services.jcr.impl.core.query.lucene.SearchIndex. You have to write the constructor, to set the right analyzer, and the method
public Analyzer getAnalyzer() {
    return MyAnalyzer;
  }
to return your analyzer. You can see the attached SearchIndex.
Note
Since 1.12 version, we can set Analyzer directly in configuration. So, creation new SearchIndex only for new Analyzer is redundant.
In
portal/WEB-INF/conf/jcr/repository-configuration.xml,
you have to replace each
<query-handler class="org.exoplatform.services.jcr.impl.core.query.lucene.SearchIndex">
by your own class
<query-handler class="mypackage.indexation.MySearchIndex">
In
portal/WEB-INF/conf/jcr/repository-configuration.xml,
you have to add parameter "analyzer" to each query-handler
config:
<query-handler class="org.exoplatform.services.jcr.impl.core.query.lucene.SearchIndex">
   <properties>
      ...
      <property name="analyzer" value="org.exoplatform.services.jcr.impl.core.MyAnalyzer"/>
      ...
   </properties>
</query-handler>
When you start exo, your SearchIndex will start to index contents with the specified filters.
Starting with version 1.9, the default search index implementation in JCR allows you to control which properties of a node are indexed. You also can define different analyzers for different nodes.
The configuration parameter is called indexingConfiguration and per default is not set. This means all properties of a node are indexed.
If you wish to configure the indexing behavior, you need to add a parameter to the query-handler element in your configuration file.
<param name="indexing-configuration-path" value="/indexing_configuration.xml"/>
To optimize the index size, you can limit the node scope so that only certain properties of a node type are indexed.
With the below configuration, only properties named Text are indexed for nodes of type nt:unstructured. This configuration also applies to all nodes whose type extends from nt:unstructured.
<?xml version="1.0"?>
<!DOCTYPE configuration SYSTEM "http://www.exoplatform.org/dtd/indexing-configuration-1.0.dtd">
<configuration xmlns:nt="http://www.jcp.org/jcr/nt/1.0">
  <index-rule nodeType="nt:unstructured">
    <property>Text</property>
  </index-rule>
</configuration>
Please note that you have to declare the namespace prefixes in the configuration element that you are using throughout the XML file!
It is also possible to configure a boost value for the nodes that match the index rule. The default boost value is 1.0. Higher boost values (a reasonable range is 1.0 - 5.0) will yield a higher score value and appear as more relevant.
<?xml version="1.0"?>
<!DOCTYPE configuration SYSTEM "http://www.exoplatform.org/dtd/indexing-configuration-1.0.dtd">
<configuration xmlns:nt="http://www.jcp.org/jcr/nt/1.0">
  <index-rule nodeType="nt:unstructured"
              boost="2.0">
    <property>Text</property>
  </index-rule>
</configuration>
If you do not wish to boost the complete node but only certain properties, you can also provide a boost value for the listed properties:
<?xml version="1.0"?>
<!DOCTYPE configuration SYSTEM "http://www.exoplatform.org/dtd/indexing-configuration-1.0.dtd">
<configuration xmlns:nt="http://www.jcp.org/jcr/nt/1.0">
  <index-rule nodeType="nt:unstructured">
    <property boost="3.0">Title</property>
    <property boost="1.5">Text</property>
  </index-rule>
</configuration>
You may also add a condition to the index rule and have multiple rules with the same nodeType. The first index rule that matches will apply and all remain ones are ignored:
<?xml version="1.0"?>
<!DOCTYPE configuration SYSTEM "http://www.exoplatform.org/dtd/indexing-configuration-1.0.dtd">
<configuration xmlns:nt="http://www.jcp.org/jcr/nt/1.0">
  <index-rule nodeType="nt:unstructured"
              boost="2.0"
              condition="@priority = 'high'">
    <property>Text</property>
  </index-rule>
  <index-rule nodeType="nt:unstructured">
    <property>Text</property>
  </index-rule>
</configuration>
In the above example, the first rule only applies if the nt:unstructured node has a priority property with a value 'high'. The condition syntax supports only the equals operator and a string literal.
You may also refer properties in the condition that are not on the current node:
<?xml version="1.0"?>
<!DOCTYPE configuration SYSTEM "http://www.exoplatform.org/dtd/indexing-configuration-1.0.dtd">
<configuration xmlns:nt="http://www.jcp.org/jcr/nt/1.0">
  <index-rule nodeType="nt:unstructured"
              boost="2.0"
              condition="ancestor::*/@priority = 'high'">
    <property>Text</property>
  </index-rule>
  <index-rule nodeType="nt:unstructured"
              boost="0.5"
              condition="parent::foo/@priority = 'low'">
    <property>Text</property>
  </index-rule>
  <index-rule nodeType="nt:unstructured"
              boost="1.5"
              condition="bar/@priority = 'medium'">
    <property>Text</property>
  </index-rule>
  <index-rule nodeType="nt:unstructured">
    <property>Text</property>
  </index-rule>
</configuration>
The indexing configuration also allows you to specify the type of a node in the condition. Please note however that the type match must be exact. It does not consider sub types of the specified node type.
<?xml version="1.0"?>
<!DOCTYPE configuration SYSTEM "http://www.exoplatform.org/dtd/indexing-configuration-1.0.dtd">
<configuration xmlns:nt="http://www.jcp.org/jcr/nt/1.0">
  <index-rule nodeType="nt:unstructured"
              boost="2.0"
              condition="element(*, nt:unstructured)/@priority = 'high'">
    <property>Text</property>
  </index-rule>
</configuration>Per default all configured properties are fulltext indexed if they are of type STRING and included in the node scope index. A node scope search finds normally all nodes of an index. That is, the select jcr:contains(., 'foo') returns all nodes that have a string property containing the word 'foo'. You can exclude explicitly a property from the node scope index:
<?xml version="1.0"?>
<!DOCTYPE configuration SYSTEM "http://www.exoplatform.org/dtd/indexing-configuration-1.0.dtd">
<configuration xmlns:nt="http://www.jcp.org/jcr/nt/1.0">
  <index-rule nodeType="nt:unstructured">
    <property nodeScopeIndex="false">Text</property>
  </index-rule>
</configuration>
Sometimes it is useful to include the contents of descendant nodes into a single node to easier search on content that is scattered across multiple nodes.
JCR allows you to define indexed aggregates, basing on relative path patterns and primary node types.
The following example creates an indexed aggregate on nt:file that includes the content of the jcr:content node:
<?xml version="1.0"?>
<!DOCTYPE configuration SYSTEM "http://www.exoplatform.org/dtd/indexing-configuration-1.0.dtd">
<configuration xmlns:jcr="http://www.jcp.org/jcr/1.0"
               xmlns:nt="http://www.jcp.org/jcr/nt/1.0">
  <aggregate primaryType="nt:file">
    <include>jcr:content</include>
  </aggregate>
</configuration>
You can also restrict the included nodes to a certain type:
<?xml version="1.0"?>
<!DOCTYPE configuration SYSTEM "http://www.exoplatform.org/dtd/indexing-configuration-1.0.dtd">
<configuration xmlns:jcr="http://www.jcp.org/jcr/1.0"
               xmlns:nt="http://www.jcp.org/jcr/nt/1.0">
  <aggregate primaryType="nt:file">
    <include primaryType="nt:resource">jcr:content</include>
  </aggregate>
</configuration>
You may also use the * to match all child nodes:
<?xml version="1.0"?>
<!DOCTYPE configuration SYSTEM "http://www.exoplatform.org/dtd/indexing-configuration-1.0.dtd">
<configuration xmlns:jcr="http://www.jcp.org/jcr/1.0"
               xmlns:nt="http://www.jcp.org/jcr/nt/1.0">
  <aggregate primaryType="nt:file">http://wiki.exoplatform.com/xwiki/bin/edit/JCR/Search+Configuration
    <include primaryType="nt:resource">*</include>
  </aggregate>
</configuration>
If you wish to include nodes up to a certain depth below the current node, you can add multiple include elements. E.g. the nt:file node may contain a complete XML document under jcr:content:
<?xml version="1.0"?>
<!DOCTYPE configuration SYSTEM "http://www.exoplatform.org/dtd/indexing-configuration-1.0.dtd">
<configuration xmlns:jcr="http://www.jcp.org/jcr/1.0"
               xmlns:nt="http://www.jcp.org/jcr/nt/1.0">
  <aggregate primaryType="nt:file">
    <include>*</include>
    <include>*/*</include>
    <include>*/*/*</include>
  </aggregate>
</configuration>
In this configuration section, you define how a property has to be analyzed. If there is an analyzer configuration for a property, this analyzer is used for indexing and searching of this property. For example:
<?xml version="1.0"?>
<!DOCTYPE configuration SYSTEM "http://www.exoplatform.org/dtd/indexing-configuration-1.0.dtd">
<configuration xmlns:nt="http://www.jcp.org/jcr/nt/1.0">
  <analyzers>
        <analyzer class="org.apache.lucene.analysis.KeywordAnalyzer">
            <property>mytext</property>
        </analyzer>
        <analyzer class="org.apache.lucene.analysis.WhitespaceAnalyzer">
            <property>mytext2</property>
        </analyzer>
  </analyzers>
</configuration>
The configuration above means that the property "mytext" for the entire workspace is indexed (and searched) with the Lucene KeywordAnalyzer, and property "mytext2" with the WhitespaceAnalyzer. Using different analyzers for different languages is particularly useful.
The WhitespaceAnalyzer tokenizes a property, the KeywordAnalyzer takes the property as a whole.
When using analyzers, you may encounter an unexpected behavior when searching within a property compared to searching within a node scope. The reason is that the node scope always uses the global analyzer.
Let's suppose that the property "mytext" contains the text : "testing my analyzers" and that you haven't configured any analyzers for the property "mytext" (and not changed the default analyzer in SearchIndex).
If your query is for example:
xpath = "//*[jcr:contains(mytext,'analyzer')]"
This xpath does not return a hit in the node with the property above and default analyzers.
Also a search on the node scope
xpath = "//*[jcr:contains(.,'analyzer')]"
won't give a hit. Realize that you can only set specific analyzers on a node property, and that the node scope indexing/analyzing is always done with the globally defined analyzer in the SearchIndex element.
Now, if you change the analyzer used to index the "mytext" property above to
<analyzer class="org.apache.lucene.analysis.Analyzer.GermanAnalyzer">
     <property>mytext</property>
</analyzer>
and you do the same search again, then for
xpath = "//*[jcr:contains(mytext,'analyzer')]"
you would get a hit because of the word stemming (analyzers - analyzer).
The other search,
xpath = "//*[jcr:contains(.,'analyzer')]"
still would not give a result, since the node scope is indexed with the global analyzer, which in this case does not take into account any word stemming.
In conclusion, be aware that when using analyzers for specific properties, you might find a hit in a property for some search text, and you do not find a hit with the same search text in the node scope of the property!
Note
Both index rules and index aggregates influence how content is indexed in JCR. If you change the configuration, the existing content is not automatically re-indexed according to the new rules. You, therefore, have to manually re-index the content when you change the configuration!
eXo JCR supports some advanced features, which are not specified in JSR 170:
Get a text excerpt with highlighted words that matches the query: ExcerptProvider.
Search a term and its synonyms: SynonymSearch
Search similar nodes: SimilaritySearch
Check spelling of a full text query statement: SpellChecker
Define index aggregates and rules: IndexingConfiguration.
JCR Repository Service uses
org.exoplatform.services.jcr.config.RepositoryServiceConfiguration
component to read its configuration.
<component>
    <key>org.exoplatform.services.jcr.config.RepositoryServiceConfiguration</key>
    <type>org.exoplatform.services.jcr.impl.config.RepositoryServiceConfigurationImpl</type>
    <init-params>
      <value-param>
        <name>conf-path</name>
        <description>JCR configuration file</description>
        <value>/conf/standalone/exo-jcr-config.xml</value>
      </value-param>
    </init-params>
  </component>
In the example, Repository Service will read the configuration from
the file /conf/standalone/exo-jcr-config.xml.
But in some cases, it's required to change the configuration on the fly. And know that the new one will be used. Additionally we wish not to modify the original file.
In this case, we have to use the configuration persister feature which allows to store the configuration in different locations.
On startup RepositoryServiceConfiguration
component checks if a configuration persister was configured. In that
case, it uses the provided ConfigurationPersister
implementation class to instantiate the persister object.
Configuration with persister:
<component>
    <key>org.exoplatform.services.jcr.config.RepositoryServiceConfiguration</key>
    <type>org.exoplatform.services.jcr.impl.config.RepositoryServiceConfigurationImpl</type>
    <init-params>
      <value-param>
        <name>conf-path</name>
        <description>JCR configuration file</description>
        <value>/conf/standalone/exo-jcr-config.xml</value>
      </value-param>
      <properties-param>
        <name>working-conf</name>
        <description>working-conf</description>
        <property name="source-name" value="jdbcjcr" />
        <property name="dialect" value="mysql" />
        <property name="persister-class-name" value="org.exoplatform.services.jcr.impl.config.JDBCConfigurationPersister" />
      </properties-param>
    </init-params>
  </component>
Where:
source-name: JNDI source name configured inInitialContextInitializercomponent. (sourceNameprior v.1.9.) Find more in database configuration.dialect: SQL dialect which will be used with database fromsource-name. Find more in database configuration.persister-class-name- class name ofConfigurationPersisterinterface implementation. (persisterClassNameprior v.1.9.)
ConfigurationPersister interface:
/**
   * Init persister.
   * Used by RepositoryServiceConfiguration on init.
   * @return - config data stream
   */
  void init(PropertiesParam params) throws RepositoryConfigurationException;

  /**
   * Read config data.
   * @return - config data stream
   */
  InputStream read() throws RepositoryConfigurationException;

  /**
   * Create table, write data.
   * @param confData - config data stream
   */
  void write(InputStream confData) throws RepositoryConfigurationException;

  /**
   * Tell if the config exists.
   * @return - flag
   */
  boolean hasConfig() throws RepositoryConfigurationException;
JCR Core implementation contains a persister which stores the
repository configuration in the relational database using JDBC calls -
org.exoplatform.services.jcr.impl.config.JDBCConfigurationPersister.
The implementation will crate and use table JCR_CONFIG in the provided database.
But the developer can implement his own persister for his particular usecase.
eXo JCR persistent data container can work in two configuration modes:
Multi-database: One database for each workspace (used in standalone eXo JCR service mode)
Single-database: All workspaces persisted in one database (used in embedded eXo JCR service mode, e.g. in eXo portal)
The data container uses the JDBC driver to communicate with the actual database software, i.e. any JDBC-enabled data storage can be used with eXo JCR implementation.
Currently the data container is tested with the following configurations:
MySQL 5.0.18 MYSQL Connector/J 5.0.8
MySQL 5.1.36 MYSQL Connector/J 5.1.14
PostgresSQL 8.2.4 JDBC4 Driver, Version 8.2-507
PostgresSQL 8.3.7 JDBC4 Driver, Version 8.3-606
Oracle DB 10g R2 (10.2.0.4), JDBC Driver Oracle 10g R2 (10.2.0.4)
Oracle DB 11g R1 (11.1.0.6.0), JDBC Driver Oracle 11g R1 (11.1.0.6.0)
Oracle DB 11g R2 (11.2.0.1.0), JDBC Driver Oracle 11g R2 (11.2.0.1.0)
DB2 9.7.4 IBM Data Server Driver for JDBC and SQLJ (JCC Driver) v.9.7
MS SQL Server 2005 SP3 JDBC Driver 3.0
MS SQL Server 2008 JDBC Driver 3.0
Sybase 15.0.3 ASE Driver: Sybase jConnect JDBC driver v7 (Build 26502)
HSQLDB (2.0.0)
Each database software supports ANSI SQL standards but also has its own specifics. So, each database has its own configuration in eXo JCR as a database dialect parameter. If you need a more detailed configuration of the database, it's possible to do that by editing the metadata SQL-script files.
SQL-scripts you can obtain from jar-file exo.jcr.component.core-XXX.XXX.jar:conf/storage/. They also can be found at SVN here.
In the next two tables correspondence between the scripts and databases is shown.
| MySQL DB | jcr-sjdbc.mysql.sql |
| MySQL DB with utf-8 | jcr-sjdbc.mysql-utf8.sql |
| MySQL DB with MyISAM* | jcr-sjdbc.mysql-myisam.sql |
| MySQL DB with MyISAM and utf-8* | jcr-sjdbc.mysql-myisam-utf8.sql |
| PostgresSQL | jcr-sjdbc.pqsql.sql |
| Oracle DB | jcr-sjdbc.ora.sql |
| DB2 | jcr-sjdbc.db2.sql |
| MS SQL Server | jcr-sjdbc.mssql.sql |
| Sybase | jcr-sjdbc.sybase.sql |
| HSQLDB | jcr-sjdbc.sql |
| MySQL DB | jcr-mjdbc.mysql.sql |
| MySQL DB with utf-8 | jcr-mjdbc.mysql-utf8.sql |
| MySQL DB with MyISAM* | jcr-mjdbc.mysql-myisam.sql |
| MySQL DB with MyISAM and utf-8* | jcr-mjdbc.mysql-myisam-utf8.sql |
| PostgresSQL | jcr-mjdbc.pqsql.sql |
| Oracle DB | jcr-mjdbc.ora.sql |
| DB2 | jcr-mjdbc.db2.sql |
| MS SQL Server | jcr-mjdbc.mssql.sql |
| Sybase | jcr-mjdbc.sybase.sql |
| HSQLDB | jcr-mjdbc.sql |
In case the non-ANSI node name is used, it's necessary to use a
database with MultiLanguage support[TODO link to MultiLanguage]. Some JDBC
drivers need additional parameters for establishing a Unicode friendly
connection. E.g. under mysql it's necessary to add an additional parameter
for the JDBC driver at the end of JDBC URL. For instance:
jdbc:mysql://exoua.dnsalias.net/portal?characterEncoding=utf8
There are preconfigured configuration files for HSQLDB. Look for these files in /conf/portal and /conf/standalone folders of the jar-file exo.jcr.component.core-XXX.XXX.jar or source-distribution of eXo JCR implementation.
By default, the configuration files are located in service jars
/conf/portal/configuration.xml (eXo services
including JCR Repository Service) and
exo-jcr-config.xml (repositories configuration). In
eXo portal product, JCR is configured in portal web application
portal/WEB-INF/conf/jcr/jcr-configuration.xml (JCR
Repository Service and related serivces) and repository-configuration.xml
(repositories configuration).
Read more about Repository configuration.
Please note, that JCR requires at least READ_COMMITED isolation level and other RDBMS configurations can cause some side-effects and issues. So, please, make sure proper isolation level is configured on database server side.
RDBMS reindexing feature use queries based on LIMIT and OFFSET clauses which are not enabled by default. However, you can ensure they are enabled by executing the following
$ db2set DB2_COMPATIBILITY_VECTOR=MYS
$ db2stop
$ db2start
Statistics is collected automatically starting from DB2 Version 9, however it is needed to launch statistics collection manually during the very first start, otherwise it could be very long. You need to run 'RUNSTATS' command
RUNSTATS ON TABLE <scheme>.<table> WITH DISTRIBUTION AND INDEXES ALL
for JCR_SITEM (or JCR_MITEM) and JCR_SVALUE (or JCR_MVALUE) tables.
MyISAM is not supported due to its lack of transaction support and integrity check, so use it only if you don't expect any support and if performances in read accesses are more important than the consistency in your use-case. This dialect is only dedicated to the community.
MySQL relies on collected statistics for keeping track of data distribution in tables and for optimizing join statements, but you can manually call 'ANALYZE' to update statistics if needed. For example
ANALYZE TABLE JCR_SITEM, JCR_SVALUE
Be aware, when using RDBMS for reindexing need to set "enable_seqscan" to "off" or "default_statistics_target" at least "50"
Though PostgreSQL server performs query optimization automatically, you can manualy call 'ANALYZE' command to collect statistics which can influence the performance. For example
ANALYZE JCR_SITEM
ANALYZE JCR_SVALUE
One more mandatory JCR requirement for underlying databases is a case sensitive collation. Microsoft SQL Server both 2005 and 2008 customers must configure their server with collation corresponding to personal needs and requirements, but obligatorily case sensitive. For more information please refer to Microsoft SQL Server documentation page "Selecting a SQL Server Collation" here.
MS SQL DB server's optimizer automatically processes queries to increase performance. Optimization is based on statistical data which is collected automatically, but you can manually call Transact-SQL command 'UPDATE STATISTICS' which in very few situations may increase performance. For example
UPDATE STATISTICS JCR_SITEM
UPDATE STATISTICS JCR_SVALUE
Sybase DB Server optimizer automatically processes queries to increase performance. Optimization is based on statistical data which is collected automatically, but you can manually call Transact-SQL command 'update statistics' which in very few situations may increase performance. For example
update statistics JCR_SITEM
update statistics JCR_SVALUE
Oracle DB automatically collects statistics to optimize performance of queries, but you can manually call 'ANALYZE' command to start collecting statistics immediately which may improve performance. For example
ANALYZE INDEX JCR_PK_SITEM COMPUTE STATISTICS
ANALYZE INDEX JCR_IDX_SITEM_PARENT_FK COMPUTE STATISTICS
ANALYZE INDEX JCR_IDX_SITEM_PARENT COMPUTE STATISTICS
ANALYZE INDEX JCR_IDX_SITEM_PARENT_NAME COMPUTE STATISTICS
ANALYZE INDEX JCR_IDX_SITEM_PARENT_ID COMPUTE STATISTICS
ANALYZE INDEX JCR_PK_SVALUE COMPUTE STATISTICS
ANALYZE INDEX JCR_IDX_SVALUE_PROPERTY COMPUTE STATISTICS
ANALYZE INDEX JCR_PK_SREF COMPUTE STATISTICS
ANALYZE INDEX JCR_IDX_SREF_PROPERTY COMPUTE STATISTICS
ANALYZE INDEX JCR_PK_SCONTAINER COMPUTE STATISTICS
You need to configure each workspace in a repository. You may have each one on different remote servers as far as you need.
First of all configure the data containers in the
org.exoplatform.services.naming.InitialContextInitializer
service. It's the JNDI context initializer which registers (binds) naming
resources (DataSources) for data containers.
For example (standalone mode, two data containers
jdbcjcr - local HSQLDB,
jdbcjcr1 - remote MySQL):
<component>
    <key>org.exoplatform.services.naming.InitialContextInitializer</key>
    <type>org.exoplatform.services.naming.InitialContextInitializer</type>
    <component-plugins>
      <component-plugin>
        <name>bind.datasource</name>
        <set-method>addPlugin</set-method>
        <type>org.exoplatform.services.naming.BindReferencePlugin</type>
        <init-params>
          <value-param>
            <name>bind-name</name>
            <value>jdbcjcr</value>
          </value-param>
          <value-param>
            <name>class-name</name>
            <value>javax.sql.DataSource</value>
          </value-param>
          <value-param>
            <name>factory</name>
            <value>org.apache.commons.dbcp.BasicDataSourceFactory</value>
          </value-param>
          <properties-param>
            <name>ref-addresses</name>
            <description>ref-addresses</description>
            <property name="driverClassName" value="org.hsqldb.jdbcDriver"/>
            <property name="url" value="jdbc:hsqldb:file:target/temp/data/portal"/>
            <property name="username" value="sa"/>
            <property name="password" value=""/>
          </properties-param>
        </init-params>
      </component-plugin>
      <component-plugin>
        <name>bind.datasource</name>
        <set-method>addPlugin</set-method>
        <type>org.exoplatform.services.naming.BindReferencePlugin</type>
        <init-params>
          <value-param>
            <name>bind-name</name>
            <value>jdbcjcr1</value>
          </value-param>
          <value-param>
            <name>class-name</name>
            <value>javax.sql.DataSource</value>
          </value-param>
          <value-param>
            <name>factory</name>
            <value>org.apache.commons.dbcp.BasicDataSourceFactory</value>
          </value-param>
          <properties-param>
            <name>ref-addresses</name>
            <description>ref-addresses</description>
            <property name="driverClassName" value="com.mysql.jdbc.Driver"/>
            <property name="url" value="jdbc:mysql://exoua.dnsalias.net/jcr"/>
            <property name="username" value="exoadmin"/>
            <property name="password" value="exo12321"/>
            <property name="maxActive" value="50"/>
            <property name="maxIdle" value="5"/>
            <property name="initialSize" value="5"/>
          </properties-param>
        </init-params>
      </component-plugin>
    <component-plugins>
    <init-params>
      <value-param>
        <name>default-context-factory</name>
        <value>org.exoplatform.services.naming.SimpleContextFactory</value>
      </value-param>
    </init-params>
  </component>
We configure the database connection parameters:
driverClassName, e.g. "org.hsqldb.jdbcDriver", "com.mysql.jdbc.Driver", "org.postgresql.Driver"url, e.g. "jdbc:hsqldb:file:target/temp/data/portal", "jdbc:mysql://exoua.dnsalias.net/jcr"username, e.g. "sa", "exoadmin"password, e.g. "", "exo12321"
There can be connection pool configuration parameters (org.apache.commons.dbcp.BasicDataSourceFactory):
maxActive, e.g. 50maxIdle, e.g. 5initialSize, e.g. 5and other according to Apache DBCP configuration
When the data container configuration is done, we can configure the repository service. Each workspace will be configured for its own data container.
For example (two workspaces ws - jdbcjcr,
ws1 - jdbcjcr1):
<workspaces>
  <workspace name="ws" auto-init-root-nodetype="nt:unstructured">
    <container class="org.exoplatform.services.jcr.impl.storage.jdbc.JDBCWorkspaceDataContainer">
    <properties>
      <property name="source-name" value="jdbcjcr"/>
      <property name="dialect" value="hsqldb"/>
      <property name="multi-db" value="true"/>
      <property name="max-buffer-size" value="200K"/>
      <property name="swap-directory" value="target/temp/swap/ws"/>
    </properties>
    </container>
    <cache enabled="true">
      <properties>
        <property name="max-size" value="10K"/><!-- 10Kbytes -->
        <property name="live-time" value="30m"/><!-- 30 min -->
      </properties>
    </cache>
    <query-handler class="org.exoplatform.services.jcr.impl.core.query.lucene.SearchIndex">
    <properties>
      <property name="index-dir" value="target/temp/index"/>
    </properties>
    </query-handler>
    <lock-manager>
    <time-out>15m</time-out><!-- 15 min -->
    <persister class="org.exoplatform.services.jcr.impl.core.lock.FileSystemLockPersister">
      <properties>
      <property name="path" value="target/temp/lock/ws"/>
      </properties>
    </persister>
    </lock-manager>
  </workspace>
  <workspace name="ws1" auto-init-root-nodetype="nt:unstructured">
    <container class="org.exoplatform.services.jcr.impl.storage.jdbc.JDBCWorkspaceDataContainer">
    <properties>
      <property name="source-name" value="jdbcjcr1"/>
      <property name="dialect" value="mysql"/>
      <property name="multi-db" value="true"/>
      <property name="max-buffer-size" value="200K"/>
      <property name="swap-directory" value="target/temp/swap/ws1"/>
    </properties>
    </container>
    <cache enabled="true">
      <properties>
        <property name="max-size" value="10K"/>
        <property name="live-time" value="5m"/>
      </properties>
    </cache>
    <query-handler class="org.exoplatform.services.jcr.impl.core.query.lucene.SearchIndex">
    <properties>
      <property name="index-dir" value="target/temp/index"/>
    </properties>
    </query-handler>
    <lock-manager>
    <time-out>15m</time-out><!-- 15 min -->
    <persister class="org.exoplatform.services.jcr.impl.core.lock.FileSystemLockPersister">
      <properties>
      <property name="path" value="target/temp/lock/ws1"/>
      </properties>
    </persister>
    </lock-manager>
  </workspace>
</workspaces>
source-name: A javax.sql.DataSource name configured in InitialContextInitializer component (wassourceNameprior JCR 1.9);dialect: A database dialect, one of "hsqldb", "mysql", "mysql-utf8", "pgsql", "oracle", "oracle-oci", "mssql", "sybase", "derby", "db2", "db2v8" or "auto" for dialect autodetection;multi-db: Enable multi-database container with this parameter (set value "true");max-buffer-size: Aa threshold (in bytes) after which a javax.jcr.Value content will be swapped to a file in a temporary storage. I.e. swap for pending changes.swap-directory: A path in the file system used to swap the pending changes.
In this way, we have configured two workspace which will be persisted in two different databases (ws in HSQLDB, ws1 in MySQL).
Note
Starting from v.1.9 repository configuration parameters supports human-readable formats of values (e.g. 200K - 200 Kbytes, 30m - 30 minutes etc)
It's more simple to configure a single-database data container. We have to configure one naming resource.
For example (embedded mode for jdbcjcr data
container):
<external-component-plugins>
    <target-component>org.exoplatform.services.naming.InitialContextInitializer</target-component>
    <component-plugin>
        <name>bind.datasource</name>
        <set-method>addPlugin</set-method>
        <type>org.exoplatform.services.naming.BindReferencePlugin</type>
        <init-params>
          <value-param>
            <name>bind-name</name>
            <value>jdbcjcr</value>
          </value-param>
          <value-param>
            <name>class-name</name>
            <value>javax.sql.DataSource</value>
          </value-param>
          <value-param>
            <name>factory</name>
            <value>org.apache.commons.dbcp.BasicDataSourceFactory</value>
          </value-param>
          <properties-param>
            <name>ref-addresses</name>
            <description>ref-addresses</description>
            <property name="driverClassName" value="org.postgresql.Driver"/>
            <property name="url" value="jdbc:postgresql://exoua.dnsalias.net/portal"/>
            <property name="username" value="exoadmin"/>
            <property name="password" value="exo12321"/>
            <property name="maxActive" value="50"/>
            <property name="maxIdle" value="5"/>
            <property name="initialSize" value="5"/>
          </properties-param>
        </init-params>
    </component-plugin>
  </external-component-plugins>
And configure repository workspaces in repositories configuration with this one database. Parameter "multi-db" must be switched off (set value "false").
For example (two workspaces ws - jdbcjcr,
ws1 - jdbcjcr):
<workspaces>
  <workspace name="ws" auto-init-root-nodetype="nt:unstructured">
    <container class="org.exoplatform.services.jcr.impl.storage.jdbc.JDBCWorkspaceDataContainer">
    <properties>
      <property name="source-name" value="jdbcjcr"/>
      <property name="dialect" value="pgsql"/>
      <property name="multi-db" value="false"/>
      <property name="max-buffer-size" value="200K"/>
      <property name="swap-directory" value="target/temp/swap/ws"/>
    </properties>
    </container>
    <cache enabled="true">
    <properties>
      <property name="max-size" value="10K"/>
      <property name="live-time" value="30m"/>
    </properties>
    </cache>
    <query-handler class="org.exoplatform.services.jcr.impl.core.query.lucene.SearchIndex">
    <properties>
      <property name="index-dir" value="../temp/index"/>
    </properties>
    </query-handler>
    <lock-manager>
    <time-out>15m</time-out>
    <persister class="org.exoplatform.services.jcr.impl.core.lock.FileSystemLockPersister">
      <properties>
      <property name="path" value="target/temp/lock/ws"/>
      </properties>
    </persister>
    </lock-manager>
  </workspace>
  <workspace name="ws1" auto-init-root-nodetype="nt:unstructured">
    <container class="org.exoplatform.services.jcr.impl.storage.jdbc.JDBCWorkspaceDataContainer">
    <properties>
      <property name="source-name" value="jdbcjcr"/>
      <property name="dialect" value="pgsql"/>
      <property name="multi-db" value="false"/>
      <property name="max-buffer-size" value="200K"/>
      <property name="swap-directory" value="target/temp/swap/ws1"/>
    </properties>
    </container>
    <cache enabled="true">
    <properties>
      <property name="max-size" value="10K"/>
      <property name="live-time" value="5m"/>
    </properties>
    </cache>
    <lock-manager>
    <time-out>15m</time-out>
    <persister class="org.exoplatform.services.jcr.impl.core.lock.FileSystemLockPersister">
      <properties>
      <property name="path" value="target/temp/lock/ws1"/>
      </properties>
    </persister>
    </lock-manager>
  </workspace>
</workspaces>
In this way, we have configured two workspaces which will be persisted in one database (PostgreSQL).
Repository configuration without using of the
javax.sql.DataSource bounded in JNDI.
This case may be usable if you have a dedicated JDBC driver implementation with special features like XA transactions, statements/connections pooling etc:
You have to remove the configuration in
InitialContextInitializerfor your database and configure a new one directly in the workspace container.Remove parameter "source-name" and add next lines instead. Describe your values for a JDBC driver, database url and username.
Note
But be careful in this case JDBC driver should implement and provide connection pooling. Connection pooling is very recommended for use with JCR to prevent a database overload.
<workspace name="ws" auto-init-root-nodetype="nt:unstructured">
  <container class="org.exoplatform.services.jcr.impl.storage.jdbc.JDBCWorkspaceDataContainer">
    <properties>
      <property name="dialect" value="hsqldb"/>
      <property name="driverClassName" value="org.hsqldb.jdbcDriver"/>
      <property name="url" value="jdbc:hsqldb:file:target/temp/data/portal"/>
      <property name="username" value="su"/>
      <property name="password" value=""/>
......Workspaces can be added dynamically during runtime.
This can be performed in two steps:
Firstly,
ManageableRepository.configWorkspace(WorkspaceEntry
            wsConfig)
- register a new configuration in RepositoryContainer and create a WorkspaceContainer.Secondly, the main step,
ManageableRepository.createWorkspace(String
            workspaceName)
- creation of a new workspace.
eXo JCR provides two ways for interact with Database -
JDBCStorageConnection that uses simple queries and
CQJDBCStorageConection that uses complex queries
for reducing amount of database callings.
Simple queries will be used if you chose
org.exoplatform.services.jcr.impl.storage.jdbc.JDBCWorkspaceDataContainer:
<workspaces>
  <workspace name="ws" auto-init-root-nodetype="nt:unstructured">
    <container class="org.exoplatform.services.jcr.impl.storage.jdbc.JDBCWorkspaceDataContainer">
    ...
  </workspace>
</worksapces>
Complex queries will be used if you chose
org.exoplatform.services.jcr.impl.storage.jdbc.optimisation.CQJDBCWorkspaceDataContainer:
<workspaces>
  <workspace name="ws" auto-init-root-nodetype="nt:unstructured">
    <container class="org.exoplatform.services.jcr.impl.storage.jdbc.optimisation.CQJDBCWorkspaceDataContainer">
    ...
  </workspace>
</worksapces>
Why we should use a Complex Queries?
| They are optimised to reduce amount of requests to database. |
Why we should use a Simple Queries?
| Simple queries implemented in way to support as many database dialects as possible. |
| Simple queries do not use sub queries, left or right joins. |
Some databases supports hints to increase query performance (like Oracle, MySQL, etc). eXo JCR have separate Complex Query implementation for Orcale dialect, that uses query hints to increase performance for few important queries.
To enable this option put next configuration property:
<workspace name="ws" auto-init-root-nodetype="nt:unstructured">
  <container class="org.exoplatform.services.jcr.impl.storage.jdbc.JDBCWorkspaceDataContainer">
    <properties>
      <property name="dialect" value="oracle"/>
      <property name="force.query.hints" value="true" />
      ......
Query hints enabled by default.
eXo JCR uses query hints only for Complex Query Oracle dialect. For all other dialects this parameter is ignored.
The current configuration of eXo JCR uses Apache DBCP connection pool
(org.apache.commons.dbcp.BasicDataSourceFactory).
It's possible to set a big value for maxActive parameter in
configuration.xml. That means usage of lots of TCP/IP
ports from a client machine inside the pool (i.e. JDBC driver). As a
result, the data container can throw exceptions like "Address already in
use". To solve this problem, you have to configure the client's machine
networking software for the usage of shorter timeouts for opened TCP/IP
ports.
Microsoft Windows has MaxUserPort,
TcpTimedWaitDelay registry keys in the node
HKEY_LOCAL_MACHINESYSTEMCurrentControlSetServicesTcpipParameters,
by default these keys are unset, set each one with values like
these:
"TcpTimedWaitDelay"=dword:0000001e, sets TIME_WAIT parameter to 30 seconds, default is 240.
"MaxUserPort"=dword:00001b58, sets the maximum of open ports to 7000 or higher, default is 5000.
A sample registry file is below:
Windows Registry Editor Version 5.00

[HKEY_LOCAL_MACHINE\SYSTEM\CurrentControlSet\Services\Tcpip\Parameters]
"MaxUserPort"=dword:00001b58
"TcpTimedWaitDelay"=dword:0000001e
By default JCR Values are stored in the Workspace Data container along with the JCR structure (i.e. Nodes and Properties). eXo JCR offers an additional option of storing JCR Values separately from Workspace Data container, which can be extremely helpful to keep Binary Large Objects (BLOBs) for example.
Value storage configuration is a part of Repository configuration, find more details there.
Tree-based storage is recommended for most of cases. If you run an application on Amazon EC2 - the S3 option may be interesting for architecture. Simple 'flat' storage is good in speed of creation/deletion of values, it might be a compromise for a small storages.
Holds Values in tree-like FileSystem files. path property points to the root directory to store the files.
This is a recommended type of external storage, it can contain large amount of files limited only by disk/volume free space.
A disadvantage is that it's a higher time on Value deletion due to unused tree-nodes remove.
<value-storage id="Storage #1" class="org.exoplatform.services.jcr.impl.storage.value.fs.TreeFileValueStorage">
     <properties>
       <property name="path" value="data/values"/>
     </properties>
     <filters>
       <filter property-type="Binary" min-value-size="1M"/>
     </filters>
Where :
id: The value storage unique
identifier, used for linking with properties stored in workspace
container. |
path: A location where value files will
be stored. |
Each file value storage can have the filter(s)
for incoming values. A filter can match values by property type
(property-type), property name
(property-name), ancestor path
(ancestor-path) and/or size of values stored
(min-value-size, in bytes). In code sample, we use a
filter with property-type and min-value-size only. I.e. storage for binary
values with size greater of 1MB. It's recommended to store properties with
large values in file value storage only.
Another example shows a value storage with different locations for large files (min-value-size a 20Mb-sized filter). A value storage uses ORed logic in the process of filter selection. That means the first filter in the list will be asked first and if not matched the next will be called etc. Here a value matches the 20 MB-sized filter min-value-size and will be stored in the path "data/20Mvalues", all other in "data/values".
<value-storages>
  <value-storage id="Storage #1" class="org.exoplatform.services.jcr.impl.storage.value.fs.TreeFileValueStorage">
    <properties>
      <property name="path" value="data/20Mvalues"/>
    </properties>
    <filters>
      <filter property-type="Binary" min-value-size="20M"/>
    </filters>
  <value-storage>
  <value-storage id="Storage #2" class="org.exoplatform.services.jcr.impl.storage.value.fs.TreeFileValueStorage">
    <properties>
      <property name="path" value="data/values"/>
    </properties>
    <filters>
      <filter property-type="Binary" min-value-size="1M"/>
    </filters>
  <value-storage>
<value-storages>Note
It's not recommended to use in production due to low capacity capabilities on most file systems.
But if you're sure in your file-system or data amount is small it may be useful for you as haves a faster speed of Value removal.
Hold Values in flat FileSystem files. path property points to root directory in order to store files
<value-storage id="Storage #1" class="org.exoplatform.services.jcr.impl.storage.value.fs.SimpleFileValueStorage">
     <properties>
       <property name="path" value="data/values"/>
     </properties>
     <filters>
       <filter property-type="Binary" min-value-size="1M"/>
</filters>eXo JCR supports Content-addressable storage feature for Values storing.
Note
Content-addressable storage, also referred to as associative storage and abbreviated CAS, is a mechanism for storing information that can be retrieved based on its content, not its storage location. It is typically used for high-speed storage and retrieval of fixed content, such as documents stored for compliance with government regulations.
Content Addressable Value storage stores unique content once. Different properties (values) with same content will be stored as one data file shared between those values. We can tell the Value content will be shared across some Values in storage and will be stored on one physical file.
Storage size will be decreased for application which governs potentially same data in the content.
Note
For example: if you have 100 different properties containing the same data (e.g. mail attachment), the storage stores only one single file. The file will be shared with all referencing properties.
If property Value changes, it is stored in an additional file. Alternatively the file is shared with other values, pointing to the same content.
The storage calculates Value content address each time the property was changed. CAS write operations are much more expensive compared to the non-CAS storages.
Content address calculation based on java.security.MessageDigest hash computation and tested with MD5 and SHA1 algorithms.
Note
CAS storage works most efficiently on data that does not change often. For data that changes frequently, CAS is not as efficient as location-based addressing.
CAS support can be enabled for Tree and Simple File Value Storage types.
To enable CAS support, just configure it in JCR Repositories configuration as we do for other Value Storages.
<workspaces>
        <workspace name="ws">
          <container class="org.exoplatform.services.jcr.impl.storage.jdbc.JDBCWorkspaceDataContainer">
            <properties>
              <property name="source-name" value="jdbcjcr"/>
              <property name="dialect" value="oracle"/>
              <property name="multi-db" value="false"/>
              <property name="update-storage" value="false"/>
              <property name="max-buffer-size" value="200k"/>
              <property name="swap-directory" value="target/temp/swap/ws"/>
            </properties>
            <value-storages>
<!------------------- here ----------------------->
              <value-storage id="ws" class="org.exoplatform.services.jcr.impl.storage.value.fs.CASableTreeFileValueStorage">
                <properties>
                  <property name="path" value="target/temp/values/ws"/>
                  <property name="digest-algo" value="MD5"/>
                  <property name="vcas-type" value="org.exoplatform.services.jcr.impl.storage.value.cas.JDBCValueContentAddressStorageImpl"/>
                  <property name="jdbc-source-name" value="jdbcjcr"/>
                  <property name="jdbc-dialect" value="oracle"/>
                </properties>
                <filters>
                  <filter property-type="Binary"/>
                </filters>
              </value-storage>
            </value-storages>
Properties:
digest-algo: Digest hash algorithm (MD5
and SHA1 were tested); |
vcas-type: Value CAS internal data
type, JDBC backed is currently implemented
org.exoplatform.services.jcr.impl.storage.value.cas.JDBCValueContentAddressStorageImp;l |
jdbc-source-name:
JDBCValueContentAddressStorageImpl specific parameter, database will
be used to save CAS metadata. It's simple to use same as in workspace
container; |
jdbc-dialect:
JDBCValueContentAddressStorageImpl specific parameter, database
dialect. It's simple to use the same as in workspace
container; |
Each Workspace of JCR has its own persistent storage to hold workspace's items data. eXo Content Repository can be configured so that it can use one or more workspaces that are logical units of the repository content. Physical data storage mechanism is configured using mandatory element container. The type of container is described in the attribute class = fully qualified name of org.exoplatform.services.jcr.storage.WorkspaceDataContainer subclass like
<container class="org.exoplatform.services.jcr.impl.storage.jdbc.JDBCWorkspaceDataContainer">
  <properties>
    <property name="source-name" value="jdbcjcr1"/>
    <property name="dialect" value="hsqldb"/>
    <property name="multi-db" value="true"/>
    <property name="max-buffer-size" value="200K"/>
    <property name="swap-directory" value="target/temp/swap/ws"/>
    <property name="lazy-node-iterator-page-size" value="50"/>
    <property name="acl-bloomfilter-false-positive-probability" value="0.1d"/>
    <property name="acl-bloomfilter-elements-number" value="1000000"/>
  </properties>
Properties are Container specific parameters:
source-name: JDBC data source name, registered in JDNI by InitialContextInitializer. ( sourceName prior v.1.9)
dialect: Database dialect, one of "hsqldb", "mysql", "mysql-utf8", "pgsql", "oracle", "oracle-oci", "mssql", "sybase", "derby", "db2", "db2v8"
multi-db: Enable multi-database container with this parameter (if "true").
max-buffer-size: A threshold in bytes, if a value size is greater, then it will be spooled to a temporary file.
swap-directory: A location where the value will be spooled if no value storage is configured but a max-buffer-size is exceeded.
lazy-node-iterator-page-size: "Lazy" child nodes iterator settings. Defines size of page, the number of nodes that are retrieved from persistent storage at once.
acl-bloomfilter-false-positive-probability: ACL Bloom-filter settings. ACL Bloom-filter desired false positive probability. Range [0..1]. Default value 0.1d.
acl-bloomfilter-elements-number: ACL Bloom-filter settings. Expected number of ACL-elements in the Bloom-filter. Default value 1000000.
Note
Bloom filters are not supported by all the cache implementations so far only the inplementation for infinispan supports it.
Bloom-filter used to avoid read nodes that definitely do not have ACL. acl-bloomfilter-false-positive-probability and acl-bloomfilter-elements-number used to configure such filters. Bloom filters are not supported by all the cache implementations so far only the inplementation for infinispan supports it.
More about Bloom filters you can read here http://en.wikipedia.org/wiki/Bloom_filter.
eXo JCR has an RDB (JDBC) based, production ready Workspace Data Container.
Workspace Data Container MAY support external storages for javax.jcr.Value (which can be the case for BLOB values for example) using the optional element value-storages. Data Container will try to read or write Value using underlying value storage plugin if the filter criteria (see below) match the current property.
<value-storages>
  <value-storage id="Storage #1" class="org.exoplatform.services.jcr.impl.storage.value.fs.TreeFileValueStorage">
    <properties>
      <property name="path" value="data/values"/>
    </properties>
    <filters>
     <filter property-type="Binary" min-value-size="1M"/><!-- Values large of 1Mbyte -->
    </filters>
.........
</value-storages>
Where value-storage is the subclass of org.exoplatform.services.jcr.storage.value.ValueStoragePlugin and properties are optional plugin specific parameters.
filters : Each file value storage can have the filter(s) for incoming values. If there are several filter criteria, they all have to match (AND-Condition).
A filter can match values by property type (property-type), property name (property-name), ancestor path (ancestor-path) and/or the size of values stored (min-value-size, e.g. 1M, 4.2G, 100 (bytes)).
In a code sample, we use a filter with property-type and min-value-size only. That means that the storage is only for binary values whose size is greater than 1Mbyte.
It's recommended to store properties with large values in a file value storage only.
Starting from version 1.9, JCR Service supports REST services creation on Groovy script.
The feature bases on RESTful framework and uses ResourceContainer concept.
Scripts should extend ResourceContainer and should be stored in JCR as a node of type exo:groovyResourceContainer.
Detailed REST services step-by-step implementation check there Create REST service step by step.
Component configuration enables Groovy services loader:
<component>
  <type>org.exoplatform.services.jcr.ext.script.groovy.GroovyScript2RestLoader</type>
  <init-params>
    <object-param>
      <name>observation.config</name>
      <object type="org.exoplatform.services.jcr.ext.script.groovy.GroovyScript2RestLoader$ObservationListenerConfiguration">
        <field name="repository">
          <string>repository</string>
        </field>
        <field name="workspaces">
          <collection type="java.util.ArrayList">
            <value>
              <string>collaboration</string>
            </value>
          </collection>
        </field>
      </object>
    </object-param>
  </init-params>
</component>To deploy eXo JCR to JBoss, do the following steps:
Download the latest version of eXo JCR .ear file distribution.
Copy <jcr.ear> into <%jboss_home%/server/default/deploy>
Put exo-configuration.xml to the root <%jboss_home%/exo-configuration.xml>
Configure JAAS by inserting XML fragment shown below into <%jboss_home%/server/default/conf/login-config.xml>
<application-policy name="exo-domain">
   <authentication>
      <login-module code="org.exoplatform.services.security.j2ee.JbossLoginModule" flag="required"></login-module>
   </authentication>
</application-policy>
Ensure that you use JBossTS Transaction Service and JBossCache Transaction Manager. Your exo-configuration.xml must contain such parts:
<component>
   <key>org.jboss.cache.transaction.TransactionManagerLookup</key>
   <type>org.jboss.cache.GenericTransactionManagerLookup</type>^
</component>

<component>
   <key>org.exoplatform.services.transaction.TransactionService</key>
   <type>org.exoplatform.services.transaction.jbosscache.JBossTransactionsService</type>
   <init-params>
      <value-param>
         <name>timeout</name>
         <value>300</value>
      </value-param>
   </init-params>
</component>
Start server:
bin/run.sh for Unix
bin/run.bat for Windows
Try accessing
http://localhostu:8080/browserwith root/exo as login/password if you have done everything right, you'll get access to repository browser.
To manually configure repository, create a new configuration file (e.g., exo-jcr-configuration.xml). For details, see JCR Configuration. Your configuration must look like:
<repository-service default-repository="repository1">
   <repositories>
      <repository name="repository1" system-workspace="ws1" default-workspace="ws1">
         <security-domain>exo-domain</security-domain>
         <access-control>optional</access-control>
         <authentication-policy>org.exoplatform.services.jcr.impl.core.access.JAASAuthenticator</authentication-policy>
         <workspaces>
            <workspace name="ws1">
               <container class="org.exoplatform.services.jcr.impl.storage.jdbc.optimisation.CQJDBCWorkspaceDataContainer">
                  <properties>
                     <property name="source-name" value="jdbcjcr" />
                     <property name="dialect" value="oracle" />
                     <property name="multi-db" value="false" />
                     <property name="update-storage" value="false" />
                     <property name="max-buffer-size" value="200k" />
                     <property name="swap-directory" value="../temp/swap/production" />
                  </properties>
                  <value-storages>
                     see "Value storage configuration" part.
                  </value-storages>
               </container>
               <initializer class="org.exoplatform.services.jcr.impl.core.ScratchWorkspaceInitializer">
                  <properties>
                     <property name="root-nodetype" value="nt:unstructured" />
                  </properties>
               </initializer>
               <cache enabled="true" class="org.exoplatform.services.jcr.impl.dataflow.persistent.jbosscache.JBossCacheWorkspaceStorageCache">
                     see  "Cache configuration" part.
               </cache>
               <query-handler class="org.exoplatform.services.jcr.impl.core.query.lucene.SearchIndex">
                  see  "Indexer configuration" part.
               </query-handler>
               <lock-manager class="org.exoplatform.services.jcr.impl.core.lock.jbosscache.CacheableLockManagerImpl">
                  see  "Lock Manager configuration" part.
               </lock-manager>
            </workspace>
            <workspace name="ws2">
                        ...
            </workspace>
            <workspace name="wsN">
                        ...
            </workspace>
         </workspaces>
      </repository>
   </repositories>
</repository-service>
Then, update RepositoryServiceConfiguration configuration in exo-configuration.xml to use this file:
<component>
   <key>org.exoplatform.services.jcr.config.RepositoryServiceConfiguration</key>
   <type>org.exoplatform.services.jcr.impl.config.RepositoryServiceConfigurationImpl</type>
   <init-params>
      <value-param>
         <name>conf-path</name>
         <description>JCR configuration file</description>
         <value>exo-jcr-configuration.xml</value>
      </value-param>
   </init-params>
</component>
Every node of cluster MUST have the same mounted Network File System with the read and write permissions on it.
"/mnt/tornado" - path to the mounted Network File System (all cluster nodes must use the same NFS).
Every node of cluster MUST use the same database.
The same Clusters on different nodes MUST have the same names (e.g., if Indexer cluster in workspace production on the first node has the name "production_indexer_cluster", then indexer clusters in workspace production on all other nodes MUST have the same name "production_indexer_cluster" ).
Configuration of every workspace in repository must contains of such parts:
<value-storages> <value-storage id="system" class="org.exoplatform.services.jcr.impl.storage.value.fs.TreeFileValueStorage"> <properties> <property name="path" value="/mnt/tornado/temp/values/production" /> <!--path within NFS where ValueStorage will hold it's data--> </properties> <filters> <filter property-type="Binary" /> </filters> </value-storage> </value-storages><cache enabled="true" class="org.exoplatform.services.jcr.impl.dataflow.persistent.jbosscache.JBossCacheWorkspaceStorageCache"> <properties> <property name="jbosscache-configuration" value="jar:/conf/portal/test-jbosscache-data.xml" /> <!-- path to JBoss Cache configuration for data storage --> <property name="jgroups-configuration" value="jar:/conf/portal/udp-mux.xml" /> <!-- path to JGroups configuration --> <property name="jbosscache-cluster-name" value="JCR_Cluster_cache_production" /> <!-- JBoss Cache data storage cluster name --> <property name="jgroups-multiplexer-stack" value="true" /> </properties> </cache><query-handler class="org.exoplatform.services.jcr.impl.core.query.lucene.SearchIndex"> <properties> <property name="changesfilter-class" value="org.exoplatform.services.jcr.impl.core.query.jbosscache.JBossCacheIndexChangesFilter" /> <property name="index-dir" value="/mnt/tornado/temp/jcrlucenedb/production" /> <!-- path within NFS where ValueStorage will hold it's data --> <property name="jbosscache-configuration" value="jar:/conf/portal/test-jbosscache-indexer.xml" /> <!-- path to JBoss Cache configuration for indexer --> <property name="jgroups-configuration" value="jar:/conf/portal/udp-mux.xml" /> <!-- path to JGroups configuration --> <property name="jbosscache-cluster-name" value="JCR_Cluster_indexer_production" /> <!-- JBoss Cache indexer cluster name --> <property name="jgroups-multiplexer-stack" value="true" /> </properties> </query-handler><lock-manager class="org.exoplatform.services.jcr.impl.core.lock.jbosscache.CacheableLockManagerImpl"> <properties> <property name="time-out" value="15m" /> <property name="jbosscache-configuration" value="jar:/conf/portal/test-jbosscache-lock.xml" /> <!-- path to JBoss Cache configuration for lock manager --> <property name="jgroups-configuration" value="jar:/conf/portal/udp-mux.xml" /> <!-- path to JGroups configuration --> <property name="jgroups-multiplexer-stack" value="true" /> <property name="jbosscache-cluster-name" value="JCR_Cluster_lock_production" /> <!-- JBoss Cache locks cluster name --> <property name="jbosscache-cl-cache.jdbc.table.name" value="jcrlocks_production"/> <!-- the name of the DB table where lock's data will be stored --> <property name="jbosscache-cl-cache.jdbc.table.create" value="true"/> <property name="jbosscache-cl-cache.jdbc.table.drop" value="false"/> <property name="jbosscache-cl-cache.jdbc.table.primarykey" value="jcrlocks_production_pk"/> <property name="jbosscache-cl-cache.jdbc.fqn.column" value="fqn"/> <property name="jbosscache-cl-cache.jdbc.node.column" value="node"/> <property name="jbosscache-cl-cache.jdbc.parent.column" value="parent"/> <property name="jbosscache-cl-cache.jdbc.datasource" value="jdbcjcr"/> </properties> </lock-manager>
To be sure that all transactions are over and JCR is in consistent state after stopping node, you need to follow next steps:
Connect using JMX to one of cluster's node which you won't need to stop.
Use RepositorySuspendController suspend all repositories (see 37.1 Repository suspending)
Stop the node
Use RepositorySuspendController to resume all repositories (see 37.3 Repository resuming)
Each mentioned components uses instances of JBoss Cache product for caching in clustered environment. So every element has it's own transport and has to be configured in a proper way. As usual, workspaces have similar configuration but with different cluster-names and may-be some other parameters. The simplest way to configure them is to define their own configuration files for each component in each workspace:
<property name="jbosscache-configuration" value="conf/standalone/test-jbosscache-lock-db1-ws1.xml" />
But if there are few workspaces, configuring them in such a way can be painful and hard-manageable. eXo JCR offers a template-based configuration for JBoss Cache instances. You can have one template for Lock Manager, one for Indexer and one for data container and use them in all the workspaces, defining the map of substitution parameters in a main configuration file. Just simply define ${jbosscache-<parameter name>} inside xml-template and list correct value in JCR configuration file just below "jbosscache-configuration", as shown:
Template:
...
<clustering mode="replication" clusterName="${jbosscache-cluster-name}">
  <stateRetrieval timeout="20000" fetchInMemoryState="false" />
...
and JCR configuration file:
...
<property name="jbosscache-configuration" value="jar:/conf/portal/jbosscache-lock.xml" />
<property name="jbosscache-cluster-name" value="JCR-cluster-locks-db1-ws" />
...
JGroups is used by JBoss Cache for network communications and transport in a clustered environment. If property "jgroups-configuration" is defined in component configuration, it will be injected into the JBoss Cache instance on startup.
<property name="jgroups-configuration" value="your/path/to/modified-udp.xml" />
As mentioned above, each component (lock manager, data container and query handler) for each workspace requires its own clustered environment. In other words, they have their own clusters with unique names. By default, each cluster should perform multi-casts on a separate port. This configuration leads to much unnecessary overhead on cluster. That's why JGroups offers multiplexer feature, providing ability to use one single channel for set of clusters. This feature reduces network overheads and increase performance and stability of application. To enable multiplexer stack, you should define appropriate configuration file (upd-mux.xml is pre-shipped one with eXo JCR) and set "jgroups-multiplexer-stack" into "true".
<property name="jgroups-configuration" value="jar:/conf/portal/udp-mux.xml" />
<property name="jgroups-multiplexer-stack" value="true" />
A JBoss Cache instance is quite resource consuming and by default we will have 3 JBoss Cache instances (one instance for the indexer, one for the lock manager and one for the data container) for each workspace, so if you intend to have a lot of workspaces it could make sense to decide to share one JBoss Cache instance with several cache instances of the same type (i.e. indexer, lock manager or data container). This feature is disabled by default and can be enabled at component configuration level (i.e. indexer configuration, lock manager configuration and/or data container configuration) by setting the property "jbosscache-shareable" to true as below:
<property name="jbosscache-shareable" value="true" />
Once enabled this feature will allow the JBoss Cache instance used by the component to be re-used by another components of the same type (i.e. indexer, lock manager or data container) with the exact same JBoss Cache configuration (except the eviction configuration that cans be different), which means that all the parameters of type ${jbosscache-<parameter name>} must be identical between the components of same type of different workspaces. In other words, if we use the same values for the parameters of type ${jbosscache-<parameter name>} in each workspace, we will have only 3 JBoss Cache instances (one instance for the indexer, one for the lock manager and one for the data container) used whatever the total amount of workspaces defined.
eXo JCR implementation is shipped with ready-to-use JBoss Cache configuration templates for JCR's components. They are situated in application package in /conf/porta/ folder.
Data container template is "jbosscache-data.xml":
<?xml version="1.0" encoding="UTF-8"?>
<jbosscache xmlns:xsi="http://www.w3.org/2001/XMLSchema-instance" xmlns="urn:jboss:jbosscache-core:config:3.1">

   <locking useLockStriping="false" concurrencyLevel="50000" lockParentForChildInsertRemove="false"
      lockAcquisitionTimeout="20000" />

   <clustering mode="replication" clusterName="${jbosscache-cluster-name}">
      <stateRetrieval timeout="20000" fetchInMemoryState="false" />
      <jgroupsConfig multiplexerStack="jcr.stack" />
      <sync />
   </clustering>

   <!-- Eviction configuration -->
   <eviction wakeUpInterval="5000">
      <default algorithmClass="org.jboss.cache.eviction.LRUAlgorithm"
         actionPolicyClass="org.exoplatform.services.jcr.impl.dataflow.persistent.jbosscache.ParentNodeEvictionActionPolicy"
         eventQueueSize="1000000">
         <property name="maxNodes" value="1000000" />
         <property name="timeToLive" value="120000" />
      </default>
   </eviction>
</jbosscache>It's template name is "jbosscache-lock.xml"
<?xml version="1.0" encoding="UTF-8"?>
<jbosscache xmlns:xsi="http://www.w3.org/2001/XMLSchema-instance" xmlns="urn:jboss:jbosscache-core:config:3.1">

   <locking useLockStriping="false" concurrencyLevel="50000" lockParentForChildInsertRemove="false"
      lockAcquisitionTimeout="20000" />
   <clustering mode="replication" clusterName="${jbosscache-cluster-name}">
      <stateRetrieval timeout="20000" fetchInMemoryState="false" />
      <jgroupsConfig multiplexerStack="jcr.stack" />
      <sync />
   </clustering>
   <loaders passivation="false" shared="true">
      <preload>
         <node fqn="/" />
      </preload>
      <loader class="org.jboss.cache.loader.JDBCCacheLoader" async="false" fetchPersistentState="false"
         ignoreModifications="false" purgeOnStartup="false">
         <properties>
            cache.jdbc.table.name=${jbosscache-cl-cache.jdbc.table.name}
            cache.jdbc.table.create=${jbosscache-cl-cache.jdbc.table.create}
            cache.jdbc.table.drop=${jbosscache-cl-cache.jdbc.table.drop}
            cache.jdbc.table.primarykey=${jbosscache-cl-cache.jdbc.table.primarykey}
            cache.jdbc.fqn.column=${jbosscache-cl-cache.jdbc.fqn.column}
            cache.jdbc.fqn.type=${jbosscache-cl-cache.jdbc.fqn.type}
            cache.jdbc.node.column=${jbosscache-cl-cache.jdbc.node.column}
            cache.jdbc.node.type=${jbosscache-cl-cache.jdbc.node.type}
            cache.jdbc.parent.column=${jbosscache-cl-cache.jdbc.parent.column}
            cache.jdbc.datasource=${jbosscache-cl-cache.jdbc.datasource}
         </properties>
      </loader>
   </loaders>
</jbosscache>
Table 23.2. Template variables
| Variable |
|---|
| jbosscache-cluster-name |
| jbosscache-cl-cache.jdbc.table.name |
| jbosscache-cl-cache.jdbc.table.create |
| jbosscache-cl-cache.jdbc.table.drop |
| jbosscache-cl-cache.jdbc.table.primarykey |
| jbosscache-cl-cache.jdbc.fqn.column |
| jbosscache-cl-cache.jdbc.fqn.type |
| jbosscache-cl-cache.jdbc.node.column |
| jbosscache-cl-cache.jdbc.node.type |
| jbosscache-cl-cache.jdbc.parent.column |
| jbosscache-cl-cache.jdbc.datasource |
Have a look at "jbosscache-indexer.xml"
<?xml version="1.0" encoding="UTF-8"?>
<jbosscache xmlns:xsi="http://www.w3.org/2001/XMLSchema-instance" xmlns="urn:jboss:jbosscache-core:config:3.1">
   <locking useLockStriping="false" concurrencyLevel="50000" lockParentForChildInsertRemove="false"
      lockAcquisitionTimeout="20000" />
   <clustering mode="replication" clusterName="${jbosscache-cluster-name}">
      <stateRetrieval timeout="20000" fetchInMemoryState="false" />
      <jgroupsConfig multiplexerStack="jcr.stack" />
      <sync />
   </clustering>
   <!-- Eviction configuration -->
   <eviction wakeUpInterval="5000">
      <default algorithmClass="org.jboss.cache.eviction.FIFOAlgorithm" eventQueueSize="1000000">
         <property name="maxNodes" value="10000" />
         <property name="minTimeToLive" value="60000" />
      </default>
   </eviction>
</jbosscache>What LockManager does?
In general, LockManager stores Lock objects, so it can give a Lock object or can release it, etc.
Also, LockManager is responsible for removing Locks that live too long. This parameter may be configured with "time-out" property.
JCR provides two basic implementations of LockManager:
org.exoplatform.services.jcr.impl.core.lock.LockManagerImpl;org.exoplatform.services.jcr.impl.core.lock.jbosscache.CacheableLockManagerImpl;
In this article, we will mostly mention about CacheableLockManagerImpl.
You can enable LockManager by adding lock-manager-configuration to workspace-configuration.
For example:
<workspace name="ws">
   ...
   <lock-manager class="org.exoplatform.services.jcr.impl.core.lock.jbosscache.CacheableLockManagerImpl">
      <properties>
         <property name="time-out" value="15m" />
         ...
      </properties>
   </lock-manager>
   ...
</workspace>LockManagerImpl is a simple implementation of LockManager, and also faster than CacheableLockManager. It stores Lock objects in HashMap and may also persist Locks if LockPersister is configured. LockManagerImpl does not support replication in any way.
See more about LockManager Configuration at here.
CacheableLockManagerImpl stores Lock objects in JBoss-cache, so Locks are replicable and affect on cluster, not only a single node. Also, JBoss-cache has JDBCCacheLoader, so Locks will be stored to the database.
Both of the implementations support to remove Expired Locks. LockRemover separates threads, that periodically ask LockManager to remove Locks that live so long. So, the timeout for LockRemover may be set as follows, the default value is 30m.
<properties>
   <property name="time-out" value="10m" />
   ...
</properties>
Replication requirements are the same for Cache.
You can see a full JCR configuration example at here.
Common tips:
clusterName("jbosscache-cluster-name") must be unique;cache.jdbc.table.namemust be unique per datasource;cache.jdbc.fqn.typeand cache.jdbc.node.type must be configured according to used database;
There are a few ways to configure CacheableLockManagerImpl, and all of them configure JBoss-cache and JDBCCacheLoader.
See http://community.jboss.org/wiki/JBossCacheJDBCCacheLoader
The first one is putting JbossCache configuraion file path to CacheableLockManagerImpl.
Note
This configuration is not so good as you think. Because the repository may contain many workspaces, and each workspace must contain LockManager configuration, and LockManager configuration may contain the JbossCache config file. So, the total configuration will grow up. But it is useful if we want to have a single LockManager with a special configuration.
Configuration is as follows:
<lock-manager class="org.exoplatform.services.jcr.impl.core.lock.jbosscache.CacheableLockManagerImpl">
   <properties>
     <property name="time-out" value="15m" />
     <property name="jbosscache-configuration" value="conf/standalone/cluster/test-jbosscache-lock-config.xml" />
   </properties>
</lock-manager>
test-jbosscache-lock-config.xml
<?xml version="1.0" encoding="UTF-8"?>
<jbosscache xmlns:xsi="http://www.w3.org/2001/XMLSchema-instance" xmlns="urn:jboss:jbosscache-core:config:3.2">

 <locking useLockStriping="false" concurrencyLevel="50000" lockParentForChildInsertRemove="false" lockAcquisitionTimeout="20000" />

 <clustering mode="replication" clusterName="JBoss-Cache-Lock-Cluster_Name">
  <stateRetrieval timeout="20000" fetchInMemoryState="false" nonBlocking="true" />
  <jgroupsConfig>

   <TCP bind_addr="127.0.0.1" start_port="9800" loopback="true" recv_buf_size="20000000" send_buf_size="640000" discard_incompatible_packets="true"
    max_bundle_size="64000" max_bundle_timeout="30" use_incoming_packet_handler="true" enable_bundling="false" use_send_queues="false" sock_conn_timeout="300"
    skip_suspected_members="true" use_concurrent_stack="true" thread_pool.enabled="true" thread_pool.min_threads="1" thread_pool.max_threads="25"
    thread_pool.keep_alive_time="5000" thread_pool.queue_enabled="false" thread_pool.queue_max_size="100" thread_pool.rejection_policy="run"
    oob_thread_pool.enabled="true" oob_thread_pool.min_threads="1" oob_thread_pool.max_threads="8" oob_thread_pool.keep_alive_time="5000"
    oob_thread_pool.queue_enabled="false" oob_thread_pool.queue_max_size="100" oob_thread_pool.rejection_policy="run" />
   <MPING timeout="2000" num_initial_members="2" mcast_port="34540" bind_addr="127.0.0.1" mcast_addr="224.0.0.1" />


   <MERGE2 max_interval="30000" min_interval="10000" />
   <FD_SOCK />
   <FD max_tries="5" shun="true" timeout="10000" />
   <VERIFY_SUSPECT timeout="1500" />
   <pbcast.NAKACK discard_delivered_msgs="true" gc_lag="0" retransmit_timeout="300,600,1200,2400,4800" use_mcast_xmit="false" />
   <UNICAST timeout="300,600,1200,2400,3600" />
   <pbcast.STABLE desired_avg_gossip="50000" max_bytes="400000" stability_delay="1000" />
   <pbcast.GMS join_timeout="5000" print_local_addr="true" shun="false" view_ack_collection_timeout="5000" view_bundling="true" />
   <FRAG2 frag_size="60000" />
   <pbcast.STREAMING_STATE_TRANSFER />
  <pbcast.FLUSH timeout="0" />

  </jgroupsConfig

  <sync />
 </clustering>

 <loaders passivation="false" shared="true">
  <preload>
   <node fqn="/" />
  </preload>
  <loader class="org.jboss.cache.loader.JDBCCacheLoader" async="false" fetchPersistentState="false" ignoreModifications="false" purgeOnStartup="false">
   <properties>
    cache.jdbc.table.name=jcrlocks_ws
    cache.jdbc.table.create=true
    cache.jdbc.table.drop=false
    cache.jdbc.table.primarykey=jcrlocks_ws_pk
    cache.jdbc.fqn.column=fqn
    cache.jdbc.fqn.type=VARCHAR(512)
    cache.jdbc.node.column=node
    cache.jdbc.node.type=<BLOB>
    cache.jdbc.parent.column=parent
    cache.jdbc.datasource=jdbcjcr
   </properties>
  </loader>

 </loaders>

</jbosscache>
Configuration requirements:
<clustering mode="replication" clusterName="JBoss-Cache-Lock-Cluster_Name"> - the cluster name must be unique;
cache.jdbc.table.namemust be unique per datasource;cache.jdbc.node.typeandcache.jdbc.fqn.typemust be configured according to using the database. See Data Types in Different Databases .
The second one is using the template JBoss-cache configuration for all LockManagers.
Lock template configuration
test-jbosscache-lock.xml
<?xml version="1.0" encoding="UTF-8"?>
<jbosscache xmlns:xsi="http://www.w3.org/2001/XMLSchema-instance" xmlns="urn:jboss:jbosscache-core:config:3.1">

   <locking useLockStriping="false" concurrencyLevel="50000" lockParentForChildInsertRemove="false"
      lockAcquisitionTimeout="20000" />

   <clustering mode="replication" clusterName="${jbosscache-cluster-name}">
      <stateRetrieval timeout="20000" fetchInMemoryState="false" />
      <jgroupsConfig multiplexerStack="jcr.stack" />
      <sync />
   </clustering>

   <loaders passivation="false" shared="true">
      <!-- All the data of the JCR locks needs to be loaded at startup -->
      <preload>
         <node fqn="/" />
      </preload>
      <!--
      For another cache-loader class you should use another template with
      cache-loader specific parameters
      ->
      <loader class="org.jboss.cache.loader.JDBCCacheLoader" async=q"false" fetchPersistentState="false"
         ignoreModifications="false" purgeOnStartup="false">
         <properties>
            cache.jdbc.table.name=${jbosscache-cl-cache.jdbc.table.name}
            cache.jdbc.table.create=${jbosscache-cl-cache.jdbc.table.create}
            cache.jdbc.table.drop=${jbosscache-cl-cache.jdbc.table.drop}
            cache.jdbc.table.primarykey=${jbosscache-cl-cache.jdbc.table.primarykey}
            cache.jdbc.fqn.column=${jbosscache-cl-cache.jdbc.fqn.column}
            cache.jdbc.fqn.type=${jbosscache-cl-cache.jdbc.fqn.type}
            cache.jdbc.node.column=${jbosscache-cl-cache.jdbc.node.column}
            cache.jdbc.node.type=${jbosscache-cl-cache.jdbc.node.type}
            cache.jdbc.parent.column=${jbosscache-cl-cache.jdbc.parent.column}
            cache.jdbc.datasource=${jbosscache-cl-cache.jdbc.datasource}
         </properties>
      </loader>
   </loaders>
</jbosscache>
As you see, all configurable parameters are filled by templates and will be replaced by LockManagers configuration parameters:
<lock-manager class="org.exoplatform.services.jcr.impl.core.lock.jbosscache.CacheableLockManagerImpl">
   <properties>
      <property name="time-out" value="15m" />
      <property name="jbosscache-configuration" value="test-jbosscache-lock.xml" />
      <property name="jgroups-configuration" value="udp-mux.xml" />
      <property name="jgroups-multiplexer-stack" value="true" />
      <property name="jbosscache-cluster-name" value="JCR-cluster-locks-ws" />
      <property name="jbosscache-cl-cache.jdbc.table.name" value="jcrlocks_ws" />
      <property name="jbosscache-cl-cache.jdbc.table.create" value="true" />
      <property name="jbosscache-cl-cache.jdbc.table.drop" value="false" />
      <property name="jbosscache-cl-cache.jdbc.table.primarykey" value="jcrlocks_ws_pk" />
      <property name="jbosscache-cl-cache.jdbc.fqn.column" value="fqn" />
      <property name="jbosscache-cl-cache.jdbc.fqn.type" value="AUTO"/>
      <property name="jbosscache-cl-cache.jdbc.node.column" value="node" />
      <property name="jbosscache-cl-cache.jdbc.node.type" value="AUTO"/>
      <property name="jbosscache-cl-cache.jdbc.parent.column" value="parent" />
      <property name="jbosscache-cl-cache.jdbc.datasource" value="jdbcjcr" />
   </properties>
</lock-manager>
Configuration requirements:
jbosscache-cl-cache.jdbc.fqn.columnandjbosscache-cl-cache.jdbc.node.typeis the same as cache.jdbc.fqn.type and cache.jdbc.node.type in JBoss-Cache configuration. You can set those data types according to database type (See Data Types in Different Databases) or set it as AUTO (or do not set at all) and data type will be detected automatically.As you see, jgroups-configuration is moved to separate the configuration file - udp-mux.xml. In this case, the udp-mux.xml file is a common JGroup configuration for all components (QueryHandler, Cache, LockManager), but we can still create our own configuration.
our-udp-mux.xml
<protocol_stacks>
   <stack name="jcr.stack">
      <config>
         <UDP mcast_addr="228.10.10.10" mcast_port="45588" tos="8" ucast_recv_buf_size="20000000"
            ucast_send_buf_size="640000" mcast_recv_buf_size="25000000" mcast_send_buf_size="640000" loopback="false"
            discard_incompatible_packets="true" max_bundle_size="64000" max_bundle_timeout="30"
            use_incoming_packet_handler="true" ip_ttl="2" enable_bundling="true" enable_diagnostics="true"
            thread_naming_pattern="cl" use_concurrent_stack="true" thread_pool.enabled="true" thread_pool.min_threads="2"
            thread_pool.max_threads="8" thread_pool.keep_alive_time="5000" thread_pool.queue_enabled="true"
            thread_pool.queue_max_size="1000" thread_pool.rejection_policy="discard" oob_thread_pool.enabled="true"
            oob_thread_pool.min_threads="1" oob_thread_pool.max_threads="8" oob_thread_pool.keep_alive_time="5000"
            oob_thread_pool.queue_enabled="false" oob_thread_pool.queue_max_size="100" oob_thread_pool.rejection_policy="Run" />

         <PING timeout="2000" num_initial_members="3" />
         <MERGE2 max_interval="30000" min_interval="10000" />
         <FD_SOCK />
         <FD timeout="10000" max_tries="5" shun="true" />
         <VERIFY_SUSPECT timeout="1500" />
         <BARRIER />
         <pbcast.NAKACK use_stats_for_retransmission="false" exponential_backoff="150" use_mcast_xmit="true"
            gc_lag="0" retransmit_timeout="50,300,600,1200" discard_delivered_msgs="true" />
         <UNICAST timeout="300,600,1200" />
         <pbcast.STABLE stability_delay="1000" desired_avg_gossip="50000" max_bytes="1000000" />
         <VIEW_SYNC avg_send_interval="60000" />
         <pbcast.GMS print_local_addr="true" join_timeout="3000" shun="false" view_bundling="true" />
         <FC max_credits="500000" min_threshold="0.20" />
         <FRAG2 frag_size="60000" />
         <!--pbcast.STREAMING_STATE_TRANSFER /-->
         <pbcast.STATE_TRANSFER />
         <!-- pbcast.FLUSH  /-->
      </config>
   </stack>
</protocol_stacks> Table 24.1. FQN type and node type in different databases
| DataBase name | Node data type | FQN data type |
|---|---|---|
| default | BLOB | VARCHAR(512) |
| HSSQL | OBJECT | VARCHAR(512) |
| MySQL | LONGBLOB | VARCHAR(512) |
| ORACLE | BLOB | VARCHAR2(512) |
| PostgreSQL | bytea | VARCHAR(512) |
| MSSQL | VARBINARY(MAX) | VARCHAR(512) |
| DB2 | BLOB | VARCHAR(512) |
| Sybase | IMAGE | VARCHAR(512) |
| Ingres | long byte | VARCHAR(512) |
There are 3 choices:
I. When new Shareable Cache feature is not going to be used and all locks should be kept after migration.
Ensure that the same lock tables used in configuration;
Start the server;
II. When new Shareable Cache feature is not going to be used and all locks should be removed after migration.
Ensure that the same lock tables used in configuration;
Start the sever WITH system property -Dorg.exoplatform.jcr.locks.force.remove=true;
Stop the server;
Start the server (WITHOUT system property -Dorg.exoplatform.jcr.locks.force.remove);
III. When new Shareable Cache feature will be used (in this case all locks are removed after migration).
Start the sever WITH system property -Dorg.exoplatform.jcr.locks.force.remove=true;
Stop the server;
Start the server (WITHOUT system property -Dorg.exoplatform.jcr.locks.force.remove);
(Not mandatory) manually remove old tables for lock;
JCR offers multiple indexing strategies. They include both for standalone and clustered environments using the advantages of running in a single JVM or doing the best to use all resources available in cluster. JCR uses Lucene library as underlying search and indexing engine, but it has several limitations that greatly reduce possibilities and limits the usage of cluster advantages. That's why eXo JCR offers three strategies that are suitable for it's own usecases. They are standalone, clustered with shared index and clustered with local indexes. Each one has it's pros and cons.
Stanadlone strategy provides a stack of indexes to achieve greater performance within single JVM.

It combines in-memory buffer index directory with delayed file-system flushing. This index is called "Volatile" and it is invoked in searches also. Within some conditions volatile index is flushed to the persistent storage (file system) as new index directory. This allows to achieve great results for write operations.
Clustered implementation with local indexes is built upon same strategy with volatile in-memory index buffer along with delayed flushing on persistent storage.
As this implementation designed for clustered environment it has additional mechanisms for data delivery within cluster. Actual text extraction jobs done on the same node that does content operations (i.e. write operation). Prepared "documents" (Lucene term that means block of data ready for indexing) are replicated withing cluster nodes and processed by local indexes. So each cluster instance has the same index content. When new node joins the cluster it has no initial index, so it must be created. There are some supported ways of doing this operation. The simplest is to simply copy the index manually but this is not intended for use. If no initial index found JCR uses automated sceneries. They are controlled via configuration (see "index-recovery-mode" parameter) offering full re-indexing from database or copying from another cluster node.
For some reasons having a multiple index copies on each instance can be costly. So shared index can be used instead (see diagram below).
This indexing strategy combines advantages of in-memory index along with shared persistent index offering "near" real time search capabilities. This means that newly added content is accessible via search practically immediately. This strategy allows nodes to index data in their own volatile (in-memory) indexes, but persistent indexes are managed by single "coordinator" node only. Each cluster instance has a read access for shared index to perform queries combining search results found in own in-memory index also. Take in account that shared folder must be configured in your system environment (i.e. mounted NFS folder). But this strategy in some extremely rare cases can have a bit different volatile indexes within cluster instances for a while. In a few seconds they will be up2date.
See more about Search Configuration.
Configuration example:
<workspace name="ws">
   <query-handler class="org.exoplatform.services.jcr.impl.core.query.lucene.SearchIndex">
      <properties>
         <property name="index-dir" value="shareddir/index/db1/ws" />
         <property name="changesfilter-class"
            value="org.exoplatform.services.jcr.impl.core.query.jbosscache.JBossCacheIndexChangesFilter" />
         <property name="jbosscache-configuration" value="jbosscache-indexer.xml" />
         <property name="jgroups-configuration" value="udp-mux.xml" />
         <property name="jgroups-multiplexer-stack" value="true" />
         <property name="jbosscache-cluster-name" value="JCR-cluster-indexer-ws" />
         <property name="max-volatile-time" value="60" />
         <property name="rdbms-reindexing" value="true" />
         <property name="reindexing-page-size" value="1000" />
         <property name="index-recovery-mode" value="from-coordinator" />
         <property name="index-recovery-filter" value="org.exoplatform.services.jcr.impl.core.query.lucene.DocNumberRecoveryFilter" />
      </properties>
   </query-handler>
</workspace>
Table 25.1. Config properties description
| Property name | Description |
|---|---|
| index-dir | path to index |
| changesfilter-class | template of JBoss-cache configuration for all query-handlers in repository |
| jbosscache-configuration | template of JBoss-cache configuration for all query-handlers in repository |
| jgroups-configuration | jgroups-configuration is template configuration for all components (search, cache, locks) [Add link to document describing template configurations] |
| jgroups-multiplexer-stack | [TODO about jgroups-multiplexer-stack - add link to JBoss doc] |
| jbosscache-cluster-name | cluster name (must be unique) |
| max-volatile-time | max time to live for Volatile Index |
| rdbms-reindexing | indicate that need to use rdbms reindexing mechanism if possible, the default value is true |
| reindexing-page-size | maximum amount of nodes which can be retrieved from storage for re-indexing purpose, the default value is 100 |
| index-recovery-mode | If the parameter has been set to
from-indexing, so a full indexing will be
automatically launched (default behavior), if the parameter has
been set to from-coordinator, the index will
be retrieved from coordinator |
| index-recovery-filter | Defines implementation class or classes of RecoveryFilters, the mechanism of index synchronization for Local Index strategy. |
| async-reindexing | Controls the process of re-indexing on JCR's startup. If flag set, indexing will be launched asynchronously, without blocking the JCR. Default is "false". |
Note
If you use postgreSQL and the parameter rdbms-reindexing is set to true, the performances of the queries used while indexing can be improved by setting the parameter "enable_seqscan" to "off" or "default_statistics_target" to at least "50" in the configuration of your database. Then you need to restart DB server and make analyze of the JCR_SVALUE (or JCR_MVALUE) table.
Note
If you use DB2 and the parameter rdbms-reindexing is set to true, the performance of the queiries used while indexing can be improved by making statisticks on tables by running "RUNSTATS ON TABLE <scheme>.<table> WITH DISTRIBUTION AND INDEXES ALL" for JCR_SITEM (or JCR_MITEM) and JCR_SVALUE (or JCR_MVALUE) tables.
When running JCR in standalone usually standalone indexing is used also. Such parameters as "changesfilter-class", "jgroups-configuration" and all the "jbosscache-*" must be skipped and not defined. Like the configuration below.
<workspace name="ws">
   <query-handler class="org.exoplatform.services.jcr.impl.core.query.lucene.SearchIndex">
      <properties>
         <property name="index-dir" value="shareddir/index/db1/ws" />
         <property name="max-volatile-time" value="60" />
         <property name="rdbms-reindexing" value="true" />
         <property name="reindexing-page-size" value="1000" />
         <property name="index-recovery-mode" value="from-coordinator" />
      </properties>
   </query-handler>
</workspace>For both cluster-ready implementations JBoss Cache, JGroups and Changes Filter values must be defined. Shared index requires some kind of remote or shared file system to be attached in a system (i.e. NFS, SMB or etc). Indexing directory ("indexDir" value) must point to it. Setting "changesfilter-class" to "org.exoplatform.services.jcr.impl.core.query.jbosscache.JBossCacheIndexChangesFilter" will enable shared index implementation.
<workspace name="ws">
   <query-handler class="org.exoplatform.services.jcr.impl.core.query.lucene.SearchIndex">
      <properties>
         <property name="index-dir" value="/mnt/nfs_drive/index/db1/ws" />
         <property name="changesfilter-class"
            value="org.exoplatform.services.jcr.impl.core.query.jbosscache.JBossCacheIndexChangesFilter" />
         <property name="jbosscache-configuration" value="jbosscache-indexer.xml" />
         <property name="jgroups-configuration" value="udp-mux.xml" />
         <property name="jgroups-multiplexer-stack" value="true" />
         <property name="jbosscache-cluster-name" value="JCR-cluster-indexer-ws" />
         <property name="max-volatile-time" value="60" />
         <property name="rdbms-reindexing" value="true" />
         <property name="reindexing-page-size" value="1000" />
         <property name="index-recovery-mode" value="from-coordinator" />
      </properties>
   </query-handler>
</workspace>
In order to use cluster-ready strategy based on local indexes, when each node has own copy of index on local file system, the following configuration must be applied. Indexing directory must point to any folder on local file system and "changesfilter-class" must be set to "org.exoplatform.services.jcr.impl.core.query.jbosscache.LocalIndexChangesFilter".
<workspace name="ws">
   <query-handler class="org.exoplatform.services.jcr.impl.core.query.lucene.SearchIndex">
      <properties>
         <property name="index-dir" value="/mnt/nfs_drive/index/db1/ws" />
         <property name="changesfilter-class"
            value="org.exoplatform.services.jcr.impl.core.query.jbosscache.LocalIndexChangesFilter" />
         <property name="jbosscache-configuration" value="jbosscache-indexer.xml" />
         <property name="jgroups-configuration" value="udp-mux.xml" />
         <property name="jgroups-multiplexer-stack" value="true" />
         <property name="jbosscache-cluster-name" value="JCR-cluster-indexer-ws" />
         <property name="max-volatile-time" value="60" />
         <property name="rdbms-reindexing" value="true" />
         <property name="reindexing-page-size" value="1000" />
         <property name="index-recovery-mode" value="from-coordinator" />
      </properties>
   </query-handler>
</workspace>
Common usecase for all cluster-ready applications is a hot joining and leaving of processing units. Node that is joining cluster for the first time or node joining after some downtime, they all must be in a synchronized state. When having a deal with shared value storages, databases and indexes, cluster nodes are synchronized anytime. But it's an issue when local index strategy used. If new node joins cluster, having no index it is retrieved or recreated. Node can be restarted also and thus index not empty. By default existing index is thought to be actual, but can be outdated. JCR offers a mechanism called RecoveryFilters that will automatically retrieve index for the joining node on startup. This feature is a set of filters that can be defined via QueryHandler configuration:
<property name="index-recovery-filter" value="org.exoplatform.services.jcr.impl.core.query.lucene.DocNumberRecoveryFilter" />
Filter number is not limited so they can be combined:
<property name="index-recovery-filter" value="org.exoplatform.services.jcr.impl.core.query.lucene.DocNumberRecoveryFilter" />
<property name="index-recovery-filter" value="org.exoplatform.services.jcr.impl.core.query.lucene.SystemPropertyRecoveryFilter" />
If any one returns fires, the index is re-synchronized. This feature uses standard index recovery mode defined by previously described parameter (can be "from-indexing" (default) or "from-coordinator")
<property name="index-recovery-mode" value="from-coordinator" />
There are couple implementations of filters:
org.exoplatform.services.jcr.impl.core.query.lucene.DummyRecoveryFilter: always returns true, for cases when index must be force resynchronized (recovered) each time;
org.exoplatform.services.jcr.impl.core.query.lucene.SystemPropertyRecoveryFilter : return value of system property "org.exoplatform.jcr.recoveryfilter.forcereindexing". So index recovery can be controlled from the top without changing documentation using system properties;
org.exoplatform.services.jcr.impl.core.query.lucene.ConfigurationPropertyRecoveryFilter : return value of QueryHandler configuration property "index-recovery-filter-forcereindexing". So index recovery can be controlled from configuration separately for each workspace. I.e:
<property name="index-recovery-filter" value="org.exoplatform.services.jcr.impl.core.query.lucene.ConfigurationPropertyRecoveryFilter" />
<property name="index-recovery-filter-forcereindexing" value="true" />
org.exoplatform.services.jcr.impl.core.query.lucene.DocNumberRecoveryFilter : checks number of documents in index on coordinator side and self-side. Return true if differs. Advantage of this filter comparing to other, it will skip reindexing for workspaces where index wasn't modified. I.e. there is 10 repositories with 3 workspaces in each one. Only one is really heavily used in cluster : frontend/production. So using this filter will only reindex those workspaces that are really changed, without affecting other indexes thus greatly reducing startup time.
JBoss-Cache template configuration for query handler is about the same for both clustered strategies.
jbosscache-indexer.xml
<?xml version="1.0" encoding="UTF-8"?>
<jbosscache xmlns:xsi="http://www.w3.org/2001/XMLSchema-instance" xmlns="urn:jboss:jbosscache-core:config:3.1">

   <locking useLockStriping="false" concurrencyLevel="50000" lockParentForChildInsertRemove="false"
      lockAcquisitionTimeout="20000" />
   <!-- Configure the TransactionManager -->
   <transaction transactionManagerLookupClass="org.jboss.cache.transaction.JBossStandaloneJTAManagerLookup" />

   <clustering mode="replication" clusterName="${jbosscache-cluster-name}">
      <stateRetrieval timeout="20000" fetchInMemoryState="false" />
      <jgroupsConfig multiplexerStack="jcr.stack" />
      <sync />
   </clustering>
   <!-- Eviction configuration -->
   <eviction wakeUpInterval="5000">
      <default algorithmClass="org.jboss.cache.eviction.FIFOAlgorithm" eventQueueSize="1000000">
         <property name="maxNodes" value="10000" />
         <property name="minTimeToLive" value="60000" />
      </default>
   </eviction>

</jbosscache>
See more about template configurations here.
Managing a big set of data using JCR in production environment sometimes requires special operations with Indexes, stored on File System. One of those maintenance operations is a recreation of it. Also called "re-indexing". There are various usecases when it's important to do. They include hardware faults, hard restarts, data-corruption, migrations and JCR updates that brings new features related to index. Usually index re-creation requested on server's startup or in runtime.
Common usecase for updating and re-creating the index is to stop the server and manually remove indexes for workspaces requiring it. When server will be started, missing indexes are automatically recovered by re-indexing. JCR Supports direct RDBMS re-indexing, that usually is faster than ordinary and can be configured via QueryHandler parameter "rdbms-reindexing" set to "true" (for more information please refer to "Query-handler configuration overview"). New feature to introduce is asynchronous indexing on startup. Usually startup is blocked until process is finished. Block can take any period of time, depending on amount of data persisted in repositories. But this can be resolved by using an asynchronous approaches of startup indexation. Saying briefly, it performs all operations with index in background, without blocking the repository. This is controlled by the value of "async-reindexing" parameter in QueryHandler configuration. With asynchronous indexation active, JCR starts with no active indexes present. Queries on JCR still can be executed without exceptions, but no results will be returned until index creation completed. Checking index state is possible via QueryManagerImpl:
boolean online = ((QueryManagerImpl)Workspace.getQueryManager()).getQueryHandeler().isOnline();
"OFFLINE" state means that index is currently re-creating. When state changed, corresponding log event is printed. From the start of background task index is switched to "OFFLINE", with following log event :
[INFO] Setting index OFFLINE (repository/production[system]).
When process finished, two events are logged :
[INFO] Created initial index for 143018 nodes (repository/production[system]).
[INFO] Setting index ONLINE (repository/production[system]).
Those two log lines indicates the end of process for workspace given in brackets. Calling isOnline() as mentioned above, will also return true.
Some hard system faults, error during upgrades, migration issues and some other factors may corrupt the index. Most likely end customers would like the production systems to fix index issues in run-time, without delays and restarts. Current versions of JCR supports "Hot Asynchronous Workspace Reindexing" feature. It allows end-user (Service Administrator) to launch the process in background without stopping or blocking whole application by using any JMX-compatible console (see screenshot below, "JConsole in action").
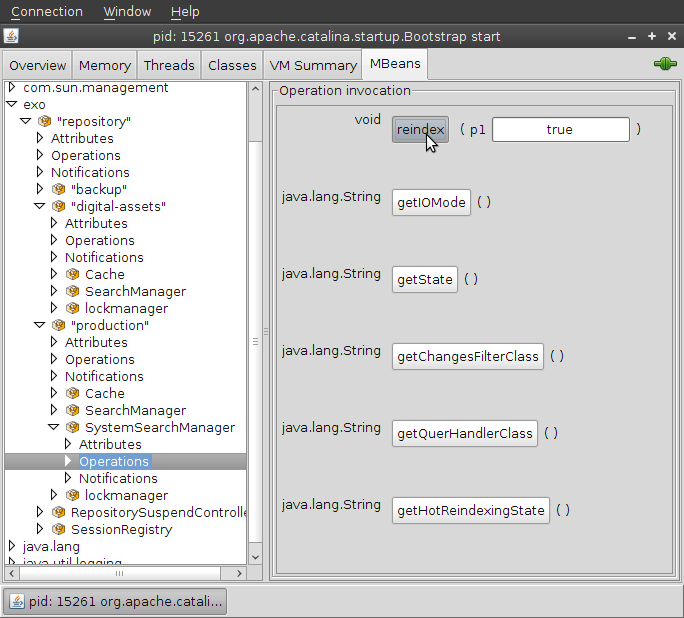
Server can continue working as expected while index is recreated. This depends on the flag "allow queries", passed via JMX interface to reindex operation invocation. If the flag set, then application continues working. But there is one critical limitation the end-users must be aware. Index is frozen while background task is running. It meant that queries are performed on index present on the moment of task startup and data written into repository after startup won't be available through the search until process finished. Data added during re-indexation is also indexed, but will be available only when task is done. Briefly, JCR makes the snapshot of indexes on asynch task startup and uses it for searches. When operation finished, stale indexes replaced by newly created including newly added data. If flag "allow queries" is set to false, then all queries will throw an exception while task is running. Current state can be acquired using the following JMX operation:
getHotReindexingState() - returns information about latest invocation: start time, if in progress or finish time if done.
First of all, can't launch Hot re-indexing via JMX if index is already in offline mode. It means that index is currently is invoked in some operations, like re-indexing at startup, copying in cluster to another node or whatever. Another important this is Hot Asynchronous Reindexing via JMX and "on startup" reindexing are completely different features. So you can't get the state of startup reindexing using command getHotReindexingState in JMX interface, but there are some common JMX operations:
getIOMode - returns current index IO mode (READ_ONLY / READ_WRITE), belongs to clustered configuration states;
getState - returns current state: ONLINE / OFFLINE.
As mentioned above, JCR Indexing is based on Lucene indexing library as underlying search engine. It uses Directories to store index and manages access to index by Lock Factories. By default JCR implementation uses optimal combination of Directory implementation and Lock Factory implementation. When running on OS different from Windows, NIOFSDirectory implementation used. And SimpleFSDirectory for Windows stations. NativeFSLockFactory is an optimal solution for wide variety of cases including clustered environment with NFS shared resources. But those default can be overridden with the help of system properties. There are two properties: "org.exoplatform.jcr.lucene.store.FSDirectoryLockFactoryClass" and "org.exoplatform.jcr.lucene.FSDirectory.class" that are responsible for changing default behavior. First one defines implementation of abstract Lucene LockFactory class and the second one sets implementation class for FSDirectory instances. For more information please refer to Lucene documentation. But be sure You know what You are changing. JCR allows end users to change implementation classes of Lucene internals, but doesn't guarantee it's stability and functionality.
JBossTransactionsService implements eXo TransactionService and provides access to JBoss Transaction Service (JBossTS) JTA implementation via eXo container dependency.
TransactionService used in JCR cache org.exoplatform.services.jcr.impl.dataflow.persistent.jbosscache.JBossCacheWorkspaceStorageCache implementaion. See Cluster configuration for example.
Example configuration:
  <component>
    <key>org.exoplatform.services.transaction.TransactionService</key>
    <type>org.exoplatform.services.transaction.jbosscache.JBossTransactionsService</type>
    <init-params>
      <value-param>
        <name>timeout</name>
        <value>3000</value>
      </value-param>
    </init-params>
  </component>
timeout - XA transaction timeout in seconds
It's JBossCache class registered as eXo container component in configuration.xml file.
  <component>
     <key>org.jboss.cache.transaction.TransactionManagerLookup</key>
     <type>org.jboss.cache.transaction.JBossStandaloneJTAManagerLookup</type>
  </component>
JBossStandaloneJTAManagerLookup used in standalone environment. Bur for Application Server environment use GenericTransactionManagerLookup.
eXo JCR can rely on distributed cache such as Infinispan. This article describes the required configuration.
<component>
    <key>org.infinispan.transaction.lookup.TransactionManagerLookup</key>
    <type>org.exoplatform.services.transaction.infinispan.JBossStandaloneJTAManagerLookup</type>
</component>

<component profiles="ispn">
    <key>org.exoplatform.services.transaction.TransactionService</key>
    <type>org.exoplatform.services.transaction.infinispan.JBossTransactionsService</type>
    <init-params>
        <value-param>
            <name>timeout</name>
            <value>3000</value>
        </value-param>
    </init-params>
</component>

<component profiles="ispn">
    <key>org.exoplatform.services.rpc.RPCService</key>
    <type>org.exoplatform.services.rpc.jgv3.RPCServiceImpl</type>
    <init-params>
        <value-param>
            <name>jgroups-configuration</name>
            <value>jar:/conf/udp-mux-v3.xml</value>
        </value-param>
        <value-param>
            <name>jgroups-cluster-name</name>
            <value>RPCService-Cluster</value>
        </value-param>
        <value-param>
            <name>jgroups-default-timeout</name>
            <value>0</value>
        </value-param>
    </init-params>
</component>
Each mentioned below components uses instances of Infinispan Cache product for caching in clustered environment. So every element has it's own transport and has to be configured in a proper way. As usual, workspaces have similar configuration. The simplest way to configure them is to define their own configuration files for each component in each workspace. There are several commons parameters.
"infinispan-configuration" defines path to template based configuration for Infinispan Cache instance.
JGroups is used by Infinispan Cache for network communications and transport in a clustered environment. If property "jgroups-configuration" is defined in component configuration, it will be injected into the Infinispan Cache instance on startup.
The another parameter is "infinispan-cluster-name". This defines the name of the cluster. Needs to be the same for all nodes in a cluster in order to find each other.
Cache configuration:
<cache enabled="true" class="org.exoplatform.services.jcr.impl.dataflow.persistent.infinispan.ISPNCacheWorkspaceStorageCache">
    <properties>
        <property name="infinispan-configuration" value="jar:/conf/portal/cluster/infinispan-data.xml" />
        <property name="jgroups-configuration" value="jar:/conf/udp-mux-v3.xml" />
        <property name="infinispan-cluster-name" value="JCR-cluster" />
    </properties>
</cache>
Indexer configuration
<query-handler class="org.exoplatform.services.jcr.impl.core.query.lucene.SearchIndex">
    <properties>
        <property name="index-dir" value="${exo.jcr.parent.dir:..}/temp/jcrlucenedb/production" />
        <property name="changesfilter-class" value="org.exoplatform.services.jcr.impl.core.query.ispn.ISPNIndexChangesFilter" />
        <property name="infinispan-configuration" value="jar:/conf/portal/cluster/infinispan-indexer.xml" />
        <property name="jgroups-configuration" value="jar:/conf/udp-mux-v3.xml" />
        <property name="infinispan-cluster-name" value="JCR-cluster" />
        <property name="max-volatile-time" value="60" />
    </properties>
</query-handler>
changesfilter-class - defines cluster-ready index strategy based on Infinispan Cache, it can be either
org.exoplatform.services.jcr.impl.core.query.ispn.ISPNIndexChangesFilter(for shared index) ororg.exoplatform.services.jcr.impl.core.query.ispn.LocalIndexChangesFilter(for local index)
Lock Manager configuration
<lock-manager class="org.exoplatform.services.jcr.impl.core.lock.infinispan.ISPNCacheableLockManagerImpl">
    <properties>
        <property name="time-out" value="15m" />
        <property name="infinispan-configuration" value="jar:/conf/portal/cluster/infinispan-lock.xml" />
        <property name="jgroups-configuration" value="jar:/conf/udp-mux-v3.xml" />
        <property name="infinispan-cluster-name" value="JCR-cluster" />
        <property name="infinispan-cl-cache.jdbc.table.name" value="lk" />
        <property name="infinispan-cl-cache.jdbc.table.create" value="true" />
        <property name="infinispan-cl-cache.jdbc.table.drop" value="false" />
        <property name="infinispan-cl-cache.jdbc.id.column" value="id" />
        <property name="infinispan-cl-cache.jdbc.data.column" value="data" />
        <property name="infinispan-cl-cache.jdbc.timestamp.column" value="timestamp" />
        <property name="infinispan-cl-cache.jdbc.datasource" value="jdbcjcr" />
        <property name="infinispan-cl-cache.jdbc.connectionFactory" value="org.infinispan.loaders.jdbc.connectionfactory.ManagedConnectionFactory" />
    </properties>
</lock-manager>^
infinispan-cl-cache.jdbc.table.name - table name
infinispan-cl-cache.jdbc.table.create - is true or false. Indicates whether to create table at start phase. If true, the table is created if it does not already exist.
infinispan-cl-cache.jdbc.table.drop - is true or false. Indicates whether to drop the table at stop phase.
infinispan-cl-cache.jdbc.id.column - id column name
infinispan-cl-cache.jdbc.data.column - data column name
infinispan-cl-cache.jdbc.timestamp.column - timestamp column name
infinispan-cl-cache.jdbc.datasource - name of configured in Container datasource, where you want to store locks. The best idea is to use the same as for workspace.
infinispan-cl-cache.jdbc.connectionFactory - connection factories for use with the JDBC Cache Store.
eXo JCR implementation is shipped with ready-to-use Infinispan Cache configuration templates for JCR's components.
Data container template is "infinispan-data.xml":
<infinispan
      xmlns:xsi="http://www.w3.org/2001/XMLSchema-instance".
      xsi:schemaLocation="urn:infinispan:config:5.1 http://www.infinispan.org/schemas/infinispan-config-5.1.xsd".
      xmlns="urn:infinispan:config:5.1">

    <global>
      <evictionScheduledExecutor factory="org.infinispan.executors.DefaultScheduledExecutorFactory">
        <properties>
          <property name="threadNamePrefix" value="EvictionThread"/>
        </properties>
      </evictionScheduledExecutor>

      <globalJmxStatistics jmxDomain="exo" enabled="true" allowDuplicateDomains="true"/>

      <transport transportClass="org.infinispan.remoting.transport.jgroups.JGroupsTransport" clusterName="${infinispan-cluster-name}" distributedSyncTimeout=
        <properties>
          <property name="configurationFile" value="${jgroups-configuration}"/>
        </properties>
      </transport>
    </global>

    <default>
      <clustering mode="replication">
        <stateTransfer timeout="20000" fetchInMemoryState="false" />
        <sync replTimeout="20000"/>
      </clustering>

      <locking isolationLevel="READ_COMMITTED" lockAcquisitionTimeout="20000" writeSkewCheck="false" concurrencyLevel="500" useLockStriping="true"/>
      <transaction transactionManagerLookupClass="org.exoplatform.services.transaction.infinispan.JBossStandaloneJTAManagerLookup" syncRollbackPhase="true" s
      <jmxStatistics enabled="true"/>
      <eviction strategy="LRU" threadPolicy="DEFAULT" maxEntries="1000000"/>
      <expiration wakeUpInterval="5000"/>
   </default>
</infinispan>
Its template name is "infinispan-lock.xml"
<infinispan
      xmlns:xsi="http://www.w3.org/2001/XMLSchema-instance".
      xsi:schemaLocation="urn:infinispan:config:5.1 http://www.infinispan.org/schemas/infinispan-config-5.1.xsd".
      xmlns="urn:infinispan:config:5.1">

    <global>
      <evictionScheduledExecutor factory="org.infinispan.executors.DefaultScheduledExecutorFactory">
        <properties>
          <property name="threadNamePrefix" value="EvictionThread"/>
        </properties>
      </evictionScheduledExecutor>

      <globalJmxStatistics jmxDomain="exo" enabled="true" allowDuplicateDomains="true"/>

      <transport transportClass="org.infinispan.remoting.transport.jgroups.JGroupsTransport" clusterName="${infinispan-cluster-name}" distributedSyncTimeout=
        <properties>
          <property name="configurationFile" value="${jgroups-configuration}"/>
        </properties>
      </transport>
    </global>

    <default>
      <clustering mode="replication">
        <stateTransfer timeout="20000" fetchInMemoryState="false" />
        <sync replTimeout="20000"/>
      </clustering>

      <locking isolationLevel="READ_COMMITTED" lockAcquisitionTimeout="20000" writeSkewCheck="false" concurrencyLevel="500" useLockStriping="false"/>
      <transaction transactionManagerLookupClass="org.exoplatform.services.transaction.infinispan.JBossStandaloneJTAManagerLookup" syncRollbackPhase="true" s
      <jmxStatistics enabled="true"/>
      <eviction strategy="NONE"/>

      <loaders passivation="false" shared="true" preload="true">
        <loader class="org.infinispan.loaders.jdbc.stringbased.JdbcStringBasedCacheStore" fetchPersistentState="true" ignoreModifications="false" purgeOnStar
          <properties>
             <property name="stringsTableNamePrefix" value="${infinispan-cl-cache.jdbc.table.name}"/>
             <property name="idColumnName" value="${infinispan-cl-cache.jdbc.id.column}"/>
             <property name="dataColumnName" value="${infinispan-cl-cache.jdbc.data.column}"/>
             <property name="timestampColumnName" value="${infinispan-cl-cache.jdbc.timestamp.column}"/>
             <property name="idColumnType" value="${infinispan-cl-cache.jdbc.id.type}"/>
             <property name="dataColumnType" value="${infinispan-cl-cache.jdbc.data.type}"/>
             <property name="timestampColumnType" value="${infinispan-cl-cache.jdbc.timestamp.type}"/>
             <property name="dropTableOnExit" value="${infinispan-cl-cache.jdbc.table.drop}"/>
             <property name="createTableOnStart" value="${infinispan-cl-cache.jdbc.table.create}"/>
             <property name="connectionFactoryClass" value="${infinispan-cl-cache.jdbc.connectionFactory}"/>
             <property name="datasourceJndiLocation" value="${infinispan-cl-cache.jdbc.datasource}"/>
          </properties>
          <async enabled="false"/>
        </loader>
      </loaders>
   </default>

</infinispan>
Table 28.2. Template variables
| infinispan-cluster-name |
| jgroups-configuration |
| infinispan-cl-cache.jdbc.table.name |
| infinispan-cl-cache.jdbc.id.column |
| infinispan-cl-cache.jdbc.data.column |
| infinispan-cl-cache.jdbc.timestamp.column |
| infinispan-cl-cache.jdbc.id.type |
| infinispan-cl-cache.jdbc.data.type |
| infinispan-cl-cache.jdbc.timestamp.type |
| infinispan-cl-cache.jdbc.table.drop |
| infinispan-cl-cache.jdbc.table.create |
| infinispan-cl-cache.jdbc.connectionFactory |
| infinispan-cl-cache.jdbc.datasource |
Have a look at "infinispan-indexer.xml"
<infinispan
      xmlns:xsi="http://www.w3.org/2001/XMLSchema-instance".
      xsi:schemaLocation="urn:infinispan:config:5.1 http://www.infinispan.org/schemas/infinispan-config-5.1.xsd".
      xmlns="urn:infinispan:config:5.1">

    <global>
      <evictionScheduledExecutor factory="org.infinispan.executors.DefaultScheduledExecutorFactory">
        <properties>
          <property name="threadNamePrefix" value="EvictionThread"/>
        </properties>
      </evictionScheduledExecutor>

      <globalJmxStatistics jmxDomain="exo" enabled="true" allowDuplicateDomains="true"/>

      <transport transportClass="org.infinispan.remoting.transport.jgroups.JGroupsTransport" clusterName="${infinispan-cluster-name}" distributedSyncTimeout=
        <properties>
          <property name="configurationFile" value="${jgroups-configuration}"/>
        </properties>
      </transport>
    </global>

    <default>
      <clustering mode="replication">
        <stateTransfer timeout="20000" fetchInMemoryState="false" />
        <sync replTimeout="20000"/>
      </clustering>

      <locking isolationLevel="READ_COMMITTED" lockAcquisitionTimeout="20000" writeSkewCheck="false" concurrencyLevel="500" useLockStriping="false"/>
      <transaction transactionManagerLookupClass="org.exoplatform.services.transaction.infinispan.JBossStandaloneJTAManagerLookup" syncRollbackPhase="true" s
      <jmxStatistics enabled="true"/>
      <eviction strategy="NONE"/>

      <loaders passivation="false" shared="false" preload="false">
        <loader class="${infinispan-cachestore-classname}" fetchPersistentState="false" ignoreModifications="false" purgeOnStartup="false">
          <async enabled="false"/>
        </loader>
      </loaders>
   </default>
</infinispan>
RepositoryCreationService is the service for creation repositories in runtime. The service can be used in standalone or cluster environment.
RepositoryConfigurationService depends to next components:
DBCreator - DBCreator used to create new database for each unbinded datasource.
BackupManager - BackupManager used to created repository from backup.
RPCService - RPCService used for communication between cluster-nodes
Note
RPCService may not be configured - in this case, RepositoryService will work as standalone service.
User executes reserveRepositoryName(String repositoryName) - client-node calls coordinator-node to reserve repositoryName. If this name is already reserved or repository with this name exist, client-node will fetch RepositoryCreationException. If not Client will get token string.
than user executes createRepository(String backupId, RepositoryEntry rEntry, String token). Coordinator-node checks the token, and creates Repository.
whan repository become created - user-node broadcast message to all clusterNodes with RepositoryEntry, so each cluster node starts new Repository.
There is two ways to create repositry: make it in single step - just call createRepository(String backupId, RepositoryEntry); or reserve repositoryName at first (reserveRepositoryName(String repositoryName)), than create reserved repository (createRepository(String backupId, RepositoryEntry rEntry, String token)).
RepositoryCreationService configuration
<component>
   <key>org.exoplatform.services.jcr.ext.backup.BackupManager</key>
   <type>org.exoplatform.services.jcr.ext.backup.impl.BackupManagerImpl</type>
   <init-params>
      <properties-param>
         <name>backup-properties</name>
         <property name="backup-dir" value="target/backup" />
      </properties-param>
   </init-params>
</component>

<component>
   <key>org.exoplatform.services.database.creator.DBCreator</key>
   <type>org.exoplatform.services.database.creator.DBCreator</type>
   <init-params>
      <properties-param>
         <name>db-connection</name>
         <description>database connection properties</description>
         <property name="driverClassName" value="org.hsqldb.jdbcDriver" />
         <property name="url" value="jdbc:hsqldb:file:target/temp/data/" />
         <property name="username" value="sa" />
         <property name="password" value="" />
      </properties-param>
      <properties-param>
         <name>db-creation</name>
         <description>database creation properties</description>
         <property name="scriptPath" value="src/test/resources/test.sql" />
         <property name="username" value="sa" />
         <property name="password" value="" />
      </properties-param>
   </init-params>
</component>

<component>
   <key>org.exoplatform.services.rpc.RPCService</key>
   <type>org.exoplatform.services.rpc.impl.RPCServiceImpl</type>
   <init-params>
      <value-param>
         <name>jgroups-configuration</name>
         <value>jar:/conf/standalone/udp-mux.xml</value>
      </value-param>
      <value-param>
         <name>jgroups-cluster-name</name>
         <value>RPCService-Cluster</value>
      </value-param>
      <value-param>
         <name>jgroups-default-timeout</name>
         <value>0</value>
      </value-param>
   </init-params>
</component>

<component>
   <key>org.exoplatform.services.jcr.ext.repository.creation.RepositoryCreationService</key>
   <type>
      org.exoplatform.services.jcr.ext.repository.creation.RepositoryCreationServiceImpl
   </type>
     <init-params>
         <value-param>
            <name>factory-class-name</name>
            <value>org.apache.commons.dbcp.BasicDataSourceFactory</value>
         </value-param>
      </init-params>
</component>
factory-class-name - is not mandatory parameter, indicates what the factory need to use to create DataSource objects
public interface RepositoryCreationService
{
   /**
    * Reserves, validates and creates repository in a simplified form.
    *
    * @param rEntry - repository Entry - note that datasource must not exist.
    * @param backupId - backup id
    * @param creationProps - storage creation properties
    * @throws RepositoryConfigurationException
    *          if some exception occurred during repository creation or repository name is absent in reserved list
    * @throws RepositoryCreationServiceException
    *          if some exception occurred during repository creation or repository name is absent in reserved list
    */
   void createRepository(String backupId, RepositoryEntry rEntry, StorageCreationProperties creationProps)
      throws RepositoryConfigurationException, RepositoryCreationException;n

   /**
    * Reserves, validates and creates repository in a simplified form.
    *
    * @param rEntry - repository Entry - note that datasource must not exist.
    * @param backupId - backup id
    * @throws RepositoryConfigurationException
    *          if some exception occurred during repository creation or repository name is absent in reserved list
    * @throws RepositoryCreationServiceException
    *          if some exception occurred during repository creation or repository name is absent in reserved list
    */
   void createRepository(String backupId, RepositoryEntry rEntry) throws RepositoryConfigurationException,
      RepositoryCreationException;

   /**
    * Reserve repository name to prevent repository creation with same name from other place in same time
    * via this service.
    *
    * @param repositoryName - repositoryName
    * @return repository token. Anyone obtaining a token can later create a repository of reserved name.
    * @throws RepositoryCreationServiceException if can't reserve name
    */
   String reserveRepositoryName(String repositoryName) throws RepositoryCreationException;

   /**
    * Creates repository, using token of already reserved repository name.
    * Good for cases, when repository creation should be delayed or made asynchronously in dedicated thread.
    *
    * @param rEntry - repository entry - note, that datasource must not exist
    * @param backupId - backup id
    * @param rToken - token
    * @param creationProps - storage creation properties
    * @throws RepositoryConfigurationException
    *          if some exception occurred during repository creation or repository name is absent in reserved list
    * @throws RepositoryCreationServiceException
    *          if some exception occurred during repository creation or repository name is absent in reserved list
    */
   void createRepository(String backupId, RepositoryEntry rEntry, String rToken, StorageCreationProperties creationProps)
      throws RepositoryConfigurationException, RepositoryCreationException;

   /**
    * Creates  repository, using token of already reserved repository name. Good for cases, when repository creation should be delayed or
    * made asynchronously in dedicated thread.
    *
    * @param rEntry - repository entry - note, that datasource must not exist
    * @param backupId - backup id
    * @param rToken - token
    * @throws RepositoryConfigurationException
    *          if some exception occurred during repository creation or repository name is absent in reserved list
    * @throws RepositoryCreationServiceException
    *          if some exception occurred during repository creation or repository name is absent in reserved list
    */
   void createRepository(String backupId, RepositoryEntry rEntry, String rToken)
      throws RepositoryConfigurationException, RepositoryCreationException;

   /**
    * Remove previously created repository.
    *
    * @param repositoryName - the repository name to delete
    * @param forceRemove - force close all opened sessions
    * @throws RepositoryCreationServiceException
    *          if some exception occurred during repository removing occurred
    */
   void removeRepository(String repositoryName, boolean forceRemove) throws RepositoryCreationException;

}Each datasource in RepositoryEntry of new Repository must have unbinded datasources. Thats mean, such datasource must have not databases behind them. This restriction exists to avoid corruption of existing repositories data.
RPCService is optional component, but without it, RepositoryCreatorService can not communicate with other cluster-nodes and works as standalone.
- 30.1. Intro
- 30.2. Query Lifecycle
- 30.3. Query result settings
- 30.4. Type Constraints
- 30.5. Property Constraints
- 30.6. Path Constraint
- 30.7. Ordering specifing
- 30.8. Fulltext Search
- 30.9. Indexing rules and additional features
- 30.10. Query Examples
- 30.10.1. SetOffset and SetLimit
- 30.10.2. Finding All Nodes
- 30.10.3. Finding Nodes by Primary Type
- 30.10.4. Finding Nodes by Mixin Type
- 30.10.5. Property Comparison
- 30.10.6. LIKE Constraint
- 30.10.7. Escaping in LIKE Statements
- 30.10.8. NOT Constraint
- 30.10.9. AND Constraint
- 30.10.10. OR Constraint
- 30.10.11. Property Existence Constraint
- 30.10.12. Finding Nodes in a Case-Insensitive Way
- 30.10.13. Date Property Comparison
- 30.10.14. Node Name Constraint
- 30.10.15. Multivalue Property Comparison
- 30.10.16. Exact Path Constraint
- 30.10.17. Child Node Constraint
- 30.10.18. Finding All Descendant Nodes
- 30.10.19. Sorting Nodes by Property
- 30.10.20. Ordering by Descendant Nodes Property (XPath only)
- 30.10.21. Ordering by Score
- 30.10.22. Ordering by Path or Name
- 30.10.23. Fulltext Search by Property
- 30.10.24. Fulltext Search by All Properties in Node
- 30.10.25. Ignoring Accent Symbols. New Analyzer Setting.
- 30.10.26. Finding nt:file node by content of child jcr:content node
- 30.10.27. Changing Priority of Node
- 30.10.28. Removing Nodes Property From Indexing Scope
- 30.10.29. Regular Expression as Property Name in Indexing Rules
- 30.10.30. High-lighting Result of Fulltext Search
- 30.10.31. Searching By Synonim
- 30.10.32. Checking the spelling of Phrase
- 30.10.33. Finding Similar Nodes
- 30.11. Tips and tricks
JCR supports two query languages - JCR and XPath. A query, whether XPath or SQL, specifies a subset of nodes within a workspace, called the result set. The result set constitutes all the nodes in the workspace that meet the constraints stated in the query.
SQL
// get QueryManager
QueryManager queryManager = workspace.getQueryManager();
// make SQL query
Query query = queryManager.createQuery("SELECT * FROM nt:base ", Query.SQL);
// execute query
QueryResult result = query.execute();
XPath
// get QueryManager
QueryManager queryManager = workspace.getQueryManager();
// make XPath query
Query query = queryManager.createQuery("//element(*,nt:base)", Query.XPATH);
// execute query
QueryResult result = query.execute();// fetch query result QueryResult result = query.execute();
Now we can get result in an iterator of nodes:
NodeIterator it = result.getNodes();
or we get the result in a table:
// get column names
String[] columnNames = result.getColumnNames();
// get column rows
RowIterator rowIterator = result.getRows();
while(rowIterator.hasNext()){
   // get next row
   Row row = rowIterator.nextRow();
   // get all values of row
   Value[] values = row.getValues();
}The result returns a score for each row in the result set. The score contains a value that indicates a rating of how well the result node matches the query. A high value means a better matching than a low value. This score can be used for ordering the result.
eXo JCR Scoring is a mapping of Lucene scoring. For a more in-depth understanding, please study Lucene documentation.
jcr:score counted in next way - (lucene score)*1000f.
Score may be increased for specified nodes, see Index Boost Value
Also, see an example Order by Score
30.8. Fulltext Search
Select all nodes with primary type 'nt:unstructured' and returns only 3 nodes starting with the second node in the list.
QueryImpl class has two methods: one to indicate how many results shall be returned at most, and another to fix the starting position.
setOffset(long offset) - Sets the start offset of the result set.
setLimit(long position) - Sets the maximum size of the result set.
Repository contains mix:title nodes, where jcr:title has different values.
root
node1 (nt:unstructured)
node2 (nt:unstructured)
node3 (nt:unstructured)
node4 (nt:unstructured)
node5 (nt:unstructured)
node6 (nt:unstructured)
SQL
// make SQL query
QueryManager queryManager = workspace.getQueryManager();
// create query
String sqlStatement = "SELECT * FROM nt:unstructured";
QueryImpl query = (QueryImpl)queryManager.createQuery(sqlStatement, Query.SQL);
//return starting with second result
query.setOffset(1);
// return 3 results
query.setLimit(3);
// execute query and fetch result
QueryResult result = query.execute();
Let's get nodes:
NodeIterator it = result.getNodes();

if(it.hasNext())
{
   Node findedNode = it.nextNode();
}
In usual case (without using setOffset and setLimit methods), Node iterator returns all nodes (node1...node6). But in our case NodeIterator will return "node2","node3" and "node4".
\[node1 node2 node3 node4 node5 node6\]
Find all nodes in the repository. Only those nodes are found to which the session has READ permission. See also Access Control.
Repository contains many different nodes.
root
folder1 (nt:folder)
document1 (nt:file)
folder2 (nt:folder)
document2 (nt:unstructured)
document3 (nt:folder)
SQL
// make SQL query
QueryManager queryManager = workspace.getQueryManager();
// create query
String sqlStatement = "SELECT * FROM nt:base";
Query query = queryManager.createQuery(sqlStatement, Query.SQL);
// execute query and fetch result
QueryResult result = query.execute();
XPath
// make XPath query
QueryManager queryManager = workspace.getQueryManager();
// create query
String xpathStatement = "//element(*,nt:base)";
Query query = queryManager.createQuery(xpathStatement, Query.XPATH);
// execute query and fetch result
QueryResult result = query.execute();
Let's get nodes:
NodeIterator it = result.getNodes();

if(it.hasNext())
{
   Node findedNode = it.nextNode();
}
NodeIterator will return "folder1", "folder2","document1","document2","document3", and each other nodes in workspace if they are here.
We can also get a table:
String[] columnNames = result.getColumnNames();
RowIterator rit = result.getRows();
while (rit.hasNext())
{
   Row row = rit.nextRow();
   // get values of the row
   Value[] values = row.getValues();
}
Table content is
Table 30.1. Table content
| jcr:path | jcr:score |
|---|---|
| /folder1 | 1000 |
| /folder1/document1 | 1000 |
| /folder1/folder2 | 1000 |
| /folder1/folder2/document2 | 1000 |
| /folder1/folder2/document3 | 1000 |
| ... | ... |
Find all nodes whose primary type is "nt:file".
The repository contains nodes with different primary types and mixin types.
root
document1 primarytype = "nt:unstructured" mixintype = "mix:title"
document2 primarytype = "nt:file" mixintype = "mix:lockable"
document3 primarytype = "nt:file" mixintype = "mix:title"
SQL
// make SQL query
QueryManager queryManager = workspace.getQueryManager();
// create query
String sqlStatement = "SELECT * FROM nt:file";
Query query = queryManager.createQuery(sqlStatement, Query.SQL);
// execute query and fetch result
QueryResult result = query.execute();
XPath
// make XPath query
QueryManager queryManager = workspace.getQueryManager();
// create query
String xpathStatement = "//element(*,nt:file)";
Query query = queryManager.createQuery(xpathStatement, Query.XPATH);
// execute query and fetch result
QueryResult result = query.execute();
Let's get nodes:
NodeIterator it = result.getNodes();

if(it.hasNext())
{
   Node findedNode = it.nextNode();
}
NodeIterator will return "document2" and "document3".
We can also get a table:
String[] columnNames = result.getColumnNames();
RowIterator rit = result.getRows();
while (rit.hasNext())
{
   Row row = rit.nextRow();
   // get values of the row
   Value[] values = row.getValues();
}
The table content is
Find all nodes in repository, that contain a mixin type "mix:title".
The repository contains nodes with different primary types and mixin types.
root
document1 primarytype = "nt:unstructured" mixintype = "mix:title"
document2 primarytype = "nt:file" mixintype = "mix:lockable"
document3 primarytype = "nt:file" mixintype = "mix:title"
SQL
// make SQL query
QueryManager queryManager = workspace.getQueryManager();
// create query
String sqlStatement = "SELECT * FROM mix:title";
Query query = queryManager.createQuery(sqlStatement, Query.SQL);
// execute query and fetch result
QueryResult result = query.execute();
XPath
// make XPath query
QueryManager queryManager = workspace.getQueryManager();
// create query
String xpathStatement = "//element(*,mix:title)";
Query query = queryManager.createQuery(xpathStatement, Query.XPATH);
// execute query and fetch result
QueryResult result = query.execute();
Let's get nodes:
NodeIterator it = result.getNodes();

if(it.hasNext())
{
   Node findedNode = it.nextNode();
}
The NodeIterator will return "document1" and "document3".
We can also get a table:
String[] columnNames = result.getColumnNames();
RowIterator rit = result.getRows();
while (rit.hasNext())
{
   Row row = rit.nextRow();
   // get values of the row
   Value[] values = row.getValues();
}
Table content is
Table 30.3. Table content
| jcr:title | ... | jcr:path | jcr:score |
|---|---|---|---|
| First document | ... | /document1 | 2674 |
| Second document | ... | /document3 | 2674 |
Find all nodes with mixin type 'mix:title' where the prop_pagecount property contains a value less than 90. Only select the title of each node.
Repository contains several mix:title nodes, where each prop_pagecount contains a different value.
root
document1 (mix:title) jcr:title="War and peace" prop_pagecount=1000
document2 (mix:title) jcr:title="Cinderella" prop_pagecount=100
document3 (mix:title) jcr:title="Puss in Boots" prop_pagecount=60
SQL
// make SQL query
QueryManager queryManager = workspace.getQueryManager();
// create query
String sqlStatement = "SELECT jcr:title FROM mix:title WHERE prop_pagecount < 90";
Query query = queryManager.createQuery(sqlStatement, Query.SQL);
// execute query and fetch result
QueryResult result = query.execute();
XPath
// make XPath query
QueryManager queryManager = workspace.getQueryManager();
// create query
String xpathStatement = "//element(*,mix:title)[@prop_pagecount < 90]/@jcr:title";
Query query = queryManager.createQuery(xpathStatement, Query.XPATH);
// execute query and fetch result
QueryResult result = query.execute();
Let's get nodes:
NodeIterator it = result.getNodes();

if(it.hasNext())
{
   Node findedNode = it.nextNode();
}
The NodeIterator will return "document3".
We can also get a table:
String[] columnNames = result.getColumnNames();
RowIterator rit = result.getRows();
while (rit.hasNext())
{
   Row row = rit.nextRow();
   // get values of the row
   Value[] values = row.getValues();
}
The table content is
Find all nodes with mixin type 'mix:title' and where the property 'jcr:title' starts with 'P'.
Note
See also the article about "Find all mix:title nodes where jcr:title does NOT start with 'P'"
The repository contains 3 mix:title nodes, where each jcr:title has a different value.
root
document1 (mix:title) jcr:title="Star wars" jcr:description="Dart rules!!"
document2 (mix:title) jcr:title="Prison break" jcr:description="Run, Forest, run ))"
document3 (mix:title) jcr:title="Panopticum" jcr:description="It's imagine film"
SQL
// make SQL query
QueryManager queryManager = workspace.getQueryManager();
// create query
String sqlStatement = "SELECT * FROM mix:title WHERE jcr:title LIKE 'P%'";
Query query = queryManager.createQuery(sqlStatement, Query.SQL);
// execute query and fetch result
QueryResult result = query.execute();
XPath
// make XPath query
QueryManager queryManager = workspace.getQueryManager();
// create query
String xpathStatement = "//element(*,mix:title)[jcr:like(@jcr:title, 'P%')]";
Query query = queryManager.createQuery(xpathStatement, Query.XPATH);
// execute query and fetch result
QueryResult result = query.execute();
Let's get nodes:
NodeIterator it = result.getNodes();

if(it.hasNext())
{
   Node findedNode = it.nextNode();
}
The NodeIterator will return "document2" and "document3".
We can also get a table:
String[] columnNames = result.getColumnNames();
RowIterator rit = result.getRows();
while (rit.hasNext())
{
   Row row = rit.nextRow();
   // get values of the row
   Value[] values = row.getValues();
}
The table content is
Table 30.5. Table content
| jcr:title | jcr:description | jcr:path | jcr:score |
|---|---|---|---|
| Prison break | Run, Forest, run )) | /document2 | 4713 |
| Panopticum | It's imagine film | /document3 | 5150 |
Find all nodes with a mixin type 'mix:title' and whose property 'jcr:title' starts with 'P%ri'.
As you see "P%rison break" contains the symbol '%'. This symbol is reserved for LIKE comparisons. So what can we do?
Within the LIKE pattern, literal instances of percent ("%") or underscore ("_") must be escaped. The SQL ESCAPE clause allows the definition of an arbitrary escape character within the context of a single LIKE statement. The following example defines the backslash ' \' as escape character:
SELECT * FROM mytype WHERE a LIKE 'foo\%' ESCAPE '\'
XPath does not have any specification for defining escape symbols, so we must use the default escape character (' \').
The repository contains mix:title nodes, where jcr:title can have different values.
root
document1 (mix:title) jcr:title="Star wars" jcr:description="Dart rules!!"
document2 (mix:title) jcr:title="P%rison break" jcr:description="Run, Forest, run ))"
document3 (mix:title) jcr:title="Panopticum" jcr:description="It's imagine film"
SQL
// make SQL query
QueryManager queryManager = workspace.getQueryManager();
// create query
String sqlStatement = "SELECT * FROM mix:title WHERE jcr:title LIKE 'P#%ri%' ESCAPE '#'";
Query query = queryManager.createQuery(sqlStatement, Query.SQL);
// execute query and fetch result
QueryResult result = query.execute();
XPath
// make XPath query
QueryManager queryManager = workspace.getQueryManager();
// create query
String xpathStatement = "//element(*,mix:title)[jcr:like(@jcr:title, 'P\\%ri%')]";
Query query = queryManager.createQuery(xpathStatement, Query.XPATH);
// execute query and fetch result
QueryResult result = query.execute();
Let's get nodes:
NodeIterator it = result.getNodes();

if(it.hasNext())
{
   Node findedNode = it.nextNode();
}
NodeIterator will return "document2".
We can also get a table:
String[] columnNames = result.getColumnNames();
RowIterator rit = result.getRows();
while (rit.hasNext())
{
   Row row = rit.nextRow();
   // get values of the row
   Value[] values = row.getValues();
}
The table content is
Table 30.6. Table content
| jcr:title | jcr:description | jcr:path | jcr:score |
|---|---|---|---|
| P%rison break | Run, Forest, run )) | /document2 | 7452 |
Find all nodes with a mixin type 'mix:title' and where the property 'jcr:title' does NOT start with a 'P' symbol
The repository contains a mix:title nodes, where the jcr:title has different values.
root
document1 (mix:title) jcr:title="Star wars" jcr:description="Dart rules!!"
document2 (mix:title) jcr:title="Prison break" jcr:description="Run, Forest, run ))"
document3 (mix:title) jcr:title="Panopticum" jcr:description="It's imagine film"
SQL
// make SQL query
QueryManager queryManager = workspace.getQueryManager();
// create query
String sqlStatement = "SELECT * FROM mix:title WHERE NOT jcr:title LIKE 'P%'";
Query query = queryManager.createQuery(sqlStatement, Query.SQL);
// execute query and fetch result
QueryResult result = query.execute();
XPath
// make XPath query
QueryManager queryManager = workspace.getQueryManager();
// create query
String xpathStatement = "//element(*,mix:title)[not(jcr:like(@jcr:title, 'P%'))]";
Query query = queryManager.createQuery(xpathStatement, Query.XPATH);
// execute query and fetch result
QueryResult result = query.execute();
Let's get the nodes:
NodeIterator it = result.getNodes();

if(it.hasNext())
{
   Node findedNode = it.nextNode();
}
NodeIterator will return "document1".
We can also get a table:
String[] columnNames = result.getColumnNames();
RowIterator rit = result.getRows();
while (rit.hasNext())
{
   Row row = rit.nextRow();
   // get values of the row
   Value[] values = row.getValues();
}
Table content is
Table 30.7. Table content
| jcr:title | jcr:description | jcr:path | jcr:score |
|---|---|---|---|
| Star wars | Dart rules!! | /document1 | 4713 |
Find all fairytales with a page count more than 90 pages.
How does it sound in jcr terms - Find all nodes with mixin type 'mix:title' where the property 'jcr:description' equals "fairytale" and whose "prop_pagecount" property value is less than 90.
Note
See also Multivalue Property Comparison.
The repository contains mix:title nodes, where prop_pagecount has different values.
root
document1 (mix:title) jcr:title="War and peace" jcr:description="novel" prop_pagecount=1000
document2 (mix:title) jcr:title="Cinderella" jcr:description="fairytale" prop_pagecount=100
document3 (mix:title) jcr:title="Puss in Boots" jcr:description="fairytale" prop_pagecount=60
SQL
// make SQL query
QueryManager queryManager = workspace.getQueryManager();
// create query
String sqlStatement = "SELECT * FROM mix:title WHERE jcr:description = 'fairytale' AND prop_pagecount > 90";
Query query = queryManager.createQuery(sqlStatement, Query.SQL);
// execute query and fetch result
QueryResult result = query.execute();
XPath
// make XPath query
QueryManager queryManager = workspace.getQueryManager();
// create query
String xpathStatement = "//element(*,mix:title)[@jcr:description='fairytale' and @prop_pagecount > 90]";
Query query = queryManager.createQuery(xpathStatement, Query.XPATH);
// execute query and fetch result
QueryResult result = query.execute();
Let's get nodes:
NodeIterator it = result.getNodes();

if(it.hasNext())
{
   Node findedNode = it.nextNode();
}
NodeIterator will return "document2".
We can also get a table:
String[] columnNames = result.getColumnNames();
RowIterator rit = result.getRows();
while (rit.hasNext())
{
   Row row = rit.nextRow();
   // get values of the row
   Value[] values = row.getValues();
}
Table content is:
Table 30.8. Table content
| jcr:title | jcr:description | prop_pagecount | jcr:path | jcr:score |
|---|---|---|---|---|
| Cinderella | fairytale | 100 | /document2 | 7086 |
Find all documents whose title is 'Cinderella' or whose description is 'novel'.
How does it sound in jcr terms? - Find all nodes with a mixin type 'mix:title' whose property 'jcr:title' equals "Cinderella" or whose "jcr:description" property value is "novel".
The repository contains mix:title nodes, where jcr:title and jcr:description have different values.
root
document1 (mix:title) jcr:title="War and peace" jcr:description="novel"
document2 (mix:title) jcr:title="Cinderella" jcr:description="fairytale"
document3 (mix:title) jcr:title="Puss in Boots" jcr:description="fairytale"
SQL
// make SQL query
QueryManager queryManager = workspace.getQueryManager();
// create query
String sqlStatement = "SELECT * FROM mix:title WHERE jcr:title = 'Cinderella' OR jcr:description = 'novel'";
Query query = queryManager.createQuery(sqlStatement, Query.SQL);
// execute query and fetch result
QueryResult result = query.execute();
XPath
// make XPath query
QueryManager queryManager = workspace.getQueryManager();
// create query
String xpathStatement = "//element(*,mix:title)[@jcr:title='Cinderella' or @jcr:description = 'novel']";
Query query = queryManager.createQuery(xpathStatement, Query.XPATH);
// execute query and fetch result
QueryResult result = query.execute();
Let's get nodes:
NodeIterator it = result.getNodes();

if(it.hasNext())
{
   Node findedNode = it.nextNode();
}
NodeIterator will return "document1" and "document2".
We can also get a table:
String[] columnNames = result.getColumnNames();
RowIterator rit = result.getRows();
while (rit.hasNext())
{
   Row row = rit.nextRow();
   // get values of the row
   Value[] values = row.getValues();
}
Table content is:
Table 30.9. Table content
| jcr:title | jcr:description | jcr:path | jcr:score |
|---|---|---|---|
| War and peace | novel | /document1 | 3806 |
| Cinderella | fairytale | /document2 | 3806 |
Find all nodes with a mixin type 'mix:title' where the property 'jcr:description' does not exist (is null).
The repository contains mix:title nodes, in one of these nodes the jcr:description property is null.
root
document1 (mix:title) jcr:title="Star wars" jcr:description="Dart rules!!"
document2 (mix:title) jcr:title="Prison break" jcr:description="Run, Forest, run ))"
document3 (mix:title) jcr:title="Titanic" // The description property does not exist. This is the node we wish to find.
SQL
// make SQL query
QueryManager queryManager = workspace.getQueryManager();
// create query
String sqlStatement = "SELECT * FROM mix:title WHERE jcr:description IS NULL";
Query query = queryManager.createQuery(sqlStatement, Query.SQL);
// execute query and fetch result
QueryResult result = query.execute();
XPath
// make XPath query
QueryManager queryManager = workspace.getQueryManager();
// create query
String xpathStatement = ""//element(*,mix:title)[not(@jcr:description)]"";
Query query = queryManager.createQuery(xpathStatement, Query.XPATH);
// execute query and fetch result
QueryResult result = query.execute();
Let's get nodes:
NodeIterator it = result.getNodes();

if(it.hasNext())
{
   Node findedNode = it.nextNode();
}
NodeIterator will return "document3".
We can also get a table:
String[] columnNames = result.getColumnNames();
RowIterator rit = result.getRows();
while (rit.hasNext())
{
   Row row = rit.nextRow();
   // get values of the row
   Value[] values = row.getValues();
}
Table content is:
Find all nodes with a mixin type 'mix:title' and where the property 'jcr:title' equals 'casesensitive' in lower or upper case.
The repository contains mix:title nodes, whose jcr:title properties have different values.
root
document1 (mix:title) jcr:title="CaseSensitive"
document2 (mix:title) jcr:title="casesensitive"
document3 (mix:title) jcr:title="caseSENSITIVE"
UPPER case
SQL
// make SQL query
QueryManager queryManager = workspace.getQueryManager();
// create query
String sqlStatement = "SELECT * FROM mix:title WHERE UPPER(jcr:title) = 'CASESENSITIVE'";
Query query = queryManager.createQuery(sqlStatement, Query.SQL);
// execute query and fetch result
QueryResult result = query.execute();
XPath
// make XPath query
QueryManager queryManager = workspace.getQueryManager();
// create query
String xpathStatement = "//element(*,mix:title)[fn:upper-case(@jcr:title)='CASESENSITIVE']";
Query query = queryManager.createQuery(xpathStatement, Query.XPATH);
// execute query and fetch result
QueryResult result = query.execute();
LOWER case
SQL
// make SQL query
QueryManager queryManager = workspace.getQueryManager();
// create query
String sqlStatement = "SELECT * FROM mix:title WHERE LOWER(jcr:title) = 'casesensitive'";
Query query = queryManager.createQuery(sqlStatement, Query.SQL);
// execute query and fetch result
QueryResult result = query.execute();
XPath
// make XPath query
QueryManager queryManager = workspace.getQueryManager();
// create query
String xpathStatement = "//element(*,mix:title)[fn:lower-case(@jcr:title)='casesensitive']";
Query query = queryManager.createQuery(xpathStatement, Query.XPATH);
// execute query and fetch result
QueryResult result = query.execute();
Let's get nodes:
NodeIterator it = result.getNodes();

if(it.hasNext())
{
   Node findedNode = it.nextNode();
}
NodeIterator will return "document1", "document2" and "document3" (in all examples).
We can also get a table:
String[] columnNames = result.getColumnNames();
RowIterator rit = result.getRows();
while (rit.hasNext())
{
   Row row = rit.nextRow();
   // get values of the row
   Value[] values = row.getValues();
}
Table content is:
Table 30.11. Table content
| jcr:title | ... | jcr:path |
|---|---|---|
| CaseSensitive | ... | /document1 |
| casesensitive | ... | /document2 |
| caseSENSITIVE | ... | /document3 |
Find all nodes of primary type "nt:resource" whose jcr:lastModified property value is greater than 2006-06-04 and less than 2008-06-04.
Repository contains nt:resource nodes with different values of jcr:lastModified property
root
document1 (nt:file)
jcr:content (nt:resource) jcr:lastModified="2006-01-19T15:34:15.917+02:00"
document2 (nt:file)
jcr:content (nt:resource) jcr:lastModified="2005-01-19T15:34:15.917+02:00"
document3 (nt:file)
jcr:content (nt:resource) jcr:lastModified="2007-01-19T15:34:15.917+02:00"
SQL
In SQL you have to use the keyword TIMESTAMP for date comparisons. Otherwise, the date would be interpreted as a string. The date has to be surrounded by single quotes (TIMESTAMP 'datetime') and in the ISO standard format: YYYY-MM-DDThh:mm:ss.sTZD ( http://en.wikipedia.org/wiki/ISO_8601 and well explained in a W3C note http://www.w3.org/TR/NOTE-datetime).
You will see that it can be a date only (YYYY-MM-DD) but also a complete date and time with a timezone designator (TZD).
// make SQL query
QueryManager queryManager = workspace.getQueryManager();
// create query
StringBuffer sb = new StringBuffer();
sb.append("select * from nt:resource where ");
sb.append("( jcr:lastModified >= TIMESTAMP '");
sb.append("2006-06-04T15:34:15.917+02:00");
sb.append("' )");
sb.append(" and ");
sb.append("( jcr:lastModified <= TIMESTAMP '");
sb.append("2008-06-04T15:34:15.917+02:00");
sb.append("' )");
String sqlStatement = sb.toString();
Query query = queryManager.createQuery(sqlStatement, Query.SQL);
// execute query and fetch result
QueryResult result = query.execute();
XPath
Compared to the SQL format, you have to use the keyword xs:dateTime and surround the datetime by extra brackets: xs:dateTime('datetime'). The actual format of the datetime also conforms with the ISO date standard.
// make XPath query
QueryManager queryManager = workspace.getQueryManager();
// create query
StringBuffer sb = new StringBuffer();
sb.append("//element(*,nt:resource)");
sb.append("[");
sb.append("@jcr:lastModified >= xs:dateTime('2006-08-19T10:11:38.281+02:00')");
sb.append(" and ");
sb.append("@jcr:lastModified <= xs:dateTime('2008-06-04T15:34:15.917+02:00')");
sb.append("]");
String xpathStatement = sb.toString();
Query query = queryManager.createQuery(xpathStatement, Query.XPATH);
// execute query and fetch result
QueryResult result = query.execute();Let's get nodes:
NodeIterator it = result.getNodes();

if(it.hasNext())
{
   Node foundNode = it.nextNode();
}
NodeIterator will return "/document3/jcr:content".
We can also get a table:
String[] columnNames = result.getColumnNames();
RowIterator rit = result.getRows();
while (rit.hasNext())
{
   Row row = rit.nextRow();
   // get values of the row
   Value[] values = row.getValues();
}
The table content is:
Table 30.12. Table content
| jcr:lastModified | ... | jcr:path |
|---|---|---|
| 2007-01-19T15:34:15.917+02:00 | ... | /document3/jcr:content |
Find all nodes with primary type 'nt:file' whose node name is 'document'. The node name is accessible by a function called "fn:name()".
Note
fn:name() can be used ONLY with an equal('=') comparison.
The repository contains nt:file nodes with different names.
root
document1 (nt:file)
file (nt:file)
somename (nt:file)
SQL
// make SQL query
QueryManager queryManager = workspace.getQueryManager();
// create query
String sqlStatement = "SELECT * FROM nt:file WHERE fn:name() = 'document'";
Query query = queryManager.createQuery(sqlStatement, Query.SQL);
// execute query and fetch result
QueryResult result = query.execute();
XPath
// make XPath query
QueryManager queryManager = workspace.getQueryManager();
// create query
String xpathStatement = "//element(*,nt:file)[fn:name() = 'document']";
Query query = queryManager.createQuery(xpathStatement, Query.XPATH);
// execute query and fetch result
QueryResult result = query.execute();
Let's get nodes:
NodeIterator it = result.getNodes();

if(it.hasNext())
{
   Node findedNode = it.nextNode();
}
The NodeIterator will return the node whose fn:name equals "document".
Also we can get a table:
String[] columnNames = result.getColumnNames();
RowIterator rit = result.getRows();
while (rit.hasNext())
{
   Row row = rit.nextRow();
   // get values of the row
   Value[] values = row.getValues();
}
Table content is:
Find all nodes with the primary type 'nt:unstructured' whose property 'multiprop' contains both values "one" and "two".
The repository contains nt:unstructured nodes with different 'multiprop' properties.
root
node1 (nt:unstructured) multiprop = [ "one","two" ]
node1 (nt:unstructured) multiprop = [ "one","two","three" ]
node1 (nt:unstructured) multiprop = [ "one","five" ]
SQL
// make SQL query
QueryManager queryManager = workspace.getQueryManager();
// create query
String sqlStatement = "SELECT * FROM nt:unstructured WHERE multiprop = 'one' AND multiprop = 'two'";
Query query = queryManager.createQuery(sqlStatement, Query.SQL);
// execute query and fetch result
QueryResult result = query.execute();
XPath
// make XPath query
QueryManager queryManager = workspace.getQueryManager();
// create query
String xpathStatement = "//element(*,nt:unstructured)[@multiprop = 'one' and @multiprop = 'two']";
Query query = queryManager.createQuery(xpathStatement, Query.XPATH);
// execute query and fetch result
QueryResult result = query.execute();
Let's get nodes:
NodeIterator it = result.getNodes();

if(it.hasNext())
{
   Node findedNode = it.nextNode();
}
The NodeIterator will return "node1" and "node2".
We can also get a table:
String[] columnNames = result.getColumnNames();
RowIterator rit = result.getRows();
while (rit.hasNext())
{
   Row row = rit.nextRow();
   // get values of the row
   Value[] values = row.getValues();
}
Table content is:
Table 30.14. Table content
| jcr:primarytyp | jcr:path | jcr:score |
|---|---|---|
| nt:unstructured | /node1 | 3806 |
| nt:unstructured | /node2 | 3806 |
Find a node with the primary type 'nt:file' that is located on the exact path "/folder1/folder2/document1".
Repository filled by different nodes. There are several folders which contain other folders and files.
root
folder1 (nt:folder)
folder2 (nt:folder)
document1 (nt:file) // This document we want to find
folder3 (nt:folder)
document1 (nt:file)
SQL
// make SQL query
QueryManager queryManager = workspace.getQueryManager();
// we want find 'document1'
String sqlStatement = "SELECT * FROM nt:file WHERE jcr:path = '/folder1/folder2/document1'";
// create query
Query query = queryManager.createQuery(sqlStatement, Query.SQL);
// execute query and fetch result
QueryResult result = query.execute();
XPath
// make SQL query
QueryManager queryManager = workspace.getQueryManager();
// we want to find 'document1'
String xpathStatement = "/jcr:root/folder1[1]/folder2[1]/element(document1,nt:file)[1]";
// create query
Query query = queryManager.createQuery(xpathStatement, Query.XPATH);
// execute query and fetch result
QueryResult result = query.execute();
Remark: The indexes [1] are used in order to get the same result as the SQL statement. SQL by default only returns the first node, whereas XPath fetches by default all nodes.
Let's get nodes:
NodeIterator it = result.getNodes();

if(it.hasNext())
{
   Node findedNode = it.nextNode();
}
NodeIterator will return expected "document1".
We can also get a table:
String[] columnNames = result.getColumnNames();
RowIterator rit = result.getRows();
while (rit.hasNext())
{
   Row row = rit.nextRow();
   // get values of the row
   Value[] values = row.getValues();
}
Table content is:
Find all nodes with the primary type 'nt:folder' that are children of node by path "/root1/root2". Only find children, do not find further descendants.
The repository is filled by "nt:folder" nodes. The nodes are placed in a multilayer tree.
root
folder1 (nt:folder)
folder2 (nt:folder)
folder3 (nt:folder) // This node we want to find
folder4 (nt:folder) // This node is not child but a descendant of '/folder1/folder2/'.
folder5 (nt:folder) // This node we want to find
SQL
The use of "%" in the LIKE statement includes any string, therefore there is a second LIKE statement that excludes that the string contains "/". This way child nodes are included but descendant nodes are excluded.
// make SQL query
QueryManager queryManager = workspace.getQueryManager();
// create query
String sqlStatement = "SELECT * FROM nt:folder WHERE jcr:path LIKE '/folder1/folder2/%' AND NOT jcr:path LIKE '/folder1/folder2/%/%'";
Query query = queryManager.createQuery(sqlStatement, Query.SQL);
// execute query and fetch result
QueryResult result = query.execute();
XPath
// make XPath query
QueryManager queryManager = workspace.getQueryManager();
// create query
String xpathStatement = "/jcr:root/folder1[1]/folder2[1]/element(*,nt:folder)";
Query query = queryManager.createQuery(xpathStatement, Query.XPATH);
// execute query and fetch result
QueryResult result = query.execute();
Let's get nodes:
NodeIterator it = result.getNodes();

if(it.hasNext())
{
   Node findedNode = it.nextNode();
}
The NodeIterator will return "folder3" and "folder5".
We can also get a table:
String[] columnNames = result.getColumnNames();
RowIterator rit = result.getRows();
while (rit.hasNext())
{
   Row row = rit.nextRow();
   // get values of the row
   Value[] values = row.getValues();
}
The table content is:
Find all nodes with the primary type 'nt:folder' that are descendants of the node "/folder1/folder2".
The repository contains "nt:folder" nodes. The nodes are placed in a multilayer tree.
root
folder1 (nt:folder)
folder2 (nt:folder)
folder3 (nt:folder) // This node we want to find
folder4 (nt:folder) // This node we want to find
folder5 (nt:folder) // This node we want to find
SQL
// make SQL query
QueryManager queryManager = workspace.getQueryManager();
// create query
String sqlStatement = "SELECT * FROM nt:folder WHERE jcr:path LIKE '/folder1/folder2/%'";
Query query = queryManager.createQuery(sqlStatement, Query.SQL);
// execute query and fetch result
QueryResult result = query.execute();
XPath
// make XPath query
QueryManager queryManager = workspace.getQueryManager();
// create query
String xpathStatement = "/jcr:root/folder1[1]/folder2[1]//element(*,nt:folder)";
Query query = queryManager.createQuery(xpathStatement, Query.XPATH);
// execute query and fetch result
QueryResult result = query.execute();
Let's get nodes:
NodeIterator it = result.getNodes();

if(it.hasNext())
{
   Node findedNode = it.nextNode();
}
The NodeIterator will return "folder3", "folder4" and "folder5" nodes.
We can also get a table:
String[] columnNames = result.getColumnNames();
RowIterator rit = result.getRows();
while (rit.hasNext())
{
   Row row = rit.nextRow();
   // get values of the row
   Value[] values = row.getValues();
}
Table content is:
Table 30.17. Table content
| jcr:path | jcr:score |
|---|---|
| /folder1/folder2/folder3 | 1000 |
| /folder1/folder2/folder3/folder4 | 1000 |
| /folder1/folder2/folder5 | 1000 |
Select all nodes with the mixin type ''mix:title' and order them by the 'prop_pagecount' property.
The repository contains several mix:title nodes, where prop_pagecount has different values.
root
document1 (mix:title) jcr:title="War and peace" jcr:description="roman" prop_pagecount=4
document2 (mix:title) jcr:title="Cinderella" jcr:description="fairytale" prop_pagecount=7
document3 (mix:title) jcr:title="Puss in Boots" jcr:description="fairytale" prop_pagecount=1
SQL
// make SQL query
QueryManager queryManager = workspace.getQueryManager();
// create query
String sqlStatement = "SELECT * FROM mix:title ORDER BY prop_pagecount ASC";
Query query = queryManager.createQuery(sqlStatement, Query.SQL);
// execute query and fetch result
QueryResult result = query.execute();
XPath
// make XPath query
QueryManager queryManager = workspace.getQueryManager();
// create query
String xpathStatement = "//element(*,mix:title) order by @prop_pagecount ascending";
Query query = queryManager.createQuery(xpathStatement, Query.XPATH);
// execute query and fetch result
QueryResult result = query.execute();
Let's get nodes:
NodeIterator it = result.getNodes();

if(it.hasNext())
{
   Node findedNode = it.nextNode();
}
The NodeIterator will return nodes in the following order "document3", "document1", "document2".
We can also get a table:
String[] columnNames = result.getColumnNames();
RowIterator rit = result.getRows();
while (rit.hasNext())
{
Row row = rit.nextRow();
// get values of the row
Value[] values = row.getValues();
}Table content is:
Table 30.18. Table content
| jcr:title | jcr:description | prop_pagecount | jcr:path | jcr:score |
|---|---|---|---|---|
| Puss in Boots | fairytale | 1 | /document3 | 1405 |
| War and peace | roman | 4 | /document1 | 1405 |
| Cinderella | fairytale | 7 | /document2 | 1405 |
Find all nodes with the primary type 'nt:unstructured' and sort them by the property value of descendant nodes with the relative path '/a/b'.
Note
This ORDER BY construction only works in XPath!
root
node1 (nt:unstructured)
a (nt:unstructured)
b (nt:unstructured)
node2 (nt:unstructured)
a (nt:unstructured)
b (nt:unstructured)
c (nt:unstructured) prop = "a"
node3 (nt:unstructured)
a (nt:unstructured)
b (nt:unstructured)
c (nt:unstructured) prop = "b"
XPath
// make XPath query QueryManager queryManager = workspace.getQueryManager(); // create query String xpathStatement = "/jcr:root/* order by a/b/c/@prop descending; Query query = queryManager.createQuery(xpathStatement, Query.XPATH); // execute query and fetch result QueryResult result = query.execute();
Let's get nodes:
NodeIterator it = result.getNodes();
if(it.hasNext())
{
Node findedNode = it.nextNode();
}NodeIterator will return nodes in the following order - "node3","node2" and "node1".
We can also get a table:
String[] columnNames = result.getColumnNames();
RowIterator rit = result.getRows();
while (rit.hasNext())
{
Row row = rit.nextRow();
// get values of the row
Value[] values = row.getValues();
}Table content is:
Table 30.19. Table content
| jcr:primaryType | jcr:path | jcr:score |
|---|---|---|
| nt:unstructured | /testroot/node3 | 1000 |
| nt:unstructured | /testroot/node2 | 1000 |
| nt:unstructured | /testroot/node1 | 1000 |
Select all nodes with the mixin type 'mix:title' containing any word from the set {'brown','fox','jumps'}. Then, sort result by the score in ascending node. This way nodes that match better the query statement are ordered at the last positions in the result list.
SQL and XPath queries support both score constructions jcr:score and jcr:score()
SELECT * FROM nt:base ORDER BY jcr:score [ASC|DESC] SELECT * FROM nt:base ORDER BY jcr:score()[ASC|DESC] //element(*,nt:base) order by jcr:score() [descending] //element(*,nt:base) order by @jcr:score [descending]
Do not use "ascending" combined with jcr:score in XPath. The following XPath statement may throw an exception:
... order by jcr:score() ascending
Do not set any ordering specifier - ascending is default:
... order by jcr:score()
The repository contains mix:title nodes, where the jcr:description has different values.
root
document1 (mix:title) jcr:description="The quick brown fox jumps over the lazy dog."
document2 (mix:title) jcr:description="The brown fox lives in the forest."
document3 (mix:title) jcr:description="The fox is a nice animal."
SQL
// make SQL query QueryManager queryManager = workspace.getQueryManager(); // create query String sqlStatement = "SELECT * FROM mix:title WHERE CONTAINS(*, 'brown OR fox OR jumps') ORDER BY jcr:score() ASC"; Query query = queryManager.createQuery(sqlStatement, Query.SQL); // execute query and fetch result QueryResult result = query.execute();
XPath
// make XPath query QueryManager queryManager = workspace.getQueryManager(); // create query String xpathStatement = "//element(*,mix:title)[jcr:contains(., 'brown OR fox OR jumps')] order by jcr:score()"; Query query = queryManager.createQuery(xpathStatement, Query.XPATH); // execute query and fetch result QueryResult result = query.execute();
Let's get nodes
NodeIterator it = result.getNodes();
if(it.hasNext())
{
Node findedNode = it.nextNode();
}NodeIterator will return nodes in the following order: "document3", "document2", "document1".
We can also get a table:
String[] columnNames = result.getColumnNames();
RowIterator rit = result.getRows();
while (rit.hasNext())
{
Row row = rit.nextRow();
// get values of the row
Value[] values = row.getValues();
}Table content is:
Table 30.20. Table content
| jcr:description | ... | jcr:path | jcr:score |
|---|---|---|---|
| The fox is a nice animal. | ... | /document3 | 2512 |
| The brown fox lives in the forest. | ... | /document2 | 3595 |
| The quick brown fox jumps over the lazy dog. | ... | /document1 | 5017 |
Warning
Ordering by jcr:path or jcr:name does not supported.
There is two ways to order results, when path may be used as criteria:
Order by property with value type NAME or PATH (jcr supports it)
Order by jcr:path or jcr:name - sort by exact path or name of node (jcr do not supports it)
If no order specification is supplied in the query statement, implementations may support document order on the result nodes (see jsr-170 / 6.6.4.2 Document Order). And it's sorted by order number.
By default, (if query do not contains any ordering statements) result nodes is sorted by document order.
SELECT * FROM nt:unstructured WHERE jcr:path LIKE 'testRoot/%'
Find all nodes containing a mixin type 'mix:title' and whose 'jcr:description' contains "forest" string.
The repository is filled with nodes of the mixin type 'mix:title' and different values of the 'jcr:description' property.
root
document1 (mix:title) jcr:description = "The quick brown fox jumps over the lazy dog."
document2 (mix:title) jcr:description = "The brown fox lives in a forest." // This is the node we want to find
document3 (mix:title) jcr:description = "The fox is a nice animal."
document4 (nt:unstructured) jcr:description = "There is the word forest, too."
SQL
// make SQL query QueryManager queryManager = workspace.getQueryManager(); // we want find document which contains "forest" word String sqlStatement = "SELECT \* FROM mix:title WHERE CONTAINS(jcr:description, 'forest')"; // create query Query query = queryManager.createQuery(sqlStatement, Query.SQL); // execute query and fetch result QueryResult result = query.execute();
XPath
// make SQL query QueryManager queryManager = workspace.getQueryManager(); // we want find document which contains "forest" word String xpathStatement = "//element(*,mix:title)[jcr:contains(@jcr:description, 'forest')]"; // create query Query query = queryManager.createQuery(xpathStatement, Query.XPATH); // execute query and fetch result QueryResult result = query.execute();
Let's get nodes:
NodeIterator it = result.getNodes();
if(it.hasNext())
{
Node findedNode = it.nextNode();
}NodeIterator will return "document2".
We can also get a table:
String[] columnNames = result.getColumnNames();
RowIterator rit = result.getRows();
while (rit.hasNext())
{
Row row = rit.nextRow();
// get values of the row
Value[] values = row.getValues();
}Table content is:
Find nodes with mixin type 'mix:title' where any property contains 'break' string.
Repository filled with different nodes with mixin type 'mix:title' and different values of 'jcr:title' and 'jcr:description' properties.
root
document1 (mix:title) jcr:title ='Star Wars' jcr:description = 'Dart rules!!'
document2 (mix:title) jcr:title ='Prison break' jcr:description = 'Run, Forest, run ))'
document3 (mix:title) jcr:title ='Titanic' jcr:description = 'An iceberg breaks a ship.'
SQL
// make SQL query QueryManager queryManager = workspace.getQueryManager(); String sqlStatement = "SELECT * FROM mix:title WHERE CONTAINS(*,'break')"; // create query Query query = queryManager.createQuery(sqlStatement, Query.SQL); // execute query and fetch result QueryResult result = query.execute();
XPath
// make SQL query QueryManager queryManager = workspace.getQueryManager(); // we want find 'document1' String xpathStatement = "//element(*,mix:title)[jcr:contains(.,'break')]"; // create query Query query = queryManager.createQuery(xpathStatement, Query.XPATH); // execute query and fetch result QueryResult result = query.execute();
Let's get nodes:
NodeIterator it = result.getNodes();
while(it.hasNext())
{
Node findedNode = it.nextNode();
}NodeIterator will return "document1" and "document2".
We can also get a table:
String[] columnNames = result.getColumnNames();
RowIterator rit = result.getRows();
while (rit.hasNext())
{
Row row = rit.nextRow();
// get values of the row
Value[] values = row.getValues();
}Table content is:
Table 30.22. Table content
| jcr:title | jcr:description | ... | jcr:path |
|---|---|---|---|
| Prison break. | Run, Forest, run )) | ... | /document2 |
| Titanic | An iceberg breaks a ship. | ... | /document3 |
In this example, we will create new Analyzer, set it in QueryHandler configuration, and make query to check it.
Standard analyzer does not normalize accents like é,è,à. So, a word like 'tréma' will be stored to index as 'tréma'. But if we want to normalize such symbols or not? We want to store 'tréma' word as 'trema'.
There is two ways of setting up new Analyzer (no matter standarts or our):
The first way: Create descendant class of SearchIndex with new Analyzer (see Search Configuration);
There is only one way - create new Analyzer (if there is no previously created and accepted for our needs) and set it in Search index.
The second way: Register new Analyzer in QueryHandler configuration (this one eccepted since 1.12 version);
We will use the last one:
Create new MyAnalyzer
public class MyAnalyzer extends Analyzer
{
@Override
public TokenStream tokenStream(String fieldName, Reader reader)
{
StandardTokenizer tokenStream = new StandardTokenizer(reader);
// process all text with standard filter
// removes 's (as 's in "Peter's") from the end of words and removes dots from acronyms.
TokenStream result = new StandardFilter(tokenStream);
// this filter normalizes token text to lower case
result = new LowerCaseFilter(result);
// this one replaces accented characters in the ISO Latin 1 character set (ISO-8859-1) by their unaccented equivalents
result = new ISOLatin1AccentFilter(result);
// and finally return token stream
return result;
}
}Then, register new MyAnalyzer in configuration
<workspace name="ws">
...
<query-handler class="org.exoplatform.services.jcr.impl.core.query.lucene.SearchIndex">
<properties>
<property name="analyzer" value="org.exoplatform.services.jcr.impl.core.MyAnalyzer"/>
...
</properties>
</query-handler>
...
</workspace>After that, check it with query:
Find node with mixin type 'mix:title' where 'jcr:title' contains "tréma" and "naïve" strings.
Repository filled by nodes with mixin type 'mix:title' and different values of 'jcr:title' property.
root
node1 (mix:title) jcr:title = "tréma blabla naïve"
node2 (mix:title) jcr:description = "trema come text naive"
SQL
// make SQL query QueryManager queryManager = workspace.getQueryManager(); // create query String sqlStatement = "SELECT * FROM mix:title WHERE CONTAINS(jcr:title, 'tr\u00E8ma na\u00EFve')"; Query query = queryManager.createQuery(sqlStatement, Query.SQL); // execute query and fetch result QueryResult result = query.execute();
XPath
// make SQL query QueryManager queryManager = workspace.getQueryManager(); // create query String xpathStatement = "//element(*,mix:title)[jcr:contains(@jcr:title, 'tr\u00E8ma na\u00EFve')]"; Query query = queryManager.createQuery(xpathStatement, Query.XPATH); // execute query and fetch result QueryResult result = query.execute();
Let's get nodes:
NodeIterator it = result.getNodes();
if(it.hasNext())
{
Node findedNode = it.nextNode();
}NodeIterator will return "node1" and "node2". How is it possible? Remember that our MyAnalyzer transforms 'tréma' word to 'trema'. So node2 accepts our constraints to.
Also, we can get a table:
String[] columnNames = result.getColumnNames();
RowIterator rit = result.getRows();
while (rit.hasNext())
{
Row row = rit.nextRow();
// get values of the row
Value[] values = row.getValues();
}Table content is
Table 30.23. Table content
| cr:title | ... | cr:path |
|---|---|---|
| trèma blabla naïve | ... | /node1 |
| trema come text naive | ... | /node2 |
The node type nt:file represents a file. It requires a single child node, called jcr:content. This node type represents images and other binary content in a JCRWiki entry. The node type of jcr:conent is nt:resource which represents the actual content of a file.
Find node with the primary type is 'nt:file' and which whose 'jcr:content' child node contains "cats".
Normally, we can't find nodes (in our case) using just JCR SQL or XPath queries. But we can configure indexing so that nt:file aggregates jcr:content child node.
So, change indexing-configuration.xml:
<?xml version="1.0"?>
<!DOCTYPE configuration SYSTEM "http://www.exoplatform.org/dtd/indexing-configuration-1.2.dtd">
<configuration xmlns:jcr="http://www.jcp.org/jcr/1.0"
xmlns:nt="http://www.jcp.org/jcr/nt/1.0">
<aggregate primaryType="nt:file">
<include>jcr:content</include>
<include>jcr:content/*</include>
<include-property>jcr:content/jcr:lastModified</include-property>
</aggregate>
</configuration>Now the content of 'nt:file' and 'jcr:content' ('nt:resource') nodes are concatenated in a single Lucene document. Then, we can make a fulltext search query by content of 'nt:file'; this search includes the content of child 'jcr:content' node.
Repository contains different nt:file nodes.
root
document1 (nt:file)
jcr:content (nt:resource) jcr:data = "The quick brown fox jumps over the lazy dog."
document2 (nt:file)
jcr:content (nt:resource) jcr:data = "Dogs do not like cats."
document3 (nt:file)
jcr:content (nt:resource) jcr:data = "Cats jumping high."
SQL
// make SQL query QueryManager queryManager = workspace.getQueryManager(); // create query String sqlStatement = "SELECT * FROM nt:file WHERE CONTAINS(*,'cats')"; Query query = queryManager.createQuery(sqlStatement, Query.SQL); // execute query and fetch result QueryResult result = query.execute();
XPath
// make XPath query QueryManager queryManager = workspace.getQueryManager(); // create query String xpathStatement = "//element(*,nt:file)[jcr:contains(.,'cats')]"; Query query = queryManager.createQuery(xpathStatement, Query.XPATH); // execute query and fetch result QueryResult result = query.execute();
Let's get nodes:
NodeIterator it = result.getNodes();
if(it.hasNext())
{
Node findedNode = it.nextNode();
}NodeIterator will return "document2" and "document3".
We can also get a table:
String[] columnNames = result.getColumnNames();
RowIterator rit = result.getRows();
while (rit.hasNext())
{
Row row = rit.nextRow();
// get values of the row
Value[] values = row.getValues();
}Table content is:
In this example, we will set different boost values for predefined nodes, and will check effect by selecting those nodes and order them by jcr:score.
The default boost value is 1.0. Higher boost values (a reasonable range is 1.0 - 5.0) will yield a higher score value and appear as more relevant.
Note
See 4.2.2 Index Boost Value Search Configuration
In next configuration, we will set boost values for nt:ustructured nodes 'text' property.
indexing-config.xml:
<!-- This rule actualy do nothing. 'text' property has default boost value. --> <index-rule nodeType="nt:unstructured" condition="@rule='boost1'"> <!-- default boost: 1.0 --> <property>text</property> </index-rule> <!-- Set boost value as 2.0 for 'text' property in nt:unstructured nodes where property 'rule' equal to 'boost2' --> <index-rule nodeType="nt:unstructured" condition="@rule='boost2'"> <!-- boost: 2.0 --> <property boost="2.0">text</property> </index-rule> <!-- Set boost value as 3.0 for 'text' property in nt:unstructured nodes where property 'rule' equal to 'boost3' --> <index-rule nodeType="nt:unstructured" condition="@rule='boost3'"> <!-- boost: 3.0 --> <property boost="3.0">text</property> </index-rule>
Repository contains many nodes with primary type nt:unstructured. Each node contains 'text' property and 'rule' property with different values.
root
node1(nt:unstructured) rule='boost1' text='The quick brown fox jump...'
node2(nt:unstructured) rule='boost2' text='The quick brown fox jump...'
node3(nt:unstructured) rule='boost3' text='The quick brown fox jump...'
SQL
// make SQL query QueryManager queryManager = workspace.getQueryManager(); // create query String sqlStatement = "SELECT * FROM nt:unstructured WHERE CONTAINS(text, 'quick') ORDER BY jcr:score() DESC"; Query query = queryManager.createQuery(sqlStatement, Query.SQL); // execute query and fetch result QueryResult result = query.execute();
XPath
// make XPath query QueryManager queryManager = workspace.getQueryManager(); // create query String xpathStatement = "//element(*,nt:unstructured)[jcr:contains(@text, 'quick')] order by @jcr:score descending"; Query query = queryManager.createQuery(xpathStatement, Query.XPATH); // execute query and fetch result QueryResult result = query.execute();
In this example, we will exclude some 'text' property of nt:unstructured node from indexind. And, therefore, node will not be found by the content of this property, even if it accepts all constraints.
First of all, add rules to indexing-configuration.xml:
<index-rule nodeType="nt:unstructured" condition="@rule='nsiTrue'">
<!-- default value for nodeScopeIndex is true -->
<property>text</property>
</index-rule>
<index-rule nodeType="nt:unstructured" condition="@rule='nsiFalse'">
<!-- do not include text in node scope index -->
<property nodeScopeIndex="false">text</property>
</index-rule>Note
Repository contains nt:unstructured nodes, with same 'text'property and different 'rule' properties (even null)
root
node1 (nt:unstructured) rule="nsiTrue" text="The quick brown fox ..."
node2 (nt:unstructured) rule="nsiFalse" text="The quick brown fox ..."
node3 (nt:unstructured) text="The quick brown fox ..." // as you see this node not mentioned in indexing-coniguration
SQL
// make SQL query QueryManager queryManager = workspace.getQueryManager(); // create query String sqlStatement = "SELECT * FROM nt:unstructured WHERE CONTAINS(*,'quick')"; Query query = queryManager.createQuery(sqlStatement, Query.SQL); // execute query and fetch result QueryResult result = query.execute();
XPath
// make XPath query QueryManager queryManager = workspace.getQueryManager(); // create query String xpathStatement = "//element(*,nt:unstructured)[jcr:contains(., 'quick')]"; Query query = queryManager.createQuery(xpathStatement, Query.XPATH); // execute query and fetch result QueryResult result = query.execute();
Let's get nodes:
NodeIterator it = result.getNodes();
if(it.hasNext())
{
Node findedNode = it.nextNode();
}NodeIterator will return "node1" and "node3". Node2, as you see, is not in result set.
Also, we can get a table:
String[] columnNames = result.getColumnNames();
RowIterator rit = result.getRows();
while (rit.hasNext())
{
Row row = rit.nextRow();
// get values of the row
Value[] values = row.getValues();
}Table content is
Table 30.25. Table content
| jcr:primarytype | jcr:path | jcr:score |
|---|---|---|
| nt:unstructured | /node1 | 3806 |
| nt:unstructured | /node3 | 3806 |
In this example, we want to configure indexind in the next way. All properties of nt:unstructured nodes must be excluded from search, except properties whoes names ends with 'Text' string. First of all, add rules to indexing-configuration.xml:
<index-rule nodeType="nt:unstructured""> <property isRegexp="true">.*Text</property> </index-rule>
Note
Now, let's check this rule with simple query - select all nodes with primary type 'nt:unstructured' and containing 'quick' string (fulltext search by full node).
Repository contains nt:unstructured nodes, with different 'text'-like named properties
root
node1 (nt:unstructured) Text="The quick brown fox ..."
node2 (nt:unstructured) OtherText="The quick brown fox ..."
node3 (nt:unstructured) Textle="The quick brown fox ..."
SQL
// make SQL query QueryManager queryManager = workspace.getQueryManager(); // create query String sqlStatement = "SELECT * FROM nt:unstructured WHERE CONTAINS(*,'quick')"; Query query = queryManager.createQuery(sqlStatement, Query.SQL); // execute query and fetch result QueryResult result = query.execute();
XPath
// make XPath query QueryManager queryManager = workspace.getQueryManager(); // create query String xpathStatement = "//element(*,nt:unstructured)[jcr:contains(., 'quick')]"; Query query = queryManager.createQuery(xpathStatement, Query.XPATH); // execute query and fetch result QueryResult result = query.execute();
Let's get nodes:
NodeIterator it = result.getNodes();
if(it.hasNext())
{
Node findedNode = it.nextNode();
}NodeIterator will return "node1" and "node2". "node3", as you see, is not in result set.
Also, we can get a table:
String[] columnNames = result.getColumnNames();
RowIterator rit = result.getRows();
while (rit.hasNext())
{
Row row = rit.nextRow();
// get values of the row
Value[] values = row.getValues();
}Table content is:
Table 30.26. Table content
| jcr:primarytype | jcr:path | jcr:score |
|---|---|---|
| nt:unstructured | /node1 | 3806 |
| nt:unstructured | /node2 | 3806 |
It's also called excerption (see Excerpt configuration in Search Configuration and in Searching Repository article).
The goal of this query is to find words "eXo" and "implementation" with fulltext search and high-light this words in result value.
High-lighting is not default feature so we must set it in jcr-config.xml, also excerpt provider must be defined:
<query-handler class="org.exoplatform.services.jcr.impl.core.query.lucene.SearchIndex">
<properties>
...
<property name="support-highlighting" value="true" />
<property name="excerptprovider-class" value="org.exoplatform.services.jcr.impl.core.query.lucene.WeightedHTMLExcerpt"/>
...
<properties>
</query-handler>Also, remember that we can make indexing rules, as in the example below:
Let's write rule for all nodes with primary node type 'nt:unstructed' where property 'rule' equal to "excerpt" string. For those nodes, we will exclude property "title" from high-lighting and set "text" property as highlightable. Indexing-configuration.xml must containt the next rule:
<index-rule nodeType="nt:unstructured" condition="@rule='excerpt'"> <property useInExcerpt="false">title</property> <property>text</property> </index-rule>
We have single node with primary type 'nt:unstructured'
document (nt:unstructured)
rule = "excerpt"
title = "eXoJCR"
text = "eXo is a JCR implementation"
SQL
// make SQL query QueryManager queryManager = workspace.getQueryManager(); // create query String sqlStatement = "SELECT rep:excerpt() FROM nt:unstructured WHERE CONTAINS(*, 'eXo implementation')"; Query query = queryManager.createQuery(sqlStatement, Query.SQL); // execute query and fetch result QueryResult result = query.execute();
XPath
// make XPath query QueryManager queryManager = workspace.getQueryManager(); // create query String xpathStatement = "//element(*,nt:unstructured)[jcr:contains(., 'eXo implementation')]/rep:excerpt(.)"; Query query = queryManager.createQuery(xpathStatement, Query.XPATH); // execute query and fetch result QueryResult result = query.execute();
Now let's see on the result table:
String[] columnNames = result.getColumnNames();
RowIterator rit = result.getRows();
while (rit.hasNext())
{
Row row = rit.nextRow();
// get values of the row
Value[] values = row.getValues();
}Table content is
Table 30.27. Table content
| rep:excerpt() | jcr:path | jcr:score |
|---|---|---|
| \<div\>\<span\>\<strong\>eXo\</strong\> is a JCR \<strong\>implementation\</strong\>\</span\>\</div\> | /testroot/node1 | 335 |
As you see, words "eXo" and "implamentation" is highlighted.
Also, we can get exactly "rep:excerpt" value:
RowIterator rows = result.getRows();
Value excerpt = rows.nextRow().getValue("rep:excerpt(.)");
// excerpt will be equal to "<div><span\><strong>eXo</strong> is a JCR <strong>implementation</strong></span></div>"Find all mix:title nodes where title contains synonims to 'fast' word.
Note
See also about synonim propvider configuration - Searching Repository Content
Synonim provider must be configured in indexing-configuration.xml :
<query-handler class="org.exoplatform.services.jcr.impl.core.query.lucene.SearchIndex">
<properties>
...
<property name="synonymprovider-class" value="org.exoplatform.services.jcr.impl.core.query.lucene.PropertiesSynonymProvider" />
<property name="synonymprovider-config-path" value="../../synonyms.properties" />
...
</properties>
</query-handler>File synonim.properties contains next synonims list:
ASF=Apache Software Foundation quick=fast sluggish=lazy
Repository contains mix:title nodes, where jcr:title has different values.
root
document1 (mix:title) jcr:title="The quick brown fox jumps over the lazy dog."
SQL
// make SQL query QueryManager queryManager = workspace.getQueryManager(); // create query String sqlStatement = "SELECT * FROM mix:title WHERE CONTAINS(jcr:title, '~fast')"; Query query = queryManager.createQuery(sqlStatement, Query.SQL); // execute query and fetch result QueryResult result = query.execute();
XPath
// make XPath query QueryManager queryManager = workspace.getQueryManager(); // create query String xpathStatement = "//element(*,mix:title)[jcr:contains(@jcr:title, '~fast')]"; Query query = queryManager.createQuery(xpathStatement, Query.XPATH); // execute query and fetch result QueryResult result = query.execute();
Check the correct spelling of phrase 'quik OR (-foo bar)' according to data already stored in index.
Note
See also about SpellChecker configuration - Searching Repository Content
SpellChecker must be settled in query-handler config.
test-jcr-config.xml:
<query-handler class="org.exoplatform.services.jcr.impl.core.query.lucene.SearchIndex">
<properties>
...
<property name="spellchecker-class" value="org.exoplatform.services.jcr.impl.core.query.lucene.spell.LuceneSpellChecker$FiveSecondsRefreshInterval" />
...
</properties>
</query-handler>Repository contains node, with string property "The quick brown fox jumps over the lazy dog."
root
node1 property="The quick brown fox jumps over the lazy dog."
Query looks only for root node, because spell checker looks for suggestions by full index. So complicated query is redundant.
SQL
// make SQL query
QueryManager queryManager = workspace.getQueryManager();
// create query
String sqlStatement = "SELECT rep:spellcheck() FROM nt:base WHERE jcr:path = '/' AND SPELLCHECK('quik OR (-foo bar)')";
Query query = queryManager.createQuery(sqlStatement, Query.SQL);
// execute query and fetch result
QueryResult result = query.execute();XPath
// make XPath query
QueryManager queryManager = workspace.getQueryManager();
// create query
String xpathStatement = "/jcr:root[rep:spellcheck('quik OR (-foo bar)')]/(rep:spellcheck())";
Query query = queryManager.createQuery(xpathStatement, Query.XPATH);
// execute query and fetch result
QueryResult result = query.execute();Find similar nodes to node by path '/baseFile/jcr:content'.
In our example, baseFile will contain text where "terms" word happens many times. That's a reason why the existanse of this word will be used as a criteria of node similarity (for node baseFile).
Note
See also about Similarity and configuration - Searching Repository Content
Higlighting support must be added to configuration. test-jcr-config.xml:
<query-handler class="org.exoplatform.services.jcr.impl.core.query.lucene.SearchIndex">
<properties>
...
<property name="support-highlighting" value="true" />
...
</properties>
</query-handler>Repository contains many nt:file nodes"
root
baseFile (nt:file)
jcr:content (nt:resource) jcr:data="Similarity is determined by looking up terms that are common to nodes. There are some conditions that must be met for a term to be considered. This is required to limit the number possibly relevant terms. Only terms with at least 4 characters are considered. Only terms that occur at least 2 times in the source node are considered. Only terms that occur in at least 5 nodes are considered."
target1 (nt:file)
jcr:content (nt:resource) jcr:data="Similarity is determined by looking up terms that are common to nodes."
target2 (nt:file)
jcr:content (nt:resource) jcr:data="There is no you know what"
target3 (nt:file)
jcr:content (nt:resource) jcr:data=" Terms occures here"
SQL
// make SQL query QueryManager queryManager = workspace.getQueryManager(); // create query String sqlStatement = "SELECT * FROM nt:resource WHERE SIMILAR(.,'/baseFile/jcr:content')"; Query query = queryManager.createQuery(sqlStatement, Query.SQL); // execute query and fetch result QueryResult result = query.execute();
XPath
// make XPath query QueryManager queryManager = workspace.getQueryManager(); // create query String xpathStatement = "//element(*, nt:resource)[rep:similar(., '/testroot/baseFile/jcr:content')]"; Query query = queryManager.createQuery(xpathStatement, Query.XPATH); // execute query and fetch result QueryResult result = query.execute();
Let's get nodes:
NodeIterator it = result.getNodes();
if(it.hasNext())
{
Node findedNode = it.nextNode();
}NodeIterator will return "/baseFile/jcr:content","/target1/jcr:content" and "/target3/jcr:content".
As you see the base node are also in result set.
We can also get a table:
String[] columnNames = result.getColumnNames();
RowIterator rit = result.getRows();
while (rit.hasNext())
{
Row row = rit.nextRow();
// get values of the row
Value[] values = row.getValues();
}The table content is
Table 30.28. Table content
| jcr:path | ... | jcr:score |
|---|---|---|
| /baseFile/jcr:content | ... | 2674 |
| /target1/jcr:content | ... | 2674 |
| /target3/jcr:content | ... | 2674 |
If you execute an XPath request like this:
XPath
// get QueryManager
QueryManager queryManager = workspace.getQueryManager();
// make XPath query
Query query = queryManager.createQuery("/jcr:root/Documents/Publie/2010//element(*, exo:article)", Query.XPATH);You will have an error : "Invalid request". This happens because XML does not allow names starting with a number - and XPath is part of XML: http://www.w3.org/TR/REC-xml/#NT-Name
Therefore, you cannot do XPath requests using a node name that starts with a number.
Easy workarounds:
Use an SQL request.
Use escaping :
XPath
// get QueryManager
QueryManager queryManager = workspace.getQueryManager();
// make XPath query
Query query = queryManager.createQuery("/jcr:root/Documents/Publie/_x0032_010//element(*, exo:article)", Query.XPATH);You can find the JCR configuration file here: .../portal/WEB-INF/conf/jcr/repository-configuration.xml. Please read also Search Configuration for more information about index configuration.
QueryResult.getNodes() will return bi-directional NodeIterator implementation.
Note
Bi-directional NodeIterator is not supported in two cases:
SQL query: select * from nt:base
XPath query: //* .
TwoWayRangeIterator interface:
/** * Skip a number of elements in the iterator. * * @param skipNum the non-negative number of elements to skip * @throws java.util.NoSuchElementException if skipped past the first element * in the iterator. */ public void skipBack(long skipNum);
Usage:
NodeIterator iter = queryResult.getNodes();
while (iter.hasNext()) {
if (skipForward) {
iter.skip(10); // Skip 10 nodes in forward direction
} else if (skipBack) {
TwoWayRangeIterator backIter = (TwoWayRangeIterator) iter;
backIter.skipBack(10); // Skip 10 nodes back
}
.......
}JCR supports such features as Lucene Fuzzy Searches Apache Lucene - Query Parser Syntax.
To use it, you have to form a query like the one described below:
QueryManager qman = session.getWorkspace().getQueryManager();
Query q = qman.createQuery("select * from nt:base where contains(field, 'ccccc~')", Query.SQL);
QueryResult res = q.execute();Searching with synonyms is integrated in the jcr:contains() function and uses the same syntax as synonym searches in Google. If a search term is prefixed by a tilde symbol ( ~ ), also synonyms of the search term are taken into consideration. For example:
SQL: select * from nt:resource where contains(., '~parameter') XPath: //element(*, nt:resource)[jcr:contains(., '~parameter')
This feature is disabled by default and you need to add a configuration parameter to the query-handler element in your jcr configuration file to enable it.
<param name="synonymprovider-config-path" value="..you path to configuration file....."/> <param name="synonymprovider-class" value="org.exoplatform.services.jcr.impl.core.query.lucene.PropertiesSynonymProvider"/>
/**
* <code>SynonymProvider</code> defines an interface for a component that
* returns synonyms for a given term.
*/
public interface SynonymProvider {
/**
* Initializes the synonym provider and passes the file system resource to
* the synonym provider configuration defined by the configuration value of
* the <code>synonymProviderConfigPath</code> parameter. The resource may be
* <code>null</code> if the configuration parameter is not set.
*
* @param fsr the file system resource to the synonym provider
* configuration.
* @throws IOException if an error occurs while initializing the synonym
* provider.
*/
public void initialize(InputStream fsr) throws IOException;
/**
* Returns an array of terms that are considered synonyms for the given
* <code>term</code>.
*
* @param term a search term.
* @return an array of synonyms for the given <code>term</code> or an empty
* array if no synonyms are known.
*/
public String[] getSynonyms(String term);
}An ExcerptProvider retrieves text excerpts for a node in the query result and marks up the words in the text that match the query terms.
By default highlighting words matched the query is disabled because this feature requires that additional information is written to the search index. To enable this feature, you need to add a configuration parameter to the query-handler element in your jcr configuration file to enable it.
<param name="support-highlighting" value="true"/>
Additionally, there is a parameter that controls the format of the excerpt created. In JCR 1.9, the default is set to org.exoplatform.services.jcr.impl.core.query.lucene.DefaultHTMLExcerpt. The configuration parameter for this setting is:
<param name="excerptprovider-class" value="org.exoplatform.services.jcr.impl.core.query.lucene.DefaultXMLExcerpt"/>
This excerpt provider creates an XML fragment of the following form:
<excerpt>
<fragment>
<highlight>exoplatform</highlight> implements both the mandatory
XPath and optional SQL <highlight>query</highlight> syntax.
</fragment>
<fragment>
Before parsing the XPath <highlight>query</highlight> in
<highlight>exoplatform</highlight>, the statement is surrounded
</fragment>
</excerpt>This excerpt provider creates an HTML fragment of the following form:
<div>
<span>
<strong>exoplatform</strong> implements both the mandatory XPath
and optional SQL <strong>query</strong> syntax.
</span>
<span>
Before parsing the XPath <strong>query</strong> in
<strong>exoplatform</strong>, the statement is surrounded
</span>
</div>If you are using XPath, you must use the rep:excerpt() function in the last location step, just like you would select properties:
QueryManager qm = session.getWorkspace().getQueryManager();
Query q = qm.createQuery("//*[jcr:contains(., 'exoplatform')]/(@Title|rep:excerpt(.))", Query.XPATH);
QueryResult result = q.execute();
for (RowIterator it = result.getRows(); it.hasNext(); ) {
Row r = it.nextRow();
Value title = r.getValue("Title");
Value excerpt = r.getValue("rep:excerpt(.)");
}The above code searches for nodes that contain the word exoplatform and then gets the value of the Title property and an excerpt for each result node.
It is also possible to use a relative path in the call Row.getValue() while the query statement still remains the same. Also, you may use a relative path to a string property. The returned value will then be an excerpt based on string value of the property.
Both available excerpt provider will create fragments of about 150 characters and up to 3 fragments.
In SQL, the function is called excerpt() without the rep prefix, but the column in the RowIterator will nonetheless be labled rep:excerpt(.)!
QueryManager qm = session.getWorkspace().getQueryManager();
Query q = qm.createQuery("select excerpt(.) from nt:resource where contains(., 'exoplatform')", Query.SQL);
QueryResult result = q.execute();
for (RowIterator it = result.getRows(); it.hasNext(); ) {
Row r = it.nextRow();
Value excerpt = r.getValue("rep:excerpt(.)");
}The lucene based query handler implementation supports a pluggable spell checker mechanism. By default, spell checking is not available and you have to configure it first. See parameter spellCheckerClass on page Search Configuration. JCR currently provides an implementation class , which uses the lucene-spellchecker to contribute . The dictionary is derived from the fulltext indexed content of the workspace and updated periodically. You can configure the refresh interval by picking one of the available inner classes of org.exoplatform.services.jcr.impl.core.query.lucene.spell.LuceneSpellChecker:
OneMinuteRefreshInterval
FiveMinutesRefreshInterval
ThirtyMinutesRefreshInterval
OneHourRefreshInterval
SixHoursRefreshInterval
TwelveHoursRefreshInterval
OneDayRefreshInterval
For example, if you want a refresh interval of six hours, the class name is: org.exoplatform.services.jcr.impl.core.query.lucene.spell.LuceneSpellChecker$SixHoursRefreshInterval. If you use org.exoplatform.services.jcr.impl.core.query.lucene.spell.LuceneSpellChecker, the refresh interval will be one hour.
The spell checker dictionary is stored as a lucene index under "index-dir"/spellchecker. If it does not exist, a background thread will create it on startup. Similarly, the dictionary refresh is also done in a background thread to not block regular queries.
You can spell check a fulltext statement either with an XPath or a SQL query:
// rep:spellcheck('explatform') will always evaluate to true
Query query = qm.createQuery("/jcr:root[rep:spellcheck('explatform')]/(rep:spellcheck())", Query.XPATH);
RowIterator rows = query.execute().getRows();
// the above query will always return the root node no matter what string we check
Row r = rows.nextRow();
// get the result of the spell checking
Value v = r.getValue("rep:spellcheck()");
if (v == null) {
// no suggestion returned, the spelling is correct or the spell checker
// does not know how to correct it.
} else {
String suggestion = v.getString();
}And the same using SQL:
// SPELLCHECK('exoplatform') will always evaluate to true
Query query = qm.createQuery("SELECT rep:spellcheck() FROM nt:base WHERE jcr:path = '/' AND SPELLCHECK('explatform')", Query.SQL);
RowIterator rows = query.execute().getRows();
// the above query will always return the root node no matter what string we check
Row r = rows.nextRow();
// get the result of the spell checking
Value v = r.getValue("rep:spellcheck()");
if (v == null) {
// no suggestion returned, the spelling is correct or the spell checker
// does not know how to correct it.
} else {
String suggestion = v.getString();
}Starting with version, 1.12 JCR allows you to search for nodes that are similar to an existing node.
Similarity is determined by looking up terms that are common to nodes. There are some conditions that must be met for a term to be considered. This is required to limit the number possibly relevant terms.
Only terms with at least 4 characters are considered.
Only terms that occur at least 2 times in the source node are considered.
Only terms that occur in at least 5 nodes are considered.
Note: The similarity functionality requires that the support Hightlighting is enabled. Please make sure that you have the following parameter set for the query handler in your workspace.xml.
<param name="support-highlighting" value="true"/>
The functions are called rep:similar() (in XPath) and similar() (in SQL) and have two arguments:
relativePath: a relative path to a descendant node or . for the current node. absoluteStringPath: a string literal that contains the path to the node for which to find similar nodes.
Warning
Relative path is not supported yet.
Examples:
//element(*, nt:resource)[rep:similar(., '/parentnode/node.txt/jcr:content')]
Finds nt:resource nodes, which are similar to node by path /parentnode/node.txt/jcr:content.
Each property of a node (if it is indexable) is processed with Lucene analyzer and stored in Lucene index. That's called indexing of a property. After that we can perform a fulltext search among these indexed properties.
The sense of analyzers is to transform all strings stored in the index in a well-defined condition. The same analyzer(s) is/are used when searching in order to adapt the query string to the index reality.
Therefore, performing the same query using different analyzers can return different results.
Now, let's see how the same string is transformed by different analyzers.
Table 32.1. "The quick brown fox jumped over the lazy dogs"
| Analyzer | Parsed |
|---|---|
| org.apache.lucene.analysis.WhitespaceAnalyzer | [The] [quick] [brown] [fox] [jumped] [over] [the] [lazy] [dogs] |
| org.apache.lucene.analysis.SimpleAnalyzer | [the] [quick] [brown] [fox] [jumped] [over] [the] [lazy] [dogs] |
| org.apache.lucene.analysis.StopAnalyzer | [quick] [brown] [fox] [jumped] [over] [lazy] [dogs] |
| org.apache.lucene.analysis.standard.StandardAnalyzer | [quick] [brown] [fox] [jumped] [over] [lazy] [dogs] |
| org.apache.lucene.analysis.snowball.SnowballAnalyzer | [quick] [brown] [fox] [jump] [over] [lazi] [dog] |
| org.apache.lucene.analysis.standard.StandardAnalyzer (configured without stop word - jcr default analyzer) | [the] [quick] [brown] [fox] [jumped] [over] [the] [lazy] [dogs] |
Table 32.2. "XY&Z Corporation - xyz@example.com"
| Analyzer | Parsed |
|---|---|
| org.apache.lucene.analysis.WhitespaceAnalyzer | [XY&Z] [Corporation] [-] [xyz@example.com] |
| org.apache.lucene.analysis.SimpleAnalyzer | [xy] [z] [corporation] [xyz] [example] [com] |
| org.apache.lucene.analysis.StopAnalyzer | [xy] [z] [corporation] [xyz] [example] [com] |
| org.apache.lucene.analysis.standard.StandardAnalyzer | [xy&z] [corporation] [xyz@example] [com] |
| org.apache.lucene.analysis.snowball.SnowballAnalyzer | [xy&z] [corpor] [xyz@exampl] [com] |
| org.apache.lucene.analysis.standard.StandardAnalyzer (configured without stop word - jcr default analyzer) | [xy&z] [corporation] [xyz@example] [com] |
Note
StandardAnalyzer is the default analyzer in exo's jcr search engine. But we do not use stop words.
You can assign your analyzer as described in Search Configuration
Different properties are indexed in different ways, this affects to if it can be searched like fulltext by property or not.
Only two property types are indexed as fulltext searcheable: STRING and BINARY.
Table 32.3. Fulltext search by different properties
| Property Type | Fulltext search by all properties | Fulltext search by exact property |
|---|---|---|
| STRING | YES | YES |
| BINARY | YES | NO |
For example, ưe have property jcr:data (it' BINARY). It's stored well, but you will never find any string with query like:
SELECT * FROM nt:resource WHERE CONTAINS(jcr:data, 'some string')
Because, BINARY is not searchable by fulltext search on exact property.
But, next query will return result (off course if node has searched data):
SELECT * FROM nt:resource WHERE CONTAINS( * , 'some string')
First of all, we will fill repository by nodes with mixin type 'mix:title' and different values of 'jcr:description' property.
root
document1 (mix:title) jcr:description = "The quick brown fox jumped over the lazy dogs"
document2 (mix:title) jcr:description = "Brown fox live in forest."
document3 (mix:title) jcr:description = "Fox is a nice animal."
Let's see analyzers effect closer. In first case, we use base jcr settings, so, as mentioned above, string "The quick brown fox jumped over the lazy dogs" will be transformed to set {[the] [quick] [brown] [fox] [jumped] [over] [the] [lazy] [dogs] }
// make SQL query QueryManager queryManager = workspace.getQueryManager(); String sqlStatement = "SELECT * FROM mix:title WHERE CONTAINS(jcr:description, 'the')"; // create query Query query = queryManager.createQuery(sqlStatement, Query.SQL); // execute query and fetch result QueryResult result = query.execute();
NodeIterator will return "document1".
Now change the default analyzer to org.apache.lucene.analysis.StopAnalyzer. Fill repository again (new Analyzer must process nodes properties) and run the same query again. It will return nothing, because stop words like "the" will be excluded from parsed string set.
eXo JCR implementation offers new extended feature beyond JCR specification. Sometimes it happens that one JCR Node has hundreds or even thousands of child nodes. This situation is highly not recommended for content repository data storage, but some times it occurs. JCR Team is pleased to announce new feature that will help to have a deal with huge child lists. They can be iterated in a "lazy" manner now giving improvement in term of performance and RAM usage.
Lazy child nodes iteration feature is accessible via extended interface org.exoplatform.services.jcr.core.ExtendedNode, the inheritor of javax.jcr.Node. It provides a new single method shown below:
/**
* Returns a NodeIterator over all child Nodes of this Node. Does not include properties
* of this Node. If this node has no child nodes, then an empty iterator is returned.
*
* @return A NodeIterator over all child Nodes of this <code>Node</code>.
* @throws RepositoryException If an error occurs.
*/
public NodeIterator getNodesLazily() throws RepositoryException;
From the view of end-user or client application, getNodesLazily() works similar to JCR specified getNodes() returning NodeIterator. "Lazy" iterator supports the same set of features as an ordinary NodeIterator, including skip() and excluding remove() features. "Lazy" implementation performs reading from DB by pages. Each time when it has no more elements stored in memory, it reads next set of items from persistent layer. This set is called "page". Must admit that getNodesLazily feature fully supports session and transaction changes log, so it's a functionally-full analogue of specified getNodes() operation. So when having a deal with huge list of child nodes, getNodes() can be simply and safely substituted with getNodesLazily().
JCR gives an experimental opportunity to replace all getNodes() invocations with getNodesLazily() calls. It handles a boolean system property named "org.exoplatform.jcr.forceUserGetNodesLazily" that internally replaces one call with another, without any code changes. But be sure using it only for development purposes. This feature can be used with top level products using eXo JCR to perform a quick compatibility and performance tests without changing any code. This is not recommended to be used as a production solution.
In order to enable add the "-Dorg.exoplatform.jcr.forceUserGetNodesLazily=true" to the java system properties.
The "lazy" iterator reads the child nodes "page" after "page" into the memory. In this context, a "page" is a set of nodes that is read at once. The size of the page is by default 100 nodes and can be configured though workspace container configuration using "lazy-node-iterator-page-size" parameter. For example:
<container class="org.exoplatform.services.jcr.impl.storage.jdbc.optimisation.CQJDBCWorkspaceDataContainer">
<properties>
<property name="source-name" value="jdbcjcr" />
<property name="multi-db" value="true" />
<property name="max-buffer-size" value="200k" />
<property name="swap-directory" value="target/temp/swap/ws" />
<property name="lazy-node-iterator-page-size" value="50" />
...
</properties>It's not recommended to configure a large number for the page size.
Current "lazy" child nodes iterator supports caching, when pages are cached atomically in safe and optimized way. Cache is always kept in consistent state using invalidation if child list changed. Take in account the following difference in getNodes and getNodesLazily. Specification defined getNodes method reads whole list of nodes, so child items added after invocation will never be in results. GetNodesLazily doesn't acquire full list of nodes, so child items added after iterator creation can be found in result. So getNodesLazily can represent some kind of "real-time" results. But it is highly depend on numerous conditions and should not be used as a feature, it more likely implementation specific issue typical for "lazy-pattern".
The WebDAV protocol enables you to use the third party tools to communicate with hierarchical content servers via HTTP. It is possible to add and remove documents or a set of documents from a path on the server. DeltaV is an extension of the WebDav protocol that allows managing document versioning. Locking guarantees protection against multiple access when writing resources. The ordering support allows changing the position of the resource in the list and sort the directory to make the directory tree viewed conveniently. The full-text search makes it easy to find the necessary documents. You can search by using two languages: SQL and XPATH.
In eXo JCR, we plug in the WebDAV layer - based on the code taken from the extension modules of the reference implementation - on the top of our JCR implementation so that it is possible to browse a workspace using the third party tools (it can be Windows folders or Mac ones as well as a Java WebDAV client, such as DAVExplorer or IE using File->Open as a Web Folder).
Now WebDav is an extension of the REST service. To get the WebDav server ready, you must deploy the REST application. Then, you can access any workspaces of your repository by using the following URL:
Standalone mode:
http://host:port/rest/jcr/{RepositoryName}/{WorkspaceName}/{Path}
Portal mode:
http://host:port/portal/rest/private/jcr/{RepositoryName}/{WorkspaceName}/{Path}
When accessing the WebDAV server with the URLhttp://localhost:8080/rest/jcr/repository/production, you might
also use "collaboration" (instead of "production") which is the default
workspace in eXo products. You will be asked to enter your login and
password. Those will then be checked by using the organization service
that can be implemented thanks to an InMemory (dummy) module or a DB module
or an LDAP one and the JCR user session will be created with the correct JCR
Credentials.
Note
If you try the "in ECM" option, add "@ecm" to the user's password. Alternatively, you may modify jaas.conf by adding the domain=ecm option as follows:
exo-domain {
org.exoplatform.services.security.jaas.BasicLoginModule required domain=ecm;
};<component>
<key>org.exoplatform.services.webdav.WebDavServiceImpl</key>
<type>org.exoplatform.services.webdav.WebDavServiceImpl</type>
<init-params>
<!-- this parameter indicates the default login and password values
used as credentials for accessing the repository -->
<!-- value-param>
<name>default-identity</name>
<value>admin:admin</value>
</value-param -->
<!-- this is the value of WWW-Authenticate header -->
<value-param>
<name>auth-header</name>
<value>Basic realm="eXo-Platform Webdav Server 1.6.1"</value>
</value-param>
<!-- default node type which is used for the creation of collections -->
<value-param>
<name>def-folder-node-type</name>
<value>nt:folder</value>
</value-param>
<!-- default node type which is used for the creation of files -->
<value-param>
<name>def-file-node-type</name>
<value>nt:file</value>
</value-param>
<!-- if MimeTypeResolver can't find the required mime type,
which conforms with the file extension, and the mimeType header is absent
in the HTTP request header, this parameter is used
as the default mime type-->
<value-param>
<name>def-file-mimetype</name>
<value>application/octet-stream</value>
</value-param>
<!-- This parameter indicates one of the three cases when you update the content of the resource by PUT command.
In case of "create-version", PUT command creates the new version of the resource if this resource exists.
In case of "replace" - if the resource exists, PUT command updates the content of the resource and its last modification date.
In case of "add", the PUT command tries to create the new resource with the same name (if the parent node allows same-name siblings).-->
<value-param>
<name>update-policy</name>
<value>create-version</value>
<!--value>replace</value -->
<!-- value>add</value -->
</value-param>
<!--
This parameter determines how service responds to a method that attempts to modify file content.
In case of "checkout-checkin" value, when a modification request is applied to a checked-in version-controlled resource, the request is automatically preceded by a checkout and followed by a checkin operation.
In case of "checkout" value, when a modification request is applied to a checked-in version-controlled resource, the request is automatically preceded by a checkout operation.
-->
<value-param>
<name>auto-version</name>
<value>checkout-checkin</value>
<!--value>checkout</value -->
</value-param>
<!--
This parameter is responsible for managing Cache-Control header value which will be returned to the client.
You can use patterns like "text/*", "image/*" or wildcard to define the type of content.
-->
<value-param>
<name>cache-control</name>
<value>text/xml,text/html:max-age=3600;image/png,image/jpg:max-age=1800;*/*:no-cache;</value>
</value-param>
<!--
This parameter determines the absolute path to the folder icon file, which is shown
during WebDAV view of the contents
-->
<value-param>
<name>folder-icon-path</name>
<value>/absolute/path/to/file</value>
</value-param>
</init-params
</component>At present, eXo JCR WebDav server is tested by using MS Internet Explorer, Dav Explorer, Xythos Drive, Microsoft Office 2003 (as client), and Ubuntu Linux.
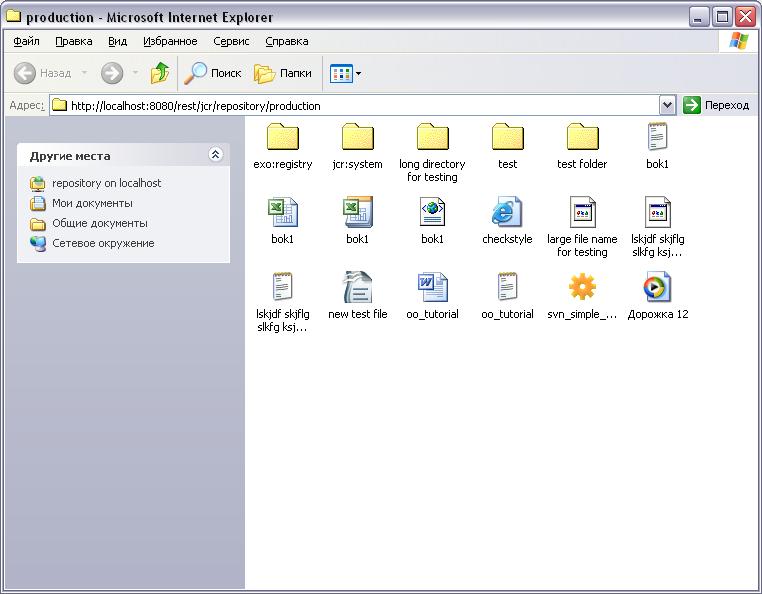
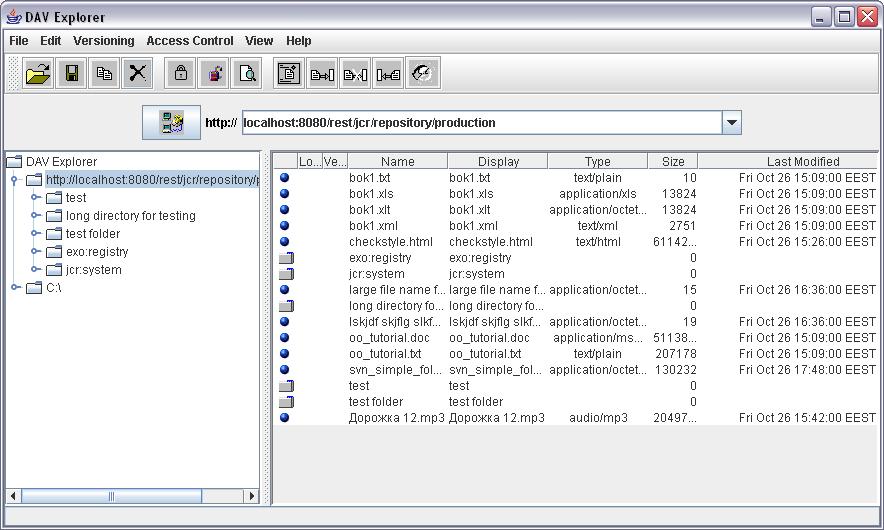
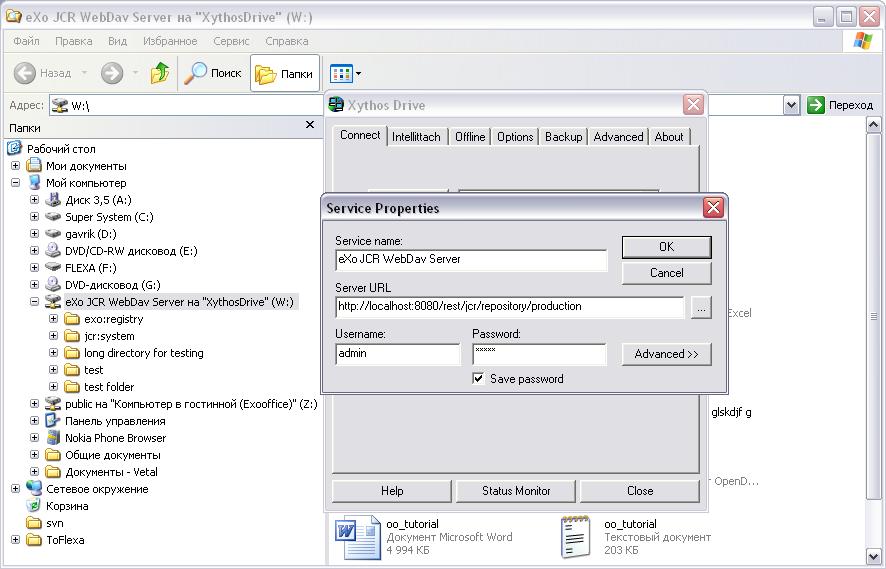
(as client) (File->Open with typing http://... href in the file name box)
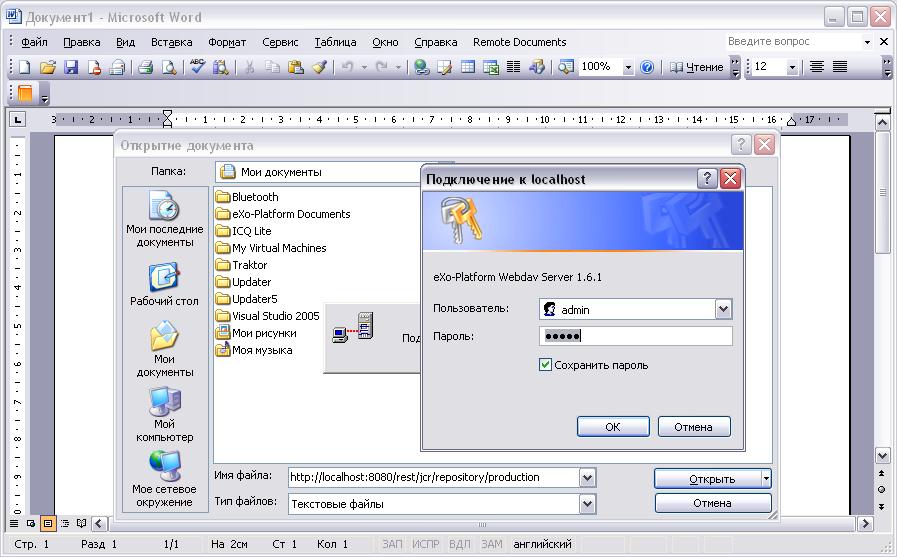
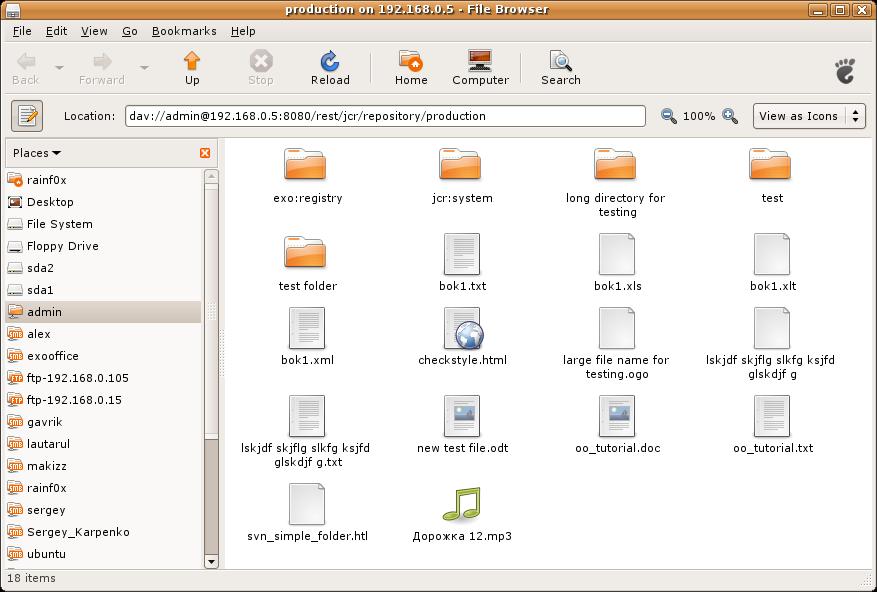
Table 34.1.
| WebDav | JCR |
|---|---|
| COPY | Workspace.copy(...) |
| DELETE | Node.remove() |
| GET | Node.getProperty(...); Property.getValue() |
| HEAD | Node.getProperty(...); Property.getLength() |
| MKCOL | Node.addNode(...) |
| MOVE | Session.move(...) or Workspace.move(...) |
| PROPFIND | Session.getNode(...); Node.getNode(...); Node.getNodes(...); Node.getProperties() |
| PROPPATCH | Node.setProperty(...); Node.getProperty(...).remove() |
| PUT | Node.addNode("node","nt:file"); Node.setProperty("jcr:data", "data") |
| CHECKIN | Node.checkin() |
| CHECKOUT | Node.checkout() |
| REPORT | Node.getVersionHistory(); VersionHistory.getAllVersions(); Version.getProperties() |
| RESTORE | Node.restore(...) |
| UNCHECKOUT | Node.restore(...) |
| VERSION-CONTROL | Node.addMixin("mix:versionable") |
| LOCK | Node.lock(...) |
| UNLOCK | Node.unlock() |
| ORDERPATCH | Node.orderBefore(...) |
| SEARCH | Workspace.getQueryManager(); QueryManager.createQuery(); Query.execute() |
There are some restrictions for WebDAV in different Operating systems.
When you try to set up a web folder by “adding a network location” or “map a network drive” through My Computer, you can get an error message saying that either “The folder you entered does not appear to be valid. Please choose another” or “Windows cannot access… Check the spelling of the name. Otherwise, there might be…”. These errors may appear when you are using SSL or non-SSL.
To fix this, do as follows:
Go to Windows Registry Editor.
Find a key: \HKEY_LOCAL_MACHINE\SYSTEM\CurrentControlset\services\WebClient\Parameters\BasicAuthLevel .
Change the value to 2.
If you have Microsoft Office 2010 applications or Microsoft Office 2007 applications installed on a client computer. From that client computer, you try to access an Office file that is stored on a web server that is configured for Basic authentication. The connection between your computer and the web server does not use Secure Sockets Layer (SSL). When you try to open or to download the file, you experience the following symptoms:
The Office file does not open or download.
You do not receive a Basic authentication password prompt when you try to open or to download the file.
You do not receive an error message when you try to open the file. The associated Office application starts. However, the selected file does not open.
To enable Basic authentication on the client computer, follow these steps:
Click Start, type regedit in the Start Search box, and then press Enter.
Locate and then click the following registry subkey:
HKEY_CURRENT_USER\Software\Microsoft\Office\14.0\Common\Internet
On the Edit menu, point to New, and then click DWORD Value.
Type BasicAuthLevel, and then press Enter.
Right-click BasicAuthLevel, and then click Modify.
In the Value data box, type 2, and then click OK.
The JCR-FTP Server represents the standard eXo service, operates as an FTP server with an access to a content stored in JCR repositories in the form of nt:file/nt:folder nodes or their successors. The client of an executed Server can be any FTP client. The FTP server is supported by a standard configuration which can be changed as required.
<value-param> <name>command-port</name> <value>21</value> </value-param>
The value of the command channel port. The value '21' is default.
When you have already some FTP server installed in your system , this parameter needs to be changed (2121 for example) to avoid conflicts or if the port is protected.
<value-param> <name>data-min-port</name> <value>52000</value> </value-param>
<value-param> <name>data-max-port</name> <value>53000</value> </value-param>
These two parameters indicate the minimal and maximal values of the range of ports, used by the server. The usage of the additional data channel is required by the FTP - protocol, which is used to transfer the contents of files and the listing of catalogues. This range of ports should be free from listening by other server-programs.
<value-param>
<name>system</name>
<value>Windows_NT</value>
or
<value>UNIX Type: L8</value>
</value-param>Types of formats of listing of catalogues which are supported.
<value-param>
<name>client-side-encoding</name>
<value>windows-1251</value>
or
<value>KOI8-R</value>
</value-param>This parameter specifies the coding which is used for dialogue with the client.
<value-param> <name>def-folder-node-type</name> <value>nt:folder</value> </value-param>
This parameter specifies the type of a node, when an FTP-folder is created.
<value-param> <name>def-file-node-type</name> <value>nt:file</value> </value-param>
This parameter specifies the type of a node, when an FTP - file is created.
<value-param> <name>def-file-mime-type</name> <value>application/zip</value> </value-param>
The mime type of a created file is chosen by using its file extention. In case, a server cannot find the corresponding mime type, this value is used.
<value-param> <name>cache-folder-name</name> <value>../temp/ftp_cache</value> </value-param>
The Path of the cache folder.
<value-param> <name>upload-speed-limit</name> <value>20480</value> </value-param>
Restriction of the upload speed. It is measured in bytes.
<value-param> <name>download-speed-limit</name> <value>20480</value> </value-param>
Restriction of the download speed. It is measured in bytes.
Note
Restore of system workspace is not supported only as part of restoring of whole repository.
The main purpose of that feature is to restore data in case of system faults and repository crashes. Also, the backup results may be used as a content history.
The concept is based on the export of a workspace unit in the Full, or Full + Incrementals model. A repository workspace can be backup and restored using a combination of these modes. In all cases, at least one Full (initial) backup must be executed to mark a starting point of the backup history. An Incremental backup is not a complete image of the workspace. It contains only changes for some period. So it is not possible to perform an Incremental backup without an initial Full backup.
The Backup service may operate as a hot-backup process at runtime on an in-use workspace. It's a case when the Full + Incrementals model should be used to have a guaranty of data consistency during restoration. An Incremental will be run starting from the start point of the Full backup and will contain changes that have occured during the Full backup, too.
A restore operation is a mirror of a backup one. At least one Full backup should be restored to obtain a workspace corresponding to some points in time. On the other hand, Incrementals may be restored in the order of creation to reach a required state of a content. If the Incremental contains the same data as the Full backup (hot-backup), the changes will be applied again as if they were made in a normal way via API calls.
According to the model there are several modes for backup logic:
Full backup only : Single operation, runs once
Full + Incrementals : Start with an initial Full backup and then keep incrementals changes in one file. Run until it is stopped.
Full + Incrementals(periodic) : Start with an initial Full backup and then keep incrementals with periodic result file rotation. Run until it is stopped.
Full backup/restore is implemented using the JCR SysView Export/Import. Workspace data will be exported into Sysview XML data from root node.
Restoring is implemented, using the special eXo JCR API feature: a dynamic workspace creation. Restoring of the workspace Full backup will create one new workspace in the repository. Then, the SysView XML data will be imported as the root node.
Incremental backup is implemented using the eXo JCR ChangesLog API. This API allows to record each JCR API call as atomic entries in a changelog. Hence, the Incremental backup uses a listener that collects these logs and stores them in a file.
Restoring an incremental backup consists in applying the collected set of ChangesLogs to a workspace in the correct order.
Note
Incremental backup is an experimental feture and not supported, so it must be used with a lot of caution.
The work of Backup is based on the BackupConfig configuration and the BackupChain logical unit.
BackupConfig describes the backup operation chain that will be performed by the service. When you intend to work with it, the configuration should be prepared before the backup is started.
The configuration contains such values as:
Types of full and incremental backup (fullBackupType, incrementalBackupType): Strings with full names of classes which will cover the type functional.
Incremental period: A period after that a current backup will be stopped and a new one will be started in seconds (long).
Target repository and workspace names: Strings with described names
Destination directory for result files: String with a path to a folder where operation result files will be stored.
BackupChain is a unit performing the backup process and it covers the principle of initial Full backup execution and manages Incrementals operations. BackupChain is used as a key object for accessing current backups during runtime via BackupManager. Each BackupJob performs a single atomic operation - a Full or Incremental process. The result of that operation is data for a Restore. BackupChain can contain one or more BackupJobs. But at least the initial Full job is always there. Each BackupJobs has its own unique number which means its Job order in the chain, the initial Full job always has the number 0.
Backup process, result data and file location
To start the backup process, it's necessary to create the BackupConfig and call the BackupManager.startBackup(BackupConfig) method. This method will return BackupChain created according to the configuration. At the same time, the chain creates a BackupChainLog which persists BackupConfig content and BackupChain operation states to the file in the service working directory (see Configuration).
When the chain starts the work and the initial BackupJob starts, the job will create a result data file using the destination directory path from BackupConfig. The destination directory will contain a directory with an automatically created name using the pattern repository_workspace-timestamp where timestamp is current time in the format of yyyyMMdd_hhmmss (E.g. db1_ws1-20080306_055404). The directory will contain the results of all Jobs configured for execution. Each Job stores the backup result in its own file with the name repository_workspace-timestamp.jobNumber. BackupChain saves each state (STARTING, WAITING, WORKING, FINISHED) of its Jobs in the BackupChainLog, which has a current result full file path.
BackupChain log file and job result files are a whole and consistent unit, that is a source for a Restore.
Note
BackupChain log contains absolute paths to job result files. Don't move these files to another location.
Restore requirements
As mentioned before a Restore operation is a mirror of a Backup. The process is a Full restore of a root node with restoring an additional Incremental backup to reach a desired workspace state. Restoring of the workspace Full backup will create a new workspace in the repository using given RepositoyEntry of existing repository and given (preconfigured) WorkspaceEntry for a new target workspace. A Restore process will restore a root node from the SysView XML data.
Note
The target workspace should not be in the repository. Otherwise, a BackupConfigurationException exception will be thrown.
Finally, we may say that Restore is a process of a new Workspace creation and filling it with a Backup content. In case you already have a target Workspace (with the same name) in a Repository, you have to configure a new name for it. If no target workspace exists in the Repositor, you may use the same name as the Backup one.
As an optional extension, the Backup service is not enabled by default. You need to enable it via configuration.
The following is an example configuration :
<component>
<key>org.exoplatform.services.jcr.ext.backup.BackupManager</key>
<type>org.exoplatform.services.jcr.ext.backup.impl.BackupManagerImpl</type>
<init-params>
<properties-param>
<name>backup-properties</name>
<property name="backup-dir" value="target/backup" />
</properties-param>
</init-params>
</component>Where mandatory paramet is:
backup-dir : The path to a working directory where the service will store internal files and chain logs.
Also, there are optional parameters:
incremental-backup-type : The FQN of incremental job class. Must implement org.exoplatform.services.jcr.ext.backup.BackupJob. By default : org.exoplatform.services.jcr.ext.backup.impl.fs.FullBackupJob used.
default-incremental-job-period : The period between incremetal flushes (in seconds). Default is 3600 seconds.
full-backup-type : The FQN of the full backup job class; Must implement org.exoplatform.services.jcr.ext.backup.BackupJob. By default : org.exoplatform.services.jcr.ext.backup.impl.rdbms.FullBackupJob used. Please, notice that file-system based implementation org.exoplatform.services.jcr.ext.backup.impl.fs.FullBackupJob is deprecated and not recommended for use.
RDBMS backup It is the lastest, currently supportedm used by default and recommended implementation of full backup job for BackupManager service. It is useful in case when database is used to store data.
Brings such advantages:
fast: backup takes only several minutes to perform full backup of repository with 1 million rows in tables;
atomic restore: restore process into existing workspace/repository with same configuration is atomic, it means you don’t loose the data when restore failed, the original data remains;
cluster aware: it is possible to make backup/restore in cluster environment into existing workspace/repository with same configuration;
consistence backup: all threads make waiting until backup is finished and then continue to work, so, there are no data modification during backup process;
In the following example, we create a BackupConfig bean for the Full + Incrementals mode, then we ask the BackupManager to start the backup process.
// Obtaining the backup service from the eXo container.
BackupManager backup = (BackupManager) container.getComponentInstanceOfType(BackupManager.class);
// And prepare the BackupConfig instance with custom parameters.
// full backup & incremental
File backDir = new File("/backup/ws1"); // the destination path for result files
backDir.mkdirs();
BackupConfig config = new BackupConfig();
config.setRepository(repository.getName());
config.setWorkspace("ws1");
config.setBackupDir(backDir);
// Before 1.9.3, you also need to indicate the backupjobs class FDNs
// config.setFullBackupType("org.exoplatform.services.jcr.ext.backup.impl.fs.FullBackupJob");
// config.setIncrementalBackupType("org.exoplatform.services.jcr.ext.backup.impl.fs.IncrementalBackupJob");
// start backup using the service manager
BackupChain chain = backup.startBackup(config);To stop the backup operation, you have to use the BackupChain instance.
// stop backup backup.stopBackup(chain);
Restoration involves reloading the backup file into a BackupChainLog and applying appropriate workspace initialization. The following snippet shows the typical sequence for restoring a workspace :
// find BackupChain using the repository and workspace names (return null if not found)
BackupChain chain = backup.findBackup("db1", "ws1");
// Get the RepositoryEntry and WorkspaceEntry
ManageableRepository repo = repositoryService.getRepository(repository);
RepositoryEntry repoconf = repo.getConfiguration();
List<WorkspaceEntry> entries = repoconf.getWorkspaceEntries();
WorkspaceEntry = getNewEntry(entries, workspace); // create a copy entry from an existing one
// restore backup log using ready RepositoryEntry and WorkspaceEntry
File backLog = new File(chain.getLogFilePath());
BackupChainLog bchLog = new BackupChainLog(backLog);
// initialize the workspace
repository.configWorkspace(workspaceEntry);
// run restoration
backup.restore(bchLog, repositoryEntry, workspaceEntry);Note
These instructions only applies to regular workspace. Special instructions are provided for System workspace below.
To restore a backup over an existing workspace, you are required to clear its data. Your backup process should follow these steps:
Remove workspace
ManageableRepository repo = repositoryService.getRepository(repository); repo.removeWorkspace(workspace);
Clean database, value storage, index
Restore (see snippet above)
Note
The BackupWorkspaceInitializer is available in JCR 1.9 and later.
Restoring the JCR System workspace requires to shutdown the system and use of a special initializer.
Follow these steps (this will also work for normal workspaces):
Stop repository (or portal)
Clean database, value storage, index;
In configuration, the workspace set BackupWorkspaceInitializer to refer to your backup.
For example:
<workspaces>
<workspace name="production" ... >
<container class="org.exoplatform.services.jcr.impl.storage.jdbc.JDBCWorkspaceDataContainer">
...
</container>
<initializer class="org.exoplatform.services.jcr.impl.core.BackupWorkspaceInitializer">
<properties>
<property name="restore-path" value="D:\java\exo-working\backup\repository_production-20090527_030434"/>
</properties>
</initializer>
...
</workspace>
Start repository (or portal).
Repository and Workspace initialization from backup can use the BackupWorkspaceInitializer.
Will be configured BackupWorkspaceInitializer in configuration of workspace to restore the Workspace from backup over initializer.
Will be configured BackupWorkspaceInitializer in all configurations workspaces of the Repository to restore the Repository from backup over initializer.
Restoring the repository or workspace requires to shutdown the repository.
Follow these steps:
Stop repository (will be skipped this step if repository or workace is not exists)
Clean database, value storage, index; (will be skipped this step if repository or worksace is new)
In configuration, the workspace/-s set BackupWorkspaceInitializer to refer to your backup.
Start repository
Example of configuration initializer to restore workspace "backup" over BackupWorkspaceInitializer:
<workspaces>
<workspace name="backup" ... >
<container class="org.exoplatform.services.jcr.impl.storage.jdbc.JDBCWorkspaceDataContainer">
...
</container>
<initializer class="org.exoplatform.services.jcr.impl.core.BackupWorkspaceInitializer">
<properties>
<property name="restore-path" value="D:\java\exo-working\backup\repository_backup-20110120_044734"/>
</properties>
</initializer>
...
</workspace>Example of configuration initializer to resore the workspace "backup" over BackupWorkspaceInitializer:
Stop repository (will be skipped this step if workspace is not exists)
Clean database, value storage, index; (will be skipped this step if workspace is new)
In configuration, the workspace/-s set BackupWorkspaceInitializer to refer to your backup.
<workspaces>
<workspace name="backup" ... >
<container class="org.exoplatform.services.jcr.impl.storage.jdbc.JDBCWorkspaceDataContainer">
...
</container>
<initializer class="org.exoplatform.services.jcr.impl.core.BackupWorkspaceInitializer">
<properties>
<property name="restore-path" value="D:\java\exo-working\backup\repository_backup-20110120_044734"/>
</properties>
</initializer>
...
</workspace>Start repository
Example of configuration initializers to restore the repository "repository" over BackupWorkspaceInitializer:
Stop repository (will be skipped this step if repository is not exists)
Clean database, value storage, index; (will be skipped this step if repository is new)
In configuration of repository will be configured initializers of workspace to refer to your backup.
For example:
...
<workspaces>
<workspace name="system" ... >
<container class="org.exoplatform.services.jcr.impl.storage.jdbc.JDBCWorkspaceDataContainer">
...
</container>
<initializer class="org.exoplatform.services.jcr.impl.core.BackupWorkspaceInitializer">
<properties>
<property name="restore-path" value="D:\java\exo-working\backup\repository_system-20110120_052334"/>
</properties>
</initializer>
...
</workspace>
<workspace name="collaboration" ... >
<container class="org.exoplatform.services.jcr.impl.storage.jdbc.JDBCWorkspaceDataContainer">
...
</container>
<initializer class="org.exoplatform.services.jcr.impl.core.BackupWorkspaceInitializer">
<properties>
<property name="restore-path" value="D:\java\exo-working\backup\repository_collaboration-20110120_052341"/>
</properties>
</initializer>
...
</workspace>
<workspace name="backup" ... >
<container class="org.exoplatform.services.jcr.impl.storage.jdbc.JDBCWorkspaceDataContainer">
...
</container>
<initializer class="org.exoplatform.services.jcr.impl.core.BackupWorkspaceInitializer">
<properties>
<property name="restore-path" value="D:\java\exo-working\backup\repository_backup-20110120_052417"/>
</properties>
</initializer>
...
</workspace>
</workspaces>
Start repository.
The Backup service has an additional feature that can be useful for a production level backup implementation. When you need to organize a backup of a repository, it's necessary to have a tool which will be able to create and manage a cycle of Full and Incremental backups in periodic manner.
The service has internal BackupScheduler which can run a configurable cycle of BackupChains as if they have been executed by a user during some period of time. I.e. BackupScheduler is a user-like daemon which asks the BackupManager to start or stop backup operations.
For that purpose, BackupScheduler has the method.
BackupScheduler.schedule(backupConfig, startDate, stopDate, chainPeriod, incrementalPeriod)
where
backupConfig: A ready configuration which will be given to the BackupManager.startBackup() method
startDate: The date and time of the backup start
stopDate: The date and time of the backup stop
chainPeriod: A period after which a current BackupChain will be stopped and a new one will be started in seconds
incrementalPeriod: If it is greater than 0, it will be used to override the same value in backupConfig.
// geting the scheduler from the BackupManager BackupScheduler scheduler = backup.getScheduler(); // schedule backup using a ready configuration (Full + Incrementals) to run from startTime // to stopTime. Full backuop will be performed every 24 hours (BackupChain lifecycle), // incremental will rotate result files every 3 hours. scheduler.schedule(config, startTime, stopTime, 3600 * 24, 3600 * 3); // it's possible to run the scheduler for an uncertain period of time (i.e. without stop time). // schedule backup to run from startTime till it will be stopped manually // also there, the incremental will rotate result files as it configured in BackupConfig scheduler.schedule(config, startTime, null, 3600 * 24, 0); // to unschedule backup simply call the scheduler with the configuration describing the // already planned backup cycle. // the scheduler will search in internal tasks list for task with repository and // workspace name from the configuration and will stop that task. scheduler.unschedule(config);
When the BackupScheduler starts the scheduling, it uses the internal Timer with startDate for the first (or just once) execution. If chainPeriod is greater than 0, then the task is repeated with this value used as a period starting from startDate. Otherwise, the task will be executed once at startDate time. If the scheduler has stopDate, it will stop the task ( the chain cycle) after stopDate. And the last parameter incrementalPeriod will be used instead of the same from BackupConfig if its values are greater than 0.
Starting each task (BackupScheduler.schedule(...)), the scheduler creates a task file in the service working directory (see Configuration, backup-dir) which describes the task backup configuration and periodic values. These files will be used at the backup service start (JVM start) to reinitialize BackupScheduler for continuous task scheduling. Only tasks that don't have a stopDate or a stopDate not expired will be reinitialized.
There is one notice about BackupScheduler task reinitialization in the current implementation. It comes from the BackupScheduler nature and its implemented behaviour. As the scheduler is just a virtual user which asks the BackupManager to start or stop backup operations, it isn't able to reinitialize each existing BackupChain before the service (JVM) is stopped. But it's possible to start a new operation with the same configuration via BackupManager (that was configured before and stored in a task file).
This is a main detail of the BackupScheduler which should be taken into suggestion of a backup operation design now. In case of reinitialization, the task will have new time values for the backup operation cycle as the chainPeriod and incrementalPeriod will be applied again. That behaviour may be changed in the future.
The resore of existing workspace or repositry is available.
For restore will be used spacial methods:
/**
* Restore existing workspace. Previous data will be deleted.
* For getting status of workspace restore can use
* BackupManager.getLastRestore(String repositoryName, String workspaceName) method
*
* @param workspaceBackupIdentifier
* backup identifier
* @param workspaceEntry
* new workspace configuration
* @param asynchronous
* if 'true' restore will be in asynchronous mode (i.e. in separated thread)
* @throws BackupOperationException
* if backup operation exception occurred
* @throws BackupConfigurationException
* if configuration exception occurred
*/
void restoreExistingWorkspace(String workspaceBackupIdentifier, String repositoryName, WorkspaceEntry workspaceEntry,
boolean asynchronous) throws BackupOperationException, BackupConfigurationException;
/**
* Restore existing workspace. Previous data will be deleted.
* For getting status of workspace restore use can use
* BackupManager.getLastRestore(String repositoryName, String workspaceName) method
*
* @param log
* workspace backup log
* @param workspaceEntry
* new workspace configuration
* @param asynchronous
* if 'true' restore will be in asynchronous mode (i.e. in separated thread)
* @throws BackupOperationException
* if backup operation exception occurred
* @throws BackupConfigurationException
* if configuration exception occurred
*/
void restoreExistingWorkspace(BackupChainLog log, String repositoryName, WorkspaceEntry workspaceEntry, boolean asynchronous) throws BackupOperationException, BackupConfigurationException;
/**
* Restore existing repository. Previous data will be deleted.
* For getting status of repository restore can use
* BackupManager.getLastRestore(String repositoryName) method
*
* @param repositoryBackupIdentifier
* backup identifier
* @param repositoryEntry
* new repository configuration
* @param asynchronous
* if 'true' restore will be in asynchronous mode (i.e. in separated thread)
* @throws BackupOperationException
* if backup operation exception occurred
* @throws BackupConfigurationException
* if configuration exception occurred
*/
void restoreExistingRepository(String repositoryBackupIdentifier, RepositoryEntry repositoryEntry, boolean asynchronous) throws BackupOperationException, BackupConfigurationException;
/**
* Restore existing repository. Previous data will be deleted.
* For getting status of repository restore can use
* BackupManager.getLastRestore(String repositoryName) method
*
* @param log
* repository backup log
* @param repositoryEntry
* new repository configuration
* @param asynchronous
* if 'true' restore will be in asynchronous mode (i.e. in separated thread)
* @throws BackupOperationException
* if backup operation exception occurred
* @throws BackupConfigurationException
* if configuration exception occurred
*/
void restoreExistingRepository(RepositoryBackupChainLog log, RepositoryEntry repositoryEntry, boolean asynchronous)
throws BackupOperationException, BackupConfigurationException;These methods for restore will do:
remove existed workspace or repository;
clean database;
clean index data;
clean value storage;
restore from backup.
The Backup manager allows you to restore a repository or a workspace using the original configuration stored into the backup log:
/**
* Restore existing workspace. Previous data will be deleted.
* For getting status of workspace restore can use
* BackupManager.getLastRestore(String repositoryName, String workspaceName) method
* WorkspaceEntry for restore should be contains in BackupChainLog.
*
* @param workspaceBackupIdentifier
* identifier to workspace backup.
* @param asynchronous
* if 'true' restore will be in asynchronous mode (i.e. in separated thread)
* @throws BackupOperationException
* if backup operation exception occurred
* @throws BackupConfigurationException
* if configuration exception occurred
*/
void restoreExistingWorkspace(String workspaceBackupIdentifier, boolean asynchronous)
throws BackupOperationException,
BackupConfigurationException;
/**
* Restore existing repository. Previous data will be deleted.
* For getting status of repository restore can use
* BackupManager.getLastRestore(String repositoryName) method.
* ReprositoryEntry for restore should be contains in BackupChainLog.
*
* @param repositoryBackupIdentifier
* identifier to repository backup.
* @param asynchronous
* if 'true' restore will be in asynchronous mode (i.e. in separated thread)
* @throws BackupOperationException
* if backup operation exception occurred
* @throws BackupConfigurationException
* if configuration exception occurred
*/
void restoreExistingRepository(String repositoryBackupIdentifier, boolean asynchronous)
throws BackupOperationException,
BackupConfigurationException;
/**
* WorkspaceEntry for restore should be contains in BackupChainLog.
*
* @param workspaceBackupIdentifier
* identifier to workspace backup.
* @param asynchronous
* if 'true' restore will be in asynchronous mode (i.e. in separated thread)
* @throws BackupOperationException
* if backup operation exception occurred
* @throws BackupConfigurationException
* if configuration exception occurred
*/
void restoreWorkspace(String workspaceBackupIdentifier, boolean asynchronous) throws BackupOperationException,
BackupConfigurationException;
/**
* ReprositoryEntry for restore should be contains in BackupChainLog.
*
* @param repositoryBackupIdentifier
* identifier to repository backup.
* @param asynchronous
* if 'true' restore will be in asynchronous mode (i.e. in separated thread)
* @throws BackupOperationException
* if backup operation exception occurred
* @throws BackupConfigurationException
* if configuration exception occurred
*/
void restoreRepository(String repositoryBackupIdentifier, boolean asynchronous) throws BackupOperationException,
BackupConfigurationException;
/**
* Restore existing workspace. Previous data will be deleted.
* For getting status of workspace restore can use
* BackupManager.getLastRestore(String repositoryName, String workspaceName) method
* WorkspaceEntry for restore should be contains in BackupChainLog.
*
* @param workspaceBackupSetDir
* the directory with backup set
* @param asynchronous
* if 'true' restore will be in asynchronous mode (i.e. in separated thread)
* @throws BackupOperationException
* if backup operation exception occurred
* @throws BackupConfigurationException
* if configuration exception occurred
*/
void restoreExistingWorkspace(File workspaceBackupSetDir, boolean asynchronous)
throws BackupOperationException, BackupConfigurationException;
/**
* Restore existing repository. Previous data will be deleted.
* For getting status of repository restore can use
* BackupManager.getLastRestore(String repositoryName) method.
* ReprositoryEntry for restore should be contains in BackupChainLog.
*
* @param repositoryBackupSetDir
* the directory with backup set
* @param asynchronous
* if 'true' restore will be in asynchronous mode (i.e. in separated thread)
* @throws BackupOperationException
* if backup operation exception occurred
* @throws BackupConfigurationException
* if configuration exception occurred
*/
void restoreExistingRepository(File repositoryBackupSetDir, boolean asynchronous)
throws BackupOperationException, BackupConfigurationException;
/**
* WorkspaceEntry for restore should be contains in BackupChainLog.
*
* @param workspaceBackupSetDir
* the directory with backup set
* @param asynchronous
* if 'true' restore will be in asynchronous mode (i.e. in separated thread)
* @throws BackupOperationException
* if backup operation exception occurred
* @throws BackupConfigurationException
* if configuration exception occurred
*/
void restoreWorkspace(File workspaceBackupSetDir, boolean asynchronous) throws BackupOperationException,
BackupConfigurationException;
/**
* ReprositoryEntry for restore should be contains in BackupChainLog.
*
* @param repositoryBackupSetDir
* the directory with backup set
* @param asynchronous
* if 'true' restore will be in asynchronous mode (i.e. in separated thread)
* @throws BackupOperationException
* if backup operation exception occurred
* @throws BackupConfigurationException
* if configuration exception occurred
*/
void restoreRepository(File repositoryBackupSetDir, boolean asynchronous) throws BackupOperationException,
BackupConfigurationException;- 37.1. Introduction
- 37.2. HTTPBackupAgent
- 37.3. Backup Client
- 37.4. Backup Client Usage
- 37.4.1. Building application
- 37.4.2. Running application
- 37.4.3. Getting information about backup service
- 37.4.4. Starting full backup
- 37.4.5. Starting full and incremental backup on a single workspace
- 37.4.6. Getting information about the current backups (in progress)
- 37.4.7. Getting information about the current backup by 'backup_id'
- 37.4.8. Stopping backup by "backup_id"
- 37.4.9. Getting information about the completed (ready to restore) backups
- 37.4.10. Restoring to workspace
- 37.4.11. Getting information about the current restore
- 37.4.12. Restoring workspace and remove exists workspace
- 37.4.13. Restoring workspace from backup set
- 37.4.14. Restoring workspace from backup set and remove exists workspace
- 37.4.15. Restoring workspace with original configuation
- 37.4.16. Restoring workspace with original configuation and remove exists workspace
- 37.4.17. Restoring workspace from backup set with original configuation
- 37.4.18. Restoring workspace from backup set with original configuation and remove exists workspace
- 37.4.19. Restoring repository
- 37.4.20. Restoring repository and remove exists repository
- 37.4.21. Restoring repository from backup set
- 37.4.22. Restoring repository from backup set and remove exists repository
- 37.4.23. Restoring repository with original configuation
- 37.4.24. Restoring repository with original configuation and remove exists repository
- 37.4.25. Restoring repository from backup set with original configuation
- 37.4.26. Restoring repository from backup set with original configuation and remove exists repository
- 37.5. Full example about creating backup and restoring it for workspace 'backup'
- 37.6. Full example about creating backup and restoring it for repository 'repository'
Warning
For this service, you should configure the org.exoplatform.services.jcr.impl.config.JDBCConfigurationPersister in order to save the changes of the repository configuration. See the eXo JCR Configuration article at chapter '2 Portal and Standalone configuration' .
GateIn uses context /portal/rest, therefore you need to use http://host:port/portal/rest/ instread of http://host:port/rest/
GateIn uses form authentication, so first you need to login (url to form authentication is http://host:port/portal/login) and then perform requests.
The service org.exoplatform.services.jcr.ext.backup.server.HTTPBackupAgent is REST-based front-end to service org.exoplatform.services.jcr.ext.backup.BackupManager. HTTPBackupAgent is representation BackupManager to creation backup, restore, getting status of current or completed backup/restore, etc.
The backup client is http client for HTTPBackupAgent.
The HTTPBackupAgent is based on REST (see details about the REST Framework).
HTTPBackupAgent is using POST and GET methods for request.
The HTTPBackupAgent allows :
Start backup
Stop backup
Restore from backup
Delete the workspace
Get information about backup service (BackupManager)
Get information about current backup / restores / completed backups
/rest/jcr-backup/start/{repo}/{ws}
Start backup on specific workspace
URL:
http://host:port/rest/jcr-backup/start/{repo}/{ws}
Formats: json.
Method: POST
Parameters:
{repo} - the repository name;
{ws} - the workspace name;
BackupConfigBean - the JSON to BackupConfigBean.
The BackupConfigBean:
header : "Content-Type" = "application/json; charset=UTF-8" body: <JSON to BackupConfigBean>
The JSON bean of org.exoplatform.services.jcr.ext.backup.server.bean.BackupConfigBean :
{"incrementalRepetitionNumber":<Integer>,"incrementalBackupJobConfig":<JSON to BackupJobConfig>,
"backupType":<Integer>,"fullBackupJobConfig":<JSON to BackupJobConfig>,
"incrementalJobPeriod":<Long>,"backupDir":"<String>"}Where :
backupType - the type of backup:
0 - full backup only;
1 - full and incremental backup.
backupDir - the path to backup folder;
incrementalJobPeriod - the incremental job period;
incrementalRepetitionNumber - the incremental repetition number;
fullBackupJobConfig - the configuration to full backup, JSON to BackupJobConfig;
incrementalJobPeriod - the configuration to incremental backup, JSON to BackupJobConfig.The JSON bean of org.exoplatform.services.jcr.ext.backup.server.bean.response.BackupJobConfig :
{"parameters":[<JSON to Pair>, ..., <JSON to pair> ],"backupJob":"<String>"}Where:
backupJob - the FQN (fully qualified name) to BackupJob class; parameters - the list of JSON of Pair.
The JSON bean of org.exoplatform.services.jcr.ext.backup.server.bean.response.Pair :
{"name":"<String>","value":"<String>"}Where:
name - the name of parameter; value - the value of parameter.
Returns:
Return when being successful
status code = 200
Return when being failure
status code = 404 - the not found repositry '{repo}' or workspace '{ws}' status code = 500 - the other unknown errors failure message in response - the description of failure
/rest/jcr-backup/stop/{id}
Stop backup with identifier {id}.
URL:
http://host:port/rest/jcr-backup/stop/{id}
Formats: plain text
Method: GET
Parameters:
{id} - the identifier of backup
Returns:
Return when being successful
status code = 200
Return when being failure
status code = 404 - the no active backup with identifier {id} status code = 500 - the other unknown errors failure message in response - the description of failure
/rest/jcr-backup/info
Information about the backup service.
URL:
http://host:port/rest/jcr-backup/info
Formats: json
Method: GET
Parameters: no
Returns:
Return when being successful
Return the JSON bean of org.exoplatform.services.jcr.ext.backup.server.bean.response.BackupServiceInfoBean :
{"backupLogDir":"<String>","defaultIncrementalJobPeriod":<Long>,"fullBackupType":"<String>","incrementalBackupType":"<String>"}Where:
fullBackupType - the FQN (fully qualified name) of BackupJob class for full backup type; incrementalBackupType - the FQN (fully qualified name) of BackupJob class for incremental backup type; backupLogDir - path to backup folder; defaultIncrementalJobPeriod - the default incremental job period.
Return when being failure
status code = 500 - the unknown error failure message in response - the description of failure
/rest/jcr-backup/drop-workspace/{repo}/{ws}/{force-session-close}
Delete the workspace from repository /{repo}/{ws}. With this service, you can delete any workspaces regardless of whether the workspace is a backup or has been copied to a backup.
URL:
http://host:port/rest/jcr-backup/drop-workspace/{repo}/{ws}/{force-session-close}
Formats: plain text
Method: GET
Parameters:
{repo} - the repository name;
{ws} - the workspace name;
{force-session-close} - the boolean value : true - the open sessions on workspace will be closed; false - will not close open sessions.
Returns:
Return when being successful.
status code = 200
Return when being failure
status code = 500 - the other unknown errors; - not found repositry '{repo}' or workspace '{ws}' failure message in response - the description of failure
/rest/jcr-backup/info/backup
Information about the current and completed backups
URL:
http://host:port/rest/jcr-backup/info/backup
Formats: json
Method: GET
Parameters: no
Returns:
Return when being successful
The JSON bean of org.exoplatform.services.jcr.ext.backup.server.bean.response.ShortInfoList :
{"backups":[<JSON to ShortInfo>,<JSON to ShortInfo>,...,<JSON to ShortInfo>]}The JSON bean of org.exoplatform.services.jcr.ext.backup.server.bean.response.ShortInfo :
{"startedTime":"<String>","backupId":"<String>","type":<Integer>,"state":<Integer>,"backupType":<Integer>, "workspaceName":"<String>","finishedTime":"<String>","repositoryName":"<String>"}Where:
type - the type of ShortInfo : 0 - the ShorInfo to completed backup; -1 - the ShorInfo to current (active) backup. 1 - the ShorInfo to current restore. backupType - the type of backup: 0 - full backup only; 1 - full and incremental backup. backupId - the identifier of backup; workspaceName - the name of workspace; repositoryName - the name of repository. startedTime - the date of started backup. The date in format RFC 1123 (for examle "Thu, 16 Apr 2009 14:56:49 EEST"). The ShorInfo to current (active) backup : finishedTime - no applicable, always an empty string (""); state - the state of full backup : 0 - starting; 1 - waiting; 2 - working; 4 - finished. The ShorInfo to completed backup : finishedTime - the date of finished backup. The date in format RFC 1123; state - no applicable, always zero (0). The ShorInfo to current restore : finishedTime - the date of finished backup. The date in format RFC 1123; state - the state of restore : 1 - started; 2 - successful; 3 - failure; 4 - initialized.Return when being failure
status code = 500 - the unknown error failure message in response - the description of failure
/rest/jcr-backup/info/backup/current Information about the current backups
URL:
http://host:port/rest/jcr-backup/info/backup/current
Formats: json
Method: GET
Parameters: no
Returns:
Return when being successful
The JSON bean of org.exoplatform.services.jcr.ext.backup.server.bean.response.ShortInfoList (see item /rest/jcr-backup/info/backup)
Return when being failure
status code = 500 - the unknown error failure message in response - the description of failure
/rest/jcr-backup/info/backup/completed Information about the completed backups.
URL:
http://host:port/rest/jcr-backup/info/backup/completed
Formats: json
Method: GET
Parameters: no
Returns:
Return when being successful
The JSON bean of org.exoplatform.services.jcr.ext.backup.server.bean.response.ShortInfoList (see item /rest/jcr-backup/info/backup)
Return when being failure
status code = 500 - the unknown error failure message in response - the description of failure
/rest/jcr-backup/info/backup/{repo}/{ws} Information about the current and completed backups for specific workspace.
URL:
http://host:port/rest/jcr-backup/info/backup/{repo}/{ws}
Formats: json
Method: GET
Parameters:
{repo} - the repository name
{ws} - the workspace name
Returns:
Return when being successful
The JSON bean of org.exoplatform.services.jcr.ext.backup.server.bean.response.ShortInfoList (see item /rest/jcr-backup/info/backup)
Return when being failure
status code = 500 - the unknown error failure message in response - the description of failure
/rest/jcr-backup/info/backup/{id} Detailed information about a current or completed backup with identifier '{id}'.
URL:
http://host:port/rest/jcr-backup/info/backup/{id}
Formats: json
Method: GET
Parameters:
{id} - the identifier of backup
Returns:
Return when being successful
The JSON bean of org.exoplatform.services.jcr.ext.backup.server.bean.response.DetailedInfo :
{"backupConfig":<JSON to BackupConfigBean>,"startedTime":"<String>","backupId":"<String>","type":<Integer>, "state":<Integer>,"backupType":<Integer>,"workspaceName":"<String>","finishedTime":"<String>", "repositoryName":"<String>"}Where:
type - the type of DetailedInfo : 0 - the DetailedInfo to completed backup; -1 - the DetailedInfo to current (active) backup; 1 - the DetailedInfo to restore. backupType - the type of backup: 0 - full backup only; 1 - full and incremental backup. backupId - the identifier of backup; workspaceName - the name of workspace; repositoryName - the name of repository; backupConfig - the JSON to BackupConfigBean. The DetailedInfo to current (active) backup : startedTime - the date of started backup. The date in format RFC 1123 (for examle "Thu, 16 Apr 2009 14:56:49 EEST"); finishedTime - no applicable, always an empty string (""); state - the state of full backup : 0 - starting; 1 - waiting; 2 - working; 4 - finished. The DetailedInfo to completed backup : startedTime - the date of started backup. The date in format RFC 1123 (for examle "Thu, 16 Apr 2009 14:56:49 EEST"); finishedTime - the date of finished backup. The date in format RFC 1123; state - no applicable, always zero (0). The DetailedInfo to restore : startedTime - the date of started restore. The date in format RFC 1123 (for examle "Thu, 16 Apr 2009 14:56:49 EEST"); finishedTime - the date of finished restore; state - the state of restore : 1 - started; 2 - successful; 3 - failure; 4 - initialized.The JSON bean of org.exoplatform.services.jcr.ext.backup.server.bean.BackupConfigBean (see item /rest/jcr-backup/start/{repo}/{ws}).
Return when being failure
status code = 404 - not found the backup with {id} status code = 500 - the unknown error failure message in response - the description of failure
/rest/jcr-backup/info/restore/{repo}/{ws} The information about the last restore on a specific workspace /{repo}/{ws}.
URL:
http://host:port/rest/jcr-backup/info/restore/{repo}/{ws}
Formats: json
Method: GET
Parameters:
{repo} - the repository name
{ws} - the workspace name
Returns:
Return when being successful
The JSON bean of org.exoplatform.services.jcr.ext.backup.server.bean.response.DetailedInfo (see item /rest/jcr-backup/info/backup/{id})
Return when being failure
status code = 404 - the not found the restore for workspace /{repo}/{ws} status code = 500 - the unknown error failure message in response - the description of failure
/rest/jcr-backup/info/restores
The information about the last restores.
URL:
http://host:port/rest/jcr-backup/info/restores
Formats: json
Method: GET
Parameters: no
Returns:
Return when being successful
The JSON bean of org.exoplatform.services.jcr.ext.backup.server.bean.response.ShortInfoList (see item /rest/jcr-backup/info/backup)
Return when being failure
status code = 500 - the unknown error failure message in response - the description of failure
/rest/jcr-backup/restore/{repo}/{id}
Restore the workspace from specific backup.
URL:
http://host:port/rest/jcr-backup/restore/{repo}/{id}
Formats: json.
Method: POST
Parameters:
{repo} - the repository name;
{id} - the identifier to backup; * WorkspaceEntry - the JSON to WorkspaceEntry.
The RestoreBean:
header : "Content-Type" = "application/json; charset=UTF-8" body: <JSON to WorkspaceEntry>
The example of JSON bean to org.exoplatform.services.jcr.config.WorkspaceEntry :
{ "accessManager" : null,
"autoInitPermissions" : null,
"autoInitializedRootNt" : null,
"cache" : { "parameters" : [ { "name" : "max-size",
"value" : "10k"
},
{ "name" : "live-time",
"value" : "1h"
}
],
"type" : "org.exoplatform.services.jcr.impl.dataflow.persistent.LinkedWorkspaceStorageCacheImpl"
},
"container" : { "parameters" : [ { "name" : "source-name",
"value" : "jdbcjcr"
},
{ "name" : "dialect",
"value" : "hsqldb"
},
{ "name" : "multi-db",
"value" : "false"
},
{ "name" : "update-storage",
"value" : "false"
},
{ "name" : "max-buffer-size",
"value" : "200k"
},
{ "name" : "swap-directory",
"value" : "../temp/swap/production"
}
],
"type" : "org.exoplatform.services.jcr.impl.storage.jdbc.JDBCWorkspaceDataContainer",
"valueStorages" : [ { "filters" : [ { "ancestorPath" : null,
"minValueSize" : 0,
"propertyName" : null,
"propertyType" : "Binary"
} ],
"id" : "system",
"parameters" : [ { "name" : "path",
"value" : "../temp/values/production"
} ],
"type" : "org.exoplatform.services.jcr.impl.storage.value.fs.TreeFileValueStorage"
} ]
},
"initializer" : { "parameters" : [ { "name" : "root-nodetype",
"value" : "nt:unstructured"
} ],
"type" : "org.exoplatform.services.jcr.impl.core.ScratchWorkspaceInitializer"
},
"lockManager" : { "persister" : { "parameters" : [ { "name" : "path",
"value" : "../temp/lock/system"
} ],
"type" : "org.exoplatform.services.jcr.impl.core.lock.FileSystemLockPersister"
},
"timeout" : 15728640
},
"name" : "production",
"queryHandler" : { "analyzer" : { },
"autoRepair" : true,
"bufferSize" : 10,
"cacheSize" : 1000,
"documentOrder" : true,
"errorLogSize" : 50,
"excerptProviderClass" : "org.exoplatform.services.jcr.impl.core.query.lucene.DefaultHTMLExcerpt",
"excludedNodeIdentifers" : null,
"extractorBackLogSize" : 100,
"extractorPoolSize" : 0,
"extractorTimeout" : 100,
"indexDir" : "../temp/jcrlucenedb/production",
"indexingConfigurationClass" : "org.exoplatform.services.jcr.impl.core.query.lucene.IndexingConfigurationImpl",
"indexingConfigurationPath" : null,
"maxFieldLength" : 10000,
"maxMergeDocs" : 2147483647,
"mergeFactor" : 10,
"minMergeDocs" : 100,
"parameters" : [ { "name" : "index-dir",
"value" : "../temp/jcrlucenedb/production"
} ],
"queryClass" : "org.exoplatform.services.jcr.impl.core.query.QueryImpl",
"queryHandler" : null,
"resultFetchSize" : 2147483647,
"rootNodeIdentifer" : "00exo0jcr0root0uuid0000000000000",
"spellCheckerClass" : null,
"supportHighlighting" : false,
"synonymProviderClass" : null,
"synonymProviderConfigPath" : null,
"type" : "org.exoplatform.services.jcr.impl.core.query.lucene.SearchIndex",
"useCompoundFile" : false,
"volatileIdleTime" : 3
},
"uniqueName" : "repository_production"
}Returns:
Return when being successful
status code = 200
Return the JSON bean org.exoplatform.services.jcr.ext.backup.server.bean.response.ShortInfo of just started restore. For JSON description see item /rest/jcr-backup/info/backup
Return when being failure
status code = 403 - the already was restore to workspace /{repo}/{ws} status code = 404 - the not found repositry '{repo}' or unsupported encoding to workspaceConfig status code = 500 - the other unknown errors failure message in response - the description of failure
/rest/jcr-backup/info/default-ws-config Will be returned the JSON bean to WorkspaceEntry for default workspace.
URL:
http://host:port/rest/jcr-backup/info/default-ws-config
Formats: json
Method: GET
Parameters: no
Returns:
Return when being successful
The JSON bean to org.exoplatform.services.jcr.config.WorkspaceEntry :
{ "accessManager" : null, "autoInitPermissions" : null, "autoInitializedRootNt" : null, "cache" : { "parameters" : [ { "name" : "max-size", "value" : "10k" }, { "name" : "live-time", "value" : "1h" } ], "type" : "org.exoplatform.services.jcr.impl.dataflow.persistent.LinkedWorkspaceStorageCacheImpl" }, "container" : { "parameters" : [ { "name" : "source-name", "value" : "jdbcjcr" }, { "name" : "dialect", "value" : "hsqldb" }, { "name" : "multi-db", "value" : "false" }, { "name" : "update-storage", "value" : "false" }, { "name" : "max-buffer-size", "value" : "200k" }, { "name" : "swap-directory", "value" : "../temp/swap/production" } ], "type" : "org.exoplatform.services.jcr.impl.storage.jdbc.JDBCWorkspaceDataContainer", "valueStorages" : [ { "filters" : [ { "ancestorPath" : null, "minValueSize" : 0, "propertyName" : null, "propertyType" : "Binary" } ], "id" : "system", "parameters" : [ { "name" : "path", "value" : "../temp/values/production" } ], "type" : "org.exoplatform.services.jcr.impl.storage.value.fs.TreeFileValueStorage" } ] }, "initializer" : { "parameters" : [ { "name" : "root-nodetype", "value" : "nt:unstructured" } ], "type" : "org.exoplatform.services.jcr.impl.core.ScratchWorkspaceInitializer" }, "lockManager" : { "persister" : { "parameters" : [ { "name" : "path", "value" : "../temp/lock/system" } ], "type" : "org.exoplatform.services.jcr.impl.core.lock.FileSystemLockPersister" }, "timeout" : 15728640 }, "name" : "production", "queryHandler" : { "analyzer" : { }, "autoRepair" : true, "bufferSize" : 10, "cacheSize" : 1000, "documentOrder" : true, "errorLogSize" : 50, "excerptProviderClass" : "org.exoplatform.services.jcr.impl.core.query.lucene.DefaultHTMLExcerpt", "excludedNodeIdentifers" : null, "extractorBackLogSize" : 100, "extractorPoolSize" : 0, "extractorTimeout" : 100, "indexDir" : "../temp/jcrlucenedb/production", "indexingConfigurationClass" : "org.exoplatform.services.jcr.impl.core.query.lucene.IndexingConfigurationImpl", "indexingConfigurationPath" : null, "maxFieldLength" : 10000, "maxMergeDocs" : 2147483647, "mergeFactor" : 10, "minMergeDocs" : 100, "parameters" : [ { "name" : "index-dir", "value" : "../temp/jcrlucenedb/production" } ], "queryClass" : "org.exoplatform.services.jcr.impl.core.query.QueryImpl", "queryHandler" : null, "resultFetchSize" : 2147483647, "rootNodeIdentifer" : "00exo0jcr0root0uuid0000000000000", "spellCheckerClass" : null, "supportHighlighting" : false, "synonymProviderClass" : null, "synonymProviderConfigPath" : null, "type" : "org.exoplatform.services.jcr.impl.core.query.lucene.SearchIndex", "useCompoundFile" : false, "volatileIdleTime" : 3 }, "uniqueName" : "repository_production" }Return when being failure
status code = 500 - the unknown error failure message in response - the description of failure
Add the components org.exoplatform.services.jcr.ext.backup.server.HTTPBackupAgent and org.exoplatform.services.jcr.ext.backup.BackupManager to services configuration :
<component>
<type>org.exoplatform.services.jcr.ext.backup.server.HTTPBackupAgent</type>
</component>
<component>
<type>org.exoplatform.services.jcr.ext.repository.RestRepositoryService</type>
</component>
<component>
<key>org.exoplatform.services.jcr.ext.backup.BackupManager</key>
<type>org.exoplatform.services.jcr.ext.backup.impl.BackupManagerImpl</type>
<init-params>
<properties-param>
<name>backup-properties</name>
<property name="backup-dir" value="../temp/backup" />
</properties-param>
</init-params>
</component>In case, if you will restore backup in same workspace (so you will drop previous workspace), you need configure RepositoryServiceConfiguration in order to save the changes of the repository configuration. For example
<component>
<key>org.exoplatform.services.jcr.config.RepositoryServiceConfiguration</key>
<type>org.exoplatform.services.jcr.impl.config.RepositoryServiceConfigurationImpl</type>
<init-params>
<value-param>
<name>conf-path</name>
<description>JCR repositories configuration file</description>
<value>jar:/conf/portal/exo-jcr-config.xml</value>
</value-param>
<properties-param>
<name>working-conf</name>
<description>working-conf</description>
<property name="source-name" value="jdbcjcr" />
<property name="dialect" value="hsqldb" />
<property name="persister-class-name" value="org.exoplatform.services.jcr.impl.config.JDBCConfigurationPersister" />
</properties-param>
</init-params>
</component>See the eXo JCR Configuration article at chapter '2 Portal and Standalone configuration' for details.
For GateIn should use context "/portal/rest". GateIn uses form authentication, so first you need to login (url to form authentication is http://host:port/portal/login) and then perform requests.
Backup client is support form authentication. For example call command "info" with form authentication to GateIn :
./jcrbackup.sh http://127.0.0.1:8080/portal/rest form POST "/portal/login?initialURI=/portal/private&username=root&password=gtn" info
Backup client is console application.
The backup client is http client for HTTPBackupAgent.
Command signature:
Help info:
<url_basic_authentication>|<url form authentication> <cmd>
<url_basic_authentication> : http(s)//login:password@host:port/<context>
<url form authentication> : http(s)//host:port/<context> "<form auth parm>"
<form auth parm> : form <method> <form path>
<method> : POST or GET
<form path> : /path/path?<paramName1>=<paramValue1>&<paramName2>=<paramValue2>...
Example to <url form authentication> : http://127.0.0.1:8080/portal/rest form POST "/portal/login?initialURI=/portal/private&username=root&password=gtn"
<cmd> : start <repo[/ws]> <backup_dir> [<incr>]
stop <backup_id>
status <backup_id>
restores <repo[/ws]>
restore [remove-exists] {{<backup_id>|<backup_set_path>} | {<repo[/ws]> {<backup_id>|<backup_set_path>} [<pathToConfigFile>]}}
list [completed]
info
drop [force-close-session] <repo[/ws]>
help
start - start backup of repository or workspace
stop - stop backup
status - information about the current or completed backup by 'backup_id'
restores - information about the last restore on specific repository or workspace
restore - restore the repository or workspace from specific backup
list - information about the current backups (in progress)
list completed - information about the completed (ready to restore) backups
info - information about the service backup
drop - delete the repository or workspace
help - print help information about backup console
<repo[/ws]> - /<reponsitory-name>[/<workspace-name>] the repository or workspace
<backup_dir> - path to folder for backup on remote server
<backup_id> - the identifier for backup
<backup_set_dir> - path to folder with backup set on remote server
<incr> - incemental job period
<pathToConfigFile> - path (local) to repository or workspace configuration
remove-exists - remove fully (db, value storage, index) exists repository/workspace
force-close-session - close opened sessions on repository or workspace.
All valid combination of parameters for command restore:
1. restore remove-exists <repo/ws> <backup_id> <pathToConfigFile>
2. restore remove-exists <repo> <backup_id> <pathToConfigFile>
3. restore remove-exists <repo/ws> <backup_set_path> <pathToConfigFile>
4. restore remove-exists <repo> <backup_set_path> <pathToConfigFile>
5. restore remove-exists <backup_id>
6. restore remove-exists <backup_set_path>
7. restore <repo/ws> <backup_id> <pathToConfigFile>
8. restore <repo> <backup_id> <pathToConfigFile>
9. restore <repo/ws> <backup_set_path> <pathToConfigFile>
10. restore <repo> <backup_set_path> <pathToConfigFile>
11. restore <backup_id>
12. restore <backup_set_path>
Go to folder of "backup client" ${JCR-SRC-HOME}/applications/exo.jcr.applications.backupconsole . - build the application :
mvn clean install -P deploy
Go to ${JCR-SRC-HOME}/applications/exo.jcr.applications.backupconsole/target/backupconsole-binary and use it.
Note
${JCR-SRC-HOME} the path where eXo JCR sources located
Run jar
java -jar exo.jcr.applications.backupconsole-binary.jar <command>
or use jcrbackup.cmd (or .sh);
jcrbackup http://root:exo@127.0.0.1:8080 info
Return :
The backup service information : full backup type : org.exoplatform.services.jcr.ext.backup.impl.fs.FullBackupJob incremetal backup type : org.exoplatform.services.jcr.ext.backup.impl.fs.IncrementalBackupJob backup log folder : /home/rainf0x/java/exo-working/JCR-839/new_JCR/exo-tomcat/bin/../temp/backup default incremental job period : 3600
Start full backup only on workspace "backup", the parameter <bakcup_dir> (../temp/backup) should be exists:
jcrbackup http://root:exo@127.0.0.1:8080 start /repository/backup ../temp/backup
Return :
Successful : status code = 200
Start full and incremental backup on workspace "production":
jcrbackup http://root:exo@127.0.0.1:8080 start /repository/production ../temp/backup 10000
Return :
Successful : tatus code = 200
jcrbackup http://root:exo@127.0.0.1:8080 list
Return :
The current backups information :
1) Backup with id b46370107f000101014b03ea5fbe8d54 :
repository name : repository
workspace name : production
backup type : full + incremetal
full backup state : finished
incremental backup state : working
started time : Fri, 17 Apr 2009 17:03:16 EEST
2) Backup with id b462e4427f00010101cf243b4c6015bb :
repository name : repository
workspace name : backup
backup type : full only
full backup state : finished
started time : Fri, 17 Apr 2009 17:02:41 EESTjcrbackup http://root:exo@127.0.0.1:8080 status b46370107f000101014b03ea5fbe8d54
return:
The current backup information :
backup id : b46370107f000101014b03ea5fbe8d54
backup folder : /home/rainf0x/java/exo-working/JCR-839/new_JCR/exo-tomcat/bin/../temp/backup
repository name : repository
workspace name : production
backup type : full + incremetal
full backup state : finished
incremental backup state : working
started time : Fri, 17 Apr 2009 17:03:16 EESTjcrbackup http://root:exo@127.0.0.1:8080 stop 6c302adc7f00010100df88d29535c6ee
Return:
Successful : status code = 200
jcrbackup http://root:exo@127.0.0.1:8080 list completed
Return:
The completed (ready to restore) backups information :
1) Backup with id adf6fadc7f00010100053b2cba43513c :
repository name : repository
workspace name : backup
backup type : full only
started time : Thu, 16 Apr 2009 11:07:05 EEST
2) Backup with id b46370107f000101014b03ea5fbe8d54 :
repository name : repository
workspace name : production
backup type : full + incremetal
started time : Fri, 17 Apr 2009 17:03:16 EEST
3) Backup with id aec419cc7f000101004aca277b2b4e9f :
repository name : repository
workspace name : backup8
backup type : full only
started time : Thu, 16 Apr 2009 14:51:08 EESTRestore to workspace "backup3", for restore need the <backup_id> of completed backup and path to file with workspace configuration:
jcrbackup http://root:exo@127.0.0.1:8080 restore /repository/backup3 6c302adc7f00010100df88d29535c6ee /home/rainf0x/java/exo-working/JCR-839/exo-jcr-config_backup3.xml
Return:
Successful : status code = 200
Get information about the current restore for workspace /repository/backup3:
jcrbackup http://root:exo@127.0.0.1:8080 restores
Return:
The current restores information :
1) Restore with id 6c302adc7f00010100df88d29535c6ee:
full backup date : 2009-04-03T16:34:37.394+03:00
backup log file : /home/rainf0x/java/exo-working/JCR-839/exo-tomcat/bin/../temp/backup/backup-6c302adc7f00010100df88d29535c6ee.xml
repository name : repository
workspace name : backup3
backup type : full only
path to backup folder : /home/rainf0x/java/exo-working/JCR-839/exo-tomcat/bin/../temp/backup
restore state : successfulRestore to workspace "backup" and remove fully (will be removed content from db, value storage, index) exists workspace, for restore need the <backup_id> of completed backup and path to file with workspace configuration:
jcrbackup http://root:exo@127.0.0.1:8080 restore remove-exists /repository/backup 6c302adc7f00010100df88d29535c6ee /home/rainf0x/java/exo-working/JCR-839/exo-jcr-config_backup.xml
Return:
Successful : status code = 200
Restore to workspace "backup", for restore need the <backup_set_path> (<backup_set_path> is path to backup set folder on server side) of completed backup and path to file with workspace configuration:
jcrbackup http://root:exo@127.0.0.1:8080 restore /repository/backup /tmp/123/repository_backup-20101220_114156 /home/rainf0x/java/exo-working/JCR-839/exo-jcr-config_backup.xml
Return:
Successful : status code = 200
Restore to workspace "backup" and remove fully (will be removed content from db, value storage, index) exists workspace, for restore need the <backup_set_path> (<backup_set_path> is path to backup set folder on server side) of completed backup and path to file with workspace configuration:
jcrbackup http://root:exo@127.0.0.1:8080 restore remove-exists /repository/backup /repository/backup /tmp/123/repository_backup-20101220_114156 /home/rainf0x/java/exo-working/JCR-839/exo-jcr-config_backup.xml
Return:
Successful : status code = 200
Restore to workspace "backup" with original configuration of workspace (the original configuration was stored in backup set), for restore need the <backup_id> of completed backup:
jcrbackup http://root:exo@127.0.0.1:8080 restore 6c302adc7f00010100df88d29535c6ee
Return:
Successful : status code = 200
Restore to workspace "backup" with original configuration of workspace (the original configuration was stored in backup set) and remove fully (will be removed content from db, value storage, index) exists workspace, for restore need the <backup_id> of completed backup:
jcrbackup http://root:exo@127.0.0.1:8080 restore remove-exists 6c302adc7f00010100df88d29535c6ee
Return:
Successful : status code = 200
Restore to workspace "backup" with original configuration of workspace (the original configuration was stored in backup set), for restore need the <backup_set_path> (<backup_set_path> is path to backup set folder on server side) of completed backup:
jcrbackup http://root:exo@127.0.0.1:8080 restore /tmp/123/repository_backup-20101220_114156
Return:
Successful : status code = 200
Restore to workspace "backup" and remove fully (will be removed content from db, value storage, index) exists workspace with original configuration of workspace (the original configuration was stored in backup set), for restore need the <backup_set_path> (<backup_set_path> is path to backup set folder on server side) of completed backup:
jcrbackup http://root:exo@127.0.0.1:8080 restore remove-exists /tmp/123/repository_backup-20101220_114156
Return:
Successful : status code = 200
Restore to repository "repository" , for restore need the <backup_id> of completed backup and path to file with repository configuration:
jcrbackup http://root:exo@127.0.0.1:8080 restore remove-exists /repository 6c302adc7f00010100df88d29535c6ee /home/rainf0x/java/exo-working/JCR-839/exo-jcr-config.xml
Return:
Successful : status code = 200
Restore to repositoy "repository" and remove fully (will be removed content from db, value storage, index) exists repository, for restore need the <backup_id> of completed backup and path to file with repository configuration:
jcrbackup http://root:exo@127.0.0.1:8080 restore remove-exists /repository 6c302adc7f00010100df88d29535c6ee /home/rainf0x/java/exo-working/JCR-839/exo-jcr-config.xml
Return:
Successful : status code = 200
Restore to repository "repository", for restore need the <backup_set_path> (<backup_set_path> is path to backup set folder on server side) of completed backup and path to file with repository configuration:
jcrbackup http://root:exo@127.0.0.1:8080 restore /repository /tmp/123/repository_repository_backup_1292833493681 /home/rainf0x/java/exo-working/JCR-839/exo-jcr-config.xml
Return:
Successful : status code = 200
Restore to repository "repository" and remove fully (will be removed content from db, value storage, index) exists repository, for restore need the <backup_set_path> (<backup_set_path> is path to backup set folder on server side) of completed backup and path to file with repository configuration:
jcrbackup http://root:exo@127.0.0.1:8080 restore remove-exists /repository /repository/backup /tmp/123/repository_repository_backup_1292833493681 /home/rainf0x/java/exo-working/JCR-839/exo-jcr-config.xml
Return:
Successful : status code = 200
Restore to repository "repository" with original configuration of repository (the original configuration was stored in backup set), for restore need the <backup_id> of completed backup:
jcrbackup http://root:exo@127.0.0.1:8080 restore 6c302adc7f00010100df88d29535c6ee
Return:
Successful : status code = 200
Restore to repository "repository" with original configuration of repository (the original configuration was stored in backup set) and remove fully (will be removed content from db, value storage, index) exists repository, for restore need the <backup_id> of completed backup:
jcrbackup http://root:exo@127.0.0.1:8080 restore remove-exists 6c302adc7f00010100df88d29535c6ee
Return:
Successful : status code = 200
Restore to repository "repository" with original configuration of repository (the original configuration was stored in backup set), for restore need the <backup_set_path> (<backup_set_path> is path to backup set folder on server side) of completed backup:
jcrbackup http://root:exo@127.0.0.1:8080 restore /tmp/123/repository_repository_backup_1292833493681
Return:
Successful : status code = 200
Restore to repository "repository" and remove fully (will be removed content from db, value storage, index) exists repository with original configuration of repository (the original configuration was stored in backup set), for restore need the <backup_set_path> (<backup_set_path> is path to backup set folder on server side) of completed backup:
jcrbackup http://root:exo@127.0.0.1:8080 restore remove-exists /tmp/123/repository_repository_backup_1292833493681
Return:
Successful : status code = 200
jcrbackup http://root:exo@127.0.0.1:8080 start /repository/backup ../temp/backup 10000
Return :
Successful : status code = 200
jcrbackup http://root:exo@127.0.0.1:8080 list
Return :
The current backups information :
1) Backup with id b469ba957f0001010178febaedf20eb7 :
repository name : repository
workspace name : backup
backup type : full + incremetal
full backup state : finished
incremental backup state : working
started time : Fri, 17 Apr 2009 17:10:09 EESTStop backup with id b469ba957f0001010178febaedf20eb7 :
jcrbackup http://root:exo@127.0.0.1:8080 stop b469ba957f0001010178febaedf20eb7
Return :
Successful : status code = 200
jcrbackup http://root:exo@127.0.0.1:8080 drop force-close-session /repository/backup
Return :
Successful : status code = 200
Delete/clean the database for workspace "backup" : When we use "single-db", then we will run the SQL queries for clean database :
delete from JCR_SREF where NODE_ID in (select ID from JCR_SITEM where CONTAINER_NAME = 'backup') delete from JCR_SVALUE where PROPERTY_ID in (select ID from JCR_SITEM where CONTAINER_NAME = 'backup') delete from JCR_SITEM where CONTAINER_NAME='backup'
Delete the value storage for workspace "backup"; - delete the index data for workspace "backup"; - restore :
jcrbackup http://root:exo@127.0.0.1:8080 restore /repository/backup b469ba957f0001010178febaedf20eb7 /home/rainf0x/java/exo-working/JCR-839/exo-jcr-config_backup.xml
Return :
Successful : status code = 200
The /home/rainf0x/java/exo-working/JCR-839/exo-jcr-config_backup.xml content the configuration for restored workspace "backup":
<repository-service default-repository="repository">
<repositories>
<repository name="repository" system-workspace="production" default-workspace="production">
<security-domain>exo-domain</security-domain>
<access-control>optional</access-control>
<authentication-policy>org.exoplatform.services.jcr.impl.core.access.JAASAuthenticator</authentication-policy>
<workspaces>
<workspace name="backup">
<container class="org.exoplatform.services.jcr.impl.storage.jdbc.JDBCWorkspaceDataContainer">
<properties>
<property name="source-name" value="jdbcjcr" />
<property name="dialect" value="pgsql" />
<property name="multi-db" value="false" />
<property name="update-storage" value="false" />
<property name="max-buffer-size" value="200k" />
<property name="swap-directory" value="../temp/swap/backup" />
</properties>
<value-storages>
<value-storage id="draft" class="org.exoplatform.services.jcr.impl.storage.value.fs.TreeFileValueStorage">
<properties>
<property name="path" value="../temp/values/backup" />
</properties>
<filters>
<filter property-type="Binary"/>
</filters>
</value-storage>
</value-storages>
</container>
<initializer class="org.exoplatform.services.jcr.impl.core.ScratchWorkspaceInitializer">
<properties>
<property name="root-nodetype" value="nt:unstructured" />
</properties>
</initializer>
<cache enabled="true" class="org.exoplatform.services.jcr.impl.dataflow.persistent.LinkedWorkspaceStorageCacheImpl">
<properties>
<property name="max-size" value="10k" />
<property name="live-time" value="1h" />
</properties>
</cache>
<query-handler class="org.exoplatform.services.jcr.impl.core.query.lucene.SearchIndex">
<properties>
<property name="index-dir" value="../temp/jcrlucenedb/backup" />
</properties>
</query-handler>
</workspace>
</workspaces>
</repository>
</repositories>
</repository-service>
jcrbackup http://root:exo@127.0.0.1:8080 restores /repository/backup
Return:
The current restores information :
Restore with id b469ba957f0001010178febaedf20eb7:
backup folder : /home/rainf0x/java/exo-working/JCR-839/new_JCR/exo-tomcat/bin/../temp/backup
repository name : repository
workspace name : backup
backup type : full + incremetal
restore state : successful
started time : Fri, 17 Apr 2009 16:38:00 EEST
finished time : Fri, 17 Apr 2009 16:38:00 EESTNote
If delete default repository that should be restored repository with name as default repository.
This usecase needs RestRepositoryService enabled. (Deleting the repository needs it)
<component> <type>org.exoplatform.services.jcr.ext.repository.RestRepositoryService</type> </component>
jcrbackup http://root:exo@127.0.0.1:8080 start /repository ../temp/backup 10000
Return :
Successful : status code = 200
jcrbackup http://root:exo@127.0.0.1:8080 list
Return :
The current backups information :
1) Repository backup with id 9a4d40fb7f0000012ec8f0a4ec70b3da :
repository name : repository
backup type : full + incremetal
full backups state : finished
incremental backups state : working
started time : Mon, 11 Oct 2010 10:59:35 EESTStop backup with id 9a4d40fb7f0000012ec8f0a4ec70b3da :
jcrbackup http://root:exo@127.0.0.1:8080 stop 9a4d40fb7f0000012ec8f0a4ec70b3da
Return :
Successful : status code = 200
jcrbackup http://root:exo@127.0.0.1:8080 drop force-close-session /repository
Return :
Successful : status code = 200
Delete/clean the database for workspace "repository": When we use "single-db", then we will run the SQL queries for clean database :
drop table JCR_SREF; drop table JCR_SVALUE; drop table JCR_SITEM;Delete the value storage for repository "repository";
Delete the index data for repository "repository";
Restore:
jcrbackup http://root:exo@127.0.0.1:8080 restore /repository 9a6dba327f000001325dfb228a181b07 /home/rainf0x/exo-jcr-config_backup.xml
Return :
Successful : status code = 200
The /home/rainf0x/exo-jcr-config_backup.xml content the configuration for restored repository "repository":
<repository-service default-repository="repository">
<repositories>
<repository name="repository" system-workspace="production" default-workspace="production">
<security-domain>exo-domain</security-domain>
<access-control>optional</access-control>
<authentication-policy>org.exoplatform.services.jcr.impl.core.access.JAASAuthenticator</authentication-policy>
<workspaces>
<workspace name="production">
<!-- for system storage -->
<container class="org.exoplatform.services.jcr.impl.storage.jdbc.optimisation.CQJDBCWorkspaceDataContainer">
<properties>
<property name="source-name" value="jdbcjcr" />
<property name="multi-db" value="false" />
<property name="update-storage" value="false" />
<property name="max-buffer-size" value="200k" />
<property name="swap-directory" value="../temp/swap/production" />
</properties>
<value-storages>
<value-storage id="system" class="org.exoplatform.services.jcr.impl.storage.value.fs.TreeFileValueStorage">
<properties>
<property name="path" value="../temp/values/production" />
</properties>
<filters>
<filter property-type="Binary" />
</filters>
</value-storage>
</value-storages>
</container>
<initializer class="org.exoplatform.services.jcr.impl.core.ScratchWorkspaceInitializer">
<properties>
<property name="root-nodetype" value="nt:unstructured" />
</properties>
</initializer>
<cache enabled="true" class="org.exoplatform.services.jcr.impl.dataflow.persistent.LinkedWorkspaceStorageCacheImpl">
<properties>
<property name="max-size" value="10k" />
<property name="live-time" value="1h" />
</properties>
</cache>
<query-handler class="org.exoplatform.services.jcr.impl.core.query.lucene.SearchIndex">
<properties>
<property name="index-dir" value="../temp/jcrlucenedb/production" />
</properties>
</query-handler>
<lock-manager>
<time-out>15m</time-out>
<persister class="org.exoplatform.services.jcr.impl.core.lock.FileSystemLockPersister">
<properties>
<property name="path" value="../temp/lock/system" />
</properties>
</persister>
</lock-manager>
</workspace>
<workspace name="backup">
<container class="org.exoplatform.services.jcr.impl.storage.jdbc.optimisation.CQJDBCWorkspaceDataContainer">
<properties>
<property name="source-name" value="jdbcjcr" />
<property name="multi-db" value="false" />
<property name="update-storage" value="false" />
<property name="max-buffer-size" value="200k" />
<property name="swap-directory" value="../temp/swap/backup" />
</properties>
<value-storages>
<value-storage id="draft" class="org.exoplatform.services.jcr.impl.storage.value.fs.TreeFileValueStorage">
<properties>
<property name="path" value="../temp/values/backup" />
</properties>
<filters>
<filter property-type="Binary" />
</filters>
</value-storage>
</value-storages>
</container>
<initializer class="org.exoplatform.services.jcr.impl.core.ScratchWorkspaceInitializer">
<properties>
<property name="root-nodetype" value="nt:unstructured" />
</properties>
</initializer>
<cache enabled="true" class="org.exoplatform.services.jcr.impl.dataflow.persistent.LinkedWorkspaceStorageCacheImpl">
<properties>
<property name="max-size" value="10k" />
<property name="live-time" value="1h" />
</properties>
</cache>
<query-handler class="org.exoplatform.services.jcr.impl.core.query.lucene.SearchIndex">
<properties>
<property name="index-dir" value="../temp/jcrlucenedb/backup" />
</properties>
</query-handler>
</workspace>
<workspace name="digital-assets">
<container class="org.exoplatform.services.jcr.impl.storage.jdbc.optimisation.CQJDBCWorkspaceDataContainer">
<properties>
<property name="source-name" value="jdbcjcr" />
<property name="multi-db" value="false" />
<property name="update-storage" value="false" />
<property name="max-buffer-size" value="200k" />
<property name="swap-directory" value="../temp/swap/digital-assets" />
</properties>
<value-storages>
<value-storage id="digital-assets" class="org.exoplatform.services.jcr.impl.storage.value.fs.TreeFileValueStorage">
<properties>
<property name="path" value="../temp/values/digital-assets" />
</properties>
<filters>
<filter property-type="Binary" />
</filters>
</value-storage>
</value-storages>
</container>
<initializer class="org.exoplatform.services.jcr.impl.core.ScratchWorkspaceInitializer">
<properties>
<property name="root-nodetype" value="nt:folder" />
</properties>
</initializer>
<cache enabled="true" class="org.exoplatform.services.jcr.impl.dataflow.persistent.LinkedWorkspaceStorageCacheImpl">
<properties>
<property name="max-size" value="5k" />
<property name="live-time" value="15m" />
</properties>
</cache>
<query-handler class="org.exoplatform.services.jcr.impl.core.query.lucene.SearchIndex">
<properties>
<property name="index-dir" value="../temp/jcrlucenedb/digital-assets" />
</properties>
</query-handler>
</workspace>
</workspaces>
</repository>
</repositories>
</repository-service>
jcrbackup http://root:exo@127.0.0.1:8080 restores /repository
Return:
Repository restore with id 9a6dba327f000001325dfb228a181b07:
backup folder : /home/rainf0x/java/exo-working/JCR-1459/exo-tomcat/bin/../temp/backup/repository_repository_backup_1286786103858
repository name : repository
backup type : full + incremetal
restore state : successful
started time : Mon, 11 Oct 2010 11:51:15 EEST
finished time : Mon, 11 Oct 2010 11:51:17 EESTTo have the repository content consistent with the search index and value storate, the repository should be suspened. It means all working threads are suspended until resume operation performed. Index will be flushed.
JCR provides ability to suspend repository via JMX.
To suspend repository just need to invoke suspend() operation. The returned result will be "suspended" if everything passed successfully.
The result "undefined" means not all components successfully suspended, check console to see stacktraces.
Now we can backup content manually or using third part software. We need to backup:
Database
Lucene index
Value storage (if configured)
In order to have a better idea of the time spent into the database access layer, it can be interesting to get some statistics on that part of the code, knowing that most of the time spent into eXo JCR is mainly the database access. This statistics will then allow you to identify without using any profiler what is normally slow in this layer, which could help to fix the problem quickly.
In case you use
org.exoplatform.services.jcr.impl.storage.jdbc.optimisation.CQJDBCWorkspaceDataContainer
or
org.exoplatform.services.jcr.impl.storage.jdbc.JDBCWorkspaceDataContainer
as WorkspaceDataContainer, you can get statistics on the
time spent into the database access layer. The database access layer (in
eXo JCR) is represented by the methods of the interface
org.exoplatform.services.jcr.storage.WorkspaceStorageConnection,
so for all the methods defined in this interface, we can have the
following figures:
The minimum time spent into the method.
The maximum time spent into the method.
The average time spent into the method.
The total amount of time spent into the method.
The total amount of time the method has been called.
Those figures are also available globaly for all the methods which gives us the global behavior of this layer.
If you want to enable the statistics, you just need to set the JVM parameter called JDBCWorkspaceDataContainer.statistics.enabled to true. The corresponding CSV file is StatisticsJDBCStorageConnection-${creation-timestamp}.csv for more details about how the csv files are managed, please refer to the section dedicated to the statistics manager.
The format of each column header is ${method-alias}-${metric-alias}. The metric alias are described in the statistics manager section.
The name of the category of statistics corresponding to these statistics is JDBCStorageConnection, this name is mostly needed to access to the statistics through JMX.
Table 39.1. Method Alias
| global | This is the alias for all the methods. |
| getItemDataById | This is the alias for the method getItemData(String identifier). |
| getItemDataByNodeDataNQPathEntry | This is the alias for the method getItemData(NodeData parentData, QPathEntry name). |
| getChildNodesData | This is the alias for the method getChildNodesData(NodeData parent). |
| getChildNodesCount | This is the alias for the method getChildNodesCount(NodeData parent). |
| getChildPropertiesData | This is the alias for the method getChildPropertiesData(NodeData parent). |
| listChildPropertiesData | This is the alias for the method listChildPropertiesData(NodeData parent). |
| getReferencesData | This is the alias for the method getReferencesData(String nodeIdentifier). |
| commit | This is the alias for the method commit(). |
| addNodeData | This is the alias for the method add(NodeData data). |
| addPropertyData | This is the alias for the method add(PropertyData data). |
| updateNodeData | This is the alias for the method update(NodeData data). |
| updatePropertyData | This is the alias for the method update(PropertyData data). |
| deleteNodeData | This is the alias for the method delete(NodeData data). |
| deletePropertyData | This is the alias for the method delete(PropertyData data). |
| renameNodeData | This is the alias for the method rename(NodeData data). |
| rollback | This is the alias for the method rollback(). |
| isOpened | This is the alias for the method isOpened(). |
| close | This is the alias for the method close(). |
In order to know exactly how your application uses eXo JCR, it can be interesting to register all the JCR API accesses in order to easily create real life test scenario based on pure JCR calls and also to tune your eXo JCR to better fit your requirements.
In order to allow you to specify the configuration which part of eXo JCR needs to be monitored whithout applying any changes in your code and/or building anything, we choose to rely on the Load-time Weaving proposed by AspectJ.
To enable this feature, you will have to add in your classpath the following jar files:
exo.jcr.component.statistics-X.Y.Z.jar corresponding to your eXo JCR version that you can get from the jboss maven repository https://repository.jboss.org/nexus/content/groups/public/org/exoplatform/jcr/exo.jcr.component.statistics.
aspectjrt-1.6.8.jar that you can get from the main maven repository
http://repo2.maven.org/maven2/org/aspectj/aspectjrt.
You will also need to get aspectjweaver-1.6.8.jar from the main maven repository http://repo2.maven.org/maven2/org/aspectj/aspectjweaver. At this stage, to enable the statistics on the JCR API accesses, you will need to add the JVM parameter -javaagent:${pathto}/aspectjweaver-1.6.8.jar to your command line, for more details please refer to http://www.eclipse.org/aspectj/doc/released/devguide/ltw-configuration.html.
By default, the configuration will collect statistcs on all the methods of the internal interfaces org.exoplatform.services.jcr.core.ExtendedSession and org.exoplatform.services.jcr.core.ExtendedNode, and the JCR API interface javax.jcr.Property. To add and/or remove some interfaces to monitor, you have two configuration files to change that are bundled into the jar exo.jcr.component.statistics-X.Y.Z.jar, which are conf/configuration.xml and META-INF/aop.xml.
The file content below is the content of conf/configuration.xml that you will need to modify to add and/or remove the full qualified name of the interfaces to monitor, into the list of parameter values of the init param called targetInterfaces.
<configuration xmlns:xsi="http://www.w3.org/2001/XMLSchema-instance" xsi:schemaLocation="http://www.exoplatform.org/xml/ns/kernel_1_2.xsd http://www.exoplatform.org/xml/ns/kernel_1_2.xsd"
xmlns="http://www.exoplatform.org/xml/ns/kernel_1_2.xsd">
<component>
<type>org.exoplatform.services.jcr.statistics.JCRAPIAspectConfig</type>
<init-params>
<values-param>
<name>targetInterfaces</name>
<value>org.exoplatform.services.jcr.core.ExtendedSession</value>
<value>org.exoplatform.services.jcr.core.ExtendedNode</value>
<value>javax.jcr.Property</value>
</values-param>
</init-params>
</component>
</configuration>The file content below is the content of META-INF/aop.xml that you will to need to modify to add and/or remove the full qualified name of the interfaces to monitor, into the expression filter of the pointcut called JCRAPIPointcut. As you can see below, by default only JCR API calls from the exoplatform packages are took into account, don't hesistate to modify this filter to add your own package names.
<aspectj>
<aspects>
<concrete-aspect name="org.exoplatform.services.jcr.statistics.JCRAPIAspectImpl" extends="org.exoplatform.services.jcr.statistics.JCRAPIAspect">
<pointcut name="JCRAPIPointcut"
expression="(target(org.exoplatform.services.jcr.core.ExtendedSession) || target(org.exoplatform.services.jcr.core.ExtendedNode) || target(javax.jcr.Property)) && call(public * *(..))" />
</concrete-aspect>
</aspects>
<weaver options="-XnoInline">
<include within="org.exoplatform..*" />
</weaver>
</aspectj> The corresponding CSV files are of type Statistics${interface-name}-${creation-timestamp}.csv for more details about how the csv files are managed, please refer to the section dedicated to the statistics manager.
The format of each column header is ${method-alias}-${metric-alias}. The method alias will be of type ${method-name}(list of parameter types separeted by ; to be compatible with the CSV format).
The metric alias are described in the statistics manager section.
The name of the category of statistics corresponding to these statistics is the simple name of the monitored interface (e.g. ExtendedSession for org.exoplatform.services.jcr.core.ExtendedSession), this name is mostly needed to access to the statistics through JMX.
Please note that this feature will affect the performances of eXo JCR so it must be used with caution.
The statistics manager manages all the statistics provided by eXo JCR, it is responsible of printing the data into the CSV files and also exposing the statistics through JMX and/or Rest.
The statistics manager will create all the CSV files for each
category of statistics that it manages, the format of those files is
Statistics${category-name}-${creation-timestamp}.csv.
Those files will be created into the user directory if it is possible
otherwise it will create them into the temporary directory. The format of
those files is CSV (i.e. Comma-Seperated Values), one new
line will be added regularily (every 5 seconds by default) and one last
line will be added at JVM exit. Each line, will be composed of the 5
figures described below for each method and globaly for all the
methods.
Table 39.2. Metric Alias
| Min | The minimum time spent into the method expressed in milliseconds. |
| Max | The maximum time spent into the method expressed in milliseconds. |
| Total | The total amount of time spent into the method expressed in milliseconds. |
| Avg | The average time spent into the method expressed in milliseconds. |
| Times | The total amount of times the method has been called. |
You can disable the persistence of the statistics by setting the
JVM parameter called
JCRStatisticsManager.persistence.enabled to
false, by default, it is set to
true. You can aslo define the period of time between
each record (i.e. line of data into the file) by setting the JVM parameter
called JCRStatisticsManager.persistence.timeout to
your expected value expressed in milliseconds, by default it is set to
5000.
You can also access to the statistics thanks to JMX, the available methods are the following:
Table 39.3. JMX Methods
| getMin | Give the minimum time spent into the method corresponding to the given category name and statistics name. The expected arguments are the name of the category of statistics (e.g. JDBCStorageConnection) and the name of the expected method or global for the global value. |
| getMax | Give the maximum time spent into the method corresponding to the given category name and statistics name. The expected arguments are the name of the category of statistics (e.g. JDBCStorageConnection) and the name of the expected method or global for the global value. |
| getTotal | Give the total amount of time spent into the method corresponding to the given category name and statistics name. The expected arguments are the name of the category of statistics (e.g. JDBCStorageConnection) and the name of the expected method or global for the global value. |
| getAvg | Give the average time spent into the method corresponding to the given category name and statistics name. The expected arguments are the name of the category of statistics (e.g. JDBCStorageConnection) and the name of the expected method or global for the global value. |
| getTimes | Give the total amount of times the method has been called corresponding to the given ,category name and statistics name. The expected arguments are the name of the category of statistics (e.g. JDBCStorageConnection) and the name of the expected method or global for the global value. |
| reset | Reset the statistics for the given category name and statistics name. The expected arguments are the name of the category of statistics (e.g. JDBCStorageConnection) and the name of the expected method or global for the global value. |
| resetAll | Reset all the statistics for the given category name. The expected argument is the name of the category of statistics (e.g. JDBCStorageConnection). |
The full name of the related MBean is
exo:service=statistic, view=jcr.
Production and any other system may have faults some day. They may be caused by hardware problems, human faults, software errors during updates and many other circumstances. It is important to check integrity and consistency of the system if there is no backup or it is stale, or recovery process takes much. Exo JCR implementation offers an innovative JMX-based complex checking tool. Running inspection, tool check every major JCR component, such as persistent data layer and index. Persistent layer includes JDBC Data Container and Value-Storages if they are configured. Database verified using the set of complex specialized domain-specific queries. Value Storage tool checks existence and access to each file. Index verification contains two-way pass cycle, existence of each node in index checks on persistent layer along with opposite direction, when each node from Data Container validated in index. Access to check tool is exposed via JMX interface, with the following operation available:
Table 40.1. Available methods
| checkRepositoryDataConsistency() | Inspect full repository data (db, value storage and search index) |
| checkRepositoryDataBaseConsistency() | Inspect only DB |
| checkRepositoryValueStorageConsistency() | Inspect only ValueStorage |
| checkRepositorySearchIndexConsistency() | Inspect only SearchIndex |
All inspection activities and corrupted data identifier are stored
in file, which can be found in app directory by name
report-<repository name>-dd-MMM-yy-HH-mm.txt. Path to
file will be returned in result message also. Please, take in account
thare is three types of inconsistency and two of them are critical. They
are Errors and Index faults. Index faults are marked as "Reindex" and can
be fixed by reindexing the workspace, but the Errors can only be fixed
manually. Warnings found by tool can be a normal situation in some cases
and usually production system will still remain fully functional.
eXo JCR supports the Java Transaction API out of the box. If a TransactionService has been defined (refer to the chapter about the TransactionService for more details) at session save, it checks if a global transaction is active and if so, it automatically enrolles the JCR session in the global transaction. If you intend to use a managed data source, you will have to configure the service DataSourceProvider (for more details please refer to the corresponding chapter).
eXo JCR supports J2EE Connector Architecture 1.5, thus If you would like to delegate the JCR Session lifecycle to your application server, you can use the JCA Resource Adapter for eXo JCR if your application server supports JCA 1.5. This adapter only supports XA Transaction, in other words you cannot use it for local transactions. Since the JCR Sessions have not been designed to be shareable, the session pooling is simply not covered by the adapter.
The equivalent of the javax.resource.cci.ConnectionFactory in JCA terminology is org.exoplatform.connectors.jcr.adapter.SessionFactory in the context of eXo JCR, the resource that you will get thanks to a JNDI lookup is of type SessionFactory and provides the following methods:
/**
* Get a JCR session corresponding to the repository
* defined in the configuration and the default workspace.
* @return a JCR session corresponding to the criteria
* @throws RepositoryException if the session could not be created
*/
Session getSession() throws RepositoryException;
/**
* Get a JCR session corresponding to the repository
* defined in the configuration and the default workspace, using
* the given user name and password.
* @param userName the user name to use for the authentication
* @param password the password to use for the authentication
* @return a JCR session corresponding to the criteria
* @throws RepositoryException if the session could not be created
*/
Session getSession(String userName, String password) throws RepositoryException;
/**
* Get a JCR session corresponding to the repository
* defined in the configuration and the given workspace.
* @param workspace the name of the expected workspace
* @return a JCR session corresponding to the criteria
* @throws RepositoryException if the session could not be created
*/
Session getSession(String workspace) throws RepositoryException;
/**
* Get a JCR session corresponding to the repository
* defined in the configuration and the given workspace, using
* the given user name and password.
* @param workspace the name of the expected workspace
* @param userName the user name to use for the authentication
* @param password the password to use for the authentication
* @return a JCR session corresponding to the criteria
* @throws RepositoryException if the session could not be created
*/
Session getSession(String workspace, String userName, String password) throws RepositoryException;Table 42.1. Configuration Properties
| PortalContainer | In case of the portal mode, if no portal container can be found in the context of the request, the adapter will use the value of this parameter to get the name of the expected portal container to create the JCR sessions. In case of a standalone mode, this parameter is not used. This parameter is optional, by default the default portal container will be used. |
| Repository | The repository name used to create JCR sessions. This parameter is optional, by default the current repository will be used. |
In case of the standalone mode where the JCR and its dependencies are not provided, you will need to deploy the whole ear file corresponding to the artifactId exo.jcr.ear and groupId org.exoplatform.jcr, the rar file is embedded into the ear file. In case the JCR and its dependencies are provided like when you use it with gateIn for example, you will need to deploy only the rar file corresponding to the artifactId exo.jcr.connectors.jca and groupId org.exoplatform.jcr.
Then you will need to configure the connector itself, for example for JBoss AS, you need to create in your deploy directory a file of type *-ds.xml (jcr-ds.xml for example) with the following content:
<connection-factories>
<tx-connection-factory>
<jndi-name>jcr/repository</jndi-name>
<xa-transaction/>
<!-- The rar name will be exo.jcr.connectors.jca.X.Y.Z.rar in case you deploy only the rar file -->
<rar-name>exo.jcr.ear.ear#exo-jcr.rar</rar-name>
<adapter-display-name>eXo JCR Adapter</adapter-display-name>
<connection-definition>org.exoplatform.connectors.jcr.adapter.SessionFactory</connection-definition>
<!--
<config-property name="PortalContainer" type="java.lang.String">portal</config-property>
-->
<config-property name="Repository" type="java.lang.String">repository</config-property>
</tx-connection-factory>
</connection-factories>eXo JCR is a complete implementation of the standard JSR 170: Content Repository for Java TM Technology API, including Level 1, Level 2 and Additional Features specified in the JCR Specification.
The JCR specification (JSR 170) does not have many requirements about Access Control. It only requires the implementation of the Session.checkPermission(String absPath, String actions) method. This method checks if a current session has permissions to perform some actions on absPath:
absPath : The string representation of a JCR absolute path.
actions : eXo JCR interprets this string as a comma separated the list of individual action names, such as the 4 types defined in JSR 170 :
add_node : Permission to add a node.
set_property : Permission to set a property.
remove : Permission to remove an item (node or property).
read : Permission to retrieve a node or read a property value.
For example :
session.checkPermission("/Groups/organization", "add_node,set_property") will check if the session is allowed to add a child node to "organization" and to modify its properties. If one of the two permissions is denied, an AccessDeniedException is thrown.
session.checkPermission("/Groups/organization/exo:name", "read,set_property") will check if the session is allowed to read and change the "exo:name" property of the "organization" node.
session.checkPermission("/Groups/organization/exo:name", "remove") will check if the session allowed to remove "exo:name" property or node.
The JSR170 specification does not define how permissions are managed or checked. So eXo JCR has implemented its own proprietary extension to manage and check permissions on nodes. In essence, this extension uses an Access Control List (ACL) policy model applied to eXo Organization model (see eXo Platform Organization Service).
At the heart of eXo Access Control, is the notion of the identity concept. Access to JCR is made through sessions acquired against a repository. Sessions can be authenticated through the standard (but optional) repository login mechanism. Each session is associated with a principal. The principal is an authenticated user or group that may act on JCR data. The identity is a string identifying this group or user.'
There are 3 reserved identities that have special meanings in eXo JCR:
any : represents any authenticated session.
anonim : represents a principal for non authenticated sessions. (No error, it's really "\_\_anonim".)
system : represents a principal for system sessions, typically used for administrative purposes. System session has full access (all permissions) to all nodes; therefore be careful when working with system sessions.
An access control list (ACL) is a list of permissions attached to an object. An ACL specifies which users, groups or system processes are granted access to JCR nodes, as well as what operations are allowed to be performed on given objects.
eXo JCR Access Control is based on two facets applied to nodes :
Privilegeable : Means that the user or group (also called principal) needs the appropriate privileges to access to this node. The privileges are defined as (positive) permissions that are granted to users or groups.
Ownable : The node has an owner. The owner has always full access (all permissions) to the node, independent of the privilegeable facet.
A privilegeable node defines the permissions required for actions on this node. For this purpose, it contains an ACL.
At JCR level, this is implemented by an exo:privilegeable mixin.
<nodeType name="exo:privilegeable" isMixin="true" hasOrderableChildNodes="false" primaryItemName="">
<propertyDefinitions>
<propertyDefinition name="exo:permissions" requiredType="Permission" autoCreated="true" mandatory="true"
onParentVersion="COPY" protected="true" multiple="true">
<valueConstraints/>
</propertyDefinition>
</propertyDefinitions>
</nodeType>A privilegeable node can have multiple exo:permissions values. The type of these values is the eXo JCR specific Permission type. The Permission type contains a list of ACL.
The possible values are corresponding to JCR standard actions:
read: The node or its properties can be read.
remove: The node or its properties can be removed.
add_node : Child nodes can be added to this node.
set_property : The node's properties can be modified, added or removed.
An ownable node defines an owner identity. The owner has always full privileges. These privileges are independent of the permissions set by exo:permissions. At JCR level, the ownership is implemented by an exo:owneable mixin. This mixin holds an owner property.
<nodeType name="exo:owneable" isMixin="true" hasOrderableChildNodes="false" primaryItemName="">
<propertyDefinitions>
<propertyDefinition name="exo:owner" requiredType="String" autoCreated="true" mandatory="true" onParentVersion="COPY"
protected="true" multiple="false">
<valueConstraints/>
</propertyDefinition>
</propertyDefinitions>
</nodeType>The exo:owner property value contains exactly one identity string value. There might be a long list of different permissions for different identities (user or groups). All permissions are always positive permissions; denials are not possible. When checking a permission of an action, it's therefore perfectly sufficient that the principal of a session belongs to the groups to which the concerned action is granted.
To grant or deny access to a node, eXo JCR applies a privilege resolving logic at node access time.
If a node is privilegeable, the node's ACL is used exclusively. If the ACL does not match the principal's identity, the principal has no access (except the owner of the node).
Non-privilegeable nodes inherit permissions from their parent node. If the parent node is not privilegeable either, the resolving logic looks further up the node hierarchy and stops with the first privilegeable ancestor of the current node. All nodes potentially inherit from the workspace root node.
The owner of a node is inherited in accordance with the same logic: If the node has no owner, the owner information of the closest owneable ancestor is inherited.
This inheritance is implemented by browsing up the node's hierarchy. At access time, if the node does not have owner or permissions, the system looks up into the node's ancestor hierarchy for the first ACL.
When no matching ACL is found in the ancestor hierarchy, the system may end up looking at the root node's ACL. As ACL are optional, even for the root node, if the root node has no ACL, the following rule is ultimately applied to resolve privileges:
any identity (any authenticated session) is granted all permissions
Access Control nodetypes are not extendible: The access control mechanism works for exo:owneable and exo:privilegeable nodetypes only, not for their subtypes! So you cannot extend those nodetypes.
Autocreation: By default, newly created nodes are neither exo:privilegeable nor exo:owneable but it is possible to configure the repository to auto-create exo:privilegeable or/and exo:owneable thanks to eXo's JCR interceptors extension (see JCR Extensions)
OR-based Privilege Inheritance: Note, that eXo's Access Control implementation supports a privilege inheritance that follows a strategy of either...or/ and has only an ALLOW privilege mechanism (there is no DENY feature). This means that a session is allowed to perform some operations on some nodes if its identity has an appropriate permission assigned to this node. Only if there is no exo:permission property assigned to the node itself, the permissions of the node's ancestors are used.
In the following example, you see a node named "Politics" which contains two nodes named "Cats" and "Dogs".
Note
These examples are exported from eXo DMS using the \"document view\" representation of JCR. Each value of a multi-value property is separated by a whitespace, each whitespace is escaped by x0020.
<Politics jcr:primaryType="nt:unstructured" jcr:mixinTypes="exo:owneable exo:datetime exo:privilegeable" exo:dateCreated="2009-10-08T18:02:43.687+02:00" exo:dateModified="2009-10-08T18:02:43.703+02:00" exo:owner="root" exo:permissions="any_x0020_read *:/platform/administrators_x0020_read *:/platform/administrators_x0020_add_node *:/platform/administrators_x0020_set_property *:/platform/administrators_x0020_remove"> <Cats jcr:primaryType="exo:article" jcr:mixinTypes="exo:owneable" exo:owner="marry" exo:summary="The_x0020_secret_x0020_power_x0020_of_x0020_cats_x0020_influences_x0020_the_x0020_leaders_x0020_of_x0020_the_x0020_world." exo:text="" exo:title="Cats_x0020_rule_x0020_the_x0020_world" /> <Dogs jcr:primaryType="exo:article" jcr:mixinTypes="exo:privilegeable" exo:permissions="manager:/organization_x0020_read manager:/organization_x0020_set_property" exo:summary="Dogs" exo:text="" exo:title="Dogs_x0020_are_x0020_friends" /> </Politics>
The "Politics" node is exo:owneable and exo:privilegeable. It has both an exo:owner property and an exo:permissions property. There is an exo:owner="root" property so that the user root is the owner. In the exo:permissions value, you can see the ACL that is a list of access controls. In this example, the group *:/platform/administrators has all rights on this node (remember that the "*" means any kind of membership). any means that any users also have the read permission.s
As you see in the jcr:mixinTypes property, the "Cats" node is exo:owneable and there is an exo:owner="marry" property so that the user marry is the owner. The "Cats" node is not exo:privilegeable and has no exo:permissions. In this case, we can see the inheritance mechanism here is that the "Cats" node has the same permissions as "Politics" node.
Finally, the "Dogs" node is also a child node of "Politics". This node is not exo:owneable and inherits the owner of the "Politics" node (which is the user root). Otherwise, "Dogs" is exo:privilegeable and therefore, it has its own exo:permissions. That means only the users having a "manager" role in the group "/organization" and the user "root" have the rights to access this node.
Here is an example showing the accessibility of two nodes (to show inheritance) for two sample users named manager and user:
The "+" symbol means that there is a child node "exo:owneable".
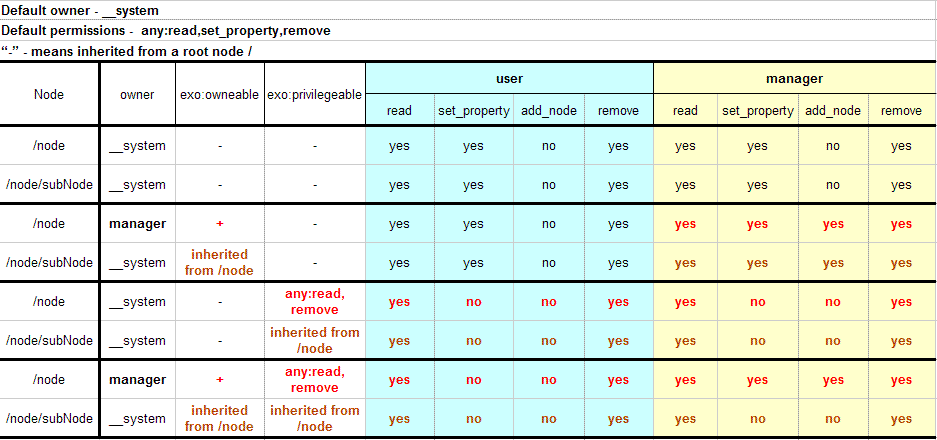
This session describes how permission is validated for different JCR actions.
read node: Check the read permission on a target node.
For example: Read /node1/subnode node, JCR will check the "read" permission exactly on "subnode".
read property : Check the read permission on a parent node.
For example: Read /node1/myprop - JCR will check the "read" permission on "node1".
add node: Check add_node on a parent node.
For example: Add /node1/subnode node, JCR will check the "add_node" permission on "node1".
set property: set_property on a parent node.
For example: Try to set /node1/myprop property, JCR will check the "set_property" permission on "node1".
remove node: Check the remove permission on a target node.
For example: Try to remove /node1/subnode node, JCR will check the "remove" permission on "subnode".
remove property: Check the remove permission on a parent node.
For example: Try to remove /node1/myprop property, JCR will check the "remove" permission on "node1".
add mixin: Check the "add_node" and "set_property" permission on a target node.
For example: Try to add mixin to /node1/subnode node, JCR will check the "add_node" and "set_property" permission on "subnode".
Note
The behavior of the permission "remove" and "add mixin" validation has changed since JCR 1.12.6-GA. The old behavior is:
remove node: Check the remove permission on a parent node.
For example: Try to remove /node1/subnode node, JCR will check the "remove" permission on "node1".
add mixin: Check the "add_node" and "set_property" permission on a parent node.
For example: Try to add mixin to /node1/subnode node, JCR will check the "add_node" and "set_property" permission on "node1".
eXo JCR's ExtendedNode interface which extends javax.jcr.Node interface provides additional methods for Access Control management.
Table 43.1. Additional methods
| Method signature | Description |
|---|---|
| void setPermissions(Map<String, String[]> permissions) | Assigns a set of Permissions to a node |
| void setPermission(String identity, String[] permission) | Assigns some Identities' Permission to a node |
| void removePermission(String identity) | Removes an Identity's Permission |
| void removePermission(String identity, String permission) | Removes the specified permission for a particular identity |
| void clearACL() | Clears the current ACL so it becomes default |
| AccessControlList getACL() | Returns the current ACL |
| void checkPermission(String actions) | Checks Permission (AccessDeniedException will be thrown if denied) |
The "identity" parameter is a user or a group name. The permissions are the literal strings of the standard action permissions (add_node, set_property, remove, read).
This is an extension of eXo JCR Access Control features. Please read Access Control and JCR Extensions topics first.
An extended Access Control system consists of:
Specifically configured custom ExtendedAccessManager which is called by eXo JCR internals to check if user's Session (user) has some privilege to perform some operation or not.
The Action sets a thread local InvocationContext at runtime, the InvocationContext instance is then used by the ExtendedAccessManager in handling permissions of the current Session.
InvocationContext is a collection of properties which reflect the state of a current Session. At present, it contains: the type of the current operation on Session (event), current Item (javax.jcr.Item) on which this operation is performed and the current eXo Container
SetAccessContextAction implements Action and may be called by SessionActionInterceptor as a reaction of some events - usually before writing methods and after reading (getNode(), getProperty() etc). This SetAccessContextAction calls the AccessManager.setContext(InvocationContext context) method which sets the ThreadLocal invocation context for the current call.
Action's Configuration may look like as the following:
<value>
<object type="org.exoplatform.services.jcr.impl.ext.action.ActionConfiguration">
<field name="eventTypes"><string>addNode,read</string></field>
<field name="workspace"><string>production</string></field >
<field name="actionClassName"><string>org.exoplatform.services.jcr.ext.SetAccessContextAction</string></field>
</object>
</value>The InvocationContext contains the current Item, the current ExoContainer and the current EventType is like below:
public interface InvocationContext extends ContextBase {
Item getCurrentItem();
int getEventType();
ExoContainer getContainer();
}By default, all Workspaces share an AccessManager instance, created by RepositoryService at the startup (DefaultAccessManagerImpl) which supports default access control policy as described in the Access Control chapter. Custom Access Control policy can be applied to certain Workspace configuring access-manager element inside workspace as follows:
<workspace name="ws">
...
<!-- after query-handler element -->
<access-manager class="org.exoplatform.services.jcr.CustomAccessManagerImpl">
<properties>
<property name="someProperty" value="value"/>
...
</properties>
</access-manager>
...
</workspace>When implementing AccessManager, hasPermission() method has to be overriden so it uses the current invocation context at its discretion. For instance, it may get the current node's metadata and make a decision if the current User has appropriate permissions. Use Invocation Context's runtime properties to make a decision about current Session's privileges (see the Example below)
Simplified Sequence diagram for the Session.getNode() method (as an Example):
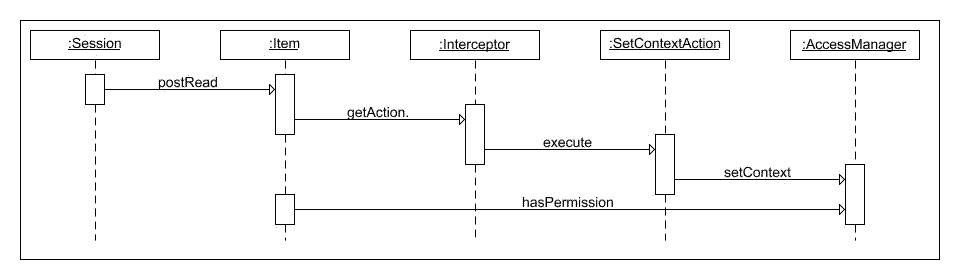
The sample CustomAccessManagerImpl below extends the default access manager and uses some DecisionMakingService in the overloaded hasPermission method to find out if a current user has permission to use current item, event type, userID and some parameter of AccessManager. To make this Access manager work, it is necessary to configure it in jcr configuration as mentioned in Custom Extended Access Manager and SetAccessContextAction should be configured in the way mentioned in Access Context Action.
public class CustomAccessManagerImpl extends AccessManager {
private String property;
private DecisionMakingService theService;
public CustomAccessManagerImpl (RepositoryEntry config, WorkspaceEntry wsConfig,
OrganizationService orgService, DecisionMakingService someService) throws RepositoryException {
super(config, wsConfig, orgService);
this.property = wsConfig.getAccessManager().getParameterValue("someParam");
this.theService = someService;
}
@Override
public boolean hasPermission(AccessControlList acl, String[] permission, String userId) {
// call the default permission check
if (super.hasPermission(acl, permission, userId)) {
Item curItem = context().getCurrentItem();
int eventType = context().getEventType();
ExoContainer container = context().getContainer();
// call some service's method
return theService.makeDecision(curItem, eventType, userId, property);
} else {
return false;
}
}
}Link Producer Service - a simple service, which generates an .lnk file, that is compatible with the Microsoft link file format. It is an extension of the REST Framework library and is included into the WebDav service. On dispatching a GET request the service generates the content of an .lnk file, which points to a JCR resource via WebDav.
Link Producer has a simple configuration like described below:
<component> <key>org.exoplatform.services.webdav.lnkproducer.LnkProducer</key> <type>org.exoplatform.services.webdav.lnkproducer.LnkProducer</type> </component>
When using JCR the resource can be addressed by WebDav reference
(href) like
http://host:port/rest/jcr/repository/workspace/somenode/somefile.extention
, the link servlet must be called for this resource by several hrefs, like
http://localhost:8080/rest/lnkproducer/openit.lnk?path=/repository/workspace/somenode/somefile.extention
Please note, that when using the portal mode the REST servlet is
available using a reference (href) like
http://localhost:8080/portal/rest/...
The name of the .lnk file can be any. But for the best compatibility it must be the same as the name of the JCR resource.
Here is a step by step sample of a use case of the link producer... At first, type valid reference to the resource, using the link producer in your browser's adress field:
Internet Explorer will give a dialog window requesting to Open a file or to Save it. Click on the Open button
In Windows system an .lnk file will be downloaded and opened with the application which is registered to open the files, which are pointed to by the .lnk file. In case of a .doc file, Windows opens Microsoft Office Word which will try to open a remote file (test0000.doc). Maybe it will be necessary to enter USERNAME and PASSWORD.
Next, you will be able to edit the file in Microsoft Word.
The Link Producer is necessary for opening/editing and then saving the remote files in Microsoft Office Word, without any further updates.
Also the Link Producer can be referenced to from an HTML page. If page contains code like
<a href="http://localhost:8080/rest/lnkproducer/openit.lnk?path=/repository/workspace/somenode/somefile.extention">somefile.extention</a>
the file "somefile.extention" will open directly.
Binary large object (BLOB) properties can be stored in two ways in the eXo JCR: in the database with items information or in an external storage on host file system. These options can be configured at workspace in the repository configuration file (repository-configuration.xml in portal and exo-jcr-config.xml in standalone mode). The database storage can't be completely disabled.
The first case is optimal for most of cases which you do not use very large values or/and do not have too many BLOBs. The configuration of the BLOBs size and BLOBs quantity in a repository depend on your database features and hardware.
The second case is to use an external values storage. The storage can be located on a built-in hard disk or on an attached storage. But in any cases, you should access to the storage as if it was a regular file(s). The external value storage is optional and can be enabled in a database configuration.
Note
eXo JCR Repository service configuration basics is discussed in Configuration
Database and workspace persistence storage configuration is discussed in JDBC Data Container config
Configuration details for External Value Storages.
In both of the cases, a developer can set/update the binary Property via Node.setProperty(String, InputStream), Property.setValue(InputStream) as described in the spec JSR-170. Also, there is the setter with a ready Value object (obtainer from ValueFactory.createValue(InputStream)).
An example of a specification usage.
// Set the property value with given stream content.
Property binProp = node.setProperty("BinData", myDataStream);
// Get the property value stream.
InputStream binStream = binProp.getStream();
// You may change the binary property value with a new Stream, all data will be replaced
// with the content from the new stream.
Property updatedBinProp = node.setProperty("BinData", newDataStream);
// Or update an obtained property
updatedBinProp.setValue(newDataStream);
// Or update using a Value object
updatedBinProp.setValue(ValueFactory.createValue(newDataStream));
// Get the updated property value stream.
InputStream newStream = updatedBinProp.getStream();But if you need to update the property sequentially and with partial content, you have no choice but to edit the whole data stream outside and get it back to the repository each time. In case of really large-sized data, the application will be stuck and the productivity will decrease a lot. JCR stream setters will also check constraints and perform common validation each time.
There is a feature of the eXo JCR extension that can be used for binary values partial writing without frequent session level calls. The main idea is to use a value object obtained from the property as the storage of the property content while writing/reading during runtime.
According to the spec JSR-170, Value interface provides the state of property that can't be changed (edited). The eXo JCR core provides ReadableBinaryValue and EditableBinaryValue interfaces which themselves extend JCR Value. The interfaces allow the user to partially read and change a value content.
ReadableBinaryValue value can be casted from any value, i.e. String, Binary, Date etc.
// get the property value of type PropertyType.STRING
ReadableBinaryValue extValue = (ReadableBinaryValue) node.getProperty("LargeText").getValue();
// read 200 bytes to a destStream from the position 1024 in the value content
OutputStream destStream = new FileOutputStream("MyTextFile.txt");
extValue.read(destStream, 200, 1024);But EditableBinaryValue can be applied only to properties of type PropertyType.BINARY. In other cases, a cast to EditableBinaryValue will fail.
After the value has been edited, the EditableBinaryValue value can be applied to the property using the standard setters (Property.setValue(Value), Property.setValues(Value), Node.setProperty(String, Value) etc.). Only after the EditableBinaryValue has been set to the property, it can be obtained in this session by getters (Property.getValue(), Node.getProperty(String) etc.).
The user can obtain an EditableBinaryValue instance and fill it with data in an interaction manner (or any other appropriated to the targets) and return (set) the value to the property after the content will be done.
// get the property value for PropertyType.BINARY Property
EditableBinaryValue extValue = (EditableBinaryValue) node.getProperty("BinData").getValue();
// update length bytes from the stream starting from the position 1024 in existing Value data
extValue.update(dataInputStream, dataLength, 1024);
// apply the edited EditableBinaryValue to the Property
node.setProperty("BinData", extValue);
// save the Property to persistence
node.save();A practical example of the iterative usage. In this example, the value is updated with data from the sequence of streams and after the update is done, the value will be applied to the property and be visible during the session.
// update length bytes from the stream starting from the particular
// position in the existing Value data
int dpos = 1024;
while (source.dataAvailable()) {
extValue.update(source.getInputStream(), source.getLength(), dpos);
dpos = dpos + source.getLength();
}
// apply the edited EditableBinaryValue to the Property
node.setProperty("BinData", extValue);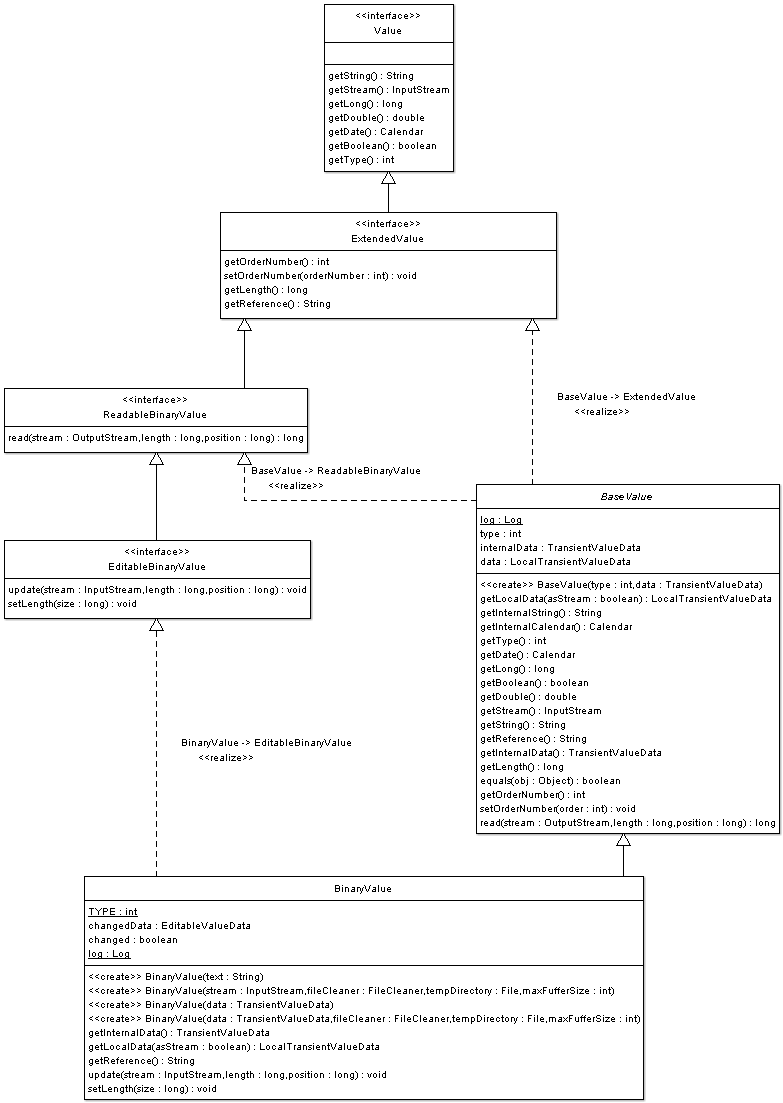
ReadableBinaryValue has one method to read Value.
Read length bytes is counted from the binary value to the given position into the stream.
long read(OutputStream stream, long length, long position) throws IOException, RepositoryException ;
EditableBinaryValue has two methods to edit value.
Update with length bytes from the specified stream to this value data at a position. If the position is lower than 0, the IOException exception will be thrown. If the position is higher than the current Value length, the Value length will be increased at first to the size of position and length bytes will be added after the position.
void update(InputStream stream, long length, long position) throws IOException;
Set the length of the Value in bytes to the specified size. If the size is lower than 0, the IOException exception will be thrown. This operation can be used to extend or truncat the Value size. This method is used internally in the update operation in case of extending the size to the given position.
void setLength(long size) throws IOException;
An application can perform JCR binary operations more flexibly and will have less I/O and CPU usage using these methods.
* Java Community Process: JSR 170 and JSR 283
* Tom Wheeler, The Java Content Repository (2007)
* Roy T. Fielding, JSR 170 Overview: Standardizing the Content Repository Interface (March 13, 2005)
* David Nuescheler and Janus Boye, JSR-170 What's in it for me? (April 20, 2005)
* Benjamin Mestrallet, Tuan Nguyen, Gennady Azarenkov, Francois Moron and Brice Revenant eXo Platform v2, Portal, JCR, ECM, Groupware and Business Intelligence (January 2006)
Cover the requirements on Workspace Data Container implementation
Describe container life cycle
Describe relations between container and high-level DataManagers
Workspace Data Container (container) serves Repository Workspace persistent storage. WorkspacePersistentDataManager (data manager) uses container to perform CRUD operation on the persistent storage. Accessing to the storage in the data manager is implemented via storage connection obtained from the container (WorkspaceDataContainer interface implemenatiton). Each connection represents a transaction on the storage. Storage Connection (connection) should be an implementation of WorkspaceStorageConnection.
Container acts as a factory of a new storage connections. Usually, this method is designed to be synchronized to avoid possible concurrent issues.
WorkspaceStorageConnection openConnection() throws RepositoryException;
Open read-only WorkspaceStorageConnection. Read-only connections can be potentially a bit faster in some cases.
WorkspaceStorageConnection openConnection(boolean readOnly) throws RepositoryException;
*EXPERIMENTAL*
Read-only WorkspaceStorageConnection is experimental feature and not currently handled in JCR. Actually, such connections didn't prove their performance, so JCR Core doesn't use them.
Storage connection might also be reused. This means reuse of physical resource (e.g. JDBC Connection) allocated by one connection in another. This feature is used in a data manager for saving ordinary and system changes on the system Workspace. But the reuse is an optional feature and it can work, otherwise a new connection will open.
WorkspaceStorageConnection reuseConnection(WorkspaceStorageConnection original) throws RepositoryException;
When checking Same-Name Siblings (SNS) existence, JCR Core can use new connection or not. This is defined via Workspace Data Container configuration and retrieved by using a special method.
boolean isCheckSNSNewConnection();
Container initialization is only based on a configuration. After the container has been created, it's not possible to change parameters. Configuration consists of implementation class and set of properties and Value Storages configuration.
Container provides optional special mechanism for Value storing. It's possible to configure external Value Storages via container configuration (available only via configuration). Value Storage works as fully independent pluggable storage. All required parameters storage obtains from its configuration. Some storages are possible for one container. Configuration describes such parameters as ValueStoragePluginimplementation class, set of implementation specific properties and filters. The filters declares criteria for Value matching to the storage. Only matched Property Values will be stored. So, in common case, the storage might contains only the part of the Workspace content. Value Storages are very useful for BLOB storing. E.g. storing on the File System instead of a database.
Container obtains Values Storages from ValueStoragePluginProvider component. Provider acts as a factory of Value channels (ValueIOChannel). Channel provides all CRUD operation for Value Storage respecting the transaction manner of work (how it can be possible due to implementation specifics of the storages).
Container is used for read and write operations by data manager. Read operations (getters) uses connection once and close it on the finally. Write operations performs in commit method as a sequence of creating/ updating calls and final commit (or rollback on error). Writes uses one connection (or two - another for system workspace) per commit call. One connection guaranties transaction support for write operations. Commit or rollback should free/clean all resources consumed by the container (connection).
Connection creation and reuse should be a thread safe operation. Connection provides CRUD operations support on the storage.
Read ItemData from the storage by item identifier.
ItemData getItemData(String identifier) throws RepositoryException, IllegalStateException;
Read ItemData from the storage by using the parent and name of the item, related to the parent location.
ItemData getItemData(NodeData parentData, QPathEntry name) throws RepositoryException,IllegalStateException;
Read List of NodeData from the storage by using the parent location of the item.
List<NodeData> getChildNodesData(NodeData parent) throws RepositoryException, IllegalStateException;
Reads List of PropertyData from the storage by using the parent location of the item.
List<PropertyData> getChildPropertiesData(NodeData parent) throws RepositoryException, IllegalStateException;
Reads List of PropertyData with empty ValueData from the storage by using the parent location of the item.
This methiod specially dedicated for non-content modification operations (e.g. Items delete).
List<PropertyData> listChildPropertiesData(NodeData parent) throws RepositoryException, IllegalStateException;
Reads List of PropertyData from the storage by using the parent location of the item.
It's REFERENCE type: Properties referencing Node with given nodeIdentifier. See more in javax.jcr.Node.getReferences()
List<PropertyData> getReferencesData(String nodeIdentifier) throws RepositoryException,IllegalStateException,UnsupportedOperationException;
Add single NodeData.
void add(NodeData data) throws RepositoryException,UnsupportedOperationException,InvalidItemStateException,IllegalStateException;
Add single PropertyData.
void add(PropertyData data) throws RepositoryException,UnsupportedOperationException,InvalidItemStateException,IllegalStateException;
Update NodeData.
void update(NodeData data) throws RepositoryException,UnsupportedOperationException,InvalidItemStateException,IllegalStateException;
Update PropertyData.
void update(PropertyData data) throws RepositoryException,UnsupportedOperationException,InvalidItemStateException,IllegalStateException;
Rename NodeData by using Node identifier and new name and indexing from the data.
void rename(NodeData data) throws RepositoryException,UnsupportedOperationException,InvalidItemStateException,IllegalStateException;
Delete NodeData.
void delete(NodeData data) throws RepositoryException,UnsupportedOperationException,InvalidItemStateException,IllegalStateException;
Delete PropertyData.
void delete(PropertyData data) throws RepositoryException,UnsupportedOperationException,InvalidItemStateException,IllegalStateException;
Persist changes and closes connection. It can be database transaction commit for instance etc.
void commit() throws IllegalStateException, RepositoryException;
Refuse persistent changes and closes connection. It can be database transaction rollback for instance etc.
void rollback() throws IllegalStateException, RepositoryException;
All methods throw IllegalStateException if connection is closed. UnsupportedOperationException if the method is not supported (e.g. JCR Level 1 implementation etc). RepositoryException if some errors occur during preparation, validation or persistence.
Container has to care about storage consistency (JCR constraints) on write operations: (InvalidItemStateException should be thrown according the spec). At least, the following checks should be performed:
On ADD errors
Parent not found. Condition: Parent ID (Item with ID is not exists).
Item already exists. Condition: ID (Item with ID already exists).
Item already exists. Condition: Parent ID, Name, Index (Item with parent ID, name and index already exists).
On DELETE errors
Item not found. Condition ID.
Can not delete parent till children exists.
On UPDATE errors
Item not found. Condition ID.
Item already exists with higher Version. Condition: ID, Version (Some Session had updated Item with ID prior this update).
The container (connection) should implement consistency of Commit (Rollback) in transaction manner. I.e. If a set of operations was performed before the future Commit and another next operation fails. It should be possible to rollback applied changes using Rollback command.
Container implementation obtains Values Storages option via ValueStoragePluginProvider component. Provider acts as a factory of Value channels (ValueIOChannel) and has two methods for this purpose:
Return ValueIOChannel matched this property and valueOrderNumer. Null will be returned if no channel matches.
ValueIOChannel getApplicableChannel(PropertyData property, int valueOrderNumer) throws IOException;
Return ValueIOChannel associated with given storageId.
ValueIOChannel getChannel(String storageId) throws IOException, ValueStorageNotFoundException;
There is also method for consistency check, but this method doesn't used anywhere and storage implementations has it empty.
Provider implementation should use ValueStoragePlugin abstract class as a base for all storage implementations. Plugin provides support for provider implementation methods. Plugin's methods should be implemented:
Initialize this plugin. Used at start time in ValueStoragePluginProvider.
public abstract void init(Properties props, ValueDataResourceHolder resources) throws RepositoryConfigurationException, IOException;
Open ValueIOChannel.Used in ValueStoragePluginProvider.getApplicableChannel(PropertyData, int) and getChannel(String)
public abstract ValueIOChannel openIOChannel() throws IOException;
Return true if this storage has the same storageId.
public abstract boolean isSame(String valueDataDescriptor);
Channel should implement ValueIOChannel interface. CRUD operation for Value Storage:
Read Property value.
ValueData read(String propertyId, int orderNumber, int maxBufferSize) throws IOException;
Add or update Property value.
void write(String propertyId, ValueData data) throws IOException;
Delete Property all values.
void delete(String propertyId) throws IOException;
Read a bit about the contract.
Start new implementation project pom.xml with org.exoplatform.jcr parent. (optional, but will makes the development easy)
Update sources of JCR Core and read JavaDoc on org.exoplatform.services.jcr.storage.WorkspaceDataContainer and org.exoplatform.services.jcr.storage.WorkspaceStorageConnection interfaces. They are the main part for the implemenation.
Look at org.exoplatform.services.jcr.impl.dataflow.persistent.WorkspacePersistentDataManager sourcecode, check how data menager uses container and its connections (see in save() method)
Create WorkspaceStorageConnection dummy implementation class. It's freeform class, but to be close to the eXo JCR, check how to implement JDBC or SimpleDB containers ( org.exoplatform.services.jcr.impl.storage.jdbc.JDBCStorageConnection and org.exoplatform.services.jcr.aws.storage.sdb.SDBWorkspaceStorageConnection). Take in account usage of ValueStoragePluginProvider in both implementations.Value storage is an useful option for production versions. But leave it to the end of implementation work.
Create the connection implementation unit tests to play TTD. (optional, but takes many benefits for the process)
Implement CRUD starting from the read to write etc. Test the methods by using the external implementation ways of data read/write in your backend.
When all methods of the connection done start WorkspaceDataContainer. Container class is very simple, it's like a factory for the connections only.
Care about container reuseConnection(WorkspaceStorageConnection) method logic. For some backends, it cab be same as openConnection(), but for some others, it's important to reuse physical backend connection, e.g. to be in the same transaction - see JDBC container.
It's almost ready to use in data manager. Start another test and go on.
When the container will be ready to run as JCR persistence storage (e.g. for this level testing), it should be configured in Repository configuration.
Assuming that our new implementation class name is org.project.jcr.impl.storage.MyWorkspaceDataContainer.
<repository-service default-repository="repository">
<repositories>
<repository name="repository" system-workspace="production" default-workspace="production">
.............
<workspaces>
<workspace name="production">
<container class="org.project.jcr.impl.storage.MyWorkspaceDataContainer">
<properties>
<property name="propertyName1" value="propertyValue1" />
<property name="propertyName2" value="propertyValue2" />
.......
<property name="propertyNameN" value="propertyValueN" />
</properties>
<value-storages>
.......
</value-storages>
</container>
Container can be configured by using set properties.
Value storages are pluggable to the container but if they are used, the container implementation should respect set of interfaces and external storage usage principles.
If the container has ValueStoragePluginProvider (e.g. via constructor), it's just a few methods to manipulate external Values data.
// get channel for ValueData write (add or update)
ValueIOChannel channel = valueStorageProvider.getApplicableChannel(data, i);
if (channel == null) {
// write
channel.write(data.getIdentifier(), vd);
// obtain storage id, id can be used for linkage of external ValueData and PropertyData in main backend
String storageId = channel.getStorageId();
}
....
// delete all Property Values in external storage
ValueIOChannel channel = valueStorageProvider.getChannel(storageId);
channel.delete(propertyData.getIdentifier());
....
// read ValueData from external storage
ValueIOChannel channel = valueStorageProvider.getChannel(storageId);
ValueData vdata = channel.read(propertyData.getIdentifier(), orderNumber, maxBufferSize);
Important
After a sequence of write and/or delete operations on the storage channel, the channel should be committed (or rolled back on an error). See ValueIOChannel.commit() and ValueIOChannel.rollback() and how those methods are used in JDBC container.
It is special service for data removal from database. The article shortly describes the principles of work DBCleaner under all databases
Note
Code that invokes methods of DBCleanService must have JCRRuntimePermissions.MANAGE_REPOSITORY_PERMISSION permission;
There are several methods of DBCleanerService:
Table 50.1. API
| public static void cleanWorkspaceData(WorkspaceEntry wsEntry) | Clean workspace data from database |
| public static void cleanRepositoryData(RepositoryEntry repoEntry) | Cleanup repository data from database |
| public static DBCleaner getWorkspaceDBCleaner(Connection jdbcConn, WorkspaceEntry wsEntry) | Returns database cleaner of workspace. |
| public static DBCleaner getRepositoryDBCleaner(Connection jdbcConn, RepositoryEntry repoEntry) | Returns database cleaner of repository. Returns null in case of multi-db configuration. |
The cleaning is a part of restoring from backup and it is used in the following restore phases:
Table 50.2. Relations between restore phases and what is called on DBCleaner
| clean | dbCleaner.executeCleanScripts(); |
| restore | does nothing with DBCleaner |
| commit | dbCleaner.executeCommitScripts(); connection.commit(); |
| rollback | connection.rollback(); dbCleaner.executeRollbackScripts(); connection.commit(); |
Different approaches are used for database cleaning depending on database and JCR configuration.
Simple cleaning records from JCR table is used in case of single-db configuration.
Table 50.3. PostgreSQL, DB2 and MSSQL
| executeCleanScripts() | removing all records from the database. Foreign key of JCR_SITEM table is also removed |
| executeCommitScripts() | adding foreign key |
| executeRollbackScripts() |
Table 50.4. Oracle, Sybase, HSQLDB, MySQL
| executeCleanScripts() | removing all records from the database. Foreign key of JCR_SITEM table is also removed |
| executeCommitScripts() | adding foreign key |
| executeRollbackScripts() | adding foreign key |
Either removing or renaming JCR tables are used in case of mult-db configuration.
Table 50.5. PostgreSQL, DB2 and MSSQL
| executeCleanScripts() | removing tables JCR_MVALUE, JCR_MREF, JCR_MITEM, initializing new tables without foreign key of JCR_MITEM table, adding root |
| executeCommitScripts() | adding foreign key |
| executeRollbackScripts() |
Table 50.6. Oracle, Sybase, HSQLDB, MySQL
| executeCleanScripts() | renaming current tables, initializing new tables without foreign key of JCR_MITEM table, adding root node, removing indexes for some databases |
| executeCommitScripts() | renaming tables, adding indexes |
| executeRollbackScripts() | removing previously renamed tables, adding indexes, adding foreign key |
This guide will show you possible ways of improving JCR performance.
It is intended to GateIn Administrators and those who wants to use JCR features.
EC2 network: 1Gbit
Servers hardware:
| 7.5 GB memory |
| 4 EC2 Compute Units (2 virtual cores with 2 EC2 Compute Units each) |
| 850 GB instance storage (2×420 GB plus 10 GB root partition) |
| 64-bit platform |
| I/O Performance: High |
| API name: m1.large |
Note
NFS and statistics (cacti snmp) server were located on one physical server.
JBoss AS configuration
JAVA_OPTS: -Dprogram.name=run.sh -server -Xms4g -Xmx4g
-XX:MaxPermSize=512m -Dorg.jboss.resolver.warning=true
-Dsun.rmi.dgc.client.gcInterval=3600000
-Dsun.rmi.dgc.server.gcInterval=3600000 -XX:+UseParallelGC
-Djava.net.preferIPv4Stack=true
Benchmark test using webdav (Complex read/write load test (benchmark)) with 20K same file. To obtain per-operation results we have used custom output from the testscase threads to CSV file.
Read operation:
| Warm-up iterations: 100 |
| Run iterations: 2000 |
| Background writing threads: 25 |
| Reading threads: 225 |
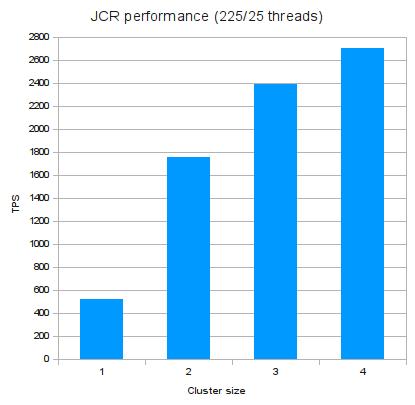
Table 51.1.
| Nodes count | tps | Responses >2s | Responses >4s |
|---|---|---|---|
| 1 | 523 | 6.87% | 1.27% |
| 2 | 1754 | 0.64% | 0.08% |
| 3 | 2388 | 0.49% | 0.09% |
| 4 | 2706 | 0.46% | 0.1% |
Read operaion with more threads:
| Warm-up iterations: 100 |
| Run iterations: 2000 |
| Background writing threads: 50 |
| Reading threads: 450 |
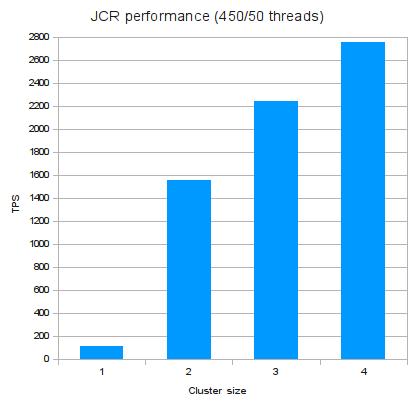
You can use maxThreads parameter to
increase maximum amount of threads that can be launched in AS instance.
This can improve performance if you need a high level of concurrency.
also you can use -XX:+UseParallelGC java directory to use
paralel garbage collector.
Tip
Beware of setting maxThreads too big,
this can cause OutOfMemoryError. We've
got it with maxThreads=1250 on such machine:
| 7.5 GB memory |
| 4 EC2 Compute Units (2 virtual cores with 2 EC2 Compute Units each) |
| 850 GB instance storage (2×420 GB plus 10 GB root partition) |
| 64-bit platform |
| I/O Performance: High |
| API name: m1.large |
| java -Xmx 4g |
Cache size
JCR-cluster implementation is built using JBoss Cache as distributed, replicated cache. But there is one particularity related to remove action in it. Speed of this operation depends on the actual size of cache. As many nodes are currently in cache as much time is needed to remove one particular node (subtree) from it.
Eviction
Manipulations with eviction wakeUpInterval
value doestn't affect on performance. Performance results with values
from 500 up to 3000 are approximately equal.
Transaction Timeout
Using short timeout for long transactions such as Export/Import,
removing huge subtree defined timeout may cause
TransactionTimeoutException. [TODO] put
recomended timeout value
For performance it is better to have loadbalacer, DB server and shared NFS on different computers. If in some reasons you see that one node gets more load than others you can decrease this load using load value in load balancer.
JGroups configuration
It's recommended to use "multiplexer stack" feature present in JGroups. It is set by default in eXo JCR and offers higher performance in cluster, using less network connections also. If there are two or more clusters in your network, please check that they use different ports and different cluster names.
Write performance in cluster
Exo JCR implementation uses Lucene indexing engine to provide search capabilities. But Lucene brings some limitations for write operations: it can perform indexing only in one thread. Thats why write performance in cluster is not higher than in singleton environment. Data is indexed on coordinator node, so increasing write-load on cluster may lead to ReplicationTimeout exception. It occurs because writing threads queue in the indexer and under high load timeout for replication to coordinator will be exceeded.
Taking in consideration this fact, it is recommended to exceed
replTimeout value in cache configurations in case
of high write-load.
Replication timeout
Some operations may take too much time. So if you get
ReplicationTimeoutException try
increasing replication timeout:
<clustering mode="replication" clusterName="${jbosscache-cluster-name}">
...
<sync replTimeout="60000" />
</clustering>
value is set in miliseconds.
PermGen space size
If you intend to use Infinispan, you will have to increase the PermGen size to at least 256 Mo due to the latest versions of JGroups that are needed by Infinispan (please note that Infinspan is only dedicated to the community for now, no support will be provided). In case, you intend to use JBoss Cache, you can keep on using JGroups 2.6.13.GA which means that you don't need to increase the PermGen size.
Table of Contents
- 52. eXo Kernel
- 53. ExoContainer info
- 54. Service Configuration for Beginners
- 55. Service Configuration in Detail
- 56. Container Configuration
- 57. Inversion Of Control
- 58. Services Wiring
- 59. Component Plugin Priority
- 60. Understanding the ListenerService
- 61. Initial Context Binder
- 62. Job Scheduler Service
- 63. eXo Cache
- 64. TransactionService
- 64.1. Base information
- 64.2. Existing TransactionService implementations
- 64.2.1. JOTM in standalone mode
- 64.2.2. Generic TransactionService based on the TransactionManagerLookup of JBoss Cache
- 64.2.3. Specific GenericTransactionService for JBoss Cache and Arjuna
- 64.2.4. Generic TransactionService based on the TransactionManagerLookup of Infinispan
- 64.2.5. Specific GenericTransactionService for Infinispan and Arjuna
- 64.2.6. A very specific TransactionService for JBoss AS
- 64.2.7. TransactionsEssentials in standalone mode
- 65. The data source provider
- 66. JNDI naming
- 67. Logs configuration
- 68. Manageability
- 69. ListenerService
- 70. RPC Service
eXo Kernel is the basis of all eXo platform products and modules. Any component available in eXo Platform is managed by the Exo Container, our micro container responsible for gluing the services through dependency injection
Therefore, each product is composed of a set of services and plugins registered to the container and configured by XML configuration files.
The Kernel module also contains a set of very low level services.
ExoContainer is the main IoC kernel object. The container is responsible for loading services/components.
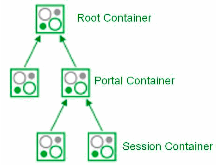
Related documents
We are going to talk about service configuration. You will learn about modes, services and containers, you will find out where the service configuration files have to be placed and you will also see the overriding mechanism of configurations. Finally you will understand how the container creates the services one after the other and what Inversion of Control really means.
By reading this article you are already glancing at the heart of eXo Kernel.
Even you will read in this article to open the directory "exo-tomcat", you may have installed eXo Portal on any application server, just replace "exo-tomcat" by your folder name.
Note
If you only installed the all-in-one package for the eXo Portal, the folder paths are a slightly different. You have to replace exo-tomcat by exo-eXoPortal-2.5.1-tomcat (obviously depending on your version). Furthermore the webapps are delivered as war files.
You certainly already discovered eXo's fisheye URL (eXo is open source!) - https://anonsvn.jboss.org/repos/exo-jcr/ - which allows you to surf in the source code of all classes, if you wish to do so.
Nearly everything could be considered a service! To get a better idea, let's look into the exo-tomcat/lib folder where you find all deployed jar files.

For example you find services for databases, caching, ldap and ftp:
exo.core.component.database-2.1.3.jar
exo.kernel.component.cache-2.0.5.jar
exo.core.component.organization.ldap-2.1.3.jar
exo.jcr.component.ftp-1.10.1.jar
Of course, there are many more services, in fact a lot of these jar files are services. To find out you have to open the jar file and then look into its /conf or /conf/portal directory. Only if there is a file named configuration.xml, you are sure to have found a service.
Note
Why are there 2 different places to look for the
configuration.xml? Because the /conf directory is
used by the RootContainer and the
/conf/portal directory is used by the
PortalContainer. Later you will see more details
about these containers.
Interface - Implementation It's important to get the idea that you separate the interface and implementation for a service. That is a good concept to reduce dependencies on specific implementations. This concept is well known for JDBC. If you use standard JDBC (=interface), you can connect any database (=implementation) to your application. In a similar way any service in eXo is defined by a java interface and may have many different implementations. The service implementation is then injected by a container into the application.
Singleton Each service has to be implemented as a singleton, which means that each service is created only once - in one single instance.
Service = Component You always read about services, and you imagine a service as a large application which does big things, but that's not true, a service can be just a little component that reads or transforms a document, therefore the term component is often used instead of service - so bear in mind: a service and a component can safely be considered to be the same thing.
The jar file of a service should contain a default configuration, you find this configuration in the configuration.xml file which comes with the jar. A configuration file can specify several services, as well as there can be several services in one jar file.
For example open the exo.kernel.component.cache-2.0.5.jar file and inside this jar open /conf/portal/configuration.xml. You will see:
<component> <key>org.exoplatform.services.cache.CacheService</key> <type>org.exoplatform.services.cache.impl.CacheServiceImpl</type> ...
Here you will note that a service is specified between the
<component> tags. Each service has got a key,
which defines the kind of service. As you imagine the content of the
<key> tag matches the qualified
java interface name
(org.exoplatform.services.cache.CacheService) of
the service. The specific implementation class of the
CacheService is defined in the
<type> tag.
Parameters You have already opened
some configuration files and seen that there are more than just
<key> and <type>
tags. You can provide your service with init parameters. The parameters
can be simple parameters, properties, or object-params. There are also
plugins and they are special because the container
calls the setters of your service in order to inject
your plugin in your service (called setter injection)
see Service
Configuration in Detail. In general your service is free to use
init parameters, they are not required.
If you ever need to create your own service, the minimum is to create an empty interface, an empty class and a constructor for your class - that's all. Ok, you also should put your class and the interface in a jar file and add a default configuration file.
One important thing to understand concerns execution modes. There are only two modes:
Portal mode: The service runs embedded in the eXo Portal. In this mode a
PortalContaineris used.Standalone mode: The service runs without the portal. For example, the JCR service can run standalone, and also the eXo Portlet Container. This mode is used by eXo developers for unit tests. As the name suggests a
StandaloneContaineris used.
In order to access to a service you need to use a Container. Just open https://anonsvn.jboss.org/repos/exo-jcr/kernel/trunk/exo.kernel.container/src/main/java/org/exoplatform/container.
Among the classes you see in this directory, you only will be interested in these three container types:
RootContainer: This is a base container. This container plays an important role during startup, but you should not use it directly.
PortalContainer: Created at the startup of the portal web application (in the init() method of the PortalController servlet)
StandaloneContainer: A context independent eXo Container. The
StandaloneContaineris also used for unit tests.
Use only one container Even if there are several container types you always use exactly one. The RootContainer is never directly used and it depends on the execution mode if you use the PortalContainer or the StandaloneContainer. You will ask how to find out the execution mode in my application and how to manage these two modes. It's easy, you don't have to worry about it because the ExoContainerContext class provides a static method that allows you to get the right container from anywhere (see info box).
PicoContainer All containers
inherit from the ExoContainer class which itself inherits from a
PicoContainer. PicoContainer is a framework
which allows eXo to apply the IoC (Inversion of Control)
principles. The precise implementations of any service is unknown at
compile time. Various implementations can be used, eXo supplies different
implementations but they also may be delivered by other vendors. The
decision which service to use during runtime is made in configuration
files.
These configuration files are read by the container, the container adds all services to a list or more exactly a java HashTable. It's completely correct to suppose that the configuration.xml you already saw plays an important role. But there are more places where a configuration for a service can be defined as you see in the next chapter.
Note
"In your java code you have to use
ExoContainer myContainer = ExoContainerContext.getCurrentContainer();
in order to access to the current container. It doesn't greatly matter
to your application if the current container is a
PortalContainer or a
StandaloneContainer. Once you have your container
you may access to any service registered in this container using
MyService myService = (MyService) myContainer.getComponentInstance(MyService.class);
You easily realize that MyService.class is the
name of the service interface.
The configuration you find inside the jar file is considered as the default configuration. If you want to override this default configuration you can do it in different places outside the jar. When the container finds several configurations for the same service, the configuration which is found later replaces completely the one found previously. Let's call this the configuration override mechanism.
As both containers, PortalContainer and StandaloneContainer, depend on the RootContainer, we will start by looking into this one.
The retrieval sequence in short:
Services default
RootContainerconfigurations from JAR files /conf/configuration.xmlExternal
RootContainerconfiguration, to be found at exo-tomcat/exo-conf/configuration.xml
Note
Naturally you always have to replace
exo-tomcat by your own folder name. In case of
a Java Standalone application you have to use the
user.dir JVM system property value.
HashTable The
RootContainer creates a java
HashTable which contains key-value pairs for the
services. The qualified interface name of each service is used as key
for the hashtable. Hopefully you still remember that the
<key> tag of the configuration file
contains the interface name? The value of each hashtable pair is an
object that contains the service configuration (yes, this means the
whole structure between the <component>
tags of your configuration.xml file).
The RootContainer runs over all jar files
you find in exo-tomcat/lib and looks if there is a
configuration file at /conf/configuration.xml, the
services configured in this file are added to the hashtable. That way -
at the end of this process - the default configurations for all services
are stored in the hashtable.
Note
What happens if the same service - recognized by the same qualified interface name - is configured in different jars? As the service only can exist one time the configuration of the jar found later overrides the previous configuration. You know that the loading order of the jars is unpredictable you must not depend on this.
If you wish to provide your own configurations for one or several services, you can do it in a general configuration file that has to be placed at exo-tomcat/exo-conf/configuration.xml. Do not search for such a file on your computer - you won't find one, because this option is not used in the default installation. Here again the same rule applies: The posterior configuration replaces the previous one.
The further configuration retrieval depends on the container type.
The PortalContainer takes the hashtable filled by the RootContainer and continues to look in some more places. Here you get the opportunity to replace RootContainer configurations by those which are specific to your portal. Again, the configurations are overridden whenever necessary.
In short PortalContainer configurations are retrieved in the following lookup sequence :
Take over the configurations of the RootContainer
Default PortalContainer configurations from all JAR files (folder /conf/portal/configuration.xml)
Web application configurations from the portal.war file - or the portal weppapp (folder /WEB-INF/conf/configuration.xml)
External configuration for services of a named portal, it will be found at exo-tomcat/exo-conf/portal/$portal_name/configuration.xml (as of Portal 2.5)
You see, here the /conf/portal/configuration.xml file of each jar enters the game, they are searched at first. Next, there is nearly always a configuration.xml in the portal.war file (or in the portal webapp folder), you find this file at /WEB-INF/conf/configuration.xml. If you open it, you will find a lot of import statements that point to other configuration files in the same portal.war (or portal webapp).
Multiple Portals Be aware that
you might set up several different portals ("admin", "mexico", etc.),
and each of these portals will use a different PortalContainer. And each
of these PortalContainers can be configured separately. As of eXo Portal
2.5 you also will be able to provide configurations from outside the
jars and wars or webapps. Put a configuration file in
exo-tomcat/exo-conf/portal/$portal_name/configuration.xml
where $portal_name is the name of the portal you
want to configure for . But normally you only have one portal which is
called "portal" so you use
exo-tomcat/exo-conf/portal/portal/configuration.xml.
Note
As of eXo Portal 2.5 you can override the external configuration location with the system property exo.conf.dir. If the property exists its value will be used as path to the eXo configuration directory, that means this is an alternative to exo-tomcat/exo-conf. Just put this property in the command line: java -Dexo.conf.dir=/path/to/exo/conf or use eXo.bat or eXo.sh. In this particular use case, you have no need to use any prefixes in your configuration file to import other files. For example, if your configuration file is exo-tomcat/exo-conf/portal/PORTAL_NAME/configuration.xml and you want to import the configuration file exo-tomcat/exo-conf/portal/PORTAL_NAME/mySubConfDir/myConfig.xml, you can do it by adding <import>mySubConfDir/myConfig.xml</import> to your configuration file.
Note
Under JBoss application server exo-conf will be looked up in directory described by JBoss System property jboss.server.config.url. If the property is not found or empty exo-jboss/exo-conf will be asked (since kernel 2.0.4).
In the same way as the PortalContainer the StandaloneContainer takes over the configuration of the RootContainer. After that our configuration gets a little bit more tricky because standalone containers can be initialized using an URL. This URL contains a link to an external configuration. As you probably never need a standalone configuration you can safely jump over the remaining confusing words of this chapter.
After taking over RootContainer's configuration, there are three cases which depend on the URL initialization, :
Independent configuration by URL No other configuration file is taken in consideration. The configuration provided by the URL is used without any default configs. That means that the container creates a new empty hashtable and not any bit of previous configuration is used. Apply the following code to do this:
StandaloneContainer.setConfigurationURL(containerConf);
Additional configuration by URL The StandaloneContainer is initialized very similar to the PortalContainer, but the last step is slightly different. A configuration file that is provided by the URL is used to replace some of the service configurations.The code looks like this:
StandaloneContainer.addConfigurationURL(containerConf);
Take over the configurations of the RootContainer
Default StandaloneContainer configurations from JAR files (folder /conf/portal/configuration.xml)
Web application configurations from WAR files (folder /WEB-INF/conf/configuration.xml)
Configuration from added URL containerConf overrides only services configured in the file
File based configuration No URL is involved, in this case the sequence is:
Take over the configurations of the RootContainer
Default StandaloneContainer configurations from JAR files (folder /conf/portal/configuration.xml)
Web applications configurations from WAR files (folder /WEB-INF/conf/configuration.xml)
External configuration for StandaloneContainer services, it will be found at $user_home/exo-configuration.xml. If $user_home/exo-configuration.xml doesn't exist and the StandaloneContainer instance obtained with the dedicated configuration classloader the container will try to retrieve the resource conf/exo-configuration.xml within the given classloader (user_home is your home directory like "C:/Documents and Settings/Smith").
As you have already learned the services are all singletons, so that
the container creates only one single instance of each container. The
services are created by calling the constructors (called
constructor injection). If there are only
zero-arguments constructors (Foo public Foo(){}) there are no
problems to be expected. That's easy.
This JDBC implementation of BaseOrganizationService interface has only one constructor:
public OrganizationServiceImpl(ListenerService listenerService, DatabaseService dbService);
You see this service depends on two other services. In order to be
able to call this constructor the container first needs a
ListenerService and a
DatabaseService. Therefore these services must be
instantiated before BaseOrganizationService,
because BaseOrganizationService depends on
them.
For this purpose the container first looks at the constructors of
all services and creates a matrix of service dependencies in order to call
the services in a proper order. If for any reason there are
interdependencies or circular dependencies you will get a java
Exception. In this way the dependencies
are injected by the container.
Note
What happens if one service has more than one constructor? The container always tries first to use the constructor with a maximum of arguments, if this is not possible the container continues step by step with constructors that have less arguments until arriving at the zero-argument constructor (if there is one).
Your service can implement the startable interface which defines a start() and a stop() method. These methods are called by the container at the beginning and the end of the container's lifecycle. This way the lifecycle of your service is managed by the container.
Retrospection Do you remember your last project where you had some small components and several larger services? How was this organized? Some services had their own configuration files, others had static values in the source code. Most components were probably tightly coupled to the main application, or you called static methods whenever you needed a service in your java class. Presumably you even copied the source code of an earlier project in order to adapt the implementation to your needs. In short:
Each of your service had a proprietary configuration mechanism.
The service lifecycles were managed inside of each service or were arbitrary.
The dependencies between your services were implementation-dependent and tightly coupled in your source code.
New Approach You have seen that eXo uses the Inversion of Control (IoC) pattern which means that the control of the services is given to an independent outside entity, in this case a container. Now the container takes care of everything:
The configuration is injected by external configuration files.
The lifecycle is managed from outside, because the constructors are called by the container. You can achieve an even finer lifecycle management if you use the startable interface.
The dependencies are injected by the service instantiation process.
Dependency Injection You also saw two types of dependency injections:
Constructor injection: The constructor is called by the container.
Setter injection: Whenever you use external-plugins to provide your service with plugins (see Service Configuration in Detail.
There are two more Containers called
RepositoryContainer and
WorkspaceContainer. These are specificities of
eXo JCR, for the sake of simplicity. You don't need them.
In some case the developer of a service does not expect that there will be several implementations for his service. Therefore he does not create an interface. In this case the configuration looks like this:
<key>org.exoplatform.services.database.jdbc.DBSchemaCreator</key> <type>org.exoplatform.services.database.jdbc.DBSchemaCreator</type>
The key and type tags contain equally the qualified class name.
Since kernel 2.0.7 and 2.1, it is possible to use system properties in literal values of component configuration meta data. Thus it is possible to resolve properties at runtime instead of providing a value at packaging time.
<component>
...
<init-params>
<value-param>
<name>simple_param</name>
<value>${simple_param_value}</value>
</value-param>
<properties-param>
<name>properties_param</name>
<property name="value_1" value="properties_param_value_1"/>
<property name="value_2" value="${properties_param_value_2}"/>
</properties-param>
<object-param>
<name>object_param</name>
<object type="org.exoplatform.xml.test.Person">
<field name="address"><string>${person_address}</string></field>
<field name="male"><boolean>${person_male}</boolean></field>
<field name="age"><int>${age_value}</int></field>
<field name="size"><double>${size_value}</double></field>
</object>
</object-param>
</init-params>
</component>In case you need to solve problems with your service
configuration, you have to know from which JAR/WAR causes your troubles.
Add the JVM system property
org.exoplatform.container.configuration.debug to
your eXo.bat or eXo.sh file (exo-tomcat/bin/).
set EXO_CONFIG_OPTS="-Dorg.exoplatform.container.configuration.debug"
If this property is set the container configuration manager reports during startup the configuration retrieval process to the standard output (System.out).
...... Add configuration jar:file:/D:/Projects/eXo/dev/exo-working/exo-tomcat/lib/exo.kernel.container-trunk.jar!/conf/portal/configuration.xml Add configuration jar:file:/D:/Projects/eXo/dev/exo-working/exo-tomcat/lib/exo.kernel.component.cache-trunk.jar!/conf/portal/configuration.xml Add configuration jndi:/localhost/portal/WEB-INF/conf/configuration.xml import jndi:/localhost/portal/WEB-INF/conf/common/common-configuration.xml import jndi:/localhost/portal/WEB-INF/conf/database/database-configuration.xml import jndi:/localhost/portal/WEB-INF/conf/ecm/jcr-component-plugins-configuration.xml import jndi:/localhost/portal/WEB-INF/conf/jcr/jcr-configuration.xml ......
Do you feel an expert now? Not yet. Get a deeper look and read this Services Wiring article. You read so much about configuration, that you should wonder what the XML Schema of the configuration file looks like.
If you wish to see a examples of service configurations you should study the Core. Where you find descriptions of some eXo's core services. Finally you might wish to read more about PicoContainer.
Related documents
This article shows how to setup a sample service with some configurations and how to access to the configuration parameters. The later chapters describe all details of the configuration file (parameters, object-params, plugins, imports, etc.), it also shows how to access the configuration values. You may consider this article as a reference, but you can also use this article as a tutorial and read it from the beginning to the end.
You should have read and understood Service Configuration for Beginners. Obviously you should know java and xml. We are working with examples that are created for teaching reasons only and you will see extracts from the eXo Products default installation. When reading this article, you do not forget that the terms service and component are interchangeable in eXo Products.
Imagine that you are working for a publishing company called "La Verdad" that is going to use eXo platform. Your boss asks you be able to calculate the number of sentences of an article.
You remember in eXo product everything is a service so you decide to create a simple class. In the future, you want to be able to plug different implementations of your service, so that you should define an interface that defines your service.
package com.laverdad.services;
public interface ArticleStatsService {
public abstract int calcSentences(String article);
}A very simple implementation:
public class ArticleStatsServiceImpl implements ArticleStatsService {
public int calcSentences(String article) {
throw new RuntimeException("Not implemented");
}
}That's it! You see there are no special prerequisites for a service.
You should already have prepared your working environment, where you have a base folder (let's call it our service base folder). If you wish to try out this example create this class in the com/laverdad/services/ArticleStatsService subfolder.
When creating a service, you also should declare its existence to the Container, therefore you create a first simple configuration file. Copy the following code to a file called "configuration.xml" and place this file in a /conf subdirectory of your service base folder. As you already know the container looks for a "/conf/configuration.xml" file in each jar-file.
<?xml version="1.0" encoding="UTF8"?>
<configuration
xmlns:xsi="http://www.w3.org/2001/XMLSchema-instance"
xsi:schemaLocation="http://www.exoplatform.org/xml/ns/kernel_1_2.xsd http://www.exoplatform.org/xml/ns/kernel_1_2.xsd"
xmlns="http://www.exoplatform.org/xml/ns/kernel_1_2.xsd">
<component>
<key>com.laverdad.services.ArticleStatsService</key>
<type>com.laverdad.services.ArticleStatsServiceImpl</type>
</component>
</configuration>Note
You are correctly using the namespace of the configuration
schema ( http://www.exoplatform.org/xml/ns/kernel_1_2.xsd).
Most of the configuration schema is explained in this article,
therefore you do not need to open and understand the schema. For
backward compatibility it is not necessary to declare the
schema.
When eXo kernel reads a configuration, it loads the file from the kernel jar using the classloader and does not use an internet connection to resolve the file.
You see your service has a configuration file, but you wonder how the file could possibly access to its configuration. Imagine that you are asked to implement two different calculation methods: fast and exact.
You create one init parameter containing the calculation methods. For the exact method, you wish to configure more details for the service. Let's enhance the word service configuration file:
<component>
<key>com.laverdad.services.ArticleStatsService</key>
<type>com.laverdad.services.ArticleStatsServiceImpl</type>
<init-params>
<value-param>
<name>calc-method</name>
<description>calculation method: fast, exact</description>
<value>fast</value>
</value-param>
<properties-param>
<name>details-for-exact-method</name>
<description>details for exact phrase counting</description>
<property name="language" value="English" />
<property name="variant" value="us" />
</properties-param>
</init-params>
</component>Note
When configuring your service, you are totally free. You can provide as many value-param, property-param, and properties you wish and you can give them any names or values. You only must respect the xml structure.
Now let's see how our service can read this configuration. The implementation of the calcSentences() method serves just as a simple example. It's up to your imagination to implement the exact method.
public class ArticleStatsServiceImpl implements ArticleStatsService {
private String calcMethod = "fast";
private String variant = "French";
private String language = "France";
public ArticleStatsServiceImpl(InitParams initParams) {
super();
calcMethod = initParams.getValueParam("calc-method").getValue();
PropertiesParam detailsForExactMethod = initParams.getPropertiesParam("details-for-exact-method");
if ( detailsForExactMethod != null) {
language = detailsForExactMethod.getProperty("language");
variant = detailsForExactMethod.getProperty("variant");
}
}
public int calcSentences(String article) {
if (calcMethod == "fast") {
// just count the number of periods "."
int res = 0;
int period = article.indexOf('.');
while (period != -1) {
res++;
article = article.substring(period+1);
period = article.indexOf('.');
}
return res;
}
throw new RuntimeException("Not implemented");
}
}You see you just have to declare a parameter of org.exoplatform.container.xml.InitParams in your constructor. The container provides an InitParams object that correspond to the xml tree of init-param.
As you want to follow the principle of Inversion of Control, you must not access the service directly. You need a Container to access the service.
With this command you get your current container:
ExoContainer myContainer = ExoContainerContext.getCurrentContainer();
This might be a PortalContainer or a StandaloneContainer, dependant on the execution mode in which you are running your application.
Whenever you need one of the services that you have configured use the method:
myContainer.getComponentInstance(class)
In our case:
ArticleStatsService statsService = (ArticleStatsService) myContainer.getComponentInstance(ArticleStatsService.class);
Recapitulation:
package com.laverdad.common;
import org.exoplatform.container.ExoContainer;
import org.exoplatform.container.ExoContainerContext;
import com.laverdad.services.*;
public class Statistics {
public int makeStatistics(String articleText) {
ExoContainer myContainer = ExoContainerContext.getCurrentContainer();
ArticleStatsService statsService = (ArticleStatsService)
myContainer.getComponentInstance(ArticleStatsService.class);
int numberOfSentences = statsService.calcSentences(articleText);
return numberOfSentences;
}
public static void main( String args[]) {
Statistics stats = new Statistics();
String newText = "This is a normal text. The method only counts the number of periods. "
+ "You can implement your own implementation with a more exact counting. "
+ "Let`s make a last sentence.";
System.out.println("Number of sentences: " + stats.makeStatistics(newText));
}
}If you test this sample in standalone mode, you need to put all jars of eXo Kernel in your buildpath, furthermore picoContainer is needed.
There is an value-param example:
<component>
<key>org.exoplatform.portal.config.UserACL</key>
<type>org.exoplatform.portal.config.UserACL</type>
<init-params>
...
<value-param>
<name>access.control.workspace</name>
<description>groups with memberships that have the right to access the User Control Workspace</description>
<value>*:/platform/administrators,*:/organization/management/executive-board</value>
</value-param>
...
</component>The UserACL class accesses to the value-param in its constructor.
package org.exoplatform.portal.config;
public class UserACL {
public UserACL(InitParams params) {
UserACLMetaData md = new UserACLMetaData();
ValueParam accessControlWorkspaceParam = params.getValueParam("access.control.workspace");
if(accessControlWorkspaceParam != null) md.setAccessControlWorkspace(accessControlWorkspaceParam.getValue());
...Properties are name-value pairs. Both the name and the value are Java Strings.
Here you see the hibernate configuration example:
<component>
<key>org.exoplatform.services.database.HibernateService</key>
<type>org.exoplatform.services.database.impl.HibernateServiceImpl</type>
<init-params>
<properties-param>
<name>hibernate.properties</name>
<description>Default Hibernate Service</description>
<property name="hibernate.show_sql" value="false"/>
<property name="hibernate.cglib.use_reflection_optimizer" value="true"/>
<property name="hibernate.connection.url" value="jdbc:hsqldb:file:../temp/data/exodb"/>
<property name="hibernate.connection.driver_class" value="org.hsqldb.jdbcDriver"/>
...
</properties-param>
</init-params>
</component>In the org.exoplatform.services.database.impl.HibernateServiceImpl you will find that the name "hibernate.properties" of the properties-param is used to access the properties.
package org.exoplatform.services.database.impl;
public class HibernateServiceImpl implements HibernateService, ComponentRequestLifecycle {
public HibernateServiceImpl(InitParams initParams, CacheService cacheService) {
PropertiesParam param = initParams.getPropertiesParam("hibernate.properties");
...
}Let's have a look at the configuration of the LDAPService. It's not important to know LDAP, we only discuss the parameters.
<component>
<key>org.exoplatform.services.ldap.LDAPService</key>
<type>org.exoplatform.services.ldap.impl.LDAPServiceImpl</type>
<init-params>
<object-param>
<name>ldap.config</name>
<description>Default ldap config</description>
<object type="org.exoplatform.services.ldap.impl.LDAPConnectionConfig">
<field name="providerURL"><string>ldaps://10.0.0.3:636</string></field>
<field name="rootdn"><string>CN=Administrator,CN=Users,DC=exoplatform,DC=org</string></field>
<field name="password"><string>exo</string></field>
<field name="version"><string>3</string></field>
<field name="minConnection"><int>5</int></field>
<field name="maxConnection"><int>10</int></field>
<field name="referralMode"><string>ignore</string></field>
<field name="serverName"><string>active.directory</string></field>
</object>
</object-param>
</init-params>
</component>You see here an object-param is being used to pass the parameters inside an object (actually a java bean). It consists of a name, a description and exactly one object. The object defines the type and a number of fields.
Here you see how the service accesses the object:
package org.exoplatform.services.ldap.impl;
public class LDAPServiceImpl implements LDAPService {
...
public LDAPServiceImpl(InitParams params) {
LDAPConnectionConfig config = (LDAPConnectionConfig) params.getObjectParam("ldap.config")
.getObject();
...The passed object is LDAPConnectionConfig which is a classic java bean. It contains all fields and also the appropriate getters and setters (not listed here). You also can provide default values. The container creates a new instance of your bean and calls all setters whose values are configured in the configuration file.
package org.exoplatform.services.ldap.impl;
public class LDAPConnectionConfig {
private String providerURL = "ldap://127.0.0.1:389";
private String rootdn;
private String password;
private String version;
private String authenticationType = "simple";
private String serverName = "default";
private int minConnection;
private int maxConnection;
private String referralMode = "follow";
...You see that the types (String, int) of the fields in the configuration correspond with the bean. A short glance in the kernel_1_0.xsd file let us discover more simple types:
string, int, long, boolean, date, double
Have a look on this type test xml file: https://anonsvn.jboss.org/repos/exo-jcr/kernel/trunk/exo.kernel.container/src/test/resources/object.xml.
You also can use java collections to configure your service. In order to see an example, let's open the database-organization-configuration.xml file. This file defines a default user organization (users, groups, memberships/roles) of your portal. They use component-plugins which are explained later. You wil see that object-param is used again.
There are two collections: The first collection is an ArrayList. This ArrayList contains only one value, but there could be more. The only value is an object which defines the field of the NewUserConfig$JoinGroup bean.
The second collection is a HashSet that is a set of strings.
<component-plugin>
<name>new.user.event.listener</name>
<set-method>addListenerPlugin</set-method>
<type>org.exoplatform.services.organization.impl.NewUserEventListener</type>
<description>this listener assign group and membership to a new created user</description>
<init-params>
<object-param>
<name>configuration</name>
<description>description</description>
<object type="org.exoplatform.services.organization.impl.NewUserConfig">
<field name="group">
<collection type="java.util.ArrayList">
<value>
<object type="org.exoplatform.services.organization.impl.NewUserConfig$JoinGroup">
<field name="groupId"><string>/platform/users</string></field>
<field name="membership"><string>member</string></field>
</object>
</value>
</collection>
</field>
<field name="ignoredUser">
<collection type="java.util.HashSet">
<value><string>root</string></value>
<value><string>john</string></value>
<value><string>marry</string></value>
<value><string>demo</string></value>
<value><string>james</string></value>
</collection>
</field>
</object>
</object-param>
</init-params>
</component-plugin>Let's look at the org.exoplatform.services.organization.impl.NewUserConfig bean:
public class NewUserConfig {
private List role;
private List group;
private HashSet ignoredUser;
...
public void setIgnoredUser(String user) {
ignoredUser.add(user);
...
static public class JoinGroup {
public String groupId;
public String membership;
...
}You see the values of the HashSet are set one by one by the container, and it's the responsibility of the bean to add these values to its HashSet.
The JoinGroup object is just an inner class and implements a bean of its own. It can be accessed like any other inner class using NewUserConfig.JoinGroup.
The External Plugin allows you to add configuration on the fly.
As you have carefully read Service Configuration for Beginners you know that normally newer configurations always replaces previous configurations. An external plugin allows you to add configuration without replacing previous configurations.
That can be interesting if you adapt a service configuration for your project-specific needs (country, language, branch, project, etc.).
Let's have a look at the configuration of the TaxonomyPlugin of the CategoriesService:
<external-component-plugins>
<target-component>org.exoplatform.services.cms.categories.CategoriesService</target-component>
<component-plugin>
<name>predefinedTaxonomyPlugin</name>
<set-method>addTaxonomyPlugin</set-method>
<type>org.exoplatform.services.cms.categories.impl.TaxonomyPlugin</type>
<init-params>
<value-param>
<name>autoCreateInNewRepository</name>
<value>true</value>
</value-param>
<value-param>
<name>repository</name>
<value>repository</value>
</value-param>
<object-param>
<name>taxonomy.configuration</name>
<description>configuration predefined taxonomies to inject in jcr</description>
<object type="org.exoplatform.services.cms.categories.impl.TaxonomyConfig">
<field name="taxonomies">
<collection type="java.util.ArrayList">
<!-- cms taxonomy -->
<value>
<object type="org.exoplatform.services.cms.categories.impl.TaxonomyConfig$Taxonomy">
<field name="name"><string>cmsTaxonomy</string></field>
<field name="path"><string>/cms</string></field>
</object>
</value>
<value>
<object type="org.exoplatform.services.cms.categories.impl.TaxonomyConfig$Taxonomy">
<field name="name"><string>newsTaxonomy</string></field>
<field name="path"><string>/cms/news</string></field>
</object>
</value>
</field>
</object>
</object-param>
</init-params>
</component-plugin>
<external-component-plugins>The <target-component> defines the service for which the plugin is defined. The configuration is injected by the container using a method that is defined in <set-method>. The method has exactly one argument of the type org.exoplatform.services.cms.categories.impl.TaxonomyPlugin:
addTaxonomyPlugin(org.exoplatform.services.cms.categories.impl.TaxonomyPlugin plugin)
The content of <init-params> corresponds to the structure of the TaxonomyPlugin object.
Note
You can configure the component CategoriesService using the addTaxonomyPlugin as often as you wish, you can also call addTaxonomyPlugin in different configuration files. The method addTaxonomyPlugin is then called several times, everything else depends on the implementation of the method.
The import tag allows to import other configuration files using URLs that are configuration manager specific, for more details about what are the supported URLs please refer to the next section about the configuration manager.
See below an example of a configuration file composed of imports:
<import>war:/conf/common/common-configuration.xml</import> <import>war:/conf/common/logs-configuration.xml</import> <import>war:/conf/database/database-configuration.xml</import> <import>war:/conf/jcr/jcr-configuration.xml</import> <import>war:/conf/common/portlet-container-configuration.xml</import> ...
Since kernel 2.0.7 and 2.1, it is possible to use system properties in literal values of component configuration meta data. This makes it possible to resolve properties at runtime instead of providing a value at packaging time.
See below an example of a configuration file based on system properties:
<component>
<key>org.exoplatform.services.database.HibernateService</key>
<jmx-name>database:type=HibernateService</jmx-name>
<type>org.exoplatform.services.database.impl.HibernateServiceImpl</type>
<init-params>
<properties-param>
<name>hibernate.properties</name>
<description>Default Hibernate Service</description>
...
<property name="hibernate.connection.url" value="${connectionUrl}"/>
<property name="hibernate.connection.driver_class" value="${driverClass}"/>
<property name="hibernate.connection.username" value="${username}"/>
<property name="hibernate.connection.password" value="${password}"/>
<property name="hibernate.dialect" value="${dialect}"/>
...
</properties-param>
</init-params>
</component>As these are system properties you use the -D command: java -DconnectionUrl=jdbc:hsqldb:file:../temp/data/exodb -DdriverClass=org.hsqldb.jdbcDriver Or better use the parameters of eXo.bat / eXo.sh when you start eXo Portal: set EXO_OPTS="-DconnectionUrl=jdbc:hsqldb:file:../temp/data/exodb -DdriverClass=org.hsqldb.jdbcDriver"
The configuration manager allows you to find files using URL with special prefixes that we describe in details below.
war: try to find the file using the Servlet Context of your portal.war or any web applications defined as PortalContainerConfigOwner, so for example in case of the portal.war if the URL is war:/conf/common/portlet-container-configuration.xml it will try to get the file from portal.war/WEB-INF/conf/common/portlet-container-configuration.xml.
jar or classpath: you can use this prefix to find a file that is accessible using the ClassLoader. For example jar:/conf/my-file.xml will be understood as try to find conf/my-file.xml from the ClassLoader.
file: this prefix will indicate the configuration manager that it needs to interprete the URL as an absolute path. For example file:///path/to/my/file.xml will be understood as an obsolute path.
Without prefixes: it will be understood as a relative path from the parent directory of the last processed configuration file. For example, if the configuration manager is processing the file corresonding to the URL file:///path/to/my/configuration.xml and in this file you import dir/to/foo.xml, the configuration manager will try to get the file from file:///path/to/my/dir/to/foo.xml. Please note that it works also for other perfixes. In case you use the configuration manager in a component to get a file like the example below, it will depend on the mode and will be relative to the following directories:
<component> <key>org.exoplatform.services.resources.LocaleConfigService</key> <type>org.exoplatform.services.resources.impl.LocaleConfigServiceImpl</type> <init-params> <value-param> <name>locale.config.file</name> <value>war:/conf/common/locales-config.xml</value> </value-param> </init-params> </component>In standalone mode: it will be a relative path to where it can find the file exo-configuration.xml knowing that the file is first checked in the user directory, if it cannot be found there, it will check in the exo configuration directory and if it still cannot be found it will try to find conf/exo-configuration.xml in the ClassLoader.
In portal mode: it will be a relative path to the exo configuration directory in case of the RootContainer (assuming that a file configuration.xml exists there otherwise it would be hard to know) and from ${exo-configuration-directory}/portal/${portal-container-name} in case of the PortalContainer (assuming that a file configuration.xml exists there otherwise it would be hard to know).
Note
For more details about the exo configuration directory please refer to the chapter Configuration Retrieval.
eXo Portal uses PicoContainer, which implements the Inversion of Control (IoC) design pattern. All eXo containers inherit from a PicoContainer. There are mainly two eXo containers used, each of them can provide one or several services. Each container service is delivered in a JAR file. This JAR file may contain a default configuration. The use of default configurations is recommended and most services provide it.
When a Pico Container searches for services and its configurations, each configurable service may be reconfigured to override default values or set additional parameters. If the service is configured in two or more places the configuration override mechanism will be used.
Confused? - You might be interested in the Service Configuration for Beginners article, which explains the basics.
To be effective, the namespace URI
http://www.exoplatform.org/xml/ns/kernel_1_2.xsd must be target
namespace of the XML configuration file.
<configuration xmlns:xsi="http://www.w3.org/2001/XMLSchema-instance"
xsi:schemaLocation="http://www.exoplatform.org/xml/ns/kernel_1_2.xsd http://www.exoplatform.org/xml/ns/kernel_1_2.xsd"
xmlns="http://www.exoplatform.org/xml/ns/kernel_1_2.xsd">
...
</configuration>Note
Any values in the configuration files can be created thanks to variables since the eXo kernel resolves them, for example the following configuration will be well interpreted:
<configuration
xmlns:xsi="http://www.w3.org/2001/XMLSchema-instance"
xsi:schemaLocation="http://www.exoplatform.org/xml/ns/kernel_1_2.xsd http://www.exoplatform.org/xml/ns/kernel_1_2.xsd"
xmlns="http://www.exoplatform.org/xml/ns/kernel_1_2.xsd">
<import>${db.configuration.path}/db.xml</import>
<import>${java.io.tmpdir}/bindfile.xml</import>
<import>simple.xml</import>
</configuration>The variables that are supported, are System properties and variables that are specific to your portal container, see next chapters for more details.
eXo Portal uses PicoContainer, which implements the Inversion of Control (IoC) design pattern. All eXo containers inherit from a PicoContainer. There are mainly two eXo containers used, each of them can provide one or several services. Each container service is delivered in a JAR file. This JAR file may contain a default configuration. The use of default configurations is recommended and most of services provide it.
When a Pico Container searches for services and its configurations, each configurable service may be reconfigured to override default values or set additional parameters. If the service is configured in two or more places, the configuration override mechanism will be used.
The container performs the following steps to make eXo Container configuration retrieval, depending on the container type.
The container is initialized by looking into different locations. This container is used by portal applications. Configurations are overloaded in the following lookup sequence:
Services default
RootContainerconfigurations from JAR files /conf/configuration.xmlExternal
RootContainerconfiguration can be found at $AS_HOME/exo-conf/configuration.xmlServices default
PortalContainerconfigurations from JAR files /conf/portal/configuration.xmlWeb applications configurations from WAR files /WEB-INF/conf/configuration.xml
External configuration for services of named portal can be found at $AS_HOME/exo-conf/portal/$PORTAL_NAME/configuration.xml
The container is initialized by looking into different locations. This container is used by non portal applications. Configurations are overloaded in the following lookup sequence:
Services default
RootContainerconfigurations from JAR files /conf/configuration.xmlExternal
RootContainerconfiguration can be found at $AS_HOME/exo-conf/configuration.xmlServices default
StandaloneContainerconfigurations from JAR files /conf/portal/configuration.xmlWeb applications configurations from WAR files /WEB-INF/conf/configuration.xml
Then depending on the
StandaloneContainerconfiguration URL initialization:if configuration URL was initialized to be added to services defaults, as below:
// add configuration to the default services configurations from JARs/WARs StandaloneContainer.addConfigurationURL(containerConf);
Configuration from added URL containerConf will override only services configured in the file
if configuration URL not initialized at all, it will be found at $AS_HOME/exo-configuration.xml. If $AS_HOME/exo-configuration.xml doesn't exist the container will try find it at $AS_HOME/exo-conf/exo-configuration.xml location and if it's still not found and the
StandaloneContainerinstance obtained with the dedicated configurationClassLoaderthe container will try to retrieve the resource conf/exo-configuration.xml within the givenClassLoader.
Note
$AS_HOME - application server home directory, or user.dir JVM system property value in case of Java Standalone application. The application server home is:
For
Jonas, the value of the variable ${jonas.base}.For
Jetty, the value of the variable ${jetty.home}.For
Websphere, the value of the variable ${was.install.root}.For
Weblogic, the value of the variable ${wls.home}.For
Glassfish, the value of the variable ${com.sun.aas.instanceRoot}.For
Tomcat, the value of the variable ${catalina.home}.For
JBoss AS, the value of the variable ${jboss.server.config.url} if the exo-conf directory can be found there otherwise it will be the value of the variable ${jboss.home.dir}.
Note
$PORTAL_NAME - portal web application name.
Note
External configuration location can be overridden with System property exo.conf.dir. If the property exists, its value will be used as path to eXo configuration directory, i.e. to $AS_HOME/exo-conf alternative. E.g. put property in command line java -Dexo.conf.dir=/path/to/exo/conf. In this particular use case, you do not need to use any prefix to import other files. For instance, if your configuration file is $AS_HOME/exo-conf/portal/PORTAL_NAME/configuration.xml and you want to import the configuration file $AS_HOME/exo-conf/portal/PORTAL_NAME/mySubConfDir/myConfig.xml, you can do it by adding <import>mySubConfDir/myConfig.xml</import> to your configuration file.
Note
The name of the configuration folder that is by default "exo-conf", can be changed thanks to the System property exo.conf.dir.name.
Note
The search looks for a configuration file in each JAR/WAR available from the classpath using the current thread context classloader. During the search these configurations are added to a set. If the service was configured previously and the current JAR contains a new configuration of that service the latest (from the current JAR/WAR) will replace the previous one. The last one will be applied to the service during the services start phase.
Warning
Take care to have no dependencies between configurations from JAR files (/conf/portal/configuration.xml and /conf/configuration.xml) since we have no way to know in advance the loading order of those configurations. In other words, if you want to overload some configuration located in the file /conf/portal/configuration.xml of a given JAR file, you must not do it from the file /conf/portal/configuration.xml of another JAR file but from another configuration file loaded after configurations from JAR files /conf/portal/configuration.xml.
After the processing of all configurations available in system, the container will initialize it and start each service in order of the dependency injection (DI).
The user/developer should be careful when configuring the same service in different configuration files. It's recommended to configure a service in its own JAR only. Or, in case of a portal configuration, strictly reconfigure the services in portal WAR files or in an external configuration.
There are services that can be (or should be) configured more than one time. This depends on business logic of the service. A service may initialize the same resource (shared with other services) or may add a particular object to a set of objects (shared with other services too). In the first case, it's critical who will be the last, i.e. whose configuration will be used. In the second case, it's no matter who is the first and who is the last (if the parameter objects are independent).
In case of problems with service configuration, it's important to know from which JAR/WAR it comes. For that purpose, the JVM system property org.exoplatform.container.configuration.debug can be used.
java -Dorg.exoplatform.container.configuration.debug ...
If the property is enabled, the container configuration manager will log the configuration adding process at INFO level.
......
Add configuration jar:file:/D:/Projects/eXo/dev/exo-working/exo-tomcat/lib/exo.kernel.container-trunk.jar!/conf/portal/configuration.xml
Add configuration jar:file:/D:/Projects/eXo/dev/exo-working/exo-tomcat/lib/exo.kernel.component.cache-trunk.jar!/conf/portal/configuration.xml
Add configuration jndi:/localhost/portal/WEB-INF/conf/configuration.xml
import jndi:/localhost/portal/WEB-INF/conf/common/common-configuration.xml
import jndi:/localhost/portal/WEB-INF/conf/database/database-configuration.xml
import jndi:/localhost/portal/WEB-INF/conf/ecm/jcr-component-plugins-configuration.xml
import jndi:/localhost/portal/WEB-INF/conf/jcr/jcr-configuration.xml
......The effective configuration of the StandaloneContainer, RootContainer and/or PortalContainer can be known thanks to the method getConfigurationXML() that is exposed through JMX at the container's level. This method will give you the effective configuration in XML format that has been really interpreted by the kernel. This could be helpful to understand how a given component or plugin has been initialized.
Since eXo JCR 1.12, we added a set of new features that have been designed to extend portal applications such as GateIn.
A ServletContextListener called
org.exoplatform.container.web.PortalContainerConfigOwner
has been added in order to notify the application that a given web
application provides some configuration to the portal container, and
this configuration file is the file
WEB-INF/conf/configuration.xml available in the
web application itself.
If your war file contains some configuration to add to the
PortalContainer simply add the following lines in your
web.xml file.
<?xml version="1.0" encoding="ISO-8859-1" ?>
<!DOCTYPE web-app PUBLIC "-//Sun Microsystems, Inc.//DTD Web Application 2.3//EN"
"http://java.sun.com/dtd/web-app_2_3.dtd">
<web-app>
...
<!-- ================================================================== -->
<!-- LISTENER -->
<!-- ================================================================== -->
<listener>
<listener-class>org.exoplatform.container.web.PortalContainerConfigOwner</listener-class>
</listener>
...
</web-app>A ServletContextListener called
org.exoplatform.container.web.PortalContainerCreator
has been added in order to create the current portal containers that
have been registered. We assume that all the web applications have
already been loaded before calling
PortalContainerCreator.contextInitialized[.]
Note
In GateIn, the PortalContainerCreator is
already managed by the file
starter.war/ear.
Now we can define precisely a portal container and its
dependencies and settings thanks to the
PortalContainerDefinition that currently contains the
name of the portal container, the name of the rest context, the name
of the realm, the web application dependencies ordered by loading
priority (i.e. the first dependency must be loaded at first and so
on..) and the settings.
To be able to define a PortalContainerDefinition,
we need to ensure first of all that a
PortalContainerConfig has been defined at the
RootContainer level, see an example below:
<component>
<!-- The full qualified name of the PortalContainerConfig -->
<type>org.exoplatform.container.definition.PortalContainerConfig</type>
<init-params>
<!-- The name of the default portal container -->
<value-param>
<name>default.portal.container</name>
<value>myPortal</value>
</value-param>
<!-- The name of the default rest ServletContext -->
<value-param>
<name>default.rest.context</name>
<value>myRest</value>
</value-param>
<!-- The name of the default realm -->
<value-param>
<name>default.realm.name</name>
<value>my-exo-domain</value>
</value-param>
<!-- Indicates whether the unregistered webapps have to be ignored -->
<value-param>
<name>ignore.unregistered.webapp</name>
<value>true</value>
</value-param>
<!-- The default portal container definition -->
<!-- It cans be used to avoid duplicating configuration -->
<object-param>
<name>default.portal.definition</name>
<object type="org.exoplatform.container.definition.PortalContainerDefinition">
<!-- All the dependencies of the portal container ordered by loading priority -->
<field name="dependencies">
<collection type="java.util.ArrayList">
<value>
<string>foo</string>
</value>
<value>
<string>foo2</string>
</value>
<value>
<string>foo3</string>
</value>
</collection>
</field>
<!-- A map of settings tied to the default portal container -->
<field name="settings">
<map type="java.util.HashMap">
<entry>
<key>
<string>foo5</string>
</key>
<value>
<string>value</string>
</value>
</entry>
<entry>
<key>
<string>string</string>
</key>
<value>
<string>value0</string>
</value>
</entry>
<entry>
<key>
<string>int</string>
</key>
<value>
<int>100</int>
</value>
</entry>
</map>
</field>
<!-- The path to the external properties file -->
<field name="externalSettingsPath">
<string>classpath:/org/exoplatform/container/definition/default-settings.properties</string>
</field>
</object>
</object-param>
</init-params>
</component>Table 56.1. Descriptions of the fields of
PortalContainerConfig
| default.portal.container (*) | The name of the default portal container. This field is optional. |
| default.rest.context (*) | The name of the default rest
ServletContext. This field is optional. |
| default.realm.name (*) | The name of the default realm. This field is optional. |
| ignore.unregistered.webapp (*) | Indicates whether the unregistered webapps have to be
ignored. If a webapp has not been registered as a dependency
of any portal container, the application will use the value of
this parameter to know what to do:
|
| default.portal.definition | The definition of the default portal container. This
field is optional. The expected type is
org.exoplatform.container.definition.PortalContainerDefinition
that is described below. Allow the parameters defined in this
default PortalContainerDefinition will be the
default values. |
Note
All the value of the parameters marked with a (*) can be defined thanks to System properties like any values in configuration files but also thanks to variables loaded by the PropertyConfigurator. For example in GateIn by default, it would be all the variables defined in the file configuration.properties.
A new PortalContainerDefinition can be defined at
the RootContainer level thanks to an external plugin,
see an example below:
<external-component-plugins>
<!-- The full qualified name of the PortalContainerConfig -->
<target-component>org.exoplatform.container.definition.PortalContainerConfig</target-component>
<component-plugin>
<!-- The name of the plugin -->
<name>Add PortalContainer Definitions</name>
<!-- The name of the method to call on the PortalContainerConfig in order to register the PortalContainerDefinitions -->
<set-method>registerPlugin</set-method>
<!-- The full qualified name of the PortalContainerDefinitionPlugin -->
<type>org.exoplatform.container.definition.PortalContainerDefinitionPlugin</type>
<init-params>
<object-param>
<name>portal</name>
<object type="org.exoplatform.container.definition.PortalContainerDefinition">
<!-- The name of the portal container -->
<field name="name">
<string>myPortal</string>
</field>
<!-- The name of the context name of the rest web application -->
<field name="restContextName">
<string>myRest</string>
</field>
<!-- The name of the realm -->
<field name="realmName">
<string>my-domain</string>
</field>
<!-- All the dependencies of the portal container ordered by loading priority -->
<field name="dependencies">
<collection type="java.util.ArrayList">
<value>
<string>foo</string>
</value>
<value>
<string>foo2</string>
</value>
<value>
<string>foo3</string>
</value>
</collection>
</field>
<!-- A map of settings tied to the portal container -->
<field name="settings">
<map type="java.util.HashMap">
<entry>
<key>
<string>foo</string>
</key>
<value>
<string>value</string>
</value>
</entry>
<entry>
<key>
<string>int</string>
</key>
<value>
<int>10</int>
</value>
</entry>
<entry>
<key>
<string>long</string>
</key>
<value>
<long>10</long>
</value>
</entry>
<entry>
<key>
<string>double</string>
</key>
<value>
<double>10</double>
</value>
</entry>
<entry>
<key>
<string>boolean</string>
</key>
<value>
<boolean>true</boolean>
</value>
</entry>
</map>
</field>
<!-- The path to the external properties file -->
<field name="externalSettingsPath">
<string>classpath:/org/exoplatform/container/definition/settings.properties</string>
</field>
</object>
</object-param>
</init-params>
</component-plugin>
</external-component-plugins>Table 56.2. Descriptions of the fields of a
PortalContainerDefinition when it is used to define a
new portal container
| name (*) | The name of the portal container. This field is mandatory . |
| restContextName (*) | The name of the context name of the rest web
application. This field is optional. The default value will be
defined at the PortalContainerConfig
level. |
| realmName (*) | The name of the realm. This field is optional. The
default value will be defined at the
PortalContainerConfig level. |
| dependencies | All the dependencies of the portal container ordered by
loading priority. This field is optional. The default value
will be defined at the PortalContainerConfig
level. The dependencies are in fact the list of the context
names of the web applications from which the portal container
depends. This field is optional. The dependency order is
really crucial since it will be interpreted the same way by
several components of the platform. All those components, will
consider the 1st element in the list less important than the
second element and so on. It is currently used
to:
|
| settings | A java.util.Map of internal parameters
that we would like to tie the portal container. Those
parameters could have any type of value. This field is
optional. If some internal settings are defined at the
PortalContainerConfig level, the two maps of
settings will be merged. If a setting with the same name is
defined in both maps, it will keep the value defined at the
PortalContainerDefinition level. |
| externalSettingsPath | The path of the external properties file to load as
default settings to the portal container. This field is
optional. If some external settings are defined at the
PortalContainerConfig level, the two maps of
settings will be merged. If a setting with the same name is
defined in both maps, it will keep the value defined at the
PortalContainerDefinition level. The external
properties files can be either of type "properties" or of type
"xml". The path will be interpreted as follows:
|
Table 56.3. Descriptions of the fields of a
PortalContainerDefinition when it is used to define
the default portal container
| name (*) | The name of the portal container. This field is
optional. The default portal name will be:
|
| restContextName (*) | The name of the context name of the rest web
application. This field is optional. The default value wil
be:
|
| realmName (*) | The name of the realm. This field is optional. The
default value wil be:
|
| dependencies | All the dependencies of the portal container ordered by loading priority. This field is optional. If this field has a non empty value, it will be the default list of dependencies. |
| settings | A java.util.Map of internal parameters
that we would like to tie the default portal container. Those
parameters could have any type of value. This field is
optional. |
| externalSettingsPath | The path of the external properties file to load as
default settings to the default portal container. This field
is optional. The external properties files can be either of
type "properties" or of type "xml". The path will be
interpreted as follows:
|
Note
All the value of the parameters marked with a (*) can be defined thanks to System properties like any values in configuration files but also thanks to variables loaded by the PropertyConfigurator. For example in GateIn by default, it would be all the variables defined in the file configuration.properties.
Internal and external settings are both optional, but if we give a non empty value for both the application will merge the settings. If the same setting name exists in both settings, we apply the following rules:
The value of the external setting is null, we ignore the value.
The value of the external setting is not null and the value of the internal setting is null, the final value will be the external setting value that is of type
String.Both values are not
null, we will have to convert the external setting value into the target type which is the type of the internal setting value, thanks to the static method valueOf(String), the following sub-rules are then applied:The method cannot be found, the final value will be the external setting value that is of type
String.The method can be found and the external setting value is an empty
String, we ignore the external setting value.The method can be found and the external setting value is not an empty
Stringbut the method call fails, we ignore the external setting value.The method can be found and the external setting value is not an empty
Stringand the method call succeeds, the final value will be the external setting value that is of type of the internal setting value.
We can inject the value of the portal container settings into the portal container configuration files thanks to the variables which name start with "portal.container.", so to get the value of a setting called "foo", just use the following syntax ${portal.container.foo}. You can also use internal variables, such as:
Table 56.4. Definition of the internal variables
| portal.container.name | Gives the name of the current portal container. |
| portal.container.rest | Gives the context name of the rest web application of the current portal container. |
| portal.container.realm | Gives the realm name of the current portal container. |
You can find below an example of how to use the variables:
<configuration xmlns:xsi="http://www.w3.org/2001/XMLSchema-instance" xsi:schemaLocation="http://www.exoplatform.org/xml/ns/kernel_1_2.xsd http://www.exoplatform.org/xml/ns/kernel_1_2.xsd"
xmlns="http://www.exoplatform.org/xml/ns/kernel_1_2.xsd">
<component>
<type>org.exoplatform.container.TestPortalContainer$MyComponent</type>
<init-params>
<!-- The name of the portal container -->
<value-param>
<name>portal</name>
<value>${portal.container.name}</value>
</value-param>
<!-- The name of the rest ServletContext -->
<value-param>
<name>rest</name>
<value>${portal.container.rest}</value>
</value-param>
<!-- The name of the realm -->
<value-param>
<name>realm</name>
<value>${portal.container.realm}</value>
</value-param>
<value-param>
<name>foo</name>
<value>${portal.container.foo}</value>
</value-param>
<value-param>
<name>before foo after</name>
<value>before ${portal.container.foo} after</value>
</value-param>
</init-params>
</component>
</configuration>In the properties file corresponding to the external settings, you can reuse variables previously defined (in the external settings or in the internal settings) to create a new variable. In this case, the prefix "portal.container." is not needed, see an example below:
my-var1=value 1
my-var2=value 2
complex-value=${my-var1}-${my-var2}In the external and internal settings, you can also use create
variables based on value of System paramaters. The System parameters
can either be defined at launch time or thanks to the
PropertyConfigurator (see next section for more
details). See an example below:
temp-dir=${java.io.tmpdir}${file.separator}my-tempHowever, for the internal settings, you can use System
parameters only to define settings of type
java.lang.String.
It cans be also very usefull to define a generic variable in the settings of the default portal container, the value of this variable will change according to the current portal container. See below an example:
my-generic-var=value of the portal container "${name}"If this variable is defined at the default portal container level, the value of this variable for a portal container called "foo" will be value of the portal container "foo".
It is possible to use component-plugin elements
in order to dynamically change a PortalContainerDefinition. In the
example below, we add the dependency foo to the default
portal container and to the portal containers called
foo1 and foo2:
<external-component-plugins>
<!-- The full qualified name of the PortalContainerConfig -->
<target-component>org.exoplatform.container.definition.PortalContainerConfig</target-component>
<component-plugin>
<!-- The name of the plugin -->
<name>Change PortalContainer Definitions</name>
<!-- The name of the method to call on the PortalContainerConfig in order to register the changes on the PortalContainerDefinitions -->
<set-method>registerChangePlugin</set-method>
<!-- The full qualified name of the PortalContainerDefinitionChangePlugin -->
<type>org.exoplatform.container.definition.PortalContainerDefinitionChangePlugin</type>
<init-params>
<value-param>
<name>apply.default</name>
<value>true</value>
</value-param>
<values-param>
<name>apply.specific</name>
<value>foo1</value>
<value>foo2</value>
</values-param>
<object-param>
<name>change</name>
<object type="org.exoplatform.container.definition.PortalContainerDefinitionChange$AddDependencies">
<!-- The list of name of the dependencies to add -->
<field name="dependencies">
<collection type="java.util.ArrayList">
<value>
<string>foo</string>
</value>
</collection>
</field>
</object>
</object-param>
</init-params>
</component-plugin>
</external-component-plugins>Table 56.5. Descriptions of the fields of a
PortalContainerDefinitionChangePlugin
| apply.all (*) | Indicates whether the changes have to be applied to all
the portal containers or not. The default value of this field
is false. This field is a
ValueParam and is not mandatory. |
| apply.default (*) | Indicates whether the changes have to be applied to the
default portal container or not. The default value of this
field is false. This field is a
ValueParam and is not mandatory. |
| apply.specific (*) | A set of specific portal container names to which we
want to apply the changes. This field is a
ValuesParam and is not mandatory. |
Rest of the expected parameters | The rest of the expected paramaters are
ObjectParam of type
PortalContainerDefinitionChange. Those
parameters are in fact the list of changes that we want to
apply to one or several portal containers. If the list of
changes is empty, the component plugin will be ignored. The
supported implementations of PortalContainerDefinitionChange
are described later in this section. |
Note
All the value of the parameters marked with a (*) can be defined thanks to System properties like any values in configuration files but also thanks to variables loaded by the PropertyConfigurator. For example in GateIn by default, it would be all the variables defined in the file configuration.properties.
To identify the portal containers to which the changes have to be applied, we use the follwing algorithm:
The parameter
apply.allhas been set totrue. The corresponding changes will be applied to all the portal containers. The other parameters will be ignored.The parameter
apply.defaulthas been set totrueand the parameterapply.specificisnull. The corresponding changes will be applied to the default portal container only.The parameter
apply.defaulthas been set totrueand the parameterapply.specificis notnull. The corresponding changes will be applied to the default portal container and the given list of specific portal containers.The parameter
apply.defaulthas been set tofalseor has not been set and the parameterapply.specificisnull. The corresponding changes will be applied to the default portal container only.The parameter
apply.defaulthas been set tofalseor has not been set and the parameterapply.specificis notnull. The corresponding changes will be applied to the given list of specific portal containers.
The modifications that can be applied to a
PortalContainerDefinition must be a class of type
PortalContainerDefinitionChange. The product proposes
out of the box some implementations that we describe in the next sub
sections.
This modification adds a list of dependencies at the end of
the list of dependencies defined into the
PortalContainerDefinition. The full qualified name
is
org.exoplatform.container.definition.PortalContainerDefinitionChange$AddDependencies.
Table 56.6. Descriptions of the fields of an
AddDependencies
| dependencies | A list of String corresponding to the list of name of the dependencies to add. If the value of this field is empty, the change will be ignored. |
See an example below, that will add foo at
the end of the dependency list of the default portal
container:
<external-component-plugins>
<!-- The full qualified name of the PortalContainerConfig -->
<target-component>org.exoplatform.container.definition.PortalContainerConfig</target-component>
<component-plugin>
<!-- The name of the plugin -->
<name>Change PortalContainer Definitions</name>
<!-- The name of the method to call on the PortalContainerConfig in order to register the changes on the PortalContainerDefinitions -->
<set-method>registerChangePlugin</set-method>
<!-- The full qualified name of the PortalContainerDefinitionChangePlugin -->
<type>org.exoplatform.container.definition.PortalContainerDefinitionChangePlugin</type>
<init-params>
<value-param>
<name>apply.default</name>
<value>true</value>
</value-param>
<object-param>
<name>change</name>
<object type="org.exoplatform.container.definition.PortalContainerDefinitionChange$AddDependencies">
<!-- The list of name of the dependencies to add -->
<field name="dependencies">
<collection type="java.util.ArrayList">
<value>
<string>foo</string>
</value>
</collection>
</field>
</object>
</object-param>
</init-params>
</component-plugin>
</external-component-plugins>This modification adds a list of dependencies before a given
target dependency defined into the list of dependencies of the
PortalContainerDefinition. The full qualified name
is
org.exoplatform.container.definition.PortalContainerDefinitionChange$AddDependenciesBefore.
Table 56.7. Descriptions of the fields of an
AddDependenciesBefore
| dependencies | A list of String corresponding to the list of name of the dependencies to add. If the value of this field is empty, the change will be ignored. |
| target | The name of the dependency before which we would
like to add the new dependencies. If this field is
null or the target dependency cannot be
found in the list of dependencies defined into the
PortalContainerDefinition, the new
dependencies will be added in first position to the
list. |
See an example below, that will add foo
before foo2 in the dependency list of the default
portal container:
<external-component-plugins>
<!-- The full qualified name of the PortalContainerConfig -->
<target-component>org.exoplatform.container.definition.PortalContainerConfig</target-component>
<component-plugin>
<!-- The name of the plugin -->
<name>Change PortalContainer Definitions</name>
<!-- The name of the method to call on the PortalContainerConfig in order to register the changes on the PortalContainerDefinitions -->
<set-method>registerChangePlugin</set-method>
<!-- The full qualified name of the PortalContainerDefinitionChangePlugin -->
<type>org.exoplatform.container.definition.PortalContainerDefinitionChangePlugin</type>
<init-params>
<value-param>
<name>apply.default</name>
<value>true</value>
</value-param>
<object-param>
<name>change</name>
<object type="org.exoplatform.container.definition.PortalContainerDefinitionChange$AddDependenciesBefore">
<!-- The list of name of the dependencies to add -->
<field name="dependencies">
<collection type="java.util.ArrayList">
<value>
<string>foo</string>
</value>
</collection>
</field>
<!-- The name of the target dependency -->
<field name="target">
<string>foo2</string>
</field>
</object>
</object-param>
</init-params>
</component-plugin>
</external-component-plugins>This modification adds a list of dependencies before a given
target dependency defined into the list of dependencies of the
PortalContainerDefinition. The full qualified name
is
org.exoplatform.container.definition.PortalContainerDefinitionChange$AddDependenciesAfter.
Table 56.8. Descriptions of the fields of an
AddDependenciesAfter
| dependencies | A list of String corresponding to the list of name of the dependencies to add. If the value of this field is empty, the change will be ignored. |
| target | The name of the dependency after which we would
like to add the new dependencies. If this field is
null or the target dependency cannot be
found in the list of dependencies defined into the
PortalContainerDefinition, the new
dependencies will be added in last position to the
list. |
See an example below, that will add foo after
foo2 in the dependency list of the default portal
container:
<external-component-plugins>
<!-- The full qualified name of the PortalContainerConfig -->
<target-component>org.exoplatform.container.definition.PortalContainerConfig</target-component>
<component-plugin>
<!-- The name of the plugin -->
<name>Change PortalContainer Definitions</name>
<!-- The name of the method to call on the PortalContainerConfig in order to register the changes on the PortalContainerDefinitions -->
<set-method>registerChangePlugin</set-method>
<!-- The full qualified name of the PortalContainerDefinitionChangePlugin -->
<type>org.exoplatform.container.definition.PortalContainerDefinitionChangePlugin</type>
<init-params>
<value-param>
<name>apply.default</name>
<value>true</value>
</value-param>
<object-param>
<name>change</name>
<object type="org.exoplatform.container.definition.PortalContainerDefinitionChange$AddDependenciesAfter">
<!-- The list of name of the dependencies to add -->
<field name="dependencies">
<collection type="java.util.ArrayList">
<value>
<string>foo</string>
</value>
</collection>
</field>
<!-- The name of the target dependency -->
<field name="target">
<string>foo2</string>
</field>
</object>
</object-param>
</init-params>
</component-plugin>
</external-component-plugins>This modification adds new settings to a
PortalContainerDefinition. The full qualified name
is
org.exoplatform.container.definition.PortalContainerDefinitionChange$AddSettings.
Table 56.9. Descriptions of the fields of an
AddSettings
| settings | A map of <String, Object> corresponding to the settings to add. If the value of this field is empty, the change will be ignored. |
See an example below, that will add the settings
string and stringX to the settings
of the default portal container:
<external-component-plugins>
<!-- The full qualified name of the PortalContainerConfig -->
<target-component>org.exoplatform.container.definition.PortalContainerConfig</target-component>
<component-plugin>
<!-- The name of the plugin -->
<name>Change PortalContainer Definitions</name>
<!-- The name of the method to call on the PortalContainerConfig in order to register the changes on the PortalContainerDefinitions -->
<set-method>registerChangePlugin</set-method>
<!-- The full qualified name of the PortalContainerDefinitionChangePlugin -->
<type>org.exoplatform.container.definition.PortalContainerDefinitionChangePlugin</type>
<init-params>
<value-param>
<name>apply.default</name>
<value>true</value>
</value-param>
<object-param>
<name>change</name>
<object type="org.exoplatform.container.definition.PortalContainerDefinitionChange$AddSettings">
<!-- The settings to add to the to the portal containers -->
<field name="settings">
<map type="java.util.HashMap">
<entry>
<key>
<string>string</string>
</key>
<value>
<string>value1</string>
</value>
</entry>
<entry>
<key>
<string>stringX</string>
</key>
<value>
<string>value1</string>
</value>
</entry>
</map>
</field>
</object>
</object-param>
</init-params>
</component-plugin>
</external-component-plugins>It is possible to use component-plugin elements
in order to dynamically disable one or several portal containers. In
the example below, we disable the portal container named
foo:
<external-component-plugins>
<!-- The full qualified name of the PortalContainerConfig -->
<target-component>org.exoplatform.container.definition.PortalContainerConfig</target-component>
<component-plugin>
<!-- The name of the plugin -->
<name>Disable a PortalContainer</name>
<!-- The name of the method to call on the PortalContainerConfig in order to register the changes on the PortalContainerDefinitions -->
<set-method>registerDisablePlugin</set-method>
<!-- The full qualified name of the PortalContainerDefinitionDisablePlugin -->
<type>org.exoplatform.container.definition.PortalContainerDefinitionDisablePlugin</type>
<init-params>
<!-- The list of the name of the portal containers to disable -->
<values-param>
<name>names</name>
<value>foo</value>
</values-param>
</init-params>
</component-plugin>
</external-component-plugins>Table 56.10. Descriptions of the fields of a
PortalContainerDefinitionDisablePlugin
| names (*) | The list of the name of the portal containers to disable. |
Note
All the value of the parameters marked with a (*) can be defined thanks to System properties like any values in configuration files but also thanks to variables loaded by the PropertyConfigurator. For example in GateIn by default, it would be all the variables defined in the file configuration.properties.
To prevent any accesses to a web application corresponding to
PortalContainer that has been disabled, you need to
make sure that the following Http Filter (or a sub class of it) has
been added to your web.xml in first position as below:
<filter> <filter-name>PortalContainerFilter</filter-name> <filter-class>org.exoplatform.container.web.PortalContainerFilter</filter-class> </filter> <filter-mapping> <filter-name>PortalContainerFilter</filter-name> <url-pattern>/*</url-pattern> </filter-mapping>
Note
It is only possible to disable a portal container when at least one PortalContainerDefinition has been registered.
A new property configurator service has been developed for taking care of configuring system properties from the inline kernel configuration or from specified property files.
The services is scoped at the root container level because it is used by all the services in the different portal containers in the application runtime.
The properties init param takes a property declared to configure various properties.
<component>
<key>PropertyManagerConfigurator</key>
<type>org.exoplatform.container.PropertyConfigurator</type>
<init-params>
<properties-param>
<name>properties</name>
<property name="foo" value="bar"/>
</properties-param>
</init-params>
</component>The properties URL init param allow to load an external file by
specifying its URL. Both property and XML format are supported, see the
javadoc of the java.util.Properties
class for more information. When a property file is loaded the various
property declarations are loaded in the order in which the properties
are declared sequentially in the file.
<component>
<key>PropertyManagerConfigurator</key>
<type>org.exoplatform.container.PropertyConfigurator</type>
<init-params>
<value-param>
<name>properties.url</name>
<value>classpath:configuration.properties</value>
</value-param>
</init-params>
</component>In the properties file corresponding to the external properties, you can reuse variables before defining to create a new variable. In this case, the prefix "portal.container." is not needed, see an example below:
my-var1=value 1
my-var2=value 2
complex-value=${my-var1}-${my-var2}All the variables that we described in the previous chapters can be defined thanks to 2 possible syntaxes which are ${variable-name} or ${variable-name:default-value}. The first syntax doesn't define any default value so if the variable has not be set the value will be ${variable-name} to indicate that it could not be resolved. The second syntax allows you to define the default value after the semi colon so if the variable has not be set the value will be the given default value.
The kernel configuration is able to handle configuration profiles at runtime (as opposed to packaging time).
An active profile list is obtained during the boot of the root container and is composed of the system property exo.profiles sliced according the "," delimiter and also a server specific profile value (tomcat for tomcat, jboss for jboss, etc...).
# runs GateIn on Tomcat with the profiles tomcat and foo sh gatein.sh -Dexo.profiles=foo # runs GateIn on JBoss with the profiles jboss, foo and bar sh run.sh -Dexo.profiles=foo,bar
Profiles are configured in the configuration files of the eXo kernel.
Profile activation occurs at XML to configuration object unmarshalling time. It is based on an "profile" attribute that is present on some of the XML element of the configuration files. To enable this, the kernel configuration schema has been upgraded to kernel_1_1.xsd. The configuration is based on the following rules:
Any kernel element with the no profiles attribute will create a configuration object
Any kernel element having a profiles attribute containing at least one of the active profiles will create a configuration object
Any kernel element having a profiles attribute matching none of the active profile will not create a configuration object
Resolution of duplicates (such as two components with same type) is left up to the kernel
A configuration element is profiles capable when it carries a profiles element.
The component element declares a component when activated. It will shadow any element with the same key declared before in the same configuration file:
<component> <key>Component</key> <type>Component</type> </component> <component profiles="foo"> <key>Component</key> <type>FooComponent</type> </component>
The component-plugin element is used to dynamically extend the configuration of a given component. Thanks to the profiles the component-plugins could be enabled or disabled:
<external-component-plugins>
<target-component>Component</target-component>
<component-plugin profiles="foo">
<name>foo</name>
<set-method>addPlugin</set-method>
<type>type</type>
<init-params>
<value-param>
<name>param</name>
<value>empty</value>
</value-param>
</init-params>
</component-plugin>
</external-component-plugins>The import element imports a referenced configuration file when activated:
<import>empty</import> <import profiles="foo">foo</import> <import profiles="bar">bar</import>
The init param element configures the parameter argument of the construction of a component service:
<component>
<key>Component</key>
<type>ComponentImpl</type>
<init-params>
<value-param>
<name>param</name>
<value>empty</value>
</value-param>
<value-param profiles="foo">
<name>param</name>
<value>foo</value>
</value-param>
<value-param profiles="bar">
<name>param</name>
<value>bar</value>
</value-param>
</init-params>
</component>The value collection element configures one of the value of collection data:
<object type="org.exoplatform.container.configuration.ConfigParam">
<field name="role">
<collection type="java.util.ArrayList">
<value><string>manager</string></value>
<value profiles="foo"><string>foo_manager</string></value>
<value profiles="foo,bar"><string>foo_bar_manager</string></value>
</collection>
</field>
</object>The field configuration element configures the field of an object:
<object-param>
<name>test.configuration</name>
<object type="org.exoplatform.container.configuration.ConfigParam">
<field name="role">
<collection type="java.util.ArrayList">
<value><string>manager</string></value>
</collection>
</field>
<field name="role" profiles="foo,bar">
<collection type="java.util.ArrayList">
<value><string>foo_bar_manager</string></value>
</collection>
</field>
<field name="role" profiles="foo">
<collection type="java.util.ArrayList">
<value><string>foo_manager</string></value>
</collection>
</field>
</object>
</object-param>The component request life cycle is an interface that defines a contract for a component for being involved into a request:
public interface ComponentRequestLifecycle
{
/**
* Start a request.
* @param container the related container
*/
void startRequest(ExoContainer container);
/**
* Ends a request.
* @param container the related container
*/
void endRequest(ExoContainer container);
}The container passed is the container to which the component is related. This contract is often used to setup a thread local based context that will be demarcated by a request.
For instance in the GateIn portal context, a component request life cycle is triggered for user requests. Another example is the initial data import in GateIn that demarcates using callbacks made to that interface.
The RequestLifeCycle class has several statics
methods that are used to schedule the component request life cycle of
components. Its main responsability is to perform scheduling while
respecting the constraint to execute the request life cycle of a
component only once even if it can be scheduled several times.
RequestLifeCycle.begin(component);
try
{
// Do something
}
finally
{
RequestLifeCycle.end();
}Scheduling a container triggers the component request life cyle
of all the components that implement the interface
ComponentRequestLifeCycle. If one of the component has
already been scheduled before and then that component will not be
scheduled again. When the local value is true, then the looked
components will be those of the container, when it is false then the
scheduler will also look at the components in the ancestor
containers.
RequestLifeCycle.begin(container, local);
try
{
// Do something
}
finally
{
RequestLifeCycle.end();
}Each portal request triggers the life cycle of the associated portal container.
The services are not responsible for the instantiation of the components on which they depend.
This architecture provides a loosely coupled design where the implementation of dependant services can be transparently exchanged.
This pattern has several names :
Hollywood principle : "don't call me, I will call you"
Inversion of Control
Dependency injection
Don't let the object create itself the instances of the object that it references. This job is delegated to the container (assembler in the picture).
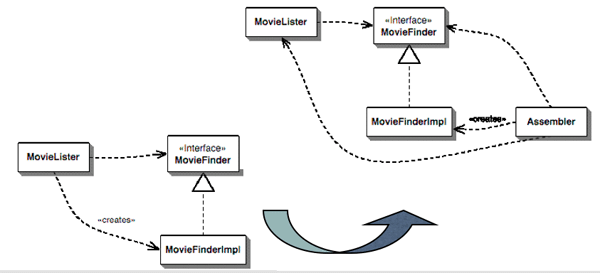
There are two ways to inject a dependency :
Using a constructor:
public ServiceA(ServiceB serviceB)
Using setter methods:
public void setServiceB(ServiceB serviceB)
When a client service can not be stored in the container then the service locator pattern is used:
public ServiceA(){
this.serviceB =Container.getSInstance().getService(ServiceB.class);
}The container package is responsible of building a hierarchy of containers. Each service will then be registered in one container or the other according to the XML configuration file it is defined in. It is important to understand that there can be several PortalContainer instances that all are children of the RootContainer.
The behavior of the hierarchy is similar to a class loader one, hence when you will lookup a service that depends on another one, the container will look for it in the current container and if it cannot be found, then it will look in the parent container. That way you can load all the reusable business logic components in the same container (here the RootContainer) and differentiate the service implementation from one portal instance to the other by just loading different service implementations in two sibling PortalContainers.
Therefore, if you look at the Portal Container as a service repository for all the business logic in a portal instance, then you understand why several PortalContainers allows you to manage several portals (each one deployed as a single war) in the same server by just changing XML configuration files.
The default configuration XML files are packaged in the service jar. There are three configuration.xml files, one for each container type. In that XML file, we define the list of services and their init parameters that will be loaded in the corresponding container.
As there can be several portal container instances per JVM. it is important to be able to configure the loaded services per instance. Therefore all the default configuration files located in the service impl jar can be overridden from the portal war. For more information refer to Service Configuration for Beginners.
After deploying you find the configuration.xml file in webapps/portal/WEB-INF/conf Use component registration tags. Let's look at the key tag that defines the interface and the type tag that defines the implementation. Note that the key tag is not mandatory, but it improves performance.
<!-- Portlet container hooks -->
<component>
<key>org.exoplatform.services.portletcontainer.persistence.PortletPreferencesPersister</key>
<type>org.exoplatform.services.portal.impl.PortletPreferencesPersisterImpl</type>
</component>Register plugins that can act as listeners or external plugin to bundle some plugin classes in other jar modules. The usual example is the hibernate service to which we can add hbm mapping files even if those are deployed in an other maven artifact.
<external-component-plugins>
<target-component>org.exoplatform.services.database.HibernateService</target-component>
<component-plugin>
<name>add.hibernate.mapping</name>
<set-method>addPlugin</set-method>
<type>org.exoplatform.services.database.impl.AddHibernateMappingPlugin</type>
<init-params>
<values-param>
<name>hibernate.mapping</name>
<value>org/exoplatform/services/portal/impl/PortalConfigData.hbm.xml</value>
<value>org/exoplatform/services/portal/impl/PageData.hbm.xml</value>
<value>org/exoplatform/services/portal/impl/NodeNavigationData.hbm.xml</value>
</values-param>
</init-params>
</component-plugin>
</external-component-plugins>In that sample we target the HibernateService and we will call its addPlugin() method with an argument of the type AddHibernateMappingPlugin. That object will first have been filled with the init parameters.
Therefore, it is possible to define services that will be able to receive plugins without implementing any framework interface.
Another example of use is the case of listeners as in the following code where a listener is added to the OrganisationService and will be called each time a new user is created:
<external-component-plugins>
<target-component>org.exoplatform.services.organization.OrganizationService</target-component>
<component-plugin>
<name>portal.new.user.event.listener</name>
<set-method>addListenerPlugin</set-method>
<type>org.exoplatform.services.portal.impl.PortalUserEventListenerImpl</type>
<description>this listener create the portal configuration for the new user</description>
<init-params>
<object-param>
<name>configuration</name>
<description>description</description>
<object type="org.exoplatform.services.portal.impl.NewPortalConfig">
<field name="predefinedUser">
<collection type="java.util.HashSet">
<value><string>admin</string></value>
<value><string>exo</string></value>
<value><string>company</string></value>
<value><string>community</string></value>
<value><string>portal</string></value>
<value><string>exotest</string></value>
</collection>
</field>
<field name="templateUser"><string>template</string></field>
<field name="templateLocation"><string>war:/conf/users</string></field>
</object>
</object-param>
</init-params>
</component-plugin>
...In the previous XML configuration, we refer the organization service and we will call its method addListenerPlugin with an object of type PortalUserEventListenerImpl. Each time a new user will be created (apart the predefined ones in the list above) methods of the PortalUserEventListenerImpl will be called by the service.
As you can see, there are several types of init parameters, from a simple value param which binds a key with a value to a more complex object mapping that fills a JavaBean with the info defined in the XML.
Many other examples exist such as for the Scheduler Service where you can add a job with a simple XML configuration or the JCR Service where you can add a NodeType from your own configuration.xml file.
When the RootContainer is starting the configuration retrieval looks for configuration files in each jar available from the classpath at jar path /conf/portal/configuration.xml and from each war at path /WEB-INF/conf/configuration.xml. These configurations are added to a set. If a component was configured in a previous jar and the current jar contains a new configuration of that component the latest (from the current jar) will replace the previous configuration.
After the processing of all configurations available on the system the container will initialize it and start each component in order of the dependency injection (DI).
So, in general the user/developer should be careful when configuring the same components in different configuration files. It's recommended to configure service in its own jar only. Or, in case of a portal configuration, strictly reconfigure the component in portal files.
But, there are components that can be (or should be) configured more than one time. This depends on the business logic of the component. A component may initialize the same resource (shared with other players) or may add a particular object to a set of objects (shared with other players too). In the first case it's critical who will be the last, i.e. whose configuration will be used. In second case it doesn't matter who is the first and who is the last (if the parameter objects are independent).
In case of problems with configuration of component it's important to know from which jar/war it comes. For that purpose user/developer can set JVM system property org.exoplatform.container.configuration.debug, in command line:
java -Dorg.exoplatform.container.configuration.debug ...
With that property container configuration manager will report configuration adding process to the standard output (System.out).
......
Add configuration jar:file:/D:/Projects/eXo/dev/exo-working/exo-tomcat/lib/exo.kernel.container-trunk.jar!/conf/portal/configuration.xml
Add configuration jar:file:/D:/Projects/eXo/dev/exo-working/exo-tomcat/lib/exo.kernel.component.cache-trunk.jar!/conf/portal/configuration.xml
Add configuration jndi:/localhost/portal/WEB-INF/conf/configuration.xml
import jndi:/localhost/portal/WEB-INF/conf/common/common-configuration.xml
import jndi:/localhost/portal/WEB-INF/conf/database/database-configuration.xml
import jndi:/localhost/portal/WEB-INF/conf/ecm/jcr-component-plugins-configuration.xml
import jndi:/localhost/portal/WEB-INF/conf/jcr/jcr-configuration.xml
......Since kernel version 2.0.6 it is possible to setup order of loading for ComponentPlugin. Use the ' priority' tag to define plugin's load priority. By default all plugins get priority '0'; they will be loaded in the container's natural way. If you want one plugin to be loaded later than the others then just set priority for it higher than zero.
Simple example of fragment of a configuration.xml.
...
<component>
<type>org.exoplatform.services.Component1</type>
</component>
<external-component-plugins>
<target-component>org.exoplatform.services.Component1</target-component>
<component-plugin>
<name>Plugin1</name>
<set-method>addPlugin</set-method>
<type>org.exoplatform.services.plugins.Plugin1</type>
<description>description</description>
<priority>1</priority>
</component-plugin>
<component-plugin>
<name>Plugin2</name>
<set-method>addPlugin</set-method>
<type>org.exoplatform.services.plugins.Plugin2</type>
<description>description</description>
<priority>2</priority>
</component-plugin>
</external-component-plugins>
<external-component-plugins>
<target-component>org.exoplatform.services.Component1</target-component>
<component-plugin>
<name>Plugin3</name>
<set-method>addPlugin</set-method>
<type>org.exoplatform.services.plugins.Plugin3</type>
<description>description</description>
</component-plugin>
</external-component-plugins>
...In the above example plugin 'Plugin3' will be loaded first because it has the default priority '0'. Then, plugin 'Plugin1' will be loaded and last one is plugin 'Plugin2'.
Related documents
This article will first describe how the ListenerService works and then it will show you how to configure the ListenerService.
Inside eXo, an event mechanism allows to trigger and listen to events under specific conditions. This mechanism is used in several places in eXo such as login/logout time.
Listeners must be subclasses of org.exoplatform.services.listener.Listener registered by the ListenerService.
To register a listener, you need to call the addListener() method.
/**
* This method is used to register a listener with the service. The method
* should: 1. Check to see if there is a list of listener with the listener
* name, create one if the listener list doesn't exit 2. Add the new listener
* to the listener list
*
* @param listener
*/
public void addListener(Listener listener) {
...
}By convention, we use the listener name as the name of the event to listen to.
To trigger an event, an application can call one of the broadcast() methods of ListenerService.
/**
* This method is used to broadcast an event. This method should: 1. Check if
* there is a list of listener that listen to the event name. 2. If there is a
* list of listener, create the event object with the given name , source and
* data 3. For each listener in the listener list, invoke the method
* onEvent(Event)
*
* @param <S> The type of the source that broadcast the event
* @param <D> The type of the data that the source object is working on
* @param name The name of the event
* @param source The source object instance
* @param data The data object instance
* @throws Exception
*/
public <S, D> void broadcast(String name, S source, D data) throws Exception {
...
}
/**
* This method is used when a developer want to implement his own event object
* and broadcast the event. The method should: 1. Check if there is a list of
* listener that listen to the event name. 2. If there is a list of the
* listener, For each listener in the listener list, invoke the method
* onEvent(Event)
*
* @param <T> The type of the event object, the type of the event object has
* to be extended from the Event type
* @param event The event instance
* @throws Exception
*/
public <T extends Event> void broadcast(T event) throws Exception {
...
}The boadcast() methods retrieve the name of the event and find the registered listeners with the same name and call the method onEvent() on each listener found.
Each listener is a class that extends org.exoplatform.services.listener.Listener, as you can see below:
public abstract class Listener<S, D> extends BaseComponentPlugin {
/**
* This method should be invoked when an event with the same name is
* broadcasted
*/
public abstract void onEvent(Event<S, D> event) throws Exception;
}Warning
As you can see we use generics to limit the source of the event to the type 'S' and the data of the event to the type 'D', so we expect that listeners implement the method onEvent() with the corresponding types
Each listener is also a ComponentPlugin with a name and a description, in other words, the name of the listener will be the name given in the configuration file, for more details see the next section.
public interface ComponentPlugin {
public String getName();
public void setName(String name);
public String getDescription();
public void setDescription(String description);
}All listeners are in fact a ComponentPlugin so it must be configured as below:
<?xml version="1.0" encoding="ISO-8859-1"?>
<configuration>
...
<external-component-plugins>
<!-- The full qualified name of the ListenerService -->
<target-component>org.exoplatform.services.listener.ListenerService</target-component>
<component-plugin>
<!-- The name of the listener that is also the name of the target event -->
<name>${name-of-the-target-event}</name>
<!-- The name of the method to call on the ListenerService in order to register the Listener -->
<set-method>addListener</set-method>
<!-- The full qualified name of the Listener -->
<type>${the-FQN-of-the-listener}</type>
</component-plugin>
</external-component-plugins>
</configuration>The org.exoplatform.services.security.ConversationRegistry uses the ListenerService to notify that a user has just signed in or just left the application. For example, when a new user signs in, the following code is called:
listenerService.broadcast("exo.core.security.ConversationRegistry.register", this, state);This code will in fact create a new Event which name is "exo.core.security.ConversationRegistry.register", which source is the current instance of ConversationRegistry and which data is the given state. The ListenerService will call the method onEvent(Event<ConversationRegistry, ConversationState> event) on all the listeners which name is "exo.core.security.ConversationRegistry.register".
In the example below, we define a Listener that will listen the event "exo.core.security.ConversationRegistry.register".
<?xml version="1.0" encoding="ISO-8859-1"?>
<configuration>
...
<external-component-plugins>
<!-- The full qualified name of the ListenerService -->
<target-component>org.exoplatform.services.listener.ListenerService</target-component>
<component-plugin>
<!-- The name of the listener that is also the name of the target event -->
<name>exo.core.security.ConversationRegistry.register</name>
<!-- The name of the method to call on the ListenerService in order to register the Listener -->
<set-method>addListener</set-method>
<!-- The full qualified name of the Listener -->
<type>org.exoplatform.forum.service.AuthenticationLoginListener</type>
</component-plugin>
</external-component-plugins>
</configuration>
...Initial Context Binder is responsible for binding references at runtime, persisting in file and automatically rebinding. Java temp directory is used to persist references in bind-references.xml file by default. In case when need to definde special file it can be done by add parameter to InitialContextInitializer configuration.
Service provide methods for binding reference:
public void bind(String bindName, String className, String factory, String factoryLocation, Map<String, String> refAddr) throws NamingException, FileNotFoundException, XMLStreamExcept
bindName - name of binding
className - the fully-qualified name of the class of the object to which this Reference refers
factory - the name of the factory class for creating an instance of the object to which this Reference refers
factoryLocation - the location of the factory class
refAddr - object's properties map
public void bind(String bindName, Reference ref) throws NamingException, FileNotFoundException, XMLStreamExcept
Returns reference associated with defined name:
public Reference getReference(String bindName)
Unbind the Reference with defined name:
public void unbind(String bindName) throws NamingException, FileNotFoundException, XMLStreamException
Job scheduler defines a job to execute a given number of times during a given period. It is a service that is in charge of unattended background executions, commonly known for historical reasons as batch processing. It is used to create and run jobs automatically and continuously, to schedule event-driven jobs and reports.
Job Scheduler Service is widely used in many eXo products such as Social, DMS, WCM, eXo Knowledge and eXo Collaboration.
In eXo products, Job Schedulers are used to do some tasks as below:
Automatically send notification, such as task/event reminder in the Calendar application of eXo Collaboration.
Automatically save chat messages from Openfire Server to History in the Chat application of eXo Collaboration.
Inactivate topics in the Forum application of eXo Knowledge.
Calculate the number of active and online users in the Forum application of eXo Knowledge.
Automatically collect RSS items from various RSS resources to post to the activity stream of users and spaces in eXo Social.
Automatically send Newsletters to users in WCM.
Also, it is used in Schedule lifecycle in DMS.
By using Job Scheduler Service in eXo kernel, many kinds of job can be configured to run, such as, addPeriodJob, addCronJob, addGlobalJobListener, addJobListener and many more. Just write a job (a class implements Job interface of quartz library and configures plug-in for JobSchedulerService and you're done.
Jobs are scheduled to run when a given Trigger occurs. Triggers can be created with nearly any combination of the following directives:
at a certain time of day (to the millisecond)
on certain days of the week
on certain days of the month
on certain days of the year
not on certain days listed within a registered Calendar (such as business holidays)
repeated a specific number of times
repeated until a specific time/date
repeated indefinitely
repeated with a delay interval
Jobs are given names by their creator and can also be organized into named groups. Triggers may also be given names and placed into groups, in order to easily organize them within the scheduler. Jobs can be added to the scheduler once, but registered with multiple Triggers. Within a J2EE environment, Jobs can perform their work as part of a distributed (XA) transaction.
(Source: quartz-scheduler.org)
Kernel leverages Quartz for its scheduler
service and wraps org.quartz.Scheduler in
org.exoplatform.services.scheduler.impl.QuartzSheduler
for easier service wiring and configuration like any other services. To
work with Quartz in Kernel, you will mostly work with
org.exoplatform.services.scheduler.JobSchedulerService
(implemented by
org.exoplatform.services.scheduler.impl.JobSchedulerServiceImpl.
To use JobSchedulerService, you can
configure it as a component in the configuration.xml. Because
JobSchedulerService requires
QuartzSheduler and
QueueTasks, you also have to configure these two
components.
<?xml version="1.0" encoding="UTF-8"?>
<configuration
xmlns:xsi="http://www.w3.org/2001/XMLSchema-instance"
xsi:schemaLocation="http://www.exoplatform.org/xml/ns/kernel_1_2.xsd http://www.exoplatform.org/xml/ns/kernel_1_2.xsd"
xmlns="http://www.exoplatform.org/xml/ns/kernel_1_2.xsd">
<component>
<type>org.exoplatform.services.scheduler.impl.QuartzSheduler</type>
</component>
<component>
<type>org.exoplatform.services.scheduler.QueueTasks</type>
</component>
<component>
<key>org.exoplatform.services.scheduler.JobSchedulerService</key>
<type>org.exoplatform.services.scheduler.impl.JobSchedulerServiceImpl</type>
</component>
</configuration>Note
You can download the project code from here
Work with JobSchedulerService by
creating a sample project and use GateIn-3.1.0-GA for testing.
Firstly, create a project by using maven archetype plugin:
mvn archetype:generate
For project type: select maven-archetype-quickstart
For groupId: select org.exoplatform.samples
For artifactId: select exo.samples.scheduler
For version: select 1.0.0-SNAPSHOT
For package: select org.exoplatform.samples.scheduler
Edit the pom.xml as follows:
<project
xmlns="http://maven.apache.org/POM/4.0.0"
xmlns:xsi="http://www.w3.org/2001/XMLSchema-instance"
xsi:schemaLocation="http://maven.apache.org/POM/4.0.0 http://maven.apache.org/maven-v4_0_0.xsd">
<modelVersion>4.0.0</modelVersion>
<parent>
<artifactId>exo.portal.parent</artifactId>
<groupId>org.exoplatform.portal</groupId>
<version>3.1.0-GA</version>
</parent>
<groupId>org.exoplatform.samples</groupId>
<artifactId>exo.samples.scheduler</artifactId>
<version>1.0.0-SNAPSHOT</version>
<name>eXo Samples For Scheduler</name>
<description>eXo Samples Code For Scheduler</description>
</project> Generate an eclipse project by using maven eclipse plugin and then import into eclipse:
mvn eclipse:eclipse
eXo Kernel makes it easier to work with job scheduler service. All you need is just to define your "job" class to be performed by implementing org.quartz.Job interface and add configuration for it.
To define a job, do as follows:
Define your job to be performed. For example, the job DumbJob is defined as follows:
package org.exoplatform.samples.scheduler.jobs;
import org.exoplatform.services.log.ExoLogger;
import org.exoplatform.services.log.Log;
import org.quartz.Job;
import org.quartz.JobExecutionContext;
import org.quartz.JobExecutionException;
/**
* DumbJob for executing a defined dumb job.
*/
public class DumbJob implements Job {
/**
* The logger
*/
private static final Log LOG = ExoLogger.getLogger(DumbJob.class);
/**
* The job of the DumbJob will be done by executing this method.
*
* @param context
* @throws JobExecutionException
*/
public void execute(JobExecutionContext context) throws JobExecutionException {
LOG.info("DumbJob is executing...");
}
}All jobs are required to implement the method execute from org.quartz.Job interface. This method will be called whenever a job is performed. With DumbJob, you just use logging to see that it will work. By looking at the terminal, you will see the the log message: "DumbJob is executing..."
After defining the "job", the only next step is to configure it by using external-component-plugin configuration for org.exoplatform.services.scheduler.JobSchedulerService. You can use these methods below for setting component plugin:
public void addPeriodJob(ComponentPlugin plugin) throws Exception;
The component plugin for this method must be the type of org.exoplatform.services.scheduler.PeriodJob. This type of job is used to perform actions that are executed in a period of time. You have to define when this job is performed, when it ends, when it performs the first action, how many times it is executed and the period of time to perform the action. See the configuration sample below to understand more clearly:
<external-component-plugins>
<target-component>org.exoplatform.services.scheduler.JobSchedulerService</target-component>
<component-plugin>
<name>PeriodJob Plugin</name>
<set-method>addPeriodJob</set-method>
<type>org.exoplatform.services.scheduler.PeriodJob</type>
<description>period job configuration</description>
<init-params>
<properties-param>
<name>job.info</name>
<description>dumb job executed periodically</description>
<property name="jobName" value="DumbJob"/>
<property name="groupName" value="DumbJobGroup"/>
<property name="job" value="org.exoplatform.samples.scheduler.jobs.DumbJob"/>
<property name="repeatCount" value="0"/>
<property name="period" value="60000"/>
<property name="startTime" value="+45"/>
<property name="endTime" value=""/>
</properties-param>
</init-params>
</component-plugin>
</external-component-plugins>public void addCronJob(ComponentPlugin plugin) throws Exception;
The component plugin for this method must be the type of org.exoplatform.services.scheduler.CronJob. This type of job is used to perform actions at specified time with Unix 'cron-like' definitions. The plugin uses "expression" field for specifying the 'cron-like' definitions to execute the job. This is considered as the most powerful and flexible job to define when it will execute. For example, at 12pm every day => "0 0 12 * * ?"; or at 10:15am every Monday, Tuesday, Wednesday, Thursday and Friday => "0 15 10 ? * MON-FRI". To see more about Cron expression, please refer to this article:
See the configuration sample below to understand more clearly:
<external-component-plugins>
<target-component>org.exoplatform.services.scheduler.JobSchedulerService</target-component>
<component-plugin>
<name>CronJob Plugin</name>
<set-method>addCronJob</set-method>
<type>org.exoplatform.services.scheduler.CronJob</type>
<description>cron job configuration</description>
<init-params>
<properties-param>
<name>cronjob.info</name>
<description>dumb job executed by cron expression</description>
<property name="jobName" value="DumbJob"/>
<property name="groupName" value="DumbJobGroup"/>
<property name="job" value="org.exoplatform.samples.scheduler.jobs.DumbJob"/>
<!-- The job will be performed at 10:15am every day -->
<property name="expression" value="0 15 10 * * ?"/>
</properties-param>
</init-params>
</component-plugin>
</external-component-plugins>public void addGlobalJobListener(ComponentPlugin plugin) throws Exception;
public void addJobListener(ComponentPlugin plugin) throws Exception;
The component plugin for two methods above must be the type of org.quartz.JobListener. This job listener is used so that it will be informed when a org.quartz.JobDetail executes.
public void addGlobalTriggerListener(ComponentPlugin plugin) throws Exception;
public void addTriggerListener(ComponentPlugin plugin) throws Exception;
The component plugin for two methods above must be the type of org.quartz.TriggerListener. This trigger listener is used so that it will be informed when a org.quartz.Trigger fires.
Create conf.portal package in your sample project. Add the configuration.xml file with the content as follows:
<?xml version="1.0" encoding="UTF-8"?>
<configuration
xmlns:xsi="http://www.w3.org/2001/XMLSchema-instance"
xsi:schemaLocation="http://www.exoplatform.org/xml/ns/kernel_1_2.xsd http://www.exoplatform.org/xml/ns/kernel_1_2.xsd"
xmlns="http://www.exoplatform.org/xml/ns/kernel_1_2.xsd">
<component>
<type>org.exoplatform.services.scheduler.impl.QuartzSheduler</type>
</component>
<component>
<type>org.exoplatform.services.scheduler.QueueTasks</type>
</component>
<component>
<key>org.exoplatform.services.scheduler.JobSchedulerService</key>
<type>org.exoplatform.services.scheduler.impl.JobSchedulerServiceImpl</type>
</component>
<external-component-plugins>
<target-component>org.exoplatform.services.scheduler.JobSchedulerService</target-component>
<component-plugin>
<name>PeriodJob Plugin</name>
<set-method>addPeriodJob</set-method>
<type>org.exoplatform.services.scheduler.PeriodJob</type>
<description>period job configuration</description>
<init-params>
<properties-param>
<name>job.info</name>
<description>dumb job executed periodically</description>
<property name="jobName" value="DumbJob"/>
<property name="groupName" value="DumbJobGroup"/>
<property name="job" value="org.exoplatform.samples.scheduler.jobs.DumbJob"/>
<property name="repeatCount" value="0"/>
<property name="period" value="60000"/>
<property name="startTime" value="+45"/>
<property name="endTime" value=""/>
</properties-param>
</init-params>
</component-plugin>
</external-component-plugins>
</configuration>mvn clean install the project. Copy .jar file to lib in tomcat bundled with GateIn-3.1.0-GA. Run bin/gatein.sh to see the DumbJob to be executed on the terminal when portal containers are initialized. Please look at the terminal to see the log message of DumbJob.
From now on, you can easily create any job to be executed in GateIn's portal by defining your job and configuring it.
To further understand about Job Scheduler, you can refer the following links:
All applications on the top of eXo JCR that need a cache, can rely
on an org.exoplatform.services.cache.ExoCache instance that
is managed by the
org.exoplatform.services.cache.CacheService. The main
implementation of this service is
org.exoplatform.services.cache.impl.CacheServiceImpl which
depends on the
org.exoplatform.services.cache.ExoCacheConfig in order to
create new ExoCache instances. See the below example of
org.exoplatform.services.cache.CacheService
definition:
<component>
<key>org.exoplatform.services.cache.CacheService</key>
<jmx-name>cache:type=CacheService</jmx-name>
<type>org.exoplatform.services.cache.impl.CacheServiceImpl</type>
<init-params>
<object-param>
<name>cache.config.default</name>
<description>The default cache configuration</description>
<object type="org.exoplatform.services.cache.ExoCacheConfig">
<field name="name"><string>default</string></field>
<field name="maxSize"><int>300</int></field>
<field name="liveTime"><long>600</long></field>
<field name="distributed"><boolean>false</boolean></field>
<field name="implementation"><string>org.exoplatform.services.cache.concurrent.ConcurrentFIFOExoCache</string></field>
</object>
</object-param>
</init-params>
</component>Note
The ExoCacheConfig which name is
default, will be the default configuration of all the
ExoCache instances that don't have dedicated
configuration.
See the below example about how to define a new
ExoCacheConfig thanks to a
external-component-plugin:
<external-component-plugins>
<target-component>org.exoplatform.services.cache.CacheService</target-component>
<component-plugin>
<name>addExoCacheConfig</name>
<set-method>addExoCacheConfig</set-method>
<type>org.exoplatform.services.cache.ExoCacheConfigPlugin</type>
<description>Configures the cache for query service</description>
<init-params>
<object-param>
<name>cache.config.wcm.composer</name>
<description>The default cache configuration</description>
<object type="org.exoplatform.services.cache.ExoCacheConfig">
<field name="name"><string>wcm.composer</string></field>
<field name="maxSize"><int>300</int></field>
<field name="liveTime"><long>600</long></field>
<field name="distributed"><boolean>false</boolean></field>
<field name="implementation"><string>org.exoplatform.services.cache.concurrent.ConcurrentFIFOExoCache</string></field>
</object>
</object-param>
</init-params>
</component-plugin>
</external-component-plugins>Table 63.1. Descriptions of the fields of
ExoCacheConfig
| name | The name of the cache. This field is mandatory since it
will be used to retrieve the ExoCacheConfig
corresponding to a given cache name. |
| label | The label of the cache. This field is optional. It is mainly used to indicate the purpose of the cache. |
| maxSize | The maximum numbers of elements in cache. This field is mandatory. |
| liveTime | The amount of time (in seconds) that an element is not written or read before it is evicted. This field is mandatory. |
| implementation | The full qualified name of the cache implementation to use.
This field is optional. This field is only used for simple cache
implementation. The default and main implementation is
org.exoplatform.services.cache.concurrent.ConcurrentFIFOExoCache,
this implementation only works with local caches with FIFO as
eviction policy. For more complex implementation see the next
sections. |
| distributed | Indicates if the cache is distributed. This field is optional. This field is deprecated. |
| replicated | Indicates if the cache is replicated. This field is optional. |
| logEnabled | Indicates if the log is enabled. This field is optional. This field is used for backward compatibility. |
| avoidValueReplication | Indicates whether the values of the cache should be replicated or not in case of a replicated cache. This field is optional. By default it is disabled. Find more details about this field in the next section. |
In case, you have big values or non serializable values and you need a replicated cache to at list invalidate the data when it is needed, you can use the invalidation mode that will work on top of any replicated cache implementations. This is possible thanks to the class InvalidationExoCache which is actually a decorator whose idea is to replicate the the hash code of the value in order to know if it is needed or not to invalidate the local data, if the new hash code of the value is the same as the old value, we assume that it is the same value so we don't invalidate the old value. This is required to avoid the following infinite loop that we will face with invalidation mode proposed out of the box by JBoss Cache for example:
Cluster node #1 puts (key1, value1) into the cache
On cluster node #2 key1 is invalidated by put call in node #1
Node #2 re-loads key1 and puts (key1, value1) into the cache
On cluster node #1 key1 is invalidated, so we get back to step #1
In the use case above, thanks to the InvalidationExoCache since the value loaded at step #3 has the same hash code as the value loaded as step #1, the step #4 won't invalidate the data on the cluster node #1.
It exists 2 ways to use the invalidation mode which are the following:
By configuration: For this you simply need to set the parameter avoidValueReplication to true in your eXo cache configuration, this will indicate the CacheService to wrap your eXo cache instance into an InvalidationExoCache in case the cache is defined as replicated or distributed.
Programmatically; You can wrap your eXo cache instance into an org.exoplatform.services.cache.invalidation.InvalidationExoCache yourself using the public constructors that are available. Please note that if you use CacheListeners add them to the InvalidationExoCache instance instead of the nested eXo Cache because the nested eXo Cache will contain only hash codes so the related listeners will get hash codes instead of the real values.
Note
The invalidation will be efficient if and only if the hash code method is properly implemented, in other words 2 value objects representing the same data need to return the same hash code otherwise the infinite loop described above will still be effective.
If the data that you want to store into your eXo Cache instance takes a lot of time to load and/or you would like to prevent multiple concurrent loading of the same data at the same time, you can use org.exoplatform.services.cache.future.FutureExoCache on top of your eXo Cache instance in order to delegate the loading of your data to a loader that will be called only once whatever the total amount of concurrent threads looking for it. See below an example of how the FutureExoCache can be used:
import org.exoplatform.services.cache.future.Loader;
import org.exoplatform.services.cache.future.FutureExoCache;
...
// Define first your loader and choose properly your context object in order
// to be able to reuse the same loader for different FutureExoCache instances
Loader<String, String, String> loader = new Loader<String, String, String>()
{
public String retrieve(String context, String key) throws Exception
{
return "Value loaded thanks to the key = '" + key + "' and the context = '" + context + "'";
}
};
// Create your FutureExoCache from your eXo cache instance and your loader
FutureExoCache<String, String, String> myFutureExoCache = new FutureExoCache<String, String, String>(loader, myExoCache);
// Get your data from your future cache instance
System.out.println(myFutureExoCache.get("my context", "foo"));In the previous versions of eXo kernel, it was quite complex to implement your own ExoCache because it was not open enough. Since kernel 2.0.8, it is possible to easily integrate your favorite cache provider in eXo Products.
You just need to implement your own ExoCacheFactory
and register it in an eXo container, as described below:
package org.exoplatform.services.cache;
...
public interface ExoCacheFactory {
/**
* Creates a new instance of {@link org.exoplatform.services.cache.ExoCache}
* @param config the cache to create
* @return the new instance of {@link org.exoplatform.services.cache.ExoCache}
* @exception ExoCacheInitException if an exception happens while initializing the cache
*/
public ExoCache createCache(ExoCacheConfig config) throws ExoCacheInitException;
}As you can see, there is only one method to implement which can be
seen as a converter of an ExoCacheConfig to get an instance
of ExoCache. Once, you created your own implementation, you
can simply register your factory by adding a file
conf/portal/configuration.xml with a content of the
following type:
<configuration>
<component>
<key>org.exoplatform.services.cache.ExoCacheFactory</key>
<type>org.exoplatform.tutorial.MyExoCacheFactoryImpl</type>
...
</component>
</configuration>
Note
Since kernel 2.3.0-CR1, if the configuration is not a sub class of
ExoCacheConfig and the implementation given in the
configuration is the full qualified name of an existing implementation
of eXo Cache, we will assume that the user expects to have an instance
of this eXo Cache type so we won't use the configured cache
factory.
When you add, the eXo library in your classpath, the eXo service container will use the default configuration provided in the library itself but of course you can still redefined the configuration if you wish as you can do with any components.
The default configuration of the factory is:
<configuration>
<component>
<key>org.exoplatform.services.cache.ExoCacheFactory</key>
<type>org.exoplatform.services.cache.impl.jboss.ExoCacheFactoryImpl</type>
<init-params>
<value-param>
<name>cache.config.template</name>
<value>jar:/conf/portal/cache-configuration-template.xml</value>
</value-param>
<value-param>
<name>allow.shareable.cache</name>
<value>true</value>
</value-param>
</init-params>
</component>
</configuration>Table 63.2. Fields description
| cache.config.template | This parameter allows you to define the location of the
default configuration template of JBoss Cache. In the default
configuration, we ask the eXo kernel to get the file shipped
into the jar at
/conf/portal/cache-configuration-template.xml.
The default configuration template aims to be the skeleton from
which we will create any type of jboss cache instance, thus it
must be very generic.NoteThe default configuration template provided with the jar aims to work with any application servers, but if you intend to use JBoss AS, you should redefine it in your custom configuration to fit better with your AS. |
| allow.shareable.cache | This parameter allows you to Indicate whether the JBoss
Cache instances used can by default be shared between several
eXo caches instances. indeed to consume less resources, you can
allow to use the same instance of JBoss Cache for several eXo
Cache instances, each eXo Cache Instances will have his own
cache region with its own eviction configuration. The default
value of this parameter is false.NoteThis value is only the default value that cans be
redefined at |
If for a given reason, you need to use a specific configuration for a cache, you can register one thanks to an "external plugin", see an example below:
<configuration>
...
<external-component-plugins>
<target-component>org.exoplatform.services.cache.ExoCacheFactory</target-component>
<component-plugin>
<name>addConfig</name>
<set-method>addConfig</set-method>
<type>org.exoplatform.services.cache.impl.jboss.ExoCacheFactoryConfigPlugin</type>
<description>add Custom Configurations</description>
<init-params>
<value-param>
<name>myCustomCache</name>
<value>jar:/conf/portal/custom-cache-configuration.xml</value>
</value-param>
</init-params>
</component-plugin>
</external-component-plugins>
...
</configuration>In the example above, I call the method
addConfig(ExoCacheFactoryConfigPlugin plugin) on
the current implementation of ExoCacheFactory which is
actually the jboss cache implementation.
In the init-params block, you can define a set of value-param blocks and for each value-param, we expect the name of cache that needs a specific configuration as name and the location of your custom configuration as value.
In this example, we indicates to the factory that we would like that the cache myCustomCache use the configuration available at jar:/conf/portal/custom-cache-configuration.xml.
The factory for jboss cache, delegates the cache creation to
ExoCacheCreator that is defined as below:
package org.exoplatform.services.cache.impl.jboss;
...
public interface ExoCacheCreator {
/**
* Creates an eXo cache according to the given configuration {@link org.exoplatform.services.cache.ExoCacheConfig}
* @param config the configuration of the cache to apply
* @param cache the cache to initialize
* @exception ExoCacheInitException if an exception happens while initializing the cache
*/
public ExoCache create(ExoCacheConfig config, Cache<Serializable, Object> cache) throws ExoCacheInitException;
/**
* Returns the type of {@link org.exoplatform.services.cache.ExoCacheConfig} expected by the creator
* @return the expected type
*/
public Class<? extends ExoCacheConfig> getExpectedConfigType();
/**
* Returns the name of the implementation expected by the creator. This is mainly used to be backward compatible
* @return the expected by the creator
*/
public String getExpectedImplementation();
}The ExoCacheCreator allows you to define any kind
of jboss cache instance that you would like to have. It has been
designed to give you the ability to have your own type of
configuration and to always be backward compatible.
In an ExoCacheCreator, you need to implement 3
methods which are:
create: this method is used to create a new
ExoCachefrom theExoCacheConfigand a jboss cache instance.getExpectedConfigType: this method is used to indicate the factory the subtype of
ExoCacheConfigsupported by the creator.getExpectedImplementation: this method is used to indicate the factory and the value of field implementation of
ExoCacheConfigthat is supported by the creator. This is used for backward compatibility, in other words, you can still configure your cache with a super classExoCacheConfig.
You can register any cache creator that you want thanks to an "external plugin", see an example below:
<external-component-plugins>
<target-component>org.exoplatform.services.cache.ExoCacheFactory</target-component>
<component-plugin>
<name>addCreator</name>
<set-method>addCreator</set-method>
<type>org.exoplatform.services.cache.impl.jboss.ExoCacheCreatorPlugin</type>
<description>add Exo Cache Creator</description>
<init-params>
<object-param>
<name>LRU</name>
<description>The lru cache creator</description>
<object type="org.exoplatform.services.cache.impl.jboss.lru.LRUExoCacheCreator">
<field name="defaultTimeToLive"><long>1500</long></field>
<field name="defaultMaxAge"><long>2000</long></field>
</object>
</object-param>
</init-params>
</component-plugin>
</external-component-plugins>In the example above, I call the method
addCreator(ExoCacheCreatorPlugin plugin) on the
current implementation of ExoCacheFactory which is
actually the jboss cache implementation.
In the init-params block, you can define a
set of object-param blocks and for each
object-param, we expect any object definition of
type ExoCacheCreator.
In this example, we register the action creator related to the eviction policy LRU.
By default, no cache creator are defined, so you need to define them yourself by adding them in your configuration files.
..
<object-param>
<name>LRU</name>
<description>The lru cache creator</description>
<object type="org.exoplatform.services.cache.impl.jboss.lru.LRUExoCacheCreator">
<field name="defaultTimeToLive"><long>${my-value}</long></field>
<field name="defaultMaxAge"><long>${my-value}</long></field>
</object>
</object-param>
...Table 63.3. Fields description
| defaultTimeToLive | This is the default value of the field timeToLive described in the section dedicated to this cache type. This value is only used when we define a cache of this type with the old configuration. |
| defaultMaxAge | This is the default value of the field maxAge described in the section dedicated to this cache type. This value is only used when we define a cache of this type with the old configuration. |
... <object-param> <name>FIFO</name> <description>The fifo cache creator</description> <object type="org.exoplatform.services.cache.impl.jboss.fifo.FIFOExoCacheCreator"></object> </object-param> ...
... <object-param> <name>MRU</name> <description>The mru cache creator</description> <object type="org.exoplatform.services.cache.impl.jboss.mru.MRUExoCacheCreator"></object> </object-param> ...
...
<object-param>
<name>LFU</name>
<description>The lfu cache creator</description>
<object type="org.exoplatform.services.cache.impl.jboss.lfu.LFUExoCacheCreator">
<field name="defaultMinNodes"><int>${my-value}</int></field>
</object>
</object-param>
...Table 63.4. Fields description
| defaultMinNodes | This is the default value of the field minNodes described in the section dedicated to this cache type. This value is only used when we define a cache of this type with the old configuration. |
...
<object-param>
<name>EA</name>
<description>The ea cache creator</description>
<object type="org.exoplatform.services.cache.impl.jboss.ea.EAExoCacheCreator">
<field name="defaultExpirationTimeout"><long>2000</long></field>
</object>
</object-param>
...Table 63.5. Fields description
| defaultExpirationTimeout | This is the default value of the field minNodes described in the section dedicated to this cache type. This value is only used when we define a cache of this type with the old configuration. |
You have 2 ways to define a cache which are:
At
CacheServiceinitializationWith an "external plugin"
...
<component>
<key>org.exoplatform.services.cache.CacheService</key>
<type>org.exoplatform.services.cache.impl.CacheServiceImpl</type>
<init-params>
...
<object-param>
<name>fifocache</name>
<description>The default cache configuration</description>
<object type="org.exoplatform.services.cache.ExoCacheConfig">
<field name="name"><string>fifocache</string></field>
<field name="maxSize"><int>${my-value}</int></field>
<field name="liveTime"><long>${my-value}</long></field>
<field name="distributed"><boolean>false</boolean></field>
<field name="implementation"><string>org.exoplatform.services.cache.FIFOExoCache</string></field>
</object>
</object-param>
...
</init-params>
</component>
...In this example, we define a new cache called fifocache.
...
<external-component-plugins>
<target-component>org.exoplatform.services.cache.CacheService</target-component>
<component-plugin>
<name>addExoCacheConfig</name>
<set-method>addExoCacheConfig</set-method>
<type>org.exoplatform.services.cache.ExoCacheConfigPlugin</type>
<description>add ExoCache configuration component plugin </description>
<init-params>
...
<object-param>
<name>fifoCache</name>
<description>The fifo cache configuration</description>
<object type="org.exoplatform.services.cache.ExoCacheConfig">
<field name="name"><string>fifocache</string></field>
<field name="maxSize"><int>${my-value}</int></field>
<field name="liveTime"><long>${my-value}</long></field>
<field name="distributed"><boolean>false</boolean></field>
<field name="implementation"><string>org.exoplatform.services.cache.FIFOExoCache</string></field>
</object>
</object-param>
...
</init-params>
</component-plugin>
</external-component-plugins>
...In this example, we define a new cache called fifocache which is in fact the same cache as in previous example but defined in a different manner.
Actually, if you use a custom configuration for your cache as described in a previous section, we will use the cache mode definde in your configuration file.
In case, you decide to use the default configuration template,
we use the field distributed of your
ExoCacheConfig to decide. In other words, if the value
of this field is false (the default value), the cache will be a local
cache, otherwise it will be the cache mode defined in your default
configuration template that should be distributed.
In order to avoid creating several JBoss Cache instances that consume resources, it is possible to share the same JBoss Cache instance between multiple eXo Cache instances that rely on the same JBoss Cache config. Each eXo Cache instances will then have their own cache region with their own eviction configuration. To allow sharing JBoss Cache instances, you can set the global value at ExoCacheFactory level and if needed set the local value at ExoCacheConfig level knowing that local value will redefine the global value. Each new ExoCacheConfig described below are a sub class of AbstractExoCacheConfig that gives access to the parameter allowShareableCache, if this parameter is set, it will be the value used otherwise it will use the global value. For all the old ExoCacheConfig, only the global value will be used.
New configuration
...
<object-param>
<name>lru</name>
<description>The lru cache configuration</description>
<object type="org.exoplatform.services.cache.impl.jboss.lru.LRUExoCacheConfig">
<field name="name"><string>lru</string></field>
<field name="maxNodes"><int>${my-value}</int></field>
<field name="minTimeToLive"><long>${my-value}</long></field>
<field name="maxAge"><long>${my-value}</long></field>
<field name="timeToLive"><long>${my-value}</long></field>
</object>
</object-param>
...Table 63.6. Fields description
| maxNodes | This is the maximum number of nodes allowed in this region. 0 denotes immediate expiry, -1 denotes no limit. |
| minTimeToLive | The minimum amount of time (in milliseconds) that a node must be allowed to live after being accessed before it is allowed to be considered for eviction. 0 denotes that this feature is disabled, which is the default value. |
| maxAge | Lifespan of a node (in milliseconds) regardless of idle time before the node is swept away. 0 denotes immediate expiry, -1 denotes no limit. |
| timeToLive | The amount of time that a node is not written to or read (in milliseconds) before the node is swept away. 0 denotes immediate expiry, -1 denotes no limit. |
Old configuration
...
<object-param>
<name>lru-with-old-config</name>
<description>The lru cache configuration</description>
<object type="org.exoplatform.services.cache.ExoCacheConfig">
<field name="name"><string>lru-with-old-config</string></field>
<field name="maxSize"><int>${my-value}</int></field>
<field name="liveTime"><long>${my-value}</long></field>
<field name="implementation"><string>LRU</string></field>
</object>
</object-param>
...Table 63.7. Fields description
| maxSize | This is the maximum number of nodes allowed in this region. 0 denotes immediate expiry, -1 denotes no limit. |
| liveTime | The minimum amount of time (in seconds) that a node must be allowed to live after being accessed before it is allowed to be considered for eviction. 0 denotes that this feature is disabled, which is the default value. |
Note
For the fields maxAge and timeToLive needed by JBoss cache, we will use the default values provided by the creator.
New configuration
...
<object-param>
<name>fifo</name>
<description>The fifo cache configuration</description>
<object type="org.exoplatform.services.cache.impl.jboss.fifo.FIFOExoCacheConfig">
<field name="name"><string>fifo</string></field>
<field name="maxNodes"><int>${my-value}</int></field>
<field name="minTimeToLive"><long>${my-value}</long></field>
</object>
</object-param>
...Table 63.8. Fields description
| maxNodes | This is the maximum number of nodes allowed in this region. 0 denotes immediate expiry, -1 denotes no limit. |
| minTimeToLive | The minimum amount of time (in milliseconds) that a node must be allowed to live after being accessed before it is allowed to be considered for eviction. 0 denotes that this feature is disabled, which is the default value. |
Old configuration
...
<object-param>
<name>fifo-with-old-config</name>
<description>The fifo cache configuration</description>
<object type="org.exoplatform.services.cache.ExoCacheConfig">
<field name="name"><string>fifo-with-old-config</string></field>
<field name="maxSize"><int>${my-value}</int></field>
<field name="liveTime"><long>${my-value}</long></field>
<field name="implementation"><string>FIFO</string></field>
</object>
</object-param>
...Table 63.9. Fields description
| maxSize | This is the maximum number of nodes allowed in this region. 0 denotes immediate expiry, -1 denotes no limit. |
| liveTime | The minimum amount of time (in seconds) that a node must be allowed to live after being accessed before it is allowed to be considered for eviction. 0 denotes that this feature is disabled, which is the default value. |
New configuration
...
<object-param>
<name>mru</name>
<description>The mru cache configuration</description>
<object type="org.exoplatform.services.cache.impl.jboss.mru.MRUExoCacheConfig">
<field name="name"><string>mru</string></field>
<field name="maxNodes"><int>${my-value}</int></field>
<field name="minTimeToLive"><long>${my-value}</long></field>
</object>
</object-param>
...Table 63.10. Fields description
| maxNodes | This is the maximum number of nodes allowed in this region. 0 denotes immediate expiry, -1 denotes no limit. |
| minTimeToLive | The minimum amount of time (in milliseconds) that a node must be allowed to live after being accessed before it is allowed to be considered for eviction. 0 denotes that this feature is disabled, which is the default value. |
Old configuration
...
<object-param>
<name>mru-with-old-config</name>
<description>The mru cache configuration</description>
<object type="org.exoplatform.services.cache.ExoCacheConfig">
<field name="name"><string>mru-with-old-config</string></field>
<field name="maxSize"><int>${my-value}</int></field>
<field name="liveTime"><long>${my-value}</long></field>
<field name="implementation"><string>MRU</string></field>
</object>
</object-param>
...Table 63.11. Fields description
| maxSize | This is the maximum number of nodes allowed in this region. 0 denotes immediate expiry, -1 denotes no limit. |
| liveTime | The minimum amount of time (in seconds) that a node must be allowed to live after being accessed before it is allowed to be considered for eviction. 0 denotes that this feature is disabled, which is the default value. |
New configuration
...
<object-param>
<name>lfu</name>
<description>The lfu cache configuration</description>
<object type="org.exoplatform.services.cache.impl.jboss.lfu.LFUExoCacheConfig">
<field name="name"><string>lfu</string></field>
<field name="maxNodes"><int>${my-value}</int></field>
<field name="minNodes"><int>${my-value}</int></field>
<field name="minTimeToLive"><long>${my-value}</long></field>
</object>
</object-param>
...Table 63.12. Fields description
| maxNodes | This is the maximum number of nodes allowed in this region. 0 denotes immediate expiry, -1 denotes no limit. |
| minNodes | This is the minimum number of nodes allowed in this region. This value determines what the eviction queue should prune down to per pass. e.g. If minNodes is 10 and the cache grows to 100 nodes, the cache is pruned down to the 10 most frequently used nodes when the eviction timer makes a pass through the eviction algorithm. |
| minTimeToLive | The minimum amount of time (in milliseconds) that a node must be allowed to live after being accessed before it is allowed to be considered for eviction. 0 denotes that this feature is disabled, which is the default value. |
Old configuration
...
<object-param>
<name>lfu-with-old-config</name>
<description>The lfu cache configuration</description>
<object type="org.exoplatform.services.cache.ExoCacheConfig">
<field name="name"><string>lfu-with-old-config</string></field>
<field name="maxSize"><int>${my-value}</int></field>
<field name="liveTime"><long>${my-value}</long></field>
<field name="implementation"><string>LFU</string></field>
</object>
</object-param>
...Table 63.13. Fields description
| maxSize | This is the maximum number of nodes allowed in this region. 0 denotes immediate expiry, -1 denotes no limit. |
| liveTime | The minimum amount of time (in milliseconds) that a node must be allowed to live after being accessed before it is allowed to be considered for eviction. 0 denotes that this feature is disabled, which is the default value. |
Note
For the fields minNodes and timeToLive needed by JBoss cache, we will use the default values provided by the creator.
New configuration
...
<object-param>
<name>ea</name>
<description>The ea cache configuration</description>
<object type="org.exoplatform.services.cache.impl.jboss.ea.EAExoCacheConfig">
<field name="name"><string>ea</string></field>
<field name="maxNodes"><int>${my-value}</int></field>
<field name="minTimeToLive"><long>${my-value}</long></field>
<field name="expirationTimeout"><long>${my-value}</long></field>
</object>
</object-param>
...Table 63.14. Fields description
| maxNodes | This is the maximum number of nodes allowed in this region. 0 denotes immediate expiry, -1 denotes no limit. |
| minTimeToLive | The minimum amount of time (in milliseconds) that a node must be allowed to live after being accessed before it is allowed to be considered for eviction. 0 denotes that this feature is disabled, which is the default value. |
| expirationTimeout | This is the timeout after which the cache entry must be evicted. |
Old configuration
...
<object-param>
<name>ea-with-old-config</name>
<description>The ea cache configuration</description>
<object type="org.exoplatform.services.cache.ExoCacheConfig">
<field name="name"><string>lfu-with-old-config</string></field>
<field name="maxSize"><int>${my-value}</int></field>
<field name="liveTime"><long>${my-value}</long></field>
<field name="implementation"><string>EA</string></field>
</object>
</object-param>
...Table 63.15. Fields description
| maxSize | This is the maximum number of nodes allowed in this region. 0 denotes immediate expiry, -1 denotes no limit. |
| liveTime | The minimum amount of time (in milliseconds) that a node must be allowed to live after being accessed before it is allowed to be considered for eviction. 0 denotes that this feature is disabled, which is the default value. |
Note
For the fields expirationTimeout needed by JBoss cache, we will use the default values provided by the creator.
When you add the related jar file in your classpath, the eXo service container will use the default configuration provided in the library itself but of course you can still redefined the configuration if you wish as you can do with any components.
The default configuration of the factory is:
<configuration>
<component>
<key>org.exoplatform.services.cache.ExoCacheFactory</key>
<type>org.exoplatform.services.cache.impl.infinispan.ExoCacheFactoryImpl</type>
<init-params>
<value-param>
<name>cache.config.template</name>
<value>jar:/conf/portal/cache-configuration-template.xml</value>
</value-param>
</init-params>
</component>
</configuration>As you can see the factory requires one single parameter which is cache.config.template, this parameter allows you to define the location of the default configuration template of your infinispan. In the default configuration, we ask the eXo container to get the file shipped into the jar at /conf/portal/cache-configuration-template.xml.
The default configuration template aims to be the skeleton from which we will create any type of infinispan cache instance, thus it must be very generic.
Note
All the cache instances fo which we configure the same cluster
name will also share the same
EmbeddedCacheManager.
If for a given reason, you need to use a specific configuration for a cache, you can register one thanks to an "external plugin", see an example below:
<configuration>
...
<external-component-plugins>
<target-component>org.exoplatform.services.cache.ExoCacheFactory</target-component>
<component-plugin>
<name>addConfig</name>
<set-method>addConfig</set-method>
<type>org.exoplatform.services.cache.impl.infinispan.ExoCacheFactoryConfigPlugin</type>
<description>add Custom Configurations</description>
<init-params>
<value-param>
<name>myCustomCache</name>
<value>jar:/conf/portal/custom-cache-configuration.xml</value>
</value-param>
</init-params>
</component-plugin>
</external-component-plugins>
...
</configuration>In the example above, I call the method
addConfig(ExoCacheFactoryConfigPlugin plugin) on
the current implementation of ExoCacheFactory which is
actually the infinispan implementation.
In the init-params block, you can define a set of value-param blocks and for each value-param, we expect the name of cache that needs a specific configuration as name and the location of your custom configuration as value.
In this example, we indicates to the factory that we would like that the cache myCustomCache use the configuration available at jar:/conf/portal/custom-cache-configuration.xml.
Note
All the cache instances that will rely on the cache
configuration located at the same location will share the same
EmbeddedCacheManager.
The factory for infinispan, delegates the cache creation to
ExoCacheCreator that is defined as below:
package org.exoplatform.services.cache.impl.infinispan;
...
public interface ExoCacheCreator {
/**
* Creates an eXo cache according to the given configuration {@link org.exoplatform.services.cache.ExoCacheConfig}
* @param config the configuration of the cache to apply
* @param confBuilder the configuration builder of the infinispan cache
* @param cacheGetter a {@link Callable} instance from which we can get the cache
* @exception ExoCacheInitException if an exception happens while initializing the cache
*/
public ExoCache<Serializable, Object> create(ExoCacheConfig config, ConfigurationBuilder confBuilder,
Callable<Cache<Serializable, Object>> cacheGetter) throws ExoCacheInitException;
/**
* Returns the type of {@link org.exoplatform.services.cache.ExoCacheConfig} expected by the creator
* @return the expected type
*/
public Class<? extends ExoCacheConfig> getExpectedConfigType();
/**
* Returns a set of all the implementations expected by the creator. This is mainly used to be backward compatible
* @return the expected by the creator
*/
public Set<String> getExpectedImplementations();
}The ExoCacheCreator allows you to define any kind
of infinispan cache instance that you would like to have. It has been
designed to give you the ability to have your own type of
configuration and to always be backward compatible.
In an ExoCacheCreator, you need to implement 3
methods which are:
create - this method is used to create a new
ExoCachefrom theExoCacheConfig, an inifinispan cache configuration and a Callable object to allow you to get the cache instance.getExpectedConfigType - this method is used to indicate the factory the subtype of
ExoCacheConfigsupported by the creator.getExpectedImplementations - this method is used to indicate the factory the values of the field implementation of
ExoCacheConfigthat is supported by the creator. This is used for backward compatibility, in other words you can still configure your cache with an instance ofExoCacheConfig.
You can register any cache creator you want thanks to an "external plugin", see an example below:
<external-component-plugins>
<target-component>org.exoplatform.services.cache.ExoCacheFactory</target-component>
<component-plugin>
<name>addCreator</name>
<set-method>addCreator</set-method>
<type>org.exoplatform.services.cache.impl.infinispan.ExoCacheCreatorPlugin</type>
<description>add Exo Cache Creator</description>
<init-params>
<object-param>
<name>Test</name>
<description>The cache creator for testing purpose</description>
<object type="org.exoplatform.services.cache.impl.infinispan.TestExoCacheCreator"></object>
</object-param>
</init-params>
</component-plugin>
</external-component-plugins>In the example above, I call the method
addCreator(ExoCacheCreatorPlugin plugin) on the
current implementation of ExoCacheFactory which is
actually the infinispan implementation.
In the init-params block, you can define a
set of object-param blocks and for each
object-param, we expect any object definition of
type ExoCacheCreator.
In this example, we register the cache creator related to the eviction policy Test.
By default, no cache creator are defined, so you need to define them yourself by adding them in your configuration files.
This is the generic cache creator that allows you to use any eviction strategies defined by default in Infinispan.
..
<object-param>
<name>GENERIC</name>
<description>The generic cache creator</description>
<object type="org.exoplatform.services.cache.impl.infinispan.generic.GenericExoCacheCreator">
<field name="implementations">
<collection type="java.util.HashSet">
<value>
<string>NONE</string>
</value>
<value>
<string>FIFO</string>
</value>
<value>
<string>LRU</string>
</value>
<value>
<string>UNORDERED</string>
</value>
<value>
<string>LIRS</string>
</value>
</collection>
</field>
<field name="defaultStrategy"><string>${my-value}</string></field>
<field name="defaultMaxIdle"><long>${my-value}</long></field>
<field name="defaultWakeUpInterval"><long>${my-value}</long></field>
</object>
</object-param>
...Table 63.16. Fields description
| implementations | This is the list of all the implementations supported by the cache creator. Actualy, it is a subset of the full list of the eviction strategies supported by infinispan to which you want to give access to. In the configuraton above, you have the full list of all the eviction strategies currently supported by infinispan 4.1. This field is used to manage the backward compatibility. |
| defaultStrategy | This is the name of the default eviction strategy to use. By default the value is LRU. This value is only use when we define a cache of this type with the old configuration. |
| defaultMaxIdle | This is the default value of the field maxIdle described in the section dedicated to this cache type. By default the value is -1.This value is only use when we define a cache of this type with the old configuration. |
| defaultWakeUpInterval | his is the default value of the field wakeUpInterval described in the section dedicated to this cache type. By default the value is 5000.This value is only use when we define a cache of this type with the old configuration |
Actually, if you use a custom configuration for your cache as described in a previous section, we will use the cache mode define in your configuration file.
In case, you decide to use the default configuration template,
we use the fields distributed and
replicated of your ExoCacheConfig
to decide. In other words, if the value of these fields is false (the
default value), the cache will be a local cache otherwise if the field
distributed is set to true, the cache will be
then be considered as distrbuted and will be retrieved from the
DistributedCacheManager (more details about it in
the next chapter). Finally if the field
replicated is set to true, the cache mode of your
cache will be the one defined in the configuration assuming that it
should be replicated.
All the eviction strategies proposed by default in infinispan rely on the generic cache creator.
New configuration
...
<object-param>
<name>myCache</name>
<description>My cache configuration</description>
<object type="org.exoplatform.services.cache.impl.infinispan.generic.GenericExoCacheConfig">
<field name="name"><string>myCacheName</string></field>
<field name="strategy"><int>${my-value}</int></field>
<field name="maxEntries"><long>${my-value}</long></field>
<field name="lifespan"><long>${my-value}</long></field>
<field name="maxIdle"><long>${my-value}</long></field>
<field name="wakeUpInterval"><long>${my-value}</long></field>
</object>
</object-param>
...Table 63.17. Fields description
| strategy | The name of the strategy to use such as 'UNORDERED', 'FIFO', 'LRU', 'LIRS' and 'NONE' (to disable eviction). |
| maxEntries | Maximum number of entries in a cache instance. If selected value is not a power of two the actual value will default to the least power of two larger than selected value. -1 means no limit which is also the default value. |
| lifespan | Maximum lifespan of a cache entry, after which the entry is expired cluster-wide, in milliseconds. -1 means the entries never expire which is also the default value. |
| maxIdle | Maximum idle time a cache entry will be maintained in the cache, in milliseconds. If the idle time is exceeded, the entry will be expired cluster-wide. -1 means the entries never expire which is also the default value. |
| wakeUpInterval | Interval between subsequent eviction runs, in milliseconds. If you wish to disable the periodic eviction process altogether, set wakeupInterval to -1. The default value is 5000. |
Old configuration
...
<object-param>
<name>myCache</name>
<description>My cache configuration</description>
<field name="name"><string>lru-with-old-config</string></field>
<field name="maxSize"><int>${my-value}</int></field>
<field name="liveTime"><long>${my-value}</long></field>
<field name="implementation"><string>${my-value}</string></field>
</object>
</object-param>
...Table 63.18. Fields description
| maxSize | Maximum number of entries in a cache instance. If selected value is not a power of two the actual value will default to the least power of two larger than selected value. -1 means no limit which is also the default value. |
| liveTime | Maximum lifespan of a cache entry, after which the entry is expired cluster-wide, in milliseconds. -1 means the entries never expire which is also the default value. |
| implementation | The name of the implementation to use the expected value is one of the eviction strategies defined in the field implementations of the generic cache creator. |
Note
For the fields maxIdle and wakeUpInterval needed by infinispan, we will use the default values provided by the creator.
In order to be able to use infinispan in distributed mode with the ability to launch external JVM instances that will manage a part of the cache, we need to configure the DistributedCacheManager. In the next sections, we will show how to configure the component and how to launch external JVM instances.
The DistributedCacheManager is the component that will manage all the cache instances that we expect to be distributed, it must be unique in the whole JVM which means that it must be declared at RootContainer level in portal mode or at StandaloneContainer in standalone mode. See below an example of configuration.
<component>
<type>org.exoplatform.services.ispn.DistributedCacheManager</type>
<init-params>
<value-param>
<name>infinispan-configuration</name>
<value>jar:/conf/distributed-cache-configuration.xml</value>
</value-param>
<properties-param>
<name>parameters</name>
<description>The parameters of the configuration</description>
<property name="configurationFile" value="${gatein.jcr.jgroups.config}"></property>
<property name="invalidationThreshold" value="0"></property>
<property name="numOwners" value="3"></property>
<property name="numVirtualNodes" value="2"></property>
</properties-param>
</init-params>
</component>Table 63.19. Fields description
| infinispan-configuration | Location of the infinispan configuration to use in which all the distributed caches must be configured by name. All paths supported by the ConfigurationManager with prefixes like jar:/..., classpath:/..., etc. This parameter is mandatory. |
| parameters | In the configuration file, you can add a set of variables of type ${variable-name}, these variables will be solved using the values of the parameters. The name of the variable in the configuration file must match with the name of the parameter. This parameter is optional. |
As described above, the configuration of infinispan must defined explicitly each cache using the nameCache block no dynamic configuration of cache is supported. Indeed to ensure that the whole cluster is consistent in term of defined cache, it is required to configure all the cache that you will need and register it using its future name.
For now, we have 2 supported cache name which are JCRCache and eXoCache. JCRCache is the name of the cache that we use in case we would like to store the data of the JCR into a distributed cache. eXoCache is the name of the cache that we use in case we would like to store the data of some eXo Cache instances into a distributed cache.
See below an example of infinispan configuration with both eXoCache and JCRCache defined:
<infinispan xmlns:xsi="http://www.w3.org/2001/XMLSchema-instance" xsi:schemaLocation="urn:infinispan:config:5.1 http://www.infinispan.org/schemas/infinispan-config-5.1.xsd"
xmlns="urn:infinispan:config:5.1">
<global>
<globalJmxStatistics jmxDomain="exo" enabled="true" allowDuplicateDomains="true"/>
<transport transportClass="org.infinispan.remoting.transport.jgroups.JGroupsTransport" clusterName="JCR-cluster" distributedSyncTimeout="20000">
<properties>
<property name="configurationFile" value="${configurationFile}"/>
</properties>
</transport>
<shutdown hookBehavior="DEFAULT"/>
</global>
<namedCache name="JCRCache">
<locking isolationLevel="READ_COMMITTED" lockAcquisitionTimeout="120000" writeSkewCheck="false" concurrencyLevel="500" useLockStriping="true" />
<transaction transactionManagerLookupClass="org.infinispan.transaction.lookup.GenericTransactionManagerLookup" syncRollbackPhase="true" syncCommitPhase="true" eagerLockSingleNode="true" transactionMode="TRANSACTIONAL"/>
<jmxStatistics enabled="true"/>
<clustering mode="distribution">
<l1 enabled="true" invalidationThreshold="${invalidationThreshold}"/>
<hash numOwners="${numOwners}" numVirtualNodes="${numVirtualNodes}" rehashRpcTimeout="120000">
<groups enabled="true"/>
</hash>
<sync replTimeout="180000"/>
</clustering>
</namedCache>
<namedCache name="eXoCache">
<locking isolationLevel="READ_COMMITTED" lockAcquisitionTimeout="120000" writeSkewCheck="false" concurrencyLevel="500" useLockStriping="true" />
<transaction transactionManagerLookupClass="org.infinispan.transaction.lookup.GenericTransactionManagerLookup" syncRollbackPhase="true" syncCommitPhase="true" eagerLockSingleNode="true" transactionMode="TRANSACTIONAL"/>
<jmxStatistics enabled="true"/>
<clustering mode="distribution">
<l1 enabled="true" invalidationThreshold="${invalidationThreshold}"/>
<hash numOwners="${numOwners}" numVirtualNodes="${numVirtualNodes}" rehashRpcTimeout="120000"/>
<sync replTimeout="180000"/>
</clustering>
</namedCache>
</infinispan>In case you intend to use the distribued mode, you can launch external JVM in standalone mode to provide more memory to your current cache. To do so, you will need to get the file of type exo.jcr.component.core.impl.infinispan.v5-binary.zip in which you will find scripts to launch your cache servers. These scripts allow optional arguments that are described below:
help|?|<configuration-file-path>|udp|tcp <initial-hosts>
Table 63.20. Arguments description
| help | Print the expected syntax. |
| ? | Print the expected syntax. |
| configuration-file-path | The location of the configuration file to use, we expect an absolute path. It will try to get it using the current class loader, if it cannot be found it will get it from the file system. By default it will use the path /conf/cache-server-configuration.xml that is actually a file bundled into the jar. |
| udp | We use this parameter value when we want to use the default configuration file with udp as transport stack which is actually the default stack used which means that it will have the exact same behavior as when we don't provide any parameter. |
| tcp | We use this parameter value when we want to use the default configuration file with tcp as transport stack. |
| initial-hosts | This parameter is optional and is only allowed in case the tcp stack is enabled, it will allow you to define the set of hosts that will be part of the cluster. The syntax of this parameter is a list of hostname[port] comma-separated. Knowing that the default value is "localhost[7800],localhost[7801]" if this parameter is not set, the bind address will be automatically set to 127.0.0.1 so you need to ensure that your server is configured to have it mapped to localhost. |
Note
If you intend to use the CacheServer in order to manage some of your eXo Cache instances, don't forget to add the jar files that define both the keys and the values in the lib directory of the CacheServer distribution and restarts your CacheServer instances otherwise the unmarshalling will fail with java.lang.ClassNotFoundException.
In case you would like to configure your workspace in order to rely on a distributed cache apart using org.exoplatform.services.jcr.impl.dataflow.persistent.infinispan.ISPNCacheWorkspaceStorageCache as FQN of your cache you will need to set the property use-distributed-cache to true. If you do so the JCR cache will rely on the cache called JCRCache defined in the infinispan configuration provided to the DistributedCacheManager.
- 64.1. Base information
- 64.2. Existing TransactionService implementations
- 64.2.1. JOTM in standalone mode
- 64.2.2. Generic TransactionService based on the TransactionManagerLookup of JBoss Cache
- 64.2.3. Specific GenericTransactionService for JBoss Cache and Arjuna
- 64.2.4. Generic TransactionService based on the TransactionManagerLookup of Infinispan
- 64.2.5. Specific GenericTransactionService for Infinispan and Arjuna
- 64.2.6. A very specific TransactionService for JBoss AS
- 64.2.7. TransactionsEssentials in standalone mode
TransactionServices provides access to the TransactionManager and the UserTransaction (See JTA specification for details).
Table 64.1. List methods
| getTransactionManager() | Get used TransactionManager |
| getUserTransaction() | Get UserTransaction on TransactionManager |
| getDefaultTimeout() | Return default TimeOut |
| setTransactionTimeout(int seconds) | Set TimeOut in second |
| enlistResource(XAResource xares) | Enlist XA resource in TransactionManager |
| delistResource(XAResource xares) | Delist XA resource from TransactionManager |
eXo JCR proposes out of the box several implementations, they all implement the abstract class org.exoplatform.services.transaction.impl.AbstractTransactionService. This main class implement the biggest part of all the methods proposed by the TransactionService. For each sub-class of AbstractTransactionService, you can set the transaction timeout by configuration using the value parameter timeout that is expressed in seconds.
To use JOTM as TransactionManager in standalone mode, simply add the following component configuration:
<component>
<key>org.exoplatform.services.transaction.TransactionService</key>
<type>org.exoplatform.services.transaction.impl.jotm.TransactionServiceJotmImpl</type>
<!-- Uncomment the lines below if you want to set default transaction timeout that is expressed in seconds -->
<!--init-params>
<value-param>
<name>timeout</name>
<value>60</value>
</value-param>
</init-params-->
</component>If you intend to use JBoss Cache, you can use a generic TransactionService based on its TransactionManagerLookup which is able to automatically find the TransactionManager of several Application Servers thanks to a set of JNDI lookups. This generic TransactionService covers mainly the TransactionManager lookups, the UserTransaction is actually simply the TransactionManager instance that has been wrapped. See below an example of configuration:
<!-- Configuration of the TransactionManagerLookup -->
<component>
<key>org.jboss.cache.transaction.TransactionManagerLookup</key>
<type>org.jboss.cache.transaction.GenericTransactionManagerLookup</type>
</component>
<!-- Configuration of the TransactionService -->
<component>
<key>org.exoplatform.services.transaction.TransactionService</key>
<type>org.exoplatform.services.transaction.jbosscache.GenericTransactionService</type>
<!-- Uncomment the lines below if you want to set default transaction timeout that is expressed in seconds -->
<!--init-params>
<value-param>
<name>timeout</name>
<value>60</value>
</value-param>
</init-params-->
</component>If you intend to use JBoss Cache with Arjuna, you can use a more specific GenericTransactionService, it is mostly interesting in case you want to use the real UserTransaction. See below an example of configuration:
<!-- Configuration of the TransactionManagerLookup -->
<component>
<key>org.jboss.cache.transaction.TransactionManagerLookup</key>
<type>org.jboss.cache.transaction.JBossStandaloneJTAManagerLookup</type>
</component>
<!-- Configuration of the TransactionService -->
<component>
<key>org.exoplatform.services.transaction.TransactionService</key>
<type>org.exoplatform.services.transaction.jbosscache.JBossTransactionsService</type>
<!-- Uncomment the lines below if you want to set default transaction timeout that is expressed in seconds -->
<!--init-params>
<value-param>
<name>timeout</name>
<value>60</value>
</value-param>
</init-params-->
</component>If you intend to use Infinispan, you can use a generic TransactionService based on its TransactionManagerLookup which is able to automatically find the TransactionManager of several Application Servers thanks to a set of JNDI lookups. This generic TransactionService covers mainly the TransactionManager lookups, the UserTransaction is actually simply the TransactionManager instance that has been wrapped. See below an example of configuration:
<!-- Configuration of the TransactionManagerLookup -->
<component>
<key>org.infinispan.transaction.lookup.TransactionManagerLookup</key>
<type>org.infinispan.transaction.lookup.GenericTransactionManagerLookup</type>
</component>
<!-- Configuration of the TransactionService -->
<component>
<key>org.exoplatform.services.transaction.TransactionService</key>
<type>org.exoplatform.services.transaction.infinispan.GenericTransactionService</type>
<!-- Uncomment the lines below if you want to set default transaction timeout that is expressed in seconds -->
<!--init-params>
<value-param>
<name>timeout</name>
<value>60</value>
</value-param>
</init-params-->
</component>If you intend to use Infinispan with Arjuna, you can use a more specific GenericTransactionService, it is mostly interesting in case you want to use the real UserTransaction. See below an example of configuration:
<!-- Configuration of the TransactionManagerLookup -->
<component>
<key>org.infinispan.transaction.lookup.TransactionManagerLookup</key>
<type>org.exoplatform.services.transaction.infinispan.JBossStandaloneJTAManagerLookup</type>
</component>
<!-- Configuration of the TransactionService -->
<component>
<key>org.exoplatform.services.transaction.TransactionService</key>
<type>org.exoplatform.services.transaction.infinispan.JBossTransactionsService</type>
<!-- Uncomment the lines below if you want to set default transaction timeout that is expressed in seconds -->
<!--init-params>
<value-param>
<name>timeout</name>
<value>60</value>
</value-param>
</init-params-->
</component>If you intend to use JBoss AS with JBoss Cache and Infinispan, you can use a very specific TransactionService for JBoss AS. See below an example of configuration:
<component>
<key>org.exoplatform.services.transaction.TransactionService</key>
<type>org.exoplatform.services.transaction.impl.jboss.JBossTransactionService</type>
<!-- Uncomment the lines below if you want to set default transaction timeout that is expressed in seconds -->
<!--init-params>
<value-param>
<name>timeout</name>
<value>60</value>
</value-param>
</init-params-->
</component>To use TransactionsEssentials as TransactionManager in standalone mode, simply add the following component configuration:
<component>
<key>org.exoplatform.services.transaction.TransactionService</key>
<type>org.exoplatform.services.transaction.impl.atomikos.TransactionsEssentialsTransactionService</type>
<!-- Uncomment the lines below if you want to set default transaction timeout that is expressed in seconds -->
<!--init-params>
<value-param>
<name>timeout</name>
<value>60</value>
</value-param>
</init-params-->
</component>The DataSourceProvider is a service used to give access to a data source in an uniform manner in order to be able to support data sources that are managed by the application server.
Table 65.1. List methods
| getDataSource(String dataSourceName) | Tries to get the data source from a JNDI lookup. If it can be found and the data source is defined as managed, the service will wrap the original DataSource instance in a new DataSource instance that is aware of its managed state otherwise it will return the original DataSource instance. |
| isManaged(String dataSourceName) | Indicates whether or not the given data source is managed. |
The configuration of the DataSourceProvider should be defined only if you use managed data sources since by default all the data sources are considered as not managed. See below the default configuration
<configuration>
....
<component>
<key>org.exoplatform.services.jdbc.DataSourceProvider</key>
<type>org.exoplatform.services.jdbc.impl.DataSourceProviderImpl</type>
<init-params>
<!-- Indicates that the data source needs to check if a tx is active
to decide if the provided connection needs to be managed or not.
If it is set to false, the data source will provide only
managed connections if the data source itself is managed. -->
<!--value-param>
<name>check-tx-active</name>
<value>true</value>
</value-param-->
<!-- Indicates that all the data sources are managed
If set to true the parameter never-managed and
managed-data-sources will be ignored -->
<!--value-param>
<name>always-managed</name>
<value>true</value>
</value-param-->
<!-- Indicates the list of all the data sources that are
managed, each value tag can contain a list of
data source names separated by a comma, in the
example below we will register ds-foo1, ds-foo2
and ds-foo3 as managed data source. If always-managed
and/or never-managed is set true this parameter is ignored -->
<!--values-param>
<name>managed-data-sources</name>
<value>ds-foo1, ds-foo2</value>
<value>ds-foo3</value>
</values-param-->
</init-params>
</component>
...
</configuration>Table 65.2. Fields description
| check-tx-active | This parameter indicates that the data source needs to check if a transaction is active to decide if the provided connection needs to be managed or not. If it is set to false, the data source will provide only managed connections if the data source itself is managed. By default, this parameter is set to true. If this parameter is set to true, it will need the TransactionService to work propertly, so please ensure that the TransactionService is defined in your configuration. |
| always-managed | This parameter indicates that all the data sources are managed. If set to true the parameter never-managed and managed-data-sources will be ignored, so it will consider all the data sources as managed. By default, this parameter is set to false. |
| managed-data-sources | This parameter indicates the list of all the data sources that are managed, each value tag can contain a list of data source names separated by a comma. If always-managed and/or never-managed is set true this parameter is ignored. |
We need to configure JNDI environment properties and Reference binding with the eXo container standard mechanism.
The Naming service covers:
Configuring the current Naming Context Factory implemented as an ExoContainer Component
org.exoplatform.services.naming.InitialContextInitializer.Binding Objects (References) to the current Context using
org.exoplatform.services.naming.BindReferencePlugincomponent plugin.
Make sure you understand the Java Naming and Directory InterfaceTM (JNDI) concepts before using this service.
After the start time the Context Initializer
(org.exoplatform.services.naming.InitialContextInitializer) traverses
all initial parameters (that concern the Naming Context) configured in
default-properties and
mandatory-properties (see Configuration examples)
and:
For
default-properties: Check if this property is already set as a System property (System.getProperty(name)) and set this property if it's not found. Using those properties is recommended with a third party Naming service provider.For
mandatory-properties: Set the property without checking.
Standard JNDI properties:
java.naming.factory.initialjava.naming.provider.url
and others (see JNDI docs)
Another responsibility of Context Initializer
org.exoplatform.services.naming.InitialContextInitializer
is binding of preconfigured references to the naming context. For this
purpose, it uses a standard eXo component plugin mechanism and in
particular the
org.exoplatform.services.naming.BindReferencePlugin
component plugin. The configuration of this plugin includes three
mandatory value parameters:
bind-name: the name of binding reference.class-name: the type of binding reference.factory: the object factory type.
And also ref-addresses property parameter with a
set of references' properties. (see Configuration examples) Context
Initializer uses those parameters to bind the neccessary reference
automatically.
The InitialContextInitializer configuration
example:
<component>
<type>org.exoplatform.services.naming.InitialContextInitializer</type>
<init-params>
<value-param>.
<name>bindings-store-path</name>.
<value>bind-references.xml</value>.
</value-param>.
<value-param>
<name>overload-context-factory</name>
<value>true</value>
</value-param>
<properties-param>
<name>default-properties</name>
<description>Default initial context properties</description>
<property name="java.naming.factory.initial" value="org.exoplatform.services.naming.SimpleContextFactory"/>
</properties-param>
<properties-param>
<name>mandatory-properties</name>
<description>Mandatory initial context properties</description>
<property name="java.naming.provider.url" value="rmi://localhost:9999"/>
</properties-param>
</init-params>
</component>where
binding-store-path is file path which stores binded datasources in runtime
overload-context-factory allows to overload the default initial context factory by a context factory that is ExoContainer aware and that is able to delegate to the original initial context factory if it detects that it is not in the eXo scope. By default the feature is disabled since it is only required on AS that don't share the objects by default like tomcat but unlike JBoss AS
The BindReferencePlugin component plugin
configuration example (for JDBC datasource):
<component-plugins>
<component-plugin>
<name>bind.datasource</name>
<set-method>addPlugin</set-method>
<type>org.exoplatform.services.naming.BindReferencePlugin</type>
<init-params>
<value-param>
<name>bind-name</name>
<value>jdbcjcr</value>
</value-param>
<value-param>
<name>class-name</name>
<value>javax.sql.DataSource</value>
</value-param>
<value-param>
<name>factory</name>
<value>org.apache.commons.dbcp.BasicDataSourceFactory</value>
</value-param>
<properties-param>
<name>ref-addresses</name>
<description>ref-addresses</description>
<property name="driverClassName" value="org.hsqldb.jdbcDriver"/>
<property name="url" value="jdbc:hsqldb:file:target/temp/data/portal"/>
<property name="username" value="sa"/>
<property name="password" value=""/>
</properties-param>
</init-params>
</component-plugin>SimpleContextFactoryis created for testing purposes only, do not use it for production.In J2EE environment use Naming Factory objects provided with the Application Server.
InitialContextInitalizer also provides feature of
references binding in runtime. References have bind in runtime will be
persisted and automatically rebinded on a next system start.
Service provides methods for binding reference.
public void bind(String bindName,
String className,
String factory,
String factoryLocation,
Map<String, String> refAddr)
throws NamingException, FileNotFoundException, XMLStreamException;bindName: name of binding.className: the fully-qualified name of the class of the object to which this Reference refers.factory: the name of the factory class for creating an instance of the object to which this Reference refers.factoryLocation: the location of the factory class.refAddr: object's properties map.
Example of usage:
// obtain InitialContextInitializer instance from ExoContainer (e.g. PortalContainer)
InitialContextInitializer initContext = (InitialContextInitializer)container.getComponentInstanceOfType(InitialContextInitializer.class);
Map<String, String> refAddr = new HashMap<String, String>();
refAddr.put("driverClassName", "oracle.jdbc.OracleDriver");
refAddr.put("url", "jdbc:oracle:thin:@oraclehost:1521:orcl");
refAddr.put("username", "exouser");
refAddr.put("password", "exopassword");
initContext.bind("jdbcexco", "javax.sql.DataSource", "org.apache.commons.dbcp.BasicDataSourceFactory", null, refAddr);
// try to get just bound DataSource
DataSource ds = (DataSource)new InitialContext().lookup("jdbcexo");In order to accommodate to the different target runtime where it can be deployed, eXo is capable of leveraging several logging systems. eXo lets you choose the underlying logging engine to use and even configure that engine (as a quick alternative to doing it directly in your runtime environment).
The currently supported logging engines are :
Apache Log4J
JDK's logging
Apache Commons logging (which is itself a pluggable logging abstraction)
eXo lets you choose whatever logging engine you want as this is generally influences by the AS runtime or internal policy.
This is done through an eXo component called
LogConfigurationInitializer.
org.exoplatform.services.log.LogConfigurationInitializer
that reads init parameters and configures logging system according to
them. The parameters:
configurator - an implementation of the
LogConfiguratorinterface with one method configure() that accepts a list of properties (3rd init parameter) to configure the underlying log system using the concrete mechanism. Again, there are three configurators for the most known log systems (commons, log4j, jdk).properties - properties to configure the concrete log system (system properties for commons, log4j.properties or logging.properties for commons, log4j and jdk respectively) Look at the configuration examples below.
logger - an implementation of commons-logging Log interface. It is possible to use commons wrappers but to support buffering required by the log portlet three kinds of loggers were added:
BufferedSimpleLog,BufferedLog4JLoggerandBufferedJdk14Logger(they contain BufferedLog and extend SimpleLog, Log4JLogger and Jdk14Logger commons-logging wrappers respectively).
Log4J is a very popular and flexible logging system. It is a good option for JBoss.
<component>
<type>org.exoplatform.services.log.LogConfigurationInitializer</type>
<init-params>
<value-param>
<name>logger</name>
<value>org.exoplatform.services.log.impl.BufferedLog4JLogger</value>
</value-param>
<value-param>
<name>configurator</name>
<value>org.exoplatform.services.log.impl.Log4JConfigurator</value>
</value-param>
<properties-param>
<name>properties</name>
<description>Log4J properties</description>
<property name="log4j.rootLogger" value="DEBUG, stdout, file"/>
<property name="log4j.appender.stdout" value="org.apache.log4j.ConsoleAppender"/>
<property name="log4j.appender.stdout.layout" value="org.apache.log4j.PatternLayout"/>
<property name="log4j.appender.stdout.layout.ConversionPattern" value="%d {dd.MM.yyyy HH:mm:ss} %c {1}: %m (%F, line %L) %n"/>
<property name="log4j.appender.file" value="org.apache.log4j.FileAppender"/>
<property name="log4j.appender.file.File" value="jcr.log"/>
<property name="log4j.appender.file.layout" value="org.apache.log4j.PatternLayout"/>
<property name="log4j.appender.file.layout.ConversionPattern" value="%d{dd.MM.yyyy HH:mm:ss} %m (%F, line %L) %n"/>
</properties-param >
</init-params>
</component>You can set logger level for class or group of classes by setting next property:
<property name="log4j.category.{component or class name}" value="DEBUG"/>For example:
We want to log all debug messages for class
org.exoplatform.services.jcr.impl.core.SessionDataManager, that lies in exo.jcr.component.core component
<property name="log4j.category.exo.jcr.component.core.SessionDataManager" value="DEBUG"/>
Or we want to log all debug messages for all classes in exo.jcr.component.core component
<property name="log4j.category.exo.jcr.component.core" value="DEBUG"/>
Or we want to log all messages for all kernel components
<property name="log4j.category.exo.kernel" value="DEBUG"/>
JDK logging (aka JUL) is the builtin logging framework introduced in JDK 1.4. It is a good option for Tomcat AS.
Edit the variable
LOG_OPTSin youreXo.shoreXo.bat:
LOG_OPTS="-Dorg.apache.commons.logging.Log=org.apache.commons.logging.impl.Jdk14Logger"
Edit your
logs-configuration.xml:
<component>
<type>org.exoplatform.services.log.LogConfigurationInitializer</type>
<init-params>
<value-param>
<name>logger</name>
<value>org.exoplatform.services.log.impl.BufferedJdk14Logger</value>
</value-param>
<value-param>
<name>configurator</name>
<value>org.exoplatform.services.log.impl.Jdk14Configurator</value>
</value-param>
<properties-param>
<name>properties</name>
<description>jdk1.4 Logger properties</description>
<property name="handlers" value="java.util.logging.ConsoleHandler"/>
<property name=".level" value="FINE"/>
<property name="java.util.logging.ConsoleHandler.level" value="FINE"/>
</properties-param>
</init-params>
</component>SimpleLog is a minimal logging system distributed with Commons Logging. To be used when nothing else is available or when you seek simplicity.
<component>
<type>org.exoplatform.services.log.LogConfigurationInitializer</type>
<init-params>
<value-param>
<name>logger</name>
<value>org.exoplatform.services.log.impl.BufferedSimpleLog</value>
</value-param>
<value-param>
<name>configurator</name>
<value>org.exoplatform.services.log.impl.SimpleLogConfigurator</value>
</value-param>
<properties-param>
<name>properties</name>
<description>SimpleLog properties</description>
<property name="org.apache.commons.logging.simplelog.defaultlog" value="debug"/>
<property name="org.apache.commons.logging.simplelog.showdatetime" value="true"/>
</properties-param>
</init-params>
</component>If you use log4j configuration, you can change the log configuration directly at runtime in:
JBOSS_HOME/server/default/conf/jboss-log4j.xml.
To enable debug logs:
<param name="Threshold" value="DEBUG"/>
To exclude messages from unnecessary classes (server's internal) modify the threshold of these classes to "FATAL".
Tip
If you see only ERROR level logs while starting ear on jboss (4.2.2), you have to remove log4j*.jar from your ear and application.xml.
The kernel has a framework for exposing a management view of the various sub systems of the platform. The management view is a lose term for defining how we can access relevant information about the system and how we can apply management operations. JMX is the de facto standard for exposing a management view in the Java Platform but we take in consideration other kind of views such as REST web services. Therefore, the framework is not tied to JMX, yet it provides a JMX part to define more precisely details related to the JMX management view. The legacy framework is still in use but is deprecated in favor of the new framework as it is less tested and less efficient. It will be removed by sanitization in the future.
The managed frameworks defines an API for exposing a management view of objects. The API is targeted for internal use and is not a public API. The framework leverages Java 5 annotations to describe the management view from an object.
The @Managed annotates elements that wants to expose a management view to a management layer.
@Managed for objects
The framework will export a management view for the objects annotated.
@Managed for getter/setter
Defines a managed property. An annotated getter defines a read property, an annotated setter defines a write property and if matching getter/setter are annotated it defines a read/write property.
@Managed on method
Defines a managed operation.
The @ManagedDescription annotation provides a description of a managed element. It is valid to annotated object or methods. It takes as sole argument a string that is the description value.
The @ManagedName annotation provides an alternative name for managed properties. It is used to accomodate legacy methods of an object that can be renamed for compatibility reasons. It takes as sole argument a string that is the name value.
The @Property annotation is used to within other annotations such as @NameTemplate or @NamingContext. It should be seen as a structural way for a list of properties. A property is made of a key and a value. The value can either be a string litteral or it can be surrounded by curly brace to be a dynamic property. A dynamic property is resolved against the instance of the object at runtime.
The @NameTemplate defines a template that is used at registration time of a managed object to create the JMX object name. The template is formed of properties.
@NameTemplate({
@Property(key="container", value="workspace"),
@Property(key="name", value="{Name}")})The @NamingContext annotations defines a set of properties which are used within a management context. It allows to propagate properties down to managed objects which are defined by an object implementing the ManagementAware interface. The goal is to scope different instances of the same class that would have the same object name otherwise.
@NamingContext(@Property(key="workspace", value="{Name}"))The cache service delegates most of the work to the CacheServiceManaged class by using the @ManagedBy annotation. At runtime when a new cache is created, it calls the CacheServiceManaged class in order to let the CacheServiceManaged object register the cache.
@ManagedBy(CacheServiceManaged.class)
public class CacheServiceImpl implements CacheService {
CacheServiceManaged managed;
...
synchronized private ExoCache createCacheInstance(String region) throws Exception {
...
if (managed != null) {
managed.registerCache(simple);
}
...
}
}The ExoCache interface is annotated to define its management view. The @NameTemplate is used to produce object name values when ExoCache instance are registered.
@Managed
@NameTemplate({@Property(key="service", value="cache"), @Property(key="name", value="{Name}")})
@ManagedDescription("Exo Cache")
public interface ExoCache {
@Managed
@ManagedName("Name")
@ManagedDescription("The cache name")
public String getName();
@Managed
@ManagedName("Capacity")
@ManagedDescription("The maximum capacity")
public int getMaxSize();
@Managed
@ManagedDescription("Evict all entries of the cache")
public void clearCache() throws Exception;
...
}The CacheServiceManaged is the glue code between the CacheService and the management view. The main reason is that only exo services are registered automatically against the management view. Any other managed bean must be registered manually for now. Therefore, it needs to know about the management layer via the management context. The management context allows an object implementing the ManagementAware interface to receive a context to perform further registration of managed objects.
@Managed
public class CacheServiceManaged implements ManagementAware {
/** . */
private ManagementContext context;
/** . */
private CacheServiceImpl cacheService;
public CacheServiceManaged(CacheServiceImpl cacheService) {
this.cacheService = cacheService;
//
cacheService.managed = this;
}
public void setContext(ManagementContext context) {
this.context = context;
}
void registerCache(ExoCache cache) {
if (context != null) {
context.register(cache);
}
}
}Basicaly, ListenerService used to store Listeners and broadcast events to them.
ListenerService event broadcasting works in next way - it takes a destination listeners and executes event on those listeners.
But, some events may take a lot of time, so idea to make event processing asynchronous is usefull.
What do I need to make my listener asynchronous?
- It's very simple, just mark your Listener implementation as
@Asynchronous.
@Asynchronous
class AsynchListenerWithException<S,D> extends Listener<S,D>
{
@Override
public void onEvent(Event<S,D> event) throws Exception
{
// some expensive operation
}
}Now, our AsynchListener will be executed in separate thread by
ExecutorService.
By default, ExecutoreService configured with
thread pool size 1, you can change it in configuration:
<component>
<key>org.exoplatform.services.listener.ListenerService</key>
<type>org.exoplatform.services.listener.ListenerService</type>
<init-params>
<value-param>
<name>asynchPoolSize</name>
<value>5</value>
</value-param>
</init-params>
</component>The RPCService is only needed in a cluser environment, it is used to communicate with the other cluster nodes. It allows to execute a command on all the cluster nodes or on the coordinator i.e. the oldest node in the cluster. The RPCService has been designed to rely on JGroups capabilites and should not be used for heavy load. It can be used for example to notify other nodes that something happened or to collect some information from the other nodes.
The RPCService relies on 3 main interfaces which are:
The org.exoplatform.services.rpc.RPCService that defines the service itslef
The org.exoplatform.services.rpc.RemoteCommand that defines the command that we can execute on other nodes.
The org.exoplatform.services.rpc.TopologyChangeListener that defines the listeners that will be notified anytime the topology of the cluster changes.
The arguments that will be given to the RemoteCommand must be Serializable and its return type also in order to prevent any issue due to the serialization. To prevent to execute any RemoteCommand that could be malicious and to allow to use non Serializable command, you need to register the command first before using it. Since the service will keep only one instance of RemoteCommand per command Id, the implementation of the RemoteCommand must be thread safe.
To be usable, all the RemoteCommands must be registered before being used on all the cluster nodes, which means that the command registration must be done in the constructor of your component in other words before that the RPCService is started. If you try to launch a command that has been registered but the RPCService is not yet launched, you will get an RPCException due to an illegal state. This has for consequences that you will be able to execute a command only once your component will be started.
See an example below:
public class MyService implements Startable
{
private RPCService rpcService;
private RemoteCommand sayHelloCommand;
public MyService(RPCService rpcService)
{
this.rpcService = rpcService;
// Register the command before that the RPCService is started
sayHelloCommand = rpcService.registerCommand(new RemoteCommand()
{
public Serializable execute(Serializable[] args) throws Throwable
{
System.out.println("Hello !");
return null;
}
public String getId()
{
return "hello-world-command";
}
});
}
public void start()
{
// Since the RPCService is a dependency of RPCService, it will be started before
// so I can execute my command
try
{
// This will make all the nodes say "Hello !"
rpcService.executeCommandOnAllNodes(sayHelloCommand, false);
}
catch (SecurityException e)
{
e.printStackTrace();
}
catch (RPCException e)
{
e.printStackTrace();
}
}
public void stop()
{
}
}In the previous example, We register the command sayHelloCommand in the constructor of MyService and we execute this command in the start method.
Note
We expect to have one RPCService instance per PortalContainer in a portal mode and only one RPCService instance in a standalone mode
The configuration of the RPCService should be added only in a cluster environment. See below an example of configuration in case you intend to use JGroups 2 (which is mandatory if you use JBoss Cache as underlying cache):
<configuration>
....
<component>
<key>org.exoplatform.services.rpc.RPCService</key>
<type>org.exoplatform.services.rpc.impl.RPCServiceImpl</type>
<init-params>
<value-param>
<name>jgroups-configuration</name>
<value>classpath:/udp.xml</value>
</value-param>
<value-param>
<name>jgroups-cluster-name</name>
<value>RPCService-Cluster</value>
</value-param>
<value-param>
<name>jgroups-default-timeout</name>
<value>0</value>
</value-param>
<value-param>
<name>allow-failover</name>
<value>true</value>
</value-param>
<value-param>
<name>retry-timeout</name>
<value>20000</value>
</value-param>
</init-params>
</component>
...
</configuration>See below an example of configuration in case you intend to use JGroups 3 (which is mandatory if you use Infinispan as underlying cache):
<configuration>
....
<component>
<key>org.exoplatform.services.rpc.RPCService</key>
<type>org.exoplatform.services.rpc.jgv3.RPCServiceImpl</type>
<init-params>
<value-param>
<name>jgroups-configuration</name>
<value>classpath:/udp.xml</value>
</value-param>
<value-param>
<name>jgroups-cluster-name</name>
<value>RPCService-Cluster</value>
</value-param>
<value-param>
<name>jgroups-default-timeout</name>
<value>0</value>
</value-param>
<value-param>
<name>allow-failover</name>
<value>true</value>
</value-param>
<value-param>
<name>retry-timeout</name>
<value>20000</value>
</value-param>
</init-params>
</component>
...
</configuration>The implementation for JGroups 3 is available in the library exo.kernel.component.ext.rpc.impl.jgroups.v3-X.Y.Z.jar.
Table 70.1. Fields description
| jgroups-configuration | This is the location of the configuration of jgroups. This parameter is mandatory. |
| jgroups-cluster-name | This is the name of the cluster. This parameter is optional and its default value is RPCService-Cluster. Since we could have several instances of the RPCService, the final name will be "${jgroups-cluster-name}-${container-name}" |
| jgroups-default-timeout | This is the default timeout to use if the timeout is not given, if no response could be get after this timeout an exception will be thrown. This parameter is optional and its default value is 0 which means that we don't use any timeout by default. This parameter is expressed in milliseconds. |
| allow-failover | This is parameter indicates whether a command on the coordinator needs to be relaunched or not if the coordintator seems to have left the cluster. This parameter only affects the behavior of the methods executeCommandOnCoordinator. This parameter is optional and its default value is true. |
| retry-timeout | This parameter is the maximum amount of time to wait until the new coordinator is elected. This parameter is linked to the parameter allow-failover, and thus used in the exact same conditions. This parameter is optional and its default value is 20000. This parameter is expressed in milliseconds. |
Most of the time we only need to call a method on a given object, this can be done thanks to the org.exoplatform.services.rpc.SingleMethodCallCommand which is the implementation of a RemoteCommand proposed by default. This command will dynamically execute a method on a given object.
// Register the command first (to be done before that the RPCService has been started)
RemoteCommand commandGetName = rpcService.registerCommand(new SingleMethodCallCommand(myService, "getName"));
...
// Execute the command on the coordinator (can be done only after having started the RPCService)
String name = rpcService.executeCommandOnCoordinator(commandGetName, true);
// Print the name
System.out.println("Name : " + name);This example:
Register a SingleMethodCallCommand that will call getName() on the Object myService anytime the command will be executed.
Execute the command synchronously on the coordinator, assuming that the same command (with the same id) has already been registered on the coordinator
Print the name got from the coordinator
Note
As any RemoteCommand, it has to be registered before being executed and before the RPCService is launched.
Note
As any RemoteCommand, the command can be executed only once the RPCService is launched.
Note
The SingleMethodCallCommand only allow public methods, if you try to register a non public method an RPCException will be thrown at creation level.
Table of Contents
- 71. eXo Core
- 72. Database Creator
- 73. Security Service
- 74. Spring Security Integration
- 75. Organization Service
- 76. Organization Service Initializer
- 77. Organization Listener
- 78. Update ConversationState when user's Membership changed
- 79. DB Schema creator service (JDBC implementation)
- 80. Database Configuration for Hibernate
- 81. LDAP Configuration
- 82. Organization Service TCK tests configuration
- 83. Tika Document Reader Service
- 84. Digest Authentication
Database creator DBCreator is responsible for
execution DDL script in runtime. A DDL script may contain templates for
database name, user name and password which will be replaced by real
values at execution time.
Three templates supported:
${database}for database name;${username}for user name;${password}for user's password;
Service provide method for execute script for new database creation.
Database name which are passed as parameter will be substituted in DDL
script instead of ${database} template. Returns
DBConnectionInfo object (with all neccesary information of
new database's connection) or throws DBCreatorException
exception if any errors occurs in other case.
public DBConnectionInfo createDatabase(String dbName) throws DBCreatorException;
For MSSQL and Sybase servers, use autocommit mode to set true for connection. It's due to after execution "create database" command newly created database not available for "use" command and therefore you can't create new user inside database per one script.
public DBConnectionInfo getDBConnectionInfo(String dbName) throws DBCreatorException;
Return database connection information without database creation.
Service's configuration.
<component>
<key>org.exoplatform.services.database.creator.DBCreator</key>
<type>org.exoplatform.services.database.creator.DBCreator</type>
<init-params>
<properties-param>
<name>db-connection</name>
<description>database connection properties</description>
<property name="driverClassName" value="com.mysql.jdbc.Driver" />
<property name="url" value="jdbc:mysql://localhost/" />
<property name="username" value="root" />
<property name="password" value="admin" />
<property name="additional_property" value="value">
...
<property name="additional_property_n" value="value">
</properties-param>
<properties-param>
<name>db-creation</name>.
<description>database creation properties</description>.
<property name="scriptPath" value="script.sql" />
<property name="username" value="testuser" />
<property name="password" value="testpwd" />
</properties-param>
</init-params>
</component>db-connection properties section contains parameters
needed for connection to database server
There is four reserved and mandatory properties driverClassName, url, username and password. But db-connection may contain additonal properties.
For example, next additional proprites allows reconnect to MySQL database when connection was refused:
<properties-param>
<name>db-connection</name>
...
<property name="validationQuery" value="select 1"/>
<property name="testOnReturn" value="true"/>
...
</properties-param>db-creation properties section contains paramaters
for database creation using DDL script:
scriptPath: absolute path to DDL script file;username:user name for substitution${username}template in DDL script;password: user's password for substitution${password}template in DDL script;
Specific db-connection properties section for
different databases.
MySQL:
<property name="driverClassName" value="com.mysql.jdbc.Driver" /> <property name="url" value="jdbc:mysql://localhost/" /> <property name="username" value="root" /> <property name="password" value="admin" />
PostgreSQL:
<property name="driverClassName" value="org.postgresql.Driver" /> <property name="url" value="jdbc:postgresql://localhost/" /> <property name="username" value="root" /> <property name="password" value="admin" />
MSSQL:
<property name="driverClassName" value="com.microsoft.sqlserver.jdbc.SQLServerDriver"/> <property name="url" value="jdbc:sqlserver://localhost:1433;"/> <property name="username" value="root"/> <property name="password" value="admin"/>
Sybase:
<property name="driverClassName" value="com.sybase.jdbc3.jdbc.SybDriver" /> <property name="url" value="jdbc:sybase:Tds:localhost:5000/"/> <property name="username" value="root"/> <property name="password" value="admin"/>
Oracle:
<property name="driverClassName" value="oracle.jdbc.OracleDriver" /> <property name="url" value="jdbc:oracle:thin:@db2.exoua-int:1521:orclvm" /> <property name="username" value="root" /> <property name="password" value="admin" />
MySQL:
CREATE DATABASE ${database};
USE ${database};
CREATE USER '${username}' IDENTIFIED BY '${password}';
GRANT SELECT,INSERT,UPDATE,DELETE ON ${database}.* TO '${username}';PostgreSQL:
CREATE USER ${username} WITH PASSWORD '${password}';
CREATE DATABASE ${database} WITH OWNER ${username};MSSQL:
USE MASTER;
CREATE DATABASE ${database};
USE ${database};
CREATE LOGIN ${username} WITH PASSWORD = '${password}';
CREATE USER ${username} FOR LOGIN ${username};Sybase:
sp_addlogin ${username}, ${password};
CREATE DATABASE ${database};
USE ${database};
sp_adduser ${username};Oracle:
CREATE TABLESPACE "${database}" DATAFILE '/var/oracle_db/orclvm/${database}' SIZE 10M AUTOEXTEND ON NEXT 6M MAXSIZE UNLIMITED LOGGING EXTENT MANAGEMENT LOCAL SEGMENT SPACE MANAGEMENT AUTO;
CREATE TEMPORARY TABLESPACE "${database}.TEMP" TEMPFILE '/var/oracle_db/orclvm/${database}.temp' SIZE 5M AUTOEXTEND ON NEXT 5M MAXSIZE UNLIMITED EXTENT MANAGEMENT LOCAL UNIFORM SIZE 1M;
CREATE USER "${username}" PROFILE "DEFAULT" IDENTIFIED BY "${password}" DEFAULT TABLESPACE "${database}" TEMPORARY TABLESPACE "${database}.TEMP" ACCOUNT UNLOCK;
GRANT CREATE SEQUENCE TO "${username}";
GRANT CREATE TABLE TO "${username}";
GRANT CREATE TRIGGER TO "${username}";
GRANT UNLIMITED TABLESPACE TO "${username}";
GRANT "CONNECT" TO "${username}";
GRANT "RESOURCE" TO "${username}";The purpose is to make a simple, unified way for the authentication and the storing/propagation of user sessions through all the eXo components and J2EE containers. JAAS is supposed to be the primary login mechanism but the Security Service framework should not prevent other (custom or standard) mechanisms from being used. You can learn more about JAAS in the Java Tutorial
The central point of this framework is the ConversationState object which stores all information about the state of the current user (very similar to the Session concept). The same ConversationState also stores acquired attributes of an Identity which is a set of principals to identify a user.
The ConversationState has definite lifetime. This object should be created when the user's identity becomes known by eXo (login procedure) and destroyed when the user leaves an eXo based application (logout procedure). Using JAAS it should happen in LoginModule's login() and logout() methods respectively.
The ConversationState can be stored
In a static local thread variable, or
As a key-value pair in the ConversationRegistry component.
One or the other, or both methods can be used to set/retrieve the state at runtime. The most important thing is that they should be complementary, i.e. make sure that the conversation state is set before you try to use it.
Local Thread Variable: Storing the ConversationState in a static local thread variable makes it possible to represent it as a context (current user's state).
ConversationState.setCurrent(conversationState); .... ConversationState.getCurrent();
Key-Value way
If you store the ConversationState inside the ConversationRegistry component as a set of key-value pairs, the session key is an arbitrary String (user name, ticket id, httpSessionId etc).
conversationRegistry.register("key", conversationState);
...
conversationRegistry.getState("key");ConversationRegistry The ConversationRegistry is a mandatory component deployed into eXo Container as following:
<component>
<type>org.exoplatform.services.security.ConversationRegistry</type>
</component>An Authenticator is responsible for Identity creating, it contains two methods:
validateUser() accepts an array of credentials and returns the userId (which can be something different from the username).
createIdentity() accepts the userId and returns a newly created Identity object.
public interface Authenticator {
/**
* Authenticate user and return userId which can be different to username.
* @param credentials - list of users credentials (such as name/password, X509 certificate etc)
* @return userId
* @throws LoginException
* @throws Exception
*/
String validateUser(Credential[] credentials) throws LoginException, Exception;
/**
* @param credentials - userId.
* @return Identity
* @throws Exception
*/
Identity createIdentity(String userId) throws Exception;
}It is up to the application developer (and deployer) whether to use the Authenticator component(s) and how many implementations of this components should be deployed in eXo container. The developer is free to create an Identity object using a different way, but the Authenticator component is the highly recommended way from architectural considerations.
Typical functionality of the validateUser(Credential\[] credentials) method is the comparison of incoming credentials (username/password, digest etc) with those credentials that are stored in an implementation specific database. Then, validateUser(Credential\[] credentials) returns back the userId or throws a LoginException in a case of wrong credentials.
Default Authenticator implementation is org.exoplatform.services.organization.auth.OrganizationAuthenticatorImpl which compares incoming username/password credentials with the ones stored in OrganizationService. Configuration example:
<component> <key>org.exoplatform.services.security.Authenticator</key> <type>org.exoplatform.services.organization.auth.OrganizationAuthenticatorImpl</type> </component>
The framework described is not coupled with any authentication mechanism but the most logical and implemented by default is the JAAS Login module. The typical sequence looks as follows (see org.exoplatform.services.security.jaas.DefaultLoginModule):
LoginModule.login() creates a list of credentials using standard JAAS Callbacks features, obtains an Authenticator instance, and creates an Identity object calling Authenticator.authenticate(..) method
Authenticator authenticator = (Authenticator) container()
.getComponentInstanceOfType(Authenticator.class);
// RolesExtractor can be null
RolesExtractor rolesExtractor = (RolesExtractor) container().
getComponentInstanceOfType(RolesExtractor.class);
Credential[] credentials = new Credential[] {new UsernameCredential(username), new PasswordCredential(password) };
String userId = authenticator.validateUser(credentials);
identity = authenticator.createIdentity(userId);LoginModule.commit() obtains the IdentityRegistry object, and register the identity using userId as a key.
When initializing the login module, you can set the option parameter "singleLogin". With this option you can disallow the same Identity to login for a second time.
By default singleLogin is disabled, so the same identity can be registered more than one time. Parameter can be passed in this form singleLogin=yes or singleLogin=true.
IdentityRegistry identityRegistry = (IdentityRegistry) getContainer().getComponentInstanceOfType(IdentityRegistry.class);
if (singleLogin && identityRegistry.getIdentity(identity.getUserId()) != null)
throw new LoginException("User " + identity.getUserId() + " already logined.");
identity.setSubject(subject);
identityRegistry.register(identity);In the case of using several LoginModules, JAAS allows to place the login() and commit() methods in different REQUIRED modules.
After that, the web application must use SetCurrentIdentityFilter. This filter obtains the ConversationRegistry object and tries to get the ConversationState by sessionId (HttpSession). If there is no ConversationState, then SetCurrentIdentityFilter will create a new one, register it and set it as current one using ConversationState.setCurrent(state).
LoginModule.logout() can be called by JAASConversationStateListener, it extends ConversationStateListener.
This listener must be configured in web.xml. The method sessionDestroyed(HttpSessionEvent) is called by the ServletContainer. This method removes the ConversationState from the ConversationRegistry ConversationRegistry.unregister(sesionId) and calls the method LoginModule.logout().
ConversationRegistry conversationRegistry = (ConversationRegistry) getContainer().getComponentInstanceOfType(ConversationRegistry.class);
ConversationState conversationState = conversationRegistry.unregister(sesionId);
if (conversationState != null) {
log.info("Remove conversation state " + sesionId);
if (conversationState.getAttribute(ConversationState.SUBJECT) != null) {
Subject subject = (Subject) conversationState.getAttribute(ConversationState.SUBJECT);
LoginContext ctx = new LoginContext("exo-domain", subject);
ctx.logout();
} else {
log.warn("Subject was not found in ConversationState attributes.");
}There are several JAAS Login modules included in eXo Platform sources:
org.exoplatform.services.security.jaas.DefaultLoginModule which provides both authentication (using eXo Authenticator based mechanism) and authorization, filling Conversation Registry as it described in previous section. There are also several per-Application Server extensions of this login module which can be found in org.exoplatform.services.security.jaas package, which can be used in appropriate AS. In particular, we have dedicated Login modules for Tomcat, JBoss, Jonas and WebSphere.
Besides that, for the case when third party authentication mechanism required, we have org.exoplatform.services.security.jaas.IdentitySetLoginModule, which catches a login identity from third party "authenticating" login module and preforms eXo specific authorization job. In this case third party login module has to put login (user) name to the shared state map under "javax.security.auth.login.name" key and third party LM has to be configured before IdentitySetLoginModule like:
exo {
com.third.party.LoginModuleImpl required;
org.exoplatform.services.security.jaas.IdentitySetLoginModule required;
};As you know, when a user in JAAS is authenticated, a Subject is created as a result. This Subject represents the authenticated user. It is important to know and follow the rules regarding Subject filling which are specific for each J2EE server, where eXo Platform is deployed.
To make it workable for the particular J2EE server, it is necessary to add specific Principals/Credentials to the Subject to be propagated into the specific J2EE container implementation. We extended the DefaultLoginModule by overloading its commit() method with a dedicated logic, presently available for Tomcat, JBOSS and JONAS application servers.
Furthermore, you can use the optional RolesExtractor which is responsible for mapping primary Subject's principals (userId and a set of groups) to J2EE Roles:
public interface RolesExtractor {
Set <String> extractRoles(String userId, Set<MembershipEntry> memberships);
}This component may be used by Authenticator to create the Identity with a particular set of Roles.
How to Integrate the spring security framework in the eXo portal?
This tutorial will guide you through a few steps and show you how easy it is to integrate spring security (or the Spring framework in general) in eXo portal. We will create a login portlet example as a support all along the document reading. The login portlet example has been developed and deployed using the eXo WCM product running on the application server JBoss 4.2.3. But it can easily be adapted to another eXo product (such as ECM) and to other servers such as tomcat. Moreover, the example, claiming to be a real world example, is implemented using JSF 1.2, the JBoss portlet bridge and Spring and can serve as a example project from where you can start your own portlet development targeting the eXo platform.
This tutorial assumes that you have a working eXo WCM installation running under JBoss 4.2.x.
Download the spring framework: http://s3.amazonaws.com/dist.springframework.org/release/SPR/spring-framework-2.5.6-with-dependencies.zip
Download spring-security: http://sourceforge.net/project/showfiles.php?group_id=73357&package_id=270072&release_id=630203
Unzip the 02portal.war file in the jboss server/default/deploy/exoplatform.sar directory and copy the following jars in WEB-INF/lib:
spring.jar
spring-security-core.jar
aspectjrt-1.5.4.jar
exo-spring.jar (contains the filters and event handlers described in this tutorial - see the attachment section of this page)
To enable spring security in exo we need to go through a few configuration steps:
First, we need to disable the JAAS security which is the default authentication mechanism in exo. Edit 02portal.war web.xml file and comment out the JAAS configuration related lines:
...
<session-config>
<session-timeout>15</session-timeout>
</session-config>
<!--
<security-constraint>
<web-resource-collection>
<web-resource-name>user authentication</web-resource-name>
<url-pattern>/private/*</url-pattern>
<http-method>POST</http-method>
<http-method>GET</http-method>
</web-resource-collection>
<auth-constraint>
<role-name>users</role-name>
</auth-constraint>
<user-data-constraint>
<transport-guarantee>NONE</transport-guarantee>
</user-data-constraint>
</security-constraint>
<login-config>
<auth-method>FORM</auth-method>
<realm-name>exo-domain</realm-name>
<form-login-config>
<form-login-page>/login/jsp/login.jsp</form-login-page>
<form-error-page>/login/jsp/login.jsp</form-error-page>
</form-login-config>
</login-config>
-->
<security-role>
<description>a simple user role</description>
<role-name>users</role-name>
</security-role>
...To enable spring and set the spring security filter, add the following lines:
...
<context-param>
<param-name>contextConfigLocation</param-name>
<param-value>/WEB-INF/security-context.xml</param-value>
</context-param>
<listener>
<listener-class>org.springframework.web.context.ContextLoaderListener</listener-class>
</listener>
<filter>
<filter-name>springSecurityFilterChain</filter-name>
<filter-class>org.springframework.web.filter.DelegatingFilterProxy</filter-class>
</filter>
...Activate the spring security filter at the right position, i.e. just after the filter responsible of exo container initialization.
...
<filter-mapping>
<filter-name>PortalContainerInitializedFilter</filter-name>
<url-pattern>/*</url-pattern>
</filter-mapping>
<filter-mapping>
<filter-name>springSecurityFilterChain</filter-name>
<url-pattern>/*</url-pattern>
</filter-mapping>
<filter-mapping>
<filter-name>SetCurrentIdentityFilter</filter-name>
<url-pattern>/*</url-pattern>
</filter-mapping>
...We need to configure the spring security filter chain for our purposes. Create a file named security-context.xml in 02portal.war WEB-INF directory containing the following lines:
<?xml version="1.0" encoding="UTF-8"?>
<beans:beans xmlns="http://www.springframework.org/schema/security"
xmlns:beans="http://www.springframework.org/schema/beans"
xmlns:xsi="http://www.w3.org/2001/XMLSchema-instance"
xsi:schemaLocation="http://www.springframework.org/schema/beans http://www.springframework.org/schema/beans/spring-beans-2.0.xsd
http://www.springframework.org/schema/security http://www.springframework.org/schema/security/spring-security-2.0.1.xsd">
<http auto-config="true">
<intercept-url pattern="/private/**" access="ROLE_USER" />
<form-login login-page='/public/classic/Login' default-target-url='/private/classic/home' />
</http>
<authentication-provider>
<user-service>
<user name="rod" password="koala" authorities="ROLE_SUPERVISOR, ROLE_USER, ROLE_TELLER" />
<user name="root" password="exo" authorities="ROLE_USER" />
</user-service>
</authentication-provider>
</beans:beans>The file contains two elements. The http node which is responsible of configuring the filter chain. The auto-config mode set to true allows us to do just a minimal configuration, everything else being smartly initialized by default. We just set an intercept URL pointing to '/private/**' with the ROLE_USER authority which corresponds to secured resources in exo. In case of successful auhentication, the user will be redirected to the specified default target URL.
The second element defines a simple authentication provider based on the spring security InMemoryDaoImpl implementation of the UserDetailsService. Note that we define the exo root user in the configuration which will allow us to log in with admin privileges in the exo portal.
Now that we have successfully installed and configured spring security in exo, we need a login portlet example to capture user credentials and serve as an entry point in the authentication process. The login portlet itself is based on JSF 1.2, Jboss portlet bridge and the spring framework, but you can obviously use whatever web framework you want to achieve the same.
So we need a login form to capture user credentials inputs. The portlet login form consists of the following lines of xml:
<f:view xmlns:f="http://java.sun.com/jsf/core"
xmlns:h="http://java.sun.com/jsf/html"
xmlns:ice="http://www.icesoft.com/icefaces/component"
xmlns:liferay-faces="http://liferay.com/tld/faces"
xmlns:ui="http://java.sun.com/jsf/facelets"
xmlns:c="http://java.sun.com/jstl/core"
xmlns:fn="http://java.sun.com/jsp/jstl/functions"
xmlns:t="http://myfaces.apache.org/tomahawk">
<style type="text/css" media="screen">
@import "/loginportlet/css/starter.css";
@import "/loginportlet/css/uni-form.css";
</style>
<script src="/loginportlet/js/jquery.js" type="text/javascript"></script>
<script src="/loginportlet/js/uni-form.jquery.js" type="text/javascript"></script>
<h:form styleClass="uniForm" >
<fieldset class="inlineLabels">
<legend>Sign in</legend>
<div class="ctrlHolder">
<h:outputLabel for="login" style="width: 70px"><em>*</em>Login:</h:outputLabel>
<h:inputText id="login" value="#{loginBean.login}" required="true" styleClass="textInput" />
<h:message for="login" styleClass="portlet-msg-error" />
</div>
<div class="ctrlHolder">
<h:outputLabel for="password" style="width: 70px"><em>*</em>Password:</h:outputLabel>
<h:inputSecret id="password" value="#{loginBean.passwd}" required="true" styleClass="textInput" />
<h:message for="password" styleClass="portlet-msg-error" />
</div>
</fieldset>
<div class="buttonHolder" style="margin-top: 20px; margin-right: 20px">
<h:commandButton styleClass="primaryAction" value="Submit" action="#{loginBean.login}" />
</div>
</h:form>
</f:view>The interesting part resides in the backing bean which implements the login action triggered when the user clicks the login form submit button.
package org.exoplatform.loginportlet;
import org.springframework.context.annotation.Scope;
import org.springframework.stereotype.Controller;
@Controller
@Scope("request")
public class LoginBean {
String login;
String passwd;
public String login() throws Exception {
String redirect = "/portal/j_spring_security_check?j_username=" + login + "&j_password=" + passwd;
PortalUtils.sendRedirect(redirect);
return null;
}
...
}The login action simply sends a HTTP redirect to the spring security login URL passing the user login and password as parameters. This URL informs the filter to try to authenticate the supplied user credentials. This is the Spring security authentication process entry point.
Now that we have a login portlet available we need to set it up into a portal page.
Log in as root in exo portal.
Go to application registry and import the loginportlet
Add a new hidden page named 'Login' under the portal classic's navigation (read more on page creation here>WCM.Tutorial). Make sure that the visible flag is unchecked to hide the page. Also declare the page as public so that everyone can access it without being authenticated for obvious reasons.
Finally, drag & drop the login portlet in the page with the desired layout.
In the portal header, there is a login or logout action displayed depending whether you are already logged in or not. We need to customize those actions so that when the user clicks on it she or he will be redirected either to our login page or to the spring security logout url. Edit the article, go to the default.js tab and apply the following changes to the code:
function validateUser() {
var user = eXo.env.portal.userName;
var rootObj = document.getElementById("classic-access");
var loginContentObj = eXo.core.DOMUtil.findFirstDescendantByClass(rootObj, "div", "UIWCMLoginPortlet");
var welcomeObj = eXo.core.DOMUtil.findFirstDescendantByClass(rootObj, "span", "Welcome");
var userObj = eXo.core.DOMUtil.findFirstDescendantByClass(rootObj, "span", "LoggedUser");
var languageObj = eXo.core.DOMUtil.findFirstDescendantByClass(rootObj, "a", "LanguageIcon");
var logXXXObj = eXo.core.DOMUtil.findPreviousElementByTagName(languageObj, "a");
if (user != "null") {
welcomeObj.innerHTML = "Welcome: ";
userObj.innerHTML = user;
logXXXObj.innerHTML = "Logout";
if (eXo.core.DOMUtil.hasClass(logXXXObj, "LoginIcon")) {
eXo.core.DOMUtil.removeClass(logXXXObj, "LoginIcon");
eXo.core.DOMUtil.addClass(logXXXObj, "LogoutIcon");
}
logXXXObj.onclick = function() { document.location.href = '/portal/j_spring_security_logout' }
} else {
if (eXo.core.DOMUtil.hasClass(logXXXObj, "LogoutIcon")) {
eXo.core.DOMUtil.removeClass(logXXXObj, "LogoutIcon");
eXo.core.DOMUtil.addClass(logXXXObj, "LoginIcon");
}
logXXXObj.innerHTML = "Login";
logXXXObj.onclick = function() { document.location.href = '/portal/public/classic/Login' };
}
languageObj.onclick = function () { if(document.getElementById('UIMaskWorkspace')) ajaxGet(eXo.env.server.createPortalURL('UIPortal', 'ChangeLanguage', true)); }
}
eXo.core.Browser.addOnLoadCallback("validateUser", validateUser);As you can see, the two onclick event handler function bodies have been changed to a simple redirect to the login page or the logout URL.
Until now we haven't discussed about any integration strategies concerning a potential existing security realm outside of the eXo platform. To address this problem we have the choice between at least two different strategies:
1.1.1 Direct integration We can directly integrate eXo with the external realm. Everything related to organisation and user management in exo is cleanly separated in its own abstraction accessible through the OrganisationService. The authentication process itself is encapsulated in the Authenticator abstraction which sits on top of the organization service. eXo provides several implementations of both. So whether your realm is based on LDAP or JDBC and because the default implementations are generic enough, you will be able to use them and fits them to your needs with a matter of a little configuration. You can even develop a custom implementation to meet your more specific needs.
Being successfully authenticated against an external realm is not sufficient by itself. We also need to propagate the newly created security context to the portal own security mechanism. In eXo portal terminology, it means we have to create an Identity object for the user and register it into the Identity Registry.
Spring framework provides a simple notification model where a bean can listen to application events published by other beans. Fortunately, spring security uses this mechanism and publishes an InteractiveAuthenticationSuccessEvent in case of successful authentication. That will allow us to hook up custom code to that event.
Furthermore, we need to replicate the user details from the external realm to the eXo portal one according to the integration strategy defined above.
We create a SpringSecurityEventHandler bean that implements the ApplicationListener interface and listens to the InteractiveAuthenticationSuccessEvent event.
package org.exoplatform.spring.security.web;
...
public class SpringSecurityEventHandler implements ApplicationListener {
private String portalContainerName = "portal";
public void onApplicationEvent(ApplicationEvent event) {
if (event instanceof InteractiveAuthenticationSuccessEvent) {
try {
InteractiveAuthenticationSuccessEvent successEvent = (InteractiveAuthenticationSuccessEvent) event;
ExoContainer container = getContainer();
String login = successEvent.getAuthentication().getName();
String passwd = successEvent.getAuthentication().getCredentials().toString();
IdentityRegistry identityRegistry = (IdentityRegistry) container.getComponentInstanceOfType(IdentityRegistry.class);
Authenticator authenticator = (Authenticator) container.getComponentInstanceOfType(Authenticator.class);
OrganizationService orgService = (OrganizationService) container.getComponentInstanceOfType(OrganizationService.class);
User user = orgService.getUserHandler().findUserByName(login);
if (user == null) {
user = orgService.getUserHandler().createUserInstance(login);
user.setFirstName(login);
user.setLastName(login);
orgService.getUserHandler().createUser(user, false);
orgService.getUserHandler().saveUser(user, false);
//TODO: put some more integration code here
}
Identity identity = authenticator.createIdentity(login);
Subject subject = new Subject();
subject.getPrivateCredentials().add(passwd);
subject.getPublicCredentials().add(new UsernameCredential(login));
identity.setSubject(subject);
identityRegistry.register(identity);
} catch (Exception e) {
e.getMessage();
}
}
}
protected ExoContainer getContainer() {
// TODO set correct current container
ExoContainer container = ExoContainerContext.getCurrentContainer();
if (container instanceof RootContainer) {
container = RootContainer.getInstance().getPortalContainer(portalContainerName);
}
return container;
}
...
}Basically the bean retrieves user login and password from the InteractiveAuthenticationSuccessEvent object and tries to get the user from the organization service. In case he cannot find it in the repository, he simply creates it on the fly. In this example the user is created with just a few details, but you can put some custom integration code with the external realm here, and create the user with all the details (email, birth date, roles, etc.) it seems appropriate to you. After that, the bean creates an Identity object with the help of the authenticator service, populates it with a subject containing the user credentials and registers it. That's all we have to do to make the portal aware of the user logging in.
Registering our bean is done the usual way in security-context.xml file:
... <beans:bean id="myEventHandler" class="org.exoplatform.spring.security.web.SpringSecurityEventHandler" /> ...
Part of the problem is the question of security context propagation between on one side the portal webapp and at the other side the portlets webapps. This means that the security context has to be available in the portlet side allowing the application logic to deal the with current user principal and granted authorities. By default, Spring security uses a thread local variable to partially achieve this. But a problem may arise due to the fact that the portal invokes the portlet through a webapp cross context call. This means that it can lead to a class cast exceptions (two different classloaders involved), or that the security context is simply not propagated at all. To accommodate this, we will need to set up two request filters, one at the portal webapp side and the other at the portlet webapp side and use the http request to propagate the context in between.
We will use the spring security extensible filter chain to plug in our filter.
package org.exoplatform.spring.security.web;
...
public class PortalSideSecurityContextFilter extends SpringSecurityFilter {
@Override
protected void doFilterHttp(HttpServletRequest request, HttpServletResponse response, FilterChain chain) throws IOException, ServletException {
//fill request with security context
SecurityContext context = SecurityContextHolder.getContext();
request.setAttribute(HttpSessionContextIntegrationFilter.SPRING_SECURITY_CONTEXT_KEY, context);
//fill request with security last exception
Object e = request.getSession().getAttribute(AbstractProcessingFilter.SPRING_SECURITY_LAST_EXCEPTION_KEY);
request.setAttribute(AbstractProcessingFilter.SPRING_SECURITY_LAST_EXCEPTION_KEY, e);
chain.doFilter(request, response);
}
public int getOrder() {
// TODO Auto-generated method stub
return 0;
}
}The PortalSideSecurityContextFilter simply fills the request with the security context and security last exception using the HttpSessionContextIntegrationFilter.SPRING_SECURITY_CONTEXT_KEY and AbstractProcessingFilter.SPRING_SECURITY_LAST_EXCEPTION_KEY attribute names. The portlet can have a look to the AbstractProcessingFilter.SPRING_SECURITY_LAST_EXCEPTION_KEY attribute to check if a security exception has occured.
The following lines in the security-context file register our custom filter in the chain at the last position.
...
<beans:bean id="myCustomFilter" class="org.exoplatform.spring.security.web.PortalSideSecurityContextFilter">
<custom-filter after="LAST" />
</beans:bean>
...In the portlet webapp we create a regular filter named PortletSideSecurityContextFilter.
package org.exoplatform.spring.security.web;
...
public class PortletSideSecurityContextFilter implements Filter {
public void destroy() {
}
public void doFilter(ServletRequest request, ServletResponse response, FilterChain filterChain) throws IOException, ServletException {
Object object = request.getAttribute(HttpSessionContextIntegrationFilter.SPRING_SECURITY_CONTEXT_KEY);
SecurityContext context = (SecurityContext) serializeDeserialize(object);
if (context != null) {
SecurityContextHolder.setContext(context);
} else {
SecurityContextHolder.clearContext();
}
filterChain.doFilter(request, response);
}
public void init(FilterConfig arg0) throws ServletException {
}
private Object serializeDeserialize(Object obj) {
Object result = null;
try {
ByteArrayOutputStream bout = new ByteArrayOutputStream();
ObjectOutputStream out = new ObjectOutputStream(bout);
out.writeObject(obj);
ByteArrayInputStream bin = new ByteArrayInputStream(bout.toByteArray());
ObjectInputStream in = new ObjectInputStream(bin);
result = in.readObject();
} catch (Exception e) {
//TODO: handle exception
}
return result;
}
}The PortletSideSecurityContextFilter retrieves the security context from the request and proceeds to a serialization de-serialization of it to avoid a potential class cast exception that may occur when propagating an object across webapps. Then the context is simply set or cleared whether the context is null or not.
To register your filter simply add the following lines to your portlet webapp web.xml file.
...
<filter>
<filter-name>portletSideSecurityContextFilter</filter-name>
<filter-class>org.exoplatform.spring.security.web.PortletSideSecurityContextFilter</filter-class>
</filter>
<filter-mapping>
<filter-name>portletSideSecurityContextFilter</filter-name>
<url-pattern>/*</url-pattern>
<dispatcher>REQUEST</dispatcher>
<dispatcher>INCLUDE</dispatcher>
<dispatcher>FORWARD</dispatcher>
</filter-mapping>
...OrganizationService is the service that allows to access the Organization model. This model is composed of :
Users
Groups
Memberships
It is the basis of eXo personalization and authorizations in eXo and is used to all over the platform. The model is abstract and does not rely on any specific storage. Multiple implementations exist in eXo :
Hibernate : for storage into a RDBMS
Jndi : for storage into a directory such as an LDAP or MS Active Directory
Jcr : for storage inside a Java Content Repository
Gather a set of users
Applicative or business
Tree structure
No inheritance
Expressed as /group/subgroup/subsubgroup
To create a custom organization service you need to implement a several interfaces and extend some classes which will be listed below.
First of all you need to create classes implementing the following interfaces (each of which represent a basic unit of organization service):
org.exoplatform.services.organization.User
This is the interface for a User data model. The OrganizationService implementor can use the different strategy to implement this class, he can use the native field for each get method or use a Map to hold the user data.
org.exoplatform.services.organization.UserProfile
This is the interface for a UserProfile data model. The implementor should have an user map info in the implementation. The map should only accept the java.lang.String for the key and the value.
org.exoplatform.services.organization.Group
This is the interface for the group data model.
org.exoplatform.services.organization.Membership
This is the interface for the membership data model.
org.exoplatform.services.organization.MembershipType
This is the interface for the membership type data model.
Note
After each set method is called the developer must call UserHandler.saveUser (GroupHandler.saveGroup, MembershipHandler.saveMembership etc.) method to persist the changes.
You can find examples of the mentioned above implementations at subversion server:
After you created basic organization service unit instances you need to create classess to handle them e.g. to persist changes, to add listener etc. For that purpose you need to implement a several interfaces correspondingly:
User handler
org.exoplatform.services.organization.UserHandler
This class is acted as a sub component of the organization service. It is used to manage the user account and broadcast the user event to all the registered listener in the organization service. The user event can be: new user event, update user event and delete user event. Each event should have 2 phases: pre event and post event. The method createUser , saveUser and removeUser broadcast the event at each phase so the listeners can handle the event properly.
org.exoplatform.services.organization.ExtendedUserHandler
Optional. Implement it if you want to be able to use Digest access authentication i.e. you need a one way password encyption for authentication.
org.exoplatform.services.organization.UserEventListenerHandler
Optional. Provides the ability to get the list of org.exoplatform.services.organization.UserEventListener. List should be unmodifiable to prevent modification outside of org.exoplatform.services.organization.UserHandler.
User profile handler
org.exoplatform.services.organization.UserProfileHandler
This interface is acted as a sub interface of the organization service. It is used to manage the the UserProfile record, the extra information of an user such address, phone... The interface should allow the developer create, delete and update a UserProfile. and broadcast the event to the user profile event listeners.
org.exoplatform.services.organization.UserProfileEventListenerHandler
Optional. Provides the ability to get the list of org.exoplatform.services.organization.UserProfileEventListener. List should be unmodifiable to prevent modification outside of org.exoplatform.services.organization.UserProfileHandler.
Group handler
org.exoplatform.services.organization.GroupHandler
This class is acted as a sub component of the organization service. It is used to manage the group and broadcast the group event to all the registered listener in the organization service. The group event can be: new group event, update group event and delete group event. Each event should have 2 phases: pre event and post event. The methods createGroup, saveGroup and removeGroup broadcast the event at each phase so the listeners can handle the event properly.
org.exoplatform.services.organization.GroupEventListenerHandler
Optional. Provides the ability to get the of org.exoplatform.services.organization.GroupEventListener. List should be unmodifiable to prevent modification outside of org.exoplatform.services.organization.GroupHandler.
Membership handler
org.exoplatform.services.organization.MembershipHandler
This class is acted as a sub component of the organization service. It is used to manage the membership - the relation of user , group, and membership type - and broadcast the membership event to all the registered listener in the organization service. The membership event can be: new linked membership and delete the membership type event. Each event should have 2 phases: pre event and post event. The method linkMembership and removeMembership broadcast the event at each phase so the listeners can handle the event properly.
org.exoplatform.services.organization.MembershipEventListenerHandler
Optional. Provides the ability to get the of org.exoplatform.services.organization.MembershipEventListener. List should be unmodifiable to prevent modification outside of org.exoplatform.services.organization.MembershipHandler.
Membership type handler
org.exoplatform.services.organization.MembershipTypeHandler
This class is acted as a sub component of the organization service. It is used to manage the membership - the relation of user , group, and membership type - and broadcast the membership event to all the registered listener in the organization service. The membership event can be: new linked membership and delete the membership type event. Each event should have 2 phases: pre event and post event. The method linkMembership and removeMembership broadcast the event at each phase so the listeners can handle the event properly.
org.exoplatform.services.organization.MembershipTypeEventListenerHandler
Optional. Provides the ability to get the list of org.exoplatform.services.organization.MembershipTypeEventListener. List should be unmodifiable to prevent modification outside of org.exoplatform.services.organization.MembershipTypeHandler.
You can find examples of the mentioned above implementations at subversion server:
Finally you need to create your main custom organization service class. It must extend org.exoplatform.services.organization.BaseOrganizationService. BaseOrganizationService class contains organization service unit handlers as protected fields, so you can initialize them in accordance to your purposes. It also has org.exoplatform.services.organization.OrganizationService interface methods' implementations. This is the class you need to mention in the configuration file if you want to use your custom organization service.
You can find example of such class at subversion server: JCROrganizationServiceImpl.
Make sure that your custom organization service implementation is fully compliant with Organization Service TCK tests. Tests are available as maven artifact:
groupId - org.exoplatform.core
artifactId - exo.core.component.organization.tests
You can find TCK tests package source code here
Note
In order to be able to run unit tests you may need to configure the following maven plugins:
Check pom.xml file to find out one of the ways to configure maven project object model. More detailed description you can find in the dedicated chapter called "Organization Service TCK tests configuration"
Use the Organization Service Initializer to create users, groups and membership types by default.
<external-component-plugins>
<target-component>org.exoplatform.services.organization.OrganizationService</target-component>
<component-plugin>
<name>init.service.listener</name>
<set-method>addListenerPlugin</set-method>
<type>org.exoplatform.services.organization.OrganizationDatabaseInitializer</type>
<description>this listener populate organization data for the first launch</description>
<init-params>
<value-param>
<name>checkDatabaseAlgorithm</name>
<description>check database</description>
<value>entry</value>
</value-param>
<value-param>
<name>printInformation</name>
<description>Print information init database</description>
<value>false</value>
</value-param>
<object-param>
<name>configuration</name>
<description>description</description>
<object type="org.exoplatform.services.organization.OrganizationConfig">
<field name="membershipType">
<collection type="java.util.ArrayList">
<value>
<object type="org.exoplatform.services.organization.OrganizationConfig$MembershipType">
<field name="type">
<string>manager</string>
</field>
<field name="description">
<string>manager membership type</string>
</field>
</object>
</value>
</collection>
</field>
<field name="group">
<collection type="java.util.ArrayList">
<value>
<object type="org.exoplatform.services.organization.OrganizationConfig$Group">
<field name="name">
<string>platform</string>
</field>
<field name="parentId">
<string></string>
</field>
<field name="description">
<string>the /platform group</string>
</field>
<field name="label">
<string>Platform</string>
</field>
</object>
</value>
<value>
<object type="org.exoplatform.services.organization.OrganizationConfig$Group">
<field name="name">
<string>administrators</string>
</field>
<field name="parentId">
<string>/platform</string>
</field>
<field name="description">
<string>the /platform/administrators group</string>
</field>
<field name="label">
<string>Administrators</string>
</field>
</object>
</value>
</collection>
</field>
<field name="user">
<collection type="java.util.ArrayList">
<value>
<object type="org.exoplatform.services.organization.OrganizationConfig$User">
<field name="userName">
<string>root</string>
</field>
<field name="password">
<string>exo</string>
</field>
<field name="firstName">
<string>Root</string>
</field>
<field name="lastName">
<string>Root</string>
</field>
<field name="email">
<string>root@localhost</string>
</field>
<field name="groups">
<string>
manager:/platform/administrators
</string>
</field>
</object>
</value>
</collection>
</field>
</object>
</object-param>
</init-params>
</component-plugin>
</external-component-plugins>Params for membership type:
type: The membership type's name.
description: The membership type's description.
Params for group:
name: The group's name
parentId: The id of the parent group. If the parent id is null, it means that the group is at the first level. The parentId should have the form: /ancestor/parent
description: The group's description
label: The group's label
Params for user:
userName: The user's name
password: The user's password
firstName: The user's first name
lastName: The user's last name
email: The user's email
groups: The user's membership types and groups in which he consist.
The Organization Service provides a mechanism to receive notifications when :
A User is created, deleted or modified.
A Group is created, deleted or modified.
A Membership is created or removed.
This mechanism is very useful to cascade some actions when the organization model is modified. For example, it is currently used to :
Initialize the personal portal pages.
Initialize the personal calendars, address books and mail accounts in CS.
Create drives and personal areas in ECM.
To implement your own listener, you just need to write extend some existing listener classes. These classes define hooks that are invoked before or after operations are performed on organization model.
To listen to user changes, you need to extend <>org.exoplatform.services.organization.UserEventListener</> :
public class MyUserListener extends UserEventListener {
public void preSave(User user, boolean isNew) throws Exception {
System.out.println("Before " + (isNew?"creating":"updating") + " user " + user.getUserName());
}
public void postSave(User user, boolean isNew) throws Exception {
System.out.println("After user " + user.getUserName() + (isNew?" created":" updated"));
}
public void preDelete(User user) throws Exception {
System.out.println("Before deleting user " + user.getUserName());
}
public void preDelete(User user) throws Exception {
System.out.println("After deleting user " + user.getUserName());
}
}To listen to group changes, you need to extend <>org.exoplatform.services.organization.GroupEventListener</> :
public class MyGroupListener extends GroupEventListener {
public void preSave(Group group, boolean isNew) throws Exception {
System.out.println("Before " + (isNew?"creating":"updating") + " group " + group.getName());
}
public void postSave(Group group, boolean isNew) throws Exception {
System.out.println("After group " + group.getName() + (isNew?" created":" updated"));
}
public void preDelete(Group group) throws Exception {
System.out.println("Before deleting group " + group.getName());
}
public void preDelete(Group group) throws Exception {
System.out.println("After deleting group " + group.getName());
}
}To listen to membership changes, you need to extend <>org.exoplatform.services.organization.MembershipEventListener</> :
public class MyMembershipListener extends MembershipEventListener {
public void preSave(Membership membership, boolean isNew) throws Exception {
System.out.println("Before " + (isNew?"creating":"updating") + " membership.");
}
public void postSave(Membership membership, boolean isNew) throws Exception {
System.out.println("After membership " + (isNew?" created":" updated"));
}
public void preDelete(Membership membership) throws Exception {
System.out.println("Before deleting membership");
}
public void preDelete(Membership membership) throws Exception {
System.out.println("After deleting membership");
}
}Registering the listeners is then achieved by using the ExoContainer plugin mechanism. Learn more about it on the Service Configuration for Beginners article.
To effectively register organization service's listeners you simply need to use the <>addListenerPlugin</> seer injector.
So, the easiest way to register your listeners is to pack them into a .jar and create a configuration file into it under mylisteners.jar!/conf/portal/configuration.xml
<?xml version="1.0" encoding="ISO-8859-1"?>
<configuration>
<external-component-plugins>
<target-component>org.exoplatform.services.organization.OrganizationService</target-component>
<component-plugin>
<name>myuserplugin</name>
<set-method>addListenerPlugin</set-method>
<type>org.example.MyUserListener</type>
<description></description>
</component-plugin>
<component-plugin>
<name>mygroupplugin</name>
<set-method>addListenerPlugin</set-method>
<type>org.example.MyGroupListener</type>
<description></description>
</component-plugin>
<component-plugin>
<name>mymembershipplugin</name>
<set-method>addListenerPlugin</set-method>
<type>org.example.MyMembershipListener</type>
<description></description>
</component-plugin>
</external-component-plugins>
<configuration>Now, simply deploy the jar under $TOMCAT_HOME/lib and your listeners are ready!
Note
Be aware that you need to set proper RuntimePermission to be able to add or remove Listeners. To do that you need to grant the following permission for your code
permission java.lang.RuntimePermission "manageListeners"
When a user logged in portal in ConversationRegistry added ConversationSate for this user. ConversationState keeps user's Identity that is actual for logged in time. In this case even user's Membership updated in OrganizationService ConversationState still keeps old (not actual Identity). User must logged out and loggin in again to update Identity. To fix this issue, need add special listener in configuration of OrganizationServicer. This listener is extended MembershipEventListener.
Example of configuration.
<?xml version="1.0" encoding="ISO-8859-1"?>
<configuration
xmlns:xsi="http://www.w3.org/2001/XMLSchema-instance"
xsi:schemaLocation="http://www.exoplatform.org/xml/ns/kernel_1_2.xsd http://www.exoplatform.org/xml/ns/kernel_1_2.xsd"
xmlns="http://www.exoplatform.org/xml/ns/kernel_1_2.xsd">
<external-component-plugins>
<target-component>org.exoplatform.services.organization.OrganizationService</target-component>
.....
.....
<component-plugin>
<name>MembershipUpdateListener</name>
<set-method>addListenerPlugin</set-method>
<type>org.exoplatform.services.organization.impl.MembershipUpdateListener</type>
</component-plugin>
<external-component-plugins>
</configuration>DB Schema Creator is responsible for creating database schema, using a DDL script inside service configuration or in an external file, calling:
org.exoplatform.services.database.jdbc.DBSchemaCreator.createTables(String dsName, String script)
via
org.exoplatform.services.database.jdbc.CreateDBSchemaPlugin component plugin
A configuration example:
<component>
<key>org.exoplatform.services.database.jdbc.DBSchemaCreator</key>
<type>org.exoplatform.services.database.jdbc.DBSchemaCreator</type>
<component-plugins>
<component-plugin>
<name>jcr.dbschema</name>
<set-method>addPlugin</set-method>
<type>org.exoplatform.services.database.jdbc.CreateDBSchemaPlugin</type>
<init-params>
<value-param>
<name>data-source</name>
<value>jdbcjcr</value>
</value-param>
<value-param>
<name>script-file</name>
<value>conf/storage/jcr-mjdbc.sql</value>
</value-param>
</init-params>
</component-plugin>
........An example of a DDL script:
CREATE TABLE JCR_MITEM(
ID VARCHAR(255) NOT NULL PRIMARY KEY,
VERSION INTEGER NOT NULL,
PATH VARCHAR(1024) NOT NULL
);
CREATE INDEX JCR_IDX_MITEM_PATH ON JCR_MITEM(PATH);As usual, it is quite simple to use our configuration XML syntax to configure and parametrize different Databases for eXo tables but also for your own use.
The default DB configuration uses HSQLDB, a Java Database quite useful for demonstrations.
<component>
<key>org.exoplatform.services.database.HibernateService</key>
<jmx-name>exo-service:type=HibernateService</jmx-name>
<type>org.exoplatform.services.database.impl.HibernateServiceImpl</type>
<init-params>
<properties-param>
<name>hibernate.properties</name>
<description>Default Hibernate Service</description>
<property name="hibernate.show_sql" value="false"/>
<property name="hibernate.cglib.use_reflection_optimizer" value="true"/>
<property name="hibernate.connection.url" value="jdbc:hsqldb:file:../temp/data/portal"/>
<property name="hibernate.connection.driver_class" value="org.hsqldb.jdbcDriver"/>
<property name="hibernate.connection.autocommit" value="true"/>
<property name="hibernate.connection.username" value="sa"/>
<property name="hibernate.connection.password" value=""/>
<property name="hibernate.dialect" value="org.hibernate.dialect.HSQLDialect"/>
<property name="hibernate.c3p0.min_size" value="5"/>
<property name="hibernate.c3p0.max_size" value="20"/>
<property name="hibernate.c3p0.timeout" value="1800"/>
<property name="hibernate.c3p0.max_statements" value="50"/>
</properties-param>
</init-params>
</component>In the init parameter section, we define the default hibernate properties including the DB URL, the driver and the credentials in use.
For any portals that configuration can be overridden, depending on the needs of your environment.
Several databases have been tested and can be used in production....which is not the case of HSQLDB, HSQLDB can only be used for development environments and for demonstrations.
For MySQL
<component>
<key>org.exoplatform.services.database.HibernateService</key>
<jmx-name>database:type=HibernateService</jmx-name>
<type>org.exoplatform.services.database.impl.HibernateServiceImpl</type>
<init-params>
<properties-param>
<name>hibernate.properties</name>
<description>Default Hibernate Service</description>
<property name="hibernate.show_sql" value="false"/>
<property name="hibernate.cglib.use_reflection_optimizer" value="true"/>
<property name="hibernate.connection.url" value="jdbc:mysql://localhost:3306/exodb?relaxAutoCommit=true&amp;autoReconnect=true&amp;useUnicode=true&amp;characterEncoding=utf8"/>
<property name="hibernate.connection.driver_class" value="com.mysql.jdbc.Driver"/>
<property name="hibernate.connection.autocommit" value="true"/>
<property name="hibernate.connection.username" value="exo"/>
<property name="hibernate.connection.password" value="exo"/>
<property name="hibernate.dialect" value="org.hibernate.dialect.MySQLDialect"/>
<property name="hibernate.c3p0.min_size" value="5"/>
<property name="hibernate.c3p0.max_size" value="20"/>
<property name="hibernate.c3p0.timeout" value="1800"/>
<property name="hibernate.c3p0.max_statements" value="50"/>
</properties-param>
</init-params>
</component>It is possible to use the eXo hibernate service and register your hibernate hbm.xml files to leverage some add-on features of the service such as the table automatic creation as well as the cache of the hibernate session in a ThreadLocal object during all the request lifecycle. To do so, you just have to add a plugin and indicate the location of your files.
<?xml version="1.0" encoding="ISO-8859-1"?>
<configuration>
<external-component-plugins>
<target-component>org.exoplatform.services.database.HibernateService</target-component>
<component-plugin>
<name>add.hibernate.mapping</name>
<set-method>addPlugin</set-method>
<type>org.exoplatform.services.database.impl.AddHibernateMappingPlugin</type>
<init-params>
<values-param>
<name>hibernate.mapping</name>
<value>org/exoplatform/services/organization/impl/UserImpl.hbm.xml</value>
<value>org/exoplatform/services/organization/impl/MembershipImpl.hbm.xml</value>
<value>org/exoplatform/services/organization/impl/GroupImpl.hbm.xml</value>
<value>org/exoplatform/services/organization/impl/MembershipTypeImpl.hbm.xml</value>
<value>org/exoplatform/services/organization/impl/UserProfileData.hbm.xml</value>
</values-param>
</init-params>
</component-plugin>
</external-component-plugins>
</configuration>You may decide that you want eXo users to be mapped to an existing directory. eXo provides a flexible implementation of its OrganizationService on top of LDAP. It can be used on any LDAP compliant directory and even Active Directory. This page will guide you how to configure eXo Platform to work with your directory.
If you just want to have a look at how eXo works with ldap. eXo comes with a predefined ldap configuration. You just need to activate it and eXo will create all it needs to work at startup.
You need to have a working ldap server and a user with write permissions.
Open exo-tomcat/webapps/portal/WEB-INF/conf/configuration.xml and replace:
<import>war:/conf/organization/hibernate-configuration.xml</import>
With
<import>war:/conf/organization/ldap-configuration.xml</import>
0pen ldap-configuration.xml and update the providerURL, rootdn and password settings according to your environment
<field name="providerURL"><string>ldap://127.0.0.1:389</string></field> <field name="rootdn"><string>CN=Manager,DC=MyCompany,DC=com</string></field> <field name="password"><string>secret</string></field>
Delete exo-tomcat/temp/* to have a clean database and then start tomcat.
eXo starts and autocreates its organization model in your directory tree. Finally, the structure of the default LDAP schema looks like:

That's it! Now eXo uses your LDAP directory as its org model storage. Users, groups and memberships are now stored and retrieved from there. We suggest that you complete some guideline functions with eXo user management portlet and see what it changes in your directory tree.
If you have an existing LDAP server, the eXo predefined settings will likely not match your directory structure. eXo LDAP organization service implementation was written with flexibility in mind and can certainly be configured to meet your requirements.
The configuration is done in ldap-configuration.xml file, and this chapter will explain the numerous parameters it contains.
Firstly, start by connection settings which will tell eXo how to connect to your directory server. These settings are very close to JNDI API context parameters. This configuration is activated by the init-param ldap.config of service LDAPServiceImpl.
<component>
<key>org.exoplatform.services.ldap.LDAPService</key>
<type>org.exoplatform.services.ldap.impl.LDAPServiceImpl</type>
<init-params>
<object-param>
<name>ldap.config</name>
<description>Default ldap config</description>
<object type="org.exoplatform.services.ldap.impl.LDAPConnectionConfig">
<field name="providerURL"><string>ldap://127.0.0.1:389,10.0.0.1:389</string></field>
<field name="rootdn"><string>CN=Manager,DC=exoplatform,DC=org</string></field>
<field name="password"><string>secret</string></field>
<!-- field name="authenticationType"><string>simple</string></field-->
<field name="version"><string>3</string></field>
<field name="referralMode"><string>follow</string></field>
<!-- field name="serverName"><string>active.directory</string></field-->
<field name="minConnection"><int>5</int></field>
<field name="maxConnection"><int>10</int></field>
<field name="timeout"><int>50000</int></field>
</object>
</object-param>
</init-params>
</component>providerURL: LDAP server URL (see PROVIDER_URL). For multiple ldap servers, use comma separated list of host:port (Ex. ldap://127.0.0.1:389,10.0.0.1:389).
rootdn: dn of user that will be used by the service to authenticate on the server (see SECURITY_PRINCIPAL).
password: password for user rootdn (see SECURITY_CREDENTIALS).
authenticationType: type of authentication to be used (see SECURITY_AUTHENTICATION). Use one of none, simple, strong. Default is simple.
version: LDAP protocol version (see java.naming.ldap.version). Set to 3 if your server supports LDAP V3.
referalMode: one of follow, ignore,throw (see REFERRAL).
serverName: you will need to set this to active.directory in order to work with Active Directory servers. Any other value will be ignore and the service will act as on a standard LDAP.
maxConnection: the maximum number of connections per connection identity that can be maintained concurrently.
minConnection: the number of connections per connection identity to create when initially creating a connection for the identity.
timeout: the number of milliseconds that an idle connection may remain in the pool without being closed and removed from the pool.
Next, you need to configure the eXo OrganizationService to tell him how the directory is structured and how to interact with it. This is managed by a couple of of init-params : ldap.userDN.key and ldap.attribute.mapping in file ldap-configuration.xml (by default located at portal.war/WEB-INF/conf/organization)
<component>
<key>org.exoplatform.services.organization.OrganizationService</key>
<type>org.exoplatform.services.organization.ldap.OrganizationServiceImpl</type>
[...]
<init-params>
<value-param>
<name>ldap.userDN.key</name>
<description>The key used to compose user DN</description>
<value>cn</value>
</value-param>
<object-param>
<name>ldap.attribute.mapping</name>
<description>ldap attribute mapping</description>
<object type="org.exoplatform.services.organization.ldap.LDAPAttributeMapping">
[...]
</object-param>
</init-params>
[...]
</component>ldap.attribute.mapping maps your ldap to eXo. At first there are two main parameters to configure in it:
<field name="baseURL"><string>dc=exoplatform,dc=org</string></field> <field name="ldapDescriptionAttr"><string>description</string></field>
baseURL: root dn for eXo organizational entities. This entry can't be created by eXo and must preexist in directory.
ldapDescriptionAttr (since core 2.2+) : Name of a common attribute that will be used as description for groups and membership types.
Note
(since core 2.2+) : Name of a common attribute that will be used as description for groups and membership types.
Other parameters are discussed in the following sections.
Here are the main parameters to map eXo users to your directory :
<field name="userURL"><string>ou=users,ou=portal,dc=exoplatform,dc=org</string></field> <field name="userObjectClassFilter"><string>objectClass=person</string></field> <field name="userLDAPClasses"><string>top,person,organizationalPerson,inetOrgPerson</string></field>
userURL : base dn for users. Users are created in a flat structure under this base with a dn of the form: ldap.userDN.key=username,userURL
Example :
uid=john,cn=People,o=MyCompany,c=com
However, if users exist deeply under userURL, eXo will be able to retrieve them.
Example :
uid=tom,ou=France,ou=EMEA,cn=People,o=MyCompany,c=com
userObjectClassFilter: Filter used under userURL branch to distinguish eXo user entries from others.
Example : john and tom will be recognized as valid eXo users but EMEA and France entries will be ignored in the following subtree :
uid=john,cn=People,o=MyCompany,c=com
objectClass: person
…
ou=EMEA,cn=People,o=MyCompany,c=com
objectClass: organizationalUnit
…
ou=France,ou=EMEA,cn=People,o=MyCompany,c=com
objectClass: organizationalUnit
…
uid=tom,ou=EMEA,cn=People,o=MyCompany,c=com
objectClass: person
…userLDAPClasses : comma separated list of classes used for user creation.
When creating a new user, an entry will be created with the given objectClass attributes. The classes must at least define cn and any attribute refernced in the user mapping.
Example : Adding the user Marry Simons could produce :
uid=marry,cn=users,ou=portal,dc=exoplatform,dc=org objectclass: top objectClass: person objectClass: organizationalPerson objectClass: inetOrgPerson …
The following parameters maps ldap attributes to eXo User java objects attributes.
<field name="userUsernameAttr"><string>uid</string></field> <field name="userPassword"><string>userPassword</string></field> <field name="userFirstNameAttr"><string>givenName</string></field> <field name="userLastNameAttr"><string>sn</string></field> <field name="userDisplayNameAttr"><string>displayName</string></field> <field name="userMailAttr"><string>mail</string></field>
userUsernameAttr: username (login)
userPassword: password (used when portal authentication is done by eXo login module)
userFirstNameAttr: firstname
userLastNameAttr: lastname
userDisplayNameAttr: displayed name
userMailAttr: email address
Example : In the previous example, user Marry Simons could produce :
uid=marry,cn=users,ou=portal,dc=exoplatform,dc=org objectclass: top objectClass: person objectClass: organizationalPerson objectClass: inetOrgPerson …
eXo groups can be mapped to organizational or applicative groups defined in your directory.
<field name="groupsURL"><string>ou=groups,ou=portal,dc=exoplatform,dc=org</string></field> <field name="groupLDAPClasses"><string>top,organizationalUnit</string></field> <field name="groupObjectClassFilter"><string>objectClass=organizationalUnit</string></field>
groupsURL : base dn for eXo groups
Groups can be structured hierarchically under groupsURL.
Example: Groups communication, communication/marketing and communication/press would map to :
ou=communication,ou=groups,ou=portal,dc=exoplatform,dc=org … ou=marketing,ou=communication,ou=groups,ou=portal,dc=exoplatform,dc=org … ou=press,ou=communication,ou=groups,ou=portal,dc=exoplatform,dc=org …
groupLDAPClasses: comma separated list of classes used for group creation.
When creating a new group, an entry will be created with the given objectClass attributes. The classes must define at least the required attributes: ou, description and l.
Note
l attribute corresponds to the City property in OU property editor
Example : Adding the group human-resources could produce:
ou=human-resources,ou=groups,ou=portal,dc=exoplatform,dc=org objectclass: top objectClass: organizationalunit ou: human-resources description: The human resources department l: Human Resources …
groupObjectClassFilter: filter used under groupsURL branch to distinguish eXo groups from other entries. You can also use a complex filter if you need.
Example : groups WebDesign, WebDesign/Graphists and Sales could be retrieved in :
l=Paris,dc=sites,dc=mycompany,dc=com
…
ou=WebDesign,l=Paris,dc=sites,dc=mycompany,dc=com
…
ou=Graphists,WebDesign,l=Paris,dc=sites,dc=mycompany,dc=com
…
l=London,dc=sites,dc=mycompany,dc=com
…
ou=Sales,l=London,dc=sites,dc=mycompany,dc=com
…Membership types are the possible roles that can be assigned to users in groups.
<field name="membershipTypeURL"><string>ou=memberships,ou=portal,dc=exoplatform,dc=org</string></field> <field name="membershipTypeLDAPClasses"><string>top,organizationalRole</string></field> <field name="membershipTypeNameAttr"><string>cn</string></field>
membershipTypeURL : base dn for membership types storage.
eXo stores membership types in a flat structure under membershipTypeURL.
Example : Roles manager, user, admin and editor could by defined by the subtree :
ou=roles,ou=portal,dc=exoplatform,dc=org … cn=manager,ou=roles,ou=portal,dc=exoplatform,dc=org … cn=user,ou=roles,ou=portal,dc=exoplatform,dc=org … cn=admin,ou=roles,ou=portal,dc=exoplatform,dc=org … cn=editor,ou=roles,ou=portal,dc=exoplatform,dc=org …
membershipTypeLDAPClasses: comma separated list of classes for membership types creation.
When creating a new membership type, an entry will be created with the given objectClass attributes. The classes must define the required attributes : description, cn
Example : Adding membership type validator would produce :
cn=validator,ou=roles,ou=portal,dc=exoplatform,dc=org objectclass: top objectClass: organizationalRole …
membershipTypeNameAttr : Attribute that will be used as the name of the role
Example : If membershipTypeNameAttr is 'cn', then role name is 'manager' for the following membership type entry :
cn=manager,ou=roles,ou=portal,dc=exoplatform,dc=org </pre>
Memberships are used to assign a role within a group. They are entries that are placed under the group entry of their scope group. Users in this role are defined as attributes of the membership entry.
Example: To designate tom as the manager of the group human-resources:
ou=human-resources,ou=groups,ou=portal,dc=exoplatform,dc=org
…
cn=manager,ou=human-resources,ou=groups,ou=portal,dc=exoplatform,dc=org
member: uid=tom,ou=users,ou=portal,dc=exoplatform,dc=org
…The parameters to configure memberships are:
<field name="membershipLDAPClasses"><string>top,groupOfNames</string></field> <field name="membershipTypeMemberValue"><string>member</string></field> <field name="membershipTypeRoleNameAttr"><string>cn</string></field> <field name="membershipTypeObjectClassFilter"><string>objectClass=organizationalRole</string></field>
membershipLDAPClasses : comma separated list of classes used to create memberships.
When creating a new membership, an entry will be created with the given objectClass attributes. The classes must at least define the attribute designated by membershipTypeMemberValue.
Example : Adding membership validator would produce :
cn=validator,ou=human-resources,ou=groups,ou=portal,dc=exoplatform,dc=org objectclass: top objectClass: groupOfNames …
<pre> cn=validator,ou=human-resources,ou=groups,ou=portal,dc=exoplatform,dc=org objectclass: top objectClass: groupOfNames ... </pre>
membershipTypeMemberValue: Multivalued attribute used in memberships to reference users that have the role in the group.
Values should be a user dn.
Example: james and root have admin role within the group human-resources, would give:
cn=admin,ou=human-resources,ou=groups,ou=portal,dc=exoplatform,dc=org member: cn=james,ou=users,ou=portal,dc=exoplatform,dc=org member: cn=root,ou=users,ou=portal,dc=exoplatform,dc=org …
membershipTypeRoleNameAttr: Attribute of the membership entry whose value references the membership type.
Example : In the following membership entry:
<pre> cn=manager,ou=human-resources,ou=groups,ou=portal,dc=exoplatform,dc=org </pre>
'cn' attribute is used to designate the 'manager' membership type. Which could also be said : The name of the role is given by 'cn' the attribute.
membershipTypeObjectClassFilter : Filter used to distinguish membership entries under groups.
You can use rather complex filters.
Example: Here is a filter we used for a customer that needed to trigger a dynlist overlay on openldap.
(&(objectClass=ExoMembership)(membershipURL=*))
Note: Pay attention to the xml escaping of the '&' (and) operator
eXo User profiles also have entries in the ldap but the actual storage is still done with the hibernate service. You will need the following parameters:
<field name="profileURL"><string>ou=profiles,ou=portal,dc=exoplatform,dc=org</string></field> <field name="profileLDAPClasses"><string>top,organizationalPerson</string></field>
profileURL: base dn to store user profiles
profileLDAPClasses: Classes used to when creating user profiles
At startup, eXo can populate the organization model based on
eXo organizational model has User,Group,Membership and Profile entities. For each, we define a base dn that should be below baseURL. At startup, if one of userURL, groupsURL, membershipTypeURL or profileURL does not exist fully, eXo will attempt to create the missing subtree by parsing the dn and creating entries on-the-fly. To determine the classes of the created entries, the following rules are applied :
ou=... : objectClass=top,objectClass=organizationalUnit
cn=... : objectClass=top,objectClass=organizationalRole
c=... : objectClass=country
o=... : objectClass=organization
dc=.. : objectClass=top,objectClass=dcObject,objectClass=organization
Example:
If baseURL is o=MyCompany,c=com and groupsURL is dc=groups,cn=Extranet,c=France,ou=EMEA,o=MyCompany,c=com then, the following subtree will be created :
ou=EMEA,o=MyCompany,c=com
objectClass: top
objectClass: organizationalUnit
…
c=France,ou=EMEA,o=MyCompany,c=com
objectClass: top
objectClass: country
…
cn=Extranet,c=France,ou=EMEA,o=MyCompany,c=com
objectClass: top
objectClass: organizationalRole
…
dc=groups,cn=Extranet,c=France,ou=EMEA,o=MyCompany,c=com
objectClass: top
objectClass: dcObject
objectClass: organization
…Here is an alternative configuration for active directory that you can find in activedirectory-configuration.xml
Note
There is a microsoft limitation: password can't be set in AD via unsecured connection you have to use the ldaps protocol
here is how to use LDAPS protocol with Active Directory :
1 setup AD to use SSL:
* add Active Directory Certificate Services role
* install right certificate for DC machine
2 enable Java VM to use certificate from AD:
* import root CA used in AD, to keystore, something like
keytool -importcert -file 2008.cer -keypass changeit -keystore /home/user/java/jdk1.6/jre/lib/security/cacerts
* set java options
JAVA_OPTS="${JAVA_OPTS} -Djavax.net.ssl.trustStorePassword=changeit -Djavax.net.ssl.trustStore=/home/user/java/jdk1.6/jre/lib/security/cacerts"[...]
<component>
<key>org.exoplatform.services.ldap.LDAPService</key>
[..]
<object type="org.exoplatform.services.ldap.impl.LDAPConnectionConfig">
<!-- for multiple ldap servers, use comma seperated list of host:port (Ex. ldap://127.0.0.1:389,10.0.0.1:389) -->
<!-- whether or not to enable ssl, if ssl is used ensure that the javax.net.ssl.keyStore & java.net.ssl.keyStorePassword properties are set -->
<!-- exo portal default installed javax.net.ssl.trustStore with file is java.home/lib/security/cacerts-->
<!-- ldap service will check protocol, if protocol is ldaps, ssl is enable (Ex. for enable ssl: ldaps://10.0.0.3:636 ;for disable ssl: ldap://10.0.0.3:389 ) -->
<!-- when enable ssl, ensure server name is *.directory and port (Ex. active.directory) -->
<field name="providerURL"><string>ldaps://10.0.0.3:636</string></field>
<field name="rootdn"><string>CN=Administrator,CN=Users, DC=exoplatform,DC=org</string></field>
<field name="password"><string>site</string></field>
<field name="version"><string>3</string></field>
<field name="referralMode"><string>ignore</string></field>
<field name="serverName"><string>active.directory</string></field>
</object>
[..]
<component>
<key>org.exoplatform.services.organization.OrganizationService</key>
[...]
<object type="org.exoplatform.services.organization.ldap.LDAPAttributeMapping">
[...]
<field name="userAuthenticationAttr"><string>mail</string></field>
<field name="userUsernameAttr"><string>sAMAccountName</string></field>
<field name="userPassword"><string>unicodePwd</string></field>
<field name="userLastNameAttr"><string>sn</string></field>
<field name="userDisplayNameAttr"><string>displayName</string></field>
<field name="userMailAttr"><string>mail</string></field>
[..]
<field name="membershipTypeLDAPClasses"><string>top,group</string></field>
<field name="membershipTypeObjectClassFilter"><string>objectClass=group</string></field>
[..]
<field name="membershipLDAPClasses"><string>top,group</string></field>
<field name="membershipObjectClassFilter"><string>objectClass=group</string></field>
</object>
[...]
</component> If you use OpenLDAP, you may want to use the overlays. Here is how you can use the dynlist overlay to have memberships dynamically populated.
The main idea is to have your memberships populated dynamically by an ldap query. Thus, you no longer have to maintain manually the roles on users.
To configure the dynlist, add the following to your slapd.conf :
dynlist-attrset ExoMembership membershipURL member
This snipet means : On entries that have ExoMembership class, use the URL defined in the value of attribute membershipURL as a query and populate results under the multivalues attribute member.
Now let's declare the corresponding schema (replace XXXXX to adapt to your own IANA code):
attributeType ( 1.3.6.1.4.1.XXXXX.1.59 NAME 'membershipURL' SUP memberURL )
membershipURL inherits from memberURL.
objectClass ( 1.3.6.1.4.1.XXXXX.2.12 NAME 'ExoMembership' SUP top MUST ( cn ) MAY (membershipURL $ member $ description ) )
ExoMembership must define cn and can have attributes :
membershipURL: trigger for the dynlist
member : attribute populated by the dynlist
description : used by eXo for display
# the TestGroup group dn: ou=testgroup,ou=groups,ou=portal,o=MyCompany,c=com objectClass: top objectClass: organizationalUnit ou: testgroup l: TestGroup description: the Test Group
On this group, we can bind an eXo membership where the overlay will occur:
# the manager membership on group TestGroup dn: cn=manager, ou=TestGroup,ou=groups,ou=portal,o=MyCompany,c=com objectClass: top objectClass: ExoMembership membershipURL: ldap:///ou=users,ou=portal,o=MyCompany,c=com??sub?(uid=*) cn: manager
This dynlist assigns the role manager:/testgroup to any user.
The process of launching the Organization Service TCK tests against your Organization Service is quite easy. For instance you may add TCK tests to your maven project and launch them during unit testing phase. To do that you need to complete the next two steps:
Configure your maven pom.xml file
Configure standalone container and Organization Service
Note
If you need deeper investigation you can find Organization Service TCK test sources at svn
Organization Service TCK tests are available as a separate maven artifact, so the first thing you need to do is to add this artifact as a dependency to your pom.xml file
<dependency>
<groupId>org.exoplatform.core</groupId>
<artifactId>exo.core.component.organization.tests</artifactId>
<version>2.4.3-GA</version>
<classifier>sources</classifier>
<scope>test</scope>
</dependency>You will also need to unpack tests as they are archieved within jar file. For this purpose you may use maven-dependency-plugin
<plugin>
<groupId>org.apache.maven.plugins</groupId>
<artifactId>maven-dependency-plugin</artifactId>
<executions>
<execution>
<id>unpack</id>
<phase>generate-test-sources</phase>
<goals>
<goal>unpack</goal>
</goals>
<configuration>
<artifactItems>
<artifactItem>
<groupId>org.exoplatform.core</groupId>
<artifactId>exo.core.component.organization.tests</artifactId>
<classifier>sources</classifier>
<type>jar</type>
<overWrite>false</overWrite>
</artifactItem>
</artifactItems>
<outputDirectory>${project.build.directory}/org-service-tck-tests</outputDirectory>
</configuration>
</execution>
</executions>
</plugin>Note
Remember the value of outputDirectory parameter as you will need it later.
After you have unpacked the tests you need to add the tests sources and resources, use build-helper-maven-plugin
<plugin>
<groupId>org.codehaus.mojo</groupId>
<artifactId>build-helper-maven-plugin</artifactId>
<version>1.3</version>
<executions>
<execution>
<id>add-test-resource</id>
<phase>generate-test-sources</phase>
<goals>
<goal>add-test-resource</goal>
</goals>
<configuration>
<resources>
<resource>
<directory>${project.build.directory}/org-service-tck-tests</directory>
</resource>
</resources>
</configuration>
</execution>
<execution>
<id>add-test-source</id>
<phase>generate-test-sources</phase>
<goals>
<goal>add-test-source</goal>
</goals>
<configuration>
<sources>
<source>${project.build.directory}/org-service-tck-tests</source>
</sources>
</configuration>
</execution>
</executions>
</plugin> Note
directory and source parameter should point to the location you've specified in outputDirectory parameter just above.
You also need to include all TCK tests using maven-surefire-plugin
<plugin>
<groupId>org.apache.maven.plugins</groupId>
<artifactId>maven-surefire-plugin</artifactId>
<configuration>
...
<includes>
<include>org/exoplatform/services/tck/organization/Test*.java</include>
</includes>
...
</configuration>
</plugin>As a result you should have TCK being launched during your next maven clean install. Example of configured pom.xml file you can find at svn server
TCK tests use standalone container, so to launch TCK tests propertly you will also need to add Organization Service as a standalone component. For that purpose use configuration file, which is to be located in 'src/test/java/conf/standalone/test-configuration.xml' by default, but its location can be changed by system property called orgservice.test.configuration.file. Add your Organization Service configuration with all needed components there.
In addition you need to populate your Organization Service with organization data (TCK tests are designed to use this data):
<external-component-plugins>
<target-component>org.exoplatform.services.organization.OrganizationService</target-component>
<component-plugin>
<name>init.service.listener</name>
<set-method>addListenerPlugin</set-method>
<type>org.exoplatform.services.organization.OrganizationDatabaseInitializer</type>
<description>this listener populate organization data for the first launch</description>
<init-params>
<value-param>
<name>checkDatabaseAlgorithm</name>
<description>check database</description>
<value>entry</value>
</value-param>
<value-param>
<name>printInformation</name>
<description>Print information init database</description>
<value>false</value>
</value-param>
<object-param>
<name>configuration</name>
<description>description</description>
<object type="org.exoplatform.services.organization.OrganizationConfig">
<field name="membershipType">
<collection type="java.util.ArrayList">
<value>
<object type="org.exoplatform.services.organization.OrganizationConfig$MembershipType">
<field name="type"><string>manager</string></field>
<field name="description"><string>manager membership type</string></field>
</object>
</value>
<value>
<object type="org.exoplatform.services.organization.OrganizationConfig$MembershipType">
<field name="type"><string>member</string></field>
<field name="description"><string>member membership type</string></field>
</object>
</value>
<value>
<object type="org.exoplatform.services.organization.OrganizationConfig$MembershipType">
<field name="type"><string>validator</string></field>
<field name="description"><string>validator membership type</string></field>
</object>
</value>
</collection>
</field>
<field name="group">
<collection type="java.util.ArrayList">
<value>
<object type="org.exoplatform.services.organization.OrganizationConfig$Group">
<field name="name"><string>platform</string></field>
<field name="parentId"><string></string></field>
<field name="description"><string>the /platform group</string></field>
<field name="label"><string>Platform</string></field>
</object>
</value>
<value>
<object type="org.exoplatform.services.organization.OrganizationConfig$Group">
<field name="name"><string>administrators</string></field>
<field name="parentId"><string>/platform</string></field>
<field name="description"><string>the /platform/administrators group</string></field>
<field name="label"><string>Administrators</string></field>
</object>
</value>
<value>
<object type="org.exoplatform.services.organization.OrganizationConfig$Group">
<field name="name"><string>users</string></field>
<field name="parentId"><string>/platform</string></field>
<field name="description"><string>the /platform/users group</string></field>
<field name="label"><string>Users</string></field>
</object>
</value>
<value>
<object type="org.exoplatform.services.organization.OrganizationConfig$Group">
<field name="name"><string>guests</string></field>
<field name="parentId"><string>/platform</string></field>
<field name="description"><string>the /platform/guests group</string></field>
<field name="label"><string>Guests</string></field>
</object>
</value>
<value>
<object type="org.exoplatform.services.organization.OrganizationConfig$Group">
<field name="name"><string>organization</string></field>
<field name="parentId"><string></string></field>
<field name="description"><string>the organization group</string></field>
<field name="label"><string>Organization</string></field>
</object>
</value>
<value>
<object type="org.exoplatform.services.organization.OrganizationConfig$Group">
<field name="name"><string>management</string></field>
<field name="parentId"><string>/organization</string></field>
<field name="description"><string>the /organization/management group</string></field>
<field name="label"><string>Management</string></field>
</object>
</value>
<value>
<object type="org.exoplatform.services.organization.OrganizationConfig$Group">
<field name="name"><string>executive-board</string></field>
<field name="parentId"><string>/organization/management</string></field>
<field name="description"><string>the /organization/management/executive-board group</string></field>
<field name="label"><string>Executive Board</string></field>
</object>
</value>
<value>
<object type="org.exoplatform.services.organization.OrganizationConfig$Group">
<field name="name"><string>human-resources</string></field>
<field name="parentId"><string>/organization/management</string></field>
<field name="description"><string>the /organization/management/human-resource group</string></field>
<field name="label"><string>Human Resources</string></field>
</object>
</value>
<value>
<object type="org.exoplatform.services.organization.OrganizationConfig$Group">
<field name="name"><string>communication</string></field>
<field name="parentId"><string>/organization</string></field>
<field name="description"><string>the /organization/communication group</string></field>
<field name="label"><string>Communication</string></field>
</object>
</value>
<value>
<object type="org.exoplatform.services.organization.OrganizationConfig$Group">
<field name="name"><string>marketing</string></field>
<field name="parentId"><string>/organization/communication</string></field>
<field name="description"><string>the /organization/communication/marketing group</string></field>
<field name="label"><string>Marketing</string></field>
</object>
</value>
<value>
<object type="org.exoplatform.services.organization.OrganizationConfig$Group">
<field name="name"><string>press-and-media</string></field>
<field name="parentId"><string>/organization/communication</string></field>
<field name="description"><string>the /organization/communication/press-and-media group</string></field>
<field name="label"><string>Press and Media</string></field>
</object>
</value>
<value>
<object type="org.exoplatform.services.organization.OrganizationConfig$Group">
<field name="name"><string>operations</string></field>
<field name="parentId"><string>/organization</string></field>
<field name="description"><string>the /organization/operations and media group</string></field>
<field name="label"><string>Operations</string></field>
</object>
</value>
<value>
<object type="org.exoplatform.services.organization.OrganizationConfig$Group">
<field name="name"><string>sales</string></field>
<field name="parentId"><string>/organization/operations</string></field>
<field name="description"><string>the /organization/operations/sales group</string></field>
<field name="label"><string>Sales</string></field>
</object>
</value>
<value>
<object type="org.exoplatform.services.organization.OrganizationConfig$Group">
<field name="name"><string>finances</string></field>
<field name="parentId"><string>/organization/operations</string></field>
<field name="description"><string>the /organization/operations/finances group</string></field>
<field name="label"><string>Finances</string></field>
</object>
</value>
<value>
<object type="org.exoplatform.services.organization.OrganizationConfig$Group">
<field name="name"><string>customers</string></field>
<field name="parentId"><string></string></field>
<field name="description"><string>the /customers group</string></field>
<field name="label"><string>Customers</string></field>
</object>
</value>
<value>
<object type="org.exoplatform.services.organization.OrganizationConfig$Group">
<field name="name"><string>partners</string></field>
<field name="parentId"><string></string></field>
<field name="description"><string>the /partners group</string></field>
<field name="label"><string>Partners</string></field>
</object>
</value>
</collection>
</field>
<field name="user">
<collection type="java.util.ArrayList">
<value>
<object type="org.exoplatform.services.organization.OrganizationConfig$User">
<field name="userName"><string>root</string></field>
<field name="password"><string>exo</string></field>
<field name="firstName"><string>Root</string></field>
<field name="lastName"><string>Root</string></field>
<field name="email"><string>root@localhost</string></field>
<field name="groups">
<string>
manager:/platform/administrators,member:/platform/users,
member:/organization/management/executive-board
</string>
</field>
</object>
</value>
<value>
<object type="org.exoplatform.services.organization.OrganizationConfig$User">
<field name="userName"><string>john</string></field>
<field name="password"><string>exo</string></field>
<field name="firstName"><string>John</string></field>
<field name="lastName"><string>Anthony</string></field>
<field name="email"><string>john@localhost</string></field>
<field name="groups">
<string>
member:/platform/administrators,member:/platform/users,
manager:/organization/management/executive-board
</string>
</field>
</object>
</value>
<value>
<object type="org.exoplatform.services.organization.OrganizationConfig$User">
<field name="userName"><string>marry</string></field>
<field name="password"><string>exo</string></field>
<field name="firstName"><string>Marry</string></field>
<field name="lastName"><string>Kelly</string></field>
<field name="email"><string>marry@localhost</string></field>
<field name="groups">
<string>member:/platform/users</string>
</field>
</object>
</value>
<value>
<object type="org.exoplatform.services.organization.OrganizationConfig$User">
<field name="userName"><string>demo</string></field>
<field name="password"><string>exo</string></field>
<field name="firstName"><string>Demo</string></field>
<field name="lastName"><string>exo</string></field>
<field name="email"><string>demo@localhost</string></field>
<field name="groups">
<string>member:/platform/guests,member:/platform/users</string>
</field>
</object>
</value>
</collection>
</field>
</object>
</object-param>
</init-params>
</component-plugin>
</external-component-plugins>
<external-component-plugins>
<target-component>org.exoplatform.services.organization.OrganizationService</target-component>
<component-plugin>
<name>tester.membership.type.listener</name>
<set-method>addListenerPlugin</set-method>
<type>org.exoplatform.services.organization.MembershipTypeEventListener</type>
<description>Membership type listerner for testing purpose</description>
</component-plugin>
</external-component-plugins>
Ultimately you will have a configuration file which determines standalone container and consists of Organization Service configuration and initialization data. You can find prepared test-configuration.xml file at svn
DocumentReaderService provides API to retrieve DocumentReader by mimetype.
DocumentReader lets the user fetch content of document as String or, in case of TikaDocumentReader, as Reader.
Basicaly, DocumentReaderService is a container for all registered DocumentReaders. So, you can register DocumentReader (method addDocumentReader(ComponentPlugin reader)) and fetch DocumentReader by mimeType (method getDocumentReader(String mimeType)).
TikaDocumentReaderServiceImpl extends DocumentReaderService with simple goal - read Tika configuration and lazy register each Tika Parser as TikaDocumentReader.
Note
By default, all Tikas Parsers are not registered in readers <mimetype, DocumentReader> map. When user tries to fetch a DocumentReader by unknown mimetype. Than TikaDocumentReaderService checks tika configuration, and register a new mimetype-DocumentReader pair.
How TikaDocumentReaderService Impl configuration looks like:
<component>
<key>org.exoplatform.services.document.DocumentReaderService</key>
<type>org.exoplatform.services.document.impl.tika.TikaDocumentReaderServiceImpl</type>
<!-- Old-style document readers -->
<component-plugins>
<component-plugin>
<name>pdf.document.reader</name>
<set-method>addDocumentReader</set-method>
<type>org.exoplatform.services.document.impl.PDFDocumentReader</type>
<description>to read the pdf inputstream</description>
</component-plugin>
<component-plugin>
<name>document.readerMSWord</name>
<set-method>addDocumentReader</set-method>
<type>org.exoplatform.services.document.impl.MSWordDocumentReader</type>
<description>to read the ms word inputstream</description>
</component-plugin>
<component-plugin>
<name>document.readerMSXWord</name>
<set-method>addDocumentReader</set-method>
<type>org.exoplatform.services.document.impl.MSXWordDocumentReader</type>
<description>to read the ms word inputstream</description>
</component-plugin>
<component-plugin>
<name>document.readerMSExcel</name>
<set-method>addDocumentReader</set-method>
<type>org.exoplatform.services.document.impl.MSExcelDocumentReader</type>
<description>to read the ms excel inputstream</description>
</component-plugin>
<component-plugin>
<name>document.readerMSXExcel</name>
<set-method>addDocumentReader</set-method>
<type>org.exoplatform.services.document.impl.MSXExcelDocumentReader</type>
<description>to read the ms excel inputstream</description>
</component-plugin>
<component-plugin>
<name>document.readerMSOutlook</name>
<set-method>addDocumentReader</set-method>
<type>org.exoplatform.services.document.impl.MSOutlookDocumentReader</type>
<description>to read the ms outlook inputstream</description>
</component-plugin>
<component-plugin>
<name>PPTdocument.reader</name>
<set-method>addDocumentReader</set-method>
<type>org.exoplatform.services.document.impl.PPTDocumentReader</type>
<description>to read the ms ppt inputstream</description>
</component-plugin>
<component-plugin>
<name>MSXPPTdocument.reader</name>
<set-method>addDocumentReader</set-method>
<type>org.exoplatform.services.document.impl.MSXPPTDocumentReader</type>
<description>to read the ms pptx inputstream</description>
</component-plugin>
<component-plugin>
<name>document.readerHTML</name>
<set-method>addDocumentReader</set-method>
<type>org.exoplatform.services.document.impl.HTMLDocumentReader</type>
<description>to read the html inputstream</description>
</component-plugin>
<component-plugin>
<name>document.readerXML</name>
<set-method>addDocumentReader</set-method>
<type>org.exoplatform.services.document.impl.XMLDocumentReader</type>
<description>to read the xml inputstream</description>
</component-plugin>
<component-plugin>
<name>TPdocument.reader</name>
<set-method>addDocumentReader</set-method>
<type>org.exoplatform.services.document.impl.TextPlainDocumentReader</type>
<description>to read the plain text inputstream</description>
<init-params>
<!--
values-param> <name>defaultEncoding</name> <description>description</description> <value>UTF-8</value>
</values-param
-->
</init-params>
</component-plugin>
<component-plugin>
<name>document.readerOO</name>
<set-method>addDocumentReader</set-method>
<type>org.exoplatform.services.document.impl.OpenOfficeDocumentReader</type>
<description>to read the OO inputstream</description>
</component-plugin>
</component-plugins>
<init-params>
<value-param>
<name>tika-configuration</name>
<value>jar:/conf/portal/tika-config.xml</value>
</value-param>
</init-params>
</component>
</configuration>tika-config.xml example:
<properties>
<mimeTypeRepository magic="false"/>
<parsers>
<parser name="parse-dcxml" class="org.apache.tika.parser.xml.DcXMLParser">
<mime>application/xml</mime>
<mime>image/svg+xml</mime>
<mime>text/xml</mime>
<mime>application/x-google-gadget</mime>
</parser>
<parser name="parse-office" class="org.apache.tika.parser.microsoft.OfficeParser">
<mime>application/excel</mime>
<mime>application/xls</mime>
<mime>application/msworddoc</mime>
<mime>application/msworddot</mime>
<mime>application/powerpoint</mime>
<mime>application/ppt</mime>
<mime>application/x-tika-msoffice</mime>
<mime>application/msword</mime>
<mime>application/vnd.ms-excel</mime>
<mime>application/vnd.ms-excel.sheet.binary.macroenabled.12</mime>
<mime>application/vnd.ms-powerpoint</mime>
<mime>application/vnd.visio</mime>
<mime>application/vnd.ms-outlook</mime>
</parser>
<parser name="parse-ooxml" class="org.apache.tika.parser.microsoft.ooxml.OOXMLParser">
<mime>application/x-tika-ooxml</mime>
<mime>application/vnd.openxmlformats-package.core-properties+xml</mime>
<mime>application/vnd.openxmlformats-officedocument.spreadsheetml.sheet</mime>
<mime>application/vnd.openxmlformats-officedocument.spreadsheetml.template</mime>
<mime>application/vnd.ms-excel.sheet.macroenabled.12</mime>
<mime>application/vnd.ms-excel.template.macroenabled.12</mime>
<mime>application/vnd.ms-excel.addin.macroenabled.12</mime>
<mime>application/vnd.openxmlformats-officedocument.presentationml.presentation</mime>
<mime>application/vnd.openxmlformats-officedocument.presentationml.template</mime>
<mime>application/vnd.openxmlformats-officedocument.presentationml.slideshow</mime>
<mime>application/vnd.ms-powerpoint.presentation.macroenabled.12</mime>
<mime>application/vnd.ms-powerpoint.slideshow.macroenabled.12</mime>
<mime>application/vnd.ms-powerpoint.addin.macroenabled.12</mime>
<mime>application/vnd.openxmlformats-officedocument.wordprocessingml.document</mime>
<mime>application/vnd.openxmlformats-officedocument.wordprocessingml.template</mime>
<mime>application/vnd.ms-word.document.macroenabled.12</mime>
<mime>application/vnd.ms-word.template.macroenabled.12</mime>
</parser>
<parser name="parse-html" class="org.apache.tika.parser.html.HtmlParser">
<mime>text/html</mime>
</parser>
<parser mame="parse-rtf" class="org.apache.tika.parser.rtf.RTFParser">
<mime>application/rtf</mime>
</parser>
<parser name="parse-pdf" class="org.apache.tika.parser.pdf.PDFParser">
<mime>application/pdf</mime>
</parser>
<parser name="parse-txt" class="org.apache.tika.parser.txt.TXTParser">
<mime>text/plain</mime>
<mime>script/groovy</mime>
<mime>application/x-groovy</mime>
<mime>application/x-javascript</mime>
<mime>application/javascript</mime>
<mime>text/javascript</mime>
</parser>
<parser name="parse-openoffice" class="org.apache.tika.parser.opendocument.OpenOfficeParser">
<mime>application/vnd.oasis.opendocument.database</mime>
<mime>application/vnd.sun.xml.writer</mime>
<mime>application/vnd.oasis.opendocument.text</mime>
<mime>application/vnd.oasis.opendocument.graphics</mime>
<mime>application/vnd.oasis.opendocument.presentation</mime>
<mime>application/vnd.oasis.opendocument.spreadsheet</mime>
<mime>application/vnd.oasis.opendocument.chart</mime>
<mime>application/vnd.oasis.opendocument.image</mime>
<mime>application/vnd.oasis.opendocument.formula</mime>
<mime>application/vnd.oasis.opendocument.text-master</mime>
<mime>application/vnd.oasis.opendocument.text-web</mime>
<mime>application/vnd.oasis.opendocument.text-template</mime>
<mime>application/vnd.oasis.opendocument.graphics-template</mime>
<mime>application/vnd.oasis.opendocument.presentation-template</mime>
<mime>application/vnd.oasis.opendocument.spreadsheet-template</mime>
<mime>application/vnd.oasis.opendocument.chart-template</mime>
<mime>application/vnd.oasis.opendocument.image-template</mime>
<mime>application/vnd.oasis.opendocument.formula-template</mime>
<mime>application/x-vnd.oasis.opendocument.text</mime>
<mime>application/x-vnd.oasis.opendocument.graphics</mime>
<mime>application/x-vnd.oasis.opendocument.presentation</mime>
<mime>application/x-vnd.oasis.opendocument.spreadsheet</mime>
<mime>application/x-vnd.oasis.opendocument.chart</mime>
<mime>application/x-vnd.oasis.opendocument.image</mime>
<mime>application/x-vnd.oasis.opendocument.formula</mime>
<mime>application/x-vnd.oasis.opendocument.text-master</mime>
<mime>application/x-vnd.oasis.opendocument.text-web</mime>
<mime>application/x-vnd.oasis.opendocument.text-template</mime>
<mime>application/x-vnd.oasis.opendocument.graphics-template</mime>
<mime>application/x-vnd.oasis.opendocument.presentation-template</mime>
<mime>application/x-vnd.oasis.opendocument.spreadsheet-template</mime>
<mime>application/x-vnd.oasis.opendocument.chart-template</mime>
<mime>application/x-vnd.oasis.opendocument.image-template</mime>
<mime>application/x-vnd.oasis.opendocument.formula-template</mime>
</parser>
<parser name="parse-image" class="org.apache.tika.parser.image.ImageParser">
<mime>image/bmp</mime>
<mime>image/gif</mime>
<mime>image/jpeg</mime>
<mime>image/png</mime>
<mime>image/tiff</mime>
<mime>image/vnd.wap.wbmp</mime>
<mime>image/x-icon</mime>
<mime>image/x-psd</mime>
<mime>image/x-xcf</mime>
</parser>
<parser name="parse-class" class="org.apache.tika.parser.asm.ClassParser">
<mime>application/x-tika-java-class</mime>
</parser>
<parser name="parse-mp3" class="org.apache.tika.parser.mp3.Mp3Parser">
<mime>audio/mpeg</mime>
</parser>
<parser name="parse-midi" class="org.apache.tika.parser.audio.MidiParser">
<mime>application/x-midi</mime>
<mime>audio/midi</mime>
</parser>
<parser name="parse-audio" class="org.apache.tika.parser.audio.AudioParser">
<mime>audio/basic</mime>
<mime>audio/x-wav</mime>
<mime>audio/x-aiff</mime>
</parser>
</parsers>
</properties>As you see configuration above, there is both old-style DocumentReaders and new Tika parsers registered.
But MSWordDocumentReader and org.apache.tika.parser.microsoft.OfficeParser both refer to same "application/msword" mimetype, exclaims attentive reader. And he is right. But only one DocumentReader will be fetched.
Old-style DocumentReader registered in configuration become registered into DocumentReaderService. So, mimetypes that is supported by those DocumentReaders will have a registered pair, and user will always fetch this DocumentReaders with getDocumentReader(..) method. Tika configuration will be checked for Parsers only if there is no already registered DocumentReader.
You can make you own DocumentReader in two ways.
Old-Style Document Reader:
extend BaseDocumentReader
public class MyDocumentReader extends BaseDocumentReader
{
public String[] getMimeTypes()
{
return new String[]{"mymimetype"};
}
...
}register it as component-plugin
<component-plugin> <name>my.DocumentReader</name> <set-method>addDocumentReader</set-method> <type>com.mycompany.document.MyDocumentReader</type> <description>to read my own file format</description> </component-plugin>
Tika Parser:
implement Parser
public class MyParser implements Parser
{
...
}register it in tika-config.xml
<parser name="parse-mydocument" class="com.mycompany.document.MyParser">
<mime>mymimetype</mime>
</parser>
TikaDocumentReader features and notes:
TikaDocumentReader may return document contant as Reader object. Old-Style DocumentReader does not;
TikaDocumentReader do not detects document mimetipe. You will get exact parser as configured in tika-config;
All readers methods closes InputStream at final.
Digest access authentication is one of the agreed methods a web server can use to negotiate credentials with a web user's browser. It uses encryption to send the password over the network which is safer than the Basic access authentication that sends plaintext.
Technically digest authentication is an application of MD5 cryptographic hashing with usage of nonce values to discourage cryptanalysis. It uses the HTTP protocol.
To configure you server to use DIGEST authentication we need to edit serverside JAAS module implementation configuration file.
You need to fulfill a couple of steps. Firstly change login configuration:
Edit config file located here: exo-tomcat/webapps/rest.war/WEB-INF/web.xml
Replace
<login-config> <auth-method>BASIC</auth-method> <realm-name>eXo REST services</realm-name> </login-config>
for
<login-config> <auth-method>DIGEST</auth-method> <realm-name>eXo REST services</realm-name> </login-config>
More information about tomcat configuration can be found at Apache Tomcat Configuration Reference.
Secondly you also need to specify new login module for JAAS:
Edit config file located here: exo-tomcat/conf/jaas.conf
Replace
exo-domain {
org.exoplatform.services.security.j2ee.TomcatLoginModule required;
};for
exo-domain {
org.exoplatform.services.security.j2ee.DigestAuthenticationTomcatLoginModule required;
};You need to fulfill a couple of steps. Firstly change login configuration:
Edit config file located here: exo-jetty/webapps/rest.war/WEB-INF/web.xml
Replace
<login-config> <auth-method>BASIC</auth-method> <realm-name>eXo REST services</realm-name> </login-config>
for
<login-config> <auth-method>DIGEST</auth-method> <realm-name>eXo REST services</realm-name> </login-config>
Secondly you also need to specify new login module for JAAS:
Edit config file located here: exo-jetty/jaas.conf
Replace
exo-domain {
org.exoplatform.services.security.j2ee.JettyLoginModule required;
};for
exo-domain {
org.exoplatform.services.security.j2ee.DigestAuthenticationJettyLoginModule required;
};Edit config file located here: exo-jboss/server/default/deploy/exo.jcr.ear.ear/rest.war/WEB-INF/web.xml
Replace
<login-config> <auth-method>BASIC</auth-method> <realm-name>eXo REST services</realm-name> </login-config>
for
<login-config> <auth-method>DIGEST</auth-method> <realm-name>eXo REST services</realm-name> </login-confi
You also need to edit login configuration file located here: exo-jboss/server/default/conf/login-config.xml
<application-policy name="exo-domain">
<authentication>
<login-module code="org.exoplatform.services.security.j2ee.DigestAuthenticationJbossLoginModule"
flag="required">
<module-option name="usersProperties">props/jmx-console-users.properties</module-option>
<module-option name="rolesProperties">props/jmx-console-roles.properties</module-option>
<module-option name="hashAlgorithm">MD5</module-option>
<module-option name="hashEncoding">rfc2617</module-option>
<module-option name="hashUserPassword">false</module-option>
<module-option name="hashStorePassword">true</module-option>
<module-option name="passwordIsA1Hash">true</module-option>
<module-option name="storeDigestCallback">
org.jboss.security.auth.spi.RFC2617Digest
</module-option>
</login-module>
</authentication>
</application-policy>You probably should define users.properties and role.properties according to your own needs.
More information about jboss server Digest authentication configuration can be found at JBoss quide chapter.
To make your own
org.exoplatform.services.organization.OrganizationService
implementation able to use DIGEST authentication you need to make your
UserHandler implementation also implement
org.exoplatform.services.organization.DigestAuthenticator
interface which provide more flexible authenticate method. As it is called
from
org.exoplatform.services.organization.auth.OrganizationAuthenticatorImpl
it receive a
org.exoplatform.services.security.Credential instances,
you can get more information from
org.exoplatform.services.security.PasswordCredential.getPasswordContext().
It can be used to calculate md5 digest of original password to compare it
with recieved from clientside.
Table of Contents
Representational State Transfer (REST) is a style
of software architecture for distributed hypermedia systems such as the
World Wide Web. The term was introduced in the doctoral dissertation in
2000 by Roy Fielding, one of the principal authors of the Hypertext
Transfer Protocol (HTTP) specification, and has come into widespread use
in the networking community.
REST strictly refers to a collection of network architecture principles that outline how resources are defined and addressed. The term is often used in a looser sense to describe any simple interface that transmits domain-specific data over HTTP without an additional messaging layer such as SOAP or session tracking via HTTP cookies.
The key abstraction of information in REST is a
resource. Any information that can be named can be a
resource: a document or image, a temporal service (e.g. "today's weather
in Los Angeles"), a collection of other resources, a non-virtual object
(e.g. a person), and so on. In other words, any concept that might be the
target of an author's hypertext reference must fit within the definition
of a resource. A resource is a conceptual mapping to a set of entities,
not the entity that corresponds to the mapping at any particular point in
time.
REST uses a resource identifier to identify the
particular resource involved in an interaction between components. REST
connectors provide a generic interface for accessing and manipulating the
value set of a resource, regardless of how the membership function is
defined or the type of software that is handling the request. URL or URN
are the examples of a resource identifier.
REST components perform actions with a resource by using a
representation to capture the current or intended state
of that resource and transferring that representation between components.
A representation is a sequence of bytes, plus representation
metadata to describe those bytes. Other commonly used but less
precise names for a representation include: document, file, and
HTTP message entity, instance, or variant. A representation
consists of data, metadata describing the data, and, on occasion, metadata
to describe the metadata (usually for the purpose of verifying message
integrity). Metadata are in the form of name-value pairs, where the name
corresponds to a standard that defines the value's structure and
semantics. The data format of a representation is known as a media
type.
Table 86.1. REST Data Elements
| Data Element | Modern Web Examples |
|---|---|
| resource | the intended conceptual target of a hypertext reference |
| resource identifier | URL, URN |
| representation | HTML document, JPEG image |
| representation metadata | media type, last-modified time |
| resource metadata | source link, alternates, vary |
| control data | if-modified-since, cache-control |
REST uses various connector types to encapsulate
the activities of accessing resources and transferring resource
representations. The connectors present an abstract interface for
component communication, enhancing simplicity by providing a complete
separation of concepts and hiding the underlying implementation of
resources and communication mechanisms.
Table 86.2. REST Connectors
| Connector | Modern Web Examples |
|---|---|
| client | libwww, libwww-perl |
| server | libwww, Apache API, NSAPI |
| cache | browser cache, Akamai cache network |
| resolver | bind (DNS lookup library) |
| tunnel | SOCKS, SSL after HTTP CONNECT |
The primary connector types are client and server. The essential difference between the two is that a client initiates communication by making a request, whereas a server listens for connections and responds to requests in order to supply access to its services. A component may include both client and server connectors.
An important part of RESTful architecture is a well-defined interface to communicate, in particular it is a set of HTTP methods such as POST, GET, PUT and DELETE. These methods are often compared with the CREATE, READ, UPDATE, DELETE (CRUD) operations associated with database technologies. An analogy can also be made:
PUT is analogous to CREATE or PASTE OVER,
GET to READ or COPY,
POST to UPDATE or PASTE AFTER, and
DELETE to DELETE or CUT.
Note: RESTful architecture is not limited to
those methods, one of good examples of extension is the WebDAV
protocol.
The CRUD (Create, Read, Update and Delete) verbs
are designed to operate with atomic data within the context of a database
transaction. REST is designed around the atomic transfer of a more complex
state and can be viewed as a mechanism for transferring structured
information from one application to another.
HTTP separates the notions of a web server and a web browser. This
allows the implementation of each to vary from the other based on the
client/server principle. When used RESTfully, HTTP is
stateless. Each message contains all the information
necessary to understand the request.
As a result, neither the client nor the server needs to remember any communication-state between messages. Any state retained by the server must be modeled as a resource..
There is set of providers embedded in eXo JAX-RS implementation.
Implementations of MessageBodyReader and MessageBodyWriters are taking care about serialization/deserialization of message body (HTTP request/response's body).
The next set of media and Java types processed automatically, thanks to embedded Readers (Writers).
Table 87.1. Embedded Reader and Writers of message body
| Media Type | Java Type |
|---|---|
| */* | byte[] |
| */* | javax.activation.DataSource |
| */* | java.io.File |
| */* | java.io.InputStream |
| */* | java.io.Reader |
| */* | java.lang.String |
| */* | javax.ws.rs.core.StreamingOutput (Writer ONLY) |
| application/json | 1. Object with simple constructor + get/set methods; 2. Java Collection (java.uitl.List<T>, java.uitl.Set<T>, java.util.Map<String, T>, etc) where T as described in 1. |
| application/x-www-form-urlencoded | javax.ws.rs.core.MultivaluedMap<String, String> |
| multipart/* | java.util.Iterator<org.apache.commons.fileupload.FileItem> |
| application/xml, application/xhtml+xml, text/xml | javax.xml.bind.JAXBElement |
| application/xml, application/xhtml+xml, text/xml | Object with JAXB annotations |
| application/xml, application/xhtml+xml, text/xml | javax.xml.transform.stream.StreamSource |
| application/xml, application/xhtml+xml, text/xml | javax.xml.transform.sax.SAXSource |
| application/xml, application/xhtml+xml, text/xml | javax.xml.transform.dom.DOMSource |
In some case it may be required to use alternative provider for the same media and java type but such changes must not impact to any other services.
To be able overwrite default JAX-RS provider(s) developer need:
Deploy own RESTful service(s) by using subclass of javax.ws.rs.core.Application (hereinafter Application).
Service(s) NOT NEED to implement marker interface ResourceContainer and MUST NOT be configured as component(s) of eXo Container. Instead of it Application must be configured as component of eXo Container.
If RESTful services or providers require some dependencies from eXo Container then Application should inject it by own constructor and then delegate to services or providers. As alternative method getClasses() may be used for deliver services/providers classes instead of instances. In this case services/providers will work in per-request mode and RESTful framework will take care about resolving dependencies.
In example below see how to use Jackson JSON provider instead of embedded in eXo RESTful framework.
Create subclass of javax.ws.rs.core.Application with code as bellow and add it to the eXo Container configuration.
package org.exoplatform.test.jackson;
import org.codehaus.jackson.jaxrs.JacksonJaxbJsonProvider;
import java.util.HashSet;
import java.util.Set;
import javax.ws.rs.core.Application;
public class Application1 extends Application
{
@Override
public Set<Class<?>> getClasses()
{
Set<Class<?>> cls = new HashSet<Class<?>>(1);
cls.add(Resource1.class);
return cls;
}
@Override
public Set<Object> getSingletons()
{
Set<Object> objs = new HashSet<Object>(1);
objs.add(new JacksonJaxbJsonProvider());
return objs;
}
}In this example we assumes Resource1 is Java class which carries JAX-RS annotations and it uses JSON. In this case RESTful framework will use JacksonJaxbJsonProvider for serializing/deserializing of all messages to/from Resource1. But it will not impact to other services in any kind.
RestServicesList service is intendet to provide information about rest services deployed to the application server.
Path - path to service
Regex - service's URL regular expression
FQN - full qualified name of service's class
The list can be provided in two formats: HTML and JSON.
Note
Class does not implement org.exoplatform.services.rest.resource.ResourceContainer and must never be binded to RESTful framework by using eXoContainer. This service must works as per-request resource.
To get the list of services in HTML format use listHTML() method:
@GET
@Produces({MediaType.TEXT_HTML})
public byte[] listHTML()
{
...
} To do this, perform a simple GET request to the RestServicesList link.
f.e. curl -u root:exo http://localhost:8080/rest/ will return such HTML code:
<?xml version="1.0" encoding="UTF-8"?><!DOCTYPE html PUBLIC "-//W3C//DTD XHTML 1.0 Strict//EN" "http://www.w3.org/TR/xhtml1/DTD/xhtml1-strict.dtd">
<html xmlns="http://www.w3.org/1999/xhtml">
<head>
<title>eXo JAXRS Implementation</title>
</head>
<body>
<h3 style="text-align:center;">Root resources</h3>
<table width="90%" style="table-layout:fixed;">
<tr>
<th>Path</th>
<th>Regex</th>
<th>FQN</th>
</tr>
<tr>
<td>script/groovy</td>
<td>/script/groovy(/.*)?</td>
<td>org.exoplatform.services.jcr.ext.script.groovy.GroovyScript2RestLoader</td>
</tr>
<tr>
<td>/lnkproducer/</td>
<td>/lnkproducer(/.*)?</td>
<td>org.exoplatform.services.jcr.webdav.lnkproducer.LnkProducer</td>
</tr>
<tr>
<td>/registry/</td>
<td>/registry(/.*)?</td>
<td>org.exoplatform.services.jcr.ext.registry.RESTRegistryService</td>
</tr>
<tr>
<td>/jcr</td>
<td>/jcr(/.*)?</td>
<td>org.exoplatform.services.jcr.webdav.WebDavServiceImpl</td>
</tr>
<tr>
<td>/</td>
<td>(/.*)?</td>
<td>org.exoplatform.services.rest.ext.service.RestServicesList</td>
</tr>
</table>
</body>
</html> If you perform the same request with your browser, you'll see the table with the list of deployed services like this:
Table 88.1. Root resources
| Path | Regex | FQN |
|---|---|---|
| script/groovy | /script/groovy(/.*)? | org.exoplatform.services.jcr.ext.script.groovy.GroovyScript2RestLoader |
| /lnkproducer/ | /lnkproducer(/.*)? | org.exoplatform.services.jcr.webdav.lnkproducer.LnkProducer |
| /registry/ | /registry(/.*)? | org.exoplatform.services.jcr.ext.registry.RESTRegistryService |
| /jcr | /jcr(/.*)? | org.exoplatform.services.jcr.webdav.WebDavServiceImpl |
| / | (/.*)? | org.exoplatform.services.rest.ext.service.RestServicesList |
To get the list of services in HTML format use listJSON() method:
@GET
@Produces({MediaType.APPLICATION_JSON})
public RootResourcesList listJSON()
{
...
}To do this, add "Accept:application/json" header to your GET request
f.e. curl -u root:exo http://localhost:8080/rest/ -H "Accept:application/json" will return such JSON:
{"rootResources":[
{
"fqn":"org.exoplatform.services.jcr.ext.script.groovy.GroovyScript2RestLoader",
"regex":"/script/groovy(/.*)?",
"path":"script/groovy"
},
{
"fqn":"org.exoplatform.services.jcr.webdav.lnkproducer.LnkProducer",
"regex":"/lnkproducer(/.*)?",
"path":"/lnkproducer/"
},
{
"fqn":"org.exoplatform.services.jcr.ext.registry.RESTRegistryService",
"regex":"/registry(/.*)?",
"path":"/registry/"
},
{
"fqn":"org.exoplatform.services.jcr.webdav.WebDavServiceImpl",
"regex":"/jcr(/.*)?",
"path":"/jcr"
},
{
"fqn":"org.exoplatform.services.rest.ext.service.RestServicesList",
"regex":"(/.*)?",
"path":"/"
}
]}This article describes how to use Groovy scripts as REST services. We are going to consider these operations:
Load script and save it in JCR.
Instantiate script
Deploy newly created Class as RESTful service.
Script Lifecycle Management.
And finally we will discover simple example which can get JCR node UUID
In this article, we consider RESTful service compatible with JSR-311 specification. Currently last feature available in version 1.11-SNAPSHOT of JCR, 2.0-SNAPSHOT of WS and version 2.1.4-SNAPSHOT of core.
There are two ways to save a script in JCR. The first way is to save it at server startup time by using configuration.xml and the second way is to upload the script via HTTP.
Load script at startup time
This way can be used for load prepared scripts, to use this way. we must configure org.exoplatform.services.jcr.ext.script.groovy.GroovyScript2RestLoaderPlugin. This is simple configuration example.
<external-component-plugins>
<target-component>org.exoplatform.services.jcr.ext.script.groovy.GroovyScript2RestLoader</target-component>
<component-plugin>
<name>test</name>
<set-method>addPlugin</set-method>
<type>org.exoplatform.services.jcr.ext.script.groovy.GroovyScript2RestLoaderPlugin</type>
<init-params>
<value-param>
<name>repository</name>
<value>repository</value>
</value-param>
<value-param>
<name>workspace</name>
<value>production</value>
</value-param>
<value-param>
<name>node</name>
<value>/script/groovy</value>
</value-param>
<properties-param>
<name>JcrGroovyTest.groovy</name>
<property name="autoload" value="true" />
<property name="path" value="file:/home/andrew/JcrGroovyTest.groovy" />
</properties-param>
</init-params>
</component-plugin>
</external-component-plugins>The first is value-param sets JCR repository, the second is value-param sets workspace and the third one is sets JCR node where scripts from plugin will be stored. If specified node does not exist, then it will be created. List of scripts is set by properties-params. Name of each properties-param will be used as node name for stored script, property autoload says to deploy this script at startup time, property path sets the source of script to be loaded. In this example we try to load single script from local file /home/andrew/JcrGroovyTest.groovy.
Load script via HTTP
This is samples of HTTP requests. In this example, we will upload script from file with name test.groovy.
andrew@ossl:~> curl -u root:exo \ -X POST \ -H 'Content-type:script/groovy' \ --data-binary @test.groovy \ http://localhost:8080/rest/script/groovy/add/repository/production/script/groovy/test.groovy
This example imitate sending data with HTML form ('multipart/form-data'). Parameter autoload is optional. If parameter autoload=true then script will be instantiate and deploy script immediately.
andrew@ossl:~> curl -u root:exo \ -X POST \ -F "file=@test.groovy;name=test" \ -F "autoload=true" \ http://localhost:8080/rest/script/groovy/add/repository/production/script/groovy/test1.groovy
org.exoplatform.services.script.groovy.GroovyScriptInstantiator is part of project exo.core.component.script.groovy. GroovyScriptInstantiator can load script from specified URL and parse stream that contains Groovy source code. It has possibility inject component from Container in Groovy Class constructor. Configuration example:
<component> <type>org.exoplatform.services.script.groovy.GroovyScriptInstantiator</type> </component>
To deploy script automatically at server statup time, its property exo:autoload must be set as true. org.exoplatform.services.jcr.ext.script.groovy.GroovyScript2RestLoader check JCR workspaces which were specified in configuration and deploy all auto-loadable scripts.
Example of configuration.
<component>
<type>org.exoplatform.services.jcr.ext.script.groovy.GroovyScript2RestLoader</type>
<init-params>
<object-param>
<name>observation.config</name>
<object type="org.exoplatform.services.jcr.ext.script.groovy.ObservationListenerConfiguration">
<field name="repository">
<string>repository</string>
</field>
<field name="workspaces">
<collection type="java.util.ArrayList">
<value>
<string>production</string>
</value>
</collection>
</field>
</object>
</object-param>
</init-params>
</component>In example above JCR workspace "production" will be checked for autoload scripts. At once, this workspace will be listened for changes script's source code (property jcr:data).
If GroovyScript2RestLoader configured as was decribed in the previous section, then all "autoload" scripts deployed. In the first section, we added script from file /home/andrew/JcrGroovyTest.groovy to JCR node /script/groovy/JcrGroovyTest.groovy, repository repository, workspace production. In section "Load script via HTTP", it was refered about load scripts via HTTP, there is an opportunity to manage the life cycle of script.
Undeploy script, which is alredy deployed:
andrew@ossl:~> curl -u root:exo \ -X GET \ http://localhost:8080/rest/script/groovy/load/repository/production/script/groovy/JcrGroovyTest.groovy?state=false
Then deploy it again:
andrew@ossl:~> curl -u root:exo \ -X GET \ http://localhost:8080/rest/script/groovy/load/repository/production/script/groovy/JcrGroovyTest.groovy?state=true
or even more simple:
andrew@ossl:~> curl -u root:exo \ -X GET \ http://localhost:8080/rest/script/groovy/load/repository/production/script/groovy/JcrGroovyTest.groovy
Disable scripts autoloading, NOTE it does not change current state:
andrew@ossl:~> curl -u root:exo \ -X GET \ http://localhost:8080/rest/script/groovy/repository/production/script/groovy/JcrGroovyTest.groovy/autoload?state=false
Enable it again:
andrew@ossl:~> curl -u root:exo \ -X GET \ http://localhost:8080/rest/script/groovy/autoload/repository/production/script/groovy/JcrGroovyTest.groovy?state=true
and again more simpe variant:
andrew@ossl:~> curl -u root:exo \ -X GET \ http://localhost:8080/rest/script/groovy/autoload/repository/production/script/groovy/JcrGroovyTest.groovy
Change script source code:
andrew@ossl:~> curl -u root:exo \ -X POST \ -H 'Content-type:script/groovy' \ --data-binary @JcrGroovyTest.groovy \ http://localhost:8080/rest/script/groovy/update/repository/production/script/groovy/JcrGroovyTest.groovy
This example imitates sending data with HTML form ('multipart/form-data').
andrew@ossl:~> curl -u root:exo \ -X POST \ -F "file=@JcrGroovyTest.groovy;name=test" \ http://localhost:8080/rest/script/groovy/update/repository/production/script/groovy/JcrGroovyTest.groovy
Remove script from JCR:
andrew@ossl:~> curl -u root:exo \ -X GET \ http://localhost:8080/rest/script/groovy/delete/repository/production/script/groovy/JcrGroovyTest.groovy
Now we are going to try simple example of Groovy RESTfull service. There is one limitation, even if we use groovy, we should use Java style code and decline to use dynamic types, but of course we can use it in private methods and feilds. Create file JcrGroovyTest.groovy, in this example I save it in my home directory /home/andrew/JcrGroovyTest.groovy. Then, configure GroovyScript2RestLoaderPlugin as described in section Load script at startup time.
import javax.jcr.Node
import javax.jcr.Session
import javax.ws.rs.GET
import javax.ws.rs.Path
import javax.ws.rs.PathParam
import org.exoplatform.services.jcr.RepositoryService
import org.exoplatform.services.jcr.ext.app.ThreadLocalSessionProviderService
@Path("groovy/test/{repository}/{workspace}")
public class JcrGroovyTest {
private RepositoryService repositoryService
private ThreadLocalSessionProviderService sessionProviderService
public JcrGroovyTest(RepositoryService repositoryService,
ThreadLocalSessionProviderService sessionProviderService) {
this.repositoryService = repositoryService
this.sessionProviderService = sessionProviderService
}
@GET
@Path("{path:.*}")
public String nodeUUID(@PathParam("repository") String repository,
@PathParam("workspace") String workspace,
@PathParam("path") String path) {
Session ses = null
try {
ses = sessionProviderService.getSessionProvider(null).getSession(workspace, repositoryService.getRepository(repository))
Node node = (Node) ses.getItem("/" + path)
return node.getUUID() + "\n"
} finally {
if (ses != null)
ses.logout()
}
}After configuration is done, start the server. If configuration is correct and script does not have syntax error, you should see next:
In the screenshot, we can see the service deployed.
First, create a folder via WebDAV in the repository production, folder name 'test'. Now, we can try access this service. Open another console and type command:
andrew@ossl:~> curl -u root:exo \ http://localhost:8080/rest/groovy/test/repository/production/test
Whe you try to execute this command, you should have exception, because JCR node '/test' is not referenceable and has not UUID. We can try add mixin mix:referenceable. To do this, add one more method in script. Open script from local source code /home/andrew/JcrGroovyTest.groovy, add following code and save file.
@POST
@Path("{path:.*}")
public void addReferenceableMixin(@PathParam("repository") String repository,
@PathParam("workspace") String workspace,
@PathParam("path") String path) {
Session ses = null
try {
ses = sessionProviderService.getSessionProvider(null).getSession(workspace, repositoryService.getRepository(repository))
Node node = (Node) ses.getItem("/" + path)
node.addMixin("mix:referenceable")
ses.save()
} finally {
if (ses != null)
ses.logout()
}
}Now we can try to change script deployed on the server without server restart. Type in console next command:
andrew@ossl:~> curl -i -v -u root:exo \ -X POST \ --data-binary @JcrGroovyTest.groovy \ -H 'Content-type:script/groovy' \ http://localhost:8080/rest/script/groovy/update/repository/production/script/groovy/JcrGroovyTest.groovy
Node '/script/groovy/JcrGroovyTest.groovy' has property exo:autoload=true so script will be re-deployed automatically when script source code changed.
Script was redeployed, now try to access a newly created method.
andrew@ossl:~> curl -u root:exo \ -X POST \ http://localhost:8080/rest/groovy/test/repository/production/test
Method excution should be quiet, without output, traces, etc. Then we can try again get node UUID.
andrew@ossl:~> curl -u root:exo \ http://localhost:8080/rest/groovy/test/repository/production/test 1b8c88d37f0000020084433d3af4941f
Node UUID: 1b8c88d37f0000020084433d3af4941f
We don't need this scripts any more, so remove it from JCR.
andrew@ossl:~> curl -u root:exo \ http://localhost:8080/rest/script/groovy/delete/repository/production/script/groovy/JcrGroovyTest.groovy

You should keep one class per one groovy file. The same actually for interface and it implementation. It's limitation of groovy parser that does not have type Class[] parseClass(InputStream) or Collection parseClass(InputStream) but only Class parseClass(InputStream) instead.
That is all.
(https://anonsvn.jboss.org/repos/exo-jcr/ws/trunk/exo.ws.frameworks.javascript.cross-domain-ajax)
XmlHttpRequest objects are bound by the same origin security policy of browsers, which prevents a page from accessing data from another server. This has put a serious limitation on Ajax developers: you can use XmlHttpRequests to make background calls to a server, but it has to be the same server that served up the current page. For more details, you can visit http://www.mozilla.org/projects/security/components/same-origin.html.
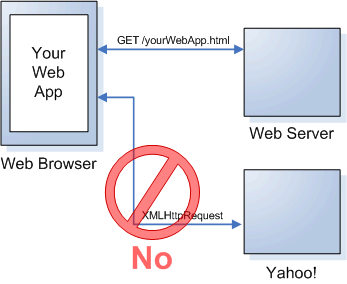
But actually writing client web applications that use this object can be tricky given restrictions imposed by web browsers on network connections across domains. So you need to find the way to bypass this limitation of AJAX.
To describe our method for cross-domain AJAX solution, let's consider the following scheme contains of 3 components:
1). User agent (a browser).
2). ServerA contains a main page with dedicated client and server IFRAMEs (see below) and an HTML client page (client.html) referenced from the client IFRAME. This client page contains dedicated script to push the data for request into server IFRAME.
3). ServerB contains remote service that want get access to and an HTML server page (server.html) referenced from the server IFRAME. This server page contains dedicated script to push the requested data into client IFRAME.
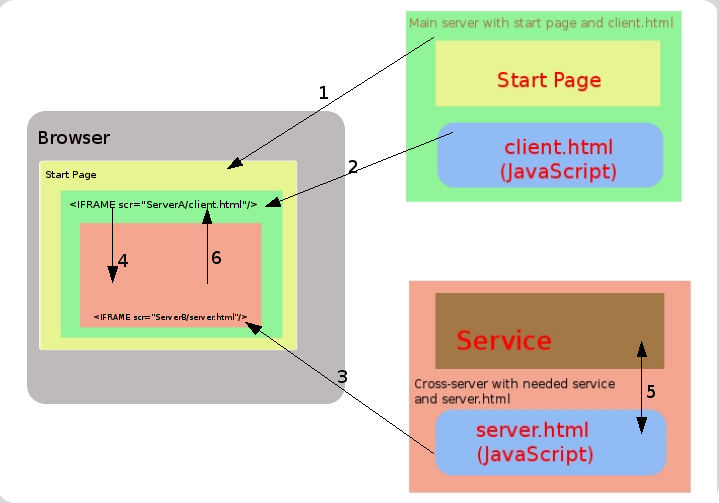
1) A Browser requests the Start page from the ServerA
2) The Start page is retrieved from the ServerA.
3) Create in the start page IFRAME (name it - "client iframe") and insert it in the document from ServerA (client.
4) In "client iframe" create ne IFRAME element ("server iframe") and insert it in the document from ServerB (server.html). Documents (client.html and server.html) contain special script that can transfer data between ifarmes.
5) "Client iframe" transfer information about HTTP method and URL that we want do cross-domain request to "server iframe".
6) "Server iframe" do simple XmlHttpRequest to the service that we need (it can do that because download from same domain) and get informaton from service.
7) "Server iframe" transfer data to "client iframe" and now we get information that we want.
1). Place the file client.html and xda.js on the serverA.
2). Place the file server.html on the serverB.
3). Declare xda.js in the main page.
<script type="text/javascript" src="xda.js"></script>
4). Create JS function which performs cross domain call as in the following example:
<script type="text/javascript">
function test(){
var facade = xdaInit();
facade.clientURI = "http://localhost/cross-domain-ajax/client/client.html";
facade.serverURI = "http://localhost:8080/cross-domain-ajax/server/server.html";
facade.apiURI = "http://localhost:8080/cross-domain-ajax/server/test.txt";
facade.method = "POST";
facade.load = function(result) {
alert(result.responseText);
}
facade.setRequestHeader("keep-alive","200");
xda.create(facade);
}
</script>5). Use this function (here it is bound to a button's onclick event).
<button onclick='test()'>test cross-domain</button>
Table of Contents
It's the draft for a future FAQ of JCR usage.
Session.getNodeByUUID() about 2.5 times faster of Session.getItem(String) and only 25% faster of Node.getNode(String). See the daily tests results for such comparisons, e.g.
Until it's applicable for a business logic it can be. But take in account the paths are human readable and lets you think in hierarchy. If it's important a location based approach is preferable.
Use Session.itemExists(String absPath), Node.hasNode(String relPath) or Property.hasProperty(String name). It's also is possible to check Node.hasNodes() and Node.hasProprties().
JCR Observation's a way to listen on persistence changes of a Repository. It provides several options to configure the listener for an interesting only changes. To use properly, it's important to understand concept of events filtering for a registered EventListener (8.3.3 Observation Manager). An often confusing part, it's the absPath, it's an associated parent of a location you want to observe events on. I.e. it's a parent of child node(s) or this parent property(ies); if isDeep is true then you'll get events of all the subtree of child nodes also. The same actual for uuid and nodeTypeName parameters of ObservationManager.addEventListener() method.
No, direct access to items via JCR API is more efficient. Search will consume additional resources for index querying and only then return the items.
By default (if query do not contains any ordering statements) result nodes is sorted by document order.
No, it does not supported. There is two ways to ordering results, when path may be used as criteria:
Order by property with value type NAME or PATH (jcr supports it).
Order by jcr:path - sort by exact path of node (jcr do not supports it).
Order by jcr:path
If no order specification is supplied in the query statement, implementations may support document order on the result nodes (see 6.6.4.2 Document Order). And it is sorted by order number.
By default, (if query do not contains any ordering statements) result nodes is sorted by document order.
SELECT * FROM nt:unstructured WHERE jcr:path LIKE 'testRoot/%'
For specified jcr:path ordering there is different proceeding in XPath and SQL:
SQL no matter ascending or descending - query returns result nodes in random order: {code}SELECT * FROM nt:unstructured WHERE jcr:path LIKE 'testRoot/%' ORDER BY jcr:path{code}
XPath - jcr:path order construction is ignored (so result is not sorted according path); {code}/testRoot/* @jcr:primaryType='nt:unstructured' order by jcr:path{code}
1. Indexer uses jcr:encoding property of nt:resource node (used as jcr:content child node of nt:file) 2. if no jcr:encoding property set the Document Service will use the one configured in the service (defaultEncoding) 3. if nothing is configured a JVM, the default encoding will be used
If the question is a performance, it's difficult question, as each database can be configured to be more (and more) faster for each special case. MySQL with MyISAM engine will be faster. But MySQL has limitations for indexes for multilingual columns (Item names actually). So, with long Item names (larger ofOracle or PostgreSQL also are good for performance. DB2 and MSSQL are slower in default configurations. Default configuration of Sybase leader of slowness. But in this question, take the database server maintenance in account. MySQL and PostgreSQL are simple in installation and can work even on limited hardware. Oracle, DB2, MSSQL or Sybase need more efforts. The same actual for maintenance during the work. Note for Sybase: "check-sns-new-connection" data container configuration parameter should be set to "true". For testing purpose, embedded database such as HSQLDB is the best choice. Apache Derby and H2 also supported. But H2 surprisingly needs "beta" feature enabled - MVCC=TRUE in JDBC url.
To allow multiple character sets to be sent from the client, the UTF-8 encoding should be used, either by configuring utf8 as the default server character set, or by configuring the JDBC driver to use UTF-8 through the characterEncoding property. MySQL database should be created in single-byte encoding, e.g. "latin1":
CREATE DATABASE db1 CHARACTER SET latin1 COLLATE latin1_general_cs;
eXo JCR application (e.g. GateIn) should use JCR dialect "MySQL-UTF8".
In other words: MySQL database default encoding and JCR dialect cannot be UTF8 both. Use single-byte encoding (e.g. "latin1") for database and "mysql-utf8" dialect for eXo JCR.
Notice: "MySQL-UTF8" dialect cannot be auto-detected, it should be set explicitly in configuration.
Index's key length of JCR_SITEM (JCR_MITEM) table for mysql-utf8 dialect is reduced to 765 bytes (or 255 chars).
To enable JCR working properly with Sybase, a property 'check-sns-new-connection' with 'false' value is required for each workspace data container:
<container class="org.exoplatform.services.jcr.impl.storage.jdbc.optimisation.CQJDBCWorkspaceDataContainer">
<properties>
<property name="source-name" value="jdbcjcr" />
<property name="dialect" value="auto" />
<property name="multi-db" value="true" />
<property name="update-storage" value="false" />
<property name="max-buffer-size" value="200k" />
<property name="swap-directory" value="target/temp/swap/ws" />
<property name="swap-directory" value="target/temp/swap/ws" />
<property name="check-sns-new-connection" value="false" />
</properties>Session session = repository.login(credentials);
try
{
// here your code
}
finally
{
session.logout();
}No. Any instance of Session or Node (acquired through session) shouldn't be used after loging out anymore. At least, it is highly recommended not to use.
So we have configured JCR in standalone mode and want to reconfigure it for clustered environment. First of all, let's check whether all requirements are satisfied:
Dedicated RDBMS anyone like MySQL, Postges, Oracle and, etc but just not HSSQL;
Shared storage. The simplest thing is to use shared FS like NFS or SMB mounted in operation system, but they are rather slow. The best thing is to use SAN (Storage Area Network);
Fast network between JCR nodes.
So now, need to configure Container a bit. Check exo-configuration.xml to be sure that you are using JBossTS Transaction Service and JBossCache Transaction Manager, as shown below.
<component>
<key>org.jboss.cache.transaction.TransactionManagerLookup</key>
<type>org.jboss.cache.GenericTransactionManagerLookup</type>
</component>
<component>
<key>org.exoplatform.services.transaction.TransactionService</key>
<type>org.exoplatform.services.transaction.jbosscache.JBossTransactionsService</type>
<init-params>
<value-param>
<name>timeout</name>
<value>300</value>
</value-param>
</init-params>
</component>Next stage is actually the JCR configuration. We need JBossCache configuration templates for : data-cache, indexer-cache and lock-manager-cache. Later they will be used to configure JCR's core components. There are pre-bundled templates in EAR or JAR in conf/standalone/cluster. They can be used as is or re-written if needed. And now, re-configure a bit each workspace. Actually, a few parameters need changing, e.g. <cache>, <query-handler> and <lock-manager>.
<cache> configuration should look like this:
<cache enabled="true" class="org.exoplatform.services.jcr.impl.dataflow.persistent.jbosscache.JBossCacheWorkspaceStorageCache"> <properties> <property name="jbosscache-configuration" value="test-jbosscache-data.xml" /> <property name="jgroups-configuration" value="udp-mux.xml" /> <property name="jgroups-multiplexer-stack" value="true" /> <property name="jbosscache-cluster-name" value="JCR-cluster-db1-ws" /> </properties> </cache>"jbosscache-configuration" is the path to configuration template;
"jgroups-configuration" is path to JGroups configuration that is multiplexer stack is used (default). This file is also pre-bundled with templates and is recommended for use;
"jgroups-multiplexer-stack" just simply "true". Strongly recommended;
"jbosscache-cluster-name" is the name of cluster group. It should be different for each workspace and each workspace component. I.e.: <repository_name>-<ws_name>-<component(cache\|lock\|index)>
<query-handler> configuration
You must replace or add in <query-handler> block the "changesfilter-class" parameter equals with:
<property name="changesfilter-class" value="org.exoplatform.services.jcr.impl.core.query.jbosscache.JBossCacheIndexChangesFilter"/>
add JBossCache-oriented configuration:
<property name="jbosscache-configuration" value="test-jbosscache-indexer.xml" /> <property name="jgroups-configuration" value="udp-mux.xml" /> <property name="jgroups-multiplexer-stack" value="true" /> <property name="jbosscache-cluster-name" value="JCR-cluster-indexer-db1-ws" /> <property name="max-volatile-time" value="60" />
Those properties have the same meaning and restrictions as in the previous block. The last property "max-volatile-time" is not mandatory but recommended. This notifies that the latest changes in index will be visible for each cluster node not later than in 60s.
<lock-manager> configuration
Maybe this is the hardest element to configure, because we have to define access to DB where locks will be stored. Replace exsiting lock-manager configuration with shown below.
<lock-manager class="org.exoplatform.services.jcr.impl.core.lock.jbosscache.CacheableLockManagerImpl"> <properties> <property name="time-out" value="15m" /> <property name="jbosscache-configuration" value="test-jbosscache-lock.xml" /> <property name="jgroups-configuration" value="udp-mux.xml" /> <property name="jgroups-multiplexer-stack" value="true" /> <property name="jbosscache-cluster-name" value="JCR-cluster-locks-db1-ws" /> <property name="jbosscache-cl-cache.jdbc.table.name" value="jcrlocks_db1_ws" /> <property name="jbosscache-cl-cache.jdbc.table.create" value="true" /> <property name="jbosscache-cl-cache.jdbc.table.drop" value="false" /> <property name="jbosscache-cl-cache.jdbc.table.primarykey" value="jcrlocks_db1_ws_pk" /> <property name="jbosscache-cl-cache.jdbc.fqn.column" value="fqn" /> <property name="jbosscache-cl-cache.jdbc.node.column" value="node" /> <property name="jbosscache-cl-cache.jdbc.parent.column" value="parent" /> <property name="jbosscache-cl-cache.jdbc.datasource" value="jdbcjcr" /> </properties> </lock-manager>First few properties are the same as in the previous components, but here you can see some strange "jbosscache-cl-cache.jdbc.*" properties. They define access parameters for database where lock are persisted.
"jbosscache-cl-cache.jdbc.table.create" - whether to create it or not. Usually "true";
"jbosscache-cl-cache.jdbc.table.drop" - whether to drop on a start or not. Use "false";
"jbosscache-cl-cache.jdbc.table.primarykey" - the name of column with pk;
"jbosscache-cl-cache.jdbc.fqn.column" - the name of one more column. If you are not sure how to use, follow the example above (if much interested, please refer to JBossCache JDBCCacheLoader documentation)
"jbosscache-cl-cache.jdbc.node.column" - the name of one more column. If you are not sure how to use, follow the example above (if much interested, please refer to JBossCache JDBCCacheLoader documentation)
"jbosscache-cl-cache.jdbc.parent.column" - name of one more column. If you are not sure how to use, follow the example above if you are not sure (if much interested, please refer to JBossCache JDBCCacheLoader documentation)
"jbosscache-cl-cache.jdbc.datasource" - name of configured in Container datasource, where you want to store locks. The best idea is to use the same as for workspace.
That's all. JCR is ready for running in a cluster.
There is few steps:
Enable lucene spellchecker in jcr QueryHandler configuration:
<query-handler class="org.exoplatform.services.jcr.impl.core.query.lucene.SearchIndex"> <properties> ... <property name="spellchecker-class" value="org.exoplatform.services.jcr.impl.core.query.lucene.spell.LuceneSpellChecker$FiveSecondsRefreshInterval" /> ... </properties> </query-handler>
Execute query with rep:spellcheck function and word that is checked:
Query query = qm.createQuery("select rep:spellcheck() from nt:base where " + "jcr:path = '/' and spellcheck('word that is checked')", Query.SQL); RowIterator rows = query.execute().getRows();
Fetch a result:
Row r = rows.nextRow(); Value v = r.getValue("rep:spellcheck()");
If there is no any results, that means there is no suggestion, so word is correct or spellcheckers dictionary do not contain any words like the checked word.
There is two parameters in jcr QueryHandler configuration:
Minimal distance between checked word and proposed suggestion;
Search for more popular suggestions;
<query-handler class="org.exoplatform.services.jcr.impl.core.query.lucene.SearchIndex"> <properties> ... <property name="spellchecker-class" value="org.exoplatform.services.jcr.impl.core.query.lucene.spell.LuceneSpellChecker$FiveSecondsRefreshInterval" /> <property name="spellchecker-more-popular" value="false" /> <property name="spellchecker-min-distance" value="0.55" /> ... </properties> </query-handler>
Minimal distance is counted as Levenshtein distance between checked word and spellchecker suggestion.
MorePopular paramter affects in next way: If "morePopular" disabled:
If the proposed word exists in the directory - no suggestion given;
If the proposed word doesn't exist in the directory - propose the closed word;
If "morePopular" enabled:
No matter word exists or not, checker will propose the closed word that is more popular than the checked word.
Remove existing repository, use:
RepositoryService.removeRepository(String repositoryName)
Restore repository, use
BackupManager.restore(RepositoryBackupChainLog log, RepositoryEntry repositoryEntry, boolean asynchronous)
Remove existing workspace, use:
ManageableRepository.removeWorkspace(String workspaceName)
Restore workspace, use:
BackupManager.restore(BackupChainLog log, String repositoryName, WorkspaceEntry workspaceEntry, boolean asynchronous)
This is known as a finder bug started from Mac OS v.10.5.3 and not yet fixed, .
For more details follow: Apple Disscussion thread.
Use "cache-control" configuration parameter.
The value of this parameter must contain colon-separated pairs "MediaType:cache-control value"
For example, if you need to cache all text/xml and text/plain files for 5 minutes (300 sec.) and other text/\* files for 10 minutes (600 sec.), use the next configuration:
<component>
<type>org.exoplatform.services.jcr.webdav.WebDavServiceImpl</type>
<init-params>
<value-param>
<name>cache-control</name>
<value>text/xml,text/plain:max-age=300;text/*:max-age=600;</value>
</value-param>
<init-params>
<component>
Simple Requests
For simple request such as: GET, HEAD, MKCOL, COPY, MOVE, DELETE, CHECKIN, CHECKOUT, UNCHECKOUT, LOCK, UNLOCK, VERSIONCONTROL, OPTIONS
perform:
curl -i -u 'user:pass' -X 'METHOD_NAME' 'resource_url'
for example to create a folder named test perform:
curl -i -u 'root:exo' -X MKCOL 'http://localhost:8080/rest/jcr/repository/production/test
to PUT a test.txt file from your current folder to "test "folder on server perform:
curl -i -u 'root:exo' -X PUT 'http://localhost:8080/rest/jcr/repository/production/test/test.txt' -d @test.txt
Requests with XML body
For requests which contains xml body such as: ORDER, PROPFIND, PROPPATCH, REPORT, SEARCH
add -d 'xml_body text' or -d @body.xml
(body.xml must contain a valid xml request bidy.) to you curl-command:
curl -i -u 'user:pass' -X 'METHOD_NAME' -H 'Headers' 'resource_url' -d 'xml_body text'
For example about finding all files containing "test" perform:
curl -i -u "root:exo" -X "SEARCH" "http://192.168.0.7:8080/rest/jcr/repository/production/" -d
"<?xml version='1.0' encoding='UTF-8' ?>
<D:searchrequest xmlns:D='DAV:'>
<D:sql>SELECT * FROM nt:base WHERE contains(*, 'text')</D:sql>
</D:searchrequest>"If you need to add some headers to your request, use \-H key.
To have more information about methods parameters, you can find in HTTP Extensions for Distributed Authoring specification.
OS client (Windows, Linux etc) doesn't set an encoding in a request. But eXo JCR WebDAV server looks for an encoding in a Content-Type header and set it to jcr:encoding. See http://www.w3.org/Protocols/rfc2616/rfc2616-sec14.html, 14.17 Content-Type. e.g. Content-Type: text/html; charset=ISO-8859-4 So, if a client will set Content-Type header, e.g. JS code from a page, it will works for a text file as expected.
If WebDAV request doesn't contain a content encoding, it's possible to write a dedicated action in a customer application. The action will set jcr:encoding using its own logic, e.g. based on IP or user preferences.
Table of Contents
- 92. How to extend my GateIn instance?
- 92.1. Introduction
- 92.2. Prerequisites
- 92.2.1. Removing all the hard coded portal container name (i.e. "portal")
- 92.2.2. Removing all the hard coded rest context name (i.e. "rest")
- 92.2.3. Removing all the hard coded realm name (i.e. "exo-domain")
- 92.2.4. Making your Http Filters compatible
- 92.2.5. Making your HttpServlets compatible
- 92.2.6. Making your HttpSessionListeners compatible
- 92.2.7. Use init tasks if you need a PortalContainer to initialize an Http Filter or an HttpServlet
- 92.2.8. Making your LoginModules compatible
- 92.2.9. Avoiding static modifier on component dependency
- 92.2.10. Avoid component initialization based on component dependency in the constructor
- 92.3. FAQ
- 92.3.1. What has changed since the previous versions?
- 92.3.2. What is the main purpose of a portal extension?
- 92.3.3. What is the main purpose of the starter?
- 92.3.4. How a portal and a portal container are related?
- 92.3.5. How to define and register a PortalContainerDefinition?
- 92.3.6. How the platform interprets the dependency order defined into the PortalContainerDefinition?
- 92.3.7. How to change the ServletContext name, the realm name and/or the rest context name of my portal without using a PortalContainerDefinition?
- 92.3.8. How to add new configuration file to a given portal from a war file?
- 92.3.9. How to create/define a portal extension?
- 92.3.10. How to deploy a portal extension?
- 92.3.11. How to create/define a new portal?
- 92.3.12. How to deploy a new portal?
- 92.3.13. How to import properly a configuration file using the prefix "war:"?
- 92.3.14. How to avoid duplicating configuration files just to rename a simple value?
- 92.3.15. How to add or change a Repository and/or a Workspace?
- 92.3.16. How to add new ResourceBundles to my portal?
- 92.3.17. How to overwrite existing ResourceBundles in my portal?
- 92.3.18. How to replace a groovy template of my portal?
- 92.3.19. How to add new Portal Configurations, Navigations, Pages or Portlet Preferences to my portal?
- 92.3.20. How to add new Http Filters to my portal without modifying the portal binary?
- 92.3.21. How to add new HttpSessionListeners and/or ServletContextListeners to my portal without modifying the portal binary?
- 92.3.22. How to add new HttpServlet to my portal without modifying the portal binary?
- 92.3.23. How to override or add a Context Parameter to my portal without modifying the portal binary?
- 92.3.24. Where can I found an example of how to extend my portal?
- 92.3.25. How to deploy the sample extension?
- 92.3.26. Where can I find an example of how to create a new portal?
- 92.3.27. How to deploy the sample portal?
- 92.3.28. I get "java.lang.IllegalStateException: No pre init tasks can be added to the portal container 'portal', because it has already been initialized." what can I do to fix it?
- 92.4. Recommendations
- 93. How to use AS Managed DataSource under JBoss AS
- 92.1. Introduction
- 92.2. Prerequisites
- 92.2.1. Removing all the hard coded portal container name (i.e. "portal")
- 92.2.2. Removing all the hard coded rest context name (i.e. "rest")
- 92.2.3. Removing all the hard coded realm name (i.e. "exo-domain")
- 92.2.4. Making your Http Filters compatible
- 92.2.5. Making your HttpServlets compatible
- 92.2.6. Making your HttpSessionListeners compatible
- 92.2.7. Use init tasks if you need a PortalContainer to initialize an Http Filter or an HttpServlet
- 92.2.8. Making your LoginModules compatible
- 92.2.9. Avoiding static modifier on component dependency
- 92.2.10. Avoid component initialization based on component dependency in the constructor
- 92.3. FAQ
- 92.3.1. What has changed since the previous versions?
- 92.3.2. What is the main purpose of a portal extension?
- 92.3.3. What is the main purpose of the starter?
- 92.3.4. How a portal and a portal container are related?
- 92.3.5. How to define and register a PortalContainerDefinition?
- 92.3.6. How the platform interprets the dependency order defined into the PortalContainerDefinition?
- 92.3.7. How to change the ServletContext name, the realm name and/or the rest context name of my portal without using a PortalContainerDefinition?
- 92.3.8. How to add new configuration file to a given portal from a war file?
- 92.3.9. How to create/define a portal extension?
- 92.3.10. How to deploy a portal extension?
- 92.3.11. How to create/define a new portal?
- 92.3.12. How to deploy a new portal?
- 92.3.13. How to import properly a configuration file using the prefix "war:"?
- 92.3.14. How to avoid duplicating configuration files just to rename a simple value?
- 92.3.15. How to add or change a Repository and/or a Workspace?
- 92.3.16. How to add new ResourceBundles to my portal?
- 92.3.17. How to overwrite existing ResourceBundles in my portal?
- 92.3.18. How to replace a groovy template of my portal?
- 92.3.19. How to add new Portal Configurations, Navigations, Pages or Portlet Preferences to my portal?
- 92.3.20. How to add new Http Filters to my portal without modifying the portal binary?
- 92.3.21. How to add new HttpSessionListeners and/or ServletContextListeners to my portal without modifying the portal binary?
- 92.3.22. How to add new HttpServlet to my portal without modifying the portal binary?
- 92.3.23. How to override or add a Context Parameter to my portal without modifying the portal binary?
- 92.3.24. Where can I found an example of how to extend my portal?
- 92.3.25. How to deploy the sample extension?
- 92.3.26. Where can I find an example of how to create a new portal?
- 92.3.27. How to deploy the sample portal?
- 92.3.28. I get "java.lang.IllegalStateException: No pre init tasks can be added to the portal container 'portal', because it has already been initialized." what can I do to fix it?
- 92.4. Recommendations
Since GateIn beta 2, we added a set of features in order to customize a GateIn instance without modifying the GateIn binary, this usecase will be called portal extension in this documentation. Those features are also required to be able to launch several portal instances at the same time, in "eXo terminology" that means to have several "portal.war".
Up to now, to create an application over an eXo portal such as DMS, WCM, CS and KS, we need to modify files into the "portal.war". This has many painful consequences, such as:
It is quite hard to manage from the support point of view since we never know if or how the customer changed his eXo product.
It is hard to be able to package several eXo products (WCM, CS...) as we need to merge everything manually which is quite error prone.
Finally, at the very beginning, eXo was developed to be able to support several portal instances (which also means several portal containers) but with the time several bad practices made it impossible. So it was important to review the whole code base in order to help/enforce all the GateIn developers to follow the "good practices".
To be able to migrate an application to GateIn, the first thing we need to do is to ensure that our application supports properly several portal container instances. The following section aims to help you to be compatible with GateIn.
Now if we need to get the portal container name (even in a standalone mode: in case of standalone mode the default value will be returned), we can:
If the component is instantiated by Pico container, you can add in the constructor of your component, the component ExoContainerContext, then call the method getPortalContainerName()
If the component is not instantiated by Pico container, you can call at runtime the static method PortalContainer.getCurrentPortalContainerName()
In js files, you can use the variable currentContext if your script must be loaded before the variable eXo.env.server.context, otherwise use eXo.env.server.context instead.
In jsp files, you can use request.getContextPath().
Now if we need to get the rest context name (even in a standalone mode: in case of standalone mode the default value will be returned), we can:
If the component is instantiated by Pico container, you can add in the constructor of your component, the component ExoContainerContext, then call the method getRestContextName()
If the component is not instantiated by Pico container, you can call at runtime the static method PortalContainer.getCurrentRestContextName()
Now if we need to get the realm name (even in a standalone mode: in case of standalone mode the default value will be returned), we can:
If the component is instantiated by Pico container, you can add in the constructor of your component, the component ExoContainerContext, then call the method getRealmName()
If the component is not instantiated by Pico container, you can call at runtime the static method PortalContainer.getCurrentRealmName()
Now all your Http Filters that need to get the current ExoContainer must extends org.exoplatform.container.web.AbstractFilter. You just need to call the method getContainer() to get the current ExoContainer.
Now all your HttpServlets that need to get the current ExoContainer must extends org.exoplatform.container.web.AbstractHttpServlet. This abstract class will ensure that the environment has been properly set, so you will be able to call the usual methods such as ExoContainerContext.getCurrentContainer() (if it must also be compatible with the standalone mode) or PortalContainer.getInstance() (if it will only work on a portal environment mode).
If you had to implement the method service(HttpServletRequest req, HttpServletResponse res), now you will need to implement onService(ExoContainer container, HttpServletRequest req, HttpServletResponse res), this method will directly give you the current ExoContainer in its signature.
Useful Information
In the class org.exoplatform.container.web.AbstractHttpServlet you have a method called requirePortalEnvironment() that is used to indicate that we would like the abstract class to setup or not the full portal environment ( PortalContainer, ClassLoader and ServletContext) before executing the servlet. This value should return true when the servlet is executed within the web application of a portal container. By default, it checks if the name of the current ServletContext is a portal container name, it is sufficient in most of cases but you can still overload this method if you already know that the servlet will always been executed within the web application of portal container (i.e. the method always return true) or will never be executed within the web application of a portal container (i.e. the method always return false) .
Now all your HttpSessionListeners that need to get the current ExoContainer must extends org.exoplatform.container.web.AbstractHttpSessionListener. This abstract class will give you the current ExoContainer directly in the signature of the methods to implement which are _ onSessionCreated(ExoContainer container, HttpSessionEvent event)\_ and onSessionDestroyed(ExoContainer container, HttpSessionEvent event)
You will also need to implement the method called requirePortalEnvironment() that is used to indicate that we would like the abstract class to setup or not the full portal environment ( PortalContainer and ClassLoader) before processing the event. This value should return true when the event is processed within the web application of a portal container.
If your Http Filter or your HttpServlet requires a PortalContainer to initialize, you need to convert your code in order to launch the code responsible for the initialization in the method onAlreadyExists of an org.exoplatform.container.RootContainer.PortalContainerInitTask.
We need to rely on init tasks, in order to be sure that the portal container is at the right state when the task is executed, in other words the task could be delayed if you try to execute it too early. Each task is linked to a web application, so when we add a new task, we first retrieve all the portal containers that depend on this web application according to the PortalContainerDefinitions, and for each container we add the task in a sorted queue which order is in fact the order of the web applications dependencies defined in the PortalContainerDefinition. If no PortalContainerDefinition can be found we execute synchronously the task which is in fact the old behavior (i.e. without the starter).
The supported init tasks are:
The org.exoplatform.container.RootContainer.PortalContainerPreInitTask which are executed before the portal container has been initialized
The org.exoplatform.container.RootContainer.PortalContainerPostInitTask which are executed after the portal container has been initialized
The org.exoplatform.container.RootContainer.PortalContainerPostCreateTask which are executed after the portal container has been fully created (i.e. after all the post init tasks).
An init task is defined as below:
PortalContainerPreInitTask
/**
* This interface is used to define a task that needs to be launched at a given state during the
* initialization of a portal container
*/
public static interface PortalContainerInitTask
{
/**
* This method allows the implementation to define what the state "already exists"
* means for a portal container
*
* @param portalContainer the value of the current portal container
* @return <code>true</code> if the portal container exists according to the task
* requirements, <code>false</code> otherwise
*/
public boolean alreadyExists(PortalContainer portalContainer);
/**
* This method is called if the related portal container has already been registered
*
* @param context the servlet context of the web application
* @param portalContainer the value of the current portal container
*/
public void onAlreadyExists(ServletContext context, PortalContainer portalContainer);
/**
* Executes the task
*
* @param context the servlet context of the web application
* @param container The portal container on which we would like to execute the task
*/
public void execute(ServletContext context, PortalContainer portalContainer);
/**
* @return the type of the task
*/
public String getType();
}To add a task, you can either call:
PortalContainer.addInitTask(ServletContext context, PortalContainerInitTask task) in order to execute the task on all the portal containers that depend on the given ServletContext according to the PortalContainerDefinitions.
PortalContainer.addInitTask(ServletContext context, PortalContainerInitTask task, String portalContainerName) in order to execute the task on a given portal container.
RootContainer.addInitTask(ServletContext context, PortalContainerInitTask task) in order to execute the task on the portal container which name is the name of the given ServletContext.
We will take for example the class GadgetRegister that is used to register new google gadgets on a given portal container.
The old code was:
Old GadgetRegister.java
...
public class GadgetRegister implements ServletContextListener
{
...
public void contextInitialized(ServletContextEvent event)
{
try
{
ExoContainer pcontainer = ExoContainerContext.getContainerByName("portal") ;
SourceStorage sourceStorage = (SourceStorage)pcontainer.getComponentInstanceOfType(SourceStorage.class);
...
}
...
}The new code relies on a org.exoplatform.container.RootContainer.PortalContainerPostInitTask, as you can see below
New GadgetRegister.java
...
public class GadgetRegister implements ServletContextListener {
...
public void contextInitialized(ServletContextEvent event)
{
// Create a new post init task
final PortalContainerPostInitTask task = new PortalContainerPostInitTask()
{
public void execute(ServletContext context, PortalContainer portalContainer)
{
contextInitialized(context, portalContainer);
}
};
// Add the init task to all the related portal containers
PortalContainer.addInitTask(event.getServletContext(), task);
}
private void contextInitialized(ServletContext context, PortalContainer pcontainer)
{
try
{
SourceStorage sourceStorage = (SourceStorage)pcontainer.getComponentInstanceOfType(SourceStorage.class);
...
}
...
}Now all your LoginModules that need to get the current ExoContainer must extends org.exoplatform.services.security.jaas.AbstractLoginModule. You just need to call the method getContainer() to get the current ExoContainer.
Useful Information
The class org.exoplatform.services.security.jaas.AbstractLoginModule supports 2 login module options which are portalContainerName and realmName, to allow you to indicate the realm name and the portal container name, if you want to change the default value.
A local variable that stores a component dependency must not be static. In other words, when you create a component A that depends on component B, we don't store B in a static variable of A otherwise we cannot have several different instances of A in the same JVM which is not compatible with a multi-portal instance.
We will have more and more extensible components (i.e. that can be extended thanks to an external plugin) which means that those components can only be initialized in the start method, thus it is not a good practice to initialize a component in its constructor if this initialization uses other components because those components may not be initialized. For example, now the ResourceBundleService is extensible, so if you create a component that depends on the ResourceBundleService and you need the ResourceBundleService to initialize your component, your component will need to be "Startable" and you will have to initialize your component in a start method.
The main difference with previous versions is the way to package your application, in the previous versions you had to change the content of the file portal.war in order to customize the portal. Now we more consider your application as an add-on that you can packaged in another ear/war file. You just need to follow some rules in order to notify the platform that it must take into account your add-on in order to customize the portal.
Among other things, you will have to:
Indicate the platform how to initialize and manage your application by defining and registering the PortalContainerDefinition related to your portal instance.
Deploy the starter ear/war file that is used to create and start all the portals (i.e. portal containers).
Warning
Please take into account, that you need to ensure that the starter is launched after all the other ear/war files.
Nota Bene
If you don't need to customize the portal, you don't have to deploy the starter. The old way to deploy an application is still compatible.
An extension is just a set of files that we use to customize or add new features to a given portal. An extension must be the least intrusive as possible, as we could potentially have several extensions for the same portal. In other words, we are supposed to only add what is missing in the portal and avoid changing or duplicated files that are in the portal.war.
The sarter is a web application that has been added to create and start all the portals (i.e. portal containers) at the same time when all the other web applications have already been started. In fact all other web applications can potentially defined several things at startup such as skins, javascripts, google gadgets and configuration files, thus the loading order is important as we can redefine skins or configuration files or a javascript from a web application 1 could depend on another javascript from a web application 2 so if the web application 2 is loaded after the web application 1, we will get errors in the merged javascript file.
If a PortalContainerDefinition has been defined, the loading order will be the order that has been used to define the list of dependency. And if you defined a PortalContainerDefinition you need to deploy the starter otherwise the loading order will be the default one (i.e. the loading order of the Application Server)
So if you need to customize your portal by adding a new extension and/or a new portal, you need to defined the related PortalContainerDefinitions so you need to deploy also the starter. Otherwise, you don't need to define any PortalContainerDefinition and to deploy the starter.
Each portal instance has its own portal container which allows the portal to have its own set of components/services. It will ensure the isolation between the different portal instances.
A PortalContainerDefinition allows you to indicate the platform how it must initialize and manage your portal. In a PortalContainerDefinition, you can define a set of properties, such as:
The name of the portal container
The name of the context name of the rest web application
The name of the realm
The list of all the dependencies of the portal container ordered by priority
You can define and register a PortalContainerDefinition thanks to an external plugin that has to be treated at the RootContainer level. In other words, your configuration file must be a file conf/configuration.xml packaged into a jar file or $AS_HOME/exo-conf/configuration.xml (for more details, please have a look to the article Container Configuration).
See below an example of configuration file that define and register a PortalContainerDefinition:
<?xml version="1.0" encoding="UTF-8"?>
<configuration
xmlns:xsi="http://www.w3.org/2001/XMLSchema-instance"
xsi:schemaLocation="http://www.exoplatform.org/xml/ns/kernel_1_2.xsd http://www.exoplatform.org/xml/ns/kernel_1_2.xsd"
xmlns="http://www.exoplatform.org/xml/ns/kernel_1_2.xsd">
<external-component-plugins>
<!-- The full qualified name of the PortalContainerConfig -->
<target-component>org.exoplatform.container.definition.PortalContainerConfig</target-component>
<component-plugin>
<!-- The name of the plugin -->
<name>Add PortalContainer Definitions</name>
<!-- The name of the method to call on the PortalContainerConfig in order to register the PortalContainerDefinitions -->
<set-method>registerPlugin</set-method>
<!-- The full qualified name of the PortalContainerDefinitionPlugin -->
<type>org.exoplatform.container.definition.PortalContainerDefinitionPlugin</type>
<init-params>
<object-param>
<name>portal</name>
<object type="org.exoplatform.container.definition.PortalContainerDefinition">
<!-- The name of the portal container -->
<field name="name"><string>portal</string></field>
<!-- The name of the context name of the rest web application -->
<field name="restContextName"><string>rest</string></field>
<!-- The name of the realm -->
<field name="realmName"><string>exo-domain</string></field>
<!-- All the dependencies of the portal container ordered by loading priority -->
<field name="dependencies">
<collection type="java.util.ArrayList">
<value>
<string>eXoResources</string>
</value>
<value>
<string>portal</string>
</value>
<value>
<string>dashboard</string>
</value>
<value>
<string>exoadmin</string>
</value>
<value>
<string>eXoGadgets</string>
</value>
<value>
<string>eXoGadgetServer</string>
</value>
<value>
<string>rest</string>
</value>
<value>
<string>web</string>
</value>
<value>
<string>wsrp-producer</string>
</value>
<value>
<string>sample-ext</string>
</value>
</collection>
</field>
</object>
</object-param>
</init-params>
</component-plugin>
</external-component-plugins>
</configuration>In the previous example, we define a portal container called "portal", which rest context name is "rest", which realm name is "exo-domain" and which dependencies are the web applications "eXoResources", "portal"... The platform will load first "eXoResources", then "portal" and so on.
The dependency order defined into the PortalContainerDefinition is really crucial since it will be interpreted the same way by several components of the platform. All those components, will consider the 1st element in the list is less important than the second element and so on.
So it is currently used to:
Know loading order of all the dependencies
If we have several PortalContainerConfigOwner (see next section for more details about a PortalContainerConfigOwner)
The ServletContext of all the PortalContainerConfigOwner will be unified, if we use the unified ServletContext (PortalContainer.getPortalContext()) to get a resource, it will try to get the resource in the ServletContext of the most important PortalContainerConfigOwner (i.e. last in the dependency list) and if it cans find it, it will try with the second most important PortalContainerConfigOwner and so on.
The ClassLoader of all the PortalContainerConfigOwner will be unified, if we use the unified ClassLoader (PortalContainer.getPortalClassLoader()) to get a resource, it will try to get the resource in the ClassLoader of the most important PortalContainerConfigOwner (i.e. last in the dependency list) and if it cans find it, it will try with the second most important PortalContainerConfigOwner and so on.
To do that you need first to change the default values used by a PortalContainer that has not been defined thanks to a PortalContainerDefinition. Those default values can be modified thanks to a set of init parameters of the component PortalContainerConfig.
The component PortalContainerConfig must be registered at the RootContainer level. In other words, your configuration file must be a file conf/configuration.xml packaged into a jar file or $AS_HOME/exo-conf/configuration.xml (for more details please have a look to the article Container Configuration).
In the example below we will rename:
The portal name "portal" to "myPortal".
The rest servlet context name "rest" to "myRest".
The realm name "exo-domain" to "my-exo-domain".
See below an example
<?xml version="1.0" encoding="UTF-8"?>
<configuration
xmlns:xsi="http://www.w3.org/2001/XMLSchema-instance"
xsi:schemaLocation="http://www.exoplatform.org/xml/ns/kernel_1_2.xsd http://www.exoplatform.org/xml/ns/kernel_1_2.xsd"
xmlns="http://www.exoplatform.org/xml/ns/kernel_1_2.xsd">
<component>
<!-- The full qualified name of the PortalContainerConfig -->
<type>org.exoplatform.container.definition.PortalContainerConfig</type>
<init-params>
<!-- The name of the default portal container -->
<value-param>
<name>default.portal.container</name>
<value>myPortal</value>
</value-param>
<!-- The name of the default rest ServletContext -->
<value-param>
<name>default.rest.context</name>
<value>myRest</value>
</value-param>
<!-- The name of the default realm -->
<value-param>
<name>default.realm.name</name>
<value>my-exo-domain</value>
</value-param>
</init-params>
</component>
</configuration>Once your configuration is ready, you need to:
Update the file WEB-INF/web.xml of the file "portal.war" by changing the "display-name" (the new value is "myPortal") and the "realm-name" in the "login-config" (the new value is "my-exo-domain").
If you use JBoss AS: Update the file WEB-INF/jboss-web.xml of the file "portal.war" by changing the "security-domain" (the new value is "java:/jaas/my-exo-domain").
Rename the "portal.war" to "myPortal.war" (or "02portal.war" to "02myPortal.war")
Update the file WEB-INF/web.xml of the file "rest.war" by changing the "display-name" (the new value is "myRest") and the "realm-name" in the "login-config" (the new value is "my-exo-domain").
If you use JBoss AS: Update the file WEB-INF/jboss-web.xml of the file "rest.war" by changing the "security-domain" (the new value is "java:/jaas/my-exo-domain").
Rename the "rest.war" to "myRest.war"
If "portal.war" and "rest.war" were embedded into an ear file: Update the file META-INF/application.xml of the file "exoplatform.ear" by remaming "02portal.war" to "02myPortal.war", "portal" to "myPortal", "rest.war" to "myRest.war" and "rest" to "myRest".
The end of the process depends on your application server
You need to change the name of the application policy in your file conf/login-config.xml (the new name is "my-exo-domain").
You need to:
Update the file tomcat/conf/Catalina/localhost/portal.xml by changing the "path" (the new value is "/myPortal"), the "docBase" (the new value is "myPortal") and the "appName" in the "Realm" definition (the new value is "my-exo-domain").
Rename the file tomcat/conf/Catalina/localhost/portal.xml to myPortal.xml.
Update the file tomcat/conf/Catalina/localhost/rest.xml by changing the "path" (the new value is "/myRest"), the "docBase" (the new value is "myRest") and the "appName" in the "Realm" definition (the new value is "my-exo-domain").
Rename the file tomcat/conf/Catalina/localhost/rest.xml to myRest.xml.
Change the realm name in the file tomcat/conf/jaas.conf (the new name is "my-exo-domain").
To indicate the platform that a given web application has configuration file to provide, you need to:
Add the ServletContextListener org.exoplatform.container.web.PortalContainerConfigOwner in its web.xml.
Add the servlet context name of this web application as a new dependency in the PortalContainerDefinition of all the portal containers for which you want to share the configuration file embedded into the war file, located at WEB-INF/conf/configuration.xml.
The simple fact to add this Servlet Context Listener, will add the Servlet Context of this web application to the Unified Servlet Context of all the PortalContainers that depend on this web application according to their PortalContainerDefinition.
Useful Information #1
The position of the servlet context name of this web application in the dependency list is important since the last configuration file loaded has always right towards other configuration files. Each configuration file loaded, could potentially redefine a configuration file that has already been loaded. Moreover, as we now use a unified Servlet Context to load the configuration files, if you want for instance to import the file war:/conf/database/database-configuration.xml and this file exists in 2 different web applications, the file from the last (according to the dependency order) web application will be loaded.
Useful Information #2
A portal is implicitly considered as a PortalContainerConfigOwner without having to define the ServletContextListener org.exoplatform.container.web.PortalContainerConfigOwner in its web.xml.
See an example of a web.xml below:
<?xml version="1.0" encoding="ISO-8859-1" ?>
<!DOCTYPE web-app PUBLIC "-//Sun Microsystems, Inc.//DTD Web Application 2.3//EN"
"http://java.sun.com/dtd/web-app_2_3.dtd">
<web-app>
<display-name>sample-ext</display-name>
<context-param>
<param-name>org.exoplatform.frameworks.jcr.command.web.fckeditor.digitalAssetsWorkspace</param-name>
<param-value>collaboration</param-value>
<description>Binary assets workspace name</description>
</context-param>
<context-param>
<param-name>org.exoplatform.frameworks.jcr.command.web.fckeditor.digitalAssetsPath</param-name>
<param-value>/Digital Assets/</param-value>
<description>Binary assets path</description>
</context-param>
<context-param>
<param-name>CurrentFolder</param-name>
<param-value>/Digital Assets/</param-value>
<description>Binary assets workspace name</description>
</context-param>
<!-- ================================================================== -->
<!-- RESOURCE FILTER TO CACHE MERGED JAVASCRIPT AND CSS -->
<!-- ================================================================== -->
<filter>
<filter-name>ResourceRequestFilter</filter-name>
<filter-class>org.exoplatform.portal.application.ResourceRequestFilter</filter-class>
</filter>
<filter-mapping>
<filter-name>ResourceRequestFilter</filter-name>
<url-pattern>/*</url-pattern>
</filter-mapping>
<!-- ================================================================== -->
<!-- LISTENER -->
<!-- ================================================================== -->
<listener>
<listener-class>org.exoplatform.container.web.PortalContainerConfigOwner</listener-class>
</listener>
<!-- ================================================================== -->
<!-- SERVLET -->
<!-- ================================================================== -->
<servlet>
<servlet-name>GateInServlet</servlet-name>
<servlet-class>org.gatein.wci.api.GateInServlet</servlet-class>
<load-on-startup>0</load-on-startup>
</servlet>
<!-- ================================================================= -->
<servlet-mapping>
<servlet-name>GateInServlet</servlet-name>
<url-pattern>/gateinservlet</url-pattern>
</servlet-mapping>
</web-app>A portal extension is in fact a web application declared as a PortalContainerConfigOwner (see previous section for more details about a PortalContainerConfigOwner) that has been added to the dependency list of the PortalContainerDefinition of a given portal.
See below an example of configuration file that add the portal extension "portal-ext" to the dependency list of the portal "portal":
<?xml version="1.0" encoding="UTF-8"?>
<configuration
xmlns:xsi="http://www.w3.org/2001/XMLSchema-instance"
xsi:schemaLocation="http://www.exoplatform.org/xml/ns/kernel_1_2.xsd http://www.exoplatform.org/xml/ns/kernel_1_2.xsd"
xmlns="http://www.exoplatform.org/xml/ns/kernel_1_2.xsd">
<external-component-plugins>
<!-- The full qualified name of the PortalContainerConfig -->
<target-component>org.exoplatform.container.definition.PortalContainerConfig</target-component>
<component-plugin>
<!-- The name of the plugin -->
<name>Add PortalContainer Definitions</name>
<!-- The name of the method to call on the PortalContainerConfig in order to register the PortalContainerDefinitions -->
<set-method>registerPlugin</set-method>
<!-- The full qualified name of the PortalContainerDefinitionPlugin -->
<type>org.exoplatform.container.definition.PortalContainerDefinitionPlugin</type>
<init-params>
<object-param>
<name>portal</name>
<object type="org.exoplatform.container.definition.PortalContainerDefinition">
<!-- The name of the portal container -->
<field name="name"><string>portal</string></field>
<!-- The name of the context name of the rest web application -->
<field name="restContextName"><string>rest</string></field>
<!-- The name of the realm -->
<field name="realmName"><string>exo-domain</string></field>
<!-- All the dependencies of the portal container ordered by loading priority -->
<field name="dependencies">
<collection type="java.util.ArrayList">
<value>
<string>eXoResources</string>
</value>
<value>
<string>portal</string>
</value>
<value>
<string>dashboard</string>
</value>
<value>
<string>exoadmin</string>
</value>
<value>
<string>eXoGadgets</string>
</value>
<value>
<string>eXoGadgetServer</string>
</value>
<value>
<string>rest</string>
</value>
<value>
<string>web</string>
</value>
<value>
<string>wsrp-producer</string>
</value>
<!-- The sample-ext has been added at the end of the dependency list in order to have the highest priority towards
the other web applications and particularly towards "portal" -->
<value>
<string>sample-ext</string>
</value>
</collection>
</field>
</object>
</object-param>
</init-params>
</component-plugin>
</external-component-plugins>
</configuration>To duplicate the entire "portal.war" file to create a new portal, you just need to duplicate the following files from the original "portal.war":
login/jsp/login.jsp
login/skin: You can customize the css files and pictures
bookmark.jsp
favicon.ico: You can replace it by your own logo
index.jsp
portal-unavailable.jsp
portal-warning.jsp
WEB-INF/web.xml: You just need to change the "display-name" and set a different value for the "realm-name" in the "login-config". Indeed, we must have one realm name per portal.
WEB-INF/jboss-web.xml: If you use JBoss AS, you need to duplicate also this file and set the new "security-domain" with the new realm name.
You need also to duplicate the "rest.war" file to create a dedicated rest web application for your portal as we must have one rest web application per portal, in fact you just need to duplicate the following files from the original "rest.war":
WEB-INF/web.xml: You just need to change the "display-name" and set a different value for the "realm-name" in the "login-config". Indeed, we must have one realm name per portal.
WEB-INF/jboss-web.xml: If you use JBoss AS, you need to duplicate also this file and set the new "security-domain" with the new realm name.
Finally, you need to register and define the corresponding PortalContainerDefinition. The PortalContainerDefinition of your portal will be composed of:
The name of new portal
The name of the context name of the new rest web application
The name of the new realm
The list of all the dependencies of the original portal, with the new name of the rest web application instead of the old name (i.e. "rest") and with a new dependency which is in fact the name of your portal. As we leave the dependency of the original portal in the list of dependencies, it will load the configuration files of original "portal.war" file.
See an example below:
<?xml version="1.0" encoding="UTF-8"?>
<configuration
xmlns:xsi="http://www.w3.org/2001/XMLSchema-instance"
xsi:schemaLocation="http://www.exoplatform.org/xml/ns/kernel_1_2.xsd http://www.exoplatform.org/xml/ns/kernel_1_2.xsd"
xmlns="http://www.exoplatform.org/xml/ns/kernel_1_2.xsd">
<external-component-plugins>
<!-- The full qualified name of the PortalContainerConfig -->
<target-component>org.exoplatform.container.definition.PortalContainerConfig</target-component>
<component-plugin>
<!-- The name of the plugin -->
<name>Add PortalContainer Definitions</name>
<!-- The name of the method to call on the PortalContainerConfig in order to register the PortalContainerDefinitions -->
<set-method>registerPlugin</set-method>
<!-- The full qualified name of the PortalContainerDefinitionPlugin -->
<type>org.exoplatform.container.definition.PortalContainerDefinitionPlugin</type>
<init-params>
<object-param>
<name>sample-portal</name>
<object type="org.exoplatform.container.definition.PortalContainerDefinition">
<!-- The name of the portal container -->
<field name="name"><string>sample-portal</string></field>
<!-- The name of the context name of the rest web application -->
<field name="restContextName"><string>rest-sample-portal</string></field>
<!-- The name of the realm -->
<field name="realmName"><string>exo-domain-sample-portal</string></field>
<!-- All the dependencies of the portal container ordered by loading priority -->
<field name="dependencies">
<collection type="java.util.ArrayList">
<value>
<string>eXoResources</string>
</value>
<value>
<string>portal</string>
</value>
<value>
<string>dashboard</string>
</value>
<value>
<string>exoadmin</string>
</value>
<value>
<string>eXoGadgets</string>
</value>
<value>
<string>eXoGadgetServer</string>
</value>
<value>
<string>rest-sample-portal</string>
</value>
<value>
<string>web</string>
</value>
<value>
<string>wsrp-producer</string>
</value>
<value>
<string>sample-portal</string>
</value>
</collection>
</field>
</object>
</object-param>
</init-params>
</component-plugin>
</external-component-plugins>
</configuration>Useful Information #1
A portal is implicitly a PortalContainerConfigOwner which means that it shares the configuration file embedded into the war file, located at WEB-INF/conf/configuration.xml
Useful Information #2
The position of the servlet context name of this web application in the dependency list is important since the last configuration file loaded has always right towards other configuration files. Each configuration file loaded, could potentially redefine a configuration file that has already been loaded. Moreover, as we now use a unified Servlet Context to load the configuration files, if you want for instance to import the file war:/conf/database/database-configuration.xml and this file exists in 2 different web applications, the file from the last (according to the dependency order) web application will be loaded.
Now, the ConfigurationManager uses by default the unified servlet context of the portal in order to get any resources in particular the configuration files. The unified servlet context is aware of the priorities that has been set in the PortalContainerDefinition of the portal. In other words, if you want for instance to import the file war:/conf/database/database-configuration.xml and this file exists in 2 different web applications, the file from the last (according to the dependency order) web application will be loaded.
So, in order to avoid issues when we would like to package several products at the same time (i.e. WCM, DMS, CS, KS), we need to:
Avoid the best you can to redefine a configuration file from the "portal.war" by using the exact same path (like the previous example)
Add your configuration files in a dedicated folder which name will be the name of the product, in oder to ensure that no other products will use the same path
The example below, is an the example of a file WEB-INF/conf/configuration.xml of the product "sample-ext".
<?xml version="1.0" encoding="ISO-8859-1"?> <configuration xmlns:xsi="http://www.w3.org/2001/XMLSchema-instance" xsi:schemaLocation="http://www.exoplatform.org/xml/ns/kernel_1_2.xsd http://www.exoplatform.org/xml/ns/kernel_1_2.xsd" xmlns="http://www.exoplatform.org/xml/ns/kernel_1_2.xsd"> <import>war:/conf/sample-ext/common/common-configuration.xml</import> <import>war:/conf/sample-ext/jcr/jcr-configuration.xml</import> <import>war:/conf/sample-ext/portal/portal-configuration.xml</import> <import>war:/conf/sample-ext/web/web-inf-extension-configuration.xml</import> </configuration>
In your configuration file, you can use a special variable called container.name.suffix in order to add a suffix to values that could change between portal containers. The value of this variable will be an empty sting if no PortalContainerDefinition has been defined otherwise the value will be \-$portal.container.name. See an example below:
<?xml version="1.0" encoding="ISO-8859-1"?>
<configuration
xmlns:xsi="http://www.w3.org/2001/XMLSchema-instance"
xsi:schemaLocation="http://www.exoplatform.org/xml/ns/kernel_1_2.xsd http://www.exoplatform.org/xml/ns/kernel_1_2.xsd"
xmlns="http://www.exoplatform.org/xml/ns/kernel_1_2.xsd">
<component>
<key>org.exoplatform.services.database.HibernateService</key>
<jmx-name>database:type=HibernateService</jmx-name>
<type>org.exoplatform.services.database.impl.HibernateServiceImpl</type>
<init-params>
<properties-param>
<name>hibernate.properties</name>
<description>Default Hibernate Service</description>
<property name="hibernate.show_sql" value="false"/>
<property name="hibernate.cglib.use_reflection_optimizer" value="true"/>
<property name="hibernate.connection.url" value="jdbc:hsqldb:file:../temp/data/exodb${container.name.suffix}"/>
<property name="hibernate.connection.driver_class" value="org.hsqldb.jdbcDriver"/>
<property name="hibernate.connection.autocommit" value="true"/>
<property name="hibernate.connection.username" value="sa"/>
<property name="hibernate.connection.password" value=""/>
<property name="hibernate.dialect" value="org.hibernate.dialect.HSQLDialect"/>
<property name="hibernate.c3p0.min_size" value="5"/>
<property name="hibernate.c3p0.max_size" value="20"/>
<property name="hibernate.c3p0.timeout" value="1800"/>
<property name="hibernate.c3p0.max_statements" value="50"/>
</properties-param>
</init-params>
</component>
</configuration>Now you can add new JCR repositories or workspaces thanks to an external plugin, the configuration of your JCR Repositories will be merged knowing that the merge algorithm will:
Add missing Repository Definitions and/or Workspace Definitions.
Change the properties of a Repository Definition if it has already been defined.
Replace the Workspace Definition if it has already been defined.
See an example of jcr-configuration.xml below:
<?xml version="1.0" encoding="ISO-8859-1"?>
<configuration
xmlns:xsi="http://www.w3.org/2001/XMLSchema-instance"
xsi:schemaLocation="http://www.exoplatform.org/xml/ns/kernel_1_2.xsd http://www.exoplatform.org/xml/ns/kernel_1_2.xsd"
xmlns="http://www.exoplatform.org/xml/ns/kernel_1_2.xsd">
<external-component-plugins>
<!-- The full qualified name of the RepositoryServiceConfiguration -->
<target-component>org.exoplatform.services.jcr.config.RepositoryServiceConfiguration</target-component>
<component-plugin>
<!-- The name of the plugin -->
<name>Sample RepositoryServiceConfiguration Plugin</name>
<!-- The name of the method to call on the RepositoryServiceConfiguration in order to add the RepositoryServiceConfigurations -->
<set-method>addConfig</set-method>
<!-- The full qualified name of the RepositoryServiceConfigurationPlugin -->
<type>org.exoplatform.services.jcr.impl.config.RepositoryServiceConfigurationPlugin</type>
<init-params>
<value-param>
<name>conf-path</name>
<description>JCR configuration file</description>
<value>war:/conf/sample-ext/jcr/repository-configuration.xml</value>
</value-param>
</init-params>
</component-plugin>
</external-component-plugins>
</configuration>See an example of repository-configuration.xml below:
<repository-service default-repository="repository">
<repositories>
<repository name="repository" system-workspace="system" default-workspace="portal-system">
<security-domain>exo-domain</security-domain>
<access-control>optional</access-control>
<authentication-policy>org.exoplatform.services.jcr.impl.core.access.JAASAuthenticator</authentication-policy>
<workspaces>
<workspace name="sample-ws">
<container class="org.exoplatform.services.jcr.impl.storage.jdbc.JDBCWorkspaceDataContainer">
<properties>
<property name="source-name" value="jdbcexo${container.name.suffix}" />
<property name="dialect" value="hsqldb" />
<property name="multi-db" value="false" />
<property name="update-storage" value="true" />
<property name="max-buffer-size" value="204800" />
<property name="swap-directory" value="../temp/swap/sample-ws${container.name.suffix}" />
</properties>
<value-storages>
<value-storage id="sample-ws" class="org.exoplatform.services.jcr.impl.storage.value.fs.TreeFileValueStorage">
<properties>
<property name="path" value="../temp/values/sample-ws${container.name.suffix}" />
</properties>
<filters>
<filter property-type="Binary" />
</filters>
</value-storage>
</value-storages>
</container>
<initializer class="org.exoplatform.services.jcr.impl.core.ScratchWorkspaceInitializer">
<properties>
<property name="root-nodetype" value="nt:unstructured" />
<property name="root-permissions"
value="any read;*:/platform/administrators read;*:/platform/administrators add_node;*:/platform/administrators set_property;*:/platform/administrators remove" />
</properties>
</initializer>
<cache enabled="true">
<properties>
<property name="max-size" value="20000" />
<property name="live-time" value="30000" />
</properties>
</cache>
<query-handler class="org.exoplatform.services.jcr.impl.core.query.lucene.SearchIndex">
<properties>
<property name="index-dir" value="../temp/jcrlucenedb/sample-ws${container.name.suffix}" />
</properties>
</query-handler>
<lock-manager>
<time-out>15m</time-out><!-- 15min -->
<persister class="org.exoplatform.services.jcr.impl.core.lock.FileSystemLockPersister">
<properties>
<property name="path" value="../temp/lock/sample-ws${container.name.suffix}" />
</properties>
</persister>
</lock-manager>
</workspace>
</workspaces>
</repository>
</repositories>
</repository-service>Warning
If you have to change the default repository or the default workspace, please be careful since it could cause side effects as you could be incompatible with some portal configuration files that refer explicitly to portal-system and/or to repository. To solve this problem you can either redefine the configuration file in a portal extension to change the workspace name and/or the repository name or you could also add your own repository instead of your own workspace.
Now you can add new Resource Bundles, thanks to an external plugin.
See an example below:
<?xml version="1.0" encoding="ISO-8859-1"?>
<configuration
xmlns:xsi="http://www.w3.org/2001/XMLSchema-instance"
xsi:schemaLocation="http://www.exoplatform.org/xml/ns/kernel_1_2.xsd http://www.exoplatform.org/xml/ns/kernel_1_2.xsd"
xmlns="http://www.exoplatform.org/xml/ns/kernel_1_2.xsd">
<external-component-plugins>
<!-- The full qualified name of the ResourceBundleService -->
<target-component>org.exoplatform.services.resources.ResourceBundleService</target-component>
<component-plugin>
<!-- The name of the plugin -->
<name>Sample ResourceBundle Plugin</name>
<!-- The name of the method to call on the ResourceBundleService in order to register the ResourceBundles -->
<set-method>addResourceBundle</set-method>
<!-- The full qualified name of the BaseResourceBundlePlugin -->
<type>org.exoplatform.services.resources.impl.BaseResourceBundlePlugin</type>
<init-params>
<!--values-param>
<name>classpath.resources</name>
<description>The resources that start with the following package name should be load from file system</description>
<value>locale.portlet</value>
</values-param-->
<values-param>
<name>init.resources</name>
<description>Store the following resources into the db for the first launch </description>
<value>locale.portal.sample</value>
</values-param>
<values-param>
<name>portal.resource.names</name>
<description>The properties files of the portal , those file will be merged
into one ResoruceBundle properties </description>
<value>locale.portal.sample</value>
</values-param>
</init-params>
</component-plugin>
</external-component-plugins>
</configuration>Now each portal container has its own ClassLoader which is automatically set for you at runtime (FYI: it could be retrieved thanks to portalContainer.getPortalClassLoader()). This ClassLoader is an unified ClassLoader that is also aware of the dependency order defined into the PortalContainerDefinition, so to add new keys or update key values, you just need to:
Add the corresponding resource bundle with the same name, with the same extension (xml or properties) at the same location into the classpath of your Web application (i.e. directly into the WEB-INF/classes directory or into a jar file in the WEB-INF/lib directory)
Ensure that your web application is defined after the web application of the portal in the dependency list of the related PortalContainerDefinition.
In the example below, we want to change the values of the keys UIHomePagePortlet.Label.Username and UIHomePagePortlet.Label.Password, and add the new key UIHomePagePortlet.Label.SampleKey into the Resource Bundle locale.portal.webui.
WEB-INF/classes/local/portal/webui_en.properties
############################################################################# #org.exoplatform.portal.webui.component.UIHomePagePortlet # ############################################################################# UIHomePagePortlet.Label.Username=Usr: UIHomePagePortlet.Label.Password=Pwd: UIHomePagePortlet.Label.SampleKey=This is a new key that has been added to the Resource Bundle "locale.portal.webui" of "sample-ext"
Now each portal container has its own ServletContext which is automatically set for you at runtime (FYI: it could be retrieved thanks to portalContainer.getPortalContext()). This ServletContext is an unified ServletContext that is also aware of the dependency order defined into the PortalContainerDefinition so to replace a groovy template of the portal, you just need to:
Add the corresponding groovy template with the same name at the same location into your Web application
Ensure that your web application is defined after the web application of the portal in the dependency list of the related PortalContainerDefinition.
Now you can add new Portal Configurations, Navigations, Pages or Portlet Preferences thanks to an external plugin.
See an example below:
<?xml version="1.0" encoding="ISO-8859-1"?>
<configuration
xmlns:xsi="http://www.w3.org/2001/XMLSchema-instance"
xsi:schemaLocation="http://www.exoplatform.org/xml/ns/kernel_1_2.xsd http://www.exoplatform.org/xml/ns/kernel_1_2.xsd"
xmlns="http://www.exoplatform.org/xml/ns/kernel_1_2.xsd">
<external-component-plugins>
<!-- The full qualified name of the UserPortalConfigService -->
<target-component>org.exoplatform.portal.config.UserPortalConfigService</target-component>
<component-plugin>
<!-- The name of the plugin -->
<name>new.portal.config.user.listener</name>
<!-- The name of the method to call on the UserPortalConfigService in order to register the NewPortalConfigs -->
<set-method>initListener</set-method>
<!-- The full qualified name of the NewPortalConfigListener -->
<type>org.exoplatform.portal.config.NewPortalConfigListener</type>
<description>this listener init the portal configuration</description>
<init-params>
<object-param>
<name>portal.configuration</name>
<description>description</description>
<object type="org.exoplatform.portal.config.NewPortalConfig">
<field name="predefinedOwner">
<collection type="java.util.HashSet">
<value>
<string>classic</string>
</value>
</collection>
</field>
<field name="ownerType">
<string>portal</string>
</field>
<field name="templateLocation">
<string>war:/conf/sample-ext/portal</string>
</field>
</object>
</object-param>
<object-param>
<name>group.configuration</name>
<description>description</description>
<object type="org.exoplatform.portal.config.NewPortalConfig">
<field name="predefinedOwner">
<collection type="java.util.HashSet">
<value>
<string>platform/users</string>
</value>
</collection>
</field>
<field name="ownerType">
<string>group</string>
</field>
<field name="templateLocation">
<string>war:/conf/sample-ext/portal</string>
</field>
</object>
</object-param>
<object-param>
<name>user.configuration</name>
<description>description</description>
<object type="org.exoplatform.portal.config.NewPortalConfig">
<field name="predefinedOwner">
<collection type="java.util.HashSet">
<value>
<string>root</string>
</value>
</collection>
</field>
<field name="ownerType">
<string>user</string>
</field>
<field name="templateLocation">
<string>war:/conf/sample-ext/portal</string>
</field>
</object>
</object-param>
</init-params>
</component-plugin>
</external-component-plugins>
</configuration>We added a GenericFilter that allows you to define new Http Filters thanks to an external plugin. Your filter will need to implement the interface org.exoplatform.web.filter.Filter.
See an example of configuration below:
<?xml version="1.0" encoding="UTF-8"?>
<configuration
xmlns:xsi="http://www.w3.org/2001/XMLSchema-instance"
xsi:schemaLocation="http://www.exoplatform.org/xml/ns/kernel_1_2.xsd http://www.exoplatform.org/xml/ns/kernel_1_2.xsd"
xmlns="http://www.exoplatform.org/xml/ns/kernel_1_2.xsd">
<external-component-plugins>
<!-- The full qualified name of the ExtensibleFilter -->
<target-component>org.exoplatform.web.filter.ExtensibleFilter</target-component>
<component-plugin>
<!-- The name of the plugin -->
<name>Sample Filter Definition Plugin</name>
<!-- The name of the method to call on the ExtensibleFilter in order to register the FilterDefinitions -->
<set-method>addFilterDefinitions</set-method>
<!-- The full qualified name of the FilterDefinitionPlugin -->
<type>org.exoplatform.web.filter.FilterDefinitionPlugin</type>
<init-params>
<object-param>
<name>Sample Filter Definition</name>
<object type="org.exoplatform.web.filter.FilterDefinition">
<!-- The filter instance -->
<field name="filter"><object type="org.exoplatform.sample.ext.web.SampleFilter"/></field>
<!-- The mapping to use -->
<!-- WARNING: the mapping is expressed with regular expressions -->
<field name="patterns">
<collection type="java.util.ArrayList" item-type="java.lang.String">
<value>
<string>/.*</string>
</value>
</collection>
</field>
</object>
</object-param>
</init-params>
</component-plugin>
</external-component-plugins>
</configuration>See an example of Filter below:
SampleFilter.java
...
import org.exoplatform.web.filter.Filter;
import java.io.IOException;
import javax.servlet.FilterChain;
import javax.servlet.ServletException;
import javax.servlet.ServletRequest;
import javax.servlet.ServletResponse;
public class SampleFilter implements Filter
{
public void doFilter(ServletRequest request, ServletResponse response, FilterChain chain) throws IOException,
ServletException
{
System.out.println("SampleFilter start");
try
{
chain.doFilter(request, response);
}
finally
{
System.out.println("SampleFilter end");
}
}
}We added a GenericHttpListener that allows you to define new HttpSessionListeners and/or ServletContextListeners thanks to an external plugin. Actually, the GenericHttpListener will broadcast events thanks to the ListenerService that you can easily capture. The events that it broadcasts are:
org.exoplatform.web.GenericHttpListener.sessionCreated: When a new session is created in the portal.
org.exoplatform.web.GenericHttpListener.sessionDestroyed: When a session is destroyed in the portal.
org.exoplatform.web.GenericHttpListener.contextInitialized: When the servlet context of the portal is initialized.
org.exoplatform.web.GenericHttpListener.contextDestroyed: When the servlet context of the portal is destroyed.
If you want to listen to org.exoplatform.web.GenericHttpListener.sessionCreated, you will need to create a Listener that extends _Listener<PortalContainer, HttpSessionEvent>_If you want to listen to \_org.exoplatform.web.GenericHttpListener.sessionDestroyed_, you will need to create a Listener that extends _Listener<PortalContainer, HttpSessionEvent>_If you want to listen to \_org.exoplatform.web.GenericHttpListener.contextInitialized_, you will need to create a Listener that extends _Listener<PortalContainer, ServletContextEvent>_If you want to listen to \_org.exoplatform.web.GenericHttpListener.contextDestroyed_, you will need to create a Listener that extends Listener<PortalContainer, ServletContextEvent>
See an example of configuration below:
<?xml version="1.0" encoding="UTF-8"?>
<configuration
xmlns:xsi="http://www.w3.org/2001/XMLSchema-instance"
xsi:schemaLocation="http://www.exoplatform.org/xml/ns/kernel_1_2.xsd http://www.exoplatform.org/xml/ns/kernel_1_2.xsd"
xmlns="http://www.exoplatform.org/xml/ns/kernel_1_2.xsd">
<external-component-plugins>
<!-- The full qualified name of the ListenerService -->
<target-component>org.exoplatform.services.listener.ListenerService</target-component>
<component-plugin>
<!-- The name of the listener that is also the name of the target event -->
<name>org.exoplatform.web.GenericHttpListener.sessionCreated</name>
<!-- The name of the method to call on the ListenerService in order to register the Listener -->
<set-method>addListener</set-method>
<!-- The full qualified name of the Listener -->
<type>org.exoplatform.sample.ext.web.SampleHttpSessionCreatedListener</type>
</component-plugin>
<component-plugin>
<!-- The name of the listener that is also the name of the target event -->
<name>org.exoplatform.web.GenericHttpListener.sessionDestroyed</name>
<!-- The name of the method to call on the ListenerService in order to register the Listener -->
<set-method>addListener</set-method>
<!-- The full qualified name of the Listener -->
<type>org.exoplatform.sample.ext.web.SampleHttpSessionDestroyedListener</type>
</component-plugin>
<component-plugin>
<!-- The name of the listener that is also the name of the target event -->
<name>org.exoplatform.web.GenericHttpListener.contextInitialized</name>
<!-- The name of the method to call on the ListenerService in order to register the Listener -->
<set-method>addListener</set-method>
<!-- The full qualified name of the Listener -->
<type>org.exoplatform.sample.ext.web.SampleContextInitializedListener</type>
</component-plugin>
<component-plugin>
<!-- The name of the listener that is also the name of the target event -->
<name>org.exoplatform.web.GenericHttpListener.contextDestroyed</name>
<!-- The name of the method to call on the ListenerService in order to register the Listener -->
<set-method>addListener</set-method>
<!-- The full qualified name of the Listener -->
<type>org.exoplatform.sample.ext.web.SampleContextDestroyedListener</type>
</component-plugin>
</external-component-plugins>
</configuration>See an example of Session Listener below:
SampleHttpSessionCreatedListener.java
..
import org.exoplatform.container.PortalContainer;
import org.exoplatform.services.listener.Event;
import org.exoplatform.services.listener.Listener;
import javax.servlet.http.HttpSessionEvent;
public class SampleHttpSessionCreatedListener extends Listener<PortalContainer, HttpSessionEvent>
{
@Override
public void onEvent(Event<PortalContainer, HttpSessionEvent> event) throws Exception
{
System.out.println("Creating a new session");
}
}See an example of Context Listener below:
SampleContextInitializedListener.java
..
import org.exoplatform.container.PortalContainer;
import org.exoplatform.services.listener.Event;
import org.exoplatform.services.listener.Listener;
import javax.servlet.ServletContextEvent;
public class SampleContextInitializedListener extends Listener<PortalContainer, ServletContextEvent>
{
@Override
public void onEvent(Event<PortalContainer, ServletContextEvent> event) throws Exception
{
System.out.println("Initializing the context");
}
}Actually, it is not possible but you can create a rest component instead. For more details about rest, please refer to the following article WS.
Actually, you have nothing to do, you just need to ensure that you get the context parameter value from the unified servlet context of the portal, that should be set for you but you can still get it from portalContainer.getPortalContext().
We added an example of portal extension (i.e. ability to customize a portal without changing anything in the portal.ear) that you can find in the svn of gatein at gatein/sample/extension.
We assume that you have a clean JBoss version of GateIn, in other words, we assume that you have already the file exoplatform.ear in the deploy directory of JBoss and you have the related application policy in your conf/login-config.xml.
You need to:
Add the file sample-ext.ear from sample/extension/ear/target/ to the deploy directory of JBoss, this file contains:
The file sample-ext.war which is the web application that contains (potentially) configuration files, groovy templates, resource bundles, skins and javascript files, that will extend the portal.
The file exo.portal.sample.extension.config-X.Y.Z.jar which is the file in which we defined the PortalContainerDefinition of the original portal in which we added sample-ext at the end of dependency list.
The file exo.portal.sample.extension.jar-X.Y.Z.jar which is the file in which we have internal classes that are actualy a set of sample classes (SampleFilter, SampleContextInitializedListener, SampleContextDestroyedListener, SampleHttpSessionCreatedListener and SampleHttpSessionDestroyedListener)
Add the file starter.ear from starter/ear/target/ to the deploy directory of JBoss, this file contains:
The file starter.war which is the web application that will create and start all the portal containers, that is why it must be launched after all the other web applications.
Warning #1
This can only work if a Unified ClassLoader has been configured on your JBoss (default behavior) and the load order is first the exoplatform.ear then the sample-ext.ear and finally the starter.ear.
Warning #2
The file starter.ear must always been started last.
We assume that you have a clean Tomcat version of GateIn, in other words, we assume that you have already all the jar files of GateIn and their dependencies into tomcat/lib, you have all the war files of GateIn into tomcat/webapps and you have the realm name "exo-domain" defined into the file tomcat/conf/jaas.conf.
Add the file sample-ext.war from sample/extension/war/target/ to the tomcat/webapps directory. (See the purpose of this file in the JBoss section).
Add the folder starter from starter/war/target/ to the tomcat/webapps directory. (See the purpose of this file in the JBoss section).
Rename the directory (unzipped folder) starter to starter.war (for more details see the warning below)
Add the jar file exo.portal.sample.extension.config-X.Y.Z.jar from sample/extension/config/target/ to the tomcat/lib directory. (See the purpose of this file in the JBoss section).
Add the jar file exo.portal.sample.extension.jar-X.Y.Z.jar from sample/extension/jar/target/ to the tomcat/lib directory. (See the purpose of this file in the JBoss section).
Warning
This can only work if the starter.war is the last war file to be loaded, so don't hesitate to rename it if your war files are loaded following to the alphabetic order.
We added an example of new portal (i.e. ability to create a new portal from another portal without changing anything in the portal.ear) that you can find in the svn of gatein at gatein/sample/portal.
We assume that you have a clean JBoss version of GateIn, in other words, we assume that you have already the file exoplatform.ear in the deploy directory of JBoss and you have the related application policy in your conf/login-config.xml.
You need to:
Add the file sample-portal.ear from sample/portal/ear/target/ to the deploy directory of JBoss, this file contains:
The file sample-portal.war which is the entry point of the new portal
The file rest-sample-portal.war which is the entry point for rest outside the portal (in the portal you can access to rest thanks to path prefix /sample-portal/rest)
The file exo.portal.sample.portal.config-X.Y.Z.jar which is the file in which we defined the PortalContainerDefinition of this portal
The file exo.portal.sample.portal.jar-X.Y.Z.jar which is the file in which we have internal classes that are actualy a set of sample classes (SampleFilter, SampleContextInitializedListener, SampleContextDestroyedListener, SampleHttpSessionCreatedListener and SampleHttpSessionDestroyedListener)
Add the file starter.ear from starter/ear/target/ to the deploy directory of JBoss, this file contains:
The file starter.war which is the web application that will create and start all the portal containers, that is why it must be launched after all the other web applications.
Define the related application policy in your file conf/login-config.xml, as below:
<application-policy name="exo-domain-sample-portal">
<authentication>
<login-module code="org.exoplatform.web.security.PortalLoginModule" flag="required">
<module-option name="portalContainerName">sample-portal</module-option>
<module-option name="realmName">exo-domain-sample-portal</module-option>
</login-module>
<login-module code="org.exoplatform.services.security.jaas.SharedStateLoginModule" flag="required">
<module-option name="portalContainerName">sample-portal</module-option>
<module-option name="realmName">exo-domain-sample-portal</module-option>
</login-module>
<login-module code="org.exoplatform.services.security.j2ee.JbossLoginModule" flag="required">
<module-option name="portalContainerName">sample-portal</module-option>
<module-option name="realmName">exo-domain-sample-portal</module-option>
</login-module>
</authentication>
</application-policy>Warning #1
This can only work if a Unified ClassLoader has been configured on your JBoss (default behavior) and the load order is first the exoplatform.ear then the sample-portal.ear and finally the starter.ear.
Warning #2
The file starter.ear must always been started last.
We assume that you have a clean Tomcat version of GateIn, in other words, we assume that you have already all the jar files of GateIn and their dependencies into tomcat/lib, you have all the war files of GateIn into tomcat/webapps and you have the realm name "exo-domain" defined into the file tomcat/conf/jaas.conf.
Add the file sample-portal.war from sample/portal/war/target/ to the tomcat/webapps directory. (See the purpose of this file in the JBoss section).
Add the file rest-sample-portal.war from sample/portal/rest-war/target/ to the tomcat/webapps directory. (See the purpose of this file in the JBoss section).
Add the folder starter from starter/war/target/ to the tomcat/webapps directory. (See the purpose of this file in the JBoss section).
Rename the directory (unzipped folder) starter to starter.war (for more details see the warning below).
Add the jar file exo.portal.sample.portal.config-X.Y.Z.jar from sample/portal/config/target/ to the tomcat/lib directory. (See the purpose of this file in the JBoss section).
Add the jar file exo.portal.sample.portal.jar-X.Y.Z.jar from sample/portal/jar/target/ to the tomcat/lib directory. (See the purpose of this file in the JBoss section).
Define the related realm in your file tomcat/conf/jaas.conf, as below:
tomcat/conf/jaas.conf
...
exo-domain-sample-portal {
org.exoplatform.web.security.PortalLoginModule required
portalContainerName="sample-portal"
realmName="exo-domain-sample-portal";
org.exoplatform.services.security.jaas.SharedStateLoginModule required
portalContainerName="sample-portal"
realmName="exo-domain-sample-portal";
org.exoplatform.services.security.j2ee.TomcatLoginModule required
portalContainerName="sample-portal"
realmName="exo-domain-sample-portal";
};Define the context of sample-portal by creating a file called sample-portal.xml into tomcat/conf/Catalina/localhost/ with the following content:
tomcat/conf/Catalina/localhost/sample-portal.xml
<Context path='/sample-portal' docBase='sample-portal' debug='0' reloadable='true' crossContext='true' privileged='true'>
<Logger className='org.apache.catalina.logger.SystemOutLogger'
prefix='localhost_portal_log.' suffix='.txt' timestamp='true'/>
<Manager className='org.apache.catalina.session.PersistentManager' saveOnRestart='false'/>
<Realm className='org.apache.catalina.realm.JAASRealm'
appName='exo-domain-sample-portal'
userClassNames='org.exoplatform.services.security.jaas.UserPrincipal'
roleClassNames='org.exoplatform.services.security.jaas.RolePrincipal'
debug='0' cache='false'/>
<Valve className='org.apache.catalina.authenticator.FormAuthenticator' characterEncoding='UTF-8'/></Context>Define the context of rest-sample-portal by creating a file called rest-sample-portal.xml into tomcat/conf/Catalina/localhost/ with the following content:
tomcat/conf/Catalina/localhost/rest-sample-portal.xml
<Context path="/rest-sample-portal" docBase="rest-sample-portal" reloadable="true" crossContext="false">
<Logger className='org.apache.catalina.logger.SystemOutLogger'
prefix='localhost_portal_log.' suffix='.txt' timestamp='true'/>
<Manager className='org.apache.catalina.session.PersistentManager' saveOnRestart='false'/>
<Realm className='org.apache.catalina.realm.JAASRealm'
appName='exo-domain-sample-portal'
userClassNames="org.exoplatform.services.security.jaas.UserPrincipal"
roleClassNames="org.exoplatform.services.security.jaas.RolePrincipal"
debug='0' cache='false'/>
</Context>Warning
This can only work if the starter.war is the last war file to be loaded, so don't hesitate to rename it if your war files are loaded following to the alphabetic order.
To fix this issue you need to check if:
The file starter-gatein.ear (which will be starter.war for Tomcat) has been deployed
The file starter-gatein.ear (which will be starter.war for Tomcat) is the last ear file to be launched
Note
With Tomcat to prevent any alphabetic issue, the good way to solve this problem is to:
Unzip the archive starter.war into a directory called starter
Remove the archive starter.war
Rename the folder starter to starter.war
This tip works because folders corresponding to unzipped wars are launched after war files.
Remove all the configuration files from the jar files ( conf/configuration.xml and conf/portal/configuration.xml) and move them to the war file of your extension, otherwise your configuration files will be loaded for all the portal containers which could cause incompatibility issues with other portals.
Each extension should manage independently, its css files, js files, google gadgets and configuration files. If you add configuration files into the jar files of your extension, you brake this law.
Important
Checked under Gatein 3.1.0-GA Final
Important
only no-tx-datasource is supported in JCR 1.12
Under JBoss, just put a file XXX-ds.xml in the deploy server (example: \server\default\deploy). In this file, we will configure all datasources which eXo will need. (there should be 4 named: jdbcjcr_portal, jdbcjcr_portal-sample, jdbcidm_portal & jdbcidm_sample-portal).
Example:
<?xml version="1.0" encoding="UTF-8"?>
<datasources>
<no-tx-datasource>
<jndi-name>jdbcjcr_portal</jndi-name>
<connection-url>jdbc:hsqldb:${jboss.server.data.dir}/data/jdbcjcr_portal</connection-url>
<driver-class>org.hsqldb.jdbcDriver</driver-class>
<user-name>sa</user-name>
<password></password>
</no-tx-datasource>
<no-tx-datasource>
<jndi-name>jdbcjcr_sample-portal</jndi-name>
<connection-url>jdbc:hsqldb:${jboss.server.data.dir}/data/jdbcjcr_sample-portal</connection-url>
<driver-class>org.hsqldb.jdbcDriver</driver-class>
<user-name>sa</user-name>
<password></password>
</no-tx-datasource>
<no-tx-datasource>
<jndi-name>jdbcidm_portal</jndi-name>
<connection-url>jdbc:hsqldb:${jboss.server.data.dir}/data/jdbcidm_portal</connection-url>
<driver-class>org.hsqldb.jdbcDriver</driver-class>
<user-name>sa</user-name>
<password></password>
</no-tx-datasource>
<no-tx-datasource>
<jndi-name>jdbcidm_sample-portal</jndi-name>
<connection-url>jdbc:hsqldb:${jboss.server.data.dir}/data/jdbcidm_sample-portal</connection-url>
<driver-class>org.hsqldb.jdbcDriver</driver-class>
<user-name>sa</user-name>
<password></password>
</no-tx-datasource>
</datasources>Which properties can be set for datasource can be found here: Configuring JDBC DataSources - The non transactional DataSource configuration schema
Edit server/default/conf/gatein/configuration.properties and comment out next rows in JCR section:
#gatein.jcr.datasource.driver=org.hsqldb.jdbcDriver
#gatein.jcr.datasource.url=jdbc:hsqldb:file:${gatein.db.data.dir}/data/jdbcjcr_${name}
#gatein.jcr.datasource.username=sa
#gatein.jcr.datasource.password=and in IDM section:
#gatein.idm.datasource.driver=org.hsqldb.jdbcDriver
#gatein.idm.datasource.url=jdbc:hsqldb:file:${gatein.db.data.dir}/data/jdbcidm_${name}
#gatein.idm.datasource.username=sa
#gatein.idm.datasource.password=In jcr-configuration.xml and idm-configuration.xml comment out the plugin InitialContextInitializer.
<!-- Commented because, Datasources are declared and bound by AS, not in eXo -->
<!--
<external-component-plugins>
[...]
</external-component-plugins>
-->Running eXo after these configurations goes well.