When creating a node in eXo Platform, you must set its properties. Thus, each node needs to have a form to enter data for their properties (called the Dialog template), and display the existing values (called the View template). The template management allows users to view, delete and modify the predefined templates or to add a new template.
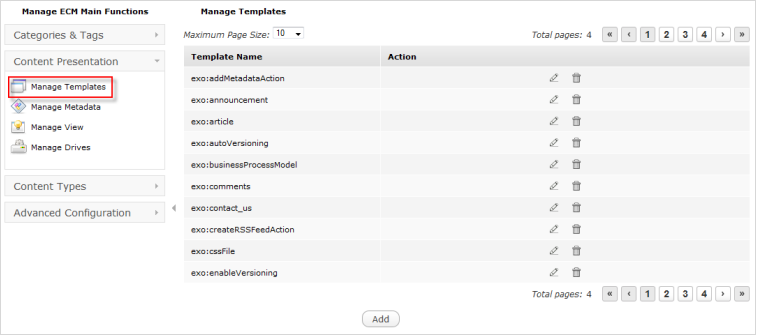
Click Content Presentation --> Manage Templates.
Click the Add button in the Manage Templates form to open the Template Form.
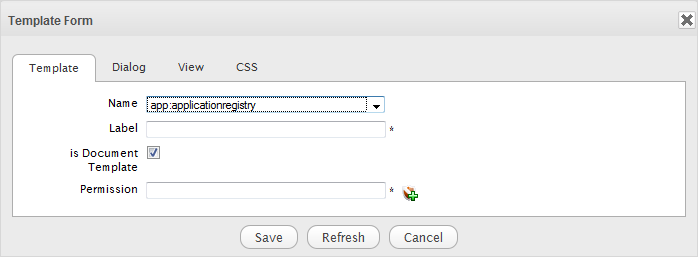
Select the template type from the Name drop-down menu.
Specify a name for the template in the Label field. It is required.
Select the is Document Template checkbox if you want your created template to become a template for a document.
Click
 next to the
Permission
field to open the
Select Permission
dialog. It is required.
next to the
Permission
field to open the
Select Permission
dialog. It is required.
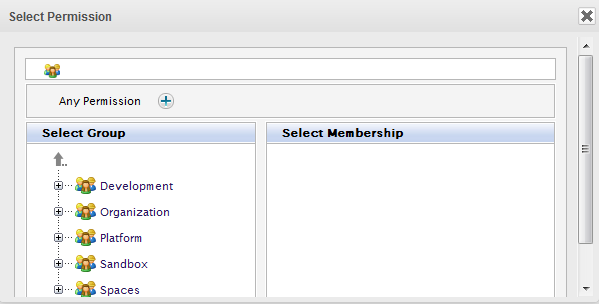
Select the group from the left pane and the membership from the right pane;
Or, you can set permissions for everyone by clicking
 next to
Any Permission.
next to
Any Permission.
Optionally, select the Dialog tab and enter the value in the Dialog Content field.
Optionally, select the View tab and enter the value in the View Content field.
Optionally, select the CSS tab and enter the value in the CSS Content field.
Click Save to create the template.
Click Content Presentation --> Manage Templates.
Click
 in the
Action
column, corresponding to the template you want to edit.
in the
Action
column, corresponding to the template you want to edit.
Make changes on the values of each tab, including:
In the Template tab, you can edit the label of the template.
In the Dialog tab, you can do the followings:
Add a dialog
i. Input content for this dialog in the Content field.
ii. Input the name for this dialog that is required.
iii. Select permissions for a group that can use this dialog that is required.
Edit an existing dialog
i. Click
in the dialog row you want to edit.
ii. Edit the dialog properties.
iii. Click Save to accept all changes in the Dialog tab.
Delete an existing dialog
i. Click
 in the dialog row you want to edit.
ii. Click OK to accept your deletion.
Note
You cannot delete the default dialog. You must create a new one before you can delete the current default dialog.
In the View tab, you can do the followings:
Add a view
i. Enter content into the Content field.
ii. Input name for this view that is required.
iii. Select permissions for a group that can use this view that is required.
Edit an existing view
i. Click
in the
Actions
column, corresponding to the view you want to edit.
ii. Edit the view properties.
iii. Click Save to accept all changes in the View tab.
Note
You cannot change the view name.
If you click is Enable Version checkbox, this view automatically increments one version after you have clicked Save. It is displayed at Version column in the View tab.
If the dialog has at least two versions, in the View tab, it displays the Restore button. You can use Restore to roll back to the previous View.
Delete an existing view
i. Click
 in the
Actions
column, corresponding to the view you want to delete.
in the
Actions
column, corresponding to the view you want to delete.
ii. Click OK to accept your deletion.
iii. Click Save to accept all changes.
Click
corresponding to the template you want to remove in the
Manage Templates
page.
Click OK in the confirmation message to accept your deletion.