You can perform this action only when you are a member of the /platform/administrators group.
Open the Create New Portal window by following one of the two ways:
The first way
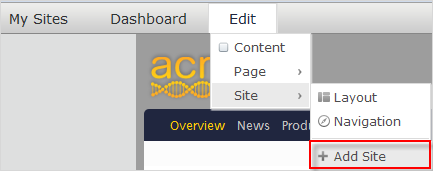
Hover your cursor over Edit --> Site on the Administration bar, then select Add site from the drop-down menu.
The second way
i. Hover your cursor over
 on the Administration bar, then select Portal --> Sites from the drop-down menu.
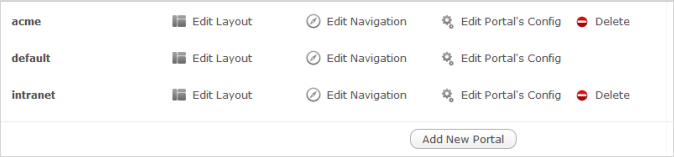
ii. Click the Add New Portal button.
By default, the Create New Portal window, which contains the Portal Settings tab, will open.

Enter a string into the Portal Name field. This field is required and must be unique. Only alphabetical, numerical and underscore characters are allowed for this field with the length from 3 to 30 characters.
Select the default display language for the portal from the Locale field.
Click the Properties tab to set the properties of a portal.

Details:
Field Description Keep session alive Keep the working session for a long time to avoid the time-out. There are 3 options: Never: The session will time out if the logged-in user does not do any action after a given period. In this case, there will be a message which asks the user to log in again.
On Demand: The session will time out to the application's requirement. If there is no request from the application, the session will time out after the given period that is similar to that of Never.
Always: The session will never time out even if the logged-in user does not do any action after a long time.
Show info bar by default Tick the checkbox to show the info bar of the porlet by default when the portlet is used in a page of the portal. The "Show info bar by default" option only takes effect on new porlets as from the time you select the checkbox rather than all portlets of the portal. In particular, after creating your new portal with the "Show info bar by default" option checked, newly created portlets of the portal will be displayed with the info bar by default. However, if you deselect the "Show info bar by default" option when editing the portal's configuration, the former portlets with the shown info bars are remained; meanwhile new portlets, which are created after this option is deselected, will be shown without the info bars.
Click the Permission Settings tab to set permissions on the portal.
The list of Access permissions for the portal is empty by default. You have to select at least one or tick the Make it public (everyone can access) checkbox to assign the Access permission to everyone.
Note
For more details on how to grant permissions on the portal, see the Set permissions on a portal section.
Click the Portal Templates tab to select the template for your portal.
Click Save to accept creating your new portal.