Preface
Full text search engines like Apache Lucene are very powerful technologies to add efficient free text search capabilities to applications. However, Lucene suffers several mismatches when dealing with object domain models. Amongst other things indexes have to be kept up to date and mismatches between index structure and domain model as well as query mismatches have to be avoided.
Hibernate Search addresses these shortcomings: it indexes your domain model with the help of a few annotations, takes care of database/index synchronization and brings back regular managed objects from free text queries.
To achieve this, Hibernate Search combines the power of Hibernate ORM and Apache Lucene/Elasticsearch/OpenSearch.
1. Getting started
This section will guide you through the initial steps required to integrate Hibernate Search into your application.
1.1. Compatibility
Version |
Note |
|
|---|---|---|
Java Runtime |
8, 11 or 17 |
|
Hibernate ORM (for the ORM mapper) |
5.6.12.Final |
|
JPA (Java EE) (for the ORM mapper) |
2.2 |
|
Jakarta Persistence (for the ORM mapper) |
3.0 |
Need to use different Maven artifacts. |
Apache Lucene (for the Lucene backend) |
8.11.1 |
|
Elasticsearch server (for the Elasticsearch backend) |
5.6, 6.8, 7.10 or 7.16 |
Other minor versions (e.g. 6.0 or 7.0) may work but are not given priority for bugfixes and new features. |
OpenSearch server (for the Elasticsearch backend) |
1.0 or 1.2 |
Other minor versions may work but are not given priority for bugfixes and new features. |
|
Find more information for all versions of Hibernate Search on our compatibility matrix. The compatibility policy may also be of interest. |
|
Elasticsearch 7.11+ licensing
While Elasticsearch up to 7.10 was distributed under the Apache License 2.0, be aware that Elasticsearch 7.11 and later are distributed under the Elastic License and the SSPL, which are not considered open-source by the Open Source Initiative. Only the low-level Java REST client, which Hibernate Search depends on, remains open-source. |
|
OpenSearch
While it historically targeted Elastic’s Elasticsearch distribution, Hibernate Search is also compatible with OpenSearch and regularly tested against it. Every section of this documentation referring to Elasticsearch is also relevant for the OpenSearch distribution. |
1.2. Migration notes
If you are upgrading an existing application from an earlier version of Hibernate Search to the latest release, make sure to check out the migration guide.
|
To Hibernate Search 5 users If you pull our artifacts from a Maven repository, and you come from Hibernate Search 5, be aware that just bumping the version number will not be enough. In particular, the group IDs changed from Additionally, be aware that a lot of APIs have changed, some only because of a package change, others because of more fundamental changes (like moving away from using Lucene types in Hibernate Search APIs). For that reason, you are encouraged to migrate first to Hibernate Search 6.0 using the 6.0 migration guide, and only then to later versions (which will be significantly easier). |
1.3. Framework support
1.3.1. Quarkus
Quarkus has an official extension for Hibernate Search with Elasticsearch. We recommend you follow Quarkus’s Hibernate Search Guide: it is a great hands-on introduction to Hibernate Search, and it covers the specifics of Quarkus (different dependencies, different configuration properties, …).
1.3.2. Spring Boot
Hibernate Search can easily be integrated into a Spring Boot application. Just read about Spring Boot’s specifics below, then follow the getting started guide.
Configuration properties
application.properties/application.yaml are Spring Boot configuration files,
not JPA or Hibernate Search configuration files.
Adding Hibernate Search properties starting with hibernate.search. directly in that file will not work.
Instead, prefix your Hibernate Search properties with
spring.jpa.properties.,
so that Spring Boot passes along the properties to Hibernate ORM, which will pass them along to Hibernate Search.
For example:
spring.jpa.properties.hibernate.search.backend.hosts = elasticsearch.mycompany.comDependency versions
Spring Boot automatically sets the version of dependencies without your knowledge. While this is ordinarily a good thing, from time to time Spring Boot dependencies will be a little out of date. Thus, it is recommended to override Spring Boot’s defaults at least for some key dependencies.
With Maven, add this to your POM’s <properties>:
<properties>
    <hibernate.version>5.6.12.Final</hibernate.version>
    <elasticsearch.version>7.16.3</elasticsearch.version>
    <!-- ... plus any other properties of yours ... -->
</properties>|
If, after setting the properties above,
you still have problems (e.g. |
Application hanging on startup
Spring Boot 2.3.x and above is affected by a bug that causes the application to hang on startup when using Hibernate Search, particularly when using custom components (custom bridges, analysis configurers, …).
The problem, which is not limited to just Hibernate Search, has been reported, but hasn’t been fixed yet in Spring Boot 2.5.1.
As a workaround, you can set the property spring.data.jpa.repositories.bootstrap-mode to deferred or,
if that doesn’t work, default.
Interestingly, using @EnableJpaRepositories(bootstrapMode = BootstrapMode.DEFERRED) has been reported to work
even in situations where setting spring.data.jpa.repositories.bootstrap-mode to deferred didn’t work.
Alternatively, if you do not need dependency injection in your custom components,
you can refer to those components with the prefix constructor:
so that Hibernate Search doesn’t even try to use Spring to retrieve the components,
and thus avoids the deadlock in Spring.
See this section for more information.
1.4. Architecture
For the sake of simplicity, this guide assumes we are building application deployed as a single instance on a single node.
For more advanced setups, you are encouraged to have a look at the Examples of architectures.
1.5. Dependencies
The Hibernate Search artifacts can be found in Maven’s Central Repository.
If you do not want to, or cannot, fetch the JARs from a Maven repository, you can get them from the distribution bundle hosted at Sourceforge.
In order to use Hibernate Search, you will need at least two direct dependencies:
-
a dependency to the "mapper", which extracts data from your domain model and maps it to indexable documents;
-
and a dependency to the "backend", which allows indexing and searching these documents.
Below are the most common setups and matching dependencies for a quick start; read Architecture for more information.
- Hibernate ORM + Lucene
-
Allows indexing of ORM entities in a single application node, storing the index on the local filesystem.
If you get Hibernate Search from Maven, use these dependencies:
<dependency>
   <groupId>org.hibernate.search</groupId>
   <artifactId>hibernate-search-mapper-orm</artifactId>
   <version>6.1.8.Final</version>
</dependency>
<dependency>
   <groupId>org.hibernate.search</groupId>
   <artifactId>hibernate-search-backend-lucene</artifactId>
   <version>6.1.8.Final</version>
</dependency>
If you get Hibernate Search from the distribution bundle, copy the JARs from
dist/engine,dist/mapper/orm,dist/backend/lucene, and their respectivelibsubdirectories. - Hibernate ORM + Elasticsearch (or OpenSearch)
-
Allows indexing of ORM entities on multiple application nodes, storing the index on a remote Elasticsearch or OpenSearch cluster (to be configured separately).
If you get Hibernate Search from Maven, use these dependencies:
<dependency>
   <groupId>org.hibernate.search</groupId>
   <artifactId>hibernate-search-mapper-orm</artifactId>
   <version>6.1.8.Final</version>
</dependency>
<dependency>
   <groupId>org.hibernate.search</groupId>
   <artifactId>hibernate-search-backend-elasticsearch</artifactId>
   <version>6.1.8.Final</version>
</dependency>
If you get Hibernate Search from the distribution bundle, copy the JARs from
dist/engine,dist/mapper/orm,dist/backend/elasticsearch, and their respectivelibsubdirectories.
1.6. Configuration
Once you have added all required dependencies to your application, it’s time to have a look at the configuration file.
|
If you are new to Hibernate ORM, we recommend you start there to implement entity persistence in your application, and only then come back here to add Hibernate Search indexing. |
The configuration properties of Hibernate Search are sourced from Hibernate ORM, so they can be added to any file from which Hibernate ORM takes its configuration:
-
A
hibernate.propertiesfile in your classpath. -
The
hibernate.cfg.xmlfile in your classpath, if using Hibernate ORM native bootstrapping. -
The
persistence.xmlfile in your classpath, if using Hibernate ORM JPA bootstrapping.
Hibernate Search provides sensible defaults for all configuration properties, but depending on your setup you might want to set the following:
persistence.xml for a "Hibernate ORM + Lucene" setup<property name="hibernate.search.backend.directory.root"
value="some/filesystem/path"/> (1)| 1 | Set the location of indexes in the filesystem. By default, the backend will store indexes in the current working directory. |
persistence.xml for a "Hibernate ORM + Elasticsearch/OpenSearch" setup<property name="hibernate.search.backend.hosts"
value="elasticsearch.mycompany.com"/> (1)
<property name="hibernate.search.backend.protocol"
value="https"/> (2)
<property name="hibernate.search.backend.username"
value="ironman"/> (3)
<property name="hibernate.search.backend.password"
value="j@rV1s"/>| 1 | Set the Elasticsearch hosts to connect to.
By default, the backend will attempt to connect to localhost:9200. |
| 2 | Set the protocol. The default is http, but you may need to use https. |
| 3 | Set the username and password for basic HTTP authentication. You may also be interested in AWS IAM authentication. |
1.7. Mapping
Let’s assume that your application contains the Hibernate ORM managed classes Book and Author
and you want to index them in order to search the books contained in your database.
import java.util.HashSet;
import java.util.Set;
import javax.persistence.Entity;
import javax.persistence.GeneratedValue;
import javax.persistence.Id;
import javax.persistence.ManyToMany;

@Entity
public class Book {

    @Id
    @GeneratedValue
    private Integer id;

    private String title;

    private String isbn;

    private int pageCount;

    @ManyToMany
    private Set<Author> authors = new HashSet<>();

    public Book() {
    }

    // Getters and setters
    // ...

}
import java.util.HashSet;
import java.util.Set;
import javax.persistence.Entity;
import javax.persistence.GeneratedValue;
import javax.persistence.Id;
import javax.persistence.ManyToMany;
@Entity
public class Author {
@Id
@GeneratedValue
private Integer id;
private String name;
@ManyToMany(mappedBy = "authors")
private Set<Book> books = new HashSet<>();
public Author() {
}
// Getters and setters
// ...
}To make these entities searchable, you will need to map them to an index structure. The mapping can be defined using annotations, or using a programmatic API; this getting started guide will show you a simple annotation mapping. For more details, refer to Mapping Hibernate ORM entities to indexes.
Below is an example of how the model above can be mapped.
import java.util.HashSet;
import java.util.Set;
import javax.persistence.Entity;
import javax.persistence.GeneratedValue;
import javax.persistence.Id;
import javax.persistence.ManyToMany;

import org.hibernate.search.mapper.pojo.mapping.definition.annotation.FullTextField;
import org.hibernate.search.mapper.pojo.mapping.definition.annotation.GenericField;
import org.hibernate.search.mapper.pojo.mapping.definition.annotation.Indexed;
import org.hibernate.search.mapper.pojo.mapping.definition.annotation.IndexedEmbedded;
import org.hibernate.search.mapper.pojo.mapping.definition.annotation.KeywordField;

@Entity
@Indexed (1)
public class Book {

    @Id (2)
    @GeneratedValue
    private Integer id;

    @FullTextField (3)
    private String title;

    @KeywordField (4)
    private String isbn;

    @GenericField (5)
    private int pageCount;

    @ManyToMany
    @IndexedEmbedded (6)
    private Set<Author> authors = new HashSet<>();

    public Book() {
    }

    // Getters and setters
    // ...

}
import java.util.HashSet;
import java.util.Set;
import javax.persistence.Entity;
import javax.persistence.GeneratedValue;
import javax.persistence.Id;
import javax.persistence.ManyToMany;
import org.hibernate.search.mapper.pojo.mapping.definition.annotation.FullTextField;
@Entity (7)
public class Author {
@Id
@GeneratedValue
private Integer id;
@FullTextField (3)
private String name;
@ManyToMany(mappedBy = "authors")
private Set<Book> books = new HashSet<>();
public Author() {
}
// Getters and setters
// ...
}| 1 | @Indexed marks Book as indexed, i.e. an index will be created for that entity, and that index will be kept up to date. |
| 2 | By default, the JPA @Id is used to generate a document identifier. |
| 3 | @FullTextField maps a property to a full-text index field with the same name and type.
Full-text fields are broken down into tokens and normalized (lowercased, …).
Here we’re relying on default analysis configuration,
but most applications need to customize it;
this will be addressed further down. |
| 4 | @KeywordField maps a property to a non-analyzed index field.
Useful for identifiers, for example. |
| 5 | Hibernate Search is not just for full-text search: you can index non-String types with the @GenericField annotation,
A broad range of property types are supported out-of-the-box,
such as primitive types (int, double, …) and their boxed counterpart (Integer, Double, …),
enums, date/time types, BigInteger/BigDecimal, etc. |
| 6 | @IndexedEmbedded "embeds" the indexed form of associated objects (entities or embeddables)
into the indexed form of the embedding entity.
Here, the |
| 7 | Entities that are only @IndexedEmbedded in other entities,
but do not require to be searchable by themselves, do not need to be annotated with @Indexed. |
This is a very simple example, but is enough to get started. Just remember that Hibernate Search allows more complex mappings:
-
Multiple
@*Fieldannotations exist, some of them allowing full-text search, some of them allowing finer-grained configuration for field of a certain type. You can find out more about@*Fieldannotations in Mapping a property to an index field with@GenericField,@FullTextField, …. -
Properties, or even types, can be mapped with finer-grained control using "bridges". This allows the mapping of types that are not supported out-of-the-box. See Bridges for more information.
1.8. Initialization
Before the application is started for the first time, some initialization may be required:
-
The indexes and their schema need to be created.
-
Data already present in the database (if any) needs to be indexed.
1.8.1. Schema management
Before indexing can take place, indexes and their schema need to be created, either on disk (Lucene) or through REST API calls (Elasticsearch).
Fortunately, by default, Hibernate Search will take care of creating indexes on the first startup: you don’t have to do anything.
The next time the application is started, existing indexes will be re-used.
|
Any change to your mapping (adding new fields, changing the type of existing fields, …) between two restarts of the application will require an update to the index schema. This will require some special handling, though it can easily be solved by dropping and re-creating the index. See Changing the mapping of an existing application for more information. |
1.8.2. Initial indexing
As we’ll see later, Hibernate Search takes care of triggering indexing every time an entity changes in the application.
However, data already present in the database when you add the Hibernate Search integration is unknown to Hibernate Search, and thus has to be indexed through a batch process. To that end, you can use the mass indexer API, as shown in the following code:
SearchSession searchSession = Search.session( entityManager ); (1)

MassIndexer indexer = searchSession.massIndexer( Book.class ) (2)
        .threadsToLoadObjects( 7 ); (3)

indexer.startAndWait(); (4)| 1 | Get a Hibernate Search session, called SearchSession, from the EntityManager. |
| 2 | Create an "indexer", passing the entity types you want to index.
To index all entity types, call massIndexer() without any argument. |
| 3 | It is possible to set the number of threads to be used. For the complete list of options see Reindexing large volumes of data with the MassIndexer. |
| 4 | Invoke the batch indexing process. |
| If no data is initially present in the database, mass indexing is not necessary. |
1.9. Indexing
Hibernate Search will transparently index every entity persisted, updated or removed through Hibernate ORM. Thus, this code would transparently populate your index:
// Not shown: get the entity manager and open a transaction
Author author = new Author();
author.setName( "John Doe" );

Book book = new Book();
book.setTitle( "Refactoring: Improving the Design of Existing Code" );
book.setIsbn( "978-0-58-600835-5" );
book.setPageCount( 200 );
book.getAuthors().add( author );
author.getBooks().add( book );

entityManager.persist( author );
entityManager.persist( book );
// Not shown: commit the transaction and close the entity manager|
By default, in particular when using the Elasticsearch backend, changes will not be visible right after the transaction is committed. A slight delay (by default one second) will be necessary for Elasticsearch to process the changes. For that reason, if you modify entities in a transaction, and then execute a search query right after that transaction, the search results may not be consistent with the changes you just performed. See Synchronization with the indexes for more information about this behavior and how to tune it. |
1.10. Searching
Once the data is indexed, you can perform search queries.
The following code will prepare a search query targeting the index for the Book entity,
filtering the results so that at least one field among title and authors.name
contains the string refactoring.
The matches are implicitly on words ("tokens") instead of the full string,
and are case-insensitive: that’s because the targeted fields are full-text fields.
// Not shown: get the entity manager and open a transaction
SearchSession searchSession = Search.session( entityManager ); (1)

SearchResult<Book> result = searchSession.search( Book.class ) (2)
        .where( f -> f.match() (3)
                .fields( "title", "authors.name" )
                .matching( "refactoring" ) )
        .fetch( 20 ); (4)

long totalHitCount = result.total().hitCount(); (5)
List<Book> hits = result.hits(); (6)

List<Book> hits2 =
        /* ... same DSL calls as above... */
        .fetchHits( 20 ); (7)
// Not shown: commit the transaction and close the entity manager| 1 | Get a Hibernate Search session, called SearchSession, from the EntityManager. |
| 2 | Initiate a search query on the index mapped to the Book entity. |
| 3 | Define that only documents matching the given predicate should be returned.
The predicate is created using a factory f passed as an argument to the lambda expression. |
| 4 | Build the query and fetch the results, limiting to the top 20 hits. |
| 5 | Retrieve the total number of matching entities. |
| 6 | Retrieve matching entities. |
| 7 | In case you’re not interested in the whole result, but only in the hits,
you can also call fetchHits() directly. |
If for some reason you don’t want to use lambdas, you can use an alternative, object-based syntax, but it will be a bit more verbose:
// Not shown: get the entity manager and open a transaction
SearchSession searchSession = Search.session( entityManager ); (1)

SearchScope<Book> scope = searchSession.scope( Book.class ); (2)

SearchResult<Book> result = searchSession.search( scope ) (3)
        .where( scope.predicate().match() (4)
                .fields( "title", "authors.name" )
                .matching( "refactoring" )
                .toPredicate() )
        .fetch( 20 ); (5)

long totalHitCount = result.total().hitCount(); (6)
List<Book> hits = result.hits(); (7)

List<Book> hits2 =
        /* ... same DSL calls as above... */
        .fetchHits( 20 ); (8)
// Not shown: commit the transaction and close the entity manager| 1 | Get a Hibernate Search session, called SearchSession, from the EntityManager. |
| 2 | Create a "search scope", representing the indexed types that will be queried. |
| 3 | Initiate a search query targeting the search scope. |
| 4 | Define that only documents matching the given predicate should be returned. The predicate is created using the same search scope as the query. |
| 5 | Build the query and fetch the results, limiting to the top 20 hits. |
| 6 | Retrieve the total number of matching entities. |
| 7 | Retrieve matching entities. |
| 8 | In case you’re not interested in the whole result, but only in the hits,
you can also call fetchHits() directly. |
It is possible to get just the total hit count, using fetchTotalHitCount().
// Not shown: get the entity manager and open a transaction
SearchSession searchSession = Search.session( entityManager );

long totalHitCount = searchSession.search( Book.class )
        .where( f -> f.match()
                .fields( "title", "authors.name" )
                .matching( "refactoring" ) )
        .fetchTotalHitCount(); (1)
// Not shown: commit the transaction and close the entity manager| 1 | Fetch the total hit count. |
Note that, while the examples above retrieved hits as managed entities, it is just one of the possible hit types. See Projection DSL for more information.
1.11. Analysis
Full-text search allows fast matches on words in a case-insensitive way, which is one step further than substring search in a relational database. But it can get much better: what if we want a search with the term "refactored" to match our book whose title contains "refactoring"? That’s possible with custom analysis.
Analysis is how text is supposed to be processed when indexing and searching. This involves analyzers, which are made up of three types of components, applied one after the other:
-
zero or (rarely) more character filters, to clean up the input text:
A <strong>GREAT</strong> résume⇒A GREAT résume. -
a tokenizer, to split the input text into words, called "tokens":
A GREAT résume⇒[A, GREAT, résume]. -
zero or more token filters, to normalize the tokens and remove meaningless tokens.
[A, GREAT, résume]⇒[great, resume].
There are built-in analyzers, in particular the default one, which will:
-
tokenize (split) the input according to the Word Break rules of the Unicode Text Segmentation algorithm;
-
filter (normalize) tokens by turning uppercase letters to lowercase.
The default analyzer is a good fit for most language, but is not very advanced. To get the most of analysis, you will need to define a custom analyzer by picking the tokenizer and filters most suited to your specific needs.
The following paragraphs will explain how to configure and use a simple yet reasonably useful analyzer. For more information about analysis and how to configure it, refer to the Analysis section.
Each custom analyzer needs to be given a name in Hibernate Search. This is done through analysis configurers, which are defined per backend:
-
First, you need to implement an analysis configurer, a Java class that implements a backend-specific interface:
LuceneAnalysisConfigurerorElasticsearchAnalysisConfigurer. -
Second, you need to alter the configuration of your backend to actually use your analysis configurer.
As an example, let’s assume that one of your indexed Book entities has the title
"Refactoring: Improving the Design of Existing Code",
and you want to get hits for any of the following search terms:
"Refactor", "refactors", "refactored" and "refactoring".
One way to achieve this is to use an analyzer with the following components:
-
A "standard" tokenizer, which splits words at whitespaces, punctuation characters and hyphens. It is a good general-purpose tokenizer.
-
A "lowercase" filter, which converts every character to lowercase.
-
A "snowball" filter, which applies language-specific stemming.
-
Finally, an "ascii-folding" filter, which replaces characters with diacritics ("é", "à", …) with their ASCII equivalent ("e", "a", …).
The examples below show how to define an analyzer with these components, depending on the backend you picked.
persistence.xml for a "Hibernate ORM + Lucene" setuppackage org.hibernate.search.documentation.gettingstarted.withhsearch.customanalysis;
import org.hibernate.search.backend.lucene.analysis.LuceneAnalysisConfigurationContext;
import org.hibernate.search.backend.lucene.analysis.LuceneAnalysisConfigurer;
public class MyLuceneAnalysisConfigurer implements LuceneAnalysisConfigurer {
@Override
public void configure(LuceneAnalysisConfigurationContext context) {
context.analyzer( "english" ).custom() (1)
.tokenizer( "standard" ) (2)
.tokenFilter( "lowercase" ) (3)
.tokenFilter( "snowballPorter" ) (3)
.param( "language", "English" ) (4)
.tokenFilter( "asciiFolding" );
context.analyzer( "name" ).custom() (5)
.tokenizer( "standard" )
.tokenFilter( "lowercase" )
.tokenFilter( "asciiFolding" );
}
}<property name="hibernate.search.backend.analysis.configurer"
value="class:org.hibernate.search.documentation.gettingstarted.withhsearch.customanalysis.MyLuceneAnalysisConfigurer"/> (6)| 1 | Define a custom analyzer named "english", to analyze English text such as book titles. |
| 2 | Set the tokenizer to a standard tokenizer. You need to pass Lucene-specific names to refer to tokenizers; see Custom analyzers and normalizers for information about available tokenizers, their name and their parameters. |
| 3 | Set the token filters. Token filters are applied in the order they are given. Here too, Lucene-specific names are expected; see Custom analyzers and normalizers for information about available token filters, their name and their parameters. |
| 4 | Set the value of a parameter for the last added char filter/tokenizer/token filter. |
| 5 | Define another custom analyzer, called "name", to analyze author names. On contrary to the first one, do not use enable stemming, as it is unlikely to lead to useful results on proper nouns. |
| 6 | Assign the configurer to the backend in the Hibernate Search configuration (here in persistence.xml).
For more information about the format of bean references, see Parsing of bean references. |
persistence.xml for a "Hibernate ORM + Elasticsearch/OpenSearch" setuppackage org.hibernate.search.documentation.gettingstarted.withhsearch.customanalysis;
import org.hibernate.search.backend.elasticsearch.analysis.ElasticsearchAnalysisConfigurationContext;
import org.hibernate.search.backend.elasticsearch.analysis.ElasticsearchAnalysisConfigurer;
public class MyElasticsearchAnalysisConfigurer implements ElasticsearchAnalysisConfigurer {
@Override
public void configure(ElasticsearchAnalysisConfigurationContext context) {
context.analyzer( "english" ).custom() (1)
.tokenizer( "standard" ) (2)
.tokenFilters( "lowercase", "snowball_english", "asciifolding" ); (3)
context.tokenFilter( "snowball_english" ) (4)
.type( "snowball" )
.param( "language", "English" ); (5)
context.analyzer( "name" ).custom() (6)
.tokenizer( "standard" )
.tokenFilters( "lowercase", "asciifolding" );
}
}<property name="hibernate.search.backend.analysis.configurer"
value="class:org.hibernate.search.documentation.gettingstarted.withhsearch.customanalysis.MyElasticsearchAnalysisConfigurer"/> (7)| 1 | Define a custom analyzer named "english", to analyze English text such as book titles. |
| 2 | Set the tokenizer to a standard tokenizer. You need to pass Elasticsearch-specific names to refer to tokenizers; see Custom analyzers and normalizers for information about available tokenizers, their name and their parameters. |
| 3 | Set the token filters. Token filters are applied in the order they are given. Here too, Elasticsearch-specific names are expected; see Custom analyzers and normalizers for information about available token filters, their name and their parameters. |
| 4 | Note that, for Elasticsearch, any parameterized char filter, tokenizer or token filter must be defined separately and assigned a new name. |
| 5 | Set the value of a parameter for the char filter/tokenizer/token filter being defined. |
| 6 | Define another custom analyzer, named "name", to analyze author names. On contrary to the first one, do not use enable stemming, as it is unlikely to lead to useful results on proper nouns. |
| 7 | Assign the configurer to the backend in the Hibernate Search configuration (here in persistence.xml).
For more information about the format of bean references, see Parsing of bean references. |
Once analysis is configured, the mapping must be adapted to assign the relevant analyzer to each field:
import java.util.HashSet;
import java.util.Set;
import javax.persistence.Entity;
import javax.persistence.GeneratedValue;
import javax.persistence.Id;
import javax.persistence.ManyToMany;

import org.hibernate.search.mapper.pojo.mapping.definition.annotation.FullTextField;
import org.hibernate.search.mapper.pojo.mapping.definition.annotation.GenericField;
import org.hibernate.search.mapper.pojo.mapping.definition.annotation.Indexed;
import org.hibernate.search.mapper.pojo.mapping.definition.annotation.IndexedEmbedded;
import org.hibernate.search.mapper.pojo.mapping.definition.annotation.KeywordField;

@Entity
@Indexed
public class Book {

    @Id
    @GeneratedValue
    private Integer id;

    @FullTextField(analyzer = "english") (1)
    private String title;

    @KeywordField
    private String isbn;

    @GenericField
    private int pageCount;

    @ManyToMany
    @IndexedEmbedded
    private Set<Author> authors = new HashSet<>();

    public Book() {
    }

    // Getters and setters
    // ...

}
import java.util.HashSet;
import java.util.Set;
import javax.persistence.Entity;
import javax.persistence.GeneratedValue;
import javax.persistence.Id;
import javax.persistence.ManyToMany;
import org.hibernate.search.mapper.pojo.mapping.definition.annotation.FullTextField;
@Entity
public class Author {
@Id
@GeneratedValue
private Integer id;
@FullTextField(analyzer = "name") (1)
private String name;
@ManyToMany(mappedBy = "authors")
private Set<Book> books = new HashSet<>();
public Author() {
}
// Getters and setters
// ...
}| 1 | Replace the @GenericField annotation with @FullTextField,
and set the analyzer parameter to the name of the custom analyzer configured earlier. |
That’s it! Now, once the entities will be re-indexed, you will be able to search for the terms "Refactor", "refactors", "refactored" or "refactoring", and the book entitled "Refactoring: Improving the Design of Existing Code" will show up in the results.
|
Mapping changes are not auto-magically applied to already-indexed data. Unless you know what you are doing, you should remember to reindex your data after you changed the Hibernate Search mapping of your entities. |
// Not shown: get the entity manager and open a transaction
SearchSession searchSession = Search.session( entityManager );

SearchResult<Book> result = searchSession.search( Book.class )
        .where( f -> f.match()
                .fields( "title", "authors.name" )
                .matching( "refactored" ) )
        .fetch( 20 );
// Not shown: commit the transaction and close the entity manager
1.12. What’s next
The above paragraphs gave you an overview of Hibernate Search.
The next step after this tutorial is to get more familiar with the overall architecture of Hibernate Search ( Architecture) and review the Examples of architectures to pick the most appropriate for your use case; distributed applications in particular require a specific setup involving a coordination strategy.
You may also want to explore the basic features in more detail. Two topics which were only briefly touched in this tutorial were analysis configuration ( Analysis) and bridges ( Bridges). Both are important features required for more fine-grained indexing.
When it comes to initializing your index, you will be interested in schema management and mass indexing.
When querying, you will probably want to know more about predicates, sorts, projections, aggregations.
You can also have a look at sample applications:
-
The Examples of architectures give an idea of how data flows inside and outside a Hibernate Search application.
-
The Quarkus quickstart, a sample application using Hibernate Search with the Quarkus framework.
-
The "Library" showcase, a sample application using Hibernate Search with the Spring Boot framework.
2. Concepts
2.1. Full-text search
Full-text search is a set of techniques for searching, in a corpus of text documents, the documents that best match a given query.
The main difference with traditional search — for example in an SQL database — is that the stored text is not considered as a single block of text, but as a collection of tokens (words).
Hibernate Search relies on either Apache Lucene or Elasticsearch to implement full-text search. Since Elasticsearch uses Lucene internally, they share a lot of characteristics and their general approach to full-text search.
To simplify, these search engines are based on the concept of inverted indexes: a dictionary where the key is a token (word) found in a document, and the value is the list of identifiers of every document containing this token.
Still simplifying, once all documents are indexed, searching for documents involves three steps:
-
extracting tokens (words) from the query;
-
looking up these tokens in the index to find matching documents;
-
aggregating the results of the lookups to produce a list of matching documents.
|
Lucene and Elasticsearch are not limited to just text search: numeric data is also supported, enabling support for integers, doubles, longs, dates, etc. These types are indexed and queried using a slightly different approach, which obviously does not involve text processing. |
2.2. Mapping
Applications targeted by Hibernate search generally use an entity-based model to represent data.
In this model, each entity is a single object with a few properties of atomic type
(String, Integer, LocalDate, …).
Each entity can have multiple associations to one or even many other entities.
Entities are thus organized as a graph, where each node is an entity and each association is an edge.
By contrast, Lucene and Elasticsearch work with documents. Each document is a collection of "fields", each field being assigned a name — a unique string — and a value — which can be text, but also numeric data such as an integer or a date. Fields also have a type, which not only determines the type of values (text/numeric), but more importantly the way this value will be stored: indexed, stored, with doc values, etc. It is possible to introduce nested documents, but not real associations.
Documents are thus organized, at best, as a collection of trees, where each tree is a document, optionally with nested documents.
There are multiple mismatches between the entity model and the document model: properties vs. fields, associations vs. nested documents, graph vs. collection of trees.
The goal of mapping, in Hibernate search, is to resolve these mismatches by defining how to transform one or more entities into a document, and how to resolve a search hit back into the original entity. This is the main added value of Hibernate Search, the basis for everything else from automatic indexing to the various search DSLs.
Mapping is usually configured using annotations in the entity model, but this can also be achieved using a programmatic API. To learn more about how to configure mapping, see Mapping Hibernate ORM entities to indexes.
To learn how to index the resulting documents, see Indexing Hibernate ORM entities (hint: it’s automatic).
To learn how to search with an API that takes advantage of the mapping to be closer to the entity model, in particular by returning hits as entities instead of just document identifiers, see Searching.
2.3. Analysis
As mentioned in Full-text search, the full-text engine works on tokens, which means text has to be processed both when indexing (document processing, to build the token → document index) and when searching (query processing, to generate a list of tokens to look up).
However, the processing is not just about "tokenizing".
Index lookups are exact lookups,
which means that looking up Great (capitalized) will not return documents containing only great (all lowercase).
An extra step is performed when processing text to address this caveat:
token filtering, which normalizes tokens.
Thanks to that "normalization",
Great will be indexed as great,
so that an index lookup for the query great will match as expected.
In the Lucene world (Lucene, Elasticsearch, Solr, …), text processing during both the indexing and searching phases is called "analysis" and is performed by an "analyzer".
The analyzer is made up of three types of components, which will each process the text successively in the following order:
-
Character filter: transforms the input characters. Replaces, adds or removes characters.
-
Tokenizer: splits the text into several words, called "tokens".
-
Token filter: transforms the tokens. Replaces, add or removes characters in a token, derives new tokens from the existing ones, removes tokens based on some condition, …
The tokenizer usually splits on whitespaces (though there are other options).
Token filters are usually where customization takes place.
They can remove accented characters,
remove meaningless suffixes (-ing, -s, …)
or tokens (a, the, …),
replace tokens with a chosen spelling (wi-fi ⇒ wifi),
etc.
|
Character filters, though useful, are rarely used, because they have no knowledge of token boundaries. Unless you know what you are doing, you should generally favor token filters. |
In some cases, it is necessary to index text in one block, without any tokenization:
-
For some types of text, such as SKUs or other business codes, tokenization simply does not make sense: the text is a single "keyword".
-
For sorts by field value, tokenization is not necessary. It is also forbidden in Hibernate Search due to performance issues; only non-tokenized fields can be sorted on.
To address these use cases, a special type of analyzer, called "normalizer", is available. Normalizers are simply analyzers that are guaranteed not to use a tokenizer: they can only use character filters and token filters.
In Hibernate Search, analyzers and normalizers are referenced by their name, for example when defining a full-text field. Analyzers and normalizers have two separate namespaces.
Some names are already assigned to built-in analyzers (in Elasticsearch in particular), but it is possible (and recommended) to assign names to custom analyzers and normalizers, assembled using built-in components (tokenizers, filters) to address your specific needs.
Each backend exposes its own APIs to define analyzers and normalizers, and generally to configure analysis. See the documentation of each backend for more information:
2.4. Commit and refresh
In order to get the best throughput when indexing and when searching, both Elasticsearch and Lucene rely on "buffers" when writing to and reading from the index:
-
When writing, changes are not directly written to the index, but to an "index writer" that buffers changes in-memory or in temporary files.
The changes are "pushed" to the actual index when the writer is committed. Until the commit happens, uncommitted changes are in an "unsafe" state: if the application crashes or if the server suffers from a power loss, uncommitted changes will be lost.
-
When reading, e.g. when executing a search query, data is not read directly from the index, but from an "index reader" that exposes a view of the index as it was at some point in the past.
The view is updated when the reader is refreshed. Until the refresh happens, results of search queries might be slightly out of date: documents added since the last refresh will be missing, documents delete since the last refresh will still be there, etc.
Unsafe changes and out-of-sync indexes are obviously undesirable, but they are a trade-off that improves performance.
Different factors influence when refreshes and commit happen:
-
Automatic indexing will, by default, require that a commit of the index writer is performed after each set of changes, meaning the changes are safe after the Hibernate ORM transaction commit returns. However, no refresh is requested by default, meaning the changes may only be visible at a later time, when the backend decides to refresh the index reader. This behavior can be customized by setting a different synchronization strategy.
-
The mass indexer will not require any commit or refresh until the very end of mass indexing, to maximize indexing throughput.
-
Whenever there are no particular commit or refresh requirements, backend defaults will apply:
-
See here for Lucene.
-
A commit may be forced explicitly through the
flush()API. -
A refresh may be forced explicitly though the
refresh()API.
|
Even though we use the word "commit", this is not the same concept as a commit in relational database transactions: there is no transaction and no "rollback" is possible. There is no concept of isolation, either. After a refresh, all changes to the index are taken into account: those committed to the index, but also those that are still buffered in the index writer. For this reason, commits and refreshes can be treated as completely orthogonal concepts: certain setups will occasionally lead to committed changes not being visible in search queries, while others will allow even uncommitted changes to be visible in search queries. |
2.5. Sharding and routing
Sharding consists in splitting index data into multiple "smaller indexes", called shards, in order to improve performance when dealing with large amounts of data.
In Hibernate Search, similarly to Elasticsearch, another concept is closely related to sharding: routing. Routing consists in resolving a document identifier, or generally any string called a "routing key", into the corresponding shard.
When indexing:
-
A document identifier and optionally a routing key are generated from the indexed entity.
-
The document, along with its identifier and optionally its routing key, is passed to the backend.
-
The backend "routes" the document to the correct shard, and adds the routing key (if any) to a special field in the document (so that it’s indexed).
-
The document is indexed in that shard.
When searching:
-
The search query can optionally be passed one or more routing keys.
-
If no routing key is passed, the query will be executed on all shards.
-
If one or more routing keys are passed:
-
The backend resolves these routing keys into a set of shards, and the query will only be executed on all shards, ignoring the other shards.
-
A filter is added to the query so that only documents indexed with one of the given routing keys are matched.
-
Sharding, then, can be leveraged to boost performance in two ways:
-
When indexing: a sharded index can spread the "stress" onto multiple shards, which can be located on different disks (Lucene) or different servers (Elasticsearch).
-
When searching: if one property, let’s call it
category, is often used to select a subset of documents, this property can be defined as a routing key in the mapping, so that it’s used to route documents instead of the document ID. As a result, documents with the same value forcategorywill be indexed in the same shard. Then when searching, if a query already filters documents so that it is known that the hits will all have the same value forcategory, the query can be manually routed to the shards containing documents with this value, and the other shards can be ignored.
To enable sharding, some configuration is required:
-
The backends require explicit configuration: see here for Lucene and here for Elasticsearch.
-
In most cases, document IDs are used to route documents to shards by default. This does not allow taking advantage of routing when searching, which requires multiple documents to share the same routing key. Applying routing to a search query in that case will return at most one result. To explicitly define the routing key to assign to each document, assign routing bridges to your entities.
|
Sharding is static by nature: each index is expected to have the same shards, with the same identifiers, from one boot to the other. Changing the number of shards or their identifiers will require full reindexing. |
3. Architecture
3.1. Components of Hibernate Search
From the user’s perspective, Hibernate Search consists of two components:
- Mapper
-
The mapper "maps" the user model to an index model, and provide APIs consistent with the user model to perform indexing and searching.
Most applications rely on the ORM mapper, which offers the ability to index properties of Hibernate ORM entities.
The mapper is configured partly through annotations on the domain model, and partly through configuration properties.
- Backend
-
The backend is the abstraction over the full-text engines, where "things get done". It implements generic indexing and searching interfaces for use by the mapper through "index managers", each providing access to one index.
For instance the Lucene backend delegates to the Lucene library, and the Elasticsearch backend delegates to a remote Elasticsearch cluster.
The backend is configured partly by the mapper, which tells the backend which indexes must exist and what fields they must have, and partly through configuration properties.
The mapper and backend work together to provide three main features:
- Mass indexing
-
This is how Hibernate Search rebuilds indexes from zero based on the content of a database.
The mapper queries the database to retrieve the identifier of every entity, then processes these identifiers in batches, loading the entities then processing them to generate documents that are sent to the backend for indexing. The backend puts the document in an internal queue, and will index documents in batches, in background processes, notifying the mapper when it’s done.
See Reindexing large volumes of data with the
MassIndexerfor details. - Automatic indexing
-
This is how Hibernate Search keeps indexes in sync with a database.
When an entity changes, the mapper detects the change and stores the information in an indexing plan. Upon transaction commit, these changes processed (either in the same thread or in a background process, depending on the coordination strategy), and documents are generated, then sent to the backend for indexing. The backend puts the documents in an internal queue, and will index documents in batches, in background processes, notifying the mapper when it’s done.
See Automatic indexing for details.
- Searching
-
This is how Hibernate Search provides ways to query an index.
The mapper exposes entry points to the search DSL, allowing selection of entity types to query. When one or more entity types are selected, the mapper delegates to the corresponding index managers to provide a Search DSL and ultimately create the search query. Upon query execution, the backend submits a list of entity references to the mapper, which loads the corresponding entities. The entities are then returned by the query.
See Searching for details.
3.2. Examples of architectures
3.2.1. Overview
| Architecture | Single-node with Lucene | No coordination with Elasticsearch | Outbox polling with Elasticsearch |
|---|---|---|---|
Application topology |
Single-node |
Single-node or multi-node |
|
Extra bits to maintain |
Indexes on filesystem |
Elasticsearch cluster |
|
Guarantee of index updates |
|||
Visibility of index updates |
|||
Native features |
Mostly for experts |
For anyone |
|
Overhead for application threads |
|||
Overhead for the database |
|||
Impact on database schema |
None |
||
Limitations |
Automatic indexing ignores: JPQL/SQL queries, asymmetric association updates |
||
Out-of-sync indexes in rare situations: concurrent |
No other known limitation |
||
3.2.2. Single-node application with the Lucene backend
Description
With the Lucene backend, indexes are local to a given application node (JVM). They are accessed through direct calls to the Lucene library, without going through the network.
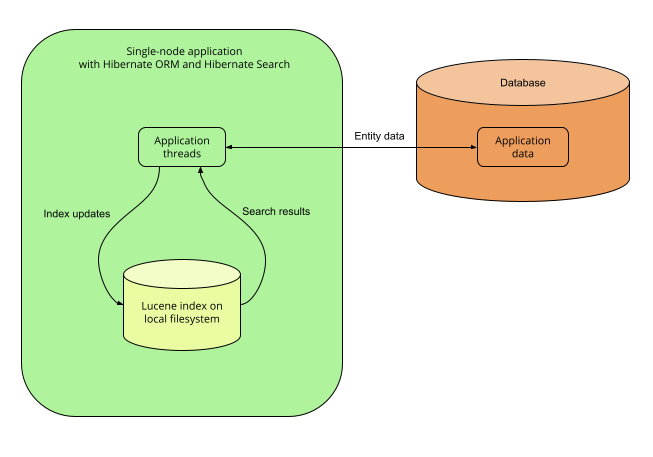
This mode is only relevant to single-node applications.
Pros and cons
Pros:
-
Simplicity: no external services are required, everything lives on the same server.
-
Immediate visibility (~milliseconds) of index updates. While other architectures can perform comparably well for most use cases, a single-node, Lucene backend is the best way to implement indexing if you need changes to be visible immediately after the database changes.
Cons:
-
Without coordination, backend errors during automatic indexing may lead to out-of sync indexes.
-
Not so easy to extend: experienced developers can access a lot of Lucene features, even those that are not exposed by Hibernate Search, by providing native Lucene objects; however, Lucene APIs are not very easy to figure out for developers unfamiliar with Lucene. If you’re interested, see for example
Query-based predicates. -
Overhead for application threads: reindexing is done directly in application threads, and it may require additional time to load data that must be indexed from the database. Depending on the amount of data to load, this may increase the application’s latency and/or decrease its throughput.
-
No horizontal scalability: there can only be one application node, and all indexes need to live on the same server.
Getting started
To implement this architecture, use the following Maven dependencies:
<dependency>
   <groupId>org.hibernate.search</groupId>
   <artifactId>hibernate-search-mapper-orm</artifactId>
   <version>6.1.8.Final</version>
</dependency>
<dependency>
   <groupId>org.hibernate.search</groupId>
   <artifactId>hibernate-search-backend-lucene</artifactId>
   <version>6.1.8.Final</version>
</dependency>
3.2.3. Single-node or multi-node application, without coordination and with the Elasticsearch backend
Description
With the Elasticsearch backend, indexes are not tied to the application node. They are managed by a separate cluster of Elasticsearch nodes, and accessed through calls to REST APIs.
Thus, it is possible to set up multiple application nodes in such a way that they all perform index updates and search queries independently, without coordinating with each other.
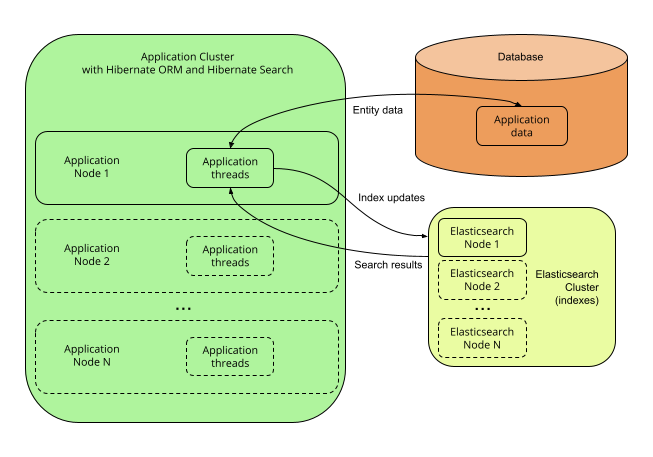
| The Elasticsearch cluster may be a single node living on the same server as the application. |
Pros and cons
Pros:
-
Easy to extend: you can easily access most Elasticsearch features, even those that are not exposed by Hibernate Search, by providing your own JSON. See for example JSON-defined predicates, or JSON-defined aggregations, or leveraging advanced features with JSON manipulation.
-
Horizontal scalability of the indexes: you can size the Elasticsearch cluster according to your needs. See "Scalability and resilience" in the Elasticsearch documentation.
-
Horizontal scalability of the application: you can have as many instances of the application as you need (though high concurrency increases the likeliness of some problems with this architecture, see "Cons" below).
Cons:
-
Without coordination, backend errors during automatic indexing may lead to out-of sync indexes.
-
Need to manage an additional service: the Elasticsearch cluster.
-
Overhead for application threads: reindexing is done directly in application threads, and it may require additional time to load data that must be indexed from the database. Depending on the amount of data to load, this may increase the application’s latency and/or decrease its throughput.
-
Delayed visibility (~1 second) of index updates (near-real-time). While changes can be made visible as soon as possible after the database changes, Elasticsearch is near-real-time by nature, and won’t perform very well if you need changes to be visible immediately after the database changes.
Getting started
To implement this architecture, use the following Maven dependencies:
<dependency>
   <groupId>org.hibernate.search</groupId>
   <artifactId>hibernate-search-mapper-orm</artifactId>
   <version>6.1.8.Final</version>
</dependency>
<dependency>
   <groupId>org.hibernate.search</groupId>
   <artifactId>hibernate-search-backend-elasticsearch</artifactId>
   <version>6.1.8.Final</version>
</dependency>
3.2.4. Multi-node application with outbox polling and Elasticsearch backend
|
Features detailed in this section are incubating: they are still under active development. The usual compatibility policy does not apply: the contract of incubating elements (e.g. types, methods, configuration properties, etc.) may be altered in a backward-incompatible way — or even removed — in subsequent releases. You are encouraged to use incubating features so the development team can get feedback and improve them, but you should be prepared to update code which relies on them as needed. |
Description
With Hibernate Search’s outbox-polling coordination strategy,
entity change events are not processed immediately in the ORM session where they arise,
but are pushed to an outbox table in the database.
A background process polls that outbox table for new events, and processes them asynchronously, updating the indexes as necessary. Since that queue can be sharded, multiple application nodes can share the workload of indexing.
This requires the Elasticsearch backend so that indexes are not tied to a single application node and can be updated or queried from multiple application nodes.
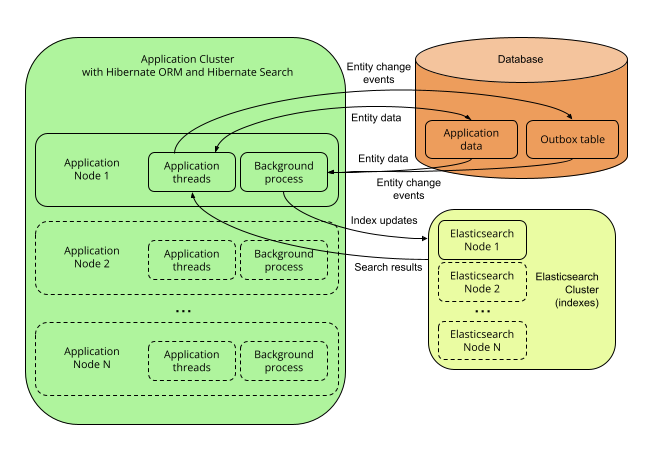
Pros and cons
Pros:
-
Safest:
-
the possibility of out-of-sync indexes caused by indexing errors in the backend that affects other architectures is eliminated here, because entity change events are persisted in the same transaction as the entity changes allowing retries for as long as necessary.
-
the possibility of out-of-sync indexes caused by concurrent updates that affects other architectures is eliminated here, because each entity instance is reloaded from the database within a new transaction before being re-indexed.
-
-
Easy to extend: you can easily access most Elasticsearch features, even those that are not exposed by Hibernate Search, by providing your own JSON. See for example JSON-defined predicates, or JSON-defined aggregations, or leveraging advanced features with JSON manipulation.
-
Minimal overhead for application threads: application threads only need to append events to the queue, they don’t perform reindexing themselves.
-
Horizontal scalability of the indexes: you can size the Elasticsearch cluster according to your needs. See "Scalability and resilience" in the Elasticsearch documentation.
-
Horizontal scalability of the application: you can have as many instances of the application as you need.
Cons:
-
Need to manage an additional service: the Elasticsearch cluster.
-
Delayed visibility (~1 second or more, depending on load and hardware) of index updates. First because Elasticsearch is near-real-time by nature, but also because the event queue introduces additional delays.
-
Impact on the database schema: additional tables must be created in the database to hold the data necessary for coordination.
-
Overhead for the database: the background process that reads entity changes and performs reindexing needs to read changed entities from the database.
Getting started
The outbox-polling coordination strategy requires an extra dependency.
To implement this architecture, use the following Maven dependencies:
<dependency>
   <groupId>org.hibernate.search</groupId>
   <artifactId>hibernate-search-mapper-orm</artifactId>
   <version>6.1.8.Final</version>
</dependency>
<dependency>
   <groupId>org.hibernate.search</groupId>
   <artifactId>hibernate-search-mapper-orm-coordination-outbox-polling</artifactId>
   <version>6.1.8.Final</version>
</dependency>
<dependency>
   <groupId>org.hibernate.search</groupId>
   <artifactId>hibernate-search-backend-elasticsearch</artifactId>
   <version>6.1.8.Final</version>
</dependency>
Also, configure coordination as explained in outbox-polling: additional event tables and polling in background processors.
4. Configuration
4.1. Configuration sources
When using Hibernate Search within Hibernate ORM, configuration properties are retrieved from Hibernate ORM.
This means that wherever you set Hibernate ORM properties, you can set Hibernate Search properties:
-
In a
hibernate.propertiesfile at the root of your classpath. -
In
persistence.xml, if you bootstrap Hibernate ORM with the JPA APIs -
In JVM system properties (
-DmyProperty=myValuepassed to thejavacommand) -
In the configuration file of your framework, for example
application.yaml/application.properties.
|
When setting properties through the configuration file of your framework, the keys of configuration properties will likely be different from the keys mentioned in this documentation. For example See Framework support for more information. |
4.2. Configuration properties
4.2.1. Structure of configuration properties
Configuration properties are all grouped under a common root.
In the ORM integration, this root is hibernate.search,
but other integrations (Infinispan, …) may use a different one.
This documentation will use hibernate.search in all examples.
Under that root, we can distinguish between three categories of properties.
- Global properties
-
These properties potentially affect all Hibernate Search. They are generally located just under the
hibernate.searchroot.Global properties are explained in the relevant parts of this documentation:
- Backend properties
-
These properties affect a single backend. They are grouped under a common root:
-
hibernate.search.backendfor the default backend (most common usage). -
hibernate.search.backends.<backend name>for a named backend (advanced usage).
Backend properties are explained in the relevant parts of this documentation:
-
- Index properties
-
These properties affect either one or multiple indexes, depending on the root.
With the root
hibernate.search.backend, they set defaults for all indexes of the backend.With the root
hibernate.search.backend.indexes.<index name>, they set the value for a specific index, overriding the defaults (if any). The backend and index names must match the names defined in the mapping. For ORM entities, the default index name is the name of the indexed class, without the package:org.mycompany.Bookwill haveBookas its default index name. Index names can be customized in the mapping.Alternatively, the backend can also be referenced by name, i.e. the roots above can also be
hibernate.search.backends.<backend name>orhibernate.search.backends.<backend name>.indexes.<index name>.Examples:
-
hibernate.search.backend.io.commit_interval = 500sets theio.commit_intervalproperty for all indexes of the default backend. -
hibernate.search.backend.indexes.Product.io.commit_interval = 2000sets theio.commit_intervalproperty for theProductindex of the default backend. -
hibernate.search.backends.myBackend.io.commit_interval = 500sets theio.commit_intervalproperty for all indexes of backendmyBackend. -
hibernate.search.backends.myBackend.indexes.Product.io.commit_interval = 2000sets theio.commit_intervalproperty for theProductindex of backendmyBackend.
Other index properties are explained in the relevant parts of this documentation:
-
4.2.2. Building property keys programmatically
Both BackendSettings and IndexSettings provide tools to help build the configuration property keys.
- BackendSettings
-
BackendSettings.backendKey(ElasticsearchBackendSettings.HOSTS)is equivalent tohibernate.search.backend.hosts.BackendSettings.backendKey("myBackend", ElasticsearchBackendSettings.HOSTS)is equivalent tohibernate.search.backends.myBackend.hosts.For a list of available property keys, see ElasticsearchBackendSettings or LuceneBackendSettings
- IndexSettings
-
IndexSettings.indexKey("myIndex", ElasticsearchIndexSettings.INDEXING_QUEUE_SIZE)is equivalent tohibernate.search.backend.indexes.myIndex.indexing.queue_size.IndexSettings.indexKey("myBackend", "myIndex", ElasticsearchIndexSettings.INDEXING_QUEUE_SIZE)is equivalent tohibernate.search.backends.myBackend.indexes.myIndex.indexing.queue_size.For a list of available property keys, see ElasticsearchIndexSettings or LuceneIndexSettings
private Properties buildHibernateConfiguration() {
    Properties config = new Properties();
    // backend configuration
    config.put( BackendSettings.backendKey( ElasticsearchBackendSettings.HOSTS ), "127.0.0.1:9200" );
    config.put( BackendSettings.backendKey( ElasticsearchBackendSettings.PROTOCOL ), "http" );
    // index configuration
    config.put(
            IndexSettings.indexKey( "myIndex", ElasticsearchIndexSettings.INDEXING_MAX_BULK_SIZE ),
            20
    );
    // orm configuration
    config.put(
            HibernateOrmMapperSettings.AUTOMATIC_INDEXING_SYNCHRONIZATION_STRATEGY,
            AutomaticIndexingSynchronizationStrategyNames.ASYNC
    );
    // engine configuration
    config.put( EngineSettings.BACKGROUND_FAILURE_HANDLER, "myFailureHandler" );
    return config;
}
4.3. Type of configuration properties
Property values can be set programmatically as Java objects, or through a configuration file as a string that will have to be parsed.
Each configuration property in Hibernate Search has an assigned type, and this type defines the accepted values in both cases.
Here are the definitions of all property types.
| Designation | Accepted Java objects | Accepted String format |
|---|---|---|
String |
|
Any string |
Boolean |
|
|
Integer |
|
Any string that can be parsed by |
Long |
|
Any string that can be parsed by |
Bean reference of type T |
An instance of |
|
Multivalued bean reference of type T |
A |
Comma-separated string containing bean references (see above) |
4.4. Configuration property checking
Hibernate Search will track the parts of the provided configuration that are actually used and will log a warning if any configuration property starting with "hibernate.search." is never used, because that might indicate a configuration issue.
To disable this warning, set the hibernate.search.configuration_property_checking.strategy
property to ignore.
4.5. Beans
Hibernate Search allows plugging in references to custom beans in various places: configuration properties, mapping annotations, arguments to APIs, …
This section describes the supported frameworks, how to reference beans, how the beans are resolved and how the beans can get injected with other beans.
4.5.1. Supported frameworks
When using the Hibernate Search integration into Hibernate ORM, all dependency injection frameworks supported by Hibernate ORM are supported.
This includes, but may not be limited to:
When the framework is not supported, or when using Hibernate Search without Hibernate ORM, beans can only be retrieved using reflection by calling the public, no-arg constructor of the referenced type.
4.5.2. Bean references
Bean references are composed of two parts:
-
The type, i.e. a
java.lang.Class. -
Optionally, the name, as a
String.
When referencing beans using a string value in configuration properties, the type is implicitly set to whatever interface Hibernate Search expects for that configuration property.
|
For experienced users, Hibernate Search also provides the |
4.5.3. Parsing of bean references
When referencing beans using a string value in configuration properties, that string is parsed.
Here are the most common formats:
-
bean:followed by the name of a Spring or CDI bean. For examplebean:myBean. -
class:followed by the fully-qualified name of a class, to be instantiated through Spring/CDI if available, or through its public, no-argument constructor otherwise. For exampleclass:com.mycompany.MyClass. -
An arbitrary string that doesn’t contain a colon: it will be interpreted as explained in Bean resolution. In short:
-
first, look for a built-in bean with the given name;
-
then try to retrieve a bean with the given name from Spring/CDI (if available);
-
then try to interpret the string as a fully-qualified class name and to retrieve the corresponding bean from Spring/CDI (if available);
-
then try to interpret the string as a fully-qualified class name and to instantiate it through its public, no-argument constructor.
-
The following formats are also accepted, but are only useful for advanced use cases:
-
any:followed by an arbitrary string. Equivalent to leaving out the prefix in most cases. Only useful if the arbitrary string contains a colon. -
builtin:followed by the name of a built-in bean, e.g.simplefor the Elasticsearch index layout strategies. This will not fall back to Spring/CDI or a direct constructor call. -
constructor:followed by the fully-qualified name of a class, to be instantiated through its public, no-argument constructor. This will ignore built-in beans and will not try to instantiate the class through Spring/CDI.
4.5.4. Bean resolution
Bean resolution (i.e. the process of turning this reference into an object instance) happens as follows by default:
-
If the given reference matches a built-in bean, that bean is used.
Example: the name
simple, when used as the value of the propertyhibernate.search.backend.layout.strategyto configure the Elasticsearch index layout strategy, resolves to the built-insimplestrategy. -
Otherwise, if a dependency injection framework is integrated into Hibernate ORM, the reference is resolved using the DI framework (see Supported frameworks).
-
If a managed bean with the given type (and if provided, name) exists, that bean is used.
Example: the name
myLayoutStrategy, when used as the value of the propertyhibernate.search.backend.layout.strategyto configure the Elasticsearch index layout strategy, resolves to any bean known from CDI/Spring of typeIndexLayoutStrategyand annotated with@Named("myLayoutStrategy"). -
Otherwise, if a name is given, and that name is a fully-qualified class name, and a managed bean of that type exists, that bean is used.
Example: the name
com.mycompany.MyLayoutStrategy, when used as the value of the propertyhibernate.search.backend.layout.strategyto configure the Elasticsearch index layout strategy, resolves to any bean known from CDI/Spring and extendingcom.mycompany.MyLayoutStrategy.
-
-
Otherwise, reflection is used to resolve the bean.
-
If a name is given, and that name is a fully-qualified class name, and that class extends the type reference, an instance is created by invoking the public, no-argument constructor of that class.
Example: the name
com.mycompany.MyLayoutStrategy, when used as the value of the propertyhibernate.search.backend.layout.strategyto configure the Elasticsearch index layout strategy, resolves to an instance ofcom.mycompany.MyLayoutStrategy. -
If no name is given, an instance is created by invoking the public, no-argument constructor of the referenced type.
Example: the class
com.mycompany.MyLayoutStrategy.class(ajava.lang.Class, not aString), when used as the value of the propertyhibernate.search.backend.layout.strategyto configure the Elasticsearch index layout strategy, resolves to an instance ofcom.mycompany.MyLayoutStrategy.
-
|
It is possible to control bean retrieval more finely by selecting a |
4.5.5. Bean injection
All beans resolved by Hibernate Search using a supported framework can take advantage of injection features of this framework.
For example a bean can be injected with another bean
by annotating one of its fields in the bridge with @Inject.
Lifecycle annotations such as @PostConstruct should also work as expected.
Even when not using any framework,
it is still possible to take advantage of the BeanResolver.
This component, passed to several methods during bootstrap,
exposes several methods to resolve
a reference into a bean,
exposing programmatically what would usually be achieved with an @Inject annotation.
See the javadoc of BeanResolver for more information.
4.5.6. Bean lifecycle
As soon as beans are no longer needed,
Hibernate Search will release them and let the dependency injection framework
call the appropriate methods (@PreDestroy, …).
Some beans are only necessary during bootstrap,
such as ElasticsearchAnalysisConfigurers,
so they will be released just after bootstrap.
Other beans are necessary at runtime, such as ValueBridges,
so they will be released on shutdown.
|
Be careful to define the scope of your beans as appropriate. Immutable beans or beans used only once such as However, some beans are expected to be mutable and instantiated multiple times,
such as for example |
Beans resolved by Hibernate Search using a supported framework can take advantage of injection features of this framework.
4.6. Global configuration
4.6.1. Background failure handling
Hibernate Search generally propagates exceptions occurring in background threads to the user thread,
but in some cases, such as Lucene segment merging failures,
or some failures during automatic indexing,
the exception in background threads cannot be propagated.
By default, when that happens, the failure is logged at the ERROR level.
To customize background failure handling, you will need to:
-
Define a class that implements the
org.hibernate.search.engine.reporting.FailureHandlerinterface. -
Configure the backend to use that implementation by setting the configuration property
hibernate.search.background_failure_handlerto a bean reference pointing to the implementation, for exampleclass:com.mycompany.MyFailureHandler.
Hibernate Search will call the handle methods whenever a failure occurs.
FailureHandlerpackage org.hibernate.search.documentation.reporting.failurehandler;
import java.util.ArrayList;
import java.util.List;
import org.hibernate.search.engine.reporting.EntityIndexingFailureContext;
import org.hibernate.search.engine.reporting.FailureContext;
import org.hibernate.search.engine.reporting.FailureHandler;
import org.hibernate.search.util.impl.test.rule.StaticCounters;
public class MyFailureHandler implements FailureHandler {
@Override
public void handle(FailureContext context) { (1)
String failingOperationDescription = context.failingOperation().toString(); (2)
Throwable throwable = context.throwable(); (3)
// ... report the failure ... (4)
}
@Override
public void handle(EntityIndexingFailureContext context) { (5)
String failingOperationDescription = context.failingOperation().toString();
Throwable throwable = context.throwable();
List<String> entityReferencesAsStrings = new ArrayList<>();
for ( Object entityReference : context.entityReferences() ) { (6)
entityReferencesAsStrings.add( entityReference.toString() );
}
// ... report the failure ... (7)
}
}| 1 | handle(FailureContext) is called for generic failures that do not fit any other specialized handle method. |
| 2 | Get a description of the failing operation from the context. |
| 3 | Get the throwable thrown when the operation failed from the context. |
| 4 | Use the context-provided information to report the failure in any relevant way. |
| 5 | handle(EntityIndexingFailureContext) is called for failures occurring when indexing entities. |
| 6 | On top of the failing operation and throwable, the context also lists references to entities that could not be indexed correctly because of the failure. |
| 7 | Use the context-provided information to report the failure in any relevant way. |
(1)
hibernate.search.background_failure_handler = org.hibernate.search.documentation.reporting.failurehandler.MyFailureHandler| 1 | Assign the background failure handler using a Hibernate Search configuration property. |
|
When a failure handler’s |
4.6.2. Multi-tenancy
If your application uses Hibernate ORM’s multi-tenancy support, Hibernate Search should detect that and configure your backends transparently. For details, see:
In some cases, in particular when using the outbox-polling coordination strategy,
you will need to list explicitly all tenant identifiers that your application might use.
This information is used by Hibernate Search when spawning background processes
that should apply an operation to every tenant.
The list of identifiers is defined through the following configuration property:
hibernate.search.multi_tenancy.tenant_ids = mytenant1,mytenant2,mytenant3This property may be set to a String containing multiple tenant identifiers separated by commas,
or a Collection<String> containing tenant identifiers.
5. Mapping Hibernate ORM entities to indexes
5.1. Configuration
5.1.1. Enabling/disabling Hibernate Search
The Hibernate Search integration into Hibernate ORM is enabled by default as soon as it is present in the classpath.
If for some reason you need to disable it,
set the hibernate.search.enabled boolean property to false.
5.1.2. Configuring the mapping
By default, Hibernate Search will automatically process mapping annotations for entity types,
as well as nested types in those entity types, for instance embedded types.
See Entity/index mapping and Mapping a property to an index field with @GenericField, @FullTextField, …
to get started with annotation-based mapping.
If you want to ignore these annotations, set hibernate.search.mapping.process_annotations to false.
To configure the mapping programmatically, see Programmatic mapping.
5.1.3. Other configuration properties
Other configuration properties are mentioned in the relevant parts of this documentation. You can find a full reference of available properties in the Hibernate Search javadoc: org.hibernate.search.mapper.orm.cfg.HibernateOrmMapperSettings.
5.2. Programmatic mapping
5.2.1. Basics
Most examples in this documentation use annotation-based mapping, which is generally enough for most applications. However, some applications have needs that go beyond what annotations can offer:
-
a single entity type must be mapped differently for different deployments — e.g. for different customers.
-
many entity types must be mapped similarly, without code duplication.
To address those needs, you can use programmatic mapping: define the mapping through code that will get executed on startup.
Implementing a programmatic mapping requires two steps:
-
Define a class that implements the
org.hibernate.search.mapper.orm.mapping.HibernateOrmSearchMappingConfigurerinterface. -
Configure Hibernate Search to use that implementation by setting the configuration property
hibernate.search.mapping.configurerto a bean reference pointing to the implementation, for exampleclass:com.mycompany.MyMappingConfigurer.
Hibernate Search will call the configure method of this implementation on startup,
and the configurer will be able to take advantage of a DSL to define
the programmatic mapping.
|
Programmatic mapping is declarative and exposes the exact same features as annotation-based mapping. In order to implement more complex, "imperative" mapping, for example to combine two entity properties into a single index field, use custom bridges. |
|
Alternatively, if you only need to repeat the same mapping for several types or properties, you can apply a custom annotation on those types or properties, and have Hibernate Search execute some programmatic mapping code when it encounters that annotation. This solution doesn’t require a mapping configurer. See Custom mapping annotations for more information. |
See below for an example. The following sections also provide one example of programmatic mapping for each feature.
public class MySearchMappingConfigurer implements HibernateOrmSearchMappingConfigurer {
    @Override
    public void configure(HibernateOrmMappingConfigurationContext context) {
        ProgrammaticMappingConfigurationContext mapping = context.programmaticMapping(); (1)
        TypeMappingStep bookMapping = mapping.type( Book.class ); (2)
        bookMapping.indexed(); (3)
        bookMapping.property( "title" ) (4)
                .fullTextField().analyzer( "english" ); (5)
    }
}| 1 | Access the programmatic mapping. |
| 2 | Access the programmatic mapping of type Book. |
| 3 | Define Book as indexed. |
| 4 | Access the programmatic mapping of property title of type Book. |
| 5 | Define an index field based on property title of type Book. |
|
By default, programmatic mapping will be merged with annotation mapping (if any). To disable annotation mapping, set |
5.2.2. Mapping Map-based models
"dynamic-map" entity models,
i.e. models based on java.util.Map instead of custom classes,
cannot be mapped using annotations.
However, they can be mapped using the programmatic mapping API.
You just need to refer to the types by their name using context.programmaticMapping().type("thename"):
-
Pass the entity name for dynamic entity types.
-
Pass the "role" for dynamic embedded/component types, i.e. the name of the owning entity, followed by a dot ("."), followed by the dot-separated path to the component in that entity. For example
MyEntity.myEmbeddedorMyEntity.myEmbedded.myNestedEmbedded.
5.3. Entity/index mapping
5.3.1. Basics
In order to index an entity, it must be annotated with @Indexed.
@Indexed@Entity
@Indexed
public class Book {|
Subclasses inherit the If the fact that |
By default:
-
The index name will be equal to the entity name, which in Hibernate ORM is set using the
@Entityannotation and defaults to the simple class name. -
The identifier of indexed documents will be generated from the entity identifier. Most types commonly used for entity identifiers are supported out of the box, but for more exotic types you may need specific configuration. See Mapping the document identifier for details.
-
The index won’t have any field. Fields must be mapped to properties explicitly. See Mapping a property to an index field with
@GenericField,@FullTextField, … for details.
5.3.2. Explicit index/backend
You can change the name of the index by setting @Indexed(index = …).
Note that index names must be unique in a given application.
@Indexed.index@Entity
@Indexed(index = "AuthorIndex")
public class Author {If you defined named backends, you can map entities to another backend than the default one.
By setting @Indexed(backend = "backend2") you inform Hibernate Search that the index
for your entity must be created in the backend named "backend2".
This may be useful if your model has clearly defined sub-parts with very different indexing requirements.
@Indexed.backend@Entity
@Table(name = "\"user\"")
@Indexed(backend = "backend2")
public class User {|
Entities indexed in different backends cannot be targeted by the same query.
For example, with the mappings defined above,
the following code will throw an exception
because |
5.3.3. Conditional indexing and routing
The mapping of an entity to an index is not always as straightforward as "this entity type goes to this index". For many reasons, but mainly for performance reasons, you may want to customize when and where a given entity is indexed:
-
You may not want to index all entities of a given type: for example, prevent indexing of entities when their
statusproperty is set toDRAFTorARCHIVED, because users are not supposed to search for those entities. -
You may want to route entities to a specific shard of the index: for example, route entities based on their
languageproperty, because each user has a specific language and only searches for entities in their language.
These behaviors can be implemented in Hibernate Search by assigning a routing bridge
to the indexed entity type through @Indexed(routingBinder = …).
For more information about routing bridges, see Routing bridge.
5.3.4. Programmatic mapping
You can mark an entity as indexed through the programmatic mapping too. Behavior and options are identical to annotation-based mapping.
.indexed()TypeMappingStep bookMapping = mapping.type( Book.class );
bookMapping.indexed();
TypeMappingStep authorMapping = mapping.type( Author.class );
authorMapping.indexed().index( "AuthorIndex" );
TypeMappingStep userMapping = mapping.type( User.class );
userMapping.indexed().backend( "backend2" );5.4. Mapping the document identifier
5.4.1. Basics
Index documents, much like entities, need to be assigned an identifier so that Hibernate Search can handle updates and deletion.
When indexing Hibernate ORM entities, the entity identifier is used as a document identifier by default.
Provided the entity identifier has a supported type, identifier mapping will work out of the box and no explicit mapping is necessary.
5.4.2. Explicit identifier mapping
Explicit identifier mapping is required in the following cases:
-
The document identifier is not the entity identifier.
-
OR the entity identifier has a type that is not supported by default. This is the case of composite identifiers, in particular.
To select a property to map to the document identifier,
just apply the @DocumentId annotation to that property:
@DocumentId@Entity
@Indexed
public class Book {
@Id
@GeneratedValue
private Integer id;
@NaturalId
@DocumentId
private String isbn;
public Book() {
}
// Getters and setters
// ...
}When the property type is not supported,
it is also necessary to implement a custom identifier bridge,
then refer to it in the @DocumentId annotation:
@DocumentId@Entity
@Indexed
public class Book {
@Id
@Convert(converter = ISBNAttributeConverter.class)
@DocumentId(identifierBridge = @IdentifierBridgeRef(type = ISBNIdentifierBridge.class))
private ISBN isbn;
public Book() {
}
// Getters and setters
// ...
}5.4.3. Supported identifier property types
Below is a table listing all types with built-in identifier bridges, i.e. property types that are supported out of the box when mapping a property to a document identifier.
The table also explains the value assigned to the document identifier, i.e. the value passed to the underlying backend.
| Property type | Value of document identifiers | Limitations |
|---|---|---|
|
|
- |
|
Unchanged |
- |
|
A single-character |
- |
|
|
- |
|
|
- |
|
|
- |
|
|
- |
|
|
- |
|
|
- |
|
|
- |
|
|
- |
|
|
- |
|
|
- |
|
|
- |
|
Formatted according to |
- |
|
Formatted according to |
- |
|
Formatted according to |
- |
|
Formatted according to |
- |
|
Formatted according to |
- |
|
Formatted according to |
- |
|
Formatted according to |
- |
|
|
- |
|
|
- |
|
Formatted according to the ISO 8601 format for a duration
(e.g. |
- |
|
Formatted according to the ISO 8601 format for a duration,
using seconds and nanoseconds only (e.g. |
- |
|
Formatted according to the ISO 8601 format for a Year
(e.g. |
- |
|
Formatted according to the ISO 8601 format for a Year-Month
(e.g. |
- |
|
Formatted according to the ISO 8601 format for a Month-Day
(e.g. |
- |
|
|
- |
|
A |
|
|
|
|
|
|
|
|
|
|
|
|
|
|
Latitude as double and longitude as double, separated by a comma
(e.g. |
- |
5.4.4. Programmatic mapping
You can map the document identifier through the programmatic mapping too. Behavior and options are identical to annotation-based mapping.
.documentId()TypeMappingStep bookMapping = mapping.type( Book.class );
bookMapping.indexed();
bookMapping.property( "isbn" ).documentId();5.5. Mapping a property to an index field with @GenericField, @FullTextField, …
5.5.1. Basics
Properties of an entity can be mapped to an index field directly: you just need to add an annotation, configure the field through the annotation attributes, and Hibernate Search will take care of extracting the property value and populating the index field when necessary.
Mapping a property to an index field looks like this:
@FullTextField(analyzer = "english", projectable = Projectable.YES) (1)
@KeywordField(name = "title_sort", normalizer = "english", sortable = Sortable.YES) (2)
private String title;
@GenericField(projectable = Projectable.YES, sortable = Sortable.YES) (3)
private Integer pageCount;| 1 | Map the title property to a full-text field with the same name.
Some options can be set to customize the fields' behavior, in this case the analyzer (for full-text indexing)
and the fact that this field is projectable (its value can be retrieved from the index). |
| 2 | Map the title property to another field, configured differently:
it is not analyzed, but simply normalized (i.e. it’s not split into multiple tokens),
and it is stored in such a way that it can be used in sorts.
Mapping a single property to multiple fields is particularly useful when doing full-text search: at query time, you can use a different field depending on what you need. You can map a property to as many fields as you want, but each must have a unique name. |
| 3 | Map another property to its own field. |
Before you map a property, you must consider two things:
- The
@*Fieldannotation -
In its simplest form, property/field mapping is achieved by applying the
@GenericFieldannotation to a property. This annotation will work for every supported property type, but is rather limited: it does not allow full-text search in particular. To go further, you will need to rely on different, more specific annotations, which offer specific attributes. The available annotations are described in details in Available field annotations. - The type of the property
-
In order for the
@*Fieldannotation to work correctly, the type of the mapped property must be supported by Hibernate Search. See Supported property types for a list of all types that are supported out of the box, and Mapping custom property types for indications on how to handle more complex types, be it simply containers (List<String>,Map<String, Integer>, …) or custom types.
5.5.2. Available field annotations
Various field annotations exist, each offering its own set of attributes.
This section lists the different annotations and their use. For more details about available attributes, see Field annotation attributes.
@GenericField-
A good default choice that will work for every property type with built-in support.
Fields mapped using this annotation do not provide any advanced features such as full-text search: matches on a generic field are exact matches.
-
@FullTextField -
A text field whose value is considered as multiple words. Only works for
Stringfields.Matches on a full-text field can be more subtle than exact matches: match fields which contains a given word, match fields regardless of case, match fields ignoring diacritics, …
Full-text fields should be assigned an analyzer, referenced by its name. By default, the analyzer named
defaultwill be used. See Analysis for more details about analyzers and full-text analysis.Note you can also define a search analyzer to analyze searched terms differently.
Full-text fields cannot be sorted on. If you need to sort on the value of a property, it is recommended to use @KeywordField, with a normalizer if necessary (see below). Note that multiple fields can be added to the same property, so you can use both@FullTextFieldand@KeywordFieldif you need both full-text search and sorting. -
@KeywordField -
A text field whose value is considered as a single keyword. Only works for
Stringfields.Keyword fields allow more subtle matches, similarly to full-text fields, with the limitation that keyword fields only contain one token. On the other hand, this limitation allows keyword fields to be sorted on.
Keyword fields may be assigned a normalizer, referenced by its name. See Analysis for more details about normalizers and full-text analysis.
-
@ScaledNumberField -
A numeric field for integer or floating-point values that require a higher precision than doubles but always have roughly the same scale. Only works for either
java.math.BigDecimalorjava.math.BigIntegerfields.Scaled numbers are indexed as integers, typically a long (64 bits), with a fixed scale that is consistent for all values of the field across all documents. Because scaled numbers are indexed with a fixed precision, they cannot represent all
BigDecimalorBigIntegervalues. Values that are too large to be indexed will trigger a runtime exception. Values that have trailing decimal digits will be rounded to the nearest integer.This annotation allows to set the decimalScale attribute.
@NonStandardField-
An annotation for advanced use cases where a value binder is used and that binder is expected to define an index field type that does not support any of the standard options:
searchable,sortable, …This annotation is very useful for cases when a field type native to the backend is necessary: defining the mapping directly as JSON for Elasticsearch, or manipulating
IndexableFielddirectly for Lucene.Fields mapped using this annotation have very limited configuration options from the annotation (no
searchable/sortable/etc.), but the value binder will be able to pick a non-standard field type, which generally gives much more flexibility.
5.5.3. Field annotation attributes
Various field mapping annotations exist, each offering its own set of attributes.
This section lists the different annotation attributes and their use. For more details about available annotations, see Available field annotations.
-
name -
The name of the index field. By default, it is the same as the property name. You may want to change it in particular when mapping a single property to multiple fields.
Value:
String. The name must not contain the dot character (.). Defaults to the name of the property. -
sortable -
Whether the field can be sorted on, i.e. whether a specific data structure is added to the index to allow efficient sorts when querying.
Value:
Sortable.YES,Sortable.NO,Sortable.DEFAULT.This option is not available for
@FullTextField. See here for an explanation and some solutions. -
projectable -
Whether the field can be projected on, i.e. whether the field value is stored in the index to allow retrieval later when querying.
Value:
Projectable.YES,Projectable.NO,Projectable.DEFAULT. -
aggregable -
Whether the field can be aggregated, i.e. whether the field value is stored in a specific data structure in the index to allow aggregations later when querying.
Value:
Aggregable.YES,Aggregable.NO,Aggregable.DEFAULT. searchable-
Whether the field can be searched on. i.e. whether the field is indexed in order to allow applying predicates later when querying.
Value:
Searchable.YES,Searchable.NO,Searchable.DEFAULT. -
indexNullAs -
The value to use as a replacement anytime the property value is null.
Disabled by default.
The replacement is defined as a String. Thus, its value has to be parsed. Look up the column Parsing method for 'indexNullAs' in Supported property types to find out the format used when parsing.
extraction-
How elements to index should be extracted from the property in the case of container types (
List,Optional,Map, …).By default, for properties that have a container type, the innermost elements will be indexed. For example for a property of type
List<String>, elements of typeStringwill be indexed.This default behavior and ways to override it are described in the section Mapping container types with container extractors.
-
analyzer -
The analyzer to apply to field values when indexing and querying. Only available on
@FullTextField.By default, the analyzer named
defaultwill be used.See Analysis for more details about analyzers and full-text analysis.
-
searchAnalyzer -
An optional different analyzer, overriding the one defined with the
analyzerattribute, to use only when analyzing searched terms.If not defined, the analyzer assigned to
analyzerwill be used.See Analysis for more details about analyzers and full-text analysis.
-
normalizer -
The normalizer to apply to field values when indexing and querying. Only available on
@KeywordField.See Analysis for more details about normalizers and full-text analysis.
norms-
Whether index-time scoring information for the field should be stored or not. Only available on
@KeywordFieldand@FullTextField.Enabling norms will improve the quality of scoring. Disabling norms will reduce the disk space used by the index.
Value:
Norms.YES,Norms.NO,Norms.DEFAULT. termVector-
The term vector storing strategy. Only available on
@FullTextField.The different values of this attribute are:
Value Definition TermVector.YESStore the term vectors of each document. This produces two synchronized arrays, one contains document terms and the other contains the term’s frequency.
TermVector.NODo not store term vectors.
TermVector.WITH_POSITIONSStore the term vector and token position information. This is the same as
TermVector.YESplus it contains the ordinal positions of each occurrence of a term in a document.TermVector.WITH_OFFSETSStore the term vector and token offset information. This is the same as
TermVector.YESplus it contains the starting and ending offset position information for the terms.TermVector.WITH_POSITION_OFFSETSStore the term vector, token position and offset information. This is a combination of the
YES,WITH_OFFSETSandWITH_POSITIONS.TermVector.WITH_POSITIONS_PAYLOADSStore the term vector, token position and token payloads. This is the same as
TermVector.WITH_POSITIONSplus it contains the payload of each occurrence of a term in a document.TermVector.WITH_POSITIONS_OFFSETS_PAYLOADSStore the term vector, token position, offset information and token payloads. This is the same as
TermVector.WITH_POSITION_OFFSETSplus it contains the payload of each occurrence of a term in a document. -
decimalScale -
How the scale of a large number (
BigIntegerorBigDecimal) should be adjusted before it is indexed as a fixed-precision integer. Only available on@ScaledNumberField.To index numbers that have significant digits after the decimal point, set the
decimalScaleto the number of digits you need indexed. The decimal point will be shifted that many times to the right before indexing, preserving that many digits from the decimal part. To index very large numbers that cannot fit in a long, set the decimal point to a negative value. The decimal point will be shifted that many times to the left before indexing, dropping all digits from the decimal part.decimalScalewith strictly positive values is allowed only forBigDecimal, sinceBigIntegervalues have no decimal digits.Note that shifting of the decimal points is completely transparent and will not affect how you use the search DSL: you be expected to provide "normal"
BigDecimalorBigIntegervalues, and Hibernate Search will apply thedecimalScaleand rounding transparently.As a result of the rounding, search predicates and sorts will only be as precise as what the
decimalScaleallows.Note that rounding does not affect projections, which will return the original value without any loss of precision.
A typical use case is monetary amounts, with a decimal scale of 2 because only two digits are generally needed beyond the decimal point. Using Hibernate ORM mapping, a default decimalScaleis taken automatically from the underlyingscalevalue of the relative SQL@Column, using the Hibernate ORM metadata. The value could be overridden explicitly using thedecimalScaleattribute.
5.5.4. Supported property types
Below is a table listing all types with built-in value bridges, i.e. property types that are supported out of the box when mapping a property to an index field.
The table also explains the value assigned to the index field, i.e. the value passed to the underlying backend for indexing.
|
For information about the underlying indexing and storage used by the backend, see Lucene field types or Elasticsearch field types depending on your backend. |
| Property type | Value of index field (if different) | Limitations | Parsing method for 'indexNullAs' |
|---|---|---|---|
|
|
- |
|
|
- |
- |
- |
|
A single-character |
- |
Accepts any single-character |
|
- |
- |
|
|
- |
- |
|
|
- |
- |
|
|
- |
- |
|
|
- |
- |
|
|
- |
- |
|
|
- |
- |
Accepts the strings |
|
- |
- |
|
|
- |
- |
|
|
|
- |
|
|
|
- |
|
|
- |
|
|
|
- |
|
|
|
- |
|
|
|
- |
|
|
|
- |
|
|
|
- |
|
|
|
- |
|
|
|
|
- |
|
|
|
- |
|
|
A formatted |
- |
|
|
|
|
|
|
- |
|
|
|
- |
|
|
|
- |
- |
|
|
|
- |
|
|
A |
|
|
|
|
|
|
|
|
|
|
|
|
|
|
|
|
|
|
|
- |
- |
Latitude as double and longitude as double, separated by a comma. Ex: |
|
Range and resolution of date/time fields
With a few exceptions, most date and time values are passed as-is to the backend;
e.g. a Internally, however, the Lucene and Elasticsearch backend use a different representation of date/time types. As a result, date and time fields stored in the index may have a smaller range and resolution than the corresponding Java type. The documentation of each backend provides more information: see here for Lucene and here for Elasticsearch. |
5.5.5. Support for legacy java.util date/time APIs
Using legacy date/time types such as java.util.Calendar, java.util.Date, java.sql.Timestamp, java.sql.Date, java.sql.Time
is not recommended,
due to their numerous quirks and shortcomings.
The java.time package introduced
in Java 8 should generally be preferred.
That being said, integration constraints may force you to rely on the legacy date/time APIs, which is why Hibernate Search still attempts to support them on a best effort basis.
Since Hibernate Search uses the java.time APIs to represent date/time internally,
the legacy date/time types need to be converted before they can be indexed.
Hibernate Search keeps things simple:
java.util.Date, java.util.Calendar, etc. will be converted using their time-value (number of milliseconds since the epoch),
which will be assumed to represent the same date/time in Java 8 APIs.
In the case of java.util.Calendar, timezone information will be preserved for projections.
For all dates after 1900, this will work exactly as expected.
Before 1900, indexing and searching through Hibernate Search APIs will also work as expected,
but if you need to access the index natively, for example through direct HTTP calls to an Elasticsearch server,
you will notice that the indexed values are slightly "off".
This is caused by differences in the implementation of java.time and legacy date/time APIs
which lead to slight differences in the interpretation of time-values (number of milliseconds since the epoch).
The "drifts" are consistent: they will also happen when building a predicate, and they will happen in the opposite direction when projecting. As a result, the differences will not be visible from an application relying on the Hibernate Search APIs exclusively. They will, however, be visible when accessing indexes natively.
For the large majority of use cases, this will not be a problem.
If this behavior is not acceptable for your application,
you should look into implementing custom value bridges
and instructing Hibernate Search to use them by default for java.util.Date, java.util.Calendar, etc.:
see Assigning default bridges with the bridge resolver.
|
Technically, conversions are difficult because the In particular:
Those are the two main problems, but there may be others. |
5.5.6. Mapping custom property types
Even types that are not supported out of the box can be mapped. There are various solutions, some simple and some more powerful, but they all come down to extracting data from the unsupported type and converting it to types that are supported by the backend.
There are two cases to distinguish between:
-
If the unsupported type is simply a container (
List<String>) or multiple nested containers (Map<Integer, List<String>>) whose elements have a supported type, then what you need is a container extractor. See Mapping container types with container extractors for more information. -
Otherwise, you will have to rely on a custom component, called a bridge, to extract data from your type. See Bridges for more information on custom bridges.
5.5.7. Programmatic mapping
You can map properties of an entity to an index field directly through the programmatic mapping too. Behavior and options are identical to annotation-based mapping.
.genericField(), .fullTextField(), …TypeMappingStep bookMapping = mapping.type( Book.class );
bookMapping.indexed();
bookMapping.property( "title" )
.fullTextField()
.analyzer( "english" ).projectable( Projectable.YES )
.keywordField( "title_sort" )
.normalizer( "english" ).sortable( Sortable.YES );
bookMapping.property( "pageCount" )
.genericField().projectable( Projectable.YES ).sortable( Sortable.YES );5.6. Mapping associated elements with @IndexedEmbedded
5.6.1. Basics
Using only @Indexed combined with @*Field annotations allows indexing an entity and its direct properties,
which is nice but simplistic.
A real-world model will include multiple object types holding references to one another,
like the authors association in the example below.
This mapping will declare the following fields in the Book index:
-
title -
… and nothing else.
@Entity
@Indexed (1)
public class Book {
@Id
private Integer id;
@FullTextField(analyzer = "english") (2)
private String title;
@ManyToMany
private List<Author> authors = new ArrayList<>(); (3)
public Book() {
}
// Getters and setters
// ...
}@Entity
public class Author {
@Id
private Integer id;
private String name;
@ManyToMany(mappedBy = "authors")
private List<Book> books = new ArrayList<>();
public Author() {
}
// Getters and setters
// ...
}| 1 | The Book entity is indexed. |
| 2 | The title of the book is mapped to an index field. |
| 3 | But how to index the Author name into the Book index? |
When searching for a book, users will likely need to search by author name.
In the world of high-performance indexes, cross-index joins are costly and usually not an option.
The best way to address such use cases is generally to copy data:
when indexing a Book, just copy the name of all its authors into the Book document.
That’s what @IndexedEmbedded does:
it instructs Hibernate Search to embed the fields of an associated object into the main object.
In the example below, it will instruct Hibernate Search to embed the name field
defined in Author into Book, creating the field authors.name.
|
|
@IndexedEmbedded to index associated elementsThis mapping will declare the following fields in the Book index:
-
title -
authors.name
@Entity
@Indexed
public class Book {
@Id
private Integer id;
@FullTextField(analyzer = "english")
private String title;
@ManyToMany
@IndexedEmbedded (1)
private List<Author> authors = new ArrayList<>();
public Book() {
}
// Getters and setters
// ...
}@Entity
public class Author {
@Id
private Integer id;
@FullTextField(analyzer = "name") (2)
private String name;
@ManyToMany(mappedBy = "authors")
private List<Book> books = new ArrayList<>();
public Author() {
}
// Getters and setters
// ...
}| 1 | Add an @IndexedEmbedded to the authors property. |
| 2 | Map Author.name to an index field, even though Author is not directly mapped to an index (no @Indexed). |
|
Document identifiers are not index fields.
Consequently, they will be ignored by To embed another entity’s identifier with |
|
When See Reindexing when embedded elements change for the reasons behind this restriction and ways to circumvent it. |
Index-embedding can be nested on multiple levels; for example you can decide to index-embed the place of birth of authors, to be able to search for books written by Russian authors exclusively:
@IndexedEmbeddedThis mapping will declare the following fields in the Book index:
-
title -
authors.name -
authors.placeOfBirth.country
@Entity
@Indexed
public class Book {

    @Id
    private Integer id;

    @FullTextField(analyzer = "english")
    private String title;

    @ManyToMany
    @IndexedEmbedded (1)
    private List<Author> authors = new ArrayList<>();

    public Book() {
    }

    // Getters and setters
    // ...

}
@Entity
public class Author {
@Id
private Integer id;
@FullTextField(analyzer = "name") (2)
private String name;
@Embedded
@IndexedEmbedded (3)
private Address placeOfBirth;
@ManyToMany(mappedBy = "authors")
private List<Book> books = new ArrayList<>();
public Author() {
}
// Getters and setters
// ...
}@Embeddable
public class Address {
@FullTextField(analyzer = "name") (4)
private String country;
private String city;
private String street;
public Address() {
}
// Getters and setters
// ...
}| 1 | Add an @IndexedEmbedded to the authors property. |
| 2 | Map Author.name to an index field, even though Author is not directly mapped to an index (no @Indexed). |
| 3 | Add an @IndexedEmbedded to the placeOfBirth property. |
| 4 | Map Address.country to an index field, even though Address is not directly mapped to an index (no @Indexed). |
|
By default, To address this, see Filtering embedded fields and breaking |
5.6.2. @IndexedEmbedded and null values
When properties targeted by an @IndexedEmbedded contain null elements,
these elements are simply not indexed.
On contrary to Mapping a property to an index field with @GenericField, @FullTextField, …,
there is no indexNullAs feature to index a specific value for null objects,
but you can take advantage of the exists predicate
in search queries to look for documents where a given @IndexedEmbedded
has or doesn’t have a value:
simply pass the name of the object field to the exists predicate,
for example authors in the example above.
5.6.3. @IndexedEmbedded on container types
When properties targeted by an @IndexedEmbedded have a container type
(List, Optional, Map, …),
the innermost elements will be embedded.
For example for a property of type List<MyEntity>, elements of type MyEntity will be embedded.
This default behavior and ways to override it are described in the section Mapping container types with container extractors.
5.6.4. Setting the object field name with name
By default, @IndexedEmbedded will create an object field with the same name as the annotated property,
and will add embedded fields to that object field.
So if @IndexedEmbedded is applied to a property named authors in a Book entity,
the index field name of the authors will be copied to the index field authors.name when Book is indexed.
It is possible to change the name of the object field by setting the name attribute;
for example using @IndexedEmbedded(name = "allAuthors") in the example above will result
in the name of authors being copied to the index field allAuthors.name
instead of authors.name.
|
The name must not contain the dot character ( |
5.6.5. Setting the field name prefix with prefix
|
The |
By default, @IndexedEmbedded will prepend the name of embedded fields
with the name of the property it is applied to followed by a dot.
So if @IndexedEmbedded is applied to a property named authors in a Book entity,
the name field of the authors will be copied to the authors.name field when Book is indexed.
It is possible to change this prefix by setting the prefix attribute,
for example @IndexedEmbedded(prefix = "author.") (do not forget the trailing dot!).
|
The prefix should generally be a sequence of non-dots ending with a single dot, for example Changing the prefix to a string that does not include any dot at the end ( In particular, a prefix that does not end with a dot will lead to incorrect behavior
in some APIs exposed to custom bridges:
the |
5.6.6. Casting the target of @IndexedEmbedded with targetType
By default, the type of indexed-embedded values is detected automatically using reflection,
taking into account container extraction if relevant;
for example @IndexedEmbedded List<MyEntity> will be detected as having values of type MyEntity.
Fields to be embedded will be inferred from the mapping of the value type and its supertypes;
in the example, @GenericField annotations present on MyEntity and its superclasses will be taken into account,
but annotations defined in its subclasses will be ignored.
If for some reason a schema does not expose the correct type for a property
(e.g. a raw List, or List<MyEntityInterface> instead of List<MyEntityImpl>)
it is possible to define the expected type of values
by setting the targetType attribute in @IndexedEmbedded.
On bootstrap, Hibernate Search will then resolve fields to be embedded based on the given target type,
and at runtime it will cast values to the given target type.
|
Failures to cast indexed-embedded values to the designated type will be propagated and lead to indexing failure. |
5.6.7. Reindexing when embedded elements change
When the "embedded" entity changes, Hibernate Search will handle reindexing of the "embedding" entity.
This will work transparently most of the time,
as long as the association @IndexedEmbedded is applied to is bidirectional
(uses Hibernate ORM’s mappedBy).
When Hibernate Search is unable to handle an association, it will throw an exception on bootstrap. If this happens, refer to Basics to know more.
5.6.8. Filtering embedded fields and breaking @IndexedEmbedded cycles
By default, @IndexedEmbedded will "embed" everything:
every field encountered in the indexed-embedded element,
and every @IndexedEmbedded encountered in the indexed-embedded element,
recursively.
This will work just fine for simpler use cases, but may lead to problems for more complex models:
-
If the indexed-embedded element declares many index fields (Hibernate Search fields), only some of which are actually useful to the "index-embedding" type, the extra fields will decrease indexing performance needlessly.
-
If there is a cycle of
@IndexedEmbedded(e.g.Aindex-embedsbof typeB, which index-embedsaof typeA) the index-embedding type will end up with an infinite amount of fields (a.b.someField,a.b.a.b.someField,a.b.a.b.a.b.someField, …), which Hibernate Search will detect and reject with an exception.
To address these problems, it is possible to filter the fields to embed,
to only include those that are actually useful.
Two filtering attributes are available on @IndexedEmbedded and may be combined:
includePaths-
The paths of index fields from the indexed-embedded element that should be embedded.
Provided paths must be relative to the indexed-embedded element, i.e. they must not include its name or prefix.
This takes precedence over
includeDepth(see below). includeDepth-
The number of levels of indexed-embedded that will have all their fields included by default.
includeDepthis the number of@IndexedEmbeddedthat will be traversed and for which all fields of the indexed-embedded element will be included, even if these fields are not included explicitly throughincludePaths:-
includeDepth=0means that fields of the indexed-embedded element are not included, nor is any field of nested indexed-embedded elements, unless these fields are included explicitly throughincludePaths. -
includeDepth=1means that fields of the indexed-embedded element are included, but not fields of nested indexed-embedded elements, unless these fields are included explicitly throughincludePaths. -
And so on.
The default value depends on the value of the
includePathsattribute: ifincludePathsis empty, the default isInteger.MAX_VALUE(include all fields at every level) ifincludePathsis not empty, the default is0(only include fields included explicitly). -
|
Dynamic fields and filtering
Dynamic fields are not directly affected by filtering rules: a dynamic field will be included if and only if its parent is included. This means in particular that |
Below are two examples: one leveraging includePaths only,
and one leveraging includePaths and includeDepth.
includePathsThis mapping will declare the following fields in the Human index:
-
name -
nickname -
parents.name: explicitly included becauseincludePathsonparentsincludesname. -
parents.nickname: explicitly included becauseincludePathsonparentsincludesnickname. -
parents.parents.name: explicitly included becauseincludePathsonparentsincludesparents.name.
The following fields in particular are excluded:
-
parents.parents.nickname: not implicitly included becauseincludeDepthis not set and defaults to0, and not explicitly included either becauseincludePathsonparentsdoes not includeparents.nickname. -
parents.parents.parents.name: not implicitly included becauseincludeDepthis not set and defaults to0, and not explicitly included either becauseincludePathsonparentsdoes not includeparents.parents.name.
@Entity
@Indexed
public class Human {

    @Id
    private Integer id;

    @FullTextField(analyzer = "name")
    private String name;

    @FullTextField(analyzer = "name")
    private String nickname;

    @ManyToMany
    @IndexedEmbedded(includePaths = { "name", "nickname", "parents.name" })
    private List<Human> parents = new ArrayList<>();

    @ManyToMany(mappedBy = "parents")
    private List<Human> children = new ArrayList<>();

    public Human() {
    }

    // Getters and setters
    // ...

}includePaths and includeDepthThis mapping will declare the following fields in the Human index:
-
name -
surname -
parents.name: implicitly at depth0becauseincludeDepth > 0(soparents.*is included implicitly). -
parents.nickname: implicitly included at depth0becauseincludeDepth > 0(soparents.*is included implicitly). -
parents.parents.name: implicitly included at depth1becauseincludeDepth > 1(soparents.parents.*is included implicitly). -
parents.parents.nickname: implicitly included at depth1becauseincludeDepth > 1(soparents.parents.*is included implicitly). -
parents.parents.parents.name: not implicitly included at depth2becauseincludeDepth = 2(soparents.parents.parentsis included implicitly, but subfields can only be included explicitly) but explicitly included becauseincludePathsonparentsincludesparents.parents.name.
The following fields in particular are excluded:
-
parents.parents.parents.nickname: not implicitly included at depth2becauseincludeDepth = 2(soparents.parents.parentsis included implicitly, but subfields must be included explicitly) and not explicitly included either becauseincludePathsonparentsdoes not includeparents.parents.nickname. -
parents.parents.parents.parents.name: not implicitly included at depth3becauseincludeDepth = 2(soparents.parents.parentsis included implicitly, butparents.parents.parents.parentsand subfields can only be included explicitly) and not explicitly included either becauseincludePathsonparentsdoes not includeparents.parents.parents.name.
@Entity
@Indexed
public class Human {

    @Id
    private Integer id;

    @FullTextField(analyzer = "name")
    private String name;

    @FullTextField(analyzer = "name")
    private String nickname;

    @ManyToMany
    @IndexedEmbedded(includeDepth = 2, includePaths = { "parents.parents.name" })
    private List<Human> parents = new ArrayList<>();

    @ManyToMany(mappedBy = "parents")
    private List<Human> children = new ArrayList<>();

    public Human() {
    }

    // Getters and setters
    // ...

}
5.6.9. Structuring embedded elements as nested documents using structure
Indexed-embedded fields can be structured in one of two ways,
configured through the structure attribute of the @IndexedEmbedded annotation.
To illustrate structure options, let’s assume the class Book is annotated with @Indexed
and its authors property is annotated with @IndexedEmbedded:
-
Book instance
-
title = Leviathan Wakes
-
authors =
-
Author instance
-
firstName = Daniel
-
lastName = Abraham
-
-
Author instance
-
firstName = Ty
-
lastName = Frank
-
-
-
DEFAULT or FLATTENED structure
By default, or when using @IndexedEmbedded(structure = FLATTENED) as shown below,
indexed-embedded fields are "flattened",
meaning that the tree structure is not preserved.
@IndexedEmbedded with a flattened structure@Entity
@Indexed
public class Book {
@Id
private Integer id;
@FullTextField(analyzer = "english")
private String title;
@ManyToMany
@IndexedEmbedded(structure = ObjectStructure.FLATTENED) (1)
private List<Author> authors = new ArrayList<>();
public Book() {
}
// Getters and setters
// ...
}| 1 | Explicitly set the structure of indexed-embedded to FLATTENED.
This is not strictly necessary, since FLATTENED is the default. |
@Entity
public class Author {

    @Id
    private Integer id;

    @FullTextField(analyzer = "name")
    private String firstName;

    @FullTextField(analyzer = "name")
    private String lastName;

    @ManyToMany(mappedBy = "authors")
    private List<Book> books = new ArrayList<>();

    public Author() {
    }

    // Getters and setters
    // ...

}
The book instance mentioned earlier would be indexed with a structure roughly similar to this:
-
Book document
-
title = Leviathan Wakes
-
authors.firstName = [Daniel, Ty]
-
authors.lastName = [Abraham, Frank]
-
The authors.firstName and authors.lastName fields were "flattened"
and now each has two values;
the knowledge of which last name corresponds to which first name has been lost.
This is more efficient for indexing and querying, but can cause unexpected behavior when querying the index on both the author’s first name and the author’s last name.
For example, the book instance described above
would show up as a match to a query such as authors.firstname:Ty AND authors.lastname:Abraham,
even though "Ty Abraham" is not one of this book’s authors:
List<Book> hits = searchSession.search( Book.class )
        .where( f -> f.bool()
                .must( f.match().field( "authors.firstName" ).matching( "Ty" ) ) (1)
                .must( f.match().field( "authors.lastName" ).matching( "Abraham" ) ) ) (1)
        .fetchHits( 20 );

assertThat( hits ).isNotEmpty(); (2)| 1 | Require that hits have an author with the first name Ty and an author with the last name Abraham…
but not necessarily the same author! |
| 2 | The hits will include a book whose authors are "Ty Daniel" and "Frank Abraham". |
NESTED structure
When indexed-embedded elements are "nested", i.e. when using @IndexedEmbedded(structure = NESTED) as shown below,
the tree structure is preserved by transparently creating one separate "nested" document
for each indexed-embedded element.
@IndexedEmbedded with a nested structure@Entity
@Indexed
public class Book {
@Id
private Integer id;
@FullTextField(analyzer = "english")
private String title;
@ManyToMany
@IndexedEmbedded(structure = ObjectStructure.NESTED) (1)
private List<Author> authors = new ArrayList<>();
public Book() {
}
// Getters and setters
// ...
}| 1 | Explicitly set the structure of indexed-embedded objects to NESTED. |
@Entity
public class Author {

    @Id
    private Integer id;

    @FullTextField(analyzer = "name")
    private String firstName;

    @FullTextField(analyzer = "name")
    private String lastName;

    @ManyToMany(mappedBy = "authors")
    private List<Book> books = new ArrayList<>();

    public Author() {
    }

    // Getters and setters
    // ...

}
The book instance mentioned earlier would be indexed with a structure roughly similar to this:
-
Book document
-
title = Leviathan Wakes
-
Nested documents
-
Nested document #1 for "authors"
-
authors.firstName = Daniel
-
authors.lastName = Abraham
-
-
Nested document #2 for "authors"
-
authors.firstName = Ty
-
authors.lastName = Frank
-
-
-
The book is effectively indexed as three documents: the root document for the book, and two internal, "nested" documents for the authors, preserving the knowledge of which last name corresponds to which first name at the cost of degraded performance when indexing and querying.
| The nested documents are "hidden" and won’t directly show up in search results. No need to worry about nested documents being "mixed up" with root documents. |
If special care is taken when building predicates on fields within nested documents,
using a nested predicate,
queries containing predicates on both the author’s first name and the author’s last name
will behave as one would (intuitively) expect.
For example, the book instance described above
would not show up as a match to a query such as authors.firstname:Ty AND authors.lastname:Abraham,
thanks to the nested predicate (which can only be used when indexing with the NESTED structure):
List<Book> hits = searchSession.search( Book.class )
        .where( f -> f.nested().objectField( "authors" ).nest( f.bool() (1)
                .must( f.match().field( "authors.firstName" ).matching( "Ty" ) ) (2)
                .must( f.match().field( "authors.lastName" ).matching( "Abraham" ) ) ) ) (2)
        .fetchHits( 20 );

assertThat( hits ).isEmpty(); (3)| 1 | Require that the two constraints (first name and last name) apply to the same author. |
| 2 | Require that hits have an author with the first name Ty and an author with the last name Abraham. |
| 3 | The hits will not include a book whose authors are "Ty Daniel" and "Frank Abraham". |
5.6.10. Programmatic mapping
You can embed the fields of an associated object into the main object through the programmatic mapping too. Behavior and options are identical to annotation-based mapping.
.indexedEmbedded() to index associated elementsThis mapping will declare the following fields in the Book index:
-
title -
authors.name
TypeMappingStep bookMapping = mapping.type( Book.class );
bookMapping.indexed();
bookMapping.property( "title" )
        .fullTextField().analyzer( "english" );
bookMapping.property( "authors" )
        .indexedEmbedded();
TypeMappingStep authorMapping = mapping.type( Author.class );
authorMapping.property( "name" )
        .fullTextField().analyzer( "name" );
5.7. Mapping container types with container extractors
5.7.1. Basics
Most built-in annotations applied to properties will work transparently when applied to container types:
-
@GenericFieldapplied to a property of typeStringwill index the property value directly. -
@GenericFieldapplied to a property of typeOptionalIntwill index the optional’s value (an integer). -
@GenericFieldapplied to a property of typeList<String>will index the list elements (strings). -
@GenericFieldapplied to a property of typeMap<Integer, String>will index the map values (strings). -
@GenericFieldapplied to a property of typeMap<Integer, List<String>>will index the list elements in the map values (strings). -
Etc.
Same goes for other field annotations such as @FullTextField,
as well as @IndexedEmbedded in particular.
What happens behind the scenes is that Hibernate Search will inspect the property type and attempt to apply "container extractors", picking the first that works.
5.7.2. Explicit container extraction
In some cases, you will want to pick the container extractors to use explicitly.
This is the case when a map’s keys must be indexed, instead of the values.
Relevant annotations offer an extraction attribute to configure this,
as shown in the example below.
All built-in extractor names are available as constants
in org.hibernate.search.mapper.pojo.extractor.builtin.BuiltinContainerExtractors.
|
Map keys to an index field using explicit container extractor definition@ElementCollection (1)
@JoinTable(name = "book_pricebyformat")
@MapKeyColumn(name = "format")
@Column(name = "price")
@OrderBy("format asc")
@GenericField( (2)
name = "availableFormats",
extraction = @ContainerExtraction(BuiltinContainerExtractors.MAP_KEY) (3)
)
private Map<BookFormat, BigDecimal> priceByFormat = new LinkedHashMap<>();| 1 | This annotation — and those below — are just Hibernate ORM configuration. |
| 2 | Declare an index field based on the priceByFormat property. |
| 3 | By default, Hibernate Search would index the map values (the book prices).
This uses the extraction attribute to specify that map keys (the book formats)
must be indexed instead. |
When multiple levels of extractions are necessary,
multiple extractors can be configured:
extraction = @ContainerExtraction(BuiltinContainerExtractors.MAP_KEY, BuiltinContainerExtractors.OPTIONAL).
However, such complex mappings are unlikely since they are generally not supported by Hibernate ORM.
|
|
It is possible to implement and use custom container extractors, but at the moment these extractors will not be handled correctly for automatic reindexing, so the corresponding property must have automatic reindexing disabled. See HSEARCH-3688 for more information. |
5.7.3. Disabling container extraction
In some rare cases, container extraction is not wanted,
and the @GenericField/@IndexedEmbedded is meant to be applied to the List/Optional/etc. directly.
To ignore the default container extractors,
most annotations offer an extraction attribute.
Set it as below to disable extraction altogether:
@ManyToMany
@GenericField( (1)
        name = "authorCount",
        valueBridge = @ValueBridgeRef(type = MyCollectionSizeBridge.class), (2)
        extraction = @ContainerExtraction(extract = ContainerExtract.NO) (3)
)
private List<Author> authors = new ArrayList<>();| 1 | Declare an index field based on the authors property. |
| 2 | Instruct Hibernate Search to use the given bridge, which will extract the collection size (the number of authors). |
| 3 | Because the bridge is applied to the collection as a whole,
and not to each author,
the extraction attribute is used to disable container extraction. |
5.7.4. Programmatic mapping
You can pick the container extractors to use explicitly when defining fields or indexed-embeddeds through the programmatic mapping too. Behavior and options are identical to annotation-based mapping.
Map keys to an index field using .extractor(…)/.extactors(…) for explicit container extractor definitionbookMapping.property( "priceByFormat" )
.genericField( "availableFormats" )
.extractor( BuiltinContainerExtractors.MAP_KEY );Similarly, you can disable container extraction.
.noExtractors()bookMapping.property( "authors" )
.genericField( "authorCount" )
.valueBridge( new MyCollectionSizeBridge() )
.noExtractors();5.8. Mapping geo-point types
5.8.1. Basics
Hibernate Search provides a variety of spatial features such as a distance predicate and a distance sort. These features require that spatial coordinates are indexed. More precisely, it requires that a geo-point, i.e. a latitude and longitude in the geographic coordinate system, are indexed.
Geo-points are a bit of an exception,
because there isn’t any type in the standard Java library to represent them.
For that reason, Hibernate Search defines its own interface,
org.hibernate.search.engine.spatial.GeoPoint.
Since your model probably uses a different type to represent geo-points,
mapping geo-points requires some extra steps.
Two options are available:
5.8.2. Using @GenericField and the GeoPoint interface
When geo-points are represented in your entity model by a dedicated, immutable type,
you can simply make that type implement the GeoPoint interface,
and use simple property/field mapping with @GenericField:
GeoPoint and using @GenericField@Embeddable
public class MyCoordinates implements GeoPoint { (1)
@Basic
private Double latitude;
@Basic
private Double longitude;
protected MyCoordinates() {
// For Hibernate ORM
}
public MyCoordinates(double latitude, double longitude) {
this.latitude = latitude;
this.longitude = longitude;
}
@Override
public double latitude() { (2)
return latitude;
}
@Override
public double longitude() {
return longitude;
}
}@Entity
@Indexed
public class Author {
@Id
@GeneratedValue
private Integer id;
private String name;
@Embedded
@GenericField (3)
private MyCoordinates placeOfBirth;
public Author() {
}
// Getters and setters
// ...
}| 1 | Model the geo-point as an embeddable implementing GeoPoint.
A custom type with a corresponding Hibernate ORM UserType would work as well. |
| 2 | The geo-point type must be immutable: it does not declare any setter. |
| 3 | Apply the @GenericField annotation to the placeOfBirth property holding the coordinates.
An index field named placeOfBirth will be added to the index.
Options generally used on @GenericField can be used here as well. |
|
The geo-point type must be immutable, i.e. the latitude and longitude of a given instance may never change. This is a core assumption of If the type holding your coordinates is mutable,
do not use |
|
If your geo-point type is immutable, but extending the |
5.8.3. Using @GeoPointBinding, @Latitude and @Longitude
For cases where coordinates are stored in a mutable object,
the solution is the @GeoPointBinding annotation.
Combined with the @Latitude and @Longitude annotation,
it can map the coordinates of any type that declares a latitude and longitude of type double:
@GeoPointBinding@Entity
@Indexed
@GeoPointBinding(fieldName = "placeOfBirth") (1)
public class Author {
@Id
@GeneratedValue
private Integer id;
private String name;
@Latitude (2)
private Double placeOfBirthLatitude;
@Longitude (3)
private Double placeOfBirthLongitude;
public Author() {
}
// Getters and setters
// ...
}| 1 | Apply the @GeoPointBinding annotation to the type,
setting fieldName to the name of the index field. |
| 2 | Apply @Latitude to the property holding the latitude. It must be of double or Double type. |
| 3 | Apply @Longitude to the property holding the longitude. It must be of double or Double type. |
The @GeoPointBinding annotation may also be applied to a property,
in which case the @Latitude and @Longitude must be applied to properties of the property’s type:
@GeoPointBinding on a property@Embeddable
public class MyCoordinates { (1)
@Basic
@Latitude (2)
private Double latitude;
@Basic
@Longitude (3)
private Double longitude;
protected MyCoordinates() {
// For Hibernate ORM
}
public MyCoordinates(double latitude, double longitude) {
this.latitude = latitude;
this.longitude = longitude;
}
public double getLatitude() {
return latitude;
}
public void setLatitude(Double latitude) { (4)
this.latitude = latitude;
}
public double getLongitude() {
return longitude;
}
public void setLongitude(Double longitude) {
this.longitude = longitude;
}
}@Entity
@Indexed
public class Author {
@Id
@GeneratedValue
private Integer id;
@FullTextField(analyzer = "name")
private String name;
@Embedded
@GeoPointBinding (5)
private MyCoordinates placeOfBirth;
public Author() {
}
// Getters and setters
// ...
}| 1 | Model the geo-point as embeddable. An entity would work as well. |
| 2 | In the geo-point type, apply @Latitude to the property holding the latitude. |
| 3 | In the geo-point type, apply @Longitude to the property holding the longitude. |
| 4 | The geo-point type may safely declare setters (it can be mutable). |
| 5 | Apply the @GeoPointBinding annotation to the property.
Setting fieldName to the name of the index field is possible, but optional:
the property name will be used by default. |
It is possible to handle multiple sets of coordinates by applying the annotations multiple times
and setting the markerSet attribute to a unique value:
@GeoPointBinding@Entity
@Indexed
@GeoPointBinding(fieldName = "placeOfBirth", markerSet = "birth") (1)
@GeoPointBinding(fieldName = "placeOfDeath", markerSet = "death") (2)
public class Author {
@Id
@GeneratedValue
private Integer id;
@FullTextField(analyzer = "name")
private String name;
@Latitude(markerSet = "birth") (3)
private Double placeOfBirthLatitude;
@Longitude(markerSet = "birth") (4)
private Double placeOfBirthLongitude;
@Latitude(markerSet = "death") (5)
private Double placeOfDeathLatitude;
@Longitude(markerSet = "death") (6)
private Double placeOfDeathLongitude;
public Author() {
}
// Getters and setters
// ...
}| 1 | Apply the @GeoPointBinding annotation to the type,
setting fieldName to the name of the index field, and markerSet to a unique value. |
| 2 | Apply the @GeoPointBinding annotation to the type a second time,
setting fieldName to the name of the index field (different from the first one),
and markerSet to a unique value (different from the first one). |
| 3 | Apply @Latitude to the property holding the latitude for the first geo-point field.
Set the markerSet attribute to the same value as the corresponding @GeoPointBinding annotation. |
| 4 | Apply @Longitude to the property holding the longitude for the first geo-point field.
Set the markerSet attribute to the same value as the corresponding @GeoPointBinding annotation. |
| 5 | Apply @Latitude to the property holding the latitude for the second geo-point field.
Set the markerSet attribute to the same value as the corresponding @GeoPointBinding annotation. |
| 6 | Apply @Longitude to the property holding the longitude for the second geo-point field.
Set the markerSet attribute to the same value as the corresponding @GeoPointBinding annotation. |
5.8.4. Programmatic mapping
You can map geo-point fields document identifier through the programmatic mapping too. Behavior and options are identical to annotation-based mapping.
GeoPoint and using .genericField()TypeMappingStep authorMapping = mapping.type( Author.class );
authorMapping.indexed();
authorMapping.property( "placeOfBirth" )
.genericField();GeoPointBinderTypeMappingStep authorMapping = mapping.type( Author.class );
authorMapping.indexed();
authorMapping.binder( GeoPointBinder.create().fieldName( "placeOfBirth" ) );
authorMapping.property( "placeOfBirthLatitude" )
.marker( GeoPointBinder.latitude() );
authorMapping.property( "placeOfBirthLongitude" )
.marker( GeoPointBinder.longitude() );5.9. Mapping multiple alternatives
5.9.1. Basics
In some situations, it is necessary for a particular property to be indexed differently depending on the value of another property.
For example there may be an entity that has text properties whose content
is in a different language depending on the value of another property, say language.
In that case, you probably want to analyze the text differently depending on the language.
While this could definitely be solved with a custom type bridge,
a convenient solution to that problem is to use the AlternativeBinder.
This binder solves the problem this way:
-
at bootstrap, declare one index field per language, assigning a different analyzer to each field;
-
at runtime, put the content of the text property in a different field based on the language.
In order to use this binder, you will need to:
-
annotate a property with
@AlternativeDiscriminator(e.g. thelanguageproperty); -
implement an
AlternativeBinderDelegatethat will declare the index fields (e.g. one field per language) and create anAlternativeValueBridge. This bridge is responsible for passing the property value to the relevant field at runtime. -
apply the
AlternativeBinderto the type hosting the properties (e.g. the type declaring thelanguageproperty and the multi-language text properties). Generally you will want to create your own annotation for that.
Below is an example of how to use the binder.
language property using AlternativeBinderpublic enum Language { (1)
ENGLISH( "en" ),
FRENCH( "fr" ),
GERMAN( "de" );
public final String code;
Language(String code) {
this.code = code;
}
}| 1 | A Language enum defines supported languages. |
@Entity
@Indexed
public class BlogEntry {

    @Id
    private Integer id;

    @AlternativeDiscriminator (1)
    @Enumerated(EnumType.STRING)
    private Language language;

    @MultiLanguageField (2)
    private String text;

    // Getters and setters
    // ...

}| 1 | Mark the language property as the discriminator which will be used to determine the language. |
| 2 | Map the text property to multiple fields using a custom annotation. |
@Retention(RetentionPolicy.RUNTIME) (1)
@Target({ ElementType.METHOD, ElementType.FIELD }) (2)
@PropertyMapping(processor = @PropertyMappingAnnotationProcessorRef( (3)
        type = MultiLanguageField.Processor.class
))
@Documented (4)
public @interface MultiLanguageField {

    String name() default ""; (5)

    class Processor implements PropertyMappingAnnotationProcessor<MultiLanguageField> { (6)
        @Override
        public void process(PropertyMappingStep mapping, MultiLanguageField annotation,
                PropertyMappingAnnotationProcessorContext context) {
            LanguageAlternativeBinderDelegate delegate = new LanguageAlternativeBinderDelegate( (7)
                    annotation.name().isEmpty() ? null : annotation.name()
            );
            mapping.hostingType() (8)
                    .binder( AlternativeBinder.create( (9)
                            Language.class, (10)
                            context.annotatedElement().name(), (11)
                            String.class, (12)
                            BeanReference.ofInstance( delegate ) (13)
                    ) );
        }
    }
}| 1 | Define an annotation with retention RUNTIME.
Any other retention policy will cause the annotation to be ignored by Hibernate Search. |
| 2 | Allow the annotation to target either methods (getters) or fields. |
| 3 | Mark this annotation as a property mapping, and instruct Hibernate Search to apply the given processor whenever it finds this annotation. It is also possible to reference the processor by its name, in the case of a CDI/Spring bean. |
| 4 | Optionally, mark the annotation as documented, so that it is included in the javadoc of your entities. |
| 5 | Optionally, define parameters. Here we allow to customize the field name (which will default to the property name, see further down). |
| 6 | The processor must implement the PropertyMappingAnnotationProcessor interface,
setting its generic type argument to the type of the corresponding annotation.
Here the processor class is nested in the annotation class,
because it is more convenient,
but you are obviously free to implement it in a separate Java file. |
| 7 | In the annotation processor, instantiate a custom binder delegate (see below for the implementation). |
| 8 | Access the mapping of the type hosting the property (in this example, BlogEntry). |
| 9 | Apply the AlternativeBinder to the type hosting the property (in this example, BlogEntry). |
| 10 | Pass to AlternativeBinder the expected type of discriminator values. |
| 11 | Pass to AlternativeBinder the name of the property from which field values should be extracted
(in this example, text). |
| 12 | Pass to AlternativeBinder the expected type of the property from which index field values are extracted. |
| 13 | Pass to AlternativeBinder the binder delegate. |
public class LanguageAlternativeBinderDelegate implements AlternativeBinderDelegate<Language, String> { (1)

    private final String name;

    public LanguageAlternativeBinderDelegate(String name) { (2)
        this.name = name;
    }

    @Override
    public AlternativeValueBridge<Language, String> bind(IndexSchemaElement indexSchemaElement, (3)
            PojoModelProperty fieldValueSource) {
        EnumMap<Language, IndexFieldReference<String>> fields = new EnumMap<>( Language.class );
        String fieldNamePrefix = ( name != null ? name : fieldValueSource.name() ) + "_";

        for ( Language language : Language.values() ) { (4)
            String languageCode = language.code;
            IndexFieldReference<String> field = indexSchemaElement.field(
                    fieldNamePrefix + languageCode, (5)
                    f -> f.asString().analyzer( "text_" + languageCode ) (6)
            )
                    .toReference();
            fields.put( language, field );
        }

        return new Bridge( fields ); (7)
    }

    private static class Bridge implements AlternativeValueBridge<Language, String> { (8)
        private final EnumMap<Language, IndexFieldReference<String>> fields;

        private Bridge(EnumMap<Language, IndexFieldReference<String>> fields) {
            this.fields = fields;
        }

        @Override
        public void write(DocumentElement target, Language discriminator, String bridgedElement) {
            target.addValue( fields.get( discriminator ), bridgedElement ); (9)
        }
    }
}| 1 | The binder delegate must implement AlternativeBinderDelegate.
The first type parameter is the expected type of discriminator values (in this example, Language);
the second type parameter is the expected type of the property from which field values are extracted
(in this example, String). |
| 2 | Any (custom) parameter can be passed through the constructor. |
| 3 | Implement bind, to bind a property to index fields. |
| 4 | Define one field per language. |
| 5 | Make sure to give a different name to each field.
Here we’re using the language code as a suffix, i.e. text_en, text_fr, text_de, … |
| 6 | Assign a different analyzer to each field.
The analyzers text_en, text_fr, text_de must have been defined in the backend;
see Analysis. |
| 7 | Return a bridge. |
| 8 | The bridge must implement the AlternativeValueBridge interface.
Here the bridge class is nested in the binder class,
because it is more convenient,
but you are obviously free to implement it in a separate java file. |
| 9 | The bridge is called when indexing; it selects the field to write to based on the discriminator value, then writes the value to index to that field. |
5.9.2. Programmatic mapping
You can apply AlternativeBinder through the programmatic mapping too.
Behavior and options are identical to annotation-based mapping.
AlternativeBinder with .binder(…)TypeMappingStep blogEntryMapping = mapping.type( BlogEntry.class );
blogEntryMapping.indexed();
blogEntryMapping.property( "language" )
.marker( AlternativeBinder.alternativeDiscriminator() );
LanguageAlternativeBinderDelegate delegate = new LanguageAlternativeBinderDelegate( null );
blogEntryMapping.binder( AlternativeBinder.create( Language.class,
"text", String.class, BeanReference.ofInstance( delegate ) ) );5.10. Tuning automatic reindexing
5.10.1. Basics
When an entity property is mapped to the index,
be it through @GenericField, @IndexedEmbedded,
or a custom bridge,
this mapping introduces a dependency:
the document will need to be updated when the property changes.
For simpler, single-entity mappings, this only means that Hibernate Search will need to detect when an entity changes and reindex the entity. This will be handled transparently.
If the mapping includes a "derived" property,
i.e. a property that is not persisted directly,
but instead is dynamically computed in a getter that uses other properties as input,
Hibernate Search will be unable to guess which part of the persistent state
these properties are based on.
In this case, some explicit configuration will be required;
see Reindexing when a derived value changes with @IndexingDependency for more information.
When the mapping crosses the entity boundaries,
things get more complicated.
Let’s consider a mapping where a Book entity is mapped to a document,
and that document must include the name property of the Author entity
(for example using @IndexedEmbedded).
Hibernate Search will need to track changes to the author’s name,
and whenever that happens,
it will need to retrieve all the books of that author,
to reindex these books automatically.
In practice, this means that whenever an entity mapping relies on an association to another entity,
this association must be bidirectional:
if Book.authors is @IndexedEmbedded,
Hibernate Search must be aware of an inverse association Author.books.
An exception will be thrown on startup if the inverse association cannot be resolved.
Most of the time, Hibernate Search is able to take advantage of Hibernate ORM metadata
(the mappedBy attribute of @OneToOne and @OneToMany)
to resolve the inverse side of an association,
so this is all handled transparently.
In some rare cases, with the more complex mappings,
it is possible that even Hibernate ORM is not aware that an association is bidirectional,
because mappedBy cannot be used.
A few solutions exist:
-
The association can simply be ignored. This means the index will be out of date whenever associated entities change, but this can be an acceptable solution if the index is rebuilt periodically. See Limiting automatic reindexing with
@IndexingDependencyfor more information. -
If the association is actually bidirectional, its inverse side can be specified to Hibernate Search explicitly using
@AssociationInverseSide. See Enriching the entity model with@AssociationInverseSidefor more information.
5.10.2. Enriching the entity model with @AssociationInverseSide
Given an association from an entity type A to entity type B,
@AssociationInverseSide defines the inverse side of an association,
i.e. the path from B to A.
This is mostly useful when a bidirectional association
is not mapped as such in Hibernate ORM (no mappedBy).
@AssociationInverseSide@Entity
@Indexed
public class Book {
@Id
@GeneratedValue
private Integer id;
private String title;
@ElementCollection (1)
@JoinTable(
name = "book_editionbyprice",
joinColumns = @JoinColumn(name = "book_id")
)
@MapKeyJoinColumn(name = "edition_id")
@Column(name = "price")
@OrderBy("edition_id asc")
@IndexedEmbedded( (2)
name = "editionsForSale",
extraction = @ContainerExtraction(BuiltinContainerExtractors.MAP_KEY)
)
@AssociationInverseSide( (3)
extraction = @ContainerExtraction(BuiltinContainerExtractors.MAP_KEY),
inversePath = @ObjectPath( @PropertyValue( propertyName = "book" ) )
)
private Map<BookEdition, BigDecimal> priceByEdition = new LinkedHashMap<>();
public Book() {
}
// Getters and setters
// ...
}@Entity
public class BookEdition {
@Id
@GeneratedValue
private Integer id;
@ManyToOne (4)
private Book book;
@FullTextField(analyzer = "english")
private String label;
public BookEdition() {
}
// Getters and setters
// ...
}| 1 | This annotation and the following ones are the Hibernate ORM mapping for a Map<BookEdition, BigDecimal>
where the keys are BookEdition entities and the values are the price of that edition. |
| 2 | Index-embed the editions that are actually for sale. |
| 3 | In Hibernate ORM, it is not possible to use mappedBy for an association modeled by a Map key.
Thus, we use @AssociationInverseSide to tell Hibernate Search what the inverse side
of this association is. |
| 4 | We could have applied the @AssociationInverseSide annotation here instead:
either side will do. |
5.10.3. Reindexing when a derived value changes with @IndexingDependency
When a property is not persisted directly, but instead is dynamically computed in a getter that uses other properties as input, Hibernate Search will be unable to guess which part of the persistent state these properties are based on, and thus will be unable to trigger automatic reindexing when the relevant persistent state changes. By default, Hibernate Search will detect such cases on bootstrap and throw an exception.
Annotating the property with @IndexingDependency(derivedFrom = …)
will give Hibernate Search the information it needs and allow automatic reindexing.
@IndexingDependency.derivedFrom@Entity
@Indexed
public class Book {
@Id
@GeneratedValue
private Integer id;
private String title;
@ElementCollection
private List<String> authors = new ArrayList<>(); (1)
public Book() {
}
// Getters and setters
// ...
@Transient (2)
@FullTextField(analyzer = "name") (3)
@IndexingDependency(derivedFrom = @ObjectPath( (4)
@PropertyValue(propertyName = "authors")
))
public String getMainAuthor() {
return authors.isEmpty() ? null : authors.get( 0 );
}
}| 1 | Authors are modeled as a list of string containing the author names. |
| 2 | The transient mainAuthor property dynamically returns the main author (the first one). |
| 3 | We use @FullTextField on the getMainAuthor() getter to index the name of the main author. |
| 4 | We use @IndexingDependency.derivedFrom to tell Hibernate Search
that whenever the list of authors changes, the result of getMainAuthor() may have changed. |
5.10.4. Limiting automatic reindexing with @IndexingDependency
In some cases, fully automatic reindexing is not realistically achievable:
-
When an association is massive, for example a single entity instance is indexed-embedded in thousands of other entities.
-
When a property mapped to the index is updated very frequently, leading to a very frequent reindexing and unacceptable usage of disks or database.
-
Etc.
When that happens, it is possible to tell Hibernate Search to ignore updates
to a particular property (and, in the case of @IndexedEmbedded, anything beyond that property).
Several options are available to control exactly how updates to a given property affect reindexing. See the sections below for an explanation of each option.
ReindexOnUpdate.SHALLOW: limiting automatic reindexing to same-entity updates only
ReindexOnUpdate.SHALLOW is most useful when an association is highly asymmetric and therefore unidirectional.
Think associations to "reference" data such as categories, types, cities, countries, …
It essentially tells Hibernate Search that changing an association — adding or removing associated elements, i.e. "shallow" updates — should trigger automatic reindexing, but changing properties of associated entities — "deep" updates — should not.
For example, let’s consider the (incorrect) mapping below:
@Entity
@Indexed
public class Book {

    @Id
    private Integer id;

    private String title;

    @ManyToOne (1)
    @IndexedEmbedded (2)
    private BookCategory category;

    public Book() {
    }

    // Getters and setters
    // ...

}
@Entity
public class BookCategory {
@Id
private Integer id;
@FullTextField(analyzer = "english")
private String name;
(3)
// Getters and setters
// ...
}| 1 | Each book has an association to a BookCategory entity. |
| 2 | We want to index-embed the BookCategory into the Book … |
| 3 | … but we really don’t want to model the (huge) inverse association from BookCategory to Book:
There are potentially thousands of books for each category, so calling a getBooks() method
would lead to loading thousands of entities into the Hibernate ORM session at once,
and would perform badly.
Thus, there isn’t any getBooks() method to list all books in a category. |
With this mapping, Hibernate Search will not be able to reindex all books when the category name changes:
the getter that would list all books for that category simply doesn’t exist.
Since Hibernate Search tries to be safe by default,
it will reject this mapping and throw an exception at bootstrap,
saying it needs an inverse side to the Book → BookCategory association.
However, in this case, we don’t expect the name of a BookCategory to change.
That’s really "reference" data, which changes so rarely that we can conceivably plan ahead such change
and reindex all books whenever that happens.
So we would really not mind if Hibernate Search just ignored changes to BookCategory…
That’s what @IndexingDependency(reindexOnUpdate = ReindexOnUpdate.SHALLOW) is for:
it tells Hibernate Search to ignore the impact of updates to an associated entity.
See the modified mapping below:
ReindexOnUpdate.SHALLOW@Entity
@Indexed
public class Book {
@Id
private Integer id;
private String title;
@ManyToOne
@IndexedEmbedded
@IndexingDependency(reindexOnUpdate = ReindexOnUpdate.SHALLOW) (1)
private BookCategory category;
public Book() {
}
// Getters and setters
// ...
}| 1 | We use ReindexOnUpdate.SHALLOW to tell Hibernate Search that Book
should be re-indexed automatically when it’s assigned a new category (book.setCategory( newCategory )),
but not when properties of its category change (category.setName( newName )). |
Hibernate Search will accept the mapping above and boot successfully,
since the inverse side of the association from Book to BookCategory is no longer deemed necessary.
Only shallow changes to a book’s category will trigger automatic reindexing:
-
When a book is assigned a new category (
book.setCategory( newCategory )), Hibernate Search will consider it a "shallow" change, since it only affects theBookentity. Thus, Hibernate Search will reindex the book automatically. -
When a category itself changes (
category.setName( newName )), Hibernate Search will consider it a "deep" change, since it occurs beyond the boundaries of theBookentity. Thus, Hibernate Search will not reindex books of that category automatically. The index will become slightly out-of-sync, but this can be solved by reindexingBookentities, for example every night.
ReindexOnUpdate.NO: disabling automatic reindexing for updates of a particular property
ReindexOnUpdate.NO is most useful for properties that change very frequently
and don’t need to be up-to-date in the index.
It essentially tells Hibernate Search that changes to that property should not trigger automatic reindexing,
For example, let’s consider the mapping below:
@Entity
@Indexed
public class Sensor {

    @Id
    private Integer id;

    @FullTextField
    private String name; (1)

    @KeywordField
    private SensorStatus status; (1)

    @Column(name = "\"value\"")
    private double value; (2)

    @GenericField
    private double rollingAverage; (3)

    public Sensor() {
    }

    // Getters and setters
    // ...

}| 1 | The sensor name and status get updated very rarely. |
| 2 | The sensor value gets updated every few milliseconds |
| 3 | When the sensor value gets updated, we also update the rolling average over the last few seconds (based on data not shown here). |
Updates to the name and status, which are rarely updated, can perfectly well trigger automatic reindexing. But considering there are thousands of sensors, updates to the sensor value cannot reasonably trigger automatic reindexing: reindexing thousands of sensors every few milliseconds probably won’t perform well.
In this scenario, however, search on sensor value is not considered critical and indexes don’t need to be as fresh. We can accept indexes to lag behind a few minutes when it comes to sensor value. We can consider setting up a batch process that runs every few seconds to reindex all sensors, either through a mass indexer or other means. So we would really not mind if Hibernate Search just ignored changes to sensor values…
That’s what @IndexingDependency(reindexOnUpdate = ReindexOnUpdate.NO) is for:
it tells Hibernate Search to ignore the impact of updates to the rollingAverage property.
See the modified mapping below:
ReindexOnUpdate.NO@Entity
@Indexed
public class Sensor {
@Id
private Integer id;
@FullTextField
private String name;
@KeywordField
private SensorStatus status;
@Column(name = "\"value\"")
private double value;
@GenericField
@IndexingDependency(reindexOnUpdate = ReindexOnUpdate.NO) (1)
private double rollingAverage;
public Sensor() {
}
// Getters and setters
// ...
}| 1 | We use ReindexOnUpdate.NO to tell Hibernate Search that updates to rollingAverage
should not trigger automatic reindexing. |
With this mapping:
-
When a sensor is assigned a new name (
sensor.setName( newName )) or status (sensor.setStatus( newStatus )), Hibernate Search will reindex the sensor automatically. -
When a sensor is assigned a new rolling average (
sensor.setRollingAverage( newName )), Hibernate Search will not reindex the sensor automatically.
5.10.5. Programmatic mapping
You can control reindexing through the programmatic mapping too. Behavior and options are identical to annotation-based mapping.
.associationInverseSide(…)TypeMappingStep bookMapping = mapping.type( Book.class );
bookMapping.indexed();
bookMapping.property( "priceByEdition" )
.indexedEmbedded( "editionsForSale" )
.extractor( BuiltinContainerExtractors.MAP_KEY )
.associationInverseSide( PojoModelPath.parse( "book" ) )
.extractor( BuiltinContainerExtractors.MAP_KEY );
TypeMappingStep bookEditionMapping = mapping.type( BookEdition.class );
bookEditionMapping.property( "label" )
.fullTextField().analyzer( "english" );.indexingDependency().derivedFrom(…)TypeMappingStep bookMapping = mapping.type( Book.class );
bookMapping.indexed();
bookMapping.property( "mainAuthor" )
.fullTextField().analyzer( "name" )
.indexingDependency().derivedFrom( PojoModelPath.parse( "authors" ) );.indexingDependency().reindexOnUpdate(…)TypeMappingStep bookMapping = mapping.type( Book.class );
bookMapping.indexed();
bookMapping.property( "category" )
.indexedEmbedded()
.indexingDependency().reindexOnUpdate( ReindexOnUpdate.SHALLOW );
TypeMappingStep bookCategoryMapping = mapping.type( BookCategory.class );
bookCategoryMapping.property( "name" )
.fullTextField().analyzer( "english" );5.11. Changing the mapping of an existing application
Over the lifetime of an application, it will happen that the mapping of a particular indexed entity type has to change. When this happens, the mapping changes are likely to require changes to the structure of the index, i.e. its schema. Hibernate Search does not handle this structure change automatically, so manual intervention is required.
The simplest solution when the index structure needs to change is to:
-
Drop and re-create the index and its schema, either manually by deleting the filesystem directory for Lucene or using the REST API to delete the index for Elasticsearch, or using Hibernate Search’s schema management features.
-
Re-populate the index, for example using the mass indexer.
|
Technically, dropping the index and reindexing is not strictly required if the mapping changes include only:
However, you will still need to:
|
5.12. Custom mapping annotations
By default, Hibernate Search only recognizes built-in mapping annotations
such as @Indexed, @GenericField or @IndexedEmbedded.
To use custom annotations in a Hibernate Search mapping, two steps are required:
-
Implementing a processor for that annotation:
TypeMappingAnnotationProcessorfor type annotations orPropertyMappingAnnotationProcessorfor method/field annotations. -
Annotating the custom annotation with either
@TypeMappingor@PropertyMapping, passing as an argument the reference to the annotation processor.
Once this is done, Hibernate Search will be able to detect custom annotations in indexed classes.
Whenever a custom annotation is encountered,
Hibernate Search will instantiate the annotation processor
and call its process method, passing the following as arguments:
-
A
mappingparameter allowing to define the mapping for the type or property using the programmatic mapping API. -
An
annotationparameter representing the annotation instance. -
A
contextobject with various helpers.
Custom annotations are most frequently used to apply custom, parameterized bridges. You can find examples in these sections in particular:
|
It is completely possible to use custom annotations for parameter-less bridges, or even for more complex features such as indexed-embedded: every feature available in the programmatic API can be triggered by a custom annotation. |
5.13. Inspecting the mapping
After Hibernate Search has successfully booted, the SearchMapping can be used
to get a list of indexed entities and get more direct access to the corresponding indexes,
as shown in the example below.
SearchMapping mapping = Search.mapping( entityManagerFactory ); (1)
SearchIndexedEntity<Book> bookEntity = mapping.indexedEntity( Book.class ); (2)
String jpaName = bookEntity.jpaName(); (3)
IndexManager indexManager = bookEntity.indexManager(); (4)
Backend backend = indexManager.backend(); (5)

SearchIndexedEntity<?> bookEntity2 = mapping.indexedEntity( "Book" ); (6)
Class<?> javaClass = bookEntity2.javaClass();

for ( SearchIndexedEntity<?> entity : mapping.allIndexedEntities() ) { (7)
    // ...
}| 1 | Retrieve the SearchMapping. |
| 2 | Retrieve the SearchIndexedEntity by its entity class.
SearchIndexedEntity gives access to information pertaining to that entity and its index. |
| 3 | Get the JPA name of that entity. |
| 4 | Get the index manager for that entity. |
| 5 | Get the backend for that index manager. |
| 6 | Retrieve the SearchIndexedEntity by its entity name. |
| 7 | Retrieve all indexed entities. |
From an IndexManager, you can then access the index metamodel,
to inspect available fields and their main characteristics,
as shown below.
SearchIndexedEntity<Book> bookEntity = mapping.indexedEntity( Book.class ); (1)
IndexManager indexManager = bookEntity.indexManager(); (2)
IndexDescriptor indexDescriptor = indexManager.descriptor(); (3)

indexDescriptor.field( "releaseDate" ).ifPresent( field -> { (4)
    String path = field.absolutePath(); (5)
    String relativeName = field.relativeName();
    // Etc.

    if ( field.isValueField() ) { (6)
        IndexValueFieldDescriptor valueField = field.toValueField(); (7)

        IndexValueFieldTypeDescriptor type = valueField.type(); (8)
        boolean projectable = type.projectable();
        Class<?> dslArgumentClass = type.dslArgumentClass();
        Class<?> projectedValueClass = type.projectedValueClass();
        Optional<String> analyzerName = type.analyzerName();
        Optional<String> searchAnalyzerName = type.searchAnalyzerName();
        Optional<String> normalizerName = type.normalizerName();
        // Etc.
    }
    else if ( field.isObjectField() ) { (9)
        IndexObjectFieldDescriptor objectField = field.toObjectField();

        IndexObjectFieldTypeDescriptor type = objectField.type();
        boolean nested = type.nested();
        // Etc.
    }
} );| 1 | Retrieve a SearchIndexedEntity. |
| 2 | Get the index manager for that entity.
IndexManager gives access to information pertaining to the index.
This includes the metamodel, but not only (see below). |
| 3 | Get the descriptor for that index. The descriptor exposes the index metamodel. |
| 4 | Retrieve a field by name. The method returns an Optional, which is empty if the field does not exist. |
| 5 | The field descriptor exposes information about the field structure: path, name, parent, … |
| 6 | Check that the field is a value field, holding a value (integer, text, …), as opposed to object fields, holding other fields. |
| 7 | Narrow down the field descriptor to a value field descriptor. |
| 8 | Get the descriptor for the field type. The type descriptor exposes information about the field’s capabilities: is it searchable, sortable, projectable, what is the expected java class for arguments to the Search DSL, what are the analyzers/normalizer set on this field, … |
| 9 | Object fields can also be inspected. |
|
The |
The SearchMapping also exposes methods to retrieve an IndexManager by name,
or even a whole Backend by name.
6. Bridges
6.1. Basics
In Hibernate Search, bridges are the components responsible for converting pieces of data from the entity model to the document model.
For example, when @GenericField is applied to a property of a custom enum type,
a built-in bridge will be used to convert this enum to a string when indexing,
and to convert the string back to an enum when projecting.
Similarly, when an entity identifier of type Long is mapped to a document identifier,
a built-in bridge will be used to convert the Long to a String
(since all document identifiers are strings)
when indexing,
and back from a String to a Long when loading search results.
Bridges are not limited to one-to-one mapping:
for example, the @GeoPointBinding annotation,
which maps two properties annotated with @Latitude and @Longitude
to a single field, is backed by another built-in bridge.
While built-in bridges are provided for a wide range of standard types, they may not be enough for complex models. This is why bridges are really useful: it is possible to implement custom bridges and to refer to them in the Hibernate Search mapping. Using custom bridges, custom types can be mapped, even complex types that require user code to execute at indexing time.
There are multiple types of bridges, detailed in the next sections. If you need to implement a custom bridge, but don’t quite know which type of bridge you need, the following table may help:
| Bridge type | ValueBridge |
PropertyBridge |
TypeBridge |
IdentifierBridge |
RoutingBridge |
|---|---|---|---|---|---|
Applied to… |
Class field or getter |
Class field or getter |
Class |
Class field or getter (usually entity ID) |
Class |
Maps to… |
One index field. Value field only: integer, text, geopoint, etc. No object field (composite). |
One index field or more. Value fields as well as object fields (composite). |
One index field or more. Value fields as well as object fields (composite). |
Document identifier |
Route (conditional indexing, routing key) |
Built-in annotation(s) |
|
|
|
||
Supports container extractors |
Yes |
No |
No |
No |
No |
Supports mutable types |
No |
Yes |
Yes |
No |
Yes |
6.2. Value bridge
6.2.1. Basics
A value bridge is a pluggable component that implements
the mapping of a property to an index field.
It is applied to a property with a @*Field annotation
(@GenericField, @FullTextField, …)
or with a custom annotation.
A value bridge is relatively straightforward to implement:
in its simplest form,
it boils down to converting a value from the property type
to the index field type.
Thanks to the integration to the @*Field annotations,
several features come for free:
-
The type of the index field can be customized directly in the
@*Fieldannotation: it can be defined as sortable, projectable, it can be assigned an analyzer, … -
The bridge can be transparently applied to elements of a container. For example, you can implement a
ValueBridge<ISBN, String>and transparently use it on a property of typeList<ISBN>: the bridge will simply be applied once per list element and populate the index field with as many values.
However, due to these features, several limitations are imposed on a value bridge which are not present in a property bridge for example:
-
A value bridge only allows one-to-one mapping: one property to one index field. A single value bridge cannot populate more than one index field.
-
A value bridge will not work correctly when applied to a mutable type. A value bridge is expected to be applied to "atomic" data, such as a
LocalDate; if it is applied to an entity, for example, extracting data from its properties, Hibernate Search will not be aware of which properties are used and will not be able to automatically trigger reindexing when these properties change.
Below is an example of a custom value bridge that converts
a custom ISBN type to its string representation to index it:
ValueBridgepublic class ISBNValueBridge implements ValueBridge<ISBN, String> { (1)
@Override
public String toIndexedValue(ISBN value, ValueBridgeToIndexedValueContext context) { (2)
return value == null ? null : value.getStringValue();
}
}| 1 | The bridge must implement the ValueBridge interface.
Two generic type arguments must be provided:
the first one is the type of property values (values in the entity model),
and the second one is the type of index fields (values in the document model). |
| 2 | The toIndexedValue method is the only one that must be implemented: all other methods are optional.
It takes the property value and a context object as parameters,
and is expected to return the corresponding index field value.
It is called when indexing,
but also when parameters to the search DSL must be transformed. |
@Entity
@Indexed
public class Book {

    @Id
    @GeneratedValue
    private Integer id;

    @Convert(converter = ISBNAttributeConverter.class) (1)
    @KeywordField( (2)
            valueBridge = @ValueBridgeRef(type = ISBNValueBridge.class), (3)
            normalizer = "isbn" (4)
    )
    private ISBN isbn;

    // Getters and setters
    // ...

}| 1 | This is unrelated to the value bridge, but necessary in order for Hibernate ORM to store the data correctly in the database. |
| 2 | Map the property to an index field. |
| 3 | Instruct Hibernate Search to use our custom value bridge. It is also possible to reference the bridge by its name, in the case of a CDI/Spring bean. |
| 4 | Customize the field as usual. |
Here is an example of what an indexed document would look like, with the Elasticsearch backend:
{
  "isbn": "978-0-58-600835-5"
}
The example above is just a minimal implementations. A custom value bridge can do more:
See the next sections for more information.
6.2.2. Type resolution
By default, the value bridge’s property type and index field type are determined automatically,
using reflection to extract the generic type arguments of the ValueBridge interface:
the first argument is the property type while the second argument is the index field type.
For example, in public class MyBridge implements ValueBridge<ISBN, String>,
the property type is resolved to ISBN and the index field type is resolved to String:
the bridge will be applied to properties of type ISBN
and will populate an index field of type String.
The fact that types are resolved automatically using reflection brings a few limitations.
In particular, it means the generic type arguments cannot be just anything;
as a general rule, you should stick to literal types (MyBridge implements ValueBridge<ISBN, String>)
and avoid generic type parameters and wildcards (MyBridge<T> implements ValueBridge<List<T>, T>).
If you need more complex types,
you can bypass the automatic resolution and specify types explicitly
using a ValueBinder.
6.2.3. Using value bridges in other @*Field annotations
In order to use a custom value bridge with specialized annotations such as @FullTextField,
the bridge must declare a compatible index field type.
For example:
-
@FullTextFieldand@KeywordFieldrequire an index field type of typeString(ValueBridge<Whatever, String>); -
@ScaledNumberFieldrequires an index field type of typeBigDecimal(ValueBridge<Whatever, BigDecimal>) orBigInteger(ValueBridge<Whatever, BigInteger>).
Refer to Available field annotations for the specific constraints of each annotation.
Attempts to use a bridge that declares an incompatible type will trigger exceptions at bootstrap.
6.2.4. Supporting projections with fromIndexedValue()
By default, any attempt to project on a field using a custom bridge will result in an exception, because Hibernate Search doesn’t know how to convert the projected values obtained from the index back to the property type.
It is possible to disable conversion explicitly to get the raw value from the index,
but another way of solving the problem is to simply implement fromIndexedValue in the custom bridge.
This method will be called whenever a projected value needs to be converted.
fromIndexedValue to convert projected valuespublic class ISBNValueBridge implements ValueBridge<ISBN, String> {
@Override
public String toIndexedValue(ISBN value, ValueBridgeToIndexedValueContext context) {
return value == null ? null : value.getStringValue();
}
@Override
public ISBN fromIndexedValue(String value, ValueBridgeFromIndexedValueContext context) { (1)
return value == null ? null : ISBN.parse( value );
}
}| 1 | Implement fromIndexedValue as necessary. |
@Entity
@Indexed
public class Book {

    @Id
    @GeneratedValue
    private Integer id;

    @Convert(converter = ISBNAttributeConverter.class) (1)
    @KeywordField( (2)
            valueBridge = @ValueBridgeRef(type = ISBNValueBridge.class), (3)
            normalizer = "isbn",
            projectable = Projectable.YES (4)
    )
    private ISBN isbn;

    // Getters and setters
    // ...

}| 1 | This is unrelated to the value bridge, but necessary in order for Hibernate ORM to store the data correctly in the database. |
| 2 | Map the property to an index field. |
| 3 | Instruct Hibernate Search to use our custom value bridge. |
| 4 | Do not forget to configure the field as projectable. |
6.2.5. Supporting indexNullAs with parse()
By default, the indexNullAs attribute of @*Field annotations cannot be used together with a custom bridge.
In order to make it work, the bridge needs to implement the parse method
so that Hibernate Search can convert the string assigned to indexNullAs
to a value of the correct type for the index field.
parse to support indexNullAspublic class ISBNValueBridge implements ValueBridge<ISBN, String> {
@Override
public String toIndexedValue(ISBN value, ValueBridgeToIndexedValueContext context) {
return value == null ? null : value.getStringValue();
}
@Override
public String parse(String value) {
// Just check the string format and return the string
return ISBN.parse( value ).getStringValue(); (1)
}
}| 1 | Implement parse as necessary.
The bridge may throw exceptions for invalid strings. |
@Entity
@Indexed
public class Book {

    @Id
    @GeneratedValue
    private Integer id;

    @Convert(converter = ISBNAttributeConverter.class) (1)
    @KeywordField( (2)
            valueBridge = @ValueBridgeRef(type = ISBNValueBridge.class), (3)
            normalizer = "isbn",
            indexNullAs = "000-0-00-000000-0" (4)
    )
    private ISBN isbn;

    // Getters and setters
    // ...

}| 1 | This is unrelated to the value bridge, but necessary in order for Hibernate ORM to store the data correctly in the database. |
| 2 | Map the property to an index field. |
| 3 | Instruct Hibernate Search to use our custom value bridge. |
| 4 | Set indexNullAs to a valid value. |
6.2.6. Compatibility across indexes with isCompatibleWith()
A value bridges is involved in indexing, but also in the various search DSLs, to convert values passed to the DSL to an index field value that the backend will understand.
When creating a predicate targeting a single field across multiple indexes, Hibernate Search will have multiple bridges to choose from: one per index. Since only one predicate with a single value can be created, Hibernate Search needs to pick a single bridge. By default, when a custom bridge is assigned to the field, Hibernate Search will throw an exception because it cannot decide which bridge to pick.
If the bridges assigned to the field in all indexes produce the same result,
it is possible to indicate to Hibernate Search that any bridge will do
by implementing isCompatibleWith.
This method accepts another bridge in parameter,
and returns true if that bridge can be expected to always behave the same as this.
isCompatibleWith to support multi-index searchpublic class ISBNValueBridge implements ValueBridge<ISBN, String> { (1)
@Override
public String toIndexedValue(ISBN value, ValueBridgeToIndexedValueContext context) { (2)
return value == null ? null : value.getStringValue();
}
@Override
public boolean isCompatibleWith(ValueBridge<?, ?> other) {
return getClass().equals( other.getClass() );
}
}| 1 | Implement isCompatibleWith as necessary.
Here we just deem any instance of the same class to be compatible. |
6.2.7. Configuring the bridge more finely with ValueBinder
To configure a bridge more finely, it is possible to implement a value binder that will be executed at bootstrap. This binder will be able in particular to define a custom index field type.
ValueBinderpublic class ISBNValueBinder implements ValueBinder { (1)
@Override
public void bind(ValueBindingContext<?> context) { (2)
context.bridge( (3)
ISBN.class, (4)
new ISBNValueBridge(), (5)
context.typeFactory() (6)
.asString() (7)
.normalizer( "isbn" ) (8)
);
}
private static class ISBNValueBridge implements ValueBridge<ISBN, String> {
@Override
public String toIndexedValue(ISBN value, ValueBridgeToIndexedValueContext context) { (9)
return value == null ? null : value.getStringValue();
}
}
}| 1 | The binder must implement the ValueBinder interface. |
| 2 | Implement the bind method. |
| 3 | Call context.bridge(…) to define the value bridge to use. |
| 4 | Pass the expected type of property values. |
| 5 | Pass the value bridge instance. |
| 6 | Use the context’s type factory to create an index field type. |
| 7 | Pick a base type for the index field using an as*() method. |
| 8 | Configure the type as necessary.
This configuration will set defaults that are applied for any type using this bridge,
but they can be overridden.
Type configuration is similar to the attributes found in the various @*Field annotations.
See Defining index field types for more information. |
| 9 | The value bridge must still be implemented. Here the bridge class is nested in the binder class, because it is more convenient, but you are obviously free to implement it in a separate java file. |
@Entity
@Indexed
public class Book {

    @Id
    @GeneratedValue
    private Integer id;

    @Convert(converter = ISBNAttributeConverter.class) (1)
    @KeywordField( (2)
            valueBinder = @ValueBinderRef(type = ISBNValueBinder.class), (3)
            sortable = Sortable.YES (4)
    )
    private ISBN isbn;

    // Getters and setters
    // ...

}| 1 | This is unrelated to the value bridge, but necessary in order for Hibernate ORM to store the data correctly in the database. |
| 2 | Map the property to an index field. |
| 3 | Instruct Hibernate Search to use our custom value binder.
Note the use of valueBinder instead of valueBridge.
It is also possible to reference the binder by its name, in the case of a CDI/Spring bean. |
| 4 | Customize the field as usual. Configuration set using annotation attributes take precedence over the index field type configuration set by the value binder. For example, in this case, the field with be sortable even if the binder didn’t define the field as sortable. |
|
When using a value binder with a specialized For example, These restrictions are similar to those when
assigning a value bridge directly;
see Using value bridges in other |
6.2.8. Passing parameters
The value bridges are usually applied with built-in @*Field annotation,
which already accept parameters to configure the field name,
whether the field is sortable, etc.
However, these parameters are not passed to the value bridge or value binder. There are two ways to pass parameters to value bridges:
-
One is (mostly) limited to string parameters, but is trivial to implement.
-
The other can allow any type of parameters, but requires you to declare your own annotations.
Simple, string parameters
You can define string parameters to the @ValueBinderRef annotation and then use them later in the binder:
ValueBridge using the @ValueBinderRef annotationpublic class BooleanAsStringBridge implements ValueBridge<Boolean, String> { (1)
private final String trueAsString;
private final String falseAsString;
public BooleanAsStringBridge(String trueAsString, String falseAsString) { (2)
this.trueAsString = trueAsString;
this.falseAsString = falseAsString;
}
@Override
public String toIndexedValue(Boolean value, ValueBridgeToIndexedValueContext context) {
if ( value == null ) {
return null;
}
return value ? trueAsString : falseAsString;
}
}| 1 | Implement a bridge that does not index booleans directly, but indexes them as strings instead. |
| 2 | The bridge accepts two parameters in its constructors:
the string representing true and the string representing false. |
public class BooleanAsStringBinder implements ValueBinder {

    @Override
    @SuppressWarnings("unchecked")
    public void bind(ValueBindingContext<?> context) {
        String trueAsString = (String) context.param( "trueAsString" ); (1)
        String falseAsString = (String) context.param( "falseAsString" );

        context.bridge( Boolean.class, (2)
                new BooleanAsStringBridge( trueAsString, falseAsString ) );
    }
}| 1 | Use the binding context to get the parameter values.
Getting the param using the param method assumes that the param has been defined.
Alternatively it is possible to use paramOptional to get the java.util.Optional of the param. |
| 2 | Pass them as arguments to the bridge constructor. |
@Entity
@Indexed
public class Book {

    @Id
    @GeneratedValue
    private Integer id;

    private String title;

    @GenericField(valueBinder = @ValueBinderRef(type = BooleanAsStringBinder.class, (1)
            params = {
                    @Param(name = "trueAsString", value = "yes"),
                    @Param(name = "falseAsString", value = "no")
            }))
    private boolean published;

    @ElementCollection
    @GenericField(valueBinder = @ValueBinderRef(type = BooleanAsStringBinder.class, (2)
            params = {
                    @Param(name = "trueAsString", value = "passed"),
                    @Param(name = "falseAsString", value = "failed")
            }), name = "censorshipAssessments_allYears")
    private Map<Year, Boolean> censorshipAssessments = new HashMap<>();

    // Getters and setters
    // ...

}| 1 | Define the binder to use on the property,
setting the fieldName parameter. |
| 2 | Because we use a value bridge, the annotation can be transparently applied to containers. Here, the bridge will be applied successively to each value in the map. |
Parameters with custom annotations
You can pass parameters of any type to the bridge by defining a custom annotation with attributes:
ValueBridge using a custom annotationpublic class BooleanAsStringBridge implements ValueBridge<Boolean, String> { (1)
private final String trueAsString;
private final String falseAsString;
public BooleanAsStringBridge(String trueAsString, String falseAsString) { (2)
this.trueAsString = trueAsString;
this.falseAsString = falseAsString;
}
@Override
public String toIndexedValue(Boolean value, ValueBridgeToIndexedValueContext context) {
if ( value == null ) {
return null;
}
return value ? trueAsString : falseAsString;
}
}| 1 | Implement a bridge that does not index booleans directly, but indexes them as strings instead. |
| 2 | The bridge accepts two parameters in its constructors:
the string representing true and the string representing false. |
@Retention(RetentionPolicy.RUNTIME) (1)
@Target({ ElementType.METHOD, ElementType.FIELD }) (2)
@PropertyMapping(processor = @PropertyMappingAnnotationProcessorRef( (3)
        type = BooleanAsStringField.Processor.class
))
@Documented (4)
@Repeatable(BooleanAsStringField.List.class) (5)
public @interface BooleanAsStringField {

    String trueAsString() default "true"; (6)

    String falseAsString() default "false";

    String name() default ""; (7)

    ContainerExtraction extraction() default @ContainerExtraction(); (7)

    @Documented
    @Target({ ElementType.METHOD, ElementType.FIELD })
    @Retention(RetentionPolicy.RUNTIME)
    @interface List {
        BooleanAsStringField[] value();
    }

    class Processor implements PropertyMappingAnnotationProcessor<BooleanAsStringField> { (8)
        @Override
        public void process(PropertyMappingStep mapping, BooleanAsStringField annotation,
                PropertyMappingAnnotationProcessorContext context) {
            BooleanAsStringBridge bridge = new BooleanAsStringBridge( (9)
                    annotation.trueAsString(), annotation.falseAsString()
            );
            mapping.genericField( annotation.name().isEmpty() ? null : annotation.name() ) (10)
                    .valueBridge( bridge ) (11)
                    .extractors( context.toContainerExtractorPath( annotation.extraction() ) ); (12)
        }
    }
}| 1 | Define an annotation with retention RUNTIME.
Any other retention policy will cause the annotation to be ignored by Hibernate Search. |
| 2 | Since we’re defining a value bridge, allow the annotation to target either methods (getters) or fields. |
| 3 | Mark this annotation as a property mapping, and instruct Hibernate Search to apply the given processor whenever it finds this annotation. It is also possible to reference the processor by its name, in the case of a CDI/Spring bean. |
| 4 | Optionally, mark the annotation as documented, so that it is included in the javadoc of your entities. |
| 5 | Optionally, mark the annotation as repeatable, in order to be able to declare multiple fields on the same property. |
| 6 | Define custom attributes to configure the value bridge.
Here we define two strings that the bridge should use to represent the boolean values true and false. |
| 7 | Since we will be using a custom annotation,
and not the built-in @*Field annotation,
the standard parameters that make sense for this bridge need to be declared here, too. |
| 8 | The processor must implement the PropertyMappingAnnotationProcessor interface,
setting its generic type argument to the type of the corresponding annotation.
Here the processor class is nested in the annotation class,
because it is more convenient,
but you are obviously free to implement it in a separate Java file. |
| 9 | In the process method, instantiate the bridge
and pass the annotation attributes as constructor arguments. |
| 10 | Declare the field with the configured name (if provided). |
| 11 | Assign our bridge to the field.
Alternatively, we could assign a value binder instead,
using the valueBinder() method. |
| 12 | Configure the remaining standard parameters.
Note that the context object passed to the process method
exposes utility methods to convert standard Hibernate Search annotations
to something that can be passed to the mapping
(here, @ContainerExtraction is converted to a container extractor path). |
@Entity
@Indexed
public class Book {

    @Id
    @GeneratedValue
    private Integer id;

    private String title;

    @BooleanAsStringField(trueAsString = "yes", falseAsString = "no") (1)
    private boolean published;

    @ElementCollection
    @BooleanAsStringField( (2)
            name = "censorshipAssessments_allYears",
            trueAsString = "passed", falseAsString = "failed"
    )
    private Map<Year, Boolean> censorshipAssessments = new HashMap<>();

    // Getters and setters
    // ...

}| 1 | Apply the bridge using its custom annotation, setting the parameters. |
| 2 | Because we use a value bridge, the annotation can be transparently applied to containers. Here, the bridge will be applied successively to each value in the map. |
6.2.9. Accessing the ORM session or session factory from the bridge
Contexts passed to the bridge methods can be used to retrieve the Hibernate ORM session or session factory.
ValueBridgepublic class MyDataValueBridge implements ValueBridge<MyData, String> {
@Override
public String toIndexedValue(MyData value, ValueBridgeToIndexedValueContext context) {
SessionFactory sessionFactory = context.extension( HibernateOrmExtension.get() ) (1)
.sessionFactory(); (2)
// ... do something with the factory ...
}
@Override
public MyData fromIndexedValue(String value, ValueBridgeFromIndexedValueContext context) {
Session session = context.extension( HibernateOrmExtension.get() ) (3)
.session(); (4)
// ... do something with the session ...
}
}| 1 | Apply an extension to the context to access content specific to Hibernate ORM. |
| 2 | Retrieve the SessionFactory from the extended context.
The Session is not available here. |
| 3 | Apply an extension to the context to access content specific to Hibernate ORM. |
| 4 | Retrieve the Session from the extended context. |
6.2.10. Injecting beans into the value bridge or value binder
With compatible frameworks,
Hibernate Search supports injecting beans into both the ValueBridge and the ValueBinder.
This only applies to bridges/binders instantiated by Hibernate Search itself.
As a rule of thumb, if you need to call new MyBridge() at some point,
the bridge won’t get auto-magically injected.
|
The context passed to the value binder’s bind method
also exposes a beanResolver() method to access the bean resolver and instantiate beans explicitly.
See Bean injection for more details.
6.2.11. Programmatic mapping
You can apply a value bridge through the programmatic mapping too. Just pass an instance of the bridge.
ValueBridge with .valueBridge(…)TypeMappingStep bookMapping = mapping.type( Book.class );
bookMapping.indexed();
bookMapping.property( "isbn" )
.keywordField().valueBridge( new ISBNValueBridge() );Similarly, you can pass a binder instance. You can pass arguments either through the binder’s constructor or through setters.
ValueBinder with .valueBinder(…)TypeMappingStep bookMapping = mapping.type( Book.class );
bookMapping.indexed();
bookMapping.property( "isbn" )
.genericField()
.valueBinder( new ISBNValueBinder() )
.sortable( Sortable.YES );6.2.12. Incubating features
|
Features detailed in this section are incubating: they are still under active development. The usual compatibility policy does not apply: the contract of incubating elements (e.g. types, methods, configuration properties, etc.) may be altered in a backward-incompatible way — or even removed — in subsequent releases. You are encouraged to use incubating features so the development team can get feedback and improve them, but you should be prepared to update code which relies on them as needed. |
The context passed to the value binder’s bind method
exposes a bridgedElement() method that gives access to metadata about the value being bound,
in particular its type.
See the javadoc for more information.
6.3. Property bridge
6.3.1. Basics
A property bridge, like a value bridge,
is a pluggable component that implements
the mapping of a property to one or more index fields.
It is applied to a property with the @PropertyBinding annotation
or with a custom annotation.
Compared to the value bridge, the property bridge is more complex to implement, but covers a broader range of use cases:
-
A property bridge can map a single property to more than one index field.
-
A property bridge can work correctly when applied to a mutable type, provided it is implemented correctly.
However, due to its rather flexible nature, the property bridge does not transparently provide all the features that come for free with a value bridge. They can be supported, but have to be implemented manually. This includes in particular container extractors, which cannot be combined with a property bridge: the property bridge must extract container values explicitly.
Implementing a property bridge requires two components:
-
A custom implementation of
PropertyBinder, to bind the bridge to a property at bootstrap. This involves declaring the parts of the property that will be used, declaring the index fields that will be populated along with their type, and instantiating the property bridge. -
A custom implementation of
PropertyBridge, to perform the conversion at runtime. This involves extracting data from the property, transforming it if necessary, and pushing it to index fields.
Below is an example of a custom property bridge that maps a list of invoice line items to several fields summarizing the invoice.
PropertyBridgepublic class InvoiceLineItemsSummaryBinder implements PropertyBinder { (1)
@Override
public void bind(PropertyBindingContext context) { (2)
context.dependencies() (3)
.use( "category" )
.use( "amount" );
IndexSchemaObjectField summaryField = context.indexSchemaElement() (4)
.objectField( "summary" );
IndexFieldType<BigDecimal> amountFieldType = context.typeFactory() (5)
.asBigDecimal().decimalScale( 2 ).toIndexFieldType();
context.bridge( List.class, new Bridge( (6)
summaryField.toReference(), (7)
summaryField.field( "total", amountFieldType ).toReference(), (8)
summaryField.field( "books", amountFieldType ).toReference(), (8)
summaryField.field( "shipping", amountFieldType ).toReference() (8)
) );
}
// ... class continues below| 1 | The binder must implement the PropertyBinder interface. |
| 2 | Implement the bind method in the binder. |
| 3 | Declare the dependencies of the bridge, i.e. the parts of the property value that the bridge will actually use. This is absolutely necessary in order for Hibernate Search to correctly trigger reindexing when these parts are modified. See Declaring dependencies to bridged elements for more information about declaring dependencies. |
| 4 | Declare the fields that are populated by this bridge.
In this case we’re creating a summary object field,
which will have multiple subfields (see below).
See Declaring and writing to index fields
for more information about declaring index fields. |
| 5 | Declare the type of the subfields.
We’re going to index monetary amounts,
so we will use a BigDecimal type with two digits after the decimal point.
See Defining index field types
for more information about declaring index field types. |
| 6 | Call context.bridge(…) to define the property bridge to use,
and pass an instance of the bridge. |
| 7 | Pass a reference to the summary object field to the bridge. |
| 8 | Create a subfield for the total amount of the invoice,
a subfield for the subtotal for books,
and a subfield for the subtotal for shipping.
Pass references to these fields to the bridge. |
    // ... class InvoiceLineItemsSummaryBinder (continued)

    @SuppressWarnings("rawtypes")
    private static class Bridge implements PropertyBridge<List> { (1)

        private final IndexObjectFieldReference summaryField;
        private final IndexFieldReference<BigDecimal> totalField;
        private final IndexFieldReference<BigDecimal> booksField;
        private final IndexFieldReference<BigDecimal> shippingField;

        private Bridge(IndexObjectFieldReference summaryField, (2)
                IndexFieldReference<BigDecimal> totalField,
                IndexFieldReference<BigDecimal> booksField,
                IndexFieldReference<BigDecimal> shippingField) {
            this.summaryField = summaryField;
            this.totalField = totalField;
            this.booksField = booksField;
            this.shippingField = shippingField;
        }

        @Override
        public void write(DocumentElement target, List bridgedElement, PropertyBridgeWriteContext context) { (3)
            @SuppressWarnings("unchecked")
            List<InvoiceLineItem> lineItems = (List<InvoiceLineItem>) bridgedElement;

            BigDecimal total = BigDecimal.ZERO;
            BigDecimal books = BigDecimal.ZERO;
            BigDecimal shipping = BigDecimal.ZERO;
            for ( InvoiceLineItem lineItem : lineItems ) { (4)
                BigDecimal amount = lineItem.getAmount();
                total = total.add( amount );
                switch ( lineItem.getCategory() ) {
                    case BOOK:
                        books = books.add( amount );
                        break;
                    case SHIPPING:
                        shipping = shipping.add( amount );
                        break;
                }
            }

            DocumentElement summary = target.addObject( this.summaryField ); (5)
            summary.addValue( this.totalField, total ); (6)
            summary.addValue( this.booksField, books ); (6)
            summary.addValue( this.shippingField, shipping ); (6)
        }
    }
}| 1 | The bridge must implement the PropertyBridge interface.
One generic type argument must be provided: the type of the property,
i.e. the type of the "bridged element".
Here the bridge class is nested in the binder class,
because it is more convenient,
but you are obviously free to implement it in a separate java file. |
| 2 | The bridge stores references to the fields: it will need them when indexing. |
| 3 | Implement the write method in the bridge.
This method is called on indexing. |
| 4 | Extract data from the bridged element, and optionally transform it. |
| 5 | Add an object to the summary object field.
Note the summary field was declared at the root,
so we call addObject directly on the target argument. |
| 6 | Add a value to each of the summary.total, summary.books
and summary.shipping fields.
Note the fields were declared as subfields of summary,
so we call addValue on summaryValue instead of target. |
@Entity
@Indexed
public class Invoice {

    @Id
    @GeneratedValue
    private Integer id;

    @ElementCollection
    @OrderColumn
    @PropertyBinding(binder = @PropertyBinderRef(type = InvoiceLineItemsSummaryBinder.class)) (1)
    private List<InvoiceLineItem> lineItems = new ArrayList<>();

    // Getters and setters
    // ...

}| 1 | Apply the bridge using the @PropertyBinding annotation. |
Here is an example of what an indexed document would look like, with the Elasticsearch backend:
{
  "summary": {
    "total": 38.96,
    "books": 30.97,
    "shipping": 7.99
  }
}
6.3.2. Passing parameters
There are two ways to pass parameters to property bridges:
-
One is (mostly) limited to string parameters, but is trivial to implement.
-
The other can allow any type of parameters, but requires you to declare your own annotations.
Simple, string parameters
You can pass string parameters to the @PropertyBinderRef annotation and then use them later in the binder:
PropertyBinder using the @PropertyBinderRef annotationpublic class InvoiceLineItemsSummaryBinder implements PropertyBinder {
@Override
@SuppressWarnings("uncheked")
public void bind(PropertyBindingContext context) {
context.dependencies()
.use( "category" )
.use( "amount" );
String fieldName = (String) context.param( "fieldName" ); (1)
IndexSchemaObjectField summaryField = context.indexSchemaElement()
.objectField( fieldName ); (2)
IndexFieldType<BigDecimal> amountFieldType = context.typeFactory()
.asBigDecimal().decimalScale( 2 ).toIndexFieldType();
context.bridge( List.class, new Bridge(
summaryField.toReference(),
summaryField.field( "total", amountFieldType ).toReference(),
summaryField.field( "books", amountFieldType ).toReference(),
summaryField.field( "shipping", amountFieldType ).toReference()
) );
}
@SuppressWarnings("rawtypes")
private static class Bridge implements PropertyBridge<List> {
/* ... same implementation as before ... */
}
}| 1 | Use the binding context to get the parameter value.
Getting the param using the param method assumes that the param has been defined.
Alternatively it is possible to use paramOptional to get the java.util.Optional of the param. |
| 2 | In the bind method, use the value of parameters.
Here use the fieldName parameter to set the field name,
but we could pass parameters for any purpose:
defining the field as sortable,
defining a normalizer,
… |
@Entity
@Indexed
public class Invoice {

    @Id
    @GeneratedValue
    private Integer id;

    @ElementCollection
    @OrderColumn
    @PropertyBinding(binder = @PropertyBinderRef( (1)
            type = InvoiceLineItemsSummaryBinder.class,
            params = @Param(name = "fieldName", value = "itemSummary")))
    private List<InvoiceLineItem> lineItems = new ArrayList<>();

    // Getters and setters
    // ...

}| 1 | Define the binder to use on the property,
setting the fieldName parameter. |
Parameters with custom annotations
You can pass parameters of any type to the bridge by defining a custom annotation with attributes:
PropertyBinder using a custom annotation@Retention(RetentionPolicy.RUNTIME) (1)
@Target({ ElementType.METHOD, ElementType.FIELD }) (2)
@PropertyMapping(processor = @PropertyMappingAnnotationProcessorRef( (3)
type = InvoiceLineItemsSummaryBinding.Processor.class
))
@Documented (4)
public @interface InvoiceLineItemsSummaryBinding {
String fieldName() default ""; (5)
class Processor implements PropertyMappingAnnotationProcessor<InvoiceLineItemsSummaryBinding> { (6)
@Override
public void process(PropertyMappingStep mapping, InvoiceLineItemsSummaryBinding annotation,
PropertyMappingAnnotationProcessorContext context) {
InvoiceLineItemsSummaryBinder binder = new InvoiceLineItemsSummaryBinder(); (7)
if ( !annotation.fieldName().isEmpty() ) { (8)
binder.fieldName( annotation.fieldName() );
}
mapping.binder( binder ); (9)
}
}
}| 1 | Define an annotation with retention RUNTIME.
Any other retention policy will cause the annotation to be ignored by Hibernate Search. |
| 2 | Since we’re defining a property bridge, allow the annotation to target either methods (getters) or fields. |
| 3 | Mark this annotation as a property mapping, and instruct Hibernate Search to apply the given processor whenever it finds this annotation. It is also possible to reference the processor by its name, in the case of a CDI/Spring bean. |
| 4 | Optionally, mark the annotation as documented, so that it is included in the javadoc of your entities. |
| 5 | Define an attribute of type String to specify the field name. |
| 6 | The processor must implement the PropertyMappingAnnotationProcessor interface,
setting its generic type argument to the type of the corresponding annotation.
Here the processor class is nested in the annotation class,
because it is more convenient,
but you are obviously free to implement it in a separate Java file. |
| 7 | In the annotation processor, instantiate the binder. |
| 8 | Process the annotation attributes and pass the data to the binder. Here we’re using a setter, but passing the data through the constructor would work, too. |
| 9 | Apply the binder to the property. |
public class InvoiceLineItemsSummaryBinder implements PropertyBinder {

    private String fieldName = "summary";

    public InvoiceLineItemsSummaryBinder fieldName(String fieldName) { (1)
        this.fieldName = fieldName;
        return this;
    }

    @Override
    public void bind(PropertyBindingContext context) {
        context.dependencies()
                .use( "category" )
                .use( "amount" );

        IndexSchemaObjectField summaryField = context.indexSchemaElement()
                .objectField( this.fieldName ); (2)

        IndexFieldType<BigDecimal> amountFieldType = context.typeFactory()
                .asBigDecimal().decimalScale( 2 ).toIndexFieldType();

        context.bridge( List.class, new Bridge(
                summaryField.toReference(),
                summaryField.field( "total", amountFieldType ).toReference(),
                summaryField.field( "books", amountFieldType ).toReference(),
                summaryField.field( "shipping", amountFieldType ).toReference()
        ) );
    }

    @SuppressWarnings("rawtypes")
    private static class Bridge implements PropertyBridge<List> {

        /* ... same implementation as before ... */

    }
}| 1 | Implement setters in the binder. Alternatively, we could expose a parameterized constructor. |
| 2 | In the bind method, use the value of parameters.
Here use the fieldName parameter to set the field name,
but we could pass parameters for any purpose:
defining the field as sortable,
defining a normalizer,
… |
@Entity
@Indexed
public class Invoice {

    @Id
    @GeneratedValue
    private Integer id;

    @ElementCollection
    @OrderColumn
    @InvoiceLineItemsSummaryBinding( (1)
            fieldName = "itemSummary"
    )
    private List<InvoiceLineItem> lineItems = new ArrayList<>();

    // Getters and setters
    // ...

}| 1 | Apply the bridge using its custom annotation,
setting the fieldName parameter. |
6.3.3. Accessing the ORM session from the bridge
Contexts passed to the bridge methods can be used to retrieve the Hibernate ORM session.
PropertyBridgeprivate static class Bridge implements PropertyBridge<Object> {
private final IndexFieldReference<String> field;
private Bridge(IndexFieldReference<String> field) {
this.field = field;
}
@Override
public void write(DocumentElement target, Object bridgedElement, PropertyBridgeWriteContext context) {
Session session = context.extension( HibernateOrmExtension.get() ) (1)
.session(); (2)
// ... do something with the session ...
}
}| 1 | Apply an extension to the context to access content specific to Hibernate ORM. |
| 2 | Retrieve the Session from the extended context. |
6.3.4. Injecting beans into the binder
With compatible frameworks, Hibernate Search supports injecting beans into:
-
the
PropertyMappingAnnotationProcessorif you use custom annotations and instantiate the binder yourself. -
the
PropertyBinderif you use the@PropertyBindingannotation and let Hibernate Search instantiate the binder using your dependency injection framework.
This only applies to binders instantiated by Hibernate Search itself.
As a rule of thumb, if you need to call new MyBinder() at some point,
the binder won’t get auto-magically injected.
|
The context passed to the property binder’s bind method
also exposes a beanResolver() method to access the bean resolver and instantiate beans explicitly.
See Bean injection for more details.
6.3.5. Programmatic mapping
You can apply a property bridge through the programmatic mapping too. Just pass an instance of the binder. You can pass arguments either through the binder’s constructor, or through setters.
PropertyBinder with .binder(…)TypeMappingStep invoiceMapping = mapping.type( Invoice.class );
invoiceMapping.indexed();
invoiceMapping.property( "lineItems" )
.binder( new InvoiceLineItemsSummaryBinder().fieldName( "itemSummary" ) );6.3.6. Incubating features
|
Features detailed in this section are incubating: they are still under active development. The usual compatibility policy does not apply: the contract of incubating elements (e.g. types, methods, configuration properties, etc.) may be altered in a backward-incompatible way — or even removed — in subsequent releases. You are encouraged to use incubating features so the development team can get feedback and improve them, but you should be prepared to update code which relies on them as needed. |
The context passed to the property binder’s bind method
exposes a bridgedElement() method that gives access to metadata about the property being bound.
The metadata can be used to inspect the property in details:
-
Getting the name of the property.
-
Checking the type of the property.
-
Getting accessors to properties.
-
Detecting properties with markers. Markers are applied by specific annotations carrying a
@MarkerBindingmeta-annotation.
See the javadoc for more information.
Below is an example of the simplest use of this metadata, getting the property name and using it as a field name.
PropertyBinderpublic class InvoiceLineItemsSummaryBinder implements PropertyBinder {
@Override
@SuppressWarnings("uncheked")
public void bind(PropertyBindingContext context) {
context.dependencies()
.use( "category" )
.use( "amount" );
PojoModelProperty bridgedElement = context.bridgedElement(); (1)
IndexSchemaObjectField summaryField = context.indexSchemaElement()
.objectField( bridgedElement.name() ); (2)
IndexFieldType<BigDecimal> amountFieldType = context.typeFactory()
.asBigDecimal().decimalScale( 2 ).toIndexFieldType();
context.bridge( List.class, new Bridge(
summaryField.toReference(),
summaryField.field( "total", amountFieldType ).toReference(),
summaryField.field( "books", amountFieldType ).toReference(),
summaryField.field( "shipping", amountFieldType ).toReference()
) );
}
@SuppressWarnings("rawtypes")
private static class Bridge implements PropertyBridge<List> {
/* ... same implementation as before ... */
}
}| 1 | Use the binding context to get the bridged element. |
| 2 | Use the name of the property as the name of a newly declared index field. |
@Entity
@Indexed
public class Invoice {

    @Id
    @GeneratedValue
    private Integer id;

    @ElementCollection
    @OrderColumn
    @PropertyBinding(binder = @PropertyBinderRef(type = InvoiceLineItemsSummaryBinder.class)) (1)
    private List<InvoiceLineItem> lineItems = new ArrayList<>();

    // Getters and setters
    // ...

}| 1 | Apply the bridge using the @PropertyBinding annotation. |
Here is an example of what an indexed document would look like, with the Elasticsearch backend:
{
  "lineItems": {
    "total": 38.96,
    "books": 30.97,
    "shipping": 7.99
  }
}
6.4. Type bridge
6.4.1. Basics
A type bridge is a pluggable component that implements
the mapping of a whole type to one or more index fields.
It is applied to a type with the @TypeBinding annotation
or with a custom annotation.
The type bridge is very similar to the property bridge in its core principles and in how it is implemented. The only (obvious) difference is that the property bridge is applied to properties (fields or getters), while the type bridge is applied to the type (class or interface). This entails some slight differences in the APIs exposed to the type bridge.
Implementing a type bridge requires two components:
-
A custom implementation of
TypeBinder, to bind the bridge to a type at bootstrap. This involves declaring the properties of the type that will be used, declaring the index fields that will be populated along with their type, and instantiating the type bridge. -
A custom implementation of
TypeBridge, to perform the conversion at runtime. This involves extracting data from an instance of the type, transforming the data if necessary, and pushing it to index fields.
Below is an example of a custom type bridge that maps
two properties of the Author class, the firstName and lastName,
to a single fullName field.
TypeBridgepublic class FullNameBinder implements TypeBinder { (1)
@Override
public void bind(TypeBindingContext context) { (2)
context.dependencies() (3)
.use( "firstName" )
.use( "lastName" );
IndexFieldReference<String> fullNameField = context.indexSchemaElement() (4)
.field( "fullName", f -> f.asString().analyzer( "name" ) ) (5)
.toReference();
context.bridge( (6)
Author.class, (7)
new Bridge(
fullNameField (8)
)
);
}
// ... class continues below| 1 | The binder must implement the TypeBinder interface. |
| 2 | Implement the bind method in the binder. |
| 3 | Declare the dependencies of the bridge, i.e. the parts of the type instances that the bridge will actually use. This is absolutely necessary in order for Hibernate Search to correctly trigger reindexing when these parts are modified. See Declaring dependencies to bridged elements for more information about declaring dependencies. |
| 4 | Declare the field that will be populated by this bridge.
In this case we’re creating a single fullName String field.
Multiple index fields can be declared.
See Declaring and writing to index fields
for more information about declaring index fields. |
| 5 | Declare the type of the field.
Since we’re indexing a full name,
we will use a String type with a name analyzer (defined separately, see Analysis).
See Defining index field types
for more information about declaring index field types. |
| 6 | Call context.bridge(…) to define the type bridge to use,
and pass an instance of the bridge. |
| 7 | Pass the expected type of the entity. |
| 8 | Pass a reference to the fullName field to the bridge. |
    // ... class FullNameBinder (continued)

    private static class Bridge implements TypeBridge<Author> { (1)

        private final IndexFieldReference<String> fullNameField;

        private Bridge(IndexFieldReference<String> fullNameField) { (2)
            this.fullNameField = fullNameField;
        }

        @Override
        public void write(DocumentElement target, Author author, TypeBridgeWriteContext context) { (3)
            String fullName = author.getLastName() + " " + author.getFirstName(); (4)
            target.addValue( this.fullNameField, fullName ); (5)
        }
    }
}| 1 | The bridge must implement the TypeBridge interface.
One generic type argument must be provided: the type of the "bridged element".
Here the bridge class is nested in the binder class,
because it is more convenient,
but you are obviously free to implement it in a separate java file. |
| 2 | The bridge stores references to the fields: it will need them when indexing. |
| 3 | Implement the write method in the bridge.
This method is called on indexing. |
| 4 | Extract data from the bridged element, and optionally transform it. |
| 5 | Set the value of the fullName field.
Note the fullName field was declared at the root,
so we call addValue directly on the target argument. |
@Entity
@Indexed
@TypeBinding(binder = @TypeBinderRef(type = FullNameBinder.class)) (1)
public class Author {

    @Id
    @GeneratedValue
    private Integer id;

    private String firstName;

    private String lastName;

    @GenericField (2)
    private LocalDate birthDate;

    // Getters and setters
    // ...

}| 1 | Apply the bridge using the @TypeBinding annotation. |
| 2 | It is still possible to map properties directly using other annotations,
as long as index field names are distinct from the names used in the type binder.
But no annotation is necessary on the firstName and lastName properties:
these are already handled by the bridge. |
Here is an example of what an indexed document would look like, with the Elasticsearch backend:
{
  "fullName": "Asimov Isaac"
}
6.4.2. Passing parameters
There are two ways to pass parameters to type bridges:
-
One is (mostly) limited to string parameters, but is trivial to implement.
-
The other can allow any type of parameters, but requires you to declare your own annotations.
Simple, string parameters
You can pass string parameters to the @TypeBinderRef annotation and then use them later in the binder:
TypeBinder using the @TypeBinderRef annotationpublic class FullNameBinder implements TypeBinder {
@Override
@SuppressWarnings("unchecked")
public void bind(TypeBindingContext context) {
context.dependencies()
.use( "firstName" )
.use( "lastName" );
IndexFieldReference<String> fullNameField = context.indexSchemaElement()
.field( "fullName", f -> f.asString().analyzer( "name" ) )
.toReference();
IndexFieldReference<String> fullNameSortField = null;
String sortField = (String) context.param( "sortField" ); (1)
if ( "true".equalsIgnoreCase( sortField ) ) { (2)
fullNameSortField = context.indexSchemaElement()
.field(
"fullName_sort",
f -> f.asString().normalizer( "name" ).sortable( Sortable.YES )
)
.toReference();
}
context.bridge( Author.class, new Bridge(
fullNameField,
fullNameSortField
) );
}
private static class Bridge implements TypeBridge<Author> {
private final IndexFieldReference<String> fullNameField;
private final IndexFieldReference<String> fullNameSortField;
private Bridge(IndexFieldReference<String> fullNameField,
IndexFieldReference<String> fullNameSortField) { (2)
this.fullNameField = fullNameField;
this.fullNameSortField = fullNameSortField;
}
@Override
public void write(DocumentElement target, Author author, TypeBridgeWriteContext context) {
String fullName = author.getLastName() + " " + author.getFirstName();
target.addValue( this.fullNameField, fullName );
if ( this.fullNameSortField != null ) {
target.addValue( this.fullNameSortField, fullName );
}
}
}
}| 1 | Use the binding context to get the parameter value.
Getting the param using the param method assumes that the param has been defined.
Alternatively it is possible to use paramOptional to get the java.util.Optional of the param. |
| 2 | In the bind method, use the value of parameters.
Here use the sortField parameter to decide whether to add another, sortable field,
but we could pass parameters for any purpose:
defining the field name,
defining a normalizer,custom annotation
… |
@Entity
@Indexed
@TypeBinding(binder = @TypeBinderRef(type = FullNameBinder.class, (1)
        params = @Param(name = "sortField", value = "true")))
public class Author {

    @Id
    @GeneratedValue
    private Integer id;

    private String firstName;

    private String lastName;

    // Getters and setters
    // ...

}| 1 | Define the binder to use on the type,
setting the sortField parameter. |
Parameters with custom annotations
You can pass parameters of any type to the bridge by defining a custom annotation with attributes:
TypeBinder using a custom annotation@Retention(RetentionPolicy.RUNTIME) (1)
@Target({ ElementType.TYPE }) (2)
@TypeMapping(processor = @TypeMappingAnnotationProcessorRef(type = FullNameBinding.Processor.class)) (3)
@Documented (4)
public @interface FullNameBinding {
boolean sortField() default false; (5)
class Processor implements TypeMappingAnnotationProcessor<FullNameBinding> { (6)
@Override
public void process(TypeMappingStep mapping, FullNameBinding annotation,
TypeMappingAnnotationProcessorContext context) {
FullNameBinder binder = new FullNameBinder() (7)
.sortField( annotation.sortField() ); (8)
mapping.binder( binder ); (9)
}
}
}| 1 | Define an annotation with retention RUNTIME.
Any other retention policy will cause the annotation to be ignored by Hibernate Search. |
| 2 | Since we’re defining a type bridge, allow the annotation to target types. |
| 3 | Mark this annotation as a type mapping, and instruct Hibernate Search to apply the given binder whenever it finds this annotation. It is also possible to reference the binder by its name, in the case of a CDI/Spring bean. |
| 4 | Optionally, mark the annotation as documented, so that it is included in the javadoc of your entities. |
| 5 | Define an attribute of type boolean to specify whether a sort field should be added. |
| 6 | The processor must implement the TypeMappingAnnotationProcessor interface,
setting its generic type argument to the type of the corresponding annotation.
Here the processor class is nested in the annotation class,
because it is more convenient,
but you are obviously free to implement it in a separate Java file. |
| 7 | In the annotation processor, instantiate the binder. |
| 8 | Process the annotation attributes and pass the data to the binder. Here we’re using a setter, but passing the data through the constructor would work, too. |
| 9 | Apply the binder to the type. |
public class FullNameBinder implements TypeBinder {

    private boolean sortField;

    public FullNameBinder sortField(boolean sortField) { (1)
        this.sortField = sortField;
        return this;
    }

    @Override
    public void bind(TypeBindingContext context) {
        context.dependencies()
                .use( "firstName" )
                .use( "lastName" );

        IndexFieldReference<String> fullNameField = context.indexSchemaElement()
                .field( "fullName", f -> f.asString().analyzer( "name" ) )
                .toReference();

        IndexFieldReference<String> fullNameSortField = null;
        if ( this.sortField ) { (2)
            fullNameSortField = context.indexSchemaElement()
                    .field(
                            "fullName_sort",
                            f -> f.asString().normalizer( "name" ).sortable( Sortable.YES )
                    )
                    .toReference();
        }

        context.bridge( Author.class, new Bridge(
                fullNameField,
                fullNameSortField
        ) );
    }

    private static class Bridge implements TypeBridge<Author> {

        private final IndexFieldReference<String> fullNameField;
        private final IndexFieldReference<String> fullNameSortField;

        private Bridge(IndexFieldReference<String> fullNameField,
                IndexFieldReference<String> fullNameSortField) { (2)
            this.fullNameField = fullNameField;
            this.fullNameSortField = fullNameSortField;
        }

        @Override
        public void write(DocumentElement target, Author author, TypeBridgeWriteContext context) {
            String fullName = author.getLastName() + " " + author.getFirstName();

            target.addValue( this.fullNameField, fullName );
            if ( this.fullNameSortField != null ) {
                target.addValue( this.fullNameSortField, fullName );
            }
        }
    }
}| 1 | Implement setters in the binder. Alternatively, we could expose a parameterized constructor. |
| 2 | In the bind method, use the value of parameters.
Here use the sortField parameter to decide whether to add another, sortable field,
but we could pass parameters for any purpose:
defining the field name,
defining a normalizer,custom annotation
… |
@Entity
@Indexed
@FullNameBinding(sortField = true) (1)
public class Author {

    @Id
    @GeneratedValue
    private Integer id;

    private String firstName;

    private String lastName;

    // Getters and setters
    // ...

}| 1 | Apply the bridge using its custom annotation,
setting the sortField parameter. |
6.4.3. Accessing the ORM session from the bridge
Contexts passed to the bridge methods can be used to retrieve the Hibernate ORM session.
TypeBridgeprivate static class Bridge implements TypeBridge<Object> {
private final IndexFieldReference<String> field;
private Bridge(IndexFieldReference<String> field) {
this.field = field;
}
@Override
public void write(DocumentElement target, Object bridgedElement, TypeBridgeWriteContext context) {
Session session = context.extension( HibernateOrmExtension.get() ) (1)
.session(); (2)
// ... do something with the session ...
}
}| 1 | Apply an extension to the context to access content specific to Hibernate ORM. |
| 2 | Retrieve the Session from the extended context. |
6.4.4. Injecting beans into the binder
With compatible frameworks, Hibernate Search supports injecting beans into:
-
the
TypeMappingAnnotationProcessorif you use custom annotations and instantiate the binder yourself. -
the
TypeBinderif you use the@TypeBindingannotation and let Hibernate Search instantiate the binder using your dependency injection framework.
This only applies to binders instantiated by Hibernate Search itself.
As a rule of thumb, if you need to call new MyBinder() at some point,
the binder won’t get auto-magically injected.
|
The context passed to the routing key binder’s bind method
also exposes a beanResolver() method to access the bean resolver and instantiate beans explicitly.
See Bean injection for more details.
6.4.5. Programmatic mapping
You can apply a type bridge through the programmatic mapping too. Just pass an instance of the binder. You can pass arguments either through the binder’s constructor, or through setters.
TypeBinder with .binder(…)TypeMappingStep authorMapping = mapping.type( Author.class );
authorMapping.indexed();
authorMapping.binder( new FullNameBinder().sortField( true ) );6.4.6. Incubating features
|
Features detailed in this section are incubating: they are still under active development. The usual compatibility policy does not apply: the contract of incubating elements (e.g. types, methods, configuration properties, etc.) may be altered in a backward-incompatible way — or even removed — in subsequent releases. You are encouraged to use incubating features so the development team can get feedback and improve them, but you should be prepared to update code which relies on them as needed. |
The context passed to the type binder’s bind method
exposes a bridgedElement() method that gives access to metadata about the type being bound.
The metadata can in particular be used to inspect the type in details:
-
Getting accessors to properties.
-
Detecting properties with markers. Markers are applied by specific annotations carrying a
@MarkerBindingmeta-annotation.
See the javadoc for more information.
6.5. Identifier bridge
6.5.1. Basics
An identifier bridge is a pluggable component that implements
the mapping of an entity property to a document identifier.
It is applied to a property with the @DocumentId annotation
or with a custom annotation.
Implementing an identifier bridge boils down to implementing two methods:
-
one method to convert the property value (any type) to the document identifier (a string);
-
one method to convert the document identifier back to the original property value.
Below is an example of a custom identifier bridge that converts
a custom BookId type to its string representation and back:
IdentifierBridgepublic class BookIdBridge implements IdentifierBridge<BookId> { (1)
@Override
public String toDocumentIdentifier(BookId value,
IdentifierBridgeToDocumentIdentifierContext context) { (2)
return value.getPublisherId() + "/" + value.getPublisherSpecificBookId();
}
@Override
public BookId fromDocumentIdentifier(String documentIdentifier,
IdentifierBridgeFromDocumentIdentifierContext context) { (3)
String[] split = documentIdentifier.split( "/" );
return new BookId( Long.parseLong( split[0] ), Long.parseLong( split[1] ) );
}
}| 1 | The bridge must implement the IdentifierBridge interface.
One generic parameters must be provided:
the type of property values (values in the entity model). |
| 2 | The toDocumentIdentifier method takes the property value and a context object as parameters,
and is expected to return the corresponding document identifier.
It is called when indexing,
but also when parameters to the search DSL
must be transformed,
in particular for the ID predicate. |
| 3 | The fromDocumentIdentifier methods takes the document identifier and a context object as parameters,
and is expected to return the original property value.
It is called when mapping search hits to the corresponding entity. |
@Entity
@Indexed
public class Book {

    @EmbeddedId
    @DocumentId( (1)
            identifierBridge = @IdentifierBridgeRef(type = BookIdBridge.class) (2)
    )
    private BookId id = new BookId();

    private String title;

    // Getters and setters
    // ...

}| 1 | Map the property to the document identifier. |
| 2 | Instruct Hibernate Search to use our custom identifier bridge. It is also possible to reference the bridge by its name, in the case of a CDI/Spring bean. |
6.5.2. Type resolution
By default, the identifier bridge’s property type is determined automatically,
using reflection to extract the generic type argument of the IdentifierBridge interface.
For example, in public class MyBridge implements IdentifierBridge<BookId>,
the property type is resolved to BookId:
the bridge will be applied to properties of type BookId.
The fact that the type is resolved automatically using reflection brings a few limitations.
In particular, it means the generic type argument cannot be just anything;
as a general rule, you should stick to literal types (MyBridge implements IdentifierBridge<BookId>)
and avoid generic type parameters and wildcards
(MyBridge<T extends Number> implements IdentifierBridge<T>,
`MyBridge implements IdentifierBridge<List<? extends Number>>).
If you need more complex types,
you can bypass the automatic resolution and specify types explicitly
using an IdentifierBinder.
6.5.3. Compatibility across indexes with isCompatibleWith()
An identifier bridge is involved in indexing,
but also in the search DSLs,
to convert values passed to the id predicate
to a document identifier that the backend will understand.
When creating an id predicate targeting multiple entity types (and their indexes),
Hibernate Search will have multiple bridges to choose from: one per entity type.
Since only one predicate with a single value can be created,
Hibernate Search needs to pick a single bridge.
By default, when a custom bridge is assigned to the field, Hibernate Search will throw an exception because it cannot decide which bridge to pick.
If the bridges assigned to the field in all indexes produce the same result,
it is possible to indicate to Hibernate Search that any bridge will do
by implementing isCompatibleWith.
This method accepts another bridge in parameter,
and returns true if that bridge can be expected to always behave the same as this.
isCompatibleWith to support multi-index searchpublic class BookOrMagazineIdBridge implements IdentifierBridge<BookOrMagazineId> {
@Override
public String toDocumentIdentifier(BookOrMagazineId value,
IdentifierBridgeToDocumentIdentifierContext context) {
return value.getPublisherId() + "/" + value.getPublisherSpecificBookId();
}
@Override
public BookOrMagazineId fromDocumentIdentifier(String documentIdentifier,
IdentifierBridgeFromDocumentIdentifierContext context) {
String[] split = documentIdentifier.split( "/" );
return new BookOrMagazineId( Long.parseLong( split[0] ), Long.parseLong( split[1] ) );
}
@Override
public boolean isCompatibleWith(IdentifierBridge<?> other) {
return getClass().equals( other.getClass() ); (1)
}
}| 1 | Implement isCompatibleWith as necessary.
Here we just deem any instance of the same class to be compatible. |
6.5.4. Configuring the bridge more finely with IdentifierBinder
To configure a bridge more finely, it is possible to implement a value binder that will be executed at bootstrap. This binder will be able in particular to inspect the type of the property.
IdentifierBinderpublic class BookIdBinder implements IdentifierBinder { (1)
@Override
public void bind(IdentifierBindingContext<?> context) { (2)
context.bridge( (3)
BookId.class, (4)
new Bridge() (5)
);
}
private static class Bridge implements IdentifierBridge<BookId> { (6)
@Override
public String toDocumentIdentifier(BookId value,
IdentifierBridgeToDocumentIdentifierContext context) {
return value.getPublisherId() + "/" + value.getPublisherSpecificBookId();
}
@Override
public BookId fromDocumentIdentifier(String documentIdentifier,
IdentifierBridgeFromDocumentIdentifierContext context) {
String[] split = documentIdentifier.split( "/" );
return new BookId( Long.parseLong( split[0] ), Long.parseLong( split[1] ) );
}
}
}| 1 | The binder must implement the IdentifierBinder interface. |
| 2 | Implement the bind method. |
| 3 | Call context.bridge(…) to define the identifier bridge to use. |
| 4 | Pass the expected type of property values. |
| 5 | Pass the identifier bridge instance. |
| 6 | The identifier bridge must still be implemented. Here the bridge class is nested in the binder class, because it is more convenient, but you are obviously free to implement it in a separate java file. |
@Entity
@Indexed
public class Book {

    @EmbeddedId
    @DocumentId( (1)
            identifierBinder = @IdentifierBinderRef(type = BookIdBinder.class) (2)
    )
    private BookId id = new BookId();

    @FullTextField(analyzer = "english")
    private String title;

    // Getters and setters
    // ...

}| 1 | Map the property to the document identifier. |
| 2 | Instruct Hibernate Search to use our custom identifier binder.
Note the use of identifierBinder instead of identifierBridge.
It is also possible to reference the binder by its name, in the case of a CDI/Spring bean. |
6.5.5. Passing parameters
There are two ways to pass parameters to identifier bridges:
-
One is (mostly) limited to string parameters, but is trivial to implement.
-
The other can allow any type of parameters, but requires you to declare your own annotations.
Simple, string parameters
You can pass string parameters to the @IdentifierBinderRef annotation and then use them later in the binder:
IdentifierBridge using the @IdentifierBinderRef annotationpublic class OffsetIdentifierBridge implements IdentifierBridge<Integer> { (1)
private final int offset;
public OffsetIdentifierBridge(int offset) { (2)
this.offset = offset;
}
@Override
public String toDocumentIdentifier(Integer propertyValue, IdentifierBridgeToDocumentIdentifierContext context) {
return String.valueOf( propertyValue + offset );
}
@Override
public Integer fromDocumentIdentifier(String documentIdentifier,
IdentifierBridgeFromDocumentIdentifierContext context) {
return Integer.parseInt( documentIdentifier ) - offset;
}
}| 1 | Implement a bridge that indexes the identifier as is, but adds a configurable offset, For example, with an offset of 1 and database identifiers starting at 0, index identifiers will start at 1. |
| 2 | The bridge accepts one parameter in its constructors: the offset to apply to identifiers. |
public class OffsetIdentifierBinder implements IdentifierBinder {

    @Override
    @SuppressWarnings("unchecked")
    public void bind(IdentifierBindingContext<?> context) {
        String offset = (String) context.param( "offset" ); (1)
        context.bridge(
                Integer.class,
                new OffsetIdentifierBridge( Integer.parseInt( offset ) ) (2)
        );
    }
}| 1 | Use the binding context to get the parameter value.
Getting the param using the param method assumes that the param has been defined.
Alternatively it is possible to use paramOptional to get the java.util.Optional of the param. |
| 2 | Pass it as argument to the bridge constructor. |
@Entity
@Indexed
public class Book {

    @Id
    // DB identifiers start at 0, but index identifiers start at 1
    @DocumentId(identifierBinder = @IdentifierBinderRef( (1)
            type = OffsetIdentifierBinder.class,
            params = @Param(name = "offset", value = "1")))
    private Integer id;

    private String title;

    // Getters and setters
    // ...

}| 1 | Define the binder to use on the identifier, setting the parameter. |
Parameters with custom annotations
You can pass parameters of any type to the bridge by defining a custom annotation with attributes:
IdentifierBridge using a custom annotationpublic class OffsetIdentifierBridge implements IdentifierBridge<Integer> { (1)
private final int offset;
public OffsetIdentifierBridge(int offset) { (2)
this.offset = offset;
}
@Override
public String toDocumentIdentifier(Integer propertyValue, IdentifierBridgeToDocumentIdentifierContext context) {
return String.valueOf( propertyValue + offset );
}
@Override
public Integer fromDocumentIdentifier(String documentIdentifier,
IdentifierBridgeFromDocumentIdentifierContext context) {
return Integer.parseInt( documentIdentifier ) - offset;
}
}| 1 | Implement a bridge that index the identifier as is, but adds a configurable offset, For example, with an offset of 1 and database identifiers starting at 0, index identifiers will start at 1. |
| 2 | The bridge accepts one parameter in its constructors: the offset to apply to identifiers. |
@Retention(RetentionPolicy.RUNTIME) (1)
@Target({ ElementType.METHOD, ElementType.FIELD }) (2)
@PropertyMapping(processor = @PropertyMappingAnnotationProcessorRef( (3)
        type = OffsetDocumentId.Processor.class
))
@Documented (4)
public @interface OffsetDocumentId {

    int offset(); (5)

    class Processor implements PropertyMappingAnnotationProcessor<OffsetDocumentId> { (6)
        @Override
        public void process(PropertyMappingStep mapping, OffsetDocumentId annotation,
                PropertyMappingAnnotationProcessorContext context) {
            OffsetIdentifierBridge bridge = new OffsetIdentifierBridge( (7)
                    annotation.offset()
            );
            mapping.documentId() (8)
                    .identifierBridge( bridge ); (9)
        }
    }
}| 1 | Define an annotation with retention RUNTIME.
Any other retention policy will cause the annotation to be ignored by Hibernate Search. |
| 2 | Since we’re defining an identifier bridge, allow the annotation to target either methods (getters) or fields. |
| 3 | Mark this annotation as a property mapping, and instruct Hibernate Search to apply the given processor whenever it finds this annotation. It is also possible to reference the processor by its name, in the case of a CDI/Spring bean. |
| 4 | Optionally, mark the annotation as documented, so that it is included in the javadoc of your entities. |
| 5 | Define custom attributes to configure the value bridge. Here we define an offset that the bridge should add to entity identifiers. |
| 6 | The processor must implement the PropertyMappingAnnotationProcessor interface,
setting its generic type argument to the type of the corresponding annotation.
Here the processor class is nested in the annotation class,
because it is more convenient,
but you are obviously free to implement it in a separate Java file. |
| 7 | In the process method, instantiate the bridge
and pass the annotation attribute as constructor argument. |
| 8 | Declare that this property is to be used to generate the document identifier. |
| 9 | Instruct Hibernate Search to use our bridge to convert between the property and the document identifiers.
Alternatively, we could pass an identifier binder instead,
using the identifierBinder() method. |
@Entity
@Indexed
public class Book {

    @Id
    // DB identifiers start at 0, but index identifiers start at 1
    @OffsetDocumentId(offset = 1) (1)
    private Integer id;

    private String title;

    // Getters and setters
    // ...

}| 1 | Apply the bridge using its custom annotation, setting the parameter. |
6.5.6. Accessing the ORM session or session factory from the bridge
Contexts passed to the bridge methods can be used to retrieve the Hibernate ORM session or session factory.
IdentifierBridgepublic class MyDataIdentifierBridge implements IdentifierBridge<MyData> {
@Override
public String toDocumentIdentifier(MyData propertyValue, IdentifierBridgeToDocumentIdentifierContext context) {
SessionFactory sessionFactory = context.extension( HibernateOrmExtension.get() ) (1)
.sessionFactory(); (2)
// ... do something with the factory ...
}
@Override
public MyData fromDocumentIdentifier(String documentIdentifier,
IdentifierBridgeFromDocumentIdentifierContext context) {
Session session = context.extension( HibernateOrmExtension.get() ) (3)
.session(); (4)
// ... do something with the session ...
}
}| 1 | Apply an extension to the context to access content specific to Hibernate ORM. |
| 2 | Retrieve the SessionFactory from the extended context.
The Session is not available here. |
| 3 | Apply an extension to the context to access content specific to Hibernate ORM. |
| 4 | Retrieve the Session from the extended context. |
6.5.7. Injecting beans into the bridge or binder
With compatible frameworks,
Hibernate Search supports injection of beans into both the IdentifierBridge and the IdentifierBinder.
This only applies to beans instantiated by Hibernate Search itself.
As a rule of thumb, if you need to call new MyBridge() at some point,
the bridge won’t get auto-magically injected.
|
The context passed to the identifier binder’s bind method
also exposes a beanResolver() method to access the bean resolver and instantiate beans explicitly.
See Bean injection for more details.
6.5.8. Programmatic mapping
You can apply an identifier bridge through the programmatic mapping too. Just pass an instance of the bridge.
IdentifierBridge with .identifierBridge(…)TypeMappingStep bookMapping = mapping.type( Book.class );
bookMapping.indexed();
bookMapping.property( "id" )
.documentId().identifierBridge( new BookIdBridge() );Similarly, you can pass a binder instance:
IdentifierBinder with .identifierBinder(…)TypeMappingStep bookMapping = mapping.type( Book.class );
bookMapping.indexed();
bookMapping.property( "id" )
.documentId().identifierBinder( new BookIdBinder() );6.5.9. Incubating features
|
Features detailed in this section are incubating: they are still under active development. The usual compatibility policy does not apply: the contract of incubating elements (e.g. types, methods, configuration properties, etc.) may be altered in a backward-incompatible way — or even removed — in subsequent releases. You are encouraged to use incubating features so the development team can get feedback and improve them, but you should be prepared to update code which relies on them as needed. |
The context passed to the identifier binder’s bind method
exposes a bridgedElement() method that gives access to metadata about the value being bound,
in particular its type.
See the javadoc for more information.
6.6. Routing bridge
6.6.1. Basics
A routing bridge is a pluggable component that defines, at runtime,
whether an entity should be indexed and to which shard the corresponding indexed document should be routed.
It is applied to an indexed entity type with the @Indexed annotation,
using its routingBinder attribute (@Indexed(routingBinder = …)).
Implementing a routing bridge requires two components:
-
A custom implementation of
RoutingBinder, to bind the bridge to an indexed entity type at bootstrap. This involves declaring the properties of the indexed entity type that will be used by the routing bridge and instantiating the routing bridge. -
A custom implementation of
RoutingBridge, to route entities to the index at runtime. This involves extracting data from an instance of the type, transforming the data if necessary, and defining the current route (or marking the entity as "not indexed").If routing can change during the lifetime of an entity instance, you will also need to define the potential previous routes, so that Hibernate Search can find and delete previous documents indexed for this entity instance.
In the sections below, you will find examples for the main use cases:
6.6.2. Using a routing bridge for conditional indexing
Below is a first example of a custom routing bridge that
disables indexing for instances of the Book class if their status is ARCHIVED.
RoutingBridge for conditional indexingpublic class BookStatusRoutingBinder implements RoutingBinder { (1)
@Override
public void bind(RoutingBindingContext context) { (2)
context.dependencies() (3)
.use( "status" );
context.bridge( (4)
Book.class, (5)
new Bridge() (6)
);
}
// ... class continues below| 1 | The binder must implement the RoutingBinder interface. |
| 2 | Implement the bind method in the binder. |
| 3 | Declare the dependencies of the bridge, i.e. the parts of the entity instances that the bridge will actually use. See Declaring dependencies to bridged elements for more information about declaring dependencies. |
| 4 | Call context.bridge(…) to define the routing bridge to use. |
| 5 | Pass the expected type of indexed entities. |
| 6 | Pass the routing bridge instance. |
    // ... class BookStatusRoutingBinder (continued)

    public static class Bridge implements RoutingBridge<Book> { (1)
        @Override
        public void route(DocumentRoutes routes, Object entityIdentifier, Book indexedEntity, (2)
                RoutingBridgeRouteContext context) {
            switch ( indexedEntity.getStatus() ) { (3)
                case PUBLISHED:
                    routes.addRoute(); (4)
                    break;
                case ARCHIVED:
                    routes.notIndexed(); (5)
                    break;
            }
        }

        @Override
        public void previousRoutes(DocumentRoutes routes, Object entityIdentifier, Book indexedEntity, (6)
                RoutingBridgeRouteContext context) {
            routes.addRoute(); (7)
        }
    }
}| 1 | The bridge must implement the RoutingBridge interface.
Here the bridge class is nested in the binder class,
because it is more convenient,
but you are obviously free to implement it in a separate java file. |
| 2 | Implement the route(…) method in the bridge.
This method is called on indexing. |
| 3 | Extract data from the bridged element and inspect it. |
| 4 | If the Book status is PUBLISHED, then we want to proceed with indexing:
add a route so that Hibernate Search indexes the entity as usual. |
| 5 | If the Book status is ARCHIVED, then we don’t want to index it:
call notIndexed() so that Hibernate Search knows it should not index the entity. |
| 6 | When a book gets archived, there might be a previously indexed document that needs to be deleted.
The previousRoutes(…) method allows you to tell Hibernate Search where this document can possibly be.
When necessary, Hibernate Search will follow each given route, look for documents corresponding to this entity,
and delete them. |
| 7 | In this case, routing is very simple: there is only one possible previous route, so we only register that route. |
@Entity
@Indexed(routingBinder = @RoutingBinderRef(type = BookStatusRoutingBinder.class)) (1)
public class Book {

    @Id
    private Integer id;

    private String title;

    @Basic(optional = false)
    @KeywordField (2)
    private Status status;

    // Getters and setters
    // ...

}| 1 | Apply the bridge using the @Indexed annotation. |
| 2 | Properties used in the bridge can still be mapped as index fields, but they don’t have to be. |
6.6.3. Using a routing bridge to control routing to index shards
|
For a preliminary introduction to sharding, including how it works in Hibernate Search and what its limitations are, see Sharding and routing. |
Routing bridges can also be used to control routing to index shards.
Below is an example of a custom routing bridge that
uses the genre property of the Book class as a routing key.
See Routing for an example of how to use routing in search queries,
with the same mapping as the example below.
RoutingBridge to control routing to index shardspublic class BookGenreRoutingBinder implements RoutingBinder { (1)
@Override
public void bind(RoutingBindingContext context) { (2)
context.dependencies() (3)
.use( "genre" );
context.bridge( (4)
Book.class, (5)
new Bridge() (6)
);
}
// ... class continues below| 1 | The binder must implement the RoutingBinder interface. |
| 2 | Implement the bind method in the binder. |
| 3 | Declare the dependencies of the bridge, i.e. the parts of the entity instances that the bridge will actually use. See Declaring dependencies to bridged elements for more information about declaring dependencies. |
| 4 | Call context.bridge(…) to define the routing bridge to use. |
| 5 | Pass the expected type of indexed entities. |
| 6 | Pass the routing bridge instance. |
    // ... class BookGenreRoutingBinder (continued)

    public static class Bridge implements RoutingBridge<Book> { (1)
        @Override
        public void route(DocumentRoutes routes, Object entityIdentifier, Book indexedEntity, (2)
                RoutingBridgeRouteContext context) {
            String routingKey = indexedEntity.getGenre().name(); (3)
            routes.addRoute().routingKey( routingKey ); (4)
        }

        @Override
        public void previousRoutes(DocumentRoutes routes, Object entityIdentifier, Book indexedEntity, (5)
                RoutingBridgeRouteContext context) {
            for ( Genre possiblePreviousGenre : Genre.values() ) {
                String routingKey = possiblePreviousGenre.name();
                routes.addRoute().routingKey( routingKey ); (6)
            }
        }
    }
}| 1 | The bridge must implement the RoutingBridge interface.
Here the bridge class is nested in the binder class,
because it is more convenient,
but you are obviously free to implement it in a separate java file. |
| 2 | Implement the route(…) method in the bridge.
This method is called on indexing. |
| 3 | Extract data from the bridged element and derive a routing key. |
| 4 | Add a route with the generated routing key. Hibernate Search will follow this route when adding/updating/deleting the entity in the index. |
| 5 | When the genre of a book changes, the route will change,
and there it might be a previously indexed document in the index that needs to be deleted.
The previousRoutes(…) method allows you to tell Hibernate Search where this document can possibly be.
When necessary, Hibernate Search will follow each given route, look for documents corresponding to this entity,
and delete them. |
| 6 | In this case, we simply don’t know what the previous genre of the book was, so we tell Hibernate Search to follow all possible routes, one for every possible genre. |
@Entity
@Indexed(routingBinder = @RoutingBinderRef(type = BookGenreRoutingBinder.class)) (1)
public class Book {

    @Id
    private Integer id;

    private String title;

    @Basic(optional = false)
    @KeywordField (2)
    private Genre genre;

    // Getters and setters
    // ...

}| 1 | Apply the bridge using the @Indexed annotation. |
| 2 | Properties used in the bridge can still be mapped as index fields, but they don’t have to be. |
|
Optimizing
previousRoutes(…)In some cases you might have more information than in the example above about the previous routes, and you can take advantage of that information to trigger fewer deletions in the index:
|
6.6.4. Passing parameters
There are two ways to pass parameters to routing bridges:
-
One is (mostly) limited to string parameters, but is trivial to implement.
-
The other can allow any type of parameters, but requires you to declare your own annotations.
Refer to this example for TypeBinder,
which is fairly similar to what you’ll need for a RoutingBinder.
6.6.5. Accessing the ORM session from the bridge
Contexts passed to the bridge methods can be used to retrieve the Hibernate ORM session.
RoutingBridgeprivate static class Bridge implements RoutingBridge<MyEntity> {
@Override
public void route(DocumentRoutes routes, Object entityIdentifier, MyEntity indexedEntity,
RoutingBridgeRouteContext context) {
Session session = context.extension( HibernateOrmExtension.get() ) (1)
.session(); (2)
// ... do something with the session ...
}
@Override
public void previousRoutes(DocumentRoutes routes, Object entityIdentifier, MyEntity indexedEntity,
RoutingBridgeRouteContext context) {
// ...
}
}| 1 | Apply an extension to the context to access content specific to Hibernate ORM. |
| 2 | Retrieve the Session from the extended context. |
6.6.6. Injecting beans into the binder
With compatible frameworks, Hibernate Search supports injecting beans into:
-
the
TypeMappingAnnotationProcessorif you use custom annotations and instantiate the binder yourself. -
the
RoutingBinderif you use@Indexed(routingBinder = …)and let Hibernate Search instantiate the binder using your dependency injection framework.
This only applies to binders instantiated by Hibernate Search itself.
As a rule of thumb, if you need to call new MyBinder() at some point,
the binder won’t get auto-magically injected.
|
The context passed to the routing binder’s bind method
also exposes a beanResolver() method to access the bean resolver and instantiate beans explicitly.
See Bean injection for more details.
6.6.7. Programmatic mapping
You can apply a routing key bridge through the programmatic mapping too. Just pass an instance of the binder.
RoutingBinder with .binder(…)TypeMappingStep bookMapping = mapping.type( Book.class );
bookMapping.indexed()
.routingBinder( new BookStatusRoutingBinder() );
bookMapping.property( "status" ).keywordField();6.6.8. Incubating features
|
Features detailed in this section are incubating: they are still under active development. The usual compatibility policy does not apply: the contract of incubating elements (e.g. types, methods, configuration properties, etc.) may be altered in a backward-incompatible way — or even removed — in subsequent releases. You are encouraged to use incubating features so the development team can get feedback and improve them, but you should be prepared to update code which relies on them as needed. |
The context passed to the routing binder’s bind method
exposes a bridgedElement() method that gives access to metadata about the type being bound.
The metadata can in particular be used to inspect the type in details:
-
Getting accessors to properties.
-
Detecting properties with markers. Markers are applied by specific annotations carrying a
@MarkerBindingmeta-annotation.
See the javadoc for more information.
6.7. Declaring dependencies to bridged elements
6.7.1. Basics
In order to keep the index synchronized, Hibernate Search needs to be aware of all the entity properties that are used to produce indexed documents, so that it can trigger reindexing when they change.
When using a type bridge or a property bridge, the bridge itself decides which entity properties to access during indexing. Thus, it needs to let Hibernate Search know of its "dependencies" (the entity properties it may access).
This is done through a dedicated DSL, accessible from the bind(…) method of TypeBinder
and PropertyBinder.
Below is an example of a type binder that expects to be applied to the ScientificPaper type,
and declares a dependency to the paper author’s last name and first name.
public class AuthorFullNameBinder implements TypeBinder {

    @Override
    public void bind(TypeBindingContext context) {
        context.dependencies() (1)
                .use( "author.firstName" ) (2)
                .use( "author.lastName" ); (3)

        IndexFieldReference<String> authorFullNameField = context.indexSchemaElement()
                .field( "authorFullName", f -> f.asString().analyzer( "name" ) )
                .toReference();

        context.bridge( Book.class, new Bridge( authorFullNameField ) );
    }

    private static class Bridge implements TypeBridge<Book> {

        // ...
    }
}| 1 | Start the declaration of dependencies. |
| 2 | Declare that the bridge will access the paper’s author property,
then the author’s firstName property. |
| 3 | Declare that the bridge will access the paper’s author property,
then the author’s lastName property. |
The above should be enough to get started, but if you want to know more, here are a few facts about declaring dependencies.
- Paths are relative to the bridged element
-
For example:
-
for a type bridge on type
ScientificPaper, pathauthorwill refer to the value of propertyauthoronScientificPaperinstances. -
for a property bridge on the property
authorofScientificPaper, pathnamewill refer to the value of propertynameonAuthorinstances.
-
- Every component of given paths will be considered as a dependency
-
You do not need to declare every sub-path.
For example, if the path
myProperty.someOtherPropertyis declared as used, Hibernate Search will automatically assume thatmyPropertyis also used. - Only mutable properties need to be declared
-
If a property never, ever changes after the entity is first persisted, then it will never trigger reindexing and Hibernate Search does not need to know about the dependency.
If your bridge only relies on immutable properties, see
useRootOnly(): declaring no dependency at all. - Associations included in dependency paths need to have an inverse side
-
If you declare a dependency that crosses entity boundaries through an association, and that association has no inverse side in the other entity, an exception will be thrown.
For example, when you declare a dependency to path
author.lastName, Hibernate Search infers that whenever the last name of an author changes, its books need to be re-indexed. Thus, when it detects an author’s last name changed, Hibernate Search will need to retrieve the books to reindex them. That’s why theauthorassociation in entityScientificPaperneeds to have an inverse side in entityAuthor, e.g. abooksassociation.See Tuning automatic reindexing for more information about these constraints and how to address non-trivial models.
6.7.2. Traversing non-default containers (map keys, …)
|
Features detailed in this section are incubating: they are still under active development. The usual compatibility policy does not apply: the contract of incubating elements (e.g. types, methods, configuration properties, etc.) may be altered in a backward-incompatible way — or even removed — in subsequent releases. You are encouraged to use incubating features so the development team can get feedback and improve them, but you should be prepared to update code which relies on them as needed. |
When a path element refers to a property of a container type (List, Map, Optional, …),
the path will be implicitly resolved to elements of that container.
For example someMap.otherObject will resolve to the otherObject property
of the values (not the keys) of someMap.
If the default resolution is not what you need,
you can explicitly control how to traverse containers by passing PojoModelPath objects
instead of just strings:
@Entity
@Indexed
@TypeBinding(binder = @TypeBinderRef(type = BookEditionsForSaleTypeBinder.class)) (1)
public class Book {

    @Id
    @GeneratedValue
    private Integer id;

    @FullTextField(analyzer = "name")
    private String title;

    @ElementCollection
    @JoinTable(
            name = "book_editionbyprice",
            joinColumns = @JoinColumn(name = "book_id")
    )
    @MapKeyJoinColumn(name = "edition_id")
    @Column(name = "price")
    @OrderBy("edition_id asc")
    @AssociationInverseSide(
            extraction = @ContainerExtraction(BuiltinContainerExtractors.MAP_KEY),
            inversePath = @ObjectPath( @PropertyValue( propertyName = "book" ) )
    )
    private Map<BookEdition, BigDecimal> priceByEdition = new LinkedHashMap<>(); (2)

    public Book() {
    }

    // Getters and setters
    // ...

}| 1 | Apply a custom bridge to the ScientificPaper entity. |
| 2 | This (rather complex) map is the one we’ll access in the custom bridge. |
public class BookEditionsForSaleTypeBinder implements TypeBinder {

    @Override
    public void bind(TypeBindingContext context) {
        context.dependencies()
                .use( PojoModelPath.builder() (1)
                        .property( "priceByEdition" ) (2)
                        .value( BuiltinContainerExtractors.MAP_KEY ) (3)
                        .property( "label" ) (4)
                        .toValuePath() ); (5)

        IndexFieldReference<String> editionsForSaleField = context.indexSchemaElement()
                .field( "editionsForSale", f -> f.asString().analyzer( "english" ) )
                .multiValued()
                .toReference();

        context.bridge( Book.class, new Bridge( editionsForSaleField ) );
    }

    private static class Bridge implements TypeBridge<Book> {

        private final IndexFieldReference<String> editionsForSaleField;

        private Bridge(IndexFieldReference<String> editionsForSaleField) {
            this.editionsForSaleField = editionsForSaleField;
        }

        @Override
        public void write(DocumentElement target, Book book, TypeBridgeWriteContext context) {
            for ( BookEdition edition : book.getPriceByEdition().keySet() ) { (6)
                target.addValue( editionsForSaleField, edition.getLabel() );
            }
        }
    }
}| 1 | Start building a PojoModelPath. |
| 2 | Append the priceByEdition property (a Map) to the path. |
| 3 | Explicitly mention that the bridge will access keys from the priceByEdition map — the paper editions.
Without this, Hibernate Search would have assumed that values are accessed. |
| 4 | Append the label property to the path. This is the label property in paper editions. |
| 5 | Create the path and pass it to .use(…) to declare the dependency. |
| 6 | This is the actual code that accesses the paths as declared above. |
For property binders applied to a container property,
you can control how to traverse the property itself
by passing a container extractor path as the first argument to use(…):
@Entity
@Indexed
public class Book {

    @Id
    @GeneratedValue
    private Integer id;

    @FullTextField(analyzer = "name")
    private String title;

    @ElementCollection
    @JoinTable(
            name = "book_editionbyprice",
            joinColumns = @JoinColumn(name = "book_id")
    )
    @MapKeyJoinColumn(name = "edition_id")
    @Column(name = "price")
    @OrderBy("edition_id asc")
    @AssociationInverseSide(
            extraction = @ContainerExtraction(BuiltinContainerExtractors.MAP_KEY),
            inversePath = @ObjectPath( @PropertyValue( propertyName = "book" ) )
    )
    @PropertyBinding(binder = @PropertyBinderRef(type = BookEditionsForSalePropertyBinder.class)) (1)
    private Map<BookEdition, BigDecimal> priceByEdition = new LinkedHashMap<>();

    public Book() {
    }

    // Getters and setters
    // ...

}| 1 | Apply a custom bridge to the pricesByEdition property of the ScientificPaper entity. |
public class BookEditionsForSalePropertyBinder implements PropertyBinder {

    @Override
    public void bind(PropertyBindingContext context) {
        context.dependencies()
                .use( ContainerExtractorPath.explicitExtractor( BuiltinContainerExtractors.MAP_KEY ), (1)
                        "label" ); (2)

        IndexFieldReference<String> editionsForSaleField = context.indexSchemaElement()
                .field( "editionsForSale", f -> f.asString().analyzer( "english" ) )
                .multiValued()
                .toReference();

        context.bridge( Map.class, new Bridge( editionsForSaleField ) );
    }

    @SuppressWarnings("rawtypes")
    private static class Bridge implements PropertyBridge<Map> {

        private final IndexFieldReference<String> editionsForSaleField;

        private Bridge(IndexFieldReference<String> editionsForSaleField) {
            this.editionsForSaleField = editionsForSaleField;
        }

        @Override
        public void write(DocumentElement target, Map bridgedElement, PropertyBridgeWriteContext context) {
            @SuppressWarnings("unchecked")
            Map<BookEdition, ?> priceByEdition = (Map<BookEdition, ?>) bridgedElement;

            for ( BookEdition edition : priceByEdition.keySet() ) { (3)
                target.addValue( editionsForSaleField, edition.getLabel() );
            }
        }
    }
}| 1 | Explicitly mention that the bridge will access keys from the priceByEdition property — the paper editions.
Without this, Hibernate Search would have assumed that values are accessed. |
| 2 | Declare a dependency to the label property in paper editions. |
| 3 | This is the actual code that accesses the paths as declared above. |
6.7.3. useRootOnly(): declaring no dependency at all
If your bridge only accesses immutable properties, then it’s safe to declare that its only dependency is to the root object.
To do so, call .dependencies().useRootOnly().
|
Without this call, Hibernate Search will suspect an oversight and will throw an exception on startup. |
6.7.4. fromOtherEntity(…): declaring dependencies using the inverse path
|
Features detailed in this section are incubating: they are still under active development. The usual compatibility policy does not apply: the contract of incubating elements (e.g. types, methods, configuration properties, etc.) may be altered in a backward-incompatible way — or even removed — in subsequent releases. You are encouraged to use incubating features so the development team can get feedback and improve them, but you should be prepared to update code which relies on them as needed. |
It is not always possible to represent the dependency as a path from the bridged element to the values accessed by the bridge.
In particular, when the bridge relies on other components (queries, services) to retrieve another entity, there may not even be a path from the bridge element to that entity. In this case, if there is an inverse path from the other entity to the bridged element, and the bridged element is an entity, you can simply declare the dependency from the other entity, as shown below.
@Entity
@Indexed
@TypeBinding(binder = @TypeBinderRef(type = ScientificPapersReferencedByBinder.class)) (1)
public class ScientificPaper {

    @Id
    private Integer id;

    private String title;

    @ManyToMany
    private List<ScientificPaper> references = new ArrayList<>();

    public ScientificPaper() {
    }

    // Getters and setters
    // ...

}| 1 | Apply a custom bridge to the ScientificPaper type. |
public class ScientificPapersReferencedByBinder implements TypeBinder {

    @Override
    public void bind(TypeBindingContext context) {
        context.dependencies()
                .fromOtherEntity( ScientificPaper.class, "references" ) (1)
                .use( "title" ); (2)

        IndexFieldReference<String> papersReferencingThisOneField = context.indexSchemaElement()
                .field( "referencedBy", f -> f.asString().analyzer( "english" ) )
                .multiValued()
                .toReference();

        context.bridge( ScientificPaper.class, new Bridge( papersReferencingThisOneField ) );
    }

    private static class Bridge implements TypeBridge<ScientificPaper> {

        private final IndexFieldReference<String> referencedByField;

        private Bridge(IndexFieldReference<String> referencedByField) { (2)
            this.referencedByField = referencedByField;
        }

        @Override
        public void write(DocumentElement target, ScientificPaper paper, TypeBridgeWriteContext context) {
            for ( String referencingPaperTitle : findReferencingPaperTitles( context, paper ) ) { (3)
                target.addValue( referencedByField, referencingPaperTitle );
            }
        }

        private List<String> findReferencingPaperTitles(TypeBridgeWriteContext context, ScientificPaper paper) {
            Session session = context.extension( HibernateOrmExtension.get() ).session();
            Query<String> query = session.createQuery(
                    "select p.title from ScientificPaper p where :this member of p.references",
                    String.class );
            query.setParameter( "this", paper );
            return query.list();
        }
    }
}| 1 | Declare that this bridge relies on other entities of type ScientificPaper,
and that those other entities reference the indexed entity through their references property. |
| 2 | Declare which parts of the other entities are actually used by the bridge. |
| 3 | The bridge retrieves the other entity through a query, but then uses exclusively the parts that were declared previously. |
|
Currently, dependencies declared this way will be ignored when the "other entity" gets deleted. See HSEARCH-3567 to track progress on solving this problem. |
6.8. Declaring and writing to index fields
6.8.1. Basics
When implementing a PropertyBinder
or TypeBinder,
it is necessary to declare the index fields that the bridge will contribute to.
This declaration is performed using a dedicated DSL.
The entry point to this DSL is the IndexNode,
which represents the part of the document structure that the binder will push data to.
From the IndexNode, it is possible to declare fields.
The declaration of each field yields a field reference.
This reference is to be stored in the bridge,
which will use it at runtime to set the value of this field in a given document,
represented by a DocumentElement.
Below is a simple example using the DSL to declare a single field in a property binder and then write to that field in a property bridge.
public class ISBNBinder implements PropertyBinder {

    @Override
    public void bind(PropertyBindingContext context) {
        context.dependencies()
                /* ... (declaration of dependencies, not relevant) ... */

        IndexSchemaElement schemaElement = context.indexSchemaElement(); (1)

        IndexFieldReference<String> field =
                schemaElement.field( (2)
                        "isbn", (3)
                        f -> f.asString() (4)
                                .normalizer( "isbn" )
                )
                        .toReference(); (5)

        context.bridge( (6)
                ISBN.class, (7)
                new ISBNBridge( field ) (8)
        );
    }
}| 1 | Get the IndexNode, the entry point to the index field declaration DSL. |
| 2 | Declare a field. |
| 3 | Pass the name of the field. |
| 4 | Declare the type of the field. This is done through a lambda taking advantage of another DSL. See Defining index field types for more information. |
| 5 | Get a reference to the declared field. |
| 6 | Call context.bridge(…) to define the bridge to use. |
| 7 | Pass the expected type of values. |
| 8 | Pass the bridge instance. |
private static class ISBNBridge implements PropertyBridge<ISBN> {

    private final IndexFieldReference<String> fieldReference;

    private ISBNBridge(IndexFieldReference<String> fieldReference) {
        this.fieldReference = fieldReference;
    }

    @Override
    public void write(DocumentElement target, ISBN bridgedElement, PropertyBridgeWriteContext context) {
        String indexedValue = /* ... (extraction of data, not relevant) ... */
        target.addValue( this.fieldReference, indexedValue ); (1)
    }
}| 1 | In the bridge, use the reference obtained above to add a value to the field for the current document. |
6.8.2. Type objects
The lambda syntax to declare the type of each field is convenient, but sometimes gets in the way, in particular when multiple fields must be declared with the exact same type.
For that reason, the context object passed to binders exposes a typeFactory() method.
Using this factory, it is possible to build IndexFieldType objects
that can be re-used in multiple field declarations.
@Override
public void bind(TypeBindingContext context) {
    context.dependencies()
            /* ... (declaration of dependencies, not relevant) ... */

    IndexSchemaElement schemaElement = context.indexSchemaElement();

    IndexFieldType<String> nameType = context.typeFactory() (1)
            .asString() (2)
            .analyzer( "name" )
            .toIndexFieldType(); (3)

    context.bridge( Author.class, new Bridge(
            schemaElement.field( "firstName", nameType ) (4)
                    .toReference(),
            schemaElement.field( "lastName", nameType ) (4)
                    .toReference(),
            schemaElement.field( "fullName", nameType ) (4)
                    .toReference()
    ) );
}| 1 | Get the type factory. |
| 2 | Define the type. |
| 3 | Get the resulting type. |
| 4 | Pass the type directly instead of using a lambda when defining the field. |
6.8.3. Multivalued fields
Fields are considered single-valued by default: if you attempt to add multiple values to a single-valued field during indexing, an exception will be thrown.
In order to add multiple values to a field, this field must be marked as multivalued during its declaration:
@Override
public void bind(TypeBindingContext context) {
    context.dependencies()
            /* ... (declaration of dependencies, not relevant) ... */

    IndexSchemaElement schemaElement = context.indexSchemaElement();

    context.bridge( Author.class, new Bridge(
            schemaElement.field( "names", f -> f.asString().analyzer( "name" ) )
                    .multiValued() (1)
                    .toReference()
    ) );
}| 1 | Declare the field as multivalued. |
6.8.4. Object fields
The previous sections only presented flat schemas with value fields, but the index schema can actually be organized in a tree structure, with two categories of index fields:
-
Value fields, often simply called "fields", which hold an atomic value of a specific type: string, integer, date, …
-
Object fields, which hold a composite value.
Object fields are declared similarly to value fields, with an additional step to declare each subfield, as shown below.
@Override
public void bind(PropertyBindingContext context) {
    context.dependencies()
            /* ... (declaration of dependencies, not relevant) ... */

    IndexSchemaElement schemaElement = context.indexSchemaElement();

    IndexSchemaObjectField summaryField =
            schemaElement.objectField( "summary" ); (1)

    IndexFieldType<BigDecimal> amountFieldType = context.typeFactory()
            .asBigDecimal().decimalScale( 2 )
            .toIndexFieldType();

    context.bridge( List.class, new Bridge(
            summaryField.toReference(), (2)
            summaryField.field( "total", amountFieldType ) (3)
                    .toReference(),
            summaryField.field( "books", amountFieldType ) (3)
                    .toReference(),
            summaryField.field( "shipping", amountFieldType ) (3)
                    .toReference()
    ) );
}| 1 | Declare an object field with objectField, passing its name in parameter. |
| 2 | Get a reference to the declared object field and pass it to the bridge for later use. |
| 3 | Create subfields, get references to these fields and pass them to the bridge for later use. |
|
The subfields of an object field can include object fields. |
|
Just as value fields, object fields are single-valued by default.
Be sure to call |
Object fields as well as their subfields are each assigned a reference, which will be used by the bridge to write to documents, as shown in the example below.
@Override
public void write(DocumentElement target, List bridgedElement, PropertyBridgeWriteContext context) {
    @SuppressWarnings("unchecked")
    List<InvoiceLineItem> lineItems = (List<InvoiceLineItem>) bridgedElement;

    BigDecimal total = BigDecimal.ZERO;
    BigDecimal books = BigDecimal.ZERO;
    BigDecimal shipping = BigDecimal.ZERO;
    /* ... (computation of amounts, not relevant) ... */

    DocumentElement summary = target.addObject( this.summaryField ); (1)
    summary.addValue( this.totalField, total ); (2)
    summary.addValue( this.booksField, books ); (2)
    summary.addValue( this.shippingField, shipping ); (2)
}| 1 | Add an object to the summary object field for the current document,
and get a reference to that object. |
| 2 | Add a value to the subfields for the object we just added.
Note we’re calling addValue on the object we just added, not on target. |
6.8.5. Object structure
By default, object fields are flattened,
meaning that the tree structure is not preserved.
See DEFAULT or FLATTENED structure for more information.
It is possible to switch to a nested structure
by passing an argument to the objectField method, as shown below.
Each value of the object field will then transparently be indexed as a separate nested document,
without any change to the write method of the bridge.
@Override
public void bind(PropertyBindingContext context) {
    context.dependencies()
            /* ... (declaration of dependencies, not relevant) ... */

    IndexSchemaElement schemaElement = context.indexSchemaElement();

    IndexSchemaObjectField lineItemsField =
            schemaElement.objectField( (1)
                    "lineItems", (2)
                    ObjectStructure.NESTED (3)
            )
            .multiValued(); (4)

    context.bridge( List.class, new Bridge(
            lineItemsField.toReference(), (5)
            lineItemsField.field( "category", f -> f.asString() ) (6)
                    .toReference(),
            lineItemsField.field( "amount", f -> f.asBigDecimal().decimalScale( 2 ) ) (7)
                    .toReference()
    ) );
}| 1 | Declare an object field with objectField. |
| 2 | Define the name of the object field. |
| 3 | Define the structure of the object field, here NESTED. |
| 4 | Define the object field as multivalued. |
| 5 | Get a reference to the declared object field and pass it to the bridge for later use. |
| 6 | Create subfields, get references to these fields and pass them to the bridge for later use. |
6.8.6. Dynamic fields with field templates
Field declared in the sections above are all static: their path and type are known on bootstrap.
In some very specific cases, the path of a field is not known until you actually index it;
for example, you may want to index a Map<String, Integer> by using the map keys as field names,
or index the properties of a JSON object whose schema is not known in advance.
The fields, then, are considered dynamic.
Dynamic fields are not declared on bootstrap, but need to match a field template that is declared on bootstrap. The template includes the field types and structural information (multivalued or not, …), but omits the field names.
A field template is always declared in a binder: either in a type binder
or in a property binder.
As for static fields, the entry point to declaring a template is the IndexNode
passed to the binder’s bind(…) method
A call to the fieldTemplate method on the schema element will declare a field template.
Assuming a field template was declared during binding,
the bridge can then add dynamic fields to the DocumentElement when indexing,
by calling addValue and passing the field name (as a string) and the field value.
Below is a simple example using the DSL to declare a field template in a property binder and then write to that field in a property bridge.
public class UserMetadataBinder implements PropertyBinder {

    @Override
    public void bind(PropertyBindingContext context) {
        context.dependencies()
                /* ... (declaration of dependencies, not relevant) ... */

        IndexSchemaElement schemaElement = context.indexSchemaElement();

        IndexSchemaObjectField userMetadataField =
                schemaElement.objectField( "userMetadata" ); (1)

        userMetadataField.fieldTemplate( (2)
                "userMetadataValueTemplate", (3)
                f -> f.asString().analyzer( "english" ) (4)
        ); (5)

        context.bridge( Map.class, new UserMetadataBridge( userMetadataField.toReference() ) ); (6)
    }
}| 1 | Declare an object field with objectField.
It’s better to always host your dynamic fields on a dedicated object field,
to avoid conflicts with other templates. |
| 2 | Declare a field template with fieldTemplate. |
| 3 | Pass the template name — this is not the field name, and is only used to uniquely identify the template. |
| 4 | Define the field type. |
| 5 | On contrary to static field declarations, field template declarations do not return a field reference, because you won’t need it when writing to the document. |
| 6 | Get a reference to the declared object field and pass it to the bridge for later use. |
@SuppressWarnings("rawtypes")
private static class UserMetadataBridge implements PropertyBridge<Map> {

    private final IndexObjectFieldReference userMetadataFieldReference;

    private UserMetadataBridge(IndexObjectFieldReference userMetadataFieldReference) {
        this.userMetadataFieldReference = userMetadataFieldReference;
    }

    @Override
    public void write(DocumentElement target, Map bridgedElement, PropertyBridgeWriteContext context) {
        @SuppressWarnings("unchecked")
        Map<String, String> userMetadata = (Map<String, String>) bridgedElement;

        DocumentElement indexedUserMetadata = target.addObject( userMetadataFieldReference ); (1)

        for ( Map.Entry<String, String> entry : userMetadata.entrySet() ) {
            String fieldName = entry.getKey();
            String fieldValue = entry.getValue();
            indexedUserMetadata.addValue( fieldName, fieldValue ); (2)
        }
    }
}| 1 | Add an object to the userMetadata object field for the current document,
and get a reference to that object. |
| 2 | Add one field per user metadata entry, with the field name and field value defined by the user. Note that field names should usually be validated before that point, in order to avoid exotic characters (whitespaces, dots, …). |
|
Though rarely necessary, you can also declare templates for object fields using the |
It is also possible to add multiple fields with different types to the same object. To that end, make sure that the format of a field can be inferred from the field name. You can then declare multiple templates and assign a path pattern to each template, as shown below.
public class MultiTypeUserMetadataBinder implements PropertyBinder {

    @Override
    public void bind(PropertyBindingContext context) {
        context.dependencies()
                /* ... (declaration of dependencies, not relevant) ... */

        IndexSchemaElement schemaElement = context.indexSchemaElement();

        IndexSchemaObjectField userMetadataField =
                schemaElement.objectField( "multiTypeUserMetadata" ); (1)

        userMetadataField.fieldTemplate( (2)
                "userMetadataValueTemplate_int", (3)
                f -> f.asInteger().sortable( Sortable.YES ) (4)
        )
                .matchingPathGlob( "*_int" ); (5)

        userMetadataField.fieldTemplate( (6)
                "userMetadataValueTemplate_default",
                f -> f.asString().analyzer( "english" )
        );

        context.bridge( Map.class, new Bridge( userMetadataField.toReference() ) );
    }
}| 1 | Declare an object field with objectField. |
| 2 | Declare a field template for integer with fieldTemplate. |
| 3 | Pass the template name. |
| 4 | Define the field type as integer, sortable. |
| 5 | Assign a path pattern to the template, so that only fields ending with _int will be considered as integers. |
| 6 | Declare another field template, so that fields are considered as english text if they do not match the previous template. |
@SuppressWarnings("rawtypes")
private static class Bridge implements PropertyBridge<Map> {

    private final IndexObjectFieldReference userMetadataFieldReference;

    private Bridge(IndexObjectFieldReference userMetadataFieldReference) {
        this.userMetadataFieldReference = userMetadataFieldReference;
    }

    @Override
    public void write(DocumentElement target, Map bridgedElement, PropertyBridgeWriteContext context) {
        @SuppressWarnings("unchecked")
        Map<String, Object> userMetadata = (Map<String, Object>) bridgedElement;

        DocumentElement indexedUserMetadata = target.addObject( userMetadataFieldReference ); (1)

        for ( Map.Entry<String, Object> entry : userMetadata.entrySet() ) {
            String fieldName = entry.getKey();
            Object fieldValue = entry.getValue();
            indexedUserMetadata.addValue( fieldName, fieldValue ); (2)
        }
    }
}| 1 | Add an object to the userMetadata object field for the current document,
and get a reference to that object. |
| 2 | Add one field per user metadata entry,
with the field name and field value defined by the user.
Note that field values should be validated before that point;
in this case, adding a field named foo_int with a value of type String
will lead to a SearchException when indexing. |
|
Precedence of field templates
Hibernate Search tries to match templates in the order they are declared, so you should always declare the templates with the most specific path pattern first. Templates declared on a given schema element can be matched in children of that element. For example, if you declare templates at the root of your entity (through a type bridge), these templates will be implicitly available in every single property bridge of that entity. In such cases, templates declared in property bridges will take precedence over those declared in the type bridge. |
6.9. Defining index field types
6.9.1. Basics
A specificity of Lucene-based search engines (including Elasticsearch) is that field types are much more complex than just a data type ("string", "integer", …).
When declaring a field, you must not only declare the data type, but also various characteristics that will define how the data is stored exactly: is the field sortable, is it projectable, is it analyzed and if so with which analyzer, …
Because of this complexity,
when field types must be defined in the various binders
(ValueBinder, PropertyBinder, TypeBinder),
they are defined using a dedicated DSL.
The entry point to this DSL is the IndexFieldTypeFactory.
The type factory is generally accessible though the context object passed to the binders
(context.typeFactory()).
In the case of PropertyBinder and TypeBinder,
the type factory can also be passed to the lambda expression passed to the field method
to define the field type inline.
The type factory exposes various as*() methods,
for example asString or asLocalDate.
These are the first steps of the type definition DSL,
where the data type is defined.
They return other steps, from which options
can be set, such as the analyzer.
See below for an example.
IndexFieldType<String> type = context.typeFactory() (1)
        .asString() (2)
        .normalizer( "isbn" ) (3)
        .sortable( Sortable.YES ) (3)
.toIndexFieldType(); (4)| 1 | Get the IndexFieldTypeFactory from the binding context. |
| 2 | Define the data type. |
| 3 | Define options.
Available options differ based on the field type:
for example, normalizer is available for String fields,
but not for Double fields. |
| 4 | Get the index field type. |
|
In
|
6.9.2. Available data types
All available data types have a dedicated as*() method in IndexFieldTypeFactory.
For details, see the javadoc of IndexFieldTypeFactory,
or the backend-specific documentation:
6.9.3. Available type options
Most of the options available in the index field type DSL are identical
to the options exposed by @*Field annotations.
See Field annotation attributes for details about them.
Other options are explained in the following sections.
6.9.4. DSL converter
|
This section is not relevant for |
The various search DSLs expose some methods that expect a field value:
matching(), between(), atMost(), missingValue().use(), …
By default, the expected type will be the same as the data type,
i.e. String if you called asString(),
LocalDate if you called asLocalDate(),
etc.
This can be annoying when the bridge converts values from a different type when indexing. For example, if the bridge converts an enum to a string when indexing, you probably don’t want to pass a string to search predicates, but rather the enum.
By setting a DSL converter on a field type, it is possible to change the expected type of values passed to the various DSL, See below for an example.
IndexFieldType<String> type = context.typeFactory()
        .asString() (1)
        .normalizer( "isbn" )
        .sortable( Sortable.YES )
        .dslConverter( (2)
                ISBN.class, (3)
                (value, convertContext) -> value.getStringValue() (4)
        )
.toIndexFieldType();| 1 | Define the data type as String. |
| 2 | Define a DSL converter that converts from ISBN to String.
This converter will be used transparently by the search DSLs. |
| 3 | Define the input type as ISBN by passing ISBN.class as the first parameter. |
| 4 | Define how to convert an ISBN to a String by passing a converter as the second parameter. |
ISBN expectedISBN = /* ... */
List<Book> result = searchSession.search( Book.class )
        .where( f -> f.match().field( "isbn" )
                .matching( expectedISBN ) ) (1)
.fetchHits( 20 );| 1 | Thanks to the DSL converter,
predicates targeting fields using our type
accept ISBN values by default. |
| DSL converters can be disabled in the various DSLs where necessary. See Type of arguments passed to the DSL. |
6.9.5. Projection converter
|
This section is not relevant for |
By default, the type of values returned by field projections
or aggregations
will be the same as the data type of the corresponding field,
i.e. String if you called asString(),
LocalDate if you called asLocalDate(),
etc.
This can be annoying when the bridge converts values from a different type when indexing. For example, if the bridge converts an enum to a string when indexing, you probably don’t want projections to return a string, but rather the enum.
By setting a projection converter on a field type, it is possible to change the type of values returned by field projections or aggregations. See below for an example.
IndexFieldType<String> type = context.typeFactory()
        .asString() (1)
        .projectable( Projectable.YES )
        .projectionConverter( (2)
                ISBN.class, (3)
                (value, convertContext) -> ISBN.parse( value ) (4)
        )
.toIndexFieldType();| 1 | Define the data type as String. |
| 2 | Define a projection converter that converts from String to ISBN.
This converter will be used transparently by the search DSLs. |
| 3 | Define the converted type as ISBN by passing ISBN.class as the first parameter. |
| 4 | Define how to convert a String to an ISBN by passing a converter as the second parameter. |
List<ISBN> result = searchSession.search( Book.class )
        .select( f -> f.field( "isbn", ISBN.class ) ) (1)
        .where( f -> f.matchAll() )
.fetchHits( 20 );| 1 | Thanks to the projection converter,
fields using our type are projected to an ISBN by default. |
| Projection converters can be disabled in the projection DSL where necessary. See Type of projected values. |
6.10. Defining named predicates
|
Features detailed in this section are incubating: they are still under active development. The usual compatibility policy does not apply: the contract of incubating elements (e.g. types, methods, configuration properties, etc.) may be altered in a backward-incompatible way — or even removed — in subsequent releases. You are encouraged to use incubating features so the development team can get feedback and improve them, but you should be prepared to update code which relies on them as needed. |
When implementing a PropertyBinder
or TypeBinder,
it is possible to assign "named predicates"
to index schema elements (either the index root or an object field).
These named predicates will then be usable through the Search DSL, referencing them by name and optionally passing parameters. The main point is that the implementation is hidden from callers: they do not need to understand how data is indexed in order to use a named predicate.
Below is a simple example using the DSL to declare an object field and assign a named predicate to that field, in a property binder.
/**
 * A binder for Stock Keeping Unit (SKU) identifiers, i.e. Strings with a specific format.
 */
public class SkuIdentifierBinder implements PropertyBinder {

    @Override
    public void bind(PropertyBindingContext context) {
        context.dependencies().useRootOnly();

        IndexSchemaObjectField skuIdObjectField = context.indexSchemaElement()
                .objectField( context.bridgedElement().name() );

        IndexFieldType<String> skuIdPartType = context.typeFactory()
                .asString().normalizer( "lowercase" ).toIndexFieldType();

        context.bridge( String.class, new Bridge(
                skuIdObjectField.toReference(),
                skuIdObjectField.field( "departmentCode", skuIdPartType ).toReference(),
                skuIdObjectField.field( "collectionCode", skuIdPartType ).toReference(),
                skuIdObjectField.field( "itemCode", skuIdPartType ).toReference()
        ) );

        skuIdObjectField.namedPredicate( (1)
                "skuIdMatch", (2)
                new SkuIdentifierMatchPredicateProvider() (3)
        );
    }

// ... class continues below| 1 | The binder defines a named predicate. Note this predicate is assigned to an object field. |
| 2 | The predicate name will be used to refer to this predicate when calling the named predicate. Since the predicate is assigned to an object field, callers will have to prefix the predicate name with the path to that object field. |
| 3 | The named predicate provider will define how to create the predicate when searching. |
// ... class SkuIdentifierBinder (continued)

private static class Bridge implements PropertyBridge<String> { (1)

    private final IndexObjectFieldReference skuIdObjectField;
    private final IndexFieldReference<String> departmentCodeField;
    private final IndexFieldReference<String> collectionCodeField;
    private final IndexFieldReference<String> itemCodeField;

    private Bridge(IndexObjectFieldReference skuIdObjectField,
            IndexFieldReference<String> departmentCodeField,
            IndexFieldReference<String> collectionCodeField,
            IndexFieldReference<String> itemCodeField) {
        this.skuIdObjectField = skuIdObjectField;
        this.departmentCodeField = departmentCodeField;
        this.collectionCodeField = collectionCodeField;
        this.itemCodeField = itemCodeField;
    }

    @Override
    public void write(DocumentElement target, String skuId, PropertyBridgeWriteContext context) {
        DocumentElement skuIdObject = target.addObject( this.skuIdObjectField );(2)

        // An SKU identifier is formatted this way: "<department code>.<collection code>.<item code>".
        String[] skuIdParts = skuId.split( "\\." );
        skuIdObject.addValue( this.departmentCodeField, skuIdParts[0] ); (3)
        skuIdObject.addValue( this.collectionCodeField, skuIdParts[1] ); (3)
        skuIdObject.addValue( this.itemCodeField, skuIdParts[2] ); (3)
    }
}

// ... class continues below| 1 | Here the bridge class is nested in the binder class, because it is more convenient, but you are obviously free to implement it in a separate java file. |
| 2 | The bridge creates an object to hold the various components of the SKU identifier. |
| 3 | The bridge populates the various components of the SKU identifier. |
    // ... class SkuIdentifierBinder (continued)

    private static class SkuIdentifierMatchPredicateProvider implements NamedPredicateProvider { (1)
        @Override
        public SearchPredicate create(NamedPredicateProviderContext context) {
            SearchPredicateFactory f = context.predicate(); (2)

            String pattern = (String) context.param( "pattern" ); (3)

            return f.bool( b -> { (4)
                // An SKU identifier pattern is formatted this way: "<department code>.<collection code>.<item code>".
                // Each part supports * and ? wildcards.
                String[] patternParts = pattern.split( "\\." );
                if ( patternParts.length > 0 ) {
                    b.must( f.wildcard()
                            .field( "departmentCode" ) (5)
                            .matching( patternParts[0] ) );
                }
                if ( patternParts.length > 1 ) {
                    b.must( f.wildcard()
                            .field( "collectionCode" )
                            .matching( patternParts[1] ) );
                }
                if ( patternParts.length > 2 ) {
                    b.must( f.wildcard()
                            .field( "itemCode" )
                            .matching( patternParts[2] ) );
                }
            } ).toPredicate(); (6)
        }
    }
}| 1 | The named predicate provider must implement the NamedPredicateProvider interface.
Here the named predicate provider class is nested in the binder class, because it is more convenient, but you are obviously free to implement it in a separate java file. |
| 2 | The context passed to the provider exposes the predicate factory, which is the entry point to the predicate DSL, used to create predicates. |
| 3 | The provider can access parameters that are passed when calling the named predicates.
Getting the param using the param method assumes that the param has been defined.
Alternatively it is possible to use paramOptional to get the java.util.Optional of the param. |
| 4 | The provider uses the predicate factory to create predicates. In this example, this implementation transforms a pattern with a custom format into three patterns, one for each field populated by the bridge. |
| 5 | Be careful: the search predicate factory expects paths
relative to the object field where the named predicate was registered.
Here the path departmentCode will be understood as <path to the object field>.departmentCode.
See also Field paths. |
| 6 | Do not forget to call toPredicate() to return a SearchPredicate instance. |
@Entity
@Indexed
public class ItemStock {

    @Id
    @PropertyBinding(binder = @PropertyBinderRef(type = SkuIdentifierBinder.class)) (1)
    private String skuId;

    private int amountInStock;

    // Getters and setters
    // ...


}| 1 | Apply the bridge using the @PropertyBinding annotation.
The predicate will be available in the Search DSL,
as shown in named: call a predicate defined in the mapping. |
6.11. Assigning default bridges with the bridge resolver
6.11.1. Basics
Both the @*Field annotations
and the @DocumentId annotation
support a broad range of standard types by default,
without needing to tell Hibernate Search how to convert values to something that can be indexed.
Under the hood, the support for default types is handled by the bridge resolver.
For example, when a property is mapped with @GenericField
and neither @GenericField.valueBridge nor @GenericField.valueBinder is set,
Hibernate Search will resolve the type of this property,
then pass it to the bridge resolver,
which will return an appropriate bridge, or fail if there isn’t any.
It is possible to customize the bridge resolver,
to override existing default bridges (indexing java.util.Date differently, for example)
or to define default bridges for additional types (a geospatial type from an external library, for example).
To that end, define a mapping configurer as explained in Programmatic mapping, then define bridges as shown below:
public class MyDefaultBridgesConfigurer implements HibernateOrmSearchMappingConfigurer {
    @Override
    public void configure(HibernateOrmMappingConfigurationContext context) {
        context.bridges().exactType( MyCoordinates.class )
                .valueBridge( new MyCoordinatesBridge() ); (1)

        context.bridges().exactType( MyProductId.class )
                .identifierBridge( new MyProductIdBridge() ); (2)

        context.bridges().exactType( ISBN.class )
                .valueBinder( new ValueBinder() { (3)
                    @Override
                    public void bind(ValueBindingContext<?> context) {
                        context.bridge( ISBN.class, new ISBNValueBridge(),
                                context.typeFactory().asString().normalizer( "isbn" ) );
                    }
                } );
    }
}| 1 | Use our custom bridge (MyCoordinatesBridge) by default when a property of type MyCoordinates
is mapped to an index field (e.g. with @GenericField). |
| 2 | Use our custom bridge (MyProductBridge) by default when a property of type MyProductId
is mapped to a document identifier (e.g. with @DocumentId). |
| 3 | It’s also possible to specify a binder instead of a bridge, so that additional settings can be tuned. Here we’re assigning the "isbn" normalizer every time we map an ISBN to an index field. |
6.11.2. Assigning a single binder to multiple types
|
Features detailed in this section are incubating: they are still under active development. The usual compatibility policy does not apply: the contract of incubating elements (e.g. types, methods, configuration properties, etc.) may be altered in a backward-incompatible way — or even removed — in subsequent releases. You are encouraged to use incubating features so the development team can get feedback and improve them, but you should be prepared to update code which relies on them as needed. |
For more advanced use cases, it is also possible to assign a single binder to subtypes of a given type. This is useful when many types should be indexed similarly.
Below is an example where enums are not indexed as their .name() (which is the default),
but instead are indexed as their label retrieved from an external service.
context.bridges().subTypesOf( Enum.class ) (1)
        .valueBinder( new ValueBinder() {
            @Override
            public void bind(ValueBindingContext<?> context) {
                Class<?> enumType = context.bridgedElement().rawType(); (2)
                doBind( context, enumType );
            }

            private <T> void doBind(ValueBindingContext<?> context, Class<T> enumType) {
                BeanHolder<EnumLabelService> serviceHolder =
                        context.beanResolver().resolve( EnumLabelService.class, BeanRetrieval.ANY ); (3)
                context.bridge( enumType, new EnumLabelBridge<>( enumType, serviceHolder ) ); (4)
            }
} );| 1 | Match all subtypes of Enum. |
| 2 | Retrieve the type of the element being bridged. |
| 3 | Retrieve an external service (through CDI/Spring). |
| 4 | Create and assign the bridge. |
7. Managing the index schema
7.1. Basics
Before indexes can be used for indexing or searching, they must be created on disk (Lucene) or in the remote cluster (Elasticsearch). With Elasticsearch in particular, this creation may not be obvious since it requires to describe the schema for each index, which includes in particular:
-
the definition of every analyzer or normalizer used in this index;
-
the definition of every single field used in this index, including in particular its type, the analyzer assigned to it, whether it requires doc values, etc.
Hibernate Search has all the necessary information to generate this schema automatically, so it is possible to delegate the task of managing the schema to Hibernate Search.
7.2. Automatic schema management on startup/shutdown
The property hibernate.search.schema_management.strategy can be set to one of the following values
in order to define what to do with the indexes and their schema on startup and shutdown.
| Strategy | Definition | Warnings |
|---|---|---|
A strategy that does not do anything on startup or shutdown. Indexes and their schema will not be created nor deleted on startup or shutdown. Hibernate Search will not even check that the index actually exists. |
With Elasticsearch, indexes and their schema will have to be created explicitly before startup. |
|
A strategy that does not change indexes nor their schema, but checks that indexes exist and validates their schema on startup. An exception will be thrown on startup if:
"Compatible" differences such as extra fields are ignored. |
Indexes and their schema will have to be created explicitly before startup. With the Lucene backend, validation is limited to checking that the indexes exist, because local Lucene indexes don’t have a schema. |
|
A strategy that creates missing indexes and their schema on startup, but does not touch existing indexes and assumes their schema is correct without validating it. |
||
A strategy that creates missing indexes and their schema on startup, and validates the schema of existing indexes. With the Elasticsearch backend only, an exception will be thrown on startup if some indexes already exist but their schema does not match the requirements of the Hibernate Search mapping: missing fields, fields with incorrect type, missing analyzer definitions or normalizer definitions, … "Compatible" differences such as extra fields are ignored. |
With the Lucene backend, validation is limited to checking that the indexes exist, because local Lucene indexes don’t have a schema. |
|
A strategy that creates missing indexes and their schema on startup, and updates the schema of existing indexes if possible. |
This strategy is unfit for production environments, due to several limitations including the impossibility to change the type of an existing field or the requirement to close indexes while updating analyzer definitions (which is not possible at all on AWS). With the Lucene backend, schema update is a no-op, because local Lucene indexes don’t have a schema. |
|
A strategy that drops existing indexes and re-creates them and their schema on startup. |
All indexed data will be lost on startup. |
|
A strategy that drops existing indexes and re-creates them and their schema on startup, then drops the indexes on shutdown. |
All indexed data will be lost on startup and shutdown. |
7.3. Manual schema management
Schema management does not have to happen automatically on startup and shutdown.
Using the SearchSchemaManager interface,
it is possible to trigger schema management operations explicitly
after Hibernate Search has started.
|
The most common use case is to set the automatic schema management strategy to After schema management operations are complete, you will often want to populate indexes. To that end, use the mass indexer. |
The SearchSchemaManager interface exposes the following methods.
| Method | Definition | Warnings |
|---|---|---|
Does not change indexes nor their schema, but checks that indexes exist and validates their schema. |
With the Lucene backend, validation is limited to checking that the indexes exist, because local Lucene indexes don’t have a schema. |
|
Creates missing indexes and their schema, but does not touch existing indexes and assumes their schema is correct without validating it. |
||
Creates missing indexes and their schema, and validates the schema of existing indexes. |
With the Lucene backend, validation is limited to checking that the indexes exist, because local Lucene indexes don’t have a schema. |
|
Creates missing indexes and their schema, and updates the schema of existing indexes if possible. |
With the Elasticsearch backend, updating a schema may fail. With the Elasticsearch backend, updating a schema may close indexes while updating analyzer definitions (which is not possible at all on AWS). With the Lucene backend, schema update is a no-op, because local Lucene indexes don’t have a schema. (it just creates missing indexes). |
|
Drops existing indexes. |
||
Drops existing indexes and re-creates them and their schema. |
Below is an example using a SearchSchemaManager to drop and create indexes,
then using a mass indexer to re-populate the indexes.
The
dropAndCreateSchemaOnStart setting of the mass indexer
would be an alternative solution to achieve the same results.
SearchSchemaManagerSearchSession searchSession = Search.session( entityManager ); (1)
SearchSchemaManager schemaManager = searchSession.schemaManager(); (2)
schemaManager.dropAndCreate(); (3)
searchSession.massIndexer().startAndWait(); (4)| 1 | Get a SearchSession. |
| 2 | Get a schema manager. |
| 3 | Drop and create the indexes. This method is synchronous and will only return after the operation is complete. |
| 4 | Optionally, trigger mass indexing. |
You can also select entity types when creating a schema manager, to manage the indexes of these types only (and their indexed subtypes, if any):
SearchSchemaManagerSearchSchemaManager schemaManager = searchSession.schemaManager( Book.class ); (1)
schemaManager.dropAndCreate(); (2)| 1 | Get a schema manager targeting the index mapped to the Book entity type. |
| 2 | Drop and create the index for the Book entity only.
Other indexes are unaffected. |
7.4. How schema management works
- Creating/updating a schema does not create/update indexed data
-
Creating or updating indexes and their schema through schema management will not populate the indexes:
-
newly created indexes will always be empty.
-
indexes with a recently updated schema will still contain the same indexed data, i.e. new fields won’t be added to documents just because they were added to the schema.
-
This is by design: reindexing is a potentially long-running task that should be triggered explicitly. To populate indexes with pre-existing data from the database, use mass indexing.
- Dropping the schema means losing indexed data
-
Dropping a schema will drop the whole index, including all indexed data.
A dropped index will need to be re-created through schema management, then populated with pre-existing data from the database through mass indexing.
- Schema validation and update are not effective with Lucene
-
The Lucene backend will only validate that the index actually exists and create missing indexes, because there is no concept of schema in Lucene beyond the existence of index segments.
- Schema validation is permissive
-
With Elasticsearch, schema validation is as permissive as possible:
-
Fields that are unknown to Hibernate Search will be ignored.
-
Settings that are more powerful than required will be deemed valid. For example, a field that is not marked as sortable in Hibernate Search but marked as
"docvalues": truein Elasticsearch will be deemed valid. -
Analyzer/normalizer definitions that are unknown to Hibernate Search will be ignored.
One exception: date formats must match exactly the formats specified by Hibernate Search, due to implementation constraints.
-
- Schema updates may fail
-
A schema update, triggered by the
create-or-updatestrategy, may simply fail. This is because schemas may change in an incompatible way, such as a field having its type changed, or its analyzer changed, etc.Worse, since updates are handled on a per-index basis, a schema update may succeed for one index but fail on another, leaving your schema as a whole half-updated.
For these reasons, using schema updates in a production environment is not recommended. Whenever the schema changes, you should either:
-
drop and create indexes, then reindex.
-
OR update the schema manually through custom scripts.
In this case, the
create-or-updatestrategy will prevent Hibernate Search from starting, but it may already have successfully updated the schema for another index, making a rollback difficult. -
- Schema updates on Elasticsearch may close indexes
-
Elasticsearch does not allow updating analyzer/normalizer definitions on an open index. Thus, when analyzer or normalizer definitions have to be updated during a schema update, Hibernate Search will temporarily stop the affected indexes.
For this reason, the
create-or-updatestrategy should be used with caution when multiple clients use Elasticsearch indexes managed by Hibernate Search: those clients should be synchronized in such a way that while Hibernate Search is starting, no other client needs to access the index.Also, since Elasticsearch on Amazon Web Services (AWS) does not support the
_close/_openoperations, the schema update will fail when trying to update analyzer definitions on an AWS Elasticsearch cluster. The only workaround is to avoid the schema update on AWS. It should be avoided in production environments regardless: see [mapper-orm-schema-management-concepts-update-failure].
8. Indexing Hibernate ORM entities
8.1. Automatic indexing
By default, every time an entity is changed through a Hibernate ORM Session, if that entity is mapped to an index, Hibernate Search updates the relevant index.
Exactly how and when the index update happens depends on the coordination strategy; see Overview for more information.
8.1.1. Overview
Below is a summary of how automatic indexing works depending on the configured coordination strategy.
Follow the links for more details.
| Coordination strategy | No coordination (default) | Outbox polling |
|---|---|---|
Detects changes occurring in ORM sessions ( |
||
Detects changes caused by JPQL or SQL queries ( |
||
Associations must be updated on both sides |
||
Changes triggering reindexing |
||
Guarantee of indexes updates |
||
Visibility of index updates |
||
Overhead for application threads |
||
Overhead for the database |
||
8.1.2. Configuration
Automatic indexing may be unnecessary if your index is read-only
or if you update it regularly by reindexing,
either using the MassIndexer
or manually.
You can disable automatic indexing by setting the configuration property
hibernate.search.automatic_indexing.enabled to false.
8.1.3. In-session entity change detection and limitations
Hibernate Search uses internal events of Hibernate ORM in order to detect changes.
These events will be triggered if you actually manipulate managed entity objects in your code:
calls o session.persist(…), session.delete(…), to entity setters, etc.
This works great for most applications, but you need to consider some limitations:
8.1.4. Dirty checking
Hibernate Search is aware of the entity properties that are accessed when building indexed documents. Thanks to that knowledge, it is able to detect which entity changes are actually relevant to indexing, and to skip reindexing when a property is modified, but does not affect the indexed document.
You can control this "dirty checking" by setting
the boolean property hibernate.search.automatic_indexing.enable_dirty_check:
-
by default, or when set to
true, Hibernate Search will consider whether modified properties are relevant before triggering reindexing. -
when set to
false, Hibernate Search will trigger reindexing upon any change, regardless of the entity properties that changed.
8.1.5. Synchronization with the indexes
Basics
|
For a preliminary introduction to writing to and reading from indexes in Hibernate Search, including in particular the concepts of commit and refresh, see Commit and refresh. |
|
Indexing synchronization is only relevant when coordination is disabled. With coordination strategies such as |
When a transaction is committed, with default coordination settings, automatic indexing can (and, by default, will) block the application thread until indexing reaches a certain level of completion.
There are two main reasons for blocking the thread:
-
Indexed data safety: if, once the database transaction completes, index data must be safely stored to disk, an index commit is necessary. Without it, index changes may only be safe after a few seconds, when a periodic index commit happens in the background.
-
Real-time search queries: if, once the database transaction completes, any search query must immediately take the index changes into account, an index refresh is necessary. Without it, index changes may only be visible after a few seconds, when a periodic index refresh happens in the background.
These two requirements are controlled by the synchronization strategy.
The default strategy is defined by the configuration property
hibernate.search.automatic_indexing.synchronization.strategy.
Below is a reference of all available strategies and their guarantees.
Strategy |
Throughput |
Guarantees when the application thread resumes |
||
|---|---|---|---|---|
Changes applied (with or without commit) |
Changes safe from crash/power loss (commit) |
Changes visible on search (refresh) |
||
|
Best |
No guarantee |
No guarantee |
No guarantee |
|
Medium |
Guaranteed |
Guaranteed |
No guarantee |
|
Medium to worst |
Guaranteed |
No guarantee |
Guaranteed |
|
Guaranteed |
Guaranteed |
Guaranteed |
|
|
Depending on the backend and its configuration,
the This is why this strategy is only recommended if you know your backend is designed for it, or for integration tests.
In particular, the |
|
Indexing failures may be reported differently depending on the chosen strategy:
|
Per-session override
While the configuration property mentioned above defines a default,
it is possible to override this default on a particular session
by calling SearchSession#automaticIndexingSynchronizationStrategy(…) and passing a different strategy.
The built-in strategies can be retrieved by calling:
-
AutomaticIndexingSynchronizationStrategy.async() -
AutomaticIndexingSynchronizationStrategy.writeSync() -
AutomaticIndexingSynchronizationStrategy.readSync() -
or
AutomaticIndexingSynchronizationStrategy.sync()
SearchSession searchSession = Search.session( entityManager ); (1)
searchSession.automaticIndexingSynchronizationStrategy(
        AutomaticIndexingSynchronizationStrategy.sync()
); (2)

entityManager.getTransaction().begin();
try {
    Book book = entityManager.find( Book.class, 1 );
    book.setTitle( book.getTitle() + " (2nd edition)" ); (3)
    entityManager.getTransaction().commit(); (4)
}
catch (RuntimeException e) {
    entityManager.getTransaction().rollback();
}

List<Book> result = searchSession.search( Book.class )
        .where( f -> f.match().field( "title" ).matching( "2nd edition" ) )
.fetchHits( 20 ); (5)| 1 | Obtain the search session, which by default uses the synchronization strategy configured in properties. |
| 2 | Override the synchronization strategy. |
| 3 | Change an entity. |
| 4 | Commit the changes, triggering reindexing. |
| 5 | The overridden strategy guarantees that the modified book will be present in these results, even though the query was executed just after the transaction commit. |
Custom strategy
You can also implement custom strategy. The custom strategy can then be set just like the built-in strategies:
-
as the default by setting the configuration property
hibernate.search.automatic_indexing.synchronization.strategyto a bean reference pointing to the custom implementation, for exampleclass:com.mycompany.MySynchronizationStrategy. -
at the session level by passing an instance of the custom implementation to
SearchSession#automaticIndexingSynchronizationStrategy(…).
8.2. Reindexing large volumes of data with the MassIndexer
8.2.1. Basics
There are cases where automatic indexing is not enough, because a pre-existing database has to be indexed:
-
when restoring a database backup;
-
when indexes had to be wiped, for example because the Hibernate Search mapping or some core settings changed;
-
when automatic indexing had to be disabled for performance reasons, and periodic reindexing (every night, …) is preferred.
To address these situations, Hibernate Search provides the MassIndexer:
a tool to rebuild indexes completely based on the content of the database.
It can be told to reindex a few selected indexed types, or all of them.
The MassIndexer takes the following approach to provide a reasonably high throughput:
-
Indexes are purged completely when mass indexing starts.
-
Mass indexing is performed by several parallel threads, each loading data from the database and sending indexing requests to the indexes.
|
Because of the initial index purge, and because mass indexing is a very resource-intensive operation,
it is recommended to take your application offline while the Querying the index while a |
The following snippet of code will rebuild the index of all indexed entities, deleting the index and then reloading all entities from the database.
MassIndexerSearchSession searchSession = Search.session( entityManager ); (1)
searchSession.massIndexer() (2)
.startAndWait(); (3)| 1 | Get the SearchSession. |
| 2 | Create a MassIndexer targeting every indexed entity type. |
| 3 | Start the mass indexing process and return when it is over. |
|
The |
|
A note to MySQL users: the To avoid this "optimization" set the |
You can also select entity types when creating a mass indexer, to reindex only these types (and their indexed subtypes, if any):
MassIndexersearchSession.massIndexer( Book.class ) (1)
.startAndWait(); (2)| 1 | Create a MassIndexer targeting the Book type and its indexed subtypes (if any). |
| 2 | Start the mass indexing process for the selected types and return when it is over. |
It is possible to run the mass indexer asynchronously, because, the mass indexer does not rely on the original Hibernate ORM session. When used asynchronously, the mass indexer will return a completion stage to track the completion of mass indexing:
MassIndexersearchSession.massIndexer() (1)
.start() (2)
.thenRun( () -> { (3)
logger.info( "Mass indexing succeeded!" );
} )
.exceptionally( throwable -> {
logger.error( "Mass indexing failed!", throwable );
return null;
} );
// OR
Future<?> future = searchSession.massIndexer().start()
.toCompletableFuture(); (4)| 1 | Create a MassIndexer. |
| 2 | Start the mass indexing process, but do not wait for the process to finish.
A CompletionStage is returned. |
| 3 | The CompletionStage exposes methods to execute more code after indexing is complete. |
| 4 | Alternatively, call toCompletableFuture() on the returned object to get a Future. |
Although the MassIndexer is simple to use, some tweaking is recommended to speed up the process.
Several optional parameters are available, and can be set as shown below,
before the mass indexer starts.
See MassIndexer parameters for a reference of all available parameters,
and Tuning the MassIndexer for best performance for details about key topics.
searchSession.massIndexer() (1)
        .idFetchSize( 150 ) (2)
        .batchSizeToLoadObjects( 25 ) (3)
        .threadsToLoadObjects( 12 ) (4)
.startAndWait(); (5)| 1 | Create a MassIndexer. |
| 2 | Load Book identifiers by batches of 150 elements. |
| 3 | Load Book entities to reindex by batches of 25 elements. |
| 4 | Create 12 parallel threads to load the Book entities. |
| 5 | Start the mass indexing process and return when it is over. |
|
Running the |
8.2.2. Conditional reindexing
You can also select a subset of target entities to be reindexed.
SearchSession searchSession = Search.session( entityManager ); (1)
MassIndexer massIndexer = searchSession.massIndexer(); (2)
massIndexer.type( Book.class ).reindexOnly( "e.publicationYear <= 2100" ); (3)
massIndexer.type( Author.class ).reindexOnly( "e.birthDate < :birthDate" ) (4)
        .param( "birthDate", LocalDate.ofYearDay( 2100, 77 ) ); (5)
massIndexer.startAndWait(); (6)| 1 | Get the SearchSession. |
| 2 | Create a MassIndexer targeting every indexed entity type. |
| 3 | Reindex only the books published before year 2100. |
| 4 | Reindex only the authors born prior to a given local date. |
| 5 | In this example the date is passed as a query parameter. |
| 6 | Start the mass indexing process and return when it is over. |
|
Even if the reindexing is applied on a subset of entities, by default all entities will be purged at the start. The purge can be disabled completely, but when enabled there is no way to filter the entities that will be purged. See HSEARCH-3304 for more information. |
8.2.3. MassIndexer parameters
| Setter | Default value | Description |
|---|---|---|
|
|
The number of types to index in parallel. |
|
|
The number of threads for entity loading, for each type indexed in parallel.
That is to say, the number of threads spawned for entity loading
will be |
|
The fetch size to be used when loading primary keys. Some databases
accept special values, for example MySQL might benefit from using |
|
|
|
The fetch size to be used when loading entities from database. Some databases
accept special values, for example MySQL might benefit from using |
|
Drops the indexes and their schema (if they exist) and re-creates them before indexing. Indexes will be unavailable for a short time during the dropping and re-creation, so this should only be used when failures of concurrent operations on the indexes (automatic indexing, …) are acceptable. This should be used when the existing schema is known to be obsolete, for example when the Hibernate Search mapping changed and some fields now have a different type, a different analyzer, new capabilities (projectable, …), etc. This may also be used when the schema is up-to-date,
since it can be faster than a purge ( As an alternative to this parameter, you can also use a schema manager to manage schemas manually at the time of your choosing: Manual schema management. |
|
|
|
Removes all entities from the indexes before indexing. Only set this to |
|
|
Force merging of each index into a single segment after the initial index purge, just before indexing.
This setting has no effect if |
|
|
Force merging of each index into a single segment after indexing. This operation does not always improve performance: see Merging segments and performance. |
|
|
The Hibernate |
|
- |
Only supported in JTA-enabled environments.
Timeout of transactions for loading ids and entities to be re-indexed.
The timeout should be long enough to load and index all entities of one type.
Note that these transactions are read-only,
so choosing a large value (e.g. |
|
- |
The maximum number of results to load per entity type. This parameter let you define a threshold
value to avoid loading too many entities accidentally. The value defined must be greater than 0.
The parameter is not used by default. It is equivalent to keyword |
|
A logging monitor. |
The component responsible for monitoring progress of mass indexing. As a Implementations of |
|
A failure handler. |
The component responsible for handling failures occurring during mass indexing. A The default, built-in failure handler just forwards the failures
to the global background failure handler,
which by default will log them at the Implementations of |
8.2.4. Tuning the MassIndexer for best performance
Basics
The MassIndexer was designed to finish the re-indexing task as quickly as possible,
but there is no one-size-fits-all solution,
so some configuration is required to get the best of it.
Performance optimization can get quite complex,
so keep the following in mind while you attempt to configure the MassIndexer:
-
Always test your changes to assess their actual effect: advice provided in this section is true in general, but each application and environment is different, and some options, when combined, may produce unexpected results.
-
Take baby steps: before tuning mass indexing with 40 indexed entity types with two million instances each, try a more reasonable scenario with only one entity type, optionally limiting the number of entities to index to assess performance more quickly.
-
Tune your entity types individually before you try to tune a mass indexing operation that indexes multiple entity types in parallel.
Threads and JDBC connections
Increasing parallelism usually helps as the bottleneck usually is the latency to the database connection: it’s probably worth it to experiment with a number of threads significantly higher than the number of actual cores available.
However, each thread requires one JDBC connection, and JDBC connections are usually in limited supply. In order to increase the number of threads safely:
-
You should make sure your database can actually handle the resulting number of connections.
-
Your JDBC connection pool should be configured to provide a sufficient number of connections.
-
The above should take into account the rest of your application (request threads in a web application): ignoring this may bring other processes to a halt while the
MassIndexeris working.
There is a simple formula to understand how
the different options applied to the MassIndexer affect
the number of used worker threads and connections:
if ( using the default 'none' coordination strategy ) {
    threadsToCoordinate = 0;
}
else {
    threadsToCoordinate = 1;
}
threadsToLoadIdentifiers = 1;
threads = threadsToCoordinate + typesToIndexInParallel * (threadsToLoadObjects + threadsToLoadIdentifiers);
required JDBC connections = threads;
Here are a few suggestions for a roughly sane tuning starting point for the parameters that affect parallelism:
typesToIndexInParallel-
Should probably be a low value, like 1 or 2, depending on how much of your CPUs have spare cycles and how slow a database round trip will be.
threadsToLoadObjects-
Higher increases the preloading rate for the picked entities from the database, but also increases memory usage and the pressure on the threads working on subsequent indexing. Note that each thread will extract data from the entity to reindex, which depending on your mapping might require accessing lazy associations and load associated entities, thus making blocking calls to the database, so you will probably need a high number of threads working in parallel.
|
All internal thread groups have meaningful names prefixed with "Hibernate Search", so they should be easily identified with most diagnostic tools, including simply thread dumps. |
8.3. Reindexing large volumes of data with the JSR-352 integration
Hibernate Search provides a JSR-352 job to perform mass indexing. It covers not only the existing functionality of the mass indexer described above, but also benefits from some powerful standard features of the Java Batch Platform (JSR-352), such as failure recovery using checkpoints, chunk oriented processing, and parallel execution. This batch job accepts different entity type(s) as input, loads the relevant entities from the database, then rebuilds the full-text index from these.
However, it requires a batch runtime for the execution. Please notice that we don’t provide any batch runtime, you are free to choose one that fits you needs, e.g. the default batch runtime embedded in your Java EE container. We provide full integration to the JBeret implementation (see how to configure it here). As for other implementations, they can also be used, but will require a bit more configuration on your side.
If the runtime is JBeret, you need to add the following dependency:
<dependency>
   <groupId>org.hibernate.search</groupId>
   <artifactId>hibernate-search-mapper-orm-batch-jsr352-jberet</artifactId>
   <version>6.1.8.Final</version>
</dependency>
For any other runtime, you need to add the following dependency:
<dependency>
   <groupId>org.hibernate.search</groupId>
   <artifactId>hibernate-search-mapper-orm-batch-jsr352-core</artifactId>
   <version>6.1.8.Final</version>
</dependency>
Here is an example of how to run a batch instance:
JSR-352 mass-indexing jobProperties jobProps = MassIndexingJob.parameters() (1)
.forEntities( Book.class, Author.class ) (2)
.build();
JobOperator jobOperator = BatchRuntime.getJobOperator(); (3)
long executionId = jobOperator.start( MassIndexingJob.NAME, jobProps ); (4)| 1 | Start building parameters for a mass-indexing job. |
| 2 | Define some parameters. In this case, the list of the entity types to be indexed. |
| 3 | Get the JobOperator from the framework. |
| 4 | Start the job. |
8.3.1. Job Parameters
The following table contains all the job parameters you can use to customize the mass-indexing job.
| Parameter Name / Builder Method | Default value | Description |
|---|---|---|
|
- |
This parameter is always required. The entity types to index in this job execution, comma-separated. |
|
True |
Specify whether the existing index should be purged at the beginning of the job. This operation takes place before indexing. |
|
True |
Specify whether the mass indexer should merge segments at the beginning of the job. This operation takes place after the purge operation and before indexing. |
|
True |
Specify whether the mass indexer should merge segments at the end of the job. This operation takes place after indexing. |
|
|
Specify the Hibernate |
|
1000 |
Specifies the fetch size to be used when loading primary keys. Some databases
accept special values, for example MySQL might benefit from using |
|
The value of |
Specifies the fetch size to be used when loading entities from database. Some databases
accept special values, for example MySQL might benefit from using |
|
- |
Use HQL / JPQL to index entities of a target entity type. Your query should contain only one entity type. Mixing this approach with the criteria restriction is not allowed. Please notice that there’s no query validation for your input. See Indexing mode for more detail and limitations. |
|
- |
The maximum number of results to load per entity type. This parameter let you define a threshold
value to avoid loading too many entities accidentally. The value defined must be greater than 0.
The parameter is not used by default. It is equivalent to keyword |
|
20,000 |
The maximum number of rows to process per partition. The value defined must be greater than 0, and
equal to or greater than the value of |
|
The number of partitions |
The maximum number of threads to use for processing the job. Note the batch runtime cannot guarantee the request number of threads are available; it will use as many as it can up to the request maximum. |
|
2,000, or the value of |
The number of entities to process before triggering a checkpoint. The value defined must be greater
than 0, and equal to or less than the value of |
|
200, or the value of |
The number of entities to process before clearing the session. The value defined must be greater
than 0, and equal to or less than the value of |
|
- |
This parameter is required when there is more than one persistence unit. The string that will identify the |
|
- |
- |
8.3.2. Indexing mode
The mass indexing job allows you to define your own entities to be indexed — you can start a full indexing or a partial indexing through 2 different methods: selecting the desired entity types, or using HQL.
restrictedBy HQL parameterProperties jobProps = MassIndexingJob.parameters() (1)
.forEntities( Author.class ) (2)
.restrictedBy( "from Author a where a.lastName = 'Smith1'" ) (3)
.build();
JobOperator jobOperator = BatchRuntime.getJobOperator(); (4)
long executionId = jobOperator.start( MassIndexingJob.NAME, jobProps ); (5)| 1 | Start building parameters for a mass-indexing job. |
| 2 | Define the entity type to be indexed. |
| 3 | Restrict the scope of the job using an HQL restriction. |
| 4 | Get JobOperator form the framework. |
| 5 | Start the job. |
While the full indexing is useful when you perform the very first indexing, or after extensive changes to your whole database, it may also be time-consuming. If your want to reindex only part of your data, you need to add restrictions using HQL: they help you to define a customized selection, and only the entities inside that selection will be indexed. A typical use-case is to index the new entities appeared since yesterday.
Note that, as detailed below, some features may not be supported depending on the indexing mode.
| Indexing mode | Scope | Parallel Indexing |
|---|---|---|
Full Indexation |
All entities |
Supported |
HQL |
Some entities |
Not supported |
|
When using the HQL mode, there isn’t any query validation before the job’s start. If the query is invalid, the job will start and fail. Also, parallel indexing is disabled in HQL mode, because our current parallelism implementations relies on selection order, which might not be provided by the HQL given by user. Because of those limitations, we suggest you use this approach only for indexing small numbers of entities, and only if you know that no entities matching the query will be created during indexing. |
8.3.3. Parallel indexing
For better performance, indexing is performed in parallel using multiple threads. The set of entities to index is split into multiple partitions. Each thread processes one partition at a time.
The following section will explain how to tune the parallel execution.
|
The "sweet spot" of number of threads, fetch size, partition size, etc. to achieve best performance is highly dependent on your overall architecture, database design and even data values. You should experiment with these settings to find out what’s best in your particular case. |
Threads
The maximum number of threads used by the job execution is defined through method maxThreads().
Within the N threads given, there’s 1 thread reserved for the core, so only N - 1 threads are
available for different partitions. If N = 1, the program will work, and all batch elements will run
in the same thread. The default number of threads used in Hibernate Search is 10. You can overwrite
it with your preferred number.
MassIndexingJob.parameters()
        .maxThreads( 5 )
...|
Note that the batch runtime cannot guarantee the requested number of threads are available, it will use as many as possible up to the requested maximum (JSR352 v1.0 Final Release, page 34). Note also that all batch jobs share the same thread pool, so it’s not always a good idea to execute jobs concurrently. |
Rows per partition
Each partition consists of a fixed number of elements to index. You may tune exactly how many elements
a partition will hold with rowsPerPartition.
MassIndexingJob.parameters()
        .rowsPerPartition( 5000 )
...|
This property has nothing to do with "chunk size", which is how many elements are processed together between each write. That aspect of processing is addressed by chunking. Instead, Please see the Chunking section to see how to tune chunking. |
When rowsPerPartition is low, there will be many small partitions,
so processing threads will be less likely to starve (stay idle because there’s no more partition to process),
but on the other hand you will only be able to take advantage of a small fetch size,
which will increase the number of database accesses.
Also, due to the failure recovery mechanisms, there is some overhead in starting a new partition,
so with an unnecessarily large number of partitions, this overhead will add up.
When rowsPerPartition is high, there will be a few big partitions,
so you will be able to take advantage of a higher chunk size,
and thus a higher fetch size,
which will reduce the number of database accesses,
and the overhead of starting a new partition will be less noticeable,
but on the other hand you may not use all the threads available.
|
Each partition deals with one root entity type, so two different entity types will never run under the same partition. |
8.3.4. Chunking and session clearing
The mass indexing job supports restart a suspended or failed job more or less from where it stopped.
This is made possible by splitting each partition in several consecutive chunks of entities, and saving process information in a checkpoint at the end of each chunk. When a job is restarted, it will resume from the last checkpoint.
The size of each chunk is determined by the checkpointInterval parameter.
MassIndexingJob.parameters()
        .checkpointInterval( 1000 )
        ...
But the size of a chunk is not only about saving progress, it is also about performance:
-
a new Hibernate session is opened for each chunk;
-
a new transaction is started for each chunk;
-
inside a chunk, the session is cleared periodically according to the
sessionClearIntervalparameter, which must thereby be smaller than (or equal to) the chunk size; -
documents are flushed to the index at the end of each chunk.
|
In general the checkpoint interval should be small compared to the number of rows per partition. Indeed, due to the failure recovery mechanism, the elements before the first checkpoint of each partition will take longer to process than the other, so in a 1000-element partition, having a 100-element checkpoint interval will be faster than having a 1000-element checkpoint interval. On the other hand, chunks shouldn’t be too small in absolute terms. Performing a checkpoint means your JSR-352 runtime will write information about the progress of the job execution to its persistent storage, which also has a cost. Also, a new transaction and session are created for each chunk which doesn’t come for free, and implies that setting the fetch size to a value higher than the chunk size is pointless. Finally, the index flush performed at the end of each chunk is an expensive operation that involves a global lock, which essentially means that the less you do it, the faster indexing will be. Thus having a 1-element checkpoint interval is definitely not a good idea. |
8.3.5. Selecting the persistence unit (EntityManagerFactory)
|
Regardless of how the entity manager factory is retrieved, you must make sure that the entity manager factory used by the mass indexer will stay open during the whole mass indexing process. |
JBeret
If your JSR-352 runtime is JBeret (used in WildFly in particular),
you can use CDI to retrieve the EntityManagerFactory.
If you use only one persistence unit, the mass indexer will be able to access your database automatically without any special configuration.
If you want to use multiple persistence units, you will have to register the EntityManagerFactories
as beans in the CDI context.
Note that entity manager factories will probably not be considered as beans by default, in which case
you will have to register them yourself. You may use an application-scoped bean to do so:
@ApplicationScoped
public class EntityManagerFactoriesProducer {

    @PersistenceUnit(unitName = "db1")
    private EntityManagerFactory db1Factory;

    @PersistenceUnit(unitName = "db2")
    private EntityManagerFactory db2Factory;

    @Produces
    @Singleton
    @Named("db1") // The name to use when referencing the bean
    public EntityManagerFactory createEntityManagerFactoryForDb1() {
        return db1Factory;
    }

    @Produces
    @Singleton
    @Named("db2") // The name to use when referencing the bean
    public EntityManagerFactory createEntityManagerFactoryForDb2() {
        return db2Factory;
    }
}
Once the entity manager factories are registered in the CDI context, you can instruct the mass
indexer to use one in particular by naming it using the entityManagerReference parameter.
|
Due to limitations of the CDI APIs, it is not currently possible to reference an entity manager factory by its persistence unit name when using the mass indexer with CDI. |
Other DI-enabled JSR-352 implementations
If you want to use a different JSR-352 implementation that happens to allow dependency injection:
-
You must map the following two scope annotations to the relevant scope in the dependency injection mechanism:
-
org.hibernate.search.batch.jsr352.core.inject.scope.spi.HibernateSearchJobScoped -
org.hibernate.search.batch.jsr352.core.inject.scope.spi.HibernateSearchPartitionScoped
-
-
You must make sure that the dependency injection mechanism will register all injection-annotated classes (
@Named, …) from thehibernate-search-mapper-orm-batch-jsr352-coremodule in the dependency injection context. For instance this can be achieved in Spring DI using the@ComponentScanannotation. -
You must register a single bean in the dependency injection context that will implement the
EntityManagerFactoryRegistryinterface.
Plain Java environment (no dependency injection at all)
The following will work only if your JSR-352 runtime does not support dependency injection at all,
i.e. it ignores @Inject annotations in batch artifacts.
This is the case for JBatch in Java SE mode, for instance.
If you use only one persistence unit,
the mass indexer will be able to access your database automatically without any special configuration:
you only have to make sure to create the EntityManagerFactory (or SessionFactory)
in your application before launching the mass indexer.
If you want to use multiple persistence units, you will have to add two parameters when launching the mass indexer:
-
entityManagerFactoryReference: this is the string that will identify theEntityManagerFactory. -
entityManagerFactoryNamespace: this allows to select how you want to reference theEntityManagerFactory. Possible values are:-
persistence-unit-name(the default): use the persistence unit name defined inpersistence.xml. -
session-factory-name: use the session factory name defined in the Hibernate configuration by thehibernate.session_factory_nameconfiguration property.
-
|
If you set the |
8.4. Manual indexing
8.4.1. Basics
While automatic indexing and
the MassIndexer
or the mass indexing job
should take care of most needs,
it is sometimes necessary to control indexing manually,
for example to reindex just a few entity instances
that were affected by changes to the database that automatic indexing cannot detect,
such as JPQL/SQL insert, update or delete queries.
To address these use cases, Hibernate Search exposes several APIs explained if the following sections.
As with everything in Hibernate Search, these APIs only affect the Hibernate Search indexes: they do not write anything to the database.
8.4.2. Controlling entity reads and index writes with SearchIndexingPlan
A fairly common use case when manipulating large datasets with JPA
is the periodic "flush-clear" pattern,
where a loop reads or writes entities for every iteration
and flushes then clears the session every n iterations.
This patterns allows processing a large number of entities
while keeping the memory footprint reasonably low.
Below is an example of this pattern to persist a large number of entities when not using Hibernate Search.
entityManager.getTransaction().begin();
try {
    for ( int i = 0 ; i < NUMBER_OF_BOOKS ; ++i ) { (1)
        Book book = newBook( i );
        entityManager.persist( book ); (2)

        if ( ( i + 1 ) % BATCH_SIZE == 0 ) {
            entityManager.flush(); (3)
            entityManager.clear(); (4)
        }
    }
    entityManager.getTransaction().commit();
}
catch (RuntimeException e) {
    entityManager.getTransaction().rollback();
    throw e;
}| 1 | Execute a loop for a large number of elements, inside a transaction. |
| 2 | For every iteration of the loop, instantiate a new entity and persist it. |
| 3 | Every BATCH_SIZE iterations of the loop, flush the entity manager to send the changes to the database-side buffer. |
| 4 | After a flush, clear the ORM session to release some memory. |
With Hibernate Search 6 (on contrary to Hibernate Search 5 and earlier), this pattern will work as expected:
-
with coordination disabled (the default), documents will be built on flushes, and sent to the index upon transaction commit.
-
with outbox-polling coordination, entity change events will be persisted on flushes, and committed along with the rest of the changes upon transaction commit.
However, each flush call will potentially add data to an internal buffer,
which for large volumes of data may lead to an OutOfMemoryException,
depending on the JVM heap size,
the coordination strategy
and the complexity and number of documents.
If you run into memory issues, the first solution is to break down the batch process into multiple transactions, each handling a smaller number of elements: the internal document buffer will be cleared after each transaction.
See below for an example.
|
With this pattern, if one transaction fails, part of the data will already be in the database and in indexes, with no way to roll back the changes. However, the indexes will be consistent with the database, and it will be possible to (manually) restart the process from the last transaction that failed. |
try {
    int i = 0;
    while ( i < NUMBER_OF_BOOKS ) { (1)
        entityManager.getTransaction().begin(); (2)
        int end = Math.min( i + BATCH_SIZE, NUMBER_OF_BOOKS ); (3)
        for ( ; i < end; ++i ) {
            Book book = newBook( i );
            entityManager.persist( book ); (4)
        }
        entityManager.getTransaction().commit(); (5)
    }
}
catch (RuntimeException e) {
    entityManager.getTransaction().rollback();
    throw e;
}| 1 | Add an outer loop that creates one transaction per iteration. |
| 2 | Begin the transaction at the beginning of each iteration of the outer loop. |
| 3 | Only handle a limited number of elements per transaction. |
| 4 | For every iteration of the loop, instantiate a new entity and persist it. Note we’re relying on automatic indexing to index the entity, but this would work just as well if automatic indexing was disabled, only requiring an extra call to index the entity. See Explicitly indexing and deleting specific documents. |
| 5 | Commit the transaction at the end of each iteration of the outer loop. The entities will be flushed and indexed automatically. |
|
The multi-transaction solution
and the original This combined solution is the most flexible, hence the most suitable if you want to fine-tune your batch process. |
If breaking down the batch process into multiple transactions is not an option,
a second solution is to just write to indexes
after the call to session.flush()/session.clear(),
without waiting for the database transaction to be committed:
the internal document buffer will be cleared after each write to indexes.
This is done by calling the execute() method on the indexing plan,
as shown in the example below.
|
With this pattern, if an exception is thrown, part of the data will already be in the index, with no way to roll back the changes, while the database changes will have been rolled back. The index will thus be inconsistent with the database. To recover from that situation, you will have to either execute the exact same database changes that failed manually (to get the database back in sync with the index), or reindex the entities affected by the transaction manually (to get the index back in sync with the database). Of course, if you can afford to take the indexes offline for a longer period of time, a simpler solution would be to wipe the indexes clean and reindex everything. |
execute()SearchSession searchSession = Search.session( entityManager ); (1)
SearchIndexingPlan indexingPlan = searchSession.indexingPlan(); (2)
entityManager.getTransaction().begin();
try {
for ( int i = 0 ; i < NUMBER_OF_BOOKS ; ++i ) {
Book book = newBook( i );
entityManager.persist( book ); (3)
if ( ( i + 1 ) % BATCH_SIZE == 0 ) {
entityManager.flush();
entityManager.clear();
indexingPlan.execute(); (4)
}
}
entityManager.getTransaction().commit(); (5)
}
catch (RuntimeException e) {
entityManager.getTransaction().rollback();
throw e;
}| 1 | Get the SearchSession. |
| 2 | Get the search session’s indexing plan. |
| 3 | For every iteration of the loop, instantiate a new entity and persist it. Note we’re relying on automatic indexing to index the entity, but this would work just as well if automatic indexing was disabled, only requiring an extra call to index the entity. See Explicitly indexing and deleting specific documents. |
| 4 | After a flush()/clear(), call indexingPlan.execute().
The entities will be processed and the changes will be sent to the indexes immediately.
Hibernate Search will wait for index changes to be "completed"
as required by the configured synchronization strategy. |
| 5 | After the loop, commit the transaction. The remaining entities that were not flushed/cleared will be flushed and indexed automatically. |
8.4.3. Explicitly indexing and deleting specific documents
When automatic indexing is disabled, the indexes will start empty and stay that way until explicit indexing commands are sent to Hibernate Search.
Indexing is done in the context of an ORM session
using the SearchIndexingPlan interface.
This interface represents the (mutable) set of changes
that are planned in the context of a session,
and will be applied to indexes upon transaction commit.
This interface offers the following methods:
addOrUpdate(Object entity)-
Add or update a document in the index if the entity type is mapped to an index (
@Indexed), and re-index documents that embed this entity (through@IndexedEmbeddedfor example). delete(Object entity)-
Delete a document from the index if the entity type is mapped to an index (
@Indexed), and re-index documents that embed this entity (through@IndexedEmbeddedfor example). purge(Class<?> entityType, Object id)-
Delete the entity from the index, but do not try to re-index documents that embed this entity.
Compared to
delete, this is mainly useful if the entity has already been deleted from the database and is not available, even in a detached state, in the session. In that case, reindexing associated entities will be the user’s responsibility, since Hibernate Search cannot know which entities are associated to an entity that no longer exists. purge(String entityName, Object id)-
Same as
purge(Class<?> entityType, Object id), but the entity type is referenced by its name (see@javax.persistence.Entity#name). process()andexecute()-
Respectively, process the changes and apply them to indexes.
These methods will be executed automatically on commit, so they are only useful when processing large number of items, as explained in Controlling entity reads and index writes with
SearchIndexingPlan.
Below are examples of using addOrUpdate and delete.
SearchIndexingPlanSearchSession searchSession = Search.session( entityManager ); (1)
SearchIndexingPlan indexingPlan = searchSession.indexingPlan(); (2)
entityManager.getTransaction().begin();
try {
Book book = entityManager.getReference( Book.class, 5 ); (3)
indexingPlan.addOrUpdate( book ); (4)
entityManager.getTransaction().commit(); (5)
}
catch (RuntimeException e) {
entityManager.getTransaction().rollback();
throw e;
}| 1 | Get the SearchSession. |
| 2 | Get the search session’s indexing plan. |
| 3 | Fetch from the database the Book we want to index. |
| 4 | Submit the Book to the indexing plan for an add-or-update operation.
The operation won’t be executed immediately,
but will be delayed until the transaction is committed. |
| 5 | Commit the transaction, allowing Hibernate Search to actually write the document to the index. |
SearchIndexingPlanSearchSession searchSession = Search.session( entityManager ); (1)
SearchIndexingPlan indexingPlan = searchSession.indexingPlan(); (2)
entityManager.getTransaction().begin();
try {
Book book = entityManager.getReference( Book.class, 5 ); (3)
indexingPlan.delete( book ); (4)
entityManager.getTransaction().commit(); (5)
}
catch (RuntimeException e) {
entityManager.getTransaction().rollback();
throw e;
}| 1 | Get the SearchSession. |
| 2 | Get the search session’s indexing plan. |
| 3 | Fetch from the database the Book we want to un-index. |
| 4 | Submit the Book to the indexing plan for a delete operation.
The operation won’t be executed immediately,
but will be delayed until the transaction is committed. |
| 5 | Commit the transaction, allowing Hibernate Search to actually delete the document from the index. |
|
Multiple operations can be performed in a single indexing plan. The same entity can even be changed multiple times, for example added and then removed: Hibernate Search will simplify the operation as expected. This will work fine for any reasonable number of entities,
but changing or simply loading large numbers of entities in a single session
requires special care with Hibernate ORM,
and then some extra care with Hibernate Search.
See Controlling entity reads and index writes with |
8.4.4. Explicitly altering a whole index
Some index operations are not about a specific entity/document, but rather about a large number of documents, possibly all of them. This includes, for example, purging the index to remove all of its content.
The operations are performed outside the context of an ORM session,
using the SearchWorkspace interface.
The SearchWorkspace can be retrieved from the SearchMapping,
and can target one, several or all indexes:
SearchWorkspace from the SearchMappingSearchMapping searchMapping = Search.mapping( entityManagerFactory ); (1)
SearchWorkspace allEntitiesWorkspace = searchMapping.scope( Object.class ).workspace(); (2)
SearchWorkspace bookWorkspace = searchMapping.scope( Book.class ).workspace(); (3)
SearchWorkspace bookAndAuthorWorkspace = searchMapping.scope( Arrays.asList( Book.class, Author.class ) )
.workspace(); (4)| 1 | Get a SearchMapping. |
| 2 | Get a workspace targeting all indexes. |
| 3 | Get a workspace targeting the index mapped to the Book entity type. |
| 4 | Get a workspace targeting the indexes mapped to the Book and Author entity types. |
Alternatively, for convenience, the SearchWorkspace can be retrieved from the SearchSession:
SearchWorkspace from the SearchSessionSearchMapping searchMapping = Search.mapping( entityManagerFactory ); (1)
SearchWorkspace allEntitiesWorkspace = searchMapping.scope( Object.class ).workspace(); (2)
SearchWorkspace bookWorkspace = searchMapping.scope( Book.class ).workspace(); (3)
SearchWorkspace bookAndAuthorWorkspace = searchMapping.scope( Arrays.asList( Book.class, Author.class ) )
.workspace(); (4)| 1 | Get a SearchSession. |
| 2 | Get a workspace targeting all indexes. |
| 3 | Get a workspace targeting the index mapped to the Book entity type. |
| 4 | Get a workspace targeting the indexes mapped to the Book and Author entity types. |
The SearchWorkspace exposes various large-scale operations
that can be applied to an index or a set of indexes.
These operations are triggered as soon as they are requested,
without waiting for the transaction commit.
This interface offers the following methods:
purge()-
Delete all documents from indexes targeted by this workspace.
With multi-tenancy enabled, only documents of the current tenant will be removed: the tenant of the session from which this workspace originated.
purgeAsync()-
Asynchronous version of
purge()returning aCompletionStage. purge(Set<String> routingKeys)-
Delete documents from indexes targeted by this workspace that were indexed with any of the given routing keys.
With multi-tenancy enabled, only documents of the current tenant will be removed: the tenant of the session from which this workspace originated.
purgeAsync(Set<String> routingKeys)-
Asynchronous version of
purge(Set<String>)returning aCompletionStage. flush()-
Flush to disk the changes to indexes that have not been committed yet. In the case of backends with a transaction log (Elasticsearch), also apply operations from the transaction log that were not applied yet.
This is generally not useful as Hibernate Search commits changes automatically. See Commit and refresh for more information.
flushAsync()-
Asynchronous version of
flush()returning aCompletionStage. refresh()-
Refresh the indexes so that all changes executed so far will be visible in search queries.
This is generally not useful as indexes are refreshed automatically. See Commit and refresh for more information.
refreshAsync()-
Asynchronous version of
refresh()returning aCompletionStage. mergeSegments()-
Merge each index targeted by this workspace into a single segment. This operation does not always improve performance: see Merging segments and performance.
mergeSegmentsAsync()-
Asynchronous version of
mergeSegments()returning aCompletionStage. This operation does not always improve performance: see Merging segments and performance.
|
Merging segments and performance
The merge-segments operation may affect performance positively as well as negatively. This operation will regroup all index data into a single, huge segment (a file). This may speed up search at first, but as documents are deleted, this huge segment will begin to fill with "holes" which have to be handled as special cases during search, degrading performance. Elasticsearch/Lucene do address this by rebuilding the segment at some point, but only once a certain ratio of deleted documents is reached. If all documents are in a single, huge segment, this ratio is less likely to be reached, and the index performance will continue to degrade for a long time. There are, however, two situations in which merging segments may help:
|
Below is an example using a SearchWorkspace to purge several indexes.
SearchWorkspaceSearchSession searchSession = Search.session( entityManager ); (1)
SearchWorkspace workspace = searchSession.workspace( Book.class, Author.class ); (2)
workspace.purge(); (3)| 1 | Get a SearchSession. |
| 2 | Get a workspace targeting the indexes mapped to the Book and Author entity types. |
| 3 | Trigger a purge.
This method is synchronous and will only return after the purge is complete,
but an asynchronous method, purgeAsync, is also available. |
9. Searching
Beyond simply indexing, Hibernate Search also exposes high-level APIs to search these indexes without having to resort to native APIs.
One key feature of these search APIs is the ability to use indexes to perform the search, but to return entities loaded from the database, effectively offering a new type of query for Hibernate ORM entities.
9.1. Query DSL
9.1.1. Basics
Preparing and executing a query requires just a few lines:
// Not shown: get the entity manager and open a transaction
SearchSession searchSession = Search.session( entityManager ); (1)
SearchResult<Book> result = searchSession.search( Book.class ) (2)
.where( f -> f.match() (3)
.field( "title" )
.matching( "robot" ) )
.fetch( 20 ); (4)
long totalHitCount = result.total().hitCount(); (5)
List<Book> hits = result.hits(); (6)
// Not shown: commit the transaction and close the entity manager| 1 | Get a Hibernate Search session, called SearchSession, from the EntityManager. |
| 2 | Initiate a search query on the index mapped to the Book entity. |
| 3 | Define that only documents matching the given predicate should be returned.
The predicate is created using a factory f passed as an argument to the lambda expression.
See Predicate DSL for more information about predicates. |
| 4 | Build the query and fetch the results, limiting to the top 20 hits. |
| 5 | Retrieve the total number of matching entities. See Fetching the total (hit count, …) for ways to optimize computation of the total hit count. |
| 6 | Retrieve matching entities. |
By default, the hits of a search query will be entities managed by Hibernate ORM, bound to the entity manager used to create the search session. This provides all the benefits of Hibernate ORM, in particular the ability to navigate the entity graph to retrieve associated entities if necessary.
The query DSL offers many features, detailed in the following sections. Some commonly used features include:
-
predicates, the main component of a search query, i.e. the condition that every document must satisfy in order to be included in search results.
-
fetching the results differently: getting the hits directly as a list, using pagination, scrolling, etc.
-
sorts, to order the hits in various ways: by score, by the value of a field, by distance to a point, etc.
-
projections, to retrieve hits that are not just managed entities: data can be extracted from the index (field values), or even from both the index and the database.
-
aggregations, to group hits and compute aggregated metrics for each group — hit count by category, for example.
9.1.2. Advanced entity types targeting
Targeting multiple entity types
When multiple entity types have similar indexed fields, it is possible to search across these multiple types in a single search query: the search result will contain hits from any of the targeted types.
SearchResult<Person> result = searchSession.search( Arrays.asList( (1)
Manager.class, Associate.class
) )
.where( f -> f.match() (2)
.field( "name" )
.matching( "james" ) )
.fetch( 20 ); (3)| 1 | Initiate a search query targeting the indexes mapped to the Manager and Associate entity types.
Since both entity types implement the Person interface,
search hits will be instances of Person. |
| 2 | Continue building the query as usual. There are restrictions regarding the fields that can be used: see the note below. |
| 3 | Fetch the search result. Hits will all be instances of Person. |
|
Multi-entity (multi-index) searches will only work well as long as the fields referenced in predicates/sorts/etc. are identical in all targeted indexes (same type, same analyzer, …). Fields that are defined in only one of the targeted indexes will also work correctly. If you want to reference index fields that are even slightly different in one of the targeted indexes (different type, different analyzer, …), see Targeting multiple fields. |
Targeting entity types by name
Though rarely necessary, it is also possible to use entity names instead of classes to designate the entity types targeted by the search:
SearchResult<Person> result = searchSession.search( (1)
searchSession.scope( (2)
Person.class,
Arrays.asList( "Manager", "Associate" )
)
)
.where( f -> f.match() (3)
.field( "name" )
.matching( "james" ) )
.fetch( 20 ); (4)| 1 | Initiate a search query. |
| 2 | Pass a custom scope encompassing the indexes mapped to the Manager and Associate entity types,
expecting those entity types to implement the Person interface (Hibernate Search will check that). |
| 3 | Continue building the query as usual. |
| 4 | Fetch the search result. Hits will all be instances of Person. |
9.1.3. Fetching results
Basics
In Hibernate Search, the default search result is a bit more complicated than just "a list of hits".
This is why the default methods return a composite SearchResult object offering getters
to retrieve the part of the result you want,
as shown in the example below.
SearchResultSearchResult<Book> result = searchSession.search( Book.class ) (1)
.where( f -> f.matchAll() )
.fetch( 20 ); (2)
long totalHitCount = result.total().hitCount(); (3)
List<Book> hits = result.hits(); (4)
// ... (5)| 1 | Start building the query as usual. |
| 2 | Fetch the results, limiting to the top 20 hits. |
| 3 | Retrieve the total hit count, i.e. the total number of matching entities/documents, which could be 10,000 even if you only retrieved the top 20 hits. This is useful to give end users and idea of how many more hits they query produced. See Fetching the total (hit count, …) for ways to optimize computation of the total hit count. |
| 4 | Retrieve the top hits, in this case the top 20 matching entities/documents. |
| 5 | Other kinds of results and information can be retrieved from SearchResult.
They are explained in dedicated sections, such as Aggregation DSL. |
It is possible to retrieve the total hit count alone, for cases where only the number of hits is of interest, not the hits themselves:
long totalHitCount = searchSession.search( Book.class )
.where( f -> f.matchAll() )
.fetchTotalHitCount();The top hits can also be obtained directly,
without going through a SearchResult,
which can be handy if only the top hits are useful, and not the total hit count:
List<Book> hits = searchSession.search( Book.class )
.where( f -> f.matchAll() )
.fetchHits( 20 );If only zero to one hit is expected, it is possible to retrieve it as an Optional.
An exception will be thrown if more than one hits are returned.
Optional<Book> hit = searchSession.search( Book.class )
.where( f -> f.id().matching( 1 ) )
.fetchSingleHit();Fetching all hits
|
Fetching all hits is rarely a good idea: if the query matches many entities/documents, this may lead to loading millions of entities in memory, which will likely crash the JVM, or at the very least slow it down to a crawl. If you know your query will always have less than N hits, consider setting the limit to N to avoid memory issues. If there is no bound to the number of hits you expect, you should consider Pagination or Scrolling to retrieve data in batches. If you still want to fetch all hits in one call, be aware that the Elasticsearch backend will only ever return 10,000 hits at a time, due to internal safety mechanisms in the Elasticsearch cluster. |
SearchResultSearchResult<Book> result = searchSession.search( Book.class )
.where( f -> f.id().matchingAny( Arrays.asList( 1, 2 ) ) )
.fetchAll();
long totalHitCount = result.total().hitCount();
List<Book> hits = result.hits();List<Book> hits = searchSession.search( Book.class )
.where( f -> f.id().matchingAny( Arrays.asList( 1, 2 ) ) )
.fetchAllHits();Fetching the total (hit count, …)
A SearchResultTotal contains the count of the total hits have been matched the query, either belonging
to the current page or not. For pagination see Pagination.
The total hit count is exact by default, but can be replaced with a lower-bound estimate in the following cases:
-
The
totalHitCountThresholdoption is enabled. SeetotalHitCountThreshold(…): optimizing total hit count computation. -
The
truncateAfteroption is enabled and a timeout occurs.
SearchResult<Book> result = searchSession.search( Book.class )
.where( f -> f.matchAll() )
.fetch( 20 );
SearchResultTotal resultTotal = result.total(); (1)
long totalHitCount = resultTotal.hitCount(); (2)
long totalHitCountLowerBound = resultTotal.hitCountLowerBound(); (3)
boolean hitCountExact = resultTotal.isHitCountExact(); (4)
boolean hitCountLowerBound = resultTotal.isHitCountLowerBound(); (5)| 1 | Extract the SearchResultTotal from the SearchResult. |
| 2 | Retrieve the exact total hit count. This call will raise an exception if the only available hit count is a lower-bound estimate. |
| 3 | Retrieve a lower-bound estimate of the total hit count. This will return the exact hit count if available. |
| 4 | Test if the count is exact. |
| 5 | Test if the count is a lower bound. |
totalHitCountThreshold(…): optimizing total hit count computation
When working with large result sets, counting the number of hits exactly can be very resource-consuming.
When sorting by score (the default) and retrieving the result through fetch(…),
it is possible to yield significant performance improvements by allowing Hibernate Search to return
a lower-bound estimate of the total hit count, instead of the exact total hit count.
In that case, the underlying engine (Lucene or Elasticsearch) will be able to skip large chunks of non-competitive hits,
leading to fewer index scans and thus better performance.
To enable this performance optimization, call totalHitCountThreshold(…) when building the query, as shown in the example below.
|
This optimization has no effect in the following cases:
|
SearchResult<Book> result = searchSession.search( Book.class )
.where( f -> f.matchAll() )
.totalHitCountThreshold( 1000 ) (1)
.fetch( 20 );
SearchResultTotal resultTotal = result.total(); (2)
long totalHitCountLowerBound = resultTotal.hitCountLowerBound(); (3)
boolean hitCountExact = resultTotal.isHitCountExact(); (4)
boolean hitCountLowerBound = resultTotal.isHitCountLowerBound(); (5)| 1 | Define a totalHitCountThreshold for the current query |
| 2 | Extract the SearchResultTotal from the SearchResult. |
| 3 | Retrieve a lower-bound estimate of the total hit count. This will return the exact hit count if available. |
| 4 | Test if the count is exact. |
| 5 | Test if the count is a lower-bound estimate. |
Pagination
Pagination is the concept of splitting hits in successive "pages", all pages containing a fixed number of elements (except potentially the last one). When displaying results on a web page, the user will be able to go to an arbitrary page and see the corresponding results, for example "results 151 to 170 of 14,265".
Pagination is achieved in Hibernate Search by passing an offset and a limit to the fetch or fetchHits method:
-
The offset defines the number of documents that should be skipped because they were displayed in previous pages. It is a number of documents, not a number of pages, so you will usually want to compute it from the page number and page size this way:
offset = zero-based-page-number * page-size. -
The limit defines the maximum number of hits to return, i.e. the page size.
SearchResultSearchResult<Book> result = searchSession.search( Book.class )
.where( f -> f.matchAll() )
.fetch( 40, 20 ); (1)| 1 | Set the offset to 40 and the limit to 20. |
List<Book> hits = searchSession.search( Book.class )
.where( f -> f.matchAll() )
.fetchHits( 40, 20 ); (1)| 1 | Set the offset to 40 and the limit to 20. |
|
The index may be modified between the retrieval of two pages. As a result of that modification, it is possible that some hits change position, and end up being present on two subsequent pages. If you’re running a batch process and want to avoid this, use Scrolling. |
Scrolling
Scrolling is the concept of keeping a cursor on the search query at the lowest level, and advancing that cursor progressively to collect subsequent "chunks" of search hits.
Scrolling relies on the internal state of the cursor (which must be closed at some point), and thus is not appropriate for stateless operations such as displaying a page of results to a user in a webpage. However, thanks to this internal state, scrolling is able to guarantee that all returned hits are consistent: there is absolutely no way for a given hit to appear twice.
Scrolling is therefore most useful when processing a large result set as small chunks.
Below is an example of using scrolling in Hibernate Search.
SearchScroll exposes a close() method that must be called to avoid resource leaks.
|
|
With the Elasticsearch backend, scrolls can time out and become unusable after some time; See here for more information. |
try ( SearchScroll<Book> scroll = searchSession.search( Book.class )
.where( f -> f.matchAll() )
.scroll( 20 ) ) { (1)
for ( SearchScrollResult<Book> chunk = scroll.next(); (2)
chunk.hasHits(); chunk = scroll.next() ) { (3)
for ( Book hit : chunk.hits() ) { (4)
// ... do something with the hits ...
}
totalHitCount = chunk.total().hitCount(); (5)
entityManager.flush(); (6)
entityManager.clear(); (6)
}
}| 1 | Start a scroll that will return chunks of 20 hits.
Note the scroll is used in a try-with-resource block to avoid resource leaks. |
| 2 | Retrieve the first chunk by calling next().
Each chunk will include at most 20 hits, since that was the selected chunk size. |
| 3 | Detect the end of the scroll by calling hasHits() on the last retrieved chunk,
and retrieve the next chunk by calling next() again on the scroll. |
| 4 | Retrieve the hits of a chunk. |
| 5 | Optionally, retrieve the total number of matching entities. |
| 6 | Optionally, if using Hibernate ORM and retrieving entities, you might want to use the periodic "flush-clear" pattern to ensure entities don’t stay in the session taking more and more memory. |
9.1.4. Routing
|
For a preliminary introduction to sharding, including how it works in Hibernate Search and what its limitations are, see Sharding and routing. |
If, for a given index, there is one immutable value that documents are often filtered on, for example a "category" or a "user id", it is possible to match documents with this value using a routing key instead of a predicate.
The main advantage of a routing key over a predicate is that, on top of filtering documents, the routing key will also filter shards. If sharding is enabled, this means only part of the index will be scanned during query execution, potentially increasing search performance.
|
A pre-requisite to using routing in search queries is to map your entity in such a way that it is assigned a routing key at indexing time. |
Specifying routing keys is done by calling the .routing(String) or .routing(Collection<String>) methods
when building the query:
SearchResult<Book> result = searchSession.search( Book.class ) (1)
.where( f -> f.match()
.field( "genre" )
.matching( Genre.SCIENCE_FICTION ) ) (2)
.routing( Genre.SCIENCE_FICTION.name() ) (3)
.fetch( 20 ); (4)| 1 | Start building the query. |
| 2 | Define that only documents matching the given genre should be returned. |
| 3 | In this case, the entity is mapped in such a way that the genre is also used as a routing key.
We know all documents will have the given genre value,
so we can specify the routing key to limit the query to relevant shards. |
| 4 | Build the query and fetch the results. |
9.1.5. Entity loading options
Hibernate Search executes database queries to load entities that are returned as part of the hits of a search query.
This section presents all available options related to entity loading in search queries.
Cache lookup strategy
By default, Hibernate Search will load entities from the database directly, without looking at any cache. This is a good strategy when the size of caches (Hibernate ORM session or second level cache) is much lower than the total number of indexed entities.
If a significant portion of your entities are present in the second level cache, you can force Hibernate Search to retrieve entities from the persistence context (the session) and/or the second level cache if possible. Hibernate Search will still need to execute a database query to retrieve entities missing from the cache, but the query will likely have to fetch fewer entities, leading to better performance and lower stress on your database.
This is done through the cache lookup strategy,
which can be configured by setting the configuration property hibernate.search.query.loading.cache_lookup.strategy:
-
skip(the default) will not perform any cache lookup. -
persistence-contextwill only look into the persistence context, i.e. will check if the entities are already loaded in the session. Useful if most search hits are expected to already be loaded in session, which is generally unlikely. -
persistence-context-then-second-level-cachewill first look into the persistence context, then into the second level cache, if enabled in Hibernate ORM for the searched entity. Useful if most search hits are expected to be cached, which may be likely if you have a small number of entities and a large cache.
|
Before a second-level cache can be used for a given entity type, some configuration is required in Hibernate ORM. See the caching section of the Hibernate ORM documentation for more information. |
It is also possible to override the configured strategy on a per-query basis, as shown below.
SearchResult<Book> result = searchSession.search( Book.class ) (1)
.where( f -> f.match()
.field( "title" )
.matching( "robot" ) )
.loading( o -> o.cacheLookupStrategy( (2)
EntityLoadingCacheLookupStrategy.PERSISTENCE_CONTEXT_THEN_SECOND_LEVEL_CACHE
) )
.fetch( 20 ); (3)| 1 | Start building the query. |
| 2 | Access the loading options of the query, then mention that the persistence context and second level cache should be checked before entities are loaded from the database. |
| 3 | Fetch the results. The more entities found in the persistence context or second level cache, the fewer entities will be loaded from the database. |
Fetch size
By default, Hibernate Search will use a fetch size of 100,
meaning that for a single fetch*() call on a single query,
it will run a first query to load the first 100 entities,
then if there are more hits it will run a second query to load the next 100,
etc.
The fetch size can be configured by setting the configuration property hibernate.search.query.loading.fetch_size.
This property expects a strictly positive Integer value.
It is also possible to override the configured fetch size on a per-query basis, as shown below.
SearchResult<Book> result = searchSession.search( Book.class ) (1)
.where( f -> f.match()
.field( "title" )
.matching( "robot" ) )
.loading( o -> o.fetchSize( 50 ) ) (2)
.fetch( 200 ); (3)| 1 | Start building the query. |
| 2 | Access the loading options of the query,
then set the fetch size to an arbitrary value (must be 1 or more). |
| 3 | Fetch the results, limiting to the top 200 hits. One query will be executed to load the hits if there are fewer hits than the given fetch size; two queries if there are more hits than the fetch size but less than twice the fetch size, etc. |
Entity graph
By default, Hibernate Search will load associations according to the defaults of your mappings: associations marked as lazy won’t be loaded, while associations marked as eager will be loaded before returning the entities.
It is possible to force the loading of a lazy association, or to prevent the loading of an eager association, by referencing an entity graph in the query. See below for an example, and this section of the Hibernate ORM documentation for more information about entity graphs.
EntityManager entityManager = /* ... */
EntityGraph<Manager> graph = entityManager.createEntityGraph( Manager.class ); (1)
graph.addAttributeNodes( "associates" );
SearchResult<Manager> result = Search.session( entityManager ).search( Manager.class ) (2)
.where( f -> f.match()
.field( "name" )
.matching( "james" ) )
.loading( o -> o.graph( graph, GraphSemantic.FETCH ) ) (3)
.fetch( 20 ); (4)| 1 | Build an entity graph. |
| 2 | Start building the query. |
| 3 | Access the loading options of the query,
then set the entity graph to the graph built above.
You must also pass a semantic: GraphSemantic.FETCH means only associations referenced in the graph will be loaded;
GraphSemantic.LOAD means associations referenced in the graph and associations marked as EAGER in the mapping will be loaded. |
| 4 | Fetch the results.
All managers loaded by this search query will have their associates association already populated. |
Instead of building the entity graph on the spot,
you can also define the entity graph statically using the @NamedEntityGraph annotation,
and pass the name of your graph to Hibernate Search, as shown below.
See this section of the Hibernate ORM documentation
for more information about @NamedEntityGraph.
SearchResult<Manager> result = Search.session( entityManager ).search( Manager.class ) (1)
.where( f -> f.match()
.field( "name" )
.matching( "james" ) )
.loading( o -> o.graph( "preload-associates", GraphSemantic.FETCH ) ) (2)
.fetch( 20 ); (3)| 1 | Start building the query. |
| 2 | Access the loading options of the query,
then set the entity graph to "preload-associates", which was defined elsewhere using the @NamedEntityGraph annotation. |
| 3 | Fetch the results.
All managers loaded by this search query will have their associates association already populated. |
9.1.6. Timeout
You can limit the time it takes for a search query to execute in two ways:
-
Aborting (throwing an exception) when the time limit is reached with
failAfter(). -
Truncating the results when the time limit is reached with
truncateAfter().
|
Currently, the two approaches are incompatible:
trying to set both |
failAfter(): Aborting the query after a given amount of time
By calling failAfter(…) when building the query,
it is possible to set a time limit for the query execution.
Once the time limit is reached,
Hibernate Search will stop the query execution and throw a SearchTimeoutException.
|
Timeouts are handled on a best-effort basis. Depending on the resolution of the internal clock and on how often Hibernate Search is able to check that clock, it is possible that a query execution exceeds the timeout. Hibernate Search will try to minimize this excess execution time. |
try {
SearchResult<Book> result = searchSession.search( Book.class ) (1)
.where( f -> f.match()
.field( "title" )
.matching( "robot" ) )
.failAfter( 500, TimeUnit.MILLISECONDS ) (2)
.fetch( 20 ); (3)
}
catch (SearchTimeoutException e) { (4)
// ...
}| 1 | Build the query as usual. |
| 2 | Call failAfter to set the timeout. |
| 3 | Fetch the results. |
| 4 | Catch the exception if necessary. |
|
|
truncateAfter(): Truncating the results after a given amount of time
By calling truncateAfter(…) when building the query,
it is possible to set a time limit for the collection of search results.
Once the time limit is reached,
Hibernate Search will stop collecting hits and return an incomplete result.
|
Timeouts are handled on a best-effort basis. Depending on the resolution of the internal clock and on how often Hibernate Search is able to check that clock, it is possible that a query execution exceeds the timeout. Hibernate Search will try to minimize this excess execution time. |
SearchResult<Book> result = searchSession.search( Book.class ) (1)
.where( f -> f.match()
.field( "title" )
.matching( "robot" ) )
.truncateAfter( 500, TimeUnit.MILLISECONDS ) (2)
.fetch( 20 ); (3)
Duration took = result.took(); (4)
Boolean timedOut = result.timedOut(); (5)| 1 | Build the query as usual. |
| 2 | Call truncateAfter to set the timeout. |
| 3 | Fetch the results. |
| 4 | Optionally extract took: how much time the query took to execute. |
| 5 | Optionally extract timedOut: whether the query timed out. |
|
|
9.1.7. Obtaining a query object
The example presented in most of this documentation fetch the query results directly at the end of the query definition DSL, not showing any "query" object that can be manipulated. This is because the query object generally only makes code more verbose without bringing anything worthwhile.
However, in some cases a query object can be useful.
To get a query object, just call toQuery() at the end of the query definition:
SearchQuery objectSearchQuery<Book> query = searchSession.search( Book.class ) (1)
.where( f -> f.matchAll() )
.toQuery(); (2)
List<Book> hits = query.fetchHits( 20 ); (3)| 1 | Build the query as usual. |
| 2 | Retrieve a SearchQuery object. |
| 3 | Fetch the results. |
This query object supports all fetch* methods supported by the query DSL.
The main advantage over calling these methods directly at the end of a query definition
is mostly related to troubleshooting,
but the query object can also be useful if you need an adapter to another API.
Hibernate Search provides an adapter to JPA and Hibernate ORM’s native APIs,
i.e. a way to turn a SearchQuery into a javax.persistence.TypedQuery (JPA)
or a org.hibernate.query.Query (native ORM API):
SearchQuery into a JPA or Hibernate ORM querySearchQuery<Book> query = searchSession.search( Book.class ) (1)
.where( f -> f.matchAll() )
.toQuery(); (2)
javax.persistence.TypedQuery<Book> jpaQuery = Search.toJpaQuery( query ); (3)
org.hibernate.query.Query<Book> ormQuery = Search.toOrmQuery( query ); (4)| 1 | Build the query as usual. |
| 2 | Retrieve a SearchQuery object. |
| 3 | Turn the SearchQuery object into a JPA query. |
| 4 | Turn the SearchQuery object into a Hibernate ORM query. |
|
The resulting query does not support all operations, so it is recommended to only convert search queries when absolutely required, for example when integrating with code that only works with Hibernate ORM queries. The following operations are expected to work correctly in most cases,
even though they may behave slightly differently from what is expected from a JPA
The following operations are known not to work correctly, with no plan to fix them at the moment:
|
9.1.8. explain(…): Explaining scores
In order to explain the score of a particular document,
create a SearchQuery object
using toQuery() at the end of the query definition,
and then use one of the backend-specific explain(…) methods;
the result of these methods will include a human-readable description of
how the score of a specific document was computed.
|
Regardless of the API used, explanations are rather costly performance-wise: only use them for debugging purposes. |
LuceneSearchQuery<Book> query = searchSession.search( Book.class )
.extension( LuceneExtension.get() ) (1)
.where( f -> f.match()
.field( "title" )
.matching( "robot" ) )
.toQuery(); (2)
Explanation explanation1 = query.explain( 1 ); (3)
Explanation explanation2 = query.explain( "Book", 1 ); (4)
LuceneSearchQuery<Book> luceneQuery = query.extension( LuceneExtension.get() ); (5)| 1 | Build the query as usual, but using the Lucene extension so that the retrieved query exposes Lucene-specific operations. |
| 2 | Retrieve a SearchQuery object. |
| 3 | Retrieve the explanation of the score of the entity with ID 1.
The explanation is of type Explanation, but you can convert it to a readable string using toString(). |
| 4 | For multi-index queries, it is necessary to refer to the entity not only by its ID, but also by the name of its type. |
| 5 | If you cannot change the code building the query to use the Lucene extension,
you can instead use the Lucene extension on the SearchQuery to convert it after its creation. |
ElasticsearchSearchQuery<Book> query = searchSession.search( Book.class )
.extension( ElasticsearchExtension.get() ) (1)
.where( f -> f.match()
.field( "title" )
.matching( "robot" ) )
.toQuery(); (2)
JsonObject explanation1 = query.explain( 1 ); (3)
JsonObject explanation2 = query.explain( "Book", 1 ); (4)
ElasticsearchSearchQuery<Book> elasticsearchQuery = query.extension( ElasticsearchExtension.get() ); (5)| 1 | Build the query as usual, but using the Elasticsearch extension so that the retrieved query exposes Elasticsearch-specific operations. |
| 2 | Retrieve a SearchQuery object. |
| 3 | Retrieve the explanation of the score of the entity with ID 1. |
| 4 | For multi-index queries, it is necessary to refer to the entity not only by its ID, but also by the name of its type. |
| 5 | If you cannot change the code building the query to use the Elasticsearch extension,
you can instead use the Elasticsearch extension on the SearchQuery to convert it after its creation. |
9.1.9. took and timedOut: finding out how long the query took
SearchQuery<Book> query = searchSession.search( Book.class )
.where( f -> f.match()
.field( "title" )
.matching( "robot" ) )
.toQuery();
SearchResult<Book> result = query.fetch( 20 ); (1)
Duration took = result.took(); (2)
Boolean timedOut = result.timedOut(); (3)| 1 | Fetch the results. |
| 2 | Extract took: how much time the query took (in case of Elasticsearch, ignoring network latency between the application and the Elasticsearch cluster). |
| 3 | Extract timedOut: whether the query timed out (in case of Elasticsearch, ignoring network latency between the application and the Elasticsearch cluster). |
9.1.10. Elasticsearch: leveraging advanced features with JSON manipulation
|
Features detailed in this section are incubating: they are still under active development. The usual compatibility policy does not apply: the contract of incubating elements (e.g. types, methods, configuration properties, etc.) may be altered in a backward-incompatible way — or even removed — in subsequent releases. You are encouraged to use incubating features so the development team can get feedback and improve them, but you should be prepared to update code which relies on them as needed. |
Elasticsearch ships with many features. It is possible that at some point, one feature you need will not be exposed by the Search DSL.
To work around such limitations, Hibernate Search provides ways to:
-
Transform the HTTP request sent to Elasticsearch for search queries.
-
Read the raw JSON of the HTTP response received from Elasticsearch for search queries.
|
Direct changes to the HTTP request may conflict with Hibernate Search features and be supported differently by different versions of Elasticsearch. Similarly, the content of the HTTP response may change depending on the version of Elasticsearch, depending on which Hibernate Search features are used, and even depending on how Hibernate Search features are implemented. Thus, features relying on direct access to HTTP requests or responses
cannot be guaranteed to continue to work when upgrading Hibernate Search,
even for micro upgrades ( Use this at your own risk. |
Most simple use cases will only need to change the HTTP request slightly, as shown below.
List<Book> hits = searchSession.search( Book.class )
.extension( ElasticsearchExtension.get() ) (1)
.where( f -> f.match()
.field( "title" )
.matching( "robot" ) )
.requestTransformer( context -> { (2)
Map<String, String> parameters = context.parametersMap(); (3)
parameters.put( "search_type", "dfs_query_then_fetch" );
JsonObject body = context.body(); (4)
body.addProperty( "min_score", 0.5f );
} )
.fetchHits( 20 ); (5)| 1 | Build the query as usual, but using the Elasticsearch extension so that Elasticsearch-specific options are available. |
| 2 | Add a request transformer to the query.
Its transform method will be called whenever a request is about to be sent to Elasticsearch. |
| 3 | Inside the transform method, alter the HTTP query parameters. |
| 4 | It is also possible to alter the request’s JSON body as shown here, or even the request’s path (not shown in this example). |
| 5 | Retrieve the result as usual. |
For more complicated use cases, it is possible to access the raw JSON of the HTTP response, as shown below.
ElasticsearchSearchResult<Book> result = searchSession.search( Book.class )
.extension( ElasticsearchExtension.get() ) (1)
.where( f -> f.match()
.field( "title" )
.matching( "robt" ) )
.requestTransformer( context -> { (2)
JsonObject body = context.body();
body.add( "suggest", jsonObject( suggest -> { (3)
suggest.add( "my-suggest", jsonObject( mySuggest -> {
mySuggest.addProperty( "text", "robt" );
mySuggest.add( "term", jsonObject( term -> {
term.addProperty( "field", "title" );
} ) );
} ) );
} ) );
} )
.fetch( 20 ); (4)
JsonObject responseBody = result.responseBody(); (5)
JsonArray mySuggestResults = responseBody.getAsJsonObject( "suggest" ) (6)
.getAsJsonArray( "my-suggest" );| 1 | Build the query as usual, but using the Elasticsearch extension so that Elasticsearch-specific options are available. |
| 2 | Add a request transformer to the query. |
| 3 | Add content to the request body, so that Elasticsearch will return more data in the response. Here we’re asking Elasticsearch to apply a suggester. |
| 4 | Retrieve the result as usual.
Since we used the Elasticsearch extension when building the query,
the result is an ElasticsearchSearchResult instead of the usual SearchResult. |
| 5 | Get the response body as a JsonObject. |
| 6 | Extract useful information from the response body. Here we’re extracting the result of the suggester we configured above. |
|
Gson’s API for building JSON objects is quite verbose, so the example above relies on a small, custom helper method to make the code more readable: |
|
When data needs to be extracted from each hit,
it is often more convenient to use the |
9.1.11. Lucene: retrieving low-level components
Lucene queries allow to retrieve some low-level components. This should only be useful to integrators, but is documented here for the sake of completeness.
LuceneSearchQuery<Book> query = searchSession.search( Book.class )
.extension( LuceneExtension.get() ) (1)
.where( f -> f.match()
.field( "title" )
.matching( "robot" ) )
.sort( f -> f.field( "title_sort" ) )
.toQuery(); (2)
Sort sort = query.luceneSort(); (3)
LuceneSearchResult<Book> result = query.fetch( 20 ); (4)
TopDocs topDocs = result.topDocs(); (5)| 1 | Build the query as usual, but using the Lucene extension so that Lucene-specific options are available. |
| 2 | Since we used the Lucene extension when building the query,
the query is a LuceneSearchQuery instead of the usual SearchQuery. |
| 3 | Retrieve the org.apache.lucene.search.Sort this query relies on. |
| 4 | Retrieve the result as usual.
LuceneSearchQuery returns a LuceneSearchResult instead of the usual SearchResult. |
| 5 | Retrieve the org.apache.lucene.search.TopDocs for this result.
Note that the TopDocs are offset according to the arguments to the fetch method, if any. |
9.2. Predicate DSL
9.2.1. Basics
The main component of a search query is the predicate, i.e. the condition that every document must satisfy in order to be included in search results.
The predicate is configured when building the search query:
SearchSession searchSession = Search.session( entityManager );
List<Book> result = searchSession.search( Book.class ) (1)
.where( f -> f.match().field( "title" ) (2)
.matching( "robot" ) )
.fetchHits( 20 ); (3)| 1 | Start building the query. |
| 2 | Mention that the results of the query are expected to have a title field matching the value robot.
If the field does not exist or cannot be searched on, an exception will be thrown. |
| 3 | Fetch the results, which will match the given predicate. |
Alternatively, if you don’t want to use lambdas:
SearchSession searchSession = Search.session( entityManager );
SearchScope<Book> scope = searchSession.scope( Book.class );
List<Book> result = searchSession.search( scope )
.where( scope.predicate().match().field( "title" )
.matching( "robot" )
.toPredicate() )
.fetchHits( 20 );The predicate DSL offers more predicate types, and multiple options for each type of predicate.
To learn more about the match predicate, and all the other types of predicate,
refer to the following sections.
9.2.2. matchAll: match all documents
The matchAll predicate simply matches all documents.
List<Book> hits = searchSession.search( Book.class )
.where( f -> f.matchAll() )
.fetchHits( 20 );except(…): exclude documents matching a given predicate
Optionally, you can exclude a few documents from the hits:
List<Book> hits = searchSession.search( Book.class )
.where( f -> f.matchAll()
.except( f.match().field( "title" )
.matching( "robot" ) )
)
.fetchHits( 20 );Other options
-
The score of a
matchAllpredicate is constant and equal to 1 by default, but can be boosted with.boost(…).
9.2.3. id: match a document identifier
The id predicate matches documents by their identifier.
List<Book> hits = searchSession.search( Book.class )
.where( f -> f.id().matching( 1 ) )
.fetchHits( 20 );You can also match multiple ids in a single predicate:
List<Integer> ids = new ArrayList<>();
ids.add( 1 );
ids.add( 2 );
List<Book> hits = searchSession.search( Book.class )
.where( f -> f.id().matchingAny( ids ) )
.fetchHits( 20 );Expected type of arguments
By default, the id predicate expects arguments to the matching(…)/matchingAny(…) methods
to have the same type as the entity property corresponding to the document id.
For example, if the document identifier is generated from an entity identifier of type Long,
the document identifier will still be of type String.
matching(…)/matchingAny(…) will expect its argument to be of type Long regardless.
This should generally be what you want,
but if you ever need to bypass conversion and pass an unconverted argument (of type String)
to matching(…)/matchingAny(…), see Type of arguments passed to the DSL.
Other options
-
The score of an
idpredicate is constant and equal to 1 by default, but can be boosted with.boost(…).
9.2.4. match: match a value
The match predicate matches documents for which a given field has a given value.
List<Book> hits = searchSession.search( Book.class )
.where( f -> f.match().field( "title" )
.matching( "robot" ) )
.fetchHits( 20 );Expected type of arguments
By default, the match predicate expects arguments to the matching(…) method
to have the same type as the entity property corresponding to the target field.
For example, if an entity property is of an enum type,
the corresponding field may be of type String.
.matching(…) will expect its argument to have the enum type regardless.
This should generally be what you want,
but if you ever need to bypass conversion and pass an unconverted argument
(of type String in the example above)
to .matching(…), see Type of arguments passed to the DSL.
Targeting multiple fields
Optionally, the predicate can target multiple fields. In that case, the predicate will match documents for which any of the given fields matches.
Analysis
For most field types (number, date, …), the match is exact.
However, for full-text fields
or normalized keyword fields,
the value passed to the matching(…) method is analyzed or normalized before being compared to the values in the index.
This means the match is more subtle in two ways.
First, the predicate will not just match documents for which a given field has the exact same value: it will match all documents for which this field has a value whose normalized form is identical. See below for an example.
List<Author> hits = searchSession.search( Author.class )
.where( f -> f.match().field( "lastName" )
.matching( "ASIMOV" ) )(1)
.fetchHits( 20 );
assertThat( hits ).extracting( Author::getLastName )
.contains( "Asimov" );(2)| 1 | For analyzed/normalized fields, the value passed to matching will be analyzed/normalized.
In this case, the result of analysis is a lowercase string: asimov. |
| 2 | All returned hits will have a value whose normalized form is identical.
In this case, Asimov was normalized to asimov too, so it matched. |
Second, for full-text fields,
the value passed to the matching(…) method is tokenized.
This means multiple terms may be extracted from the input value,
and the predicate will match all documents for which the given field has a value that contains any of those terms,
at any place and in any order.
See below for an example.
List<Book> hits = searchSession.search( Book.class )
.where( f -> f.match().field( "title" )
.matching( "ROBOT Dawn" ) ) (1)
.fetchHits( 20 );
assertThat( hits ).extracting( Book::getTitle )
.contains( "The Robots of Dawn", "I, Robot" ); (2)| 1 | For full-text fields, the value passed to matching will be tokenized and normalized.
In this case, the result of analysis is the terms robot and dawn (notice they were lowercased). |
| 2 | All returned hits will match at least one term of the given string.
The Robots of Dawn contained both normalized terms robot and dawn, so it matched,
but so did I, Robot, even though it didn’t contain dawn: only one term is required. |
|
Hits matching multiple terms, or matching more relevant terms, will have a higher score. Thus, if you sort by score, the most relevant hits will appear to the top of the result list. This usually makes up for the fact that the predicate does not require all terms to be present in matched documents. |
|
If you need all terms to be present in matched documents,
you should be able to do so by using the |
fuzzy: match a text value approximately
The .fuzzy() option allows for approximate matches,
i.e. it allows matching documents for which a given field has a value that is not exactly the value passed to matching(…),
but a close value, for example with one letter that was switched for another.
| This option is only available on text fields. |
List<Book> hits = searchSession.search( Book.class )
.where( f -> f.match()
.field( "title" )
.matching( "robto" )
.fuzzy() )
.fetchHits( 20 );Roughly speaking, the edit distance is the number of changes between two terms:
switching characters, removing them, …
It defaults to 2 when fuzzy matching is enabled,
but can also be set to 0 (fuzzy matching disabled) or 1 (only one change allowed, so "less fuzzy").
Values higher than 2 are not allowed.
List<Book> hits = searchSession.search( Book.class )
.where( f -> f.match()
.field( "title" )
.matching( "robto" )
.fuzzy( 1 ) )
.fetchHits( 20 );Optionally, you can force the match to be exact for the first n characters.
n is called the "exact-prefix length".
Setting this to a non-zero value is recommended for indexes containing a large amount of distinct terms,
for performance reasons.
List<Book> hits = searchSession.search( Book.class )
.where( f -> f.match()
.field( "title" )
.matching( "robto" )
.fuzzy( 1, 3 ) )
.fetchHits( 20 );Other options
-
The score of a
matchpredicate is variable for text fields by default, but can be made constant with.constantScore(). -
The score of a
matchpredicate can be boosted, either on a per-field basis with a call to.boost(…)just after.field(…)/.fields(…)or for the whole predicate with a call to.boost(…)after.matching(…). -
The
matchpredicate uses the search analyzer of targeted fields to analyze searched text by default, but this can be overridden.
9.2.5. range: match a range of values
The range predicate matches documents for which a given field has a value within a given range.
List<Book> hits = searchSession.search( Book.class )
.where( f -> f.range().field( "pageCount" )
.between( 210, 250 ) )
.fetchHits( 20 );The between method includes both bounds,
i.e. documents whose value is exactly one of the bounds will match the range predicate.
At least one bound must be provided.
If a bound is null, it will not constrain matches.
For example .between( 2, null ) will match all values higher than or equal to 2.
Different methods can be called instead of between in order to control the inclusion of the lower and upper bound:
atLeast-
Example 170. Matching values equal to or greater than a given value
List<Book> hits = searchSession.search( Book.class ) .where( f -> f.range().field( "pageCount" ) .atLeast( 400 ) ) .fetchHits( 20 ); greaterThan-
Example 171. Matching values strictly greater than a given value
List<Book> hits = searchSession.search( Book.class ) .where( f -> f.range().field( "pageCount" ) .greaterThan( 400 ) ) .fetchHits( 20 ); atMost-
Example 172. Matching values equal to or less than a given value
List<Book> hits = searchSession.search( Book.class ) .where( f -> f.range().field( "pageCount" ) .atMost( 400 ) ) .fetchHits( 20 ); lessThan-
Example 173. Matching values strictly less than a given value
List<Book> hits = searchSession.search( Book.class ) .where( f -> f.range().field( "pageCount" ) .lessThan( 400 ) ) .fetchHits( 20 );
Alternatively, you can specify whether bounds are included or excluded explicitly:
List<Book> hits = searchSession.search( Book.class )
.where( f -> f.range().field( "pageCount" )
.between(
200, RangeBoundInclusion.EXCLUDED,
250, RangeBoundInclusion.EXCLUDED
) )
.fetchHits( 20 );Expected type of arguments
By default, the range predicate expects arguments to the between(…)/atLeast(…)/etc. method
to have the same type as the entity property corresponding to the target field.
For example, if an entity property is of type java.util.Date,
the corresponding field may be of type java.time.Instant;
between(…)/atLeast(…)/etc. will expect its arguments to have type java.util.Date regardless.
Similarly, range(…) will expect an argument of type Range<java.util.Date>.
This should generally be what you want,
but if you ever need to bypass conversion and pass an unconverted argument
(of type java.time.Instant in the example above)
to between(…)/atLeast(…)/etc., see Type of arguments passed to the DSL.
Targeting multiple fields
Optionally, the predicate can target multiple fields. In that case, the predicate will match documents for which any of the given fields matches.
Other options
-
The score of a
rangepredicate is constant and equal to 1 by default, but can be boosted, either on a per-field basis with a call to.boost(…)just after.field(…)/.fields(…)or for the whole predicate with a call to.boost(…)after.between(…)/atLeast(…)/etc.
9.2.6. phrase: match a sequence of words
The phrase predicate matches documents for which a given field contains a given sequence of words, in the given order.
| This predicate is only available on full-text fields. |
List<Book> hits = searchSession.search( Book.class )
.where( f -> f.phrase().field( "title" )
.matching( "robots of dawn" ) )
.fetchHits( 20 );slop: match a sequence of words approximately
Specifying a slop allows for approximate matches, i.e. it allows matching documents for which a given field contains the given sequence of words, but in a slightly different order, or with extra words.
The slop represents the number of edit operations that can be applied to the sequence of words to match,
where each edit operation moves one word by one position.
So quick fox with a slop of 1 can become quick <word> fox, where <word> can be any word.
quick fox with a slop of 2 can become quick <word> fox, or quick <word1> <word2> fox
or even fox quick (two operations: moved fox to the left and quick to the right).
And similarly for higher slops and for phrases with more words.
slop(…)List<Book> hits = searchSession.search( Book.class )
.where( f -> f.phrase().field( "title" )
.matching( "dawn robot" )
.slop( 3 ) )
.fetchHits( 20 );Targeting multiple fields
Optionally, the predicate can target multiple fields. In that case, the predicate will match documents for which any of the given fields matches.
Other options
-
The score of a
phrasepredicate is variable by default, but can be made constant with.constantScore(). -
The score of a
phrasepredicate can be boosted, either on a per-field basis with a call to.boost(…)just after.field(…)/.fields(…)or for the whole predicate with a call to.boost(…)after.matching(…). -
The
phrasepredicate uses the search analyzer of targeted fields to analyze searched text by default, but this can be overridden.
9.2.7. exists: match fields with content
The exists predicate matches documents for which a given field has a non-null value.
List<Book> hits = searchSession.search( Book.class )
.where( f -> f.exists().field( "comment" ) )
.fetchHits( 20 );|
There isn’t any built-in predicate to match documents for which a given field is null,
but you can easily create one yourself by negating an This can be achieved by using an |
Object fields
The exists predicate can also be applied to an object field.
In that case, it will match all documents for which at least one inner field of the given object field has a non-null value.
List<Author> hits = searchSession.search( Author.class )
.where( f -> f.exists().field( "placeOfBirth" ) )
.fetchHits( 20 );|
Object fields need to have at least one inner field with content in order to be considered as "existing". Let’s consider the example above, and let’s assume the
Because of this, it is preferable to use the |
Other options
-
The score of an
existspredicate is constant and equal to 1 by default, but can be boosted with a call to.boost(…).
9.2.8. wildcard: match a simple pattern
The wildcard predicate matches documents for which a given field contains a word matching the given pattern.
List<Book> hits = searchSession.search( Book.class )
.where( f -> f.wildcard().field( "description" )
.matching( "rob*t" ) )
.fetchHits( 20 );The pattern may include the following characters:
-
*matches zero, one or multiple characters. -
?matches zero or one character. -
\escape the following character, e.g.\?is interpreted as a literal?,\\as a literal\, etc. -
any other character is interpreted as a literal.
|
If a normalizer has been defined on the field, the patterns used in wildcard predicates will be normalized. If an analyzer has been defined on the field:
For example, a pattern such as A pattern such as When the goal is to match user-provided query strings, the simple query string predicate should be preferred. |
Targeting multiple fields
Optionally, the predicate can target multiple fields. In that case, the predicate will match documents for which any of the given fields matches.
Other options
-
The score of a
wildcardpredicate is constant and equal to 1 by default, but can be boosted, either on a per-field basis with a call to.boost(…)just after.field(…)/.fields(…)or for the whole predicate with a call to.boost(…)after.matching(…).
9.2.9. regexp: match a regular expression pattern
The regexp predicate matches documents for which a given field contains a word matching the given regular expression.
List<Book> hits = searchSession.search( Book.class )
.where( f -> f.regexp().field( "description" )
.matching( "r.*t" ) )
.fetchHits( 20 );Regexp predicates and analysis
| For an introduction to analysis and how to configure it, refer to the Analysis section. |
The behavior of regexp predicates on analyzed/normalized fields is a bit complex, so here is a summary of how it works.
- Regexps must match the entirety of analyzed/normalized tokens
-
For a field that is lowercased and tokenized on spaces (using an analyzer), the regexp
robots?:-
will match
Robot: the indexed tokenrobotmatches. -
will match
I love robots: the indexed tokenrobotsmatches. -
will not match
Mr. Roboto: the indexed tokenrobotodoes not match.For a field that is lowercased but not tokenized (using a normalizer), the regexp
robots?: -
will match
Robot: the indexed tokenrobotmatches. -
will not match
I love robots: the indexed tokeni love robotsdoes not match. -
will not match
Mr. Roboto: the indexed tokenmr. robotodoes not match.
-
- Regexps are never tokenized, even if fields are
-
Beware of spaces in regexps, in particular.
For a field that is tokenized on spaces (using an analyzer), the regexp
.*love .* robots?will never match anything, because it requires a space inside the token and indexed tokens don’t contain any (since tokenization happens on spaces).For a field that is lowercased, but not tokenized (using a normalizer), the regexp
.*love .* robots?:-
will match
I love robots, which was indexed asi love robots. -
will match
I love my Robot, which was indexed asi love my robot. -
will not match
I love Mr. Roboto, which was indexed asi love mr. roboto:robotodoesn’t matchrobots?.
-
- With the Lucene backend, regexps are never analyzed nor normalized
-
For a field that is lowercased and tokenized on spaces:
-
the regexp
Robots?will not be normalized and will never match anything, because it requires an uppercase letter and indexed tokens don’t contain any (since they are lowercased). -
the regexp
[Rr]obots?will not be normalized but will matchI love Robots: the indexed tokenrobotsmatches. -
the regexp
love .* robots?will not be normalized and will matchI love my Robotas well asI love robots, but notRobots love me.
-
- With the Elasticsearch backend, regexps are not analyzed nor normalized on text (tokenized) fields, but are normalized on keyword (non-tokenized) fields
-
For a field that is lowercased and tokenized on spaces (using an analyzer):
-
the regexp
Robots?will not be normalized and will never match anything, because it requires an uppercase letter and indexed tokens don’t contain any (since they are lowercased). -
the regexp
[Rr]obots?will not be normalized but will matchI love Robots: the indexed tokenrobotsmatches. -
the regexp
love .* robots?will not be normalized and will matchI love my Robotas well asI love robots, but notRobots love me.However, behavior differs from Lucene for normalized fields! For a field that is lowercased, but not tokenized (using a normalizer):
-
the regexp
Robots?+will be normalized torobots?and will matchI love robots: the indexed tokenrobotsmatches. -
the regexp
[Rr]obots?+will be normalized to[rr]obots?and will matchI love Robots: the indexed tokenrobotsmatches. -
the regexp
love .* robots?will matchI love my Robotas well asI love robots, but notRobots love me.As a result of Elasticsearch normalizing regular expressions, normalizers can interfere with regexp meta-characters and completely change the meaning of a regexp.
For example, for a field whose normalizer replaces the characters
*and?with_, the regexpRobots?will be normalized toRobots_and will probably never match anything.This behavior is considered a bug and was reported to the Elasticsearch project.
-
flags: enabling only specific syntax constructs
By default, Hibernate Search does not enable any optional operators.
To enable some of them, it is possible to specify the flags attribute.
hits = searchSession.search( Book.class )
.where( f -> f.regexp().field( "description" )
.matching( "r@t" )
.flags( RegexpQueryFlag.ANY_STRING, RegexpQueryFlag.COMPLEMENT )
)
.fetchHits( 20 );The following flags/operators are available:
-
COMPLEMENT: the~operator will negate the following pattern.For example
a~bcmatchesaacbut notabc.Don’t forget to use parentheses if you need to negate a composite pattern, e.g.
a~(bc) -
INTERVAL: the<>operator matches a non-negative integer range, both ends included.For example
a<1-10>matchesa1,a2, …a9,a10, but nota11.Leading zeroes are meaningful, e.g.
a<01-10>matchesa01anda02but nota1nora2. -
INTERSECTION: the&operator combines two regexps with an AND operator.For example
.*a.*&.*z.*matchesaz,za,babzb,bzbab, but notanorz. -
ANYSTRING: the@operator matches any string; equivalent to.*.This operator is mostly useful to negate a pattern, e.g.
@&~(ab)matches anything except the stringab.
Targeting multiple fields
Optionally, the predicate can target multiple fields. In that case, the predicate will match documents for which any of the given fields matches.
Other options
-
The score of a
regexppredicate is constant and equal to 1 by default, but can be boosted, either on a per-field basis with a call to.boost(…)just after.field(…)/.fields(…)or for the whole predicate with a call to.boost(…)after.matching(…).
9.2.10. terms: match a set of terms
The terms predicate matches documents for which a given field contains some terms, any or all of them.
With matchingAny we require that at least one of the provided terms matches.
Functionally, this is somewhat similar to a boolean OR with one match predicate per term, but the syntax for a single terms predicate is more concise.
matchingAny expects to be passed terms, not just any string. The given terms will not be analyzed. See terms predicates and analysis.
|
List<Book> hits = searchSession.search( Book.class )
.where( f -> f.terms().field( "genre" )
.matchingAny( Genre.CRIME_FICTION, Genre.SCIENCE_FICTION ) )
.fetchHits( 20 );With matchingAll we require that all the provided terms match.
Functionally, this is somewhat similar to a boolean AND with one match predicate per term, but the syntax for a single terms predicate is more concise.
matchingAll expects to be passed terms, not just any string. The given terms will not be analyzed. See terms predicates and analysis.
|
|
By default, It is possible to raise this limit through backend-specific configuration:
However, keep in mind the limit is there for a reason: attempts to match very large numbers of terms will perform poorly and could lead to crashes. |
List<Book> hits = searchSession.search( Book.class )
.where( f -> f.terms().field( "genre" )
.matchingAny( Genre.CRIME_FICTION, Genre.SCIENCE_FICTION ) )
.fetchHits( 20 );terms predicates and analysis
| For an introduction to analysis and how to configure it, refer to the Analysis section. |
Differently from other predicates, the terms passed to matchingAny() or matchingAll()
are never analyzed nor usually normalized.
|
If an analyzer has been defined on the field, the terms will not be analyzed nor normalized. If a normalizer has been defined on the field:
For example, the term |
Expected type of arguments
By default, the terms predicate expects arguments to the matchingAny(…) or matchingAll(…) methods
to have the same type as the entity property corresponding to the target field.
For example, if an entity property is of an enum type,
the corresponding field may be of type String.
.matchingAny(…) will expect its argument to have the enum type regardless.
This should generally be what you want,
but if you ever need to bypass conversion and pass an unconverted argument
(of type String in the example above)
to .matchingAny(…) or .matchingAll(…), see Type of arguments passed to the DSL.
Targeting multiple fields
Optionally, the predicate can target multiple fields. In that case, the predicate will match documents for which any of the given fields matches.
Other options
-
The score of a
termspredicate is constant and equal to 1 by default, but can be boosted, either on a per-field basis with a call to.boost(…)just after.field(…)/.fields(…)or for the whole predicate with a call to.boost(…)after.matchingAny(…)or.matchingAll(…).
9.2.11. bool: combine predicates (or/and/…)
The bool predicate matches documents that match one or more inner predicates, called "clauses".
It can be used in particular to build AND/OR operators.
Inner predicates are added as clauses of one of the following types:
must-
mustclauses are required to match: if they don’t match, then theboolpredicate will not match.Matching "must" clauses are taken into account during score computation.
mustNot-
mustNotclauses are required to not match: if they match, then theboolpredicate will not match."must not" clauses are ignored during score computation.
filter-
filterclauses are required to match: if they don’t match, then the boolean predicate will not match.filterclauses are ignored during score computation, and so are any clauses of boolean predicates contained in the filter clause (evenmustorshouldclauses). should-
shouldclauses may optionally match, and are required to match depending on the context.Matching
shouldclauses are taken into account during score computation.The exact behavior of
shouldclauses is as follows:-
When there isn’t any
mustclause nor anyfilterclause in theboolpredicate then at least one "should" clause is required to match. Simply put, in this case, the "should" clauses behave as if there was anORoperator between each of them. -
When there is at least one
mustclause or onefilterclause in theboolpredicate, then the "should" clauses are not required to match, and are simply used for scoring. -
This behavior can be changed by specifying
minimumShouldMatchconstraints.
-
Emulating an OR operator
A bool predicate with only should clauses will behave as an OR operator.
OR operator)List<Book> hits = searchSession.search( Book.class )
.where( f -> f.bool()
.should( f.match().field( "title" )
.matching( "robot" ) ) (1)
.should( f.match().field( "description" )
.matching( "investigation" ) ) (2)
)
.fetchHits( 20 ); (3)| 1 | The hits should have a title field matching the text robot,
or they should match any other clause in the same boolean predicate. |
| 2 | The hits should have a description field matching the text investigation,
or they should match any other clause in the same boolean predicate. |
| 3 | All returned hits will match at least one of the clauses above:
they will have a title field matching the text robot
or they will have a description field matching the text investigation. |
Emulating an AND operator
A bool predicate with only must clauses will behave as an AND operator.
AND operator)List<Book> hits = searchSession.search( Book.class )
.where( f -> f.bool()
.must( f.match().field( "title" )
.matching( "robot" ) ) (1)
.must( f.match().field( "description" )
.matching( "crime" ) ) (2)
)
.fetchHits( 20 ); (3)| 1 | The hits must have a title field matching the text robot,
independently of other clauses in the same boolean predicate. |
| 2 | The hits must have a description field matching the text crime,
independently of other clauses in the same boolean predicate. |
| 3 | All returned hits will match all the clauses above:
they will have a title field matching the text robot
and they will have a description field matching the text crime. |
mustNot: excluding documents that match a given predicate
List<Book> hits = searchSession.search( Book.class )
.where( f -> f.bool()
.must( f.match().field( "title" )
.matching( "robot" ) ) (1)
.mustNot( f.match().field( "description" )
.matching( "investigation" ) ) (2)
)
.fetchHits( 20 ); (3)| 1 | The hits must have a title field matching the text robot,
independently of other clauses in the same boolean predicate. |
| 2 | The hits must not have a description field matching the text investigation,
independently of other clauses in the same boolean predicate. |
| 3 | All returned hits will match all the clauses above:
they will have a title field matching the text robot
and they will not have a description field matching the text investigation. |
|
While it is possible to execute a boolean predicate with only "negative" clauses ( |
filter: matching documents that match a given predicate without affecting the score
filter clauses are essentially must clauses with only one difference:
they are ignored when computing the total score of a document.
List<Book> hits = searchSession.search( Book.class )
.where( f -> f.bool() (1)
.should( f.bool() (2)
.filter( f.match().field( "genre" )
.matching( Genre.SCIENCE_FICTION ) ) (3)
.must( f.match().fields( "description" )
.matching( "crime" ) ) (4)
)
.should( f.bool() (5)
.filter( f.match().field( "genre" )
.matching( Genre.CRIME_FICTION ) ) (6)
.must( f.match().fields( "description" )
.matching( "robot" ) ) (7)
)
)
.fetchHits( 20 ); (8)| 1 | Create a top-level boolean predicate, with two should clauses. |
| 2 | In the first should clause, create a nested boolean predicate. |
| 3 | Use a filter clause to require documents to have the science-fiction genre,
without taking this predicate into account when scoring. |
| 4 | Use a must clause to require documents with the science-fiction genre
to have a title field matching crime,
and take this predicate into account when scoring. |
| 5 | In the second should clause, create a nested boolean predicate. |
| 6 | Use a filter clause to require documents to have the crime fiction genre,
without taking this predicate into account when scoring. |
| 7 | Use a must clause to require documents with the crime fiction genre
to have a description field matching robot,
and take this predicate into account when scoring. |
| 8 | The score of hits will ignore the filter clauses,
leading to fairer sorts if there are much more "crime fiction" documents than "science-fiction" documents. |
should as a way to tune scoring
Apart from being used alone to emulate an OR operator,
should clauses can also be used in conjunction with must clauses.
When doing so, the should clauses become completely optional,
and their only purpose is to increase the score of documents that match these clauses.
should clauses to boost the score of some documentsList<Book> hits = searchSession.search( Book.class )
.where( f -> f.bool()
.must( f.match().field( "title" )
.matching( "robot" ) ) (1)
.should( f.match().field( "description" )
.matching( "crime" ) ) (2)
.should( f.match().field( "description" )
.matching( "investigation" ) ) (3)
)
.fetchHits( 20 ); (4)| 1 | The hits must have a title field matching the text robot,
independently of other clauses in the same boolean predicate. |
| 2 | The hits should have a description field matching the text crime,
but they might not, because matching the must clause above is enough.
However, matching this should clause will improve the score of the document. |
| 3 | The hits should have a description field matching the text investigation,
but they might not, because matching the must clause above is enough.
However, matching this should clause will improve the score of the document. |
| 4 | All returned hits will match the must clause, and optionally the should clauses:
they will have a title field matching the text robot,
and the ones whose description matches either crime or investigation will have a better score. |
minimumShouldMatch: fine-tuning how many should clauses are required to match
It is possible to require that an arbitrary number of should clauses match
in order for the bool predicate to match.
This is the purpose of the minimumShouldMatch* methods,
as demonstrated below.
should clauses matching requirements with minimumShouldMatchList<Book> hits = searchSession.search( Book.class )
.where( f -> f.bool()
.minimumShouldMatchNumber( 2 ) (1)
.should( f.match().field( "description" )
.matching( "robot" ) ) (2)
.should( f.match().field( "description" )
.matching( "investigation" ) ) (3)
.should( f.match().field( "description" )
.matching( "disappearance" ) ) (4)
)
.fetchHits( 20 ); (5)| 1 | At least two "should" clauses must match for this boolean predicate to match. |
| 2 | The hits should have a description field matching the text robot. |
| 3 | The hits should have a description field matching the text investigate. |
| 4 | The hits should have a description field matching the text crime. |
| 5 | All returned hits will match at least two of the should clauses:
their description will match either robot and investigate,
robot and crime, investigate and crime, or all three of these terms. |
Adding clauses dynamically with the lambda syntax
It is possible to define the bool predicate inside a lambda expression.
This is especially useful when clauses need to be added dynamically to the bool predicate,
for example based on user input.
MySearchParameters searchParameters = getSearchParameters(); (1)
List<Book> hits = searchSession.search( Book.class )
.where( f -> f.bool( b -> { (2)
b.must( f.matchAll() ); (3)
if ( searchParameters.getGenreFilter() != null ) { (4)
b.must( f.match().field( "genre" )
.matching( searchParameters.getGenreFilter() ) );
}
if ( searchParameters.getFullTextFilter() != null ) {
b.must( f.match().fields( "title", "description" )
.matching( searchParameters.getFullTextFilter() ) );
}
if ( searchParameters.getPageCountMaxFilter() != null ) {
b.must( f.range().field( "pageCount" )
.atMost( searchParameters.getPageCountMaxFilter() ) );
}
} ) )
.fetchHits( 20 ); (5)| 1 | Get a custom object holding the search parameters provided by the user through a web form, for example. |
| 2 | Call .bool(Consumer).
The consumer, implemented by a lambda expression, will receive a builder as an argument
and will add clauses to that builder as necessary. |
| 3 | By default, a boolean predicate will match nothing if there is no clause.
To match every document when there is no clause, add a must clause that matches everything. |
| 4 | Inside the lambda, the code is free to check conditions before adding clauses. In this case, we only add clauses if the relevant parameter was filled in by the user. |
| 5 | The hits will match the clauses added by the lambda expression. |
Other options
-
The score of a
boolpredicate is variable by default, but can be made constant with.constantScore(). -
The score of a
boolpredicate can be boosted with a call to.boost(…).
9.2.12. simpleQueryString: match a user-provided query string
The simpleQueryString predicate matches documents according to a structured query given as a string.
Its syntax is quite simple, so it’s especially helpful when end user expect to be able to submit text queries with a few syntax elements such as boolean operators, quotes, etc.
Boolean operators
The syntax includes three boolean operators:
-
AND using
+ -
OR using
| -
NOT using
-
List<Book> hits = searchSession.search( Book.class )
.where( f -> f.simpleQueryString().field( "description" )
.matching( "robots + (crime | investigation | disappearance)" ) )
.fetchHits( 20 );List<Book> hits = searchSession.search( Book.class )
.where( f -> f.simpleQueryString().field( "description" )
.matching( "robots + -investigation" ) )
.fetchHits( 20 );Default boolean operator
By default, the query uses the OR operator if the operator is not explicitly defined.
If you prefer using the AND operator as default,
you can call .defaultOperator(…).
List<Book> hits = searchSession.search( Book.class )
.where( f -> f.simpleQueryString().field( "description" )
.matching( "robots investigation" )
.defaultOperator( BooleanOperator.AND ) )
.fetchHits( 20 );Prefix
The syntax includes support for prefix predicates through the * wildcard.
List<Book> hits = searchSession.search( Book.class )
.where( f -> f.simpleQueryString().field( "description" )
.matching( "rob*" ) )
.fetchHits( 20 );
The * wildcard will only be understood at the end of a word.
rob*t will be interpreted as a literal.
This really is a prefix predicate, not a wildcard predicate.
|
Fuzzy
The syntax includes support for the fuzzy operator ~.
Its behavior is similar to that of fuzzy matching in the match predicate.
List<Book> hits = searchSession.search( Book.class )
.where( f -> f.simpleQueryString().field( "description" )
.matching( "robto~2" ) )
.fetchHits( 20 );Phrase
The syntax includes support for phrase predicates
using quotes around the sequence of terms to match.
List<Book> hits = searchSession.search( Book.class )
.where( f -> f.simpleQueryString().field( "title" )
.matching( "\"robots of dawn\"" ) )
.fetchHits( 20 );A slop can be assigned to a phrase predicate
using the NEAR operator ~.
List<Book> hits = searchSession.search( Book.class )
.where( f -> f.simpleQueryString().field( "title" )
.matching( "\"dawn robot\"~3" ) )
.fetchHits( 20 );flags: enabling only specific syntax constructs
By default, all syntax features are enabled.
You can pick the operators to enable explicitly through the .flags(…) method.
List<Book> hits = searchSession.search( Book.class )
.where( f -> f.simpleQueryString().field( "title" )
.matching( "I want a **robot**" )
.flags( SimpleQueryFlag.AND, SimpleQueryFlag.OR, SimpleQueryFlag.NOT ) )
.fetchHits( 20 );If you wish, you can disable all syntax constructs:
List<Book> hits = searchSession.search( Book.class )
.where( f -> f.simpleQueryString().field( "title" )
.matching( "**robot**" )
.flags( Collections.emptySet() ) )
.fetchHits( 20 );Targeting multiple fields
Optionally, the predicate can target multiple fields. In that case, the predicate will match documents for which any of the given fields matches.
| If targeted fields have different analyzers, an exception will be thrown. You can avoid this by picking an analyzer explicitly, but make sure you know what you’re doing. |
Other options
-
The score of a
simpleQueryStringpredicate is variable by default, but can be made constant with.constantScore(). -
The score of a
simpleQueryStringpredicate can be boosted, either on a per-field basis with a call to.boost(…)just after.field(…)/.fields(…)or for the whole predicate with a call to.boost(…)after.matching(…). -
The
simpleQueryStringpredicate uses the search analyzer of targeted fields to analyze searched text by default, but this can be overridden.
9.2.13. nested: match nested documents
The nested predicate can be used on object fields indexed as nested documents
to require two or more inner predicates to match the same object.
This is how you ensure that authors.firstname:isaac AND authors.lastname:asimov
will not match a book whose authors are "Jane Asimov" and "Isaac Deutscher".
List<Book> hits = searchSession.search( Book.class )
.where( f -> f.nested().objectField( "authors" ) (1)
.nest( f.bool()
.must( f.match().field( "authors.firstName" )
.matching( "isaac" ) ) (2)
.must( f.match().field( "authors.lastName" )
.matching( "asimov" ) ) (3)
) )
.fetchHits( 20 ); (4)| 1 | Create a nested predicate on the authors object field. |
| 2 | The author must have a first name matching isaac. |
| 3 | The author must have a last name matching asimov. |
| 4 | All returned hits will be books for which at least one author
has a first name matching isaac and a last name matching asimov.
Books that happen to have multiple authors,
one of which has a first name matching isaac
and another of which has a last name matching asimov,
will not match. |
Implicit nesting
Hibernate Search automatically wraps a nested predicate around other predicates when necessary. However, this is done for each single predicate, so implicit nesting will not give the same behavior as explicit nesting grouping multiple inner predicates. See below for an example.
List<Book> hits = searchSession.search( Book.class )
.where( f -> f.bool()
.must( f.match().field( "authors.firstName" ) (1)
.matching( "isaac" ) ) (2)
.must( f.match().field( "authors.lastName" )
.matching( "asimov" ) ) (3)
)
.fetchHits( 20 ); (4)| 1 | The nested predicate is created implicitly, since target fields here belong to a nested object. |
| 2 | The author must have a first name matching isaac. |
| 3 | The author must have a last name matching asimov. |
| 4 | All returned hits will be books for which at least one author
has a first name matching isaac and a last name matching asimov.
Books that happen to have multiple authors,
one of which has a first name matching isaac
and another of which has a last name matching asimov,
will match, because we apply the nested predicate separately to each match predicate. |
9.2.14. within: match points within a circle, box, polygon
The within predicate matches documents for which a given field is a geo-point
contained within a given circle, bounding-box or polygon.
| This predicate is only available on geo-point fields. |
Matching points within a circle (within a distance to a point)
With .circle(…), the matched points must be within a given distance from a given point (center).
GeoPoint center = GeoPoint.of( 53.970000, 32.150000 );
List<Author> hits = searchSession.search( Author.class )
.where( f -> f.spatial().within().field( "placeOfBirth.coordinates" )
.circle( center, 50, DistanceUnit.KILOMETERS ) )
.fetchHits( 20 );
Other distance units are available, in particular METERS, YARDS and MILES.
When the distance unit is omitted, it defaults to METERS.
|
You can also pass the coordinates of the center as two doubles (latitude, then longitude).
List<Author> hits = searchSession.search( Author.class )
.where( f -> f.spatial().within().field( "placeOfBirth.coordinates" )
.circle( 53.970000, 32.150000, 50, DistanceUnit.KILOMETERS ) )
.fetchHits( 20 );Matching points within a bounding box
With .boundingBox(…), the matched points must be within a given bounding box
defined by its top-left and bottom-right corners.
GeoBoundingBox box = GeoBoundingBox.of(
53.99, 32.13,
53.95, 32.17
);
List<Author> hits = searchSession.search( Author.class )
.where( f -> f.spatial().within().field( "placeOfBirth.coordinates" )
.boundingBox( box ) )
.fetchHits( 20 );You can also pass the coordinates of the top-left and bottom-right corners as four doubles: top-left latitude, top-left longitude, bottom-right latitude, bottom-right longitude.
List<Author> hits = searchSession.search( Author.class )
.where( f -> f.spatial().within().field( "placeOfBirth.coordinates" )
.boundingBox( 53.99, 32.13,
53.95, 32.17 ) )
.fetchHits( 20 );Matching points within a polygon
With .polygon(…), the matched points must be within a given polygon.
GeoPolygon polygon = GeoPolygon.of(
GeoPoint.of( 53.976177, 32.138627 ),
GeoPoint.of( 53.986177, 32.148627 ),
GeoPoint.of( 53.979177, 32.168627 ),
GeoPoint.of( 53.876177, 32.159627 ),
GeoPoint.of( 53.956177, 32.155627 ),
GeoPoint.of( 53.976177, 32.138627 )
);
List<Author> hits = searchSession.search( Author.class )
.where( f -> f.spatial().within().field( "placeOfBirth.coordinates" )
.polygon( polygon ) )
.fetchHits( 20 );Targeting multiple fields
Optionally, the predicate can target multiple fields. In that case, the predicate will match documents for which any of the given fields matches.
Other options
-
The score of a
withinpredicate is constant and equal to 1 by default, but can be boosted, either on a per-field basis with a call to.boost(…)just after.field(…)/.fields(…)or for the whole predicate with a call to.boost(…)after.circle(…)/.boundingBox(…)/.polygon(…).
9.2.15. named: call a predicate defined in the mapping
A named predicate, i.e. a predicate defined in the mapping,
can be called and included in a query.
Below is an example that calls the named predicate from the example of section Defining named predicates.
List<ItemStock> hits = searchSession.search( ItemStock.class )
.where( f -> f.named( "skuId.skuIdMatch" ) (1)
.param( "pattern", "*.WI2012" ) ) (2)
.fetchHits( 20 );| 1 | The named predicate is referred to by its name,
prefixed with the path of the object where the predicate was defined and a dot.
Here, the predicate is named |
| 2 | Named predicates can accept parameters, which will be handled as explained in Defining named predicates. |
9.2.16. Backend-specific extensions
By calling .extension(…) while building a query,
it is possible to access backend-specific predicates.
|
As their name suggests, backend-specific predicates are not portable from one backend technology to the other. |
Lucene: fromLuceneQuery
.fromLuceneQuery(…) turns a native Lucene Query into a Hibernate Search predicate.
|
This feature implies that application code rely on Lucene APIs directly. An upgrade of Hibernate Search, even for a bugfix (micro) release, may require an upgrade of Lucene, which may lead to breaking API changes in Lucene. If this happens, you will need to change application code to deal with the changes. |
org.apache.lucene.search.QueryList<Book> hits = searchSession.search( Book.class )
.extension( LuceneExtension.get() ) (1)
.where( f -> f.fromLuceneQuery( (2)
new RegexpQuery( new Term( "description", "neighbor|neighbour" ) )
) )
.fetchHits( 20 );| 1 | Build the query as usual, but using the Lucene extension so that Lucene-specific options are available. |
| 2 | Add a predicate defined by a given Lucene Query object. |
Elasticsearch: fromJson
.fromJson(…) turns JSON representing an Elasticsearch query into a Hibernate Search predicate.
|
This feature requires to directly manipulate JSON in application code. The syntax of this JSON may change:
If this happens, you will need to change application code to deal with the changes. |
JsonObjectJsonObject jsonObject =
/* ... */; (1)
List<Book> hits = searchSession.search( Book.class )
.extension( ElasticsearchExtension.get() ) (2)
.where( f -> f.fromJson( jsonObject ) ) (3)
.fetchHits( 20 );| 1 | Build a JSON object using Gson. |
| 2 | Build the query as usual, but using the Lucene extension so that Lucene-specific options are available. |
| 3 | Add a predicate defined by a given JsonObject. |
List<Book> hits = searchSession.search( Book.class )
.extension( ElasticsearchExtension.get() ) (1)
.where( f -> f.fromJson( "{" (2)
+ "\"regexp\": {"
+ "\"description\": \"neighbor|neighbour\""
+ "}"
+ "}" ) )
.fetchHits( 20 );| 1 | Build the query as usual, but using the Lucene extension so that Lucene-specific options are available. |
| 2 | Add a predicate defined by a given JSON-formatted string. |
9.2.17. Options common to multiple predicate types
Targeting multiple fields in one predicate
Some predicates offer the ability to target multiple fields in the same predicate.
In that case, the predicate will match documents for which any of the given fields matches.
Below is an example with the match predicate.
List<Book> hits = searchSession.search( Book.class )
.where( f -> f.match()
.field( "title" ).field( "description" )
.matching( "robot" ) )
.fetchHits( 20 );List<Book> hits = searchSession.search( Book.class )
.where( f -> f.match()
.fields( "title", "description" )
.matching( "robot" ) )
.fetchHits( 20 );It is possible to boost the score of each field separately; see Boosting the score of a predicate.
Tuning the score
Each predicate yields a score if it matched the document. The more relevant a document for a given predicate, the higher the score.
That score can be used when sorting by score (which is the default) to get more relevant hits at the top of the result list.
Below are a few ways to tune the score, and thus to get the most of the relevance sort.
Boosting the score of a predicate
The score of each predicate may be assigned a multiplier, called a boost:
-
if a given predicate is more relevant to your search query than other predicates, assigning it a boost (multiplier) higher than 1 will increase its impact on the total document score.
-
if a given predicate is less relevant to your search query than other predicates, assigning it a boost (multiplier) lower than 1 will decrease its impact on the total document score.
| The boost should always be higher than 0. |
Below is an example with the match predicate.
List<Book> hits = searchSession.search( Book.class )
.where( f -> f.bool()
.must( f.match()
.field( "title" )
.matching( "robot" )
.boost( 2.0f ) )
.must( f.match()
.field( "description" )
.matching( "self-aware" ) ) )
.fetchHits( 20 );For predicates targeting multiple fields,
it is also possible to assign more importance to matches on a given field (or set of fields)
by calling .boost(…) after the call to .field(…)/.fields(…).
Below is an example with the match predicate.
List<Book> hits = searchSession.search( Book.class )
.where( f -> f.match()
.field( "title" ).boost( 2.0f )
.field( "description" )
.matching( "robot" ) )
.fetchHits( 20 );Variable and constant score
Some predicates already have a constant score by default, because a variable score doesn’t make sense for them.
For example, the id predicate has a constant score by default.
Predicates with a constant score have an "all-or-nothing" impact on the total document score:
either a document matches and it will benefit from the score of this predicate
(1.0f by default, but it can be boosted),
or it doesn’t match and it won’t benefit from the score of this predicate.
Predicates with a variable score have a more subtle impact on the score.
For example the match predicate, on a text field,
will yield a higher score for documents
When this "variable score" behavior is not desired,
you can suppress it by calling .constantScore().
This may be useful if only the fact that the predicate matched is relevant,
but not the content of the document.
Below is an example with the match predicate.
List<Book> hits = searchSession.search( Book.class )
.where( f -> f.bool()
.must( f.match()
.field( "genre" )
.matching( Genre.SCIENCE_FICTION )
.constantScore() )
.must( f.match()
.field( "title" )
.matching( "robot" )
.boost( 2.0f ) ) )
.fetchHits( 20 );
Alternatively, you can take advantage of
the filter clause in boolean predicates,
which is equivalent to a must clause but completely suppresses the impact of the clause on the score.
|
Overriding analysis
In some cases it might be necessary to use a different analyzer to analyze searched text than the one used to analyze indexed text.
This can be achieved by calling .analyzer(…) and passing the name of the analyzer to use.
Below is an example with the match predicate.
If you always apply the same analyzer when searching,
you might want to configure a search analyzer
on your field instead. Then you won’t need to use .analyzer(…) when searching.
|
List<Book> hits = searchSession.search( Book.class )
.where( f -> f.match()
.field( "title_autocomplete" )
.matching( "robo" )
.analyzer( "autocomplete_query" ) )
.fetchHits( 20 );If you need to disable analysis of searched text completely,
call .skipAnalysis().
List<Book> hits = searchSession.search( Book.class )
.where( f -> f.match()
.field( "title" )
.matching( "robot" )
.skipAnalysis() )
.fetchHits( 20 );9.3. Sort DSL
9.3.1. Basics
By default, query results are sorted by matching score (relevance). Other sorts, including the sort by field value, can be configured when building the search query:
SearchSession searchSession = Search.session( entityManager );
List<Book> result = searchSession.search( Book.class ) (1)
.where( f -> f.matchAll() )
.sort( f -> f.field( "pageCount" ).desc() (2)
.then().field( "title_sort" ) )
.fetchHits( 20 ); (3)| 1 | Start building the query as usual. |
| 2 | Mention that the results of the query are expected to be sorted on field "pageCount" in descending order, then (for those with the same page count) on field "title_sort" in ascending order. If the field does not exist or cannot be sorted on, an exception will be thrown. |
| 3 | Fetch the results, which will be sorted according to instructions. |
Alternatively, if you don’t want to use lambdas:
SearchSession searchSession = Search.session( entityManager );
SearchScope<Book> scope = searchSession.scope( Book.class );
List<Book> result = searchSession.search( scope )
.where( scope.predicate().matchAll().toPredicate() )
.sort( scope.sort()
.field( "pageCount" ).desc()
.then().field( "title_sort" )
.toSort() )
.fetchHits( 20 );|
There are a few constraints regarding sorts by field. In particular, in order for a field to be "sortable", it must be marked as such in the mapping, so that the correct data structures are available in the index. |
The sort DSL offers more sort types, and multiple options for each type of sort.
To learn more about the field sort, and all the other types of sort,
refer to the following sections.
9.3.2. score: sort by matching score (relevance)
score sorts on the score of each document:
-
in descending order (the default), documents with a higher score appear first in the list of hits.
-
in ascending order, documents with a lower score appear first in the list of hits.
The score is computed differently for each query, but roughly speaking you can consider that a higher score means that more predicates were matched, or they were matched better. Thus, the score of a given document is a representation of how relevant that document is to a particular query.
|
To get the most out of a sort by score, you will need to assign weight to your predicates by boosting some of them. Advanced users may even want to change the scoring formula by specifying a different Similarity. |
Sorting by score is the default, so it’s generally not necessary to ask for a sort by score explicitly, but below is an example of how you can do it.
List<Book> hits = searchSession.search( Book.class )
.where( f -> f.match().field( "title" )
.matching( "robot dawn" ) )
.sort( f -> f.score() )
.fetchHits( 20 );Options
-
You can sort by ascending score by changing the sort order. However, this means the least relevant hits will appear first, which is completely pointless. This option is only provided for completeness.
9.3.3. indexOrder: sort according to the order of documents on storage
indexOrder sorts on the position of documents on internal storage.
This sort is not predictable, but is the most efficient. Use it when performance matters more than the order of hits.
List<Book> hits = searchSession.search( Book.class )
.where( f -> f.matchAll() )
.sort( f -> f.indexOrder() )
.fetchHits( 20 );
indexOrder should not be used to stabilize sorts.
That’s because the index order may change when the index is updated,
or even without any change, after index segments are merged.
See Stabilizing a sort for a solution to unstable sorts.
|
9.3.4. field: sort by field values
field sorts on the value of a given field for each document.
-
in ascending order (the default), documents with a lower value appear first in the list of hits.
-
in descending order, documents with a higher value appear first in the list of hits.
|
For text fields, "lower" means "lower in the alphabetical order". |
Prerequisites
In order for the field sort to be available on a given field,
you need to mark the field as sortable in the mapping.
GeoPoint fields cannot be marked as sortable; refer to the distance sort for these fields.
full-text fields (multi-word text fields) cannot be marked as sortable; you need to use keyword fields for text sorts. Remember you can map a single property to multiple fields with different names, so you can have a full-text field for predicates along with a keyword field for sorts, all for the same property.
Syntax
List<Book> hits = searchSession.search( Book.class )
.where( f -> f.matchAll() )
.sort( f -> f.field( "title_sort" ) )
.fetchHits( 20 );Options
-
The sort order is ascending by default, but can be controlled explicitly with
.asc()/.desc(). -
The behavior on missing values can be controlled explicitly with
.missing(). -
The behavior on multivalued fields can be controlled explicitly with
.mode(…). -
For fields in nested objects, all nested objects are considered by default, but that can be controlled explicitly with
.filter(…).
9.3.5. distance: sort by distance to a point
distance sorts on the distance from a given center to the geo-point value of a given field for each document.
-
in ascending order (the default), documents with a lower distance appear first in the list of hits.
-
in descending order, documents with a higher distance appear first in the list of hits.
Prerequisites
In order for the distance sort to be available on a given field,
you need to mark the field as sortable in the mapping.
Syntax
GeoPoint center = GeoPoint.of( 47.506060, 2.473916 );
List<Author> hits = searchSession.search( Author.class )
.where( f -> f.matchAll() )
.sort( f -> f.distance( "placeOfBirth", center ) )
.fetchHits( 20 );Options
-
The sort order is ascending by default, but can be controlled explicitly with
.asc()/.desc(). -
The behavior on multivalued fields can be controlled explicitly with
.mode(…). -
For fields in nested objects, all nested objects are considered by default, but that can be controlled explicitly with
.filter(…).
9.3.6. composite: combine sorts
composite applies multiple sorts one after the other.
It is useful when applying incomplete sorts.
composite()List<Book> hits = searchSession.search( Book.class )
.where( f -> f.matchAll() )
.sort( f -> f.composite() (1)
.add( f.field( "genre_sort" ) ) (2)
.add( f.field( "title_sort" ) ) ) (3)
.fetchHits( 20 ); (4)| 1 | Start a composite sort. |
| 2 | Add a field sort on the genre_sort field.
Since many books share the same genre, this sort is incomplete:
the relative order of books with the same genre is undetermined,
and may change from one query execution to the other. |
| 3 | Add a field sort on the title_sort field.
When two books have the same genre,
their relative order will be determined by comparing their titles.
If two books can have the same title,
we can stabilize the sort even further by adding a last sort on the id. |
| 4 | The hits will be sorted by genre, then by title. |
Alternatively, you can append a sort to another simply by calling .then() after the first sort:
then()List<Book> hits = searchSession.search( Book.class )
.where( f -> f.matchAll() )
.sort( f -> f.field( "genre_sort" )
.then().field( "title_sort" ) )
.fetchHits( 20 );Adding sorts dynamically with the lambda syntax
It is possible to define the composite sort inside a lambda expression.
This is especially useful when inner sorts need to be added dynamically to the composite sort,
for example based on user input.
MySearchParameters searchParameters = getSearchParameters(); (1)
List<Book> hits = searchSession.search( Book.class )
.where( f -> f.matchAll() )
.sort( f -> f.composite( b -> { (2)
for ( MySort mySort : searchParameters.getSorts() ) { (3)
switch ( mySort.getType() ) {
case GENRE:
b.add( f.field( "genre_sort" ).order( mySort.getOrder() ) );
break;
case TITLE:
b.add( f.field( "title_sort" ).order( mySort.getOrder() ) );
break;
case PAGE_COUNT:
b.add( f.field( "pageCount" ).order( mySort.getOrder() ) );
break;
}
}
} ) )
.fetchHits( 20 ); (4)| 1 | Get a custom object holding the search parameters provided by the user through a web form, for example. |
| 2 | Call .composite(Consumer).
The consumer, implemented by a lambda expression, will receive a builder as an argument
and will add sorts to that builder as necessary. |
| 3 | Inside the lambda, the code is free to do whatever is necessary before adding sorts. In this case, we iterate over user-selected sorts and add sorts accordingly. |
| 4 | The hits will be sorted according to sorts added by the lambda expression. |
Stabilizing a sort
If your first sort (e.g. by field value) results in a tie for many documents (e.g. many documents have the same field value), you may want to append an arbitrary sort just to stabilize your sort: to make sure the search hits will always be in the same order if you execute the same query.
In most cases, a quick and easy solution for stabilizing a sort is
to change your mapping to add a sortable field on your entity ID,
and to append a field sort by id to your unstable sort:
List<Book> hits = searchSession.search( Book.class )
.where( f -> f.matchAll() )
.sort( f -> f.field( "genre_sort" ).then().field( "id_sort" ) )
.fetchHits( 20 );9.3.7. Backend-specific extensions
By calling .extension(…) while building a query,
it is possible to access backend-specific sorts.
|
As their name suggests, backend-specific sorts are not portable from one backend technology to the other. |
Lucene: fromLuceneSort
.fromLuceneSort(…) turns a native Lucene Sort into a Hibernate Search sort.
|
This feature implies that application code rely on Lucene APIs directly. An upgrade of Hibernate Search, even for a bugfix (micro) release, may require an upgrade of Lucene, which may lead to breaking API changes in Lucene. If this happens, you will need to change application code to deal with the changes. |
org.apache.lucene.search.SortList<Book> hits = searchSession.search( Book.class )
.extension( LuceneExtension.get() )
.where( f -> f.matchAll() )
.sort( f -> f.fromLuceneSort(
new Sort(
new SortedSetSortField( "genre_sort", false ),
new SortedSetSortField( "title_sort", false )
)
) )
.fetchHits( 20 ); Lucene: fromLuceneSortField
.fromLuceneSortField(…) turns a native Lucene SortField into a Hibernate Search sort.
|
This feature implies that application code rely on Lucene APIs directly. An upgrade of Hibernate Search, even for a bugfix (micro) release, may require an upgrade of Lucene, which may lead to breaking API changes in Lucene. If this happens, you will need to change application code to deal with the changes. |
org.apache.lucene.search.SortFieldList<Book> hits = searchSession.search( Book.class )
.extension( LuceneExtension.get() )
.where( f -> f.matchAll() )
.sort( f -> f.fromLuceneSortField(
new SortedSetSortField( "title_sort", false )
) )
.fetchHits( 20 );Elasticsearch: fromJson
.fromJson(…) turns JSON representing an Elasticsearch sort into a Hibernate Search sort.
|
This feature requires to directly manipulate JSON in application code. The syntax of this JSON may change:
If this happens, you will need to change application code to deal with the changes. |
JsonObjectJsonObject jsonObject =
/* ... */;
List<Book> hits = searchSession.search( Book.class )
.extension( ElasticsearchExtension.get() )
.where( f -> f.matchAll() )
.sort( f -> f.fromJson( jsonObject ) )
.fetchHits( 20 );List<Book> hits = searchSession.search( Book.class )
.extension( ElasticsearchExtension.get() )
.where( f -> f.matchAll() )
.sort( f -> f.fromJson( "{"
+ "\"title_sort\": \"asc\""
+ "}" ) )
.fetchHits( 20 );9.3.8. Options common to multiple sort types
Sort order
Most sorts use the ascending order by default, with the notable exception of the score sort.
The order controlled explicitly through the following options:
-
.asc()for an ascending order. -
.desc()for a descending order. -
.order(…)for an order defined by the given argument:SortOrder.ASC/SortOrder.DESC.
Below are a few examples with the field sort.
asc()List<Book> hits = searchSession.search( Book.class )
.where( f -> f.matchAll() )
.sort( f -> f.field( "title_sort" ).asc() )
.fetchHits( 20 );desc()List<Book> hits = searchSession.search( Book.class )
.where( f -> f.matchAll() )
.sort( f -> f.field( "title_sort" ).desc() )
.fetchHits( 20 );order(…)List<Book> hits = searchSession.search( Book.class )
.where( f -> f.matchAll() )
.sort( f -> f.field( "title_sort" ).order( SortOrder.DESC ) )
.fetchHits( 20 );Missing values
By default:
-
For sorts by field values, the documents that do not have any value for a sort field will appear in the last position.
-
For sorts by distance to a point, the documents that do not have any value for a sort field will be treated as if their distance from the given point was infinite.
The behavior for missing values can be controlled explicitly through the .missing() option:
-
.missing().first()puts documents with no value in first position (regardless of the sort order). -
.missing().last()puts documents with no value in last position (regardless of the sort order). -
.missing().use(…)uses the given value as a default for documents with no value.
|
All these options are supported for sorts by field values and sorts by distance to a point using the Lucene backend. When sorting by distance to a point using the Elasticsearch backend, due to limitations of the Elasticsearch APIs, only the following combinations are supported:
|
Below are a few examples with the field sort.
List<Book> hits = searchSession.search( Book.class )
.where( f -> f.matchAll() )
.sort( f -> f.field( "pageCount" ).missing().first() )
.fetchHits( 20 );List<Book> hits = searchSession.search( Book.class )
.where( f -> f.matchAll() )
.sort( f -> f.field( "pageCount" ).missing().last() )
.fetchHits( 20 );List<Book> hits = searchSession.search( Book.class )
.where( f -> f.matchAll() )
.sort( f -> f.field( "pageCount" ).missing().use( 300 ) )
.fetchHits( 20 );Expected type of arguments
By default, .use(…) expects its argument to have the same type as
the entity property corresponding to the target field.
For example, if an entity property is of type java.util.Date,
the corresponding field may be of type java.time.Instant.
.use(…) will expect its argument to be of type java.util.Date regardless.
This should generally be what you want,
but if you ever need to bypass conversion and pass an unconverted argument
(of type java.time.Instant in the example above)
to .use(…), see Type of arguments passed to the DSL.
Sort mode for multivalued fields
Documents that have multiple values for a sort field can be sorted too.
A single value is picked for each document in order to compare it with order documents.
How the value is picked is called the sort mode, specified using the .mode(…) option.
The following sort modes are available:
Mode |
Description |
Supported value types |
Unsupported value types |
|
Picks the lowest value for field sorts, the lowest distance for distance sorts. This is default for ascending sorts. |
All. |
- |
|
Picks the highest value for field sorts, the highest distance for distance sorts. This is default for descending sorts. |
All. |
- |
|
Computes the sum of all values for each document, and picks that sum for comparison with other documents. |
Numeric fields ( |
Text and temporal fields ( |
|
Computes the arithmetic mean of all values for each document and picks that average for comparison with other documents. |
Numeric and temporal fields ( |
Text fields ( |
|
Computes the median of all values for each document, and picks that median for comparison with other documents. |
Numeric and temporal fields ( |
Text fields ( |
Below is an example with the field sort.
List<Author> hits = searchSession.search( Author.class )
.where( f -> f.matchAll() )
.sort( f -> f.field( "books.pageCount" ).mode( SortMode.AVG ) )
.fetchHits( 20 );Filter for fields in nested objects
When the sort field is located in a nested object, by default all nested objects will be considered for the sort and their values will be combined using the configured sort mode.
It is possible to filter the nested documents whose values will be considered for the sort
using one of the filter(…) methods.
Below is an example with the field sort: authors are sorted by the average page count of their books, but only books of the "crime fiction" genre are considered:
List<Author> hits = searchSession.search( Author.class )
.where( f -> f.matchAll() )
.sort( f -> f.field( "books.pageCount" )
.mode( SortMode.AVG )
.filter( pf -> pf.match().field( "books.genre" )
.matching( Genre.CRIME_FICTION ) ) )
.fetchHits( 20 );9.4. Projection DSL
9.4.1. Basics
For some use cases, you only need the query to return a small subset of the data contained in your domain object. In these cases, returning managed entities and extracting data from these entities may be overkill: extracting the data from the index itself would avoid the database round-trip.
Projections do just that: they allow the query to return something more precise than just "the matching entities". Projections can be configured when building the search query:
SearchSession searchSession = Search.session( entityManager );
List<String> result = searchSession.search( Book.class ) (1)
.select( f -> f.field( "title", String.class ) ) (2)
.where( f -> f.matchAll() )
.fetchHits( 20 ); (3)| 1 | Start building the query as usual. |
| 2 | Mention that the expected result of the query is a projection on field "title", of type String. If that type is not appropriate or if the field does not exist, an exception will be thrown. |
| 3 | Fetch the results, which will have the expected type. |
Alternatively, if you don’t want to use lambdas:
SearchSession searchSession = Search.session( entityManager );
SearchScope<Book> scope = searchSession.scope( Book.class );
List<String> result = searchSession.search( scope )
.select( scope.projection().field( "title", String.class )
.toProjection() )
.where( scope.predicate().matchAll().toPredicate() )
.fetchHits( 20 );|
There are a few constraints regarding |
While field projections are certainly the most common,
they are not the only type of projection.
Other projections allow
composing custom beans containing extracted data,
get references to the extracted documents
or the corresponding entities,
or get information related to the search query itself
(score, …).
To learn more about the field projection, and all the other types of projection, refer to the following sections.
9.4.2. documentReference: return references to matched documents
The documentReference projection returns a reference to the matched document as a DocumentReference object.
List<DocumentReference> hits = searchSession.search( Book.class )
.select( f -> f.documentReference() )
.where( f -> f.matchAll() )
.fetchHits( 20 );
Since it’s a reference to the document, not the entity,
DocumentReference only exposes low-level concepts such as the type name and the document identifier (a String).
Use the entityReference projection to get a reference to the entity.
|
9.4.3. entityReference: return references to matched entities
The entityReference projection returns a reference to the matched entity as an EntityReference object.
List<EntityReference> hits = searchSession.search( Book.class )
.select( f -> f.entityReference() )
.where( f -> f.matchAll() )
.fetchHits( 20 );
The entity does not get loaded as part of the projection.
If you want the actual entity instance, use the entity projection
|
9.4.4. id: return identifiers of matched entities
The identifier projection returns the identifier of the matched entity.
List<Integer> hits = searchSession.search( Book.class )
.select( f -> f.id( Integer.class ) )
.where( f -> f.matchAll() )
.fetchHits( 20 );If the provided identifier type does not match the type of identifiers for targeted entity types, an exception will be thrown. See also Type of projected values.
You can omit the "identifier type" argument, but then you will get projections of type Object:
List<Object> hits = searchSession.search( Book.class )
.select( f -> f.id() )
.where( f -> f.matchAll() )
.fetchHits( 20 );9.4.5. entity: return matched entities
The entityReference projection returns the entity corresponding to the document that matched.
| With the Hibernate ORM integration, returned objects are managed entities loaded from the database. You can use them as you would use any entity returned from traditional Hibernate ORM queries. |
List<Book> hits = searchSession.search( Book.class )
.select( f -> f.entity() )
.where( f -> f.matchAll() )
.fetchHits( 20 );
If an entity cannot be loaded (e.g. it was deleted and the index wasn’t updated yet),
the hit will be omitted and won’t appear in the returned List at all.
The total hit count, however, will not take this omission into account.
|
9.4.6. field: return field values from matched documents
The field projection returns the value of a given field for the matched document.
Prerequisites
In order for the field projection to be available on a given field,
you need to mark the field as projectable in the mapping.
Syntax
By default, the field projection returns a single value per document,
so the code below will be enough for a single-valued field:
List<Genre> hits = searchSession.search( Book.class )
.select( f -> f.field( "genre", Genre.class ) )
.where( f -> f.matchAll() )
.fetchHits( 20 );| Hibernate Search will throw an exception when building the query if you do this on a multivalued field. To project on multivalued fields, see Multivalued fields. |
You can omit the "field type" argument, but then you will get projections of type Object:
List<Object> hits = searchSession.search( Book.class )
.select( f -> f.field( "genre" ) )
.where( f -> f.matchAll() )
.fetchHits( 20 );Multivalued fields
To return multiple values, and thus allow projection on multivalued fields, use .multi().
This will change the return type of the projection to List<T> where T is what the single-valued projection
would have returned.
List<List<String>> hits = searchSession.search( Book.class )
.select( f -> f.field( "authors.lastName", String.class ).multi() )
.where( f -> f.matchAll() )
.fetchHits( 20 );Skipping conversion
By default, the values returned by the field projection have the same type as
the entity property corresponding to the target field.
For example, if an entity property if of an enum type,
the corresponding field may be of type String;
the values returned by the field projection will be of the enum type regardless.
This should generally be what you want,
but if you ever need to bypass conversion and have unconverted values returned to you instead
(of type String in the example above),
you can do it this way:
List<String> hits = searchSession.search( Book.class )
.select( f -> f.field( "genre", String.class, ValueConvert.NO ) )
.where( f -> f.matchAll() )
.fetchHits( 20 );See Type of projected values for more information.
9.4.7. score: return the score of matched documents
The score projection returns the score of the matched document.
List<Float> hits = searchSession.search( Book.class )
.select( f -> f.score() )
.where( f -> f.match().field( "title" )
.matching( "robot dawn" ) )
.fetchHits( 20 );|
Two scores can only be reliably compared if they were computed during the very same query execution. Trying to compare scores from two separate query executions will only lead to confusing results, in particular if the predicates are different or if the content of the index changed enough to alter the frequency of some terms significantly. On a related note, exposing scores to end users is generally not an easy task. See this article for some insight into what’s wrong with displaying the score as a percentage, specifically. |
9.4.8. distance: return the distance to a point
The distance projection returns the distance between a given point
and the geo-point value of a given field for the matched document.
Prerequisites
In order for the distance projection to be available on a given field,
you need to mark the field as projectable in the mapping.
Syntax
By default, the distance projection returns a single value per document,
so the code below will be enough for a single-valued field:
GeoPoint center = GeoPoint.of( 47.506060, 2.473916 );
SearchResult<Double> result = searchSession.search( Author.class )
.select( f -> f.distance( "placeOfBirth", center ) )
.where( f -> f.matchAll() )
.fetch( 20 );| Hibernate Search will throw an exception when building the query if you do this on a multivalued field. To project on multivalued fields, see Multivalued fields. |
The returned distance is in meters by default, but you can pick a different unit:
GeoPoint center = GeoPoint.of( 47.506060, 2.473916 );
SearchResult<Double> result = searchSession.search( Author.class )
.select( f -> f.distance( "placeOfBirth", center )
.unit( DistanceUnit.KILOMETERS ) )
.where( f -> f.matchAll() )
.fetch( 20 );Multivalued fields
To return multiple values, and thus allow projection on multivalued fields, use .multi().
This will change the return type of the projection to List<Double>.
GeoPoint center = GeoPoint.of( 47.506060, 2.473916 );
SearchResult<List<Double>> result = searchSession.search( Book.class )
.select( f -> f.distance( "authors.placeOfBirth", center ).multi() )
.where( f -> f.matchAll() )
.fetch( 20 );9.4.9. composite: combine projections
The composite projection applies multiple projections and combines their results.
To preserve type-safety, you can provide a custom combining function.
The combining function can be a Function, a BiFunction,
or a org.hibernate.search.util.common.function.TriFunction.
It will receive values returned by inner projections and return an object combining these values.
Depending on the type of function, either one, two, or three additional arguments are expected, one for each inner projection.
List<MyPair<String, Genre>> hits = searchSession.search( Book.class )
.select( f -> f.composite( (1)
MyPair::new, (2)
f.field( "title", String.class ), (3)
f.field( "genre", Genre.class ) (4)
) )
.where( f -> f.matchAll() )
.fetchHits( 20 ); (5)| 1 | Call .composite(…). |
| 2 | Use the constructor of a custom object, MyPair, as the combining function. |
| 3 | Define the first projection to combine as a projection on the title field,
meaning the constructor of MyPair will be called for each matched document
with the value of the title field as its first argument. |
| 4 | Define the second projection to combine as a projection on the genre field,
meaning the constructor of MyPair will be called for each matched document
with the value of the genre field as its second argument. |
| 5 | The hits will be the result of calling the combining function for each matched document,
in this case MyPair instances. |
If you need more inner projections, or simply if you don’t mind receiving the result of inner projections as a List<?>,
you can use the variant of .composite(…) that doesn’t expect a function argument:
List of projected valuesList<List<?>> hits = searchSession.search( Book.class )
.select( f -> f.composite( (1)
f.field( "title", String.class ), (2)
f.field( "genre", Genre.class ) (3)
) )
.where( f -> f.matchAll() )
.fetchHits( 20 ); (4)| 1 | Call .composite(…). |
| 2 | Define the first projection to combine as a projection on the title field,
meaning the hits will be List instances with the value of the title field of the matched document at index 0. |
| 3 | Define the second projection to combine as a projection on the genre field,
meaning the hits will be List instances with the value of the genre field of the matched document at index 1. |
| 4 | The hits will be List instances holding the result of the given projections, in the given order, for each matched document. |
9.4.10. Backend-specific extensions
By calling .extension(…) while building a query,
it is possible to access backend-specific projections.
|
As their name suggests, backend-specific projections are not portable from one backend technology to the other. |
Lucene: document
The .document() projection returns the matched document as a native Lucene Document.
|
This feature implies that application code rely on Lucene APIs directly. An upgrade of Hibernate Search, even for a bugfix (micro) release, may require an upgrade of Lucene, which may lead to breaking API changes in Lucene. If this happens, you will need to change application code to deal with the changes. |
org.apache.lucene.document.DocumentList<Document> hits = searchSession.search( Book.class )
.extension( LuceneExtension.get() )
.select( f -> f.document() )
.where( f -> f.matchAll() )
.fetchHits( 20 );|
The returned document is similar to the one that was indexed. For example, if a value was transformed by the However, there are some differences between the returned document and the one that was indexed:
If you want a projection that retrieves the value as it was in your entity upon indexing,
use a |
Lucene: explanation
The .explanation() projection returns an explanation
of the match as a native Lucene Explanation.
|
Regardless of the API used, explanations are rather costly performance-wise: only use them for debugging purposes. |
|
This feature implies that application code rely on Lucene APIs directly. An upgrade of Hibernate Search, even for a bugfix (micro) release, may require an upgrade of Lucene, which may lead to breaking API changes in Lucene. If this happens, you will need to change application code to deal with the changes. |
org.apache.lucene.search.ExplanationList<Explanation> hits = searchSession.search( Book.class )
.extension( LuceneExtension.get() )
.select( f -> f.explanation() )
.where( f -> f.matchAll() )
.fetchHits( 20 );Elasticsearch: source
The .source() projection returns the JSON of the document as it was indexed in Elasticsearch,
as a JsonObject.
|
This feature requires to directly manipulate JSON in application code. The syntax of this JSON may change:
If this happens, you will need to change application code to deal with the changes. |
JsonObjectList<JsonObject> hits = searchSession.search( Book.class )
.extension( ElasticsearchExtension.get() )
.select( f -> f.source() )
.where( f -> f.matchAll() )
.fetchHits( 20 );|
The source is returned exactly as it appears in the response from Elasticsearch. In particular, Hibernate Search will not apply any kind of the conversions described in Type of projected values. For example, if a value was transformed by the If you want a projection that retrieves the value as it was in your entity upon indexing,
use a |
Elasticsearch: explanation
The .explanation() projection returns an explanation
of the match as a JsonObject.
|
Regardless of the API used, explanations are rather costly performance-wise: only use them for debugging purposes. |
|
This feature requires to directly manipulate JSON in application code. The syntax of this JSON may change:
If this happens, you will need to change application code to deal with the changes. |
JsonObjectList<JsonObject> hits = searchSession.search( Book.class )
.extension( ElasticsearchExtension.get() )
.select( f -> f.explanation() )
.where( f -> f.matchAll() )
.fetchHits( 20 );Elasticsearch: jsonHit
The .jsonHit() projection returns the exact JSON returned by Elasticsearch for the hit, as a JsonObject.
|
This is particularly useful when customizing the request’s JSON to ask for additional data within each hit. |
|
This feature requires to directly manipulate JSON in application code. The syntax of this JSON may change:
If this happens, you will need to change application code to deal with the changes. |
JsonObjectList<JsonObject> hits = searchSession.search( Book.class )
.extension( ElasticsearchExtension.get() )
.select( f -> f.jsonHit() )
.where( f -> f.matchAll() )
.fetchHits( 20 );9.5. Aggregation DSL
9.5.1. Basics
Sometimes, you don’t just need to list query hits directly: you also need to group and aggregate the hits.
For example, almost any e-commerce website you can visit will have some sort of "faceting", which is a simple form of aggregation. In the "book search" webpage of an online bookshop, beside the list of matching books, you will find "facets", i.e. a count of matching documents in various categories. These categories can be taken directly from the indexed data, e.g. the genre of the book (science-fiction, crime fiction, …), but also derived from the indexed data slightly, e.g. a price range ("less than $5", "less than $10", …).
Aggregations allow just that (and, depending on the backend, much more): they allow the query to return "aggregated" hits.
SearchSession searchSession = Search.session( entityManager );
AggregationKey<Map<Genre, Long>> countsByGenreKey = AggregationKey.of( "countsByGenre" ); (1)
SearchResult<Book> result = searchSession.search( Book.class ) (2)
.where( f -> f.match().field( "title" ) (3)
.matching( "robot" ) )
.aggregation( countsByGenreKey, f -> f.terms() (4)
.field( "genre", Genre.class ) )
.fetch( 20 ); (5)
Map<Genre, Long> countsByGenre = result.aggregation( countsByGenreKey ); (6)| 1 | Define a key that will uniquely identify the aggregation. Make sure to give it the correct type (see <6>). |
| 2 | Start building the query as usual. |
| 3 | Define a predicate: the aggregation will only take into account documents matching this predicate. |
| 4 | Request an aggregation on the genre field,
with a separate count for each genre: science-fiction, crime fiction, …
If the field does not exist or cannot be aggregated, an exception will be thrown. |
| 5 | Fetch the results. |
| 6 | Retrieve the aggregation from the results as a Map,
with the genre as key and the hit count as value of type Long. |
Alternatively, if you don’t want to use lambdas:
SearchSession searchSession = Search.session( entityManager );
SearchScope<Book> scope = searchSession.scope( Book.class );
AggregationKey<Map<Genre, Long>> countsByGenreKey = AggregationKey.of( "countsByGenre" );
SearchResult<Book> result = searchSession.search( scope )
.where( scope.predicate().match().field( "title" )
.matching( "robot" )
.toPredicate() )
.aggregation( countsByGenreKey, scope.aggregation().terms()
.field( "genre", Genre.class )
.toAggregation() )
.fetch( 20 );
Map<Genre, Long> countsByGenre = result.aggregation( countsByGenreKey );|
There are a few constraints regarding aggregations. In particular, in order for a field to be "aggregable", it must be marked as such in the mapping, so that it is correctly stored in the index. |
|
Faceting generally involves a concept of "drill-down", i.e. the ability to select a facet and restrict the hits to only those that match that facet. Hibernate Search 5 used to offer a dedicated API to enable this "drill-down", but in Hibernate Search 6 you should simply create a new query with the appropriate predicate. |
The aggregation DSL offers more aggregation types, and multiple options for each type of aggregation.
To learn more about the terms aggregation, and all the other types of aggregations,
refer to the following sections.
9.5.2. terms: group by the value of a field
The terms aggregation returns a count of documents for each term value of a given field.
|
The |
AggregationKey<Map<Genre, Long>> countsByGenreKey = AggregationKey.of( "countsByGenre" );
SearchResult<Book> result = searchSession.search( Book.class )
.where( f -> f.matchAll() )
.aggregation( countsByGenreKey, f -> f.terms()
.field( "genre", Genre.class ) ) (1)
.fetch( 20 );
Map<Genre, Long> countsByGenre = result.aggregation( countsByGenreKey ); (2)| 1 | Define the path and type of the field whose values should be considered. |
| 2 | The result is a map from field value to document count. |
Skipping conversion
By default, the values returned by the terms aggregation have the same type as
the entity property corresponding to the target field.
For example, if an entity property if of an enum type,
the corresponding field may be of type String;
the values returned by the terms aggregation will be of the enum type regardless.
This should generally be what you want,
but if you ever need to bypass conversion and have unconverted values returned to you instead
(of type String in the example above),
you can do it this way:
AggregationKey<Map<String, Long>> countsByGenreKey = AggregationKey.of( "countsByGenre" );
SearchResult<Book> result = searchSession.search( Book.class )
.where( f -> f.matchAll() )
.aggregation( countsByGenreKey, f -> f.terms()
.field( "genre", String.class, ValueConvert.NO ) )
.fetch( 20 );
Map<String, Long> countsByGenre = result.aggregation( countsByGenreKey );See Type of projected values for more information.
maxTermCount: limiting the number of returned entries
By default, Hibernate Search will return at most 100 entries.
You can customize the limit by calling .maxTermCount(…):
terms aggregationAggregationKey<Map<Genre, Long>> countsByGenreKey = AggregationKey.of( "countsByGenre" );
SearchResult<Book> result = searchSession.search( Book.class )
.where( f -> f.matchAll() )
.aggregation( countsByGenreKey, f -> f.terms()
.field( "genre", Genre.class )
.maxTermCount( 1 ) )
.fetch( 20 );
Map<Genre, Long> countsByGenre = result.aggregation( countsByGenreKey );minDocumentCount: requiring at least N matching documents per term
By default, Hibernate search will return an entry only if the document count is at least 1.
You can set the threshold to an arbitrary value by calling .minDocumentCount(…).
This is particularly useful to return all terms that exist in the index,
even if no document containing the term matched the query.
To that end, just call .minDocumentCount(0):
terms aggregationAggregationKey<Map<Genre, Long>> countsByGenreKey = AggregationKey.of( "countsByGenre" );
SearchResult<Book> result = searchSession.search( Book.class )
.where( f -> f.matchAll() )
.aggregation( countsByGenreKey, f -> f.terms()
.field( "genre", Genre.class )
.minDocumentCount( 0 ) )
.fetch( 20 );
Map<Genre, Long> countsByGenre = result.aggregation( countsByGenreKey );This can also be used to omit entries with a document count that is too low to matter:
terms aggregationAggregationKey<Map<Genre, Long>> countsByGenreKey = AggregationKey.of( "countsByGenre" );
SearchResult<Book> result = searchSession.search( Book.class )
.where( f -> f.matchAll() )
.aggregation( countsByGenreKey, f -> f.terms()
.field( "genre", Genre.class )
.minDocumentCount( 2 ) )
.fetch( 20 );
Map<Genre, Long> countsByGenre = result.aggregation( countsByGenreKey );Order of entries
By default, entries are returned in descending order of document count, i.e. the terms with the most matching documents appear first.
Several other orders are available.
|
With the Lucene backend, due to limitations of the current implementation, using any order other than the default one (by descending count) may lead to incorrect results. See HSEARCH-3666 for more information. |
You can order entries by ascending term value:
terms aggregationAggregationKey<Map<Genre, Long>> countsByGenreKey = AggregationKey.of( "countsByGenre" );
SearchResult<Book> result = searchSession.search( Book.class )
.where( f -> f.matchAll() )
.aggregation( countsByGenreKey, f -> f.terms()
.field( "genre", Genre.class )
.orderByTermAscending() )
.fetch( 20 );
Map<Genre, Long> countsByGenre = result.aggregation( countsByGenreKey );You can order entries by descending term value:
terms aggregationAggregationKey<Map<Genre, Long>> countsByGenreKey = AggregationKey.of( "countsByGenre" );
SearchResult<Book> result = searchSession.search( Book.class )
.where( f -> f.matchAll() )
.aggregation( countsByGenreKey, f -> f.terms()
.field( "genre", Genre.class )
.orderByTermDescending() )
.fetch( 20 );
Map<Genre, Long> countsByGenre = result.aggregation( countsByGenreKey );Finally, you can order entries by ascending document count:
terms aggregationAggregationKey<Map<Genre, Long>> countsByGenreKey = AggregationKey.of( "countsByGenre" );
SearchResult<Book> result = searchSession.search( Book.class )
.where( f -> f.matchAll() )
.aggregation( countsByGenreKey, f -> f.terms()
.field( "genre", Genre.class )
.orderByCountAscending() )
.fetch( 20 );
Map<Genre, Long> countsByGenre = result.aggregation( countsByGenreKey );|
When ordering entries by ascending count in a |
Other options
-
For fields in nested objects, all nested objects are considered by default, but that can be controlled explicitly with
.filter(…).
9.5.3. range: grouped by ranges of values for a field
The range aggregation returns a count of documents for given ranges of values of a given field.
|
The |
AggregationKey<Map<Range<Double>, Long>> countsByPriceKey = AggregationKey.of( "countsByPrice" );
SearchResult<Book> result = searchSession.search( Book.class )
.where( f -> f.matchAll() )
.aggregation( countsByPriceKey, f -> f.range()
.field( "price", Double.class ) (1)
.range( 0.0, 10.0 ) (2)
.range( 10.0, 20.0 )
.range( 20.0, null ) (3)
)
.fetch( 20 );
Map<Range<Double>, Long> countsByPrice = result.aggregation( countsByPriceKey );| 1 | Define the path and type of the field whose values should be considered. |
| 2 | Define the ranges to group hits into. The range can be passed directly as the lower bound (included) and upper bound (excluded). Other syntaxes exist to define different bound inclusion (see other examples below). |
| 3 | null means "to infinity". |
Passing Range arguments
Instead of passing two arguments for each range (a lower and upper bound),
you can pass a single argument of type Range.
Range objectsAggregationKey<Map<Range<Double>, Long>> countsByPriceKey = AggregationKey.of( "countsByPrice" );
SearchResult<Book> result = searchSession.search( Book.class )
.where( f -> f.matchAll() )
.aggregation( countsByPriceKey, f -> f.range()
.field( "price", Double.class )
.range( Range.canonical( 0.0, 10.0 ) ) (1)
.range( Range.between( 10.0, RangeBoundInclusion.INCLUDED,
20.0, RangeBoundInclusion.EXCLUDED ) ) (2)
.range( Range.atLeast( 20.0 ) ) (3)
)
.fetch( 20 );
Map<Range<Double>, Long> countsByPrice = result.aggregation( countsByPriceKey );| 1 | With Range.of(Object, Object), the lower bound is included and the upper bound is excluded. |
| 2 | Range.of(Object, RangeBoundInclusion, Object, RangeBoundInclusion) is more verbose, but allows setting the bound inclusion explicitly. |
| 3 | Range also offers multiple static methods to create ranges for a variety of use cases ("at least", "greater than", "at most", …). |
|
With the Elasticsearch backend, due to a limitation of Elasticsearch itself,
all ranges must have their lower bound included (or If you need to exclude the lower bound, or to include the upper bound,
replace that bound with the immediate next value instead.
For example with integers, |
It’s also possible to pass a collection of Range objects,
which is especially useful if ranges are defined dynamically (e.g. in a web interface):
Range objectsList<Range<Double>> ranges =
/* ... */;
AggregationKey<Map<Range<Double>, Long>> countsByPriceKey = AggregationKey.of( "countsByPrice" );
SearchResult<Book> result = searchSession.search( Book.class )
.where( f -> f.matchAll() )
.aggregation( countsByPriceKey, f -> f.range()
.field( "price", Double.class )
.ranges( ranges )
)
.fetch( 20 );
Map<Range<Double>, Long> countsByPrice = result.aggregation( countsByPriceKey );Skipping conversion
By default, the bounds of ranges accepted by the range aggregation must have the same type as
the entity property corresponding to the target field.
For example, if an entity property if of type java.util.Date,
the corresponding field may be of type java.time.Instant;
the values returned by the terms aggregation will have to be of type java.util.Date regardless.
This should generally be what you want,
but if you ever need to bypass conversion and have unconverted values returned to you instead
(of type java.time.Instant in the example above),
you can do it this way:
AggregationKey<Map<Range<Instant>, Long>> countsByPriceKey = AggregationKey.of( "countsByPrice" );
SearchResult<Book> result = searchSession.search( Book.class )
.where( f -> f.matchAll() )
.aggregation( countsByPriceKey, f -> f.range()
// Assuming "releaseDate" is of type "java.util.Date" or "java.sql.Date"
.field( "releaseDate", Instant.class, ValueConvert.NO )
.range( null,
LocalDate.of( 1970, 1, 1 )
.atStartOfDay().toInstant( ZoneOffset.UTC ) )
.range( LocalDate.of( 1970, 1, 1 )
.atStartOfDay().toInstant( ZoneOffset.UTC ),
LocalDate.of( 2000, 1, 1 )
.atStartOfDay().toInstant( ZoneOffset.UTC ) )
.range( LocalDate.of( 2000, 1, 1 )
.atStartOfDay().toInstant( ZoneOffset.UTC ),
null )
)
.fetch( 20 );
Map<Range<Instant>, Long> countsByPrice = result.aggregation( countsByPriceKey );See Type of arguments passed to the DSL for more information.
Other options
-
For fields in nested objects, all nested objects are considered by default, but that can be controlled explicitly with
.filter(…).
9.5.4. Backend-specific extensions
By calling .extension(…) while building a query,
it is possible to access backend-specific aggregations.
|
As their name suggests, backend-specific aggregations are not portable from one backend technology to the other. |
Elasticsearch: fromJson
.fromJson(…) turns JSON representing an Elasticsearch aggregation into a Hibernate Search aggregation.
|
This feature requires to directly manipulate JSON in application code. The syntax of this JSON may change:
If this happens, you will need to change application code to deal with the changes. |
JsonObjectJsonObject jsonObject =
/* ... */;
AggregationKey<JsonObject> countsByPriceHistogramKey = AggregationKey.of( "countsByPriceHistogram" );
SearchResult<Book> result = searchSession.search( Book.class )
.extension( ElasticsearchExtension.get() )
.where( f -> f.matchAll() )
.aggregation( countsByPriceHistogramKey, f -> f.fromJson( jsonObject ) )
.fetch( 20 );
JsonObject countsByPriceHistogram = result.aggregation( countsByPriceHistogramKey ); (1)| 1 | The aggregation result is a JsonObject. |
AggregationKey<JsonObject> countsByPriceHistogramKey = AggregationKey.of( "countsByPriceHistogram" );
SearchResult<Book> result = searchSession.search( Book.class )
.extension( ElasticsearchExtension.get() )
.where( f -> f.matchAll() )
.aggregation( countsByPriceHistogramKey, f -> f.fromJson( "{"
+ "\"histogram\": {"
+ "\"field\": \"price\","
+ "\"interval\": 10"
+ "}"
+ "}" ) )
.fetch( 20 );
JsonObject countsByPriceHistogram = result.aggregation( countsByPriceHistogramKey ); (1)| 1 | The aggregation result is a JsonObject. |
9.5.5. Options common to multiple aggregation types
Filter for fields in nested objects
When the aggregation field is located in a nested object, by default all nested objects will be considered for the aggregation, and the document will be counted once for each value found in any nested object.
It is possible to filter the nested documents whose values will be considered for the aggregation
using one of the filter(…) methods.
Below is an example with the range aggregation: the result of the aggregation is a count of books for each price range, with only the price of "paperback" editions being taken into account; the price of e-book editions, for example, is ignored.
AggregationKey<Map<Range<Double>, Long>> countsByPriceKey = AggregationKey.of( "countsByPrice" );
SearchResult<Book> result = searchSession.search( Book.class )
.where( f -> f.matchAll() )
.aggregation( countsByPriceKey, f -> f.range()
.field( "editions.price", Double.class )
.range( 0.0, 10.0 )
.range( 10.0, 20.0 )
.range( 20.0, null )
.filter( pf -> pf.match().field( "editions.label" ).matching( "paperback" ) )
)
.fetch( 20 );
Map<Range<Double>, Long> countsByPrice = result.aggregation( countsByPriceKey );9.6. Field types and compatibility
9.6.1. Type of arguments passed to the DSL
Some predicates, such as the match predicate or the range predicate,
require a parameter of type Object at some point (matching(Object), atLeast(Object), …).
Similarly, it is possible to pass an argument of type Object in the sort DSL
when defining the behavior for missing values (missing().use(Object)).
These methods do not actually accept any object, and will throw an exception when passed an argument with the wrong type.
Generally the expected type of this argument should be rather obvious:
for example if you created a field by mapping an Integer property,
then an Integer value will be expected when building a predicate;
if you mapped a java.time.LocalDate, then a java.time.LocalDate will be expected,
etc.
Things get a little more complex if you start defining and using custom bridges.
You will then have properties of type A mapped to an index field of type B.
What should you pass to the DSL?
To answer that question, we need to understand DSL converters.
DSL converters are a feature of Hibernate Search that allows the DSL to accept arguments that match the type of the indexed property, instead of the type of the underlying index field.
Each custom bridge has the possibility to define a DSL converter for the index fields it populates. When it does, every time that field is mentioned in the predicate DSL, Hibernate Search will use that DSL converter to convert the value passed to the DSL to a value that the backend understands.
For example, let’s imagine an AuthenticationEvent entity with an outcome property of type AuthenticationOutcome.
This AuthenticationOutcome type is an enum.
We index the AuthenticationEvent entity and its outcome property in order to allow users to find events by their outcome.
The default bridge for enums puts the result of Enum.name() into a String field.
However, this default bridge also defines a DSL converter under the hood.
As a result, any call to the DSL will be expected to pass an AuthenticationOutcome instance:
List<AuthenticationEvent> result = searchSession.search( AuthenticationEvent.class )
.where( f -> f.match().field( "outcome" )
.matching( AuthenticationOutcome.INVALID_PASSWORD ) )
.fetchHits( 20 );This is handy, and especially appropriate if users are asked to select an outcome in a list of choices.
But what if we want users to type in some words instead, i.e. what if we want full-text search on the outcome field?
Then we will not have an AuthenticationOutcome instance to pass to the DSL, only a String…
In that case, we will first need to assign some text to each enum.
This can be achieved by defining a custom ValueBridge<AuthenticationOutcome, String>
and applying it to the outcome property to index a textual description of the outcome,
instead of the default Enum#name().
Then, we will need to tell Hibernate Search that the value passed to the DSL should not be passed to the DSL converter,
but should be assumed to match the type of the index field directly (in this case, String).
To that end, one can simply use the variant of the matching method that accepts a ValueConvert parameter,
and pass ValueConvert.NO:
List<AuthenticationEvent> result = searchSession.search( AuthenticationEvent.class )
.where( f -> f.match().field( "outcome" )
.matching( "Invalid password", ValueConvert.NO ) )
.fetchHits( 20 );All methods that apply DSL converters offer a variant that accepts a ValueConvert parameter:
matching, between, atLeast, atMost, greaterThan, lessThan, range, …
|
A DSL converter is always automatically generated for value bridges. However, more complex bridges will require explicit configuration. See Type bridge or Property bridge for more information. |
9.6.2. Type of projected values
Generally the type of values returned by projections should be rather obvious:
for example if you created a field by mapping an Integer property,
then an Integer value will be returned when projecting;
if you mapped a java.time.LocalDate, then a java.time.LocalDate will be returned,
etc.
Things get a little more complex if you start defining and using custom bridges.
You will then have properties of type A mapped to an index field of type B.
What will be returned by projections?
To answer that question, we need to understand projection converters.
Projection converters are a feature of Hibernate Search that allows the projections to return values that match the type of the indexed property, instead of the type of the underlying index field.
Each custom bridge has the possibility to define a projection converter for the index fields it populates. When it does, every time that field is projected on, Hibernate Search will use that projection converter to convert the projected value returned by the index.
For example, let’s imagine an Order entity with a status property of type OrderStatus.
This OrderStatus type is an enum.
We index the Order entity and its status property.
The default bridge for enums puts the result of Enum.name() into a String field.
However, this default bridge also defines a projection converter.
As a result, any projection on the status field will return an OrderStatus instance:
List<OrderStatus> result = searchSession.search( Order.class )
.select( f -> f.field( "status", OrderStatus.class ) )
.where( f -> f.matchAll() )
.fetchHits( 20 );This is probably what you want in general.
But in some cases, you may want to disable this conversion and return the index value instead
(i.e. the value of Enum.name()).
In that case, we will need to tell Hibernate Search that the value returned by the backend should not be passed to the projection converter.
To that end, one can simply use the variant of the field method that accepts a ValueConvert parameter,
and pass ValueConvert.NO:
List<String> result = searchSession.search( Order.class )
.select( f -> f.field( "status", String.class, ValueConvert.NO ) )
.where( f -> f.matchAll() )
.fetchHits( 20 );|
Projection converters must be configured explicitly in custom bridges. See Value bridge, Property bridge or Type bridge for more information. |
9.6.3. Targeting multiple fields
Sometimes a predicate/sort/projection targets multiple field, which may have conflicting definitions:
-
when multiple field names are passed to the
fieldsmethod in the predicate DSL (each field has its own definition); -
or when the search query targets multiple indexes (each index has its own definition of each field).
In such cases, the definition of the targeted fields is expected to be compatible.
For example targeting an Integer field and a java.time.LocalDate field
in the same match predicate will not work,
because you won’t be able to pass a non-null argument to the matching(Object) method
that is both an Integer and a java.time.LocalDate.
If you are looking for a simple rule of thumb, here it is: if the indexed properties do not have the same type, or are mapped differently, the corresponding fields are probably not going to be compatible.
However, if you’re interested in the details, Hibernate Search is a bit more flexible than that.
There are three different constraints when it comes to field compatibility:
-
The fields must be "encoded" in a compatible way. This means the backend must use the same representation for the two fields, for example they are both
Integer, or they are bothBigDecimalwith the same decimal scale, or they are bothLocalDatewith the same date format, etc. -
The fields must have a compatible DSL converter (for predicates and sorts) or projection converter (for projections).
-
For full-text predicates, the fields must have a compatible analyzer.
The following sections describe all the possible incompatibilities, and how to solve them.
Incompatible codec
In a search query targeting multiple indexes, if a field is encoded differently in each index, you cannot apply predicates, sorts or projections on that field.
Encoding is not only about the field type, such as LocalDate or BigDecimal.
Some codecs are parameterized and two codecs with different parameters will often be considered incompatible.
Examples of parameters include the format for temporal types
or the decimal scale
for BigDecimal and BigInteger.
|
In that case, your only option is to change your mapping to avoid the conflict:
-
rename the field in one index
-
OR change the field type in one index
-
OR if the problem is simply different codec parameters (date format, decimal scale, …), align the value of these parameters in one index with the other index.
If you choose to rename the field in one index, you will still be able to apply a similar predicate to the two fields in a single query: you will have to create one predicate per field and combine them with a boolean junction.
Incompatible DSL converters
Incompatible DSL converters are only a problem when you need to pass an argument to the DSL in certain methods:
matching(Object)/between(Object)/atLeast(Object)/greaterThan(Object)/etc. in the predicate DSL,
missing().use(Object) in the sort DSL,
`range(Object, Object) in the aggregation DSL,
…
If two fields encoded in a compatible way (for example both as String),
but that have different DSL converters
(for example the first one converts from String to String, but the second one converts from Integer to String),
you can still use these methods, but you will need to disable the DSL converter
as explained in Type of arguments passed to the DSL:
you will just pass the "index" value to the DSL (using the same example, a String).
Incompatible projection converters
If, in a search query targeting multiple indexes,
a field is encoded in a compatible way in every index (for example both as String),
but that has a different projection converters
(for example the first one converts from String to String, but the second one converts from String to Integer),
you can still project on this field, but you will need to disable the projection converter
as explained in Type of projected values:
the projection will return the "index", unconverted value (using the same example, a String).
Incompatible analyzer
Incompatible analyzers are only a problem with full-text predicates: match predicate on a text field, phrase predicate, simple query string predicate, …
If two fields encoded in a compatible way (for example both as String),
but that have different analyzers,
you can still use these predicates, but you will need to explicitly configure the predicate to either
set the search analyzer to an analyzer of your choosing with .analyzer(analyzerName),
or skip analysis completely with .skipAnalysis().
See Predicate DSL for more information about how to create predicates and about the available options.
9.7. Field paths
9.7.1. Absolute field paths
By default, field paths passed to the Search DSL are interpreted as absolute, i.e. relative to the index root.
The components of the paths are separated by a dot (.).
|
The following examples use the predicate DSL, but all information in this section applies to other search DSLs as well: sort DSL, projection DSL, aggregation DSL, … |
List<Book> hits = searchSession.search( Book.class )
.where( f -> f.match().field( "title" ) (1)
.matching( "robot" ) )
.fetchHits( 20 );| 1 | Fields declared at the root of the index can simply be referenced by their name. |
List<Book> hits = searchSession.search( Book.class )
.where( f -> f.match().field( "writers.firstName" ) (1)
.matching( "isaac" ) )
.fetchHits( 20 );| 1 | Fields declared in object fields (created by @IndexedEmbedded, for example)
must be referenced by their absolute path: the absolute path of the object field, followed by a dot,
followed by the name of the targeted field. |
List<Book> hits = searchSession.search( Book.class )
.where( f -> f.nested().objectField( "writers" )
.nest( f.bool()
.must( f.match().field( "writers.firstName" ) (1)
.matching( "isaac" ) )
.must( f.match().field( "writers.lastName" )
.matching( "asimov" ) )
) )
.fetchHits( 20 );| 1 | Even within a nested predicate, fields referenced in inner predicates must be referenced by their absolute path. |
The only exception is named predicates registered on object fields: the factory used to build those predicates interprets field paths as relative to that object field by default.
9.7.2. Relative field paths
|
Features detailed in this section are incubating: they are still under active development. The usual compatibility policy does not apply: the contract of incubating elements (e.g. types, methods, configuration properties, etc.) may be altered in a backward-incompatible way — or even removed — in subsequent releases. You are encouraged to use incubating features so the development team can get feedback and improve them, but you should be prepared to update code which relies on them as needed. |
In some cases, one may want to pass relative paths instead.
This can be useful when calling reusable methods that can apply the same predicate
on different object fields that have same structure (same subfields).
By calling the withRoot(String) method on a factory,
you can create a new factory which interprets paths as relative to the object field passed as argument to the method.
List<Book> hits = searchSession.search( Book.class )
.where( f -> f.bool()
.should( f.nested().objectField( "writers" )
.nest( matchFirstAndLastName( (1)
f.withRoot( "writers" ), (2)
"bob", "kane" ) ) )
.should( f.nested().objectField( "artists" )
.nest( matchFirstAndLastName( (3)
f.withRoot( "artists" ), (4)
"bill", "finger" ) ) ) )
.fetchHits( 20 );| 1 | Call a reusable method to apply a predicate to the name of the book’s writers. |
| 2 | Pass to that method a factory whose root will be the object field writers. |
| 3 | Call a reusable method to apply a predicate to the name of the book’s artists. |
| 4 | Pass to that method a factory whose root will be the object field artists. |
private SearchPredicate matchFirstAndLastName(SearchPredicateFactory f,
String firstName, String lastName) {
return f.bool()
.must( f.match().field( "firstName" ) (1)
.matching( firstName ) )
.must( f.match().field( "lastName" )
.matching( lastName ) )
.toPredicate();
}| 1 | When manipulating factories created with withRoot, paths are interpreted as relative.
Here firstName will be understood as either writers.firstName or artists.firstName,
depending on the factory that was passed to this method. |
|
When building native constructs (for example Lucene Queries), you will need to deal with absolute paths, even if the factory accepts relative paths. To convert a relative path to an absolute path, use the factory’s |
10. Lucene backend
10.1. Basic configuration
All configuration properties of the Lucene backend are optional, but the defaults might not suit everyone. In particular, you might want to set the location of your indexes in the filesystem.
Other configuration properties are mentioned in the relevant parts of this documentation. You can find a full reference of available properties in the Hibernate Search javadoc:
10.2. Index storage (Directory)
The component responsible for index storage in Lucene is the org.apache.lucene.store.Directory.
The implementation of the directory determines where the index will be stored:
on the filesystem, in the JVM’s heap, …
By default, the Lucene backend stores the indexes on the filesystem, in the JVM’s working directory.
The type of directory can be configured as follows:
# To configure the defaults for all indexes:
hibernate.search.backend.directory.type = local-filesystem
# To configure a specific index:
hibernate.search.backend.indexes.<index name>.directory.type = local-filesystemThe following directory types are available:
-
local-filesystem: Store the index on the local filesystem. See Local filesystem storage for details and configuration options. -
local-heap: Store the index in the local JVM heap. Local heap directories and all contained indexes are lost when the JVM shuts down. See Local heap storage for details and configuration options.
10.2.1. Local filesystem storage
The local-filesystem directory type will store each index in
a subdirectory of a configured filesystem directory.
|
Local filesystem directories really are designed to be local to one server and one application. In particular, they should not be shared between multiple Hibernate Search instances.
Even if network shares allow to share the raw content of indexes,
using the same index files from multiple Hibernate Search
would require more than that:
non-exclusive locking, routing of write requests from one node to another, …
These additional features are simply not available on If you need to share indexes between multiple Hibernate Search instances, the Elasticsearch backend will be a better choice. Refer to Architecture for more information. |
Index location
Each index is assigned a subdirectory under a root directory.
By default, the root directory is the JVM’s working directory. It can be configured as follows:
# To configure the defaults for all indexes:
hibernate.search.backend.directory.root = /path/to/my/root
# To configure a specific index:
hibernate.search.backend.indexes.<index name>.directory.root = /path/to/my/rootFor example, with the configuration above,
an entity type named Order will be indexed in directory
/path/to/my/root/Order/.
If that entity is explicitly assigned the index name orders
(see @Indexed(index = …) in Entity/index mapping),
it will instead be indexed in directory
/path/to/my/root/orders/.
Filesystem access strategy
The default strategy for accessing the filesystem is determined automatically based on the operating system and architecture. It should work well in most situations.
For situations where a different filesystem access strategy is needed, Hibernate Search exposes a configuration property:
# To configure the defaults for all indexes:
hibernate.search.backend.directory.filesystem_access.strategy = auto
# To configure a specific index:
hibernate.search.backend.indexes.<index name>.directory.filesystem_access.strategy = autoAllowed values are:
-
auto: lets Lucene select the most appropriate implementation based on the operating system and architecture. This is the default value for the property. -
simple: a straightforward strategy based onFiles.newByteChannel. Seeorg.apache.lucene.store.SimpleFSDirectory. This strategy is deprecated and will be removed in a future version of Lucene. -
mmap: usesmmapfor reading, andFSDirectory.FSIndexOutputfor writing. Seeorg.apache.lucene.store.MMapDirectory. -
nio: usesjava.nio.channels.FileChannel's positional read for concurrent reading, andFSDirectory.FSIndexOutputfor writing. Seeorg.apache.lucene.store.NIOFSDirectory.
|
Make sure to refer to Javadocs of these |
Other configuration options
The local-filesystem directory also allows configuring a
locking strategy.
10.2.2. Local heap storage
The local-heap directory type will store indexes in the local JVM’s heap.
As a result, indexes contained in a local-heap directory are lost when the JVM shuts down.
This directory type is only provided for use in testing configurations with small indexes and low concurrency, where it could slightly improve performance. In setups requiring larger indexes and/or high concurrency, a filesystem-based directory will achieve better performance.
The local-heap directory does not offer any specific option
beyond the locking strategy.
10.2.3. Locking strategy
In order to write to an index, Lucene needs to acquire a lock to ensure no other application instance writes to the same index concurrently. Each directory type comes with a default locking strategy that should work well enough in most situations.
For those (very) rare situations where a different locking strategy is needed, Hibernate Search exposes a configuration property:
# To configure the defaults for all indexes:
hibernate.search.backend.directory.locking.strategy = native-filesystem
# To configure a specific index:
hibernate.search.backend.indexes.<index name>.directory.locking.strategy = native-filesystemThe following strategies are available:
-
simple-filesystem: Locks the index by creating a marker file and checking it before write operations. This implementation is very simple and based Java’s File API. If for some reason an application ends abruptly, the marker file will stay on the filesystem and will need to be removed manually.This strategy is only available for filesystem-based directories.
See
org.apache.lucene.store.SimpleFSLockFactory. -
native-filesystem: Similarly tosimple-filesystem, locks the index by creating a marker file, but using native OS file locks instead of Java’s File API, so that locks will be cleaned up if the application ends abruptly.This is the default strategy for the
local-filesystemdirectory type.This implementation has known problems with NFS: it should be avoided on network shares.
This strategy is only available for filesystem-based directories.
See
org.apache.lucene.store.NativeFSLockFactory. -
single-instance: Locks using a Java object held in the JVM’s heap. Since the lock is only accessible by the same JVM, this strategy will only work properly when it is known that only a single application will ever try to access the indexes.This is the default strategy for the
local-heapdirectory type.See
org.apache.lucene.store.SingleInstanceLockFactory. -
none: Does not use any lock. Concurrent writes from another application will result in index corruption. Test your application carefully and make sure you know what it means.See
org.apache.lucene.store.NoLockFactory.
10.3. Sharding
10.3.1. Basics
|
For a preliminary introduction to sharding, including how it works in Hibernate Search and what its limitations are, see Sharding and routing. |
In the Lucene backend, sharding is disabled by default, but can be enabled by selecting a sharding strategy. Multiple strategies are available:
hash-
# To configure the defaults for all indexes: hibernate.search.backend.sharding.strategy = hash hibernate.search.backend.sharding.number_of_shards = 2 # To configure a specific index: hibernate.search.backend.indexes.<index name>.sharding.strategy = hash hibernate.search.backend.indexes.<index name>.sharding.number_of_shards = 2The
hashstrategy requires to set a number of shards through thenumber_of_shardsproperty.This strategy will set up an explicitly configured number of shards, numbered from 0 to the chosen number minus one (e.g. for 2 shards, there will be shard "0" and shard "1").
When routing, the routing key will be hashed to assign it to a shard. If the routing key is null, the document ID will be used instead.
This strategy is suitable when there is no explicit routing key configured in the mapping, or when the routing key has a large number of possible values that need to be brought down to a smaller number (e.g. "all integers").
explicit-
# To configure the defaults for all indexes: hibernate.search.backend.sharding.strategy = explicit hibernate.search.backend.sharding.shard_identifiers = fr,en,de # To configure a specific index: hibernate.search.backend.indexes.<index name>.sharding.strategy = explicit hibernate.search.backend.indexes.<index name>.sharding.shard_identifiers = fr,en,deThe
explicitstrategy requires to set a list of shard identifiers through theshard_identifiersproperty. The identifiers must be provided as a String containing multiple shard identifiers separated by commas, or aCollection<String>containing shard identifiers. A shard identifier can be any string.This strategy will set up one shard per configured shard identifier.
When routing, the routing key will be validated to make sure it matches a shard identifier exactly. If it does, the document will be routed to that shard. If it does not, an exception will be thrown. The routing key cannot be null, and the document ID will be ignored.
This strategy is suitable when there is an explicit routing key configured in the mapping, and that routing key has a limited number of possible values that are known before starting the application.
10.3.2. Per-shard configuration
In some cases, in particular when using the explicit
sharding strategy, it may be necessary to configure some shards in a slightly different way.
For example, one of the shards may hold massive, but infrequently-accessed data,
which should be stored on a different drive.
This can be achieved by adding configuration properties for a specific shard:
# Default configuration for all shards an index:
hibernate.search.backend.indexes.<index name>.directory.root = /path/to/fast/drive/
# Configuration for a specific shard:
hibernate.search.backend.indexes.<index name>.shards.<shard identifier>.directory.root = /path/to/large/drive/|
Not all settings can be overridden per shard; for example you can’t override the sharding strategy on a per-shard basis. |
Valid shard identifiers depend on the sharding strategy:
10.4. Index format compatibility
While Hibernate Search strives to offer a backwards compatible API, making it easy to port your application to newer versions, it still delegates to Apache Lucene to handle the index writing and searching. This creates a dependency to the Lucene index format. The Lucene developers of course attempt to keep a stable index format, but sometimes a change in the format can not be avoided. In those cases you either have to re-index all your data or use an index upgrade tool. Sometimes, Lucene is also able to read the old format, so you don’t need to take specific actions (beside making backup of your index).
While an index format incompatibility is a rare event, it can happen more often that Lucene’s Analyzer implementations might slightly change its behavior. This can lead to some documents not matching anymore, even though they used to.
To avoid this analyzer incompatibility, Hibernate Search allows configuring to which version of Lucene the analyzers and other Lucene classes should conform their behavior.
This configuration property is set at the backend level:
hibernate.search.backend.lucene_version = LUCENE_8_1_1Depending on the specific version of Lucene you’re using,
you might have different options available:
see org.apache.lucene.util.Version contained in lucene-core.jar
for a list of allowed values.
When this option is not set, Hibernate Search will instruct Lucene to use the latest version, which is usually the best option for new projects. Still, it’s recommended to define the version you’re using explicitly in the configuration, so that when you happen to upgrade, Lucene the analyzers will not change behavior. You can then choose to update this value at a later time, for example when you have the chance to rebuild the index from scratch.
|
The setting will be applied consistently when using Hibernate Search APIs, but if you are also making use of Lucene bypassing Hibernate Search (for example when instantiating an Analyzer yourself), make sure to use the same value. |
|
For information about which versions of Hibernate Search you can upgrade to, while retaining backward compatibility with a given version of Lucene APIs, refer to the compatibility policy. |
10.5. Schema
Lucene does not really have a concept of centralized schema to specify the data type and capabilities of each field, but Hibernate Search maintains such a schema in memory, in order to remember which predicates/projections/sorts can be applied to each field.
For the most part, the schema is inferred from the mapping configured through Hibernate Search’s mapping APIs, which are generic and independent of Lucene.
Aspects that are specific to the Lucene backend are explained in this section.
10.5.1. Field types
Available field types
|
Some types are not supported directly by the Lucene backend,
but will work anyway because they are "bridged" by the mapper.
For example a |
|
Field types that are not in this list can still be used with a bit more work:
|
| Field type | Limitations |
|---|---|
java.lang.String |
- |
java.lang.Byte |
- |
java.lang.Short |
- |
java.lang.Integer |
- |
java.lang.Long |
- |
java.lang.Double |
- |
java.lang.Float |
- |
java.lang.Boolean |
- |
java.math.BigDecimal |
- |
java.math.BigInteger |
- |
java.time.Instant |
|
java.time.LocalDate |
|
java.time.LocalTime |
|
java.time.LocalDateTime |
|
java.time.ZonedDateTime |
|
java.time.OffsetDateTime |
|
java.time.OffsetTime |
|
java.time.Year |
|
java.time.YearMonth |
|
java.time.MonthDay |
- |
org.hibernate.search.<wbr>engine.<wbr>spatial.<wbr>GeoPoint |
|
Range and resolution of date/time fields
Date/time types do not support the whole range of years that can be represented in
Values that are out of range will trigger indexing failures. Resolution for time types is also lower:
Precision beyond the millisecond will be lost when indexing. |
|
Range and resolution of
GeoPoint fields
This effectively means indexed points can be off by about 13 centimeters (5.2 inches) in the worst case. |
Index field type DSL extensions
Not all Lucene field types have built-in support in Hibernate Search.
Unsupported field types can still be used, however,
by taking advantage of the "native" field type.
Using this field type, Lucene IndexableField instances can be created directly,
giving access to everything Lucene can offer.
Below is an example of how to use the Lucene "native" type.
public class PageRankValueBinder implements ValueBinder { (1)
@Override
public void bind(ValueBindingContext<?> context) {
context.bridge(
Float.class,
new PageRankValueBridge(),
context.typeFactory() (2)
.extension( LuceneExtension.get() ) (3)
.asNative( (4)
Float.class, (5)
(absoluteFieldPath, value, collector) -> { (6)
collector.accept( new FeatureField( absoluteFieldPath, "pageRank", value ) );
collector.accept( new StoredField( absoluteFieldPath, value ) );
},
field -> (Float) field.numericValue() (7)
)
);
}
private static class PageRankValueBridge implements ValueBridge<Float, Float> {
@Override
public Float toIndexedValue(Float value, ValueBridgeToIndexedValueContext context) {
return value; (8)
}
@Override
public Float fromIndexedValue(Float value, ValueBridgeFromIndexedValueContext context) {
return value; (8)
}
}
}| 1 | Define a custom binder and its bridge. The "native" type can only be used from a binder, it cannot be used directly with annotation mapping. Here we’re defining a value binder, but a type binder, or a property binder would work as well. |
| 2 | Get the context’s type factory. |
| 3 | Apply the Lucene extension to the type factory. |
| 4 | Call asNative to start defining a native type. |
| 5 | Define the field value type. |
| 6 | Define the LuceneFieldContributor.
The contributor will be called upon indexing to add as many fields as necessary to the document.
All fields must be named after the absoluteFieldPath passed to the contributor. |
| 7 | Optionally, if projections are necessary, define the LuceneFieldValueExtractor.
The extractor will be called upon projecting to extract the projected value from a single stored field. |
| 8 | The value bridge is free to apply a preliminary conversion
before passing the value to Hibernate Search, which will pass it along to the LuceneFieldContributor. |
@Entity
@Indexed
public class WebPage {
@Id
private Integer id;
@NonStandardField( (1)
valueBinder = @ValueBinderRef(type = PageRankValueBinder.class) (2)
)
private Float pageRank;
// Getters and setters
// ...
}| 1 | Map the property to an index field.
Note that value bridges using a non-standard field type (such as Lucene’s "native" type)
must be mapped using the @NonStandardField annotation:
other annotations such as @GenericField will fail. |
| 2 | Instruct Hibernate Search to use our custom value binder. |
10.5.2. Multi-tenancy
Multi-tenancy is supported and handled transparently, according to the tenant ID defined in the current session:
-
documents will be indexed with the appropriate values, allowing later filtering;
-
queries will filter results appropriately.
The multi-tenancy is automatically enabled in the backend if it is enabled in the mapper, e.g. if a multi-tenancy strategy is selected in Hibernate ORM.
However, it is possible to enable multi-tenancy manually.
The multi-tenancy strategy is set at the backend level:
hibernate.search.backend.multi_tenancy.strategy = noneSee the following subsections for details about available strategies.
none: single-tenancy
The none strategy (the default) disables multi-tenancy completely.
Attempting to set a tenant ID will lead to a failure when indexing.
discriminator: type name mapping using the index name
With the discriminator strategy,
all documents from all tenants are stored in the same index.
When indexing, a discriminator field holding the tenant ID is populated transparently for each document.
When searching, a filter targeting the tenant ID field is added transparently to the search query to only return search hits for the current tenant.
10.6. Analysis
10.6.1. Basics
Analysis is the text processing performed by analyzers, both when indexing (document processing) and when searching (query processing).
The Lucene backend comes with some default analyzers, but analysis can also be configured explicitly.
To configure analysis in a Lucene backend, you will need to:
-
Define a class that implements the
org.hibernate.search.backend.lucene.analysis.LuceneAnalysisConfigurerinterface. -
Configure the backend to use that implementation by setting the configuration property
hibernate.search.backend.analysis.configurerto a bean reference pointing to the implementation, for exampleclass:com.mycompany.MyAnalysisConfigurer.
Hibernate Search will call the configure method of this implementation on startup,
and the configurer will be able to take advantage of a DSL to define
analyzers and normalizers or even (for more advanced use) the similarity.
See below for examples.
10.6.2. Built-in analyzers
Built-in analyzers are available out-of-the-box and don’t require explicit configuration. If necessary, they can be overridden by defining your own analyzer with the same name.
The Lucene backend comes with a series of built-in analyzer:
default-
The analyzer used by default with
@FullTextField.Default implementation:
org.apache.lucene.analysis.standard.StandardAnalyzer.Default behavior: first, tokenize using the standard tokenizer, which follows Word Break rules from the Unicode Text Segmentation algorithm, as specified in Unicode Standard Annex #29. Then, lowercase each token.
standard-
Default implementation:
org.apache.lucene.analysis.standard.StandardAnalyzer.Default behavior: first, tokenize using the standard tokenizer, which follows Word Break rules from the Unicode Text Segmentation algorithm, as specified in Unicode Standard Annex #29. Then, lowercase each token.
simple-
Default implementation:
org.apache.lucene.analysis.core.SimpleAnalyzer.Default behavior: first, split the text at non-letter characters. Then, lowercase each token.
whitespace-
Default implementation:
org.apache.lucene.analysis.core.WhitespaceAnalyzer.Default behavior: split the text at whitespace characters. Do not change the tokens.
stop-
Default implementation:
org.apache.lucene.analysis.core.StopAnalyzer.Default behavior: first, split the text at non-letter characters. Then, lowercase each token. Finally, remove English stop words.
keyword-
Default implementation:
org.apache.lucene.analysis.core.KeywordAnalyzer.Default behavior: do not change the text in any way.
With this analyzer a full text field would behave similarly to a keyword field, but with fewer features: no terms aggregations, for example.
Consider using a
@KeywordFieldinstead.
10.6.4. Custom analyzers and normalizers
Referencing components by name
The context passed to the configurer exposes a DSL to define analyzers and normalizers:
package org.hibernate.search.documentation.analysis;
import org.hibernate.search.backend.lucene.analysis.LuceneAnalysisConfigurationContext;
import org.hibernate.search.backend.lucene.analysis.LuceneAnalysisConfigurer;
public class MyLuceneAnalysisConfigurer implements LuceneAnalysisConfigurer {
@Override
public void configure(LuceneAnalysisConfigurationContext context) {
context.analyzer( "english" ).custom() (1)
.tokenizer( "standard" ) (2)
.charFilter( "htmlStrip" ) (3)
.tokenFilter( "lowercase" ) (4)
.tokenFilter( "snowballPorter" ) (4)
.param( "language", "English" ) (5)
.tokenFilter( "asciiFolding" );
context.normalizer( "lowercase" ).custom() (6)
.tokenFilter( "lowercase" )
.tokenFilter( "asciiFolding" );
context.analyzer( "french" ).custom() (7)
.tokenizer( "standard" )
.charFilter( "htmlStrip" )
.tokenFilter( "lowercase" )
.tokenFilter( "snowballPorter" )
.param( "language", "French" )
.tokenFilter( "asciiFolding" );
}
}| 1 | Define a custom analyzer named "english", because it will be used to analyze English text such as book titles. |
| 2 | Set the tokenizer to a standard tokenizer: components are referenced by their name. |
| 3 | Set the char filters. Char filters are applied in the order they are given, before the tokenizer. |
| 4 | Set the token filters. Token filters are applied in the order they are given, after the tokenizer. |
| 5 | Set the value of a parameter for the last added char filter/tokenizer/token filter. |
| 6 | Normalizers are defined in a similar way, the only difference being that they cannot use a tokenizer. |
| 7 | Multiple analyzers/normalizers can be defined in the same configurer. |
(1)
hibernate.search.backend.analysis.configurer = class:org.hibernate.search.documentation.analysis.MyLuceneAnalysisConfigurer| 1 | Assign the configurer to the backend using a Hibernate Search configuration property. |
To know which character filters, tokenizers and token filters are available,
you can call context.availableTokenizers(), context.availableTokenizers()
and context.availableTokenFilters() on the context passed to your analysis configurer;
this will return a set of all valid names.
To know more about the behavior of these character filters, tokenizers and token filters, either browse the Lucene Javadoc or read the corresponding section on the Solr Wiki (you don’t need Solr to use these analyzers, it’s just that there is no documentation page for Lucene proper).
|
In the Lucene Javadoc, the description of each factory class includes the mention "SPI Name" followed by a string constant. This is the name that should be passed to use that factory when defining analyzers. |
Referencing components by factory class
Instead of names, you may also pass Lucene factory classes to refer to a particular tokenizer,
char filter or token filter implementation.
Those classes extend org.apache.lucene.analysis.util.TokenizerFactory,
org.apache.lucene.analysis.util.TokenFilterFactory
or org.apache.lucene.analysis.util.CharFilterFactory.
This avoids string constants in your code, at the cost of having a direct compile-time dependency to Lucene.
context.analyzer( "english" ).custom()
.tokenizer( StandardTokenizerFactory.class )
.charFilter( HTMLStripCharFilterFactory.class )
.tokenFilter( LowerCaseFilterFactory.class )
.tokenFilter( SnowballPorterFilterFactory.class )
.param( "language", "English" )
.tokenFilter( ASCIIFoldingFilterFactory.class );
context.normalizer( "lowercase" ).custom()
.tokenFilter( LowerCaseFilterFactory.class )
.tokenFilter( ASCIIFoldingFilterFactory.class );To know which character filters, tokenizers and token filters are available, either browse the Lucene Javadoc or read the corresponding section on the Solr Wiki (you don’t need Solr to use these analyzers, it’s just that there is no documentation page for Lucene proper).
10.6.5. Similarity
When searching, scores are assigned to documents based on statistics recorded at index time, using a specific formula.
Those statistics and the formula are defined by a single component called the similarity,
implementing Lucene’s org.apache.lucene.search.similarities.Similarity interface.
By default, Hibernate Search uses BM25Similarity with its defaults parameters (k1 = 1.2, b = 0.75).
This should provide satisfying scoring in most situations.
If you have advanced needs, you can set a custom Similarity in your analysis configurer, as shown below.
|
Remember to also reference the analysis configurer from your configuration properties, as explained in Custom analyzers and normalizers. |
public class CustomSimilarityLuceneAnalysisConfigurer implements LuceneAnalysisConfigurer {
@Override
public void configure(LuceneAnalysisConfigurationContext context) {
context.similarity( new ClassicSimilarity() ); (1)
context.analyzer( "english" ).custom() (2)
.tokenizer( "standard" )
.tokenFilter( "lowercase" )
.tokenFilter( "asciiFolding" );
}
}| 1 | Set the similarity to ClassicSimilarity. |
| 2 | Define analyzers and normalizers as usual. |
|
For more information about You can also find useful resources on the web, for example in Elasticsearch’s documentation. |
10.7. Threads
The Lucene backend relies on an internal thread pool to execute write operations on the index.
By default, the pool contains exactly as many threads as the number of processors available to the JVM on bootstrap. That can be changed using a configuration property:
hibernate.search.backend.thread_pool.size = 4|
This number is per backend, not per index. Adding more indexes will not add more threads. |
|
Operations happening in this thread-pool include blocking I/O, so raising its size above the number of processor cores available to the JVM can make sense and may improve performance. |
10.8. Indexing queues
Among all the write operations performed by Hibernate Search on the indexes, it is expected that there will be a lot of "indexing" operations to create/update/delete a specific document. We generally want to preserve the relative order of these requests when they are about the same documents.
For this reason, Hibernate Search pushes these operations to internal queues and applies them in batches. Each index maintains 10 queues holding at most 1000 elements each. Queues operate independently (in parallel), but each queue applies one operation after the other, so at any given time there can be at most 10 batches of indexing requests being applied for each index.
|
Indexing operations relative to the same document ID are always pushed to the same queue. |
It is possible to customize the queues in order to reduce resource consumption, or on the contrary to improve throughput. This is done through the following configuration properties:
# To configure the defaults for all indexes:
hibernate.search.backend.indexing.queue_count = 10
hibernate.search.backend.indexing.queue_size = 1000
# To configure a specific index:
hibernate.search.backend.indexes.<index name>.indexing.queue_count = 10
hibernate.search.backend.indexes.<index name>.indexing.queue_size = 1000-
indexing.queue_countdefines the number of queues. Expects a strictly positive integer value. The default for this property is10.Higher values will lead to more indexing operations being performed in parallel, which may lead to higher indexing throughput if CPU power is the bottleneck when indexing.
Note that raising this number above the number of threads is never useful, as the number of threads limits how many queues can be processed in parallel.
-
indexing.queue_sizedefines the maximum number of elements each queue can hold. Expects a strictly positive integer value. The default for this property is1000.Lower values may lead to lower memory usage, especially if there are many queues, but values that are too low will increase the likeliness of application threads blocking because the queue is full, which may lead to lower indexing throughput.
|
When a queue is full, any attempt to request indexing will block until the request can be put into the queue. In order to achieve a reasonable level of performance, be sure to set the size of queues to a high enough number that this kind of blocking only happens when the application is under very high load. |
|
When sharding is enabled, each shard will be assigned its own set of queues. If you use the For example, if you set the number of shards to 8 and the number of queues to 4,
documents ending up in the shard #0 will always end up in queue #0 of that shard.
That’s because both the routing to a shard and the routing to a queue take the hash of the document ID
then apply a modulo operation to that hash,
and |
10.9. Writing and reading
10.9.1. Commit
|
For a preliminary introduction to writing to and reading from indexes in Hibernate Search, including in particular the concepts of commit and refresh, see Commit and refresh. |
In Lucene terminology, a commit is when changes buffered in an index writer are pushed to the index itself, so that a crash or power loss will no longer result in data loss.
Some operations are critical and are always committed before they are considered complete. This is the case for changes triggered by automatic indexing (unless configured otherwise), and also for large-scale operations such as a purge. When such an operation is encountered, a commit will be performed immediately, guaranteeing that the operation is only considered complete after all changes are safely stored on disk.
Other operations, however, are not expected to be committed immediately.
This is the case for changes contributed by the mass indexer,
or by automatic indexing when using the
async synchronization strategy.
Performance-wise, committing may be an expensive operation, which is why Hibernate Search tries not to commit too often. By default, when changes that do not require an immediate commit are applied to the index, Hibernate Search will delay the commit by one second. If other changes are applied during that second, they will be included in the same commit. This dramatically reduces the amount of commits in write-intensive scenarios (e.g. mass indexing), leading to much better performance.
It is possible to control exactly how often Hibernate Search will commit by setting the commit interval (in milliseconds):
# To configure the defaults for all indexes:
hibernate.search.backend.io.commit_interval = 1000
# To configure a specific index:
hibernate.search.backend.indexes.<index name>.io.commit_interval = 1000The default for this property is 1000.
|
Setting the commit interval to 0 will force Hibernate Search to commit after every batch of changes, which may result in a much lower throughput, both for automatic indexing and mass indexing. |
|
Remember that individual write operations may force a commit, which may cancel out the potential performance gains from setting a higher commit interval. By default, the commit interval may only improve throughput of the mass indexer. If you want changes triggered by automatic indexing to benefit from it too, you will need to select a non-default synchronization strategy, so as not to require a commit after each change. |
10.9.2. Refresh
|
For a preliminary introduction to writing to and reading from indexes in Hibernate Search, including in particular the concepts of commit and refresh, see Commit and refresh. |
In Lucene terminology, a refresh is when a new index reader is opened, so that the next search queries will take into account the latest changes to the index.
Performance-wise, refreshing may be an expensive operation, which is why Hibernate Search tries not to refresh too often. The index reader is refreshed upon every search query, but only if writes have occurred since the last refresh.
In write-intensive scenarios where refreshing after each write is still too frequent, it is possible to refresh less frequently and thus improve read throughput by setting a refresh interval in milliseconds. When set to a value higher than 0, the index reader will no longer be refreshed upon every search query: if, when a search query starts, the refresh occurred less than X milliseconds ago, then the index reader will not be refreshed, even though it may be out-of-date.
The refresh interval can be set this way:
# To configure the defaults for all indexes:
hibernate.search.backend.io.refresh_interval = 0
# To configure a specific index:
hibernate.search.backend.indexes.<index name>.io.refresh_interval = 0The default for this property is 0.
10.9.3. IndexWriter settings
Lucene’s IndexWriter, used by Hibernate Search to write to indexes,
exposes several settings that can be tweaked to better fit your application,
and ultimately get better performance.
Hibernate Search exposes these settings through configuration properties prefixed with io.writer.,
at the index level.
Below is a list of all index writer settings.
They can all be set similarly through configuration properties;
for example, io.writer.ram_buffer_size can be set like this:
# To configure the defaults for all indexes:
hibernate.search.backend.io.writer.ram_buffer_size = 32
# To configure a specific index:
hibernate.search.backend.indexes.<index name>.io.writer.ram_buffer_size = 32| Property | Description |
|---|---|
|
The maximum number of documents that can be buffered in-memory before they are flushed to the Directory. Large values mean faster indexing, but more RAM usage. When used together with |
|
The maximum amount of RAM that may be used for buffering added documents and deletions before they are flushed to the Directory. Large values mean faster indexing, but more RAM usage. Generally for faster indexing performance it’s best to use this setting rather than When used together with |
Enables low level trace information about Lucene’s internal components; Logs will be appended to the logger
This may cause significant performance degradation, even if the logger ignores the TRACE level, so this should only be used for troubleshooting purposes. Disabled by default. |
|
Refer to Lucene’s documentation, in particular the javadoc and source code of |
10.9.4. Merge settings
A Lucene index is not stored in a single, continuous file. Instead, each flush to the index will generate a small file containing all the documents added to the index. This file is called a "segment". Search can be slower on an index with too many segments, so Lucene regularly merges small segments to create fewer, larger segments.
Lucene’s merge behavior is controlled through a MergePolicy.
Hibernate Search uses the LogByteSizeMergePolicy,
which exposes several settings that can be tweaked to better fit your application,
and ultimately get better performance.
Below is a list of all merge settings.
They can all be set similarly through configuration properties;
for example, io.merge.factor can be set like this:
# To configure the defaults for all indexes:
hibernate.search.backend.io.merge.factor = 10
# To configure a specific index:
hibernate.search.backend.indexes.<index name>.io.merge.factor = 10| Property | Description |
|---|---|
|
The maximum number of documents that a segment can have before merging. Segments with more than this number of documents will not be merged. Smaller values perform better on frequently changing indexes, larger values provide better search performance if the index does not change often. |
|
The number of segments that are merged at once. With smaller values, merging happens more often and thus uses more resources,
but the total number of segments will be lower on average, increasing read performance.
Thus, larger values ( The value must not be lower than |
|
The minimum target size of segments, in MB, for background merges. Segments smaller than this size are merged more aggressively. Setting this too large might result in expensive merge operations, even tough they are less frequent. |
|
The maximum size of segments, in MB, for background merges. Segments larger than this size are never merged in the background. Settings this to a lower value helps reduce memory requirements and avoids some merging operations at the cost of optimal search speed. When forcefully merging an index, this value is ignored and |
|
The maximum size of segments, in MB, for forced merges. This is the equivalent of |
|
Whether the number of deleted documents in an index should be taken into account; When enabled, Lucene will consider that a segment with 100 documents, 50 of which are deleted, actually contains 50 documents. When disabled, Lucene will consider that such a segment contains 100 documents. Setting |
|
Refer to Lucene’s documentation, in particular the javadoc and source code of |
|
The options First, consider that merging a segment is about adding it together with another existing segment to form a larger one.
Second, merge options do not affect the size of segments initially created by the index writer, before they are merged.
This size can be limited with the setting So, for example, to be fairly confident no file grows larger than 15MB, use something like this: |
10.10. Searching
Searching with the Lucene backend relies on the same APIs as any other backend.
This section details Lucene-specific configuration related to searching.
10.10.1. Low-level hit caching
|
This feature implies that application code rely on Lucene APIs directly. An upgrade of Hibernate Search, even for a bugfix (micro) release, may require an upgrade of Lucene, which may lead to breaking API changes in Lucene. If this happens, you will need to change application code to deal with the changes. |
Lucene supports caching low-level hits,
i.e. caching the list of documents that match a given org.apache.lucene.search.Query
in a given index segment.
This cache can be useful in read-intensive scenarios, where the same query is executed very often on the same index, and the index is rarely written to.
| This is different from Hibernate ORM caching, which caches the content of entities or the results of database queries. Hibernate ORM caching can also be leveraged in Hibernate Search, but through a different API: see Cache lookup strategy. |
To configure caching in a Lucene backend, you will need to:
-
Define a class that implements the
org.hibernate.search.backend.lucene.cache.QueryCachingConfigurerinterface. -
Configure the backend to use that implementation by setting the configuration property
hibernate.search.backend.query.caching.configurerto a bean reference pointing to the implementation, for exampleclass:com.mycompany.MyQueryCachingConfigurer.
Hibernate Search will call the configure method of this implementation on startup,
and the configurer will be able to take advantage of a DSL to define
the org.apache.lucene.search.QueryCache and the org.apache.lucene.search.QueryCachingPolicy.
10.11. Retrieving analyzers and normalizers
Lucene analyzers and normalizers defined in Hibernate Search can be retrieved from the Lucene backend.
SearchMapping mapping = Search.mapping( entityManagerFactory ); (1)
Backend backend = mapping.backend(); (2)
LuceneBackend luceneBackend = backend.unwrap( LuceneBackend.class ); (3)
Optional<? extends Analyzer> analyzer = luceneBackend.analyzer( "english" ); (4)
Optional<? extends Analyzer> normalizer = luceneBackend.normalizer( "isbn" ); (5)| 1 | Retrieve the SearchMapping. |
| 2 | Retrieve the Backend. |
| 3 | Narrow down the backend to the LuceneBackend type. |
| 4 | Get an analyzer by name.
The method returns an Optional, which is empty if the analyzer does not exist.
The analyzer must have been defined in Hibernate Search,
otherwise it won’t exist. |
| 5 | Get a normalizer by name.
The method returns an Optional, which is empty if the normalizer does not exist.
The normalizer must have been defined in Hibernate Search,
otherwise it won’t exist. |
Alternatively, you can also retrieve the (composite) analyzers for a whole index. These analyzers behave differently for each field, delegating to the analyzer configured in the mapping for each field.
SearchMapping mapping = Search.mapping( entityManagerFactory ); (1)
IndexManager indexManager = mapping.indexManager( "Book" ); (2)
LuceneIndexManager luceneIndexManager = indexManager.unwrap( LuceneIndexManager.class ); (3)
Analyzer indexingAnalyzer = luceneIndexManager.indexingAnalyzer(); (4)
Analyzer searchAnalyzer = luceneIndexManager.searchAnalyzer(); (5)| 1 | Retrieve the SearchMapping. |
| 2 | Retrieve the IndexManager. |
| 3 | Narrow down the index manager to the LuceneIndexManager type. |
| 4 | Get the indexing analyzer. This is the analyzer used when indexing documents. It ignores the search analyzer in particular. |
| 5 | Get the search analyzer. This is the analyzer used when building search queries through the Search DSL. On contrary to the indexing analyzer, it takes into account the search analyzer. |
10.12. Retrieving the index size
The size of a Lucene index can be retrieved from the LuceneIndexManager.
SearchMapping mapping = Search.mapping( entityManagerFactory ); (1)
IndexManager indexManager = mapping.indexManager( "Book" ); (2)
LuceneIndexManager luceneIndexManager = indexManager.unwrap( LuceneIndexManager.class ); (3)
long size = luceneIndexManager.computeSizeInBytes(); (4)
luceneIndexManager.computeSizeInBytesAsync() (5)
.thenAccept( sizeInBytes -> {
// ...
} );| 1 | Retrieve the SearchMapping. |
| 2 | Retrieve the IndexManager. |
| 3 | Narrow down the index manager to the LuceneIndexManager type. |
| 4 | Compute the index size and get the result. |
| 5 | An asynchronous version of the method is also available. |
10.13. Retrieving a Lucene IndexReader
The low-level IndexReader can be retrieved from the LuceneIndexScope.
SearchMapping mapping = Search.mapping( entityManagerFactory ); (1)
LuceneIndexScope indexScope = mapping
.scope( Book.class ).extension( LuceneExtension.get() ); (2)
try ( IndexReader indexReader = indexScope.openIndexReader() ) { (3)
// work with the low-level index reader:
numDocs = indexReader.numDocs();
}| 1 | Retrieve the SearchMapping. |
| 2 | Retrieve the LuceneIndexScope extending the search scope with the LuceneExtension. |
| 3 | Open an instance of IndexReader. Optionally it is possible to provide the routing keys
to target only some shards of the indexes using the method openIndexReader(Set<String>).
The IndexReader must be closed after use. |
|
Even if multi-tenancy is enabled, the returned reader exposes documents of all tenants. |
11. Elasticsearch backend
11.1. Compatibility
Hibernate Search expects an Elasticsearch cluster running version 5.6, 6.x or 7.x, or an OpenSearch cluster running version 1.x.
The version running on your cluster will be automatically detected on startup, and Hibernate Search will adapt based on the detected version; see Version for details.
|
For information about which versions of Hibernate Search you can upgrade to, while retaining backward compatibility with a given version of Elasticsearch/OpenSearch, refer to the compatibility policy. |
The targeted version is mostly transparent to Hibernate Search users, but there are a few differences in how Hibernate Search behaves depending on the Elasticsearch version that may affect you. The following table details those differences.
| Elasticsearch | OpenSearch | |||
|---|---|---|---|---|
5.6 |
6.x |
7.x |
1.x |
|
Formats for date fields in the Elasticsearch schema |
Formats changed in ES 7, see Field types |
|||
|
Not available |
Available |
||
11.1.1. Upgrading Elasticsearch
When upgrading your Elasticsearch cluster, some administrative tasks are still required on your cluster: Hibernate Search will not take care of those.
On top of that, there are some fundamental differences between some versions of Elasticsearch. For example date formats changed in Elasticsearch 7, meaning the schema defined in Elasticsearch 6 may not be compatible with the one expected by Hibernate Search for Elasticsearch 7.
In such cases, the easiest way to upgrade is to delete your indexes manually, make Hibernate Search re-create the indexes along with their schema, and reindex your data.
11.2. Basic configuration
All configuration properties of the Elasticsearch backend are optional,
but the defaults might not suit everyone.
In particular your production Elasticsearch cluster is probably not reachable at http://localhost:9200,
so you will need to set the address of your cluster by configuring the client.
Configuration properties are mentioned in the relevant parts of this documentation. You can find a full reference of available properties in the Hibernate Search javadoc:
11.3. Configuration of the Elasticsearch cluster
Most of the time, Hibernate Search does not require any specific configuration to be applied by hand to the Elasticsearch cluster, beyond the index mapping (schema) which can be automatically generated.
The only exception is Sharding, which needs to be enabled explicitly.
11.4. Client configuration
An Elasticsearch backend communicates with an Elasticsearch cluster through a REST client. Below are the options that affect this client.
11.4.1. Target hosts
The following property configures the Elasticsearch host (or hosts) to send indexing requests and search queries to:
hibernate.search.backend.hosts = localhost:9200The default for this property is localhost:9200.
This property may be set to a String representing a host and port such as localhost or es.mycompany.com:4400,
or a String containing multiple such host-and-port strings separated by commas,
or a Collection<String> containing such host-and-port strings.
You may change the protocol used to communicate with the hosts using this configuration property:
hibernate.search.backend.protocol = httpThe default for this property is http.
This property may be set to either http or https.
Alternatively, it is possible to define both the protocol and hosts as one or more URIs using a single property:
hibernate.search.backend.uris = http://localhost:9200This property may be set to a String representing a URI such as http://localhost or https://es.mycompany.com:4400,
or a String containing multiple such URI strings separated by commas,
or a Collection<String> containing such URI strings.
|
There are some constraints regarding the use of this property:
|
11.4.2. Path prefix
By default, the REST API is expected to be available to the root path (/).
For example a search query target all indexes will be sent to path /_search.
This is what you need for a standard Elasticsearch setup.
If your setup is non-standard, for example because of a non-transparent proxy between the application and the Elasticsearch cluster, you can use a configuration similar to this:
hibernate.search.backend.path_prefix = my/pathWith the above, a search query targeting all indexes will be sent to path /my/path/_search instead of /_search.
The path will be prefixed similarly for all requests sent to Elasticsearch.
11.4.3. Node discovery
When using automatic discovery, the Elasticsearch client will periodically probe for new nodes in the cluster,
and will add those to the host list (see hosts in Client configuration).
Automatic discovery is controlled by the following properties:
hibernate.search.backend.discovery.enabled = false
hibernate.search.backend.discovery.refresh_interval = 10-
discovery.enableddefines whether the feature is enabled. Expects a boolean value. The default for this property isfalse. -
discovery.refresh_intervaldefines the interval between two executions of the automatic discovery. Expects a positive integer, in seconds. The default for this property is10.
11.4.4. HTTP authentication
HTTP authentication is disabled by default, but may be enabled by setting the following configuration properties:
hibernate.search.backend.username = ironman
hibernate.search.backend.password = j@rv1sThe default for these properties is an empty string.
The username and password to send when connecting to the Elasticsearch servers.
|
If you use HTTP instead of HTTPS (see above), your password will be transmitted in clear text over the network. |
11.4.5. Authentication on Amazon Web Services
The Hibernate Search Elasticsearch backend, once configured, will work just fine in most setups. However, if you need to use Amazon’s managed Elasticsearch service, you will find it requires a proprietary authentication method: request signing.
While request signing is not supported by default, you can enable it with an additional dependency and a bit of configuration.
You will need to add this dependency:
<dependency>
<groupId>org.hibernate.search</groupId>
<artifactId>hibernate-search-backend-elasticsearch-aws</artifactId>
<version>6.1.8.Final</version>
</dependency>With that dependency in your classpath, you will still need to configure it.
The following configuration is mandatory:
hibernate.search.backend.aws.signing.enabled = true
hibernate.search.backend.aws.region = us-east-1-
aws.signing.enableddefines whether request signing is enabled. Expects a boolean value. Defaults tofalse. -
aws.regiondefines the AWS region. Expects a string value. This property has no default and must be provided for the AWS authentication to work.
By default, Hibernate Search will rely on the default credentials provider from the AWS SDK. This provider will look for credentials in the following place and in the following order:
-
Java System Properties:
aws.accessKeyIdandaws.secretKey. -
Environment Variables:
AWS_ACCESS_KEY_IDandAWS_SECRET_ACCESS_KEY. -
Credential profiles file at the default location (
~/.aws/credentials) shared by all AWS SDKs and the AWS CLI. -
Credentials delivered through the Amazon EC2 container service if
AWS_CONTAINER_CREDENTIALS_RELATIVE_URIenvironment variable is set and security manager has permission to access the variable. -
Instance profile credentials delivered through the Amazon EC2 metadata service.
Optionally, you can set static credentials with the following options:
hibernate.search.backend.aws.credentials.type = static
hibernate.search.backend.aws.credentials.access_key_id = AKIDEXAMPLE
hibernate.search.backend.aws.credentials.secret_access_key = wJalrXUtnFEMI/K7MDENG+bPxRfiCYEXAMPLEKEY-
aws.credentials.typedefines the type of credentials. Set todefaultto get the default behavior (as explained above), or tostaticto provide credentials using the properties below. -
aws.credentials.access_key_iddefines the access key ID. Expects a string value. This property has no default and must be provided when the credentials type is set tostatic. -
aws.credentials.secret_access_keydefines the secret access key. Expects a string value. This property has no default and must be provided when the credentials type is set tostatic.
11.4.6. Connection tuning
- Timeouts
-
# hibernate.search.backend.request_timeout = 30000 hibernate.search.backend.connection_timeout = 1000 hibernate.search.backend.read_timeout = 30000-
request_timeoutdefines the timeout when executing a request. This includes the time needed to establish a connection, send the request and read the response. This property is not defined by default. -
connection_timeoutdefines the timeout when establishing a connection. The default for this property is1000. -
read_timeoutdefines the timeout when reading a response. The default for this property is30000.These properties expect a positive Integer value in milliseconds, such as
3000.
-
- Connection pool
-
hibernate.search.backend.max_connections = 20 hibernate.search.backend.max_connections_per_route = 10-
max_connectionsdefines maximum number of simultaneous connections to the Elasticsearch cluster, all hosts taken together. The default for this property is20. -
max_connections_per_routedefines maximum number of simultaneous connections to each host of the Elasticsearch cluster. The default for this property is10.
These properties expect a positive Integer value, such as
20. -
11.4.7. Custom HTTP client configurations
It is possible to configure the HTTP client directly
using an instance of org.apache.http.impl.nio.client.HttpAsyncClientBuilder.
With this API you can add interceptors, change the keep alive, the max connections, the SSL key/trust store settings and many other client configurations.
Configure the HTTP client directly requires two steps:
-
Define a class that implements the
org.hibernate.search.backend.elasticsearch.client.ElasticsearchHttpClientConfigurerinterface. -
Configure Hibernate Search to use that implementation by setting the configuration property
hibernate.search.backend.client.configurerto a bean reference pointing to the implementation, for exampleclass:org.hibernate.search.documentation.backend.elasticsearch.client.HttpClientConfigurer.
ElasticsearchHttpClientConfigurerpublic class HttpClientConfigurer implements ElasticsearchHttpClientConfigurer { (1)
@Override
public void configure(ElasticsearchHttpClientConfigurationContext context) { (2)
HttpAsyncClientBuilder clientBuilder = context.clientBuilder(); (3)
clientBuilder.setMaxConnPerRoute( 7 ); (4)
clientBuilder.addInterceptorFirst( (HttpResponseInterceptor) (request, httpContext) -> {
long contentLength = request.getEntity().getContentLength();
// doing some stuff with contentLength
} );
}
}| 1 | The class has to implement the ElasticsearchHttpClientConfigurer interface. |
| 2 | The configure method provides the access to the ElasticsearchHttpClientConfigurationContext. |
| 3 | From the context it is possible to get the HttpAsyncClientBuilder. |
| 4 | Finally, you can use the builder to configure the client with your custom settings. |
(1)
hibernate.search.backend.client.configurer = class:org.hibernate.search.documentation.backend.elasticsearch.client.HttpClientConfigurer| 1 | Specify the HTTP client configurer. |
|
Any setting defined by a custom http client configurer will override any other setting defined by Hibernate Search. |
11.4.8. Version
Different distributions and versions of Elasticsearch expose slightly different APIs. As a result, Hibernate Search needs to be aware of the distribution and version of Elasticsearch it is talking to in order to generate correct HTTP requests.
By default, Hibernate Search will query the Elasticsearch cluster at boot time to retrieve this information, and will infer the correct behavior to adopt.
If necessary, you can disable the call to the Elasticsearch cluster on startup, and provide the information manually. To do that:
-
set the property
hibernate.search.backend.version_check.enabledtofalse; -
and set the property
hibernate.search.backend.versionto a version string.The expected format for that string is either
x.y.z-qualifieror<distribution>:x.y.z-qualifier, where '<distribution>' is eitherelasticoropensearch(defaults toelastic), 'x', 'y' and 'z' are integers, andqualifieris a string of word characters (alphanumeric or_).The major and minor version numbers (
xandyin the formats above) are mandatory, but all other components (distribution, micro, qualifier) are optional.For example,
7.0,7.10,opensearch:1.0are all valid version strings.
|
The property In that case, Hibernate Search will still query the Elasticsearch/OpenSearch cluster to detect the actual distribution and version of the cluster, and will check that the configured distribution and version match the actual ones. This can be helpful while developing, in particular. |
11.4.9. Logging
The hibernate.search.backend.log.json_pretty_printing boolean property
defines whether JSON included in logs should be pretty-printed (indented, with line breaks).
It defaults to false.
11.5. Sharding
|
For a preliminary introduction to sharding, including how it works in Hibernate Search and what its limitations are, see Sharding and routing. |
Elasticsearch disables sharding by default.
To enable it,
set the property index.number_of_shards in your cluster.
11.6. Schema management
Elasticsearch indexes need to be created before they can be used for indexing and searching; see Managing the index schema for more information about how to create indexes and their schema in Hibernate Search.
For Elasticsearch specifically, some fine-tuning is available through the following options:
# To configure the defaults for all indexes:
hibernate.search.backend.schema_management.minimal_required_status = green
hibernate.search.backend.schema_management.minimal_required_status_wait_timeout = 10000
# To configure a specific index:
hibernate.search.backend.indexes.<index name>.schema_management.minimal_required_status = green
hibernate.search.backend.indexes.<index name>.schema_management.minimal_required_status_wait_timeout = 10000-
minimal_required_statusdefines the minimal required status of an index before creation is considered complete. The default for this property isyellow. -
minimal_required_status_wait_timeoutdefines the maximum time to wait for this status, as an integer value in milliseconds. The default for this property is10000.
These properties are only effective when creating or validating an index as part of schema management.
11.7. Index layout
Hibernate Search works with aliased indexes. This means an index with a given name in Hibernate Search will not directly be mapped to an index with the same name in Elasticsearch.
The index layout is how Hibernate Search index names are mapped to Elasticsearch indexes, and the strategy controlling that layout is set at the backend level:
hibernate.search.backend.layout.strategy = simpleThe default for this property is simple.
See the following subsections for details about available strategies.
11.7.1. simple: the default, future-proof strategy
For an index whose name in Hibernate Search is myIndex:
-
If Hibernate Search creates the index automatically, it will name the index
myindex-000001and will automatically create the write and read aliases. -
Write operations (indexing, purge, …) will target the alias
myindex-write. -
Read operations (searching, explaining, …) will target the alias
myindex-read.
|
The Using aliases has a significant advantage over directly targeting the index: it makes full reindexing on a live application possible without downtime, which is useful in particular when automatic indexing is disabled (completely or partially) and you need to fully reindex periodically (for example on a daily basis). With aliases, you just need to direct the read alias (used by search queries) to an old copy of the index,
while the write alias (used by document writes) is redirected to a new copy of the index.
Without aliases (in particular with the This "zero-downtime" reindexing, which shares some characteristics with "blue/green" deployment, is not currently provided by Hibernate Search itself. However, you can implement it in your application by directly issuing commands to Elasticsearch’s REST APIs. The basic sequence of actions is the following:
Note this will only work if the Hibernate Search mapping did not change; a zero-downtime upgrade with a changing schema would be considerably more complex. You will find discussions on this topic in HSEARCH-2861 and HSEARCH-3499. |
11.7.2. no-alias: a strategy without index aliases
This strategy is mostly useful on legacy clusters.
For an index whose name in Hibernate Search is myIndex:
-
If Hibernate Search creates the index automatically, it will name the index
myindexand will not create any alias. -
Write operations (indexing, purge, …) will target the index directly by its name,
myindex. -
Read operations (searching, explaining, …) will target the index directly by its name
myindex.
11.7.3. Custom strategy
If the built-in layout strategies do not fit your requirements, you can define a custom layout in two simple steps:
-
Define a class that implements the interface
org.hibernate.search.backend.elasticsearch.index.layout.IndexLayoutStrategy. -
Configure the backend to use that implementation by setting the configuration property
hibernate.search.backend.layout.strategyto a bean reference pointing to the implementation, for exampleclass:com.mycompany.MyLayoutStrategy.
For example, the implementation below will lead to the following layout for an index named myIndex:
-
Write operations (indexing, purge, …) will target the alias
myindex-write. -
Read operations (searching, explaining, …) will target the alias
myindex(no suffix). -
If Hibernate Search creates the index automatically at exactly 19:19:00 on November 6th, 2017, it will name the index
myindex-20171106-191900-000000000.
import java.time.Clock;
import java.time.Instant;
import java.time.ZoneOffset;
import java.time.format.DateTimeFormatter;
import java.util.Locale;
import java.util.regex.Matcher;
import java.util.regex.Pattern;
import org.hibernate.search.backend.elasticsearch.index.layout.IndexLayoutStrategy;
public class CustomLayoutStrategy implements IndexLayoutStrategy {
private static final DateTimeFormatter INDEX_SUFFIX_FORMATTER =
DateTimeFormatter.ofPattern( "uuuuMMdd-HHmmss-SSSSSSSSS", Locale.ROOT )
.withZone( ZoneOffset.UTC );
private static final Pattern UNIQUE_KEY_PATTERN =
Pattern.compile( "(.*)-\\d+-\\d+-\\d+" );
@Override
public String createInitialElasticsearchIndexName(String hibernateSearchIndexName) {
// Clock is Clock.systemUTC() in production, may be overridden in tests
Clock clock = MyApplicationClock.get();
return hibernateSearchIndexName + "-"
+ INDEX_SUFFIX_FORMATTER.format( Instant.now( clock ) );
}
@Override
public String createWriteAlias(String hibernateSearchIndexName) {
return hibernateSearchIndexName + "-write";
}
@Override
public String createReadAlias(String hibernateSearchIndexName) {
return hibernateSearchIndexName;
}
@Override
public String extractUniqueKeyFromHibernateSearchIndexName(
String hibernateSearchIndexName) {
return hibernateSearchIndexName;
}
@Override
public String extractUniqueKeyFromElasticsearchIndexName(
String elasticsearchIndexName) {
Matcher matcher = UNIQUE_KEY_PATTERN.matcher( elasticsearchIndexName );
if ( !matcher.matches() ) {
throw new IllegalArgumentException(
"Unrecognized index name: " + elasticsearchIndexName
);
}
return matcher.group( 1 );
}
}11.7.4. Retrieving index or alias names
Index or alias names used to read and write can be retrieved from the metamodel.
SearchMapping mapping = Search.mapping( entityManagerFactory ); (1)
IndexManager indexManager = mapping.indexManager( "Book" ); (2)
ElasticsearchIndexManager esIndexManager = indexManager.unwrap( ElasticsearchIndexManager.class ); (3)
ElasticsearchIndexDescriptor descriptor = esIndexManager.descriptor();(4)
String readName = descriptor.readName();(5)
String writeName = descriptor.writeName();(5)| 1 | Retrieve the SearchMapping. |
| 2 | Retrieve the IndexManager. |
| 3 | Narrow down the index manager to the ElasticsearchIndexManager type. |
| 4 | Get the index descriptor. |
| 5 | Get the index (or alias) read and write names. |
11.8. Schema ("mapping")
What Elasticsearch calls the "mapping" is the schema assigned to each index, specifying the data type and capabilities of each "property" (called an "index field" in Hibernate Search).
For the most part, the Elasticsearch mapping is inferred from the mapping configured through Hibernate Search’s mapping APIs, which are generic and independent of Elasticsearch.
Aspects that are specific to the Elasticsearch backend are explained in this section.
|
Hibernate Search can be configured to push the mapping to Elasticsearch when creating the indexes through schema management. |
11.8.1. Field types
Available field types
|
Some types are not supported directly by the Elasticsearch backend,
but will work anyway because they are "bridged" by the mapper.
For example a |
|
Field types that are not in this list can still be used with a little bit more work:
|
| Field type | Data type in Elasticsearch | Limitations |
|---|---|---|
|
|
- |
|
|
- |
|
|
- |
|
|
- |
|
|
- |
|
|
- |
|
|
- |
|
|
- |
|
|
- |
|
|
- |
|
|
|
|
|
|
|
|
|
|
|
|
|
|
|
|
|
|
|
|
|
|
|
|
|
|
|
|
|
- |
|
- |
|
Range and resolution of date/time fields
The Elasticsearch
Values that are out of range will trigger indexing failures. Resolution is also lower:
Precision beyond the millisecond will be lost when indexing. |
Index field type DSL extension
Not all Elasticsearch field types have built-in support in Hibernate Search. Unsupported field types can still be used, however, by taking advantage of the "native" field type. Using this field type, the Elasticsearch "mapping" can be defined as JSON directly, giving access to everything Elasticsearch can offer.
Below is an example of how to use the Elasticearch "native" type.
public class IpAddressValueBinder implements ValueBinder { (1)
@Override
public void bind(ValueBindingContext<?> context) {
context.bridge(
String.class,
new IpAddressValueBridge(),
context.typeFactory() (2)
.extension( ElasticsearchExtension.get() ) (3)
.asNative() (4)
.mapping( "{\"type\": \"ip\"}" ) (5)
);
}
private static class IpAddressValueBridge implements ValueBridge<String, JsonElement> {
@Override
public JsonElement toIndexedValue(String value, ValueBridgeToIndexedValueContext context) {
return value == null ? null : new JsonPrimitive( value ); (6)
}
@Override
public String fromIndexedValue(JsonElement value, ValueBridgeFromIndexedValueContext context) {
return value == null ? null : value.getAsString(); (7)
}
}
}| 1 | Define a custom binder and its bridge. The "native" type can only be used from a binder, it cannot be used directly with annotation mapping. Here we’re defining a value binder, but a type binder, or a property binder would work as well. |
| 2 | Get the context’s type factory. |
| 3 | Apply the Elasticsearch extension to the type factory. |
| 4 | Call asNative to start defining a native type. |
| 5 | Pass the Elasticsearch mapping as JSON. |
| 6 | Values of native fields are represented as a JsonElement in Hibernate Search.
JsonElement is a type from the Gson library.
Do not forget to format them correctly before you pass them to the backend.
Here we are creating a JsonPrimitive (a subtype of JsonElement) from a String
because we just need a JSON string,
but it’s completely possible to handle more complex objects,
or even to convert directly from POJOs to JSON using Gson. |
| 7 | For nicer projections, you can also implement this method to convert
from JsonElement to the mapped type (here, String). |
@Entity
@Indexed
public class CompanyServer {
@Id
@GeneratedValue
private Integer id;
@NonStandardField( (1)
valueBinder = @ValueBinderRef(type = IpAddressValueBinder.class) (2)
)
private String ipAddress;
// Getters and setters
// ...
}| 1 | Map the property to an index field.
Note that value bridges using a non-standard type (such as Elasticsearch’s "native" type)
must be mapped using the @NonStandardField annotation:
other annotations such as @GenericField will fail. |
| 2 | Instruct Hibernate Search to use our custom value binder. |
11.8.2. Type name mapping
When Hibernate Search performs a search query targeting multiple entity types, and thus multiple indexes, it needs to determine the type of each search hit in order to map it back to an entity.
There are multiple strategies to handle this "type name resolution", and each has pros and cons.
The strategy is set at the backend level:
hibernate.search.backend.mapping.type_name.strategy = discriminatorThe default for this property is discriminator.
See the following subsections for details about available strategies.
discriminator: type name mapping using a discriminator field
With the discriminator strategy, a discriminator field is used to retrieve the type name directly from each document.
When indexing, the _entity_type field is populated transparently with type name for each document.
When searching, the docvalues for the type field is transparently requested to Elasticsearch and extracted from the response.
Pros:
-
Works correctly when targeting index aliases.
Cons:
-
Small storage overhead: a few bytes of storage per document.
-
Requires reindexing if an entity name changes, even if the index name doesn’t change.
index-name: type name mapping using the index name
With the index-name strategy, the _index meta-field returned for each search hit
is used to resolve the index name, and from that the type name.
Pros:
-
No storage overhead.
Cons:
-
Relies on the actual index name, not aliases, because the
_indexmeta-field returned by Elasticsearch contains the actual index name (e.g.myindex-000001), not the alias (e.g.myindex-read). If indexes do not follow the default naming scheme<hibernateSearchIndexName>-<6 digits>, a custom index layout must be configured.
11.8.3. Dynamic mapping
By default, Hibernate Search sets the dynamic property in Elasticsearch index mappings to strict.
This means that attempting to index documents with fields that are not present in the mapping will lead to an indexing failure.
If Hibernate Search is the only client, that won’t be a problem, since Hibernate Search usually works on declared schema fields only. For the other cases in which we need to change this setting, we can use the following index-level property to change the value.
# To configure the defaults for all indexes:
hibernate.search.backend.dynamic_mapping = strict
# To configure a specific index:
hibernate.search.backend.indexes.<index name>.dynamic_mapping = strictThe default for this property is strict.
We said that Hibernate Search usually works on declared schema fields. More precisely, it always does
if no Dynamic fields with field templates are defined.
When field templates are defined, dynamic will be forced to true, in order to allow for dynamic fields. In that case, the value of the dynamic_mapping property is ignored.
11.8.4. Multi-tenancy
Multi-tenancy is supported and handled transparently, according to the tenant ID defined in the current session:
-
documents will be indexed with the appropriate values, allowing later filtering;
-
queries will filter results appropriately.
The multi-tenancy is automatically enabled in the backend if it is enabled in the mapper, e.g. if a multi-tenancy strategy is selected in Hibernate ORM.
However, it is possible to enable multi-tenancy manually.
The multi-tenancy strategy is set at the backend level:
hibernate.search.backend.multi_tenancy.strategy = noneSee the following subsections for details about available strategies.
none: single-tenancy
The none strategy (the default) disables multi-tenancy completely.
Attempting to set a tenant ID will lead to a failure when indexing.
discriminator: type name mapping using the index name
With the discriminator strategy,
all documents from all tenants are stored in the same index.
The Elasticsearch ID of each document is set to the concatenation of the tenant ID and original ID.
When indexing, two fields are populated transparently for each document:
-
_tenant_id: the "discriminator" field holding the tenant ID. -
_tenant_doc_id: a field holding the original (tenant-scoped) document ID.
When searching, a filter targeting the tenant ID field is added transparently to the search query to only return search hits for the current tenant. The ID field is used to retrieve the original document IDs.
11.8.5. Custom index mapping
Basics
Hibernate Search can create and validate indexes, but by default created indexes will only include the bare minimum required to index and search: the mapping, and the analysis settings. Should you need to customize some mapping parameters, it is possible to provide a custom mapping to Hibernate Search: it will include the custom mapping when creating an index.
|
The consistency of the custom Elasticsearch mapping with the Hibernate Search mapping will not get checked in any way.
You are responsible for making sure that any override in your mapping can work,
e.g. that you’re not changing the type of an index field from An invalid custom mapping may not trigger any exception on bootstrap, but later while indexing or querying. In the worst case, it could not trigger any exception, but simply lead to incorrect search results. Exercise extreme caution. |
# To configure the defaults for all indexes:
hibernate.search.backend.schema_management.mapping_file = custom/index-mapping.json
# To configure a specific index:
hibernate.search.backend.indexes.<index name>.schema_management.mapping_file = custom/index-mapping.jsoncustom/index-mapping.json file{
"properties":{
"userField":{
"type":"keyword",
"index":true,
"norms":true,
"doc_values":true
},
"userObject":{
"dynamic":"true",
"type":"object"
}
},
"_source": {
"enabled": false
}
}|
Properties that are only defined in the custom mappings file but not mapped by Hibernate Search will not be visible to Hibernate Search. This means Hibernate Search will throw exceptions if you try to reference these properties in the Search DSL, or when writing to a document from a bridge |
The file does not need to contain the full mapping: Hibernate Search will automatically inject missing properties (index fields) in the given mapping.
Conflicts between the given mapping and the mapping generated by Hibernate Search will be handled as follows:
-
Mapping parameters other than
propertiesat the root of the mapping will be those from the given mapping; those generated by Hibernate Search will be ignored. -
propertieswill be merged, using properties defined in both the given mapping and the mapping generated by Hibernate Search. -
If a property is defined on both sides, mapping parameters from the given mapping will be used, except for
properties, which will be merged recursively as described in item 2.
In the example above, the resulting, merged mapping could look like this:
custom/index-mapping.json with the Hibernate Search mapping{
"_source":{
"enabled":false
},
"properties":{
"_entity_type":{ (1)
"type":"keyword",
"index":false
},
"title":{ (2)
"type":"text",
"analyzer":"english"
},
"userField":{
"type":"keyword",
"norms":true
},
"userObject":{
"type":"object",
"dynamic":"true"
}
}
}| 1 | This property is always added by Hibernate Search for internal implementation purposes. |
| 2 | This is a property generated by Hibernate Search because the indexed entity
has a String name property annotated with @FullTextField. |
Disabling _source
Using this feature it is possible to disable the _source field.
For instance, you could pass a custom/index-mapping.json file like the following:
custom/index-mapping.json file to disable the _source field{
"_source": {
"enabled": false
}
}|
Disabling the Several projections rely on the |
11.9. Analysis
11.9.1. Basics
Analysis is the text processing performed by analyzers, both when indexing (document processing) and when searching (query processing).
All built-in Elasticsearch analyzers can be used transparently, without any configuration in Hibernate Search: just use their name wherever Hibernate Search expects an analyzer name. However, analysis can also be configured explicitly.
|
Elasticsearch analysis configuration is not applied immediately on startup: it needs to be pushed to the Elasticsearch cluster. Hibernate Search will only push the configuration to the cluster if instructed to do so through schema management. |
To configure analysis in an Elasticsearch backend, you will need to:
-
Define a class that implements the
org.hibernate.search.backend.elasticsearch.analysis.ElasticsearchAnalysisConfigurerinterface. -
Configure the backend to use that implementation by setting the configuration property
hibernate.search.backend.analysis.configurerto a bean reference pointing to the implementation, for exampleclass:com.mycompany.MyAnalysisConfigurer.
Hibernate Search will call the configure method of this implementation on startup,
and the configurer will be able to take advantage of a DSL to define
analyzers and normalizers.
|
A different analysis configurer can be assigned to each index: If a specific configurer is assigned to an index, the default configurer will be ignored for that index: only definitions from the specific configurer will be taken into account. |
11.9.2. Built-in analyzers
Built-in analyzers are available out-of-the-box and don’t require explicit configuration. If necessary, they can be overridden by defining your own analyzer with the same name.
The Elasticsearch backend comes with several built-in analyzers. The exact list depends on the version of Elasticsearch and can be found here.
One important built-in analyzer is the one named default:
it is used by default with @FullTextField.
Unless overridden explicitly, this analyzer uses a standard tokenizer and a lowercase filter.
11.9.4. Custom analyzers and normalizers
The context passed to the configurer exposes a DSL to define analyzers and normalizers:
package org.hibernate.search.documentation.analysis;
import org.hibernate.search.backend.elasticsearch.analysis.ElasticsearchAnalysisConfigurationContext;
import org.hibernate.search.backend.elasticsearch.analysis.ElasticsearchAnalysisConfigurer;
public class MyElasticsearchAnalysisConfigurer implements ElasticsearchAnalysisConfigurer {
@Override
public void configure(ElasticsearchAnalysisConfigurationContext context) {
context.analyzer( "english" ).custom() (1)
.tokenizer( "standard" ) (2)
.charFilters( "html_strip" ) (3)
.tokenFilters( "lowercase", "snowball_english", "asciifolding" ); (4)
context.tokenFilter( "snowball_english" ) (5)
.type( "snowball" )
.param( "language", "English" ); (6)
context.normalizer( "lowercase" ).custom() (7)
.tokenFilters( "lowercase", "asciifolding" );
context.analyzer( "french" ).custom() (8)
.tokenizer( "standard" )
.tokenFilters( "lowercase", "snowball_french", "asciifolding" );
context.tokenFilter( "snowball_french" )
.type( "snowball" )
.param( "language", "French" );
}
}| 1 | Define a custom analyzer named "english", because it will be used to analyze English text such as book titles. |
| 2 | Set the tokenizer to a standard tokenizer. |
| 3 | Set the char filters. Char filters are applied in the order they are given, before the tokenizer. |
| 4 | Set the token filters. Token filters are applied in the order they are given, after the tokenizer. |
| 5 | Note that, for Elasticsearch, any parameterized char filter, tokenizer or token filter must be defined separately and assigned a name. |
| 6 | Set the value of a parameter for the char filter/tokenizer/token filter being defined. |
| 7 | Normalizers are defined in a similar way, the only difference being that they cannot use a tokenizer. |
| 8 | Multiple analyzers/normalizers can be defined in the same configurer. |
(1)
hibernate.search.backend.analysis.configurer = class:org.hibernate.search.documentation.analysis.MyElasticsearchAnalysisConfigurer| 1 | Assign the configurer to the backend using a Hibernate Search configuration property. |
It is also possible to assign a name to a parameterized built-in analyzer:
context.analyzer( "english_stopwords" ).type( "standard" ) (1)
.param( "stopwords", "_english_" ); (2)| 1 | Define an analyzer with the given name and type. |
| 2 | Set the value of a parameter for the analyzer being defined. |
To know which analyzers, character filters, tokenizers and token filters are available, refer to the documentation:
-
If you want to use a built-in analyzer and not create your own: analyzers;
-
If you want to define your own analyzer: character filters, tokenizers, token filters.
11.10. Custom index settings
Hibernate Search can create and validate indexes, but by default created indexes will only include the bare minimum required to index and search: the mapping, and the analysis settings. Should you need to set some custom index settings, it is possible to provide these settings to Hibernate Search: it will include them when creating an index and take them into account when validating an index.
# To configure the defaults for all indexes:
hibernate.search.backend.schema_management.settings_file = custom/index-settings.json
# To configure a specific index:
hibernate.search.backend.indexes.<index name>.schema_management.settings_file = custom/index-settings.jsoncustom/index-settings.json file{
"number_of_shards": "3",
"number_of_replicas": "3",
"analysis": {
"analyzer": {
"my_standard-english": {
"type": "standard",
"stopwords": "_english_"
},
"my_analyzer_ngram": {
"type": "custom",
"tokenizer": "my_analyzer_ngram_tokenizer"
}
},
"tokenizer": {
"my_analyzer_ngram_tokenizer": {
"type": "ngram",
"min_gram": "5",
"max_gram": "6"
}
}
}
}The provided settings will be merged with those generated by Hibernate Search, including analyzer definitions. When analysis is configured both through an analysis configurer and these custom settings, the behavior is undefined; it should not be relied upon.
|
Custom index setting must be provided in the simplified form, the one without the attribute the |
11.11. Threads
The Elasticsearch backend relies on an internal thread pool to orchestrate indexing requests (add/update/delete) and to schedule request timeouts.
By default, the pool contains exactly as many threads as the number of processors available to the JVM on bootstrap. That can be changed using a configuration property:
hibernate.search.backend.thread_pool.size = 4|
This number is per backend, not per index. Adding more indexes will not add more threads. |
|
As all operations happening in this thread-pool are non-blocking, raising its size above the number of processor cores available to the JVM will not bring noticeable performance benefits. The only reason to alter this setting would be to reduce the number of threads; for example, in an application with a single index with a single indexing queue, running on a machine with 64 processor cores, you might want to bring down the number of threads. |
11.12. Indexing queues
Among all the requests sent by Hibernate Search to Elasticsearch, it is expected that there will be a lot of "indexing" requests to create/update/delete a specific document. Sending these requests one by one would be inefficient (mainly because of network latency). Also, we generally want to preserve the relative order of these requests when they are about the same documents.
For these reasons, Hibernate Search pushes these requests to ordered queues and relies on the Bulk API to send them in batches. Each index maintains 10 queues holding at most 1000 elements each, and each queue will send bulk requests of at most 100 indexing requests. Queues operate independently (in parallel), but each queue sends one bulk request after the other, so at any given time there can be at most 10 bulk requests being sent for each index.
|
Indexing operations relative to the same document ID are always pushed to the same queue. |
It is possible to customize the queues in order to reduce the load on the Elasticsearch server, or on the contrary to improve throughput. This is done through the following configuration properties:
# To configure the defaults for all indexes:
hibernate.search.backend.indexing.queue_count = 10
hibernate.search.backend.indexing.queue_size = 1000
hibernate.search.backend.indexing.max_bulk_size = 100
# To configure a specific index:
hibernate.search.backend.indexes.<index name>.indexing.queue_count = 10
hibernate.search.backend.indexes.<index name>.indexing.queue_size = 1000
hibernate.search.backend.indexes.<index name>.indexing.max_bulk_size = 100-
indexing.queue_countdefines the number of queues. Expects a strictly positive integer value. The default for this property is10.Higher values will lead to more connections being used in parallel, which may lead to higher indexing throughput, but incurs a risk of overloading Elasticsearch, leading to Elasticsearch giving up on some requests and resulting in indexing failures.
-
indexing.queue_sizedefines the maximum number of elements each queue can hold. Expects a strictly positive integer value. The default for this property is1000.Lower values may lead to lower memory usage, especially if there are many queues, but values that are too low will reduce the likeliness of reaching the max bulk size and increase the likeliness of application threads blocking because the queue is full, which may lead to lower indexing throughput.
-
indexing.max_bulk_sizedefines the maximum number of indexing requests in each bulk request. Expects a strictly positive integer value. The default for this property is100.Higher values will lead to more documents being sent in each HTTP request sent to Elasticsearch, which may lead to higher indexing throughput, but incurs a risk of overloading Elasticsearch, leading to Elasticsearch giving up on some requests and resulting in indexing failures.
Note that raising this number above the queue size has no effect, as bulks cannot include more requests than are contained in the queue.
|
When a queue is full, any attempt to request indexing will block until the request can be put into the queue. In order to achieve a reasonable level of performance, be sure to set the size of queues to a high enough number that this kind of blocking only happens when the application is under very high load. |
|
Elasticsearch nodes can only handle so many parallel requests, and in particular they limit the amount of memory available to store all pending requests at any given time. In order to avoid indexing failures, avoid using overly large numbers for the number of queues and the maximum bulk size, especially if you expect your index to hold large documents. |
11.13. Writing and reading
|
For a preliminary introduction to writing to and reading from indexes in Hibernate Search, including in particular the concepts of commit and refresh, see Commit and refresh. |
11.13.1. Commit
When writing to indexes, Elasticsearch relies on a transaction log to make sure that changes, even uncommitted, are always safe as soon as the REST API call returns.
For that reason, the concept of "commit" is not as important to the Elasticsearch backend, and commit requirements are largely irrelevant.
11.13.2. Refresh
When reading from indexes, Elasticsearch relies on a periodically refreshed index reader, meaning that search queries will return slightly out-of-date results, unless a refresh was forced: this is called near-real-time behavior.
By default, the index reader is refreshed every second,
but this can be customized on the Elasticsearch side through index settings:
see the refresh_interval setting on this page.
11.14. Searching
Searching with the Elasticsearch backend relies on the same APIs as any other backend.
This section details Elasticsearch-specific configuration related to searching.
11.14.1. Scroll timeout
With the Elasticsearch backend, scrolls are subject to timeout.
If next() is not called for a long period of time (default: 60 seconds),
the scroll will be closed automatically and the next call to next() will fail.
Use the following configuration property at the backend level to configure the timeout (in seconds):
hibernate.search.backend.scroll_timeout = 60The default for this property is 60.
11.15. Retrieving the REST client
When writing complex applications with advanced requirements, it may be necessary from time to time to send requests to the Elasticsearch cluster directly, in particular if Hibernate Search does not support this kind of requests out of the box.
To that end, you can retrieve the Elasticsearch backend, then get access the Elasticsearch client used by Hibernate Search internally. See below for an example.
SearchMapping mapping = Search.mapping( entityManagerFactory ); (1)
Backend backend = mapping.backend(); (2)
ElasticsearchBackend elasticsearchBackend = backend.unwrap( ElasticsearchBackend.class ); (3)
RestClient client = elasticsearchBackend.client( RestClient.class ); (4)| 1 | Retrieve the SearchMapping. |
| 2 | Retrieve the Backend. |
| 3 | Narrow down the backend to the ElasticsearchBackend type. |
| 4 | Get the client, passing the expected type of the client as an argument. |
|
The client itself is not part of the Hibernate Search API, but of the official Elasticsearch REST client API. Hibernate Search may one day switch to another client with a different Java type, without prior notice. If that happens, the snippet of code above will throw an exception. |
12. Coordination
12.1. Basics
|
Coordination is a complex topic, and the problems it solves may appear unclear at first sight. You may find it easier to approach coordination from a higher level. For a few example architectures involving different coordination strategies and a summary of the differences between each architecture, see Examples of architectures. For a summary of the differences between coordination strategies specifically in the context of automatic indexing, see Overview. |
An application using Hibernate Search usually relies on multiple threads, or even multiple application instances, which will update the database concurrently.
The coordination strategy defines how these threads/nodes will coordinate with each other in order to update indexes according to these database updates, in a way that ensures consistency, prevents data loss, and optimizes performance.
This strategy is set through configuration properties:
hibernate.search.coordination.strategy = outbox-pollingThe default for this property is none.
See the following subsections for details about available strategies.
12.2. No coordination
12.2.1. Basics
The default strategy is the simplest and does not involve any additional infrastructure for communication between application nodes.
All automatic indexing operations are executed directly in application threads, which gives this strategy the unique ability to provide synchronous indexing, at the cost of a few limitations:
|
Coordination is a complex topic, and the problems it solves may appear unclear at first sight. You may find it easier to approach coordination from a higher level. For a few example architectures involving different coordination strategies and a summary of the differences between each architecture, see Examples of architectures. For a summary of the differences between coordination strategies specifically in the context of automatic indexing, see Overview. |
12.2.2. How indexing works without coordination
- Changes have to occur in the ORM session in order to be detected
-
See In-session entity change detection and limitations for more details.
- Associations must be updated on both sides
-
See Automatic indexing ignores asymmetric association updates for more details.
- Only relevant changes trigger indexing
-
See Dirty checking for more details.
- Entity data is extracted from entities upon session flushes
-
When a Hibernate ORM session is flushed, Hibernate Search will extract data from the entities to build documents to index, and will put these documents in an internal buffer for indexing after the commit. This extraction may involve loading extra data from the database.
The fact that this internal buffer is populated on session flush means that you can safely
clear()the session after aflush(): entity changes performed up to the flush will be indexed correctly.If you come from Hibernate Search 5 or earlier, you may see this as a significant improvement: there is no need to call
flushToIndexes()and update indexes in the middle of a transaction anymore, except for larger volumes of data (see Controlling entity reads and index writes withSearchIndexingPlan).However, if you perform a batch process inside a transaction, and call
session.flush()/session.clear()regularly to save memory, be aware that Hibernate Search’s internal buffer holding documents to index will grow on each flush, and will not be cleared until the transaction is committed or rolled back. If you encounter memory issues because of that, see Controlling entity reads and index writes withSearchIndexingPlanfor a few solutions.
- Extraction of entity data may fetch extra data from the database
-
Even when you change only a single property of an indexed entity, if that property is indexed, Hibernate Search needs to rebuild the corresponding document in full.
Hibernate Search tries to only load what is necessary for indexing, but depending on your mapping, this may lead to lazy associations being loaded just to reindex entities, even if you didn’t need them in your business code, which may represent an overhead for your application threads as well as your database.
This extra cost can be mitigated to some extent by:
-
leveraging Hibernate ORM’s batch fetching: see the
batch_fetch_sizeproperty and the@BatchSizeannotation. -
leveraging Hibernate ORM’s second-level cache, especially for immutable entities referenced from indexed entities (e.g. for reference data such as countries, cities, …).
-
- Indexing is not guaranteed on commit, but only when the application thread returns
-
When entity changes happen inside a transaction, indexes are not updated immediately, but only after the transaction is successfully committed. That way, if a transaction is rolled back, the indexes will be left in a state consistent with the database, discarding all the index changes that were planned during the transaction.
However, if an error occurs in the backend while indexing, this behavior means that index changes may be lost, leading to out-of-sync indexes. If this is a problem for you, you should consider switching to another coordination strategy.
When entity changes happen outside any transaction (not recommended), indexes are updated immediately upon session flush(). Without that flush, indexes will not be updated automatically.
- Index changes may not be visible immediately
-
By default, indexing will resume the application thread after index changes are committed to the indexes. This means index changes are safely stored to disk, but this does not mean a search query ran immediately after indexing will take the changes into account: when using the Elasticsearch backend in particular, changes may take some time to be visible from search queries.
See Synchronization with the indexes for details.
12.3. outbox-polling: additional event tables and polling in background processors
|
Features detailed in this section are incubating: they are still under active development. The usual compatibility policy does not apply: the contract of incubating elements (e.g. types, methods, configuration properties, etc.) may be altered in a backward-incompatible way — or even removed — in subsequent releases. You are encouraged to use incubating features so the development team can get feedback and improve them, but you should be prepared to update code which relies on them as needed. |
12.3.1. Basics
The outbox-polling strategy implements coordination through
additional tables in the application database.
Automatic indexing is implemented by pushing events to an outbox table within the same transaction as the entity changes, and polling this outbox table from background processors which perform indexing.
This strategy is able to provide guarantees that entities will be indexed regardless of temporary I/O errors in backend, at the cost of being only able to perform this indexing asynchronously.
The outbox-polling strategy can be enabled with the following settings:
hibernate.search.coordination.strategy = outbox-polling|
If multi-tenancy is enabled, you will need extra configuration. See Multi-tenancy. |
You will also need to add this dependency:
<dependency>
<groupId>org.hibernate.search</groupId>
<artifactId>hibernate-search-mapper-orm-coordination-outbox-polling</artifactId>
<version>6.1.8.Final</version>
</dependency>|
Coordination is a complex topic, and the problems it solves may appear unclear at first sight. You may find it easier to approach coordination from a higher level. For a few example architectures involving different coordination strategies and a summary of the differences between each architecture, see Examples of architectures. For a summary of the differences between coordination strategies specifically in the context of automatic indexing, see Overview. |
12.3.2. How indexing works with outbox-polling coordination
- Changes have to occur in the ORM session in order to be detected
-
See In-session entity change detection and limitations for more details.
- Associations must be updated on both sides
-
See Automatic indexing ignores asymmetric association updates for more details.
- Only relevant changes trigger indexing
-
See Dirty checking for more details.
- Indexing happens in a background thread
-
When a Hibernate ORM session is flushed, Hibernate Search will persist entity change events within the same Hibernate ORM session and the same transaction.
An event processor polls the database for new entity change events, and asynchronously performs reindexing of the appropriate entities when it finds new events (i.e. after the transaction is committed).
The fact that events are persisted on session flush means that you can safely
clear()the session after aflush(): entity changes events detected up to the flush will be persisted correctly.If you come from Hibernate Search 5 or earlier, you may see this as a significant improvement: there is no need to call
flushToIndexes()and update indexes in the middle of a transaction anymore.
- The background processor will completely reload entities from the database
-
The background processor responsible for reindexing entities does not have access to the state of the first level cache when the entity change occurred, because it occurred in a different session.
This means each time an entity changes and has to be re-indexed, the background process will load that entity in full. Depending on your mapping, it may also need to load lazy associations to other entities.
This extra cost can be mitigated to some extent by:
-
leveraging Hibernate ORM’s batch fetching; see the
batch_fetch_sizeproperty and the@BatchSizeannotation. -
leveraging Hibernate ORM’s second-level cache, especially for immutable entities referenced from indexed entities (e.g. for reference data such as countries, cities, …).
-
- Indexing is guaranteed on transaction commit
-
When entity changes happen inside a transaction, Hibernate Search will persist entity change events within the same transaction.
If the transaction is committed, these events will be committed as well; if it rolls back, the events will be rolled back as well. This guarantees the events will eventually be processed by a background thread and that the indexes will be updated accordingly, but only when (if) the transaction succeeds.
When entity changes happen outside any transaction (not recommended), events indexes are sent immediately after the session flush(). Without that flush, indexes will not be updated automatically.
- Index changes will not be visible immediately
-
By default, the application thread will resume after entity change events are committed to the database. This means these changes are safely stored to disk, but this does not mean a search query ran immediately when the thread resumes will take the changes into account: indexing will happen at a later time, asynchronously, in a background processor.
You can configure this event processor to run more often, but it will remain asynchronous.
12.3.3. Impact on the database schema
The outbox-polling coordination strategy needs to store data in additional tables in the application database,
so that this data can be consumed by background threads.
This includes in particular an outbox table, to which one row (representing a change event) is pushed every time an entity is changed in a way that requires reindexing.
This also includes an agent table, where Hibernate Search registers every background event processor in order to dynamically assign shards to each application instance, or simply to check that statically assigned shards are consistent.
These tables are accessed through entities that are automatically added to the Hibernate ORM configuration, and as such they should be automatically generated when relying on Hibernate ORM’s automatic schema generation.
If you need to integrate the creation/dropping of these tables to your own script,
the easiest solution is to have Hibernate ORM generate DDL scripts for your whole schema
and copy everything related to constructs (tables, sequences, …) prefixed with HSEARCH_.
See automatic schema generation,
in particular the Hibernate ORM properties javax.persistence.schema-generation.scripts.action,
javax.persistence.schema-generation.scripts.create-target
and javax.persistence.schema-generation.scripts.drop-target.
12.3.4. Sharding and pulse
In order to avoid unnecessarily indexing the same entity multiple times on different application nodes, Hibernate Search partitions the entities in what it calls "shards":
-
Each entity belongs to exactly one shard.
-
Each application node involved in event processing is uniquely assigned one or more shards, and will only process events related to entities in these shards.
In order to reliably assign shards, Hibernate Search adds an agent table to the database, and uses that table to register agents involved in indexing (most of the time, one application instance = one agent = the event processor). The registered agents form a cluster.
To make sure that agents are always assigned one shard, and that one shard is never assigned to more than one agent, each agent will periodically perform a "pulse", updating and inspecting the agent table.
What happens during a pulse depends on the type of agent. During a "pulse":
-
An event processor will:
-
update its own entry in the agent table, to let other agents knows it’s still active;
-
forcibly remove entries from other agents if it detects that these agents expired (did not update their entry for a long time);
-
detect and report configuration mistakes if using static sharding, e.g. two agents assigned to the same shard;
-
decide to suspend itself if a mass indexer is running;
-
trigger rebalancing as necessary if using dynamic sharding; e.g. when it detects that new agents recently joined the cluster, or that agents left the cluster (voluntarily or forcibly).
-
-
A mass indexer will:
-
update its own entry in the agent table, to let other agents knows it’s still active;
-
forcibly remove entries from other agents if it detects that these agents expired (did not update their entry for a long time);
-
switch to active waiting mode (frequent polling) if it notices some event processors are still running;
-
switch to pulse-only mode (infrequent polling) and give the green light for mass indexing to start if it notices no event processors are running anymore.
-
For more details about dynamic and static sharding, see the following sections.
12.3.5. Event processor
Basics
Among agents of the outbox-polling coordination strategy executing in the background,
the most important one is the event processor:
it polls the outbox table for events
and then re-indexes the corresponding entities when new events are found.
The event processor can be configured using the following configuration properties:
hibernate.search.coordination.event_processor.enabled = true
hibernate.search.coordination.event_processor.polling_interval = 100
hibernate.search.coordination.event_processor.pulse_interval = 2000
hibernate.search.coordination.event_processor.pulse_expiration = 30000
hibernate.search.coordination.event_processor.batch_size = 50
hibernate.search.coordination.event_processor.transaction_timeout = 10
hibernate.search.coordination.event_processor.retry_delay = 15-
event_processor.enableddefines whether the event processor is enabled, as a boolean value. The default for this property istrue, but it can be set tofalseto disable event processing on some application nodes, for example to dedicate some nodes to HTTP request processing and other nodes to event processing. -
event_processor.polling_intervaldefines how long to wait for another query to the outbox events table after a query didn’t return any event, as an integer value in milliseconds. The default for this property is100.High values mean higher latency between an entity change and the corresponding update in the index, but less stress on the database when there are no events to process.
Low values mean lower latency between an entity change and the corresponding update in the index, but more stress on the database when there are no events to process.
-
event_processor.pulse_intervaldefines how long the event processor can poll for events before it must perform a "pulse", as an integer value in milliseconds. The default for this property is2000.See the sharding basics for information about "pulses".
The pulse interval must be set to a value between the polling interval (see above) and one third (1/3) of the expiration interval (see below).
Low values (closer to the polling interval) mean less time wasted not processing events when a node joins or leaves the cluster, and reduced risk of wasting time not processing events because an event processor is incorrectly considered disconnected, but more stress on the database because of more frequent checks of the list of agents.
High values (closer to the expiration interval) mean more time wasted not processing events when a node joins or leaves the cluster, and increased risk of wasting time not processing events because an event processor is incorrectly considered disconnected, but less stress on the database because of less frequent checks of the list of agents.
-
event_processor.pulse_expirationdefines how long an event processor "pulse" remains valid before considering the processor disconnected and forcibly removing it from the cluster, as an integer value in milliseconds. The default for this property is30000.See the sharding basics for information about "pulses".
The expiration interval must be set to a value at least 3 times larger than the pulse interval (see above).
Low values (closer to the pulse interval) mean less time wasted not processing events when a node abruptly leaves the cluster due to a crash or network failure, but increased risk of wasting time not processing events because an event processor is incorrectly considered disconnected.
High values (much larger than the pulse interval) mean more time wasted not processing events when a node abruptly leaves the cluster due to a crash or network failure, but reduced risk of wasting time not processing events because an event processor is incorrectly considered disconnected.
-
event_processor.batch_sizedefines how many outbox events, at most, are processed in a single transaction as an integer value. The default for this property is50.High values mean a lower number of transactions opened by the background process and may increase performance thanks to the first-level cache (persistence context), but will increase memory usage and in extreme cases may lead to
OutOfMemoryErrors. -
event_processor.transaction_timeoutdefines the timeout for transactions processing outbox events as an integer value in seconds.Only effective when a JTA transaction manager is configured.
When using JTA and this property is not set, Hibernate Search will use whatever default transaction timeout is configured in the JTA transaction manager.
-
event_processor.retry_delaydefines how long the event processor must wait before re-processing an event after its processing failed, as a positive integer value in seconds. The default for this property is30.Use the value
0to reprocess failed events as soon as possible, with no delay.
Sharding
By default, sharding is dynamic: Hibernate Search registers each application instance in the database, and uses that information to dynamically assign a single, unique shard to each application instance, updating assignments as instances start or stop. Dynamic sharding does not accept any configuration beyond the basics.
If you want to configure sharding explicitly, you can use static sharding by setting the following configuration properties:
hibernate.search.coordination.event_processor.shards.total_count = 4
hibernate.search.coordination.event_processor.shards.assigned = 0-
shards.total_countdefines the total number of shards as an integer value. This property has no default and must be set explicitly if you want static sharding. It must be set to the same value on all application nodes with assigned shards. When this property is set,shards.assignedmust also be set -
shards.assigneddefines the shards assigned to the application node as an integer value, or multiple comma-separated integer values. This property has no default and must be set explicitly if you want static sharding. When this property is set,shards.total_countmust also be set.Shards are referred to by an index in the range
[0, total_count - 1](see above fortotal_count). A given application node must be assigned at least one shard but may be assigned multiple shards by settingshards.assignedto a comma-separated list, e.g.0,3.
|
Each shard must be assigned to one and only one application node. Event processing simply won’t start until every shard has exactly one node. |
For example, the following configuration with 4 application nodes
would assign shard 0 to application node #0, shard 1 application node #1,
and no shard at all to application nodes #2 and #3:
# Node #0
hibernate.search.coordination.strategy = outbox-polling
hibernate.search.coordination.event_processor.shards.total_count = 2
hibernate.search.coordination.event_processor.shards.assigned = 0# Node #1
hibernate.search.coordination.strategy = outbox-polling
hibernate.search.coordination.event_processor.shards.total_count = 2
hibernate.search.coordination.event_processor.shards.assigned = 1# Node #2
hibernate.search.coordination.strategy = outbox-polling
hibernate.search.coordination.event_processor.enabled = false# Node #3
hibernate.search.coordination.strategy = outbox-polling
hibernate.search.coordination.event_processor.enabled = false12.3.6. Mass indexer
Basics
During mass indexing, an application instance will exceptionally bypass sharding and index entities from any shard.
Bypassing sharding can be dangerous, because indexing the same entity simultaneously from an event processor and the mass indexer could potentially result in an out-of-sync index in some rare situations. This is why, to be perfectly safe, event processing gets suspended while mass indexing is in progress. Events are still produced and persisted, but their processing gets delayed until mass indexing finishes.
The suspension of event processing is achieved by registering a mass indexer agent in the agent table, which event processors will eventually detect and react to by suspending themselves. When mass indexing finishes, the mass indexer agent is removed from the agent table, event processors detect that and resume event processing.
The mass indexer agent can be configured using the following configuration properties:
hibernate.search.coordination.mass_indexer.polling_interval = 100
hibernate.search.coordination.mass_indexer.pulse_interval = 2000
hibernate.search.coordination.mass_indexer.pulse_expiration = 30000-
mass_indexer.polling_intervaldefines how long to wait for another query to the agent table when actively waiting for event processors to suspend themselves, as an integer value in milliseconds. The default for this property is100.Low values will reduce the time it takes for the mass indexer agent to detect that event processors finally suspended themselves, but will increase the stress on the database while the mass indexer agent is actively waiting.
High values will increase the time it takes for the mass indexer agent to detect that event processors finally suspended themselves, but will reduce the stress on the database while the mass indexer agent is actively waiting.
-
mass_indexer.pulse_intervaldefines how long the mass indexer can wait before it must perform a "pulse", as an integer value in milliseconds. The default for this property is2000.See the sharding basics for information about "pulses".
The pulse interval must be set to a value between the polling interval (see above) and one third (1/3) of the expiration interval (see below).
Low values (closer to the polling interval) mean reduced risk of event processors starting to process events again during mass indexing because a mass indexer agent is incorrectly considered disconnected, but more stress on the database because of more frequent updates of the mass indexer agent’s entry in the agent table.
High values (closer to the expiration interval) mean increased risk of event processors starting to process events again during mass indexing because a mass indexer agent is incorrectly considered disconnected, but less stress on the database because of less frequent updates of the mass indexer agent’s entry in the agent table.
-
mass_indexer.pulse_expirationdefines how long an event processor "pulse" remains valid before considering the processor disconnected and forcibly removing it from the cluster, as an integer value in milliseconds. The default for this property is30000.See the sharding basics for information about "pulses".
The expiration interval must be set to a value at least 3 times larger than the pulse interval (see above).
Low values (closer to the pulse interval) mean less time wasted with event processors not processing events when a mass indexer agent terminates due to a crash, but increased risk of event processors starting to process events again during mass indexing because a mass indexer agent is incorrectly considered disconnected.
High values (much larger than the pulse interval) mean more time wasted with event processors not processing events when a mass indexer agent terminates due to a crash, but reduced risk of event processors starting to process events again during mass indexing because a mass indexer agent is incorrectly considered disconnected.
12.3.7. Multi-tenancy
If you use Hibernate ORM’s multi-tenancy support, you will need to configure the list of all possible tenant identifiers.
Failing to mention a tenant identifier in this configuration might result in events piling up in the outbox table without ever being processed, or in exceptions being thrown upon mass indexing due to incomplete configuration.
Apart from that, multi-tenancy support should be fairly transparent: Hibernate Search will simply duplicate event processors for each tenant identifiers.
You can use different configuration for different tenants by using a different root for configuration properties:
-
hibernate.search.coordinationis the default root, whose properties will be used as a default for all tenants. -
hibernate.search.coordination.tenants.<tenant ID>is the tenant-specific root.
See below for an example.
Node 1:
hibernate.search.multi_tenancy.tenant_ids=tenant1,tenant2,tenant3,tenant4
hibernate.search.coordination.strategy = outbox-polling
hibernate.search.coordination.tenants.tenant1.event_processor.enabled = false (1)| 1 | This node will process events for all tenants except tenant1. |
Node 2:
hibernate.search.multi_tenancy.tenant_ids=tenant1,tenant2,tenant3,tenant4
hibernate.search.coordination.strategy = outbox-polling
hibernate.search.coordination.event_processor.enabled = false (1)
hibernate.search.coordination.tenants.tenant1.event_processor.enabled = true (2)| 1 | This node will not process events for any tenant… |
| 2 | … except tenant1. |
12.3.8. Aborted events
If something goes wrong when an outbox event is processed, the event processor will try to re-process the events two times, after that the event will be marked as aborted. Aborted events won’t be processed by the processor.
Hibernate Search exposes some APIs to work on aborted events.
OutboxPollingSearchMapping searchMapping = Search.mapping( sessionFactory ).extension( OutboxPollingExtension.get() ); (1)
long count = searchMapping.countAbortedEvents(); (2)
searchMapping.reprocessAbortedEvents(); (3)
searchMapping.clearAllAbortedEvents(); (4)| 1 | To have the access to the API we need to pass the OutboxPollingExtension |
| 2 | Count aborted events |
| 3 | Re-process aborted events |
| 4 | Clear all the aborted events |
If multi-tenancy is enabled, it will be necessary to pass the tenant id to target the tenant operations are performed on.
long count = searchMapping.countAbortedEvents( tenantId ); (1)
searchMapping.reprocessAbortedEvents( tenantId ); (2)
searchMapping.clearAllAbortedEvents( tenantId ); (3)| 1 | Count aborted events for the given tenantId |
| 2 | Re-process aborted events for the given tenantId |
| 3 | Clear all the aborted events for the given tenantId |
13. Standards and integrations
13.1. Jakarta EE
|
Features detailed in this section are incubating: they are still under active development. The usual compatibility policy does not apply: the contract of incubating elements (e.g. types, methods, configuration properties, etc.) may be altered in a backward-incompatible way — or even removed — in subsequent releases. You are encouraged to use incubating features so the development team can get feedback and improve them, but you should be prepared to update code which relies on them as needed. |
Hibernate Search includes experimental support for Jakarta EE,
and it requires only one small change:
when declaring the dependencies of your project,
you must add -jakarta to some artifact identifiers.
For example, an application using Hibernate ORM and the Elasticsearch backend will need to update its dependencies as follows:
<dependency>
<groupId>org.hibernate</groupId>
<artifactId>hibernate-core-jakarta</artifactId> (1)
<version>5.6.12.Final</version>
</dependency>
<dependency>
<groupId>org.hibernate.search</groupId>
<artifactId></artifactId>
<artifactId>hibernate-search-mapper-orm-jakarta</artifactId> (2)
<version>6.1.8.Final</version>
</dependency>
<dependency>
<groupId>org.hibernate.search</groupId>
<artifactId>hibernate-search-backend-elasticsearch</artifactId> (3)
<version>6.1.8.Final</version>
</dependency>| 1 | Replaces hibernate-core. |
| 2 | Replaces hibernate-search-mapper-orm. |
| 3 | No replacement necessary: this artifact does not rely on Java EE. |
All artifacts relying directly or indirectly on Java EE must be replaced with their Jakarta counterpart. This includes in particular:
-
hibernate-search-mapper-orm⇒hibernate-search-mapper-orm-jakarta -
hibernate-search-mapper-orm-batch-jsr352-core⇒hibernate-search-mapper-orm-batch-jsr352-core-jakarta -
…
Artifacts that do not rely on Java EE at all, on the other hand, do not have a Jakarta counterpart and must not be replaced. These artifacts should be excluded from your replacements in particular:
-
hibernate-search-engine -
hibernate-search-backend-lucene -
hibernate-search-backend-elasticsearch -
hibernate-search-backend-elasticsearch-aws -
…
13.2. Hibernate ORM 6
|
Features detailed in this section are incubating: they are still under active development. The usual compatibility policy does not apply: the contract of incubating elements (e.g. types, methods, configuration properties, etc.) may be altered in a backward-incompatible way — or even removed — in subsequent releases. You are encouraged to use incubating features so the development team can get feedback and improve them, but you should be prepared to update code which relies on them as needed. |
Hibernate Search includes experimental support for Hibernate ORM 6,
and it requires only one small change:
when declaring the dependencies of your project,
you must add -orm6 to some artifact identifiers.
|
The experimental support for Hibernate ORM 6 in Hibernate Search 6.1.8.Final targets Hibernate ORM version 6.0.2.Final. Newer versions of Hibernate ORM 6 may introduce breaking changes, in which case they will no longer be compatible with the experimental support for Hibernate ORM 6 in Hibernate Search 6.1.8.Final, until Hibernate Search catches up in its next release. |
For example, an application using Hibernate ORM 6 and the Elasticsearch backend will need to update its dependencies as follows:
<dependency>
<groupId>org.hibernate.orm</groupId> (1)
<artifactId>hibernate-core</artifactId>
<version>6.0.2.Final</version>
</dependency>
<dependency>
<groupId>org.hibernate.search</groupId>
<artifactId>hibernate-search-mapper-orm-orm6</artifactId> (2)
<version>6.1.8.Final</version>
</dependency>
<dependency>
<groupId>org.hibernate.search</groupId>
<artifactId>hibernate-search-backend-elasticsearch</artifactId> (3)
<version>6.1.8.Final</version>
</dependency>| 1 | Replaces org.hibernate:hibernate-core; notice how the groupId changed in Hibernate ORM 6. |
| 2 | Replaces hibernate-search-mapper-orm. |
| 3 | No replacement necessary: this artifact does not rely on Java EE or Hibernate ORM. |
All artifacts relying directly or indirectly on Java EE or Hibernate ORM must be replaced with their ORM 6 counterpart. This includes in particular:
-
hibernate-search-mapper-orm⇒hibernate-search-mapper-orm-orm6 -
hibernate-search-mapper-orm-batch-jsr352-core⇒hibernate-search-mapper-orm-batch-jsr352-core-orm6 -
…
Artifacts that do not rely on Java EE or Hibernate ORM at all, on the other hand, do not have an ORM 6 counterpart and must not be replaced. These artifacts should be excluded from your replacements in particular:
-
hibernate-search-engine -
hibernate-search-backend-lucene -
hibernate-search-backend-elasticsearch -
hibernate-search-backend-elasticsearch-aws -
…
14. Known issues and limitations
14.1. Without coordination, in rare cases, automatic indexing involving @IndexedEmbedded may lead to out-of sync indexes
14.1.1. Description
With the default settings (no coordination), if two entity instances are indexed-embedded in the same "index-embedding" entity, and these two entity instance are updated in parallel transactions, there is a small risk that the transaction commits happen in just the wrong way, leading to the index-embedding entity being re-indexed with only part of the updates.
For example, consider indexed entity A, which index-embeds B and C. The following course of events involving two parallel transactions (T1 and T2) will lead to an out of date index:
-
T1: Load B.
-
T1: Change B in a way that will require reindexing A.
-
T2: Load C.
-
T2: Change C in a way that will require reindexing A.
-
T2: Request the transaction commit. Hibernate Search builds the document for A. While doing so, it automatically loads B. B appears unmodified, as T1 wasn’t committed yet.
-
T1: Request the transaction commit. Hibernate Search builds documents to index. While doing so, it automatically loads C. C appears unmodified, as T2 wasn’t committed yet.
-
T1: Transaction is committed. Hibernate Search automatically sends the updated A to the index. In this version, B is updated, but C is not.
-
T2: Transaction is committed. Hibernate Search automatically sends the updated A to the index. In this version, C is updated, but B is not.
This chain of events ends with the index containing a version of A where C is updated, but B is not.
14.1.2. Solutions and workarounds
The following solutions can help circumvent this limitation:
-
Use a safer coordination strategy, e.g. the
outbox-pollingcoordination strategy. See in particular Examples of architectures. -
OR avoid parallel updates to entities that are indexed-embedded in the same indexed entity. This is only possible in very specific setups.
-
OR schedule a full reindexing of your database periodically (e.g. every night) to get the index back in sync with the database.
14.1.3. Roadmap
This limitation is caused directly by the lack of coordination between threads or application nodes, so it can only be addressed completely by configuring coordination.
There are no other solutions currently on the roadmap.
14.2. Without coordination, backend errors during automatic indexing may lead to out-of sync indexes
14.2.1. Description
With the default settings (no coordination), automatic indexing will actually apply index changes in the backend just after the transaction commit, without any kind of transaction log for the index changes.
Consequently, should an error occur in the backend while indexing (i.e. an I/O error), this indexing will be cancelled, with no way to cancel the corresponding database transaction: the index will thus become out of sync.
| The risk is exclusively related to errors in the backend, mostly to filesystem or network issues. Errors occurring in user code (getters, custom bridges, …) will safely cancel the whole database transaction without indexing anything, ensuring that indexes are still in sync with the database. |
14.2.2. Solutions and workarounds
The following solutions can help circumvent this limitation:
-
Use a safer coordination strategy, e.g. the
outbox-pollingcoordination strategy. See in particular Examples of architectures. -
OR schedule a full reindexing of your database periodically (e.g. every night) to get the index back in sync with the database.
14.2.3. Roadmap
This limitation is caused directly by the lack of persistence of entity change events,
so it can only be addressed completely by persisting those events,
e.g. by switching to the outbox-polling coordination strategy.
Some incomplete countermeasures may be considered in future versions, such as automatic in-thread retries, but they will never solve the problem completely, and they are not currently on the roadmap.
14.3. Automatic indexing only considers changes applied directly to entity instances in Hibernate ORM sessions
14.3.1. Description
Due to how Hibernate Search uses internal events of Hibernate ORM
in order to detect changes,
it will not detect changes resulting from insert/delete/update queries,
be it SQL or JPQL/HQL queries.
This is because queries are executed on the database side, without Hibernate ORM or Search having any knowledge of which entities are actually created, deleted or updated.
14.3.2. Solutions and workarounds
One workaround is to reindex explicitly after you run JPQL/SQL queries,
either using the MassIndexer
or manually.
14.3.3. Roadmap
One solution to actually detect these changes would be to source entity change events directly from the database, using for example Debezium.
This is tracked as HSEARCH-3513, but is long-term goal.
14.4. Automatic indexing ignores asymmetric association updates
14.4.1. Description
Hibernate ORM is able to handle asymmetric updates of associations, where only the owning side of association is updated and the other side is ignored. The entities in the session will be inconsistent for the duration of the session, but upon reloading they will be consistent once again, due to how entity loading works.
This practice of asymmetric updates of associations can cause problems in applications in general, but also in Hibernate Search specifically, where it may lead to out-of-sync indexes. Thus, it must be avoided.
For example, let’s assume an indexed entity A has an @IndexedEmbedded association A.b to entity B,
and that B owns that association on its side, B.a.
One can just set B.a to null in order to remove the association between A and B,
and the effect on the database will be exactly what we want.
However, Hibernate Search will only be able to detect that B.a changed,
and by the time it tries to infer which entities need to be re-indexed,
it will no longer be able to know what B.a used to refer to.
That change in itself is useless to Hibernate Search:
Hibernate Search will not know that A, specifically, needs to be re-indexed.
It will "forget" to reindex A, leading to an out-of-sync index where A.b still contains B.
In the end, the only way for Hibernate Search to know that A needs to be re-indexed
is to also set A.b to null, which will cause Hibernate Search to detect that A.b changed,
and thus that A changed too.
14.4.2. Solutions and workarounds
The following solutions can help circumvent this limitation:
-
When you update one side of an association, always update the other side consistently.
-
When the above is not possible, reindex affected entities explicitly after the association update, either using the
MassIndexeror manually.
14.4.3. Roadmap
Hibernate Search may handle asymmetric association updates in the future,
by keeping tracks of entities added to / removed from an association.
However, this will only solve the problem completely if indexing happens asynchronously in a background thread,
such as with the outbox-polling coordination strategy.
This is tracked as HSEARCH-3567.
Alternatively, sourcing entity change events directly from the database, using for example Debezium, would also solve the problem. This is tracked as HSEARCH-3513, but is long-term goal.
14.5. Automatic indexing is not compatible with Session serialization
14.5.1. Description
When automatic indexing is enabled,
Hibernate Search collects entity change events
to build an "indexing plan" inside the ORM EntityManager/Session.
The indexing plan holds information relative to which entities need to be re-indexed,
and sometimes documents that have not been indexed yet.
The indexing plan cannot be serialized.
If the ORM Session gets serialized,
all collected change events will be lost upon deserializing the session,
and Hibernate Search will likely "forget" to reindex some entities.
This is fine in most applications, since they do not rely on serializing the session, but it might be a problem with some JEE applications relying on Bean Passivation.
15. Troubleshooting
15.1. Finding out what is executed under the hood
For search queries, you can get a human-readable representation of a SearchQuery object
by calling toString() or queryString().
Alternatively, rely on the logs:
org.hibernate.search.query will log every query at the TRACE level
before it is executed.
For more general information about what is being executed, rely on loggers:
-
org.hibernate.search.backend.lucene.infostreamfor Lucene. -
org.hibernate.search.elasticsearch.requestfor Elasticsearch.
15.2. Loggers
Here are a few loggers that can be useful when debugging an application that uses Hibernate Search:
org.hibernate.search.query-
Available for all backends.
Logs every single search query at the
TRACElevel, before its execution. org.hibernate.search.elasticsearch.request-
Available for Elasticsearch backends only.
Logs requests sent to Elasticsearch at the
DEBUGorTRACElevel after their execution. All available request and response information is logged: method, path, execution time, status code, but also the full request and response.Use the
DEBUGlevel to only log non-success requests (status code different from2xx), or theTRACElevel to log every single request.You can enable pretty-printing (line breaks and indentation) for the request and response using a configuration property.
org.hibernate.search.backend.lucene.infostream-
Available for Lucene backends only.
Logs low level trace information about Lucene’s internal components, at the
TRACElevel.Enabling the
TRACElevel on this logger is not enough: you must also enable the infostream using a configuration property.
15.3. Frequently asked questions
15.3.1. Unexpected or missing documents in search hits
When some documents unexpectedly match or don’t match a query, you will need information about the exact query being executed, and about the index content.
To find out what the query being executed looks like exactly, see Finding out what is executed under the hood.
To inspect the content of the index:
-
With the Elasticsearch backend, run simpler queries using either Hibernate Search or the REST APIs directly.
-
With the Lucene backend, run simpler queries using Hibernate Search or use the Luke tool distributed as part of the Lucene binary packages.
15.3.2. Unsatisfying order of search hits when sorting by score
When sorting by score, if the documents don’t appear in the order you expect, it means some documents have a score that is higher or lower than what you want.
The best way to gain insight into these scores is to just ask the backend to explain how the score was computed. The returned explanation will include a human-readable description of how the score of a specific document was computed.
|
Regardless of the API used, explanations are rather costly performance-wise: only use them for debugging purposes. |
There are two ways to retrieve explanations:
-
If you are interested in a particular entity and know its identifier: use the
explain(…)method on the query. Seeexplain(…): Explaining scores. -
If you just want an explanation for all the top hits: use an
explanationprojection. See here for Lucene and here for Elasticsearch.
15.3.3. Search query execution takes too long
When the execution of a search query is too long, you may need more information about how long it took exactly, and what was executed exactly.
To find out how long a query execution took,
use the took() method on the search result.
To find out what the query being executed looks like exactly, see Finding out what is executed under the hood.
16. Further reading
16.1. Elasticsearch
Elasticsearch’s reference documentation is an excellent starting point to learn more about Elasticsearch.
16.2. Lucene
To learn more about Lucene, you can get a copy to Lucene in Action (Second Edition), though it covers an older version of Lucene.
Otherwise, you can always try your luck with Lucene’s Javadoc.
16.3. Hibernate ORM
If you want to deepen your knowledge of Hibernate ORM, start with the online documentation or get hold of a copy of Java Persistence with Hibernate, Second Edition.
16.4. Other
If you have any further questions or feedback regarding Hibernate Search, reach out to the Hibernate community. We are looking forward to hearing from you.
In case you would like to report a bug use the Hibernate Search JIRA instance.
17. Credits
The full list of contributors to Hibernate Search can be found in the copyright.txt file in the Hibernate Search sources,
available in particular in our git repository.
The following contributors have been involved in this documentation:
-
Emmanuel Bernard
-
Hardy Ferentschik
-
Gustavo Fernandes
-
Fabio Massimo Ercoli
-
Sanne Grinovero
-
Mincong Huang
-
Nabeel Ali Memon
-
Gunnar Morling
-
Yoann Rodière
-
Guillaume Smet