JBoss.org Community Documentation
Authors
Nov 2008
Abstract
This book is a guide to the administration and configuration of the JBoss Application Server 5.
- What this Book Covers
- About JBoss
- 1. Introduction
- I. JBoss AS Infrastructure
- II. JBoss Application Server 5 Configuration
-
- 3. Deployment
- 4. Microcontainer
- 5. Web Services
-
- 5.1. Who needs web services?
- 5.2. Service Oriented Architecture (SOA)
- 5.3. What web services are not...
- 5.4. Jboss Web services Attachment support with XOP (XML-binary Optimized Packaging) and SwA
- 5.5. Using SwaRef with JAX-WS endpoints
- 5.6. MTOM/XOP
- 5.7. Enabling MTOM per endpoint
- 5.8. Document/Literal
- 5.9. Document/Literal (Bare)
- 5.10. Document/Literal (Wrapped)
- 5.11. RPC/Literal
- 5.12. RPC/Encoded
- 5.13. Web Service Endpoints
- 5.14. Plain old Java Object (POJO)
- 5.15. The endpoint as a web application
- 5.16. Packaging the endpoint
- 5.17. Accessing the generated WSDL
- 5.18. EJB3 Stateless Session Bean (SLSB)
- 5.19. Endpoint Provider
- 5.20. WebServiceContext
- 5.21. Web Service Clients
- 5.22. Common API
- 5.23. DataBinding
- 5.24. Attachments
- 5.25. Tools
- 5.26. Web Service Extensions
- 5.27. JBossWS Extensions
- 5.28. Web Services Appendix
- 5.29. References
- 6. JBoss5 Virtual Deployment Framework
- 7. JBOSS AOP
- 8. JBoss Cache
- 9. JBoss Transactions
- 10. JGroups
- 11. Remoting
- 12. JBoss Messaging
-
- 12.1. Configuring JBoss Messaging
- 12.2. Configuring the ServerPeer
- 12.3. Server Attributes
-
- 12.3.1. ServerPeerID
- 12.3.2. DefaultQueueJNDIContext
- 12.3.3. DefaultTopicJNDIContext
- 12.3.4. PostOffice
- 12.3.5. DefaultDLQ
- 12.3.6. DefaultMaxDeliveryAttempts
- 12.3.7. DefaultExpiryQueue
- 12.3.8. DefaultRedeliveryDelay
- 12.3.9. MessageCounterSamplePeriod
- 12.3.10. FailoverStartTimeout
- 12.3.11. FailoverCompleteTimeout
- 12.3.12. DefaultMessageCounterHistoryDayLimit
- 12.3.13. ClusterPullConnectionFactory
- 12.3.14. DefaultPreserveOrdering
- 12.3.15. RecoverDeliveriesTimeout
- 12.3.16. SuckerPassword
- 12.3.17. StrictTCK
- 12.3.18. Destinations
- 12.3.19. MessageCounters
- 12.3.20. MessageCountersStatistics
- 12.3.21. SupportsFailover
- 12.3.22. PersistenceManager
- 12.3.23. JMSUserManager
- 12.3.24. SecurityStore
- 12.4. MBean operations of the ServerPeer MBean
-
- 12.4.1. DeployQueue
- 12.4.2. UndeployQueue
- 12.4.3. DestroyQueue
- 12.4.4. DeployTopic
- 12.4.5. UndeployTopic
- 12.4.6. DestroyTopic
- 12.4.7. ListMessageCountersHTML
- 12.4.8. ResetAllMesageCounters
- 12.4.9. ResetAllMesageCounters
- 12.4.10. EnableMessageCounters
- 12.4.11. DisableMessageCounters
- 12.4.12. RetrievePreparedTransactions
- 12.4.13. ShowPreparedTransactions
- 13. Use Alternative Databases with JBoss AS
-
- 13.1. How to Use Alternative Databases
- 13.2. Install JDBC Drivers
- 13.3. Creating a DataSource for the External Database
- 13.4. Common configuration for DataSources and ConnectionFactorys
- 13.5. Change Database for the JMS Services
- 13.6. Support Foreign Keys in CMP Services
- 13.7. Specify Database Dialect for Java Persistence API
- 13.8. Change Other JBoss AS Services to Use the External Database
- 13.9. A Special Note About Oracle DataBases
- 13.10. DataSource configuration
- 13.11. Parameters specific for java.sql.Driver usage
- 13.12. Parameters specific for javax.sql.XADataSource usage
- 13.13. Common DataSource parameters
- 13.14. Generic Datasource Sample
- 13.15. Configuring a DataSource for remote usage
- 13.16. Configuring a DataSource to use login modules
- 14. Pooling
- 15. Frequently Asked Questions
- III. Clustering Guide
-
- 16. Clustering
- 17. Clustered JNDI Services
- 18. Clustered Session EJBs
- 19. Clustered Entity EJBs
- 20. HTTP Services
-
- 20.1. Configuring load balancing using Apache and mod_jk
- 20.2. Download the software
- 20.3. Configure Apache to load mod_jk
- 20.4. Configure worker nodes in mod_jk
- 20.5. Configuring JBoss to work with mod_jk
- 20.6. Configuring HTTP session state replication
- 20.7. Enabling session replication in your application
- 20.8. Using FIELD level replication
- 20.9. Monitoring session replication
- 20.10. Using Clustered Single Sign On
- 20.11. Clustered Singleton Services
- 21. JBoss Messaging Clustering Notes
- 22. JBossCache and JGroups Services
-
- 22.1. JGroups Configuration
- 22.2. Common Configuration Properties
- 22.3. Transport Protocols
- 22.4. Discovery Protocols
- 22.5. Failure Detection Protocols
- 22.6. Reliable Delivery Protocols
- 22.7. Other Configuration Options
-
- 22.7.1. Group Membership
- 22.7.2. Flow Control
- 22.7.3. Fragmentation
- 22.7.4. State Transfer
- 22.7.5. Distributed Garbage Collection
- 22.7.6. Merging
- 22.7.7. Binding JGroups Channels to a particular interface
- 22.7.8. Isolating JGroups Channels
- 22.7.9. Changing the Group Name
- 22.7.10. Changing the multicast address and port
- 22.7.11. JGroups Troubleshooting
- 22.7.12. Causes of missing heartbeats in FD
The primary focus of this book is the presentation of the standard JBoss 4.2 architecture components from both the perspective of their configuration and architecture. As a user of a standard JBoss distribution you will be given an understanding of how to configure the standard components. Note that this book is not an introduction to J2EE or how to use J2EE in applications. It focuses on the internal details of the JBoss server architecture and how our implementation of a given J2EE container can be configured and extended.
As a JBoss developer, you will be given a good understanding of the architecture and integration of the standard components to enable you to extend or replace the standard components for your infrastructure needs. We also show you how to obtain the JBoss source code, along with how to build and debug the JBoss server.
JBoss, a division of Red Hat, is the global leader in open source middleware software, combining enterprise-class JEMS open source software with the industry’s leading services and tools to provide simply a better way to transform your business to Service-Oriented Architecture (SOA).
JBoss, pioneered the disruptive Professional Open Source model, which combines the best of the open source and proprietary software worlds to make open source a safe choice for the enterprise and give CIOs peace of mind. This includes the royalty-free software, transparent development and active community inherent in open source and the accountability and professional support services expected of a traditional software vendor. The company finds innovative open source projects and professionalizes the project from a hobby into a livelihood by hiring the lead developer(s), often the founders themselves. JBoss provides the resources, core development and support services to enable popular open source projects to scale into enterprise-class software.
Coverage: North America and Europe on a direct basis. JBoss provides coverage worldwide via our extensive authorized partner network.
Mission Statement: JBoss' mission is to revolutionize the way enterprise middleware software is built, distributed, and supported through the Professional Open Source model. We are committed to delivering innovative and high quality technology and services that make JBoss the safe choice for enterprises and software providers.
Customers: Enterprise customers deploying JBoss technologies in mission-critical applications with professional services support from JBoss include Aviva Canada, Continental Airlines, La Quinta, NLG, MCI, Nielsen Media Research and Travelocity. For a current list of customer success stories, please visit the Customers section of our website.
Partners: JBoss works with software and hardware vendors, systems integrators and OEMs to deliver implementation services, frontline support, and certification for products embedded with JBoss technologies. For more information on the JBoss Certified Partner Program, please visit the Partners section of our website.
Professional Open Source(tm) from JBoss Inc. offers you:
-
Standards-based and stable Java Middleware technology
-
No cost open source product licenses
-
Backed by a professional and expert support staff
-
Comprehensive services including Professional Support, Training, and Consulting
-
A very large and active community of developers
-
An extensive worldwide network of authorized and certified partners
Benefits of Professional Open Source from JBoss Inc.:
-
Lowest possible total cost of ownership
-
Reliable and safe technology
-
Support, accountability, and trust from a stable company
-
Expedited problem resolution compared to commercial software vendors
The basic idea behind open source is very simple: When programmers can read, redistribute, and modify the source code for a piece of software, the software evolves. People improve it, people adapt it, people fix bugs. And this can happen at a speed that, if one is used to the slow pace of conventional software development, seems astonishing. Open Source is an often-misunderstood term relating to free software. The Open Source Initiative (OSI) web site provides a number of resources that define the various aspects of Open Source including an Open Source Definition at: http://www.opensource.org/docs/definition.html. The following quote from the OSI home page summarizes the key aspects as they relate to JBoss nicely:
|
We in the open source community have learned that this rapid evolutionary process produces better software than the traditional closed model, in which only very few programmers can see the source and everybody else must blindly use an opaque block of bits. Open Source Initiative exists to make this case to the commercial world. Open source software is an idea whose time has finally come. For twenty years it has been building momentum in the technical cultures that built the Internet and the World Wide Web. Now it's breaking out into the commercial world, and that's changing all the rules. Are you ready? |
||
| --The Open Source Initiative | ||
JBoss is the leader in the second generation of open source, which we have termed Professional Open Source. The Professional Open Source methodology is based on the following:
-
We hire and pay experts in the open source community to write exceptional and innovative software full-time.
-
We only use open source licenses that are friendly to end-user IT shops, independent software vendors, and the community itself.
-
Directly and through our authorized partners, we deliver the best support services available; all of which are backed up by the real product experts.
-
Unlike first generation open source providers, we control the direction and source code for our projects. We can ensure that all bug fixes and patches are rolled into future versions of our products.
-
By combining enterprise-proven technology, business-friendly open source licenses, and world-class support services, we have made Professional Open Source the safe choice for end-user enterprises and independent software vendors alike.
If you find a typographical error in the Administration and Configuration Guide, or if you have thought of a way to make this manual better, we would love to hear from you! Please submit a report in JIRA: http://jira.jboss.com against the project JBoss Application Server and component Documentation.
If you have a suggestion for improving the documentation, try to be as specific as possible when describing it. If you have found an error, please include the section number and some of the surrounding text so we can find it easily.
Note
Be sure to give us your name so you can receive full credit.
Note
This content is taken from svn.jboss.org/repos/jbossas/projects/docs/trunk and has yet to be branched.
To access the content directly and make changes yourself:
svn co https://svn.jboss.org/repos/jbossas/projects/docs/trunk/AS_5/Administration_And_Configuration_Guide/ --username yourname
The directory structure includes other languages the book will be translated in. For English please edit the files under en-US .
To identify the filename you wish to edit, please check the chapter title which will match the file's name. The files are written in Docbook xml. After saving your changes please validate the files you've edited for error's before committing your changes.
JBoss Application Server 5 is built on top of the new JBoss Microcontainer. The JBoss Microcontainer is a lightweight container that supports direct deployment, configuration and lifecycle of plain old Java objects (POJOs). The JBoss Microcontainer project is standalone and replaces the JBoss JMX Microkernel used in the 3.x and 4.x JBoss Application Servers. Project goals include:
-
Make the JBoss Microcontainer available as a standalone project.
-
Embrace JBoss' POJO middleware strategy.
-
Enable JBoss services to be easily deployed in the other containers.
-
Allow the features to be used in more restrictive environments (e.g. Applets, J2ME, etc.).
-
Provide POJO configuration management, support for dependencies, and support for clustering.
The JBoss Microcontainer integrates nicely with the JBoss Aspect Oriented Programming framework (JBoss AOP). JBoss AOP is discussed in Chapter 7, JBOSS AOP Support for JMX in JBoss AS 5 remains strong and MBean services written against the old Microkernel are expected to work.
JBoss AS5 is designed around the advanced concept of a Virtual Deployment Framework (VDF). The JBoss5 Virtual Deployment Framework (VDF) takes the aspect oriented design of many of the earlier JBoss containers and applies it to the deployment layer. It is also based on the POJO microntainer rather than JMX as in previous releases. More information about the Virtual Deployment Framework (VDF) can be found in Chapter 6, JBoss5 Virtual Deployment Framework .
A sample Java EE 5 application that can be run on top of JBoss 5.0.0.Beta4 and above which demonstrates many interesting technologies is the Seam Booking Application available on http://seam.demo.jboss.com/home.seam. This application makes use of the following technologies running on JBoss AS5:
-
EJB3
-
Stateful Session Beans
-
Stateless Session Beans
-
JPA (w/ Hibernate validation)
-
JSF
-
Facelets
-
Ajax4JSF
-
Seam
Many key features of JBoss AS5 are provided by integrating other standalone JBoss projects which include: -
-
JBoss EJB3 included with JBoss 5 provides the implementation of the latest revision of the Enterprise Java Beans (EJB) specification. EJB 3.0 is a deep overhaul and simplification of the EJB specification. EJB 3.0's goals are to simplify development, facilitate a test driven approach, and focus more on writing plain old java objects (POJOs) rather than coding against complex EJB APIs.
-
JBoss Messaging is a high performance JMS provider in the JBoss Enterprise Middleware Stack (JEMS), included with JBoss 5 as the default messaging provider. It is also the backbone of the JBoss ESB infrastructure. JBoss Messaging is a complete rewrite of JBossMQ, which is the default JMS provider for the JBoss AS 4.x series.
-
JBossCache 2.0 that comes in two flavors. A traditional tree-structured node-based cache and a PojoCache, an in-memory, transactional, and replicated cache system that allows users to operate on simple POJOs transparently without active user management of either replication or persistency aspects.
-
JBossWS 2 is the web services stack for JBoss 5 providing Java EE compatible web services, JAXWS-2.0.
-
JBoss Transactions is the default transaction manager for JBoss 5. JBoss Transactions is founded on industry proven technology and 18 year history as a leader in distributed transactions, and is one of the most interoperable implementations available.
-
JBoss Web is the Web container in JBoss 5, an implementation based on Apache Tomcat that includes the Apache Portable Runtime (APR) and Tomcat native technologies to achieve scalability and performance characteristics that match and exceed the Apache Http server.
JBoss AS5 includes numerous features and bug fixes, many of them carried over upstream from the JBoss AS4.x codebase. See the Detailed Release Notes section for the full details.
-
99% of web apps involve a database
-
mission critical web applications likely to be clustered.
-
Simple web applications with JSPs/Servlets upgrade to jboss As with tomcat embedded.
-
Intermediate web applications with JSPs/Servlets using a web framework such as Struts, Java Server Faces, Cocoon, Tapestry, Spring, Expresso, Avalon, Turbine.
-
Complex web apps with JSPs/Servlets, SEAM, Enterprise Java Beans (EJB), Java Messaging (JMS), caching etc.
-
Cross application middleware (JMS, Corba, JMX etc).
The community JBoss Application Server is sponsored by JBoss/Red Hat. It allows innovation at a faster pace.
Fueled by the thriving JBoss.org community, JBoss Enterprise Middleware is a comprehensive middleware portfolio that combines and integrates the latest enterprise-ready features from JBoss.org into stable, enterprise-class platform distributions. JBoss Enterprise Middleware further mitigates risk with industry leading 24x7 support and multi-year update and maintenance policies. This means you have an enterprise-class open source option for application and service hosting, content aggregation, data federation, and service integration – for both development and production.
JBoss Enterprise Application Platform is a rigorously tested, stable, supported platform for developing and deploying mission critical Java applications and services. It integrates code from the JBoss.org Application Server/Clustering project, JBoss Hibernate Framework, JBoss Seam Framework into a single distribution with a single patch and update stream, multi-year maintenance policy. JBoss EAP is certified on 17 operating systems, 5 Database Management systems and JVM combinations. It also integrates with JBoss Developer Studio and the JBoss Operations Network.
Key benefits of using JBoss:
-
significant CPU deployments,
-
commitment to web apps, and experience with open source
-
The need to reduce operational costs. You can reduce enterprise middleware costs by upto 70%. With zero licence fees you can refocus savings on business differentiation. JBoss Middleware is Enterprise-class technology with significantly lower Total Cost of ownership (TCO).
-
The need/desire to shed vendor lock in and high maintenance/support fees. Jboss Mitigates risks and helps customers avoid vendor lock in. You can therefore start new projects without any cost prohibition. You can use the Application Server with other middleware such as Hibernate and Websphere. With Red Hat open source Assurance program the code is always there and not dependent on a single vendor.
-
unplanned growth of systems leads to unplanned maintenance and licence cost increases.
-
System consolidation – mergers and acquisitions.
-
You can consistently meet service level agreements (SLA's) with as little change as possible by back porting patches to previous versions. With 24x7x365 support with 1 hour SLA you are guaranteed support when you need it. Please visit http://jboss.com/services/profsupport for more details. Performance tuning and certification services are also available to our customers. Automated patch and upgrade management on JBoss Enterprise middleware increases reliability of resources with minimal downtime if any.
-
Multi channel integration needs leading to Service Oriented Architecture (SOA).
More information about JBoss Enterprise Application Platform and Enterprise middleware can be obtained on http://www.jboss.com/products/index and http://www.redhat.com/promo/migration/
The following are current compatibility issues for JBoss AS5:
-
JBossAS 5 runs under Java 5 but there is an ongoing task to make it run safely under Java 6, too http://jira.jboss.org/jira/browse/JBAS-5031. If using a Sun Java 6 runtime, you may want to set
-Dsun.lang.ClassLoader.allowArraySyntax=true, as described in http://jira.jboss.org/jira/browse/JBAS-4491. -
If using proprietary JBoss/EJB3 annotations, those have moved into the
org.jboss.ejb3.annotationpackage, http://jira.jboss.org/jira/browse/EJBTHREE-1099. Those are now included in a new artifact,jboss-ejb3-ext-api.jar -
Work on EJB3 Extended Persistence Context support is not completed, http://jira.jboss.org/jira/browse/EJBTHREE-1026.
-
Interoperating with previous JBoss EJB3 implementations may present problems due to serialVersionUIDs issues, http://jira.jboss.org/jira/browse/EJBTHREE-1118.
-
EJB 2.1 View requirements
-
Home extending EJBLocalHome? or EJBHome must be defined
-
Remote or Local interface must either be defined via @Local/@Remote or via return type of "create<METHOD>" methods of the Home
-
EJB 2.1 Remote/Local interfaces must extend EJBObject/EJBLocalObject
-
-
@Local/@Remote may be used to define either EJB 3.0 View Business Interface, or EJB 2.1 View Remote/Local interface
-
Use of JBoss Cache 2.x. JBC 2.x has a significantly different API from the 1.x releases used in JBoss AS 4.x and 3.2.x.
Table of Contents
The following diagram illustrates an overview of the JBoss.org community projects including the JBoss Appplication Server and its components.

The directory structure of JBoss 5 resembles that of the 4.x series with some notable differences:
-<JBOSS_HOME>/ - the path to your JBoss AS installation.
	+ bin/ - contains start scripts and run.jar
	+ client/ - client jars
	+ docs/ - docs, schemas/dtds, examples
	+ lib/ - core bootstrap jars, different with the introduction of
	        the microcontainer and breakup of jboss-common.
	+ server/ - contains the same server configuration directories.
		+ default/ configuration
			+ conf/ - contains server configuration files used when starting the server.
			changes in here are detected on restarting your server.
				# bootstrap-beans.xml - new mc kernel bootstrap configuration
				# jax-ws-catalog.xml - oasis catalog driven schema/dtd namespace configuration
				# jbossjta-properties.xml - new JBossTS properties
				# jboss-service.xml - legacy static mbeans for compatibility
				# jndi.properties - the same jndi props
				# log4j.xml - the same log4j config
				# login-config.xml - the same jaas login config
				# props/ - the same default jaas login properties files
				# standardjaws.xml - obsolete cmp config
				# standardjbosscmp-jdbc.xml - the same cmp2 config
				# standardjboss.xml - the same ejb2 config
				# xmdesc/ - legacy xmbean descriptors
			+ data/ - contains hypersonic local database, transactions, xmbean configuration files.
	+ deploy/ - this is where services and your java applications are deployed.
	   You can deploy an application on the JBoss application server by simply
	   copying the application's (WAR, EAR or JAR files) into this directory.
	+ deployers/ - new vdf deployers
		# bsh-deployer - beanshell deployer
		# ejb3.deployer - ejb3 deployers
		# jboss-aop-jboss5.deployer - aspect deployer
		# jboss-jca.deployer - JCA deployers
		# jbossweb.deployer - war deployers
		# jbossws.deployer - web services deployers
		# ear-deployer-beans.xml - ear deployers
		# ejb-deployer-beans.xml - ejb2.x deployers
		# metadata-beans.xml - metadata handlers
		# security-deployer-beans.xml - security deployers
		# profileservice-beans.xml.bak - an example of the repository based profile service
	+ lib/ - the JBoss AS static library files shared by the services and applications
		in the respective configuration.
Table of Contents
- 3. Deployment
- 4. Microcontainer
- 5. Web Services
-
- 5.1. Who needs web services?
- 5.2. Service Oriented Architecture (SOA)
- 5.3. What web services are not...
- 5.4. Jboss Web services Attachment support with XOP (XML-binary Optimized Packaging) and SwA
- 5.5. Using SwaRef with JAX-WS endpoints
- 5.6. MTOM/XOP
- 5.7. Enabling MTOM per endpoint
- 5.8. Document/Literal
- 5.9. Document/Literal (Bare)
- 5.10. Document/Literal (Wrapped)
- 5.11. RPC/Literal
- 5.12. RPC/Encoded
- 5.13. Web Service Endpoints
- 5.14. Plain old Java Object (POJO)
- 5.15. The endpoint as a web application
- 5.16. Packaging the endpoint
- 5.17. Accessing the generated WSDL
- 5.18. EJB3 Stateless Session Bean (SLSB)
- 5.19. Endpoint Provider
- 5.20. WebServiceContext
- 5.21. Web Service Clients
- 5.22. Common API
- 5.23. DataBinding
- 5.24. Attachments
- 5.25. Tools
- 5.26. Web Service Extensions
- 5.27. JBossWS Extensions
- 5.28. Web Services Appendix
- 5.29. References
- 6. JBoss5 Virtual Deployment Framework
- 7. JBOSS AOP
- 8. JBoss Cache
- 9. JBoss Transactions
- 10. JGroups
- 11. Remoting
- 12. JBoss Messaging
-
- 12.1. Configuring JBoss Messaging
- 12.2. Configuring the ServerPeer
- 12.3. Server Attributes
-
- 12.3.1. ServerPeerID
- 12.3.2. DefaultQueueJNDIContext
- 12.3.3. DefaultTopicJNDIContext
- 12.3.4. PostOffice
- 12.3.5. DefaultDLQ
- 12.3.6. DefaultMaxDeliveryAttempts
- 12.3.7. DefaultExpiryQueue
- 12.3.8. DefaultRedeliveryDelay
- 12.3.9. MessageCounterSamplePeriod
- 12.3.10. FailoverStartTimeout
- 12.3.11. FailoverCompleteTimeout
- 12.3.12. DefaultMessageCounterHistoryDayLimit
- 12.3.13. ClusterPullConnectionFactory
- 12.3.14. DefaultPreserveOrdering
- 12.3.15. RecoverDeliveriesTimeout
- 12.3.16. SuckerPassword
- 12.3.17. StrictTCK
- 12.3.18. Destinations
- 12.3.19. MessageCounters
- 12.3.20. MessageCountersStatistics
- 12.3.21. SupportsFailover
- 12.3.22. PersistenceManager
- 12.3.23. JMSUserManager
- 12.3.24. SecurityStore
- 12.4. MBean operations of the ServerPeer MBean
-
- 12.4.1. DeployQueue
- 12.4.2. UndeployQueue
- 12.4.3. DestroyQueue
- 12.4.4. DeployTopic
- 12.4.5. UndeployTopic
- 12.4.6. DestroyTopic
- 12.4.7. ListMessageCountersHTML
- 12.4.8. ResetAllMesageCounters
- 12.4.9. ResetAllMesageCounters
- 12.4.10. EnableMessageCounters
- 12.4.11. DisableMessageCounters
- 12.4.12. RetrievePreparedTransactions
- 12.4.13. ShowPreparedTransactions
- 13. Use Alternative Databases with JBoss AS
-
- 13.1. How to Use Alternative Databases
- 13.2. Install JDBC Drivers
- 13.3. Creating a DataSource for the External Database
- 13.4. Common configuration for DataSources and ConnectionFactorys
- 13.5. Change Database for the JMS Services
- 13.6. Support Foreign Keys in CMP Services
- 13.7. Specify Database Dialect for Java Persistence API
- 13.8. Change Other JBoss AS Services to Use the External Database
- 13.9. A Special Note About Oracle DataBases
- 13.10. DataSource configuration
- 13.11. Parameters specific for java.sql.Driver usage
- 13.12. Parameters specific for javax.sql.XADataSource usage
- 13.13. Common DataSource parameters
- 13.14. Generic Datasource Sample
- 13.15. Configuring a DataSource for remote usage
- 13.16. Configuring a DataSource to use login modules
- 14. Pooling
- 15. Frequently Asked Questions
Deploying applications on JBoss AS is very easy. You just need to copy the application into the JBOSS_HOME/server/default/deploy directory. You can replace default with different server profiles such as all or minimal. We will cover those later in this chapter. JBoss AS constantly scans the deploy directory to pick up new applications or any changes to existing applications. So, you can "hot deploy" application on the fly while JBoss AS is still running.
You can deploy several different types of enterprise applications in JBoss AS:
-
The WAR application archive (e.g., myapp.war) packages a Java EE web application in a JAR file. It contains servlet classes, view pages, libraries, and deployment descriptors such as web.xml, faces-config.xml, and jboss-web.xml etc..
-
The EAR application archive (e.g., myapp.ear) packages a Java EE enterprise application in a JAR file. It typically contains a WAR file for the web module, JAR files for EJB modules, as well as deployment descriptors such as application.xml and jboss-app.xml etc.
-
The SAR application archive (e.g., myservice.sar) packages a JBoss service in a JAR file. It is mostly used by JBoss internal services.
-
The *-ds.xml file defines connections to external databases. The data source can then be reused by all applications and services in JBoss AS via the internal JNDI.
-
You can deploy XML files with MBean service definitions. If you have the appropriate JAR files available in the deploy or lib directories, the MBeans specified in the XML files will be started. This is the way how you start many JBoss AS internal services, such as the JMS queues.
-
You can also deploy JAR files containing EJBs or other service objects directly in JBoss AS.
Exploded Deployment
The WAR, EAR, and SAR deployment packages are really just JAR files with special XML deployment descriptors in directories like META-INF and WEB-INF. JBoss AS allows you to deploy those archives as expanded directories instead of JAR files. That allows you to make changes to web pages etc on the fly without re-deploying the entire application. If you do need to re-deploy the exploded directory without re-start the server, you can just "touch" the deployment descriptors (e.g., the WEB-INF/web.xml in a WAR and the META-INF/application.xml in an EAR) to update their timestamps.
The JBoss Application Server ships with three server configurations. You can choose which configuration to start by passing the -c parameter to the server startup script. For instance, command run.sh -c all would start the server in the all configuration. Each configuration is contained in a directory named JBOSS_HOME/server/[config name]/. You can look into each server configuration's directory to see the default services, applications, and libraries supported in the configuration.
-
The minimal configuration starts the core server container without any of the enterprise services. It is a good starting point if you want to build a customized version of JBoss AS that only contains the services you need.
-
The default configuration is the mostly common used configuration for application developers. It supports the standard J2EE 1.4 and most of the Java EE 5.0 programming APIs (e.g., JSF and EJB3).
-
The all configuration is the default configuration with clustering support and other enterprise extensions.
The detailed services and APIs supported in each of those configurations will be discussed throughout this book.
JBoss Application Server 5.0 uses the microcontainer to integrate enterprise services together with a Servlet/JSP container, EJB container, deployers and management utilities in order to provide a standard Java EE environment. If you need additional services then you can simply deploy these on top of Java EE to provide the functionality you need. Likewise you are free to remove any services that you don't need simply by changing the configuration. You can even use the microcontainer to do this in other environments such as Tomcat and GlassFish since you can plug in different classloading models during the service deployment phase.
Since JBoss Microcontainer is very lightweight and deals with POJOs it can also be used to deploy services into a Java ME runtime environment. This opens up new possibilities for mobile applications that can now take advantage of enterprise services without requiring a full JEE application server.
In common with other lightweight containers JBoss Microcontainer uses dependency injection to wire individual POJOs together to create services. Configuration is performed using either annotations or XML depending on where the information is best located. Finally unit testing is made extremely simple thanks to a helper class that extends JUnit to setup the test environment, allowing you to access POJOs and services from your test methods using just a few lines of code.
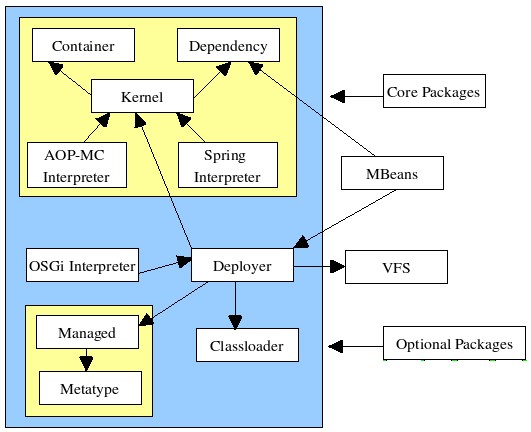
This section introduces the various Microcontainer modules. The figure below gives an overview of the modules.
-
aop-mc-inthandles integration between the JBossAOP and Microcontainer projects -
The
containermodule contains: reflection, the integration point for manipulating class information at runtime, e.g. overriding annotations or obtaining an aop instance advisor. joinpoint, the joinpoint model including the join point factory. classadaptor, the integration and configuration spi. metadata, base metadata types and repository -
dependencymanagement is handled by the controller. The controller is the core component for keeping track of contexts to make sure the configuration and lifecycle are done in the correct order including dependencies and classloading considerations. -
deployersload components from various models, POJOs, JMX, spring, Java EE, etc. into the Microcontainer runtime. -
kernelkernel defines the core kernel spi including, boostrap, configuration, POJO deployments, dependency, events, bean metadata, and bean registry. -
The
managedmodule defines the base objects defining the management view of a component. -
The
metatypemetatype module defines the base types found in the management view of a component. -
osgi-intcontains the integration classes that adapt the OSGi model onto the Microcontainer. -
spring-intcontains the integration classes that adapt the spring model onto the Microcontainer.
To configure your microcontainer the you can use the JBOSS_HOME/server/<server_configuration>/conf/bootstrap-beans.xml and JBOSS_HOME/server/<server_configuration>/conf/bootstrap-repo-beans.xml files where <server_configuration> represents the all , default or minimal JBoss AS configurations. The configuration files have comments to guide you on the specific configurations available as illustrated by the example below.
	<deployment xmlns="urn:jboss:bean-deployer:2.0">

		<!-- All beans use the bootstrap classloader -->
		<classloader><inject bean="BootstrapClassLoader"/></classloader>

		<!-- TODO Should split this file up and use the new classloader -->
		<bean name="BootstrapClassLoader" class="org.jboss.system.NoAnnotationURLClassLoader">
		<classloader><null/></classloader>
			<constructor factoryClass="org.jboss.system.NoAnnotationURLClassLoader" factoryMethod="createClassLoader">
		<parameter>
.....
......
<bean name="ProfileServiceBootstrap" class="org.jboss.system.server.profileservice.ProfileServiceBootstrap">
<property name="kernel"><inject bean="jboss.kernel:service=Kernel"/></property>
</bean>

<!-- The legacy JMX kernel -->
<bean name="JMXKernel" class="org.jboss.system.server.jmx.JMXKernel">
<property name="kernel"><inject bean="jboss.kernel:service=Kernel"/></property>
	<property name="serverImpl"><inject bean="JBossServer"/></property>
	<property name="oldClassLoader">false</property>
</bean>
....(content truncated)
......

	<!-- The ManagedDeploymentCreator implementation -->
	<bean name="ManagedDeploymentCreator" 	class="org.jboss.deployers.plugins.managed.DefaultManagedDeploymentCreator" />

	<!-- The holder for deployers that determine structure -->
	<bean name="StructuralDeployers" 		class="org.jboss.deployers.vfs.plugins.structure.VFSStructuralDeployersImpl">
		<property name="structureBuilder">
		<!-- The consolidator of the structure information -->
		<bean name="StructureBuilder" 		class="org.jboss.deployers.vfs.plugins.structure.VFSStructureBuilder"/>
	</property>
	<!-- Accept any implementor of structure deployer -->
	<incallback method="addDeployer"/>
	<uncallback method="removeDeployer"/>
</bean>
...(content truncated)
...
The main beans are:
-
ProfileService : this bean loads the deployments associated with the named server profile, "default", "all" or whatever name is passed in as the "-c" option to the server. Its an extension of the jboss-4.0.x and earlier notion of always looking to the filesystem
server/name/conf/jboss-service.xmlandserver/name/deployto load deployments. -
AspectManager? : the AOP aspects
-
MainDeployer : this bean is an update of the JMX based MainDeployer from earlier versions to a one based on the Microcontainer, JBoss5VirtualFileSystem, and Virtual Deployment Framework(VDF). Deployer aspects are registered with the MainDeployer as an ordered list via inject of the deployers property.
-
ServiceClassLoaderDeployer? : this bean manages the class loading aspect of deployment.
-
JARDeployer : this bean is a structural deployment aspect which handles the legacy nested deployment behavior of adding non-deployable jars to the current deployment classpath.
-
FileStructure? : this bean is a structural deployment aspect which recognizes well know deployment file types specified by suffix.
-
AspectDeployer? : handles aop descriptor deployments.
-
BeanDeployer? : this bean translates deployer-beans.xml into KernelDeployment? for the descriptor beans.
-
KernelDeploymentDeployer? : translates a KernelDeployment? into the constituent BeanMetaData instances for the kernel beans.
-
BeanMetaDataDeployer? : creates the kernel beans from the deployment BeanMetaData.
-
SARDeployer : this bean is a port of the legacy JMX SARDeployer to the VDF. It handles the legacy jboss-service.xml style of mbean deployment descriptors and maps this into a ServiceDeployment? pojo.
-
ServiceDeploymentDeployer? : translates ServiceDeployment? pojo into the constituent ServiceMetaData that represent the various mbeans.
-
ServiceDeployer? : creates the mbean services from deployment ServiceMetaData instances.
-
JMXKernel : this bean manages the instantiation of a JMX kernel and MBeanServer in the jboss domain. It is used by the SARDeployer. It will be used by other management deployment aspects in the future to expose kernel beans via JMX.
-
VFSDeployerScanner? : a scanner bean that loads the deployers directory contents into the basic profile service.
-
VFSDeploymentScanner? : a scanner bean that loads the deploy directory contents into the basic profile service.
-
HDScanner : a bean that queries the profile service for changes in deploy directory contents and redeploys updated content, undeploys removed content, and add new deployment content to the profile service.
More information on the JBoss Microcontainer project can be obtained from http://labs.jboss.com/jbossmc/.
- 5.1. Who needs web services?
- 5.2. Service Oriented Architecture (SOA)
- 5.3. What web services are not...
- 5.4. Jboss Web services Attachment support with XOP (XML-binary Optimized Packaging) and SwA
- 5.5. Using SwaRef with JAX-WS endpoints
- 5.6. MTOM/XOP
- 5.7. Enabling MTOM per endpoint
- 5.8. Document/Literal
- 5.9. Document/Literal (Bare)
- 5.10. Document/Literal (Wrapped)
- 5.11. RPC/Literal
- 5.12. RPC/Encoded
- 5.13. Web Service Endpoints
- 5.14. Plain old Java Object (POJO)
- 5.15. The endpoint as a web application
- 5.16. Packaging the endpoint
- 5.17. Accessing the generated WSDL
- 5.18. EJB3 Stateless Session Bean (SLSB)
- 5.19. Endpoint Provider
- 5.20. WebServiceContext
- 5.21. Web Service Clients
- 5.22. Common API
- 5.23. DataBinding
- 5.24. Attachments
- 5.25. Tools
- 5.26. Web Service Extensions
- 5.27. JBossWS Extensions
- 5.28. Web Services Appendix
- 5.29. References
Web services are a key contributing factor in the ways Web commerce is conducted today. Web services enable application/programs to communicate by sending small and large chunks of data to each other.
A web service is essentially a software application that supports interaction of applications over a computer network or the world wide web. Web services usually interact via XML documents that map to an object, computer program, business process or database. To communicate, an application sends a message in XML document format to a web service which sends this message to the respective programs. Responses may be received based on requirements and the web service receives and sends them in XML document format to the required program or applications. Web services can be used in many ways examples include supply chain information management and business integration among a multitude of other applications.
JBossWS is a web service framework developed as part of the JBoss Application Server. It implements the JAX-WS specification that defines a programming model and run-time architecture for implementing web services in Java, targeted at the Java Platform, Enterprise Edition 5 (Java EE 5).
JBossWS integrates with most current JBoss Application Server releases as well as earlier ones, that did implement the J2EE 1.4 specifications. Even though JAX-RPC, the web service specification for J2EE 1.4, is still supported JBossWS does put a clear focus on JAX-WS.
Enterprise systems communication may benefit from a wise adoption of WS technologies. Exposing well designed contracts allows developers to extract an abstract view of their service capabilities. Considering the standardized way contracts are written, this definitely helps communication with third-party systems and eventually support business-to-business integration. No more agreement required on vendor specific implementation details, home-brew communication protocol or custom per-customer settings. Everything is clear and standardized in the contract the provider and consumer agree on. Of course this also reduces the dependencies between implementations allowing other consumers to easily use the provided service without major changes.
Enterprise system may benefit from web service technologies also for internal heterogenous subsystems communication. As a matter of fact their interoperability boosts service reuse and composition. No more need to rewrite whole functionalities only because they were developed by another enterprise department using another software language.
In case you think you already heard something like this... yes, those in previous paragraph are some of the principles Service Oriented Architecture is based on.
Transforming an enterprise business to Service Oriented Architecture includes obtaining standardized service contract, service reusability, service abstraction, service loose coupling, service composability and so on.
Of course SOA is an architectural model agnostic to technology platforms and every enterprise can pursue the strategic goals associated with service-oriented computing using different technologies. However in the current marketplace, Web Services are probably the technology platform that better suits SOA principles and are most used to get to this architecture.
Needless to say that web services are not the solution for every software system communication.
Nowadays they are meant to be used for loosely-coupled coarse-grained communication, for message (document) exchange. Moreover during the last years a lot of specifications (WS-*) were discussed and finally approved to standardize ws-related advanced aspects including reliable messaging, message-level security, cross-service transactions, etc. Finally web service specifications also include notion of registries to collect service contract references, to easily discover service implementations, etc.
This all means that the web services technology platform suits complex enterprise communication and is not simply the latest way of doing remote procedure calls.
JBoss-WS4EE relied on a deprecated attachments technology called SwA (SOAP with Attachments). SwA required soap/encoding which is disallowed by the WS-I Basic Profile. JBossWS provides support for WS-I AP 1.0, and MTOM instead. There will be no API change for users, however, since this is an updated protocol you will not be able to transfer attachments between older versions of JBoss AS and JBoss AS 4.0.4 or above.
WS-I Attachment Profile 1.0 defines mechanism to reference MIME attachment parts using swaRef. In this mechanism the content of XML element of type wsi:swaRef is sent as MIME attachment and the element inside SOAP Body holds the reference to this attachment in the CID URI scheme as defined by RFC 2111.
JAX-WS endpoints delegate all marshalling/unmarshalling to the JAXB API. The most simple way to enable SwaRef encoding for DataHandler types is to annotate a payload bean with the @XmlAttachmentRef annotation as shown below:
/**
* Payload bean that will use SwaRef encoding
*/
@XmlRootElement
public class DocumentPayload
{
private DataHandler data;
public DocumentPayload()
{
}

public DocumentPayload(DataHandler data)
{
this.data = data;
}

@XmlElement
@XmlAttachmentRef
public DataHandler getData()
{
return data;
	}

public void setData(DataHandler data)
{
	this.data = data;
	}
}

	With document wrapped endpoints you may even specify the @XmlAttachmentRef annotation on the service endpoint interface:

@WebService
public interface DocWrappedEndpoint
	{
	@WebMethod
	DocumentPayload beanAnnotation(DocumentPayload dhw, String test);

	@WebMethod
	@XmlAttachmentRef
	DataHandler parameterAnnotation(@XmlAttachmentRef DataHandler data, String test);

	}
The message would then refer to the attachment part by CID:
<env:Envelope xmlns:env='http://schemas.xmlsoap.org/soap/envelope/'>
	     <env:Header/>
	     <env:Body>
	     <ns2:parameterAnnotation xmlns:ns2='http://swaref.samples.jaxws.ws.test.jboss.org/'>
	     <arg0>cid:0-1180017772935-32455963@ws.jboss.org</arg0>
	     <arg1>Wrapped test</arg1>
	</ns2:parameterAnnotation>
	</env:Body>
	</env:Envelope>
This chapter describes Message Transmission Optimization Mechanism (MTOM) and XML-binary Optimized Packaging (XOP), a means of more efficiently serializing XML Infosets that have certain types of content. The related specifications are
-
SOAP Message Transmission Optimization Mechanism ((MTOM) http://www.w3.org/TR/soap12-mtom/)
-
XML-binary Optimized Packaging (XOP) (http://www.w3.org/TR/xop10/)
|
image/jpeg |
java.awt.Image |
|
text/xml |
javax.xml.transform.Source |
|
application/xml |
javax.xml.transform.Source |
|
application/octet-stream |
javax.activation.DataHandler |
Table 5.1. Supported MTOM parameter types
The above table shows a list of supported endpoint parameter types. The recommended approach is to use the javax.activation.DataHandler classes to represent binary data as service endpoint parameters.
Note
Microsoft endpoints tend to send any data as application/octet-stream. The only Java type that can easily cope with this ambiguity is javax.activation.DataHandler
On the server side MTOM processing is enabled through the @BindingType annotation. JBossWS does handle SOAP1.1 and SOAP1.2. Both come with or without MTOM flavours: MTOM enabled service implementations
package org.jboss.test.ws.jaxws.samples.xop.doclit;

	import javax.ejb.Remote;
	import javax.jws.WebService;
	import javax.jws.soap.SOAPBinding;
	import javax.xml.ws.BindingType;

	@Remote
	@WebService(targetNamespace = "http://org.jboss.ws/xop/doclit")
	@SOAPBinding(style = SOAPBinding.Style.DOCUMENT, parameterStyle = SOAPBinding.ParameterStyle.BARE)
	@BindingType(value="http://schemas.xmlsoap.org/wsdl/soap/http?mtom=true")                         (1)
	public interface MTOMEndpoint {

	[...]
	}
MTOM enabled clients
Web service clients can use the same approach described above or rely on the Binding API to enable MTOM (Excerpt taken from the org.jboss.test.ws.jaxws.samples.xop.doclit.XOPTestCase):
[...]
	Service service = Service.create(wsdlURL, serviceName);
	port = service.getPort(MTOMEndpoint.class);

	// enable MTOM
	binding = (SOAPBinding)((BindingProvider)port).getBinding();
	binding.setMTOMEnabled(true);
With document style web services two business partners agree on the exchange of complex business documents that are well defined in XML schema. For example, one party sends a document describing a purchase order, the other responds (immediately or later) with a document that describes the status of the purchase order. No need to agree on such low level details as operation names and their associated parameters. The payload of the SOAP message is an XML document that can be validated against XML schema. Document is defined by the style attribute on the SOAP binding.
<binding name='EndpointInterfaceBinding' type='tns:EndpointInterface'>
	<soap:binding style='document' transport='http://schemas.xmlsoap.org/soap/http'/>
<operation name='concat'>
	<soap:operation soapAction=''/>
<input>
	<soap:body use='literal'/>
</input>
	<output>
	<soap:body use='literal'/>
</output>
	</operation>
	</binding>
With document style web services the payload of every message is defined by a complex type in XML schema.
<complexType name='concatType'>
	<sequence>
	<element name='String_1' nillable='true' type='string'/>
	<element name='long_1' type='long'/>
	</sequence>
	</complexType>
	<element name='concat' type='tns:concatType'/>
	Therefore, message parts must refer to an element from the schema.
	<message name='EndpointInterface_concat'>
	<part name='parameters' element='tns:concat'/>
	</message>
The following message definition is invalid.
<message name='EndpointInterface_concat'>
	<part name='parameters' type='tns:concatType'/>
</message>
Bare is an implementation detail from the Java domain. Neither in the abstract contract (i.e. wsdl+schema) nor at the SOAP message level is a bare endpoint recognizable. A bare endpoint or client uses a Java bean that represents the entire document payload.
@WebService
@SOAPBinding(parameterStyle = SOAPBinding.ParameterStyle.BARE)
public class DocBareServiceImpl
{
@WebMethod
public SubmitBareResponse submitPO(SubmitBareRequest poRequest)
{
			...
}
}
The trick is that the Java beans representing the payload contain JAXB annotations that define how the payload is represented on the wire.
@XmlAccessorType(XmlAccessType.FIELD)
	@XmlType(name = "SubmitBareRequest", namespace="http://soapbinding.samples.jaxws.ws.test.jboss.org/", propOrder = { "product" })
	@XmlRootElement(namespace="http://soapbinding.samples.jaxws.ws.test.jboss.org/", name = "SubmitPO")
	public class SubmitBareRequest
	{
	@XmlElement(namespace="http://soapbinding.samples.jaxws.ws.test.jboss.org/",  required = true)
	private String product;

			...
}
Wrapped is an implementation detail from the Java domain. Neither in the abstract contract (i.e. wsdl+schema) nor at the SOAP message level is a wrapped endpoint recognizable. A wrapped endpoint or client uses the individual document payload properties. Wrapped is the default and does not have to be declared explicitly.
@WebService
public class DocWrappedServiceImpl
	{
	@WebMethod
	@RequestWrapper (className="org.somepackage.SubmitPO")
	@ResponseWrapper (className="org.somepackage.SubmitPOResponse")
	public String submitPO(String product, int quantity)
	{
	...
	}
	}
Note, that with JBossWS the request/response wrapper annotations are not required, they will be generated on demand using sensible defaults.
With RPC there is a wrapper element that names the endpoint operation. Child elements of the RPC parent are the individual parameters. The SOAP body is constructed based on some simple rules:
-
The port type operation name defines the endpoint method name
-
Message parts are endpoint method parameters
RPC is defined by the style attribute on the SOAP binding.
	<binding name='EndpointInterfaceBinding' type='tns:EndpointInterface'>
	<soap:binding style='rpc' transport='http://schemas.xmlsoap.org/soap/http'/>
	<operation name='echo'>
		<soap:operation soapAction=''/>
		<input>
			<soap:body namespace='http://org.jboss.ws/samples/jsr181pojo' use='literal'/>
		</input>
		<output>
			<soap:body namespace='http://org.jboss.ws/samples/jsr181pojo' use='literal'/>
		</output>
	</operation>
</binding>
With rpc style web services the portType names the operation (i.e. the java method on the endpoint)
<portType name='EndpointInterface'>
	<operation name='echo' parameterOrder='String_1'>
	<input message='tns:EndpointInterface_echo'/>
<output message='tns:EndpointInterface_echoResponse'/>
	</operation>
  </portType>
Operation parameters are defined by individual message parts.
 <message name='EndpointInterface_echo'>
 <part name='String_1' type='xsd:string'/>
 </message>
 <message name='EndpointInterface_echoResponse'>
 <part name='result' type='xsd:string'/>
 </message>
Note, there is no complex type in XML schema that could validate the entire SOAP message payload.
 @WebService
 @SOAPBinding(style = SOAPBinding.Style.RPC)
 public class JSEBean01
 {
 @WebMethod
 @WebResult(name="result")
 public String echo(@WebParam(name="String_1") String input)
 {
 ...
 }
}
The element names of RPC parameters/return values may be defined using the JAX-WS Annotations#javax.jws.WebParam and JAX-WS Annotations#javax.jws.WebResult respectively.
SOAP encodeding style is defined by the infamous chapter 5 of the SOAP-1.1 specification. It has inherent interoperability issues that cannot be fixed. The Basic Profile-1.0 prohibits this encoding style in 4.1.7 SOAP encodingStyle Attribute. JBossWS has basic support for rpc/encoded that is provided as is for simple interop scenarios with SOAP stacks that do not support literal encoding. Specifically, JBossWS does not support:-
-
element references
-
soap arrays as bean properties
JAX-WS simplifies the development model for a web service endpoint a great deal. In short, an endpoint implementation bean is annotated with JAX-WS annotations and deployed to the server. The server automatically generates and publishes the abstract contract (i.e. wsdl+schema) for client consumption. All marshalling/unmarshalling is delegated to JAXB [2].
Let's take a look at simple POJO endpoint implementation. All endpoint associated metadata is provided via JSR-181 annotations
@WebService
@SOAPBinding(style = SOAPBinding.Style.RPC)
public class JSEBean01
   {
    @WebMethod
    public String echo(String input)
    {
    ...
    }
 }
A JAX-WS java service endpoint (JSE) is deployed as a web application.
<web-app ...>
	<servlet>
	<servlet-name>TestService</servlet-name>
	<servlet-class>org.jboss.test.ws.jaxws.samples.jsr181pojo.JSEBean01</servlet-class>
	</servlet>
	<servlet-mapping>
<servlet-name>TestService</servlet-name>
	<url-pattern>/*</url-pattern>
	</servlet-mapping>
</web-app>
A JSR-181 java service endpoint (JSE) is packaged as a web application in a *.war file.
<war warfile="${build.dir}/libs/jbossws-samples-jsr181pojo.war" webxml="${build.resources.dir}/samples/jsr181pojo/WEB-INF/web.xml">
	<classes dir="${build.dir}/classes">
<include name="org/jboss/test/ws/samples/jsr181pojo/JSEBean01.class"/>
	</classes>
</war>
Note that only the endpoint implementation bean and web.xml are required.
A successfully deployed service endpoint will show up in the service endpoint manager. This is also where you find the links to the generated wsdl.
http://yourhost:8080/jbossws/services
a Note, it is also possible to generate the abstract contract off line using jbossw tools. For details of that please see #Top Down (Java to WSDL)
The JAX-WS programming model support the same set of annotations on EJB3 stateless session beans as on # Plain old Java Object (POJO) endpoints. EJB-2.1 endpoints are supported using the JAX-RPC progamming model.
  @Stateless
  @Remote(EJB3RemoteInterface.class)
  @RemoteBinding(jndiBinding = "/ejb3/EJB3EndpointInterface")

  @WebService
  @SOAPBinding(style = SOAPBinding.Style.RPC)
  public class EJB3Bean01 implements EJB3RemoteInterface
  {
  @WebMethod
  public String echo(String input)
  {
  ...
  }
  }
Above you see an EJB-3.0 stateless session bean that exposes one method both on the remote interface and on and as an endpoint operation.
Packaging the endpoint
A JSR-181 EJB service endpoint is packaged as an ordinary ejb deployment.
<jar jarfile="${build.dir}/libs/jbossws-samples-jsr181ejb.jar">
<fileset dir="${build.dir}/classes">
<include name="org/jboss/test/ws/samples/jsr181ejb/EJB3Bean01.class"/>
<include name="org/jboss/test/ws/samples/jsr181ejb/EJB3RemoteInterface.class"/>
</fileset>
</jar>
Accessing the generated WSDL
A successfully deployed service endpoint will show up in the service endpoint manager. This is also where you find the links to the generated wsdl.
http://yourhost:8080/jbossws/services
Note, it is also possible to generate the abstract contract off line using jbossw tools. For details of that please see #Top Down (Java to WSDL)
JAX-WS services typically implement a native Java service endpoint interface (SEI), perhaps mapped from a WSDL port type, either directly or via the use of annotations.
Java SEIs provide a high level Java-centric abstraction that hides the details of converting between Java objects and their XML representations for use in XML-based messages. However, in some cases it is desirable for services to be able to operate at the XML message level. The Provider interface offers an alternative to SEIs and may be implemented by services wishing to work at the XML message level.
A Provider based service instance’s invoke method is called for each message received for the service.
@WebServiceProvider
@ServiceMode(value = Service.Mode.PAYLOAD)
public class ProviderBeanPayload implements Provider<Source>
{
public Source invoke(Source req)
{
// Access the entire request PAYLOAD and return the response PAYLOAD
 }
}
Note, Service.Mode.PAYLOAD is the default and does not have to be declared explicitly. You can also use Service.Mode.MESSAGE to access the entire SOAP message (i.e. with MESSAGE the Provider can also see SOAP Headers)
The WebServiceContext is treated as an injectable resource that can be set at the time an endpoint is initialized. The WebServiceContext object will then use thread-local information to return the correct information regardless of how many threads are concurrently being used to serve requests addressed to the same endpoint object.
@WebService
public class EndpointJSE
{
@Resource
WebServiceContext wsCtx;

@WebMethod
public String testGetMessageContext()
{
SOAPMessageContext jaxwsContext = (SOAPMessageContext)wsCtx.getMessageContext();
return jaxwsContext != null ? "pass" : "fail";
}
..
@WebMethod
public String testGetUserPrincipal()
{
Principal principal = wsCtx.getUserPrincipal();
return principal.getName();
}

@WebMethod
public boolean testIsUserInRole(String role)
{
return wsCtx.isUserInRole(role);
}
}
Service is an abstraction that represents a WSDL service. A WSDL service is a collection of related ports, each of which consists of a port type bound to a particular protocol and available at a particular endpoint address.
For most clients, you will start with a set of stubs generated from the WSDL. One of these will be the service, and you will create objects of that class in order to work with the service (see "static case" below).
Static case
Most clients will start with a WSDL file, and generate some stubs using jbossws tools like wsconsume . This usually gives a mass of files, one of which is the top of the tree. This is the service implementation class.
The generated implementation class can be recognised as it will have two public constructors, one with no arguments and one with two arguments, representing the wsdl location (a java.net.URL) and the service name (a javax.xml.namespace.QName) respectively.
Usually you will use the no-argument constructor. In this case the WSDL location and service name are those found in the WSDL. These are set implicitly from the WebServiceClient annotation that decorates the generated class.
The following code snippet shows the generated constructors from the generated class:
// Generated Service Class

 @WebServiceClient(name="StockQuoteService", targetNamespace="http://example.com/stocks", wsdlLocation="http://example.com/stocks.wsdl")
public class StockQuoteService extends javax.xml.ws.Service
{
public StockQuoteService()
{
super(new URL("http://example.com/stocks.wsdl"), new QName("http://example.com/stocks", "StockQuoteService"));
}

public StockQuoteService(String wsdlLocation, QName serviceName)
{
super(wsdlLocation, serviceName);
}

...
}
Section #Dynamic Proxy explains how to obtain a port from the service and how to invoke an operation on the port. If you need to work with the XML payload directly or with the XML representation of the entire SOAP message, have a look at #Dispatch.
Dynamic case
In the dynamic case, when nothing is generated, a web service client uses Service.create to create Service instances, the following code illustrates this process.
URL wsdlLocation = new URL("http://example.org/my.wsdl");
QName serviceName = new QName("http://example.org/sample", "MyService");
Service service = Service.create(wsdlLocation, serviceName);
This is the nastiest way to work with JBossWs. Older versions have extensive details on DII as it was then known.
JAX-WS provides a flexible plug-in framework for message processing modules, known as handlers, that may be used to extend the capabilities of a JAX-WS runtime system. #Handler Framework describes the handler framework in detail. A Service instance provides access to a HandlerResolver via a pair of getHandlerResolver/setHandlerResolver methods that may be used to configure a set of handlers on a per-service, per-port or per-protocol binding basis.
When a Service instance is used to create a proxy or a Dispatch instance then the handler resolver currently registered with the service is used to create the required handler chain. Subsequent changes to the handler resolver configured for a Service instance do not affect the handlers on previously created proxies, or Dispatch instances.
Service instances can be configured with a java.util.concurrent.Executor. The executor will then be used to invoke any asynchronous callbacks requested by the application. The setExecutor and getExecutor methods of Service can be used to modify and retrieve the executor configured for a service.
You can create an instance of a client proxy using one of getPort methods on the #Service.
 /**
 * The getPort method returns a proxy. A service client
 * uses this proxy to invoke operations on the target
 * service endpoint. The <code>serviceEndpointInterface</code>
 * specifies the service endpoint interface that is supported by
 * the created dynamic proxy instance.
 **/
 public <T> T getPort(QName portName, Class<T> serviceEndpointInterface)
 {
  ...
  }

  /**
 * The getPort method returns a proxy. The parameter
 * <code>serviceEndpointInterface</code> specifies the service
 * endpoint interface that is supported by the returned proxy.
 * In the implementation of this method, the JAX-WS
 * runtime system takes the responsibility of selecting a protocol
 * binding (and a port) and configuring the proxy accordingly.
 * The returned proxy should not be reconfigured by the client.
 *
 **/
 public <T> T getPort(Class<T> serviceEndpointInterface)
 {
 ...
  }
The service endpoint interface (SEI) is usually generated using tools. For details see # Top Down (WSDL to Java)
A generated static #Service usually also offers typed methods to get ports. These methods also return dynamic proxies that implement the SEI.
@WebServiceClient(name = "TestEndpointService", targetNamespace = "http://org.jboss.ws/wsref",
  wsdlLocation = "http://localhost.localdomain:8080/jaxws-samples-webserviceref?wsdl")

	public class TestEndpointService extends Service
	{
	...

	public TestEndpointService(URL wsdlLocation, QName serviceName) {
	super(wsdlLocation, serviceName);
	}

	@WebEndpoint(name = "TestEndpointPort")
	public TestEndpoint getTestEndpointPort()
	{
	return (TestEndpoint)super.getPort(TESTENDPOINTPORT, TestEndpoint.class);
	}
  }
The WebServiceRef annotation is used to declare a reference to a Web service. It follows the resource pattern exemplified by the javax.annotation.Resource annotation in JSR-250 [5]
There are two uses to the WebServiceRef annotation:
-
To define a reference whose type is a generated service class. In this case, the type and value element will both refer to the generated service class type. Moreover, if the reference type can be inferred by the field/method declaration the annotation is applied to, the type and value elements MAY have the default value (Object.class, that is). If the type cannot be inferred, then at least the type element MUST be present with a non-default value.
-
To define a reference whose type is a SEI. In this case, the type element MAY be present with its default value if the type of the reference can be inferred from the annotated field/method declaration, but the value element MUST always be present and refer to a generated service class type (a subtype of javax.xml.ws.Service). The wsdlLocation element, if present, overrides theWSDL location information specified in the WebService annotation of the referenced generated service class.
public class EJB3Client implements EJB3Remote
{
 @WebServiceRef
 public TestEndpointService service4;

 @WebServiceRef
 public TestEndpoint port3;
WebServiceRef Customization
In jboss-5.0.x we offer a number of overrides and extensions to the WebServiceRef annotation. These include
-
define the port that should be used to resolve a container-managed port
-
define default Stub property settings for Stub objects
-
define the URL of a final WSDL document to be used
Example:
<service-ref>
<service-ref-name>OrganizationService</service-ref-name>
<wsdl-override>file:/wsdlRepository/organization-service.wsdl</wsdl-override>
</service-ref>
..
<service-ref>
<service-ref-name>OrganizationService</service-ref-name>
<config-name>Secure Client Config</config-name>
<config-file>META-INF/jbossws-client-config.xml</config-file>
<handler-chain>META-INF/jbossws-client-handlers.xml</handler-chain>
</service-ref>

<service-ref>
<service-ref-name>SecureService</service-ref-name>
<service-class-name>org.jboss.tests.ws.jaxws.webserviceref.SecureEndpointService</service-class-name>
<service-qname>{http://org.jboss.ws/wsref}SecureEndpointService</service-qname>
<port-info>
<service-endpoint-interface>org.jboss.tests.ws.jaxws.webserviceref.SecureEndpoint</service-endpoint-interface>
<port-qname>{http://org.jboss.ws/wsref}SecureEndpointPort</port-qname>
<stub-property>
<name>javax.xml.ws.security.auth.username</name>
<value>kermit</value>
</stub-property>
<stub-property>
<name>javax.xml.ws.security.auth.password</name>
<value>thefrog</value>
</stub-property>
</port-info>
</service-ref>
For details please see service-ref_5_0.dtd in the jboss docs directory.
XMLWeb Services use XML messages for communication between services and service clients. The higher level JAX-WS APIs are designed to hide the details of converting between Java method invocations and the corresponding XML messages, but in some cases operating at the XML message level is desirable. The Dispatch interface provides support for this mode of interaction.
Dispatch supports two usage modes, identified by the constants javax.xml.ws.Service.Mode.MESSAGE and javax.xml.ws.Service.Mode.PAYLOAD respectively:
Message In this mode, client applications work directly with protocol-specific message structures. E.g., when used with a SOAP protocol binding, a client application would work directly with a SOAP message.
Message Payload In this mode, client applications work with the payload of messages rather than the messages themselves. E.g., when used with a SOAP protocol binding, a client application would work with the contents of the SOAP Body rather than the SOAP message as a whole.
Dispatch is a low level API that requires clients to construct messages or message payloads as XML and requires an intimate knowledge of the desired message or payload structure. Dispatch is a generic class that supports input and output of messages or message payloads of any type.
Service service = Service.create(wsdlURL, serviceName);
Dispatch dispatch = service.createDispatch(portName, StreamSource.class, Mode.PAYLOAD);

String payload = "<ns1:ping xmlns:ns1='http://oneway.samples.jaxws.ws.test.jboss.org/'/>";
dispatch.invokeOneWay(new StreamSource(new StringReader(payload)));

payload = "<ns1:feedback xmlns:ns1='http://oneway.samples.jaxws.ws.test.jboss.org/'/>";
Source retObj = (Source)dispatch.invoke(new StreamSource(new StringReader(payload)));
The BindingProvider interface represents a component that provides a protocol binding for use by clients, it is implemented by proxies and is extended by the Dispatch interface.
BindingProvider instances may provide asynchronous operation capabilities. When used, asynchronous operation invocations are decoupled from the BindingProvider instance at invocation time such that the response context is not updated when the operation completes. Instead a separate response context is made available using the Response interface.
public void testInvokeAsync() throws Exception
{
URL wsdlURL = new URL("http://" + getServerHost() + ":8080/jaxws-samples-asynchronous?wsdl");
QName serviceName = new QName(targetNS, "TestEndpointService");
Service service = Service.create(wsdlURL, serviceName);
TestEndpoint port = service.getPort(TestEndpoint.class);

Response response = port.echoAsync("Async");

// access future
String retStr = (String) response.get();
assertEquals("Async", retStr);
}
@Oneway indicates that the given web method has only an input message and no output. Typically, a oneway method returns the thread of control to the calling application prior to executing the actual business method.
@WebService (name="PingEndpoint")
@SOAPBinding(style = SOAPBinding.Style.RPC)
public class PingEndpointImpl
{
 private static String feedback;
..
@WebMethod
@Oneway
public void ping()
{
log.info("ping");
feedback = "ok";
}
..
@WebMethod
public String feedback()
{
log.info("feedback");
return feedback;
}
}
This sections describes concepts that apply equally to #Web Service Endpoints and #Web Service Clients
The handler framework is implemented by a JAX-WS protocol binding in both client and server side runtimes. Proxies, and Dispatch instances, known collectively as binding providers, each use protocol bindings to bind their abstract functionality to specific protocols.
Client and server-side handlers are organized into an ordered list known as a handler chain. The handlers within a handler chain are invoked each time a message is sent or received. Inbound messages are processed by handlers prior to binding provider processing. Outbound messages are processed by handlers after any binding provider processing.
Handlers are invoked with a message context that provides methods to access and modify inbound and outbound messages and to manage a set of properties. Message context properties may be used to facilitate communication between individual handlers and between handlers and client and service implementations. Different types of handlers are invoked with different types of message context.
Handlers that only operate on message context properties and message payloads. Logical handlers are protocol agnostic and are unable to affect protocol specific parts of a message. Logical handlers are handlers that implement javax.xml.ws.handler.LogicalHandler.
Handlers that operate on message context properties and protocol specific messages. Protocol handlers are specific to a particular protocol and may access and change protocol specific aspects of a message. Protocol handlers are handlers that implement any interface derived from javax.xml.ws.handler.Handler except javax.xml.ws.handler.LogicalHandler.
On the service endpoint, handlers are defined using the @HandlerChain annotation.
@WebService
@HandlerChain(file = "jaxws-server-source-handlers.xml")
public class SOAPEndpointSourceImpl
{
...
}
The location of the handler chain file supports 2 formats
1. An absolute java.net.URL in externalForm. (ex: http://myhandlers.foo.com/handlerfile1.xml)
2. A relative path from the source file or class file. (ex: bar/handlerfile1.xml)
On the client side, handler can be configured using the @HandlerChain annotation on the SEI or dynamically using the API.
Service service = Service.create(wsdlURL, serviceName);
Endpoint port = (Endpoint)service.getPort(Endpoint.class);

BindingProvider bindingProvider = (BindingProvider)port;
List<Handler> handlerChain = new ArrayList<Handler>();
handlerChain.add(new LogHandler());
handlerChain.add(new AuthorizationHandler());
handlerChain.add(new RoutingHandler());
bindingProvider.getBinding().setHandlerChain(handlerChain); // important!
MessageContext is the super interface for all JAX-WS message contexts. It extends Map<String,Object> with additional methods and constants to manage a set of properties that enable handlers in a handler chain to share processing related state. For example, a handler may use the put method to insert a property in the message context that one or more other handlers in the handler chain may subsequently obtain via the get method.
Properties are scoped as either APPLICATION or HANDLER. All properties are available to all handlers for an instance of an MEP on a particular endpoint. E.g., if a logical handler puts a property in the message context, that property will also be available to any protocol handlers in the chain during the execution of an MEP instance. APPLICATION scoped properties are also made available to client applications (see section 4.2.1) and service endpoint implementations. The defaultscope for a property is HANDLER.
There is currently no portable way of doing this in 4.0.5. @WebServiceContext injection will be available with 4.2. In the meantime you can access the message context like this:
CommonMessageContext msgContext = MessageContextAssociation.peekMessageContext();
msgContext.setProperty(<Name>, <Value>);
#Logical Handlers are passed a message context of type LogicalMessageContext when invoked. LogicalMessageContext extends MessageContext with methods to obtain and modify the message payload, it does not provide access to the protocol specific aspects of amessage. A protocol binding defines what component of a message are available via a logical message context. The SOAP binding defines that a logical handler deployed in a SOAP binding can access the contents of the SOAP body but not the SOAP headers whereas the XML/HTTP binding defines that a logical handler can access the entire XML payload of a message.
An implementation may thow a SOAPFaultException
public void throwSoapFaultException()
{
SOAPFactory factory = SOAPFactory.newInstance();
SOAPFault fault = factory.createFault("this is a fault string!", new QName("http://foo", "FooCode"));
fault.setFaultActor("mr.actor");
fault.addDetail().addChildElement("test");
throw new SOAPFaultException(fault);
}
or an application specific user exception
public void throwApplicationException() throws UserException
{
throw new UserException("validation", 123, "Some validation error");
}
Note
In case of the latter JBossWS generates the required fault wrapper beans at runtime if they are not part of the deployment
Since 2.0.2
JAXB is heavily driven by Java Annotations on the Java Bindings. It currently doesn't support an external binding configuration. This recently became an issue for us on JBossESB since the JBossWS 2.0.0 native SOAP stack uses JAXB to perform the SOAP to Java bindings (see 1, 2). It's an issue for JBossESB simply because it needs to be able to support user definition of JBossWS native Webservice Endpoints (e.g. JSR 181) using Java typesets that have not been "JAXB Annotated" (see JAXB Introductions On JBossWS).
In order to support this, we built on a JAXB RI feature whereby it allows you to specify a RuntimeInlineAnnotationReader implementation during JAXBContext creation (see JAXBRIContext).
We call this feature "JAXB Annotation Introduction" and we've made it available for general consumption i.e. it can be checked out, built and used from SVN:
Complete documentation can be found here:
This section describes Message Transmission Optimization Mechanism (MTOM) and XML-binary Optimized Packaging (XOP), a means of more efficiently serializing XML Infosets that have certain types of content. The related specifications are
|
image/jpeg |
java.awt.Image |
|
text/xml |
javax.xml.transform.Source |
|
application/xml |
javax.xml.transform.Source |
|
application/octet-stream |
javax.activation.DataHandler |
The above table shows a list of supported endpoint parameter types. The recommended approach is to use the javax.activation.DataHandler classes to represent binary data as service endpoint parameters.
Note
Microsoft endpoints tend to send any data as application/octet-stream. The only Java type that can easily cope with this ambiguity is javax.activation.DataHandler
On the server side MTOM processing is enabled through the @BindingType annotation. JBossWS does handle SOAP1.1 and SOAP1.2. Both come with or without MTOM flavours:
MTOM enabled service implementations
package org.jboss.test.ws.jaxws.samples.xop.doclit;

import javax.ejb.Remote;
import javax.jws.WebService;
import javax.jws.soap.SOAPBinding;
import javax.xml.ws.BindingType;

@Remote
@WebService(targetNamespace = "http://org.jboss.ws/xop/doclit")
@SOAPBinding(style = SOAPBinding.Style.DOCUMENT, parameterStyle = SOAPBinding.ParameterStyle.BARE)
@BindingType(value="http://schemas.xmlsoap.org/wsdl/soap/http?mtom=true")                         (1)
public interface MTOMEndpoint {

[...]
}
-
The MTOM enabled SOAP 1.1 binding ID
MTOM enabled clients
Web service clients can use the same approach described above or rely on the Binding API to enable MTOM (Excerpt taken from the org.jboss.test.ws.jaxws.samples.xop.doclit.XOPTestCase):
[...]
Service service = Service.create(wsdlURL, serviceName);
port = service.getPort(MTOMEndpoint.class);

// enable MTOM
binding = (SOAPBinding)((BindingProvider)port).getBinding();
binding.setMTOMEnabled(true);
Note
You might as well use the JBossWS configuration templates to setup deployment defaults.
Since 2.0
WS-I Attachment Profile 1.0 defines mechanism to reference MIME attachment parts using swaRef. In this mechanism the content of XML element of type wsi:swaRef is sent as MIME attachment and the element inside SOAP Body holds the reference to this attachment in the CID URI scheme as defined by RFC 2111.
JAX-WS endpoints delegate all marshalling/unmarshalling to the JAXB API. The most simple way to enable SwaRef encoding for DataHandler types is to annotate a payload bean with the @XmlAttachmentRef annotation as shown below:
/**
* Payload bean that will use SwaRef encoding
*/
@XmlRootElement
public class DocumentPayload
{
private DataHandler data;

public DocumentPayload()
{
}

public DocumentPayload(DataHandler data)
{
this.data = data;
}

@XmlElement
@XmlAttachmentRef
public DataHandler getData()
{
return data;
}

public void setData(DataHandler data)
{
this.data = data;
}
}
With document wrapped endpoints you may even specify the @XmlAttachmentRef annotation on the service endpoint interface:
@WebService
public interface DocWrappedEndpoint
{
@WebMethod
DocumentPayload beanAnnotation(DocumentPayload dhw, String test);

@WebMethod
@XmlAttachmentRef
DataHandler parameterAnnotation(@XmlAttachmentRef DataHandler data, String test);

}
The message would then refer to the attachment part by CID:
<env:Envelope xmlns:env='http://schemas.xmlsoap.org/soap/envelope/'>
<env:Header/>
<env:Body>
<ns2:parameterAnnotation xmlns:ns2='http://swaref.samples.jaxws.ws.test.jboss.org/'>
<arg0>cid:0-1180017772935-32455963@ws.jboss.org</arg0>
<arg1>Wrapped test</arg1>
</ns2:parameterAnnotation>
</env:Body>
</env:Envelope>
If you chose the contract first approach then you need to ensure that any element declaration that should use SwaRef encoding simply refers to wsi:swaRef schema type:
<element name="data" type="wsi:swaRef"
xmlns:wsi="http://ws-i.org/profiles/basic/1.1/xsd"/>
Any wsi:swaRef schema type would then be mapped to DataHandler.
The JAX-WS tools provided by JBossWS can be used in a variety of ways. First we will look at server-side development strategies, and then proceed to the client. When developing a Web Service Endpoint (the server-side) you have the option of starting from Java (bottom-up development), or from the abstact contract (WSDL) that defines your service (top-down development). If this is a new service (no existing contract), the bottom-up approach is the fastest route; you only need to add a few annotations to your classes to get a service up and running. However, if you are developing a service with an already defined contract, it is far simpler to use the top-down approach, since the provided tool will generate the annotated code for you.
Bottom-up use cases:
-
Exposing an already existing EJB3 bean as a Web Service
-
Providing a new service, and you want the contract to be generated for you
Top-down use cases:
-
Replacing the implementation of an existing Web Service, and you can't break compatibility with older clients
-
Exposing a service that conforms to a contract specified by a third party (e.g. a vender that calls you back using an already defined protocol).
-
Creating a service that adheres to the XML Schema and WSDL you developed by hand up front
The following JAX-WS command line tools are included in JBossWS:
|
Command |
Description |
|
Generates JAX-WS portable artifacts, and provides the abstract contract. Used for bottom-up development. |
|
|
Consumes the abstract contract (WSDL and Schema files), and produces artifacts for both a server and client. Used for top-down and client development |
|
|
Executes a Java client (has a main method) using the JBossWS classpath. |
The bottom-up strategy involves developing the Java code for your service, and then annotating it using JAX-WS annotations. These annotations can be used to customize the contract that is generated for your service. For example, you can change the operation name to map to anything you like. However, all of the annotations have sensible defaults, so only the @WebService annotation is required.
This can be as simple as creating a single class:
package echo;

@javax.jws.WebService
public class Echo
{
public String echo(String input)
{
return input;
}
}
A JSE or EJB3 deployment can be built using this class, and it is the only Java code needed to deploy on JBossWS. The WSDL, and all other Java artifacts called "wrapper classes" will be generated for you at deploy time. This actually goes beyond the JAX-WS specification, which requires that wrapper classes be generated using an offline tool. The reason for this requirement is purely a vender implementation problem, and since we do not believe in burdening a developer with a bunch of additional steps, we generate these as well. However, if you want your deployment to be portable to other application servers, you will unfortunately need to use a tool and add the generated classes to your deployment.
This is the primary purpose of the wsprovide tool, to generate portable JAX-WS artifacts. Additionally, it can be used to "provide" the abstract contract (WSDL file) for your service. This can be obtained by invoking wsprovide using the "-w" option:
$ javac -d . -classpath jboss-jaxws.jar Echo.java
$ wsprovide -w echo.Echo
Generating WSDL:
EchoService.wsdl
Writing Classes:
echo/jaxws/Echo.class
echo/jaxws/EchoResponse.class
Inspecting the WSDL reveals a service called EchoService:
<service name='EchoService'>
<port binding='tns:EchoBinding' name='EchoPort'>
<soap:address location='REPLACE_WITH_ACTUAL_URL'/>
</port>
</service>
As expected, this service defines one operation, "echo":
<portType name='Echo'>
<operation name='echo' parameterOrder='echo'>
<input message='tns:Echo_echo'/>
<output message='tns:Echo_echoResponse'/>
</operation>
</portType>
Note
Remember that when deploying on JBossWS you do not need to run this tool. You only need it for generating portable artifacts and/or the abstract contract for your service.
Let's create a POJO endpoint for deployment on JBoss AS. A simple web.xml needs to be created:
<web-app xmlns="http://java.sun.com/xml/ns/j2ee"
xmlns:xsi="http://www.w3.org/2001/XMLSchema-instance"
xsi:schemaLocation="http://java.sun.com/xml/ns/j2ee http://java.sun.com/xml/ns/j2ee/web-app_2_4.xsd"
version="2.4">

<servlet>
<servlet-name>Echo</servlet-name>
<servlet-class>echo.Echo</servlet-class>
</servlet>

<servlet-mapping>
<servlet-name>Echo</servlet-name>
<url-pattern>/Echo</url-pattern>
</servlet-mapping>
</web-app>
The web.xml and the single class can now be used to create a war:
$ mkdir -p WEB-INF/classes
$ cp -rp echo WEB-INF/classes/
$ cp web.xml WEB-INF
$ jar cvf echo.war WEB-INF
added manifest
adding: WEB-INF/(in = 0) (out= 0)(stored 0%)
adding: WEB-INF/classes/(in = 0) (out= 0)(stored 0%)
adding: WEB-INF/classes/echo/(in = 0) (out= 0)(stored 0%)
adding: WEB-INF/classes/echo/Echo.class(in = 340) (out= 247)(deflated 27%)
adding: WEB-INF/web.xml(in = 576) (out= 271)(deflated 52%)
The war can then be deployed:
cp echo.war /usr/local/jboss-4.2.0.GA-ejb3/server/default/deploy
This will internally invoke wsprovide, which will generate the WSDL. If deployment was successful, and you are using the default settings, it should be available here: http://localhost:8080/echo/Echo?wsdl
For a portable JAX-WS deployment, the wrapper classes generated earlier could be added to the deployment.
The top-down development strategy begins with the abstract contract for the service, which includes the WSDL file and zero or more schema files. The wsconsume tool is then used to consume this contract, and produce annotated Java classes (and optionally sources) that define it.
Note
wsconsume seems to have a problem with symlinks on unix systems
Using the WSDL file from the bottom-up example, a new Java implementation that adheres to this service can be generated. The "-k" option is passed to wsconsume to preserve the Java source files that are generated, instead of providing just classes:
$ wsconsume -k EchoService.wsdl
echo/Echo.java
echo/EchoResponse.java
echo/EchoService.java
echo/Echo_Type.java
echo/ObjectFactory.java
echo/package-info.java
echo/Echo.java
echo/EchoResponse.java
echo/EchoService.java
echo/Echo_Type.java
echo/ObjectFactory.java
echo/package-info.java
The following table shows the purpose of each generated file:
|
File |
Purpose |
|
Echo.java |
Service Endpoint Interface |
|
Echo_Type.java |
Wrapper bean for request message |
|
EchoResponse.java |
Wrapper bean for response message |
|
ObjectFactory.java |
JAXB XML Registry |
|
package-info.java |
Holder for JAXB package annotations |
|
EchoService.java |
Used only by JAX-WS clients |
Examining the Service Endpoint Interface reveals annotations that are more explicit than in the class written by hand in the bottom-up example, however, these evaluate to the same contract:
@WebService(name = "Echo", targetNamespace = "http://echo/")
public interface Echo {
@WebMethod
@WebResult(targetNamespace = "")
@RequestWrapper(localName = "echo", targetNamespace = "http://echo/", className = "echo.Echo_Type")
@ResponseWrapper(localName = "echoResponse", targetNamespace = "http://echo/", className = "echo.EchoResponse")
public String echo(
@WebParam(name = "arg0", targetNamespace = "")
String arg0);

}
The only missing piece (besides the packaging) is the implementation class, which can now be written, using the above interface.
package echo;

@javax.jws.WebService(endpointInterface="echo.Echo")
public class EchoImpl implements Echo
{
public String echo(String arg0)
{
return arg0;
}
}
Before going to detail on the client-side it is important to understand the decoupling concept that is central to Web Services. Web Services are not the best fit for internal RPC, even though they can be used in this way. There are much better technologies for this (CORBA, and RMI for example). Web Services were designed specifically for interoperable coarse-grained correspondence. There is no expectation or guarantee that any party participating in a Web Service interaction will be at any particular location, running on any particular OS, or written in any particular programming language. So because of this, it is important to clearly separate client and server implementations. The only thing they should have in common is the abstract contract definition. If, for whatever reason, your software does not adhere to this principal, then you should not be using Web Services. For the above reasons, the recommended methodology for developing a client is to follow the top-down approach , even if the client is running on the same server.
Let's repeat the process of the top-down section, although using the deployed WSDL, instead of the one generated offline by wsprovide. The reason why we do this is just to get the right value for soap:address. This value must be computed at deploy time, since it is based on container configuration specifics. You could of course edit the WSDL file yourself, although you need to ensure that the path is correct.
Offline version:
<service name='EchoService'>
<port binding='tns:EchoBinding' name='EchoPort'>
<soap:address location='REPLACE_WITH_ACTUAL_URL'/>
</port>
</service>
Online version:
<service name="EchoService">
<port binding="tns:EchoBinding" name="EchoPort">
<soap:address location="http://localhost.localdomain:8080/echo/Echo"/>
</port>
</service>
Using the online deployed version with wsconsume:
$ wsconsume -k http://localhost:8080/echo/Echo?wsdl
echo/Echo.java
echo/EchoResponse.java
echo/EchoService.java
echo/Echo_Type.java
echo/ObjectFactory.java
echo/package-info.java
echo/Echo.java
echo/EchoResponse.java
echo/EchoService.java
echo/Echo_Type.java
echo/ObjectFactory.java
echo/package-info.java
The one class that was not examined in the top-down section, was EchoService.java. Notice how it stores the location the WSDL was obtained from.
@WebServiceClient(name = "EchoService", targetNamespace = "http://echo/", wsdlLocation = "http://localhost:8080/echo/Echo?wsdl")
public class EchoService extends Service
{
private final static URL ECHOSERVICE_WSDL_LOCATION;

static {
URL url = null;
try {
url = new URL("http://localhost:8080/echo/Echo?wsdl");
} catch (MalformedURLException e) {
e.printStackTrace();
}
ECHOSERVICE_WSDL_LOCATION = url;
}

public EchoService(URL wsdlLocation, QName serviceName) {
super(wsdlLocation, serviceName);
}

public EchoService() {
super(ECHOSERVICE_WSDL_LOCATION, new QName("http://echo/", "EchoService"));
}

@WebEndpoint(name = "EchoPort")
public Echo getEchoPort() {
return (Echo)super.getPort(new QName("http://echo/", "EchoPort"), Echo.class);
}
}
As you can see, this generated class extends the main client entry point in JAX-WS, javax.xml.ws.Service. While you can use Service directly, this is far simpler since it provides the configuration info for you. The only method we really care about is the getEchoPort() method, which returns an instance of our Service Endpoint Interface. Any WS operation can then be called by just invoking a method on the returned interface.
Note
It's not recommended to refer to a remote WSDL URL in a production application. This causes network I/O every time you instantiate the Service Object. Instead, use the tool on a saved local copy, or use the URL version of the constructor to provide a new WSDL location.
All that is left to do, is write and compile the client:
import echo.*;
..
public class EchoClient
{
public static void main(String args[])
{
if (args.length != 1)
{
System.err.println("usage: EchoClient <message>");
System.exit(1);
}

EchoService service = new EchoService();
Echo echo = service.getEchoPort();
System.out.println("Server said: " + echo.echo(args[0]));
}
}
It can then be easily executed using the wsrunclient tool. This is just a convenience tool that invokes java with the needed classpath:
$ wsrunclient EchoClient 'Hello World!'
Server said: Hello World!
It is easy to change the endpoint address of your operation at runtime, setting the ENDPOINT_ADDRESS_PROPERTY as shown below:
...
EchoService service = new EchoService();
Echo echo = service.getEchoPort();

/* Set NEW Endpoint Location */
String endpointURL = "http://NEW_ENDPOINT_URL";
BindingProvider bp = (BindingProvider)echo;
bp.getRequestContext().put(BindingProvider.ENDPOINT_ADDRESS_PROPERTY, endpointURL);

System.out.println("Server said: " + echo.echo(args[0]));
...
An introduction to binding customizations:
The schema for the binding customization files can be found here:
This section describes how WS-Addressing can be used to provide a staful service endpoint.
WS-Addressing is defined by a combination of the following specifications from the W3C Candidate Recommendation 17 August 2005. The WS-Addressing API is standardized by JSR-261 - Java API for XML Web Services Addressing
The following endpoint implementation has a set of operation for a typical stateful shopping chart application.
@WebService(name = "StatefulEndpoint", targetNamespace = "http://org.jboss.ws/samples/wsaddressing", serviceName = "TestService")
@EndpointConfig(configName = "Standard WSAddressing Endpoint")
@HandlerChain(file = "WEB-INF/jaxws-handlers.xml")
@SOAPBinding(style = SOAPBinding.Style.RPC)
public class StatefulEndpointImpl implements StatefulEndpoint, ServiceLifecycle
{
@WebMethod
public void addItem(String item)
{ ... }

@WebMethod
public void checkout()
{ ... }

@WebMethod
public String getItems()
{ ... }
}
It uses the JAX-WS Endpoint Configuration# Standard WSAddressing Endpoint to enable the server side addressing handler. It processes the incomming WS-Addressing header elements and provides access to them through the JSR-261 API.
The endpoint handler chain
<handler-chains xmlns="http://java.sun.com/xml/ns/javaee" xmlns:xsi="http://www.w3.org/2001/XMLSchema-instance"
xsi:schemaLocation="http://java.sun.com/xml/ns/javaee javaee_web_services_1_2.xsd">

<handler-chain>
<protocol-bindings>##SOAP11_HTTP</protocol-bindings>
<handler>
<handler-name>Application Server Handler</handler-name>
<handler-class>org.jboss.test.ws.jaxws.samples.wsaddressing.ServerHandler</handler-class>
</handler>
</handler-chain>

</handler-chains>
defines an application specific hander that assignes/processes stateful client ids.
On the client side there are simmilar handlers that does the reverse. It uses the JSR-261 API to add WS-Addressing header elements including the clientid association.
The client sets a custom handler chain in the binding
Service service = Service.create(wsdlURL, serviceName);
port1 = (StatefulEndpoint)service.getPort(StatefulEndpoint.class);
BindingProvider bindingProvider = (BindingProvider)port1;

List<Handler> customHandlerChain = new ArrayList<Handler>();
customHandlerChain.add(new ClientHandler());
customHandlerChain.add(new WSAddressingClientHandler());
bindingProvider.getBinding().setHandlerChain(customHandlerChain);
The WSAddressingClientHandler is provided by JBossWS and reads/writes the addressing properties and puts then into the message context.
A client connecting to the stateful endpoint
public class AddressingStatefulTestCase extends JBossWSTest
{
public void testAddItem() throws Exception
{
port1.addItem("Ice Cream");
port1.addItem("Ferrari");

port2.addItem("Mars Bar");
port2.addItem("Porsche");
}

public void testGetItems() throws Exception
{
String items1 = port1.getItems();
assertEquals("[Ice Cream, Ferrari]", items1);

String items2 = port2.getItems();
assertEquals("[Mars Bar, Porsche]", items2);
}
}
SOAP message exchange
Below you see the SOAP messages that are beeing exchanged.
<env:Envelope xmlns:env='http://schemas.xmlsoap.org/soap/envelope/'>
<env:Header xmlns:wsa='http://schemas.xmlsoap.org/ws/2004/08/addressing'>
<wsa:To>uri:jbossws-samples-wsaddr/TestService</wsa:To>
<wsa:Action>http://org.jboss.ws/addressing/stateful/action</wsa:Action>
<wsa:ReferenceParameters>
<ns1:clientid xmlns:ns1='http://somens'>clientid-1</ns1:clientid>
</wsa:ReferenceParameters>
</env:Header>
<env:Body>
<ns1:addItem xmlns:ns1='http://org.jboss.ws/samples/wsaddr'>
<String_1>Ice Cream</String_1>
</ns1:addItem>
</env:Body>
</env:Envelope>

<env:Envelope xmlns:env='http://schemas.xmlsoap.org/soap/envelope/'>
<env:Header xmlns:wsa='http://schemas.xmlsoap.org/ws/2004/08/addressing'>
<wsa:To>http://www.w3.org/2005/08/addressing/anonymous</wsa:To>
<wsa:Action>http://org.jboss.ws/addressing/stateful/actionReply</wsa:Action>
<ns1:clientid xmlns:ns1='http://somens'>clientid-1</ns1:clientid>
</env:Header>
<env:Body>
<ns1:addItemResponse xmlns:ns1='http://org.jboss.ws/samples/wsaddr'/>
</env:Body>
</env:Envelope>

...

<env:Envelope xmlns:env='http://schemas.xmlsoap.org/soap/envelope/'>
<env:Header xmlns:wsa='http://schemas.xmlsoap.org/ws/2004/08/addressing'>
<wsa:To>uri:jbossws-samples-wsaddr/TestService</wsa:To>
<wsa:Action>http://org.jboss.ws/addressing/stateful/action</wsa:Action>
<wsa:ReferenceParameters>
<ns1:clientid xmlns:ns1='http://somens'>clientid-1</ns1:clientid>
</wsa:ReferenceParameters>
</env:Header>
<env:Body>
<ns1:getItems xmlns:ns1='http://org.jboss.ws/samples/wsaddr'/>
</env:Body>
</env:Envelope>

<env:Envelope xmlns:env='http://schemas.xmlsoap.org/soap/envelope/'>
<env:Header xmlns:wsa='http://schemas.xmlsoap.org/ws/2004/08/addressing'>
<wsa:To>http://www.w3.org/2005/08/addressing/anonymous</wsa:To>
<wsa:Action>http://org.jboss.ws/addressing/stateful/actionReply</wsa:Action>
<ns1:clientid xmlns:ns1='http://somens'>clientid-1</ns1:clientid>
</env:Header>
<env:Body>
<ns1:getItemsResponse xmlns:ns1='http://org.jboss.ws/samples/wsaddr'>
<result>[Ice Cream, Ferrari]</result>
</ns1:getItemsResponse>
</env:Body>
</env:Envelope>
WS-BPEL is not supported with JAX-WS, please refer to JAX-RPC User Guide#WS-BPEL.
WS-Eventing specifies a set of operations that allow an event consumer to register (subscribe) with an event producer (source) to receive events (notifications) in an asynchronous fashion.
WS-Eventing is defined by the combination of the following specifications:
The following section will introduce the main eventing actors and their responsiblities.
Note
The original eventing specification builds upon WS-Addressing 2004/08. JBossWS however decided to stick to the latest version, which is the W3C candidate release.
-
An event sink (web service client) sends a subscribtion request to the event source endpoint. This includes the event sink endpoint address where notifications should delivered. Upon successful subscription the sink receives a leased subscription ID that can be used to identify the client in subsequent requests.
-
A successfully registered event sink directs management requests (Renew, GetStatus, Unsubscribe) to the subscription manager endpoint using the previously received subscription ID. The subscription manager endpoint address was returned as part of the subscription response in the first place.
-
The actual event sink (application) emits notification messages through the JBossWS-Eventing module. JBossWS-Eventing dispatches the notification to any subscriber endpoint that is registered with a particular event source.s
-
Besides notifications JBossWS-Eventing may emit lifecycle events at any time, i.e. to inform an event sink that a subscription was canceled. This can be the case when the subscription expired or the event source was undeployed.
It is the users responsibilty to supply the web service endpoints (EventSourceEndpoint, SubscriptionManagerEndpoint) that are required for a complete event source deployment. Fortunatly JBossWS-Eventing already ships with a implementation that can be used right away. All that's left todo is packaging of standard JSR-109 deployment archive that includes the event source specific WSDL and points to the JBossWS-Eventing endpoint implementations.
The relevant steps are:
-
Create a custom WSDL that describes your event source, in respect to the notification schema (1) and the fact that is actually contains an event source port (2)
-
Use the JBossWS SEI (3) and endpoint (4) implementations (webservices.xml, web.xml).
With JAX-WS the event source setup has actually become quiet easy. All you need to do is to subclass your endpoint implementation from AbstractEventSourceEndpoint and a subscription manager from AbstractSubscriptionManagerEndpoint and finally point that implementation to a event source specific WSDL.
package org.jboss.test.ws.jaxws.samples.wseventing;
..
import javax.jws.WebService;

import org.jboss.logging.Logger;
import org.jboss.ws.annotation.EndpointConfig;
import org.jboss.ws.extensions.eventing.jaxws.AbstractEventSourceEndpoint;

/**
* @author Heiko.Braun@jboss.org
* @version $Id$
* @since 18.01.2007
*/
@WebService(                                                                   (1)
name = "EventSource",
portName = "EventSourcePort",
targetNamespace = "http://schemas.xmlsoap.org/ws/2004/08/eventing",
wsdlLocation = "/WEB-INF/wsdl/sysmon.wsdl",                                 (2)
endpointInterface = "org.jboss.ws.extensions.eventing.jaxws.EventSourceEndpoint")
@EndpointConfig(configName = "Standard WSAddressing Endpoint")                 (3)
public class SysmonRegistrationEndpoint extends AbstractEventSourceEndpoint {  (4)

private static final Logger log = Logger.getLogger(SysmonRegistrationEndpoint.class);

protected Logger getLogger()
{
return log;
}
}
-
Of course we need a
@WebServiceannotation -
It's important to override the WSDL here
-
You need to tell JBossWS that it requires WS-Addressing for this endpoint
-
Subclass a predefined implementation that knows how to delegate to the actual eventing service implementation
Even though we are already using the annotation driven approach, JBossWS eventing still requires an event source specific WSDL.
The following excerpt shows the relevant WSDL details that describe an event source.
<?xml version="1.0" encoding="UTF-8"?>

<wsdl:definitions
targetNamespace="http://www.jboss.org/sysmon"
xmlns:tns="http://www.jboss.org/sysmon"
xmlns:wse='http://schemas.xmlsoap.org/ws/2004/08/eventing'
xmlns:wsdl='http://schemas.xmlsoap.org/wsdl/'
xmlns:wsa10='http://www.w3.org/2005/08/addressing'
xmlns:xs='http://www.w3.org/2001/XMLSchema'
xmlns:soap="http://schemas.xmlsoap.org/wsdl/soap/">

<wsdl:import
(1)        namespace='http://schemas.xmlsoap.org/ws/2004/08/eventing'
location='jbwse.wsdl' />

<wsdl:types>

<xs:schema targetNamespace='http://schemas.xmlsoap.org/ws/2004/08/eventing'>
(2)      <xs:include schemaLocation='jbwse.xsd'/>
</xs:schema>

(3)   <xs:schema
targetNamespace="http://www.jboss.org/sysmon"
elementFormDefault="qualified"
blockDefault="#all">
<xs:element name="SystemStatus">
<xs:complexType>
<xs:sequence>
<xs:element name="Time " type="xs:dateTime"/>
<xs:element name="HostName" type="xs:string"/>
<xs:element name="HostAddress" type="xs:string"/>
<xs:element name="ActiveThreadCount" type="xs:int"/>
<xs:element name="FreeMemory" type="xs:string"/>
<xs:element name="MaxMemory" type="xs:string"/>
</xs:sequence>
</xs:complexType>
</xs:element>
</xs:schema>

</wsdl:types>

<wsdl:message name='SystemInfoMsg'>
<wsdl:part name='body' element='tns:SystemStatus'/>
</wsdl:message>

(4) <wsdl:portType name='SystemInfo' wse:EventSource='true'>
<wsdl:operation name='SysmonOp'>
<wsdl:output message='tns:SystemInfoMsg'/>
</wsdl:operation>
</wsdl:portType>

<wsdl:binding name="SystemInfoBinding" type="tns:SystemInfo">
<soap:binding style="document" transport="http://schemas.xmlsoap.org/soap/http"/>
<wsdl:operation name="SysmonOp">
<soap:operation soapAction=""/>
<wsdl:output>
<soap:body use="literal"/>
</wsdl:output>
</wsdl:operation>
</wsdl:binding>

</wsdl:definitions>
-
Import the default eventing WSDL, that includes service and port declarations.
-
Include the default eventing Types
-
Specifiy the notitification message schema.
-
Declare a port type, attributed "wse:EventSource='true'" that points to your notification message schema.
JBossWS-Eventing registeres a event dispatcher within local JNDI tree that can be used to emit notifications from applications.
java:/EventDispatcher
The event dispatcher interface:
public interface EventDispatcher
{
void dispatch(URI eventSourceNS, Element payload);
}
Example notification
(1)   URI eventSourceURI = new URI("http://http://www.jboss.org/sysmon/SystemInfo");
(2)   Element payload = DOMUtils.parse("SOME XML STRING");
try
{
InitialContext iniCtx = getInitialContext();
(3)      EventDispatcher delegate = (EventDispatcher)
iniCtx.lookup(EventingConstants.DISPATCHER_JNDI_NAME);
(4)      delegate.dispatch(eventSourceURI, payload);
}
catch (Exception e)
{
//
}
-
Address your event source correctly (TargetNamespace+PortTypeName)
-
Create your payload
-
Lookup dispatcher from JNDI
-
Dispatch notification.
The SubscriptionManager MBean is the actual core component that drives the JBossWS-Eventing implementation. It can be accessed through the jmx-console.
jboss.ws.eventing:service=SubscriptionManager
Management operations exist to monitor and maintain active subscritions and deployed event sources. The current implementation is backed by a ThreadPoolExecutor, that asynchronously delivers messages to event sink endpoints. It can be configured through the following attributes:
-
corePoolSize - average number of idle threads
-
maximumPoolSize - maximum number of threads
-
eventKeepAlive - keep alive before an undelivered event message is discarded.
WS-Security addresses message level security. It standardizes authorization, encryption, and digital signature processing of web services. Unlike transport security models, such as SSL, WS-Security applies security directly to the elements of the web service message. This increases the flexibility of your web services, by allowing any message model to be used (point to point, multi-hop relay, etc).
This chapter describes how to use WS-Security to sign and encrypt a simple SOAP message.
Specifications
WS-Security is defined by the combination of the following specifications:
JBossWS uses handlers to identify ws-security encoded requests and invoke the security components to sign and encrypt messages. In order to enable security processing, the client and server side need to include a corressponding handler configuration. The preferred way is to reference a predefined JAX-WS Endpoint Configuration or JAX-WS Client Configuration respectively.
Note
You need to setup both the endpoint configuration and the WSSE declarations. That's two separate steps.
In this example we configure both the client and the server to sign the message body. Both also require this from each other. So, if you remove either the client or the server security deployment descriptor, you will notice that the other party will throw a fault explaining that the message did not conform to the proper security requirements.
<jboss-ws-security xmlns="http://www.jboss.com/ws-security/config"
xmlns:xsi="http://www.w3.org/2001/XMLSchema-instance"
xsi:schemaLocation="http://www.jboss.com/ws-security/config
http://www.jboss.com/ws-security/schema/jboss-ws-security_1_0.xsd">
(1)  <key-store-file>WEB-INF/wsse.keystore</key-store-file>
(2)  <key-store-password>jbossws</key-store-password>
(3)  <trust-store-file>WEB-INF/wsse.truststore</trust-store-file>
(4)  <trust-store-password>jbossws</trust-store-password>
(5)  <config>
(6)    <sign type="x509v3" alias="wsse"/>
(7)    <requires>
(8)      <signature/>
</requires>
</config>
</jboss-ws-security>
-
This specifies that the key store we wish to use is WEB-INF/wsse.keystore, which is located in our war file.
-
This specifies that the store password is "jbossws". Password can be encypted using the {EXT} and {CLASS} commands. Please see samples for their usage.
-
This specifies that the trust store we wish to use is WEB-INF/wsse.truststore, which is located in our war file.
-
This specifies that the trust store password is also "jbossws". Password can be encrypted using the {EXT} and {CLASS} commands. Please see samples for their usage.
-
Here we start our root config block. The root config block is the default configuration for all services in this war file.
-
This means that the server must sign the message body of all responses. Type means that we are to use a X.509v3 certificate (a standard certificate). The alias option says that the certificate/key pair to use for signing is in the key store under the "wsse" alias
-
Here we start our optional requires block. This block specifies all security requirements that must be met when the server receives a message.
-
This means that all web services in this war file require the message body to be signed.
By default an endpoint does not use the WS-Security configuration. Use the proprietary @EndpointConfig annotation to set the config name. See JAX-WS_Endpoint_Configuration for the list of available config names.
@WebService
@EndpointConfig(configName = "Standard WSSecurity Endpoint")
public class HelloJavaBean
{
...
}
<jboss-ws-security xmlns="http://www.jboss.com/ws-security/config"
xmlns:xsi="http://www.w3.org/2001/XMLSchema-instance"
xsi:schemaLocation="http://www.jboss.com/ws-security/config
http://www.jboss.com/ws-security/schema/jboss-ws-security_1_0.xsd">
(1)  <config>
(2)    <sign type="x509v3" alias="wsse"/>
(3)    <requires>
(4)      <signature/>
</requires>
</config>
</jboss-ws-security>
-
Here we start our root config block. The root config block is the default configuration for all web service clients (Call, Proxy objects).
-
This means that the client must sign the message body of all requests it sends. Type means that we are to use a X.509v3 certificate (a standard certificate). The alias option says that the certificate/key pair to use for signing is in the key store under the "wsse" alias
-
Here we start our optional requires block. This block specifies all security requirements that must be met when the client receives a response.
-
This means that all web service clients must receive signed response messages.
We did not specify a key store or trust store, because client apps instead use the wsse System properties instead. If this was a web or ejb client (meaning a webservice client in a war or ejb jar file), then we would have specified them in the client descriptor.
Here is an excerpt from the JBossWS samples:
<sysproperty key="org.jboss.ws.wsse.keyStore"
value="${tests.output.dir}/resources/jaxrpc/samples/wssecurity/wsse.keystore"/>
<sysproperty key="org.jboss.ws.wsse.trustStore"
value="${tests.output.dir}/resources/jaxrpc/samples/wssecurity/wsse.truststore"/>
<sysproperty key="org.jboss.ws.wsse.keyStorePassword" value="jbossws"/>
<sysproperty key="org.jboss.ws.wsse.trustStorePassword" value="jbossws"/>
<sysproperty key="org.jboss.ws.wsse.keyStoreType" value="jks"/>
<sysproperty key="org.jboss.ws.wsse.trustStoreType" value="jks"/>
SOAP message exchange
Below you see the incomming SOAP message with the details of the security headers ommited. The idea is, that the SOAP body is still plain text, but it is signed in the security header and can therefore not manipulated in transit.
Incomming SOAPMessage
<env:Envelope xmlns:env="http://schemas.xmlsoap.org/soap/envelope/">
<env:Header>
<wsse:Security env:mustUnderstand="1" ...>
<wsu:Timestamp wsu:Id="timestamp">...</wsu:Timestamp>
<wsse:BinarySecurityToken ...>
...
</wsse:BinarySecurityToken>
<ds:Signature xmlns:ds="http://www.w3.org/2000/09/xmldsig#">
...
</ds:Signature>
</wsse:Security>
</env:Header>
<env:Body wsu:Id="element-1-1140197309843-12388840" ...>
<ns1:echoUserType xmlns:ns1="http://org.jboss.ws/samples/wssecurity">
<UserType_1 xmlns:xsi="http://www.w3.org/2001/XMLSchema-instance">
<msg>Kermit</msg>
</UserType_1>
</ns1:echoUserType>
</env:Body>
</env:Envelope>
The information below has originaly been provided by The Legion of the Bouncy Castle.
The provider can be configured as part of your environment via static registration by adding an entry to the java.security properties file (found in $JAVA_HOME/jre/lib/security/java.security, where $JAVA_HOME is the location of your JDK/JRE distribution). You'll find detailed instructions in the file but basically it comes down to adding a line:
security.provider.<n>=org.bouncycastle.jce.provider.BouncyCastleProvider
Where <n> is the preference you want the provider at.
Note
Issues may arise if the Sun provided providers are not first.
Where you put the jar is mostly up to you, although with jdk1.4 the best (and in some cases only) place to have it is in $JAVA_HOME/jre/lib/ext. Under Windows there will normally be a JRE and a JDK install of Java if you think you have installed it correctly and it still doesn't work chances are you have added the provider to the installation not being used.
Note
If you having a hard time understanding how the different trust- and keystore configurations are used for signature and encryption, then read this thread first: http://www.jboss.org/index.html?module=bb&op=viewtopic&t=94406
Support for the WS-Coordination, WS-AtomicTransaction and WS-BusinessActivity specifications will be provided by technology recently acquired from Arjuna Technologies Ltd. This technology will be present within the JBoss Transactions 4.2.1 release. Further information can be obtained from the JBoss Transactions Project
J2EE 1.4 mandates support for Java API for XML Registries (JAXR). Inclusion of a XML Registry with the J2EE 1.4 certified Application Server is optional. Starting jboss-4.0.2, JBoss ships a UDDI v2.0 compliant registry, the Apache jUDDI registry. We also provide support for JAXR Capability Level 0 (UDDI Registries) via integration of Apache Scout.
This chapter describes how to configure the jUDDI registry in JBoss and some sample code outlines for using JAXR API to publish and query the jUDDI registry.
Configuration of the jUDDI registry happens via an MBean Service that is deployed in the juddi-service.sar archive in the "all" configuration. The configuration of this service can be done in the jboss-service.xml of the META-INF directory in the juddi-service.sar
Let us look at the individual configuration items that can be changed.
DataSources configuration
<!-- Datasource to Database-->
<attribute name="DataSourceUrl">java:/DefaultDS</attribute>
Database Tables (Should they be created on start, Should they be dropped on stop, Should they be dropped on start etc)
<!-- Should all tables be created on Start-->
  <attribute name="CreateOnStart">false</attribute>
	  <!-- Should all tables be dropped on Stop-->
  <attribute name="DropOnStop">true</attribute>
  <!-- Should all tables be dropped on Start-->
  <attribute name="DropOnStart">false</attribute>
JAXR Connection Factory to be bound in JNDI. (Should it be bound? and under what name?)
<!-- Should I bind a Context to which JaxrConnectionFactory bound-->
<attribute name="ShouldBindJaxr">true</attribute>

<!-- Context to which JaxrConnectionFactory to bind to. If you have remote clients, please bind it to the global namespace(default behavior).
To just cater to clients running on the same VM as JBoss, change to java:/JAXR -->
<attribute name="BindJaxr">JAXR</attribute>
Other common configuration:
Add authorized users to access the jUDDI registry. (Add a sql insert statement in a single line)
Look at the script META-INF/ddl/juddi_data.ddl for more details. Example for a user 'jboss'

INSERT INTO PUBLISHER (PUBLISHER_ID,PUBLISHER_NAME,
EMAIL_ADDRESS,IS_ENABLED,IS_ADMIN)
VALUES ('jboss','JBoss User','jboss@xxx','true','true');
In this section, we will discuss the configuration needed to run the JAXR API. The JAXR configuration relies on System properties passed to the JVM. The System properties that are needed are:
javax.xml.registry.ConnectionFactoryClass=org.apache.ws.scout.registry.ConnectionFactoryImpl
jaxr.query.url=http://localhost:8080/juddi/inquiry
jaxr.publish.url=http://localhost:8080/juddi/publish
juddi.proxy.transportClass=org.jboss.jaxr.juddi.transport.SaajTransport
Please remember to change the hostname from "localhost" to the hostname of the UDDI service/JBoss Server.
You can pass the System Properties to the JVM in the following ways:
-
When the client code is running inside JBoss (maybe a servlet or an EJB). Then you will need to pass the System properties in the run.sh/run.bat scripts to the java process via the "-D" option.
-
When the client code is running in an external JVM. Then you can pass the properties either as "-D" options to the java process or explicitly set them in the client code(not recommended).
System.setProperty(propertyname, propertyvalue);
There are two categories of API: JAXR Publish API and JAXR Inquiry API. The important JAXR interfaces that any JAXR client code will use are the following.
-
javax.xml.registry.RegistryService From J2EE 1.4 JavaDoc: "This is the principal interface implemented by a JAXR provider. A registry client can get this interface from a Connection to a registry. It provides the methods that are used by the client to discover various capability specific interfaces implemented by the JAXR provider."
-
javax.xml.registry.BusinessLifeCycleManager From J2EE 1.4 JavaDoc: "The BusinessLifeCycleManager interface, which is exposed by the Registry Service, implements the life cycle management functionality of the Registry as part of a business level API. Note that there is no authentication information provided, because the Connection interface keeps that state and context on behalf of the client."
-
javax.xml.registry.BusinessQueryManager From J2EE 1.4 JavaDoc: "The BusinessQueryManager interface, which is exposed by the Registry Service, implements the business style query interface. It is also referred to as the focused query interface."
Let us now look at some of the common programming tasks performed while using the JAXR API:
Getting a JAXR Connection to the registry.
String queryurl = System.getProperty("jaxr.query.url", "http://localhost:8080/juddi/inquiry");
String puburl = System.getProperty("jaxr.publish.url", "http://localhost:8080/juddi/publish");
..
Properties props = new Properties();
props.setProperty("javax.xml.registry.queryManagerURL", queryurl);
props.setProperty("javax.xml.registry.lifeCycleManagerURL", puburl);

String transportClass = System.getProperty("juddi.proxy.transportClass", "org.jboss.jaxr.juddi.transport.SaajTransport");
System.setProperty("juddi.proxy.transportClass", transportClass);

// Create the connection, passing it the configuration properties
factory = ConnectionFactory.newInstance();
factory.setProperties(props);
connection = factory.createConnection();
Authentication with the registry.
/**
* Does authentication with the uddi registry
*/
protected void login() throws JAXRException
{
PasswordAuthentication passwdAuth = new PasswordAuthentication(userid, passwd.toCharArray());
Set creds = new HashSet();
creds.add(passwdAuth);

connection.setCredentials(creds);
}
Save a Business
/**
* Creates a Jaxr Organization with 1 or more services
*/
protected Organization createOrganization(String orgname) throws JAXRException
{
Organization org = blm.createOrganization(getIString(orgname));
org.setDescription(getIString("JBoss Inc"));
Service service = blm.createService(getIString("JBOSS JAXR Service"));
service.setDescription(getIString("Services of XML Registry"));
//Create serviceBinding
ServiceBinding serviceBinding = blm.createServiceBinding();
serviceBinding.setDescription(blm.createInternationalString("Test Service Binding"));

//Turn validation of URI off
serviceBinding.setValidateURI(false);
serviceBinding.setAccessURI("http://testjboss.org");
..
// Add the serviceBinding to the service
service.addServiceBinding(serviceBinding);

User user = blm.createUser();
org.setPrimaryContact(user);
PersonName personName = blm.createPersonName("Anil S");
TelephoneNumber telephoneNumber = blm.createTelephoneNumber();
telephoneNumber.setNumber("111-111-7777");
telephoneNumber.setType(null);
PostalAddress address = blm.createPostalAddress("111", "My Drive", "BuckHead", "GA", "USA", "1111-111", "");
Collection postalAddresses = new ArrayList();
postalAddresses.add(address);
Collection emailAddresses = new ArrayList();
EmailAddress emailAddress = blm.createEmailAddress("anil@apache.org");
emailAddresses.add(emailAddress);

Collection numbers = new ArrayList();
numbers.add(telephoneNumber);
user.setPersonName(personName);
user.setPostalAddresses(postalAddresses);
user.setEmailAddresses(emailAddresses);
user.setTelephoneNumbers(numbers);

ClassificationScheme cScheme = getClassificationScheme("ntis-gov:naics", "");
Key cKey = blm.createKey("uuid:C0B9FE13-324F-413D-5A5B-2004DB8E5CC2");
cScheme.setKey(cKey);
Classification classification = blm.createClassification(cScheme, "Computer Systems Design and Related Services", "5415");
org.addClassification(classification);
ClassificationScheme cScheme1 = getClassificationScheme("D-U-N-S", "");
Key cKey1 = blm.createKey("uuid:3367C81E-FF1F-4D5A-B202-3EB13AD02423");
cScheme1.setKey(cKey1);
ExternalIdentifier ei = blm.createExternalIdentifier(cScheme1, "D-U-N-S number", "08-146-6849");
org.addExternalIdentifier(ei);
org.addService(service);
return org;
}
Query a Business
/**
* Locale aware Search a business in the registry
*/
public void searchBusiness(String bizname) throws JAXRException
{
try
{
// Get registry service and business query manager
this.getJAXREssentials();

// Define find qualifiers and name patterns
Collection findQualifiers = new ArrayList();
findQualifiers.add(FindQualifier.SORT_BY_NAME_ASC);
Collection namePatterns = new ArrayList();
String pattern = "%" + bizname + "%";
LocalizedString ls = blm.createLocalizedString(Locale.getDefault(), pattern);
namePatterns.add(ls);

// Find based upon qualifier type and values
BulkResponse response = bqm.findOrganizations(findQualifiers, namePatterns, null, null, null, null);

// check how many organisation we have matched
Collection orgs = response.getCollection();
if (orgs == null)
{
log.debug(" -- Matched 0 orgs");

}
else
{
log.debug(" -- Matched " + orgs.size() + " organizations -- ");

// then step through them
for (Iterator orgIter = orgs.iterator(); orgIter.hasNext();)
{
Organization org = (Organization)orgIter.next();
log.debug("Org name: " + getName(org));
log.debug("Org description: " + getDescription(org));
log.debug("Org key id: " + getKey(org));
checkUser(org);
checkServices(org);
}
}
}
finally
{
connection.close();
}
}
For more examples of code using the JAXR API, please refer to the resources in the Resources Section.
-
I cannot connect to the registry from JAXR. Please check the inquiry and publish url passed to the JAXR ConnectionFactory.
-
I cannot connect to the jUDDI registry. Please check the jUDDI configuration and see if there are any errors in the server.log. And also remember that the jUDDI registry is available only in the "all" configuration.
-
I cannot authenticate to the jUDDI registry. Have you added an authorized user to the jUDDI database, as described earlier in the chapter?
-
I would like to view the SOAP messages in transit between the client and the UDDI Registry. Please use the tcpmon tool to view the messages in transit. TCPMon
Since 2.1
The Web Services Policy Framework (WS-Policy) provides a general purpose model and corresponding syntax to describe the policies of a Web Service.
WS-Policy defines a base set of constructs that can be used and extended by other Web services specifications to describe a broad range of service requirements and capabilities.
Current JBoss implementation can instrument a webservice with policies attached at endpoint, port or port-type scope level only. There are two different methods to attach policies: providing a wsdl decorated with policies and policy attachments as defined by specifications, or using JBoss proprietary annotations. The first way has the advantage of being standard, while the second one is much more simple to implement. Of course the wsdl generated by these annotations conforms to standard defined in specifications and can be used with any ws-policy compliant client.
Please note that ws-policy specifications only define policy requirements and their attachment method to wsdl through specific extensions. It is out of the scope of ws-policy specifications and thus implementation to define and use the content of assertions. The way these assertions (called domain assertions or domain policies) have to be deployed and used is left to other specification like WS-Security-Policy or more generally to domain specific implementation.
WS-Policy is defined by the combination of the following specifications:
* <ulink url="http://www.w3.org/Submission/WS-Policy/"> WS-Policy specification</ulink>
* <ulink url="http://www.w3.org/Submission/WS-PolicyAttachment/"> WS-Policy-Attachment specification</ulink>
To attach policies in this manner, the only thing you have to do in a webservice class is to provide a custom wsdl. This will cause JBossws to skip wsdl generation at deploy time, since the wsdl file you provided will be published. Please refer to specification (WS-Policy-Attachment) to learn how to modify wsdl to attach a policy.
Here you find an example of a webservice class and provided wsdl with a policy containing a domain assertion for JBoss wssecurity.
@WebService(name = "Hello",
targetNamespace = "http://org.jboss.ws/samples/wssecuritypolicy",
wsdlLocation="WEB-INF/wsdl/HelloService.wsdl")
@SOAPBinding(style = SOAPBinding.Style.RPC)
public class HelloJavaBean
{
private Logger log = Logger.getLogger(HelloJavaBean.class);
..
@WebMethod
public UserType echoUserType(@WebParam(name = "user") UserType in0)
{
log.info(in0);
return in0;
}
}
<?xml version="1.0" encoding="UTF-8"?>
<definitions name='HelloService' targetNamespace='http://org.jboss.ws/samples/wssecuritypolicy' xmlns='http://schemas.xmlsoap.org/wsdl/' xmlns:ns1='http://org.jboss.ws/samples/wssecurity' xmlns:soap='http://schemas.xmlsoap.org/wsdl/soap/' xmlns:tns='http://org.jboss.ws/samples/wssecuritypolicy' xmlns:wsp='http://schemas.xmlsoap.org/ws/2004/09/policy' xmlns:xsd='http://www.w3.org/2001/XMLSchema'>
<types>
<xs:schema targetNamespace='http://org.jboss.ws/samples/wssecurity' version='1.0' xmlns:xs='http://www.w3.org/2001/XMLSchema'>
<xs:complexType name='UserType'>
<xs:sequence>
<xs:element minOccurs='0' name='msg' type='xs:string'/>
</xs:sequence>
</xs:complexType>
</xs:schema>
</types>
<wsp:Policy wsu:Id='X509EndpointPolicy' xmlns:wsu='http://docs.oasis-open.org/wss/2004/01/oasis-200401-wss-wssecurity-utility-1.0.xsd'>
<wsp:All>
<sp:jboss-ws-security xmlns:sp='http://www.jboss.com/ws-security/schema/jboss-ws-security_1_0.xsd'>
<sp:key-store-file>WEB-INF/wsse.keystore</sp:key-store-file>
<sp:key-store-password>jbossws</sp:key-store-password>
<sp:trust-store-file>WEB-INF/wsse.truststore</sp:trust-store-file>
<sp:trust-store-password>jbossws</sp:trust-store-password>
<sp:config>
<sp:encrypt alias='wsse' type='x509v3'/>
<sp:requires>
<sp:encryption/>
</sp:requires>
</sp:config>
</sp:jboss-ws-security>
</wsp:All>
</wsp:Policy>
<message name='Hello_echoUserType'>
<part name='user' type='ns1:UserType'/>
</message>
<message name='Hello_echoUserTypeResponse'>
<part name='return' type='ns1:UserType'/>
</message>
<portType name='Hello'>
<operation name='echoUserType' parameterOrder='user'>
<input message='tns:Hello_echoUserType'/>
<output message='tns:Hello_echoUserTypeResponse'/>
</operation>
</portType>
<binding name='HelloBinding' type='tns:Hello'>
<wsp:PolicyReference URI='#X509EndpointPolicy'/>
<soap:binding style='rpc' transport='http://schemas.xmlsoap.org/soap/http'/>
<operation name='echoUserType'>
<soap:operation soapAction=''/>
<input>
<soap:body namespace='http://org.jboss.ws/samples/wssecuritypolicy' use='literal'/>
</input>
<output>
<soap:body namespace='http://org.jboss.ws/samples/wssecuritypolicy' use='literal'/>
</output>
</operation>
</binding>
<service name='HelloService'>
<port binding='tns:HelloBinding' name='HelloPort'>
<soap:address location='REPLACE_WITH_ACTUAL_URL'/>
</port>
</service>
</definitions>
Please note in the wsdl file the wsp:Policy element and the wsp:PolicyReference in 'HelloBinding' binding Element.
Using JBoss proprietary annotation you only have to provide the policy xml, leaving wsdl generation to the JBossWS deployer.
There are two annotations to use, the first one (@PolicyAttachment) containing an array of the second one (@Policy): this lets you have many policies attached to a class or method. In future domain policy implementations might ship domain annotations extending the @Policy annotation to provide needed metadata directly as annotation parameters. The current @Policy annotation takes a reference to a xml file containing a generic policy description written respecting ws-policy specification rules.
/**

@Target(ElementType.TYPE)
@Retention(RetentionPolicy.RUNTIME)
public @interface PolicyAttachment {
Policy[] value();
}
...
@Retention(RetentionPolicy.RUNTIME)
public @interface Policy {

public String policyFileLocation();

public PolicyScopeLevel scope();
}
And here you have the previous section example re-implemented using annotations and xml policy file:
@WebService(name = "Hello", targetNamespace = "http://org.jboss.ws/samples/wssecurityAnnotatedpolicy")
@PolicyAttachment({@Policy( policyFileLocation="WEB-INF/Policy.xml", scope = PolicyScopeLevel.WSDL_PORT ) })
@SOAPBinding(style = SOAPBinding.Style.RPC)
public class HelloJavaBean
{
private Logger log = Logger.getLogger(HelloJavaBean.class);

@WebMethod
public UserType echoUserType(@WebParam(name = "user") UserType in0)
{
log.info(in0);
return in0;
}
}
<?xml version="1.0" encoding="UTF-8"?>
...
<wsp:Policy wsu:Id="X509EndpointPolicy"  xmlns:wsp="http://schemas.xmlsoap.org/ws/2004/09/policy"
xmlns:wsu="http://docs.oasis-open.org/wss/2004/01/oasis-200401-wss-wssecurity-utility-1.0.xsd">
<wsp:ExactlyOne>
<wsp:All>
<sp:jboss-ws-security xmlns:sp="http://www.jboss.com/ws-security/schema/jboss-ws-security_1_0.xsd">
<sp:key-store-file>WEB-INF/wsse.keystore</sp:key-store-file>
<sp:key-store-password>jbossws</sp:key-store-password>
<sp:trust-store-file>WEB-INF/wsse.truststore</sp:trust-store-file>
<sp:trust-store-password>jbossws</sp:trust-store-password>
<sp:config>
<sp:encrypt type="x509v3" alias="wsse"/>
<sp:requires>
<sp:encryption/>
</sp:requires>
</sp:config>
</sp:jboss-ws-security>
</wsp:All>
</wsp:ExactlyOne>
</wsp:Policy>
This section describes propriatary JBoss extensions to JAX-WS.
For the set of standard annotations, please have a look at JAX-WS Annotations
/**
* Defines an endpoint or client configuration.
* This annotation is valid on an endpoint implementaion bean or a SEI.
*
* @author Heiko.Braun@jboss.org
* @since 16.01.2007
*/
@Retention(value = RetentionPolicy.RUNTIME)
@Target(value = { ElementType.TYPE })
public @interface EndpointConfig {
...
/**
* The optional config-name element gives the configuration name that must be present in
* the configuration given by element config-file.
*
* Server side default: Standard Endpoint
* Client side default: Standard Client
*/
String configName() default "";
...
/**
* The optional config-file element is a URL or resource name for the configuration.
*
* Server side default: standard-jaxws-endpoint-config.xml
* Client side default: standard-jaxws-client-config.xml
*/
String configFile() default "";
}
/**
* Provides web context specific meta data to EJB based web service endpoints.
*
* @author thomas.diesler@jboss.org
* @since 26-Apr-2005
*/
@Retention(value = RetentionPolicy.RUNTIME)
@Target(value = { ElementType.TYPE })
public @interface WebContext {
...
/**
* The contextRoot element specifies the context root that the web service endpoint is deployed to.
* If it is not specified it will be derived from the deployment short name.
*
* Applies to server side port components only.
*/
String contextRoot() default "";
...
/**
* The virtual hosts that the web service endpoint is deployed to.
*
* Applies to server side port components only.
*/
String[] virtualHosts() default {};

/**
* Relative path that is appended to the contextRoot to form fully qualified
* endpoint address for the web service endpoint.
*
* Applies to server side port components only.
*/
String urlPattern() default "";

/**
* The authMethod is used to configure the authentication mechanism for the web service.
* As a prerequisite to gaining access to any web service which are protected by an authorization
* constraint, a user must have authenticated using the configured mechanism.
*
* Legal values for this element are "BASIC", or "CLIENT-CERT".
*/
String authMethod() default "";

/**
* The transportGuarantee specifies that the communication
* between client and server should be NONE, INTEGRAL, or
* CONFIDENTIAL. NONE means that the application does not require any
* transport guarantees. A value of INTEGRAL means that the application
* requires that the data sent between the client and server be sent in
* such a way that it can't be changed in transit. CONFIDENTIAL means
* that the application requires that the data be transmitted in a
* fashion that prevents other entities from observing the contents of
* the transmission. In most cases, the presence of the INTEGRAL or
* CONFIDENTIAL flag will indicate that the use of SSL is required.
*/
String transportGuarantee() default "";

/**
* A secure endpoint does not by default publish it's wsdl on an unsecure transport.
* You can override this behaviour by explicitly setting the secureWSDLAccess flag to false.
*
* Protect access to WSDL. See http://jira.jboss.org/jira/browse/JBWS-723
*/
boolean secureWSDLAccess() default true;
}
/**
* Annotation for specifying the JBoss security domain for an EJB
*
* @author <a href="mailto:bill@jboss.org">Bill Burke</a>
**/
@Target(ElementType.TYPE) @Retention(RetentionPolicy.RUNTIME)
public @interface SecurityDomain
{
/**
* The required name for the security domain.
*
* Do not use the JNDI name
*
*    Good: "MyDomain"
*    Bad:  "java:/jaas/MyDomain"
*/
String value();

/**
* The name for the unauthenticated pricipal
*/
String unauthenticatedPrincipal() default "";
}
As indicated in Chapter 1, Introduction the JBoss Application Server 5 is designed around the advanced concept of a Virtual Deployment Framework (VDF). This chapter discusses the JBoss5 Virtual Deployment Framework further. The following UML diagram illustrates an overview of the key JBoss5 Deployment Framework classes.
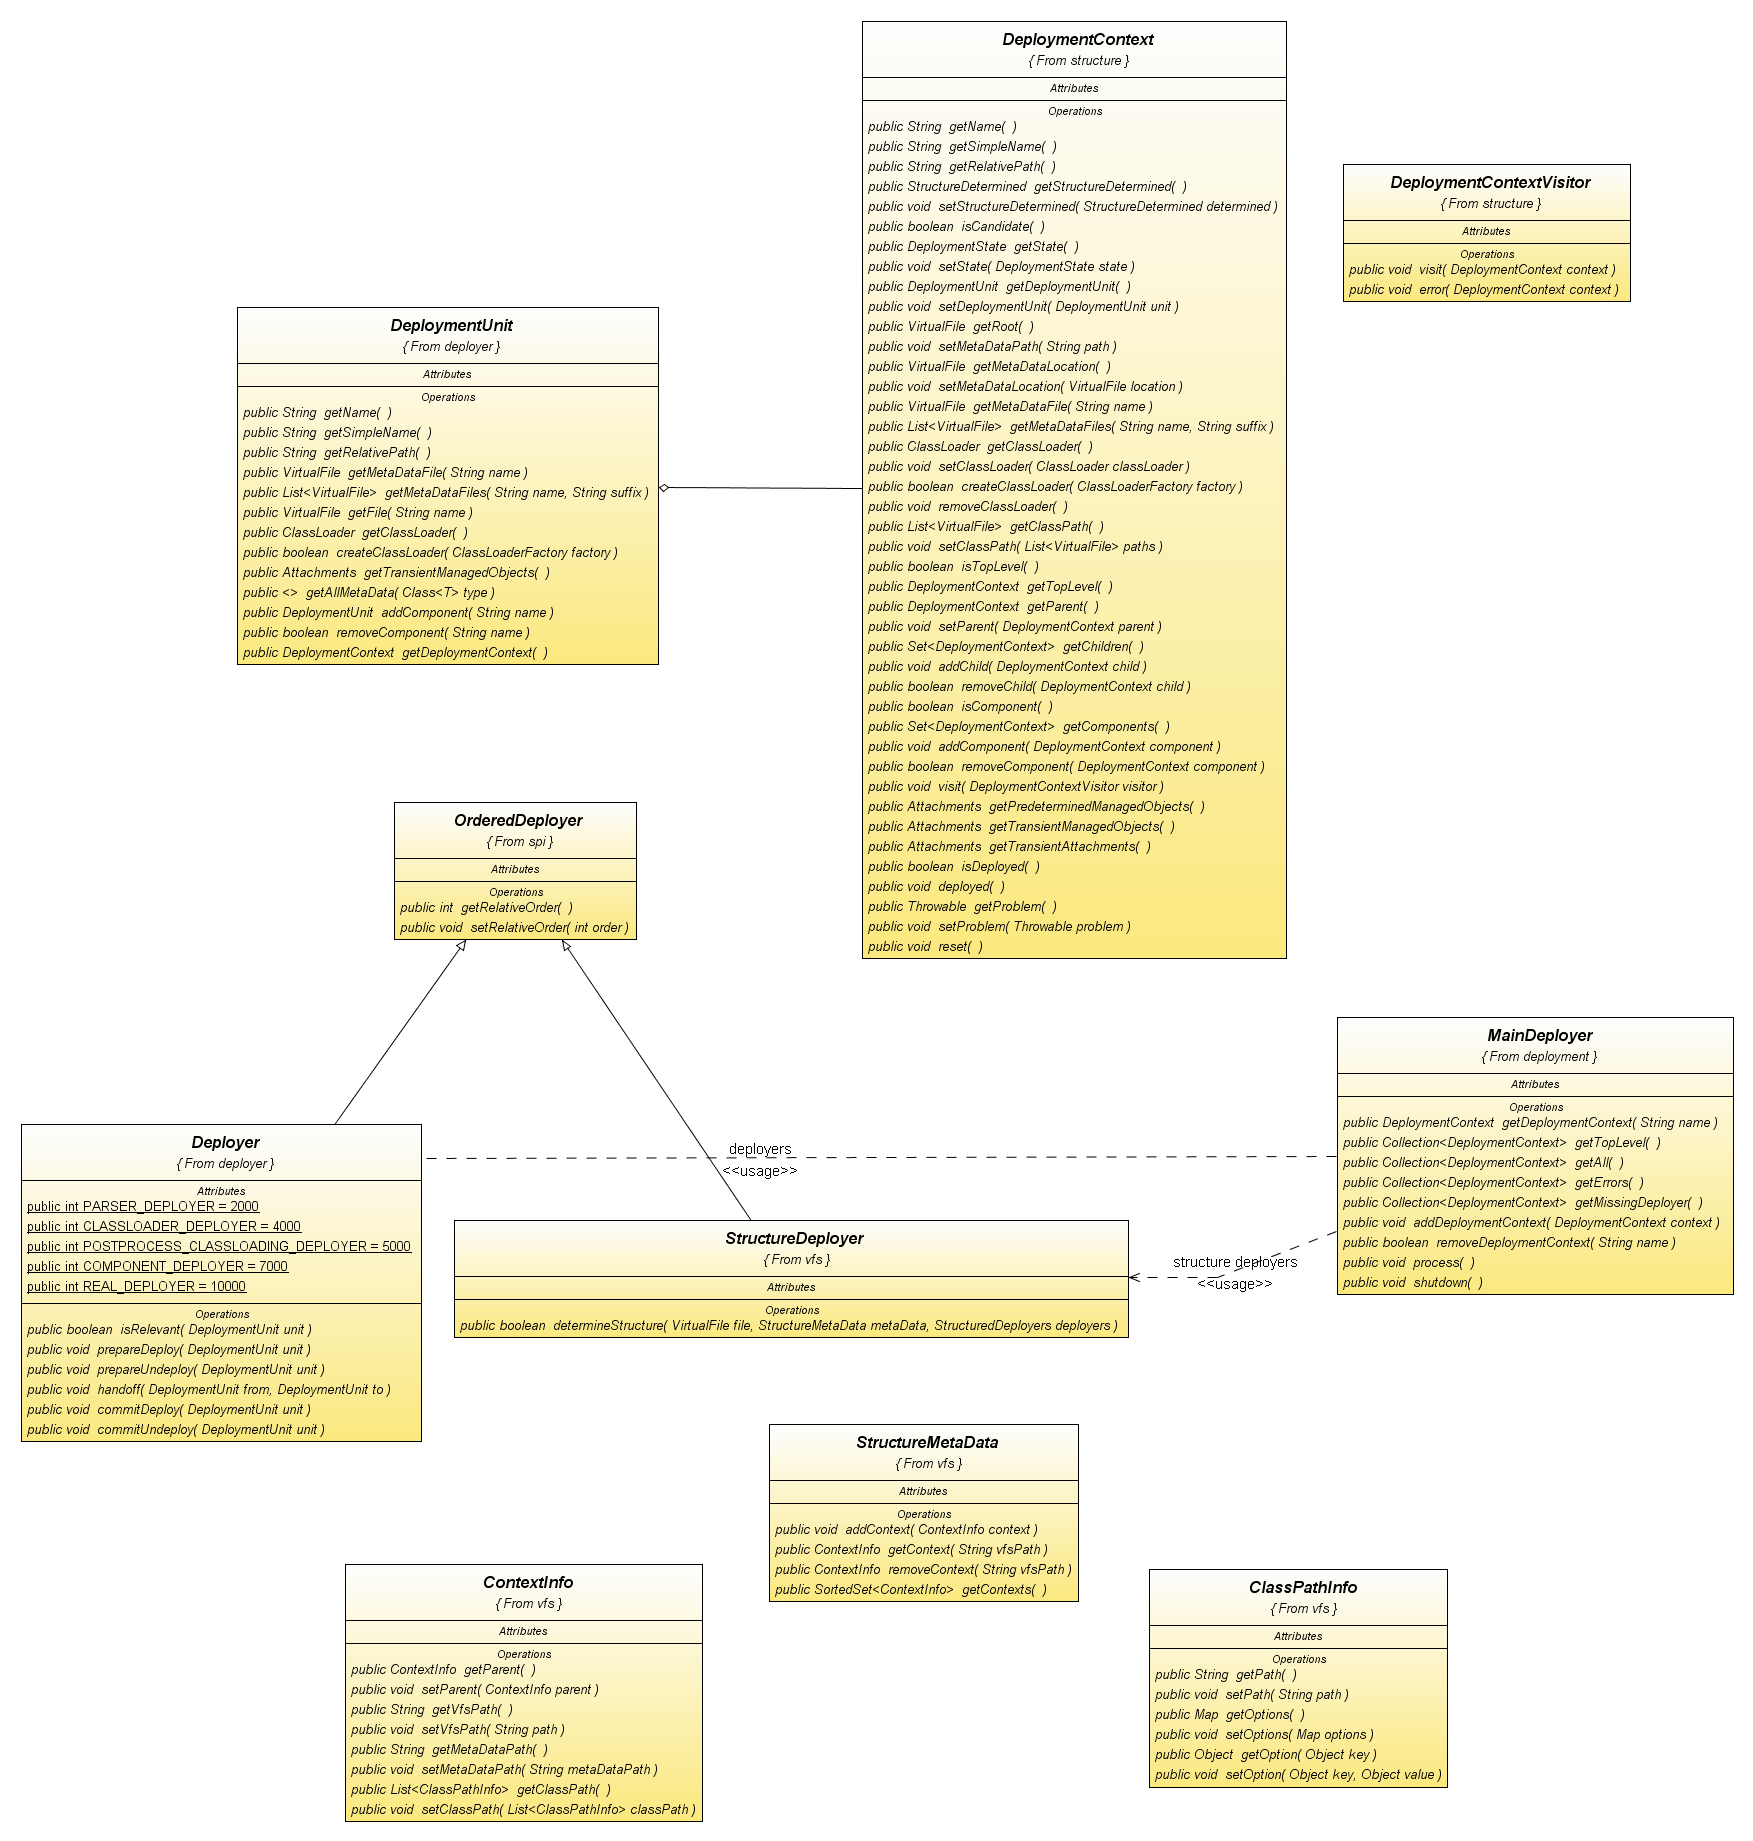
The key classes in the above diagram are:
-
MainDeployer : this interface defines the contract for the MainDeployer. The MainDeployer handles parsing of deployment archives into Deployment instances and deployment of those instances into the microcontainer. This in is an update of the JMX based MainDeployer from earlier versions to a one based on the Microcontainer, JBoss5VirtualFileSystem, and Virtual Deployment Framework (VDF). Deployers are registered with the MainDeployer as an ordered list of deployers. MainDeployer contains two sets of deployers:
-
StructureDeployers used to analyze the structure of a DeploymentContext when addDeploymentContext(DeploymentContext) is invoked. For each StructureDeployer the determineStructure(DeploymentContext) method is invoked to analyze the deployment. A StructureDeployer returns true to indicate that the deployment was recognized and no further StructureDeployer should analyze the DeploymentContext.
-
-
Deployers used to translate a DeploymentUnit into runtime kernel beans when the MainDeployer.process is run. The Deployer methods are:
-
isRelevant() : does the deployer want to process the unit.
-
prepareDeploy() : take the new deployment to the ready stage
-
prepareUndeploy() : get ready to undeploy
-
handoff(new, old) : handover control from new to old
-
commitDeploy() : new deployment is now in control
-
commitUndeploy() : old deployment is out of here
-
getRelativeOrder() : specify the relative order of the deployer in a chain
-
.
-
DeploymentUnit : a representation of a runtime unit of work a Deployer operates on.
-
DeploymentContext : a representation of structural aspects of deployable content.
-
ManagedObject : a representation of the manageable properties for a deployment.
-
VFS : the api for representing the read-only file system of the deployment.
-
VirtualFile : the api for a file in the deployment.
-
DomainClassLoader/ClassLoadingDomain : A generalization of the legacy JMX based unified class loading model. This is still in progress. The org.jboss.vfs.classloding.VFSClassLoader is the current simple implementation.
The org.jboss.deployers.plugins.deployment.MainDeployerImpl implementation of the org.jboss.deployers.spi.deployment.MainDeployer interfaces, includes the following standard method details:
-
DeploymentContext getDeploymentContext(String name) : obtain the DeploymentContext associated with the given name from all of the DeploymentContexts that have been added to the MainDeployer. This includes top level and all child contexts.
-
Collection <DeploymentContext> getTopLevel() : get a list of all of the top level DeploymentContexts added via the addDeploymentContext(DeploymentContext) method.
-
Collection <DeploymentContext> getAll() : get all of the DeploymentContexts, top-level and child associated with the MainDeployer.
-
Collection <DeploymentContext> getErrors() : get the DeploymentContexts that have failed to be structurally analyzed or deployed.
-
Collection <DeploymentContext> getMissingDeployer() : get the DeploymentContexts that are not deployed (isDeployed() == false) and are not root .jar files.
-
void addDeploymentContext(DeploymentContext context) throws DeploymentException : add a top-level deployment context. This runs a structural analysis of the DeploymentContext if its StructureDetermined state is not PREDETERMINED. If the structural analysis succeeds, the DeploymentContext is added for deployment during process.
-
boolean removeDeploymentContext(String name) throws DeploymentException : remove the top-level deployment associated with name.
-
void process() : runs through all DeploymentContexts that have been removed undeploys each top-level DeployemntContext. The undeployment involves invoking performUndeploy(DeploymentUnit) on each DeploymentContext.getDeploymentUnit(). Then for each component DeploymentContext, performUndeploy(DeploymentUnit) on the component DeploymentContext.getDeploymentUnit() is performed. Next, the top-level DeploymentContexts that have been added are deployed by invoking commitDeploy on each deployer. The details of the deployment process are that each deployer is run on top-level context DeploymentUnit by invoking Deployer.commitDeploy(DeploymentUnit), followed by the deployment of each context of the top-level DeploymentContext components (DeploymentContext.getComponents()).
-
void shutdown() : removes all top-level DeploymentContexts, and then invokes process to perform the undeployments.
In addition, the implementation adds the following methods.
-
public synchronized void addDeployer(Deployer deployer) : add a component deployer for non-structurual processing.
-
public synchronized void removeDeployer(Deployer deployer) : removes a component Deployer.
-
public synchronized Set <Deployer> getDeployers() : get the registered component deployers.
-
public synchronized void setDeployers(Set<Deployer> deployers) : set the component deployers.
-
public synchronized void addStructureDeployer(StructureDeployer deployer) : add a structural deployer.
-
public synchronized void removeStructureDeployer(StructureDeployer deployer) : remove a structural deployer.
-
public synchronized Set<StructureDeployer> getStructureDeployers() : obtain the registered structural deployers.
-
public synchronized void setStructureDeployers(Set<StructureDeployer> deployers) : set the structural deployers.
org.jboss.deployers.plugins.structure.vfs.AbstractStructureDeployer
-
org.jboss.deployers.plugins.structure.vfs.file.FileStructure
-
org.jboss.deployers.plugins.structure.vfs.jar.JARStructure
-
org.jboss.deployers.plugins.structure.vfs.war.WARStructure
org.jboss.deployers.plugins.deployer.AbstractDeployer - simply stubs out isRelevant to return true and getRelativeOrder to return Integer.MAX_VALUE.
-
org.jboss.deployers.plugins.deployers.helpers.AbstractSimpleDeployer - essentially collapses the Deployer contract to deploy(DeploymentUnit) and undeploy(DeploymentUnit) by stubbing out:
-
prepareDeploy to do nothing
-
commitDeploy to call deploy
-
prepareUndeploy to call undeploy
-
commitUndeploy to do nothing
-
handoff to do nothing.
-
org.jboss.deployers.plugins.deployers.helpers.AbstractClassLoaderDeployer - implements org.jboss.deployers.spi.classloader.ClassLoaderFactory, and deploy(DeploymentUnit u) as u.createClassLoader(this).
-
-
org.jboss.deployers.plugins.deployers.helpers.AbstractTopLevelClassLoaderDeployer - Adds a createTopLevelClassLoader(DeploymentContext)/removeTopLevelClassLoader(DeploymentContext) methods and implements createClassLoader to invoke createTopLevelClassLoader if context.isTopLevel() is true, to return context.getTopLevel().getClassLoader() otherwise.
-
org.jboss.deployers.plugins.deployers.helpers.AbstractRealDeployer<T> - adds an attachment type T known as the deploymentType and a SimpleDeploymentVisitor<T> visitor. The deploy implementation obtains a deploymentType metadata from the deployment unit and then delegates deployment to visitor.deploy(DeploymentUnit, metadata) for each deploymentType metadata. Undeploy similarly delegates to visitor.undeploy(DeploymentUnit, metadata).
-
org.jboss.deployers.plugins.deployers.helpers.AbstractComponentDeployer<D, C> - in addition to a deployment type D, a component type C is introduced along with a SimpleDeploymentVisitor<C> compVisitor. Deployer.deploy(DeploymentUnit) invokes super.deploy(unit) to process the deployment type metadata, and then obtains unit.getAllMetaData(C) and delegates to compVisitor.deploy(unit, metadata) to process the component metadata. Undeploy similarly invokes super.undeploy(unit) and the delegates to compVisitor.undeploy(unit, metadata). The component visitor is expected to create DeploymentUnit components (DeploymentUnit.addComponent(String)) for the component metadata.
-
org.jboss.deployers.plugins.deployers.helpers.AbstractTypedDeployer<T> - adds an attachment type T known as the deploymentType and accessor, but has new features.
-
org.jboss.deployers.plugins.deployers.helpers.AbstractParsingDeployer<T> - adds a notion of obtaining an instance of the deploymentType by parsing a metadata file. The helper methods added include:
-
-
protected T getMetaData(DeploymentUnit unit, String key) - returns unit.getAttachment(key, getDeploymentType());
-
protected void createMetaData(DeploymentUnit unit, String name, String suffix) - calls createMetaData(unit, name, suffix, getDeploymentType().getName());
-
protected void createMetaData(DeploymentUnit unit, String name, String suffix, String key) - calls parse(unit, name) if suffix is null, parse(unit, name, suffix) otherwise. The result is added as an attachment to unit.getTransientManagedObjects() under key with expected type T.
-
protected T parse(DeploymentUnit unit, String name) - locates VirtualFile unit.getMetaDataFile(name), and if found, calls T result = parse(unit, file); init(unit, result, file);
-
protected T parse(DeploymentUnit unit, String name, String suffix) - locates List<VirtualFile> files = unit.getMetaDataFiles(name, suffix), and if found, calls T result = parse(unit, files.get(0)); init(unit, result, file);
-
protected abstract T parse(DeploymentUnit unit, VirtualFile file) - abstract.
-
protected void init(DeploymentUnit unit, T metaData, VirtualFile file) - empty.
-
org.jboss.deployers.plugins.deployers.helpers.JAXPDeployer<T> - implements parse(DeploymentUnit unit, VirtualFile file) to obtain the org.w3c.dom.Document corresponding to file using JAXP DocumentBuilder and file InputStream. This is parsed into deploymentType T by calling parse(unit, file, document).
-
protected abstract T parse(DeploymentUnit unit, VirtualFile file, Document document) throws Exception - abstract method.
-
org.jboss.deployers.plugins.deployers.helpers.XSLDeployer<T> - add an xslPath that corresponds to a class loader resource for an xsl document. It also overrides parse(DeploymentUnit unit, VirtualFile file) to transform the jaxp document obtained from JAXPDeployer.doParse, and then parses this into deploymentType T by calling the abstract parse(unit, file, document).
-
-
org.jboss.deployers.plugins.deployers.helpers.ObjectModelFactoryDeployer<T> - add an abstract JBossXB ObjectModelFactory accessor that is used from within an overriden parse(DeploymentUnit unit, VirtualFile file) to unmarshall the xml document represented by file into an instance of deploymentType T.
-
org.jboss.deployers.plugins.deployers.helpers.SchemaResolverDeployer<T> - uses JBossXB UnmarshallerFactory with a SchemaBindingResolver from within an overriden parse(DeploymentUnit unit, VirtualFile file) to unmarshall the xml document represented by file into an instance of deploymentType T. The xml document must have a valid schema with JBossXB annotations.
-
org.jboss.deployers.plugins.deployers.helpers.AbstractSimpleRealDeployer<T> - adds two abstract methods:
-
public abstract void deploy(DeploymentUnit unit, T deployment);
-
public abstract void undeploy(DeploymentUnit unit, T deployment);
-
overrides deploy(DeploymentUnit unit) to obtain the deploymentType instance using unit.unit.getAttachment(getDeploymentType()), and invokes deploy(DeploymentUnit unit, T deployment).
-
overrides undeploy(DeploymentUnit unit) to obtain the deploymentType instance using unit.unit.getAttachment(getDeploymentType()), and invokes undeploy(DeploymentUnit unit, T deployment).
-
-
org.jboss.deployers.plugins.deployers.kernel.BeanDeployer
-
org.jboss.deployers.plugins.deployers.kernel.KernelDeploymentDeployer
-
org.jboss.deployers.plugins.deployers.kernel.BeanMetaDataDeployer
-
ServiceDeployments
-
org.jboss.system.deployers.SARDeployer
-
org.jboss.system.deployers.ServiceClassLoaderDeployer
-
org.jboss.system.deployers.ServiceDeploymentDeployer
-
org.jboss.system.deployers.ServiceDeployer
-
JBoss5WebDeployments
-
org.jboss.deployment.WebAppParsingDeployer
-
org.jboss.deployment.JBossWebAppParsingDeployer
-
org.jboss.web.tomcat.tc6.deployers.TomcatDeployer
-
-
org.jboss.resource.deployers.RARDeployer
-
org.jboss.resource.deployers.RARParserDeployer
The virtual file system model of the deployment framework provides a consistent api for accessing logical files in logical file systems referenced by a URI/URL.
-
VFS : the main API for accessing read-only file system of the deployment. A VFS instance represents a virtual file system mount for a given root URI/URL.
-
VirtualFile : the api for a file in the deployment.
JBoss AOP is a 100% Pure Java Aspected Oriented Framework usable in any programming environment or tightly integrated with our application server. Aspects allow you to more easily modularize your code base when regular object oriented programming just doesn't fit the bill. It can provide a cleaner separation from application logic and system code. It provides a great way to expose integration points into your software. Combined with JDK 1.5 Annotations, it also is a great way to expand the Java language in a clean pluggable way rather than using annotations solely for code generation.
JBoss AOP is not only a framework, but also a prepackaged set of aspects that are applied via annotations, pointcut expressions, or dynamically at runtime. Some of these include caching, asynchronous communication, transactions, security, remoting, and many many more.
An aspect is a common feature that's typically scattered across methods, classes, object hierarchies, or even entire object models. It is behavior that looks and smells like it should have structure, but you can't find a way to express this structure in code with traditional object-oriented techniques.
For example, metrics is one common aspect. To generate useful logs from your application, you have to (often liberally) sprinkle informative messages throughout your code. However, metrics is something that your class or object model really shouldn't be concerned about. After all, metrics is irrelevant to your actual application: it doesn't represent a customer or an account, and it doesn't realize a business rule. It's simply orthogonal.
Joinpoint
A joinpoint is any point in your java program. The call of a method. The execution of a constructor the access of a field. All these are joinpoints. You could also think of a joinpoint as a particular Java event. Where an event is a method call, constructor call, field access etc...
Invocation
An Invocation is a JBoss AOP class that encapsulates what a joinpiont is at runtime. It could contain information like which method is being called, the arguments of the method, etc...
Advice
An advice is a method that is called when a particular joinpoint is executed, i.e., the behavior that is triggered when a method is called. It could also be thought of as the code that does the interception. Another analogy is that an advice is an "event handler".
Pointcut
Pointcuts are AOP's expression language. Just as a regular expression matches strings, a pointcut expression matches a particular joinpoint.
Introductions
An introduction modifies the type and structure of a Java class. It can be used to force an existing class to implement an interface or to add an annotation to anything.
Aspect
An Aspect is a plain Java class that encapsulates any number of advices, pointcut definitions, mixins, or any other JBoss AOP construct.
Interceptor
An interceptor is an Aspect with only one advice named "invoke". It is a specific interface that you can implement if you want your code to be checked by forcing your class to implement an interface. It also will be portable and can be reused in other JBoss environments like EJBs and JMX MBeans.
In AOP, a feature like metrics is called a crosscutting concern , as it's a behavior that "cuts" across multiple points in your object models, yet is distinctly different. As a development methodology, AOP recommends that you abstract and encapsulate crosscutting concerns.
For example, let's say you wanted to add code to an application to measure the amount of time it would take to invoke a particular method. In plain Java, the code would look something like the following.
public class BankAccountDAO
{
 public void withdraw(double amount)
 {
  long startTime = System.currentTimeMillis();
  try
  {
   // Actual method body...
  }
  finally
  {
   long endTime = System.currentTimeMillis() - startTime;
   System.out.println("withdraw took: " + endTime);
  }
 }
}
While this code works, there are a few problems with this approach:
-
It's extremely difficult to turn metrics on and off, as you have to manually add the code in the try>/finally block to each and every method or constructor you want to benchmark.
-
The profiling code really doesn't belong sprinkled throughout your application code. It makes your code bloated and harder to read, as you have to enclose the timings within a try/finally block.
-
If you wanted to expand this functionality to include a method or failure count, or even to register these statistics to a more sophisticated reporting mechanism, you'd have to modify a lot of different files (again).
This approach to metrics is very difficult to maintain, expand, and extend, because it's dispersed throughout your entire code base. And this is just a tiny example! In many cases, OOP may not always be the best way to add metrics to a class.
Aspect-oriented programming gives you a way to encapsulate this type of behavior functionality. It allows you to add behavior such as metrics "around" your code. For example, AOP provides you with programmatic control to specify that you want calls to BankAccountDAO to go through a metrics aspect before executing the actual body of that code.
In short, all AOP frameworks define two things: a way to implement crosscutting concerns, and a programmatic construct -- a programming language or a set of tags -- to specify how you want to apply those snippets of code. Let's take a look at how JBoss AOP, its cross-cutting concerns, and how you can implement a metrics aspect in JBoss.
The first step in creating a metrics aspect in JBoss AOP is to encapsulate the metrics feature in its own Java class. Listing Two extracts the try/finally block in Listing One's BankAccountDAO.withdraw() method into Metrics, an implementation of a JBoss AOP Interceptor class.
The following listing demonstrates Implementing metrics in a JBoss AOP Interceptor
01. public class Metrics implements org.jboss.aop.advice.Interceptor
02. {
03.   public Object invoke(Invocation invocation) throws Throwable
04.   {
05.     long startTime = System.currentTimeMillis();
06.     try
07.     {
08.       return invocation.invokeNext();
09.     }
10.     finally
11.     {
12.       long endTime = System.currentTimeMillis() - startTime;
13.       java.lang.reflect.Method m = ((MethodInvocation)invocation).method;
14.       System.out.println("method " + m.toString() + " time: " + endTime + "ms");
15.     }
16.   }
17. }
Under JBoss AOP, the Metrics class wraps withdraw(): when calling code invokes withdraw(), the AOP framework breaks the method call into its parts and encapsulates those parts into an Invocation object. The framework then calls any aspects that sit between the calling code and the actual method body.
When the AOP framework is done dissecting the method call, it calls Metric's invoke method at line 3. Line 8 wraps and delegates to the actual method and uses an enclosing try/finally block to perform the timings. Line 13 obtains contextual information about the method call from the Invocation object, while line 14 displays the method name and the calculated metrics.
Having the metrics code within its own object allows us to easily expand and capture additional measurements later on. Now that metrics are encapsulated into an aspect, let's see how to apply it.
To apply an aspect, you define when to execute the aspect code. Those points in execution are called pointcuts. An analogy to a pointcut is a regular expression. Where a regular expression matches strings, a pointcut expression matches events/points within your application. For example, a valid pointcut definition would be "for all calls to the JDBC method executeQuery(), call the aspect that verifies SQL syntax."
An entry point could be a field access, or a method or constructor call. An event could be an exception being thrown. Some AOP implementations use languages akin to queries to specify pointcuts. Others use tags. JBoss AOP uses both. Listing Three shows how to define a pointcut for the metrics example.
The following listing demonstrates defining a pointcut in JBoss AOP
1. <bind pointcut="public void com.mc.BankAccountDAO->withdraw(double amount)">
2.       <interceptor class="com.mc.Metrics"/>
3. </bind >

4. <bind pointcut="* com.mc.billing.*->*(..)">
5.       <interceptor class="com.mc.Metrics"/>
6. </bind >]]></programlisting>
Lines 1-3 define a pointcut that applies the metrics aspect to the specific method BankAccountDAO.withdraw(). Lines 4-6 define a general pointcut that applies the metrics aspect to all methods in all classes in the com.mc.billing package. There is also an optional annotation mapping if you do not like XML. See our Reference Guide for more information.
JBoss AOP has a rich set of pointcut expressions that you can use to define various points/events in your Java application so that you can apply your aspects. You can attach your aspects to a specific Java class in your application or you can use more complex compositional pointcuts to specify a wide range of classes within one expression.
With AOP, as this example shows, you're able to pull together crosscutting behavior into one object and apply it easily and simply, without polluting and bloating your code with features that ultimately don't belong mingled with business logic. Instead, common crosscutting concerns can be maintained and extended in one place.
Notice too that the code within the BankAccountDAO class has no idea that it's being profiled. This is what aspect-oriented programmers deem orthogonal concerns. Profiling is an orthogonal concern. In the OOP code snippet in Listing One, profiling was part of the application code. With AOP, you can remove that code. A modern promise of middleware is transparency, and AOP (pardon the pun) clearly delivers.
Just as important, orthogonal behavior could be bolted on after development. In Listing One, monitoring and profiling must be added at development time. With AOP, a developer or an administrator can (easily) add monitoring and metrics as needed without touching the code. This is a very subtle but significant part of AOP, as this separation (obliviousness, some may say) allows aspects to be layered on top of or below the code that they cut across. A layered design allows features to be added or removed at will. For instance, perhaps you snap on metrics only when you're doing some benchmarks, but remove it for production. With AOP, this can be done without editing, recompiling, or repackaging the code.
JBoss Cache is a tree-structured, clustered, transactional cache. It is the backbone for many fundamental JBoss Application Server clustering services, including - in certain versions - clustering JNDI, HTTP and EJB sessions.
JBoss Cache can also be used as a standalone transactional and clustered caching library or even an object oriented data store. It can even be embedded in other enterprise Java frameworks and application servers such as BEA WebLogic or IBM WebSphere, Tomcat, Spring, Hibernate, and many others. It is also very commonly used directly by standalone Java applications that do not run from within an application server, to maintain clustered state.
Pojo Cache is an extension of the core JBoss Cache API. Pojo Cache offers additional functionality such as:
-
maintaining object references even after replication or persistence.
-
fine grained replication, where only modified object fields are replicated.
-
"API-less" clustering model where pojos are simply annotated as being clustered.
Pojo Cache has a complete and separate set of documentation, including a user guide, FAQ and tutorial and as such, Pojo Cache is not discussed further in this book.
Pojo Cache deployment in the JBoss AS5 is discussed more in Section 8.5, “Pojo Cache Deployment Options”
JBoss Cache offers a simple and straightforward API, where data (simple Java objects) can be placed in the cache and, based on configuration options selected, this data may be one or all of:
-
replicated to some or all cache instances in a cluster.
-
persisted to disk and/or a remote cluster ("far-cache").
-
garbage collected from memory when memory runs low, and passivated to disk so state isn't lost.
In addition, JBoss Cache offers a rich set of enterprise-class features:
-
being able to participate in JTA transactions (works with Java EE compliant TransactionManagers).
-
attach to JMX servers and provide runtime statistics on the state of the cache.
-
allow client code to attach listeners and receive notifications on cache events.
A cache is organised as a tree, with a single root. Each node in the tree essentially contains a Map, which acts as a store for key/value pairs. The only requirement placed on objects that are cached is that they implement java.io.Serializable . Note that this requirement does not exist for Pojo Cache.
JBoss Cache can be either local or replicated. Local trees exist only inside the JVM in which they are created, whereas replicated trees propagate any changes to some or all other trees in the same cluster. A cluster may span different hosts on a network or just different JVMs on a single host.
When a change is made to an object in the cache and that change is done in the context of a transaction, the replication of changes is deferred until the transaction commits successfully. All modifications are kept in a list associated with the transaction for the caller. When the transaction commits, we replicate the changes. Otherwise, (on a rollback) we simply undo the changes locally resulting in zero network traffic and overhead. For example, if a caller makes 100 modifications and then rolls back the transaction, we will not replicate anything, resulting in no network traffic.
If a caller has no transaction associated with it (and isolation level is not NONE - more about this later), we will replicate right after each modification, e.g. in the above case we would send 100 messages, plus an additional message for the rollback. In this sense, running without a transaction can be thought of as analogous as running with auto-commit switched on in JDBC terminology, where each operation is committed automatically.
JBoss Cache works out of the box with most popular transaction managers, and even provides an API where custom transaction manager lookups can be written.
The cache is also completely thread-safe. It uses a pessimistic locking scheme for nodes in the tree by default, with an optimistic locking scheme as a configurable option. With pessimistic locking, the degree of concurrency can be tuned using a number of isolation levels, corresponding to database-style transaction isolation levels, i.e., SERIALIZABLE, REPEATABLE_READ, READ_COMMITTED, READ_UNCOMMITTED and NONE. Concurrency, locking and isolation levels will be discussed later.
JBoss Cache uses JGroups as a transport layer. More information on JGroups can be found on Chapter 10, JGroups
In the JBoss Application Server 5, JBoss cache runs in the all configuration of the application server(i.e <JBOSS_HOME>/server/all). All you need to do is start the server with this configuration.
<JBOSS_HOME>/bin/./run.sh -c all
All required jars will be on the classpath. Otherwise, you will need to ensure jbosscache.jar and jgroups-all.jar are on the classpath. You may need to add other jars if you're using things like JdbmCacheLoader. The simplest way to do this is to copy the jars from the JBoss Cache distribution's lib directory to the server configurations
all
lib directory. You could also package the jars with the configuration file in Service Archive (.sar) file or an EAR.
It is possible to deploy a JBoss Cache 2.0 instance in JBoss AS 4.x (at least in 4.2.0.GA; other AS releases are completely untested). However, the significant API changes between the JBoss Cache 2.x and 1.x releases mean none of the standard AS 4.x clustering services (e.g. http session replication) that rely on JBoss Cache will work with JBoss Cache 2.x. Also, be aware that usage of JBoss Cache 2.x in AS 4.x is not something the JBoss Cache developers are making any significant effort to test, so be sure to test your application well (which of course you're doing anyway.)
Note in the http://labs.jboss.com/file-access/default/members/jbosscache/freezone/docs/2.1.0.GA/userguide_en/html_single/index.html#sample_xml_file the value of the mbean element's code attribute: org.jboss.cache.jmx.CacheJmxWrapper . This is the class JBoss Cache uses to handle JMX integration; the Cache itself does not expose an MBean interface. See the JBoss Cache MBeans section for more on the CacheJmxWrapper .
Once your cache is deployed, in order to use it with an in-VM client such as a servlet, a JMX proxy can be used to get a reference to the cache:
MBeanServer server = MBeanServerLocator.locateJBoss();

ObjectName on = new ObjectName("jboss.cache:service=Cache");

CacheJmxWrapperMBean cacheWrapper =

  (CacheJmxWrapperMBean) MBeanServerInvocationHandler.newProxyInstance(server, on,
  CacheJmxWrapperMBean.class, false);

    Cache cache = cacheWrapper.getCache();

    Node root = cache.getRoot(); // etc etc
The MBeanServerLocator class is a helper to find the (only) JBoss MBean server inside the current JVM. The javax.management.MBeanServerInvocationHandler class' newProxyInstance method creates a dynamic proxy implementing the given interface and uses JMX to dynamically dispatch methods invoked against the generated interface to the MBean. The name used to look up the MBean is the same as defined in the cache's configuration file.
Once the proxy to the CacheJmxWrapper is obtained, the getCache() will return a reference to the Cache itself.
There are a number of ways to deploy POJO Cache:
Simply instantiate a PojoCacheFactory and invoke one of the overloaded createCache methods shown in the API Overview.
If PojoCache is run in JBoss AS then your cache can be deployed as an MBean simply by copying a standard cache configuration file to the server's deploy directory. The standard format of PojoCache's standard XML configuration file (as shown in the Appendix) is the same as a JBoss AS MBean deployment descriptor, so the AS's SAR Deployer has no trouble handling it. Also, you don't have to place the configuration file directly in deploy; you can package it along with other services or JEE components in a SAR or EAR.
In AS 5, if you're using a server config based on the standard all config, then that's all you need to do; all required jars will be on the classpath. Otherwise, you will need to ensure pojocache.jar, jbosscache.jar and jgroups-all.jar are on the classpath. You may need to add other jars if you're using things like JdbmCacheLoader. The simplest way to do this is to copy the jars from the PojoCache distribution's lib directory to the server config's lib directory. You could also package the jars with the configuration file in Service Archive (.sar) file or an EAR.
It is possible, to deploy a POJO Cache 2.0 instance in JBoss AS 4.x However, the significant API changes between the 2.x and 1.x releases mean none of the standard AS 4.x clustering services (e.g. http session replication) that rely on the 1.x API will work with PojoCache 2.x. Also, be aware that usage of PojoCache 2.x in AS 4.x is not something the cache developers are making any significant effort to test, so be sure to test your application well (which of course you're doing anyway.)
Note in the example the value of the mbean element's code attribute: org.jboss.cache.pojo.jmx.PojoCacheJmxWrapper. This is the class JBoss Cache uses to handle JMX integration; the PojoCache itself does not expose an MBean interface. See the JBoss Cache MBeans section for more on the PojoCacheJmxWrapper.
Once your cache is deployed, in order to use it with an in-VM client such as a servlet, a JMX proxy can be used to get a reference to the cache:
MBeanServer server = MBeanServerLocator.locateJBoss();

	ObjectName on = new ObjectName("jboss.cache:service=PojoCache");

	PojoCacheJmxWrapperMBean cacheWrapper =

	(PojoCacheJmxWrapperMBean) MBeanServerInvocationHandler.newProxyInstance(server, on,

	PojoCacheJmxWrapperMBean.class, false);

	PojoCache cache = cacheWrapper.getPojoCache();
The MBeanServerLocator class is a helper to find the (only) JBoss MBean server inside the current JVM. The javax.management.MBeanServerInvocationHandler class' newProxyInstance method creates a dynamic proxy implementing the given interface and uses JMX to dynamically dispatch methods invoked against the generated interface to the MBean. The name used to look up the MBean is the same as defined in the cache's configuration file.
Once the proxy to the PojoCacheJmxWrapper is obtained, the getPojoCache() will return a reference to the PojoCache itself.
Beginning with AS 5, JBoss AS also supports deployment of POJO services via deployment of a file whose name ends with -beans.xml. A POJO service is one whose implementation is via a "Plain Old Java Object", meaning a simple java bean that isn't required to implement any special interfaces or extend any particular superclass. A PojoCache is a POJO service, and all the components in a Configuration are also POJOS, so deploying a cache in this way is a natural step.
Deployment of the cache is done using the JBoss Microcontainer that forms the core of JBoss AS. JBoss Microcontainer is a sophisticated IOC framework (similar to Spring). A -beans.xml file is basically a descriptor that tells the IOC framework how to assemble the various beans that make up a POJO service.
The rules for how to deploy the file, how to package it, how to ensure the required jars are on the classpath, etc. are the same as for a JMX-based deployment.
Following is an abbreviated example -beans.xml file. The details of building up the Configuration are omitted; see the "Deploying JBoss Cache" chapter in the JBoss Cache User Guide for a more complete example. If you look in the server/all/deploy directory of an AS 5 installation, you can find several more examples.
<?xml version="1.0" encoding="UTF-8"?>
<deployment xmlns="urn:jboss:bean-deployer:2.0">

	<!-- First we create a Configuration object for the cache -->

	<bean name="ExampleCacheConfig"

	class="org.jboss.cache.config.Configuration">

	... details omitted


	</bean>

<!-- The cache itself. -->

<bean name="ExampleCache" class="org.jboss.cache.pojo.impl.PojoCacheImpl">

	<constructor factoryClass="org.jboss.cache.pojo.PojoCacheFactory

		factoryMethod="createCache">

	<parameter><inject bean="ExampleCacheConfig"/></parameter>

	<parameter>false</false>

	</constructor>

</bean>

</deployment>....
An interesting thing to note in the above example is the difference between POJO Cache and a plain Cache in the use of a factory to create the cache. (See the "Deploying JBoss Cache" chapter in the JBoss Cache User Guide for the comparable plain Cache example.) The PojoCacheFactory exposes static methods for creating a PojoCache; as a result there is no need to add a separate bean element for the factory. Core Cache's DefaultCacheFactory creates caches from a singleton instance, requiring a bit more boilerplate in the config file.
More information on JBoss Cache can be obtained from the following resources:
JBoss Transactions runs in the all server configurations or customized configurations based on the all configuration.
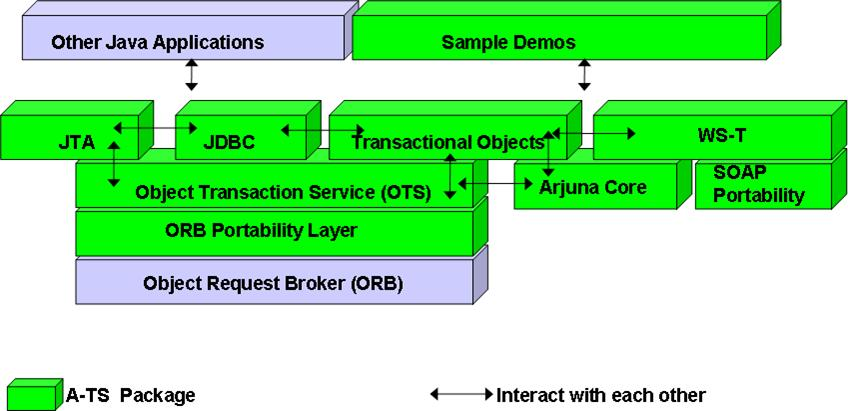
In todays business environment data corruption can have serious consequences for the enterprise including service unavailability, system reconciliation costs, and damage to customer relationships and business reputation. The JBoss Transaction Service (JBossTS) protects businesses from data corruption by guaranteeing complete, accurate business transactions for Java based applications (including those written for the JEE and EJB frameworks) thereby eliminating the risks and costs associated with time-consuming manual reconciliation following failures.
In the modern business environment of system consolidations, worldwide utilization, and "always- on" availability, enterprises need distributed transaction processing infrastructure to build reliable, sophisticated business applications that can guarantee absolute completion and accuracy of business processes. Transaction services ensure that sequences of database updates have been accurately and reliably committed as a single complete unit of work or that, in the event of failure, the database information is recovered. "Multimodal Transaction Processing" is the term coined by Gartner to describe the new generation of transactional application required to face the challenges posed by new business requirements, technologies and innovative computing architectures.
Note
"Multimodal transaction processing will emerge. Users' adoption of client/server, the Internet, service-oriented architecture, Web services, mobile and wireless devices, and event-driven architectures means that the next generation of transaction processing applications will have to be implemented in very different ways to respond to new business strategies, including multichannel, the real-time enterprise and business process fusion." Predicts 2004: Prepare for Multimodal Transaction Processing, M. Pezzini, Gartner, 19 December 2003
JBossTS is a middleware solution that supports mission-critical applications in distributed computing environments. It plays a critical role in building reliable, sophisticated e-business applications guaranteeing absolute completion and accuracy of business processes. JBossTS supports "multimodal transaction processing" by enabling reliable transactions to span from front-end e-commerce applications to back office systems and beyond the enterprise firewall to business partners - across any system, anywhere in the world.
Building on the industry proven Java EE 5 transaction technology, version 4.0 adds native support for Web services transactions by providing all of the components necessary to build interoperable, reliable, multi-party, Web services-based applications with the minimum of effort. The product supports the WS-AtomicTransaction and WS-BusinessActivity specifications.
In traditional ACID transaction systems, transactions are short lived, resources (such as databases) are locked for the duration of the transaction and participants have a high degree of trust with each other. With the advent of the Internet and Web services, the scenario that is now emerging requires involvement of participants unknown to each other in distributed transactions. These transactions have the following characteristics:
-
Transactions may be of a long duration, sometimes lasting hours, days, or more.
-
Participants may not allow their resources to be locked for long durations.
-
The communication infrastructure between participants may not be reliable.
-
Some of the ACID properties of traditional transactions are not mandatory.
-
A transaction may succeed even if only some of the participants choose to confirm and others cancel.
-
All participants may choose to have their own coordinator (Transaction Manager), because of lack of trust.
-
All activities are logged.
-
Transactions that have to be rolled back have the concept of compensation.
Building on the industry proven JEE transaction technology, version 4.0 adds native support for Web services transactions by providing all of the components necessary to build interoperable, reliable, multi-party, Web services-based applications with the minimum of effort. The programming interfaces are based on the Java API for XML Transactioning (JAXTX) and the product includes protocol support for the WS-AtomicTransaction and WS-BusinessActivity specifications. JBossTS 4.2 is designed to support multiple coordination protocols and therefore helps to future-proof transactional applications. For a more detailed description of the product capabilities, see the full feature list below for more details.
JBossTS is a pure Java multi-modal transaction service that supports distributed transactions in CORBA, JEE and Web services environments.
-
Standards compliance
-
CORBA Object Transaction Service (OTS)
-
Java Enterprise (JEE) transactions
-
Java Transaction API (JTA)
-
Java Transaction Service (JTS)
-
-
Web services transactions
-
Web Services Coordination (WS-Coordination)
-
Web Services Atomic Transaction (WS-AtomicTransaction)
-
Web Services Business Activity Framework (WS-BusinessActivity)
-
-
-
JEE and CORBA transactioning features
-
Complete distributed transaction support
-
Automated failure recovery system
-
Flexible deployment: centralized and distributed transaction manager options
-
Interposition support for improved distributed transaction performance
-
POA ORB support
-
Support for both checked and unchecked transaction behaviour
-
Support for both flat and nested transaction models, with nested-aware resources and resource adapters
-
Support for CosTransaction::Current API
-
Direct and indirect transaction management
-
Synchronization interface support
-
Transaction heuristic support
-
Explicit and implicit transaction context propagation
-
Multi-thread aware
-
-
Web services transactioning features
-
Ensures reliable coordination and application data consistency for business processes that involve Web services.
-
Supports transaction models for both intra-enterprise (EAI) and inter-enterprise (supply chain) Web services integration.
-
Allows for consistent real-time updates across any component or resource involved in the business process.
-
Fully automated crash recovery provides fast, unattended restoration of service after component failures.
-
Future-proof, generic coordination engine architecture supports pluggable protocols.
-
Currently supports the WS-Coordination WS- AtomicTransaction and WS-BusinessActivity specifications. Supports the leveraging of existing transaction infrastructure investments.
-
Architected for portability across a wide- range of Web services platforms. Supports the open source JBoss application server for highly cost effective development and deployment.
-
Close integration with enterprise Java standards, allowing Web services transactions to seamlessly integrate with JEE application servers, messaging systems and database back- ends.
-
Easy to use Java programming interfaces, based on the emerging JAXTX standard. A rich programming framework reduces overhead in adding transactioning capabilities to Web services.
-
Leverages Arjuna's long history in transaction software, including the industry proven coordination engine, ArjunaCore - as used in the Bluestone and HP application servers.
-
JBoss AS clustering is built on JGroups - a toolkit for reliable multicast communication between AS server nodes on an existing computer network. It can be used to create groups of processes whose members can send messages to each other. JGroups enables developers to create reliable multipoint (multicast) applications where reliability is a deployment issue. JGroups also relieves the application developer from implementing this logic themselves. This saves significant development time and allows for the application to be deployed in different environments without having to change code. The following are the key features of JGroup.
-
Group creation and deletion. Group members can be spread across LANs or WANs
-
Joining and leaving of groups
-
Membership detection and notification about joined/left/crashed members
-
Detection and removal of crashed members
-
Sending and receiving of member-to-group messages (point-to-multipoint)
-
Sending and receiving of member-to-member messages (point-to-point)
The most powerful feature of JGroups is its flexible protocol stack, which allows developers to adapt it to exactly match their application requirements and network characteristics. The benefit of this is that you only pay for what you use. By mixing and matching protocols, various differing application requirements can be satisfied. JGroups comes with a number of protocols (but anyone can write their own), for example.
-
Transport protocols: UDP (IP Multicast), TCP, JMS
-
Fragmentation of large messages
-
Reliable unicast and multicast message transmission. Lost messages are retransmitted
-
Failure detection: crashed members are excluded from the membership
-
Ordering protocols: Atomic (all-or-none message delivery), Fifo, Causal, Total Order (sequencer or token based)
-
Membership
-
Encryption
More information on JGroups can be found on the The JGroups homepage
The main objective of JBoss Remoting is to provide a single API for most network based invocations and related service that uses pluggable transports and data marshallers. The JBoss Remoting API provides the ability for making synchronous and asynchronous remote calls, push and pull callbacks, and automatic discovery of remoting servers. The intention is to allow for the addition of different transports to fit different needs, yet still maintain the same API for making the remote invocations and only requiring configuration changes, not code changes, to fit these different needs.
JBossRemoting is a standalone project but is included in the recent releases of the JBoss Application Server including AS5 and can be run as a service within the container as well. This chapter discusses the JBoss Remoting service configurations.
The features available with JBoss Remoting are:
-
Server identification – a simple url based identifier which allows for remoting servers to be identified and called upon.
-
Pluggable transports – can use different protocol transports the same remoting API. Provided transports:
-
Socket (SSL Socket)
-
RMI (SSL RMI)
-
HTTP(S)
-
Multiplex (SSL Multiplex)
-
Servlet (SSL Servlet)
-
BiSocket (SSL BiSocket)
-
-
Pluggable data marshallers – can use different data marshallers and unmarshallers to convert the invocation payloads into desired data format for wire transfer.
-
Pluggable serialization - can use different serialization implementations for data streams. Provided serialization implementations:
-
Java serialization
-
JBoss serialization
-
-
Automatic discovery – can detect remoting servers as they come on and off line. Provided detection implementations:
-
Multicast
-
JNDI
-
-
Server grouping – ability to group servers by logical domains, so only communicate with servers within specified domains.
-
Callbacks – can receive server callbacks via push and pull models. Pull model allows for persistent stores and memory management.
-
Asynchronous calls – can make asynchronous, or one way, calls to server.
-
Local invocation – if making an invocation on a remoting server that is within the same process space, remoting will automatically make this call by reference, to improve performance.
-
Remote classloading – allows for classes, such as custom marshallers, that do not exist within client to be loaded from server.
-
Sending of streams – allows for clients to send input streams to server, which can be read on demand on the server.
-
Clustering - seamless client failover for remote invocations.
-
Connection failure notification - notification if client or server has failed
-
Data Compression - can use compression marshaller and unmarshaller for compresssion of large payloads.
All the features within JBoss Remoting were created with ease of use and extensibility in mind. If you have a suggestion for a new feature or an improvement to a current feature, please log in our issue tracking system at http://jira.jboss.com.
As indicated earlier in this chapter, JBoss Remoting manages synchronous and asynchronous remote calls, push and pull callbacks, and automatic discovery of remoting servers. You can configure JBoss Remoting through the JBoss Messaging service configuration file JBOSS_HOME/server/<your_configuration>/deploy/messaging/remoting-service.xml.
- 12.1. Configuring JBoss Messaging
- 12.2. Configuring the ServerPeer
- 12.3. Server Attributes
-
- 12.3.1. ServerPeerID
- 12.3.2. DefaultQueueJNDIContext
- 12.3.3. DefaultTopicJNDIContext
- 12.3.4. PostOffice
- 12.3.5. DefaultDLQ
- 12.3.6. DefaultMaxDeliveryAttempts
- 12.3.7. DefaultExpiryQueue
- 12.3.8. DefaultRedeliveryDelay
- 12.3.9. MessageCounterSamplePeriod
- 12.3.10. FailoverStartTimeout
- 12.3.11. FailoverCompleteTimeout
- 12.3.12. DefaultMessageCounterHistoryDayLimit
- 12.3.13. ClusterPullConnectionFactory
- 12.3.14. DefaultPreserveOrdering
- 12.3.15. RecoverDeliveriesTimeout
- 12.3.16. SuckerPassword
- 12.3.17. StrictTCK
- 12.3.18. Destinations
- 12.3.19. MessageCounters
- 12.3.20. MessageCountersStatistics
- 12.3.21. SupportsFailover
- 12.3.22. PersistenceManager
- 12.3.23. JMSUserManager
- 12.3.24. SecurityStore
- 12.4. MBean operations of the ServerPeer MBean
-
- 12.4.1. DeployQueue
- 12.4.2. UndeployQueue
- 12.4.3. DestroyQueue
- 12.4.4. DeployTopic
- 12.4.5. UndeployTopic
- 12.4.6. DestroyTopic
- 12.4.7. ListMessageCountersHTML
- 12.4.8. ResetAllMesageCounters
- 12.4.9. ResetAllMesageCounters
- 12.4.10. EnableMessageCounters
- 12.4.11. DisableMessageCounters
- 12.4.12. RetrievePreparedTransactions
- 12.4.13. ShowPreparedTransactions
JBoss Messaging is the new enterprise messaging system from JBoss. It is a complete rewrite of JBossMQ, the legacy JBoss JMS provider. It is the default JMS provider on JBoss AS 5. Production support is already available through JBoss EAP 4.3, and we offer developer support for JBoss 4.2.x.
JBoss Messaging is a high Performance JMS 1.1 compliant implementation integrated with JBoss Transactions. It also offers:
-
Clustered Queues and Topics by Default
-
Intelligent Message Redistributions
-
Transparent Failover
-
In memory message Replication
JBoss Messaging will be the default JMS provider in later versions of JBoss Enterprise Application Platform, and JBoss Service Integration Platform. It is also the default JMS provider in JBoss Application Server 5, and is the default JMS provider for JBoss ESB.
JBoss Messaging is an integral part of Red Hat's strategy for messaging.
Compared with JBossMQ, JBoss Messaging offers improved performance in both single node and clustered environments.
JBoss Messaging also features a much better modular architecture that will allow us to add more features in the future.
JBoss Messaging provides an open source and standards-based messaging platform that brings enterprise-class messaging to the mass market. It also implements a high performance, robust messaging core that is designed to support the largest and most heavily utilized SOAs, enterprise service buses (ESBs) and other integration needs ranging from the simplest to the highest demand networks.
It allows you to smoothly distribute your application load across your cluster, intelligently balancing and utilizing each nodes CPU cycles, with no single point of failure, providing a highly scalable and performance clustering implementation.
JBoss Messaging includes a JMS front-end to deliver messaging in a standards-based format as well as being designed to be able to support other messaging protocols in the future.
JBoss Messaging is destined to become an integral part of the JBoss Enterprise Application Platform, and the new Service Integration Platform.
JBoss Messaging is also an integral part of Red Hat's strategy for messaging. JBoss Messaging is committed to AMQP ( AMQP)- the new messaging standard from Red Hat and others. Later versions of JBoss Messaging will support AMQP, and JBoss Messaging will be focussed on becoming the premier AMQP Java broker.
The JBoss Messaging service configuration is spread among several configuration files. Depending on the functionality provided by the services it configures, the configuration data is distributed between <JBOSS_HOME>/server/<configuration>/deploy/messaging-service.xml, remoting-service.xml, connection-factories-service.xml, destinations-service.xml and xxx-persistence-service.xml (where xxx is the name of your database). The default will be hsqldb-persistence-service.xml for the hsqldb database.
SecurityStore is a pluggable object, and it has a default implementation on messaging-service.xml.
<server>
	<mbean code="org.jboss.jms.server.security.SecurityMetadataStore"
	name="jboss.messaging:service=SecurityStore">

	<attribute name="DefaultSecurityConfig">
	<security>
	<role name="guest" read="true" write="true" create="true"/>
	</security>
	</attribute>

	<attribute name="SecurityDomain">java:/jaas/messaging</attribute>

	<attribute name="SuckerPassword">CHANGE ME!!</attribute>
</mbean>
...
...file truncated..
The following are SecurityStore attributes from the messaging-service.xml file above.
Default security configuration is used when the security configuration for a specific queue or topic has not been overridden in the destination's deployment descriptor. It has exactly the same syntax and semantics as in JBossMQ.
The DefaultSecurityConfig attribute element should contain one <security> element. The <security> element can contain multiple <role> elements. Each <role> element defines the default access for that particular role.
If the read attribute is true then that role will be able to read (create consumers, receive messaages or browse) destinations by default. If the write attribute is true then that role will be able to write (create producers or send messages) to destinations by default. If the create attribute is true then that role will be able to create durable subscriptions on topics by default.
The Server Peer is the heart of the JBoss Messaging JMS facade. The server's configuration, resides in messaging-service.xml configuration file.
All JBoss Messaging services are rooted at the server peer.
An example of a Server Peer configuration is presented below. Note that not all values for the server peer's attributes are specified in the example.
<!-- ServerPeer MBean configuration
	============================== -->

	<mbean code="org.jboss.jms.server.ServerPeer"
	name="jboss.messaging:service=ServerPeer"
	xmbean-dd="xmdesc/ServerPeer-xmbean.xml">

	<!-- The unique id of the server peer - in a cluster each node MUST have a unique value - must be an integer -->

	<attribute name="ServerPeerID">${jboss.messaging.ServerPeerID:0}</attribute>

	<!-- The default JNDI context to use for queues when they are deployed without specifying one -->

	<attribute name="DefaultQueueJNDIContext">/queue</attribute>

	<!-- The default JNDI context to use for topics when they are deployed without specifying one -->

	<attribute name="DefaultTopicJNDIContext">/topic</attribute>

	<attribute name="PostOffice">jboss.messaging:service=PostOffice</attribute>

	<!-- The default Dead Letter Queue (DLQ) to use for destinations.
	This can be overridden on a per destinatin basis -->

	<attribute name="DefaultDLQ">jboss.messaging.destination:service=Queue,name=DLQ</attribute>

	<!-- The default maximum number of times to attempt delivery of a message before sending to the DLQ (if configured).
	This can be overridden on a per destinatin basis -->

	<attribute name="DefaultMaxDeliveryAttempts">10</attribute>

	<!-- The default Expiry Queue to use for destinations. This can be overridden on a per destinatin basis -->

	<attribute name="DefaultExpiryQueue">jboss.messaging.destination:service=Queue,name=ExpiryQueue</attribute>

	<!-- The default redelivery delay to impose. This can be overridden on a per destination basis -->

	<attribute name="DefaultRedeliveryDelay">0</attribute>

	<!-- The periodicity of the message counter manager enquiring on queues for statistics -->

	<attribute name="MessageCounterSamplePeriod">5000</attribute>

	<!-- The maximum amount of time for a client to wait for failover to start on the server side after
	it has detected failure -->

	<attribute name="FailoverStartTimeout">60000</attribute>

	<!-- The maximum amount of time for a client to wait for failover to complete on the server side after
	it has detected failure -->

	<attribute name="FailoverCompleteTimeout">300000</attribute>

	<attribute name="StrictTck">false</attribute>

	<!-- The maximum number of days results to maintain in the message counter history -->

	<attribute name="DefaultMessageCounterHistoryDayLimit">-1</attribute>

	<!-- The name of the connection factory to use for creating connections between nodes to pull messages -->

	<attribute name="ClusterPullConnectionFactoryName">jboss.messaging.connectionfactory:service=ClusterPullConnectionFactory</attribute>

	<!-- When redistributing messages in the cluster. Do we need to preserve the order of messages received
	by a particular consumer from a particular producer? -->

	<attribute name="DefaultPreserveOrdering">false</attribute>

	<!-- Max. time to hold previously delivered messages back waiting for clients to reconnect after failover -->

	<attribute name="RecoverDeliveriesTimeout">300000</attribute>

	<!-- The password used by the message sucker connections to create connections.
	THIS SHOULD ALWAYS BE CHANGED AT INSTALL TIME TO SECURE SYSTEM
	<attribute name="SuckerPassword"></attribute>
	-->

	<!-- The name of the server aspects configuration resource
	<attribute name="ServerAopConfig">aop/jboss-aop-messaging-server.xml</attribute>
	-->
	<!-- The name of the client aspects configuration resource
	<attribute name="ClientAopConfig">aop/jboss-aop-messaging-client.xml</attribute>
	-->

	<depends optional-attribute-name="PersistenceManager">jboss.messaging:service=PersistenceManager</depends>

	<depends optional-attribute-name="JMSUserManager">jboss.messaging:service=JMSUserManager</depends>

	<depends>jboss.messaging:service=Connector,transport=bisocket</depends>
	<depends optional-attribute-name="SecurityStore"
	proxy-type="org.jboss.jms.server.SecurityStore">jboss.messaging:service=SecurityStore</depends>
</mbean>
...
This section discusses the MBean attributes of the ServerPeer MBean.
The unique id of the server peer. Every node you deploy MUST have a unique id. This applies whether the different nodes form a cluster, or are only linked via a message bridge. The id must be a valid integer.
The default JNDI context to use when binding queues. Defaults to /queue.
The default JNDI context to use when binding topics.wa Defaults to /topic.
This is the post office that the ServerPeer uses. You will not normally need to change this attribute. The post office is responsible for routing messages to queues and maintaining the mapping between addresses and queues.
This is the name of the default DLQ (Dead Letter Queue) the server peer will use for destinations. The DLQ can be overridden on a per destination basis - see the destination MBean configuration for more details. A DLQ is a special destination where messages are sent when the server has attempted to deliver them unsuccessfully more than a certain number of times. If the DLQ is not specified at all then the message will be removed after the maximum number of delivery attempts. The maximum number of delivery attempts can be specified using the attribute DefaultMaxDeliveryAttempts for a global default or individually on a per destination basis.
The default for the maximum number of times delivery of a message will be attempted before sending the message to the DLQ, if configured.
The default value is 10.This value can also be overridden on a per destination basis.
This is the name of the default expiry queue the server peer will use for destinations. The expiry can be overridden on a per destination basis - see the destination MBean configuration for more details. An expiry queue is a special destination where messages are sent when they have expired. Message expiry is determined by the value of Message::getJMSExpiration() If the expiry queue is not specified at all then the message will be removed after it is expired.
When redelivering a message after failure of previous delivery it is often beneficial to introduce a delay perform redelivery in order to prevent thrashing of delivery-failure, delivery-failure etc.
The default value is 0 which means there will be no delay.
Change this if your application could benefit with a delay before redelivery. This value can also be overridden on a per destination basis.
Periodically the server will query each queue to gets its statistics. This is the period.
The default value is 10000 milliseconds.
The maximum number of milliseconds the client will wait for failover to start on the server side when a problem is detected.
The default value is 60000 (one minute).
The maximum number of milliseconds the client will wait for failover to complete on the server side after it has started. The default value is 300000 (five minutes).
JBoss Messaging provides a message counter history which shows the number of messages arriving on each queue of a certain number of days. This attribute represents the maxiumum number of days for which to store message counter history. It can be overridden on a per destination basis.
The name of the connection factory to use for pulling messages between nodes. If you wish to turn off message sucking between queues altogether, but retain failover, then you can ommit this attribute altogether.
If true, then strict JMS ordering is preserved in the cluster. See the cluster configurations section for more details. Default is false.
When failover occurs, already delivered messages will be kept aside, waiting for clients to reconnect. In the case that clients never reconnect (e.g. the client is dead) then eventually these messages will timeout and be added back to the queue. The value is in ms. The default is 5 mins.
JBoss Messaging internally makes connections between nodes in order to redistribute messages between clustered destinations. These connections are made with the user name of a special reserved user. On this parameter you define the password used as these connections are made. After JBossMessaging 1.4.1.GA you will need to define the Sucker Password on the ServerPeer and on the SecurityMetadataStore.
Warning
This must be specified at install time, or the default password will be used. Any one who then knows the default password will be able to gain access to any destinations on the server. This value MUST be changed at install time.
JBoss Messaging provides statistics for each message counter for each queue.
Set to false to prevent server side failover occurring in a cluster when a node crashes.
This is the persistence manager that the ServerPeer uses. You will not normally need to change this attribute.
This is the JMS user manager that the ServerPeer uses. You will not normally need to change this attribute.
This operation lets you programmatically deploy a queue. There are two overloaded versions of this operation. If the queue already exists but is undeployed it is deployed. Otherwise it is created and deployed. The name parameter represents the name of the destination to deploy. The jndiName parameter (optional) represents the full jndi name where to bind the destination. If this is not specified then the destination will be bound in <DefaultQueueJNDIContext>/<name>.
The first version of this operation deploys the destination with the default paging parameters. The second overloaded version deploys the destination with the specified paging parameters. See the section on configuring destinations for a discussion of what the paging parameters mean.
This operation lets you programmatically undeploy a queue. The queue is undeployed but is NOT removed from persistent storage. This operation returns true if the queue was successfull undeployed. otherwise it returns false.
This operation lets you programmatically destroy a queue. The queue is undeployed and then all its data is destroyed from the database.
Warning
Be cautious when using this method since it will delete all data for the queue.
This operation returns true if the queue was successfully destroyed. otherwise it returns false.
This operation lets you programmatically deploy a topic.
There are two overloaded versions of this operation.
If the topic already exists but is undeployed it is deployed. Otherwise it is created and deployed.
The name parameter represents the name of the destination to deploy.
The jndiName parameter (optional) represents the full jndi name where to bind the destination. If this is not specified then the destination will be bound in <DefaultTopicJNDIContext>/<name>.
The first version of this operation deploys the destination with the default paging parameters. The second overloaded version deploys the destination with the specified paging parameters. See the section on configuring destinations for a discussion of what the paging parameters mean.
This operation lets you programmatically undeploy a topic. The queue is undeployed but is NOT removed from persistent storage. This operation returns true if the topic was successfully undeployed. otherwise it returns false.
This operation lets you programmatically destroy a topic.
The topic is undeployed and then all its data is destroyed from the database.
Warning
Be careful when using this method since it will delete all data for the topic.
This operation returns true if the topic was successfully destroyed. otherwise it returns false.
This operation returns message counters in an easy to display HTML format.
This operation enables all message counters for all destinations. Message counters are disabled by default.
This operation disables all message counters for all destinations. Message counters are disabled by default.
Retrieves a list of the Xids for all transactions currently in a prepared state on the node.
- 13.1. How to Use Alternative Databases
- 13.2. Install JDBC Drivers
- 13.3. Creating a DataSource for the External Database
- 13.4. Common configuration for DataSources and ConnectionFactorys
- 13.5. Change Database for the JMS Services
- 13.6. Support Foreign Keys in CMP Services
- 13.7. Specify Database Dialect for Java Persistence API
- 13.8. Change Other JBoss AS Services to Use the External Database
- 13.9. A Special Note About Oracle DataBases
- 13.10. DataSource configuration
- 13.11. Parameters specific for java.sql.Driver usage
- 13.12. Parameters specific for javax.sql.XADataSource usage
- 13.13. Common DataSource parameters
- 13.14. Generic Datasource Sample
- 13.15. Configuring a DataSource for remote usage
- 13.16. Configuring a DataSource to use login modules
JBoss utilizes the Hypersonic database as its default database. While this is good for development and prototyping, you or your company will probably require another database to be used for production. This chapter covers configuring JBoss AS to use alternative databases. We cover the procedures for all officially supported databases on the JBoss Application Server. They include: MySQL 5.0, PostgreSQL 8.1, Oracle 9i and 10g R2, DB2 7.2 and 8, Sybase ASE 12.5, as well as MS SQL 2005.
Please note that in this chapter, we explain how to use alternative databases to support all services in JBoss AS. This includes all the system level services such as EJB and JMS. For individual applications (e.g., WAR or EAR) deployed in JBoss AS, you can still use any backend database by setting up the appropriate data source connection.
We assume that you have already installed the external database server, and have it running. You should create an empty database named jboss, accessible via the username / password pair jbossuser / jbosspass. The jboss database is used to store JBoss AS internal data -- JBoss AS will automatically create tables and data in it.
For the JBoss Application Server and our applications to use the external database, we also need to install the database's JDBC driver. The JDBC driver is a JAR file, which you'll need to copy into your JBoss AS's <JBoss_Home>/server/all/lib directory. Replace all with the server configuration you are using if needed. This file is loaded when JBoss starts up. So if you have the JBoss AS running, you'll need to shut down and restart. The availability of JDBC drivers for different databases are as follows.
-
IBM DB2 JDBC drivers can be downloaded from the IBM web site http://www-306.ibm.com/software/data/db2/java/.
-
Sybase JDBC drivers can be downloaded from the Sybase jConnect product page http://www.sybase.com/products/allproductsa-z/softwaredeveloperkit/jconnect
-
MS SQL Server JDBC drivers can be downloaded from the MSDN web site http://msdn.microsoft.com/data/jdbc/.
Some of the services in JBoss uses null values for the default tables that are created. Sybase Adaptive Server should be configured to allow nulls by default.
sp_dboption db_name, "allow nulls by default", true
Refer the sybase manuals for more options.
Enable JAVA services
To use any java service like JMS, CMP, timers etc. configured with Sybase, java should be enabled on Sybase Adaptive Server. To do this use:
sp_configure "enable java",1
Refer to the sybase manuals for more information.
If java is not enabled you might see this exception being thrown when you try to use any of the above services.
com.sybase.jdbc2.jdbc.SybSQLException: Cannot run this command because Java services are not enabled. A user with System Administrator (SA) role must reconfigure the system to enable Java
CMP Configuration
To use Container Managed Persistence for user defined Java objects with Sybase Adaptive Server Enterprise the java classes should be installed in the database. The system table 'sysxtypes' contains one row for each extended, Java-SQL datatype. This table is only used for Adaptive Servers enabled for Java. Install java classes using the installjava program.
installjava -f <jar-file-name> -S<sybase-server> -U<super-user> -P<super-pass> -D<db-name>
Refer the installjava manual in Sybase for more options.
Installing Java Classes
-
You have to be a super-user with required privileges to install java classes.
-
The jar file you are trying to install should be created without compression.
-
Java classes that you install and use in the server must be compiled with JDK 1.2.2. If you compile a class with a later JDK, you will be able to install it in the server using the installjava utility, but you will get a java.lang.ClassFormatError exception when you attempt to use the class. This is because Sybase Adaptive Server uses an older JVM internally, and hence requires the java classes to be compiled with the same.
Rather than configuring the connection manager factory related MBeans discussed in the previous section via a mbean services deployment descriptor, JBoss provides a simplified datasource centric descriptor. This is transformed into the standard jboss-service.xml MBean services deployment descriptor using a XSL transform applied by the org.jboss.deployment.XSLSubDeployer included in the jboss-jca.sar deployment. The simplified configuration descriptor is deployed the same as other deployable components. The descriptor must be named using a *-ds.xml pattern in order to be recognized by the XSLSubDeployer.
The schema for the top-level datasource elements of the *-ds.xml configuration deployment file is shown in Figure 13.1, “The simplified JCA DataSource configuration descriptor top-level schema elements”.

Multiple datasource configurations may be specified in a configuration deployment file. The child elements of the datasources root are:
-
mbean : Any number mbean elements may be specified to define MBean services that should be included in the
jboss-service.xmldescriptor that results from the transformation. This may be used to configure services used by the datasources. -
no-tx-datasource : This element is used to specify the (
org.jboss.resource.connectionmanager)NoTxConnectionManagerservice configuration.NoTxConnectionManageris a JCA connection manager with no transaction support. Theno-tx-datasourcechild element schema is given in Figure 13.2, “The non-transactional DataSource configuration schema”. -
local-tx-datasource : This element is used to specify the (
org.jboss.resource.connectionmanager)LocalTxConnectionManagerservice configuration.LocalTxConnectionManagerimplements aConnectionEventListenerthat implementsXAResourceto manage transactions through the transaction manager. To ensure that all work in a local transaction occurs over the sameManagedConnection, it includes a xid toManagedConnectionmap. When a Connection is requested or a transaction started with a connection handle in use, it checks to see if aManagedConnectionalready exists enrolled in the global transaction and uses it if found. Otherwise, a freeManagedConnectionhas itsLocalTransactionstarted and is used. Thelocal-tx-datasourcechild element schema is given in Figure 13.3, “The non-XA DataSource configuration schema” -
xa-datasource : This element is used to specify the (
org.jboss.resource.connectionmanager)XATxConnectionManagerservice configuration.XATxConnectionManagerimplements aConnectionEventListenerthat obtains theXAResourceto manage transactions through the transaction manager from the adaptorManagedConnection. To ensure that all work in a local transaction occurs over the sameManagedConnection, it includes a xid toManagedConnectionmap. When aConnectionis requested or a transaction started with a connection handle in use, it checks to see if aManagedConnectionalready exists enrolled in the global transaction and uses it if found. Otherwise, a freeManagedConnectionhas itsLocalTransactionstarted and is used. Thexa-datasourcechild element schema is given in Figure 13.4, “The XA DataSource configuration schema”. -
ha-local-tx-datasource : This element is identical to
local-tx-datasource, with the addition of the experimental datasource failover capability allowing JBoss to failover to an alternate database in the event of a database failure. -
ha-xa-datasource : This element is identical to
xa-datasource, with the addition of the experimental datasource failover capability allowing JBoss to failover to an alternate database in the event of a database failure.


Elements that are common to all datasources include:
-
jndi-name : The JNDI name under which the
DataSourcewrapper will be bound. Note that this name is relative to thejava:/context, unlessuse-java-contextis set to false.DataSourcewrappers are not usable outside of the server VM, so they are normally bound under thejava:/, which isn't shared outside the local VM. -
use-java-context : If this is set to false the the datasource will be bound in the global JNDI context rather than the
java:context. -
user-name : This element specifies the default username used when creating a new connection. The actual username may be overridden by the application code
getConnectionparameters or the connection creation context JAAS Subject. -
password : This element specifies the default password used when creating a new connection. The actual password may be overridden by the application code
getConnectionparameters or the connection creation context JAAS Subject. -
application-managed-security : Specifying this element indicates that connections in the pool should be distinguished by application code supplied parameters, such as from
getConnection(user, pw). -
security-domain : Specifying this element indicates that connections in the pool should be distinguished by JAAS Subject based information. The content of the
security-domainis the name of the JAAS security manager that will handle authentication. This name correlates to the JAASlogin-config.xmldescriptorapplication-policy/nameattribute. -
security-domain-and-application : Specifying this element indicates that connections in the pool should be distinguished both by application code supplied parameters and JAAS Subject based information. The content of the
security-domainis the name of the JAAS security manager that will handle authentication. This name correlates to the JAASlogin-config.xmldescriptorapplication-policy/nameattribute. -
min-pool-size : This element specifies the minimum number of connections a pool should hold. These pool instances are not created until an initial request for a connection is made. This default to 0.
-
max-pool-size : This element specifies the maximum number of connections for a pool. No more than the
max-pool-sizenumber of connections will be created in a pool. This defaults to 20. -
blocking-timeout-millis : This element specifies the maximum time in milliseconds to block while waiting for a connection before throwing an exception. Note that this blocks only while waiting for a permit for a connection, and will never throw an exception if creating a new connection takes an inordinately long time. The default is 5000.
-
idle-timeout-minutes : This element specifies the maximum time in minutes a connection may be idle before being closed. The actual maximum time depends also on the
IdleRemoverscan time, which is 1/2 the smallest idle-timeout-minutes of any pool. -
new-connection-sql : This is a SQL statement that should be executed when a new connection is created. This can be used to configure a connection with database specific settings not configurable via connection properties.
-
check-valid-connection-sql : This is a SQL statement that should be run on a connection before it is returned from the pool to test its validity to test for stale pool connections. An example statement could be:
select count(*) from x. -
exception-sorter-class-name : This specifies a class that implements the
org.jboss.resource.adapter.jdbc.ExceptionSorterinterface to examine database exceptions to determine whether or not the exception indicates a connection error. Current implementations include:-
org.jboss.resource.adapter.jdbc.vendor.OracleExceptionSorter
-
org.jboss.resource.adapter.jdbc.vendor.MySQLExceptionSorter
-
org.jboss.resource.adapter.jdbc.vendor.SybaseExceptionSorter
-
org.jboss.resource.adapter.jdbc.vendor.InformixExceptionSorte
-
-
valid-connection-checker-class-name : This specifies a class that implements the
org.jboss.resource.adapter.jdbc.ValidConnectionCheckerinterface to provide aSQLException isValidConnection(Connection e)method that is called with a connection that is to be returned from the pool to test its validity. This overrides thecheck-valid-connection-sqlwhen present. The only provided implementation isorg.jboss.resource.adapter.jdbc.vendor.OracleValidConnectionChecker. -
track-statements : This boolean element specifies whether to check for unclosed statements when a connection is returned to the pool. If true, a warning message is issued for each unclosed statement. If the log4j category
org.jboss.resource.adapter.jdbc.WrappedConnectionhas trace level enabled, a stack trace of the connection close call is logged as well. This is a debug feature that can be turned off in production. -
prepared-statement-cache-size : This element specifies the number of prepared statements per connection in an LRU cache, which is keyed by the SQL query. Setting this to zero disables the cache.
-
depends : The
dependselement specifies the JMXObjectNamestring of a service that the connection manager services depend on. The connection manager service will not be started until the dependent services have been started. -
type-mapping : This element declares a default type mapping for this datasource. The type mapping should match a
type-mapping/nameelement fromstandardjbosscmp-jdbc.xml.
Additional common child elements for both no-tx-datasource and local-tx-datasource include:
-
connection-url : This is the JDBC driver connection URL string, for example,
jdbc:hsqldb:hsql://localhost:1701. -
driver-class : This is the fully qualified name of the JDBC driver class, for example,
org.hsqldb.jdbcDriver. -
connection-property : The
connection-propertyelement allows you to pass in arbitrary connection properties to thejava.sql.Driver.connect(url, props)method. Eachconnection-propertyspecifies a string name/value pair with the property name coming from the name attribute and the value coming from the element content.
Elements in common to the local-tx-datasource and xa-datasource are:
-
transaction-isolation : This element specifies the
java.sql.Connectiontransaction isolation level to use. The constants defined in the Connection interface are the possible element content values and include:-
TRANSACTION_READ_UNCOMMITTED
-
TRANSACTION_READ_COMMITTED
-
TRANSACTION_REPEATABLE_READ
-
TRANSACTION_SERIALIZABLE
-
TRANSACTION_NONE
-
-
no-tx-separate-pools : The presence of this element indicates that two connection pools are required to isolate connections used with JTA transaction from those used without a JTA transaction. The pools are lazily constructed on first use. Its use case is for Oracle (and possibly other vendors) XA implementations that don't like using an XA connection with and without a JTA transaction.
The unique xa-datasource child elements are:
-
track-connection-by-tx : Specifying a true value for this element makes the connection manager keep an xid to connection map and only put the connection back in the pool when the transaction completes and all the connection handles are closed or disassociated (by the method calls returning). As a side effect, we never suspend and resume the xid on the connection's
XAResource. This is the same connection tracking behavior used for local transactions.The XA spec implies that any connection may be enrolled in any transaction using any xid for that transaction at any time from any thread (suspending other transactions if necessary). The original JCA implementation assumed this and aggressively delisted connections and put them back in the pool as soon as control left the EJB they were used in or handles were closed. Since some other transaction could be using the connection the next time work needed to be done on the original transaction, there is no way to get the original connection back. It turns out that most
XADataSourcedriver vendors do not support this, and require that all work done under a particular xid go through the same connection. -
xa-datasource-class : The fully qualified name of the
javax.sql.XADataSourceimplementation class, for example,com.informix.jdbcx.IfxXADataSource. -
xa-datasource-property : The
xa-datasource-propertyelement allows for specification of the properties to assign to theXADataSourceimplementation class. Each property is identified by the name attribute and the property value is given by thexa-datasource-propertyelement content. The property is mapped onto theXADataSourceimplementation by looking for a JavaBeans style getter method for the property name. If found, the value of the property is set using the JavaBeans setter with the element text translated to the true property type using thejava.beans.PropertyEditorfor the type. -
isSameRM-override-value : A boolean flag that allows one to override the behavior of the
javax.transaction.xa.XAResource.isSameRM(XAResource xaRes)method behavior on the XA managed connection. If specified, this value is used unconditionally as theisSameRM(xaRes)return value regardless of thexaResparameter.
The failover options common to ha-xa-datasource and ha-local-tx-datasource are:
-
url-delimeter : This element specifies a character used to separate multiple JDBC URLs.
-
url-property : In the case of XA datasources, this property specifies the name of the
xa-datasource-propertythat contains the list of JDBC URLs to use.
JBoss AS connects to relational databases via datasources. These datasource definitions can be found in the <JBoss_Home>/server/all/deploy directory. The datasource definitions are deployable just like WAR and EAR files. The datasource files can be recognized by looking for the XML files that end in *-ds.xml.
Datasource definition files
The datasource definition files for all supported external databases can be found in the <JBoss_Home>/docs/examples/jca directory.
-
MySQL:
mysql-ds.xml -
PostgreSQL:
postgres-ds.xml -
Oracle:
oracle-ds.xml -
DB2:
db2-ds.xml -
Sybase:
sybase-ds.xml -
MS SQL Server:
mssql-ds.xml
The following code snippet shows the mysql-ds.xml file as an example. All the other *-ds.xml files are very similiar. You will need to change the connection-url, as well as the user-name / password, to fit your own database server installation.
<datasources>
<local-tx-datasource>
<jndi-name>MySqlDS</jndi-name>
<connection-url>jdbc:mysql://localhost:3306/jboss</connection-url>
<driver-class>com.mysql.jdbc.Driver</driver-class>
<user-name>jbossuser</user-name>
<password>jbosspass</password>
<exception-sorter-class-name>
org.jboss.resource.adapter.jdbc.vendor.MySQLExceptionSorter
</exception-sorter-class-name>
<!-- should only be used on drivers after 3.22.1 with "ping" support
<valid-connection-checker-class-name>
org.jboss.resource.adapter.jdbc.vendor.MySQLValidConnectionChecker
</valid-connection-checker-class-name>
-->
<!-- sql to call when connection is created
<new-connection-sql>some arbitrary sql</new-connection-sql>
-->
<!-- sql to call on an existing pooled connection when it is obtained from pool -
 MySQLValidConnectionChecker is preferred for newer drivers
<check-valid-connection-sql>some arbitrary sql</check-valid-connection-sql>
 -->

<!-- corresponding type-mapping in the standardjbosscmp-jdbc.xml (optional) -->
   <metadata>
 <type-mapping>mySQL</type-mapping>
 </metadata>
 </local-tx-datasource>

</datasources>
Once you customized the *-ds.xml file to connect to your external database, you need to copy it to the <JBoss_Home>/server/all/deploy directory. The database connection is now available through the JNDI name specified in the *-ds.xml file.
-
<mbean> - a standard jboss mbean deployment
-
<depends> - the ObjectName of an MBean service this ConnectionFactory or DataSource deployment depends upon
-
<jndi-name> - the jndi name where it is bound. This is prefixed with java by default:
-
<use-java-context> - set this to false to drop the java: context from the jndi name
<xa-resource-timeout> - the number of seconds passed to
XAResource.setTranasctionTimeout()
when not zero. This feature is available on JBoss AS 4.0.3 and above.
JCA Login Modules - are used to inject security configuration into the connection when configured
-
nothing - uses the user/password specified in
-ds.xmlfor DataSources or thegetConnection/createConnectionmethod without auser/password(the default). -
<application-managed-security> - uses the user/password passed on the
getConnectionorcreateConnectionrequest by the application. -
<security-domain> - uses the identified login module configured in
conf/login-module.xml. -
<security-domain-and-application> - uses the identified login module configured in
conf/login-module.xmland other connection request information supplied by the application, e.g. queue or topic in JMS.
-
<no-tx-separate-pools> - whether separate subpools should be created for connections inside and outside JTA transactions (default false).
-
<min-pool-size> - the minimum number of connections in the pool (default 0 - zero)
-
<max-pool-size> - the maximum number of connections in the pool (default 20)
-
<blocking-timeout-millis> - the length of time to wait for a connection to become available when all the connections are checked out (default 5000 == 5 seconds, from 3.2.4 it is 30000 == 30 seconds)
-
<idle-timeout-minutes> - the number of minutes after which unused connections are closed (default 15 minutes)
-
<track-connection-by-tx> - whether the connection should be "locked" to the transaction, returning it to the pool at the end of the transaction; in pre-JBoss-5.x releases the default value for Local connection factories is true and false for XA; since JBoss-5.x the default value is true for both Local and XA and the element is deprecated.
-
<interleaving/> - enables interleaving for XA connection factories (this feature was added in JBoss-5.x)
-
<prefill> - whether to attempt to prefill the connection pool to the minimum number of connections. NOTE: only supporting pools (OnePool) support this feature. A warning can be found in the logs if the pool does not support this. This feature is available in JBoss 4.0.5 and above.
-
<background-validation> - In JBoss 4.0.5, background connection validation was added to reduce the overall load on the RDBMS system when validating a connection. When using this feature, JBoss will attempt to validate the current connections in the pool as a seperate thread (ConnectionValidator).
-
<background-validation-minutes> - The interval, in minutes, that the ConnectionValidator will run. NOTE: It is prudent to set this value to something greater or less than the <idle-timeout-minutes>
-
<use-fast-fail> - Whether or not to continue to attempt to acquire a connection from the pool even if the nth attempt has failed. False by default. This is to address performance issues where SQL validation may take significant time and resources to execute.
The JMS service in the JBoss AS uses relational databases to persist its messages. For improved performance, we should change the JMS service to take advantage of the external database. To do that, we need to replace the file <JBoss_Home>/server/all/deploy/jms-singleton/hsqldb-jdbc2-service.xml with a file in <JBoss_Home>/docs/examples/jms/ depending on your external database. Notice that if you are using the default server profile, the file path is <JBoss_Home>/server/default/deploy/jms/hsqldb-jdbc2-service.xml.
-
MySQL:
mysql-jdbc2-service.xml -
PostgreSQL:
postgres-jdbc2-service.xml -
Oracle:
oracle-jdbc2-service.xml -
DB2:
db2-jdbc2-service.xml -
Sybase:
sybase-jdbc2-service.xml -
MS SQL Server:
mssql-jdbc2-service.xml
What about the hsqldb-jdbc-state-service.xml file?
Despite its name, the hsqldb-jdbc-state-service.xml file applies to all databases. So, there is no need to use a special jdbc-state-service.xml for each database.
Next, we need to go change the <JBoss_Home>/server/all/conf/standardjbosscmp-jdbc.xml file so that the fk-constraint property is true. That is needed for all external databases we support on the JBoss Application Server. This file configures the database connection settings for the EJB2 CMP beans deployed in the JBoss AS.
<fk-constraint>true</fk-constraint>
The Java Persistence API (JPA) entity manager can save EJB3 entity beans to any backend database. Hibernate provides the JPA implementation in JBoss AS. Hibernate has a dialect auto-detection mechanism that works for most databases including the dialects for databases referenced in this appendix which are listed below. If a specific dialect is needed for alternative databases, you can configure the database dialect in the <JBoss_Home>/server/all/deploy/ejb3.deployer/META-INF/persistence.properties file. You need to un-comment the hibernate.dialect property and change its value to the following based on the database you setup. For a complete list of dialects, refer to the Hibernate Reference Guide, Chapter 3, Section 4.1 SQL Dialects.
-
Oracle 9i: org.hibernate.dialect.Oracle9iDialect
-
Oracle 10g: org.hibernate.dialect.Oracle10gDialect
-
Microsoft SQL Server 2005: org.hibernate.dialect.SQLServerDialect
-
PostgresSQL 8.1: org.hibernate.dialect.PostgreSQLDialect
-
MySQL 5.0: org.hibernate.dialect.MySQL5Dialect
-
DB2 8.0: org.hibernate.dialect.DB2Dialect
-
Sybase ASE 12.5: org.hibernate.dialect.SybaseDialect
DB2 7.2 with Universal JDBC Driver (Type 4)
Large Objects (LOBs) are supported only with DB2 Version 8 servers and above with the universal JDBC driver. Hence JMS services which stores messages as BLOBS and Timer services which uses BLOB fields for storing objects do not work with the JDBC Type 4 driver and DB2 7.2.
DB2 7.2 with JDBC Type 2 driver
All JBoss services work with the JDBC Type 2 driver and DB2 Version 7.2 servers.
Besides JMS, CMP, and JPA, we still need to hook up the rest of JBoss services with the external database. There are two ways to do it. One is easy but inflexible. The other is flexible but requires more steps. Now, let's discuss those two approaches respectively.
The easy way is just to change the JNDI name for the external database to DefaultDS. Most JBoss services are hard-wired to use the DefaultDS by default. So, by changing the datasource name, we do not need to change the configuration for each service individually.
To change the JNDI name, just open the *-ds.xml file for your external database, and change the value of the jndi-name property to DefaultDS. For instance, in mysql-ds.xml, you'd change MySqlDS to DefaultDS and so on. You will need to remove the <JBoss_Home>/server/all/deploy/hsqldb-ds.xml file after you are done to avoid duplicated DefaultDS definition.
In the jms/*-jdbc2-service.xml file, you should also change the datasource name in the depends tag for the PersistenceManagers MBean to DefaultDS. For instance, for mysql-jdbc2-service.xml file, we change the MySqlDS to DefaultDS.
.. ...
<mbean code="org.jboss.mq.pm.jdbc2.PersistenceManager"
       name="jboss.mq:service=PersistenceManager"%gt;
  <depends optional-attribute-name="ConnectionManager">
    jboss.jca:service=DataSourceBinding,name=DefaultDS
  </depends>
... ...
Changing the external datasource to DefaultDS is convenient. But if you have applications that assume the DefaultDS always points to the factory-default HSQL DB, that approach could break your application. Also, changing DefaultDS destination forces all JBoss services to use the external database. What if you want to use the external database only on some services?
A safer and more flexible way to hook up JBoss AS services with the external datasource is to manually change the DefaultDS in all standard JBoss services to the datasource JNDI name defined in your *-ds.xml file (e.g., the MySqlDS in mysql-ds.xml etc.). Below is a complete list of files that contain DefaultDS. You can update them all to use the external database on all JBoss services or update some of them to use different combination of datasources for different services.
-
<JBoss_Home>/server/all/conf/login-config.xml: This file is used in Java EE container managed security services. -
<JBoss_Home>/server/all/conf/standardjbosscmp-jdbc.xml: This file configures the CMP beans in the EJB container. -
<JBoss_Home>/server/all/deploy/ejb-deployer.xml: This file configures the JBoss EJB deployer. -
<JBoss_Home>/server/all/deploy/schedule-manager-service.xml: This file configures the EJB timer services. -
<JBoss_Home>/server/all/deploy/snmp-adaptor.sar/attributes.xml: This file is used by the SNMP service. -
<JBoss_Home>/server/all/deploy/juddi-service.sar/META-INF/jboss-service.xml: This file configures the UUDI service. -
<JBoss_Home>/server/all/deploy/juddi-service.sar/juddi.war/WEB-INF/jboss-web.xml: This file configures the UUDI service. -
<JBoss_Home>/server/all/deploy/juddi-service.sar/juddi.war/WEB-INF/juddi.properties: This file configures the UUDI service. -
<JBoss_Home>/server/all/deploy/uuid-key-generator.sar/META-INF/jboss-service.xml: This file configures the UUDI service. -
<JBoss_Home>/server/all/jms/hsqldb-jdbc-state-service.xmland<JBoss_Home>/server/all/deploy-hasingleton/jms/hsqldb-jdbc-state-service.xml: Those files configure the JMS persistence service as we discussed earlier.
In our setup discussed in this chapter, we rely on the JBoss AS to automatically create needed tables in the external database upon server startup. That works most of the time. But for databases like Oracle, there might be some minor issues if you try to use the same database server to back more than one JBoss AS instance.
The Oracle database creates tables of the form schemaname.tablename. The TIMERS and HILOSEQUENCES tables needed by JBoss AS would not get created on a schema if the table already exists on a different schema. To work around this issue, you need to edit the <JBoss_Home>/server/all/deploy/ejb-deployer.xml file to change the table name from TIMERS to something like schemaname2.tablename.
<mbean code="org.jboss.ejb.txtimer.DatabasePersistencePolicy"
name="jboss.ejb:service=EJBTimerService,persistencePolicy=database">
<!-- DataSourceBinding ObjectName -->
<depends optional-attribute-name="DataSource">
 jboss.jca:service=DataSourceBinding,name=DefaultDS
</depends>
<!-- The plugin that handles database persistence -->
<attribute name="DatabasePersistencePlugin">
org.jboss.ejb.txtimer.GeneralPurposeDatabasePersistencePlugin
</attribute>
<!-- The timers table name -->
<attribute name="TimersTable">TIMERS</attribute>
</mbean>
Similarly, you need to change the <JBoss_Home>/server/all/deploy/uuid-key-generator.sar/META-INF/jboss-service.xml file to change the table name from HILOSEQUENCES to something like schemaname2.tablename as well.
<!-- HiLoKeyGeneratorFactory -->
<mbean code="org.jboss.ejb.plugins.keygenerator.hilo.HiLoKeyGeneratorFactory"
name="jboss:service=KeyGeneratorFactory,type=HiLo">

<depends>jboss:service=TransactionManager</depends>

<!-- Attributes common to HiLo factory instances -->

<!-- DataSource JNDI name -->
<depends optional-attribute-name="DataSource">jboss.jca:service=DataSourceBinding,name=DefaultDS</depends>

<!-- table name -->
<attribute name="TableName">HILOSEQUENCES</attribute>
DataSources are defined inside a <datasources> element.
-
<no-tx-datasource> - a DataSource that does not take part in JTA transactions using a java.sql.Driver
-
<local-tx-datasource> - a DataSource that does not support two phase commit using a java.sql.Driver
-
<xa-datasource> - a DataSource that does support two phase commit using a javax.sql.XADataSource
-
<connection-url> - the JDBC driver connection url string
-
<driver-class> - the JDBC driver class implementing java.sql.Driver
-
<connection-property> - used to configure the connections retrieved from the java.sql.Driver. For example:
<connection-property name="char.encoding">UTF-8</connection-property>
-
<xa-datasource-class> - the class implementing the XADataSource
-
<xa-datasource-property> - properties used to configure the XADataSource. For example:
<xa-datasource-property name="IfxWAITTIME">10</xa-datasource-property>
<xa-datasource-property name="IfxIFXHOST">myhost.mydomain.com</xa-datasource-property>
<xa-datasource-property name="PortNumber">1557</xa-datasource-property>
<xa-datasource-property name="DatabaseName">mydb</xa-datasource-property>
<xa-datasource-property name="ServerName">myserver</xa-datasource-property>
-
<isSameRM-override-value> - set to false to fix problems with Oracle
-
<track-connection-by-tx/> - set to fix problems with Oracle (not necessarily in JBoss-5.x where it is enabled by default and the element is deprecated)
-
<no-tx-separate-pools/> - Pool Transactional and non-Transactional connections separately. Using this option will cause your total pool size to be twice max-pool-size because two actual pools will be created. Used to fix problems with Oracle.
-
<jndi-name> - the JNDI name under which the DataSource should be bound.
-
<use-java-context> - A boolean indicating if the jndi-name should be prefixed with java: which causes the DataSource to only be accessible from within the jboss server vm. The default is true.
-
<user-name> - the user name used when creating the connection (not used when security is configured)
-
<password> - the password used when creating the connection (not used when security is configured)
-
<transaction-isolation> - the default transaction isolation of the connection (unspecified means use the default provided by the database):
-
TRANSACTION_READ_UNCOMMITTED
-
TRANSACTION_READ_COMMITTED
-
TRANSACTION_REPEATABLE_READ
-
TRANSACTION_SERIALIZABLE
-
TRANSACTION_NONE
-
-
<new-connection-sql> - an sql statement that is executed against each new connection. This can be used to set the connection schema, etc.
-
<check-valid-connection-sql> - an sql statement that is executed before it is checked out from the pool to make sure it is still valid. If the sql fails, the connection is closed and new ones created.
-
<valid-connection-checker-class-name> - a class that can check whether a connection is valid using a vendor specific mechanism
-
<exception-sorter-class-name> - a class that looks at vendor specific messages to determine whether sql errors are fatal and thus the connection should be destroyed. If none specified, no errors will be treated as fatal.
-
<track-statements> - (a) whether to monitor for unclosed Statements and ResultSets and issue warnings when the user forgets to close them (default nowarn)
-
<prepared-statement-cache-size> - the number of prepared statements per connection to be kept open and reused in subsequent requests. They are stored in a LRU cache. The default is 0 (zero), meaning no cache.
-
<share-prepared-statements> - (b) with prepared statement cache enabled whether two requests in the same transaction should return the same statement (from jboss-4.0.2 - default false).
-
<set-tx-query-timeout> - whether to enable query timeout based on the length of time remaining until the transaction times out (default false - NOTE: This was NOT ported to 4.0.x until 4.0.3)
-
<query-timeout> - a static configuration of the maximum of seconds before a query times out (since 4.0.3)
-
<metadata/typemapping> - a pointer to the type mapping in conf/standardjbosscmp.xml (available from JBoss 4 and above)
-
<validate-on-match> - Prior to JBoss 4.0.5, connection validation occurred when the JCA layer attempted to match a managed connection. With the addition of <background-validation> this is no longer required. Specifying <validate-on-match> forces the old behavior. NOTE: this is typically NOT used in conjunction with <background-validation>
-
<prefill> - whether to attempt to prefill the connection pool to the minimum number of connections. NOTE: only supporting pools (OnePool) support this feature. A warning can be found in the logs if the pool does not support this. This feature will appear in JBoss 4.0.5.
-
<background-validation> - In JBoss 4.0.5, background connection validation as been added to reduce the overall load on the RDBMS system when validating a connection. When using this feature, JBoss will attempt to validate the current connections in the pool is a seperate thread (ConnectionValidator). Default is False.
-
<idle-timeout-minutes> - indicates the maximum time a connection may be idle before being closed. Default is 15 minutes.
-
<background-validation-minutes> - The interval, in minutes, that the ConnectionValidator will run. Default is 10 minutes. NOTE: It is prudent to set this value to something greater or less than the <idle-timeout-minutes>
-
<url-delimiter> - From JBoss5 database failover is part of the main datasource config
-
<url-property> - From JBoss5 database failover is part of the main datasource config
-
<url-selector-strategy-class-name> - From JBoss5 ONLY database failover is part of the main datasource config
-
<stale-connection-checker-class-name> - An implementation of org.jboss.resource.adapter.jdbc.StateConnectionChecker that will decide whether SQLExceptions that notify of bad connections throw org.jboss.resource.adapter.jdbc.StateConnectionException (from JBoss5)
From JBoss AS 3.2.6 and above, track-statements has a new option:
<track-statements>nowarn</track-statements
This option closes Statements and ResultSets without a warning. It is also the new default value.
The purpose is to workaround questionable driver behavior where the driver applies auto-commit semantics to local transactions.
Connection c = dataSource.getConnection(); // auto-commit == false
PreparedStatement ps1 = c.prepareStatement(...);
ResultSet rs1 = ps1.executeQuery();
PreparedStatement ps2 = c.prepareStatement(...);
ResultSet rs2 = ps2.executeQuery();
Assuming the prepared statements are the same. For some drivers, ps2.executeQuery() will automatically close rs1 so we actually need two real prepared statements behind the scenes. This *should* only be for the auto-commit semantic where re-running the query starts a new transaction automatically. For drivers that follow the spec, you can set it to true to share the same real prepared statement.
<datasources>
<local-tx-datasource>
<jndi-name>GenericDS</jndi-name>
<connection-url>[jdbc: url for use with Driver class]</connection-url>
<driver-class>[fully qualified class name of java.sql.Driver implementation]</driver-class>
<user-name>x</user-name>
<password>y</password>
<!-- you can include connection properties that will get passed in
the DriverManager.getConnection(props) call-->
<!-- look at your Driver docs to see what these might be -->
<connection-property name="char.encoding">UTF-8</connection-property>
<transaction-isolation>TRANSACTION_SERIALIZABLE</transaction-isolation>

<!--pooling parameters-->
<min-pool-size>5</min-pool-size>
<max-pool-size>100</max-pool-size>
<blocking-timeout-millis>5000</blocking-timeout-millis>
<idle-timeout-minutes>15</idle-timeout-minutes>
<!-- sql to call when connection is created
<new-connection-sql>some arbitrary sql</new-connection-sql>
-->

<!-- sql to call on an existing pooled connection when it is obtained from pool
<check-valid-connection-sql>some arbitrary sql</check-valid-connection-sql>
-->

<set-tx-query-timeout/>
<query-timeout>300</query-timeout> <!-- maximum of 5 minutes for queries -->

<!-- pooling criteria.  USE AT MOST ONE-->
<!--  If you don't use JAAS login modules or explicit login
getConnection(usr,pw) but rely on user/pw specified above,
don't specify anything here -->

<!-- If you supply the usr/pw from a JAAS login module -->
<security-domain>MyRealm</security-domain>

<!-- if your app supplies the usr/pw explicitly getConnection(usr, pw) -->
<application-managed-security/>

<!--Anonymous depends elements are copied verbatim into the ConnectionManager mbean config-->
<depends>myapp.service:service=DoSomethingService</depends>

</local-tx-datasource>

<!-- you can include regular mbean configurations like this one -->
<mbean code="org.jboss.tm.XidFactory"
name="jboss:service=XidFactory">
<attribute name="Pad">true</attribute>
</mbean>

<!-- Here's an xa example -->
<xa-datasource>
<jndi-name>GenericXADS</jndi-name>
<xa-datasource-class>[fully qualified name of class implementing javax.sql.XADataSource goes here]</xa-datasource-class>
<xa-datasource-property name="SomeProperty">SomePropertyValue</xa-datasource-property>
<xa-datasource-property name="SomeOtherProperty">SomeOtherValue</xa-datasource-property>

<user-name>x</user-name>
<password>y</password>
<transaction-isolation>TRANSACTION_SERIALIZABLE</transaction-isolation>

<!--pooling parameters-->
<min-pool-size>5</min-pool-size>
<max-pool-size>100</max-pool-size>
<blocking-timeout-millis>5000</blocking-timeout-millis>
<idle-timeout-minutes>15</idle-timeout-minutes>
<!-- sql to call when connection is created
<new-connection-sql>some arbitrary sql</new-connection-sql>
-->

<!-- sql to call on an existing pooled connection when it is obtained from pool
<check-valid-connection-sql>some arbitrary sql</check-valid-connection-sql>
-->

<!-- pooling criteria.  USE AT MOST ONE-->
<!--  If you don't use JAAS login modules or explicit login
getConnection(usr,pw) but rely on user/pw specified above,
don't specify anything here -->

<!-- If you supply the usr/pw from a JAAS login module -->
<security-domain/>

<!-- if your app supplies the usr/pw explicitly getConnection(usr, pw) -->
<application-managed-security/>

</xa-datasource>

</datasources>
From JBoss-4.0.0 and above, there is support for accessing a DataSource from a remote client. The one change that is necessary for the client to be able to lookup the DataSource from JNDI is to specify use-java-context=false as shown here:
<datasources>
<local-tx-datasource>
<jndi-name>GenericDS</jndi-name>
<use-java-context>false</use-java-context>
<connection-url>...</connection-url>
This results in the DataSource being bound under the JNDI name "GenericDS" instead of the default of "java:/GenericDS" which restricts the lookup to the same VM as the jboss server.
Note
JBoss does not recommend using this feature on a production environment. It requires accessing a connection pool remotely and this is an anti-pattern as connections are not serializable. Besides, transaction propagation is not supported and it could lead to connection leaks if the remote clients are unreliable (i.e crashes, network failure). If you do need to access a datasource remotely, JBoss recommends accessing it via a remote session bean facade.
Add the security-domain parameter to the *-ds.xml file.
<datasources>
<local-tx-datasource>
...
<security-domain>MyDomain</security-domain>
...
</local-tx-datasource>
</datasources>
Add an application-policy to the login-config.xml file. The authentication section should include the configuration for your login-module. For example, if you want to encrypt the database password, use the SecureIdentityLoginModule login module.
<application-policy name="MyDomain">
<authentication>
<login-module code="org.jboss.resource.security.SecureIdentityLoginModule" flag="required">
<module-option name="username">scott</module-option>
<module-option name="password">-170dd0fbd8c13748</module-option>
<module-option name="managedConnectionFactoryName">jboss.jca:service=LocalTxCM,name=OracleDSJAAS</module-option>
</login-module>
</authentication>
</application-policy>
In case you plan to fetch the data source connection from a web application, make sure authentication is turned on for the web application. This is in order for the Subject to be populated. If you wish for users to be able to connect anonymously, an additional login module needs to be added to the application-policy, in order to populate the security credentials. Add the UsersRolesLoginModule as the first login module in the chain. The usersProperties and rolesProperties parameters can be directed to dummy files.
<login-module code="org.jboss.security.auth.spi.UsersRolesLoginModule" flag="required">
<module-option name="unauthenticatedIdentity">nobody</module-option>
<module-option name="usersProperties">props/users.properties</module-option>
<module-option name="rolesProperties">props/roles.properties</module-option>
</login-module>
JBossJCA uses a ManagedConnectionPool to perform the pooling. The ManagedConnectionPool is made up of subpools depending upon the strategy chosen and other pooling parameters.
|
xml |
mbean |
Internal Name |
Description |
|
|
ByNothing |
OnePool |
A single pool of equivalent connections |
||
|
<application-managed-security/> |
ByApplication |
PoolByCRI |
Use the connection properties from allocateConnection() |
|
|
<security-domain/> |
ByContainer |
PoolBySubject |
A pool per Subject, e.g. preconfigured or EJB/Web login subjects |
|
|
<security-domain-and-applicaton/> |
ByContainerAndApplicaton |
PoolBySubjectAndCri |
A per Subject and connection property combination |
Note
The xml names imply this is just about security. This is misleading.
For <security-domain-and-application/> the Subject always overrides any user/password from createConnection(user, password) in the CRI:
(
ConnectionRequestInfo
)
You can force the same connection from a (sub-)pool to get reused throughout a transaction with the <track-connection-by-tx/> flag
Note
This is the only supported behaviour for "local" transactions. This element is deprecated in JBoss-5.x where transaction stickiness is enabled by default. XA users can explicitly enable interleaving with <interleaving/> element.
Oracle does not like XA connections getting used both inside and outside a JTA transaction. To workaround the problem you can create separate sub-pools for the different contexts using <no-tx-separate-pools/>.
The pool is designed for concurrent usage.
Upto <max-pool-size/> threads can be inside the pool at the same time (or using connections from a pool).
Once this limit is reached, threads wait for the <blocking-timeout-seconds/> to use the pool before throwing a No Managed Connections Available
The number of connections in the pool is controlled by the pool sizes.
-
<min-pool-size/> - When the number of connections falls below this size, new connections are created
-
<max-pool-size/> - No more than this number of connections are created
-
<prefill/> - Feature Request has been implemented for 4.0.5. Note: the only pooling strategy that supports this feature is OnePool?, or ByNothing? pooling criteria.
The pool filling is done by a separate "Pool Filler" thread rather than blocking application threads.
You can configure connections to be closed when they are idle. e.g. If you just had a peak period and now want to reap the unused ones. This is done via the <idle-timeout-minutes/>.
Idle checking is done on a separate "Idle Remover" thread on an LRU (least recently used) basis. The check is done every idle-timeout-minutes divided by 2 for connections unused for idle-timeout-minutes.
The pool itself operates on an MRU (most recently used) basis. This allows the excess connections to be easily identified.
Should closing idle connections cause the pool to fall below the min-pool-size, new/fresh connections are created.
Note
If you have long running transactions and you use interleaving (i.e. don't track-connection-by-tx) make sure the idle timeout is greater than the transaction timeout. When interleaving the connection is returned to the pool for others to use. If however nobody does use it, it would be a candidate for removal before the transaction is committed.
The JDBC protocol does not provide a natural connectionErrorOccured() event when a connection is broken. To support dead/broken connection checking there are a number of plugins.
The simplest format is to just run a "quick" sql statement:
<check-valid-connection-sql>select 1 from dual</check-valid-connection-sql>
before handing the connection to the application. If this fails, another connection is selected until there are no more connections at which point new connections are constructed.
The potentially more performant check is to use vendor specific features, e.g. Oracle's or MySQL's pingDatabase() via the
<valid-connection-checker-class-name/>
You can check if a connection broke during a query by the looking the error codes or messages of the SQLException for FATAL errors rather than normal SQLExceptions. These codes/messages can be vendor specific, e.g.
<exception-sorter-class-name>org.jboss.resource.adapter.jdbc.vendor.OracleExceptionSorter</exception-sorter-class-name>
For
FATAL
errors the connection will be closed.
-
change or flush() the pool
-
closing/undeploying the pool will do a flush first
Thirdparty Pools - only if you know what you are doing
Check that you:
-
You have pad=true for the XidFactory? in conf/jboss-service.xml.
-
You have <track-connection-by-tx/> in your oracle-xa-ds.xml (not necessarily for JBoss-5.x where it is enabled by default and the element is deprecated).
-
You have <isSameRM-override-value>false</isSameRM-override-value> in your oracle-xa-ds.xml.
-
You have <no-tx-separate-pools/> in your oracle-xa-ds.xml.
-
That your jbosscmp-jdbc.xml is specifying the same version of oracle as the one you use.
-
That the oracle server you connect to has XA.
Configuring Oracle Database for XA Support You can configure Oracle database to support XA resources. This enables you to use JDBC 2.0-compliant Oracle driver. To XA-initialize Oracle database, complete the following steps:
Make sure that Oracle JServer is installed with your database. If it is not installed, you must add it using Oracle Database Configuration Assistant. Choose "Change an Existing DB" and then select the database to which you want to add Oracle JServer. Choose "Next", then "Oracle JServer" and then "Finish". If the settings you have made to your database previously, are not suitable or insufficient for the Oracle JServer installation, the system prompts you to enter additional parameters. The database configuration file ( init.ora ) is located in \oracle\admin\<your_db_name>\pfile directory. Execute initxa.sql over your database. By default, this script file is located in \oracle\ora81\javavm\install. If errors occur during the execution of the file, you must execute the SQL statements from the file manually. Use DBA Studio to create a package and package body named JAVA_XA in SYS schema, and a synonym of this package (also named JAVA_XA) in PUBLIC schema.
A slightly more detailed set of instructions can be found at Configuring and using XA distributed transactions in WebSphere Studio - Oracle Exception section.
Table of Contents
- 16. Clustering
- 17. Clustered JNDI Services
- 18. Clustered Session EJBs
- 19. Clustered Entity EJBs
- 20. HTTP Services
-
- 20.1. Configuring load balancing using Apache and mod_jk
- 20.2. Download the software
- 20.3. Configure Apache to load mod_jk
- 20.4. Configure worker nodes in mod_jk
- 20.5. Configuring JBoss to work with mod_jk
- 20.6. Configuring HTTP session state replication
- 20.7. Enabling session replication in your application
- 20.8. Using FIELD level replication
- 20.9. Monitoring session replication
- 20.10. Using Clustered Single Sign On
- 20.11. Clustered Singleton Services
- 21. JBoss Messaging Clustering Notes
- 22. JBossCache and JGroups Services
-
- 22.1. JGroups Configuration
- 22.2. Common Configuration Properties
- 22.3. Transport Protocols
- 22.4. Discovery Protocols
- 22.5. Failure Detection Protocols
- 22.6. Reliable Delivery Protocols
- 22.7. Other Configuration Options
-
- 22.7.1. Group Membership
- 22.7.2. Flow Control
- 22.7.3. Fragmentation
- 22.7.4. State Transfer
- 22.7.5. Distributed Garbage Collection
- 22.7.6. Merging
- 22.7.7. Binding JGroups Channels to a particular interface
- 22.7.8. Isolating JGroups Channels
- 22.7.9. Changing the Group Name
- 22.7.10. Changing the multicast address and port
- 22.7.11. JGroups Troubleshooting
- 22.7.12. Causes of missing heartbeats in FD
Clustering allows us to run an application on several parallel servers (a.k.a cluster nodes) while providing a single view to application clients. Load is distributed across different servers, and even if one or more of the servers fails, the application is still accessible via the surviving cluster nodes. Clustering is crucial for scalable enterprise applications, as you can improve performance by simply adding more nodes to the cluster. Clustering is crucial for highly available enterprise applications, as it is the clustering infrastructure that supports the redundancy needed for high availability.
The JBoss Application Server (AS) comes with clustering support out of the box. The simplest way to start a JBoss server cluster is to start several JBoss instances on the same local network, using the run -c all command for each instance. Those server instances, all started in the all configuration, detect each other and automatically form a cluster.
In the first section of this chapter, we discuss basic concepts behind JBoss's clustering services. It is important that you understand these concepts before reading the rest of the chapter. Clustering configurations for specific types of applications are covered after this section.
A cluster is a set of nodes that communicate with each other and work toward a common goal. In a JBoss Application Server cluster (also known as a “partition”), a node is an JBoss Application Server instance. Communication between the nodes is handled by the JGroups group communication library, with a JGroups Channel providing the core functionality of tracking who is in the cluster and reliably exchanging messages between the cluster members. JGroups channels with the same configuration and name have the ability to dynamically discover each other and form a group. This is why simply executing “run -c all” on two AS instances on the same network is enough for them to form a cluster – each AS starts a Channel (actually, several) with the same default configuration, so they dynamically discover each other and form a cluster. Nodes can be dynamically added to or removed from clusters at any time, simply by starting or stopping a Channel with a configuration and name that matches the other cluster members. In summary, a JBoss cluster is a set of AS server instances each of which is running an identically configured and named JGroups Channel.
On the same AS instance, different services can create their own Channel. In a default 5.0.x AS, four different services create channels – the web session replication service, the EJB3 SFSB replication service, the EJB3 entity caching service, and a core general purpose clustering service known as HAPartition. In order to differentiate these channels, each must have a unique name, and its configuration must match its peers yet differ from the other channels.
So, if you go to two AS 5.0.x instances and execute run -c all, the channels will discover each other and you'll have a conceptual cluster. It's easy to think of this as a two node cluster, but it's important to understand that you really have 4 channels, and hence 4 two node clusters.
On the same network, even for the same service, we may have different clusters. Figure 16.1, “Clusters and server nodes” shows an example network of JBoss server instances divided into three clusters, with the third cluster only having one node. This sort of topology can be set up simply by configuring the AS instances such that within a set of nodes meant to form a cluster the Channel configurations and names match while they differ from any other channels on the same network.

The section on “JGroups Configuration” and on “Isolating JGroups Channels” covers in detail how to configure Channels such that desired peers find each other and unwanted peers do not. As mentioned above, by default JBoss AS uses four separate JGroups Channels. These can be divided into two broad categories: the Channel used by the general purpose HAPartition service, and three Channels created by JBoss Cache for special purpose caching and cluster wide state replication.
HAPartition is a general purpose service used for a variety of tasks in AS clustering. At its core, it is an abstraction built on top of a JGroups Channel that provides support for making/receiving RPC invocations on/from one or more cluster members. HAPartition also supports a distributed registry of which clustering services are running on which cluster members. It provides notifications to interested listeners when the cluster membership changes or the clustered service registry changes. HAPartition forms the core of many of the clustering services we'll be discussing in the rest of this guide, including smart client-side clustered proxies, EJB 2 SFSB replication and entity cache management, farming, HA-JNDI and HA singletons.
The following example shows the HAPartition MBean definition packaged with the standard JBoss AS distribution.
So, if you simply start JBoss servers with their default clustering settings on a local network, you
would get a default cluster named DefaultPartition that includes all server
instances as its nodes.
<mbean code="org.jboss.ha.framework.server.ClusterPartition"
    name="jboss:service=DefaultPartition">

    <! -- Name of the partition being built -->
    <attribute name="PartitionName">
        ${jboss.partition.name:DefaultPartition}
    </attribute>

    <! -- The address used to determine the node name -->
    <attribute name="NodeAddress">${jboss.bind.address}</attribute>

    <! -- Determine if deadlock detection is enabled -->
    <attribute name="DeadlockDetection">False</attribute>

    <! -- Max time (in ms) to wait for state transfer to complete.
        Increase for large states -->
    <attribute name="StateTransferTimeout">30000</attribute>

    <! -- The JGroups protocol configuration -->
    <attribute name="PartitionConfig">
        ... ...
    </attribute>
</mbean>
Here, we omitted the detailed JGroups protocol configuration for this channel. JGroups handles the
underlying peer-to-peer communication between nodes, and its configuration is discussed in Section 22.1, “JGroups Configuration”. The following list shows the available configuration attributes
in the HAPartition MBean.
-
PartitionName is an optional attribute to specify the name of the cluster. Its default value is
DefaultPartition. Use the-g(a.k.a. --partition) command line switch to set this value at JBoss startup. -
NodeAddress is an optional attribute used to help generate a unique name for this node.
-
DeadlockDetection is an optional boolean attribute that tells JGroups to run message deadlock detection algorithms with every request. Its default value is
false. -
StateTransferTimeout is an optional attribute to specify the timeout for state replication across the cluster (in milliseconds). State replication refers to the process of obtaining initial application state from other already-running cluster members at service startup. Its default value is
30000. -
PartitionConfig is an element to specify JGroup configuration options for this cluster (see Section 22.1, “JGroups Configuration”).
In order for nodes to form a cluster, they must have the exact same PartitionName and the ParitionConfig elements. Changes in either element on some but not all nodes would cause the cluster to split.
You can view the current cluster information by pointing your browser to the JMX console of any
JBoss instance in the cluster (i.e., http://hostname:8080/jmx-console/) and then
clicking on the jboss:service=DefaultPartition MBean (change the MBean name to reflect your partitionr name if you use the -g startup switch). A list of IP addresses for the current cluster members is shown in the CurrentView field.
Note
While it is technically possible to put a JBoss server instance into multiple HAPartitions at the same time, this practice is generally not recommended, as it increases management complexity.
JBoss Cache is a fully featured distributed cache framework that can be used in any application server environment or standalone. JBoss AS integrates JBoss Cache to provide cache services for HTTP sessions, EJB 3.0 session beans, and EJB 3.0 entity beans. Each of these cache services is defined in a separate Mbean, and each cache creates its own JGroups Channel. We will cover those MBeans when we discuss specific services in the next several sections.
The clustering topography defined by the HAPartition MBean on each node is
of great importance to system administrators. But for most application developers, you are probably more concerned about the cluster architecture from a client application's point of view. Two basic clustering architectures are used with JBoss AS: client-side interceptors (a.k.a smart proxies or stubs) and external load balancers. Which architecture your application will use will depend on what type of client you have.
Most remote services provided by the JBoss application server, including JNDI, EJB, JMS, RMI and JBoss Remoting, require the client to obtain (e.g., to look up and download) a stub (or proxy) object. The stub object is generated by the server and it implements the business interface of the service. The client then makes local method calls against the stub object. The stub automatically routes the call across the network and where it is invoked against service objects managed in the server. In a clustering environment, the server-generated stub object includes an interceptor that understands how to route calls to multiple nodes in the cluster. The stub object figures out how to find the appropriate server node, marshal call parameters, un-marshall call results, and return the result to the caller client.
The stub interceptors maintain up-to-date knowledge about the cluster. For instance, they know the IP addresses of all available server nodes, the algorithm to distribute load across nodes (see next section), and how to failover the request if the target node not available. As part of handling each service request, if the cluster topology has changed the server node updates the stub interceptor with the latest changes in the cluster. For instance, if a node drops out of the cluster, each of client stub interceptor is updated with the new configuration the next time it connects to any active node in the cluster. All the manipulations done by the service stub are transparent to the client application. The client-side interceptor clustering architecture is illustrated in Figure 16.2, “The client-side interceptor (proxy) architecture for clustering”.
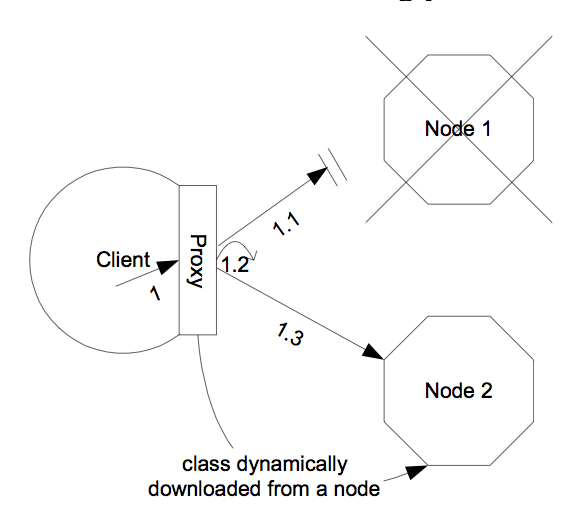
Note
Section 18.1, “Stateless Session Bean in EJB 2.x” describes how to enable the client proxy to handle the entire cluster restart.
Other JBoss services, in particular the HTTP-based services, do not require the client to download anything. The client (e.g., a web browser) sends in requests and receives responses directly over the wire according to certain communication protocols (e.g., the HTTP protocol). In this case, an external load balancer is required to process all requests and dispatch them to server nodes in the cluster. The client only needs to know about how to contact the load balancer; it has no knowledge of the JBoss AS instances behind the load balancer. The load balancer is logically part of the cluster, but we refer to it as “external” because it is not running in the same process as either the client or any of the JBoss AS instances. It can be implemented either in software or hardware. There are many vendors of hardware load balancers; the mod_jk Apache module is an excellent example of a software load balancer. An external load balancer implements its own mechanism for understanding the cluster configuration and provides its own load balancing and failover policies. The external load balancer clustering architecture is illustrated in Figure 16.3, “The external load balancer architecture for clustering”.
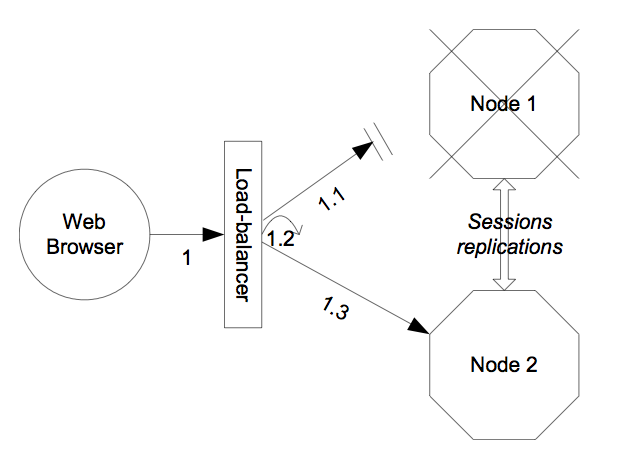
A potential problem with an external load balancer architecture is that the load balancer itself may be a single point of failure. It needs to be monitored closely to ensure high availability of the entire cluster's services.
Both the JBoss client-side interceptor (stub) and load balancer use load balancing policies to determine which server node to which node a new request should be sent. In this section, let's go over the load balancing policies available in JBoss AS.
In JBoss 5.0.0, the following load balancing options are available when the client-side interceptor architecture is used. The client-side stub maintains a list of all nodes providing the target service; the job of the load balance policy is to pick a node from this list for each request.
-
Round-Robin (
org.jboss.ha.framework.interfaces.RoundRobin): each call is dispatched to a new node, proceeding sequentially through the list of nodes. The first target node is randomly selected from the list. -
Random-Robin (
org.jboss.ha.framework.interfaces.RandomRobin): for each call the target node is randomly selected from the list. -
First Available (
org.jboss.ha.framework.interfaces.FirstAvailable): one of the available target nodes is elected as the main target and is thereafter used for every call; this elected member is randomly chosen from the list of members in the cluster. When the list of target nodes changes (because a node starts or dies), the policy will choose a new target node unless the currently elected node is still available. Each client-side stub elects its own target node independently of the other stubs, so if a particular client downloads two stubs for the same target service (e.g., an EJB), each stub will independently pick its target. This is an example of a policy that provides “session affinity” or “sticky sessions”, since the target node does not change once established. -
First Available Identical All Proxies (
org.jboss.ha.framework.interfaces.FirstAvailableIdenticalAllProxies): has the same behaviour as the "First Available" policy but the elected target node is shared by all stubs in the same client-side VM that are associated with the same target service. So if a particular client downloads two stubs for the same target service (e.g. an EJB), each stub will use the same target.
Each of the above is an implementation of the org.jboss.ha.framework.interfaces.LoadBalancePolicy interface; users are free to write their own implementation of this simple interface if they need some special behavior. In later sections we'll see how to configure the load balance policies used by different services.
As noted above, an external load balancer provides its own load balancing capabilities. What capabilities are supported depends on the provider of the load balancer. The only JBoss requirement is that the load balancer support “session affinitiy” (a.k.a. “sticky sessions”). With session affinitiy enabled, once the load balancer routes a request from a client to node A and the server initiates a session, all future requests associated with that session must be routed to node A, so long as node A is available.
The easiest way to deploy an application into the cluster is to use the farming service. That is
to hot-deploy the application archive file (e.g., the EAR, WAR or SAR file) in the
all/farm/ directory of any of the cluster members and the application will be automatically
duplicated across all nodes in the same cluster. If node joins the cluster later, it will pull in
all farm deployed applications in the cluster and deploy them locally at start-up time. If you
delete the application from one of the running cluster server node's farm/
folder, the application will be undeployed locally and then removed from all other cluster server
nodes farm folder (triggers undeployment.) You should manually delete the application from the farm
folder of any server node not currently connected to the cluster.
Note
Currently, due to an implementation weakness, the farm deployment service only works for 1) archives located in the farm/ directory of the first node to join the cluster or 2) hot-deployed archives. If you first put a new application in the farm/ directory and then start the server to have it join an already running cluster, the application will not be pushed across the cluster or deployed. This is because the farm service does not know whether the application really represents a new deployment or represents an old deployment that was removed from the rest of the cluster while the newly starting node was off-line. We are working to resolve this issue.
Note
You can only put zipped archive files, not exploded directories, in the farm directory. If exploded directories are placed in farm the directory contents will be replicated around the cluster piecemeal, and it is very likely that remote nodes will begin trying to deploy things before all the pieces have arrived, leading to deployment failure.
Note
Farmed deployment is not atomic. A problem deploying, undeploying or redeploying an application on one node in the cluster will not prevent the deployment, undeployment or redeployment being done on the other nodes. There is no rollback capability. Deployment is also not staggered; it is quite likely, for example, that a redeployment will happen on all nodes in the cluster simultaneously, briefly leaving no nodes in the cluster providing service.
Farming is enabled by default in the all configuration in JBoss AS
distributions, so you will not have to set it up yourself. The farm-service.xml configuration file is located in the deploy/deploy.last directory. If you want to enable farming in a custom configuration, simply copy the farm-service.xml file and copy it to the JBoss deploy directory $JBOSS_HOME/server/your_own_config/deploy/deploy.last. Make sure that your custom configuration has clustering enabled.
After deploying farm-service.xml you are ready to rumble. The required FarmMemberService MBean attributes for configuring a farm are listed below.
<?xml version="1.0" encoding="UTF-8"?>
<server>

    <mbean code="org.jboss.ha.framework.server.FarmMemberService"
            name="jboss:service=FarmMember,partition=DefaultPartition">
        ...

	<depends optional-attribute-name="ClusterPartition"
	proxy-type="attribute">
		jboss:service=${jboss.partition.name:DefaultPartition}
		</depends>
		<attribute name="ScanPeriod">5000</attribute>
		<attribute name="URLs">farm/</attribute>
	...
	</mbean>
</server>
-
ClusterPartition is a required attribute to inject the HAPartition service that the farm service uses for intra-cluster communication.
-
URLs points to the directory where deployer watches for files to be deployed. This MBean will create this directory is if does not already exist. If a full URL is not provided, it is assumed that the value is a filesytem path relative to the configuration directory (e.g.
$JBOSS_HOME/server/all/). -
ScanPeriod specifies the interval at which the folder must be scanned for changes.. Its default value is
5000.
The farming service is an extension of the URLDeploymentScanner, which scans for hot deployments in the deploy/ directory. So, you can use all the attributes
defined in the URLDeploymentScanner MBean in the
FarmMemberService MBean. In fact, the URLs and
ScanPeriod attributes listed above are inherited from the
URLDeploymentScanner MBean.
In a clustered server environment, distributed state management is a key service the cluster must
provide. For instance, in a stateful session bean application, the session state must be
synchronized among all bean instances across all nodes, so that the client application reaches the
same session state no matter which node serves the request. In an entity bean application, the bean
object sometimes needs to be cached across the cluster to reduce the database load. Currently, the state replication and distributed cache services in JBoss AS are provided via three ways: the HASessionState Mbean, the DistributedState MBean and the JBoss Cache framework.
-
The
HASessionStateMBean is a legacy service that provides session replication and distributed cache services for EJB 2.x stateful session beans. The MBean is defined in theall/deploy/cluster-service.xmlfile. We will show its configuration options in the EJB 2.x stateful session bean section later. -
The
DistributedStateMbean is a legacy service built on the HAPartition service. It is supported for backwards compatibility reasons, but new applications should not use it; they should use the much more sophisticated JBoss Cache instead. -
As mentioned above JBoss Cache is used to provide cache services for HTTP sessions, EJB 3.0 session beans and EJB 3.0 entity beans. It is the primary distributed state management tool in JBoss AS, and is an excellent choice for any custom caching requirements your applications may have. We will cover JBoss Cache in more detail when we discuss specific services in the next several sections..
JNDI is one of the most important services provided by the application server. The JBoss HA-JNDI (High Availability JNDI) service brings the following features to JNDI:
-
Transparent failover of naming operations. If an HA-JNDI naming Context is connected to the HA-JNDI service on a particular JBoss AS instance, and that service fails or is shut down, the HA-JNDI client can transparently fail over to another AS instance.
-
Load balancing of naming operations. An HA-JNDI naming Context will automatically load balance its requests across all the HA-JNDI servers in the cluster.
-
Automatic client discovery of HA-JNDI servers (using multicast).
-
Unified view of JNDI trees cluster-wide. Client can connect to the HA-JNDI service running on any node in the cluster and find objects bound in JNDI on any other node. This is accomplished via two mechanisms:
-
Cross-cluster lookups. A client can perform a lookup and the server side HA-JNDI service has the ability to find things bound in regular JNDI on any node in the cluster.
-
A replicated cluster-wide context tree. An object bound into the HA-JNDI service will be replicated around the cluster, and a copy of that object will be available in-VM on each node in the cluster.
JNDI is a key component for many other interceptor-based clustering services: those services register themselves with the JNDI so that the client can lookup their proxies and make use of their services. HA-JNDI completes the picture by ensuring that clients have a highly-available means to look up those proxies. However, it is important to understand that using HA-JNDI (or not) has no effect whatsoever on the clustering behavior of the objects that are looked up. To illustrate:
-
If an EJB is not configured as clustered, looking up the EJB via HA-JNDI does not somehow result in the addition of clustering capabilities (load balancing of EJB calls, transparent failover, state replication) to the EJB.
-
If an EJB is configured as clustered, looking up the EJB via regular JNDI instead of HA-JNDI does not somehow result in the removal of the bean proxy's clustering capabilities.
The JBoss client-side HA-JNDI naming Context is based on the client-side interceptor architecture. The client obtains an HA-JNDI proxy object (via the InitialContext object) and invokes JNDI lookup services on the remote server through the proxy. The client specifies that it wants an HA-JNDI proxy by configuring the naming properties used by the InitialContext object. This is covered in detail in the “Client Configuration” section. Other than the need to ensure the appropriate naming properties are provided to the InitialContext, the fact that the naming Context is using HA-JNDI is completely transparent to the client.
On the server side, he the HA-JNDI service maintains a cluster-wide context tree. The cluster wide tree is always available as long as there is one node left in the cluster. Each node in the cluster also maintains its own local JNDI context tree. The HA-JNDI service on that node is able to find objects bound into the local JNDI context tree. An application can bind its objects to either tree. The design rationale for this architecture is as follows:
-
It avoids migration issues with applications that assume that their JNDI implementation is local. This allows clustering to work out-of-the-box with just a few tweaks of configuration files.
-
In a homogeneous cluster, this configuration actually cuts down on the amount of network traffic. A homogenous cluster is one where the same types of objects are bound under the same names on each node.
-
Designing it in this way makes the HA-JNDI service an optional service since all underlying cluster code uses a straight new
InitialContext()to lookup or create bindings.
On the server side, a naming Context obtained via a call to new InitialContext() will be bound to the local-only, non-cluster-wide JNDI Context (this is actually basic JNDI). So, all EJB homes and such will not be bound to the cluster-wide JNDI Context, but rather, each home will be bound into the local JNDI.
When a remote client does a lookup through HA-JNDI, HA-JNDI will delegate to the local JNDI Context when it cannot find the object within the global cluster-wide Context. The detailed lookup rule is as follows.
-
If the binding is available in the cluster-wide JNDI tree, return it.
-
If the binding is not in the cluster-wide tree, delegate the lookup query to the local JNDI service and return the received answer if available.
-
If not available, the HA-JNDI services asks all other nodes in the cluster if their local JNDI service owns such a binding and returns the answer from the set it receives.
-
If no local JNDI service owns such a binding, a
NameNotFoundExceptionis finally raised.
In practice, objects are rarely bound in the cluster-wide JNDI tree; rather they are bound in the local JNDI tree. For example, when EJBs are deployed, their proxies are always bound in local JNDI, not HA-JNDI. So, an EJB home lookup done through HA-JNDI will always be delegated to the local JNDI instance.
Note
If different beans (even of the same type, but participating in different clusters) use the same JNDI name, this means that each JNDI server will have a logically different "target" bound (JNDI on node 1 will have a binding for bean A and JNDI on node 2 will have a binding, under the same name, for bean B). Consequently, if a client performs a HA-JNDI query for this name, the query will be invoked on any JNDI server of the cluster and will return the locally bound stub. Nevertheless, it may not be the correct stub that the client is expecting to receive! So, it is always best practice to ensure that across the cluster different names are used for logically different bindings.
Note
You cannot currently use a non-JNP JNDI implementation (i.e. LDAP) for your local JNDI implementation if you want to use HA-JNDI. However, you can use JNDI federation using the ExternalContext MBean to bind non-JBoss JNDI trees into the JBoss JNDI namespace. Furthermore, nothing prevents you using one centralized JNDI server for your whole cluster and scrapping HA-JNDI and JNP.
Note
If a binding is only made available on a few nodes in the cluster (for example because a bean is only deployed on a small subset of nodes in the cluster), the probability that a lookup will hit a HA-JNDI server that does not own this binding is higher and thus the lookup will need to be forwarded to all nodes in the cluster. Consequently, the query time will be longer than if the binding would have been available locally. Moral of the story: as much as possible, cache the result of your JNDI queries in your client.
So, an EJB home lookup through HA-JNDI, will always be delegated to the local JNDI instance. If different beans (even of the same type, but participating in different clusters) use the same JNDI name, it means that each JNDI server will have a different "target" bound (JNDI on node 1 will have a binding for bean A and JNDI on node 2 will have a binding, under the same name, for bean B). Consequently, if a client performs a HA-JNDI query for this name, the query will be invoked on any JNDI server of the cluster and will return the locally bound stub. Nevertheless, it may not be the correct stub that the client is expecting to receive!
Note
You cannot currently use a non-JNP JNDI implementation (i.e. LDAP) for your local JNDI
implementation if you want to use HA-JNDI. However, you can use JNDI federation using the
ExternalContext MBean to bind non-JBoss JNDI trees into the JBoss JNDI
namespace. Furthermore, nothing prevents you though of using one centralized JNDI server for
your whole cluster and scrapping HA-JNDI and JNP.
Note
If a binding is only made available on a few nodes in the cluster (for example because a bean is only deployed on a small subset of nodes in the cluster), the probability to lookup a HA-JNDI server that does not own this binding is higher and the lookup will need to be forwarded to all nodes in the cluster. Consequently, the query time will be longer than if the binding would have been available locally. Moral of the story: as much as possible, cache the result of your JNDI queries in your client.
If you want to access HA-JNDI from inside the application server, you must explicitly get an InitialContext by passing in JNDI properties. The following code shows how to create a naming Context bound to HA-JNDI:
Properties p = new Properties();
p.put(Context.INITIAL_CONTEXT_FACTORY,
"org.jnp.interfaces.NamingContextFactory");
p.put(Context.URL_PKG_PREFIXES, "jboss.naming:org.jnp.interfaces");
p.put(Context.PROVIDER_URL, "localhost:1100"); // HA-JNDI port.
return new InitialContext(p);
The Context.PROVIDER_URL property points to the HA-JNDI service configured in the HANamingService MBean (see the section called “JBoss configuration”).
However, this does not work in all cases, especially when running a multihomed cluster (several JBoss instances on one machine bound to different IPs). A safer method is not to specify the Context.PROVIDER_URL (which does not work in all scenarios) but the partition name property:
Properties p = new Properties();
p.put(Context.INITIAL_CONTEXT_FACTORY, "org.jnp.interfaces.NamingContextFactory");
p.put(Context.URL_PKG_PREFIXES, "jboss.naming:org.jnp.interfaces");
p.put("jnp.partitionName", "DefaultPartition"); // partition name.
return new InitialContext(p);
Do not attempt to simplify things by placing a jndi.properties file in your deployment or by editing the AS's conf/jndi.properties file. Doing either will almost certainly break things for your application and quite possibly across the application server. If you want to externalize your client configuration, one approach is to deploy a properties file not named jndi.properties, and then programatically create a Properties object that loads that file's contents.
Note
Previously, HANamingServiceMBean.bindAddress served two functions:
From trunk/cluster/src/etc/hajndi-service.xml:
<!-- Bind address of bootstrap and HA-JNDI RMI endpoints -->
		<attribute name="BindAddress">${jboss.bind.address}</attribute>
The bootstrap and HA-JNDI RMI endpoints are now defined separately:
		<!-- Bind address of bootstrap endpoint -->
		<attribute name="BindAddress">${jboss.bind.address}</attribute>
		<!-- Bind address of the HA-JNDI RMI endpoint -->
		<attribute name="RmiBindAddress">${jboss.bind.address}</attribute>
They each default to the same value. Users may want to override the RMI bind address if deployed on a multi-homed machine, and want to use an specific network interface for HA-JNDI RMI calls. This ability already exists in the standard NamingService.
If your HA-JNDI client is an EJB or servlet, the least intrusive way to configure the lookup of resources is to bind the resources to the environment naming context of the bean or webapp performing the lookup. The binding can then be configured to use HA-JNDI instead of a local mapping. Following is an example of doing this for a JMS connection factory and queue (the most common use case for this kind of thing.
Within the bean definition in the ejb-jar.xml or in the war's web.xml you will need to define two resource-ref mappings, one for the connection factory and one for the destination.
<resource-ref>
	<res-ref-name>jms/ConnectionFactory</res-ref-name>
	<res-type>javax.jms.QueueConnectionFactory</res-type>
	<res-auth>Container</res-auth>
</resource-ref>

<resource-ref>
	<res-ref-name>jms/Queue</res-ref-name>
	<res-type>javax.jms.Queue</res-type>
	<res-auth>Container</res-auth>
</resource-ref>
Using these examples the bean performing the lookup can obtain the connection factory by looking up 'java:comp/env/jms/ConnectionFactory' and can obtain the queue by looking up 'java:comp/env/jms/Queue'.
Within the JBoss-specific deployment descriptor (jboss.xml for EJBs, jboss-web.xml for a WAR) these references need to mapped to a URL that makes use of HA-JNDI.
<resource-ref>
	<res-ref-name>jms/ConnectionFactory</res-ref-name>
	<jndi-name>jnp://localhost:1100/ConnectionFactory</jndi-name>
</resource-ref>

<resource-ref>
	<res-ref-name>jms/Queue</res-ref-name>
	<jndi-name>jnp://localhost:1100/queue/A</jndi-name>
 </resource-ref>
The URL should be the URL to the HA-JNDI server running on the same node as the bean; if the bean is available the local HA-JNDI server should also be available. The lookup will then automatically query all of the nodes in the cluster to identify which node has the JMS resources available.
The JBoss application server's internal naming environment is controlled by the conf/jndi.properties file, which should not be edited.
No other jndi.properties file should be deployed inside the application server because of the possibility of its being found on the classpath when it shouldn't and thus disrupting the internal operation of the server. For example, if an EJB deployment included a jndi.properties configured for HA-JNDI, when the server binds the EJB proxies into JNDI it will likely bind them into the replicated HA-JNDI tree and not into the local JNDI tree where they belong.
Go into the the jmx-console and execute the list operation on the jboss:service=JNDIView mbean. Towards the bottom of the results, the contents of the "HA-JNDI Namespace" are listed. Typically this will be empty; if any of your own deployments are shown there and you didn't explicitly bind them there, there's probably an improper jndi.properties file on the classpath. Please visit the following link for an example: Problem with removing a Node from Cluster
The JNDI client needs to be aware of the HA-JNDI cluster. You can pass a list of JNDI servers (i.e., the nodes in the HA-JNDI cluster) to the java.naming.provider.url JNDI setting in the jndi.properties file. Each server node is identified by its IP address and the JNDI port number. The server nodes are separated by commas (see Section 17.2.3, “JBoss configuration” for how to configure the servers and ports).
java.naming.provier.url=server1:1100,server2:1100,server3:1100,server4:1100
When initialising, the JNP client code will try to get in touch with each server node from the list, one after the other, stopping as soon as one server has been reached. It will then download the HA-JNDI stub from this node.
Note
There is no load balancing behavior in the JNP client lookup process itself. It just goes through the provider lists and uses the first available server to obtain the stub. The HA-JNDI provider list only needs to contain a subset of HA-JNDI nodes in the cluster.
The downloaded smart proxy contains the list of currently running nodes and the logic to load balance naming requests and to fail-over to another node if necessary. Furthermore, each time a JNDI invocation is made to the server, the list of targets in the proxy interceptor is updated (only if the list has changed since the last call).
If the property string java.naming.provider.url is empty or if all servers it mentions are not reachable, the JNP client will try to discover a HA-JNDI server through a multicast call on the network (auto-discovery). See the section called “JBoss configuration” on how to configure auto-discovery on the JNDI server nodes. Through auto-discovery, the client might be able to get a valid HA-JNDI server node without any configuration. Of course, for auto-discovery to work, the network segment(s) between the client and the server cluster must be configured to propagate such multicast datagrams.
Note
By default the auto-discovery feature uses multicast group address 230.0.0.4 and port1102.
In addition to the java.naming.provider.url property, you can specify a set of other properties. The following list shows all clustering-related client side properties you can specify when creating a new InitialContext. (All of the standard, non-clustering-related environment properties used with regular JNDI are also available.)
-
java.naming.provider.url: Provides a list of IP addresses and port numbers for HA-JNDI provider nodes in the cluster. The client tries those providers one by one and uses the first one that responds. -
jnp.disableDiscovery: When set totrue, this property disables the automatic discovery feature. Default isfalse. -
jnp.partitionName: In an environment where multiple HA-JNDI services bound to distinct clusters (a.k.a. partitions), are running, this property allows you to ensure that your client only accepts automatic-discovery responses from servers in the desired partition. If you do not use the automatic discovery feature (i.e. jnp.disableDiscovery is true), this property is not used. By default, this property is not set and the automatic discovery select the first HA-JNDI server that responds, irregardless of the cluster partition name. -
jnp.discoveryTimeout: Determines how much time the context will wait for a response to its automatic discovery packet. Default is 5000 ms. -
jnp.discoveryGroup: Determines which multicast group address is used for the automatic discovery. Default is 230.0.0.4. Must match the value of the AutoDiscoveryAddress configured on the server side HA-JNDI service. -
jnp.discoveryPort: Determines which multicast group port is used for the automatic discovery. Default is 1102. Must match the value of the AutoDiscoveryPort configured on the server side HA-JNDI service. -
jnp.discoveryTTL: specifies the TTL (time-to-live) for autodiscovery IP multicast packets. This value represents the number of network hops a multicast packet can be allowed to propagate before networking equipment should drop the packet. Despite its name, it does not represent a unit of time.
The cluster-service.xml file in the all/deploy directory
includes the following MBean to enable HA-JNDI services.
<mbean code="org.jboss.ha.jndi.HANamingService"
name="jboss:service=HAJNDI">
<depends optional-attribute-name="ClusterPartition"
proxy-type="attribute">jboss:service=${jboss.partition.name:DefaultPartition}</depends>

<mbean>
You can see that this MBean depends on the DefaultPartition MBean defined above it (discussed earlier in this chapter). In other configurations, you can put that
element in the jboss-service.xml file or any other JBoss configuration files in
the /deploy directory to enable HA-JNDI services. The available attributes for
this MBean are listed below.
-
Cluster Partition is a required attribute to inject the HAPartition service that HA-JNDI uses for intra-cluster communication.
-
BindAddress is an optional attribute to specify the address to which the HA-JNDI server will bind waiting for JNP clients. Only useful for multi-homed computers. The default value is the value of the jboss.bind.address system property, or the host's default addresss if that property is not set. The jboss.bind.address system property is set if the -b command line switch is used when JBoss is started.
-
Port is an optional attribute to specify the port to which the HA-JNDI server will bind waiting for JNP clients. The default value is
1100. -
Backlog is an optional attribute to specify the backlog value used for the TCP server socket waiting for JNP clients. The default value is
50. -
RmiPort determines which port the server should use to communicate with the downloaded stub. This attribute is optional. The default value is 1101. If no value is set, the server automatically assigns a RMI port.
-
DiscoveryDisabledis a boolean flag that disables configuration of the auto discovery multicast listener. -
AutoDiscoveryAddress is an optional attribute to specify the multicast address to listen to for JNDI automatic discovery. The default value is the value of the jboss.partition.udpGroup system property, or 230.0.0.4 if that is not set. The jboss.partition.udpGroup system property is set if the -u command line switch is used when JBoss is started.
-
AutoDiscoveryGroup is an optional attribute to specify the multicast group to listen to for JNDI automatic discovery.. The default value is
1102. -
AutoDiscoveryBindAddress sets the interface on which HA-JNDI should listen for auto-discovery request packets. If this attribute is not specified and a
BindAddressis specified, theBindAddresswill be used.. -
AutoDiscoveryTTL specifies the TTL (time-to-live) for autodiscovery IP multicast packets. This value represents the number of network hops a multicast packet can be allowed to propagate before networking equipment should drop the packet. Despite its name, it does not represent a unit of time.
-
LoadBalancePolicy specifies the class name of the LoadBalancePolicyimplementation that should be included in the client proxy. See the earlier section on “Load-Balancing Policies” for details.
-
LookupPool specifies the thread pool service used to control the bootstrap and auto discovery lookups.
The full default configuration of the HANamingService MBean is as follows.
 <mbean code="org.jboss.ha.jndi.HANamingService"
	name="jboss:service=HAJNDI">
	 <!-- We now inject the partition into the HAJNDI service instead
	 of requiring that the partition name be passed -->
	 <depends optional-attribute-name="ClusterPartition"
	 proxy-type="attribute">jboss:service=${jboss.partition.name:DefaultPartition}</depends>
	 <!-- Bind address of bootstrap and HA-JNDI RMI endpoints -->
	 <attribute name="BindAddress">${jboss.bind.address}</attribute>
	 <!-- Port on which the HA-JNDI stub is made available -->
	 <attribute name="Port">1100</attribute>
	 <!-- RmiPort to be used by the HA-JNDI service once bound. 0 => auto. -->
	 <attribute name="RmiPort">1101</attribute>
	 <!-- Accept backlog of the bootstrap socket -->
	 <attribute name="Backlog">50</attribute>
	 <!-- The thread pool service used to control the bootstrap and auto discovery lookups -->
	<depends optional-attribute-name="LookupPool"
	 proxy-type="attribute">jboss.system:service=ThreadPool</depends>
	 <!-- A flag to disable the auto discovery via multicast -->
	<attribute name="DiscoveryDisabled">false</attribute>
	<!-- Set the auto-discovery bootstrap multicast bind address. If not
	 specified and a BindAddress is specified, the BindAddress will be used. -->
	 <attribute name="AutoDiscoveryBindAddress">${jboss.bind.address}</attribute>
	 <!-- Multicast Address and group port used for auto-discovery -->
	 <attribute name="AutoDiscoveryAddress">${jboss.partition.udpGroup:230.0.0.4}</attribute>
	 <attribute name="AutoDiscoveryGroup">1102</attribute>
	 <!-- The TTL (time-to-live) for autodiscovery IP multicast packets -->
	 <attribute name="AutoDiscoveryTTL">16</attribute>
	 <!-- The load balancing policy for HA-JNDI -->
	 <attribute name="LoadBalancePolicy">org.jboss.ha.framework.interfaces.RoundRobin</attribute>

	 <!-- Client socket factory to be used for client-server
	 RMI invocations during JNDI queries
	 <attribute name="ClientSocketFactory">custom</attribute>
	 -->
	 <!-- Server socket factory to be used for client-server
	 RMI invocations during JNDI queries
	 <attribute name="ServerSocketFactory">custom</attribute>
	  -->
   </mbean>
It is possible to start several HA-JNDI services that use different clusters. This can be used, for example, if a node is part of many clusters. In this case, make sure that you set a different port or IP address for eachservices. For instance, if you wanted to hook up HA-JNDI to the example cluster you set up and change the binding port, the Mbean descriptor would look as follows.
<mbean code="org.jboss.ha.jndi.HANamingService"
      name="jboss:service=HAJNDI">

      <depends optional-attribute-name="ClusterPartition"
   proxy-type="attribute">jboss:service=MySpecialPartition</depends>
 <attribute name="Port">56789</attribute>
</mbean>
Session EJBs provide remote invocation services. They are clustered based on the client-side
interceptor architecture. The client application for a clustered session bean is exactly the same as the
client for the non-clustered version of the session bean, except for a minor change to the
java.naming.provier.url system property to enable HA-JNDI lookup (see previous
section). No code change or re-compilation is needed on the client side. Now, let's check out how to
configure clustered session beans in EJB 2.x and EJB 3.0 server applications respectively.
Clustering stateless session beans is most probably the easiest case: as no state is involved,
calls can be load-balanced on any participating node (i.e. any node that has this specific bean
deployed) of the cluster. To make a bean clustered, you need to modify its
jboss.xml descriptor to contain a <clustered> tag.
<jboss>
    <enterprise-beans>
        <session>
            <ejb-name>nextgen.StatelessSession</ejb-name>
            <jndi-name>nextgen.StatelessSession</jndi-name>
            <clustered>True</clustered>
            <cluster-config>
                <partition-name>DefaultPartition</partition-name>
                <home-load-balance-policy>
                    org.jboss.ha.framework.interfaces.RoundRobin
                </home-load-balance-policy>
                <bean-load-balance-policy>
                    org.jboss.ha.framework.interfaces.RoundRobin
                </bean-load-balance-policy>
            </cluster-config>
        </session>
    </enterprise-beans>
</jboss>
Note
The <clustered>True</clustered> element is really just an
alias for the <configuration-name>Clustered Stateless
SessionBean</configuration-name> element in the conf/standard-jboss.xml file.
In the bean configuration, only the <clustered> element is mandatory. It indicates that the bean needs to support clustering features. The <cluster-config> element is optional and the default values of its attributes are indicated in the sample configuration above. Below is a description of the attributes in the <cluster-config> element..
-
partition-name specifies the name of the cluster the bean participates in. The default value is
DefaultPartition. The default partition name can also be set system-wide using thejboss.partition.namesystem property. -
home-load-balance-policy indicates the class to be used by the home stub to balance calls made on the nodes of the cluster. By default, the proxy will load-balance calls in a
RoundRobinfashion. You can also implement your own load-balance policy class or use the classFirstAvailablethat persists to use the first node available that it meets until it fails. -
bean-load-balance-policy Indicates the class to be used by the bean stub to balance calls made on the nodes of the cluster. Comments made for the
home-load-balance-policyattribute also apply.
Clustering stateful session beans is more complex than clustering their stateless counterparts
since JBoss needs to manage the state information. The state of all stateful session beans are
replicated and synchronized across the cluster each time the state of a bean changes. The JBoss AS
uses the HASessionState MBean to manage distributed session states for clustered
EJB 2.x stateful session beans. In this section, we cover both the session bean configuration and
the HASessionState MBean configuration.
In the EJB application, you need to modify the jboss.xml descriptor file
for each stateful session bean and add the <clustered> tag.
<jboss>
    <enterprise-beans>
        <session>
            <ejb-name>nextgen.StatefulSession</ejb-name>
            <jndi-name>nextgen.StatefulSession</jndi-name>
            <clustered>True</clustered>
            <cluster-config>
                <partition-name>DefaultPartition</partition-name>
                <home-load-balance-policy>
                    org.jboss.ha.framework.interfaces.RoundRobin
                </home-load-balance-policy>
                <bean-load-balance-policy>
                    org.jboss.ha.framework.interfaces.FirstAvailable
                </bean-load-balance-policy>
                <session-state-manager-jndi-name>
                    /HASessionState/Default
                </session-state-manager-jndi-name>
            </cluster-config>
        </session>
    </enterprise-beans>
</jboss>
In the bean configuration, only the <clustered> tag is mandatory to
indicate that the bean works in a cluster. The <cluster-config>
element is optional and its default attribute values are indicated in the sample configuration
above.
The <session-state-manager-jndi-name> tag is used to give the JNDI
name of the HASessionState service to be used by this bean.
The description of the remaining tags is identical to the one for stateless session bean. Actions on the clustered stateful session bean's home interface are by default load-balanced, round-robin. Once the bean's remote stub is available to the client, calls will not be load-balanced round-robin any more and will stay "sticky" to the first node in the list.
As the replication process is a costly operation, you can optimise this behaviour by optionally implementing in your bean class a method with the following signature:
public boolean isModified ();
Before replicating your bean, the container will detect if your bean implements this method.
If your bean does, the container calls the isModified() method and it only
replicates the bean when the method returns true. If the bean has not been
modified (or not enough to require replication, depending on your own preferences), you can
return false and the replication would not occur. This feature is available
on JBoss AS 3.0.1+ only.
The HASessionState service MBean is defined in the
all/deploy/cluster-service.xml file.
<mbean code="org.jboss.ha.hasessionstate.server.HASessionStateService"
   name="jboss:service=HASessionState">

    <depends>jboss:service=Naming</depends>
   <!-- We now inject the partition into the HAJNDI service instead
 of requiring that the partition name be passed -->
 <depends optional-attribute-name="ClusterPartition"
  proxy-type="attribute">
  jboss:service=${jboss.partition.name:DefaultPartition}
  </depends>
  <!-- JNDI name under which the service is bound -->
  <attribute name="JndiName">/HASessionState/Default</attribute>
  <!-- Max delay before cleaning unreclaimed state.
Defaults to 30*60*1000 => 30 minutes -->
<attribute name="BeanCleaningDelay">0</attribute>
</mbean>
The configuration attributes in the HASessionState MBean are listed below.
-
ClusterPartition is a required attribute to inject the HAPartition service that HA-JNDI uses for intra-cluster communication.
-
JndiName is an optional attribute to specify the JNDI name under which this
HASessionStateservice is bound. The default value is/HAPartition/Default. -
BeanCleaningDelay is an optional attribute to specify the number of miliseconds after which the
HASessionStateservice can clean a state that has not been modified. If a node, owning a bean, crashes, its brother node will take ownership of this bean. Nevertheless, the container cache of the brother node will not know about it (because it has never seen it before) and will never delete according to the cleaning settings of the bean. That is why theHASessionStateservice needs to do this cleanup sometimes. The default value is30*60*1000milliseconds (i.e., 30 minutes).
We have covered the HA smart client architecture in the section called “Client-side interceptor architecture”. The default HA smart proxy client can only failover as long as one node in the cluster exists. If there is a complete cluster shutdown, the proxy becomes orphaned and loses knowledge of the available nodes in the cluster. There is no way for the proxy to recover from this. The proxy needs to look up a fresh set of targets out of JNDI/HAJNDI when the nodes are restarted.
The 3.2.7+/4.0.2+ releases contain a RetryInterceptor that can be added to the proxy client side interceptor stack to allow for a transparent recovery from such a restart failure. To enable it for an EJB, setup an invoker-proxy-binding that includes the RetryInterceptor. Below is an example jboss.xml configuration.
 <jboss>
 <session>
 	<ejb-name>nextgen_RetryInterceptorStatelessSession</ejb-name>
 	<invoker-bindings>
 	<invoker>
 	<invoker-proxy-binding-name>
 	clustered-retry-stateless-rmi-invoker
 	</invoker-proxy-binding-name>
 	<jndi-name>
 	nextgen_RetryInterceptorStatelessSession
 	</jndi-name>
 	</invoker>
 	</invoker-bindings>
 	<clustered>true</clustered>
 </session>

 <invoker-proxy-binding>
 	<name>clustered-retry-stateless-rmi-invoker</name>
	 <invoker-mbean>jboss:service=invoker,type=jrmpha</invoker-mbean>
 	<proxy-factory>org.jboss.proxy.ejb.ProxyFactoryHA</proxy-factory>
	 <proxy-factory-config>
 	<client-interceptors>
 		<home>
 		<interceptor>
 		org.jboss.proxy.ejb.HomeInterceptor
 		</interceptor>
		<interceptor>
		org.jboss.proxy.SecurityInterceptor
		</interceptor>
		<interceptor>
  		org.jboss.proxy.TransactionInterceptor
  		</interceptor>
 		<interceptor>
 		org.jboss.proxy.ejb.RetryInterceptor
 		</interceptor>
  		<interceptor>
  		org.jboss.invocation.InvokerInterceptor
  		</interceptor>
  	</home>
 	<bean>
 		 <interceptor>
  		org.jboss.proxy.ejb.StatelessSessionInterceptor
 		 </interceptor>
		 <interceptor>
		 org.jboss.proxy.SecurityInterceptor
 		</interceptor>
		 <interceptor>
		org.jboss.proxy.TransactionInterceptor
		</interceptor>
		<interceptor>
		org.jboss.proxy.ejb.RetryInterceptor
 		</interceptor>
 		<interceptor>
 		org.jboss.invocation.InvokerInterceptor
		</interceptor>
	</bean>
	  </client-interceptors>
	  </proxy-factory-config>
 </invoker-proxy-binding>
In order to recover the HA proxy, the RetryInterceptor does a lookup in JNDI. This means that internally it creates a new InitialContext and does a JNDI lookup. But, for that lookup to succeed, the InitialContext needs to be configured properly to find your naming server. The RetryInterceptor will go through the following steps in attempting to determine the proper naming environment properties:
-
It will check its own static retryEnv field. This field can be set by client code via a call to RetryInterceptor.setRetryEnv(Properties). This approach to configuration has two downsides: first, it reduces portability by introducing JBoss-specific calls to the client code; and second, since a static field is used only a single configuration per JVM is possible.
-
If the retryEnv field is null, it will check for any environment properties bound to a ThreadLocal by the org.jboss.naming.NamingContextFactory class. To use this class as your naming context factory, in your jndi.properties set property java.naming.factory.initial=org.jboss.naming.NamingContextFactory. The advantage of this approach is use of org.jboss.naming.NamingContextFactory is simply a configuration option in your jndi.properties file, and thus your java code is unaffected. The downside is the naming properties are stored in a ThreadLocal and thus are only visible to the thread that originally created an InitialContext.
-
If neither of the above approaches yield a set of naming environment properties, a default InitialContext is used. If the attempt to contact a naming server is unsuccessful, by default the InitialContext will attempt to fall back on multicast discovery to find an HA-JNDI naming server. See the section on “ClusteredJNDI Services” for more on multicast discovery of HA-JNDI.
The RetryInterceptor is useful in many use cases, but a disadvantage it has is that it will continue attempting to re-lookup the HA proxy in JNDI until it succeeds. If for some reason it cannot succeed, this process could go on forever, and thus the EJB call that triggered the RetryInterceptor will never return. For many client applications, this possibility is unacceptable. As a result, JBoss doesn't make the RetryInterceptor part of its default client interceptor stacks for clustered EJBs.
In the 4.0.4.RC1 release, a new flavor of retry interceptor was introduced, the org.jboss.proxy.ejb.SingleRetryInterceptor. This version works like the RetryInterceptor, but only makes a single attempt to re-lookup the HA proxy in JNDI. If this attempt fails, the EJB call will fail just as if no retry interceptor was used. Beginning with 4.0.4.CR2, the SingleRetryInterceptor is part of the default client interceptor stacks for clustered EJBs.
The downside of the SingleRetryInterceptor is that if the retry attempt is made during a portion of a cluster restart where no servers are available, the retry will fail and no further attempts will be made.
To cluster a stateless session bean in EJB 3.0, all you need to do is to annotate the bean class
withe the @Clustered annotation. You can pass in the load balance policy and
cluster partition as parameters to the annotation. The default load balance policy is
org.jboss.ha.framework.interfaces.RandomRobin and the default cluster is
DefaultPartition. Below is the definition of the @Cluster
annotation.
public @interface Clustered {
   Class loadBalancePolicy() default LoadBalancePolicy.class;
   String partition() default  "${jboss.partition.name:DefaultPartition}";
}
Here is an example of a clustered EJB 3.0 stateless session bean implementation.
@Stateless
@Clustered
public class MyBean implements MySessionInt {

   public void test() {
      // Do something cool
   }
}
The @Clustered annotation can also be omitted and the clustering configuration applied in jboss.xml:
<jboss>
	 <enterprise-beans>
	 <session>
		 <ejb-name>NonAnnotationStateful</ejb-name>
		<clustered>true</clustered>
			<cluster-config>
			<partition-name>FooPartition</partition-name>
			<load-balance-policy>
			org.jboss.ha.framework.interfaces.RandomRobin
			 </load-balance-policy>
		 </cluster-config>
	 </session>
	 </enterprise-beans>
</jboss>
To cluster stateful session beans in EJB 3.0, you need to tag the bean implementation class with
the @Cluster annotation, just as we did with the EJB 3.0 stateless session bean
earlier. The @org.jboss.ejb3.annotation.cache.tree.CacheConfig annotation can also be applied to the bean to specify caching behavior. Below is the definition of the @CacheConfig annotation:
public @interface CacheConfig
{
String name() default "jboss.cache:service=EJB3SFSBClusteredCache";
int maxSize() default 10000;
long idleTimeoutSeconds() default 300;
boolean replicationIsPassivation() default true;
long removalTimeoutSeconds() default 0;
}
-
namespecifies the object name of the JBoss Cache Mbean that should be used for caching the bean (see below for more on this Mbean). -
maxSizespecifies the maximum number of beans that can cached before the cache should start passivating beans, using an LRU algorithm. -
idleTimeoutSecondsspecifies the max period of time a bean can go unused before the cache should passivate it (irregardless of whether maxSize beans are cached.) -
removalTimeoutSecondsspecifies the max period of time a bean can go unused before the cache should remove it altogether. -
replicationIsPassivationspecifies whether the cache should consider a replication as being equivalent to a passivation, and invoke any @PrePassivate and @PostActivate callbacks on the bean. By default true, since replication involves serializing the bean, and preparing for and recovering from serialization is a common reason for implementing the callback methods.
Here is an example of a clustered EJB 3.0 stateful session bean implementation.
@Stateful
@Clustered
@CacheConfig(maxSize=5000,removalTimeoutSeconds=18000)
public class MyBean implements MySessionInt {

   private int state = 0;

   public void increment() {
      System.out.println("counter: " + (state++));
   }
}
As with stateless beans, the @Clustered annotation can also be omitted and the clustering configuration applied in jboss.xml; see the example above.
As with EJB 2.0 clustered SFSBs, JBoss provides a mechanism whereby a bean implementation can expose a method the container can invoke to check whether the bean's state is not dirty after a request and doesn't need to be replicated. With EJB3, the mechanism is a little more formal; instead of just exposing a method with a known signature, an EJB3 SFSB must implement the org.jboss.ejb3.cache.Optimized interface:
public interface Optimized {
boolean isModified();
}
JBoss Cache provides the session state replication service for EJB 3.0 stateful session beans. The
related MBean service is defined in the ejb3-clustered-sfsbcache-service.xml file
in the deploy directory. The contents of the file are as follows.
<server>
	<mbean code="org.jboss..cache.TreeCache"
	name="jboss.cache:service=EJB3SFSBClusteredCache">

		<attribute name="ClusterName">
			${jboss.partition.name:DefaultPartition}-SFSBCache
			</attribute>
			<attribute name="IsolationLevel">REPEATABLE_READ</attribute>
			<attribute name="CacheMode">REPL_ASYNC</attribute>

			<!-- We want to activate/inactivate regions as beans are deployed -->
			 <attribute name="UseRegionBasedMarshalling">true</attribute>
			<!-- Must match the value of "useRegionBasedMarshalling" -->
			<attribute name="InactiveOnStartup">true</attribute>

			<attribute name="ClusterConfig">
			... ...
			</attribute>

			<!-- The max amount of time (in milliseconds) we wait until the
			initial state (ie. the contents of the cache) are retrieved from
			existing members.  -->
			<attribute name="InitialStateRetrievalTimeout">17500</attribute>

			<!--  Number of milliseconds to wait until all responses for a
				synchronous call have been received.
				-->
			<attribute name="SyncReplTimeout">17500</attribute>

			<!--  Max number of milliseconds to wait for a lock acquisition -->
			<attribute name="LockAcquisitionTimeout">15000</attribute>

			 <!--  Name of the eviction policy class. -->
			<attribute name="EvictionPolicyClass">
				org.jboss.cache.eviction.LRUPolicy
			</attribute>

			<!--  Specific eviction policy configurations. This is LRU -->
			<attribute name="EvictionPolicyConfig">
			 <config>
				<attribute name="wakeUpIntervalSeconds">5</attribute>
				 <name>statefulClustered</name>
				<!-- So default region would never timeout -->
				<region name="/_default_">
				<attribute name="maxNodes">0</attribute>
				 <attribute name="timeToIdleSeconds">0</attribute>
				</region>
			</config>
		</attribute>

	<!-- Store passivated sessions to the file system -->
	 <attribute name="CacheLoaderConfiguration">
	<config>

	 <passivation>true</passivation>
	<shared>false</shared>

	  <cacheloader>
		 <class>org.jboss.cache.loader.FileCacheLoader</class>
		<!-- Passivate to the server data dir -->
		 <properties>
			location=${jboss.server.data.dir}${/}sfsb
		</properties>
		<async>false</async>
		<fetchPersistentState>true</fetchPersistentState>
		<ignoreModifications>false</ignoreModifications>
		</cacheloader>

			 </config>
	   </attribute>
	</mbean>
</server>
The configuration attributes in this MBean are essentially the same as the attributes in the standard JBoss Cache TreeCache MBean discussed
in Chapter 22, JBossCache and JGroups Services
. Again, we omitted the JGroups configurations in the
ClusterConfig attribute (see more in Section 22.1, “JGroups Configuration”). Two noteworthy items:
-
The cache is configured to support eviction. The EJB3 SFSB container uses the JBoss Cache eviction mechanism to manage SFSB passivation. When beans are deployed, the EJB container will programatically add eviction regions to the cache, one region per bean type.
-
A JBoss Cache CacheLoader is also configured; again to support SFSB passivation. When beans are evicted from the cache, the cache loader passivates them to a persistent store; in this case to the filesystem in the $JBOSS_HOME/server/all/data/sfsb directory. JBoss Cache supports a variety of different CacheLoader implementations that know how to store data to different persistent store types; see the JBoss Cache documentation for details. However, if you change the CacheLoaderConfiguration, be sure that you do not use a shared store (e.g., a single schema in a shared database.) Each node in the cluster must have its own persistent store, otherwise as nodes independently passivate and activate clustered beans, they will corrupt each others data.
In a JBoss AS cluster, the entity bean instance caches need to be kept in sync across all nodes. If an entity bean provides remote services, the service methods need to be load balanced as well.
To use a clustered entity bean, the application does not need to do anything special, except for looking up EJB 2.x remote bean references from the clustered HA-JNDI.
First of all, it is worth noting that clustering 2.x entity beans is a bad thing to do. Its exposes elements that generally are too fine grained for use as remote objects to clustered remote objects and introduces data synchronization problems that are non-trivial. Do NOT use EJB 2.x entity bean clustering unless you fit into the sepecial case situation of read-only, or one read-write node with read-only nodes synched with the cache invalidation services.
To cluster EJB 2.x entity beans, you need to add the <clustered> element
to the application's jboss.xml descriptor file. Below is a typical
jboss.xml file.
<jboss>
    <enterprise-beans>
        <entity>
            <ejb-name>nextgen.EnterpriseEntity</ejb-name>
            <jndi-name>nextgen.EnterpriseEntity</jndi-name>
            <clustered>True</clustered>
            <cluster-config>
                <partition-name>DefaultPartition</partition-name>
                <home-load-balance-policy>
                    org.jboss.ha.framework.interfaces.RoundRobin
                </home-load-balance-policy>
                <bean-load-balance-policy>
                    org.jboss.ha.framework.interfaces.FirstAvailable
                </bean-load-balance-policy>
            </cluster-config>
        </entity>
    </enterprise-beans>
</jboss>
The EJB 2.x entity beans are clustered for load balanced remote invocations. All the bean instances are synchronized to have the same contents on all nodes.
However, clustered EJB 2.x Entity Beans do not have a distributed locking mechanism or a
distributed cache. They can only be synchronized by using row-level locking at the database level
(see <row-lock> in the CMP specification) or by setting the Transaction
Isolation Level of your JDBC driver to be TRANSACTION_SERIALIZABLE. Because there
is no supported distributed locking mechanism or distributed cache Entity Beans use Commit Option
"B" by default (See standardjboss.xml and the container configurations Clustered
CMP 2.x EntityBean, Clustered CMP EntityBean, or Clustered BMP EntityBean). It is not recommended
that you use Commit Option "A" unless your Entity Bean is read-only. (There are some design patterns
that allow you to use Commit Option "A" with read-mostly beans. You can also take a look at the
Seppuku pattern http://dima.dhs.org/misc/readOnlyUpdates.html. JBoss may incorporate
this pattern into later versions.)
Note
If you are using Bean Managed Persistence (BMP), you are going to have to implement synchronization on your own. The MVCSoft CMP 2.0 persistence engine (see http://www.jboss.org/jbossgroup/partners.jsp) provides different kinds of optimistic locking strategies that can work in a JBoss cluster.
In EJB 3.0, the entity beans primarily serve as a persistence data model. They do not provide remote services. Hence, the entity bean clustering service in EJB 3.0 primarily deals with distributed caching and replication, instead of load balancing.
To avoid round trips to the database, you can use a cache for your entities. JBoss EJB 3.0 entity beans are implemented by Hibernate, which has support for a second-level cache. The Hibernate setup used for the JBoss EJB 3.0 implementation uses JBoss Cache as its underlying second-level cache implementation. The second-level cache provides the following functionalities.
-
If you persist a cache enabled entity bean instance to the database via the entity manager the entity will inserted into the cache.
-
If you update an entity bean instance and save the changes to the database via the entity manager the entity will updated in the cache.
-
If you remove an entity bean instance from the database via the entity manager the entity will removed from the cache.
-
If loading a cached entity from the database via the entity manager, and that entity does not exist in the database, it will be inserted into the cache.
The JBoss Cache service for EJB 3.0 entity beans is configured in a TreeCache
MBean in the
deploy/ejb3-entity-cache-service.xml file. The name of the cache MBean
service is jboss.cache:service=EJB3EntityTreeCache. Below are the contents of
the ejb3-entity-cache-service.xml file in the standard JBoss distribution.
Again, we omitted the JGroups configuration element ClusterConfig.
 <server>
  <mbean code="org.jboss.cache.TreeCache"
 name="jboss.cache:service=EJB3EntityTreeCache">

  <depends>jboss:service=Naming</depends>
  <depends>jboss:service=TransactionManager</depends>

  <!-- Name of cluster. Needs to be the same on all nodes in the clusters,
	       in order to find each other -->
	  <attribute name="ClusterName">
  		${jboss.partition.name:DefaultPartition}-EntityCache
	  </attribute>

	  <!-- Configure the TransactionManager -->
	 <attribute name="TransactionManagerLookupClass">
	   org.jboss.cache.JBossTransactionManagerLookup
	 </attribute>

	 <attribute name="IsolationLevel">REPEATABLE_READ</attribute>
	 <attribute name="CacheMode">REPL_SYNC</attribute>

	 <!-- Must be true if any entity deployment uses a scoped classloader -->
	 <attribute name="UseRegionBasedMarshalling">true</attribute>
	 <!-- Must match the value of "useRegionBasedMarshalling" -->
	 <attribute name="InactiveOnStartup">true</attribute>

	 <attribute name="ClusterConfig">
	  ... ...
	 </attribute>

	 <attribute name="InitialStateRetrievalTimeout">17500</attribute>
	 <attribute name="SyncReplTimeout">17500</attribute>
	 <attribute name="LockAcquisitionTimeout">15000</attribute>

	 <attribute name="EvictionPolicyClass">
	 org.jboss.cache.eviction.LRUPolicy
	 </attribute>

	 <!--  Specific eviction policy configurations. This is LRU -->
	  <attribute name="EvictionPolicyConfig">
	  <config>
	  <attribute name="wakeUpIntervalSeconds">5</attribute>
	  <!--  Cache wide default -->
		  <region name="/_default_">
		  <attribute name="maxNodes">5000</attribute>
		  <attribute name="timeToLiveSeconds">1000</attribute>
		  </region>
	  </config>
	 </attribute>
	 </mbean>
</server>
This is a replicated cache, so, if running within a cluster, and the cache is updated, changes to the entries in one node will be replicated to the corresponding entries in the other nodes in the cluster.
JBoss Cache allows you to specify timeouts to cached entities. Entities not accessed within a certain amount of time are dropped from the cache in order to save memory. The above configuration sets up a default configuration region that says that at most the cache will hold 5000 nodes, after which nodes will start being evicted from memory, least-recently used nodes last. Also, if any node has not been accessed within the last 1000 seconds, it will be evicted from memory. In general, a node in the cache represents a cached item (entity, collection, or query result set), although there are also a few other node that are used for internal purposes. If the above values of 5000 maxNodes and 1000 idle seconds are invalid for your application(s), you can change the cache-wide defaults. You can also add separate eviction regions for each of your entities; more on this below.
Now, we have JBoss Cache configured to support distributed caching of EJB 3.0 entity beans. We still have to configure individual entity beans to use the cache service.
You define your entity bean classes the normal way. Future versions of JBoss EJB 3.0 will
support annotating entities and their relationship collections as cached, but for now you have
to configure the underlying hibernate engine directly. Take a look at the
persistence.xml file, which configures the caching options for hibernate
via its optional property elements. The following element in
persistence.xml defines that caching should be enabled:
<!-- Clustered cache with TreeCache -->
<property name="cache.provider_class">
    org.jboss.ejb3.entity.TreeCacheProviderHook
</property>
The following property element defines the object name of the cache to be used, i.e., the name of the TreeCache MBean shown above.
<property name="treecache.mbean.object_name">
    jboss.cache:service=EJB3EntityTreeCache
</property>
Finally, you should give a “region_prefix” to this configuration. This ensures that all cached items associated with this persistence.xml are properly grouped together in JBoss Cache. The jboss.cache:service=EJB3EntityTreeCache cache is a shared resource, potentially used by multiple persistence units. The items cached in that shared cache need to be properly grouped to allow the cache to properly manage classloading. <property name="hibernate.cache.region_prefix" value="myprefix"/>
If you do not provide a region prefix, JBoss will automatically provide one for you, building it up from the name of the EAR (if any) and the name of the JAR that includes the persistence.xml. For example, a persistence.xml packaged in foo.ear, bar.jar would be given “foo_ear,bar_jar” as its region prefix. This is not a particularly friendly region prefix if you need to use it to set up specialized eviction regions (see below), so specifying your own region prefix is recommended.
Next we need to configure what entities be cached. The default is to not cache anything, even with the settings shown above. We use the @org.hibernate.annotations.Cache annotation to tag entity beans that needs to be cached.
@Entity
@Cache(usage=CacheConcurrencyStrategy.TRANSACTIONAL)
public class Account implements Serializable {
  // ... ...
}
A very simplified rule of thumb is that you will typically want to do caching for objects that
rarely change, and which are frequently read. You can fine tune the cache for each entity bean in the ejb3-entity-cache-service.xml configuration file. For instance, you can specify the size of the cache. If there are too many objects in the cache, the cache could evict oldest objects (or least used objects, depending on configuration) to make room for new objects. Assuming the region_prefix specified in persistence.xml was myprefix, the default name of the cache region for the com.mycompany.entities.Account entity bean /myprefix/com/mycompany/entities/Account.
<server>
  <mbean code="org.jboss.cache.TreeCache"
		 name="jboss.cache:service=EJB3EntityTreeCache">
		  ... ...
	  <attribute name="EvictionPolicyConfig">
		  <config>
			  <attribute name="wakeUpIntervalSeconds">5</attribute>
			  <region name="/_default_">
				  <attribute name="maxNodes">5000</attribute>
				  <attribute name="timeToLiveSeconds">1000</attribute>
			  </region>
		  <!-- Separate eviction rules for Account entities -->
			  <region name="/myprefix/com/mycompany/entities/Account">
				  <attribute name="maxNodes">10000</attribute>
				  <attribute name="timeToLiveSeconds">5000</attribute>
			  </region>
		  ... ...
		 </config>
	 </attribute>
 </mbean>
</server>
If you do not specify a cache region for an entity bean class, all instances of this class will be cached in the /_default region as defined above. The @Cache annotation exposes an optional attribute “region” that lets you specify the cache region where an entity is to be stored, rather than having it be automatically be created from the fully-qualified class name of the entity class.
@Entity
@Cache(usage=CacheConcurrencyStrategy.TRANSACTIONAL,
region=”Account”)
public class Account implements Serializable {
// ... ...
}
The eviction configuration would then become:
<server>
	<mbean code="org.jboss.cache.TreeCache"
	      name="jboss.cache:service=EJB3EntityTreeCache">
		... ...
	<attribute name="EvictionPolicyConfig">
	<config>
		<attribute name="wakeUpIntervalSeconds">5</attribute>
		<region name="/_default_">
		<attribute name="maxNodes">5000</attribute>
		<attribute name="timeToLiveSeconds">1000</attribute>
			</region>
		<!-- Separate eviction rules for Account entities -->
			<region name="/myprefix/Account">
				<attribute name="maxNodes">10000</attribute>
				<attribute name="timeToLiveSeconds">5000</attribute>
			</region>
			... ...
	</config>
	</attribute>
	</mbean>
</server>
The EJB3 Query API also provides means for you to save in the second-level cache the results (i.e., collections of primary keys of entity beans, or collections of scalar values) of specified queries. Here we show a simple example of annotating a bean with a named query, also providing the Hibernate-specific hints that tells Hibernate to cache the query.
First, in persistence.xml you need to tell Hibernate to enable query caching:
<property name="hibernate.cache.use_query_cache" value="true"/>
Next, you create a named query associated with an entity, and tell Hibernate you want to cache the results of that query:
@Entity
@Cache (usage=CacheConcurrencyStrategy.TRANSACTIONAL,
region=”Account”)
@NamedQueries({
@NamedQuery(name="account.bybranch",
query="select acct from Account as acct where acct.branch = ?1",
hints={@QueryHint(name="org.hibernate.cacheable",value="true")})
})
public class Account implements Serializable {
// ... ...
}
The @NamedQueries, @NamedQuery and @QueryHint annotations are all in the javax.persistence package.See the Hibernate and EJB3 documentation for more on how to use EJB3 queries and on how to instruct EJB3 to cache queries.
By default, Hibernate stores query results in JBoss Cache in a region named {region_prefix}/org/hibernate/cache/StandardQueryCache. Based on this, you can set up separate eviction handling for your query results. So, if the region prefix were set to myprefix in persistence.xml, you could, for example, create this sort of eviction handling:
<server>
	  <mbean code="org.jboss.cache.TreeCache"
		 name="jboss.cache:service=EJB3EntityTreeCache">
		  ... ...
		  <attribute name="EvictionPolicyConfig">
			  <config>
			  <attribute name="wakeUpIntervalSeconds">5</attribute>
				  <region name="/_default_">
				  <attribute name="maxNodes">5000</attribute>
				  <attribute name="timeToLiveSeconds">1000</attribute>
				  </region>
				  <!-- Separate eviction rules for Account entities -->
				  <region name="/myprefix/Account">
					  <attribute name="maxNodes">10000</attribute>
					  <attribute name="timeToLiveSeconds">5000</attribute>
				  </region>
				  <!-- Cache queries for 10 minutes -->
				  <region name="/myprefix/org/hibernate/cache/StandardQueryCache">
					  <attribute name="maxNodes">100</attribute>
					  <attribute name="timeToLiveSeconds">600</attribute>
				  </region>
				  ... ...
			  </config>
		  </attribute>
	  </mbean>
</server>
The @NamedQuery.hints attribute shown above takes an array of vendor-specific @QueryHints as a value. Hibernate accepts the “org.hibernate.cacheRegion” query hint, where the value is the name of a cache region to use instead ofthe default /org/hibernate/cache/StandardQueryCache. For example:
	@Entity
	@Cache (usage=CacheConcurrencyStrategy.TRANSACTIONAL,
	region=”Account”)
	@NamedQueries({
	@NamedQuery(name="account.bybranch",
	query="select acct from Account as acct where acct.branch = ?1",
	hints={@QueryHint(name="org.hibernate.cacheable",value="true"),
	@QueryHint(name=”org.hibernate.cacheRegion,value=”Queries”)
	})
	})
	public class Account implements Serializable {
	// ... ...
	}
The related eviction configuration:
<server>
	<mbean code="org.jboss.cache.TreeCache"
	       name="jboss.cache:service=EJB3EntityTreeCache">
		... ...
		<attribute name="EvictionPolicyConfig">
			<config>
				<attribute name="wakeUpIntervalSeconds">5</attribute>
				<region name="/_default_">
					<attribute name="maxNodes">5000</attribute>
					<attribute name="timeToLiveSeconds">1000</attribute>
				</region>
				<!-- Separate eviction rules for Account entities -->
				<region name="/myprefix/Account">
					<attribute name="maxNodes">10000</attribute>
					<attribute name="timeToLiveSeconds">5000</attribute>
				</region>
				<!-- Cache queries for 10 minutes -->
				<region name="/myprefix/Queries">
					<attribute name="maxNodes">100</attribute>
					<attribute name="timeToLiveSeconds">600</attribute>
				</region>
				... ...
			</config>
		</attribute>
	</mbean>
</server>
- 20.1. Configuring load balancing using Apache and mod_jk
- 20.2. Download the software
- 20.3. Configure Apache to load mod_jk
- 20.4. Configure worker nodes in mod_jk
- 20.5. Configuring JBoss to work with mod_jk
- 20.6. Configuring HTTP session state replication
- 20.7. Enabling session replication in your application
- 20.8. Using FIELD level replication
- 20.9. Monitoring session replication
- 20.10. Using Clustered Single Sign On
- 20.11. Clustered Singleton Services
HTTP session replication is used to replicate the state associated with your web clients on other nodes of a cluster. Thus, in the event one of your node crashes, another node in the cluster will be able to recover. Two distinct functions must be performed:
-
Session state replication
-
Load-balancing of incoming invocations
State replication is directly handled by JBoss. When you run JBoss in the all
configuration, session state replication is enabled by default. Just configure your web application as distributable in its web.xml (see below), deploy it, and its session state is automtically replicated across all JBoss instances in the cluster.
However, load-balancing is a different story; it is not handled by JBoss itself and requires an external load balancer. aThis function could be provided by specialized hardware switches or routers (Cisco LoadDirector for example) or by specialized software running on commodity hardware. As a very common scenario, we will demonstrate how to set up a software load balancer using Apache httpd and mod_jk.
Note
A load-balancer tracks HTTP requests and, depending on the session to which the request is linked, it dispatches the request to the appropriate node. This is called load-balancing with sticky-sessions: once a session is created on a node, every future request will also be processed by that same node. Using a load-balancer that supports sticky-sessions but not configuring your web application for session replication allows you to scale very well by avoiding the cost of session state replication: each query will always be handled by the same node. But in case a node dies, the state of all client sessions hosted by this node (the shopping carts, for example) will be lost and the clients will most probably need to login on another node and restart with a new session. In many situations, it is acceptable not to replicate HTTP sessions because all critical state is stored in a database. In other situations, losing a client session is not acceptable and, in this case, session state replication is the price one has to pay.
Apache is a well-known web server which can be extended by plugging in modules. One of these modules, mod_jk has been specifically designed to allow the forwarding of requests from Apache to a Servlet container. Furthermore, it is also able to load-balance HTTP calls to a set of Servlet containers while maintaining sticky sessions, which is what is most interesting for us in this section.
First of all, make sure that you have Apache installed. You can download Apache directly from
Apache web site at http://httpd.apache.org/. Its installation is pretty
straightforward and requires no specific configuration. As several versions of Apache exist, we
advise you to use version 2.0.x. We will consider, for the next sections, that you have installed
Apache in the APACHE_HOME directory.
Next, download mod_jk binaries. Several versions of mod_jk exist as well. We strongly advise you
to use mod_jk 1.2.x, as both mod_jk and mod_jk2 are deprecated, unsupported and no further
developments are going on in the community. The mod_jk 1.2.x binary can be downloaded from
http://www.apache.org/dist/jakarta/tomcat-connectors/jk/binaries/. Rename the
downloaded file to mod_jk.so and copy it under
APACHE_HOME/modules/.
Modify APACHE_HOME/conf/httpd.conf and add a single line at the end of the file:
# Include mod_jk's specific configuration file
Include conf/mod-jk.conf
Next, create a new file named APACHE_HOME/conf/mod-jk.conf:
# Load mod_jk module
# Specify the filename of the mod_jk lib
LoadModule jk_module modules/mod_jk.so

# Where to find workers.properties
JkWorkersFile conf/workers.properties

# Where to put jk logs
JkLogFile logs/mod_jk.log

# Set the jk log level [debug/error/info]
JkLogLevel info

# Select the log format
JkLogStampFormat  "[%a %b %d %H:%M:%S %Y]"

# JkOptions indicates to send SSK KEY SIZE
JkOptions +ForwardKeySize +ForwardURICompat -ForwardDirectories

# JkRequestLogFormat
JkRequestLogFormat "%w %V %T"

# Mount your applications
JkMount /application/* loadbalancer

# You can use external file for mount points.
# It will be checked for updates each 60 seconds.
# The format of the file is: /url=worker
# /examples/*=loadbalancer
JkMountFile conf/uriworkermap.properties

# Add shared memory.
# This directive is present with 1.2.10 and
# later versions of mod_jk, and is needed for
# for load balancing to work properly
JkShmFile logs/jk.shm

# Add jkstatus for managing runtime data
<Location /jkstatus/>
    JkMount status
    Order deny,allow
    Deny from all
    Allow from 127.0.0.1
</Location>
Please note that two settings are very important:
-
The
LoadModuledirective must reference the mod_jk library you have downloaded in the previous section. You must indicate the exact same name with the "modules" file path prefix. -
The
JkMountdirective tells Apache which URLs it should forward to the mod_jk module (and, in turn, to the Servlet containers). In the above file, all requests with URL path/application/*are sent to the mod_jk load-balancer. This way, you can configure Apache to server static contents (or PHP contents) directly and only use the loadbalancer for Java applications. If you only use mod_jk as a loadbalancer, you can also forward all URLs (i.e.,/*) to mod_jk.
In addition to the JkMount directive, you can also use the
JkMountFile directive to specify a mount points configuration file, which
contains multiple Tomcat forwarding URL mappings. You just need to create a
uriworkermap.properties file in the APACHE_HOME/conf
directory. The format of the file is /url=worker_name. To get things started,
paste the following example into the file you created:
# Simple worker configuration file

# Mount the Servlet context to the ajp13 worker
/jmx-console=loadbalancer
/jmx-console/*=loadbalancer
/web-console=loadbalancer
/web-console/*=loadbalancer
This will configure mod_jk to forward requests to /jmx-console and
/web-console to Tomcat.
You will most probably not change the other settings in mod_jk.conf. They are
used to tell mod_jk where to put its logging file, which logging level to use and so on.
Next, you need to configure mod_jk workers file conf/workers.properties. This
file specifies where the different Servlet containers are located and how calls should be
load-balanced across them. The configuration file contains one section for each target servlet
container and one global section. For a two nodes setup, the file could look like this:
# Define list of workers that will be used
# for mapping requests
worker.list=loadbalancer,status

# Define Node1
# modify the host as your host IP or DNS name.
worker.node1.port=8009
worker.node1.host=node1.mydomain.com
worker.node1.type=ajp13
worker.node1.lbfactor=1
worker.node1.cachesize=10

# Define Node2
# modify the host as your host IP or DNS name.
worker.node2.port=8009
worker.node2.host= node2.mydomain.com
worker.node2.type=ajp13
worker.node2.lbfactor=1
worker.node2.cachesize=10

# Load-balancing behaviour
worker.loadbalancer.type=lb
worker.loadbalancer.balance_workers=node1,node2
worker.loadbalancer.sticky_session=1
#worker.list=loadbalancer

# Status worker for managing load balancer
worker.status.type=status
Basically, the above file configures mod_jk to perform weighted round-robin load balancing with sticky sessions between two servlet containers (JBoss Tomcat) node1 and node2 listening on port 8009.
In the works.properties file, each node is defined using the
worker.XXX naming convention where XXX represents an
arbitrary name you choose for each of the target Servlet containers. For each worker, you must specify the host name (or IP address) and the port number of the AJP13 connector running in the Servlet container.
The lbfactor attribute is the load-balancing factor for this specific worker.
It is used to define the priority (or weight) a node should have over other nodes. The higher this number is for a given worker relative to the other workers, the more HTTP requests the worker will receive. This setting can be used to differentiate servers with different processing power.
The cachesize attribute defines the size of the thread pools associated to the
Servlet container (i.e. the number of concurrent requests it will forward to the Servlet container).
Make sure this number does not outnumber the number of threads configured on the AJP13 connector of
the Servlet container. Please review
http://jakarta.apache.org/tomcat/connectors-doc/config/workers.html for
comments on cachesize for Apache 1.3.x.
The last part of the conf/workers.properties file defines the loadbalancer
worker. The only thing you must change is the
worker.loadbalancer.balanced_workers line: it must list all workers previously
defined in the same file: load-balancing will happen over these workers.
The sticky_session property specifies the cluster behavior for HTTP sessions.
If you specify worker.loadbalancer.sticky_session=0, each request will be load
balanced between node1 and node2; i.e., different requests for the same session will go to different servers. But when a user opens a session on one server, it is always necessary to always forward this user's requests to the same server, as long as that server is available. This is called a "sticky session", as the client is always using the same server he reached on his first request. To enable session stickiness, you need to set
worker.loadbalancer.sticky_session to 1.
Note
A non-loadbalanced setup with a single node requires a worker.list=node1
entry.
Finally, we must configure the JBoss Tomcat instances on all clustered nodes so that they can expect requests forwarded from the mod_jk loadbalancer.
On each clustered JBoss node, we have to name the node according to the name specified in
workers.properties. For instance, on JBoss instance node1, edit the
JBOSS_HOME/server/all/deploy/jboss-web.deployer/server.xml file (replace
/all with your own server name if necessary). Locate the
<Engine> element and add an attribute jvmRoute:
<Engine name="jboss.web" defaultHost="localhost" jvmRoute="node1">
... ...
</Engine>
You also need to be sure the AJP connector in server.xml is enabled (i.e., uncommented). It is enabled by default.
<!-- Define an AJP 1.3 Connector on port 8009 -->
<Connector port="8009" address="${jboss.bind.address}" protocol="AJP/1.3"
emptySessionPath="true" enableLookups="false" redirectPort="8443" />
Then, for each JBoss Tomcat instance in the cluster, we need to tell it that mod_jk is in use, so it can properly manage the jvmRoute appended to its session cookies so that mod_jk can properly route incoming requests. Edit the
JBOSS_HOME/server/all/deploy/jbossweb-tomcat50.sar/META-INF/jboss-service.xml
file (replace /all with your own server name). Locate the
<attribute> element with a name of UseJK, and set
its value to true:
<attribute name="UseJK">true</attribute>
At this point, you have a fully working Apache+mod_jk load-balancer setup that will balance call to the Servlet containers of your cluster while taking care of session stickiness (clients will always use the same Servlet container).
Note
For more updated information on using mod_jk 1.2 with JBoss Tomcat, please refer to the JBoss
wiki page at
http://wiki.jboss.org/wiki/Wiki.jsp?page=UsingMod_jk1.2WithJBoss.
The preceding discussion has been focused on using mod_jk as a load balancer. The content of the remainder our discussion of clustering HTTP services in JBoss AS applies no matter what load balancer is used.
In Section 20.4, “Configure worker nodes in mod_jk”, we covered how to use sticky sessions to make sure that a client in a session always hits the same server node in order to maintain the session state. However, sticky sessions by themselves are not an ideal solution. If a node goes down, all its session data is lost. A better and more reliable solution is to replicate session data across the nodes in the cluster. This way, the client can hit any server node and obtain the same session state.
The jboss.cache:service=TomcatClusteringCache MBean makes use of JBoss Cache to
provide HTTP session replication services to the JBoss Tomcat cluster. This MBean is defined in the deploy/jboss-web-cluster.sar/META-INF/jboss-service.xml file.
Note
Before AS 4.2.0, the location of the HTTP session cache configuration file was deploy/tc5-cluster.sar/META-INF/jboss-service.xml. Prior to AS 4.0.4 CR2, the file was named deploy/tc5-cluster-service.xml.
Below is a typical deploy/jbossweb-cluster.sar/META-INF/jboss-service.xml file. The
configuration attributes in the TomcatClusteringCache MBean are very similar to
those in the JBoss AS cache configuration.
<mbean code="org.jboss.cache.aop.TreeCacheAop"
    name="jboss.cache:service=TomcatClusteringCache">

    <depends>jboss:service=Naming</depends>
    <depends>jboss:service=TransactionManager</depends>
    <depends>jboss.aop:service=AspectDeployer</depends>

    <attribute name="TransactionManagerLookupClass">
        org.jboss.cache.BatchModeTransactionManagerLookup
    </attribute>

    <attribute name="IsolationLevel">REPEATABLE_READ</attribute>

    <attribute name="CacheMode">REPL_ASYNC</attribute>

    <attribute name="ClusterName">
      Tomcat-${jboss.partition.name:Cluster}
    </attribute>

    <attribute name="UseMarshalling">false</attribute>

    <attribute name="InactiveOnStartup">false</attribute>

    <attribute name="ClusterConfig">
        ... ...
    </attribute>


    <attribute name="LockAcquisitionTimeout">15000</attribute>
    <attribute name="SyncReplTimeout">20000</attribute>
</mbean>
Note that the value of the mbean element's code attribute is org.jboss.cache.aop.TreeCacheAop, which is different from the other JBoss Cache Mbeans used in JBoss AS. This is because FIELD granularity HTTP session replication (covered below) needs the added features of the TreeCacheAop (a.k.a. PojoCache) class.
The details of all the configuration options for a TreeCache MBean are covered in the JBoss Cache documentation. Below, we will just discuss several attributes that are most relevant to the HTTP cluster session replication.
-
TransactionManagerLookupClass sets the transaction manager factory. The default value is
org.jboss.cache.BatchModeTransactionManagerLookup. It tells the cache NOT to participate in JTA-specific transactions. Instead, the cache manages its own transactions. Please do not change this. -
CacheMode controls how the cache is replicated. The valid values are
REPL_SYNCandREPL_ASYNC. With either setting the client request thread updates the local cache with the current sesssion contents and then sends a message to the caches on the other members of the cluster, telling them to make the same change. With REPL_ASYNC (the default) the request thread returns as soon as the update message has been put on the network. With REPL_SYNC, the request thread blocks until it gets a reply message from all cluster members, informing it that the update was successfully applied. Using synchronous replication makes sure changes are applied aroundthe cluster before the web request completes. However, synchronous replication is much slower. -
ClusterName specifies the name of the cluster that the cache works within. The default cluster name is the the word "Tomcat-" appended by the current JBoss partition name. All the nodes must use the same cluster name.
-
The UseMarshalling and InactiveOnStartup attributes must have the same value. They must be
trueifFIELDlevel session replication is needed (see later). Otherwise, they are default tofalse. -
ClusterConfig configures the underlying JGroups stack. Please refer to Section 22.1, “JGroups Configuration” for more information.
-
LockAcquisitionTimeout sets the maximum number of milliseconds to wait for a lock acquisition when trying to lock a cache node. The default value is 15000.
-
SyncReplTimeout sets the maximum number of milliseconds to wait for a response from all nodes in the cluster when a synchronous replication message is sent out. The default value is 20000; should be a few seconds longer than LockAcquisitionTimeout.
To enable clustering of your web application you must tag it as distributable in the
web.xml descriptor. Here's an example:
<?xml version="1.0"?>
<web-app  xmlns="http://java.sun.com/xml/ns/j2ee"
          xmlns:xsi="http://www.w3.org/2001/XMLSchema-instance"
          xsi:schemaLocation="http://java.sun.com/xml/ns/j2ee
                              http://java.sun.com/xml/ns/j2ee/web-app_2_4.xsd"
          version="2.4">

                        <distributable/>

    <!-- ... -->
</web-app>
You can futher configure session replication using the replication-config
element in the jboss-web.xml file. Here is an example:
<jboss-web>
    <replication-config>
        <replication-trigger>SET_AND_NON_PRIMITIVE_GET</replication-trigger>
        <replication-granularity>SESSION</replication-granularity>
        <replication-field-batch-mode>true</replication-field-batch-mode>
    </replication-config>
</jboss-web>
The replication-trigger element determines what triggers a session replication
(i.e. when is a session is considered dirty and in need of replication). It has 4 options:
-
SET : With this policy, the session is considered dirty only when an attribute is set in the session (i.e., HttpSession.setAttribute() is invoked.) If your application always writes changed values back into the session, this option will be most optimal in terms of performance. The downside of SET is that if an object is retrieved from the session and modified without being written back into the session, the session manager will not know the attribute is dirty and the change to that object may not be replicated.
-
SET_AND_GET : With this policy, any attribute that is get or set will be marked as dirty. If an object is retrieved from the session and modified without being written back into the session, the change to that object will be replicated. The downside of SET_AND_GET is that it can have significant performance implications, since even reading immutable objects from the session (e.g., strings, numbers) will mark the read attributes as needing to be replicated.
-
SET_AND_NON_PRIMITIVE_GET : This policy is similar to the SET_AND_GET policy except that get operationsthat return attribute values with primitive types do not mark the attribute as dirty. Primitive system types (i.e., String, Integer, Long, etc.) are immutable, so there is no reason to mark an attribute with such a type as dirty just because it has been read. If a get operation returns a value of a non-primitive type, the session manager has no simple way to know whether the object is mutable, so it assumes it is an marks the attribute as dirty. This setting avoids the downside of SET while reducing the performance impact of SET_AND_GET. It is the default setting.
-
ACCESS : This option causes the session to be marked as dirty whenever it is accessed. Since a the session is accessed during each HTTP request, it will be replicated with each request. The purpose of ACCESS is to ensure session last-access timestamps are kept in sync around the cluster.. Since with the other replication-trigger options the time stamp may not be updated in other clustering nodes because of no replication, the session in other nodes may expire before the active node if the HTTP request does not retrieve or modify any session attributes. When this option is set, the session timestamps will be synchronized throughout the cluster nodes. Note that use of this option can have a significant performance impact, so use it with caution. With the other replication-trigger options, if a session has gone 80% of its expiration interval without being replicated, as a safeguard its timestamp will be replicated no matter what. So, ACCESS is only useful in special circumstances where the above safeguard is considered inadequate.
The replication-granularity element controls the size of the replication units.
The supported values are:
-
ATTRIBUTE : Replication is only for the dirty attributes in the session plus some session data, like the last-accessed timestamp. For sessions that carry large amounts of data, this option can increase replication performance. However, attributes will be separately serialized, so if there are any shared references between objects stored in the attributes, those shared references may be broken on remote nodes. For example, say a Person object stored under key “husband” has a reference to an Address, while another Person object stored under key “wife” has a reference to that same Address object. When the “husband” and “wife” attributes are separately deserialized on the remote nodes, each Person object will now have a reference to its own Address object; the Address object will no longer be shared.
-
SESSION : The entire session object is replicated if any attribute is dirty. The entire session is serialized in one unit, so shared object references are maintained on remote nodes. This is the default setting.
-
FIELD : Replication is only for individual changed data fields inside session attribute objects. Shared object references will be preserved across the cluster. Potentially most performant, but requires changes to your application (this will be discussed later).
The replication-field-batch-mode element indicates whether you want all replication messages associated with a request to be batched into one message. Only applicable if replication-granularity is FIELD. Default is true.
If your sessions are generally small, SESSION is the better policy. If your session is larger and some parts are infrequently accessed, ATTRIBUTE replication will be more effective. If your application has very big data objects in session attributes and only fields in those objects are frequently modified, the FIELD policy would be the best. In the next section, we will discuss exactly how the FIELD level replication works.
FIELD-level replication only replicates modified data fields inside objects stored in the session. Its use could potentially drastically reduce the data traffic between clustered nodes, and hence improve the performance of the whole cluster. To use FIELD-level replication, you have to first prepare (i.e., bytecode enhance) your Java class to allow the session cache to detect when fields in cached objects have been changed and need to be replicated.
The first step in doing this is to identify the classes that need to be prepared. This is done via annotations. For example:
@org.jboss.cache.aop.AopMarker
public class Address
{
...
}
If you annotate a class with InstanceAopMarker instead, then all of its subclasses will be automatically annotated as well. Similarly, you can annotate an interface with InstanceofAopMarker and all of its implementing classes will be annotated. For example:
@org.jboss.cache.aop.InstanceOfAopMarker
public class Person
{
...
}
then when you have a sub-class like
public class Student extends Person
{
...
}
There will be no need to annotate Student. It will be annotated automatically because it is a sub-class of Person.
Jboss AS 4.2 requires JDK 5 at runtime, but some users may still need to build their projects using JDK 1.4. In this case, annotating classes can be done via JDK 1.4 style annotations embedded in JavaDocs. For example:
/*
 * My usual comments here first.
 * @@org.jboss.web.tomcat.tc5.session.AopMarker
 */
public class Address
{
...
}
The anologue for @InstanceAopMarker is:
/*
 *
 * @@org.jboss.web.tomcat.tc5.session.InstanceOfAopMarker
 */
public class Person
{
...
}
Once you have annotated your classes, you will need to perform a pre-processing step to bytecode enhance your classes for use by TreeCacheAop. You need to use the JBoss AOP pre-compiler annotationc and post-compiler aopc to process the above source code before and after they are compiled by the Java compiler. The annotationc step is only need if the JDK 1.4 style annotations are used; if JDK 5 annotations are used it is not necessary. Here is an example on how to invoke those commands from command line.
$ annotationc [classpath] [source files or directories]
$ javac -cp [classpath] [source files or directories]
$ aopc [classpath] [class files or directories]
Please see the JBoss AOP documentation for the usage of the pre- and post-compiler. The JBoss AOP project also provides easy to use ANT tasks to help integrate those steps into your application build process.
Note
You can see a complete example on how to build, deploy, and validate a FIELD-level replicated web application from this page: http://wiki.jboss.org/wiki/Wiki.jsp?page=Http_session_field_level_example. The example bundles the pre- and post-compile tools so you do not need to download JBoss AOP separately.
When you deploy the web application into JBoss AS, make sure that the following configurations are correct:
-
In the server's
deploy/jboss-web-cluster.sar/META-INF/jboss-service.xmlfile, theinactiveOnStartupanduseMarshallingattributes must both betrue. -
In the application's
jboss-web.xmlfile, thereplication-granularityattribute must beFIELD.
Finally, let's see an example on how to use FIELD-level replication on those data classes. Notice
that there is no need to call session.setAttribute() after you make changes to
the data object, and all changes to the fields are automatically replicated across the cluster.
// Do this only once. So this can be in init(), e.g.
if(firstTime)
{
  Person joe = new Person("Joe", 40);
  Person mary = new Person("Mary", 30);
  Address addr = new Address();
  addr.setZip(94086);

  joe.setAddress(addr);
  mary.setAddress(addr); // joe and mary share the same address!

  session.setAttribute("joe", joe); // that's it.
  session.setAttribute("mary", mary); // that's it.
}

Person mary = (Person)session.getAttribute("mary");
mary.getAddress().setZip(95123); // this will update and replicate the zip code.
Besides plain objects, you can also use regular Java collections of those objects as session attributes. JBoss cache automatically figures out how to handle those collections and replicate field changes in their member objects.
If you have deployed and accessed your application, go to the
jboss.cache:service=TomcatClusteringCache MBean and invoke the
printDetails operation. You should see output resembling the following.
/JSESSION

/localhost

/quote

/FB04767C454BAB3B2E462A27CB571330
VERSION: 6
FB04767C454BAB3B2E462A27CB571330: org.jboss.invocation.MarshalledValue@1f13a81c

/AxCI8Ovt5VQTfNyYy9Bomw**
VERSION: 4
AxCI8Ovt5VQTfNyYy9Bomw**: org.jboss.invocation.MarshalledValue@e076e4c8
This output shows two separate web sessions, in one application named
quote
, that are being shared via JBossCache. This example uses a replication-granularity of session. Had ATTRIBUTE level replication been used, there would be additional entries showing each replicated session attribute. In either case, the replicated values are stored in an opaque MarshelledValue container. There aren't currently any tools that allow you to inspect the contents of the replicated session values. If you do not see any output, either the application was not correctly marked as distributable or you haven't accessed a part of application that places values in the HTTP session. The org.jboss.cache and org.jboss.web logging categories provide additional insight into session replication useful for debugging purposes.
JBoss supports clustered single sign-on, allowing a user to authenticate to one web application on a JBoss server and to be recognized on all web applications, on that same machine or on another node in the cluster, that are deployed on the same virtual host. Authentication replication is handled by the same JBoss Cache Mbean that is used by the HTTP session replication service. Although session replication does not need to be explicitly enabled for the applications in question, the jboss-web-cluster.sar file needs to be deployed.
To enable single sign-on, you must add the ClusteredSingleSignOn valve to the appropriate Host elements of the tomcat server.xml file. The valve configuration is shown here:
<Valve className="org.jboss.web.tomcat.tc5.sso.ClusteredSingleSignOn" />
A clustered singleton service (also known as an HA singleton) is a service that is deployed on multiple nodes in a cluster, but is providing its service on only one of the nodes. The node running the singleton service is typically called the master node. When the master fails or is shut down, another master is selected from the remaining nodes and the service is restarted on the new master. Thus, other than a brief interval when one master has stopped and another has yet to take over, the service is always being provided by one but only one node.

The JBoss Application Server (AS) provides support for a number of strategies for helping you deploy clustered singleton services. In this section we will explore the different strategies. All of the strategies are built on top of the HAPartition service described in the introduction. They rely on the HAPartition to provide notifications when different nodes in the cluster start and stop; based on those notifications each node in the cluster can independently (but consistently) determine if it is now the master node and needs to begin providing a service.
The simplest and most commonly used strategy for deploying an HA singleton is to take an ordinary deployment (war, ear, jar, whatever you would normally put in deploy) and deploy it in the $JBOSS_HOME/server/all/deploy-hasingleton directory instead of in deploy. The deploy-hasingleton directory does not lie under deploy or farm, so its contents are not automatically deployed when an AS instance starts. Instead, deploying the contents of this directory is the responsibility of a special service, the jboss.ha:service=HASingletonDeployer MBean (which itself is deployed via the deploy/deploy-hasingleton-service.xml file.) The HASingletonDeployer service is itself an HA Singleton, one whose provided service when it becomes master is to deploy the contents of deploy-hasingleton and whose service when it stops being the master (typically at server shutdown) is to undeploy the contents of deploy-hasingleton.
So, by placing your deployments in deploy-hasingleton you know that they will be deployed only on the master node in the cluster. If the master node cleanly shuts down, they will be cleanly undeployed as part of shutdown. If the master node fails or is shut down, they will be deployed on whatever node takes over as master.
Using deploy-hasingleton is very simple, but it does have two drawbacks:
-
There is no hot-deployment feature for services in
deploy-hasingleton. Redeploying a service that has been deployed todeploy-hasingletonrequires a server restart. -
If the master node fails and another node takes over as master, your singleton service needs to go through the entire deployment process before it will be providing services. Depending on how complex the deployment of your service is and what sorts of startup activities it engages in, this could take a while, during which time the service is not being provided.
If your service is an Mbean (i.e., not a J2EE deployment like an ear or war or jar), you can deploy it along with a service called an HASingletonController in order to turn it into an HA singleton. It is the job of the HASingletonController to work with the HAPartition service to monitor the cluster and determine if it is now the master node for its service. If it determines it has become the master node, it invokes a method on your service telling it to begin providing service. If it determines it is no longer the master node, it invokes a method on your service telling it to stop providing service. Let's walk through an illustration.
First, we have an MBean service that we want to make an HA singleton. The only thing special about it is it needs to expose in its MBean interface a method that can be called when it should begin providing service, and another that can be called when it should stop providing service:
public class HASingletonExample
implements HASingletonExampleMBean {

private boolean isMasterNode = false;

public void startSingleton() {
isMasterNode = true;
}
.
public boolean isMasterNode() {
return isMasterNode;
 }

 public void stopSingleton() {
 isMasterNode = false;
 }
}
We used “startSingleton” and “stopSingleton” in the above example, but you could name the methods anything.
Next, we deploy our service, along with an HASingletonController to control it, most likely packaged in a .sar file, with the following META-INF/jboss-service.xml:
 <server>
	 <!-- This MBean is an example of a clustered singleton -->
	 <mbean code="org.jboss.ha.examples.HASingletonExample"
		name=“jboss:service=HASingletonExample"/>

	 <!-- This HASingletonController manages the cluster Singleton -->
	 <mbean code="org.jboss.ha.singleton.HASingletonController"
		name="jboss:service=ExampleHASingletonController">

		 <!-- Inject a ref to the HAPartition -->
		 <depends optional-attribute-name="ClusterPartition" proxy-type="attribute">
			 jboss:service=${jboss.partition.name:DefaultPartition}
		 </depends>
		 <!-- Inject a ref to the service being controlled -->
		 <depends optional-attribute-name="TargetName">
			 jboss:service=HASingletonExample
		 </depends>
		 <!-- Methods to invoke when become master / stop being master -->
		 <attribute name="TargetStartMethod">startSingleton</attribute>
		 <attribute name="TargetStopMethod">stopSingleton</attribute>
	 </mbean>
</server>
Voila! A clustered singleton service.
The obvious downside to this approach is it only works for MBeans. Upsides are that the above example can be placed in deploy or farm and thus can be hot deployed and farmed deployed. Also, if our example service had complex, time-consuming startup requirements, those could potentially be implemented in create() or start() methods. JBoss will invoke create() and start() as soon as the service is deployed; it doesn't wait until the node becomes the master node. So, the service could be primed and ready to go, just waiting for the controller to implement startSingleton() at which point it can immediately provide service.
The jboss.ha:service=HASingletonDeployer service discussed above is itself an interesting example of using an HASingletonController. Here is its deployment descriptor (extracted from the deploy/deploy-hasingleton-service.xml file):
<mbean code="org.jboss.ha.singleton.HASingletonController"
name="jboss.ha:service=HASingletonDeployer">
 <depends optional-attribute-name="ClusterPartition" proxy-type="attribute">
  jboss:service=${jboss.partition.name:DefaultPartition}
 </depends>
 <depends optional-attributeame="TargetName">
  jboss.system:service=MainDeployer
 </depends>
 <attribute name="TargetStartMethod">deploy</attribute>
 <attribute name="TargetStartMethodArgument">
  ${jboss.server.home.url}/deploy-hasingleton
 </attribute>
 <attribute name="TargetStopMethod">undeploy</attribute>
 <attribute name="TargetStopMethodArgument">
  ${jboss.server.home.url}/deploy-hasingleton
 </attribute>
</mbean>
A few interesting things here. First the service being controlled is the MainDeployer service, which is the core deployment service in JBoss. That is, it's a service that wasn't written with an intent that it be controlled by an HASingletonController. But it still works! Second, the target start and stop methods are “deploy” and “undeploy”. No requirement that they have particular names, or even that they logically have “start” and “stop” functionality. Here the functionality of the invoked methods is more like “do” and “undo”. Finally, note the “TargetStart(Stop)MethodArgument” attributes. Your singleton service's start/stop methods can take an argument, in this case the location of the directory the MainDeployer should deploy/undeploy.
Services deployed normally inside deploy or farm that want to be started/stopped whenever the content of deploy-hasingleton gets deployed/undeployed, (i.e., whenever the current node becomes the master), need only specify a dependency on the Barrier mbean:
<depends>jboss.ha:service=HASingletonDeployer,type=Barrier</depends>
The way it works is that a BarrierController is deployed along with the jboss.ha:service=HASingletonDeployer MBean and listens for JMX notifications from it. A BarrierController is a relatively simple Mbean that can subscribe to receive any JMX notification in the system. It uses the received notifications to control the lifecycle of a dynamically created Mbean called the Barrier.The Barrier is instantiated, registered and brought to the CREATE state when the BarrierController is deployed. After that, the BarrierController starts and stops the Barrier when matching JMX notifications are received. Thus, other services need only depend on the Barrier MBean using the usual <depends> tag, and they will be started and stopped in tandem with the Barrier. When the BarrierController is undeployed the Barrier is destroyed too.
This provides an alternative to the deploy-hasingleton approach in that we can use farming to distribute the service, while content in deploy-hasingleton must be copied manually on all nodes.
On the other hand, the barrier-dependent service will be instantiated/created (i.e., any create() method invoked) on all nodes, but only started on the master node. This is different with the deploy-hasingleton approach that will only deploy (instantiate/create/start) the contents of the deploy-hasingleton directory on one of the nodes.
So services depending on the barrier will need to make sure they do minimal or no work inside their create() step, rather they should use start() to do the work.
Note
The Barrier controls the start/stop of dependent services, but not their destruction, which happens only when the BarrierController is itself destroyed/undeployed. Thus using the Barrier to control services that need to be "destroyed" as part of their normal “undeploy” operation (like, for example, an EJBContainer) will not have the desired effect.
The various clustered singleton management strategies all depend on the fact that each node in the cluster can independently react to changes in cluster membership and correctly decide whether it is now the “master node”. How is this done?
Prior to JBoss AS 4.2.0, the methodology for this was fixed and simple. For each member of the cluster, the HAPartition mbean maintains an attribute called the CurrentView, which is basically an ordered list of the current members of the cluster. As nodes join and leave the cluster, JGroups ensures that each surviving member of the cluster gets an updated view. You can see the current view by going into the JMX console, and looking at the CurrentView attribute in the jboss:service=DefaultPartition mbean. Every member of the cluster will have the same view, with the members in the same order.
Let's say, for example, that we have a 4 node cluster, nodes A through D, and the current view can be expressed as {A, B, C, D}. Generally speaking, the order of nodes in the view will reflect the order in which they joined the cluster (although this is not always the case, and should not be assumed to be the case.)
To further our example, let's say there is a singleton service (i.e., an HASingletonController) named Foo that's deployed around the cluster, except, for whatever reason, on B. The HAPartition service maintains across the cluster a registry of what services are deployed where, in view order. So, on every node in the cluster, the HAPartition service knows that the view with respect to the Foo service is {A, C, D} (no B).
Whenever there is a change in the cluster topology of the Foo service, the HAPartition service invokes a callback on Foo notifying it of the new topology. So, for example, when Foo started on D, the Foo service running on A, C and D all got callbacks telling them the new view for Foo was {A, C, D}. That callback gives each node enough information to independently decide if it is now the master. The Foo service on each node does this by checking if they are the first member of the view – if they are, they are the master; if not, they're not. Simple as that.
If A were to fail or shutdown, Foo on C and D would get a callback with a new view for Foo of {C, D}. C would then become the master. If A restarted, A, C and D would get a callback with a new view for Foo of {C, D, A}. C would remain the master – there's nothing magic about A that would cause it to become the master again just because it was before.
JBoss Messaging clustering should work out of the box in the all configuration with no configuration changes. It is however crucial that every node is assigned a unique server id.
Every node deployed must have a unique id, including those in a particular LAN cluster, and also those only linked by message bridges.
JBoss Messaging clusters JMS queues and topics transparently across the cluster. Messages sent to a distributed queue or topic on one node are consumable on other nodes. To designate that a particular destination is clustered simply set the clustered attribute in the destination deployment descriptor to true.
JBoss Messaging balances messages between nodes, catering for faster or slower consumers to efficiently balance processing load across the cluster.
If you do not want message redistribution between nodes, but still want to retain the other characteristics of clustered destinations, you can specify the attribute ClusterPullConnectionFactoryName on the server peer.
JBoss Messaging durable subscriptions can also be clustered. This means multiple subscribers can consume from the same durable subscription from different nodes of the cluster. A durable subscription will be clustered if it's topic is clustered.
JBoss Messaging also supports clustered temporary topics and queues. All temporary topics and queues will be clustered if the post office is clustered.
If you don't want your nodes to participate in a cluster, or only have one non clustered server you can set the clustered attribute on the postoffice to false.
If you wish to apply strict JMS ordering to messages, such that a particular JMS consumer consumes messages in the same order as they were produced by a particular producer, you can set the DefaultPreserveOrdering attribute in the server peer to true. By default this is false.
Note
The side effect of setting this to true is that messages cannot be distributed as freely around the cluster.
If the call to send a persistent message to a persistent destination returns successfully with no exception, then you can be sure that the message was persisted. However if the call doesn't return successfully e.g. if an exception is thrown, then you can't be sure the message wasn't persisted . This is because the failure might have occurred after persisting the message but before writing the response to the caller. This is a common attribute of any RPC type call: You can't tell by the call not returning that the call didn't actually succeed. Whether it's a web services call, a HTTP get request, an EJB invocation the same applies. The trick is to code your application so your operations are idempotent i.e. they can be repeated without getting the system into an inconsistent state. With a message system you can do this on the application level, by checking for duplicate messages, and discarding them if they arrive. Duplicate checking is a very powerful technique that can remove the need for XA transactions in many cases.
If the supportsLoadBalancing attribute of the connection factory is set to true then consecutive create connection attempts will round robin between available servers. The first node to try is chosen randomly.
If the supportsFailover attribute of the connection factory is set to true then automatic failover is enabled. This will automatically failover from one server to another, transparently to the user, in case of failure.
If automatic failover is not required or you wish to do manual failover (JBoss MQ style) this can be set to false, and you can supply a standard JMS ExceptionListener on the connection which will be called in case of connection failure. You would then need to manually close the connection, lookup a new connection factory from HA JNDI and recreate the connection.
- 22.1. JGroups Configuration
- 22.2. Common Configuration Properties
- 22.3. Transport Protocols
- 22.4. Discovery Protocols
- 22.5. Failure Detection Protocols
- 22.6. Reliable Delivery Protocols
- 22.7. Other Configuration Options
-
- 22.7.1. Group Membership
- 22.7.2. Flow Control
- 22.7.3. Fragmentation
- 22.7.4. State Transfer
- 22.7.5. Distributed Garbage Collection
- 22.7.6. Merging
- 22.7.7. Binding JGroups Channels to a particular interface
- 22.7.8. Isolating JGroups Channels
- 22.7.9. Changing the Group Name
- 22.7.10. Changing the multicast address and port
- 22.7.11. JGroups Troubleshooting
- 22.7.12. Causes of missing heartbeats in FD
JGroups and JBossCache provide the underlying communication, node replication and caching services, for JBoss AS clusters. Those services are configured as MBeans. There is a set of JBossCache and JGroups MBeans for each type of clustering applications (e.g., the Stateful Session EJBs, HTTP session replication etc.).
The JBoss AS ships with a reasonable set of default JGroups and JBossCache MBean configurations. Most applications just work out of the box with the default MBean configurations. You only need to tweak them when you are deploying an application that has special network or performance requirements.
The JGroups framework provides services to enable peer-to-peer communications between nodes in a cluster. It is built on top a stack of network communication protocols that provide transport, discovery, reliability and failure detection, and cluster membership management services. Figure 22.1, “Protocol stack in JGroups” shows the protocol stack in JGroups.
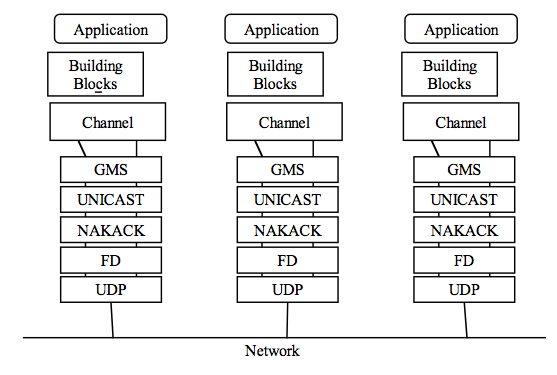
JGroups configurations often appear as a nested attribute in cluster related MBean services, such as
the PartitionConfig attribute in the ClusterPartition MBean or the
ClusterConfig attribute in the TreeCache MBean. You can
configure the behavior and properties of each protocol in JGroups via those MBean attributes. Below is
an example JGroups configuration in the ClusterPartition MBean.
<mbean code="org.jboss.ha.framework.server.ClusterPartition"
	name="jboss:service=${jboss.partition.name:DefaultPartition}">

	 ... ...

	 <attribute name="PartitionConfig">
		 <Config>

			 <UDP mcast_addr="${jboss.partition.udpGroup:228.1.2.3}"
			      mcast_port="${jboss.hapartition.mcast_port:45566}"
			      tos="8"
			      ucast_recv_buf_size="20000000"
			      ucast_send_buf_size="640000"
			      mcast_recv_buf_size="25000000"
			      mcast_send_buf_size="640000"
			      loopback="false"
			      discard_incompatible_packets="true"
			      enable_bundling="false"
			      max_bundle_size="64000"
			      max_bundle_timeout="30"
			      use_incoming_packet_handler="true"
			      use_outgoing_packet_handler="false"
			      ip_ttl="${jgroups.udp.ip_ttl:2}"
			      down_thread="false" up_thread="false"/>

			 <PING timeout="2000"
			       down_thread="false" up_thread="false" num_initial_members="3"/>

			 <MERGE2 max_interval="100000"
				 down_thread="false" up_thread="false" min_interval="20000"/>
			 <FD_SOCK down_thread="false" up_thread="false"/>

			 <FD timeout="10000" max_tries="5"
			     down_thread="false" up_thread="false" shun="true"/>
			 <VERIFY_SUSPECT timeout="1500" down_thread="false" up_thread="false"/>
			 <pbcast.NAKACK max_xmit_size="60000"
					use_mcast_xmit="false" gc_lag="0"
					retransmit_timeout="300,600,1200,2400,4800"
					down_thread="false" up_thread="false"
					discard_delivered_msgs="true"/>
			 <UNICAST timeout="300,600,1200,2400,3600"
				  down_thread="false" up_thread="false"/>
			 <pbcast.STABLE stability_delay="1000" desired_avg_gossip="50000"
					down_thread="false" up_thread="false"
					max_bytes="400000"/>
			 <pbcast.GMS print_local_addr="true" join_timeout="3000"
				     down_thread="false" up_thread="false"
				     join_retry_timeout="2000" shun="true"
				     view_bundling="true"/>
			 <FRAG2 frag_size="60000" down_thread="false" up_thread="false"/>
			 <pbcast.STATE_TRANSFER down_thread="false"
						up_thread="false" use_flush="false"/>
		 </Config>
	 </attribute>
</mbean>
All the JGroups configuration data is contained in the <Config> element under the JGroups config MBean attribute. This information is used to configure a JGroups Channel; the Channel is conceptually similar to a socket, and manages communication between peers in a cluster. Each element inside the <Config> element defines a particular JGroups Protocol; each Protocol performs one function, and the combination of those functions is what defines the characteristics of the overall Channel. In the next several sections, we will dig into the commonly used protocols and their options and explain exactly what they mean.
The following common properties are exposed by all of the JGroups protocols discussed below:
-
down_threadwhether the protocol should create an internal queue and a queue processing thread (aka the down_thread) for messages passed down from higher layers. The higher layer could be another protocol higher in the stack, or the application itself, if the protocol is the top one on the stack. If true (the default), when a message is passed down from a higher layer, the calling thread places the message in the protocol's queue, and then returns immediately. The protocol's down_thread is responsible for reading messages off the queue, doing whatever protocol-specific processing is required, and passing the message on to the next protocol in the stack. -
up_threadis conceptually similar to down_thread, but here the queue and thread are for messages received from lower layers in the protocol stack.
Generally speaking, up_thread and down_thread should be set to false.
The transport protocols send messages from one cluster node to another (unicast) or from cluster node to all other nodes in the cluster (mcast). JGroups supports UDP, TCP, and TUNNEL as transport protocols.
Note
The UDP, TCP, and TUNNEL elements are
mutually exclusive. You can only have one transport protocol in each JGroups
Config element
UDP is the preferred protocol for JGroups. UDP uses multicast or multiple unicasts to send and
receive messages. If you choose UDP as the transport protocol for your cluster service, you need
to configure it in the UDP sub-element in the JGroups
Config element. Here is an example.
<UDP mcast_addr="${jboss.partition.udpGroup:228.1.2.3}"
     mcast_port="${jboss.hapartition.mcast_port:45566}"
     tos="8"
     ucast_recv_buf_size="20000000"
     ucast_send_buf_size="640000"
     mcast_recv_buf_size="25000000"
     mcast_send_buf_size="640000"
     loopback="false"
     discard_incompatible_packets="true"
     enable_bundling="false"
     max_bundle_size="64000"
     max_bundle_timeout="30"
     use_incoming_packet_handler="true"
     use_outgoing_packet_handler="false"
     ip_ttl="${jgroups.udp.ip_ttl:2}"
 down_thread="false" up_thread="false"/>
The available attributes in the above JGroups configuration are listed below.
-
ip_mcast specifies whether or not to use IP multicasting. The default is
true. If set to false, it will send n unicast packets rather than 1 multicast packet. Either way, packets are UDP datagrams. -
mcast_addr specifies the multicast address (class D) for joining a group (i.e., the cluster). If omitted, the default is
228.8.8.8. -
mcast_port specifies the multicast port number. If omitted, the default is
45566. -
bind_addr specifies the interface on which to receive and send multicasts (uses the
-Djgroups.bind_addresssystem property, if present). If you have a multihomed machine, set thebind_addrattribute or system property to the appropriate NIC IP address. By default, system property setting takes priority over XML attribute unless -Djgroups.ignore.bind_addr system property is set. -
receive_on_all_interfaces specifies whether this node should listen on all interfaces for multicasts. The default is
false. It overrides thebind_addrproperty for receiving multicasts. However,bind_addr(if set) is still used to send multicasts. -
send_on_all_interfaces specifies whether this node send UDP packets via all the NICs if you have a multi NIC machine. This means that the same multicast message is sent N times, so use with care.
-
receive_interfaces specifies a list of of interfaces to receive multicasts on. The multicast receive socket will listen on all of these interfaces. This is a comma-separated list of IP addresses or interface names. E.g. "
192.168.5.1,eth1,127.0.0.1". -
ip_ttl specifies time-to-live for IP Multicast packets. TTL is the commonly used term in multicast networking, but is actually something of a misnomer, since the value here refers to how many network hops a packet will be allowed to travel before networking equipment will drop it.
-
use_incoming_packet_handler specifies whether to use a separate thread to process incoming messages. Sometimes receivers are overloaded (they have to handle de-serialization etc). Packet handler is a separate thread taking care of de-serialization, receiver thread(s) simply put packet in queue and return immediately. Setting this to true adds one more thread. The default is
true. -
use_outgoing_packet_handler specifies whether to use a separate thread to process outgoing messages. The default is false.
-
enable_bundling specifies whether to enable message bundling. If it is
true, the node would queue outgoing messages untilmax_bundle_sizebytes have accumulated, ormax_bundle_timemilliseconds have elapsed, whichever occurs first. Then bundle queued messages into a large message and send it. The messages are unbundled at the receiver. The default isfalse. -
loopback specifies whether to loop outgoing message back up the stack. In
unicastmode, the messages are sent to self. Inmcastmode, a copy of the mcast message is sent. The default isfalse -
discard_incompatibe_packets specifies whether to discard packets from different JGroups versions. Each message in the cluster is tagged with a JGroups version. When a message from a different version of JGroups is received, it will be discarded if set to true, otherwise a warning will be logged. The default is
false -
mcast_send_buf_size, mcast_recv_buf_size, ucast_send_buf_size, ucast_recv_buf_size define receive and send buffer sizes. It is good to have a large receiver buffer size, so packets are less likely to get dropped due to buffer overflow.
-
tosspecifies traffic class for sending unicast and multicast datagrams.
Note
On Windows 2000 machines, because of the media sense feature being broken with multicast
(even after disabling media sense), you need to set the UDP protocol's
loopback attribute to true.
Alternatively, a JGroups-based cluster can also work over TCP connections. Compared with UDP,
TCP generates more network traffic when the cluster size increases. TCP
is fundamentally a unicast protocol. To send multicast messages, JGroups uses multiple TCP
unicasts. To use TCP as a transport protocol, you should define a TCP element
in the JGroups Config element. Here is an example of the
TCP element.
<TCP start_port="7800"
    bind_addr="192.168.5.1"
    loopback="true"
    down_thread="false" up_thread="false"/>
Below are the attributes available in the TCP element.
-
bind_addr specifies the binding address. It can also be set with the
-Djgroups.bind_addresscommand line option at server startup. -
start_port, end_port define the range of TCP ports the server should bind to. The server socket is bound to the first available port from
start_port. If no available port is found (e.g., because of a firewall) before theend_port, the server throws an exception. If noend_portis provided orend_port < start_portthen there is no upper limit on the port range. Ifstart_port == end_port, then we force JGroups to use the given port (start fails if port is not available). The default is 7800. If set to 0, then the operating system will pick a port. Please, bear in mind that setting it to 0 will work only if we use MPING or TCPGOSSIP as discovery protocol becauseTCCPINGrequires listing the nodes and their corresponding ports. -
loopback specifies whether to loop outgoing message back up the stack. In
unicastmode, the messages are sent to self. Inmcastmode, a copy of the mcast message is sent. The default is false. -
recv_buf_size, send_buf_size define receive and send buffer sizes. It is good to have a large receiver buffer size, so packets are less likely to get dropped due to buffer overflow.
-
conn_expire_time specifies the time (in milliseconds) after which a connection can be closed by the reaper if no traffic has been received.
-
reaper_interval specifies interval (in milliseconds) to run the reaper. If both values are 0, no reaping will be done. If either value is > 0, reaping will be enabled. By default, reaper_interval is 0, which means no reaper.
-
sock_conn_timeout specifies max time in millis for a socket creation. When doing the initial discovery, and a peer hangs, don't wait forever but go on after the timeout to ping other members. Reduces chances of *not* finding any members at all. The default is 2000.
-
use_send_queues specifies whether to use separate send queues for each connection. This prevents blocking on write if the peer hangs. The default is true.
-
external_addr specifies external IP address to broadcast to other group members (if different to local address). This is useful when you have use (Network Address Translation) NAT, e.g. a node on a private network, behind a firewall, but you can only route to it via an externally visible address, which is different from the local address it is bound to. Therefore, the node can be configured to broadcast its external address, while still able to bind to the local one. This avoids having to use the TUNNEL protocol, (and hence a requirement for a central gossip router) because nodes outside the firewall can still route to the node inside the firewall, but only on its external address. Without setting the external_addr, the node behind the firewall will broadcast its private address to the other nodes which will not be able to route to it.
-
skip_suspected_members specifies whether unicast messages should not be sent to suspected members. The default is true.
-
tcp_nodelay specifies TCP_NODELAY. TCP by default nagles messages, that is, conceptually, smaller messages are bundled into larger ones. If we want to invoke synchronous cluster method calls, then we need to disable nagling in addition to disabling message bundling (by setting
enable_bundlingto false). Nagling is disabled by settingtcp_nodelayto true. The default is false.
The TUNNEL protocol uses an external router to send messages. The external router is known as
a GossipRouter. Each node has to register with the router. All messages are sent to the router and forwarded on to their destinations. The TUNNEL approach can be used to setup communication with nodes behind firewalls. A node can establish a TCP connection to the GossipRouter through the firewall (you can use port 80). The same connection is used by the router to send messages to nodes behind the firewall as most firewalls do not permit outside hosts to initiate a TCP connection to a host inside the firewall. The TUNNEL configuration is defined in the TUNNEL element in the JGroups Config element. Here is an example..
<TUNNEL router_port="12001"
    router_host="192.168.5.1"
    down_thread="false" up_thread="false/>
The available attributes in the TUNNEL element are listed below.
-
router_host specifies the host on which the GossipRouter is running.
-
router_port specifies the port on which the GossipRouter is listening.
-
loopback specifies whether to loop messages back up the stack. The default is
true.
The cluster needs to maintain a list of current member nodes at all times so that the load balancer and client interceptor know how to route their requests. Discovery protocols are used to discover active nodes in the cluster and detect the oldest member of the cluster, which is the coordinator. All initial nodes are discovered when the cluster starts up. When a new node joins the cluster later, it is only discovered after the group membership protocol (GMS, see Section 22.7.1, “Group Membership”) admits it into the group.
Since the discovery protocols sit on top of the transport protocol, you can choose to use different discovery protocols based on your transport protocol. These are also configured as sub-elements in the JGroups MBean Config element.
PING is a discovery protocol that works by either multicasting PING requests to an IP multicast address or connecting to a gossip router. As such, PING normally sits on top of the UDP or TUNNEL transport protocols. Each node responds with a packet {C, A}, where C=coordinator's address and A=own address. After timeout milliseconds or num_initial_members replies, the joiner determines the coordinator from the responses, and sends a JOIN request to it (handled by). If nobody responds, we assume we are the first member of a group.
Here is an example PING configuration for IP multicast.
<PING timeout="2000"
    num_initial_members="2"
    down_thread="false" up_thread="false"/>
Here is another example PING configuration for contacting a Gossip Router.
<PING gossip_host="localhost"
      gossip_port="1234"
	      timeout="3000"
	      num_initial_members="3"
	      down_thread="false" up_thread="false"/>
The available attributes in the PING element are listed below.
-
timeout specifies the maximum number of milliseconds to wait for any responses. The default is 3000.
-
num_initial_members specifies the maximum number of responses to wait for unless timeout has expired. The default is 2.
-
gossip_host specifies the host on which the GossipRouter is running.
-
gossip_port specifies the port on which the GossipRouter is listening on.
-
gossip_refresh specifies the interval (in milliseconds) for the lease from the GossipRouter. The default is 20000.
-
initial_hosts is a comma-seperated list of addresses (e.g.,
host1[12345],host2[23456]), which are pinged for discovery.
If both gossip_host and gossip_port are defined, the
cluster uses the GossipRouter for the initial discovery. If the initial_hosts
is specified, the cluster pings that static list of addresses for discovery. Otherwise, the
cluster uses IP multicasting for discovery.
Note
The discovery phase returns when the timeout ms have elapsed or the
num_initial_members responses have been received.
The TCPGOSSIP protocol only works with a GossipRouter. It works essentially the same way as
the PING protocol configuration with valid gossip_host and
gossip_port attributes. It works on top of both UDP and TCP transport protocols. Here is an example.
<TCPGOSSIP timeout="2000"
	    initial_hosts="192.168.5.1[12000],192.168.0.2[12000]"
	    num_initial_members="3"
  down_thread="false" up_thread="false"/>
The available attributes in the TCPGOSSIP element are listed below.
-
timeout specifies the maximum number of milliseconds to wait for any responses. The default is 3000.
-
num_initial_members specifies the maximum number of responses to wait for unless timeout has expired. The default is 2.
-
initial_hosts is a comma-seperated list of addresses (e.g.,
host1[12345],host2[23456]) for GossipRouters to register with.
The TCPPING protocol takes a set of known members and ping them for discovery. This is
essentially a static configuration. It works on top of TCP. Here is an example of the
TCPPING configuration element in the JGroups Config
element.
<TCPPING timeout="2000"
	initial_hosts="hosta[2300],hostb[3400],hostc[4500]"
	port_range="3"
	num_initial_members="3"
         down_thread="false" up_thread="false"/>
The available attributes in the TCPPING element are listed below.
-
timeout specifies the maximum number of milliseconds to wait for any responses. The default is 3000.
-
num_initial_members specifies the maximum number of responses to wait for unless timeout has expired. The default is 2.
-
initial_hosts is a comma-seperated list of addresses (e.g.,
host1[12345],host2[23456]) for pinging. -
port_range specifies the number of consecutive ports to be probed when getting the initial membership, starting with the port specified in the initial_hosts parameter. Given the current values of port_range and initial_hosts above, the TCPPING layer will try to connect to hosta:2300, hosta:2301, hosta:2302, hostb:3400, hostb:3401, hostb:3402, hostc:4500, hostc:4501, hostc:4502. The configuration options allows for multiple nodes on the same host to be pinged.
MPING uses IP multicast to discover the initial membership. It can be used with all transports, but usually this is used in combination with TCP. TCP usually requires TCPPING, which has to list all group members explicitly, but MPING doesn't have this requirement. The typical use case for this is when we want TCP as transport, but multicasting for discovery so we don't have to define a static list of initial hosts in TCPPING or require external Gossip Router.
<MPING timeout="2000"
    bind_to_all_interfaces="true"
    mcast_addr="228.8.8.8"
    mcast_port="7500"
    ip_ttl="8"
    num_initial_members="3"
    down_thread="false" up_thread="false"/>
The available attributes in the MPING element are listed below.
-
timeout specifies the maximum number of milliseconds to wait for any responses. The default is 3000.
-
num_initial_members specifies the maximum number of responses to wait for unless timeout has expired. The default is 2..
-
bind_addr specifies the interface on which to send and receive multicast packets.
-
bind_to_all_interfaces overrides the
bind_addrand uses all interfaces in multihome nodes. -
mcast_addr, mcast_port, ip_ttl attributes are the same as related attributes in the UDP protocol configuration.
The failure detection protocols are used to detect failed nodes. Once a failed node is detected, a suspect verification phase can occur after which, if the node is still considered dead, the cluster updates its view so that the load balancer and client interceptors know to avoid the dead node. The failure detection protocols are configured as sub-elements in the JGroups MBean
Config element.
FD is a failure detection protocol based on heartbeat messages. This protocol requires each node to periodically send are-you-alive messages to its neighbour. If the neighbour fails to respond, the calling node sends a SUSPECT message to the cluster. The current group coordinator can optionally double check whether the suspected node is indeed dead after which, if the node is still considered dead, updates the cluster's view. Here is an example FD configuration.
<FD timeout="2000"
    max_tries="3"
    shun="true"
    down_thread="false" up_thread="false"/>
The available attributes in the FD element are listed below.
-
timeout specifies the maximum number of milliseconds to wait for the responses to the are-you-alive messages. The default is 3000.
-
max_tries specifies the number of missed are-you-alive messages from a node before the node is suspected. The default is 2.
-
shun specifies whether a failed node will be shunned. Once shunned, the node will be expelled from the cluster even if it comes back later. The shunned node would have to re-join the cluster through the discovery process. JGroups allows to configure itself such that shunning leads to automatic rejoins and state transfer, which is the default behaivour within JBoss Application Server.
Note
Regular traffic from a node counts as if it is a live. So, the are-you-alive messages are only sent when there is no regular traffic to the node for sometime.
FD_SOCK is a failure detection protocol based on a ring of TCP sockets created between group members. Each member in a group connects to its neighbor (last member connects to first) thus forming a ring. Member B is suspected when its neighbor A detects abnormally closed TCP socket (presumably due to a node B crash). However, if a member B is about to leave gracefully, it lets its neighbor A know, so that it does not become suspected. The simplest FD_SOCK configuration does not take any attribute. You can just declare an empty FD_SOCK element in JGroups's Config element.
<FD_SOCK_down_thread="false" up_thread="false"/>
There available attributes in the FD_SOCK element are listed below.
-
bind_addr specifies the interface to which the server socket should bind to. If -Djgroups.bind_address system property is defined, XML value will be ignore. This behaivour can be reversed setting -Djgroups.ignore.bind_addr=true system property.
This protocol verifies whether a suspected member is really dead by pinging that member once again. This verification is performed by the coordinator of the cluster. The suspected member is dropped from the cluster group if confirmed to be dead. The aim of this protocol is to minimize false suspicions. Here's an example.
<VERIFY_SUSPECT timeout="1500"
	down_thread="false" up_thread="false"/>
The available attributes in the FD_SOCK element are listed below.
-
timeout specifies how long to wait for a response from the suspected member before considering it dead.
FD and FD_SOCK, each taken individually, do not provide a solid failure detection layer. Let's look at the the differences between these failure detection protocols to understand how they complement each other:
-
FD
-
An overloaded machine might be slow in sending are-you-alive responses.
-
A member will be suspected when suspended in a debugger/profiler.
-
Low timeouts lead to higher probability of false suspicions and higher network traffic.
-
High timeouts will not detect and remove crashed members for some time.
-
FD_SOCK :
-
Suspended in a debugger is no problem because the TCP connection is still open.
-
High load no problem either for the same reason.
-
Members will only be suspected when TCP connection breaks
-
So hung members will not be detected.
-
Also, a crashed switch will not be detected until the connection runs into the TCP timeout (between 2-20 minutes, depending on TCP/IP stack implementation).
The aim of a failure detection layer is to report real failures and therefore avoid false suspicions. There are two solutions:
-
By default, JGroups configures the FD_SOCK socket with KEEP_ALIVE, which means that TCP sends a heartbeat on socket on which no traffic has been received in 2 hours. If a host crashed (or an intermediate switch or router crashed) without closing the TCP connection properly, we would detect this after 2 hours (plus a few minutes). This is of course better than never closing the connection (if KEEP_ALIVE is off), but may not be of much help. So, the first solution would be to lower the timeout value for KEEP_ALIVE. This can only be done for the entire kernel in most operating systems, so if this is lowered to 15 minutes, this will affect all TCP sockets.
-
The second solution is to combine FD_SOCK and FD; the timeout in FD can be set such that it is much lower than the TCP timeout, and this can be configured individually per process. FD_SOCK will already generate a suspect message if the socket was closed abnormally. However, in the case of a crashed switch or host, FD will make sure the socket is eventually closed and the suspect message generated. Example:
<FD_SOCK down_thread="false" up_thread="false"/>
<FD timeout="10000" max_tries="5" shun="true"
down_thread="false" up_thread="false" />
This suspects a member when the socket to the neighbor has been closed abonormally (e.g. process crash, because the OS closes all sockets). However, f a host or switch crashes, then the sockets won't be closed, therefore, as a seond line of defense, FD will suspect the neighbor after 50 seconds. Note that with this example, if you have your system stopped in a breakpoint in the debugger, the node you're debugging will be suspected after ca 50 seconds.
A combination of FD and FD_SOCK provides a solid failure detection layer and for this reason, such technique is used accross JGroups configurations included within JBoss Application Server.
Reliable delivery protocols within the JGroups stack ensure that data pockets are actually delivered in the right order (FIFO) to the destination node. The basis for reliable message delivery is positive and negative delivery acknowledgments (ACK and NAK). In the ACK mode, the sender resends the message until the acknowledgment is received from the receiver. In the NAK mode, the receiver requests retransmission when it discovers a gap.
The UNICAST protocol is used for unicast messages. It uses ACK. It is configured as a sub-element under the JGroups Config element. If the JGroups stack is configured with TCP transport protocol, UNICAST is not necessary because TCP itself guarantees FIFO delivery of unicast messages. Here is an example configuration for the UNICAST protocol.
<UNICAST timeout="100,200,400,800"
down_thread="false" up_thread="false"/>
There is only one configurable attribute in the UNICAST element.
-
timeout specifies the retransmission timeout (in milliseconds). For instance, if the timeout is "100,200,400,800", the sender resends the message if it hasn't received an ACK after 100 ms the first time, and the second time it waits for 200 ms before resending, and so on.
The NAKACK protocol is used for multicast messages. It uses NAK. Under this protocol, each
message is tagged with a sequence number. The receiver keeps track of the sequence numbers and
deliver the messages in order. When a gap in the sequence number is detected, the receiver asks
the sender to retransmit the missing message. The NAKACK protocol is configured as the
pbcast.NAKACK sub-element under the JGroups Config
element. Here is an example configuration.
<pbcast.NAKACK max_xmit_size="60000" use_mcast_xmit="false"

   retransmit_timeout="300,600,1200,2400,4800" gc_lag="0"
   discard_delivered_msgs="true"
   down_thread="false" up_thread="false"/>
The configurable attributes in the pbcast.NAKACK element are as follows.
-
retransmit_timeout specifies the retransmission timeout (in milliseconds). It is the same as the
timeoutattribute in the UNICAST protocol. -
use_mcast_xmit determines whether the sender should send the retransmission to the entire cluster rather than just the node requesting it. This is useful when the sender drops the pocket -- so we do not need to retransmit for each node.
-
max_xmit_size specifies maximum size for a bundled retransmission, if multiple packets are reported missing.
-
discard_delivered_msgs specifies whether to discard delivery messages on the receiver nodes. By default, we save all delivered messages. However, if we only ask the sender to resend their messages, we can enable this option and discard delivered messages.
-
gc_lag specifies the number of messages garbage collection lags behind.
In addition to the protocol stacks, you can also configure JGroups network services in the Config element.
The group membership service in the JGroups stack maintains a list of active nodes. It handles
the requests to join and leave the cluster. It also handles the SUSPECT messages sent by failure
detection protocols. All nodes in the cluster, as well as the load balancer and client side
interceptors, are notified if the group membership changes. The group membership service is
configured in the pbcast.GMS sub-element under the JGroups
Config element. Here is an example configuration.
<pbcast.GMS print_local_addr="true"
    join_timeout="3000"
    down_thread="false" up_thread="false"
    join_retry_timeout="2000"
    shun="true"
    view_bundling="true"/>
The configurable attributes in the pbcast.GMS element are as follows.
-
join_timeout specifies the maximum number of milliseconds to wait for a new node JOIN request to succeed. Retry afterwards.
-
join_retry_timeout specifies the maximum number of milliseconds to wait after a failed JOIN to re-submit it.
-
print_local_addr specifies whether to dump the node's own address to the output when started.
-
shun specifies whether a node should shun itself if it receives a cluster view that it is not a member node.
-
disable_initial_coord specifies whether to prevent this node as the cluster coordinator.
-
view_bundling specifies whether multiple JOIN or LEAVE request arriving at the same time are bundled and handled together at the same time, only sending out 1 new view / bundle. This is is more efficient than handling each request separately.
The flow control service tries to adapt the sending data rate and the receiving data among
nodes. If a sender node is too fast, it might overwhelm the receiver node and result in dropped
packets that have to be retransmitted. In JGroups, the flow control is implemented via a
credit-based system. The sender and receiver nodes have the same number of credits (bytes) to
start with. The sender subtracts credits by the number of bytes in messages it sends. The
receiver accumulates credits for the bytes in the messages it receives. When the sender's credit
drops to a threshold, the receivers sends some credit to the sender. If the sender's credit is
used up, the sender blocks until it receives credits from the receiver. The flow control service
is configured in the FC sub-element under the JGroups
Config element. Here is an example configuration.
<FC max_credits="1000000"
down_thread="false" up_thread="false"
    min_threshold="0.10"/>
The configurable attributes in the FC element are as follows.
-
max_credits specifies the maximum number of credits (in bytes). This value should be smaller than the JVM heap size.
-
min_credits specifies the threshold credit on the sender, below which the receiver should send in more credits.
-
min_threshold specifies percentage value of the threshold. It overrides the
min_creditsattribute.
Note
Applications that use synchronous group RPC calls primarily do not require FC protocol in their JGroups protocol stack because synchronous communication, where the hread that makes the call blocks waiting for responses from all the members of the group, already slows overall rate of calls. Even though TCP provides flow control by itself, FC is still required in TCP based JGroups stacks because of group communication, where we essentially have to send group messages at the highest speed the slowest receiver can keep up with. TCP flow control only takes into account individual node communications and has not a notion of who's the slowest in the group, which is why FC is required.
The reason is group communication, where we essentially have to send group messages at the highest speed the slowest receiver can keep up with. Let's say we have a cluster {A,B,C,D}. D is slow (maybe overloaded), the rest is fast. When A sends a group message, it establishes TCP connections A-A (conceptually), A-B, A-C and A-D (if they don't yet exist). So let's say A sends 100 million messages to the cluster. Because TCP's flow control only applies to A-B, A-C and A-D, but not to A-{B,C,D}, where {B,C,D} is the group, it is possible that A, B and C receive the 100M, but D only received 1M messages. (BTW: this is also the reason why we need NAKACK, although TCP does its own retransmission).
Now JGroups has to buffer all messages in memory for the case when the original sender S dies and a node asks for retransmission of a message of S. Because all members buffer all messages they received, they need to purge stable messages (= messages seen by everyone) every now and then. This is done by the STABLE protocol, which can be configured to run the stability protocol round time based (e.g. every 50s) or size based (whenever 400K data has been received).
In the above case, the slow node D will prevent the group from purging messages above 1M, so every member will buffer 99M messages ! This in most cases leads to OOM exceptions. Note that - although the sliding window protocol in TCP will cause writes to block if the window is full - we assume in the above case that this is still much faster for A-B and A-C than for A-D.
So, in summary, we need to send messages at a rate the slowest receiver (D) can handle.
This depends on how the application uses the JGroups channel. Referring to the example above, if there was something about the application that would naturally cause A to slow down its rate of sending because D wasn't keeping up, then FC would not be needed.
A good example of such an application is one that makes synchronous group RPC calls (typically using a JGroups RpcDispatcher.) By synchronous, we mean the thread that makes the call blocks waiting for responses from all the members of the group. In that kind of application, the threads on A that are making calls would block waiting for responses from D, thus naturally slowing the overall rate of calls.
A JBoss Cache cluster configured for REPL_SYNC is a good example of an application that makes synchronous group RPC calls. If a channel is only used for a cache configured for REPL_SYNC, we recommend you remove FC from its protocol stack.
And, of course, if your cluster only consists of two nodes, including FC in a TCP-based protocol stack is unnecessary. There is no group beyond the single peer-to-peer relationship, and TCP's internal flow control will handle that just fine.
Another case where FC may not be needed is for a channel used by a JBoss Cache configured for buddy replication and a single buddy. Such a channel will in many respects act like a two node cluster, where messages are only exchanged with one other node, the buddy. (There may be other messages related to data gravitation that go to all members, but in a properly engineered buddy replication use case these should be infrequent. But if you remove FC be sure to load test your application.)
This protocol fragments messages larger than certain size. Unfragments at the receiver's side. It works for both unicast and multicast messages. It is configured in the FRAG2 sub-element under the JGroups Config element. Here is an example configuration.
<FRAG2 frag_size="60000" down_thread="false" up_thread="false"/>
The configurable attributes in the FRAG2 element are as follows.
-
frag_size specifies the max frag size in bytes. Messages larger than that are fragmented.
Note
TCP protocol already provides fragmentation but a fragmentation JGroups protocol is still needed if FC is used. The reason for this is that if you send a message larger than FC.max_bytes, FC protocol would block. So, frag_size within FRAG2 needs to be set to always be less than FC.max_bytes.
The state transfer service transfers the state from an existing node (i.e., the cluster
coordinator) to a newly joining node. It is configured in the
pbcast.STATE_TRANSFER sub-element under the JGroups Config
element. It does not have any configurable attribute. Here is an example configuration.
<pbcast.STATE_TRANSFER down_thread="false" up_thread="false"/>
In a JGroups cluster, all nodes have to store all messages received for potential retransmission in case of a failure. However, if we store all messages forever, we will run out of memory. So, the distributed garbage collection service in JGroups periodically purges messages that have seen by all nodes from the memory in each node. The distributed garbage collection service is configured in the pbcast.STABLE sub-element under the JGroups Config element. Here is an example configuration.
<pbcast.STABLE stability_delay="1000"
    desired_avg_gossip="5000"
    down_thread="false" up_thread="false"
       max_bytes="400000"/>
The configurable attributes in the pbcast.STABLE element are as follows.
-
desired_avg_gossip specifies intervals (in milliseconds) of garbage collection runs. Value
0disables this service. -
max_bytes specifies the maximum number of bytes received before the cluster triggers a garbage collection run. Value
0disables this service. -
stability_delay specifies delay before we send STABILITY msg (give others a change to send first). If used together with max_bytes, this attribute should be set to a small number.
Note
Set the max_bytes attribute when you have a high traffic
cluster.
When a network error occurs, the cluster might be partitioned into several different partitions. JGroups has a MERGE service that allows the coordinators in partitions to communicate with each other and form a single cluster back again. The flow control service is configured in the MERGE2 sub-element under the JGroups Config element. Here is an example configuration.
<MERGE2 max_interval="10000"
    min_interval="2000"
    down_thread="false" up_thread="false"/>
The configurable attributes in the FC element are as follows.
-
max_interval specifies the maximum number of milliseconds to send out a MERGE message.
-
min_interval specifies the minimum number of milliseconds to send out a MERGE message.
JGroups chooses a random value between min_interval and
max_interval to send out the MERGE message.
Note
The cluster states are not merged in a merger. This has to be done by the application. If MERGE2 is used in conjunction with TCPPING, the initial_hosts attribute must contain all the nodes that could potentially be merged back, in order for the merge process to work properly. Otherwise, the merge process would not merge all the nodes even though shunning is disabled. Alternatively use MPING, which is commonly used with TCP to provide multicast member discovery capabilities, instead of TCPPING to avoid having to specify all the nodes.
In the Transport Protocols section above, we briefly touched on how the interface to which JGroups will bind sockets is configured. Let's get into this topic in more depth:
First, it's important to understand that the value set in any bind_addr element in an XML configuration file will be ignored by JGroups if it finds that system property jgroups.bind_addr (or a deprecated earlier name for the same thing, bind.address) has been set. The system property trumps XML. If JBoss AS is started with the -b (a.k.a. --host) switch, the AS will set jgroups.bind_addr to the specified value.
Beginning with AS 4.2.0, for security reasons the AS will bind most services to localhost if -b is not set. The effect of this is that in most cases users are going to be setting -b and thus jgroups.bind_addr is going to be set and any XML setting will be ignored.
So, what are best practices for managing how JGroups binds to interfaces?
-
Binding JGroups to the same interface as other services. Simple, just use -b:
./run.sh -b 192.168.1.100 -c all
-
Binding services (e.g., JBoss Web) to one interface, but use a different one for JGroups:
./run.sh -b 10.0.0.100 -Djgroups.bind_addr=192.168.1.100 -c all
Specifically setting the system property overrides the -b value. This is a common usage pattern; put client traffic on one network, with intra-cluster traffic on another.
-
Binding services (e.g., JBoss Web) to all interfaces. This can be done like this:
./run.sh -b 0.0.0.0 -c all
However, doing this will not cause JGroups to bind to all interfaces! Instead , JGroups will bind to the machine's default interface. See the Transport Protocols section for how to tell JGroups to receive or send on all interfaces, if that is what you really want.
-
Binding services (e.g., JBoss Web) to all interfaces, but specify the JGroups interface:
./run.sh -b 0.0.0.0 -Djgroups.bind_addr=192.168.1.100 -c all
Again, specifically setting the system property overrides the -b value.
-
Using different interfaces for different channels:
./run.sh -b 10.0.0.100 -Djgroups.ignore.bind_addr=true -c all
This setting tells JGroups to ignore the jgroups.bind_addr system property, and instead use whatever is specfied in XML. You would need to edit the various XML configuration files to set the bind_addr to the desired interfaces.
Within JBoss AS, there are a number of services that independently create JGroups channels -- 3 different JBoss Cache services (used for HttpSession replication, EJB3 SFSB replication and EJB3 entity replication) along with the general purpose clustering service called HAPartition that underlies most other JBossHA services.
It is critical that these channels only communicate with their intended peers; not with the channels used by other services and not with channels for the same service opened on machines not meant to be part of the group. Nodes improperly communicating with each other is one of the most common issues users have with JBoss AS clustering.
Whom a JGroups channel will communicate with is defined by its group name, multicast address, and multicast port, so isolating JGroups channels comes down to ensuring different channels use different values for the group name, multicast address and multicast port.
To isolate JGroups channels for different services on the same set of AS instances from each other, you MUST change the group name and the multicast port. In other words, each channel must have its own set of values.
For example, say we have a production cluster of 3 machines, each of which has an HAPartition deployed along with a JBoss Cache used for web session clustering. The HAPartition channels should not communicate with the JBoss Cache channels. They should use a different group name and multicast port. They can use the same multicast address, although they don't need to.
To isolate JGroups channels for the same service from other instances of the service on the network, you MUST change ALL three values. Each channel must have its own group name, multicast address, and multicast port.
For example, say we have a production cluster of 3 machines, each of which has an HAPartition deployed. On the same network there is also a QA cluster of 3 machines, which also has an HAPartition deployed. The HAPartition group name, multicast address, and multicast port for the production machines must be different from those used on the QA machines.
The group name for a JGroups channel is configured via the service that starts the channel. Unfortunately, different services use different attribute names for configuring this. For HAPartition and related services configured in the deploy/cluster-service.xml file, this is configured via a PartitionName attribute. For JBoss Cache services, the name of the attribute is ClusterName.
Starting with JBoss AS 4.0.4, for the HAPartition and all the standard JBoss Cache services, we make it easy for you to create unique groups names simply by using the -g (a.k.a. –partition) switch when starting JBoss:
./run.sh -g QAPartition -b 192.168.1.100 -c all
This switch sets the jboss.partition.name system property, which is used as a component in the configuration of the group name in all the standard clustering configuration files. For example,
<attribute name="ClusterName">Tomcat-${jboss.partition.name:Cluster}</attribute>
The -u (a.k.a. --udp) command line switch may be used to control the multicast address used by the JGroups channels opened by all standard AS services.
/run.sh -u 230.1.2.3 -g QAPartition -b 192.168.1.100 -c all
This switch sets the jboss.partition.udpGroup system property, which you can see referenced in all of the standard protocol stack configs in JBoss AS:
<Config>
<UDP mcast_addr="${jboss.partition.udpGroup:228.1.2.3}"
 ....
Unfortunately, setting the multicast ports is not so simple. As described above, by default there are four separate JGroups channels in the standard JBoss AS all configuration, and each should be given a unique port. There are no command line switches to set these, but the standard configuration files do use system properties to set them. So, they can be configured from the command line by using -D. For example,
/run.sh -u 230.1.2.3 -g QAPartition -Djboss.hapartition.mcast_port=12345 -Djboss.webpartition.mcast_port=23456 -Djboss.ejb3entitypartition.mcast_port=34567 -Djboss.ejb3sfsbpartition.mcast_port=45678 -b 192.168.1.100 -c all
Why isn't it sufficient to change the group name?
If channels with different group names share the same multicast address and port, the lower level JGroups protocols in each channel will see, process and eventually discard messages intended for the other group. This will at a minimum hurt performance and can lead to anomalous behavior.
Why do I need to change the multicast port if I change the address?
It should be sufficient to just change the address, but there is a problem on several operating systems whereby packets addressed to a particular multicast port are delivered to all listeners on that port, regardless of the multicast address they are listening on. So the recommendation is to change both the address and the port.
Nodes do not form a cluster
Make sure your machine is set up correctly for IP multicast. There are 2 test programs that can be used to detect this: McastReceiverTest and McastSenderTest. Go to the $JBOSS_HOME/server/all/lib directory and start McastReceiverTest, for example:
java -cp jgroups.jar org.jgroups.tests.McastReceiverTest -mcast_addr 224.10.10.10 -port 5555
Then in another window start McastSenderTest:
java -cp jgroups.jar org.jgroups.tests.McastSenderTest -mcast_addr 224.10.10.10 -port 5555
If you want to bind to a specific network interface card (NIC), use -bind_addr 192.168.0.2, where 192.168.0.2 is the IP address of the NIC to which you want to bind. Use this parameter in both the sender and the receiver.
You should be able to type in the McastSenderTest window and see the output in the McastReceiverTest window. If not, try to use -ttl 32 in the sender. If this still fails, consult a system administrator to help you setup IP multicast correctly, and ask the admin to make sure that multicast will work on the interface you have chosen or, if the machines have multiple interfaces, ask to be told the correct interface.
Once you know multicast is working properly on each machine in your cluster, you can repeat the above test to test the network, putting the sender on one machine and the receiver on another.
Sometimes a member is suspected by FD because a heartbeat ack has not been received for some time T (defined by timeout and max_tries). This can have multiple reasons, e.g. in a cluster of A,B,C,D; C can be suspected if (note that A pings B, B pings C, C pings D and D pings A):
-
B or C are running at 100% CPU for more than T seconds. So even if C sends a heartbeat ack to B, B may not be able to process it because it is at 100%
-
B or C are garbage collecting, same as above.
-
A combination of the 2 cases above
-
The network loses packets. This usually happens when there is a lot of traffic on the network, and the switch starts dropping packets (usually broadcasts first, then IP multicasts, TCP packets last).
-
B or C are processing a callback. Let's say C received a remote method call over its channel and takes T+1 seconds to process it. During this time, C will not process any other messages, including heartbeats, and therefore B will not receive the heartbeat ack and will suspect C.