Table of Contents
 |
Many IT organizations look to achieve a competitive advantage for the enterprise by improving business productivity and reducing costs. Today's top enterprises are realizing this goal by deploying enterprise portals within their IT infrastructure. Enterprise portals simplify access to information by providing a single source of interaction with corporate information. Although today?s packaged portal frameworks help enterprises launch portals more quickly, only JBoss Portal can deliver the benefits of a zero-cost open source license combined with a flexible and scalable underlying platform.
JBoss Portal provides an open source and standards-based environment for hosting and serving a portal's Web interface, publishing and managing its content, and customizing its experience. It is entirely standards-based and supports the JSR-168 portlet specification, which allows you to easily plug-in standards-compliant portlets to meet your specific portal needs. JBoss Portal is available through the business-friendly LGPL open source license and is supported by JBoss Inc. Professional Support and Consulting . JBoss support services are available to assist you in designing, developing, deploying, and ultimately managing your portal environment. JBoss Portal is currently developed by JBoss, Inc. developers, Novell developers, and community contributors.
The JBoss Portal framework and architecture includes the portal container and supports a wide range of features including standard portlets, single sign-on, clustering and internationalization. Portal themes and layouts are configurable. Fine-grained security administration down to portlet permissions rounds out the security model. JBoss Portal includes a rich content management system and message board support.
JBoss Portal Resources:
The JBoss Portal team encourages you to use this guide to install and configure JBoss Portal. If you encounter any configuration issues or simply want to take part in our community, we would love to hear from you in our forums.
Welcome to the JBoss Portal Quickstart tutorial. In this tutorial, you will:
- Download and unzip the JBoss Portal bundle
- Execute the JBoss Portal
- Interact with the default portal
- Create and edit content in the JBoss Portal
- Manage the JBoss Portal
- Add a new portlet to the JBoss Portal
Before we get started, a couple of notes about this tutorial:
- For those that are not familiar with portals or portlets, please start with this article on portals: http://java.sys-con.com/read/131819.htm
- This guide is not intended to show all of the features of JBoss Portal. The intention is to show how to use the basic functionality of JBoss Portal. There is also a user guide and reference guide that will assist you with further use of JBoss Portal.
- This guide was created with JBoss Portal 2.4. This guide is expected to be forward compatible with future versions of Portal (although the screenshots may vary slightly).
- JBoss Portal is platform independent, but this guide was developed using a windows platform. This guide should work equally well for Unix/Linux installations because JBoss Portal is 100% Pure Java. Obviously, you may need use the run_init_XXXX.sh instead of run.bat and use forward slashes instead of backslashes, etc.
The JBoss Portal bundle contains everything needed to execute JBoss Portal with the exception of Java itself. The JBoss Application Server in the JBoss Portal bundle requires either JDK 1.4 or JDK 1.5. If you do not have one of these on the machine that JBoss Portal will be running on, please download it here: http://java.sun.com/j2se/1.4.2/download.html Once you have Java installed, you are ready to download the JBoss Portal bundle. The following link has the list of downloads for JBoss Portal: http://labs.jboss.com/portal/jbossportal/download . Please select the JBoss Portal bundled with JBoss Application Server and select to download it to your machine. From here, you will need to unzip it to your machine (Note: If you do not have Zip, please go to this link to get it: http://sourceforge.net/projects/sevenzip ). Once you have unzipped it, you should have a directory structure with the following folders under, jboss-portal-2.4-bundled:
- bin - Contains the startup/shutdown commands for the JBoss Portal
- client - Contains client libraries
- docs - Contains documentation for the JBoss Portal
- lib - Contains libraries
- server - Contains JBoss Application Server configuration and the Portal.sar file
Note
Binary distributions of JBoss Portal include the WSRP service which is not automatically deployed with the source distribution. WSRP is built upon the JBoss WS web service stack. As such, it has some additional constraints. In particular, there is a known issue with the version 1.0.0.GA of JBoss WS (bundled with JBoss Application Server 4.0.4.GA) that prevents the complete deployment of JBoss Portal's WSRP service if the user is not online or behind a firewall/proxy. This, in turn, prevents the deployment of JBoss Portal. If you do not need the WSRP service, you can remove the portal-wsrp.sar file from the jboss-portal.sar file. If you'd like to use the WSRP service, the JBoss WS issue has been addressed in version 1.0.2.GA of JBoss WS. Please follow the instructions on how to upgrade JBoss WS as found on JBoss Portal's wiki.Go to the bin directory and double click on the run.bat. A command window should come up with the Portal console (Figure 1).
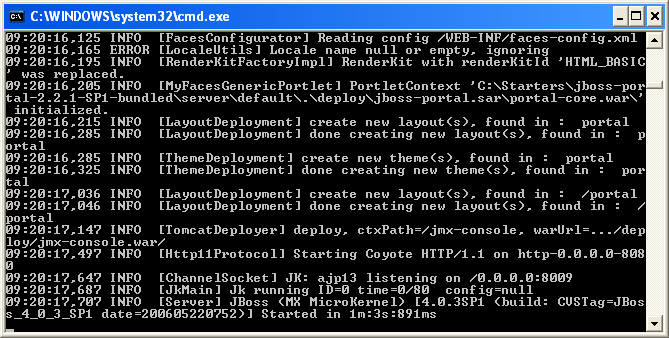 |
Figure 1: Portal console
Note
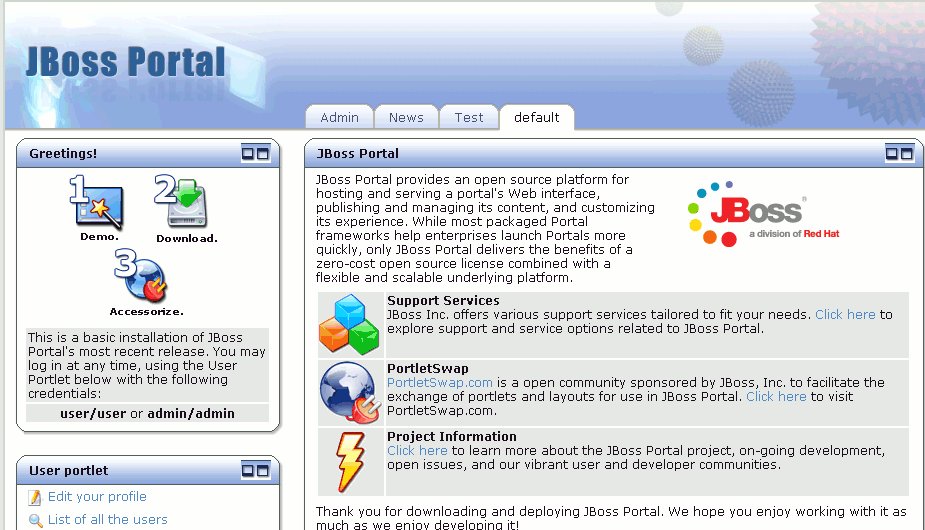
If the database tables do not exist, you may see some errors the first time the portal runs and it creates the tables. This is not an error.Now, bring up Internet Explorer and go to the following URL: http://localhost:8080/portal . You should see the default page for JBoss Portal (Figure 2).
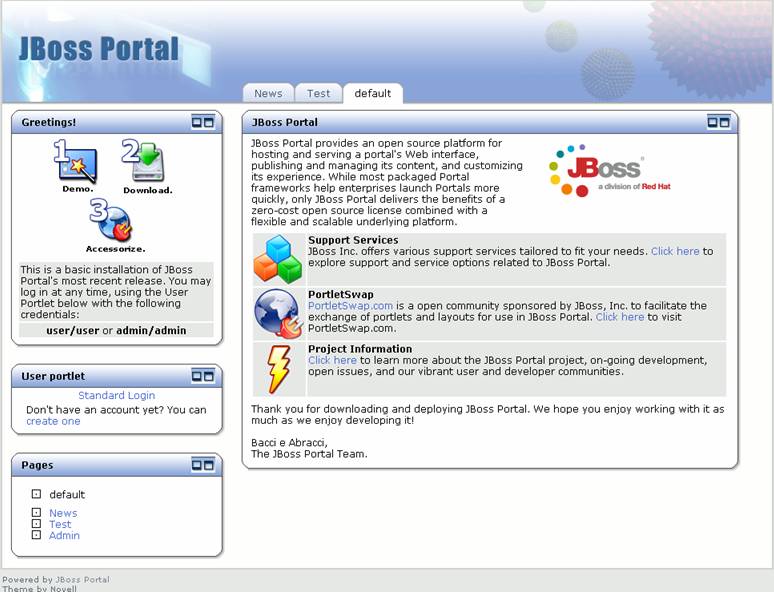 |
Figure 2. Default page for the JBoss Portal.
JBoss Portal is made up of portals, portal containers, portal pages, and portlets. What are these things? Here are some definitions:
- Portal: Hosts the presentation layer for personalization, single sign on and content aggregation.
- Portlet Container: A Portal can host multiple portlet containers and each portlet container has its own runtime environment.
- Portal Page: Aggregation of portlets, organized and displayed on a single page.
- Portlet: A portlet is a Java technology based web component, managed by a portlet container, that processes requests and generates dynamic content.
- Portlet Instance: A portlet instance can be placed on multiple pages and will show the same state.
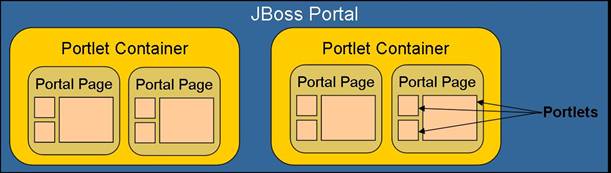 |
Figure 3. Portal Definition Diagram.
Now let's look at that default portal page again with these terms in mind (Figure 4).
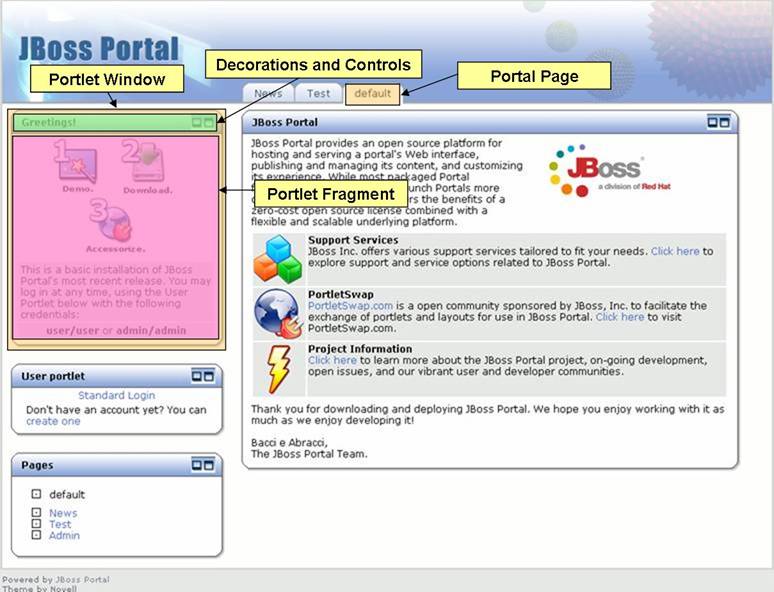 |
Figure 4. The default portal page with components highlighted.
Now we see that the default portal we are looking at has three portal pages, and the default portal page has five portlets on it (navigation, greetings, user, portal pages, and content view). In addition, we see that each portlet window is made up of decorations/controls and a portlet fragment (navigation does not need decoration/controls). Each portlet can represent some fragment of information that you want to present to users. By having multiple portlets on a portal page, we can aggregate portlet information.
Each portlet in the portal page can be interacted with individually. Let's interact with a couple of portlets, and see the results. Click on the minimize icon on the "Select a Portal Theme" portlet. The portlet is then minimized (Figure 5):
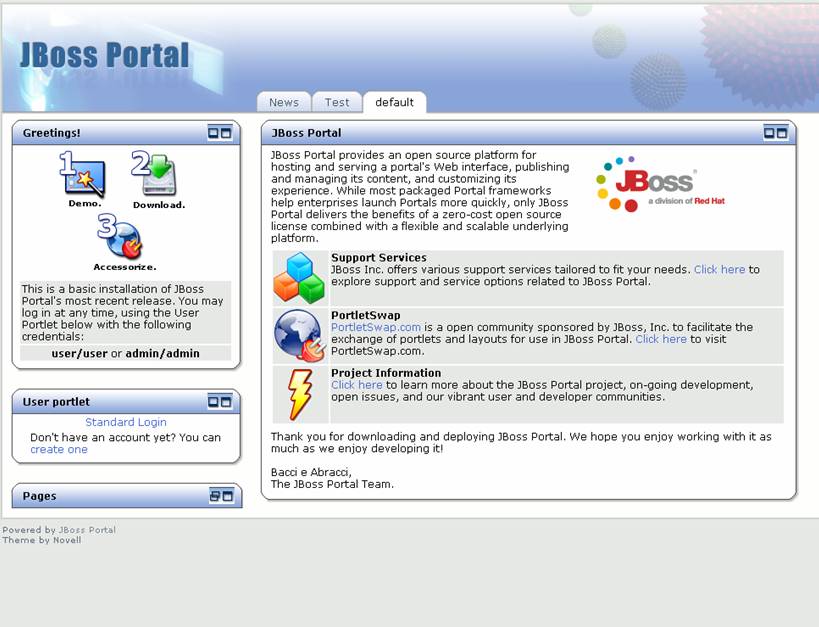 |
Figure 5. Default page with portlet minimized.
Click on the maximize button for that same portlet, and it now takes the entire page (Figure 6). Click on the "resize" icon to return the portlet to its starting size.
 |
Figure 6. Portal with portlet maximized.
Let's create a user for the portal. Click on the "create one" link in the user portlet. The create user view now shows in the user portlet. Enter the information as shown in Figure 10 (password is starter). Once you have clicked "create new user", the default view will show (Figure 11).
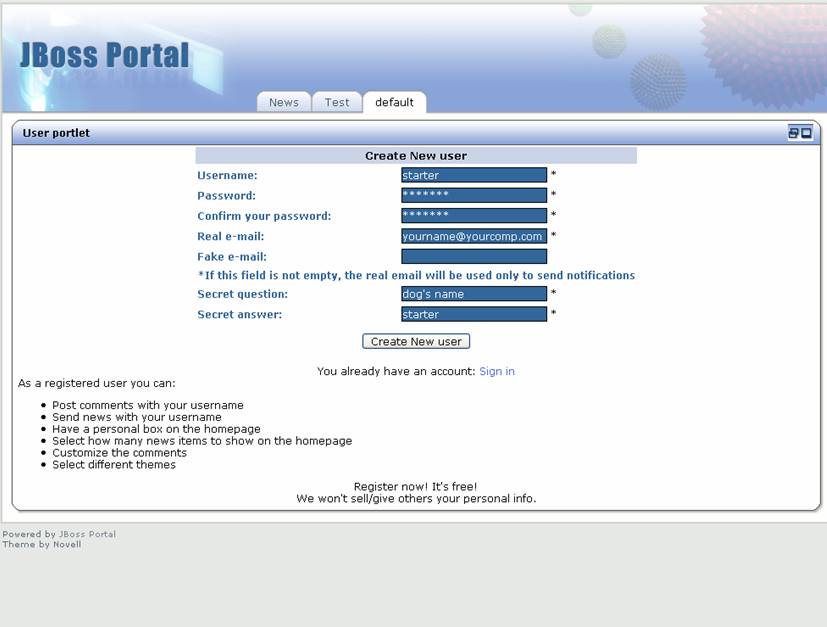 |
Figure 10. The Create user view in the user portlet.
 |
Figure 11. The default view in the user portlet maximized.
Click on the resize button to make the user portlet shrink back to normal size. Now, click "Standard login". The login page will show (Figure 12). Log in with username and password of "admin"
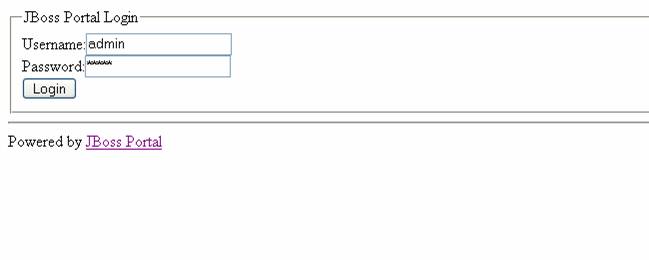 |
Figure 12. Portal login page.
Click "Login", and the portal will now show us the portlets and portal pages for the administrator (Figure 13).
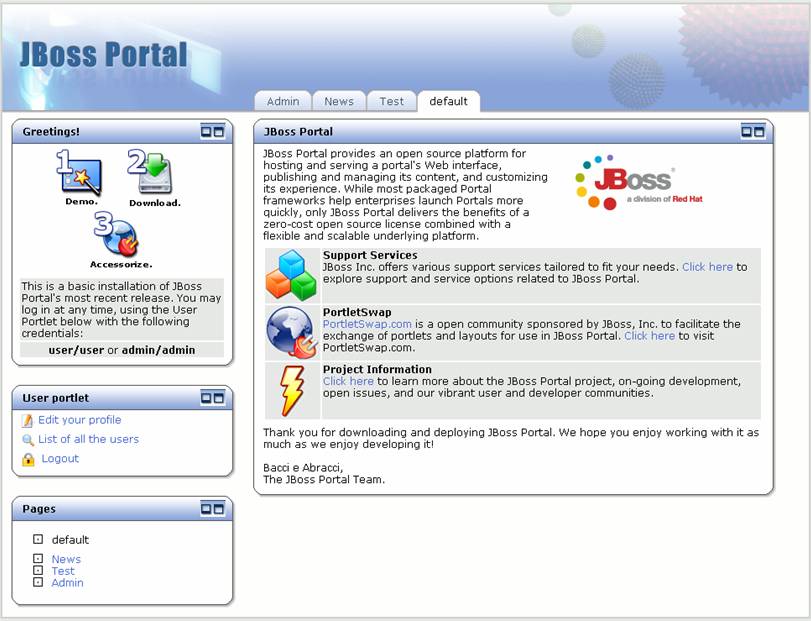 |
Figure 13. default portal page for administrator.
Now that we are logged in, there is a portal page available for the content management and portal administration. Click on the "Admin" tab. The Admin portal page displays(Figure 14).
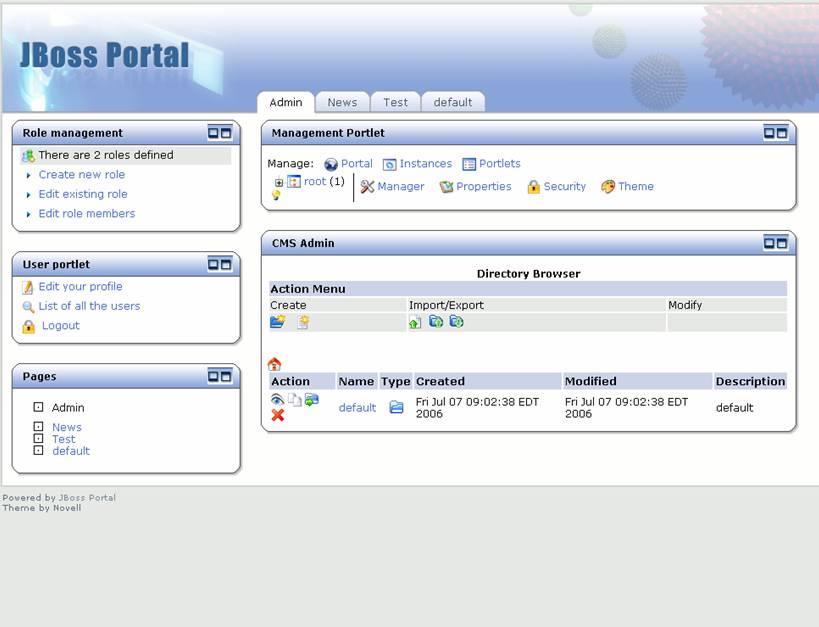 |
Figure 14. Admin portal page.
The content management portlet allows users to create/delete files and folders, edit text/HTML files, and batch upload files. These files are then viewable through the content view portlet. HTML files can refer to other HTML files through the directory structure in the CMS. Different groups or departments in an organization can have their own area (directory structure) for the files/HTML pages they want to share on the Portal. Let's batch upload a set of HTML pages with images and style sheets. Click on the upload archive file icon on the page. The upload archive view shows (Figure 15).
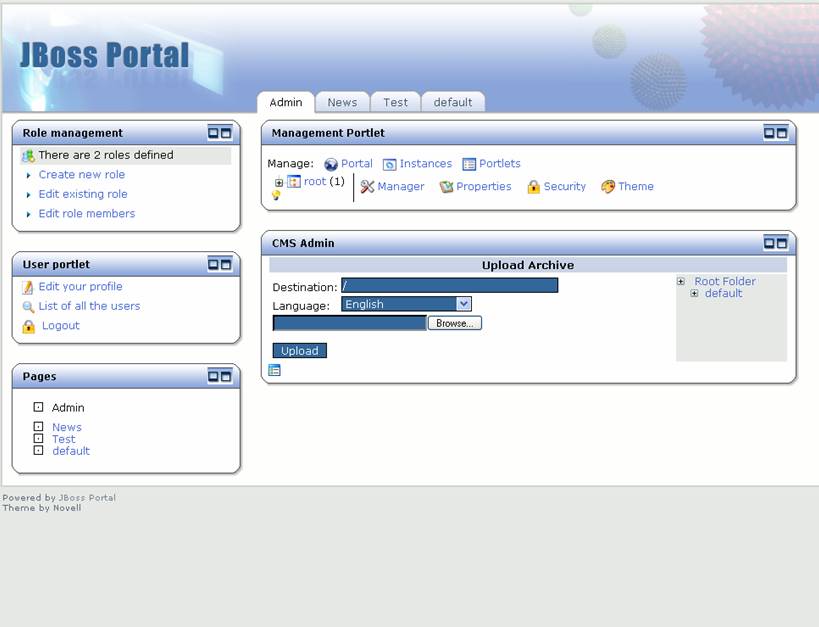 |
Figure 15. Upload Archive view.
Note
Please use the quickstart.zip for the batch upload. You may also download it from here .We can choose the destination folder for the upload (the current folder structure is shown on the right), and the language of the files being uploaded. Click browse to find the file you want to upload (Figure 16).
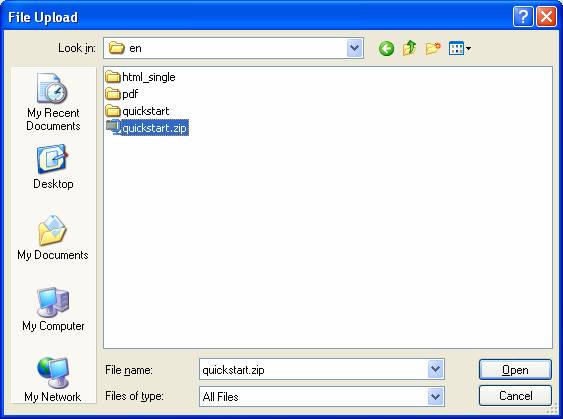 |
Figure 16. Choose file to batch upload.
Click on the quickstart.zip that you downloaded earlier(see note above) and select "Open". The quickstart.zip will be uploaded into the content repository, and the files and directories will now appear in the content management structure (see the new quickstart directory in Figure 17).
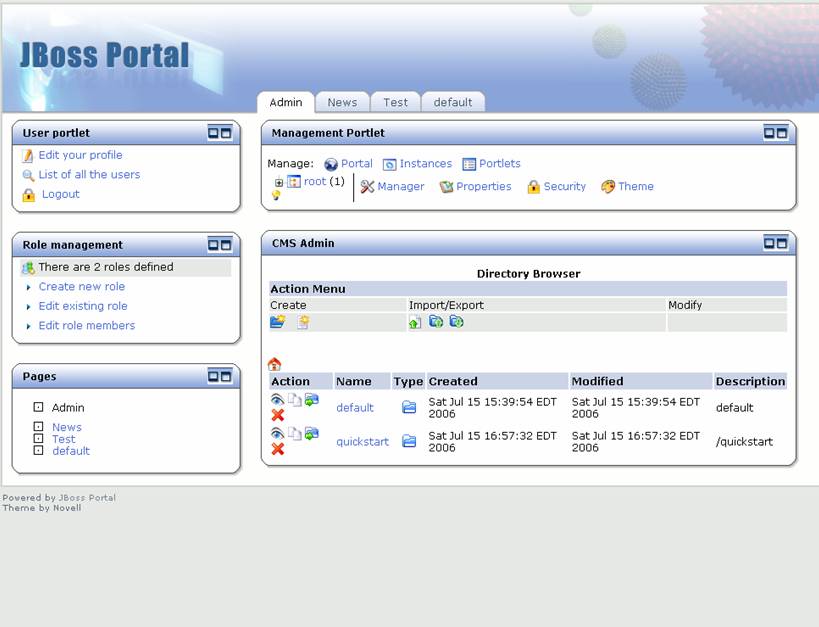 |
Figure 17. New quickstart directory shows in content management repository.
Click on the quickstart link to see the HTML files and sub-directories that were uploaded (Figure 18). Click on the "home" symbol to return to the top of the content manager repository (back to Figure 17).
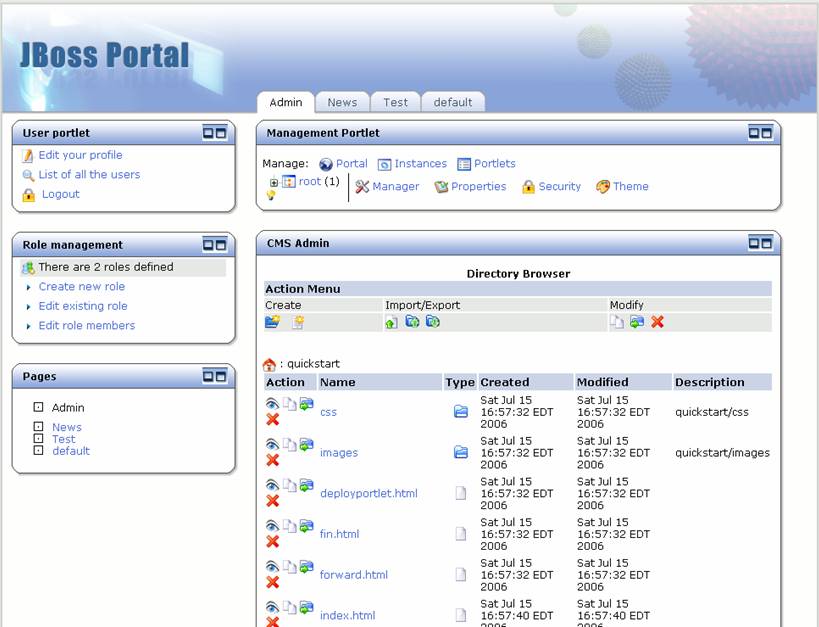 |
Figure 18. HTML files and sub-directories that were uploaded intoquickstart directory shows in content management repository.
Let's edit the default page to contain a link to our new pages. Clicking on the default link, we can see that an images directory, as well as three HTML files (Figure 19).
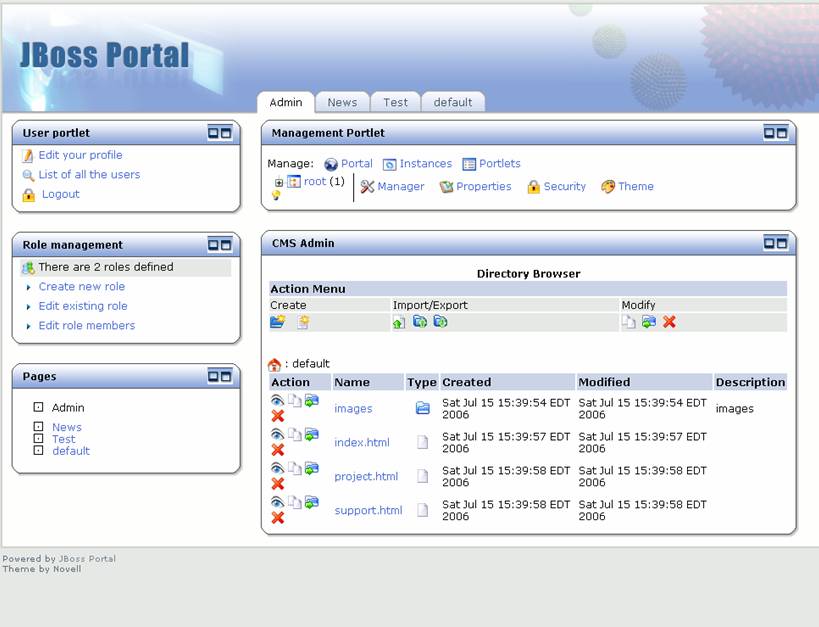 |
Figure 19. Default directory listing.
Click on the index.html link. The file browser will show the versions of this file (Figure 20).
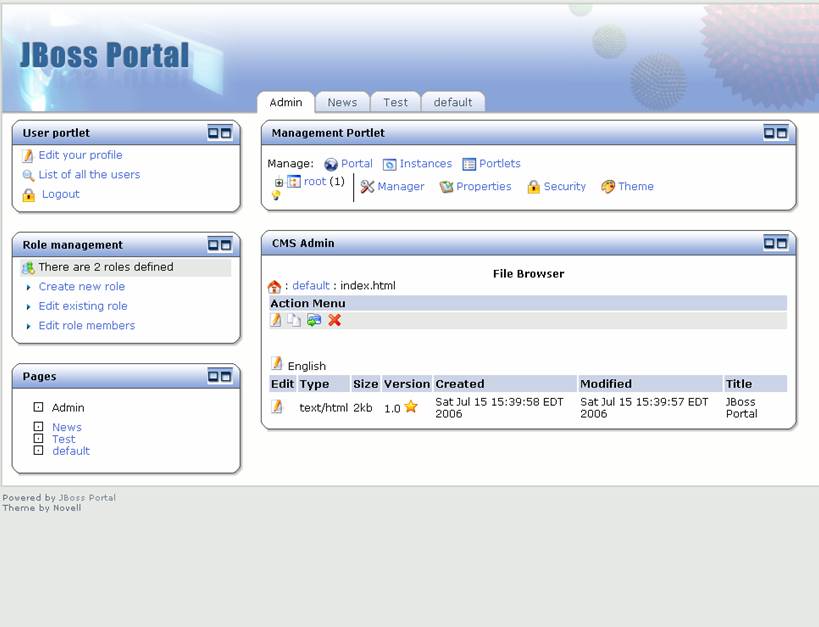 |
Figure 20. Version view for index.html.
To edit this HTML file, click on the edit icon. The WYSIWYG editor view will appear (Figures 21 and 22). Note: The WYSIWYG editor is dependent on browser. Some browsers show a box to enter HTML.
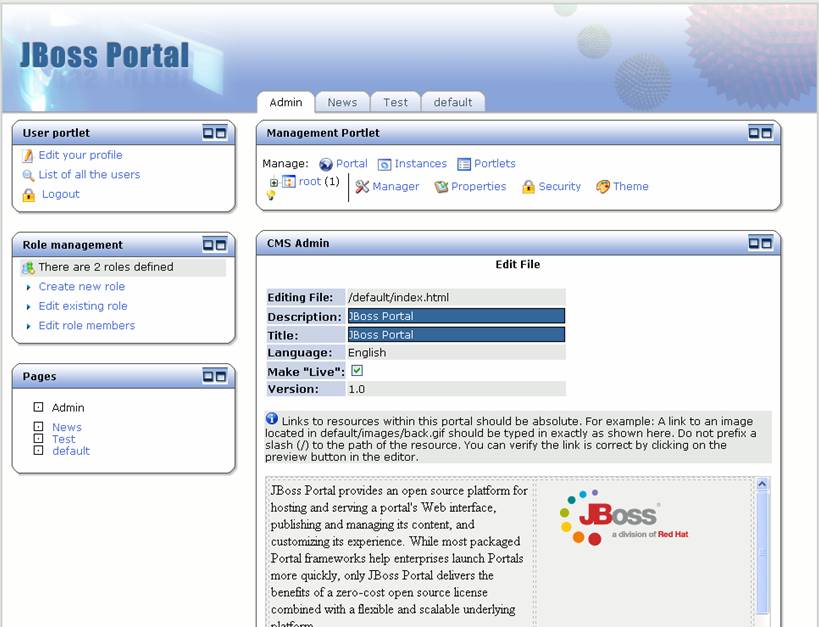 |
Figure 21. Content editor view (top).
 |
Figure 22. Content editor view (bottom).
HTML pages can be edited through this view. Let's change this page to point to our uploaded pages. Change the title next to the lightning bolt from "Project Information" to "Quickstart Guide" and change the text following the link below that to "to see the Quickstart guide for JBoss Portal.". The updated text is in Figures 23 and 24.
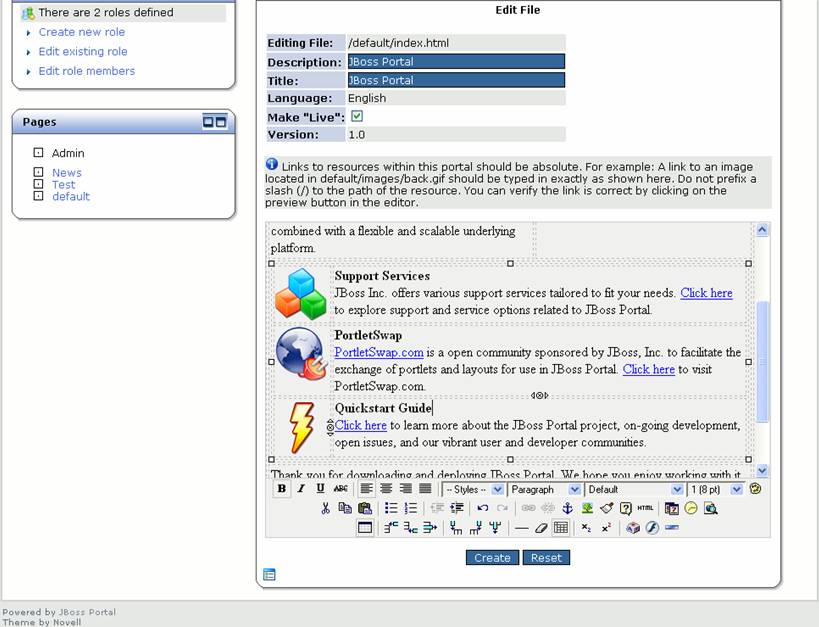 |
Figure 23. Updated heading text in HTML page.
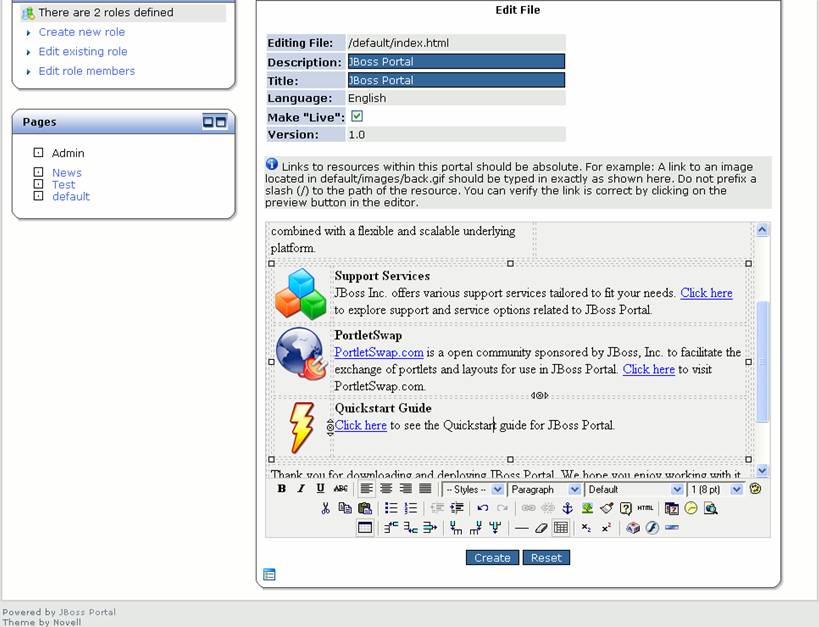 |
Figure 24. Updated heading text in HTML page.
Now let's update the link to point to the index.html page in the quickstart directory. Click on the "Click here" link under Portal Documentation, then on the edit link button (it looks like a chain). The insert/edit link window appears. Change the Link URL to "quickstart/index.html" (Figure 25).
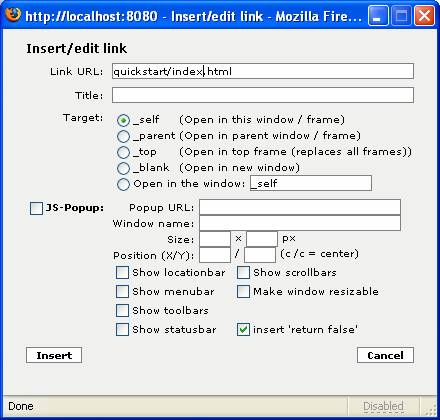 |
Figure 25. Insert/edit link window with updated link URL
Click Insert to save the updated link. Click Create to create the new version of the HTML file. The file browser view shows again with the new 1.1 version shown (Figure 26). The star icon next to the version number shows this is the live version.
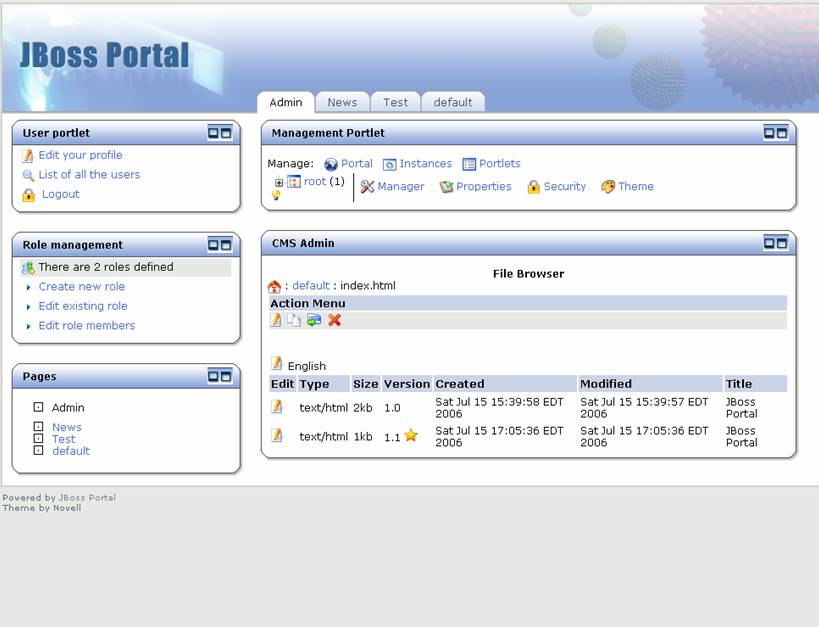 |
Figure 26. File browser with new version of index.html.
Click on the default portal page to see the changes we have made. The content view portlet shows the update page for the portal documentation (Figure 27).
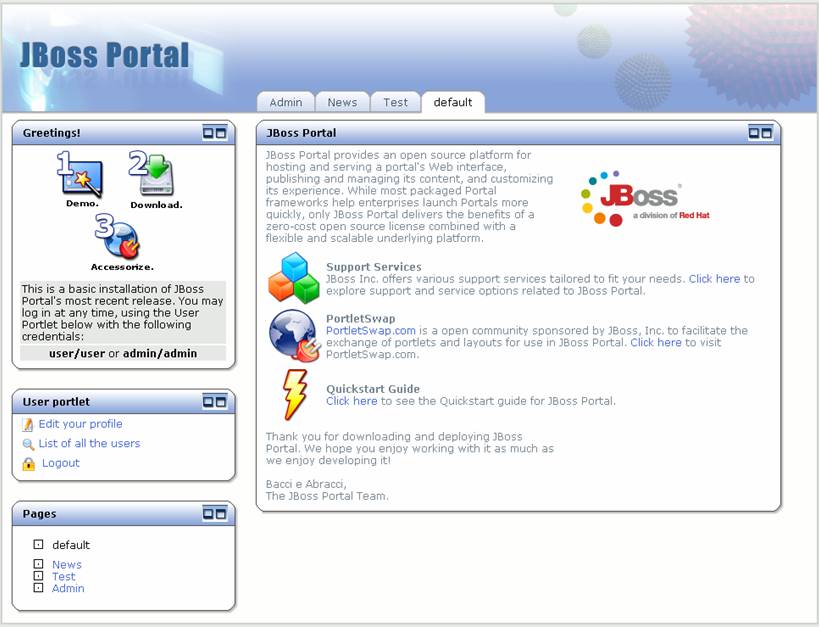 |
Figure 27. Content view portlet with the updated default page.
Click on the "Click here" link that was updated to go to the new uploaded content (Figure 28).
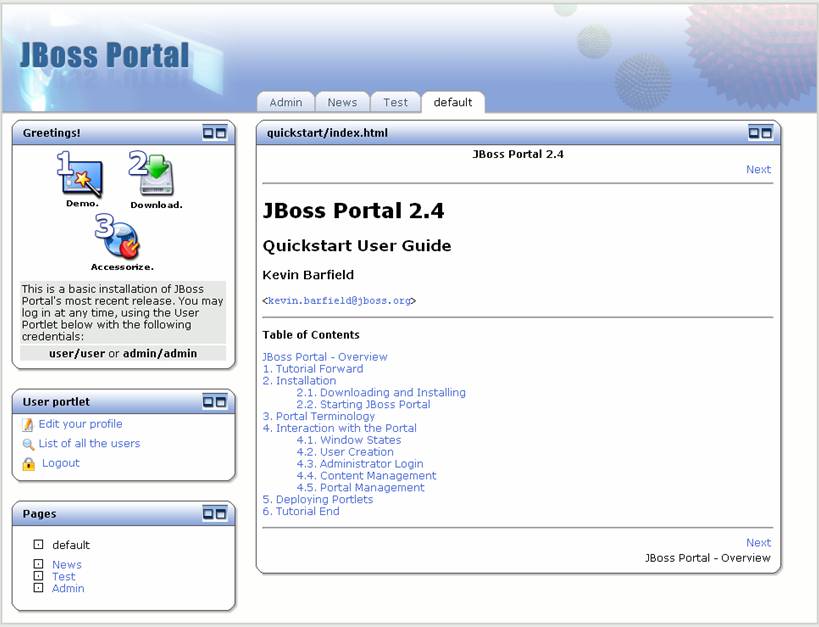 |
Figure 28. Content view portlet with docs page shown.
The links on the docs HTML page will go to other pages that were uploaded to the content repository. Try them out to see for yourself.
Click on the Admin portal page. The user, role, catalog, CMS Admin, and management portlets are on this portal page (Figure 29).
|
Figure 29. Admin portal page.
Click on the "List of all the users" link to see the users in the portal (Figure 30).
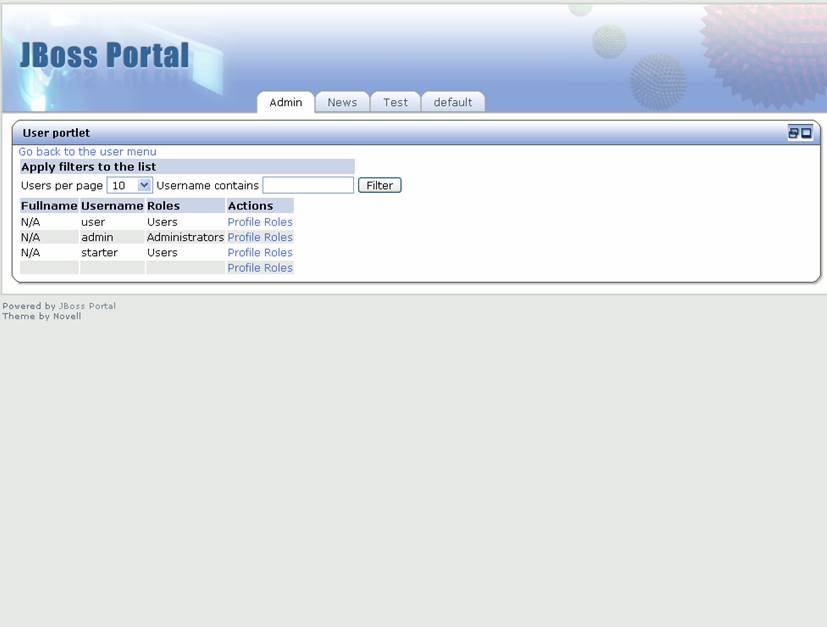 |
Figure 30. User portlet with user list view.
The starter user we created is shown in the list. Click on the "Roles" link next to the starter user to see the available roles (Figure 31).
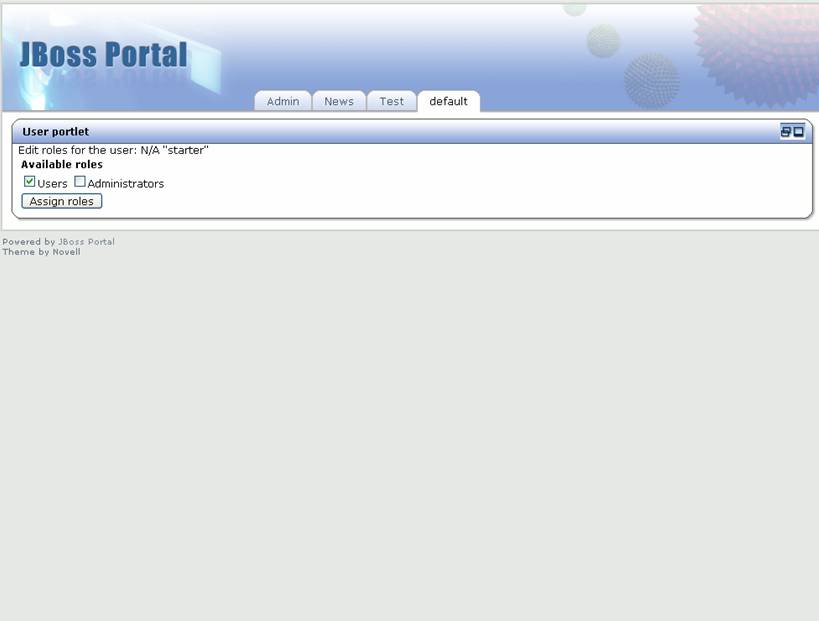 |
Figure 31. User portlet with available roles view.
Select the Administrators role and click the "Assign roles" button. This brings us back to the User portlet menu view (Figure 32).
 |
Figure 32. User portlet menu view.
Now let's look at the user profile for the starter user. Click on the "List of all users" link, then the "Profile" link next to the starter user. The user profile view appears (Figure 33).
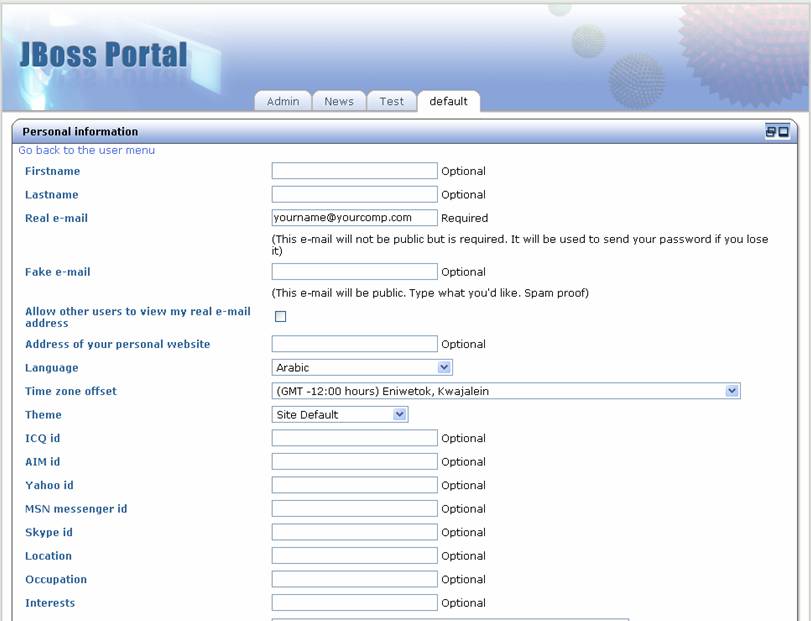 |
Figure 33. User profile view.
This shows all of the fields available in the user profile. Enter the first name of "starter" and click the "Save changes" button. The User portlet menu view is displayed again. Click on the default size icon to go back to the Admin portal page default view (Figure 34).
|
Figure 34. Management portal page default view.
Now, let's explore the management portlet. This portlet shows a tree view of the portals, portal pages, and portlet instances. Click on the "+" icon next to root, then the "+" icon next to default, and finally the "+" icon next to Admin. This shows us that there is a default portal with four portal pages defined. In addition, we can see the six portlet instances (including navigation) that are used in the management portal page (Figure 35).
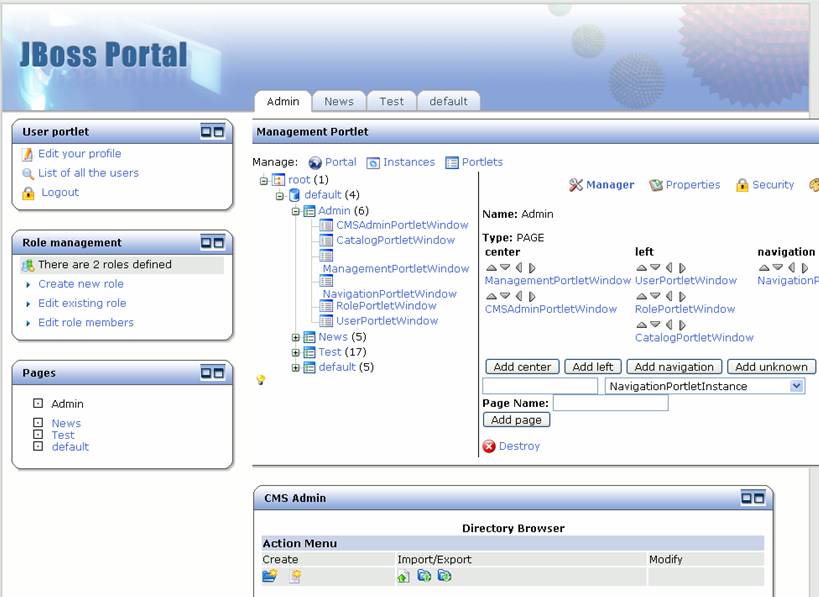 |
Figure 35. Management portlet with tree expanded.
Using the arrows next to the portlet instance names, we can dynamically move the portlet instances on the portal page. Click on the up arrow icon next to the RolePortletWindow to move the role portlet above the user portlet The page now shows the role portlet above the user portlet on the page (Figure 36).
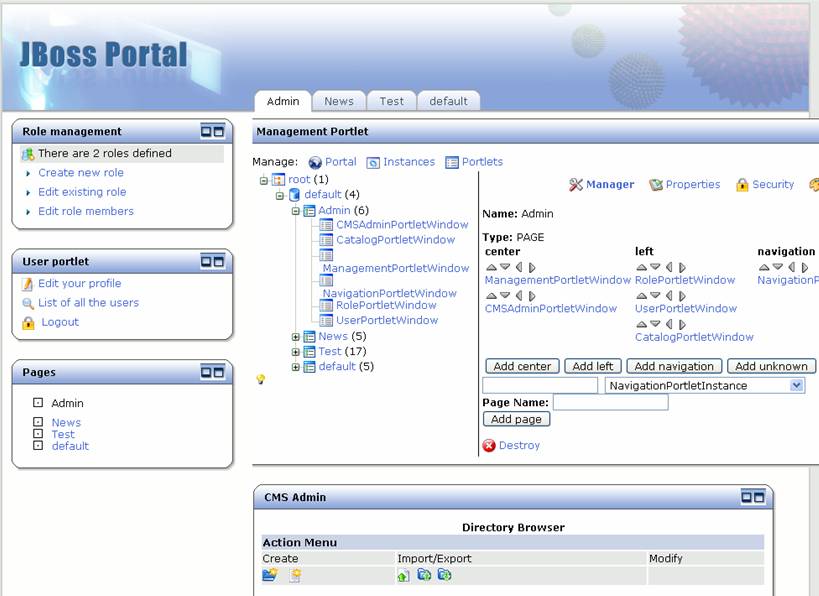 |
Figure 36. Role portlet is moved on the management portlet page.
Let's create a new portal page. Click on the "default" portal link. The add portal page view is shown (Figure 37).
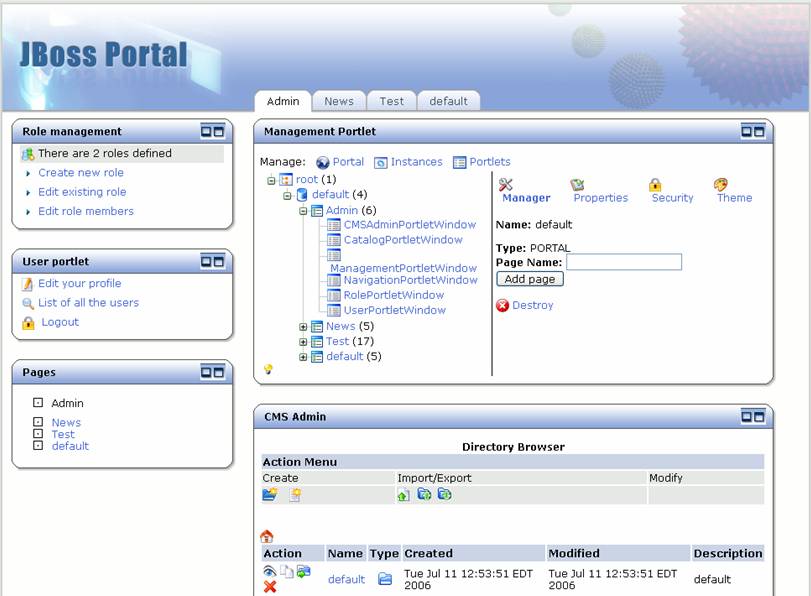 |
Figure 37. Management portlet add page view.
Enter "Starter" as the page name and click the "Add page" button. We now see the Starter tab at the top and Starter as a portal page in the list of portal pages (Figure 38).
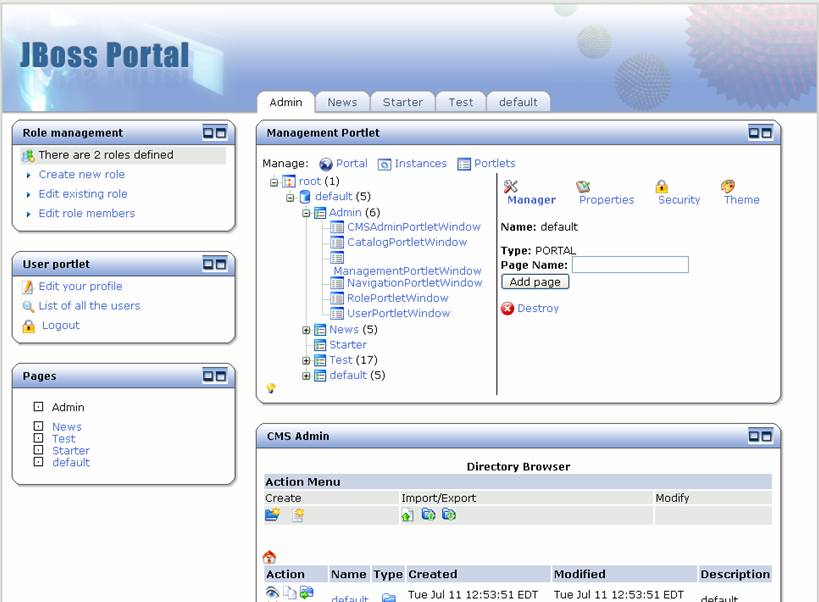 |
Figure 38. Starter portal page has been added.
Now let's add some portlet instances to the portal page. Click on the starter page in the management portlet, and the details for that portal page are shown (Figure 39).
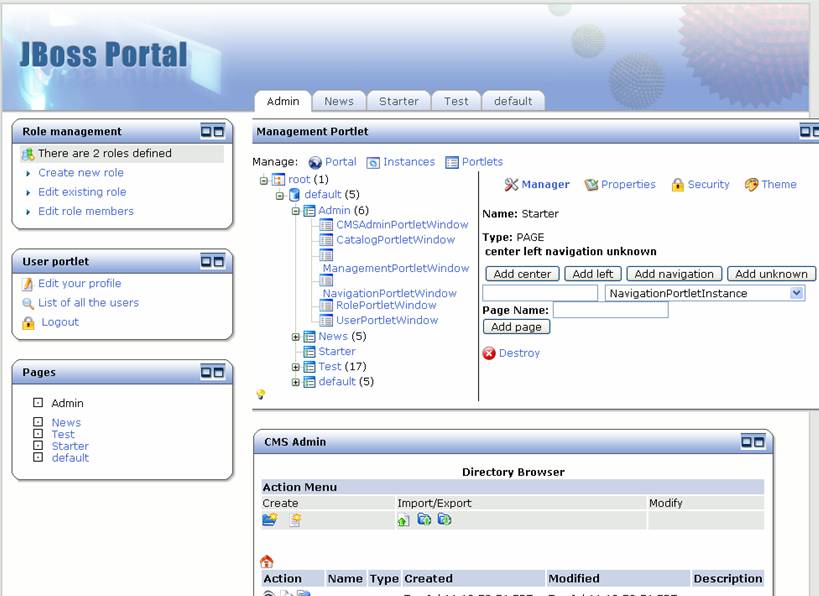 |
Figure 39. Management portlet for Starter portal page.
First, let's add a navigation portlet. Choose the navigation portlet instance from the dropdown (Figure 40).
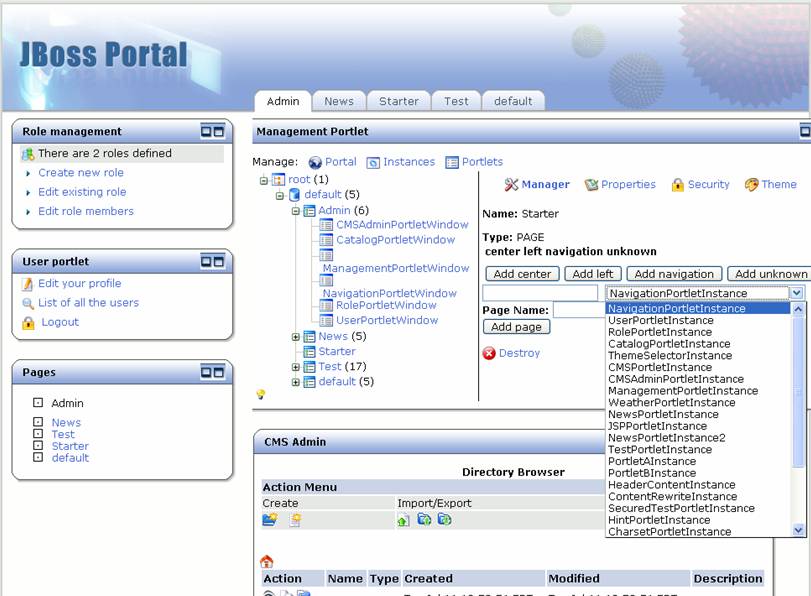 |
Figure 40. Choosing the Navigation portlet instance from the dropdown.
Type in the name you want to give this portlet instance ("nav") and click the "Add navigation" button. The "nav" portlet instance is now shown under navigation (Figure 41).
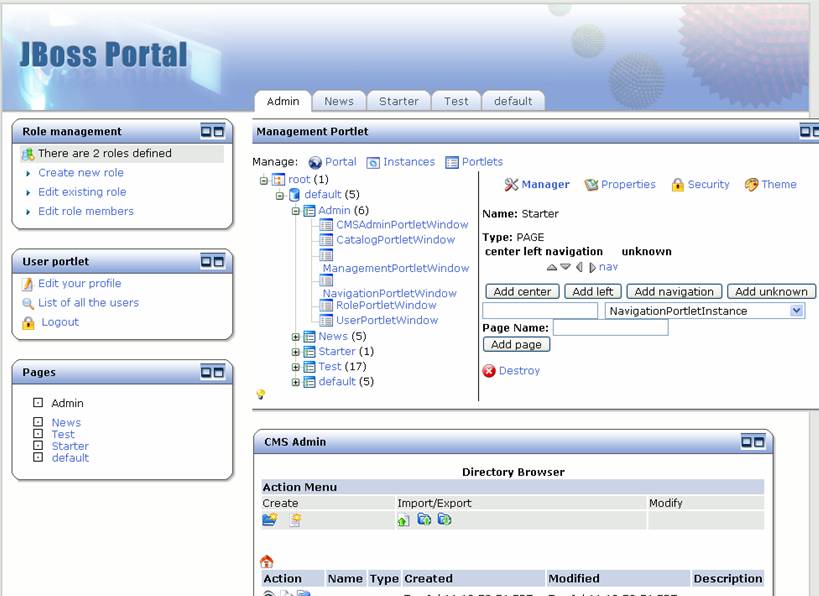 |
Figure 41. Nav portlet instance is added.
Click on the "nav" link to go into the details for that portlet instance (Figure 42)
 |
Figure 42. Details for the nav portlet instance.
Click on the "Theme" link to update the theme for this portlet. Since this is a navigation portlet and it doesn't need portlet decorations, let's set the Window Renderer, Decoration Renderer, and Portlet Renderer to "emptyRenderer" (Figure 43).
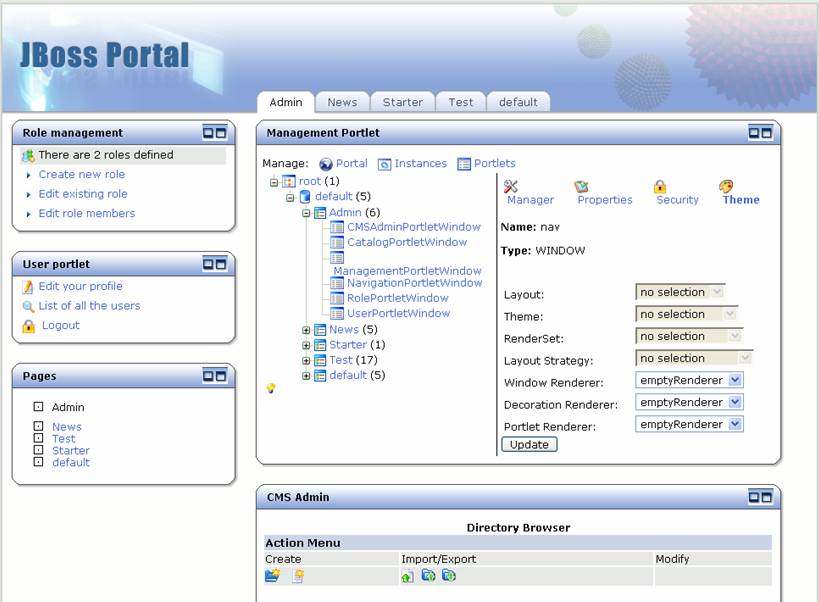 |
Figure 43. Theme details for the nav portlet instance.
Click the "Update" button, then click the Starter portal page in the management portlet to continue adding portlets to the Starter portal page. Select the CatalogPortletInstance from the portlet instance list, enter a name of "catalog", and click the "Add left" button. Select the CMSPortletInstance from the portlet instance list, enter a name of "CMS", and click the "Add center" button. See Figure 44 for the updated detail of the Starter portal page.
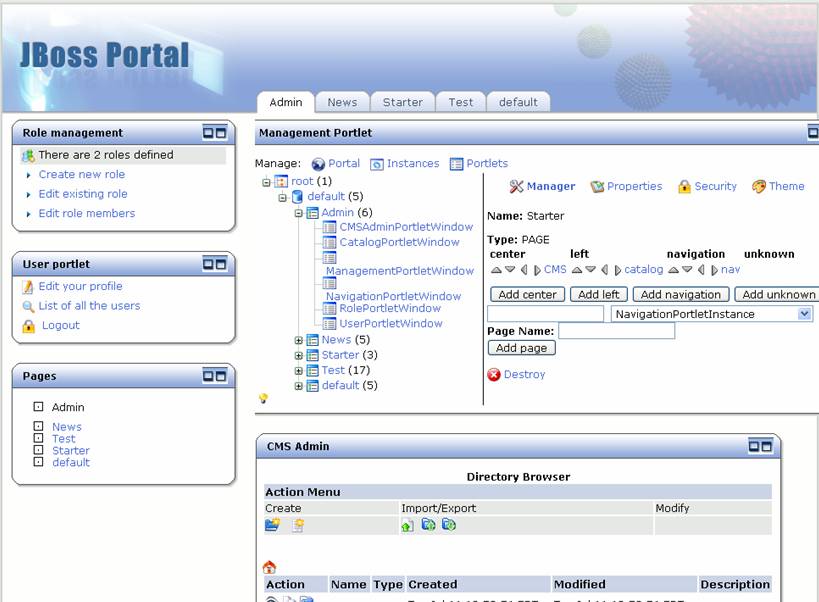 |
Figure 44. Starter page detail with portlet instances added.
Finally, let's take a look at security in the management portlet. Click on the "Security" link, and the list of available roles and actions is shown for the Starter portal page.(Figure 45).
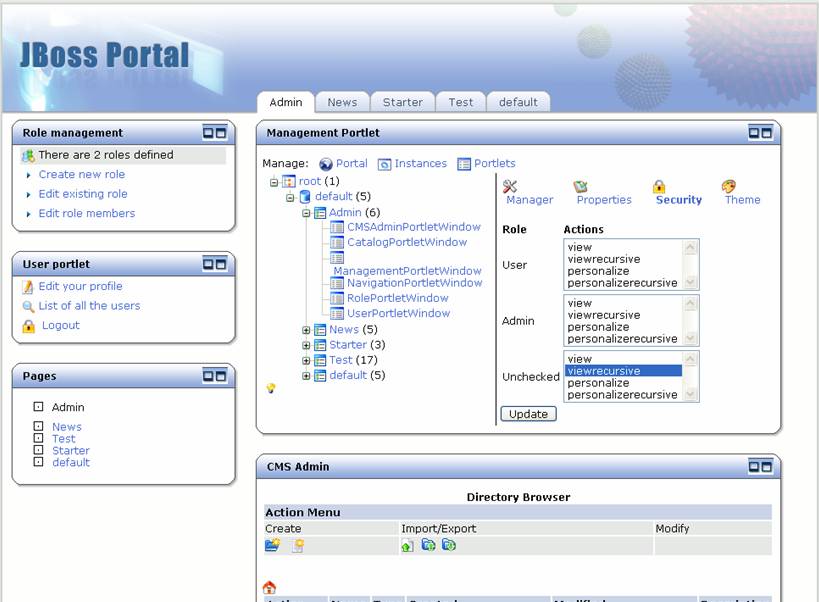 |
Figure 45. Security for the Starter portal page.
Let's take a look at the Starter portal page we created. Click on the "Starter" tab at the top to go to the Starter portal page (Figure 46).
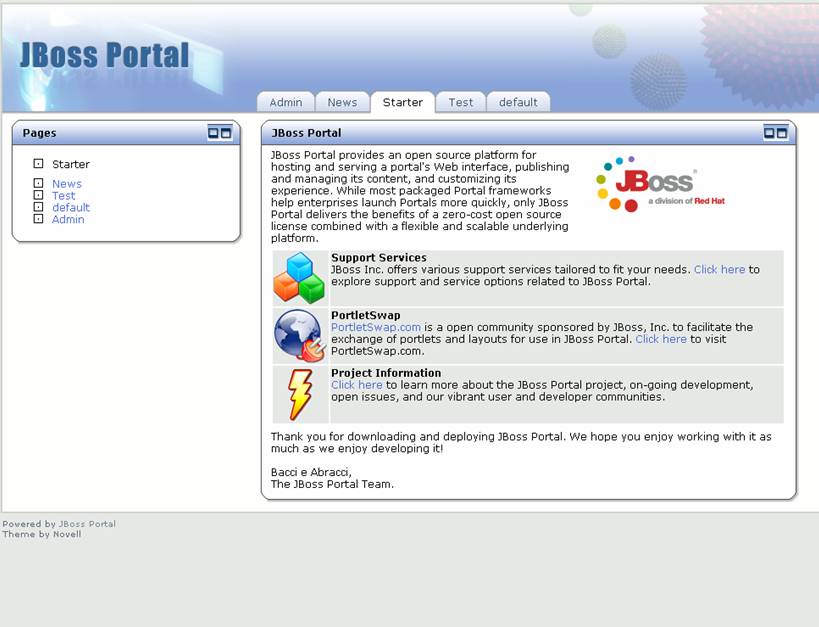 |
Figure 46. The Starter portal page.
Let's add a portlet from Portletswap to the JBoss Portal we have running. Open a browser to the following URL: http://www.portletswap.com (Figure 47).
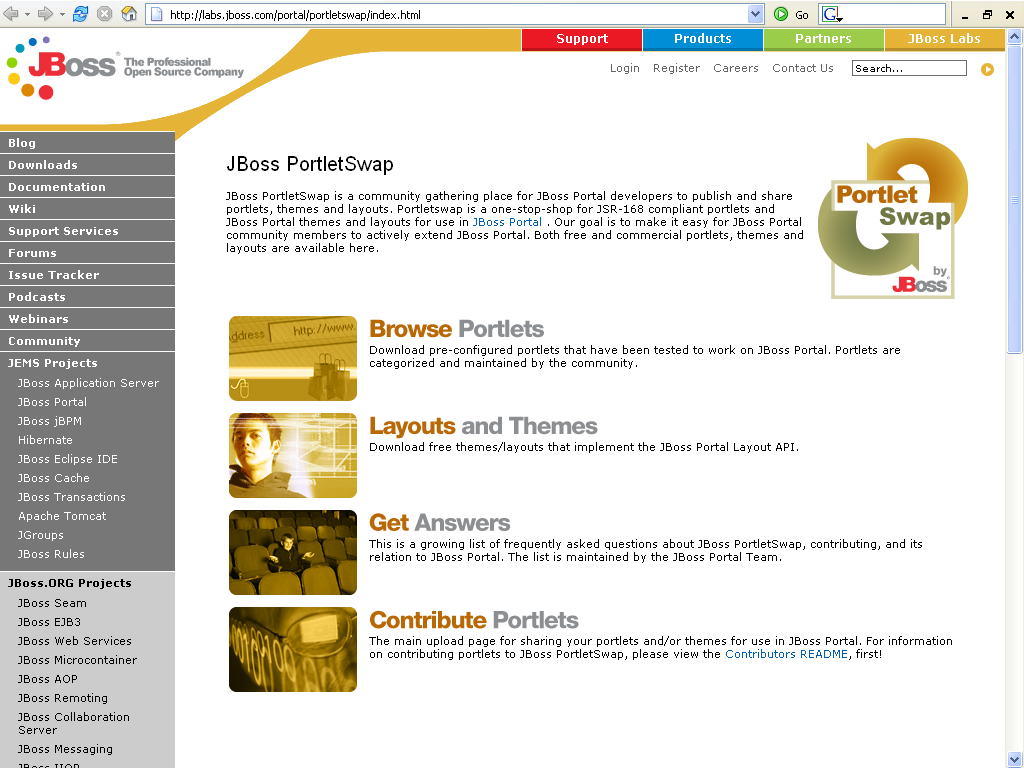 |
Figure 47. Portletswap website
Click on the "Browse Portlets" link to see the categories of portlets available (Figure 48).
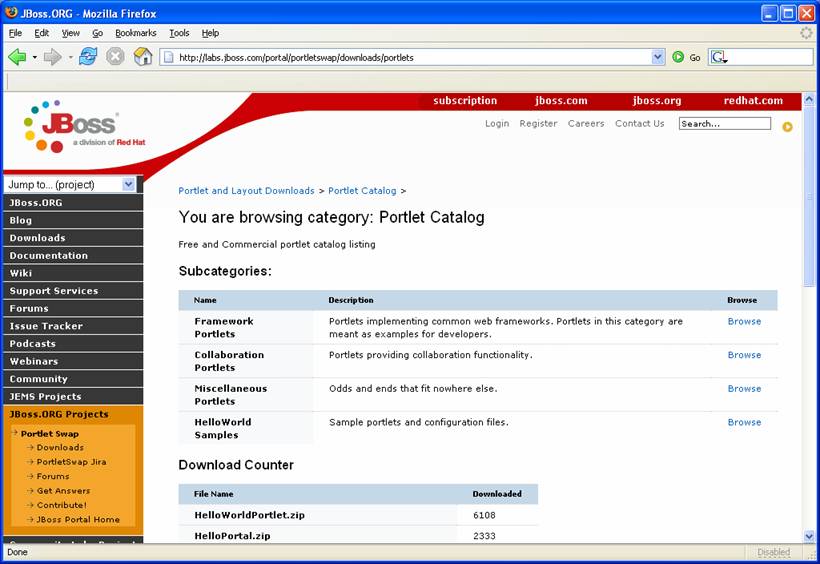 |
Figure 48. Portlet categories on portletswap.
Click on the Miscellaneous Portlets browse link to see a list of portlets (Figure 49).
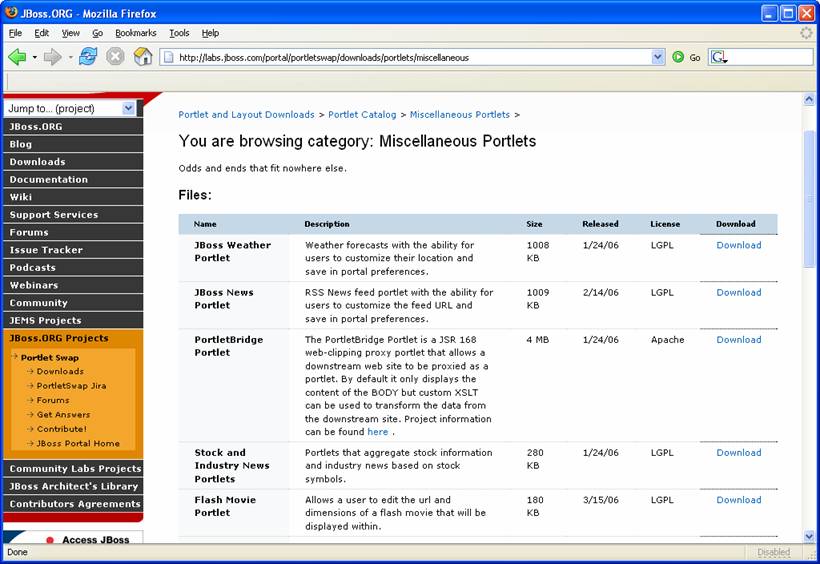 |
Figure 49. List of portlets on portletswap.
Click on the download link next to the Flash MoviePortlet. The download dialog will appear (Figure 50).
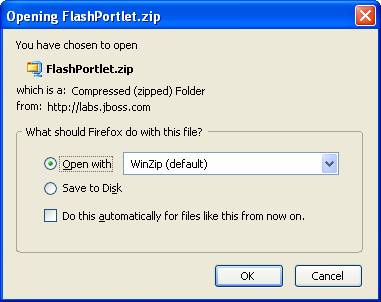 |
Figure 50. Download dialog.
This zip file contains both the binary and the source for the portlet. Open the zip and extract the flash.war file. Place this file in the jboss-portal-2.4\server\default\deploy directory. The console for the JBoss Portal will show the portlet being deployed (Figure 51).
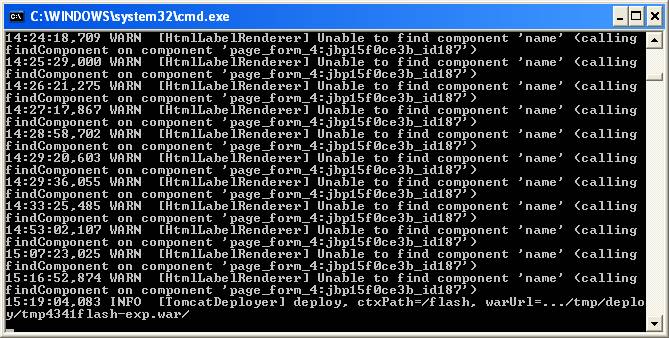 |
Figure 51. Flash portlet is deployed to JBoss Portal.
To see the deployed portlet, we need to add it to our Starter portal page. First, we need to create an instance of the portlet. Go to the Admin portal page (Figure 52).
|
Figure 52. Admin portal page.
Click on the Portlets link. A list of all portlets will be displayed. Click on the FlashPortlet link. A dialog to create an instance will appear (Figure 53).
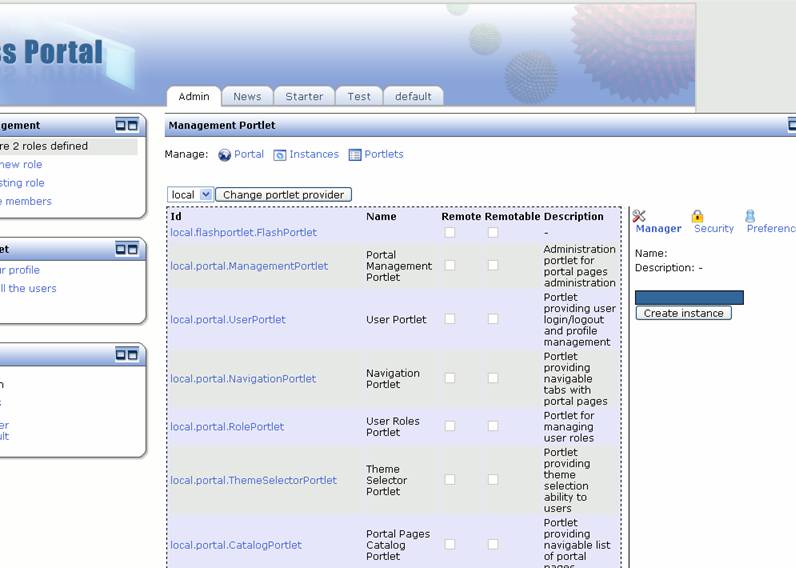 |
Figure 53. Portlets admininstration.
Type in "Flash Portlet " as the instance name and click on the create instance button. Now there is an instance of the portlet that can be added to the Starter portal page. Click on the Instances link to see all portlet instances (Figure 54).
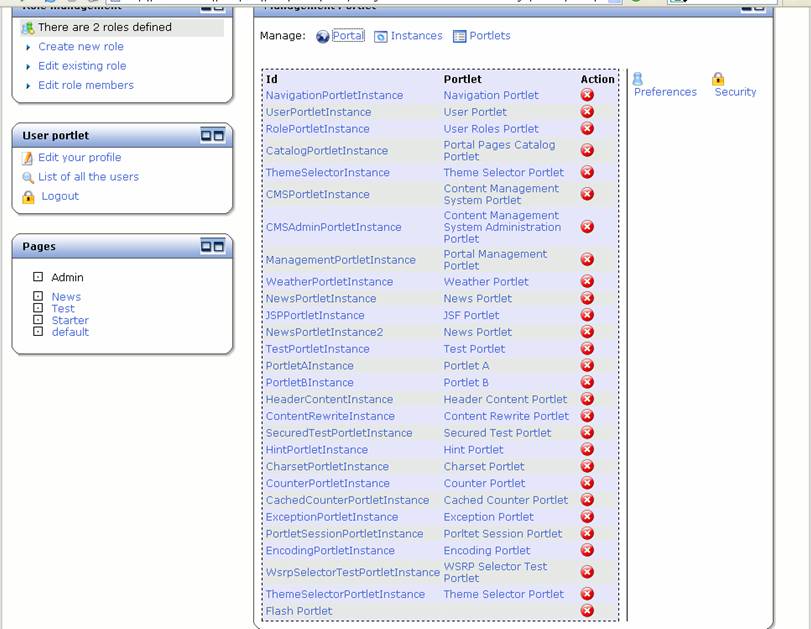 |
Figure 54. Portlet instances admininstration.
Click on the Portal link and expand the tree to the Starter portal page. Select the Flash Portlet from the portlet list, and add it to the Starter portal page with a name of "flash" (Figure 55).
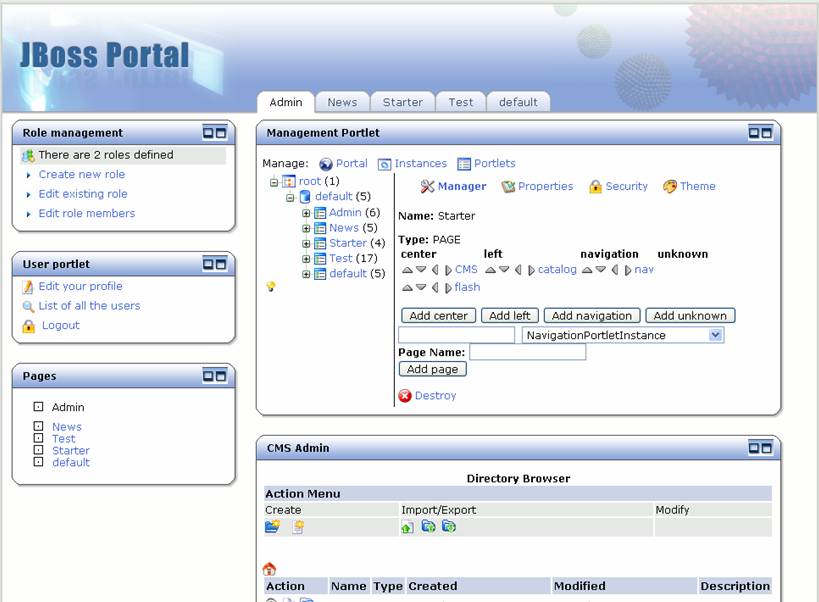 |
Figure 55. Starter portal page with flash portlet added.
Click on the Starter portal page, and the flash portlet is displayed (Figure 56).
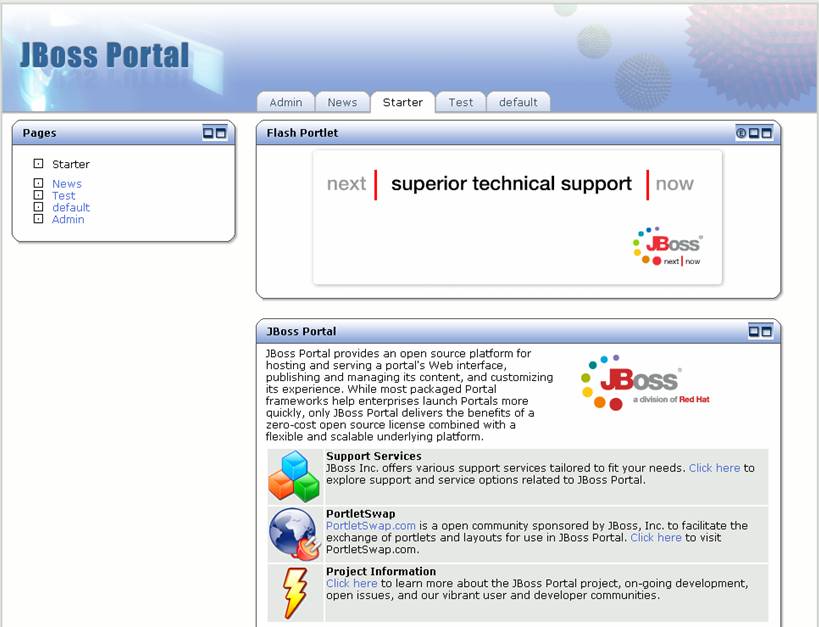 |
Figure 56. Starter portal page with flash portlet.
Congratulations! You have completed the JBoss Portal Quickstart Tutorial. During this tutorial, you:
- Downloaded and unziped the JBoss Portal bundle
- Executed the JBoss Portal
- Interacted with the default portal
- Created and edited content in the JBoss Portal
- Managed the JBoss Portal
- Added a new portlet to the JBoss Portal
Next steps: Next, take a look at the user guide for JBoss Portal. This will give you more information about using JBoss Portal. There is also a reference guide for developers using JBoss Portal. Both guides are accessible from our Documentation Page