The DTGov project layers Design Time Governance functionality on top of an S-RAMP repository. These two projects work together to provide the following:
- Store and Govern artifacts
- Custom Governance Workflows
- Integrated Governance Human Task Management
This guide will discuss the various pieces of functionality provided by DTGov and how to configure and use them.
In addition to a general framework for triggering business workflows based on changes to artifacts in the S-RAMP repository, the DTGov project focuses on the following specific Governance Use Cases:
- Deployment Lifecycle Management
This guide will not only discuss the generic governance capabilities provided by the DTGov project, but also the specific Use-Cases listed above.
- Workflows are created from JBoss jBPM (BPMN2) process definitions.
- A version of jBPM is embedded in the deployed dtgov.war. This version of jBPM is configured to use the S-RAMP repository as the source for workflow definitions.
- To use a workflow with DTGov, the jBPM workflow files must be bundled into a Jar file named "dtgov-workflows.jar" and uploaded to the DTGov S-RAMP repository. There are several methods than can be used to deploy the workflow jar file to S-RAMP. We recommend that you use maven.
- The embedded jBPM pulls the dtgov-workflow.jar out of S-RAMP at runtime and uses the workflow definitions found therein.
- In this context, "runtime" refers to whenever a new workflow instance is created (typically triggered by an artifact being added or changed in the s-ramp repository).
- Any human tasks that are used in any DTGov workflow will appear in the Tasks UI included in the DTGov UI (http://localhost:8080/dtgov-ui)
- A workflow deployment only shows up in the dtgov-ui/#deployments page once a lifecycle management jBPM process is kicked off for it.
- A sample Process Workflow ("SimpleReleaseProcess") is packaged with DTGov
- OOTB SimpleReleaseProcess does "Lifecycle Management" governance on an artifact by monitoring the S-RAMP repository periodically (60 sec default) - this monitoring takes the form of a query on the repository.
- When an artifact matches that S-RAMP query as configured in the DTGov config file (dtgov.properties) which is mapped to the SimpleReleaseProcess a new jBPM process instance is created for that artifact. The process can do anything it wants at that point.
The DTGov application is written in Java. To get started make sure your system has the following:
- Java JDK 1.6 or newer
- Apache Ant 1.7 or newer to use the installer
- Maven 3.0.3 or newer
- Overlord S-RAMP version 0.5.0.Final or newer
This Getting Started guide assumes you do not already have Overlord S-RAMP installed.
First, we recommend you download the following:
Next, you must follow these steps to install and configure the application:
-
Download and install your preferred runtime platform. We currently support:
- JBoss EAP 6.3
- JBoss Fuse 6.1
- Tomcat 7
- Jetty 8
- Download and unpack S-RAMP 0.5.0.Final
- Download and unpack DTGov 1.3.0.Final
- Run the S-RAMP installer, installing into your installed runtime platform
- Run the DTGov installer, installing into your installed runtime platform
- Start your application container (e.g. JBoss EAP)
- Populate the S-RAMP repository with DTGov seed data
Some psuedo-shell code that might help
mkdir ~/overlord
cd ~/overlord
# Download JBoss EAP 6.3 (e.g. jboss-eap-6.3.0.zip)
#    From - http://www.jboss.org/jbossas/downloads
# Download S-RAMP distribution (s-ramp-0.5.0.Final.zip)
#    From - http://www.jboss.org/overlord/downloads/sramp
# Download S-RAMP distribution (dtgov-1.3.0.Final.zip)
#    From - http://www.jboss.org/overlord/downloads/dtgov
unzip jboss-eap-6.3.0.zip
unzip s-ramp-0.5.0.Final.zip
unzip dtgov-1.3.0.Final.zip
cd s-ramp-0.5.0.Final
ant install
# !!Follow installation instructions here!!
cd ~/overlord/dtgov-1.3.0.Final
ant install
# !!Follow installation instructions here!!
# Start JBoss (~/overlord/jboss-eap-6.1/bin/standalone.sh) - wait for startup to complete
cd ~/overlord/dtgov-1.3.0.Final
ant seed -Ds-ramp.shell.password=ADMIN_PASSWORD
The dtgov.war and dtgov-ui.war applications are deployed to the runtime platform during the installation. The DTGov web UI (http://localhost:8080/dtgov-ui) is provided by dtgov-ui.war. You will see references to these in the server.log at startup and when the services are invoked.
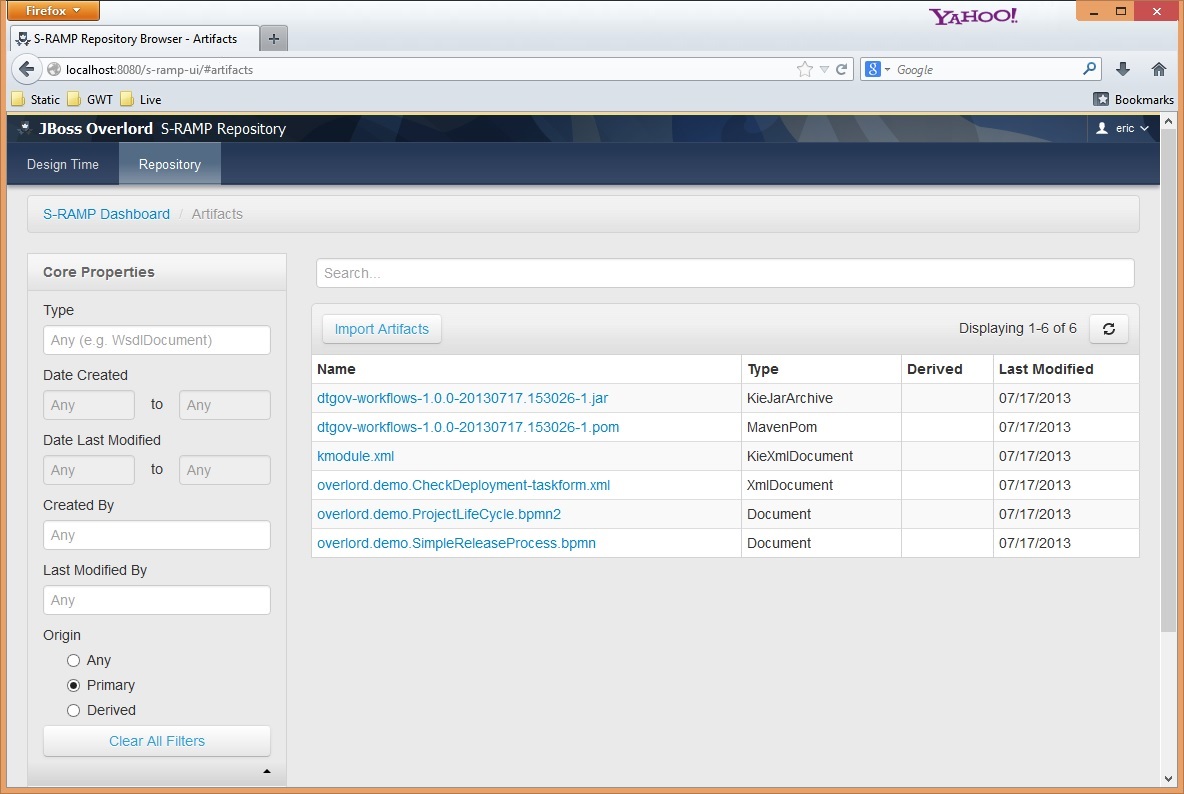
Now that everything is installed and running, you should be able to verify that everything is working by logging in to the S-RAMP Browser UI and verifying that you can see the DTGov seed data.
http://localhost:8080/s-ramp-ui (admin/overlord)
You should see something like this:
It’s all installed, running, and checked? Now it’s time to use the software! This guide will explain advanced configuration and usage, but you can get started by logging in to the DTGov User Interface as admin:
http://localhost:8080/dtgov-ui
It’s likely that users will need to customize the system based on their organization’s specific work processes. The Configuring and Governance Workflows chapters should be helpful in describing how to customize the system.
In order to do work in the DTGov system, a valid user must first be authenticated. The specific details regarding how to create and manage the list of allowed users will vary depending on the runtime configuration. This guide will focus on the mechanisms supported by the DTGov community installer.
Tip
Please note that the installer creates a single user (named admin) during the installation process.
There are several roles that the user must have in order to interact with DTGov. These roles are as follows:
- overlorduser : users must have this role in order to access the DTGov user interface
- admin.sramp : users must have this role in order to access the S-RAMP repository (both read and write)
- dev : users with this role will be able to view and complete Dev environment and developer human tasks
- test : users with this role will be able to view and complete Test environment human tasks
- stage : users with this role will be able to view and complete Staging environment human tasks
- prod : users with this role will be able to view and complete Production environment human tasks
- ba : users with this role will be able to view and complete business analyst human tasks
- arch : users with this role will be able to view and complete architect human tasks
By default DTGov uses the standard EAP Application Realm configuration as its authentication source. This means that adding users is a simple matter of using the existing EAP add-user script. If you are running on Windows you can use the add-user.bat script. Otherwise run the add-user.sh script. Both of these scripts can be found in EAP’s bin directory.
Here is an example of how to add an S-RAMP user using the add-user.sh script:
[user@host jboss-eap-6.x]$ pwd
/home/user/FSW6/jboss-eap-6.x
[user@host jboss-eap-6.x]$ ./bin/add-user.sh

What type of user do you wish to add?
 a) Management User (mgmt-users.properties)
 b) Application User (application-users.properties)
(a): b

Enter the details of the new user to add.
Realm (ApplicationRealm) : ApplicationRealm
Username : fitzuser
Password : P4SSW0RD!
Re-enter Password : P4SSW0RD!
What roles do you want this user to belong to? (Please enter a comma separated list, or leave blank for none)[  ]: overlorduser,admin.sramp,dev,test
About to add user 'fitzuser' for realm 'ApplicationRealm'
Is this correct yes/no? yes
Added user 'fitzuser' to file '/home/user/FSW6/jboss-eap-6.x/standalone/configuration/application-users.properties'
Added user 'fitzuser' to file '/home/user/FSW6/jboss-eap-6.x/domain/configuration/application-users.properties'
Added user 'fitzuser' with roles overlorduser,admin.sramp to file '/home/user/FSW6/jboss-eap-6.x/standalone/configuration/application-roles.properties'
Added user 'fitzuser' with roles overlorduser,admin.sramp to file '/home/user/FSW6/jboss-eap-6.x/domain/configuration/application-roles.properties'
Is this new user going to be used for one AS process to connect to another AS process?
e.g. for a slave host controller connecting to the master or for a Remoting connection for server to server EJB calls.
yes/no? no
Tip
the above example will create a user who can view and complete Dev and Test environment human tasks. Any other human tasks will not be visible.
When running DTGov in JBoss Fuse 6.1, the user credentials are stored in a plain text properties
file in the etc directory.
etc/users.properties
#user=password,role1,role2
admin=ADMIN_PASSWORD,overlorduser,admin.sramp,dev,test,stage,prod,ba,arch
Simply add users to this file and restart Fuse. Make sure you include the necessary roles of overlorduser
and admin.sramp (along with any additional optional roles the particular user might need) in any user
you create.
When running DTGov in Tomcat 7, the source of authentication is an XML configuration file located in Tomcat’s conf directory named tomcat-users.xml. To add another user, simply add a user element to this XML configuration file. For example, adding a user named fitzuser might make the file look like this:
<?xml version="1.0" encoding="UTF-8"?>
<tomcat-users>
<!--
  NOTE:  By default, no user is included in the "manager-gui" role required
  to operate the "/manager/html" web application.  If you wish to use this app,
  you must define such a user - the username and password are arbitrary.
-->
  <role rolename="tomcat"/>
  <role rolename="overlorduser"/>
  <role rolename="admin.sramp" />
  <user username="admin" password="4dm1n!" roles="tomcat,overlorduser,admin.sramp,dev,test,stage,prod,ba,arch"/>
  <user username="fitzuser" password="P4SSW0RD!" roles="tomcat,overlorduser,admin.sramp,dev,test"/>
</tomcat-users>
DTGov has two configurations that can be modified to suit a particular deployment and business. Specifically, the back-end DTGov system (dtgov.war) has a configuration file as does the User Interface (dtgov-ui.war). This chapter describes these two configuration files so that users can configure DTGov for their particular deployment environment and organization’s unique business processes.
The configuration of the back-end system can be modified by making changes to an external configuration file found in the application server’s configuration directory. In JBoss EAP by default the configuration file can be found here:
jboss-eap/standalone/configuration/dtgov.properties
If the file does not exist it can be created and will be picked up by the DTGov app during startup. The location of this file can be overridden by setting the following Java System Property to be the full path to a properties file anywhere on the server’s file system:
governance.file.name
For example, this system property could be configured by adding the following to the script that starts up your application server:
-Dgovernance.file.name=/home/jdoe/config/overlord/dtgov/dtgov.properties
The dtgov.properties configuration file is used to control a number of settings, listed and described in the following section.
# S-RAMP Connection details
sramp.repo.url
sramp.repo.auth.provider
sramp.repo.user
sramp.repo.password
sramp.repo.validating
sramp.repo.auth.saml.issuer
sramp.repo.auth.saml.service

# Location of the DTGov WAR
governance.url
# Frequency with which to poll S-RAMP for query matches
governance.query.interval
# Location in JNDI of the email service
governance.jndi.email.reference
# "From" information to use when sending email (domain and address)
governance.email.domain
governance.email.from

# JNDI location of the User Transaction
governance.jndi.userTx.reference

# RHQ connection info
rhq.rest.user
rhq.rest.password
rhq.base.url

# BPM connection info
governance.bpm.user
governance.bpm.password
governance.bpm.url

# BASIC auth user used to invoke DTGov provided services
governance.user
governance.password

# Deployment targets configured for the DTGov deployment service
governance.targets

# Location of the DTGov UI
dtgov.ui.url

# S-RAMP
s-ramp-wagon
dtgov.s-ramp-wagon.snapshots
dtgov.s-ramp-wagon.releases

# DTGov Workflow maven info
dtgov.workflows.group
dtgov.workflows.name
dtgov.workflows.version
dtgov.workflows.package
In particular, the governance.targets and governance.queries configuration properties bear additional explanation. Please see the Governance Workflows chapter for more information on how to use these properties to configure the DTGov Deployment Service and the Governance Workflow Queries, respectively.
The DTGov user interface can also be configured for a specific deployment and business environment. The configuration of the UI can be modified by making changes to an external configuration file found in the application server’s configuration directory. In JBoss EAP the configuration file can be found here:
jboss-eap/standalone/configuration/dtgov-ui.properties
The location of this file can be overridden by setting the following system property to be the full path to a properties file anywhere on the server’s file system:
dtgov-ui.config.file.name
This configuration file is used to control a number of settings, listed and described in the following section.
# S-RAMP API connection endpoint
dtgov-ui.s-ramp.atom-api.endpoint
# Whether to validate the S-RAMP connection
dtgov-ui.s-ramp.atom-api.validating
# What kind of authentication to use (class name)
dtgov-ui.s-ramp.atom-api.authentication.provider
# Only used when the provider is basic auth
dtgov-ui.s-ramp.atom-api.authentication.basic.username
dtgov-ui.s-ramp.atom-api.authentication.basic.password
# Only used when the provider is SAML bearer token auth
dtgov-ui.s-ramp.atom-api.authentication.saml.issuer
dtgov-ui.s-ramp.atom-api.authentication.saml.service
dtgov-ui.s-ramp.atom-api.authentication.saml.sign-assertions
dtgov-ui.s-ramp.atom-api.authentication.saml.keystore
dtgov-ui.s-ramp.atom-api.authentication.saml.keystore-password
dtgov-ui.s-ramp.atom-api.authentication.saml.key-alias
dtgov-ui.s-ramp.atom-api.authentication.saml.key-password

# Task API connection endpoint
dtgov-ui.task-api.endpoint
# Implementation of a task client
dtgov-ui.task-client.class
# Authentication to use when invoking the task API
dtgov-ui.task-api.authentication.provider
# Only used when using basic auth
dtgov-ui.task-api.authentication.basic.username
dtgov-ui.task-api.authentication.basic.password
# Only used when using saml bearer token auth
dtgov-ui.task-api.authentication.saml.issuer
dtgov-ui.task-api.authentication.saml.service
dtgov-ui.task-api.authentication.saml.sign-assertions
dtgov-ui.task-api.authentication.saml.keystore
dtgov-ui.task-api.authentication.saml.keystore-password
dtgov-ui.task-api.authentication.saml.key-alias
dtgov-ui.task-api.authentication.saml.key-password

# Deployment lifecycle base classifier
dtgov-ui.deployment-lifecycle.classifiers.base
dtgov-ui.deployment-lifecycle.classifiers.initial
# Classifier to use when querying for all deployments
dtgov-ui.deployment-lifecycle.classifiers.all
dtgov-ui.deployment-lifecycle.classifiers.in-progress
# This next one is a prefix for any property that will indicate a possible classifier stage that
# should be displayed in the UI.  In the dtgov ui configuration file, multiple properties would
# be specified that begin with this prefix and have a value of the format  {label}:{classifier}
dtgov-ui.deployment-lifecycle.classifiers.stage
# And another one that is a prefix for any property that will indicate a possible deployment type
# that should be displayed in the UI.  In the dtgov ui configuration file, multiple properties would
# be specified that begin with this prefix and have a value of the format  {label}:{type}
dtgov-ui.deployment-lifecycle.types

# S-RAMP UI integration properties
dtgov-ui.s-ramp-browser.url-base
In particular, the dtgov-ui.deployment-lifecycle.classifiers.stage and dtgov-ui.deployment-lifecycle.types properties require further explanation. See the following sections for details.
The DTGov user interface has a page that allows users to see a list of all deployments being tracked. That page allows the user to filter the list of deployments based on the environments in which the deployment is…deployed. In other words, the UI page allows the user to show only the deployments that are currently deployed in, for example, the DEV environment. Since different organizations have different numbers and names for these environments, the actual filter options are configurable. An example will prove useful:
dtgov-ui.deployment-lifecycle.classifiers.stage.dev=Development:http://www.jboss.org/overlord/deployment-status.owl#InDev
dtgov-ui.deployment-lifecycle.classifiers.stage.qa=QA:http://www.jboss.org/overlord/deployment-status.owl#InQa
dtgov-ui.deployment-lifecycle.classifiers.stage.stage=Staging:http://www.jboss.org/overlord/deployment-status.owl#InStage
dtgov-ui.deployment-lifecycle.classifiers.stage.prod=Production:http://www.jboss.org/overlord/deployment-status.owl#InProd
If the above configuration is used (in the dtgov-ui.properties file) then the UI will show four possible environments that the user can use to filter deployments (dev, qa, stage, prod). The format for the value of each entry is:
Label : Classifier
The Label will be shown in the UI (in the filter drop-down) and the Classifier will be used when performing the S-RAMP query to retrieve the filtered list of deployments.
The DTGov user interface’s deployment listing page also allows users to filter by the type of deployment (Java Web Application, SwitchYard Application, etc). Since different organizations will likely work with varying technologies, the Deployment Type filter is configurable. For example:
dtgov-ui.deployment-lifecycle.types.switchyard=SwitchYard Application:ext/SwitchYardApplication
dtgov-ui.deployment-lifecycle.types.jar=Java Archive:ext/JavaArchive
dtgov-ui.deployment-lifecycle.types.war=Java Web Application:ext/JavaWebApplication
In the above example, the user would be able to filter by SwitchYard Application, Java Archive, and Java Web Application. The format for each entry is:
Label : S-RAMP Artifact Type
The Label will be shown in the UI (in the filter drop-down) and the S-RAMP Artifact Type will be used when performing the S-RAMP query to retrieve the filtered list of deployments.
Note: the list of Deployment Types is also used in the Add Deployment dialog when adding a new deployment. In this case, the S-RAMP Artifact Type is used when adding the deployment to the repository.
This configuration works in conjuction with the Deployment Service described in the Deployment Management chapter of this guide. The classifiers specified when configuring Deployment Targets should be represented here.
By default, the S-RAMP repository and all of the Design Time Governance REST services are protected by BASIC and SAML Bearer Token authentication mechanisms (allowing clients to use either). Configuring the authentication of the REST services varies depending on application server. In JBoss the authentication is typically configured in the standalone.xml file. This section describes how the various client components can be configured when the server authentication mechanism is changed.
There are several Design Time Governance components that invoke protected REST services, and each component must be configured individually. In each case an authentication provider must be implemented and configured via either dtgov.properties or dtgov-ui.properties. The following are the client components which can be customized in this way:
- DTGov :: S-RAMP Repository Monitoring (automated process that triggers workflows when repository changes are detected)
- DTGov :: Governance Services Invoking the S-RAMP API (some of the Governance REST services invoke the S-RAMP API)
- DTGov UI :: S-RAMP Invokes (the UI displays governance data that it gets from the S-RAMP repository)
- DTGov UI :: Task Inbox Invokes (the UI queries a pluggable Task API to get human task data for display in the Task Inbox)
In each case, an authentication provider can be specified that will control how authentication information is passed to the service being invoked. The authentication provider must be a Java class that implements a specific provider interface. The classname can be set in the relevant configuration file. The following table provides the relevant details for each component:
| Component | Provider Interface | Config Property | Config File |
|---|---|---|---|
DTGov :: S-RAMP Repository Monitor | org.overlord.sramp.client.auth.AuthenticationProvider | sramp.repo.auth.provider | dtgov.properties |
DTGov :: Governance Services → S-RAMP | org.overlord.sramp.client.auth.AuthenticationProvider | sramp.repo.auth.provider | dtgov.properties |
DTGov UI :: S-RAMP Invokes | org.overlord.sramp.client.auth.AuthenticationProvider | dtgov-ui.s-ramp.atom-api.authentication.provider | dtgov-ui.properties |
DTGov UI :: Task Inbox Invokes | org.overlord.dtgov.taskclient.auth.AuthenticationProvider | dtgov-ui.task-api.authentication.provider | dtgov-ui.properties |
Example
A reasonable example might be that the Task API is configured to use some alternative authentication mechanism, in which case the DTGov UI must be configured with a different (custom) provider. The following steps will accomplish this:
- Create a new Java class that implements org.overlord.dtgov.taskclient.auth.AuthenticationProvider
package org.example.auth;

import org.apache.http.HttpRequest;
import org.overlord.dtgov.taskclient.auth.AuthenticationProvider;

public class CustomAuthenticationProvider implements AuthenticationProvider {
    // Constructor.
    public NoAuthenticationProvider() {
        // Note, you may also choose to have a constructor that accepts an Apache Commons
        // Configuration object, which will allow you to access configuration properties
        // in the dtgov-ui.properties file:
        // org.apache.commons.configuration.Configuration
    }

    // Provide any custom authentication here.
    @Override
    public void provideAuthentication(HttpRequest request) {
      // Do custom authentication now.
    }
}
- Configure the provider in dtgov-ui.properties
dtgov-ui.task-api.authentication.provider=org.example.auth.CustomAuthenticationProvider
# Optional custom configuration properties
dtgov-ui.task-api.authentication.custom.property1=some-value
dtgov-ui.task-api.authentication.custom.property2=some-value
- That’s it!
DTGov integrates tightly with a compliant S-RAMP repository, and it is recommended that the Overlord S-RAMP implementation is used. The S-RAMP repository is used as the storage mechanism for all artifacts that DTGov is interested in (e.g. Deployments). This chapter describes this integration as well as how it is configured.
DTGov is integrated with S-RAMP via the Atom based REST API that all S-RAMP repositories expose. The repository is leveraged in a number of ways, including:
- Storage of all artifacts
- Monitor for changes to trigger business workflows (described in another chapter)
- Managing deployments
A number of configuration properties drive the integration between DTGov and S-RAMP. In particular note that the DTGov back-end and the DTGov User Interface each have their own separate configuration. This is because the back-end and UI are separate applications that can be independently deployed.
Note that in addition to configuring the DTGov UI itself, the shared Overlord Header functionality (the top header for all Overlord applications) must also be customized so that the tabs in the header point to the right places. This is done by customizing the files installed (for example) in $jboss_home/standalone/configuration/overlord-apps.
DTGov Back-End Configuration
# S-RAMP Connection details
sramp.repo.url
sramp.repo.auth.provider
sramp.repo.user
sramp.repo.password
sramp.repo.validating
DTGov User Interface Configuration
# S-RAMP API connection endpoint
dtgov-ui.s-ramp.atom-api.endpoint
dtgov-ui.s-ramp.atom-api.authentication.provider
dtgov-ui.s-ramp.atom-api.authentication.saml.issuer
dtgov-ui.s-ramp.atom-api.authentication.saml.service
dtgov-ui.s-ramp.atom-api.authentication.saml.sign-assertions
dtgov-ui.s-ramp.atom-api.authentication.saml.keystore
dtgov-ui.s-ramp.atom-api.authentication.saml.keystore-password
dtgov-ui.s-ramp.atom-api.authentication.saml.key-alias
dtgov-ui.s-ramp.atom-api.authentication.saml.key-password
dtgov-ui.s-ramp.atom-api.validating
dtgov-ui.s-ramp-browser.url-base
overlord-apps/*-overlordapp.properties Configuration
overlordapp.href
Now for some examples. These examples assume that S-RAMP has been installed on server "sramp.example.org" and DTGov has been installed on server "dtgov.example.org".
First let’s make sure the UI Headers are propertly configured. To do this, we want to make sure that the files in overlord-apps are properly configured and copied to both servers (when running in EAP these files are found in $jboss_home/standalone/configuration/overlord-apps). There are two files of importance: srampui-overlordapp.properties, dtgov-overlordapp.properties
Example: srampui-overlordapp.properties
overlordapp.app-id=s-ramp-ui
overlordapp.href=http://sramp.example.org:8080/s-ramp-ui/
overlordapp.label=Repository
overlordapp.primary-brand=JBoss Overlord
overlordapp.secondary-brand=S-RAMP Repository
Example: dtgov-overlordapp.properties
overlordapp.app-id=dtgov
overlordapp.href=http://dtgov.example.org:8080/dtgov-ui/
overlordapp.label=Design Time
overlordapp.primary-brand=JBoss Overlord
overlordapp.secondary-brand=Governance
Now both servers should know where the appropriate UIs are located. This allows the shared Overlord Header (at the top of all Overlord UIs) to create the appropriate tabs.
Next let’s make sure that the DTGov back-end can properly communicate with the S-RAMP repository. This is done by editing the dtgov.properties file on the dtgov server.
Example: DTGov Back End Configuration
sramp.repo.url=http://sramp.example.org:8080/s-ramp-server/
sramp.repo.auth.provider=org.overlord.sramp.governance.auth.BasicAuthenticationProvider
sramp.repo.user=dtgov
sramp.repo.password=DTG_PASSWORD
sramp.repo.validating=true
The above configuration uses BASIC authentication when connecting to the S-RAMP repository. It will connect to S-RAMP at "sramp.example.org" (port 8080). Note that the DTGov back-end uses BASIC authentication against the S-RAMP repository because some of the functionality in DTGov occurs on the behalf of a workflow without the security context of an authenticated user. Obviously you must make sure that the user credentials you list in the configuration represent a valid S-RAMP repository user. We recommend creating a "dtgov" or "dtgovworkflow" user in S-RAMP for this purpose. Most likely you will be sharing users/authentication between the two servers in some way, but that is beyond the scope of this documentation.
Now that the back end is configured, we can configure the DTGov UI so it knows where the S-RAMP repository is (as well as where the S-RAMP UI is!). This is done by editing the dtgov-ui.properties file on the dtgov server.
Example: DTGov UI Configuration
dtgov-ui.s-ramp.atom-api.endpoint=http://sramp.example.org:8080/s-ramp-server
dtgov-ui.s-ramp.atom-api.authentication.provider=org.overlord.dtgov.ui.server.services.sramp.SAMLBearerTokenAuthenticationProvider
dtgov-ui.s-ramp.atom-api.authentication.saml.issuer=/dtgov-ui
dtgov-ui.s-ramp.atom-api.authentication.saml.service=/s-ramp-server
dtgov-ui.s-ramp.atom-api.authentication.saml.sign-assertions=true
dtgov-ui.s-ramp.atom-api.authentication.saml.keystore=${sys:jboss.server.config.dir}/overlord-saml.keystore
dtgov-ui.s-ramp.atom-api.authentication.saml.keystore-password=KEYSTORE_PASSWORD
dtgov-ui.s-ramp.atom-api.authentication.saml.key-alias=overlord
dtgov-ui.s-ramp.atom-api.authentication.saml.key-password=KEY_PASSWORD
dtgov-ui.s-ramp.atom-api.validating=true

dtgov-ui.s-ramp-browser.url-base=http://sramp.example.org:8080/s-ramp-ui
The above configuration connects to S-RAMP at "sramp.example.org" (port 8080) and uses SAML bearer token authentication. Please note that both the S-RAMP repository and the DTGov installation must share the same SAML keystore (the keystore contains encryption keys used to sign and verify SAML Assertions). This can be done by making sure that overlord-saml.keystore is the same file for both installations. Also note that the SAML Assertion used in this type of authentication has a time-to-live of only 10 seconds per request. This means that both of your servers must have their system times reasonably well in sync or this time-to-live test may fail.
The configuration also sets up the URL of the S-RAMP browser (UI). This is important because the DTGov UI occassionally creates links directly to the S-RAMP browser. Please note that this latter functionality may be adversely affected by user authentication (if the user must re-authenticate when navigating from the DTGov UI to S-RAMP UI then the right page may not display).
Both the UI and the back-end support pluggable authentication mechanisms. Out of the box DTGov provides implementations for BASIC authentication and SAML Bearer Token authentication. If the S-RAMP repository is protected by some alternative form of authentication, another implementation of the authentication provider can be created. In both cases, the authentication provider must implement the following interface:
org.overlord.sramp.client.auth.AuthenticationProvider
The DTGov back-end provides the following authentication provider implementations:
- BASIC - org.overlord.sramp.governance.auth.BasicAuthenticationProvider
- SAML Bearer Token - not supported
The DTGov user interface provides the following authentication provider implementations:
- BASIC - org.overlord.dtgov.ui.server.services.sramp.BasicAuthenticationProvider
- SAML Bearer Token - org.overlord.dtgov.ui.server.services.sramp.SAMLBearerTokenAuthenticationProvider
One of the most important features of the Overlord: DTGov software is the ability to trigger Governance Workflows based on changes detected in the S-RAMP repository. This chapter discusses this functionality, including:
- How to create a workflow
- Using DTGov supplied supporting Governance Services
- How to deploy a workflow
- Configuring a workflow to execute (trigger) when repository content changes
Overlord: DTGov integrates tightly with the jBPM business process management system. This allows DTGov to utilize any business process that is compatible with jBPM 6. The tooling available to author jBPM compatible business processes is varied and extensive (and is outside the scope of this document). One possibility is using the Eclipse based BPM tools. Another alternative is using the web based Drools authoring tools.
You need to have installed DTGov from JBoss Overlord project or as a part of Red Hat JBoss Fuse Service Works 6 and JBoss Developer Studio along with the Integration Stack plugins:
- JBoss Developer Studio with the Integration Stack can be installed according to Integration Stack for JBoss Tools and Developer Studio
- FSW can be obtained from Red Hat JBoss Fuse Service Works and DTGov from JBoss Overlord project can be found at Overlord - JBoss Community.
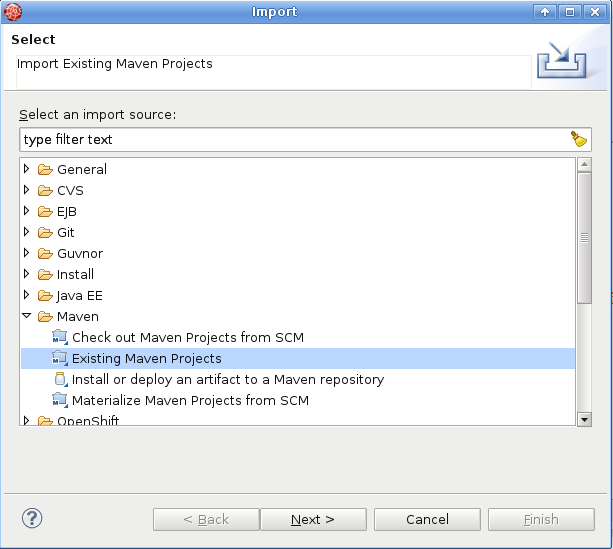
At the moment DTGov only supports one KieJar for all DTGov workflows, so first thing you need to do, after starting JBDS, is to import the default dtgov workflows into you workspace:
-
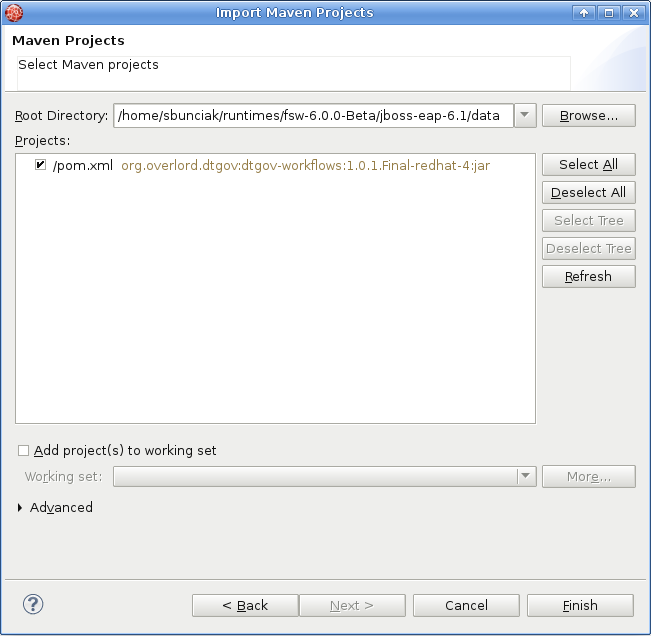
In JBDS select File → Import → Maven → Existing Maven Projects and navigate to
<FSW installation>jboss-eap-6.1/datawhere the dtgov workflows are located. The Maven integration in JBDS will take care of the rest.
-
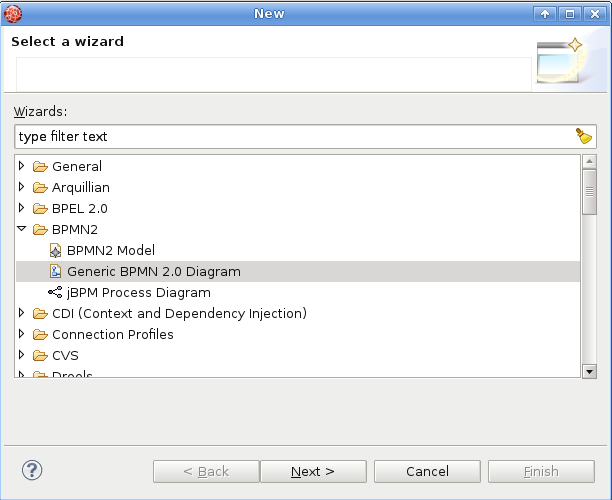
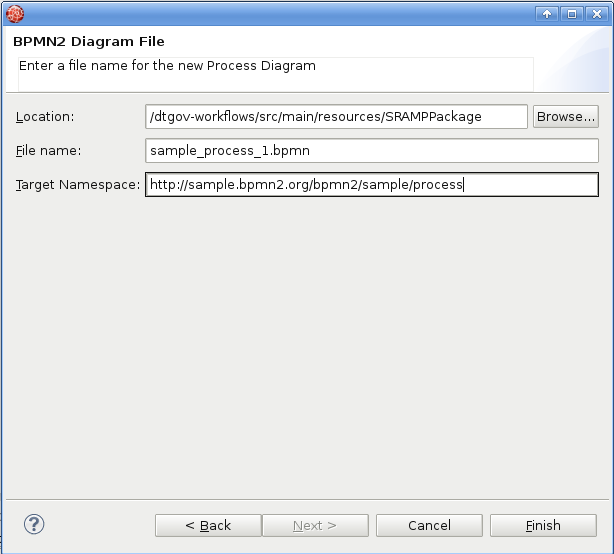
At this point you can author new governance workflows in
src/main/resources/SRAMPPackagefolder. To create new BPMN2 Process Diagram select File → New → Other → BPMN2 → Generic BPMN 2.0 Diagram → Process Diagram Type.
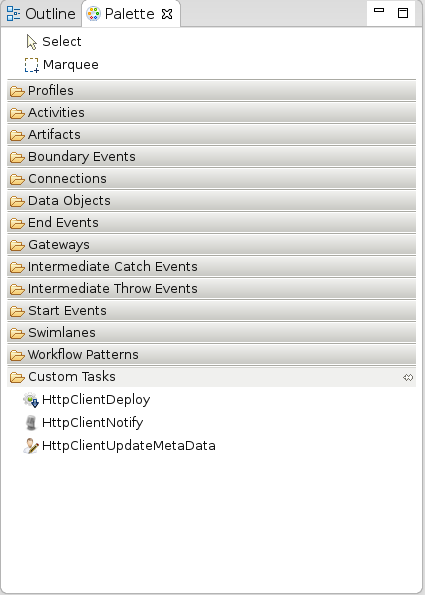
- Once the new process definition is opened in BPMN2 Modeler, make sure you have Custom tasks Modeler palette. If you don’t, right click on dtgov-workflows in Project Explorer → Properties → BPMN2 → Target Runtime → select 'JBoss jBPM 5 Business Process Engine'.
- Create model a brand new BPMN2 workflow diagram of your own. You can use overlord.demo.SimpleReleaseProcess.bpmn, which is part of the default dtgov-workflows, as an inspiration and sample for configuring DTGov Supporting Services tasks. Official DTGov demos can be found here: https://github.com/Governance/dtgov/tree/master/dtgov-demos
-
Few tips for DTGov workflow modeling:
- at first, set appropriate process id (will be used by DTGov to pick up the definition from S-RAMP repository) and package name:

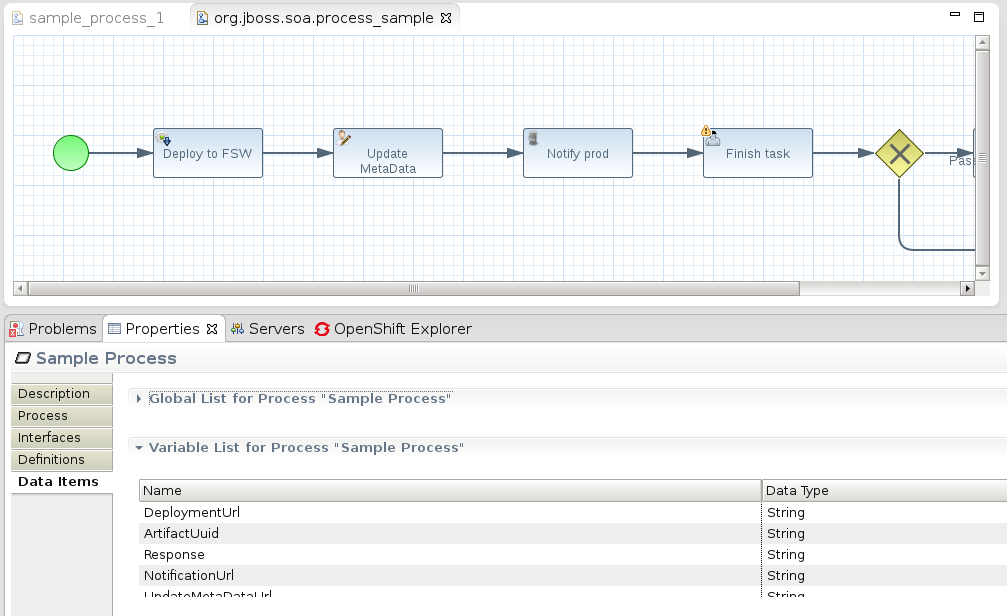
- second, create DTGov-specific Process variables in Data Items tab: DeploymentUrl , ArtifactUuid , Response , NotificationUrl , UpdateMetaDataUrl , DTGovUrl (these are used in DTGov Supporting Services):
You can download the guvnor console from the Drools-jBPM project and work on the workflows there. Once you are ready to deploy you will need to export the project and deploy to S-RAMP using a KJar format. Our experience is that this is similar to using the eclipse tooling but there are some differences regarding how to work with custom tasks. We therefor recommend using the eclipse based tooling. (note: this is an opportunity for you to contribute documentation)
For additional information about how to create jBPM processes, please consult the jBPM and Drools documentation.
All of the workflows and supporting files (images, task forms, etc) should be bundled together into a KIE archive. A KIE archive is simply a JAR with a particular structure assumed by jBPM. For example, your archive file structure might look something like this:
META-INF/kmodule.xml
SRAMPPackage/HttpClientWorkDefinitions.wid
SRAMPPackage/com.mybusiness.deploy.EARLifeCycle.bpmn2
SRAMPPackage/com.mybusiness.deploy.WARLifeCycle.bpmn2
SRAMPPackage/com.mybusiness.validate.NewSchemaReview.bpmn2
SRAMPPackage/run-build-install.png
SRAMPPackage/user-properties.png
SRAMPPackage/audio-input-microphone-3.png
What are all these files?
The kmodule.xml file is a jBPM artifact (it makes this a Kie Archive rather than just a plain old JAR file). This file should have the following content:
<?xml version="1.0" encoding="UTF-8"?>
<kmodule xmlns:xsi="http://www.w3.org/2001/XMLSchema-instance"
         xsi:schemaLocation="https://raw.github.com/droolsjbpm/droolsjbpm-knowledge/master/kie-api/src/main/resources/org/kie/api/kmodule.xsd"
         xmlns="http://jboss.org/kie/6.0.0/kmodule" >


    <kbase name="SRAMPPackage">
        <ksession name="ksessionSRAMP" scope="javax.enterprise.context.ApplicationScoped">
        	<workItemHandlers>
        		<workItemHandler name="HttpClientDeploy" type="new org.overlord.dtgov.jbpm.util.HttpClientWorkItemHandler()"/>
        		<workItemHandler name="HttpClientNotify" type="new org.overlord.dtgov.jbpm.util.HttpClientWorkItemHandler()"/>
        		<workItemHandler name="HttpClientUpdateMetaData" type="new org.overlord.dtgov.jbpm.util.HttpClientWorkItemHandler()"/>
      		</workItemHandlers>
        </ksession>
    </kbase>

</kmodule>
Next, there is a folder in the archive that maps to the kbase element found in the kmodule.xml file. This folder contains all of the business process resources, primarily the BPMN2 files. There is a file called HttpClientWorkDefinitions.wid which contains the custom work items used by Governance Workflows. It might look something like this:
import org.drools.process.core.datatype.impl.type.StringDataType;
[
  // the HttpClient work item
  [
    "name" : "HttpClientDeploy",
    "parameters" : [
      "Url" : new StringDataType(),
      "Method" : new StringDataType(),
      "Uuid" : new StringDataType(),
      "Target" : new StringDataType()
    ],
    "displayName" : "Deploy",
    "icon" : "run-build-install.png",
  ],

  // the HttpClient work item
  [
    "name" : "HttpClientNotify",
    "parameters" : [
      "Url" : new StringDataType(),
      "DTGovUrl" : new StringDataType(),
      "Method" : new StringDataType(),
      "Uuid" : new StringDataType(),
      "Target" : new StringDataType(),
      "Group" : new StringDataType(),
    ],
    "displayName" : "Notify",
    "icon" : "audio-input-microphone-3.png",
  ],

  // the HttpClient work item
  [
    "name" : "HttpClientUpdateMetaData",
    "parameters" : [
      "Url" : new StringDataType(),
      "Method" : new StringDataType(),
      "Name" : new StringDataType(),
      "Value" : new StringDataType(),
      "Uuid" : new StringDataType(),
    ],
    "displayName" : "UpdateMetaData",
    "icon" : "user-properties.png",
  ]
]
This file also refers to some images files (useful for BPMN editors) which are also included in the package.
Once the workflows are built, they must be deployed into the S-RAMP repository so that the embedded version of jBPM can find them properly. It is recommended that the S-RAMP maven integration is used to do this. The best way is to put all of the business process resources into a simple JAR style maven project. Then use the S-RAMP maven integration to mvn deploy the project directly into S-RAMP. Please see the Overlord: S-RAMP documentation’s "Maven Integration" section for details on how this works. The result should be that your Governance workflow JAR (Kie Archive) is uploaded to the S-RAMP repository, complete with relevant maven properties set.
The embedded jBPM engine will pick up the Governance Workflows by pulling the Kie Archive out of the S-RAMP repository and using the content it finds within. It’s worth noting that the maven information of the Kie Archive can be configured in the DTGov back end configuration file (dtgov.properties). The following properties control exactly what Kie Archive artifact the embedded jBPM engine will grab from S-RAMP:
dtgov.workflows.group=com.mybusiness
dtgov.workflows.name=governance-workflows
dtgov.workflows.version=1.0.7
dtgov.workflows.package=SRAMPPackage
In order to make it a little easier to author interesting Governance Workflows, DTGov provides a set of useful Governance Services. A list of these services follows:
- Deployment Service - deploys a binary application artifact to a configured target
- Meta-Data Update Service - allows simple modification of an artifact’s meta-data
- Notification Service - provides a simple way to send email notifications
These services can be invoked by using the work items defined above in the HttpClientWorkDefinitions.wid file.
E-mail templates for notifications can be modified at:
dtgov.war/WEB-INF/classes/governance-email-templates/
Note: more information about the Deployment Service can be found in the Deployment Management chapter of this guide.
Currently the only way to trigger the execution of a Governance Workflow is by configuring an S-RAMP query that will be used to monitor the S-RAMP repository for interesting changes. When changes are discovered, a new instance of the configured workflow is created and invoked. This section of the guide describes how to configure these query triggers.
All query triggers are defined as artifacts in the S-RAMP repository. These artifacts can be created and managed using the Workflow Trigger Query administrative UI found in DTGov. Simply log into the dtgov-ui web application and click on "Manage Workflow Queries" from the dashboard. You should see a screen like this:
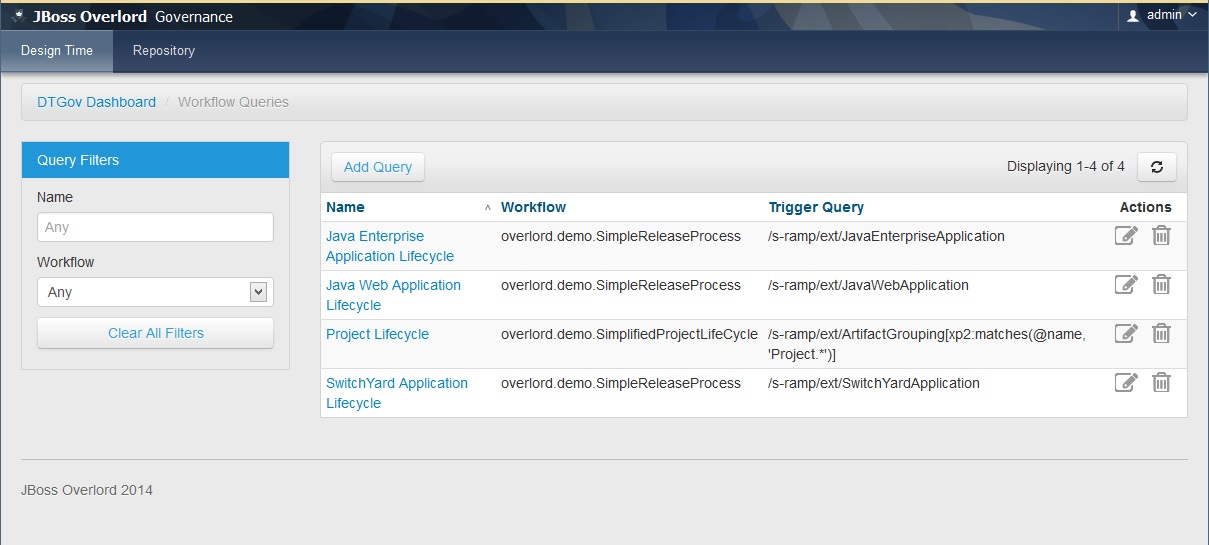
Use this page to manage the list of workflow trigger queries configured in DTGov.
You can add new queries or edit existing queries (either by clicking Add Query or by clicking one of the queries in the list). The resulting UI page will look like this:
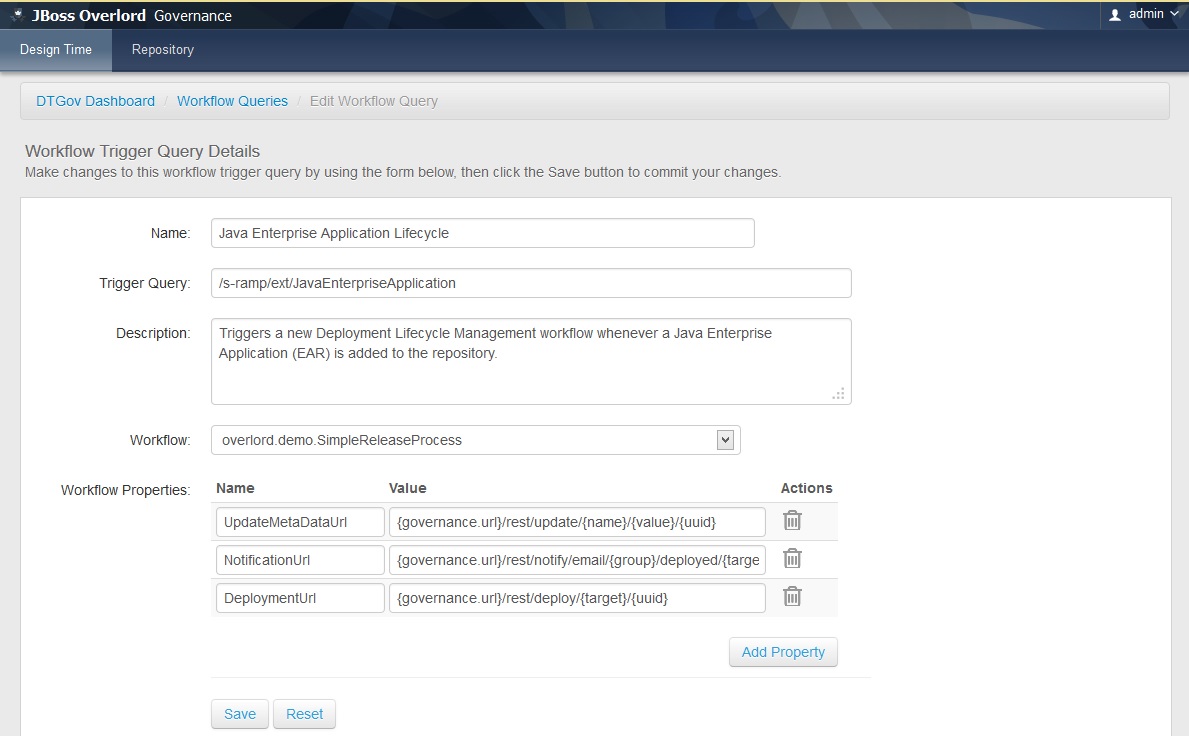
All Workflow Trigger Queries must have a name and description. In addition a valid S-RAMP query must be specified. All artifacts that are returned by the query will be processed and a new workflow instance created. The specific workflow that will be triggered must be chosen in the "Workflow" drop-down.
Finally, an optional set of properties can be specified to pass to the workflow. This is primarily useful in passing the various DTGov service URLs to the workflow, although arbitrary property mappings can be made. The following standard properties are supported and can be easily configured (with default values):
- UpdateMetaDataUrl - the URL to the "Update Meta-Data" DTGov service
- NotificationUrl - the URL to the "Notification" DTGov service
- DeploymentUrl - the URL to the "Deployment" DTGov service
When the new process is created, the set of properties specified in the UI will be passed to the process. Additionally, the following standard properties will always be passed to the new process instance upon creation:
- ArtifactUuid
- ArtifactName
- ArtifactVersion
- ArtifactCreatedBy
- ArtifactCreatedTimestamp
- ArtifactLastModifiedBy
- ArtifactLastModifiedTimestamp
- ArtifactType
The Notification Service is a service included by DTGov to make it easy to send out email notifications to users directly from the workflow. However, it can easily be used to send email notifications by any client that can perform a simple REST API call. This chapter describes how to enable and configure the Notification Service.
Invoking the Notification Service is a simple matter of sending a POST request to the proper dtgov service endpoint. For example:
http://localhost:8080/dtgov/notify/email/{group}/{template}/{target}/{uuid}
The path is made up of the following segments (see above):
- group: a logical group name - maps to a "Notification Destination" (see below)
- template: a logical name of a Template - maps to a Template (see below)
- target: string passed to the Template
- uuid: the UUID of an artifact - the name of the artifact can be used in the template
First, DTGov must either be configured with an "email" notification destination in the dtgov.properties file or the destination configuration must be left blank so that the default email settings are used. To configure explicit destination settings, the following can be set in the dtgov.properties file:
governance.email=<group1>|<fromAddress>|<toAddresses>
governance.email=<group2>|<fromAddress>|<toAddresses>
governance.email=<groupn>|<fromAddress>|<toAddresses>
This allows a mapping of logical group names to real destination email addresses. Note that the toAddresses value is a colon-separated list of real email addresses. Therefore an example configuration might be:
governance.email=DEV|overlord@mycompany.com|developers@mycompany.com:qa@mycompany.com
governance.email=PROD|overlord@mycompany.com|sysops@mycompany.com
If the governance.email property information is missing from dtgov.properties, then an implicit mapping will be used based on the group name passed to the Notification Service when it is invoked and the following global email settings configured in dtgov.properties:
governance.email.domain
governance.email.from
When these default settings are used, the Notification Service will send the email from the configured from address specified above to the following email address:
${groupName}@${governance.email.domain}
The group name is whatever is passed to the notification service and the domain comes from the governance.email.from property in dtgov.properties.
When sending an email notification, the subject and body of the email are generating by leveraging a template. When invoking the Notification Service, the template name is passed as one of the REST path segments. This logical name is used to look up the email template either from the classpath or from the S-RAMP repository.
The resulting template is then processed so that any Ant-style properties found in the template are resolved. A typical email body template might look like this:
Artifact ${uuid} with name '${name}' has been deployed to target ${target}.
Please claim this task, test this deployment and set a pass/fail status at the taskform at

${dtgovurl}/#taskInbox

--Overlord
There are two types of templates: one for the email body and one for the email subject. These template files can be located either on the classpath or in the S-RAMP repository.
When discovering the email template to use, DTGov will first look in the S-RAMP repository. DTGov will search for an artifact using the following query (for the email body template):
/s-ramp/ext/DtgovEmailTemplate[@template = '<templateName>' and @template-type = 'body']
Similarly, when looking for the email subject template, this query will be used:
/s-ramp/ext/DtgovEmailTemplate[@template = '<templateName>' and @template-type = 'subject']
When discovering the email template to use, DTGov will search the classpath for the body template here:
/governance-email-templates/<templateName>.body.tmpl
And for the subject it will look here:
/governance-email-templates/<templateName>.subject.tmpl
As a result, if the Notification Service is invoked with the following URL:
http://localhost:8080/dtgov/notify/email/DEV/invoiceReady/foo/12345
DTGov will look for email templates in the following places (in this order):
/s-ramp/ext/DtgovEmailTemplate[@template = 'invoiceReady' and @template-type = 'body']
/s-ramp/ext/DtgovEmailTemplate[@template = 'invoiceReady' and @template-type = 'subject']
/governance-email-templates/invoiceReady.body.tmpl
/governance-email-templates/invoiceReady.subject.tmpl
Overlord: DTgov uses an embedded version of jBPM by default. However, human tasks can easily be included in Governance Workflows because the Task Inbox is integrated directly into the DTGov User Interface.
Out of the box, Human Task functionality should work seamlessly. However, it is also possible to integrate a separate task system by providing an alternative (custom) Task API implementation.
To use a human task in a Governance workflow, you can simply drop a human task activity onto the canvas (when you are authoring your workflow using, for example, the Eclipse BPMN editor). Please see the documentation for your BPMN editor for more details on using jBPM human task activities. Note that, by default, a human task that executes in a Governance workflow will create a task instance that will appear in the Governance Task Inbox user interface provided with DTGov.
Whenever a task is created in a governance workflow (using a human task activity as discussed above), the Task Inbox is responsible for presenting the details of the task to relevant users. The Task Inbox allows users to perform human task related actions such as claiming, starting, and completing the tasks assigned to them.
It is important to understand that the Task Inbox must have access to a Form for each type of task it is expected to display. This is accomplished by creating a Task Form XML file for each type of task used in your Governance workflow(s). A Task Form XML file is simply an HTML5 snippet with the presentation markup specific to a task type. The Task Form XML file must be added to the S-RAMP repository that the DTGov system is connected to, so that it can be looked up when DTGov is presenting the task instance to a user.
An example Task Form XML file follows:
<form>
  <fieldset>
    <label>Notification</label>
    <p>
      You are hereby notified that a new Schema artifact named
      <b><span data-name="SchemaName">Unknown</span></b> has
      been added to the repository.  Please review it.
    </p>
    <label>Validation</label>
    <label class="radio">
      <input type="radio" name="Status" value="pass"></input>
      Schema accepted as valid
    </label>
    <label class="radio">
      <input type="radio" name="Status" value="fail"></input>
      Schema <em>not</em> accepted
    </label>
  </fieldset>
</form>
Custom task forms in DTGov will be pulled from the S-RAMP repository when needed and displayed dynamically in the user interface. Any input variables configured in the human task activity (in the governance workflow) will be used as inputs to the form. Inputs can be substituted into the following HTML elements:
- input type="text"
- input type="hidden"
- textarea
- input type="checkbox"
- input type="radio"
- select
- div
- span
- label
For HTML elements with name attributes (e.g. input, select, textarea), the name of the element must match the input variable name. For all other HTML elements the name must be specified in a data-name attribute.
When the user completes or fails a task, the data they entered in the task form is gathered up and submitted to the task engine (and is consequently sent back to the governance workflow).
Once the Task Form XML file is written, it must be added to the S-RAMP repository. The name of the file (and thus the name of the artifact in the S-RAMP repository) must be of the form:
<taskName>-taskform.xml
The taskName can be identified and configured when setting up the human task activity in your workflow. For example, if you configure the task name in your workflow to be mycompany.appx.VerifySchema then the Task Form XML file should be added to S-RAMP with a name of mycompany.appx.VerifySchema-taskform.xml.
For code newer than version 1.2 the Fail button in the TaskDetail form next to the Complete button is no longer visible. However in certain cases it may make sense to have a Fail button . To make this button visible you need to open the edit user task screen in your workflow editor and add an Input Parameter Mapping:
From: true (use expression and no language)
To: FailButtonIsVisible (type String)
Simply put, the Task API system used by the DTGov user interface can be swapped out by setting the following property in the DTGov UI configuration file (dtgov-ui.properties):
dtgov-ui.task-client.class
This property must point to a fully qualified Java class that implements the following interface:
org.overlord.dtgov.ui.server.services.tasks.ITaskClient
Of course, any Governance Workflows that create Human Task instances must also point to the alternate task system. That configuration is out of the scope of this guide.
One of the most useful services provided by the Overlord: DTGov system is the Deployment Service. This is a service that makes it possible to deploy a binary artifact stored in the S-RAMP repository into a target runtime environment such as JBoss EAP. This Deployment Service can easily be invoked from a Governance Workflow and is often included as part of a Deployment Lifecycle business process.
Invoking the Deployment Service from a Governance Workflow should be a simple matter of using the HttpClientDeploy task defined in the HttpClientWorkDefinitions.wid file as described in the Governance Workflows chapter of this guide. Within a BPMN2 process, the XML markup might look something like this:
<bpmn2:task id="Task_1" drools:taskName="HttpClientDeploy" drools:displayName="Deploy" drools:icon="run-build-install.png" name="Deploy to DEV">
  <bpmn2:incoming>bpmn20:SequenceFlow_9</bpmn2:incoming>
  <bpmn2:outgoing>bpmn20:SequenceFlow_10</bpmn2:outgoing>
  <bpmn2:ioSpecification id="_InputOutputSpecification_10">
    <bpmn2:dataInput id="_DataInput_47" itemSubjectRef="__NameInputItem" name="Url"/>
    <bpmn2:dataInput id="_DataInput_48" itemSubjectRef="__NameInputItem" name="Method"/>
    <bpmn2:dataInput id="_DataInput_49" itemSubjectRef="__NameInputItem" name="Uuid"/>
    <bpmn2:dataInput id="_DataInput_50" itemSubjectRef="__NameInputItem" name="Target"/>
    <bpmn2:inputSet id="_InputSet_10" name="Input Set 10">
      <bpmn2:dataInputRefs>_DataInput_47</bpmn2:dataInputRefs>
      <bpmn2:dataInputRefs>_DataInput_48</bpmn2:dataInputRefs>
      <bpmn2:dataInputRefs>_DataInput_49</bpmn2:dataInputRefs>
      <bpmn2:dataInputRefs>_DataInput_50</bpmn2:dataInputRefs>
    </bpmn2:inputSet>
  </bpmn2:ioSpecification>
  <bpmn2:dataInputAssociation id="_DataInputAssociation_47">
    <bpmn2:sourceRef>DeploymentUrl</bpmn2:sourceRef>
    <bpmn2:targetRef>_DataInput_47</bpmn2:targetRef>
  </bpmn2:dataInputAssociation>
  <bpmn2:dataInputAssociation id="_DataInputAssociation_48">
    <bpmn2:targetRef>_DataInput_48</bpmn2:targetRef>
    <bpmn2:assignment id="Assignment_1">
      <bpmn2:from xsi:type="bpmn2:tFormalExpression" id="FormalExpression_16">POST</bpmn2:from>
      <bpmn2:to xsi:type="bpmn2:tFormalExpression" id="FormalExpression_17">_DataInput_48</bpmn2:to>
    </bpmn2:assignment>
  </bpmn2:dataInputAssociation>
  <bpmn2:dataInputAssociation id="_DataInputAssociation_49">
    <bpmn2:sourceRef>ArtifactUuid</bpmn2:sourceRef>
    <bpmn2:targetRef>_DataInput_49</bpmn2:targetRef>
  </bpmn2:dataInputAssociation>
  <bpmn2:dataInputAssociation id="_DataInputAssociation_50">
    <bpmn2:targetRef>_DataInput_50</bpmn2:targetRef>
    <bpmn2:assignment id="Assignment_14">
      <bpmn2:from xsi:type="bpmn2:tFormalExpression" id="FormalExpression_17">dev</bpmn2:from>
      <bpmn2:to xsi:type="bpmn2:tFormalExpression" id="FormalExpression_18">_DataInput_50</bpmn2:to>
    </bpmn2:assignment>
  </bpmn2:dataInputAssociation>
</bpmn2:task>
The above task uses the DeploymentUrl and ArtifactUuid parameters that were passed in to the business process when it was invoked. It populates the inputs required by HttpClientDeploy including an input parameter named Target. The Target parameter maps to a configured Deployment Target. The target is a logical name and corresponds to a physical runtime environment configured in the DTGov configuration file (dtgov.properties). See the next section for details.
In order to make logical Deployment Targets available they must be configured in the DTGov configuration file. Typically an organization would configure three or four Deployment Targets, including:
- dev - the development environment
- qa - the test environment
- stage - the staging environment
- prod - the final production environment
Of course, any number of targets can be configured. Here is an example of how to configure the above four targets in the DTGov configuration file:
governance.targets=  dev|http://www.jboss.org/overlord/deployment-status.owl#InDev|copy|/tmp/dev/jbossas7/standalone/deployments
governance.targets=   qa|http://www.jboss.org/overlord/deployment-status.owl#InQa|copy|/tmp/qa/jbossas7/standalone/deployments
governance.targets=stage|http://www.jboss.org/overlord/deployment-status.owl#InStage|copy|/tmp/stage/jbossas7/standalone/deployments
governance.targets= prod|http://www.jboss.org/overlord/deployment-status.owl#InProd|copy|/tmp/prod/jbossas7/standalone/deployments
The format of each target is as follows:
LogicalName|Classifier|DeploymentType|TypeSpecificParams
- LogicalName : used in the BPMN process as described in the previous section as the value of Target
- Classifier : a classifier that should get added to the binary deployment artifact when deployed to the target environment (and removed when undeployed)
- DeploymentType : how to deploy to the environment. Valid values as of this writing include copy, rhq, as_cli, maven
Depending on the type of the deployment, additional parameters may be required. In the example above, the copy deployment type requires a folder on the server, which is where it will copy the deployment artifact.
Here are some examples of how to use the other deployment types:
# Deploy using RHQ/JON (username, password, rhq url)
governance.targets=rhq|rhquser::rhqpassword::rhqbaseUrl
# Deploy using the JBoss AS CLI  (username, password, host, port)
governance.targets=as_cli|asuser::aspassword::ashost::asport
# Deploy to a Maven Repository (maven-url, is-release-enabled, is-snapshot-enabled
governance.targets=maven|scp://m2.example.com/m2/snapshot-repository::false::true
Whenever the Deployment Service is used to deploy an artifact from the repository, it also annotates that artifact with relevant undeployment information. This annotation takes the form of another artifact in the repository of type ext/UndeploymentInformation. The annotation artifact will have a relationship named describesDeployment pointing from it back to the deployment artifact it annotates.
This undeployment information is used whenever an artifact needs to be undeployed. Undeploy of an artifact happens when a new version of that artifact is being deployed to a particular environment (deployment target). When this happens, the old version (whichever version is currently deployed in that environment) is undeployed in preparation of the new deployment.
Once the artifact is undeployed, its undeployment information artifact is deleted from the repository and any relevant classifier associated with the target environment is removed from the deployment artifact.
Note: please see the Configuring DTGov chapter for information about how to coordinate the configuration of the Deployment Service with the configuration of the DTGov User Interface (the Deployment Management UI).
For a short video see: http://jboss-overlord.blogspot.com/2013/11/managed-deployments-using-dtgov.html
This demo shows how DTGov can start a Project Workflow via a simple Maven build. This demo contains two projects:
- project: a very simple maven module with artifactId of "project".
- service: a maven module containing the Hello World Service API, expressed in WSDL.
The goal is to show that an upload of a pom.xml with artifactId of "project" kicks of a workflow of type overlord.demo.SimpleReleaseProcess.png.
To receive email notifications you need a running email server. The connection settings can be provided in the dtgov.properties file. It uses a mail session bound to JNDI to send the email. For example, in JBoss EAP it uses the mail-smtp settings defined in the standalone/configuration/standalone.xml
<outbound-socket-binding name="mail-smtp">
   <remote-destination host="localhost" port="25"/>
</outbound-socket-binding>
The easiest way to fulfill this requirements is to run the FakeSMTP server (http://nilhcem.github.io/FakeSMTP/), since this will list emails send to all email addresses. Just download it and run:
sudo java -jar fakeSMTP-1.0.jar
This demo uses the roles dev, qa, stage and prod. By default the admin user has all of these roles, see the standalone/configuration/application_roles.properties
admin=overlorduser,admin.sramp,dev,qa,stage,prod
which means that the admin will see tasks for all roles in this example. Follow the instructions in the application-users.properties to add users. Note that a new new user needs at least the overlorduser role.
Be aware that you must supply the maven build with credentials for your S-RAMP repository. This can be done by adding a section to your settings.xml file (or by providing a custom settings.xml on the mvn command line using the -s argument).
For more information see: http://maven.apache.org/settings.html
Your settings.xml file should contain two additional server entries in the servers section:
    <server>
      <id>local-sramp-repo</id>
      <username>admin</username>
      <password>YOUR-PASSWORD</password>
    </server>
    <server>
      <id>local-sramp-repo-snapshots</id>
      <username>admin</username>
      <password>YOUR-PASSWORD</password>
    </server>
To get this demo working you must be running the DTGov server and the S-RAMP repository (see documentation for the DTGov and S-RAMP projects to learn how to run the S-RAMP repository).
The first step is to build and deploy all artifacts to S-RAMP using Maven. The demo is configured to run against the default security settings found in the distribution.
Important
Authentication settings in your .m2/settings.xml are required.
$ mvn -Pdemo clean deploy
The -Pdemo flag will enable the demo profile, which tells the Maven distributionManagement to point to your local S-RAMP repository (http://localhost:8080/s-ramp-server/). Therefore you need to be running S-RAMP on port 8080 and deployed as the s-ramp-atom context.
The build should complete successfully and on the server you should see logging along the lines of
09:04:10,929 INFO [org.overlord.sramp.governance.QueryExecutor] (EJB default - 5) Starting workflow overlord.demo.SimpleReleaseProcess for artifact 44021610-f85e-48bf-9a1c-9adcdbe485b6
At this point there should be a number of artifacts stored in the S-RAMP repository. You can verify that by deploying the "s-ramp-ui" project and then navigating to http://localhost:8080/s-ramp-ui (or the appropriate URL for you).
You should see the following primary artifacts in the S-RAMP repository:
- dtgov-demos-switchyard-VERSION.jar
- dtgov-demos-switchyard-VERSION.pom
- OrderService.wsdl
- beans.xml
- orders
- org.overlord.sramp.demos.switchyard.service.InventoryService
- org.overlord.sramp.demos.switchyard.service.InventoryServiceBean
- org.overlord.sramp.demos.switchyard.service.Order
- org.overlord.sramp.demos.switchyard.service.OrderAck
- org.overlord.sramp.demos.switchyard.service.OrderService
- org.overlord.sramp.demos.switchyard.service.OrderServiceBean
- org.overlord.sramp.demos.switchyard.service.Transformers
Where the OrderService.wsdl, beans.xml, orders as well as some class With the query defined in the dtgov.properties:
governance.queries=/s-ramp/ext/SwitchYardApplication|overlord.demo.SimpleReleaseProcess|DeploymentUrl={governance.url}/rest/deploy/{target}/{uuid}::NotificationUrl={governance.url}/rest/notify/email/{group}/deployed/{target}/{uuid}::UpdateMetaDataUrl={governance.url}/rest/update/{name}/{value}/{uuid}....
it will start a SimpleReleaseProcess workflow when a SwitchYardApplication lands in the repository. You should see a custom property getting created which should look similar to
workflowProcessId=overlord.demo.SimpleReleaseProcess_0:workflowParameters=DeploymentUrl=http://localhost:8080/dtgov/res...
Note that the definition of the overlord.demo.SimpleReleaseProcess lives in the SRAMPPackage in the dtgov-workflows-VERSION.jar. If you want to update the workflow you need to use eclipse tooling to modify the bpmn, build and upload a new dtgov-worflow.jar to S-RAMP. The GAV settings are defined in the dtgov.properties file.
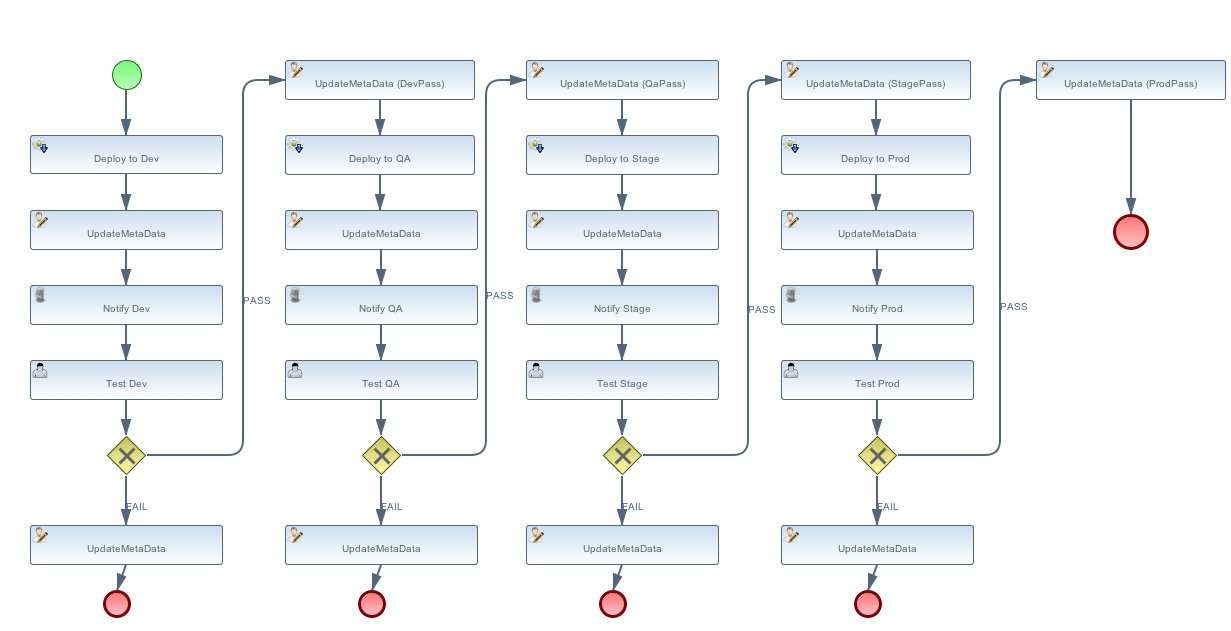
The workflow (and the deployment ontology) specifies four different environments:
- dev - development: machine hosting deployed released artifact before they go to QA. Developers can do a quick test to make sure things work on more then just their desk.
- qa - quality assurance: machine hosting deployed released artifacts so that they can go through the testing process.
- stage - staging: an environment identical to production where qa’ed artifacts can be tested on the real hardware and with interactions with other systems.
-
prod - production: the final place where the artifacts are deployed and run
When the _SimpleReleaseProcess_ is instantiated it deploy the artifact to the _dev_ environment.
The workflow makes a POST call to DeploymentUrl={governance.url}/rest/deploy/{target}/{uuid}
where
* {governance.url} is location where the DTGov REST API is hosted; this defaults to 'http://localhost:8080/dtgov'
and can be overridden in the dtgov.properties.
* {target} is the name of the deployment target which defined in the dtgov.properties and is
referenced in the 'Deploy to Dev' task.
* {uuid} is the UUID of the artifact which is set as a process parameter in the _SimpleReleaseProcess_
instance at creation time.
In this case, we assume the dev target is defined as
governance.targets= dev|http://www.jboss.org/overlord/deployment-status.owl#InDev|copy|/tmp/dev/jbossas7/standalone/deployments
where * dev: name of the target * http://www.jboss.org/overlord/deployment-status.owl#InDev: classification when deployed to Dev * copy: use file copy * /tmp/dev/jbossas7/standalone/deployments: deploy directory
We assume there is jbossas7 server running in /tmp/dev/jbossas7, and thus it uses a simple file copy to place the artifact in /tmp/dev/jbossas7/standalone/deployments. The appserver will take of deploying the artifact and on the server we should see logging along the lines of
09:04:11,168 INFO  [org.overlord.dtgov.jbpm.util.HttpClientWorkItemHandler] (EJB default - 5) Calling POST TO: http://localhost:8080/dtgov/rest/deploy/dev/44021610-f85e-48bf-9a1c-9adcdbe485b6
09:04:11,274 INFO  [org.jboss.resteasy.cdi.CdiInjectorFactory] (http-/127.0.0.1:8080-13) Found BeanManager at java:comp/BeanManager
09:04:11,300 INFO  [org.jboss.resteasy.spi.ResteasyDeployment] (http-/127.0.0.1:8080-13) Deploying javax.ws.rs.core.Application: class org.overlord.sramp.governance.services.GovernanceApplication$Proxy$_$$_WeldClientProxy
09:04:12,170 INFO  [org.overlord.dtgov.jbpm.util.HttpClientWorkItemHandler] (EJB default - 5) reply={status=success, target=COPY:/tmp/dev/jbossas7/standalone/deployments/dtgov-demos-switchyard-2.0.0-SNAPSHOT.jar}
The next task Classify #DevTest calls a REST service in DTGov using endpoint using a PUT to:
where * {governance.url} is location where the DTGov REST API is hosted; this defaults to http://localhost:8080/dtgov and can be overridden in the dtgov.properties. instance at creation time.
which adds the #DevTest classification onto the artifact. You can verify by navigating to this details of this artifact in the s-ramp-ui or by using the s-ramp.sh cli. The logging on the server should read
09:04:12,202 INFO  [org.overlord.dtgov.jbpm.util.HttpClientWorkItemHandler] (EJB default - 5) Calling PUT TO: http://localhost:8080/dtgov/rest/update/classification/http%3A*2F*2Fwww.jboss.org*2Foverlord*2Fdeployment-status.owl%23DevTest/44021610-f85e-48bf-9a1c-9adcdbe485b6
09:04:12,414 INFO  [org.overlord.dtgov.jbpm.util.HttpClientWorkItemHandler] (EJB default - 5) reply={artifactName=dtgov-demos-switchyard-2.0.0-20131107.140403-1.jar, artifactCreatedBy=admin, status=success}
The next task in the SimpleReleaseProcess is an email notification. The "Notification Task" calls a REST service in DTGov using a POST to:
where * {governance.url} is location where the DTGov REST API is hosted; this defaults to http://localhost:8080/dtgov and can be overridden in the dtgov.properties. is is set to dev the first go-around. * deployed is the name of the notification template. referenced in the Deploy to Dev task. This info is construct the notification message. instance at creation time.
On the server we should see the following logging
09:04:12,419 INFO  [org.overlord.dtgov.jbpm.util.HttpClientWorkItemHandler] (EJB default - 5) Calling POST TO: http://localhost:8080/dtgov/rest/notify/email/dev/deployed/dev/44021610-f85e-48bf-9a1c-9adcdbe485b6
09:04:12,862 INFO  [org.overlord.dtgov.jbpm.util.HttpClientWorkItemHandler] (EJB default - 5) reply={status=success}
By default an email is sent the server localhost at port 25. By default the TO address used is overlord@example.com. If you don’t want to use example.com then this can be overridden in the dtgov.properties using key governance.email.domain and governance.email.from for the FROM address. It is recommended to use an email alias or group to tie the group email to actual email addresses.
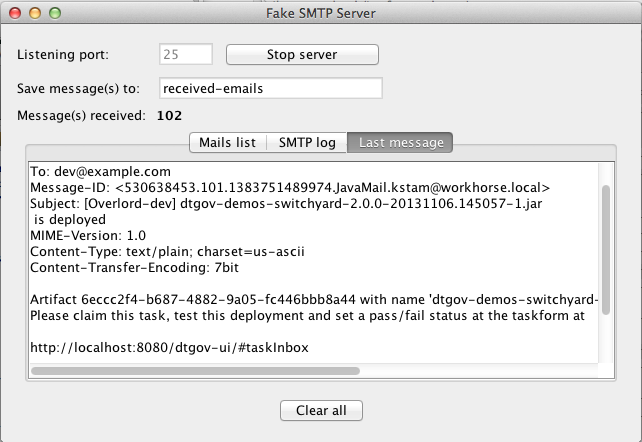
The email contains the following info:
Subject: [Overlord-dev] dtgov-demos-switchyard-2.0.0-20131106.145057-1.jar
 is deployed

Artifact 6eccc2f4-b687-4882-9a05-fc446bbb8a44 with name 'dtgov-demos-switchyard-2.0.0-20131106.145057-1.jar' has been deployed to target dev.
Please claim this task, test this deployment and set a pass/fail status at the taskform at

http://localhost:8080/dtgov-ui/#taskInbox

--Overlord
and Figure Figure 9.2, “Notification Email in FakeSMTP” shows displays the email in the FakeSMTP UI.
Email templates are deployed in the dtgov.war/WEB-INF/classes/governance-email-templates directory. in this case are deployed.subject.tmpl and deployed.subject.tmpl.
Any user in the dev group can now navigate to the taks list, and the user should see at least one entry
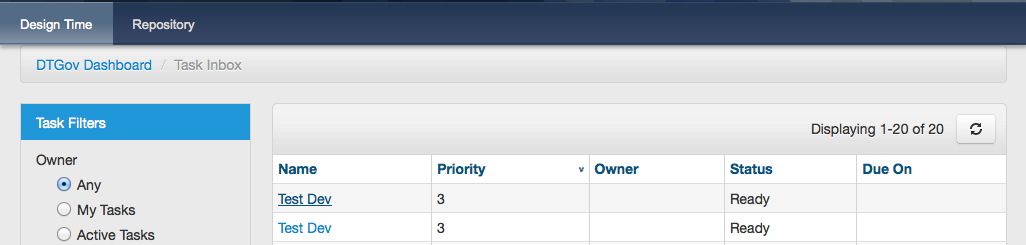
The user can click on this task to arrive at the detail screen:
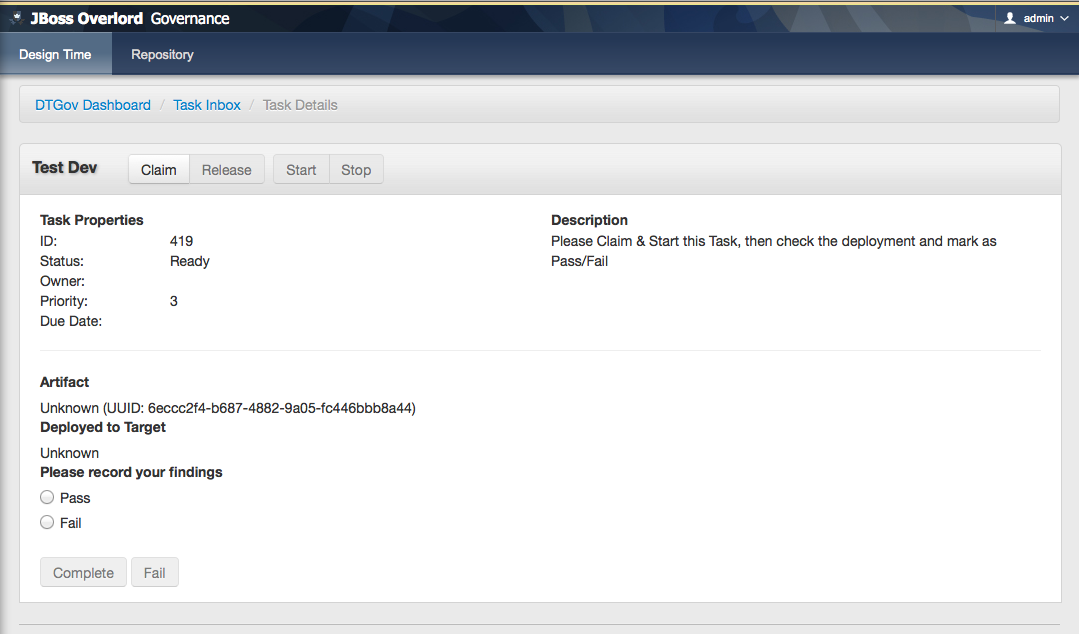
The dev user should claim and start the task and then mark as Pass/Fail and Complete. The artifact will get classified as #DevPass and you should see the following logging on the server:
09:17:21,161 INFO  [org.overlord.dtgov.jbpm.util.HttpClientWorkItemHandler] (http-/127.0.0.1:8080-39) Calling PUT TO: http://localhost:8080/dtgov/rest/update/classification/http%3A*2F*2Fwww.jboss.org*2Foverlord*2Fdeployment-status.owl%23DevPass/44021610-f85e-48bf-9a1c-9adcdbe485b6
09:17:21,359 INFO  [org.overlord.dtgov.jbpm.util.HttpClientWorkItemHandler] (http-/127.0.0.1:8080-39) reply={artifactName=dtgov-demos-switchyard-2.0.0-20131107.140403-1.jar, artifactCreatedBy=admin, status=success}
Based on the user input during the Test Dev task, a Gateway will now determine where to go next: * PASS - mark as passed in Dev, and send the artifact to QA * FAIL - mark as failed in Dev and Stop
A PASS will basically rerun the same tasks we just discussed but now in for qa, followed by stage and prod. So proceed Classify as DevTest, but you need to pretend it reads Classify as QaTest and so on.
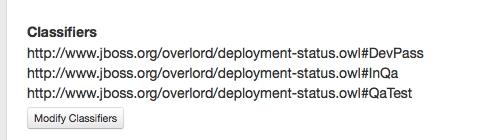
When you navigate to the detail screen of the dtgov-demos-switchyard-VERSION.jar you should see the #DevPass, #InQA and #QaTest classifiers set on this artifact.
The DTGov console has a screens specifically designed to govern deployment like these. Navigate to http://localhost:8080/dtgov-ui/#deployments and select your deployment from the list.
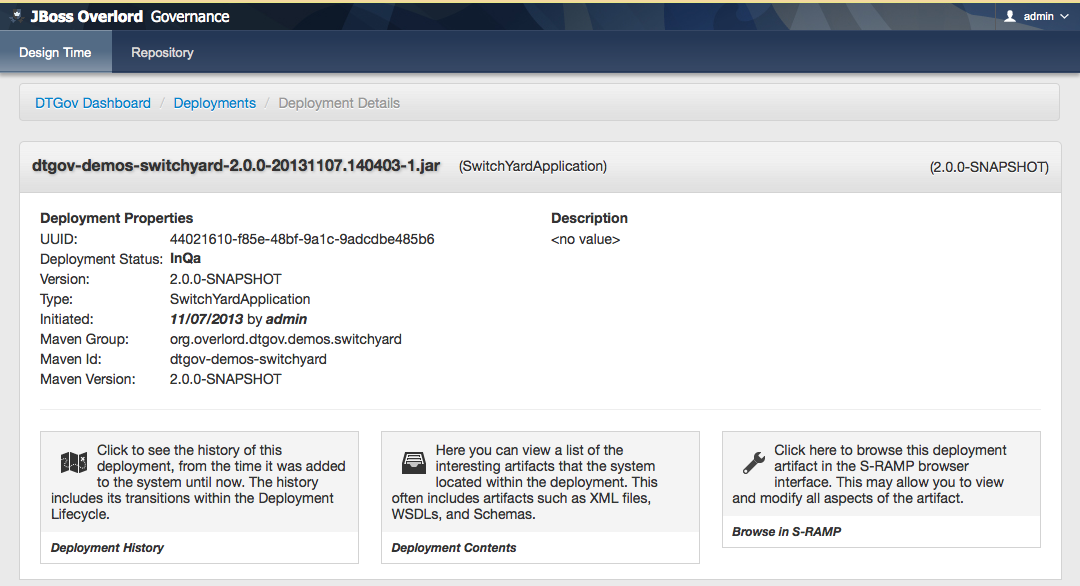
From here you can look at the deployment history, the interesting content of the artifact.
This completes this demo.
In large organizations building and maintaining services is not a one man job, instead it is a process that touches many people in the organization. Figure 10.1, “SOA Governance Roles” is a copy of figure 5.6 on page 95 of the SOA Governance book by Thomas Erl et al.
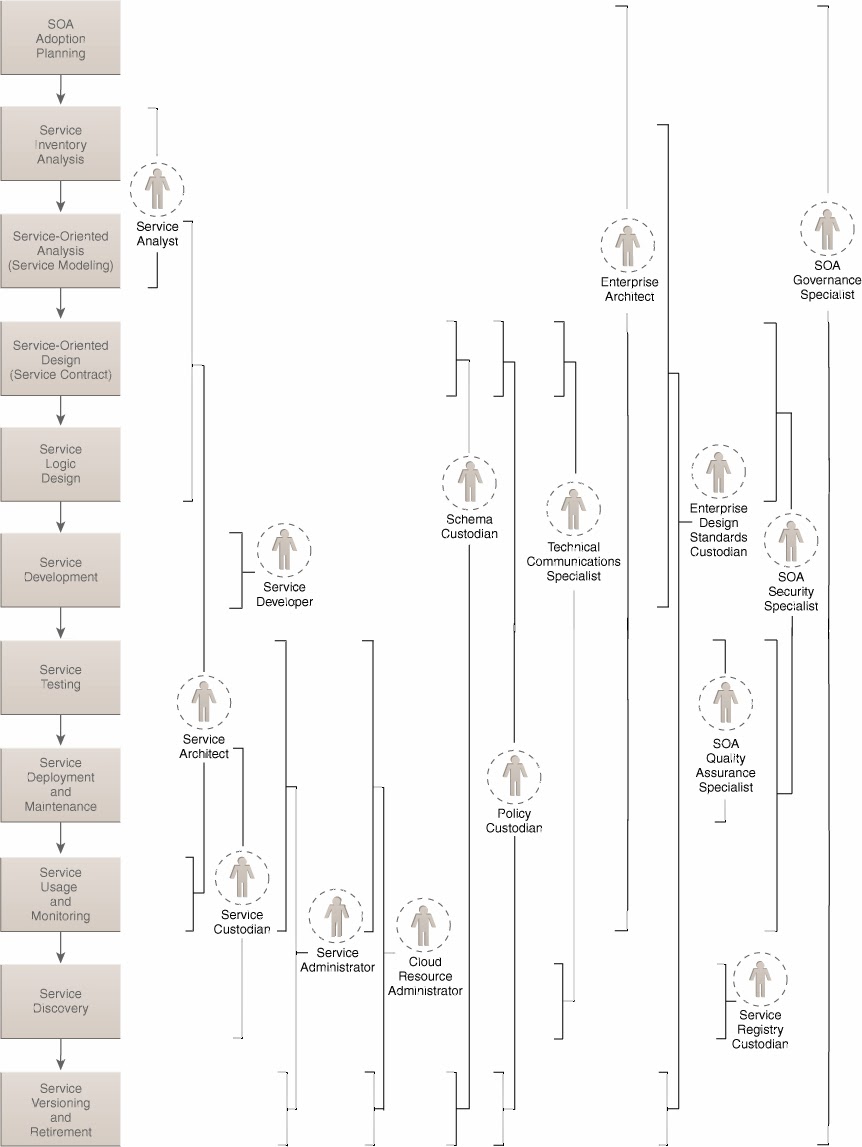
With this many people and roles involved, how to you manage a project like this? Especially since in a large organization you will have many of these project running simultaneously. We would have loved to implement a full project workflow based on the figure 1 process, but two things are currently standing in our way: time and real world input. Who is going to pick up the challenge?
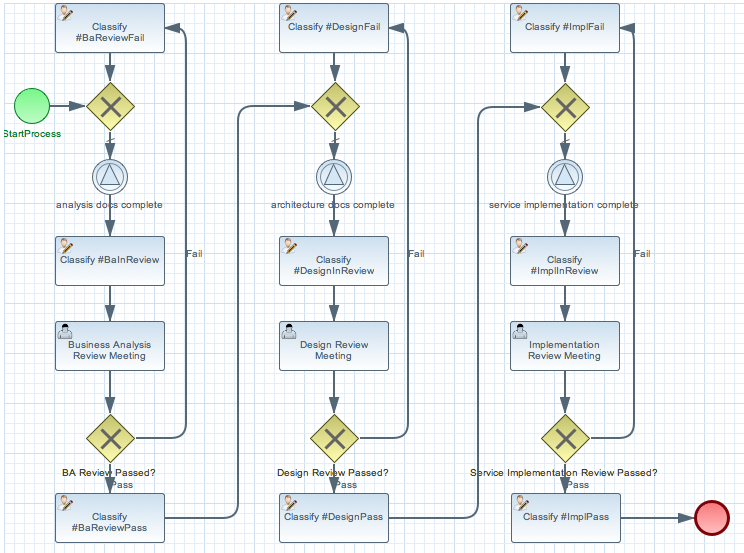
To get you started we created a Simplied Project Lifecycle Workflow demo that implements just 3 boxes; Requirements gathering, Service Design and Service Implementation, with one role responsible for each stage, which are a Business Analyst, SOA Architect and SOA Developer. Each role can be fulfilled by more then one person. In the demo we assigned all three roles to the admin user so we don’t have to log in and out as different users all time. The demo uses the workflow shown in Figure 10.3, “Project Workflow”. Each column represents one of the phases. The first phase being Business Analysis. The hope is this demo provides you with the building blocks to create the real world implementation we talked about earlier.
Some benefits of using this workflow are:
- Helps your organization with adoption of SOA by following proven processes. It is clear who is responsible for approval.
- Provides insight in where your projects are.
- Helps your organization work together in different teams.
- Audit features allow full history tracking.
- Released artifacts are in the repository, the artifact is automatically in escrow this way, and documentation and sources are stored along side the binaries all in one place.
Some optional benefits:
It is possible to send a BPMN event at the end of the workflow (or from anywhere else), which can kick off a release workflow to automate deployment. Though one could also write a governance query looking for a service implementation artifact with classification #ImplPass.
Easy integration with other systems (think bug track systems, or time management systems)
If you want to follow along with the demo you should
- Have DTGov running; see http://jboss-overlord.blogspot.com/2013/11/bleeding-edge-governance-getting-started.html.
- Install the Eclipse BPMN2 Modeler into your Eclipse IDE, or you can try the early access JBoss Developer Studio.
For a short video see: http://jboss-overlord.blogspot.com/2013/11/soa-governance-projects-and.html
This demo shows how teams can collaborate using a ProjectLifeCycle Workflow. In this example we have a simplified Project workflow with only three phases with their respective teams. Each team delivers a set of deliverables which are uploaded to the repository. Each upload triggers a review of the artifacts. The artifacts are groupedBy an ArtifactGrouping which is represented as a parent in S-RAMP.
This demo contains three submodules:
- project-requirements: a requirements doc created a Business Analyst.
- project-service-api: a service design created by a SOA-Architect.
- project-service-impl: the service implementation created by a SOA Developer.
The overlord.demo.ProjectLifeCycle.bpmn resides in the dtgov-workflow.jar in the SRAMPPackage and this should already be deployed. Also the classification ontologies should already have been installed as part of the data seeding process during install of DTGov. In the s-ramp-ui artifacts screen you can click on Classifiers to check that the Project Review Status is present.
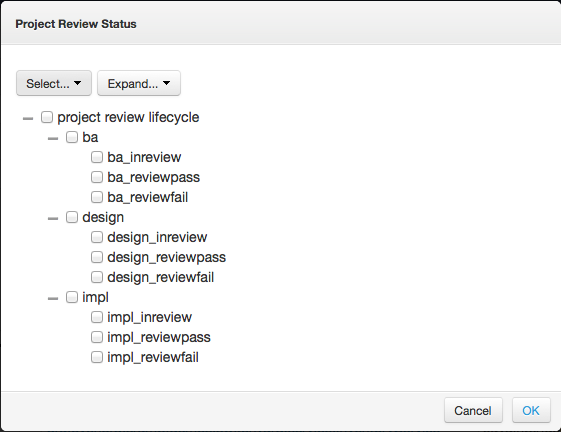
These classifications will be applied by the Classify nodes in the workflow as the project moves through its lifecycle.
You can create and update workflows using the Eclipse BPMN Editor, which can be installed from http://download.eclipse.org/bpmn2-modeler/updates/kepler/ (1.0 or newer). The project starts with a business analyst creating a requirements document, which is then reviewed and approved. On a successful approval a SOA-Architect creates a design, followed with another review meeting and finally a SOA-Developer creates an implementation of the design. When the implementation is reviewed the Service Implementation can be released into a formal QA process. The Deployment Process of an Artifact is covered in the dtgov-switchard demo.
To get this demo working you must be running the DTGov server and the S-RAMP repository (see documentation for the DTGov and S-RAMP projects to learn how to run the S-RAMP repository).
When the Business Analyst finishes the requirement doc project-requirments/src/main/resources/requirements-doc.txt. The next step is to build and deploy the requirements archive to S-RAMP using Maven:
	$ cd project-requirements
	$ mvn -Pdemo clean deploy
Important
Be aware that you must supply the maven build with credentials for your S-RAMP repository. This can be done by adding a section to your settings.xml file (or by providing a custom settings.xml on the mvn command line using the -s argument).
For more information see: http://maven.apache.org/settings.html
Your settings.xml file should contain two additional server entries in the servers section:
    <server>
      <id>local-sramp-repo</id>
      <username>admin</username>
      <password>PASSWORD</password>
    </server>
    <server>
      <id>local-sramp-repo-snapshots</id>
      <username>admin</username>
      <password>PASSWORD</password>
    </server>
That will enable the demo profile, which will configure the Maven distributionManagement to point to a local S-RAMP repository (http://localhost:8080/s-ramp-server/). Therefore you need to be running S-RAMP on port 8080 and deployed as the s-ramp-atom context.
The build should complete successfully.
At this point there should be a number of artifacts stored in the S-RAMP repository. You can verify that by deploying the "s-ramp-ui" project and then navigating to http://localhost:8080/s-ramp-ui (or the appropriate URL for you).
You should see the following artifacts in the S-RAMP repository:
- project-requirements-<version>.jar
- project-requirements-<version>.pom
- Project-org.overlord.dtgov.demos.project.<version>
The requirements-doc.txt is shipped in the requirements-<version>.jar. Note that you can use other formats if you like. You may have expected the jar and the pom, but what created the Project-org.overlord.dtgov.demos.project.<version> artifact? In the dtgov-demos-project/pom.xml you may have noticed the following section:
  <distributionManagement>
    <repository>
      <id>local-sramp-repo</id>
      <name>S-RAMP Releases Repository</name>
      <url>sramp://localhost:8080/s-ramp-server/?artifactGrouping=Project-${project.groupId}.${project.version}</url>
    </repository>
    <snapshotRepository>
      <id>local-sramp-repo-snapshots</id>
      <name>S-RAMP Snapshots Repository</name>
      <url>sramp://localhost:8080/s-ramp-server/?artifactGrouping=Project-${project.groupId}.${project.version}</url>
    </snapshotRepository>
  </distributionManagement>
This section is active when using the demo profile, and in it we specified an artifact grouping artifactGrouping=Project-${project.groupId}.${project.version}. During the upload this ArtifactGrouping artifact is created along with groupBy relationships to this parent artifacts. The dtgov.properties file defines the following :
governance.queries=/s-ramp/ext/ArtifactGrouping[xp2:matches(@name\, 'Project.*')]|overlord.demo.SimplifiedProjectLifeCycle|UpdateMetaDataUrl={governance.url}/rest/update/{name}/{value}/{uuid}
This starts a overlord.demo.SimplifiedProjectLifeCycle workflow when a ArtifactGrouping with a name that starts with Project lands in the repository. When the workflow is created you should see a new custom property on this artifact which should look like
workflowProcessId=overlord.demo.SimplifiedProjectLifeCycle_0:4_workflowParameters=UpdateMetaDataUrl=http://localhost:8080/dtgov/rest/update/{name}/{value}/{uuid}
If you where to delete this property then a new workflow will be started, and a new property will be recreated.
The upload of the requirements also triggered an AnalysisArtifactsComplete signal to the newly created workflow, to signal the workflow that the requirements docs are ready for review. This signal was triggered by upload of the project-requirements/pom.xml. Note that in this pom we have the following properties section
<properties>
   <signal>AnalysisArtifactsComplete</signal>
</properties>
During a MavenPom upload all properties are extracted and added as custom properties, prefixed with maven.property.; so the signal property end up as maven.property.signal with value AnalysisArtifactsComplete. When DTGov discovers this signal property it looks up the accompanying workflow referenced in the Project* ApplicationGroup artifact signals this process instance. After sending the signal the name of the property changes to _maven.property.signal.sent. When the signal is caught by the workflow, it will classify the Project* ApplicationGroup artifact with the #BaInReview classification, and start a Business Analysis Review Meeting task. This task is assigned to the ba role. You can defined roles in the standalone/configuration/overlord-idp-roles.properties. These roles can be referenced in the human task definition as the groupId.
By default the standalone/configuration/overlord-idp-roles.properties looks like
admin=overlorduser,admin.sramp,dev,qa,stage,prod,ba,arch
The admin user has all roles. So when logged in as admin you can work on ALL tasks. For this example the ba, arch, and dev roles in use. More roles can be created as needed.
You can work on your tasks by navigating to http://localhost:8080/dtgov-ui#taskInbox. After you’ve reviewed the requirements documents with all stakeholders, you go here to Claim, Start and record the Pass/Fail verdict. For the Business Analysis Review Meeting task you will need the ba role. On a Fail the workflow records the fail and loops back so that a new version can be submitted. On a Pass the workflow records the pass and enters the waiting for architecture docs complete state.
The architect can now take the detailed and approved requirements:
Requirements Document
---------------------
We have a pressing need for an Hello World Service.
Please develop one that can print "Hello World" when invoked.
and turn them into a design. At a minimum, for this webservice an annotated interface or a WSDL should be created. Both of these can be found in the project-service-api module. Since these are ready to go, proceed with deploying them to S-RAMP using:
	$ cd project-service-api
	$ mvn -Pdemo clean deploy
The build should complete successfully.
You should see the following newly created artifacts in the S-RAMP repository:
- project-service-api-<version>.jar
- project-service-api-<version>.pom
In this pom the signal property
<properties>
   <signal>ArchitectureArtifactsComplete</signal>
</properties>
will cause a ArchitectureArtifactsComplete signal to be send to the project workflow signalling that the design documents are ready for review. A review meeting should be called and someone with the arch role can pick up the Design Review Meeting task in the http://localhost:8080/dtgov-ui#taskInbox.
Finally, when the SOA-Developer has finished the implementation, it can be uploaded to the repository using
	$ cd project-service-impl
	$ mvn -Pdemo clean deploy
The build should complete successfully.
You should see the following newly created artifacts in the S-RAMP repository:
- project-service-impl-<version>.jar
- project-service-impl-<version>.pom
In this pom the signal property
<properties>
   <signal>ServiceImplArtifactComplete</signal>
</properties>
will cause a ServiceImplArtifactComplete signal to be send to the project workflow signalling that the design documents are ready for review. A review meeting should be called and someone with the dev role can pick up the Service Implementation Review Meeting task in the http://localhost:8080/dtgov-ui#taskInbox.
This completes this demo.