

2.3. The Authentication Process
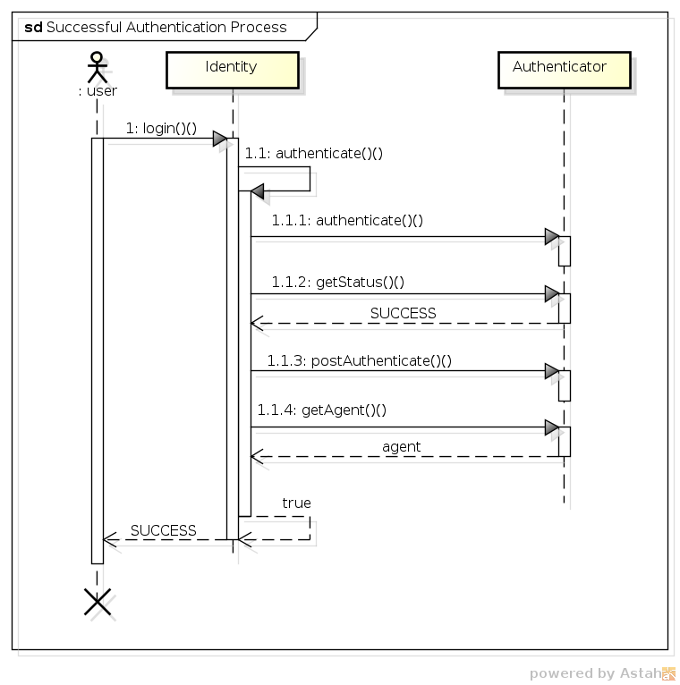
Now that we've looked at all the individual pieces, let's take a look at how they all work together to process an authentication request. For starters, the following sequence diagram shows the class interaction that occurs during a successful authentication:
-
1 - The user invokes the
login()method of theIdentitybean. -
1.1 - The
Identitybean (after performing a couple of validations) invokes its ownauthenticate()method. -
1.1.1 - Next the
Identitybean invokes theAuthenticatorbean'sauthenticate()method (which has a return value ofvoid). -
1.1.2 - To determine whether authentication was successful, the
Identitybean invokes theAuthenticator'sgetStatus()method, which returns aSUCCESS. -
1.1.3 - Upon a successful authentication, the
Identitybean then invokes theAuthenticator'spostAuthenticate()method to perform any post-authentication logic. -
1.1.4 - The
Identitybean then invokes theAuthenticator'sgetAccount()method, which returns anAccountobject representing the authenticated agent, which is then stored as a private field in theIdentitybean.
The authentication process ends when the
Identity.authenticate() method returns a value of true to the login() method, which in turn returns an authentication result of SUCCESS to the invoking user.
2.3.1. A Basic Authenticator
Let's take a closer look at an extremely simple example of an
Authenticator. The following code demonstrates an Authenticator implementation that simply tests the username and password credentials that the user has provided against hard coded values of jsmith for the username, and abc123 for the password, and if they match then authentication is deemed to be a success:
@PicketLink public class SimpleAuthenticator extends BaseAuthenticator { @Inject DefaultLoginCredentials credentials; @Override public void authenticate() { if ("jsmith".equals(credentials.getUserId()) && "abc123".equals(credentials.getPassword())) { setStatus(AuthenticationStatus.SUCCESS); setAccount(new User("jsmith")); } else { setStatus(AuthenticationStatus.FAILURE); FacesContext.getCurrentInstance().addMessage(null, new FacesMessage( "Authentication Failure - The username or password you provided were invalid.")); } } }
The first thing we can notice about the above code is that the class is annotated with the
@PicketLink annotation. This annotation indicates that this bean should be used for the authentication process. The next thing is that the authenticator class extends something called BaseAuthenticator. This abstract base class provided by PicketLink implements the Authenticator interface and provides implementations of the getStatus() and getAccount() methods (while also providing matching setStatus() and setAccount() methods), and also provides an empty implementation of the postAuthenticate() method. By extending BaseAuthenticator, our Authenticator implementation simply needs to implement the authenticate() method itself.
We can see in the above code that in the case of a successful authentication, the
setStatus() method is used to set the authentication status to SUCCESS, and the setAccount() method is used to set the user (in this case by creating a new instance of User). For an unsuccessful authentication, the setStatus() method is used to set the authentication status to FAILURE, and a new FacesMessage is created to indicate to the user that authentication has failed. While this code is obviously meant for a JSF application, it's possible to execute whichever suitable business logic is required for the view layer technology being used.
One thing that hasn't been touched on yet is the following line of code:
@Inject DefaultLoginCredentials credentials;
This line of code injects the credentials that have been provided by the user using CDI's
@Inject annotation, so that our Authenticator implementation can query the credential values to determine whether they're valid or not. We'll take a look at credentials in more detail in the next section.
Note
You may be wondering what happens if you don't provide an
Authenticator bean in your application. If this is the case, PicketLink will automatically authenticate via the identity management API, using a sensible default configuration. See the Identity Management chapter for more information.