JBoss Portlet Container is the next generation portlet container on which future versions of JBoss Portal, and the JBoss Portal platform will be based. It provides a standard-compliant implementation of the JSR-286 Portlet 2.0 specification. It has been developed with reusability in mind so that advanced users, who don't require a full-fledged portal, can leverage the portlet management services it provides in their own applications. JBoss Portlet Container is available through the business-friendly LGPL open source license.
JBoss Portlet Container is targeted at developers and advanced users who want to be able to deploy portlet-based applications but don't need a full-fledged portal.
A simple portal has been built on top of the base portlet container. A JSP taglib is also provided to make it easy to display portlet content in JSP pages. We also provide samples of portlets implementing some of the advanced capabilities of JSR-286.
Two bundled versions are provided to showcase JBoss Portlet Container in action with minimum effort. Theses bundles each include a servlet container configured with the Simple Portal demonstration portal along with some JSR-286 compliant portlets. You will need to have Java 5 configured on your machine to run the demonstration portal. You can download Java 5 at http://java.sun.com/javase/downloads/index_jdk5.jsp. Once you have Java installed, you are ready to download one of JBoss Portlet Container bundles. The following link has the list of downloads for JBoss Portlet Container: http://labs.jboss.com/portal/portletcontainer/download. Two bundles are currently provided: one with Tomcat 6.0.16 and one with JBoss Application Server 4.2.2.GA.
Of note in the bundle are the following directories:
- bin - Contains the startup/shutdown commands for JBoss Application Server
- docs - Contains documentation for JBoss Application Server
- jbosspc-docs - Contains documentation for JBoss Portlet Container (this document included)
-
server
- Contains JBoss Application Server configuration and the
simple-portal.warfile along with several sample portlets in thedeploydirectory of the default configuration
To start the demonstration portal, go to the
bin
directory and execute either
run.sh
or
run.bat
(depending on your platform).
Of note in the bundle are the following directories:
- bin - Contains the startup/shutdown commands for Tomcat
- logs - Contains the logs once the servlet container is started (the most interesting one being one with locahost in its name)
- jbosspc-docs - Contains documentation for JBoss Portlet Container (this document included)
- lib - Contains Tomcat libraries to which several support libraries for JBoss Portlet Container have been added
-
webapps
- Contains Tomcat default applications and the
simple-portal.warfile along with several sample portlets
To start the demonstration portal, go to the
bin
directory and execute either
startup.sh
or
startup.bat
(depending on your platform).
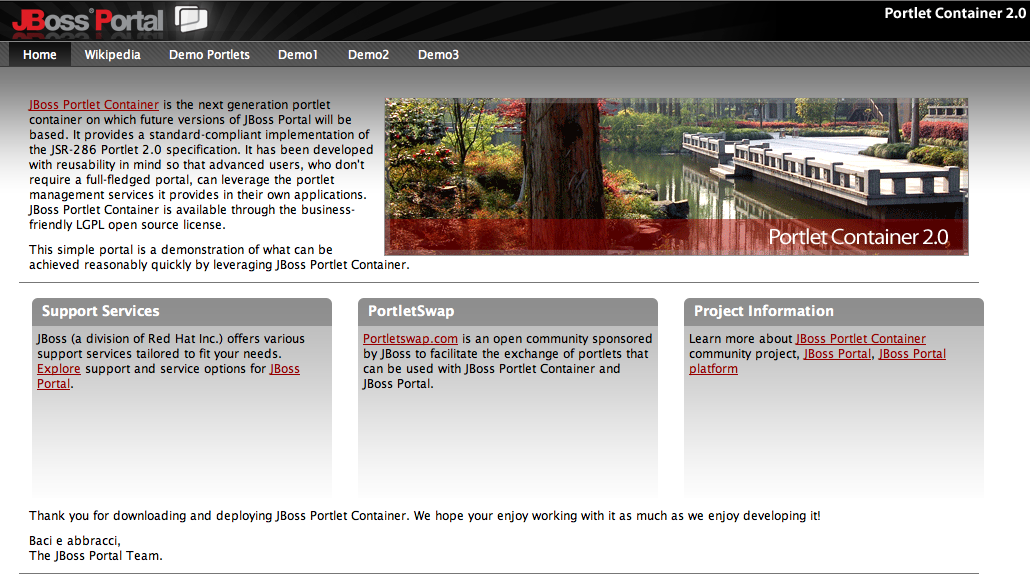
Once the servlet container is started, bring up your web browser and go to the following URL: http://localhost:8080/simple-portal. You should see the default page for Portlet Container's demonstration portal:
|
Default page for Portlet Container's demonstration portal.
A spin-off of the JBoss Portlet Container product is a portal called Simple Portal . As its name implies, Simple Portal provides an easy to use portal for small-sized sites that only require aggregation of portlets in portal pages, without the extra features of a full-fledged portal. In particular the following features are not addressed by Simple Portal:
| Security | Simple Portal relies on the servlet container authentication and does not provide any kind of security enforcement |
| Dynamic page creation | Simple Portal relies on JSP pages to create portal pages |
| Identity integration | Integration with identity systems is not provided, in particular access to the user's identity and profile |
On the other hand, Simple Portal is much simpler than a traditionnal portal server because it just consist in a few modules that only handles the basic protal concerns: the aggregation of portlet components in a web page.
The targeted use for Simple Portal are therefore restricted to:
- Portlet development
- Static portals build on top of the JSR286 specification
Simple Portal integrates with a few web containers in order to provide handling of portlet deployment and runtime. This feature leverages JBoss Portal's Web Service Provider Interface (SPI). In particular, JBoss Portlet Container uses the Web SPI in order to transparently react to the life cycle of WAR files that contains portlet components as they are deployed or undeployed on the target servlet container. The SPI defines two levels of integrations.
SPI implementation level 1 works with any web container but relies on portlet developers to insert a
specific servlet in the
web.xml
descriptor of their portlet applications.
SPI implementation level 2 is based on more advanced integration with specific web containers and provides transparent deployment of portlet applications without requiring any proprietary modification of the war file, keeping your application vendor agnostic. A few containers are supported:
- Tomcat 6.0.x
- JBoss Application Server 4.2.x
Simple Portal relies on the JSP technology to build pages for several good reasons:
- JSPs provide an adequate technology for building portal pages. This does not mean that portlet applications are required to use JSP, just that Simple Portal uses JSPs to organize portlets as pages. Portlets themselves are independent of the technology used for pages and can be developed using whichever technology or web framework you prefer/require.
- Java web developers are familiar with JSP technology.
- JSP makes it is easy and straightforward to create portal pages without requiring advanced tooling and, in most instances, can leverage IDEs support for JSPs.
- Several web frameworks are compatible with JSP and it is possible to leverage them. For example, it is possible to use Sitemesh for application skinning and still leverage Simple Portal's JSP tag library.
Any JSP page can contain portlets, the only requirement to make this possible is to have the page located in Simple Portal's WAR file and to use the portal tag library.
Let's look at a minimal portal page using the portal tag library:
<%@ page contentType="text/html;charset=UTF-8" language="java" %>
<%@ taglib uri="/WEB-INF/portal.tld" prefix="portal" %>
<?xml version="1.0" encoding="UTF-8"?>
<!DOCTYPE html
PUBLIC "-//W3C//DTD XHTML 1.0 Transitional//EN"
"http://www.w3.org/TR/xhtml1/DTD/xhtml1-transitional.dtd">
<html xmlns="http://www.w3.org/1999/xhtml" xml:lang="en" lang="en">
  <head>
    <title>Simple portal page</title>
  </head>
  <body>
    <portal:page>
       <portal:portlet name="JSPPortlet" applicationName="samples-jsp-portlet">
          <portal:portletmarkup/>
       </portal:portlet>
    </portal:page>
  </body>
</html>
Example 3.1. Minimal portal page
The portal tag library declaration enables the JSP compiler to know about the existence of the simple
portal. It is declared by the JSP declaration
<%@ taglib uri="/WEB-INF/portal.tld" prefix="portal" %>
and it binds the portal tag library to the
portal
namespace.
The interesting part of the markup is the
portal:page
element and its children. The
page
tag defines a logical scope that is used by Simple Portal to generate markup:
- It defines a container for a set of portlets.
- It defines the page area that will be replaced entirely by a maximized portlet markup (when the maximized window state is requested).
- It defines a scope for the coordination features.
Currently, only one portal page can be specified per JSP file but this should be extended to several portal pages per JSP file in future versions of JBoss Portlet Container.
Access to portlet information within a portal page is done by defining a reference to the portlet
using the
portlet
tag. The mandatory attributes for this tag are
name
and
applicationName
that are used to locate the deployed portlet. The
applicationName
refers to the name of the WAR file containing your portlet application without the extension
.war
and the
name
attribute refers to the portlet name as declared by the
portlet-name
element in the
portlet.xml
file of your portlet application WAR file. Similarly to the
page
tag, the
portlet
tag does not produce any markup but rather makes your portlet available to Simple Portal.
The portlet markup is output using the
portletmarkup
tag. This tag is replaced by the referenced portlet markup (without any decoration) when the page is
rendered.
The previous example only output the portlet markup. Let's examine how to output a complete portlet
representation. The
portlettitle
tag is used to insert the render phase generated title of the portlet referenced by the enclosing
portlet
element:
<portal:portlet name="JSPPortlet" applicationName="samples-jsp-portlet">
   ...
   <portal:portlettitle/>
   ...
</portal:portlet>
Example 3.2. Portlet title
It is also possible to output URLs targeting a given portlet. This can be used to create controls to
change the mode or window state of the portlet. The
portleturl
tag outputs such URLs and insert them in the page.
<portal:portlet name="JSPPortlet" applicationName="samples-jsp-portlet">
   ...
   <portal:portleturl windowState="maximized" mode="edit"/>
   ...
</portal:portlet>
Example 3.3. Portlet URL
The
portleturl
tag has two optional attributes. The
windowState
attribute allows to change the window state of the associated portlet while the
mode
attribute controls the portlet mode.
The Portlet 2 specification allows portlet to participate to the headers of the page. If you want to
allow portlets on the page to add header information to your page then you need to insert a
headers
tag in the
head
section of the page, as shown in the following example:
This instructs Simple Portal to insert header information contributed by portlets present on the page at the specified spot.
Portlet events provides a powerful way to decouple portlets. After the process action phase, an optional event phase is executed by the portal to process any events generated and produced by portlets. We recommend that you read the portlet specification to learn more about portlet events.
Coordination of portlets via events is scoped by pages. When an event is produced by a portlet on a
page, Simple Portal will locate all portlets on that very same page that can consume the produced event.
Produced events and consumer portlets are matched using the event's qualified name as specified in
portlet.xml.
Public render parameters allows several portlets on the same page to share render parameters.
Similarly to how portlet events are handled by Simple Portal, pages are natural scopes for shared render
parameters. Simple Portal's tag library provides for the definition of initial values for such parameters
allowing developpers to configure different pages initialized with different values of the same
parameter. This is accomplished via the
pageparam
tag.
<portal:page>
   <portal:pageparam namespaceURI="urn:jboss:portal:simple:google" localName="zipcode" value="80201"/>
   ...
</portal:page>
Example 3.5. Defining a shared render parameter
In the above example, we specify that the shared render parameter (or page parameter) identified by
the attribute pair
localName
(
zipcode
in the example) and
namespaceURI
(
urn:jboss:portal:simple:google
in the example) will be initialized with the value
80201
the first time the page is rendered. This value can change if any portlet supporting this shared
parameter updates it during an interaction triggered by the end user. However it is possible to make this
parameter unmodifiable (i.e. the parameter value will not change even if a portlet tries to update it) by
setting the optional
frozen
attribute to the
true
value.
Errors can be handled either during page rendering or when a portlet is interacted with. Simple Portal categorizes errors and associates each error type with a category name (string) that can be used to for programatic handling. The error categories are as follows:
| Category name | Use case |
|---|---|
not_found
|
The portlet that triggered the error cannot be located |
portlet_error
|
The portlet triggered an exception |
internal_error
|
The portlet triggered an unexpected exception recognized as an internal error |
unavailable
|
The portlet is located but has been put out of service |
Table 3.1. Error Categories
Simple Portal can display the content of an alternative page if, for some reason, a portlet fails during the render phase. This is similar to JSP error pages.
Several request attributes are set by Simple Portal so that the markup of the error page can be customized appropriately. The following table sums up these request attributes and their meaning.
| Attribute name | Meaning |
|---|---|
org.jboss.portal.portlet.portal.error.status
|
A <className>String</className> containing the error category as detailed in Table 3.1, “Error Categories” |
org.jboss.portal.portlet.portal.error.cause
|
A (possiblynull)
<className>Throwable</className>
representing the cause of the error, for example, a portlet exception
|
org.jboss.portal.portlet.portal.error.message
|
A <className>String</className> containing the error message, if any |
org.jboss.portal.portlet.portal.error.portlet_name
|
A
<className>String</className>
containing the name of the portlet that generated the error, as defined on the associated
portlet
tag
|
org.jboss.portal.portlet.portal.error.application_name
|
A
<className>String</className>
containing the name of the portlet application that generated the error, as defined on the
associated
portlet
tag
|
org.jboss.portal.portlet.portal.error.window_id
|
A <className>String</className> containing the identifier of the window associated with the portlet that generated the error, especially useful when several portlet windows reference the same portlet |
Table 3.2. Request Attributes for Error Pages
The
errorPage
attribute of the
portlet
tag is used to specify which error page to use for this specific portlet. The value of the attribute
should be the path to the error page relative to the root of the WAR file for that portlet. Note that
it could be a JSP or a plain file.
<portal:portlet name="JSPPortlet" applicationName="samples-jsp-portlet" errorPage="/WEB-INF/jsp/error.jsp">
   ...
</portal:portlet>
Example 3.6. Defining an error page
If a a failure occurs during an interaction with a portlet, Simple Portal will throw a servlet exception with a message set to one of the category names as specified in Table 3.1, “Error Categories”
The default error handling strategy is handled by a servlet filter that catches error messages and
translates them into HTTP errors. This filter is called
<className>ErrorHandlingFilter</className>
and is declared in the
web.xml
file of Simple Portal WAR file. This allows developers to change the error handling behavior if
desired.
<web-app>
   ...
   <filter-mapping>
      <filter-name>ErrorHandlingFilter</filter-name>
      <url-pattern>*.jsp</url-pattern>
   </filter-mapping>
   ...
</web-app>
Example 3.7. Error handling servlet filter definition
So far, we have examined the basic building blocks provided by Simple Portal's tag library. We will now examine an extension provided to allow the display of portlets pretty much as they are rendered in classic portals, that is with decorations. This extension is built on top of Simple Portal's tag library and uses the JSP 2.0 tag library extension feature. A pretty good overview of this feature can be found at http://www.onjava.com/pub/a/onjava/2004/05/12/jsp2part4.html.
The extended portlet consists of a JSP tag file located in the folder
/WEB-INF/tags/portal
of Simple Portal's WAR file.
<%@ page contentType="text/html" %>
<%@ page language="java" %>
<%@ taglib prefix="xportal" tagdir="/WEB-INF/tags/portal" %>
...
   <xportal:portlet name="GoogleMap" applicationName="samples-google-portlet"/>
...
Example 3.8. Example use of the extended portlet tag
You can consider this extension pretty much like a JSP include, just more powerful. More specifically, the JSP tag file can be edited and tweaked to your needs.
The Portlet 2.0 specification provides a new eventing feature for coordinating several portlets. This long awaited feature is very powerful but can sometime lead to complex scenarios when multiple events are consumed and fired by multiple portlets on the same page.
The simple portal provides a visual debugger that can be used to understand what happens during the event phase orchestrated by the portal. It comes as a portlet that you can place on any page and it shows a tree of events that were produced and consumed during the event phase.
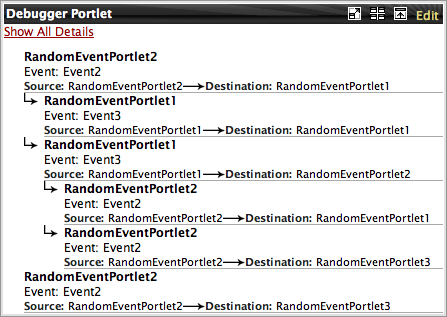
|
Event debugger portlet.
The event debugger displays a tree of events produced and consumed by portlets. The nodes of the tree don't represent events, they rather represent event routings from a source portlet to a destination portlet. By default it shows the name of the portlet that published the event, the event name and the destination of the event that was chosen by the simple portal during the event distribution phase. Hovering the mouse on a node shows more information.
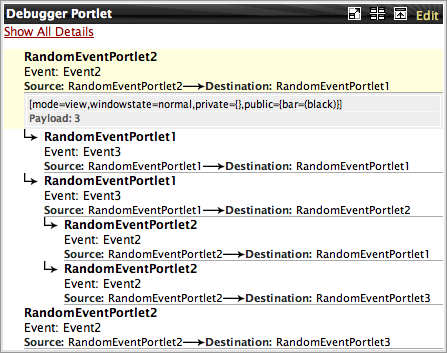
|
Event debugger portlet.
When hovering the mouse on a node you can see the optional event payload represented by
the string returned when invoked its toString() method and the state of the portlet
after the event phase. The state of the portlet consist in its portlet mode, its window state and the
set of its render parameters. Adding the event debugger to a page is easy.
...<xportal:portlet name="DebuggerPortlet" applicationName="simple-portal"/>...
Example 3.9. Adding the event debugger to a portal page
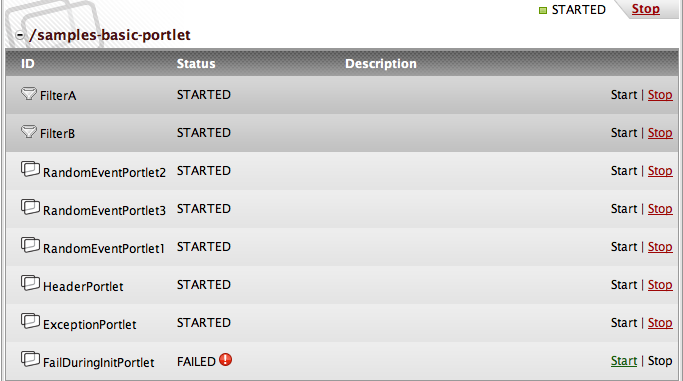
The admin portlet shows the list of portlet applications deployed in the simple portal. For each portlet application it is possible to unfold the appliation to display the portlet contained in the unfolded application as well as the portlet filters.
By default the admin portlet displays the list of portlet applications. It shows the status of each application and provides the capability to stop or start an application.

|
The admin portlet showing all the portlet applications.
On the example we can see that all the applications are in started mode except the samples-basic-portlet application. It is possible to manage the life cycle of each application by clicking on the start link when it is stopped or clicking on the stop link when it is started.
Selecting a particular portlet application unfolds it and shows the list of portlet containers that the application contains as well as the filters it contains.
|
The admin portlet showing the portlets container and filters contained in an application.
Again here it displays the name of the container and filters, the status of the life cycle and a link to start or stop the corresponding item.