Create new RichFaces Documentation Jira issue

This will launch the RichFaces Jira page - to complete your feedback please login if needed, and submit the Jira.
JBoss.orgCommunity Documentation
The <rich:columns> is a component, that allows you to create a dynamic set of columns from your model.
Highly customizable look and feel
Dynamic tables creation
Possibility to combine columns with the help of "colspan" and "breakBefore"
Possibility to combine rows with the help of "rowspan"
The <rich:columns> component gets a list from data model and outputs corresponding set of columns inside <rich:dataTable> on a page. It is possible to use "header" and "footer" facets with <rich:columns> component.
The "value" and "var" attributes are used to access the values of collection.
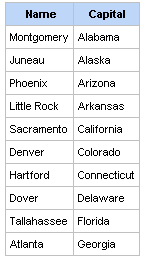
The simple example is placed below.
Example:
...

<rich:dataTable value="#{capitalsBean.capitals}" var="cap">

        <rich:columns value="#{capitalsBean.labels}" var="col" index="index">

                <f:facet name="header">

                        <h:outputText value="#{col.text}" />

                </f:facet>

         <h:outputText value="#{cap[index]}" />

         <f:facet name="footer">

                 <h:outputText value="#{col.text}" />

         </f:facet>

        </rich:columns>

</rich:dataTable>

...
The "columns" attribute defines the count of columns.
The "rowspan" attribute defines the number of rows to be displayed. If the value of this attribute is zero, all remaining rows in the table are displayed on a page.
The "begin" attribute contains the first iteration item. Note, that iteration begins from zero.
The "end" attribute contains the last iteration item.
With the help of the attributes described below you can customize the output, i.e. define which columns and how many rows appear on a page.
Example:
...

<rich:dataTable value="#{capitalsBean.capitals}" var="cap">

        <rich:columns value="#{capitalsBean.labels}" var="col" index="index" rowspan="0" columns="3" begin="1" end="2">

                <f:facet name="header">

                        <h:outputText value="#{col.text}" />

                </f:facet>

                <h:outputText value="#{cap[index]}" />

        </rich:columns>

</rich:dataTable>

...
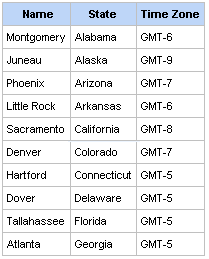
In the example below, columns from first to second and all rows are shown in the <rich:dataTable> .
The result is:
The <rich:columns> component does not prevent to use <rich:column> . In the following example one column renders in any way and another columns could be picked from the model.
Example:
...

<rich:dataTable value="#{rowBean.rows}" var="row">

        <rich:column>

                <h:outputText value ="#{row.columnValue}"/>

        </rich:column>

        <rich:columns value="#{colBean.columns}" var="col">

                <f:facet name="header">

                        <h:outputText value="#{col.header}"/>

                </f:facet>

                <h:outputText value="#{row.columnValue}"/>

                <f:facet name="footer">

                        <h:outputText value="#{col.footer}"/>

                </f:facet>

        </rich:columns>

</rich:dataTable>

...
Now, you can use a few <rich:columns> together with <rich:column> within the one table:
...

<rich:dataTable value="#{dataTableScrollerBean.model}" var="model" width="500px" rows="5">

        <f:facet name="header">

                <h:outputText value="Cars Available"></h:outputText>

        </f:facet>

        <rich:columns value="#{dataTableScrollerBean.columns}" var="columns" index="ind">

                <f:facet name="header">

                        <h:outputText value="#{columns.header}" />

                </f:facet>

                <h:outputText value="#{model[ind].model} " />

        </rich:columns>

        <rich:column>

                <f:facet name="header">

                        <h:outputText value="Price" />

                </f:facet>

               <h:outputText value="Price" />

        </rich:column>

        <rich:columns value="#{dataTableScrollerBean.columns}" var="columns" index="ind">

                <f:facet name="header">

                        <h:outputText value="#{columns.header}" />

                </f:facet>

                <h:outputText value="#{model[ind].mileage}$" />

        </rich:columns>

</rich:dataTable>

...
In order to group columns with text information into one row, use the
"colspan"
attribute, which is similar to an HTML one. In the
following example the third column contains 3 columns. In addition,
it's necessary to specify that the next column begins from
the first row with the help of the breakBefore =
"true" .
Example:
...

<rich:dataTable value="#{columns.data1}" var="data">

        <rich:column>

                <h:outputText value="#{column.Item1}" />

        </rich:column>

        <rich:column>

                <h:outputText value="#{column.Item2}" />

        </rich:column>

        <rich:column>

                <h:outputText value="#{column.Item3}" />

        </rich:column>

        <rich:columns columns="3" colspan="3" breakBefore="true">

                <h:outputText value="#{data.str0}" />

        </rich:columns>

</rich:dataTable>

...
The same way is used for columns grouping with the "rowspan" attribute that is similar to an HTML. The only thing to add in the example is an instruction to move onto the next row for each next after the second column.
Example:
...

<rich:dataTable value="#{columns.data1}" var="data">

        <rich:columns columns="2" rowspan="3">

                <h:outputText value="#{data.str0}" />

        </rich:columns>

        <rich:column>

                <h:outputText value="#{column.Item1}" />

        </rich:column>

        <rich:column  breakBefore="true">

                <h:outputText value="#{column.Item2}" />

        </rich:column>

        <rich:column  breakBefore="true">

                <h:outputText value="#{column.Item3}" />

        </rich:column>

</rich:dataTable>

...
The <rich:columns> tag is initialized during components tree building process. This process precedes page rendering at "Render Response" JSF phase. To be rendered properly the component needs all it variables to be initialized while the components tree is being building. A javax.servlet.jsp.JspTagException occurs if <rich:columns> uses variables passed from other components, if these variables are initialized during rendering. Thus, when <rich:columns> is asking for such variables they do not already exist. Use <c:forEach> JSP standard tag as workaround. Compare two examples below.
This code calls the exception:
...

<rich:dataTable value="#{bean.data}" var="var">

        <rich:columns value="#{var.columns}">

                ...

        </rich:columns>

</rich:dataTable>

...
This code works properly:
...

<c:forEach items="#{bean.data}" var="var">

        <rich:columns value="#{var.columns}">

                ...

        </rich:columns>

</c:forEach>

...
Since 3.3.0GA <rich:columns> requires explicit definition of "id" for children components to ensure that decode process works properly. The example of how you can define unique "id" for children component:
...

<rich:columns value="#{bean.columns}" var="col" index="ind" ... >

        <h:inputText id="input#{ind}" value="">

                <a4j:support id="support#{ind}" event="onchange" reRender="someId" />

        </h:inputText>

</rich:columns>

...
Only if "id" defined as shown above Ajax after onchange event will be processed as expected.
Sorting and filtering for the <rich:columns> component works the same as for <rich:column> . See the "Sorting and Filtering" section.
Table of <rich:columns> attributes.
Table 6.33. Component Identification Parameters
| Name | Value |
|---|---|
| component-type | org.richfaces.Column |
| tag-class | org.richfaces.taglib.ColumnsTagHandler |
Table 6.34. Facets
| Facet name | Description |
|---|---|
| header | Defines the header content |
| footer | Defines the footer content |
On the component LiveDemo page you can found some additional information for <rich:columns> component usage.