This is the Getting Started Guide for SAVARA. This guide starts with the installation instructions for the SAVARA tools and runtime modules.
The remainder of the document is organised to reflect phases within the SAVARA Methodology, and how the current tools can be used in support of that methodology. The tools are still in development, and therefore not all phases will have tools, and the tools in some phases will not necessarily be complete.
As an overview, the tools currently include capabilities for:
- Definition of business requirements as scenarios
- Creation of a choreography (global model) to represent the architecture for a system that delivers the requirements
- Generation of documentation based on the choreography
- Generation of service implementation using WS-BPEL
- Generation of service interfaces using WSDL
- Conformance checking a WS-BPEL service implementation against a choreography
- Runtime validation of an ESB service against a choreography description
This section describes the installation procedure for SAVARA tools and runtime modules.
The pre-requisites for the SAVARA Eclipse Tools are:
- Eclipse JEE (3.6 or higher) http://www.eclipse.org
- JBoss Tools (3.2 or higher) http://www.jboss.org/tools available from an update site
The pre-requisites for the SAVARA Service Validator are:
- JBossAS (5.1.0.GA or higher) http://www.jboss.org/jbossas
- JBossAS (4.8 or higher) http://www.jboss.org/jbossesb
- SAVARA (version 1.1.0 or higher), available from http://www.jboss.org/savara/downloads
The installation instructions for the SAVARA Eclipse tools are:
-
Eclipse
Download the latest version of Eclipse JEE, and install in your environment.
-
BPMN Modeller
When Eclipse has been lauched, go to the Help->Install New Software.. menu item. Select the Eclipse update site for the version of Eclipse (e.g. Helios). Within the SOA Development category, select the BPMN Project Feature. Follow the instructions to accept the license and then restart Eclipse after the plugins have been installed.
-
JBoss Tools
Start up your Eclipse environment, and go to the Help->Install New Software.. menu item. Select the appropriate update site URL from the JBoss Tools download page, and enter it into the top text field in the dialog window, and press the Add button. Once the contents of the update site is available, then select the appropriate components and follow the instructions to install them within your Eclipse environment.
The JBoss Savara Tools feature should be selected from the SOA Development category.
If you wish to view the generated BPEL using a BPEL editor, rather than XML, then you should also select the JBoss BPEL Editor from the SOA Development category.
NOTE: If you don't install the BPEL Editor, then you will have to install GMF. This can be found on the Helios update site, under the Modeling category. Select the Graphical Modeling Framework entry, and following the instructions to install.
It is also recommended that you install the JBoss WebServices Tools, and JBossAS Tools, from the All category. These are required to define and launch a JBossAS server from within Eclipse, generate a JAX-WS web service from a WSDL definition, and test a Web Service.
The installation instructions for the SAVARA Service Validator are:
-
JBossAS
Download the latest version and follow its installation instructions.
-
JBossESB
Download the latest version and follow the instructions for installing it into the JBossAS environment.
-
SAVARA
Unpack the SAVARA distribution and edit the
deployment.propertiesfile in this${SAVARA}/installfolder. Set the org.jboss.as.home property to the root directory where the JBossAS environment is located, and change the org.jboss.as.config property from default if you wish to start your JBossAS using a different configuration. Set the org.jboss.esb.home property to the root directory where the JBossESB environment is located.Start a command window and execute the command ant deploy.
Once the SAVARA Eclipse Tool distribution has been correctly installed, if you wish to try out any of the examples then the following steps should be followed to import the relevant projects into the previously configured Eclipse environment.
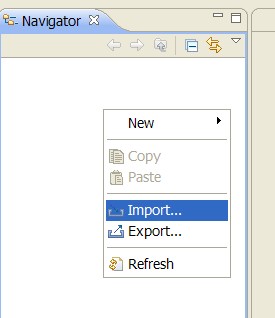
Select the 'Import...' menu item, associated with the popup menu on the background of the left panal (Navigator or Package depending on perspective being viewed).
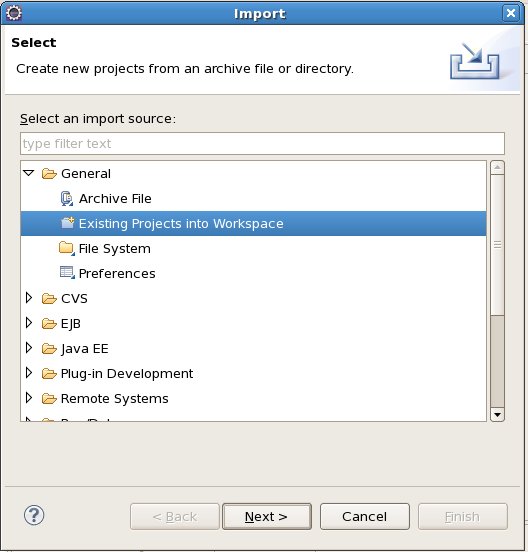
When the import dialog appears, select the General->ExistingProject from Workspace option and press the 'Next' button.
Ensuring that the 'Select root directory' radio button is selected, press the 'Browse' button and navigate to the
${SAVARA-Tools}/samplesfolder, then press 'Ok'.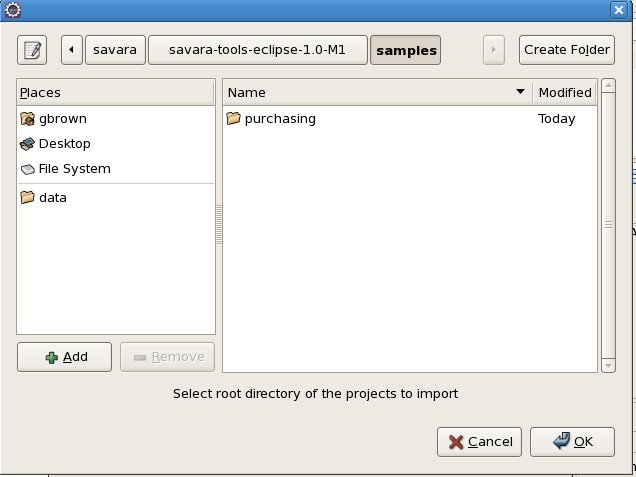
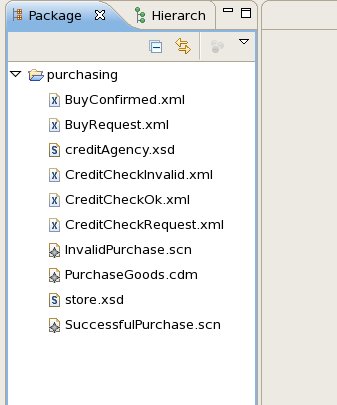
All of the Eclipse projects contained within the
${SAVARA-Tools}/samplesdirectory structure will be listed. Press the 'Finish' button to import them all.
Once imported, the Eclipse navigator will list the sample projects:
In the current Eclipse tools, that use the pi4soa Scenario and Choreography based models for defining requirements and architectural models, this phase would be achieved by defining the Participants and Roles within the choreography model.
When a choreography description is initially created, using the New->Other->Choreography->Choreography Description menu item, the roles and relationships can be defined on the first tab.
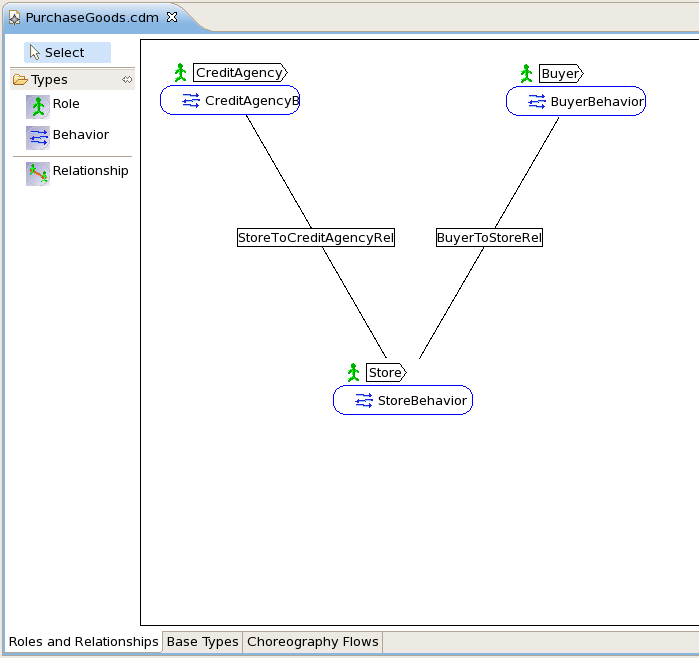
Default participant types are automatically created, one per role, and can be found on the Base Types tab. For example,
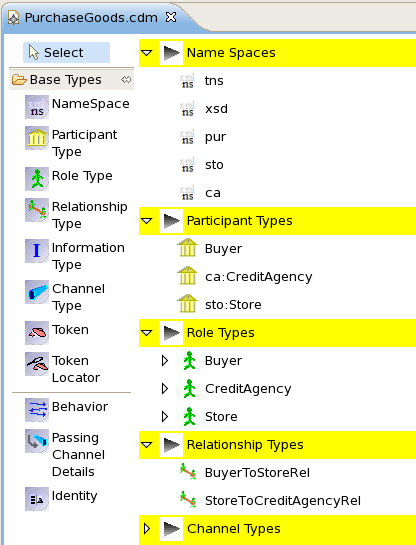
Only these components need to be specified in the choreography model. This enables them to be referenced in the subsequently defined scenarios. Otherwise it would be necessary to return to the scenarios, once the choreography model had been defined in the Architecture phase.
When designing a system, it is necessary to capture requirements. Various approaches can be used for this, but currently there are no mechanisms that enable the requirements to be documented in such a way to enable an implementation to be validated back against the requirements.
The pi4soa tools provide a means of describing requirements, representing specific use cases for the interactions between a set of cooperating services, using scenarios - which can be considered similar to UML sequence diagrams that have been enhanced to include example messages.
In the purchasing Eclipse project, the
SuccessfulPurchase.scn scenario looks like this:
The business requirements can therefore defined as a set of scenarios, each demonstrating a specific use-case, or path through the business process being enacted.
The next step is to create the example messages required by the scenarios.
Some previously defined examples can be found in the purchasing
Eclipse project. For example, the Buy request is defined as:
<tns:BuyRequest xmlns:tns="http://www.jboss.org/examples/store"

            id="1" />
Although a schema may not have been defined at this stage, unless one previously existed that is being reused, it is a good idea to define a namespace for the message type. This is because it will be used within the scenarios and architectural models defined in the following stage. If the namespace was not specified at this stage, then the example messages, scenarios and architectural models would need to be updated at a later stage.
Although this phase has been defined following the definition of the scenarios, in practice these phases are iterative. So scenarios and example messages would be defined concurrently. Similarly, new participants may be added in an evolutionary manner, as scenarios are created that require them.
One of the stages within the architecture phase is to define the information model for the message types associated with the messages exchanges between the interacting participants.
This involves defining message schema for each example message. The schema could already exist and be reused, it could be based on existing schema and just need to be upgraded to support new requirements, or it may need to be defined from scratch.
An example of a schema associated with the purchasing model is the
store.xsd shown here:
<?xml version="1.0" encoding="UTF-8"?>

<schema xmlns="http://www.w3.org/2001/XMLSchema"

        targetNamespace="http://www.jboss.org/examples/store"

        xmlns:tns="http://www.jboss.org/examples/store"

        elementFormDefault="qualified">


    <element name="BuyRequest" type="tns:StoreType"></element>

    <element name="BuyConfirmed" type="tns:StoreType"></element>

    <element name="BuyFailed" type="tns:StoreType"></element>


    <complexType name="StoreType">

        <attribute name="id" type="string"></attribute>

    </complexType>

</schema>
Once the schema has been defined, then the example messages need to be updated
to reference the schema, as shown in the following BuyRequest.xml
example message:
<tns:BuyRequest xmlns:xsi="http://www.w3.org/2001/XMLSchema-instance"

            xmlns:tns="http://www.jboss.org/examples/store"

            xsi:schemaLocation="http://www.jboss.org/examples/store store.xsd "

            id="1" />
Once the association between example messages and the schema has been established, it is possible to validate the messages against the schema.
For information on how to use the validation capabilities within Eclipse, please read the Eclipse XML Validation Tutorial.
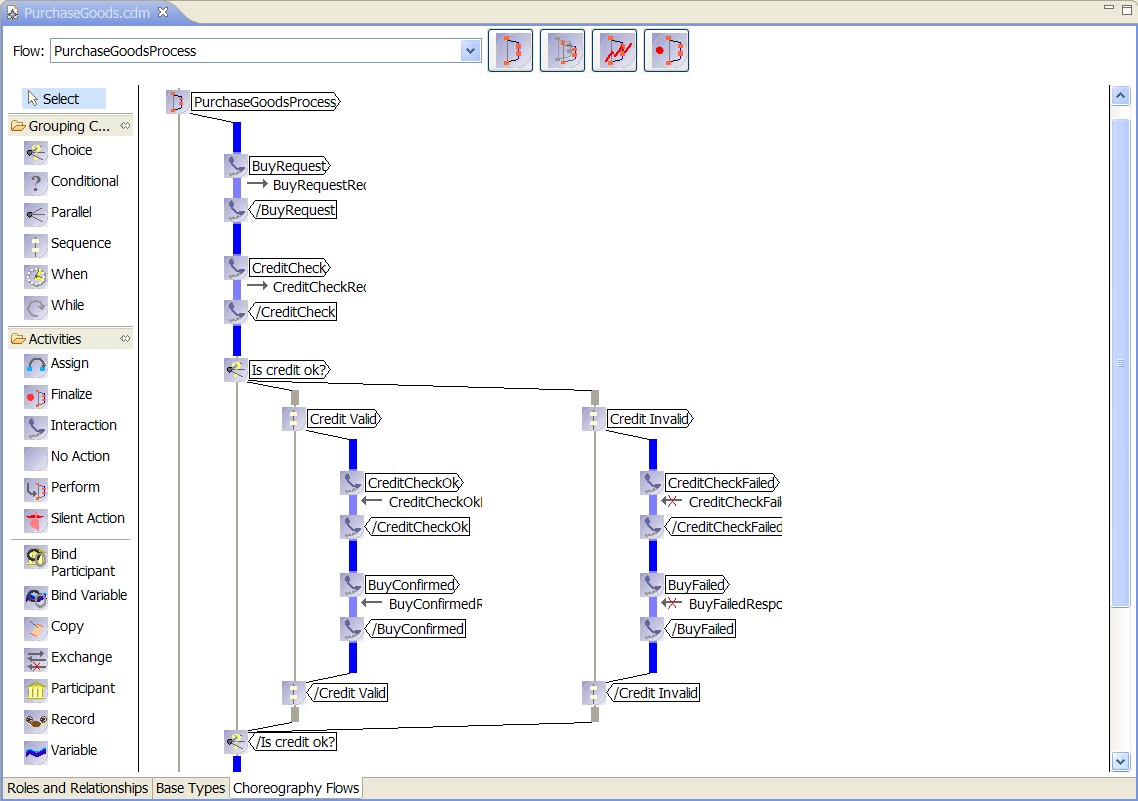
The next step in the development process is to specify a Choreography Model to implement the requirements described within the set of scenarios.
The current representation used to define Choreography Models within SAVARA is the W3C Web Service Choreography Description Language (WS-CDL). The pi4soa tools provide a WS-CDL (or choreography description) editor. Although this standard is associated with web services, it does not mean that a system specified using this standard needs to be implemented using web services. The actual WS-CDL language is used for defining the interactions between any distributed system.
The choreography description for the Purchasing example can be found in
purchasing/PurchaseGoods.cdm. When the
choreography editor has been launched, by double-clicking on this file within the Eclipse
environment, then navigate to the Choreography Flows tab to see the
definition of the purchasing process:
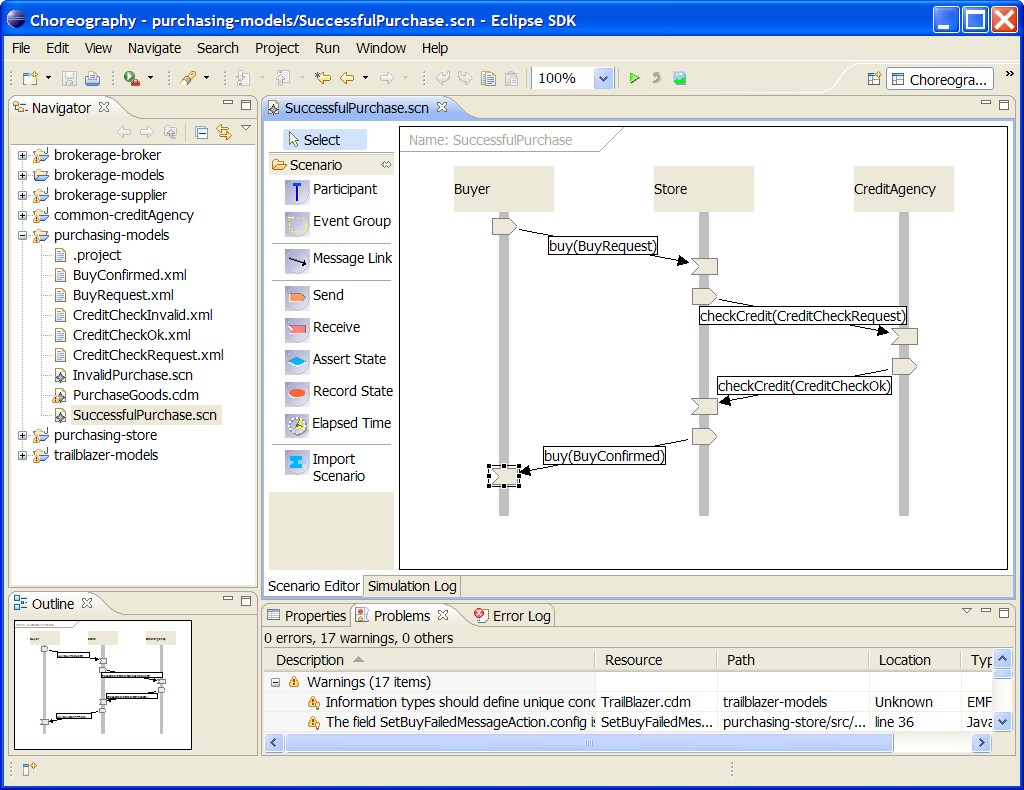
The pi4soa tools can be used to test the scenarios against the choreography description, to
ensure that the choreography correctly implements the requirements. To test the
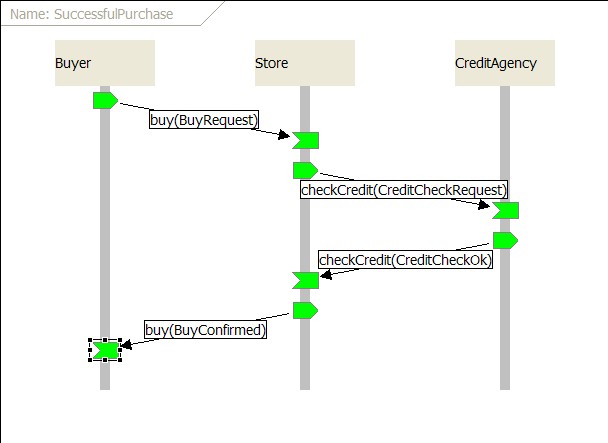
SuccessfulPurchase.scn scenario against the choreography, launch
the scenario editor by double-clicking on the scenario file, and then pressing the
green play button in the toolbar. When complete, the scenario
should look like the following image, indicating that the scenario completed successfully.
To view a scenario that demonstrates a test failure, open the
InvalidPurchase.scn scenario by double-clicking on the file, and
then initiate the test using the green play button in the toolbar.
When complete, the scenario should look like the following image.
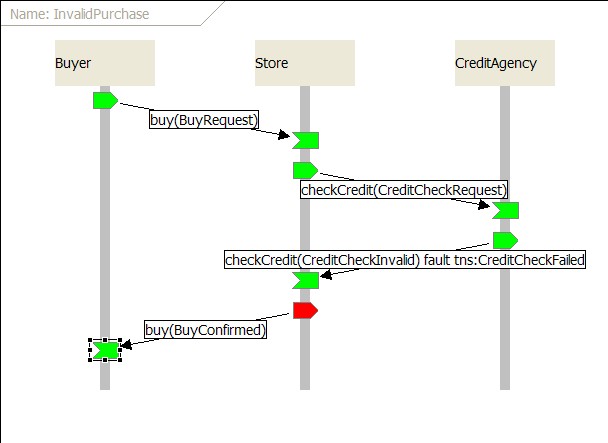
You will notice that the Store participant has a red 'send' node, indicating that this action was not expected behaviour when compared with the choreography description. The reason this is considered an error, is that the Store participant should only send a BuyFailed message following an invalid credit check.
When an error is detected in a scenario, the choreography designer can then determine whether the scenario is wrong (i.e. it does not correctly describe a business requirement), or whether the choreography is wrong and needs to be updated to accomodate the scenario.
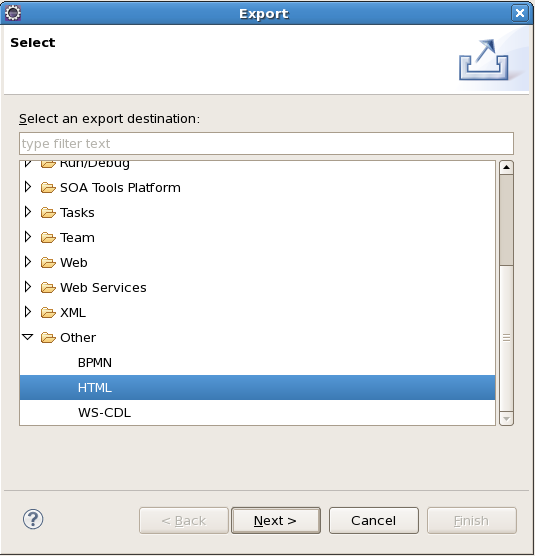
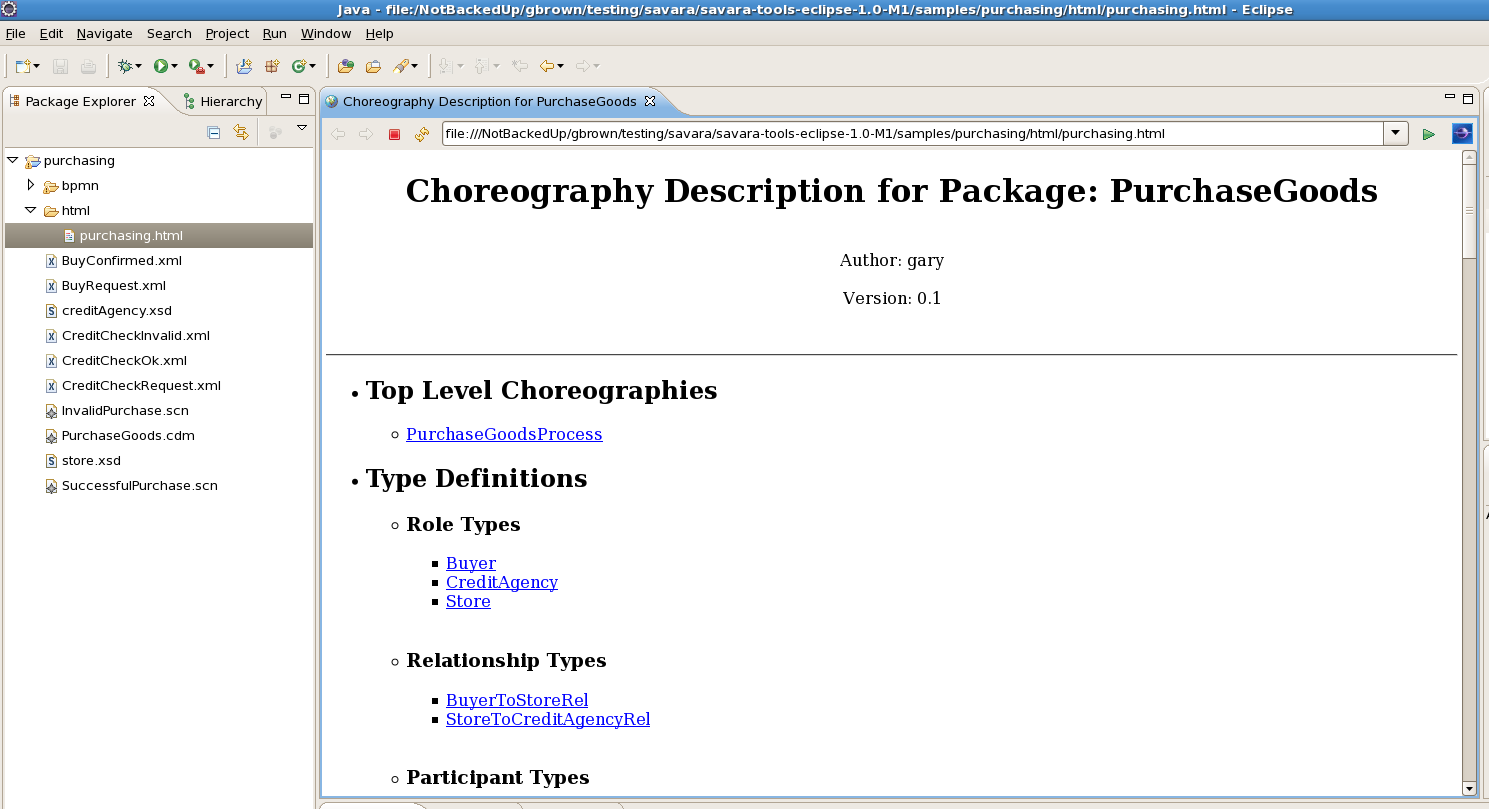
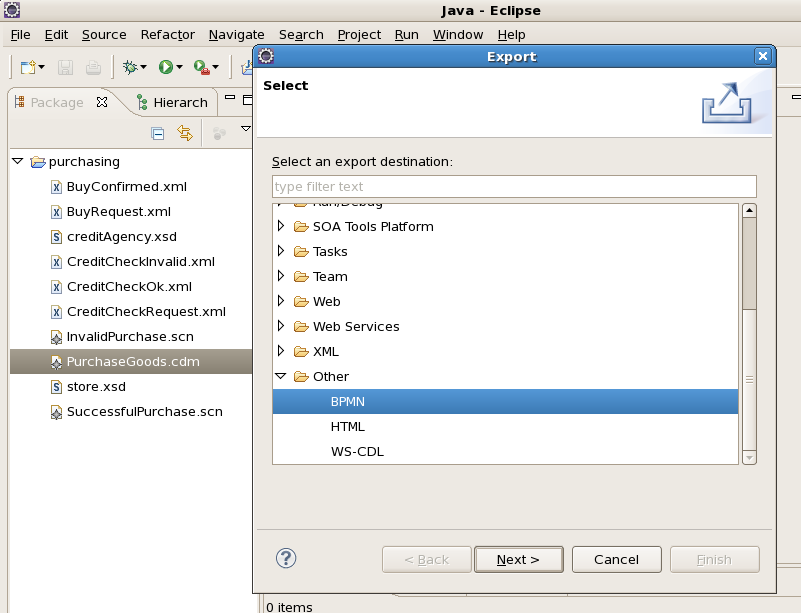
Once the choreography description has been successfully tested against the scenarios, the next step may be to obtain approval to proceed to the analysis/design phase. To help support this effort, the pi4soa tools provide the means to export the choreography description to a range of representations. HTML documentation generation is discussed below, and BPMN diagram generation is discussed in the Service Oriented Analysis and Design section.
To generate HTML documentation, select the Export->Other->HTML menu item associated with the choreography description file.
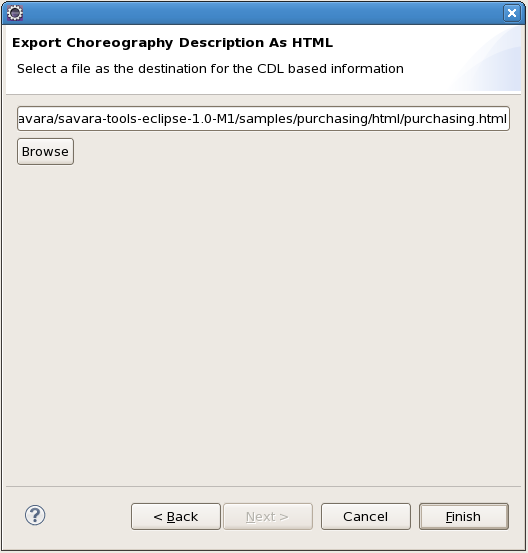
The next step is to provide the location and name of the HTML file to be generated.
If the HTML has been generated within the scope of Eclipse project, then refresh the relevant folder to show the file and open the file with the Eclipse web browser (as shown below). If outside the Eclipse project, then use a normal web browser to view the file.
At this point in the lifecycle, various activities would occur related to reviewing services (i.e. in a SOA Repository) and understanding whether existing services meet requirements, need to be modified, or whether new services need to be developed from scratch.
In the current SAVARA tooling, the main functionality in the Service Oriented Design phase is the generation of BPMN (version 1) diagrams. These diagrams can be used as guidance for the development teams that are implementing the individual services.
It is also possible to extend the generated BPMN (version 1) diagrams to include service logic. However it should be noted that changes to the choreography or BPMN diagrams will not be synchronized/merged. So changes in the choreography will not be checked for conformance against previously generated BPMN diagrams, and it will be necessary to generate new 'service contract' BPMN (version 1) diagrams to reflect changes in behaviour of a service within the updated choreography.
In future versions of the SAVARA, based on BPMN2, it will be possible to formally check BPMN2 process models for conformance against a choreography model, and potentially synchronize differences in externally observable behaviour between them.
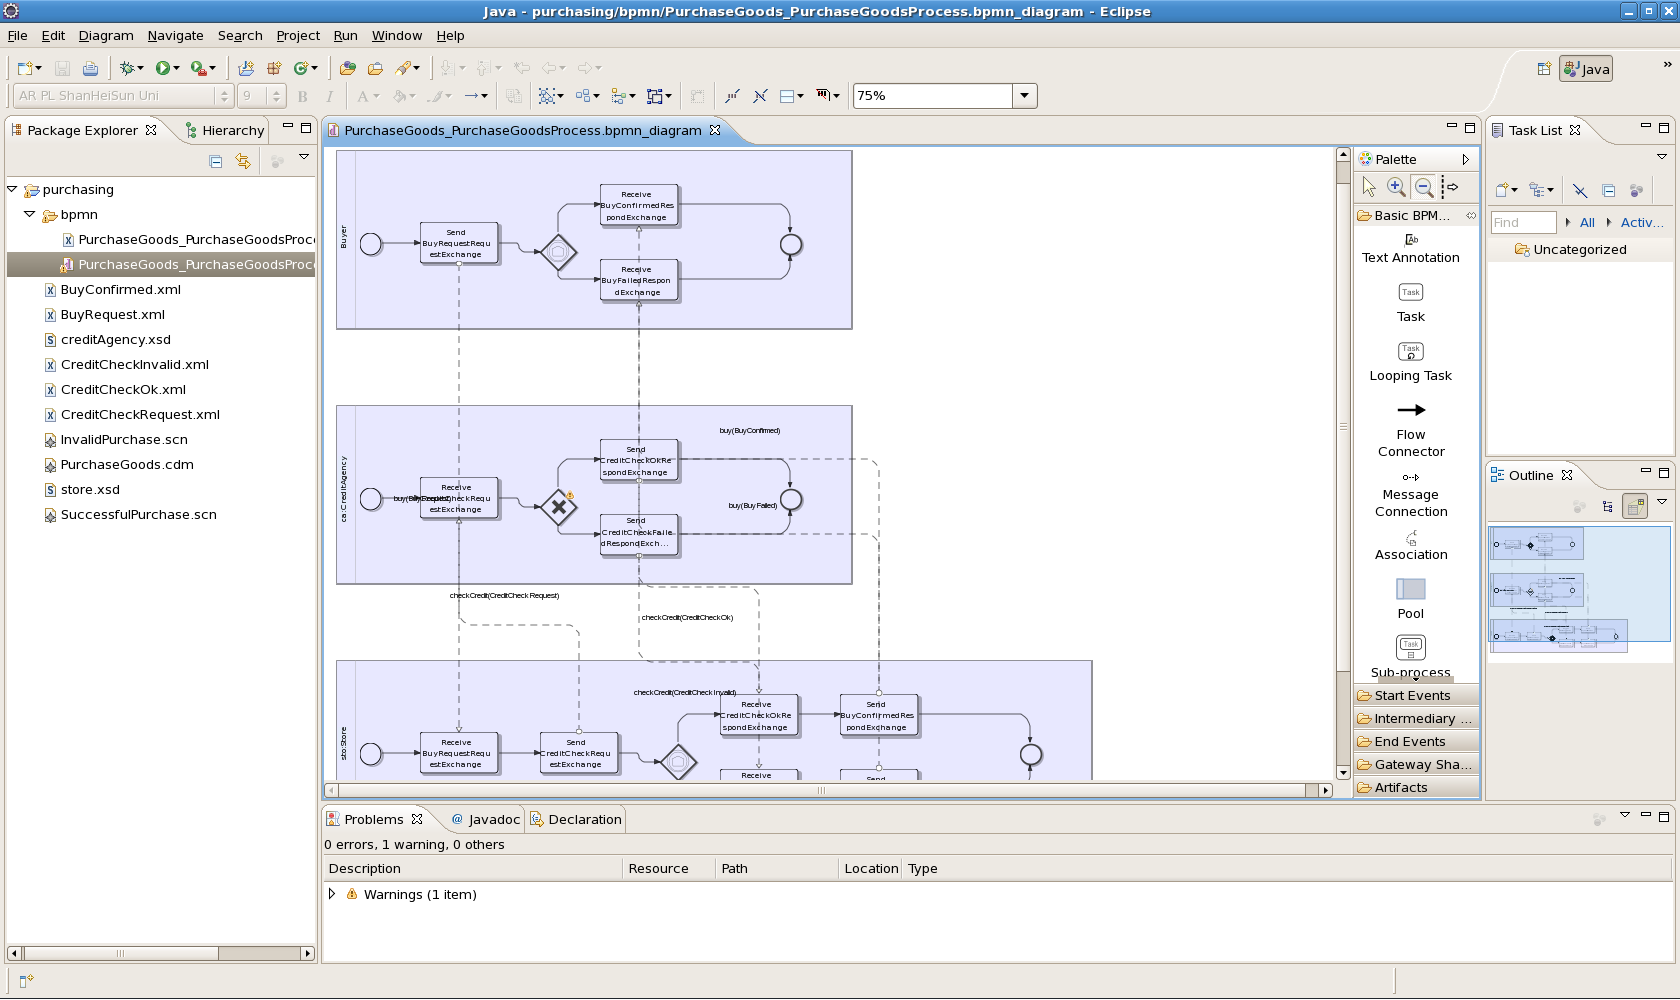
To generate a BPMN (version 1) diagram from a choreography, select the Export menu item associated with the choreography file, and select the Other->BPMN option.
Once the option has been selected, you will be asked to select the location where the generated BPMN diagrams should be stored. A diagram will be created containing all of the participants involved in the choreography in a single collaboration diagram.
Select a folder that is located within a project in your Eclipse workspace. Once the folder has been chosen, the diagrams will be generated. To see them within the Eclipse project, you will need to refresh the relevant folder.
The generated diagram will appear as two files, one contains the underlying
BPMN model (i.e. the information about the tasks, control links, message links,
etc.) and the other file contains the diagram information (i.e. node positions,
etc). Double click on the file with the .bpmn_diagram
suffix to view the diagram in the Eclipse BPMN editor.
Services can be developed by generating initial development artifacts, based on artifacts created in preceding phases (e.g. global model or service contracts/designs).
To ensure that the services continue to conform to the artifacts defined in the previous phases, the tools perform conformance checking between the service implementation and the existing architecture/design artifacts. This is not possible with all implementation languages - they must provide the means to extract the communication structure for comparison.
The following sections explain how the generation and conformance checking can be achieved for the WS-BPEL implementation language.
This tools include a capability to generate a service implementation, for a participant in a choreography, using WS-BPEL. A completed version of the PurchasingGoods example can be found in the samples directory (which can be imported into Eclipse).
However if you wish to generate the example from scratch, the follow the instructions in this section. More information about how to use this feature can be found in the User Guide.
When a choreography description has been created, it is possible to generate a BPEL Process (and associated
WSDL files and deployment descriptor) for each of the participants defined within the choreography.
To try this out, select the Savara->Generate->WS-BPEL menu item from the popup menu
associated with the PurchaseGoods.cdm.

This will display a dialog listing the possible services that can be generated from this choreography, with a proposed Eclipse project name.

To test out this feature, uncheck the Buyer participant, leave the build system as Ant, and press the 'Ok' button. This will create a single new project for the Store and CreditAgency participants.
Each project will contain a single bpel folder containing the WS-BPEL process
definition for the participant, a list of relevant WSDL files and a deployment descriptor file
for use with RiftSaw. Howeve the WS-BPEL and WSDL files are standard, so can be deployed to any
WS-BPEL 2.0 compliant engine.

The generated BPEL processes and deployment descriptors are incomplete, due to lack of implementation details in the choreography description. The choreography simply represents the externally observable interactions between the parties, and therefore cannot provide internal implementation details.
Therefore a completed version of the deployment descriptor and BPEL process files,
for both the creditAgency and store participants, can be found in the
purchasing example's completed folder.
To highlight the differences between the original generated version, and the completed version, simply select both files and use the Compare With->Each Other menu item.
The previous sections have discussed the various phases of the software development lifecycle, and the artifacts that can be created. They have also outlined some validation performed between the scenarios and choreography, when a specific link has been established from the scenario.
However the aim of the "Testable Architecture" methodology is to provide validation between all artifacts, to ensure that artifacts defined at any particular phase can be shown to be valid against the artifacts in preceding phases.
Therefore the concept of a "Testable Architecture Project" or TAP has been introduced. This is essentially a file that records information about the artifacts defined in each phase of the software development lifecycle, and the relationships between them. This file can then be validated to ensure that each artifact, and its dependencies, are valid in respect of each other.
For example, the purchasing example contains a TAP file with
the following contents:
<project xmlns="http://www.savara.org/ta/project" xmlns:xsi="http://www.w3.org/2001/XMLSchema"

            xsi:schemaLocation="http://www.savara.org/ta/project tap.xsd"

            name="Purchasing" version="1.0.0">


    <phase name="requirements">

        <resource id="SuccessfulPurchase.scn">

            <uri type="eclipse" context="purchasing" locator="/SuccessfulPurchase.scn" />

        </resource>

        <resource id="InvalidPurchase.scn">

            <uri type="eclipse" context="purchasing" locator="/InvalidPurchase.scn" />

        </resource>

    </phase>


    <phase name="architecture">

        <resource id="PurchaseGoods.cdm">

            <uri type="eclipse" context="purchasing" locator="/PurchaseGoods.cdm" />

            <relationship type="depends" ref="SuccessfulPurchase.scn" />

            <relationship type="depends" ref="InvalidPurchase.scn" />

        </resource>

    </phase>


    <phase name="implementation">

        <resource id="PurchaseGoodsProcess_Store.bpel">

            <uri type="eclipse" context="PurchaseGoodsProcess-Store"

                        locator="/bpelContent/PurchaseGoodsProcess_Store.bpel" />

            <relationship type="depends" ref="PurchaseGoods.cdm" >

                <description>

                    Link from the BPEL process to the 'Store' participant

                    within the choreography

                </description>

                <link type="role" to="Store" />

            </relationship>

        </resource>

        <resource id="PurchaseGoodsProcess_CreditAgency.bpel">

            <uri type="eclipse" context="PurchaseGoodsProcess-CreditAgency"

                        locator="/bpelContent/PurchaseGoodsProcess_CreditAgency.bpel" />

            <relationship type="depends" ref="PurchaseGoods.cdm" >

                <description>

                    Link from the BPEL process to the 'CreditAgency' participant

                    within the choreography

                </description>

                <link type="role" to="CreditAgency" />

            </relationship>

        </resource>

    </phase>

</project>
The top level element is project, with the name and version attributes to define the details of the Testable Architecture Project.
The project then contains phase elements, one for each stage of the software development lifecycle we are interested in. These elements are only used to segment the artifacts into the different phases, which can be useful for tasks such as project management or documentation generation.
The phase element contains resource elements, one per artifact. A resource represents an artifact that is of interest in the Testable Architecture Project.
The resource element contains one or more of the following elements:
-
uri
This element is used to define the location of a resource. A URI element is required for each environent in which the resource may be accessed, for example, within Eclipse and within an SOA Repository.
The type attribute defines the type of locator, which will usually map onto the environment in which the resource exists. So in this case we are only defining URI elements associated with the Eclipse environment.
The context attribute defines the local information that can be used in the particular environment, to determine where the resource is contained. For example, if the environment is Eclipse, the context would be the project name.
The locator attribute is used to specify the specific location of the resource, within the particular specified context, in the environment type. For example, if the environment was Eclipse, then the locator would be the relative path of the resource within the project identified in the context attribute.
-
relationship
This element establishes a relationship from the containing resource, to another resource identifed by the ref attribute.
The relationship element can optionally have additional information associated with it, to help clarify the nature of the relationship between the two resources.
For example, in the TAP file illustrated above, the two BPEL resources (in the implementation phase) have a relationship to the choreography file - however the relationship needs to be more specific. We need to indicate what role within that choreography the BPEL processes are associated with. The link element enables the type to be defined, and a value to be specified in the to attribute.
To trigger validation of a Testable Architecture Project (TAP), select the .tap
file and choose the Savara->Validate menu item. If any errors or warnings are
detected, they will be recorded as errors in the Problems or Markers view (depending on which
perspective is being used).
If you invoke the validation on the TAP file within the purchasing project, you will find that it will create an error associated with the choreography file, indicating that it does not meet the scenario "InvalidPurchase.scn". This is because this scenario has specifically been created to demonstrate how an error is reported.
If the scenario is simulated against the choreography, using the green play button on the toolbar, then it will be possible to see specifically where the scenario is not met by the choreography.
In this case, it is because the CreditAgency has returned a credit check failed message, but the Store is still attempting to return a buy confirmed message.
Its possible that this scenario is valid, and therefore the choreography needs to be updated to cater for this scenario. However in this case, we may just be wanting to represent a negative use case, and therefore deliberately describe a situation we do not want the choreography to handle. Therefore we need to configure the scenario to indicate that the failure is expected.
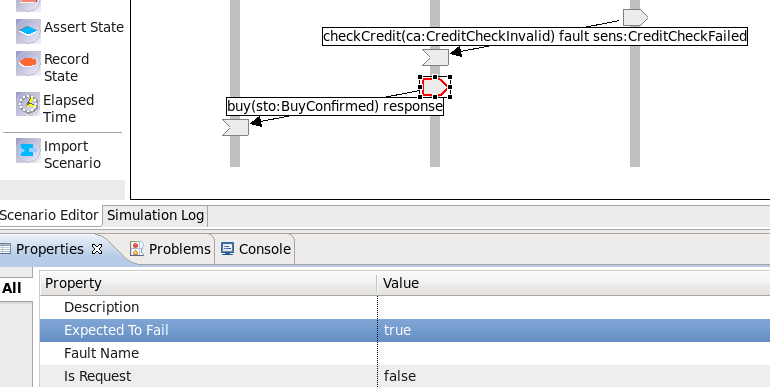
Simply select the 'send' node for the final interaction between the Store and Buyer, and set the 'Expected to Fail' property to true. This will cause a red boundary to be displayed around the node, indicating that it is expected to fail. Now when the scenario is simulated or validated, if that node does not fail, that will be reported as an error. However if the node does fail as expected, that will be treated as a valid case.
If the validation of the TAP file is performed again, the error associated with the
InvalidPurchase.scn should no disappear.
To experiment with other types of validation that are performed, open the PurchaseGoods.cdm
and go to the Base Types tab. Then open up the node for
Information Types and select the CreditCheckOk
entry. In the Properties view, change the element
attribute, e.g. appending an 'X' to the "ca:CreditCheckOk" value.
When the choreography has been saved, re-perform the validation on the TAP file. This should now display 'Type Mismatch' errors against the previously generated BPEL processes, and also flag errors associated with the scenarios.
Note
Before you can deploy and run the runtime validation example, you will need to install the SAVARA Validator module for JBoss.
The previous sections have provided a brief introduction to the design-time SOA governance features provided within the SAVARA Eclipse Tools distribution. The aim of these capabilities are to enable verification of an implementation, initially defined just using BPEL process definitions, against a choreography, which in turn has been verified against business requirements defined using scenarios. Therefore this helps to ensure that the implemented system meets the original business requirements.
Being able to statically check that the implementation should send or receive messages in the correct order is important, as it will reduce the amount of testing required to ensure the service behaves correctly. However it does not enable the internal implementation details to be verified, which may result in invalid decisions being made at runtime, resulting in unexpected paths being taken.
Therefore, to ensure this situation does not occur, we also need runtime governance. We still need to be able to verify that the services continue to conform to the choreography description. The Service Validator capability within the SAVARA distribution can be used to validate the behaviour of each service.
In this section, we will use the purchasing example found in the
${SAVARA}/samples/purchasing folder.
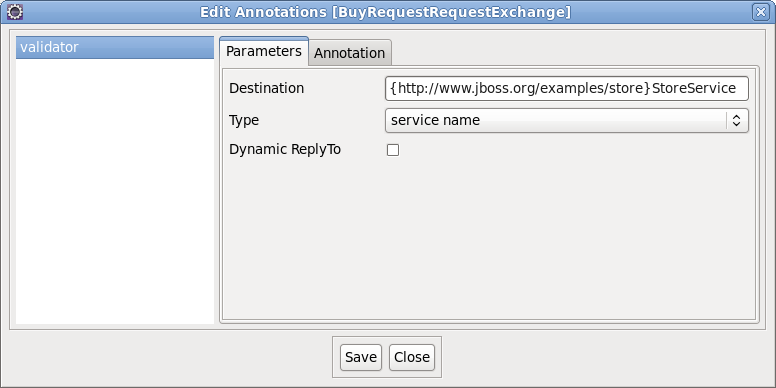
The service validator configuration is defined using specific annotation, that is associated with the 'exchange details' components (contained within interactions), within the choreography description.
To view the pre-configured service validator configuration defined for the Purchasing
example, edit the PurchaseGoods.cdm file, navigate to the
Choreography Flows tab and then select the
Choreography->Edit Annotations menu item associated with the first
'exchange details' component (as shown below).

This will display the annotation editor, with the single configured annotation called 'validator'. This annotation defines the information required for the Service Validator to monitor this specific message exchange (e.g. the JMS destination on which the message will be passed, or in this case the Service Name for the target Web Service).
Once an annotation has been defined, it will also be displayed as part of the tooltip for the associated model component, for example:

Once the annotations have been defined for all relevant 'exchange details' components
in the choreography description, the choreography file can be copied to the
${JBossAS}/server/default/deploy/savara-validator-jboss.sar/models
folder in the JBossAS environment. The service validator configuration for the
purchasing example has been preconfigured to be deployed as part of
the installation procedure.
Note
If the savara-validator-jboss.sar/validator-config.xml within the JBossAS
environment is modified, or choreography description files added, removed or updated within
the savara-validator-jboss.sar/models sub-folder, then the changes will
automatically be detected and used to re-configure the service validators without having to
restart the server.
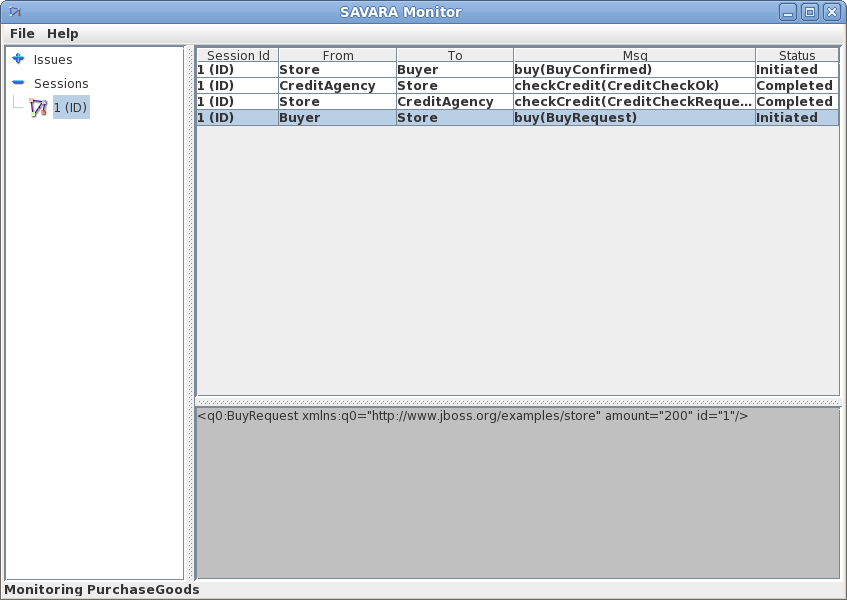
The SAVARA Monitor is an Eclipse based tool that can be used to help develop, test and validate a business process (encoded as a choreography) executing across a distributed system. (Future releases will include equivalent web based tooling to enable production based logging and query of the validation information).
The tool is used to observe a correlated view of the executing business transactions. Each service validator can be configured to report activites (i.e. sent and received messages) that it validates, to enable the correlator to reconstitute a global interpretation of each transaction.
This correlated view of each transaction can be used to understand where each transaction is within the process. It can also be used to report out of sequence, unexpected messages and more general errors in the context of the business process.
Once the following examples have been deployed to the JBossAS environment, and the server is running, then the monitoring tool can be launched from the Eclipse environment by selecting the Savara->Monitor menu item from the popup menu associated with the choreography (.cdm) file.
Wait for the monitor window to start, and indicate that the choreography is being monitored, shown in the status line at the bottom of the window.
Savara includes the ability to validate web services (and therefore BPEL processes) that use the jbossws-native stack. However the ODE engine, used to execute BPEL processes within RiftSaw, currently optimises communications between BPEL processes executing within the same engine, so that the communications do not occur using the Web Service stack. This means that Savara is currently unable to validate these interactions by default.
There are two solutions to this problem. The first is to disable the interprocess communications used between the two BPEL processes, which will be the approach described in this section. The other approach is to implement the 'Credit Agency' participant as a JAX-WS service.
Once the BPEL processes have been generated, and the implementation details added, it is currently necessary to disable the 'inter-process' communication that is used to communicate between the two processes (an ODE optimization when the processes are running in the same engine). This is achieved by editing the deployment descriptor for the Store process (using a text editor rather than the Eclipse form editor), and add the attribute usePeer2Peer="false" to the invoke element.
The next step is to deploy the BPEL processes for the Store and CreditAgency participants to a JBossAS server running RiftSaw. This can be achieved using the Eclipse Web Tooling Project (WTP) server support, in conjunction with the JBoss Tools features mentioned in the installation section.
Create a JBossAS server entry in the Servers view, using the New->Server menu item on the view's context menu. Configure the server entry to point to a JBossAS environment that has previously been configured to run RiftSaw. Select the server in the Servers view, and then select the Add and Remove ... menu item. This will show a dialog window that will include the CreditAgency and Store BPEL projects on the left. Select both projects, and press the Add button. When the Finish button is selected, the BPEL processes will be associated with the server.
Start the server using the Start menu item associated with
the JBossAS server in the Servers view, or manually from
a terminal window in the JBossAS server's bin folder using
the run script. Once the server
has fully started, the BPEL processes should have been deployed.
The next step is to start the Savara->Monitor associated
with the PurchaseGoods.cdm choreography description.
The final step is to send a test message to the Store
BPEL process. This can be achieved by selecting the PurchaseGoodsProcess_Store.wsdl
file, within the PurchaseGoodsProcess_Store project
(bpelContents folder), and then select the menu
item Web Services->Test with Web Services Explorer.
Expand the 'StoreInterfaceBinding' node, in the left hand panel of the explorer, and select the 'buy' operation. Then select the 'Source' link, which will show the various sections of the SOAP message to be sent. Edit the message body to be:
<q0:BuyRequest id="1" amount="200" />
Then press the 'Ok' button further down the panel. This will send the message to the Store process, and eventually cause a response to appear in the lower panel.
Four entries should appear in the SAVARA monitor, the buy request, credit check request, credit check ok (response) and buy confirmed (response).
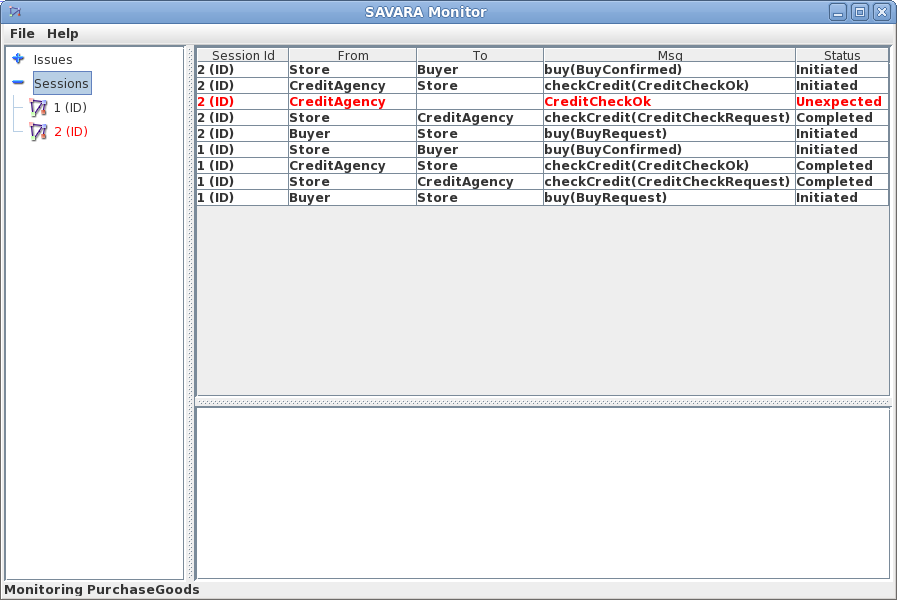
To demonstrate how an error would be detected and reported, issue a new request such as:
<q0:BuyRequest id="2" amount="300" />
This will result in an unexpected message to be reported, as there is a difference between the choreography and the CreditAgency BPEL process (implementation). The choreography defines that a valid credit check should be returned if the amount is less than 250. However the BPEL process has implemented this condition as a valid credit check is where the amount is less or equal to 500.
The first step to deploying the Trailblazer example is to configure the JBossAS environment:
-
Update the
${JBossAS}/server/default/deployers/esb.deployer/jbossesb-properties.xmlfile, in the section entitled "transports" and specify all of the SMTP mail server settings for your environment. -
Update the
trailblazer/trailblazer.propertiesUpdate the file.bank.monitored.directory and file.output.directory properties. These are folders used by the File Based Bank, and are set to
/tmp/inputand/tmp/outputby default. -
Update the
trailblazer/esb/conf/jboss-esb.xmlThere is a fs-provider block, update the directory attribute value to be the same as the file.output.directory value in
trailblazer.propertiesfile. - Start the JBossAS server
One the server has been started, the next step is to deploy the relevant components into the JBossAS environment. This is achieved by:
-
From the
trailblazerfolder, execute the following command to deploy the example to the ESB: ant deploythis should deploy the ESB and WAR files to your JBoss AS
server/default. -
From the
trailblazer/banksfolder, execute the command to start the JMS Bank service: ant runJMSBank. -
From the
trailblazer/banksfolder, execute the command to start the JMS Bank service: ant runFileBank.
To run the example, you need to start a browser and select the URL localhost:8080/trailblazer. This will show the following page, if the server has been configured correctly and the TrailBlazer example deployed:
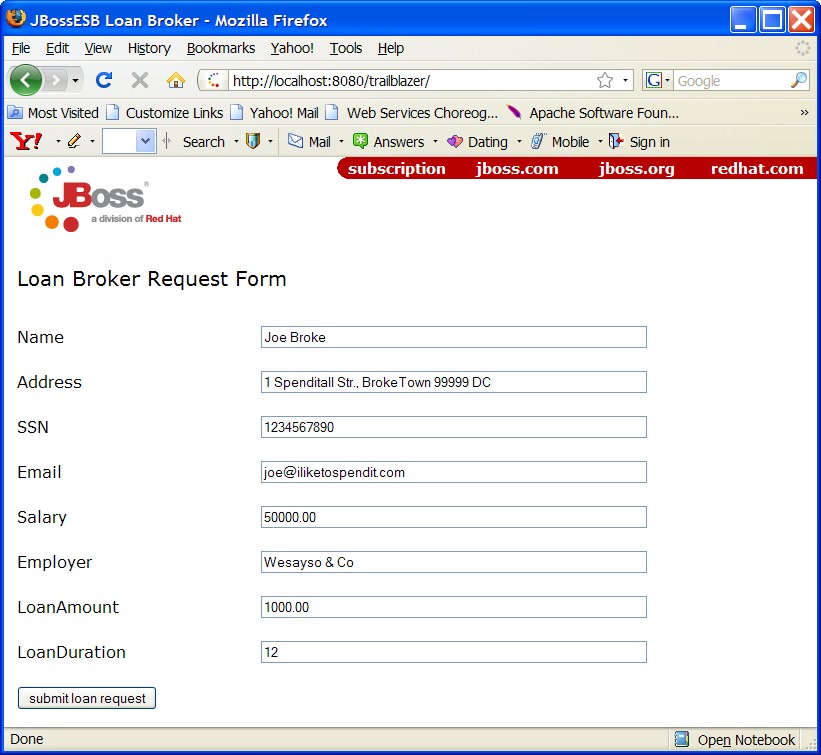
Now you can submit quotes, You will see either a loan request rejected (single email) because the score is less than 4, or two emails (one from JMS bank and one from FileBased bank) with valid quotes. When entering subsequent quotes, make sure that the quote reference is updated, so that each session has a unique id.
To demonstrate the detection of validation errors, there is an alternative implementation of the trailblazer modules that behaviour differently to the choreography that is being monitored. Specifically, the credit score threshold used to determine whether a loan request should be issued to the banks, is raised from 4 to 7.
To deploy the version of the TrailBlazer example that results in validation errors, then:
-
From the
${SAVARA}/samples/trailblazerfolder, execute the following command to deploy the example to the ESB: ant deploy-error-client.
The next step is to issue more transactions, until a credit check score occurs that is between 4 and 6 inclusive. This will result in a insufficientCredit interaction being reported, which would be unexpected in terms of the choreography.
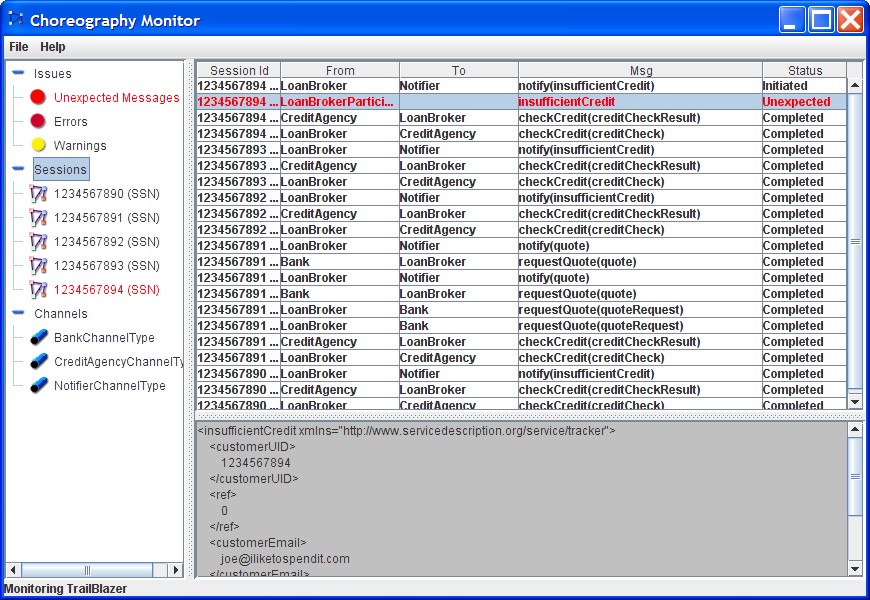
When errors, such as unexpected messages, are detected by the service validators and reported to the SAVARA Monitor, they are displayed in red.