JBoss.orgCommunity Documentation
Version: 1.3.1.GA
Copyright © 2007, 2008, 2009, 2010, 2011 JBoss by Red Hat
ESB (Enterprise Service Bus) is an abstraction layer on top of the implementation of an enterprise messaging system that provides the features that Service Oriented Architectures may be implemented with.
If you want to develop applications using ESB technology JBoss ESB also meets your needs. Read more about JBoss ESB at http://www.jboss.org/jbossesb.
JBoss ESB Tools provides an ESB editor and wizard for creating an ESB file.
This guide will provide you with the information you need to install, configure and deploy JBoss ESB Tools. Information will also be provided on the use of the ESB Editor, which allows you to quickly develop an ESB file with fewer errors.
The table below lists the main features of the ESB plugin:
Table 1.1. Key Functionality of ESB Tools
| Feature | Benefit | Chapter |
|---|---|---|
|
JBoss Tools Project Examples Wizard |
Quickly create example projects with a predefined structure. | Section 2.2, “Using ESB Project Examples” |
|
JBoss Enterprise SOA Platform |
The SOA Platform integrates specific versions of JBoss ESB, jBPM, Drools and the JBoss Enterprise Application Platform that are certified to work together in a single supported enterprise distribution. | Section 2.7, “Using and Configuring SOA Platform” |
|
ESB Editor |
JBoss ESB tooling includes a powerful editor with features including syntax validation, support for XML Schema and more. |
In this section we will focus on all concepts that JBoss Tools integrate for working with JBoss ESB.
In this chapter we suggest a step-by-step walk-through of creating a new ESB project. Let's try to create a new JBoss ESB project.
We will show you how to use the ESB Project Creation wizard for creating a new ESB project and setting basic ESB classpath.
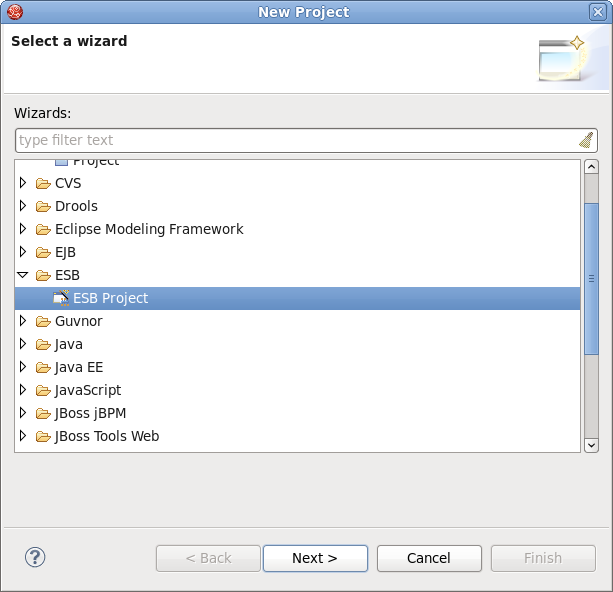
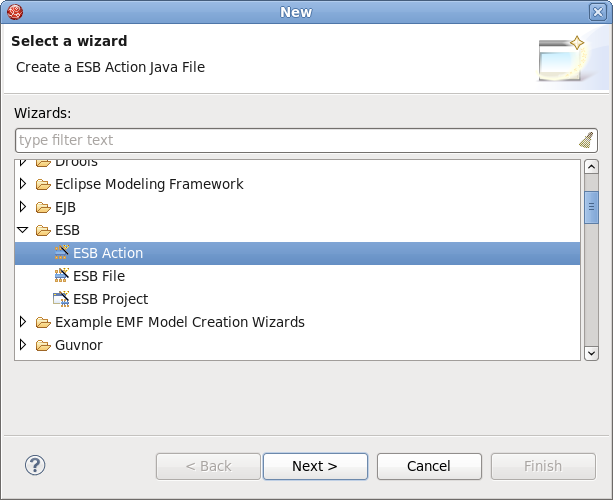
Select → → in the main menu bar or context menu for selected project and then → in the dialog opened:
Clicking Next brings you to the JBoss ESB Project wizard page where a project name, ESB version and target JBoss Runtime are to be specified. Specify, for example, helloworld as a Project name and accept the default ESB version.

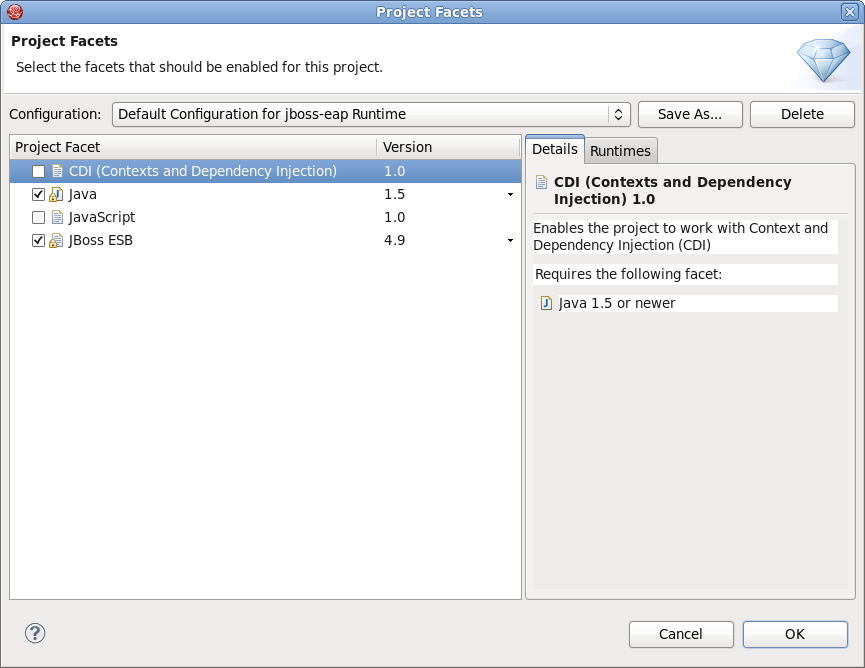
By clicking the button you can open Project Facets Wizard page, where you can select facets that should be enabled for this project. On the Project Facets Wizard page you can also configure runtime for the application
Click the button to move to the next step in the wizard, where you can select the source and output folders.

Next step provides you an opportunity to configure your project for building a java application
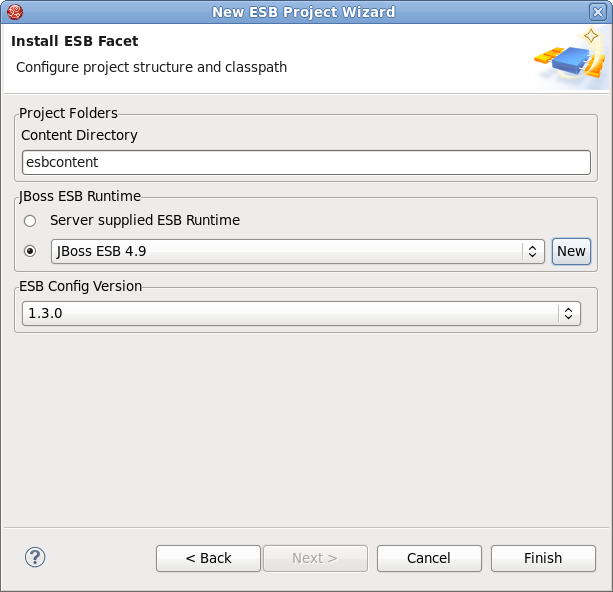
Clicking the button on this form brings you to the ESB facet installation page where you can specify the ESB Content Directory. ESB Content Directory is a folder that contains the most of artifacts that an ESB archive needs. You also can configure ESB libraries to the project by selecting a ESB runtime using one of the options:
1. Use Server Supplied ESB Runtime
2. Select a ESB runtime from the JBoss ESB runtime list predefined in the preferences. If you choose the first option, make sure that the project has the Target JBoss Runtime set and this runtime has a ESB runtime installed.
3. Choose ESB Config Version. From the version 3.1.0 JBoss ESB Tools supports three different jboss-esb.xsd versions: jbossesb-1.0.1.xsd, jbossesb-1.1.0.xsd and jbossesb-1.2.0.xsd.
Note:
If you use ESB 4.7 you should select jbossesb-1.2.0.xsd.
Click the button and a ESB project with the default jboss-esb.xml file will be created.

JBoss Tools provides a Project Example wizard that is an easy way for users to create some kinds of projects to be used as examples with some predefined structure. Let's start creating a ESB project using this wizard.
Before creating a ESB project example create JBoss Runtime with name JBoss 4.2 Runtime, it will be used by your ESB project example.
Select → → in the main menu bar or context menu for selected project and then → in the New dialog:
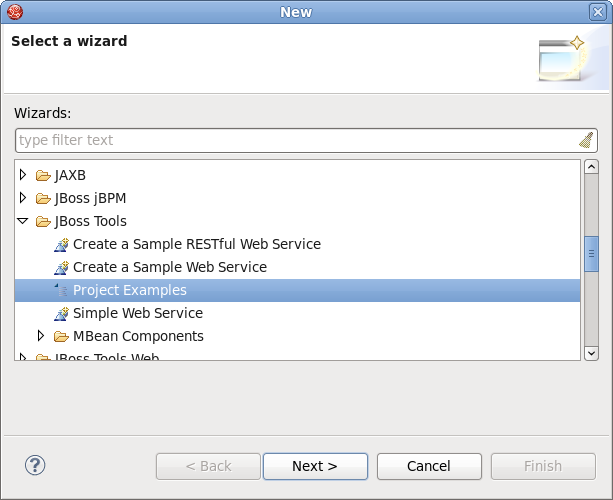
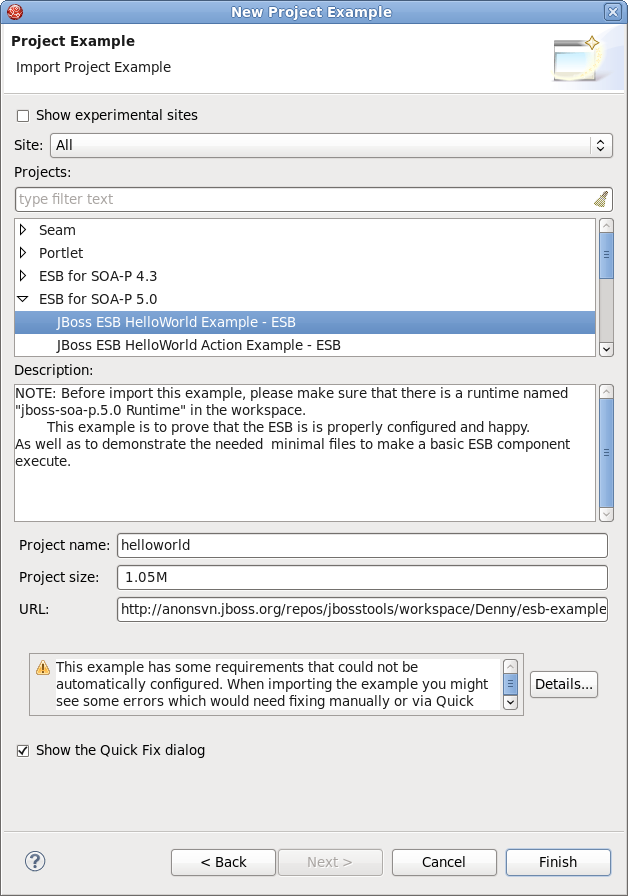
Clicking the button brings you to the wizard page where you can select a ESB project example from the example list.

Note:
Under the Projects section you can find two categories related to ESB:
ESB for SOA-P 4.3
ESB for SOA-P 5.0
It means that if you use a runtime pointed to a SOA-P 5.0, you should download the examples from the ESB for SOA-P 5.0 category in order to avoid the incompatibility errors.
Every ESB example has two projects, one is a ESB project and another is a Java project used to test the ESB project.
Here is a list of ready examples available in both categories (ESB for SOA-P 4.3 and ESB for SOA-P 5.0):
JBoss ESB HelloWorld Example - demonstrates the minimal files necessary to make a basic ESB component execute as well as to prove that the ESB is properly configured.
JBoss ESB HelloWorld Action Example - demonstrates the use of multiple action invocations from a single configuration. You can use a single Action class and make multiple method calls or use multiple Action classes.
JBoss ESB HelloWorld Email Example - demonstrates how to configure a mail gateway using a JCA mail adapter and a Camel mail endpoint. Both gateways route the messages through a JMS queue and finally to your action class for processing.
JBoss ESB HelloWorld File Action Example - demonstrates using the File gateway feature of the JBoss ESB. Files that are found in a particular directory with a particular extension are sent to a JMS queue with actions for processing.
JBoss ESB Web Service consumer1 Example - demonstrates how to consume a 181 Web Service in an ESB action.
JBoss ESB Web Service producer Example - demonstrates how to deploy a JSR181 Webservice endpoint on JBossESB using the SOAPProcessor action.
JBoss ESB Smooks CSV -> XML Example - demonstrates how to transform a comma separated value (CSV) file to an XML.
JBoss ESB Smooks XML -> POJO Example - demonstrates the use of Smooks performing a simple transformation by converting an XML file into Java POJOs.
JBoss ESB Smooks XML -> XML date-manipulation Example - demonstrates how to manually define and apply a Message Transformation within JBoss ESB.
JBoss ESB Smooks XML -> XML Example - a very basic example of how to manually define and apply a Message Transformation within JBoss ESB. It applies a very simple XSLT to a SampleOrder.xml message and prints the before and after XML to the console.
We will take as our example JBoss ESB HelloWorld Example ESB project:
Select the JBoss ESB HelloWorld Example ESB project and then click the button. As a result you will get two projects created:
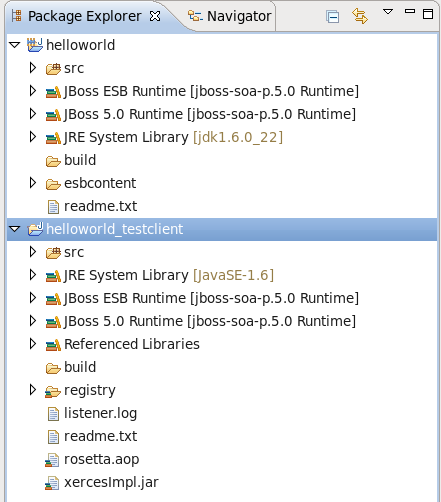
Deploy the HelloWorld ESB project and run a test class in the client Java project to see the test result in the Console view.
In this chapter you will see how to deploy a ESB project using the WTP deployment framework.
Before deploying the project, open the Servers View by selecting → → → → , create a JBoss Server in the Server view and start it, and then right click the created JBoss server, select Add and Remove Projects, and add the ESB projects you want to deploy from the left side to the right side in the opened dialog.
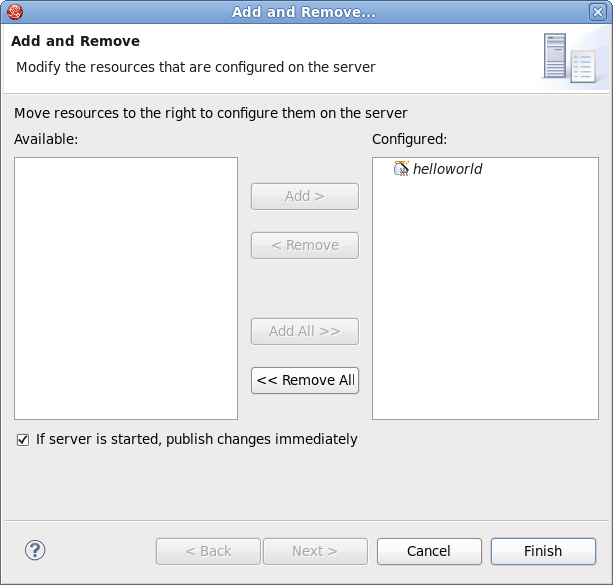
Click the button to add the project to the server. You also can drag the ESB project from the Project View to the server.
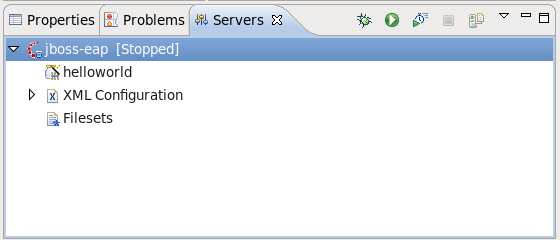
Thus, you have just added the ESB project to the JBoss server module list. Right click the JBoss Server and select to publish the project on the server. You can check the deploying result in the Console view.
The and options work on ESB projects causing a (re)deploy for a user designated server.
You can also use the "Finger touch" for a quick restart of the project without restarting the server:

The "Finger" touches descriptors dependent on project (i.e. web.xml for WAR, application.xml for EAR) and now it is also available for jboss-esb.xml in ESB projects.
You can also deploy your ESB project as an .esb archive. Right-click on the project, choose :
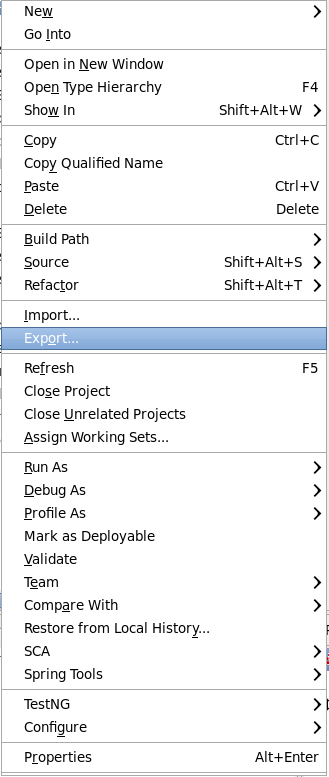
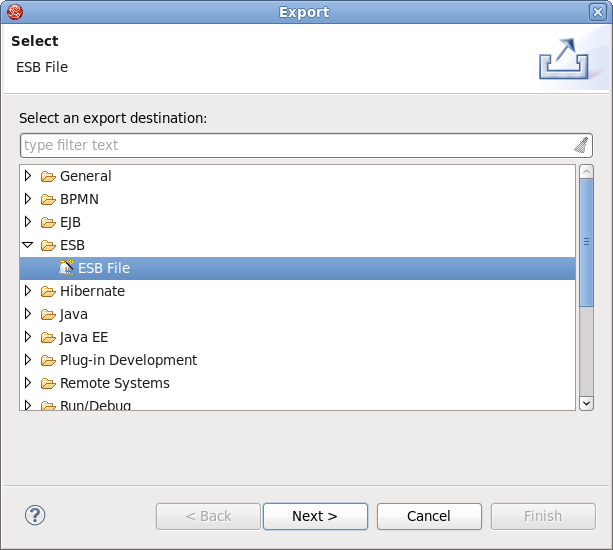
Choose → and click :
And finally export the ESB project to the file system: choose the destination, choose the target runtime if need a specific one and make the appropriate settings for the archive. Then click .
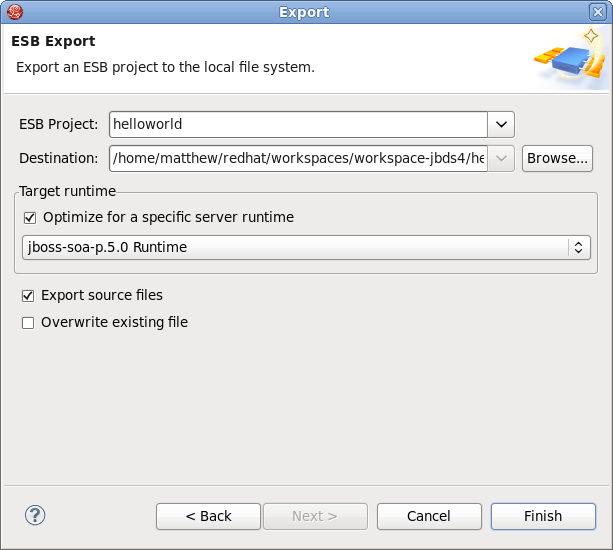
Your project is deployed as an .esb archive.
An ESB archive can be created for ESB projects only. It is also possible to deploy an .esb archive to a JBoss AS based server with JBoss ESB installed.
In this chapter we suggest a step-by-step walk-through of creating your own simple file. Let's try to organize a new ESB file.
We will show you how to use the Creation wizard for creating a new ESB file.
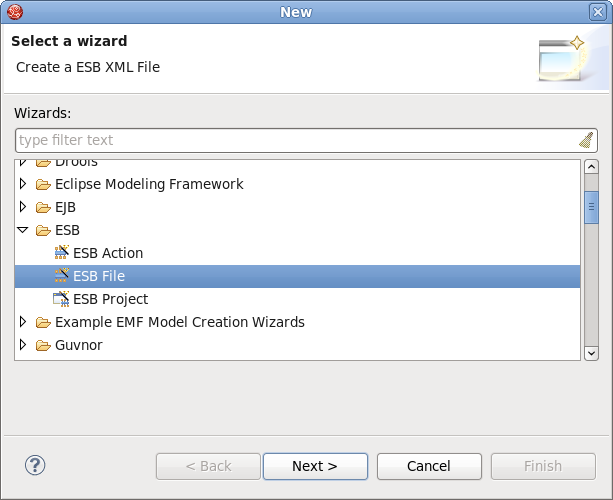
At first you should open a project that has the ESB facet enabled. Select → → in the main menu bar or context menu for selected project and then → in the New dialog:
Clicking Next brings you to the wizard page where a folder, a name and a version for the file should be specified. Choose, for example, jboss-esb.xml as the name and accept the selected projects folder and the default version.
Note:
From the version 3.1.0 JBoss ESB Tools supports three different jboss-esb.xsd versions: jbossesb-1.0.1.xsd, jbossesb-1.1.0.xsd and jbossesb-1.2.0.xsd. If you use ESB 4.7 you should select jbossesb-1.2.0.xsd.

Thus, your file will be created in the selected projects folder by default. If you want to change the folder for your future file click Browse... button to set needed folder or simply type it.
Clicking on Finish results in the file being generated. The wizard creates one xml file.
From this chapter you will find out how to create a ESB Action Java File .
At first you need to open a ESB or simple Java project. Then you should select → → in the main menu or from the context project menu. Then click → in the New dialog.
After that click Next and you will be brought to the New ESB Action wizard. In this wizard the class name should be specified, also you can set a package or add a interface as for any Java class.
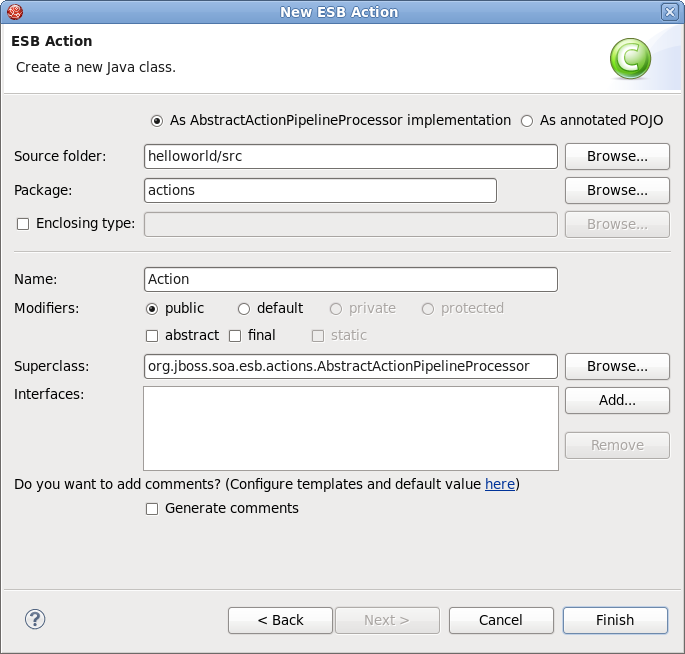
As a result, the ESB Action Java File will be created in the selected package and it will have org.jboss.soa.esb.actions.AbstractActionPipelineProcessor as superclass.
Clicking on Finish will generate the ESB Action class. Also this class will become available in ESB Editor wizards.
In this chapter you will learn how to predefine a JBoss ESB runtime on the Preferences page.
You may already know, there are two ways to set JBoss ESB runtime when creating a ESB project, one is to use the project target JBoss runtime, and another is to select a JBoss ESB runtime predefined in JBoss Tools preferences. Let's configure it.
Select → → → to open the JBoss ESB Runtime Preferences page where you can add, remove and Edit a JBoss ESB runtime.
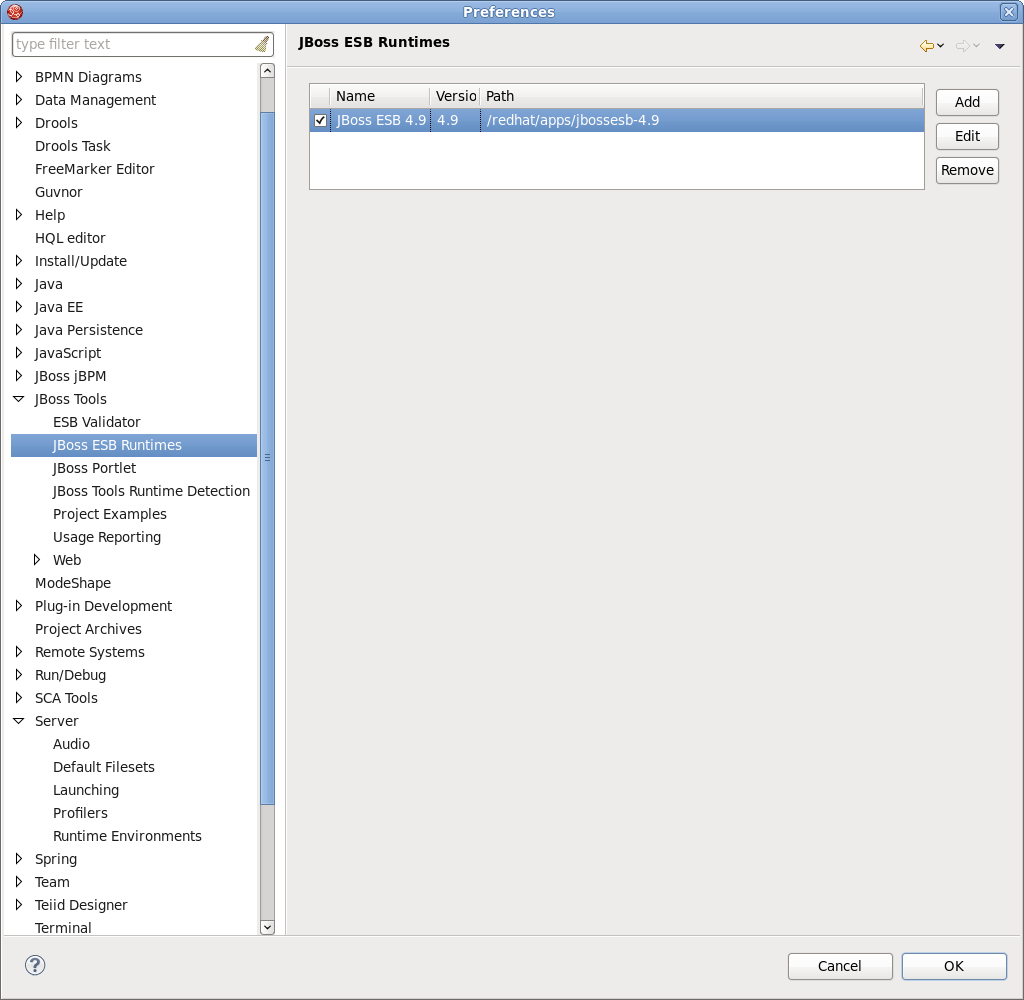
Select Add to open a dialog where you can specify the JBoss ESB runtime location, name and version number. It's also possible to define configuration if you point the home location to a Jboss AS or SOA-p, in case you select a standalone ESB runtime location, the configuration combo will be empty and should be ignored. You can also customize the libraries of the runtime by checking the Customize JBoss ESB Runtime jars checkbox.
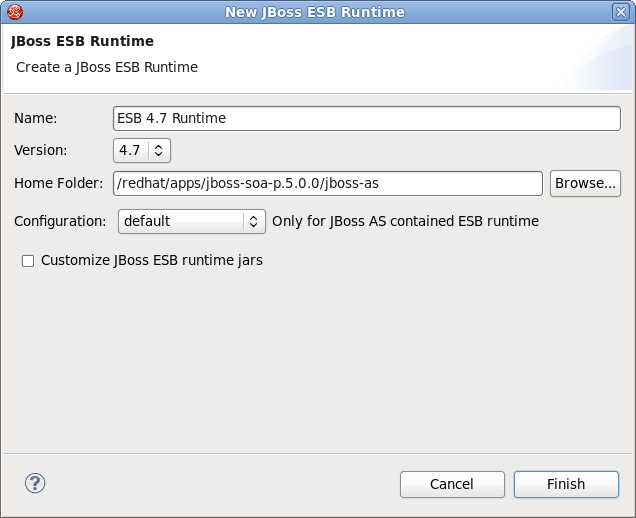
The new JBoss ESB Runtime will be configured. Click to finish and save the preferences. You can use the configuration when creating a JBoss ESB project.
When a ESB runtime is configured for your ESB project you are able to change it to any other using the classpath container page for ESB runtime. To do that, turn to the Package Explorer view and right-click the "JBoss ESB Runtime" library. Select Properties and a table listing all available JBoss ESB runtimes will appear:
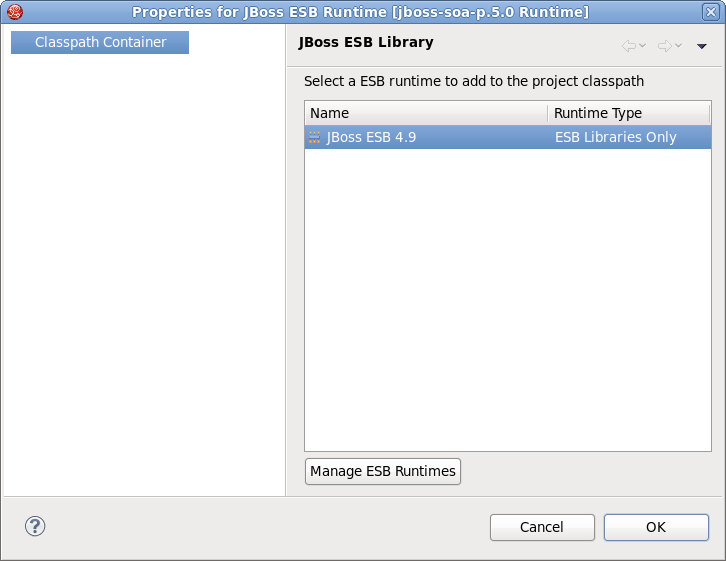
Choose one of them to set to the ESB project and click Ok .
ESB container allows Source and JavaDoc locations to be set via the Properties dialog on each contained .jar: right-click on any .jar file, select Properties . Choose Java Source Attachment and select location (folder, JAR or zip) containing new source for the chosen .jar using one of the suggested options (workspace, external folder or file) or enter the path manually:
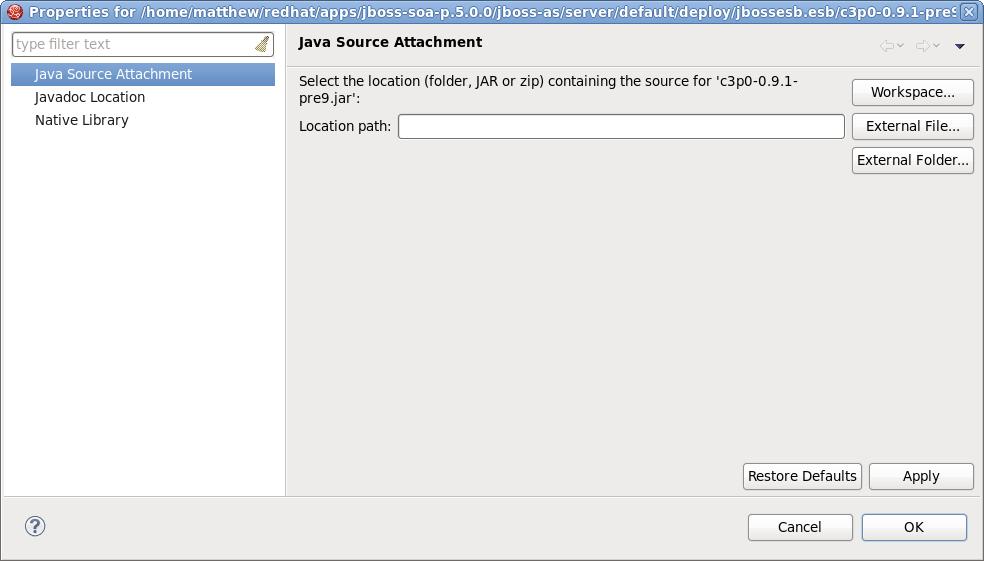
Click on Apply and then on Ok .
To change Javadoc Location choose Javadoc Location and specify URL to the documentation generated by Javadoc. The Javadoc location will contain a file called package-list :
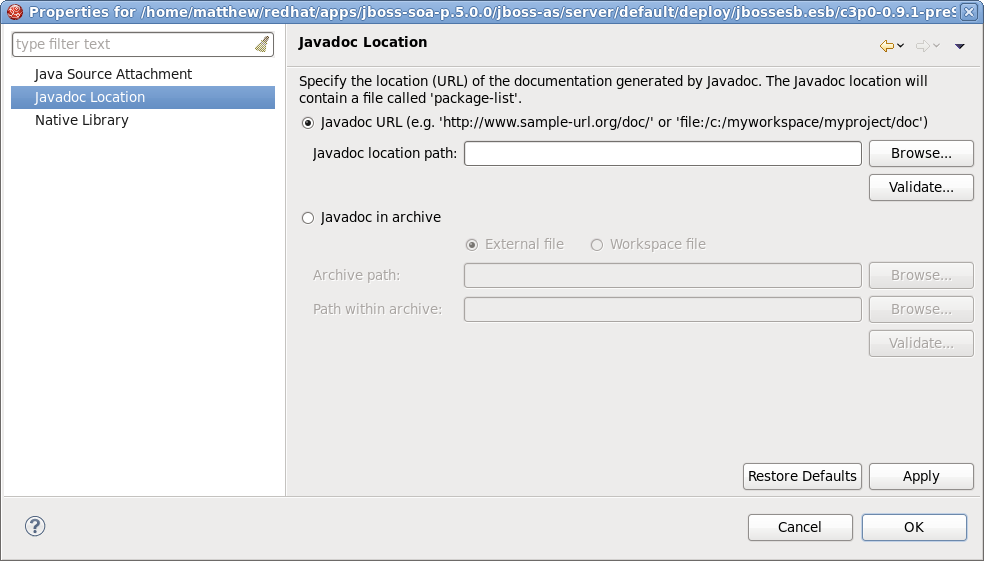
Click on Apply and then on Ok .
In this chapter you will learn what the JBoss Enterprise SOA Platform is and how you can configure it to use for your ESB projects.
JBoss Enterprise SOA Platform delivers a flexible, standards-based platform to integrate applications, SOA services, business events and automate business processes. The SOA Platform integrates specific versions of JBoss ESB, jBPM, Drools and the JBoss Enterprise Application Platform that are certified to work together in a single supported enterprise distribution.
Having configured JBoss Enterprise SOA Platform for your ESB project you don't need to install and configure ESB server and runtime as they are already included.
Check here to find more details on the platform: JBoss Enterprise SOA Platform and JBoss Enterprise SOA Platform Component Details.
You can find out what is SOA here: Basics of SOA and SOA and EOA.
To configure the JBoss Enterprise SOA platform select → → → , which will open the Server Runtime Environments Preferences page where you can add, remove and edit a Server Runtime Environment.
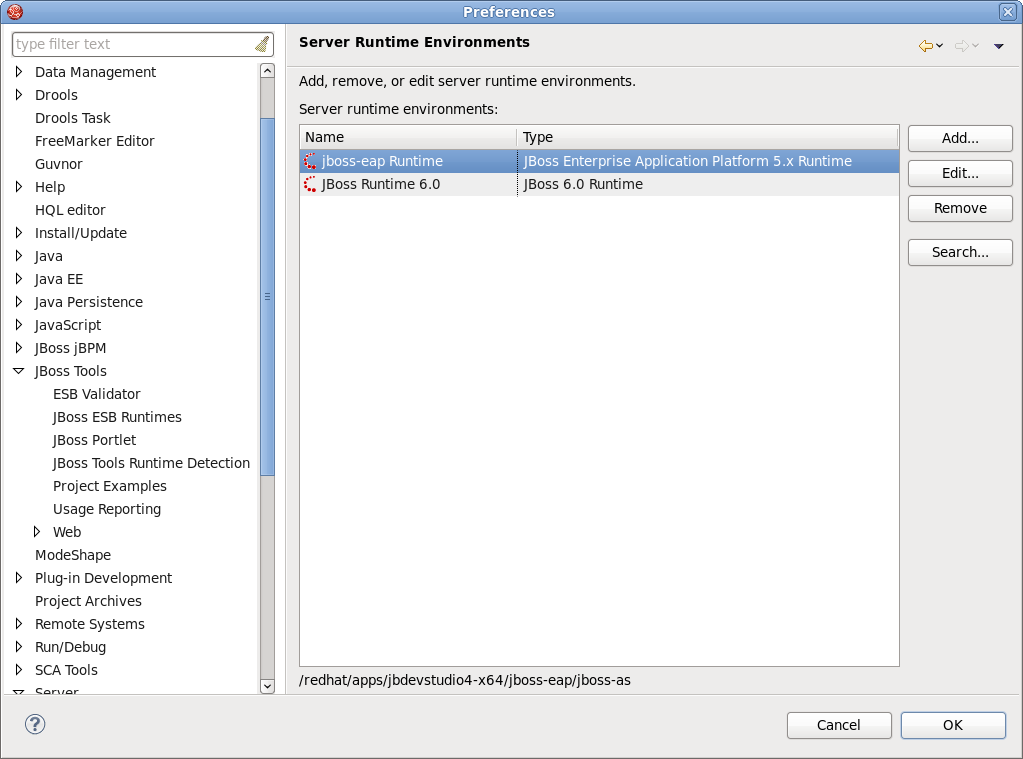
Select Add , choose JBoss 5.0 Runtime as a type of runtime environment, check the Create a new local server checkbox and click Next :
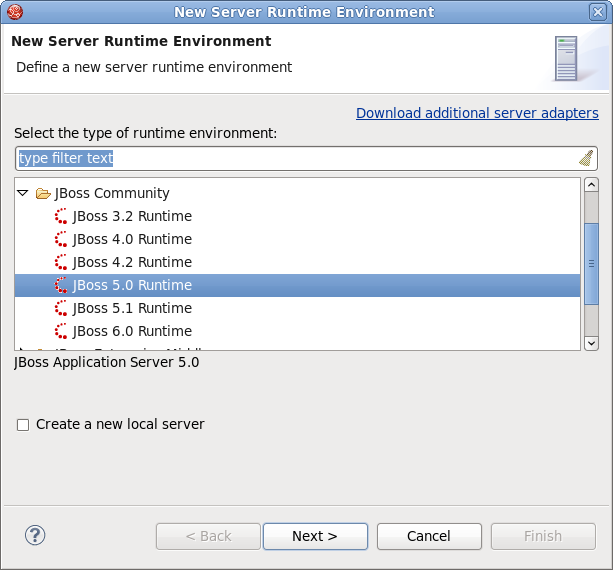
On the next step you can specify a name of the server runtime environment and browse to its location. Click Finish to add the server runtime environment.

Now you have your SOA platform configured. To check the configuration create a ESB Project using instructions described Section 2.2, “Using ESB Project Examples”. As a result you will have two projects created:
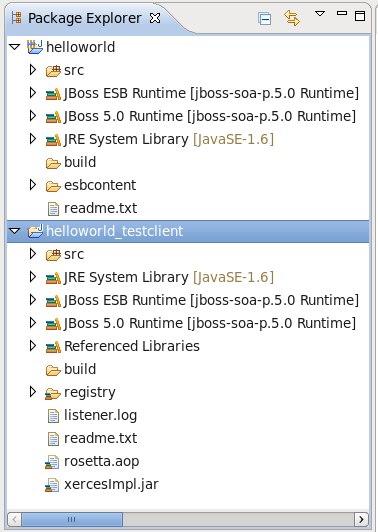
Then you will need to add JBoss ESB libraries to your projects to configure the SOA server runtime exactly for your projects. Right-click on your project, select → :
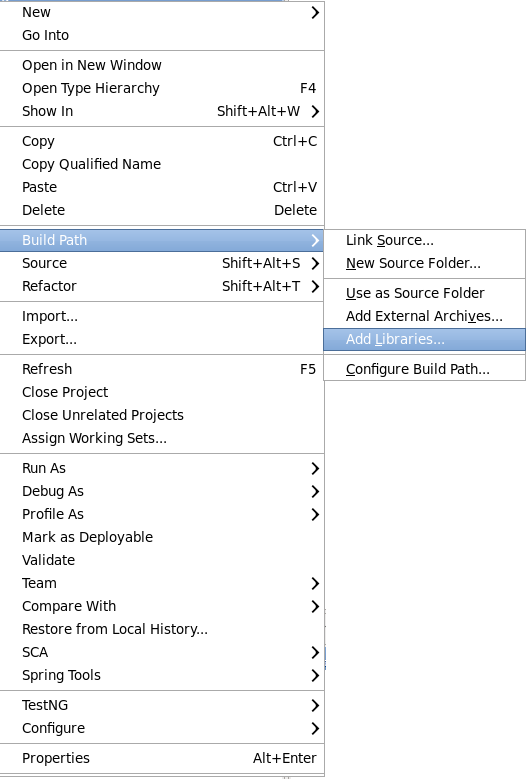
Choose JBoss ESB Libraries and click Next :
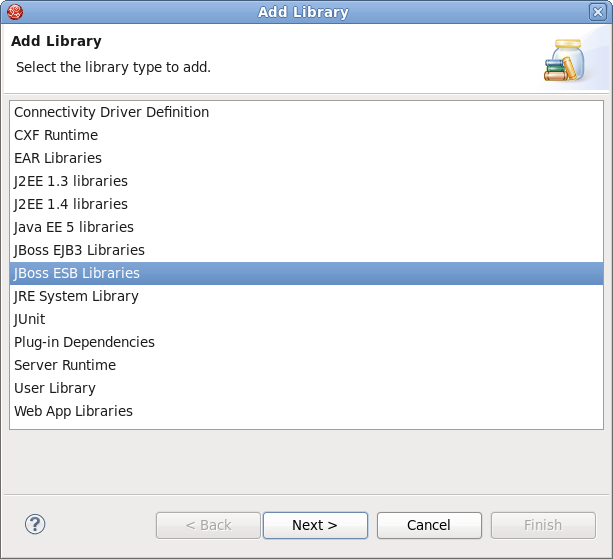
Select the necessary runtime to add to the project classpath:
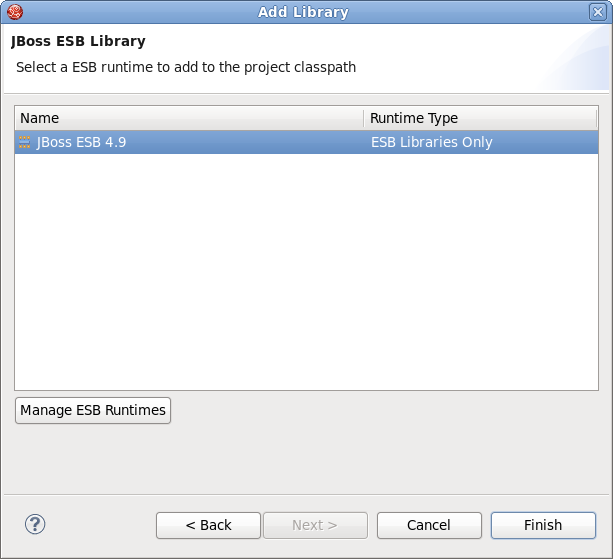
Click Finish .
Now you can deploy your Helloworld project to the server and run a test class in the client Java project to see the test result in the Console view.
This chapter includes detailed reference information about JBoss ESB Tools.
ESB editor has lots of useful features, they are described in details in this chapter.
ESB File Editor is a powerful and customizable tool which allows developing an application using ESB technology.
ESB file editor has two tabs: Tree and Source.
You can easily switch from Tree to Source by selecting the Source tab at the bottom of the editor and work in Source view.
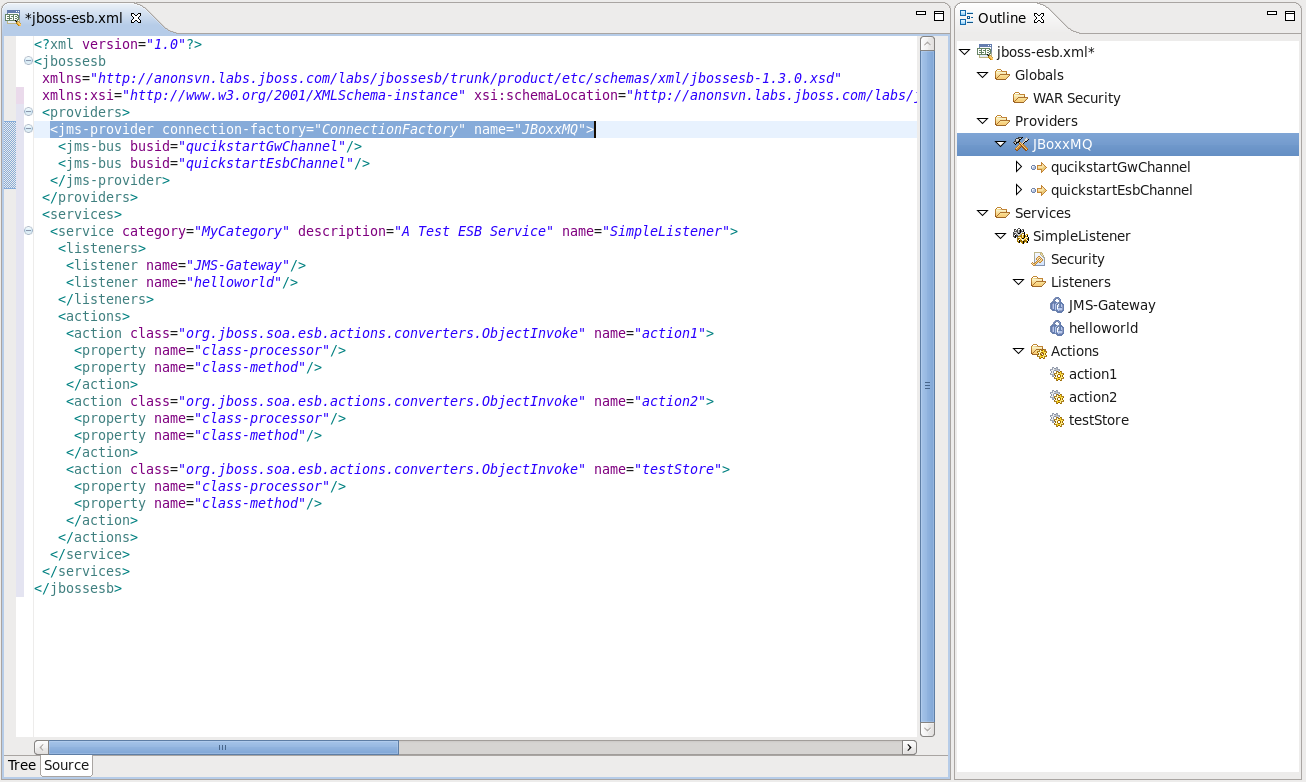
The Source view for the editor displays a text content of the ESB file. It is always synchronized with Tree view, so any changes made in one of the views will immediately appear in the other.
No matter what view you select, you get full integration with Outline view. For example, you can work in the Source view with the help of the Outline view. The Outline view shows a tree structure of the ESB file. Simply select any element in the Outline view and it will jump to the same place in the Source editor, so you can navigate through the source code with Outline view.
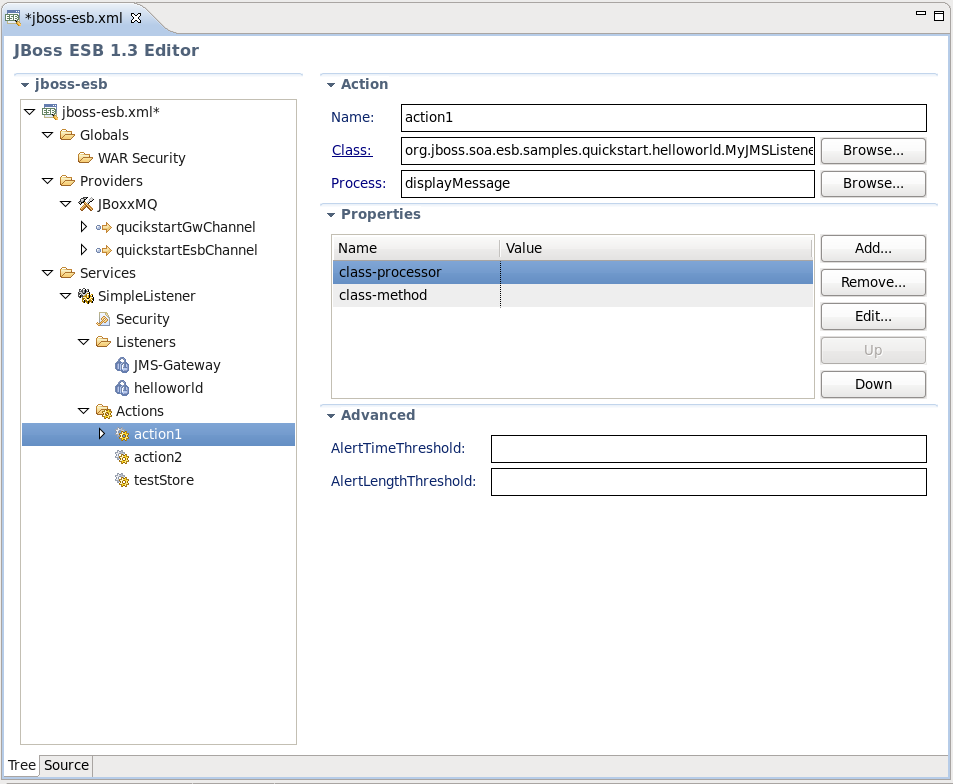
You can switch to Tree. The Tree view for the editor displays all ESB artifacts in a tree format. By selecting any node you can see and edit its properties which will appear in the right-hand area. For example, a Provider:

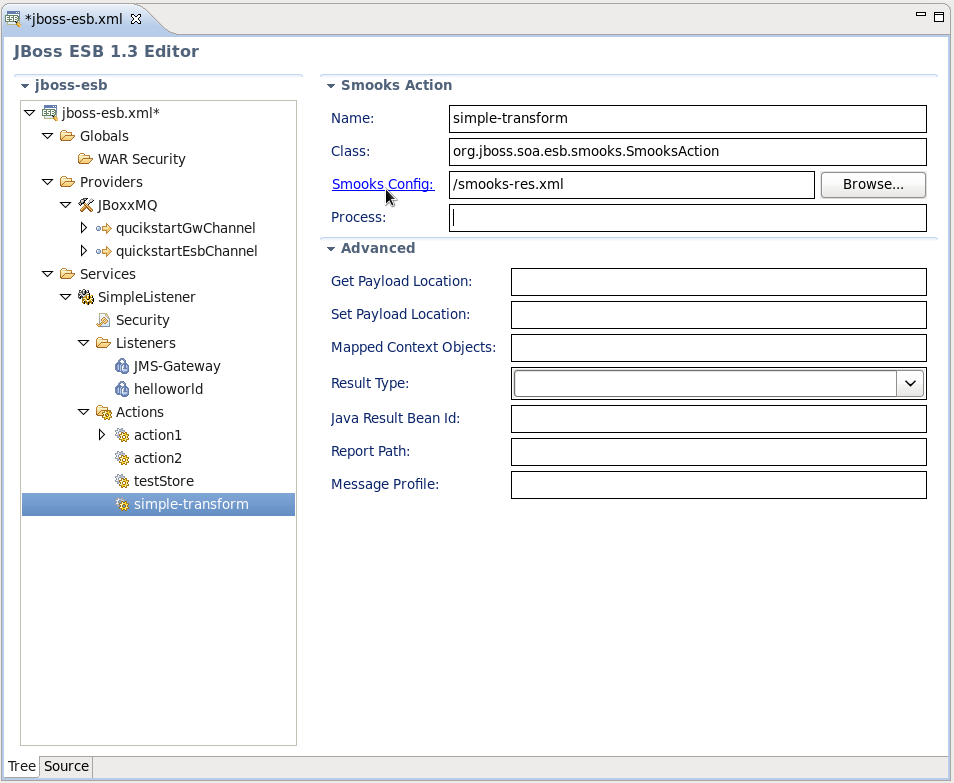
Some properties are represented as links to the associated editors.
Now when editing ESB actions which refer to other files (Drools, Groovy, Smooks, etc.), the label for the field turns into a link to launch the editor associated with that type of file.
Adding, editing or deleting of some artifacts operations are available right in the Tree view. Right-click any node and select one of the available actions in the context menu. For example, you can easily add a new Provider:
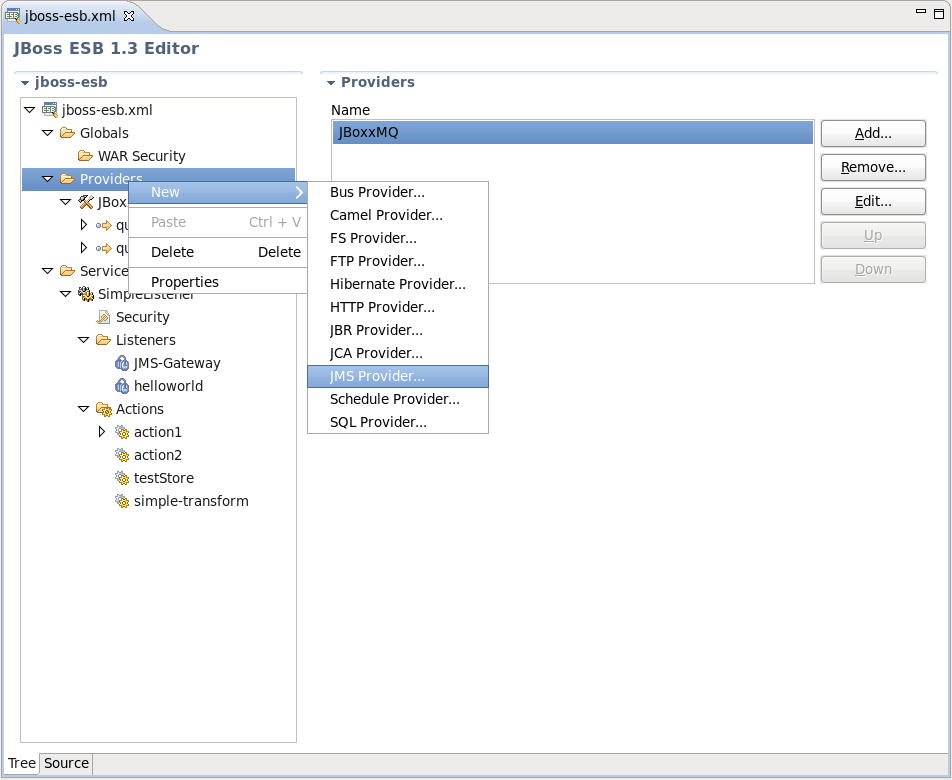
Then you can add Channels and Properties for the Providers the same way or using the forms with Add, Edit and Remove buttons to the right.
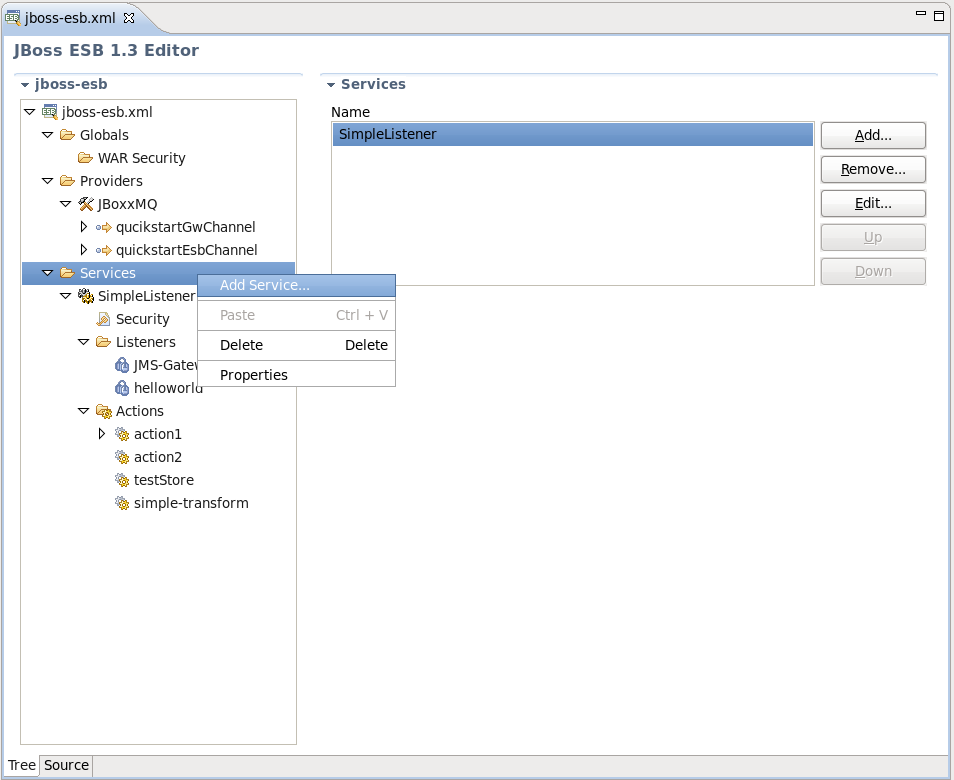
You can easily add a new Service too:
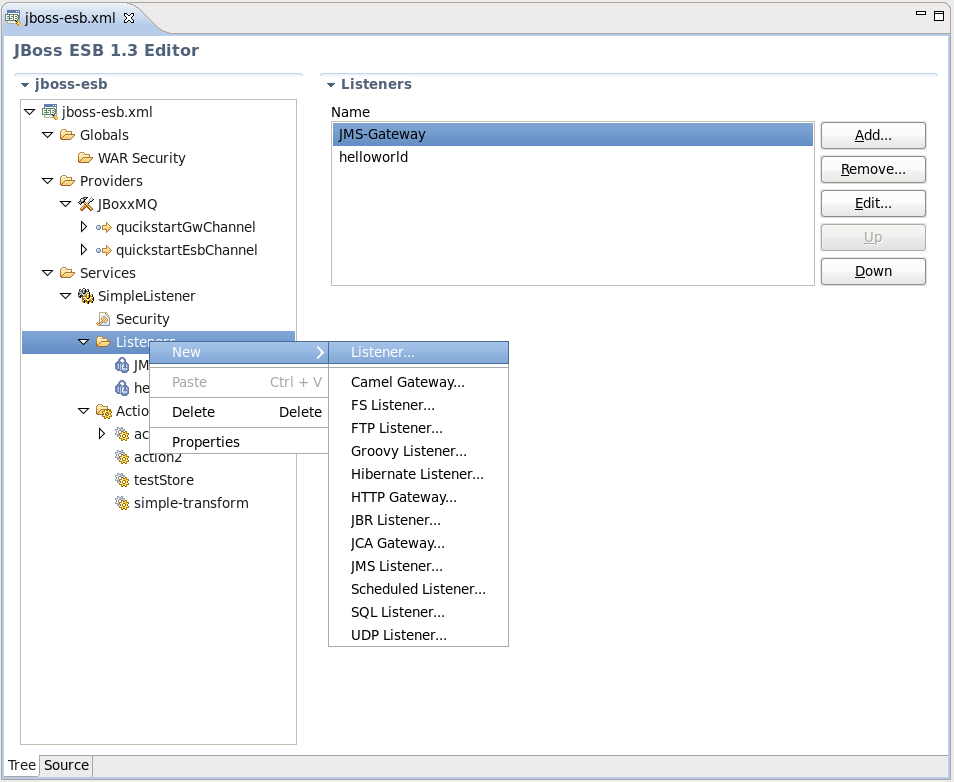
The same way you can create a listener for service and other elements of ESB:
The same actions can be done in the right part of Tree view tab (Form editor) using Add, Edit and Remove buttons.
Filter can be also edited this way

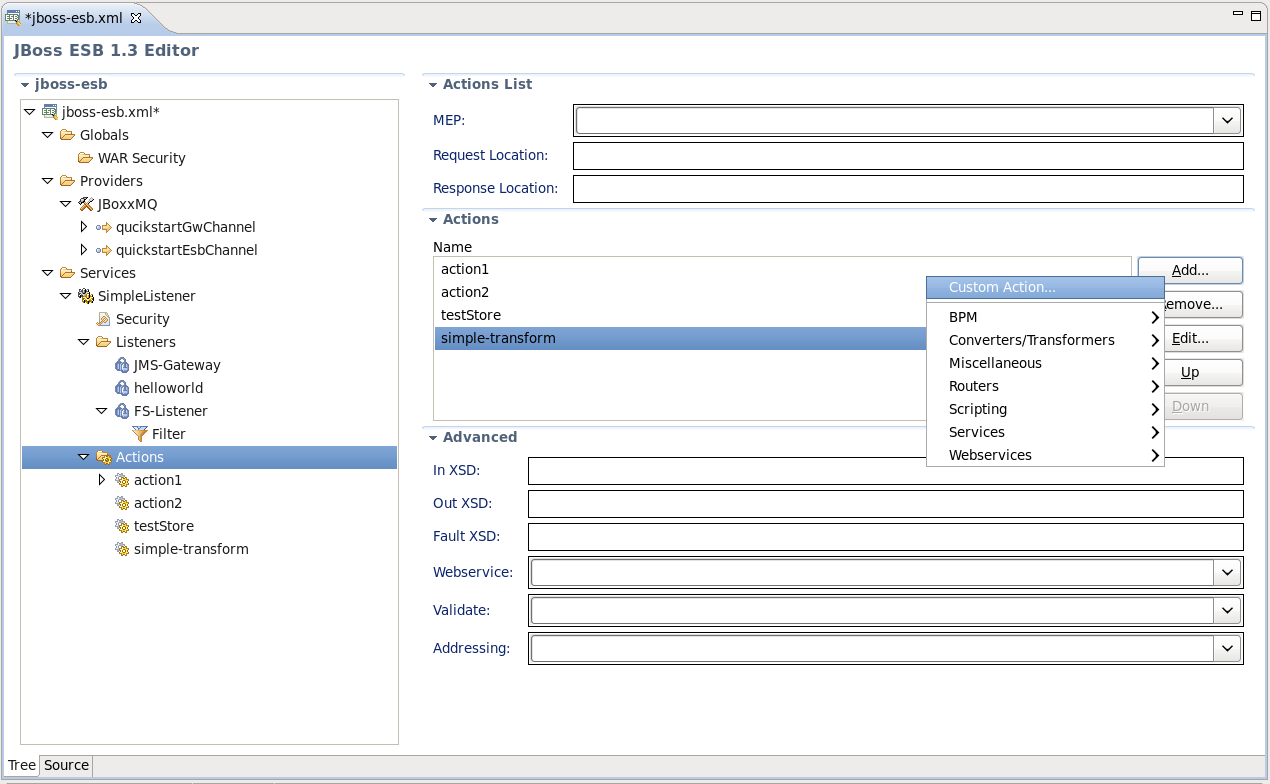
In order to add a new custom Action to your ESB XML file you should select the Actions node under the Services, then right-click and choose → .
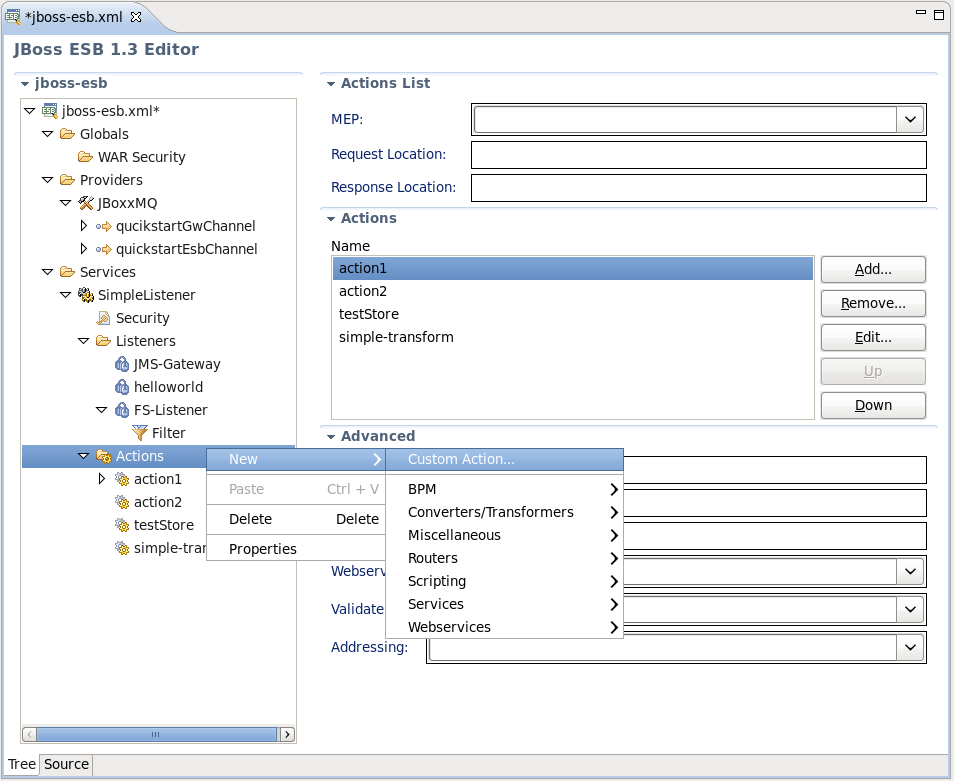
Or instead make use of Add... button in the Form editor on the left.
Note:
Some new components are available to support ESB 4.7, such as: new actions (XsltAction, PersistAction, BpmProcessor, ScriptingAction), new processors (EJBProcessor), new routers (HttpRouter, JMSRouter, EmailRouter).
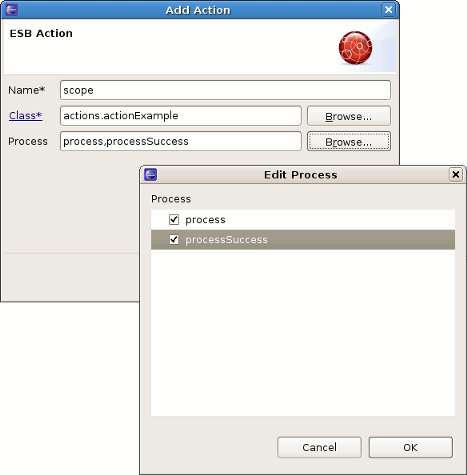
Then you will see Add Action wizard. There is a need to specify Action name and Action Java class.

To get a help with finding a proper class you can select Browse to open Select class dialog.

Moreover it's possible to type a Process name or select it with Edit Process dialog which is called out by clicking Browse.
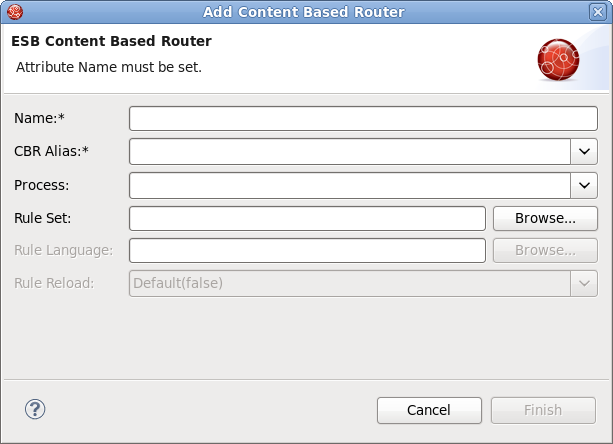
As you can see on the both figures above, the context menu will also prompt you to insert one of the Actions that are supplied out-of-the-box with JBoss ESB. After choosing one an appeared New Pre-Packed Action wizard will ask you to fill out a name field and other fields specific for each Action property. For example, for Content Based Router Action the wizard looks as follows:
After confirming creating the Action you can see it in the Tree under the Actions node and preview as well as edit its settings in the Form editor on the left.
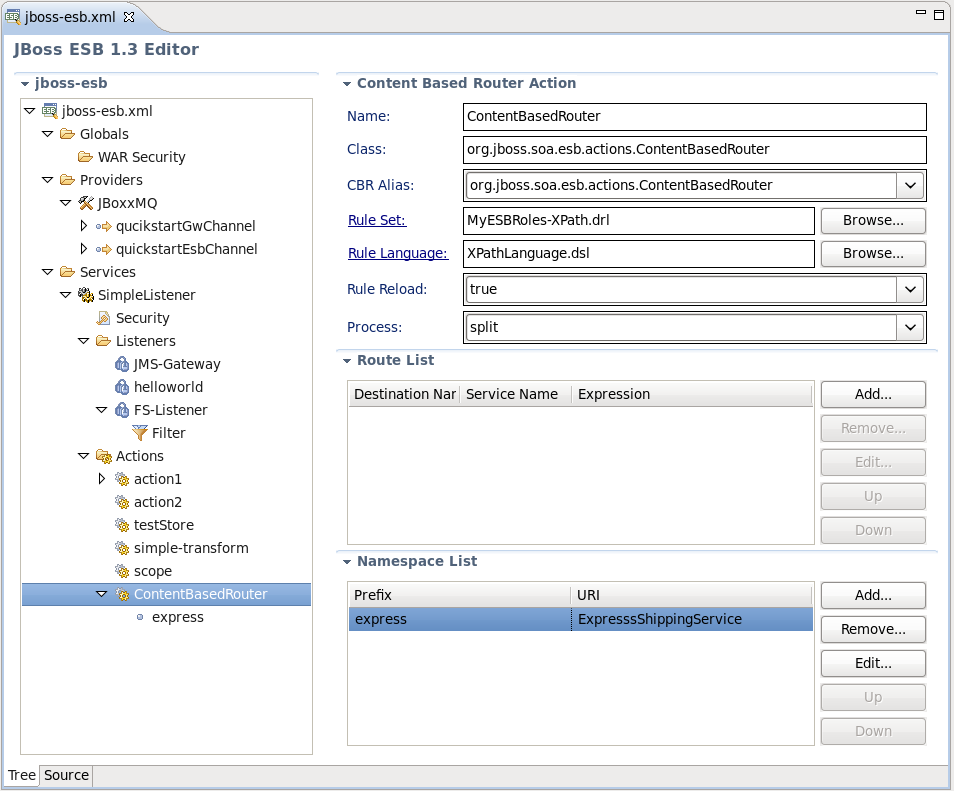
ESB editor can recognize some specific objects. On the figure you can see org.jboss.soa.esb.actions.ContentBasedRouter in the Class section.
JBoss ESB tooling has powerful editor features that help you easily make use of content and code assist.
This last chapter covers capabilities on how you can use ESB editor.
When working in JBoss ESB editor you are constantly provided with feedback and contextual error checking as you type. In the Source viewer, if at any point a tag is incorrect or incomplete, an error will be indicated next to the line and also in the Problems view below.
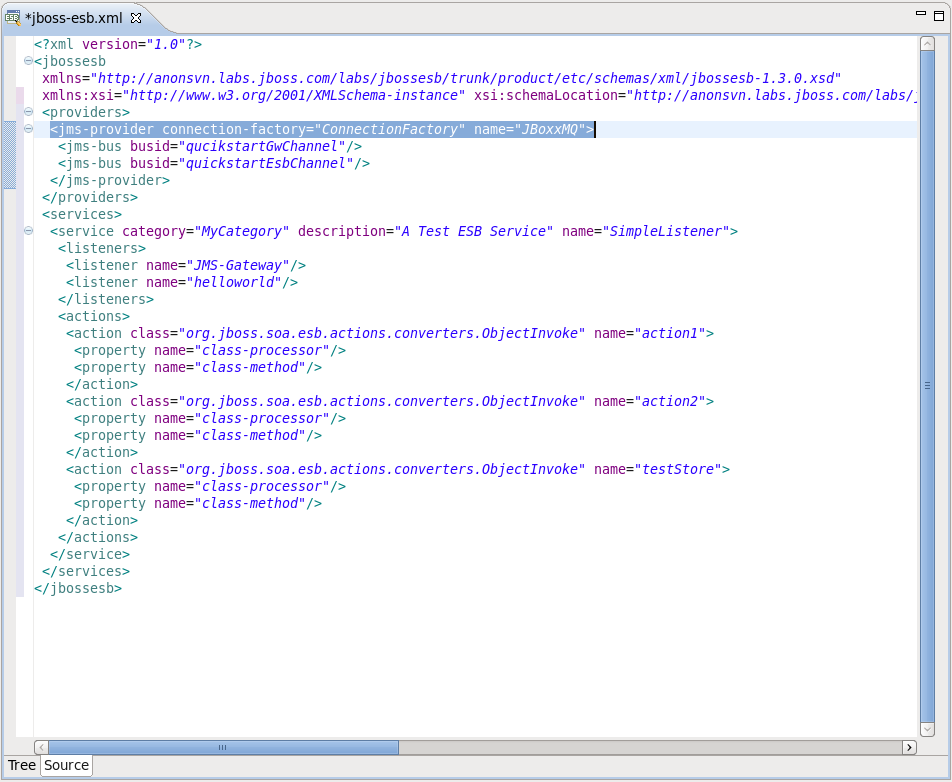
JBoss ESB Framework fully supports XML files based on schemas as well as DTDs (see Figure 3.1, “Source View”).
The schema checks the child elements of any kind of provider element; the ESB generates errors on startup if you attempt to define an incorrect combination (e.g.: a jms-bus inside an ftp-provider).
Note:
The schema used behind ESB editor now uses the latest version available (from SOA-P 4.3). This removes the errors/warnings some users have reported seeing when using SOA-P specific esb.xml files.
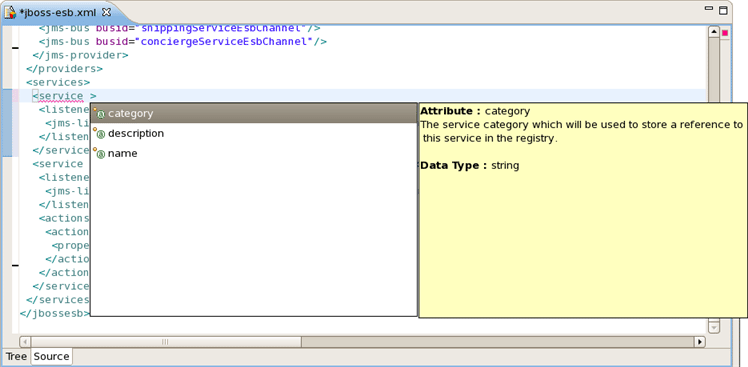
When you work with any ESB XML file Content Assist is available to help you. It provides pop-up tip to help you complete your code statements. It allows you to write your code faster and with more accuracy. Content assist is always available in the Source mode. Simply type Ctrl-Space to see what is available.
Content Assist for ESB XML file:

Content Assist for attributes:
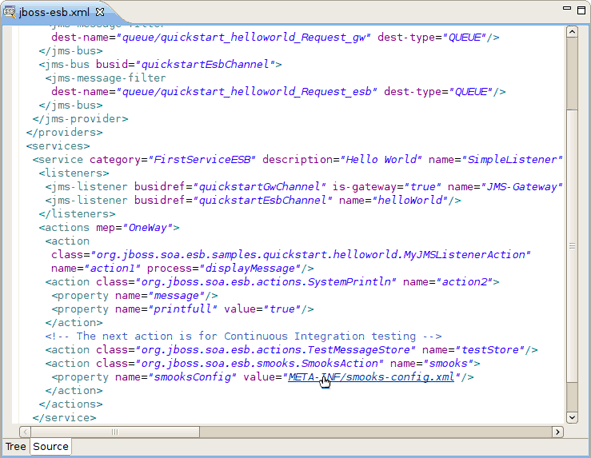
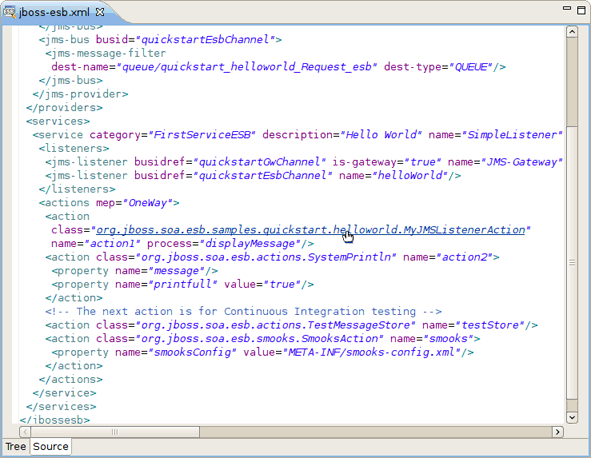
ESB file comes with the OpenOn feature that allows to make use of multiple file references in the file just with a click and the Ctrl key hold down.
The OpenOn is implemented for different types of files/pages inside the <action> tag: .xsd, .xml, etc.
It is also available for classes:
ESB file can be edited in either source or extra visual modes at the same time.
JBoss Tools provide you two different editors to speed your development: a graphical view (Tree) and source (Source). At the same time, you always have full control over esb source file. Any changes you make in the source view will immediately appear in the tree view. Both views are synchronized, you can edit the file in any view.

On the whole, this reference supplies you with all necessary information on the functionality that JBoss ESB plugin provides for work with JBoss ESB.
We hope, this guide helped you to get started with the JBoss ESB Tools. For additional information you are welcome on JBoss forum.
You can find a set of benefits and other extra information on:
The latest JBoss Tools/JBoss Developer Studio documentation builds are available on the JBoss Tools nightly documentation page.