The following features are available in the Hibernate Tools Eclipse plugins:
Mapping Editor: An editor for Hibernate XML mapping files, supporting auto-completion and syntax highlighting. It also supports semantic auto-completion for class names and property/field names, making it much more versatile than a normal XML editor.
Hibernate Console: The console is a new perspective in Eclipse. It provides an overview of your Hibernate Console configurations, were you also can get an interactive view of your persistent classes and their relationships. The console allows you to execute HQL queries against your database and browse the result directly in Eclipse.
Configuration Wizards and Code generation: A set of wizards are provided with the Hibernate Eclipse tools; you can use a wizard to quickly generate common Hibernate configuration (cfg.xml) files, and from these you can code generate a series of various artifacts, there is even support for completely reverse engineer an existing database schema and use the code generation to generate POJO source files and Hibernate mapping files.
Eclipse JDT integration: Hibernate Tools integrates into the Java code completion and build support of Java in Eclipse. This gives you codecompletion of HQL inside Java code plus Hibernate Tools will add problem markers if your queries are not valid against the console configuration associated with the project.
Please note that these tools do not try to hide any functionality of Hibernate. The tools make working with Hibernate easier, but you are still encouraged/required to read the documentation for Hibernate to fully utilize Hibernate Tools and especially Hibernate it self.
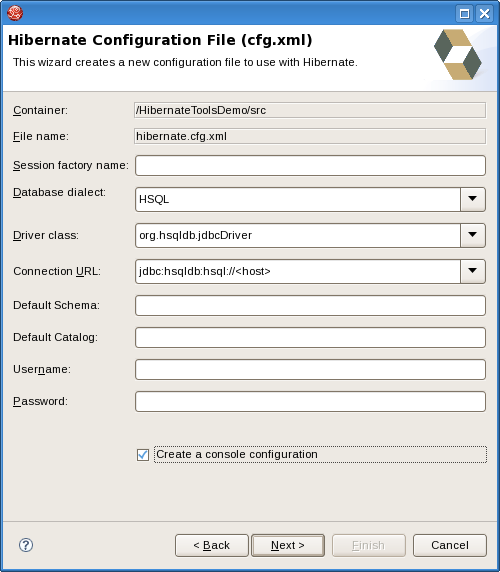
To be able to reverse engineer, prototype queries, and of course to simply use Hibernate Core a hibernate.properties or hibernate.cfg.xml file is needed. The Hibernate Tools provide a wizard for generating the hibernate.cfg.xml file if you do not already have such file.
Start the wizard by clicking New Wizard (Ctrl+N), select the Hibernate/Hibernate Configuration file (cfg.xml) wizard and press Next . After selecting the wanted location for the hibernate.cfg.xml file, you will see the following page:
Note
The contents in the combo boxes for the JDBC driver class and JDBC URL change automatically, depending on the Dialect and actual driver you have chosen.
Enter your configuration information in this dialog. Details about the configuration options can be found in Hibernate reference documentation.
Press Finish to create the configuration file, after optionally creating a Console onfiguration, the hibernate.cfg.xml will be automatically opened in an editor. The last option Create Console Configuration is enabled by default and when enabled i will automatically use the hibernate.cfg.xml for the basis of a Console Configuration.
A Console Configuration describes to the Hibernate plugin how it should configure Hibernate and what configuration files, including which classpath is needed to load the POJO's, JDBC drivers etc. It is required to make usage of query prototyping, reverse engineering and code generation. You can have multiple named console configurations. Normally you would just need one per project, but more is definitly possible.
You create a console configuration by running the Console Configuration wizard, shown in the following screenshot. The same wizard will also be used if you are coming from the hibernate.cfg.xml wizard and had enabled Create Console Configuration .
Note
The wizard will look at the current selection in the IDE and try and auto-detect the settings which you then can just approve or modify to suit your needs.
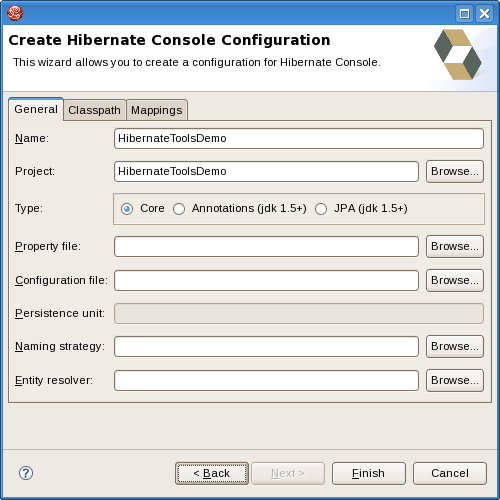
The dialog consists of three tabs,
General
for the basic/required settings,
Classpath
for classpath and
Mappings
for additional mappings. The two latter ones is normally not required if you
specify a project and it has
/hibernate.cfg.xml
or
/META-INF/persistence.xml
in its project classpath.
The following table describes the available settings. The wizard can automatically detect default values for most of these if you started the Wizard with the relevant java project or resource selected
Table 3.1. Hibernate Console Configuration Parameters
|
Parameter |
Description |
Auto detected value |
|---|---|---|
|
Name |
The unique name of the console configuration |
Name of the selected project |
|
Project |
The name of a java project which classpath should be used in the console configuration |
Name of the selected project |
|
Type |
Choose between "Core", "Annotations" and "JPA". Note that the two latter requires running Eclipse IDE with a JDK 5 runtime, otherwise you will get classloading and/or version errors. |
No default value |
|
Property file |
Path to a hibernate.properties file |
First hibernate.properties file found in the selected project |
|
Configuration file |
Path to a hibernate.cfg.xml file |
First hibernate.cfg.xml file found in the selected project |
|
Persistence unit |
Name of the persistence unit to use |
No default value (lets Hibernate Entity Manager find the persistence unit) |
|
Naming strategy |
Fully qualified classname of a custom NamingStrategy. Only required if you use a special naming strategy. |
No default value |
|
Entity resolver |
Fully qualified classname of a custom EntityResolver. Only required if you have special xml entity includes in your mapping files. |
No default value |
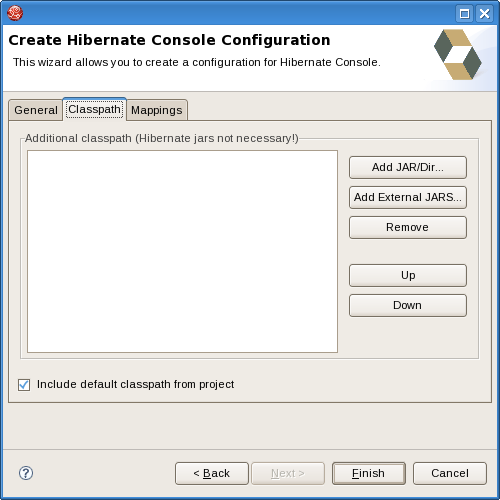
Table 3.2. Hibernate Console Configuration Classpath
|
Parameter |
Description |
Auto detected value |
|---|---|---|
|
Classpath |
The classpath for loading POJO and JDBC drivers; only needed if the default classpath of the Project does not contain the required classes. Do not add Hibernate core libraries or dependencies, they are already included. If you get ClassNotFound errors then check this list for possible missing or redundant directories/jars. |
empty |
|
Include default classpath from project |
When enabled the project classpath will be appended to the classpath specified above. |
Enabled |

Table 3.3. Hibernate Console Configuration Mappings
|
Parameter |
Description |
Auto detected value |
|---|---|---|
|
Mapping files |
List of additional mapping files that should be loaded. Note: A hibernate.cfg.xml or persistence.xml can also contain mappings. Thus if these are duplicated here, you will get "Duplicate mapping" errors when using the console configuration. |
empty |
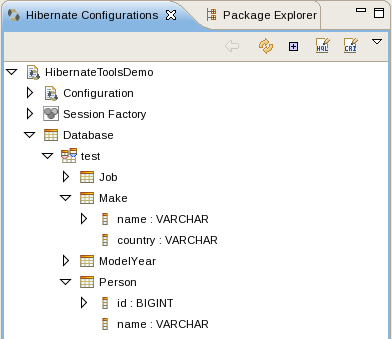
Clicking Finish creates the configuration and shows it in the Hibernate Configurations view
A "click-and-generate" reverse engineering and code generation facility is available. This facility allows you to generate a range of artifacts based on database or an already existing Hibernate configuration, be that mapping files or annotated classes. Some of these are POJO Java source file, Hibernate *.hbm.xml, hibernate.cfg.xml generation and schema documentation.
To start working with this process, start the Hibernate Code Generation which is available in the toolbar via the Hibernate icon or via the Run > Hibernate Code Generation menu item.
When you click on Hibernate Code Generation... the standard Eclipse launcher dialog will appear. In this dialog you can create, edit and delete named Hibernate code generation "launchers".
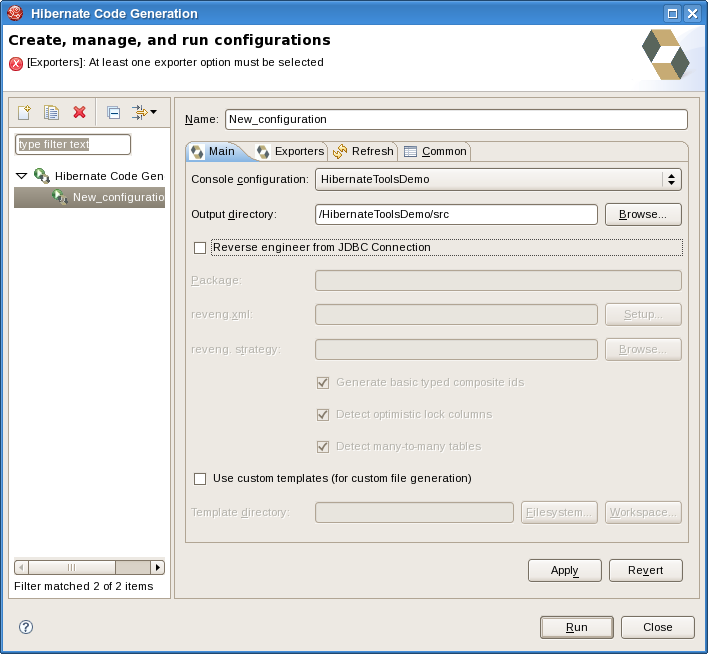
The first time you create a code generation launcher you should give it a meaningfull name, otherwise the default prefix New_Generation will be used.
Note
The "At least one exporter option must be selected" is just a warning stating that for this launch to work you need to select an exporter on the Exporter tab. When an exporter has been selected the warning will disappear.
The dialog also have the standard tabs Refresh and Common that can be used to configure which directories should be automatically refreshed and various general settings launchers, such as saving them in a project for sharing the launcher within a team.
On the Main tab you see the following fields:
Table 3.4. Code generation "Main" tab fields
|
Field |
Description |
|---|---|
|
Console Configuration |
The name of the console configuration which should be used when code generating. |
|
Output directory |
Path to a directory into where all output will be written by default. Be aware that existing files will be overwritten, so be sure to specify the correct directory. |
|
Reverse engineer from JDBC Connection |
If enabled the tools will reverse engineer the database available via the connection information in the selected Hibernate Console Configuration and generate code based on the database schema. If not enabled the code generation will just be based on the mappings already specified in the Hibernate Console configuration. |
|
Package |
The package name here is used as the default package name for any entities found when reverse engineering. |
|
reveng.xml |
Path to a reveng.xml file. A reveng.xml file allows you to control certain aspects of the reverse engineering. e.g. how jdbc types are mapped to hibernate types and especially important which tables are included/excluded from the process. Clicking "setup" allows you to select an existing reveng.xml file or create a new one. See more details about the reveng.xml file in Chapter 5, Controlling reverse engineering. |
|
reveng. strategy |
If reveng.xml does not provide enough customization you can provide your own implementation of an ReverseEngineeringStrategy. The class need to be in the claspath of the Console Configuration, otherwise you will get class not found exceptions. See Section 5.3, “Custom strategy” for details and an example of a custom strategy. |
|
Generate basic typed composite ids |
A table that has a multi-colum primary key a <composite-id> mapping will always be created. If this option is enabled and there are matching foreign-keys each key column is still considered a 'basic' scalar (string, long, etc.) instead of a reference to an entity. If you disable this option a <key-many-to-one> instead. Note: a <many-to-one> property is still created, but is simply marked as non-updatable and non-insertable. |
| Detect optimistic lock columns | Automatically detect optimistic lock columns. Controllable via reveng. strategy; the current default is to use columns named VERSION or TIMESTAMP. |
| Detect many-to-many tables | Automatically detect many-to-many tables. Controllable via reveng. strategy. |
|
Use custom templates |
If enabled, the Template directory will be searched first when looking up the templates, allowing you to redefine how the individual templates process the hibernate mapping model. |
|
Template directory |
A path to a directory with custom templates. |
The Exporters tab is used to specify which type of code that should be generated. Each selection represents an Exporter that are responsible for generating the code, hence the name.
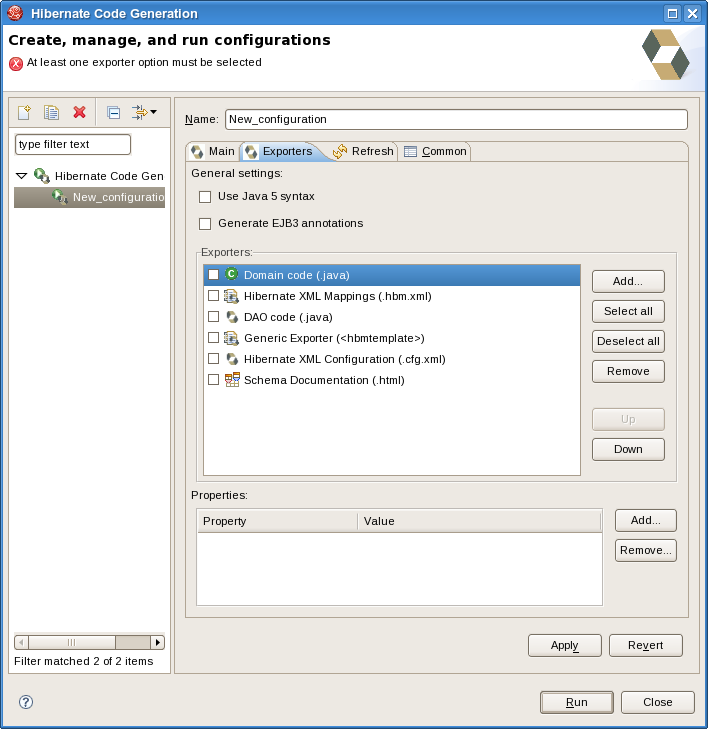
The following table describes in short the various exporters. Remember you can add/remove any Exporters depending on your needs.
Table 3.5. Code generation "Exporter" tab fields
|
Field |
Description |
|---|---|
|
Domain code |
Generates POJO's for all the persistent classes and components found in the given Hibernate configuration. |
|
DAO code |
Generates a set of DAO's for each entity found. |
|
Hibernate XML Mappings |
Generate mapping (hbm.xml) files for each entity |
|
Hibernate XML Configuration |
Generate a hibernate.cfg.xml file. Used to keep the hibernate.cfg.xml uptodate with any new found mapping files. |
|
Schema Documentation (.html) |
Generates set of html pages that documents the database schema and some of the mappings. |
|
Generic Exporter (hbmtemplate) |
Fully customizable exporter which can be used to perform custom generation. |
Each Exporter listens to certain properties and these can be setup in the Properties section where you can add/remove predefined or customer properties for each of the exporters. The following table lists the time of writing pre-defined properties:
Table 3.6. Exporter Properties
|
Name |
Description |
|---|---|
|
jdk5 |
Generate Java 5 syntax |
|
ejb3 |
Generate EJB 3 annotations |
|
for_each |
Specifies which type of model elements the exporter should create a file and run through the templates. Possible values are: entity, component, configuration |
|
template_path |
Custom template directory for this specific exporter. You can use Eclipse variables. |
|
template_name |
Name for template relative to the template path |
|
outputdir |
Custom output directory for this specific exporter. You can use Eclipse variables. |
|
file_pattern |
Pattern to use for the generated files, relatively for the output dir. Example: {package-name}/{class-name}.java |
|
dot.executable |
executable to run GraphViz (only relevant, but optional for Schema documentation) |
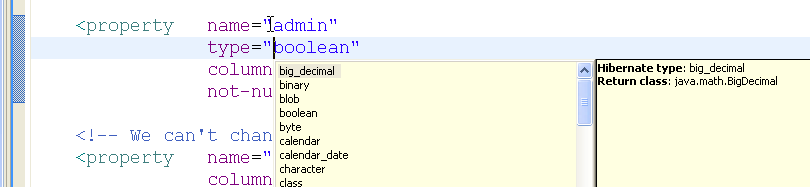
The Hibernate Mapping file editor provides XML editing functionality for the hbm.xml and cfg.xml files. The editor is based on the Eclipse WTP tools and extend its functionallity to provide Hibernate specific code completion.
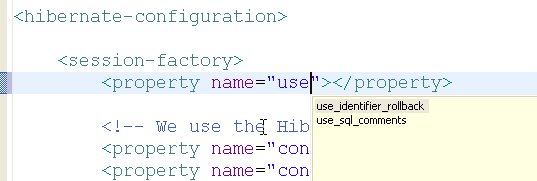
Package, class, and field completion is enabled for relevant XML attributes. The auto-completion detects its context and limits the completion for e.g. <property> and only shows the properties/fields available in the enclosing <class> , <subclass> etc. It is also possible to navigate from the hbm.xml files to the relevant class/field in java code.

This is done via the standard hyperlink navigation functionallity in Eclipse; per default it is done by pressing F3 while the cursor is on a class/field or by pressing Ctrl and the mouse button to perform the same navigation.
For java completion and navigation to work the file needs to reside inside an Eclipse Java project, otherwise no completion will occur.
Note
Java completion does not require a Hibernate console configuration to be used.
Table and column completion is also available for all table and column attributes.

Note that it requires a proper configured hibernate console configuration and this configuration should be the default for the project where the hbm.xml resides.
You can check which console configuration is selected under the Properties of a project and look under the Hibernate Settings page. When a proper configuration is selected it will be used to fetch the table/column names in the background.
Note
Currently it is not recommended to use this feature on large databases since it does not fetch the information iteratively. It will be improved in future versions.
A reveng.xml file is used to customize and control how reverse engineering is performed by the tools. The plugins provide and editor to ease the editing of this file and hence used to configure the reverse engineering process.
The editor is intended to allow easy definition of type mappings, table include/excludes and specific override settings for columns, e.g. define a explicit name for a column when the default naming rules is not applicable.
Note that not all the features of the .reveng.xml file is exposed or fully implemented in the editor, but the main functionallity is there. To understand the full flexibility of the reveng.xml, please see Section 5.2, “hibernate.reveng.xml file”
The editor is activated as soon as an .reveng.xml file is opened. To get an initial reveng.xml file the reveng.xml wizard can be started via Ctrl+N or via the code generation launcher.
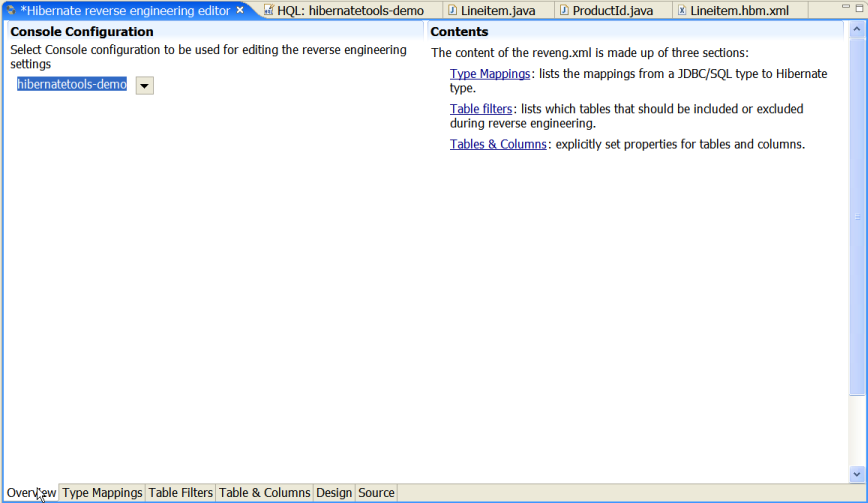
The following screentshot shows the Overview page where the wanted console configuration is selected (auto-detected if Hibernate 3 support is enabled for the project)
The Table Filter page allows you to specify which tables to include and exclude. Pressing refresh shows the tables from the database that have not yet been excluded.

The Type Mappings page is used for specifying type mappings from jdbc types to any Hibernate type (including usertypes) if the default rules are not applicable.

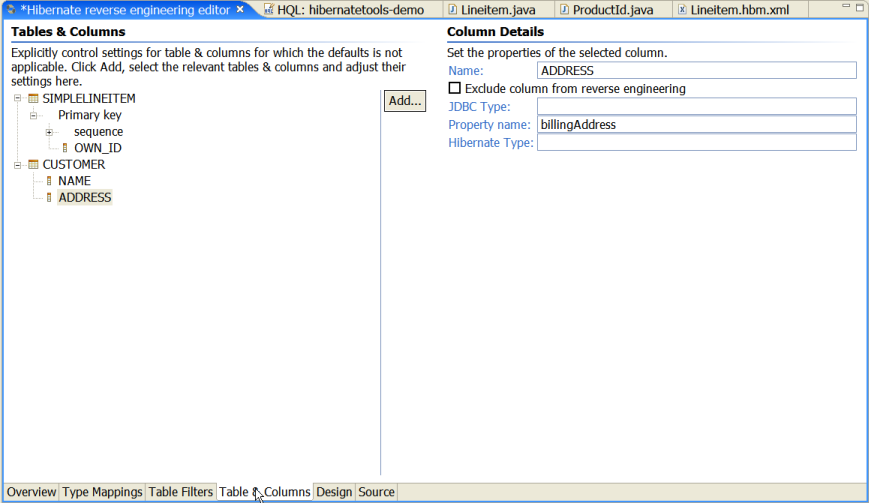
The Table and Columns page allow the user to explicit set e.g. which hibernatetype and propertyname that should be used in the reverse engineered model.
The Hibernate Console perspective combines a set of views which allow you to see the structure of your mapped entities/classes, edit HQL queries, execute the queries, and see the results. To use this perspective you need to create a console configuration.
To view your new configuration and entity/class structure, expand the Hibernate Console configuration by clicking on the + icon.
Clicking on the small + symbol allows you to browse the class/entity
structure and see the relationships.
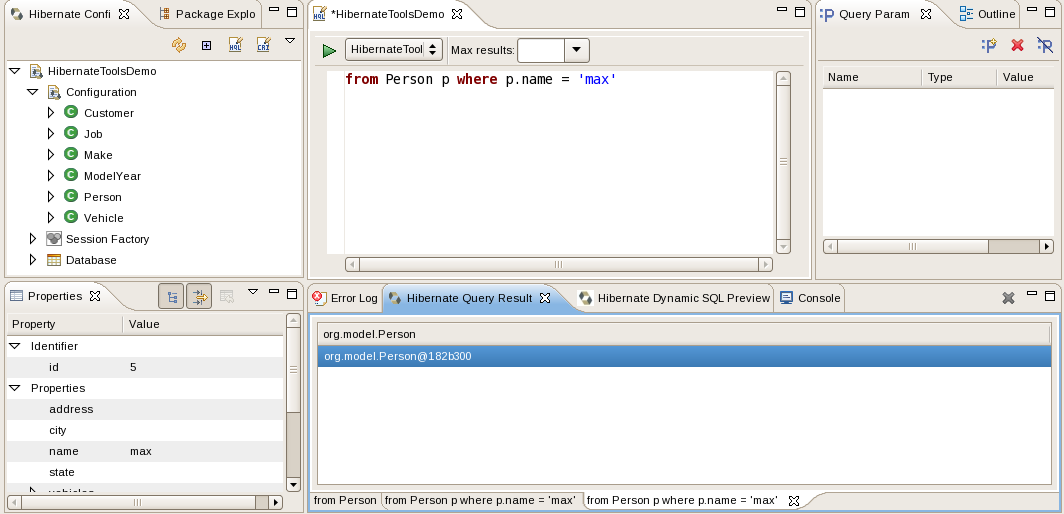
Hibernate Console perspective showing entity structure, query editor and result
The console configuration does not dynamically adjust to changes done in mappings and java code; to reload the configuration select the configuration and click the Reload button in the view toolbar or in the context menu.

Queries can be prototyped by entering them in the HQL or Criteria editor. The query editors are opened by right-clicking the Console configuration and selecting either HQL Editor or Criteria Editor.
If the menu item is disabled then you need to first create an SessionFactory. That is done by simply expanding the Session Factory node.
Executing the query is done by clicking the green run button in the toolbar or pressing Ctrl+Enter.
Errors during creation of the SessionFactory or running the queries
(e.g. if your configuration or query is incorrect) will be shown in a message dialog or
inlined in the view that detected the error, you may get more information about the error in
the Error Log view on the right pane.
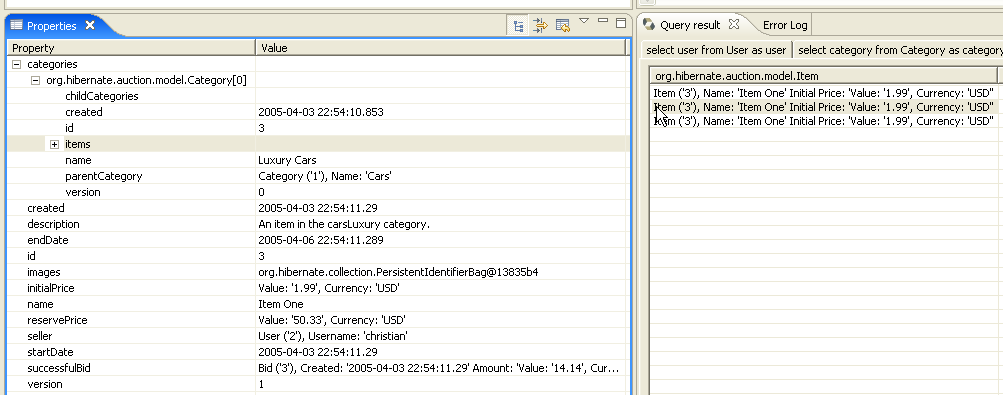
Results of a query will be shown in the Query result view and details of possible errors (syntax errors, database errors, etc.) can be seen in the Error Log view.
Note
HQL queries are executed by default using list() thus without
any limit of the size of the output the query could return a large result set. You might run
out of memory. To avoid this you can put a value in the Max results field to reduce the
number of elements returned.
If the Hibernate Dynamic Query Translator view is visible while writing in the HQL editor it will show the generated SQL for a HQL query.
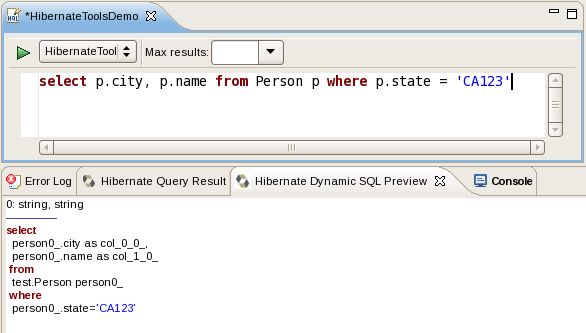
The translation is done each time you stop typing into the editor, if there are an error in the HQL the parse exception will be shown embedded in the view.
It is possible to configure the eclipse plugin to route all logging made by the plugins and hibernate code it self to the Error log view in Eclipse.
This is done by editing the hibernate-log4j.properties in org.hibernate.eclipse/ directory/jar. This file includes a default configuration that only logs WARN and above to a set of custom appenders (PluginFileAppender and PluginLogAppender). You can change these settings to be as verbose or silent as you please - see hibernate documentation for interesting categories and log4j documentation for how to configure logging via a log4j property file.