JBoss.orgCommunity Documentation
Version: 3.0.1.GA
Copyright © 2007, 2009 JBoss, a division of Red Hat
April 2008
The following chapters describe how to deal with classic/old style of JSF development. We recommend users to use JBoss Seam to simplify development, but until then you can read about classical JSF usage here.
Thus, in this document we are going to show you how to create a simple JSF application using JBoss Tools plugins for Eclipse. The completed application will ask a user to enter a name and click a button. The resulting new page will display the familiar message, "Hello <name>!" This tutorial will show you how to create and run such an application from the beginning along the way demonstrating some of the powerful features of JBoss Tools.

All JBoss Developer Studio/JBoss Tools release documentation you can find athttp://docs.jboss.org/tools in the corresponding release directory.
The latest documentation builds are available at http://download.jboss.org/jbosstools/nightly-docs.
Firstly, we assume that you have already launched Eclipse with JBoss Tools plug-ins installed and also that the Web Development perspective is the current one. (If not, make it active by selecting Window > Open Perspective > Web Development from the menu bar or by selecting Window > Open Perspective > Other... from the menu bar and then selecting Web Development from the Select Perspective dialog box.)
Now we are going to create a new project for the application.
For that go to the menu bar and select File > New > Project...
Select JBoss Tools Web > JSF > JSF Project in the New Project dialog box
Click Next
Enter "jsfHello" as the project name.
Leave everything else as is, and click Finish
A jsfHello node should appear in the upper-left Package Explorer view.

Click the plus sign next to jsfHello to reveal the child nodes
Click the plus sign next to WebContent under jsfHello
Click the plus sign next to WEB-INF under WebContent
Then double-click on the faces-config.xml node to display the JSF application configuration file editor
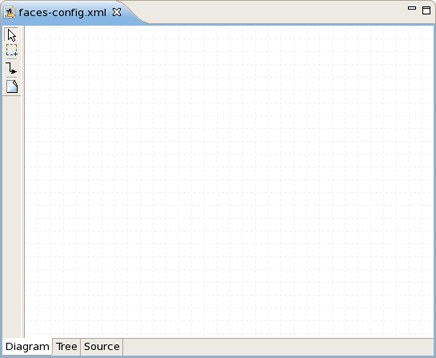
In our simple application, the flow is defined as a single navigation rule connecting two views (presentation files). At this point, we will create the placeholders for the two JSP presentation files and then the navigation rule to connect them as views. Later, we will complete the coding for the JSP presentation files. We can do all of this in the Diagram mode of the configuration file editor.
Right-click anywhere on the diagram and select New View... from the pop-up menu
In the dialog box, type pages/inputname as the value for From-view-id
Leave everything else as is
Click Finish
If you look in the Package Explorer view you should see a pages folder under WebContent. Opening it will reveal the JSP file you just created
Back on the diagram, right-click anywhere and select New View... from the pop-up menu
In the dialog box, type pages/greeting as the value for From-view-id
Leave everything else as is
Click Finish
In the diagram, select the connection icon third from the top along the upper left side of the diagram (
 ) to get an arrow cursor with a two-pronged plug at the arrow's bottom.
Click on the pages/inputname page icon and then click on the pages/greeting page icon
A transition should appear between the two icons.

Select File > Save from the menu bar

To store data in the application, we will use a managed bean.
Click on the Tree tab at the bottom of the editing window
Select the Managed Beans node and then click the Add... button displayed along the right side of the editor window
Type in jsfHello.PersonBean for Class and personBean for Name. Leave Scope as is and Generate Source Code as is (checked)
Click Finish
personBean will now be selected and three sections of information: Managed Bean , Properties , and Advanced , will be displayed about it. Under the Properties section, click the Add... button
Type in name for Property-Name. Leave everything else as is. (When Property- Class is not filled in, String is the assumed type)
Click Finish
Select the personBean node in the tree
You should see this now:
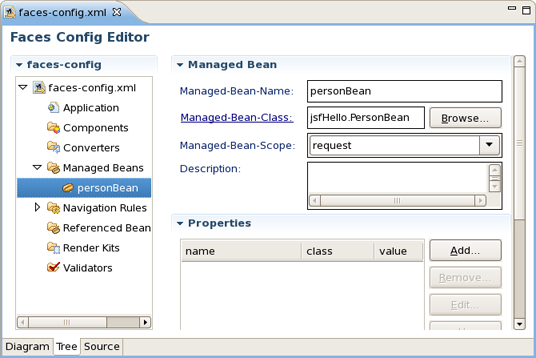
Select File > Save from the menu bar
You have now registered the managed bean and created a stub-coded class file for it.
Now we will finish editing the JSP files for our two "views" using JSP Visual Page.
Click on the Diagram tab for the configuration file editor
Open the editor for this first JSP file by double-clicking on the /pages/inputname. jsp icon
The Visual Page Editor will open in a screen split between source code along the top and a WYSIWIG view along the bottom:

Some JSF code is already in the file, because we have chosen a template to create a page.
Select the Visual tab, so we can work with the editor completely in its WYSIWYG mode
To the right of the editor, in the JBoss Tools Palette, expand the JSF HTML palette folder by selecting it

Click on form within this folder, drag the cursor over to the editor, and drop it inside the red box in the editor
Another red box will appear inside the first red box
Right-click on the innermost box and select <h:form> Attributes from the menu
In the value field next to id, type greeting and click on the Close button
Type "Please enter name:" inside the boxes
Select inputText within the JSF HTML palette folder and drag it into the innermost box in the editor after "Please enter name:"
In the attributes dialog, click in the value field next to the value attribute and click on the ... button
Then, select the Managed Beans > personBean > name node and click on the Ok button
Back in the attributes dialog, select the Advanced tab, type in name as the value for the "id" attribute, and then click on the Finish button
Select commandButton within the JSF HTML palette folder and drag it into the innermost box in the editor after the input box
In the attributes dialog, click in the value field next to the "action" attribute and click on the ... button
Then, select the View Actions > greeting node and click on the OK button
Back in the attributes dialog box, type in "Say Hello" as the value for the value attribute ("Say Hello") and then click on the Finish button
The source coding should be something like this now:
<%@ taglib uri="http://java.sun.com/jsf/html" prefix="h" %>

<%@ taglib uri="http://java.sun.com/jsf/core" prefix="f" %>

<html>

<head>

<title></title>

</head>

<body>

<f:view>

<h:form id="greeting">

Please enter name:

<h:inputText id="name" value="#{personBean.name}"/>

<h:commandButton value=" Say Hello " action="greeting"/>

</h:form>

</f:view>

</body>

</html>
The editor should look like this:
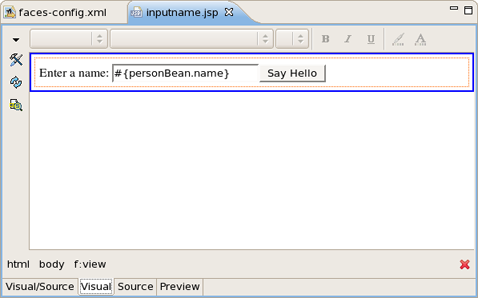
Save the file by selecting File > Save from the menu bar
Click on the faces-config.xml tab to bring the diagram back
Open the editor for the second file by double-clicking on the /pages/greeting.jsp icon
Select the Visual tab, so we can work with the editor completely in its WYSIWYG mode
Type "Hello "(note space after Hello) into the box
Select outputText within the JSF HTML palette folder and drag it into the innermost box in the editor after "Hello"
In the attributes dialog, click in value field next to the value attribute and click on the ... (Browse) button
Then, select the Managed Beans > personBean > name node, click on the Ok button, and then click on the Finish button
Right after the output field, type an exclamation point ( ! )
The source coding should be something like this now:
<%@ taglib uri="http://java.sun.com/jsf/html" prefix="h" %>

<%@ taglib uri="http://java.sun.com/jsf/core" prefix="f" %>

<html>

<head>

<title></title>

</head>

<body>

<f:view>

Hello <h:outputText value="#{personBean.name}"/>!

</f:view>

</body>

</html>
Save the file
You also need to create a start page as an entry point into the application.
In the Package Explorer view to the left, right-click jsfHello > WebContent and select New > JSP File
For Name type in index , for Template select JSPRedirect and click Finish
A JSP editor will open up on the newly created file.
In the Source part of the split screen, type /pages/inputname.jsf in between the quotes for the page attribute
The source coding should look like this now:
<!doctype html public "-//w3c//dtd html 4.0 transitional//en">

<html>

<head></head>

<body>

<jsp:forward page="/pages/inputname.jsf" />

</body>

</html>
Note the .jsf extension for the file name. This is a mapping defined in the web.xml file for the project for invoking JavaServer Faces when you run the application.
Select File > Save from the menu bar
Everything is now ready for running our application by using the JBoss engine. For controlling JBoss server there is JBoss Server view:

Start up JBoss by clicking on the icon in JBoss Server view. (If JBoss is already running, stop it by clicking on the red icon and then start it again. Remember, the JSF run-time requires restarting the servlet engine when any changes have been made.) After the messages in the Console tabbed view stop scrolling, JBoss is available
Click the Run icon(
 ) or right click your project folder and select
Run As > Run on Server
:
) or right click your project folder and select
Run As > Run on Server
:
This is the equivalent of launching the browser and typing http://localhost:8080/jsfHello into your browser. Our JSF application should now appear.
JSF on Sun: JavaServer Faces Technology
Core JSF: Core JavaServer Faces
API: JSF API
JSF Tags: JSF Core Tags
HTML Tags Reference: JSF HTML Tags Reference
JSF Central: JSF Central - Your JavaServer Faces Community
FAQ: JSF FAQ
Download: JavaServer Faces Technology - Download
In summary, with this tutorial you should now know how to organize JSF sample application using the wizards provided by JBoss Tools, configure its stuff and finally run it on the JBoss Server.
Find out more features on JSF tooling in our JSF Tools Reference Guide. If you have questions and suggestions, please refer to JBoss Tools Forum.