This guide demonstrates the use of JBoss jBPM in the creation of a process definition.
This document introduces the JBoss jBPM Graphical Process Designer (GPD), which is used to create workflow processes. It will help first time users with the following tasks:
Installing the JBoss jBPM GPD Eclipse plugin, which is available from the JBoss jBPM download area
Setting up a Java project in Eclipse and preparing it for test driven process development
Using the creation wizard to create an empty process definition
Using the designer palette to draw the first process definition
Demonstrating how the XML process definition can be inspected as an XML file
Writing an example process test case
If you have any questions, please feel free to contact Koen Aers or Tom Baeyens for more information.
JBoss jBPM is a workflow that enables the creation and automation business processes. The table below lists the main features of JBoss jBPM.
Table 1.1. Key Functionality for JBoss jBPM
| Feature | Benefit |
|---|---|
| Section 2.2.2.1, “A Minimal Process Definition” | Enables the management of workflow processes as well as human tasks and the interactions between them. jPDL combines the best techniques both in Java and in declarative processes. |
| GuidedTourJBossjBPMGPD | Is used to simplify declarative process development and the visualization of all actions. |
| Section 2.2.1, “Creating a jBPM Project” | Allows the creation of a new jBPM template project that already includes all the advanced artifacts and core jBPM libraries. |
| Section 2.2.2.1, “A Minimal Process Definition” | Provides process-building functionality and allows non-programmers to develop processes. |
| the_views | |
| Section 3.2.4.2, “The Source Mode” | Shows the corresponding XML that is generated automatically in the Source view of the process definition editor when developing the process. |
| Section 3.2.3, “The Properties View” | Facilitates configuring and editing of all nodes properties. |
| Section 3.2.4, “The jBPM Graphical Process Designer editor.” | The plugin is used for designing the workflow. |
| Interaction with all of the J2EE based integration technologies including Web Services, Java Messaging, J2EE Connectors, JBDC, EJBs. | Enables implementation, provides better functionality and flexibility. |
| Integration with jBoss Seam | Allows applications to be written with complex workflows and provides easier interactions between them. |
You can find JBoss Developer Studio and JBoss Tools release documentation at http://docs.jboss.org/tools in the corresponding release directory.
Additional information can be found in the JBoss Wiki.
The latest documentation builds are available at http://download.jboss.org/jbosstools/nightly-docs.
This chapter describes how to execute JBoss jBPM (business process management).
The jBPM plugin (jBPM Designer) is already included in JBoss Tools. To run it the jBPM runtime needs to be downloaded (jbpm-jpdl-3.2.3 currently), and the directory where you extracted the runtime to needs to be specified, either when you create a jBPM project or through the jBPM preference pages.
Note:
Try to avoid using spaces in the names of installation folders. It can cause problems with Sun based VMs.
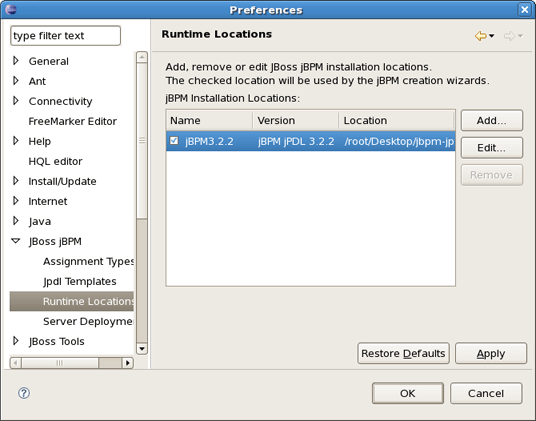
Select → → → . Here you can add, edit and remove JBoss jBPM installation locations. Click the button. In the subsequent dialog box enter a name for a newly added jBPM runtime and point to the correct location of this package on your file system. Click the button twice to save the changes.

Now that a runtime has been installed, some of the powerful features of the jBPM can be demonstrated.
This chapter will present a step-by-step walk-through demonstrating how to create and configure a simple process. First, let's try to organize a new jBPM project.
A wizard for creating a jBPM project is included in the GPD plugin. We have opted to create a project based on a template already containing a number of advanced artifacts that we will ignore for this section. In the future we will elaborate this wizard and offer the possibility to create an empty jBPM project as well as projects based on templates taken from the jBPM tutorial.
This section will show you how to use the Creation wizard to create a new jBPM project that includes the required source folders.
At first you should select → and then → in the New Project dialog:

Clicking the button brings us to the wizard page where the name and location for the project are specified. We choose, for example, HellojBPM as the name and accept the default location.

The project will be created in the workspace root directory by default. If you want to change the directory for your future project, deselect Use default location and click the button to set desired location, or simply enter the location manually.
On the next screen you will be prompted to select the core jBPM location that we have defined in the previous chapter.

Clicking on the button results in the project being generated. The wizard creates four source folders: one for the processes (src/main/jpdl), one for the java sources (src/main/java), one for the unit tests (src/test/java) and one for the resources such as the jbpm.properties and the hibernate.properties files (src/main/config). In addition a classpath container with all the core jBPM libraries is added to the project

Now when the project is set up, we can use a Creation wizard to create an empty process definition. Bring up the New wizard by selecting → → . The wizard opens on the Select Wizard page.

Selecting the JBoss jBPM category, then the jBPM Process Definition item and clicking on the button brings us to the Create Process Definition page.

We choose hello as the name of the process archive file. Click on the button to end the wizard and open the process definition editor.

You can see in the Package Explorer that creating a process definition involves creating an XML file called [process name].jpdl.xml, which contains the process definition information. A JPG file called [process name].jpg will also be automatically generated when changes are saved to the process.
Now we are ready to create a very simple process definition consisting of a begin state, an intermediate state and an end state.
The jBPM jPDL 3 perspective should be used to aid in the configuration of the actions. It provides the tabbed Properties Editor view which provides a way to configure all the relevant properties of the current selected item.
Add the Start, State and End nodes to the process definition by selecting the appropiate option from the tools palette and clicking on the canvas. The result should look similar to this:

The nodes then need to be connected with transitions. To do that select the Transition tool in the tools palette and click on the Start node, then move to the State node and click again to see the transition being drawn. Perform the same steps to create a transition from the State node to the End node. The result will look like:

Now, when you've got background knowledge of simple project creation, let's move to more advanced tools.
This chapter will demonstrate how to integrate with JBoss jBPM. The standard mechanism to implement this is to wrap the functionality you want to integrate in a class that implements the ActionHandler interface. In order to demonstrate it let's specify a simple Hello World action for our process.
Each Hello World process should integrate one or more Hello World actions, so this is what we will be doing. We can integrate custom code at different points in the process definition. To do this we have to specify an action handler, represented by an implementation of the ActionHandler interface, and attach this piece of code to a particular event. These events are amongst others, going over a transition, leaving or entering nodes, after and before signaling.
To make things a little bit more concrete, let's create a new class called HelloActionHandler. For that firstly we will create a new package com.jbay.action in the src/main/java folder of our project. Then, we should call New Class Creation wizard as usual selecting → from the context menu.

Notice that two first gaps have been filled automatically. Here, instead of the Package option, the Enclose type option can be selected to define the type in which the new class should be created will be enclosed.
In our case, we leave everything as it is, just type HelloActionHandler as a name of new class and add org.jbpm.graph.ActionHendler interface as it is shown in the picture above.
Thus, our HelloActionHandler implements the ActionHandler interface, including the execute method as shown in the next figure. Here, we add a variable named greeting to the collection of process variables and put a message in it: "Hello from ActionHandler".

Now, as we have HelloActionHandler class defined, let's explore how we can handle it.
The main purpose of this chapter is to provide you with the steps required to associate our Hello World action with a particular event and test the validity of our actions as well.
In order to validate our code we will first create a Unit Test that proves the behavior we want to achieve by adding the ActionHandler to the process. So we implement another test.
First we need to create a new Junit Test Case by selecting → → → → . Give it a name of HelloTest, place it in the com.jbay package, and click the button.

Populate the new class with the following code:
package com.jbay;

import org.jbpm.graph.def.ProcessDefinition;
import org.jbpm.graph.exe.ProcessInstance;

import junit.framework.TestCase;

public class HelloTest extends TestCase
{
	public void testActionhandler() throws Exception {

		ProcessDefinition definition =
			ProcessDefinition.parseXmlResource("hello.jpdl.xml");

		ProcessInstance instance = new ProcessInstance(definition);
		assertNull("The greeting variable should not exist",
				instance.getContextInstance().getVariable("greeting"));

		instance.signal();
		assertEquals("The greeting variable is created",
				instance.getContextInstance().getVariable("greeting"),
				"Hello from ActionHandler");
	}
}

We assert that no variable called greeting exist. Then we give the process a signal to move it to the action state. We want to associate the execution of the action with the event of going over the transition from the start state to the action state. So after the signal, the process should be in the action state as in the previous scenario. But moreover, the greeting variable should exist and contain the string "Hello from ActionHandler". That is what we assert in the last lines of the test method.
Running the tests now results in a failure. The point is that we did not associate the action with any particular event in the process definition, so the process variable did not get set.

Let's do something about it and add an action to the first transition of our sample process. To do this you can use the Actions tab in the Properties Editor that is under the graphical canvas. Bring up the popup menu of the action element container and chose New Action as it's shown on the figure below. The other way to add an action to the transition is simply to use the dropdown menu that is available under the action icon in the right upper corner of the Properties View.

After adding the action a tabbed view with three pages will appear.
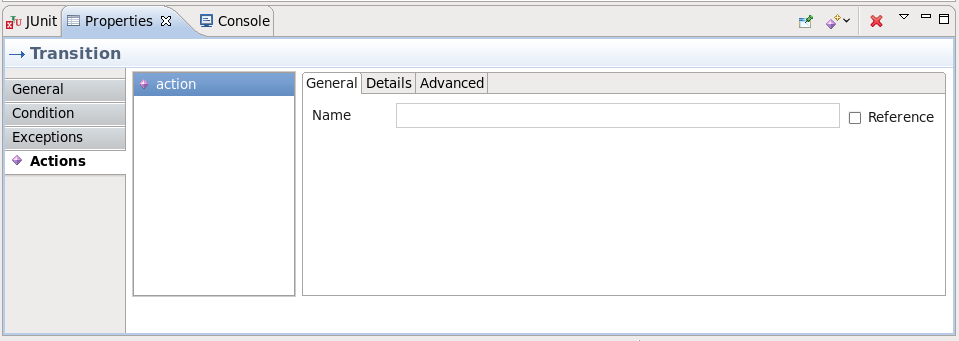
The first of these three pages allows you to give the Action a name. The last page contains some advanced attributes such as whether the Action is asynchronous. The Details page is the most important. It allows to choose and configure the actual action handler implementation.
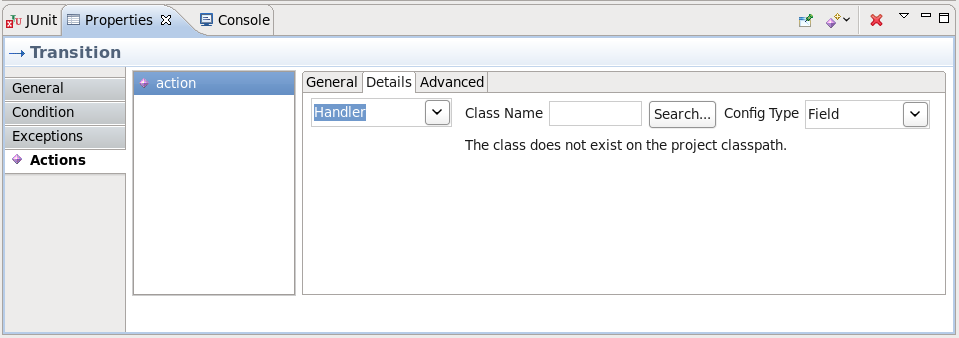
Clicking on the button brings us to a Choose Class dialog.

We choose our previously created HelloActionHandler class and click the button. After selecting the action handler for the action, we can run the test and observe it gives us a green light.

There we are. The above objective has been achieved.
The different integration points in a process definition are thoroughly documented in the JBoss jBPM User Guide. Instance nodes can contain many action elements. Each of these will appear in the Action element list of the Actions tab. But each Action also has a properties view of itself. You can navigate to this view by selecting the added Action in the outline view.
This chapter contains additional information related to the JBoss jBPM.
You can change the default jBPM installation by means of the Eclipse preference mechanism. Open the Preferences dialog by selecting → and select the → category. Using this page you can add multiple jBPM installation locations and change the default one. The default installation is used for the classpath settings when creating a new Process Project. Changing the preferences has no influence on already created projects. Getting rid of a jBPM installation that is being referenced by a project however will cause the classpath to contain errors.
Here, we'll examine how you can configure the Task nodes in jBPM jPDL GPD.
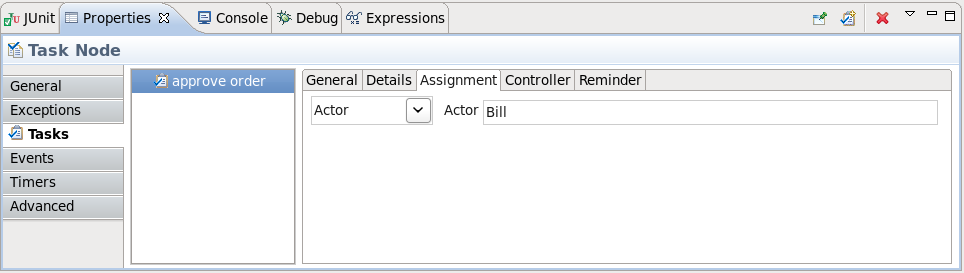
You can add Tasks to Task nodes and then configure them in a similar manner Actions are configured. Let's consider the process definition similar to the previous one that contains three nodes: Start state, Task node and End state. The Properties view for the selected Task node includes several tabs.

We should choose the Task tab and then bring up the context menu or click the button in the top right corner of the view to add a Task to our Task node.

Every added Task has its own configuration possibilities. You can access them through the Properties view as well.

The General page is a place where you can specify the name of a Task and its description. For instance, let it be approve oder with appropriate description that you can see in the figure below.

Now, look at Details page. First, you should specify the due date that is a mandatory property for the Task. The due date is the date on which the task should be accomplished. Here you can also set a Task priority as well as signaling, notifying or blocking. The Blocking attribute indicates that the process will not be able to continue if this task is still unaccomplished. The button is for creating a simple task form that can be rendered by the jBPM console.

For our example, we specify the due date as 2 business days, choose the high priority and also check the Signaling and Notify attributes. It means that the Task should be accomplished in 2 business days and the assignee will be notified by email when the task is assigned. To specify how the Task should be assigned switch on to the Assignment page.
On the Reminder page you can specify whether the assignee will be reminded of the task that awaits him.
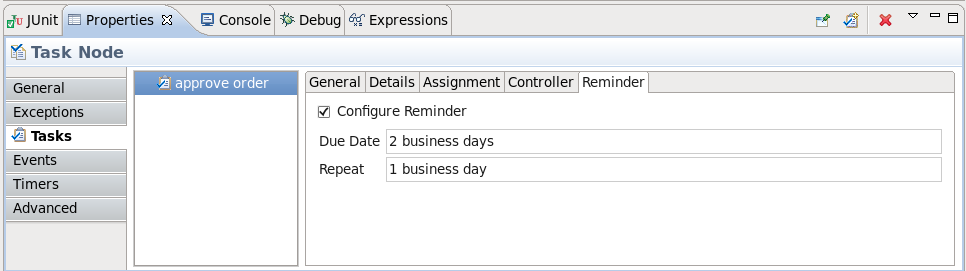
In our case, the assignee will be reminded by email after two business hours and continue to get reminding every business hour after that.
In the next figure you can see our configuring generated into XML.

We hope, our guide will help you to get started with the jPDL process language and jBPM workflow on the whole. Besides, for additional information you are welcome on JBoss forum.
This wizard is used to create new jBPM project. It is available by selecting → → → .

It consists of several pages:
On the first page you can adjust the name of the project and the directory where it will be created.
If the Use default option is checked the output directory will be the workspace, otherwise the user should specify the location by clicking the button.
On the second page you should point the location of your jbpm runtime.
The last page is only available for enabling and disabling Generate simple process definition,action handling and Unit test. If you enable the option all the mentioned code will be generated automatically.

This wizard is available by selecting → → → .

It includes the next options to adjust:
Table 3.1. New JBPM Action Wizard. Options.
| Option | Description | Default |
|---|---|---|
| Source folder | The path to the source folder relative to the selected project | The source folder of the project selected in the Project field |
| Package | Enter a package to contain an Action Handler. Either type a valid package name or click the to select a package via the dialog box. | <blank> |
| Enclosing type | Select the enclosing type of your jBPM action click the button. | <blank> |
| Modifiers | Select the modifiers that will be added to the generated class. | Public |
| Name | Type a name for a new Action Handler | <blank> |
| Superclass | Type or click the button to select a superclass for an Action Handler | org.jbpm.graph.def.ActionHandler |
| Interface | Type or click the button to select an interface/interfaces for an Action Handler | org.jbpm.graph.def.ActionHandler |
| Which method stubs you would like to create? | Select the stubs that you would like to be created automatically. |
|
| Do you want to add comments? | Select Generate comments check box if you want comment mask to be generated before the class definition. | <blank> |
Here, it will be explained how to work with views and editors provided by JBDS.
The views are used to represent and navigate through the resources you are currently working on. One of the advantages of all the views is that they immediately reflect all modifications made in the current active file. Let's explore the views that the jPDL perspective provides in more detail.

As you can see in the picture above, the jPDL perspective contains a complete set of functionality that's necessary for working on the jBPM project.
The Outline view provides a classical tree that allows you to quickly view the outline of a process. If it is not visible select → → .

This view provides a visual representation of the entire current developing process. The Overview comes as a scrollable thumbnail which enables a better navigation of the process structure if it is too large.

Here, we dwell on the JBDS Properties view.
The Properties view can be displayed by selecting → → .
This view will list the relevant properties of the selected item in the tabbed form. Every item has its own set of properties, which can be directly edited in the Properties view or by brining up the context menu.

For example, on the picture above the Properties view displays all the properties for a selected transition. Its name has been changed to to_auction. We have done it directly in active General tab of the view. The same way let's change the name for the second transition to to_end.
If no one item is selected, the view represents the properties of the whole process definition.

In this case, it contains six tabs. The first one is the General. It allows to specify a process name and add necessary description. To illustrate let's change the process definition name to jbay.
The jBPM GPD editor includes four modes: Diagram, Deployment, Design and Source, which are available as switchable tabs at the bottom of the editor.
In this mode we define the process in the form of a diagram using the tools provided on the left-hand side of the jBPM GPD.

Some properties can be directly edited in the Diagram mode of the graphical editor. One example of this is the name property of nodes. You can edit this directly by selecting the node of which you want to change the name and then clicking once inside this node. This enables an editor in the node. We then change the name of the node to auction.
Now, that we have defined a simple process definition, we can have a look at the XML that is being generated under the covers. To see this XML click on the Source tab of the graphical process designer editor.

The Source mode provides a way to easily manipulate the raw XML source. In addition, here you can take advantage of content assist.
A template is added to better render the jBPM task forms in the Visual editor. Now the jBPM Graphical Process designer can create facelets that are associated with tasks and are rendered in the jBPM console.

One more way to edit your file is to use the Design mode. This mode is shown in the next picture:
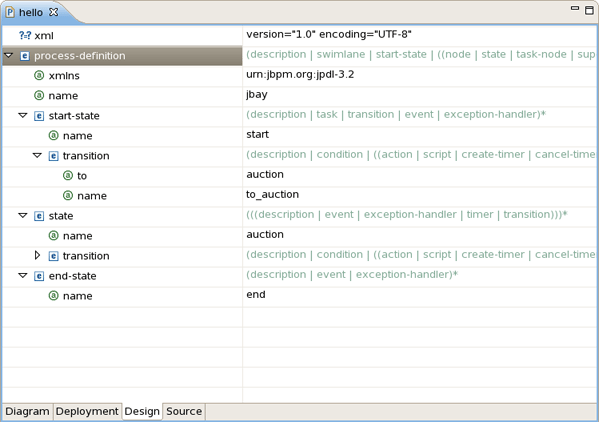
The Design mode presents a table. The process structure is shown in the first column. Here, you can also insert, remove and edit elements or attributes, moreover add comments and instructions. Their values can be directly edited in the second column of the Design mode table.
For instance, let’s add a comment on the second transition. For that, you should bring up the context menu for it and select → .

Then, we can enter the text This transition leads to the end state in the right column as its value.

Finally, to adjust the deployment settings of the project you should select the tab that opens the Deployment mode. On the picture below the Deployment mode is performed with default settings. Here, you can easily modify them or, if the settings do not match your needs, to reset them to their defaults.
