This chapter gives you a short introduction to Smooks, Smooks tools and its installation.
First, have a look at the key features of Smooks tools:
The table below provides you with a list of the key features integrated in Smooks tools.
Table 1.1. Key Functionality for Smooks Tools
| Feature | Benefit | Chapter |
|---|---|---|
|
Smooks Configuration File Wizard |
Smooks tools allows you to create and edit the Smooks configuration file for Java2Java data transformation. | Section 2.1, “New Smooks Configuration File Creation” |
|
Smooks Editor |
Smooks Editor helps configure the created Smooks configuration file. | Section 3.1, “Process tab” |
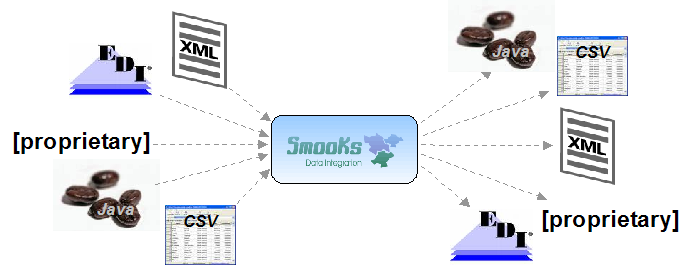
Smooks is a Java Framework/Engine for processing XML and non XML data (CSV, EDI, Java, JSON etc). It provides:
Transformation: Perform a wide range of Data Transforms. Supports many different Source and Result types -XML/CSV/EDI/Java/JSON to XML/CSV/EDI/Java/JSON.
Java Binding: Bind into a Java Object Model from any data source (CSV, EDI, XML, Java, JSON etc).
Huge Message Processing: Process huge messages (GBs) - Split, Transform and Route message fragments to JMS, File, Database etc destinations. Route multiple message formats to multiple destinations in a single pass over a message.
Message Enrichment: Enrich a message with data from a Database, or other Datasources.
Combine: Combine the above features in different ways e.g. add Message Enrichment as part of a Splitting and Routing process.
For more informations about Smooks, please visit the Smooks official site.
Smooks tools is a set of graphical tools, based on Eclipse, for editing Smooks configuration files.
During your development, you probably will be required to include additional Smooks jars to your project. This can be achieved with the following steps:
If it doesn't yet exist, create the folder named "lib" inside your project. Copy all the Smooks jars you need to include into the lib directory.
Right-click (or Control-click on Mac OS) on the project and select Properties.
Select the Java Build Path item in the Properties list, then the Libraries tab, and click the button.
In the Jar Selection dialog, select all the jars in the "lib" directory you want to include and click the button.
Now you should see all the jars included to your project hierarchy.
This chapter describes the main tasks that can be performed with Smooks tools. In this chapter we use the example that can be downloaded from here.
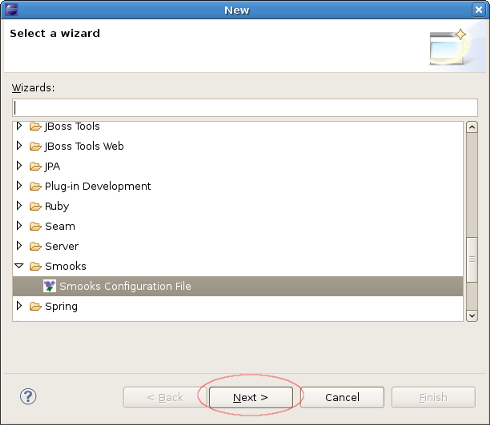
Select the project where you want to create the new Smooks Configuration File and right-click on it. Select → → → . Then click the button.
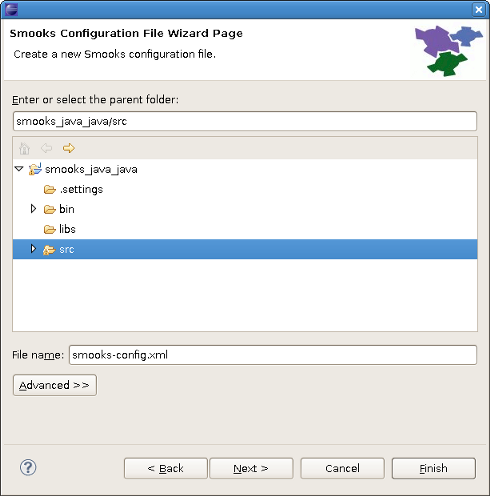
Select the src folder to be the files container, and type the name smooks-config.xml. Click the button.
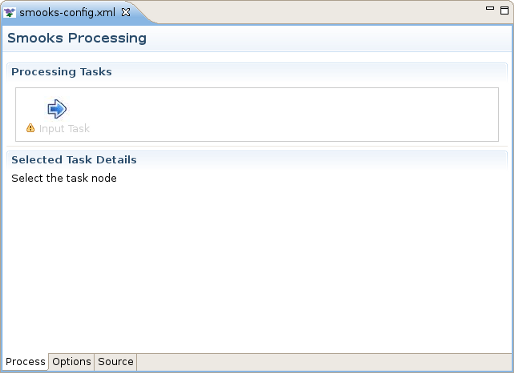
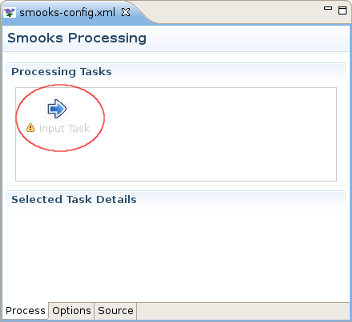
Configuring an Input task is mandatory step when creating a smooks project. You can configure it on the Process page of the editor: look for the "Input Task" in the Process Map at the top of the page.
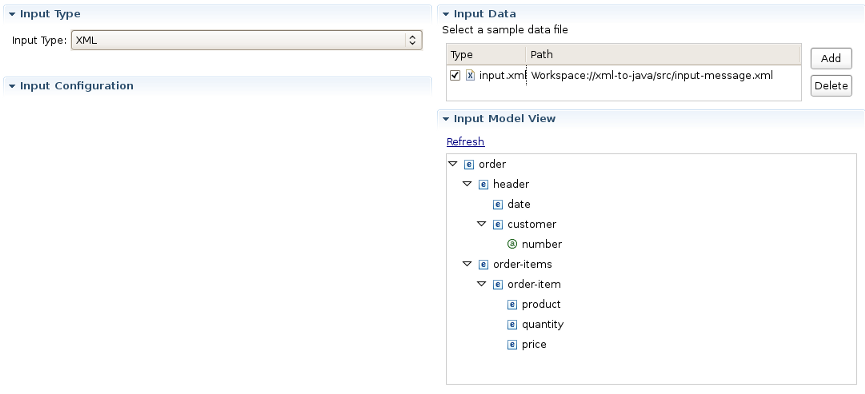
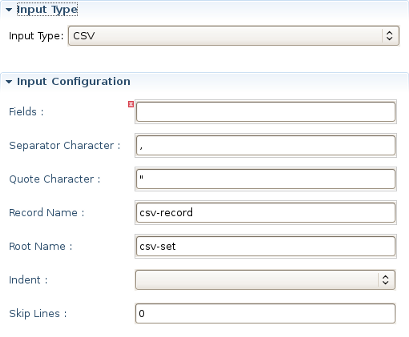
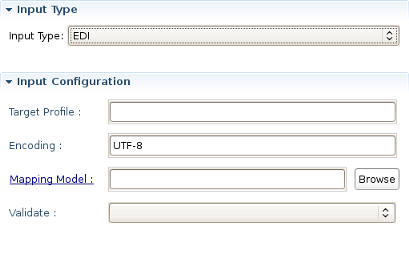
Select it and you will see all the properties to set for the Input reader of your Smooks configuration. "Input type" corresponds to the type of data that you will be working with. For example, to work with incoming CSV (Comma-separated Values) data, you would specify "CSV" in the drop-down list. Each reader type has slightly different configuration details that must be set in the "Input configuration" area. For instance, the CSV reader requires you to specify details such as the encoding, quote character, separator character, and the list of incoming fields. The EDI reader requires the encoding and the path to the Mapping Model describing the incoming data. In the Input data section, you can specify some sample data that conforms to your reader configuration.
Once you've specified your reader configuration and sample data, you can see the input model rendered in a tree form in the Input model section. In the picture below you can see the correct configuration of an XML input task where input-message.xml is set as an input data file.
Though there are many options in Smooks regarding what you can do with input data, such as transformation, routing, and persistence, this version of the Smooks Configuration Editor focuses only on mapping to java and applying templates to create different output formats. If you have a set of Java classes you want to use the incoming data for, you can use the "Java Mapping" task to specify those classes and use drag and drop to map between the input model generated by the reader and elements in the output model. Or if you simply want to transform your output to one or more formats, you can use the Apply Template task to map it to a CSV file, XML or XSD file (with other formats being provided in the future).
Note
You can't transform your output directly using only Input and Template tasks. You should use Mapping as an interagent between these tasks.
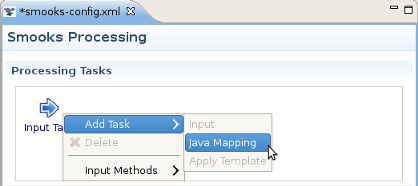
If you decide to do Java Mapping, you need to make sure that your Input reader has been set up and you have some sample data specified. Then you should select Input Task in the Process tab and click the plus (+) sign to the right of the icon. Select Java Mapping from the popup menu and it will appear to the right, connected to Input Task. Then select Java Mapping task.
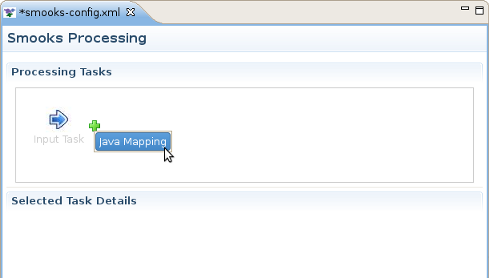
Another method of adding a Java Mapping element to the canvas in the Processing Tasks section is to right click on the Input Task element and select Java Mapping in the popup menu.
Right-click on the canvas in an empty space and select → .
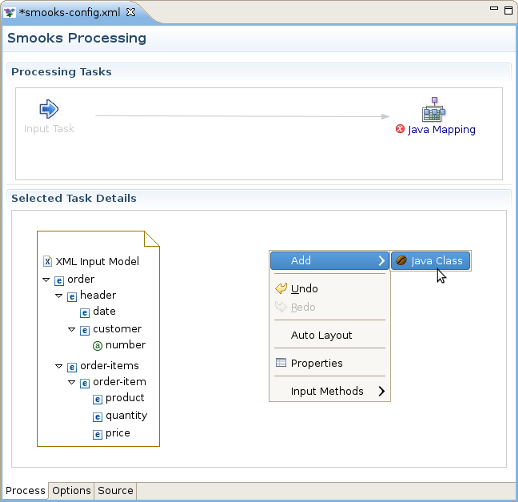
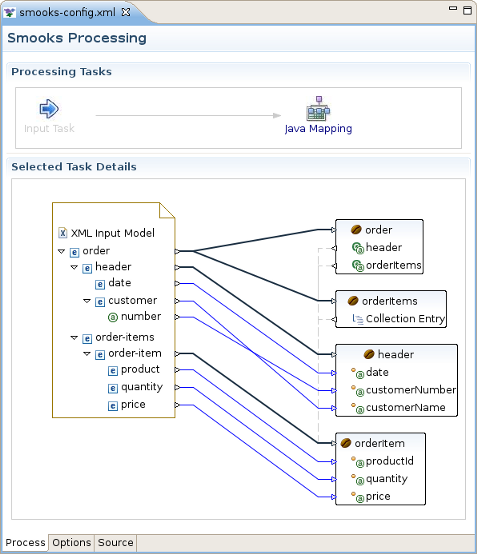
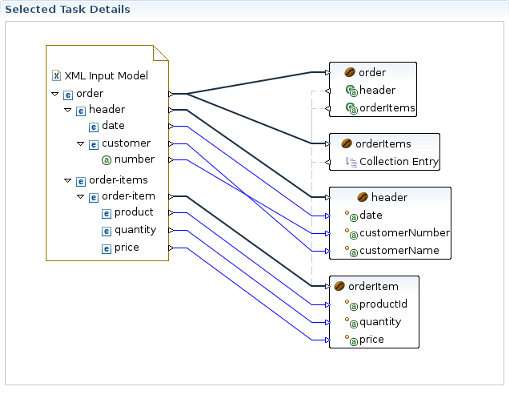
This will display the Java Bean Creation wizard. Specify a unique identifier for the new class and the class path. If the Java class is specified, you'll see a list of the properties in the box below. Click the button when you're done. Now, with the input and output models on the canvas, you can click and drag from the various input elements to corresponding output elements. Make sure to connect collection elements to corresponding collection elements. Finally your mapping should look something like the one on the picture below.
The movie "XML to Java" has more information on this process.
If you are interested in transforming EDI to Java you can find more information here.
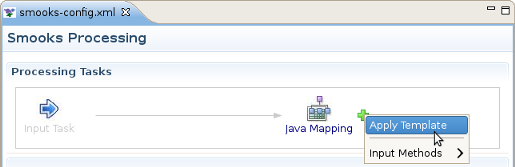
The "Apply Template" task works very similarly to the section Section 2.4, “Java Mapping Task”, where you define a mapping between an input model and an output model. Select the Java Mapping task you want to use as the input model in the Process Map pane and click the plus (+) sign to the right of the icon.
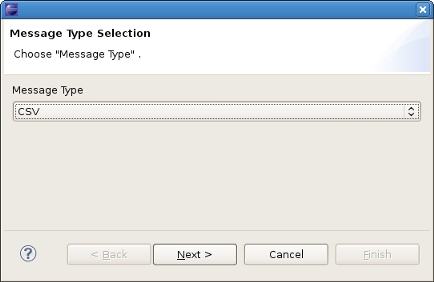
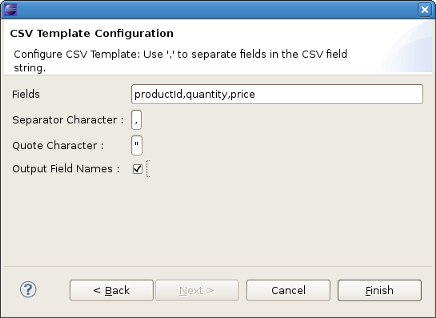
This will display the Message Type Selection wizard. In our example we will transfer our data to csv output format, so you should select CSV and click the button.
On the next wizard page put the following string into the Fields, select Output Fields Names and click the Finish button.
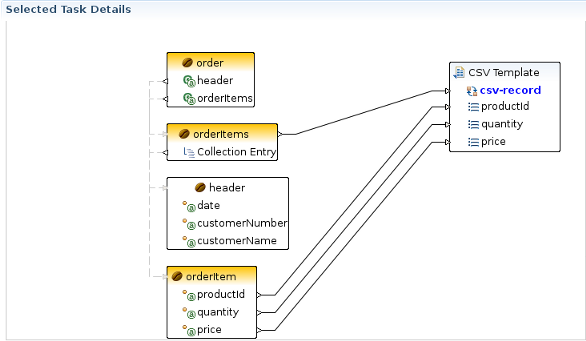
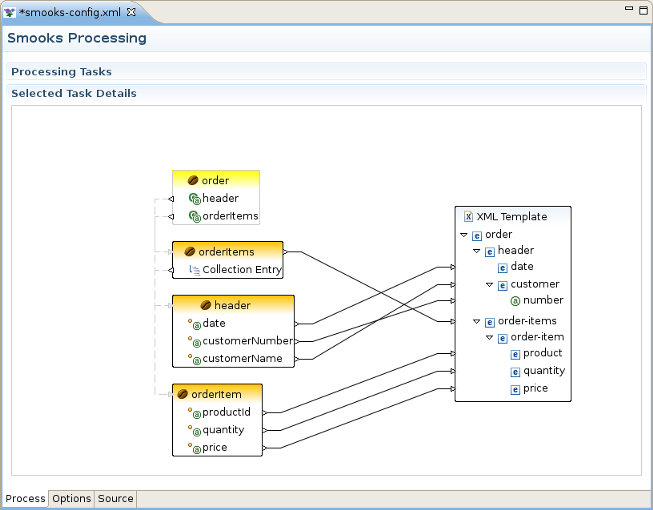
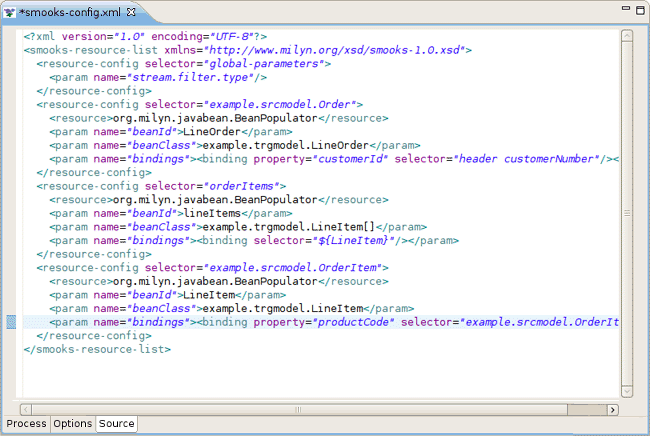
After these steps the "Apply Template" task will appear to the right, connected to the task you created it from. To continue the configuration processyou should click on it and find the CSV Template item with entered fields on the canvas. Now you can click and drag from various input elements to corresponding output elements in the template. Make sure to connect collection elements to the corresponding csv-record. In our example output only the elements of orderItems collection to the CSV format (see the picture below):
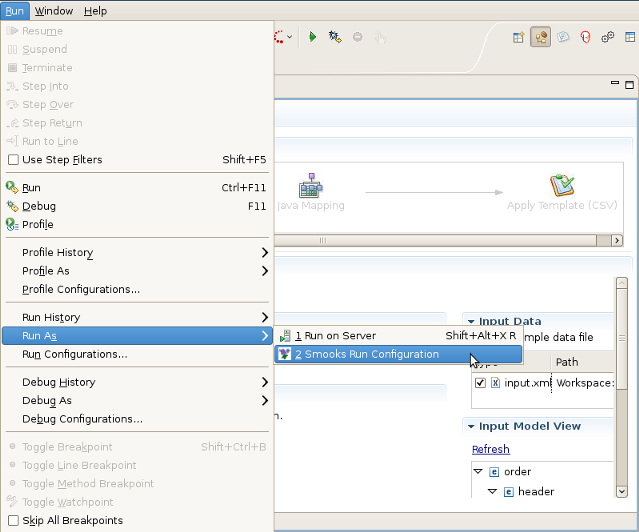
This option is used to view the results of Smooks transforming procedure. To do the testing you should select your Smooks Configuration file you want to transfer in the Project Navigator or open it in the Smooks Configuration Editor and then select "Run As..." from the Run toolbar button or select the Run->Smooks Run Configuration option in the top menu bar. The Smooks Configuration file will then be run automatically.
Any errors or warnings will appear in a pop up dialog. The output of the test will appear in the Console view. In our case the following streaming output will appear:
[Stream Templating Result ...]
    |--
    |"productId","quantity","price"
    |"111","2","8.9"
    |"222","7","5.2"
    |--

[Java Mapping Results...]
    |--
    |> order (beanId = "order")
    |    > header (beanId = "header")
    |        > date = "2006-11-15 20:45:28.0 EET"
    |        > customerNumber = 123123L
    |        > customerName = "Joe"
    |    > orderItems (beanId = "orderItems")
    |        > example.model.OrderItem (beanId = "orderItem")
    |            > productId = 111L
    |            > quantity = 2I
    |            > price = 8.9D
    |        > example.model.OrderItem (beanId = "orderItem")
    |            > productId = 222L
    |            > quantity = 7I
    |            > price = 5.2D
    |--
If the test runs but doesn't generate any streaming output the Console output will be the following:
 Nothing to Display:
            - No Java Mappings.
            - No Templates Applied.
This chapter includes detailed reference information on all tabs in the Smooks Configuration Editor.
The Process tab of the Smooks Configuration Editor provides a way to configure different types of transformations. By default the smooks configuration file is opened in this editor. If you have set another editor to open the file by default, you should right click on the smooks configuration file and select → .
The Process tab has two sections:
You can see them on the picture below.
Using the popup menu in the Processing Task section you can select which types of technologies (templating or mapping ones) you will use for transformation:
The descriptions of the popup menu options are in the following table.
Table 3.1. Process Tab. Processing Task section.
| Option | Description | Default |
|---|---|---|
| Add Task | Select one of the following tasks according to the required Source and Result file types:
| |
| Delete | Click this option if you want to delete some task from the section. Note:you can't delete input task because it's required. | |
| Input Methods | Choose one of the following methods:
| System |
The options available in this section depends on the selected task in the Processing Task section. Because there are 3 types of tasks there are 3 different sets of its options in the Selected Task Details Section. They will be described one by one.
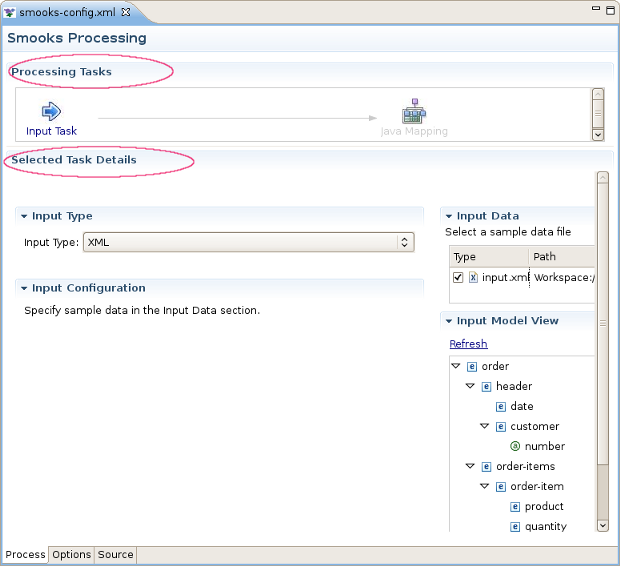
On the picture below you can find an example of the Selected Task Details Section view if XML is selected as input type.
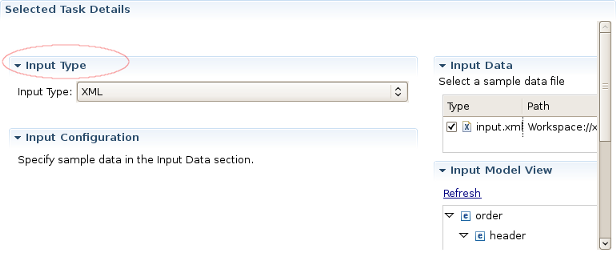
As you can see on the picture above the Input Configuration section is empty for XML input file. However, this section has special configuration options for CSV,EDI,JSON,Custom input files.
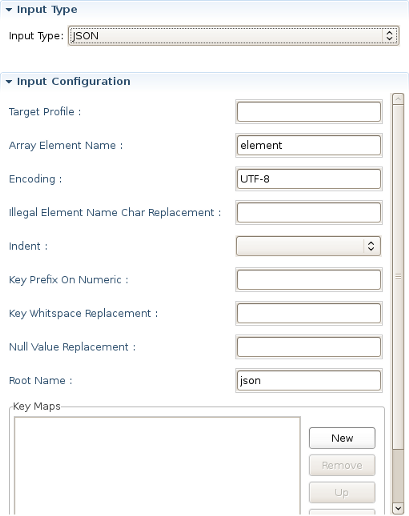
Here are the screens of these configuration options:
CSV:
EDI:
JSON:
Custom:
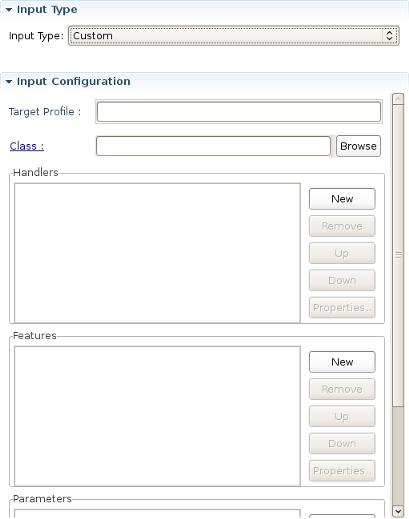
All the input task configuration positions can be found in the table below:
Table 3.2. Selected Task Details Section. Options for Input Task.
| Option | Description | Default |
|---|---|---|
| Input type | Select your type of input file.
If you don't find your type in the list, you should use Custom type:
| XML |
| Input configuration |
|
|
| Input Data | You should select a data file using the and buttons | |
| Input Model View | Using this view you can see the structure of your input file.If the file has been changed, to see the changes click the Refreshlink. |
Selected Task Details section for this task is presented by the graph, which eases the process of java mapping.
This graphical editor allows you to perform drag&drop operations with the nodes of transformed data to map the source data to target data. When you save the changes in the graphical editor the correct Smooks configuration file content will be generated.
Using the popup menu in the Selected Task Details section you can manage the diagram elements on the canvas.
The descriptions of the popup menu options are in the following table.
Table 3.3. Popup menu. Selected Task Details section.
| Option | Description | Default |
|---|---|---|
| Add | Select one of the following tasks:
| |
| Undo | This option allows you to revert any changes made in the previous step. | |
| Redo | This option allows you to redo the changes made at the previous step. | |
| Delete | This option is available only if you select an element on the canvas. Click this option if you want to delete the element from it. | |
| Auto Layout | Sets the default layout of the elements on the canvas. | |
| Properties | Click this option if you want to add the Properties view to the current perspective. The Properties view will automatically display the properties of the selected diagram element. | |
| Input Methods | Choose one of the following methods:
| System |
Selected Task Details section for this task is presented by the graph, which is similar to what is described in the section Section 3.1.2.2, “Selected Task Details section for Java Mapping Task.”.
Popup menu similar to Table 3.3, “Popup menu. Selected Task Details section.”.
This section describes Options tab of the Smooks Configuration File editor, and gives short recommendations how this tab can be used during the project configuring.
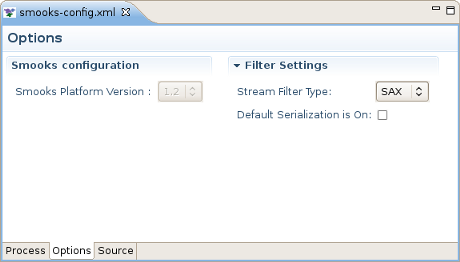
The Smooks Configuration section in the Options Tab displays only the Smooks Platform Version value.
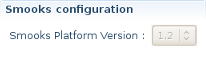
This value can not be modified, and is set according to the version of the Smooks libraries that are added to the project.
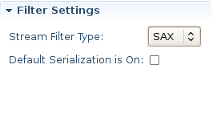
In Filter Settings section you can set the following global options responsible for the Smooks filtering configuration:
This behavior can be turned off using this global configuration parameter and can be overridden on a per fragment basis by targeting a Visitor implementation at that fragment that takes ownership of the Result writer (in the case of SAX filtering), or simply modifies the DOM (in the case of DOM filtering). As an example of this, see the FreeMarkerTemplateProcessor.
Table 3.4. Options Tab. Filter Settings section.
| Option | Description | Default |
|---|---|---|
| Stream Filter Type | Determines the type of processing model that will be used. Please refer to the Filtering Process Selection section of the official Smooks User Guide for more information about these models:
| SAX |
| Default Serialization is On | Defines whether the default serialization should be switched on. Default serialization being enabled leads to locating StreamResult/DOMResult to the Result objects provided to the Smooks.filterSource method and to serialization all the events to that Result. | false |
This section provides information about the Smooks Source Editor Page.
You can use this editor to edit the Smooks Configuration file directly.
If the Smooks tools can't understand the configuration file or the configuration file is illegal (e.g. XML structure isn't valid for a Smooks Configuration file), the error is underlined.
The Smooks configuration file validator will validate your Smooks configuration file. Just right-click on the file and then click on the button. The validator can be enabled/disabled by selecting → → , as you can see in the image below:
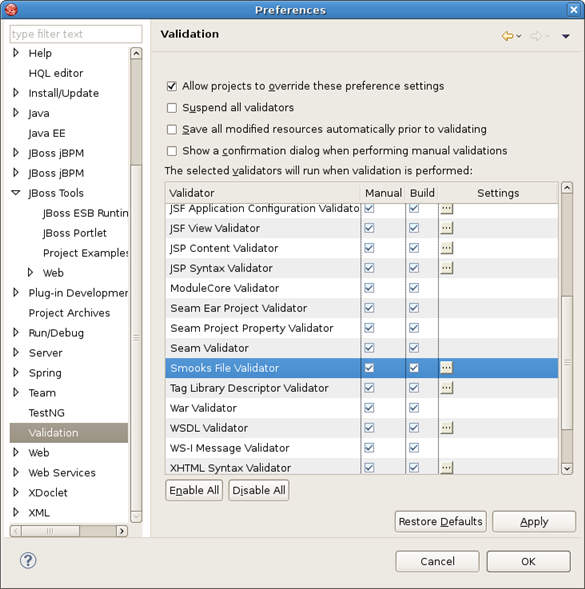
You can set up your Smooks validator to include and exclude groups to validate, and specify rules for validation. Just click on the button and use the options provided, which you can see in the image below:

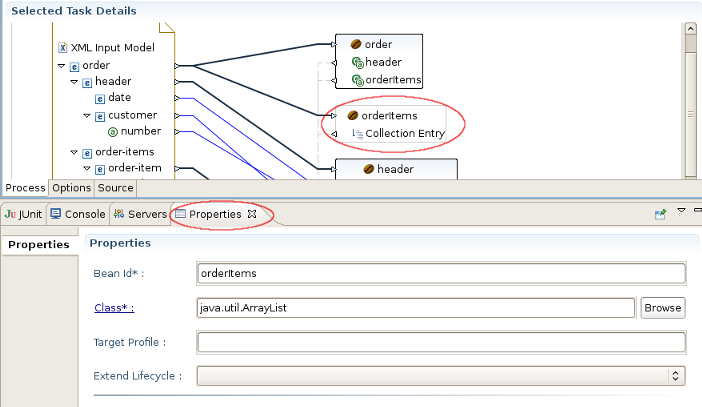
Properties View is available for some elements on the canvas of Java Mapping and Apply Template Tasks, like:
Java mapping:java class members,its fields, links between input values and the class members;
Apply Template:output template.
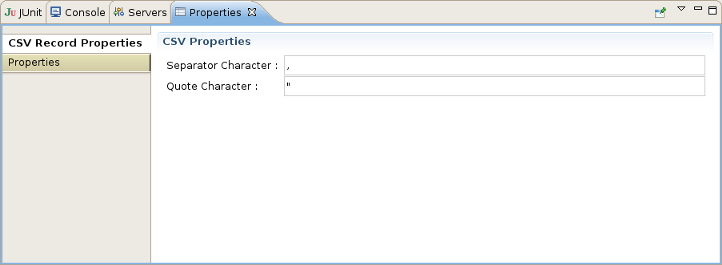
To add Properties View to the opened perspective the user can either open → → in the toolbar or right click the element which properties he wants to inspect and select Properties in the popup menu. On the picture below you can see how this view looks like when some csv template is selected.
This view is fully synchronized with the canvas of the Smooks Configuration Editor. This means that when you change the selected element by clicking on it, the properties of a new element are immediately displayed in it. Using Properties View you can then edit all the properties of the selected item.
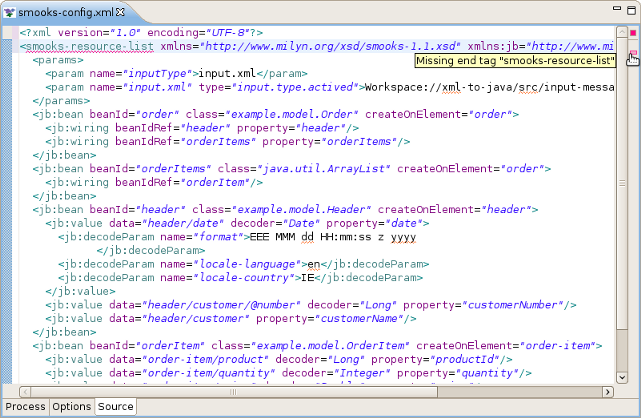
Smooks tools support decode parameter configuration through the Decode tab in Properties View activated by clicking the connection between input model and bean items.
On the picture below you can see an example of decode configurations for mapping an Input Model Item to a Date format:
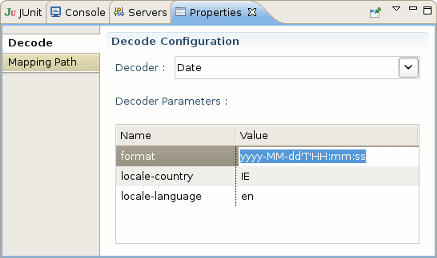
The descriptions of the Decode Configuration tab options are listed in the following table:
Table 3.5. Decode Configuration tab in Properties View
| Option | Description | |
|---|---|---|
| Decoder | Select from the dropdown list the type of decoder you need. | |
| Decoder Parameters | For most of decoders the Decoder Parameters table is empty. But some of the decoders require additional configuration
(like Date decoder on the picture above), so you should configure them by editing the corresponding line in the Value row. For example, for the Date Decoder:
|
The Decoder Parameters section for EnumDecoder quite differs from other types of decoders. See the picture below:
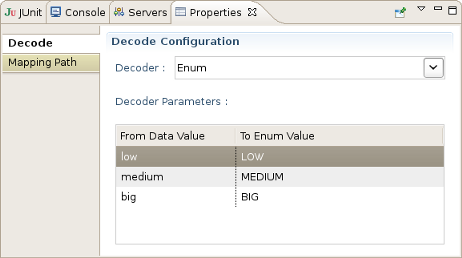
The Decoder Parameters section for EnumDecoder in Properties View consists of 2 rows:
From Data Value - The lines in this row are editable. You can change them according to the names of enum types you used in input file.
To Enum Value - The lines in this row are not editable. Here a set of all constants declared in mapped Enum type is listed. The user is responsible for correspondence between the values in these two rows.
For more information about different decoder parameters read the Smooks Technology Documentation.
The Apply Template Wizard helps you to add a new Apply Template Task to the Smooks configuration file. You can call it from the popup menu when the Java Mapping item in the Processing Task section is selected by following → (see Figure 2.9, “Apply Template configuration” picture).
The wizard consists of several pages:
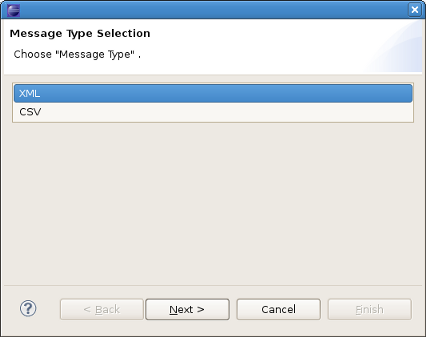
The first one includes only one option to adjust.The user should select in which of the two formats(XML or CSV) he prefers to create an output message:
The second page is specific for each of the output message formats:
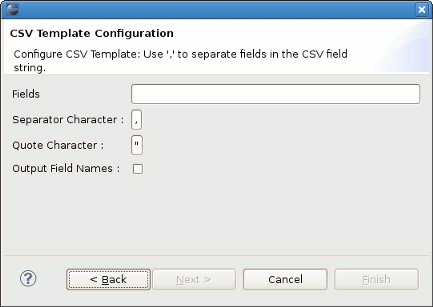
If the CSV output message type was selected in the previous step the second wizard page will be the following :
The wizard page includes the next options to adjust:
Table 3.6. Apply Template Wizard. Second Page Options if CSV output format is selected.
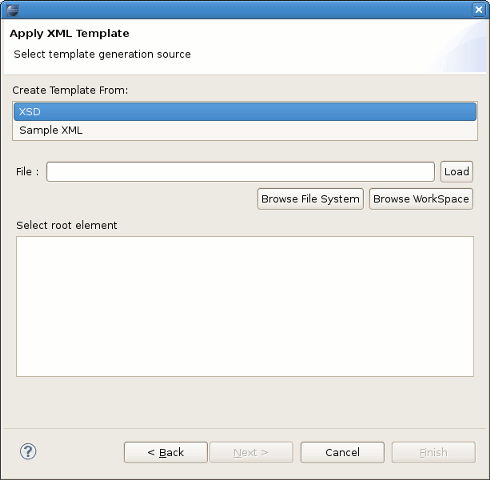
Option Description Default Fields Comma separated list of CSV record field names. Empty Separator Character Field separator character in the output message. , Quote Character Quote character in the output message. " Output Field name Click the checkbox if you want the output CSV message to also include field names. The following second wizard page will appear if the XML output message type was selected in the previous step:
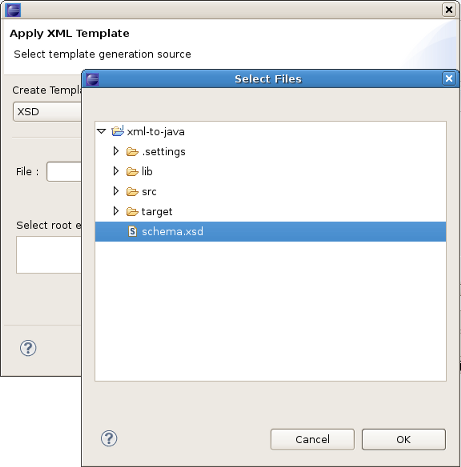
Here you should first select the XSD or Sample XML output template format and then click the Browse File System or the Browse Workspace button depending on what browse type you want to use. For example, if you click Browse Workspace the following view will appear:
In the workspace you should select the template you want to use and click the button.
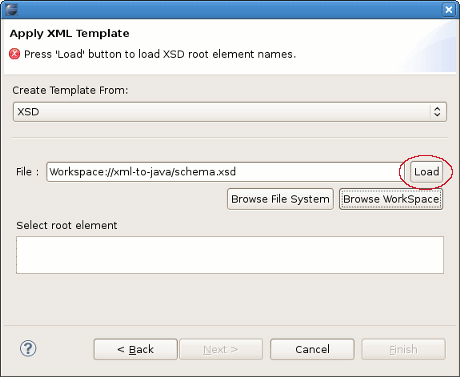
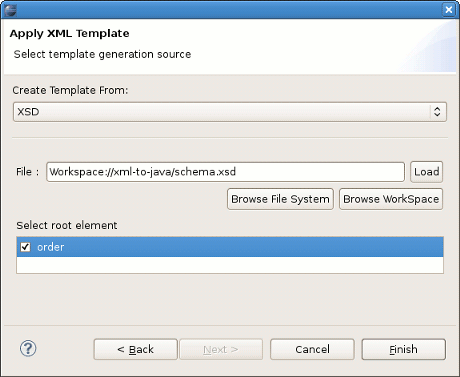
If you selected XSD format after adjusting the template path you should click the button:
After that it is necessary to select the root node for the template in the Select Root Element. Then click the button.
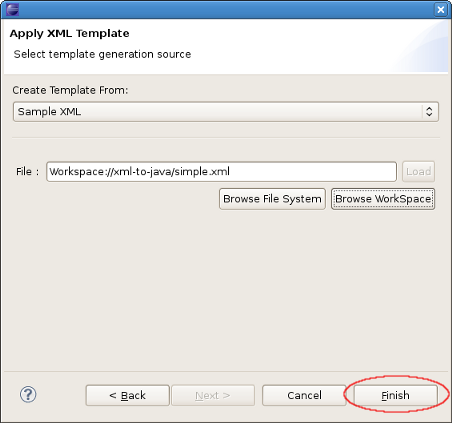
If you have chosen Sample XML option after selecting the template XML file destination you should only click the button:
The document summarizes the capabilities of Smooks Tools, and provides some instructions on how to use them. The chapters above also walked you through the steps on creating and configuring a XML to JAVA mapping project. If you have questions or suggestions concerned both the documentation and tools behavior, you are welcome to JBoss Tools Users forum. Please, use Jira to report bugs and requests on documentation.
All JBoss Developer Studio/JBoss Tools release documentation can be found at http://docs.jboss.org/tools in the corresponding release directory.
The latest documentation builds are available at http://download.jboss.org/jbosstools/nightly-docs.
For more information about Smooks technology please visit the Smooks Technology Home Page
You can find a collection of screencasts covering the Smooks tools technology here.