In JBoss Tools there is an extensive collection of specialized wizards, editors and views that can be used in various scenerios. The following chapters walksthrough these features.
Here is the table of main features of Visual Web Tools:
Table 2.1. Key Functionality for Visual Web Tools
| Feature | Benefit | Chapter |
|---|---|---|
| Visual Page Editor | Powerful and customizable visual page editor. Possibility to develop an application using any web technology: jsf, seam, struts, jsp, html and others. Developing using four tabs: visual/source, visual, source and preview.Fast and easy switching between these tabs. Split screen design of visual and source views. Full and instant synchronization between source and visual views. Integration with properties and outline views. Graphical toolbar to add inline styling to any tag. | visual page editor |
| JBoss Tools Palette | Organizing various tags by groups, inserting tags into a jsp or xhtml page with one click, adding custom or 3rd party tag libraries into the palette, easy controling the number of tag groups shown on the palette. | jboss tools palette |
| Web Projects View | Visualizing and displaying projects by function. Easy selecting of different kinds of items and dropping them into jsp pages. Using context menus to develop the application. Using icon shortcuts to create and import JSF and Struts projects. Expanding and inspecting tag library files. Selecting custom and third-party tag libraries to drag and drop onto the JBoss Tools Palette. | web projects view |
| JSF and Facelets support | Step-by-step wizards for creating new JSF and Facelets projects with a number of predefined templates, importing existing ones and adding JSF capabilities to non-jsf web projects. | jsf support |
| Flexible and customizable project template management | Jump-start development with out-of-the-box templates or easily customized templates for re-use. | working with projects |
| Support for Managed Beans | Adding new managed beans, generating code for attributes, properties and getter/setter methods. | managed beans |
| OpenOn | Easy navigation between views and other parts of your projects. | facelets support |
| Content Assist | Code completion proposals while working in java, xml, jsp, xhtml, xhtml, seam project and jsf configuration files. Content assist based on project data (dynamic code assist); with graphical editor. Code completion for values from property files, beans attributes and methods, navigation rule outcomes and jsf variables. | content assist |
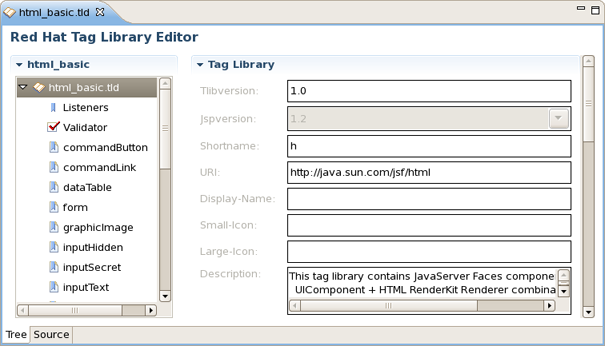
| Support for Custom Converters and Validators | Fast creating of custom converters and validators with tree view of faces-config.xml file. | converters and validators |
| Verification and Validation | All occuring errors will be immediately reported by verification feature, no matter in what view you are working. Constant validation and errors checking allows to catch many of the errors during development process that significantly reduces development time. | verification and validation |
| Drag-and-Drop | Possibility of inserting any tag onto the page you are editing by just drag-and-droping it from the palette to this page. Adding any properties, managed bean attributes, navigation rules, tag library file declarations, jsp files from web projects view by clicking them and draging to source code. | visual page editor drag-and-drop |
| Struts Support | Step-by-step wizards for creating a new struts project with a number of predefined templates, importing existing ones and adding struts capabilities to non-struts web projects. | struts support |
| Support for JSF and JSF Configuration Files | Working on files using three modes: diagram, tree and source. Synchronization between the modes and full control over the code. Easy moving around the diagram using the Diagram Navigator. Working with struts projects that have multiple modules. Possibility to use Struts configuration file debugger allowing to set break points on struts diagram and then launch the server in debug mode. | graphical editor for jsf graphical editor for struts |
| Rich Faces Support | Tight integration between JBDS and RichFaces frameworks. Easy managing RichFaces components in any web application. | rich faces support |
JBoss Developer Studio is especially designed for supporting JSF and JSF-related technologies. JBDS provides extensible and exemplary tools for building JSF-based applications as well as adding JSF capabilities to existing web projects, importing JSF projects (created outside JBDS) and choosing any JSF implementation while developing JSF application.
JBoss Developer Studio allows you to develop JSF applications much faster and with far fewer errors so sparing your time.
With JBoss Developer Studio, we don't lock you into any one JavaServer Faces implementation. Select the one you want to use for your project.
When you:
Create a new JSF project
Add JSF capability to any existing Eclipse project
Add JSF capability to any existing project (created outside JBDS)
You can always select which JSF implementation to use.
You can also create your own custom JSF environments.
JBoss Developer Studio will add all the required libraries for the selected version to your project.
Facelets extends JavaServer Faces by providing a lightweight framework that radically simplifies the design of presentation pages for JSF. JBoss Developer Studio provides support for Facelets in a variety of ways.
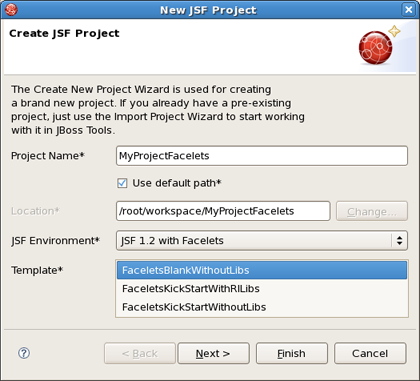
The Create New JSF Project wizard contains templates for creating Faceletsprojects based on version 1.2 of the JSF Reference Implementation:
Once you select the environment, you can select one of the six available templates:
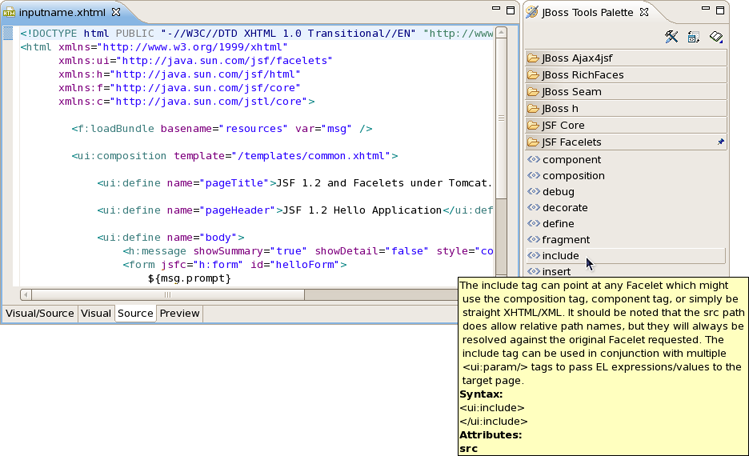
The JBoss Tools Palette comes with the Facelets components ready to use. A useful tip appears when you hover the mouse cursor over the tag:
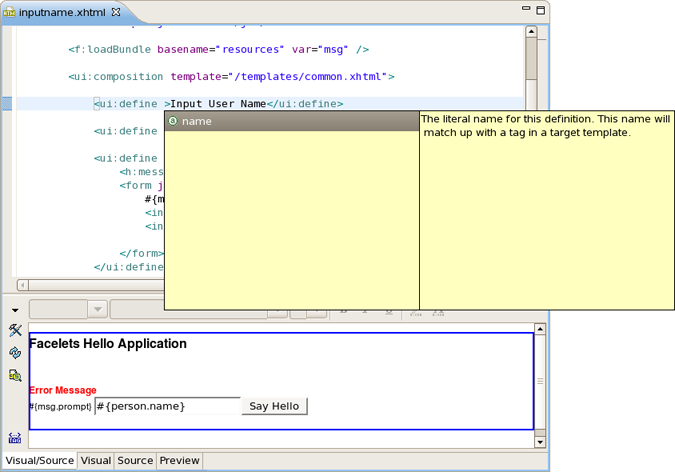
Code assist for Facelets tags is available when editing xhtml files:
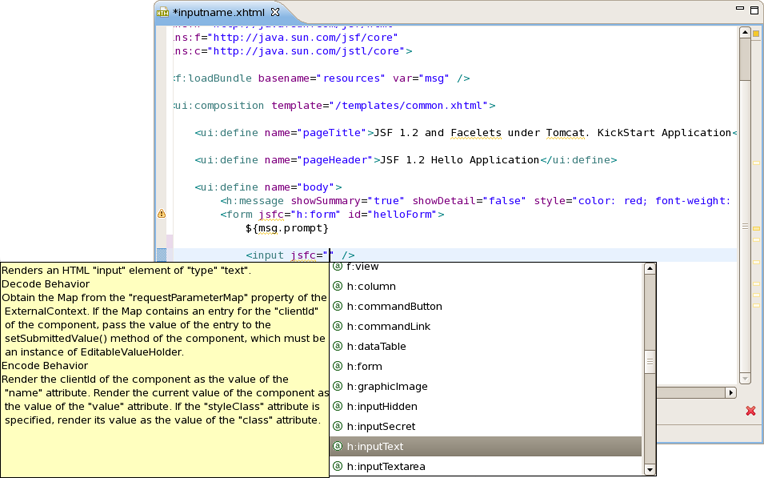
In any HTML tag you also get the code assist for "jsfc" attribute

Then you get the code assist for JSF components are available on the page
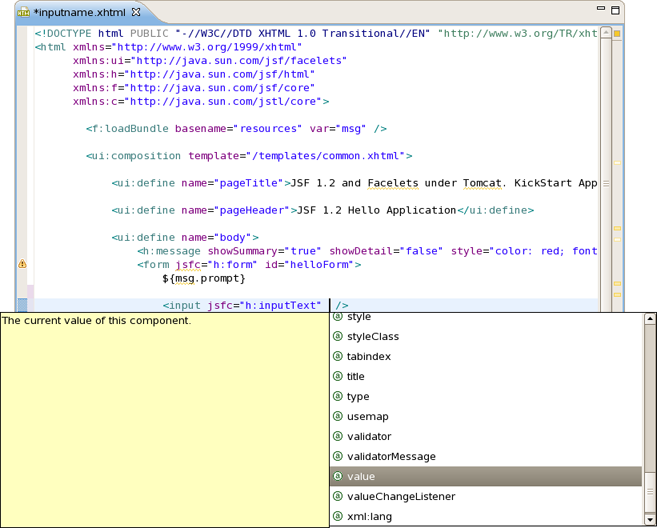
Then you will see all available attributes for the component.
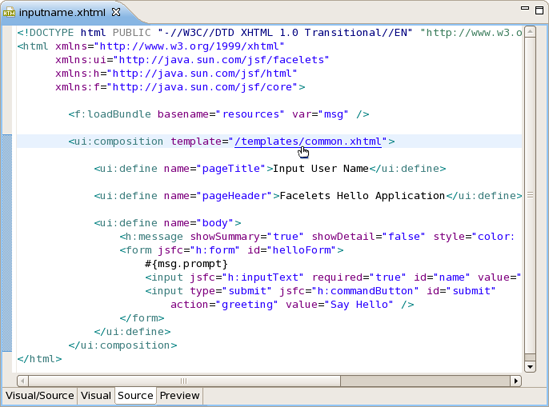
Using JBoss Developer Studio OpenOn feature, you can easily navigate between the Facelets templates and other parts of your projects. Just by holding down the Control key while hovering the mouse cursor over a reference to a template, the reference becomes a hyperlink to open that template.
JBoss Developer Studio provides the following when working with JSF:
Create new JSF projects
Import (open) existing JSF projects
Add JSF capability to any existing Eclipse project
Import and add JSF capability to any existing project created outside Eclipse
JBoss Developer Studio allows you to create brand new JSF projects . A new JSF project will have all JSF libraries, tag libraries and a JSF configuration file.
JBoss Developer Studio comes with a number of predefined project templates. These templates are flexible and easily customizable.
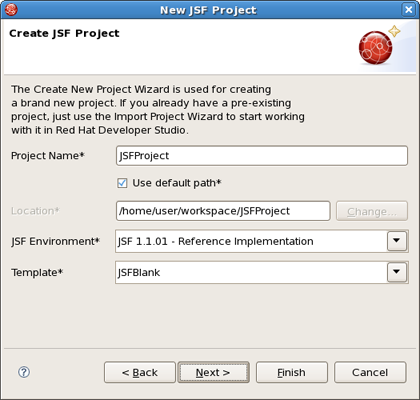
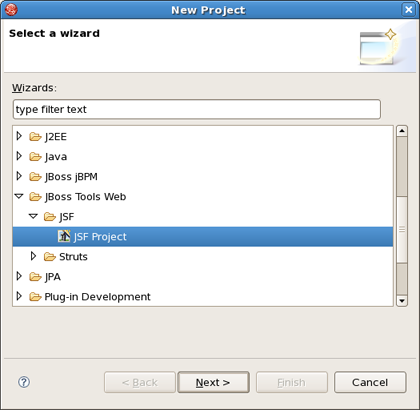
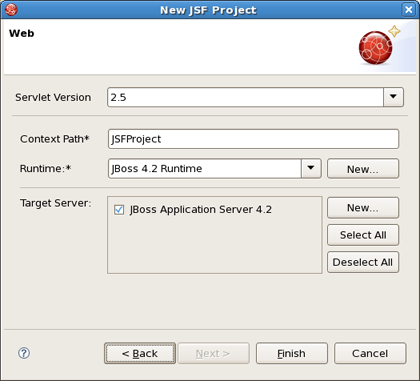
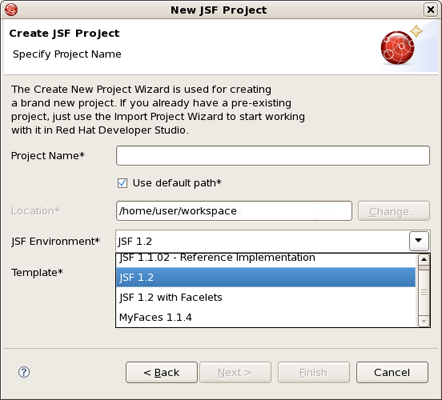
To create a brand new JSF project, select File > New > Project > JBoos Tools Web > JSF > JSF Project and click Next :
On this form enter Project Name. You can also select where to create the project.
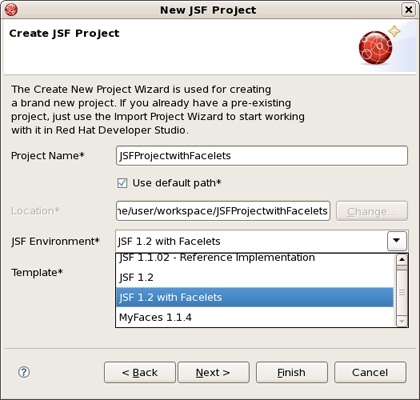
JSF Version allows you to select which JSF implementation to use:
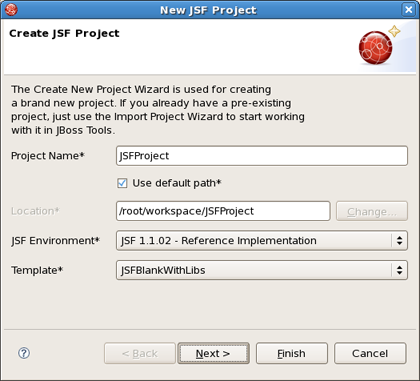
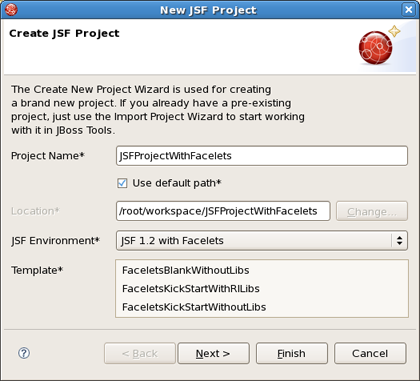
You can also pick a different template on which to base the project. Almost all templates come in two variations: with jsf libraries and without ones. Some servers already provide jsf libs and you take risk of getting conflicting libraries while deploying your project. So the idea here is to avoid such conflicts. Select a template without libs if you use a server with its own jsf libraries.
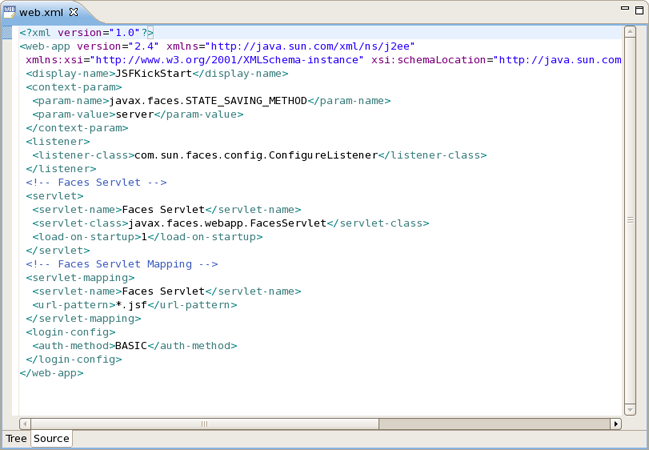
The JSFBlank template will create a standard Web project structure with all JSF capabilities.
The JSFKickStart template will create the same standard structure but will also include a sample application that is ready to run.

On the next screen select what Servlet version to use and whether to register this application with JBoss AS (or other server) for running and testing of your application.
Context Path is the name under which the application will be deployed.
The Runtime value tells Eclipse where to find Web libraries in order to build (compile) the project. It is not possible to finish project creation without selecting Runtime. If you don't have any values, select New... to add new Runtime.
Target Server allows you specify whether to deploy the application. The Target Server corresponds to the Runtime value selected above.
If you don't want to deploy the application, uncheck this value:
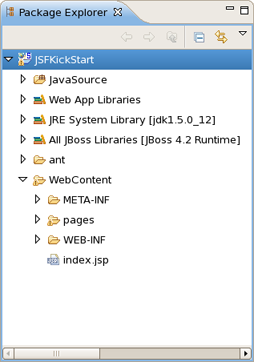
When you are all done, you should have the project that has been created in the Package Explorer view:
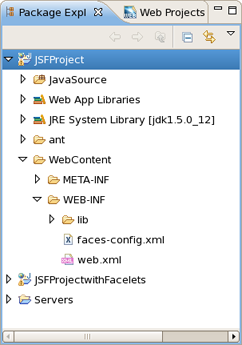
At this point you can open faces-config.xml and start working on your application.
For detailed information on migration projects to JBoss Developer Studio see Migration Guide.
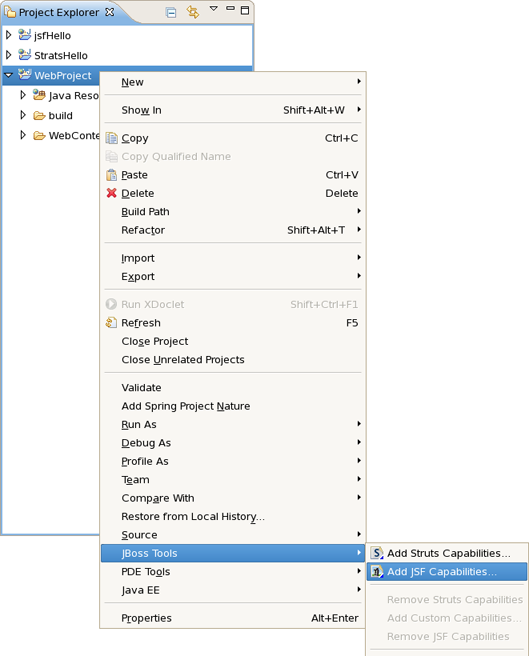
With JBoss Developer Studio you can add JSF capability (JSF libraries, tag libraries) to any existing Eclipse project in your workspace.
By adding JSF capability to your project, you can now edit any file using JBoss Developer Studio editors, such as JSF configuration editor, JBoss Tools JSP editor and any others.
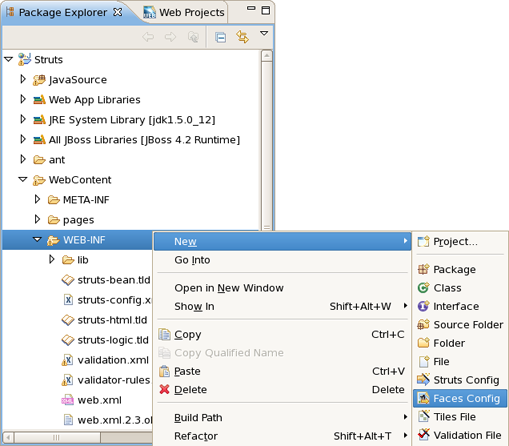
Right click the project and select JBoss Tools > Add JSF Capabilities . This will start the process of adding all necessary libraries, files to make this a Web JSF project:
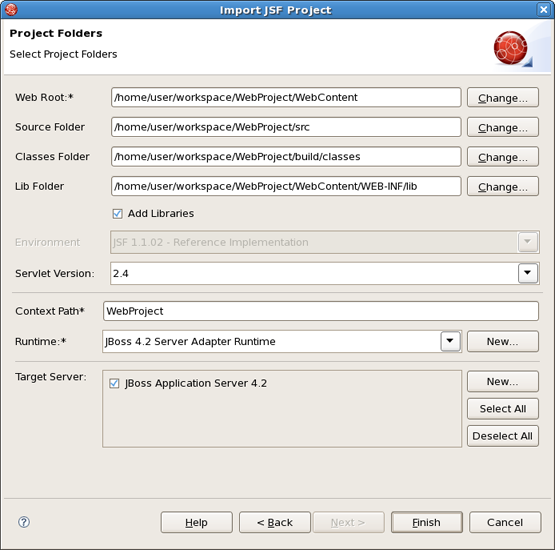
The wizard will first show you the web.xml file location and the project name:

On the last form you can set the different folders for your project as well as register this application with a servlet container.
Make sure to select Add JSF Libraries for JBoss Developer Studio to add all required JSF related libraries to this project.
Context Path is the name under which the application will be deployed.
The Runtime value tells Eclipse where to find Web libraries in order to build (compile) the project. It is not possible to finish project import without selecting Runtime. If you don't have any values, select New... to add new Runtime.
Target Server allows you specify whether to deploy the application. The Target Server corresponds to the Runtime value selected above.
If you don't want to deploy the application, uncheck this value:
Once your project is imported you can see that JSF related libraries have been added to your project jsf-api.jar and jsf-impl.jar.
You are now ready to work with JSF by creating a new JSF configuration file:
JBoss Developer Studio has a powerful templating capability for creating new and importing existing Struts and JSF projects. This templating facility has a variety of aspects to consider. But, let's start with the most straightforward case.
Let's say you have a project that you want to use as the basis for a new template. Follow these steps to make a template out of it:
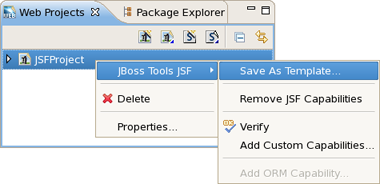
In the Web Projects view, right-click the project and select JBoss Tools JSF > Save As Template as template
In the first dialog box, you can choose a name for the template (defaults to the project name) and confirm what run-time implementation of the project's technology will be used
Select Next and you will be sent to a dialog box with your project structure displayed with check boxes. Here you can check only those parts and files in your project directory that should be part of the template
At this point, unless you want to designate some extra files as having Velocity template coding inside them, you should select Finish
That's it. Now, you can use this template with any new or imported project that uses the same run-time implementation as the project you turned into a template.
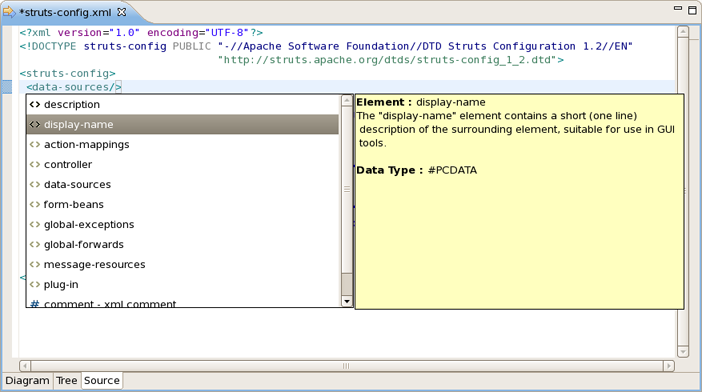
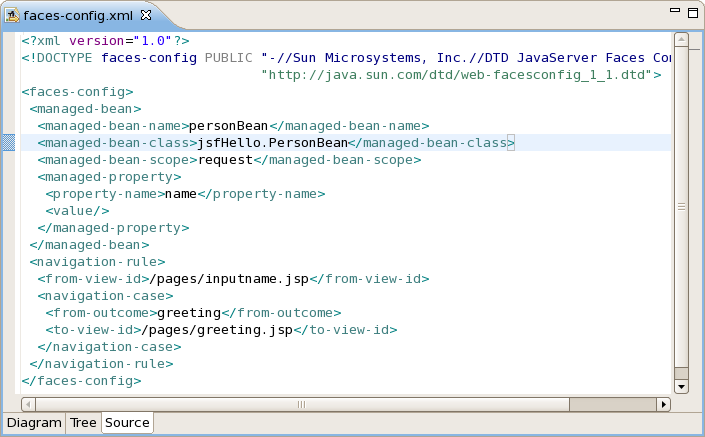
The JSF configuration file editor has three main viewers (modes):
Diagram
Tree
Source
The modes can be selected via the tabs at the bottom of the editor.
The JSF configuration editor also comes with a very useful OpenOn selection feature.
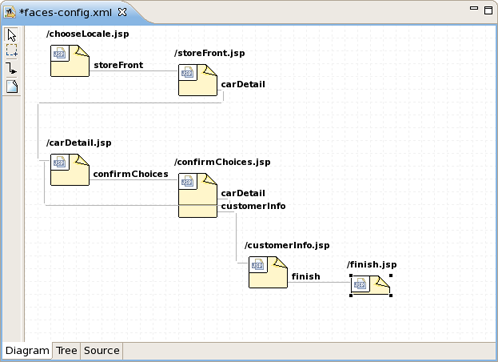
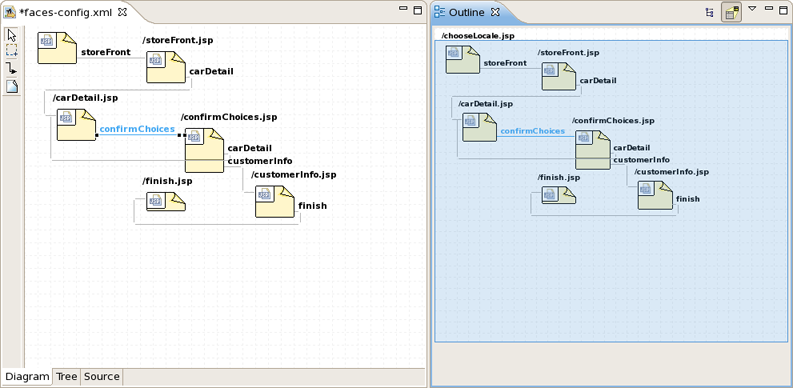
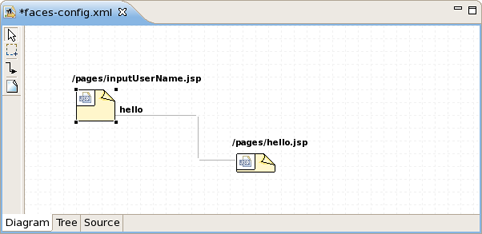
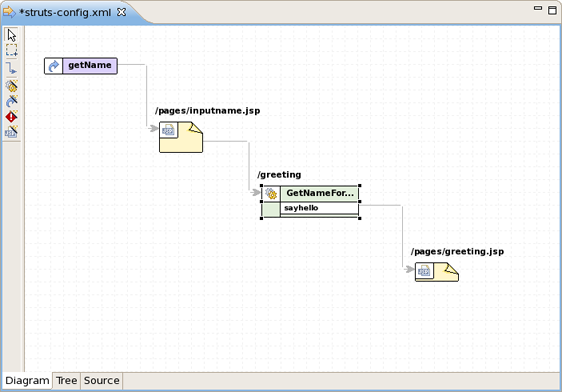
The Diagram view displays the navigation rules in the JSF configuration file:
To create a new page (view), you can click the page icon on this toolbar and then click anywhere on the diagram. A New Page Wizard will appear.
To create a transition (rule) connecting pages:
Select the transition icon from the toolbar (2nd from the bottom).
Click the source page.
Click the target page.
A transition will appear between the two pages:

It is also possible to create a new page by right-clicking anywhere on the diagram and selecting New View .

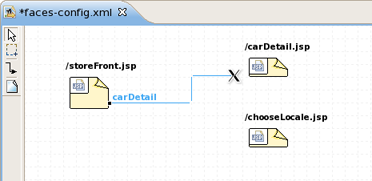
To edit an existing transition, first select the transition line. Then, place the mouse cursor over the last black dot (on the target page). The mouse cursor will change to a big +. At this point, drag the line to a new target page:
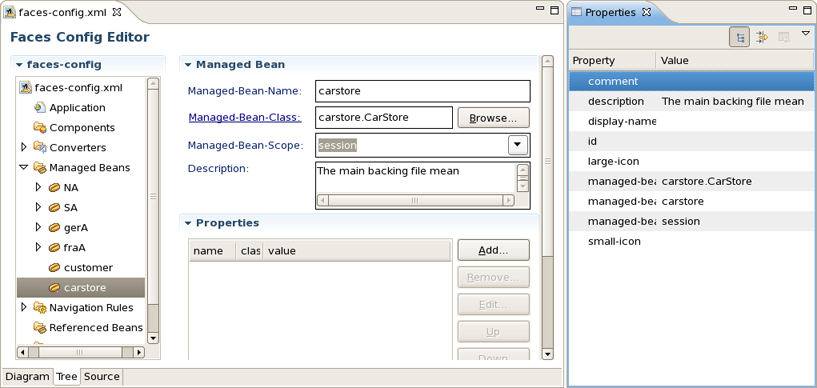
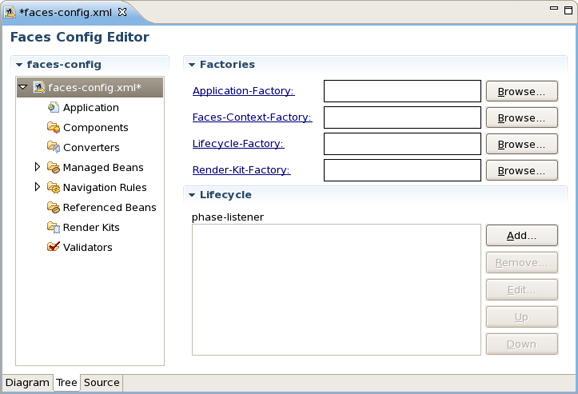
The Tree mode for the editor displays all JSF application artifacts referenced in the configuration file in a tree format. Select any node and its properties will appear in the right-hand area:
To edit, right-click any node and select one of the available actions in the context menu. You can also edit in the properties window to the right:

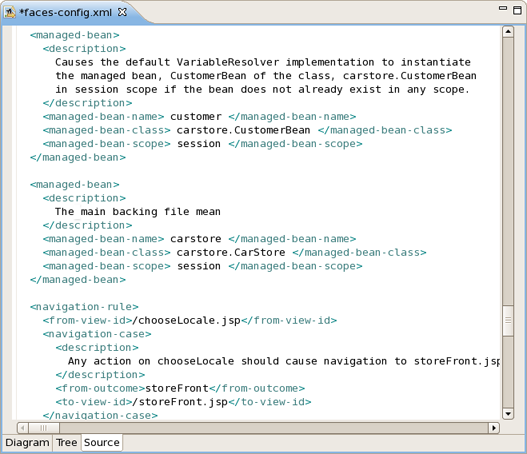
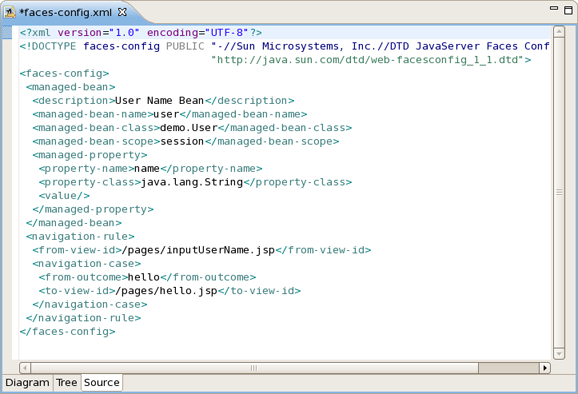
The Source mode for the editor displays a text view of the JSF configuration file. All three viewers are always synchronized, so any changes made in one of the viewers will immediately appear in the others:
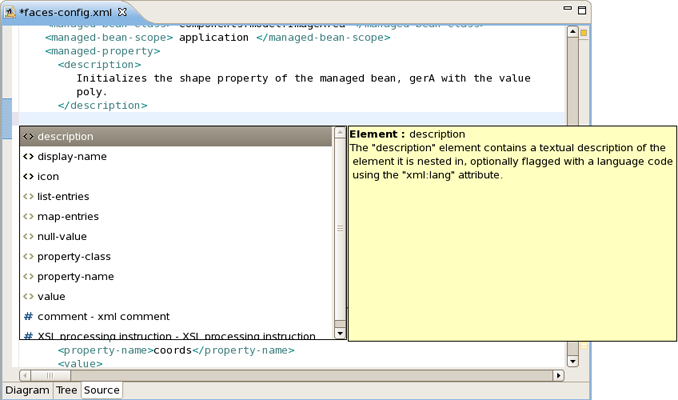
Content assist is always available in the Source viewer:
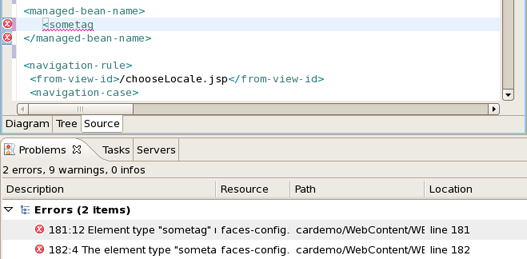
Errors will be reported by JBoss Developer Studio's verification facility:

Other errors are also reported.
You can also work in the Source viewer with the help of the Outline view . The Outline views show a tree structure of the JSF configuration file. Simply select any element in the Outline view, and it will jump to the same place in the Source viewer.

If your diagram is large, within Outline view you can switch to a Diagram Navigator mode by selecting the middle icon at the top of the view window. It allows you to easily move around the diagram. Just move the blue area in any direction, and the diagram on the left will also move:
You can also edit in the Tree viewer with the help of the Properties view as shown below:
JBoss Developer Studio gives you lots of power to work with managed beans.
Add and generate code for new managed beans
Generate code for attributes and getter/setter methods
Add existing managed beans to JSF configuration file
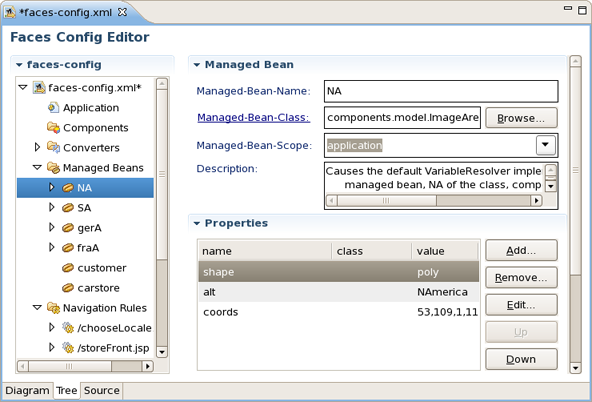
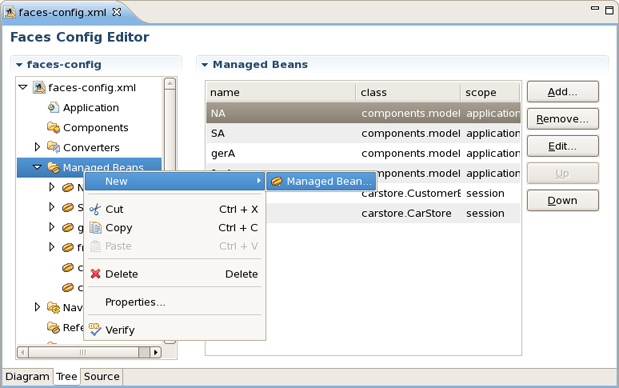
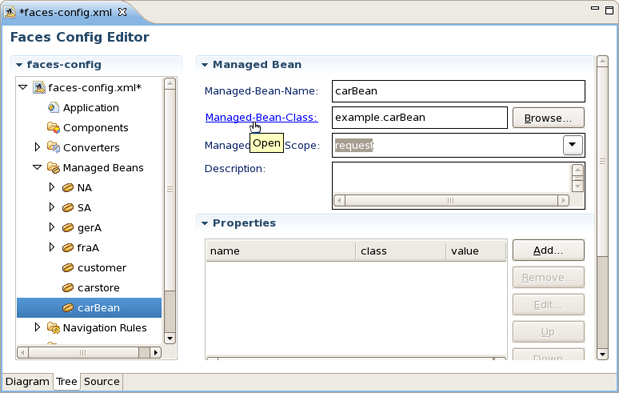
To start, create a new managed bean in JSF configuration file editor, in the Tree view.
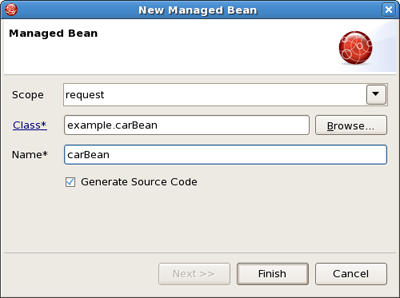
When you define a new managed bean, make sure that Generate Source Code is checked as shown in the figure below:
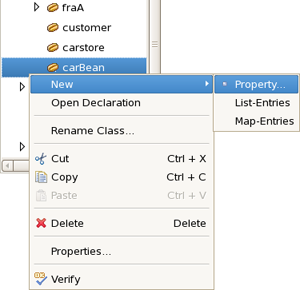
After the "Java" class has been generated you can open it for additional editing. There are two ways to open the "Java" class:
Click on Managed-Bean-Class link in the editor -or-
Right click the managed bean and select Open Source
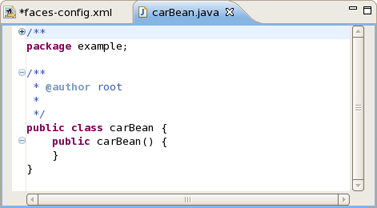
The generated Java source:
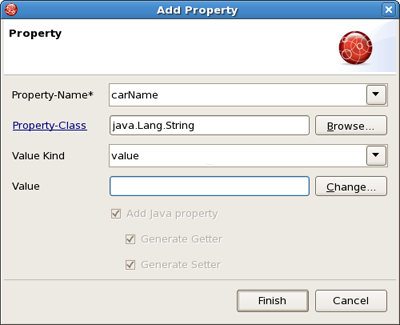
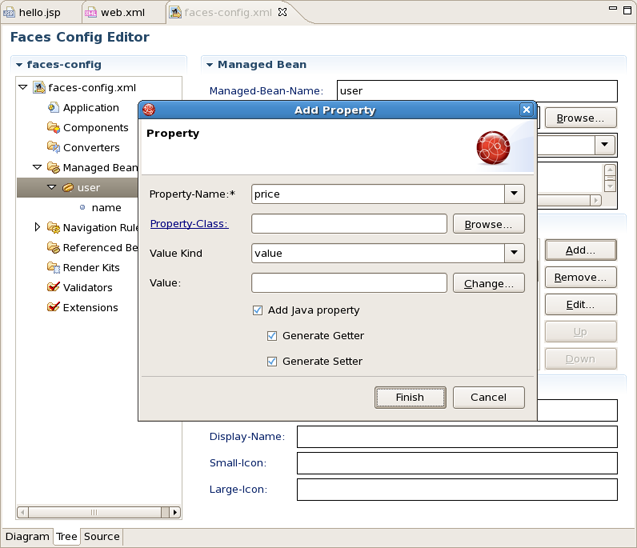
You can also generate source code for properties - this also includes "getter" and "setter" methods:
Make sure that all the check boxes are selected:
- Add Java property
- Generate Getter
- Generate Setter
Once the generation is complete, you can open the file and see the added property with "getter" and "setter" methods:

If you already have a Java bean you can easily add it to a JSF configuration file.
You should start the same way you create a new managed bean. Use Browse... to add your existing Java class.
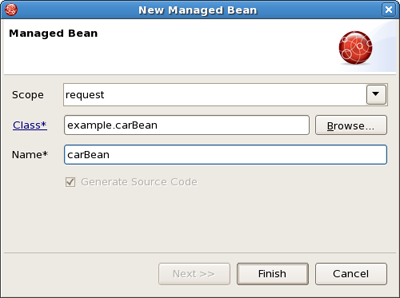
Once the class is set, it's Name will be set as well. But you can easily substitute it for the other one. Notice that Generate Source Code option is not available as the "Java" class already exists.
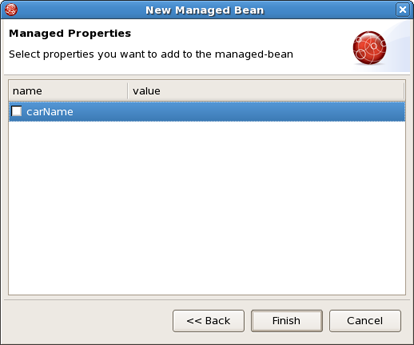
After adding your class Next button will be activated. Pressing it you'll get Managed Properties dialog where all corresponding properties are displayed. Check the necessary ones to add them into your JSF Configuration File.
If you don't want to add any, just click Finish .
In the Project Explorer view open faces-config.xml and select Tree tab.
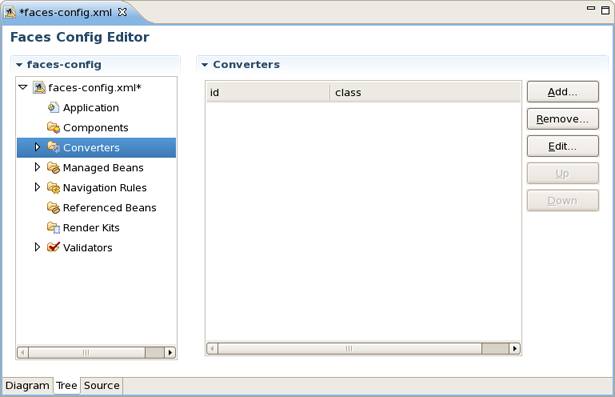
Select Converters and click on Add button.
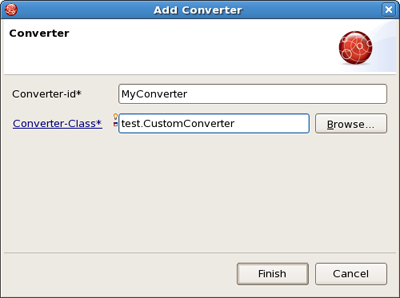
Type the name of your converter in the Converter-id field and name of the class for converters. After clicking Finish button your custom converter is registered under entered name.
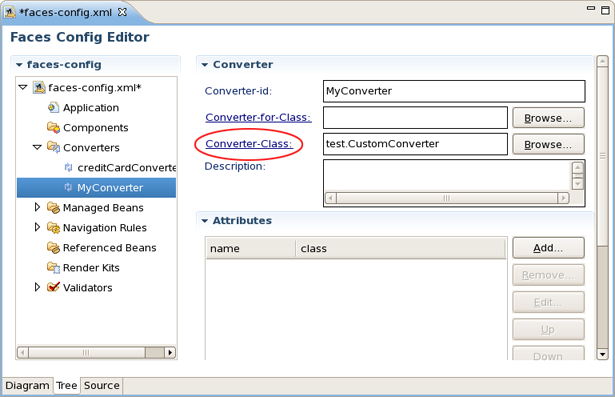
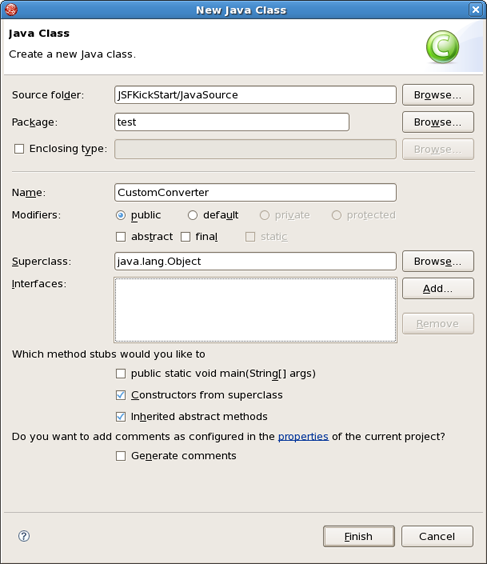
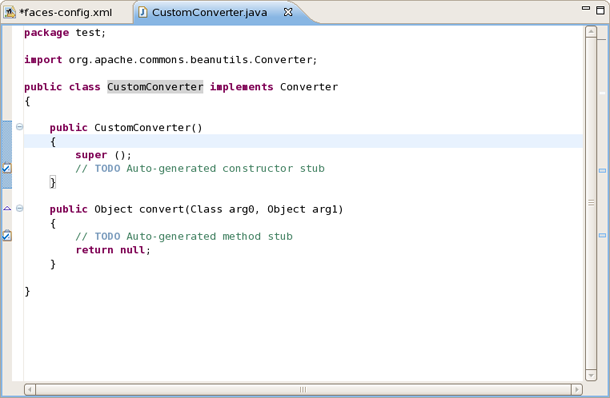
Let's create "converter" class. In the Converter section you should see your Converter-id and Converter-class. Click on Converter-class to generate the source code.
Java class will be created automatically. Leave everything without changes and click Finish .
To open converter class click again on Converter-class link in the Converter section. Now you are able to write business logic of converter.
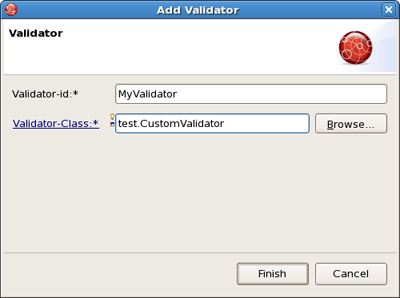
In the Project Explorer view open faces-config.xml and select Tree tab.

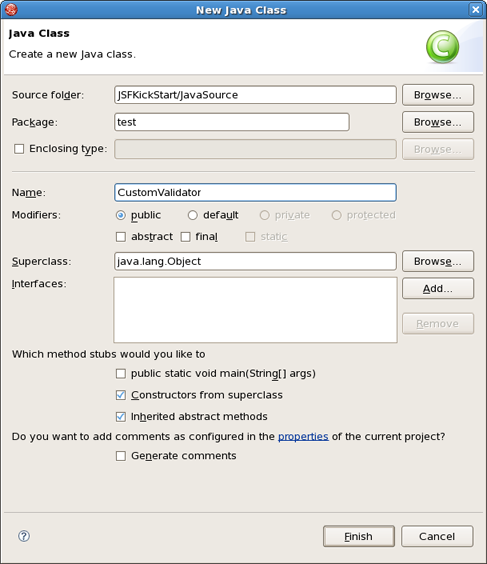
Select Validators , and click on Add button.
Type the name of your validator in the Valifator-id field an d name of the class for validators. After clicking Finish button your custom validator is registered under entered name.
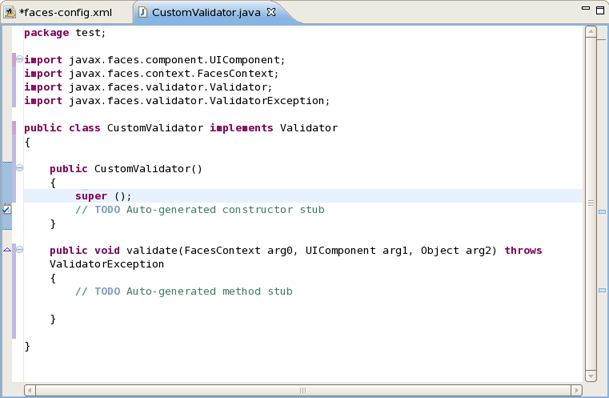
Let's create "validator" class. In the Validator section you should see your Validator-id and Validator-class. Click on Validator-class to generate the source code.

Java class will be created automatically. Leave everything without changes and click Finish .
To open validator class click again on Validator-class in the Validator section. Now you are able to write business logic of validator.
In the Project Explorer view open faces-config.xml and select Tree tab.

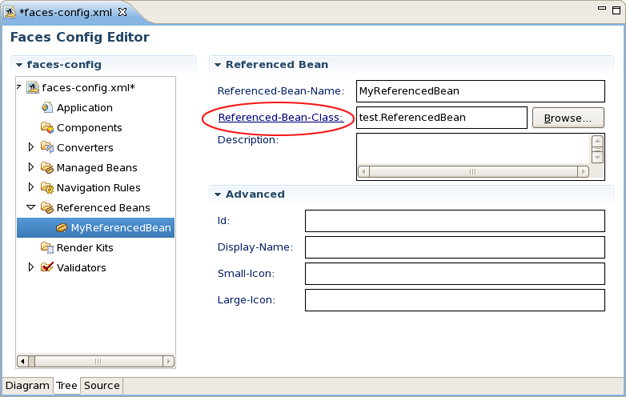
Select Referenced Beans and click on Add button.
Type in the name of your Referenced Bean and type in or select Referenced-Bean-Class by using Browse button.

In the Referenced Bean section you should see your Referenced-Bean-Name and Referenced-Bean-Class. Click on the link to open the Java creation wizard.
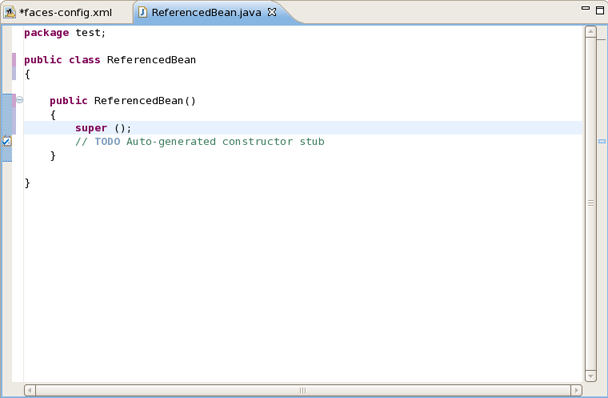
Java class will be created automatically. Leave everything without changes and click Finish .

To open Referenced Bean class click again on Referenced-Bean-Class in the Referenced Bean section. Now you are able to write business logic of Referenced Bean.
If you prefer develop web applications using Struts technology JBoss Developer Studio also meets your needs.
JBDS supports the Struts 1.1, 1.2.x versions.
When you create a brand new or import an existing project you can set which Struts version to use:
JBoss Developer Studio provides the following when working with Struts.
Create new Struts projects
Import (open) existing Struts projects
You can import any project structure
Add Struts capabilities to any existing Eclipse project
Import and add Struts capabilities to any existing project created outside Eclipse
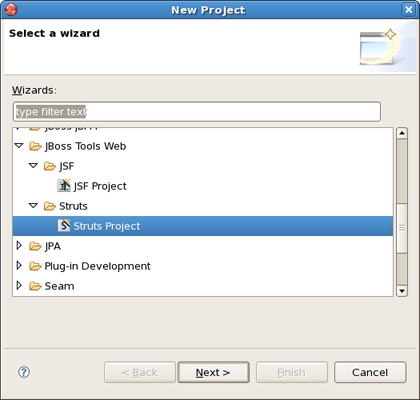
JBoss Developer Studio includes a New Struts Project Wizard that radically simplifies the process for getting started with a new Struts project. You just need to follow these 4 steps:
Select File > New > Project... from the menu bar. Then, select JBoss Tools Web > Struts > Struts Project in this dialog box. Click Next:
On this screen, provide the project name. You can leave all other values as they are:
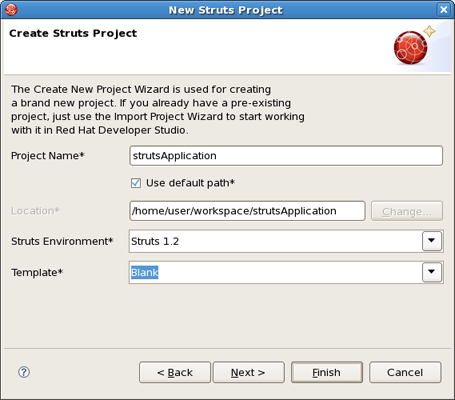
Tip:
Don't put spaces in project names.
Note:
If you select the KickStart template, then the project created will include a simple Hello World type application that is ready-to-run.
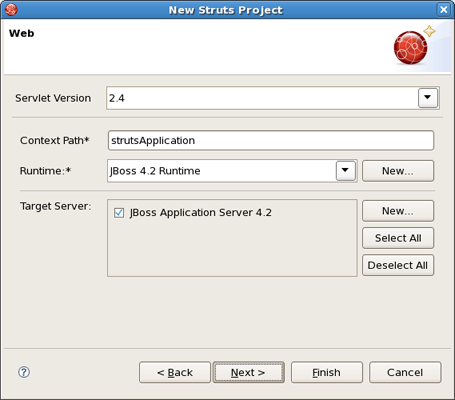
Next, you can register this application with the current servlet container defined for your workspace (JBoss AS, by default) in order to allow you to test your application more easily while still developing it. A new entry will be added in the servlet container configuration file to enable running the application in-place (called null deployment or link deployment). Uncheck the "Target Server" check box if for some reason you don't want to register your application at this point.
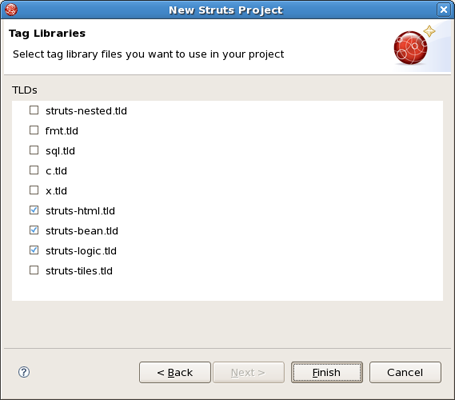
On the next screen, you can select the TLD files to include in this project:
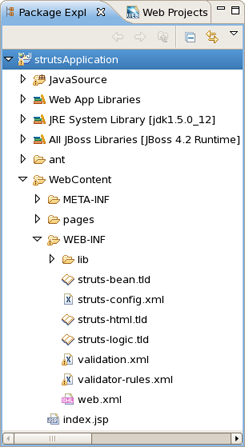
After the project is created, you should have the following project structure (if you used the KickStart template):
Tip:
If you want to hide the jar files from Web App Libraries in view, select the down-pointing arrow in the upper right corner, select Filters..., check the box next to Name filter patterns (matching names will be hidden), and type *.jar into the field. Then, click OK.
For detailed information on migration projects to JBoss Developer Studio see Migration Guide.
With JBoss Developer Studio you can add Struts capabilities (including Struts libraries, tag libraries and a Struts configuration file) to any existing Web application project in your Eclipse workspace. By adding a Struts Nature to your project, you can now edit files using JBoss Developer Studio editors, such as the Struts configuration editor and the JBoss Tools JSP editor.
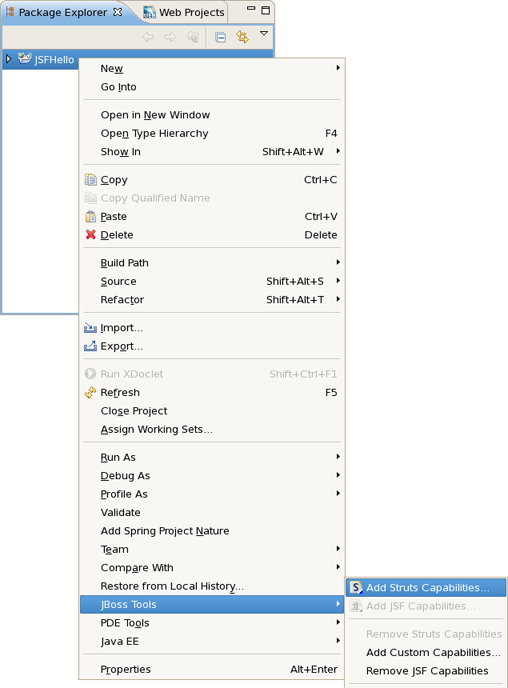
Right-click the project and select JBoss Tools > Add Struts Capabilities from the context menu. This will start the process of adding all necessary libraries and files to make this a Web JSF project.
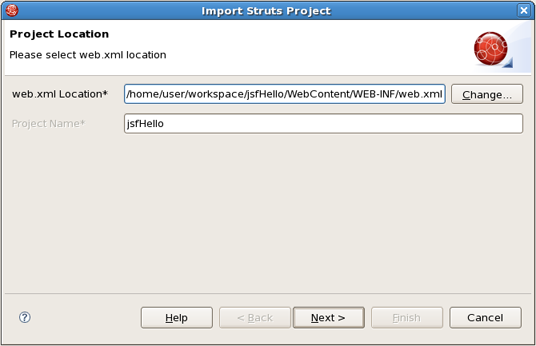
The wizard will first show you the web.xml file location and the project name.
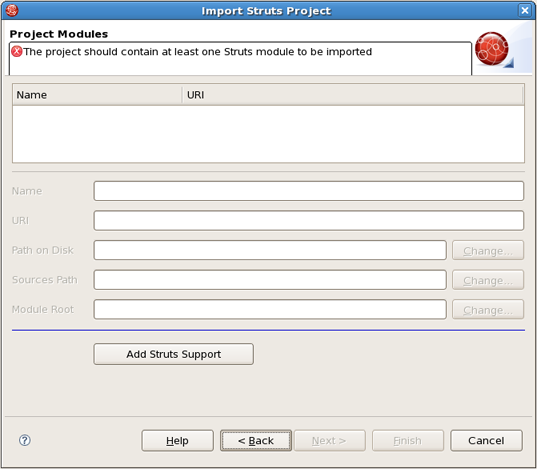
After hitting Next, you will see the following screen. This screen simply means that you need to add at least one Struts module to your project to make this project a Struts project. Adding a Struts module means that a new struts-config.xml will be added to your project and registered in the web.xml file. In addition, all required Struts libraries will be added. To add a Struts module, select the Add Struts Support button.
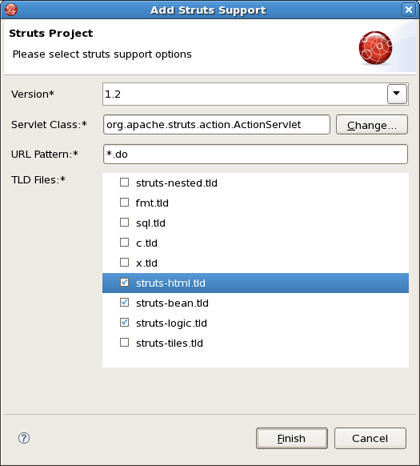
Here you can select what Struts version, Servlet class, URL pattern and TLDs to add to this project.
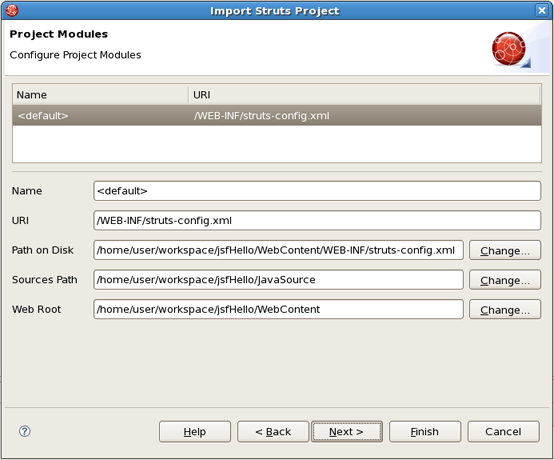
When done, you will see the default Struts module configuration information. See how to Edit Struts modules.
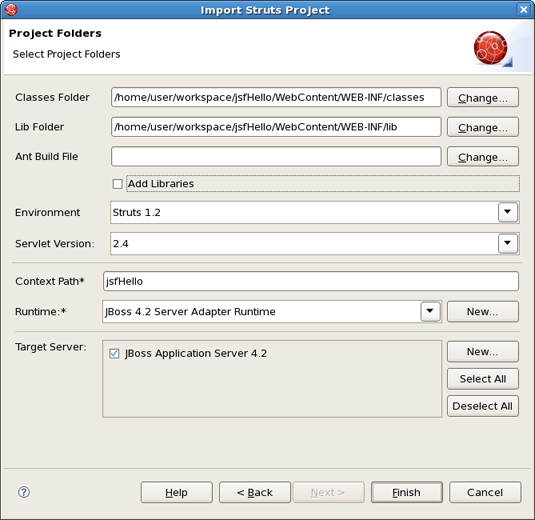
On the last screen you can set the different folders for your project as well as register this application with a servlet container.
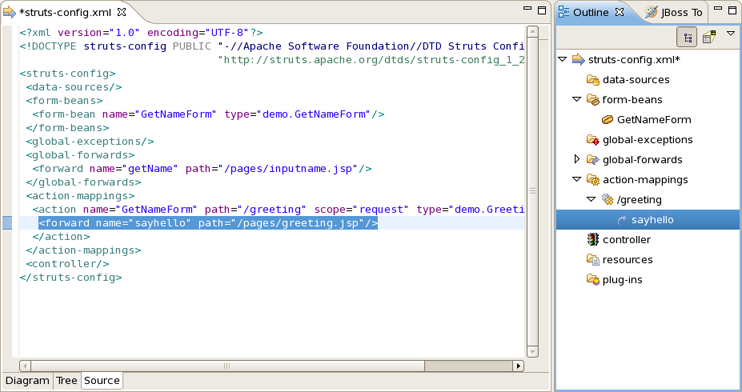
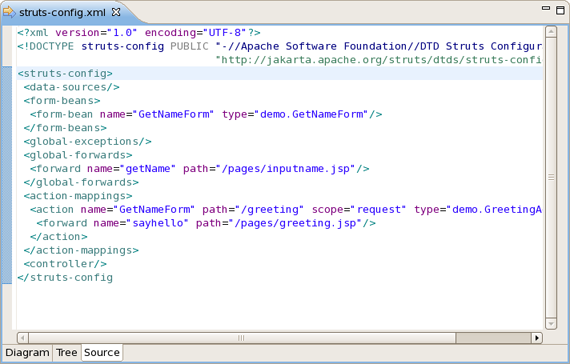
When done, you can open the struts-config.xml file. (The Struts configuration is shown below in the Tree viewer).
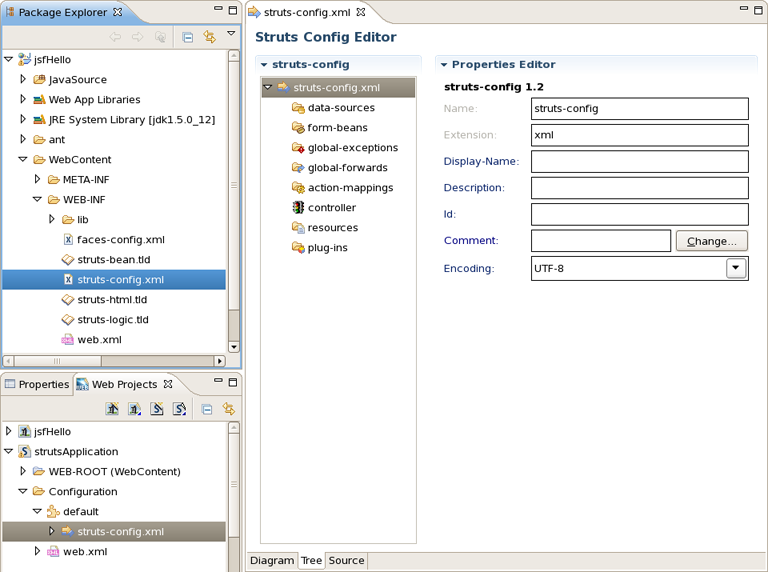
The Struts configuration file editor has three main viewers (modes): Diagram (shown), Tree and Source. The modes can be selected via the tabs at the bottom of the editor. Any changes made in one mode are immediately visible when you switch to any other mode.
When working in Source view, you always have all the following features available:
Content Assist
Open On Selection
File Folding
The Diagram mode graphically displays the Web flow of the application defined in the Struts configuration file.

Just by right-clicking anywhere on the diagram, you can use a context menu to create the building blocks of a Struts application:
Actions
Global forwards
Global exceptions
JSP Pages

Along the upper-left side of the editor is a stack of seven icons for changing the behavior of the cursor in the diagram. The first icon switches to the default regular selection cursor, the second to the marquee selection cursor and the third to the new connection cursor. The last four icons switch the cursor to an insert cursor for each type of Struts build block listed above (and in the order listed).
For instance, clicking on the first of these four icons (the one with the gears) will switch the cursor to insert actions. Clicking anywhere in the diagram with this cursor has the same effect as right-click and selecting Add > Action... from the context menu with the regular cursor active. It's just more efficient to use this cursor if you're adding more than one action at once.

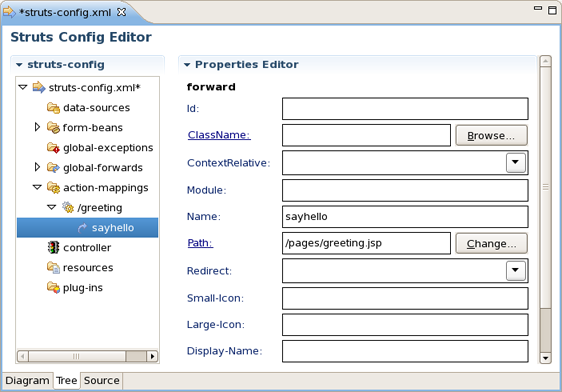
In the Tree mode, the different elements of the Struts application are organized into functional categories on the left-hand side and a form for editing the properties of currently selected items on the right-hand side.
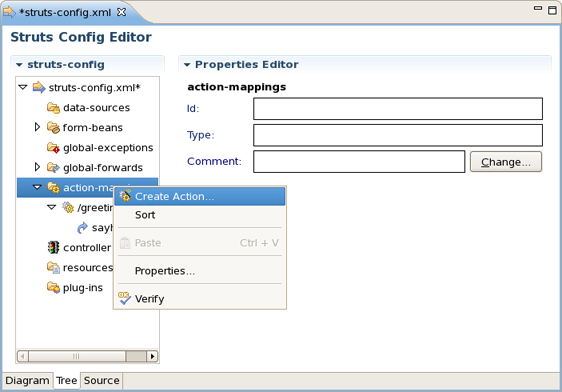
You can also right-click on any node in the category tree and perform appropriate operations through a context menu. For instance, by right-clicking on the action-mappings category node, you can add new actions to the application.
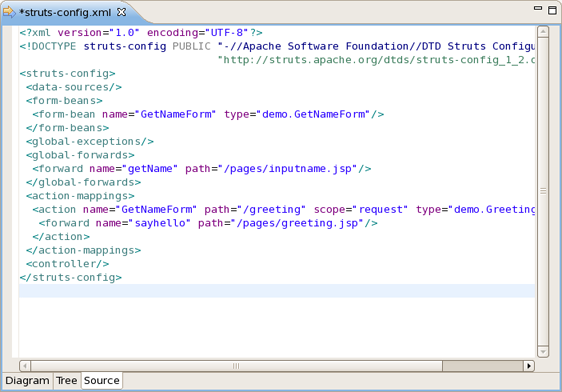
In the Source mode, you have complete editing control of the underlying XML coding:
You can take advantage of code assist:
The editor will also immediately flag any errors:
Finally, you can use the Outline view with the editor to easily navigate through the file:
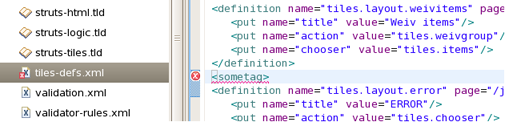
The Tiles configuration file editor has three main viewers (modes): Tree (shown), Diagram and Source. The modes can be selected via the tabs at the bottom of the editor. Any changes made in one mode are immediately visible when you switch to any other mode.
When working in Source view, you always have all following features available:
Content Assist
Open On Selection
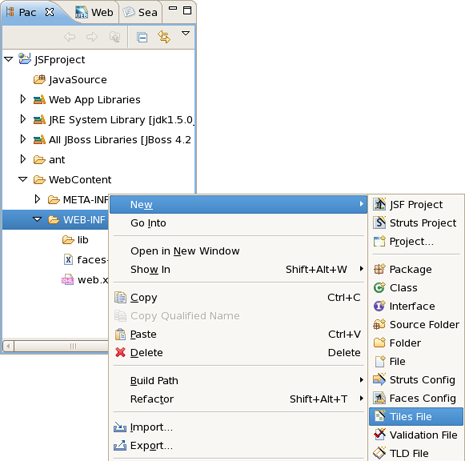
To create a new Tiles files, right click any folder and select New > Tiles File.
In the Tree mode, the different elements of the Tiles file are organized into functional categories on the left-hand side and a form for editing the properties of currently selected items on the right-hand side.
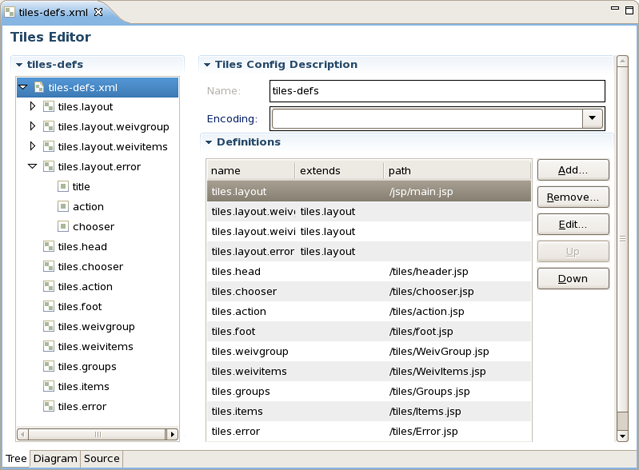
To edit the file, simply right click any node and select among the available actions:

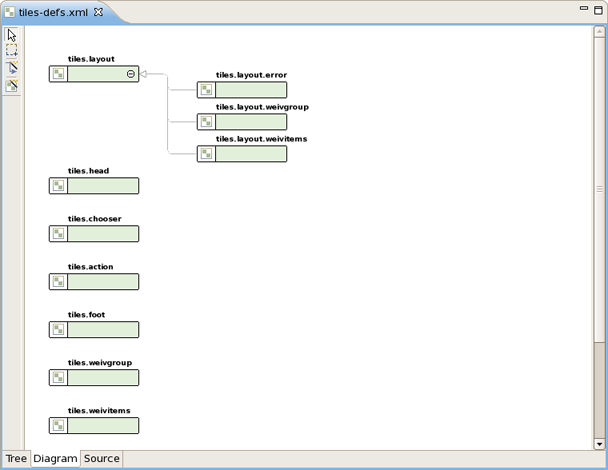
The Diagram mode is shown below:

To create new definitions, simply right click anywhere in the diagram:
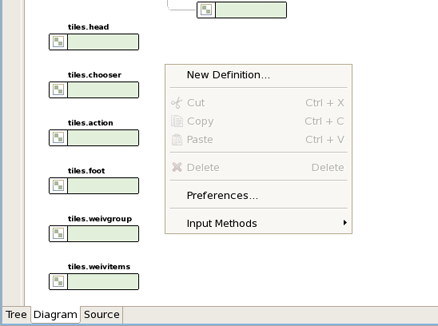
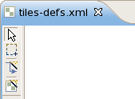
You can also use the Diagram toolbar to make editing easier:
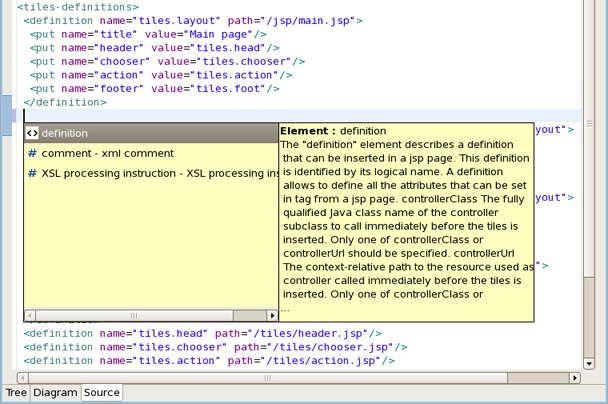
The Tiles editor also comes with a Source view that gives you full control over the source. Any changes here will immediately appear in other viewers when you switch to them.
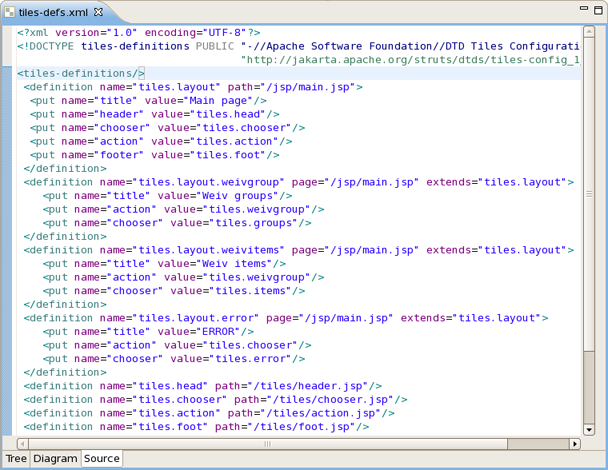
Content assist is available in the Source mode:

Any errors are immediately reported as shown below:
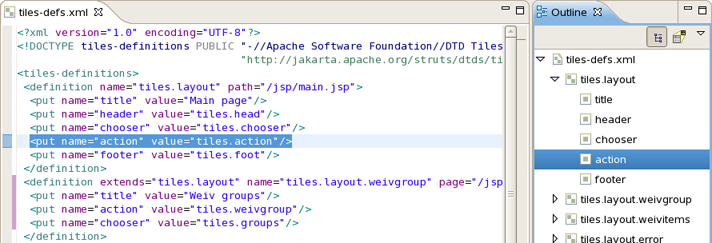
You can also use the Outline view together with the editor's Source mode. Selecting any node in the Outline view will jump to that place in the source.

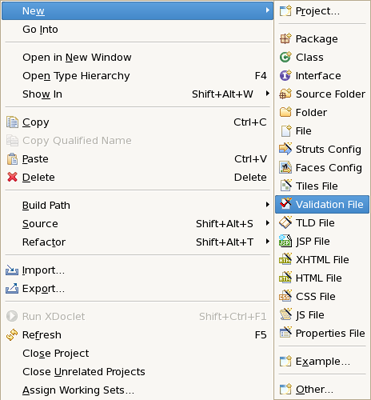
JBoss Developer Studio comes with a visual validation editor. To create a new validation file, right click any folder and select File > Validation File from the context menu.

The validation editor works through a number of viewers.
The Formsets viewer shows forms and their elements for which to define validation rules.

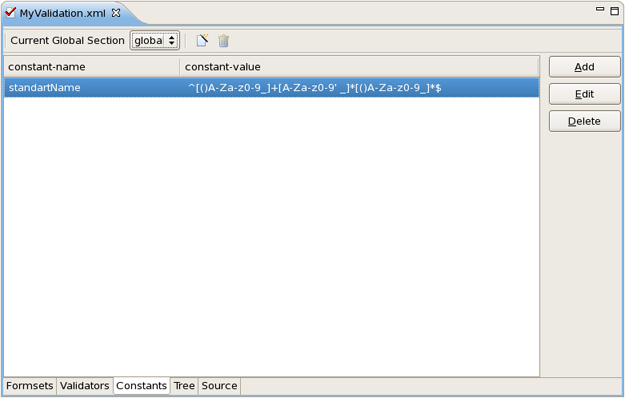
The Constants viewer lets you set constant values for your validation rules.
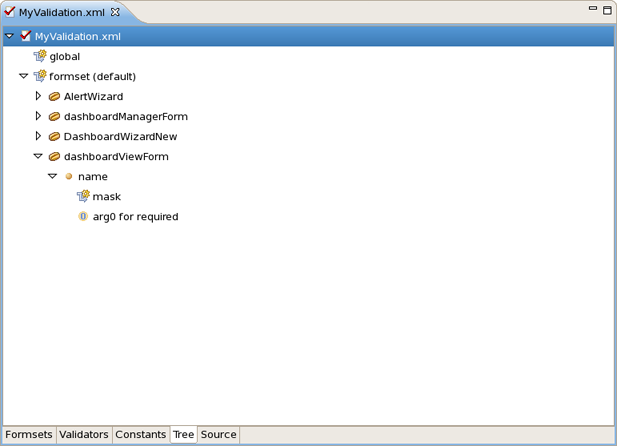
The validation file also can be viewed in a Tree viewer.

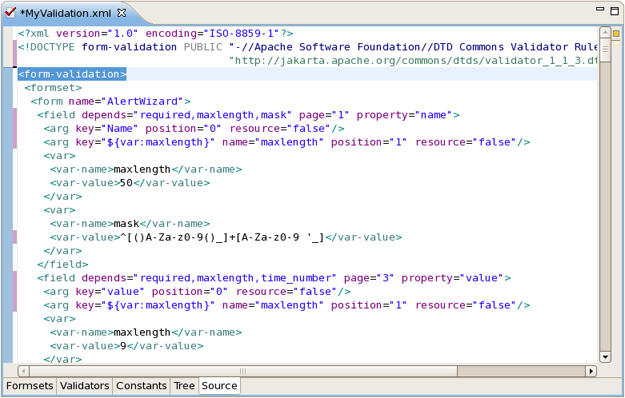
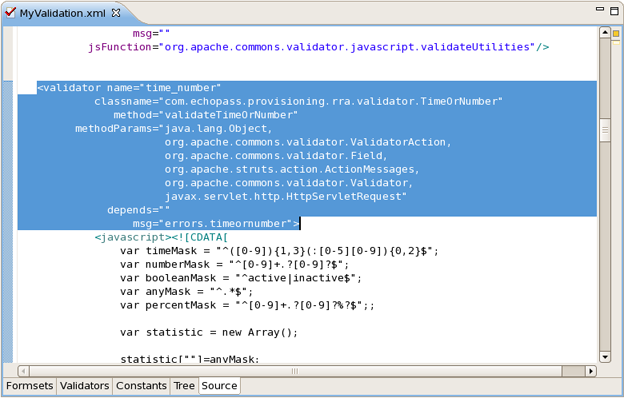
At any point you have full control over the source by switching to the Source viewer. Any editing in this viewer will immediately be available in other viewers of this editor.
You can also open your own custom or Struts-standard validation-rules.xml file.
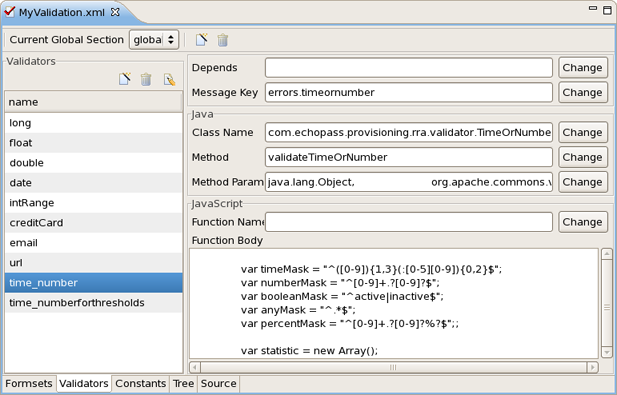
The Validators viewer shows the validation rules for a selected validator. You can of course add your own rules.
Here are the validation rules shown in the Source viewer.

JBoss Developer Studio supports working with Struts projects that have multiple modules. You can easily do the following:
Add new modules
Edit modules for an existing project or during Struts project import
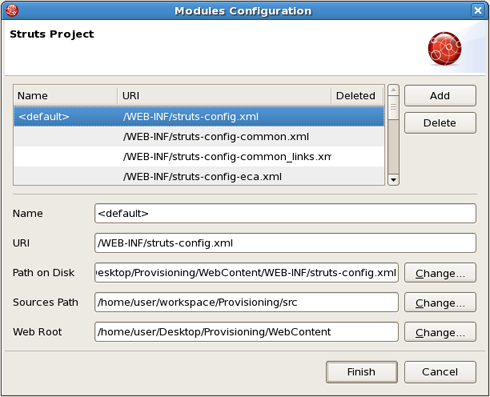
During Struts project import, if the project has multiple modules, you will see a screen with all existing modules. You can select each module and edit its details.

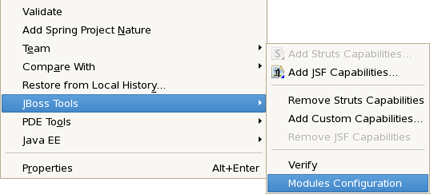
To edit modules in an existing project, right click the project and select JBoss Tools > Modules Configuration.
You will see the same screen as above where you will be able to select a module and edit its details:
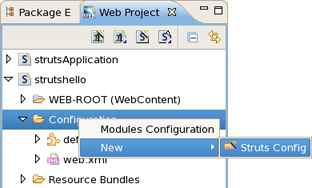
Adding a new module is very simple. First switch to Web Project view. Expand your project to the Configuration folder. Under that folder you should see the current modules. Right click on Configuration and select New > Struts Config.
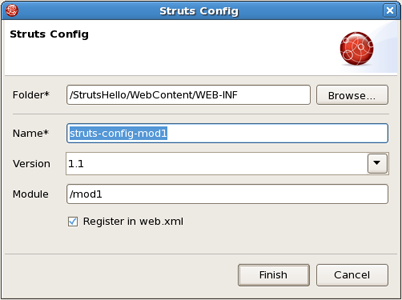
You will see the screen below. You can specify a new module name and also add the new Struts configuration file to web.xml file.
JBoss Developer Studio comes with a code generation feature. You can generate stub code for Struts Actions, FormBeans, Forwards and Exceptions.
The code generation in JBoss Developer Studio is based on Velocity templates which can be modified for your use. The templates are located at {RedHatDeveloperStudioHome} > templates > codegeneration .
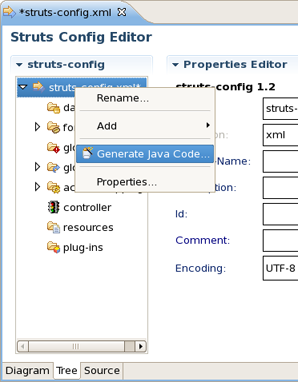
There are a number of ways to invoke code generation. One is simply right-clicking the Struts diagram and selecting Generate Java Code....
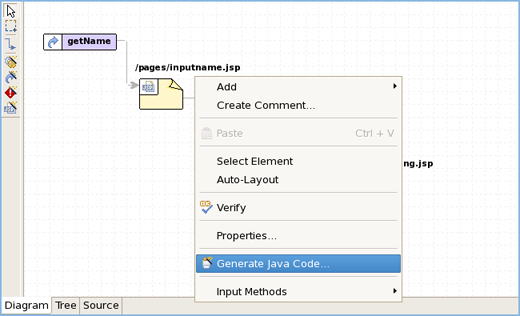
On this screen you can select for which elements to generate code. If you select Next you will be able to specify more options for each of the categories you selected.
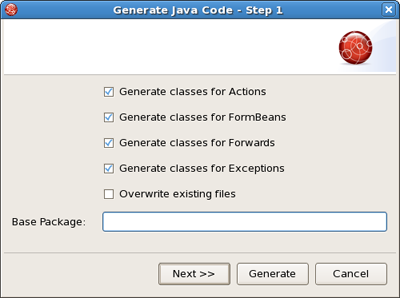
Tip:
please be careful not to override your existing files.
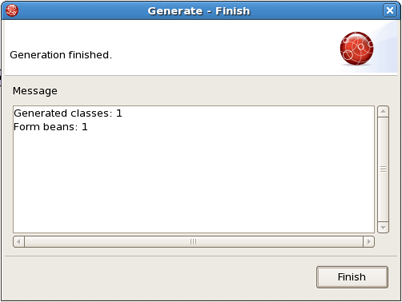
When generation is complete, a result window will appear letting you know how many classes were generated:
You don't always have to generate code for all elements at once. You can invoke generation for just an individual Struts artifact as well. Right-click an element on the diagram of the Struts configuration file and select Generate Java Code... from the context menu.
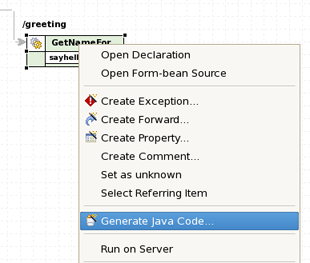
The same can be done from within the Tree viewer for the editor of the Struts configuration file.
JBoss Developer Studio comes with Struts configuration file debugger. It allows you to set break points on Struts diagram and then simply launch the server in debug mode.
Simply right click an Action or a page and select Add Breakpoint.

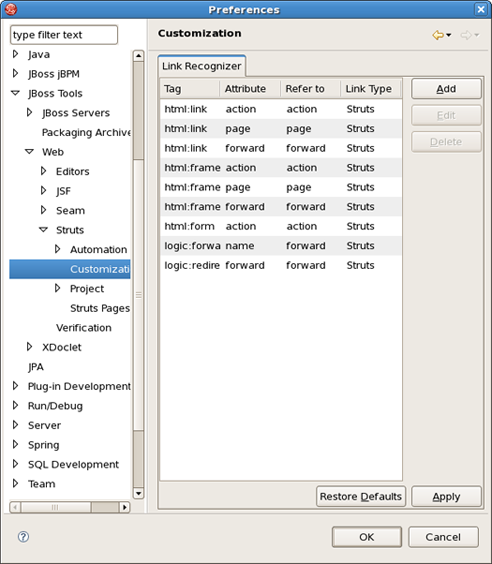
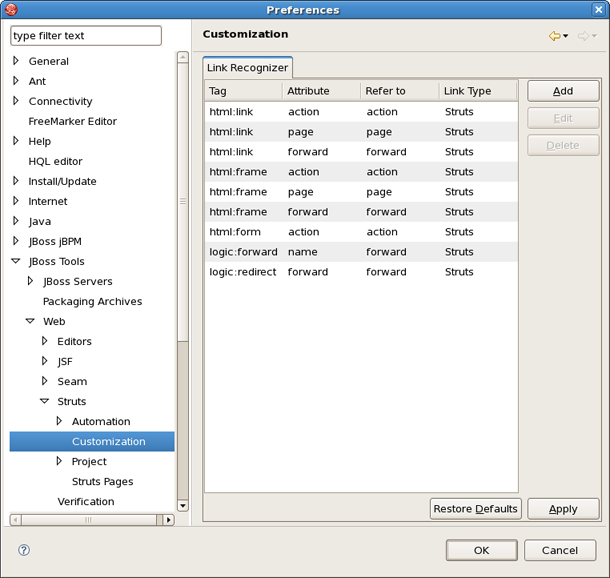
Custom page links allow you to define custom Struts page links that will be recognizable in the Struts application diagram. You can define these links by selecting Window > Preferences from the menu bar and then selecting JBoss Tools > Web > Struts > Customization from the Preferences dialog box.
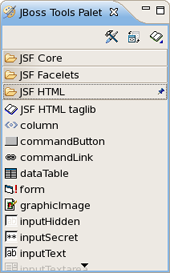
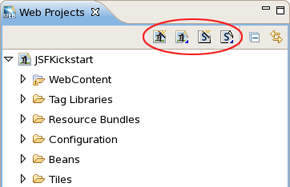
The JBoss Tools Palette allows you to:
Insert tags into a JSP page with one click
Add custom and 3rd party tags.
The JBoss Tools Palette provides possibility to add any tag libraries to it. Or you can choose a necessary one from the list of already existent tag libraries:
HTML
JBoss
JSF
JSTL
MyFaces
Oracle ADF Faces
Struts
XHTML
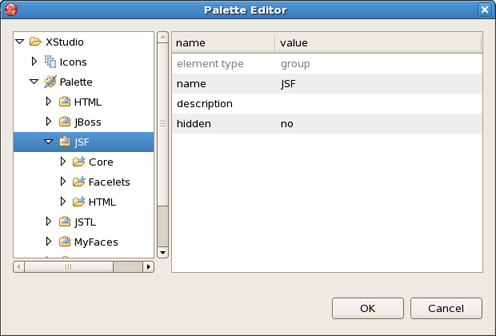
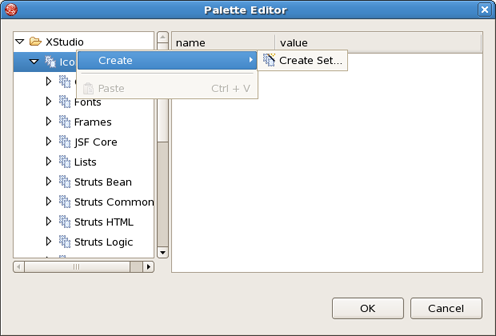
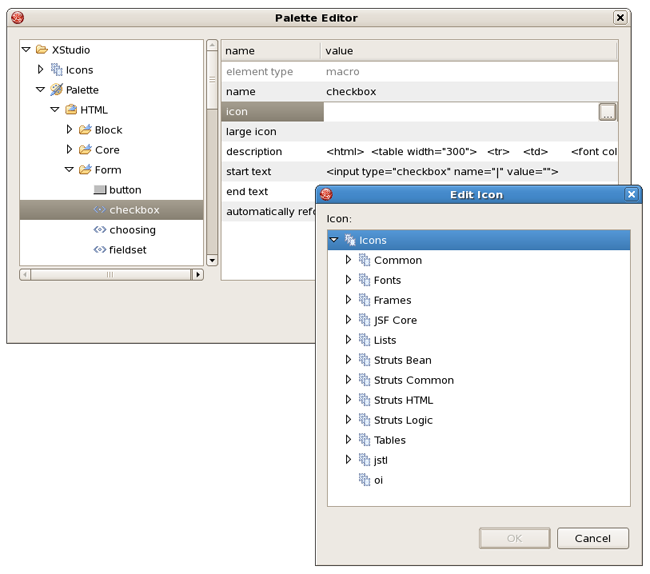
In the Palette Editor window(Figure 5.1. "Palette Editor") we can see that every group contains its own subgroups. For example, JSF includes Core, Facelets, HTML. So, in the Palette every group has the next view: <Group name> <Subgroup name>.
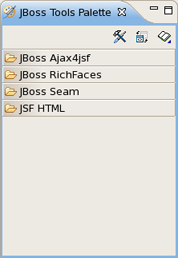
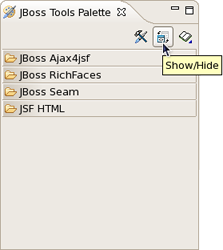
By default the Palette is represented in Web Development Perspective with four groups(Figure 5.2. "JBoss Tools Palette"). If you can't see it, select Window > Show View Other... > JBoos Tools Web > JBoss Tools Palette from the menu bar.
By using Show/Hide button you can add any predefined group of tag libraries. It's also possible to create your own group.
A new tag can be added into any text file including jsp, xhtml и htm(l).
It's very simple to do this. Place the cursor in the JSP page where you want to add a tag and then click the tag in the palette. In the example below, the commandButton tag has been inserted. Notice also that if you place the cursor over any tag, a balloon tip is shown with all the "tag" attributes.
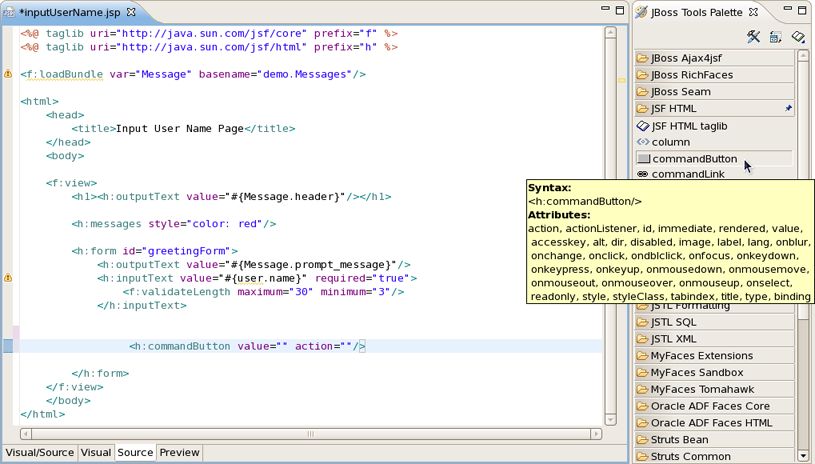
The cursor position after adding a tag into a file is specified by "|" symbol in the tag template on the right in the Palette Editor window.
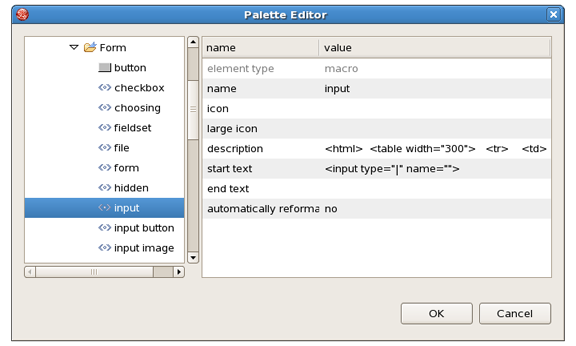
Above you can see where the cursor position for HTML/Form/input is set. So, after adding this tag into your file the cursor will be in the attribute "type". Then, you can straight use the combination of buttons Ctrl + Space to inquire about a prompting.
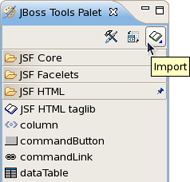
There are two ways to add any custom or 3rd party tag library to the JBoss Tools Palette:
Drag-and-drop from the Web Projects view
The Import button on the JBoss Tools Palette
Before you can add your custom component library, you need to make sure it is included in your project. Either place the ".tld" file or the ".jar" that includes your tag library under the lib folder in your project.
Switch to the Web Projects view and expand the Tag Libraries folder. If the view not active, select Window > Show View > Web Projects from the menu bar.
Also make sure that the JBoss Tools Palette is open. Select the tag library that you want to add and simply drag-and-drop it on to the JBoss Tools Palette.
You will see the following dialog window. As you can see JBoss Developer Studio takes care of all the details. You just need to set the Group name to which to add this tag library. You can either add this tag library to an existing Group or just create a new one.
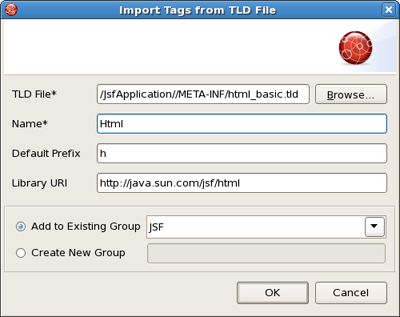
Once you are finished, you will see the new tag library added to the JBoss Tools Palette.

There is possibility to configure the JBoss Tools Palette:
to edit the palette content by adding, removing or changing the palette elements
to show/hide groups, subgroups
to import groups, subgroups

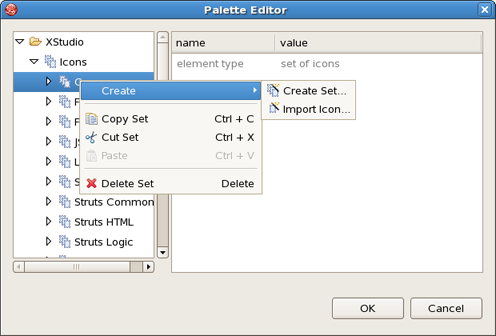
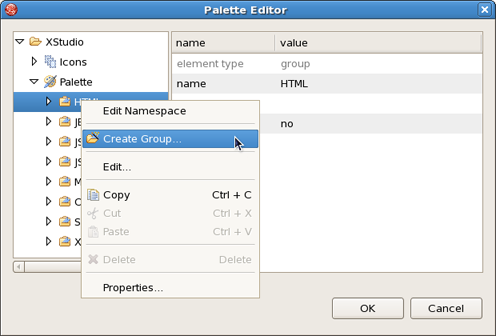
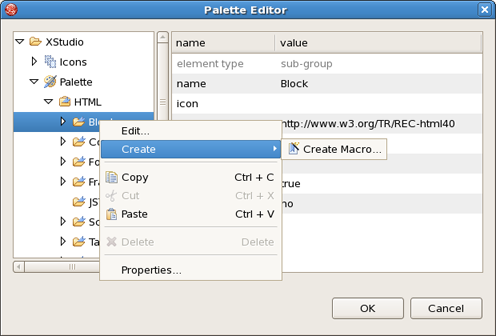
To edit the Pallete view use Edit button. The Palette Editor provides following possibilities:
to work with set of icons.
to edit icons in the chosen set
to edit a group
to edit a subgroup
to edit a subgroup content
to edit the Palette element or macro
Parameters of the Palette element are put into the table on the right. Table cells are provided with editors and modal dialogue windows for choosing necessary icons. For 'start text' and 'end text'(or macro) there is possibility to control the cursor position by using "|" symbol.


Show/Hide is a very useful feature that allows you to control the number of tag groups that are shown on the palette.
Click Show/Hide button
In the dialog Show/Hide Drawers check the groups you want to be shown on the palette:
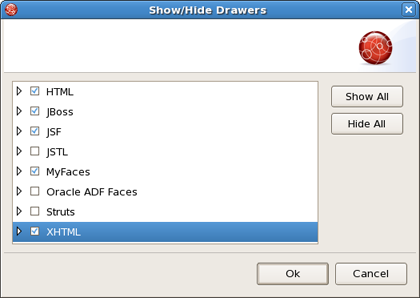
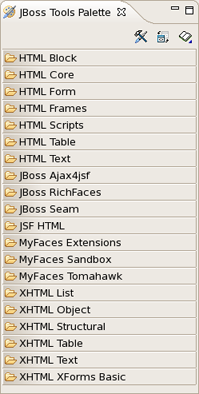
Click OK . The new groups will now be displayed on the palette:
The Import button lets you add a custom or 3rd party tag library to JBoss Tools Palette. See here how to add.

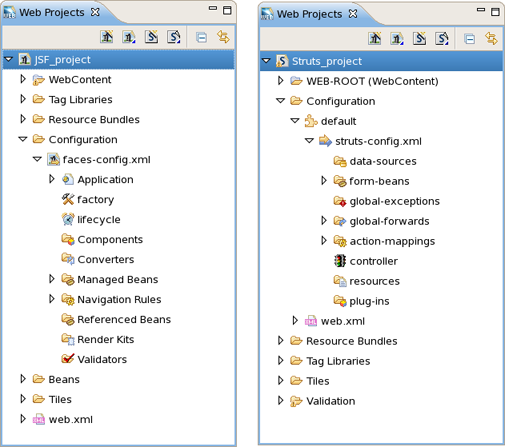
Web Projects is a special view that comes with JBoss Developer Studio.
If the Web Projects view's tab is not visible next to the Package Explorer tab, select Window > Show View > Web Projects from the menu bar.
With the Web Projects view, you can:
Visualize the project better because the project artifacts for JSF and Struts projects are organized and displayed by function.
- Select these kinds of items to drag and drop into JSP pages:
JSF managed bean attributes
JSF navigation rules outcomes
Property file values
Tag library files
Tags from tag libraries
JSP page links
Use context menus to develop the application (all create and edit functions are available)
Use icon shortcuts to create and import JSF and Struts projects
Expand and inspect tag library files
- Select custom and third-party tag libraries to drag and drop onto the JBoss Tools Palette
The Web Projects view organizes your project in a different way. The physical structure of course stays the same. The new organization combines common project artifacts together which makes it simpler to locate what you are looking for and develop.
The screen shot below shows a JSF project and a Struts project in Web Projects view.
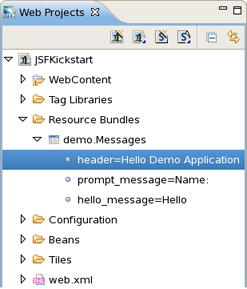
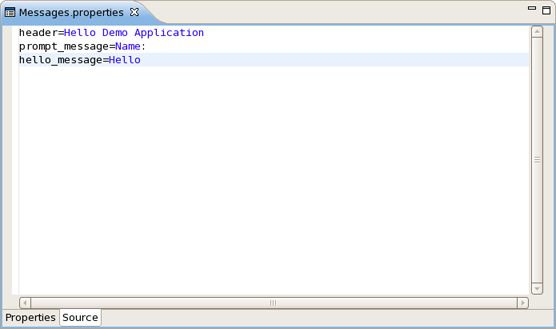
Expand the Resources Bundles folder that holds all the Property files in your project. Select the file from which you want to add the property and then select the property.
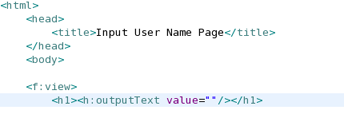
We will be dragging and dropping a property file value inside the outputText tag for the "value" attribute.
Select the property:
Drag the property and drop it between the quotes for the value attribute in the JSP file. Notice that JBoss Developer Studio added the correctly formatted expression for referring to the property value: #{Message.header} automatically.
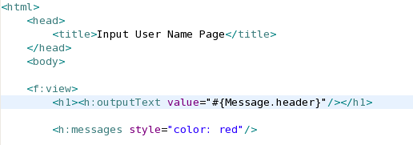
You can actually place the tag anywhere in the page, not just inside an existing tag. In this case, JBoss Developer Studio will place the complete tag <h:outputText value="#{Message.header}"/> in the page.
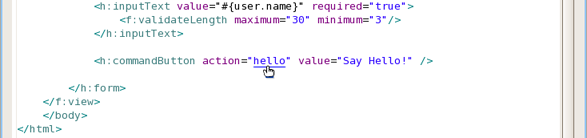
Select a "managed bean" attribute and then drag and drop it onto the JSP page. We are going to place it inside the "value" attribute of the inputText tag.
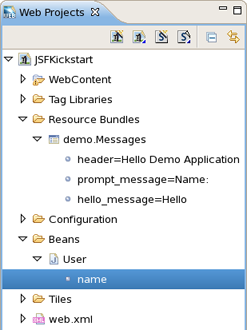
Once again, JBoss Developer Studio adds the correct expression, #{user.name}.

Select the navigation rule under Configuration > faces-config.xml > Navigation Rules:
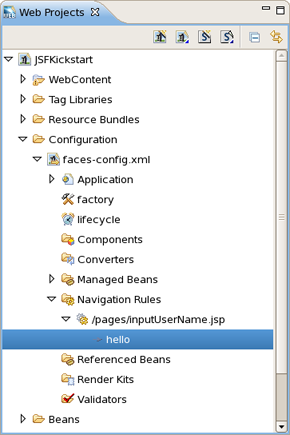
Drag and drop it inside the commandButton tag:

You could do the same if the navigation rule was defined inside an action method:

Here is how it would look after drag and drop:

Select a TLD file:
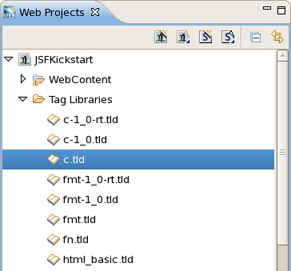
Then drag and drop it onto the JSP page to add a declaration at the top of the page:

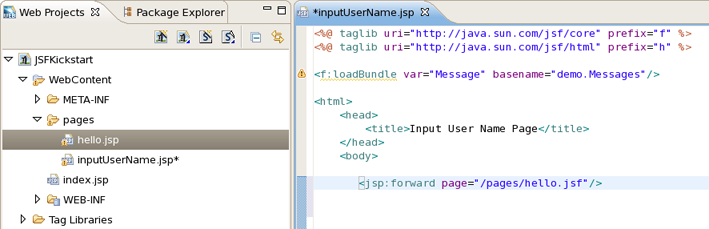
It is also possible to develop your application right from the Web Projects view. Simply right-click any node in the tree and select an appropriate action from the context menu. For instance, this screen capture shows creating a new navigation rule.
You can easily expand any TLD file in the project. Browse to the Tag Libraries folder. Right-click a TLD file and select Expand. The TLD file will now be expanded.
You can then select any tag and drag it onto a JSP page.
Read Adding Tag Libraries to learn about this.
As you are developing your project, JBoss Developer Studio Verification constantly provides dynamic validation, consistency checking and error checking. This greatly reduces your development time as it allows you to catch many of the errors during development. JBoss Developer Studio provides dynamic verification for both JSF and Struts projects.
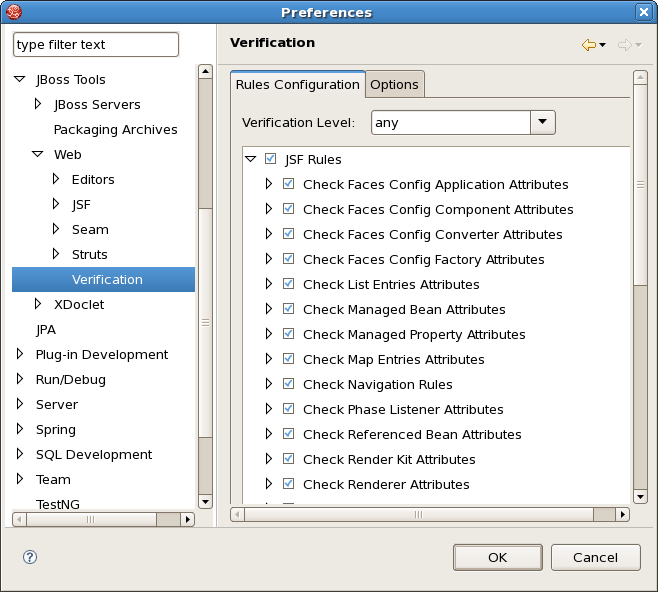
JBoss Developer Studio checks for many different rules for a JSF project that can be configured by selecting Window > Preferences from the menu bar, selecting JBoss Tools > Web > Verification from the Preferences dialog box and then expanding the JSF Rules node.
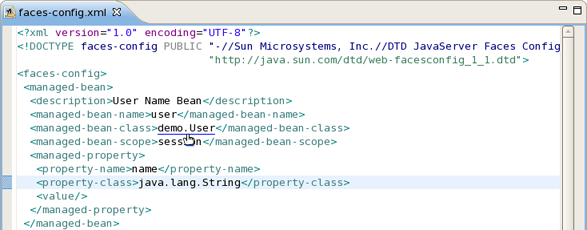
Suppose you are working in the Source viewer for a JSF configuration file as shown below:
While typing a class name, you might make a minor typo (like "jsfHello.PersonBean9" instead of "jsfHello.PersonBean"). After saving the file, verification checks to make sure everything is correct and finds the error below:
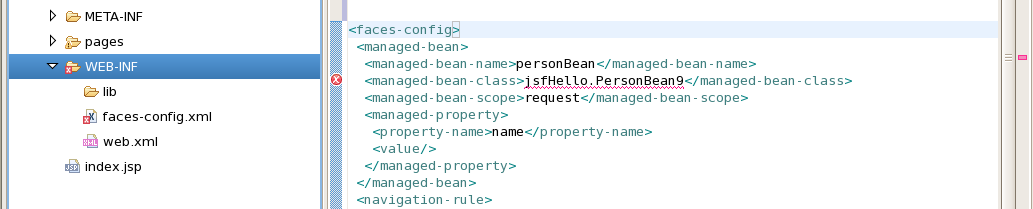
Notice that the Package Explorer View shows a marked folder and a marked file where the error is.
You can place the cursor over the line with an error message and get a detailed error message:

Verification also checks navigation rules:
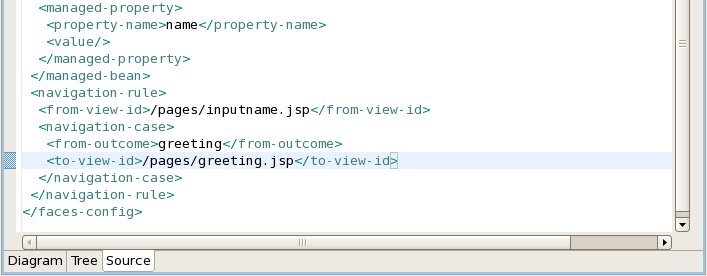
If you provide a page name that does not exist, verification will let you know about that:

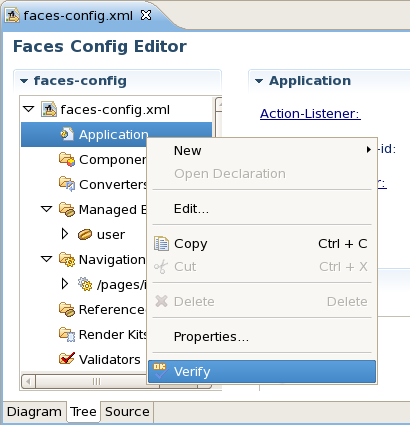
You can always call up verification explicitly by right-clicking any element in the tree and selecting Verify from the context menu. This works from both the Tree and Diagram viewers for the JSF configuration file editor. You can also invoke verification from the Web Projects view. Below we are checking all of the elements in the configuration file.
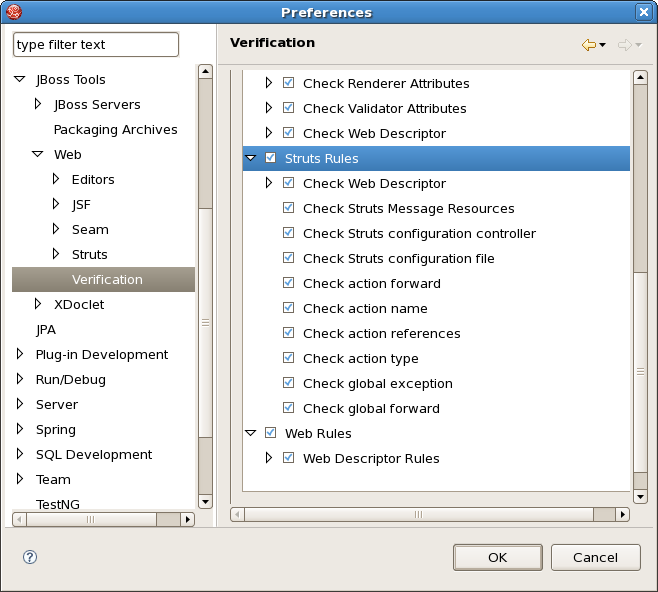
JBoss Developer Studio provides the same functionality for Struts projects. To configure Struts project verification select Window > Preferences from the menu bar, select JBoss Tools > Web > Verification from the Preferences dialog box and then expand the Struts Rules node.
Suppose you are working in the Source viewer for a Struts configuration file as shown below:
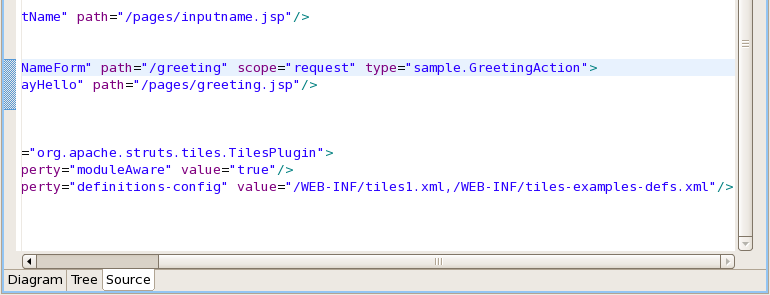
While typing a class name or entering it from the graphical editor, you might make a minor typo (like "sample.GreetingAction1" instead of "sample.GreetingAction"). After saving the file, verification checks to make sure everything is correct and finds the error below:

Notice that the Package Explorer View shows a marked folder and a marked file where the error is.
You can place the cursor over the line with the error to view a detailed error message:

The verification also checks to make sure you have specified the correct JSP page for the forward:

Once you place the cursor over the line, you can see the error message:

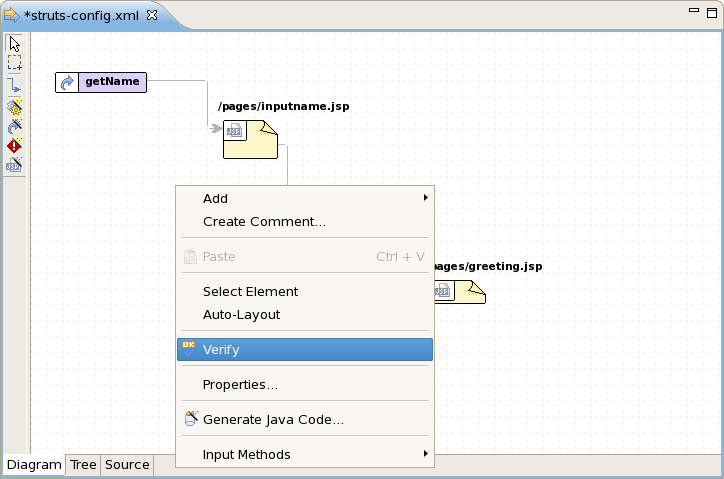
You can always invoke the verification by switching to the Diagram viewer, right-clicking and selecting Verify from the context menu:
JBDS is supplied with a huge range of various editors for different file types.
JBoss Developer Studio has powerful editor features that help you easily navigate within your application and make use of content and code assist no matter what project file (jsp, xhtml, xml, css, etc.) you are working on.
OpenOn let's you easily navigate through your project without using the Package Explorer view (project tree). With OpenOn, you can simply click on a reference to another file and that file will be opened.
OpenOn is available for the following files:
XML files
JSP/XHTML Pages
Java files
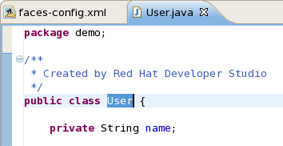
Press and hold down the Ctrl key. As you move the mouse cursor over different file references in the file, they display an underline. When you have the mouse cursor over the name of the file you want to open, click and the file will open in its own editor. In this example the managed bean NameBean will open.
This is the result of using OpenOn
You can also try OpenOn with defined attributes.

You can also open any JSP pages.
OpenOn is also very useful in JSP pages. It will allow you to quickly jump to the reference instead of having to hunt around in the project structure.
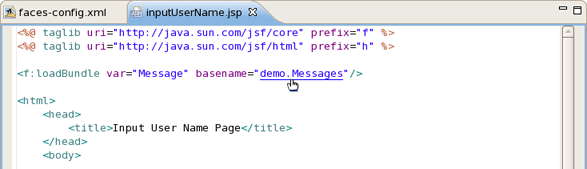
You can easily open the imported property files.
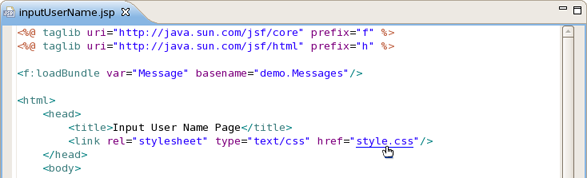
Use OpenOn to open a CSS file used with a JSP page:
Open managed beans:

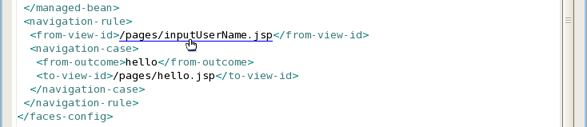
For JSP files in a JSF project, you can also easily open the navigation rules by applying OpenOn to the JSF tag for the navigation outcome:
Content assist is available when working with
Seam project files
JSF project files
Struts project files
JSP files
When working with JSF project in JBoss Developer Studio, you can use various Content Assist features while developing:
Content Assist for XML, JSP and JSF configuration files
Content Assist based on project data
Content Assist with graphical JSF editor
At any point when working with any XML, JSP and JSF configuration files Content Assist is available to help you. Simply type Ctrl-Space to see what is available.
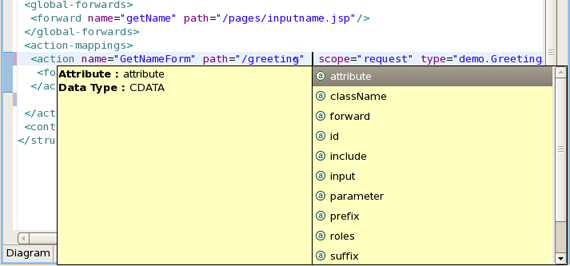
Content Assist for JSF configuration file:

Content Assist for JSF JSP file:

Content Assist for other JSF XML project files (web.xml shown):

JBoss Developer Studio takes Content Assist to the next level. Studio will constantly scan your project and you will be able to insert code into the JSP page from your project that includes:
Values from Property files
"Managed beans" attributes and methods
Navigation Rule Outcomes
JSF variables (context, request etc...)
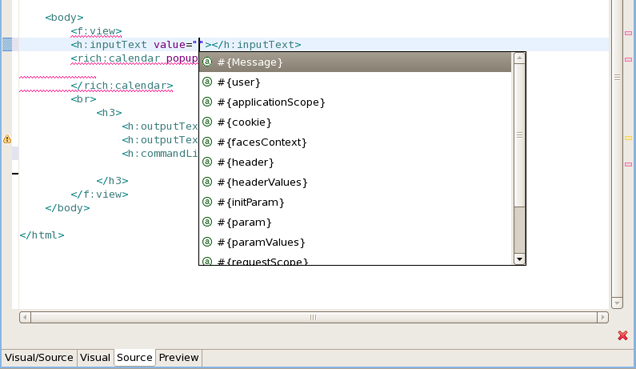
The first screenshot shows how to insert message from a Properties files. You simply put the cursor inside the "value" attribute and press Ctrl-Space . JBoss Developer Studio will scan your project and show a list of possible values to insert.

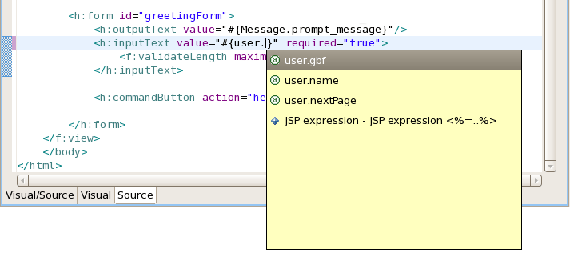
In the following screen shot we are inserting a "Managed bean" attribute value. Again, by simply clicking Ctrl-Space , JBoss Developer Studio will show a list of all possible values that you can insert:
Once you select a Managed bean, it will show you a list of all available attributes for the selected Managed bean (userBean).
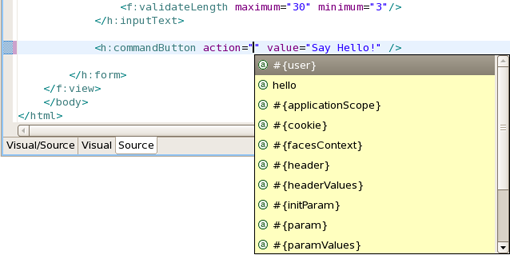
Code Assist based on project data will also prompt you for navigation rules that exist in your JSF configuration file.
JBoss Developer Studio also provides Content Assist when working within the Tree JSF configuration editor. Just click Ctrl-Space .

If a field contains right class name and you click a link near the field you will come to the file with this class otherwise a new Java Class dialog will be shown:
If you entered an incorrect name in the field error markers will be shown for field labels and tree items:

To add a new property to a managed bean expand Managed Beans and select <name_of_bean>
Click Add button in the Properties panel
In the dialog Add Property define a new property. From here also you can generate setters and getters methods:
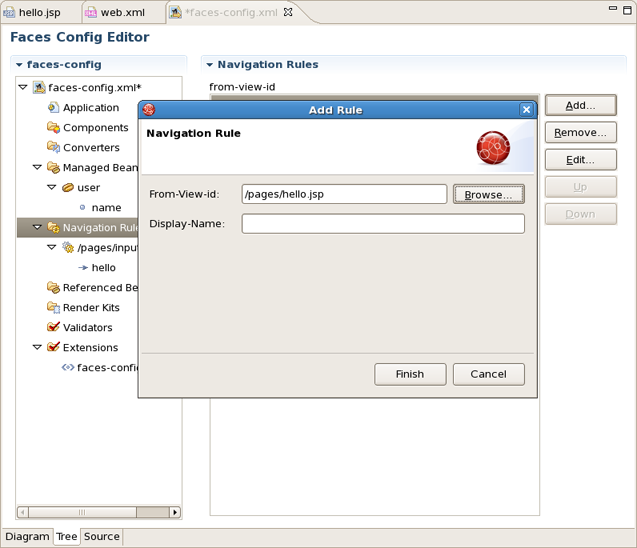
Here you can also add an additional navigation rule to the faces-config.xml file.
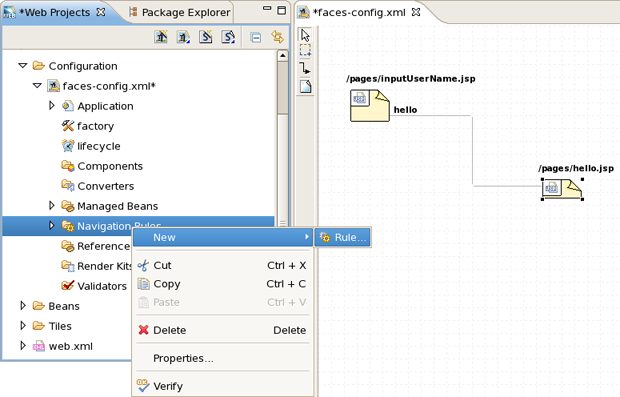
Select Navigation Rules
Click Add button
In the dialog Add Rule define a view and give a name to the rule. Click Finish:

JBDS provides full code completion for JSF tags:
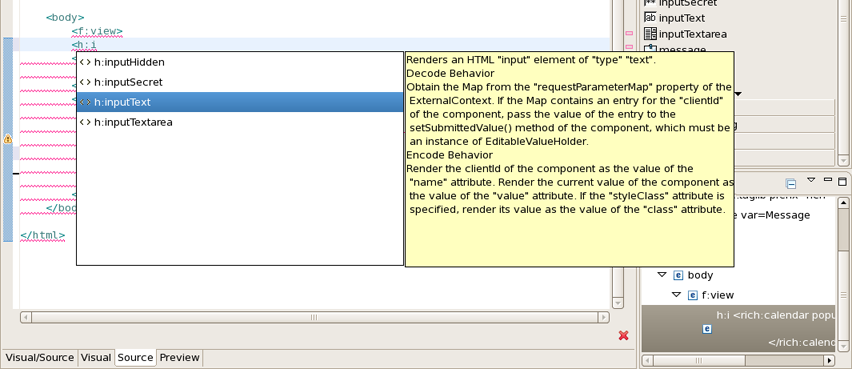
When the tag is selected the required attributes, if there any, are already inserted and the cursor is located to the first attribute. As this point you can ask for attribute proposals.
Content assist for HTML tags has the same mechanism as for JSF tags:
You can use as well attributes proposals for HTML tags:


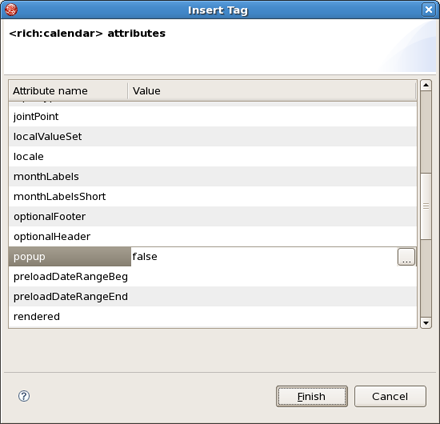
JBDS indeed provides code completion for Rich Faces framework components. All you have to do is to install Rich Faces libraries into your project. See here how to install.
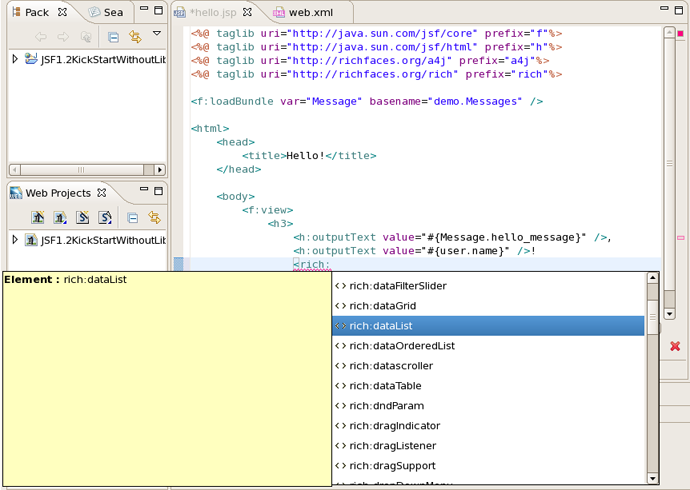
To insert a Rich Faces component on a page expand JBoss Rich Faces group on the palette
Click on some component
Put the needed attributes in the Insert Tag dialog and click Finish button
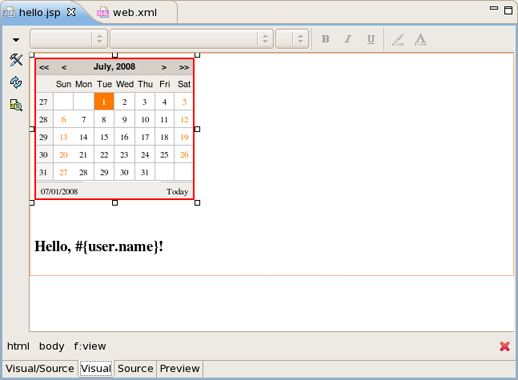
The Rich Faces tag will be inserted on your page displayed in source and visual modes:
Here is what you need to do to add project based code assist to a custom component added in JBoss Developer Studio:
Create a new xml file in <JBDS_home>studio/eclipse/plugins/org.jboss.tools.common.kb_***/schemas/tld/ . For example call it JeniaFaces.xml. The file should be written according to <JBDS_home>/studio/eclipse/plugins/org.jboss.tools.common.kb/kb.jar/org/jboss/tools/common/kb/kb-schema_1.0.dtd
Here is how you set what is available for code assist:
Adds code assist for JSF pre-defined objects, such as value= "#{param}" :
<AttributeType ...>

       <proposal type="jsfVariables"/>

</AttributeType>
Adds bundle resource (property file) code assist:
<AttributeType ...>

       <proposal type="bundleProperty"/>

</AttributeType>
Adds managed bean property code assist:
<AttributeType ...>

       <proposal type="beanProperty"/>

</AttributeType>
Adds managed bean property but with a specified type:
<AttributeType ...>

       <proposal type="beanProperty">

          <param name="type" value="java.lang.Boolean"/>

       </proposal>

</AttributeType>
Adds managed bean method with a signature:
<AttributeType ...>

       <proposal type="beanMethodBySignature">

          <param name="paramType" value="javax.faces.context.FacesContext"/>

          <param name="paramType" value="javax.faces.component.UIComponent"/>

          <param name="paramType" value="java.lang.Object"/>

          <param name="returnType" value="void"/>

       </proposal>

</AttributeType>
Add information on your xml file in <JBDS_home>/studio/eclipse/plugins/org.jboss.common.kb_***/plugin.xml
         <tld

            jsf="true"

            name="Jenia Faces"

            schema-location="schemas/tld/myJSF.xml"

            uri="http://www.jenia.org/jsf/dataTools"/>
Restart Eclipse. You should now have code assist for the component.
JBoss Developer Studio offers the flexibility to edit any files in either source or extra visual modes at the same time.
The project is yours and so is the source. JBoss Developer Studio provides you many different graphical editors to speed your application development. At the same time, you always have full control over all project source files. Any changes you make in the source view, will immediately appear in the graphical view.
The JSF configuration file editor has three views: Diagram, Tree and Source. All views are synchronized, you can edit the file in any view.
The same applies to all other JBoss Developer Studio editors.
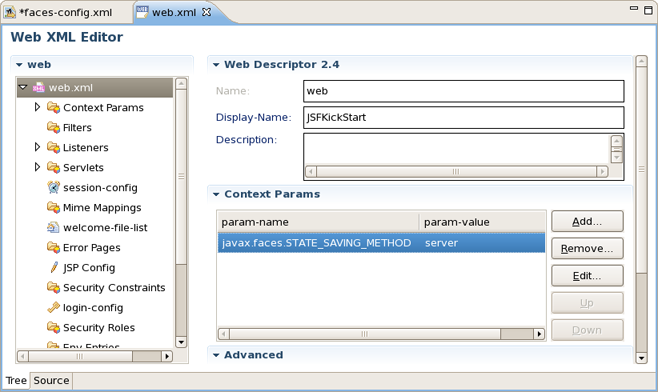
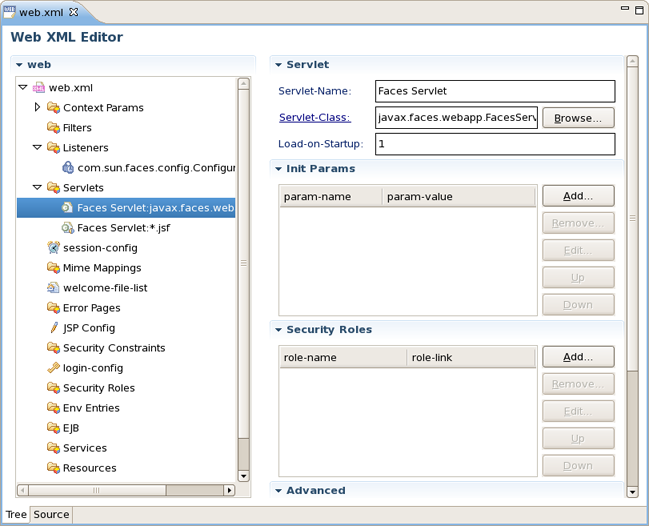
Web XML editor is shown. Web XML editor has a graphical view (Tree) and source (Source).
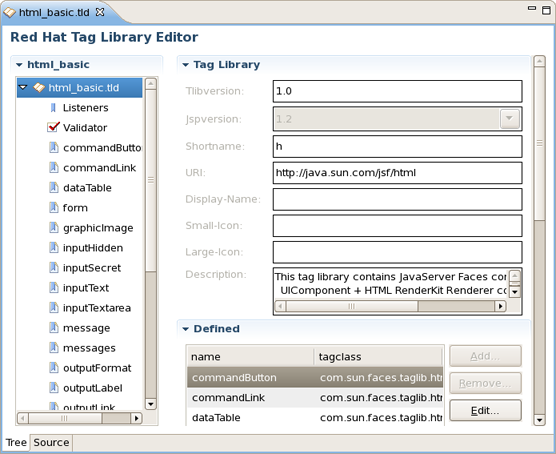
JBoss Developer Studio TLD file editor shown in Tree view. At any point you can edit the source by going switching to Source view.

The Struts configuration file editor has three views: Diagram, Tree and Source. All views are synchronized, you can edit the file in any view.
Source view. Any changes here will immediately appear in all other views.
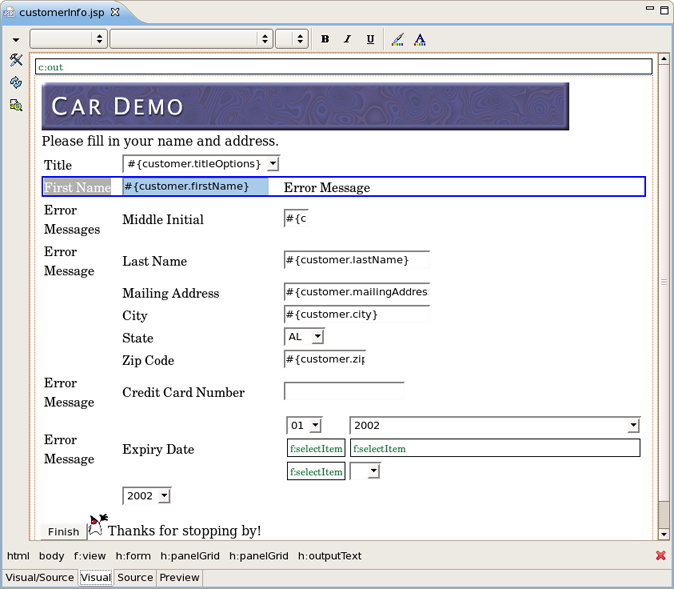
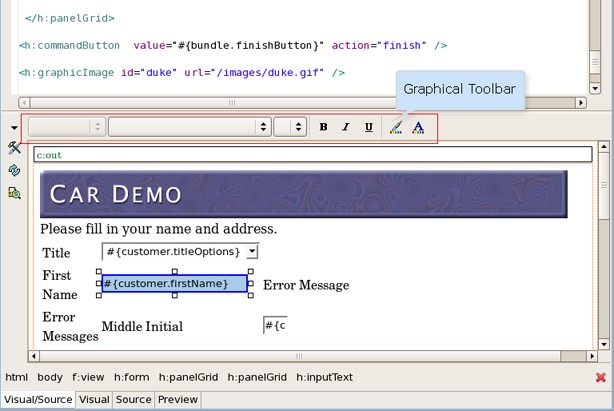
JBoss Developer Studio comes with a powerful and customizable Visual Page Editor (VPE). You can use the Visual Page Editor to develop an application using any technology: JSF, Struts, JSP, HTML and others.
Current VPE version has four tabs: Visual/Source, Visual, Source and Preview.
Split screen design with instant synchronization between source and visual views:
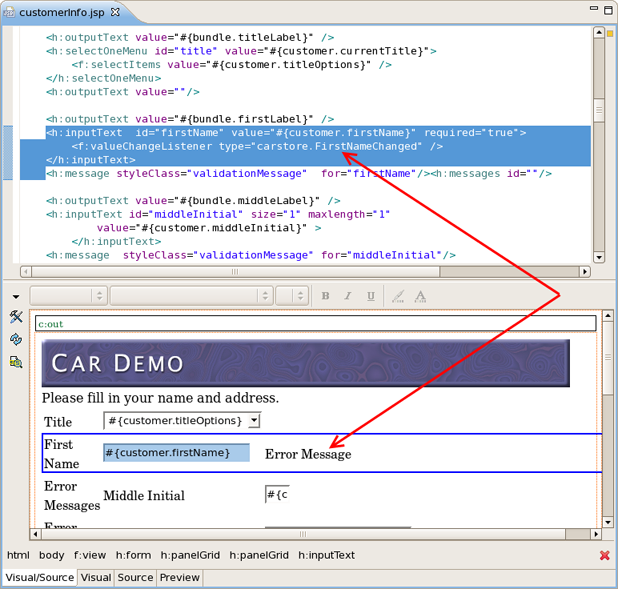
You can also switch to pure Visual design:
Or work just in Source view. Note that selection bar is now available not only in Visual mode but also in Source one:
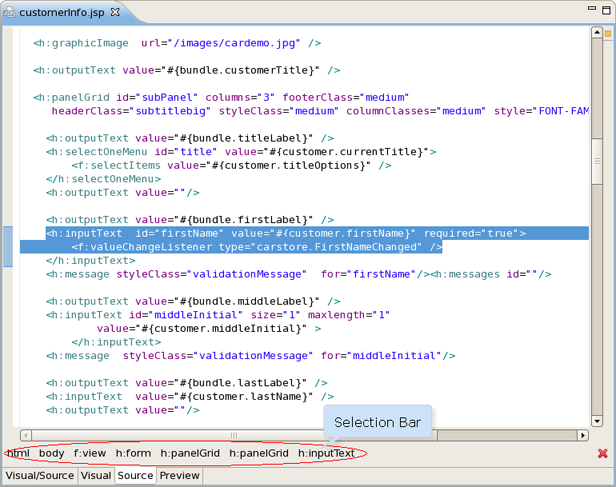
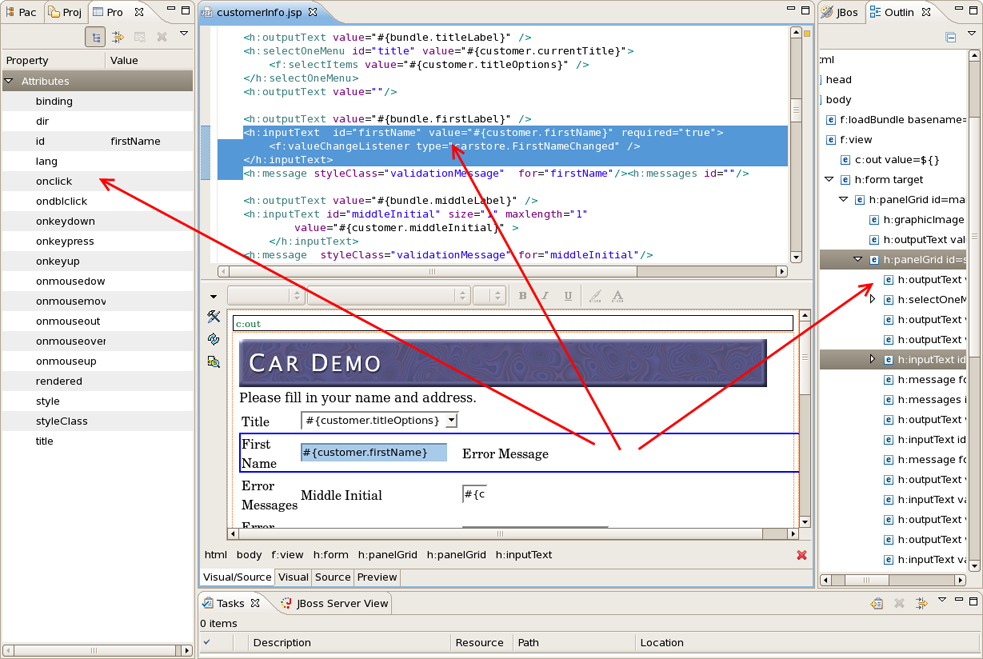
No matter what view you select, you get full integration with Properties and Outline views:
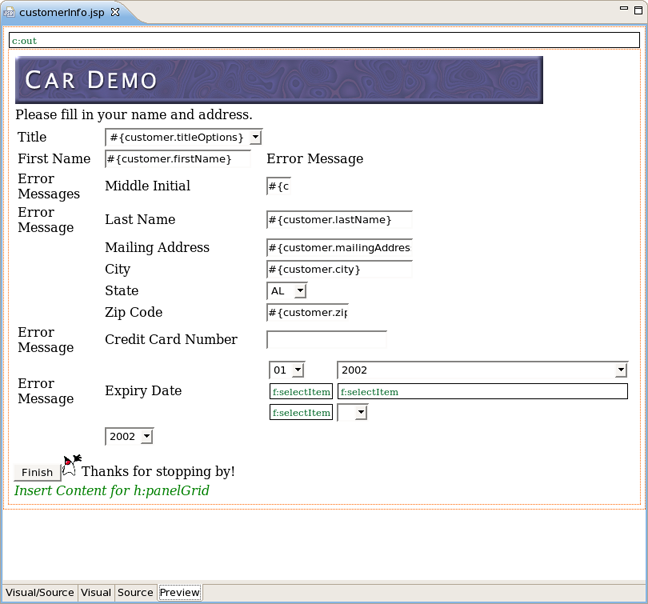
Preview mode is read-only, it only shows how the page will look like in a browser.
Use the graphical toolbar to add inline styling to any tag.
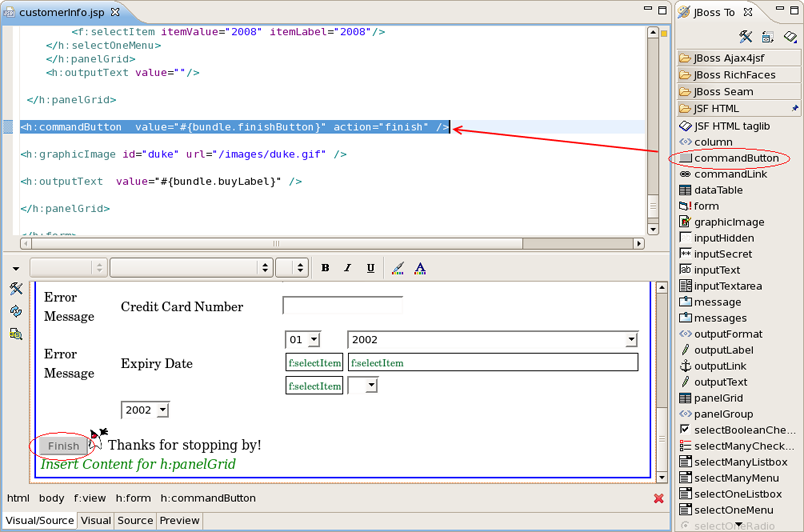
With just a click or drag-and-drop insert any tags from the palette on to the page you are editing.
There are three buttons on the Visual Page Editor left side:
Preferences
Provides quick access to Visual Page Editor preferences.
Refresh
Refresh displaying information with this button.
Page Design Options
This button leads to page design options.
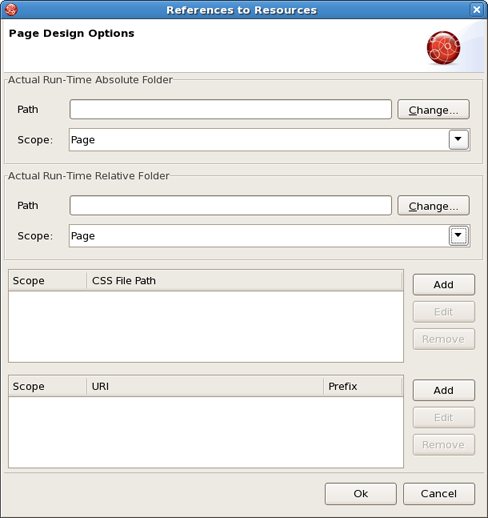
This dialog let's you set resources which are usually only resolved in runtime. To set a stylesheet, click Add (for CSS File Path section) and add your stylesheet. It works when CSS is defined on your page in the following way:
Code:
<link rel="stylesheet" type="text/css" href="#{facesContext.externalContext.requestContextPath}/style.css"/>
This will work fine in runtime, but the Visual Page Editor doesn't know what requestContextPath in design time is.
The next section (URI), let's you add URI taglibs if you are using includes so that the editor knows where to find the tag libraries.
The first two sections let you define actual runtime folders. Here is an example.
Let's say you have the following project structure:
WebContent/

  pages/

    img/

       a.gif

    header.jsp

  main.jsp
header.jsp content:
My Header

<img src="img/a.gif"/>
main.jsp:
<jsp:include page="pages/header.jsp" />
When you open main.jsp in Visual Page Editor, it will not be able to resolve the image from the header, however, it will work fine in runtime. To fix this in design time, click the Page Design Options button and set Actual Run-Time Relative Folder to <project>WebContent > pages and you will see the image appear.
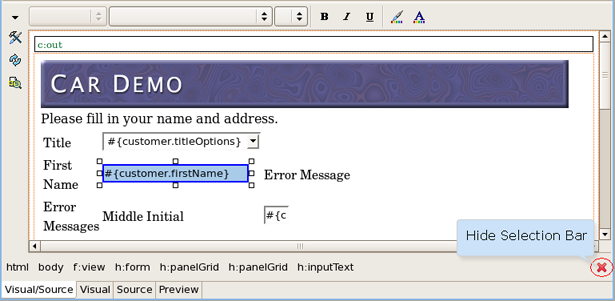
Hide Selection bar
By clicking on the component in Visual view or selecting a code snippet in Source mode you can see the tags tree. If you want to hide the selection bar, use the "Hide Selection Bar" button on the lower right side.
Linux users may need to do the following to get the Visual Editor to work correctly on their machines.
The Visual Page Editor requires the library libstdc++.so.5. This library is contained in the compat-libstdc++-33.i386 package.
To install this package on Fedora Core or Red Hat Enterprise Linux run the following command:
yum install compat-libstdc++-33.i386
On any other rpm based distributions download libstdc++.so.5 and run the following command:
rpm -Uvh compat-libstdc++-33.i386
On Debian based distributives run the following command:
apt-get install compat-libstdc++-33.i386
In case you have the library installed and you still have issue with starting the visual page editor then close all browser views/editors and leave one visual page editor open and restart eclipse. This should force a load of the right XULRunner viewer.
When working in JBoss Tools JSP editor you are constantly provided with feedback and contextual error checking as you type.
JBoss Developer Studio comes with JSP design-time preview features. When designing JSP pages you can easily preview how they will look during runtime. You can even attach your stylesheet to the preview.
JSP preview is available for:
Struts Pages
JSF Pages
The preview features are available with Visual Page Editor.
Besides Visual Page Editor JBDS provides editors for editing project files of any types: properties, TLD, web.xml, tiles, and so on.
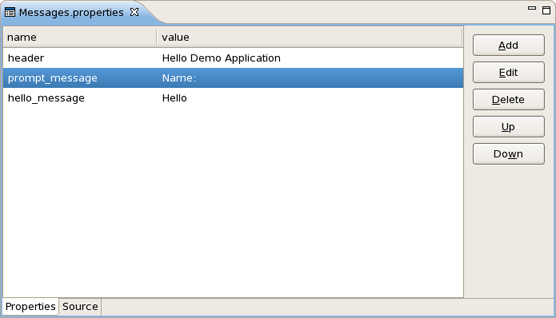
The Properties editor allows you to work in two different modes and also supports unicode characters.
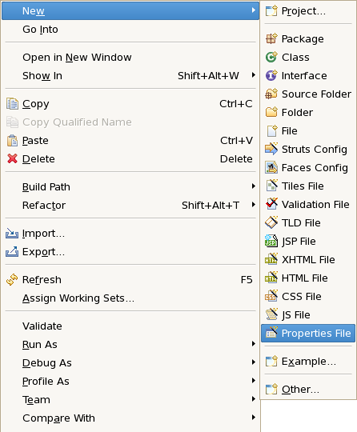
To create a new properties file, in the Package Explorer view, select New > Properties File from the right-click context menu on the folder where you want to create the file.
You can edit the file using a table-oriented "Properties" viewer:
You can also use a Source viewer for editing the file:
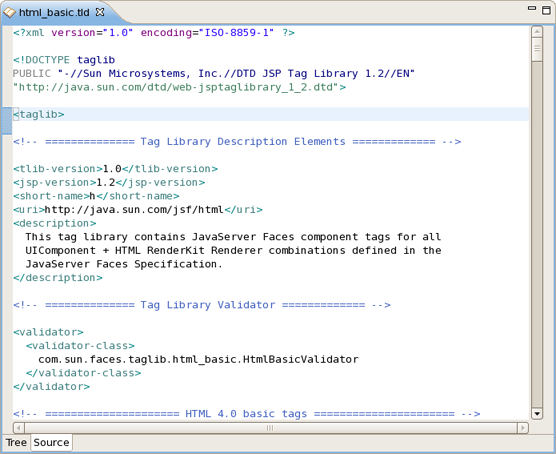
The TLD editor comes with same features you will find in all other JBoss Developer Studio editors:
Graphical and source edit modes
Validation and error checking
You can easily switch from Tree to Source by selecting the Source tab at the bottom of the editor.
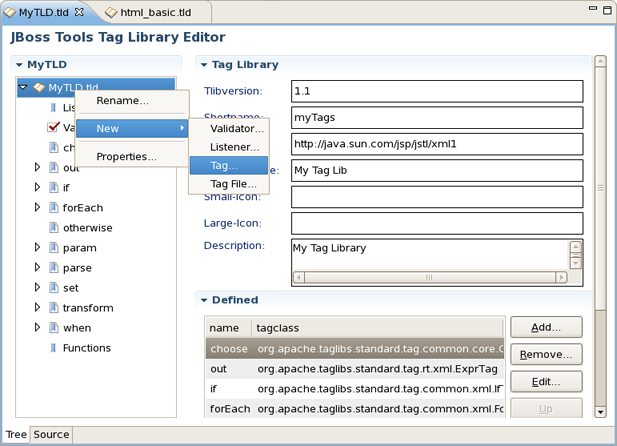
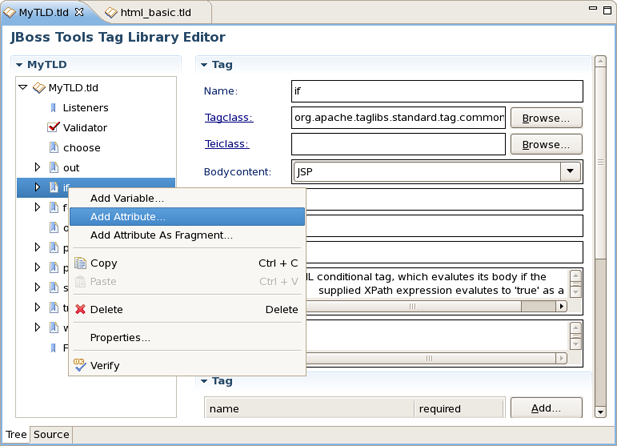
You can easily add a new tag:
You can also easily add a new attribute to an existing tag:
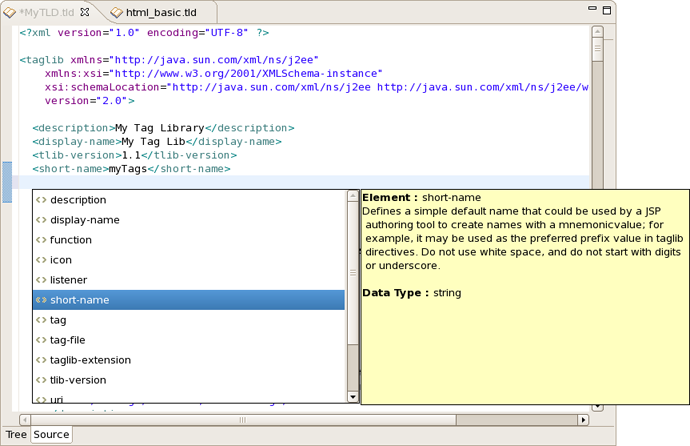
Content assist is available when editing the file using the Source viewer:
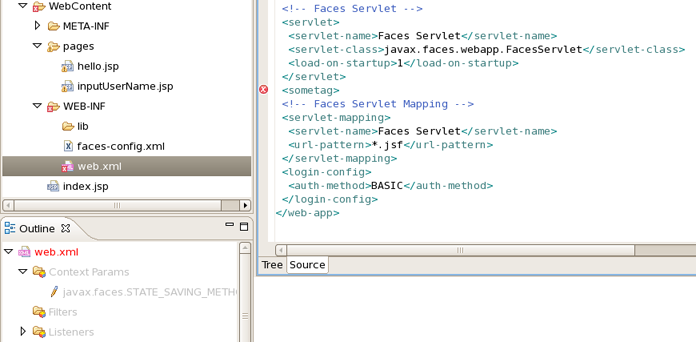
In the Source viewer, if at any point a tag is incorrect or incomplete, an error will be indicated next to the line and also in the Problems view below.
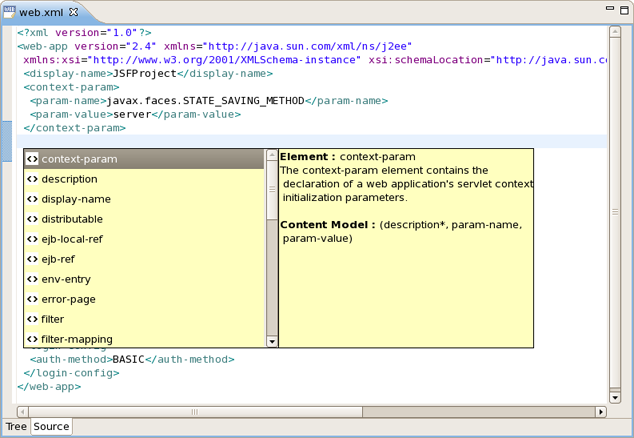
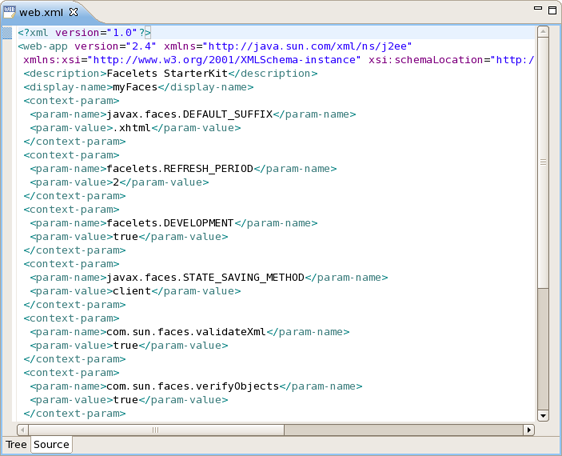
The Web Application File editor comes with the same features you will find in all other JBoss Developer Studio editors:
Graphical and source edit modes
Validation and error checking
You can add any new elements right in the Tree viewer:

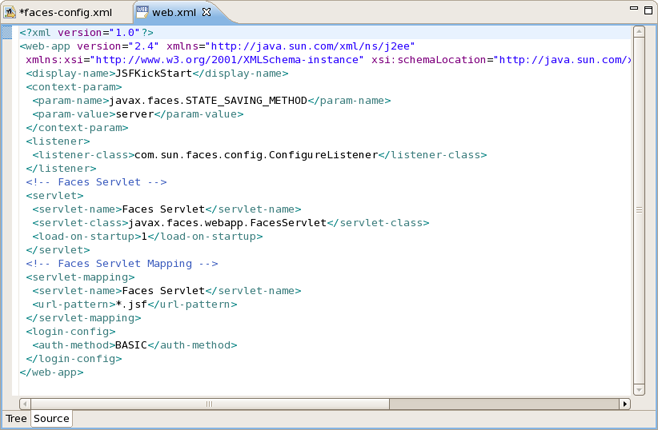
Switch to the Source viewer to edit the web.xml file by hand at any time:
Content assist is available in the Source viewer. Simply click CTRL-Space anywhere in the file.
The Tiles configuration file editor has three main viewers (modes): Tree (shown), Diagram and Source. The modes can be selected via the tabs at the bottom of the editor. Any changes made in one mode are immediately visible when you switch to any other mode.
When working in Source view, you always have all following features available:
Content Assist
Open On Selection
To create a new Tiles files, right click any folder and select New > Tiles Files :

In the Tree mode, the different elements of the Tiles file are organized into functional categories on the left-hand side and a form for editing the properties of currently selected items on the right-hand side.

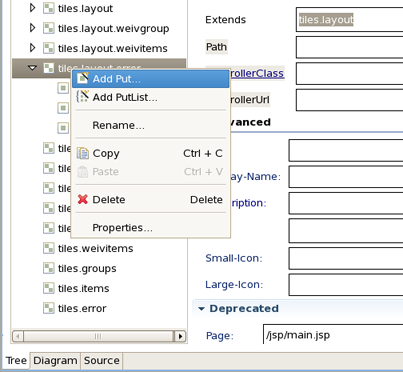
To edit the file, simply right click any node and select among the available actions:
The Diagram mode is shown below:
To create new definition, simply right click anywhere in the diagram:

You can also use the Diagram toolbar to make editing easier:

The Tiles editor also comes with a Source view that gives you full control over the source. Any changes here will immediately appear in when you switch to any of the other viewers.

Content assist is available in the Source mode.
Any errors are immediately reported as shown below:

You can also use the Outline view together with the editor's Source mode. Selecting any node in the Outline view will jump to that place in the source:
JBoss Developer Studio comes with a visual validation editor. To create a new validation file, right click any folder and select File > Validation File from the context menu.
The validation editor works through a number of viewers.
The Formsets viewer shows forms and their elements for which to define validation rules:
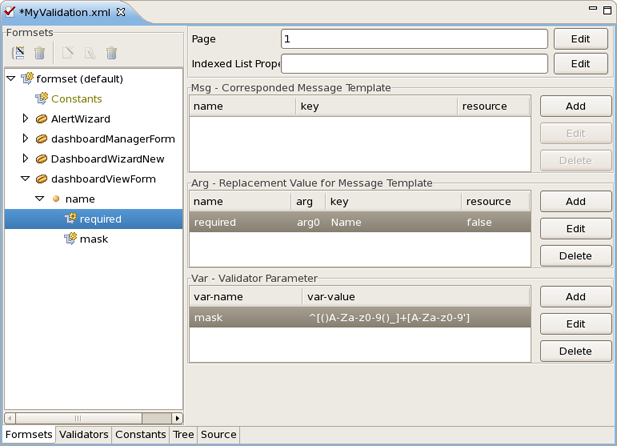
The Constants viewer lets you set constant values for your validation rules:

The validation file also can be viewed in a Tree viewer:
At any point you have full control over the source by switching to the Source viewer. Any editing in this viewer will immediately be available in the other viewers of this editor.

You can also open your own custom or Struts-standard validation-rules.xml file.
The Validators viewer shows the validation rules for a selected validator. You can of course add your own rules.

Here are the validation rules shown in the Source viewer.
JBoss Developer Studio bundles a Spring Framework editor from Spring IDE for Eclipse. Visit this site for the latest versions and documentation.
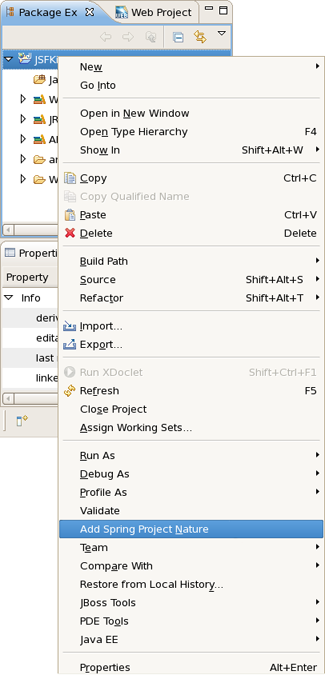
You can add a Spring Project Nature to an existing project by right-clicking on the project and selecting Adding Spring Project Nature from the context menu:
If you need to remove it you should select Remove Spring Project Nature from the context menu of your project.
Once the Nature is added, a Spring project will be decorated with a small "S" in the Package Explorer view.
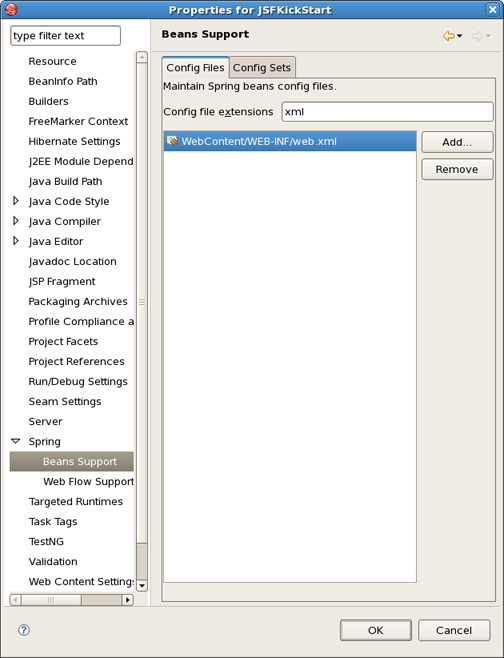
To add a Spring Configuration File with bean definitions open Properties dialog from the context menu of your project. Then select Spring > Beans Support on the left side.
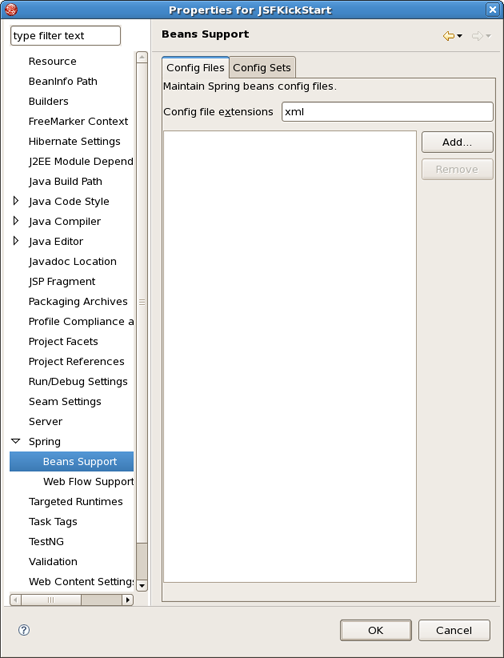
Click on Add button to choose the corresponding Spring Configuration File.
The added file will also be marked by an "S" in the Package Explorer view.
To activate the Spring Explorer view, select Window > Show View... > Other and then Spring > Spring Explorer .

This view shows a read-only outline view of the Spring Bean Configuration File.
The CSS editor comes with the same features you will find in all other JBoss Developer Studio editors.
Content assist
Validation and error checking
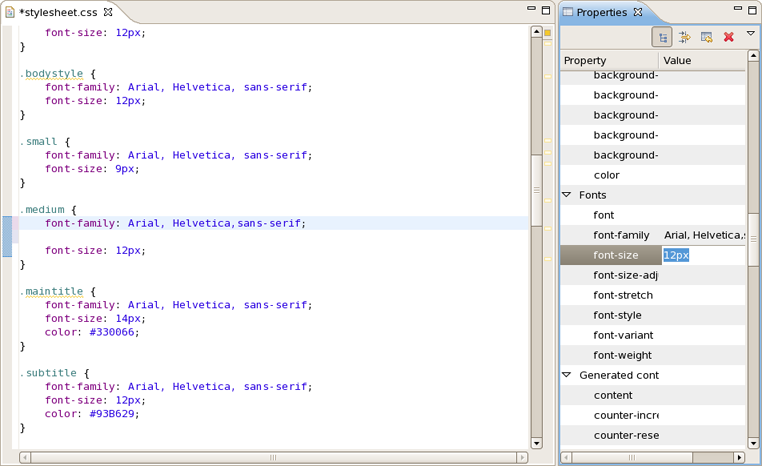
With the CSS (Cascading Style Sheet) editor, you can take advantage of code prompting:

And you can also use the Properties view next to the editor to edit existing stylesheet declaration properties:
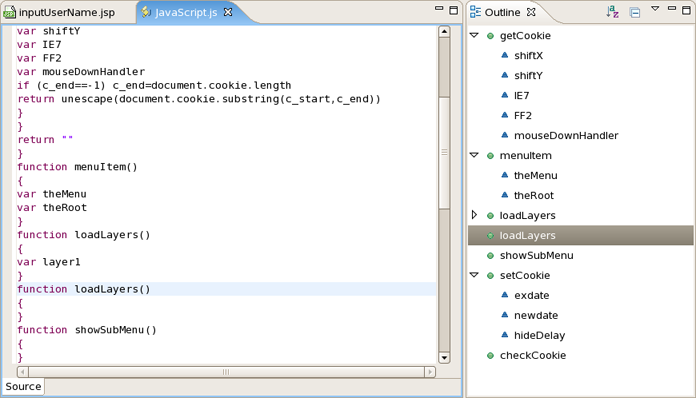
The JavaScript editor includes a Preview viewer and a Source viewer. In the Source viewer, you can use code assist:
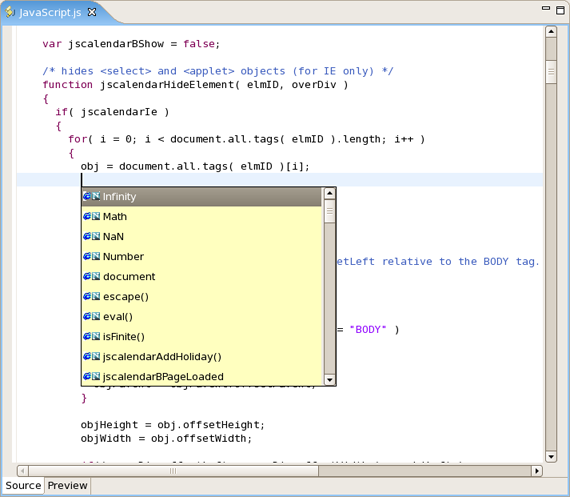
You can also use the Source viewer with the Outline view to navigate around the file:
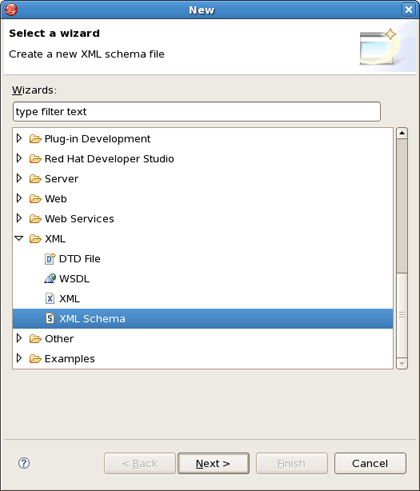
JBoss Developer Studio comes with an XSD Editor for XML Schema files. This editor comes from the Web Tools Project (WTP) (see WTP Getting Started).
To create a new XSD file, right-click a folder in the Package Explorer view, select New > Other... from the context menu and then select XML > XML Schema in the dialog box.
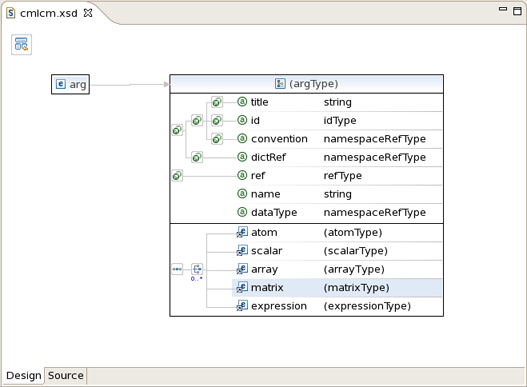
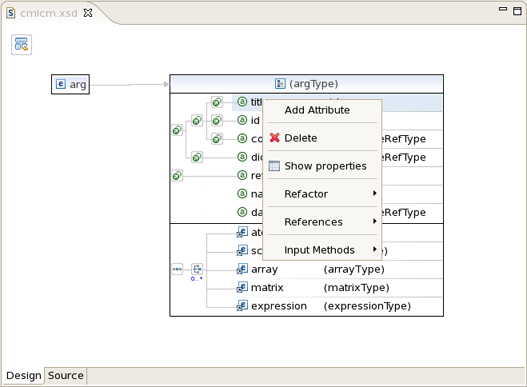
The XSD Editor includes two viewers for working on the file, a Design viewer and a Source viewer:

In the Design viewer, you can drill down on an element by double-clicking on it:
Various edit options are available when you right-click an element in the diagram:
You can also use the Properties view to edit a selected element:
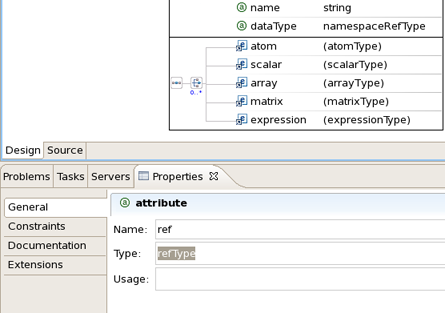
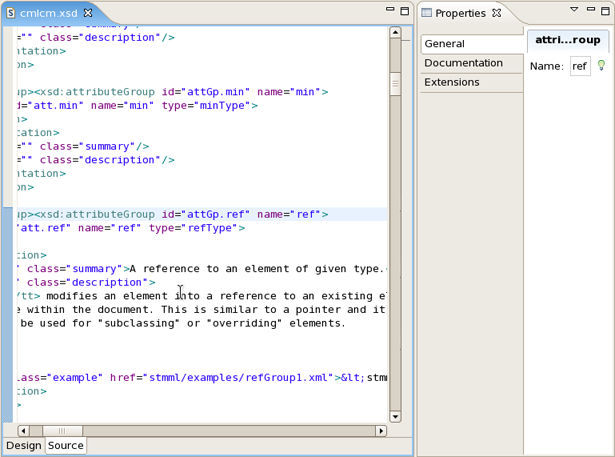
You can also use a Source viewer for the file. In this viewer, along with direct editing of the source code, you can also edit the file by using the Properties view on the right:
Configuring the various JBoss Developer Studio features is done via the Preferences screen by selecting Window > Preferences > JBoss Tools from the menu bar.
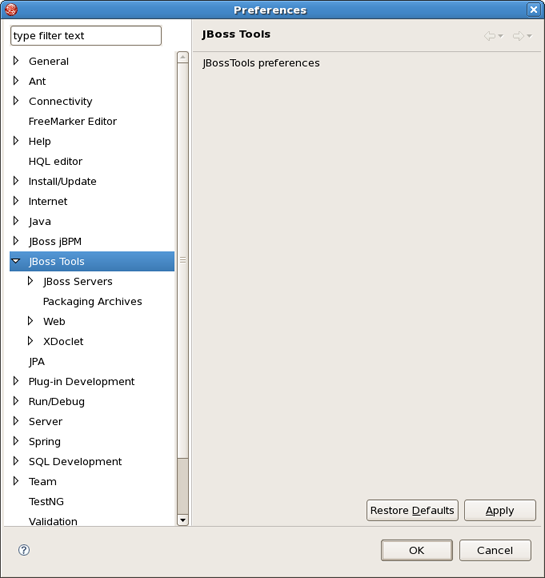
From this screen, you can select these more specific sets of JBoss Tools preferences:
- Code Assist
- Editors
- JBoss Servers
- JSF
- JSF Flow Diagram
- JSF Page
- JSF Propject
- Packaging Archives
- Plug-in Insets
- Resource Insets
- Seam
- Seam Validator
- Struts
- Struts Automatic
- Struts Customization
- Struts Flow Diagram
- Struts Pages
- Struts Project
- Struts Support
- Title Diagram
- Verification
- View
- Visual Page Editor
- XDoclet
- XDoclet Templets
- XDoclets Variables
Select JBoss Tools > XDoclet > Code Assist to see Code Assist preference page.
Here is what the Code Assist preference page looks like:

You can set various preferences for the editors that JBoss Developer Studio adds to the Eclipse environment by selectind JBoss Tools > Web > Editors.
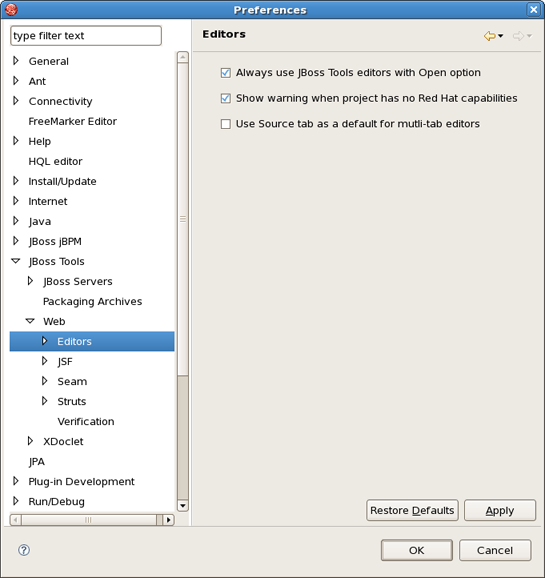
In the initial Editors screen, you can decide on some global settings for JBoss Tools editors. You can select whether an available JBoss Tools editor should always be the default editor for a type of file, whether the user should be warned that making a project an Red Hat project will make an JBoss Tools editor fully available for a particular type of file, and whether, for JBoss Tools editors, the Source mode should be the default instead of a visual mode.
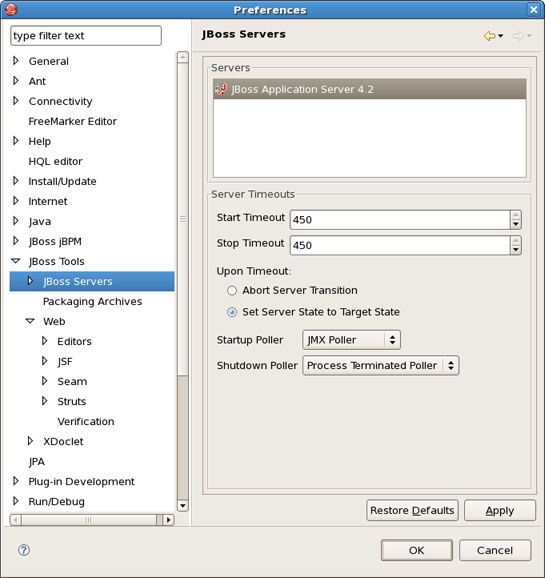
The following preferences can be changed on the JBoss Tools > JBoss Servers preference page.
Here is what the JBoss Servers preference page looks like:
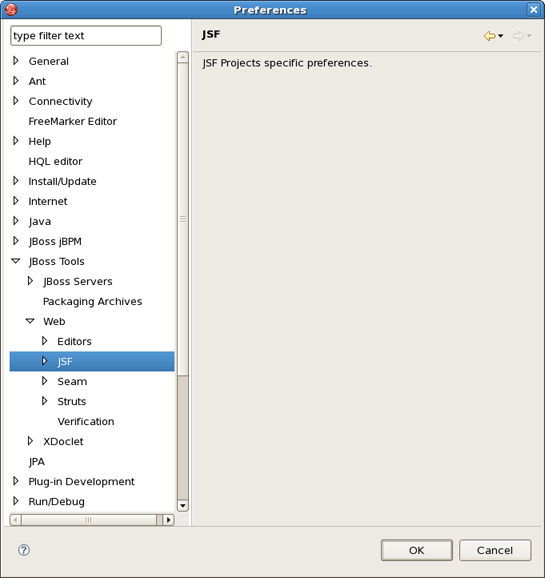
Select JBoss Tools > Web > JSF to get to the JSF Project specific preferences.
Selecting JBoss Tools > Web > Editors > JSF Flow Diagram allows you to specify some aspects of the Diagram mode of the JSF configuration file editor.
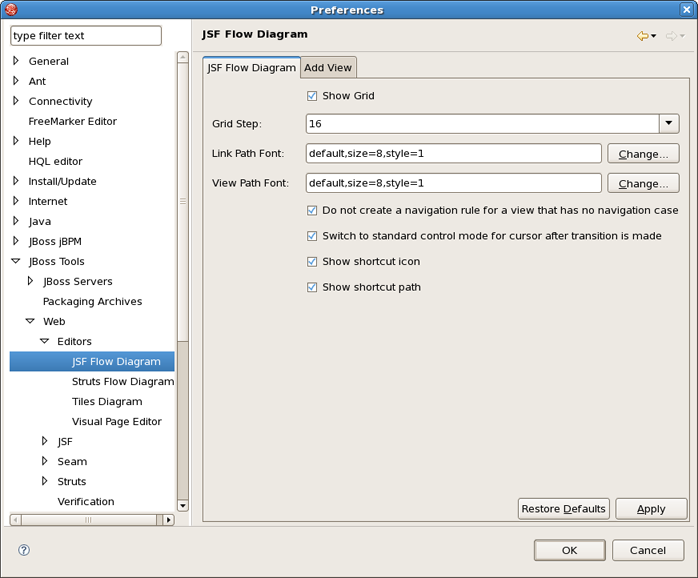
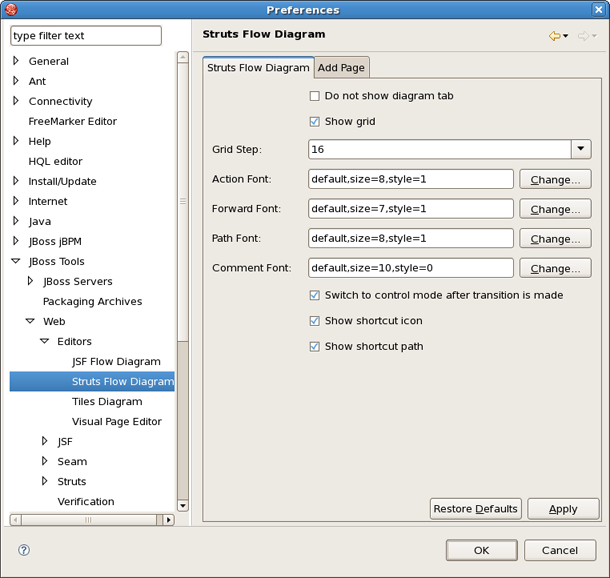
The first two items control the background grid for the diagram. The next two items allow you to control the appearance of the labels for views (pages) and the transitions between views. For these two items, clicking the Change... button allows you to assign a font with a dialog box.
The first check box determines whether a view in the diagram that doesn't have a transition connecting it to another view yet should be written to the source code as a partial navigation rule. The next check box determines whether the diagram cursor reverts immediately to the standard selection mode after it's used in the transition-drawing mode to draw a transition. Finally, the last two check boxes concern shortcuts. A shortcut is a transition that is there but isn't actually displayed in the diagram as going all the way to the target view it's connected to, in order to make the diagram clearer. With the check boxes, you can decide whether to display a small shortcut icon as part of the shortcut and also whether to display the target view as a label or not.
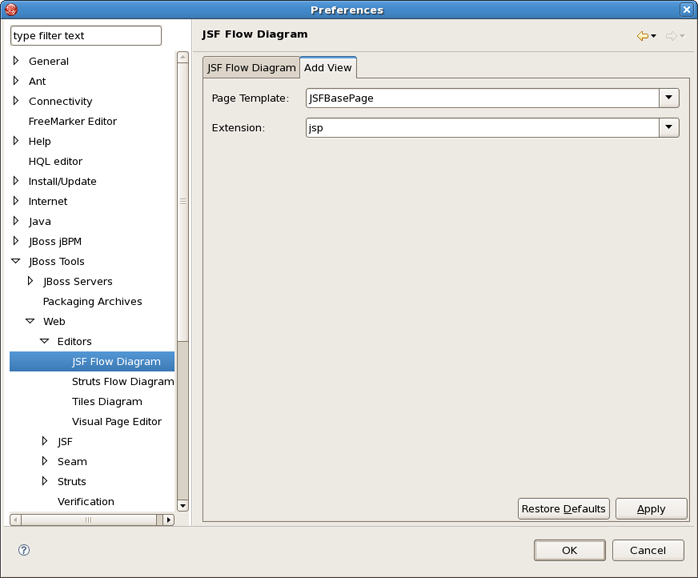
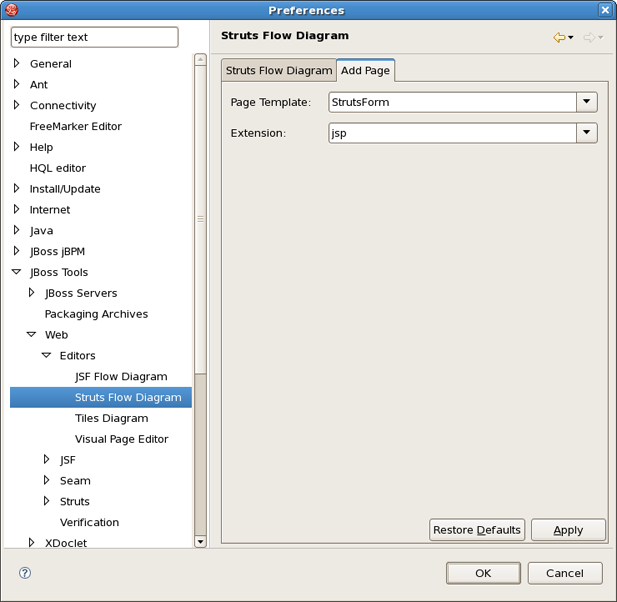
Selecting the Add Page tab in the JSF Flow Diagram screen allows you to determine the default template and file extension for views (pages) you add directly into the diagram using a context menu or the view-adding mode of the diagram cursor.
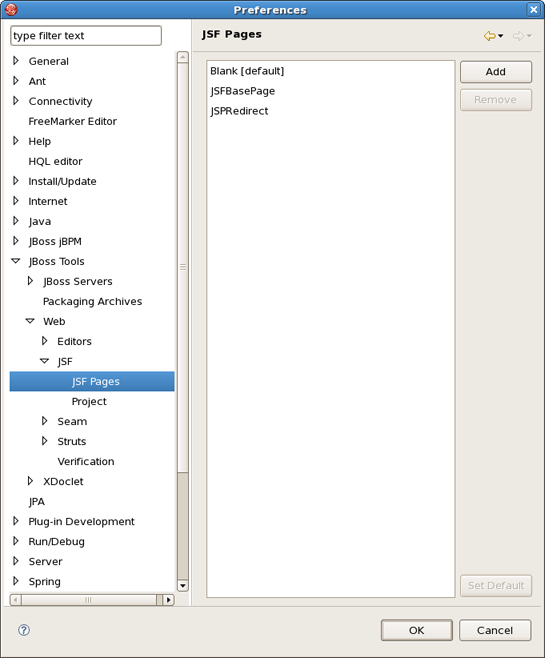
By selecting JBoss Tools > Web > JSF > > JSF Pages you can add jsf pages or remove existing ones.
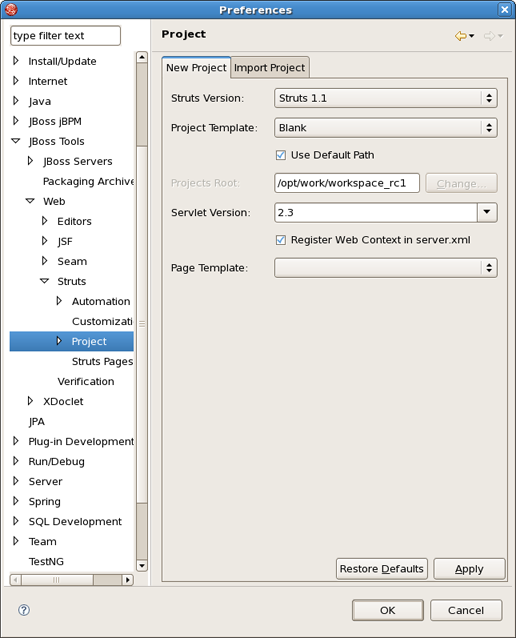
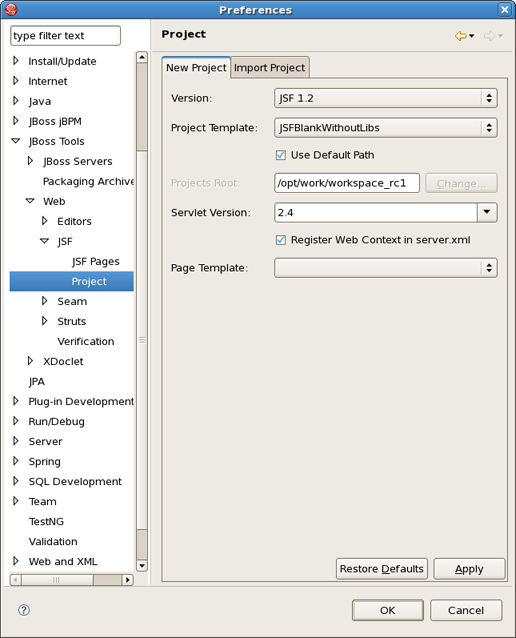
Select JBoss Tools > Web > JSF > Project to see JSF Project preference page.
On Project panel you define a template for a new created project: servlet version, page template and so on.

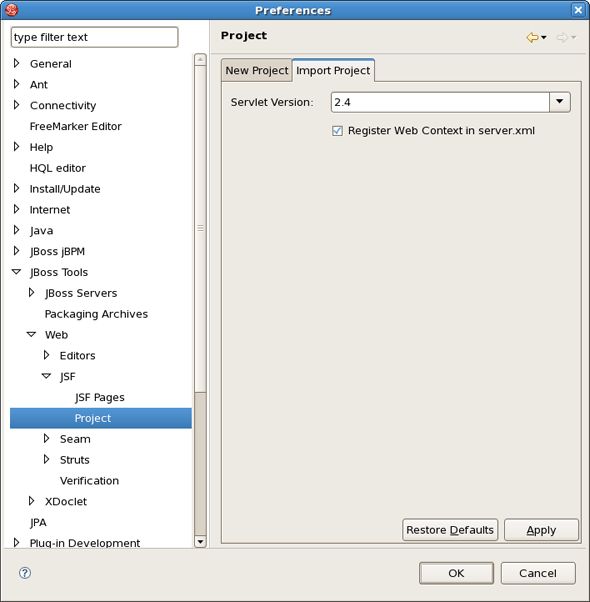
Selecting the Import Project tab in the JSF Project screen allows you to determine the default servlet version and whether to register Web Context in server.xml.
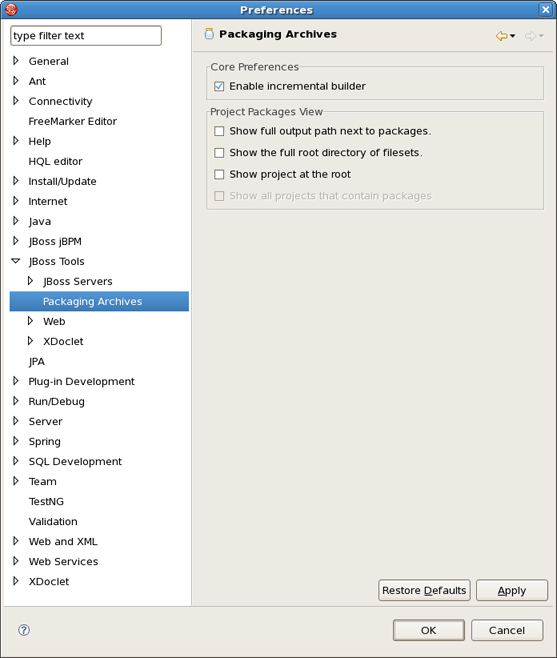
The following preferences can be changed on the JBoss Tools > Packaging Archives page.
On Packaging Archives panel you determine settings for Project Packages view and core preferences.
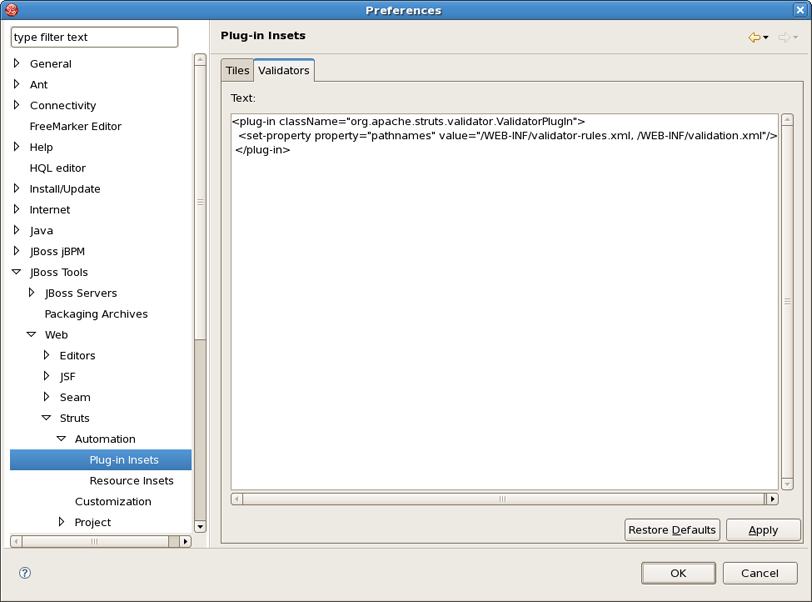
By selecting Web > Struts > Automation > Plug-in Insets on tab Tiles you can define a default text for tiles plugin.
The same is done but for validator plugin on the tab Validators.
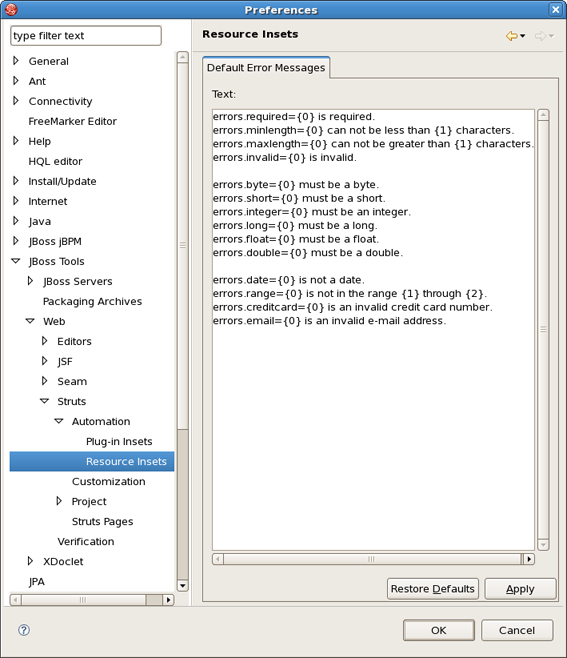
To see Resource Insets preference page select JBoss Tools > Web > Strats > Automation > Resource Insets.
On Resource Insets panel you determine default error messages for error resource files.
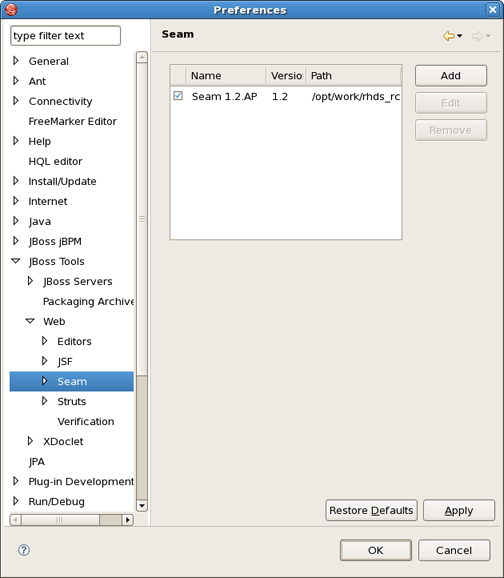
The following preferences can be changed on the JBoss Tools > Web > Seam page.
On Seam screen you can add and remove Seam runtimes.
Here is what Seam preference page looks like:
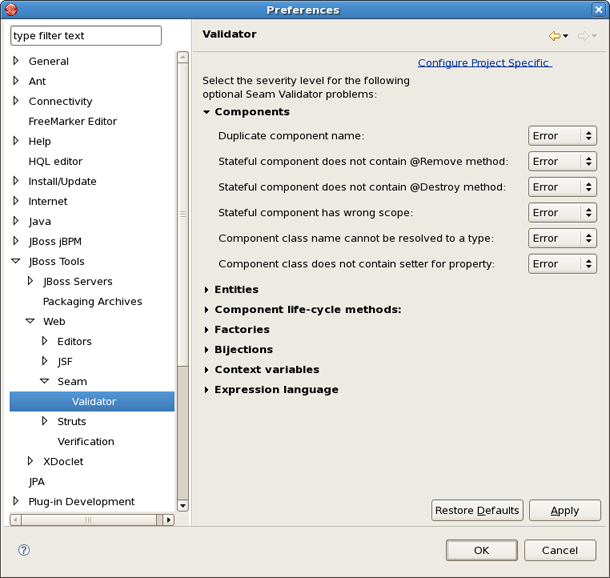
The following preferences can be changed on the JBoss Tools > Web > Seam > Validator page.
In Validator panel you configure seam problems that will be processed by validator.
By selecting JBoss Tools > Web > Struts you can configure Struts projects specific preferences.

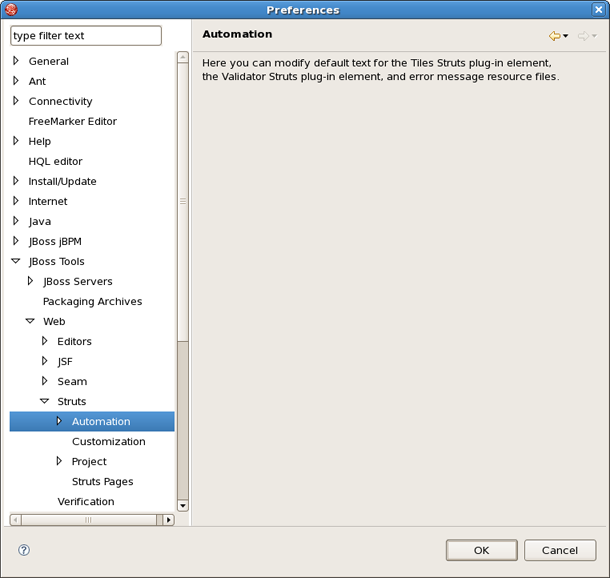
On Automation panel you can modify default text for the Tilel Struts plug-in element, the Validator Struts plug-in element, and error message resource files.
The following preferences can be changed on the JBoss Tools > Web > Struts > Customization page.
In theCustomization screen you configure Link Recognizer for Struts tags.
Similarly to the JSF Flow Diagram screen, selecting JBoss Tools > Web > Editor > Struts Flow Diagram page allows you to specify aspects of the Diagram mode of the Struts configuration file editor. The Struts Flow Diagram screen adds an option to hide the Diagram tab and labeling settings for additional artifacts.
Selecting the Add Page tab in the Struts Flow Diagram screen allows you to determine the default template and file extension for views (pages) you add directly into the diagram using a context menu or the view-adding mode of the diagram cursor.
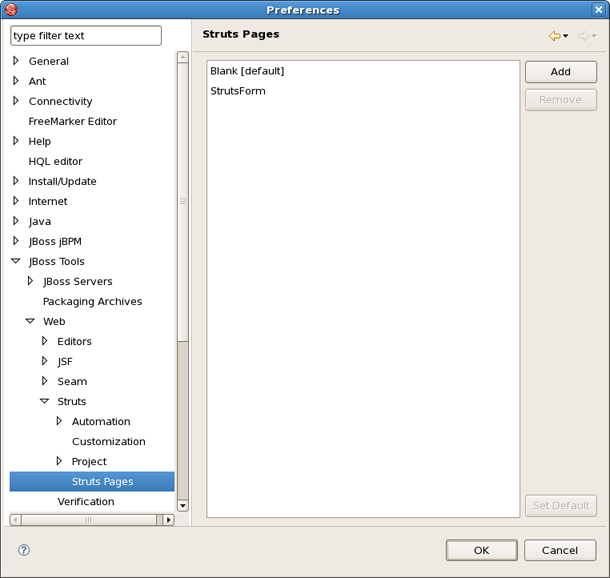
You can change the following preferences on the JBoss Tools > Web > Struts > Struts Pages preference page.
On Struts Pages panel you can add or remove Struts pages.
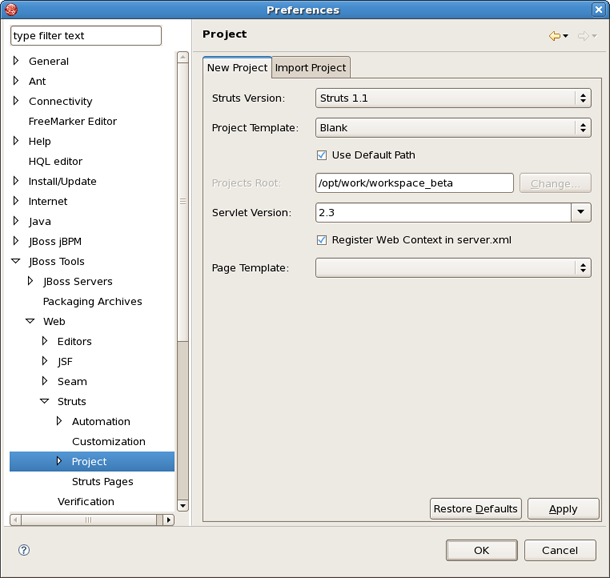
You can change the following preferences on the JBoss Tools > Web > Struts > Project preference page:
On Project panel you define a template for a new Struts created project: servlet version, page template and so on.
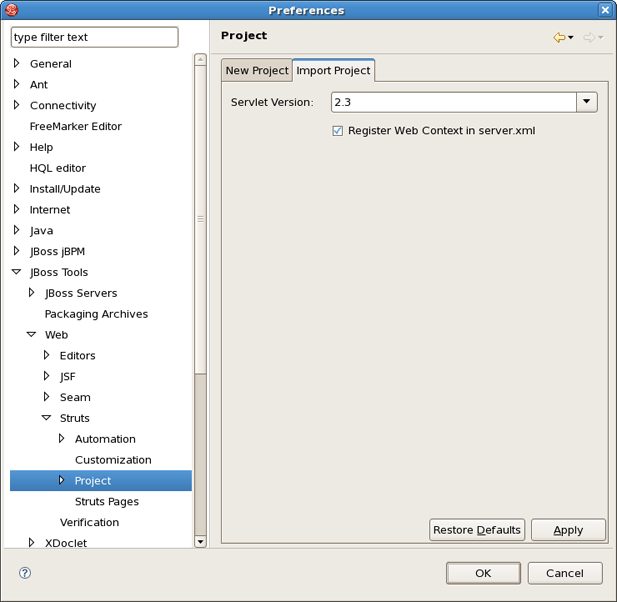
Selecting the Import Project tab in the Struts Project screen allows you to determine the default servlet version and whether to register Web Context in server.xml.
The following preferences can be changed on the JBoss Tools > Web > Struts > Project > Struts Support page.
Select Struts Support screen if you want to configure Struts versions support settings.

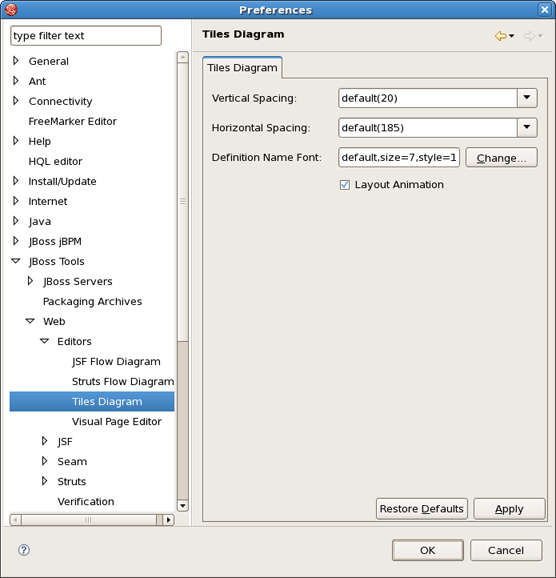
JBoss Tools > Web > Editors > Title Diagram screen allows you control some settings for the placement of Tiles definitions in the Diagram mode of the JBoss Tools Tiles editor.
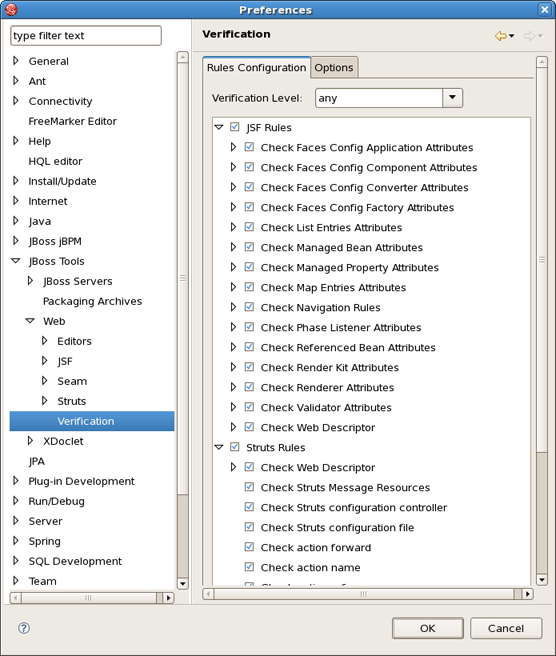
The following preferences can be changed on the JBoss Tools > Web > Verification page.
On Rules Configuration tab of Verifcation panel you can determine JSF and Struts rules.
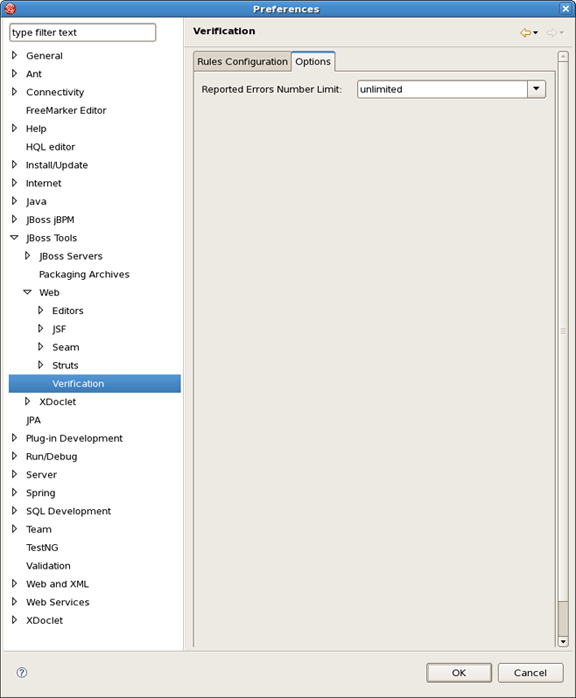
On Options tab you can define a limit for the reported errors number.
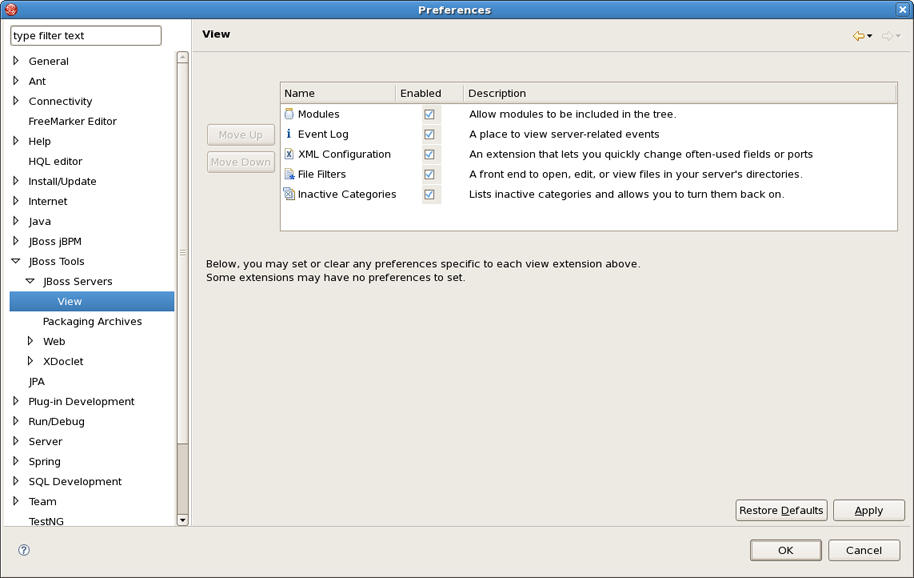
The following preferences can be changed on the JBoss Tools > JBoss Servers > View page.
The View shows you preferences for JBoss Servers view.
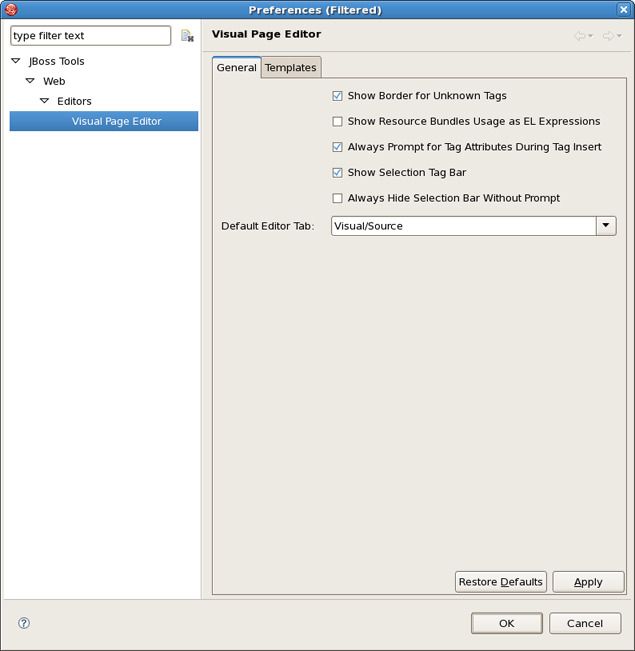
JBoss Tools > Web > Editors > Visual Page Editor screen allows you to control some aspects of the behavior of the Visual Page Editor (VPE) for JSP files. Also you can define a default editor tab.
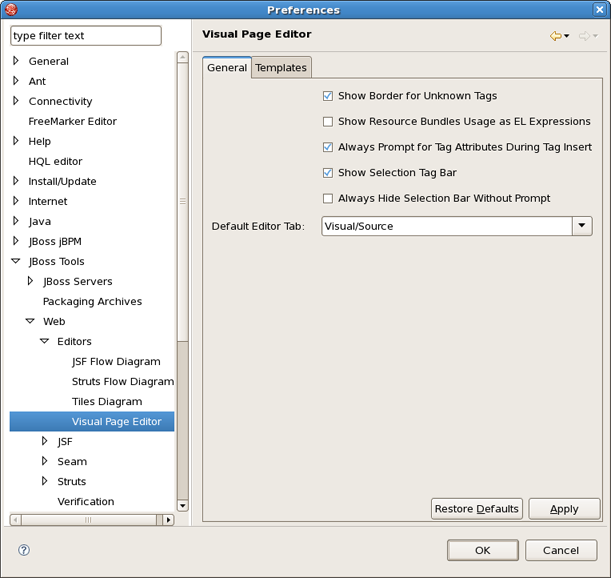
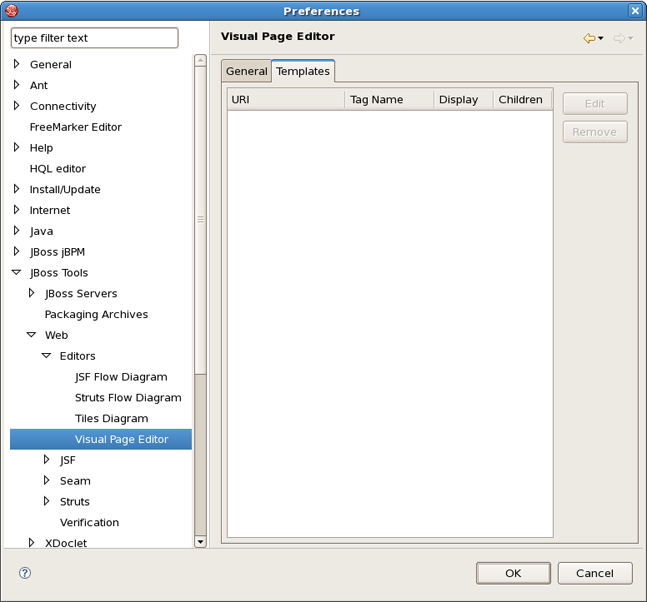
On the Templates tab you can edit or remove VPE templates.
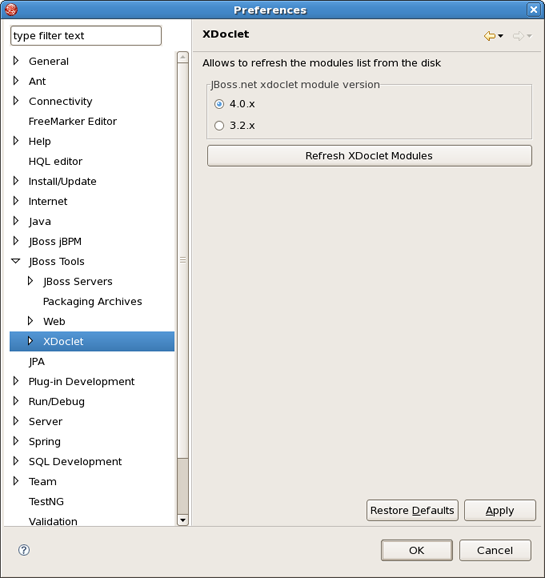
The following preferences can be changed on the JBoss Tools > XDoclet page.
On XDoclet screen you determine XDoclet module versions.
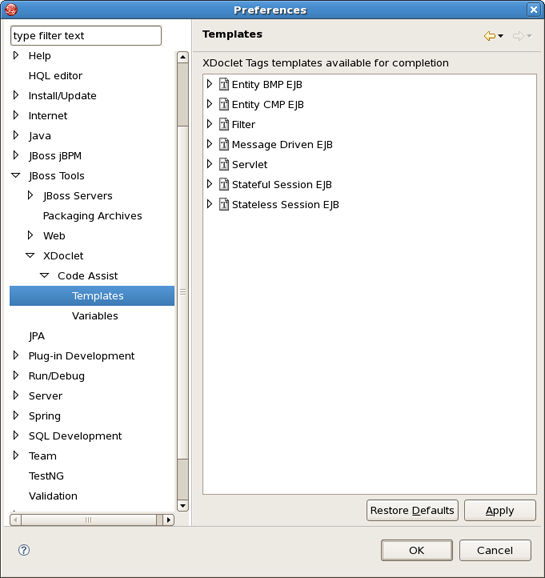
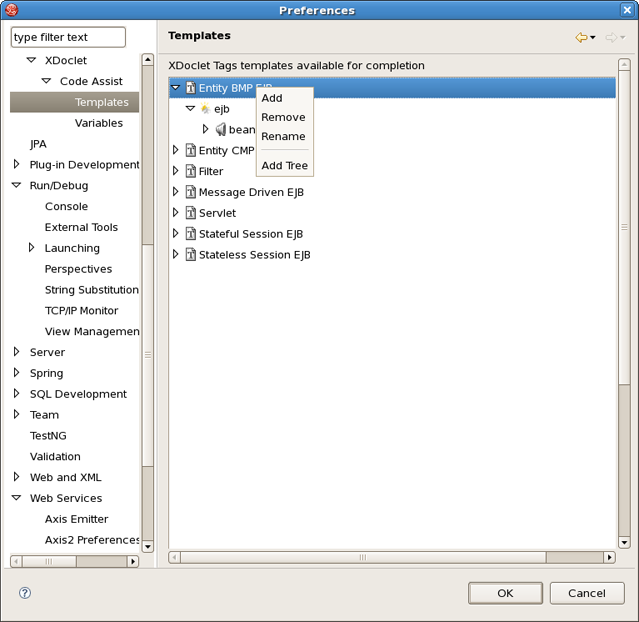
To see what XDoclet tags templates available for completion select JBoss Tools > XDoclet > Code Assist > Templates.
By right clicking on any tree element you can add a new template, remove or rename it and also add a new tree.
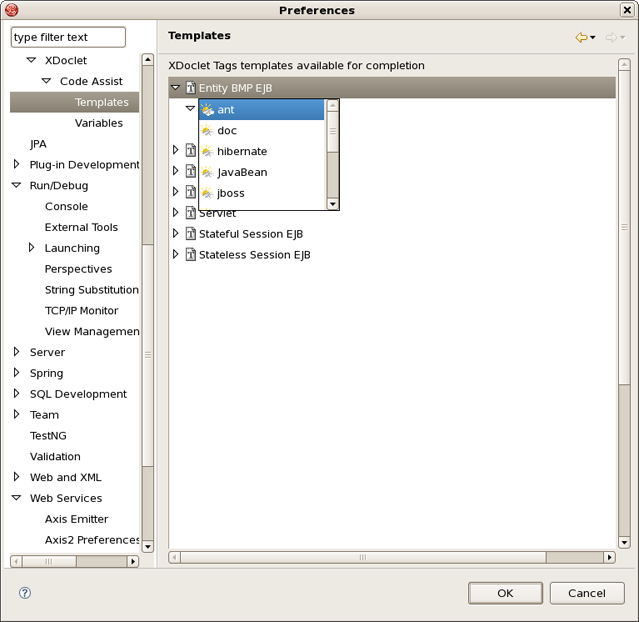
Select, for example, Add and you'll be prompted by a list of available elements to add.
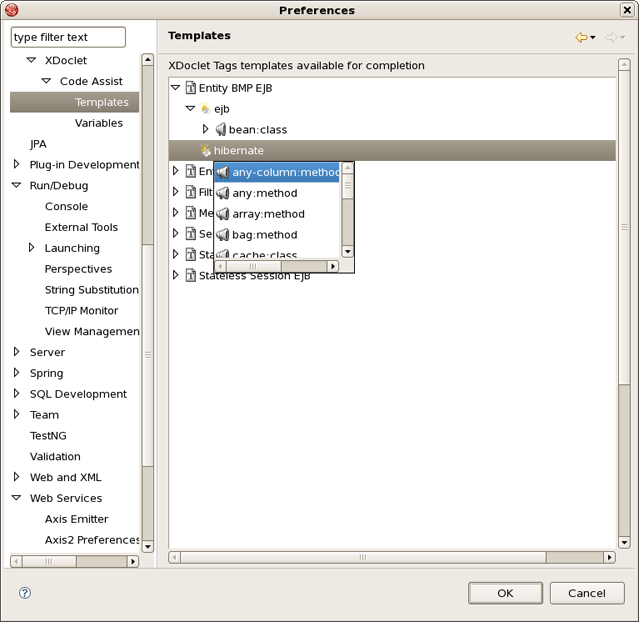
By double-clicking some element a new list will be shown: now for available methods.
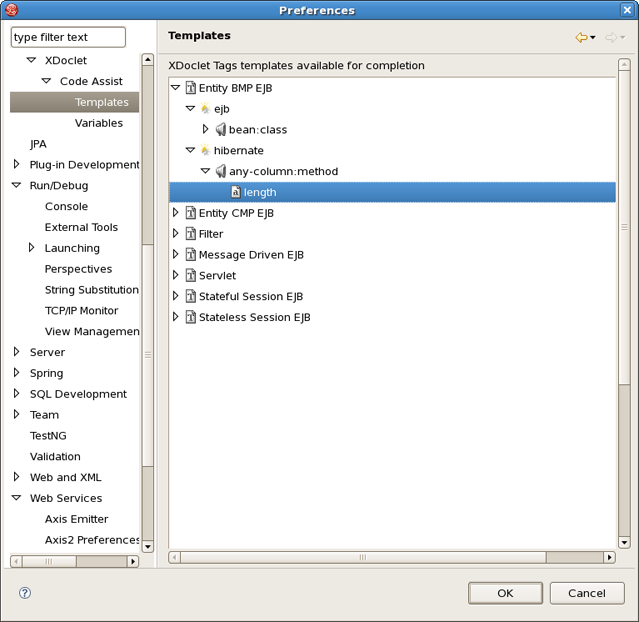
Choose any element from the list, then select an attribute.
It will be added to the available templates.
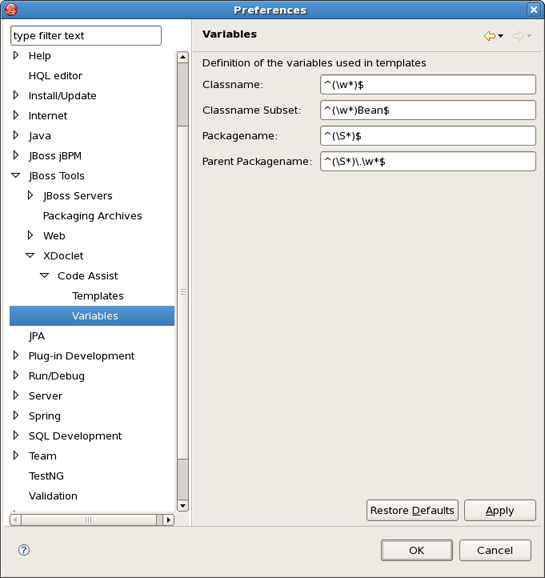
By selecting JBoss Tools > XDoclet > Variables you define variables used in templates.
To change the default environment and project template for either JSF or Struts new project creation:
Select Window > Preferences > JBoss Tools > Web > {JSF or Struts} > Project
For Version set the environment you want to be the default one
For Project Template set the template you want to be the default one
To change the default project template for either JSF or Struts new project creation:
Select Window > Preferences > JBoss Tools > Web > {JSF or Struts} > Project
For Project Template set the template you want to be the default one