Create new JBoss Tools Documentation Jira issue

JBoss.orgCommunity Documentation
Version: 3.1.0.GA
Copyright © 2007, 2008, 2009, 2010 JBoss by Red Hat
- 1. Introduction
- 2. Creating a New Seam Project via the New Seam Project wizard
- 3. Maven Integration for Seam Projects
- 4. Directory Structure of the Generated Project
- 5. Seam Menus and Actions
- 6. Seam Wizards
- 7. Seam Generate Entities
- 8. Seam Editors
- 9. Seam Views
- 10. Seam Preferences
- 11. Seam Refactoring Tools
- 12. Adding Seam support to EAR project
- 13. Generate a CRUD Database Application
- 14. The CRUD Application Walkthrough
- 15. Using TestNG project
- 16. FAQ
This introduction will help you to understand what is Seam.
Seam is a fully featured application framework on top of Java EE 5. It is also one of the most popular enterprise Java frameworks today. Seam deeply integrates many other standard-based or open source frameworks (e.g., JSF, EJB3, JMS, Web Services, jBPM, JBoss Rules, Ajax4jsf, RichFaces, Facelets, Spring, iText, Quartz, TestNG, etc.), and provides a single programming model for developers to "drive" those underlying frameworks via simple annotated POJOs (Plain Old Java Objects). It makes life easier for developers to tackle complex enterprise applications with many component frameworks.
For a start, we propose you to look through the table of main features of JBoss Seam:
Table 1.1. Key Functionality for JBoss Seam
| Feature | Benefit | Chapter |
|---|---|---|
Integrated JSF with EJB 3.0 | JBoss Seam combines the component models of EJB3 and JSF, eliminating glue code, and thus, letting the developer think about the business problem. | |
Integrated AJAX | Developer can add AJAX capability to the user interface of his application without the need to write any JavaScript code as Seam supports JBoss RichFaces and ICEfaces - the best open source JSF-based AJAX solutions. | |
Bijection | Bijection allows auto-assembly of stateful components by the container. It even allows a component to safely and easily manipulate the value of a context variable, just by assigning it to an attribute of the component. | |
New Seam Project wizard | An easy step-by-step wizard to create a standalone Seam Web Project with a form to create runtime and server instances in order to get started creating, running, and debugging J2EE (only) applications. You may also add JSF capabilities. | New Seam Project wizard |
Seam component generations options | All the Seam component generations options known from Seam-gen are available as wizards (with sensible auto-defaulting) for creating various common Seam components. | Seam Wizards |
Seam Editors | Visual Page Editor, Seam Pages Editor and Seam Components Editor provide you with a range of great possibilities and will be helpful when working with JBoss Seam. | Seam Editors |
Seam Validator | A configured Seam Validator provides validation of various possible problematic definitions. | Seam Validation |
CRUD Database Application Generation | JBoss Seam allows adding CRUD support to a Seam Web application. | CRUD Database Application |
TestNG Framework | TestNG ("Testing, the Next Generation") is a Java unit testing framework that aims to overcome many limitations of JUnit. | Using TestNG project |
Here, we are going to explain how to install Seam plugin into Eclipse.
Seam is a one module of JBoss Tools project. Since Seam has a dependence on other JBoss Tools modules we recommend you to install a bundle of all JBoss Tools plug-ins. Installation instruction you can find on JBoss Wiki in InstallingJBossTools section.
The Seam Framework - Next generation enterprise Java development.
All JBoss Developer Studio/JBoss Tools release documentation you can find athttp://docs.jboss.org/tools in the corresponding release directory.
There is some extra information on JBoss Wiki.
The latest documentation builds are available at http://download.jboss.org/jbosstools/nightly-docs.
You can find a set of screencasts on how to search/find references and use Seam refactoring tools in the following Max Andersen's blog post.
In this chapter we provide you with the necessary steps to start working with Seam Framework.
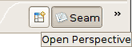
At first, we suggest to set the specific Seam perspective that combines a number of different views and editors needed for work with resources concerned. For that select Window > Open Perspective > Other > Seam or you can also access it through the button in the right top corner.
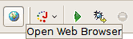
Also the Open Web Browser action is directly available in the Seam perspective.
The best way to get started with Seam is to create a simple Seam Project and experiment with it.
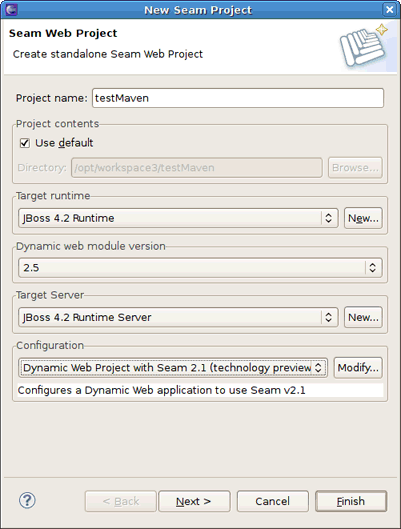
Thus, you should select File > New > Seam Web Project to run the New Seam Project wizard. The wizard form allows you to create runtime and server instances in order to get started creating, running, and debugging J2EE (only) applications.
Seam Web Project wizard has an option for selecting the actual Server (not just WTP runtime) that will be used for the project. This allows the wizard to identify correctly where the required datasource and driver libraries need to go.
Let's get through the wizard step-by-step. First, you should enter a name and a location directory for your new project.
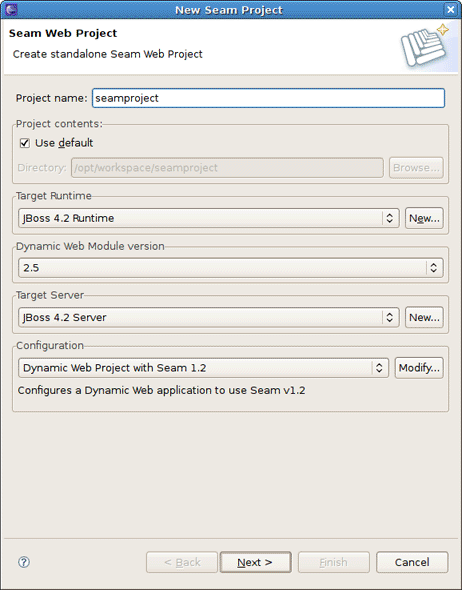
On the figure above you can see the runtime and the server already created.
If you need to create a new runtime, click on the New... button in the Target Runtime section. It brings up the wizard where you can specify a new JBoss Server Runtime environment or the other type of runtime appropriate for your project configuration. Let's create one more JBoss 4.2 Runtime. Hence, after choosing it click on Next button.
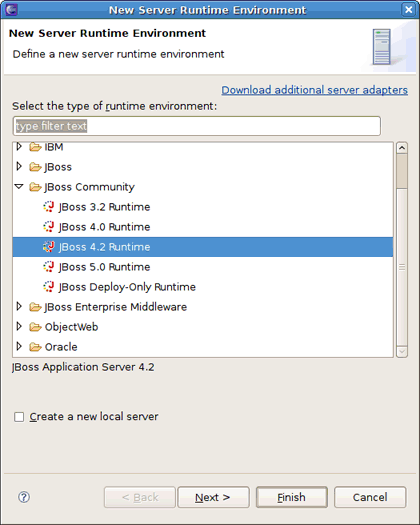
All what you need here is to name runtime, type the path to its install directory or locate it by using Browse button, select a Java Runtime Environment, and select which configuration you want.
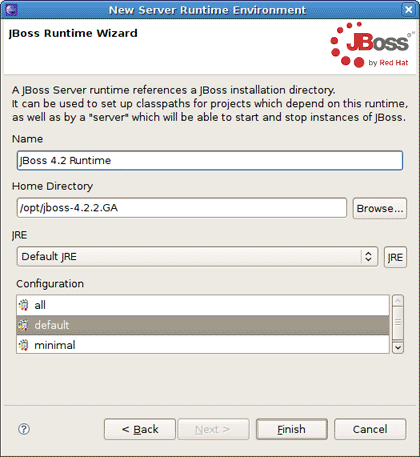
Clicking on Finish returns you to the New Seam Project wizard page.
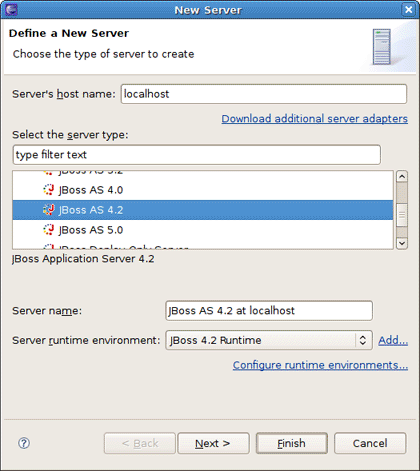
The next step is to define a Server by clicking on New... button in the Target Server section. In appeared New Server dialog the last server which matches the runtime will be selected.
All declared runtimes are listed in the combo-box under the servers view. Here, you can indicate a server runtime that you need. Click Add if you want to add a new Server Runtime.
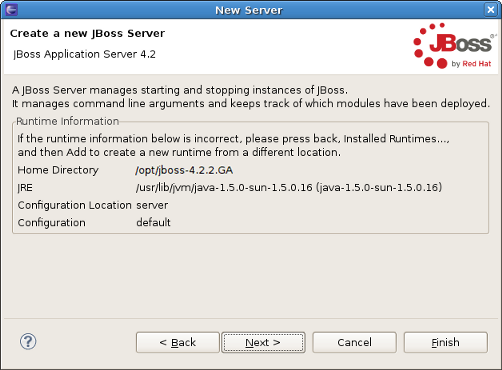
Next page allows you to verify the information for a chosen server. Leave everything as it is and click on Next .
On the last wizard step you can modify your projects to configure them on the Server.
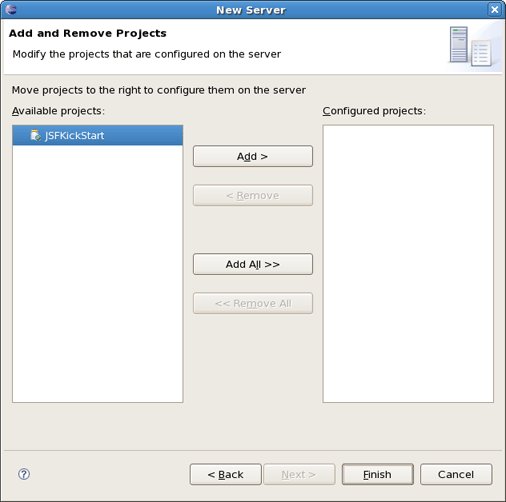
Once you have the Target Server defined click on Finish button to return to the first page of the New Seam Project wizard.
Tip:
We suggest that you look through AS manager guide to find out more about runtimes and servers.
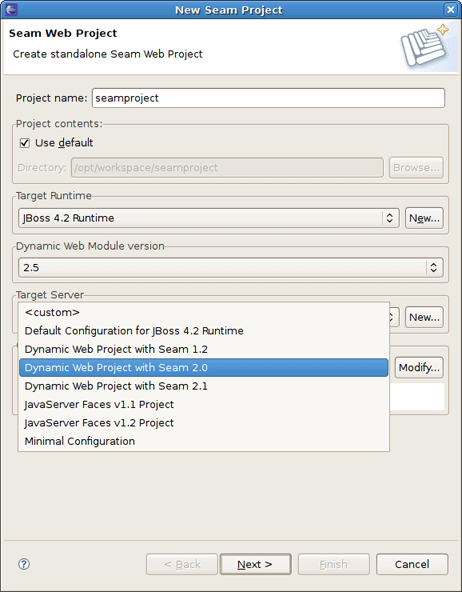
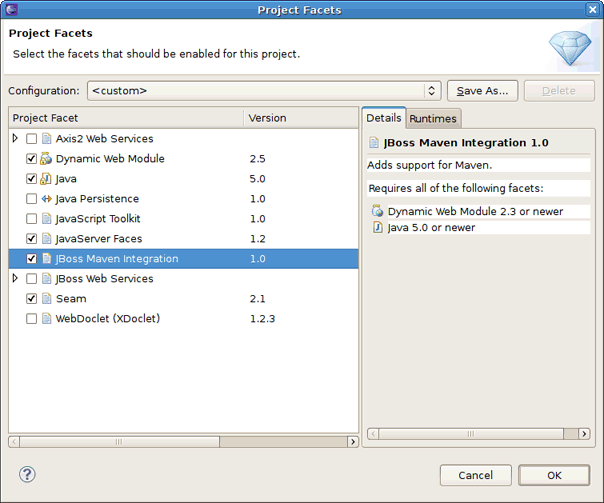
The last section on this wizard step is Configuration. Here, you can select one of the pre-defined project configurations either associated with Seam 1.2, Seam 2.0 or with Seam 2.1. Furthermore, you can create your own configuration by pressing the Modify... button. It will open the dialog which allows to configure your own set of facets for adding extra functionality to your project.
Pass to the next section to find out more details on this dialog.
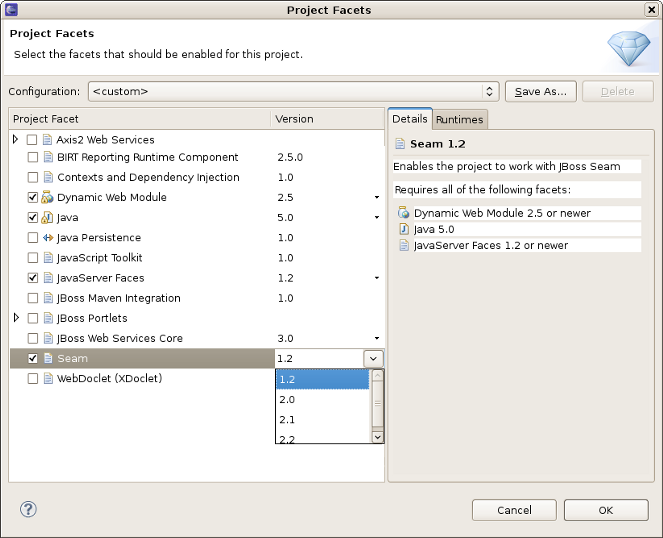
The Project Facets wizard allows you to enable or disable specific facets which define necessary features for the project. When you switch to this wizard form, all critical facets are already checked for the chosen Configuration.
Notice that this page of the wizard also allows you to set the necessary version for any facet.
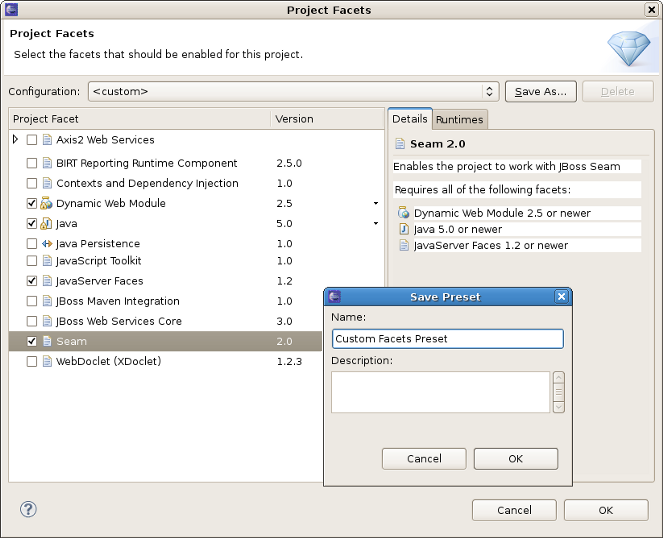
Moreover, here you can specify your own preset of selected facets by checking needed ones in project facets window and clicking on Save button.
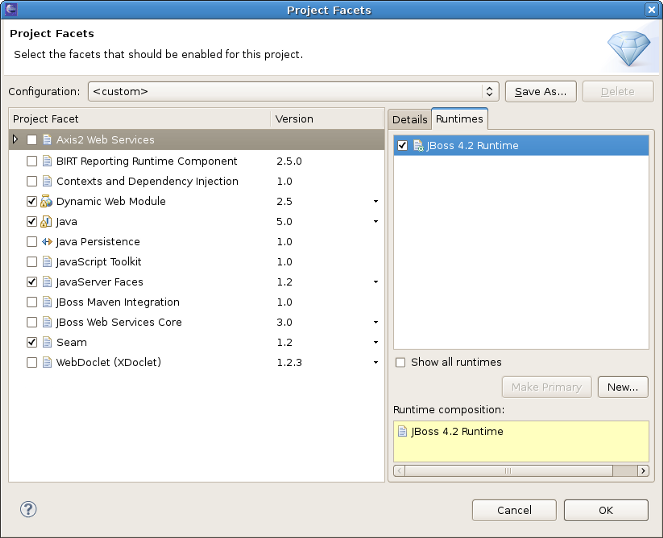
To see all available Server runtimes click on Runtimes tab on the left. You can create a new one using the New button. If more than one runtime is checked here, the Make Primary button won't be dimmed yet. Thus, you can make use of it to mark primary runtime.
Ok button will bring you to the Web Module wizard form again.
For creating Seam project with JPA support you need to select Java Persistent facet on Project Facets page and click OK.
Then you should press Next and may leave the default value on Java application building page and Web Module Settings page.
After that you will see JPA facet page.
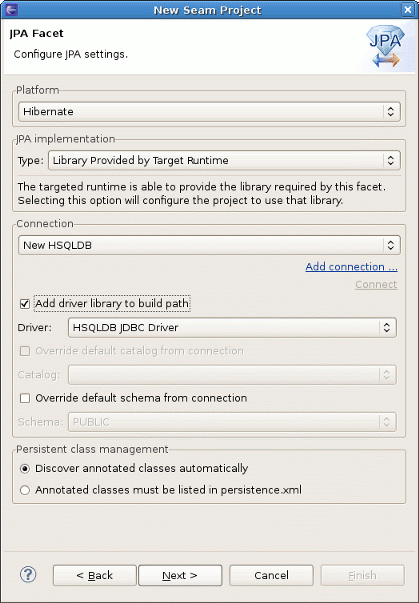
On this page you can choose Platform (vendor-specific JPA implementation) for your project, type of JPA Implementation, and configure the Connection to database in the Connection area.
More about JPA facet page you can read in Eclipse documentation.
On the next step you will see JSF Capabilities and Seam facet pages, which are mostly the same as in general Seam project.
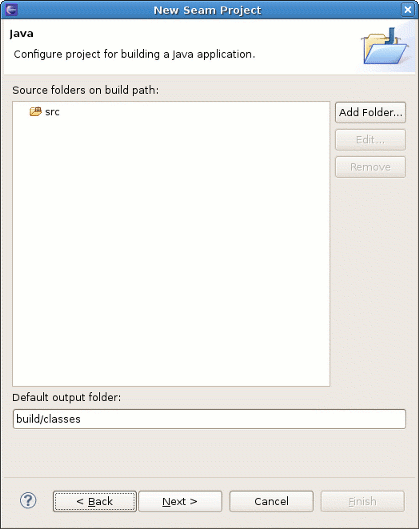
With this wizard you can define Java source directories which will be generated on build path. Also you can specify a default output folder. If you are agree with default values, press Next
As we deal with a Dynamic Web Application, we should at first specify the top level directory of our application for deploying it to a server afterwards. You know, this kind of application contains Web resources. Thus, it's important to indicate the content directory. The wizard will put all those values itself, so you can leave everything as is.
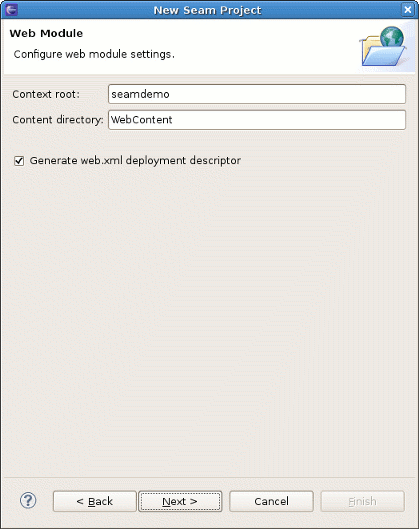
Choose Next to switch to the next wizard form.
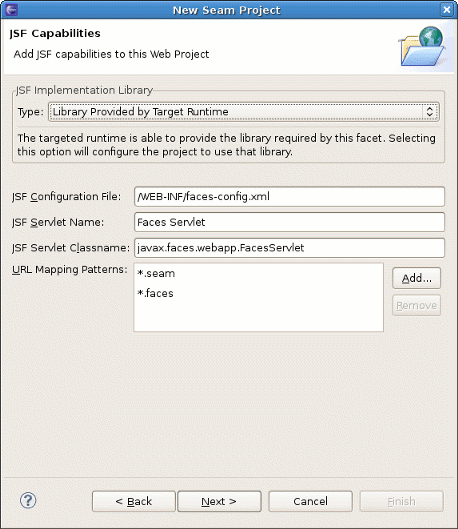
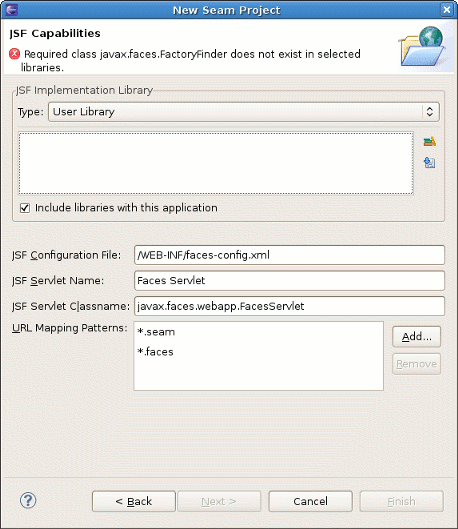
This wizard helps you to add JSF capabilities to your project.
Choose Library provided by Target Runtime from Library Type list if you'd like to use a default JSF implementation given by the present runtime.
In case if you prefer to use your custom JSF implementation, choose User Library Item from Library Type list. In User Library list you can check required library.
If a new library is required, click Manage libraries... (
 ) button. Then you should click New.
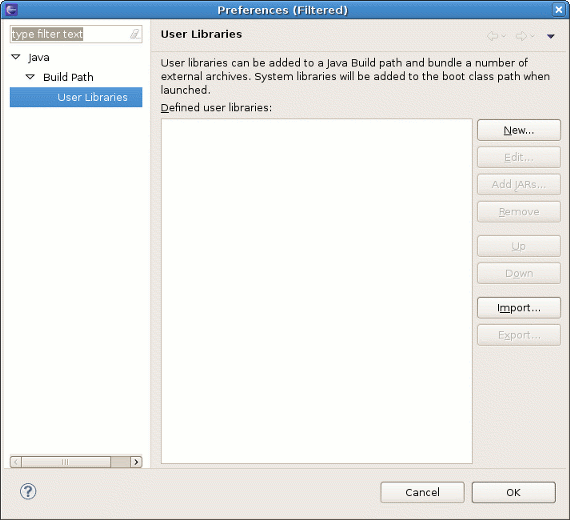
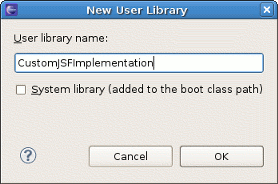
Here, it's necessary to type a Library Name.
To add proper Library JARs, click Add JARs... button and select the JARs on your hard drive.
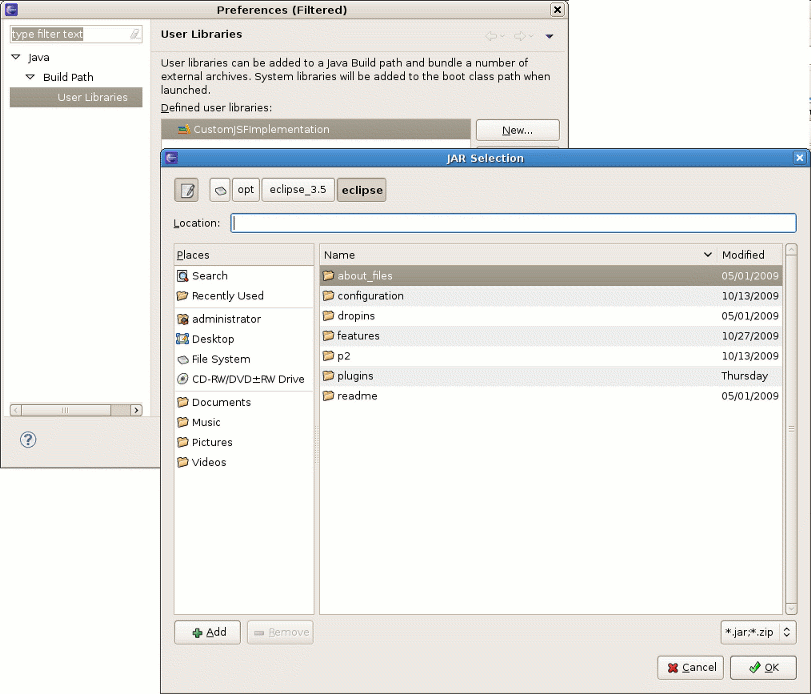
You can download necessary JSF implementation libraries provided by Sun and Apache
Foundation as well. Click Download... ( ) button and choose one of proposed libraries.

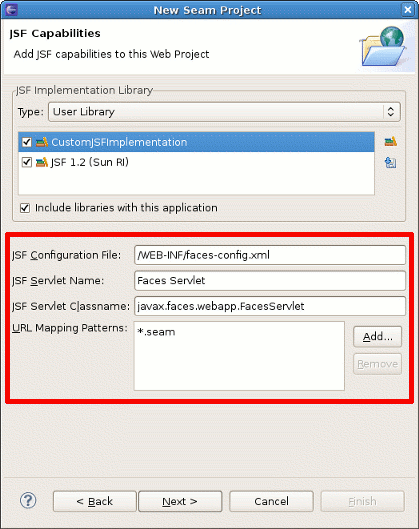
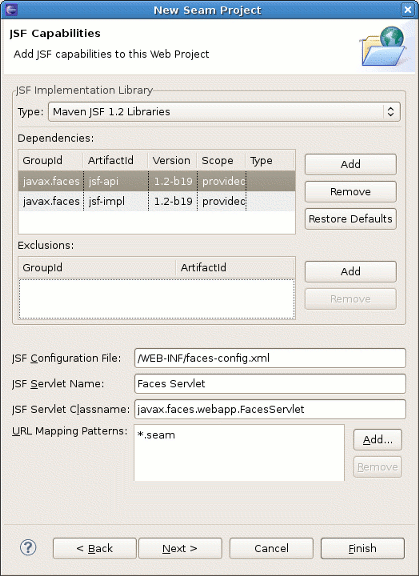
The last wizard options allows to edit a path for JSF Configuration File, a name for JSF Servlet, JSF Servlet Classname and change URL Mapping Patterns.
Since we are arranging the Seam Web project, the last step we should do is to adjust project configurations associated with the Seam.
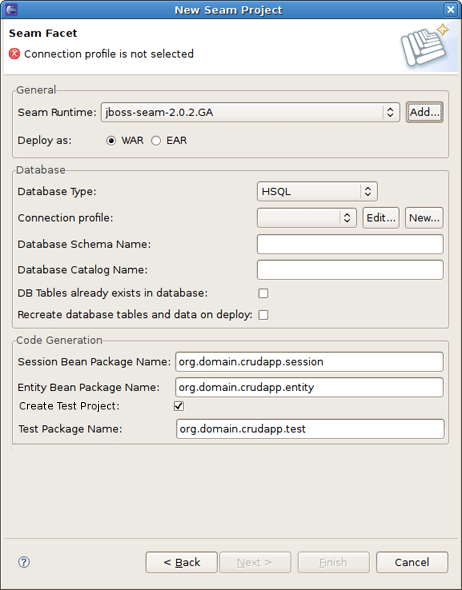
The last wizard step is related to Seam facet and allows you to do the following:
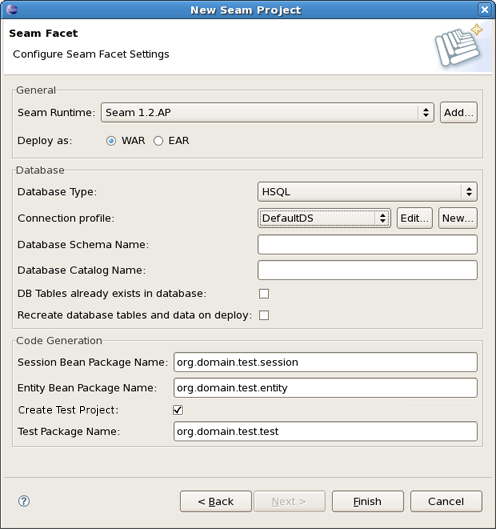
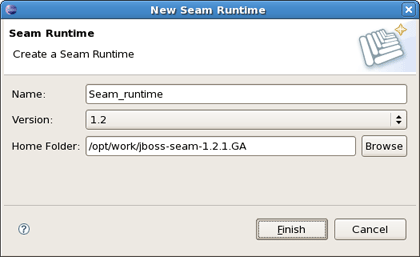
Create Seam runtime and define Seam home folder.
For that click on Add button in the General section. Note, in the wizard shown below you can create a Seam runtime only for the version that was selected in the Project Facets wizard (version 1.2 in our case).
Select EAR or WAR deployment by checking a necessary radio button.
Select a Database Type
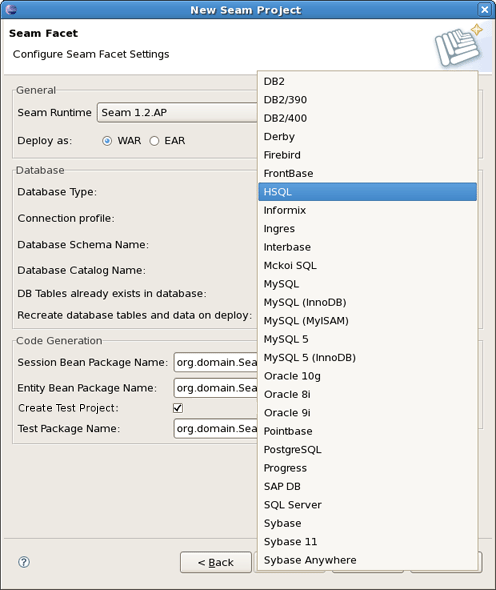
and then specify a Connection profile appropriate for your database.
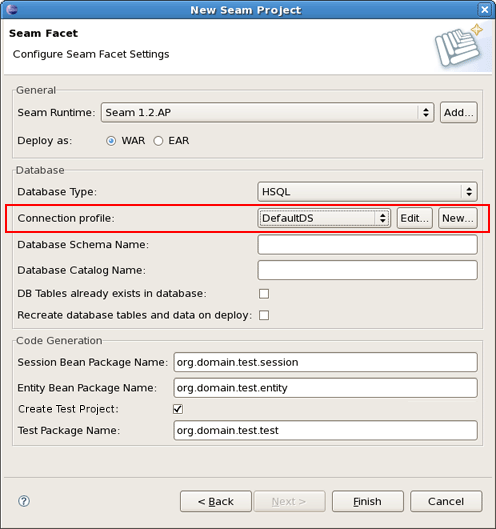
You can edit chosen profile by using Edit button or organise a new one by clicking on New button and selecting necessary for you type of connection profile.
On the dialog you'll be asked to enter its name and description. And then you should select a proper driver and adjust connection details. Press Next to preview all the adjusted settings and complete the creation of the new profile.
The next block of settings in the Seam Facet wizard are describing a Database and a connection to it.
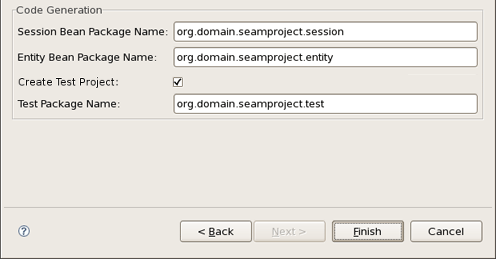
In the Code Generation section the wizard has already provided the names for your Session Bean, Entity Bean and Test packages generation (optional). Of course, you can change them on others of your choice.
Click on Finish to generate a project.
Starting from 3.1 M2 version JBoss Tools includes new Jboss Maven Integration plug-in which for now allows to create mavenized Seam projects and enable Seam tools support for imported Maven projects.
The Jboss Maven Integration requires m2eclipse to be installed.
Note:
For M2 release of Jboss Tools it is important to use m2eclipse stable updatesite or the latest integration build that M2 was developed against. If you want to use the latest development release of m2eclipse you need to use the nightly builds of JBoss Tools.
Maven Integration makes the Seam Wizard capable of creating Maven ready projects to let Maven get the libraries instead of using the Seam runtime.
To create a mavenized Seam project you should perform the following steps:
Navigate to File > New Seam Project. Give the project a meaningful name, specify a target runtime and server and select the proper configuration for your Seam project:
Click the Modify button to enable the Jboss Maven Integration facet:
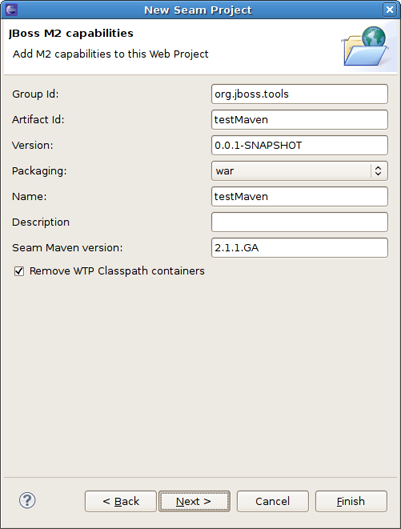
On the JBoss M2 capabilities page you'll be prompted to add the following maven properties: groupId, artifactId, version, packaging, name and description. Here it's possible to set a maven version of Seam and also decide whether to remove WTP classpath containers (where the path starts with org.eclipse.jst).
On the JSF Capabilities page you can choose Maven as libraries provider. This is possible when you use Maven JSF 1.2 Libraries as type of JSF Implementing Library. Also it gives you capability to edit Dependencies and Exclusions for the mavenized Seam project directly from the wizard.
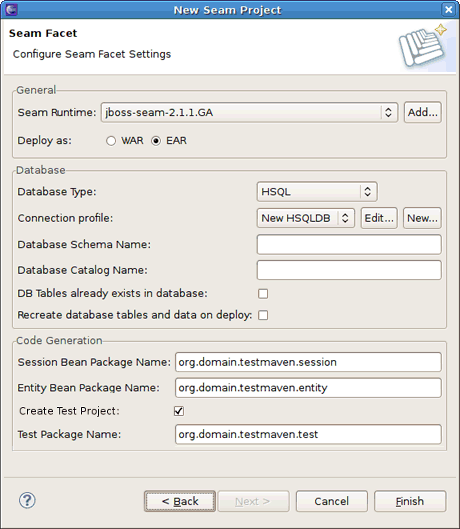
On the Seam Facet page configure the Seam Facet settings and click Finish:
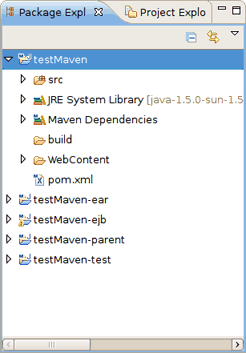
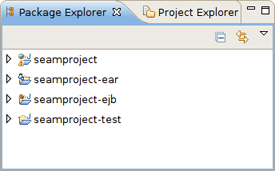
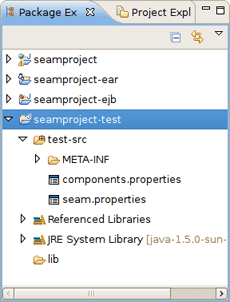
The organized Seam project contains five projects with the Maven nature, builder, Maven classpath and the pom.xml files added: projectname, projectname-ear, projectname-ejb, projectname-parent and projectname-test.
Maven Integration includes the Seam Maven configurator which is called when importing a project, changing pom.xml and/or calling Maven > Update Project Configuration. When importing a Maven Seam project, the Seam Maven configurator picks up the settings set up in pom.xml and adds to the project the following:
Seam nature
Seam facet and dependent facets to the EJB, EAR and WAR projects
JBoss Maven Integration facet if the Maven project contains a dependency with the org.jboss.seam groupId and an artifactId starting with 'jboss-seam'
other required facets (Web Module, Java, JSF, etc.)
If the Seam version from pom.xml matches a version of a Seam runtime configured in the workspace, Seam configurator will set that runtime, otherwise no Seam runtime will be set and you'll have to set it manually under Seam Settings in the project preferences.
Seam configurator recognizes the Seam artifacts in the following way: the view folder is a web content folder from the WAR project, the source folder is the first Eclipse source folder. If there is a folder containing "hot" in the name, it will be chosen as the action source folder. Package is the first package that has children or doesn't have any subpackage.
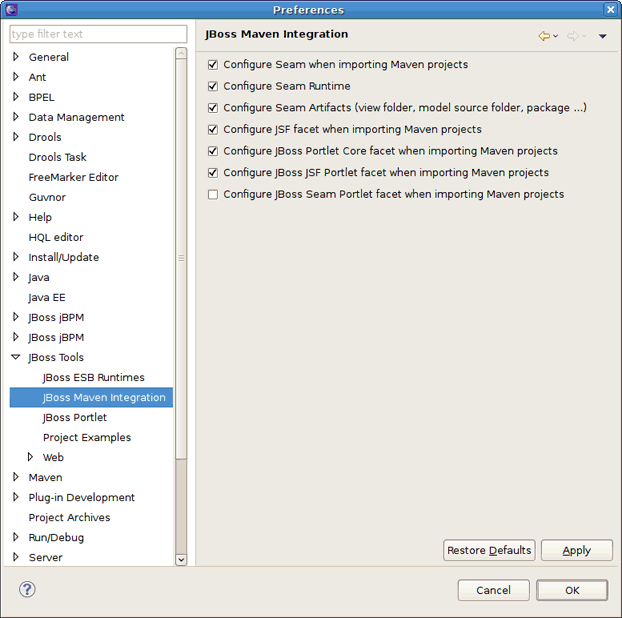
Configuring the Seam when importing a Maven project as well as a Seam Runtime, Seam artifacts and some facets could be suspended in the JBoss Maven Integration preferences ( Window > Preferences > JBoss Tools > JBoss Maven Integration).
In the Using Maven with JBoss Tools article written by Max Andersen you'll find references to the screencasts on how to use the examples of mavenized Seam projects provided by JBoss Tools.
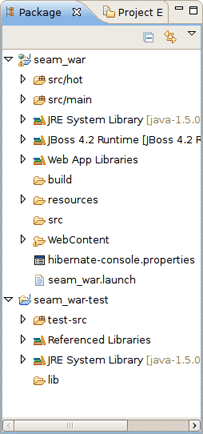
In this chapter we describe where the Seam wizard puts the generated files for both EAR and WAR deployments.
The Seam Project wizard generates projects like Eclipse WTP style in order to utilize Eclipse WTP features and to have a correct classpath. To be more precise it generates one project per artifact.
The project layout for WAR projects is:
A WAR project can only use Seam JavaBean and JPA Entity bean components; it cannot use EJB3 Session beans etc.
WAR projects are generated to enable Seam war hotdeploy feature. Classes put into src/action will be deployed to WEB-INF/dev from which Seam automatically will perform hotdeploy of new components.
Note:
Because of Eclipse WTP limits the hot deployed classes also existed in WEB-INF/classes, but since Seam gives WEB-INF/dev precedence it will work.
Furthermore the Seam Project wizard generates a test project that is setup to run TestNG directly against the proper libraries and server runtime libraries. When the TestNG plugin is installed you can just run your tests via Run As > TestNG Test.
In order to deploy WAR project on server, right-click on the project and select Run As > Run on Server. Studio will deploy WAR project into one web application on server to deploy folder.
The project layout for EAR projects is:
An EAR project can use the whole range of Seam components, including EJB3 Session beans.
In order to deploy EAR project on server, right-click on the project with -ear postfix and select Run As > Run on Server. Studio will take care about all modules and deploy EAR project into one enterprise application on server to deploy folder. EAR application keeps ejb and war modules of the EAR project.
Note:
The WAR generated for EARs is now configured to utilize Seam hot-deployment (WEB-INF/dev) similar to standalone WAR projects.

To upgrade or downgrade your projects Seam version use the facet preferences. You should right-click your project, open its Properties and choose Project Facets category. Next select Seam and change its version to needed one.
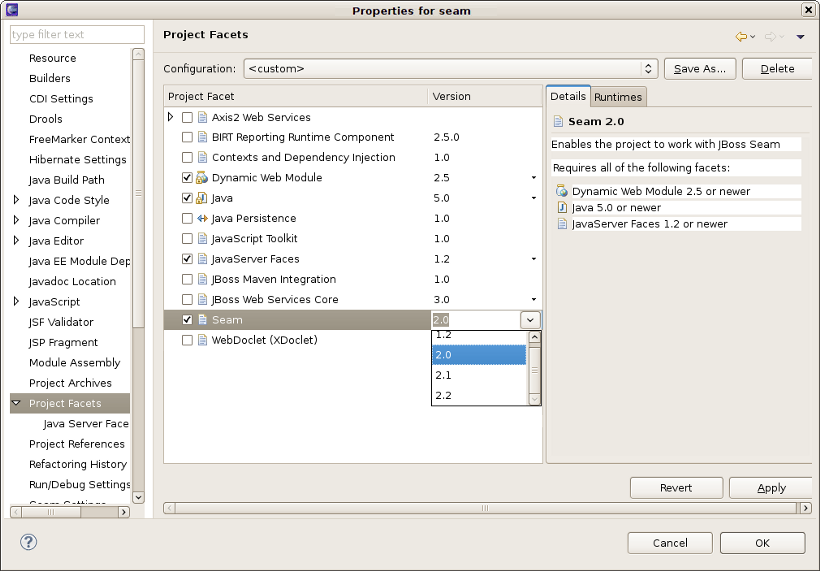
After pressing Apply the wizard for adjusting new Seam runtime settings appears.
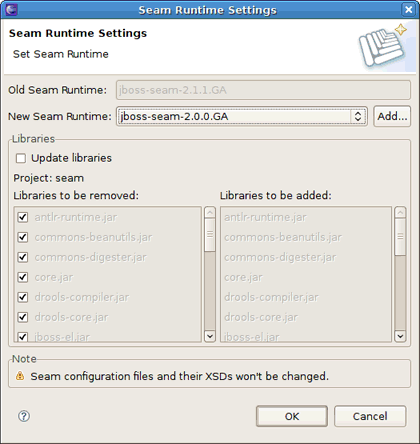
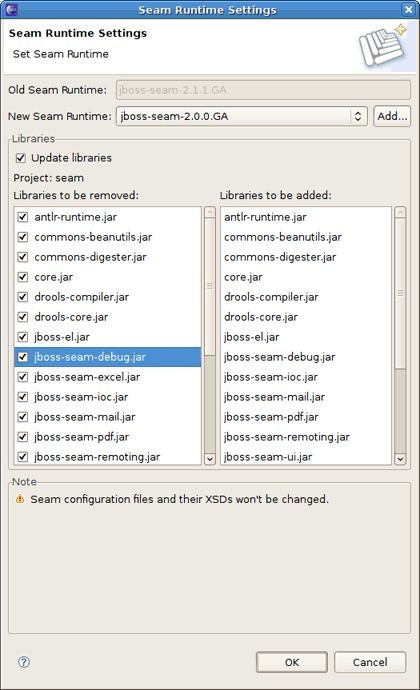
If you need to update the libraries for you project, check the Update libraries option. All libraries you checked will be removed and the libraries from the new Seam distribution will be added after clicking Ok.
Note:
The note "Seam configuration files and their XSDs won't be changed" is meant that the libraries, Seam facet and runtime version will be changed, but configuration files that refer to the old version will have to be manually updated.
Starting from the 2.0.0.CR2 version of JBoss Tools it is possible to change the Seam parent project. In earlier versions this was only controllable at a project creation time, now it can be changed for existing projects too.
Go to your project preferences and select Seam Settings category on the left. Press the Browse button next to the Main Seam Project section to select the other Seam parent project.
If you need to rename one of the Seam Project artifacts (<project_name>, <project_name>-test, <project_name>-test or <project_name>-ejb) or any entire folder like <project_name>/WebContent, <project_name>/ejbModule, <project_name>-test/test-src, or project name in packages org.domain.<project_name>.session, org.domain.<project_name>.entity, you can do this by brining the context menu and navigating Refactor > Rename... or just pressing Shift + Alt + R under the chosen resource.
Use Refactor > Move... (or Shift + Alt + V ), if you need to move <project_name>/WebContent folder, <project_name>/ejbModule folder or <project_name>/test-src folder in the other place within the Project structure.
In this chapter we provide a description of Seam actions that are available from
Menu bar
Toolbar
Context menus in views
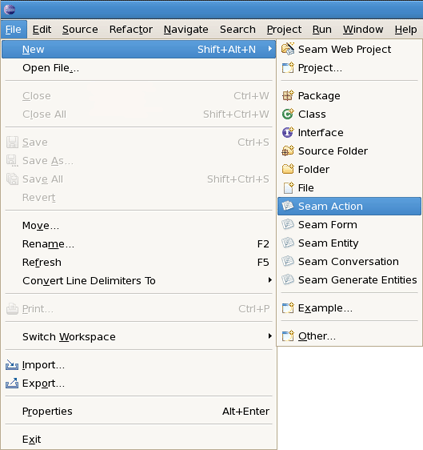
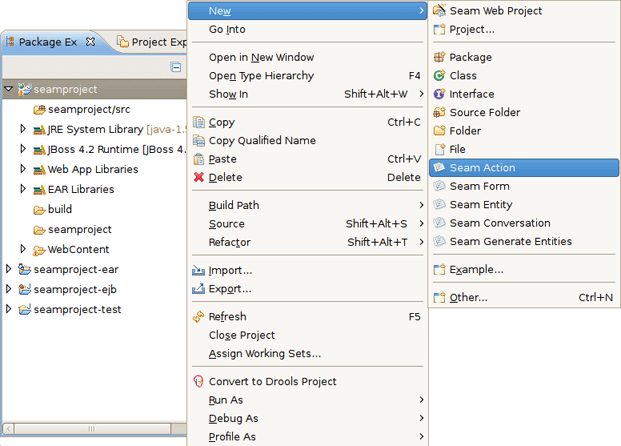
In a Seam perspective, by default there are the following actions in File > New submenu
Table 5.1. Seam Actions in the New Submenu
|
Name |
Function |
|---|---|
|
Seam Web Project |
Runs New Seam Project wizard for creating a new Seam project |
|
Seam Action |
Runs New Seam Action wizard for creating a new Seam action |
|
Seam Form |
Runs New Seam Form wizard for creating a new Seam form |
|
Seam Entity |
Runs New Seam Entity wizard for creating a new Seam entity |
|
Seam Conversation |
Runs New Seam Conversation wizard for creating a new Seam conversation |
|
Seam Generate Entities |
Runs Generate Seam Entities wizard |
In the next sections we are going to describe Seam actions which can help you to easily navigate through the source code.
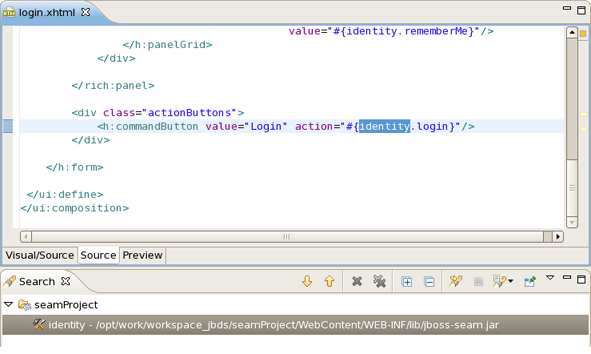
To find EL expressions both in .java and .xhtml files use Find Seam References/Declarations actions. For that, in the main menu bar click on Search > Find Seam References or Find Seam Declarations.
Look at the description of the actions in the table below.
Table 5.2. Find Seam References/Declarations actions
|
Name |
Function |
Keyboard Shortcut |
|---|---|---|
|
Find Seam References Find Seam Declarations |
Find all references and declarations to the selected element. It's available for EL expressions in both .java and .xhtml files. Differs from normal Eclipse Find References/Declarations by showing an EL or Seam references in the Search View. |
Ctrl+G Ctrl+Shift+G also Ctrl + 1 for .java files |
On the screenshot example below you could see that the search results are listed in the Search view.
You can also use Ctrl + 1 in .java files to activate the actions:

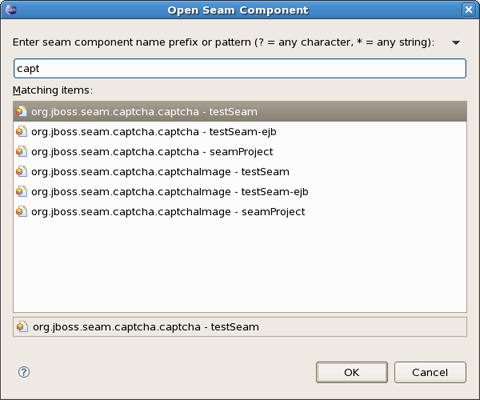
To open Seam Components click on Navigate > Open Seam Component in the main menu bar. This dialog is also available from toolbar icon or with hot keys combination "Ctrl+Shift+Z ".

In the table below read a description about the dialog.
Table 5.3. Open Seam Components Dialog
|
Name |
Function |
Keyboard Shortcut |
|---|---|---|
|
Open Seam Components |
Brings up the Open Seam Component dialog to open a component in the editor. The Open Seam Component selection dialog shows all Seam components existing in the workspace. You can search the components via their short, imported or full name. |
Ctrl+Shift+Z |
Enter a name in the text field and see the results as it shown on screenshot:
You can also open Seam Component from the other component where the required one is declared in @In by using
OpenOn (Ctrl + left click and select Open Declaration of Seam Component for seam_component in Seam_class.java ).
This chapter introduces you with Seam Components.
All the Seam component generations options known from Seam-gen are available as wizards (with sensible auto-defaulting) for creating various common Seam components:
Seam Action
Seam Form
Seam Entity
Seam Conversation
Go to File > New and select the component wizard.
The wizards create multiple resources and place it in the appropriate folders depending on your project structure (WAR or EAR).
Let's create a WAR project using the New Seam Project wizard.
After the project is created you need deploy it on server.
In this and following sections you can see example creating Seam Components.
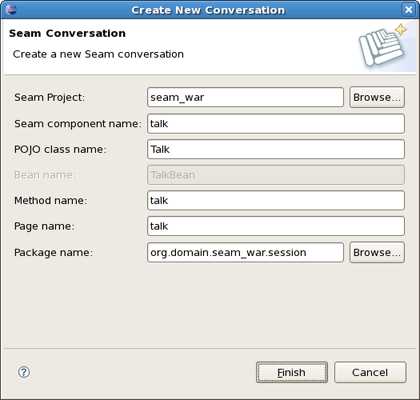
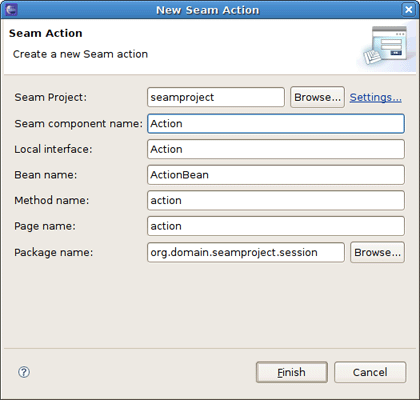
To create a New Seam Action you should select a necessary project, type a name for Seam component, POJO class, Method, Page and select a Package using the Browse button.
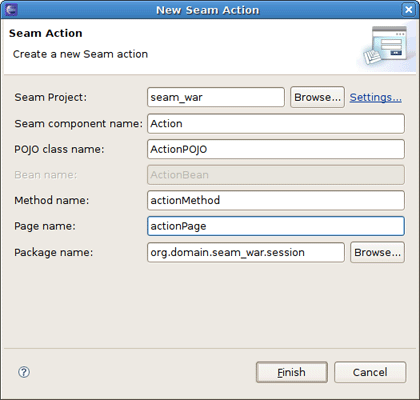
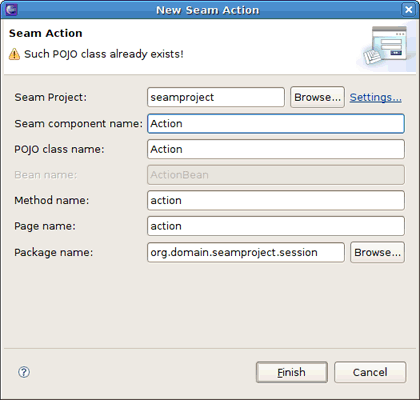
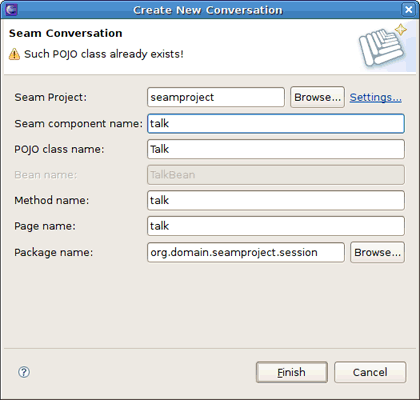
If you specify a class which already exists, the wizard will warn you about it.
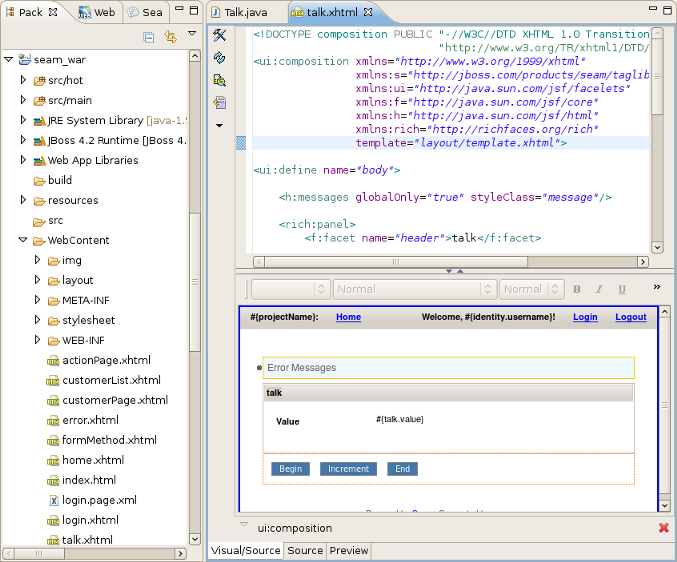
You can see the action page in WebContent folder. Click on it to open in JBoss Tools HTML Editor.
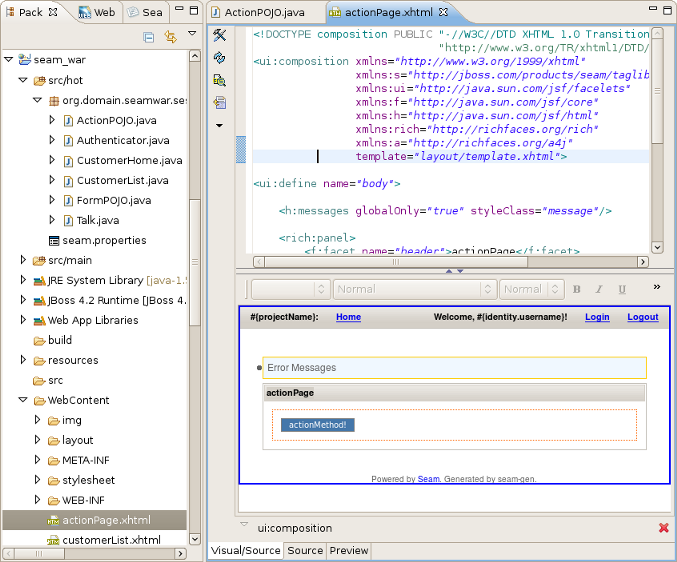
Note:
You don't need to restart the server to see how the action component works. Just use context menu Run As > Run On Server.
Action component was hot-deployed. Forms and Conversations will work the same way.
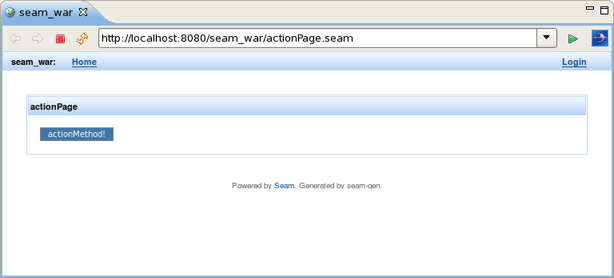
Click on actionMethod in the internal browser and add a form in your project using the New Seam Form wizard File > New > Seam Form.
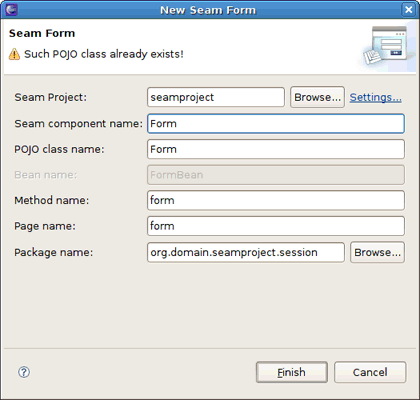
Select a necessary project, type a name for Seam component, POJO class, Method, Page and select a Package using Browse button.
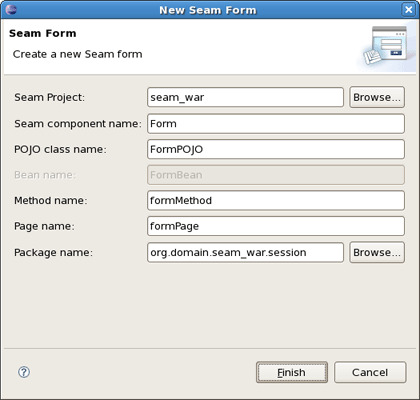
If you specify a class which already exists, the wizard will warn you about it.
The Form Page was created in WebContent folder.
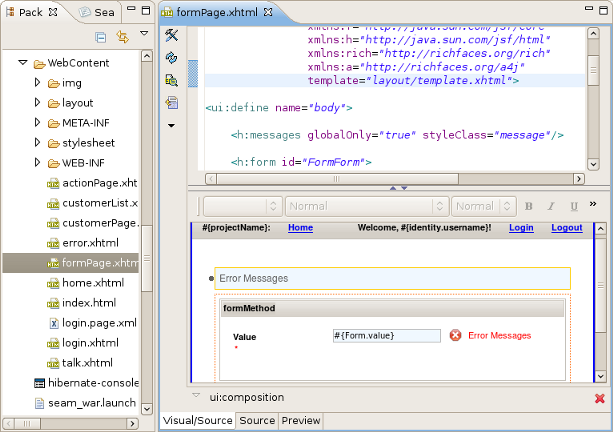
Deploy the form on server. Right click on Form Page, select Run As > Run On Server.

Form component was hot-deployed.
Enter some value in the text field (e.g. value1) and click on formMethod.
Add a conversation using the New Seam Conversation wizard File > New > Seam Form.
You should select a necessary project, type a name for Seam component, POJO class, Method, Page and select a Package using Browse button.
If you specify a class which already exists, the wizard will warn you about it.
Conversation page was created in WebContent folder.
Right click on Conversation page, select Run As > Run On Server.
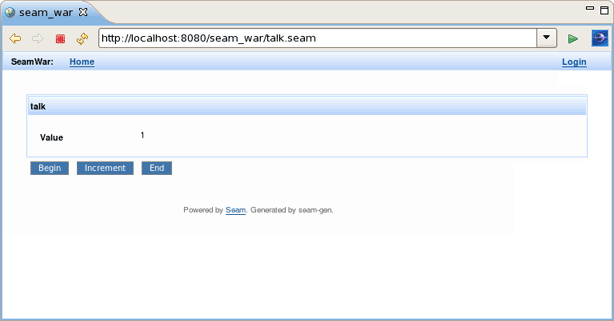
Conversation component was hot-deployed.
Click on Begin and Increment buttons to check the conversation functionality.
Entities cannot be hot-deployed, so we need to stop the server.
Create an Entity using the New Entity wizard File > New > Seam Entity.
You should select a necessary project, type a name for Entity class, select a Package using Browse button, type a name for Master Page and Page.
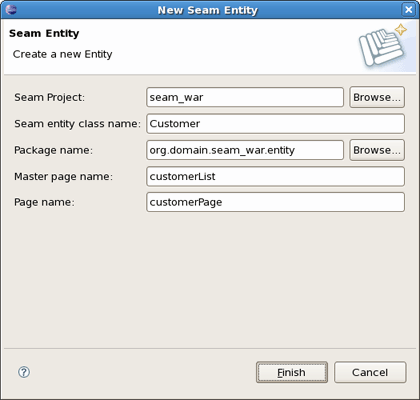
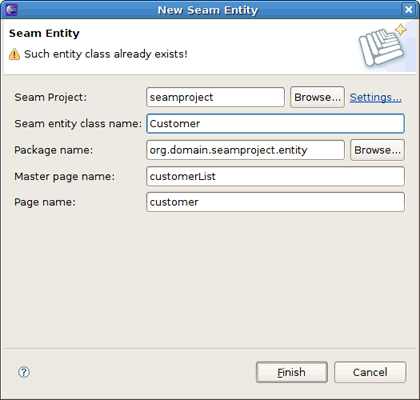
If you specify a class which already exists, the wizard will warn you about it.
The Master Page and the Entity were created in WebContent folder.
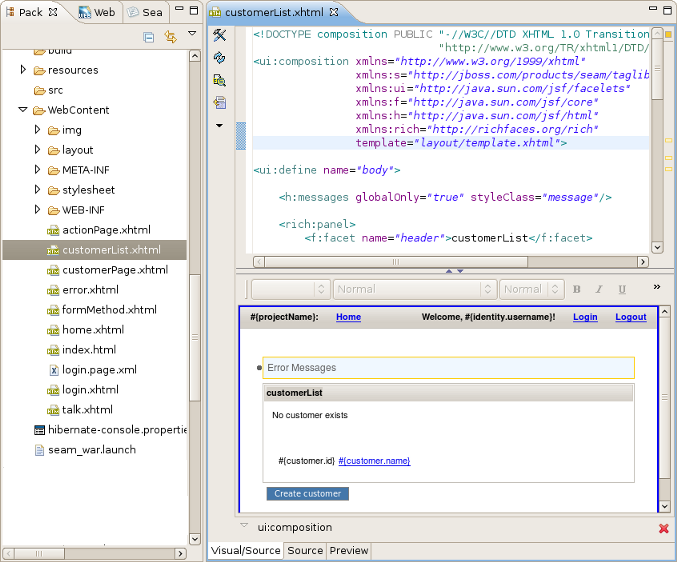
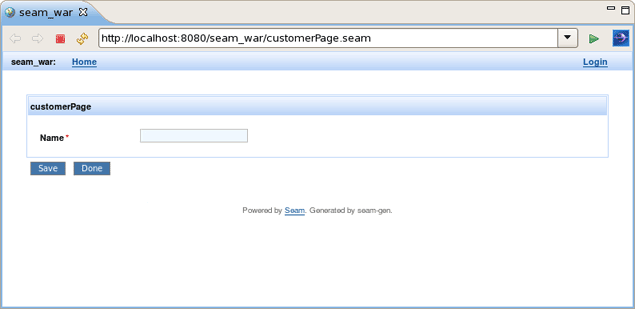
The Entity page is:
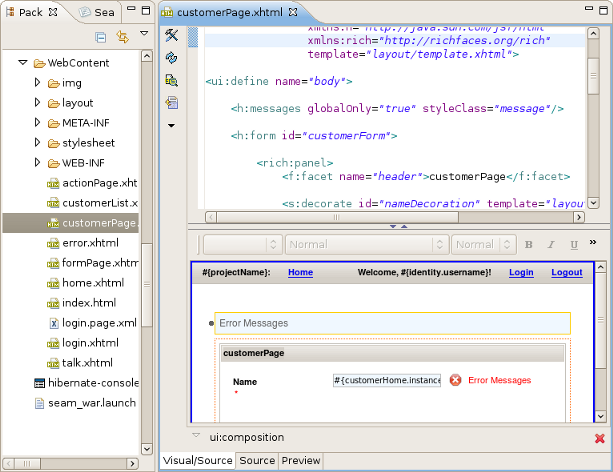
Run the Entity page on server. This is what you get:
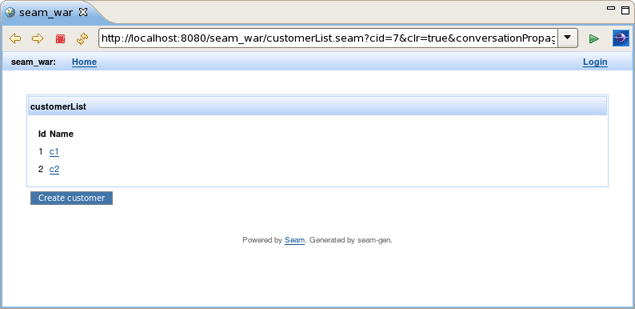
Let's create two customers c1 and c2. Enter the name in the text field and press the Save button. Customer should be successfully created. Press Done. Do the same for c2 customer. The result should be:
The main purpose of this chapter is to tell you about Seam Generate Entities.
Generate Entities is available directly from Eclipse using Hibernate Tools plugin for the standard seam-gen generation.
The wizard generates a set of CRUD Seam components and web pages based on existing tables in a database or on existing entities in your application.
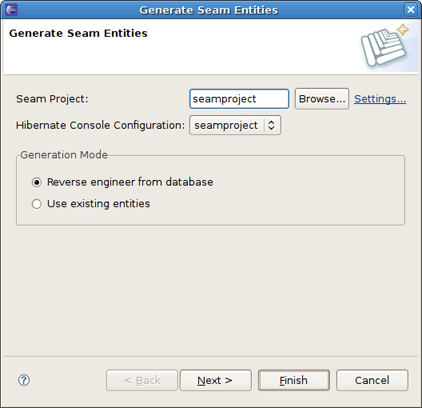
By default, the generation mode is set to Reverse engineer from database. The reverse engineering from a database could be described in four steps:
The wizard gets in database, extracts the tables and their connections
On basis of this metainfomation the Entity classes are generated into
org.domain.project.entitypackageFor the entities from step 2 the classes EntityList and EntityHome are generated into
org.domain.project.sessionpackageThe xhtml pages are generated.
Note:
The entities are generated from a database based on the console configuration that is created automatically during a Seam project creation.
(Read more about console configuration). The created console configuration is based on the
connection profile set on the Seam Facets wizard page while creating a project.
Configured connection profile settings are hold in the generated hibernate-console.properties. To change the connection
profile, double-click the console configuration. It could be found in the Hibernate Configurations view
(Window > Show view > Other > Hibernate > Hibernate Configurations
or just switch to the Hibernate perspective).
Checking the Use existing entities mode the wizard executes only 3 and 4 steps. It generates missing classes and xhtml pages.
Read the Generate a CRUD Database Application chapter in order to see how the Generate Seam Entities wizard can be used.
This chapter tells about Seam Editors and their features.
Visual Page Editor fits perfectly for authoring view Seam pages. The major features of VPE are listed in Main Features of Seam Editors
You can also read more about Visual Page Editor in Visual Page Editor chapter of "Visual Web Tools Reference Guide".
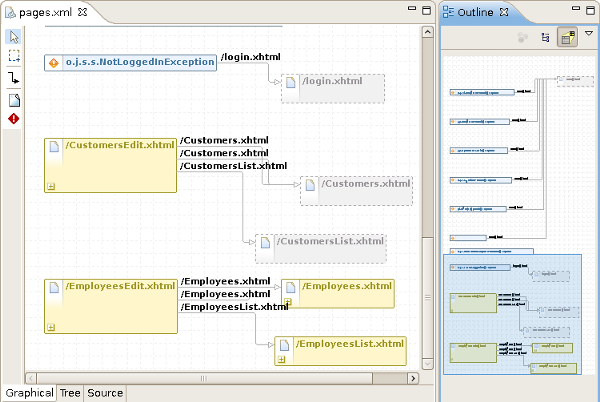
Seam Pages Editor provides a handy way to edit the pages.xml file.
You can edit the pages.xml file in three modes: Graphical, Tree and Source.
Seam Pages Editor supports synchronization with Package Explorer.This means that while renaming files in the Package Explorer all the changes immediately affect the pages.xml file.
Graphical mode provides you with a set of visual tools to organize your project pageflow, exception handling etc.

The Graphical part of the editor has some visual elements. The table below shows graphical representation of the elements and explains their meanings.
Table 8.1. Pages Editor: Graphical View. Visual elements
| Element | Description |
|---|---|
 | A yellow box with a solid border represents a |
 |
Pressing on the plus icon ( |
 |
A red cross in the upper left corner of the page box indicates that the view-id is not found in the project. |
 | A gray box with a dashed border represents a page that has navigation (navigation rule) to but the page is not defined in the page.xml file. |
 | An |
Pageflow relations are shown with gray arrows, when you select a relationship the arrow is changed to orange.
On the lefthand side of the Graphical view of Seam Page Editor you can find a toolbar with a set of icons for the most frequently used commands.
Table 8.2. Pages Editor: Graphical View. Commands Icons
| Icon Image | Command |
|---|---|
|
| Select a page element |
| Marquee a page item | |
|
| Add a page relationship |
|
| Add an exception rule |
Context menus are also available when you click either on an item or a blank space.
A context menu called on a blank space of the diagram provides the following options:
Page creates a new page element on the diagram
Exception creates a new exception element on the diagram
Auto Layout formats the layout of the diagram automatically
Select Element calls the Select Element Wizard with a filter to perform a quick search through the pages.xml file
Rightclicking on a selected
<page>
element calls a context menu where you can choose the following options if you click on the New menu item:
Rule opens the Add Navigation Rule dialog in which you can browse your project for a view page to set the view-id in the navigation rule and specify render or redirect navigation options
Param calls a dialog box where you can define a parameter (using the
<param>tag) for the<page>element
Tree Mode provides a wider range of options and way to edit and modify the pages.xml file.

In this mode all elements and attributes of the page.xml file can be viewed and edited in a visual, user friendly way.
Seam Pages Editor provides Outline view support.
You can explore the pages.xml using Outline view in two modes: Tree (  ) and Diagram Navigation (
  ).
).
The Diagram Navigation mode of Outline view gives a birds-view of the layout to allow quick navigation for large-scale applications.
The Tree mode shows a tree for every element in the pages.xml file. You can get a quick overview of the whole file. When selecting an element in the Outline view the related element is highlighted in the Graphical, Tree or Source page of Seam Pages Editor.

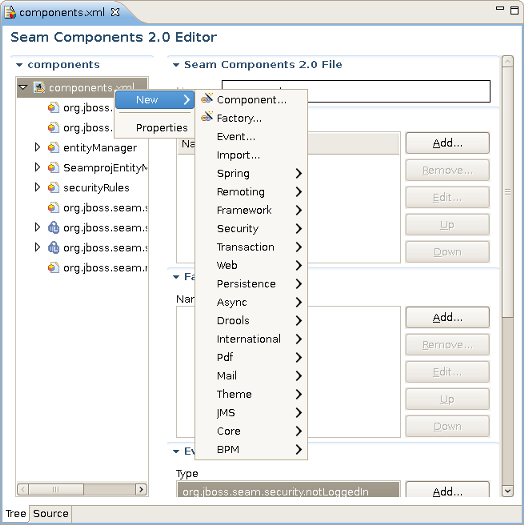
When editing components.xml a structured tree editor is available in addition to pure source editing. It has a graphical view (Tree tab) and source (Source tab).
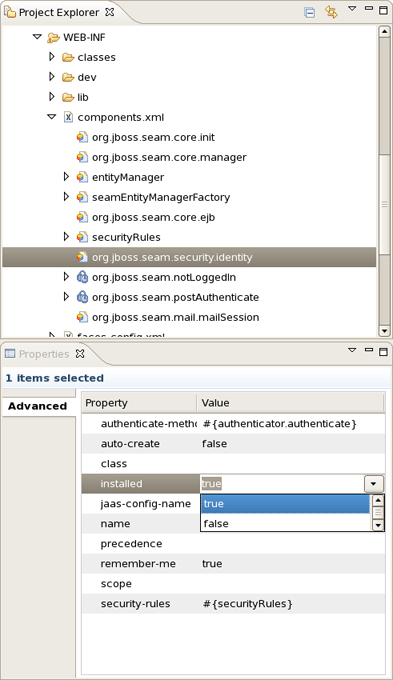
Note:
You can view and edit components.xml and other xml files directly in the Project Explorer and Properties sheet without opening the components.xml editor.
In this chapter you will know what Seam Editors features are and how to work with them.
Content Assist (Ctrl + Space) is available when using EL expressions in the following file formats:
JSP
XHTML
XML
JAVA
Notice, the code completion for the Seam components shows the proposals marked with Seam icon.
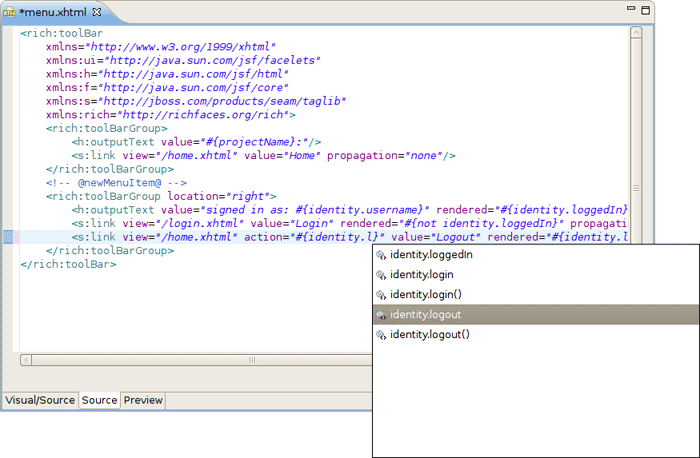
Content Assist is also available for the "jsfc " attribute, it lets you select from a list of possible attribute values. Whereas, JSF components appear above all other components in the list.

Note:
To get Code Assist available for an externally generated and imported project, don't forget to enable Seam features and configure Seam Settings in Project Preferences.
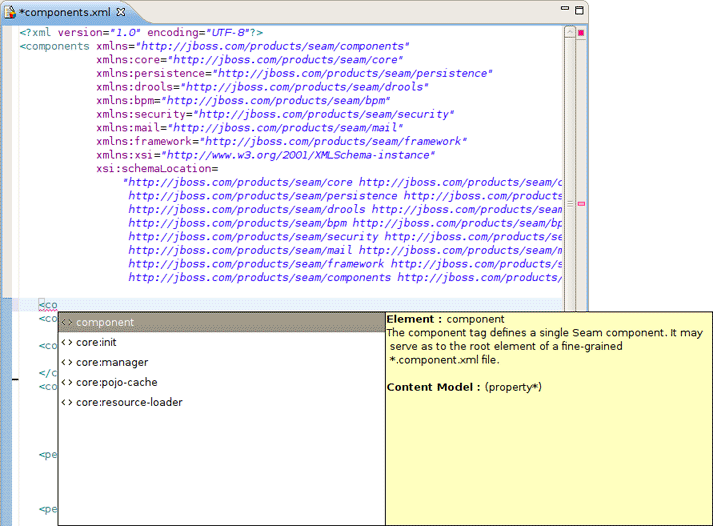
While you are editing a components.xml file you can make use of the Content Assist for inserting needed elements.
The editor also makes code completion aware of methods/attributes for EntityQuery component.

Content Assist ( CA ) is available for Page Descriptors, .page.xml and page.xml files. Content Assist lets you easily compose a Page Descriptor file by suggesting elements and attributes. The suggestions are context dependent, which means that CA provides only the elements, attributes and in some cases values for the attributes, suitable in a particular place of your Page Descriptor.
Seam Pages Editor also supports code completion in EL-expressions suggesting you possible bean properties and methods.
OpenOn lets you easily navigate through your project without using the Package Explorer or Project Explorer. After pressing Ctrl + left click (or just F3) you will see a corresponding method or class.

OpenOn is available for the following files:
Note:
In this section were described only use cases special for Seam applications.For general information please read OpenOn section in Visual Web Tools Reference Guide.
Using OpenOn in .xhtml files you can open:
components or properties resolved using an EL expression;
all actions described in pages.xml;
other .xhtml files that paths are specified in a current file;
image files that paths are set in the value property.The files will be opened in the default system graphical editor.
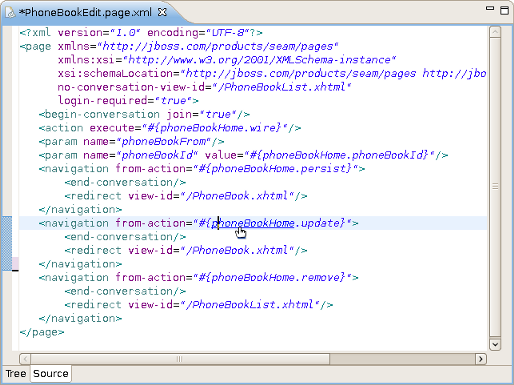
OpenOn is also supported in Page Descriptors (.page.xml and pages.xml). OpenOn allows you to navigate to Java beans as well as to view pages. You can Ctrl + left click on a bean or on view page file (e.g. XTML file) to navigate to the file you clicked on.
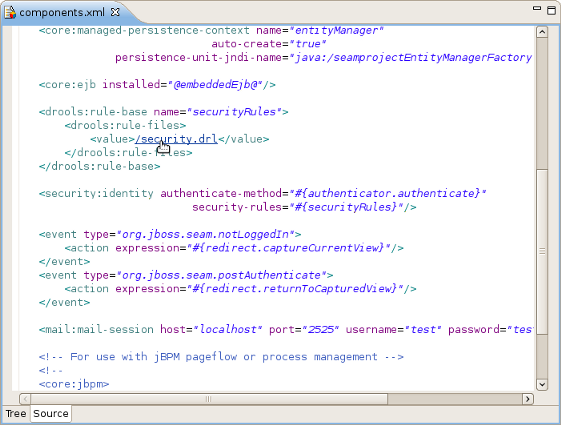
If you use Rule-based authorization with Drools in your Seam application you can apply OpenOn in components.xml to open the files containing rule definitions in the "rule-files" tag.
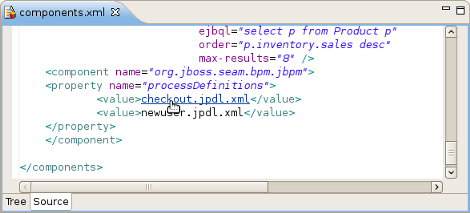
You can also use OpenOn to open jBPM components that are described in Seam component descriptor. Two places where it works are available:
OpenOn is also supported in seam components where In annotation is presented. After pressing Ctrl + left click on the seam component specified in
@Inyou will get the possibility to open the file where the component is declarated as well as all of the seam components where it is used in the next declarations:@Out
@DataModel
@Role
@Roles


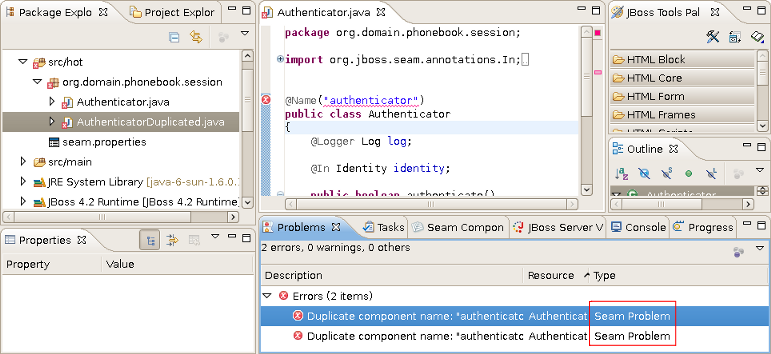
Validation of various possible problematic definitions is implemented for Seam applications.
If an issue is found it will be shown in the standard Problems View.
Note:
Please note, only files within source path and web content are validated, meaning temporary files or test files are not included.
In the preferences page for Seam Validator you can see and modify the validator behavior. Go to Window > Preferences > JBoss Tools > Web > Seam > Validator and select the severity level for the optional Seam Validator problem.

On WTP projects validation are enabled by default and thus executed automatically, but on normal Java projects you will have to go and add the Validation builder of your project . It is available in the properties of your project under Validation.
The validations can be run manually by clicking Validate via the context menu on your project (folder or file inside your project) which will execute all the active WTP validations. Following to the project's preferences under Validation it's possible to enable/disable any validator.
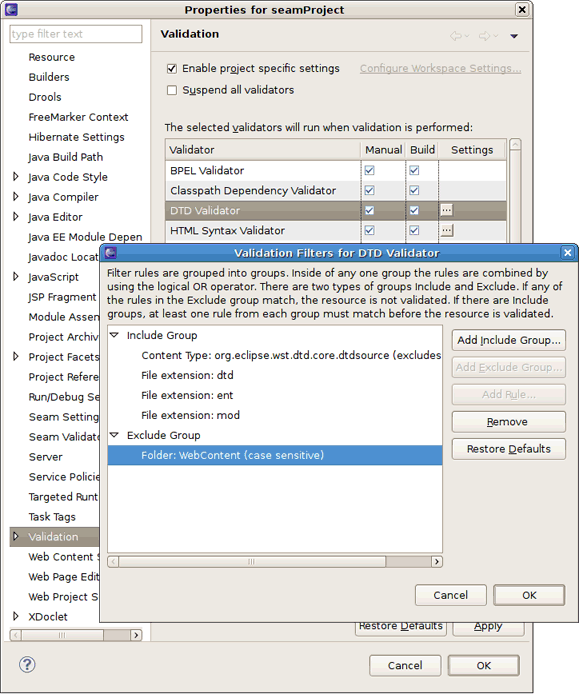
It's also possible to turn off the validation for some resource (a file, folder) inside your project via the Exclude Validation context menu option.
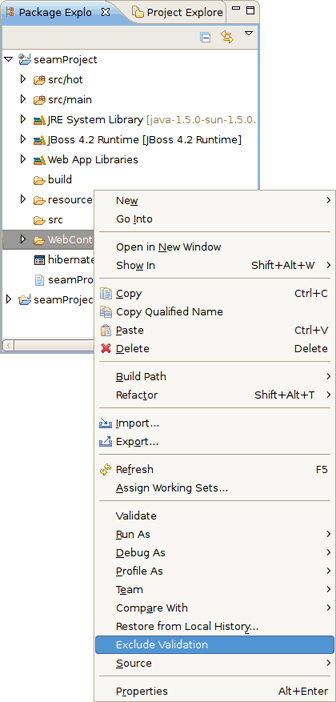
As a result, if you've turned off the validation for a folder (or file), it is put to the excluded group of the Validation filters and be ignored during the validation.
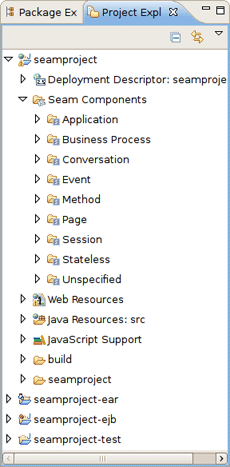
This chapter introduces you with Seam Components View.
The Seam Components View is available from Seam perspective. It provides a list of seam components found in a project.
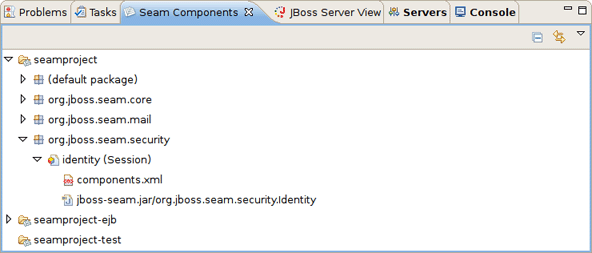
The Seam Components View can show a components default scope in two ways:
as labels on each component (click on the triangular symbol at the top of the Seam Components View page and select Scope Presentation > Label)
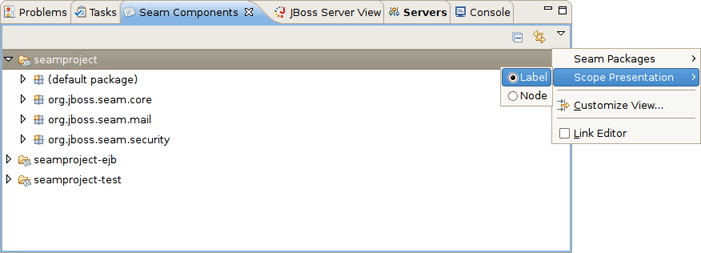
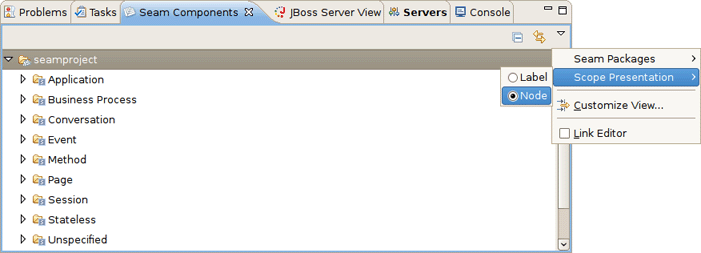
as a node per scope where the components are grouped under a node representing its default scope.
The Seam Packages can be presented in two ways:
Flat
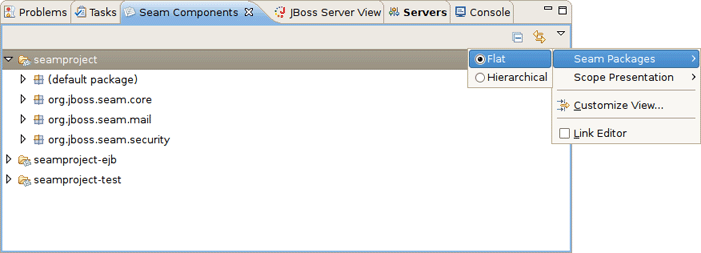
Hierarchical
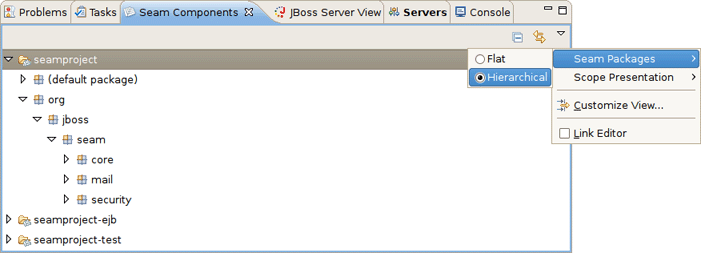
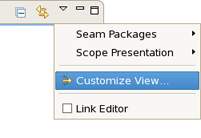
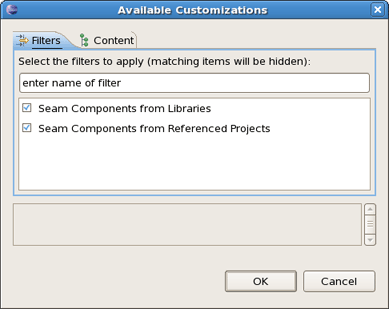
The Seam Component View can be filtered by choosing Customize View.
Select the Seam Components from Libraries under the Filters tab. This will make the view ignore components defined in jars. This will hide the many built-in Seam components and leave only those that are actually defined in the project or have been actively configured via components.xml. Therefore, deselecting the filter will show you all available components.
Selecting the Seam Components from Referenced Projects will hide the components that dependent on other project.
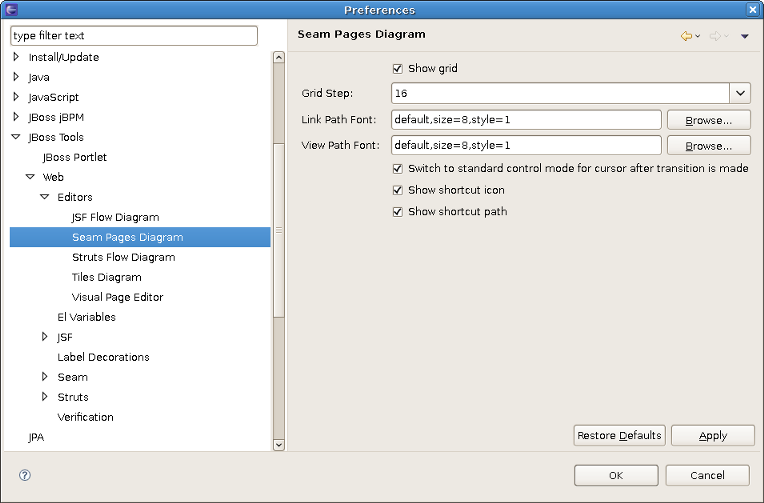
In this chapter you get to know how Seam preferences can be modified during the development process.
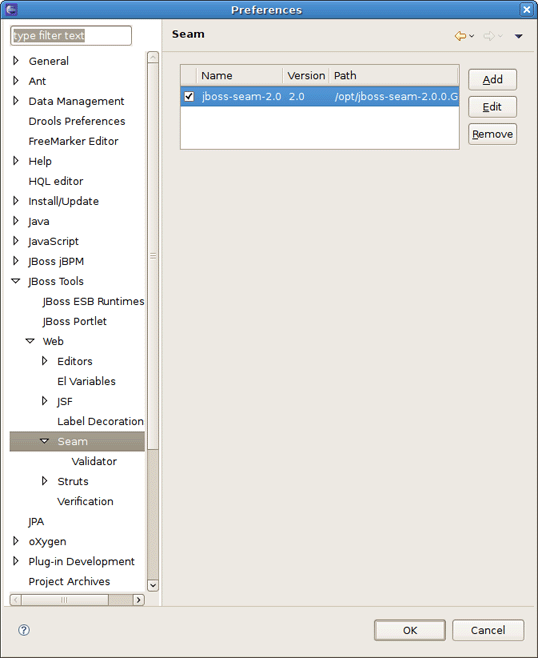
Seam preferences can be set using the Seam preference page. Click on Window > Preferences > JBoss Tools > Web > Seam.
On this page you can manage the Seam Runtime. Use the appropriate buttons to Add more runtimes or to Remove those that are not needed.
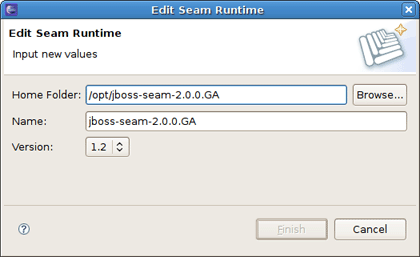
Clicking on Edit button you get the form where you can change the path of Seam runtime home folder, modify name and version. Press Finish to apply the changes.
Tip:
If you try to delete the Seam Runtime that is already in use by some project in the current workspace, then a warning message will appear. To confirm the removal press OK
Besides, when you right-click on your Seam project with deleted runtime in Project Explorer and select Properties > Seam Settings the error message "Runtime <runtime_name> does not exist" will appear.
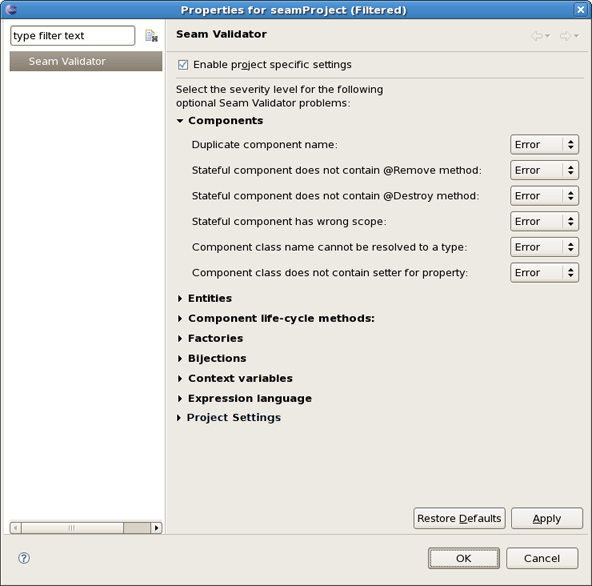
Seam preference page includes a subsection Validator. See Window > Preferences > JBoss Tools > Web > Seam > Validator.
On this page you can choose a severity level for the various Seam validator problems. For example, if you want to ignore the case when component name is duplicated expand the Components node and select Ignore next to Duplicate component name. After that you won't see the error.
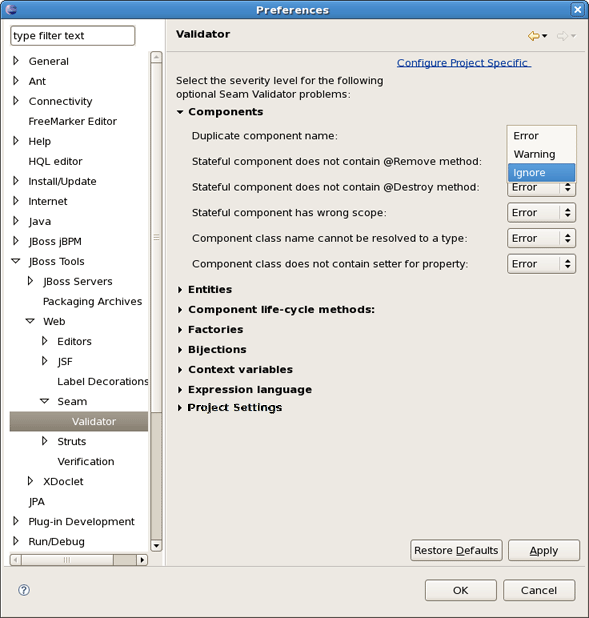
Notice, that in the Expression language section there is now a preference for setting severity of EL Syntax. You can select whether the Seam validator displays an error, a warning or just ignore the EL Syntax error.
Note
There are references made between each EL and variable name, so you can revalidate a particular EL if a context variable was changed. This makes parsing of each resource with referenced ELs much faster.

The Revalidate unresolved ELs automatically option is enabled by default. If necessary, you can uncheck it. It may increase a performance for big complex projects.
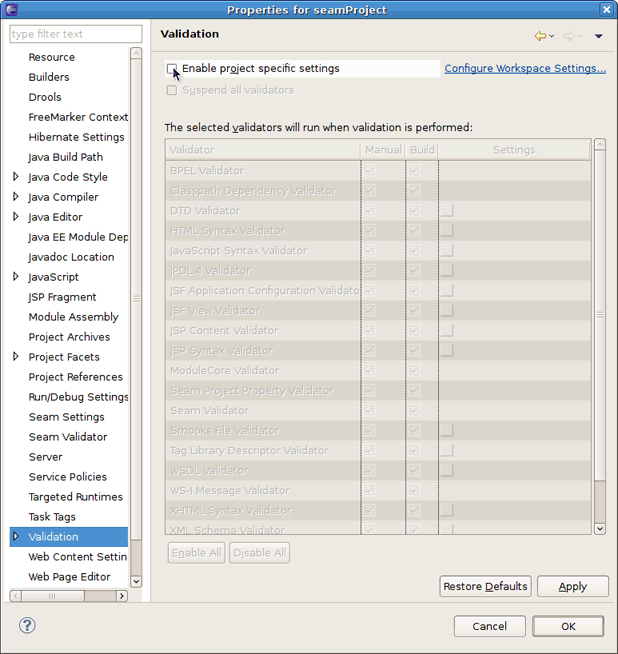
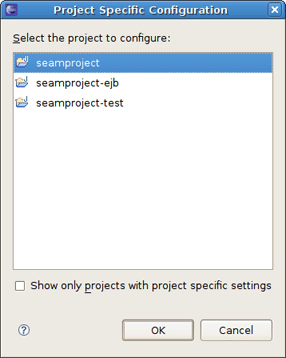
In the upper right corner of the Seam Validator preferences page there is a Configure Project Specific Settings link. Clicking on it you get the form where you can choose a project for specific setting. Project specific configuration allows you to have different validator settings for each project. Check the Show only projects with project specific settings if you want to see the projects that have been already set. Click on Ok.
You get the validator properties page for chosen project. Check the Enable project specific settings to be able to change the settings.
Note:
You can open the same page by right clicking on the needed project in Package Explorer, then Properties > Seam Validator.
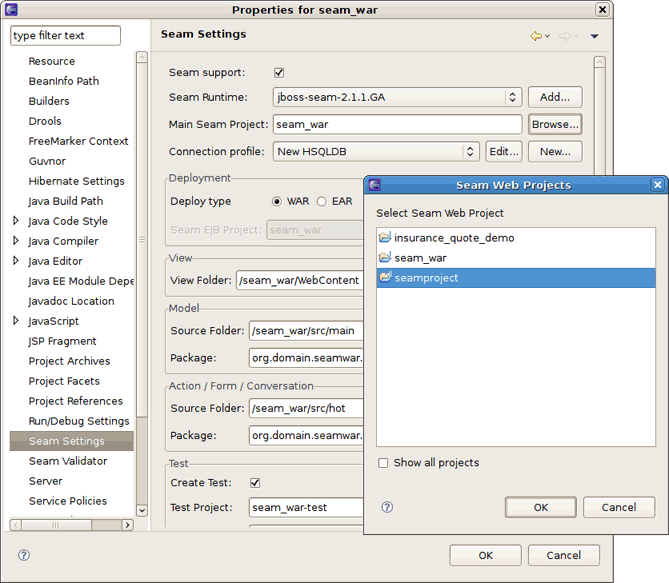
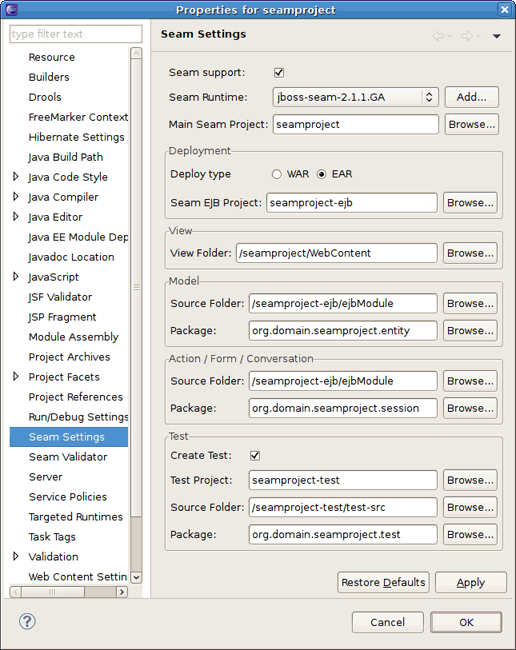
Once Seam project is created you can modify its settings. Right click on Seam project in Project Explorer and select Properties > Seam Settings.
This project properties page allows you to have a flexible project layout. It means that you are not restricted with a specific project structure. You can use the Seam wizards (New Action, Form, Entity, etc.) on Maven, command line seam-gen or your own project structure.
Tip:
The wizard doesn't allow the renaming of the artifacts listed in the Seam Settings. It's possible to do in the Package Explorer. See Renaming the Projects and Folders.
Also notice, you are not required to use the New Seam Project wizard to benefit from Seam artifact wizards. You can just enable Seam on your existing project by checking Seam Support and targeting to Seam Runtime, and then configure the folders as you want.
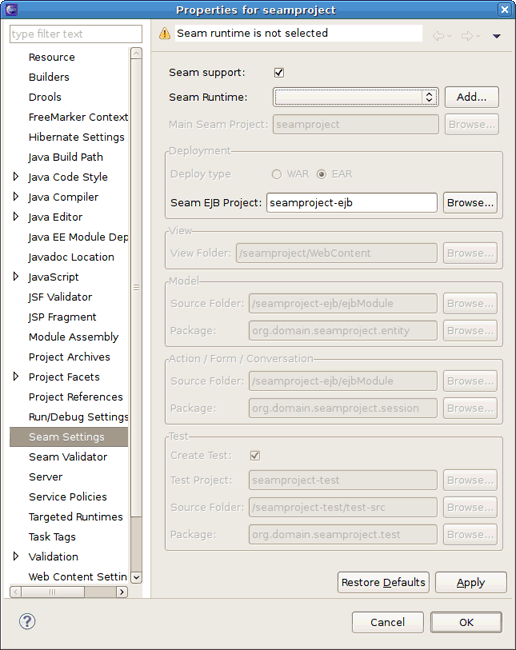
Tip:
On the figure above fields for configuring Seam artifacts are unavailable because Seam Runtime is not selected.
In Seam Wizards (New Action, Form, Entity, Conversation, Generate Entities) you can get a quick access to project settings using the Settings link in the upper right corner of each wizard.
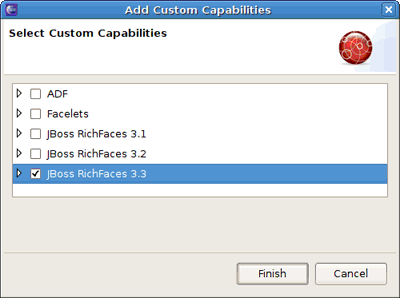
JBoss Tools provides a possibility to add custom capabilities to any Seam project, i.e. add a support of additional frameworks built on top of JSF, such as
ADF
Facelets
JBoss Rich Faces (versions 3.1, 3.2, 3.3)
To enable it, you should call the context menu for a Seam project and select JBoss Tools > Add Custom Capabilities. Then check the needed modules and press Finish.
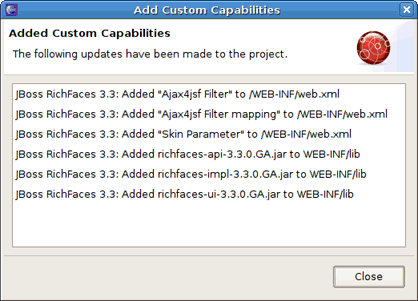
The next page displays all the updates that have been made to the project.
The goal of Seam components refactoring is to make system-wide code changes without affecting the behavior of the program. The Seam module of JBoss Tools provides assistance in easily code refactoring.
Starting from Jboss Tools M4 refactoring functionality became also available for managed beans, method and properties used in ELs. Thus now Seam refactoring tools include the next refactoring operations:
Refactoring commands are available from the context menus of several views and editors and use a standard Eclipse refactoring wizard. For details, see "Using the Refactoring Wizard" later in this chapter.
Note:
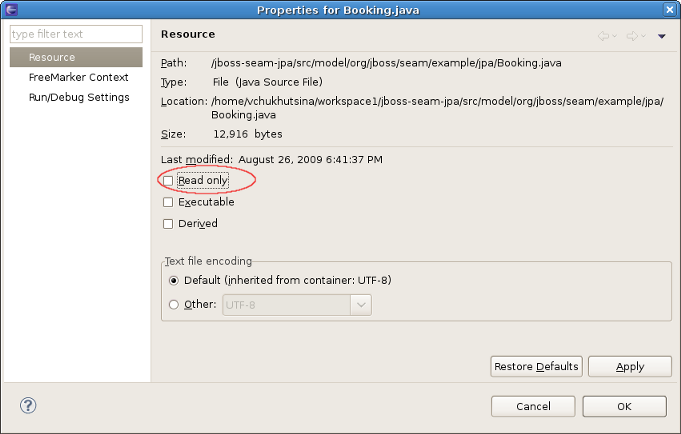
Seam refactoring could be only performed in the file that is not marked as Read only in its properties.
This wizard is opened always when the user clicks the Rename Seam Component, Rename Seam Context Variable or Rename command in any of the views/editors mentioned later in this chapter.
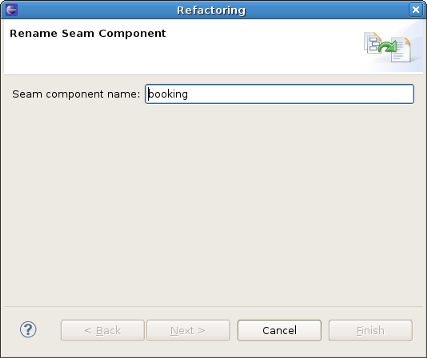
In the Seam Components name field you should enter a new name of the component, then click Next and follow the next wizard steps:
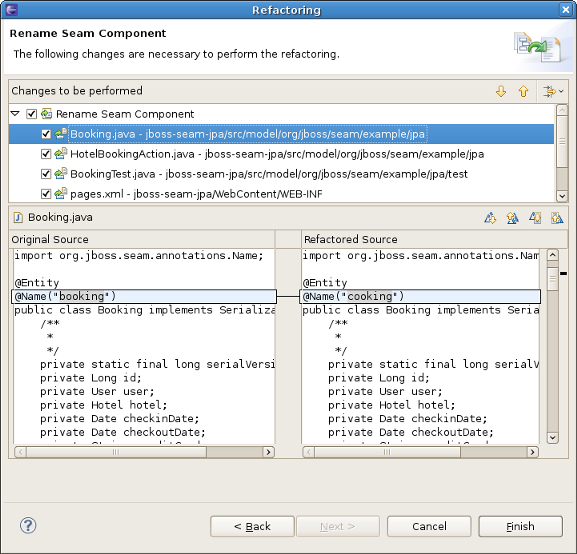
As you see, when performing a refactoring operation, you can preview all of the changes resulting from a refactoring action before you choose to carry them out.
The view represents two windows: one with the original source code and the other with refactored one.
With the help of
 ,
,
 ,
,
 ,
,
 buttons you can quickly navigate between the differences in the code.
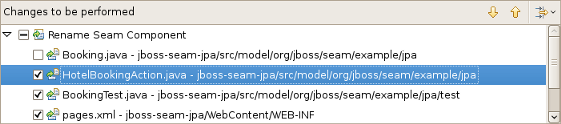
If you don't agree with some changes you can't undo them but you can remove the class from the list of classes that need refactoring.
buttons you can quickly navigate between the differences in the code.
If you don't agree with some changes you can't undo them but you can remove the class from the list of classes that need refactoring.
To apply the changes click Finish.
Renaming the selected seam component corrects all references to the component (also in other files in the project). Renaming a type doesn't allow to rename similarly named variables and methods.
Renaming a Seam component could be performed in the:
If you want to rename certain seam component using Java editor, first of all it's necessary to open it. If you don't know, where the seam component is declared, use Open Seam Components icon.
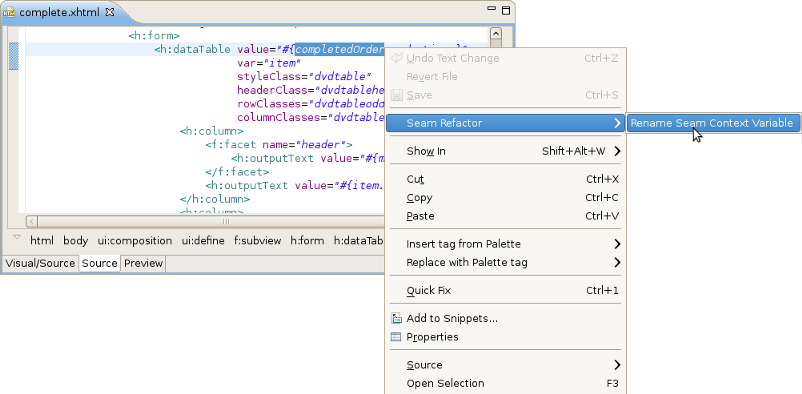
To rename a Seam component in the Java editor it's necessary to select the component, left click the file and then select Seam Refactor > Rename Seam Component.
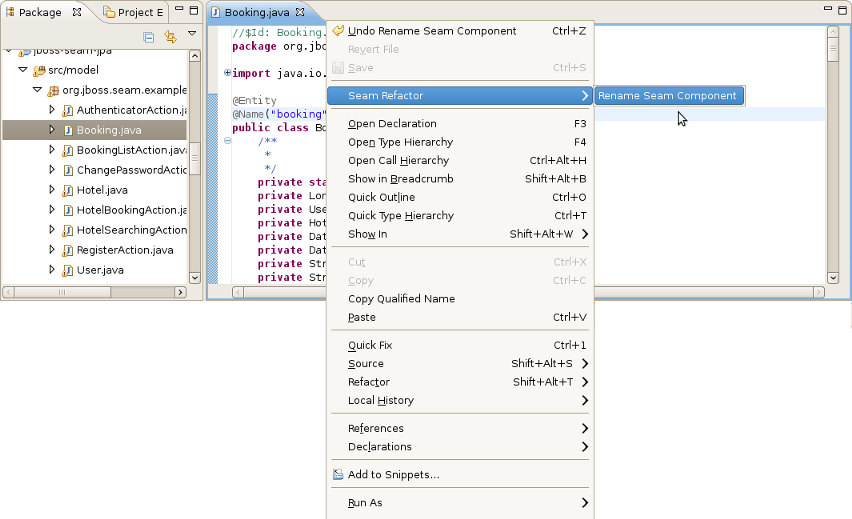
For details, see also the movie, "Renaming a Seam component in the Java Editor".
To open the Refactoring wizard in the Seam Components view you should left click the component you want to open and choose Rename Seam Component option.
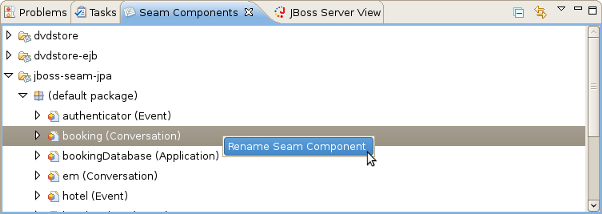
For details, see also the movie, "Renaming a Seam component in the Seam Components view".
When you open components.xml file using JBoss Tools XML Editor, open the
Refactoring wizard in the Tree tab by left-clicking the component in
components area and choosing Rename option.
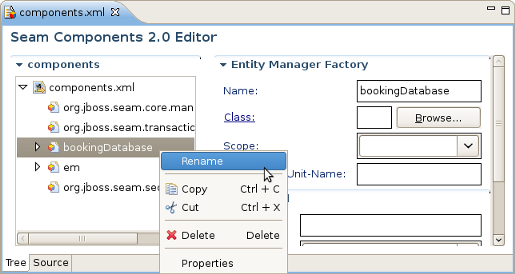
For details, see also the movie, "Renaming a Seam component in the components.xml file".
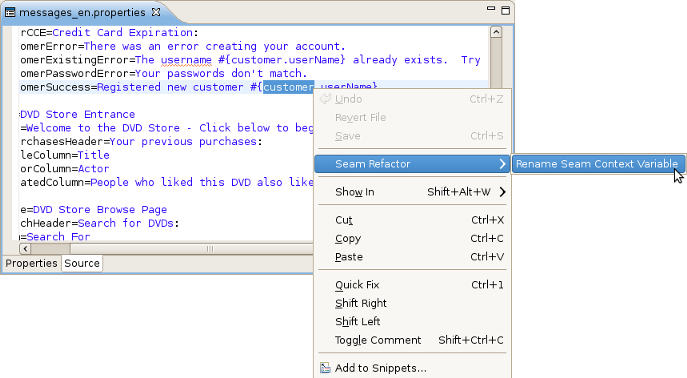
Renaming a Seam context variables in EL could be executed in .java, .xml, .jsp,
.xhtml and .properties files in Seam projects using
the context menu command Seam Refactor > Rename Seam Context Variable.
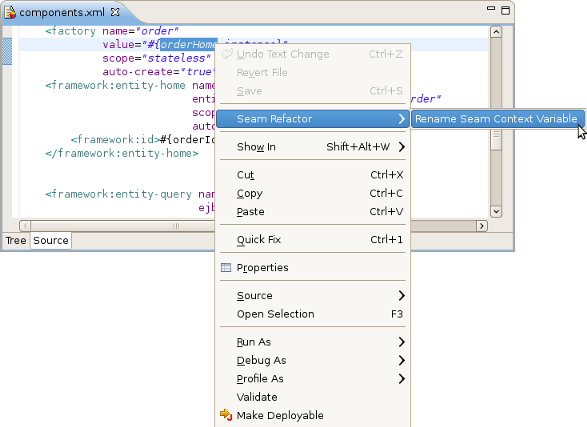
For details, see also a set of movies about renaming Seam context variables in EL in different locations:
From this chapter you will find out how to add Seam support to EAR project
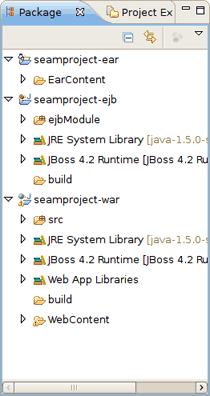
For example you have several WTP projects:
seamproject-ear (You can create WTP EAR project using New -> Project -> Java EE -> Enterprise Application Project wizard)
seamproject-ejb (You can create WTP EJB project using New -> Project -> EJB -> EJB Project wizard)
seamproject-war (You can create WTP WEB project using New -> Project -> Web -> Dynamic Web Project wizard)
Tip
You can add as many EJBs modules as you want just doing the same for each EJB project.
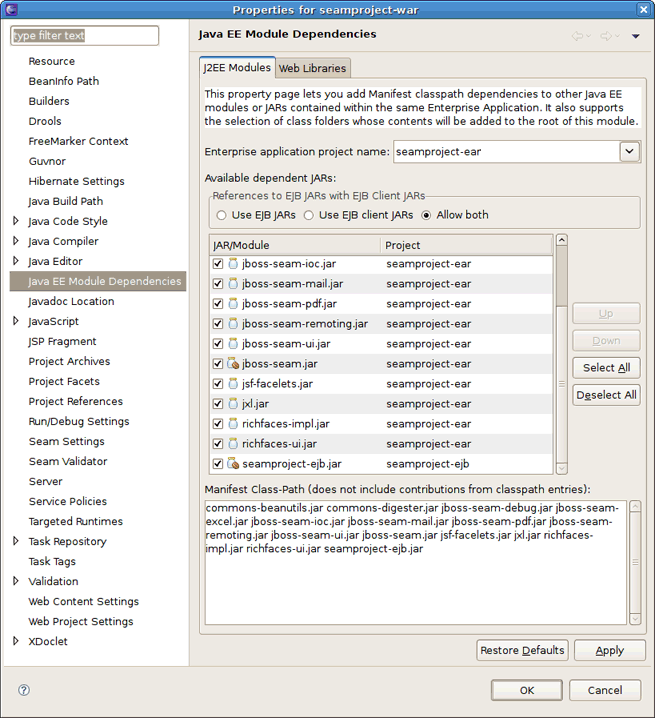
Make sure EJB and WAR are included in EAR as modules (Properties for seamproject-ear -> Java EE Module Dependencies)

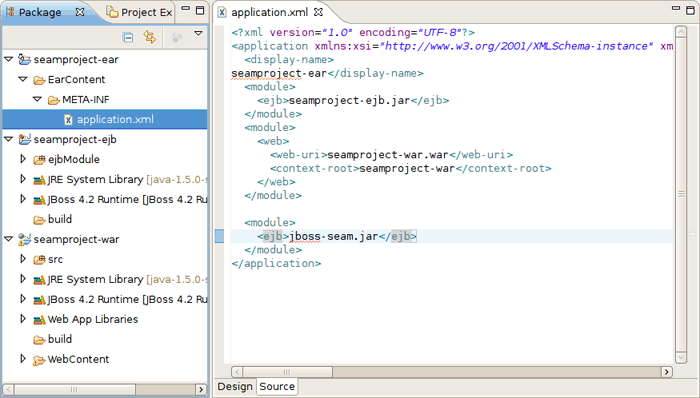
Make sure there is jboss-seam.jar in application.xml as well:
Then include libs from EAR to EJB Manifest Class-Path (Properties for seamproject-ejb -> Java EE Module Dependencies)
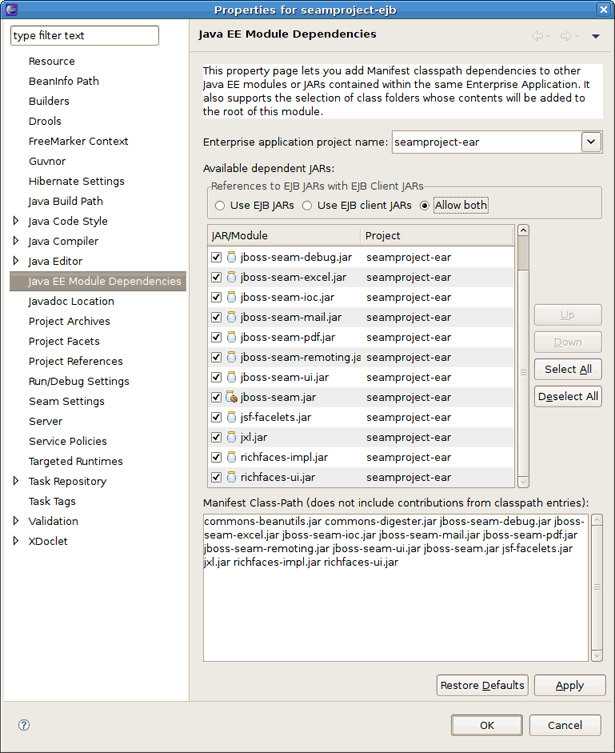
Include libs from EAR and seamproject-ejb.jar to WAR Manifest Class-Path (Properties for seamproject-war -> Java EE Module Dependencies)
Thus we have set our WTP EAR/EJB/WAR projects and now we are ready to add Seam support to them:
First you have to add Seam support to WAR project: Properties for seamproject-war -> Seam Settings
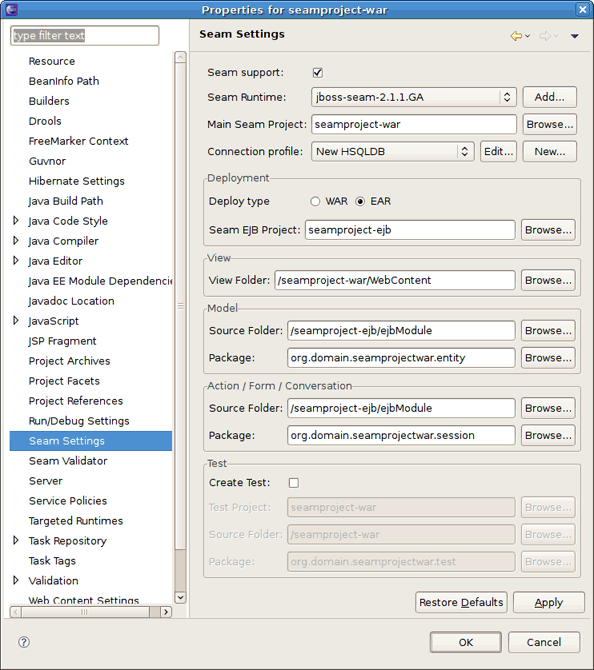
Set seamproject-war as Main Seam project. All other settings mostly are used by New Seam Entity/Action/Form/Conversation/... Wizards. Thus you can set them as you wish.
Then you can add Seam support to EJB project: Properties for seamproject-war -> Seam Settings
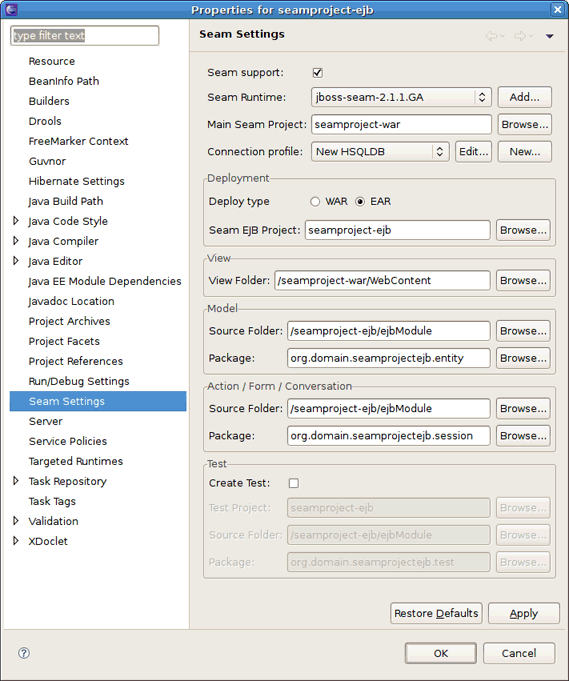
It&s important to set seamproject-war project as main Seam project there.
It will allow Seam Tools to use one common Seam model for seamproject-ejb and seamproject-war projects.
The last step is to clean/build the projects
That is all. You have added Seam support to your EAR project.

CRUD is an acronym for the four basic types of SQL commands: Create , Read , Update , Delete . Most applications have some kind of CRUD functionality, and we can assume that every programmer had to deal with CRUD at some point. A CRUD application is one that uses forms to get data into and out of a database.
In the next section we will create Seam Web application, connect it to the HSQL database and add CRUD support.
First, you should download a database and start it by running ./runDBServer.sh or runDBServer.bat from the database directory.
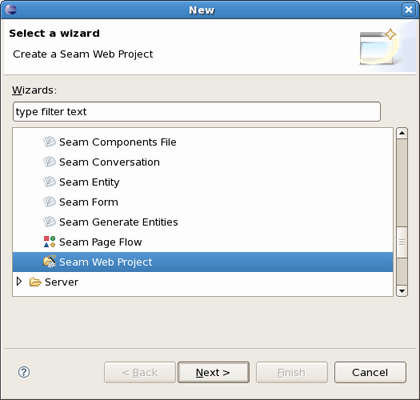
Create a new Seam Web Project using New Seam Project wizard or main menu File > New > Seam Web Project.
Name your project as crudapp, specify Target Runtime, Server and Seam Runtime configuration. Then press Next and follow the next wizard steps keeping default settings.

Tip:
Please have a look here how to create Target Runtime and Seam Runtime in order to get started creating, running, and debugging J2EE applications.
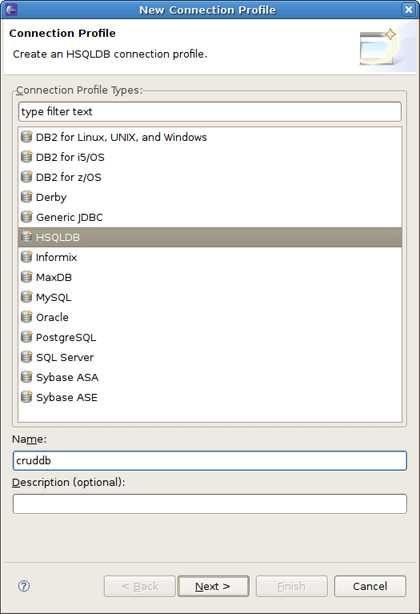
On Seam Facet page click New... next to the Connection profile section to create a new Connection profile.
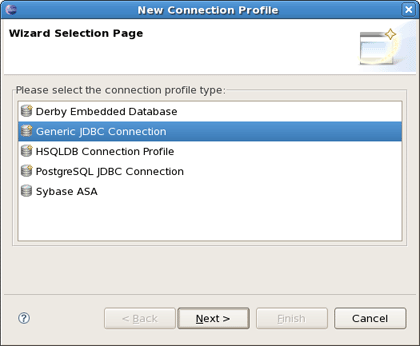
On New Connection Profile dialog select the HSQLDB connection profile type, name it cruddb and click Next.
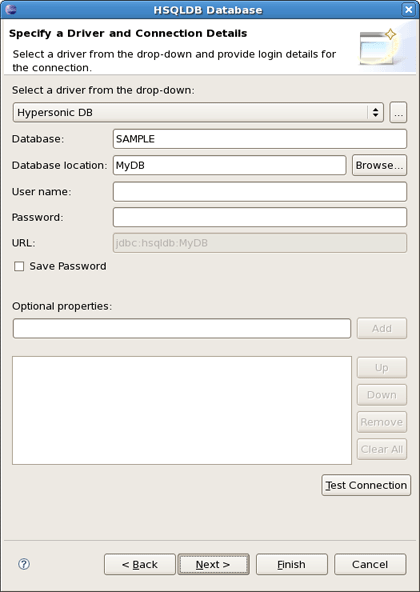
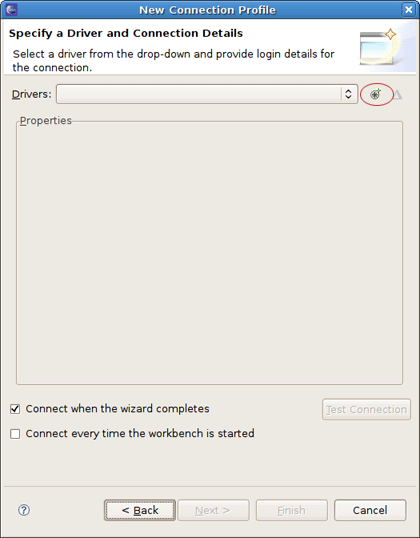
On the next page click the round icon next to the Drivers field to select a database driver.
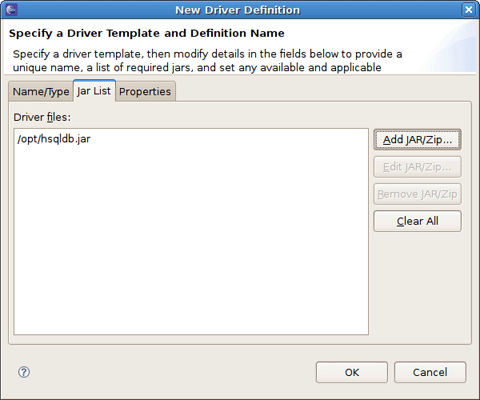
Now you should see the New Driver Definition dialog. On the first tab select the HSQLDB JBDC Driver. Underneath in the Driver name field you can change its name if you need.
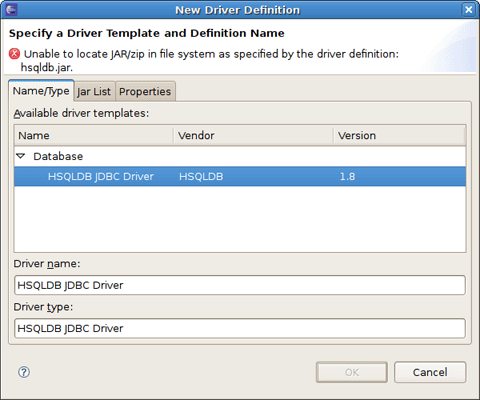
You may notice the note on the previous figure. It prompts that you should specify the driver of the type you pointed. Set the location of the driver by switching to the next tab and press Add JAR/Zip button.
On the Properties tab set the Connection URL, Database Name and User ID and click OK.

After clicking OK to submit the newly created driver you can observe and if you need edit all specified connection details.
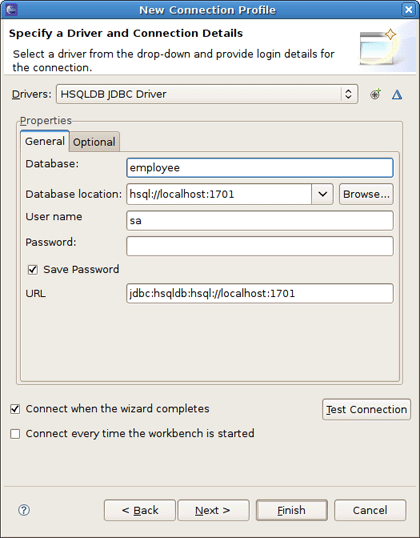
Now click Test Connection to be sure that connection can be established.
Validate JDBC Connection profile settings and press Finish or Back if something is wrong.

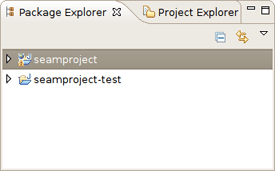
After clicking Finish two projects crudapp and crudapp-test will be created.

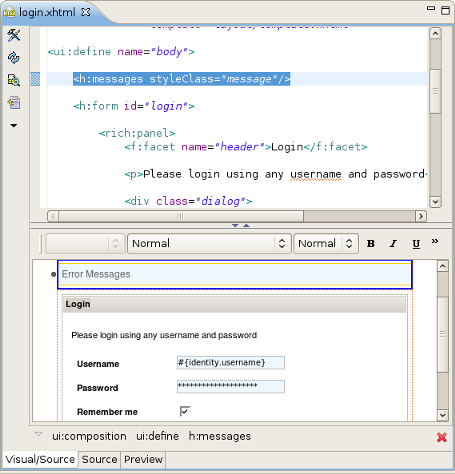
Have a look at the created projects. You can expand WEB_CONTENT folder and open home.xhtml or login.xhtml with JBoss Visual Editor.
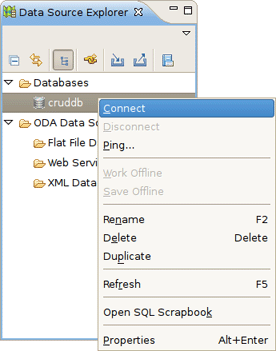
Switch to Database Development perspective with Window->Open Perspective->Other... and connect to the cruddb database.
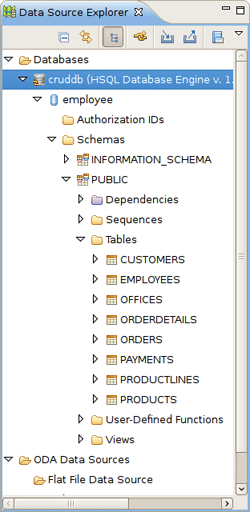
Expand cruddb nodes to view its Schemas, Tables, Columns etc.
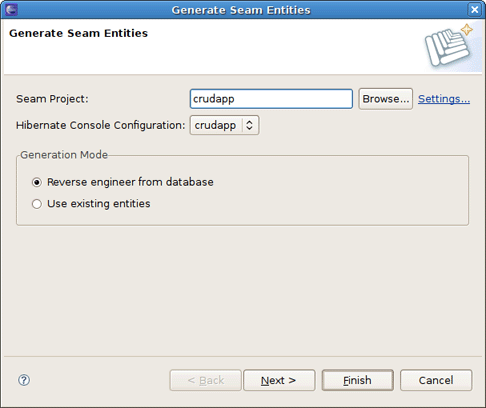
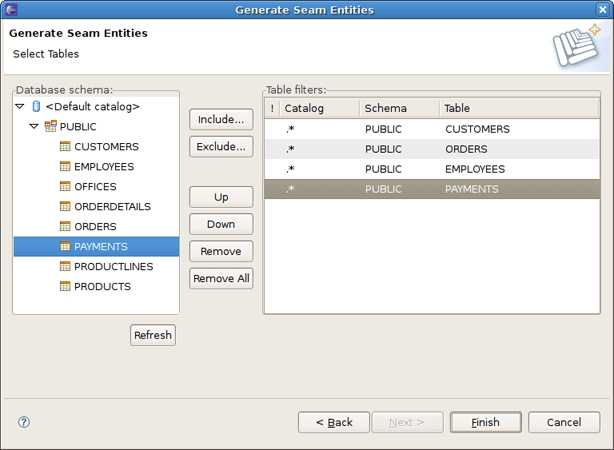
Switch back to the Seam perspective. From the toolbar select New->Seam Generate Entities to create a set of CRUD Seam components and web pages based on existing tables in the database. On the first page of Generate Seam Entities wizard keep everything by default and press Next.
Click Refresh to display all the tables from the database.
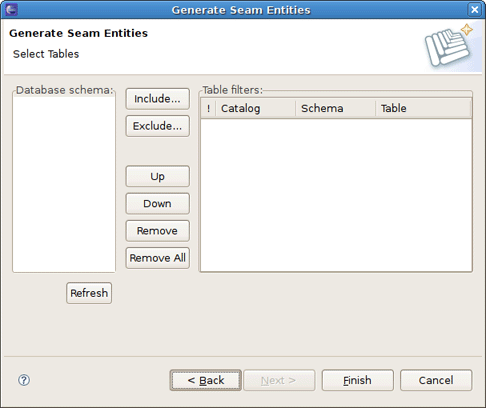
Now you can filter the tables. Use the Include button to include only necessary ones.
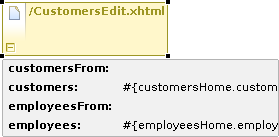
Under WebContent folder you can find all generated xhtml files:
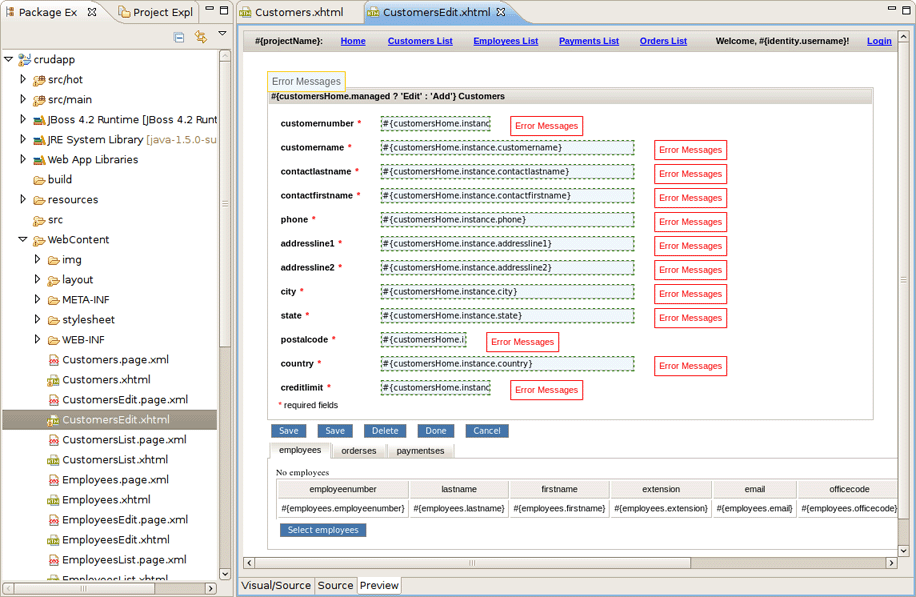
And under src folder java classes are created.

Switch to Hibernate perspective with Window->Open Perspective->Other.... On Hibernate Configurations view expand the crudapp configuration. Right click on Customers and select Open Mapping Diagram from the popup menu.

Observe the Mapping Diagram opened in the editor. Here you can see the relations between models and database tables. For better navigating on the diagram use the Outline view.
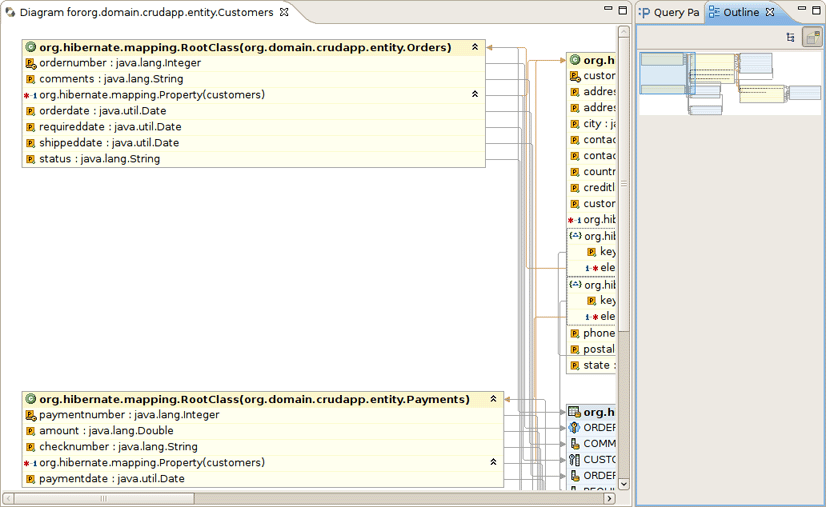
For example, select Customers entity, right click and select Open Source File. This will open the Customers.java file in the java editor. You can also do this by right-clicking on the same entity on the Mapping Diagram.

So far, you are ready to deploy your application to JBoss Application Server. This is described in the next chapter.
After you familiarized oneself with example of creating the CRUD Database Application with Seam, you can read this charter.
To run your CRUD Application you should do the following steps:
Run a project on the Server.
On Package Explorer View right click on the crudapp project, select Run As > Run on Server.

Select a Server and click Finish

Home page of the crudapp project should appear in Web Browser .

After that you can use CRUD application with "employee" database.
You can use internal JBDS Web Browser or your external Web Browser with the same link (http://localhost:8080/crudapp/home.seam).
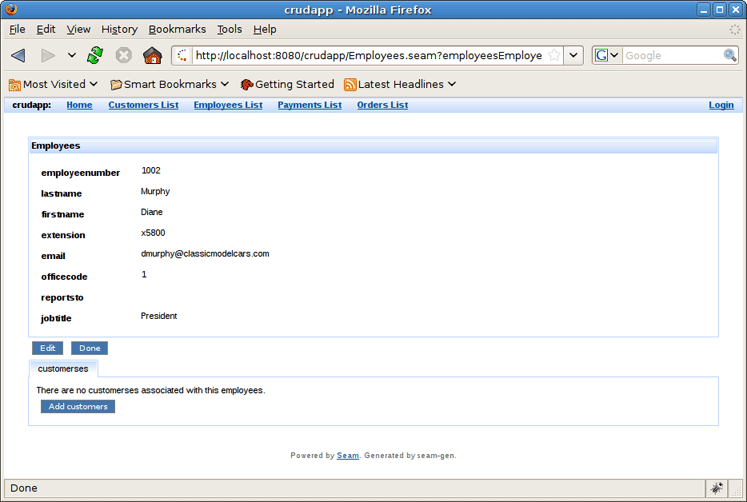
Click on the Employees List link and observe that data from employee database is displayed.
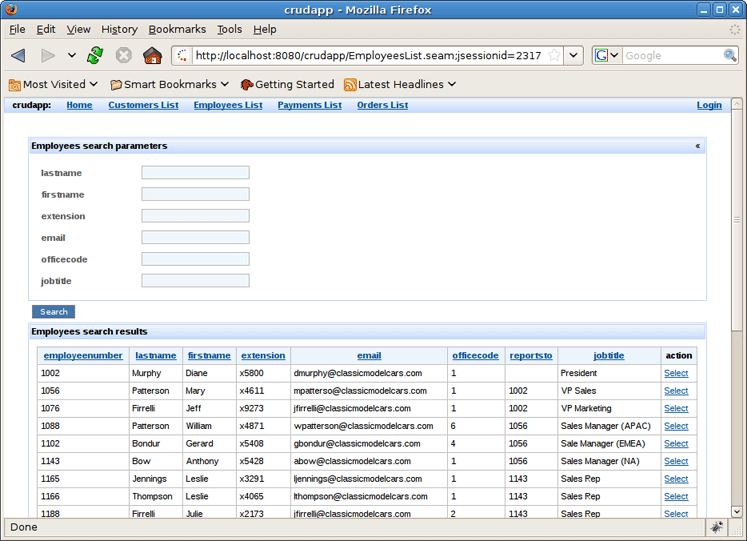
Use Employees search parameters fields to filter the selected list.
Press Select opposite one of employees.
Press Edit to edit employee fields.
Enter Login and Password to login. (Use "crudapp-user"/"secret" for example)

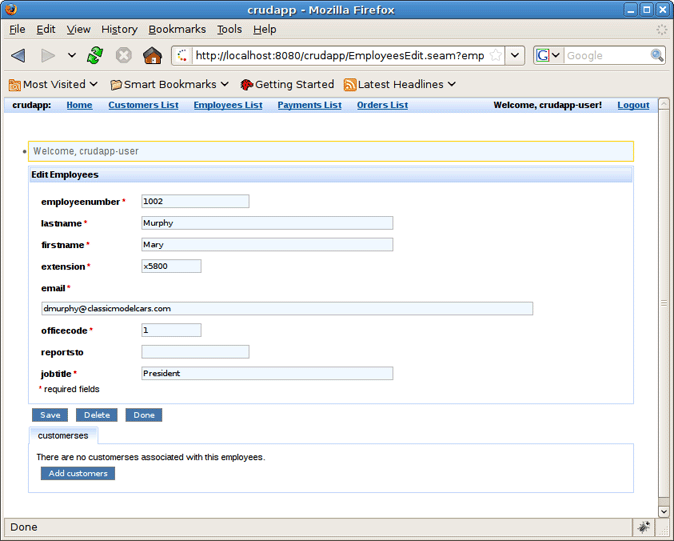
Fill in firstname and press Save.
Database will be updated.
With the help this chapter you will get to know with TestNG.
TestNG ("Testing, the Next Generation") is a Java unit testing framework that aims to overcome many limitations of JUnit. TestNG introduces some new functionalities that make it more powerful and easier to use, such as:
JDK 5 Annotations (JDK 1.4 is also supported with JavaDoc annotations)
Flexible test configuration
Support for data-driven testing (with @DataProvider)
Support for parameters
Allows distribution of tests on slave machines
Powerful execution model (no more TestSuite)
Supported by a variety of tools and plug-ins (Eclipse, IDEA, Maven, etc...)
Embeds BeanShell for further flexibility
Default JDK functions for runtime and logging (no dependencies)
Dependent methods for application server testing
More information can be found on home page: www.testng.org
Next-Generation Testing with TestNG (An Interview with Cedric Beust)
TestNG: The next generation of unit testing
Test Categorization Techniques with TestNG
Create a new Seam Web Project with EAR deployment using the New Seam Project wizard.
After a project is created you will have the generated Seam-test project that is setup to run TestNG directly against the proper libraries and server runtime libraries.
Add Seam Action to your project via File > New > Seam Action.
Fill out the wizard fields. New Seam Action wizard will create resources and place them in the appropriate folders dependent on EAR project structure.
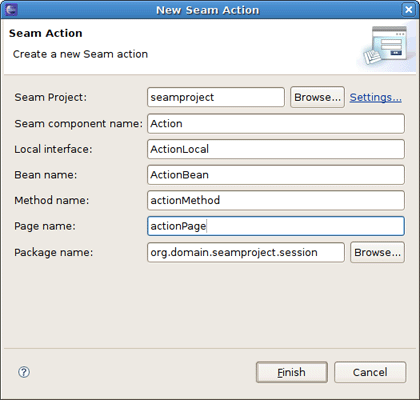
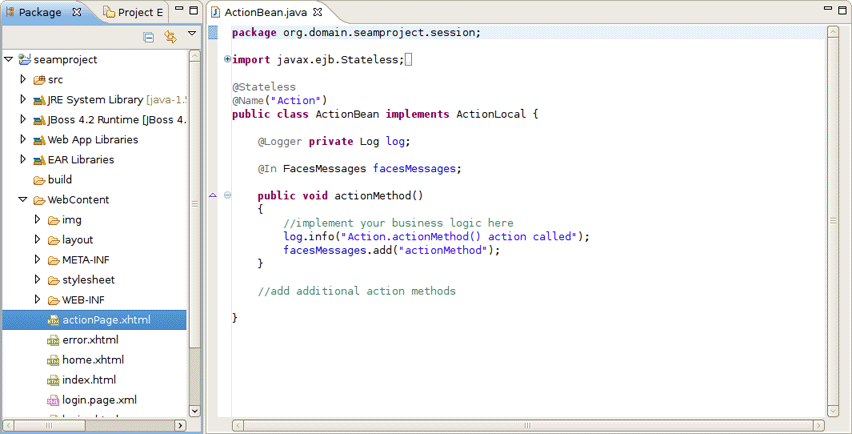
When Action is created you will see actionPage.xhtml in Package Explorer view. ActionBean.java will be automatically opened in Java Editor.
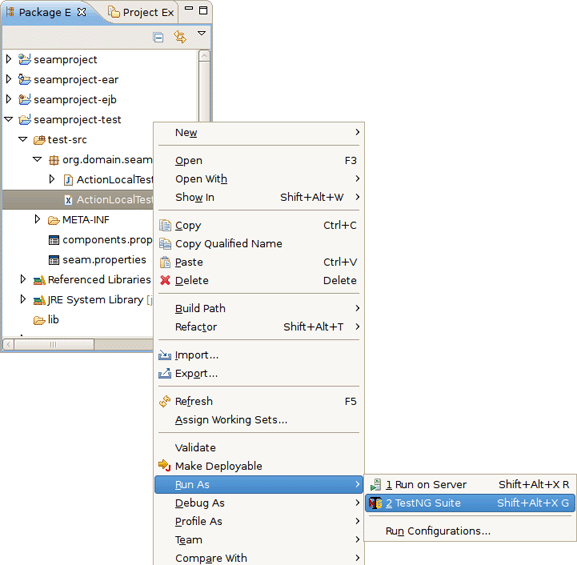
Select ActionLocalTest.xml in Seam-test project and run the test with right click Run As > TestNG Suite.
Tip
OpenOn is available in testNG XML files opened in JBoss XML Editor
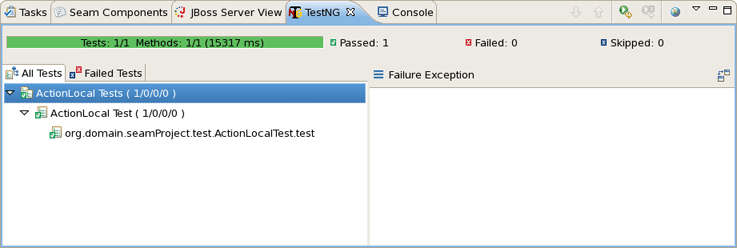
The test process will start and its output will be written in Console View.
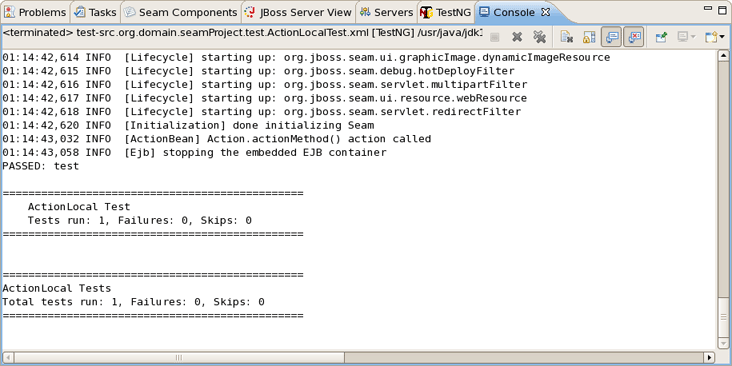
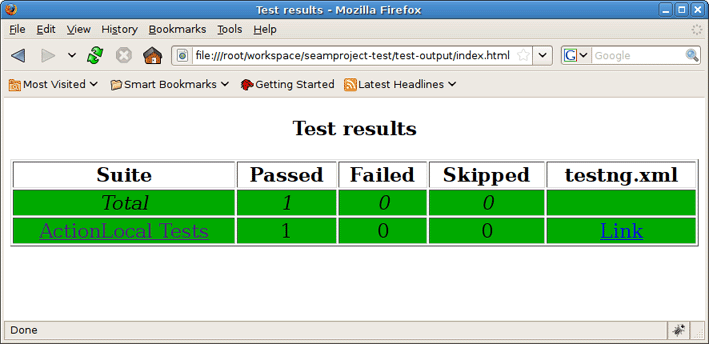
After running TestNG you will have the test results in test-output folder in Seam-test project (press F5 to refresh the Package Explorer view). Open index.html file with Web Browser or simply use the TestNG view.
The below view shows a successful run of the test.
You can see the test results in Web Browser.
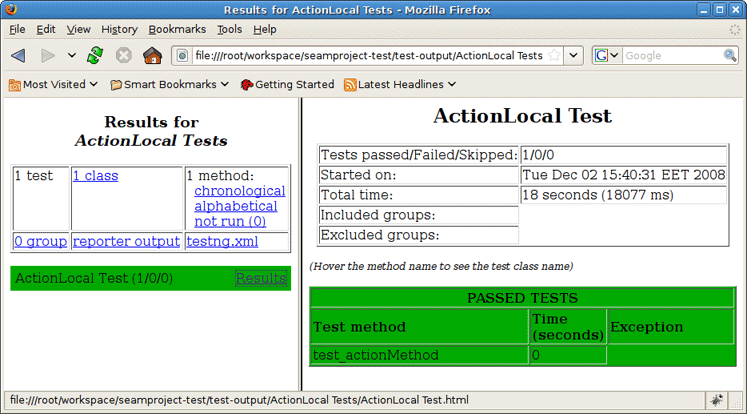
After clicking on ActionLocal Tests link you will see the Results for ActionLocal Tests.
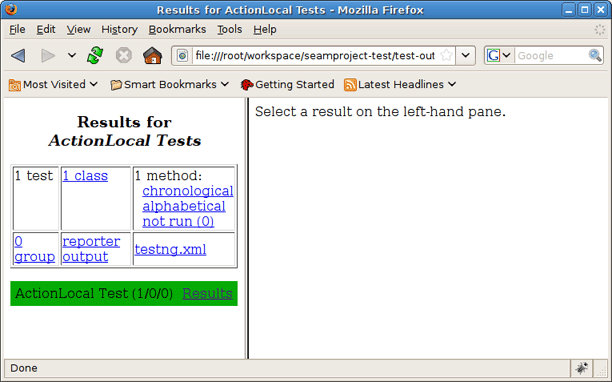
Select a result on the left-hand pane and its details will be displayed on the right-hand one.
Thus with Seam tooling you can easily take advantage of TestNG framework. As you can see, it generates its own TestNG project as a separate module within which you can easily monitor the tests execution and their output.
To get Code Assist for Seam specific resources in an externally generated project, you should enable Seam features in Project Preferences. Right click an imported project and navigate Properties > Seam Settings. Check Seam support box to enable all available Seam Settings.
To import an example Seam project from jboss-eap into your working directory, you should perform the following steps:
Go to New > Other > Java Project from Existing Buildfile
Point to the build.xml of any chosen project by pressing Browse button
Hit Finish to open the project
As these seam examples are non WTP projects, next you should enable Seam support for them. To do that, right click the project and go to Properties > Seam Settings.
You should right-click the project, select Properties > Java Build Path, then switch to the Source tab, select the output folder for src/hot ( src/main) and click Edit to change their output location.
In conclusion, the main goal of this document is to get you know with a full featureset that JBoss Tools provides to support Seam development. Thus if you have some questions, comments or suggestions on the topic, please fell free to ask in the JBoss Tools Forum. You can also influence on how you want to see JBoss Tools docs in future leaving your vote on the article Overview of the improvements required by JBossTools/JBDS Docs users.
A set of movies on Seam tooling is available on Seam movies page.