JBoss BPEL is based on WS-BPEL 2.0 to provide a way to create, edit, validate and deploy BPEL files to JBoss BPEL runtime. It is based on Eclipse BPEL project.
It improves the Eclipse BPEL project in the following way:
Implements close integration with JBoss BPEL runtime. Adds a new project type for the deployment to JBoss BPEL runtime.
Supports two ways of deployment. The first way is to deploy a BPEL project directly to JBoss BPEL runtime. The second way is to deploy BPEL files in JBoss ESB project to JBoss BPEL runtime.
Improves the BPEL validator and improves the quality of the Eclipse BPEL editor.
WS-BPEL 2.0 stands for Web Service Business Process Execution Language. Like EAI, BPEL is an XML-based language, but BPEL is more specific and targeted. A programmer uses BPEL to join sometimes disparate functions into an integrated process, resulting in a seamless use of the Internet to conduct business transactions ranging from simple money exchanges to complex calculations and asset reallocation.
The table below lists the main features of the JBoss BPEL editor:
Table 1.1. Key Functionality for JBoss BPEL editor project
| Feature | Benefit |
|---|---|
|
WS-BPEL 2.0 support |
JBoss BPEL project supports the newest WS-BPEL 2.0 specifications. |
|
Close integration with JBoss BPEL runtime |
There are two ways to deploy BPEL files to JBoss BPEL runtime. The user can deploy a BPEL project as a whole and can deploy BPEL files in JBoss ESB project to JBoss BPEL runtime. |
|
BPEL file editor |
The user can use the editor separately to edit a BPEL file. |
|
BPEL file validator |
The validator can provide a list of BPEL file errors to the user. |
To begin you need a copy of Eclipse 3.6. You can get it from Eclipse Web Site.
The JBoss BPEL editor is included with JBoss Tools. There are a number of different JBoss Tools installation methods. See Installing JBoss Tools for more information.
If you want to install only the JBoss BPEL editor, you can install it from JBoss Tools page separately. Please note that only JBoss Tools 3.1 or higher version includes JBoss BPEL editor.
For installation and configuring BPEL engine into a JBossAS environment you will need the following:
JBossAS (version 5.1.0.GA or higher), available from http://www.jboss.org/jbossas.
RiftSaw (version 2.1 or higher), available from http://www.jboss.org/riftsaw.
Ant, available from here.
Unpack the JBossAS installation archive into the required location.
Unpack the RiftSaw distribution into the location alongside the JBossAS installation:
Edit the
install/deployment.propertiesfile to update the JBossAS location settings.From the
installfolder run:ant deploy -Ddatabase=hsqlto deploy RiftSaw to JBossAS.
Then in the
${RiftSaw}/installfolder run the command:ant deploy -Ddatabase=hsql -Dws.stack=native -Dws.version=3.2.2.GAIt will help you to download the web service stack, and then upgrade it for JBoss AS. Alternatively, you can do it step by step by following the guide from JBoss RiftSaw documents or the README file in${RiftSaw}/install
In this chapter we describe the necessary steps to create a new BPEL project and edit the BPEL files. You can get the example source code from riftsaw/samples/quickstart/hello_world. In this guide we will create a simple echo example, used to respond to a sent message with a modified version of the request message.
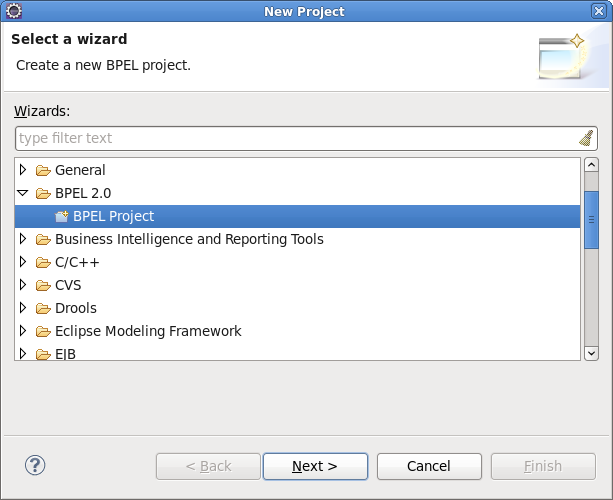
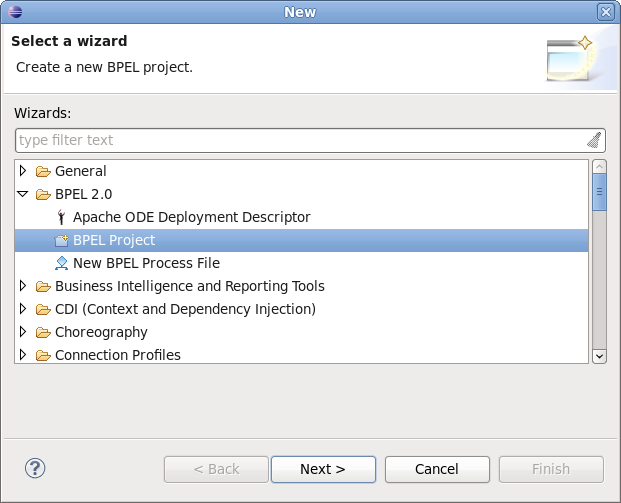
The first step is to create a BPEL project.
Create the project by selecting → → → from the menu bar. Then click the button.
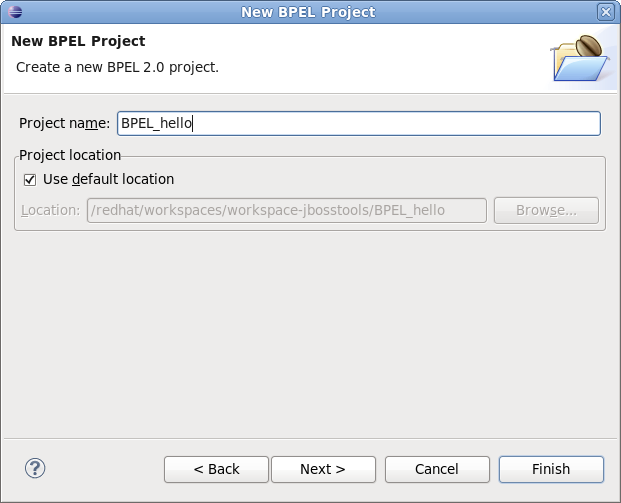
On this page of the New BPEL Project Wizard enter a project name in the Project Name field, e.g enter HelloWorld.
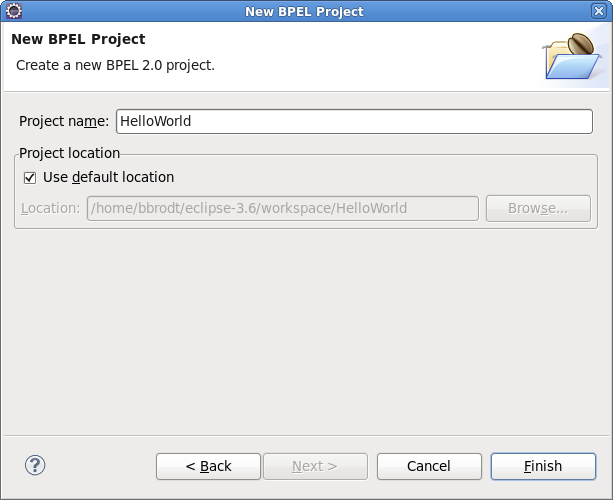
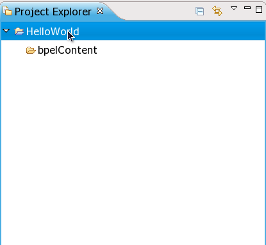
Click the button. So you have created the BPEL project named HelloWorld. Its structure is like this:
Now you should create a BPEL process. You can create it by selecting → → → .
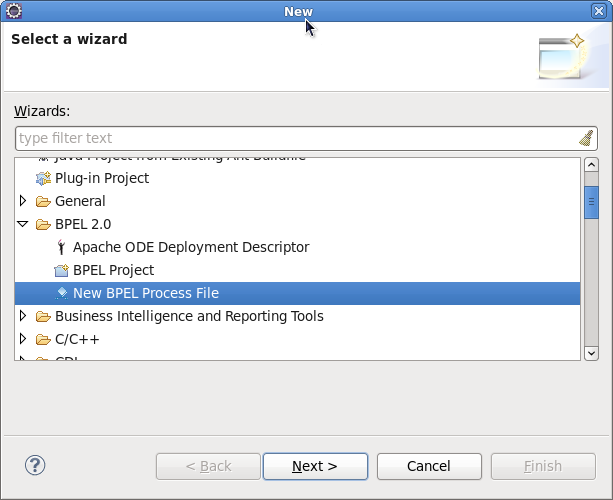
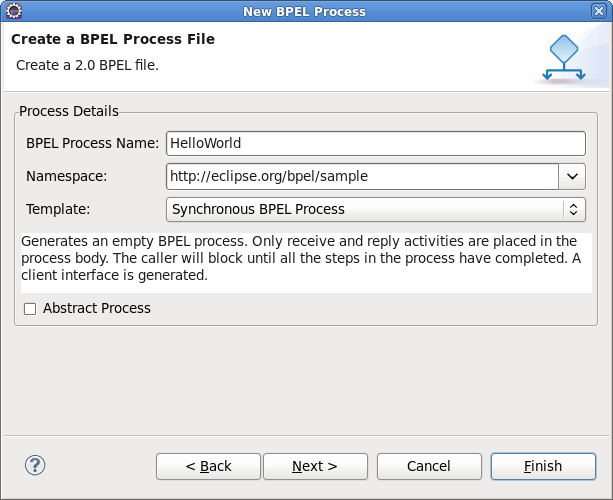
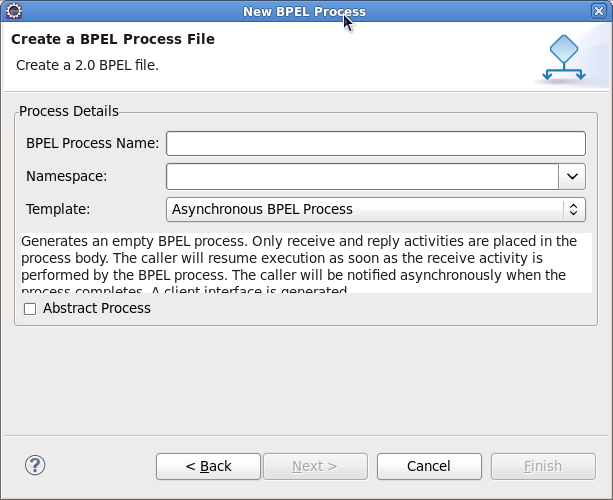
Click the button. Enter the following information:
Table 3.1. Fields and values
| Field | Value |
|---|---|
|
BPEL Process Name |
Enter a process name. For example, HelloWorld. |
|
Namespace |
Enter or select a namespace for the BPEL process. |
|
Template |
Select the necessary template for the BPEL process. When you select the template, you will see the information about the template below on the page. In our case you should select Synchronous BPEL Process. |
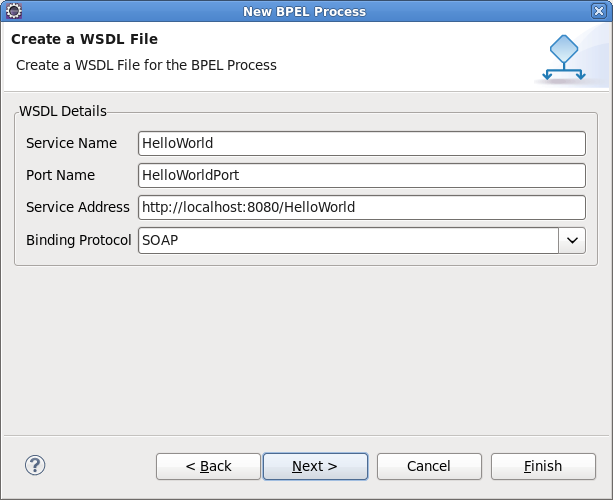
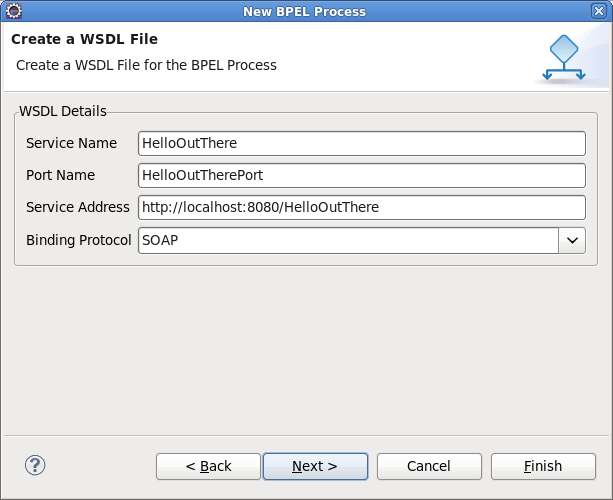
Click the button. On the second page, you can custom your WSDL service details. Enter the following information:
Table 3.2. Fields and values
| Field | Value |
|---|---|
|
Service Name |
A wsdl service name for the BPEL process. The default is, HelloWorld. |
|
Port Name |
A wsdl port name for the BPEL process. The default is, HelloWorldPort. |
|
Service Address |
An address of the WSDL service for the BPEL process. The default is, http://localhost:8080/HelloWorld. |
|
Binding Protocol |
The binding protocal that you use in the wsdl. You can choose SOAP or HTTP. The default is, SOAP. |
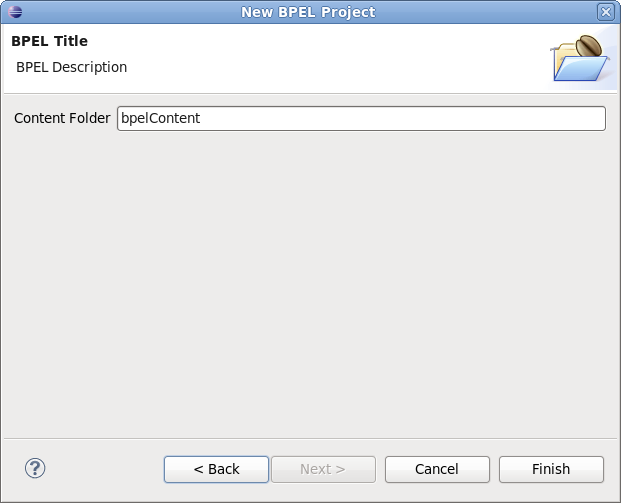
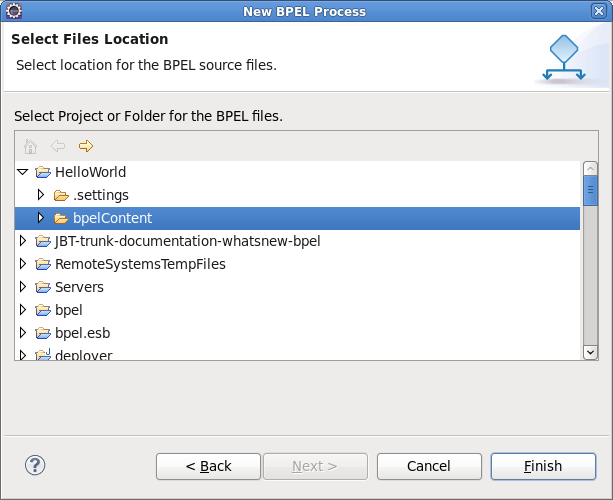
Click the button. On the third page, you can choose a folder for the process file from the projects in your workspace. If not choose, The default folder HelloWorld/bpelContent is selected. Click the button.
Note
All of your files that are used in your BPEL project must be under the bpelContent folder of a BPEL project. Only in this case these files can be deployed to JBoss server.
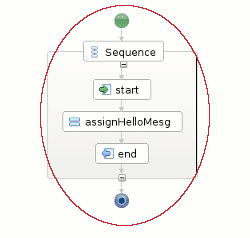
Up to now, you have got a simple BPEL process as on the screen below.
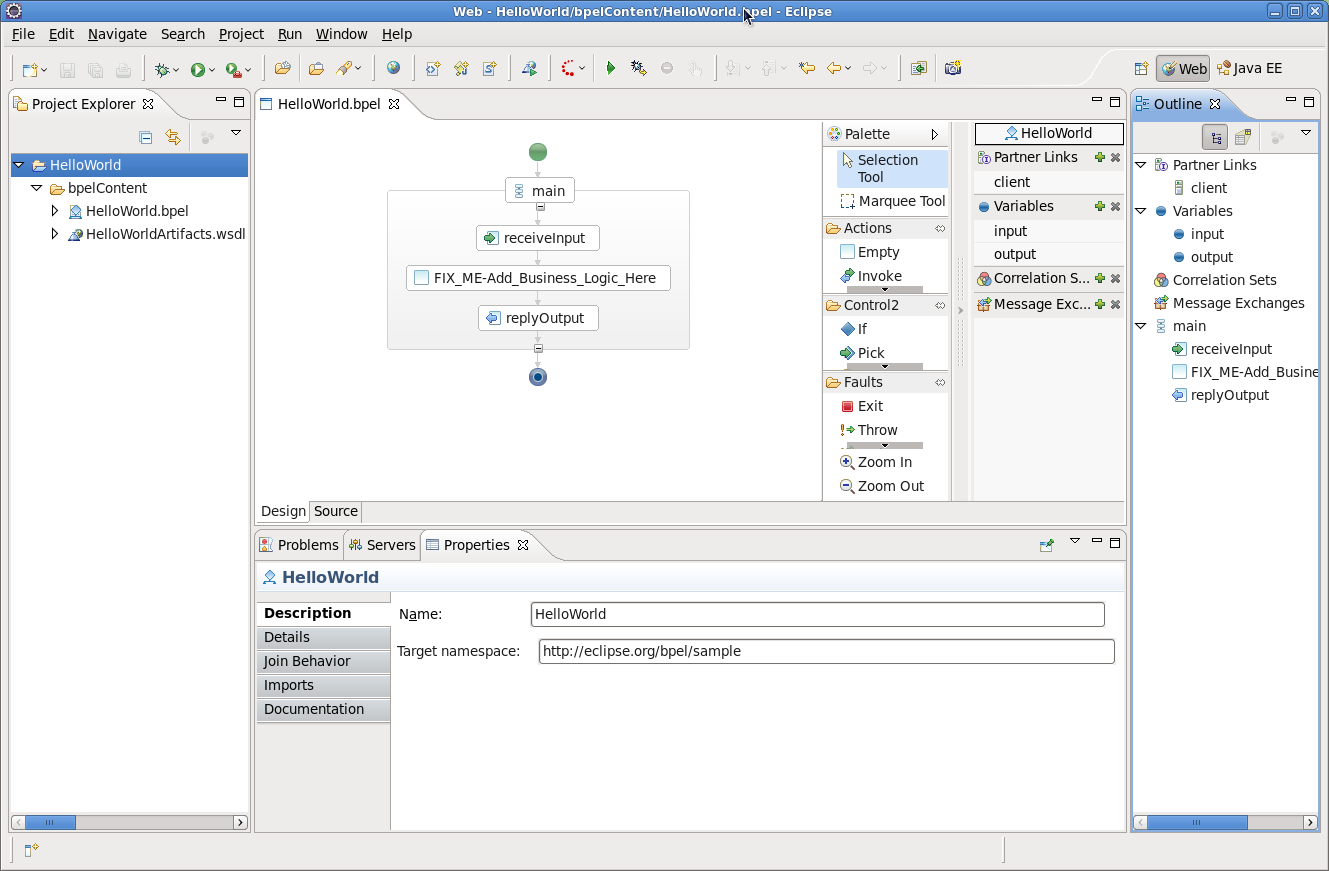
In the next step, you can edit the BPEL process file and then deploy it to JBoss server.
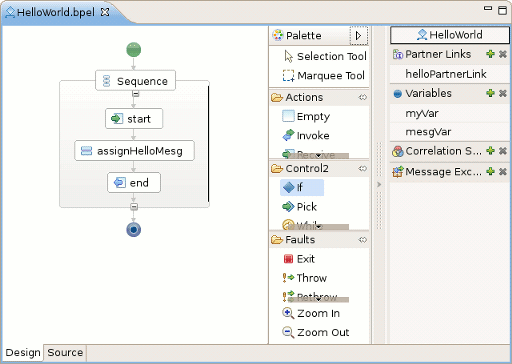
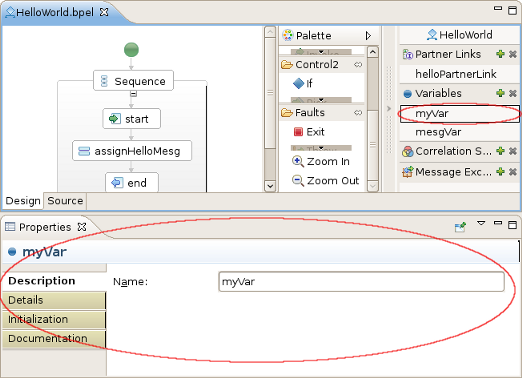
If the Properties view and Palette view are not opened, you can open the views by right-clicking the BPEL editor and selecting Show in Properties, Show Palette in Palette view. Then you should have the view like this:
In the Palette view, you can drag a BPEL element to the BPEL editor and drop it in the place you want.
In the Properties view, you can get the information about every element of the BPEL process. In the BPEL editor select any element you want,and then the element's properties will be shown in the Properties view. The table below describes the tabs of the Properties view:
Table 3.3. Tabs of the Property view
| Tab | Description |
|---|---|
|
Description |
Shows the descriptive information about the element,e.g. Name of the element. |
|
Details |
Shows the detailed and important information about the element. It is the most important section of an element. Most of the properties of an element are set in this section. |
|
Join Behavior |
Shows the Join Failure property of the element. |
|
Documentation |
Shows the documentation sub-element of an element. |
|
Other |
Every BPEL element has its own sections: Correlation section, Message Exchange section, and so on. We will introduce them while using them. |
In order to see how a simple BPEL process works in action, you should do some steps as below:
Modify two variables of the process:
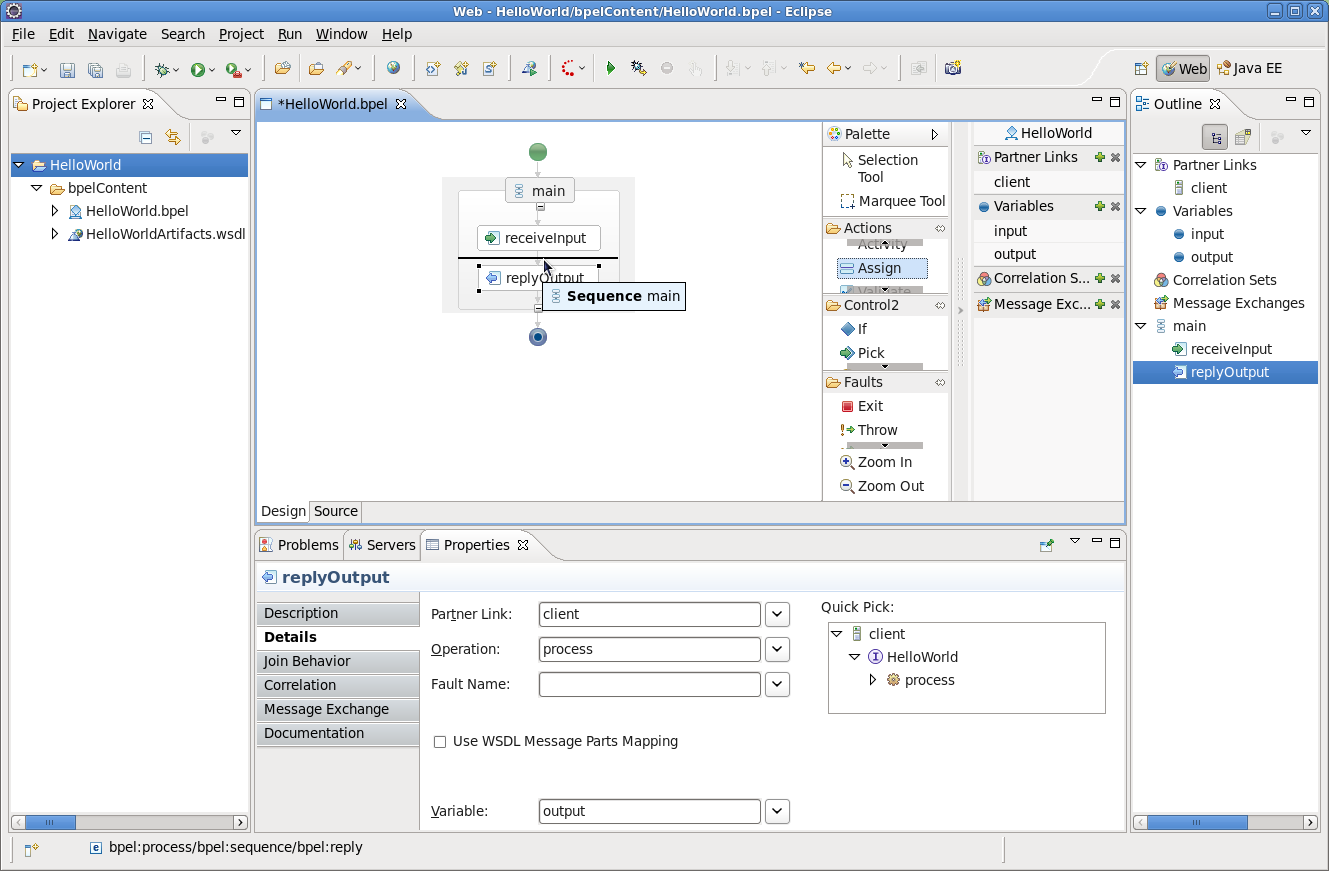
Add an Assign element between the receiveInput element and replyOutput element.
Click the Assign element in the BPEL editor in order to get the properties information of it in the Properties view.
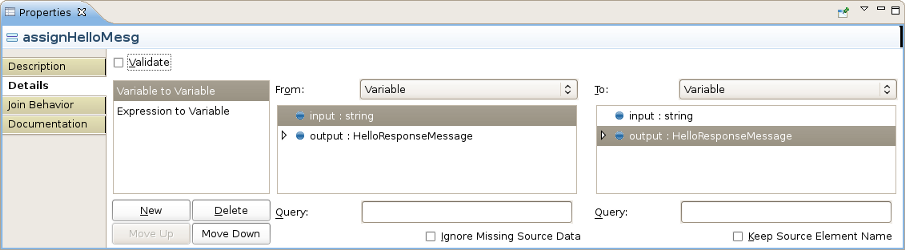
Set its name in the Description tab as assignHelloMesg.
In the Details section of Properties view, you should click the New button to add a copy sub-element to the element. Assign "Variable to Variable"(input:string to output). At this time, an "initializer" popup dialog appears. Click on the Yes button in the dialog.
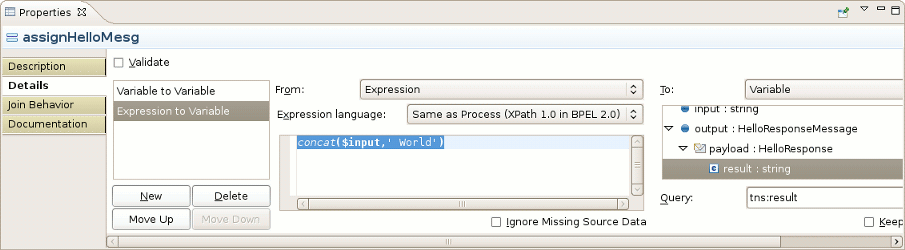
Then you should click the once more and select Expression to Variable (assign
concat($input,' World'))to result:string.
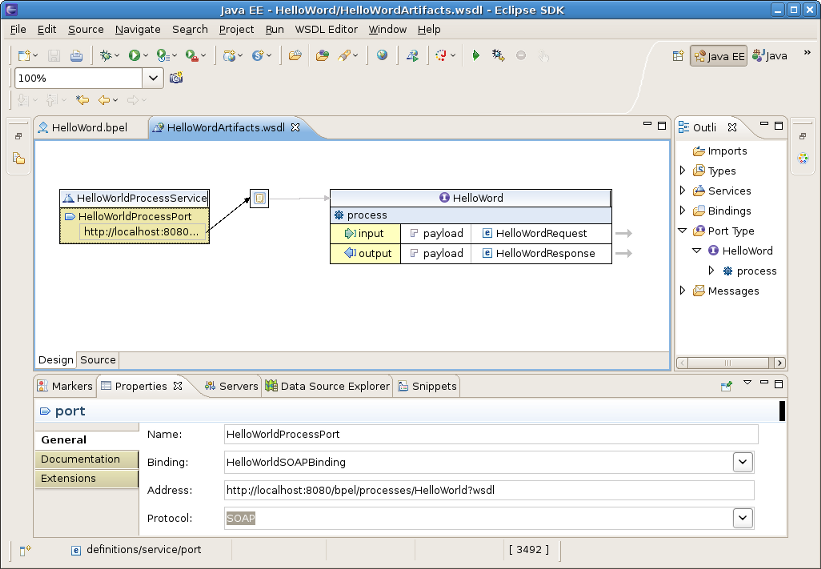
The HelloWorldArtifacts.wsdl file has been added a service when you create a BPEL process file. You have a default service in this WSDL file. But if you want to add a service by yourself, you can follow the steps as below:
Open the file
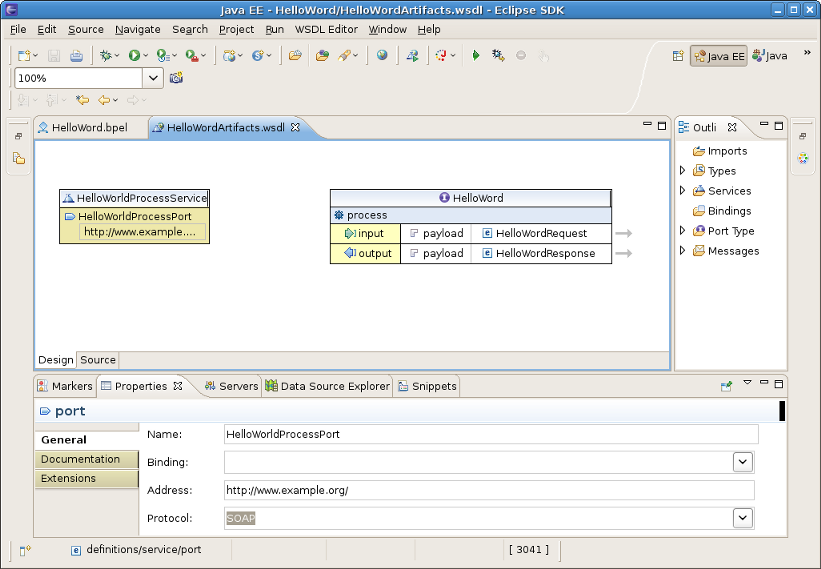
HelloWorldArtifacts.wsdlin the "HelloWorld" project by double-clicking the file. Right-click the WSDL editor and select Add Service. A new service should appear in the editor. Name it HelloWorldProcessService. It has the Port named NewPort. Select it, right-click on it and rename it to HelloWorldProcessPort in the Properties view.Right-click somewhere in the whitespace of the WSDL editor and select Add Binding. A new Binding component will appear in the editor. Name it HelloWorldSOAPBinding. Select it, in the General tab of the Properties view and select HelloWorld as a port type in the PortType. Then click on the Generate Binding Content... button to open the Binding Wizard. In the wizard, select SOAP as the Protocol. Finally, click the button to close the wizard.
Click the HelloWorldProcessPort property in the General section of the Properties view, select HelloWorldSOAPBinding in the Binding combobox. In the Address field input http://localhost:8080/bpel/processes/HelloWorld?wsdl.
You should also change some service part configurations. To do this, click part element in the WSDL editor, then put the following data in the Properties view.

Now you have finished creating a simple BPEL process. As a next step, you can deploy the BPEL project to JBoss BPEL Runtime.
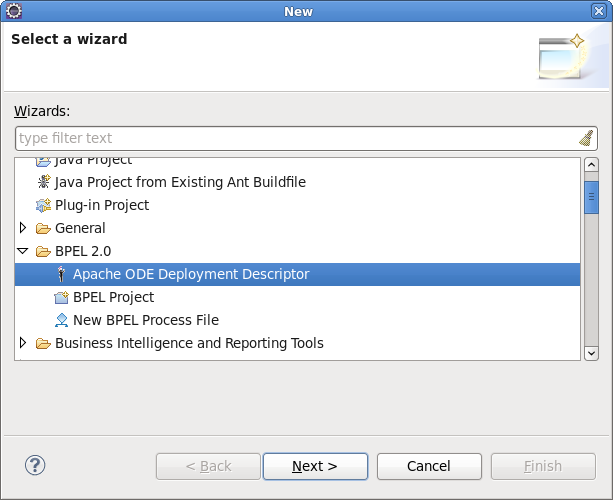
If you want to deploy a BPEL project to JBoss BPEL Runtime, you should create a bpel-deploy.xml file. JBoss tools can help you to create it:
Create the deploy.xml by selecting → → → . Click the button.
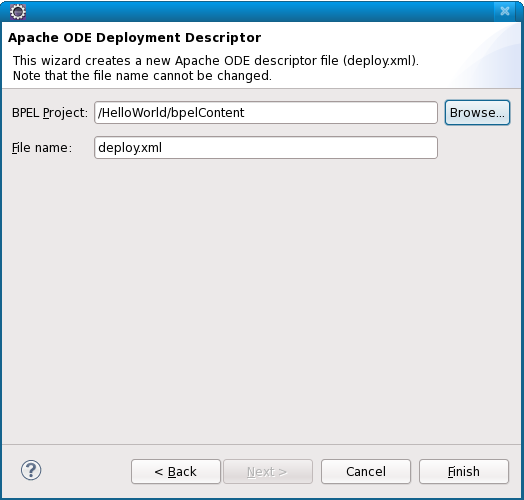
On the next wizard page you should enter the following information:
BPEL Project : Click the button to select the BPEL project in your workspace which you want to deploy to the runtime. Please note, that you should select the
bpelContentfolder in your new BPEL project as a value of BPEL Project field because thedeploy.xmlshould be created in this place.File name: The default value is
deploy.xml. Please, don't change it.Click on the button to close the wizard and a new
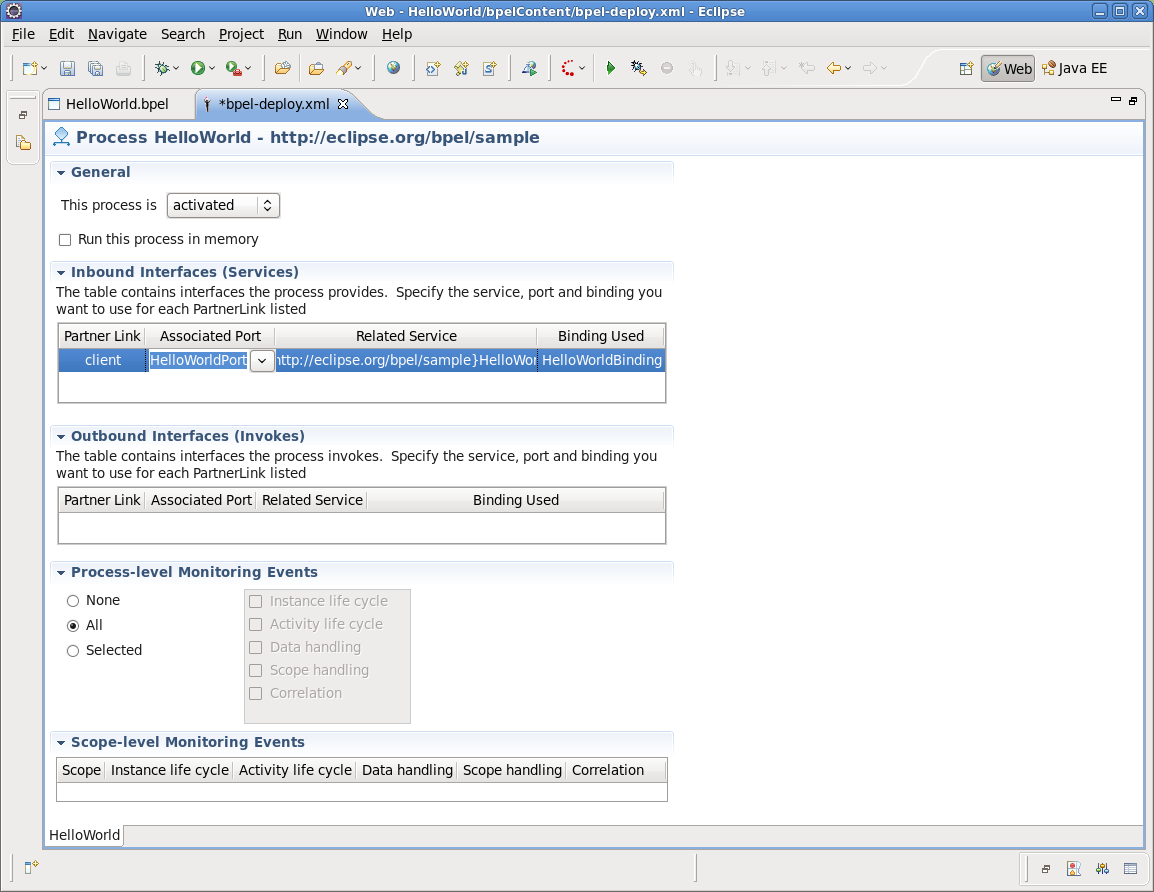
deploy.xmlfile will be created.Double-click the
deploy.xmlfile to open it in ODE Descriptor Deployment Editor. In the Inbound Interfaces section, click the Associated Port column and select HelloWorldProcessPort in the dropdown box.The Related Service and Binding Used columns should be automatically filled in. Save thedeploy.xml.
Suppose you have installed the JBoss BPEL Runtime-RiftSaw as it was described in Section 2.3, “Installation JBoss BPEL Runtime”, now you can create a server for JBoss BPEL runtime.
Open the Servers view by selecting → → → → .
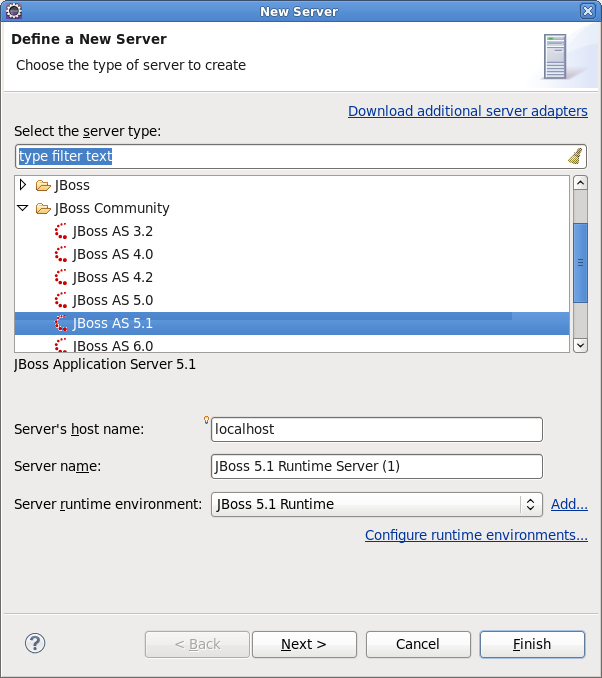
Right-click the Servers view and select → to open the New Server Wizard:
Select JBoss AS 5.1 as a server type.
Note
Please note, that only JBoss As 5.1 or higher version supports BPEL.
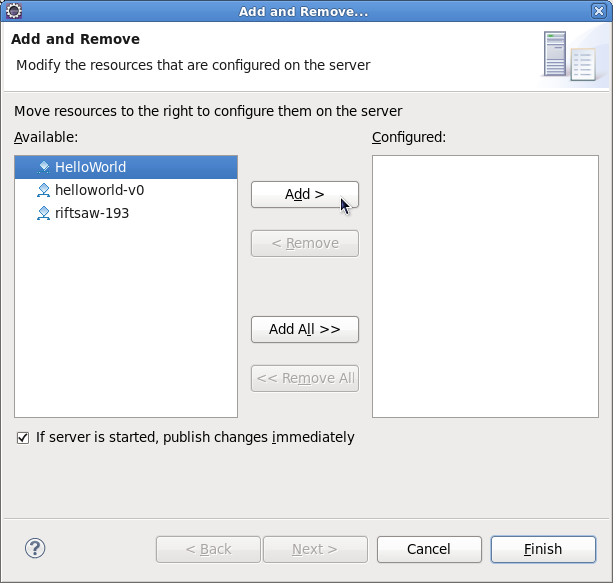
Click the button. On the next page, you should input your JBoss As location. Then click the button and you will get the page like this:
Select HelloWorld, then click the button to add the project to the server. Then click on the button.
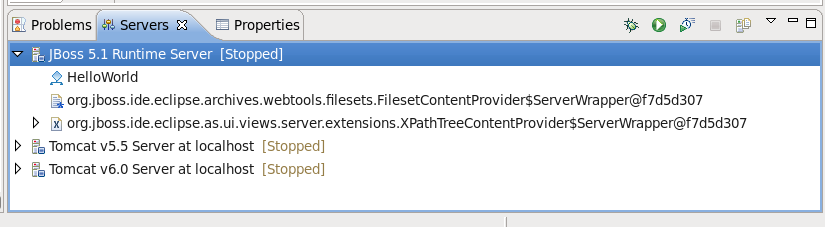
Start the server by right-clicking on the server and selecting the Start item.
If some aspects of server creation is not clear, please, read JBoss Server Manager Reference Guide for more details.
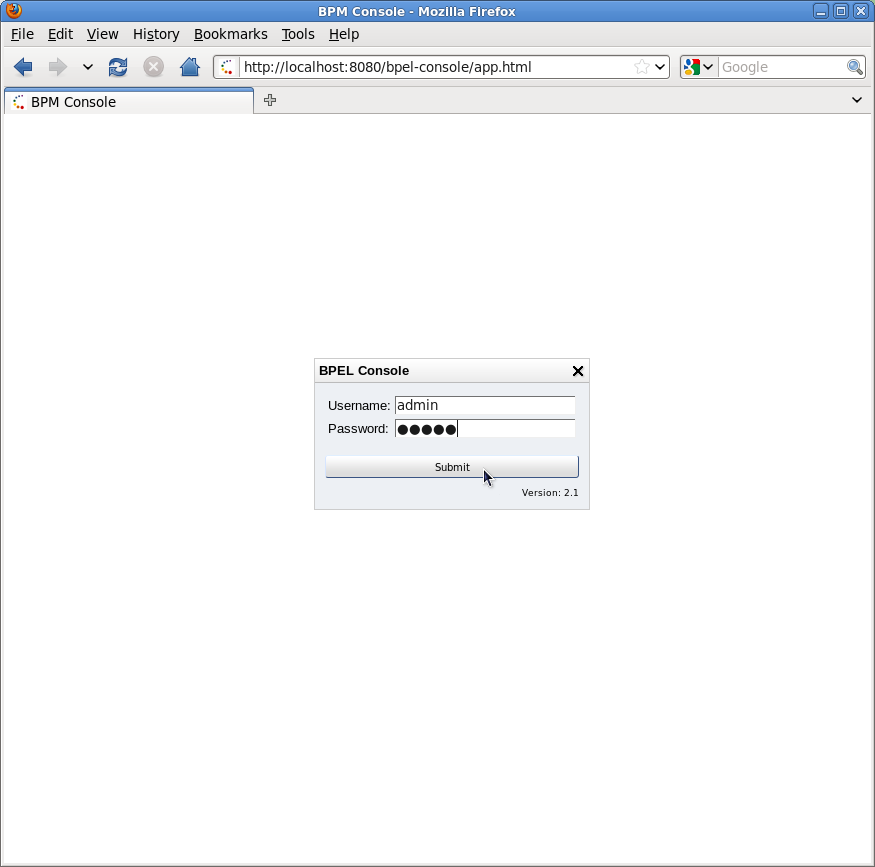
You can enter the link http://localhost:8080/bpel-console/app.html to the browser to get the deployed processes.
If there's anything we didn't cover or you can't figure out, please feel free to visit our JBoss Tools Users Forum to ask questions. There we are also waiting for your suggestions and comments.
This chapter includes detailed reference information about all BPEL tools wizards and editors.
This wizard helps to create new BPEL project. It is available by selecting → → → in the menu bar.
It consists of two pages:
On the first page you can adjust the name of the project and the directory where it will be created.
If "Use default" option is checked the output directory will be the workspace, otherwise the user should specify it by himself using button.
On the second page you can specify the name of the Content Folder.
Using this wizard user can create ODE deployment descriptor (deploy.xml) and place it in the temporary directory.It is available by selecting → → → in the menu bar.
On the page you can adjust the name of the deployment descriptor and the directory where it will be created.Note,that you should use /PROJECT_NAME/bpelContent directory as an output one.
Using the New BPEL Process file Wizard it is possible to create a BPEL process file and a WSDL file. The wizard includes several pages:
The first page has the following options to set:
Table 4.1. New BPEL Process file Wizard. First Page Options.
Option Description Default Name Enter the process name. no default value Namespace Enter the namespace url here no default value Template Select one of the provided templates: Asynchronous BPEL Process - generates the basis of orchestration logic: receive and reply activities are included into the process; client WSDL is generated, service is defined in the parentlink of the process. The caller is notified asynchronously when the process completes.
Empty BPEL Process - list of services participating in this BPEL process together with the one of messages used within the process is empty.There are no any orchestration logic.
Synchronous BPEL Process - similar to Asynchronous BPEL Process template except the fact that here the caller is notified synchronously when the process completes.
Asynchronous BPEL Process Abstract Process Specifies the created process as an abstract one -partially specified processes that are not intended to be executed. unchecked The second page has the following options to set:
Table 4.2. New BPEL Process file Wizard. Second Page Options.
Option Description Default Service Name Enter a wsdl service name for the BPEL process. The process name Port Name Enter a wsdl port name for the BPEL process. The process name + 'Port' Service Address Enter an address of the wsdl service for the BPEL process. http://localhost:8080/ + process name Binding Protocol Choose the binding protocal that you use in the wsdl: SOAP or HTTP SOAP On the third page the user should select the BPEL project and folder where the process file will be created:
Note
Process files that are used in the BPEL project must be under the bpelContent folder. Only in this case these files can be deployed to JBoss server.
Business Process Editor is intended to facilitate the process of changing and adding new logic to BPEL process file. You can open .bpel in this editor by right click the file in the project explorer and selecting →
The editor consists of two tabs:Design tab and Source tab.
Design tab is the main part of Business Process Editor.It consists of 3 parts:
Visual Pane:
The Visual Pane graphically displays the order in which the activities are executed.
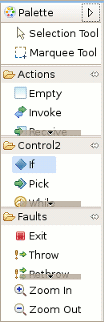
Palette:
The Palette represents different elements of the BPEL activities organized into functional categories. Using it the developer can easily add new elements to the sequence activity. To do this, click the required element and then drag and drop it to the place on the Visual Pane where it should be added.
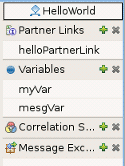
Behavior Components View:
Execution behavior components are grouped into the Behavior Components View. The view is also fully synchronized with Properties view where you can customize all the properties of the component.
To add an element to some component group click the plus (
 ) icon, and to delete it click the element and use select the Delete option in the popup menu.
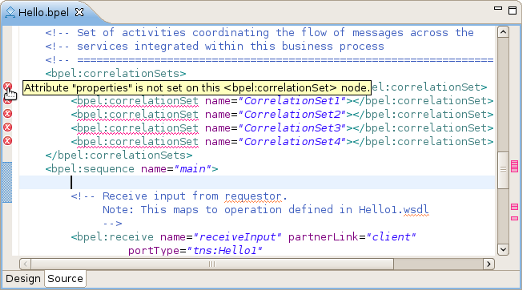
To deploy your process in ODE you need to create a simple deployment descriptor with basic information, using the ODE Deployment Descriptor Editor to facilitate the process of descriptor configuration. You can see how the descriptor file opened in the editor looks like in the picture below:
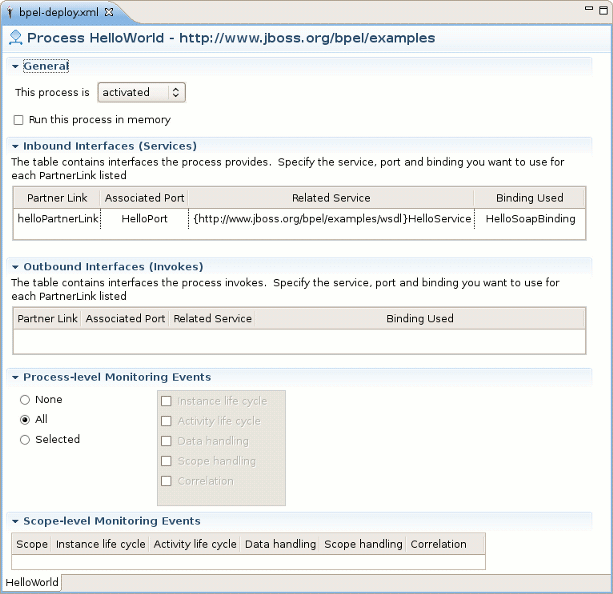
The table below describes the configuration options of the ODE Deployment Descriptor Editor:
Table 4.3. ODE Deployment Descriptor Editor.Options.
| Section | Options | Description |
|---|---|---|
General | This process is | Select one of the provided options:
|
| Run this process in memory | for performance purposes, you can define the process as being executed only in-memory. | |
| Inbound Interfaces(Services) | Associated Port | Click Associated Port and the dropdown list with all available port names will appear. Select the one you need, and the other fields will be filled automatically. This action configure the services provided by the process and binds each service to an endpoint |
| Outbound Interfaces(Invokes) | Associated Port | Click Associated Port and the dropdown list with all available port names will appear. Select the one you need, and the other fields will be filled automatically. This action configure the services invoked by the process |
| Process-level Monitoring Events |
| Using ODE's deployment descriptor, it's also possible to make events generation to filter which ones get created. All the options simply revert to the default behavior when nothing is specified in the deployment. |
| Scope-level Monitoring Events | Scope | This section makes it possible to define filtering for each scope of your process. |
This document highlights the capabilities of BPEL Tools, as well as providing the steps required to create and configure BPEL process and deployment descriptor files. If you have questions or suggestions concerned both the documentation and tools behavior, you are welcome to JBoss Tools Users forum. Please, use Jira to report bugs and requests on documentation.
All JBoss Developer Studio/JBoss Tools release documentation you can find at http://docs.jboss.org/tools in the corresponding release directory.
The latest documentation builds are available at http://download.jboss.org/jbosstools/nightly-docs.