Create new JBoss Tools Documentation Jira issue

JBoss.orgCommunity Documentation
Version: 1.0.0.CR2
Copyright © 2009, 2010 JBoss by Red Hat
JBoss BPEL project is a WS-BPEL 2.0 project that gives a way to create, edit, validate and deploy BPEL files to JBoss BPEL runtime. It is based on Eclipse BPEL project .
It improves the Eclipse BPEL project in the following way:
Implements close integration with JBoss BPEL runtime. Adds a new project type for the deployment to JBoss BPEL runtime.
Supports two ways of deployment: one way is to deploy a bpel project directly to JBoss BPEL runtime. The other way is to deploy bpel files in JBoss ESB project to JBoss BPEL runtime.
Improves the BPEL validator and increases Eclipse BPEL editor's quality.
WS-BPEL 2.0 stands for Web Service Business Process Execution Language. Like EAI, BPEL is an XML-based language, but BPEL is more specific and targeted. A programmer uses BPEL to join sometimes disparate functions into an integrated process, resulting in a seamless use of the Internet to conduct business transactions ranging from simple money exchanges to complex calculations and asset reallocation.
Let's start with looking through the table of the main features of JBoss BPEL editor project:
Table 1.1. Key Functionality for JBoss BPEL editor project
| Feature | Benefit |
|---|---|
WS-BPEL 2.0 support | JBoss BPEL project supports the newest WS-BPEL 2.0 specifications. |
Close integration with JBoss BPEL runtime | There are two ways to deploy BPEL files to JBoss BPEL runtime. The user can deploy a BPEL project as a whole and can deploy BPEL files in JBoss ESB project to JBoss BPEL runtime. |
BPEL file editor | The user can use the editor separately to edit a BPEL file. |
BPEL file validator | The validator can give the error messages about BPEL files to the user. |
At first, you need Eclipse 3.5. You can get it from Eclipse Web Site.
The JBoss BPEL editor is included into JBoss Tools. You have some methods to install JBoss Tools. See Installing JBoss Tools for more information.
If you want to install only the JBoss BPEL editor, you can install it from JBoss Tools page separately. Please, note, that only JBoss Tools 3.1 or higher version includes JBoss BPEL editor.
If you want to deploy a BPEL project to JBoss server, you should download JBoss BPEL Runtime by yourself. The JBoss BPEL Runtime is named RiftSaw. You can get it from JBoss RiftSaw page .
In the chapter we describe the necessary steps to create a new BPEL project and edit the BPEL files. First of all, you should create a BPEL project.
Create the project by selecting New > Project... > BPEL 2.0 > BPEL Project from the menu bar. Then click the Next button.
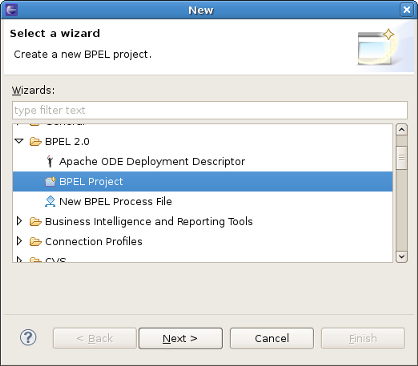
On this page of the New BPEL Project Wizard enter a project name in the Project Name field,e.g enter HelloWorld.

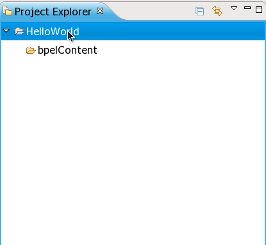
Click the Finish button. So you have created the BPEL project named HelloWorld. Its structure is like this:
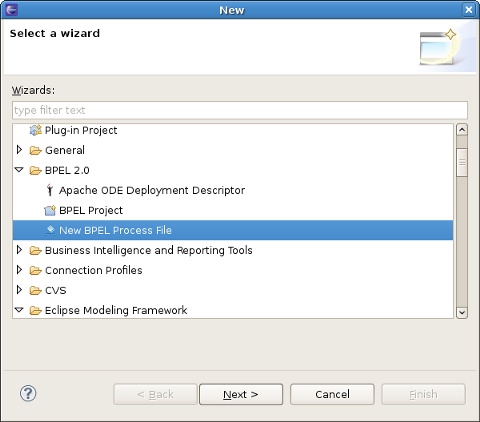
Now you should create a BPEL process. You can create it by selecting New > Others... > BPEL 2.0 > New BPEL Process File.
Click the Next button. Enter the following information:
Table 3.1. Fields and values
| Field | Value |
|---|---|
BPEL Process Name | enter a process name. For example, HelloWorld. |
Namespace | enter or select a namespace for the BPEL process. |
Template | select a template for the BPEL process. When you select the template, you will see the information about the template below on the page. |
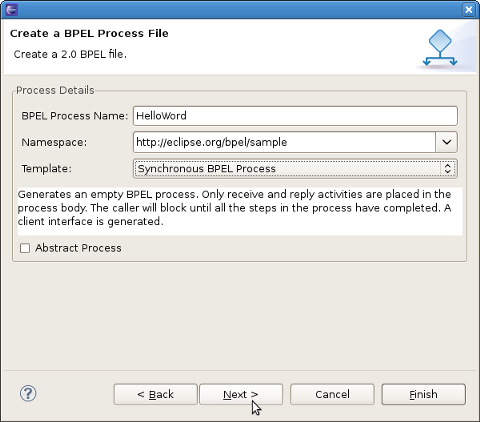
Click the Next button. On the second page make sure that the folder HelloWorld/bpelContent is selected. Click Finish.
Note
All of your files that are used in your BPEL project must be under the bpelContent folder. Only in this case these files can be deployed to JBoss server.
Up to now, you have got a simple BPEL process as on the screen below.
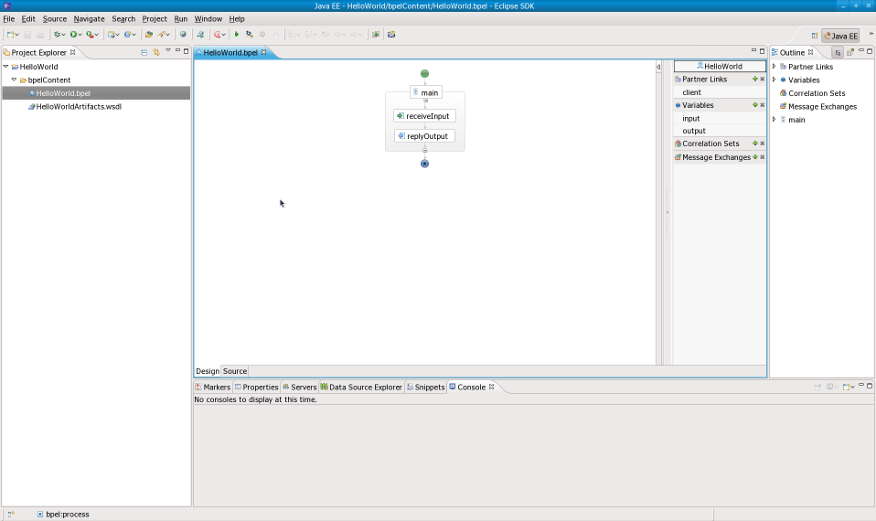
The next step, you can do is to edit the BPEL process file and then deploy it to JBoss server.
If the Properties view and Palette view are not opened, you can open the views by right-clicking the BPEL editor and selecting Show in Properties, Show Palette in Palette view. Then you should have the view like this:
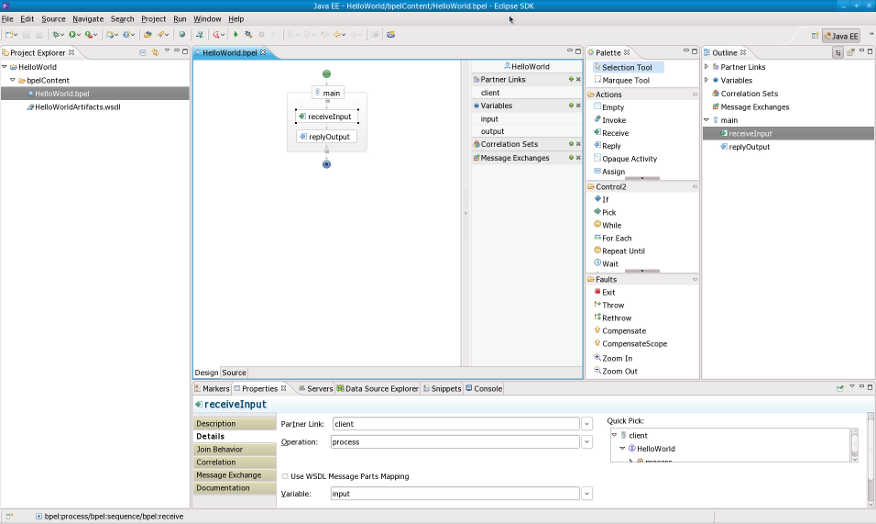
In the Palette view, you can drag a BPEL element to the BPEL editor and drop it in the place you want.
In the Properties view, you can get the information about every element of the BPEL process. In the BPEL editor select any element you want,and then the element's properties will be shown in the Properties view.The table below describes the tabs of the Properties view:
Table 3.2. Tabs of the Property view
| Tab | Description |
|---|---|
Description | Shows the descriptive information about the element,e.g. Name of the element. |
Details | Shows the detailed and important information about the element. It is the most important section of an element. Most of the properties of an element are set in this section. |
Join Behavior | Shows the Join Failure property of the element. |
Documentation | Shows the documentation sub-element of an element. |
Other | Every BPEL element has its own sections: Correlation section, Message Exchange section, and so on. We will introduce them while using them. |
In order to see how a simple BPEL process works in action, you should do some steps as below:
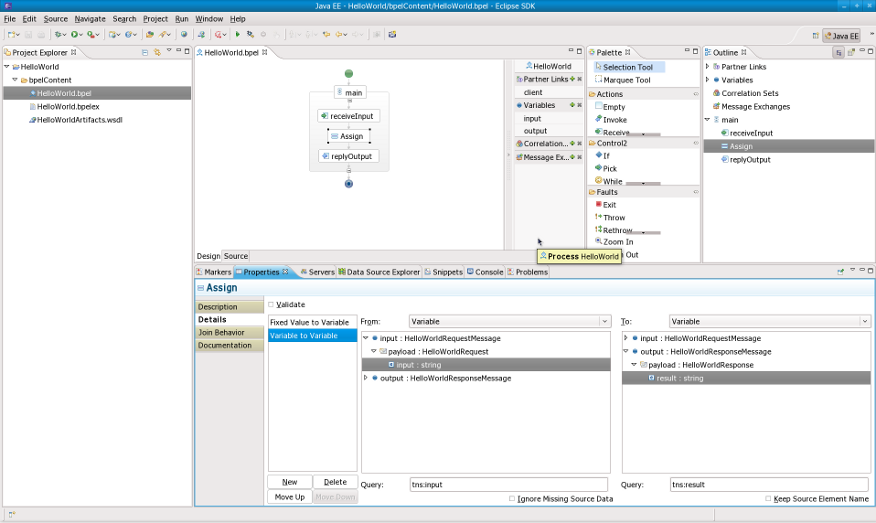
Add an Assign element between the receiveInput element and replyOutput element.
Click the Assign element in the BPEL editor in order to get the properties information of it in the Properties view.
In the Details section of Properties view, you should click the New button to add a copy sub-element to the element. Assign "input->payload->input" to "output->payload->result". At this time, an "initializer" popup dialog appears. Click on the Yes button in the dialog.
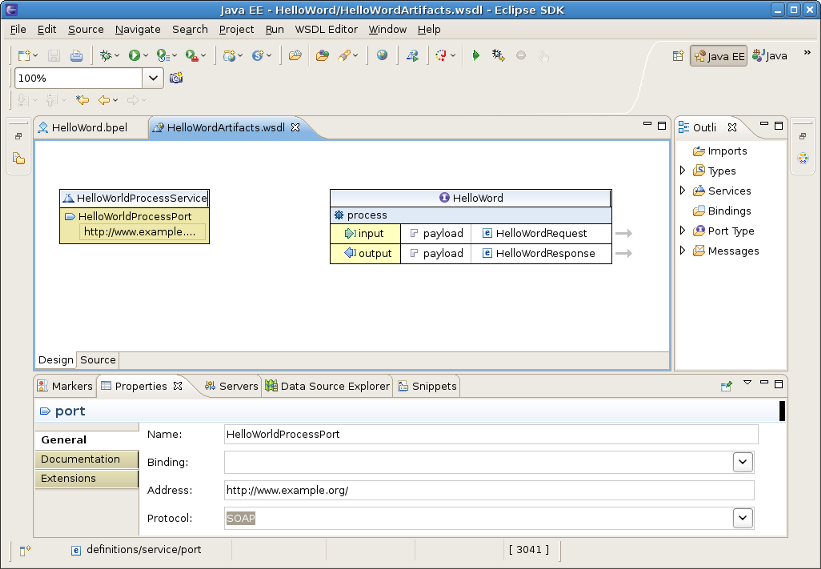
Open the file "HelloWorldArtifacts.wsdl" in the "HelloWorld" project by double-clicking the file. Right-click the WSDL editor and select Add Service. A new service should appear in the editor. Name it HelloWorldProcessService. It has the Port named NewPort. Select it, right-click on it and rename it to HelloWorldProcessPort in the Properties view.
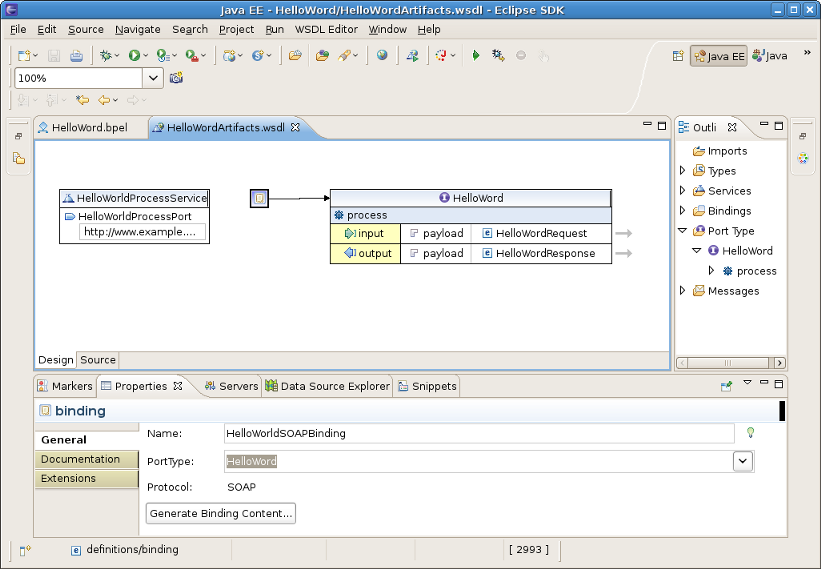
Right-click somewhere in the whitespace of the WSDL editor and select Add Binding. A new Binding component will appear in the editor. Name it HelloWorldSOAPBinding. Select it, in the General tab of the Properties view and select HelloWorld as a port type in the PortType. Then click on the Generate Binding Content... button to open the Binding Wizard. In the wizard, select SOAP as the Protocol. Finally, click the Finish button to close the wizard.
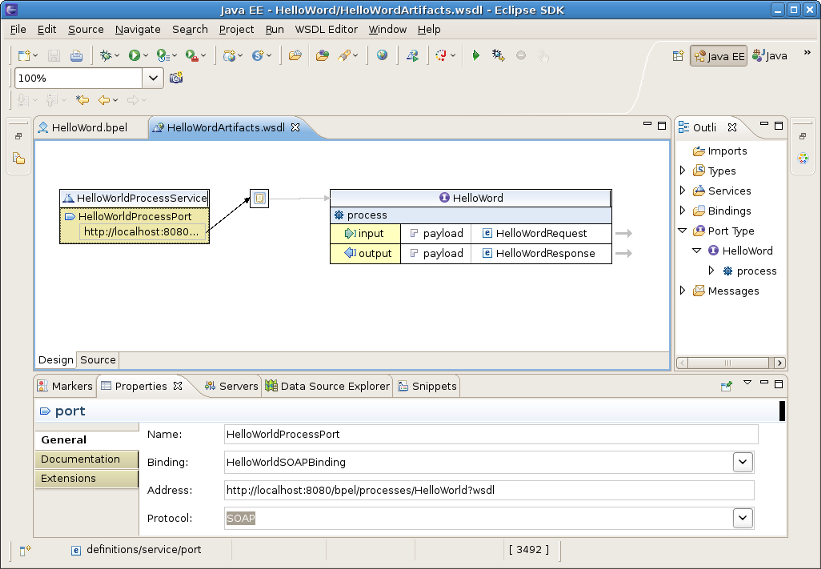
Click the HelloWorldProcessPort property in the General section of the Properties view, select HelloWorldSOAPBinding in the Binding combobox. In the Address field input http://localhost:8080/bpel/processes/HelloWorld?wsdl.
Now you have finished creating a simple BPEL process.As a next step, you can deploy the BPEL project to JBoss BPEL Runtime.
If you want to deploy a BPEL project to JBoss BPEL Runtime, you should create a bpel-deploy.xml file. JBoss tools can help you to create it:
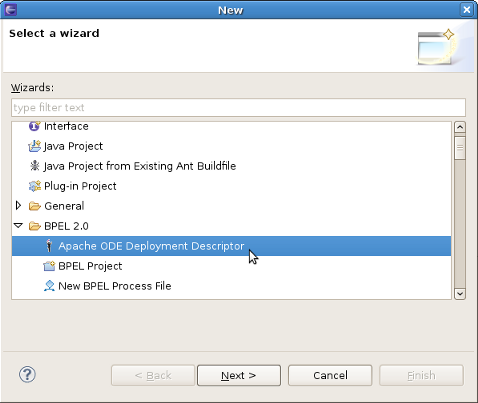
Create the bpel-deploy.xml by selecting New > Other... > BPEL 2.0 > Apache ODE Deployment Descriptor. Click the Next button.
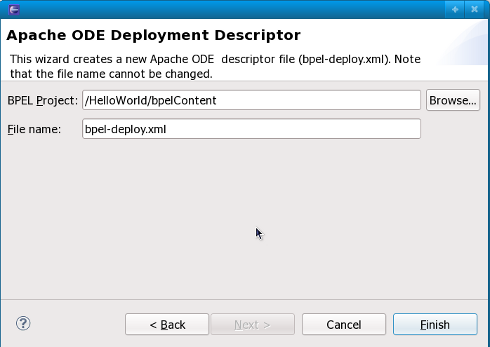
On the next wizard page you should enter the following information:
BPEL Project: Click the Browse... button to select the BPEL project in your workspace which you want to deploy to the runtime. Please note, that you should select the bpelContent folder in your new BPEL project as a value of BPEL Project field because the bpel-deploy.xml should be created in this place.
File name: The default value is bpel-deploy.xml. Please, don't change it.
Click on Finish button to close the wizard and a new bpel-deploy.xml file will be created.
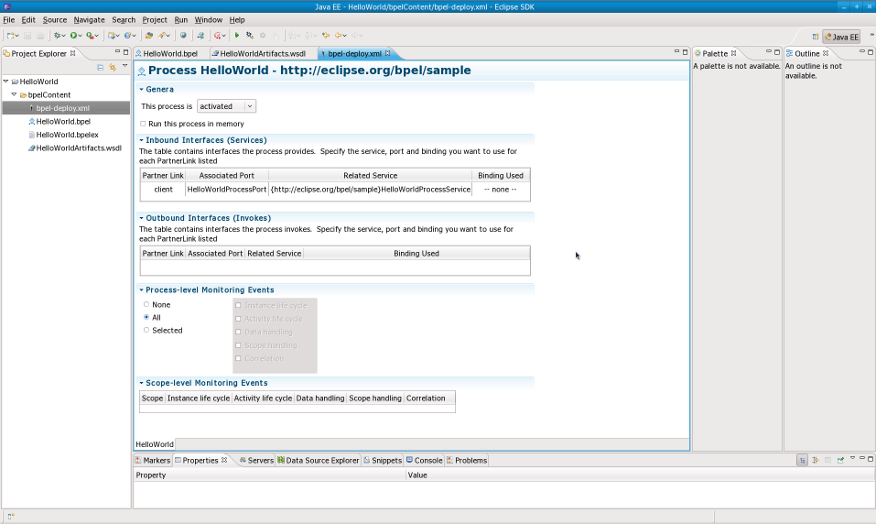
Double-click the bpel-deploy.xml file to open it in ODE Descriptor Deployment Editor. In the Inbound Interfaces section, click the Associated Port column and select HelloWorldProcessPort in the dropdown box.The Related Service and Binding Used columns should be automatically filled in. Save the bpel-deploy.xml.
Suppose you have installed the JBoss BPEL Runtime-RiftSaw, now you can create a server for JBoss BPEL runtime.
Open the JBoss Server view by selecting Windows > Show View > Other... > Server > JBoss Server view.
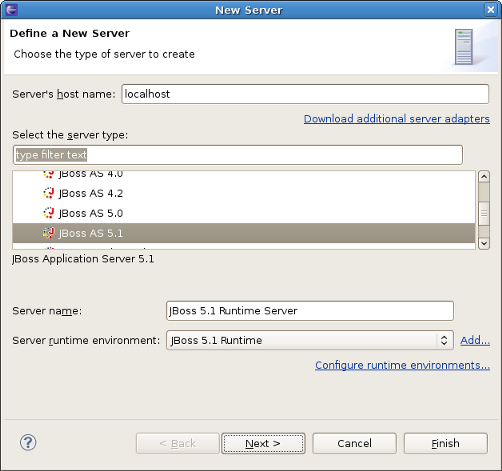
Right-click the JBoss Server view and select New > Server to open the New Server Wizard:
Select JBoss AS 5.1 as a server type.
Note
Please note, that only JBoss As 5.1 or higher version supports BPEL.
Click the Next button. On the next page, you should input your JBoss As location. Then click the Next button and you will get the page like this:
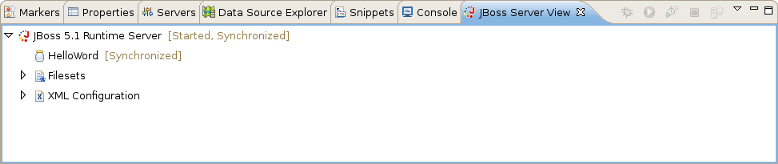
Select HelloWorld, then click the Add button to add the project to the server. Then click on the Finish button.
Start the server by right-clicking on the server and selecting the Start item.
If some aspects of server creation is not clear, please, read JBoss Server Manager Reference Guide for more details.
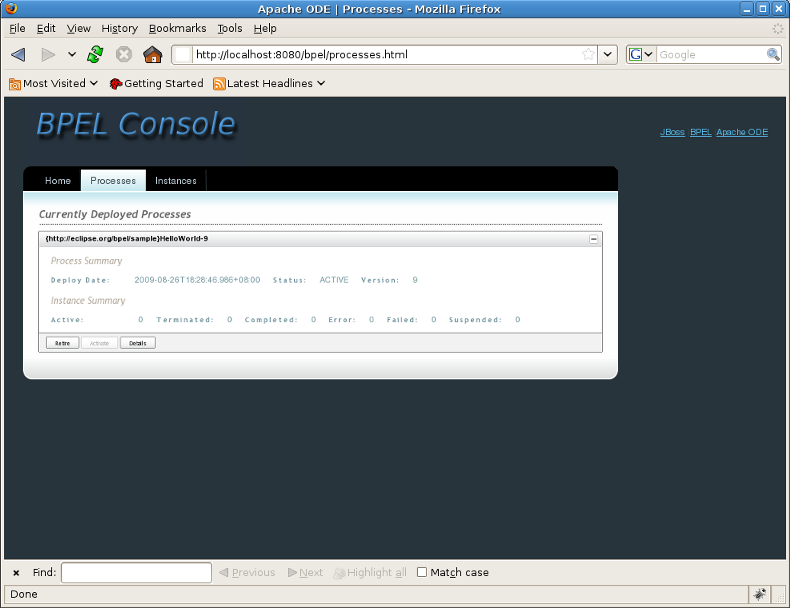
You can enter the link http://localhost:8080/bpel/processes.html to the browser to get the deployed processes.

If there's anything we didn't cover or you can't figure out, please feel free to visit our JBoss Tools Users Forum to ask questions. There we are also waiting for your suggestions and comments.