Create new JBoss Tools Documentation Jira issue

JBoss.orgCommunity Documentation
Version: 3.2.0.Beta
Copyright © 2010 JBoss by Red Hat
The JBoss Developer Studio is an Integrated Development Environment (IDE) that includes JBoss Tools and assists with the development of applications and services on JBoss Middleware software. These tools have been developed and are used by developers for increased efficiency and productivity with JBoss software.
This guide covers the basics of the interface you will be working with and the tools within it, assuming as little knowledge on your side as possible. If you are not familiar with JBoss Developer Studio then this guide is the best place to begin.
The interfaces that the JBoss Developer Studio IDE is built for are discussed.
Eclipse is the container for all development work in the JBoss Developer Studio. It allows for control over the running of the application server, the applications on it and provides an interface for developing your own applications.
Eclipse is started by double-clicking on the eclipse executeable in your installation directory.
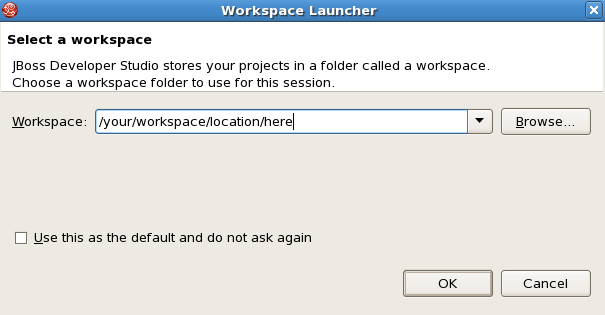
Following this you will be asked to specify a workspace. A workspace is the location on your computer where your files will be stored relating to the multiple sessions. If you wish to change your workspace location after this step you can do so by following the menu items , , .
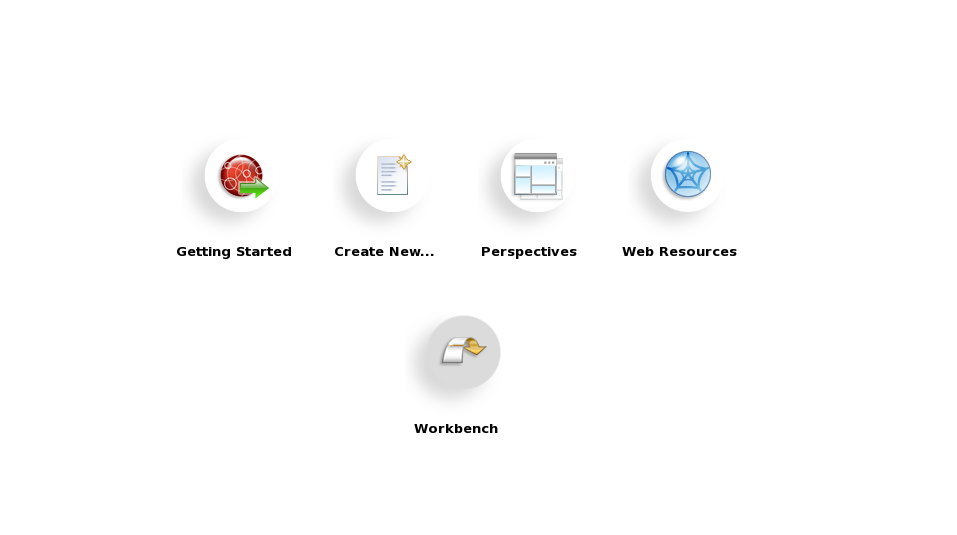
After selecting a workspace location, you will be greeted with the Welcome screen. This screen provides a few pathway options, including a Getting Started link to a selection of documentation, an option to create a new project with the Create New... option and an option to skip straight to your Workbench.
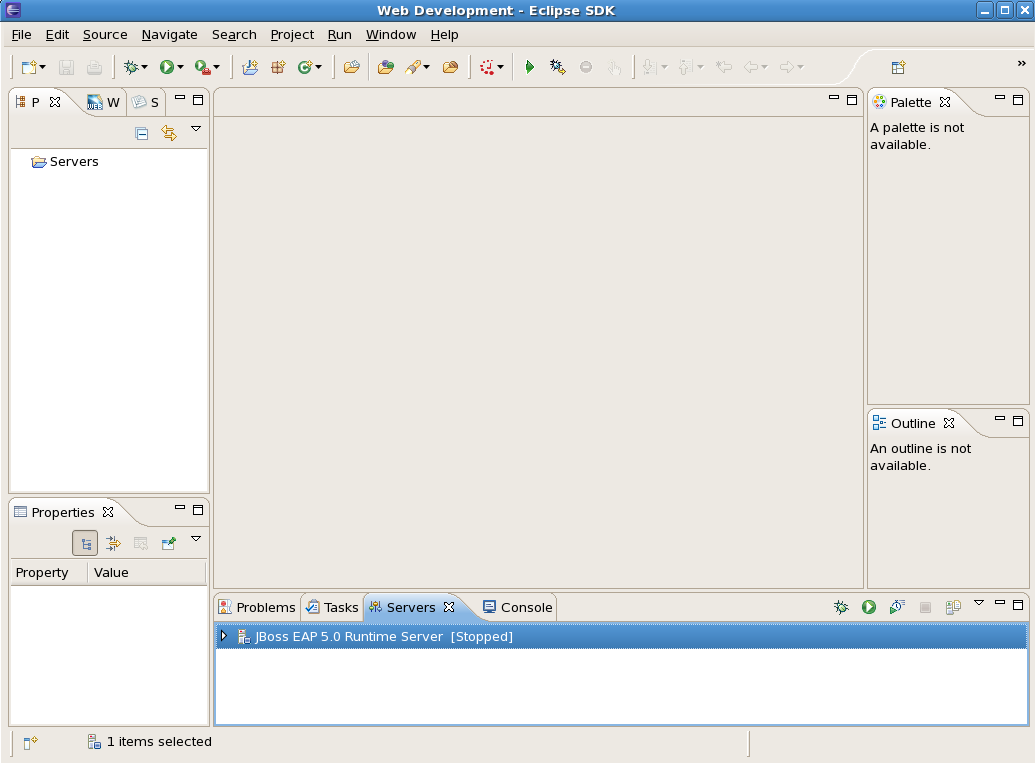
Skipping straight to your workbench, you will see a screen with a few sections and the JBoss Application Server listed in the bottom area of the interface.
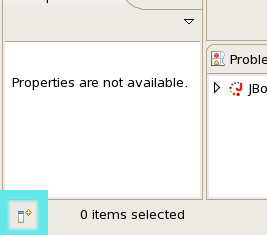
In the bottom left hand corner of the screen is a picture of a white column with a blue bar and a yellow plus sign beside it. Clicking on this button will open a menu of different views and windows.
The window that may be of most use to you can be found by following: → → . This window opens an interface to the tools included with the JBoss Developer Studio.
Refer to the Welcome to JBoss Developer Studio section of the Getting Started with JBoss Developer Studio guide for further details.
The JBoss Application Server provides the full range of Java EE 5 features as well as extended enterprise services including clustering, caching, and persistence.
This section discusses the JBoss Application Server with regards to its use through Eclipse. Once you have started the Eclipse interface for the JBoss Developer Studio, the JBoss Application Server can be started by clicking on its name in the lower part of the window and then clicking the green arrow to the right.

Note
If the view is not displayed at the bottom of your Workbench, you can activate it through → → → → and then click the button.
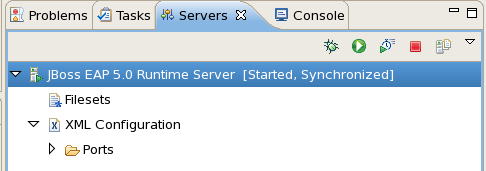
After the server has been successfully started the status next to the server name will change from displaying Stopped to displaying Started, Synchronized.

Once Eclipse and the server are started, double click on the server name in Eclipse to see an Overview screen in the center.
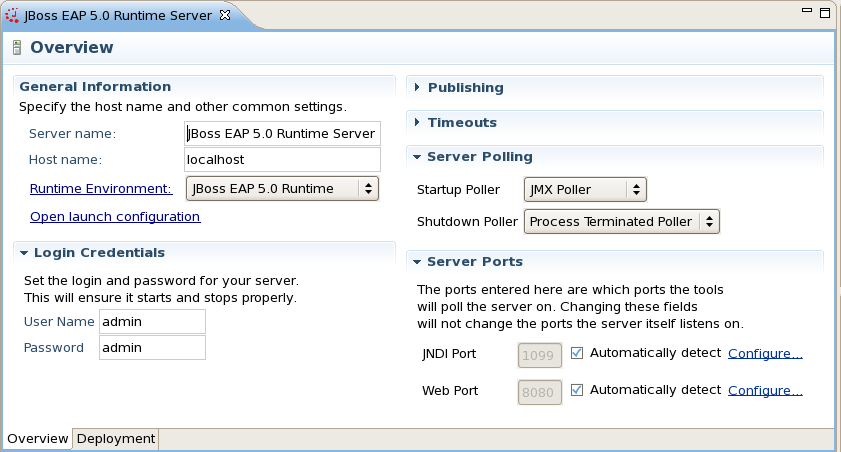
From this Overview section there are six subsections consisting of: General Information, Login Credentials, Publishing, Timeouts, Server Polling and Server Ports.
The General Information subsection allows you to change the Server name and Host name to your own preferences. By clicking on the Runtime Environment label a dialog box with options to change the name of the server runtime, the home directory, the Java Runtime and which server configuration should be used when running the application server. The button displays a dialog box for configuring the technical details of the application server instance.
Below the General Information subsection is the Login Credentials subsection. Set the User Name and Password for secure access to your server.
The Publishing subsection at the top right of the Overview section allows you to set when applications will be published to the location specified (whether the applications will be made available through the application server depends on the server running and if it is configured to recognise dynamic changes). You can select to either never have an application be published automatically or for a check of new applications yet to be published to occur at a certain timed interval.
The Timeouts subsection below Publishing allows you to set the start and stop time (in seconds) for the server to complete all of its operations. This setting is made available in order to decrease the chance of the server freezing or hanging.
Below the Timeouts subsection is the Server Polling subsection. A server poller gathers information about the server at certain points in time, capturing information about processes and applications. This section allows you to select between either the JMX Poller or Timeout Poller for startup and the Process Terminated Poller or Timeout Poller for shutdown.
The final subsection is Server Ports, below Server Polling. This section allows you to alter the port numbers that the server pollers gather their information from. The two settings of JNDI Port and Web Port are set to be automatically detected by default; normally there should be no reason to manually select the port numbers.
Note
Changing the Server Ports subsection configuration will not alter which ports the server itself listens on.
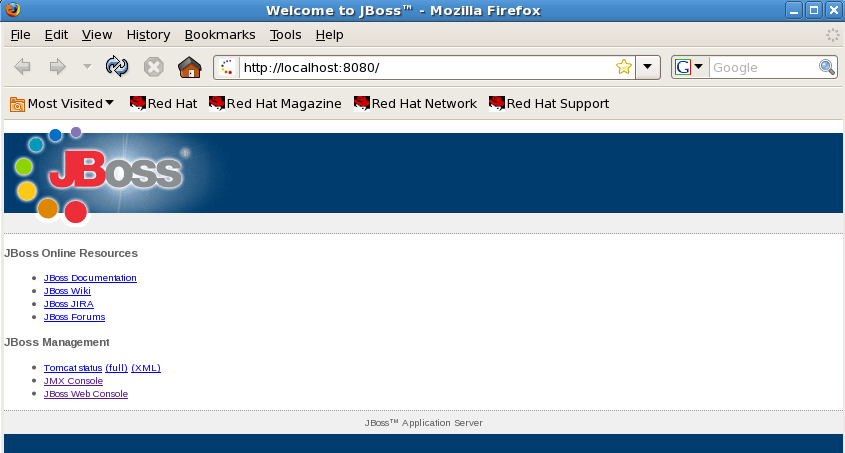
Default access to the server can be achieved by typing the address http://localhost:8080 into your Internet browser address bar.
Refer to the Manage JBoss AS from JBoss Developer Studio chapter of the Getting Started with JBoss Developer Studio guide for further details.
Though the JBoss Developer Studio may come with a pre-configured application server, you can still add your own servers. This section details how to add additional servers for use with the JBoss Developer Studio.
To add a new server runtime follow these steps:
In the Eclipse interface click on → → →
Click on the button
Select the type of runtime environment your application server is from the list provided
Tick the box for Create a new local server
Click on the button
Name your server runtime and then click on the button next to the Home Directory location space
Navigate to the directory where the server you wish to add is installed and click on the button
Select the Java Runtime Environment (JRE) you wish to use for this server from the drop-down menu. If the required JRE is not listed, click on the button beside the list and then select the button in the Preferences dialog box and follow the prompts to install the correct JRE
The Configuration section should automatically list the available profiles available for your server. Select the server configuration you wish to use by clicking on its name in the list
If the profile you wish to use is not listed click on the button, navigate to the profile location and click the button
Click the button to display the Runtime Information for the server you are about to add. If all the information is correct click the button.
If you need to change any information click the button until you reach the screen with the information that needs to be altered and then navigate back to the Runtime Information screen and click the button.
Once the new sever has been added, you can select it for use by clicking on its name in the Server Runtime Environment list and then clicking the button that will then take you back to the main Eclipse interface.
To start your new server, select it from those available through the view and click the white arrow in a green circle.
Note
If the view is not displayed at the bottom of your Workbench, you can activate it through → → → → and then click the button.
Included JBoss Developer Studio Java plug-ins are detailed.
Visual Web Tools aids in the development of web pages and web projects.
- Visual Page Editor
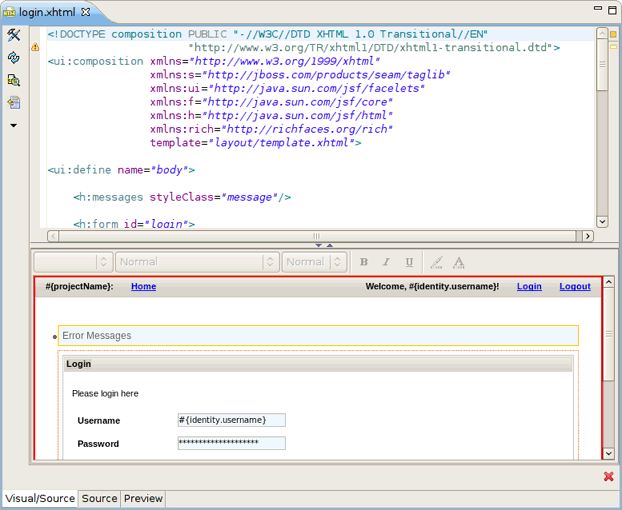
The Visual Page Editor allows an application to be developed alongside a visual preview. The application can be viewed either as the source code, as a preview of the application, or both simultaneously in a split-screen presentation. The Visual Page Editor can be used for developing an application using technologies such as JavaServer Faces (JSF), JavaServer Pages (JSP), Struts, and Hypertext Markup Language (HTML). The Visual Page Editor also features a graphical toolbar for in-line styling.
Refer to the Editors chapter of Visual Web Tools Reference Guide for full details.
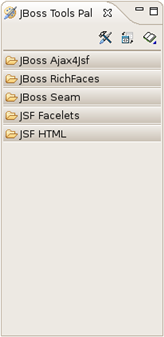
- JBoss Tools Palette
The JBoss Tools Palette provides access to tag libraries for creating JSP and JSF pages. Tags can be quickly inserted into pages from a number of included libraries:
HTML
JBoss
JSF
JSTL (JSP Standard Tag Library)
MyFaces
Oracle ADF (Application Development Framework) Faces
Struts
XHTML (Extensible Hypertext Markup Language)
Custom-made tags and third-party tag libraries can also be included in the JBoss Tools Palette.
Refer to the JBoss Tools Palette chapter of Visual Web Tools Reference Guide for full details.
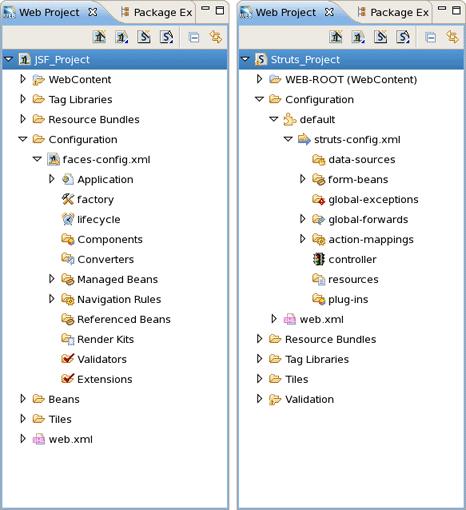
- Web Projects View
The Web Projects View is an additional view. It enhances project authoring with a number of features:
Project artifacts for JSF and Struts projects are organized by function, allowing for better project visualization.
Selected items can be dragged and dropped into JSP and other JSF compatible pages:
JSF managed bean attributes
JSF navigation rule outcomes
Property file values
Tag library files
Tags from tag libraries
JSP page links
JSF and Struts projects can be quickly created or imported from the shortcut buttons.
Tag library files can be expanded, inspected, and easily added to the JBoss Tools Palette.
Refer to the Web Projects View chapter of Visual Web Tools Reference Guide for full details.
- OpenOn
OpenOn provides an easy method for switching directly from one project resource to another without navigating through the Package Explorer view. Pressing F3 or Ctrl+ when a reference to another file is highlighted will open the file in the editor.
Refer to the Editors chapter of Visual Web Tools Reference Guide for full details.
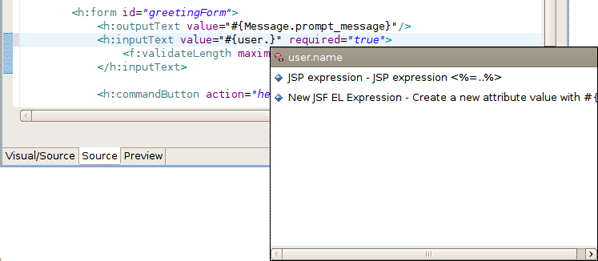
- Content Assist
Content Assist displays context-specific code completion suggestions while typing, speeding up development and reducing typing errors. Content Assist is supported in a number of contexts:
The suggestion list can be displayed by pressing Ctrl+Space, and the highlighted entry can be selected and inserted by pressing Enter.
Refer to the Editors chapter of Visual Web Tools Reference Guide for full details.
- Drag-and-Drop
Properties, managed bean attributes, navigation rules, tag library file declarations, and JSP pages can all be dragged from the Web Projects view and dropped into the editor to add content.
Refer to the Web Projects View chapter of Visual Web Tools Reference Guide for full details.
- RichFaces Support
RichFaces and Ajax4jsf tag libraries can be used from the JBoss Tools Palette, and RichFaces components are rendered in the Visual Page Editor.
Refer to the Editors chapter of Visual Web Tools Reference Guide for full details.
JBoss Seam combines several technologies to reduce the complexity of developing modern Web 2.0 applications:
Enterprise Java Beans (EJB3)
JavaServer Faces (JSF)
Asynchronous JavaScript and XML (Ajax)
Java Portlets
Business Process Management (BPM)
Seam provides an interface to these different technologies through simple Plain Old Java Objects (POJO), user interface components, and XML. Seam does not distinguish between presentation-tier components and business logic components in an effort to present a simple, unified component model for the Java Enterprise Edition platform. Seam also provides mechanisms to manage application states across multiple workspaces, methods to manage workflow and pageflow through jBPM, and comprehensive integrated testing features.
The Seam Development Tools in the JBoss Developer Studio allow for easy Seam application development:
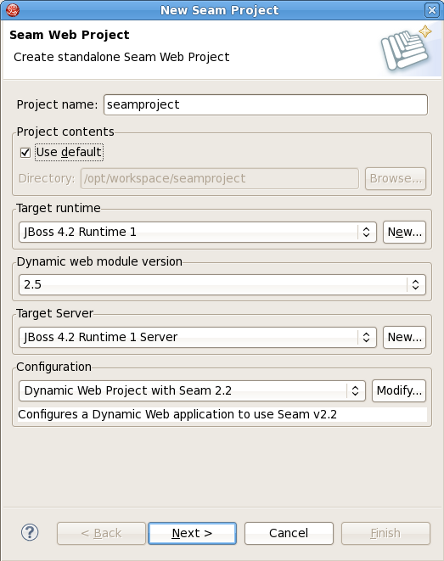
- New Seam Project wizard
The New Seam Project wizard allows the details of the Seam project to be configured, including target runtimes, target servers, project facets, and web module settings, then generates all the necessary files for a Seam project.
- Other Seam wizards
Wizards are also included for creating new Seam Actions, new Seam Forms, new Seam Conversations, and new Seam Entities.
- Entity generation
Another wizard exists for generating Seam entities. The wizard produces a set of CRUD (create-read-update-delete) Seam components and web pages. These can be generated by reverse-engineering an existing database, or by using existing entities in the application.
- Editors and views
There are a number of editors available in the JBoss Developer Studio for working with Seam in addition to the Visual Page Editor:
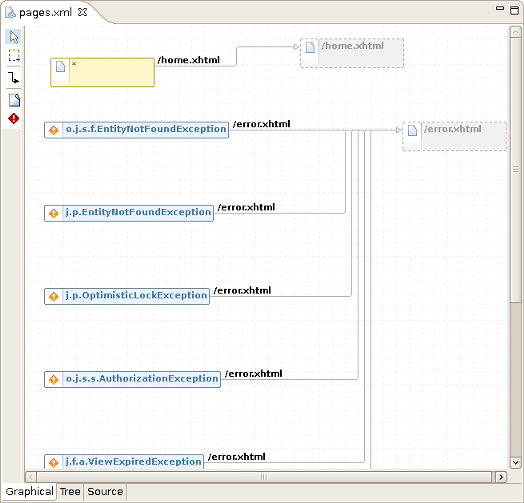
- Seam Pages Editor
The Seam Pages Editor is used for editing the
pages.xmlfile. The file can be edited through three different views:the graphical view, which diagrammatically represents the project page-flow and exception handling;
the tree view, which lists the elements and attributes of the
pages.xmlfile in a hierarchical tree for simplified editing;and the source view, which allows direct editing of the
pages.xmlsource.
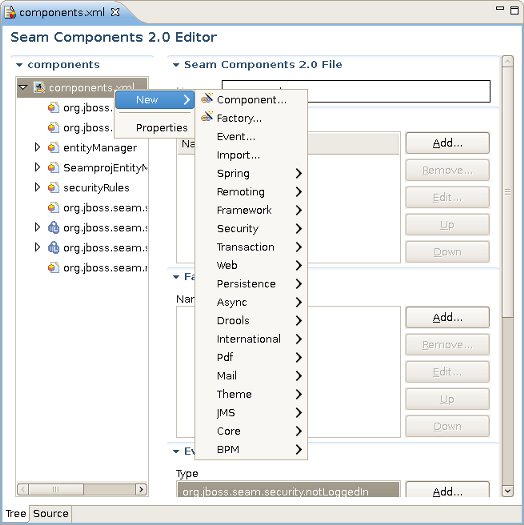
- Seam Components Editor
The Seam Components Editor is used for editing the
components.xmlfile. The file can be edited through two views, the tree view and the source view, which operate similarly to the views in the Seam Pages Editor.
The Seam Editors feature Content Assist and OpenOn; for more details on these technologies refer to Section 3.1, “Visual Web Tools”. Seam Editors also feature validation tools to highlight potential issues with the application.
- CRUD database applications
CRUD refers to the four basic SQL commands:
create,read,update, anddelete. A CRUD database application uses forms to retrieve data from and submit data to a database.CRUD database applications can be created through the New Seam Project wizard.
- TestNG
TestNG (Testing, the Next Generation) is a Java-based unit testing framework. TestNG suites can be added to a project through the New Seam Action wizard.
Refer to the Seam Development Tools Reference Guide for full details.
Hibernate is an object-relational mapping (ORM) library, used for mapping an object-oriented domain model to a relational database. Hibernate also serves as a query service, allowing queries to be expressed in native SQL (Structured Query Language), an extension of SQL named Hibernate Query Language (HQL), or an object-oriented Criteria and Example API (Application Programming Interface).
Hibernate Tools in the JBoss Developer Studio provides several features to aid in developing with Hibernate:
- Mapping Editor
The Mapping Editor is used for authoring Hibernate XML mapping files. It supports code completion (Content Assist) and syntax highlighting.
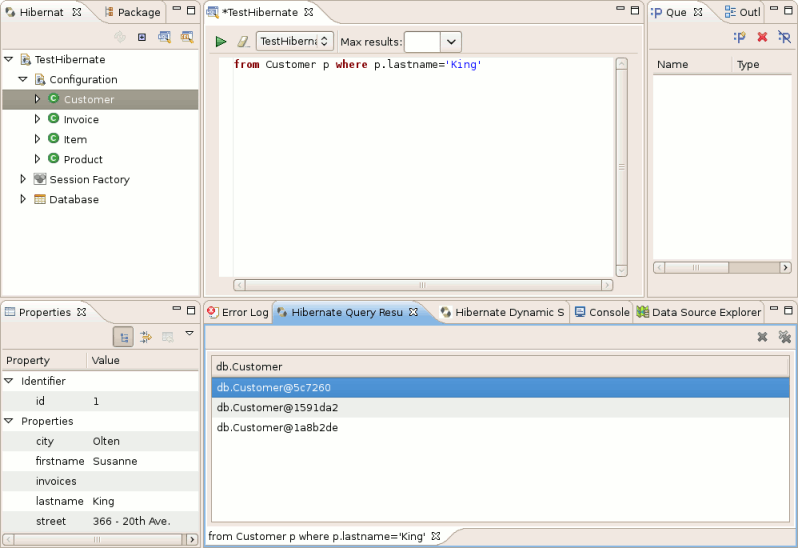
- Console
The Hibernate Console provides a visual representation of database connections and class relationships. Queries can be interactively performed on the database representation.
- Reverse Engineering
Databases can be reverse-engineered to construct domain model classes, Hibernate mapping files, annotated entity beans, HTML documentation, or complete JBoss Seam applications.
- Wizards
Wizards are included to step through procedures to generate Hibernate configuration files and Hibernate console configurations.
- Apache Ant Task
Apache Ant is a tool for automating software build processes. Hibernate Tools includes an Apache Ant Task for generating schema, mapping, and Java code related to the build process.
Refer to the Hibernate Tools Reference for full details.
JBoss Portal is a platform for hosting and serving the web interface of a web portal. It allows for content management and experience customization, and supports standard portlets, single sign-ons, clustering, and internationalization.
JBoss Portal applications can be created through the Dynamic Web Project wizard. Java portlets, JSF portlets, and Seam portlets are all supported.
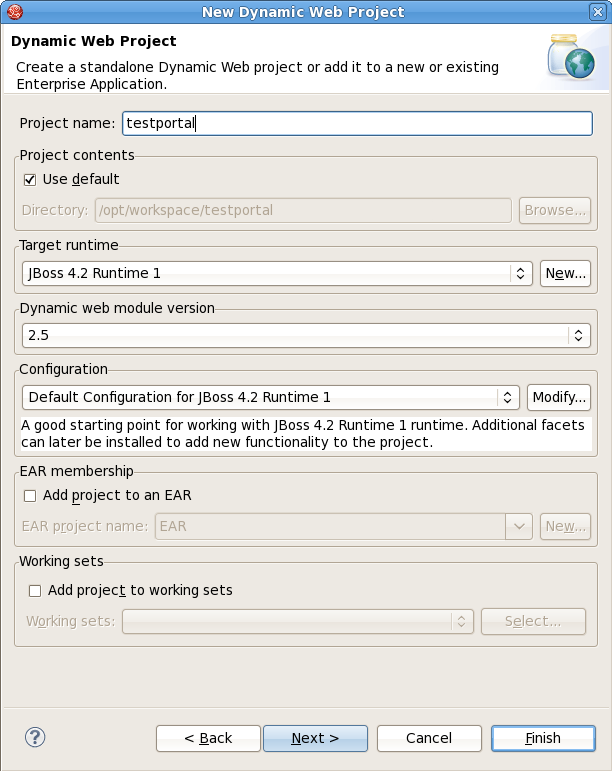
Click the button and enable portlets for the creation of JBoss Portal applications through this wizard.
Refer to the JBoss Portal Tools Reference Guide for full details.
Java Management Extensions (JMX) is a Java tool-set for managing and monitoring applications, connected devices, and service-oriented networks. A managed resource is represented by a dynamic object called a Managed Bean (or MBean, which is a JavaBean with a dependency injection.
The JMX Tools consists of the MBean Explorer and the MBean Editor.
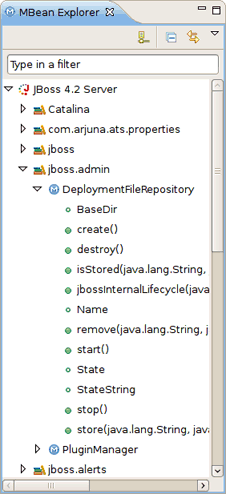
- MBean Explorer
The MBean Explorer lists a connection's Managed Beans, domains, attributes, and operations in a hierarchical tree. Items in the tree can be filtered, expanded, and collapsed, and double-clicking on any item will open the item in the MBean Editor.
- MBean Editor
The MBean Editor is a detailed property-editor made up of four pages:
the Attributes page, which allows the attributes of the Managed Bean to be viewed edited;
the Operations page, which allows the operations of the Managed Bean to be viewed and edited;
the Notifications page, which allows the Managed Bean to be subscribed to, and which notifications are received
the Info page, which displays information on the Managed Bean.

Refer to the JMX Tools Reference Guide for full details.
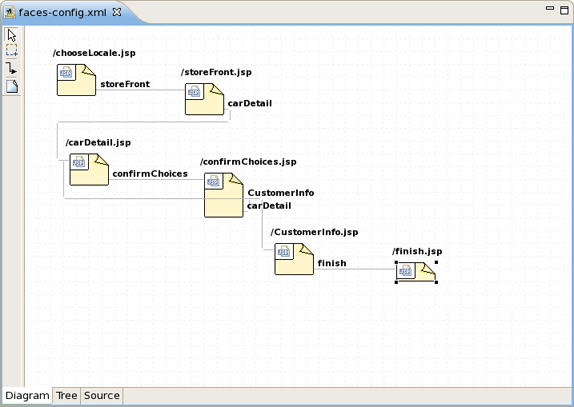
JavaServer Faces (JSF) is a Web application framework developed by Sun Microsystems© Inc. JSF Tools allows you to build JSF based applications, add JSF capabilities to existing web projects, import JSF projects and choose a JSF implementation during application development.
The tools included are outlined as follows:
Wizards that assist with the creation of new JSF and Facelets projects and adding JSF capabilities to existing web projects.
Pre-configured templates are included and the functionality to create your own.
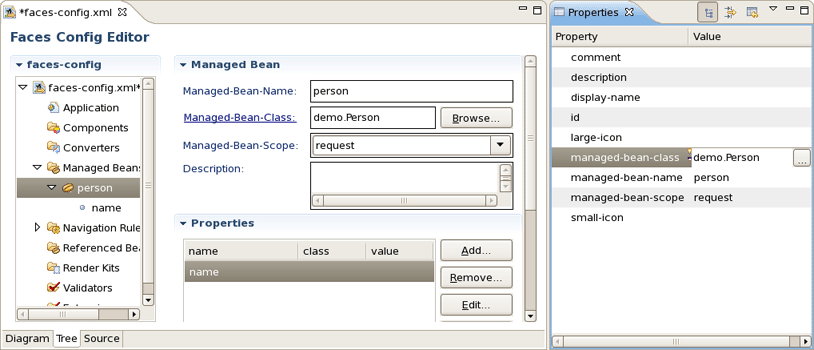
Add and generate code for new managed beans and then add them to a JSF configuration file.
The ability to create your own custom Converter and Validator.
Constant validation checking no matter how you are currently interacting with the code, ensures you are always aware of any errors during the development process.
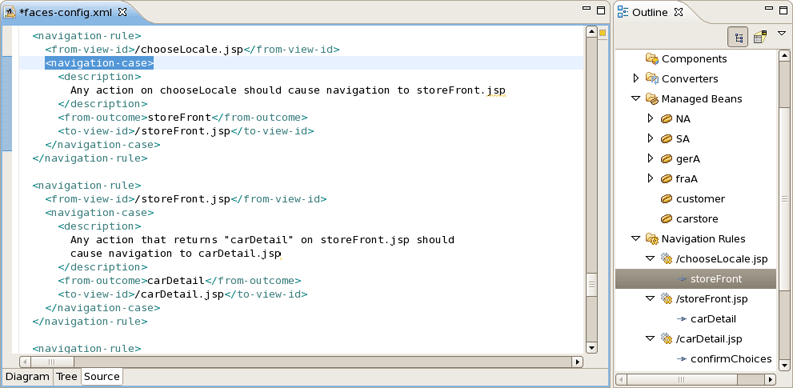
Three views are provided for interacting with the code: Diagram view, Tree view and Source view. Synchronization between the views ensures you are always working on the newest version.
Refer to the JSF Tools Reference Guide for more details.
The JBoss AS Tools consists of a number of additional views for managing an installed JBoss Server through the JBoss AS (Application Server) perspective. These additional views include the standard Console and Properties views, and the Servers view. The Servers view allows installed servers to be configured, monitored, and managed.
Refer to the JBoss Server Manager Reference Guide for full details.
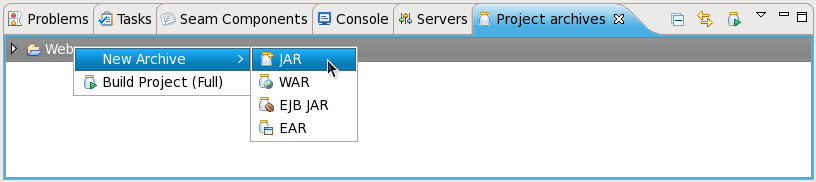
The JBoss AS Tools also include the Project Archives view for streamlined packaging and archiving of applications. Application projects can be configured with specific packaging instructions, and wizards are included for creating and managing archives.
Refer to the JBoss Server Manager Reference Guide for full details.
Included JBoss Developer Studio plug-ins for development on Service-Oriented Architecture (SOA) are detailed.
jBPM is a workflow tool for framework control over business processes and languages.
jBPM supports the jBPM Process Definition Language (jPDL) and includes a perspective for easy creation and manipulation using the jPDL. Through this view you can add states, transitions and other processes and waypoints in order to create your own business workflow. Refer to the A Minimal Process Definition section of the Creating an Empty Process Definition chapter within the jBPM Tools Reference Guide for more details.
The Enterprise Service Bus (ESB) is an abstraction layer that interacts with the messaging system in a Service-Oriented Architecture (SOA).
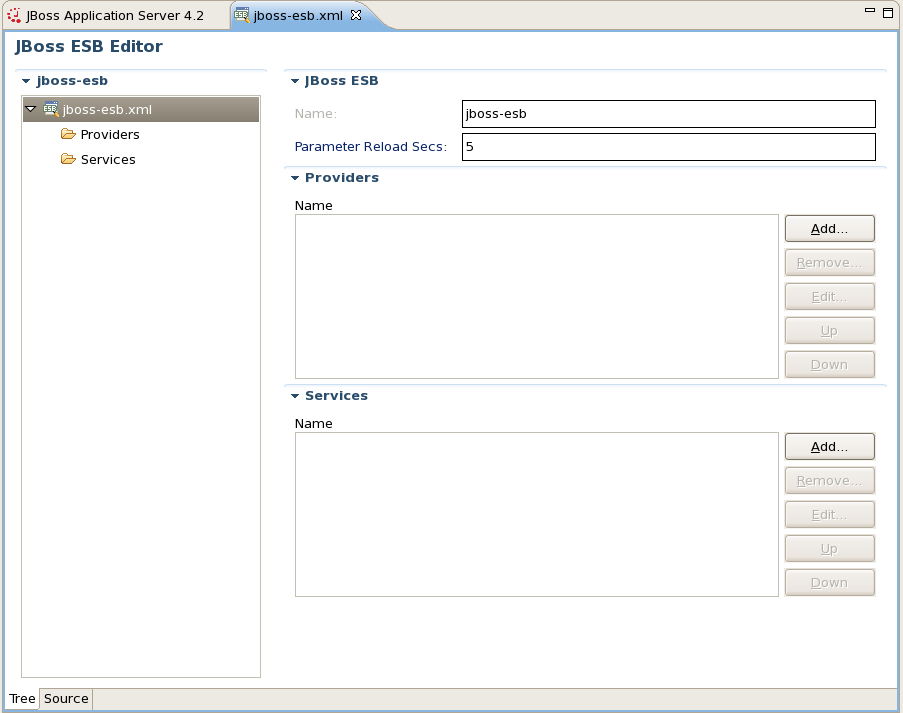
The JBoss Developer Studio includes a tool called the ESB file Editor. Through the use of this tool you can develop an application that will utilize the advantages of ESB technology. Features of the ESB Editor include:
ESB syntax validation
Contextual error checking is provided constantly, with error checking on incorrect or incomplete tags also included when using the Source viewer.
XML schema support
By checking the child elements of the providers, the ESB Editor relays incorrect usage combinations to you through error messages upon startup.
ESB XML content assistance
Content Assist enables you to write code fast and with accuracy when using the Source mode.
Synchronized source and visual editing
The ESB Editor gives you the choice of using a graphical view (Tree), a code view (Source) or both when developing your ESB applications. With both instances open at once, the changes made to one can be directly viewable in the other, ensuring that you are always working with the most current version of your application no matter your choice.
Refer to the ESB Editor chapter of the ESB Tools Reference Guide for further information.
JBoss ESB intergrates component messaging into the JBoss Service-Oriented Architecture, serving as an integral part of JBoss middleware suite. For information on how to use and configure JBoss ESB with the JBoss Service-Oriented Architecture refer to the Using and Configuring SOA Platform chapter of the ESB Tools Reference Guide.
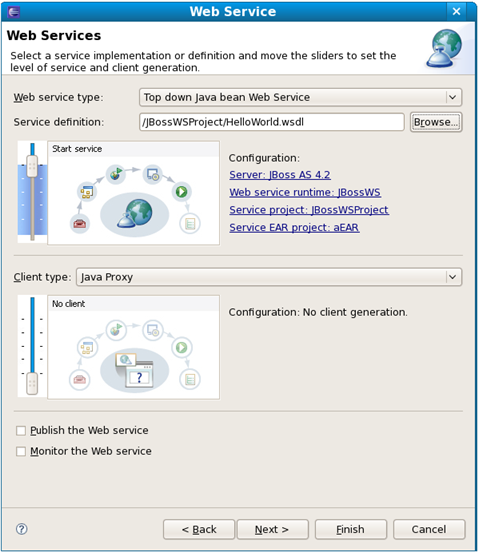
JBoss Web Services is an integral part of the JBoss Application Server and JBoss Enterprise Application Platform, providing a standard means of working reliably between different software applications.
A Web Service defines a collection of technologies that provide protocols and standards for the exchange of data between applications. You can create a Web Service for your application server through the use of wizards in the JBoss Developer Studio. For further details refer to the Creating a Web Service using JBossWS runtime chapter of the JBoss WS User Guide
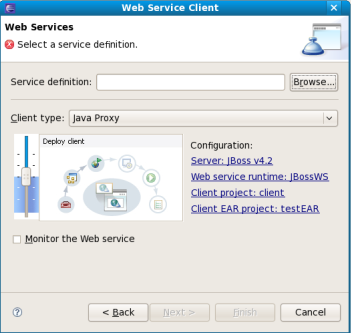
Web Services Tools also includes the ability to create a Web Service client through the use of a Web Services Description Language (WSDL) document. This can be useful if you already have a predefined service that you wish to recreate, or you wish to use one as a template for you to work with. Refer to the Creating a Web Service Client from a WSDL Document using JBoss WS chapter of the JBoss WS User Guide for more details.
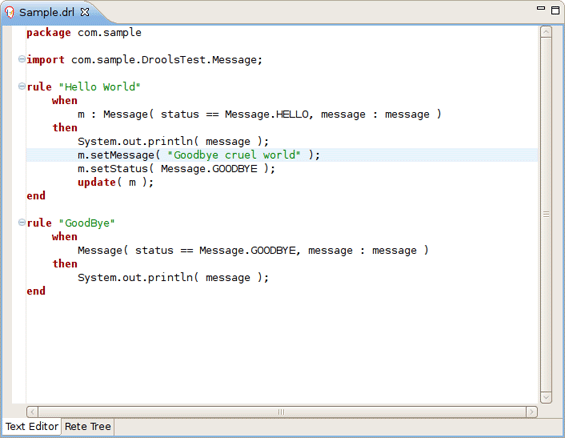
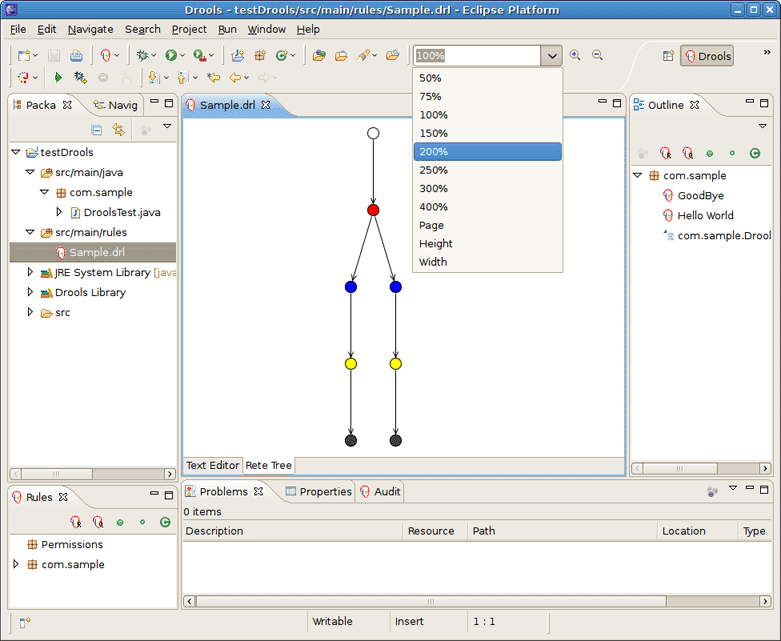
Drools is a Business Rule Management System (BRMS) that uses an enhanced implementation of the Rete algorithm to become a forward chaining inference based rules engine (production rule system). Refer to the The Rule Engine chapter of the JBoss Enterprise SOA JBoss Rules Reference Guide for more details.
Drools Tools includes wizards for creating new Drools projects and resources. The resources that can be created include a new rule, domain specific language, decision table and business rule. After these have been created there are numerous editors included to assist you with the rest of the development. Included editors are The Rule editor, The Domain Specific Language editor, The Rule Flow graphical editor and The Guided editor that provides a Graphical User Interface (GUI). Refer to the Drools Tools Reference Guide for more details.
Eclipse Guvnor Tools work with Drools Guvnor through rich web based GUIs and editors to provide a centralized repository for a vast quantity of rules. You can store versions of rules, models, functions, processes and other Drools generated components that all relate to executeable knowledge bases. Access to the Guvnor is controlled, allowing you to lock down access and restrict features so domain experts (non programmers) can view and edit rules without being exposed to all the features at once.
The tools included for Eclipse Guvnor are outlined as follows:
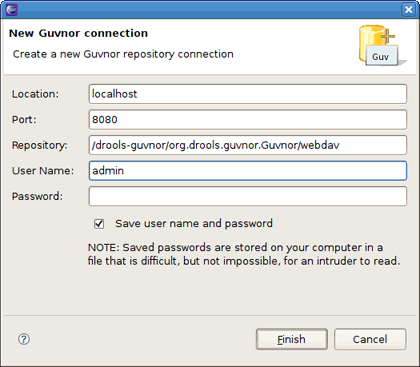
Guvnor Connection Wizard
The Guvnor Connection Wizard is used to create a connection to a Guvnor repository. This wizard can be started by following the menu items → → → → , through the Guvnor Repositories View and other locations throughout Eclipse Guvnor Tools. Refer to the Guvnor Connection Wizard section of the Functionality Overview chapter within the Eclipse Guvnor Tools Reference Guide for more details.
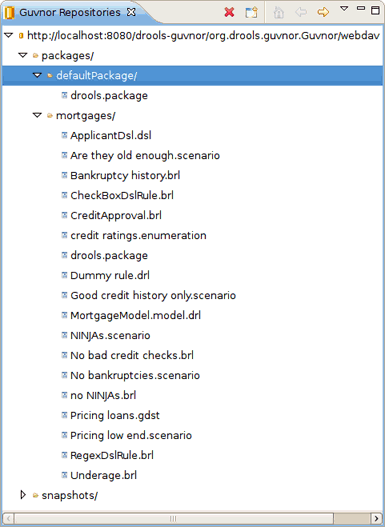
The Guvnor Repositories View
The Guvnor Repositories View tool displays the contents of a repository using a tree structure. From within this tool you can create a new Guvnor repository connection, remove a Guvnor repository connection, refresh the tree display and expand or condense the tree layout. Refer to the Guvnor Repositories View section of the Functionality Overview chapter within the Eclipse Guvnor Tools Reference Guide for more details.
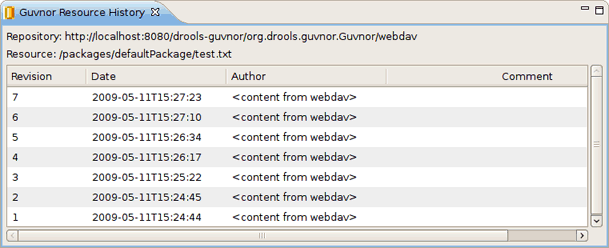
Guvnor Resource History View
The task of the Guvnor Resource History View is to display the revision history details for files that are both locally stored and within Guvnor repositories. Refer to the Guvnor Resource History View section of the Functionality Overview chapter within the Eclipse Guvnor Tools Reference Guide for more details.
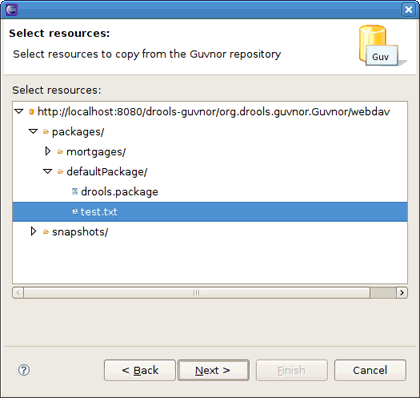
Guvnor Resource Importing Wizard
The Guvnor Resource Importing Wizard assists with the copying of one or more files from a Guvnor repository to the local workspace (while keeping file association with the Guvnor repository). This wizard can be started by following the menu items → → → . Refer to the Importing Guvnor Repository Resources section of the Functionality Overview chapter within the Eclipse Guvnor Tools Reference Guide for more details.
Actions for Local Guvnor Resources
Through Eclipse Guvnor Tools a variety of actions can be performed on a file. Those actions are:
Update: Replaces the contents of the local file with the updated contents from the Guvnor repository.
Add: Include a local file in a Guvnor repository.
Commit: Update a Guvnor repository file with new content from a locally modified version.
Show History: Displays the revision history of a file.
Compare with Version: Opens a wizard that allows to files to be compared for similarities and differences.
Switch to Version: Provides the ability to replace a local file with an earlier revision of the same file.
Delete: Removes a file from the Guvnor repository and the local copy.
Disconnect: Removes a Guvnor repository association.
Refer to the Actions for Local Guvnor Resources section of the Functionality Overview chapter within the Eclipse Guvnor Tools Reference Guide for more details.
For documentation on the plugins available as part of the JBoss Developer Studio visit http://www.redhat.com/docs/en-US/JBoss_Developer_Studio/.
For documentation about the JBoss Enterprise Application Platform visit http://www.redhat.com/docs/en-US/JBoss_Enterprise_Application_Platform/.
For information pertaining to Eclipse visit http://www.eclipse.org/.
Follow the instructions in these workshops to broaden your knowledge and understanding of the JBoss Developer Studio.
In this RESTEasy workshop we will provide an example of how to solve the problem of creating new customers for an online store. This will be achieved through the creation of a shopping application and adding customer records through a web browser.
Prerequisites
The following technologies are necessary for this workshop:
JBoss Developer Studio 3.0
JBoss Enterprise Application Platform 5 or JBoss Service Orientated Architecture Platform 5
Firefox 2.0 or higher web browser
REST Client Firefox plug-in available from https://addons.mozilla.org/en-US/firefox/addon/9780
Make sure the JBoss Developer Studio is open with the application server running. For the purpose of simplicity it will be assumed for the rest of the workshop that you are running the JBoss Enterprise Application Platform 5, however the steps will be the same if you are using the JBoss Service Orientated Architecture Platform 5.
In the JBoss Developer Studio navigate to → .
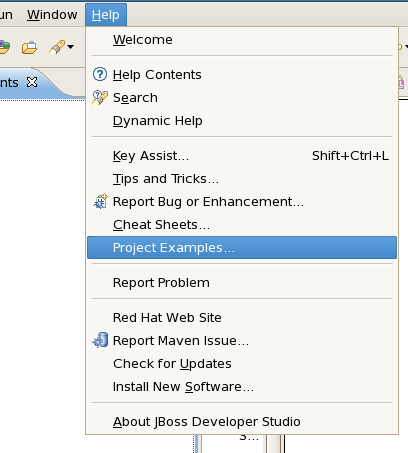
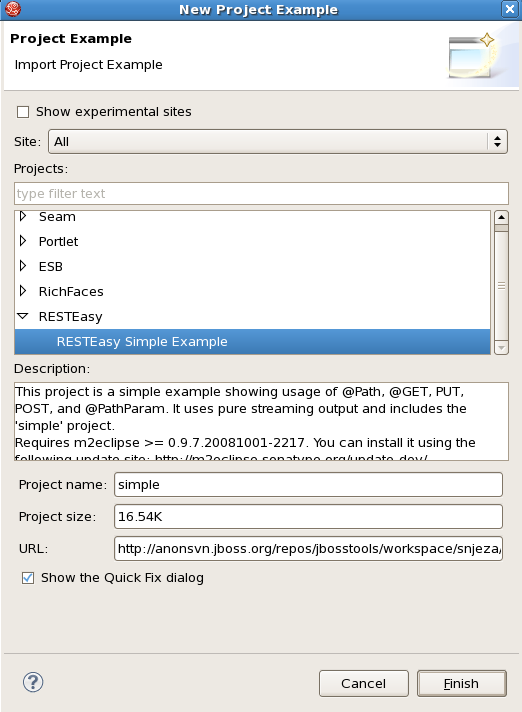
In the menu dialog box, scroll to → and click .
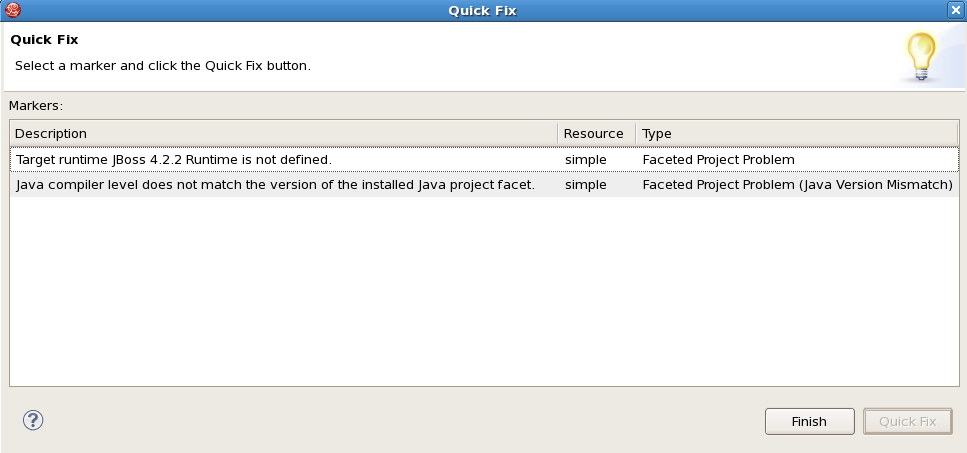
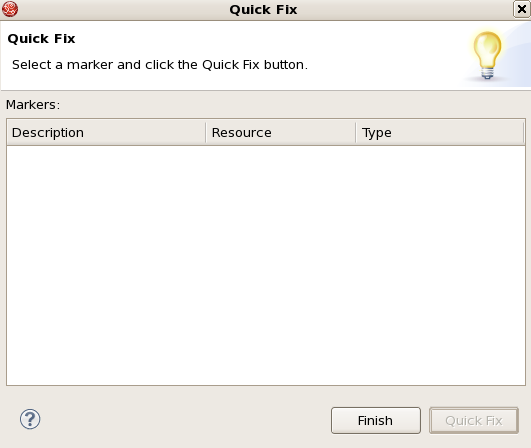
There may be two issues to fix before you can continue. The description for each of these will be Target runtime JBoss 4.2.2 Runtime is not defined and Java compiler level does not match the version of the installed Java project facet. If they do not appear skip to Figure 6.7, “Completed fixing the issues”. If they do appear, the following steps will resolve these issues.
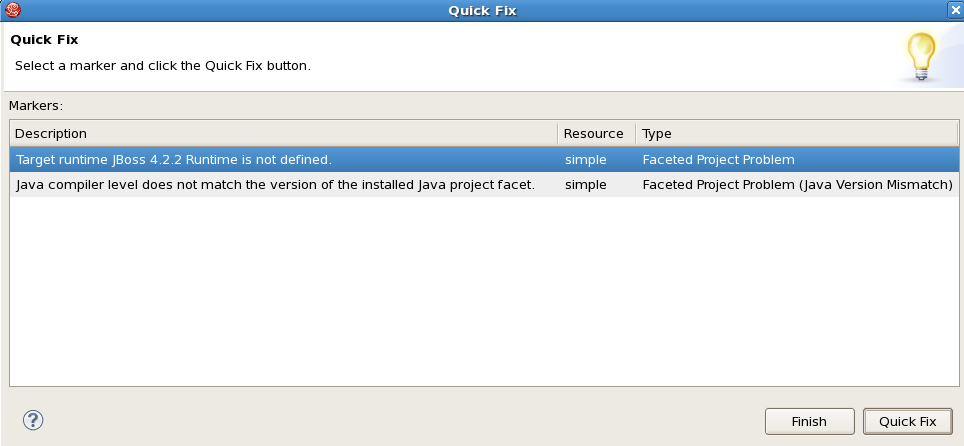
To fix the first issue with the description Target runtime JBoss 4.2.2 Runtime is not defined click on this description and then click the button.
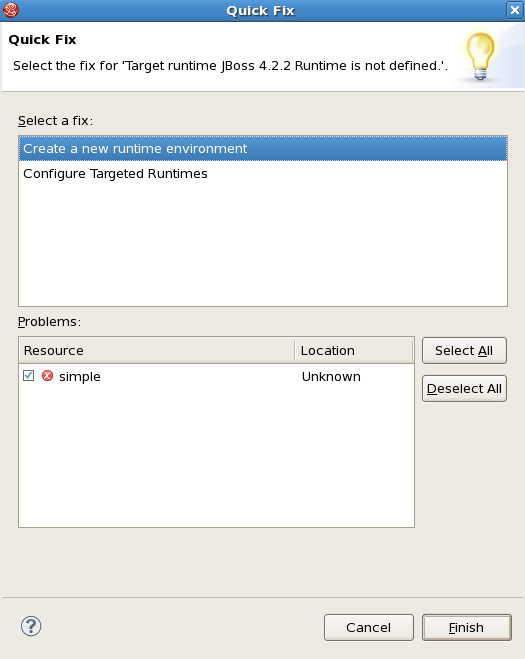
The next dialog box will display two runtime issues to fix, however by fixing the second one labeled as Configure Targeted Runtimes both issues will be corrected.
Select the issue called Configure Targeted Runtimes and click the button.
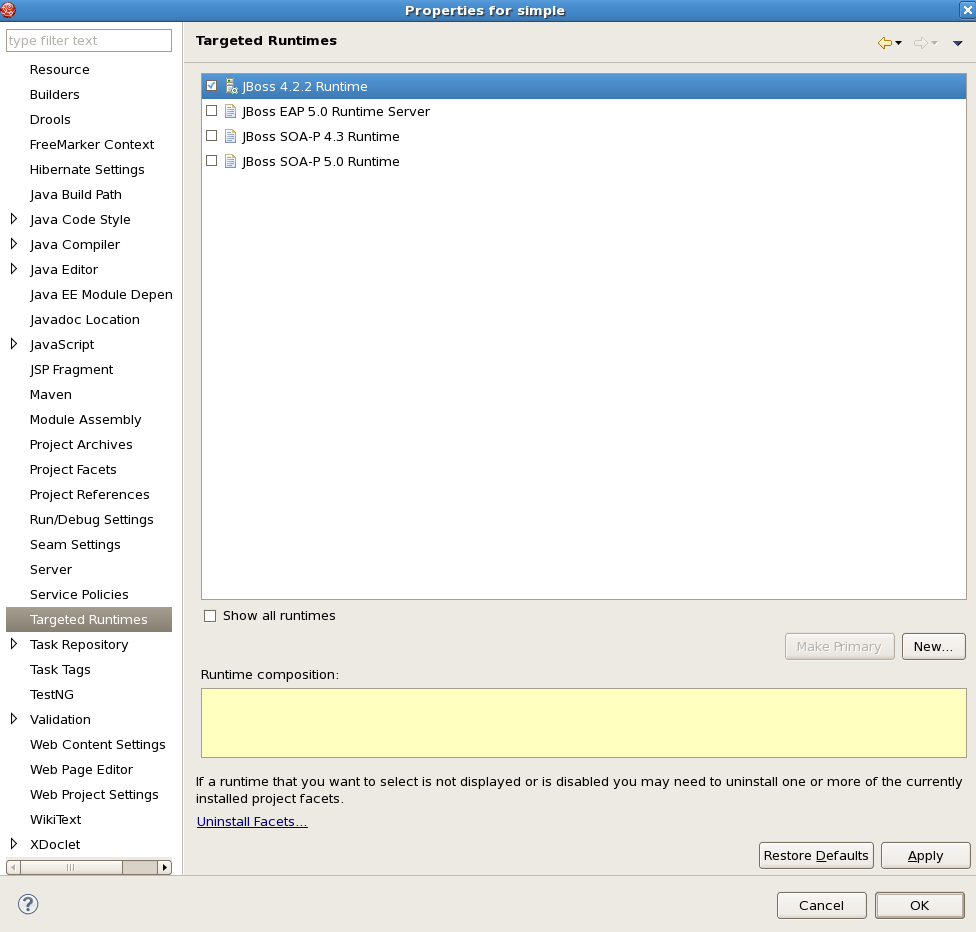
A large dialog box will open with a long list of property categories on the left hand side. Navigate down to and click on the property title. To the right of the menu where the JBoss 4.2.2 Runtime box is selected, deselect it and then select the name of your JBoss Enterprise Application Platform 5 runtime.
Once the JBoss Enterprise Application Platform 5 is selected and the old runtime deselected, click the button and then the button.
Note
In Figure 6.6, “Selecting the correct runtime”, the runtime that will be used is the one called JBoss EAP 5.0 Runtime Server, though the name will depend on what you called it when you configured the server for use with the JBoss Developer Studio.
To fix the second issue with the description Java compiler level does not match the version of the installed Java project facet click on this description and then click the button.
After clicking the button the Java compiler issue should disappear because the JBoss Developer Studio has made the necessary changes in the background to fix it.
The Quick Fix dialog box should now be empty. Click the button.
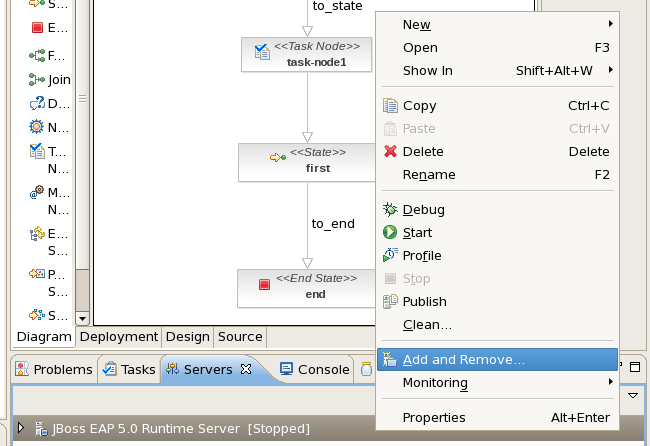
To add the project to the JBoss Enterprise Application Platform 5 server right click on the server name in the tab in the bottom section of your workbench. Click on the option.
From the Add and Remove dialog box ensure the box labeled If server is started, publish changes immediately is ticked. In the left-hand menu, highlight the project you just created called simple by clicking on it.
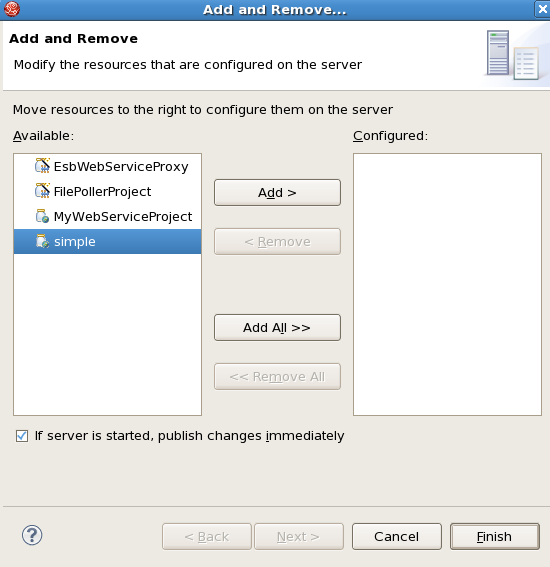
Click the button to move it from the left-hand menu labeled Available to the right-hand menu labeled Configured. Once this is completed click the button.
Your RESTEasy project has now been deployed onto your server. We will now test the application by using the REST Client plug-in within the Firefox web browser.
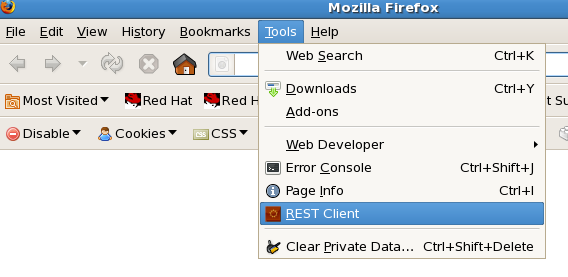
Open your Firefox web browser and navigate to → .
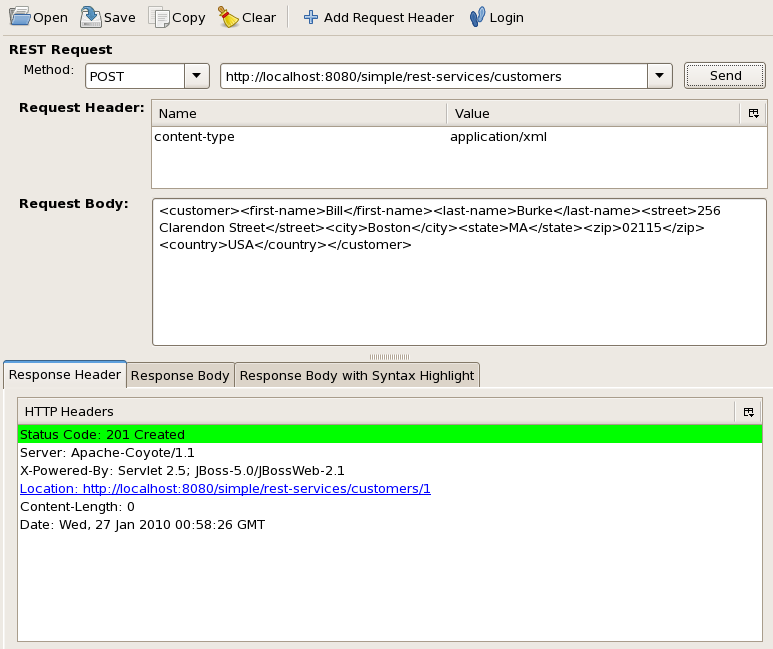
In the REST Client click on the button and type content-type for the Name and application/xml for the Value. This will ensure that the content will be consumable by the Plain Old Java Object (POJO) service at the server.
Select from the Method drop-down menu, copy http://localhost:8080/simple/rest-services/customers into the drop-down menu beside the Method and paste the following into the Request Body:
<customer><first-name>Bill</first-name><last-name>Burke</last-name><street>256 Clarendon Street</street><city>Boston</city><state>MA</state><zip>02115</zip><country>USA</country></customer>
The XML for the Request Body must not contain any spaces between XML tags to avoid exceptions occurring at the server end.
Click the button to add the customer information.
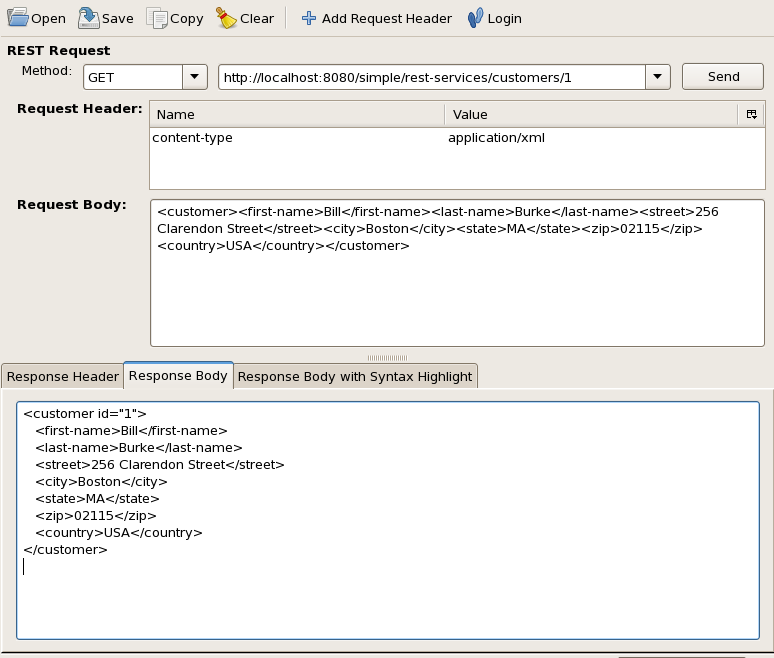
To ensure the customer details were added, change the Method type to and the URL address to http://localhost:8080/simple/rest-services/customers/1. The /1 is added to the URL to select the customer with the customer id of 1, since that is the number that was given to the customer.
Click the button to retrieve the information. Select the Response Body tab beneath the Request Body section to view the returned information.
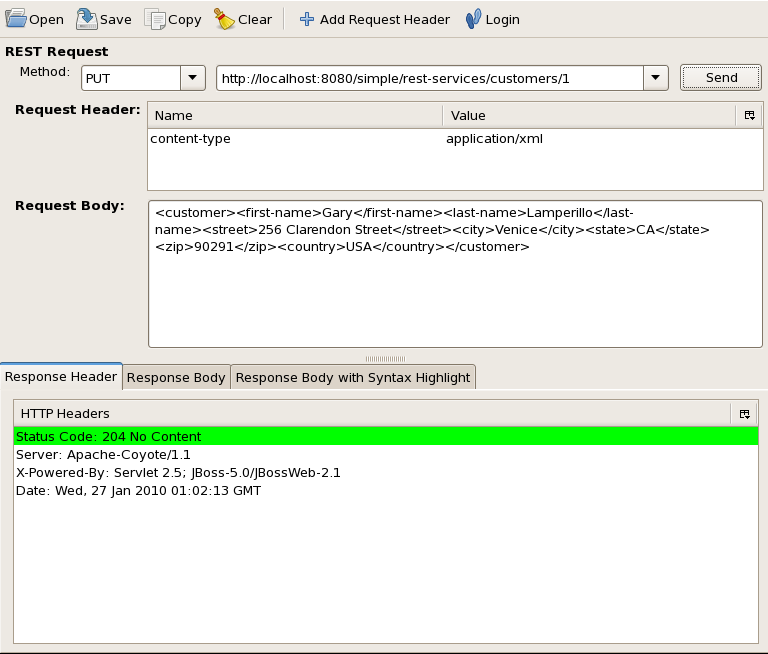
We have added a customer and retrieved their information, now we will update their information. To achieve this change the Method to being and copy the following into the Request Body (overwriting anything that may be in the Request Body already):
<customer><first-name>Gary</first-name><last-name>Lamperillo</last-name><street>256 Clarendon Street</street><city>Venice</city><state>CA</state><zip>90291</zip><country>USA</country></customer>
Remember to make sure there are no spaces between the XML tags when you copy the information into the Request Body.
Check to make sure the URL still reads http://localhost:8080/simple/rest-services/customers/1 from when you retrieved the customer information. By using the URL that references the ID of the customer you are updating that customer's record.
Click the button to update the information.
To verify that the record has been updated change the Method type to , ensure the URL still references customer ID 1 and click the button.
Select the Response Body tab beneath the Request Body section to view the returned information.

The RESTEasy workshop is now complete.
The JBoss Enterprise Application Platform book titled the Seam Reference Guide contains an example of how to setup Seam for use with the JBoss Developer Studio. This workshop can be found here: Getting Started with Seam, using JBoss Tools.