Create new JBoss Tools Documentation Jira issue

JBoss.orgCommunity Documentation
Version: 3.2.0.Beta
Copyright © 2007, 2008, 2009, 2010 JBoss by Red Hat
JBoss Tools' JMX project is a fork of eclipse-jmx, a project by Jeff Mesnil. It was forked with permission.
The Java Management Extensions (JMX) technology is a standard part of the Java Platform, Standard Edition (Java SE platform). The JMX technology was added to the platform in the Java 2 Platform, Standard Edition (J2SE) 5.0 release.
The JMX technology provides a simple, standard way of managing resources such as applications, devices, and services. Because the JMX technology is dynamic, you can use it to monitor and manage resources as they are created, installed and implemented. You can also use the JMX technology to monitor and manage the Java Virtual Machine (Java VM).
The JMX specification defines the architecture, design patterns, APIs, and services in the Java programming language for management and monitoring of applications and networks.
Using the JMX technology, a given resource is instrumented by one or more Java objects known as Managed Beans, or MBeans. These MBeans are registered in a core-managed object server, known as an MBean server. The MBean server acts as a management agent and can run on most devices that have been enabled for the Java programming language.
The specifications define JMX agents that you use to manage any resources that have been correctly configured for management. A JMX agent consists of an MBean server, in which MBeans are registered, and a set of services for handling the MBeans. In this way, JMX agents directly control resources and make them available to remote management applications.
The way in which resources are instrumented is completely independent from the management infrastructure. Resources can therefore be rendered manageable regardless of how their management applications are implemented.
The JMX technology defines standard connectors (known as JMX connectors) that enable you to access JMX agents from remote management applications. JMX connectors using different protocols provide the same management interface. Consequently, a management application can manage resources transparently, regardless of the communication protocol used. JMX agents can also be used by systems or applications that are not compliant with the JMX specification, as long as those systems or applications support JMX agents.
JBoss JMX Tools allow to setup multiple JMX connections and provide view for exploring the JMX tree and execute operations directly from Eclipse.
This chapter covers the basics of working with JMX plugin, which is used to manage Java applications (with Managed Beans) through JMX and its RMI Connector.
For a start, we propose you to look through the table of main features of JBoss JMX Tools:
Table 1.1. Key Functionality for JBoss JMX Tools
| Feature | Benefit | Chapter |
|---|---|---|
MBean Explorer | MBean Explorer is a useful view with a text filter that displays domains, mbeans, attributes, and operations inside a connection. | MBean Explorer |
MBean Editor | MBean Editor is a multi-page editor to manage MBeans. | MBean Editor |
Requirements to use JBoss JMX Tools are the following:
JBoss JMX Tools is developed on Eclipse 3.4.x milestones
JBoss JMX Tools requires that Eclipse is run on a JDK 1.5.0 or above (due to dependencies on JMX packages which were introduced in Java 1.5.0)
Here, we are going to explain how to install the JMX plugin into Eclipse.
JBoss JMX Tools is one module of the JBoss Tools project. JBoss JMX Tools has no dependency on any other part of JBoss Tools, and can be downloaded as a standalone Eclipse plugin. Even though the JMX Tools have no dependencies on other plugins, such as AS Tools, JBoss JMX Tools do depend on the JMX Tooling and even extend it.
You can find the JBoss JBoss Tools plugins over at the download pages. The only package you'll need to get is the JBoss JMX Tooling, however the AS Tools would give you a wider experience and more options when using JMX with JBoss Servers. You can find further download and installation instructions on the JBoss Wiki in the InstallingJBossTools section.
This chapter will give you answers on most popular questions asked by JMX plugin users.
To start using the JMX Tools it's necessary to open MBean Explorer. Go to Window > Show View > Other and then select MBean Explorer and click OK.
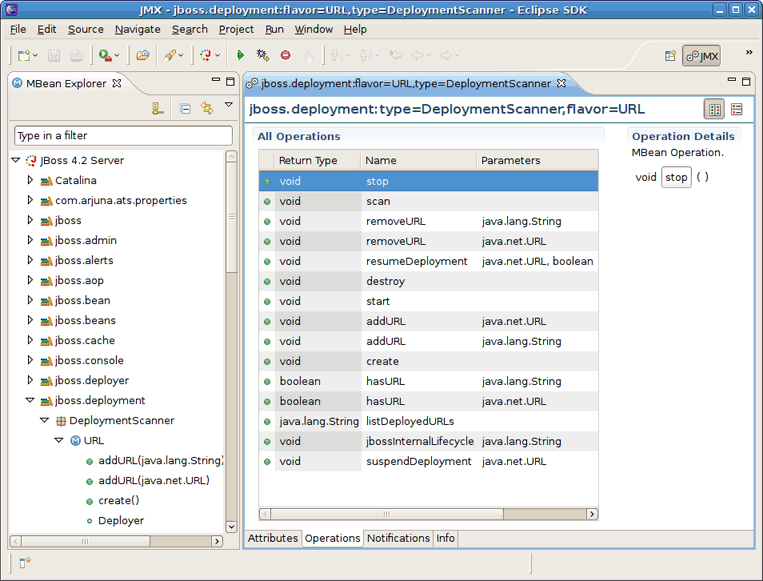
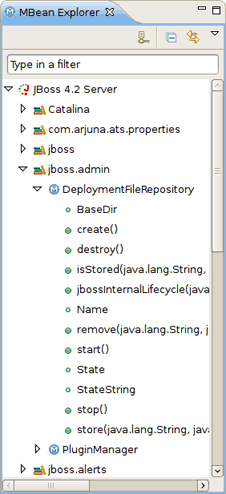
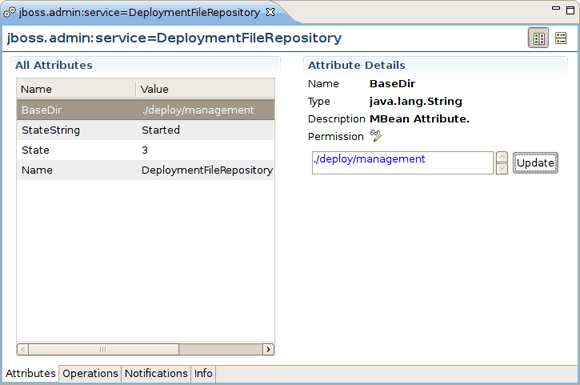
The MBean Explorer lists all the domains, mbeans, attributes, and operations inside a connection. When you double-click a MBean in the MBean Explorer, it opens a multi-page editor to manage the MBean. The MBean Editor is composed of these pages:
Attributes page, to get/set the attributes of the MBean
Operations page, to invoke operations on the MBean
Notifications page, to receive notifications from the MBean
Info page, which displays general information about the MBean
As it's been said earlier in the guide the JMX technology allows to monitor and manage Java applications. In this section we will show you how to get connected to a sample Java application and run the sayHello() method remotely from inside of the MBean Explorer.
Save the bundle of JMX API sample classes, jmx_examples.zip, to your working directory
Unzip the bundle of sample classes.
Compile the example Java classes from within where you unpacked the files directory.
javac com/example/*.java
Start the Main application, specifying the properties that expose Main for remote management:
java -Dcom.sun.management.jmxremote.port=9999 \

-Dcom.sun.management.jmxremote.authenticate=false \

-Dcom.sun.management.jmxremote.ssl=false \

com.example.Main
If everything was done correctly you will see the "Waiting for incoming requests..." message on the screen.
Now launch the Eclipse IDE, in Eclipse open the MBean Explorer. Go to Window > Show View > Other and then select MBean Explorer and click OK)
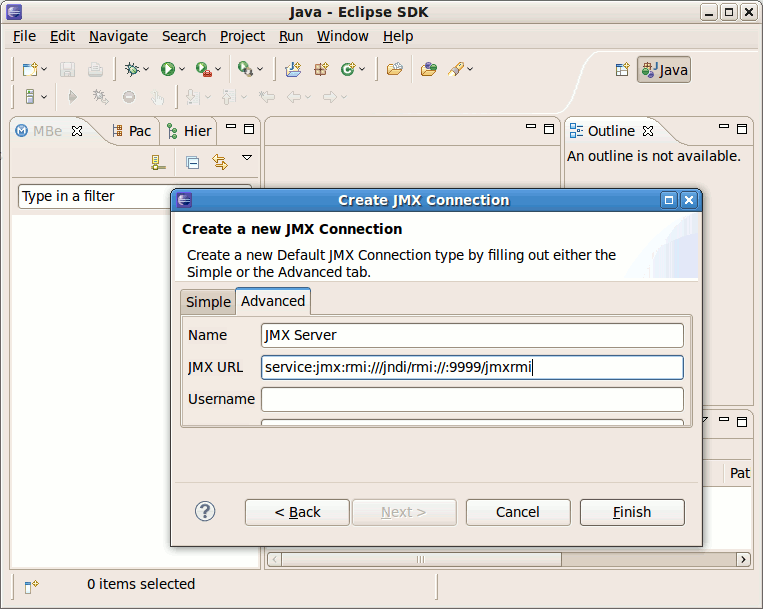
Click the New Connection icon
 in the MBean Explorer menu
bar.
in the MBean Explorer menu
bar.In the Create JMX Connection dialog, hit Next and then click the Advanced tab.
In the JMX URL input field enter the following URL:
service:jmx:rmi:///jndi/rmi://:9999/jmxrmi
Press Finish to esteblish the connection with the application.
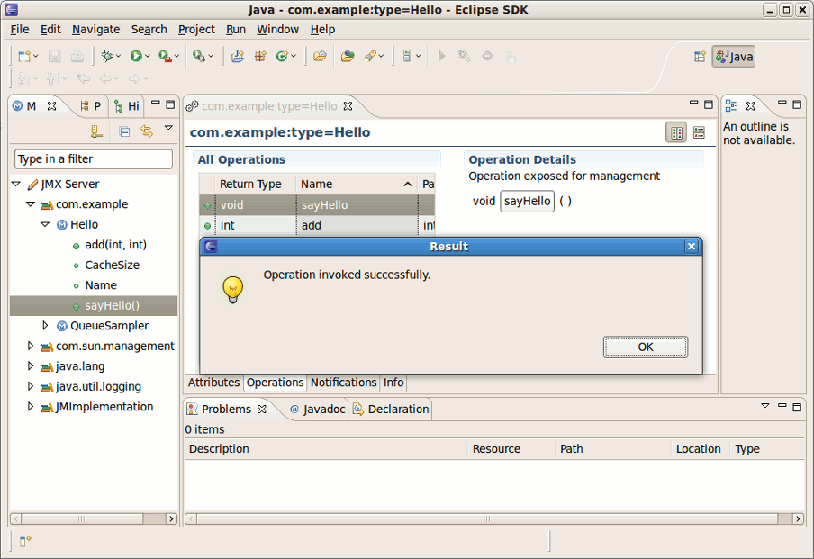
Now expand the connection you have just created, then open the com.example package and click sayHello() method.
Once the sayHello() method is clicked the MBean Editor is activated.
In the MBean Editor go to the Operation Details section and hit the sayHello() button.
You will get the "Operation inoked successfully" message.
The final step is to make sure the application worked as it was expected. Open the terminal where you launched the application in step 3. Now you see the "hello, world" message on the screen.
It's possible to manage Tomcat using JMX Tools.
Currently, JMX Tooling is able to connect to Tomcat without authentication or with password-based authentication.
Using SSL for authentication is not supported: you need to make sure that the System property com.sun.management.jmxremote.ssl is set to false.
More information to manage Tomcat can be found in Tomcat management documentation.
Instructions to manage remotely Tomcat are available in Tomcat's monitoring documentation.
You can manage Equinox through the Equinox monitoring framework.
In this section we will show you how to connect to an Equinox server via JBoss JMX tools. First off, you need to make for example a simple servlet and run it on a server. This guide is not intended to teach you how to build application and run them on the server, you can read for example this tutorial to get a better idea of how to build server-based applications with Eclipse Equinox.
Once you have run an application on the server you can connect to it using JBoss JMX tools.
Go to Window > Open Perspective > Other and select the JMX perspective.
Switch to the MBean Explorer by going to Window > Show View > Other and selecting the MBean Explorer.
Click the New Connection icon
in the MBean Explorer menu
bar.Select the Advanced tab and set the JMX URL to service:jmx:rmi:///jndi/rmi://:8118/jmxserver.
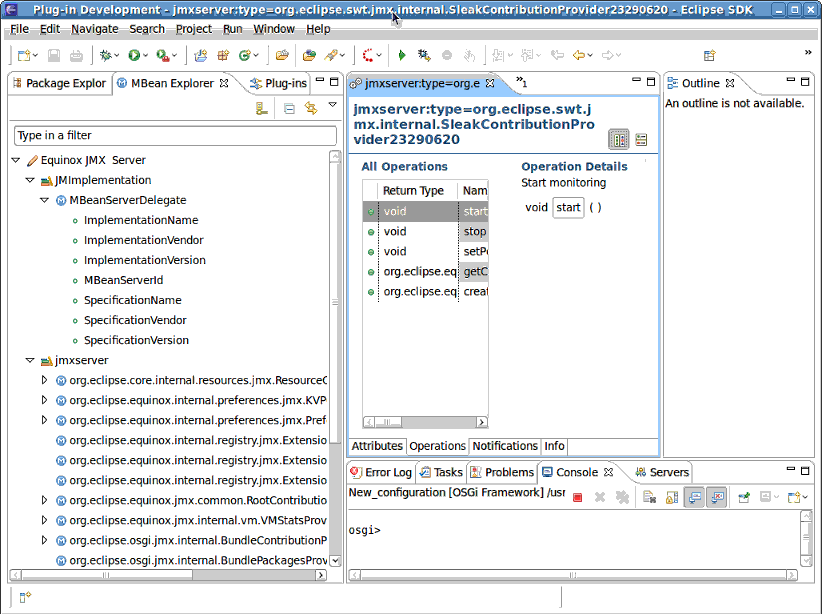
You now have access to the MBeans exposed by Equinox.
Managing JBoss instances is not supported with the JMX Tools alone. You must also download and install the AS Tools portion of the JBoss Tools distribution. Even after installing the proper tooling, you cannot create a JBoss JMX connection yourself or through the Connection Wizard. The first step is to create a JBoss Server. The full instructions for this can be found in the AS Tools section, however, the short summary is:
Open the Servers view.
Right-click in the view and select New > Server .
In the JBoss Enterprise Middleware or in JBoss Community section, select a server version.
If a runtime has not yet been created, you'll be prompted for the server's home directory, JDK, and configuration.
Finish the wizard and note that you have a new entry in both the Servers view and the MBean Explorer.
Start the server by right-clicking it and selecting Start.
Note that once the server is started, the JMX connection can be expanded.
Now you can explore MBeans exposed by a JBoss instance.
JBoss JMX Tool allow you to easily get access and mangane JBoss AS server remotely. In order to get connected to the instance of JBoss AS remotely you need to run the server or make sure the server is lauched.
Go to Window > Open Perspective > Other and select the JMX perspective.
Switch to the MBean Explorer by going to Window > Show View > Other and selecting the MBean Explorer.
Click the New Connection icon
in the MBean Explorer menu
bar.Select the Advanced tab and set the JMX URL to:
service:jmx:rmi://localhost/jndi/rmi://localhost:1090/jmxconnector
Please, note that in this example we connected to the local host.
This section will outline how to contribute your own Server type with some default behavior.
You might be asking yourself why you'd need to extend this framework if JMX is a standard. Perhaps you want a connection to be automatically created after some specific action, or perhaps you want your connection wizard to do more than simply set a host and port. JBoss, for example, requires setting some credentials on the client machine, but using JBoss classes to do it. This requires that the connection have access to JBoss jars.
To create your own JMX Connection type, you must use the org.jboss.tools.jmx.core.MBeanServerConnectionProvider extension point. This point takes one child, a connectionProvider with a class that implements org.jboss.tools.jmx.core.IConnectionProvider.
An IConnectionProvider is responsible for creation and deletion of IConnectionWrapper objects. It must also keep a list of listeners that it is expected to inform when a connection is added or removed from its list.
Each IConnectionWrapper is expected to handle running arbitrary JMX runnables or getting a "Root" object representing all JMX nodes. There are some utility methods the IConnectionWrapper can make use of.
There are two extension points currently approved for use in the UI
org.jboss.tools.jmx.ui.providerUI - provide an icon, id, displayable name, and wizardPage class for creation of new connections
org.jboss.tools.jmx.ui.attribute.controls - allows you to map class types to some Control to present them in the MBean Editor
We hope, this guide helped you to get started with the JBoss JMX Tools. Besides, for additional information you are welcome on JBoss forum.
The MBean Explorer supports several different types of connections. The tooling itself comes only with a default connection type, however other adopters can provide additional connection types that may require additional or non-spec behavior. Connections can be in either the connected state or the disconnected state. Some connection types (such as the default connection type) allow you to control the current state. Other connection types may not.
Similarly, some connection types may be able to be created, and others may not. The default connection type, for example, can be created and deleted by you at will. The AS Tools connection type, which represents a JBoss server, does not allow you this level of control. A JBoss JMX connection is created when a JBoss server is created in the server's view, and deleted when said server is deleted. The JMX connection for this server is in the connected state only when the server is started.
There are two ways to connect to an application with remote management enabled:
The first step is the same for both - to connect to a MBean Server, click the
New Connection icon
![]() in the MBean Explorer menu bar.
in the MBean Explorer menu bar.
Then to follow the simple one you just need to specify host, port (and optionally user name and password) and click OK.
On the Advanced tab you can set the sever name (it will be displayed in MBean Explorer), a url to the remote server. For example, to connect to JBoss AS you need to set the JMX URL to
service:jmx:rmi://localhost/jndi/rmi://localhost:1090/jmxconnector
If it is required you can enter user name and password for the server connection.
Note
Only JMX URL based on RMI are supported.
The MBean Explorer displays the MBean features (both attributes and operations) in its hierarchy. Double-clicking on a feature will open a MBean Editor, display the page corresponding to the feature type and select the feature.
Since it's possible to have many MBean Editors opened at the same time, the MBean Explorer
has the Link With Editor button
 to synchronize selections between the active MBean Editor and
the MBean Explorer (and vice versa).
to synchronize selections between the active MBean Editor and
the MBean Explorer (and vice versa).
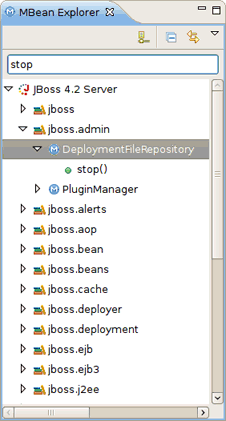
The MBean Explorer has also a filter text that can be used to filter among all the MBeans the few ones, which interest you.
For example, if you are only interested by MBeans related to memory, typing memo will show any node (domain, mbean, attribute, or operation) that matches that text, as well as that node's parents and children. So if an MBean matches, all attributes and operations from that bean will show. If, however, an attribute or operation name (a leaf node) matches, only that node and its parents in the tree will show.
The
Collapse All button
 on the MBean Explorer toolbar is used to collapse all the MBeans and
display only the domains. It is also possible to double click on a node to expand/collapse it.
on the MBean Explorer toolbar is used to collapse all the MBeans and
display only the domains. It is also possible to double click on a node to expand/collapse it.
The MBean Editor is composed of several pages:
the Attributes page
the Operations page
the Notifications page
the Info page
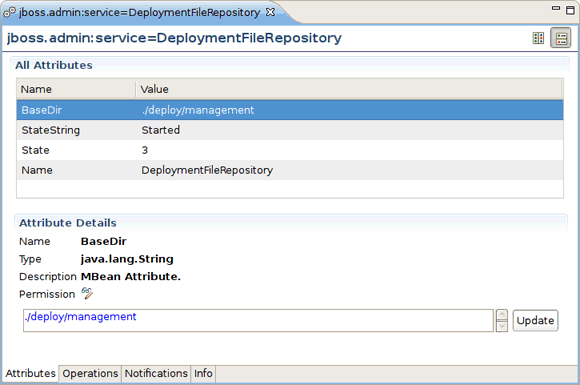
The Attributes and Operations pages display a list for either the MBean attributes or operations as well as details for the selection.
It is possible to toggle the layout between the list and the details either vertically
(by default) or horizontally with the help of the special icons
 in the right top corner of the editor.
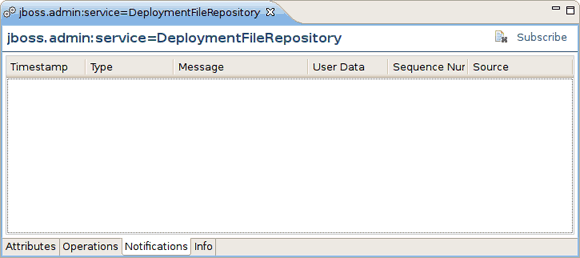
One more page in the MBean Editor is the Notifications page, which gives the possibility to subscribe (resp. unsubscribe) to a MBean to receive its notifications by checking (resp. unchecking) the Subscribe button in the right top corner.
The list of notifications is refreshed every time a new notification is received:
Note
It is only possible to subscribe to MBean, which emits notifications (they must be NotificationBroadcaster).
In conclusion, with this document you could easily start with JXM Tools. The chapters above walked you through the steps on how to do Tomcat,Eclipse Equinox or JBoss Instances managing and how to create new JMX connections. The document also includes the reference of JMX Tools features. If you have questions or suggestions concerned both the documentation and tools behavior, you are welcome to JBoss Tools Users forum. Please, use Jira to report bugs and requests on documentation.
All JBoss Developer Studio/JBoss Tools release documentation you can find at http://docs.jboss.org/tools in the corresponding release directory.
The latest documentation builds are available at http://download.jboss.org/jbosstools/nightly-docs.
You can find a set of benefits and other extra information on:
For more information about JMX technology please visit JMX Technology Home Page