JBoss.orgCommunity Documentation
Version: 3.3.0.M5
Copyright © 2007, 2008, 2009, 2010, 2011 JBoss by Red Hat
JSF Tools are especially designed to support JSF and JSF-related technologies. JSF Tools provide extensible tools for building JSF-based applications as well as adding JSF capabilities to existing web projects, importing JSF projects and choosing any JSF implementation while developing JSF application.
This guide provides the information on JSF tooling you need to allow you to quickly develop JSF applications with far fewer errors.
The table below lists the functionality provided by the JSF Tools.
Table 1.1. Key Functionality for JSF Tools
| Feature | Benefit | Chapter |
|---|---|---|
| JSF and Facelets support | Step-by-step wizards for creating new JSF and Facelets projects with a number of predefined templates, importing existing ones and adding JSF capabilities to non-JSF web projects. | Chapter 2, JavaServer Faces Support |
| Flexible and customizable project template management | Jump-start development with the supplied templates or easily create customized templates for re-use. | Chapter 3, Projects |
| Support for JSF Configuration File | Work on a file using three modes: diagram, tree and source. Automatic synchronization between the modes and full control over the code. Easily move around the diagram using the Diagram Navigator. | Chapter 5, JSF Configuration File Editor |
| Support for Managed Beans | Adding new managed beans, generating code for attributes, properties and getter/setter methods. | Chapter 6, Managed Beans |
| Support for Custom Converters and Validators | Fast creation of custom converters and validators with a tree view of the faces-config.xml file. | Chapter 7, Creation and Registration |
| Verification and Validation | All errors will be immediately reported by verification feature, no matter in what view you are working. Constant validation and error checking allows you to catch many of the errors during development process that significantly reduces development time. | Chapter 8, JSF Project Verification |
All JBoss Developer Studio and JBoss Tools release documentation can be found on the RedHat Documentation website.
Nightly documentation builds are available at http://download.jboss.org/jbosstools/nightly-docs.
JSF Tools does not lock you into any one JavaServer Faces implementation. You can always specify the desired JavaServer Faces implementation while creating a new JSF project (see Section 3.1, “Creating a New JSF Project”), adding JSF capability to any existing Eclipse project (see Section 3.3, “Adding JSF Capability to Any Existing Project”), or importing existing JSF projects (see Section 3.2, “Importing Existing JSF Projects with Any Structure”).
At this point the special wizard will prompt you to specify an appropriate JSF environment. It may be JSF 1.1.02 RI, JSF 1.2, JSF 2.0 or JSF 2.1. The wizard also lets you select JSF implementation with a component orientation such as JSF 1.2 with Facelets or MyFaces 1.1.4.
After specifying an appropriate JSF environment, all the required libraries associated with the selected version will be added to your project.
In this section we will focus all the concepts that relate to working with Facelets.
Facelets extend JavaServer Faces by providing a lightweight framework that radically simplifies the design of JSF presentation pages. Facelets can be used in a variety of ways that we will consider further in this section.
If you want to build an application using Facelets, create a project with Facelets based on version 1.2 of the JSF Reference Implementation, i. e. select the JSF 1.2 with Facelets option in the JSF Environment section of the New JSF Project wizard.
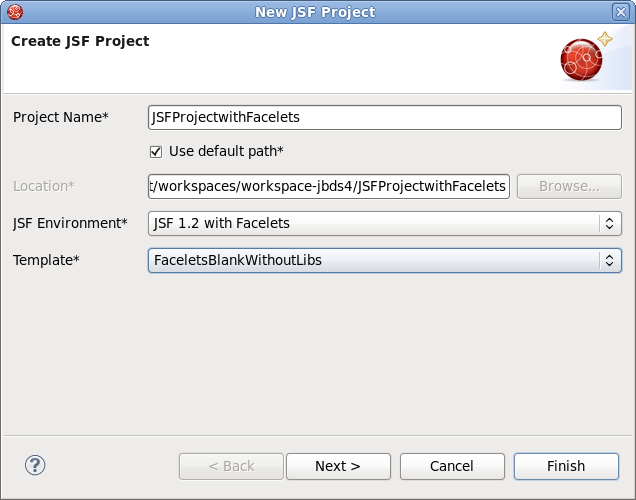
Once you have selected the environment, it is possible to specify one of three available templates:
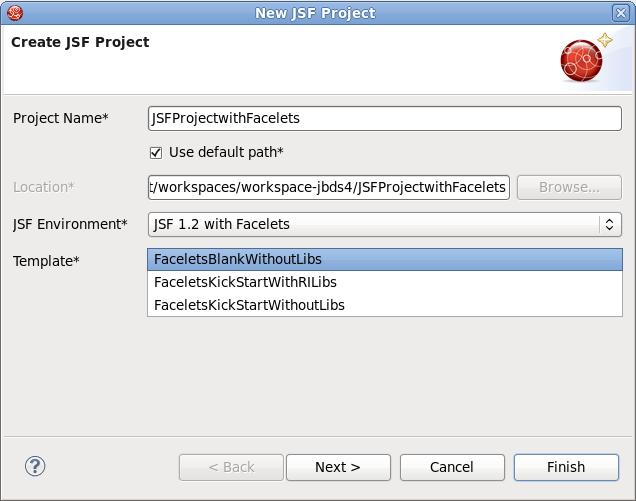
The following table lists the templates that can be used with Facelets for any JSF project, and gives a detailed description for each one.
Table 2.1. Facelets Templates
|
Template |
Description |
|---|---|
|
FaceletsBlankWithoutLibs |
Some servers already provide JSF libs and you risk library conflicts while deploying your project. To avoid such conflicts, use a template without libs if you have a server with its own JSF libraries. |
|
FaceletsKickStartWithRILibs |
A sample application with Facelets that is ready to run. |
|
FaceletsKickStartWithoutLibs |
A sample application without libraries. |
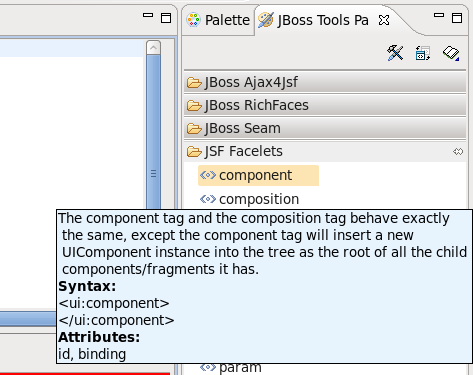
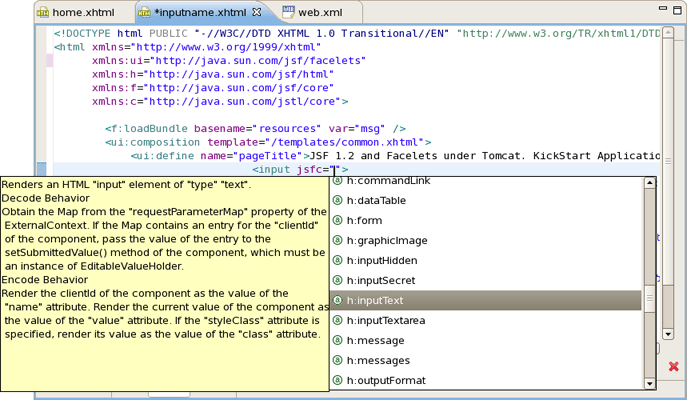
The JBoss Tools Palette comes with the Facelets components ready to use. A useful tip appears when you hover the mouse cursor over the tag; this tip includes a detailed description of the tag component, the syntax and available attributes.
JSF Tools provides Facelets code assistance, which can be accessed by pressing Ctrl+Space. It is available for Facelets tags while editing .xhtml files.
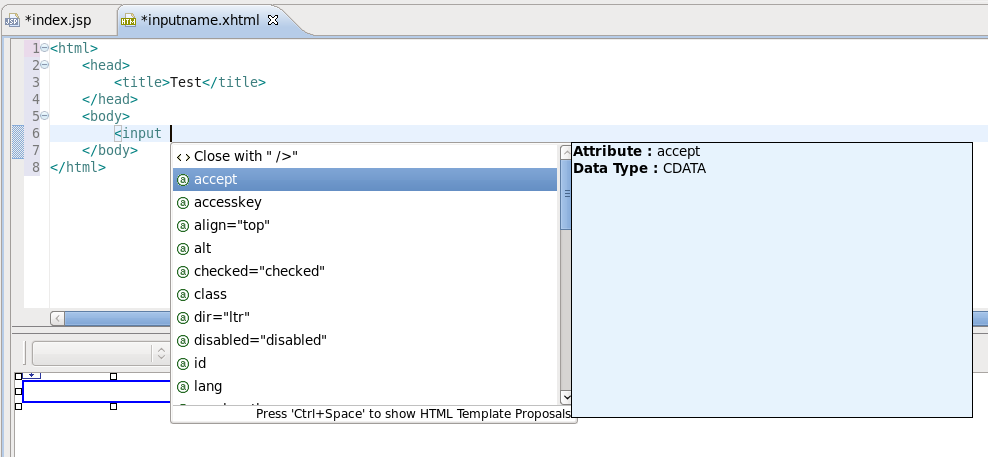
Code assist is also available for jsfc attributes in any HTML tag.
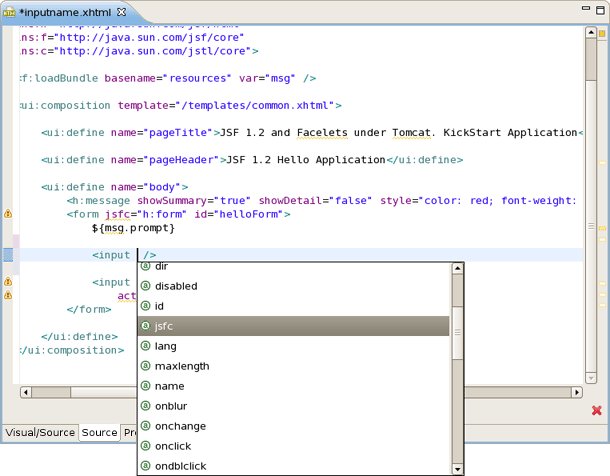
After selecting an jsfc attribute, the code assist feature will list the JSF components available on a page.
When a component is selected you will see all available attributes for it.

Finally, JSF Tools supports Eclipse's OpenOn™ feature while editing Facelets files. Using this feature, you can easily navigate between the Facelets templates and other parts of your projects. By holding down the Ctrl key while hovering the mouse cursor over a reference to a template, the reference becomes a hyperlink to navigate to that template.

To take an advantage of JSF you will need to perform one of the next steps:
Create new JSF projects
Import (open) existing JSF projects
Add JSF capability to any existing Eclipse project
Import and add JSF capability to any existing project created outside Eclipse.
This section will go into more detail for each step.
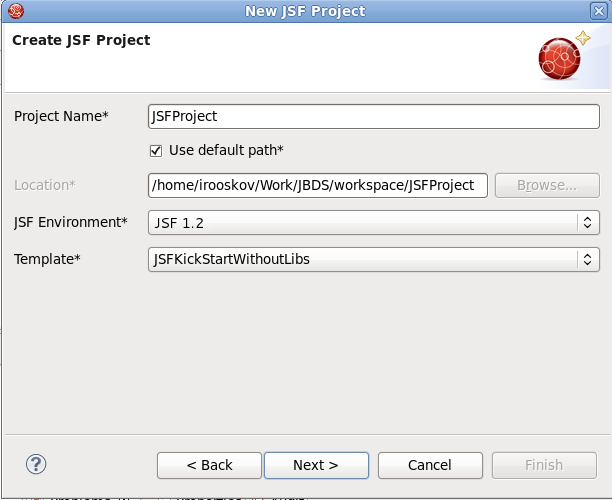
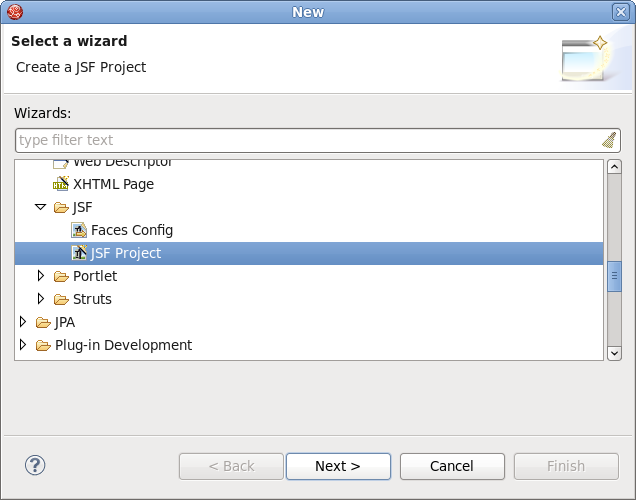
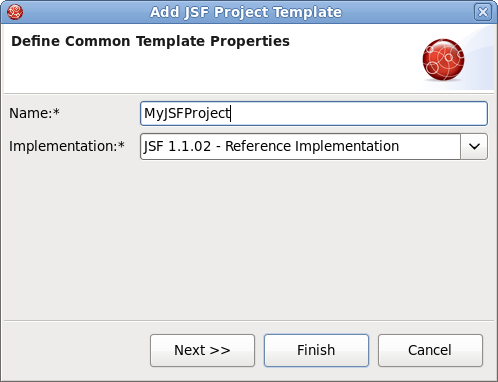
It is easy to create a new project that contains all the JSF libraries, tag libraries and JSF configuration file with the aid of a special wizard. To get it, select → → → → → and click the button.
On the next page you will be prompted to enter the Project Name and select a location for the project (or just leave a default path).
The JSF Version option also allows you to specify the JSF implementation to use.
There are a number of predefined project templates that are both flexible and easily customizable. You can pick a different template on which the projects Importing Existing should be based on. Almost all templates come in two variations: with and without JSF libraries.
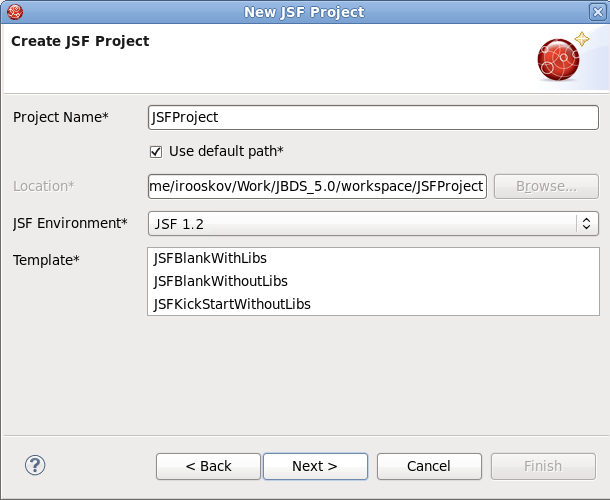
The table below provides description for each possible JSF template.
Table 3.1. JSF Project Templates
|
Template |
Description |
|---|---|
|
JSFBlankWithoutLibs |
This template will create a standard Web project structure with all the JSF capabilities. Use a template without libs to avoid library conflicts when your server already has JSF libraries installed. |
|
JSFKickStartWithoutLibs |
This template will create a standard Web project structure, and also include a sample application that is ready to run. Use a template without libs to avoid library conflicts when your server already has JSF libraries installed. |
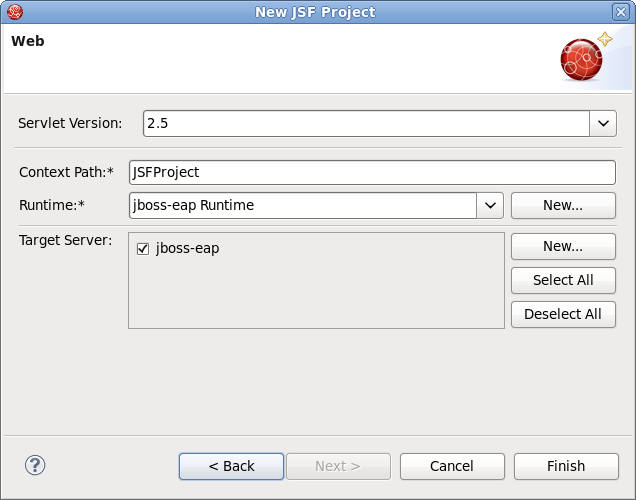
On the next page you need to select which Servlet version to use, and specify whether or not to register this application with JBoss AS (or other server) in order to run and test your application.
The Context Path option defines the name under which the application will be deployed.
The Runtime value tells Eclipse where to find the Web libraries necessary to build (compile) the project. It is not possible to finish the project creation without selecting a Runtime. If you do not have any values, click the button to add new Runtime.
The Target Server option allows you specifying whether or not to deploy the application. The Target Server corresponds to the Runtime value selected above. If you do not want to deploy the application, uncheck this option.
When you are all done, you should see that the project has appeared in the Package Explorer view:

At this point you can open the faces-config.xml file and start working on your application. There are a lot of features available when developing JSF applications. These features will be discussed in more detail later in this document.
For detailed information on migration of JSF projects into a workspace see the Migration Guide.
It is also possible to add JSF™ capabilities (JSF libraries, tag libraries) to any existing project in your workspace. After that you will be able to make use of features such as the JSF configuration editor, JBoss Tools JSP editor and any others. No pre-existing web.xml file is necessary.
Right-click on the project in the Project Explorer, bringing up the context menu. From this menu navigate to → .

This will open the Project Facets dialog for the project. Click the checkbox next to JavaServer Faces. You undertake further configuration by clicking the Further configuration available button at the bottom of the dialog; this will allow you to define specific configuration options. Click and then the on the Project Facets dialog when you are finished.
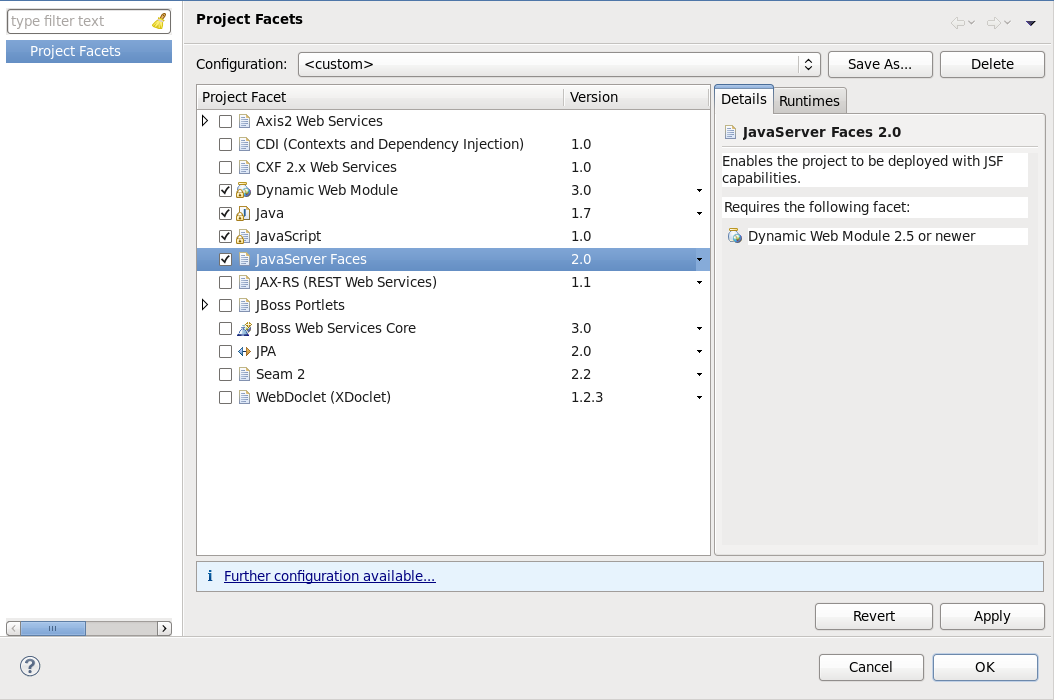
The project will now contain a new node (visible through the Project Explorer) named Web Resources.You will also notice new files within the WebContent folder.
Note:
Some application servers provide their own JSF implementation libraries. To avoid conflicts you should not add JSF libraries while adding JSF capabilities.
You can now open the new faces-config.xml file, that is found under your projects → folder. This file can be opened in a unique editor (see Chapter 5, JSF Configuration File Editor).
A template is a set of files that is provided as a basis when creating a new project. Project templates provide content and structure for a project.
JSF Tools provides powerful template capabilities which allow you to create new templates and import existing JSF projects. This templating facility has a variety of aspects to consider. Let's start with the most straightforward case and consider the process of creating a template from your existing JSF project.
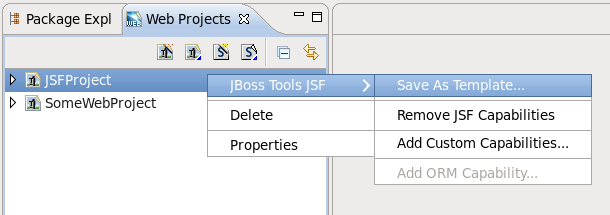
Let's say you have a project that you want to use as the basis for a new template. The following steps will show you how to achieve this:
In the Web Projects view, right-click the project and select →
In the first dialog box, you can specify a name for the template (it will default to the project name) and confirm what run-time implementation of the project technology will be used.
When you click the button a dialog box will be presented with your project structure displayed, along with a number of check boxes. Here you can select only those parts and files in your project directory that should be part of the template.
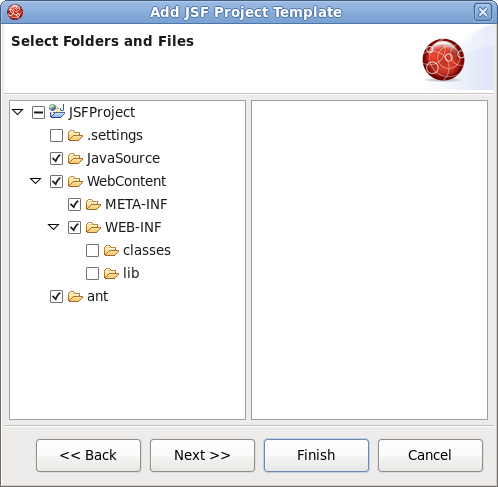
At this point, unless you want to designate some extra files as having Velocity template coding inside them, you should click the button.
That's it. This template can be used with any new or imported project that uses the same run-time implementation as the project you turned into a template.
At this point you have a fully configured project. Now you can add some additional logic to it starting with the JSF configuration file.
The web.xml file inside the WEB-INF folder is a deployment descriptor file for a Web Application. It describes the servlets and other components and deployment properties that make up your application.
JBoss Tools add the web.xml file to created JSF project automatically and provides a special editor for its editing. See the Visual Web Tools guide for more information on the web.xml editor.
First, we should mention that JSF configuration file (faces-config.xml) is intended for registering JSF application resources such as Converters, Validators, Managed Beans and page-to-page navigation rules.
Now, let's look at how you can easily configure this file by means of a special graphical editor for the JSF configuration file. The editor has three main views:
Diagram
Tree
Source
They can be selected via the tabs at the bottom of the editor.
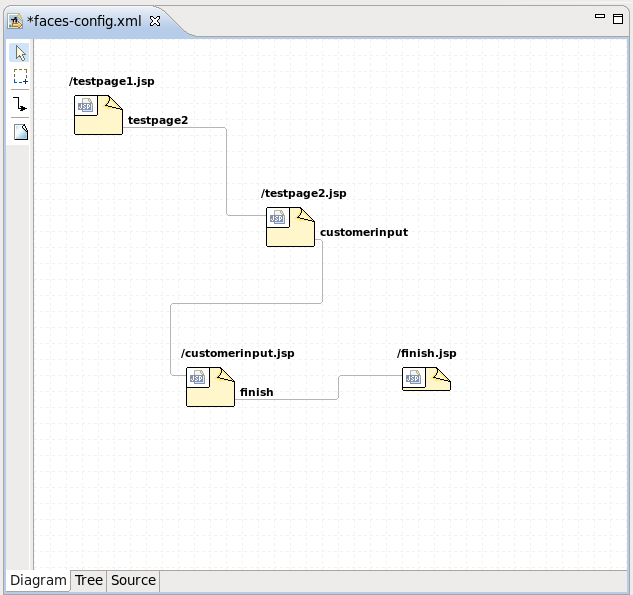
Here, we will show you how to work with JSF configuration file through the Diagram view of the editor.
As you can see on the figure below, the Diagram view displays the navigation rules container in the faces-config.xml file:
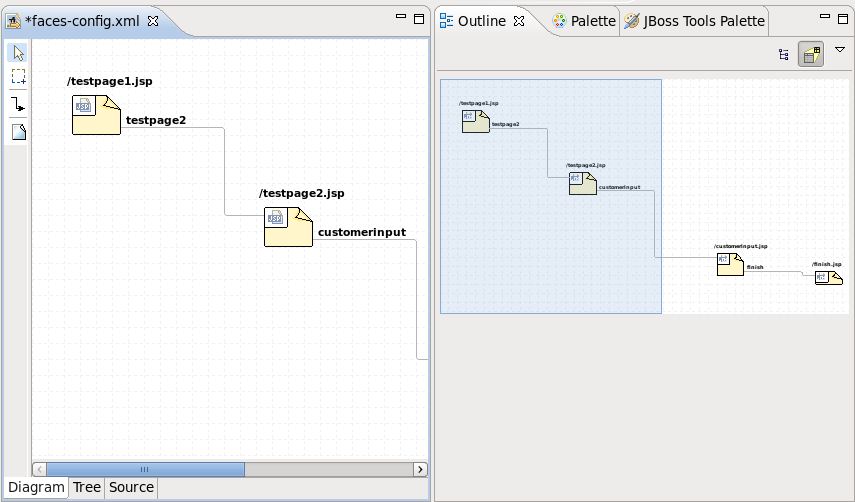
If you have a large diagram, make use of the Outline view. Within it you can switch to a Diagram Navigator mode by selecting the middle icon at the top of the view window. This allows you to easily move around the diagram. Just move the blue area in any direction, and the diagram on the left will also move:
To create a new page here, you should click the page icon (View Template) on the toolbar from the left and then click anywhere on the diagram. A New Page Wizard will appear.
To create a transition for connecting pages:
Select the transition icon from the toolbar (New Connection).
Click the source page.
Click the target page.
A transition will appear between the two pages:
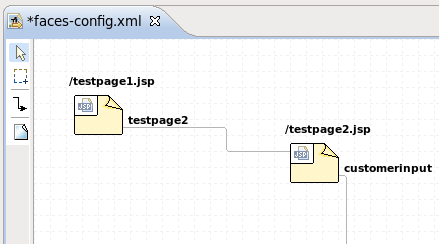
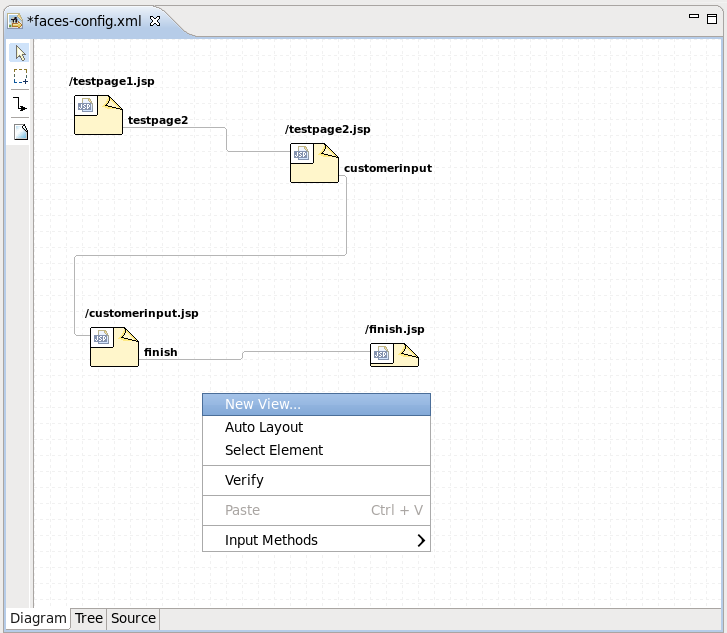
It is also possible to create a new page with context menu by right-clicking anywhere on the diagram and selecting the option.
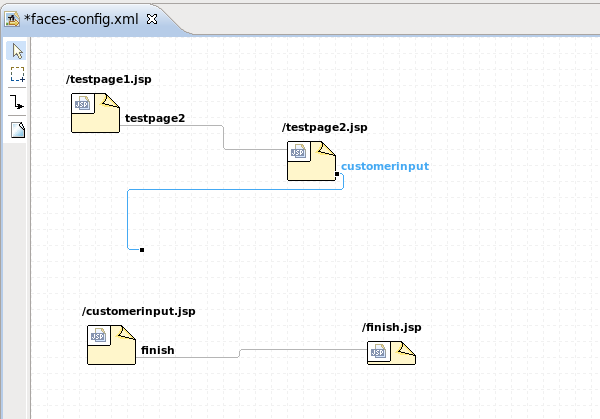
To edit an existing transition, first select the transition line. Then, place the mouse cursor over the last black dot (on the target page). The mouse cursor will change to a big +. At this point, drag the line to a new target page:
You can find it more convenient to edit your JSF Configuration file in the Tree view of the VPE.
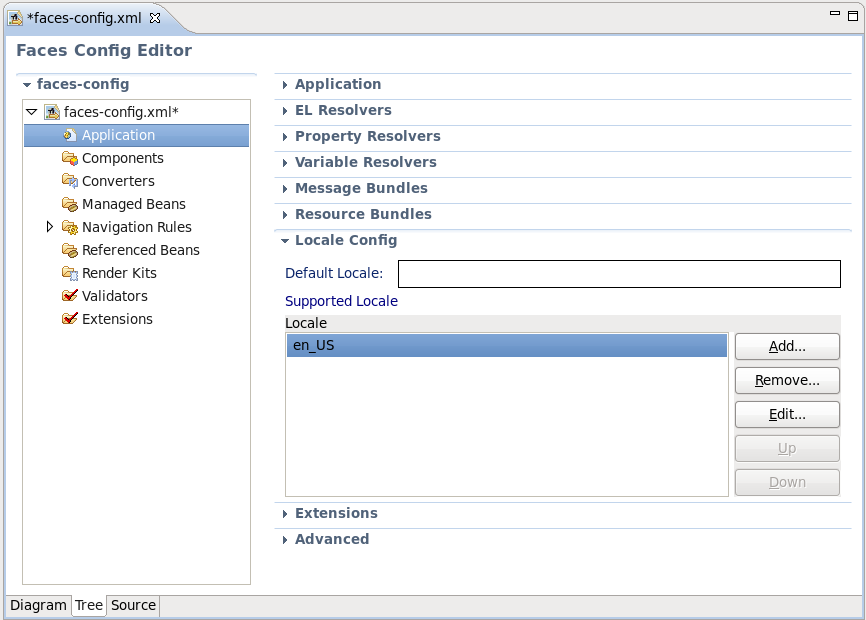
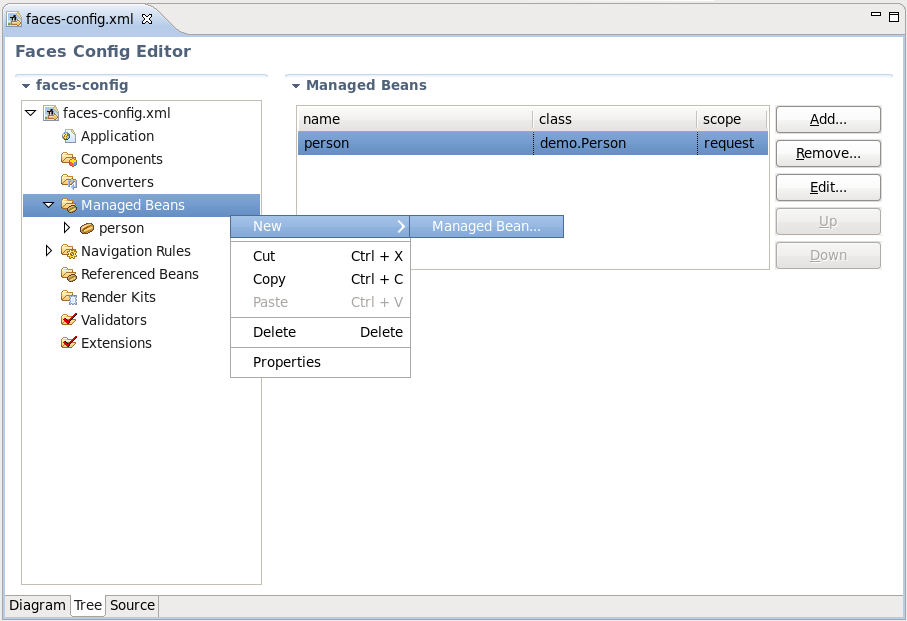
The view displays all JSF application artifacts referenced in the configuration file in a tree format. By selecting any node on the left, you can view and edit its properties which will appear in the right-hand area. Let's look at the structure of this tree more closely.
Under the Application node you can adjust JSF application specific settings such as internationalization, extensions, adding property and variable resolvers, etc.
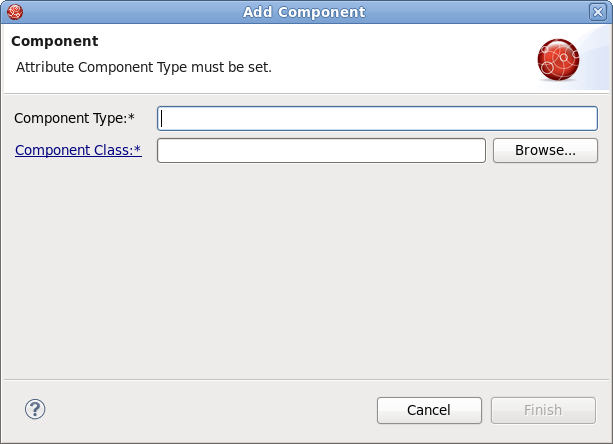
The Components node is for registering custom JSF components. Right-click and select → or just click the button in the right-hand area to add a new component to the JSF Configuration file.
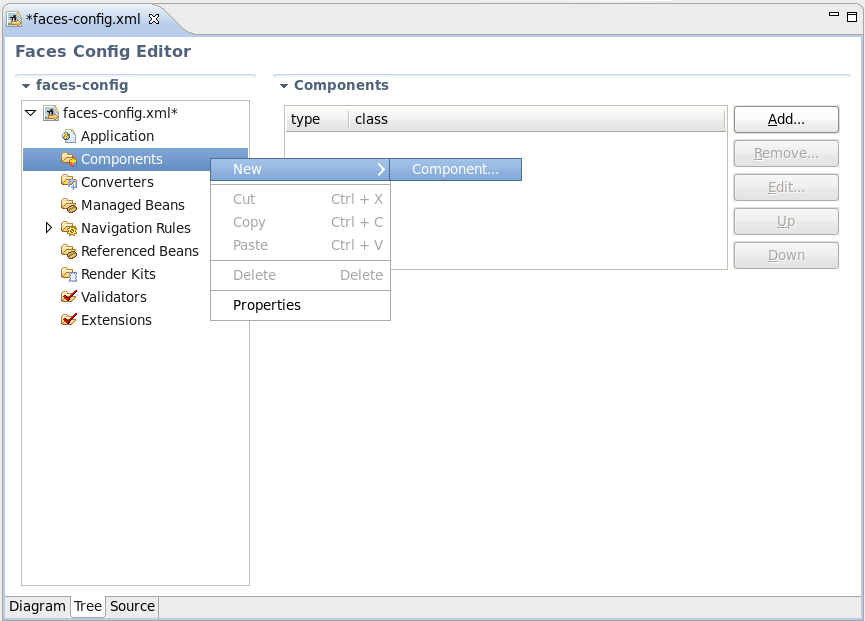
In the Add Component wizard you should set a component type and point to a component class by using the button or create a new class for this component by using the Component-Class link.
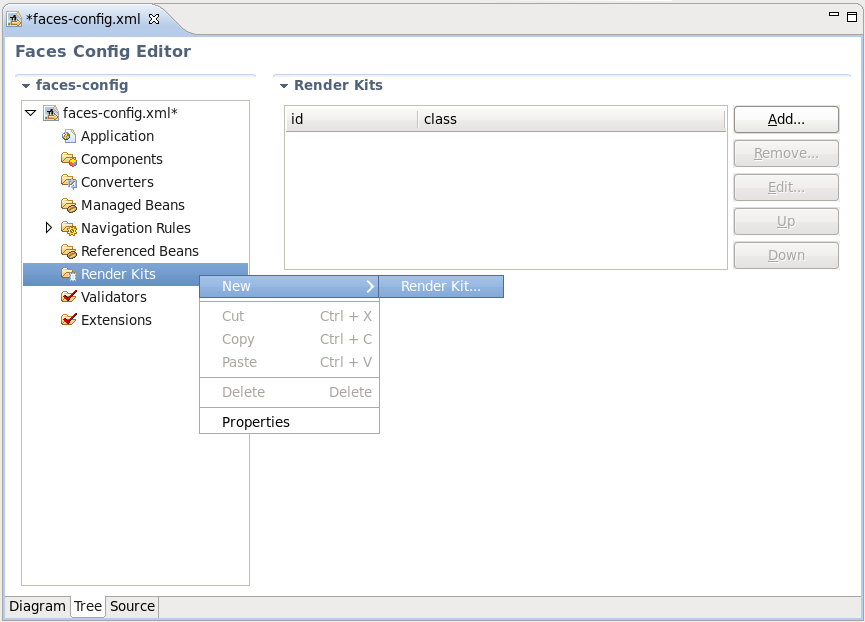
Use the Render Kit node to create and register a set of related renderers for custom JSF components.
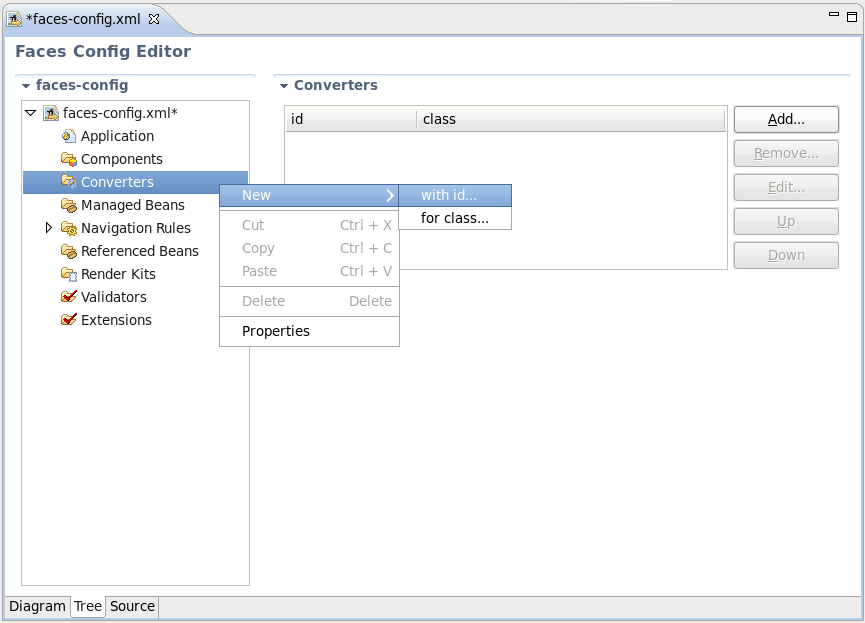
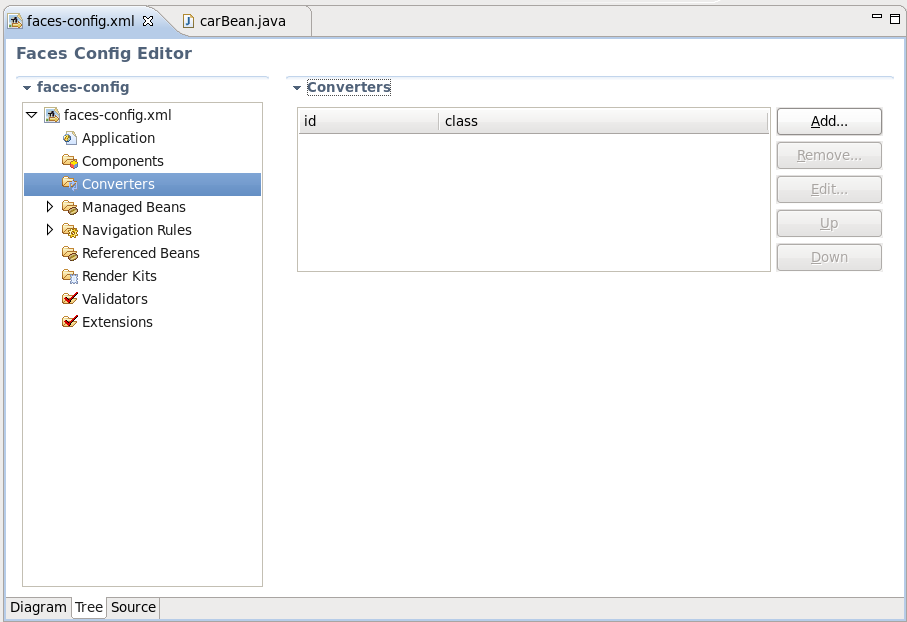
Under the Converters node you can create a converter class for your JSF application either with an id or for a proper class. For more information on this procedure see Section 7.1, “Create and Register a Custom Converter”.
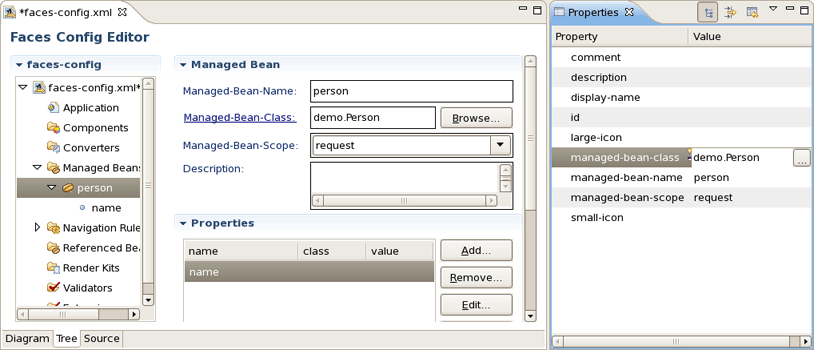
The Managed Bean node allows you to create and register Bean classes in your JSF application. Read more on the topic in Chapter 6, Managed Beans.
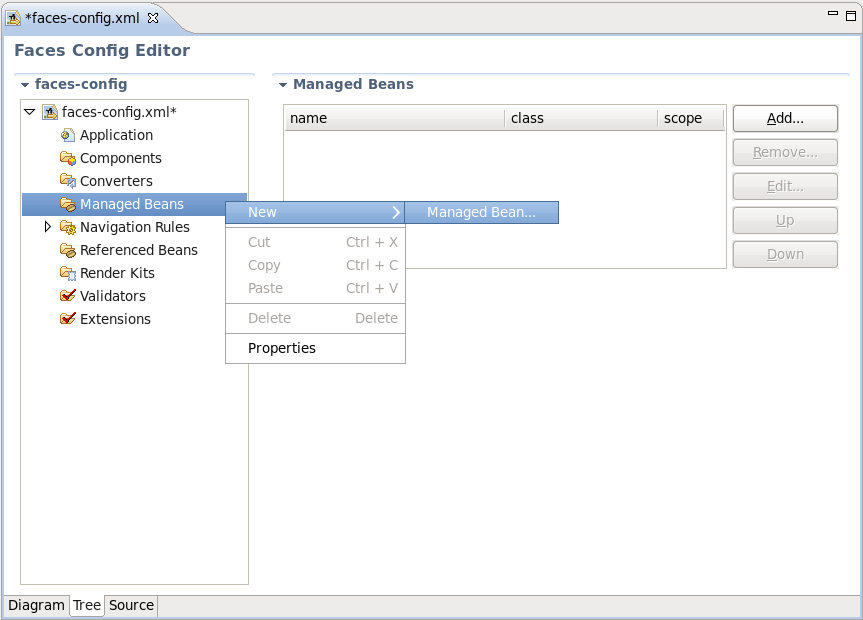
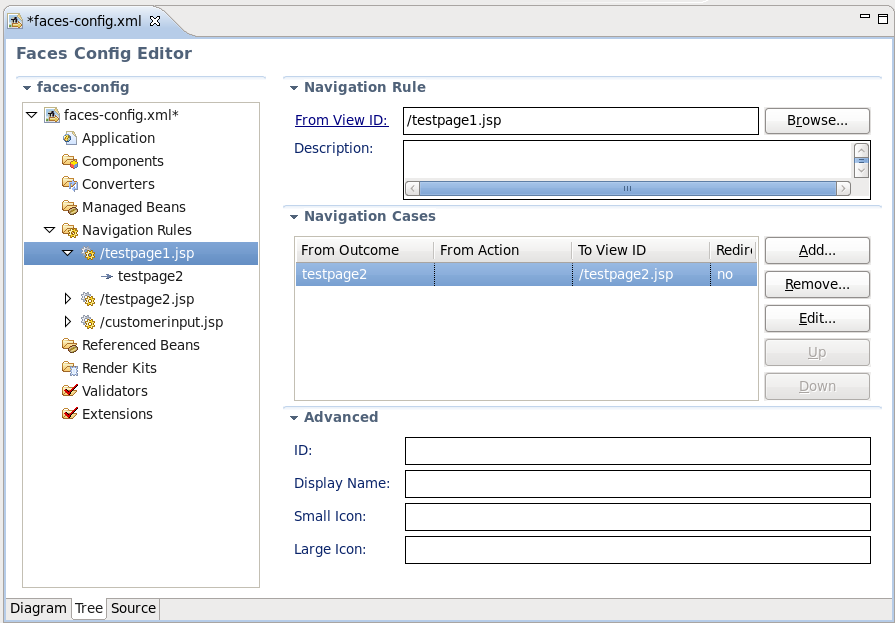
Use the Navigation Rules node to configure a navigation between the pages in your application. Here you can create a new navigation rule and adjust necessary properties for it in the right-hand area.
Tip:
The same you can do in the Diagram view of the JSF Configuration file editor (see Section 5.1, “Diagram view”).
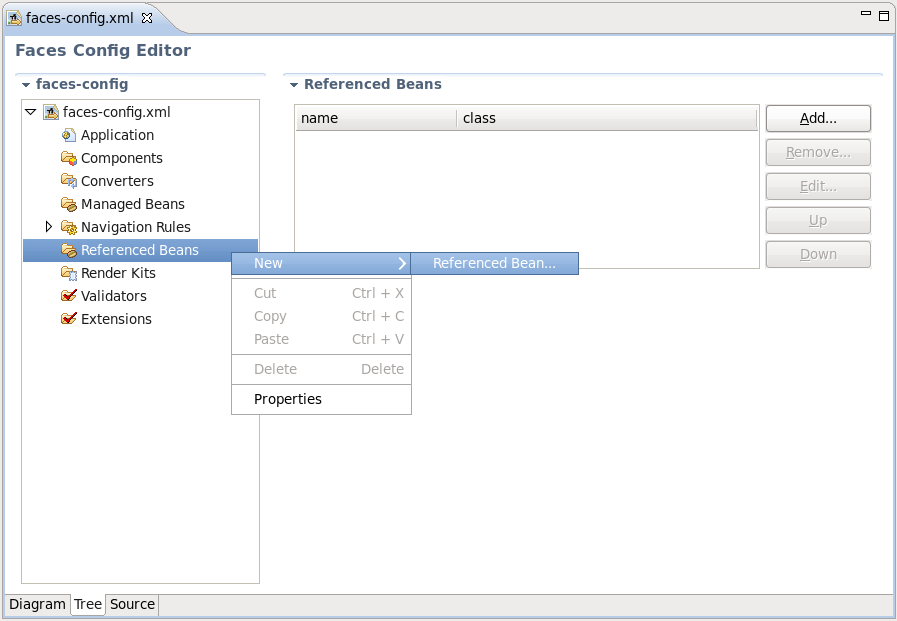
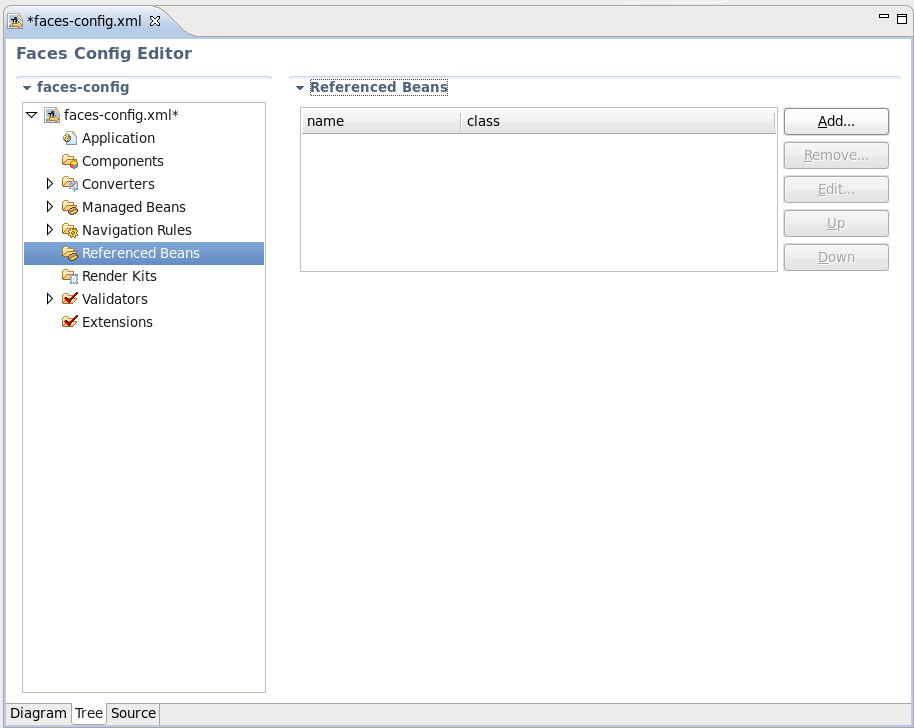
Under the Referenced Beans node you can add a new Referenced Bean and configure various properties for it. To learn more on this refer to Section 7.3, “Create and Register Referenced Beans”.
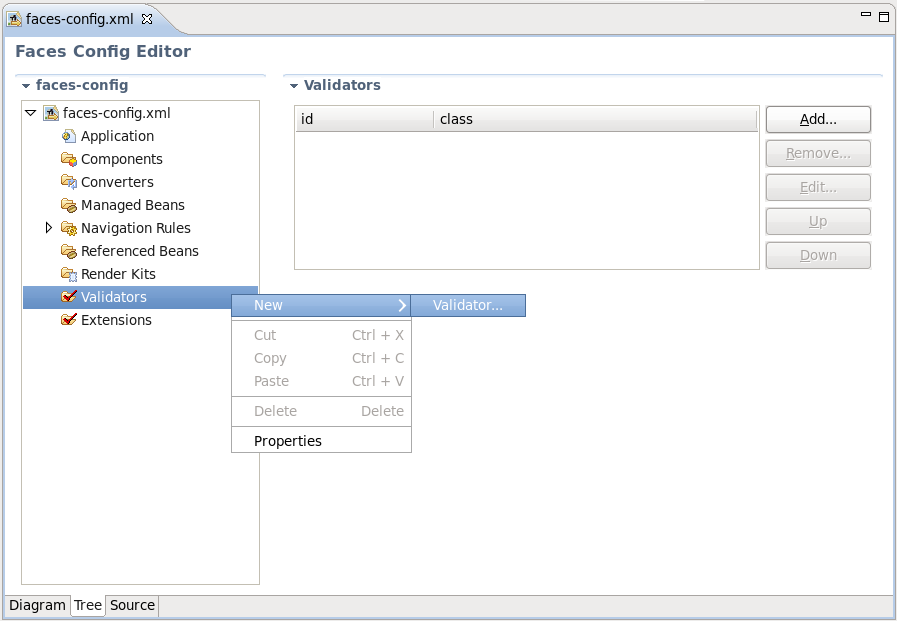
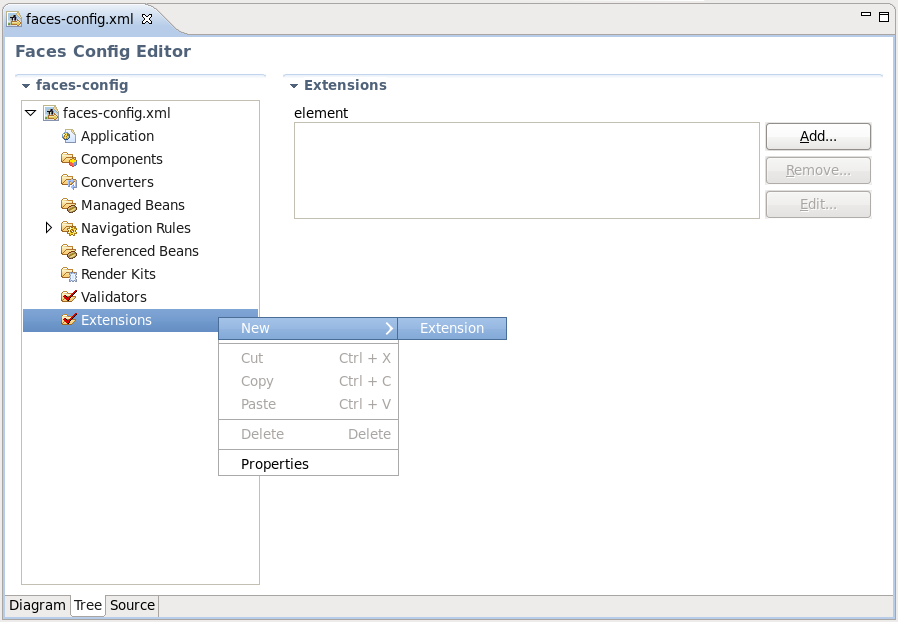
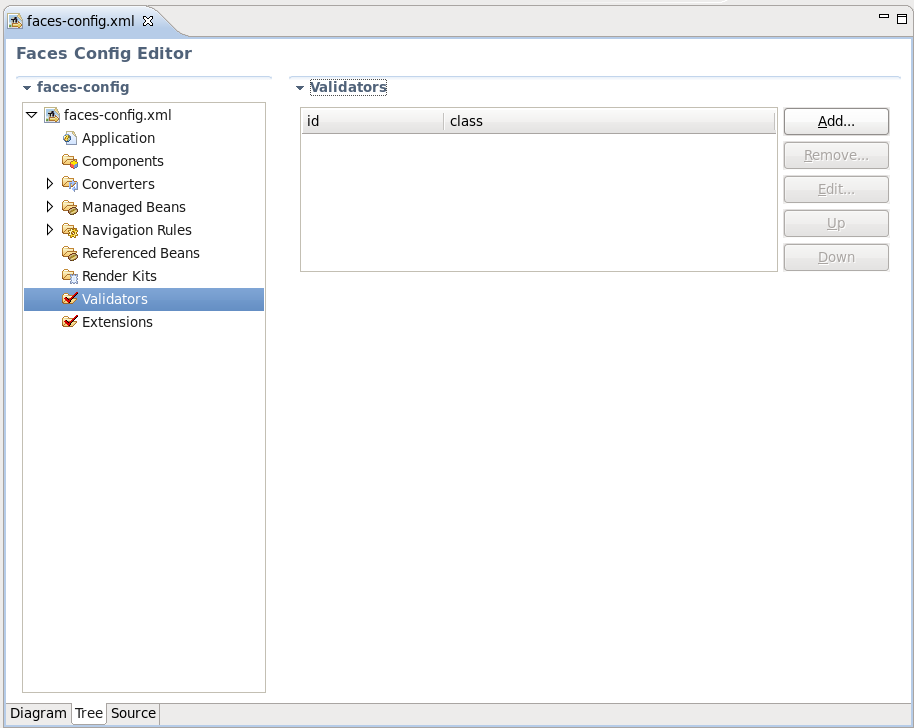
The Validators node is needed to create validator classes for organizing the validation of your application data. You can read more on the topic in Section 7.2, “Create and Register a Custom Validator”.
The Extensions node is for setting extensions in your
faces-config.xmlfile.
In the Tree view you can also edit the properties of the selected element with the help of the Properties view as shown below:
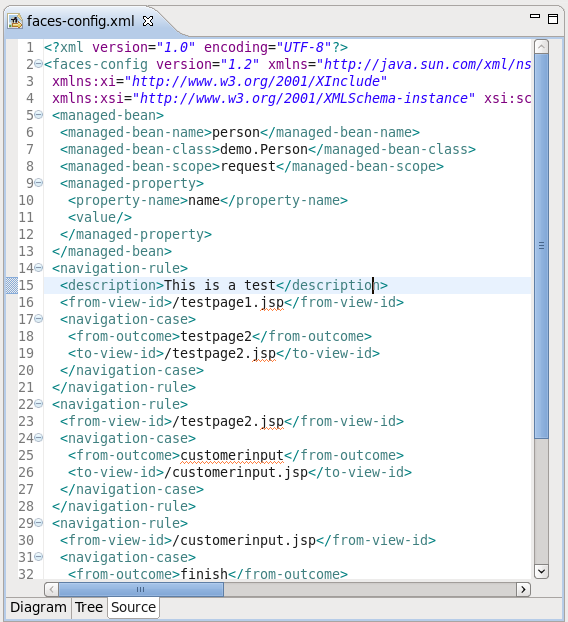
Here, we'll discuss how you can configure your faces-config.xml file with the help of the Source View.
The Source View for the editor displays the text content of the JSF configuration file. It is always synchronized with other two views, so any changes made in one of the views will immediately appear in the other:
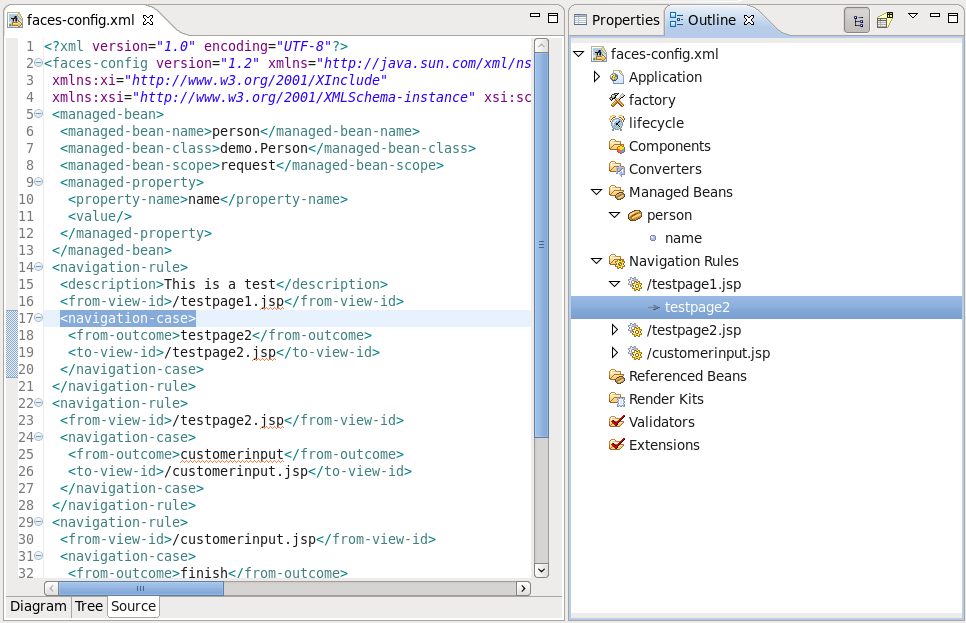
You can also work in the Source View with the help of the Outline View. The Outline view shows a tree structure of the JSF configuration file. Simply select any element in the Outline View, and it will jump to the same place in the Source editor, so you can navigate through the source code with Outline View.
Here we'll discuss a very important features that JSF configuration file editor provides when working with JSF resources.
The JSF configuration file editor comes with the very useful OpenOn navigation feature. You can find more information on this feature in the Visual Web Tools Reference Guide.
Code Assist provides a pop-up tip to help you complete your code statements. It allows you to write your code faster and with more accuracy.
Code assist is always available in the Source mode:

Constant error checking is provided while you are developing your project. This greatly reduces your development time as it allows you to catch many errors during the development process.
Errors will be reported by Chapter 8, JSF Project Verification facility:
Other errors are also reported.
JSF Tools provides a number of useful features when working with managed beans, such as:
Adding and generating code for new managed beans
Generating code for attributes and getter/setter methods
Adding existing managed beans to a JSF configuration file
This guide will look at each of these features in more detail.
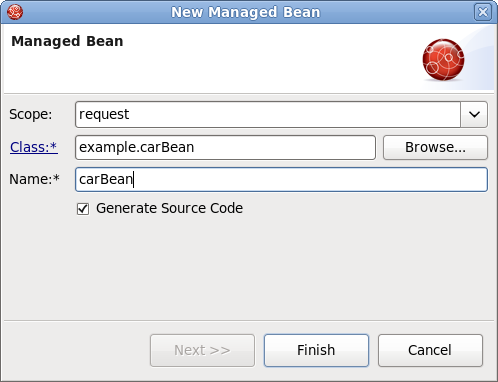
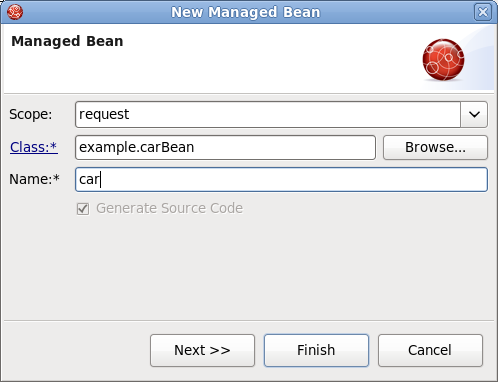
To begin, create a new managed bean in JSF configuration file editor using the Tree view.
Note:
When you define a new managed bean, make sure that Generate Source Code option is checked as shown in the figure below.
After the Java class has been generated you can open it for additional editing. There are two ways to open a Java class:
Click on the Managed-Bean-Class link in the editor.
Right click the managed bean and select the option.
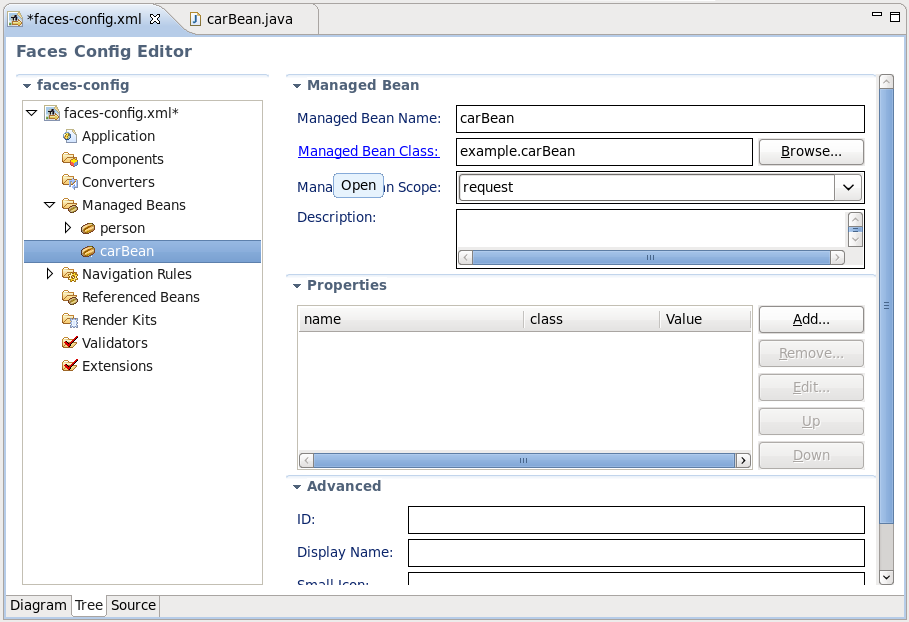
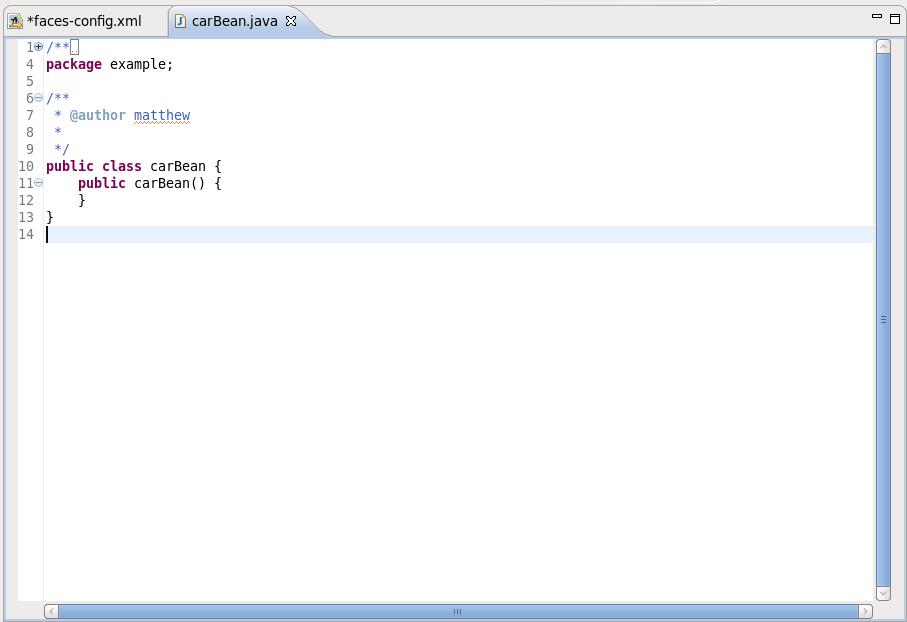
The generated Java source should look as follows:
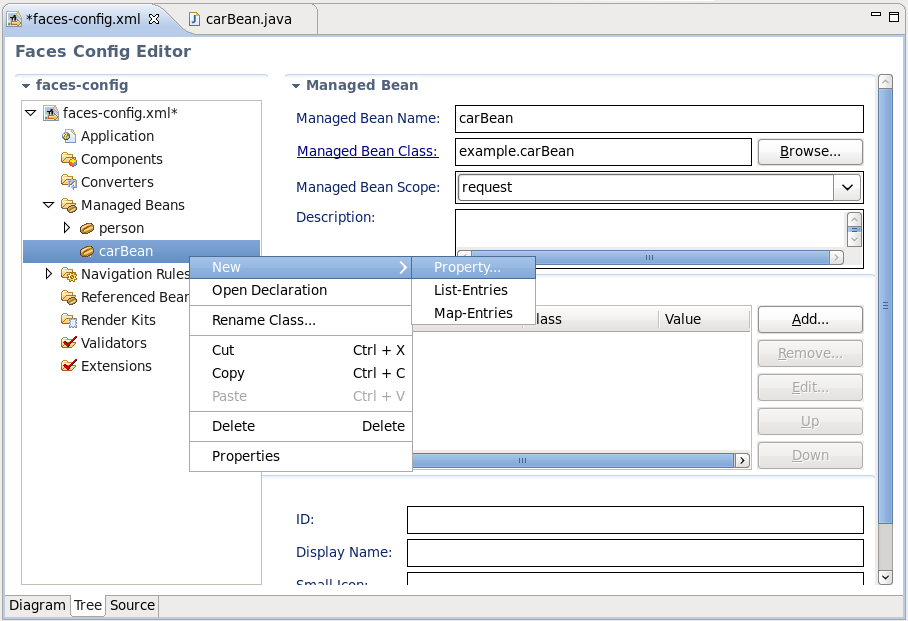
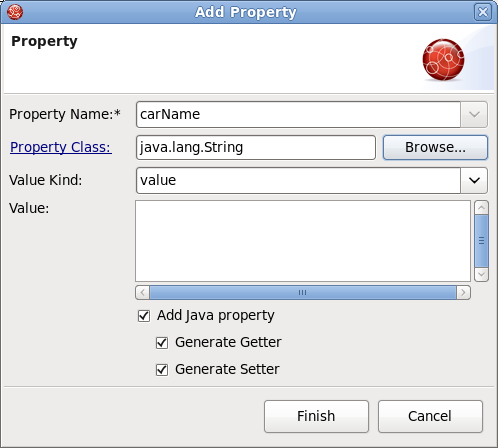
You can also generate source code for properties, also includes getter and setter methods. Right click on the bean and select → . You will then see the Add Property dialog.
When the form is open make sure that all the check boxes are selected:
Add Java property
Generate Getter
Generate Setter
Once the generation is complete, you can open the file and see the newly added property with accompanying "get" and "set" methods:

This covers the options available when creating a new Managed Bean. The next section will show you how to add an existing Bean into a JSF configuration file.
If you already have a Java bean you can easily add it to a JSF configuration file.
You should start the same way you create a new managed bean. Use the button to add your existing Java class.
Once the class is set, its Name will be set as well. But you can easily substitute it for the other one. Notice that Generate Source Code option is not available as the Java class already exists.
After adding your class the button will be activated. When you click it you will be presented with the Managed Properties dialog where all corresponding properties are displayed. Checking the appropriate ones will add them into your JSF Configuration File.
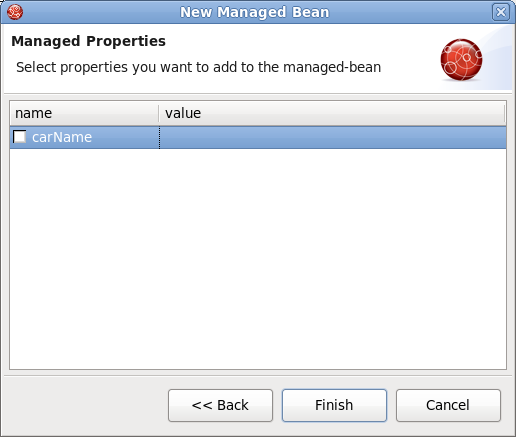
If you don't want to add any, just click the button.
The steps above have demonstrated how you can add an existing Bean to the JSF configuration file, i.e. faces-config.xml. The next chapter will demonstrate how to organize and register other kinds of artifacts.
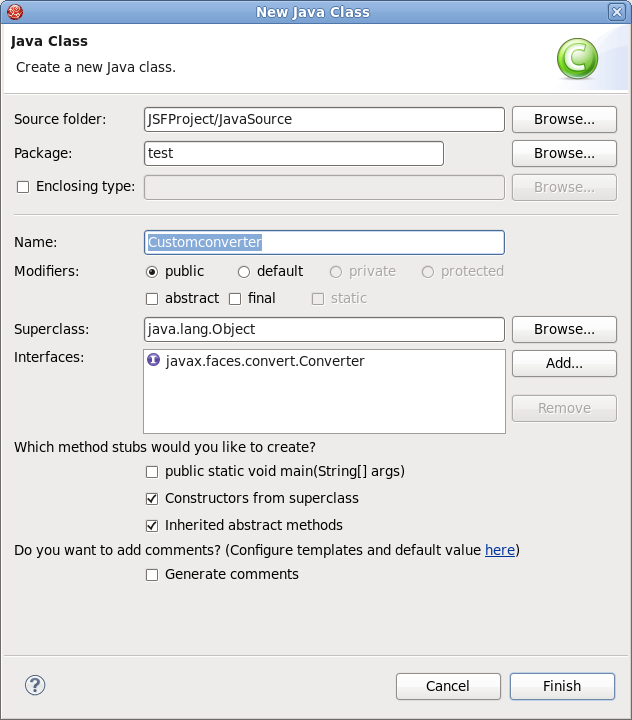
It's also possible to create a custom Converter in order to specify your own converting rules. Let's look at how you can do this.
To create and register a custom converter it is necessary perform the following steps:
In the Project Explorer view open the
faces-config.xmlfile and select Tree tab.
Select Converters and click the button.
On the form type the name of your converter in the Converter-id field and name of the class for converters. After clicking button your custom converter is registered under the entered name.

Now you can create a "converter" class. In the Converter section you should see your Converter-id and Converter-class. Click on the Converter-Class link to generate the source code.
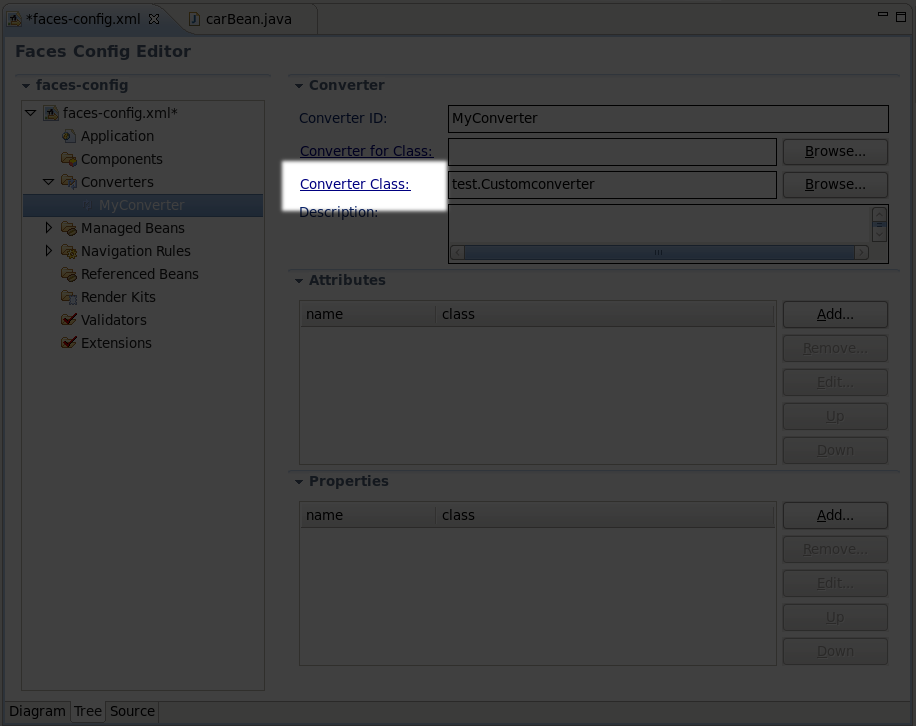
A usual wizard for creating a Java class will appear. All needed fields here will be adjusted automatically. Just leave everything without changes and click the button.
To open a converter class click again on the Converter-Class link in the Converter section.
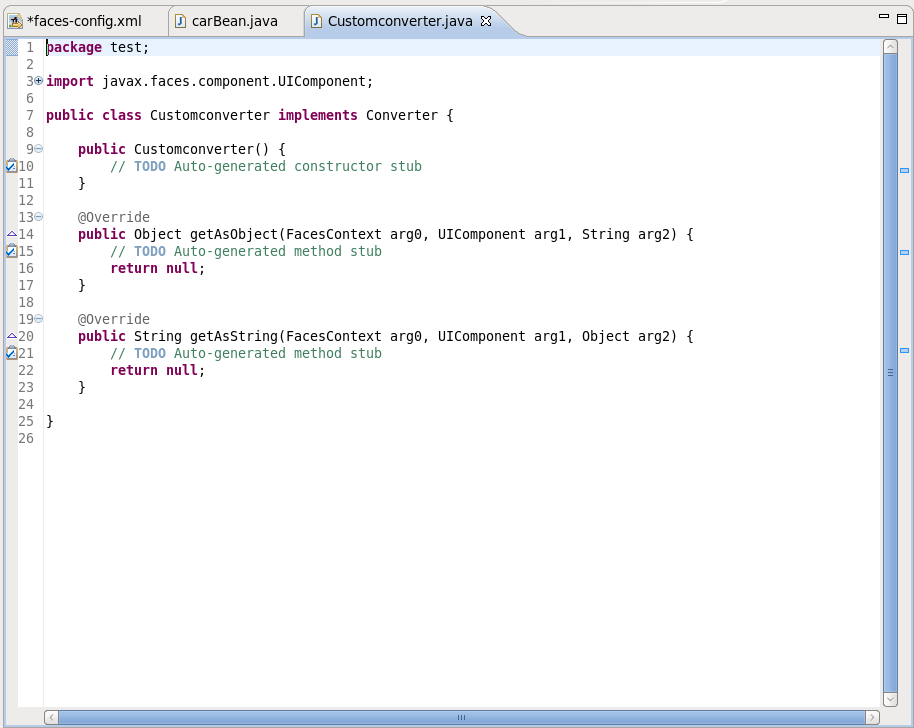
Now you are able to add a business logic of converter in the Java editor.
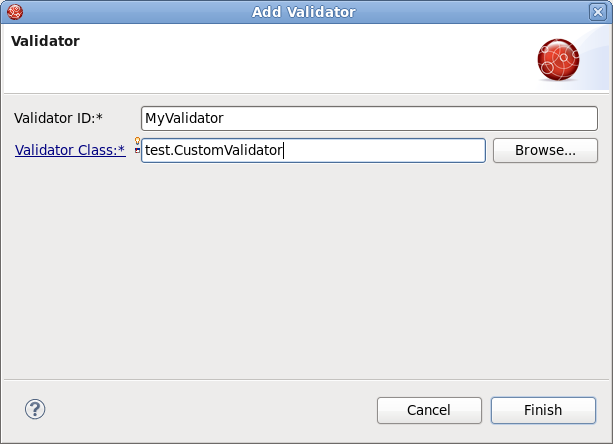
It is also quite easy to develop your own custom Validators. The required steps are similar to those shown previously:
In the Project Explorer view open the
faces-config.xmland select the Tree tab.
Select the Validators option and click the button.
Type the name of your validator in the field and name of the class for validators. After clicking the button your custom validator is registered under the entered name.
Now you can create the "validator" class.
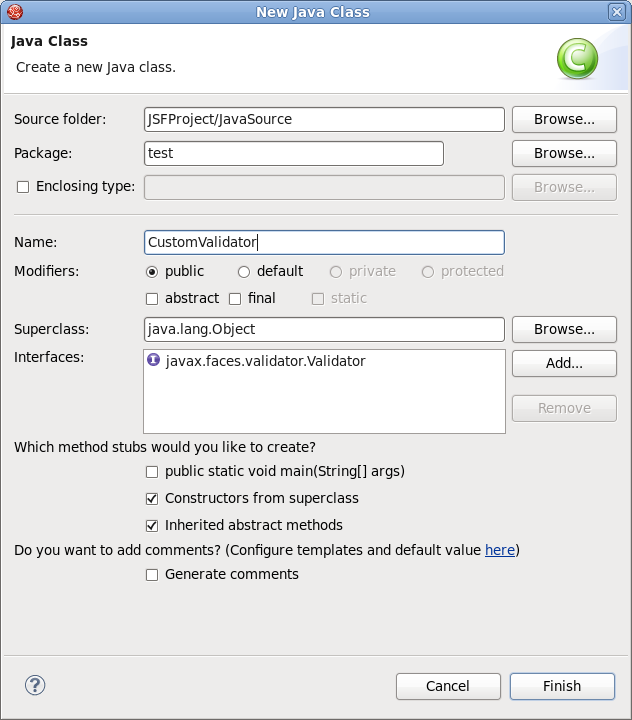
In the Validator section you can see your Validator-id and Validator-class. To generate the source code click on Validator-class.
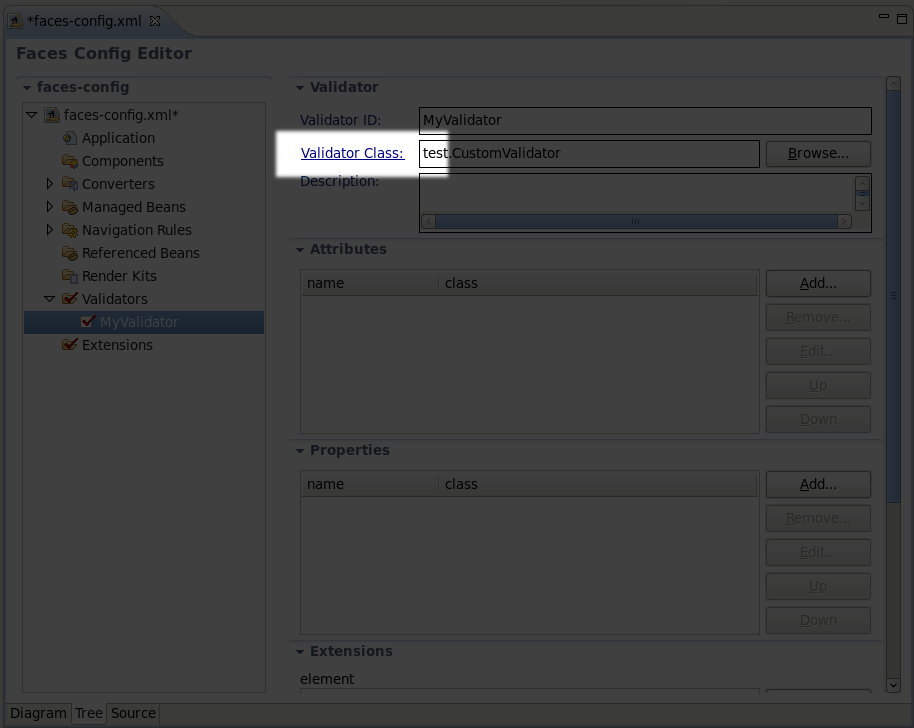
Java class will be created automatically. Leave everything without changes and click the .
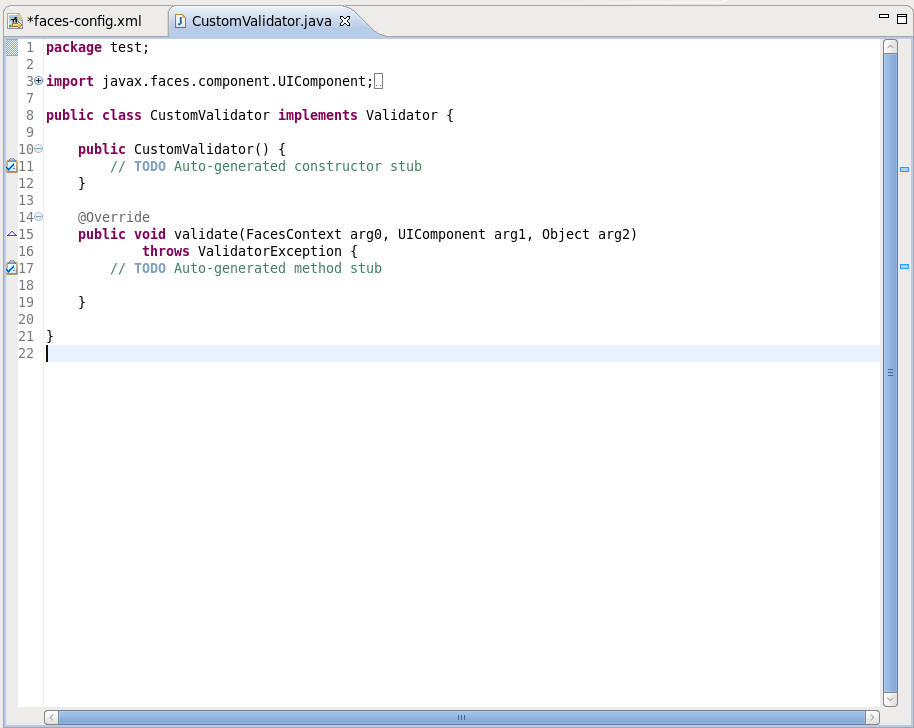
To open the validator class click on the Validator-Class link in the Validator section. Now you are able to write a business logic of validator in the Java editor.
The creation of Referenced Beans is similar to the creation of Custom Validators. The steps below show you the steps required to create Referenced Beans.
In the Project Explorer view open the
faces-config.xmland select the Tree tab.
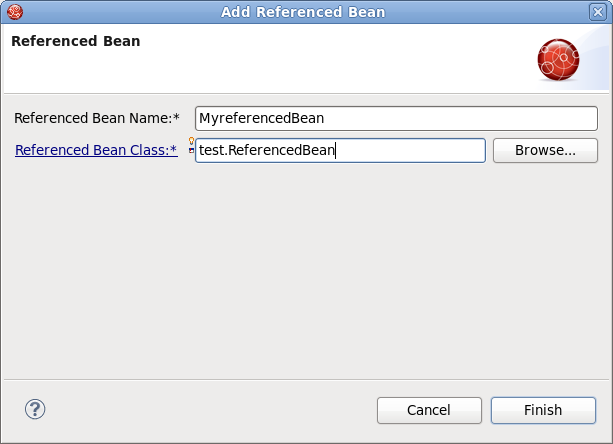
Select the Referenced Beans option and click on the button.
Type in the name of your Referenced Bean and type in or select the Referenced-Bean-Class value by clicking the button.
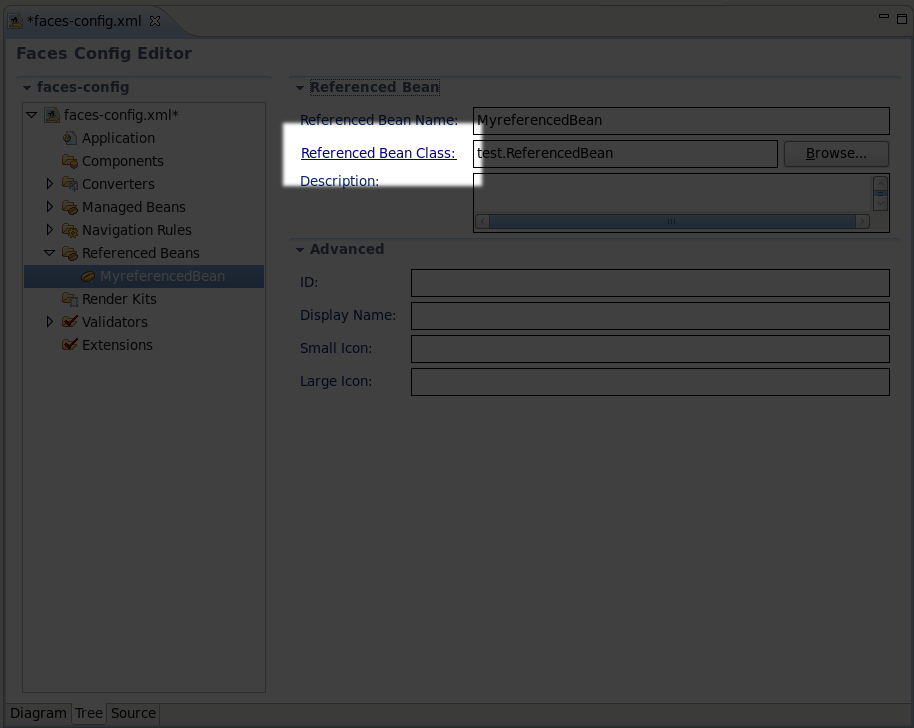
In the Referenced Bean section you should see your Referenced-Bean-Name and Referenced-Bean-Class. Click on the link to open the Java creation wizard.
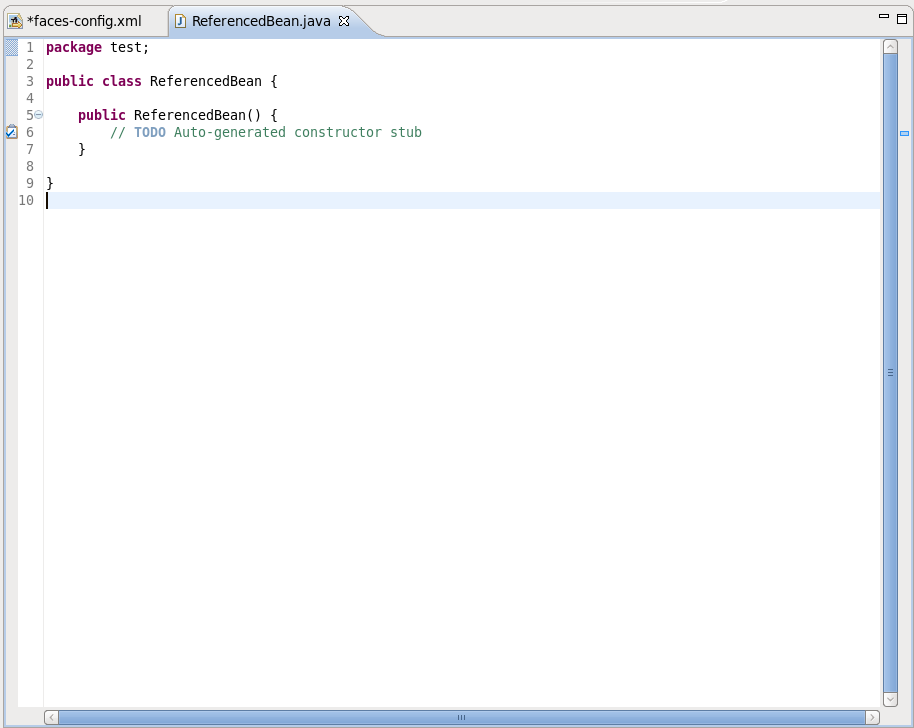
The Java class will be created automatically. Leave everything with their default values and click the button.

To open a Referenced Bean class click the Referenced-Bean-Class in the Referenced Bean section. Now you are able to write business logic of Referenced Bean in the Java editor.
In this chapter we'll discuss a possible verification that you can take advantage of.
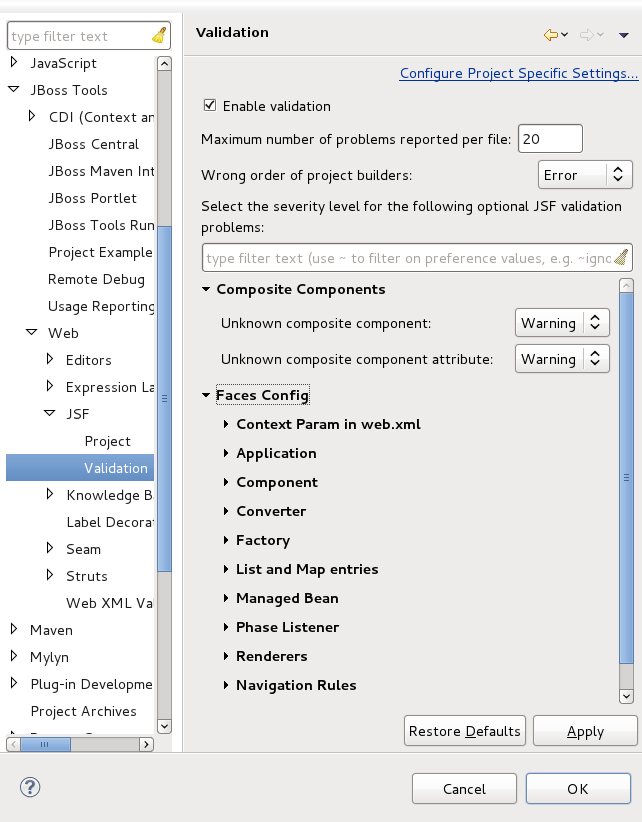
Many different rules are checked for a JSF project that can be configured by selecting → from the menu bar, selecting → → → .
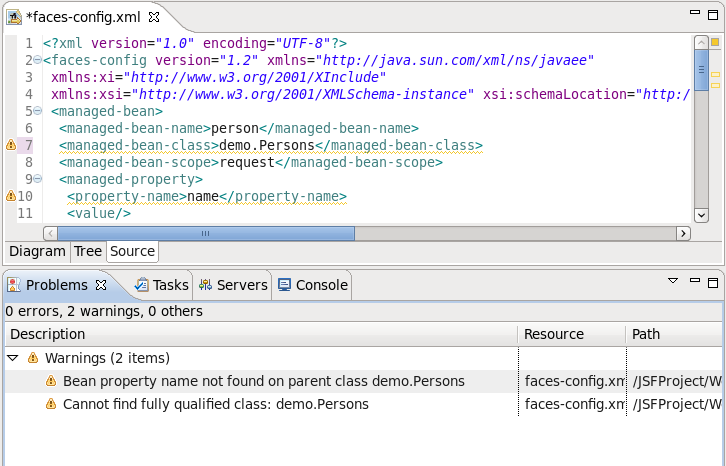
Suppose you are working in the Source viewer for a JSF configuration file as shown below:
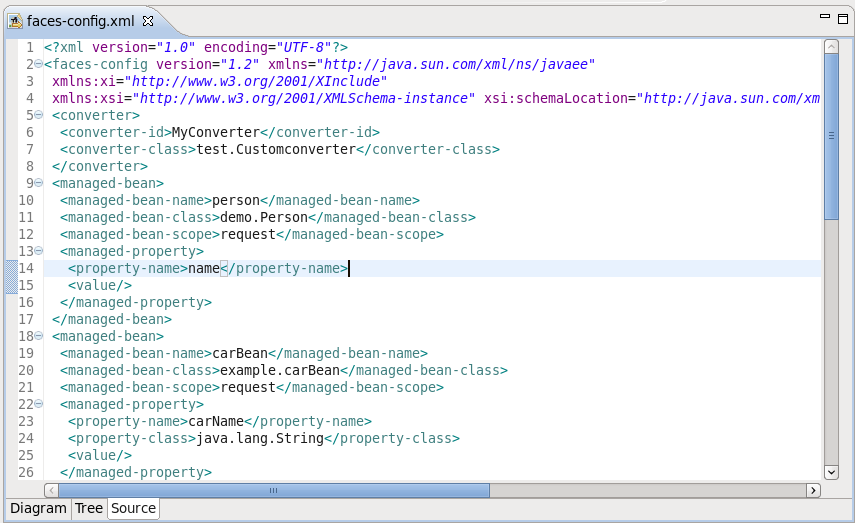
While typing a class name, you might make a minor typo (like "demo.Person9" instead of "demo.Person" ). After saving the file, verification checks to make sure everything is correct and finds the error below:
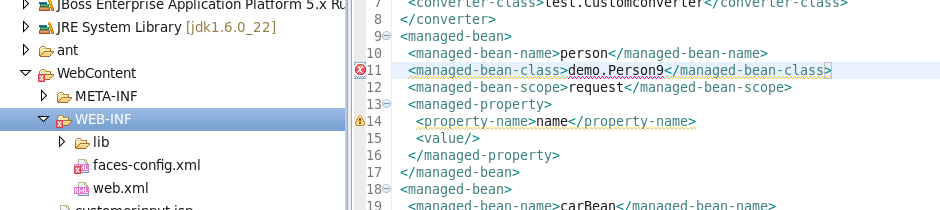
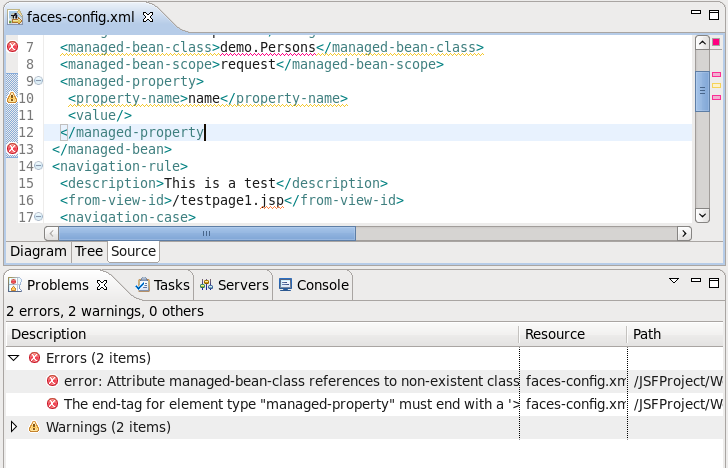
Notice that the Package Explorer View shows a marked folder and a marked file where the error is.
You can place the cursor over the line with an error message and get a detailed error message:

Verification also checks navigation rules:

If you provide a page name that does not exist, verification will let you know about that:

In summary, this document highlights all the JSF-specific features of JBoss Tools meant for enhancing the development of rich Web applications based on JSF technology. The reference introduces you to wizards for creating and importing JSF projects, JSF Configuration File editor features, functionality for enabling JSF capabilities and etc.