Getting Start with Weld, the CDI Reference Implementation
Weld, the CDI Reference Implementation (RI), can be downloaded from the download page. Information about the Weld source code repository and instructions about how to obtain and build the source can be found on the same page.
Weld provides a complete SPI allowing Java EE containers such as WildFly, GlassFish and WebLogic to use Weld as their built-in CDI implementation. Weld also runs in servlet engines like Tomcat and Jetty, or even in a plain Java SE environment.
Weld comes with an extensive library of examples, which are a great starting point from which to learn CDI. In addition, a number of quickstarts featuring CDI can be found at the JBoss Developer site
Getting started with Weld
Weld comes with a number of examples. We recommend you start with
examples/jsf/numberguess and examples/jsf/translator. Numberguess is
a web (war) example containing only non-transactional managed beans.
This example can be run on a wide range of servers, including WildFly,
GlassFish, Apache Tomcat, Jetty, and any compliant
Java EE 8 container. Translator is an enterprise (ear) example that
contains session beans. This example must be run on WildFly 14 or better,
GlassFish 5.1 or better, or any compliant Java EE 8 container.
Both examples use JSF 2.3 as the web framework and, as such, can be
found in the examples/jsf directory of the Weld distribution.
Prerequisites
To run the examples with the provided build scripts, you’ll need the following:
-
the latest release of Weld, which contains the examples
-
Maven 3, to build and deploy the examples
-
optionally, a supported runtime environment (minimum versions shown)
-
WildFly 14 (14.0.1.Final recommended),
-
GlassFish 5.1.0 or better,
-
Apache Tomcat 9 or better (war example only), or
-
Jetty 9 or better (war example only)
-
In the next few sections, you’ll be using the Maven command (mvn) to
invoke the Maven project file in each example to compile, assemble and
deploy the example to WildFly and, for the war example, Apache Tomcat.
You can also deploy the generated artifact (war or ear) to any other
container that supports Java EE 8, such as GlassFish 5.
The sections below cover the steps for deploying with Maven in detail.
First try
If you simply want to run the numberguess example without the requirement of a specific runtime you can start with the following commands:
$> cd examples/jsf/numberguess
$> mvn wildfly:run
The Maven WildFly plugin will run WildFly and deploy the example and the server will be automatically downloaded in the target directory.
The numberguess application is available at http://localhost:8080/weld-numberguess.
Deploying to WildFly
To deploy the examples to a WildFly instance, you’ll need to download WildFly first. The good news is that there are no additional modifications you have to make to the server. It’s ready to go!
After you have downloaded WildFly, extract it. You can move the extracted folder anywhere you
like. Wherever it lays to rest, that’s what we’ll call the WildFly
installation directory, or JBOSS_HOME.
$> unzip wildfly-14.0.1.Final.zip
$> mv wildfly-14.*/ wildfly-14
In order for the build scripts to know where to deploy the example, you
have to tell them where to find your WildFly installation. Set the
JBOSS_HOME environment variable to point to the WildFly installation,
e.g.:
$> export JBOSS_HOME=/path/to/wildfly-14You’re now ready to run your first example!
Switch to the examples/jsf/numberguess directory and execute the Maven
deploy target:
$> cd examples/jsf/numberguess
$> mvn wildfly:deploy|
Note
|
If you are using Eclipse, you should seriously consider installing the JBoss Tools add-ons, which include a wide variety of tooling for CDI and Java EE development, as well as an enhanced WildFly server view. |
Wait a few seconds for the application to deploy (or the application server to start) and see if you can determine the most efficient approach to pinpoint the random number at the local URL http://localhost:8080/weld-numberguess.
|
Note
|
The Maven WildFly plugin includes additional goals for WildFly to deploy and undeploy the archive.
For more information on the WildFly Maven plugin see the plugin documentation. |
You can also run functional tests to verify that the example works as expected. Run:
$> mvn verify -Darquillian=wildfly-managedYou should see the following output:
Tests run: 2, Failures: 0, Errors: 0, Skipped: 0The second starter example, weld-translator, will translate your text
into Latin. (Well, not really, but the stub is there for you to
implement, at least. Good luck!) To try it out, switch to the translator
example directory and execute the deploy target:
$> cd examples/jsf/translator/ear
$> mvn wildfly:run|
Note
|
The translator uses session beans, which are packaged in an EJB module within an ear. Java EE 8 allows session beans to be deployed in war modules, but that’s a topic for a later chapter. |
Again, wait a few seconds for the application to deploy (if you’re really bored, read the log messages), and visit http://localhost:8080/weld-translator to begin pseudo-translating.
Again, functional tests can be running by executing:
$> cd examples/jsf/translator/ftest
$> mvn verify -Darquillian=wildfly-managed
Deploying to GlassFish
Deploying to GlassFish should be easy and familiar, right? After all, it’s the Java EE 8 reference implementation and Weld is the CDI reference implementation, meaning Weld gets bundled with GlassFish. So yes, it’s all quite easy and familiar.
To deploy the examples to GlassFish, you’ll need a GlassFish 5.1.0 release. Extract
the zip to a directory of your choice and set the GLASSFISH_HOME environment
variable. Switch to the GLASSFISH_HOME directory and start the server:
$> ./bin/asadmin start-domainNow you can deploy the example.
$> ./bin/asadmin deploy /path/examples/jsf/numberguess/target/weld-numberguess.warOnce the command completes the application is available at http://localhost:8080/weld-numberguess
The reason the same artifact can be deployed to both WildFly and GlassFish, without any modifications, is because all of the features being used are part of the standard platform. And what a capable platform it has become!
Deploying to Apache Tomcat
Servlet containers are not required to support Java EE services like CDI. However, you can use CDI in a servlet container like Tomcat by embedding a standalone CDI implementation such as Weld.
Weld comes with servlet integration extension which bootstraps the CDI environment and provides injection into servlets components. Basically, it emulates some of the work done by the Java EE container, but you don’t get the enterprise features such as session beans and container-managed transactions.
|
Note
|
Note that due to limitations of servlet containers (e.g. read-only JNDI) your application might require some additional configuration as well (see Tomcat and Jetty for more info). |
Let’s give the Weld servlet extension a spin on Apache Tomcat. First, you’ll need to download Tomcat 9.0.11 or later from tomcat.apache.org and extract it.
$> unzip apache-tomcat-9.0.11.zipThe Maven plugin communicates with Tomcat over HTTP, so it doesn’t care
where you have installed Tomcat. However, the plugin configuration
assumes you are running Tomcat in its default configuration, with a
hostname of localhost and port 8080. The readme.txt file in the
example directory has information about how to modify the Maven settings
to accommodate a different setup.
You can either start Tomcat from a Linux shell:
$> cd /path/to/apache-tomcat-9
$> ./bin/startup.sh
a Windows command window:
$> cd c:\path\to\apache-tomcat-9\bin
$> start
or you can start the server using an IDE, like Eclipse.
Change to the examples/jsf/numberguess directory again and run the
following Maven command:
$> cd examples/jsf/numberguess
$> mvn clean package -Ptomcat
Now you’re ready to deploy the numberguess example to Tomcat!
$> cp examples/jsf/numberguess/target/weld-numberguess.war apache-tomcat/webapps/Diving into the Weld examples
It’s time to pull the covers back and dive into the internals of Weld
example applications. Let’s start with the simpler of the two examples,
weld-numberguess.
The numberguess example in depth
In the numberguess application you get 10 attempts to guess a number between 1 and 100. After each attempt, you’re told whether your guess was too high or too low.
The numberguess example is comprised of a number of beans, configuration files and Facelets (JSF) views, packaged as a war module. Let’s start by examining the configuration files.
All the configuration files for this example are located in WEB-INF/,
which can be found in the src/main/webapp directory of the example.
First, we have the JSF 2.2 version of faces-config.xml. A standardized
version of Facelets is the default view handler in JSF 2.2, so there’s
really nothing that we have to configure. Thus, the configuration
consists of only the root element.
<faces-config version="2.2"
   xmlns="http://xmlns.jcp.org/xml/ns/javaee"
   xmlns:xsi="http://www.w3.org/2001/XMLSchema-instance"
   xsi:schemaLocation="
      http://xmlns.jcp.org/xml/ns/javaee
      http://xmlns.jcp.org/xml/ns/javaee/web-facesconfig_2_2.xsd">

      <name>numberguess</name>

</faces-config>
There’s also an empty beans.xml file, which tells the container to
look for beans in this archive and to activate the CDI services.
Finally, some of the supported servers also need a web.xml which is
located in src/main/webapp-[server]/WEB-INF.
|
Note
|
This demo uses JSF 2 as the view framework, but you can use Weld with any servlet-based web framework, such as JSF 1.2 or Wicket. |
Let’s take a look at the main JSF view, src/main/webapp/home.xhtml.
<!DOCTYPE html PUBLIC "-//W3C//DTD XHTML 1.0 Transitional//EN"
   "http://www.w3.org/TR/xhtml1/DTD/xhtml1-transitional.dtd">
<html xmlns="http://www.w3.org/1999/xhtml"
   xmlns:ui="http://java.sun.com/jsf/facelets"
   xmlns:h="http://java.sun.com/jsf/html"
   xmlns:f="http://java.sun.com/jsf/core">

   <ui:composition template="/template.xhtml"> <!--(1)-->
      <ui:define name="content">
         <h1>Guess a number...</h1>
         <h:form id="numberGuess">
            <div style="color: red">
               <h:messages id="messages" globalOnly="false"/> <!--(2)-->
               <h:outputText id="Higher" value="Higher!" rendered="#{game.guessLower}"/>
               <h:outputText id="Lower" value="Lower!" rendered="#{game.guessHigher}"/>
            </div>

            <div>
               I'm thinking of a number between
               <span id="numberGuess:smallest">#{game.smallest}</span>
               and <span id="numberGuess:biggest">#{game.biggest}</span>.
               You have #{game.remainingGuesses} guesses remaining. <!--(3)-->
            </div>

            <div>
               Your guess:
               <h:inputText id="inputGuess" value="#{game.guess}"
                  required="true" size="3" disabled="#{game.guessCorrect}"
                  validator="#{game.validateNumberRange}"/> <!--(4)--> <!--(5)-->
               <h:commandButton id="guessButton" value="Guess" action="#{game.check}"
               disabled="#{game.guessCorrect}"/> <!--(6)-->
            </div>
            <div>
               <h:commandButton id="restartButton" value="Reset" action="#{game.reset}" immediate="true"/>
            </div>
         </h:form>
      </ui:define>
   </ui:composition>
</html>-
Facelets is the built-in templating language for JSF. Here we are wrapping our page in a template which defines the layout.
-
There are a number of messages which can be sent to the user, "Higher!", "Lower!" and "Correct!"
-
As the user guesses, the range of numbers they can guess gets smaller - this sentence changes to make sure they know the number range of a valid guess.
-
This input field is bound to a bean property using a value expression.
-
A validator binding is used to make sure the user doesn’t accidentally input a number outside of the range in which they can guess - if the validator wasn’t here, the user might use up a guess on an out of bounds number.
-
And, of course, there must be a way for the user to send their guess to the server. Here we bind to an action method on the bean.
The example consists of 4 classes, the first two of which are
qualifiers. First, there is the @Random qualifier, used for injecting
a random number:
@Qualifier
@Target( { TYPE, METHOD, PARAMETER, FIELD })
@Retention(RUNTIME)
public @interface Random {}
There is also the @MaxNumber qualifier, used for injecting the maximum
number that can be injected:
@Qualifier
@Target( { TYPE, METHOD, PARAMETER, FIELD })
@Retention(RUNTIME)
public @interface MaxNumber {}
The application-scoped Generator class is responsible for creating the
random number, via a producer method. It also exposes the maximum
possible number via a producer method:
@ApplicationScoped
public class Generator implements Serializable {

    private java.util.Random random = new java.util.Random(System.currentTimeMillis());

    private static final int MAX_NUMBER = 100;

    java.util.Random getRandom() {
        return random;
    }

    @Produces
    @Random
    int next() {
        //a number between 1 and 100
        return getRandom().nextInt(MAX_NUMBER - 1) + 1;
    }

    @Produces
    @MaxNumber
    int getMaxNumber() {
        return MAX_NUMBER;
    }
}
The Generator is application scoped, so we don’t get a different
random each time.
|
Note
|
The package declaration and imports have been excluded from these listings. The complete listing is available in the example source code. |
The final bean in the application is the session-scoped Game class.
This is the primary entry point of the application. It’s responsible for
setting up or resetting the game, capturing and validating the user’s
guess and providing feedback to the user with a FacesMessage. We’ve
used the post-construct lifecycle method to initialize the game by
retrieving a random number from the @Random
Instance<Integer> bean.
You’ll notice that we’ve also added the @Named annotation to this
class. This annotation is only required when you want to make the bean
accessible to a JSF view via EL (i.e., #{game}).
import javax.enterprise.inject.Instance;

@Named
@SessionScoped
public class Game implements Serializable {

    private static final int DEFAULT_REMAINING_GUESSES = 10;

    private int number;
    private int guess;
    private int smallest;
    private int biggest;
    private int remainingGuesses;

    @Inject
    @MaxNumber
    private int maxNumber;

    @Inject
    @Random
    private Instance<Integer> randomNumber;

    public Game() {
    }

    public int getNumber() {
        return number;
    }

    public int getGuess() {
        return guess;
    }

    public void setGuess(int guess) {
        this.guess = guess;
    }

    public int getSmallest() {
        return smallest;
    }

    public int getBiggest() {
        return biggest;
    }

    public int getRemainingGuesses() {
        return remainingGuesses;
    }

    public void check() {
        if (guess > number) {
            biggest = guess - 1;
        } else if (guess < number) {
            smallest = guess + 1;
        } else if (guess == number) {
            FacesContext.getCurrentInstance().addMessage(null, new FacesMessage("Correct!"));
        }
        remainingGuesses--;
    }

    @PostConstruct
    public void reset() {
        this.smallest = 0;
        this.guess = 0;
        this.remainingGuesses = DEFAULT_REMAINING_GUESSES;
        this.biggest = maxNumber;
        this.number = randomNumber.get();
    }

    public void validateNumberRange(FacesContext context, UIComponent toValidate, Object value) {
        if (remainingGuesses <= 0) {
            FacesMessage message = new FacesMessage("No guesses left!");
            context.addMessage(toValidate.getClientId(context), message);
            ((UIInput) toValidate).setValid(false);
            return;
        }
        int input = (Integer) value;

        if (input < smallest || input > biggest) {
            ((UIInput) toValidate).setValid(false);

            FacesMessage message = new FacesMessage("Invalid guess");
            context.addMessage(toValidate.getClientId(context), message);
        }
    }

    public boolean isGuessHigher() {
        return guess != 0 && guess > number;
    }

    public boolean isGuessLower() {
        return guess != 0 && guess < number;
    }

    public boolean isGuessCorrect() {
        return guess == number;
    }
}
The numberguess example in Apache Tomcat or Jetty
A couple of modifications must be made to the numberguess artifact in
order to deploy it to Tomcat or Jetty. First, Weld must be deployed as a
Web Application library under WEB-INF/lib since the servlet container
does not provide the CDI services. For your convenience we provide a
single jar suitable for running Weld in any servlet container (including
Jetty), weld-servlet-shaded.
|
Note
|
You must also include the jars for JSF, EL, and the common annotations
(jsr250-api.jar), all of which are provided by the Java EE platform (a
Java EE application server).
|
Second, we need to explicitly specify the servlet listener in web.xml,
again because the container isn’t doing this stuff for you. The servlet
listener boots Weld and controls it’s interaction with requests.
<listener>
   <listener-class>org.jboss.weld.environment.servlet.Listener</listener-class>
</listener>
When Weld boots, it places the
javax.enterprise.inject.spi.BeanManager, the portable SPI for
obtaining bean instances, in the ServletContext under a variable name
equal to the fully-qualified interface name. You generally don’t need to
access this interface, but Weld makes use of it.
The numberguess example for Java SE with Swing
This example shows how to use the Weld SE extension in a Java SE based
Swing application with no EJB or servlet dependencies. This example can
be found in the examples/se/numberguess folder of the Weld
distribution.
Creating the Eclipse project
To use the Weld SE numberguess example in Eclipse, you can either import it as a Maven project if you have the m2eclipse plugin installed, or generate an Eclipse project and import it.
With m2eclipse installed, you can open any Maven project directly. From within Eclipse, select File -> Import… -> Existing Maven Projects. Then, browse to the location of the Weld SE numberguess example. You should see that Eclipse recognizes the Maven project.
Without m2eclipse plugin, you first have to generate an Eclipse project. Switch into the Weld SE numberguess example folder, then execute the Maven Eclipse plugin, as follows:
mvn eclipse:configure-workspace -Declipse.workspace=/path/to/your/eclipse/workspaceand then
mvn eclipse:eclipseThen from within Eclipse, select File -> Import… -> Existing Projects into Workspace and browse to the location of the Weld SE numberguess example.
In both cases, you should now see a project in your workspace called
weld-se-numberguess.
It’s time to get the example running!
Running the example from Eclipse
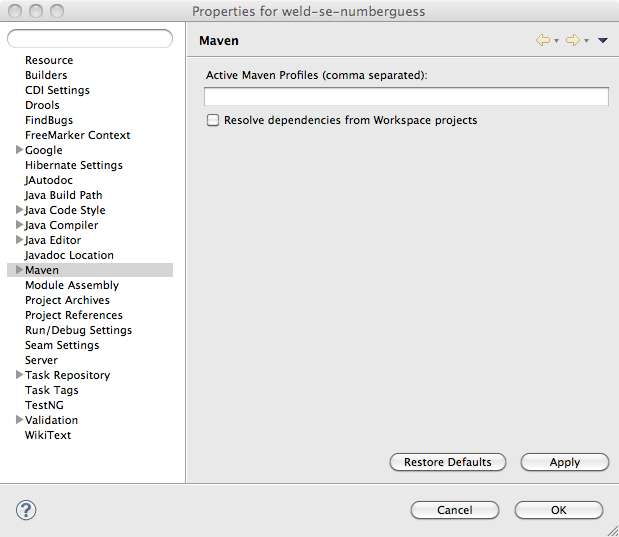
Disable m2eclipse’s Workspace Resolution, to make sure that Eclipse
can find StartMain. Right click on the project, and choose Properties
-> Maven, and uncheck Resolve dependencies from Workspace projects:
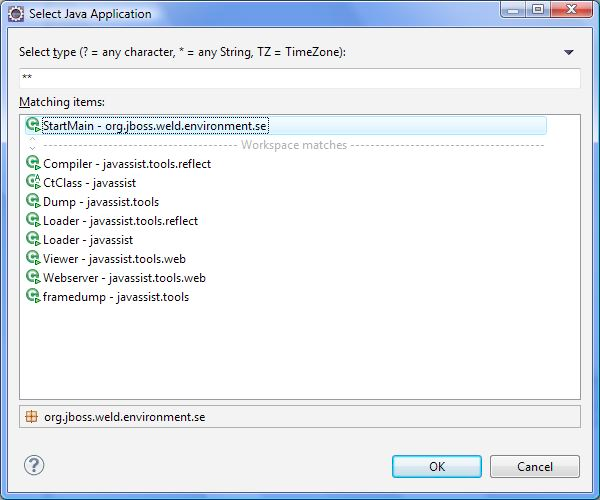
Right click on the project, and choose Run As -> Java Application:

Locate the StartMain class:
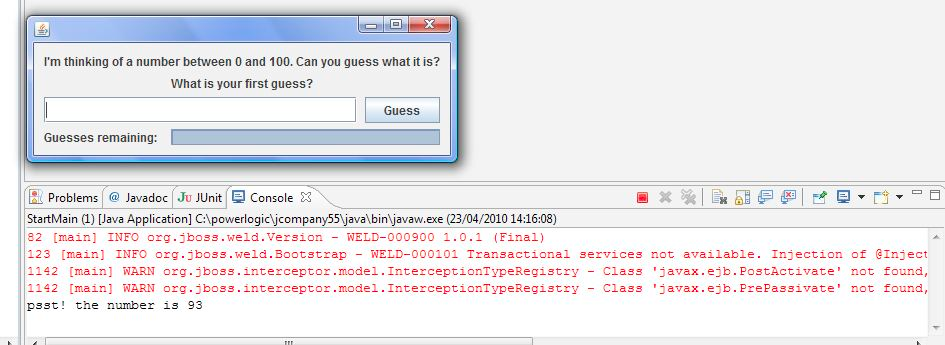
The application should now launch!
Running the example from the command line
-
Ensure that Maven 3 is installed and in your PATH
-
Ensure that the
JAVA_HOMEenvironment variable is pointing to your JDK installation -
Open a command line or terminal window in the
examples/se/numberguessdirectory -
Execute the following command
mvn -Drun
Understanding the code
Let’s have a look at the significant code and configuration files that make up this example.
There is an empty beans.xml file in the root package
(src/main/resources/META-INF/beans.xml), which marks this application
as a CDI application.
|
Note
|
The beans.xml file is no longer required for CDI enablement as of CDI
1.1. CDI is automatically enabled for archives which don’t contain
beans.xml but contain one or more bean classes with a bean defining
annotation, as described in section
Implicit bean archive
.
|
The game’s main logic is located in Game.java. Here is the code for
that class, highlighting the ways in which this differs from the web
application version:
@ApplicationScoped // (1)
public class Game { // (2)
    public static final int MAX_NUM_GUESSES = 10;

    private Integer number;
    private int guess = 0;
    private int smallest = 0;

    @Inject
    @MaxNumber
    private int maxNumber;

    private int biggest;
    private int remainingGuesses = MAX_NUM_GUESSES;
    private boolean validNumberRange = true;

    @Inject
    Generator rndGenerator;

    public Game() {
    }

    public int getNumber() {
        return number;
    }

    public int getGuess() {
        return guess;
    }

    public void setGuess(int guess) {
        this.guess = guess;
    }

    public int getSmallest() {
        return smallest;
    }

    public int getBiggest() {
        return biggest;
    }

    public int getRemainingGuesses() {
        return remainingGuesses;
    }

    public boolean isValidNumberRange() { // (3)
        return validNumberRange;
    }

    public boolean isGameWon() {
        return guess == number;
    }

    public boolean isGameLost() {
        return guess != number && remainingGuesses <= 0;
    }

    public boolean check() { // (4)
        boolean result = false;

        if (checkNewNumberRangeIsValid()) {
            if (guess > number) {
                biggest = guess - 1;
            }

            if (guess < number) {
                smallest = guess + 1;
            }

            if (guess == number) {
                result = true;
            }

            remainingGuesses--;
        }

        return result;
    }

    private boolean checkNewNumberRangeIsValid() {
        return validNumberRange = ((guess >= smallest) && (guess <= biggest));
    }

    @PostConstruct
    public void reset() { (5)
        this.smallest = 0;
        this.guess = 0;
        this.remainingGuesses = 10;
        this.biggest = maxNumber;
        this.number = rndGenerator.next();
        System.out.println("psst! the number is " + this.number);
    }
}-
The bean is application scoped rather than session scoped, since an instance of a Swing application typically represents a single 'session'.
-
Notice that the bean is not named, since it doesn’t need to be accessed via EL.
-
In Java SE there is no JSF
FacesContextto which messages can be added. Instead theGameclass provides additional information about the state of the current game including:-
If the game has been won or lost
-
If the most recent guess was invalid
This allows the Swing UI to query the state of the game, which it does indirectly via a class called
MessageGenerator, in order to determine the appropriate messages to display to the user during the game.
-
-
Since there is no dedicated validation phase, validation of user input is performed during the
check()method. -
The
reset()method makes a call to the injectedrndGeneratorin order to get the random number at the start of each game. Note that it can’t useInstance.get()like the JSF example does because there will not be any active contexts like there are during a JSF request.
The MessageGenerator class depends on the current instance of Game
and queries its state in order to determine the appropriate messages to
provide as the prompt for the user’s next guess and the response to the
previous guess. The code for MessageGenerator is as follows:
public class MessageGenerator {
    @Inject // (1)
    private Game game;

    public String getChallengeMessage() { // (2)
        StringBuilder challengeMsg = new StringBuilder("I'm thinking of a number between ");
        challengeMsg.append(game.getSmallest());
        challengeMsg.append(" and ");
        challengeMsg.append(game.getBiggest());
        challengeMsg.append(". Can you guess what it is?");

        return challengeMsg.toString();
    }

    public String getResultMessage() { // (3)
        if (game.isGameWon()) {
            return "You guessed it! The number was " + game.getNumber();
        } else if (game.isGameLost()) {
            return "You are fail! The number was " + game.getNumber();
        } else if (!game.isValidNumberRange()) {
            return "Invalid number range!";
        } else if (game.getRemainingGuesses() == Game.MAX_NUM_GUESSES) {
            return "What is your first guess?";
        } else {
            String direction = null;

            if (game.getGuess() < game.getNumber()) {
                direction = "Higher";
            } else {
                direction = "Lower";
            }

            return direction + "! You have " + game.getRemainingGuesses() + " guesses left.";
        }
    }
}-
The instance of
Gamefor the application is injected here. -
The `Game’s state is interrogated to determine the appropriate challenge message …
-
… and again to determine whether to congratulate, console or encourage the user to continue.
Finally we come to the NumberGuessFrame class which provides the Swing
front end to our guessing game.
import javax.enterprise.event.Observes;

public class NumberGuessFrame extends javax.swing.JFrame {
    @Inject
    private Game game; // (1)

    @Inject
    private MessageGenerator msgGenerator; // (2)

    public void start(@Observes ContainerInitialized event) { // (3)
        java.awt.EventQueue.invokeLater(new Runnable() {
            public void run() {
                initComponents();
                setVisible(true);
            }
        });
    }

    private void initComponents() { // (4)

        borderPanel = new javax.swing.JPanel();
        gamePanel = new javax.swing.JPanel();
        inputsPanel = new javax.swing.JPanel();
        buttonPanel = new javax.swing.JPanel();
        guessButton = new javax.swing.JButton();
        ...
        mainLabel.setText(msgGenerator.getChallengeMessage());
        mainMsgPanel.add(mainLabel);

        messageLabel.setText(msgGenerator.getResultMessage());
        mainMsgPanel.add(messageLabel);
        ...
    }

    private void guessButtonActionPerformed(java.awt.event.ActionEvent evt) { // (5)
        int guess = -1;

        try {
            guess = Integer.parseInt(guessText.getText());
        } catch (NumberFormatException nfe) {
            // noop
        }

        game.setGuess(guess);
        game.check();
        refreshUI();

        if (game.isGameWon() || game.isGameLost()) {
            switchButtons();
        }
    }

    private void replayBtnActionPerformed(java.awt.event.ActionEvent evt) { // (6)
        game.reset();
        refreshUI();
        switchButtons();
    }

    private void switchButtons() {
        CardLayout buttonLyt = (CardLayout) buttonPanel.getLayout();
        buttonLyt.next(buttonPanel);
    }

    private void refreshUI() {
        mainLabel.setText(msgGenerator.getChallengeMessage());
        messageLabel.setText(msgGenerator.getResultMessage());
        guessText.setText("");
        guessesLeftBar.setValue(game.getRemainingGuesses());
        guessText.requestFocus();
    }

    // swing components
    private javax.swing.JPanel borderPanel;
    ...
    private javax.swing.JButton replayBtn;

}-
The injected instance of the game (logic and state).
-
The injected message generator for UI messages.
-
This application is started in the prescribed Weld SE way, by observing the
ContainerInitializedevent. -
This method initializes all of the Swing components. Note the use of the
msgGeneratorhere. -
guessButtonActionPerformedis called when the 'Guess' button is clicked, and it does the following:-
Gets the guess entered by the user and sets it as the current guess in the
Game -
Calls
game.check()to validate and perform one 'turn' of the game -
Calls
refreshUI. If there were validation errors with the input, this will have been captured duringgame.check()and as such will be reflected in the messages returned byMessageGeneratorand subsequently presented to the user. If there are no validation errors then the user will be told to guess again (higher or lower) or that the game has ended either in a win (correct guess) or a loss (ran out of guesses). -
Sets the button’s label based on the game state.
-
-
replayBtnActionPerformedsimply callsgame.reset()to start a new game, refreshes the messages in the UI and sets the button’s label based on the game state.
The translator example in depth
The translator example will take any sentences you enter, and translate them to Latin. (Well, not really, but the stub is there for you to implement, at least. Good luck!)
The translator example is built as an EAR and contains EJBs. As a result, it’s structure is more complex than the numberguess example.
|
Note
|
Java EE 7, which bundles EJB 3.2, allows you to package EJBs in a WAR, which will make this structure much simpler! Still, there are other advantages of using an EAR. |
First, let’s take a look at the EAR aggregator project, which is located
in the example’s ear directory. Maven automatically generates the
application.xml for us from this plugin configuration:
<plugin>
   <groupId>org.apache.maven.plugins</groupId>
   <artifactId>maven-ear-plugin</artifactId>
   <configuration>
      <modules>
         <webModule>
            <groupId>org.jboss.weld.examples.jsf.translator</groupId>
            <artifactId>weld-jsf-translator-war</artifactId>
            <contextRoot>/weld-translator</contextRoot>
         </webModule>
      </modules>
   </configuration>
</plugin>
This configuration overrides the web context path, resulting in this application URL: http://localhost:8080/weld-translator.
|
Note
|
If you weren’t using Maven to generate these files, you would need
|
Next, let’s look at the WAR, which is located in the example’s war
directory. Just as in the numberguess example, we have a
faces-config.xml for JSF 2.2 and a web.xml (to activate JSF) under
WEB-INF, both sourced from src/main/webapp/WEB-INF.
More interesting is the JSF view used to translate text. Just as in the numberguess example we have a template, which surrounds the form (omitted here for brevity):
<h:form id="TranslatorMain">

   <table>
      <tr align="center" style="font-weight: bold">
         <td>
            Your text
         </td>
         <td>
            Translation
         </td>
      </tr>
      <tr>
         <td>
            <h:inputTextarea id="text" value="#{translator.text}" required="true" rows="5" cols="80"/>
         </td>
         <td>
            <h:outputText value="#{translator.translatedText}"/>
         </td>
      </tr>
   </table>
   <div>
      <h:commandButton id="button" value="Translate" action="#{translator.translate}"/>
   </div>

</h:form>
The user can enter some text in the left-hand text area, and hit the translate button to see the result to the right.
Finally, let’s look at the EJB module, which is located in the example’s
ejb directory. In src/main/resources/META-INF there is just an empty
beans.xml, used to mark the archive as containing beans.
|
Note
|
The beans.xml file is no longer required for CDI enablement as of CDI
1.1. CDI is automatically enabled for archives which don’t contain
beans.xml but contain one or more bean classes with a bean defining
annotation, as described in section
Implicit bean archive
.
|
We’ve saved the most interesting bit for last, the code! The project has
two simple beans, SentenceParser and TextTranslator and two session
beans, TranslatorControllerBean and SentenceTranslator. You should
be getting quite familiar with what a bean looks like by now, so we’ll
just highlight the most interesting bits here.
Both SentenceParser and TextTranslator are dependent beans, and
TextTranslator uses constructor injection:
public class TextTranslator implements Serializable {

   private SentenceParser sentenceParser;

   @EJB private Translator translator;

   @Inject public TextTranslator(SentenceParser sentenceParser) {
      this.sentenceParser = sentenceParser;
   }

   public String translate(String text) {
      StringBuilder sb = new StringBuilder();
      for (String sentence: sentenceParser.parse(text)) {
         sb.append(translator.translate(sentence)).append(". ");
      }
      return sb.toString().trim();
   }

}
TextTranslator uses the simple bean (really just a plain Java class!)
SentenceParser to parse the sentence and then calls on the stateless
bean with the local business interface Translator to perform the
translation. That’s where the magic happens. Of course, we couldn’t
develop a full translator, but it’s convincing enough to anyone who
doesn’t understand Latin!
@Stateless
public class SentenceTranslator implements Translator {

   public String translate(String sentence) {
      return "Lorem ipsum dolor sit amet";
   }

}
Finally, there is UI orientated controller. This is a request scoped, named, stateful session bean, which injects the translator. It collects the text from the user and dispatches it to the translator. The bean also has getters and setters for all the fields on the page.
@Stateful
@RequestScoped
@Named("translator")
public class TranslatorControllerBean implements TranslatorController {

   @Inject private TextTranslator translator;

   private String inputText;

   private String translatedText;

   public void translate() {
      translatedText = translator.translate(inputText);
   }

   public String getText() {
      return inputText;
   }

   public void setText(String text) {
      this.inputText = text;
   }

   public String getTranslatedText() {
      return translatedText;
   }

   @Remove public void remove() {}

}
That concludes our short tour of the Weld starter examples. For more information on Weld, please visit http://weld.cdi-spec.org/.