Now that you have the server running, we will use the Duke’s Bank example from the J2EE tutorial to illustrate how to get an application up and running in JBoss. Duke’s Bank demonstrates a selection of J2EE technologies working together to implement a simple on-line banking application. It uses EJBs and web components (JSPs and servlets) and uses a database to store the information. The persistence is bean-managed, with the entity beans containing the SQL statements which are used to manipulate the data.
We won’t look in detail at its functionality or comment on the implementation but will concentrate on a step-by-step guide to building and deploying it in JBoss.
You should have already downloaded the J2EE 1.4 tutorial, which includes Duke’s Bank. We’ll go through building and deploying the application first and then look at things in a bit more detail.
You should be able to obtain the supplementary JBoss files from the same place as this document. The file is packaged as a ZIP archive called jbossj2ee-src.zip. Download this and unpack it into the j2eetutorial14 directory, adding to the existing tutorial files. All the Duke’s Bank code is in a the examples/bank subdirectory. If you've unpacked the JBoss extensions correctly, you will see a jboss-build.xml there. This is our Ant build script for the JBoss version of the application. Rather than just overwriting the existing build.xml file, we’ve used a different name from the default. This means that Ant must now be run as ant -f jboss-build.xml.
Before we can build, you'll need to edit the jboss-build.properties file in the j2eetutorial14 to point to your JBoss install directory. Set the jboss.home property to the full path to your JBoss 4.0 installation. If you’ve unpacked JBoss 4.0 in the C: drive on a windows machine, you would set it as follows.
# Set the path to the JBoss directory containing the JBoss application server
# (This is the one containing directories like "bin", "client" etc.)
jboss.home=C:/jboss-4.0.0
At the command line, go to the bank directory. All the build commands will be run from here. Compilation is pretty straightforward; just type the following command to invoke the compile Ant target.
ant -f jboss-build.xml compile
If there aren’t any errors, you will find a newly created build directory with the class files in it.
The application has one EJB jar, bank-ejb.jar, which contains the code and descriptors (ejb-jar.xml and jboss.xml) for the entity beans and associated controller session beans which the clients interact with. The package-ejb Ant target will create them in the jar directory.
ant -f jboss-build.xml package-ejb
The next target is the web application which provides the front end to allow users to interact with the business components (the EJBs). The web source (JSPs, images etc.) is contained in the src/web directory and is added unmodified to the archive. The Ant war task also adds a WEB-INF directory which contains the files which aren’t meant to be directly accessed by a web browser but are still part of the web application. These include the deployment descriptors (web.xml and jboss-web.xml), class files, (e.g. servlets and EJB interfaces) and extra jars and the extra JSP tag-library descriptors required by the web application. The package-web Ant target builds the web client WAR file.
ant -f jboss-build.xml package-web
In addition to the web interface, there is a standalone Java client for administering customers and accounts. You can build it using the package-client Ant target.
ant -f jboss-build.xml package-client
The generated WAR file contains the application-client.xml and jboss-client.xml descriptors as well as the client jndi.properties file. The client JAR will also be included as an additional module in the EAR file and the server.
The EAR file is the complete application, containing the three EJB modules and the web module. It must also contain an additional descriptor, application.xml. It is also possible to deploy EJBs and web application modules individually but the EAR provides a convenient single unit. The assemble-app Ant target will produce the final file JBossDukesBank.ear.
ant -f jboss-build.xml assemble-app
Before we can deploy the application, we need to populate the database it will run against. If you are writing an application that uses container-managed persistence, you can configure the CMP engine to create the tables for you at deployment, but otherwise you will need have to have a set of scripts to do the job. This is also a convenient place pre-populating the database with data.
The HSQL database can be run in one of two modes: in-process or client-server (the HSQL documentation refers to this as server mode). Since we are going to be running the SQL scripts using a tool that connects to the database, we want to make sure the database is running in client-server mode and will accept TCP/IP connections. In later versions of JBoss, client-server mode is disabled to prevent direct database access, which could be a security risk if the default login and password have not been modified. Open the hsqldb-ds.xml file which you’ll find in the deploy directory and which sets up the default datasource. Near the top of the file, you’ll find the connection-url element. Make sure the value is set to jdbc:hsqldb:hsql://localhost:1701 and that any other examples are commented out.
<!-- The jndi name of the DataSource, it is prefixed with java:/ -->
<!-- Datasources are not available outside the virtual machine -->
<jndi-name>DefaultDS</jndi-name>

<!-- for tcp connection, allowing other processes to use the hsqldb
database. This requires the org.jboss.jdbc.HypersonicDatabase mbean. -->
<connection-url>jdbc:hsqldb:hsql://localhost:1701</connection-url>

<!-- for totally in-memory db, not saved when jboss stops.
The org.jboss.jdbc.HypersonicDatabase mbean is unnecessary
<connection-url>jdbc:hsqldb:.</connection-url>
-->
<!-- for in-process db with file store, saved when jboss stops. The
org.jboss.jdbc.HypersonicDatabase is unnecessary

<connection-url>jdbc:hsqldb:${jboss.server.data.dir}/hypersonic/localDB
</connection-url>
-->
Now scroll down to the bottom of the file, and you should find the MBean declaration for the Hypersonic service.
<mbean code="org.jboss.jdbc.HypersonicDatabase" name="jboss:service=Hypersonic">
    <attribute name="Port">1701</attribute>
    <attribute name="Silent">true</attribute>
    <attribute name="Database">default</attribute>
    <attribute name="Trace">false</attribute>
    <attribute name="No_system_exit">true</attribute>
</mbean>
Make sure this is also uncommented so JBoss will start the database in the correct mode.
We have supplied scripts to run with HSQL in the sql directory. The database tasks in the build file will try to contact the HSQL database. If JBoss isn’t already running, you should start it now, so that the database is available.
First we need to create the necessary tables with the db-create-table target.
ant -f jboss-build.xml db-create-table
Then run the db-insert target to populate them with the required data.
ant -f jboss-build.xml db-insert
Finally, if everything has gone according to plan, you should be able to view some of the data using the db-list target, which lists the transactions for a specific account.
ant -f jboss-build.xml db-list
Just as a quick aside at this point, start up the JMX console application web application and click on the service=Hypersonic link which you’ll find under the section jboss. If you can’t find this, make sure the service is enabled as described in Section 4.1.7.1, “Enabling the HSQL MBean and TCP/IP Connections”.
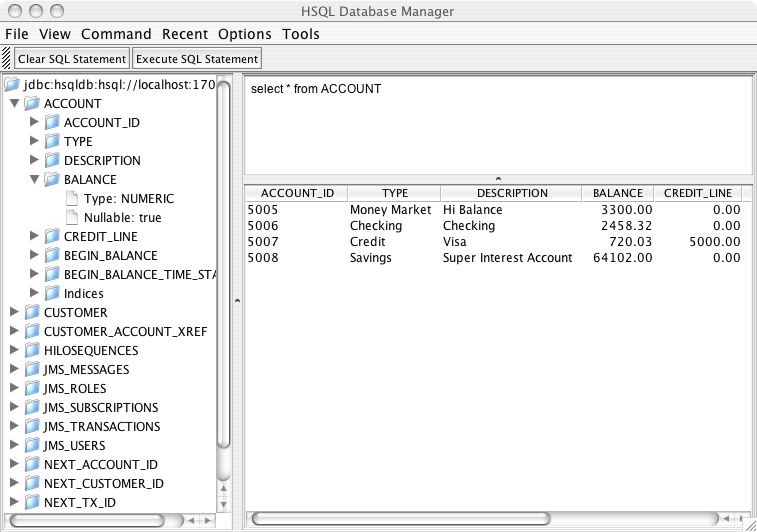
This will take you to the information for the Hypersonic service MBean. Scroll down to the bottom of the page and click the invoke button for the startDatabaseManager() operation. This starts up the HSQL Manager, a Java GUI application which you can use to manipulate the database directly.
Deploying an application in JBoss is easy. You just have to copy the EAR file to the deploy directory. The deploy target in the build file does this for our application.
ant -f jboss-build.xml deploy
You should see something close to the following output from the server (reduced for brevity).
14:14:53,763 INFO  [EARDeployer] Init J2EE application: file:/Users/orb/java/jboss-4.0.0/
server/default/deploy/JBossDukesBank.ear
14:14:55,588 INFO  [EjbModule] Deploying CustomerEJB
14:14:56,049 INFO  [EjbModule] Deploying CustomerControllerEJB
...
14:14:59,292 INFO  [EJBDeployer] Deployed: file:/Users/orb/java/jboss-4.0.0/server/
default/tmp/deploy/tmp43515JBossDukesBank.ear-contents/customer-ejb.jar
14:14:59,727 INFO  [EJBDeployer] Deployed: file:/Users/orb/java/jboss-4.0.0/server/
default/tmp/deploy/tmp43515JBossDukesBank.ear-contents/tx-ejb.jar
14:15:00,321 INFO  [EJBDeployer] Deployed: file:/Users/orb/java/jboss-4.0.0/server/
default/tmp/deploy/tmp43515JBossDukesBank.ear-contents/account-ejb.jar
14:15:00,608 INFO  [TomcatDeployer] deploy, ctxPath=/bank, warUrl=file:/Users/orb/java/
jboss-4.0.0/server/default/tmp/deploy/tmp43515JBossDukesBank.ear-contents/web-client-
exp.war/
14:15:01,594 INFO  [EARDeployer] Started J2EE application: file:/Users/orb/java/
jboss-4.0.0/server/default/deploy/JBossDukesBank.ear
If there are any errors or exceptions, make a note of the error message and at what point it occurs (e.g. during the deployment of a particular EJB, the web application or whatever). Check that the EAR is complete and inspect the WAR file and each of the EJB jar files to make sure they contain all the necessary components (classes, descriptors etc.).
You can safely redeploy the application if it is already deployed. To undeploy it you just have to remove the archive from the deploy directory. There’s no need to restart the server in either case. If everything seems to have gone OK, then point your browser at the application URL.
http://localhost:8080/bank/main
You will be forwarded to the application login page. As explained in the tutorial, you can login with a customer ID of 200 and the password j2ee. If you get an error at this point, check again that you have set up the database correctly as described in Section 4.1.7.1, “Enabling the HSQL MBean and TCP/IP Connections”. In particular, check that the connection-url is right. Then make sure that you have populated the database with data.
You can also run the standalone client application using the run-client target.
ant -f jboss-build.xml run-client
This is a Swing GUI client which allows you to administer the customers and accounts.
It’s worth taking a brief look at the use of JNDI with standalone clients. The example makes use of the J2EE Application Client framework, which introduces the concept of a client-side local environment naming context within which JNDI names are resolved with the prefix java:/comp/env. This is identical to the usage on the server side; the additional level of indirection means you can avoid using hard-coded names in the client. The name mapping is effected by the use of the proprietary jboss-client.xml which resolves the references defined in the standard application-client.xml. See Section 3.2.1, “Container-Specific Deployment Descriptors” for more information on how this works.
One issue with a Java client is how it bootstraps itself into the system, how it manages to connect to the correct JNDI server to lookup the references it needs. The information is supplied by using standard Java properties. You can find details of these and how they work in the JDK API documentation for the javax.naming.Context class. The properties can either be hard-coded, or supplied in a file named jndi.properties on the classpath. The file we’ve used is shown below.
java.naming.factory.initial=org.jnp.interfaces.NamingContextFactory
java.naming.provider.url=jnp://localhost:1099
java.naming.factory.url.pkgs=org.jboss.naming.client
j2ee.clientName=bank-client
The first three are standard properties, which are set up in order to use the JBoss JNDI implementation. The j2ee.clientName property identifies the client deployment information on the server side. The name must match the jndi-name specified in the jboss-client.xml descriptor:
<jboss-client>
    <jndi-name>bank-client</jndi-name>
    <ejb-ref>
        <ejb-ref-name>ejb/customerController</ejb-ref-name>
        <jndi-name>MyCustomerController</jndi-name>
    </ejb-ref>
    <ejb-ref>
        <ejb-ref-name>ejb/accountController</ejb-ref-name>
        <jndi-name>MyAccountController</jndi-name>
    </ejb-ref>
</jboss-client>
Of course if you were only building a simple web application, you wouldn't need to worry about remote clients
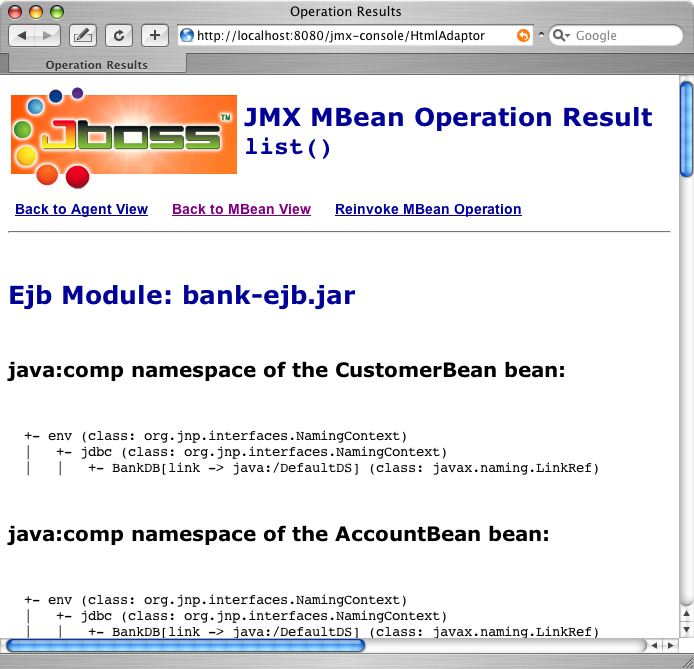
While we’re on the subject of JNDI, let’s take a quick look at the JBoss JMX console again and see what information it shows about our application. This time click on the service=JNDIView link and then invoke the list() operation, which displays the JNDI tree for the server. You should see the EJB modules from Duke’s Bank listed near the top and the contents of their private environment naming contexts as well as the names the entries are linked to in the server.
Further down, under the java: namespace[9] is a list of the active security managers, bound under their security-domain names
+- jaas (class: javax.naming.Context)
| +- dukesbank (class: org.jboss.security.plugins.SecurityDomainContext)
| +- JmsXARealm (class: org.jboss.security.plugins.SecurityDomainContext)
| +- jbossmq (class: org.jboss.security.plugins.SecurityDomainContext)
| +- HsqlDbRealm (class: org.jboss.security.plugins.SecurityDomainContext)
Note that these objects are created on demand, so the dukesbank entry will only appear if you have configured the application to use the dukesbank domain and tried to log in to the application.
You may have noticed that we haven’t done anything so far to set up any security configuration for the application. In fact there isn’t any security to speak of, and you can login with any password and gain access to the account. That is not very good for an on-line bank. Logging in with an invalid id will cause the application to crash when the first JSP tries to access the (non-existent) user’s accounts. That's not exactly ideal either.
If a web application doesn’t have a security domain [10] specified, JBoss assigns it a NullSecurityManager instance by default. This will allow any login to succeed, explaining the above behaviour.
Enabling security for your application is done through the JBoss-specific deployment descriptors. To protect the web application, you have to include a security-domain element in the jboss-web.xml.
<jboss-web>
    <security-domain>java:/jaas/dukesbank</security-domain>
    ...
</jboss-web>
If you also want access controls to be applied at the EJB layer, you should also add an identical security-domain element to the jboss.xml file too
<jboss>
    <security-domain>java:/jaas/dukesbank</security-domain>

    <enterprise-beans>
        ...
    </enterprise-beans>
</jboss>
What this means is that JBoss will bind a security manager instance for our application under the JNDI name java:/jaas/dukesbank. You can configure it in the conf/login-config.xml file, which we first saw in Section 2.2.3, “Security Service”. If you take a look at that file, you’ll see how each security domain has an application-policy element. The name attribute is the security domain name, so to add a login configuration for our application, we would insert an extra entry like the following.
<application-policy name="dukesbank">
    <authentication>
        <login-module code="org.jboss.security.auth.spi.UsersRolesLoginModule"
                      flag="required" />
    </authentication>
</application-policy>
The authentication element contains a sequence of login-module child elements, each of which specifies a JAAS login module implementation which will be used to authenticate users. The required flag means that login under this module must succeed for the user to be authenticated. The UsersRolesLoginModule which we’ve specified here is a simple login module which stores valid user names, passwords and roles in properties files. Any security domains which don’t have a login configuration entry will default to the policy named other which you will find at the bottom of the login-config.xml file. By default it uses this same login module, so we don’t really need to add a specific entry for our application. However it’s a good idea for completeness sake, and you may want to experiment with adding different login modules later.
To recap, here are the steps you need to follow to secure Duke’s Bank:
Add the security-domain element to each of the jboss.xml and jboss-web.xml descriptors in the dd directory. It should already be there, commented out.
Add an entry to the conf/login.xml file for the dukesbank security domain.
Create the users.properties and roles.properties files which contain the security information for the information for the application and include these in the EAR file (this has already been done for you).
Follow through the build steps to re-package the EJBs and the web application (to make sure the modified descriptors are included).
Assemble the EAR file and re-deploy it to JBoss.
Again make sure that the application deploys OK without any errors and exceptions and try accessing it with your browser as before. This time you should not be able to login without the correct username and password combination.
Have a quick look at the format of the files so that you can experiment with adding users of your own. You’ll find them in the src directory. The users.properties file contains name-value pairs of the form username=password. The roles.properties entries are the user name and a comma-separated list of roles for that user of the form username=role1,role2,....
In Duke’s Bank, the user id 200 must be given the role BankCustomer to be able to access the web application and the EJB methods which it calls.
In a real project you will want to use a more sophisticated approach to authentication. You can find out more about using JAAS login modules in the JBoss “JAAS Howto” document which you can download from http://sourceforge.net/docman/?group_id=22866 . We’ll also look at security in more detail in Chapter 9, Security Configuration.
We’ve only covered the proprietary aspects of securing a J2EE application in JBoss and we won’t go into the details of standard J2EE security as this is adequately covered elsewhere. However a brief overview in the context of the Duke’s Bank application is worthwhile. For more details you should see the relevant sections in the tutorial, the EJB and servlet specifications, or any textbook on J2EE applications.
The servlet spec. defines a standard means of configuring the login process for web applications. You will find an example in the element login-config in the web.xml file for Duke’s Bank:
<login-config>
    <auth-method>FORM</auth-method>
    <realm-name>Default</realm-name>
    <form-login-config>
        <form-login-page>/logon</form-login-page>
        <form-error-page>/logonError</form-error-page>
    </form-login-config>
</login-config>
This specifies that a HTML form login should be used to obtain a username and password. (The alternative would be HTTP BASIC authentication, where the browser presents a login dialog). It also specifies the URL that should be used for the login (/logon) and the URL which the user is forwarded to on a login error, such as a bad password. The format of the login form, namely the URL to submit to and the field names for username and password, are defined in the servlets specification. You can see how it works in the logon.jsp file in this application.
You should keep in mind that the authentication logic which decides whether a login succeeds or fails is outside the scope of the J2EE specification. The actual authentication mechanism is contained in the login modules that a security domain uses. So by adding the security-domain tag to your application, and thus linking it to an entry in login-config.xml, you are effectively what authentication logic will be used, be it a database, LDAP or whatever.
J2EE uses a role-based access-control model, with the emphasis placed on configuration rather than code; you can restrict access to EJBs or individual EJB methods in the ejb-jar.xml file or to specific URLs in the web.xml file by defining which user roles are allowed to access them. A set of roles, again decided by the underlying security mechanism, will be assigned to a user as part of the logon process and each subsequent attempt to access a protected resource will be checked to see if it is allowed.
If you have a look at in web.xml you will find the access controls under the security-constraint element. You can see the list of restricted URLs there under web-resource-collection and the role which is allowed to access them (BankCustomer) under the auth-constraint element. In the ejb-jar.xml file, method access is controlled using a series of method-permission elements which contain lists of method definitions and the roles that can call them (or unchecked for any role).
[9] The java: namespace is for names which can only be resolved within the VM. Remote clients can’t resolve them, unlike those in the global namespace.
[10] The term security domain is widely used in security parlance, not always with the same meaning. It generally refers to a set of users (or components) operating under a common set of authentication and access-control mechanisms. In JBoss this is seen in the mapping of a security domain name to a particular set of login modules in the login-config.xml file. The term is often used interchangeably with the term realm.