JBoss, a free J2EE 1.4 certified application server, is the most widely used Open Source application server on the market. The highly flexible and easy-to-use server architecture has made JBoss the ideal choice for users just starting out with J2EE, as well as senior architects looking for a customizable middleware platform. The server binary and source code distributions are available from the SourceForge repository. (http://sourceforge.net/projects/jboss). The ready availability of the source code allows you to debug the server, learn its inner workings and create customized versions for your personal or business use.
This chapter is a step-by-step tutorial that will show you how to install and configure JBoss 4.0. Specifically, you will learn how to:
Obtain updated binaries from the JBoss SourceForge project site
Install the binary
Test the installation
You will also learn about:
The installation directory structure
Key configuration files an administrator may want to use to customize the JBoss installation
Obtaining the source code for the 4.0 release from the SourceForge CVS repository
Building the server distribution.
The most recent release of JBoss is available from the SourceForge JBoss project files page, http://sourceforge.net/projects/jboss. You will also find previous releases as well as beta and release candidate versions of upcoming releases.
Before installing and running the server, check your system to make sure you have a working JDK 1.4+ installation. The simplest way to do this is to execute the java -version command to ensure that the java executable is in your path, and that you are using Version 1.4 or higher. For example, running this command with a 1.4.1 JDK would produce version number like the following.
[tmp]$ java -version
java version "1.4.2_05"
Java(TM) 2 Runtime Environment, Standard Edition (build 1.4.2_05-b04)
Java HotSpot(TM) Client VM (build 1.4.2_05-b04, mixed mode)
It does not matter where on your system you install JBoss. Note, however, that installing JBoss into a directory that has a name containing spaces causes problems in some situations with Sun-based VMs. This is caused by bugs with file URLs not correctly escaping the spaces in the resulting URL. There is no requirement for root access to run JBoss on UNIX/Linux systems because none of the default ports are within the 0-1023 privileged port range.
After you have the binary archive you want to install, use the JDK jar tool (or any other ZIP extraction tool) to extract the jboss-4.0.1.zip archive contents into a location of your choice. The jboss-4.0.1.tgz archive is a gzipped tar file that requires a gnutar compatible tar which can handle the long pathnames in the archive. The default tar binaries on Solaris and OS X do not currently support the long pathnames. The extraction process will create a jboss-4.0.1 directory. The following section explores the contents of this directory.
As mentioned above, installing the JBoss distribution creates a jboss-4.0.1 directory which contains server start scripts, JARs, server configuration sets and working directories. You do need to know your way around the distribution layout to locate JARs for compilation, updating configurations, deploying your code, etc. Figure 1.1, “The view of the JBoss server installation directory structure with the default server configuration file set expanded and overridable locations identified” illustrates the installation directory of the JBoss server.
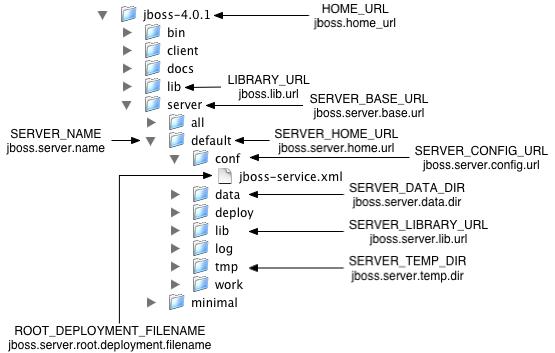
Figure 1.1. The view of the JBoss server installation directory structure with the default server configuration file set expanded and overridable locations identified
Throughout the book we will refer to the top-level jboss-4.0.1 directory as the JBOSS_DIST directory. In Figure 1.1, “The view of the JBoss server installation directory structure with the default server configuration file set expanded and overridable locations identified”, the default server configuration file set is shown expanded. It contains a number of subdirectories: conf, data, deploy, lib, log and tmp. In a clean installation, only the conf, deploy and lib directories will exist. The purpose of each of these directories are discussed in Table 1.1, “The JBoss directory structure”. In this table, the ServerConfig Property column refers to the org.jboss.system.server.ServerConfig interface constant and its corresponding system property string. The ServerConfig constant names and corresponding system property name are displayed in the blue text in Figure 1.1, “The view of the JBoss server installation directory structure with the default server configuration file set expanded and overridable locations identified”. The XXX_URL names correspond to locations that can be specified using a URL to access remote locations, for example, HTTP URLs against a web server. You can use the properties listed in the following table to override the layout of a JBoss distribution
Table 1.1. The JBoss directory structure
| Directory | Description | ServerConfig Property |
|---|---|---|
| bin | All the entry point JARs and start scripts included with the JBoss distribution are located in the bin directory. | |
| client | JARs required for clients are located in
the client directory. A
typical client requires the following:
| |
| server | The JBoss server configuration sets are located under the server directory. The default server configuration set is the server/default set. JBoss ships with minimal, default and all configuration sets. The subdirectories and key configuration files contained in the default configuration set are discussed in more detail in Section 1.1.3, “The Default Server Configuration File Set” | SERVER_BASE_DIR ="jboss.server.base.dir"SERVER_BASE_URL ="jboss.server.base.url" |
| lib | The lib directory contains startup JARs used by JBoss. Do not place your own libraries in this directory. | LIBRARY_URL ="jboss.lib.url" |
| conf | The conf directory contains the bootstrap descriptor, jboss-service.xml by default, file for a given server configuration. This defines the core services that are fixed for the lifetime of the server. | SERVER_CONFIG_URL ="jboss.server.config.url" |
| data | The data directory is a location available for use by services that want to store content in the file system. | SERVER_DATA_DIR ="jboss.server.data.dir" |
| deploy | The deploy directory is the default location the hot deployment service looks to for dynamic deployment content. This may be overridden through the URLDeploymentScanner URLs attribute. | |
| lib | The lib directory is the default location referred to the by bootstrap descriptor. All JARs in this directory are loaded into the shared classpath. | SERVER_LIBRARY_URL ="jboss.server.lib.url" |
| log | The log directory is the default directory into which the bootstrap logging service places its logs. This may be overridden through the conf/log4j.xml configuration file. | none |
| tmp | The tmp directory is the location to which deployments are copied for local use. | SERVER_TEMP_DIR="jboss.server.temp.dir" |
The JBOSS_DIST/server directory contains one or more configuration file sets. The default JBoss configuration file set is located in the JBOSS_DIST/server/default directory. JBoss allows you to add more than one configuration set so a server can easily be run using alternate configurations. Creating a new configuration file set typically starts with copying the default file set into a new directory name and then modifying the configuration files as desired. Figure 1.2, “An expanded view of the default server configuration file set conf and deploy directories” below shows the contents of the default configuration file set.
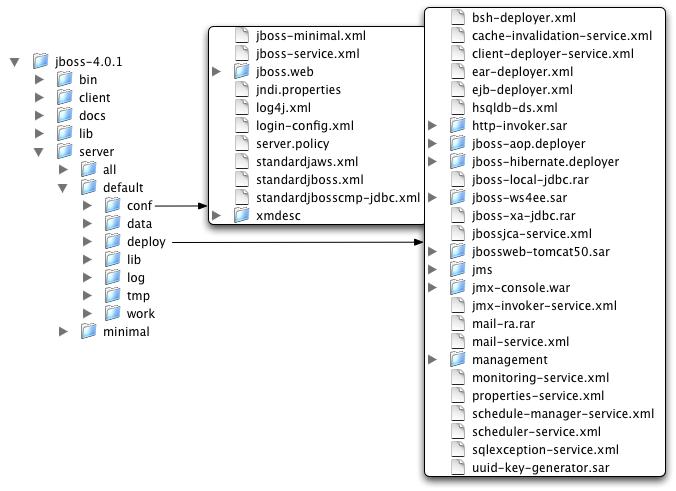
Figure 1.2. An expanded view of the default server configuration file set conf and deploy directories
- conf/jboss-minimal.xml
This is a minimalist example of the jboss-service.xml configuration file. It is the jboss-service.xml file used in the minimal configuration file set.
- conf/jboss-service.xml
jboss-service.xml defines the core services configurations. The complete DTD and syntax of this file is described, along with the details on integrating custom services, in Section 2.4.2, “JBoss MBean Services”.
- conf/jboss.web
This directory is used by Tomcat.
- conf/jndi.properties
The jndi.properties file specifies the JNDI InitialContext properties that are used within the JBoss server when an InitialContext is created using the no-arg constructor.
- conf/log4j.xml
This file configures the Apache log4j framework category priorities and appenders used by the JBoss server code. See the JBoss/Log4j book for details on configuring and using log4j with JBoss.
- conf/login-config.xml
This file contains sample server side authentication configurations that are applicable when using JAAS based security. See Chapter 8, Security on JBoss for additional details on the JBoss security framework and the format of this file.
- conf/server.policy
The server.policy file is a place holder for Java2 security permissions. The default file simply grall permissions to all codebases.
- conf/standardjaws.xml
This file provides a default configuration file for the legacy EJB 1.1 JBossCMP engine.
- conf/standardjboss.xml
This file provides the default container configurations. Use of this file is covered in Chapter 5, EJBs on JBoss
- conf/standardjbosscmp-jdbc.xml
This file provides a default configuration file for the JBoss CMP engine. See Chapter 11, The CMP Engine for the details of this descriptor.
- conf/xmdesc/*-mbean.xml
The xmdesc directory contains XMBean descriptors for several services configured in the jboss-service.xml file.
- deploy/bsh-deployer.xml
This configures the bean shell deployer, which deploys bean shell scripts as JBoss services.
- deploy/cache-invalidation-service.xml
This is a service that allows for custom invalidation of the EJB caches via JMS notifications. It is disabled by default.
- deploy/client-deployer-service.xml
This is a service that provides support for J2EE application clients. It manages the java:comp/env enterprise naming context for client applications based on the application-client.xml descriptor.
- deploy/ear-deployer.xml
The EAR deployer is the service responsible for deploying J2EE EAR files.
- deploy/ejb-deployer.xml
The EJB deployer is the service responsible for deploying J2EE EJB JAR files.
- deploy/hsqldb-ds.xml
hsqldb-ds.xml configures the Hypersonic 1.7.1 embedded database service configuration file. It sets up the embedded database and related connection factories. The format of JCA datasource files is discussed in Section 7.3, “Configuring JDBC DataSources”.
- deploy/http-invoker.sar
http-invoker.sar contains the detached invoker that supports RMI/HTTP. It also setups bindings of RMI/HTTP proxies for the JNDI naming service that allow the JBoss JNDI service to be accessed over http. This will be discussed in Section 2.7.2.5, “The HttpInvoker - RMI/HTTP Transport”
- deploy/jboss-aop.deployer
jboss-aop.deployer configures the AspectManagerService and deploys JBoss AOP applications.
- deploy/jboss-hibernate.deployer
jboss-hibernate.deployer deploys Hibernate archives (HAR files).
- deploy/jboss-local-jdbc.rar
jboss-local-jdbc.rar is a JCA resource adaptor that implements the JCA ManagedConnectionFactory interface for JDBC drivers that support the DataSource interface but not JCA.
- deploy/jboss-ws4ee.sar
jboss-ws4ee.sar provides J2EE web services support.
- deploy/jboss-xa-jdbc.rar
The jboss-xa-jdbc.rar is a JCA resource adaptor that implements the JCA ManagedConnectionFactory interface for JDBC drivers that support the XADataSource interface, but do not provide JCA adaptor.
- deploy/jbossjca-service.sar
jbossjca-service.sar is the application server implementation of the 1.0 JCA specification. It provides the connection management facilities for integrating resource adaptors into the JBoss server. The JCA layer is discussed in Chapter 7, Connectors on JBoss.
- deploy/jbossweb-tomcat50.sar
The jbossweb-tomcat50.sar directory is an unpacked MBean service archive for the configuration of the Tomcat 5 servlet engine. The SAR is unpacked rather than deployed as a JAR archive so that the tomcat configuration files can be easily edited. This service is discussed in Chapter 9, Web Applications.
- deploy/jms/hsqldb-jdbc-state-service.xml
State Management using HSQLDB
- deploy/jms/hsqldb-jdbc2-service.xml
hsqldb-jdbc2-service.xml configures the JMS persistence and caching using Hypersonic. It also contains the DestinationManager MBean which is the core service for the JMS implementation.
- deploy/jms/jbossmq-destinations-service.xml
jbossmq-destinations-service.xml configures a number of JMS queues and topics used by the JMS unit tests. Configuration of JMS destinations is discussed in Chapter 6, Messaging on JBoss.
- deploy/jms/jbossmq-httpil.sar
jbossmq-httpil.sar provides a JMS invocation layer that allows the use of JMS over http.
- deploy/jms/jbossmq-service.xml
The jbossmq-service.xml file configures the core JBossMQ JMS service. These JMS services are discussed in Chapter 6, Messaging on JBoss.
- deploy/jms/jms-ds.xml
The jms-ds.xml file configures the JBossMQ JMS provider for use with the jms-ra.rar JCA resource adaptor.
- deploy/jms/jms-ra.rar
jms-ra.rar is a JCA resource adaptor that implements the JCA ManagedConnectionFactory interface for JMS connection factories.
- deploy/jms/jvm-il-service.xml
jvm-il-service.xml configures the inter-vm JMS transport invocation layer. This transport layer is described in org.jboss.mq.il.jvm.JVMServerILService.
- deploy/jms/uil2-service.xml
uil2-service.xml configures the JMS version 2 unified invocation layer. Its a custom socket based transport that is the fastest and most reliable and should be used for inter-vm messaging. This transport layer is described in org.jboss.mq.il.uil2.UILServerILService.
- deploy/jmx-console.war
The jmx-console.war directory is an unpackaged web application archive that provides an HTML adaptor for the JMX MBeanServer. The WAR is unpackaged rather than deployed as a jar archive so that the jmx-console.war/WEB-INF/*.xml descriptors may be edited to configure role based security easily. The JMX Console is discussed in Section 2.3.1, “Inspecting the Server - the JMX Console Web Application”
- deploy/jmx-invoker-service.sar
jmx-invoker-service.sar is an unpacked MBean service archive that exposes a subset of the JMX MBeanServer interface methods as an RMI interface to enable remote access to the JMX core functionality. This is similar to the legacy jmx-rmi-adaptor.sar, with the difference that the transport is handled by the detached invoker architecture. This service is discussed in Section 2.3.4, “Connecting to JMX Using Any Protocol”.
- deploy/mail-ra.rar
mail-ra.rar is a resource adaptor that provides a JavaMail connector.
- deploy/mail-service.xml
The mail-service.xml file is an MBean service descriptor that provides JavaMail sessions for use inside of the JBoss server.
- deploy/management/console-mgr.sar, web-console.war
console-mgr.sar and web-console.war provide the Web Console. It is a web application/applet that provide a richer view of the JMX server management data than the JMX console. You may view the console using the URL http://localhost:8080/web-console/.
- deploy/monitoring-service.xml
The monitoring-service.xml file configures alert monitors like the console listener and email listener used by JMX notifications.
- deploy/properties-service.xml
The properties-service.xml file is an MBean service descriptor that allows for customization of the JavaBeans PropertyEditors as well as the definition of system properties. This is discussed further in Section 10.1, “System Properties Management”.
- deploy/scheduler-service.xml, schedule-manager-service.xml
The scheduler-service.xml, schedule-manager-service.xml files are MBean service descriptors that provides a scheduling type of service. This is discussed further in Section 10.4, “Scheduling Tasks”.
- deploy/sqlexception-service.xml
The sqlexception-service.xml file is an MBean service descriptor for handling vendor specific handling of java.sql.SQLExceptions. Its usage is discussed in Section 11.11, “Entity Commands and Primary Key Generation”.
- deploy/uuid-key-generator.sar
The uuid-key-generator.sar service provides a UUID-based key generation facility.
Once you have installed the JBoss distribution, it is wise to perform a simple startup test to validate that there are no major problems with your Java VM/operating system combination. To test your installation, move to the JBOSS_DIST/bin directory and execute the run.bat or run.sh script as appropriate for your operating system. Your output should be similar to that shown below and contain no error or exception messages:
[bin]$ sh run.sh
=========================================================================

  JBoss Bootstrap Environment

  JBOSS_HOME: /tmp/jboss-4.0.1

  JAVA: /System/Library/Frameworks/JavaVM.framework/Home//bin/java

  JAVA_OPTS: -server -Xms128m -Xmx128m -Dprogram.name=run.sh

  CLASSPATH: /tmp/jboss-4.0.1/bin/run.jar:/System/Library/Frameworks/JavaVM.framework/Home//lib/tools.jar

=========================================================================

17:29:04,702 INFO  [Server] Starting JBoss (MX MicroKernel)...
17:29:04,715 INFO  [Server] Release ID: JBoss [Zion] 4.0.1RC2 (build: CVSTag=JBoss_4_0_1_RC2 date=200411302349)
17:29:04,746 INFO  [Server] Home Dir: /private/tmp/jboss-4.0.1
17:29:04,748 INFO  [Server] Home URL: file:/private/tmp/jboss-4.0.1/
17:29:04,751 INFO  [Server] Library URL: file:/private/tmp/jboss-4.0.1/lib/
17:29:04,756 INFO  [Server] Patch URL: null
17:29:04,759 INFO  [Server] Server Name: default
17:29:04,776 INFO  [Server] Server Home Dir: /private/tmp/jboss-4.0.1/server/default
17:29:04,778 INFO  [Server] Server Home URL: file:/private/tmp/jboss-4.0.1/server/default/
17:29:04,781 INFO  [Server] Server Data Dir: /private/tmp/jboss-4.0.1/server/default/data
17:29:04,784 INFO  [Server] Server Temp Dir: /private/tmp/jboss-4.0.1/server/default/tmp
17:29:04,787 INFO  [Server] Server Config URL: file:/private/tmp/jboss-4.0.1/server/default/conf/
17:29:04,789 INFO  [Server] Server Library URL: file:/private/tmp/jboss-4.0.1/server/default/lib/
17:29:04,791 INFO  [Server] Root Deployment Filename: jboss-service.xml
17:29:04,833 INFO  [Server] Starting General Purpose Architecture (GPA)...
17:29:06,121 INFO  [ServerInfo] Java version: 1.4.2_05,Apple Computer, Inc.
17:29:06,124 INFO  [ServerInfo] Java VM: Java HotSpot(TM) Client VM 1.4.2-38,"Apple Computer, Inc."
17:29:06,127 INFO  [ServerInfo] OS-System: Mac OS X 10.3.6,ppc
17:29:07,236 INFO  [Server] Core system initialized
...
17:29:49,550 INFO  [Server] JBoss (MX MicroKernel) [4.0.1RC2 (build: CVSTag=JBoss_4_0_1_RC2 date=200411302349)] Started in 44s:3ms
If your output is similar to this (accounting for installation directory differences), you should now be ready to use JBoss. To shutdown the server, simply issue a Ctrl-C sequence in the console in which JBoss was started. Alternatively, you can use the shutdown.sh command:
[bin]$ ./shutdown.sh
A JMX client to shutdown (exit or halt) a remote JBoss server.

usage: shutdown [options] <operation>

options:
-h, --help Show this help message
-D<name>[=<value>] Set a system property
-- Stop processing options
-s, --server=<url> Specify the JNDI URL of the remote server
-n, --serverName=<url> Specify the JMX name of the ServerImpl
-a, --adapter=<name> Specify JNDI name of the RMI adapter to use
-u, --user=<name> Specify the username for authentication[not implemented yet]
-p, --password=<name> Specify the password for authentication[not implemented yet]

operations:
-S, --shutdown Shutdown the server (default)
-e, --exit=<code> Force the VM to exit with a status code
-H, --halt=<code> Force the VM to halt with a status code
Using run.sh without any arguments starts the server using the default server configuration file set. To start with an alternate configuration file set pass in the name of the directory under JBOSS_DIST/server you wish to use as the value to the -c command line option. For example, to start with the minimal configuration file set you would specify:
[bin]$ ./run.sh -c minimal
...
17:40:41,092 INFO  [Server] JBoss (MX MicroKernel) [4.0.1RC2 (build: CVSTag=JBoss_4_0_1_RC2 date=200411302349)] Started in 4s:920ms
To view all of the supported command line options for the JBoss server bootstrap class issue run -h command, and the output will be:
usage: run.sh [options]

options:
    -h, --help                    Show this help message
    -V, --version                 Show version information
    --                            Stop processing options
    -D<name>[=<value>]            Set a system property
    -p, --patchdir=<dir>          Set the patch directory; Must be absolute
    -n, --netboot=<url>           Boot from net with the given url as base
    -c, --configuration=<name>    Set the server configuration name
    -j, --jaxp=<type>             Set the JAXP impl type (ie. crimson)
    -L, --library=<filename>      Add an extra library to the loaders classpath
    -C, --classpath=<url>         Add an extra url to the loaders classpath
    -P, --properties=<url>        Load system properties from the given url
    -b, --host=<host or ip>       Bind address for all JBoss services
One very useful command line option is the --netboot=url option which causes JBoss to startup using the given URL as the base URL from which all libraries and configurations are loaded. Specifying the netboot option sets the ServerConfig.HOME_URL to the netboot option URL argument value. In the absence of any other overrides, all of the locations found in the standard JBOSS_DIST structure of will be resolved relative to the HOME_URL value. This means that if you make a JBoss distribution available from a web server you can boot JBoss using only the run scripts and run.jar file from the JBOSS_DIST/bin directory. Note that the web server must support the PROPFIND WebDAV command. JBoss includes a simple servlet filter that provides a minimal support for the PROPFIND command so that JBoss itself may be used as the netboot web server.
An example Ant build script that creates a custom netboot configuration fileset for booting the default configuration is available in the book examples/src/main/org/jboss/chap1/build-netboot.xml file. To test the netboot feature, run the build-netboot.xml script specifying the location of the JBOSS_DIST you want to use as the netboot webserver as shown here:
[examples]$ ant -Djboss.dist=/tmp/jboss-4.0.1 -buildfile src/main/org/jboss/chap1/build-netboot.xml
You then startup the netboot server by specifying the netboot configuration as follows:
[bin]$ ./run.sh -c netboot
=========================================================================

  JBoss Bootstrap Environment

  JBOSS_HOME: /tmp/jboss-4.0.1

  JAVA: /System/Library/Frameworks/JavaVM.framework/Home//bin/java

  JAVA_OPTS: -server -Xms128m -Xmx128m -Dprogram.name=run.sh

  CLASSPATH: /tmp/jboss-4.0.1/bin/run.jar:/System/Library/Frameworks/JavaVM.framework/Home//lib/tools.jar

=========================================================================

17:42:52,042 INFO  [Server] Starting JBoss (MX MicroKernel)...
...
17:43:06,818 INFO  [Server] JBoss (MX MicroKernel) [4.0.1RC2 (build: CVSTag=JBoss_4_0_1_RC2 date=200411302349)] Started in 13s:918ms
You can now startup any other instance of JBoss using just the run script and run.jar from the JBOSS_DIST/bin directory. For example:
[bin]$ sh run.sh --netboot=http://192.168.0.101:8080/netboot/
=========================================================================

  JBoss Bootstrap Environment

  JBOSS_HOME: /tmp/jboss-4.0.1

  JAVA: /System/Library/Frameworks/JavaVM.framework/Home//bin/java

  JAVA_OPTS: -server -Xms128m -Xmx128m -Dprogram.name=run.sh

  CLASSPATH: /tmp/jboss-4.0.1/bin/run.jar:/System/Library/Frameworks/JavaVM.framework/Home//lib/tools.jar

=========================================================================

18:14:29,828 INFO  [Server] Starting JBoss (MX MicroKernel)...
18:14:29,833 INFO  [Server] Release ID: JBoss [Zion] 4.0.1RC2 (build: CVSTag=JBoss_4_0_1_RC2 date=200411302349)
18:14:29,836 INFO  [Server] Home Dir: /private/tmp/jboss-4.0.1
18:14:29,838 INFO  [Server] Home URL: http://192.168.0.101:8080/netboot/
18:14:29,840 INFO  [Server] Library URL: http://192.168.0.101:8080/netboot/lib/
18:14:29,869 INFO  [Server] Patch URL: null
18:14:29,871 INFO  [Server] Server Name: default
18:14:29,874 INFO  [Server] Server Home Dir: /private/tmp/jboss-4.0.1/server/default
18:14:29,879 INFO  [Server] Server Home URL: http://192.168.0.101:8080/netboot/server/default/
18:14:29,881 INFO  [Server] Server Data Dir: /private/tmp/jboss-4.0.1/server/default/data
18:14:29,884 INFO  [Server] Server Temp Dir: /private/tmp/jboss-4.0.1/server/default/tmp
18:14:29,887 INFO  [Server] Server Config URL: http://192.168.0.101:8080/netboot/server/default/conf/
18:14:29,889 INFO  [Server] Server Library URL: http://192.168.0.101:8080/netboot/server/default/lib/
18:14:29,890 INFO  [Server] Root Deployment Filename: jboss-service.xml
18:14:29,900 INFO  [Server] Starting General Purpose Architecture (GPA)...
...
The custom netboot configuration fileset consists simply of the files needed to run the jbossweb-tomcat50.sar web server and a netboot.war whose content is the JBOSS_DIST/lib and JBOSS_DIST/server/default files.
Source code is available for every JBoss module, and you can build any version of JBoss from source by downloading the appropriate version of the code from SourceForge.
The JBoss source is hosted at SourceForge, a great Open Source community service provided by VA Linux Systems. With over 88,000 Open Source projects and nearly 950,000 registered users, SourceForge.net is the largest Open Source hosting service available. Many of tche top Open Source projects have moved their development to the sourcesorge.net site. The services offered by SourceForge include hosting of project CVS repositories and a web interface for project management that includes bug tracking, release management, mailing lists and more. Best of all, these services are free to all Open Source developers. For additional details and to browse the plethora of projects, see the SourceForge home page. (http://sourceforge.net/).
CVS (Concurrent Versions System) is an Open Source version control system that is used pervasively throughout the Open Source community. CVS is a source control or revision control tool designed to keep track of source changes made by groups of developers who are working on the same files. CVS enables developers to stay in sync with each other as each individual chooses.
The JBoss project's SourceForge CVS repository can be accessed through anonymous (pserver) CVS with the following instruction set. The module you want to check out must be specified as the modulename. When prompted for a password for anonymous, simply press the Enter key. The general syntax of the command line version of CVS for anonymous access to the JBoss repositories is:
cvs -d:pserver:anonymous@cvs.sourceforge.net:/cvsroot/jboss login
cvs -z3 -d:pserver:anonymous@cvs.sourceforge.net:/cvsroot/jboss co modulename
The first command logs into JBoss CVS repository as an anonymous user. This command only needs to be performed once for each machine on which you use CVS because the login information will be saved in your HOME/.cvspass file or equivalent for your system. The second command checks out a copy of the modulename source code into the directory from which you run the cvs command. To avoid having to type the long cvs command line each time, you can set up a CVSROOT environment variable with the value :pserver:anonymous@cvs.jboss.sourceforge.net:/cvsroot/jboss and then use the following abbreviated versions of the previous commands:
cvs login
cvs -z3 co modulename
The name of the JBoss module alias you use depends on the version of JBoss you want. For the 4.0 branch the module name is jboss-4.0, for the 3.2 branch it is jboss-3.2, and in general, for branch x.y the module name is jboss-x.y. To checkout the HEAD revision of jboss to obtain the latest code on the main branch you would use jboss-head as the module name. Releases of JBoss are tagged with the pattern JBoss_X_Y_Z where X is the major version, Y is the minor version and Z is the patch version. Release branches of JBoss are tagged with the pattern Branch_X_Y. Some checkout examples are:
cvs co -r Branch_4_0 jboss-4.0 # Checkout the current 3.0 branch code
cvs co -r JBoss_4_0_1 jboss-4.0 # Checkout the 4.0.1 release version code
cvs co -r JBoss_3_2_6 jboss-3.2 # Checkout the 3.2.6 release version code
cvs co jboss-head # Checkout the curent HEAD branch code
The command line version of the CVS program is freely available for nearly every platform, and is included by default on most Linux and UNIX distributions. A good port of CVS as well as numerous other UNIX programs for Win32 platforms is available from Cygwin at http://sources.redhat.com/cygwin/. The syntax of the command line version of CVS will be examined because this is common across all platforms.
For complete documentation on CVS, check out the CVS home page at http://www.cvshome.org/.
Every JBoss release includes a source archive that contains everything needed to build the release and is available from the files section of the JBoss project site here: http://sourceforge.net/projects/jboss/. The source directory structure matches that of the CVS source tree described below so once you have the source distribution you can build the release by following the instructions given in the next section, beginning with the instructions after the step to obtain the jboss-4.0 source tree.
This section will guide you through the task of building a JBoss distribution from the CVS source code. To start, create a directory into which you want to download the CVS source tree, and move into the newly created directory. This directory is referred to as the CVS_WD directory for CVS working directory. The example build in this book will check out code into a /tmp/jboss directory on a Linux system. Next, obtain the 4.0.1 version of the source code as shown here:
[tmp]$ mkdir jboss
[tmp]$ cd jboss
[jboss]$ export CVSROOT=:pserver:anonymous@cvs.sourceforge.net:/cvsroot/jboss
[jboss]$ cvs co -r JBoss_4_0_1 jboss-4.0
cvs checkout: Updating aop
U aop/.classpath
U aop/.cvsignore
U aop/.project
U aop/RELEASE_NOTES.txt
...
The resulting jboss-4.0 directory structure contains all of the CVS modules required to build the server. To perform the build, cd to the jboss-all/build directory and execute the build.sh or build.bat file as appropriate for you OS. You will need to set the JAVA_HOME environment variable to the location of the JDK you wish to use for compilation, and the JDK bin directory should be on your path.
[jboss]$ cd jboss-4.0/build/
[build]$ ./build.sh
Searching for build.xml ...
Buildfile: /tmp/jboss/jboss-4.0/build/build.xml
...

BUILD SUCCESSFUL
Total time: 2 minutes 41 seconds
Note that if you see an "Failed to launch JJTree" error do not have the JAVA_HOME/bin directory in your PATH required for the JavaCC JJTree Ant task.
The build process is driven by an Ant based configuration. The main Ant build script is the build.xml file located in the jboss-4.0/build directory. This script uses a number of custom Ant tasks masked as buildmagic constructs. The purpose of the main build.xml file is to compile the various module directories under jboss-4.0 and then to integrate their output to produce the binary release. The binary release structure is found under the jboss-4.0/build/output directory. The example above used the build.sh script to kickoff the build process. This is just a wrapper the launches the ant binary included in the distribution. You can use Ant directly to build if your environment is configured run it from the command line.
The top-level directory structure under the jboss-4.0 source tree is illustrated in Figure 1.3, “The testsuite CVS module directory structure”, the CVS source tree top-level directories. Table 1.2, “Descriptions of the top-level directories of the JBoss CVS source tree.” gives the primary purpose of each of the top-level directories.
Table 1.2. Descriptions of the top-level directories of the JBoss CVS source tree.
| Directory | Description |
|---|---|
| aop | The JBoss AOP module |
| aspects | The JBossAOP aspect library |
| build | The main build directory from which the release builds are initiated |
| cache | The JBoss TreeCache module |
| cluster | The clustering support services source module |
| common | A source module of common utility type code used by many of the other source modules |
| connector | The JCA support and application server integration source module |
| console | Admin apps for viewing the JMX MBeans |
| deployment | The JSR 88 J2EE application deployment module |
| hibernate | The hibernate deployer service |
| iiop | The RMI/IIOP transport service source module |
| j2ee | The core J2EE interfaces and classes |
| jaxrpc | The J2EE web services module |
| jboss.net | A web services support source module that provides support for using SOAP to invoke operations on EJBs and MBeans |
| jmx | The JBoss JMX implementation source module |
| jmx-remoting | The JMX remoting module |
| management | The JBoss JSR-77 source module |
| media | The enterprise media beans module |
| messaging | The JBoss JMS implementation source module |
| naming | The JBoss JNDI implementation source module |
| remoting | The JBoss remoting modules |
| security | The JBoss standard J2EE declarative security implementation based on JAAS |
| server | The EJB container |
| system | The JMX micro kernel based bootstrap services and standard deployment services source module |
| testsuite | The JUnit unit test source module |
| thirdparty | A module containing the third-party binary JARs used by the JBoss modules |
| tomcat | The Tomcat-5.0.x embedded service source module |
| tools | The JARs used by the JBoss build process |
| transaction | The JTA transaction manager |
| varia | Various utility services that have not or will not been integrated into one of the higher-level modules |
| webservice | The J2EE web service implementation in JBoss |
| xdoclet | Builds the XDoclet support library |
More advanced testing of the JBoss installation and builds can be done using the JBoss testsuite. The JBossTest suite is a collection of client oriented unit tests of the JBoss server application. It is an Ant based package that uses the JUnit (http://www.junit.org) unit test framework. The JBossTest suite is used as a QA benchmark by the development team to help test new functionality and prevent introduction of bugs. It is run on a nightly basis and the results are posted to the development mailing list for all to see.
The unit tests are run using Ant and the source for the tests are contained in the jboss-4.0/testsuite directory of the source tree. The structure of the testsuite CVS module is illustrated in Figure 1.3, “The testsuite CVS module directory structure”.
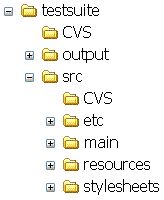
The two main source branches are src/main and src/resources. The src/main tree contains the Java source code for the unit tests. The src/resources tree contains resource files like deployment descriptors, JAR manifest, web content, etc. The root package of every unit test is org.jboss.test. The typical structure below each specific unit test subpackage (for example, security) consists of a test package that contains the unit test classes. The test subpackage is a required naming convention as this is the only directory searched for unit tests by the Ant build scripts. If the tests involves EJBs then the convention is to include an interfaces and ejb subpackage for these components. The unit tests themselves need to follow a naming convention for the class file. The unit test class must be named XXXUnitTest.java, where XXX is either the class being tested or the name of the functionality being tested.
To run the unit tests use the build scripts located in the testsuite directory. The key targets in the build.xml file include:
tests: this target builds and runs all unit tests and generates HTML and text reports of the tests into the testsuite/output/reports/html and testsuite/output/reports/text directories respectively.
tests-standard-unit: builds all unit tests and runs a subset of the key unit tests. This is useful for quick check of the server to test for gross problems.
test: this target allows one to run all tests within a particular package. To run this target you need to specify a test property that specifies a package name using -Dtest=package command line. The package value is the name of the package below org.jboss.test you want to run unit tests for. So, for example, to run all unit tests in the org.jboss.test.naming package, you would use: build.sh -Dtest=naming test
one-test: this target allows you to run a single unit test. To run this target you need to specify a test property that specifies the classname of the unit test using -Dtest=classname on the command line. So, for example, to run the org.jboss.test.naming.test.ENCUnitTestCase, you would use: build.sh -Dtest=org.jboss.test.naming.test.ENCUnitTestCase one-test
tests-report: this target generates html and text reports of the tests into the testsuite/output/reports/html and testsuite/output/reports/text directories respectively using the current JUnit XML results in the testsuite/output/reports directory. This is useful for generating the nice html reports when you have run a subset of the tests by hand and want to generate a summary.
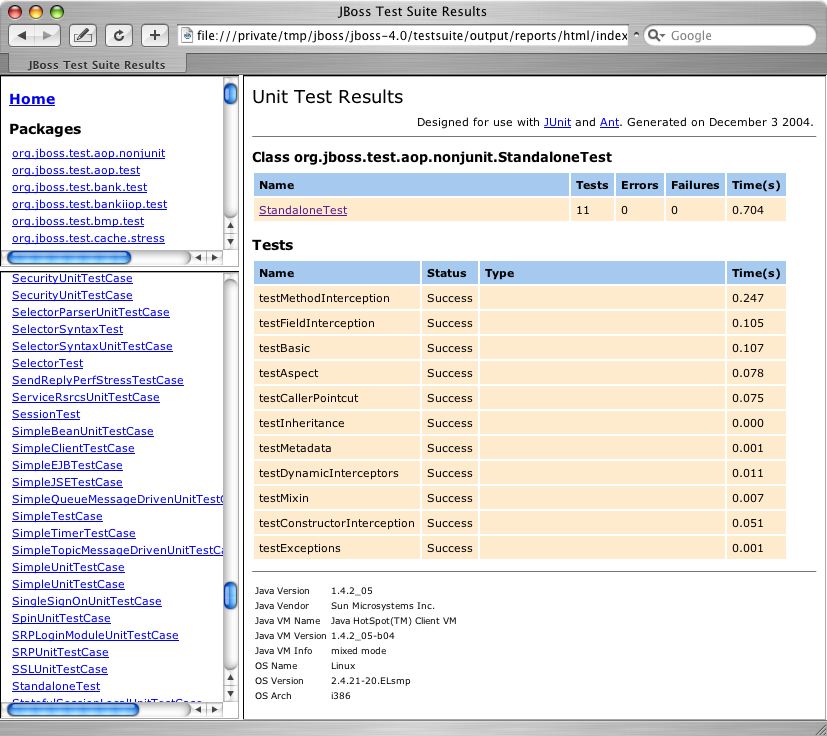
On completion of a test the testsuite/output/reports directory will contain one or more XML files that represent the individual JUnit test runs. The tests-report target collates these into an HTML report located in the html subdirectory along with a text report located in the text subdirectory. Figure 1.4, “An example testsuite run report status HTML view as generated by the testsuite” shows an example of the HTML report for a run of the test suite against the JBoss 4.0.1 release.
You can find the results of the testsuite in the JBoss distribution in under the JBOSS_DIST/docs/tests directory.