Clustering allows us to run an applications on several parallel servers (a.k.a cluster nodes). The load is distributed across different servers, and even if any of the servers fails, the application is still accessible via other cluster nodes. Clustering is crucial for scalable enterprise applications, as you can improve performance by simply adding more nodes to the cluster.
The JBoss Application Server (AS) comes with clustering support out of the box. The simplest way to start a JBoss server cluster is to start several JBoss instances on the same local network, using the run -c all command for each instance. Those server instances, all started in the all configuration, detect each other and automatically form a cluster.
In the first section of this chapter, I discuss basic concepts behind JBoss's clustering services. It is important that you understand those concepts before reading the rest of the chapter. Clustering configurations for specific types of applications are covered after this section.
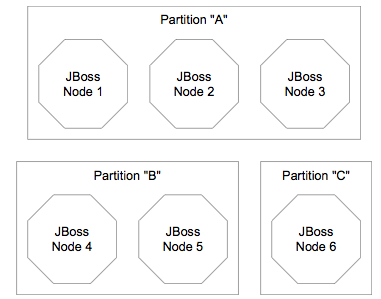
A cluster is a set of nodes. In a JBoss cluster, a node is a JBoss server instance. Thus, to build a cluster, several JBoss instances have to be grouped together (known as a "partition"). On a same network, we may have different clusters. In order to differentiate them, each cluster must have an individual name.
Figure 16.1, “Clusters and server nodes” shows an example network of JBoss server instances divided into three clusters, with each cluster only having one node. Nodes can be added to or removed from clusters at any time.
Note
While it is technically possible to put a JBoss server instance into multiple clusters at the same time, this practice is generally not recommended, as it increases the management complexity.
Each JBoss server instance (node) specifies which cluster (i.e., partition) it joins in the ClusterPartition MBean in the deploy/cluster-service.xml file. All nodes that have the same ClusterPartition MBean configuration join the same cluster. Hence, if you want to divide JBoss nodes in a network into two clusters, you can just come up with two different ClusterPartition MBean configurations, and each node would have one of the two configurations depending on which cluster it needs to join. If the designated cluster does not exist when the node is started, the cluster would be created. Likewise, a cluster is removed when all its nodes are removed.
The following example shows the MBean definition packaged with the standard JBoss AS distribution. So, if you simply start JBoss servers with their default clustering settings on a local network, you would get a default cluster named DefaultPartition that includes all server instances as its nodes.
<mbean code="org.jboss.ha.framework.server.ClusterPartition"
    name="jboss:service=DefaultPartition">

    <! -- Name of the partition being built -->
    <attribute name="PartitionName">
        ${jboss.partition.name:DefaultPartition}
    </attribute>

    <! -- The address used to determine the node name -->
    <attribute name="NodeAddress">${jboss.bind.address}</attribute>

    <! -- Determine if deadlock detection is enabled -->
    <attribute name="DeadlockDetection">False</attribute>

    <! -- Max time (in ms) to wait for state transfer to complete.
        Increase for large states -->
    <attribute name="StateTransferTimeout">30000</attribute>

    <! -- The JGroups protocol configuration -->
    <attribute name="PartitionConfig">
        ... ...
    </attribute>
</mbean>
Here, we omitted the detailed JGroups protocol configuration for this cluster. JGroups handles the underlying peer-to-peer communication between nodes, and its configuration is discussed in Section 17.1, “JGroups Configuration”. The following list shows the available configuration attributes in the ClusterPartition MBean.
PartitionName is an optional attribute to specify the name of the cluster. Its default value is DefaultPartition.
NodeAddress is an optional attribute to specify the binding IP address of this node.
DeadlockDetection is an optional boolean attribute that tells JGroups to run message deadlock detection algorithms with every request. Its default value is false.
StateTransferTimeout is an optional attribute to specify the timeout for state replication across the cluster (in milliseconds). Its default value is 30000.
PartitionConfig is an element to specify JGroup configuration options for this cluster (see Section 17.1, “JGroups Configuration”).
In order for nodes to form a cluster, they must have the exact same PartitionName and the ParitionConfig elements. Changes in either element on some but not all nodes would cause the cluster to split. It is generally easier to change the ParitionConfig (i.e., the address/port) to run multiple cluster rather than changing the PartitionName due to the mulititude of places the former needs to be changed in other configuration files. However, changing the PartitionName is made easier in 4.0.2+ due to the use of the ${jboss.partition.name} property which allows the name to be change via a single jboss.partition.name system property
You can view the current cluster information by pointing your browser to the JMX console of any JBoss instance in the cluster (i.e., http://hostname:8080/jmx-console/) and then clicking on the jboss:service=DefaultPartition MBean (change the MBean name to reflect your cluster name if this node does not join DefaultPartition). A list of IP addresses for the current cluster members is shown in the CurrentView field.
Note
A cluster (partition) contains a set of nodes that work toward a same goal. Some clustering features require to sub-partition the cluster to achieve a better scalability. For example, let's imagine that we have a 10-node cluster and we want to replicate in memory the state of stateful session beans on all 10 different nodes to provide for fault-tolerant behaviour. It would mean that each node has to store a backup of the 9 other nodes. This would not scale at all (each node would need to carry the whole state cluster load). It is probably much better to have some kind of sub-partitions inside a cluster and have beans state exchanged only between nodes that are part of the same sub-partition. The future JBoss clustering implementation will support sub-partitions and it will allow the cluster administrator to determine the optimal size of a sub-partition. The sub-partition topology computation will be done dynamically by the cluster.
The clustering topography defined by the ClusterPartition MBean on each node is of great importance to system administrators. But for most application developers, you are probably more concerned about the cluster architecture from a client application's point of view. JBoss AS supports two types of clustering architectures: client-side interceptors (a.k.a proxies or stubs) and load balancers.
Most remote services provided by the JBoss application server, including JNDI, EJB, RMI and JBoss Remoting, require the client to obtain (e.g., to look up and download) a stub (or proxy) object. The stub object is generated by the server and it implements the business interface of the service. The client then makes local method calls against the stub object. The call is automatically routed across the network and invoked against service objects managed in the server. In a clustering environment, the server-generated stub object is also an interceptor that understand how to route calls to nodes in the cluster. The stub object figures out how to find the appropriate server node, marshal call parameters, un-marshall call results, return the results to the caller client.
The stub interceptors have updated knowledge about the cluster. For instance, they know the IP addresses of all available server nodes, the algorithm to distribute load across nodes (see next section), and how to failover the request if the target node not available. With every service request, the server node updates the stub interceptor with the latest changes in the cluster. For instance, if a node drops out of the cluster, each of the client stub interceptor is updated with the new configuration the next time it connects to any active node in the cluster. All the manipulations on the service stub are transparent to the client application. The client-side interceptor clustering architecture is illustrated in Figure 16.2, “The client-side interceptor (proxy) architecture for clustering”.

Note
Section 16.3.1.1, “Handle Cluster Restart” describes how to enable the client proxy to handle the entire cluster restart.
Other JBoss services, in particular the HTTP web services, do not require the client to download anything. The client (e.g., a web browser) sends in requests and receives responses directly over the wire according to certain communication protocols (e.g., the HTTP protocol). In this case, a load balancer is required to process all requests and dispatch them to server nodes in the cluster. The load balancer is typically part of the cluster. It understands the cluster configuration as well as failover policies. The client only needs to know about the load balancer. The load balancer clustering architecture is illustrated in Figure 16.3, “The load balancer architecture for clustering”.

A potential problem with the load balancer solution is that the load balancer itself is a single point of failure. It needs to be monitored closely to ensure high availability of the entire cluster services.
Both the JBoss client-side interceptor (stub) and load balancer use load balancing policies to determine which server node to send a new request to. In this section, let's go over the load balancing policies available in JBoss AS.
In JBoss 3.0.x, the following two load balancing options are available.
Round-Robin (org.jboss.ha.framework.interfaces.RoundRobin): each call is dispatched to a new node. The first target node is randomly selected from the list.
First Available (org.jboss.ha.framework.interfaces.FirstAvailable): one of the available target nodes is elected as the main target and is used for every call: this elected member is randomly chosen from the list of members in the cluster. When the list of target nodes changes (because a node starts or dies), the policy will re-elect a target node unless the currently elected node is still available. Each client-side interceptor or load balancer elects its own target node independently of the other proxies.
In JBoss 3.2+, three load balancing options are available. The Round-Robin and First Available options have the same meaning as the ones in JBoss AS 3.0.x.
The new load balancing option in JBoss 3.2 is "First AvailableIdenticalAllProxies" (org.jboss.ha.framework.interfaces.FirstAvailableIdenticalAllProxies). It has the same behaviour as the "First Available" policy but the elected target node is shared by all client-side interceptors of the same "family".
In JBoss 3.2 (and later), the notion of "Proxy Family" is defined. A Proxy Family is a set of stub interceptors that all make invocations against the same replicated target. For EJBs for example, all stubs targeting the same EJB in a given cluster belong to the same proxy family. All interceptors of a given family share the same list of target nodes. Each interceptor also has the ability to share arbitrary information with other interceptors of the same family. A use case for the proxy family is give in Section 16.3.1, “Stateless Session Bean in EJB 2.x”.
The easiest way to deploy an application into the cluster is to use the farming service. That is to hot-deploy the application archive file (e.g., the EAR, WAR or SAR file) in the all/farm/ directory of any of the cluster member and the application is automatically duplicated across all nodes in the same cluster. If node joins the cluster later, it will pull in all farm deployed applications in the cluster and deploy them locally at start-up time. If you delete the application from one of the running cluster server node's farm/ folder, the application will be undeployed locally and then removed from all other cluster server nodes farm folder (triggers undeployment.) You should manually delete the application from the farm folder of any server node not currently connected to the cluster.
Note
Currently, due to an implementation bug, the farm deployment service only works for hot-deployed archives. If you put an application in the farm/ directory first and then start the server, the application would not be detected and pushed across the cluster. We are working to resolve this issue.
Note
You can only put archive files, not exploded directories, in the farm directory. This way, the application on a remote node is only deployed when the entire archive file is copied over. Otherwise, the application might be deployed (and failed) when the directory is only partially copied.
Farming is enabled by default in the all configuration in JBoss AS distributions, so you will not have to set it up yourself. The configuration file is located in the deploy/deploy.last directory. If you want to enable farming in your custom configuration, simply create the XML file shown below (named it farm-service.xml) and copy it to the JBoss deploy directory $JBOSS_HOME/server/your_own_config/deploy. Make sure that you custom configuration has clustering enabled.
<?xml version="1.0" encoding="UTF-8"?>
<server>

    <mbean code="org.jboss.ha.framework.server.FarmMemberService"
            name="jboss:service=FarmMember,partition=DefaultPartition">
        ...
        <attribute name="PartitionName">DefaultPartition</attribute>
        <attribute name="ScanPeriod">5000</attribute>
        <attribute name="URLs">farm/</attribute>
    </mbean>
</server>
After deploying farm-service.xml you are ready to rumble. The required FarmMemberService MBean attributes for configuring a farm are listed below.
PartitionName specifies the name of the cluster for this deployed farm. Its default value is DefaultPartition.
URLs points to the directory where deployer watches for files to be deployed. This MBean will create this directory is if does not already exist. Also, "." pertains to the configuration directory (i.e., $JBOSS_HOME/server/all/).
ScanPeriod specifies the interval at which the folder must be scanned for changes.. Its default value is 5000.
The Farming service is an extension of the URLDeploymentScanner, which scans for hot deployments in deploy/ directory. So, you can use all the attributes defined in the URLDeploymentScanner MBean in the FarmMemberService MBean. In fact, the URLs and ScanPeriod attributes listed above are inherited from the URLDeploymentScanner MBean.
In a clustered server environment, distributed state management is a key service the cluster must provide. For instance, in a stateful session bean application, the session state must be synchronized among all bean instances across all nodes, so that the client application reaches the same session state no matter which node serves the request. In an entity bean application, the bean object sometimes needs to be cached across the cluster to reduce the database load. Currently, the state replication and distributed cache services in JBoss AS are provided via two ways: the HASessionState MBean and the JBoss Cache framework.
The HASessionState MBean provides session replication and distributed cache services for EJB 2.x stateful session beans and HTTP load balancers in JBoss 3.x and 4.x. The MBean is defined in the all/deploy/cluster-service.xml file. We will show its configuration options in the EJB 2.x stateful session bean section later.
JBoss Cache is a fully featured distributed cache framework that can be used in any application server environment and standalone. It gradually replaces the HASessionState service. JBoss AS integrates JBoss Cache to provide cache services for HTTP sessions, EJB 3.0 session and entity beans, as well as Hibernate persistence objects. Each of these cache services is defined in a separate MBean. We will cover those MBeans when we discuss specific services in the next several sections.
JNDI is one of the most important services provided by the application server. The JBoss clustered JNDI service is based on the client-side interceptor architecture. The client must obtain a JNDI stub object (via the InitialContext object) and invoke JNDI lookup services on the remote server through the stub. Furthermore, JNDI is the basis for many other interceptor-based clustering services: those services register themselves with the JNDI so that the client can lookup their stubs and make use of their services.
The JBoss HA-JNDI (High Availability JNDI) service maintains a cluster-wide context tree. The cluster wide tree is always available as long as there is one node left in the cluster. Each JNDI node in the cluster also maintains its own local JNDI context. The server side application can bind its objects to either trees. In this section, you will learn the distinctions of the two trees and the best practices in application development. The design rational of this architecture is as follows.
We didn't want any migration issues with applications already assuming that their JNDI implementation was local. We wanted clustering to work out-of-the-box with just a few tweaks of configuration files.
We needed a clean distinction between locally bound objects and cluster-wide objects.
In a homogeneous cluster, this configuration actually cuts down on the amount of network traffic.
Designing it in this way makes the HA-JNDI service an optional service since all underlying cluster code uses a straight new InitialContext() to lookup or create bindings.
On the server side, new InitialContext(), will be bound to a local-only, non-cluster-wide JNDI Context (this is actually basic JNDI). So, all EJB homes and such will not be bound to the cluster-wide JNDI Context, but rather, each home will be bound into the local JNDI. When a remote client does a lookup through HA-JNDI, HA-JNDI will delegate to the local JNDI Context when it cannot find the object within the global cluster-wide Context. The detailed lookup rule is as follows.
If the binding is available in the cluster-wide JNDI tree and it returns it.
If the binding is not in the cluster-wide tree, it delegates the lookup query to the local JNDI service and returns the received answer if available.
If not available, the HA-JNDI services asks all other nodes in the cluster if their local JNDI service owns such a binding and returns the an answer from the set it receives.
If no local JNDI service owns such a binding, a NameNotFoundException is finally raised.
So, an EJB home lookup through HA-JNDI, will always be delegated to the local JNDI instance. If different beans (even of the same type, but participating in different clusters) use the same JNDI name, it means that each JNDI server will have a different "target" bound (JNDI on node 1 will have a binding for bean A and JNDI on node 2 will have a binding, under the same name, for bean B). Consequently, if a client performs a HA-JNDI query for this name, the query will be invoked on any JNDI server of the cluster and will return the locally bound stub. Nevertheless, it may not be the correct stub that the client is expecting to receive!
Note
You cannot currently use a non-JNP JNDI implementation (i.e. LDAP) for your local JNDI implementation if you want to use HA-JNDI. However, you can use JNDI federation using the ExternalContext MBean to bind non-JBoss JNDI trees into the JBoss JNDI namespace. Furthermore, nothing prevents you though of using one centralized JNDI server for your whole cluster and scrapping HA-JNDI and JNP.
Note
If a binding is only made available on a few nodes in the cluster (for example because a bean is only deployed on a small subset of nodes in the cluster), the probability to lookup a HA-JNDI server that does not own this binding is higher and the lookup will need to be forwarded to all nodes in the cluster. Consequently, the query time will be longer than if the binding would have been available locally. Moral of the story: as much as possible, cache the result of your JNDI queries in your client.
If you want to access HA-JNDI from the server side, you must explicitly get an InitialContext by passing in JNDI properties. The following code shows how to access the HA-JNDI.
Properties p = new Properties();
p.put(Context.INITIAL_CONTEXT_FACTORY,
      "org.jnp.interfaces.NamingContextFactory");
p.put(Context.URL_PKG_PREFIXES, "jboss.naming:org.jnp.interfaces");
p.put(Context.PROVIDER_URL, "localhost:1100"); // HA-JNDI port.
return new InitialContext(p);
The Context.PROVIDER_URL property points to the HA-JNDI service configured in the HANamingService MBean (see Section 16.2.3, “JBoss configuration”).
The JNDI client needs to be aware of the HA-JNDI cluster. You can pass a list of JNDI servers (i.e., the nodes in the HA-JNDI cluster) to the java.naming.provider.url JNDI setting in the jndi.properties file. Each server node is identified by its IP address and the JNDI port number. The server nodes are separated by commas (see Section 16.2.3, “JBoss configuration” on how to configure the servers and ports).
java.naming.provier.url=server1:1100,server2:1100,server3:1100,server4:1100
When initialising, the JNP client code will try to get in touch with each server node from the list, one after the other, stopping as soon as one server has been reached. It will then download the HA-JNDI stub from this node.
Note
There is no load balancing behavior in the JNP client lookup process. It just goes through the provider list and use the first available server. The HA-JNDI provider list only needs to contain a subset of HA-JNDI nodes in the cluster.
The downloaded smart stub contains the logic to fail-over to another node if necessary and the updated list of currently running nodes. Furthermore, each time a JNDI invocation is made to the server, the list of targets in the stub interceptor is updated (only if the list has changed since the last call).
If the property string java.naming.provider.url is empty or if all servers it mentions are not reachable, the JNP client will try to discover a bootstrap HA-JNDI server through a multicast call on the network (auto-discovery). See Section 16.2.3, “JBoss configuration” on how to configure auto-discovery on the JNDI server nodes. Through auto-discovery, the client might be able to get a valid HA-JNDI server node without any configuration. Of course, for the auto-discovery to work, the client must reside in the same LAN as the server cluster (e.g., the web servlets using the EJB servers). The LAN or WAN must also be configured to propagate such multicast datagrams.
Note
The auto-discovery feature uses multicast group address 230.0.0.4:1102.
In addition to the java.naming.provier.url property, you can specify a set of other properties. The following list shows all client side properties you can specify, when creating a new InitialContext.
java.naming.provier.url: Provides a list of IP addresses and port numbers for HA-JNDI provider nodes in the cluster. The client tries those providers one by one and uses the first one that responds.
jnp.disableDiscovery: When set to true, this property disables the automatic discovery feature. Default is false.
jnp.partitionName: In an environment where multiple HA-JNDI services, which are bound to distinct clusters (i.e., partitions), are started, this property allows you to configure which cluster you broadcast to when the automatic discovery feature is used. If you do not use the automatic discovery feature (e.g., you could explicitly provide a list of valid JNDI nodes in java.naming.provider.url), this property is not used. By default, this property is not set and the automatic discovery select the first HA-JNDI server that responds, independently of the cluster partition name.
jnp.discoveryTimeout: Determines how much time the context will wait for a response to its automatic discovery packet. Default is 5000 ms.
jnp.discoveryGroup: Determines which multicast group address is used for the automatic discovery. Default is 230.0.0.4.
jnp.discoveryPort: Determines which multicast group port is used for the automatic discovery. Default is 1102.
The cluster-service.xml file in the all/deploy directory includes the following MBean to enable HA-JNDI services.
<mbean code="org.jboss.ha.jndi.HANamingService"
       name="jboss:service=HAJNDI">
    <depends>jboss:service=DefaultPartition</depends>
</mbean>
You can see that this MBean depends on the DefaultPartition MBean defined above it (discussed in an earlier section in this chapter). In other configurations, you can put that element in the jboss-services.xml file or any other JBoss configuration files in the /deploy directory to enable HA-JNDI services. The available attributes for this MBean are listed below.
PartitionName is an optional attribute to specify the name of the cluster for the different nodes of the HA-JNDI service to communicate. The default value is DefaultPartition.
BindAddress is an optional attribute to specify the address to which the HA-JNDI server will bind waiting for JNP clients. Only useful for multi-homed computers.
Port is an optional attribute to specify the port to which the HA-JNDI server will bind waiting for JNP clients. The default value is 1100.
Backlog is an optional attribute to specify the backlog value used for the TCP server socket waiting for JNP clients. The default value is 50.
RmiPort determines which port the server should use to communicate with the downloaded stub. This attribute is optional. If it is missing, the server automatically assigns a RMI port.
AutoDiscoveryAddress is an optional attribute to specify the multicast address to listen to for JNDI automatic discovery. The default value is 230.0.0.4.
AutoDiscoveryGroup is an optional attribute to specify the multicast group to listen to for JNDI automatic discovery.. The default value is 1102.
LookupPool specifies the thread pool service used to control the bootstrap and auto discovery lookups.
DiscoveryDisabled is a boolean flag that disables configuration of the auto discovery multicast listener.
AutoDiscoveryBindAddress sets the auto-discovery bootstrap multicast bind address. If this attribute is not specified and a BindAddress is specified, the BindAddress will be used..
AutoDiscoveryTTL specifies the TTL (time-to-live) for autodiscovery IP multicast packets.
The full default configuration of the HANamingService MBean is as follows.
<mbean code="org.jboss.ha.jndi.HANamingService"
      name="jboss:service=HAJNDI">
    <depends>
        jboss:service=${jboss.partition.name:DefaultPartition}
    </depends>
    <! -- Name of the partition to which the service is linked -->
    <attribute name="PartitionName">
        ${jboss.partition.name:DefaultPartition}
    </attribute>
    <! -- Bind address of bootstrap and HA-JNDI RMI endpoints -->
    <attribute name="BindAddress">${jboss.bind.address}</attribute>
    <! -- Port on which the HA-JNDI stub is made available -->
    <attribute name="Port">1100</attribute>
    <! -- RmiPort to be used by the HA-JNDI service once bound.
        0 is for auto. -->
    <attribute name="RmiPort">1101</attribute>
    <! -- Accept backlog of the bootstrap socket -->
    <attribute name="Backlog">50</attribute>
    <! -- The thread pool service used to control the bootstrap and
      auto discovery lookups -->
    <depends optional-attribute-name="LookupPool"
        proxy-type="attribute">jboss.system:service=ThreadPool</depends>

    <! -- A flag to disable the auto discovery via multicast -->
    <attribute name="DiscoveryDisabled">false</attribute>
    <! -- Set the auto-discovery bootstrap multicast bind address. -->
    <attribute name="AutoDiscoveryBindAddress">
        ${jboss.bind.address}
    </attribute>

    <! -- Multicast Address and group port used for auto-discovery -->
    <attribute name="AutoDiscoveryAddress">
        ${jboss.partition.udpGroup:230.0.0.4}
    </attribute>
    <attribute name="AutoDiscoveryGroup">1102</attribute>
    <! -- The TTL (time-to-live) for autodiscovery IP multicast packets -->
    <attribute name="AutoDiscoveryTTL">16</attribute>

    <! -- Client socket factory to be used for client-server
           RMI invocations during JNDI queries
    <attribute name="ClientSocketFactory">custom</attribute>
    -->
    <! -- Server socket factory to be used for client-server
           RMI invocations during JNDI queries
    <attribute name="ServerSocketFactory">custom</attribute>
    -->
</mbean>
It is possible to start several HA-JNDI services that use different clusters. This can be used, for example, if a node is part of many clusters. In this case, make sure that you set a different port or IP address for both services. For instance, if you wanted to hook up HA-JNDI to the example cluster you set up and change the binding port, the Mbean descriptor would look as follows.
<mbean code="org.jboss.ha.jndi.HANamingService"
       name="jboss:service=HAJNDI">
    <depends>jboss:service=MySpecialPartition</depends>
    <attribute name="PartitionName">MySpecialPartition</attribute>
    <attribute name="Port">56789</attribute>
</mbean>
Session EJBs provide remote invocation services. They are clustered based on the client-side interceptor architecture. The client application for a clustered session bean is exactly the same as the client for the non-clustered version of the session bean, except for a minor change to the java.naming.provier.url system property to enable HA-JNDI lookup (see previous section). No code change or re-compilation is needed on the client side. Now, let's check out how to configure clustered session beans in EJB 2.x and EJB 3.0 server applications respectively.
Clustering stateless session beans is most probably the easiest case: as no state is involved, calls can be load-balanced on any participating node (i.e. any node that has this specific bean deployed) of the cluster. To make a bean clustered, you need to modify its jboss.xml descriptor to contain a <clustered> tag.
<jboss>
    <enterprise-beans>
        <session>
            <ejb-name>nextgen.StatelessSession</ejb-name>
            <jndi-name>nextgen.StatelessSession</jndi-name>
            <clustered>True</clustered>
            <cluster-config>
                <partition-name>DefaultPartition</partition-name>
                <home-load-balance-policy>
                    org.jboss.ha.framework.interfaces.RoundRobin
                </home-load-balance-policy>
                <bean-load-balance-policy>
                    org.jboss.ha.framework.interfaces.RoundRobin
                </bean-load-balance-policy>
            </cluster-config>
        </session>
    </enterprise-beans>
</jboss>
Note
The <clustered>True</clustered> element is really just an alias for the <configuration-name>Clustered Stateless SessionBean</configuration-name> element.
In the bean configuration, only the <clustered> element is mandatory. It indicates that the bean works in a cluster. The <cluster-config> element is optional and the default values of its attributes are indicated in the sample configuration above. Below is a description of the attributes in the <cluster-config> element.
partition-name specifies the name of the cluster the bean participates in. The default value is DefaultPartition.
home-load-balance-policy indicates the class to be used by the home stub to balance calls made on the nodes of the cluster. By default, the proxy will load-balance calls in a RoundRobin fashion. You can also implement your own load-balance policy class or use the class FirstAvailable that persists to use the first node available that it meets until it fails.
bean-load-balance-policy Indicates the class to be used by the bean stub to balance calls made on the nodes of the cluster. Comments made for the home-load-balance-policy attribute also apply.
In JBoss 3.0.x, each client-side stub has its own list of available target nodes. Consequently, some side-effects can occur. For example, if you cache your home stub and re-create a remote stub for a stateless session bean (with the Round-Robin policy) each time you need to make an invocation, a new remote stub, containing the list of available targets, will be downloaded for each invocation. Consequently, as the first target node is always the first in the list, calls will not seemed to be load-balanced because there is no usage-history between different stubs. In JBoss 3.2+, the proxy families (i.e., the "First AvailableIdenticalAllProxies" load balancing policy, see Section 16.1.3.2, “JBoss AS 3.2+”) remove this side effect as the home and remote stubs of a given EJB are in two different families.
We have covered the HA smart client architecture in Section 16.1.2.1, “Client-side interceptor”. The default HA smart proxy client can only failover as long as one node in the cluster exists. If there is a complete cluster shutdown, the proxy becomes orphanned and looses knowledge of the available nodes in the cluster. There is no way for the proxy to recover from this. The proxy needs to be looked up out of JNDI/HAJNDI when the nodes are restarted.
The 3.2.7+/4.0.2+ releases contain a RetryInterceptor that can be added to the proxy client side interceptor stack to allow for a transparent recovery from such a restart failure. To enable it for an EJB, setup an invoker-proxy-binding that includes the RetryInterceptor. Below is an example jboss.xml configuration.
<jboss>
    <session>
        <ejb-name>nextgen_RetryInterceptorStatelessSession</ejb-name>
        <invoker-bindings>
            <invoker>
                <invoker-proxy-binding-name>
                    clustered-retry-stateless-rmi-invoker
                </invoker-proxy-binding-name>
                <jndi-name>
                    nextgen_RetryInterceptorStatelessSession
                </jndi-name>
            </invoker>
        </invoker-bindings>
        <clustered>true</clustered>
    </session>

    <invoker-proxy-binding>
        <name>clustered-retry-stateless-rmi-invoker</name>
        <invoker-mbean>jboss:service=invoker,type=jrmpha</invoker-mbean>
        <proxy-factory>org.jboss.proxy.ejb.ProxyFactoryHA</proxy-factory>
        <proxy-factory-config>
            <client-interceptors>
                <home>
                    <interceptor>
                        org.jboss.proxy.ejb.HomeInterceptor
                    </interceptor>
                    <interceptor>
                        org.jboss.proxy.SecurityInterceptor
                    </interceptor>
                    <interceptor>
                        org.jboss.proxy.TransactionInterceptor
                    </interceptor>
                    <interceptor>
                        org.jboss.proxy.ejb.RetryInterceptor
                    </interceptor>
                    <interceptor>
                        org.jboss.invocation.InvokerInterceptor
                    </interceptor>
                </home>
                <bean>
                    <interceptor>
                        org.jboss.proxy.ejb.StatelessSessionInterceptor
                    </interceptor>
                    <interceptor>
                        org.jboss.proxy.SecurityInterceptor
                    </interceptor>
                    <interceptor>
                        org.jboss.proxy.TransactionInterceptor
                    </interceptor>
                    <interceptor>
                        org.jboss.proxy.ejb.RetryInterceptor
                    </interceptor>
                    <interceptor>
                        org.jboss.invocation.InvokerInterceptor
                    </interceptor>
                </bean>
            </client-interceptors>
        </proxy-factory-config>
    </invoker-proxy-binding>
Clustering stateful session beans is more complex than clustering their stateless counterparts since JBoss needs to manage the state information. The state of all stateful session beans are replicated and synchronized across the cluster each time the state of a bean changes. The JBoss AS uses the HASessionState MBean to manage distributed session states for clustered EJB 2.x stateful session beans. In this section, we cover both the session bean configuration and the HASessionState MBean configuration.
In the EJB application, you need to modify the jboss.xml descriptor file for each stateful session bean and add the <clustered> tag.
<jboss>
    <enterprise-beans>
        <session>
            <ejb-name>nextgen.StatefulSession</ejb-name>
            <jndi-name>nextgen.StatefulSession</jndi-name>
            <clustered>True</clustered>
            <cluster-config>
                <partition-name>DefaultPartition</partition-name>
                <home-load-balance-policy>
                    org.jboss.ha.framework.interfaces.RoundRobin
                </home-load-balance-policy>
                <bean-load-balance-policy>
                    org.jboss.ha.framework.interfaces.FirstAvailable
                </bean-load-balance-policy>
                <session-state-manager-jndi-name>
                    /HASessionState/Default
                </session-state-manager-jndi-name>
            </cluster-config>
        </session>
    </enterprise-beans>
</jboss>
In the bean configuration, only the <clustered> tag is mandatory to indicate that the bean works in a cluster. The <cluster-config> element is optional and its default attribute values are indicated in the sample configuration above.
The <session-state-manager-jndi-name> tag is used to give the JNDI name of the HASessionState service to be used by this bean.
The description of the remaining tags is identical to the one for stateless session bean. Actions on the clustered stateful session bean's home interface are by default load-balanced, round-robin. Once the bean's remote stub is available to the client, calls will not be load-balanced round-robin any more and will stay "sticky" to the first node in the list.
As the replication process is a costly operation, you can optimise this behaviour by optionally implementing in your bean class a method with the following signature:
public boolean isModified ();
Before replicating your bean, the container will detect if your bean implements this method. If your bean does, the container calls the isModified() method and it only replicates the bean when the method returns true. If the bean has not been modified (or not enough to require replication, depending on your own preferences), you can return false and the replication would not occur. This feature is available on JBoss AS 3.0.1+ only.
The HASessionState service MBean is defined in the all/deploy/cluster-service.xml file.
<mbean code="org.jboss.ha.hasessionstate.server.HASessionStateService"
      name="jboss:service=HASessionState">
    <depends>
        jboss:service=${jboss.partition.name:DefaultPartition}
    </depends>
    <!-- Name of the partition to which the service is linked -->
    <attribute name="PartitionName">
        ${jboss.partition.name:DefaultPartition}
    </attribute>
    <!-- JNDI name under which the service is bound -->
    <attribute name="JndiName">/HASessionState/Default</attribute>
    <!-- Max delay before cleaning unreclaimed state.
           Defaults to 30*60*1000 => 30 minutes -->
    <attribute name="BeanCleaningDelay">0</attribute>
</mbean>
The configuration attributes in the HASessionState MBean are listed below.
JndiName is an optional attribute to specify the JNDI name under which this HASessionState service is bound. The default value is /HAPartition/Default.
PartitionName is an optional attribute to specify the name of the cluster in which the current HASessionState protocol will work. The default value is DefaultPartition.
BeanCleaningDelay is an optional attribute to specify the number of miliseconds after which the HASessionState service can clean a state that has not been modified. If a node, owning a bean, crashes, its brother node will take ownership of this bean. Nevertheless, the container cache of the brother node will not know about it (because it has never seen it before) and will never delete according to the cleaning settings of the bean. That is why the HASessionState service needs to do this cleanup sometimes. The default value is 30*60*1000 milliseconds (i.e., 30 minutes).
To cluster a stateless session bean in EJB 3.0, all you need to do is to annotate the bean class withe the @Cluster annotation. You can pass in the load balance policy and cluster partition as parameters to the annotation. The default load balance policy is org.jboss.ha.framework.interfaces.RandomRobin and the default cluster is DefaultPartition. Below is the definition of the @Cluster annotation.
public @interface Clustered {
   Class loadBalancePolicy() default LoadBalancePolicy.class;
   String partition() default "DefaultPartition";
}
Here is an example of a clustered EJB 3.0 stateless session bean implementation.
@Stateless
@Clustered
public class MyBean implements MySessionInt {

   public void test() {
      // Do something cool
   }
}
To cluster stateful session beans in EJB 3.0, you need to tag the bean implementation class with the @Cluster annotation, just as we did with the EJB 3.0 stateless session bean earlier.
@Stateful
@Clustered
public class MyBean implements MySessionInt {

   private int state = 0;

   public void increment() {
      System.out.println("counter: " + (state++));
   }
}
JBoss Cache provides the session state replication service for EJB 3.0 stateful session beans. The related MBean service is defined in the ejb3-clustered-sfsbcache-service.xml file in the deploy directory. The contents of the file are as follows.
<server>
   <mbean code="org.jboss.ejb3.cache.tree.PassivationTreeCache"
       name="jboss.cache:service=EJB3SFSBClusteredCache">

        <attribute name="IsolationLevel">READ_UNCOMMITTED</attribute>
        <attribute name="CacheMode">REPL_SYNC</attribute>
        <attribute name="ClusterName">SFSB-Cache</attribute>
        <attribute name="ClusterConfig">
            ... ...
        </attribute>

        <!--  Number of milliseconds to wait until all responses for a
              synchronous call have been received.
        -->
        <attribute name="SyncReplTimeout">10000</attribute>

        <!--  Max number of milliseconds to wait for a lock acquisition -->
        <attribute name="LockAcquisitionTimeout">15000</attribute>

        <!--  Name of the eviction policy class. -->
        <attribute name="EvictionPolicyClass">
            org.jboss.ejb3.cache.tree.StatefulEvictionPolicy
        </attribute>

        <!--  Specific eviction policy configurations. This is LRU -->
        <attribute name="EvictionPolicyConfig">
            <config>
                <attribute name="wakeUpIntervalSeconds">1</attribute>
                <name>statefulClustered</name>
                <region name="/_default_">
                    <attribute name="maxNodes">1000000</attribute>
                    <attribute name="timeToIdleSeconds">300</attribute>
                </region>
            </config>
        </attribute>

        <attribute name="CacheLoaderFetchPersistentState">false</attribute>
        <attribute name="CacheLoaderFetchTransientState">true</attribute>
        <attribute name="FetchStateOnStartup">true</attribute>
        <attribute name="CacheLoaderClass">
            org.jboss.ejb3.cache.tree.StatefulCacheLoader
        </attribute>
        <attribute name="CacheLoaderConfig">
            location=statefulClustered
        </attribute>
   </mbean>
</server>
The configuration attributes in the PassivationTreeCache MBean are essentially the same as the attributes in the standard JBoss Cache TreeCache MBean discussed in Chapter 17, JBossCache and JGroups Services. Again, we omitted the JGroups configurations in the ClusterConfig attribute (see more in Section 17.1, “JGroups Configuration”).
In a JBoss AS cluster, the entity bean instances need to replicated across all nodes. If an entity bean provides remote services, the service methods need to be load balanced as well.
To use a clustered entity bean, the application does not need to do anything special, except for looking up bean references from the clustered HA-JNDI.
First of all, it is worth to note that clustering 2.x entity beans is a bad thing to do. Its exposes elements that generally are too fine grained for use as remote objects to clustered remote objects and introduces data synchronization problems that are non-trivial. Do NOT use EJB 2.x entity bean clustering unless you fit into the sepecial case situation of read-only, or one read-write node with read-only nodes synched with the cache invalidation services.
To cluster EJB 2.x entity beans, you need to add the <clustered> element to the application's jboss.xml descriptor file. Below is a typical jboss.xml file.
<jboss>
    <enterprise-beans>
        <entity>
            <ejb-name>nextgen.EnterpriseEntity</ejb-name>
            <jndi-name>nextgen.EnterpriseEntity</jndi-name>
            <clustered>True</clustered>
            <cluster-config>
                <partition-name>DefaultPartition</partition-name>
                <home-load-balance-policy>
                    org.jboss.ha.framework.interfaces.RoundRobin
                </home-load-balance-policy>
                <bean-load-balance-policy>
                    org.jboss.ha.framework.interfaces.FirstAvailable
                </bean-load-balance-policy>
            </cluster-config>
        </entity>
    </enterprise-beans>
</jboss>
The EJB 2.x entity beans are clustered for load balanced remote invocations. All the bean instances are synchronized to have the same contents on all nodes.
However, clustered EJB 2.x Entity Beans do not have a distributed locking mechanism or a distributed cache. They can only be synchronized by using row-level locking at the database level (see <row-lock> in the CMP specification) or by setting the Transaction Isolation Level of your JDBC driver to be TRANSACTION_SERIALIZABLE. Because there is no supported distributed locking mechanism or distributed cache Entity Beans use Commit Option "B" by default (See standardjboss.xml and the container configurations Clustered CMP 2.x EntityBean, Clustered CMP EntityBean, or Clustered BMP EntityBean). It is not recommended that you use Commit Option "A" unless your Entity Bean is read-only. (There are some design patterns that allow you to use Commit Option "A" with read-mostly beans. You can also take a look at the Seppuku pattern http://dima.dhs.org/misc/readOnlyUpdates.html. JBoss may incorporate this pattern into later versions.)
Note
If you are using Bean Managed Persistence (BMP), you are going to have to implement synchronization on your own. The MVCSoft CMP 2.0 persistence engine (see http://www.jboss.org/jbossgroup/partners.jsp) provides different kinds of optimistic locking strategies that can work in a JBoss cluster.
In EJB 3.0, the entity beans primarily serve as a persistence data model. They do not provide remote services. Hence, the entity bean clustering service in EJB 3.0 primarily deals with distributed caching and replication, instead of load balancing.
To avoid round trips to the database, you can use a cache for your entities. JBoss EJB 3.0 is implemented by Hibernate, which has support for a second-level cache. The Hibernate setup used for the JBoss EJB 3.0 implementation uses JBoss Cache as its underlying cache implementation. The cache provides the following functionalities.
If you persist a cache enabled entity bean instance to the database via the entity manager the entity will inserted into the cache.
If you update an entity bean instance and save the changes to the database via the entity manager the entity will updated in the cache.
If you remove an entity bean instance from the database via the entity manager the entity will removed from the cache.
If loading a cached entity from the database via the entity manager, and that entity does not exist in the database, it will be inserted into the cache.
JBoss Cache service for EJB 3.0 entity beans is configured in a TreeCache MBean (see Section 17.2, “JBossCache Configuration”) in the deploy/ejb3-entity-cache-service.xml file. The name of the cache MBean service is jboss.cache:service=EJB3EntityTreeCache. Below is the contents of the ejb3-entity-cache-service.xml file in the standard JBoss distribution. Again, we omitted the JGroups configuration element ClusterConfig.
<server>
    <mbean code="org.jboss.cache.TreeCache"
            name="jboss.cache:service=EJB3EntityTreeCache">

        <depends>jboss:service=Naming</depends>
        <depends>jboss:service=TransactionManager</depends>

        <!-- Configure the TransactionManager -->
        <attribute name="TransactionManagerLookupClass">
            org.jboss.cache.JBossTransactionManagerLookup
        </attribute>

        <attribute name="IsolationLevel">REPEATABLE_READ</attribute>
        <attribute name="CacheMode">REPL_SYNC</attribute>

        <!--Name of cluster. Needs to be the same for all clusters,
            in order to find each other -->
        <attribute name="ClusterName">EJB3-entity-cache</attribute>

        <attribute name="ClusterConfig">
            ... ...
        </attribute>

        <attribute name="InitialStateRetrievalTimeout">5000</attribute>
        <attribute name="SyncReplTimeout">10000</attribute>
        <attribute name="LockAcquisitionTimeout">15000</attribute>

        <attribute name="EvictionPolicyClass">
            org.jboss.cache.eviction.LRUPolicy
        </attribute>

        <!--  Specific eviction policy configurations. This is LRU -->
        <attribute name="EvictionPolicyConfig">
            <config>
                <attribute name="wakeUpIntervalSeconds">5</attribute>
                <!--  Cache wide default -->
                <region name="/_default_">
                    <attribute name="maxNodes">5000</attribute>
                    <attribute name="timeToLiveSeconds">1000</attribute>
                </region>
            </config>
        </attribute>
    </mbean>
</server>
As we discussed in Section 17.2, “JBossCache Configuration”, JBoss Cache allows you to specify timeouts to cached entities. Entities not accessed within a certain amount of time are dropped from the cache in order to save memory. If running within a cluster, and the cache is updated, changes to the entries in one node will be replicated to the corresponding entries in the other nodes in the cluster.
Now, we have JBoss Cache configured to support distributed caching of EJB 3.0 entity beans. We still have to configure individual entity beans to use the cache service.
You define your entity bean classes the normal way. Future versions of JBoss EJB 3.0 will support annotating entities and their relationship collections as cached, but for now you have to configure the underlying hibernate engine directly. Take a look at the persistence.xml file , which configures the caching options for hibernate via its optional property elements. The following element in persistence.xml defines that caching should be enabled:
<!-- Clustered cache with TreeCache -->
<property name="cache.provider_class">
    org.jboss.ejb3.entity.TreeCacheProviderHook
</property>
The following property element defines the object name of the cache to be used, and the MBean name.
<property name="treecache.mbean.object_name">
    jboss.cache:service=EJB3EntityTreeCache
</property>
Next we need to configure what entities be cached. The default is to not cache anything, even with the settings shown above. A very simplified rule of thumb is that you will typically want to do caching for objects that rarely change, and which are frequently read.
The following code defines that Customer and Contact entity beans should be cached . Any attempt to look up Customer and Contact by their primary key, will first attempt to read the entry from the cache. If the entity bean cannot be found in the cache, it will load it up from the database.
<!-- Define cached entities and collections -->
<class-cache class="bean.Customer" usage="transactional"/>
<class-cache class="bean.Contact" usage="transactional"/>
You can also cache relationship collections. Any attempt to access the contacts collection of the Customer entity bean will attempt to load the data from the cache before hitting the database:
<collection-cache collection="bean.Customer.contacts" usage="transactional"/>
Please consult the Hibernate documentation for further information about settings for caching.
HTTP session replication is used to replicate the state associated with your web clients on other nodes of a cluster. Thus, in the event one of your node crashes, another node in the cluster will be able to recover. Two distinct functions must be performed:
Session state replication
Load-balance of incoming invocations
State replication is directly handled by JBoss. When you run JBoss in the all configuration, session state replication is enabled by default. Just deploy your web application and its session state is already replicated across all JBoss instances in the cluster.
However, Load-balancing is a different story, it is not handled by JBoss itself and requires additional software. As a very common scenario, we will demonstrate how to setup Apache and mod_jk. This activity could be either performed by specialized hardware switches or routers (Cisco LoadDirector for example) or any other dedicated software though.
Note
A load-balancer tracks the HTTP requests and, depending on the session to which is linked the request, it dispatches the request to the appropriate node. This is called a load-balancer with sticky-sessions: once a session is created on a node, every future request will also be processed by the same node. Using a load-balancer that supports sticky-sessions without replicating the sessions allows you to scale very well without the cost of session state replication: each query will always be handled by the same node. But in the case a node dies, the state of all client sessions hosted by this node are lost (the shopping carts, for example) and the clients will most probably need to login on another node and restart with a new session. In many situations, it is acceptable not to replicate HTTP sessions because all critical state is stored in the database. In other situations, loosing a client session is not acceptable and, in this case, session state replication is the price one has to pay.
Apache is a well-known web server which can be extended by plugging modules. One of these modules, mod_jk (and the newest mod_jk2) has been specifically designed to allow forward requests from Apache to a Servlet container. Furthermore, it is also able to load-balance HTTP calls to a set of Servlet containers while maintaining sticky sessions, and this is what is actually interesting for us.
First of all, make sure that you have Apache installed. You can download Apache directly from Apache web site at http://httpd.apache.org/. Its installation is pretty straightforward and requires no specific configuration. As several versions of Apache exist, we advise you to use version 2.0.x. We will consider, for the next sections, that you have installed Apache in the APACHE_HOME directory.
Next, download mod_jk binaries. Several versions of mod_jk exist as well. We strongly advise you to use mod_jk 1.2.x, as both mod_jk and mod_jk2 are deprecated, unsupported and no further developments are going on in the community. The mod_jk 1.2.x binary can be downloaded from http://www.apache.org/dist/jakarta/tomcat-connectors/jk/binaries/. Rename the downloaded file to mod_jk.so and copy it under APACHE_HOME/modules/.
Modify APACHE_HOME/conf/httpd.conf and add a single line at the end of the file:
# Include mod_jk's specific configuration file
Include conf/mod-jk.conf
Next, create a new file named APACHE_HOME/conf/mod-jk.conf:
# Load mod_jk module
# Specify the filename of the mod_jk lib
LoadModule jk_module modules/mod_jk.so

# Where to find workers.properties
JkWorkersFile conf/workers.properties

# Where to put jk logs
JkLogFile logs/mod_jk.log

# Set the jk log level [debug/error/info]
JkLogLevel info

# Select the log format
JkLogStampFormat  "[%a %b %d %H:%M:%S %Y]"

# JkOptions indicates to send SSK KEY SIZE
JkOptions +ForwardKeySize +ForwardURICompat -ForwardDirectories

# JkRequestLogFormat
JkRequestLogFormat "%w %V %T"

# Mount your applications
JkMount /application/* loadbalancer

# You can use external file for mount points.
# It will be checked for updates each 60 seconds.
# The format of the file is: /url=worker
# /examples/*=loadbalancer
JkMountFile conf/uriworkermap.properties

# Add shared memory.
# This directive is present with 1.2.10 and
# later versions of mod_jk, and is needed for
# for load balancing to work properly
JkShmFile logs/jk.shm

# Add jkstatus for managing runtime data
<Location /jkstatus/>
    JkMount status
    Order deny,allow
    Deny from all
    Allow from 127.0.0.1
</Location>
Please note that two settings are very important:
The LoadModule directive must reference the mod_jk library you have downloaded in the previous section. You must indicate the exact same name with the "modules" file path prefix.
The JkMount directive tells Apache which URLs it should forward to the mod_jk module (and, in turn, to the Servlet containers). In the above file, all requests with URL path /application/* are sent to the mod_jk load-balancer. This way, you can configure Apache to server static contents (or PHP contents) directly and only use the loadbalancer for Java applications. If you only use mod_jk as a loadbalancer, you can also forward all URLs (i.e., /*) to mod_jk.
In addition to the JkMount directive, you can also use the JkMountFile directive to specify a mount points configuration file, which contains multiple Tomcat forwarding URL mappings. You just need to create a uriworkermap.properties file in the APACHE_HOME/conf directory. The format of the file is /url=worker_name. To get things started, paste the following example into the file you created:
# Simple worker configuration file

# Mount the Servlet context to the ajp13 worker
/jmx-console=loadbalancer
/jmx-console/*=loadbalancer
/web-console=loadbalancer
/web-console/*=loadbalancer
This will configure mod_jk to forward requests to /jmx-console and /web-console to Tomcat.
You will most probably not change the other settings in mod_jk.conf. They are used to tell mod_jk where to put its logging file, which logging level to use and so on.
Next, you need to configure mod_jk workers file conf/workers.properties. This file specify where are located the different Servlet containers and how calls should be load-balanced across them. The configuration file contains one section for each target servlet container and one global section. For a two nodes setup, the file could look like this:
# Define list of workers that will be used
# for mapping requests
worker.list=loadbalancer,status

# Define Node1
# modify the host as your host IP or DNS name.
worker.node1.port=8009
worker.node1.host=node1.mydomain.com
worker.node1.type=ajp13
worker.node1.lbfactor=1
worker.node1.cachesize=10

# Define Node2
# modify the host as your host IP or DNS name.
worker.node2.port=8009
worker.node2.host= node2.mydomain.com
worker.node2.type=ajp13
worker.node2.lbfactor=1
worker.node2.cachesize=10

# Load-balancing behaviour
worker.loadbalancer.type=lb
worker.loadbalancer.balance_workers=node1,node2
worker.loadbalancer.sticky_session=1
#worker.list=loadbalancer

# Status worker for managing load balancer
worker.status.type=status
Basically, the above file configures mod_jk to perform weighted round-robin load balancing with sticky sessions between two servlet containers (JBoss Tomcat) node1 and node2 listening on port 8009.
In the works.properties file, each node is defined using the worker.XXX naming convention where XXX represents an arbitrary name you choose for one of the target Servlet container. For each worker, you must give the host name (or IP address) and port number of the AJP13 connector running in the Servlet container.
The lbfactor attribute is the load-balancing factor for this specific worker. It is used to define the priority (or weight) a node should have over other nodes. The higher this number is, the more HTTP requests it will receive. This setting can be used to differentiate servers with different processing power.
The cachesize attribute defines the size of the thread pools associated to the Servlet container (i.e. the number of concurrent requests it will forward to the Servlet container). Make sure this number does not outnumber the number of threads configured on the AJP13 connector of the Servlet container. Please review http://jakarta.apache.org/tomcat/connectors-doc/config/workers.html for comments on cachesize for Apache 1.3.x.
The last part of the conf/workers.properties file defines the loadbalancer worker. The only thing you must change is the worker.loadbalancer.balanced_workers line: it must list all workers previously defined in the same file: load-balancing will happen over these workers.
The sticky_session property specifies the cluster behavior for HTTP sessions. If you specify worker.loadbalancer.sticky_session=0, each request will be load balanced between node1 and node2. But when a user opens a session on one server, it is a good idea to always forward this user's requests to the same server. This is called a "sticky session", as the client is always using the same server he reached on his first request. Otherwise the user's session data would need to be synchronized between both servers (session replication, see Section 16.5.5, “Configure HTTP session state replication”). To enable session stickiness, you need to set worker.loadbalancer.sticky_session to 1.
Note
A non-loadbalanced setup with a single node required the worker.list=node1 entry before mod_jk would function correctly.
Finally, we must configure the JBoss Tomcat instances on all clustered nodes so that they can expect requests forwarded from the mod_jk loadbalancer.
On each clustered JBoss node, we have to name the node according to the name specified in workers.properties. For instance, on JBoss instance node1, edit the JBOSS_HOME/server/all/deploy/jbossweb-tomcat50.sar/server.xml file (replace /all with your own server name if necessary). Locate the <Engine> element and add an attribute jvmRoute:
<Engine name="jboss.web" defaultHost="localhost" jvmRoute="node1">
... ...
</Engine>
Then, for each JBoss Tomcat instance in the cluster, we need to tell it to add the jvmRoute value to its session cookies so that mod_jk can route incoming requests. Edit the JBOSS_HOME/server/all/deploy/jbossweb-tomcat50.sar/META-INF/jboss-service.xml file (replace /all with your own server name). Locate the <attribute> element with a name of UseJK, and set its value to true:
<attribute name="UseJK">true</attribute>
At this point, you have a fully working Apache+mod_jk load-balancer setup that will balance call to the Servlet containers of your cluster while taking care of session stickiness (clients will always use the same Servlet container).
Note
For more updated information on using mod_jk 1.2 with JBoss Tomcat, please refer to the JBoss wiki page at http://wiki.jboss.org/wiki/Wiki.jsp?page=UsingMod_jk1.2WithJBoss.
In Section 16.5.3, “Configure worker nodes in mod_jk”, we covered how to use sticky sessions to make sure that a client in a session always hits the same server node in order to maintain the session state. However, that is not an ideal solution. The load might be unevenly distributed over the nodes over time and if a node goes down, all its session data is lost. A better and more reliable solution is to replicate session data across all nodes in the cluster. This way, the client can hit any server node and obtain the same session states.
The jboss.cache:service=TomcatClusteringCache MBean makes use of JBoss Cache to provide HTTP session replication service to the HTTP load balancer in a JBoss Tomcat cluster. This MBean is defined in the deploy/tc5-cluster-service.xml file.
Note
If you are not running from the all configuration, session replication can be enabled by copying deploy/tc5-cluster-service.xml, lib/jgroups.jar and lib/jboss-cache.jar from server/all into your server configuration directory.
Below is a typical tc5-cluster-service.xml file. The configuration attributes in the TomcatClusteringCache MBean is very similar to those in Section 17.2, “JBossCache Configuration”.
<mbean code="org.jboss.cache.TreeCache"
    name="jboss.cache:service=TomcatClusteringCache">

    <depends>jboss:service=Naming</depends>
    <depends>jboss:service=TransactionManager</depends>

    <attribute name="TransactionManagerLookupClass">
        org.jboss.cache.JBossTransactionManagerLookup
    </attribute>

    <attribute name="IsolationLevel">REPEATABLE_READ</attribute>

    <attribute name="CacheMode">REPL_ASYNC</attribute>

    <attribute name="ClusterName">Tomcat-Cluster</attribute>

    <attribute name="ClusterConfig">
        ... ...
    </attribute>

    <attribute name="LockAcquisitionTimeout">15000</attribute>
</mbean>
The detailed configuration for the TreeCache MBean is covered in Section 17.2, “JBossCache Configuration”. Below, we will just example several attributes that are most relevant to the HTTP cluster session replication.
TransactionManagerLookupClass sets the transaction manager factory. The default value is org.jboss.cache.JBossTransactionManagerLookup. It expects to find the transaction manager under java:/TransactionManager.
IsolationLevel sets the isolation level for updates to the transactional distributed cache. The valid values are SERIALIZABLE, REPEATABLE_READ, READ_COMMITTED, READ_UNCOMMITTED, and NONE. These isolation levels mean the same thing as isolation levels on the database. The default isolation of REPEATABLE_READ makes sense for most web applications.
CacheMode controls how the cache is replicated. The valid values are REPL_SYNC and REPL_ASYNC, which determine whether changes are made synchronously or asynchronously. Using synchronous replication makes sure changes propagated to the cluster before the web request completes. However, synchronous replication is much slower. For asyncrhonous access, you will want to enable and tune the replication queue.
ClusterName specifies the name of the cluster that the cache works within. The default cluster name is Tomcat-Cluster. All the nodes should use the same cluster name. Although session replication can share the same channel (multicast address and port) with other clustered services in JBoss, replication should have it's own cluster name.
ClusterConfig configures the underlying JGroups stack. The most import configuration elements are the muliticast adress and port, mcast_addr and mcast_port respectively, to use for clustered communication. These values should make sense for your network. Please refer to Section 17.1, “JGroups Configuration” for more information.
LockAcquisitionTimeout sets the maximum number of milliseconds to wait for a lock acquisition. The default value is 15000.
UseReplQueue determines whether to enable the replication queue when using asynchronous replication. This allows multiple cache updates to be bundled together to improve performance. The replication queue properties are controlled by the ReplQueueInterval and ReplQueueMaxElements properties.
ReplQueueInterval specifies the time in milliseconds JBoss Cache will wait before sending items in the replication queue.
ReplQueueMaxElements: specifies the maximum number of elements allowed in the replication queue before JBoss Cache will send an update.
To enable clustering of your web application you must it as distributable in the web.xml descriptor. Here's an example:
<?xml version="1.0"?>
<web-app  xmlns="http://java.sun.com/xml/ns/j2ee"
          xmlns:xsi="http://www.w3.org/2001/XMLSchema-instance"
          xsi:schemaLocation="http://java.sun.com/xml/ns/j2ee
                              http://java.sun.com/xml/ns/j2ee/web-app_2_4.xsd"
          version="2.4">
    <distributable/>
    <!-- ... -->
</web-app>
You can futher configure session replication using the replication-config element in the jboss-web.xml file. Here is an example:
<jboss-web>
    <replication-config>
        <replication-trigger>SET_AND_NON_PRIMITIVE_GET</replication-trigger>
        <replication-granularity>SESSION</replication-granularity>
    </replication-config>
</jboss-web>
The replication-trigger element determines what triggers a session replication (or when is a session is considered dirty). It has 4 options:
SET: With this policy, the session is considered dirty only when an attribute is set in the session. If your application always writes changed value back into the session, this option will be most optimized in term of performance. If an object is retrieved from the session and modified without being written back into the session, the change to that object will not be replicated.
SET_AND_GET: With this policy, any attribute that is get or set will be marked as dirty. If an object is retrieved from the session and modified without being written back into the session, the change to that object will be replicated. This option can have significant performance implications.
SET_AND_NON_PRIMITIVE_GET: This policy is similar to the SET_AND_GET policy except that only non-primitive get operations are considered dirty. For example, the http session request may retrieve a non-primitive object instance from the attribute and then modify the instance. If we don't specify that non-primitive get is considered dirty, then the modification will not be replication properly. This is the default value.
ACCESS: This option causes the session to be marked as dirty whenever it is accessed. Since a the session is accessed during each HTTP request, it will be replicated with each request. The access time stamp in the session instance will be updated as well. Since the time stamp may not be updated in other clustering nodes because of no replication, the session in other nodes may expire before the active node if the HTTP request does not retrieve or modify any session attributes. When this option is set, the session timestamps will be synchronized throughout the cluster nodes. Note that use of this option can have a significant performance impact, so use it with caution.
The replication-granularity element controls the size of the replication units. The supported values are:
session: Replication is per session instance. As long as it is considered modified when the snapshot manager is called, the whole session object will be serialized.
attribute: Replication is only for the dirty attributes plus some session data, like, lastAccessTime. For session that carries large amount of data, this option can increase replication performance.
If your sessions are generally small, session is the better policy. If your session is larger and some partsare infrequently accessed, attribute replication will be more effective.
If you have deployed and accessed your application, go to the jboss.cache:service=TomcatClusteringCache MBean and invoke the printDetails operation. You should see output resembling the following.
/JSESSION

/quote

/FB04767C454BAB3B2E462A27CB571330
VERSION: 6
FB04767C454BAB3B2E462A27CB571330: org.jboss.invocation.MarshalledValue@1f13a81c

/AxCI8Ovt5VQTfNyYy9Bomw**
VERSION: 4
AxCI8Ovt5VQTfNyYy9Bomw**: org.jboss.invocation.MarshalledValue@e076e4c8
This output shows two separate web sessions, in one application named quote, that are being shared via JBossCache. This example uses a replication-granularity of session. Had attribute level replication been used, there would be additional entries showing each replicated session attribute. In either case, the replicated values are stored in an opaque MarshelledValue container. There aren't currently any tools that allow you to inspect the contents of the replicated session values. If you don't see any output, either the application was not correctly marked as distributable or you haven't accessed a part of application that places values in the HTTP session. The org.jboss.cache and org.jboss.web logging categories provide additional insight into session replication useful for debugging purposes.
JBoss supports clustered single sign-on, allowing a user to authenticate to one application on a JBoss server and to be recognized on all applications, on that same machine or on another node in the cluster, that are deployed on the same virtual host. Authentication replication is handled by the HTTP session replication service. Although session replication does not need to be explicitly enabled for the applications in question, the tc5-cluster-service.xml file does need to be deployed.
To enable single sign-on, you must add the ClusteredSingleSignOn valve to the appropriate Host elements of the tomcat server.xml file. The valve configuration is shown here:
<Valve className="org.jboss.web.tomcat.tc5.sso.ClusteredSingleSignOn" />
JBoss AS 3.2.4 and above support high availability JMS (HA-JMS) services in the all server configuration. In the current production release of JBoss AS, the HA-JMS service is implemented as a clustered singleton fail-over service.
Note
If you are willing to configure HA-JMS yourself, you can get it to work with earlier versions of JBoss AS. We have a customer who uses HA-JMS successfully in JBoss AS 3.0.7. Please contact JBoss support for more questions.
The JBoss HA-JMS service (i.e., message queues and topics) only runs on a single node (i.e., the master node) in the cluster at any given time. If that node fails, the cluster simply elects another node to run the JMS service (fail-over). This setup provides redundancy against server failures but does not reduce the work load on the JMS server node.
Note
While you cannot load balance HA-JMS queues (there is only one master node that runs the queues), you can load balance the MDBs that process messages from those queues (see Section 16.6.1.3, “Load Balanced HA-JMS MDBs”).
To use the singleton fail-over HA-JMS service, you must configure JMS services identically on all nodes in the cluster. That includes all JMS related service MBeans and all deployed JMS applications.
The JMS server is configured to persist its data in the DefaultDS. By default, that is the embedded HSQLDB. In most cluster environments, however, all nodes need to persist data against a shared database. So, the first thing to do before you start clustered JMS is to setup a shared database for JMS. You need to do the following:
Configure DefaultDS to point to the database server of your choice. That is to replace the deploy/hsqlsb-ds.xml file with the xxx-ds.xml file in the docs/examples/jca directory, where xxx is the name of the target shared database (e.g., mysql-ds.xml, see Section 7.3, “Configuring JDBC DataSources”).
Replace the hsqldb-jdbc2-service.xml file under the server/all/deploy-hasingleton/jms directory with one tuned to the specific database. For example if you use MySQL the file is mysql-jdbc2-service.xml. Configuration files for a number of RDBMS are bundled with the JBoss AS distribution. They can be found under docs/examples/jms.
Note
There is no need to replace the hsqldb-jdbc-state-service.xml file under the server/all/deploy-hasingleton/jms directory. Despite the hsql in its name, it works with all SQL92 compliant databases, including HSQL, MySQL, SQL Server, and more. It automatically uses the DefaultDS for storage, as we configured above.
The HA-JMS client is different from regular JMS clients in two important aspects.
The HA-JMS client must obtain JMS connection factories from the HA-JNDI (the default port is 1100).
The client connection must listens for server exceptions. When the cluster fail-over to a different master node, all client operations on the current connection fails with exceptions. The client must know to re-connect.
Note
While the HA-JMS connection factory knows the current master node that runs JMS services, there is no smart client side interceptor. The client stub only knows the fixed master node and cannot adjust to server topography changes.
While the HA-JMS queues and topics only run on a single node at a time, MDBs on multiple nodes can receive and process messages from the HA-JMS master node. The contested queues and topics result in load balancing behavior for MDBs. To enable loading balancing for MDBs, you can specify a receiver for the queue. The receiver records which node is waiting for a message and in which order the messages should be processed. JBoss provides three receiver implementations.
The org.jboss.mq.server.ReceiversImpl is the default implementation using a HashSet.
The org.jboss.mq.server.ReceiversImplArrayList is theimplementation using an ArrayList.
The org.jboss.mq.server.ReceiversImplLinkedList is the implementation using a LinkedList.
You can specify the receiver implementation class name as an attribute in the MBean that defines the permanent JMS Queue or DestinationManager on each node (see Chapter 6, Messaging on JBoss). For best load balancing performance, we suggest you to use the ReceiversImplArrayList or ReceiversImplArrayList implementations due to an undesirable implementation detail of HashSet in the JVM.