
A business process is a graph that describes the order in which a series of steps need to be executed, using a flow chart. A process consists of a collection of nodes that are linked to each other using connections. Each of the nodes represents one step in the overall process while the connections specify how to transition from one node to the other. A large selection of predefined node types have been defined. This chapter describes how to define such processes and use them in your application.
Processes can be created by using one of the following three methods:
- Using the graphical process editor in the Eclipse plugin
- As an XML file, according to the XML process format as defined in the XML Schema Definition in the BPMN 2.0 specification.
- By directly creating a process using the Process API.
The graphical BPMN2 editor is a editor that allows you to create a process by dragging and dropping different nodes on a canvas and editing the properties of these nodes. The graphical BPMN2 editor is part of the jBPM / Drools Eclipse plugin. Once you have set up a jBPM project (see the installer for creating a working Eclipse environment where you can start), you can start adding processes. When in a project, launch the "New" wizard (use Ctrl+N) or right-click the directory you would like to put your process in and select "New", then "File". Give the file a name and the extension bpmn (e.g. MyProcess.bpmn). This will open up the process editor (you can safely ignore the warning that the file could not be read, this is just because the file is still empty).
First, ensure that you can see the Properties View down the bottom of the Eclipse window, as it will be necessary to fill in the different properties of the elements in your process. If you cannot see the properties view, open it using the menu "Window", then "Show View" and "Other...", and under the "General" folder select the Properties View.

The process editor consists of a palette, a canvas and an outline view. To add new elements to the canvas, select the element you would like to create in the palette and then add them to the canvas by clicking on the preferred location. For example, click on the "End Event" icon in the "Components" palette of the GUI. Clicking on an element in your process allows you to set the properties of that element. You can connect the nodes (as long as it is permitted by the different types of nodes) by using "Sequence Flow" from the "Components" palette.
You can keep adding nodes and connections to your process until it represents the business logic that you want to specify.
It is also possible to specify processes using the underlying BPMN 2.0 XML directly. The syntax of these XML processes is defined using the BPMN 2.0 XML Schema Definition. For example, the following XML fragment shows a simple process that contains a sequence of a Start Event, a Script Task that prints "Hello World" to the console, and an End Event.
<?xml version="1.0" encoding="UTF-8"?>

<definitions id="Definition"

             targetNamespace="http://www.jboss.org/drools"

             typeLanguage="http://www.java.com/javaTypes"

             expressionLanguage="http://www.mvel.org/2.0"

             xmlns="http://www.omg.org/spec/BPMN/20100524/MODEL"Rule Task

             xmlns:xsi="http://www.w3.org/2001/XMLSchema-instance"

             xsi:schemaLocation="http://www.omg.org/spec/BPMN/20100524/MODEL BPMN20.xsd"

             xmlns:g="http://www.jboss.org/drools/flow/gpd"

             xmlns:bpmndi="http://www.omg.org/spec/BPMN/20100524/DI"

             xmlns:dc="http://www.omg.org/spec/DD/20100524/DC"

             xmlns:di="http://www.omg.org/spec/DD/20100524/DI"

             xmlns:tns="http://www.jboss.org/drools">


  <process processType="Private" isExecutable="true" id="com.sample.hello" name="Hello Process" >


    <!-- nodes -->

    <startEvent id="_1" name="Start" />

    <scriptTask id="_2" name="Hello" >

      <script>System.out.println("Hello World");</script>

    </scriptTask>

    <endEvent id="_3" name="End" >

        <terminateEventDefinition/>

    </endEvent>


    <!-- connections -->

    <sequenceFlow id="_1-_2" sourceRef="_1" targetRef="_2" />

    <sequenceFlow id="_2-_3" sourceRef="_2" targetRef="_3" />


  </process>


  <bpmndi:BPMNDiagram>

    <bpmndi:BPMNPlane bpmnElement="com.sample.hello" >

      <bpmndi:BPMNShape bpmnElement="_1" >

        <dc:Bounds x="16" y="16" width="48" height="48" />

      </bpmndi:BPMNShape>

      <bpmndi:BPMNShape bpmnElement="_2" >

        <dc:Bounds x="96" y="16" width="80" height="48" />

      </bpmndi:BPMNShape>

      <bpmndi:BPMNShape bpmnElement="_3" >

        <dc:Bounds x="208" y="16" width="48" height="48" />

      </bpmndi:BPMNShape>

      <bpmndi:BPMNEdge bpmnElement="_1-_2" >

        <di:waypoint x="40" y="40" />

        <di:waypoint x="136" y="40" />

      </bpmndi:BPMNEdge>

      <bpmndi:BPMNEdge bpmnElement="_2-_3" >

        <di:waypoint x="136" y="40" />

        <di:waypoint x="232" y="40" />

      </bpmndi:BPMNEdge>

    </bpmndi:BPMNPlane>

  </bpmndi:BPMNDiagram>


</definitions>
The process XML file consists of two parts, the top part (the "process" element) contains the definition of the different nodes and their properties, the lower part (the "BPMNDiagram" element) contains all graphical information, like the location of the nodes. The process XML consist of exactly one <process> element. This element contains parameters related to the process (its type, name, id and package name), and consists of three subsections: a header section (where process-level information like variables, globals, imports and lanes can be defined), a nodes section that defines each of the nodes in the process, and a connections section that contains the connections between all the nodes in the process. In the nodes section, there is a specific element for each node, defining the various parameters and, possibly, sub-elements for that node type.
While it is recommended to define processes using the graphical editor or
the underlying XML (to shield yourself from internal APIs), it is also possible
to define a process using the Process API directly. The most important process
model elements are defined in the packages org.jbpm.workflow.core and
org.jbpm.workflow.core.node. A "fluent API" is provided that
allows you to easily construct processes in a readable manner using factories.
At the end, you can validate the process that you were constructing manually.
This is a simple example of a basic process with a script task only:
RuleFlowProcessFactory factory =

    RuleFlowProcessFactory.createProcess("org.jbpm.HelloWorld");

factory

    // Header

    .name("HelloWorldProcess")

    .version("1.0")

    .packageName("org.jbpm")

    // Nodes

    .startNode(1).name("Start").done()

    .actionNode(2).name("Action")

        .action("java", "System.out.println(\"Hello World\");").done()

    .endNode(3).name("End").done()

    // Connections

    .connection(1, 2)

    .connection(2, 3);

RuleFlowProcess process = factory.validate().getProcess();
You can see that we start by calling the static createProcess()
method from the RuleFlowProcessFactory class. This method creates
a new process with the given id and returns the RuleFlowProcessFactory
that can be used to create the process. A typical process consists of three parts.
The header part comprises global elements like the name of the process, imports,
variables, etc. The nodes section contains all the different nodes that are part of the
process. The connections section finally links these nodes to each other
to create a flow chart.
In this example, the header contains the name and the version of the process and the package name. After that, you can start adding nodes to the current process. If you have auto-completion you can see that you have different methods to create each of the supported node types at your disposal.
When you start adding nodes to the process, in this example by calling
the startNode(), actionNode() and endNode()
methods, you can see that these methods return a specific NodeFactory,
that allows you to set the properties of that node. Once you have finished
configuring that specific node, the done() method returns you to the
current RuleFlowProcessFactory so you can add more nodes, if necessary.
When you are finished adding nodes, you must connect them by creating
connections between them. This can be done by calling the method
connection, which will link previously created nodes.
Finally, you can validate the generated process by calling the
validate() method and retrieve the created
RuleFlowProcess object.
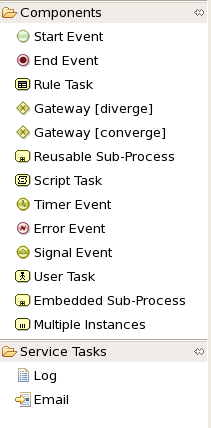
The following chapters will describe the different constructs that you can use to model your processes (and their properties) in detail. Executable processes in BPMN consist of a different types of nodes being connected to each other using sequence flows. The BPMN 2.0 specification defines three main types of nodes:
- Events: They are used to model the occurrence of a particular event. This could be a start event (that is used to indicate the start of the process), end events (that define the end of the process, or of that subflow) and intermediate events (that indicate events that might occur during the execution of the process).
- Activities: These define the different actions that need to be performed during the execution of the process. Different types of tasks exist, depending on the type of activity you are trying to model (e.g. human task, service task, etc.) and activities could also be nested (using different types of sub-processes).
- Gateways: Can be used to define multiple paths in the process. Depending on the type of gateway, these might indicate parallel execution, choice, etc.
The following sections will describe the properties of the process itself and of each of these different node types in detail, as supported by the Eclipse plugin and shown in the following figure of the palette. Note that the Eclipse property editor might show more properties for some of the supported node types, but only the properties as defined in this section are supported when using the BPMN 2.0 XML format.
A BPMN2 process is a flow chart where different types of nodes are linked using connections. The process itself exposes the following properties:
Id: The unique id of the process.
Name: The display name of the process.
Version: The version number of the process.
Package: The package (namespace) the process is defined in.
Variables: Variables can be defined to store data during the execution of your process. See section “Data” for details.
Swimlanes: Specify the swimlanes used in this process for assigning human tasks. See chapter “Human Tasks” for details.

The start of the process. A process should have exactly one start node, which cannot have incoming connections and should have one outgoing connection. Whenever a process is started, execution will start at this node and automatically continue to the first node linked to this start event, and so on. It contains the following properties:
Id: The id of the node (which is unique within one node container).
Name: The display name of the node.

The end of the process. A process should have one or more end events. The End Event should have one incoming connection and cannot have any outgoing connections. It contains the following properties:
Id: The id of the node (which is unique within one node container).
Name: The display name of the node.
Terminate: An End Event can terminate the entire process or just the path. When a process instance is terminated, it means its state is set to completed and all other nodes that might still be active (on parallel paths) in this process instance are cancelled. Non-terminating end events are simply ends for this path (execution of this branch will end here), but other parallel paths can still continue. A process instance will automatically complete if there are no more active paths inside that process instance (for example, if a process instance reaches a non-terminating end node but there are no more active branches inside the process instance, the process instance will be completed anyway). Terminating end events are visualized using a full circle inside the event node, non-terminating event nodes are empty. Note that, if you use a terminating event node inside a sub-process, you are terminating the top-level process instance, not just that sub-process.

An Error Event can be used to signal an exceptional condition in the process. It should have one incoming connection and no outgoing connections. When an Error Event is reached in the process, it will throw an error with the given name. The process will search for an appropriate error handler that is capable of handling this kind of fault. If no error handler is found, the process instance will be aborted. An Error Event contains the following properties:
Id: The id of the node (which is unique within one node container).
Name: The display name of the node.
FaultName: The name of the fault. This name is used to search for appropriate exception handlers that are capable of handling this kind of fault.
FaultVariable: The name of the variable that contains the data associated with this fault. This data is also passed on to the exception handler (if one is found).
Error handlers can be specified using boundary events. This is however currently only possible when working with XML directly. We will be adding support for graphically specifying this in the new BPMN2 editor.

Represents a timer that can trigger one or multiple times after a given period of time. A Timer Event should have one incoming connection and one outgoing connection. The timer delay specifies how long the timer should wait before triggering the first time. When a Timer Event is reached in the process, it will start the associated timer. The timer is cancelled if the timer node is cancelled (e.g., by completing or aborting the enclosing process instance). Consult the section “Timers” for more information. The Timer Event contains the following properties:
Id: The id of the node (which is unique within one node container).
Name: The display name of the node.
Timer delay: The delay that the node should wait before triggering the first time. The expression should be of the form
[#d][#h][#m][#s][#[ms]]. This means that you can specify the amount of days, hours, minutes, seconds and milliseconds (which is the default if you don't specify anything). For example, the expression "1h" will wait one hour before triggering the timer. The expression could also use #{expr} to dynamically derive the delay based on some process variable. Expr in this case could be a process variable, or a more complex expression based on a process variable (e.g. myVariable.getValue()).Timer period: The period between two subsequent triggers. If the period is 0, the timer should only be triggered once. The expression should be of the form
[#d][#h][#m][#s][#[ms]]. This means that you can specify the amount of days, hours, minutes, seconds and milliseconds (which is the default if you don't specify anything). For example, the expression "1h" will wait one hour before triggering the timer again. The expression could also use #{expr} to dynamically derive the period based on some process variable. Expr in this case could be a process variable, or a more complex expression based on a process variable (e.g. myVariable.getValue()).
Timer events could also be specified as boundary events on sub-processes. This is however currently only possible when working with XML directly. We will be adding support for graphically specifying this in the new BPMN2 editor.

A Signal Event can be used to respond to internal or external events during the execution of the process. A Signal Event should have no incoming connections and one outgoing connection. It specifies the type of event that is expected. Whenever that type of event is detected, the node connected to this event node will be triggered. It contains the following properties:
Id: The id of the node (which is unique within one node container).
Name: The display name of the node.
EventType: The type of event that is expected.
VariableName: The name of the variable that will contain the data associated with this event (if any) when this event occurs.
A process instance can be signaled that a specific event occurred using
ksession.signalEvent(eventType, data, processInstanceId)
This will trigger all (active) signal event nodes in the given process instance that are waiting for that event type. Data related to the event can be passed using the data parameter. If the event node specifies a variable name, this data will be copied to that variable when the event occurs.
It is also possible to use event nodes inside sub-processes. These event nodes will however only be active when the sub-process is active.
You can also generate a signal from inside a process instance. A script (in a script task or using on entry or on exit actions) can use
kcontext.getKnowledgeRuntime().signalEvent(
  eventType, data, kcontext.getProcessInstance().getId());
A throwing signal events could also be used to model the signaling of an event. This is however currently only possible when working with XML directly. We will be adding support for graphically specifying this in the new BPMN2 editor.

Represents a script that
should be executed in this process. A Script Task should have one incoming
connection and one outgoing connection. The associated action specifies what
should be executed, the dialect used for coding the action (i.e., Java or MVEL),
and the actual action code. This code can access any variables and globals.
There is also a predefined variable kcontext that references the
ProcessContext object (which can,
for example, be used to access the current ProcessInstance or
NodeInstance, and to get and set variables, or get access to the
ksession using kcontext.getKnowledgeRuntime()). When a Script Task
is reached in the process, it will execute the action and then continue with the
next node. It contains the following properties:
Id: The id of the node (which is unique within one node container).
Name: The display name of the node.
Action: The action script associated with this action node.
Note that you can write any valid Java code inside a script node. This basically allows you to do anything inside such a script node. There are some caveats however:
- When trying to create a higher-level business process, that should also be understood by business users, it is probably wise to avoid low-level implementation details inside the process, including inside these script tasks. Script task could still be used to quickly manipulate variables etc. but other concepts like a service task could be used to model more complex behaviour in a higher-level manner.
- Scripts should be immediate. They are using the engine thread to execute the script. Scripts that could take some time to execute should probably be modeled as an asynchronous service task.
- You should try to avoid contacting external services through a script node. Not only does this usually violate the first two caveats, it is also interacting with external services without the knowledge of the engine, which can be problematic, especially when using persistence and transactions. In general, it is probably wiser to model communication with an external service using a service task.
- Scripts should not throw exceptions. Runtime exceptions should be caught and for example managed inside the script or transformed into signals or errors that can then be handled inside the process.

Represents an (abstract) unit of work that should be executed in this process. All work that is executed outside the process engine should be represented (in a declarative way) using a Service Task. Different types of services are predefined, e.g., sending an email, logging a message, etc. Users can define domain-specific services or work items, using a unique name and by defining the parameters (input) and results (output) that are associated with this type of work. Check the chapter on domain-specific processes for a detailed explanation and illustrative examples of how to define and use work items in your processes. When a Service Task is reached in the process, the associated work is executed. A Service Task should have one incoming connection and one outgoing connection.
Id: The id of the node (which is unique within one node container).
Name: The display name of the node.
Parameter mapping: Allows copying the value of process variables to parameters of the work item. Upon creation of the work item, the values will be copied.
Result mapping: Allows copying the value of result parameters of the work item to a process variable. Each type of work can define result parameters that will (potentially) be returned after the work item has been completed. A result mapping can be used to copy the value of the given result parameter to the given variable in this process. For example, the "FileFinder" work item returns a list of files that match the given search criteria within the result parameter
Files. This list of files can then be bound to a process variable for use within the process. Upon completion of the work item, the values will be copied.On-entry and on-exit actions: Actions that are executed upon entry or exit of this node, respectively.
Additional parameters: Each type of work item can define additional parameters that are relevant for that type of work. For example, the "Email" work item defines additional parameters such as
From,To,SubjectandBody. The user can either provide values for these parameters directly, or define a parameter mapping that will copy the value of the given variable in this process to the given parameter; if both are specified, the mapping will have precedence. Parameters of typeStringcan use#{expression}to embed a value in the string. The value will be retrieved when creating the work item, and the substitution expression will be replaced by the result of callingtoString()on the variable. The expression could simply be the name of a variable (in which case it resolves to the value of the variable), but more advanced MVEL expressions are possible as well, e.g.,#{person.name.firstname}.

Processes can also involve tasks that need to be executed by human actors. A User Task represents an atomic task to be executed by a human actor. It should have one incoming connection and one outgoing connection. User Tasks can be used in combination with Swimlanes to assign multiple human tasks to similar actors. Refer to the chapter on human tasks for more details. A User Task is actually nothing more than a specific type of service node (of type "Human Task"). A User Task contains the following properties:
Id: The id of the node (which is unique within one node container).
Name: The display name of the node.
TaskName: The name of the human task.
Priority: An integer indicating the priority of the human task.
Comment: A comment associated with the human task.
ActorId: The actor id that is responsible for executing the human task. A list of actor id's can be specified using a comma (',') as separator.
GroupId: The group id that is responsible for executing the human task. A list of group id's can be specified using a comma (',') as separator.
Skippable: Specifies whether the human task can be skipped, i.e., whether the actor may decide not to execute the task.
Content: The data associated with this task.
Swimlane: The swimlane this human task node is part of. Swimlanes make it easy to assign multiple human tasks to the same actor. See the human tasks chapter for more detail on how to use swimlanes.
On entry and on exit actions: Action scripts that are executed upon entry and exit of this node, respectively.
Parameter mapping: Allows copying the value of process variables to parameters of the human task. Upon creation of the human tasks, the values will be copied.
Result mapping: Allows copying the value of result parameters of the human task to a process variable. Upon completion of the human task, the values will be copied. A human task has a result variable "Result" that contains the data returned by the human actor. The variable "ActorId" contains the id of the actor that actually executed the task.
A user task should define the type of task that needs to be executed (using properties like TaskName, Comment, etc.) and who needs to perform it (using either actorId or groupId). Note that, if there is data related to this specific process instance that the end user needs when performing the task, this data should be passed as the content of the task. The task for example does not have access to process variables. Check out the chapter on human tasks to get more detail on how to pass data between human tasks and the process instance.

Represents the invocation of another process from within this process. A sub-process node should have one incoming connection and one outgoing connection. When a Reusable Sub-Process node is reached in the process, the engine will start the process with the given id. It contains the following properties:
Id: The id of the node (which is unique within one node container).
Name: The display name of the node.
ProcessId: The id of the process that should be executed.
Wait for completion: If this property is true, this sub-process node will only continue if the child process that was started has terminated its execution (completed or aborted); otherwise it will continue immediately after starting the subprocess (so it will not wait for its completion).
Independent: If this property is true, the child process is started as an independent process, which means that the child process will not be terminated if this parent process is completed (or this sub-process node is cancelled for some other reason); otherwise the active sub-process will be cancelled on termination of the parent process (or cancellation of the sub-process node).
On-entry and on-exit actions: Actions that are executed upon entry or exit of this node, respectively.
Parameter in/out mapping: A sub-process node can also define in- and out-mappings for variables. The variables given in the "in" mapping will be used as parameters (with the associated parameter name) when starting the process. The variables of the child process that are defined the "out" mappings will be copied to the variables of this process when the child process has been completed. Note that you can use "out" mappings only when "Wait for completion" is set to true.

Represents a set
of rules that need to be evaluated. The rules are evaluated when the node
is reached. A Rule Task should have one incoming connection and
one outgoing connection. Rules are defined in separate files using the
Drools rule format. Rules can become part of a specific ruleflow group
using the ruleflow-group attribute in the header of the rule.
When a Rule Task is reached in the process, the engine will start executing rules that are
part of the corresponding ruleflow-group (if any). Execution will
automatically continue to the next node if there are no more active rules in
this ruleflow group. This means that, during the execution of a ruleflow group,
it is possible that new activations belonging to the currently active
ruleflow group are added to the Agenda due to changes made to the facts by
the other rules. Note that the process will immediately continue with the
next node if it encounters a ruleflow group where there are no active rules
at that time. If the ruleflow group was already active, the ruleflow group
will remain active and execution will only continue if all active rules of the
ruleflow group has been completed. It contains the following properties:
Id: The id of the node (which is unique within one node container).
Name: The display name of the node.
RuleFlowGroup: The name of the ruleflow group that represents the set of rules of this RuleFlowGroup node.

A Sub-Process is a node that can contain other nodes so that it acts as a node container. This allows not only the embedding of a part of the process within such a sub-process node, but also the definition of additional variables that are accessible for all nodes inside this container. A sub-process should have one incoming connection and one outgoing connection. It should also contain one start node that defines where to start (inside the Sub-Process) when you reach the sub-process. It should also contain one or more end events. Note that, if you use a terminating event node inside a sub-process, you are terminating the top-level process instance, not just that sub-process, so in general you should use non-terminating end nodes inside a sub-process. A sub-process ends when there are no more active nodes inside the sub-process. It contains the following properties:
Id: The id of the node (which is unique within one node container).
Name: The display name of the node.
Variables: Additional variables can be defined to store data during the execution of this node. See section “Data” for details.

A Multiple Instance sub-process is a special kind of sub-process that allows you to execute the contained process segment multiple times, once for each element in a collection. A multiple instance sub-process should have one incoming connection and one outgoing connection. It waits until the embedded process fragment is completed for each of the elements in the given collection before continuing. It contains the following properties:
Id: The id of the node (which is unique within one node container).
Name: The display name of the node.
CollectionExpression: The name of a variable that represents the collection of elements that should be iterated over. The collection variable should be an array or of type
java.util.Collection. If the collection expression evaluates to null or an empty collection, the multiple instances sub-process will be completed immediate and follow its outgoing connection.VariableName: The name of the variable to contain the current element from the collection. This gives nodes within the composite node access to the selected element.

Allows you to create branches in your process. A Diverging Gateway should have one incoming connection and two or more outgoing connections. There are three types of gateway nodes currently supported:
AND or parallel means that the control flow will continue in all outgoing connections simultaneously.
XOR or exclusive means that exactly one of the outgoing connections will be chosen. The decision is made by evaluating the constraints that are linked to each of the outgoing connections. The constraint with the lowest priority number that evaluates to true is selected. Constraints can be specified using different dialects. Note that you should always make sure that at least one of the outgoing connections will evaluate to true at runtime (the ruleflow will throw an exception at runtime if it cannot find at least one outgoing connection).
OR or inclusive means that all outgoing connections whose condition evaluates to true are selected. Conditions are similar to the exclusive gateway, except that no priorities are taken into account. Note that you should make sure that at least one of the outgoing connections will evaluate to true at runtime because the process will throw an exception at runtime if it cannot determine an outgoing connection.
It contains the following properties:
Id: The id of the node (which is unique within one node container).
Name: The display name of the node.
Type: The type of the split node, i.e., AND, XOR or OR (see above).
Constraints: The constraints linked to each of the outgoing connections (in case of an exclusive or inclusive gateway).

Allows you to synchronize multiple branches. A Converging Gateway should have two or more incoming connections and one outgoing connection. There are two types of splits currently supported:
AND or parallel means that is will wait until all incoming branches are completed before continuing.
XOR or exclusive means that it continues as soon as one of its incoming branches has been completed. If it is triggered from more than one incoming connection, it will trigger the next node for each of those triggers.
It contains the following properties:
Id: The id of the node (which is unique within one node container).
Name: The display name of the node.
Type: The type of the Join node, i.e. AND or XOR.
As explained in more detail in the API chapter, there are two things you need to do to be able to execute processes from within your application: (1) you need to create a Knowledge Base that contains the definition of the process, and (2) you need to start the process by creating a session to communicate with the process engine and start the process.
Creating a Knowledge Base: Once you have a valid process, you can add the process to the Knowledge Base:
KnowledgeBuilder kbuilder = KnowledgeBuilderFactory.newKnowledgeBuilder();

kbuilder.add( ResourceFactory.newClassPathResource("MyProcess.bpmn2"),

              ResourceType.BPMN2 );
After adding all your process to the builder (you can add more than one process), you can create a new knowledge base like this:
KnowledgeBase kbase = kbuilder.newKnowledgeBase();Note that this will throw an exception if the knowledge base contains errors (because it could not parse your processes correctly).
Starting a process: To start a particular process, you will need to call the
startProcessmethod on your session and pass the id of the process you want to start. For example:
StatefulKnowledgeSession ksession = kbase.newStatefulKnowledgeSession();

ksession.startProcess("com.sample.hello");
The parameter of the
startProcessmethod is the id of the process that needs to be started. When defining a process, this process id needs to be specified as a property of the process (as for example shown in the Properties View in Eclipse when you click the background canvas of your process).When you start the process, you may specify additional parameters that are used to pass additional input data to the process, using the
startProcess(String processId, Map parameters)method. The additional set of parameters is a set of name-value pairs. These parameters are copied to the newly created process instance as top-level variables of the process, so they can be accessed in the remainder of your process directly.
While the flow chart focuses on specifying the control flow of the process, it is usually also necessary to look at the process from a data perspective. Throughout the execution of a process, data can retrieved, stored, passed on and used.
For storing runtime data, during the execution of the process, process variables can be used. A variable is defined by a name and a data type. This could be a basic data type, such as boolean, int, or String, or any kind of Object subclass. Variables can be defined inside a variable scope. The top-level scope is the variable scope of the process itself. Subscopes can be defined using a Sub-Process. Variables that are defined in a subscope are only accessible for nodes within that scope.
Whenever a variable is accessed, the process will search for the appropriate variable scope that defines the variable. Nesting of variable scopes is allowed. A node will always search for a variable in its parent container. If the variable cannot be found, it will look in that one's parent container, and so on, until the process instance itself is reached. If the variable cannot be found, a read access yields null, and a write access produces an error message, with the process continuing its execution.
Variables can be used in various ways:
Process-level variables can be set when starting a process by providing a map of parameters to the invocation of the
startProcessmethod. These parameters will be set as variables on the process scope.Script actions can access variables directly, simply by using the name of the variable as a local parameter in their script. For example, if the process defines a variable of type "org.jbpm.Person" in the process, a script in the process could access this directly:
// call method on the process variable "person"

person.setAge(10);
Changing the value of a variable in a script can be done through the knowledge context:
kcontext.setVariable(variableName, value);
Service tasks (and reusable sub-processes) can pass the value of process variables to the outside world (or another process instance) by mapping the variable to an outgoing parameter. For example, the parameter mapping of a service task could define that the value of the process variable x should be mapped to a task parameter y right before the service is being invoked. You can also inject the value of process variable into a hard-coded parameter String using
#{expression}. For example, the description of a human task could be defined asYou need to contact person #{person.getName()}(where person is a process variable), which will replace this expression by the actual name of the person when the service needs to be invoked. Similarly results of a service (or reusable sub-process) can also be copied back to a variable using a result mapping.Various other nodes can also access data. Event nodes for example can store the data associated to the event in a variable, etc. Check the properties of the different node types for more information.
Finally, processes (and rules) all have access to globals, i.e.
globally defined variables and data in the Knowledge Session. Globals are directly
accessible in actions just like variables. Globals need to be defined as part of the
process before they can be used. You can for example define globals by clicking the
globals button when specifying an action script in the Eclipse action property
editor. You can also set the value of a global from the outside using
ksession.setGlobal(name, value) or from inside process scripts using
kcontext.getKnowledgeRuntime().setGlobal(name,value);.
Constraints can be used in various locations in your processes, for example in a diverging gateway. jBPM supports two types of constraints:
Code constraints are boolean expressions, evaluated directly whenever they are reached. We currently support two dialects for expressing these code constraints: Java and MVEL. Both Java and MVEL code constraints have direct access to the globals and variables defined in the process. Here is an example of a valid Java code constraint,
personbeing a variable in the process:return person.getAge() > 20;
A similar example of a valid MVEL code constraint is:
return person.age > 20;
Rule constraints are equals to normal Drools rule conditions. They use the Drools Rule Language syntax to express possibly complex constraints. These rules can, like any other rule, refer to data in the Working Memory. They can also refer to globals directly. Here is an example of a valid rule constraint:
Person( age > 20 )
This tests for a person older than 20 being in the Working Memory.
Rule constraints do not have direct access to variables defined
inside the process. It is however possible to refer to the current process
instance inside a rule constraint, by adding the process instance to the
Working Memory and matching for the process instance in your rule
constraint. We have added special logic to make sure that a variable
processInstance of type WorkflowProcessInstance
will only match to the current process instance and not to other process
instances in the Working Memory. Note that you are however responsible
yourself to insert the process instance into the session and, possibly,
to update it, for example, using Java code or an on-entry or on-exit or
explicit action in your process. The following example of a rule
constraint will search for a person with the same name as the value
stored in the variable "name" of the process:
processInstance : WorkflowProcessInstance()
Person( name == ( processInstance.getVariable("name") ) )
# add more constraints here ...Action scripts can be used in different ways:
- Within a Script Task,
- As entry or exit actions, with a number of nodes.
Actions have access to globals and the variables that are defined
for the process and the predefined variable kcontext. This
variable is of type
org.drools.runtime.process.ProcessContext and can be used for
several tasks:
Getting the current node instance (if applicable). The node instance could be queried for data, such as its name and type. You can also cancel the current node instance.
NodeInstance node = kcontext.getNodeInstance();

String name = node.getNodeName();
Getting the current process instance. A process instance can be queried for data (name, id, processId, etc.), aborted or signaled an internal event.
ProcessInstance proc = kcontext.getProcessInstance();

proc.signalEvent( type, eventObject );
Getting or setting the value of variables.
Accessing the Knowledge Runtime allows you do things like starting a process, signaling (external) events, inserting data, etc.
jBPM currently supports two dialects, Java and MVEL.
Java actions should be valid Java code. MVEL actions can use the business
scripting language MVEL to express the action. MVEL accepts any valid Java
code but additionally provides support for nested accesses of parameters
(e.g., person.name instead of person.getName()),
and many other scripting improvements. Thus, MVEL expressions are more
convenient for the business user. For example, an action that prints out
the name of the person in the "requester" variable of the process would
look like this:
// Java dialect
System.out.println( person.getName() );

//  MVEL dialect
System.out.println( person.name );

During the execution of a process, the process engine makes sure that all the relevant tasks are executed according to the process plan, by requesting the execution of work items and waiting for the results. However, it is also possible that the process should respond to events that were not directly requested by the process engine. Explicitly representing these events in a process allows the process author to specify how the process should react to such events.
Events have a type and possibly data associated with them. Users are free to define their own event types and their associated data.
A process can specify how to respond to events by using a Message Event. An Event node needs to specify the type of event the node is interested in. It can also define the name of a variable, which will receive the data that is associated with the event. This allows subsequent nodes in the process to access the event data and take appropriate action based on this data.
An event can be signaled to a running instance of a process in a number of ways:
Internal event: Any action inside a process (e.g., the action of an action node, or an on-entry or on-exit action of some node) can signal the occurrence of an internal event to the surrounding process instance, using code like the following:
kcontext.getProcessInstance().signalEvent(type, eventData);
External event: A process instance can be notified of an event from outside using code such as:
processInstance.signalEvent(type, eventData);
External event using event correlation: Instead of notifying a process instance directly, it is also possible to have the engine automatically determine which process instances might be interested in an event using event correlation, which is based on the event type. A process instance that contains an event node listening to external events of some type is notified whenever such an event occurs. To signal such an event to the process engine, write code such as:
ksession.signalEvent(type, eventData);
Events could also be used to start a process. Whenever a Message Start Event defines an event trigger of a specific type, a new process instance will be started every time that type of event is signalled to the process engine.
Timers wait for a predefined amount of time, before triggering, once or repeatedly. They can be used to trigger certain logic after a certain period, or to repeat some action at regular intervals.
A Timer node is set up with a delay and a period. The delay specifies the amount of time to wait after node activation before triggering the timer the first time. The period defines the time between subsequent trigger activations. A period of 0 results in a one-shot timer.
The (period and delay) expression should be of the form [#d][#h][#m][#s][#[ms]]. This means that you can specify the amount of days, hours, minutes, seconds and milliseconds (which is the default if you don't specify anything). For example, the expression "1h" will wait one hour before triggering the timer (again).
The timer service is responsible for making sure that timers get triggered at the appropriate times. Timers can also be cancelled, meaning that the timer will no longer be triggered.
Timers can be used in two ways inside a process:
A Timer Event may be added to the process flow. Its activation starts the timer, and when it triggers, once or repeatedly, it activates the Timer node's successor. This means that the outgoing connection of a timer with a positive period is triggered multiple times. Cancelling a Timer node also cancels the associated timer, after which no more triggers will occur.
Timers can be associated with a Sub-Process as a boundary event. This is however currently only possible when working with XML directly. We will be adding support for graphically specifying this in the new BPMN2 editor.
Over time, processes may evolve, for example because the process itself needs to be improved, or due to changing requirements. Actually, you cannot really update a process, you can only deploy a new version of the process, the old process will still exist. That is because existing process instances might still need that process definition. So the new process should have a different id, though the name could be the same, and you can use the version parameter to show when a process is updated (the version parameter is just a String and is not validated by the process framework itself, so you can select your own format for specifying minor/major updates, etc.).
Whenever a process is updated, it is important to determine what should happen to the already running process instances. There are various strategies one could consider for each running instance:
Proceed: The running process instance proceeds as normal, following the process (definition) as it was defined when the process instance was started. As a result, the already running instance will proceed as if the process was never updated. New instances can be started using the updated process.
Abort (and restart): The already running instance is aborted. If necessary, the process instance can be restarted using the new process definition.
Transfer: The process instance is migrated to the new process definition, meaning that - once it has been migrated successfully - it will continue executing based on the updated process logic.
By default, jBPM uses the proceed approach, meaning that multiple versions of the same process can be deployed, but existing process instances will simply continue executing based on the process definition that was used when starting the process instance. Running process instances could always be aborted as well of course, using the process management API. Process instance migration is more difficult and is explained in the following paragraphs.
A process instance contains all the runtime information needed to continue execution at some later point in time. This includes all the data linked to this process instance (as variables), but also the current state in the process diagram. For each node that is currently active, a node instance is used to represent this. This node instance can also contain additional state linked to the execution of that specific node only. There are different types of node instances, one for each type of node.
A process instance only contains the runtime state and is linked to a particular process (indirectly, using id references) that represents the process logic that needs to be followed when executing this process instance (this clear separation of definition and runtime state allows reuse of the definition across all process instances based on this process and minimizes runtime state). As a result, updating a running process instance to a newer version so it used the new process logic instead of the old one is simply a matter of changing the referenced process id from the old to the new id.
However, this does not take into account that the state of the process instance (the variable instances and the node instances) might need to be migrated as well. In cases where the process is only extended and all existing wait states are kept, this is pretty straightforward, the runtime state of the process instance does not need to change at all. However, it is also possible that a more sofisticated mapping is necessary. For example, when an existing wait state is removed, or split into multiple wait states, an existing process instance that is waiting in that state cannot simply be updated. Or when a new process variable is introduced, that variable might need to be initiated correctly so it can be used in the remainder of the (updated) process.
The WorkflowProcessInstanceUpgrader can be used to upgrade a workflow process instance to a newer process instance. Of course, you need to provide the process instance and the new process id. By default, jBPM will automatically map old node instances to new node instances with the same id. But you can provide a mapping of the old (unique) node id to the new node id. The unique node id is the node id, preceded by the node ids of its parents (with a colon inbetween), to allow to uniquely identify a node when composite nodes are used (as a node id is only unique within its node container. The new node id is simply the new node id in the node container (so no unique node id here, simply the new node id). The following code snippet shows a simple example.
// create the session and start the process "com.sample.process"

KnowledgeBuilder kbuilder = ...

StatefulKnowledgeSession ksession = ...

ProcessInstance processInstance = ksession.startProcess("com.sample.process");


// add a new version of the process "com.sample.process2"

kbuilder = KnowledgeBuilderFactory.newKnowledgeBuilder();

kbuilder.add(..., ResourceType.BPMN2);

kbase.addKnowledgePackages(kbuilder.getKnowledgePackages());


// migrate process instance to new version

Map<String, Long> mapping = new HashMap<String, Long>();

// top level node 2 is mapped to a new node with id 3

mapping.put("2", 3L);

// node 2, which is part of composite node 5, is mapped to a new node with id 4

mapping.put("5.2", 4L);

WorkflowProcessInstanceUpgrader.upgradeProcessInstance(

   ksession, processInstance.getId(),

   "com.sample.process2", mapping);
If this kind of mapping is still insufficient, you can still describe your own custom mappers for specific situations. Be sure to first disconnect the process instance, change the state accordingly and then reconnect the process instance, similar to how the WorkflowProcessinstanceUpgrader does it.
The engine itself allows you to run multiple threads on the same session. A process instance itself however uses logical multi-threading to implement parallel execution, not multiple real threads. The main reason for doing this is that allowing multiple threads to execute on the same process instance implicates that we have to make sure that state is consistent across these threads, and that there are no race conditions and deadlocks etc. This can have a significant impact on performance, even when multi-threading is not required. Allowing real multi-threading on the same process instance is also no guarantee on improved performance, as in general it leads to decreased performance (due to overhead and conflicts). Therefore, we only allow one thread to be processing a specific process instance at each time. It is however simple to achieve logical multi-threading using asynchronous tasks, as explained below.
In general, the engine executes the process sequentially. For example, when the engine encounters a script task in a process, it will synchronously execute that script and wait for it to complete before continuing execution. Similarly, if a process encounters a parallel gateway, it will sequentially trigger each of the outgoing branches, one after the other. This is possible since execution is almost always instantaneous, meaning that it is extremely fast and almost produces no overhead. As a result, the user usually doesn't even notice this.
When a service task is reached in the process, the engine will also invoke the handler of this service synchronously. This means that the engine will wait for the completeWorkItem(..) method to return before continuing execution. Therefore, it is important that your service handler executes your service asynchronously if its execution is not instantaneous. Image for example you want to invoke an external service. Since the delay of invoking this service remotely and waiting for the results might be too high, it might be a good idea to invoke this service asynchronously. This means that the handler will only invoke the service asynchronously and will notify the engine if the results are available. In the mean time, the process engine can then continue execution elsewhere. Similarly, your action scripts also be instantaneous, as the engine will be waiting for it to execute. For example, doing Thread.sleep(..) as part of a script will not make the engine continue execution elsewhere but will block the engine thread during that period.
Human tasks are a typical example of a service that needs to be invoked asynchronously, as we don't want the engine to wait until a human actor has responded to the request. Therefore, the human task handler will only create a new task (on the task list of the assigned actor) when the human task node is triggered. The engine will then be able to continue execution on the rest of the process (if necessary) and the handler will notify the engine asynchronously when the user has completed the task.
Image for example that you have a process that executes three service in parallel using a parallel gateway. The engine will first trigger the first service when executing this process, in which case the first service will be invoked. Since the handler will invoke this service asynchronously, this service will be executing separately. The engine can in the mean while continue executing the rest of the process, until the results of the service return. So the engine will continue with executing the second branch of the parallel gateway, triggering the second service (asynchronously). While the second service is also executing, it will then invoke the third service as well. At that point, all three services will be executing in parallel and the engine will be waiting for the results to return. As you can see, you can achieve multi-threading and parallelism by making sure that the tasks that need to be executed in parallel are invoked asynchronously
How to implement an asynchronous service handler? In general, this all depends on the technology you're using. If you're using only simple Java, you can for example execute the actual service in a new thread:
public class MyServiceTaskHandler implements WorkItemHandler {


  public void executeWorkItem(WorkItem workItem, WorkItemManager manager) {

    new Thread(new Runnable() {

      public void run() {

        // Do the heavy lifting here ...

      }

    }).start();

  }


  public void abortWorkItem(WorkItem workItem, WorkItemManager manager) {

  }


}
In general, a handler usually will not implement the business logic to perform the work item, but would rather contact an existing service to do the hard work. For example, the human task handler simply invokes the human task service to add a task there. To implement an asynchronous handler, you usually have to simply do an asynchronous invocation of this service. This usually depends on the technology you use to do the communication, but this might be as simple as asynchronously invoking a web service, sending a JMS message to the external service, etc.