The jBPM Eclipse plugin provides developers (and very technical users) with an environment to edit and test processes, and integrate it deeply with their applications. It provides the following features (on top of the Eclipse IDE):
Wizards for creation of
a jBPM project
a BPMN2 process
jBPM Perspective (showing the most commonly used views in a predefined layout)
Kie Navigator View for managing Kie Server installations and projects
The jBPM installer is capable of downloading and installing an Eclipse installation, including the Drools and jBPM Eclipse plugin (with a full jBPM runtime preconfigured) and the Eclipse BPMN2 Modeler.
Tip
Using the jBPM installer is definitely the recommended starting point for most users.
You can however also download and install the jBPM Eclipse Plugin manually. To do so, you need to:
Download Eclipse (Kepler recommended, but older versions like Indigo or Juno should also still work)
Start Eclipse
Select "Install New Software ..." from the Help menu. Add the Drools and jBPM update site http://downloads.jboss.org/jbpm/release/6.0.1.Final/updatesite/. You should see the plugins as shown below. Note that you can also download and unzip the Drools and jBPM update site to your local file system and use that as local update site instead.
Select the JBoss jBPM Core and JBoss Drools Core plugins and click "Next >". Click "Next >" again after reviewing your selecting, accept the terms of the license agreement and click "Finish" to download and install the plugins. If you get a warning about installing software that contains unsigned content, click OK. After successful installation, Eclipse should ask you to restart, click Yes.
The plugin should now be installed. To check, check if you can for example see the new jBPM Project wizard: under the "File" menu, select "New Project ..." and there you should be able to see "New jBPM Project" under the jBPM category.
Register a jBPM runtime to get started, see the section on jBPM runtimes in this chapter for more information.

Note that, when doing a manual install, you still need to manually install the Eclipse BPMN 2.0 Modeler plugin as well. Check out the chapter on the Eclipse BPMN 2.0 Modeler on how to do that.
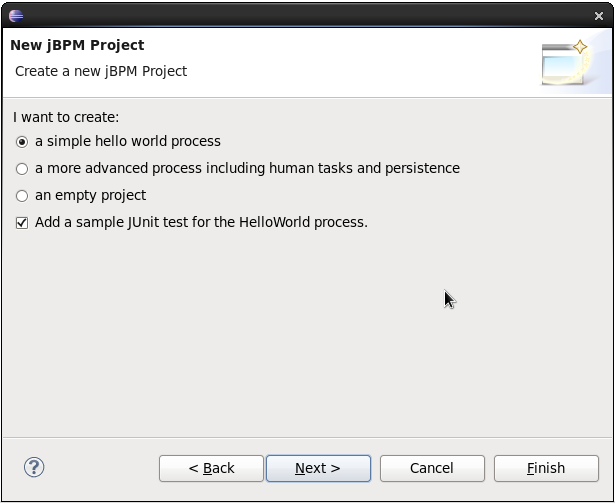
The aim of the new project wizard is to set up an executable sample project to start using processes immediately. This will set up a basic structure, the classpath, sample process and a test case to get you started. To create a new jBPM project, in the "File" menu select "New" and then "Project ..." and under the jBPM category, select "jBPM Project". A dialog as shown below should pop up.

Fill in a name for your project and if necessary change the location where this project should be located (by default Eclipse will generate it inside your Eclipse workspace folder) and click "Next >".
Now you can optionally include a sample process in your project to get started. You can select to either use a simple "Hello World" process, a slightly more advanced process including human tasks and persistence or simply an empty project. You can also select to include a JUnit test class that you can use to test your process. These can serve as a starting point, and will give you something executable almost immediately, which you can then modify to your needs.
Finally, the last page in the wizard allows you select a jBPM runtime, as shown below. You can either use the default runtime (as configured for you workspace, in your workspace preferences), or you can select a specific runtime for this project. For more information about runtimes and how to create them, see the section on jBPM runtimes in this chapter.
You can also select which version of jBPM you want to generate sample code for. By default it will generate an example using the latest jBPM 6.x API, but you could also generate examples using the old jBPM 5.x API. Note that you yourself are responsible for making sure that the code you generate can be understood by the runtime (for example, if you create an example using jBPM6 API but select a jBPM5 runtime, your sample will not compile). Also note that, if you want to execute a jBPM5 example on jBPM6, you will need to have the knowledge-api JAR inside your jBPM6 runtime, as this is responsible for the backwards compatibility of the jBPM5 API in jBPM6.
When you selected the simple 'hello world' example, the result is shown below. Feel free to experiment with the plug-in at this point.
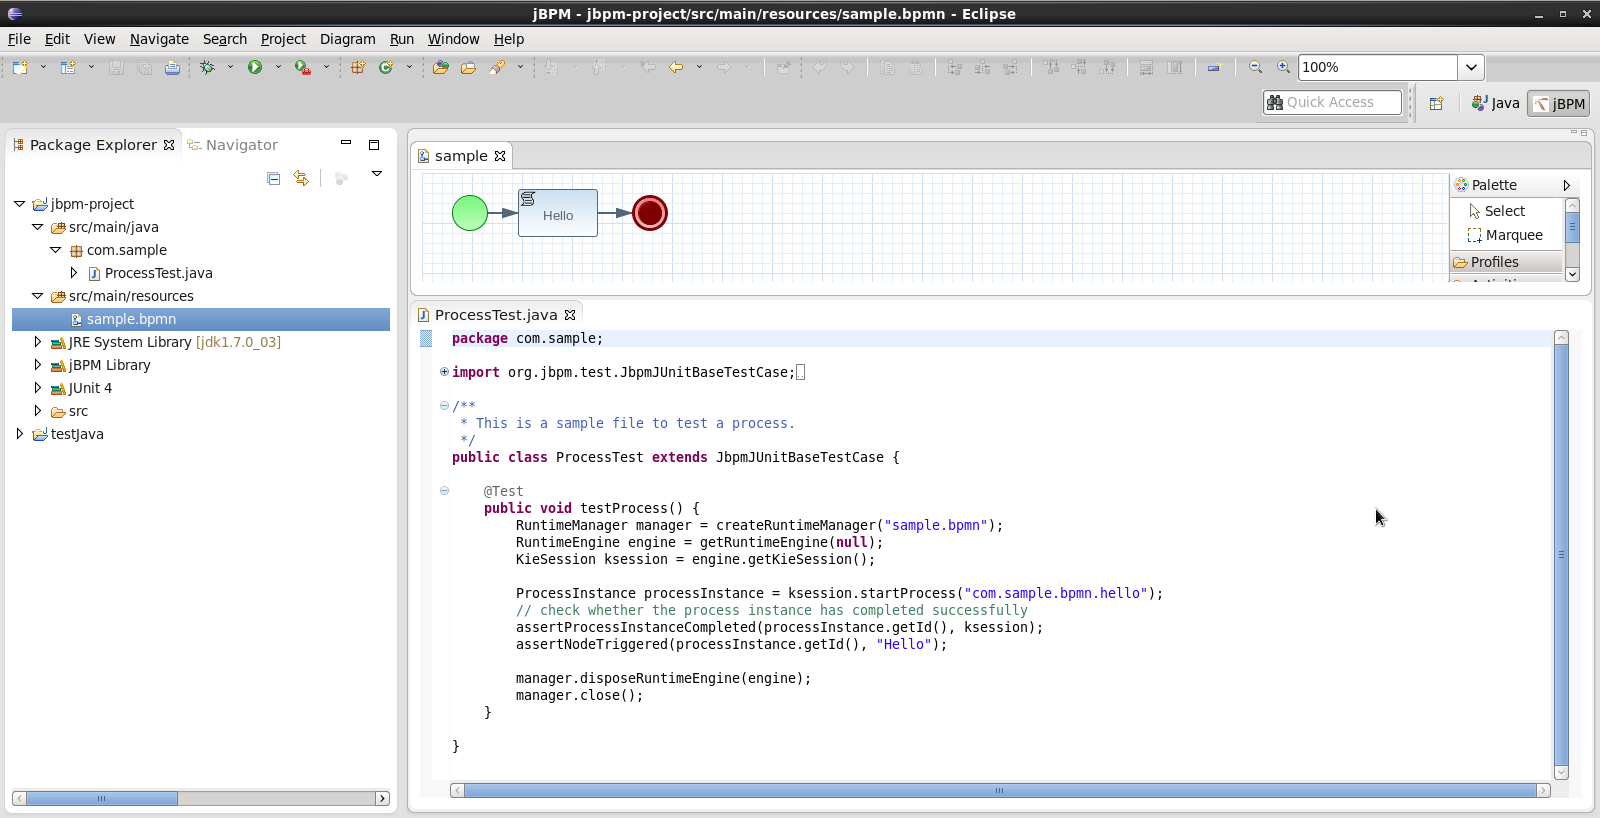
The newly created project contains an example process file (sample.bpmn) in the src/main/resources directory and an example Java file (ProcessTest.java) that can be used to test the process in a jBPM engine. You'll find this in the folder src/main/java, in the com.sample package. All the other JARs that are necessary during execution are also added to the classpath in a custom classpath container called jBPM Library.
You can also convert an existing Java project to a jBPM project by selecting the "Convert to jBPM Project" action. Right-click the project you want to convert and under the "Configure" category (at the bottom) select "Convert to jBPM Project". This will add the jBPM Library to your project's classpath.
You can create a new process simply as an empty text file with extension ".bpmn", or use the "New BPMN2 Process" wizard to do so. To create a new process, in the "File" menu select "New" and then "Other ..." and under the jBPM category, select "BPMN2 Process" and click "Next >". In the next dialog, you should select the folder where the process should be created (for example the src/main/resources folder of your project) and a name for the process. Clicking "Finish" should create your new process (by default it should only contain one start node) and open it so you can start editing it.
A jBPM runtime is a collection of JAR files that represent one specific release of the jBPM project JARs. To create a runtime, download the binary distribution of the version of jBPM you want to use and unzip on your local file system. You must then point the IDE to the release of your choice by selecting the folder where these JARs are located. If you want to create a new runtime based on the latest jBPM project JARs included in the plugin itself, you can also easily do that. You are required to specify a default jBPM runtime for your Eclipse workspace, but each individual project can override the default and select the appropriate runtime for that project specifically.
To define one or more jBPM runtimes using the Eclipse preferences view you open up your Preferences, by selecting the "Preferences" menu item in the menu "Window". A "Preferences" dialog should show all your settings. On the left side of this dialog, under the jBPM category, select "Installed jBPM runtimes". The panel on the right should then show the currently defined jBPM runtimes. For example, if you used the jBPM Installer, it should look like the figure below.

To define a new jBPM runtime, click on the "Add" button. A dialog such as the one shown below should pop up, asking for the name of your runtime and the location on your file system where it can be found.

In general, you have two options:
If you simply want to use the default JAR files as included in the jBPM Eclipse plugin, you can create a new jBPM runtime automatically by clicking the "Create a new jBPM Runtime ..." button. A file browser will show up, asking you to select the folder on your file system where you want this runtime to be created. The plugin will then automatically copy all required dependencies to the specified folder. Make sure to select a unique name for the newly created runtime and click "OK" to register this runtime.
Tip
Note that creating a jBPM runtime from the default JAR files as included in the jBPM Eclipse plugin is only recommended to get you started the first time and for very simple use cases. The runtime that is created this way only contains the minimal set of JARs, and therefore doesn't support a significant set of features, including for example persistence. Make sure to create a full runtime (using the second approach) for real development.
If you want to use one specific release of the jBPM project, you should create a folder on your file system that contains all the necessary jBPM libraries and dependencies (for example by downloading the binary distribution and unzipping it on your local file system). Instead of creating a new jBPM runtime as explained above, give your runtime a unique name and click the "Browse ..." button to select the location of this folder containing all the required JARs. Click "OK" to register this runtime.
After clicking the OK button, the runtime should show up in your table of installed jBPM runtimes, as shown below. Click on the checkbox in front of one of the installed runtimes to make it the default jBPM runtime. The default jBPM runtime will be used as the runtime of all your new jBPM projects (in case you didn't select a project-specific runtime).
You can add as many jBPM runtimes as you need. Note that you will need to restart Eclipse if you changed the default runtime and you want to make sure that all the projects that are using the default runtime update their classpath accordingly.
Whenever you create a jBPM project (using the New jBPM Project wizard or by converting an existing Java project to a jBPM project), the plugin will automatically add all the required JARs to the classpath of your project.
When creating a new jBPM project, the plugin will automatically use the default Drools runtime for that project, unless you specify a project-specific one. You can do this in the final step of the New jBPM Project wizard, as shown below, by deselecting the "Use default Drools runtime" checkbox and selecting the appropriate runtime in the drop-down box. If you click the "Configure workspace settings ..." link, the workspace preferences showing the currently installed jBPM runtimes will be opened, so you can add new runtimes there.

You can change the runtime of a jBPM project at any time by opening the project properties and selecting the jBPM category, as shown below. Mark the "Enable project specific settings" checkbox and select the appropriate runtime from the drop-down box. If you click the "Configure workspace settings ..." link, the workspace preferences showing the currently installed jBPM runtimes will be opened, so you can add new runtimes there. If you deselect the "Enable project specific settings" checkbox, it will use the default runtime as defined in your global workspace preferences.

The aim of the new Maven project wizard is to set up an executable sample project to start using processes immediately (but not as normal Java project with all jBPM dependencies added using a jBPM library but by using Maven (and thus a pom.xml) to define your project's properties and dependencies. This wizard will set up a Maven project using a pom.xml, and include a sample process and Java class to execute it. To create a new jBPM Maven project, in the "File" menu select "New" and then "Project ..." and under the jBPM category, select "jBPM Project (Maven)". Give your project a name and click finish. The result should be as shown below.

The pom.xml that is generated for your project contains the following:
<?xml version="1.0" encoding="UTF-8"?>
<project xmlns="http://maven.apache.org/POM/4.0.0"
         xmlns:xsi="http://www.w3.org/2001/XMLSchema-instance"
         xsi:schemaLocation="http://maven.apache.org/POM/4.0.0 http://maven.apache.org/xsd/maven-4.0.0.xsd">

  <modelVersion>4.0.0</modelVersion>

  <groupId>com.sample</groupId>
  <artifactId>jbpm-example</artifactId>
  <version>1.0.0-SNAPSHOT</version>

  <name>jBPM :: Sample Maven Project</name>
  <description>A sample jBPM Maven project</description>

  <properties>
    <version.org.jbpm>6.0.0.Final</version.org.jbpm>
  </properties>

  <repositories>
    <repository>
      <id>jboss-public-repository-group</id>
      <name>JBoss Public Repository Group</name>
      <url>http://repository.jboss.org/nexus/content/groups/public/</url>
      <releases>
        <enabled>true</enabled>
        <updatePolicy>never</updatePolicy>
      </releases>
      <snapshots>
        <enabled>true</enabled>
        <updatePolicy>daily</updatePolicy>
      </snapshots>
    </repository>
  </repositories>

  <dependencies>
    <dependency>
      <groupId>org.jbpm</groupId>
      <artifactId>jbpm-test</artifactId>
      <version>${version.org.jbpm}</version>
    </dependency>
  </dependencies>
</project>
In the properties section, you can specify which version of jBPM you would like to use (by default it uses 6.0.0.Final). It adds the JBoss Nexus Maven repository (where all the jBPM JARs and their dependencies are located) to your project and configures the dependencies.
Note
By default, only the jbpm-test JAR is specified as a dependency, as this has transitive dependencies to almost all of the core dependencies you will need. You are free to update the dependencies section however to include only the dependencies you need.
The project also contains a sample process, under src/main/resources, in the com.sample package, and a kmodule.xml configuration file under the META-INF folder. The kmodule.xml defines which resources (processes, rules, etc.) are to be loaded as part of your project. In this case, it is defining a kbase called "kbase" that will load all the resources in the com.sample folder:
<kmodule xmlns="http://jboss.org/kie/6.0.0/kmodule">
  <kbase name="kbase" packages="com.sample"/>
</kmodule>
Finally, it also contains a Java class that can be used to execute the sample process.
It will first create a kbase called "kbase" (by inspecting the kmodule.xml file and thus
loading the sample.bpmn process) and then use a RuntimeManager to
get access to a KieSession and TaskService. In this case, it is used
to start a process and then complete the tasks created by this process one by one.
The Drools Eclipse Plugin, which is bundled as part of the same Eclipse Update Site as the jBPM Eclipse Plugin, provides similar features for creating and editing business rules, and execute them using the Drools engine. This for example allows you to create and edit .drl files containing business rules. You can combine your processes and rules inside one project and execute them together on the same KieSession.
The Kie Navigator is a new view in the Eclipse Tooling as of version 6.3. The Kie Navigator View is accessed from the Eclipse Window->Show View main menu:

In order to use the Kie Navigator View, you must first define an Application Server in the WST Servers View. So, initially the Kie Navigator View will look like this:

Clicking on the link “Use the Servers View to create a new server…” will open the Servers View where a new server definition can be created. Management of the server, including startup and shutdown is done from here. Note that Drools/jBPM requires certain additional JVM and server startup options, which must be added to the server startup configuration. Once a new server has been defined, open the server configuration page (double click on the newly created server entry) and the server Overview page is opened:

Clicking the “Open launch configuration” link opens the following dialog:

Here the user can enter the app server and JVM arguments to properly configure startup of the Kie web service. See the Drools/jBPM documentation for more information about these arguments.
Alternatively, the app server and Kie web service application can be started from a command-line using either the provided Ant demo scripts or any other custom startup script. Note that starting from the Servers view may cause the app server to be shut down when exiting Eclipse. A server can also be configured in Eclipse for external management (see the “Server Behavior” section in the above screenshot.)
Once the server has been configured and started, the Kie Navigator View will recognize the server and attempt to communicate with the Kie web service. The view now looks something like this:

In this screenshot several nodes have been expanded to show all possible situations. At the root of this view is the app server. The Kie Navigator View is designed to support multiple servers, but each must obviously be configured a different hostname and/or HTTP port number. This, for example, allows management of development, test and production servers.
Below the server level are Organizational Units and Repositories. Repositories that are not currently associated with an Organizational Unit appear directly under the Server root node. Below the Organizational Unit level are the associated Repositories, and below the Repositories are Projects contained in the Repository.
A Repository can either be available ( ) or unavailable (
 ) in the Workspace; a Repository is only available if it has been
“imported” (see Context Menus, below) from the Kie web server.
) in the Workspace; a Repository is only available if it has been
“imported” (see Context Menus, below) from the Kie web server.
Similarly, a Project can either be available ( ) or unavailable (
 ) depending on whether it has been “imported”. When a Project has been
imported, it behaves exactly the same as if it were being viewed in the Eclipse Project
Explorer or Navigator; that is, all of the same menu actions available in the Project
Explorer are also available in the Kie Navigator View. Also, all of the icon decorators and
labels on project folders are the same as in Project Explorer.
) depending on whether it has been “imported”. When a Project has been
imported, it behaves exactly the same as if it were being viewed in the Eclipse Project
Explorer or Navigator; that is, all of the same menu actions available in the Project
Explorer are also available in the Kie Navigator View. Also, all of the icon decorators and
labels on project folders are the same as in Project Explorer.
This section describes the context menu actions available for each type of node in the Kie Navigator tree.

Refresh - causes a refresh of the entire viewer by making REST calls to the server to update the tree hierarchy.
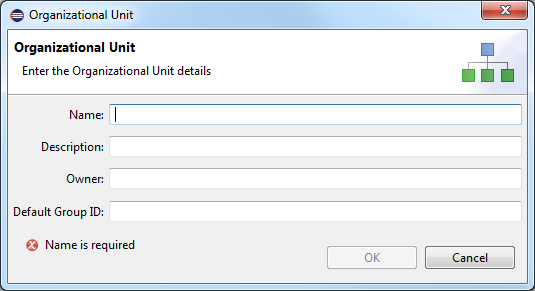
Create Organization… - creates a new Organizational Unit with information collected from the following dialog:
Properties - displays the Server Properties dialog (see the Property Pages section below.)

Add Repository... - adds a Repository that is not already associated with any other Organizational Unit to this Organization. A selection dialog containing a list of all unassociated Repositories will be displayed, from which you can select a Repository to add to the Organizational Unit.
Create Repository... - creates a new Repository with information collected from the following dialog:
Delete Organization... - deletes the selected Organizational Unit and dissociates any Repositories that were associated with this Organization. The Repositories are not deleted.
Properties - displays the Organizational Unit Properties dialog (see the Property Pages section below.)


Import Repository... - clones the Repository and makes it available in the Git Repository View. This menu action is only available if the Repository has not already been cloned. All actions that affect the Repository (pull, commit, push, etc.) can then be performed from the Git Repository View.
Create Project... - creates a new Project with information collected from the following dialog:
If the “Import the Project” checkbox is checked, the Project will be created in the local Repository and then created, and opened in the local workspace. If unchecked, the Project is only created in the local Repository; it can then be “imported” at a later time. Note that the Project will become “visible” in the Kie web console immediately, but the Project contents will only be available on the server after Repository changes are committed and pushed upstream.
Remove Repository... - removes the selected Repository from its containing Organizational Unit. The user will be prompted to optionally delete the Repository from the server.
Show in Git Repository View - opens the Git Repositories View and highlights the selected Repository in that view if it is available.
Properties - displays the Repository Properties dialog (see the Property Pages section below.)

This context menu is only available if the Project has not yet been “Imported” that is, it has not yet been created in the local workspace.

Import Project - creates a local workspace project that references the selected Project in the Repository. This makes the project available for use. If a project with the same name already exists in the workspace, the newly selected Project can not be imported.
Delete Project... - deletes the selected Project and removes it from its containing Repository.
Properties - displays the Project Properties dialog (see the Property Pages section below.)
Once a Project has been “Imported”, it becomes synchronized with the other Eclipse resource viewers as well (e.g. Project Explorer, Java Package Explorer, Eclipse Navigator, etc.) and any changes made in any of these viewers will also be reflected in the Kie Navigator View and vice-versa. The screenshot below illustrates this effect:

This section describes all of the property pages for each entry type in the Kie Navigator tree.

Server Name:the server name as defined in the WST Servers Viewer. This can not be changed.
Host Name:the name of the machine on which the app server is running. This is also managed from the WST Servers Viewer.
Username/Password:login credentials for the Kie web app. This is used to make REST calls to the Kie web service.
Trust connections to this Server:if a host is not known as a trusted site, the ssh protocol will prompt the user to verify that this is a trusted site. Setting this checkbox disables the prompt. The host can also be entered into the ssh configuration as a trusted site to avoid this problem.
KIE Application Name:the name of the Kie web app; the Kie Navigator will try the following application names by default to determine the app name:
kie-wb
kie-drools-wb
kie-jbpm-wb
business-central
drools-console
jbpm-console
jboss-brms
However, since the user has the option of renaming the Kie web app during installation, Kie Navigator may not be able to discover the actual name. This field is intended for the case where the web app name has been user-defined.
Use default Git Repository Path:when this checkbox is set, repositories will be cloned into the directory configured by Git (see the Eclipse User Preferences for Git.) When unchecked, the directory used in the following field will be used instead.
Git Repository Path:the directory to use for cloning repositories from this server; this field is only enabled if the “Use default Git Repository Path” checkbox is unset. Note that since it is possible to have many servers (e.g. production, test, etc.) with a similar organizational structure, the chances of repository name collisions are high. It is therefore suggested to use a different repository directory for each server. By default, the server name is appended to the default Git repository path, to give a unique directory name for each server.

These fields correspond to the Organizational Unit definition in the Kie web app. Note that only the Owner and Default Group ID can be changed.

These fields correspond to the Repository definition in the Kie web app. The property page also shows the remote and local Git repository locations. Note that only the description and login credentials can be changed.

These fields correspond to the Project definition in the Kie web app. Currently none of these fields can be updated on the web server due to REST API limitations.
If a Project has been imported, this property page is shown in the context of the Eclipse project properties, as shown here:

This section describes how to debug processes using the jBPM Eclipse plugin. This means that the current state of your running processes can be inspected and visualized during the execution. Note that we currently don't allow you to put breakpoints on the nodes within a process directly. You can however put breakpoints inside any Java code you might have (i.e. your application code that is invoking the engine or invoked by the engine, listeners, etc.) or inside rules (that could be evaluated in the context of a process). At these breakpoints, you can then inspect the internal state of all your process instances.
When debugging the application, you can use the following debug views to track the execution of the process:
The process instances view, showing all running process instances (and their state). When double-clicking a process instance, the process instance view visually shows the current state of that process instance at that point in time.
The audit view, showing the audit log (note that you should probably use a threaded file logger if you want to session to save the audit event to the file system on regular intervals, so the audit view can be update to show the latest state).
The global data view, showing the globals.
Other views related to rule execution like the working memory view (showing the contents (data) in the working memory related to rule execution), the agenda view (showing all activated rules), etc.
The process instances view shows the process instances currently running in the selected ksession. To be able to use the process instances view, first open the Process Instances view (Window - Show View - Other ... and under the Drools category select Process Instances and Process Instance). Tip: it might be useful to drag the Process Instance view to the Outline View and slightly enlarge it, as shown in the screenshot below, so you can see both the Process Instances and Process Instance views at the same time.
Next, use a (regular) Java breakpoint to stop your application at a specific point (for example right after starting a new process instance). In the Debug perspective, select the ksession you would like to inspect, and the Process Instances view should show the process instances that are currently active inside that ksession. For example, the screenshot below shows one running process instance (with id "1"). When double-clicking a process instance, the process instance viewer will graphically show the progress of that process instance. An example where the process instance is waiting for a human actor to perform "Task 1" is shown below.
Note
The process instances view shows the process instances currently active inside the selected ksession. Note that, when using persistence, process instances are not kept in memory inside the ksession, as they are stored in the database as soon as the command completes. Therefore, you will not be able to use the Process Instances view when using persistence. For example, when executing a JUnit test using the JbpmJUnitBaseTestCase, make sure to call "super(true, false);" in the constructor to create a runtime manager that is not using persistence.

Tip
When you double-click a process instance in the process instances view and the process instance view complains that it cannot find the process, this means that the plugin wasn't able to find the process definition of the selected process instance in the cache of parsed process definitions. To solve this, simply change the process definition in question and save again (so it will be parsed) or rebuild the project that contains the process definition in question.
The audit view can be used to show the all the events inside an audit log in a tree-based manner. An audit log is an XML-based log file which contains a log of all the events that occurred while executing a specific ksession. To create a logger, use KieServices to create a new logger and attach it to a ksession. Be sure to close the logger after usage.
KieRuntimeLogger logger = KieServices.Factory.get().getLoggers()
    .newThreadedFileLogger(ksession, "mylogfile", 1000);
// do something with the ksession here
logger.close();
To be able to use the Audit View, first open it (Window - Show View - Other ... and under the Drools category select Audit). To open up a log file in the audit view, open the selected log file in the audit view (using the "Open Log" action in the top right corner), or simply drag and drop the log file from the Package Explorer or Navigator into the audit view. A tree-based view is generated based on the data inside the audit log. An event is shown as a subnode of another event if the child event is caused by (a direct consequence of) the parent event. An example is shown below.

Tip
Note that the file-based logger will only save the events on close (or when a certain threshold is reached). If you want to make sure the events are saved on a regular interval (for example during debugging), make sure to use a threaded file logger, so the audit view can be update to show the latest state. When creating a threaded file logger, you can specify the interval after which events should be saved to the file (in milliseconds).
From Eclipse, you can synchronize your local workspace with one or more repositories that are managed inside the workbench application. This enables collaboration between developers using Eclipse and users of the web-based workbench (business analysts or end users for example). Synchronization between the workbench repositories and your local version of these projects is done using Git (a popular distributed source code version control system).
When creating and executing processes inside Eclipse, you are creating them on your local file system. You can however also import an existing repository from the Workbench, apply changes and push these changes back into the Workbench repositories. We are using existing Git tools for this. Note that this section will describe how to do this using the EGit tooling (Eclipse Tooling for Git which comes by default with most versions of Eclipse), but feel free to use your preferred Git tool instead.
Note
This section is not intended to explain what Git is, or how to use EGit, in detail. If you don't have any experience with Git and/or EGit, it might be recommended to read up on them first if necessary.
To import an existing repository from the workbench, you can use the EGit import wizard. In the File menu, select "Import ..." and in the Git category, select "Projects from Git" and click "Next >". This should open a new dialog where you should select the location of the repository you would like to import. Since we are connecting to a repository that is managed by the workbench application, select "URI" and click "Next >" once more.
Use the following URI to connect to your workbench repositories:
ssh://<hostname>:8001/<repository_name>For example, if you are running the workbench application on your local host (for example by using the jbpm-installer), and you want to import the jbpm-playground repo, use the following URI:
ssh://localhost:8001/jbpm-playgroundNote that you can change the port that is used by the server to provide ssh access
to the git repository if necessary, using the system property org.uberfire.nio.git.ssh.port
Fill in the URI of the repository you would like to import, as for example shown below, and click "Next >".

You will be asked to select which branch you would like to import. Select the master branch and click "Next >" again.
Finally, you need to specify where on your local file system you would like this repository to be created. Fill in the directory (you can use the Browse button to select the folder in question, and if necessary you can create a new folder there as well) and click "Next >". This will now download the repository to the folder you just selected.

You still need to import the repository you just downloaded as a project in your Eclipse workspace. Select "Import as general project" and after clicking "Next >", give it a name and click "Finish". After doing so, your workspace should now contain your repository, and you should be able to browse, open and edit the various assets inside.

You can commit and push changes (you do locally) back to the workbench repositories. To commit changes, right-click on your repository project and select "Team -> Commit ...". A new dialog pops up, showing all the changes you have on your local file system. Select the files you want to commit (if you double-click them, you can get an overview of the changes you did for that file), provide an appropriate commit message and click "Commit".

Once you've committed your change to your local git, you still need to push it to the workbench repository. Right-click your project again, and select "Team -> Push to Upstream".
Note
You are only allowed to push changes upstream if your local version includes all recent changes (otherwise you might be overriding someone else's changes). You might be forced to update (and if necessary resolve conflicts) before you are allowed to commit any changes.
To retrieve the latest changes from the workbench repository, right-click your repository project and select "Team -> Fetch from Upstream". This will fetch all changes from the workbench repository, but not yet apply them to your local version. Now right-click your project again and select "Team -> Merge ...". In the dialog that pops up next, you need to select "origin/master" branch (under Remote Tracking) to indicate that you want to merge in all changes from the original repository in the workbench, and click "Merge".

Note
It is possible that you have committed and/or conflicting changes in your local version, you might have to resolve these conflicts and commit the merge results before you will be able to complete the merge successfully. It is recommended to update regularly, before you start updating a file locally, to avoid merge conflicts being detected when trying to commit changes.
When you import a repository, it will download all the projects that are inside that repository. It is however useful to mount one specific project as a separate Java project in Eclipse. When you do this, Eclipse will be able to interpret the information in the project pom.xml file (that you created in the workbench), download and include any dependencies you specified, compile any Java classes you have in your project (that you for example created with the data modeler), etc.
To do so, right-click on one of the projects in your repository project and select "Import ..." and under the Maven category, select "Existing Maven Projects" (as shown below) and click Next.
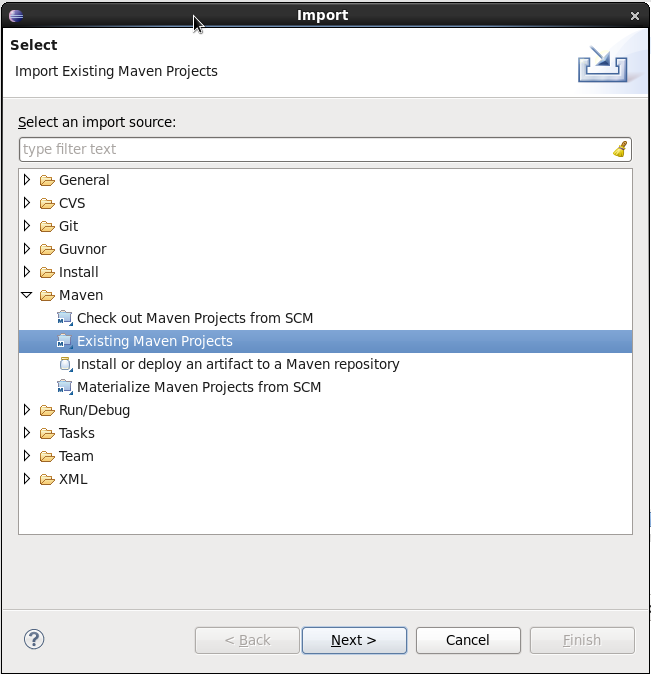
In the next page, you should see the pom.xml of the project you selected. Click Finish.

If your project requires some of the jBPM libraries to correctly compile and/or execute any Java classes in your project (for example if you have test classes in your project that start up a jBPM engine and execute some tests for your project, or if you are using the data modeler, which will add some annotations to the generated Java classes), you still need to add the jBPM libraries to the classpath of your project. To do so, simply convert your project into a jBPM project, which will add the jBPM library to your project's classpath. Right-click your project and select "Configure -> Convert to jBPM Project". Your project should now have a jBPM Library added to its classpath (it might be necessary to clean your project to pick up this change and recompile all Java classes).
