There is a lot of information stored in many of different places: databases, repositories, SCM systems, registries, file systems, services, etc. The purpose of the federation engine is to allow applications to use the JCR API to access that information as if it were all stored in a single JCR repository, but to really leave the information where it is.
Why not just copy or move the information into a JCR repository? Moving it is probably pretty difficult, since most likely there are existing applications that rely upon that information being where it is. All of those applications would break or have to change. And copying the information means that we'd have to continually synchronize the changes. This not only is a lot of work, but it often makes it difficult to know whether information is accurate and "the master" data.
ModeShape lets us leave information where it is, yet access it through the JCR API as if it were in one big repository. One major benefit is that existing applications that use the information in the original locations don't break, since they can keep using the information. But now our JCR clients can also access all the information, too. And if our federating ModeShape repository is configured to allow updates, JCR client applications can change the information in the repository and ModeShape will propagate those changes down to the original source, making those changes visible to all the other applications.
In short, all clients see the correct information, even when it changes in the underlying systems. But the JCR clients can get to all of the information in one spot, using one powerful standard API.
With ModeShape, your applications use the JCR 2.0 API to work with the repository, but the ModeShape repository transparently fetches the information from different kinds of repositories and storage systems, not just a single purpose-built store. This is fundamentally what makes ModeShape different.
How does ModeShape do this? At the heart of ModeShape and it's JCR implementation is a simple graph-based connector system. Essentially, ModeShape's JCR implementation uses a single connector to access all content:
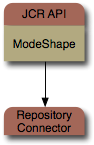
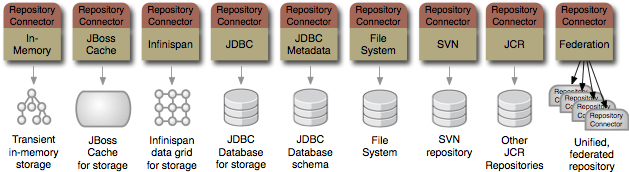
That single repository connector could access:
a transient, in-memory repository
an Infinispan data grid that acts as an extremely scalable, highly-available store for repository content
a JBoss Cache instance that acts as a clustered and replicated store for repository content
a JDBC database used as a store for repository content
a repository that accesses existing JDBC databases to project the schema structure as read-only repository content
a repository that accesses a file system to present its files and directory structure as (updatable) repository content
a repository that accesses the content in another JCR repository
a repository that accesses an SVN repository to present the files and directory structure as (updatable) repository content
a federated repository that presents a unified, updatable view of the content in multiple other systems (which are accessed via connectors)
Really, the federated connector gives us all kinds of possibilities, since we can use that connector on top of lots of connectors to other individual sources. This simple connector architecture is fundamentally what makes ModeShape so powerful and flexible. Along with a good library of connectors, which is what we're planning to create.
For instance, we want to build a connector to access existing relational databases so that some or all of the existing data (in whatever structure) can be accessed through JCR. For more information, check out our roadmap. Of course, if we don't have a connector to suit your needs, you can write your own.
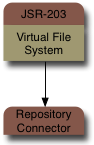
It's even possible to put a different API layer on top of the connectors. For example, the new New I/O (JSR-203) API offers the opportunity to build new file system providers. This would be very straightforward to put on top of a JCR implementation, but it could be made even simpler by putting it on top of a ModeShape connector. In both cases, it'd be a trivial mapping from nodes that represent files and folders into JSR-203 files and directories, and events on those nodes could easily be translated into JSR-203 watch events. Then, simply choose a ModeShape connector and configure it to use the source you want to use.
Before we go further, let's define some terminology regarding connectors.
A connector is the runnable code packaged in one or more JAR files that contains implementations of several interfaces (described below). A Java developer writes a connector to a type of source, such as a particular database management system, LDAP directory, source code management system, etc. It is then packaged into one or more JAR files (including dependent JARs) and deployed for use in applications that use ModeShape repositories.
The description of a particular source system (e.g., the "Customer" database, or the company LDAP system) is called a repository source. ModeShape defines a RepositorySource interface that defines methods describing the behavior and supported features and a method for establishing connections. A connector will have a class that implements this interface and that has JavaBean properties for all of the connector-specific properties required to fully describe an instance of the system. Use of JavaBean properties is not required, but it is highly recommended, as it enables reflective configuration and administration. Applications that use ModeShape create an instance of the connector's RepositorySource implementation and set the properties for the external source that the application wants to access with that connector.
A repository source instance is then used to establish connections to that source. A connector provides an implementation of the RepositoryConnection interface, which defines methods for interacting with the external system. In particular, the
execute(...)method takes anExecutionContextinstance and aRequestobject. TheExecutionContextobject defines the environment in which the processing is occurring, while theRequestobject describes the requested operations on the content, with different concrete subclasses representing each type of activity. Examples of commands include (but not limited to) getting a node, moving a node, creating a node, changing a node, and deleting a node. And, if the repository source is able to participate in JTA/JTS distributed transactions, then the RepositoryConnection must implement thegetXaResource()method by returning a validjavax.transaction.xa.XAResourceobject that can be used by the transaction monitor.
As an example, consider if we wanted ModeShape to give us access through JCR to the information contained in a
relational database. We first have to develop a connector that allows us to interact with relational databases using JDBC.
That connector would contain a JdbcAccessSource Java class that implements RepositorySource,
and that has all of the various JavaBean properties for setting the name of the driver class, URL, username, password,
and other properties. If we add a JavaBean property defining the JNDI name, our connector could look in JNDI to find a JDBC
DataSource instance, perhaps already configured to use connection pools.
Note
Of course, before you develop a connector, you should probably check the list of connectors ModeShape already provides out of the box. And we've been adding new connectors with almost every release.
Our new connector might also have a JdbcAccessConnection Java class that implements the
RepositoryConnection interface. This class would probably wrap a JDBC database connection,
and would implement the execute(...) method such that the nodes exposed by the connector
describe the database tables and their contents. For example, the connector might represent each database table
as a node with the table's name, with properties that describe the table (e.g., the description, whether it's a
temporary table), and with child nodes that represent rows in the table.
To use our connector in an application that uses ModeShape, we would need to create an instance of the
JdbcAccessSource for each database instance that we want to access. If we have 3 MySQL databases,
9 Oracle databases, and 4 PostgreSQL databases, then we'd need to create a total of 16 JdbcAccessSource
instances, each with the properties describing a single database instance. Those sources are then available for use by
ModeShape components, including the JCR implementation.
So, we've so far learned what a connector is and how they're used to establish connections to the underlying sources and access the content in those sources. Next we'll show how connectors expose the notion of workspaces, and describe how to create your own connectors.
A number of connectors are already available in ModeShape, and are outlined in detail later in the document. Note that we do want to build more connectors in the upcoming releases.
There may come a time when you want to tackle creating your own connector. Maybe the connectors we provide out-of-the-box don't work with your source. Maybe you want to use a different cache system. Maybe you have a system that you want to make available through a ModeShape repository. Or, maybe you're a contributor and want to help us round out our library with a new connector. No matter what the reason, creating a new connector is pretty straightforward, as we'll see in this section.
Creating a custom connector involves the following steps:
Create a Maven 3 project for your connector;
Implement the RepositorySource interface, using JavaBean properties for each bit of information the implementation will need to establish a connection to the source system. Then, implement the RepositoryConnection interface with a class that represents a connection to the source. The
execute(method should process any and all requests that may come down the pike, and the results of each request can be put directly on that request. This approach is pretty straightforward, and gives you ultimate freedom in terms of your class structure.ExecutionContext,Request)Alternatively, an easier way to get a complete read-write connector would be to extend one of our two abstract RepositorySource implementations. If the content your connector exposes has unique keys (such as a unique string, UUID or other identifier), consider implementing
MapRepositorySource, subclassingMapRepository, and using the existingMapRepositoryConnectionimplementation. ThisMapRepositoryConnectiondoes most of the work already, relying upon yourMapRepositorysubclass for anything that might be source-specific. (See the JavaDoc for details.) Or, if the content your connector exposes is simply path-based, consider implementingPathRepositorySource, subclassingPathRepository, and using the existingPathRepositoryConnectionimplementation. Again,PathRepositoryConnectionclass does almost all of the work and delegates to yourPathRepositorysubclass for anything that might be source-specific. (See the JavaDoc for details.)Don't forget unit tests that verify that the connector is doing what it's expected to do. (If you'll be committing the connector code to the ModeShape project, please ensure that the unit tests can be run by others that may not have access to the source system. In this case, consider writing integration tests that can be easily configured to use different sources in different environments, and try to make the failure messages clear when the tests can't connect to the underlying source.)
Configure ModeShape to use your connector. This may involve just registering the source with the
RepositoryService, or it may involve adding a source to a configuration repository used by the federated repository.Deploy the JAR file with your connector (as well as any dependencies), and make them available to ModeShape in your application.
Let's go through each one of these steps in more detail.
The first step is to create the Maven 3 project that you can use to compile your code and build the JARs. Maven 3 automates a lot of the work, and since you're already set up to use Maven, using Maven for your project will save you a lot of time and effort. Of course, you don't have to use Maven 3, but then you'll have to get the required libraries and manage the compiling and building process yourself.
Note
ModeShape may provide in the future a Maven archetype for creating connector projects. If you'd find this useful and would like to help create it, please join the community.
In lieu of a Maven archetype, you may find it easier to start with a small existing connector project. The modeshape-connector-filesystem project is small and provides good example of implementing a path-based repository. See the Git repository: http://github.com/ModeShape/modeshape//tree/modeshape-2.8.1.Final/extensions/modeshape-connector-filesystem/
You can create your Maven project any way you'd like. For examples, see the
Maven 3 documentation.
Once you've done that, just add the dependencies in your project's pom.xml dependencies section:
<dependency>

  <groupId>org.modeshape</groupId>

  <artifactId>modeshape-graph</artifactId>

  <version>2.9-SNAPSHOT</version>

</dependency>
This is the only dependency required for compiling a connector - Maven pulls in all of the dependencies needed by the 'modeshape-graph' artifact. Of course, you'll still have to add dependencies for any library your connector needs to talk to its underlying system.
As for testing, you probably will want to add more dependencies, such as those listed here:
<!-- ModeShape-related unit testing utilities and classes -->

<dependency>

  <groupId>org.modeshape</groupId>

  <artifactId>modeshape-graph</artifactId>

  <version>2.9-SNAPSHOT</version>

  <type>test-jar</type>

  <scope>test</scope>

</dependency>

<dependency>

  <groupId>org.modeshape</groupId>

  <artifactId>modeshape-common</artifactId>

  <version>2.9-SNAPSHOT</version>

  <type>test-jar</type>

  <scope>test</scope>

</dependency>

<!-- Unit testing -->

<dependency>

  <groupId>junit</groupId>

  <artifactId>junit</artifactId>

  <version>4.4</version>

  <scope>test</scope>

</dependency>

<dependency>

    <groupId>org.mockito</groupId>

    <artifactId>mockito-all</artifactId>

    <version>1.8.4</version>

    <scope>test</scope>

</dependency>

<dependency>

  <groupId>org.hamcrest</groupId>

  <artifactId>hamcrest-library</artifactId>

  <version>1.1</version>

  <scope>test</scope>

</dependency>

<!-- Logging with Log4J -->

<dependency>

  <groupId>org.slf4j</groupId>

  <artifactId>slf4j-log4j12</artifactId>

  <version>1.6.1</version>

  <scope>test</scope>

</dependency>

<dependency>

  <groupId>log4j</groupId>

  <artifactId>log4j</artifactId>

  <version>1.2.16</version>

  <scope>test</scope>

</dependency>
Testing ModeShape connectors does not require a JCR repository or the ModeShape services. (For more detail,
see the testing section.) However, if you want to do
integration testing with a JCR repository and the ModeShape services, you'll need additional dependencies
(e.g., modeshape-repository and any other extensions).
At this point, your project should be set up correctly, and you're ready to move on to writing the Java implementation for your connector.
As mentioned earlier, a connector consists of the Java code that is used to access content from a system. Perhaps the most important class that makes up a connector is the implementation of the RepositorySource. This class is analogous to JDBC's DataSource in that it is instantiated to represent a single instance of a system that will be accessed, and it contains enough information (in the form of JavaBean properties) so that it can create connections to the source.
Why is the RepositorySource implementation a JavaBean? Well, this is the class that is instantiated, usually reflectively, and so a no-arg constructor is required. Using JavaBean properties makes it possible to reflect upon the object's class to determine the properties that can be set (using setters) and read (using getters). This means that an administrative application can instantiate, configure, and manage the objects that represent the actual sources, without having to know anything about the actual implementation.
So, your connector will need a public class that implements RepositorySource and provides JavaBean properties for any kind of inputs or options required to establish a connection to and interact with the underlying source. Most of the semantics of the class are defined by the RepositorySource and inherited interface. However, there are a few characteristics that are worth mentioning here.
The previous chapter talked about how connector expose their information through the graph language of ModeShape. This is true, except that we didn't dive into too much of the detail. ModeShape graphs have the notion of workspaces in which the content appears, and its very easy for clients using the graph to switch between workspaces. In fact, workspaces differ from each other in that they provide different views of the same information.
Consider a source control system, like SVN or CVS. These systems provide different views of the source code: a mainline development branch as well as other branches (or tags) commonly used for releases. So, just like one source file might appear in the mainline branch as well as the previous two release branches, a node in a repository source might appear in multiple workspaces.
However, each connector can kind of decide how (or whether) it uses workspaces. For example, there may be no overlap in the content between workspaces. Or a connector might only expose a single workspace (in other words, there's only one "default" workspace).
When your RepositorySource instance is put into the library within a running ModeShape system,
the initialize(RepositoryContext) method will be called on the instance.
The supplied RepositoryContext object represents the context in which the RepositorySource
is running, and provides access to an ExecutionContext, a RepositoryConnectionFactory that can be used
to obtain connections to other sources, and an Observer of your source that should be called with
events describing the Changes being made within the source, either as a result of ChangeRequest operations being
performed on this source, or as a result of operations being performed on the content from outside
the source.
Each connector is responsible for determining whether and how long ModeShape is to cache the content made available by the connector. This is referred to as the caching policy, and consists of a time to live value representing the number of milliseconds that a piece of data may be cached. After the TTL has passed, the information is no longer used.
ModeShape allows a connector to use a flexible and powerful caching policy. First, each connection returns the
default caching policy for all information returned by that connection.
Often this policy can be configured via properties on the RepositorySource implementation.
This is optional, meaning the connector can return null if it does not wish to
have a default caching policy.
Second, the connector is able to override its default caching policy on individual requests (which we'll cover in the next section). Again, this is optional, meaning that a null caching policy on a request implies that the request has no overridden caching policy.
Third, if the connector has no default caching policy and none is set on the individual requests, ModeShape uses whatever caching policy is set up for that component using the connector. For example, the federating connector allows a default caching policy to be specified, and this policy is used should the sources being federated not define their own caching policy.
In summary, a connector has total control over whether and for how long the information it provides is cached.
Note
At this time, not every connector takes advantage of cache policies. However, it is anticipated that this will change.
Sometimes it is necessary (or easier) for a RepositorySource implementation to look up an object in JNDI.
One example of this is the JBoss Cache connector: while the connector can
instantiate a new JBoss Cache instance, more interesting use cases involve JBoss Cache instances that are
set up for clustering and replication, something that is generally difficult to configure in a single JavaBean.
Therefore the JBossCacheSource has optional JavaBean properties that define how it is to look up a
JBoss Cache instance in JNDI.
This is a simple pattern that you may find useful in your connector. Basically, if your source implementation can look up an object in JNDI, simply use a single JavaBean String property that defines the full name that should be used to locate that object in JNDI. Usually it's best to include "Jndi" in the JavaBean property name so that administrative users understand the purpose of the property. (And some may suggest that any optional property also use the word "optional" in the property name.)
Another characteristic of a RepositorySource implementation is that it provides some hint as to whether
it supports several features. This is defined on the interface as a method that returns a
RepositorySourceCapabilities object. This class currently provides methods that say whether the connector supports
updates, whether it supports same-name-siblings (SNS), and whether the connector supports listeners and events.
Note that these may be hard-coded values, or the connector's response may be determined at runtime by various factors. For example, a connector may interrogate the underlying system to decide whether it can support updates.
The RepositorySourceCapabilities can be used as is (the class is immutable), or it can be subclassed
to provide more complex behavior. It is important, however, that the capabilities remain constant
throughout the lifetime of the RepositorySource instance.
Note
Why a concrete class and not an interface? By using a concrete class, connectors inherit the default behavior. If additional capabilities need to be added to the class in future releases, connectors may not have to override the defaults. This provides some insulation against future enhancements to the connector framework.
As we'll see in the next section, the main method connectors have to process requests takes an ExecutionContext,
which contains the JAAS security information of the subject performing the request. This means that the connector
can use this to determine authentication and authorization information for each request.
Sometimes that is not sufficient. For example, it may be that the connector needs its own authorization information
so that it can establish a connection (even if user-level privileges still use the ExecutionContext provided with
each request). In this case, the RepositorySource implementation will probably need JavaBean properties
that represent the connector's authentication information. This may take the form of a username and password,
or it may be properties that are used to delegate authentication to JAAS.
Either way, just realize that it's perfectly acceptable for the connector to require its own security properties.
One job of the RepositorySource implementation is to create connections to the underlying sources. Connections are represented by classes that implement the RepositoryConnection interface, and creating this class is the next step in writing a connector. This is what we'll cover in this section.
The RepositoryConnection interface is pretty straightforward:
/** * A connection to a repository source. * * These connections need not support concurrent operations by multiple threads. */ @NotThreadSafe public interface RepositoryConnection { /** * Get the name for this repository source. This value should be the same as that returned * by the same RepositorySource that created this connection. * * @return the identifier; never null or empty */ String getSourceName(); /** * Return the transactional resource associated with this connection. The transaction manager * will use this resource to manage the participation of this connection in a distributed transaction. * * @return the XA resource, or null if this connection is not aware of distributed transactions */ XAResource getXAResource(); /** * Ping the underlying system to determine if the connection is still valid and alive. * * @param time the length of time to wait before timing out * @param unit the time unit to use; may not be null * @return true if this connection is still valid and can still be used, or false otherwise * @throws InterruptedException if the thread has been interrupted during the operation */ boolean ping( long time, TimeUnit unit ) throws InterruptedException; /** * Get the default cache policy for this repository. If none is provided, a global cache policy * will be used. * * @return the default cache policy */ CachePolicy getDefaultCachePolicy(); /** * Execute the supplied commands against this repository source. * * @param context the environment in which the commands are being executed; never null * @param request the request to be executed; never null * @throws RepositorySourceException if there is a problem loading the node data */ void execute(ExecutionContextcontext,Requestrequest ) throwsRepositorySourceException; /** * Close this connection to signal that it is no longer needed and that any accumulated * resources are to be released. */ void close(); }
While most of these methods are straightforward, a few warrant additional information.
The ping(...) method allows ModeShape to check the connection to see if it is
alive. This method can be used in a variety of situations, ranging from verifying that a RepositorySource's
JavaBean properties are correct to ensuring that a connection is still alive before returning the connection from
a connection pool.
The most important method on this interface, though, is the execute(...) method, which serves as the
mechanism by which the component using the connector access and manipulates the content exposed by the connector.
The first parameter to this method is the ExecutionContext, which contains the information about environment
as well as the subject performing the request. This was discussed earlier.
The second parameter, however, represents a Request that is to be processed by the connector. Request objects can
take many different forms, as there are different classes for each kind of request (see the
previous chapter for details).
Each request contains the information a connector needs to do the processing, and it also is the place
where the connector places the results (or the error, if one occurs).
A connector is technically free to implement the execute(...) method in any way, as long as the semantics
are maintained. But as discussed in the previous chapter, ModeShape provides
a RequestProcessor class that can simplify writing your own connector and at the
same time help insulate your connector from new kinds of requests that may be added in the future. The RequestProcessor
is an abstract class that defines a process(...) method for each concrete Request subclass.
In other words, there is a process(CompositeRequest) method, a process(ReadNodeRequest) method,
and so on.
To use this in your connector, simply create a subclass of RequestProcessor, overriding all of the abstract methods and optionally
overriding any of the other methods that have a default implementation.
Note
The RequestProcessor abstract class contains default implementations for quite a few of the process(...) methods,
and these will be sufficient but probably not efficient or optimum. If you can provide a more efficient
implementation given your source, feel free to do so. However, if performance is not a big issue, all of the concrete methods
will provide the correct behavior. Keep things simple to start out - you can always provide better implementations later.
Also, make sure your RequestProcessor is properly broadcasting the changes made during execution.
The RequestProcessor class has a recordChange( that can be called from each of the ChangeRequest)process(...)
methods that take a ChangeRequest. The RequestProcessor enqueues these requests, and when the RequestProcessor is
closed, the default implementation is to send a Changes to the Observer supplied into the constructor.
Then, in your connector's execute( method, instantiate your ExecutionContext, Request)RequestProcessor subclass
and call its process(
The Request) method, passing in the execute(...) method's Request parameter.RequestProcessor will determine the appropriate method given the actual Request object and will then invoke that method:
public void execute( finalExecutionContextcontext, finalRequestrequest ) throws RepositorySourceException { String sourceName = // from the RepositorySource Observer observer = // from the RepositoryContextRequestProcessorprocessor = new CustomRequestProcessor(sourceName,context,observer); try { processor.process(request); } finally { processor.close(); // sends the accumulatedChangeRequests as aChangesto the Observer } }
If you do this, the bulk of your connector implementation may be in the RequestProcessor implementation methods.
This not only is pretty maintainable, it also lends itself to easier testing. And should any new request types be added
in the future, your connector may work just fine without any changes. In fact, if the RequestProcessor class
can implement meaningful methods for those new request types, your connector may "just work". Or, at least
your connector will still be binary compatible, even if your connector won't support any of the new features.
Finally, how should the connector handle exceptions? As mentioned above, each Request object has a slot where the connector
can set any exception encountered during processing. This not only handles the exception, but in the case of CompositeRequests
it also correctly associates the problem with the request. However, it is perfectly acceptable to throw an exception
if the connection becomes invalid (e.g., there is a communication failure) or if a fatal error would prevent subsequent
requests from being processed.
Testing connectors is not really that much different than testing other classes. Using mocks may help to isolate your instances so you can create more unit tests that don't require the underlying source system.
However, there may be times when you have to use the underlying source system in your tests. If this is the case, we recommend using Maven integration tests, which run at a different point in the Maven lifecycle. The benefit of using integration tests is that by convention they're able to rely upon external systems. Plus, your unit tests don't become polluted with slow-running tests that break if the external system is not available.
In this chapter, we covered all the aspects of ModeShape connectors, including the connector API, how ModeShape's JCR implementation works with connectors, what connectors are available (and how to use them), and how to write your own connector. So now that you know how to set up and use ModeShape repositories, the next chapter describes the sequencing framework and how to build your own custom sequencers. After that, we'll get into how to configure ModeShape and use JCR.