Create new RichFaces Documentation Jira issue

This will launch the RichFaces Jira page - to complete your feedback please login if needed, and submit the Jira.
JBoss.orgCommunity Documentation
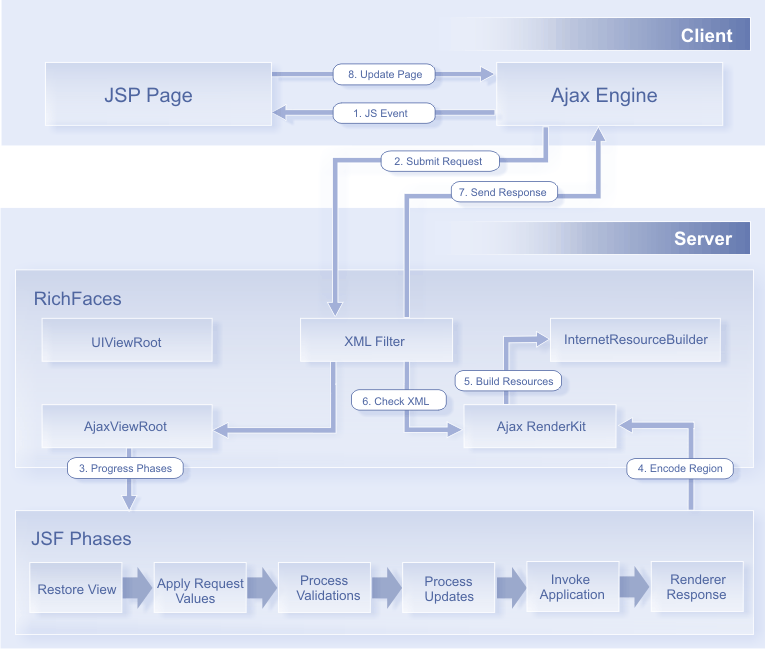
The framework is implemented as a component library which adds Ajax capability into existing pages, so you don't need to write any JavaScript code or to replace existing components with new Ajax widgets. RichFaces enables page-wide Ajax support instead of the traditional component-wide support. Hence, you can define the event on the page that invokes an Ajax request and the areas of the page that should be synchronized with the JSF Component Tree after the Ajax request changes the data on the server according to the events fired on the client.
Next Figure shows how it works:
RichFaces allows to define (by means of JSF tags) different parts of a JSF page you wish to update with an Ajax request and provide a few options to send Ajax requests to the server. Also JSF page doesn't change from a "regular" JSF page and you don't need to write any JavaScript or XMLHTTPRequest objects by hands, everything is done automatically.
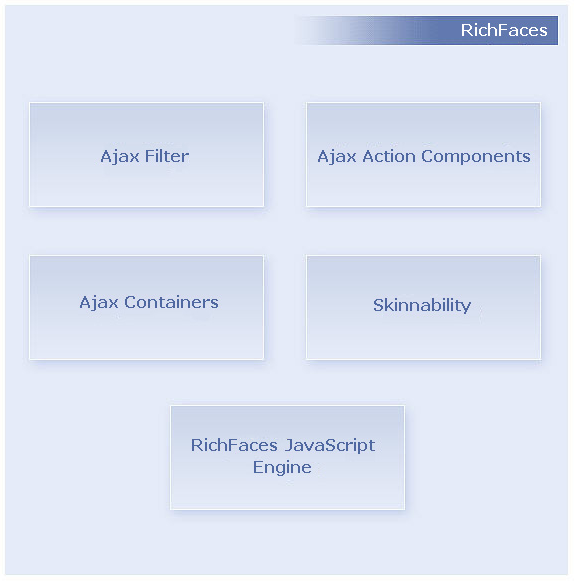
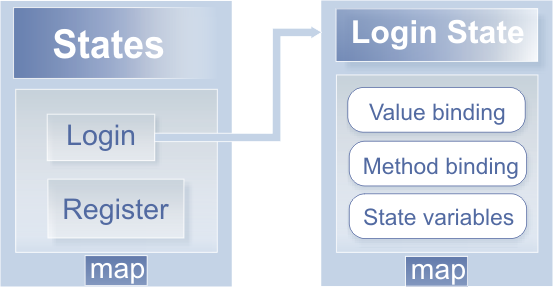
Next figure lists several important elements of the RichFaces framework
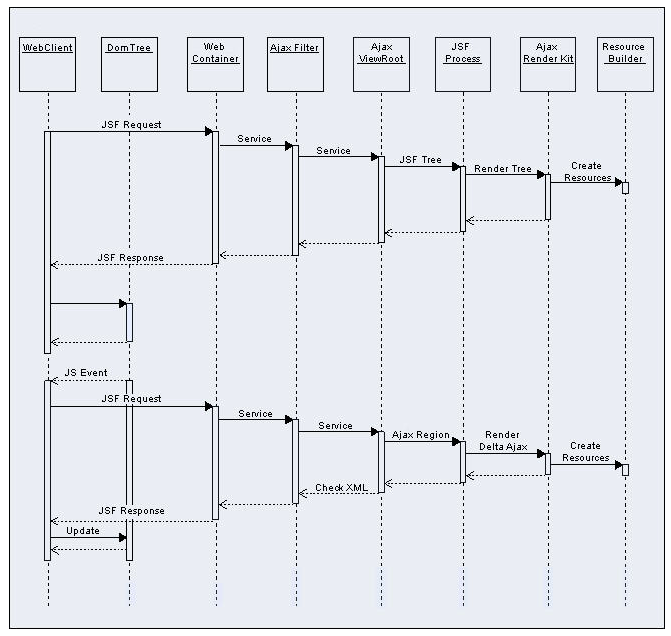
To get all benefits of RichFaces , you should register a Filter in web.xml file of your application. The Filter recognizes multiple request types. Necessary information about Filter configuration can be found in the "Filter configuration" section. The sequence diagram on Figure 3 shows the difference in processing of a "regular" JSF request and an Ajax request.
In the first case the whole JSF tree will be encoded, in the second one option it depends on the "size" of the Ajax region. As you can see, in the second case the filter parses the content of an Ajax response before sending it to the client side.
Have a look at the next picture to understand these two ways:
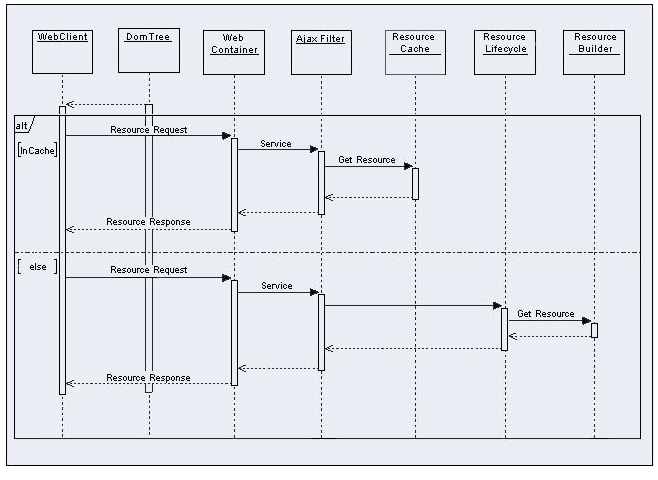
In both cases, the information about required static or dynamic resources that your application requests is registered in the ResourseBuilder class.
When a request for a resource comes (Figure 4), the RichFaces filter checks the Resource Cache for this resource and if it is there, the resource is sent to the client. Otherwise, the filter searches for the resource among those that are registered by the ResourceBuilder. If the resource is registered, the RichFaces filter will send a request to the ResourceBuilder to create (deliver) the resource.
Next Figure shows the ways of resource request processing.
There are Ajax Action Components: <a4j:commandButton> , <a4j:commandLink> , <a4j:poll> and <a4j:support> and etc. You can use them to send Ajax requests from the client side.
AjaxContainer is an interface that describes an area on your JSF page that should
be decoded during an Ajax request. AjaxViewRoot and
AjaxRegion are implementations of this interface.
RichFaces JavaScript Engine runs on the client-side. It knows how to update different areas on your JSF page based on the information from the Ajax response. Do not use this JavaScript code directly, as it is available automatically.
RichFaces framework enhances the JSF framework with partial rendering of the components with Ajax capability enabled. This means that only the part of the page that should be affected by some change is updated. Ajax capability of the components can be enabled by the "mode", "switchType" etc. set to "ajax". This approach prevents multiple page refreshes, which minimized server load.
A good example that can illustrate this feature is rendering of the tabs of the <rich:tabPanel>. By default the component updates the whole page to display the content of the tab which is clicked on, to enable partial rendering the "switchType" attribute set to "ajax" should be used.
...

<rich:tabPanel switchType="ajax">

    <rich:tab label="Tab 1">

        Content of Tab 1

    </rich:tab>

    <rich:tab label="Tab 2">

        Content of Tab 2

    </rich:tab>

    <rich:tab label="Tab 3">

        Content of Tab 3

    </rich:tab>

</rich:tabPanel>

...
The RichFaces comes with a number of integral parts (framework, libraries):
For more information about framework and libraries loading see the following section in the FAQ.
In order to prevent JavaScript versions conflict you should use only one version of the framework or library. You could find more information about libraries exclusion in the FAQ.
In order to create RichFaces applications properly, keep the following points in mind:
Any Ajax framework should not append or delete, but only replace elements on the page. For successful updates, an element with the same ID as in the response must exist on the page. If you'd like to append any code to a page, put in a placeholder for it (any empty element). For the same reason, it's recommended to place messages in the "AjaxOutput" component (as no messages is also a message).
Don't use <f:verbatim> for self-rendered containers, since this component is transient and not saved in the tree.
Ajax requests are made by XMLHTTPRequest functions in XML format, but this XML bypasses most validations and the corrections that might be made in a browser. Thus, create only a strict standards-compliant code for HTML and XHTML, without skipping any required elements or attributes. Any necessary XML corrections are automatically made by the XML filter on the server, but lot's of unexpected effects can be produced by an incorrect HTML code.
The RichFaces ViewHandler puts itself in front of the Facelets ViewHandlers chain.
RichFaces components uses their own renderers. On the Render Response Phase RichFaces framework makes a traversal of the component tree, calls its own renderer and put the result into the Faces Response.
Ajax attributes are common for Ajax components such as <a4j:support> , <a4j:commandButton> , <a4j:jsFunction> , <a4j:poll> , <a4j:push> and so on. Also, most RichFaces components with built-in Ajax support have these attributes for a similar purpose. Ajax components attributes help RichFaces to expose its features. Most of the attributes have default values. Thus, you can start working with RichFaces without knowing the usage of these attribute. However, their usage allows to tune the required Ajax behavior very smoothly.
"reRender" is a key attribute. The attribute allows to point to area(s) on a page that should be updated as a response on Ajax interaction. The value of the "reRender" attribute is an id of the JSF component or an id list.
A simple example is placed below:
...

<a4j:commandButton value="update" reRender="infoBlock"/>

...

<h:panelGrid id="infoBlock">

    ...

</h:panelGrid>

...
The value of "reRender" attribute of the <a4j:commandButton> tag defines which part(s) of your page is (are) to be updated. In this case, the only part of the page to update is the <h:panelGrid> tag because its ID value matches to the value of "reRender" attribute. As you see, it's not difficult to update multiple elements on the page, only list their IDs as the value of "reRender" .
"reRender" uses UIComponent.findComponent() algorithm (with some additional exceptions) to find the component in the component tree. As can you see, the algorithm presumes several steps. Each other step is used if the previous step is not successful. Therefore, you can define how fast the component is found mentioning it more precisely. The following example shows the difference in approaches (both buttons will work successfully):
...

<h:form id="form1">

    ...

    <a4j: commandButton value="Usual Way" reRender="infoBlock, infoBlock2" />

    <a4j:commandButton value="Shortcut" reRender=":infoBlockl,:sv:infoBlock2" />

    ...

</h:form>

<h:panelGrid id="infoBlock">

    ...

</h:panelGrid>

...

<f:subview id="sv">

    <h:panelGrid id="infoBlock2">

        ...

    </h:panelGrid>

    ...

</f:subview>

...
It's also possible to use JSF EL expression as a value of the reRender attribute. It might be a property of types Set, Collection, Array or simple String. The EL for reRender is resolved right before the Render Response phase. Hence, you can calculate what should be re-rendered on any previous phase during the Ajax request processing.
Most common problem with using reRender is pointing it to the component that has
a
"rendered"
attribute. Note, that JSF does not mark the place in the browser DOM
where the outcome of the component should be placed in case the
"rendered"
condition returns false. Therefore, after the component becomes rendered
during the Ajax request, RichFaces delivers the rendered code to the client, but
does not update a page, because the place for update is unknown. You need to point
to one of the parent components that has no
"rendered"
attribute. As an alternative, you can wrap the component with
<a4j:outputPanel>
layout="none" .
"ajaxRendered" attribute of the <a4j:outputPanel> set to "true" allows to define the area of the page that will be re-rendered even if it is not pointed in the reRender attribute explicitly. It might be useful if you have an area on a page that should be updated as a response on any Ajax request. For example, the following code allows to output error messages regardless of what Ajax request causes the Validation phase failed.
...

<a4j:outputPanel ajaxRendered="true">

    <h:messages />

</a4j:outputPanel>

...
"limitToList"
attribute allows to dismiss the behavior of the
<a4j:outputPanel>
"ajaxRendered"
attribute. limitToList = "true" means to update
only the area(s) that mentioned in the
"reRender"
attribute explicitly. All output panels with
ajaxRendered="true" is ignored. An example is placed
below:
...

<h:form>

    <h:inputText value="#{person.name}">

        <a4j:support event="onkeyup" reRender="test" limitToList="true"/>

    </h:inputText>

    <h:outputText value="#{person.name}" id="test"/>

</form>

...
"eventsQueue" attribute defines the name of the queue that will be used to order upcoming Ajax requests. By default, RichFaces does not queue Ajax requests. If events are produced simultaneously, they will come to the server simultaneously. JSF implementations (especially, the very first ones) does not guaranty that the request that comes first will be served or passed into the JSF lifecycle first. The order how the server-side data will be modified in case of simultaneous request might be unpredictable. Usage of eventsQueue attribute allows to avoid possible mess. Define the queue name explicitly, if you expect intensive Ajax traffic in your application.
The next request posted in the same queue will wait until the previos one is not processed and Ajax Response is returned back if the "eventsQueue" attribute is defined. In addition, RichFaces starts to remove from the queue "similar" requests. "Similar'"requests are the requests produced by the same event. For example, according to the following code, only the newest request will be sent to the server if you type very fast and has typed the several characters already before the previous Ajax Response is back.
...

<h:inputText value="#{userBean.name}">

    <a4j:support event="onkeyup" eventsQueue="foo" reRender="bar" />

</h:inputText>

...
"requestDelay" attribute defines the time (in ms) that the request will be wait in the queue before it is ready to send. When the delay time is over, the request will be sent to the server or removed if the newest "similar" request is in a queue already .
"ignoreDupResponses"
attribute orders to ignore the Ajax Response produced by the request if
the newest "similar" request is in a queue already.
ignoreDupResponses"="true" does not cancel the
request while it is processed on the server, but just allows to avoid unnecessary
updates on the client side if the response loses the actuality.
Defining the "eventsQueue" along with "requestDelay" allows to protect against unnecessary traffic flood and synchronizes Ajax requests order. If you have several sources of Ajax requests, you can define the same queue name there. This might be very helpful if you have Ajax components that invoke request asynchronously from the ones produced by events from users. For example, <a4j:poll> or <a4j:push> . In case the requests from such components modify the same data, the synchronization might be very helpful.
More information can be found on the RichFaces Users Forum .
"timeout" attribute is used for setting response waiting time on a particular request. If a response is not received during this time, the request is aborted.
Starting from 3.3.0 version RichFaces has an improved queue.
There are some reasons why the queue has been improved. In previous versions the queue had quite simple implementation: it sent to the server only the last Ajax request out of all requests coming in the queue during request delay.
The improved queue allows to
Eliminate the possibility of collisions when several JSF requests pass the JSF lifecycle at the same time. The queue prevents sending such requests. Only one request is processed. The rest ones are waiting.
Reduce the traffic between browser and the server. The "similar" requests came within request delay are absorbed. Only the last one is actually sent. Reducing the number of request reduces the server load.
There are 4 types of the queue:
Global default queue, defined in the web.xml file
View scoped default queue
View scoped named queue
Form-based default queue
In this section we will take a closer look at the listed above types of the queue and see in more detail how they differ. Usage details are covered in the <a4j:queue> chapter.
Design details
Only one global queue will ever exist on a view
If you define more than one with this name while attempting to set its attributes a warning will appear in server console during rendering. All the same named queues after the first instance are ignored.
The queue class name is "org.richfaces.queue.global"
Global default queue has application scope and is defined in the web.xml
It can be done as follows:
...

<context-param>

   <param-name>org.richfaces.queue.global.enabled</param-name>

   <param-value>true</param-value>

</context-param>

...
The global default queue is disabled by default, because artificial serializing of all Ajax requests on a page can significantly affect expected behavior. The global default queue causes all Asynchronous JavaScript And XML requests becoming synchronous via the single global queue. If the global queue is turned on it can change the behavior on all views of the application without any visible or obvious setting.
Design details
Only one default queue is ever active at one time for a given view or form.
If ever more are detected a warning will appears in server console during rendering. All the same named queues after the first instance are ignored.
View scoped default queue is also created for components which have the following Ajax attributes: (in this case queue has a component scope)
"requestDelay"
"ignoreDupResponce"
View scoped default queue is created automatically if the "eventsQueue" attribute is defined with some name in a component but not found in the view. It has a scope the same as defined in corresponding context param.
The view scoped default, named and formed-based types of queue utilize the <a4j:queue> tag to override the settings of the global queue defined in the web.xml file.
You can also programmatically enable/disable the global queue on a single view using the following:
...

<a4j:queue name="org.richfaces.global_queue" disabled="true"... />

...
Hence, to enable the queue for a single view page you need to define the "disable" attribute with "false".
Now, you can override the default settings using the attributes of the <a4j:queue> component. The full list of attributes is given in the "6.20. <a4j:queue>" chapter of the guide.
Example:
...

<a4j:queue name="org.richfaces.global_queue" requestDelay="1000" />

...
View scoped queue can be also added by just definition of the queue without name specified. In this case it should be placed anywhere outside the forms in order not to be recognized as a form-based queue.
...

<a4j:queue ... />

...
Design details
Named queues must have a unique name, if a second queue with the same name is defined all the same named queues after the first instance are ignored.
Form elements are used as naming container for the queue i.e. custom queue defined within the form cannot be used by the components outside this concrete form.
You can reference a named queue from any Ajax4JSF or RichFaces component that supports the "eventsQueue" attribute. Below there is an example of how the components can reference a named queue.
Example:
...

<a4j:queue name="sampleQueue"/>

<h:inputText value="#{bean.inputValue}" >

    <a4j:support id="inputSupport" event="onkeyup" eventsQueue="sampleQueue"/>

</h:inputText>

<rich:comboBox value="#{bean.state}" suggestionValues="#{bean.suggestions}" eventsQueue="sampleQueue" />

...
In this example, two components(<a4j:queue>, <rich:comboBox>,) reference the named ( "sampleQueue") queue via the "eventsQueue" attribute.
Design details
Only one enabled form based default queue can be active at a time.
A warning appears in server console during rendering if more than one enabled form based queue exists. All queues with the same name after the first instance should be ignored.
Users can define more than one form queue, however all but one must be disabled.
Queues are often used within forms, but defining the "eventsQueue" attribute on every component within a form can be tedious work. To avoid that you can create a default queue for a form (overriding the global default queue ).
You can use either a JSF <h:form> or an Ajax4JSF <a4j:form>.
Example:
...

<h:form ... >

    <a4j:queue ... /><!-- note no name specified -->

    ...

</h:form>

...
Though, using an Ajax4JSF <a4j:form> you can refrence a named queue via the "eventsQueue".
Example:
...

<a4j:form eventsQueue="fooQueue" ...>

    ...

</a4j:form>

...
However the implementation of the queue allows you to reference a named queue from the form with a form-based queue.
Example:
...

<a4j:queue name="sampleQueue" ... /> <!-- named queue -->

...

<h:form ... >

    <a4j:queue ... /><!-- form-based queue-->

    <a4j:commandButton ... /> <!-- uses the form-based queue -->

    <a4j:commandButton eventsQueue="sampleQueue" /> <!-- uses named queue -->

</h:form>

...
This section will cover some queue's functionality aspects.
By default all the events raised by the same component are similar to the queue (according to client Id of event source). This means that if new requests come from the same component they are combined with the previous ones. For example: if we use a4j:support on an input field and the user types frequently all the request raised by key up during requestDelay will be combined into one.
You can also manually specify multiple components which will produce similar requests. The "similarityGroupingId" attribute is added to all the Ajax action components with 3.3.0 release. Hence, for example, you can add two <a4j:support/> components to the input (one for key up and the second for blur) and define that request events are similar by specifying the same "similarityGroupingId".
As written above requests are collected in the queue during requestDelay and similar ones are combined. But similar requests can only be combined if they are raised sequentially. This is done in order not to block the queue and not to change the requests order.
Example:
A request with some delay comes to the queue, let it be A1 the delay counter for this request is started. If similar request(e.g. from the same component - A2) appears - these two requests are combined(A1A2 to Acombined ) and the counter is reset.
But if some not similar request comes to the queue B1 - it is placed after the first one(Acombined,B1). And if the Acombined request doesn't exit the queue and another request similar to A (let is be A3) appears again - these requests are not combined with the first one. The request is placed after B1. (Acombined, B1, A3).
Such behavior allows
to maximize similar requests throughput
to send only the latest fields state for similar requests
not to block the queue if the different types of requests comes to queue and should wait one for another
The <a4j:poll> component has delay time 0 by default staring from 3.3.0 version in order not to use the queue delay(its own value for this parameter redefines queue's parameter) to avoid blocking periodical update in the queue. You can redefine this on the component level if need.
RichFaces uses form based approach for Ajax request sending. This means each time, when you click an Ajax button or <a4j:poll> produces an asynchronous request, the data from the closest JSF form is submitted with the XMLHTTPRequest object. The form data contains the values from the form input element and auxiliary information such as state saving data.
When "ajaxSingle" attribute value is "true" , it orders to include only a value of the current component (along with <f:param> or <a4j:actionparam> values if any) to the request map. In case of <a4j:support> , it is a value of the parent component. An example is placed below:
...

<h:form>

    <h:inputText value="#{person.name}">

        <a4j:support event="onkeyup" reRender="test" ajaxSingle="true"/>

    </h:inputText>

    <h:inputText value="#{person.middleName}"/>

</form>

...
In this example the request contains only the input component causes the request
generation, not all the components contained on a form, because of
ajaxSingle="true" usage.
Note, that ajaxSingle="true" reduces the upcoming traffic,
but does not prevent decoding other input components on the server side. Some JSF
components, such as
<h:selectOneMenu>
do recognize the missing data in the request map value as a null value
and try to pass the validation process with a failed result. Thus, use
<a4j:region>
to limit a part of the component tree that will be processed on the
server side when it is required.
"immediate"
attribute has the same purpose as any other non-JSF component. The
default
"ActionListener"
should be executed immediately (i.e. during the Apply Request Values
phase of a request processing lifecycle), rather than waiting until the Invoke
Application phase. Using immediate="true" is one of the ways
to have some data model values updated when other cannot be updated because of a
problem with passing the Validation phase successfully. This might be important
inside the
<h:dataTable>
like components where using
<a4j:region>
is impossible due to the
<h:dataTable>
component architecture.
"bypassUpdates" attribute allows to bypass the Update Model phase. It might be useful if you need to check your input against the available validator, but not to update the model with those data. Note, that an action will be invoked at the end of the Validation phase only if the Validation phase is passed successfully. The listeners of the Application phase will not be invoked in any case.
Ajax component is similar to any other non-Ajax JSF component like <h:commandButton> . It allows to submit the form. You can use "action" and "actionListener" attributes to invoke the action method and define the action event.
"action"
method must return null if you want to have an Ajax Response with a
partual page update. This is regular mode called "Ajax request generates
Non-Ajax Response". In case of action does not return null, but the
action outcome that matches one of navigation rules, RichFaces starts to work in
"Ajax request generates Non-Ajax Response" mode. This
mode might be helpful in two major cases:
RichFaces allows to organize a page flow inside the <a4j:include> component. This is a typical scenario for Wizard like behavior. The new content is rendered inside the <a4j:include> area. The content is taken from the navigation rule of the faces configuration file (usually, the faces-config.xml). Note, that the content of the "wizard" is not isolated from the rest of the page. The included page should not have own <f:view> (it does not matter if you use facelets). You need to have an Ajax component inside the <a4j:include> to navigate between the wizard pages. Otherwize, the whole page update will be performed.
If you want to involve the server-side validators and navigate to the next page only if the Validation phase is passed successfully, you can replace <h:commandButton> with <a4j:commandButton> and point to the action method that navigates to the next page. If Validation process fails, the partial page update will occur and you will see an error message. Otherwize, the application proceeds to the next page. Make sure, you define <redirect/> option for the navigation rule to avoid memory leaks.
RichFaces allows writing Ajax-enabled JSF application without writing any Javascript code. However, you can still invoke the JavaScript code if you need. There are several Ajax attributes that helps to do it.
"onsubmit" attribute allows to invoke JavaScript code before an Ajax request is sent. If "onsubmit" returns "false" , the Ajax request is canceled. The code of "onsubmit" is inserted before the RichFaces Ajax call. Hence, the "onsubmit" should not has a "return" statement if you want the Ajax request to be sent. If you are going to invoke a JavaScript function that returns "true" or "false" , use the conditional statement to return something only when you need to cancel the request. For example:
...

onsubmit="if (mynosendfunct()==false){return false}"

...
"onclick" attribute is similar to the "onsubmit" , but for clickable components such as <a4j:commandLink> and <a4j:commandButton> . If it returns "false" , the Ajax request is canceled also.
The "oncomplete"
attribute is used for passing JavaScript that would be invoked right
after the Ajax response returns back and DOM is updated. It is not recommended to
use use keyword this inside the EL-expression, because it will not
always point to the component where Ajax request was initiated.
"onbeforedomupdate" attribute defines JavaScript code for call after Ajax response receiving and before updating DOM on a client side.
"data" attribute allows to get the additional data from the server during an Ajax call. You can use JSF EL to point the property of the managed bean and its value will be serialized in JSON format and be available on the client side. You can refer to it using the "data" variable. For example:
...

<a4j:commandButton value="Update" data="#{userBean.name}" oncomplete="showTheName(data.name)" />

...
RichFaces allows to serialize not only primitive types into JSON format, but also complex types including arrays and collections. The beans should be serializable to be refered with "data" .
There is a number of useful functions which can be used in JavaScript:
rich:clientId('id') - returns client id by short id or null if
the component with the id specified hasn't been found
rich:element('id') - is a shortcut for
document.getElementById(#{rich:clientId('id')})
rich:component('id') - is a shortcut for
#{rich:clientId('id')}.component
rich:findComponent('id') - returns an instance of UIComponent
taking the short ID of the component as a parameter.
...

<h:inputText id="myInput">

    <a4j:support event="onkeyup" reRender="outtext"/>

</h:inputText>

<h:outputText id="outtext" value="#{rich:findComponent('myInput').value}" />

...
"ajaxKeys" attribute defines strings that are updated after an Ajax request. It provides possibility to update several child components separately without updating the whole page.
...

<a4j:poll intervall="1000" action="#{repeater.action}" reRender="text">

    <table>

        <tbody>

            <a4j:repeat value="#{bean.props}" var="detail" ajaxKeys="#{repeater.ajaxedRowsSet}">

                <tr>

                    <td>

                        <h:outputText value="detail.someProperty" id="text"/>

                    </td>

                </tr>

            </a4j:repeat>

        </tbody>

    </table>

</a4j:poll>

...
"status" attribute for Ajax components (such as <a4j:commandButton> , <a4j:poll> , etc.) points to an ID of <a4j:status> component. Use this attribute if you want to share <a4j:status> component between different Ajax components from different regions. The following example shows it.
...

<a4j:region id="extr">

    <h:form>

        <h:outputText value="Status:" />

        <a4j:status id="commonstatus" startText="In Progress...." stopText=""/>

        <h:panelGrid columns="2">

            <h:outputText value="Name"/>

            <h:inputText id="name" value="#{userBean.name}">

                <a4j:support event="onkeyup" reRender="out" />

            </h:inputText>

            <h:outputText value="Job"/>

            <a4j:region  id="intr">

                <h:inputText id="job" value="#{userBean.job}">

                    <a4j:support event="onkeyup"  reRender="out" status="commonstatus"/>

                </h:inputText>

            </a4j:region>

        </h:panelGrid>

        <a4j:region>

            <h:outputText id="out" value="Name: #{userBean.name}, Job: #{userBean.job}" />

            <br />

            <a4j:commandButton ajaxSingle="true" value="Clean Up Form" reRender="name, job, out"  status="commonstatus">

                <a4j:actionparam name="n" value=""  assignTo="#{userBean.name}" />

                <a4j:actionparam name="j" value=""  assignTo="#{userBean.job}" />

            </a4j:commandButton>

        </a4j:region>

    </h:form>

</a4j:region>

...
In the example <a4j:support> and <a4j:commandButton> are defined in different regions. Values of "status" attribute for these components points to an ID of <a4j:support> .Thus, the <a4j:support> component is shared between two components from different regions.
More information could be found on the RichFaces Live Demo .
Other useful attribute is "focus" . It points to an ID of a component where focus will be set after an Ajax request.
This section of the guide summarizes all Ajax-related attributes that both rich and a4j components have.
Table 5.2. Title of the table
| Attribute | Description | Rich Components | A4j Components |
|---|---|---|---|
| ajaxSingle | Limits JSF tree processing (decoding, conversion, validation and model updating) only to a component that sends the request. Boolean. Default value is "false". |
<a4j:form> <a4j:support> <a4j:commandButton> <a4j:commandLink> <a4j:jsFunction> <a4j:poll> <a4j:push> |
<rich:dataFilterSlider> <rich:dataFilterSlider> <rich:datascroller> <rich:dropSupport> <rich:menuItem> <rich:tree> <rich:treeNode> <rich:panelMenuGroup> <rich:panelMenuItem> <rich:progressBar> <rich:simpleTogglePanel> <rich:tab> <rich:toggleControl> <rich:toolTip> <rich:calendar> <rich:fileUpload> <rich:suggestionbox> |
| bypassUpdates | If "true", after process validations phase it skips updates of model beans on a force render response. It can be used for validating components input |
<a4j:form> <a4j:support> <a4j:commandButton> <a4j:commandLink> <a4j:jsFunction> <a4j:poll> <a4j:push> |
<rich:dataFilterSlider> <rich:datascroller> <rich:scrollableDataTable> <rich:dropSupport> <rich:menuItem> <rich:tree> <rich:treeNode> <rich:panelMenuGroup> <rich:panelMenuItem> <rich:progressBar> <rich:simpleTogglePanel> <rich:calendar> <rich:suggestionbox> |
| limitToList | If "true", then of all AJAX-rendered on the page components only those will be updated, which ID's are passed to the "reRender" attribute of the describable component. "false"-the default value-means that all components with ajaxRendered="true" will be updated. | <a4j:form> <a4j:support> <a4j:commandButton> <a4j:jsFunction> <a4j:poll> <a4j:push> | <rich:ajaxValidator> <rich:dataFilterSlider> <rich:datascroller> <rich:dragSupport> <rich:dropSupport> <rich:menuItem> <rich:tree> <rich:treeNode> <rich:panelMenuGroup> <rich:panelMenuItem> <rich:progressBar> <rich:simpleTogglePanel> <rich:tab> <rich:toggleControl> <rich:calendar> <rich:suggestionbox> |
| reRender | Id['s] (in format of call UIComponent.findComponent()) of components, rendered in case of AjaxRequest caused by this component. Can be single id, comma-separated list of Id's, or EL Expression with array or Collection | <a4j:form> <a4j:support> <a4j:commandButton> <a4j:commandLink> <a4j:jsFunction> <a4j:poll> <a4j:push> | <rich:ajaxValidator> <rich:dataFilterSlider> <rich:datascroller> <rich:dataTable> <rich:extendedDataTable> <rich:scrollableDataTable> <rich:dragSupport> <rich:dropSupport> <rich:menuItem> <rich:tree> <rich:treeNode> <rich:panelMenuGroup> <rich:panelMenuItem> <rich:progressBar> <rich:simpleTogglePanel> <rich:tab> <rich:calendar> <rich:suggestionbox> |
| process | Id['s] (in format of call UIComponent.findComponent()) of components, processed at the phases 2-5 in case of AjaxRequest caused by this component. Can be single id, comma-separated list of Id's, or EL Expression with array or Collection | <a4j:form> <a4j:support> <a4j:commandButton> <a4j:commandLink> <a4j:jsFunction> <a4j:poll> <a4j:push> | <rich:dataFilterSlider> <rich:datascroller> <rich:dropSupport> <rich:menuItem> <rich:tree> <rich:treeNode> <rich:panelMenuGroup> <rich:panelMenuItem> <rich:progressBar> <rich:simpleTogglePanel> <rich:tab> <rich:toggleControl> <rich:calendar> <rich:suggestionbox> |
| status | ID (in format of call UIComponent.findComponent()) of Request status component | <a4j:form> <a4j:support> <a4j:commandButton> <a4j:commandLink> <a4j:jsFunction> <a4j:poll> <a4j:push> <a4j:queue> | <rich:ajaxValidator> <rich:dataFilterSlider> <rich:datascroller> <rich:scrollableDataTable> <rich:dragSupport> <rich:dropSupport> <rich:tree> <rich:treeNode> <rich:panelMenuGroup> <rich:panelMenuItem> <rich:progressBar> <rich:simpleTogglePanel> <rich:tab> <rich:toggleControl> <rich:calendar> <rich:fileUpload> <rich:suggestionbox> |
| eventsQueue | Name of requests queue to avoid send next request before complete other from same event. Can be used to reduce number of requests of frequently events (key press, mouse move etc.) | <a4j:form> <a4j:support> <a4j:commandButton> <a4j:commandLink> <a4j:jsFunction> <a4j:poll> <a4j:push> | <rich:ajaxValidator> <rich:dataFilterSlider> <rich:datascroller> <rich:scrollableDataTable> <rich:dragSupport> <rich:dropSupport> <rich:menuItem> <rich:tree> <rich:panelMenuGroup> <rich:panelMenuItem> <rich:progressBar> <rich:simpleTogglePanel> <rich:tab> <rich:toggleControl> <rich:calendar> <rich:suggestionbox> |
| requestDelay | Attribute defines the time (in ms.) that the request will be wait in the queue before it is ready to send. When the delay time is over, the request will be sent to the server or removed if the newest 'similar' request is in a queue already | <a4j:form> <a4j:support> <a4j:commandButton> <a4j:commandLink> <a4j:jsFunction> <a4j:queue> | <rich:ajaxValidator> <rich:dataFilterSlider> <rich:datascroller> <rich:scrollableDataTable> <rich:dragSupport> <rich:dropSupport> <rich:menuItem> <rich:tree> <rich:panelMenuGroup> <rich:panelMenuGroup> <rich:panelMenuItem> <rich:simpleTogglePanel> <rich:tab> <rich:calendar> <rich:suggestionbox> |
| data | Serialized (on default with JSON) data passed on the client by a developer on AJAX request. It's accessible via "data.foo" syntax | <a4j:form> <a4j:support> <a4j:commandButton> <a4j:commandLink> <a4j:jsFunction> <a4j:poll> <a4j:push> | <rich:ajaxValidator> <rich:dataFilterSlider> <rich:datascroller> <rich:scrollableDataTable> <rich:dropSupport> <rich:menuItem> <rich:tree> <rich:treeNode> <rich:paint2D> <rich:panelMenuGroup> <rich:panelMenuItem> <rich:progressBar> <rich:simpleTogglePanel> <rich:tab> <rich:toggleControl> <rich:calendar> |
| ignoreDupResponses | Attribute allows to ignore an Ajax Response produced by a request if the newest 'similar' request is in a queue already. ignoreDupResponses="true" does not cancel the request while it is processed on the server, but just allows to avoid unnecessary updates on the client side if the response isn't actual now | <a4j:form> <a4j:support> <a4j:commandButton> <a4j:jsFunction> <a4j:poll> <a4j:push> <a4j:queue> | <rich:ajaxValidator> <rich:dataFilterSlider> <rich:datascroller> <rich:scrollableDataTable> <rich:dragSupport> <rich:dropSupport> <rich:menuItem> <rich:tree> <rich:treeNode> <rich:panelMenuGroup> <rich:panelMenuItem> <rich:progressBar> <rich:simpleTogglePanel> <rich:tab> <rich:toggleControl> <rich:calendar> <rich:suggestionbox> |
| timeout | Response waiting time on a particular request. If a response is not received during this time, the request is aborted | <a4j:form> <a4j:form> <a4j:support> <a4j:commandButton> <a4j:commandLink> <a4j:jsFunction> <a4j:poll> <a4j:push> <a4j:queue> | <rich:ajaxValidator> <rich:dataFilterSlider> <rich:datascroller> <rich:scrollableDataTable> <rich:dragSupport> <rich:dropSupport> <rich:menuItem> <rich:tree> <rich:treeNode> <rich:panelMenuGroup> <rich:panelMenuItem> <rich:progressBar> <rich:simpleTogglePanel> <rich:tab> <rich:toggleControl> <rich:suggestionbox> |
| similarityGroupingId | If there are any component requests with identical IDs then these requests will be grouped. | <a4j:form> <a4j:support> <a4j:commandButton> <a4j:commandLink> <a4j:jsFunction> <a4j:poll> | <rich:ajaxValidator> <rich:dataFilterSlider> <rich:datascroller> <rich:scrollableDataTable> <rich:dragSupport> <rich:dropSupport> <rich:menuItem> <rich:tree> <rich:treeNode> <rich:panelMenuGroup> <rich:panelMenuItem> <rich:progressBar> <rich:simpleTogglePanel> <rich:tab> <rich:toggleControl> <rich:calendar> <rich:suggestionbox> <rich:message> <rich:messages> |
| keepTransient | Flag for mark all child components to non-transient. If "true", all children components will be set to non-transient state and keep in saved components tree. For output in self-renderer region all content (By default, all content in <f:verbatim> tags and non-jsf elements in facelets, marked as transient - since, self-rendered ajax regions don't plain output for ajax processing). The default value is "false". | <a4j:include> <a4j:outputPanel> | |
| ajaxListener | MethodExpression representing an action listener method that will be notified when this component is activated by the ajax Request and handle it. The expression must evaluate to a public method that takes an AjaxEvent parameter, with a return type of void. | <a4j:include> <a4j:outputPanel> | |
| selfRendered | if "true", self-render subtree at InvokeApplication ( or Decode, if immediate property set to true ) phase | <a4j:page> <a4j:region> | <rich:suggestionbox> |
| immediate | Flag indicating that, if this component is activated by ajaxrequest, notifications should be delivered to interested listeners and actions immediately (that is, during Apply Request Values phase) rather than waiting until Invoke Application phase | <a4j:region> <a4j:region> <a4j:support> <a4j:commandButton> <a4j:commandLink> <a4j:jsFunction> <a4j:poll> <a4j:push> <a4j:page> <a4j:htmlCommandLink> | <rich:dataFilterSlider> <rich:datascroller> <rich:dragSupport> <rich:dropSupport> <rich:menuItem> <rich:tree> <rich:panelBar> <rich:panelMenu> <rich:panelMenuGroup> <rich:panelMenuItem> <rich:progressBar> <rich:simpleTogglePanel> <rich:tabPanel> <rich:tab> <rich:togglePanel> <rich:toggleControl> <rich:toolTip> <rich:calendar> <rich:colorPicker> <rich:comboBox> <rich:editor> <rich:inplaceInput> <rich:inplaceSelect> <rich:inputNumberSlider> <rich:inputNumberSpinner> <rich:suggestionbox> <rich:listShuttle> <rich:orderingList> <rich:pickList> |
| mode | Defines the submission type: Ajax or Sever | <rich:panelMenu> <rich:panelMenuItem> <rich:progressBar> <rich:toolTip> <rich:calendar> | |
| switchType | Defines the re-rendering mode: Ajax, server, client. |
<rich:simpleTogglePanel> <rich:tabPanel> <rich:tab> <rich:togglePanel> <rich:tree> <rich:simpleTogglePanel> |
There are different ways to send Ajax requests from your JSF page. For example you can use <a4j:commandButton> , <a4j:commandLink> , <a4j:poll> or <a4j:support> tags or any other.
All these tags hide the usual JavaScript activities that are required for an XMHTTPRequest object building and an Ajax request sending. Also, they allow you to decide which components of your JSF page are to be re-rendered as a result of the Ajax response (you can list the IDs of these components in the "reRender" attribute).
<a4j:commandButton> and <a4j:commandLink> tags are used to send an Ajax request on "onclick" JavaScript event.
<a4j:poll> tag is used to send an Ajax request periodically using a timer.
The <a4j:support> tag allows you to add Ajax functionality to standard JSF components and send Ajax request onto a chosen JavaScript event: "onkeyup" , "onmouseover" , etc.
You may describe a region on the page you wish to send to the server, in this way you can control what part of the JSF View is decoded on the server side when you send an Ajax request.
The easiest way to describe an Ajax region on your JSF page is to do nothing, because the content between the <f:view> and </f:view> tags is considered the default Ajax region.
You may define multiple Ajax regions on the JSF page (they can even be nested) by using the <a4j:region> tag.
If you wish to render the content of an Ajax response outside of the active region then the value of the "renderRegionOnly" attribute should be set to "false" ("false" is default value). Otherwise, your Ajax updates are limited to elements of the active region.
Using IDs in the
"reRender"
attribute to define "AJAX zones" for update works
fine in many cases.
But you can not use this approach if your page contains, e.g. a <f:verbatim> tag and you wish to update its content on an Ajax response.
The problem with the <f:verbatim/> tag as described above is related to the value of the transientFlag of JSF components. If the value of this flag is true, the component must not participate in state saving or restoring of process.
In order to provide a solution to this kind of problems, RichFaces uses the concept of an output panel that is defined by the <a4j:outputPanel> tag. If you put a <f:verbatim> tag inside of the output panel, then the content of the <f:verbatim/> tag and content of other panel's child tags could be updated on Ajax response. There are two ways to control this:
By setting the "ajaxRendered" attribute value to "true".
By setting the "reRender" attribute value of an Action Component to the output panel ID.
The "process" attribute allows to define the ids of components to be processed together with the component which is marked as ajaxSingle or wrapped to region.
You could make use of the "process" attribute when you need to process only two components in the different parts of view.
Imagine you need to process only two input fields but not all the view. If you
wrap the first input to region or make
<a4j:support>
component with ajaxSingle="true" nested the
second input will not be processed.
Here is a simple solution:
...

<h:inputText value="#{bean.name}" id="name">

    <a4j:support ajaxSingle="true" process="email" event="onblur" reRender="someOut"/>

</h:inputText>

<h:inputTextarea value="#{bean.description}" id="desc" />

<h:inputText value="#{bean.email}" id="email">

    <a4j:support ajaxSingle="true" process="name" event="onblur" reRender="someOut"/>

</h:inputText>

...
In the example above when the input field with the
id="name" looses focus, an Ajax request is sent. So only
two input fields (with id="name" and additionally with
id="email") are processed: decoding,
conversion/validation, value applying phases are executed. The input field with the
id="email" is handled the same way on blur event.
RichFaces uses a filter for a correction of code received on an Ajax request. In case of a "regular" JSF request a browser makes correction independently. In case of Ajax request in order to prevent layout destruction it's needed to use a filter, because a received code could differ from a code validated by a browser and a browser doesn't make any corrections.
An example of how to set a Filter in a web.xml file of your application is placed below.
Example:
...

<filter>

    <display-name>RichFaces Filter</display-name>

    <filter-name>richfaces</filter-name>

    <filter-class>org.ajax4jsf.Filter</filter-class>

</filter>

...
Fast Filter is deprecated and available only for backward compatibility with previous RichFaces versions. Fast Filter usage isn't recomended, because there is another way to use its functionality by means of Neko filter type .
From RichFaces 3.2 filter configuration becomes more flexible. It's possible to configure different filters for different sets of pages for the same application.
The possible filter types are:
TIDY
"TIDY" filter type based on the Tidy parser. This filter is recommended for applications with complicated or non-standard markup when all necessary code corrections are made by the filter when a response comes from the server.
"NEKO" filter type corresponds to the former "Fast Filter" and it's based on the Neko parser. In case of using this filter code isn't strictly verified. Use this one if you are sure that your application markup is really strict for this filter. Otherwise it could cause lot's of errors and corrupt a layout as a result. This filter considerably accelerates all Ajax requests processing.
NONE
No correction.
An example of configuration is placed below.
Example:
...

<context-param>

    <param-name>org.ajax4jsf.xmlparser.ORDER</param-name>

    <param-value>NONE,NEKO,TIDY</param-value>

</context-param>

<context-param>

    <param-name>org.ajax4jsf.xmlparser.NONE</param-name>

    <param-value>/pages/performance\.xhtml,/pages/default.*\.xhtml</param-value>

</context-param>

<context-param>

    <param-name>org.ajax4jsf.xmlparser.NEKO</param-name>

    <param-value>/pages/repeat\.xhtml</param-value>

</context-param>

<filter>

    <display-name>RichFaces Filter</display-name>

    <filter-name>richfaces</filter-name>

    <filter-class>org.ajax4jsf.Filter</filter-class>

</filter>

<filter-mapping>

    <filter-name>richfaces</filter-name>

    <servlet-name>Faces Servlet</servlet-name>

    <dispatcher>FORWARD</dispatcher>

    <dispatcher>REQUEST</dispatcher>

    <dispatcher>INCLUDE</dispatcher>

</filter-mapping>

...
The example shows that ORDER parameter defines the order in which
particular filter types are used for pages code correction.
First of all "NONE" type is specified for the filter. Then two different sets of pages are defined for which two filter types (NONE and NEKO) are used correspondingly. If a page relates to the first set that is defined in the following way:
<param-value>/pages/performance\.xhtml,/pages/default.*\.xhtml</param-value>
it's not corrected, because filter type for this page is defined as "NONE". If a page is not from the first set, then "NEKO" type is set.
If a page relates to the second set that is defined in the following way:
<param-value>/pages/repeat\.xhtml</param-value>
then "NEKO" filter type is used for correction. If it's not related to the second set, "TIDY" type is set for the filter ("TIDY" filter type is used for code correction).
Before the version 3.1.3, RichFaces loaded styles and script on demand. I.e. files are loaded only if they are required on a particular page. Since RichFaces 3.1.3, it's possible to manage how the RichFaces script and style files are loaded to application.
org.richfaces.LoadScriptStrategy
The following declaration in your web.xml allows loading the integrated script files.
...

<context-param>

    <param-name>org.richfaces.LoadScriptStrategy</param-name>

    <param-value>ALL</param-value>

</context-param>

...
If you do not declare the org.richfaces.LoadScriptStrategy in the
web.xml, it equals to:
...

<context-param>

    <param-name>org.richfaces.LoadScriptStrategy</param-name>

    <param-value>DEFAULT</param-value>

</context-param>

...
The third possible value is "NONE". You have no a special reason to use it unless you obtain the newest (or modified) version of the script and want to include it manually in a page header.
If you use ALL value of Scripts Load Strategy, the JavaScript files compression turns off!
org.richfaces.LoadStyleStrategy
The following declaration allows to load only one integrated style sheet file.
...

<context-param>

    <param-name>org.richfaces.LoadStyleStrategy</param-name>

    <param-value>ALL</param-value>

</context-param>

...
The integrated style sheet contains style for all shipped components. The skinnability feature still works.
The "DEFAULT" value is a classical on-demand variant.
The "NONE" stops loading the styles at all. The earlier introduced plain
skin resets all color and font parameters to null. The "NONE" value for
org.richfaces.LoadStyleStrategy means that predefined styles for
RichFaces are not used.
For more information see RichFaces User Forum .
RichFaces allows to redefine standard handlers responsible for processing of different exceptional situations. It helps to define own JavaScript, which is executed when these situations occur.
Add the following code to web.xml:
<context-param>

    <param-name>org.ajax4jsf.handleViewExpiredOnClient</param-name>

    <param-value>true</param-value>

</context-param>
To execute your own code on the client in case of an error during Ajax request,
it's necessary to redefine the standard
"A4J.AJAX.onError" method:
 A4J.AJAX.onError = function(req, status, message){

    window.alert("Custom onError handler "+message);

}
The function defined this way accepts as parameters:
req - a params string of a request that calls an error
status - the number of an error returned by the server
message - a default message for the given error
Thus, it's possible to create your own handler that is called on timeouts, internal server errors, and etc.
It's possible to redefine also the "onExpired" framework method that is called on the "Session Expiration" event.
Example:
A4J.AJAX.onExpired = function(loc, expiredMsg){

    if(window.confirm("Custom onExpired handler "+expiredMsg+" for a location: "+loc)){

      return loc;

    } else {

     return false;

    }

}
Here the function receives in params:
loc - URL of the current page (on demand can be updated)
expiredMsg - a default message on
"Session Expiration"
event.
Note that custom "onError", "onExpire" handlers do not work under MyFaces. MyFaces handles exception by its internals generating debug page. You could use the following code to prevent such behavior:
...

<context-param>

    <param-name>org.apache.myfaces.ERROR_HANDLING</param-name>

    <param-value>false</param-value>

</context-param>

...
If you have a look at a CSS file in an enterprise application, for example, the one you're working on now, you'll see how often the same color is noted in it. Standard CSS has no way to define a particular color abstractly for defining as a panel header color, a background color of an active pop-up menu item, a separator color, etc. To define common interface styles, you have to copy the same values over and over again and the more interface elements you have the more copy-and-paste activity that needs to be performed.
Hence, if you want to change the application palette, you have to change all interrelating values, otherwise your interface can appear a bit clumsy. The chances of such an interface coming about is very high, as CSS editing usually becomes the duty of a general developer who doesn't necessarily have much knowledge of user interface design.
Moreover, if a customer wishes to have an interface look-and-feel that can be adjusted on-the-fly by an end user, your work is multiplied, as you have to deal with several CSS files variants, each of which contains the same values repeated numerous times.
These problems can be solved with the skinnability system built into the RichFaces project and implemented fully in RichFaces. Every named skin has some skin-parameters for the definition of a palette and the other parameters of the user interface. By changing just a few parameters, you can alter the appearance of dozens of components in an application in a synchronized fashion without messing up user interface consistency.
The skinnability feature can't completely replace standard CSS and certainly doesn't eliminate its usage. Skinnability is a high-level extension of standard CSS, which can be used together with regular CSS declarations. You can also refer to skin parameters in CSS via JSF Expression Language. You have the complete ability to synchronize the appearance of all the elements in your pages.
RichFaces skinnability is designed for mixed usage with:
Skin parameters defined in the RichFaces framework
Predefined CSS classes for components
User style classes
The color scheme of the component can be applied to its elements using any of three style classes:
A default style class inserted into the framework
This contains style parameters linked to some constants from a skin. It is defined for every component and specifies a default representation level. Thus, an application interface could be modified by changing the values of skin parameters.
A style class of skin extension
This class name is defined for every component element and inserted into the framework to allow defining a class with the same name into its CSS files. Hence, the appearance of all components that use this class is extended.
User style class
It's possible to use one of the styleClass parameters for component elements and define your own class in it. As a result, the appearance of one particular component is changed according to a CSS style parameter specified in the class.
Here is a simple panel component:
Example:
<rich:panel> ... </rich:panel>
The code generates a panel component on a page, which consists of two elements: a wrapper <div> element and a <div> element for the panel body with the particular style properties. The wrapper <div> element looks like:
Example:
<div class="dr-pnl rich-panel">

     ...

</div>
dr-pnl is a CSS class specified in the framework via skin parameters:
background-color is defined with generalBackgroundColor
border-color is defined with panelBorderColor
It's possible to change all colors for all panels on all pages by changing these skin parameters.
However, if a <rich:panel> class is specified somewhere on the page, its parameters are also acquired by all panels on this page.
A developer may also change the style properties for a particular panel. The following definition:
Example:
<rich:panel styleClass="customClass" />
Could add some style properties from customClass to one particular panel, as a result we get three styles:
Example:
<div class="dr_pnl rich-panel customClass">

    ...

</div>
RichFaces provides eight predefined skin parameters (skins) at the simplest level of common customization:
DEFAULT
plain
emeraldTown
blueSky
wine
japanCherry
ruby
classic
deepMarine
To plug one in, it's necessary to specify a skin name in the
org.richfaces.SKIN context-param.
Here is an example of a table with values for one of the main skins, "blueSky" .
Table 5.3. Colors
| Parameter name | Default value |
|---|---|
| headerBackgroundColor | #BED6F8 |
| headerGradientColor | #F2F7FF |
| headTextColor | #000000 |
| headerWeightFont | bold |
| generalBackgroundColor | #FFFFFF |
| generalTextColor | #000000 |
| generalSizeFont | 11px |
| generalFamilyFont | Arial, Verdana, sans-serif |
| controlTextColor | #000000 |
| controlBackgroundColor | #ffffff |
| additionalBackgroundColor | #ECF4FE |
| shadowBackgroundColor | #000000 |
| shadowOpacity | 1 |
| panelBorderColor | #BED6F8 |
| subBorderColor | #ffffff |
| tabBackgroundColor | #C6DEFF |
| tabDisabledTextColor | #8DB7F3 |
| trimColor | #D6E6FB |
| tipBackgroundColor | #FAE6B0 |
| tipBorderColor | #E5973E |
| selectControlColor | #E79A00 |
| generalLinkColor | #0078D0 |
| hoverLinkColor | #0090FF |
| visitedLinkColor | #0090FF |
Table 5.4. Fonts
| Parameter name | Default value |
|---|---|
| headerSizeFont | 11px |
| headerFamilyFont | Arial, Verdana, sans-serif |
| tabSizeFont | 11px |
| tabFamilyFont | Arial, Verdana, sans-serif |
| buttonSizeFont | 11px |
| buttonFamilyFont | Arial, Verdana, sans-serif |
| tableBackgroundColor | #FFFFFF |
| tableFooterBackgroundColor | #cccccc |
| tableSubfooterBackgroundColor | #f1f1f1 |
| tableBorderColor | #C0C0C0 |
Skin "plain" was added from 3.0.2 version. It doesn't have any parameters. It's necessary for embedding RichFaces components into existing projecst which have its own styles.
To get detailed information on particular parameter possibilities, see the chapter where each component has skin parameters described corresponding to its elements.
In order to create your own skin file, do the following:
Create a file and define in it skin constants which are used by style
classes (see section
"Skin Parameters Tables in RichFaces"
). The name of skin file should correspond to the following format:
<name>.skin.properties . As an example of such file
you can see RichFaces predefined skin parameters (skins): blueSky, classic,
deepMarine, etc. These files are located in the
richfaces-impl-xxxxx.jar inside the /META-INF/skins folder.
Add a skin definition <contex-param> to the web.xml of
your application. An example is placed below:
Example:
...

<context-param>

     <param-name>org.richfaces.SKIN</param-name>

     <param-value>name</param-value>

</context-param>

...
Put your <name>.skin.properties file in one of the
following classpath elements: META-INF/skins/ or classpath folder (e.g.
WEB-INF/classes).
RichFaces gives an opportunity to incorporate skinnability into UI design. With this framework you can easily use named skin parameters in properties files to control the appearance of the skins that are applied consistently to a whole set of components. You can look at examples of predefined skins at:
| http://livedemo.exadel.com/richfaces-demo/ |
You may simply control the look-and-feel of your application by using the skinnability service of the RichFaces framework. With the means of this service you can define the same style for rendering standard JSF components and custom JSF components built with the help of RichFaces.
To find out more on skinnability possibilities, follow these steps:
Create a custom render kit and register it in the faces-config.xml like this:
<render-kit>

     <render-kit-id>NEW_SKIN</render-kit-id>

     <render-kit-class>org.ajax4jsf.framework.renderer.ChameleonRenderKitImpl</render-kit-class>

</render-kit>
Then you need to create and register custom renderers for the component based on the look-and-feel predefined variables:
<renderer>

    <component-family>javax.faces.Command</component-family>

    <renderer-type>javax.faces.Link</renderer-type>

    <renderer-class>newskin.HtmlCommandLinkRenderer</renderer-class>

</renderer>
Finally, you need to place a properties file with skin parameters into the class path root. There are two requirements for the properties file:
The file must be named
<skinName>.skin.properties , in this case, it
would be called newskin.skin.properties .
The first line in this file should be
render.kit=<render-kit-id>
in this case, it would be called
render.kit=NEW_SKIN .
Extra information on custom renderers creation can be found at:
| http://java.sun.com/javaee/javaserverfaces/reference/docs/index.html |
It's possible to change skins in runtime. In order to do that, define the EL-expression in the web.xml. For example:
<context-param>

    <param-name>org.richfaces.SKIN</param-name>

    <param-value>#{skinBean.skin}</param-value>

</context-param>
The skinBean code looks as follows:
public class SkinBean {


    private String skin;


    public String getSkin() {

        return skin;

    }

    public void setSkin(String skin) {

        this.skin = skin;

    }

}
Further, it is necessary to set the skin property to the initial value in the configuration file. For example, "classic":
<managed-bean>

    <managed-bean-name>skinBean</managed-bean-name>

    <managed-bean-class>SkinBean</managed-bean-class>

    <managed-bean-scope>session</managed-bean-scope>

    <managed-property>

        <property-name>skin</property-name>

        <value>classic</value>

    </managed-property>

</managed-bean>
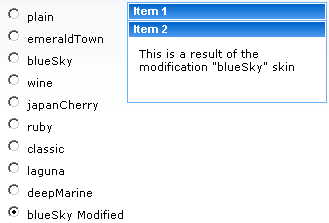
You can also change the default skin, for instance, change the default color. To do this, edit the file properties of the skin. Here is an example of the code for page:
<h:form>

     <div style="display: block; float: left">

          <h:selectOneRadio value="#{skinBean.skin}" border="0" layout="pageDirection" title="Changing skin" style="font-size: 8; font-family: comic" onchange="submit()">

                <f:selectItem itemLabel="plain" itemValue="plain" />

        <f:selectItem itemLabel="emeraldTown" itemValue="emeraldTown" />

        <f:selectItem itemLabel="blueSky" itemValue="blueSky" />

        <f:selectItem itemLabel="wine" itemValue="wine" />

        <f:selectItem itemLabel="japanCherry" itemValue="japanCherry" />

        <f:selectItem itemLabel="ruby" itemValue="ruby" />

        <f:selectItem itemLabel="classic" itemValue="classic" />

        <f:selectItem itemLabel="laguna" itemValue="laguna" />

        <f:selectItem itemLabel="deepMarine" itemValue="deepMarine" />

        <f:selectItem itemLabel="blueSky Modified" itemValue="blueSkyModify" />

          </h:selectOneRadio>

     </div>

     <div style="display: block; float: left">

          <rich:panelBar height="100" width="200">

               <rich:panelBarItem label="Item 1" style="font-family: monospace; font-size: 12;">

         Changing skin in runtime

    </rich:panelBarItem>


    <rich:panelBarItem label="Item 2" style="font-family: monospace; font-size: 12;">

         This is a result of the modification "blueSky" skin

    </rich:panelBarItem>

          </rich:panelBar>

     </div>

</h:form>
This is result:
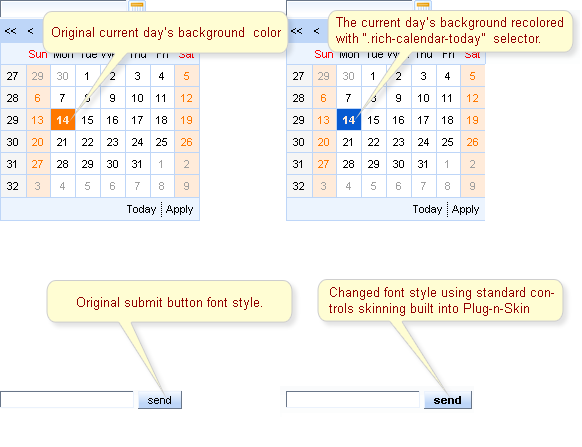
The feature is designed to unify the look and feel of standard HTML element and RichFaces components. Skinning can be applied to all controls on a page basing on elements' name and attribute type (where applicable). Also this feature provides a set of CSS styles so that skinning can be applied assigning rich-* classes to particular elements or to container of elements that nests controls.
Standard controls skinning feature provides 2 levels of skinning: Standard and Extended. The level is based
on detecting the browser type. If browser type is not identified, Advanced level is
used. However, if you want to explicitly specify the level of skinning you want to be applied, you need to add a context parameter to your web.xml
with org.richfaces.CONTROL_SKINNING_LEVEL as the parameter name
and value set to either basic or extended.
Standard level provides customization for only basic style properties.
To the following browsers Standard level of skinning is applied:
Internet Explorer 6
Internet Explorer 7 in BackCompat mode (see document.compatMode property in MSDN )
Opera
Safari
Extended level extends basic level introducing broader number of style properties and is applied to browsers with rich visual styling capability of controls
The following browsers support Extended level of skinning:
Mozilla Firefox
Internet Explorer 7 in Standards-compliant mode (CSS1Compat mode)
These are the elements that affected by skinning:
input
select
textarea
keygen
isindex
legend
fieldset
hr
a (together with a:hover, a:visited "pseudo"-elements)
Skinning for standard HTML controls can be initialized in two ways:
by adding org.richfaces.CONTROL_SKINNING parameter to web.xml.
Values: "enable" and "disable". This way implies that
skinning style properties are applied to elements by element name and
attribute type (where applicable). No additional steps required. Please find
below the table that contains the list of elements to which skinning is
applicable.
by adding org.richfaces.CONTROL_SKINNING_CLASSES parameter to
web.xml file. Possible values "enable" and "disable".
When this option is enabled you are provided with a set of predefined CSS classes
that you can use for skinning your HTML components.
By setting org.richfaces.CONTROL_SKINNING_CLASSES to
"enable" you are provided with style classes applicable to:
Basic elements nested inside element having rich-container class, e.g.:
Example:
...

.rich-container select {

   //class content

}

...
Elements that have class name corresponding to one of the basic elements
name/type mapped by the following scheme
rich-<elementName>[-<elementType>] . See the
example:
Example:
...

.rich-select {

  //class content

}


.rich-input-text {

  //class content

}


...
Elements have classes based on "link" and pseudo class name, e.g.: rich-link, rich-link-hover, rich-link-visited
Additionally, the predefined rich CSS classes that we provide can be used not only as classes for basic HTML elements but also as classes for creation of complex elements .
There is a snippet with some of them for example:
...

<u:selector name=".rich-box-bgcolor-header">

     <u:style name="background-color" skin="headerBackgroundColor" />

</u:selector>

<u:selector name=".rich-box-bgcolor-general">

     <u:style name="background-color" skin="generalBackgroundColor" />

</u:selector>

...

//gradient elements

...

<u:selector name=".rich-gradient-menu">

     <u:style name="background-image">

          <f:resource f:key="org.richfaces.renderkit.html.gradientimages.MenuGradientImage"/>

     </u:style>

     <u:style name="background-repeat" value="repeat-x" />

</u:selector>

<u:selector name=".rich-gradient-tab">

     <u:style name="background-image">

          <f:resource f:key="org.richfaces.renderkit.html.gradientimages.TabGradientImage"/>

     </u:style>

     <u:style name="background-repeat" value="repeat-x" />

</u:selector>

...
To get a better idea of standard component skinning we recommend to explore CSS files located in ui/core/src/main/resources/org/richfaces/ folder of RichFaces svn.
Table 5.5. Html Elements Skin Bindings for input, select, textarea, button, keygen, isindex, legend
| CSS Properties | Skin parameters |
|---|---|
| font-size | generalSizeFont |
| font-family | generalFamilyFont |
| color | controlTextColor |
Table 5.6. Html Elements Skin Bindings for fieldset
| CSS Properties | Skin parameters |
|---|---|
| border-color | panelBorderColor |
Table 5.7. Html Elements Skin Bindings for hr
| CSS Properties | Skin parameters |
|---|---|
| border-color | panelBorderColor |
Table 5.9. Html Elements Skin Bindings for a:hover
| CSS Properties | Skin parameters |
|---|---|
| color | hoverLinkColorgeneralLinkColor |
Table 5.10. Html Elements Skin Bindings for a:visited
| CSS Properties | Skin parameters |
|---|---|
| color | visitedLinkColor |
Table 5.11. Rich Elements Skin Bindings for .rich-input, .rich-select, .rich-textarea, .rich-keygen, .rich-isindex, .rich-link
| CSS Properties | Skin parameters |
|---|---|
| font-size | generalSizeFont |
| font-family | generalFamilyFont |
| color | controlTextColor |
Table 5.12. Rich Elements Skin Bindings for .rich-fieldset
| CSS Properties | Skin parameters |
|---|---|
| border-color | panelBorderColor |
Table 5.13. Rich Elements Skin Bindings for .rich-hr
| CSS Properties | Skin parameters/Value |
|---|---|
| border-color | panelBorderColor |
| border-width | 1px |
| border-style | solid |
Table 5.14. Rich Elements Skin Bindings for .rich-link
| CSS Properties | Skin parameters |
|---|---|
| color | generalLinkColor |
Table 5.15. Rich Elements Skin Bindings for .rich-link:hover
| CSS Properties | Skin parameters |
|---|---|
| color | hoverLinkColor |
Table 5.16. Rich Elements Skin Bindings for .rich-link:visited
| CSS Properties | Skin parameters |
|---|---|
| color | visitedLinkColor |
Table 5.17. Rich Elements Skin Bindings for .rich-field
| CSS Properties | Skin parameters/Value |
|---|---|
| border-width | 1px |
| border-style | inset |
| border-color | panelBorderColor |
| background-color | controlBackgroundColor |
| background-repeat | no-repeat |
| background-position | 1px 1px |
Table 5.18. Rich Elements Skin Bindings for .rich-field-edit
| CSS Properties | Skin parameters/Value |
|---|---|
| border-width | 1px |
| border-style | inset |
| border-color | panelBorderColor |
| background-color | editBackgroundColor |
Table 5.19. Rich Elements Skin Bindings for .rich-field-error
| CSS Properties | Skin parameter/Value |
|---|---|
| border-width | 1px |
| border-style | inset |
| border-color | panelBorderColor |
| background-color | warningBackgroundColor |
| background-repeat | no-repeat |
| background-position | center left |
| padding-left | 7px |
Table 5.20. Rich Elements Skin Bindings for .rich-button, .rich-button-disabled, .rich-button-over
| CSS Properties | Skin parameter/Value |
|---|---|
| border-width | 1px |
| border-style | solid |
| border-color | panelBorderColor |
| background-color | trimColor |
| padding | 2px 10px 2px 10px |
| text-align | center |
| cursor | pointer |
| background-repeat | repeat-x |
| background-position | top left |
Table 5.21. Rich Elements Skin Bindings for .rich-button-press
| CSS Properties | Skin parameter/Value |
|---|---|
| background-position | bottom left |
Table 5.22. Rich Elements Skin Bindings for .rich-container fieldset, .rich-fieldset
| CSS Properties | Skin parameters/Value |
|---|---|
| border-color | panelBorderColor |
| border-width | 1px |
| border-style | solid |
| padding | 10px |
| padding | 10px |
Table 5.23. Rich Elements Skin Bindings for .rich-legend
| CSS Properties | Skin parameter/Value |
|---|---|
| font-size | generalSizeFont |
| font-family | generalFamilyFont |
| color | controlTextColor |
| font-weight | bold |
Table 5.24. Rich Elements Skin Bindings for .rich-form
| CSS Properties | Skin parameters/Value |
|---|---|
| padding | 0px |
| margin | 0px |
Table 5.25. Html Elements Skin Bindings for input, select, textarea, button, keygen, isindex
| CSS properties | Skin parameters/Value |
|---|---|
| border-width | 1px |
| border-color | panelBorderColor |
| color | controlTextColor |
Table 5.26. Html Elements Skin Bindings for *|button
| CSS properties | Skin parameters |
|---|---|
| border-color | panelBorderColor |
| font-size | generalSizeFont |
| font-family | generalFamilyFont |
| color | headerTextColor |
| background-color | headerBackgroundColor |
| background-image | org.richfaces.renderkit.html.images.ButtonBackgroundImage |
Table 5.27. Html Elements Skin Bindings for button[type=button], button[type=reset], button[type=submit], input[type=reset], input[type=submit], input[type=button]
| CSS properties | Skin parameters |
|---|---|
| border-color | panelBorderColor |
| font-size | generalSizeFont |
| font-family | generalFamilyFont |
| color | headerTextColor |
| background-color | headerBackgroundColor |
| background-image | org.richfaces.renderkit.html.images.ButtonBackgroundImage |
Table 5.28. Html Elements Skin Bindings for *|button[disabled], .rich-container *|button[disabled], .rich-button-disabled
| CSS properties | Skin parameters |
|---|---|
| color | tabDisabledTextColor |
| border-color | tableFooterBackgroundColor |
| background-color | tableFooterBackgroundColor |
| background-image | org.richfaces.renderkit.html.images.ButtonDisabledBackgroundImage |
Table 5.29. Html Elements Skin Bindings for .rich-button-disabled, .rich-container button[type="button"][disabled], .rich-button-button-disabled, .rich-container button[type="reset"][disabled], .rich-button-reset-disabled, .rich-container button[type="submit"][disabled], .rich-button-submit-disabled, .rich-container input[type="reset"][disabled], .rich-input-reset-disabled, .rich-container input[type="submit"][disabled], .rich-input-submit-disabled, .rich-container input[type="button"][disabled], .rich-input-button-disabled
| CSS properties | Skin parameters |
|---|---|
| color | tabDisabledTextColor |
| background-color | tableFooterBackgroundColor |
| border-color | tableFooterBackgroundColor |
| background-image | org.richfaces.renderkit.html.images.ButtonDisabledBackgroundImage |
Table 5.30. Html Elements Skin Bindings for *button[type="button"][disabled], button[type="reset"][disabled], button[type="submit"][disabled], input[type="reset"][disabled], input[type="submit"][disabled], input[type="button"][disabled]
| CSS properties | Skin parameters |
|---|---|
| color | tabDisabledTextColor |
| border-color | tableFooterBackgroundColor |
| background-color | tableFooterBackgroundColor |
Table 5.31. Html Elements Skin Bindings for *|textarea
| CSS properties | Skin parameters |
|---|---|
| border-color | panelBorderColor |
| font-size | generalSizeFont |
| font-family | generalFamilyFont |
| color | controlTextColor |
| background-color | controlBackgroundColor |
| background-image | org.richfaces.renderkit.html.images.InputBackgroundImage |
Table 5.32. Html Elements Skin Bindings for textarea[type=textarea], input[type=text], input[type=password], select
| CSS properties | Skin parameters |
|---|---|
| border-color | panelBorderColor |
| font-size | generalSizeFont |
| font-family | generalFamilyFont |
| color | controlTextColor |
| background-color | controlBackgroundColor |
| background-image | org.richfaces.renderkit.html.images.InputBackgroundImage |
Table 5.33. Html Elements Skin Bindings for *|textarea[disabled], .rich-container *|textarea[disabled]
| CSS properties | Skin parameters |
|---|---|
| color | tableBorderColor |
Table 5.34. textarea[type="textarea"][disabled], input[type="text"][disabled], input[type="password"][disabled]
| CSS properties | Skin parameters |
|---|---|
| color | tableBorderColor |
Table 5.35. textarea[type="textarea"][disabled], input[type="text"][disabled], input[type="password"][disabled]
| CSS properties | Skin parameters |
|---|---|
| color | tableBorderColor |
Standard skinning level can fail if configuration of
ajaxPortlet is as following:
...

<portlet>

   <portlet-name>ajaxPortlet</portlet-name>

   <header-content>

      <script src="/faces/rfRes/org/ajax4jsf/framework.pack.js" type="text/javascript" />

      <script src="/faces/rfRes/org/richfaces/ui.pack.js" type="text/javascript" />

      <link rel="stylesheet" type="text/css" href="/faces/rfRes/org/richfaces/skin.xcss" />

   </header-content>

</portlet>

...
Attention.
The <a4j:portlet> component is DEPRECATED as far as JSR-301 was defined the same functionality for a UIViewRoot component.
Thus, it is implicitly defined by mandatory <f:view> component.
As it was mentioned earlier in the guide, extended skinning of standard HTML controls is applied automatically: the browser type is detected and if a browser doesn't fully support extended skinning feature, only basic skinning is applied.
However, if you don't want the RichFaces components and standard HTML controls to be skinned automatically and perform the skinnability implementation yourself, you might encounter with a problem, namely standard HTML controls in such browsers as Opera and Safari will be affected by standard controls skinning. ( In this section you can get more details on how to disable skinnability.)
In brief, to disable the skinnability mechanism of RichFaces you need to set the
"org.richfaces.LoadStyleStrategy" parameter to "NONE" in the
web.xml file.
...

<context-param>

    <param-name>org.richfaces.LoadStyleStrategy</param-name>

    <param-value>NONE</param-value>

</context-param>

...
Additionally, you should include the style sheets that perform skinning of the RichFaces component and standard HTML controls.
In order to resolve the problem with extended skinning in Opera and Safari a
client script (skinning.js) is added to the RichFaces library. The script detects
the browser type and enables extended skinning only for those browsers that fully
support it.
The script can be activated by inserting this JavaScript code to the page:
<script type="text/javascript">

    window.RICH_FACES_EXTENDED_SKINNING_ON = true;

</script>
When NO script loading strategy is used and extended skinning is turned on then corresponding warning message will appears in the console.
You also need to specify "media" attribute in the <link> tag which includes the "extended_both.xcss" style sheet with "rich-extended-skinning".
This is how you can include the style sheets to the page, in case automatic skinnability implementation is disabled.
<link href='/YOUR_PROJECT_NAME/a4j_3_2_2-SNAPSHOTorg/richfaces/renderkit/html/css/basic_both.xcss/DATB/eAF7sqpgb-jyGdIAFrMEaw__.jsf' type='text/css' rel='stylesheet' class='component' />

<link media='rich-extended-skinning' href='/ YOUR_PROJECT_NAME /a4j_3_2_2-SNAPSHOTorg/richfaces/renderkit/html/css/extended_both.xcss/DATB/eAF7sqpgb-jyGdIAFrMEaw__.jsf' type='text/css' rel='stylesheet' class='component' />

<link href='/ YOUR_PROJECT_NAME /a4j_3_2_2-SNAPSHOT/org/richfaces/skin.xcss/DATB/eAF7sqpgb-jyGdIAFrMEaw__.jsf' type='text/css' rel='stylesheet' class='component' />
Now it's necessary to use a4j/versionXXX resources prefix instead of
a4j_versionXXX. Base64 encoder changed to use
'!' instead of '.'.
XCSS files are the core of RichFaces components skinnability.
XCSS is an XML formatted CSS that adds extra functionality to the skinning process. XCSS extends skinning possibilities by parsing the XCSS file that contains all look-and-feel parameters of a particular component into a standard CSS file that a web browser can recognize.
XCSS file contains CSS properties and skin parameters mappings. Mapping of a CSS selector to a skin parameter is performed using < u:selector > and < u:style> XML tags that form the mapping structure. Please study the example below.
...

<u:selector name=".rich-component-name">

    <u:style name="background-color" skin="additionalBackgroundColor" />

    <u:style name="border-color" skin="tableBorderColor" />

    <u:style name="border-width" skin="tableBorderWidth" />

    <u:style name="border-style" value="solid" />

</u:selector>

...
During processing the code in the shown example is parsed into a standard CSS format.
...

.rich-component-name {

     background-color: additionalBackgroundColor; /*the value of the constant defined by your skin*/

     border-color: tableBorderColor; /*the value of the constant defined by your skin*/

     border-width: tableBorderWidth; /*the value of the constant defined by your skin*/

     border-style: solid;

}

...
The "name" attribute of <u:selector> tag defines the CSS selector, while "name" attribute of the <u:style> tag defines what skin constant is mapped to a CSS property. The "value" attribute of the <u:style> tag can also be used to assign a value to a CSS property.
CSS selectors with identical skinning properties can be set as a comma separated list.
...

<u:selector name=".rich-ordering-control-disabled, .rich-ordering-control-top, .rich-ordering-control-bottom, .rich-ordering-control-up, .rich-ordering-control-down">

    <u:style name="border-color" skin="tableBorderColor" />

</u:selector>

...
Plug-n-Skin is a feature that gives you an opportunity to easily create, customize and plug into your project a custom skin. The skin can be created basing on parameters of some predefined RichFaces skin.
The feature also provides an option to unify the appearance of rich controls with standard HTML elements.
In order to create your own skin using Plug-n-Skin feature, you can follow these step by step instructions.
First of all, you need to create a template for the new skin. Creation of the template can be performed using Maven build and deployment tool. More information on how to configure Maven for RichFaces you can find out from JBoss wiki article . You can copy and paste these Maven instructions to command line and execute them.
...

mvn archetype:create -DarchetypeGroupId=org.richfaces.cdk -DarchetypeArtifactId=maven-archetype-plug-n-skin -DarchetypeVersion=RF-VERSION -DartifactId=ARTIFACT-ID -DgroupId=GROUP-ID -Dversion=VERSION

...
Primary keys for the command:
archetypeVersion indicates the RichFaces version. For example,
"3.3.2-SNAPSHOT"
artifactId artifact id of the project
groupId group id of the project
version the version of the project you create, by default it
is "1.0.-SNAPSHOT"
After this operation, a folder with the name of your
"ARTIFACT-ID" appears. The folder contains a template of
Maven project.
Next steps will guide you though creating of the skin itself.
In the root folder of Maven project (the one that contains "pom.xml" file) you should run the following command in the command line:
...

mvn cdk:add-skin -Dname=SKIN-NAME -Dpackage=SKIN-PACKAGE

...
Primary keys for the command:
name defines the name of the new skin
package base package of the skin. By default
"groupId" of the project is used.
Additional optional keys for the command:
baseSkin defines the name of the base skin.
createExt if set to "true", extended CSS classes are
added. For more information, please, see
"Standard controls skinning"
As a result of the performed operations the following files and folders are created:
BaseImage.java - the base class to store images. Location: "\src\main\java\SKIN-PACKAGE\SKIN-NAME\images\"
BaseImageTest.java - a test version of a class that stores images. Location: "\src\test\java\SKIN-PACKAGE\SKIN-NAME\images\"
XCSS files - XCSS files define the new look of RichFaces components affected by the new skin. Location: "\src\main\resources\SKIN-PACKAGE\SKIN-NAME\css\"
SKIN-NAME.properties - a file that contains properties of the new skin. Location: "\src\main\resources\SKIN-PACKAGE\SKIN-NAME\css\"
The following properties are used to configure the SKIN-NAME.properties file:
baseSkin – the name of the base skin to be used as basis. The look of the skin you define will be affected by new style properties.
generalStyleSheet - a path to the style sheet (SKIN-NAME.xcss) that imports style sheets of the components to be affected by the new skin.
extendedStyleSheet - a path to a style sheet that is used to unify the appearance of RichFaces components and standard HTML controls. For additional information please read "Standard controls skinning" chapter.
gradientType - a predefined property to set the type of gradient applied to the new skin. Possible values are glass, plastic, plain. More information on gradient implementation you can find further in this chapter.
SKIN-NAME.xcss - a XCSS file that imports XCSS files of the components to be affected by the new skin. Location: "src\main\resources\META-INF\skins "
XCSS files If the command is executed with the "DcreateExt" key set to "true", the XCSS (extended_classes.xcss and extended.xcss) files that define style for standard controls will be created. Location: "\src\main\resources\SKIN-PACKAGE\SKIN-NAME\css\".
SKIN-NAME-ext.xcss If the command is executed with the "DcreateExt" key set to "true", the configuration SKIN-NAME-ext.xcss file that imports XCSS file defining styles for the standard controls will be created. Location: "src\main\resources\META-INF\skins ".
SKIN-NAME-resources.xml - the file contains the description of all listed above files. Location: "src\main\config\resources ".
Now you can start editing the XCSS files located in "\src\main\resources\SKIN-PACKAGE\SKIN-NAME\css\". New style properties can be assigned to the selectors (the selectors listed in the XCSS files) in two ways, which are both valid, and it'up to you what way to choose.
Standard CSS coding approach, i.e. you can add CSS properties
to the given selectors. The only
thing, you have to keep in mind is that the selectors must be inside
<f:verbatim> <![CDATA[ ...]]>
							</f:verbatim>
tags.
For example
...

.rich-calendar-cell {

     background: #537df8;

}

...
Using XCSS coding approach, the same way as XCSS files are normally
formed in RichFaces. The XCSS tags have to be placed outside
<f:verbatim> <![CDATA[ ...]]>
							</f:verbatim>
tags.
...

<u:selector name=".rich-calendar-cell">

     <u:style name="border-bottom-color" skin="panelBorderColor"/>

     <u:style name="border-right-color" skin="panelBorderColor"/>

     <u:style name="background-color" skin="tableBackgroundColor"/>

     <u:style name="font-size" skin="generalSizeFont"/>

     <u:style name="font-family" skin="generalFamilyFont"/>

</u:selector>

...
Having performed described above steps and edited the XCSS files you can proceed to building the new skin and to plugging it into the project. Building the new skin can be done by executing the given below command in the command line in the root folder of you skin project (the one that contains pom.xml file).
...

mvn clean install

...
In addition Plug-n-Skin has a number of predefined gradients that you can also use to make your application look nicer. The given below code snippet shows how a gradient can be used
...

<u:selector name=".rich-combobox-item-selected">

    <u:style name="border-width" value="1px" />

    <u:style name="border-style" value="solid" />

    <u:style name="border-color" skin="newBorder" />

    <u:style name="background-position" value="0% 50%" />

    <u:style name="background-image">

        <f:resource f:key="org.richfaces.renderkit.html.CustomizeableGradient">

            <f:attribute name="valign" value="middle" />

            <f:attribute name="gradientHeight" value="17px" />

            <f:attribute name="baseColor" skin="headerBackgroundColor" />

         </f:resource>

    </u:style>

</u:selector>

...
So, as you can see, the background-image CSS property is
defined with <f:resource
f:key="org.richfaces.renderkit.html.CustomizeableGradient">
that sets the gradient. While the gradient type can be specified in the
SKIN-NAME.properties file with gradientType property. The gradientType
property can be set to one of the possible values glass, plastic, plain. The
gradient in it's turn can be can be adjusted using baseColor, gradientColor,
gradientHeight, valign attributes. Their usage is shown in the snippet above.
Now, you can use your newly-created and customized skin in your project by adding your new skin parameters to web.xml file and placing the jar file with your skin ( the jar file is located in "target" folder of your skin project) to "\WebContent\WEB-INF\lib\".
...

<context-param>

    <param-name>org.ajax4jsf.SKIN</param-name>

    <param-value>SKIN-NAME</param-value>

</context-param>

...
This section will cover some practical aspects of Plug-n-Skin implementation. It's assumed that you have read the section of the guide that tells how the new skin using Plug-n-Skin prototype can be created.
Above all, we need to create a new skin, in order to do that we just have to follow the steps described in the previous section.
This command will be used to create a template of the new skin project.
mvn archetype:create -DarchetypeGroupId=org.richfaces.cdk -DarchetypeArtifactId=maven-archetype-plug-n-skin -DarchetypeVersion=3.3.2-SNAPSHOT -DartifactId=P-n-S -DgroupId=GROUPID -Dversion=1.0.-SNAPSHOT
Now you can browse the "P-n-S" folder to view what files and folders were created there.
Next, we will use Maven to add all needed files to the skin project. This will done by the following command:
mvn cdk:add-skin -DbaseSkin=blueSky -DcreateExt=true -Dname=PlugnSkinDemo -Dpackage=SKINPACKAGE
As you remember from the previous section "-DbaseSkin" key defines what RichFaces built-in skin to be used as a base one, "-DcreateExt=true" determines that the new skin will come with XCSS files that unify the look of the rich components with standard HTML controls.
So, now the files and folder with all needed resources are created and redefining/editing the new skin can be started.
Now we can start editing XCSS files of the rich components. In order to see how the Plug-n-Skin feature works we will change some style attributes of <rich:calendar> and some basic HTML controls to see how they are affected by standard controls skinning.
Thus, it will be demonstrated how to:
Recolor the current day's cell background of the <rich:calendar> to see how the new skin created with the help of Plug-n-Skin feature affects the style of the component;
Recolor a standard HTML submit button;
In oder to edit the style properties of
<rich:calendar>
you need to open the "calendar.xcss" file located in
"P-n-S\src\main\resources\skinpackage\plugnskindemo\css\". Once, you
have opened the file, please find ".rich-calendar-today" selector and amend it
as follows: background-color: #075ad1;. The current day's
background color can be considered recolored.
Now we will see how font style of a standard HTML submit button can be
changed. Please, open "extended.xcss" file located in
"P-n-S\src\main\resources\skinpackage\plugnskindemo\css\" and put in
font-weight: bold; inside the curly braces of these coma
separated selectors button[type="button"],
button[type="reset"], button[type="submit"],
input[type="reset"], input[type="submit"],
input[type="button"]. So, the CSS code should look like
this.
button[type="button"], button[type="reset"], button[type="submit"], input[type="reset"], input[type="submit"], input[type="button"] { font-weight: bold;
}
All the changes that were planned to be preformed are done and now you can
proceed to building the new PlugnSkinDemo skin and import it into the project.
As you read in the previous section, the skin should be built in the
"P-n-S" folder of the skin project by executing mvn clean
install command. This procedure results in creating a
"target" folder that contains a .jar file with a compiled new skin, it
our case the file is named "P-n-S-1.0.-SNAPSHOT.jar". The next step is
to import the new PlugnSkinDemo skin into the project.
What you need to do, in order to have the new skin imported to the project is to
Copy the "P-n-S-1.0.-SNAPSHOT.jar" file to the "\WebContent\WEB-INF\lib\" folder.
Add the new skin's name to the "web.xml" file. It is done like this
 <context-param>

    <param-name>org.ajax4jsf.SKIN</param-name>

    <param-value>PlugnSkinDemo</param-value>

</context-param>
Please, do not forget that standard controls skinning has to be enabled in the "web.xml" file, which can be done by adding the following code to the "web.xml" file:
<context-param>

    <param-name>org.richfaces.CONTROL_SKINNING</param-name>

    <param-value>enable</param-value>

</context-param>
The result of both operations is displayed on the figure below.
In the "Reference Data" section for most of the visual components (see "The RichFaces Components" chapter)
there are the tables with rich-* classes definitions. These classes allow to redefine styles for a specific component by means of CSS.
Actually, you should create classes with the same names and define new properties in them.
Let's consider the <rich:modalPanel> component.
To change the background color for the mask, it's enough to redefine the .rich-mpnl-mask-div class.
Example:
...

.rich-mpnl-mask-div{

    background-color:#fae6b0;

}

...
This is a result:
If you have multiple components on the page, the redefined styles will be applied to all of them. To change styles for a particular component on the page, create your own style classes and use them in corresponding style class attributes. An example on how to change the font style for the header of a particular modal panel is placed below:
Example:
...

.myClass{

    font-style:italic;

}

...
Next specify myClass as the value of the "headerClass" attribute for <rich:modalPanel> :
<rich:modalPanel ... headerClass="myClass"/>
This is a result:
JSF has an advanced navigation mechanism that allows you to define navigation from view to view. Navigation happens in a Web Application when a user tries to switch from one page to another page either by clicking a button, a hyperlink, or another command component. But there is no switch mechanism between some logical states of the same view. For example in Login/Register dialog an existing user signs in with his user name and password, but if a new user registers an additional field "Confirm" is displayed, buttons labels and methods are changed when the user clicks "To register" link:
RichFaces State API allows easily to define some set of states for the pages and any properties for this states.
Actually States is a map where the entry key is a name of the State and the value is a State map. Particular State map has entries with some names as keys and any objects as values that are used after the state activation. Thus, in the State map you could define any values, method bindings, or just some simple state variables (constants) which have different values for every State.
One of the most convenience features of the RichFaces State API is a navigation between states. The RichFaces State API implements states change as the standard JSF navigation. Action component just returns outcome and the RichFaces State API extension for the JSF navigation handler checks whether this outcome is registered as a state change outcome or not. If the state change outcome is found the corresponding state is activated. Otherwise the standard navigation handling is called.
In order to use RichFaces State API you should follow the next steps:
Register State Manager EL resolver and navigation handler in the faces-config.xml:
...

<application>

    <navigation-handler>org.richfaces.ui.application.StateNavigationHandler</navigation-handler>

    <el-resolver>org.richfaces.el.StateELResolver</el-resolver>

</application>

...
Register an additional application factory in the faces-config.xml:
...

<factory>

    <application-factory>org.richfaces.ui.application.StateApplicationFactory</application-factory>

</factory>

...
Register two managed beans in the faces-config.xml:
...

<managed-bean>

    <managed-bean-name>state</managed-bean-name>

    <managed-bean-class>org.richfaces.ui.model.States</managed-bean-class>

    <managed-bean-scope>request</managed-bean-scope>

    <managed-property>

        <property-name>states</property-name>

        <property-class>org.richfaces.ui.model.States</property-class>

        <value>#{config.states}</value>

    </managed-property>

</managed-bean>

<managed-bean>

    <managed-bean-name>config</managed-bean-name>

    <managed-bean-class>org.richfaces.demo.stateApi.Config</managed-bean-class>

    <managed-bean-scope>none</managed-bean-scope>

</managed-bean>

...
One bean ("config") defines and stores states as it is shown in the following example:
...

public class Config {


    /**

     * @return States

     */

    public States getStates() {

        FacesContext facesContext = FacesContext.getCurrentInstance();

        States states = new States();


        // Registering new User State definition

        states.setCurrentState("register"); // Name of the new state


        // Text labels, properties and Labels for controls in "register" state

        states.put("showConfirm", Boolean.TRUE); // confirm field rendering

        states.put("link", "(To login)"); // Switch State link label

        states.put("okBtn", "Register"); // Login/Register button label

        states.put("stateTitle", "Register New User"); // Panel title


        ExpressionFactory expressionFactory = facesContext.getApplication()

                .getExpressionFactory();


        // Define "registerbean" available under "bean" EL binding on the page

        ValueExpression beanExpression = expressionFactory

                .createValueExpression(facesContext.getELContext(),

                        "#{registerbean}", Bean.class);

        states.put("bean", beanExpression);


        // Define "registeraction" available under "action" EL binding on the

        // page

        beanExpression = expressionFactory.createValueExpression(facesContext

                .getELContext(), "#{registeraction}", RegisterAction.class);

        states.put("action", beanExpression);


        // Define method expression inside registeraction binding for this state

        MethodExpression methodExpression = expressionFactory.createMethodExpression(

                facesContext.getELContext(), "#{registeraction.ok}",

                String.class, new Class[] {});

        states.put("ok", methodExpression);


        // Outcome for switching to login state definition

        states.setNavigation("switch", "login");


        // Login Existent User State analogous definition

        states.setCurrentState("login");

        states.put("showConfirm", Boolean.FALSE);

        states.put("link", "(To register)");

        states.put("okBtn", "Login");

        states.put("stateTitle", "Login Existing User");


        beanExpression = expressionFactory.createValueExpression(facesContext

                .getELContext(), "#{loginbean}", Bean.class);

        states.put("bean", beanExpression);


        beanExpression = expressionFactory.createValueExpression(facesContext

                .getELContext(), "#{loginaction}", LoginAction.class);

        states.put("action", beanExpression);


        methodExpression = expressionFactory.createMethodExpression(

                facesContext.getELContext(), "#{loginaction.ok}",

                String.class, new Class[] {});

        states.put("ok", methodExpression);


        states.setNavigation("switch", "register");


        return states;

    }

}

...
The other bean ("state") with the type
org.richfaces.ui.model.States has the "states"
managed property that is bound to the "config" bean which defines
states.
Use state bindings on the page. See the following example:
...

<h:panelGrid columns="3">

    <h:outputText value="username" />

    <h:inputText value="#{state.bean.name}" id="name" required="true" />

    <h:outputText value="password" />

    <h:inputSecret value="#{state.bean.password}" id="password" required="true" />

    <h:outputText value="confirm" rendered="#{state.showConfirm}" />

    <h:inputSecret value="#{state.bean.confirmPassword}" rendered="#{state.showConfirm}" id="confirm" required="true" />

</h:panelGrid>

<a4j:commandButton actionListener="#{state.action.listener}" action="#{state.ok}" value="#{state.okBtn}" id="action"/>

...
To get full Login/Register dialog example, please, have a look at RichFaces Live Demo.
RichFaces provides a function to check whether the logged-in user belongs to a certain user role. The function is rich:isUserInRole(Object), it takes a String, a comma-separated list String, Collection etc. as arguments and returns a boolean value.
For example, you need to render some controls only for administrators.
To do this you need to create a role "admin" in web.xml and implement authorisation that assigns the "admin" role to the user that loggged-in as an administrator. Afterwards, you can use the rich:isUserInRole(Object) function with the "rendered" attribute of any component.
Example:
...

<rich:editor value="#{bean.text}"  rendered="#{rich:isUserInRole('admin')}" />

...
In the example above only a logged-in user with the role "admin" can see the text editor while for the user with other roles the component will not be rendered.