This section summarizes Teiid Designer features for creating and editing existing model objects contained in your models.
As discussed in the introduction, Section 1.3.3, “Metadata Models” provide a framework to model various types of metadata. Each metamodel type has a set of parent-child relationships that establish constraints on what can be created and where. You cannot, for example, create a column attribute in a stored procedure, nor can you create a mapping class column in a Web service operation's output message.
The Teiid Designer provides a common set of actions to create new children of these models as well as children of children.
You can create new model objects directly in the Figure 4.2, “Model Explorer View”, Section 5.1.1, “Diagram Editor” or Section 5.1.2, “Table Editor” using the following actions:
New Child Action
New Sibling Action
New Association Action
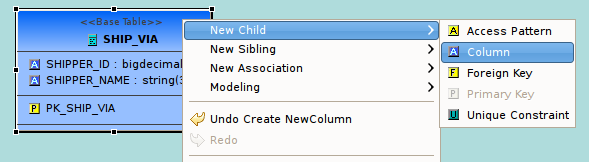
To create new child model objects in the Figure 4.2, “Model Explorer View”:
Step 1 - Select the parent object to which you want to add a child. For example, you can add a package to a package or an attribute to a class.
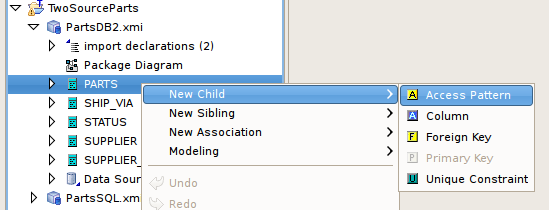
Step 2 - Right-click on a container object. From the pop-up menu, select New Child. You can now select the child object you would like to add.
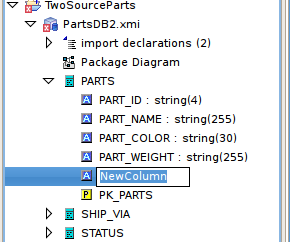
Step 3 - The new model object displays on the Figure 4.2, “Model Explorer View” and is highlighted for renaming.
To create new child model objects in the Section 5.1.1, “Diagram Editor”:
Step 1 - Select the parent object to which you want to add a child. For example, you can add a package to a package or an attribute to a class.
Step 2 - Right-click on a container object. From the pop-up menu, select New Child. You can now select the child object you would like to add.
Step 3 - The new model object displays on the diagram and is highlighted for renaming.
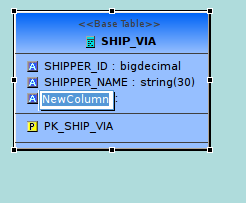
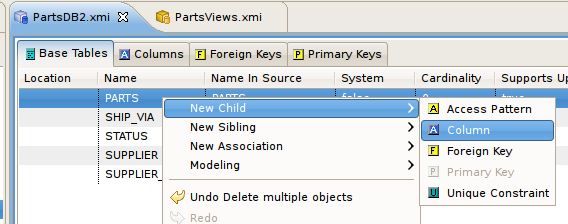
To create new child model objects in the Section 5.1.2, “Table Editor”:
Step 1 - Select the row for the parent object to which you want to add a child. For example to add a column, click the Base Table tab and select base table row.
Step 2 - Right-click on a table row. From the pop-up menu, select New Child. You can now select the child object you would like to add.
Step 3 - The selected tab in the Table Editor changes to the tab for the child object type, the new model object row is displayed and the row's name table cell is highlighted for renaming.
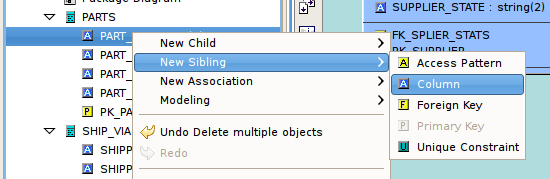
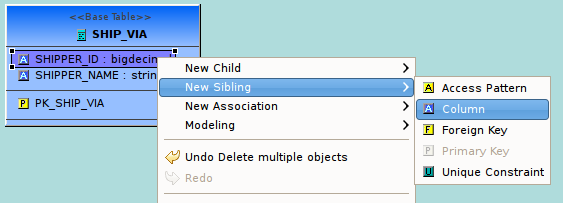
To create new sibling model objects in the Figure 4.2, “Model Explorer View”:
Step 1 - Select the object to which you want to add a sibling. For example, you can add a column sibling to a column.
Step 2 - Right-click on that object. From the pop-up menu, select New Sibling. You can now select the sibling object you would like to add.
Step 3 - The new model object displays on the Figure 4.2, “Model Explorer View” and is highlighted for renaming.
To create new sibling model objects in the Section 5.1.1, “Diagram Editor”:
Step 1 - Select the object to which you want to add a sibling. For example, you can add a column sibling to a column.
Step 2 - Right-click on that object. From the pop-up menu, select New Sibling. You can now select the sibling object you would like to add.
Step 3 - The new model object displays on the diagram and is highlighted for renaming.
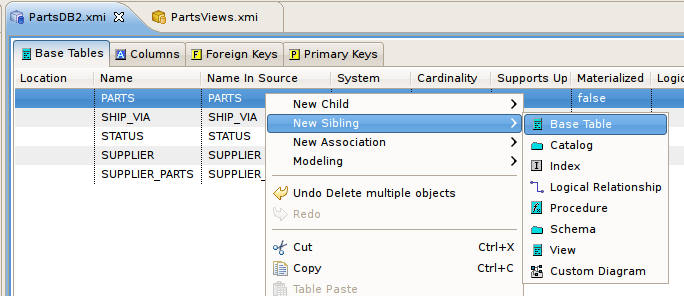
To create new sibling model objects in the Section 5.1.2, “Table Editor”:
Step 1 - Select the row for the object to which you want to add a sibling. For example, you can add a column sibling to a column.
Step 2 - Right-click on a row. From the pop-up menu, select New Sibling. You can now select the sibling object you would like to add.
Step 3 - The selected tab in the Table Editor changes to the tab for the child object type, the new model object row is displayed and the row's name table cell is highlighted for renaming.
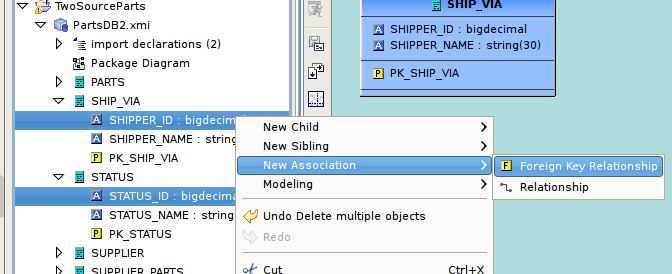
To create new associations between model objects in the Figure 4.2, “Model Explorer View”:
Step 1 - Select two objects you wish to associate. For example, select columns in different base tables.
Step 2 - Right-click. From the pop-up menu, select New Association > Foreign Key Relationship..
Step 3 - The new relationship link is displayed in the diagram.

To create new associations between model objects in the Section 5.1.1, “Diagram Editor”:
Step 1 - Select two objects you wish to associate. For example, select columns in different base tables.
Step 2 - Right-click. From the pop-up menu, select New Association > Foreign Key Relationship..
Step 3 - The new relationship link is displayed in the diagram. The Column, Foreign Key, Primary Key reference properties are properly set on the selected columns, new primary key and new foreign key.
OR
Step 1 - Select a column in table.
Step 2 - Drag the column to another table and drag over a column and drop onto this column. The target column should highlight in Yellow.
Step 3 - The new relationship link is displayed in the diagram. The Column, Foreign Key, Primary Key reference properties are properly set on the selected columns, new primary key and new foreign key.
To create new associations between model objects in the Section 5.1.2, “Table Editor”:
Step 1 - Select two objects you wish to associate. For example, select columns in different base tables.
Step 2 - Right-click. From the pop-up menu, select New Association > Foreign Key Relationship..
Step 3 - New Foreign Key and Primary Key objects will be added to the contents of their respective tabs in the Table Editor. The Column, Foreign Key, Primary Key reference properties are properly set on the selected columns, new primary key and new foreign key.
The primary actions for editing model objects are:
 Cut - Deletes the selected object(s) and copies it to the clipboard.
 Copy - Copies the selected object(s) to the clipboard.
 Paste - Pastes the contents of the clipboard to the selected context.
Clone - Duplicates the selected object in the same location with the same name; user is able to rename the new object right in the tree.
 Delete - Deletes the selected object(s).
Rename - Allows a user to rename an object.
These actions are presented in Teiid Designer's main Edit menu and also in the right-click context menus for model objects selected in the Figure 4.2, “Model Explorer View”, Section 5.1.1, “Diagram Editor” and Section 5.1.2, “Table Editor”.
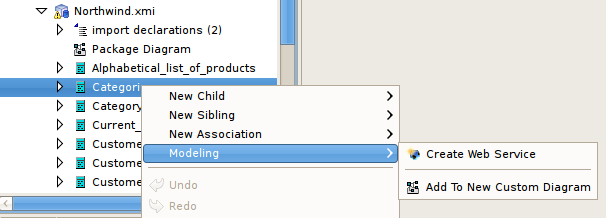
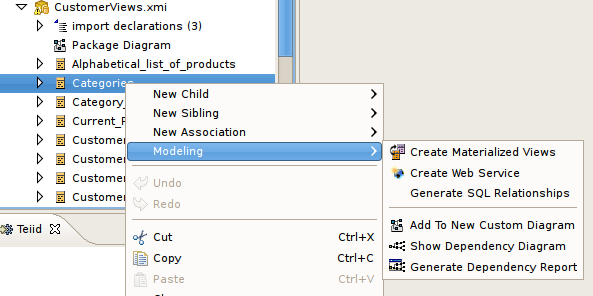
Modeling Sub-Menu
In addition to the New Child/Sibling/Association menus available for object creation Designer provides a Modeling > sub-menu which presents various object-specific actions which can be performed.
If you select a source table, for instance, the modeling menu below would be presented:
If a view table is selected, the menu would reflect the actions related to virtual operations:
Teiid Designer also provides specialized object editors to handle complex model objects and their unique properties. These objects include:
This section describes these editors in detail.
The Teiid Designer's Transformation Editor enables you to create the query transformations that describe how to derive your virtual metadata information from physical metadata sources or other virtual metadata and how to update the sources.
The Transformation Editor provides a robust set of tools you can use to create these SQL queries. You can use these tools, or you can simply type a SQL query into the Transformation Editor.
To edit a transformation you can:
Double-click Edit
A relational view table or procedure in the Model Explorer or Diagram Editor
A transformation node in a transformation diagram or mapping transformation diagram
A mapping class in a mapping diagram or mapping transformation diagram
Right-click Edit action on selected object in the Model Explorer, Diagram Editor or Table Editor
A relational view table or procedure
A transformation node in a transformation diagram or mapping transformation diagram
A mapping class in a mapping diagram or mapping transformation diagram
If a Model Editor is not currently open for the selected object's model, a Model Editor will be opened.
After the corresponding transformation diagram is opened in the Diagram Editor, the Transformation Editor is displayed in the lower section of the Diagram Editor.
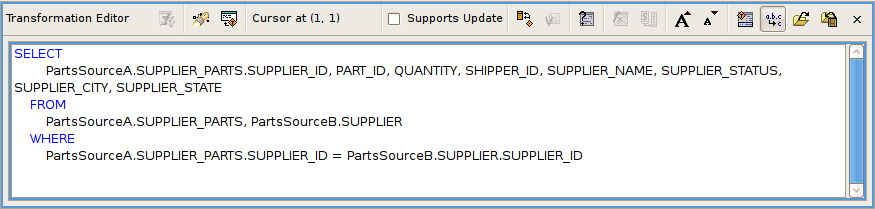
If this virtual class supports updates, the tabs on the bottom of the Transformation Editor allow you to enter SQL for each type of query this virtual class supports. If this virtual class does not support updates, only the SELECT tab is available.
You can enter separate SQL queries on each available tab to accommodate that type of query.
Within the Transformation Editor, you can:
Disable specific update transformation types on this virtual class.
Build or edit a criteria clause to use in your transformation.
Build or edit an expression to use in your transformation.
Find and replace a string within your transformation.
Validate the transformation to ensure its content contains no errors.
Reconcile target attributes to ensure the symbols in your transformation match the attributes in your virtual metadata class.
You can also set preferences that impact the display of your Transformation Editor. For more information, see Section 13.1.3.3, “Transformation Editor Preferences”
The Transformation Editor toolbar actions are summarized below.
 Prevew Virtual Data - executes a simple
preview query for the target table or procedure of the transformation being edited.
Prevew Virtual Data - executes a simple
preview query for the target table or procedure of the transformation being edited.
 Search Transformations - provides a simple
way select and edit another transformation based SQL text search criteria.
Search Transformations - provides a simple
way select and edit another transformation based SQL text search criteria.
 Edit Transformation - provides a simple way
to change which transformation to edit without searching in a diagram or the Model Explorer.
Simply click the action and select from a list of views, tables, procedures or operations from
the currently edited model.
Edit Transformation - provides a simple way
to change which transformation to edit without searching in a diagram or the Model Explorer.
Simply click the action and select from a list of views, tables, procedures or operations from
the currently edited model.
 Cursor Position (line, column) - shows the
current line and column position of the insertion cursor. For example, Cursor Position(1,4)
indicates that the cursor is presently located at column 4 of line 1.
Cursor Position (line, column) - shows the
current line and column position of the insertion cursor. For example, Cursor Position(1,4)
indicates that the cursor is presently located at column 4 of line 1.
 Supports Update - checkbox allows you to
enable or disable updates for the current transformation target. If 'Supports Update' is checked,
the editor shows four tabs at the bottom for the Select, Update, Insert and Delete transformations.
If 'Supports Update' is unchecked, all updates are disabled and only the Select transformation is
displayed.
Supports Update - checkbox allows you to
enable or disable updates for the current transformation target. If 'Supports Update' is checked,
the editor shows four tabs at the bottom for the Select, Update, Insert and Delete transformations.
If 'Supports Update' is unchecked, all updates are disabled and only the Select transformation is
displayed.
 Reconcile - allows you to resolve any
discrepancies between the transformation symbols and the target attributes. Pressing this button
will display the "Reconcile Virtual Target Attributes" dialog box in which you can resolve
discrepancies.
Reconcile - allows you to resolve any
discrepancies between the transformation symbols and the target attributes. Pressing this button
will display the "Reconcile Virtual Target Attributes" dialog box in which you can resolve
discrepancies.
 Save/Validate - saves edits to the current
transformation and validates the transformation SQL. Any Warning or Error messages will be
displayed at the bottom of the editor in the messages area. If the SQL validates without error,
the message area is not displayed.
Save/Validate - saves edits to the current
transformation and validates the transformation SQL. Any Warning or Error messages will be
displayed at the bottom of the editor in the messages area. If the SQL validates without error,
the message area is not displayed.
 Criteria Builder - allows you to build a
criteria clause in your transformation. The button will enable if the cursor position is within
a query that allows a criteria. Pressing the button will launch the Criteria Builder dialog. If
the Criteria Builder is launched inside an existing criteria, that criteria will be displayed for
edit, otherwise the Criteria Builder will be initially empty.
Criteria Builder - allows you to build a
criteria clause in your transformation. The button will enable if the cursor position is within
a query that allows a criteria. Pressing the button will launch the Criteria Builder dialog. If
the Criteria Builder is launched inside an existing criteria, that criteria will be displayed for
edit, otherwise the Criteria Builder will be initially empty.
 Expression Builder - allows you to build an
expression within your transformation. The button will enable if the cursor position is at a
location that allows an expression. Pressing the button will launch the Expression Builder dialog.
If the Expression Builder is launched inside an existing expression, that expression will be
displayed for edit, otherwise the Expression Builder will be initially empty.
Expression Builder - allows you to build an
expression within your transformation. The button will enable if the cursor position is at a
location that allows an expression. Pressing the button will launch the Expression Builder dialog.
If the Expression Builder is launched inside an existing expression, that expression will be
displayed for edit, otherwise the Expression Builder will be initially empty.
 Expand Select * - allows you to expand a
"SELECT *" clause into a SELECT clause which contains all of the SELECT symbols. The button will
enable only if the cursor is within a query that contains a SELECT * clause that can be expanded.
Expand Select * - allows you to expand a
"SELECT *" clause into a SELECT clause which contains all of the SELECT symbols. The button will
enable only if the cursor is within a query that contains a SELECT * clause that can be expanded.
 Increase Font Size - increases the font size
of all editor text by 1.
Increase Font Size - increases the font size
of all editor text by 1.
 Decrease Font Size - decreases the font size
of all editor text by 1.
Decrease Font Size - decreases the font size
of all editor text by 1.

 Show/Hide Messages - toggles the display of
the message area at the bottom of the transformation editor.
Show/Hide Messages - toggles the display of
the message area at the bottom of the transformation editor.
 Optimize SQL - when toggled 'ON', will use
the short names of all SQL symbols that can be optimized. Some symbol names may remain fully
qualified in the event of a duplicate name or if the optimizer is unable to optimize it. When the
action is toggled 'OFF', all symbol names will be fully-qualified.
Optimize SQL - when toggled 'ON', will use
the short names of all SQL symbols that can be optimized. Some symbol names may remain fully
qualified in the event of a duplicate name or if the optimizer is unable to optimize it. When the
action is toggled 'OFF', all symbol names will be fully-qualified.
 Import SQL Text - allows you to import a sql
statement from a text file on your file system. Pressing this button will display an import dialog
in which you can navigate to the file.
Import SQL Text - allows you to import a sql
statement from a text file on your file system. Pressing this button will display an import dialog
in which you can navigate to the file.
 Export SQL Text - allows you to export the
currently displayed SQL statement into a text file on your file system.
Pressing this button will display an export dialog in which you can choose the location for export.
Export SQL Text - allows you to export the
currently displayed SQL statement into a text file on your file system.
Pressing this button will display an export dialog in which you can choose the location for export.
Close "X" - closes the transformation editor.
The Transformation Editor’s Criteria Builder offers you a quick, graphical means to build criteria clauses in your transformations based on meta objects in your diagram. If you launch the Criteria Builder with your cursor within an existing criteria in your transformation SQL, the builder will open in Edit mode. If your cursor is not in an existing criteria location, the builder will open in create mode and allow you to create it from scratch.
This procedure provides an example of building a criteria clause using the Criteria Builder. When building your own criteria, you can mix and match the values and constants with whatever logic you need to build powerful and complex criteria.
To use the Criteria Builder:
Step 1 - In the Transformation Editor, click the Launch Criteria Builder button.
Step 2 - The Criteria Builder displays.
The two tabs at the top, Tree View and SQL View, show the current contents of the criteria you have built.
The Criteria Editor at the bottom allows you to build a criteria clause. To build a criteria clause, you must add information to the left side of the predicate, select a comparison operator, and add a value to the right side.
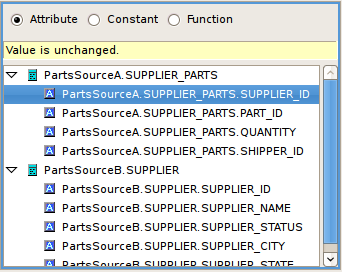
Step 3 - The radio buttons on either side of the Predicate Editor let you choose what type of content to place in that side of your predicate. Click the radio button of the type of content you want to place in your criteria. You can click:
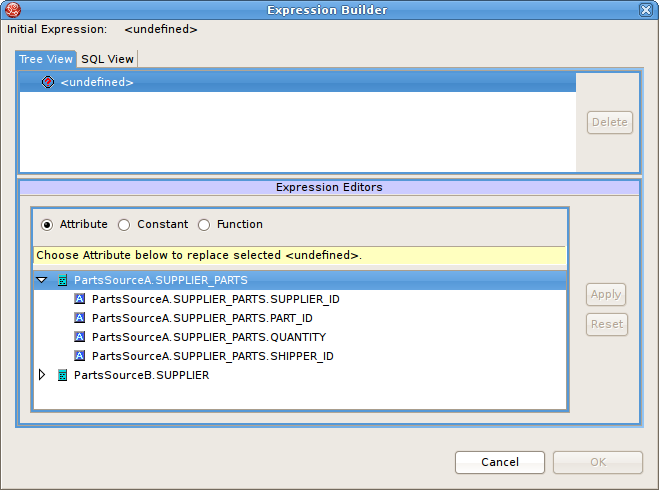
Attribute to add an attribute to the predicate. If you click the Attribute radio button, the Predicate Editor looks like this:
From the tree, select the attribute you want to add to the expression. You can select an attribute from any of the source classes in the transformation.
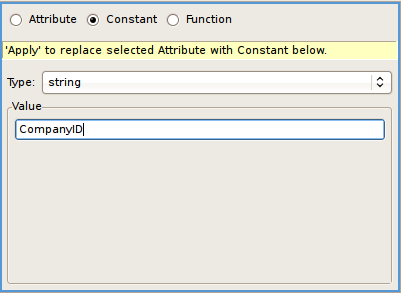
Constant to add a hard-wired constant value to the predicate. If you click this radio button, the Predicate Editor looks like this:
Select the datatype for this constant from the Type drop-down list and enter the value in the Value edit box.
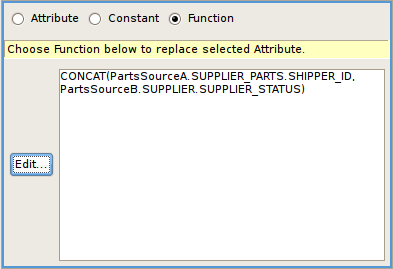
Function to add a function. If you click the Function radio button, the Predicate Editor looks like this:
Click the Edit button to use the Expression Builder to construct a function to use in the predicate of your SQL Criterion. For more information about the Expression Builder, see Section 8.2.1.2, “Using the Expression Builder”
Step 4 - Set a value left side of the predicate and, when necessary, the right side of the predicate. If the right side of the predicate does not require a value of some sort, the Criteria Builder will not let you enter one.
Step 5 - Click Apply.
Step 6 - When you have created both a Left Expression and a Right Expression in the Predicate Editor, click Apply to add the criterion to the tree view at the top of the dialog box.
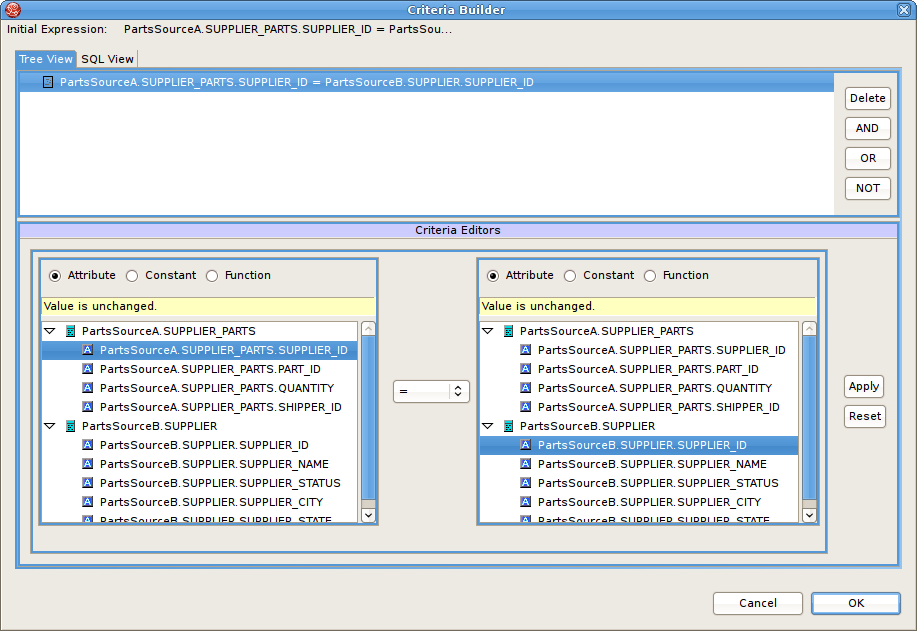
The criteria clause displays in the Criteria tree.
You can create complex criteria by joining other criteria with this one. To join criteria with this one, select the criteria in the Criteria tree and click:
Delete to remove the selected criterion.
AND to create a new criterion that must also be true.
OR to create a new criterion that can be true instead of the selected criterion.
NOT to establish negative criterion.
If you join a criterion to the one you just completed, you build the expression the same way, using the Expression Editors panel and the Predicate Editor panel. You can create complex, nested criteria by judicious use of the AND and OR buttons.
Once you have created the complete criteria you want, click OK to add it to your transformation.
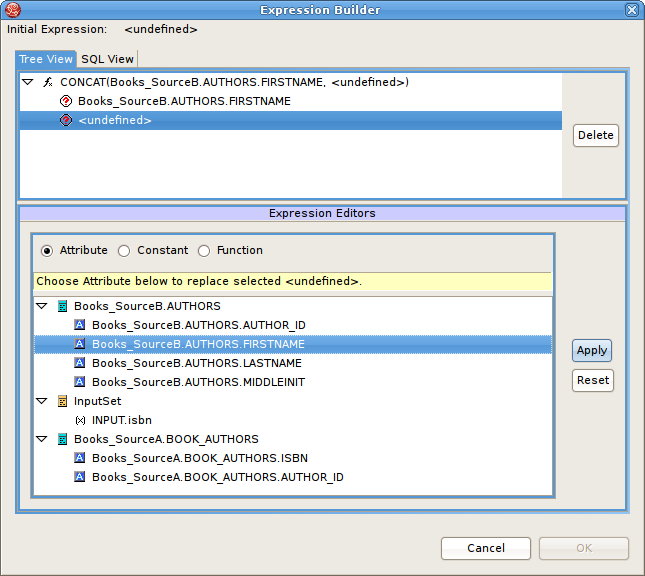
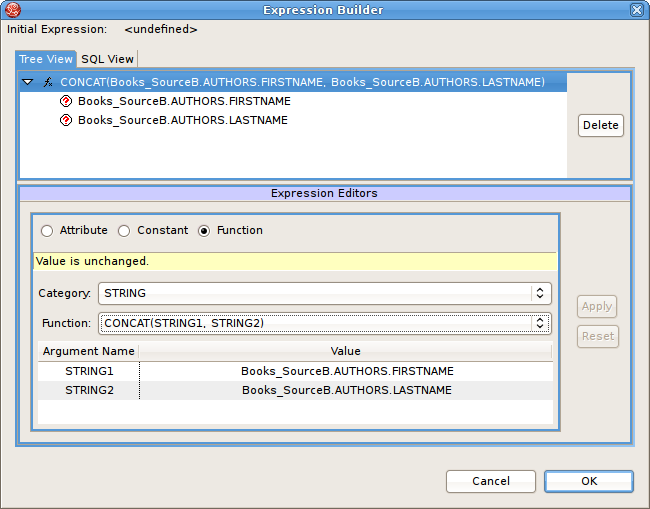
The Transformation Editor’s Expression Builder offers you a quick, graphical means to build expressions in your transformations. This Expression Builder lets you create:
Attributes by selecting an attribute.
Constants by selecting the datatype and value.
Functions from both the standard Teiid Designer SQL functions and your enterprise’s custom user-defined functions. If you select a function before you launch the Expression Builder, you can use the Expression Builder to edit the selected function; otherwise, you can create a new function from scratch.
To use the Expression Builder:
Step 1 - In the Transformation Editor, click the location where you want to insert the function.
Step 2 - Click the Expression Builder button.
The SQL Expression Builder displays.The two tabs at the top, Tree View and SQL View, show the current contents of the expression you have built. To build an expression, you must specify the type of expression you want to build and populate it. In most cases, you will use the Expression Builder to construct a complex expression.
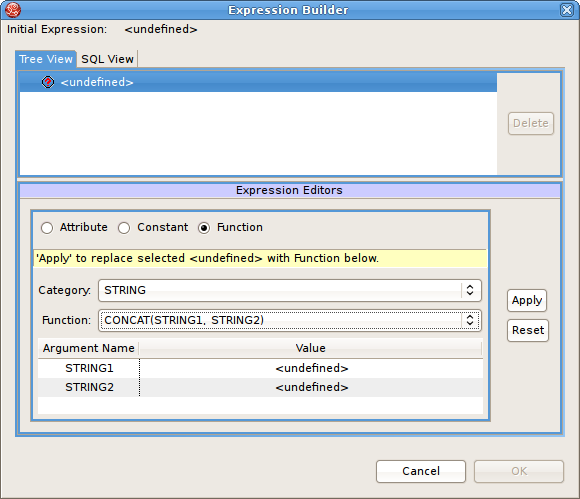
Step 3 -Click the Function radio button to add a function.
Note
You can simply add constants and attributes as expressions by themselves using the Attribute or Constant radio buttons; however, the Expression Editor is most useful for functions.
Step 4 - The Expression Editor displays the Function editor.
From the Category drop-down list, choose the type of function you want to add. By default, the Teiid Designer System offers the following categories:
Conversion for functions that convert one datatype into another.
Datetime for functions that handle date or time information.
Miscellaneous for other functions.
Numeric for mathematic and other numeric functions.
String for string manipulation functions.
Note
Any additional categories represent those containing user-defined functions your site has created.
Step 5 - From the Function drop-down list, select the function you want. The table beneath the drop-down lists displays the number of arguments required for this function.
Step 6 - Click Apply.
Step 7 - Your function displays in the tree at the top. Sub nodes display for each argument you need to set for this function.
You need to set an attribute or constant value for each sub node in the tree to specify the arguments this function needs. You can also nest another function in the tree using the Function editor.
Step 8 - Click each sub node in the tree and use the editors at the bottom of the dialog box to apply an attribute, constant, or function value to it.
Step 9 - When you have added values to all nodes, as shown below, click OK. to add this expression to your query or Cancel to close the dialog box without inserting the expression.
If the OK button does not enable, you have not added a value to all nodes in the tree.
You can also nest functions within your expressions by selecting an argument and selecting a function for that argument. The nested function displays in the tree beneath your root function and its arguments display as well. Using the Expression Builder and nested functions, you can create complex logic within your query transformations.
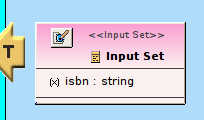
The Input Set represents a special class that contains attributes from a parent mapping class. When you create mapping classes for an XML Document model, the Teiid Designer automatically adds an Input Set to all XML transformation diagrams for mapping classes beneath the highest node in the Document meta object.
The Input Set proves especially useful for information integration using the Teiid Designer Server. Through the Input Set, you can access a row of data generated by any XML transformation in a mapping class higher in the XML document’s hierarchy. You can use Input Set attributes, which are individual columns from the rows of data, within the criteria of an XML transformation query of the child mapping class.
You cannot use the Input Set attributes within the SELECT portion of the XML transformation query.
To use an Input Set, you must use the Input Set Editor to bind attributes from parent classes.
Once you have created an Input Set, you can use the attributes within it as source material for the XML transformation diagram’s query.
The Input Set only serves to enable data flow between nested mapping classes. If you use the Teiid Designer Server for data access, your applications cannot directly query an Input Set. Input Sets only display in the XML transformation diagram to which they belong. Input Sets do not display on the Figure 4.2, “Model Explorer View” and you cannot use them as you would a normal class, such as for source classes in other transformations.
To open the Input Set Editor, either double-click the input set in the Mapping Transformation Diagram or click the edit button on the Input Set in the diagram. (see below)
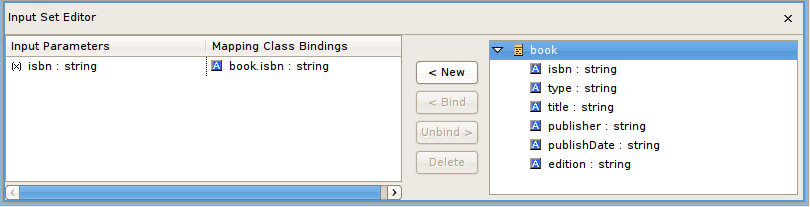
The Input Parameters table contains a list of mapping attributes within the input set and the mapping attributes bound to input set mapping attributes. The tree on the right displays the parent mapping classes and the attributes available from each.
Using the Input Set Editor, you can:
Add a mapping attribute from a parent mapping class to the Input Set. In the tree on the right, select the symbol for which you want to create an attribute and click New. The item displays in the Input Parameters and Mapping Class Bindings table.
Delete a mapping attribute from the Input Set. Click the row in the Input Parameters and Mapping Class Bindings table that you want to delete and click Delete. The Teiid Designer removes this row from the table and this mapping attribute from your Input Set.
Bind and Unbind Input Parameters.
Once you have created the mapping attributes within the Input Set that you need, you can use the Input Set Parameters within a mapping class transformation to produce mapping attributes you can map to your XML document.
Within an XML Document model, a choice compositor defines all possible document data structures (sometimes called fragments) that can appear at that location in an XML instance document. When the Teiid Designer Server populates an XML instance document at runtime based upon your virtual XML document, it will choose the first fragment that matches the criteria you specify within the Choice Editor.
To view the choice editor, right-click on the choice node in the mapping diagram's XML Document tree view and select Edit from the right-click pop up menu.
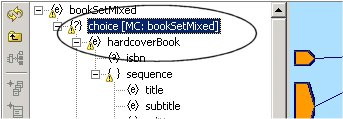
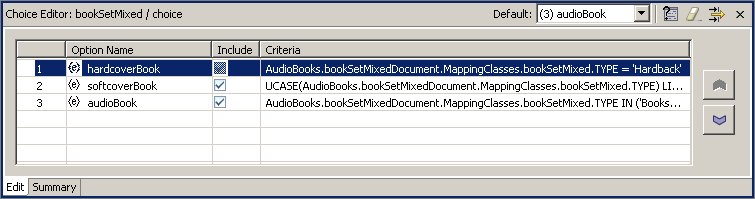
The table on this panel displays fragment options for the choice, each represented by the top node of the document fragment.
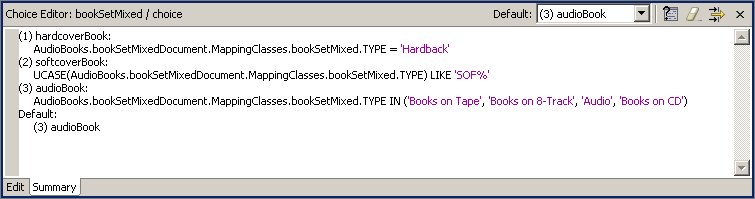
The Summary tab, shown below, displays a SQL-like version of the current choice criteria.
You should address each choice option by performing one of the following:
Specify a criteria statement for the Teiid Designer Server to apply in order to determine which elements or elements to insert into the result document.
Exclude or include the option’s fragment from the document.
Set the elements’ criteria test order.
Set a default action that occurs if none of the criteria you set is met.
The XML Schema upon which you based the XML Document model determines the nature of the options available to the choice. A schema you share with other, external sources (such as business partners) might include information that you do not want to include within XML files.
For example, Sample Financial Services shares an XML schema with its partners Example Mutual Insurance, Illustrative Brokerage, and FinancialPartners.com. The partners created the schema broadly, to cover all possibilities for information they might need to interchange. As such, the customer information XML document might include a choice compositor based on a list of all products all companies offer.
However, Sample Financial does not offer a credit card; so it could exclude those elements from the XML documents its Teiid Designer Server creates since it will never have credit card information for an XML document.
The table on the Choice Editor contains the Include column. By default, all elements specified by the schema are included. You can click to remove the checkmark beside any element you do not want to include within your XML documents generated by this virtual XML document metadata model. By removing the checkmark, you are not removing the element from the XML Document model; you are merely telling the Teiid Designer Server that it will never use this element as part of the choice.
You cannot edit criteria for excluded elements. However, if you exclude an option for which you have established a criteria, Teiid Designer will retain the criteria if you want to include the option in the future.
To edit the criteria for a choice element:
Step 1 - In the table on the Choice Editor panel, select the element you want to edit..
Step 2 - Click Edit Criteria button to launch the Criteria Builder dialog.
Step 3 - Use the Criteria Builder to create the conditions for which the Teiid Designer Server will test to determine whether to choose this option in the XML instance document.
Step 4 - Click OK. The criteria you set displays both in the table and in the summary tab.
You must set a criterion for each option in your document unless you have selected to exclude that option or specify that option will be the default option.
To edit the criteria for a choice element:
The Teiid Designer Server evaluates the choice criteria in the order in which they appear, and when one choice criteria is met, the Teiid Designer Server populates the XML instance document with that option. The Teiid Designer Server might not test all criteria for all options, so their order matters a great deal.
Therefore, the order in which your options appear within the choice criteria often determines what information appears ultimately in your XML instance documents. You can reorder the option list within the choice to set the order in which the Teiid Designer Server tests the criteria.
To set this order, select an element in the table and use the ![]() or
or ![]() button to move it into a new position in the table. The new order
displays both in the table and in the Choice Criteria box and reorders
the XML document as well.
button to move it into a new position in the table. The new order
displays both in the table and in the Choice Criteria box and reorders
the XML document as well.
The default action represents the course the Teiid Designer Server should take if none of the criteria you set evaluates to true.
You can set this default using the combo box available in the Choice Editor's toolbar to:
Any of the options within the table except those you have excluded from the document.
THROW to throw a Teiid Designer Server exception.
RECORD to record the Teiid Designer Server exception.
DISCARD to place no element within the XML instance document.
Note: You must set a default action for your choice criteria.
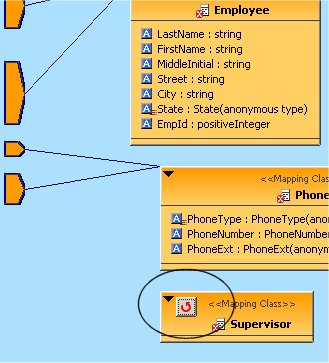
Some XML schemas define data structures that contain self-referencing elements or datatypes. When generating XML documents, such data structures can produce an endless repetition of nested tags. This self-nesting pattern is known as recursion.
When generating virtual documents from XML Schema, the Teiid Designer detects recursive data structures in the XML Schema model and halts the recursive nesting pattern after two cycles. These two cycles serve different purposes when mapping the document:
The first cycle can be thought of as an “entry condition” for the recursion. The mapping class located at this node defines a normal mapping transformation like that of any other in the document model.
The second cycle defines a mapping transformation that will be performed repeatedly until conditions are met that will halt the document instance being generated by the Teiid Designer Server. This fragment of the document model is called the recursive fragment. The mapping transformation for this fragment is no different from the first, except that you can access the first cycle's mapping class attributes, plus you have the opportunity to specify the conditions that will halt the recursion.
You can recognize a mapping class located at the second, recursive document fragment by the looping arrow button in the top-left-hand corner of the diagram object as shown below.
When you model a virtual document based on an XML Schema model containing recursion, you can choose whether to treat the nested fragments as recursive. You should only use recursion when the data access pattern from your data source(s) is also recursive; in other words, when the same query transformation should be executed over and over to generate and map the nested document's data content.
By default, the Teiid Designer does not mark the recursive fragments in document models to execute recursively in the Teiid Designer Server. To take advantage of this behavior, you must open the Recursion Editor in the recursive mapping class Section 5.1.1.5, “Mapping Transformation Diagram”, mark the transformation query as recursive, and specify the recursion limit properties.
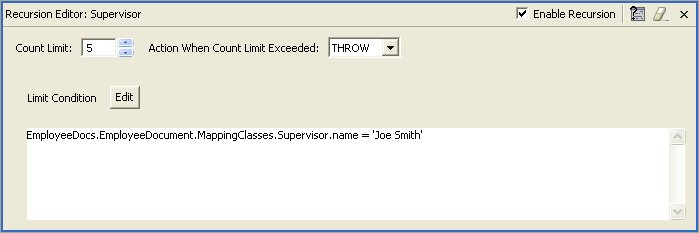
The Recursion Editor lets you enable and limit recursion. The Recursion Editor button only displays on mapping classes, which have recursive patterns. For example, if you have an element named Employee which contains a element named Supervisor which itself contains an Employee element nested within it, you might need to limit the number of times the elements are nested within the document.
You can set the following conditions to limit the recursion:
A fixed number of results to the query.
A SQL-based criteria limit condition.
A combination of both.
To open the Recursion Editor, click on the Recursion Editor
button ![]() on the displayed mapping class.
on the displayed mapping class.
To edit recursion properties:
Step 1 - Click the Enable Recursion check box if you want the Teiid Designer Server to perform the query you specify to generate the nested tags within the XML document.
Step 2 - Click the arrows beside the Count Limit box to limit the number of times to recursively perform the query. If you do not set a Limit Condition in the text area, the recursion finishes when the query reaches this limit. You can only set this limit to a maximum supported by your Teiid Designer Server. For more information about this limit, contact your system administrator
Step 3 - Click the Action When Count Limit Exceeded drop down menu to instruct the Teiid Designer Server what to do if it encounters more results for the query than the count limit before it reaches the limit condition.
Step 4 - Click the Edit button to launch the SQL Section 8.2.1.1, “Using the Criteria Builder” to build a limiting condition for this recursion.
Note
The Teiid Designer Server will evaluate this condition each time it recursively performs this query. If this criteria clause evaluates false, the Teiid Designer Server performs the query recursively again unless it has reached the Count Limit. If the criteria evaluates true, the Teiid Designer Server performs the mapping for the current level and ends its recursive loop.
When you have created the criteria, it displays in the Limit Condition box.
When the Teiid Designer Server dynamically populates your XML documents at runtime, it will use the recursion specifications you entered here.
Editing of Web Service Operation transformations is simplified via the Operation Editor. When editing a Web Service model, an additional editor tab labeled "Operation Editor" is available. This editor, shown below is comprised of:
Operations section showing a tree view of Interfaces and Operations contained within the Web Service model.
Input Variables section providing editing of desired Input Variable declarations.
Procedure section providing SQL editing of the procedure.
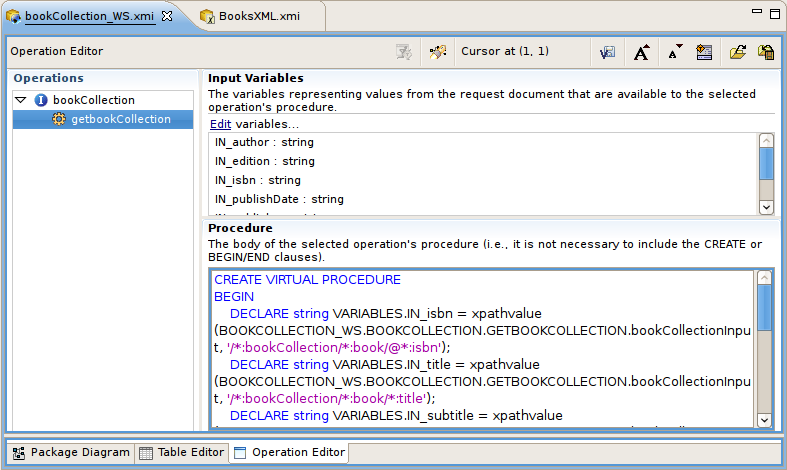
The Operations section contains all interfaces and operations currently defined in the model.
Selecting an operation will display the variables related to the input parameter's content in the Input Variables section and the body of its procedure (minus the CREATE VIRTUAL PROCEDURE BEGIN - END keywords and the input variable declarations and assignments) in the Procedure section.
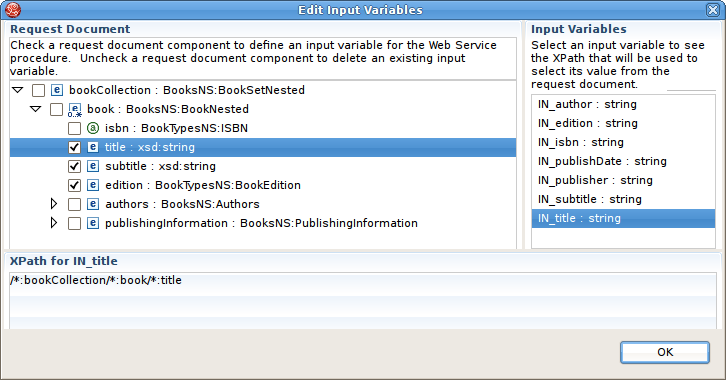
When pasting in SQL, do not include the CREATE VIRTUAL PROCEDURE BEGIN - END keywords. Input variables will be automatically generated when the Content via Element property is set on an operation's input parameter. Input variables may be edited using the Edit link in the Input Variables section, and may only represent XPath values to single attributes and elements within the input contents; other variable declarations and assignments must be typed directly into the Procedure section. Clicking the Edit link will display the following dialog:
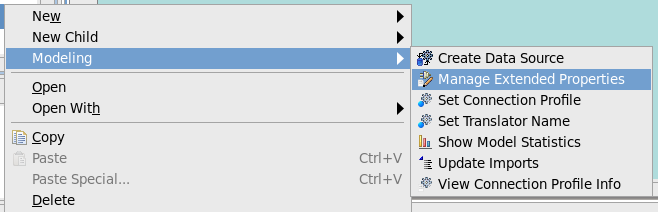
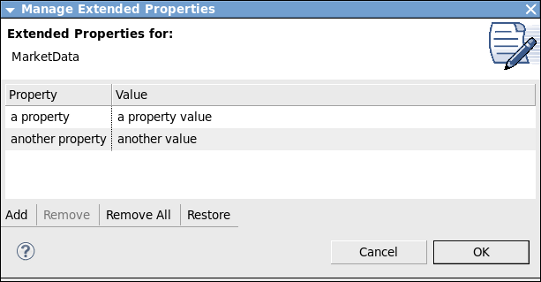
In order to facilitate custom property usage for relational models and objects such as tables, columns, and procedures, a dialog to create extended properties was added. These properties are exposed in Teiid as indexed metadata and can be read by your custom translator.
In 7.4, you can add, edit and delete these extended properties by selecting a relational model or model object using the Modeling > Manage Extended Properties action. The menu option and dialog is shown below