- 10.1. Teiid Designer Perspectives
- 10.2. Teiid Designer Views
- 10.2.1. Model Explorer View
- 10.2.2. Outline View
- 10.2.3. Teiid View
- 10.2.4. Properties View
- 10.2.5. Description View
- 10.2.6. Problems View
- 10.2.7. Search Results View
- 10.2.8. Datatype Hierarchy View
- 10.2.9. Teiid Model Classes View
- 10.2.10. System Catalog View
- 10.2.11. SQL Reserved Words View
- 10.2.12. Model Extension Definition Registry View (MED Registry View)
- 10.2.13. Guides View
- 10.2.14. Status View
- 10.2.15. Cheat Sheets View
- 10.3. Editors
- 10.4. Teiid Designer Main Menu
Teiid Designer utilizes Eclipse's Workbench environment which controls visual layout via perspectives. A perspective defines the initial set and layout of views and editors. Within the application window, each perspective shares the same set of editors. Each perspective provides a set of functionality aimed at accomplishing a specific set of tasks.
Perspectives also control what appears in certain menus and toolbars. They define visible action sets, which you can change to customize a perspective. You can save a perspective that you build in this manner, making your own custom perspective that you can open again later.
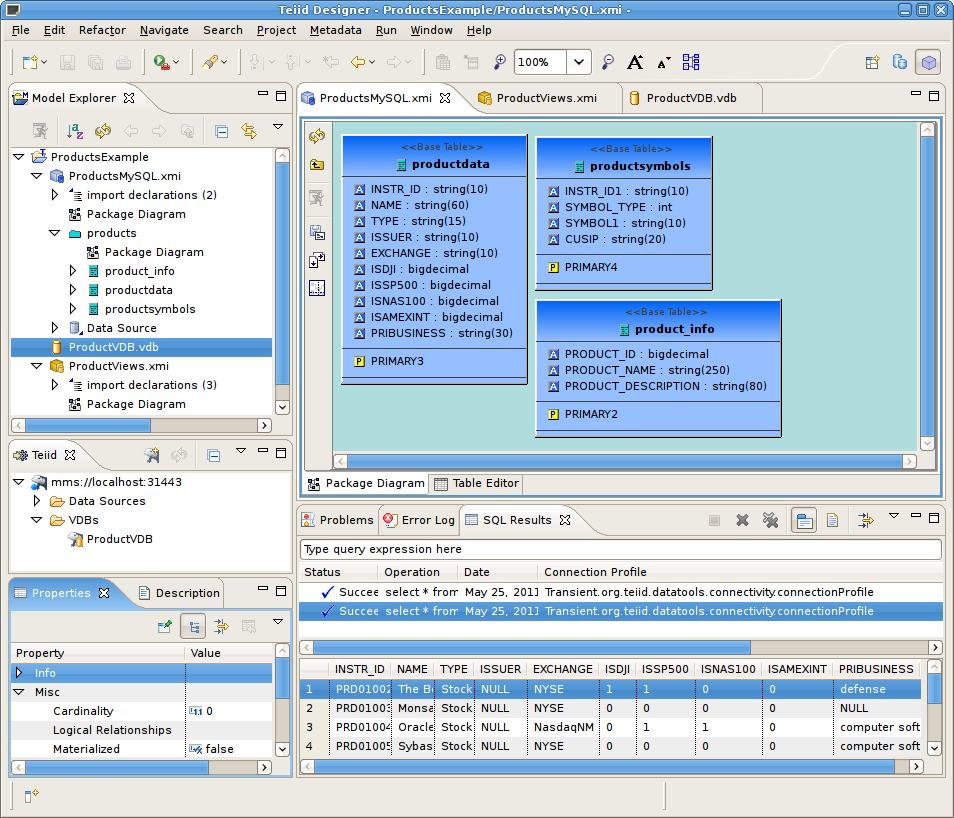
The Teiid Designer perspective provides access to fundamental model editing and management capabilities. This perspective includes 5 main UI components or groups of components as shown below. They include:
Section 10.2.3, “Teiid View” - Teiid instance view. Provides view of contents for connected instances of installed Teiid runtime.
Section 10.3.1, “Model Editor” - Custom editors targeted for ".xmi" metadata model files.
Section 10.2.4, “Properties View” - Standard property values for selected workbench objects.
Miscellaneous Views - Includes Problems view, Message Log view and the Data Tools SQL Results view (opened if Preview Data action is performed)
There are two ways to open a perspective:
Using the Open Perspective button
 on the shortcut bar.
Choosing a perspective from the Window > Open Perspective menu.
To open a perspective by using the shortcut bar button:
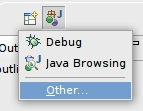
Step 1 - Click on the Open Perspective button
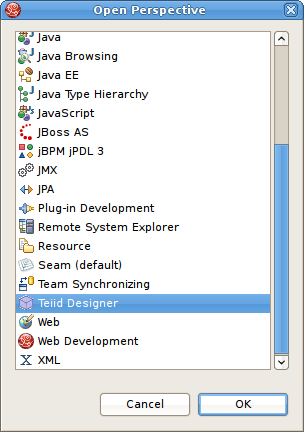
Step 2 - A menu appears showing the same choices as shown on the Window > Open Perspective menu. Choose Other from the menu.
Step 3 - In the Select Perspective dialog choose Teiid Designer and click OK.
The Teiid Designer perspective is now displayed.
There are few additional features of perspectives to take note of.
The title of the window will indicate which perspective is in use.
The shortcut bar may contain multiple perspectives. The perspective button which is pressed in, indicates that it is the current perspective.
To display the full name of the perspectives, right click the perspective bar and select Show Text and conversely select Hide Text to only show icons.
To quickly switch between open perspectives, select the desired perspective button. Notice that the set of views is different for each of the perspectives.


For more details on perspectives, views and other Eclipse workbench details, see formal Eclipse Documentation.
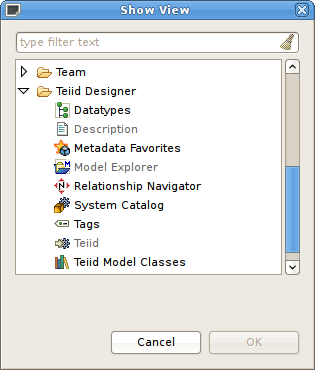
Views are dockable windows which present data from your models or your modeling session in various forms. Some views support particular Section 10.3.1, “Model Editor” and their content is dependent on workspace selection. This section summarizes most of the views used and available in Teiid Designer. The full list is presented in the main menu's Window > Show View > Other... dialog under the Teiid Designer category.
Teiid Designer allows you manage multiple projects containing multiple models and any corresponding or dependent resources. The Model Explorer provides a simple file-structured view of these resources.
The Model Explorer (shown below) is comprised of a toolbar and a tree view.
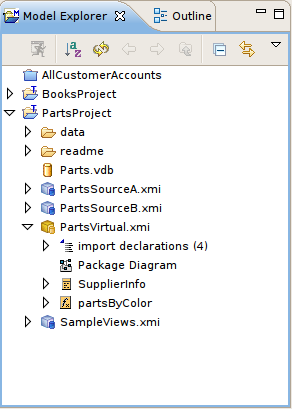
The toolbar consists of nine common actions:
 Preview Data - Executes a simple preview query (SELECT * FROM ).
 Sort Model Contents - Sorts the contents of the models based on object type and
alphabetizing.
Sort Model Contents - Sorts the contents of the models based on object type and
alphabetizing.
 Refresh Markers - Refreshes error and warning markers for objects in tree.
 Back - Displays the last "Go Into" location. (See Eclipse Help)
 Forward - Displays the next "Go Into" location. (See Eclipse Help)
 Up - Navigates up one folder/container location. (See Eclipse Help)
 Collapse All - Collapses all projects.
 Link with Editor - When object is selected in an open editor, this option
auto-selects and reveals object in Model Explorer.
Link with Editor - When object is selected in an open editor, this option
auto-selects and reveals object in Model Explorer.
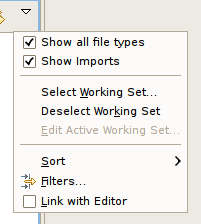
 Additional Actions
The additional actions are shown in the following figure:
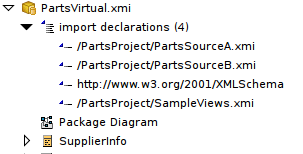
If Show Model Imports is checked, the imports will be displayed
directly under a model resource as shown below.
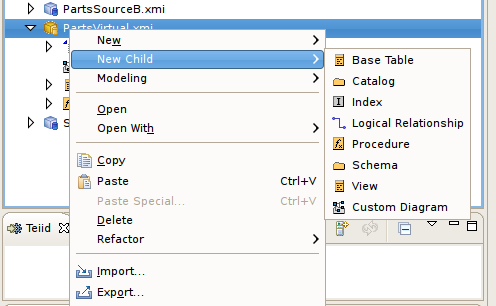
Selecting specific objects in the Model Explorer provides a context from which the Teiid Designer presents a customized menu of available actions.
Selecting a view model, for instance, results in a number of high-level options to manage edit model content, perform various operations and provides quick access to other important actions available in Teiid Designer. These may include specialized actions based on model type.
The Outline View is a utility view which provides both at tree view dedicated to a specific model (open in an editor) and a scaled thumbnail diagram representative of the diagram open in the corresponding Diagram Editor.
You can show the Outline View by clicking on its tab. If there is no open editors, the view indicates that Outline is not available. If a Model Editor is open, then the root of the displayed tree will be the model for the editor that is currently in focus in Teiid Designer (tab on top).
This tree view provides the same basic editing and navigation behavior as the Model Explorer. One additional capability is the drag and drop feature which provides re-ordering and re-parenting of objects in a model.
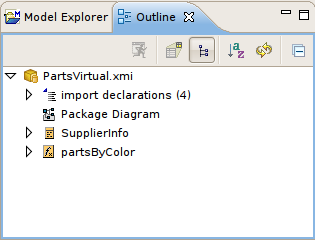
The Outline View also offers you a way to view a thumbnail
sketch of your diagram regardless of its size. To view this diagram
thumbnail from the Outline panel, click the Diagram Overview button ![]() at the top of the view. The diagram overview displays in the Outline View.
at the top of the view. The diagram overview displays in the Outline View.

The view contains a thumbnail of your entire diagram. The shaded portion represents the portion visible in the Diagram Editor view.
To move to a specific portion of your diagram, click the shaded area and drag to the position you want displayed in the Diagram Editor view.

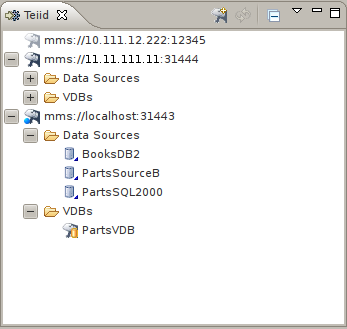
The Teiid View provides a means to display and manage Teiid server instances and their contents within Designer.
To show the Teiid View click "Window > Show View > Other..." to display the Show View dialog. Choose "Teiid Designer > Teiid" view and hit OK.
To create a new Teiid instance, either right-click select
New Teiid Instance action or click the same action
button, ![]() , in the toolbar.
, in the toolbar.
You'll get the New Teiid Instance dialog shown below.
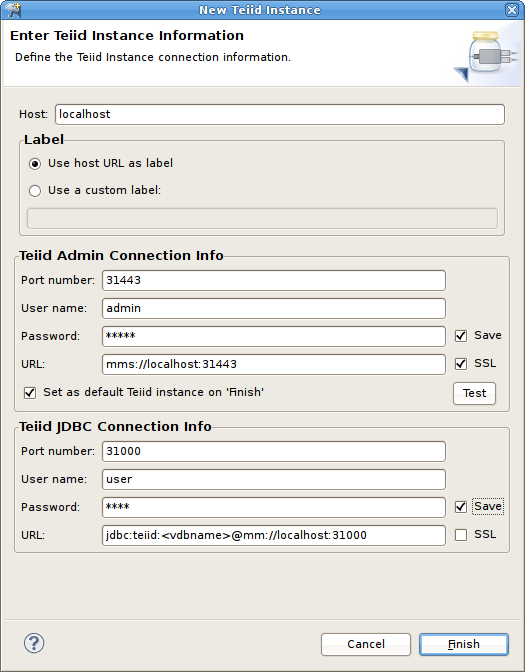
The dialog contains two three sections. The top panel contains host name and an option to customize the new Teiid instance label in the teiid view. The second panel Teiid Admin Connection Info, pertains to the connection information required to connect to the admin URL of your installed Teiid instance. The operations Designer exposes deal with deploying and undeploying VDBs as well as managing your test data sources required by those VDBs to successfully connect and query data through the Teiid runtime engine.
The third panel, Teiid JDBC Connection Info, provides for entering the connection information for that same Teiid instance. This information is required for Designer to make JDBC connections during execution of the Preview Data feature.
Enter valid Host, Port, User name and Password information, edit any options and click Finish.
Actions available in this view include:
 New Teiid Instance - Create a new instance of a running Teiid server
 Teiid Server Properties - View and edit properties of an existing Teiid instance
- Reconnect - Reconnect and refresh contents of the selected Teiid instance
 Delete - Disconnect and delete the selected Teiid instance
 Execute VDB - Creates a JDBC Teiid connection profile and opens the Data Tools Database Development perspective
 Undeploy VDB - Removes the selected VDB from the Teiid instance
 Create Data Source - Launches the New Data Source wizard
- Delete Data Source - Removes the selected Data Source from the Teiid instance
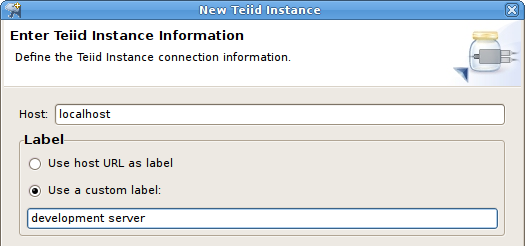
If you chose the Use a custom label option, the text entry field will enable as shown below.
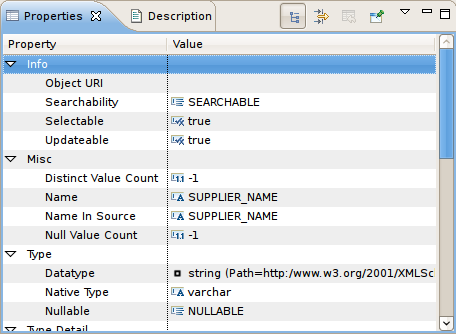
The Properties View provides editing capabilities for the currently selected object in Teiid Designer. The selection provided by whichever view or editor is currently in focus will determine the its contents.
To edit a property, click a cell in the Value column. As in the Table Editor, each cell provides a UI editor specific to the property type.
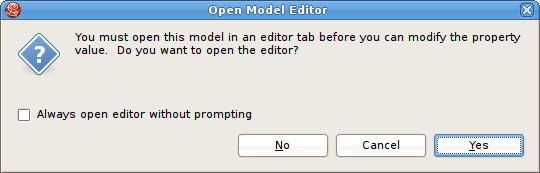
If the model for the object being edited is not open in an editor, a dialog may appear confirming the attempt to modify the model and asking the user to confirm or cancel. This dialog can be prevented by checking the preference Always open editor without prompting. You can re-set/uncheck this property via the Teiid Designer's main preference page.
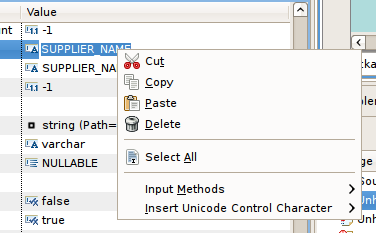
Properties can also be edited via a right-click menu presented below.
The Properties toolbar contains the following actions:
 Show Categories - toggles between categorized properties and flat alphabetical properties list.
 Show Advanced Properties - shows/hide advanced properties (if available).
 Restore Default Value - for a selected property, this action will reset the current to a default value (if available).
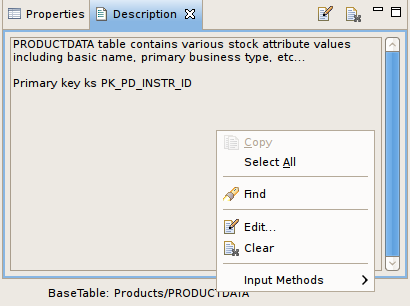
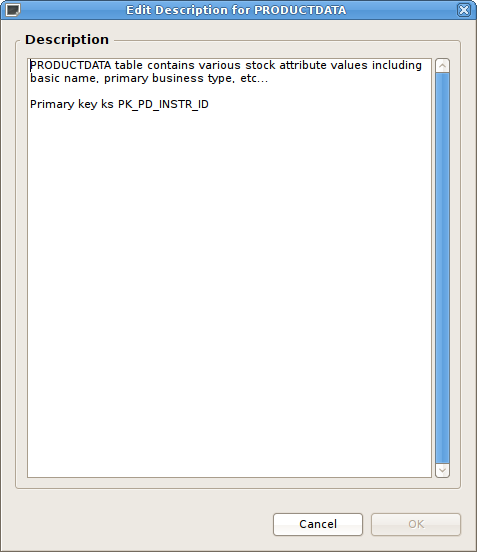
The Description View provides a means to display and edit (add, change or remove) a description for any model or model object. To show the Description View click Window > Show View > Other... to display the Figure 10.6, “Eclipse Show View Dialog” dialog. Choose Teiid Designer > Description view and hit OK .
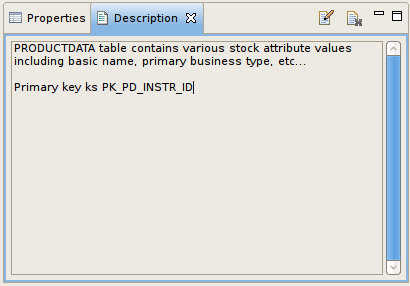
You can click the edit description action in the toolbar or right-click select "Edit" in the context menu to bring up the Edit Description dialog. edit actions.
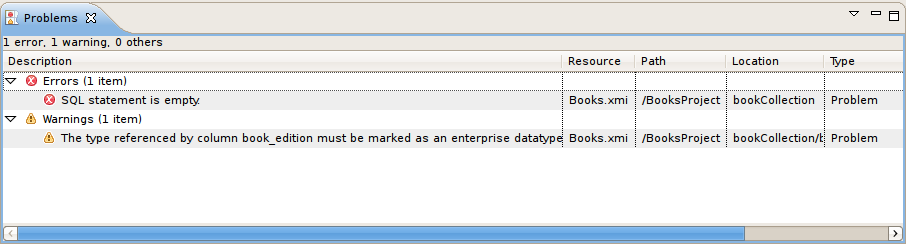
The Problems View displays validation errors, warnings, or information associated with a resource contained in open projects within your workspace.
By default, the Problems View is included in the Teiid Designer perspective. If the Problems View is not showing in the current perspective click Window > Show View > Other > Teiid Designer > Problems.
There are 5 columns in the view's table which include:
Description - A description of the problem preceded by a severity icon (i.e., error
 , warning
  , or info
  ).
).
Resource - The name of the resource.
Path - The project name.
Location - The object within the resource that has a validation error.
type - Type of validation item.
Click the upside-down triangle
![]() icon to open the View Menu icon to see various options including
sorting, filtering, displayed columns and much more.
icon to open the View Menu icon to see various options including
sorting, filtering, displayed columns and much more.
Additional actions are available by selecting a problem and right-click to open a context menu.
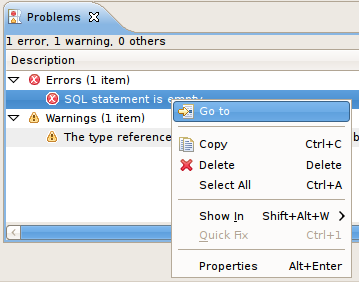
Go To - will open the appropriate editor and select the affected/referenced object.
Show In Navigator - Opens the Basic > Navigator view (if not open) and expands file system tree and reveals applicable resource.
Copy - Copies the problem information to the system clipboard.
Paste - Pastes the problem information located in the system clipboard ( if applicable ) into the curor location for a specified text editor.
Delete - Deletes the selected problem rows ( if applicable ).
Select All - selects all problems in the table.
Quick Fix - (Not yet implemented in Teiid Designer).
Properties - displays a dialog containing additional information.
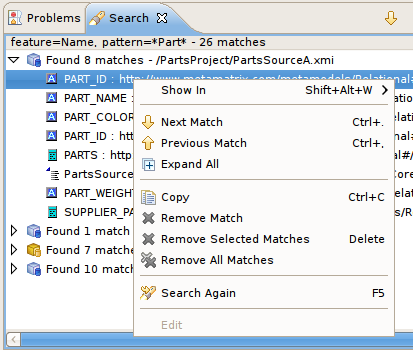
Below is an example set of search results. The view contains rows representing matches for your search parameters. You can double-click a entry and the object will be opened and selected in an editor and/or the Model Explorer if applicable.
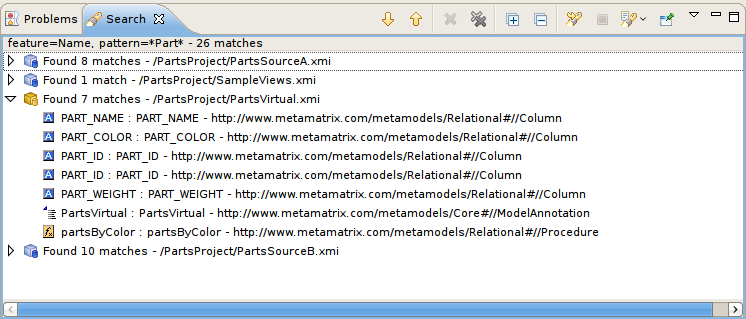
The toolbar actions for the Search Results view are:
 Show Next Match - Navigates down one row in the view.
 Show Previous Match - Navigates up one row in the view.
 Remove Selected Matches - Removes selected results from the view.
 Remove All Matches - Clears the view.
 Search - Launches
the MoTeiid Designerearch Dialog.
Search - Launches
the MoTeiid Designerearch Dialog.
 Previous Search Results - Select
previous search results from history.
Previous Search Results - Select
previous search results from history.
You can also perform some of these actions via the right-click menu:
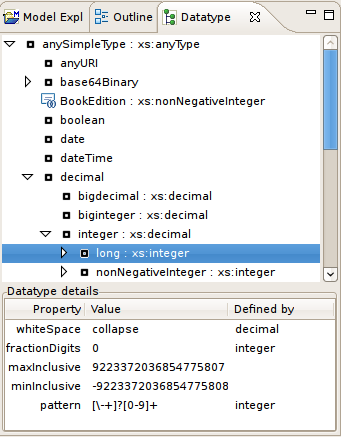
To open Teiid Designer's Datatype Hierarchy view, select the main menu's Window > Show View > Other... and select the Teiid Designer > Datatypes view in the dialog.
The Model Classes View provides a hiearchical EMF-centric view of the various metamodel classes available within Teiid Designer. This view is primarily for informational purposes, but can be used as a reference if creating relationships or searching your workspace for specific metamodel constructs.

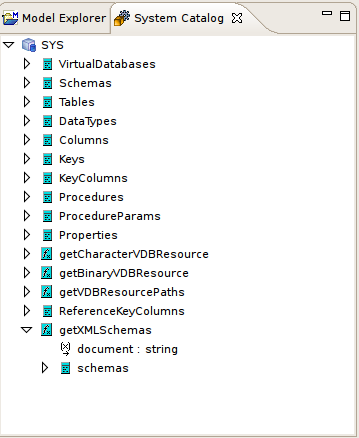
To open Teiid Designer's System Catalog view, select the main menu's Window > Show View > Other... and select the Teiid Designer > System Catalog view in the dialog..
To open Teiid Designer's SQL Reserved Words view, select the main menu's Window > Show View > Other... and select the Teiid Designer > SQL Reserved Words view in the dialog.
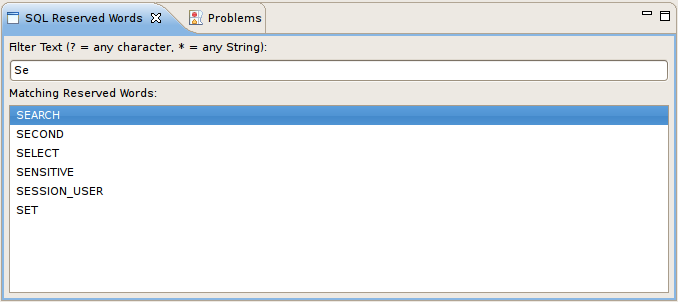
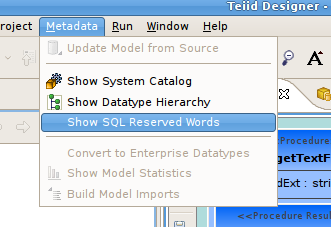
You can also display the view by selecting the the main menu's Metadata > Show SQL Reserved Words action as shown below.
To open Teiid Designer's MED Registry view, select the main menu's Window > Show View > Other... and select the Teiid Designer > Model Extension Registry view in the dialog.
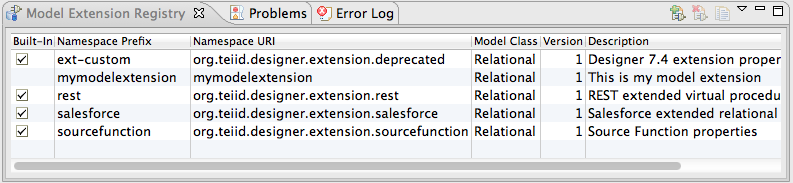
The Model Extension Registry view shows the currently registered MEDs. Registered MEDs can be applied to models in the workspace (see Section 4.3, “Managing Model Object Extensions”). The Model Extension Registry view looks like this:
You can also open the view by selecting the MED Editor toolbar action in the right corner of shared sub-editor header section.
For each registered MED, the namespace prefix, namespace URI, extended model class, version, and description is shown. In addition, a flag indicating if the MED is built-in is shown. The Model Extension Registry view has toolbar actions that register a workspace MED file, unregister a user-defined MED, and copy a registered MED to the workspace. All these actions are also available via a context menu.
A MED registry keeps track of all the MEDs that are registered in a workspace. Only registered MEDs can be used to extend a model. There are 2 different types of MEDs stored in the registry:
Built-In MED - these are registered during Designer installation. These MEDs cannot be updated or unregistered by the user.
User-Defined MED - these are created by the user. These MEDs can be updated, registered, and unregistered by the user.
Note: When a workspace MED is registered it can be deleted from the workspace if desired. The registry keeps its own copy. And a registered MED can always be copied back to the workspace by using the appropriate toolbar or context menu action.
To open Teiid Designer's Guides view, select the main menu's Window > Show View > Other... and select the Teiid Designer > Guides view in the dialog.
The Guides view provides assistance for many common modeling tasks. The view includes categorized Modeling Actions and also links to 'Cheat Sheets' for common processes. 'Cheat Sheets' are an eclipse concept for which Teiid Designer has provided contributions (see Section 10.2.15, “Cheat Sheets View”). The Guides view is shown below:
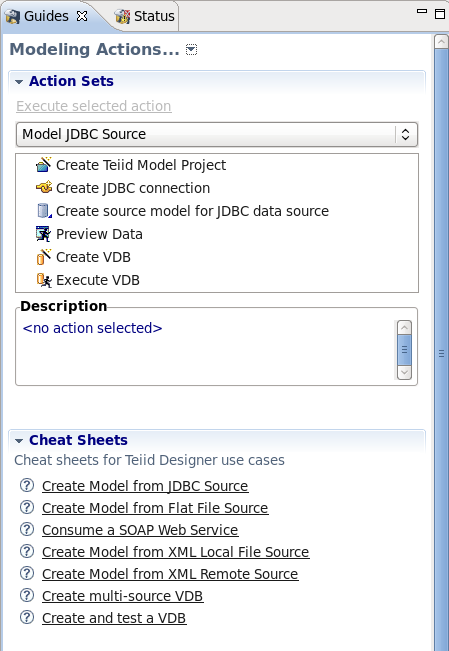
The upper 'Action Sets' section provides categorized sets of actions. Select the desired category in the dropdown, then the related actions for the selected category are displayed in the list below it. Execute an action by clicking the 'Execute selected action' link or double-clicking on the action.
The lower 'Cheat Sheets' section provides a list of available 'Cheat Sheet' links, which will launch the appropriate Cheat Sheet to guide you step-by-step through the selected process.
To open Teiid Designer's Status view, select the main menu's Window > Show View > Other... and select the Teiid Designer > Status view in the dialog.
The Status view provides a quick overview status of the selected project. A sample Status view for a project is shown below:
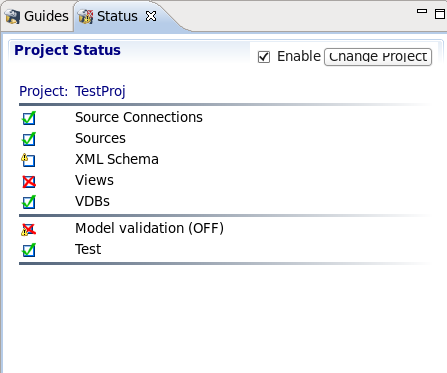
The status view is broken down into common project areas:
Source Connections - all Source Connections are fully defined.
Sources - Source Models exist.
XML Schema - XML Schemas exist.
Views - View Models exist.
VDBs - VDBs exist and are deployable.
Model Validation (Status) - all Models pass validation.
Test - all defined VDBs pass validation.
The status of each area is denoted by an icon: A green check indicates OK, a red 'x' indicates errors and a 'warning' icon indicates potential problems. The project can be changed by selecting the 'Change Project' button.
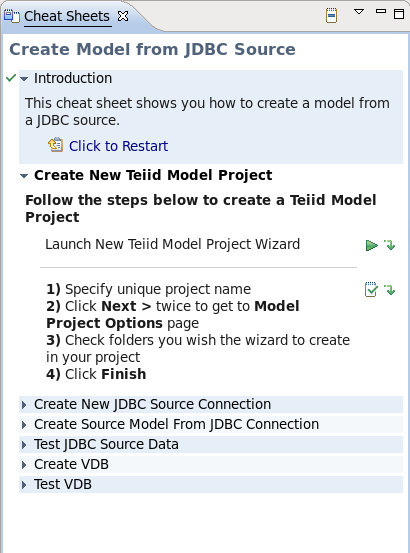
To open Cheat Sheets view, select the main menu's Window > Show View > Other... and select the Help > Cheat Sheets view in the dialog.
The Cheat Sheets view is a standard Eclipse Help concept. Cheat Sheets provide step-by-step assistance for common process workflows. Teiid Designer has contributed to the Eclipse help framework to provide assistance for many common modeling tasks. The Guides View (see Section 10.2.13, “Guides View”) provides links to these Cheat Sheets, as previously described. A sample Cheat Sheet is shown below:
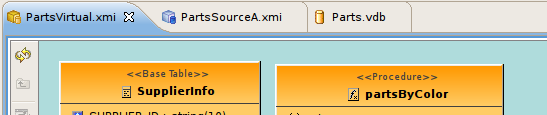
Editors are the UI components designed to assist editing your models and to maintain the state for a given model or resource in your workspace. When editing a model, the model will be opened in a Model Editor. Editing a property value, for instance, will require an open editor prior to actually changing the property.
Any number of editors can be open at once, but only one can be active at a time. The main menu bar and toolbar for Teiid Designer may contain operations that are applicable to the active editor (and removed when editor becomes inactive).
Tabs in the editor area indicate the names of models that are currently open for editing. An asterisk (*) indicates that an editor has unsaved changes.
By default, editors are stacked in the editors area, but you can choose to tile them vertically, and or horizontally in order to view multiple models simultaneously.

The Teiid Designer provides main editor views for XMI models and VDBs.
The Model Editor contains sub-editors which provide different views of the data or parts of data within an XMI model. These sub-editors, specific to model types are listed below.
Diagram Editor - All models except XML Schema models.
Table Editor - All models.
Simple Datatypes Editor - XML Schema models only.
Semantics Editor - XML Schema models only.
Source Editor - XML Schema models only.
The VDB Editor is a single page editor containing panels for editing description, model contents and data roles.
In addition to general Editors for models, there are detailed editors designed for editing specific model object types. These "object" editors include:
Transformation Editor - Manages Transformation SQL for Relational View Base Tables, Procedures and XML Web Service Operations.
Choice Editor - Manages properties and criteria for XML choice elements in XML Document View models.
Input Editor - Manages Input Set parameters used between Mapping Classes in XML Document View models.
Recursion Editor - Manages recursion properties for recursive XML Elements in XML Document View models.
Operation Editor - Manages SQL and Input Variables for Web Service Operations.
The Model Editor is comprised of sub-editors which provide multiple views of your data. The Diagram Editor provides a graphical while the Table Editor provides spreadsheet-like editing capabilities. This section describes these various sub-editors.
The Diagram Editor provides a graphical view of the a set of model components and their relationships.
Several types of diagrams are available depending on model type. They include:
 Package Diagram
 Custom Diagram
 Transformation Diagram
 Mapping Diagram
- Mapping Transformation Diagram
You can customize various diagram visual properties via Diagram Preferences.
Each diagram provides actions via the Main toolbar, diagram toolbar and selection-based context menus. These actions will be discussed below in detail for each diagram type.
When a Diagram Editor is in focus, a set of common diagram actions is added to the application's main toolbar.

The actions include:
 Zoom In
 Zoom to Level
 Zoom Out
 Increase Font Size
 Decrease Font Size
 Perform Diagram Layout
The Package Diagram provides a graphical view of the contents of a model container, be it the model itself, a relational catalog or schema.
Package Diagram toolbar actions include:
 Refresh Diagram - Re-draws diagram.
 Show Parent Diagram - Navigates to diagram for parent object (if available).
- Preview Data - Executes a simple preview query (SELECT * FROM ).
 Save Diagram as Image - Save the diagram image to file in JPG or BMP format.
 Modify Diagram Printing Preferences - Modify page layout information for printing diagrams. Includes margins, orientation, etc...

 Show/Hide Page Grid - Show current page boundaries as grid in diagram.
Context menus provide a flexible means to edit model data, especially from Package Diagrams. Each Package Diagram represents the contents of some container (i.e. Model, Category, Schema, etc...), so New Child, New Sibling and New Association actions are almost always available in addition to standard Edit actions (Delete, Cut, Copy, Paste, Rename, Clone).
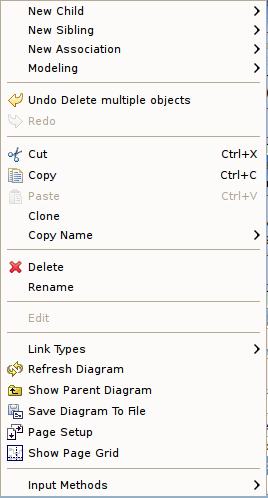
A sample context menu for a relational base table is shown below.
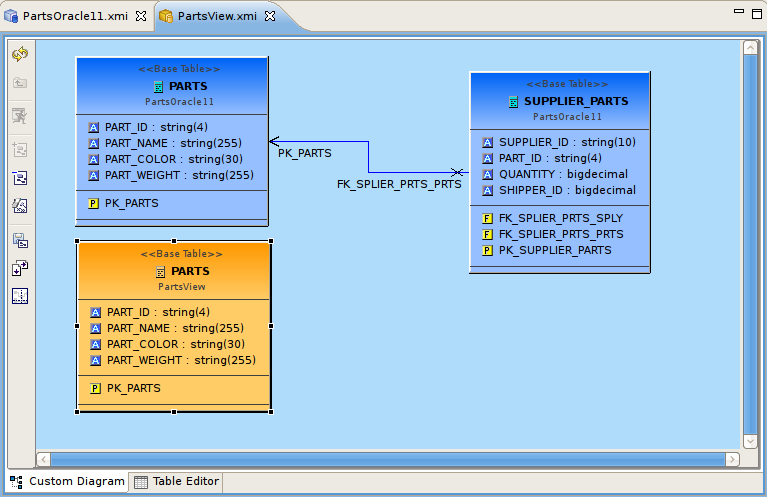
The Custom Diagram represents a view of user-defined model objects. Unlike Package Diagrams, Custom Diagrams can contain objects that are not only unrelated, but can be from different containers and even models.
Custom Diagram toolbar actions include:
- Refresh Diagram - Re-draws diagram.
- Show Parent Diagram - Navigates to diagram for parent object (if available).
- Preview Data - Executes a simple preview query (SELECT * FROM ).
 Add To Diagram - Add objects selected in Model Explorer to diagram.
 Remove From Diagram - Removed objects selected in diagram from diagram.
 Clear Diagram - Remove all objects from diagram.
- Save Diagram as Image - Save the diagram image to file in JPG or BMP format.
- Modify Diagram Printing Preferences - Modify page layout information for printing diagrams. Includes margins, orientation, etc...
- Show/Hide Page Grid - Show current page boundaries as grid in diagram.
Since Custom Diagrams do not represent represents the contents of container objects(i.e. Model, Category, Schema, etc...) its context menus are limited to adding/removing objects from diagram and basic diagram-related display options.
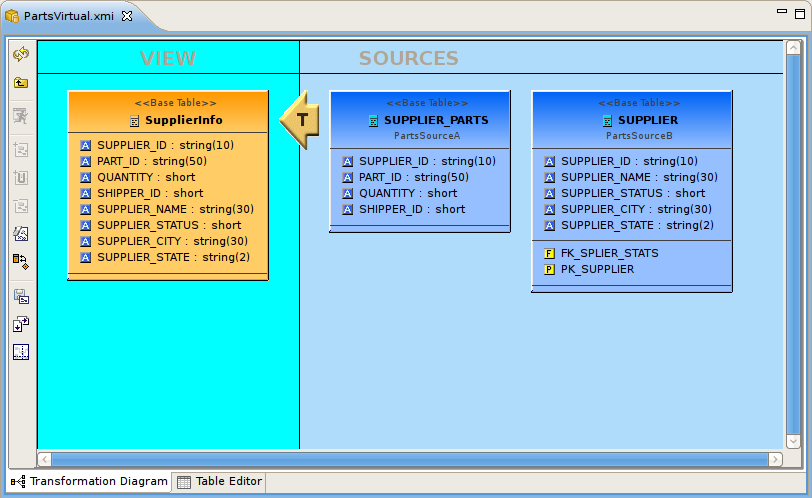
The Transformation Diagram represents a view of the relationships defined by the source inputs described in a view table's SQL transformation.
Transformation Diagram toolbar actions include:
- Refresh Diagram - Re-draws diagram.
- Show Parent Diagram - Navigates to diagram for parent object (if available).
- Preview Data - Executes a simple preview query (SELECT * FROM ).
- Add Transformation Sources - Add selected sources to transformation.
 Add Union Transformation Sources - Add selected sources as union sources.
- Remove Transformation Sources - Removed sources selected in diagram from transformation.
- Clear Transformation - Remove all sources from transformation.
 Open Transformation Reconciler dialog
- Save Diagram as Image - Save the diagram image to file in JPG or BMP format.
- Modify Diagram Printing Preferences - Modify page layout information for printing diagrams. Includes margins, orientation, etc...
- Show/Hide Page Grid - Show current page boundaries as grid in diagram.
Context menus for the
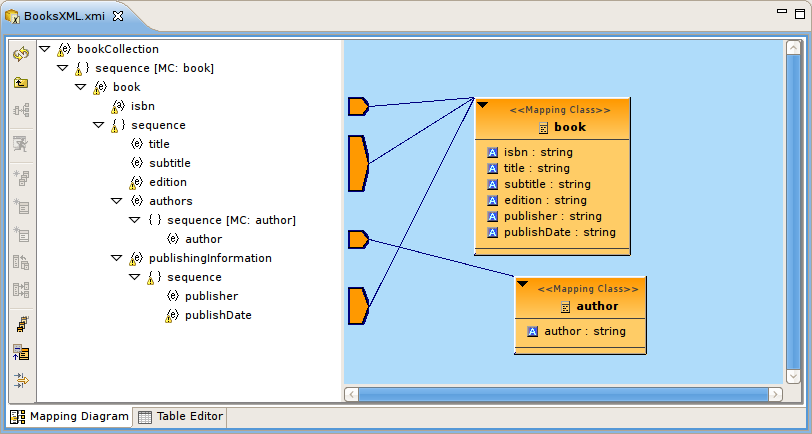
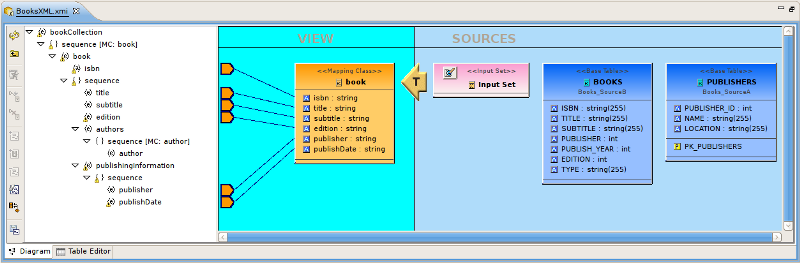
The Mapping Diagram represents a view of the mapping between virtual mapping class columns and XML document elements. This mapping defines how source data is transformed from row-based results into XML formatted text.
Mapping Diagram toolbar actions include:
- Refresh Diagram - Re-draws diagram.
- Show Parent Diagram - Navigates to diagram for parent object (if available).
 Show Mapping Transformation Diagram - Show detailed mapping transformation diagram for selected mapping class.
- Preview Data - Executes a simple preview query (SELECT * FROM ).
 Generate Mapping Classes - Generate mapping classes for the selected XML document root element.
 New Mapping Class - Insert new mapping class referenced to the selected XML document element or attribute..
 New Staging Table - Insert new staging table referenced to the selected XML document element or attribute.
 Merge Mapping Classes - Merge selected mapping classes.
 Split Mapping Class - Split selected mapping class.
 Display All Mapping Classes
 Show Mapping Class Columns
- Filter Displayed Mapping Classes with Selection
Context menus for Mapping Diagrams provide Edit capability to the mapping class in addition to mapping class manipulation actions (i.e. Merge Mapping Classes, Split Mapping Class, etc..)
The Mapping Transformation Diagram is identical to a Transformation Diagram except for displaying an Input Set and possibly Staging Tables as sources for the Mapping Class's transformation.
Mapping Transformation Diagram toolbar actions include:
- Refresh Diagram - Re-draws diagram.
- Show Parent Diagram - Navigates to diagram for parent object (if available).
- Preview Data - Executes a simple preview query (SELECT * FROM ).
 New Mapping Link - Create a mapping link between selected mapping extent (i.e. XML element or attribute) and mapping class column.
 Remove Mapping Link - Delete mapping link between selected mapping extent (i.e. XML element or attribute) and mapping class column.
- Add Transformation Sources - Add selected sources to transformation.
- Add Union Transformation Sources - Add selected sources as union sources.
- Remove Transformation Sources - Removed sources selected in diagram from transformation.
- Clear Transformation - Remove all sources from transformation.
- Open Transformation Reconciler dialog
- Save Diagram as Image - Save the diagram image to file in JPG or BMP format.
- Modify Diagram Printing Preferences - Modify page layout information for printing diagrams. Includes margins, orientation, etc...
Context menus for Mapping Transformation Diagrams identical capabilities to the Transformation Diagram with the addition of managing and editing Input Sets.
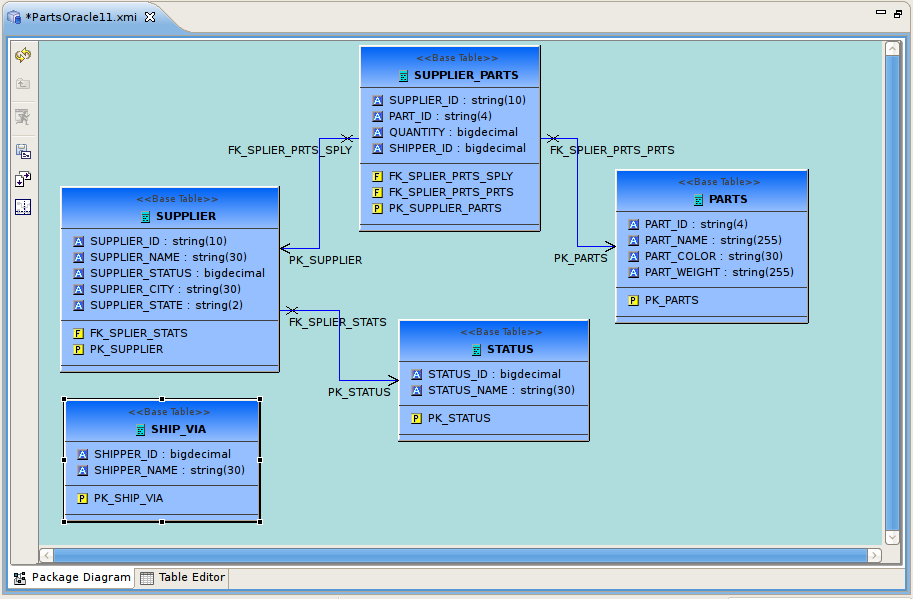
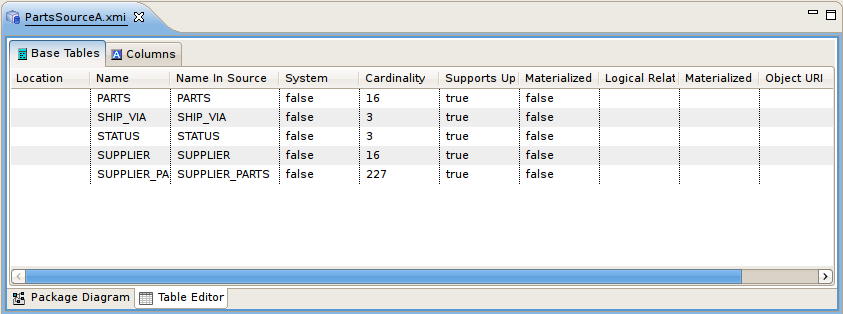
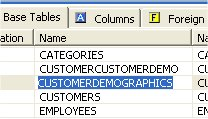
The Table Editor provides a table-based object type structured view of the contents of a model. The figure below shows a relational model viewed in the Table Editor. Common object types are displayed in individual folders/tables. All base tables, for instance, are shown in one table independent of their parentage.
You can customize Table Editor properties via Table Editor Preferences.
These are the primary features of the Table Editor:
Edit existing properties.
Add, remove or edit objects, via the main Edit menu and context menu ( Cut, Copy, Paste, Clone, Delete, Rename, Insert Rows ).
Paste information from your clipboard into the table.
Print your tables.
When a
Table Editor
is in focus, the
Insert Table Rows action ![]() is added to the application's main toolbar.
is added to the application's main toolbar.
A few Table Editor actions are contributed to the right-click menu for selected table rows. These actions, described and shown below include:
 Table Paste - Paste common spreadsheet data (like Microsoft Excel) to set object properties.
Table Editor Preferences - Change table editor preferences, including customizing visible properties.
Insert Rows - Create multiple new sibling objects.
- Refresh Table - Refreshes the contents of the current Table Editor to insure it is in sync with the model.

You can edit properties for an object by double-clicking a table cell.
For String properties, the table cell will become an in-place text editor field.
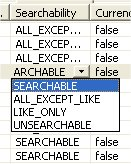
If a property is of a boolean (true or false) type or has multiple, selectable values, a combo box will be displayed to change the value.
For multi-valued properties where the available values are dynamic (i.e. can change based on available models or data), a picker-button ("....") will be displayed.
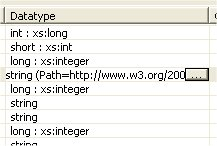
An example of of this type is the relational column datatype property. Editing via the table cell and clicking the "..." button for datatype will display the following dialog.
The Insert Rows action provides an additional way to create objects in a model. Insert Rows action performs the same function as Insert Sibling action, but allows you to create multiple children at the same time. All new rows will correspond to an object of the same type as the selected object and be located under the same parent as the selected object.
To Insert Rows in a table:
Step 1: Select a table row to insert rows after.
Step 2: Right-click select "Insert Rows" action or select the Insert Rows action on the main toolbar. The following dialog will be displayed.
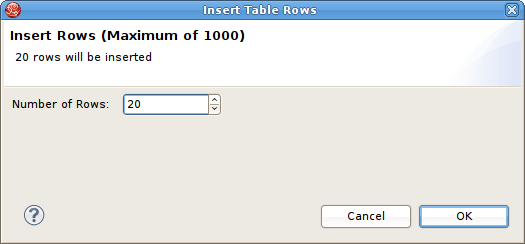
Step 3: Edit the Number of Rows value in the dialog, or use the up/down buttons to change the value.
Step 4: Select OK in dialog.
The desired number of rows (new model objects) will be added after the original selected table row.
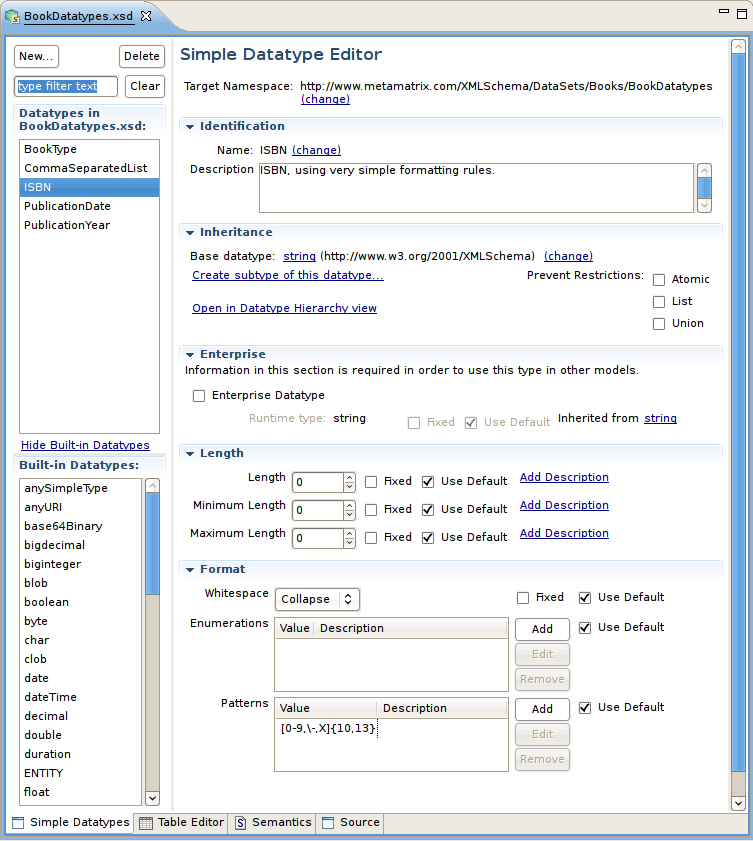
The Simple Datatype Editor provides a form-based properties view of XML Schema data.
The Semantic Editor is a tree based editor for XML Schema elements and attributes.
The Source Editor is a simple text editor which is aware of XML Schema formatting rules.
The Model Object Editors represent specialized sub-editors which are available for specific model object types.
For details, select a specific editor listed below:
A VDB, or virtual database is a container for components used to integrate data from multiple data sources, so that they can be accessed in a federated manner through a single, uniform API. A VDB contains models, which define the structural characteristics of data sources, views, and Web services. The VDB Editor, provides the means to manage the contents of the VDB as well as its deployable (validation) state.
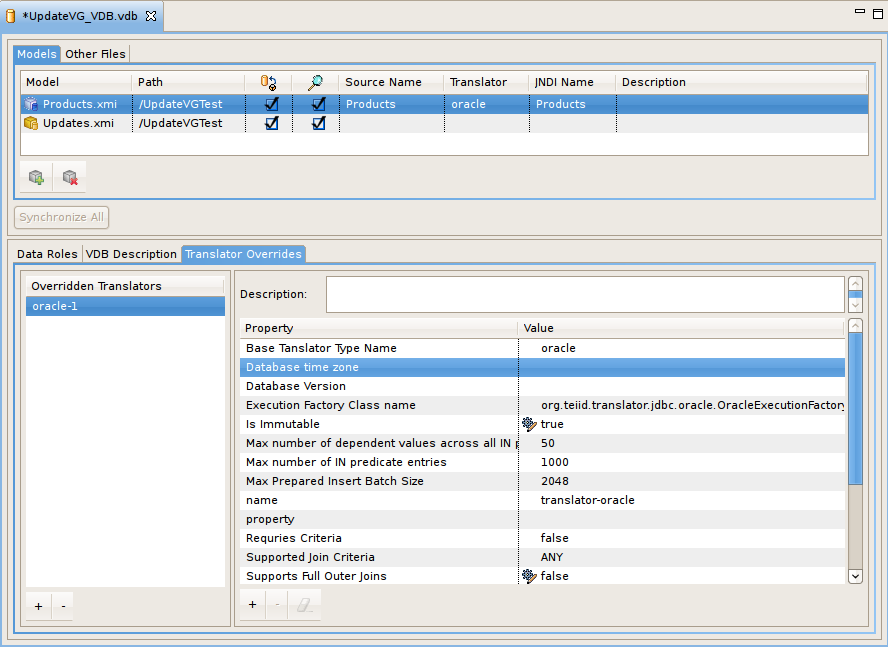
The VDB Editor, shown below, contains a upper and lower panels. The upper panel contains the Models tab and an Other Files tab. The lower panel contains tabs for managing Data Roles, the VDB Description and Translator Overrides.
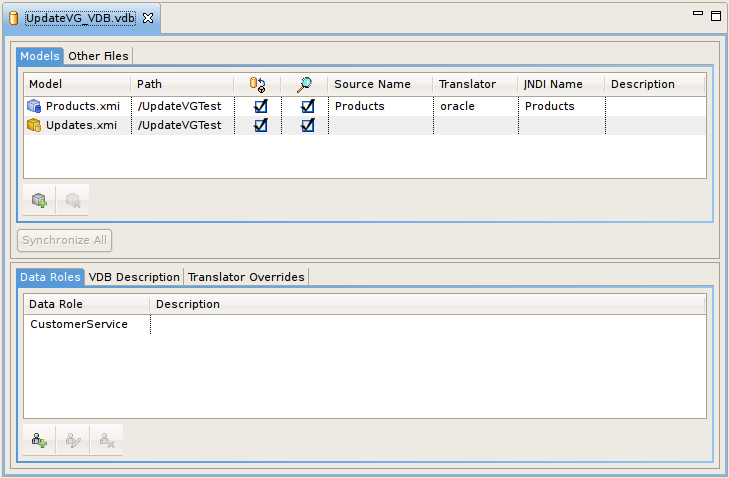
You can manage your VDB contents by using the Add or Remove models via the buttons at the right.
Set individual model visibility via the Visibility checkbox for each model. This provides low level data access security by removing specific models and their metadata contents from schema exposed in GUI tools.
In order for a VDB to be fully queryable the "Source Name", "Translator" and "JNDI Names" must have valid values and represent deployed artifacts on your Teiid server.
If you have Designer runtime plugins installed, and have a Teiid server running, you can select a source model in the VDB Editor and right-click select "Change Translator" or "Change JNDI Data Source" which will allow you to select any applicable artifacts on your server.
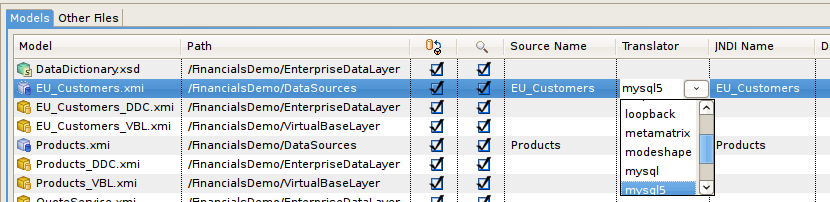
If you have a default Teiid server instance defined and connected the translator and JNDI table cells will contain drop-down lists of available translator and JNDI names available on that server.
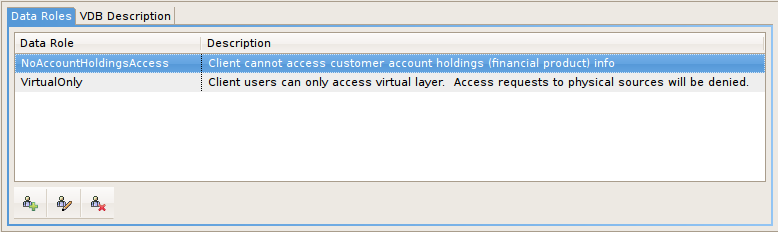
Teiid Designer provides a means to create, edit and manage data roles specific to a VDB. Once deployed within a Teiid server with the security option turned on (by default) any query run against this VDB via a Teiid JDBC connection will adhere to the data access permissions defined by the VDB's data roles.
The VDB Editor contains a VDB Data Roles section consisting of a List of current data roles and New... , Edit... and Remove action buttons.
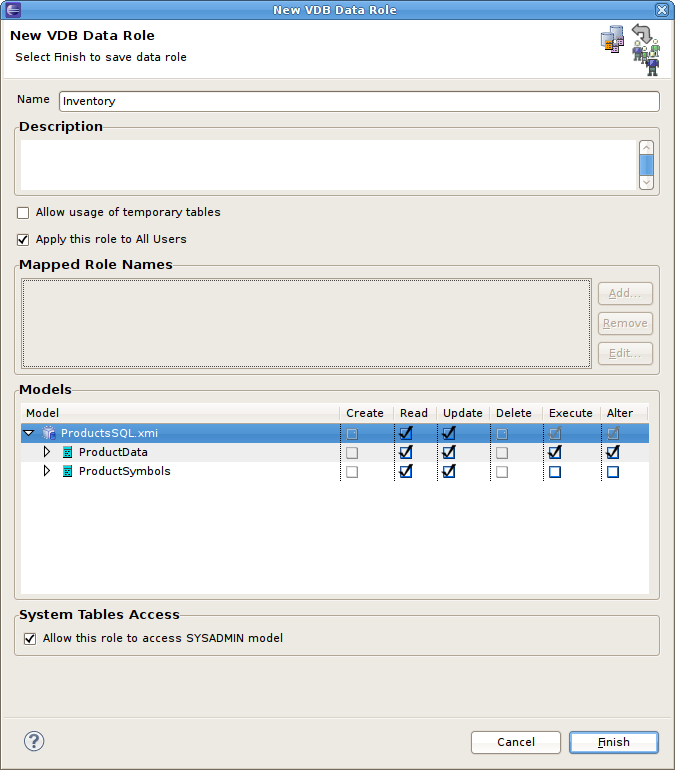
Clicking New... or Edit... will launch the New VDB Data Role editor dialog. Speicify a unique data role name, add a optional description and modify the individual model element CRUD values by check or unchecking entries in the models section.
Teiid Designer provides a means to create, edit and manage translator override properties specific to a VDB via the Tranlator Overrides tab. A translator override is a set of non-default properties targeted for a specific source model's data source. So each translator override requires a target translator name like "oracle", db2, mysql, etc. and a set of non-default key-value property sets.
The VDB Editor contains a Tranlator Overrides section consisting of a List of current tranlator overrides on the left, a properties editor panel on the right and Add (+) and Remove (-) action buttons on the lower part of the panel.
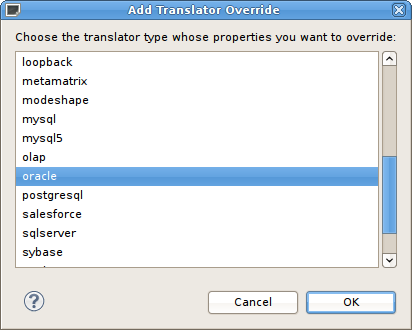
To override a specific translator type, select the add translator action (+). If a default Teiid server instance is connected and available the Add Translator Override dialog (below) is presented, the user selects an existing tranlator type and clicks OK. Note that the override is only applicable to sources within the VDB, so be sure and select a translator type that corresponds to one of the VDB's source models. The properties panel on the right side of the panel will contain editiable cells for each property type based on the data-type of the property. (i.e. boolean, integer, string, etc.).
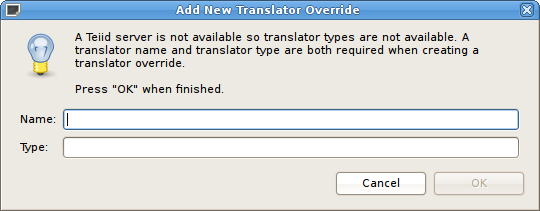
If no default Teiid server instance is available, the "Add New Translator Override" dialog is presented. Enter a unique name for the tranlator override (i.e. "oracle_override"), a valid translator type name (i.e. "oracle") and click OK. The properties panel on the right side of the panel will allow adding, editing and removing key-value string-based property sets. When editing these properties all values will be treated as type string.
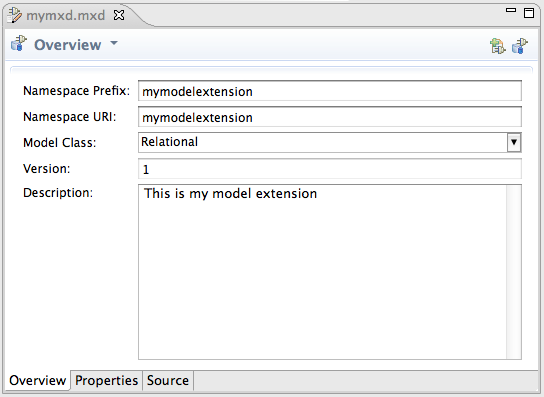
The MED Editor is a multi-tabbed editor and is used to create and edit user-defined MEDs (*.mxd files) in the workspace. The MED Editor has 3 sub-editors (Overview, Properties, and Source) which share a common header section. Here are the MED sub-editor tabs:
Overview Sub-Editor - this editor is where the general MED information is managed. This information includes the namespace prefix, namespace URI, extended model class, and the description. The Overview sub-editor looks like this:
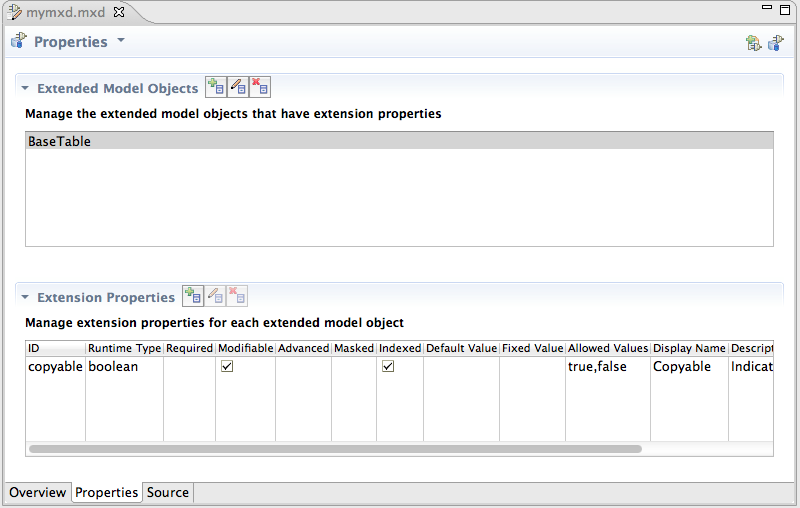
Properties Sub-Editor - this editor is where the MED extension properties are managed. Each extension property must be associated with a model object type. The Properties sub-editor is divided into 2 sections (Extended Model Objects and Extension Properties) and looks like this:
Source - this tab is a read-only XML source viewer if you wish to view the details of your MED. This source viewer is NOT editable.
The GUI components on the Overview and Properties sub-editors will be decorated with an error icon when the data in that GUI component has a validation error. Hovering over an error decoration displays a tooltip with the specific error message. Those error message relate to the error messages shown in the common header section. Here is an example of the error decoration:

The MED sub-editors share a header section. The header is composed of the following:
Status Image - an image indicating the most severe validation message (error, warning, or info). If there are no validation messages the model extension image is shown.
Title - the title of the sub-editor being shown.
Menu - a drop-down menu containing actions for (1) adding to and updating the MED in the registry, and (2) for showing the Model Extension Registry View.
Validation Message - this area will display an OK message or an error summary message. When a summary message is shown, the tooltip for that message will enumerate all the messages.
Toolbar - contains the same actions as the drop-down menu.
Below is an example of the shared header section which includes an error message tooltip.

There are 8 categories of actions on Teiid Designer's main menu bar.
These categories include:
Section 10.4.1, “File Menu” - Resource management actions.
Section 10.4.2, “Edit Menu” - Standard edit actions including undo/redo.
Section 10.4.3, “Refactor Menu” - Resource actions (i.e. Rename, Move, etc...).
Section 10.4.5, “Search Menu” - Find data within your workspace.
Section 10.4.6, “Project Menu” - Model level actions.
Section 10.4.7, “Metadata Menu” - Custom metadata-related actions.
Section 10.4.9, “Window Menu” - Change perspectives or add/remove views to your perspective.
Section 10.4.10, “Help Menu” - Access available Teiid Designer help documents, Teiid Designer SQL Support Guide and Eclipse Overview information.
The File menu provides actions to manage your workspace resources.
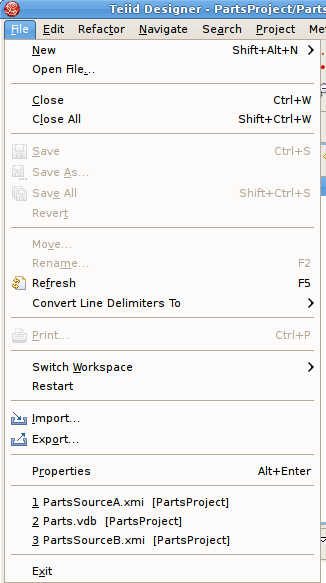
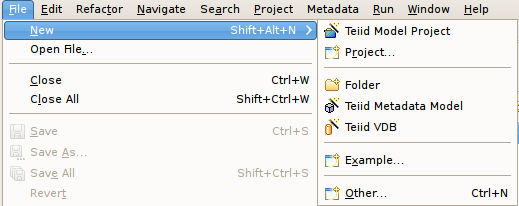
The New > sub-menu provides specific actions to create various generic workspace resources as well as Teiid Designer models and VDBs.
The File menu contains the following actions:
 New > Model Project - Create user a new
model project.
New > Model Project - Create user a new
model project.
 New > Folder - Create new folder
within an existing project or folder.
New > Folder - Create new folder
within an existing project or folder.
 New > Model - Create a new model of
a specified model type and class using
the Chapter 2, New Model Wizards.
New > Model - Create a new model of
a specified model type and class using
the Chapter 2, New Model Wizards.
 New > Virtual Database Definition - Create a new VDB, or
Virtual Database Definition.
New > Virtual Database Definition - Create a new VDB, or
Virtual Database Definition.
Open File - Enables you to open a file for editing - including files that do not reside in the Workspace.
Close (Ctrl+W) - Closes the active editor. You are prompted to save changes before the file closes.
Close All (Shift+Ctrl+W) - Closes all open editors. You are prompted to save changes before the files close.
 Save (Ctrl+S) - Saves the contents of
the active editor.
Save (Ctrl+S) - Saves the contents of
the active editor.
 Save As - Enables you to save the
contents of the active editor under another file name or location.
Save As - Enables you to save the
contents of the active editor under another file name or location.
 Save All (Shift+Ctrl+S) - Saves the
contents of all open editors.
Save All (Shift+Ctrl+S) - Saves the
contents of all open editors.
Move… - Launches a Refactor > Move resource dialog..
Rename… (F2) - Launches a Refactor > Rename resource dialog if resource selected, else in-line rename is preformed.
Refresh - Refreshes the resource with the contents in the file system.
Convert Line Delimiters To - Alters the line delimiters for the selected files. Changes are immediate and persist until you change the delimiter again - you do not need to save the file.
 Print (Ctrl+P) - Prints the contents
of the active editor. In the Teiid Designer, this action prints the diagram in the selected editor.
Allows control over orientation (portrait or landscape), scaling,
margins and page order. User can also specify a subset of the pages to
print (i.e., 2 through 8).
Print (Ctrl+P) - Prints the contents
of the active editor. In the Teiid Designer, this action prints the diagram in the selected editor.
Allows control over orientation (portrait or landscape), scaling,
margins and page order. User can also specify a subset of the pages to
print (i.e., 2 through 8).
Switch Workspace - Opens the Workspace Launcher, from which you can switch to a different workspace. This restarts the Workbench.
Restart - Exits and restarts the Workbench.
 Import - Launches the
Import Wizard which provides several ways to
construct or import models..
Import - Launches the
Import Wizard which provides several ways to
construct or import models..
 Export - Launches the
Export Wizard which provides options for exporting model data.
Export - Launches the
Export Wizard which provides options for exporting model data.
Properties (Alt+Enter) - Opens the Properties dialog for the currently selected resource. These will include path to the resource on the file system, date of last modification and its writable or executable state.
Most Recent Files List - Contains a list of the most recently accessed files in the Workbench. You can open any of these files from the File menu by simply selecting the file name.
Exit - Closes and exits the Workbench.
The Edit menu provides actions to manage the content, structure and properties of your model and project resources. The figure below represents the Edit menu presented when a metadata model is selected.
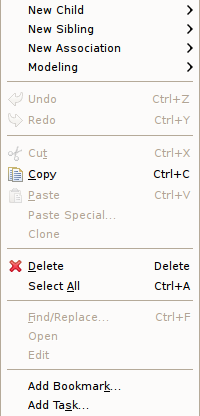
The Edit menu contains the following actions:
New > Child - This menu is created dynamically to support the creation of whatever types of child objects can be created under the selected object.
New > Sibling - This menu is created dynamically to support the creation of whatever types of sibling objects can be created under the same parent as the selected object
New > Association - This menu is created dynamically to support the creation of whatever types of associations can be created with the selected object.
Modeling > - This menu is created dynamically. Various modeling operations are presented based on selected model object type.
 Undo - Reverses the effect of the
most recent command.
Undo - Reverses the effect of the
most recent command.
 Redo - Reapplies the most recently
undone command.
Redo - Reapplies the most recently
undone command.
 Cut - Deletes the selected object(s)
and copies it to the clipboard.
Cut - Deletes the selected object(s)
and copies it to the clipboard.
 Copy - Copies the selected
object(s) to the clipboard.
Copy - Copies the selected
object(s) to the clipboard.
 Paste - Pastes the contents of the
clipboard to the selected context.
Paste - Pastes the contents of the
clipboard to the selected context.
Paste Special... - Provides additional paste capabilities for complex clipboard objects.
Clone - Duplicates the selected object in the same location with the same name. User is able to rename the new object right in the tree.
 Delete - Deletes the selected object(s).
Select All - Select All objects in current view.
Rename - Allows a user to rename an object in the tree.
Find/Replace - Launches dialog that can be used to search in the current text view, such as a Transformation Editor.
Open - Opens the selected object in the appropriate editor.
Edit - Opens the selected object in the appropriate specialized editor, such as the Choice Editor or Recursion Editor..
Add Bookmark... - This command adds a bookmark in the active file on the line where the cursor is currently displayed.
Add Task... - This command adds a task in the active file on the line where the cursor is currently displayed.
The Refactor menu provides Teiid Designer specific actions for file-level changes to the models.

The Refactor menu contains the following actions:
Undo - Undo the last refactor command.
Redo - Redo the last undone refactor command.
Move - Move a model from one container (folder or project) to another.
Rename - Rename a model.
Teiid Designer currently does not contribute actions to the Navigate menu. See Eclipse documention for details.

The Search menu presents several specific search options.
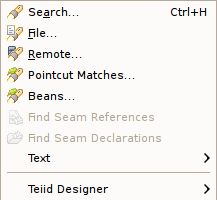
Teiid Designer contributes a sub-menu (i.e. Teiid Designer > ) to the main search menu, as shown above.
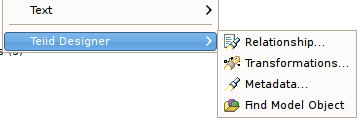
The individual actions in the Teiid Designer sub-menu are described below:
 Relationship... - Launches the
Search dialog and auto-selects the Relationships tab. User can search for models in the workspace
by specifying a relationship type, participant locations, and/or names containing sprcified
text. Search results appear in
the Section 10.2.7, “Search Results View” view,
and double-clicking a result will open that model in the appropriate editor.
Relationship... - Launches the
Search dialog and auto-selects the Relationships tab. User can search for models in the workspace
by specifying a relationship type, participant locations, and/or names containing sprcified
text. Search results appear in
the Section 10.2.7, “Search Results View” view,
and double-clicking a result will open that model in the appropriate editor.
 Transformations... - Launches the
Transformation Search dialog. User can search models in
the workspace for matching SQL text. Search results appear in the
dialog and user can select and view SQL as well as open desired transformations for editing.
Transformations... - Launches the
Transformation Search dialog. User can search models in
the workspace for matching SQL text. Search results appear in the
dialog and user can select and view SQL as well as open desired transformations for editing.
- Metadata... - Launches the
Search dialog. User can search for models in the workspace by
specifying an Object Type, and/or a Data Type, and/or a property value.
Search results appear in
the Section 10.2.7, “Search Results View” view,
and double-clicking a result will open that model in the appropriate editor.
 Find Model Object - Launches the
Find Model Object dialog, which can be used to find an object in the
workspace by specifying all or part of its name. Selecting the object
will open it in the appropriate editor.
Find Model Object - Launches the
Find Model Object dialog, which can be used to find an object in the
workspace by specifying all or part of its name. Selecting the object
will open it in the appropriate editor.
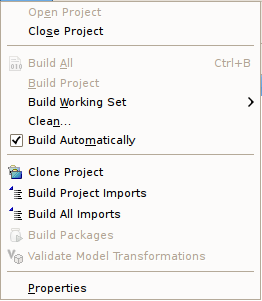
The individual actions in the Project menu are described below:
Open Project - Launches the Open Project dialog.
Close Project - Closes the currently selected project(s).
 Build All - Validates the contents of the entire workspace.
Any errors or warnings will appear in the Problems View.
Build All - Validates the contents of the entire workspace.
Any errors or warnings will appear in the Problems View.
Build Project - Validates the contents of the selected project(s). Any errors or warnings will appear in the Problems View.
Build Working Set - Validates the contents of the selected working set. Any errors or warnings will appear in the Problems View.
Clean.. - Launches the Clean dialog.
Build Automatically - Sets the Build Automatically flag on or off. When on, a check-mark appears to the left of this menu item. When this is turned on, validation of changes is done automatically each time a Save is done.
Clone Project - Launches the Clone Project dialog.
Build Project Imports - Reconciles all model import dependencies for models contained within the selected project.
Build All Imports - Reconciles all model import dependencies for models contained within the workspace.
Build Packages - TBD
Validate Model Transformations - Revalidates all transformations for the selected view model.
Properties - Displays the operating system’s file properties dialog for the selected file.
The Metadata menu provides Teiid Designer-specific actions.
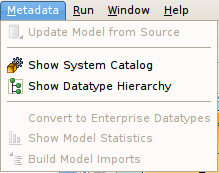
The Metadata menu contains the following actions:
Update Model from Source - If the selected model is a relational source model that was originally created via JDBC Import, then the model will be updated based on changes in the database schema.
Show System Catalog - Opens the Section 10.2.10, “System Catalog View”.
Show Datatype Hierarchy - Opens the Section 10.2.10, “System Catalog View”.
Re-resolve References - Analyzes references within models to other model components.
Convert to Enterprise Datatypes - Adds an additional property to simple datatypes within your selected schema model to label them as enterprise datatypes.
Show Model Statistics - Opens the Model Statistics dialog for the selected model.
Build Model Imports - Reconciles all model import dependencies for the selected model.
Teiid Designer currently does not contribute actions to the Run menu. See Eclipse documention for details.

The Window menu shown below contains no Teiid Designer-specific actions. See Eclipse Workbench documentation for details.
The Preferences... action launches the Preferences dialog, which can be used to set preferences and default values for many features of Teiid Designer.
Note that these menu items may vary depending on your set of installed Eclipse features and plugins.
If you wish to customize a perspective to include one or more Teiid Designer views, select the Show View > Other... action and expand the Teiid Designer category to show the available views.
The Help Menu shown below contains no Teiid Designer-specific actions. See Eclipse Workbench documentation for details.

The individual actions are described below:
Welcome - Shifts to the Welcome perspective, which contains links to documentation, examples and ‘how-to’ starting points.
Help Contents
 - Launches the Help Window. All of Designer’s online documentation is accessible from there as well.
Search
 - Launches the Help Search view, which can be used to search for phrases in the documentation.
Dynamic Help - Opens the docked dynamic help view.
Key Assist (Ctrl-Shift-L) ... - Launches a dialog describing existing key assist bindings.
Tips and Tricks... - Launches a dialog to select one of any contributed "Tips and Tricks" help pages.
Cheat Sheets... - Launches a dialog to select one of any contributed Eclipse cheat sheets.
Project Examples... - A JBoss contributed action which provides quick access to import various project examples into your workspace.
Report Problem - A JBoss contributed action which provides simple problem reporting.
Check for Updates... - provides access to retrieve updates to installed Eclipse software.
Install New Software... - provides access to install new software into your workbench.
About XXXXX - Launches the About dialog.