[standalone@localhost:9999 /] :read-children-names(child-type=interface)
{
   "outcome" => "success",
   "result" => [
       "management",
       "public"
   ]
}
Interfaces and ports
Interface declarations
JBoss AS 7 uses named interface references throughout the configuration. A network interface is declared by specifying a logical name and a selection criteria for the physical interface:
This means the server in question declares two interfaces: One is referred to as "management"; the other one "public". The "management" interface is used for all components and services that are required by the management layer (i.e. the HTTP Management Endpoint). The "public" interface binding is used for any application related network communication (i.e. Web, Messaging, etc). There is nothing special about these names; interfaces can be declared with any name. Other sections of the configuration can then reference those interfaces by their logical name, rather than having to include the full details of the interface (which, on servers in a management domain, may vary on different machines).
The domain.xml, host.xml and standalone.xml configuration files all include a section where interfaces can be declared. If we take a look at the XML declaration it reveals the selection criteria. The criteria is one of two types: either a single element indicating that the interface should be bound to a wildcard address, or a set of one or more characteristics that an interface or address must have in order to be a valid match. The selection criteria in this example are specific IP addresses for each interface:
<interfaces>
  <interface name="management">
   <inet-address value="127.0.0.1"/>
  </interface>
  <interface name="public">
   <inet-address value="127.0.0.1"/>
  </interface>
</interfaces>
Some other examples:
<interface name="global">
   <!-- Use the wildcard address -->
   <any-address/>
</interface>

<interface name="ipv4-global">
   <!-- Use the IPv4 wildcard address -->
   <any-ipv4-address/>
</interface>

<interface name="ipv6-global">
   <!-- Use the IPv6 wildcard address -->
   <any-ipv6-address/>
</interface>

<interface name="external">
   <nic name="eth0"/>
</interface>

<interface name="default">
   <!-- Match any interface/address on the right subnet if it's
        up, supports multicast and isn't point-to-point -->
   <subnet-match value="192.168.0.0/16"/>
   <up/>
   <multicast/>
   <not>
      <point-to-point/>
   </not>
</interface>
Socket Binding Groups
The socket configuration in JBoss AS 7 works similar to the interfaces declarations. Sockets are declared using a logical name, by which they will be referenced throughout the configuration. Socket declarations are grouped under a certain name. This allows you to easily reference a particular socket binding group when configuring server groups for instance (Managed Domain). Socket binding groups reference an interface by it's logical name:
<socket-binding-group name="standard-sockets" default-interface="public">
   <socket-binding name="jndi" port="1099"/>
   <socket-binding name="jmx-connector-registry" port="1090"/>
   <socket-binding name="jmx-connector-server" port="1091"/>
   <socket-binding name="http" port="8080"/>
   <socket-binding name="https" port="8443"/>
   <socket-binding name="jacorb" port="3528"/>
   <socket-binding name="jacorb-ssl" port="3529"/>
   <socket-binding name="osgi-http" port="8090"/>
   <socket-binding name="remoting" port="4447"/>
   <socket-binding name="txn-recovery-environment" port="4712"/>
   <socket-binding name="txn-status-manager" port="4713"/>
   <socket-binding name="messaging" port="5445"/>
   <socket-binding name="messaging-throughput" port="5455"/>
</socket-binding-group>
A socket binding includes the following information:
-
name -- logical name of the socket configuration that should be used elsewhere in the configuration
-
port -- base port to which a socket based on this configuration should be bound. (Note that servers can be configured to override this base value by applying an increment or decrement to all port values.)
-
interface (optional) -- logical name (see "Interfaces declarations" above) of the interface to which a socket based on this configuration should be bound. If not defined, the value of the "default-interface" attribute from the enclosing socket binding group will be used.
-
multicast-address (optional) -- if the socket will be used for multicast, the multicast address to use
-
multicast-port (optional) -- if the socket will be used for multicast, the multicast port to use
-
fixed-port (optional, defaults to false) -- if true, declares that the value of port should always be used for the socket and should not be overridden by applying an increment or decrement
Securing the Management Interfaces
In addition to the services made available by the running application server or servers, JBoss AS 7 also makes available two management interfaces to allow remote clients to connect for the purpose of managing the running JBoss AS 7 installation. This page describes how these interfaces are used and how they can be secured.
The two management interfaces that are exposed are a HTTP interface and a Native interface. The HTTP interface is both used to provide the GWT based administration console and also allows for management operations to be executed using a JSON encoded protocol and a de-typed RPC style API. When running a standalone server the native interface allows for management operations to be executed over a proprietary binary protocol. This is used by the supplied command line interface tool and can also be used by other remote clients that use the jars distributed with JBoss AS 7 to communicate.
When running a managed domain the use of these interfaces is slightly more complicated. On each host there will be a host controller process. On one host the host controller will be configured to act as the master domain controller; on the remaining hosts the host controller will be a slave to the master domain controller. In a managed domain the HTTP interface is still used in the same way; it allows GWT based administration console to run on the master domain controller and also allows any custom HTTP and JSON based management clients to execute management operations on any host controller. The native interface allows the command line interface tool to execute operations on the domain controller or on any host controller. The native interface however is also used for a couple of additional clients: once the host controller spawns the actual application server instances, these establish a connection back to the host controller through the native interface that it exposes, and, finally, the slave host controllers use the native interface to establish a connection back to the master domain controller to initially obtain a copy of the domain model and then to subsequently receive operations from the master domain controller.
Initial Configuration
The interfaces to be exposed are defined in the standalone.xml configuration for a standalone server and are in the host.xml configuration for a server within a managed domain. In both cases the structure of the configuration is the same.
<management>
   ...
   <management-interfaces>
      <native-interface interface="management" port="9999" />
      <http-interface interface="management" port="9990"/>
   </management-interfaces>
</management>
...
<interfaces>
   <interface name="management">
      <inet-address value="127.0.0.1"/>
   </interface>
   <interface name="public">
      <inet-address value="127.0.0.1"/>
   </interface>
</interfaces>
By default the native interface listens on port 9999 and the http interface listens on port 9990. The management interfaces are also associated with a network interface named 'management'. Although the configuration of this network interface by default matches the configuration of the 'public' interface it is recommended that these two configurations are not combined. Keeping them separate helps ensure that any changes to make the application server services more publicly visible don't inadvertently expose the management interfaces more publicly than is required.
Quick Configuration
The remaining sections in this chapter describe the security realm configuration in more detail - however if you would like to quickly enable a security realm and refine it for your requirements the default configuration contains a pre-defined realm definition based on a properties file and a script that can be executed using the command line interface to enable the security realm.
The security realms are defined within the <management> element of the standalone.xml or host.xml configurations. By default the following realm is defined:
<management>
   <security-realms>
      <security-realm name="PropertiesMgmtSecurityRealm">
         <authentication>
            <properties path="mgmt-users.properties" relative-to="jboss.server.config.dir" />
         </authentication>
      </security-realm>
   </security-realms>
   ...
</management>
This default realm is used to authenticate the user connecting against a properties file called 'mgmt-users.properties' located in the same folder as the configuration. By default there are no users defined in the properties file so new users will need to be added in the format username=password.
To manually enable this realm the two interfaces can be configured to use this realm.
<management>
   ...
   <management-interfaces>
      <native-interface interface="management" port="9999" security-realm="PropertiesMgmtSecurityRealm" />
      <http-interface interface="management" port="9990" security-realm="PropertiesMgmtSecurityRealm"/>
   </management-interfaces>
</management>
This will enable HTTP Digest authentication for the HTTP interface and within the Native interface will also enable the Digest SASL mechanism - this means that for authentication the raw passwords are not transmitted from the client to the server.
To use the script to enable the realm first edit the 'mgmt-users.properties' script as the changes will take effect immediately so you will need at least one user defined and then execute one of the following commands.
For standalone server: -
./jboss-admin.sh --connect --file=scripts/secure-standalone-mgmt.cli
For a server in a managed domain: -
./jboss-admin.sh --connect --file=scripts/secure-host-controller-mgmt.cli
Please do be aware that this script is specifically written to run against a host called master which is the name in the default configuration. If additional hosts with unique names are created either the script should be updated or security manually applied in the new configuration. Also please note that the script only affects the named host it is run against; if there are multiple host controllers this script should be run against all of them with their correct names. Also please read the remainder of this chapter for information on how to configure the slave host controller to authenticate when connecting to the master host controller.
Disabling JMX Remote Access
In addition to the above JBoss management protocols, remote JMX connectivity, which allows triggering JDK and application management operations. In order to secure an installation this service needs to be disabled by either removing the remote connector configuration, or removing the entire subsystem.
<subsystem xmlns="urn:jboss:domain:jmx:1.0">
     <!-- Delete the following line to disable remote access -->
     <jmx-connector registry-binding="jmx-connector-registry" server-binding="jmx-connector-server" />
</subsystem>
Detailed Configuration
The configuration of the management interfaces happens within three elements inside the parent <management> element.
<management>
   <security-realms />
   <outbound-connections />
   <management-interfaces />
</management>
-
<security-realms /> - This is where one or more security realms can be configured to define how remote users connecting to this server will be authenticated and also to define the identity of the server.
-
<outbound-connections /> - Sometimes the configuration of the security realms will require a connection to an external resource; these connections are defined here.
-
<management-interfaces /> - This is where the HTTP interface and Native interfaces are defined as covered in the introduction.
Management Interfaces
The security configuration for the individual management interfaces is the simplest. All that is required for the interfaces is a 'security-realm' attribute with the name of the security realm to use. As the management interface starts it will query the capabilities of the security realm and enable the transport level security accordingly; e.g. the HTTP interface will attempt to use Digest authentication if the users passwords can be obtained from the security realm, and if the passwords can not be obtained from the security realm then the http interface will fallback to supporting Basic authentication.
<management>   ...
   <management-interfaces>
      <native-interface ... security-realm="PropertiesMgmtSecurityRealm" />
      <http-interface   ... security-realm="PropertiesMgmtSecurityRealm"/>
   </management-interfaces>
</management>
The management interfaces can be configured to use the same realm, however this is not required - if needed the different interfaces could be secured with different realms.
Security Realms
The <security-realms /> element is used to hold the definition of one or more security realms. The definition of a security realm follows the following structure.
<management>
   <security-realms>
      <security-realm name="SampleRealm">
         <server-identities />
         <authentication />
      </security-realm>
   </security-realms>
   ...
</management>
The <server-identities /> element defines how the server can identify itself. At the moment it is possible to configure a SSL identity to define how the server obtains it's identity from a keystore. It is also possible to configure a secret identity which is what secret or password the server uses when communicating with another server.
The <authentication /> element is used to define how users connecting to the server will be authenticated.
Authentication
Initially three different mechanisms are supported for defining how the users connecting to the server are authenticated.
-
LDAP - Authentication is performed against an LDAP server to verify the users identity.
-
Users - The usernames and passwords of the users are defined within the domain model, this is only intended as a simple testing mechanism.
-
Properties - The usernames and passwords are defined in a properties file local to the server installation.
The following table outlines which mechanisms are compatible with which interface and the mechanism that will be used at the transport level to authenticate the end user.
|
Authentication |
HTTP |
Native |
|
LDAP |
HTTP BASIC |
SASL DIGEST |
|
Users |
HTTP DIGEST |
SASL DIGEST |
|
Properties |
HTTP DIGEST |
SASL DIGEST |
Please note that both the HTTP Basic and the SASL Plain mechanisms transmit the users password in a form that is easily reversed.
The following sections illustrate how each of these authentication mechanisms are configured.
LDAP
The LDAP authenticator operates by first establishing a connection to the remote directory server. A search is then performed using the username supplied by the user to identify the fully qualified distinguished name of the user. Finally the authenticator establishes a new connection to the directory server, this time using the identified distinguished name along with the password supplied by the user; this verifies that the dn / password for the user is valid.
Here is a sample configuration showing a security realm with the LDAP authenticator defined.
<security-realm name="TestRealm">
   <authentication>
      <ldap connection="ldap_connection" base-dn="CN=Users,DC=mydomain,DC=aslab" username-attribute="sAMAccountName"  />
   </authentication>
</security-realm>
The following attributes can be specified on the ldap element: -
-
connection - The name of the connection defined in <outbound-connections> to use to connect to the LDAP directory.
-
base-dn - The distinguished name of the context to begin searching for the user.
-
username-attribute - The attribute of the user in the directory to match against the supplied username.
-
recursive (default - false) - Should the search recurs into sub-contexts or just search the specified context.
-
user-dn (default - dn) - The attribute of the user that holds the distinguished name, this is subsequently used to test authentication as the user can complete.
Users
The Users authenticator is a simple authenticator to validate the user against usernames and password stored within the domain model. This authenticator is only intended for some very simple testing.
Here is a sample configuration showing a security realm with the Users authenticator defined: -
<security-realm name="TestRealm">
   <authentication>
      <users>
         <user username="TestUser">
            <password>TestUserPassword</password>
         </user>
      </users>
   </authentication>
</security-realm>
Here each user is simply defined using the <user> element, the user name is specified using the 'username' attribute and the password is defined in a nested <password> element.
Properties
The Properties authenticator is very similar to the Users authenticator except that the usernames and passwords are now defined within a properties file. The benefit of this over the Users mechanism is that sensitive passwords are not leaking into the domain model.
Here is a sample configuration showing a security realm with the Properties authenticator defined:
<security-realm name="TestRealm">
   <authentication>
      <properties path="users.properties" relative-to="jboss.server.config.dir" />
   </authentication>
</security-realm>
Here the properties file is simply specified where the 'path' attribute is the path to the file and the 'relative-to' attribute references a pre-defined path that the path attribute is relative to. In this example the users.properties can be found in the same folder as the standalone.xml file. If the 'relative-to' attribute is not specified, the value of the 'path' attribute must be an absolute path.
Server Identities
The <server-identities> element is used to define identities that the server uses to identify itself in various scenarios. Currently an SSL identity can be defined that is used to enable SSL on the HTTP interface and a Secret identity can be defined which holds a password that can be used when a host controller is establishing a connection to a remote domain controller.
SSL
The SSL identity currently takes configuration required to load a static keystore from the local filesystem. Later this will be enhanced to allow for different keystore types.
An example SSL definition is shown here: -
<security-realm name="TestRealm">
   <server-identities>
      <ssl>
         <keystore path="server.keystore" relative-to="jboss.server.config.dir" password="keystore_password" />
      </ssl>
   </server-identities>
</security-realm>
The location of the actual keystore is defined in the same way the location of the properties file for the properties authenticator is defined with a path to the keystore and an optional relative-to attribute to make the path relative to a known location.
Secret
The Secret identity is used when a slave domain controller needs to establish a connection to a secured master domain controller.
To show this in context the following shows all the additional configuration on the slave domain controller:
<host xmlns="urn:jboss:domain:1.0"
      name="slave">

   <management>
      <security-realms>
         <security-realm name="TestRealm">
            <server-identities>
               <secret value="c2xhdmVfcGFzc3dvcmQ=" />
            </server-identities>
         </security-realm>
       </security-realms>
       ...
    </management>

    <domain-controller>
       <remote host="127.0.0.1" port="9999" security-realm="TestRealm" />
    </domain-controller>

    ...
</host>
Here the <remote> definition for the domain controller references the defined security realm, this reference means that the specified security realm will be used to load the client side of the configuration (Later this will be expanded so the realm can also define SSL configuration for the client side of the connection).
The value specified for the secret is the password encoded using Base64. On attempting to connect to the remote domain controller the Base64 password will be decoded and the connection will authenticate using the name of the host (in this example 'slave') and the password obtained from the secret. The master domain controller will also need to be configured with a realm that contains the user 'slave' with the specified password.
Under the following issue AS7-1102 the password handling will be enhanced to allow better protection of configuration passwords from obfuscation using password based encryption through to encryption using external security providers, smart cards or hardware security modules over PKCS#11.
Outbound Connections
As described previously the outbound connections configuration is used to define connection to remote servers, presently only LDAP connections are supported but connection to databases will be added to allow for authentication using information stored in a databse.
LDAP
The following configuration shows a sample connection definition to an LDAP server: -
<outbound-connections>
   <ldap name="ldap_connection" url="ldap://127.0.0.1" search-dn="CN=AS7 Test Server,CN=Users,DC=mydomain,DC=aslab" search-credential="AS_Password" />
</outboundconnections>
The following attributes can be set on the ldap element: -
-
name - The name to identify this connection, the ldap authenticator will use this name to reference the connection.
-
url - The URL to connect to the directory server.
-
search-dn - The distinguished name of the user to use to perform initial searches.
-
search-credential - The password of the user to connect for the search.
-
initial-context-factory (default - com.sun.jndi.ldap.LdapCtxFactory) - The initial context factory to use when establishing the connection.
Questions
-
The individual application servers establish a connection to the native interface exposed by their host controller - how are they authenticated?
Before the JBoss AS 7 process is created a random key is generated and passed to the application server instance that is started, the application server then uses this to authenticate when connecting to the native interface.
JVM settings
Configuration of the JVM settings is different for a managed domain and a standalone server. In a managed domain, the domain controller components are responsible for starting and stoping server processes and hence determine the JVM settings. For a standalone server, it's the responsibility of the process that started the server (e.g. passing them as command line arguments).
Managed Domain
In a managed domain the JVM settings can be declared at different scopes: For a specific server group, for a host or for a particular server. If not declared, the settings are inherited from the parent scope. This allows you to customize or extend the JVM settings within every layer.
Let's take a look at the JVM declaration for a server group:
<server-groups>
       <server-group name="main-server-group" profile="default">
           <jvm name="default">
               <heap size="64m" max-size="512m"/>
           </jvm>
           <socket-binding-group ref="standard-sockets"/>
       </server-group>
       <server-group name="other-server-group" profile="default">
           <jvm name="default">
               <heap size="64m" max-size="512m"/>
           </jvm>
           <socket-binding-group ref="standard-sockets"/>
       </server-group>
</server-groups>
(See domain/configuration/domain.xml)
In this example the server group "main-server-group" declares a heap size of 64m and a maximum heap size of 512m. Any server that belongs to this group will inherit these settings. You can change these settings for the group as a whole, or a specific server or host:
<servers>
       <server name="server-one" group="main-server-group" auto-start="true">
           <jvm name="default"/>
       </server>
       <server name="server-two" group="main-server-group" auto-start="true">
           <jvm name="default">
               <heap size="64m" max-size="256m"/>
           </jvm>
           <socket-binding-group ref="standard-sockets" port-offset="150"/>
       </server>
       <server name="server-three" group="other-server-group" auto-start="false">
           <socket-binding-group ref="standard-sockets" port-offset="250"/>
       </server>
</servers>
(See domain/configuration/host.xml)
In this case, server-two, belongs to the main-server-group and inherits the JVM settings named default, but declares a lower maximum heap size.
[domain@localhost:9999 /] /host=local/server-config=server-two/jvm=default:read-resource
{
   "outcome" => "success",
   "result" => {
       "heap-size" => "64m",
       "max-heap-size" => "256m",
   }
}
Standalone Server
For a standalone sever you have to pass in the JVM settings either as command line arguments when executing the $JBOSS_HOME/bin/standalone.sh script, or by declaring them in $JBOSS_HOME/bin/standalone.conf. (For Windows users, the script to execute is %JBOSS_HOME%/bin/standalone.bat while the JVM settings can be declared in %JBOSS_HOME%/bin/standalone.conf.bat.)
Command line parameters
To start up a JBoss AS 7 managed domain you need to execute the $JBOSS_HOME/bin/domain.sh script, and to start up a standalone server use $JBOSS_HOME/bin/standalone.sh. This will start it up using the default configuration. As we will see below you can override these defaults by passing in extra arguments on the command line.
System properties
Both the standalone and the managed domain modes use a default configuration which set up standard locations. This section describes the default values of those system properties. Each of the system properties can be overridden by passing them in individually using the standard jvm -Dkey=value options:
$JBOSS_HOME/bin/standalone.sh -Djboss.home.dir=some/location/AS7/jboss-as \
    -Djboss.server.config.dir=some/location/AS7/jboss-as/custom-standalone
The above will start up a standalone server instance using a non-standard AS home directory, and a custom configuration directory. The meaning of the system properties will be described below.
Alternatively, you can tell it about a properties file by any of the following mechanisms:
$JBOSS_HOME/bin/domain.sh --properties=/some/location/jboss.properties
$JBOSS_HOME/bin/domain.sh -P=/some/location/jboss.properties
The properties file is a standard Java property file containing key=value pairs:
jboss.home.dir=/some/location/AS7/jboss-as
jboss.domain.config.dir=/some/location/AS7/custom-domain
Standalone
|
Property name |
Usage |
Default value |
|
java.ext.dirs |
Use to specify JDK extension directory paths |
null |
|
jboss.home.dir |
The root directory of the JBoss AS 7 installation. |
Set by standalone.sh to $JBOSS_HOME |
|
jboss.server.base.dir |
The base directory for server content. |
jboss.home.dir/standalone |
|
jboss.server.config.dir |
The base configuration directory. |
jboss.server.base.dir/configuration |
|
jboss.server.data.dir |
The directory used for persistent data file storage. |
jboss.server.base.dir/data |
|
jboss.server.log.dir |
The directory containing the server.log file. |
jboss.server.base.dir/log |
|
jboss.server.temp.dir |
The directory used for temporary file storage. |
jboss.server.base.dir/tmp |
|
jboss.server.deploy.dir |
The directory used to store deployed content |
jboss.server.data.dir/content |
Managed Domain
|
Property name |
Usage |
Default value |
|
jboss.home.dir |
The root directory of the JBoss AS 7 installation. |
Set by domain.sh to $JBOSS_HOME |
|
jboss.domain.base.dir |
The base directory for domain content. |
jboss.home.dir/domain |
|
jboss.domain.config.dir |
The base configuration directory |
jboss.domain.base.dir/configuration |
|
jboss.domain.data.dir |
The directory used for persistent data file storage. |
jboss.domain.base.dir/data |
|
jboss.domain.log.dir |
The directory containing the host-controller.log and process-controller.log files |
jboss.domain.base.dir/log |
|
jboss.domain.temp.dir |
The directory used for temporary file storage |
jboss.domain.base.dir/tmp |
|
jboss.domain.deployment.dir |
The directory used to store deployed content |
jboss.domain.base.dir/content |
|
jboss.domain.servers.dir |
The directory containing the output for the managed server instances |
jboss.domain.base.dir/log |
Other command line parameters
The first acceptable format is
--name=value
For example:
$JBOSS_HOME/bin/standalone.sh --server-config=standalone-ha.xml
If the parameter name is a single character, it is prefixed by a single '-' instead of two:
-x=value
For example:
$JBOSS_HOME/bin/standalone.sh -P=/some/location/jboss.properties
The sections below describe the command line parameter names that are available in standalone and domain mode.
Standalone
|
Name |
Default if absent |
Value |
|
--server-config |
jboss.server.config.dir/standalone.xml |
Either a relative path which is interpreted to be relative to jboss.server.config.dir or an absolute path. |
Managed Domain
|
Name |
Default if absent |
Value |
|
--domain-config |
jboss.domain.config.dir/domain.xml |
Either a relative path which is interpreted to be relative to jboss.domain.config.dir or an absolute path. |
|
--host-config |
jboss.domain.config.dir/host.xml |
Either a relative path which is interpreted to be relative to jboss.domain.config.dir or an absolute path. |
The following parameters take no value and are only usable on slave host controllers (i.e. hosts configured to connect to a remote domain controller.)
|
Name |
Function |
|
--backup |
Causes the slave host controller to create and maintains a local copy of the domain configuration file |
|
--cached-dc |
If the slave host controller is unable to contact the master domain controller to get its configuration on boot, boot from a local copy previously created using --backup. The slave host controller will not be able make any modifications to the domain configuration, but it will be able to launch servers. |
Common parameters
These parameters are usable in either standalone or managed domain mode, and have no values. The following table explains what each of these does
|
Name |
Function |
|
--version |
Prints out the version of JBoss AS and exits the JVM. |
|
--help |
Prints out a help message explaining the options and exits the JVM. |
Subsystem configuration
The following chapters will focus on the high level management use cases that are available through the CLI and the web interface. For a detailed description of each subsystem configuration property, please consult the respective component reference.
Schema Location
The configuration schema can found in $JBOSS_HOME/docs/schema.
Data sources
Datasources are configured through the datasource subsystem. Declaring a new datasource consists of two separate steps: You would need to provide a JDBC driver and define a datasource that references the driver you installed.
JDBC Driver Installation
The recommended way to install a JDBC driver into the application server is to simply deploy it as a regular JAR deployment. The reason for this is that when you run your application server in domain mode, deployments are automatically propagated to all servers to which the deployment applies; thus distribution of the driver JAR is one less thing for you to worry about!
Any JDBC 4-compliant driver will automatically be recognized and installed into the system by name and version. A JDBC JAR is identified using the Java service provider mechanism. Such JARs will contain a text a file named META-INF/services/java.sql.Driver, which contains the name of the class(es) of the Drivers which exist in that JAR. If your JDBC driver JAR is not JDBC 4-compliant, it can be made deployable in one of a few ways.
Modify the JAR
The most straightforward solution is to simply modify the JAR and add the missing file. You can do this from your command shell by:
-
Change to, or create, an empty temporary directory.
-
Create a META-INF subdirectory.
-
Create a META-INF/services subdirectory.
-
Create a META-INF/services/java.sql.Driver file which contains one line - the fully-qualified class name of the JDBC driver.
-
Use the jar command-line tool to update the JAR like this:
jar \-uf jdbc-driver.jar META-INF/services/java.sql.Driver
For a detailed explanation how to deploy JDBC 4 compliant driver jar, please refer to the chapter "Application Deployment".
Datasource Definitions
The datasource itself is defined within the subsystem datasources:
<subsystem xmlns="urn:jboss:domain:datasources:1.0">
    <datasources>
        <datasource jndi-name="java:jboss/datasources/ExampleDS" pool-name="ExampleDS">
            <connection-url>jdbc:h2:mem:test;DB_CLOSE_DELAY=-1</connection-url>
            <driver>h2</driver>
            <pool>
                <min-pool-size>10</min-pool-size>
                <max-pool-size>20</max-pool-size>
                <prefill>true</prefill>
            </pool>
            <security>
                <user-name>sa</user-name>
                <password>sa</password>
            </security>
        </datasource>
        <xa-datasource jndi-name="java:jboss/datasources/ExampleXADS" pool-name="ExampleXADS">
           <driver>h2</driver>
           <xa-datasource-property name="URL">jdbc:h2:mem:test</xa-datasource-property>
           <xa-pool>
                <min-pool-size>10</min-pool-size>
                <max-pool-size>20</max-pool-size>
                <prefill>true</prefill>
           </xa-pool>
           <security>
                <user-name>sa</user-name>
                <password>sa</password>
           </security>
        </xa-datasource>
        <drivers>
            <driver name="h2" module="com.h2database.h2">
                <xa-datasource-class>org.h2.jdbcx.JdbcDataSource</xa-datasource-class>
            </driver>
        </drivers>
  </datasources>

</subsystem>
(See standalone/configuration/standalone.xml)
As you can see the datasource references a driver by it's logical name.
You can easily query the same information through the CLI:
[standalone@localhost:9999 /] /subsystem=datasources:read-resource(recursive=true)
{
    "outcome" => "success",
    "result" => {
        "data-source" => {"java:/H2DS" => {
            "connection-url" => "jdbc:h2:mem:test;DB_CLOSE_DELAY=-1",
            "jndi-name" => "java:/H2DS",
            "driver-name" => "h2",
            "pool-name" => "H2DS",
            "use-java-context" => true,
            "enabled" => true,
            "jta" => true,
            "pool-prefill" => true,
            "pool-use-strict-min" => false,
            "user-name" => "sa",
            "password" => "sa",
            "flush-strategy" => "FailingConnectionOnly",
            "background-validation" => false,
            "use-fast-fail" => false,
            "validate-on-match" => false,
            "use-ccm" => true
        }},
        "xa-data-source" => undefined,
        "jdbc-driver" => {"h2" => {
            "driver-name" => "h2",
            "driver-module-name" => "com.h2database.h2",
            "driver-xa-datasource-class-name" => "org.h2.jdbcx.JdbcDataSource"
        }}
    }
}


[standalone@localhost:9999 /] /subsystem=datasources:installed-drivers-list
{
    "outcome" => "success",
    "result" => [{
        "driver-name" => "h2",
        "deployment-name" => undefined,
        "driver-module-name" => "com.h2database.h2",
        "module-slot" => "main",
        "driver-xa-datasource-class-name" => "org.h2.jdbcx.JdbcDataSource",
        "driver-class-name" => "org.h2.Driver",
        "driver-major-version" => 1,
        "driver-minor-version" => 2,
        "jdbc-compliant" => true
    }]
}
Using the web console or the CLI greatly simplifies the deployment of JDBC drivers and the creation of datasources.
The CLI offers a set of commands to create and modify datasources:
[standalone@localhost:9999 /] help
Supported commands:

 [...]

 data-source             - allows to add new, modify and remove existing data sources
 xa-data-source          - allows add new, modify and remove existing XA data sources

For a more detailed description of a specific command,
execute the command with '--help' as the argument.
Component Reference
The datasource subsystem is provided by the IronJacamar project. For a detailed description of the available configuration properties, please consult the project documentation.
-
IronJacamar homepage: http://www.jboss.org/ironjacamar
-
Project Documentation: http://www.jboss.org/ironjacamar/docs
-
Schema description: http://docs.jboss.org/ironjacamar/userguide/1.0/en-US/html/deployment.html#deployingds_descriptor
Messaging
The JMS server configuration is done through the messaging subsystem. In this chapter we are going outline the frequently used configuration options. For a more detailed explanation please consult the HornetQ user guide (See "Component Reference").
Connection Factories
The JMS connection factories can be split into two kinds: In-VM connections and connections factories that can be used by remote clients. Each connection factory does reference a connector declaration, that is associated with a socket binding. The connection factory entry declaration specifies the JNDI name under which the factory will be exposed.
<subsystem xmlns="urn:jboss:domain:messaging:1.0">
   [...]
<connectors>
   <in-vm-connector name="in-vm" server-id="0"/>
   <netty-connector name="netty" socket-binding="messaging"/>
   <netty-connector name="netty-throughput" socket-binding="messaging-throughput">
       <param key="batch-delay" value="50"/>
   </netty-connector>
</connectors>
   [...]
<jms-connection-factories>
   <connection-factory name="InVmConnectionFactory">
       <connectors>
           <connector-ref connector-name="in-vm"/>
       </connectors>
       <entries>
           <entry name="java:/ConnectionFactory"/>
       </entries>
   </connection-factory>
   <connection-factory name="RemoteConnectionFactory">
       <connectors>
           <connector-ref connector-name="netty"/>
       </connectors>
       <entries>
           <entry name="RemoteConnectionFactory"/>
       </entries>
   </connection-factory>
   <pooled-connection-factory name="hornetq-ra">
       <connectors>
           <connector-ref connector-name="in-vm"/>
       </connectors>
       <entries>
           <entry name="java:/JmsXA"/>
       </entries>
   </pooled-connection-factory>
</jms-connection-factories>
[...]
</subsystem>
(See standalone/configuration/standalone.xml)
Queues and Topics
Queues and topics are sub resources of the messaging subsystem.
Each entry refers to a JNDI name of the queue or topic:
<subsystem xmlns="urn:jboss:domain:messaging:1.0">
   [...]
   <jms-destinations>
       <jms-queue name="testQueue">
           <entry name="queue/test"/>
       </jms-queue>
       <jms-topic name="testTopic">
           <entry name="topic/test"/>
       </jms-topic>
   </jms-destinations>
</subsystem>
(See standalone/configuration/standalone.xml)
JMS endpoints can easily be created through the CLI:
[standalone@localhost:9999 /] add-jms-queue --name=myQueue --entries=queues/myQueue
[standalone@localhost:9999 /] /subsystem=messaging/jms-queue=myQueue:read-resource
{
   "outcome" => "success",
   "result" => {"entries" => ["queues/myQueue"]},
   "compensating-operation" => undefined
}
A number of additional commands to maintain the JMS subsystem are available as well:
[standalone@localhost:9999 /] help
Supported commands:

[...]
add-jms-queue           - creates a new JMS queue
remove-jms-queue        - removes an existing JMS queue
add-jms-topic           - creates a new JMS topic
remove-jms-topic        - removes an existing JMS topic
add-jms-cf              - creates a new JMS connection factory
remove-jms-cf           - removes an existing JMS connection factory

For a more detailed description of a specific command,
execute the command with '--help' as the argument.
Dead Letter & Redelivery
Some of the settings are applied against an address wild card instead of a specific messaging destination. The dead letter queue and redelivery settings belong into this group:
<subsystem xmlns="urn:jboss:domain:messaging:1.0">
[...]
<address-settings>
   <address-setting match="#">
       <dead-letter-address>
           jms.queue.DLQ
       </dead-letter-address>
       <expiry-address>
           jms.queue.ExpiryQueue
       </expiry-address>
       <redelivery-delay>
           0
       </redelivery-delay>
       [...]
   </address-setting>
</address-settings>
[...]
</subsystem>
(See standalone/configuration/standalone.xml)
Security Settings
Security constraints are matched against an address wildcard, similar to the DLQ and redelivery settings.
<subsystem xmlns="urn:jboss:domain:messaging:1.0">
[...]
<security-settings>
   <security-setting match="#">
       <permission type="send" roles="guest"/>
       <permission type="consume" roles="guest"/>
       <permission type="createNonDurableQueue" roles="guest"/>
       <permission type="deleteNonDurableQueue" roles="guest"/>
   </security-setting>
</security-settings>
[...]
</subsystem>
(See standalone/configuration/standalone.xml)
Component Reference
The messaging subsystem is provided by the HornetQ project. Fo a detailed description of the available configuration properties, please consult the project documentation.
-
HornetQ homepage: http://www.jboss.org/hornetq
-
Project Documentation: http://www.jboss.org/hornetq/docs
Web
The web subsystem configuration basically consists of three parts: The JSP Configuration, connectors and virtual servers. Advanced topics like load balancing and failover are covered on the "High Availability Guide". The default configuration does is suitable for most use cases and provides reasonable performance settings.
Required extension:
<extension module="org.jboss.as.web" />
Basic subsystem configuration example:
  <subsystem xmlns="urn:jboss:domain:web:1.0" default-virtual-server="default-host">
      <connector name="http" scheme="http" protocol="HTTP/1.1" socket-binding="http"/>
      <virtual-server name="default-host" enable-welcome-root="true">
         <alias name="localhost" />
         <alias name="example.com" />
      </virtual-server>
   </subsystem>
Dependencies on other subsystems:
None
Container configuration
JSP Configuration
The "configuration" subresource covers all aspects that relate to the configuration of the servlet engine itself. For a detailed explanation of each configuration attribute, please consult the JBossWeb documentation (See "Component Reference").
[standalone@localhost:9999 /] /subsystem=web:read-resource
{
    "outcome" => "success",
    "result" => {
        "configuration" => {
            "static-resources" => {
                "sendfile" => 49152,
                "max-depth" => 3,
                "read-only" => true,
                "webdav" => false,
                "listings" => false,
                "disabled" => false
            },
            "jsp-configuration" => {
                "development" => false,
                "keep-generated" => true,
                "recompile-on-fail" => false,
                "check-interval" => 0,
                "modification-test-interval" => 4,
                "display-source-fragment" => true,
                "error-on-use-bean-invalid-class-attribute" => false,
                "java-encoding" => "UTF8",
                "tag-pooling" => true,
                "generate-strings-as-char-arrays" => false,
                "target-vm" => "1.5",
                "dump-smap" => false,
                "mapped-file" => true,
                "disabled" => false,
                "source-vm" => "1.5",
                "trim-spaces" => false,
                "smap" => true
            }
        },
        "connector" => {"http" => undefined},
        "virtual-server" => {"localhost" => undefined}
    }
}
(See standalone/configuration/standalone.xml)
Connector configuration
The connectors are child resources of the subsystem web. Each connector does reference a particular socket binding:
[standalone@localhost:9999 /] /subsystem=web:read-children-names(child-type=connector)
{
    "outcome" => "success",
    "result" => ["http"]
}

[standalone@localhost:9999 /] /subsystem=web/connector=http:read-resource(recursive=true)
{
    "outcome" => "success",
    "result" => {
        "protocol" => "HTTP/1.1",
        "scheme" => "http",
        "socket-binding" => "http",
        "ssl" => undefined,
        "virtual-server" => undefined
    }
}
Creating a new connector requires you to declare a new socket binding first:
[standalone@localhost:9999 /] /socket-binding-group=standard-sockets/socket-binding=custom:add(port=8181)
The newly created, unused socket binding can then be used to create a new connector configuration:
[standalone@localhost:9999 /] /subsystem=web/connector=test-connector:add(
               socket-binding=custom, scheme=http, protocol="HTTP/1.1", enabled=true
               )
Statistic information can be displayed from the connectors:
The following attributes can be queried:
|
value |
description |
|
bytesSent |
Number of byte sent by the connector |
|
bytesReceived |
Number of byte received by the connector (POST data). |
|
processingTime |
Processing time used by the connector. Im milli-seconds. |
|
errorCount |
Number of error that occurs when processing requests by the connector. |
|
maxTime |
Max time spent to process a request. |
|
requestCount |
Number of requests processed by the connector. |
For example:
[standalone@localhost:9999 /] /subsystem=web/connector=http:read-attribute(name=bytesSent, name=requestCount)
{
    "outcome" => "success",
    "result" => "3"
}
There are 3 different connectors available:
HTTP Connectors
This one is the default connector, it runs usually on port 8080. See above how to configure it.
HTTPS Connectors
The HTTPS connectors are child resources of the subsystem web. By default they use JSSE. Each connector does reference a particular socket binding:
[standalone@localhost:9999 /] /subsystem=web:read-children-names(child-type=connector)
{
    "outcome" => "success",
    "result" => [
        "ajp",
        "http",
        "https"
    ]
}
[standalone@localhost:9999 /] /subsystem=web/connector=https:read-resource(recursive=true)
{
    "outcome" => "success",
    "result" => {
        "protocol" => "HTTP/1.1",
        "scheme" => "https",
        "secure" => true,
        "socket-binding" => "https",
        "ssl" => {},
        "virtual-server" => undefined
    }
}
Creating a new connector may require you to declare a new socket binding first:
[standalone@localhost:9999 /] /socket-binding-group=standard-sockets/socket-binding=https:add(port=8443)
The newly created, unused socket binding can then be used to create a new connector configuration:
[standalone@localhost:9999 /] /subsystem=web/connector=test-connector:add(socket-binding=https, scheme=https, protocol="HTTP/1.1", enabled=true, ssl = {})
The default for SSL is to use Alias "tomcat" and password "changeit". It is possible to create the corresponding keystore using keytool:
keytool -genkey -alias tomcat -keyalg RSA
Of course specify a password value of "changeit".
AJP Connectors
The AJP connectors are child resources of the subsystem web. They are used with mod_jk, mod_proxy and mod_cluster of the Apache httpd front-end. Each connector does reference a particular socket binding:
[standalone@localhost:9999 /] /subsystem=web:read-children-names(child-type=connector)
{
    "outcome" => "success",
    "result" => [
        "ajp",
        "http"
    ]
}
[standalone@localhost:9999 /] /subsystem=web/connector=ajp:read-resource(recursive=true)
{
    "outcome" => "success",
    "result" => {
        "enable-lookups" => false,
        "enabled" => true,
        "max-post-size" => 2097152,
        "max-save-post-size" => 4096,
        "protocol" => "AJP/1.3",
        "redirect-port" => 8443,
        "scheme" => "http",
        "secure" => false,
        "socket-binding" => "ajp",
        "ssl" => undefined,
        "virtual-server" => undefined
    }
}
Creating a new connector requires you to declare a new socket binding first:
[standalone@localhost:9999 /] /socket-binding-group=standard-sockets/socket-binding=ajp:add(port=8009)
The newly created, unused socket binding can then be used to create a new connector configuration:
[standalone@localhost:9999 /] /subsystem=web/connector=ajp:add(socket-binding=ajp, protocol="AJP/1.3", enabled=true)
Native Connectors
Native connectors are high performance connectors based on Tomcat native. They are used if the native modules are installed, a lot of distributions have it included, in case you don't have it try JBoss Web Native.
At a configuration level only the SSL part needs to be configured differently because it use OpenSSL.
[standalone@localhost:9999 /] /subsystem=web/connector=https:read-resource(recursive=true)
{
    "outcome" => "success",
    "result" => {
        "protocol" => "HTTP/1.1",
        "scheme" => "https",
        "secure" => true,
        "socket-binding" => "https",
        "ssl" => {
            "certificate-file" => "/home/jfclere/CERTS/SERVER/newcert.pem",
            "certificate-key-file" => "/home/jfclere/CERTS/SERVER/newkey.pem",
            "password" => "xxxxxxx"
        },
        "virtual-server" => undefined
    }
}
Virtual-Server configuration
Similar to the connectors, the virtual server declarations are child resources of the web subsystem. They will be referenced by alias names and can optionally refer to a default web application that acts serves the root web context.
[standalone@localhost:9999 /] /subsystem=web:read-children-names(child-type=virtual-server)
{
    "outcome" => "success",
    "result" => ["localhost"]
}

[standalone@localhost:9999 /] /subsystem=web/virtual-server=default-host:read-resource
{
    "outcome" => "success",
    "result" => {
        "access-log" => undefined,
        "alias" => ["example.com"],
        "default-web-module" => undefined,
        "enable-welcome-root" => true,
        "rewrite" => undefined
    }
}
Adding a virtual server declaration is can be done through the default :add() operation
[standalone@localhost:9999 /] /subsystem=web/virtual-server=example.com:add

[standalone@localhost:9999 /] /subsystem=web/virtual-server=example.com:remove
add/remove operations exists on any node in the configuration tree.
Component Reference
The web subsystem is provided by the JBossWeb project. Fo a detailed description of the available configuration properties, please consult the JBossWeb documentation.
-
JBoss Web Configuration Reference: http://docs.jboss.org/jbossweb/7.0.x/config/index.html
-
JBossWeb homepage: http://www.jboss.org/jbossweb
-
Project Documentation: http://docs.jboss.org/jbossweb/7.0.x/
Web services
Web service endpoint are exposed through the deployments that provide endpoint implementation. Thus they can be queried as deployment resources. For further information please consult the chapter "Application Deployment". Each web service endpoint specifies a web context and a WSDL Url:
[standalone@localhost:9999 /] /deployment="*"/subsystem=webservices/endpoint="*":read-resource
{
   "outcome" => "success",
   "result" => [{
       "address" => [
           ("deployment" => "jaxws-samples-handlerchain.war"),
           ("subsystem" => "webservices"),
           ("endpoint" => "jaxws-samples-handlerchain:TestService")
       ],
       "outcome" => "success",
       "result" => {
           "class" => "org.jboss.test.ws.jaxws.samples.handlerchain.EndpointImpl",
           "context" => "jaxws-samples-handlerchain",
           "name" => "TestService",
           "type" => "JAXWS_JSE",
           "wsdl-url" => "http://localhost:8080/jaxws-samples-handlerchain?wsdl"
       }
   }]
}
Component Reference
The web service subsystem is provided by the JBossWS project. Fo a detailed description of the available configuration properties, please consult the project documentation.
-
JBossWS homepage: http://www.jboss.org/jbossws
-
Project Documentation: https://docs.jboss.org/author/display/JBWS
Logging
The overall server logging configuration is represented by the logging subsystem. It consists of three notable parts: handler configurations, logger and the root logger declarations (aka log categories). Each logger does reference a handler (or set of handlers). Each handler declares the log format and output:
<subsystem xmlns="urn:jboss:domain:logging:1.0">
   <console-handler name="CONSOLE" autoflush="true">
       <level name="DEBUG"/>
       <formatter>
           <pattern-formatter pattern="%d{HH:mm:ss,SSS} %-5p [%c] (%t) %s%E%n"/>
       </formatter>
   </console-handler>
   <periodic-rotating-file-handler name="FILE" autoflush="true">
       <level name="INFO"/>
       <formatter>
           <pattern-formatter pattern="%d{HH:mm:ss,SSS} %-5p [%c] (%t) %s%E%n"/>
       </formatter>
       <file relative-to="jboss.server.log.dir" path="server.log"/>
       <suffix value=".yyyy-MM-dd"/>
   </periodic-rotating-file-handler>
   <logger category="com.arjuna">
       <level name="WARN"/>
   </logger>
   [...]
   <root-logger>
       <level name="DEBUG"/>
       <handlers>
           <handler name="CONSOLE"/>
           <handler name="FILE"/>
       </handlers>
   </root-logger>
</subsystem>
Default Log File Locations
Managed Domain
In a managed domain two types of log files do exist: Controller and server logs. The controller components govern the domain as whole. It's their responsibility to start/stop server instances and execute managed operations throughout the domain. Server logs contain the logging information for a particular server instance. They are co-located with the host the server is running on.
For the sake of simplicity we look at the default setup for managed domain. In this case, both the domain controller components and the servers are located on the same host:
|
Process |
Log File |
|
Host Controller |
./domain/log/host-controller/boot.log |
|
Process Controller |
./domain/log/process-controller/boot.log |
|
"Server One" |
./domain/servers/server-one/log/boot.log |
|
"Server One" |
./domain/servers/server-one/log/server.log |
|
"Server Three" |
./domain/servers/server-three/log/boot.log |
|
"Server Three" |
./domain/servers/server-three/log/server.log |
The server logs as you know it from previous JBoss AS versions are located in the servers subdirectory: I.e. ./domain/servers/server-three/log/server.log
Standalone Server
The default log files for a standalone server can be found in the log subdirectory of the distribution:
|
Process |
Log File |
|
Server |
./standalone/log/boot.log |
|
Server |
./standalone/log/server.log |
JMX
The JMX subsystem sets up a JMX connector so that invocations can be done on the JMX MBean server from outside the JVM
<subsystem xmlns="urn:jboss:domain:jmx:1.0">
    <jmx-connector registry-binding="jmx-connector-registry"
        server-binding="jmx-connector-server"/>
</subsystem>
...
<socket-binding-group name="standard-sockets" default-interface="public">
    ...
    <socket-binding name="jmx-connector-registry" port="1090"/>
    <socket-binding name="jmx-connector-server" port="1091"/>
    ...
</socket-binding-group>
To use the connector you can access it in the standard way:
import javax.management.MBeanServerConnection;
import javax.management.remote.JMXConnector;
import javax.management.remote.JMXConnectorFactory;
import javax.management.remote.JMXServiceURL;

public class JMXExample {

    public static void main(String[] args) throws Exception {
        //Get a connection to the JBoss AS MBean server on localhost
        String host = "localhost";
        int port = 1090;
        String urlString = System.getProperty("jmx.service.url",
            "service:jmx:rmi:///jndi/rmi://" + host + ":" + port + "/jmxrmi");
        JMXServiceURL serviceURL = new JMXServiceURL(urlString);
        JMXConnector jmxConnector = JMXConnectorFactory.connect(serviceURL, null);
        MBeanServerConnection connection = jmxConnector.getMBeanServerConnection();

        //Invoke on the JBoss AS MBean server
        int count = connection.getMBeanCount();
        System.out.println(count);
    }
}
You can also connect using jconsole. In addition to the standard JVM MBeans, the JBoss AS 7 MBean server contains the following MBeans:
|
JMX ObjectName |
Description |
|
jboss.msc:type=container,name=jboss-as |
Exposes management operations on the JBoss Modular Service Container, which is the dependency injection framework at the heart of JBoss AS 7. It is useful for debugging dependency problems, for example if you are integrating your own subsystems, as it exposes operations to dump all services and their current states |
|
jboss.naming:type=JNDIView |
Shows what is bound in JNDI |
|
jboss.modules:type=ModuleLoader,name=* |
This collection of MBeans exposes management operations on JBoss Modules classloading layer. It is useful for debugging dependency problems arising from missing module dependencies |
OSGi
Old Documentation
This documentation applies to AS 7.0 only and has been superceded by documentation that can be found
in the JBoss OSGi Documentation Pages.
OSGi functionality in JBoss AS 7 is provided through the OSGi subsystem.
More information on the OSGi component in JBoss AS 7 can be found on the JBoss OSGi project pages.
The OSGi subsystem can be configured in its section in the JBoss AS 7 configuration XML file.
<subsystem xmlns="urn:jboss:domain:osgi:1.0" activation="lazy">
    <configuration>...</configuration>
    <properties>...</properties>
    <modules>...</modules>
</subsystem>
The following items can be configured:
-
OSGi CAS (Configuration Admin Service) Configuration Information
Subsystem Attributes
|
Attribute |
Description |
|
activation |
When set to lazy the OSGi subsystem will not get activated until the first OSGi bundle deployment. When set to eager the OSGi subsystem will be activated at startup of the Application Server. |
Configuration Admin
The OSGi Configuration Admin Service (CAS) is a standard service aimed at configuring OSGi-based applications. Many OSGi applications use the CAS to configure themselves.
The OSGi subsystem configuration allows for the specification of CAS configuration information, to configure bundles written for this specification (chapter 104 in the OSGi 4.2 Compendium Specification)
To add CAS configuration information, add <configuration> tags to the OSGi subsystem configuration. For example, the following is used to configure the context root where the Felix Web Console appears:
<subsystem xmlns="urn:jboss:domain:osgi:1.0" activation="lazy">
    <configuration pid="org.apache.felix.webconsole.internal.servlet.OsgiManager">
        <property name="manager.root">jboss-osgi</property>
    </configuration>
....
Configuration information consists of a <configuration> tag specifying a PID (Persistent Identifier) attribute which identifies the system to be configured. The configuration tag can contain any number of embedded <property> tags which hold the configuration information for this PID.
Framework Properties
OSGi Framework properties are specified as embedded <property> elements in the <properties> tag.
<properties>
  <property name="org.jboss.osgi.system.modules">
    org.apache.commons.logging,
    org.apache.log4j,
    org.jboss.as.osgi,
    org.slf4j,
  </property>
  <property name="org.osgi.framework.system.packages.extra">
    org.apache.commons.logging;version=1.1.1,
    org.apache.log4j;version=1.2,
    org.jboss.as.osgi.service;version=7.0,
    org.jboss.osgi.deployment.interceptor;version=1.0,
    org.jboss.osgi.spi.capability;version=1.0,
    org.jboss.osgi.spi.util;version=1.0,
    org.jboss.osgi.testing;version=1.0,
    org.jboss.osgi.vfs;version=1.0,
    org.slf4j;version=1.5.10,
  </property>
  <property name="org.osgi.framework.startlevel.beginning">1</property>
</properties>
The following properties are specified:
|
Property |
Description |
|
org.jboss.osgi.system.modules |
A comma-separated list of module identifiers. Each system module is added as a dependency to the OSGi framework module. The packages from these system modules can be made visible as framework system packages by adding them to the org.osgi.framework.system.packages.extra property. |
|
org.osgi.framework.system.packages.extra |
Extra packages which the system bundle must export from the current execution environment. |
|
org.osgi.framework.startlevel.beginning |
The beginning start level of the OSGi Framework. This also influences which modules are pre-loaded. See the modules section. |
Additional OSGi Framework properties can be specified. For more information on OSGi Framework properties see the OSGi 4.2 Core Specification.
Modules
JBoss AS 7 comes with a repository of modules and OSGi bundles that can be automatically loaded at startup. JBoss-Modules compliant modules can be found in the modules/ directory and OSGi bundles can be found in the bundles/ directory. In the <modules> section of the XML configuration both JBoss-Modules as well as OSGi Bundles can be specified.
OSGi Bundles can also be started automatically at startup. This is specified with the startlevel attribute. The default start level of the OSGi Framework is 1. To enable additional functionality in the OSGi Framework, increase the org.osgi.framework.startlevel.beginning framework property.
Note that these modules don't trigger the activation of the OSGi subsystem. Once the subsystem is activated as described above, these modules and bundles will be automatically loaded and optionally started.
<modules>
    <!-- modules registered with the OSGi layer on startup -->
    <module identifier="javaee.api"/>
    <module identifier="org.jboss.logging"/>
    <!-- bundles installed on startup -->
    <module identifier="org.apache.aries.util"/>
    <module identifier="org.jboss.osgi.webconsole"/>
    <module identifier="org.osgi.compendium"/>
    <!-- bundles started in startlevel 1 -->
    <module identifier="org.apache.felix.log" startlevel="1"/>
    <module identifier="org.jboss.osgi.logging" startlevel="1"/>
    <module identifier="org.apache.felix.configadmin" startlevel="1"/>
    <module identifier="org.jboss.as.osgi.configadmin" startlevel="1"/>
    <!-- bundles started in startlevel 2 -->
    <module identifier="org.apache.aries.jmx" startlevel="2"/>
    <module identifier="org.apache.felix.eventadmin" startlevel="2"/>
    <module identifier="org.apache.felix.metatype" startlevel="2"/>
    <module identifier="org.apache.felix.webconsole" startlevel="2"/>
    <module identifier="org.jboss.osgi.jmx" startlevel="2"/>
    <module identifier="org.jboss.osgi.http" startlevel="2"/>
    <!-- bundles started in startlevel 3 -->
    <module identifier="org.jboss.osgi.blueprint" startlevel="3"/>
    <module identifier="org.jboss.osgi.webapp" startlevel="3"/>
    <module identifier="org.jboss.osgi.xerces" startlevel="3"/>
</modules>
The following modules and bundles are listed in the default configuration.
|
Module Identifier |
Description |
|
javaee.api |
Provides JavaEE APIs. |
|
org.apache.aries.jmx |
Provides JMX support to OSGi as described in chapter 124 of the OSGi 4.2 Enterprise Specification. For more information see Using JMX below. |
|
org.apache.aries.util |
Needed by the Aries JMX bundle. |
|
org.apache.felix.configadmin |
An implementation of the OSGi Configuration Admin specificaton. Chapter 104 in the OSGi 4.2 Compendium Specification. |
|
org.apache.felix.eventadmin |
An implementation of the OSGi Event Admin specification. Chapter 113 in the OSGi 4.2 Compendium Specification. |
|
org.apache.felix.log |
An implementation of the OSGi Log Service specification. Chapter 101 in the OSGi 4.2 Compendium Specification. |
|
org.apache.felix.metatype |
An implementation of the OSGi Metatype Service specification. Chapter 105 in the OSGi 4.2 Compendium Specification. |
|
org.apache.felix.webconsole |
The Felix Web Console. For more information see Using the Felix Web Console below. |
|
org.jboss.as.osgi.configadmin |
Component providing the OSGi Configuration Admin Service with information from the OSGi subsystem configuration. |
|
org.jboss.logging |
The JBoss Logging Framework. |
|
org.jboss.osgi.blueprint |
An implementation of the OSGi Blueprint Specification. Blueprint is a component model and IoC specification for OSGi which significantly simplifies the use of OSGi services. It can be found in chapter 121 in the OSGi 4.2 Enterprise Specification. |
|
org.jboss.osgi.http |
An implementation of the OSGi Http Service. Chapter 102 in the OSGi 4.2 Compendium Specification. The port used by this implementation is set by default to <socket-binding name="osgi-http" port="8090"/> in the socket-binding-group. |
|
org.jboss.osgi.jmx |
Enhanced JMX API, the MBeans can be found under jboss.osgi. |
|
org.jboss.osgi.logging |
Sends log messages sent to the OSGi Log Service to JBoss Logging. |
|
org.jboss.osgi.webapp |
OSGi Support for Web Apps, as described in chapter 128 in the OSGi 4.2 Compendium Specification. |
|
org.jboss.osgi.webconsole |
Customizations of the Felix Web Console. |
|
org.jboss.osgi.xerces |
An implementation of the OSGi XML Parser specification. Chapter 702 in the OSGi 4.2 Compendium Specification. |
|
org.osgi.compendium |
A bundle providing the APIs defined by the OSGi Compendium Specification. |
Using the Felix Web Console
For fine-grained management of the OSGi Framework, the Apache Felix Web Console can be used. This web console is shipped as part of JBoss AS 7 and is specifically aimed at fine-grained control of the OSGi Framework.
The Web Console is not enabled by default. The relevant modules are marked as having startlevel=2, so to enable the web console set the initial framework start level to 2 or higher:
<properties>
  ... other properties ...
  <property name="org.osgi.framework.startlevel.beginning">2</property>
</properties>
By default the console appears on http://localhost:8090/jboss-osgi with as username and password admin/admin. This can be configured through the OSGi Configuration Admin Service configuration.
<subsystem xmlns="urn:jboss:domain:osgi:1.0">
  <configuration pid="org.apache.felix.webconsole.internal.servlet.OsgiManager">
    <property name="manager.root">jboss-osgi</property>
    <property name="username">myusername</property>
    <property name="password">mypassword</property>
  </configuration>
  ...
Start JBoss AS 7 and make sure the OSGi Framework is active; the framework can be activated by deploying an OSGi bundle into JBoss AS 7 or by setting its activation mode to eager.
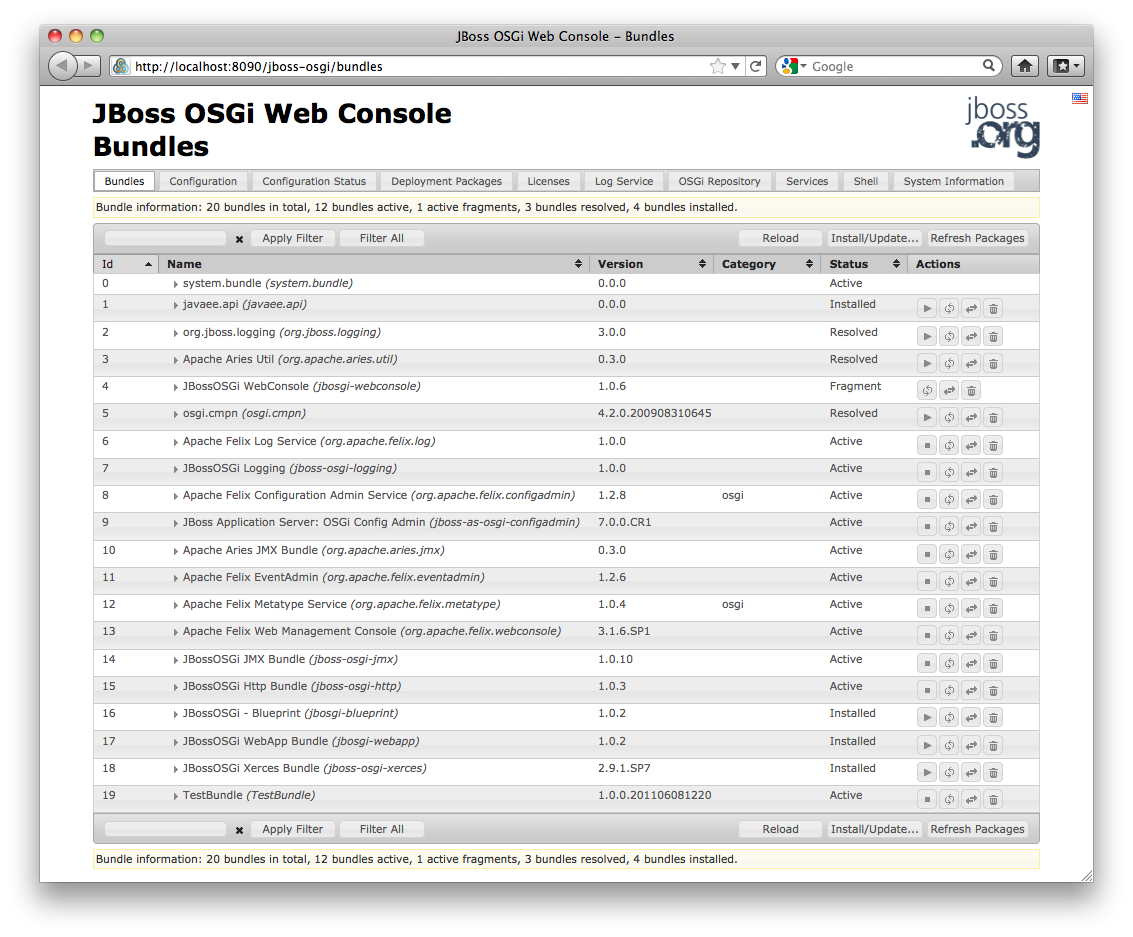
Then open a web browser and access: http://localhost:8090/jboss-osgi. A log-in dialog appears. Enter the password configured or the default username and password: admin/admin and the web console will appear:
Using JMX
The OSGi Framework exposes a number of JMX MBeans that enable remote control of the framework. Both the MBeans that are defined in chapter 124 of the OSGi 4.2 Enterprise Specification as well as JBoss-extended MBeans are available.
The JMX support is not enabled by default. The relevant modules are marked as having startlevel=2, so to enable JMX set the initial framework start level to 2 or higher:
<properties>
  ... other properties ...
  <property name="org.osgi.framework.startlevel.beginning">2</property>
</properties>
Start JBoss AS 7 and make sure the OSGi Framework is active; the framework can be activated by deploying an OSGi bundle into JBoss AS 7 or by setting its activation mode to eager.
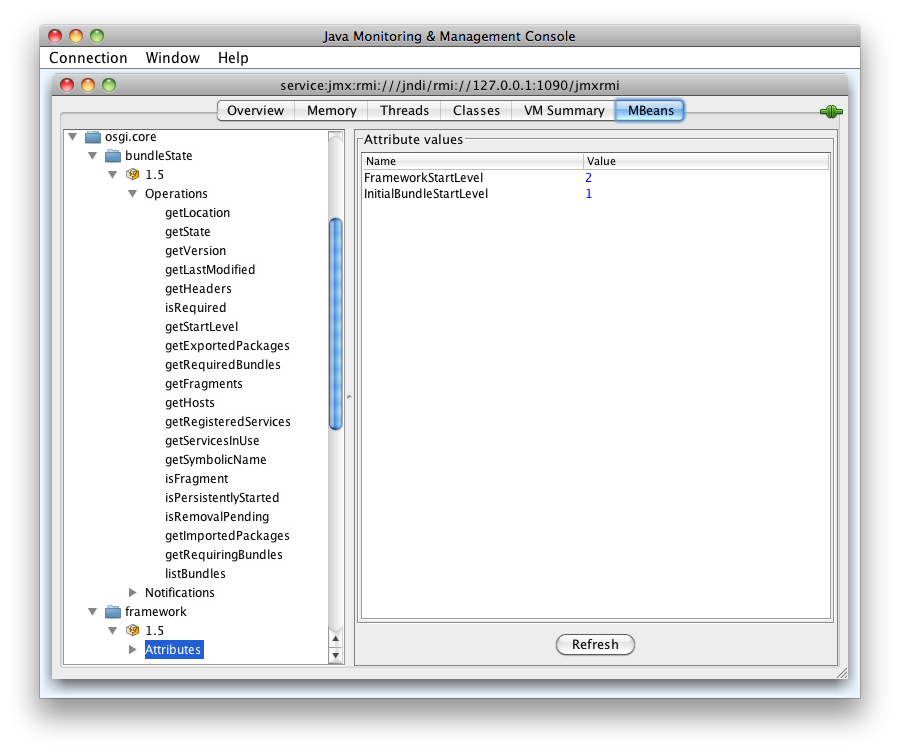
The JMX functionality can now be accessed through a JMX console, for instance jconsole which ships with the JDK:

Connect using the Remote Process URL service:jmx:rmi:///jndi/rmi://127.0.0.1:1090/jmxrmi. (You can also connect directly to the Local Process, the one that starts with jboss-modules.jar -mp ...)
When the connection is established navigate to the MBeans tab to interact with the OSGi MBeans.
Deployment Scanner
The deployment scanner is only used in standalone mode. Its job is to monitor a directory for new files and to deploy those files. It can be found in standalone.xml:
<subsystem xmlns="urn:jboss:domain:deployment-scanner:1.0">
   <deployment-scanner scan-interval="5000"
      relative-to="jboss.server.base.dir" path="deployments" />
</subsystem>
The subsystem can be removed complete from the standalone configuration, e.g. for security reasons. In this case all deployments are only possible via CLI or Console as in the domain mode.
You can define more deployment-scanner entries, by using different name identifier, to scan for deployments from more locations. The configuration showed will scan the $JBOSS_HOME/standalone/deployments directory every five seconds. The runtime model is shown below, and uses default values for attributes not specified in the xml:
[standalone@localhost:9999 /] /subsystem=deployment-scanner:read-resource(recursive=true)
{
    "outcome" => "success",
    "result" => {"scanner" => {"default" => {
        "auto-deploy-exploded" => false,
        "auto-deploy-zipped" => true,
        "deployment-timeout" => 60L,
        "name" => "default",
        "path" => "deployments",
        "relative-to" => "jboss.server.base.dir",
        "scan-enabled" => true,
        "scan-interval" => 5000
    }}}
}
The attributes are
|
Name |
Type |
Description |
|
name |
STRING |
The name of the scanner. default is used if not specified |
|
path |
STRING |
The actual filesystem path to be scanned. Treated as an absolute path, unless the 'relative-to' attribute is specified, in which case the value is treated as relative to that path. |
|
relative-to |
STRING |
Reference to a filesystem path defined in the "paths" section of the server configuration, or one of the system properties specified on startup. In the example above jboss.server.base.dir resolves to {{$JBOSS_HOME/standalone |
|
scan-enabled |
BOOLEAN |
If true scanning is enabled |
|
scan-interval |
INT |
Periodic interval, in milliseconds, at which the repository should be scanned for changes. A value of less than 1 indicates the repository should only be scanned at initial startup. |
|
auto-deploy-zipped |
BOOLEAN |
Controls whether zipped deployment content should be automatically deployed by the scanner without requiring the user to add a .dodeploy marker file. |
|
auto-deploy-exploded |
BOOLEAN |
Controls whether exploded deployment content should be automatically deployed by the scanner without requiring the user to add a .dodeploy marker file. Setting this to 'true' is not recommended for anything but basic development scenarios, as there is no way to ensure that deployment will not occur in the middle of changes to the content. |
|
deployment-timeout |
LONG |
Timeout, in seconds, a deployment is allows to execute before being canceled. The default is 60 seconds. |
Deployment scanners can be added by modifying standalone.xml before starting up the server or they can be added and removed at runtime using the CLI
[standalone@localhost:9999 /] /subsystem=deployment-scanner/scanner=new:add(scan-interval=10000,relative-to="jboss.server.base.dir",path="other-deployments")
{"outcome" => "success"}
[standalone@localhost:9999 /] /subsystem=deployment-scanner/scanner=new:remove                                              {"outcome" => "success"}
You can also change the attributes at runtime, so for example to turn off scanning you can do
[standalone@localhost:9999 /] /subsystem=deployment-scanner/scanner=default:write-attribute(name="scan-enabled",value=false)
{"outcome" => "success"}
[standalone@localhost:9999 /] /subsystem=deployment-scanner:read-resource(recursive=true)                                    {
    "outcome" => "success",
    "result" => {"scanner" => {"default" => {
        "auto-deploy-exploded" => false,
        "auto-deploy-zipped" => true,
        "deployment-timeout" => 60L,
        "name" => "default",
        "path" => "deployments",
        "relative-to" => "jboss.server.base.dir",
        "scan-enabled" => false,
        "scan-interval" => 5000
    }}}
}
Simple configuration subsystems
The following subsystems currently have no configuration beyond its root element in the configuration
<subsystem xmlns="urn:jboss:domain:ee:1.0"/>
<subsystem xmlns="urn:jboss:domain:ejb3:1.0"/>
<subsystem xmlns="urn:jboss:domain:jaxrs:1.0"/>
<subsystem xmlns="urn:jboss:domain:remoting:1.0"/>
<subsystem xmlns="urn:jboss:domain:sar:1.0"/>
<subsystem xmlns="urn:jboss:domain:threads:1.0"/>
<subsystem xmlns="urn:jboss:domain:weld:1.0"/>
The presence of each of these turns on a piece of functionality:
|
Name |
Description |
|
EE |
Enables the deployment of .EAR archives. |
|
EJB3 |
Enables the deployment and functionality of EJB 3.1 applications. |
|
JAXRS |
Enables the deployment and functionality of JAX-RS applications. This is implemented by the RestEasy project |
|
Remoting |
Turns on the remoting subsystem, which is used for the management communication and will be what underlies remote JNDI lookups and remote EJB calls in a future release. |
|
Sar |
Enables the deployment of .SAR archives containing MBean services, as supported by previous versions of JBoss Application Server |
|
Threads |
This subsystem is being deprecated and will not be part of the next release |
|
Weld |
Enables the deployment and functionality of CDI applications |
Configuration file history
The management operations may modify the model. When this occurs the xml backing the model is written out again reflecting the latest changes. In addition a full history of the file is maintained. The history of the file goes in a separate directory under the configuration directory.
As mentioned in Command line parameters#parameters the default configuration file can be selected using a command-line parameter. For a standalone server instance the history of the active standalone.xml is kept in jboss.server.config.dir/standalone_xml_history (See Command line parameters#standalone_system_properties for more details). For a domain the active domain.xml and host.xml histories are kept in jboss.domain.config.dir/domain_xml_history and jboss.domain.config.dir/host_xml_history.
The rest of this section will only discuss the history for standalone.xml. The concepts are exactly the same for domain.xml and host.xml.
Within standalone_xml_history itself following a successful first time boot we end up with three new files:
*standalone.initial.xml - This contains the original configuration that was used the first time we successfully booted. This file will never be overwritten. You may of course delete the history directory and any files in it at any stage.
*standalone.boot.xml - This contains the original configuration that was used for the last successful boot of the server. This gets overwritten every time we boot the server successfully.
*standalone.last.xml - At this stage the contents will be identical to standalone.boot.xml
standalone_xml_history contains a directory called current which should be empty. Now if we execute a management operation that modifies the model, for example adding a new system property using the CLI:
[standalone@localhost:9999 /] /system-property=test:add(value="test123")
{"outcome" => "success"}
What happens is:
*The original configuration file is backed up to standalone_xml_history/current/standalone.v1.xml. The next change to the model would result in a file called standalone.v2.xml etc. The 100 most recent of these files are kept.
*The change is applied to the original configuration file
*The changed original configuration file is copied to standalone_xml_history/current/standalone.last.xml
When restarting the server any existing standalone_xml_history/current directory is moved to a new timestamped folder within the standalone_xml_history, and a new current folder is created. These timestamped folders are kept for 30 days.
You can restart the server by using any of the backed up versions by passing in the relative filename under jboss.server.config.dir, for example:
$JBOSS_HOME/bin/standalone.sh --server-config=standalone_xml_history/current/standalone.v1.xml
Snapshots
Each successful boot results in a timestamped version of the original configuration file within the standalone_xml_history/snapshot/ directory. Again the relative name of any of these under jboss.server.config.dir may be used as the argument for --server-config.
You may also take your own snapshots using the CLI:
[standalone@localhost:9999 /] :take-snapshot
{
    "outcome" => "success",
    "result" => {"name" => "/Users/kabir/jboss-7.0.0.CR1/standalone/configuration/standalone_xml_history/snapshot/20110630-172258657standalone.xml"}
}
You can also use the CLI to list all the snapshots
[standalone@localhost:9999 /] :list-snapshots
{
    "outcome" => "success",
    "result" => {
        "directory" => "/Users/kabir/jboss-7.0.0.CR1/standalone/configuration/standalone_xml_history/snapshot",
        "names" => [
            "20110630-165714239standalone.xml",
            "20110630-165821795standalone.xml",
            "20110630-170113581standalone.xml",
            "20110630-171411463standalone.xml",
            "20110630-171908397standalone.xml",
            "20110630-172258657standalone.xml"
        ]
    }
}
To delete a particular snapshot:
[standalone@localhost:9999 /] :delete-snapshot(name="20110630-165714239standalone.xml")
{"outcome" => "success"}
and to delete all snapshots:
[standalone@localhost:9999 /] :delete-snapshot(name="all")
{"outcome" => "success"}
In domain mode executing the snapshot operations against the root node will work against the domain model. To do this for a host model you need to navigate to the host in question:
[domain@localhost:9999 /] /host=master:list-snapshots
{
    "outcome" => "success",
    "result" => {
        "domain-results" => {"step-1" => {
            "directory" => "/Users/kabir/jboss-7.0.0.CR1/domain/configuration/host_xml_history/snapshot",
            "names" => [
                "20110630-141129571host.xml",
                "20110630-172522225host.xml"
            ]
        }},
        "server-operations" => undefined
    }
}
Starting & stopping Servers in a Managed Domain
Starting a standalone server is done through the bin/standalone.sh script. However in a managed domain server instances are managed by the domain controller and need to be started through the management layer:
First of all, get to know which servers are configured on a particular host:
[domain@localhost:9999 /] :read-children-names(child-type=host)
{
   "outcome" => "success",
   "result" => ["local"]
}


[domain@localhost:9999 /] /host=local:read-children-names(child-type=server-config)
{
   "outcome" => "success",
   "result" => [
       "my-server",
       "server-one",
       "server-three"
   ]
}
Now that we know, that there are two servers configured on host "local", we can go ahead and check their status:
[domain@localhost:9999 /] /host=local/server-config=server-one:read-resource(include-runtime=true)
{
   "outcome" => "success",
   "result" => {
       "auto-start" => true,
       "group" => "main-server-group",
       "interface" => undefined,
       "name" => "server-one",
       "path" => undefined,
       "socket-binding-group" => undefined,
       "socket-binding-port-offset" => undefined,
       "status" => "STARTED",
       "system-property" => undefined,
       "jvm" => {"default" => undefined}
   }
}
You can change the server state through the "start" and "stop" operations
[domain@localhost:9999 /] /host=local/server-config=server-one:stop
{
   "outcome" => "success",
   "result" => "STOPPING"
}
Navigating through the domain topology is much more simple when you use the web interface.
Application deployment
Managed Domain
In managed domain deployments are associated with a server group (See "Core Management Concepts"). Deployments will be provided to any server that belongs to a particular group. The domain and host controller components manage the distribution of binaries across network boundaries.
Deployment Commands
The process of distributing deployment binaries involves two steps: You need to upload the deployment to the repository from which the domain controller can distribute its contents. In a second step you need to assign the deployment to one or more server groups:
Using the CLI you can do it one sweep:
[domain@localhost:9999 /] deploy ~/Desktop/test-application.war
Either --all-server-groups or --server-groups must be specified.

[domain@localhost:9999 /] deploy ~/Desktop/test-application.war --all-server-groups
'test-application.war' deployed successfully.

[domain@localhost:9999 /] deploy --help
[...]
After you've uploaded the binary using the "deploy" command, it will be available to the domain controller
and assigned to a server group:
[domain@localhost:9999 /] :read-children-names(child-type=deployment)
{
   "outcome" => "success",
   "result" => [
       "mysql-connector-java-5.1.15.jar",
       "test-application.war"
   ]
}

[domain@localhost:9999 /] /server-group=main-server-group/deployment=test-application.war:read-resource
{
   "outcome" => "success",
   "result" => {
       "enabled" => true,
       "name" => "test-application.war",
       "runtime-name" => "test-application.war"
   }
}
In a similar way it can be removed from the server group:
[domain@localhost:9999 /] undeploy test-application.war --all-relevant-server-groups
Successfully undeployed test-application.war.

[domain@localhost:9999 /] /server-group=main-server-group:read-children-names(child-type=deployment)
{
   "outcome" => "success",
   "result" => []
}
Managing deployments through the web interface provides an alternate, sometimes more simple approach.
Content Repository
Any deployment is referenced from the domain configuration file and stored co-located with the domain controller:
[...]
<deployments>
   <deployment name="test-application.war"
               runtime-name="test-application.war">
       <content sha1="dda9881fa7811b22f1424b4c5acccb13c71202bd"/>
   </deployment>
</deployments>
[...]
<server-groups>
   <server-group name="main-server-group" profile="default">
       [...]
       <deployments>
           <deployment name="test-application.war" runtime-name="test-application.war"/>
       </deployments>
   </server-group>
</server-groups>
[...]
(See domain/configuration/domain.xml)
The actual binaries are stored in the content subdirectory:
ls domain/content/
  |---/47
  |-----95cc29338b5049e238941231b36b3946952991
  |---/dd
  |-----a9881fa7811b22f1424b4c5acccb13c71202bd
Standalone Server
Deployment on a standalone server works similar to the managed domain, just that the server-group associations don't exist.
Deployment Commands
You can rely on the same CLI command as for a managed domain to deploy an application:
[standalone@localhost:9999 /] deploy ~/Desktop/test-application.war
'test-application.war' deployed successfully.

[standalone@localhost:9999 /] undeploy test-application.war
Successfully undeployed test-application.war.
File System Deployments
The standalone/deployments directory in the JBoss Application Server 7 distribution is the location end users can place their deployment content (e.g. war, ear, jar, sar files) to have it automically deployed into the server runtime.
Users, particularly those running production systems, are encouraged to use the JBoss AS 7 management APIs to upload and deploy deployment content instead of relying on the deployment scanner subsystem that periodically scans this directory.
Deployment Modes
The filesystem deployment scanner in JBoss AS 7 and later works differently from previous JBoss AS releases. The scanner can operate in one of two different modes, depending on whether it will directly monitor the deployment content in order to decide to deploy (or redeploy) it.
Auto-deploy mode:
The scanner will directly monitor the deployment content, automatically deploying new content and redeploying content whose timestamp has changed. This is similiar to the behavior of previous AS releases, although there are differences:
-
A change in any file in an exploded deployment triggers redeploy. Because EE 6 applications do not require deployment descriptors,
there is no attempt to monitor deployment descriptors and only redeploy when a deployment descriptor changes. -
The scanner will place marker files in this directory as an indication of the status of its attempts to deploy or undeploy content. These are detailed below.
Manual deploy mode:
The scanner will not attempt to directly monitor the deployment content and decide if or when the end user wishes the content to be deployed. Instead, the scanner relies on a system of marker files, with the user's addition or removal of a marker file serving as a sort of command telling the scanner to deploy, undeploy or redeploy content.
Auto-deploy mode and manual deploy mode can be independently configured for zipped deployment content and exploded deployment content. This is done via the "auto-deploy" attribute on the deployment-scanner element in the standalone.xml configuration file:
<deployment-scanner scan-interval="5000" relative-to="jboss.server.base.dir"
   path="deployments" auto-deploy-zipped="true" auto-deploy-exploded="false"/>
By default, auto-deploy of zipped content is enabled, and auto-deploy of exploded content is disabled. Manual deploy mode is strongly recommended for exploded content, as exploded content is inherently vulnerable to the scanner trying to auto-deploy partially copied content.
Marker Files
The marker files always have the same name as the deployment content to which they relate, but with an additional file suffix appended. For example, the marker file to indicate the example.war file should be deployed is named example.war.dodeploy. Different marker file suffixes have different meanings.
The relevant marker file types are:
|
File |
Purpose |
|
.dodeploy |
Placed by the user to indicate that the given content should |
|
.skipdeploy |
Disables auto-deploy of the content for as long as the file |
|
.isdeploying |
Placed by the deployment scanner service to indicate that it |
|
.deployed |
Placed by the deployment scanner service to indicate that the |
|
.failed |
Placed by the deployment scanner service to indicate that the |
|
.isundeploying |
Placed by the deployment scanner service to indicate that it |
|
.undeployed |
Placed by the deployment scanner service to indicate that the |
|
.pending |
Placed by the deployment scanner service to indicate that it |
Basic workflows:
All examples assume variable $AS points to the root of the JBoss AS 7 distribution.
A) Add new zipped content and deploy it:
-
cp target/example.war/ $AS/standalone/deployments
-
(Manual mode only) touch $AS/standalone/deployments/example.war.dodeploy
B) Add new unzipped content and deploy it:
-
cp -r target/example.war/ $AS/standalone/deployments
-
(Manual mode only) touch $AS/standalone/deployments/example.war.dodeploy
C) Undeploy currently deployed content:
-
rm $AS/standalone/deployments/example.war.deployed
D) Auto-deploy mode only: Undeploy currently deployed content:
-
rm $AS/standalone/deployments/example.war
E) Replace currently deployed zipped content with a new version and deploy it:
-
cp target/example.war/ $AS/standalone/deployments
-
(Manual mode only) touch $AS/standalone/deployments/example.war.dodeploy
F) Manual mode only: Replace currently deployed unzipped content with a new version and deploy it:
-
rm $AS/standalone/deployments/example.war.deployed
-
wait for $AS/standalone/deployments/example.war.undeployed file to appear
-
cp -r target/example.war/ $AS/standalone/deployments
-
touch $AS/standalone/deployments/example.war.dodeploy
G) Auto-deploy mode only: Replace currently deployed unzipped content with a new version and deploy it:
-
touch $AS/standalone/deployments/example.war.skipdeploy
-
cp -r target/example.war/ $AS/standalone/deployments
-
rm $AS/standalone/deployments/example.war.skipdeploy
H) Manual mode only: Live replace portions of currently deployed unzipped content without redeploying:
-
cp -r target/example.war/foo.html $AS/standalone/deployments/example.war
I) Auto-deploy mode only: Live replace portions of currently deployed unzipped content without redeploying:
-
touch $AS/standalone/deployments/example.war.skipdeploy
-
cp -r target/example.war/foo.html $AS/standalone/deployments/example.war
J) Manual or auto-deploy mode: Redeploy currently deployed content (i.e. bounce it with no content change):
-
touch $AS/standalone/deployments/example.war.dodeploy
K) Auto-deploy mode only: Redeploy currently deployed content (i.e. bounce it with no content change):
-
touch $AS/standalone/deployments/example.war
The above examples use Unix shell commands. Windows equivalents are:
cp src dest --> xcopy /y src dest
cp -r src dest --> xcopy /e /s /y src dest
rm afile --> del afile
touch afile --> echo>> afile
Note that the behavior of 'touch' and 'echo' are different but the differences are not relevant to the usages in the examples above.