jar \-uf jdbc-driver.jar META-INF/services/java.sql.Driver
The following chapters will focus on the high level management use cases that are available through the CLI and the web interface. For a detailed description of each subsystem configuration property, please consult the respective component reference.
Schema Location
The configuration schema can found in $JBOSS_HOME/docs/schema.
Data sources
Datasources are configured through the datasource subsystem. Declaring a new datasource consists of two separate steps: You would need to provide a JDBC driver and define a datasource that references the driver you installed.
JDBC Driver Installation
The recommended way to install a JDBC driver into the application server is to simply deploy it as a regular JAR deployment. The reason for this is that when you run your application server in domain mode, deployments are automatically propagated to all servers to which the deployment applies; thus distribution of the driver JAR is one less thing for you to worry about!
Any JDBC 4-compliant driver will automatically be recognized and installed into the system by name and version. A JDBC JAR is identified using the Java service provider mechanism. Such JARs will contain a text a file named META-INF/services/java.sql.Driver, which contains the name of the class(es) of the Drivers which exist in that JAR. If your JDBC driver JAR is not JDBC 4-compliant, it can be made deployable in one of a few ways.
Modify the JAR
The most straightforward solution is to simply modify the JAR and add the missing file. You can do this from your command shell by:
-
Change to, or create, an empty temporary directory.
-
Create a META-INF subdirectory.
-
Create a META-INF/services subdirectory.
-
Create a META-INF/services/java.sql.Driver file which contains one line - the fully-qualified class name of the JDBC driver.
-
Use the jar command-line tool to update the JAR like this:
For a detailed explanation how to deploy JDBC 4 compliant driver jar, please refer to the chapter "Application Deployment".
Datasource Definitions
The datasource itself is defined within the subsystem datasources:
<subsystem xmlns="urn:jboss:domain:datasources:1.0">
    <datasources>
        <datasource jndi-name="java:jboss/datasources/ExampleDS" pool-name="ExampleDS">
            <connection-url>jdbc:h2:mem:test;DB_CLOSE_DELAY=-1</connection-url>
            <driver>h2</driver>
            <pool>
                <min-pool-size>10</min-pool-size>
                <max-pool-size>20</max-pool-size>
                <prefill>true</prefill>
            </pool>
            <security>
                <user-name>sa</user-name>
                <password>sa</password>
            </security>
        </datasource>
        <xa-datasource jndi-name="java:jboss/datasources/ExampleXADS" pool-name="ExampleXADS">
           <driver>h2</driver>
           <xa-datasource-property name="URL">jdbc:h2:mem:test</xa-datasource-property>
           <xa-pool>
                <min-pool-size>10</min-pool-size>
                <max-pool-size>20</max-pool-size>
                <prefill>true</prefill>
           </xa-pool>
           <security>
                <user-name>sa</user-name>
                <password>sa</password>
           </security>
        </xa-datasource>
        <drivers>
            <driver name="h2" module="com.h2database.h2">
                <xa-datasource-class>org.h2.jdbcx.JdbcDataSource</xa-datasource-class>
            </driver>
        </drivers>
  </datasources>

</subsystem>
(See standalone/configuration/standalone.xml)
As you can see the datasource references a driver by it's logical name.
You can easily query the same information through the CLI:
[standalone@localhost:9999 /] /subsystem=datasources:read-resource(recursive=true)
{
    "outcome" => "success",
    "result" => {
        "data-source" => {"java:/H2DS" => {
            "connection-url" => "jdbc:h2:mem:test;DB_CLOSE_DELAY=-1",
            "jndi-name" => "java:/H2DS",
            "driver-name" => "h2",
            "pool-name" => "H2DS",
            "use-java-context" => true,
            "enabled" => true,
            "jta" => true,
            "pool-prefill" => true,
            "pool-use-strict-min" => false,
            "user-name" => "sa",
            "password" => "sa",
            "flush-strategy" => "FailingConnectionOnly",
            "background-validation" => false,
            "use-fast-fail" => false,
            "validate-on-match" => false,
            "use-ccm" => true
        }},
        "xa-data-source" => undefined,
        "jdbc-driver" => {"h2" => {
            "driver-name" => "h2",
            "driver-module-name" => "com.h2database.h2",
            "driver-xa-datasource-class-name" => "org.h2.jdbcx.JdbcDataSource"
        }}
    }
}


[standalone@localhost:9999 /] /subsystem=datasources:installed-drivers-list
{
    "outcome" => "success",
    "result" => [{
        "driver-name" => "h2",
        "deployment-name" => undefined,
        "driver-module-name" => "com.h2database.h2",
        "module-slot" => "main",
        "driver-xa-datasource-class-name" => "org.h2.jdbcx.JdbcDataSource",
        "driver-class-name" => "org.h2.Driver",
        "driver-major-version" => 1,
        "driver-minor-version" => 2,
        "jdbc-compliant" => true
    }]
}
Using the web console or the CLI greatly simplifies the deployment of JDBC drivers and the creation of datasources.
The CLI offers a set of commands to create and modify datasources:
[standalone@localhost:9999 /] help
Supported commands:

 [...]

 data-source             - allows to add new, modify and remove existing data sources
 xa-data-source          - allows add new, modify and remove existing XA data sources

For a more detailed description of a specific command,
execute the command with '--help' as the argument.
Component Reference
The datasource subsystem is provided by the IronJacamar project. For a detailed description of the available configuration properties, please consult the project documentation.
-
IronJacamar homepage: http://www.jboss.org/ironjacamar
-
Project Documentation: http://www.jboss.org/ironjacamar/docs
-
Schema description: http://docs.jboss.org/ironjacamar/userguide/1.0/en-US/html/deployment.html#deployingds_descriptor
Messaging
The JMS server configuration is done through the messaging subsystem. In this chapter we are going outline the frequently used configuration options. For a more detailed explanation please consult the HornetQ user guide (See "Component Reference").
Connection Factories
The JMS connection factories can be split into two kinds: In-VM connections and connections factories that can be used by remote clients. Each connection factory does reference a connector declaration, that is associated with a socket binding. The connection factory entry declaration specifies the JNDI name under which the factory will be exposed.
<subsystem xmlns="urn:jboss:domain:messaging:1.0">
   [...]
<connectors>
   <in-vm-connector name="in-vm" server-id="0"/>
   <netty-connector name="netty" socket-binding="messaging"/>
   <netty-connector name="netty-throughput" socket-binding="messaging-throughput">
       <param key="batch-delay" value="50"/>
   </netty-connector>
</connectors>
   [...]
<jms-connection-factories>
   <connection-factory name="InVmConnectionFactory">
       <connectors>
           <connector-ref connector-name="in-vm"/>
       </connectors>
       <entries>
           <entry name="java:/ConnectionFactory"/>
       </entries>
   </connection-factory>
   <connection-factory name="RemoteConnectionFactory">
       <connectors>
           <connector-ref connector-name="netty"/>
       </connectors>
       <entries>
           <entry name="RemoteConnectionFactory"/>
       </entries>
   </connection-factory>
   <pooled-connection-factory name="hornetq-ra">
       <connectors>
           <connector-ref connector-name="in-vm"/>
       </connectors>
       <entries>
           <entry name="java:/JmsXA"/>
       </entries>
   </pooled-connection-factory>
</jms-connection-factories>
[...]
</subsystem>
(See standalone/configuration/standalone.xml)
Queues and Topics
Queues and topics are sub resources of the messaging subsystem.
Each entry refers to a JNDI name of the queue or topic:
<subsystem xmlns="urn:jboss:domain:messaging:1.0">
   [...]
   <jms-destinations>
       <jms-queue name="testQueue">
           <entry name="queue/test"/>
       </jms-queue>
       <jms-topic name="testTopic">
           <entry name="topic/test"/>
       </jms-topic>
   </jms-destinations>
</subsystem>
(See standalone/configuration/standalone.xml)
JMS endpoints can easily be created through the CLI:
[standalone@localhost:9999 /] add-jms-queue --name=myQueue --entries=queues/myQueue
[standalone@localhost:9999 /] /subsystem=messaging/jms-queue=myQueue:read-resource
{
   "outcome" => "success",
   "result" => {"entries" => ["queues/myQueue"]},
   "compensating-operation" => undefined
}
A number of additional commands to maintain the JMS subsystem are available as well:
[standalone@localhost:9999 /] help
Supported commands:

[...]
add-jms-queue           - creates a new JMS queue
remove-jms-queue        - removes an existing JMS queue
add-jms-topic           - creates a new JMS topic
remove-jms-topic        - removes an existing JMS topic
add-jms-cf              - creates a new JMS connection factory
remove-jms-cf           - removes an existing JMS connection factory

For a more detailed description of a specific command,
execute the command with '--help' as the argument.
Dead Letter & Redelivery
Some of the settings are applied against an address wild card instead of a specific messaging destination. The dead letter queue and redelivery settings belong into this group:
<subsystem xmlns="urn:jboss:domain:messaging:1.0">
[...]
<address-settings>
   <address-setting match="#">
       <dead-letter-address>
           jms.queue.DLQ
       </dead-letter-address>
       <expiry-address>
           jms.queue.ExpiryQueue
       </expiry-address>
       <redelivery-delay>
           0
       </redelivery-delay>
       [...]
   </address-setting>
</address-settings>
[...]
</subsystem>
(See standalone/configuration/standalone.xml)
Security Settings
Security constraints are matched against an address wildcard, similar to the DLQ and redelivery settings.
<subsystem xmlns="urn:jboss:domain:messaging:1.0">
[...]
<security-settings>
   <security-setting match="#">
       <permission type="send" roles="guest"/>
       <permission type="consume" roles="guest"/>
       <permission type="createNonDurableQueue" roles="guest"/>
       <permission type="deleteNonDurableQueue" roles="guest"/>
   </security-setting>
</security-settings>
[...]
</subsystem>
(See standalone/configuration/standalone.xml)
Component Reference
The messaging subsystem is provided by the HornetQ project. Fo a detailed description of the available configuration properties, please consult the project documentation.
-
HornetQ homepage: http://www.jboss.org/hornetq
-
Project Documentation: http://www.jboss.org/hornetq/docs
Web
The web subsystem configuration basically consists of three parts: The JSP Configuration, connectors and virtual servers. Advanced topics like load balancing and failover are covered on the "High Availability Guide". The default configuration does is suitable for most use cases and provides reasonable performance settings.
Required extension:
<extension module="org.jboss.as.web" />
Basic subsystem configuration example:
  <subsystem xmlns="urn:jboss:domain:web:1.0" default-virtual-server="default-host">
      <connector name="http" scheme="http" protocol="HTTP/1.1" socket-binding="http"/>
      <virtual-server name="default-host" enable-welcome-root="true">
         <alias name="localhost" />
         <alias name="example.com" />
      </virtual-server>
   </subsystem>
Dependencies on other subsystems:
None
Container configuration
JSP Configuration
The "configuration" subresource covers all aspects that relate to the configuration of the servlet engine itself. For a detailed explanation of each configuration attribute, please consult the JBossWeb documentation (See "Component Reference").
[standalone@localhost:9999 /] /subsystem=web:read-resource
{
    "outcome" => "success",
    "result" => {
        "configuration" => {
            "static-resources" => {
                "sendfile" => 49152,
                "max-depth" => 3,
                "read-only" => true,
                "webdav" => false,
                "listings" => false,
                "disabled" => false
            },
            "jsp-configuration" => {
                "development" => false,
                "keep-generated" => true,
                "recompile-on-fail" => false,
                "check-interval" => 0,
                "modification-test-interval" => 4,
                "display-source-fragment" => true,
                "error-on-use-bean-invalid-class-attribute" => false,
                "java-encoding" => "UTF8",
                "tag-pooling" => true,
                "generate-strings-as-char-arrays" => false,
                "target-vm" => "1.5",
                "dump-smap" => false,
                "mapped-file" => true,
                "disabled" => false,
                "source-vm" => "1.5",
                "trim-spaces" => false,
                "smap" => true
            }
        },
        "connector" => {"http" => undefined},
        "virtual-server" => {"localhost" => undefined}
    }
}
(See standalone/configuration/standalone.xml)
Connector configuration
The connectors are child resources of the subsystem web. Each connector does reference a particular socket binding:
[standalone@localhost:9999 /] /subsystem=web:read-children-names(child-type=connector)
{
    "outcome" => "success",
    "result" => ["http"]
}

[standalone@localhost:9999 /] /subsystem=web/connector=http:read-resource(recursive=true)
{
    "outcome" => "success",
    "result" => {
        "protocol" => "HTTP/1.1",
        "scheme" => "http",
        "socket-binding" => "http",
        "ssl" => undefined,
        "virtual-server" => undefined
    }
}
Creating a new connector requires you to declare a new socket binding first:
[standalone@localhost:9999 /] /socket-binding-group=standard-sockets/socket-binding=custom:add(port=8181)
The newly created, unused socket binding can then be used to create a new connector configuration:
[standalone@localhost:9999 /] /subsystem=web/connector=test-connector:add(
               socket-binding=custom, scheme=http, protocol="HTTP/1.1", enabled=true
               )
Statistic information can be displayed from the connectors:
The following attributes can be queried:
|
value |
description |
|
bytesSent |
Number of byte sent by the connector |
|
bytesReceived |
Number of byte received by the connector (POST data). |
|
processingTime |
Processing time used by the connector. Im milli-seconds. |
|
errorCount |
Number of error that occurs when processing requests by the connector. |
|
maxTime |
Max time spent to process a request. |
|
requestCount |
Number of requests processed by the connector. |
For example:
[standalone@localhost:9999 /] /subsystem=web/connector=http:read-attribute(name=bytesSent, name=requestCount)
{
    "outcome" => "success",
    "result" => "3"
}
There are 3 different connectors available:
HTTP Connectors
This one is the default connector, it runs usually on port 8080. See above how to configure it.
HTTPS Connectors
The HTTPS connectors are child resources of the subsystem web. By default they use JSSE. Each connector does reference a particular socket binding:
[standalone@localhost:9999 /] /subsystem=web:read-children-names(child-type=connector)
{
    "outcome" => "success",
    "result" => [
        "ajp",
        "http",
        "https"
    ]
}
[standalone@localhost:9999 /] /subsystem=web/connector=https:read-resource(recursive=true)
{
    "outcome" => "success",
    "result" => {
        "protocol" => "HTTP/1.1",
        "scheme" => "https",
        "secure" => true,
        "socket-binding" => "https",
        "ssl" => {},
        "virtual-server" => undefined
    }
}
Creating a new connector may require you to declare a new socket binding first:
[standalone@localhost:9999 /] /socket-binding-group=standard-sockets/socket-binding=https:add(port=8443)
The newly created, unused socket binding can then be used to create a new connector configuration:
[standalone@localhost:9999 /] /subsystem=web/connector=test-connector:add(socket-binding=https, scheme=https, protocol="HTTP/1.1", enabled=true, ssl = {})
The default for SSL is to use Alias "tomcat" and password "changeit". It is possible to create the corresponding keystore using keytool:
keytool -genkey -alias tomcat -keyalg RSA
Of course specify a password value of "changeit".
AJP Connectors
The AJP connectors are child resources of the subsystem web. They are used with mod_jk, mod_proxy and mod_cluster of the Apache httpd front-end. Each connector does reference a particular socket binding:
[standalone@localhost:9999 /] /subsystem=web:read-children-names(child-type=connector)
{
    "outcome" => "success",
    "result" => [
        "ajp",
        "http"
    ]
}
[standalone@localhost:9999 /] /subsystem=web/connector=ajp:read-resource(recursive=true)
{
    "outcome" => "success",
    "result" => {
        "enable-lookups" => false,
        "enabled" => true,
        "max-post-size" => 2097152,
        "max-save-post-size" => 4096,
        "protocol" => "AJP/1.3",
        "redirect-port" => 8443,
        "scheme" => "http",
        "secure" => false,
        "socket-binding" => "ajp",
        "ssl" => undefined,
        "virtual-server" => undefined
    }
}
Creating a new connector requires you to declare a new socket binding first:
[standalone@localhost:9999 /] /socket-binding-group=standard-sockets/socket-binding=ajp:add(port=8009)
The newly created, unused socket binding can then be used to create a new connector configuration:
[standalone@localhost:9999 /] /subsystem=web/connector=ajp:add(socket-binding=ajp, protocol="AJP/1.3", enabled=true)
Native Connectors
Native connectors are high performance connectors based on Tomcat native. They are used if the native modules are installed, a lot of distributions have it included, in case you don't have it try JBoss Web Native.
At a configuration level only the SSL part needs to be configured differently because it use OpenSSL.
[standalone@localhost:9999 /] /subsystem=web/connector=https:read-resource(recursive=true)
{
    "outcome" => "success",
    "result" => {
        "protocol" => "HTTP/1.1",
        "scheme" => "https",
        "secure" => true,
        "socket-binding" => "https",
        "ssl" => {
            "certificate-file" => "/home/jfclere/CERTS/SERVER/newcert.pem",
            "certificate-key-file" => "/home/jfclere/CERTS/SERVER/newkey.pem",
            "password" => "xxxxxxx"
        },
        "virtual-server" => undefined
    }
}
Virtual-Server configuration
Similar to the connectors, the virtual server declarations are child resources of the web subsystem. They will be referenced by alias names and can optionally refer to a default web application that acts serves the root web context.
[standalone@localhost:9999 /] /subsystem=web:read-children-names(child-type=virtual-server)
{
    "outcome" => "success",
    "result" => ["localhost"]
}

[standalone@localhost:9999 /] /subsystem=web/virtual-server=default-host:read-resource
{
    "outcome" => "success",
    "result" => {
        "access-log" => undefined,
        "alias" => ["example.com"],
        "default-web-module" => undefined,
        "enable-welcome-root" => true,
        "rewrite" => undefined
    }
}
Adding a virtual server declaration is can be done through the default :add() operation
[standalone@localhost:9999 /] /subsystem=web/virtual-server=example.com:add

[standalone@localhost:9999 /] /subsystem=web/virtual-server=example.com:remove
add/remove operations exists on any node in the configuration tree.
Component Reference
The web subsystem is provided by the JBossWeb project. Fo a detailed description of the available configuration properties, please consult the JBossWeb documentation.
-
JBoss Web Configuration Reference: http://docs.jboss.org/jbossweb/7.0.x/config/index.html
-
JBossWeb homepage: http://www.jboss.org/jbossweb
-
Project Documentation: http://docs.jboss.org/jbossweb/7.0.x/
Web services
Web service endpoint are exposed through the deployments that provide endpoint implementation. Thus they can be queried as deployment resources. For further information please consult the chapter "Application Deployment". Each web service endpoint specifies a web context and a WSDL Url:
[standalone@localhost:9999 /] /deployment="*"/subsystem=webservices/endpoint="*":read-resource
{
   "outcome" => "success",
   "result" => [{
       "address" => [
           ("deployment" => "jaxws-samples-handlerchain.war"),
           ("subsystem" => "webservices"),
           ("endpoint" => "jaxws-samples-handlerchain:TestService")
       ],
       "outcome" => "success",
       "result" => {
           "class" => "org.jboss.test.ws.jaxws.samples.handlerchain.EndpointImpl",
           "context" => "jaxws-samples-handlerchain",
           "name" => "TestService",
           "type" => "JAXWS_JSE",
           "wsdl-url" => "http://localhost:8080/jaxws-samples-handlerchain?wsdl"
       }
   }]
}
Component Reference
The web service subsystem is provided by the JBossWS project. Fo a detailed description of the available configuration properties, please consult the project documentation.
-
JBossWS homepage: http://www.jboss.org/jbossws
-
Project Documentation: https://docs.jboss.org/author/display/JBWS
Logging
The overall server logging configuration is represented by the logging subsystem. It consists of three notable parts: handler configurations, logger and the root logger declarations (aka log categories). Each logger does reference a handler (or set of handlers). Each handler declares the log format and output:
<subsystem xmlns="urn:jboss:domain:logging:1.0">
   <console-handler name="CONSOLE" autoflush="true">
       <level name="DEBUG"/>
       <formatter>
           <pattern-formatter pattern="%d{HH:mm:ss,SSS} %-5p [%c] (%t) %s%E%n"/>
       </formatter>
   </console-handler>
   <periodic-rotating-file-handler name="FILE" autoflush="true">
       <level name="INFO"/>
       <formatter>
           <pattern-formatter pattern="%d{HH:mm:ss,SSS} %-5p [%c] (%t) %s%E%n"/>
       </formatter>
       <file relative-to="jboss.server.log.dir" path="server.log"/>
       <suffix value=".yyyy-MM-dd"/>
   </periodic-rotating-file-handler>
   <logger category="com.arjuna">
       <level name="WARN"/>
   </logger>
   [...]
   <root-logger>
       <level name="DEBUG"/>
       <handlers>
           <handler name="CONSOLE"/>
           <handler name="FILE"/>
       </handlers>
   </root-logger>
</subsystem>
Default Log File Locations
Managed Domain
In a managed domain two types of log files do exist: Controller and server logs. The controller components govern the domain as whole. It's their responsibility to start/stop server instances and execute managed operations throughout the domain. Server logs contain the logging information for a particular server instance. They are co-located with the host the server is running on.
For the sake of simplicity we look at the default setup for managed domain. In this case, both the domain controller components and the servers are located on the same host:
|
Process |
Log File |
|
Host Controller |
./domain/log/host-controller/boot.log |
|
Process Controller |
./domain/log/process-controller/boot.log |
|
"Server One" |
./domain/servers/server-one/log/boot.log |
|
"Server One" |
./domain/servers/server-one/log/server.log |
|
"Server Three" |
./domain/servers/server-three/log/boot.log |
|
"Server Three" |
./domain/servers/server-three/log/server.log |
The server logs as you know it from previous JBoss AS versions are located in the servers subdirectory: I.e. ./domain/servers/server-three/log/server.log
Standalone Server
The default log files for a standalone server can be found in the log subdirectory of the distribution:
|
Process |
Log File |
|
Server |
./standalone/log/boot.log |
|
Server |
./standalone/log/server.log |
JMX
The JMX subsystem sets up a JMX connector so that invocations can be done on the JMX MBean server from outside the JVM
<subsystem xmlns="urn:jboss:domain:jmx:1.0">
    <jmx-connector registry-binding="jmx-connector-registry"
        server-binding="jmx-connector-server"/>
</subsystem>
...
<socket-binding-group name="standard-sockets" default-interface="public">
    ...
    <socket-binding name="jmx-connector-registry" port="1090"/>
    <socket-binding name="jmx-connector-server" port="1091"/>
    ...
</socket-binding-group>
To use the connector you can access it in the standard way:
import javax.management.MBeanServerConnection;
import javax.management.remote.JMXConnector;
import javax.management.remote.JMXConnectorFactory;
import javax.management.remote.JMXServiceURL;

public class JMXExample {

    public static void main(String[] args) throws Exception {
        //Get a connection to the JBoss AS MBean server on localhost
        String host = "localhost";
        int port = 1090;
        String urlString = System.getProperty("jmx.service.url",
            "service:jmx:rmi:///jndi/rmi://" + host + ":" + port + "/jmxrmi");
        JMXServiceURL serviceURL = new JMXServiceURL(urlString);
        JMXConnector jmxConnector = JMXConnectorFactory.connect(serviceURL, null);
        MBeanServerConnection connection = jmxConnector.getMBeanServerConnection();

        //Invoke on the JBoss AS MBean server
        int count = connection.getMBeanCount();
        System.out.println(count);
    }
}
You can also connect using jconsole. In addition to the standard JVM MBeans, the JBoss AS 7 MBean server contains the following MBeans:
|
JMX ObjectName |
Description |
|
jboss.msc:type=container,name=jboss-as |
Exposes management operations on the JBoss Modular Service Container, which is the dependency injection framework at the heart of JBoss AS 7. It is useful for debugging dependency problems, for example if you are integrating your own subsystems, as it exposes operations to dump all services and their current states |
|
jboss.naming:type=JNDIView |
Shows what is bound in JNDI |
|
jboss.modules:type=ModuleLoader,name=* |
This collection of MBeans exposes management operations on JBoss Modules classloading layer. It is useful for debugging dependency problems arising from missing module dependencies |
OSGi
Old Documentation
This documentation applies to AS 7.0 only and has been superceded by documentation that can be found
in the JBoss OSGi Documentation Pages.
OSGi functionality in JBoss AS 7 is provided through the OSGi subsystem.
More information on the OSGi component in JBoss AS 7 can be found on the JBoss OSGi project pages.
The OSGi subsystem can be configured in its section in the JBoss AS 7 configuration XML file.
<subsystem xmlns="urn:jboss:domain:osgi:1.0" activation="lazy">
    <configuration>...</configuration>
    <properties>...</properties>
    <modules>...</modules>
</subsystem>
The following items can be configured:
-
OSGi CAS (Configuration Admin Service) Configuration Information
Subsystem Attributes
|
Attribute |
Description |
|
activation |
When set to lazy the OSGi subsystem will not get activated until the first OSGi bundle deployment. When set to eager the OSGi subsystem will be activated at startup of the Application Server. |
Configuration Admin
The OSGi Configuration Admin Service (CAS) is a standard service aimed at configuring OSGi-based applications. Many OSGi applications use the CAS to configure themselves.
The OSGi subsystem configuration allows for the specification of CAS configuration information, to configure bundles written for this specification (chapter 104 in the OSGi 4.2 Compendium Specification)
To add CAS configuration information, add <configuration> tags to the OSGi subsystem configuration. For example, the following is used to configure the context root where the Felix Web Console appears:
<subsystem xmlns="urn:jboss:domain:osgi:1.0" activation="lazy">
    <configuration pid="org.apache.felix.webconsole.internal.servlet.OsgiManager">
        <property name="manager.root">jboss-osgi</property>
    </configuration>
....
Configuration information consists of a <configuration> tag specifying a PID (Persistent Identifier) attribute which identifies the system to be configured. The configuration tag can contain any number of embedded <property> tags which hold the configuration information for this PID.
Framework Properties
OSGi Framework properties are specified as embedded <property> elements in the <properties> tag.
<properties>
  <property name="org.jboss.osgi.system.modules">
    org.apache.commons.logging,
    org.apache.log4j,
    org.jboss.as.osgi,
    org.slf4j,
  </property>
  <property name="org.osgi.framework.system.packages.extra">
    org.apache.commons.logging;version=1.1.1,
    org.apache.log4j;version=1.2,
    org.jboss.as.osgi.service;version=7.0,
    org.jboss.osgi.deployment.interceptor;version=1.0,
    org.jboss.osgi.spi.capability;version=1.0,
    org.jboss.osgi.spi.util;version=1.0,
    org.jboss.osgi.testing;version=1.0,
    org.jboss.osgi.vfs;version=1.0,
    org.slf4j;version=1.5.10,
  </property>
  <property name="org.osgi.framework.startlevel.beginning">1</property>
</properties>
The following properties are specified:
|
Property |
Description |
|
org.jboss.osgi.system.modules |
A comma-separated list of module identifiers. Each system module is added as a dependency to the OSGi framework module. The packages from these system modules can be made visible as framework system packages by adding them to the org.osgi.framework.system.packages.extra property. |
|
org.osgi.framework.system.packages.extra |
Extra packages which the system bundle must export from the current execution environment. |
|
org.osgi.framework.startlevel.beginning |
The beginning start level of the OSGi Framework. This also influences which modules are pre-loaded. See the modules section. |
Additional OSGi Framework properties can be specified. For more information on OSGi Framework properties see the OSGi 4.2 Core Specification.
Modules
JBoss AS 7 comes with a repository of modules and OSGi bundles that can be automatically loaded at startup. JBoss-Modules compliant modules can be found in the modules/ directory and OSGi bundles can be found in the bundles/ directory. In the <modules> section of the XML configuration both JBoss-Modules as well as OSGi Bundles can be specified.
OSGi Bundles can also be started automatically at startup. This is specified with the startlevel attribute. The default start level of the OSGi Framework is 1. To enable additional functionality in the OSGi Framework, increase the org.osgi.framework.startlevel.beginning framework property.
Note that these modules don't trigger the activation of the OSGi subsystem. Once the subsystem is activated as described above, these modules and bundles will be automatically loaded and optionally started.
<modules>
    <!-- modules registered with the OSGi layer on startup -->
    <module identifier="javaee.api"/>
    <module identifier="org.jboss.logging"/>
    <!-- bundles installed on startup -->
    <module identifier="org.apache.aries.util"/>
    <module identifier="org.jboss.osgi.webconsole"/>
    <module identifier="org.osgi.compendium"/>
    <!-- bundles started in startlevel 1 -->
    <module identifier="org.apache.felix.log" startlevel="1"/>
    <module identifier="org.jboss.osgi.logging" startlevel="1"/>
    <module identifier="org.apache.felix.configadmin" startlevel="1"/>
    <module identifier="org.jboss.as.osgi.configadmin" startlevel="1"/>
    <!-- bundles started in startlevel 2 -->
    <module identifier="org.apache.aries.jmx" startlevel="2"/>
    <module identifier="org.apache.felix.eventadmin" startlevel="2"/>
    <module identifier="org.apache.felix.metatype" startlevel="2"/>
    <module identifier="org.apache.felix.webconsole" startlevel="2"/>
    <module identifier="org.jboss.osgi.jmx" startlevel="2"/>
    <module identifier="org.jboss.osgi.http" startlevel="2"/>
    <!-- bundles started in startlevel 3 -->
    <module identifier="org.jboss.osgi.blueprint" startlevel="3"/>
    <module identifier="org.jboss.osgi.webapp" startlevel="3"/>
    <module identifier="org.jboss.osgi.xerces" startlevel="3"/>
</modules>
The following modules and bundles are listed in the default configuration.
|
Module Identifier |
Description |
|
javaee.api |
Provides JavaEE APIs. |
|
org.apache.aries.jmx |
Provides JMX support to OSGi as described in chapter 124 of the OSGi 4.2 Enterprise Specification. For more information see Using JMX below. |
|
org.apache.aries.util |
Needed by the Aries JMX bundle. |
|
org.apache.felix.configadmin |
An implementation of the OSGi Configuration Admin specificaton. Chapter 104 in the OSGi 4.2 Compendium Specification. |
|
org.apache.felix.eventadmin |
An implementation of the OSGi Event Admin specification. Chapter 113 in the OSGi 4.2 Compendium Specification. |
|
org.apache.felix.log |
An implementation of the OSGi Log Service specification. Chapter 101 in the OSGi 4.2 Compendium Specification. |
|
org.apache.felix.metatype |
An implementation of the OSGi Metatype Service specification. Chapter 105 in the OSGi 4.2 Compendium Specification. |
|
org.apache.felix.webconsole |
The Felix Web Console. For more information see Using the Felix Web Console below. |
|
org.jboss.as.osgi.configadmin |
Component providing the OSGi Configuration Admin Service with information from the OSGi subsystem configuration. |
|
org.jboss.logging |
The JBoss Logging Framework. |
|
org.jboss.osgi.blueprint |
An implementation of the OSGi Blueprint Specification. Blueprint is a component model and IoC specification for OSGi which significantly simplifies the use of OSGi services. It can be found in chapter 121 in the OSGi 4.2 Enterprise Specification. |
|
org.jboss.osgi.http |
An implementation of the OSGi Http Service. Chapter 102 in the OSGi 4.2 Compendium Specification. The port used by this implementation is set by default to <socket-binding name="osgi-http" port="8090"/> in the socket-binding-group. |
|
org.jboss.osgi.jmx |
Enhanced JMX API, the MBeans can be found under jboss.osgi. |
|
org.jboss.osgi.logging |
Sends log messages sent to the OSGi Log Service to JBoss Logging. |
|
org.jboss.osgi.webapp |
OSGi Support for Web Apps, as described in chapter 128 in the OSGi 4.2 Compendium Specification. |
|
org.jboss.osgi.webconsole |
Customizations of the Felix Web Console. |
|
org.jboss.osgi.xerces |
An implementation of the OSGi XML Parser specification. Chapter 702 in the OSGi 4.2 Compendium Specification. |
|
org.osgi.compendium |
A bundle providing the APIs defined by the OSGi Compendium Specification. |
Using the Felix Web Console
For fine-grained management of the OSGi Framework, the Apache Felix Web Console can be used. This web console is shipped as part of JBoss AS 7 and is specifically aimed at fine-grained control of the OSGi Framework.
The Web Console is not enabled by default. The relevant modules are marked as having startlevel=2, so to enable the web console set the initial framework start level to 2 or higher:
<properties>
  ... other properties ...
  <property name="org.osgi.framework.startlevel.beginning">2</property>
</properties>
By default the console appears on http://localhost:8090/jboss-osgi with as username and password admin/admin. This can be configured through the OSGi Configuration Admin Service configuration.
<subsystem xmlns="urn:jboss:domain:osgi:1.0">
  <configuration pid="org.apache.felix.webconsole.internal.servlet.OsgiManager">
    <property name="manager.root">jboss-osgi</property>
    <property name="username">myusername</property>
    <property name="password">mypassword</property>
  </configuration>
  ...
Start JBoss AS 7 and make sure the OSGi Framework is active; the framework can be activated by deploying an OSGi bundle into JBoss AS 7 or by setting its activation mode to eager.
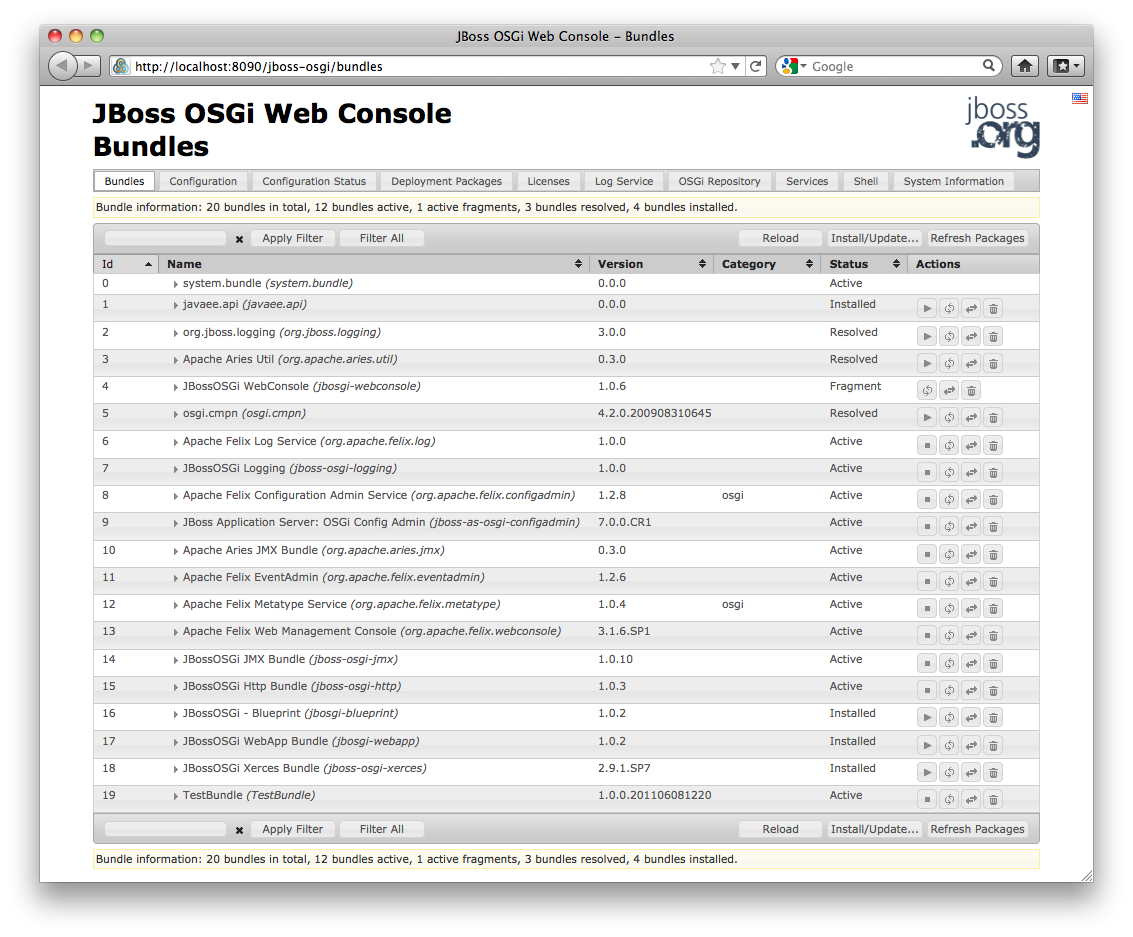
Then open a web browser and access: http://localhost:8090/jboss-osgi. A log-in dialog appears. Enter the password configured or the default username and password: admin/admin and the web console will appear:
Using JMX
The OSGi Framework exposes a number of JMX MBeans that enable remote control of the framework. Both the MBeans that are defined in chapter 124 of the OSGi 4.2 Enterprise Specification as well as JBoss-extended MBeans are available.
The JMX support is not enabled by default. The relevant modules are marked as having startlevel=2, so to enable JMX set the initial framework start level to 2 or higher:
<properties>
  ... other properties ...
  <property name="org.osgi.framework.startlevel.beginning">2</property>
</properties>
Start JBoss AS 7 and make sure the OSGi Framework is active; the framework can be activated by deploying an OSGi bundle into JBoss AS 7 or by setting its activation mode to eager.
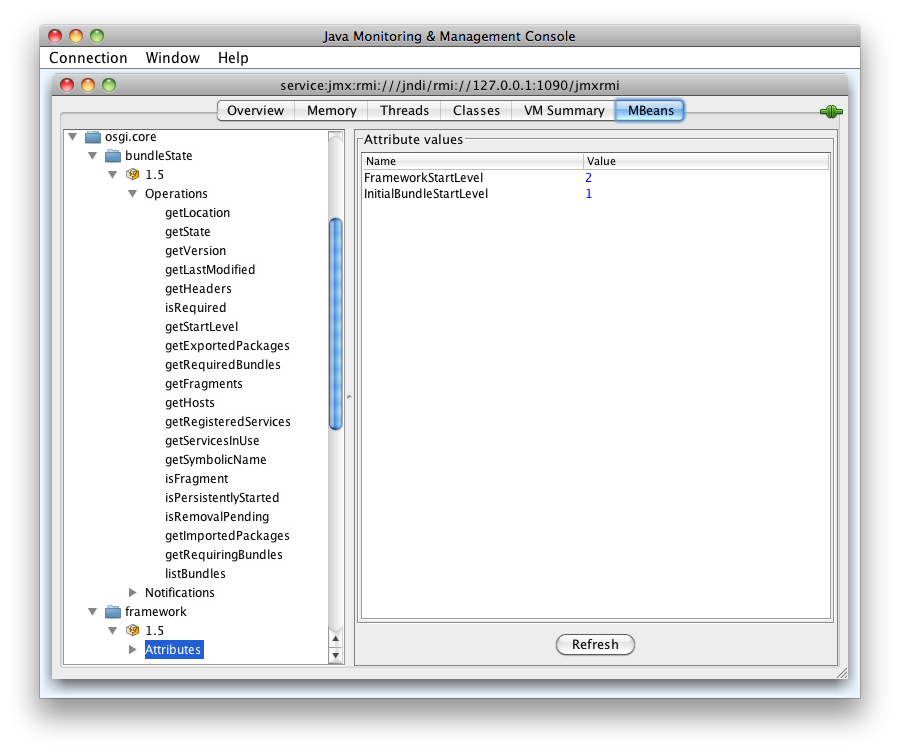
The JMX functionality can now be accessed through a JMX console, for instance jconsole which ships with the JDK:

Connect using the Remote Process URL service:jmx:rmi:///jndi/rmi://127.0.0.1:1090/jmxrmi. (You can also connect directly to the Local Process, the one that starts with jboss-modules.jar -mp ...)
When the connection is established navigate to the MBeans tab to interact with the OSGi MBeans.
Deployment Scanner
The deployment scanner is only used in standalone mode. Its job is to monitor a directory for new files and to deploy those files. It can be found in standalone.xml:
<subsystem xmlns="urn:jboss:domain:deployment-scanner:1.0">
   <deployment-scanner scan-interval="5000"
      relative-to="jboss.server.base.dir" path="deployments" />
</subsystem>
The subsystem can be removed complete from the standalone configuration, e.g. for security reasons. In this case all deployments are only possible via CLI or Console as in the domain mode.
You can define more deployment-scanner entries, by using different name identifier, to scan for deployments from more locations. The configuration showed will scan the $JBOSS_HOME/standalone/deployments directory every five seconds. The runtime model is shown below, and uses default values for attributes not specified in the xml:
[standalone@localhost:9999 /] /subsystem=deployment-scanner:read-resource(recursive=true)
{
    "outcome" => "success",
    "result" => {"scanner" => {"default" => {
        "auto-deploy-exploded" => false,
        "auto-deploy-zipped" => true,
        "deployment-timeout" => 60L,
        "name" => "default",
        "path" => "deployments",
        "relative-to" => "jboss.server.base.dir",
        "scan-enabled" => true,
        "scan-interval" => 5000
    }}}
}
The attributes are
|
Name |
Type |
Description |
|
name |
STRING |
The name of the scanner. default is used if not specified |
|
path |
STRING |
The actual filesystem path to be scanned. Treated as an absolute path, unless the 'relative-to' attribute is specified, in which case the value is treated as relative to that path. |
|
relative-to |
STRING |
Reference to a filesystem path defined in the "paths" section of the server configuration, or one of the system properties specified on startup. In the example above jboss.server.base.dir resolves to {{$JBOSS_HOME/standalone |
|
scan-enabled |
BOOLEAN |
If true scanning is enabled |
|
scan-interval |
INT |
Periodic interval, in milliseconds, at which the repository should be scanned for changes. A value of less than 1 indicates the repository should only be scanned at initial startup. |
|
auto-deploy-zipped |
BOOLEAN |
Controls whether zipped deployment content should be automatically deployed by the scanner without requiring the user to add a .dodeploy marker file. |
|
auto-deploy-exploded |
BOOLEAN |
Controls whether exploded deployment content should be automatically deployed by the scanner without requiring the user to add a .dodeploy marker file. Setting this to 'true' is not recommended for anything but basic development scenarios, as there is no way to ensure that deployment will not occur in the middle of changes to the content. |
|
deployment-timeout |
LONG |
Timeout, in seconds, a deployment is allows to execute before being canceled. The default is 60 seconds. |
Deployment scanners can be added by modifying standalone.xml before starting up the server or they can be added and removed at runtime using the CLI
[standalone@localhost:9999 /] /subsystem=deployment-scanner/scanner=new:add(scan-interval=10000,relative-to="jboss.server.base.dir",path="other-deployments")
{"outcome" => "success"}
[standalone@localhost:9999 /] /subsystem=deployment-scanner/scanner=new:remove                                              {"outcome" => "success"}
You can also change the attributes at runtime, so for example to turn off scanning you can do
[standalone@localhost:9999 /] /subsystem=deployment-scanner/scanner=default:write-attribute(name="scan-enabled",value=false)
{"outcome" => "success"}
[standalone@localhost:9999 /] /subsystem=deployment-scanner:read-resource(recursive=true)                                    {
    "outcome" => "success",
    "result" => {"scanner" => {"default" => {
        "auto-deploy-exploded" => false,
        "auto-deploy-zipped" => true,
        "deployment-timeout" => 60L,
        "name" => "default",
        "path" => "deployments",
        "relative-to" => "jboss.server.base.dir",
        "scan-enabled" => false,
        "scan-interval" => 5000
    }}}
}
Simple configuration subsystems
The following subsystems currently have no configuration beyond its root element in the configuration
<subsystem xmlns="urn:jboss:domain:ee:1.0"/>
<subsystem xmlns="urn:jboss:domain:ejb3:1.0"/>
<subsystem xmlns="urn:jboss:domain:jaxrs:1.0"/>
<subsystem xmlns="urn:jboss:domain:remoting:1.0"/>
<subsystem xmlns="urn:jboss:domain:sar:1.0"/>
<subsystem xmlns="urn:jboss:domain:threads:1.0"/>
<subsystem xmlns="urn:jboss:domain:weld:1.0"/>
The presence of each of these turns on a piece of functionality:
|
Name |
Description |
|
EE |
Enables the deployment of .EAR archives. |
|
EJB3 |
Enables the deployment and functionality of EJB 3.1 applications. |
|
JAXRS |
Enables the deployment and functionality of JAX-RS applications. This is implemented by the RestEasy project |
|
Remoting |
Turns on the remoting subsystem, which is used for the management communication and will be what underlies remote JNDI lookups and remote EJB calls in a future release. |
|
Sar |
Enables the deployment of .SAR archives containing MBean services, as supported by previous versions of JBoss Application Server |
|
Threads |
This subsystem is being deprecated and will not be part of the next release |
|
Weld |
Enables the deployment and functionality of CDI applications |